

Page 1

LD670
Utility User's Guide
Page 2

LD670 Utility User's Guide 1.0.0.0
1 INTRODUCTION.......................................................................................................... 3
1.1 HISTORY ............................................................................................................... 3
1.2 TRADEMARKS ......................................................................................................... 3
1.3 OVERVIEW ............................................................................................................. 3
1.4 OPERATING ENVIRONMENT .......................................................................................3
2 LBL32 INSTALLATION ............................................................................................. 5
3 LBL32 FUNCTIONS ...................................................................................................5
3.1 STARTING UP LBL32 ...............................................................................................5
3.2 PRINTER FUNCTION SETTINGS ................................................................................... 7
3.2.1 Menus .............................................................................................................8
3.2.2 Buttons ........................................................................................................... 9
3.2.3 Paper Layout settings ..................................................................................... 10
3.2.4 Memory Switch settings .................................................................................. 12
3.2.5 Customize Values ........................................................................................... 14
3.2.6 Others .......................................................................................................... 16
3.2.7 Logo Registration screen................................................................................ 18
4 OPERATING INSTRUCTIONS ................................................................................. 19
4.1 PAPER LAYOUT SETTINGS ....................................................................................... 19
4.1.1 Setting Paper Layout automatically ................................................................. 19
4.1.2 Setting Paper Layout manually ........................................................................ 20
4.2 RELEASING PAPER LAYOUT ERROR .......................................................................... 22
4.3 ADJUSTING CUT POSITION/ADJUSTING TEAROFF POSITION ......................................... 23
4.4 CHANGING PRINTER SETTINGS (MEMORY SWITCH, CUSTOMIZE VALUES, OTHERS) ......... 24
4.5 REGISTERING LOGO .............................................................................................. 25
Copyright (C) 2011 Oki Data Corporation
2
Page 3

LD670 Utility User's Guide 1.0.0.0
1 Introduction
1.1 History
June 2011 First Issued
1.2 Trademarks
The company and product names in this document may be trademarks or registered trademarks
of their respective companies.
1.3 Overview
This document describe s how to use LD670 Utility LBL3 2 (hereinafter called LBL32).
1.4 Operating environment
This the LD670 Utility LBL32 works with the environment as follows:
Hardware
Personal computers equipped with the following interface ports, and supported to the
Operating Systems (OS) below.
・ Serial interface
・ Centronics-compliant parallel inte rface
・ USB interface
・ LAN interface
Operating Syst ems(OS)
・ Microsoft® Windows® 2000 (*1)
・ Microsoft® Windows® XP Professional (*2)
・ Microsoft® Windows® XP Home Edition (*2)
・ Microsoft® Windows Vista® Enterprise (*3)
・ Microsoft® Windows Vista® Business (*3)
・ Microsoft® Windows Vista® Ultimate (*3)
・ Microsoft® Windows Vista® Home Premium (*3)
・ Microsoft® Windows Vista® Home Basic (*3)
・ Microsoft® Windows® 7 Ultimate (*4)
・ Microsoft® Windows® 7 Enterprise (*4)
・ Microsoft® Windows® 7 Professional (*4)
・ Microsoft® Windows® 7 Home Premium (*4)
・ Microsoft® Windows® 7 Starter (*4)
・ Microsoft® Windows Server® 2003, Enterprise Edition (*5)
・ Microsoft® Windows Server® 2003, Standard Edition (*5)
・ Microsoft® Windows Server® 2008, Enterprise Edition (*6)
・ Microsoft® Windows Server® 2008, Standard Edition (*6)
・ Microsoft® Windows Server® 2008 R2, Enterprise Edition (*7)
・ Microsoft® Windows Server® 2008 R2, Standard Edition (*7)
Copyright (C) 2011 Oki Data Corporation
3
Page 4

The 64bit Windows Operating System is also supported.
In this guide, the following abbreviations are used for th e products.
*1 : Windows 2000
*2 : Windows XP
*3 : Windows Vista
*4 : Windows 7
*5 : Windows Server 2003
*6 : Windows Server 2008
*7 : Windows Server 2008 R2
LD670 Utility User's Guide 1.0.0.0
Copyright (C) 2011 Oki Data Corporation
4
Page 5
2 LBL32 Installation
Read「4 Utility」described in the LD670 Installation Guide.
3 LBL32 Functions
This chapter describes functions of the LD670 Utility LBL32.
The LD670 Utility LBL32 is a utility program to perform printer function settings and
paper layout settings.
3.1 Starting up LBL32
1
Go t o [Start][Programs](or[All Programs])[Okidata][Utility][LD670 Utility].
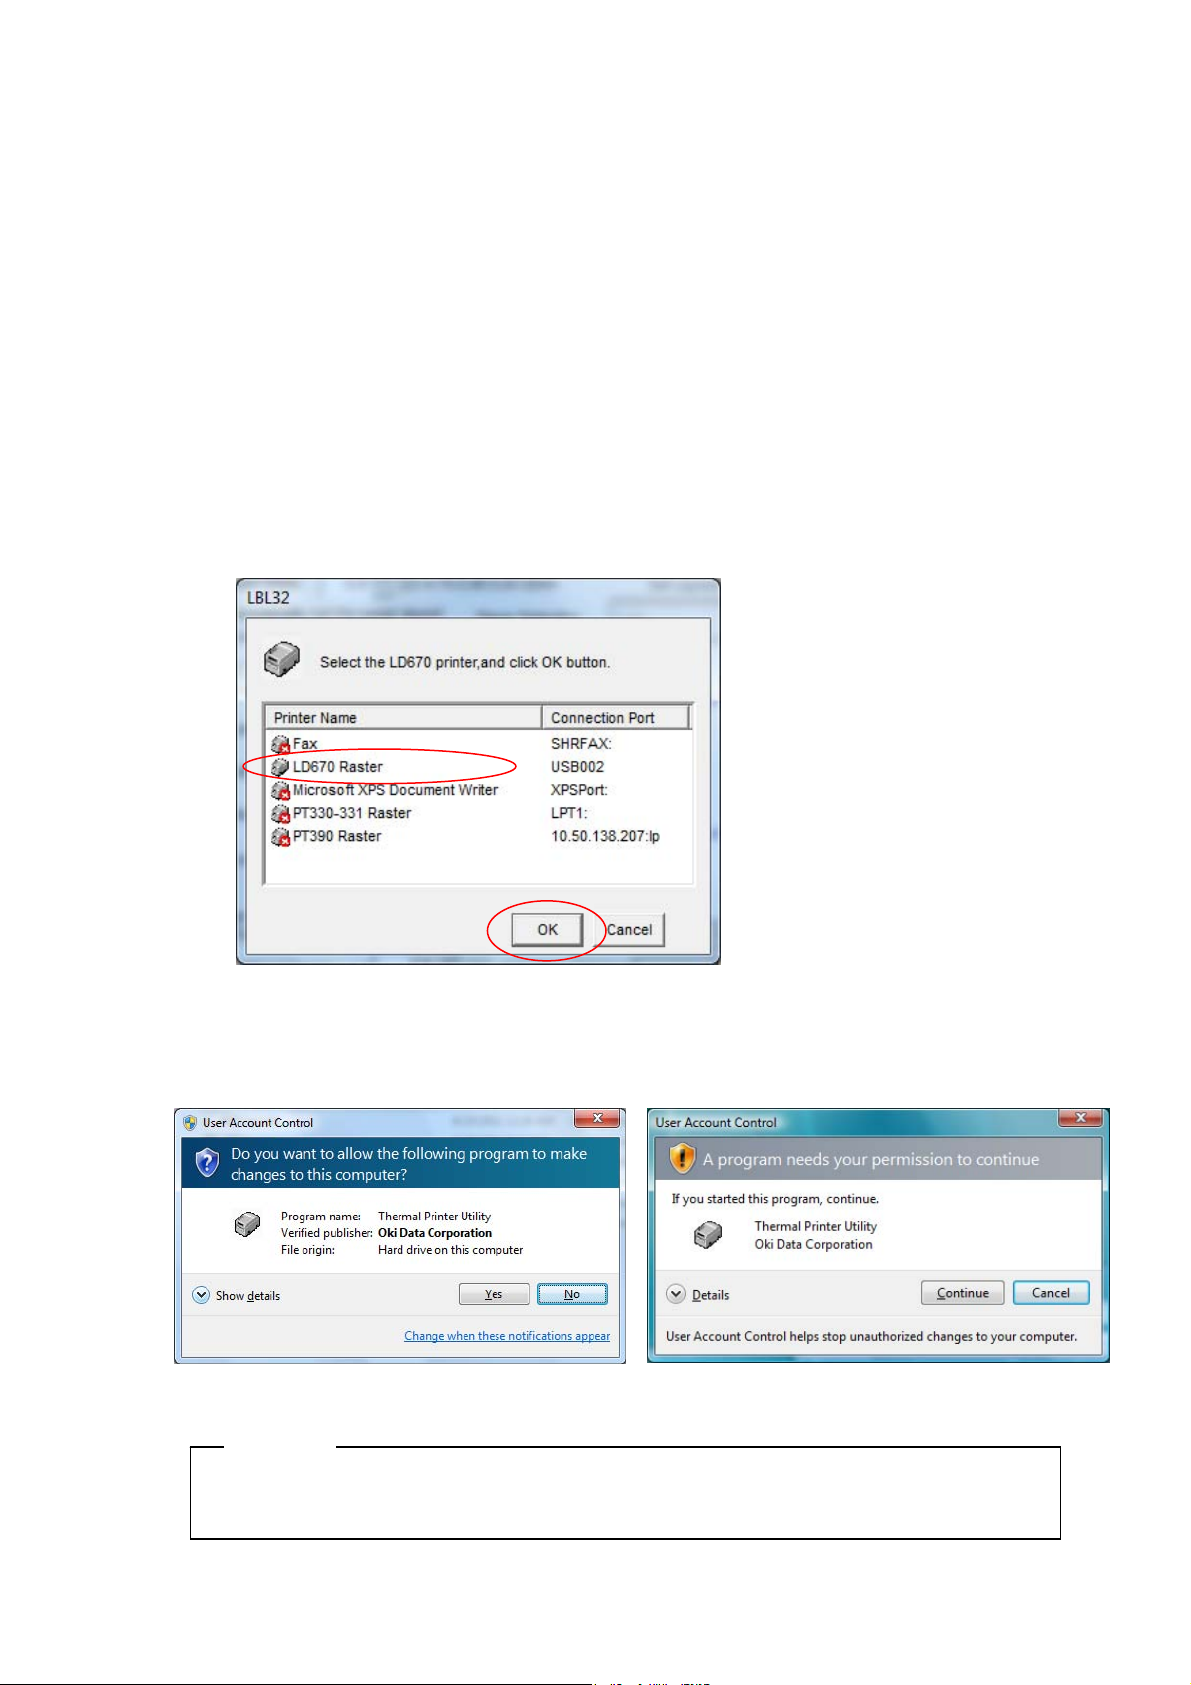
2
Select the printer and click [OK].
* In a Windows 7, Windows 2008 R2, Windows Vista or Windows 2008 environment,
the User Account Control dialog box may appear at Installation.
If so, click [Yes] or [Continue].
Notes
・ Use LBL32 on the Serial, Parallel, USB or LAN interface connection.
LD670 Utility User's Guide 1.0.0.0
Copyright (C) 2011 Oki Data Corporation
5
Page 6

LD670 Utility User's Guide 1.0.0.0
✍Guide
・When LBL32 is unavailable, warning marks are displayed on the name of printers. Select
other printers.
・For LAN interface connec tion, use LPR port with th e default port name
(xxx.xxx.xxx.xxx:lp(*1)) created by the PR-PortManager. When you use LPR port with the
non-default port name, IPP port, Windows Standard TCP/IP port, and Windows LPR port,
LBL32 may not be operated correctly.
*1: xxx.xxx.xxx.xxx is IP address.
・If the connection port is “FILE:”, the following message is displayed. Click [OK] and check
the connection.
・For
USB interface connec
in the Printer Folder is in the offline s tatus, the follow ing messag e may be di splayed. Click
[OK] and check the connection.
tion, if the power of the printer is turned off, or if the printer driver
Copyright (C) 2011 Oki Data Corporation
6
Page 7
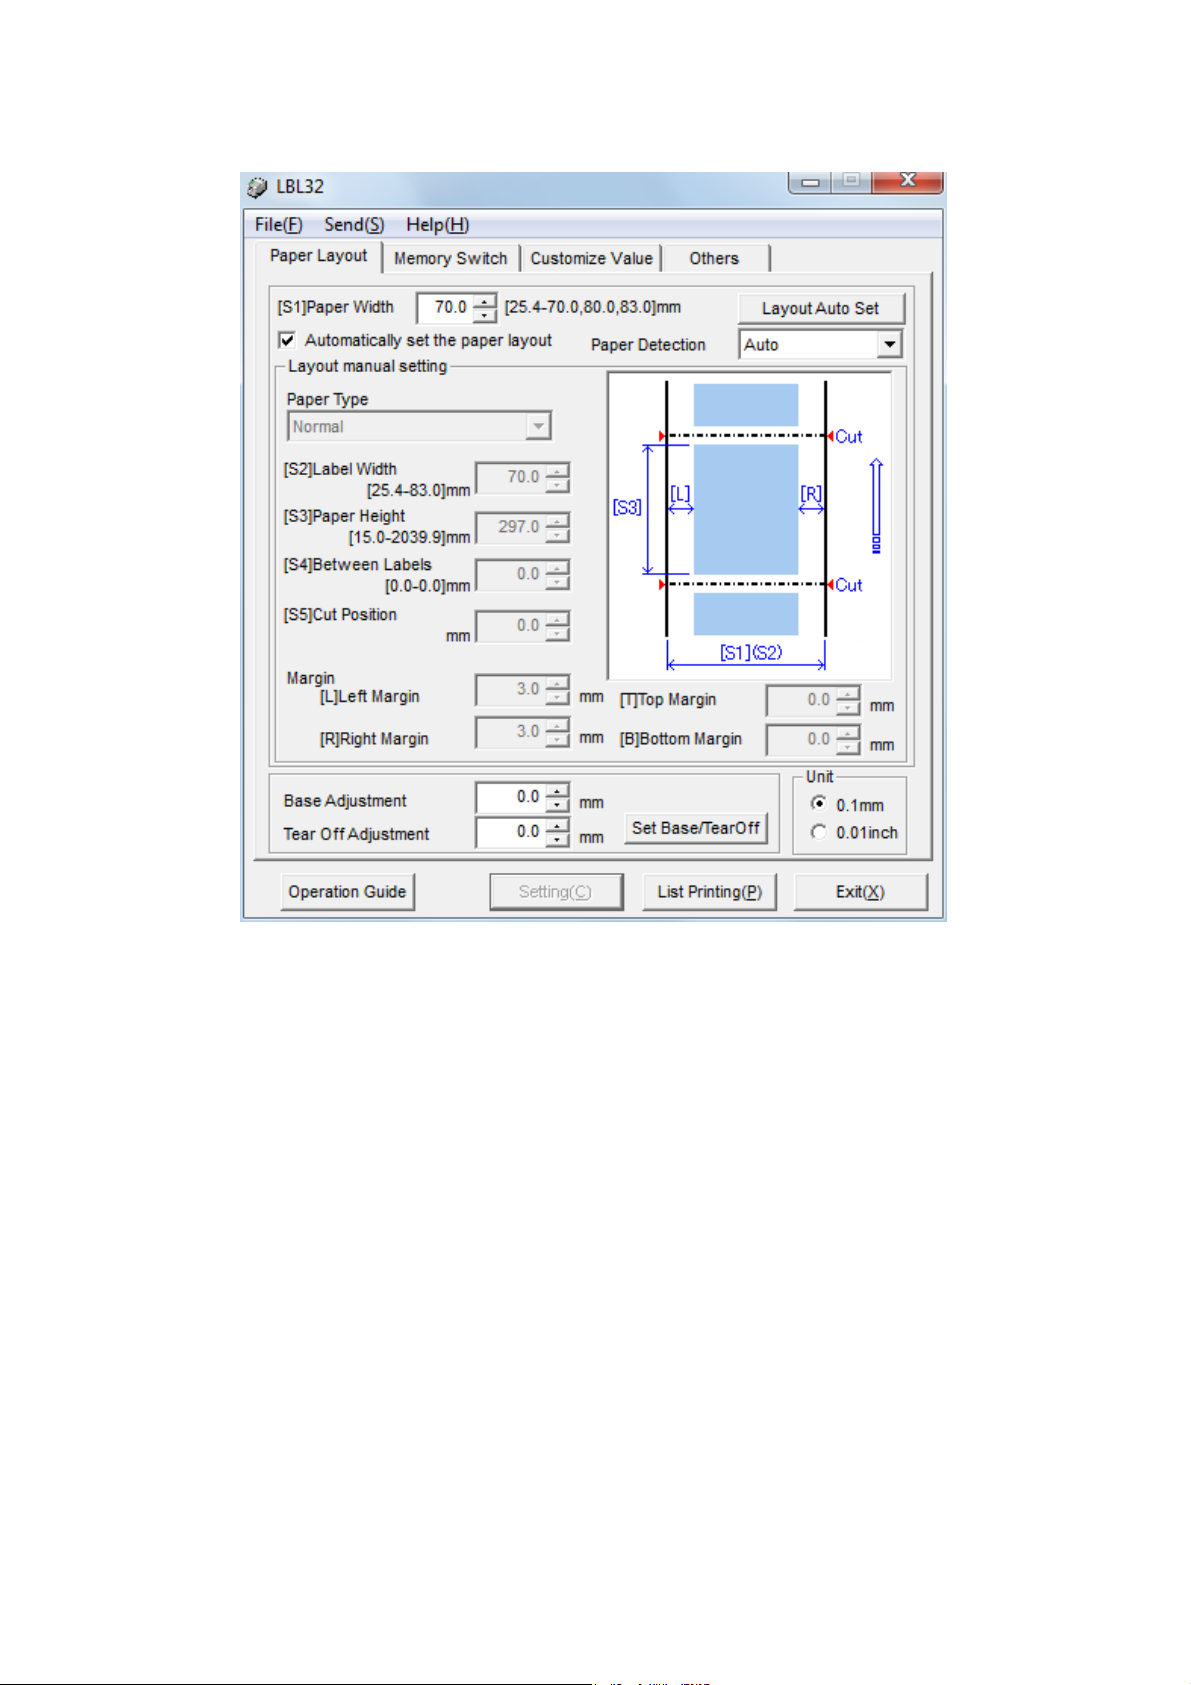
3.2 Printer function settings
LD670 Utility User's Guide 1.0.0.0
[LBL32 Start screen]
Copyright (C) 2011 Oki Data Corporation
7
Page 8
3.2.1 Menus
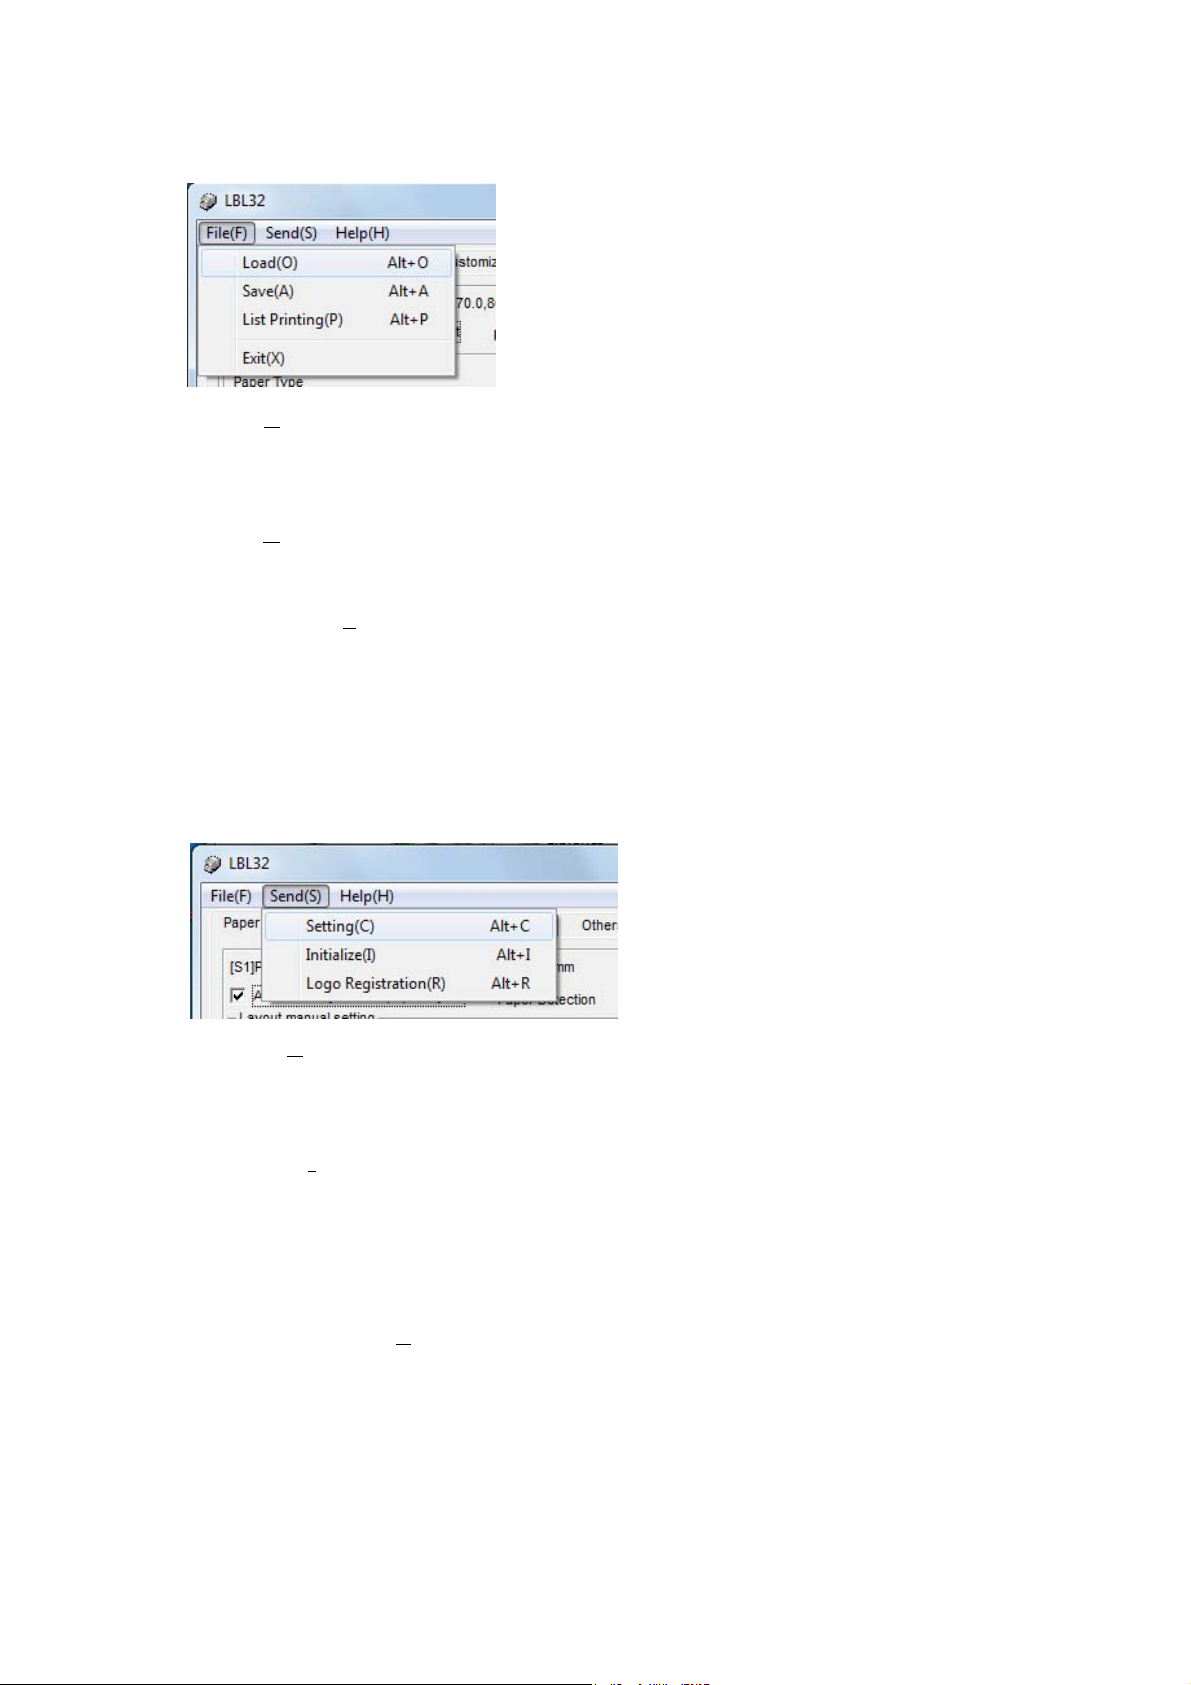
【File】Menus
・Load(O
Reads the setting values file stored on the disk, and then updates the setting values file on
LBL32.
・Save(A
Saves the setting values displayed on LBL32 to the disk as the setting values files.
・List Printing(P
Prints the list of the current setting values.
) Alt+O
) Alt+A
LD670 Utility User's Guide 1.0.0.0
) Alt+P
・Exit(X)
Exits LBL32.
【Send】Menus
・Setti
Transfers the setting information specified in the [Memory Switch] dialog box, the
[Customize Values] dialog box, and the [Others] dialog box to the printer.
・Initialize(I
Initializes the setting values on LBL32.
In this time, the Printer Setting information is also initialized.
However, the information in the [Paper layout] dialog box and the printer paper layout are
not initialized.
・Logo Registration(R
Registers logos to the printer. Logos are registered even after the powe r of the printer is
turned off.
Logos can be registered are up to 5 pieces.
Only BMP file can be registered here.
* Please refer to "3.2.7 Logo Registration screen" for the operation of the logo
registration.
ng(C
) Alt+C
) Alt+I
) Alt+R
Copyright (C) 2011 Oki Data Corporation
8
Page 9
LD670 Utility User's Guide 1.0.0.0
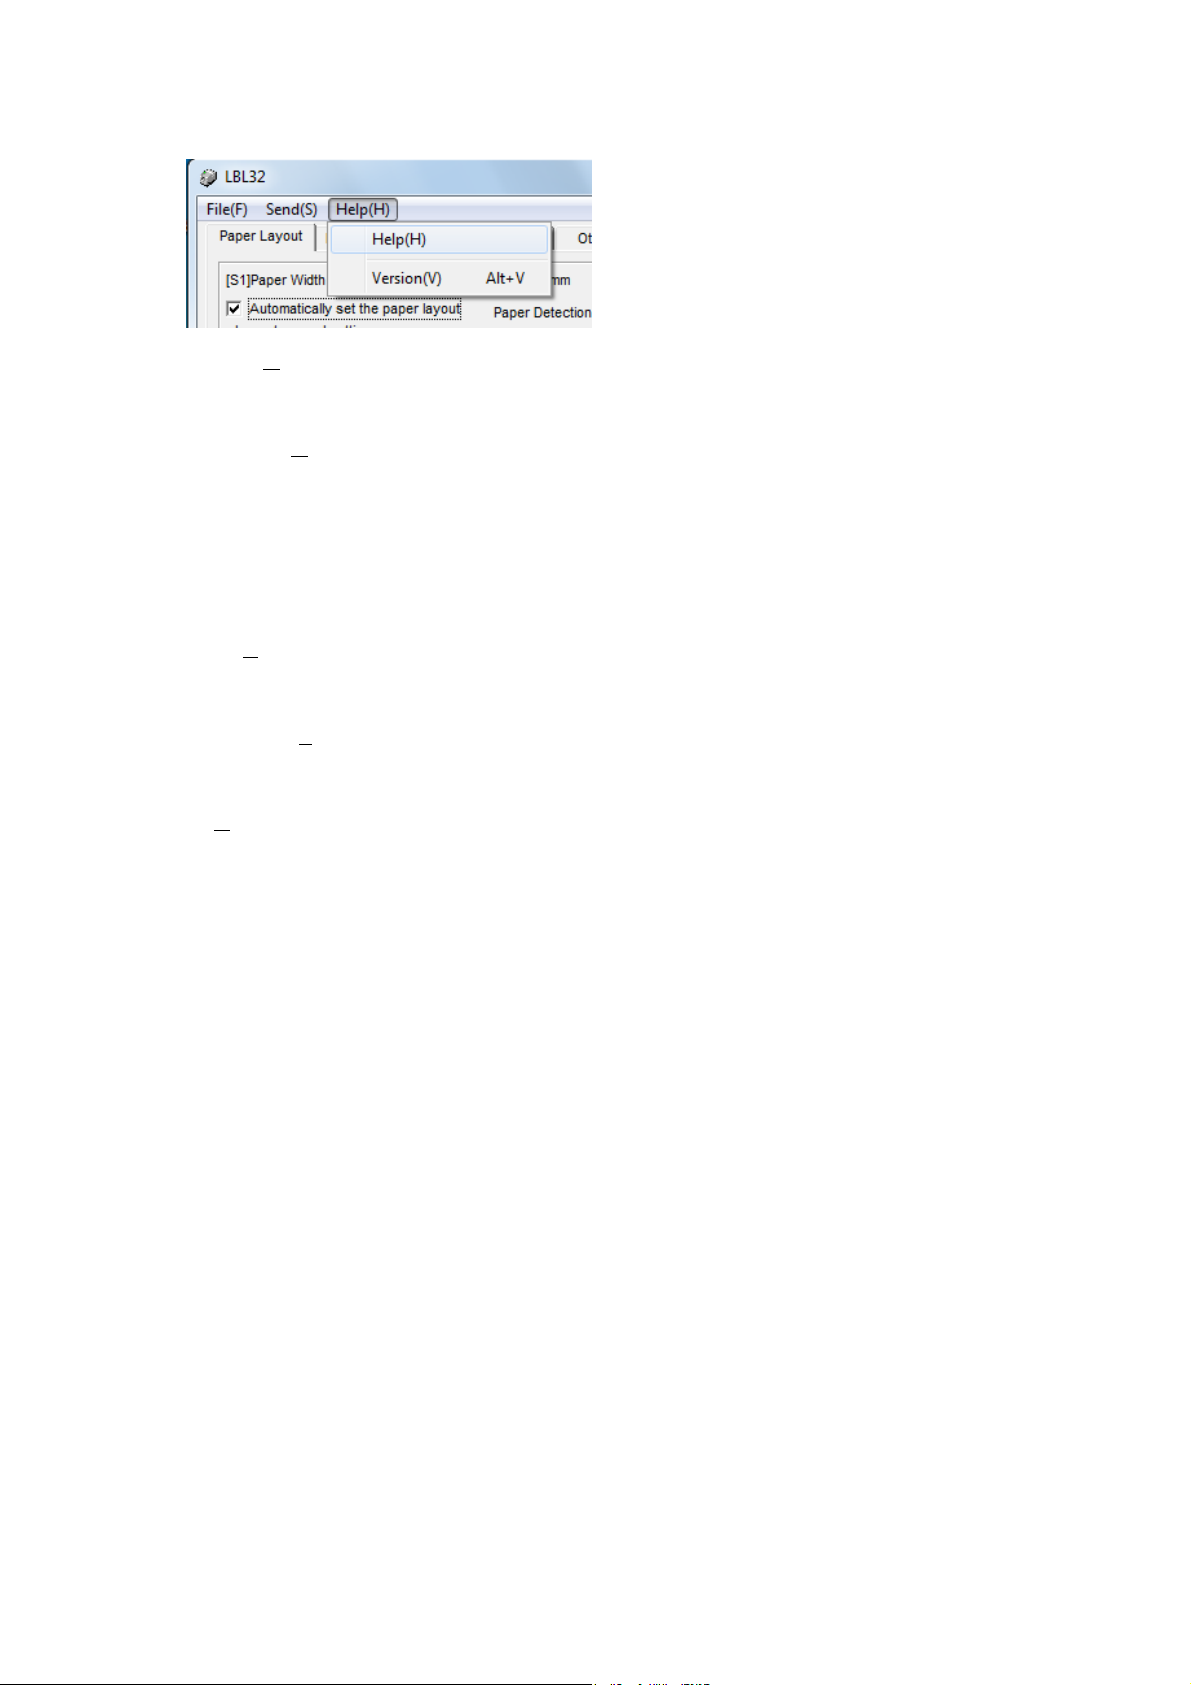
【Help】Menus
・Help(H
Starts up the Help for the LBL32.
・Version(V
Displays the version of the LBL32.
)
) Alt+V
3.2.2 Buttons
【Setting(C)】
The feature is the equiva lent to the「Setting(C).」 in the "Send" menu.
【List Printing(P
The feature is the equiva lent to the「List Printing(P)」 in the "File" menu.
【Exit(X
)】
Exits LBL32.
)】
Copyright (C) 2011 Oki Data Corporation
9
Page 10
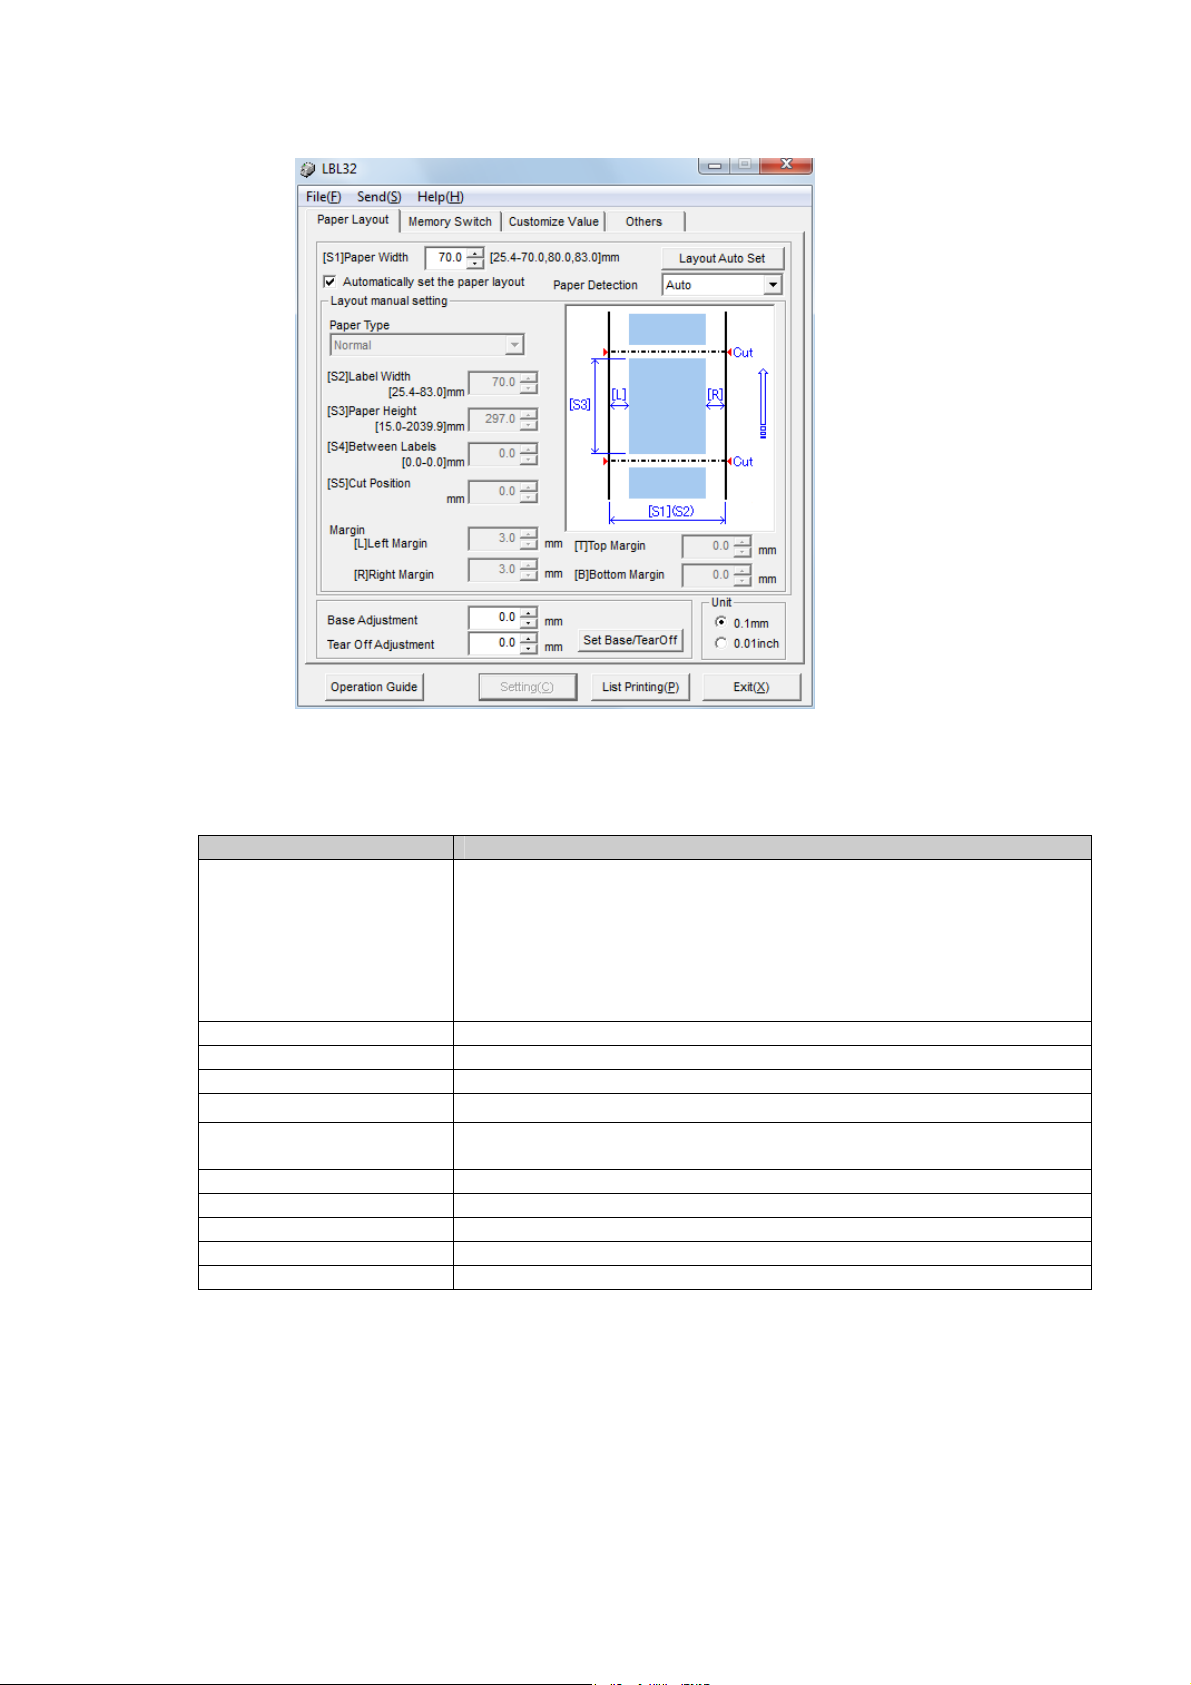
3.2.3 Paper Layout settings
I
settings.
【Items to enter】
Paper Layout] dialog box, perf orm Pa pe r Lay o ut sett ing s a nd A utom at ic Pa per Lay out
n the [
Items Explanation
Paper Type Select the paper type you intend to use.
- Normal:
- Label:
- Black Mark:
[S1] Paper Width Specify the width of the paper.
[S2] Label Width Specify the width of the label.
[S3] Paper Height Specify the height of the paper.
[S4] Between Labels Specify the length betw een labels when the Label is selected .
[S4] BM Length Specify the length of Black Mark when the Black Mark is
selected.
[S5] Cut Position Specify the cut position.
[L] Left Margin Specify the left margin.
[R] Right Margin Specify the right margin.
[T] Top Margin Specify the top margin.
[B] Bottom Margin Specify the bottom margin.
LD670 Utility User's Guide 1.0.0.0
Select Normal to use.
Select Label to use.
Select Black Mark to use.
Copyright (C) 2011 Oki Data Corporation
10
Page 11
LD670 Utility User's Guide 1.0.0.0
【Operating in
structions】
Items Explanation
[Set Layout]
button
Transfers the layout information entered
([S2],[S3],[S4],[S5],[L],[R],[T],[B]) to the pr inter. Uncheck the
[Automatically set the paper layout] check box to use this feature.
Setting of [S1]Paper Width is also transferred to the printer.
[Layout Auto set]
button
Performs Automatic Paper Layout setting for the paper set in the
printer.
[S1] Setting information of the paper width is also transferred to the
printer.
[Paper Detection] Specifies whether the paper type is detected by the automatic
operation or it uses it by specific paper type fixation.
When it sets to "Auto" and the layout is set automatically, paper type
(*1) is detected by the au tomatic operation.
Next, layout (*2) is detected by the automatic operation.
When it sets besides "Auto" and the layout is set automatically, only
layout (*2) is detected by the automatic operation for paper type
(*1) selected by this item.
When [Automatically set the paper layout] is checked, this item
becomes possible to select.
*When a set value is changed, the message to confirm the content of
the change is displayed.
When setting it besides "Auto"
If different paper type (*1) is set, "Form layout error" is generated.
*1: "paper type" shows the paper type such as Label, Black Mark,
and Normal.
*2: "layout" shows the size of the form like the height of the label
and the length between labels, etc.
[Automatically set
the paper layou t]
check box
Checked: The 「 Set Layout」 button is unavailable.
The [Layout Auto set] button is available.
[S2],[S3],[S4],[S5],[L],[R],[T],[B] settings are
unavailable.
Unchecked:The 「Set Layout」 button is available.
The [Layout Auto set] button is unavailable.
[S2],[S3],[S4],[S5],[L],[R],[T],[B] settings are available.
[Set Base/TearOff]
button
[Operation Guide]
Transfers the values entered into the Cut Position Adjustment,
TearOff Position Adjustment to the printer.
Displays operating instructions for paper layout setting.
button
Unit Switches the unit of values between mm and inch.
*Depending on the specified Paper width( the Label wid th), Paper Height and Margin ,
the settings information may not be reflected to the printer correctly even after executing
[Set Layout] to set th e paper layout.
Specify 12.0mm or more for the width and specify 3.8mm or more for the height.
*When the value of "[S5]Cut Position + [T]Top" exceeds the value of "[S3]Paper Height",
the setting change of paper layout may not influence the printer setting.
Copyright (C) 2011 Oki Data Corporation
11
Page 12

LD670 Utility User's Guide 1.0.0.0
3.2.4 Memory Switch settings
In the [Memory Switch] dialog box, set the details of the Memory Switch and the paper.
【Items to set
Power ON Status -Disable
Receive Buffer -4Kbyte
Busy Condition -Offline/Bufferfull
Receive Error
Auto LF -Disable
DSR (#6) Reset -Disable
INIT(#25) Reset -Disable
INIT(#31) Reset -Disable
Cover Open -Auto Recovery
up for Memory Switch】
Items Setup values Initial value Explanation
Enable Set the message about the power
-Enable
-45byte
-Bufferfull
-?printing
-Ignore
-Enable
-Enable
-Enable
-Enable
-Recovery by
Command
4Kbyte Set the size of the receive buffer.
Bufferfull Set the condition of Printer BUSY.
?printing
Disable Set the Auto linefeed by the CR
Disable Set the re set signal for thi s signal.
Disable Set the re set signal for thi s signal.
Enable Set the reset signal for this signal.
Auto Recovery Set the recovery steps for the
supply for host.
Set the handling for the Receive
error(Parity check error, Flaming
error, Overrun error).
Cord Receive.
Cover Open during printing.
Notes ) If you continue printing
after cover close, select the
[Auto Recovery].
Copyright (C) 2011 Oki Data Corporation
12
Page 13

【Items to setup for Pape
Items Setup values Initial values Explanation
Layout Er Process -Layout Continue
Layout Er
Recovery
Feed at Power On -Enable
Mark Feed with
Cut
Sensor Auto
Adjust
rs】
-Layout Clear
-Command /
CoverClose
-Command
-Disable
-Disable
-Enable
-Disable
-Enable
LD670 Utility User's Guide 1.0.0.0
Layout
Continue
Command /
Cover close
Enable Set to detect the top of form at
Disable Set to cut the top of form.
Enable Set to perform Automatic Sensor
Set the handlings for Paper Layout
error. When [Layout Clear] is
selected, Automatic Paper Layout
Setting is executed after releasing
the error.
Set the condition to release Paper
Layout Error.
power-on.
When the Normal paper is selected
to print, [Enable] is invalid.
When the Normal paper is selected
to print, [Enable] is invalid.
Pressing FEED key does not run
this feature.
Notes)When [Enable] is selected,
feeds the paper and cuts the top
of form even if there are Black
Mark and Label on the sensor.
Adjustment during the Automatic
Paper Layout Settin g.
Copyright (C) 2011 Oki Data Corporation
13
Page 14

LD670 Utility User's Guide 1.0.0.0
3.2.5 Customize Values
In the [Customize values] dialog box, setup the details of Customize Values and the Serial
interface communicatio n.
【Items to s
User NV Memory -1KB
NV Graphic
Memory
Print Color -Monochro me
Print Density 70% - 130 %
BK Density
etup for Custom Values】
Items Setup values Initial valu es Explanation
192KB Set the size of available NV
(2Color)
-64KB
-128KB
-192KB
-None
-64K bytes
-128K bytes
-192K bytes
-256K bytes
-320K bytes
-384K bytes
-Two
(Unit: 5%)
70% - 130%
(Unit: 5%)
384K bytes Set the size of graphic memory.
Monochrome Set the Print Color.
130% Set the Print Density.
100% Set the Black Density for 2 Color
memory.
Notes ) Select [ Two ] for 2 Color
printing.
Notes ) Adjust the Print Density
depends on the paper you intend
to use.
printing.
Notes ) Adjust the BK Density
depends on the paper you intend
to use.
Copyright (C) 2011 Oki Data Corporation
14
Page 15
LD670 Utility User's Guide 1.0.0.0
Items Setup values Initial valu es Explanation
Max Speed 1 - 9 5 Set the highest pr int speed.
Low Power -Normal
Normal Set the power consumption.
-Mode1
-Mode2
【Items to setup for Serial interface communication】
Items Setup values Initial valu es Explanation
Baudrate -2400BPS
115200BPS
-4800BPS
-9600BPS
-19200BPS
-38400BPS
-57600BPS
-115200BPS
Format -7NONE1
8NONE1
-7ODD1
-8NONE1
-8EVEN1
-8ODD1
Protocol -DSR/DTR
DSR/DTR Set buffer control protocol.
-XON/XOFF
Notes)If you select Mode 1 or Mode
2, the print quality and the print
speed may be degraded.
Set the Baud Rate(Communication
speed).
Set the data format ( Data bit ,
Parity,Stop bit).
Stop bit is fixed as 1bit.
Notes ) When printing from
Windows on the LD670 printer
connected with the serial
interface, [DSR/DTR] is
recommended to set.
Copyright (C) 2011 Oki Data Corporation
15
Page 16

3.2.6 Ot hers
In the [Others] dialog box, setup others.
【Items to setup for Others】
Items Setup values Initial values Explanation
ACK Pulse Width -1 micro second
-8 micro second
USB -V-COM
-printer
Serial Numbers
Error -Auto Recovery
Process ID
PNE Detect -Disab le
・Enable
・Disable
-Recovery by
Command
-Normal
-High-Speed
-Enable
LD670 Utility User's Guide 1.0.0.0
1 micro
second
Printer Set the oper a ting class f o r US B
Disable Set the Serial Numbers Notice
Auto Recovery Select [Auto Recovery] for the
Normal Select [Normal] for the
Enable Set to detect Paper Near End.
Set the Pulse Width for ACK
signals.
port connection.
Notes ) In general, select
[Printer] without change.
on the USB port connection.
Windows Driver.
Windows Driver.
FontB
Batch (COM IF) -Disable
Batch
(OTHER IF)
Copyright (C) 2011 Oki Data Corporation
-Mode1
-Mode2
-Enable
-Disable
-Enable
Mode1
Enable Set the print mode for Serial
Disable Set the print mode for USB,
Select the mode of font B.
interface connection.
When [Disable] is selected, the
print speed may be improved.
Parallel and LAN interface
connection.
When [Enable] is selected, the
print speed may be improved.
16
Page 17

LD670 Utility User's Guide 1.0.0.0
Items Setting values Initial
Explanation
values
Buzzer -Disable
Disable Set the buzzer beep for error.
-Enable
Roll Paper Unit -Unins tall
-Install
Uninstall Set whether Roll Paper Unit is
equipped.
*When the setup is not appropriate,
the Paper Near End can not be
detected correctly.
*When [Install] is selected, do not
connect the Drawer to LD670.
LD670 may not work correctly.
Roll Paper Unit
PE
-PE
-PNE
PE Specifies the PE detection
condition when the roll paper unit is
installed.
If PNE is detected, it becomes PE
when setting it to [PNE].
The installing setting of the roll
paper unit is done, installed, and
when the Paper type is Normal, this
setting becomes effective.
Copyright (C) 2011 Oki Data Corporation
17
Page 18

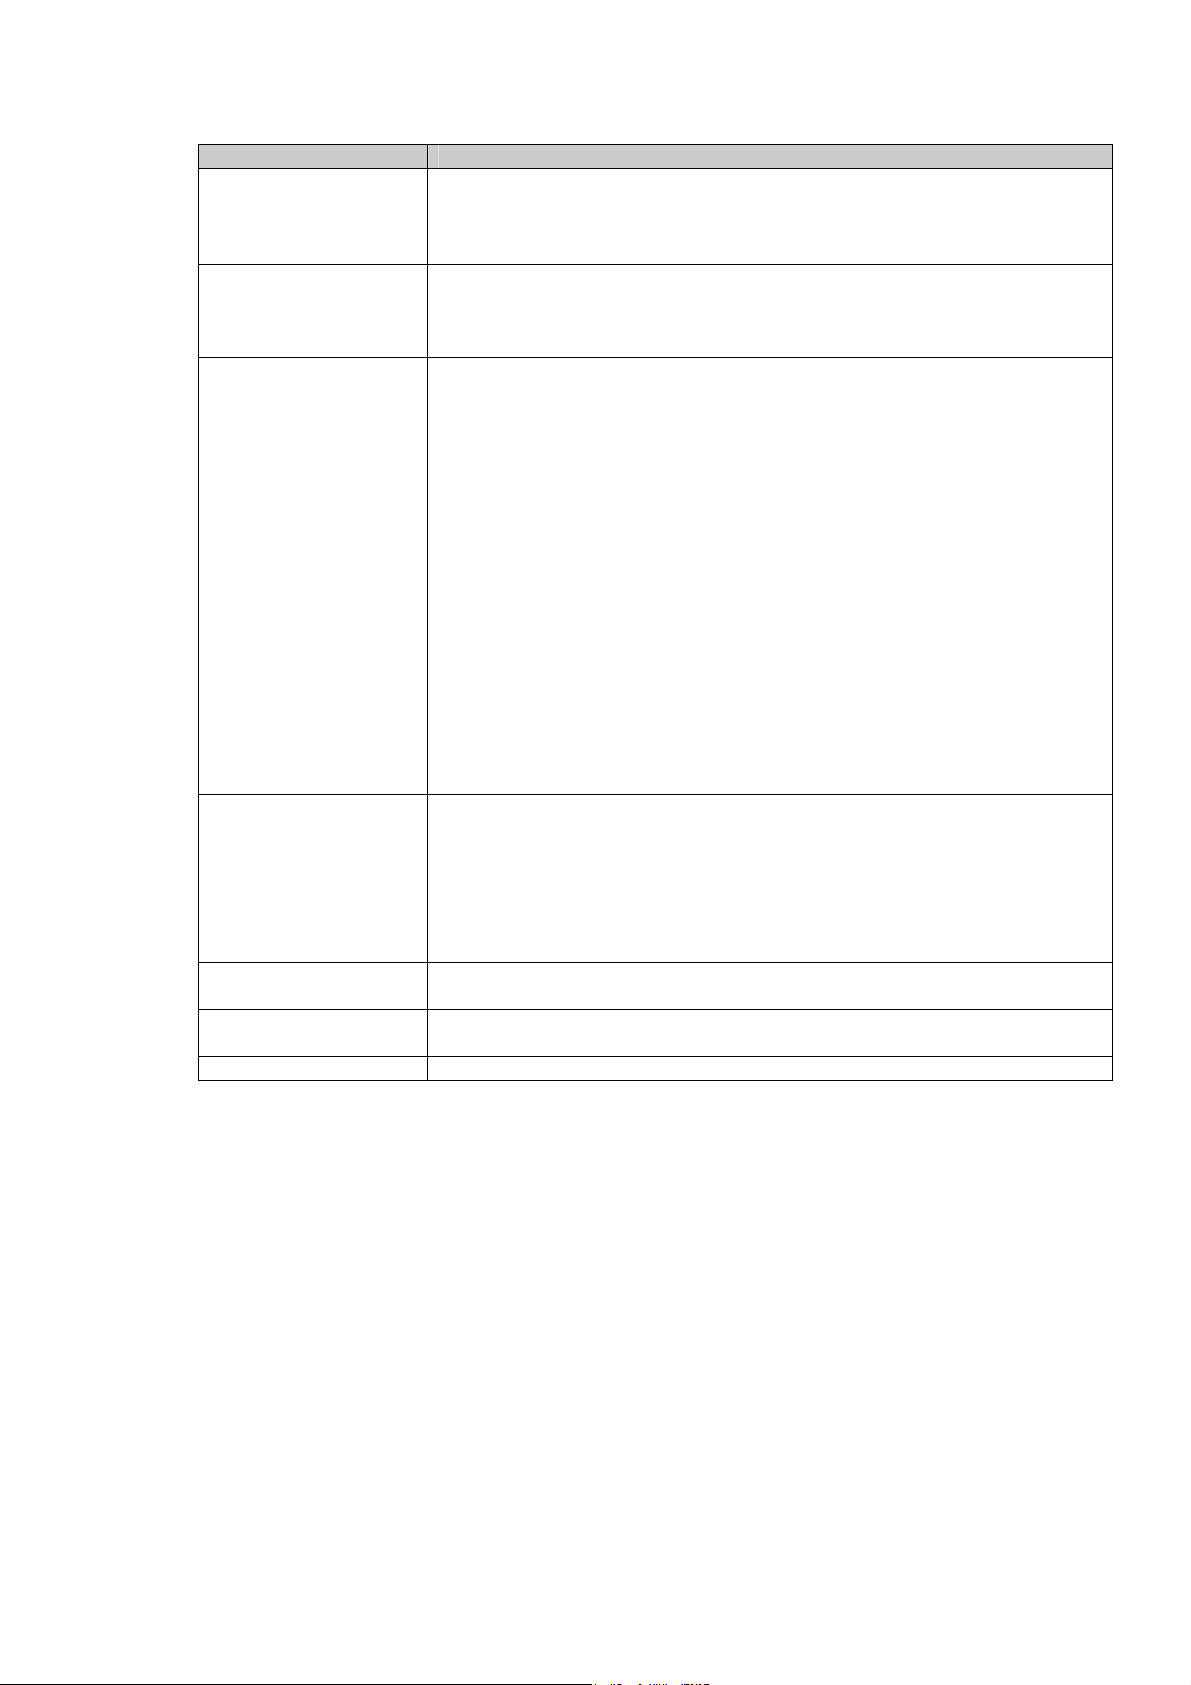
3.2.7 Logo Registration screen
In the [Logo registration] screen, register logos to the printer.
Go to [Send(S
【It
Logo1 – Logo5 Registers Logos up to 5pieces.
[2Color]button
[Refer]button
[Delete]button
[Regist] button
[Print]button
[Confirmation
[Exit]button
* Only BMP file can be registered.
* Create 2 Color logo by 16 color or 256 color.
* Recommended file size is 640×400 pixel at the maximum.
)][Logo Registration(R)] to display the screen.
ems in Logo Re
Items Explanation
Print]button
gistration screen】
On registering the 2 Color logo, check the button.
The color except white or black is registered as second color.
Displays the File menus to choose the BMP file.
Deletes the logo stored here.
Registers logos here.
Prints the registered logos.
Prints the registered logo1-5.
Exits the [Logo registration] dialog box.
LD670 Utility User's Guide 1.0.0.0
Copyright (C) 2011 Oki Data Corporation
18
Page 19

LD670 Utility User's Guide 1.0.0.0
4 Operating instructions
4.1 Paper Layout settings
Set Paper Layout on the “Paper Layout” dialog box.
4.1.1 Setting Paper Layout automatically
1) Enter paper width into the [[S1]Paper Width].
2) Check the [Automatically set the paper layout] check box.
3) Click the [Layout Auto Set] button.
4) The following message is displayed. Click [OK] to continue, or click [Cancel] to
5) The message for ch
6)
1)
2)
discontinue.
anging the paper you intend to perform the Automatic Paper settings is
displayed. Change the paper and click [OK].
The Autom
When the sensor checks Paper Layout, dozens of centimeters of paper comes out from the
printer.
atic Paper Layout setting is executed.
3)
Copyright (C) 2011 Oki Data Corporation
19
Page 20

4.1.2 Setting Paper Layout manually
1) Uncheck the[Automatically set the paper layout] check box.
2)
Select the p
3) Ref
(The picture shows when the Label is selected.)
er to the displayed l ayout chart to measu re the size of paper, and then enter the details.
aper you intend to set layout under [Paper Type].
LD670 Utility User's Guide 1.0.0.0
Layout chart
Copyright (C) 2011 Oki Data Corporation
20
Page 21

LD670 Utility User's Guide 1.0.0.0
4)Click [Set Lay
out] button.
5)
e following message is displayed. Click [OK] to continue, or click [Cancel] to
Th
discontinue.
6) The me
ssage for exchanging the paper you intend to set the la yout is displayed.
7) Ch
he paper and click [OK].
ange t
8) The printer executes the initial action. When the paper other than the Normal is selected, it
detects the top of form.
Copyright (C) 2011 Oki Data Corporation
21
Page 22

LD670 Utility User's Guide 1.0.0.0
4.2 Releasing Paper Layout error
When you change the paper before pressing the [Layout Auto Set] button or the [Set Layout]
button, Paper Layout Error may occurs. Follow the steps be low to handle this problem.
Operation 1
1) Hold down the FEED switch of the printer for 2 seconds.
2) The printer performs Automatic Paper Layout Settings and releases the Paper Layout
Error.
Operation 2
1)
2)
1
) Ente
r paper width into the [[S1]Paper Width].
2) Check the [Automatically set the paper layout] check box.
3) Click the [Layout Auto Set] button.
4) The confirmation message for Automatic settings is displayed. Click [OK].
5) The message for
6) The printer p
* When Paper Layout Error is released by these operations, you do not need to execu te Paper
Layout Settings again. However, do the manual setting when fine-tuning is necessary for the
layout set automatically.
changing paper is displayed. Click [OK].
erforms Automatic Paper Layout and releases Paper Layout Error.
3)
Copyright (C) 2011 Oki Data Corporation
22
Page 23

LD670 Utility User's Guide 1.0.0.0
4.3 Adjusting Cut Position/Adjus ting TearOff Position
It adjusts the Print Posit ion fin ely wi th ref erenc e to the Cut Posi tion in a vert ical dir ectio n. Th e
cut position, peeling-off position, and print position moves in a vertical direction by this setting.
[Cut Position Adjustment]
To move the cut position, peeling-off position, and print position upward or downward with the
set value.
[Tear Off Adjustment]
To move the Tear Off position upward or downward with the set value.
1) Enter the adjustment values.
When the plus(+) value is set, the Cut Position or the Tear Off position moves
opposite(downward) direction against the paper feeding direction.
When the minus(-) value is set, the Cut Position or the Tear Off position moves the
same(upward) direction as the papaer feeding direction.
2) Click [Set Base/T
3) The fo
discontinue.
4)
When
llowing message
Setti
ngs
are
f].
earOf
is displayed. Click [OK] to continue, or click [Cancel] to
mpleted, the printer executes the initial action.
co
Copyright (C) 2011 Oki Data Corporation
23
Page 24

LD670 Utility User's Guide 1.0.0.0
4.4 Changing printer settings (Memory Switch, Customize Values, Others)
It transfers and stores the setting information specified in the [Memory Switch] dialog box, the
[Customize Values] dialog box and the [Others] dialog box.
1) Change the settings in the [Memory Switch] dialog box, [Customize Values] dialog box and
the [Others] dialog box. Click [Setting(C
2) The confirmation message for changing setting values is displayed. Click[OK].
3) When Settings are completed, the printer executes the initial action.
4) When the Serial Interface Se ttings are chang ed, the follow ing message is displayed. Restart
the system to valid the change.
Exit the other software applications(Save live files.) and then click [ OK].
)], or go to [Send(S)] [Setting(C)].
Copyright (C) 2011 Oki Data Corporation
24
Page 25
LD670 Utility User's Guide 1.0.0.0
4.5 Registering Logo
It registers logos to the printers. Logos are registered even after the power of the printer is
turned off.
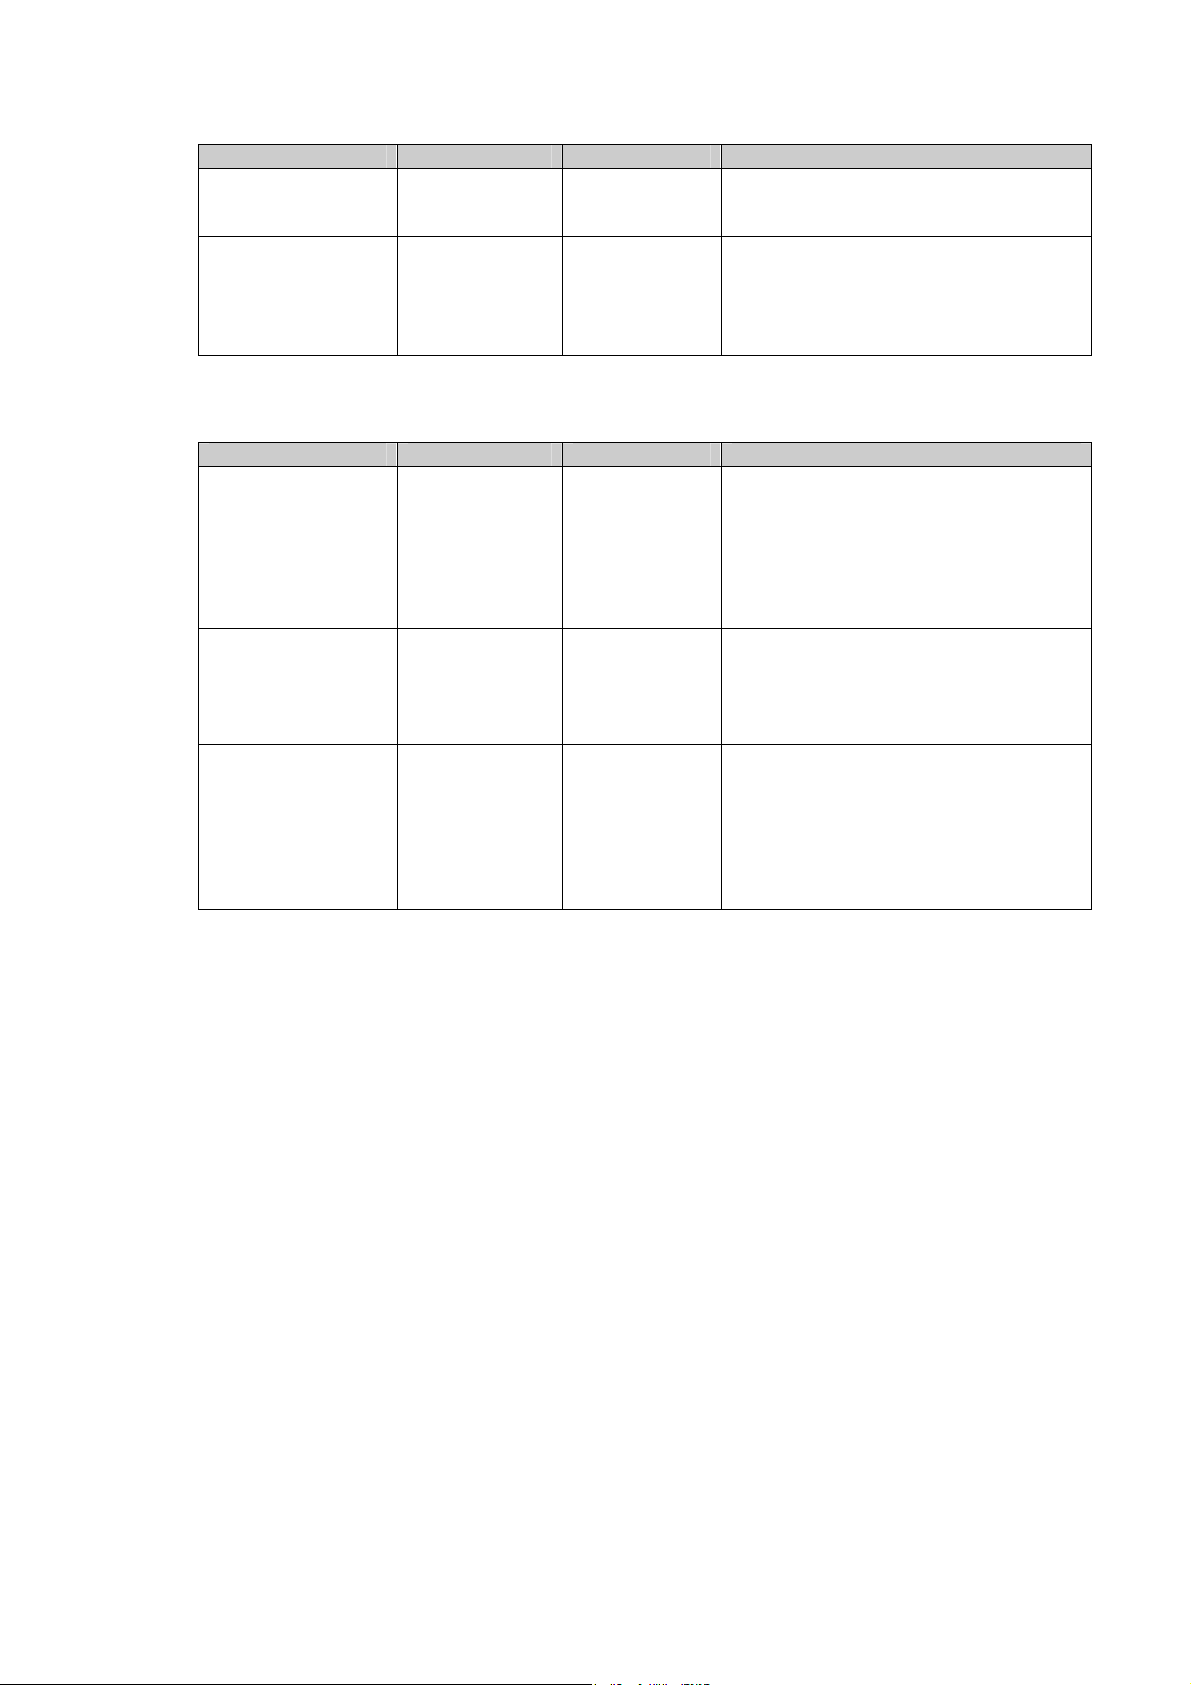
1) Go to [Send(S
2)The [Log
3) Select
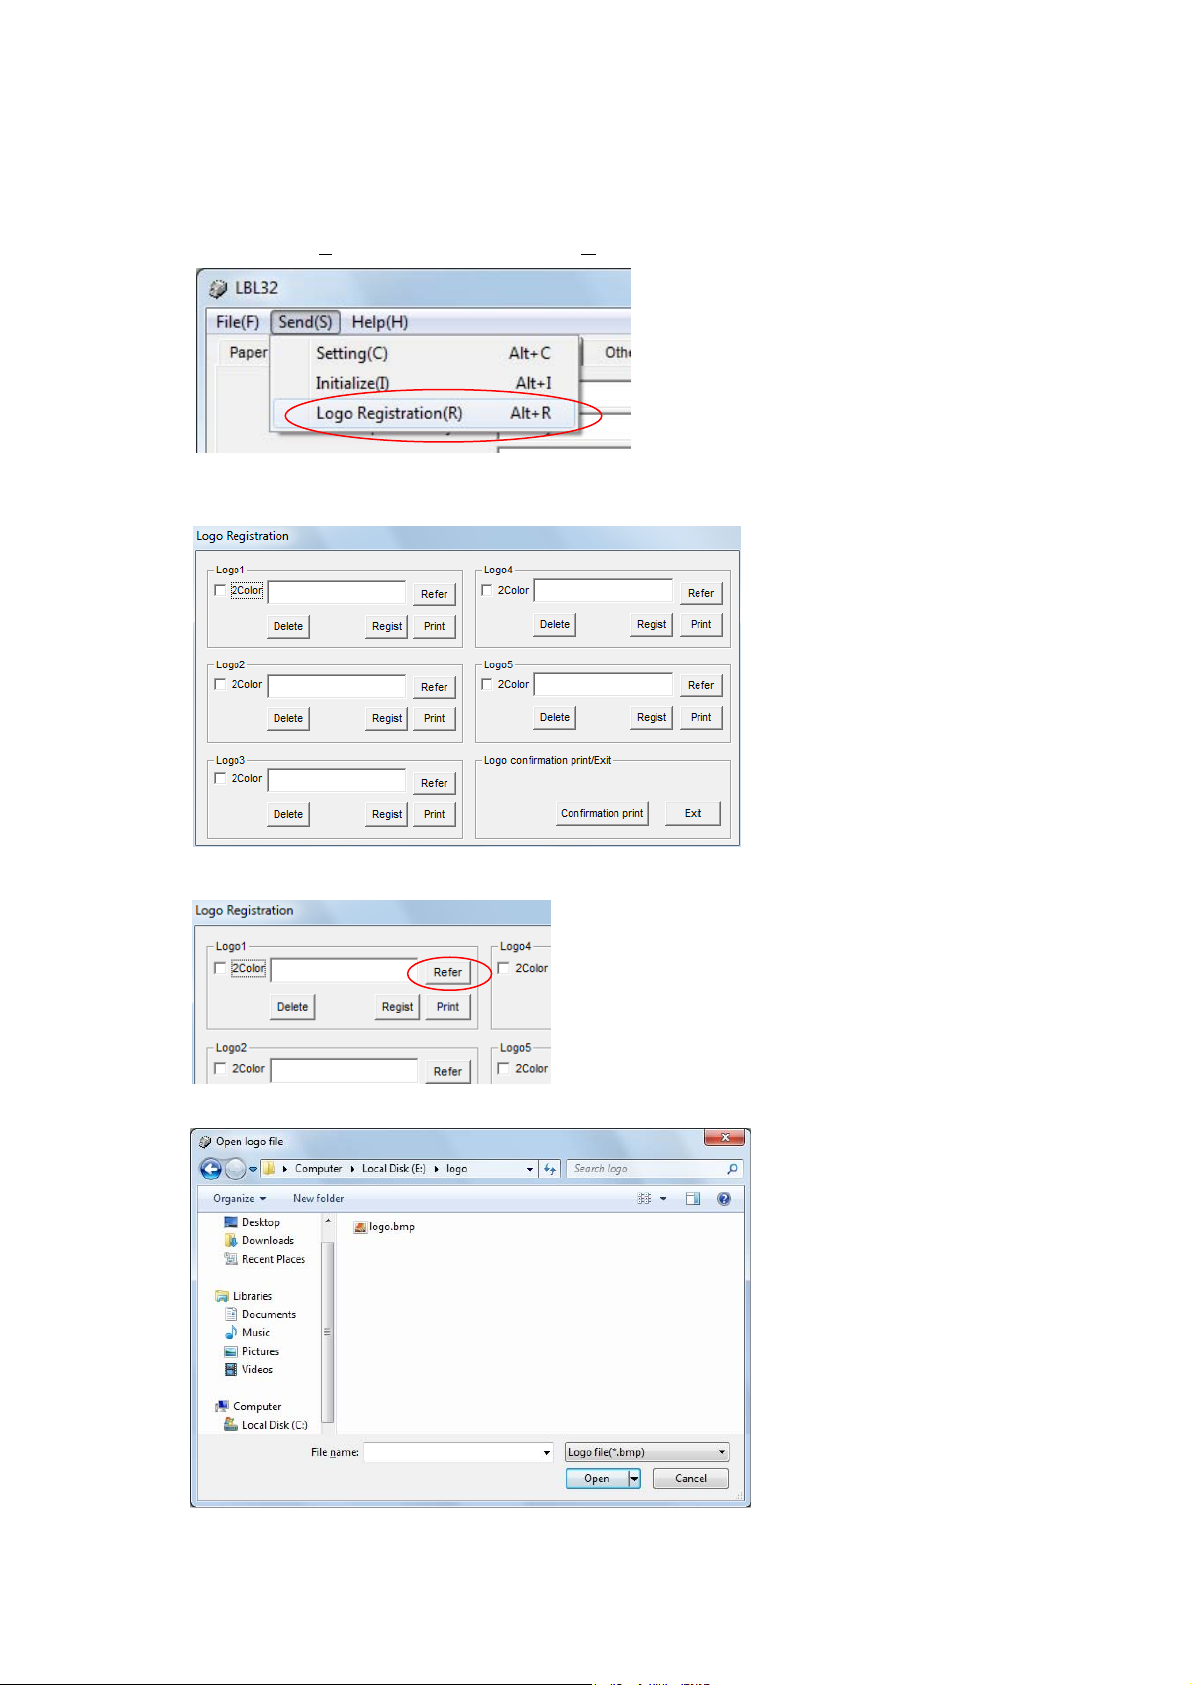
4)
Select the BMP
the l
)] [Logo Registration(R)].
o Registra
ogo number from 1 - 5 to register and click its [Refer].
tion] dialog box is displayed.
file to register the logo.
Copyright (C) 2011 Oki Data Corporation
25
Page 26
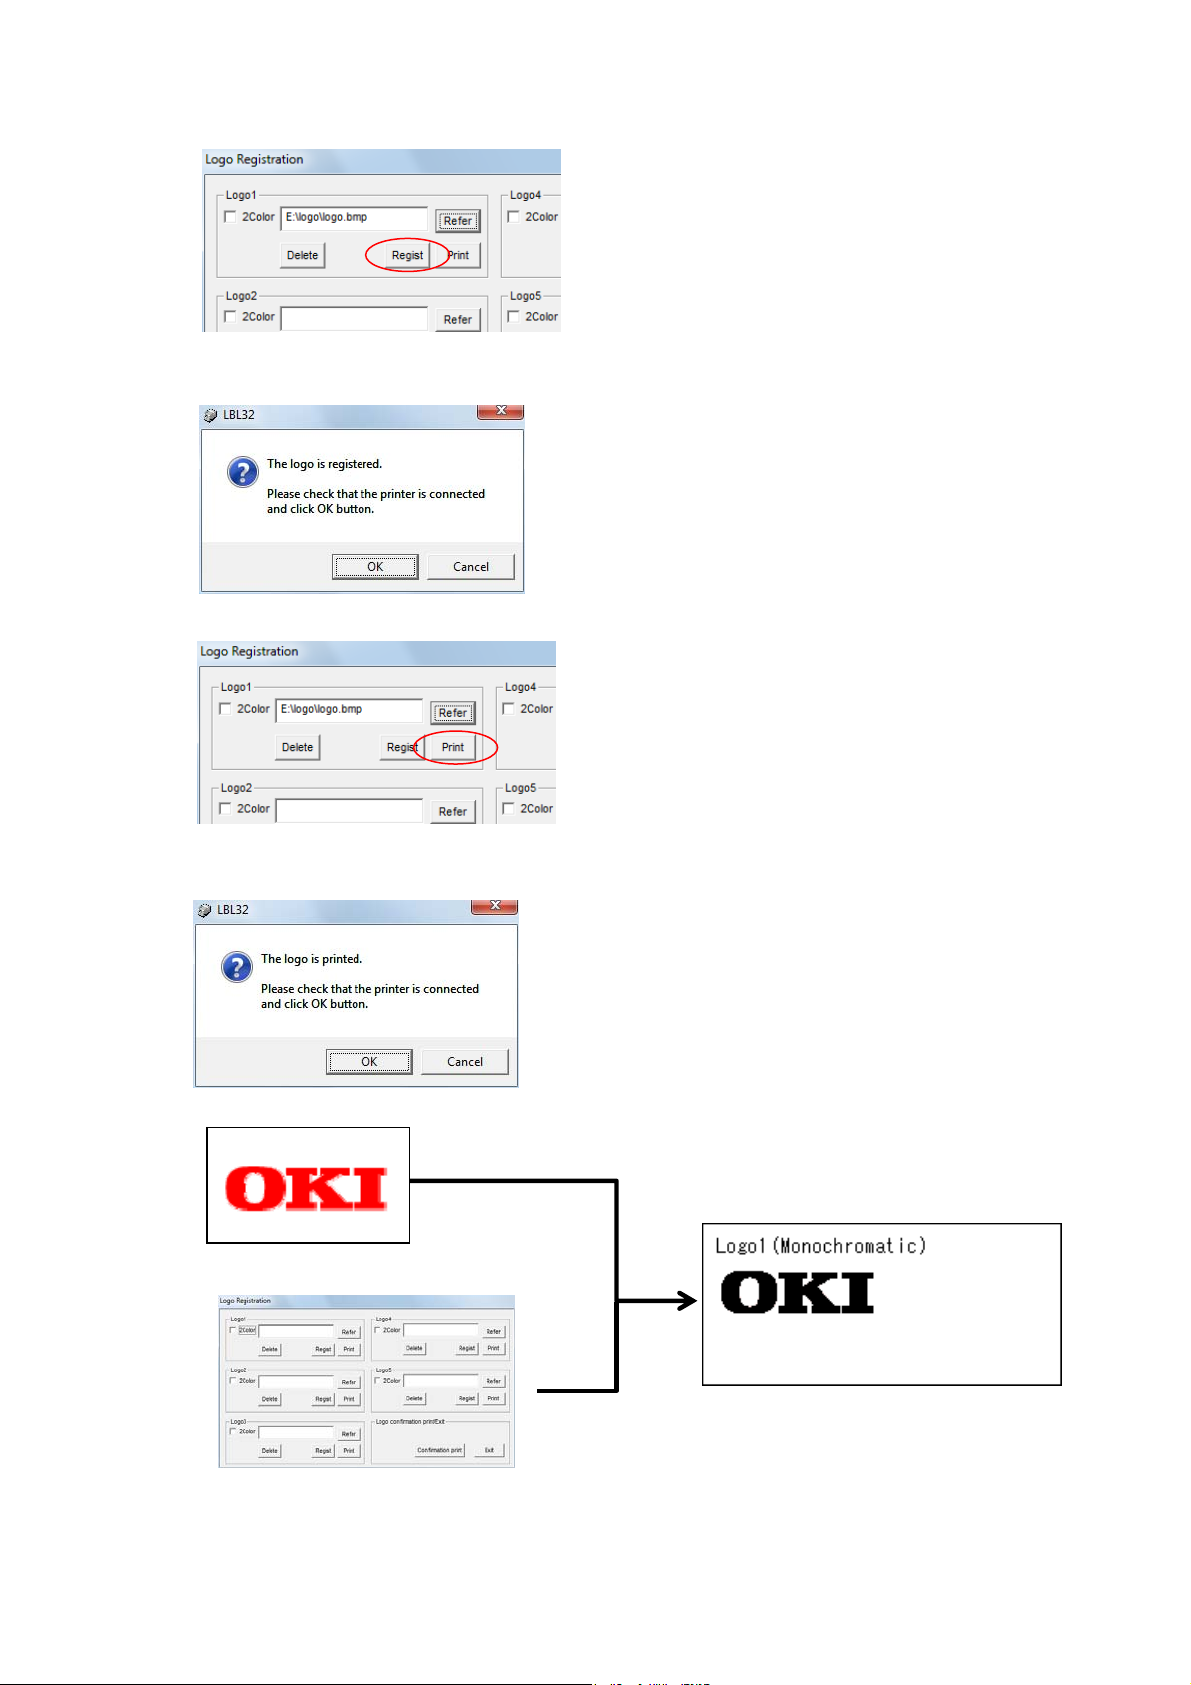
5) Click [Regist].
6) Th
confirmation message for registering logo is displayed. Click [OK] to continue, or click
e
[Cancel] to discontinue.
7)
Click [Pri
8)
The confirma
[Cancel] to discontinue.
W
hen the fo
Registered BMP file (Uncheck [2color])
[Logo Regis
LD670 Utility User's Guide 1.0.0.0
nt] to print the logo. Check that the logo is registered correctly.
tion message for printing is displayed. Click [OK] to continue, or click
llowing BMP file is registered, printed matter is shown in a right picture.
Printed matter
tration] dialog box
Copyright (C) 2011 Oki Data Corporation
26
Page 27
LD670 Utility User's Guide 1.0.0.0
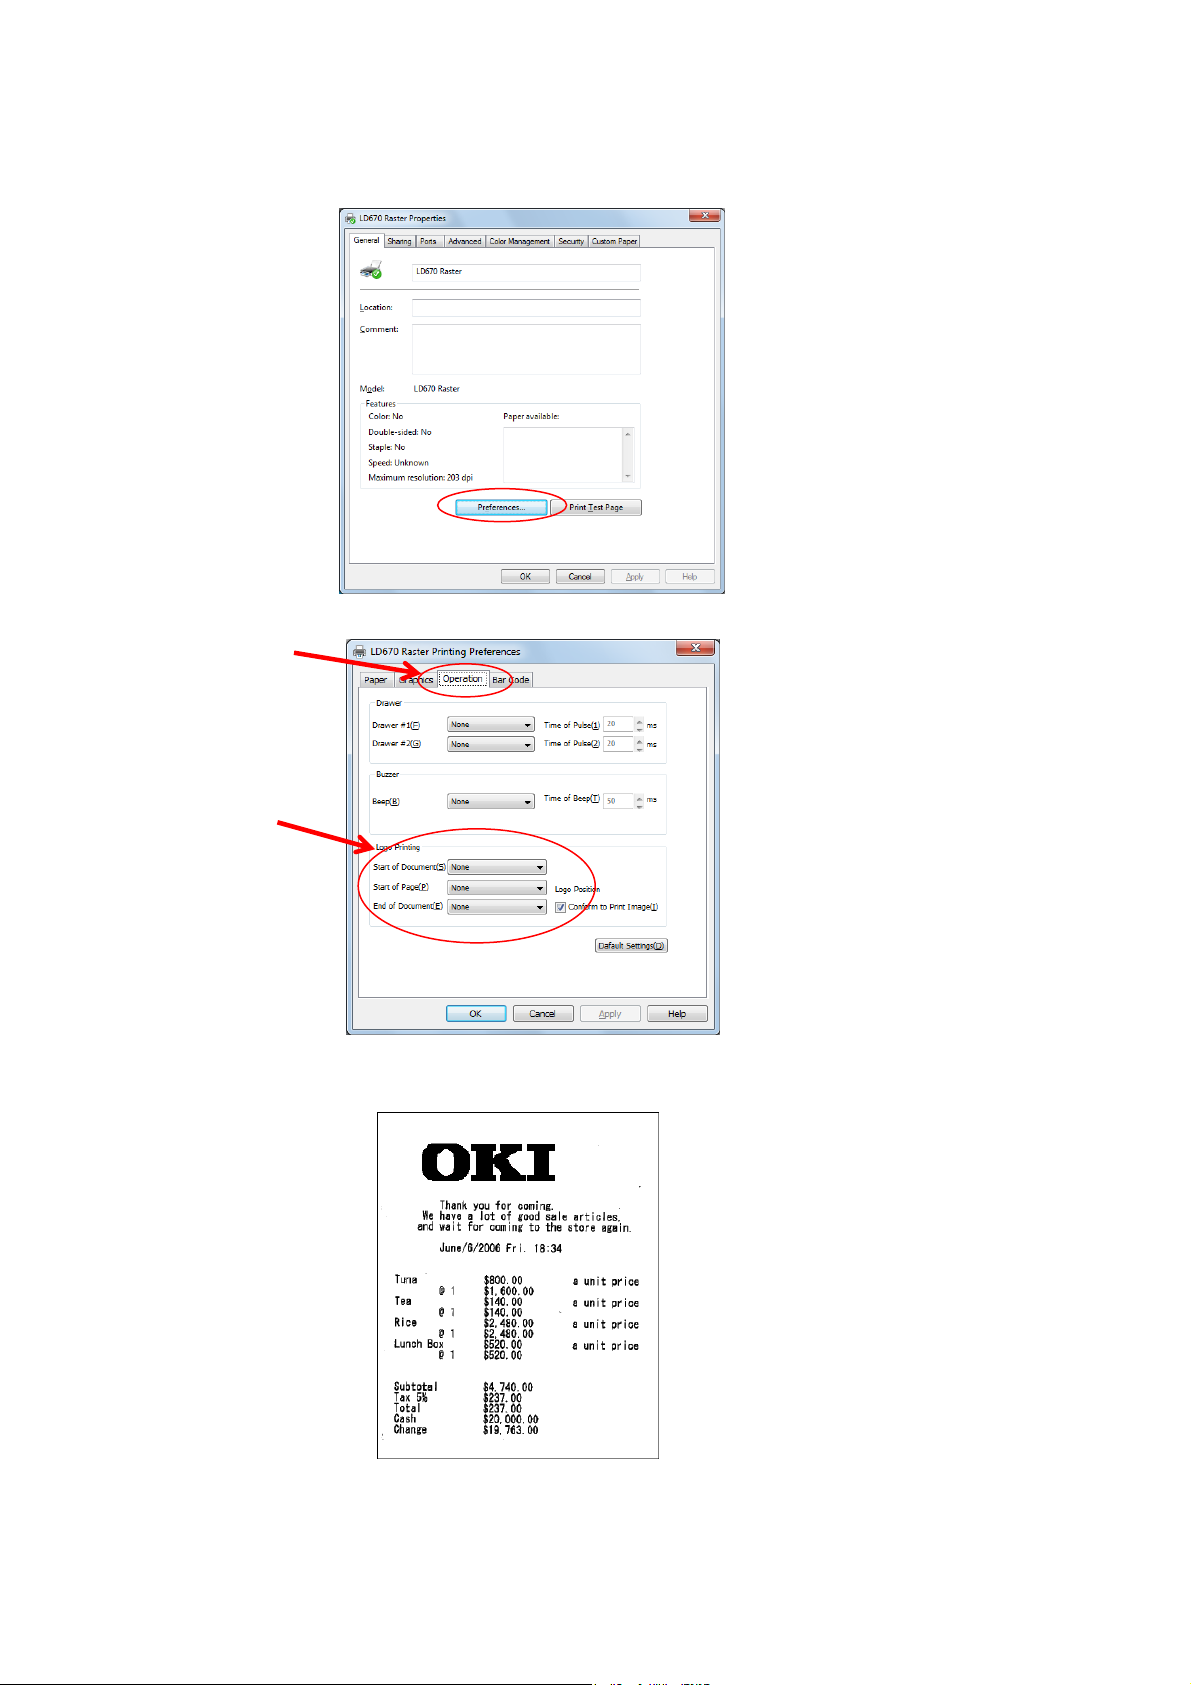
9) The logo regi
stered here can be printed on the print beginning position, each top of the page,
and the print end position at any time by setting the printer driver.
a) The property of t
he printer driver of LD670 Raster is displayed, and the print setting is
clicked.
b) Select t
he [Operation] tab.
b)
c)
c) The printi
ng position of the registered logo is set by [Logo Printing].
d) It is possible to print as follows printed matter by using the Windows driver.
*
Refe
r to "LD670 Windows printer driver user's guide" for details about the printer driver
operation.
Copyright (C) 2011 Oki Data Corporation
27
Page 28

OkicontactName. Oki Systems
(UK) Limited
OkicontactAddress.550 Dundee Road
Slough Trading Estate
Slough
Berkshire
SL1 4LE
Tel:+44 (0) 1753 819819
Fax:+44 (0) 1753 819899
http://www.oki.co.uk
Oki Systems Ireland Limited
The Square Industrial Complex
Tallaght
Dublin 24
Tel:+353 (0) 1 4049590
Fax:+353 (0)1 4049591
http://www.oki.ie
Oki Systems Ireland Limited Northern Ireland
19 Ferndale Avenue
Glengormley
BT36 5AL
Northern Ireland
Tel:+44 (0) 7767 271447
Fax:+44 (0) 1 404 9520
http://www.oki.ie
Technical Support for all Ireland:
Tel:+353 1 4049570
Fax:+353 1 4049555
E-mail: tech.support@oki.ie
OKI Systems (Czech and Slovak),
s.r.o.
IBC – Pobřežní 3
186 00 Praha 8
Czech Republic
Tel: +420 224 890158
Fax:+420 22 232 6621
Website: www.oki.cz, www.oki.sk
Oki Systems (Deutschland) GmbH
Hansaallee 187
40549 Düsseldorf
Tel: 01805/6544357**
01805/OKIHELP**
Fax: +49 (0) 211 59 33 45
Website:
www.okiprintingsolutions.de
info@oki.de
**0,14€/Minute aus dem dt. Festnetz
der T-Com (Stand 11.2008)
CPI S.A1 Rafailidou str.
177 78 Tavros
Athens
Greece
Tel: +30 210 48 05 800
Fax:+30 210 48 05 801
EMail:sales@cpi.gr
Oki Systems (Iberica), S.A.U
C/Teide, 3
San Sebastian de los Reyes
28703, Madrid
Tel:+34 91 3431620
Fax: +34 91-3431624
Atención al cliente: 902 36 00 36
Website: www.oki.es
Oki Systèmes (France) S.A.
44-50 Av. du Général de Gaulle
94246 L'Hay les Roses
Paris
Tel:+33 01 46 15 80 00
Télécopie:+33 01 46 15 80 60
Website: www.oki.fr
OKI Systems (Magyarország) Kft.
Capital Square
Tower 2
7th Floor
H-1133 Budapest,
Váci út 76
Hungary
Telefon: +36 1 814 8000
Telefax: +36 1 814 8009
Website: www.okihu.hu
OKI Systems (Italia) S.p.A.
via Milano, 11,
20084 Lacchiarella (MI)
Tel:+39 (0) 2 900261
Fax:+39 (0) 2 90026344
Website: www.oki.it
OKI Printing Solutions
Platinium Business Park II, 3rd Floor
ul. Domaniewska 42
02-672 Warsaw
Poland
Tel:+48 22 448 65 00
Fax:+48 22 448 65 01
Website: www.oki.com.pl
E-mail: oki@oki.com.pl
Hotline: 0800 120066
E-mail: tech@oki.com.pl
Oki Systems (Ibérica) S.A.
Sucursal Portugal
Edifício Prime Av. Quinta Grande 53
7º C Alfragide
2614-521 Amadora
Portugal
Tel:+351 21 470 4200
Fax:+351 21 470 4201
Website:www.oki.pt
E-mail : oki@oki.pt
Oki Service
Serviço de apoio técnico ao
Cliente
T
el: 808 2
00 197
E-mail : okiserv@oki.pt
OKI Europe Ltd. (Russia)
Office 702, Bldg 1
Zagorodnoye shosse
117152, Moscow
Tel: +74 095 258 6065
Fax: +74 095 258 6070
e-mail: info@oki.ru
Website: www.oki.ru
Technical support:
Tel: +7 495 564 8421
e-mail: tech@oki.ru
Oki Systems (Österreich)
Campus 21
Businesszentrum Wien Sued
Liebermannstrasse A02 603
22345 Brun am Gebirge
Tel: +43 223 6677 110
Drucker Support:
+43 (0) 2236 677110-501
Fax Support:
+43 (0) 2236 677110-502
Website: www.oki.at
OKI Europe Ltd. (Ukraine)
Raisy Opkinoy Street,8
Building B, 2
nd
Floor,
Kiev 02002
Ukraine
Tel: +380 44 537 5288
e-mail: info@oki.ua
Website: www.oki.ua
Harman sok Duran Is Merkezi,
No:4, Kat:6,
34394, Levent
İstanbul
Tel: +90 212 279 2393
Faks: +90 212 279 2366
Web: www.oki.com.tr
www.okiprintingsolutions.com.tr
Oki Systems (Belgium)
Medialaan 24
1800 Vilvoorde
Helpdesk: 02-2574620
Fax: 02 2531848
Website: www.oki.be
AlphaLink Bulgaria Ltd.
2 Kukush Str.
Building "Antim Tower", fl. 6
1463 Sofia, Bulgaria
tel: +359 2 821 1160
fax: +359 2 821 1193
Website: http://bulgaria.oki.com
Διανομέας των συστημάτων OKI
OKI Sistem ve Yazıcı Çözümleri
Tic. Ltd. Şti.
Oki contact details
Page 29

OKI Printing Solutions
Herstedøstervej 27
2620 Albertslund
Danmark
Adm.: +45 43 66 65 00
Hotline: +45 43 66 65 40
Salg: +45 43 66 65 30
Fax: +45 43 66 65 90
Website: www.oki.dk
Oki Systems (Finland) Oy
Polaris Capella
Vänrikinkuja 3
02600 Espoo
Tel: +358 (0) 207 900 800
Fax: +358 (0) 207 900 809
Website: www.oki.fi
Oki Systems (Holland) b.v.
Neptunustraat 27-29
2132 JA Hoofddorp
Helpdesk: 0800 5667654
Tel:+31 (0) 23 55 63 740
Fax:+31 (0) 23 55 63 750
Website: www.oki.nl
Oki Systems (Norway) AS
Tevlingveien 23
N-1081 Oslo
Tel:+47 (0) 63
Telefax:+47 (0) 63 89 36 01
Ordrefax:+47 (0) 63 89 36 02
Website: www.oki.no
General Systems S.R.L.
(Romania)
Sos. Bucuresti-Ploiesti Nr. 135.
Bucharest 1
Romania
Tel: +40 21 303 3138
Fax: +40 21303 3150
Website: http://romania.oki.com
Var vänlig kontakta din Återförsäljare
i första hand, för konsultation. I
andra hand kontakta
Oki Systems (Sweden) AB
Borgafjordsgatan 7
Box 1191
164 26 Kista
Tel. +46 (0) 8 634 37 00
e-mail:
info@oki.se fö
Oki produkter
support@oki.se för teknisk support
gällandes Oki produkter
Vardagar: 08.30 - 12.00,
13.00 - 16.00
Website: www.oki.se
89 36 00
r allmänna frågor om
Oki Systems (Schweiz)
Baslerstrasse 15
CH-4310 Rheinfelden
Support deutsch +41 61 827 94 81
Support français +41 61 827 94 82
Support italiano +41 061 827 9473
Tel: +41 61 827 9494
Website: www.oki.ch
Oki Data Americas Inc.(United
States)
2000 Bishops Gate Blvd.
Mt. Laurel, NJ 08054
USA
Tel: 1-800-654-3282
Fax: 1-856-222-5247
http://
http://my.okidata.com
Oki Data Americas Inc.(Canada •
Canadá)
4140 B Sladeview Crescent Units 7&8
Mississauga, Ontario
Canada L5L 6A1
Tél: 1-905-6
T
http://
Oki Data Americas Inc.(América
Latina (OTRO))
2000 Bishops Gate Blvd.
Mt. Laurel, NJ 08054
USA
Tel (Español): 1-856-222-7496
Fax: 1-856-222-5260
Email: LASatisfaction@okidata.com
Oki Data de Mexico, S.A. de C.V.
Mariano Escobedo #748, Piso 8
Col. Nueva Anzures
C.P. 11590, México, D.F.
Tel: 52-555-263-8780
Fax:
http://
Oki Data do Brasil, Ltda.
Rua Avenida Alfrefo Egidio de souza Aranha
100-4° andar-Bloco C Chacara Santo Antonio
Sao Paulo, Brazil 04726-170
Tel: 55-11-3444-6747 (Grande São
Fax: 5511-3444-3501
e-mail: okiserv@okidata.com.br
http://
Oki Data (Singapore) Pte. Ltd.
438A Alexandra Road #02-11/12,
Lobby 3, Alexandra Technopark
Singapore(119967)
WWW.OKIPRINTINGSOLUTIONS.COM
08-5000
éléc: 1-905-608-5040
WWW.OKIPRINTINGSOLUTIONS.COM
1-856-222-5276
52-555-250-3501
WWW.OKIPRINTINGSOLUTIONS.COM
Paulo)
0800-11-5577 (Demais
localidades)
WWW.OKIPRINTINGSOLUTIONS.COM
Oki Systems (Thailand) Ltd.
1168/81-82 Lumpini Tower,
27th Floor Rama IV Road
Tungmahamek,
Bangkok 10120
Tel:(662) 679 9235
Fax:(662) 679 9243/245
http://www.okisysthai.com
Oki Systems (Hong Kong) Ltd.
Suite 1908, 19/F, Tower 3,
China Hong Kong City
33 Canton Road, TsimShaTsui,
Kowloon, Hong Kong
Tel: (852) 3543 9288
Fax: (852) 3549 6040
http://
Oki Data(Australia) Pty Ltd.
Levwl1 67 Epping Road, Macquarie Park
NSW 2113, Australia
Tel: +61 2 8071 0000
(Support Tel: 1800 807 472)
Fax: +61 2 8071 0010
http://www.oki.com.au
Comworth Systems Ltd.
8 Antares Place Mairangi Bay,
Auckland, New Zealand
Tel:(64) 9 477 0500
Fax:(64) 9 477 0549
http://www.comworth.co.nz
Oki Data(S) P Ltd. Malaysia Rep
Office
Suite 21.03, 21st Floor Menara IGB,
d Valley City,
Mi
Lingkaran Syed Pura 59200,
Kuala Lumpur, Malaysia
Tel: (60) 3 2287 1177
Fax: (60) 3 2287 1166
Sathorn
www.okiprintingsolutions.com.hk
Tel:(65) 6221 3722
Fax:(65) 6594 0609
http://www.okidata.com.sg
Page 30

Oki Data Corporation
4-11-22 Shibaura, Minato-ku,Tokyo
108-8551, Japan
www.okiprintingsolutions.com
 Loading...