

Page 1
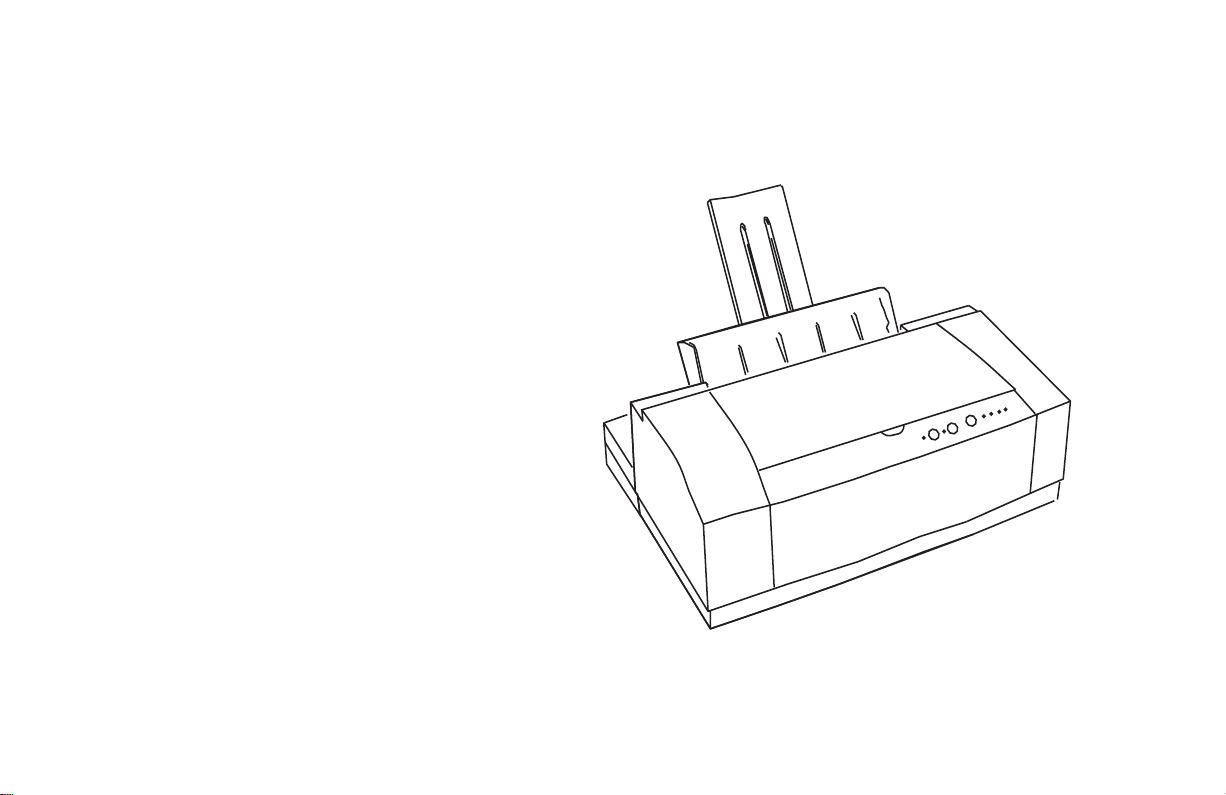
OKIJET
2500
User’s Guide
Page 2

Every effort has been made to ensure that the information in this
document is complete, accurate, and up-to-date. Oki assumes no
responsibility for the results of errors beyond its control. Oki also
cannot guarantee that changes in software and equipment made by
other manufacturers and referred to in this guide will not affect the
applicability of the information in it. Mention of software products
manufactured by other companies does not necessarily constitute
endorsement by Oki.
Copyright 1998 by Oki. All rights reserved.
This edition 04/1998.
Oki is a registered trademark of Oki Electric Industry Company,
Ltd.
Energy Star is a trademark of the United States Environmental
Protection Agency.
Energy Star
English
2 OKIJET 2500
As an Energy Star Partner, Oki has
determined that this product meets the
Energy Star guidelines for energy
efficiency.
Page 3

Contents
Safety Instructions .................................................................... 4
Control Panel Buttons and Indicators ..................................... 6
Print Head Care ......................................................................... 9
Replacing/swapping the print head
(colour or black-only) ......................................................... 9
Replacing ink cartridges .................................................... 1 1
Print head storage box ....................................................... 1 2
Transporting the printer ..................................................... 1 3
Cleaning the printer cover ................................................. 1 3
Selecting Printer Options ....................................................... 1 4
Accessing printer settings ................................................. 1 4
Spool manager .................................................................... 1 5
Troubleshooting ...................................................................... 1 5
Clearing paper misfeeds .................................................... 1 5
Clearing paper jams ........................................................... 1 6
Clear multi-page paper jams ............................................. 1 7
Problem Solving ...................................................................... 1 8
Selecting and Ordering Supplies ........................................... 2 3
Ordering supplies ............................................................... 2 3
Cartridges and print heads ................................................ 2 3
Selecting plain paper and media ....................................... 2 3
Selecting speciality print media ........................................ 2 3
Speciality print media ........................................................ 2 4
Envelope size...................................................................... 2 4
Selecting labels .................................................................. 2 4
Technical Data ......................................................................... 2 5
Printing system ................................................................... 2 5
Ink jet technology .............................................................. 2 5
Printer Specifications ............................................................. 2 6
Printable area ...................................................................... 2 8
Warranty Information ............................................................. 2 8
Packaging for return to a Service Centre .............................. 2 9
With the original box and packaging: .............................. 2 9
Without the original box and packaging .......................... 2 9
Appendix A - Printing on Speciality Media .......................... 3 1
Envelopes ............................................................................ 3 1
Other media ........................................................................ 3 2
Appendix B - Transportation Precautions ............................ 3 3
Index ........................................................................................ 3 6
English
User’s Guide 3
Page 4

Safety Instructions
Your Oki printer has been carefully designed to give you years of
safe, reliable performance. As with all electr ical equipment, howev er,
there are a few basic precautions you should take to avoid hurting
yourself or damaging the printer:
• Read the setup instructions in this handbook carefully . Be sure
to save it for future reference.
• Read and follow all warning and instruction labels on the printer
itself.
• Unplug the printer before you clean it. Use only a damp cloth;
do not use liquid or aerosol cleaners.
• Place your printer on a firm, solid surface. If you put it on
something unsteady, it may fall and be damaged; if you place
it on a soft surface, such as a rug, sofa, or bed, the vents may
become blocked, causing the printer to overheat.
• T o protect your printer from overheating, mak e sure all openings
on the printer are not blocked. Do not put the printer on or near
a heat source, such as a radiator or heat register. Keep it out of
direct sunlight. Allow enough room around the printer for
English
adequate ventilation and easy access to the paper trays.
• Do not use your printer near water, or spill liquid of any kind
on it.
• Be certain that your power source matches the rating listed on
the back of the printer. If you are not sure, check with your
dealer or with your local power company.
• Your printer has an earthed, 3-pin plug as a safety feature, and
it will only fit into an earthed outlet. If you cannot plug it in,
chances are you have an older, non-earthed outlet; contact an
electrician to have the outlet replaced. Do not use an adapter
to defeat the earthing.
• To avoid damaging the power cable, do not put anything on it
or place it where it will be walked on or damaged. If the cable
becomes damaged or frayed, replace it immediately.
• If you are using an extension cable or power strip with the
printer, make sure that the total current (amperes) required by
all the equipment on the extension is less than the extension’s
rating. The total ratings of all equipment plugged into the
outlet should not exceed 15 amperes.
• The power outlet into which you plug your printer must remain
accessible at all times.
• It is recommended that the printer be switched off prior to
opening or removing covers.
4 OKIJET 2500
Page 5

• Do not poke anything into the ventilation slots on the printer;
you could get a shock or cause a fire.
• Aside from the routine maintenance described in this handbook,
do not try to service the printer yourself; opening the cover
may expose you to shocks or other hazards.
• Do not make any adjustments other than those outlined in the
handbook since you may cause damage requiring extensive
repair work.
If anything happens that indicates that your printer is not working
properly or has been damaged, unplug it immediately and contact
your dealer.
These are some of the things to look for:
• The power cable or plug is frayed or damaged.
• Liquid has been spilled into the printer, or it has been
exposed to water.
• The printer has been dropped, or the cabinet is damaged.
• The printer does not function normally when you are
following the operating instructions.
This product complies with the requirements of the Council
Directives 89/336/EEC and 73/23/EEC on the approximation
of the laws of the member states relating to electromagnetic
compatibility and low voltage.
English
User’s Guide 5
Page 6
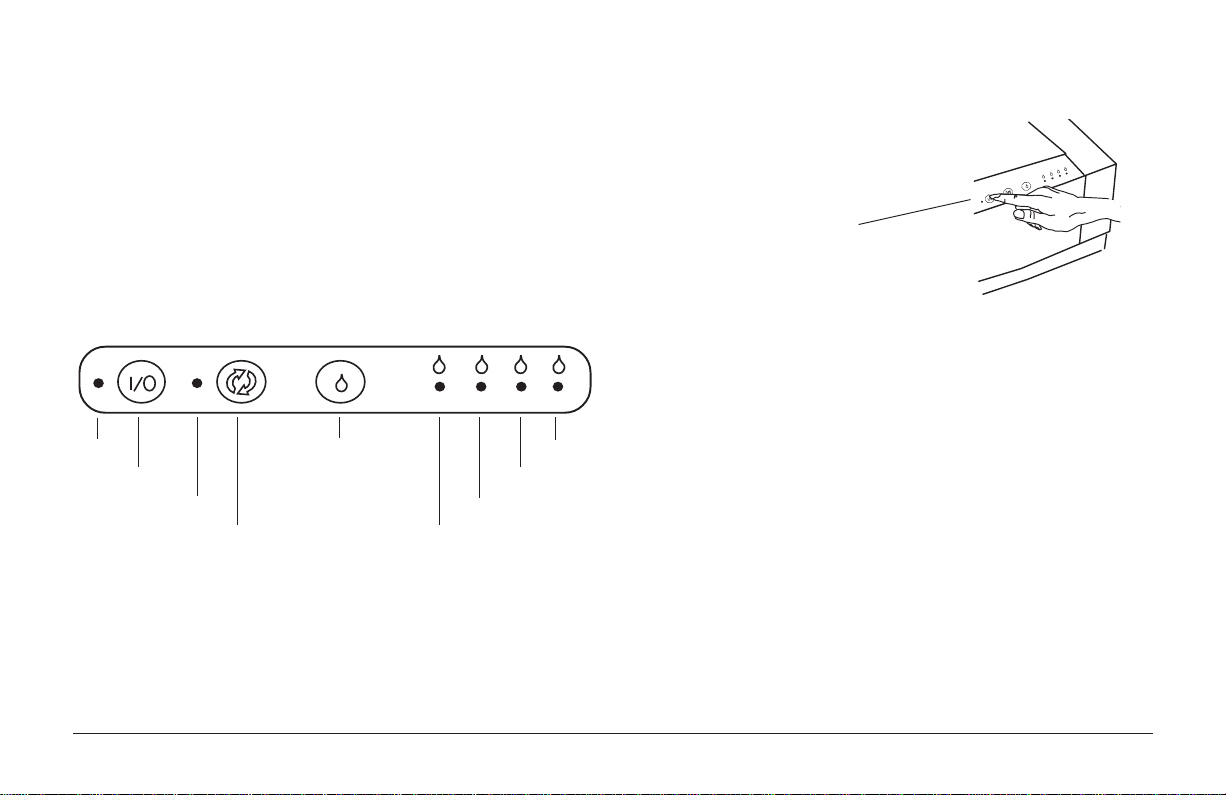
Control Panel Buttons and Indicators
Power/Reset button
The control panel has three buttons and six lights (LEDs) that are
used to control and display the condition of the printer. Each b utton
and LED has multiple functions.
The significance of each LED is determined by whether or not the
light is lit or if the light is blinking. The function of each of the
buttons and LEDs is explained in the following pages.
Power
LED
Power /
Reset
Error
LED
Resume/FF
Cartridge
Change / Clean
Magenta LED
Cyan LED
Black LED
English
Y ellow LED
Press and release the button
once to turn the printer ON.
If the printer is ON, press
and release the button to
reset the printer.
When the green Power LED
is lit, the printer is ONLINE
and ready to print.
Note: If the Power/Reset button is pressed during the print
cycle, the printer will complete the current line before it
stops printing.
Note: When the printer is reset, the following occurs:
• The data remaining in the buffer is cleared.
• The permanently stored settings in the printer memory
are retained.
6 OKIJET 2500
Page 7
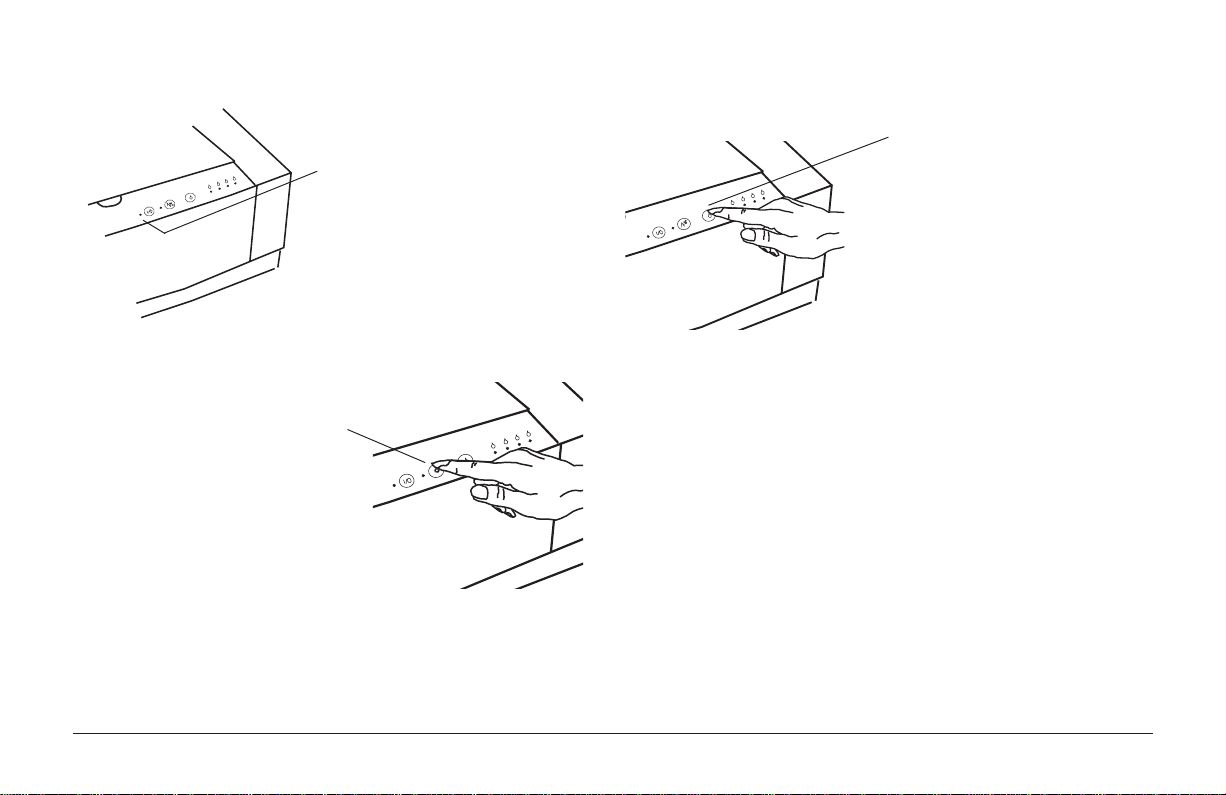
Power LED
Resume/FF Button
Resume Printing: Press and
release the Resume/FF button.
Eject Paper: Press the Resume/
FF button and hold for 2 seconds
then release the button.
Clear Errors: Press and release
the Resume/FF button.
Print a Demo Page: With no da ta
in the print buffer, press the
Resume/FF button and hold for
2 seconds then release the button.
The green Power LED will blink
when the printer is processing
data. The green Power LED will
be ON when the printer is
ONLINE and is ready to print.
Cartridge Change/Clean button
Cartridge Change: Press
and release the Change
Cartridge/Clean button.
Refer to the label on the
inside of the Carriage Cover
to change the cartridge.
Clean Cartridge: Press and
hold the Change Cartridge/
Clean button for 2 seconds
and then release. This
activates the cleaning cycle.
Note: This function is operational only when the Power LED
is ON.
Note: Cartridge changing and cartridge cleaning can be
executed during printing. The printer finishes printing
the current line, cleans the cartridge, then resumes
printing. Changing the cartridge during printing may
affect the print quality.
English
User’s Guide 7
Page 8
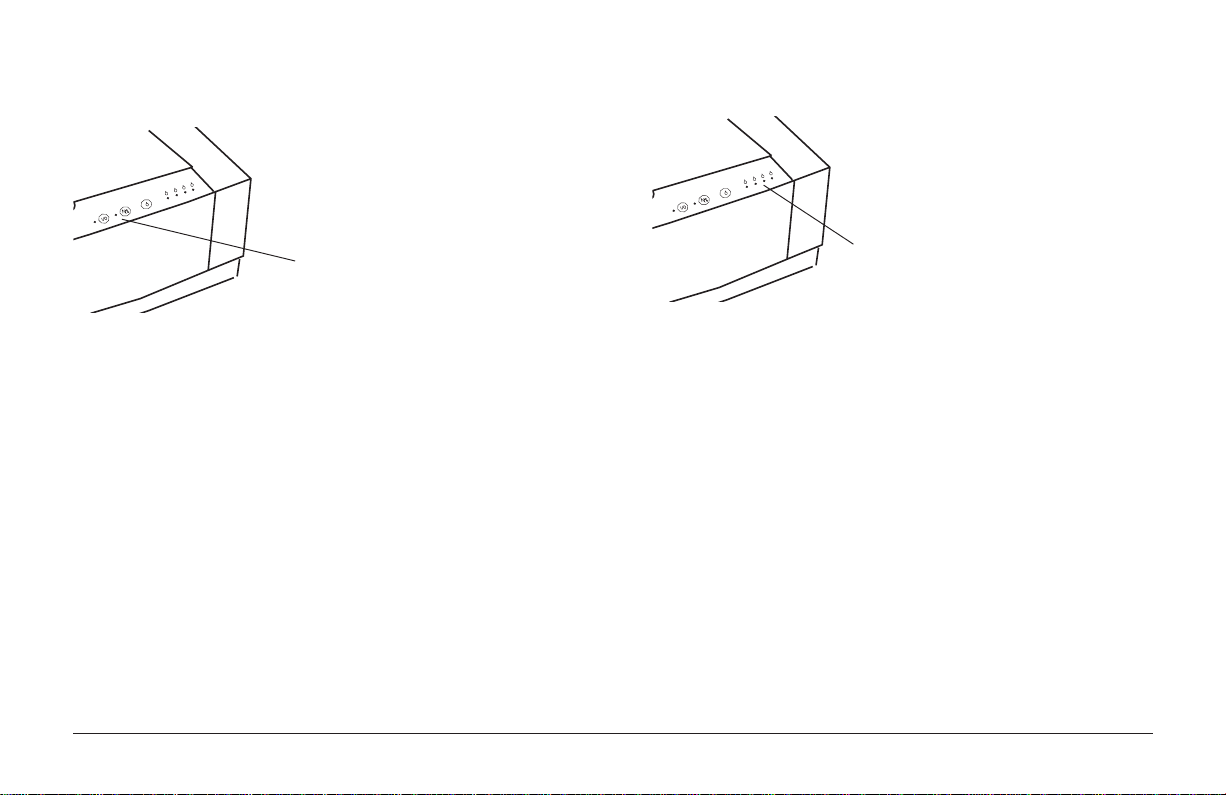
Error LED
Recoverable Error (steady light):
Press and release the Resume/FF
button.
Low Ink Indicators
The four Low Ink Indicators are
OFF when the Colour Print Head
is installed and the Ink Cartridges
contain ink.
Non-Recoverable Error (flashing
LED): Refer to the “Troubleshooting”
section in this guide.
Note: When the red Error LED is lit, the printer is in an error
status condition. When a recoverable error has
occurred, the light will stay lit.
The four Low Ink Indicators are
ON when they are low on ink.
Purchase a new Ink Cartridge. The
Ink Cartridge will soon be empty.
The four Low Ink Indicators
BLINK when the Ink Cartridge is
empty. Replace the Ink Cartridge
at this time.
English
8 OKIJET 2500
Page 9
Print Head Care
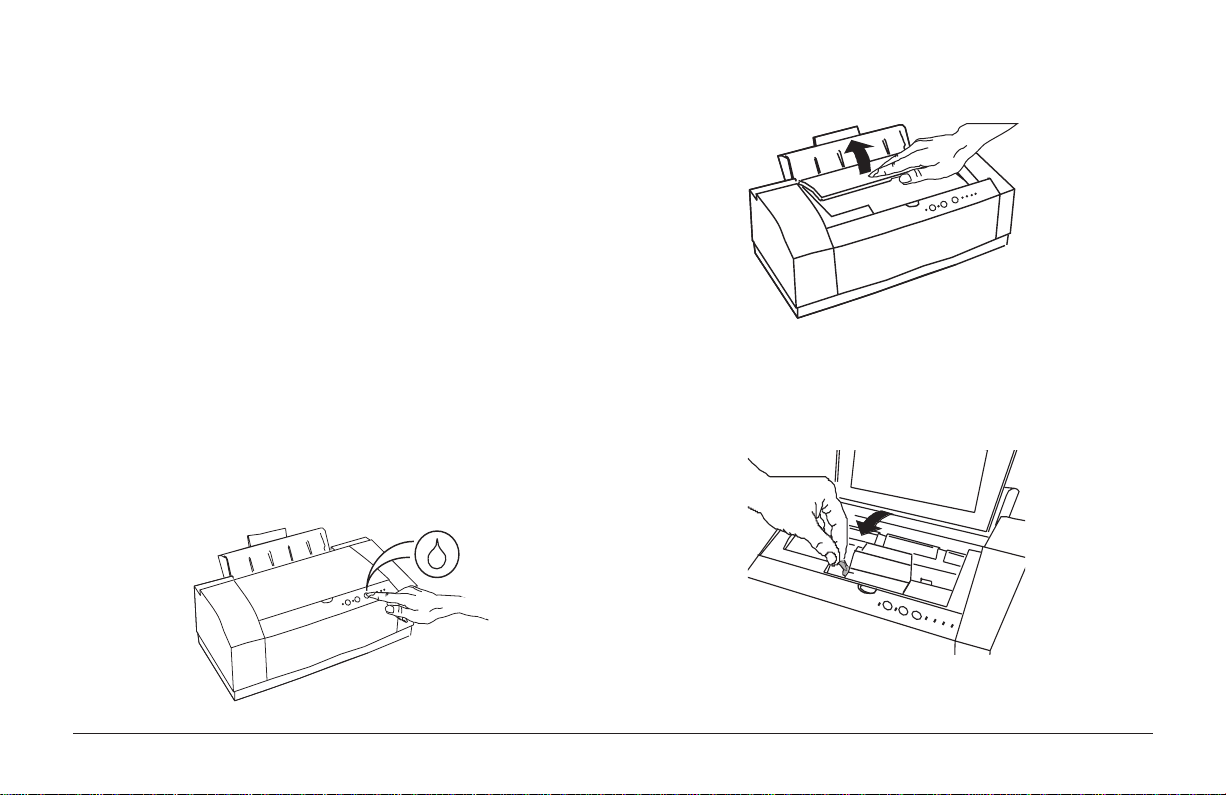
2. Open the Top Cover.
The OKIJET 2500 requires minimal maintenance. The procedures
in this section of the manual describe routine Print Head
maintenance and cleaning.
Replacing/swapping the print head (colour or black-only)
Note: If your printer has never had a Print Head installed, refer
to the “Installing the Print Head for the first time” section
of your Setup Guide for instructions.
Note: The printer must be turned ON to perform the following
steps.
1. Press the Cartridge Change/Clean button on the control panel.
3. Once the Carriage moves to the centre and stops, move the
green Cartridge Lock Lever to the forward position and remove
the Print Head.
Caution: Ensure that the green Carriage Lock Lever is STILL in
English
the forward position before performing the next step.
User’s Guide 9
Page 10
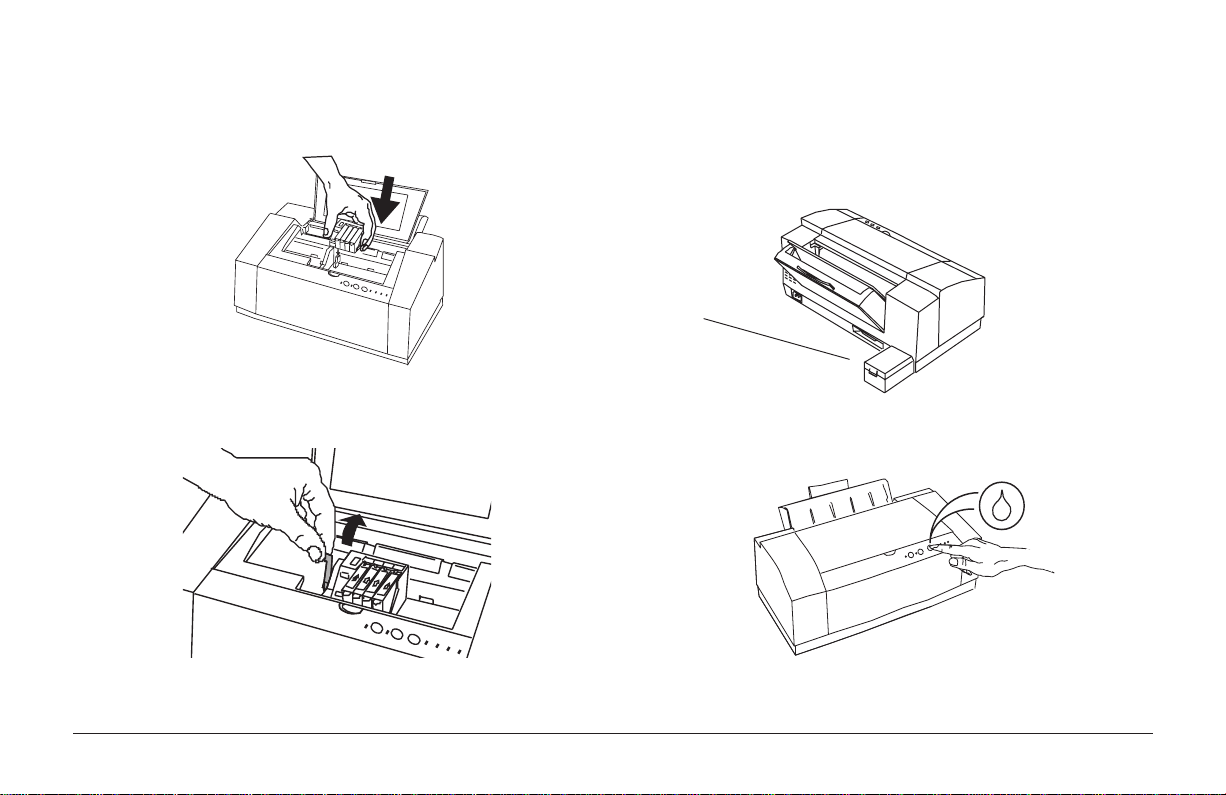
4. Reinstall the Print Head by aligning the hole in the Print Head
with the green post on the Printer Carriage. Lower the Print
Head down gently into position.
5. Move the green Cartridge Lock Lever backwards to secure the
Colour Print Head. Close the Top Cover.
not stored in the printer or the storage box, premature
failure of the Print Head will result.
6. Place the Print Head in the Print Head Storage Box and firmly
click shut the box cover.
Printhead Storage
Box
7. Press the Cartridge Change/Clean button. The printer will
prepare the cartridge for printing.
English
Note: If the carriage does not return home after the Cartridge
Note: The Print Head must be stored in the Print Head Storage
Box when not installed in the printer. If the Print Head is
10 OKIJET 2500
Change button is pressed, try removing and reinstalling
the Print Head.
Page 11
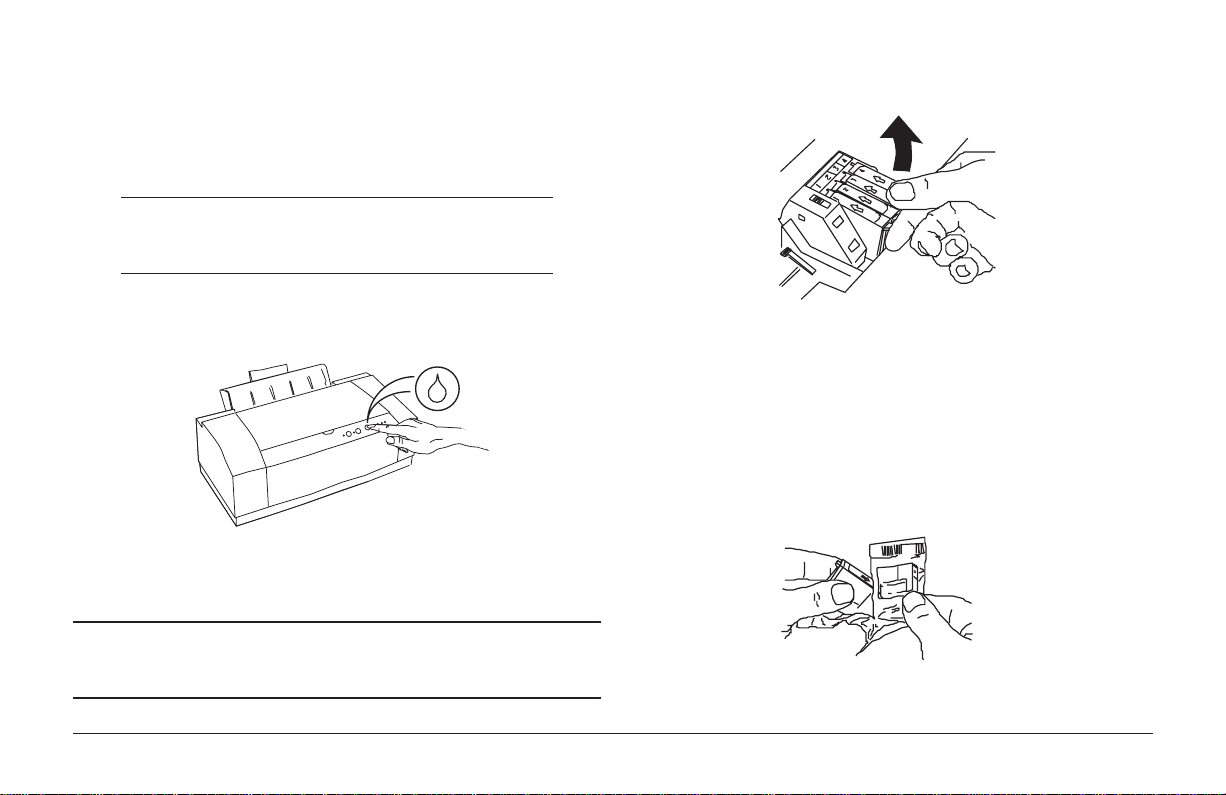
Replacing ink cartridges
This section explains how to replace an Ink Cartridge without
removing the Print Head from the printer.
Always use genuine Oki consumables. Some
alternatives can cause serious damage and may
affect your warranty.
3. Remove the empty Ink Cartridge from the Colour Print
Head.
English
1. Press the Cartridge Change/Clean button on the control
panel.
2. Open the Top Cover.
WARNING!
Keep the Ink Cartridges out of the reach of children.
Do not get the ink near your eyes or mouth.
User’s Guide 11
Note: Do not remove the Ink Cartridge until you have a
replacement cartridge ready to install.
4. Holding the ink cartridge bag upside down, tear the bag
open using the slit in the top left hand corner, as illustrated.
Slowly remove the new Ink Cartridge from the plastic bag.
A protective strip of plastic is pulled from the Ink Cartridge
as the plastic bag is removed. Follow the instructions on
the ink cartridge bag.
Note: Do not touch the uncovered hole in the Ink Cartridge.
The ink will get on your hands, if you touch it.
Page 12
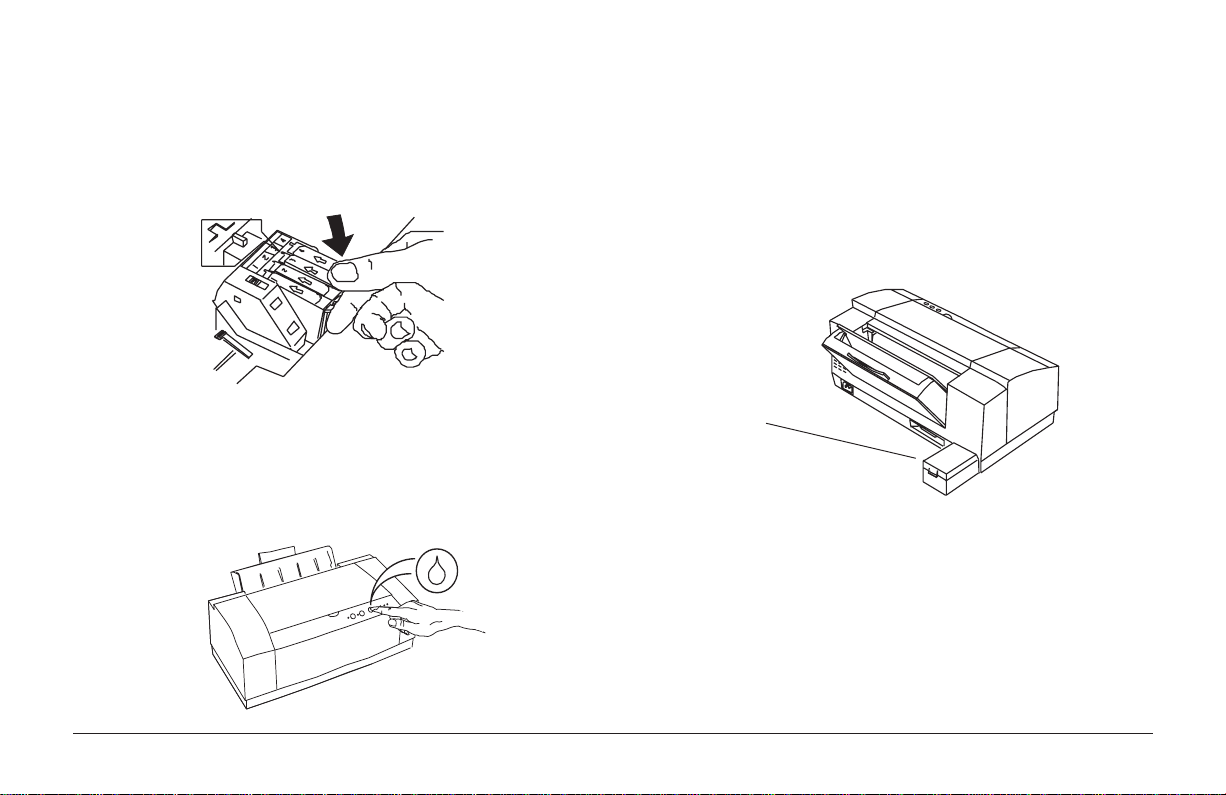
Caution: Do not force fit the Ink Cartridge into the Print Head.
Print head storage box
5. Insert the Ink Cartridge into the correct location on the
Colour Print Head as shown. The Ink Cartridges and
corresponding locations are colour coded and numbered.
6. Snap the Ink Cartrid ge into position. Close the Top Cover.
7. Press and release the Cartridge Change/Clean button. The
printer will prepare the Print Head for printing.
English
This Storage Box is designed to protect one Print Head when
the other one is installed in the printer. The box will hold either
the Colour Print Head or the optional Black Ink Jet Cartridge
when not in use. The Print Head Storage Box can be attached to
the back of the printer. If space limitations are a concern, the
Print Head Storage Box can be stored elsewhere.
Print head
storage box
Note: It is strongly recommended that the Print Head be stored
in the Storage Box. The Storage Box should be placed in
a cool location away from direct sunlight. For best
performance, once a month the Print Head should be
taken out of the Storage Box, installed in the printer and
a few demo prints run before being stored once again, in
the Storage Box.
12 OKIJET 2500
Page 13

W ARNING!
Keep the Ink Cartridges out of the reach of children.
Do not get the ink near your eyes or mouth.
Caution: Do not touch the uncovered Print Head when
removing the Print Head. Ink will get on your hands
and the Print Head may become contaminated.
Caution: Avoid contact of the Print Head with hands and
clothing. The ink cannot be removed easily from
these items.
Cleaning the printer cover
Caution: To avoid damage to the printer, do not pour or spray
water directly onto the printer. Use only water to
moisten the cleaning cloth. Do not use detergent,
alcohol, etc.
1. Press and hold the Power button for 2 seconds to switch
the printer OFF.
2. Unplug the Power Cable from the wall outlet.
English
T ransporting the printer
When moving the printer from one location to another, remove
the Print Head and place it in the Print Head Storage Box during
transit. This will prevent the Print Head and Ink Cartridges from
being damaged during the move.
User’s Guide 13
3. Slightly dampen a soft clean cloth with water and wipe the
Printer Cover.
4. Wipe Printer Cover dry with a clean cloth.
5. Reconnect the Power Cable.
Page 14

Selecting Printer Options
The purpose of this section is to provide information about how to
use the options in the OKIJET 2500 Printer Drive r.
2. Windows™ 3.1:
From the Control Panel, open the Printers dialogue box then
select the OKIJET 2500 Printer from the Installed Printers list.
Click the Setup button.
Accessing printer settings
Note: The application may override any options that are selected
using the printer driver.
Control of your print settings is provided from the dialogue box of
the OKIJET 2500 Windows™ Printer Driver. The way you access
the printer settings will vary depending on your application.
There are two ways to access the OKIJET 2500 W indows™ Printer
Driver:
1. From within your Windows™ application:
Y ou typically select Print... or Print Setup... from the File menu
of your application, and then select Options or Properties.
Each application determines the path needed to display the
OKIJET 2500 dialogue box.
English
14 OKIJET 2500
Windows 95™:
Select Start, Settings, then Printers. Highlight OKIJET 2500
and open Properties.
For information about the available settings, refer to the online help system.
Page 15

Spool manager
T roubleshooting
The Spool Manager is a queue for pending print jobs. There are
some conditions during which some jobs will not print and will be
held in the queue.
To release the documents for printing, perform the following:
1. Open the Spool Manager.
2. Select the OKIJET 2500 printer.
3. Pull down the Queue menu and select the checked Hold menu
item to release the document for printing. The status will change
to Active.
If you continue to have problems, close the Spool Manager . Do not
save the job and resend the document.
Note: Individual documents can be deleted by using the pull down
Document menu.
Clearing paper misfeeds
1. The red Error Light will be lit to indicate a paper jam.
2. Remove all paper from the Paper Tray.
3. Fan the paper and r einstall it in the Paper Tray. Press and
release the Resume/FF button to continue the print job.
4. If the misfeeds continue, flip the paper stack over, press
and release the Resume/FF button to continue the print job.
English
User’s Guide 15
Page 16

Clearing paper jams
If the trailing edge is accessible
If the trailing edge of the paper is accessible in the paper tray,
grasp it, then press the Resume/FF button for two seconds. This
will free the paper so that you can pull it out.
2. Remove the Paper Output Shelf.
3. Grip the Paper Tray with your fingers and squeeze the green
tabs backwards to release the tray.
If the trailing edge is not accessible
1. If you cannot reach the trailing edge of the paper in the
Paper Tray, remove the unused paper from the tray.
4. Swing the Paper Tray down towards the back and withdraw
from the printer.
Green T abs
English
5. Remove the jammed sheet of paper from the printer.
16 OKIJET 2500
Page 17

6. Reinstall the Paper Tray: press in on the Feed Plate and insert
the tray into the back of the printer, then swing it towards
you and press down on the green tabs.
Feed Plate
Green T abs
7. Reinstall the Paper Output Shelf.
8. Fan the paper and reinstall it in the Paper Tray.
9. Press and release the Resume/FF button to continue the
print job.
Clear multi-page paper jams
If a bunch of ten or more pages has jammed in the printer,
removing the Paper Tray will not allow sufficient clearance to
extract it. To correct such a paper jam, lift the cover of the printer
and press on the green paper jam symbol inside. This will
release the paper and allow you to remove it.
English
User’s Guide 17
Page 18

Problem Solving
Printer output does not reflect the options selected
The following charts list some conditions that may occur and the
recommended solutions. Follow the suggested solutions until the
problem is corrected. If the problem persists, contact your local
authorized Oki representative.
Printer Power LED does not turn on
Cause: No power from outlet.
Solution: Connect the power cable to a different power outlet.
Cause: Power cable is not securely inserted into the power
outlet or printer inlet.
Solution: Remove the power cable from the wall outlet. Then
remove the power cable from the printer power inlet.
Plug the power cable into the printer power inlet and
then into the wall outlet.
Cause: Power cable is damaged.
Solution: Check the power cable and replace if damaged.
English
Cause: The options selected with the print driver are being
overridden by the application.
Solution: The application will override any options that are
selected using the printer driver. Choose the desired
options through your application.
Blank print
Cause: Print Head, cable or PC.
Solution: Open Windows Printer Driver and under ‘Printer
Services’ generate a test print.
• T est print is OK:
– Check cable or PC.
• Test print is blank:
– Remove and reinstall Print Head.
– Press the Cartridge Change/Clean button for
2 seconds to clean (clean and restore) the Print
Head. Repeat if necessary .
– Replace the Print Head.
– Contact your local authorized Oki
representative.
18 OKIJET 2500
Page 19

Data is sent but not printed
Cause: Printer is not set for local port.
Solution: Check the port setting (usually LPT1) for your printer
to be sure that it is not being directed either to a remote
printer or to print to file. (In Windows 3.1x, double
click the Control Panel icon, double click Printer,
click Setup, Connect…, Network…. In Windows 95,
press Start, select Settings, Printers: click the OKIJET
2500 icon with the right mouse button: click Properties,
Details).
Cause: Interface cable is not connected properly.
Solution: Press and release the Power on/Reset button to make
the printer stop its operation. Then properly reconnect
the interface cable to the printer and host computer.
Cause: Interface cable is damaged.
Solution: Check the interface cable and replace if damaged.
Cause: The type of interface is incorrect.
Solution: Verify that the computer is using the parallel interface.
Check your software manual to ensure that your
software communicates to the interface port that your
printer is connected to.
Cause: Ready light is flashing.
Solution: Press and release the Resume/FF button to continue
printing.
English
Cause: Interface Cable.
Solution: Correct cable - IEEE1284 compliant parallel
bidirectional interface cable.
Error light turns on
Cause: Printer is out of paper.
Solution: Add paper to the Paper Tray. Press the Resume/FF
button.
Cause: Print Head has not been correctly installed.
Solution: Remove and reinstall the Print Head.
Cause: Carriage position error has occurred.
Solution: Press the Resume/FF button to clear the error and eject
the paper.
• Ensure that all packing material is removed.
User’s Guide 19
Page 20

Cause: Paper feed error has occurred.
Solution: If paper has misfed, remove the jammed paper . Refer to
“Clearing paper misfeeds” in this chapter of the manual
for information.
Error light flashes
Cause: An internal printer fault has occurred.
Solution: Switch the printer OFF then ON again. If the problem
persists, contact your local authorized Oki
representative.
White horizontal lines and streaks
Cause: The Print Head nozzles are blocked.
Solution: Press the Cartridge Change/Clean button for 2 to 5
seconds to clean and restore the Print Head.
Print is faint or missing
Cause: The paper being used is not one of the recommended
types.
Solution: Refer to the “Selecting & Ordering Supplies” section
of this manual for paper recommendations.
Cause: The paper is damp.
Solution: Reload with fresh paper .
Cause: The Print Head nozzles are blocked.
Solution: Press the Cartridge Change/Clean button for 2 to 5
seconds to clean and restore the Print Head.
Print a T est page (hold Resume/FF button while turning
printer on). If the Test pa ge still shows nozzles not firing,
repeat the process 2 more times. If the problem is not
corrected, replace the Print Head.
Print a T est page (hold Resume/FF button while turning
printer on). If the T est page still shows nozzles not firing,
repeat the above process up to 5 times. If the problem
continues, replace the Print Head.
English
Cause: The Ink Cartridge is empty.
Solution: Replace the Ink Cartridge.
20 OKIJET 2500
Cause: Printer is in the Fast mode.
Solution: Use the printer driver to select a different mode.
Cause: The Ink Cartridge is clogged, defective or empty.
Solution: Replace the Ink Cartridge.
Page 21

Blurry, or jagged vertical lines
Paper is not feeding properly
Cause: Paper problem.
Solution: Turn the paper over to print on the other side.
Cause: Print Head out of alignment.
Solution: • Perform Print Head alignment procedure in the
printer driver. (Access via the ‘Printer Services’
button).
• Switch to High Quality print mode in the printer driver .
Print image is clipped or off edge of print media
Cause: The selected document margins exceed the printer
margins.
Solution: Adjust margins in the application as necessary.
Cause: Incorrect settings for media type and/or type in the
printer driver setup.
Solution: Ensure correct selection of media size and type in the
printer driver setup.
User’s Guide 21
Cause: Paper jams / multifeeds.
Solution: • Align the left edge of the paper with the Left Paper
Guide. Adjust the Paper Guide Lever to the right
edges of the paper.
• Remove paper, fan the paper then reload.
• Use new paper .
• Ensure that paper is loaded properly. Do not over
load the Paper Tray.
• Make sure that only one type of paper is loaded in
the tray: mixing different types of paper in the tray
will cause paper jams.
• Verify use of recommended media. Refer to
“Selecting and Ordering Supplies”.
Low Ink Indicators ON
Cause: Low ink.
Solution: Purchase new ink Cartridges. Ink Cartridges will soon
be empty.
English
Page 22

Low Ink Indicators blinking
Cause: Ink Cartridge empty.
Solution: Replace Ink Cartridge.
Cause: Wrong brand of Ink Cartridge installed.
Solution: Replace Ink Cartridge with Oki Ink Cartridge.
Poor print quality when printing in High Quality
mode.
Cause: The halftone setting needs to be changed to obtain
optimum printing for the job.
Solution: In the Printer Setup dialogue box, select Fine Dither
under Halftone in the Advanced tab.
Cause: Ink Cartridge not installed correctly.
Solution: Press down on the cartridges to ensure that they are
properly seated.
Poor print quality when printing on transparencies
Cause: ‘Transparency’ is not selected as the Media.
Solution: In the Printer Setup dialogue box, select Transpar ency
as the Media in the Main Controls tab.
Paper does not stack neatly in the Output Shelf
Cause: The Star Wheel assembly bar has become disengaged.
Solution: Press down firmly on both ends of the Star Wheel
assembly bar at the same time to click it back in
position.
English
22 OKIJET 2500
Star Wheel Assembly Bar
Cause: The document was printed on the wrong side of the
transparency.
Solution: Remov e the transparencies from the printer, turn them
over , and reinsert them. The rough side should face the
paper tray .
Page 23

Selecting and Ordering Supplies
Selecting plain paper and media
Ordering supplies
To order supplies for your printer contact your local Oki dealer
or representative.
Cartridges and print heads
The following supplies are available for your printer:
Item Item Description
Colour Ink Cartridges:
Black Replacement colour cartridges
Cya n Replacement colour cartridges
Magenta Replacement colour cartridges
Yellow Replacement colour cartridges
Colour Print Head Black housing that holds the
Colour Ink Cartridges.
Black Ink Jet Cartridge Fast, black only ink cartridge
Storage Box Storage box for the Colour Print
Head or the Black only cartridge,
when not in use.
Most types of paper will work well in your printer, although some
variations in paper composition may affect print quality . Most highgrade photocopying papers produce good results. The majority of
cotton bond papers also yield excellent results. Paper should be
tested fully before large quantities are purchased.
Paper size Paper weights
100 – 216mm (3.9" – 9") width 60 – 163g/m2 (16 – 43lb)
150 – 356mm (3.9" – 14") length
Selecting speciality print media
For best results use only speciality media designed for your printer .
Avoid extremely thin paper, thick paper, or chemically-processed
paper, such as thermal fax paper, as frequent paper misfeeds may
occur.
With all speciality media, read and follo w the instructions for proper
loading into the Paper Tray.
English
User’s Guide 23
Page 24

Speciality print media
Media Recommended Select Print Quality
Plain Paper • HP Bright White C1824A Normal or High
• Xerox Colour Inkjet Quality
100gsm 3R94410
• Xerox Ultra White 90gsm
3R94625
• Xerox Colotech 90gsm
3R93022
• Xerox Excel 80gsm
3R91700
• Xerox Premier 80 gsm
3R91720
• Xerox Publisher 60gsm
3R93546
Photo Quality • HP Premium Ink Jet Paper High Quality
Matte Coated • Xerox High Resolution
Paper 3R94902
• Xerox Extra High
Resolution 3R95024
• Xerox colour Ink Jet Paper
3R93312
• Kodak Photographic
1439256 / 1783547
English
Photo Glossy • HP Photo Paper C1846A Photo Quality
(6 mil, 10 sheets) • Kodak Photographic (heavy)
• Xerox Photo Gloss 3R93915
Media Recommended Select Print Quality
Ink Jet • 3M Transparency CG3410 High Quality
Transparencies • Xerox Transparency
(4.2 mil, 20 3R94302
sheets)
Ink Jet Fabric • Xerox Iron-on Transfer
Transfer 3R94903
(10 sheets) • Xerox Colour Inkjet
Labels 3R93899
Envelope size
Most types of envelopes will wo rk well in your printer, although
some variations in paper composition may affect print quality.
Envelopes should be tested before large quantities are purchased.
Selecting labels
Use only paper face label stock. Ink will not dry on vinyl, plastic or
clear label stock. Individual labels will not feed properly. Use full
page letter or A4 label stock.
Do not used any label material which is partially used, folded,
curled, or wrinkled.
24 OKIJET 2500
Page 25

Technical Data
Printing system
The OKIJET 2500 printer accepts 2 different print heads; a 128 jet
black only, and a 120 jet segmented four Colour Print Head. The
system uses a scanning carriage in conjunction with a precision
paper advance mechanism to position the paper prior to being
marked by the ink jet.
Ink jet technology
The ink jet technology used in the OKIJET 2500 is called a Thermal
(Bubble) Drop-On-Demand (DOD) Ink Jet. The principles of this
type of ink jet are as follows:
All data sent to the printer is conv erted to raster data. Raster data is
essentially a string of 1s and 0s that are translated into drops of ink
across a scan line. As the carriage travels across the media, the
black and colour ink cartridges place drops of ink on the media as
directed by the data sent to the printer.
There are 24 ink jets for each of the three colours (Cyan, Magenta
and Yellow) and 48 for Black, giving a total of 120 jets on the four
colour ink cartridge. The black cartridge contains 128 ink jets.
English
Each of the jets is constructed with a heater, a supply of ink in
the jet and an opening where the ink is expelled. When a
command is sent to the ink cartridge to place a drop of ink on
the media, the heater switches on and heats the ink until the ink
expands into a bubble. As the bubble expands, the ink is then
expelled out of the nozzle onto the media.
The heating and expulsion of the bubble of ink takes place in a
matter of a few nano-seconds.
User’s Guide 25
Page 26

Printer Specifications
Product type Colour thermal ink jet printer
Print speed
Monochrome Up to 5 ppm (draft mode)
Colour Up to 2.5 ppm (draft mode)
Resolution
Black 600 x 600 dpi (plain paper)
Colour 1200 x 600 dpi (photo quality
glossy paper)
600 x 600 dpi (plain paper)
Cartridge type Semi-permanent print head with
expected life of 3,000 prints.
Replaceable ink cartridges (one per
colour)
Cartridge life
Black 275 prints @ 5% coverage (normal
mode)
Colour 295 prints @ 5% area coverage (each
colour)
Emulation PCL3c (HP 550c)
English
Resident fonts Courier, Univers, CG Times
Media types Plain paper, high resolution paper,
photo gloss paper, transparency,
fabric transfer sheet, envelopes,
labels
Paper size
Automatic feed US Letter, US Legal, A4, A5, B5,
Executive, 4 x 6, 5 x 8, A6,
Banner A4
Manual feed Envelopes #10, DL, C6
Paper weights
Plain paper 60-90g/m²
Input tray 125 sheets 75g/m² paper
Output tray 50 sheets 75g/m² paper
PC connectivity Bi-directional IEEE: P1284
Centronics Cable
Operating environment Windows ’95 compa tibility, DOS:
HP PCL3C (HP550c emulation)
Print driver Almost instantaneous return to
application time, SW2000/XC driver
26 OKIJET 2500
Page 27

DOS character sets HP PC-8, HP R OMAN-8, PC-8 Dan/
Nor (ISO 21), PC-850, ECMA-94,
Latin 1(ISO 8859/1), German (ISO
21), French (ISO 69), Italian (ISO
15), Spain (ISO 17), Swedish Names
(ISO 11), Swedish (ISO
10),Norwegian 1 &2 (ISO 60, 61),
Portuguese (ISO 16), UK (ISO 4),
ANSI ASCII (ISO 6), HP-Le gal, ISO
IR V (ISO 2), HP-PC-852, Latin 2 & 5
(ISO 8859/2,8859/9), HP-PC-8
Turkish, Cyrillic 3R, Cyrillic
Control panel Multinational symbols and graphics
Input voltage 110v/220v universal power supply
Power consumption
Operating 0.5A @ 110V; 0.3A @ 230V
Standby 0.1A @ 110V; 0.08A @ 230V
Temperature +10 ~40 ºC
Relative humidity 20 to 80%
Acoustic noise Sound pressure 46dB (A) at operator
position
Printer dimensions 19 x 41.6 x 29.9cm (H x W x D)
Packaged weight 8kg
Printer life
Colour use 30,000 pages or 5 years
Black use 60,000 pages or 5 years
Safety Meets all safety and emissions
requirements for North America,
Latin America and Europe
Network capable No
Colour print head
Printable nozzles 120 total (48 black, 24 cyan, 24
magenta, 24 yellow)
Storage box Polypropylene box designed to store
colour or black print head
Colour ink cartridges 4 total: 1 each black, cyan, magenta
and yellow.
Optional black ink jet cartridge
Speed Up to 7 ppm (draft mode)
Capacity 1,250 pages @ 5% area coverage
(normal mode)
English
User’s Guide 27
Page 28

Printable area
Warranty Information
English
Paper Tray Paper Tray
(Recommended) (Possible)
A
B
C
D
5.0mm 5.0mm
5.0mm 5.0mm
5.0mm 5.0mm
18.0mm 12.7mm
A
C
D
B
For warranty information for your OKIJET 2500 Ink Jet Printer
contact your local Oki Dealer or representative.
28 OKIJET 2500
Page 29

Packaging for return to a Service Centre
)
1. Remove the Print Head and place it in the Print Head Storage
Box. Do not return the Print Head.
With the original box and packaging:
Pack the printer in the original box using the original packing
material by reversing the instructions in “Unpacking the printer”
in your Setup Guide.
Note: Please do not ship the P ower Cable, Pr inter Cable, Printer
Driver Disks, User Guide, Print Head, Storage Box or Ink
Cartridges unless instructed to do so.
Without the original box and packaging
Outside box -
Outside box 275 lb test box
275 lb test box
Two layers 12.3mm (0.5")
Printer
Two layers 12.3mm (0.5")
bubble wrap
bubble wrap
Min imum 50.8mm (2 "
Minimum 50.8mm (2")
loos e fill
loose fill
2. Close Carriage Cover and Paper Tray. Remove Power Cable
and disconnect the printer cable.
Note: Please do not ship the P ower Cable, Printer Cable , Printer
Driver Disks, User Guide or Ink Cartridges unless instructed
to do so.
3. Place the printer in a large plastic bag.
4. Completely wrap the printer in 2 layers of bubble wrap
(minimum 12.3mm (0.5")) thick and tape the bubble wrap to
keep it in place.
5. Select a corrugated box large enough to allow at least 50.8mm
(2") between the bubble-wrapped printer and the walls of the
box.
Note: The strength of the box should be 275 lb test.
6. Fill the bottom of the box with 76 mm (2 to 3") of loose fill.
7. Place the bubble-wrapped printer in the centre of the box.
English
User’s Guide 29
Page 30

8. Add enough loose fill to completely surround and cover the
printer.
Note: The loose fill should be compressed to ensure minimal
movement.
9. Securely tape and seal the box.
English
30 OKIJET 2500
Page 31

Appendix A
Printing on Speciality Media
Envelopes
Envelopes should be loaded with the flap facing the front of the
printer (the side to be printed facing the Paper Tray).
Note: For best results use short-flap, side-seam envelopes.
To load envelopes:
2. Remove the Paper Output Shelf and flip up the Envelope
Feed Guide.
Envelope Feed
Guide
3. Place the envelopes against the Feed Guide, then move the
Paper Guide Lever over to touch the right edge of the
envelopes.
English
1. Remove any print media from the Paper Tray.
User’s Guide 31
4. Replace the Paper Output Shelf.
Note: Make sure you have envelopes selected as the print media
in your software or in the printer driver.
Page 32

Other media
Transparencies, sheets of labels, transfer media, etc., are loaded
in the same way as you load paper (side to be printed facing the
Paper Tray).
Note: For print media specifications, see ‘Selecting and order-
ing supplies’ in this manual.
English
32 OKIJET 2500
Page 33

Appendix B
4. Press and release the Cartridge Change/Clean button again.
After the printer completes its cycle, turn the printer off.
Transportation Precautions
The OKIJET 2500 is not designed to be a portable printer, but it
may be easily moved within your home or building. If, however,
transportation involves any of the conditions below, you will need
to take special precautions with the colour printhead and ink
cartridges to avoid potential ink leakage.
• Airplane travel
• Elevation changes greater than 300m
• Temperature changes greater than 10oC
For transport by road of one hour or less that does not involve
changes in elevation or temperature greater than that stated
above:
1. Press and release the Cartridge Change/Clean button. Open
the printer cover and remove the colour printhead and ink
cartridges as a single unit.
2. Place the printhead and ink cartridges in the storage box that
came with the printer .
3. If you have a monochrome printhead, place it in the printer.
5. Remove all paper from the paper tray and output shelf areas.
Disconnect all cables.
Your printer is now ready for transportation.
6. You may place the printer anywhere in the vehicle where it
will be protected from movement, and vibration. For example
on the floor of the rear seat.
7. Place the storage box (with the colour printhead) inside the
vehicle in an area that will be kept at a comfortable temperature.
(Ink leakage may occur if large rapid temperature changes are
experienced).
8. As soon as possible after reaching your destination, remove
the printer and storage box and place them in a location where
the temperature is maintained between 15oC to 35oC.
9. Connect the printer to the AC mains.
10. Press and release the Cartridge Change/Clean button and reinstall the colour printhead. If the monochrome printhead was
in the printer, put it in the storage box.
English
User’s Guide 33
Page 34

11. Press and release the Cartridge Change/Clean button once
more to return the printhead to its home position.
5. Remove the colour printhead and install it in the storage box
that came with your printer.
12. With your computer switched off, complete the connection to
the computer and add paper.
Your printer is now ready for use.
For transportation that involves air travel, or surface travel of more
than one hour, or changes in elevation g reater than 1000 feet:
1. With the printer switched on, press and release the Cartridge
Change/Clean button.
2. Open the printer cover and carefully remove all the
ink cartridges, placing them on a paper towel.
Note: Some ink may remain on the exterior surfaces of the ink
cartridges.
3. Wrap the cartridges individually with clear plastic wrap or
similar impervious material.
4. Important! Place all ink cartridges together in a sealed plastic
English
bag.
6. Place a moist paper towel in the storage box. Close the lid and
place the storage box in a sealed plastic bag.
7. If you have a monochrome printhead, install it in the printer
then press and release the Cartridge Change/Clean button.
Allow the printer to complete its cleaning cycle, before turning
off.
8. Disconnect all cables from the printer and remove all paper.
The printer, printhead and ink cartridge are now ready for
transportation.
9. As soon as possible after arriving at your destination, re-connect
your printer to AC power and press the Cartridge Change/
Clean button.
10. Remove the colour printhead from the storage box. Discard
the moist towel. If you have a monochrome printhead place it
in the storage box.
11. Carefully unwrap the ink cartridges. If any ink has spilled,
blot it clean.
34 OKIJET 2500
Page 35

12. Reinstall the ink cartridges in the printhead and install the
printhead in the printer.
13. Press and release the Cartridge Change/Clean button. Close
the printer cover.
Your printer is now ready for use.
English
User’s Guide 35
Page 36

Index
C
Cartridge Change/Clean
Button ............................. 7
Control Panel .......................... 6
buttons ................................ 6
LEDs ................................... 6
E
Envelopes .............................. 24
Error LED ................................ 8
Error Light............................. 1 9
I
Ink Cartridges
ordering ............................ 2 3
replacing ........................... 1 1
Ink Jet Technology ............... 2 5
L
Labels .................................... 24
LEDs
Error .................................... 8
Power .................................. 7
Low Ink Indicators .......... 8, 21
English
P
Packaging for return ............. 29
Paper ...................................... 23
Paper Jams
clear ing ............................. 1 6
Paper Misfeeds
clear ing ............................. 1 5
Power LED .............................. 7
Power/Reset Button ................ 6
Print Head
replacing ............................. 9
storage box ....................... 1 2
transporting ....................... 13
Print media ............................ 2 3
Printable Area ........................ 2 8
Printer
Cleaning ............................ 13
control panel ....................... 6
specifications .................... 26
transporting ....................... 13
Printer Options
printer settings .................. 1 4
spool manager .................. 15
Printer Settings
accessing from Windows . 1 4
Printing System ..................... 25
Problem Solving ................... 1 8
R
Resume/FF Button .................. 7
S
Safety Instructions .................. 4
Specifications
dimensions ........................ 2 8
Spool Manager ...................... 1 5
Supplies
cartridges .......................... 23
envelopes .......................... 2 4
labels ................................. 24
ordering ............................ 2 3
plain paper & media ........ 2 3
print heads ........................ 2 3
speciality print media ....... 23
T
Technical Data
ink jet technology ............ 2 5
printable area .................... 2 8
printing system ................. 25
specifications .................... 26
Troubleshooting
paper jams ........................ 1 6
paper misfeeds .................. 15
W
Warranty Information ........... 2 8
36 OKIJET 2500
Page 37

Oki Systems Company
Oki Systems (UK) Limited
550 Dundee Road
Slough Trading Estate
Slough
Berks SL1 4LE
Tel: 44 (0) 1753 819819
Fax: 44 (0) 1753 819899
http://www.oki.co.uk
Oki Systems (Ireland) Limited
The Square Industrial Complex
Tallaght
Dublin 24
Tel: (01) 4598666
Fax: (01) 4598840
http://www.oki.ie
Hawthorn Business Centre
Adelaide Industrial Estate
Falcon Road
Belfast BT12 6HP
Tel: (01232) 572355
Fax: (01232) 572350
http://www.oki.ie
English
User’s Guide 37
 Loading...