

Page 1

C9300/C9500
l
USER’S GUIDE — WINDOWS NT4
Page 2
Ev ery ef for t ha s be en m ade to e nsu re tha t th e in for mat io n in thi s do cum ent is c om ple te,
accurate, and up-to-date. The ma nufacturer assumes no responsibility for the results of
errors beyond its control. The manufacturer also cannot guarantee that changes in
software and equipment made by other manufacturers and referred to in this Guide will
not affect the applicability of the information in it. Mention of software products
manufactured by other companies does not necessarily constitute endorsement by the
manufacturer.
While all reasonable efforts have been made to make this document as accurate and
helpful as possible, we make no warranty of any kind, expressed or implied, as to the
accuracy or completeness of the information contained herein.
The most up-to-date drivers and manuals are available from the Oki Europe website:
http://www.okieurope.com
Copyright © 2005. All rights reserved.
Oki and Microline are registered trademarks of Oki Electric Industry Company Ltd.
Energy Star is a trademark of the United States Environmental Protection Agency.
Hewlett-Packard, HP, and LaserJet are registered trademarks of Hewlett-Packard
Company.
Microsoft, MS-DOS and Windows are registered trademarks of Microsoft Corporation.
Apple, Macintosh and Mac OS are registered trademarks of Apple Computers Inc.
Other product names and brand names are registered trademarks or trademarks of
their proprietors.
As an Energy Star Program Participant, the manufacturer has
determined that this product meets the Energy Star guidelines for
energy efficiency.
This product complies with the requirements of the Council Directives
89/336/EEC (EMC) and 73/23/EEC (LVD) as amended where applicable
on the approximation of the laws of the member states relating to
electromagnetic compatibility and low voltage.
Warning: This product complies with EN55022 Class B. However, when fitted with
the optional Finisher and/or Scancopier, compliance to EN55022 is Class A. In a
domestic environment this configuration may cause radio interference, in which
case the user may be required to take adequate measures.
PREFACE > 2
Page 3

CONTENTS
Introduction . . . . . . . . . . . . . . . . . . . . . . . . . . . . . . . . . . . . . . . . . .9
Features. . . . . . . . . . . . . . . . . . . . . . . . . . . . . . . . . . . . . . . . . . 9
Using this manual. . . . . . . . . . . . . . . . . . . . . . . . . . . . . . . . . 11
Online usage . . . . . . . . . . . . . . . . . . . . . . . . . . . . . . . . . . 11
Printing pages . . . . . . . . . . . . . . . . . . . . . . . . . . . . . . . . . 12
Getting started . . . . . . . . . . . . . . . . . . . . . . . . . . . . . . . . . . . . . .13
Unpacking . . . . . . . . . . . . . . . . . . . . . . . . . . . . . . . . . . . . . . . 13
CD-ROM disk contents . . . . . . . . . . . . . . . . . . . . . . . . . . . . . 14
CD1 - Drivers . . . . . . . . . . . . . . . . . . . . . . . . . . . . . . . . . . 14
CD2 - Manuals . . . . . . . . . . . . . . . . . . . . . . . . . . . . . . . . . 14
CD3 - Network . . . . . . . . . . . . . . . . . . . . . . . . . . . . . . . . .14
CD4 - Print Control Software. . . . . . . . . . . . . . . . . . . . . . 15
Printer location . . . . . . . . . . . . . . . . . . . . . . . . . . . . . . . . . . . 15
Printer components . . . . . . . . . . . . . . . . . . . . . . . . . . . . . . . 16
Setting up . . . . . . . . . . . . . . . . . . . . . . . . . . . . . . . . . . . . . . . . . .19
Packaging and protective sheet removal . . . . . . . . . . . . . . 19
Toner cartridge installation . . . . . . . . . . . . . . . . . . . . . . . . . 24
Loading paper . . . . . . . . . . . . . . . . . . . . . . . . . . . . . . . . . . . . 27
Manual feed . . . . . . . . . . . . . . . . . . . . . . . . . . . . . . . . . . . . . 31
Power connection . . . . . . . . . . . . . . . . . . . . . . . . . . . . . . . . . 33
Control panel . . . . . . . . . . . . . . . . . . . . . . . . . . . . . . . . . . . . 34
Menu settings . . . . . . . . . . . . . . . . . . . . . . . . . . . . . . . . . . . . 35
Changing the display language . . . . . . . . . . . . . . . . . . . 35
Confirmation printout . . . . . . . . . . . . . . . . . . . . . . . . . . . 36
Paper feed, size and media . . . . . . . . . . . . . . . . . . . . . . 36
Paper, envelope types, transparencies
and adhesive labels . . . . . . . . . . . . . . . . . . . . . . . . . . . . . . 40
Paper feed and exit. . . . . . . . . . . . . . . . . . . . . . . . . . . . . . . . 41
Paper Sizes . . . . . . . . . . . . . . . . . . . . . . . . . . . . . . . . . . . 41
Paper weights and media settings. . . . . . . . . . . . . . . . . 42
Printer settings . . . . . . . . . . . . . . . . . . . . . . . . . . . . . . . . . . . 44
Confirming current settings . . . . . . . . . . . . . . . . . . . . . . 44
Changing the settings. . . . . . . . . . . . . . . . . . . . . . . . . . . 44
List of menu settings . . . . . . . . . . . . . . . . . . . . . . . . . . . . . . 45
Switching off . . . . . . . . . . . . . . . . . . . . . . . . . . . . . . . . . . . . . 67
Interfaces . . . . . . . . . . . . . . . . . . . . . . . . . . . . . . . . . . . . . . . 68
CONTENTS > 3
Page 4

Printer drivers . . . . . . . . . . . . . . . . . . . . . . . . . . . . . . . . . . . . . . .70
Which printer driver? . . . . . . . . . . . . . . . . . . . . . . . . . . . . . . 70
Installed options. . . . . . . . . . . . . . . . . . . . . . . . . . . . . . . . . . 72
Additional memory . . . . . . . . . . . . . . . . . . . . . . . . . . . . . 72
Internal hard disk . . . . . . . . . . . . . . . . . . . . . . . . . . . . . . 74
Duplex unit . . . . . . . . . . . . . . . . . . . . . . . . . . . . . . . . . . . 76
Additional paper trays . . . . . . . . . . . . . . . . . . . . . . . . . . 78
High capacity feeder. . . . . . . . . . . . . . . . . . . . . . . . . . . . 80
Paper feed, size and media - defaults . . . . . . . . . . . . . . . . . 82
Printer driver network extension . . . . . . . . . . . . . . . . . . 87
Operation . . . . . . . . . . . . . . . . . . . . . . . . . . . . . . . . . . . . . . . . . . .88
Colour Printing . . . . . . . . . . . . . . . . . . . . . . . . . . . . . . . . . . . 88
Factors that affect the appearance of prints . . . . . . . . . 88
Choosing a Colour Matching Method . . . . . . . . . . . . . . . . . 91
RGB or CMYK? . . . . . . . . . . . . . . . . . . . . . . . . . . . . . . . . . 91
Matching Photographic Images . . . . . . . . . . . . . . . . . . . 91
Matching Specific Colours . . . . . . . . . . . . . . . . . . . . . . . 92
Printing Vivid Colours . . . . . . . . . . . . . . . . . . . . . . . . . . . 92
PCL Driver . . . . . . . . . . . . . . . . . . . . . . . . . . . . . . . . . . . . . . . 93
Colour Matching Options . . . . . . . . . . . . . . . . . . . . . . . .93
Colour Swatch . . . . . . . . . . . . . . . . . . . . . . . . . . . . . . . . . 94
PostScript Driver. . . . . . . . . . . . . . . . . . . . . . . . . . . . . . . . . . 95
Colour Matching Options . . . . . . . . . . . . . . . . . . . . . . . .95
Oki Colour Matching . . . . . . . . . . . . . . . . . . . . . . . . . . . .95
PostScript Colour Matching . . . . . . . . . . . . . . . . . . . . . . 96
CMYK Ink Simulation . . . . . . . . . . . . . . . . . . . . . . . . . . . 97
Windows ICM Colour Matching . . . . . . . . . . . . . . . . . . . 97
Using ICC Profiles . . . . . . . . . . . . . . . . . . . . . . . . . . . . . . 98
Multiple pages on one sheet . . . . . . . . . . . . . . . . . . . . . . .103
Custom page sizes . . . . . . . . . . . . . . . . . . . . . . . . . . . . . . . 106
Print resolution. . . . . . . . . . . . . . . . . . . . . . . . . . . . . . . . . .109
Duplex printing . . . . . . . . . . . . . . . . . . . . . . . . . . . . . . . . . . 110
Printing booklets . . . . . . . . . . . . . . . . . . . . . . . . . . . . . . . .112
Printing watermarks . . . . . . . . . . . . . . . . . . . . . . . . . . . . . .114
Collating . . . . . . . . . . . . . . . . . . . . . . . . . . . . . . . . . . . . . . . 116
Font substitution . . . . . . . . . . . . . . . . . . . . . . . . . . . . . . . .117
Printing the font list . . . . . . . . . . . . . . . . . . . . . . . . . . .118
CONTENTS > 4
Page 5

Proof and print . . . . . . . . . . . . . . . . . . . . . . . . . . . . . . . . . . 119
Printing copies . . . . . . . . . . . . . . . . . . . . . . . . . . . . . . . 120
Deleting copies . . . . . . . . . . . . . . . . . . . . . . . . . . . . . . . 120
Secure printing . . . . . . . . . . . . . . . . . . . . . . . . . . . . . . . . . . 122
Confidential printing. . . . . . . . . . . . . . . . . . . . . . . . . . .123
Deleting confidential print jobs . . . . . . . . . . . . . . . . . . 123
Store to hard disk. . . . . . . . . . . . . . . . . . . . . . . . . . . . . . . .124
Printing copies . . . . . . . . . . . . . . . . . . . . . . . . . . . . . . . 125
Deleting copies . . . . . . . . . . . . . . . . . . . . . . . . . . . . . . . 126
Overlay printing . . . . . . . . . . . . . . . . . . . . . . . . . . . . . . . . . 127
Creating documents to use as overlays. . . . . . . . . . . . 128
Downloading the print file to use as an overlay . . . . . 130
Defining overlays . . . . . . . . . . . . . . . . . . . . . . . . . . . . . 131
Printing posters . . . . . . . . . . . . . . . . . . . . . . . . . . . . . . . . . 136
Maintenance . . . . . . . . . . . . . . . . . . . . . . . . . . . . . . . . . . . . . . .138
Adding Paper. . . . . . . . . . . . . . . . . . . . . . . . . . . . . . . . . . . . 138
Changing the toner cartridge. . . . . . . . . . . . . . . . . . . . . . . 140
Changing the image drum . . . . . . . . . . . . . . . . . . . . . . . . .145
Changing the transfer belt . . . . . . . . . . . . . . . . . . . . . . . . . 150
Changing the fuser unit . . . . . . . . . . . . . . . . . . . . . . . . . . .152
Cleaning the LED head . . . . . . . . . . . . . . . . . . . . . . . . . . . . 154
Transporting the printer . . . . . . . . . . . . . . . . . . . . . . . . . . . 156
Troubleshooting . . . . . . . . . . . . . . . . . . . . . . . . . . . . . . . . . . . .157
LCD messages. . . . . . . . . . . . . . . . . . . . . . . . . . . . . . . . . . . 157
Paper jams . . . . . . . . . . . . . . . . . . . . . . . . . . . . . . . . . . . . . 160
In the paper tray . . . . . . . . . . . . . . . . . . . . . . . . . . . . . . 160
Behind the right side cover . . . . . . . . . . . . . . . . . . . . . 161
On the transfer belt. . . . . . . . . . . . . . . . . . . . . . . . . . . . 162
Behind the left side cover. . . . . . . . . . . . . . . . . . . . . . . 163
In the fuser unit . . . . . . . . . . . . . . . . . . . . . . . . . . . . . . . 164
In the duplex unit . . . . . . . . . . . . . . . . . . . . . . . . . . . . . 165
In any additional paper trays . . . . . . . . . . . . . . . . . . . . 167
Parallel transmission mode. . . . . . . . . . . . . . . . . . . . . . . .168
Problem solving . . . . . . . . . . . . . . . . . . . . . . . . . . . . . . . . . 169
Paper feed problems. . . . . . . . . . . . . . . . . . . . . . . . . . .169
Paper jam has been cleared, but printer does
not print. . . . . . . . . . . . . . . . . . . . . . . . . . . . . . . . . . . . 169
CONTENTS > 5
Page 6

Printing from Windows. . . . . . . . . . . . . . . . . . . . . . . . . . . .170
Cannot configure for parallel connection. . . . . . . . . . .170
Cannot configure for USB connection.. . . . . . . . . . . . . 170
Printout is garbled or incorrect
with parallel connection. . . . . . . . . . . . . . . . . . . . . . . 171
Cannot print. . . . . . . . . . . . . . . . . . . . . . . . . . . . . . . . . . 171
Application error or general protection fault
is displayed. . . . . . . . . . . . . . . . . . . . . . . . . . . . . . . . . 172
Insufficient memory.. . . . . . . . . . . . . . . . . . . . . . . . . . . 172
Printing is slow.. . . . . . . . . . . . . . . . . . . . . . . . . . . . . . . 172
Printer requests paper size change to
continue printing. . . . . . . . . . . . . . . . . . . . . . . . . . . . .172
Unclear printing . . . . . . . . . . . . . . . . . . . . . . . . . . . . . . 173
Miscellaneous. . . . . . . . . . . . . . . . . . . . . . . . . . . . . . . . . . .175
The power is on, but the printer does not
go online. . . . . . . . . . . . . . . . . . . . . . . . . . . . . . . . . . . 175
Print processing does not start.. . . . . . . . . . . . . . . . . .175
Print processing cancels. . . . . . . . . . . . . . . . . . . . . . . .175
Printer makes a strange noise. . . . . . . . . . . . . . . . . . . 175
It takes a long time to start printing. . . . . . . . . . . . . . .176
Toner rubs off when you rub the printed
surface. . . . . . . . . . . . . . . . . . . . . . . . . . . . . . . . . . . . .176
Accessories . . . . . . . . . . . . . . . . . . . . . . . . . . . . . . . . . . . . . . . .177
Introduction . . . . . . . . . . . . . . . . . . . . . . . . . . . . . . . . . . . . 177
Additional memory . . . . . . . . . . . . . . . . . . . . . . . . . . . . . . . 177
Internal hard disk . . . . . . . . . . . . . . . . . . . . . . . . . . . . . . . . 181
Duplex unit . . . . . . . . . . . . . . . . . . . . . . . . . . . . . . . . . . . . . 183
Additional paper trays . . . . . . . . . . . . . . . . . . . . . . . . . . . . 187
Installation . . . . . . . . . . . . . . . . . . . . . . . . . . . . . . . . . . 187
High capacity feeder. . . . . . . . . . . . . . . . . . . . . . . . . . . . . . 189
Copier unit. . . . . . . . . . . . . . . . . . . . . . . . . . . . . . . . . . . . . .191
Finisher . . . . . . . . . . . . . . . . . . . . . . . . . . . . . . . . . . . . . . . . 191
Specifications . . . . . . . . . . . . . . . . . . . . . . . . . . . . . . . . . . . . . .192
External dimensions. . . . . . . . . . . . . . . . . . . . . . . . . . . . . . 195
Consumables . . . . . . . . . . . . . . . . . . . . . . . . . . . . . . . . . . . . . . .196
CONTENTS > 6
Page 7

Factory default settings . . . . . . . . . . . . . . . . . . . . . . . . . . . . . .197
Print menu. . . . . . . . . . . . . . . . . . . . . . . . . . . . . . . . . . . . . . 197
Media menu . . . . . . . . . . . . . . . . . . . . . . . . . . . . . . . . . . . . 198
Colour menu . . . . . . . . . . . . . . . . . . . . . . . . . . . . . . . . . . . . 198
System Config menu . . . . . . . . . . . . . . . . . . . . . . . . . . . . . 198
PCL Emulation menu. . . . . . . . . . . . . . . . . . . . . . . . . . . . . . 199
PPR Emulation menu . . . . . . . . . . . . . . . . . . . . . . . . . . . . . 199
FX Emulation menu. . . . . . . . . . . . . . . . . . . . . . . . . . . . . . . 200
Parallel menu . . . . . . . . . . . . . . . . . . . . . . . . . . . . . . . . . . . 200
USB menu . . . . . . . . . . . . . . . . . . . . . . . . . . . . . . . . . . . . . . 200
Network menu. . . . . . . . . . . . . . . . . . . . . . . . . . . . . . . . . . . 201
Memory menu . . . . . . . . . . . . . . . . . . . . . . . . . . . . . . . . . . . 201
Disk Maintenance menu. . . . . . . . . . . . . . . . . . . . . . . . . . .201
System Adjust menu. . . . . . . . . . . . . . . . . . . . . . . . . . . . . . 202
Maintenance menu . . . . . . . . . . . . . . . . . . . . . . . . . . . . . . .202
Index. . . . . . . . . . . . . . . . . . . . . . . . . . . . . . . . . . . . . . . . . . . . . .203
Oki contact details . . . . . . . . . . . . . . . . . . . . . . . . . . . . . . . . . .205
CONTENTS > 7
Page 8

NOTES, CAUTIONS AND WARNINGS
NOTE
A note appears in this manual like this. A note provides additional
information to supplement the main text which may help you to use and
understand the product.
CAUTION!
A caution appears in this manual like this. A caution provides
additional information which, if ignored, may result in equipment
malfunction or damage.
WARNING!
A warning appears in this manual like this. A warning provides
additional information which, if ignored, may result in a risk of
personal injury.
PREFACE > 8
Page 9

INTRODUCTION
Congratulations on purchasing this colour printer!
In this chapter you will find a summary of the main features of your
printer followed by some advice on how to use this User’s Guide to get
the most from your printer.
FEATURES
Five different models to choose from: C9300n, C9300dn,
>
C9300hdn, C9500dn, C9500hdn.
C9300hdn, C9500dn, C9500hdn.
C9300hdn, C9500dn, C9500hdn.C9300hdn, C9500dn, C9500hdn.
High speed printing:
>
A4: 30 pages per minute (PPM) LED colour, 37 pages per
minute LED monochrome.
A3: 16 pages per minute LED colour, 20 pages per minute LED
monochrome.
Booklet printing.
>
Single pass digital technology for high quality, speed and
>
reliability.
True 1200 dpi resolution (C9500) or 600 x 1200 dpi resolution
>
(C9300) for very high quality output.
Duplex printing for fast reliable two sided output (standard on
>
C9300dn, C9300hdn, C9500dn and C9500hdn, optional on all
other models).
High speed, bi-directional parallel interface (IEEE-1284) and
>
USB interface .
Industry standard network connectivity via internal network
>
interface card.
Automatic interface switching between USB, parallel and
>
network interfaces.
High capacity 10 Gb hard disk drive (standard on hdn models,
>
optional on others).
PCL5c emulation and genuine Adobe PostScript 3 with
>
automatic switching.
Versatile paper handling with standard 550 sheet (approx.)
>
paper tray and 100 sheet (approx.) multi purpose tray.
C9300n, C9300dn,
C9300n, C9300dn, C9300n, C9300dn,
INTRODUCTION > 9
Page 10

Optional 2nd and 3rd paper trays each with a capacity of 550
>
sheets (approx.) and an optional high capacity feeder (instead
of 3rd tray) that can provide a feed of 1650 sheets (approx.)
giving a maximum capacity of 2850 sheets (approx.).
Paper weight capacity of 64 g/m² to 203 g/m².
>
Standard multi purpose tray for card stock, envelopes etc.
>
500 sheet output tray (face down) and 100 sheet face up tray
>
for continuous smooth running output.
Environmentally friendly: the advanced power save mode
>
minimises power consumption and the separate toner and
drum design cuts down on waste.
Automatic colour balance adjustment: in order to ensure
>
consistent output at all times, the machine automatically
performs a colour check when the machine is switched on,
when the top cover is opened and then closed, and adjusts the
colour balance automatically. It can even be set to adjust the
colour balance during long print runs.
Auto media detect: detects the weight of the media being fed
>
through the printer then automatically adjusts the fusing
temperature, speed (if necessary) and transfer voltage to
ensure correct fusing and print quality.
Your printer is one of the C9300/C9500 family of colour
>
printers, configured as in the following table:
Model Network
card
C9300n Standard Option (may require
C9300dn Standard Standard. 192Mb Option Option
C9300hdn Standard Standard 192Mb Standard Option
C9500dn Standard Standard 320Mb Option Option
C9500hdn Standard Standard 320Mb Standard option
Duplex Unit Memory Hard
disK
128Mb Option Option
additional memory).
Additional
Trays
INTRODUCTION > 10
Page 11

USING THIS MANUAL
This manual will lead you logically through the unpacking, setting up
and operation of your printer to help you to make the best use of its
many advanced features. Also included are guidelines for
troubleshooting and maintenance to ensure that it continues to
perform at its best. Instructions are provided for adding optional
accessories as your needs evolve.
The User’s Guide has been written using one printer as a
>
model, and the illustrations/screenshots reflect this. What
you see will be appropriate to the model you are installing.
The User’s Guide has been designed to provide you with a
>
clear presentation on the installation and maintenance of your
new printer. This information is compiled in the logical
sequence required to result in a successful installation.
NOTE
The information in this manual is supplemented by the extensive online
help facility associated with the printer driver software.
ONLINE USAGE
This manual is intended to be read on screen using Adobe Acrobat
Reader. Use the navigation and viewing tools provided in Acrobat.
You can access specific information in two ways:
In the list of bookmarks down the left hand side of your
>
screen, click on the topic of interest to jump to the required
topic. (If the bookmarks are not available, use the Table of
Contents.)
In the list of bookmarks click on Index to jump to the Index. (If
>
the bookmarks are not available, use the Table of Contents.)
Find the term of interest in the alphabetically arranged index
and click on the associated page number to jump to the page
containing the subject.
INTRODUCTION > 11
Page 12
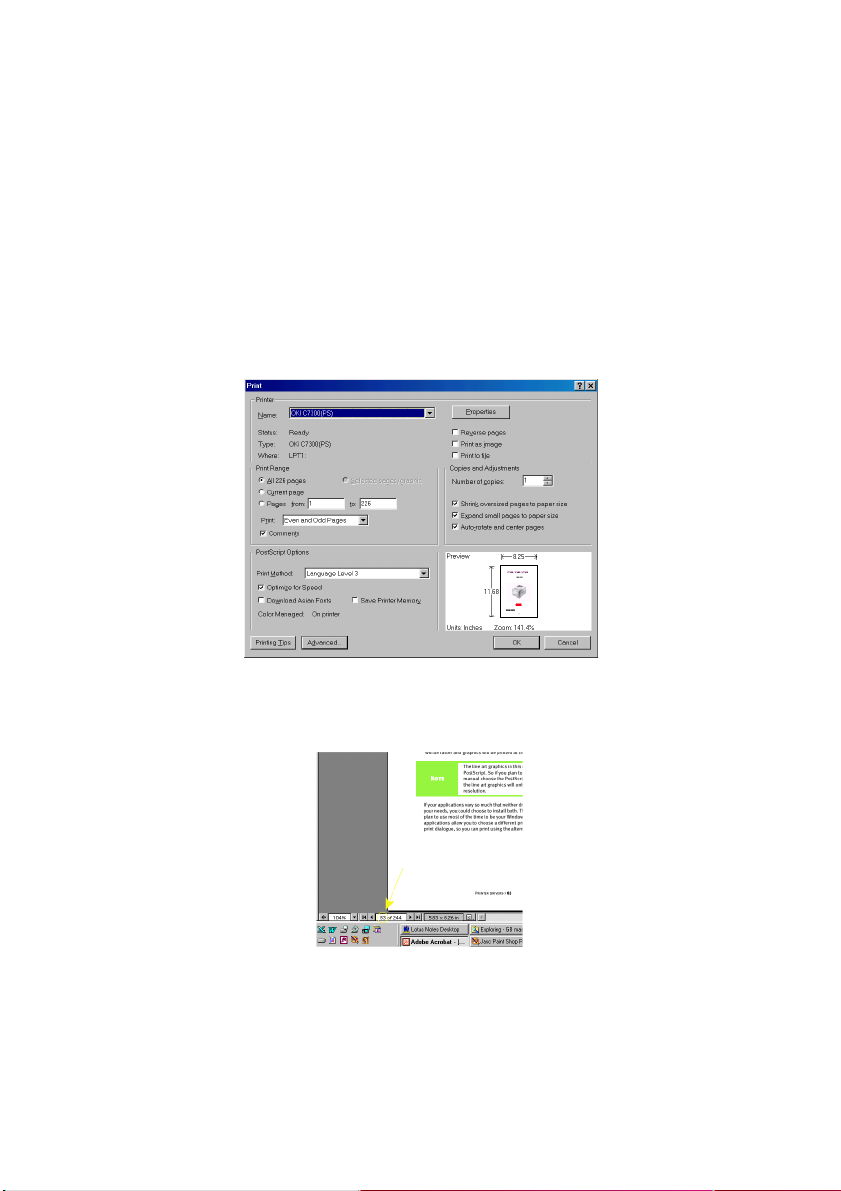
PRINTING PAGES
The whole manual, individual pages, or sections may be printed. The
procedure is:
From the toolbar, select [File], then [Print] (or press the
1.
Ctrl + P keys).
Choose which pages you wish to print:
2.
[All pages], for the entire manual
(a)
[Current page] for the page at which you are looking
(b)
[Pages from] and [to] for the range of pages you specify
(c)
by entering their page numbers.
3.
Click on [OK]....
INTRODUCTION > 12
Page 13
GETTING STARTED
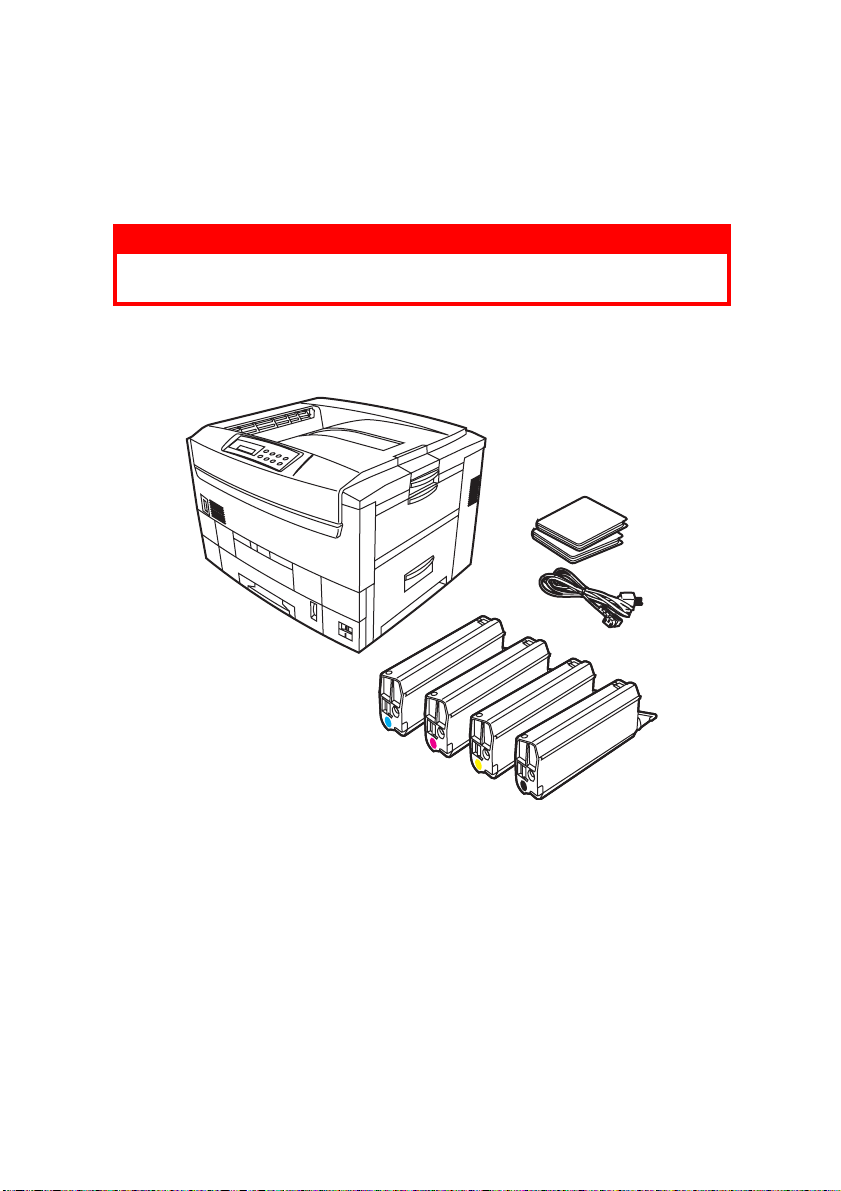
UNPACKING
WARNING!
This printer has a weight of 72 kg. 3 people are required to lift the
printer safely.
After unpacking the printer and choosing a suitable place to put it,
check that all the necessary parts are available to continue:
The printer.
1.
4 toner cartridges (cyan, magenta, yellow and black).
2.
CD-ROM disks containing printer drivers,network software and
3.
documentation (see following page for contents).
LED lens cleaner (not illustrated).
4.
Light proof plastic bags (not illustrated).
5.
2 Power cables (UK and European).
6.
Setup Guide (not illustrated).
7.
Retain all packing materials to faciliate transport.
GETTING STARTED > 13
Page 14

CD-ROM DISK CONTENTS
The CD-ROM disks supplied with your printer contain the following
software:
CD1 - DRIVERS
Oki LPR
>
CD Install
>
Oki Template
>
Storage Device Manager
>
PDF Direct Printing
>
Printer Drivers (all languages)
>
The software utilities are described briefly in the Help facility on the
CD and can be installed as required. They each have extensive on-line
Help facilities.
CD2 - MANUALS
Printer User’s Guide
>
Networking User’s Guide
>
CD3 - NETWORK
PrintSuperVision
>
NDPS
>
Net Installer
>
Oki LPR
>
CD Install
>
Web Jet Admin
>
Oki Template Manager
>
Storage Device Manager
>
PDF Direct Printing
>
Networking User’s Guide
>
GETTING STARTED > 14
Page 15
CD4 - PRINT CONTROL SOFTWARE
Print Control software
>
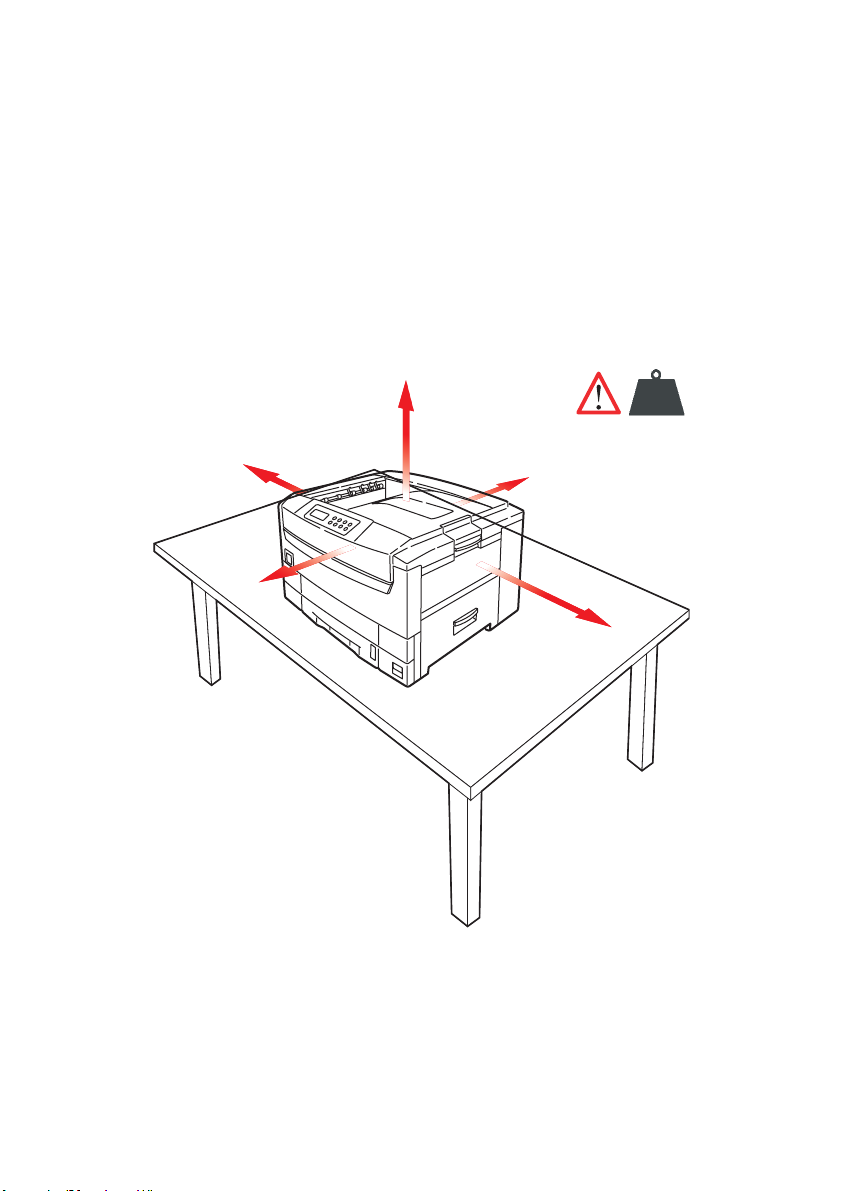
PRINTER LOCATION
Place the printer on a flat surface large enough and strong enough to
accept the size and weight of the printer. There must be sufficient
space around the printer to allow for access and printer maintenance.
60cm
100cm
70cm
72
Kg.
20cm
60cm
72kg
GETTING STARTED > 15
Page 16
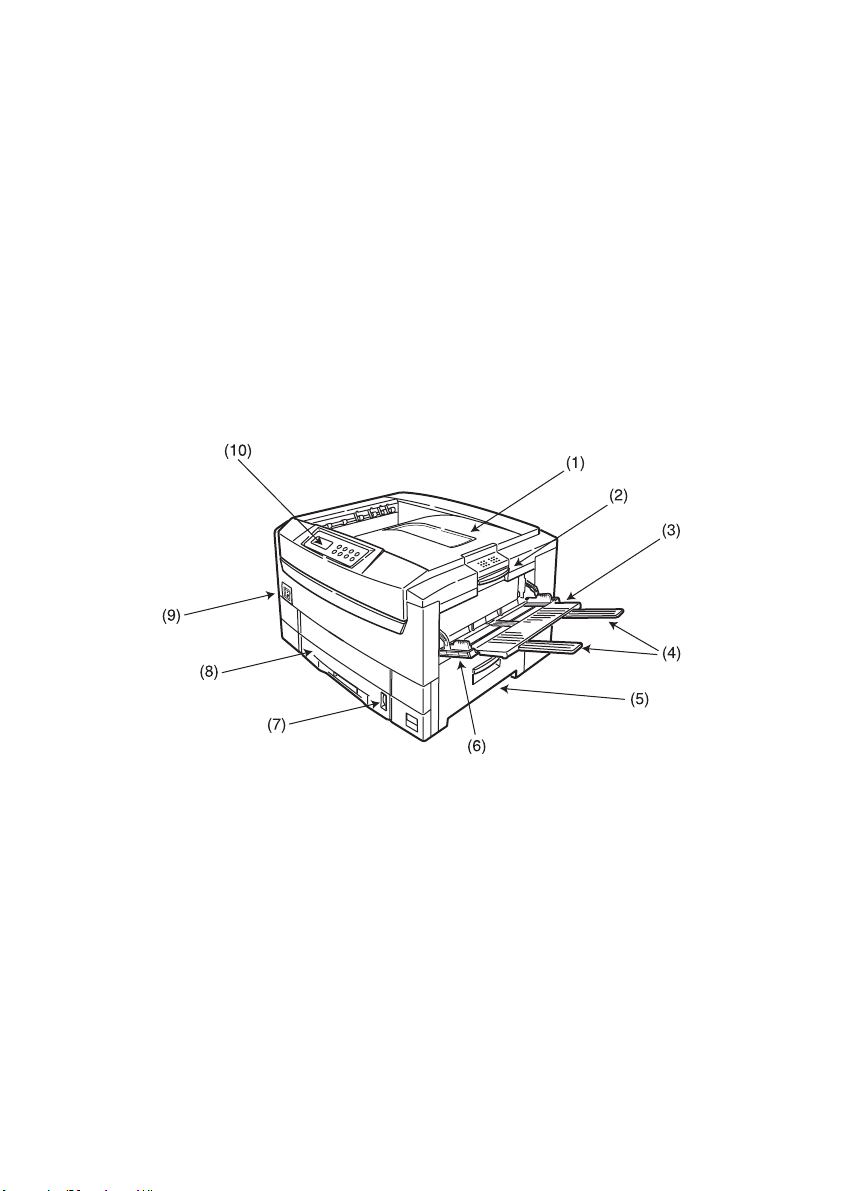
PRINTER COMPONENTS
Top cover
1.
Control panel
2.
Top cover release catch
3.
Multi purpose tray (manual feed)
4.
Paper support extension
5.
Paper guides
6.
Right side cover
7.
Paper tray
8.
Paper level indicator
9.
Power switch
10.
GETTING STARTED > 16
Page 17
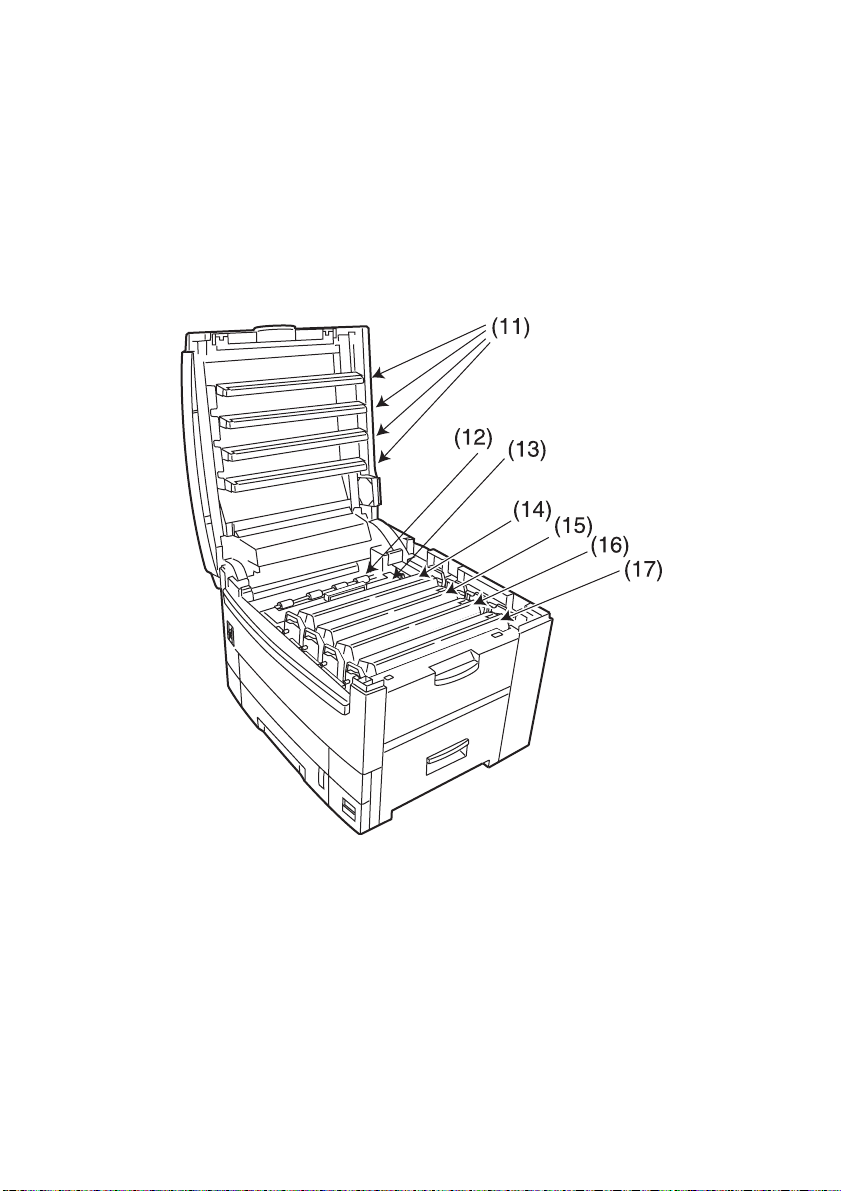
LED heads (4)
11.
Discharge roller
12.
Fuser unit
13.
Image drum (cyan)
14.
Image drum (magenta)
15.
Image drum (yellow)
16.
Image drum (black)
17.
GETTING STARTED > 17
Page 18
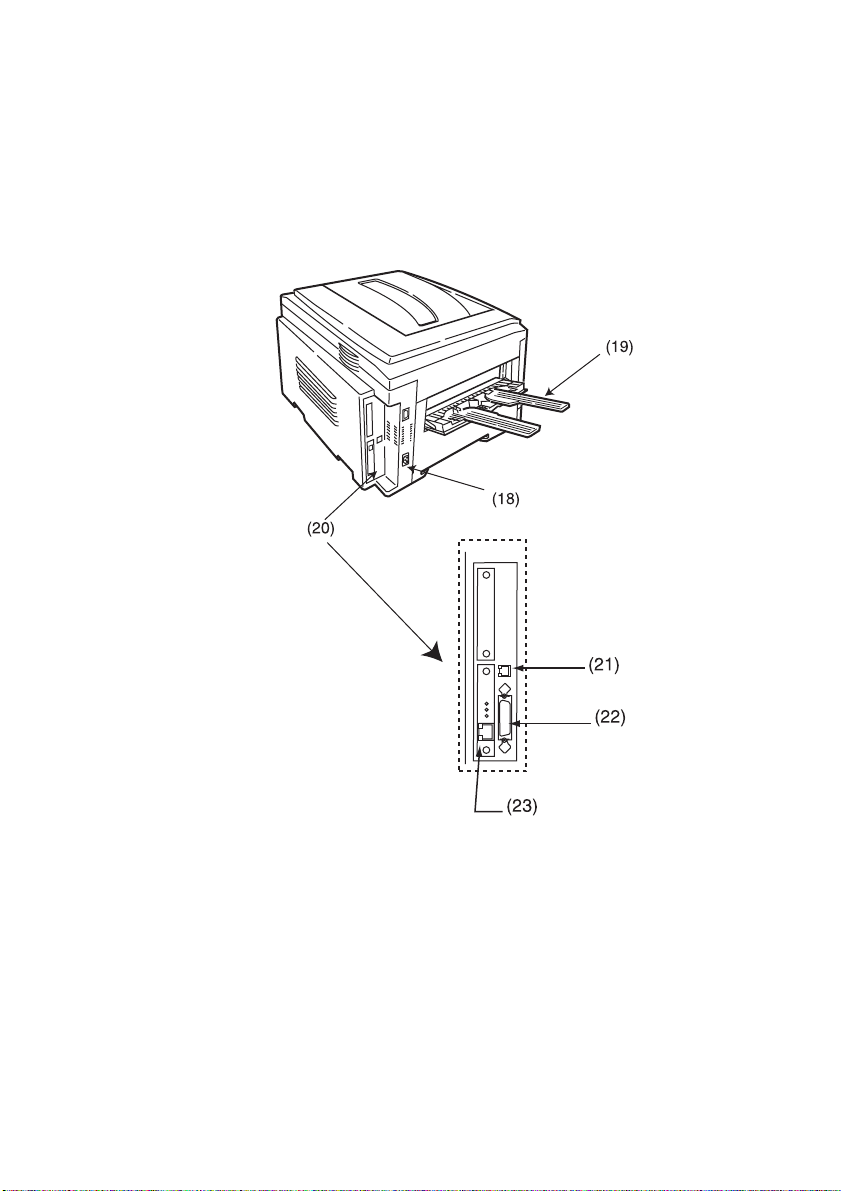
Power connector
18.
Side exit paper tray
19.
Interfaces and card slot
20.
USB interface connector
21.
Parallel interface connector
22.
Network interface card
23.
GETTING STARTED > 18
Page 19
SETTING UP
Before connecting this printer to a computer and power supply, the
toner cartridges must be installed and paper inserted in the paper
tray.
PACKAGING AND PROTECTIVE SHEET REMOVAL
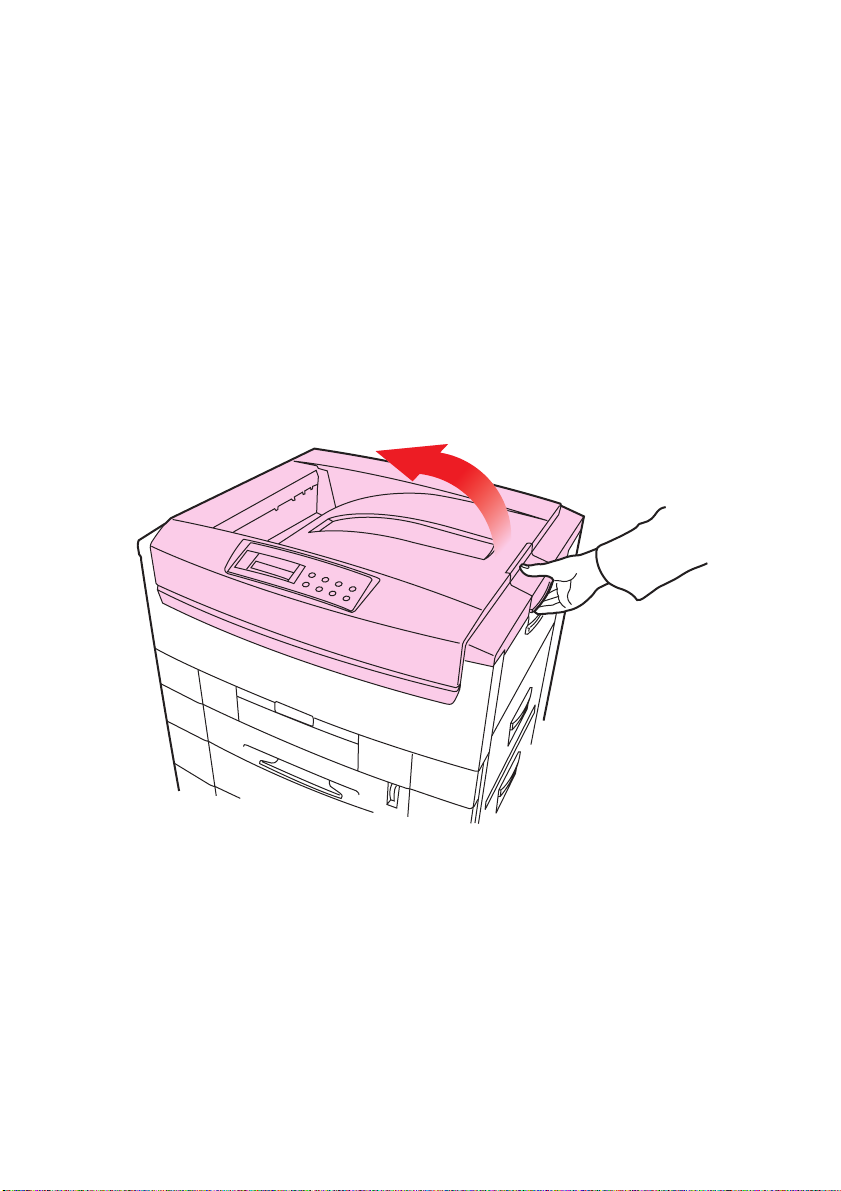
Remove any adhesive tape and packaging from the printer.
1.
Using the release handle, open the top cover.
2.
SETTING UP > 19
Page 20
Remove the LED head restrainer from behind the LED heads in
3.
the top cover.
SETTING UP > 20
Page 21
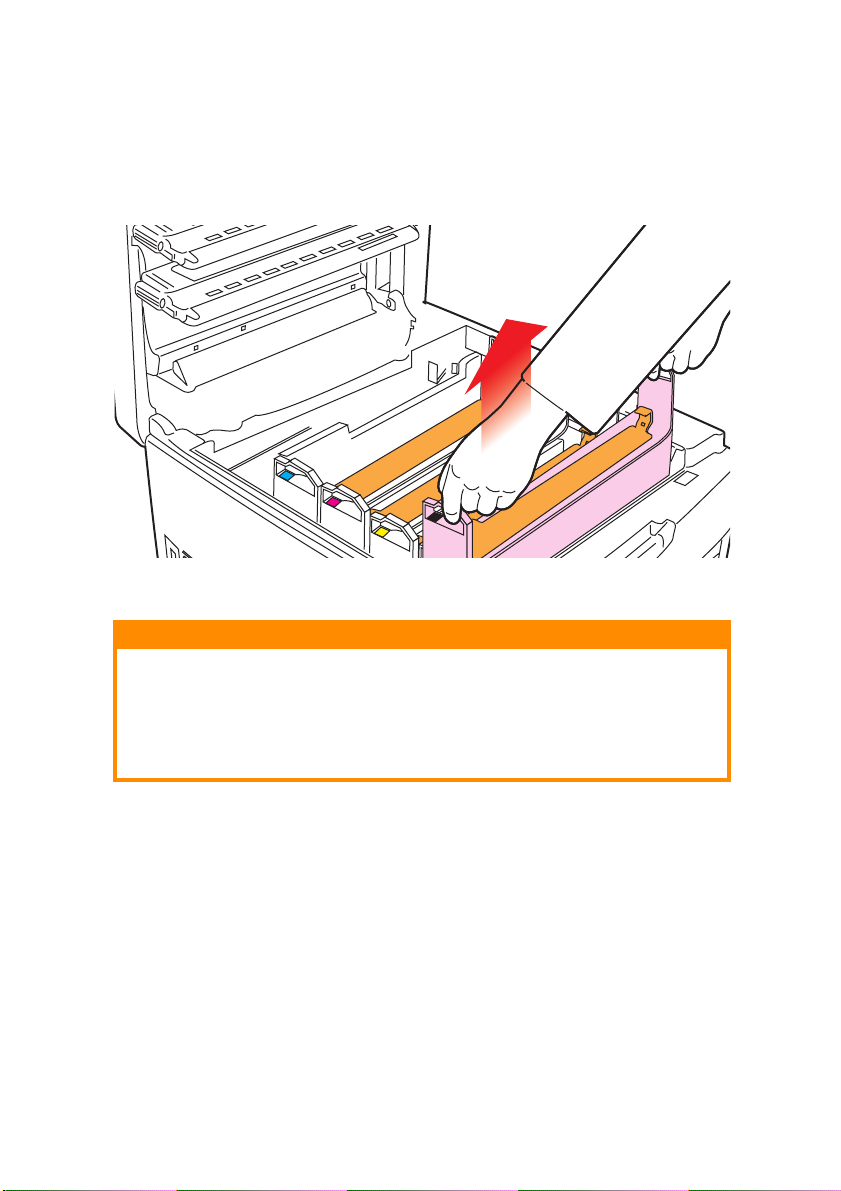
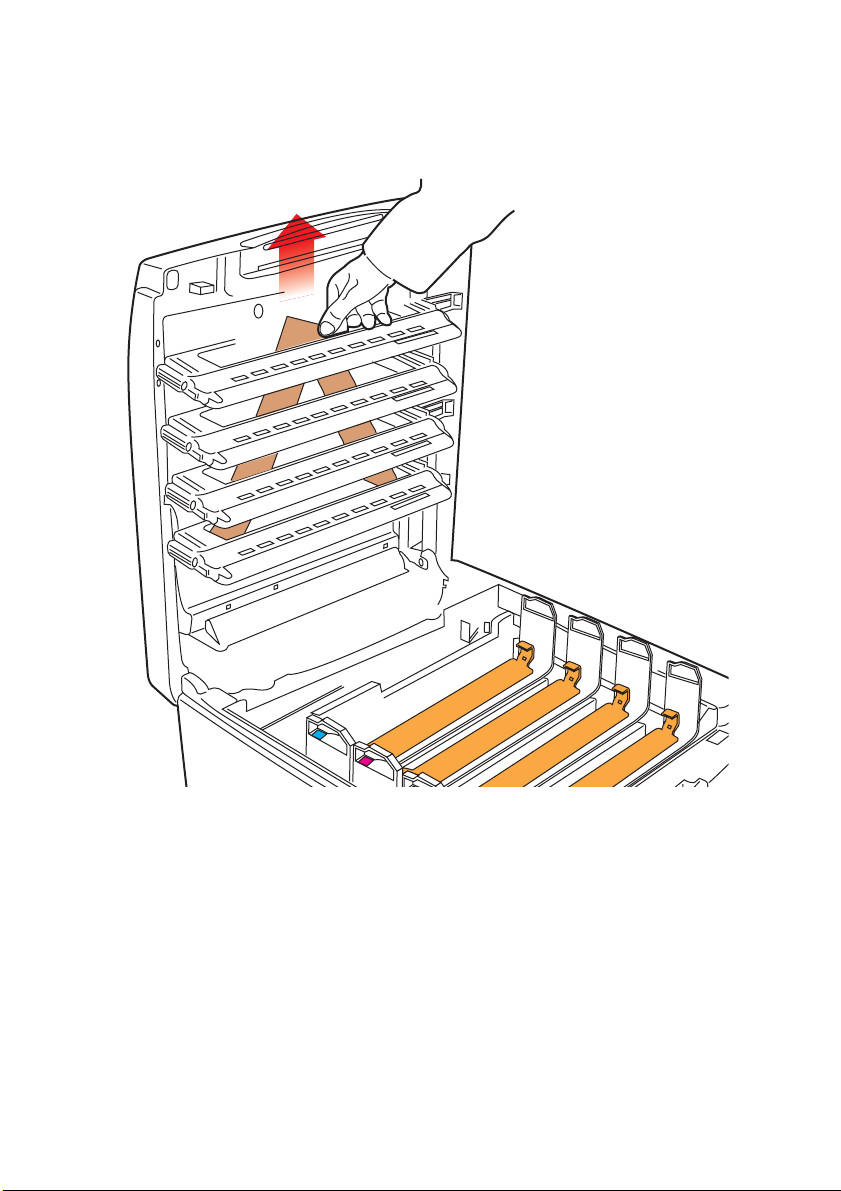
Remove the four image drums and place them on a level
4.
surface.
CAUTION!
> Never expose image drums to light for more than 5 minutes.
> Always hold image drum by the ends.
> Never expose image drums to direct sunlight.
> Never touch the green surface of the drum.
SETTING UP > 21
Page 22
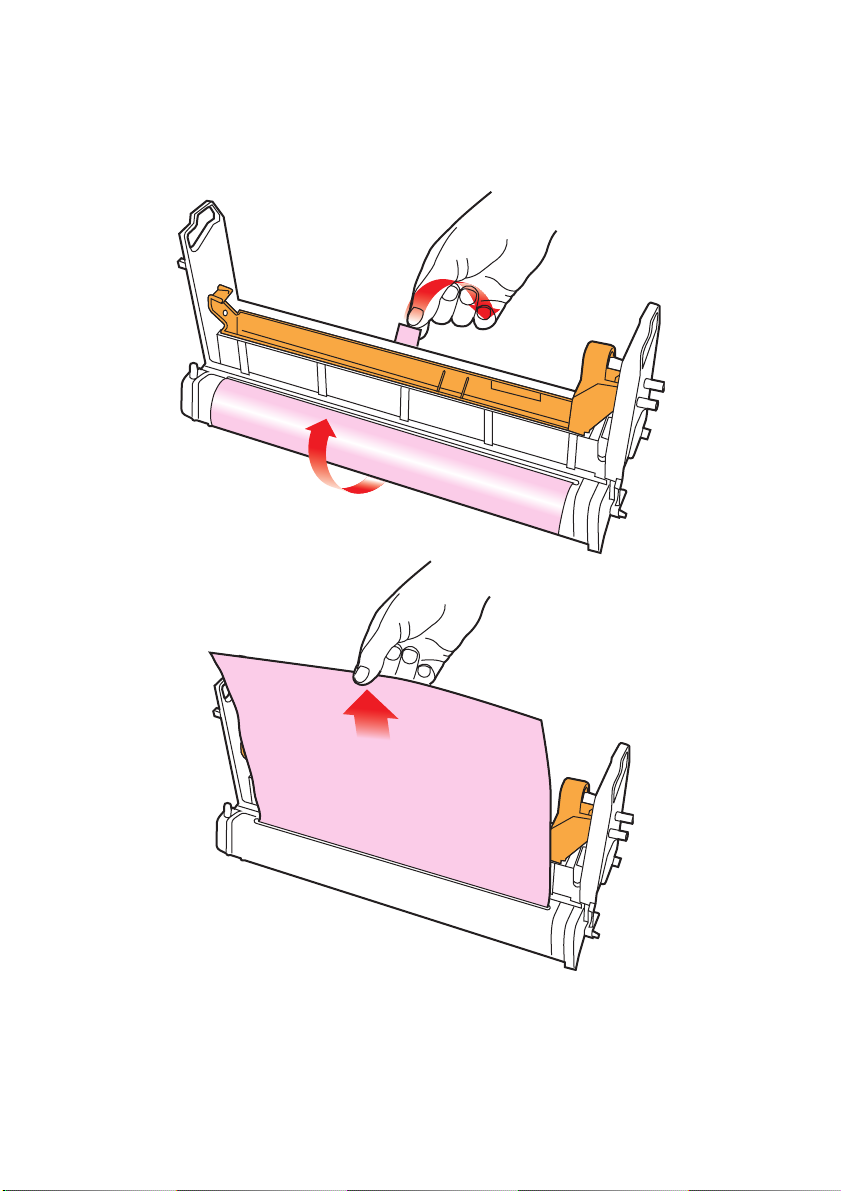
Remove the protective sheets from each of the four image
5.
drums.
SETTING UP > 22
Page 23
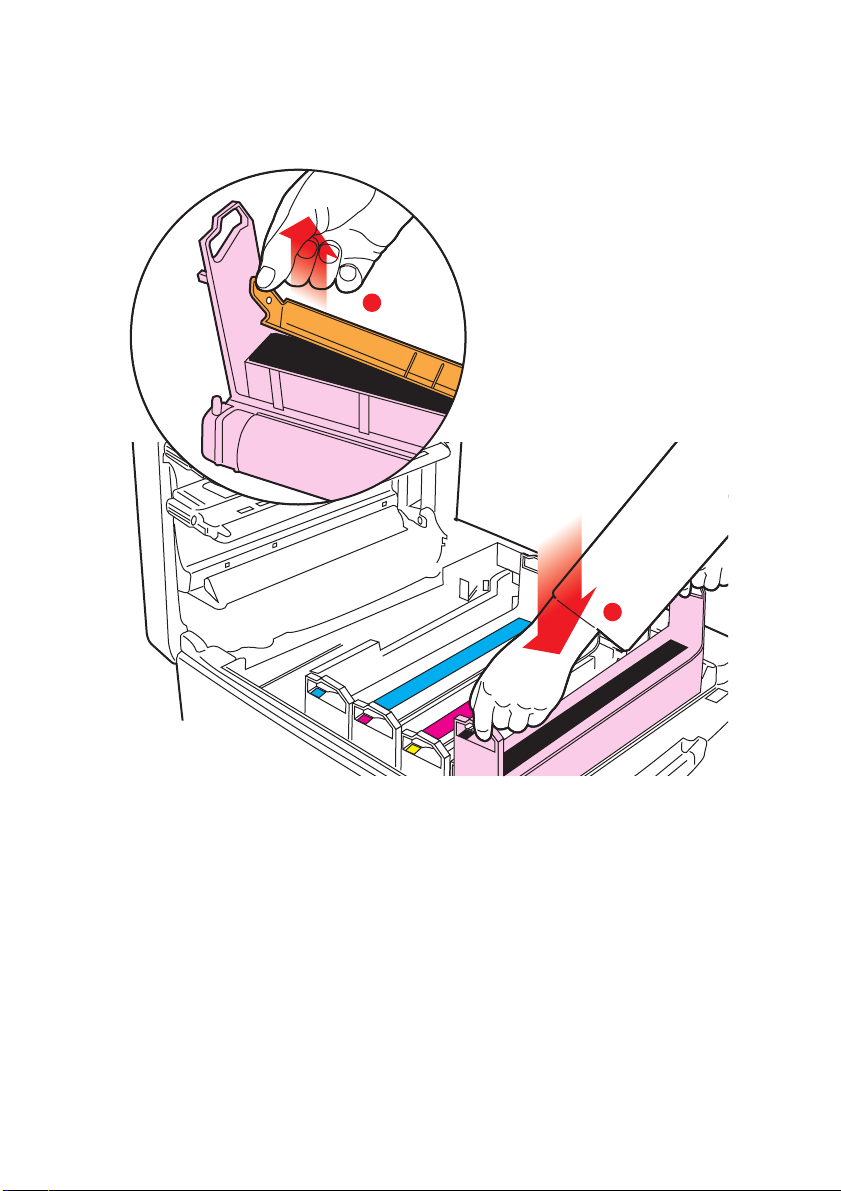
Replace the four image drums into the printer making sure
6.
each image drum is installed in its correct colour location.
2
1
Push the tab inwards and remove the blanking plate from each
7.
of the image drums.
SETTING UP > 23
Page 24
TONER CARTRIDGE INSTALLATION
WARNING!
Take extreme care when handling toner.
> Toner can be harmful if inhaled, swallowed or if it gets in the eyes.
> Toner can also stain hands and clothing.
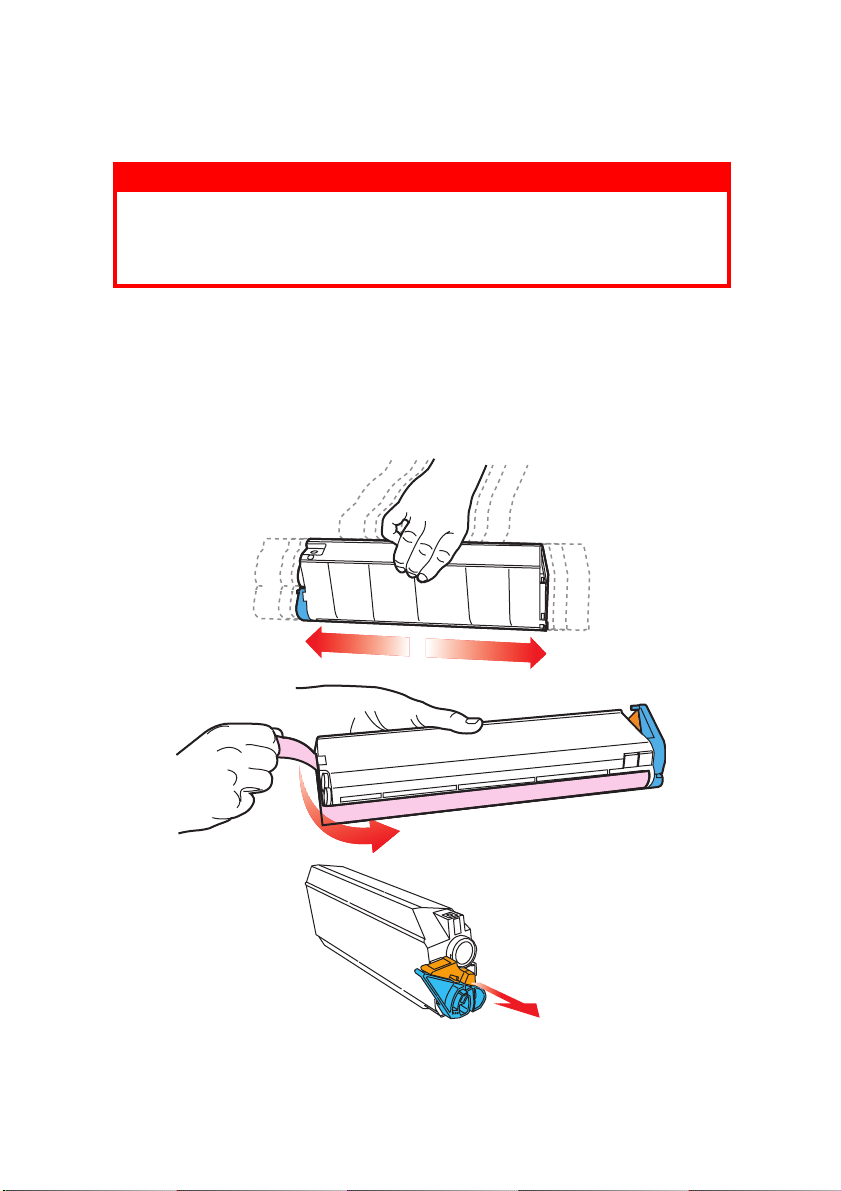
Remove the four colour toner cartridges from their packages.
1.
Shake the toner cartridges back and forth several times, then
2.
holding each toner cartridge horizontally, remove the tape,
and then remove the plastic clip rom behind the coloured
lever.
SETTING UP > 24
Page 25
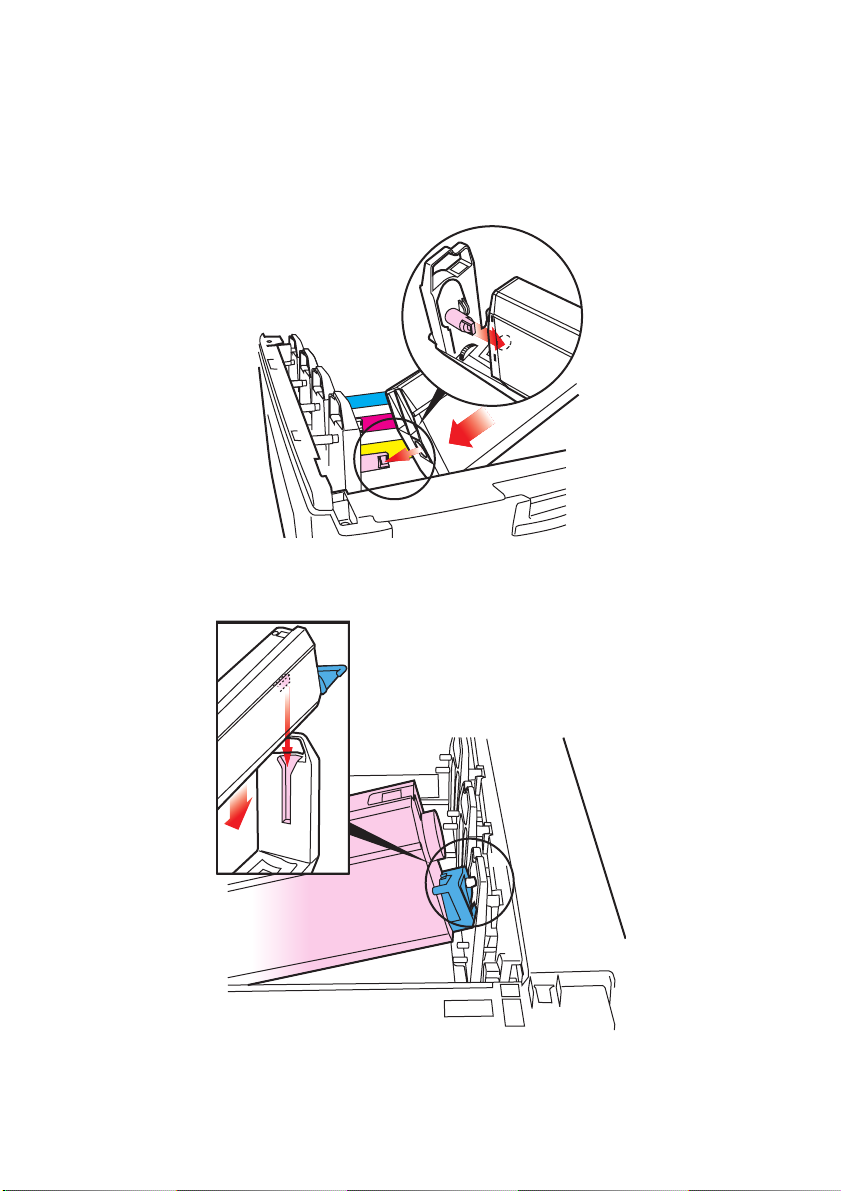
Insert each toner cartridge into its image drum, left side first,
3.
engaging the drum locating peg in the hole in its toner
cartridge. Make sure the colours of the toner cartridge and
image drum correspond.
Gently
4.
push the toner cartridge down, engaging the locking
pin into the groove on the image drum.
SETTING UP > 25
Page 26
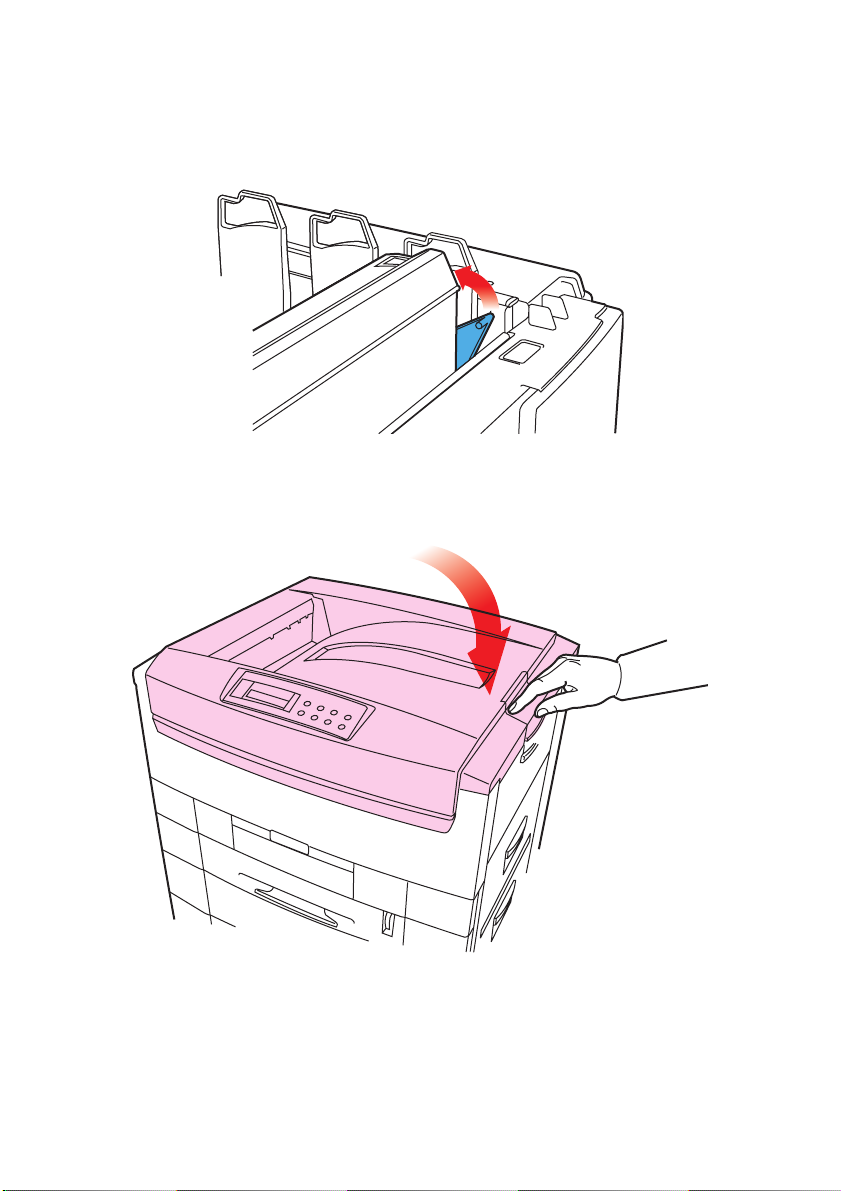
Gently
5.
push the coloured lever toward the rear of the machine
until it stops. This releases the toner into the image drum.
Close the top cover.
6.
SETTING UP > 26
Page 27
LOADING PAPER
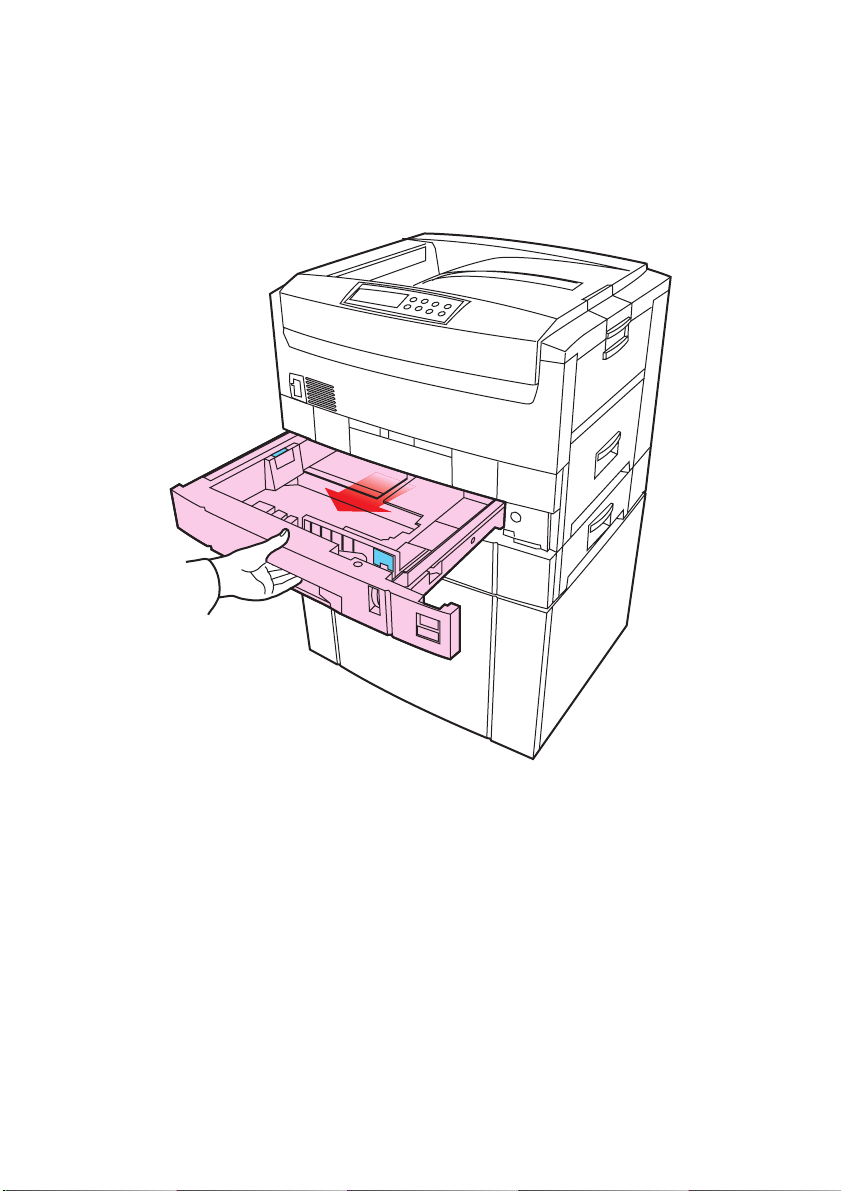
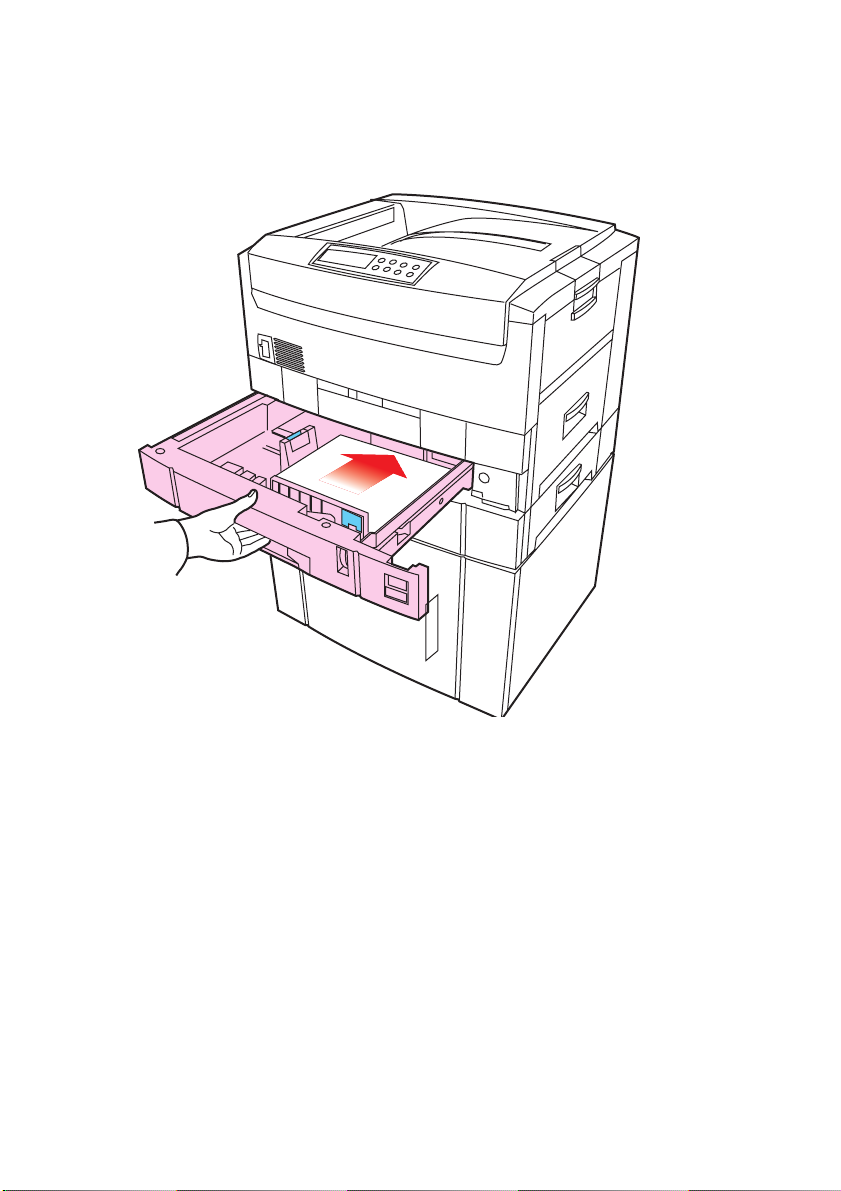
Remove the paper tray from the printer.
1.
SETTING UP > 27
Page 28
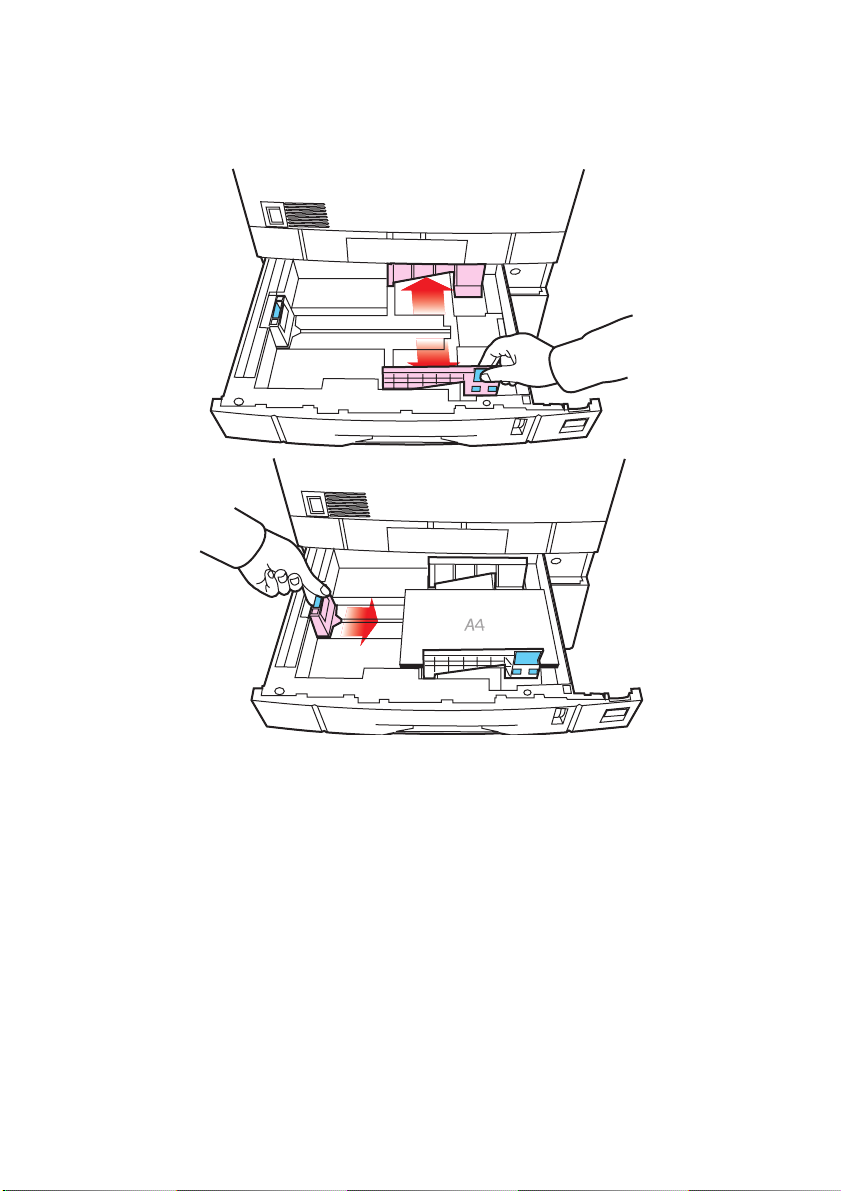
Adjust the paper guides and rear stopper for the size of paper
2.
being used.
To prevent paper jams:
3.
Don’t leave space between the paper and the paper guides
>
and rear stopper.
Don’t overfill the paper tray. Capacity depends on the type of
>
paper and the paper weight.
Don’t load damaged paper.
>
Don’t load paper of different sizes, paper quality or thickness
>
at the same time.
Don’t remove the paper tray during printing.
>
Close the paper tray
>
gently
.
SETTING UP > 28
Page 29
Always load large sizes of paper into the printer longitudinally
>
or portrait orientation. Smaller paper sizes (e.g. A4, A5, B5)
can be loaded in either portrait or landscape orientation.
If fitted, a lower paper tray cannot be used to print if there is
4.
no paper tray inserted above it.
For face down printing, make sure the rear paper exit is closed
5.
(the paper exits from the top of the printer). Paper is stacked in
printed order and paper tray capacity is approximately 500
sheets, depending on paper weight.
SETTING UP > 29
Page 30
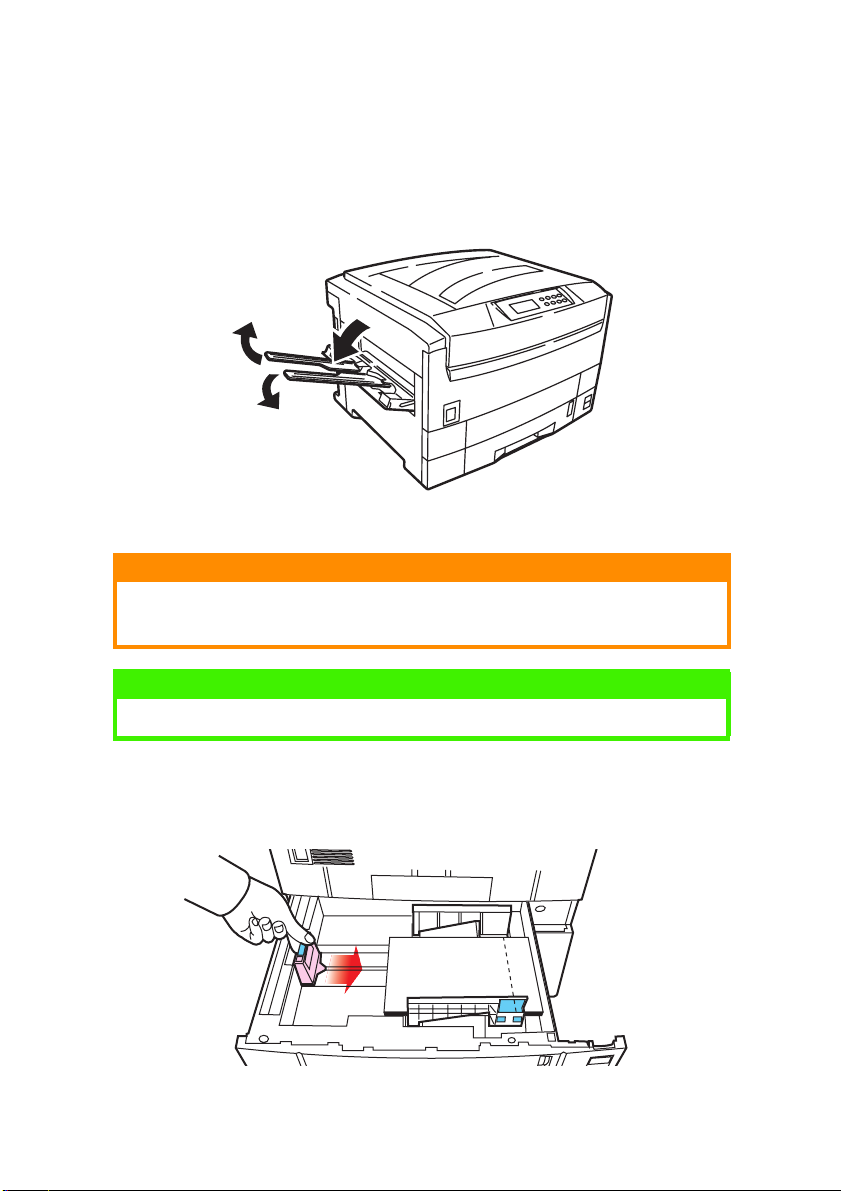
For face up printing, make sure the rear paper exit is open and
6.
the paper support is extended. Paper is stacked in reverse
order and tray capacity is approximately 100 sheets,
depending on paper weight.
CAUTION!
Don’t open or close the rear paper exit while printing as it may result in
a paper jam.
NOTE
Always use the rear stacker for thick paper (card stock etc.)
Load letter headed paper face down as shown for both portrait
7.
and landscape printing:
abc
SETTING UP > 30
Page 31

MANUAL FEED
Open the multi purpose tray and extend the paper feed
1.
guides.
Load the paper and adjust the paper guides to the size of the
2.
paper being used.
Load the paper into the multi purpose tray with the print face
3.
upward for single sided printing and print face downward for
duplex printing.
Don’t exceed the Paper Full line (about 100 sheets depending
4.
on paper weight).
SETTING UP > 31
Page 32

Load envelopes or letterheaded paper face up as shown for
5.
both portrait and landscape printing
ABC
ABC
CAUTION!
Don’t open or close the rear paper exit while printing as it may result in
a paper jam.
SETTING UP > 32
Page 33

POWER CONNECTION
WARNING!
Ensure both the printer power switch and the AC supply are switched
OFF before connecting the power cable.
Connect the power cable (1) into the power socket on the
1.
printer, then into a grounded power supply outlet.
2
1
Switch the printer ON using the main power switch (2).
2.
The printer will go through its initialisation and warm up sequence.
When the printer is ready, the READY indicator comes on and stays on
(green) and the LCD indicates ONLINE.
NOTE
After installing the new toner cartridges, the message TONER LOW or
CHANGE TONER may appear on the display. If this message does not
disappear after a few pages have been printed, reinstall the appropriate
toner cartridge.
SETTING UP > 33
Page 34

CONTROL PANEL
23
Ready
Ready
Attention
Attention
Menu
Menu
Online
Online
Item
Item
Value
Value
Select
Select
Cancel
Cancel
1
1. Attention indicator (red)
required
attention is required
, but printing will continue. FLASHING indicates that
, but printing will stop.
2. Ready indicator (green)
. ON indicates that
. ON - ready to receive data. FLASHING
11
10 9 8
attention is
indicates processing data or error.
3. Liquid crystal display.
(LCD) panel. Two rows of up to 24
alphanumeric digits displaying print status, menu items in
menu mode and error messages.
4. Menu button
. Press briefly to enter the MENU mode. Press
briefly again to select the next menu. Press for more than 2
seconds to scroll through the different menus.
5. Item( +) button
. Press briefly to scroll forward to the next
menu item.
6. Value (+) button
. Press briefly to scroll forward to the next
value setting for each menu item.
7. Select button
. Press briefly to select the menu, item or value
indicated on the LCD.
8. Cancel button
9. Value (–) button
. Press to cancel a print job.
. Press briefly to scroll backward to the next
value setting for each menu item.
10. Item (–) button
menu item.
. Press briefly to scroll backward to the next
SETTING UP > 34
Page 35

11. Online button.
Switches between online and offline status.
NOTE
When pressed in Menu mode, returns the printer to ONLINE status. When
pressed with DATA PRESENT displayed, it forces the printer to print out
the remaining data in the printer. Also when there is an error indicating
wrong paper size, pressing the
button forces the printer to print.
Online
MENU SETTINGS
CHANGING THE DISPLAY LANGUAGE
Menu
Menu
Item
Online
Online
Item
Ready
Ready
Attention
Attention
Carry out the following instructions to change the language that is
displayed on the printer’s LCD.
Value
Value
Select
Select
Cancel
Press the
1.
Press the
2.
is displayed.
Then press the
3.
Press the
4.
Press the
5.
is displayed.
Press the
6.
selected language.
Press the
7.
display language.
button to return the printer to offline status.
Online
button repeatedly until SYSTEM CONFIG MENU
Menu
button.
Select
button repeatedly until LANGUAGE is displayed.
Item
button repeatedly until the required language
Value
button. An asterisk (*) appears next to the
Select
button when you have finished setting the
Online
SETTING UP > 35
Page 36

CONFIRMATION PRINTOUT
Print a list of menu settings to confirm that the printer is correctly
configured.
Menu
Menu
Item
Ready
Ready
Attention
Attention
Make sure there is A4 size paper in the paper tray.
1.
Online
Online
Item
Value
Value
Select
Select
Cancel
Press the
2.
displayed, then press the
Confirm that PRINT MENU MAP is displayed on the LCD.
3.
Press the
4.
button until the INFORMATION MENU is
Menu
button.
Select
button to print the menu map.
Select
PAPER FEED, SIZE AND MEDIA
Using the control panel on your printer, you can set:
which paper feed to use
>
the size of the paper you wish to use
>
the weight of the paper (thickness)
>
the type of paper
>
NOTE
> If the settings in the printer differ from those selected on your
computer, the printer will not print and the LCD will display an error
message.
> The following printer settings are given as a guide only. Some
software applications require the paper feed, size and media
settings to be selected from within the application (page setup).
SETTING UP > 36
Page 37

Paper feed selection
Ready
Ready
Attention
Attention
Online
Online
Item
Value
Value
Select
Select
Cancel
Menu
Menu
Item
The paper feed, paper size, paper weight and media type can be set
manually on the printer using the control panel as follows.
Press the
1.
displayed, then press the Select
Press the
2.
Press the
3.
displayed, then press the
button repeatedly until PRINT MENU is
Menu
Select button.
Select Select
button until PAPER FEED is displayed.
Item
button until the required paper feed is
Value
button. An asterisk (*)
Select
appears next to the selected paper feed.
NOTE
When the AUTO TRAY SWITCH is set to ON and more than one paper tray
is fitted, paper feed automatically switches to the next available paper
tray, providing non-stop printing.
SETTING UP > 37
Page 38

Paper size
Ready
Ready
Attention
Attention
Online
Online
Item
Value
Value
Select
Select
Cancel
Menu
Menu
Item
NOTE
> When using paper trays, standard paper sizes are recognised
automatically with CASSETTE SIZE (default setting) selected. Paper
size need only be set for A3 Wide, A3 outsize/Nobi, Tabloid Extra and
custom paper sizes.
> When using the Multi-Purpose (MP) tray (manual feed), the paper
size has to be selected.
1.
2.
Press the
Press the
button to return the printer to offline status.
Online
button until PRINT MENU is displayed, then
Menu
preset Select button.
3.
Press either
Item (+)
or
button repeatedly until EDIT SIZE is
(–)
displayed.
Press either
4.
Value (+)
size is displayed, then press the
or
button until the required paper
(–)
button. An asterisk (*)
Select
appears next to the selected paper size.
Press the
5.
Select the correct paper settings in the printer driver before
6.
button to return the printer to ONLINE status.
Online
printing the file.
SETTING UP > 38
Page 39

Media type and weight
Your printer automatically detects paper type and weight. You have
the option, however, to override these settings as follows:
Ready
Ready
Attention
Attention
Online
Online
Item
Value
Value
Select
Select
Cancel
Menu
Menu
Item
CAUTION!
If media type or media weight are not correctly set, print quality
deteriorates and the fuser roller may be damaged.
1.
2.
Press the
Press the
button to return the printer to offline status.
Online
button until MEDIA MENU is displayed, then
Menu
press the Select button.
3.
Press the
Item (+)
or
button until MEDIA TYPE or MEDIA
(–)
WEIGHT for the required tray is displayed.
Press the
4.
Value (+)
or weight is displayed, then press the
or
button until the required paper type
(–)
button. An
Select
asterisk (*) appears next to the selected paper type or weight.
5.
Press the
button to return the printer back to online
Online
status.
Select the correct paper settings in the printer driver before printing
the file.
SETTING UP > 39
Page 40

Paper, envelope types, transparencies and adhesive labels
We recommend the following guidelines when selecting paper and
envelopes for use in this printer:
All paper and envelopes should be stored flat and away from
>
moisture, direct sunlight and heat sources.
Use envelopes designed for use in laser type printers.
>
The use of heavily laid or textured paper will seriously impact
>
on the life of the image drum and give poor print quality. Print
quality can be improved by changing the media setting to
‘Ultra Heavy’. However, this will reduce the output speed and
prevent the use of the duplex option.
Don’t use very smooth, shiny or glossy paper.
>
Don’t use heavily embossed headed paper, very rough paper
>
or paper that has a large grain difference between the two
sides.
Don’t use paper with perforations, cut-outs or ragged edges.
>
Don’t use envelopes with windows or metal clasps.
>
Don’t use envelopes with self sealing flaps.
>
Don’t use damp, damaged or curled paper and envelopes.
>
Don’t use carbon paper, NCR paper, photosensitive paper,
>
pressure sensitive paper or thermal transfer paper.
Media must be designed for use in colour laser printers and
>
photocopiers.
Must be able to withstand 200°C for 0.1 sec.
>
Labels should cover entire carrier sheet.
>
Carrier sheet or adhesive must not be exposed to any part of
>
the printer.
SETTING UP > 40
Page 41

PAPER FEED AND EXIT
Selection of which paper feed and which paper exit to use for printing
and whether simplex (single sided) or duplex (double sided) printing
is available, depends upon the paper size, media weight and media
type that is used. Please refer to the following tables:
PAPER SIZES
Pape r size Feed Exit
Tray 1 Tray 2/Tray 5 Manual Rear
(Face up)
A3 Simplex/
A4 Simplex/
A5 Simplex/
A6 Simplex * Simplex Simplex *
B4 Simplex/
B5 Simplex/
Letter Simplex/
Legal (13in) Simplex/
Legal (14in) Simplex/
Executive Simplex/
A3 Wide Simplex/
A3 Outsize/
Nobi
Tab loi d Si mpl ex/
Tabloid Extra Simplex/
duplex
Duplex
Duplex
Duplex
Duplex
Duplex
Duplex
Duplex
Duplex
Duplex
Simplex/
Duplex
Duplex
Duplex
Simplex/duplex Simplex Simplex/
Duplex
Simplex/Duplex Simplex Simplex/
Duplex
Simplex/Duplex Simplex Simplex/
Duplex
Simplex/Duplex Simplex Simplex/
Duplex
Simplex/Duplex Simplex Simplex/
Duplex
Simplex/Duplex Simplex Simplex/
Duplex
Simplex/Duplex Simplex Simplex/
Duplex
Simplex/Duplex Simplex Simplex/
Duplex
Simplex/Duplex Simplex Simplex/
Duplex
Simplex/Duplex Simplex Simplex/
Duplex
Simplex/Duplex Simplex Simplex Simplex/
Simplex/Duplex Simplex Simplex/
Duplex
Simplex/Duplex Simplex Simplex/
Duplex
Top
(Face down)
Simplex/
Duplex
Simplex/
Duplex
Simplex/
Duplex
Simplex/
Duplex
Simplex/
Duplex
Simplex/
Duplex
Simplex/
Duplex
Simplex/
Duplex
Simplex/
Duplex
Simplex/
Duplex
Duplex
Simplex/
Duplex
Simplex/
Duplex
SETTING UP > 41
Page 42

Pape r size Feed Exit
Envelopes
(Com 9; Com
10; C5; C4; DL;
Monarch
Custom (width
76.2 to
328mm; height
127.0 to
1200mm)
* Not available
Tray 1 Tray 2/Tray 5 Manual Rear
(Face up)
** SimplexSimplex*
* * Simplex Simplex *
Top
(Face down)
PAPER WEIGHTS AND MEDIA SETTINGS
Pape r
weight
64 to 67 g/m² Light Simplex Simplex Simplex Simplex Simplex
68 to 74 g/m² Medium
75 to 90 g/m² Medium Simplex/
91 to 104 g/m² Medium
105 to 120 g/m² Heavy Simplex Simplex Simplex Simplex Simplex
121 to 203 g/m² Ultra
Transparencies * Simplex * Simplex Simplex *
Labels 1 0.1 to 0.17
Labels 2 0.17 to 0.2
Media
weight
light
heavy
heavy
mm
thickness
mm
thickness
Feed Exit
Tray 1 Tray 2/
Tray 5
Manual Rear
(face up)
Top
(face
down)
Simplex Simplex Simplex Simplex Simplex
Simplex/
Duplex
Simplex/
Duplex
Duplex
Simplex/
Duplex
* *
* * Simplex Simplex *
**SimplexSimplex*
Simplex Simplex/
Duplex
Simplex Simplex/
Duplex
Simplex Simplex *
Simplex/
Duplex
Simplex/
Duplex
* Not available
SETTING UP > 42
Page 43

NOTE
Recycled paper is slightly thicker than the paper weight (ream weight)
indicated on the wrapper. To ensure that toner is fused correctly on such
paper, make sure that the MEDIA TYPE is set to RECYCLED and MEDIA
WEIGHT is set to AUTO.
SETTING UP > 43
Page 44

PRINTER SETTINGS
CONFIRMING CURRENT SETTINGS
Current MENU settings can be confirmed by printing a menu map.
Menu
Menu
Item
Item
Value
Ready
Ready
Attention
Attention
Make sure that A4 size paper is loaded into the paper tray.
1.
Online
Online
Value
Select
Select
Cancel
2.
3.
Press the
Press the
button to return the printer to offline status.
Online
button until the INFORMATION MENU is
Menu
available.
4.
Press the
button until the display prompts you to print
Select
the menu map.
5.
Press the
button to print the menu map. The printer will
Select
return to online status when the menu map is printed.
CHANGING THE SETTINGS
Press the
1.
then press the Select button.
Press the
2.
displayed.
Press the
3.
displayed.
Press the
4.
confirmed by an asterisk (*) appearing to the right of it.
Press the
5.
button until the required menu is displayed,
Menu
or
Item (+)
Value (+)
button. Selection of the value will be
Select
button to return the printer to online status.
Online
button until the required item is
(–)
or
button until the required value is
(–)
SETTING UP > 44
Page 45

LIST OF MENU SETTINGS
Listed in the following tables are the available printer settings. The
default settings for the printer are in bold italic text.
Print jobs menu
(Only displayed if a hard disk is fitted.)
Item Value Description
ENTER PASSWORD
SELECT JOB
Information menu
Item Value Description
PRINT MENU MAP
PRINT FILE LIST
PRINT PCL FONT
PRINT PS FONT
PRINT IBM PPR
FONT
PRINT EPSON FX
FONT
PRINT GL/2
PALETTE GL/2
PRINT DEMO1 TO
32
PRINT ERROR LOG
**** Sets password using a four–digit
No jobs; All jobs; File
name 1 to nn
Execute Prints menu list.
Execute Prints job file list.
Execute Prints PCL font list.
Execute Prints PostScript font list
Execute Prints an IBM PPR font list.
Execute Prints an Epson FX font list.
Execute Prints a colour sample of the Menu
Execute Prints demonstration page
Execute Prints error log.
number (0~9).
This item is also displayed even when
OP MENU “ALL CATEGORY” is set to
DISABLE in the Admin. menu.
Selects printing job for secure printing
This item is also displayed even when
OP MENU “ALL CATEGORY” is set to
DISABLE in the Admin. menu.
select pen (only when HP-GL2 is valid)
SETTING UP > 45
Page 46

Tes t Print menu
Item Value Description
PRINT ID CHECK
PATTERN
Execute Prints ID check pattern to detect bad ID.
Displayed only if "TEST PRINT MENU" of
the System Maintenance Menu is set to
ENABLE.
Shutdown menu
Item Value Description
SHUTDOWN START
Execute Shut down sequence for the printer,
and is recommended to be used when
the hard disk is fitted to prevent any
loss of data.
Print Menu
Item Value Description
COPIES
DUPLEX
BINDING
OUTPUT BIN
JOB OFFSET
PAPER FEED
AUTO TRAY
SWITCH
TRAY SEQUENCE
1 to 999 Sets the number of copies.
On; Off Specifies two-sided (duplex) printing
if the optional duplex unit is installed.
Long edge; Short edge Sets binding for duplex printing. Only
Face Up; Face Down
On
On; Off Sets job offset on or off.
OnOn
Tray 1; Tray 2; Tray 3;
Tray 4; Tray 5; MP Tray
On; Off Automatic switching to next tray when
Down; Up; Paper feed
tray
Face Down Specifies output bin.
Face DownFace Down
displayed if duplex is ON.
Selects source of paper feed. Tray 2 to
5 only displayed if fitted.
tray in use empties.
Specifies selection order priority for
switching Auto Tray Select/Auto Tray
Switch.
SETTING UP > 46
Page 47

Item Value Description
MULTI-PURPOSE
(MP) TRAY USAGE
Media check
TRANSPARENCY
DETECT OHP
RESOLUTION
TONER SAVE MOD E
MONO-PRINT
SPEED
ORIENTATION
LINE PER PAGE
Normal tray; High
priority tray; Feed
when mismatching;
Do not use
Enable; Disable Sets whether the printer checks the
Auto; Disable Enable/Disable the transparency auto
C9300 - 600 dpi
C9500 -1200 dpi
ON; OFF ON: Enables Toner Save mode.
Auto; Colour speed;
Normal speed
Portrait; Landscape Sets page orientation for printing.
5 to 128 (64) Sets the number of lines that can be
Specifies MP tray usage.
As normal tray: (Tray select/switch)
As normal tray: (Tray select/switch)
As normal tray: (Tray select/switch)As normal tray: (Tray select/switch)
Use as a normal tray.
High priority tray: (Valid with Tray
High priority tray: (Valid with Tray
High priority tray: (Valid with Tray High priority tray: (Valid with Tray
select only).
select only).
select only).select only).
If paper exists in the MP tray and
Duplex is not specified, the printer
prints on paper from MP tray.
Feed when mismatching:
Feed when mismatching:
Feed when mismatching:Feed when mismatching:
When a paper mismatch occurs (i.e.
the tray's paper size/media type does
not match the print data), a paper
request is issued to the MP Tray. If the
data is for Duplex print, a specified
tray is used instead of the MP tray.
DO NOT USE
DO NOT USE:
DO NOT USEDO NOT USE
Both Auto Tray Select and Auto Tray
Switch do not permit the use of the MP
Tray. However, if "MP TRAY" is
specified in “PAPER FEED," the printer
behaves as if a "NORMAL TRAY" is
selected even though "DO NOT USE" is
selected. (MP Tray can be selected as
Auto Tray.)
matching of paper size to that of the
tray. Only standard sizes are checked.
detect function. (Used for cutting if the
sensor wrongly detects).
Selects print resolution.
OFF: Disables Toner Save mode.
Selects monochrome printing speed.
Auto
Auto: prints at the most appropriate
AutoAuto
speed for page process.
Colour
Colour: prints always at the colour
ColourColour
print speed.
Normal
Normal: Prints always at the
NormalNormal
monochrome print speed.
printed on a page.
SETTING UP > 47
Page 48

Item Value Description
EDIT SIZE
Cassette size; Letter;
Executive; Legal 14;
Legal 13.5; Legal 13;
Tabloid Extra; Tabloid;
A3; A4; A5; A6; B4; B5;
Custom; Com-9
envelope; Com-10
envelope; Monarch
envelope; C4, C5, DL
Envelopes; Postcard;
Return Postcard;
Envelope 1; Envelope
2; Envelope 3;
Envelope 4
Cassette size is selected when using
standard sized paper in the paper
tray. Edit size is only used when
printing one page size onto a different
paper size, e.g. A6 onto A4, edit size
would be set to A6, but actual paper in
paper tray is A4.
Media menu
Item Value Description
TRAY 1 MEDIA TYPE
TRAY 2, 3, 4 ,5 MEDIA
TYPE
TRAY 1, 2, 3, 4 AND 5
MEDIA WEIGHT
Plain; Letterhead;
Transparency; Bond;
Recycled; Card stock;
Rough.
User type 1 - 5
Plain; Letterhead;
Bond; Recycled; Card
stock; Rough;
User type 1 - 5
Auto; Light; Medium
light; Medium; Medium
heavy; Heavy; Ultra
heavy
Selects the paper type for Tray 1.
User type 1 - 5 are displayed only if
registered in the host PC. If Media
character strings are specified,
these will be displayed instead.
Selects the paper type for the
selected paper tray. Tray 2 to Tray 5
only displayed if fitted.
User type 1 - 5 are displayed only if
registered in the host PC. If the
host PC specifies the character
strings for media types, they will be
displayed instead.
Sets the paper weight for the
selected paper tray. Tray 2 to Tray 5
only displayed if fitted.
SETTING UP > 48
Page 49

Item Value Description
MP TRAY
PAPER SIZE
MP TRAY MEDIA TYPE
MP TRAY MEDIA
WEIGHT
UNIT OF MEASURE
X DIMENSION
Y DIMENSION
A3 Nobi; A3 Wide; A3;
A4 Short Edge; A4 Long
Edge; A5; A6; B4; B5
Short Edge; B5 Long
Edge; Legal 14; Legal
13.5; Legal 13; Tabloid
Extra; Tabloid; Letter
Short Edge; Letter Long
Edge; Executive;
Custom; Com-9
envelope LEF; Com-10
envelope LEF; Monarch
envelope LEF; C4, C5,
DL Envelope LEF;
Postcard; Return
postcard; Envelope 1
LEF; Envelope 2 LEF;
Envelope 3 LEF;
Envelope 4 LEF
Plain; Letterhead;
Transparency; Labels;
Bond; Recycled; Card
stock; Rough; User type
1 to 5
Auto; Light; Medium
light; Medium; Medium
heavy; Heavy; Ultra
heavy
inches; millimetres Sets the units of measurement for
3 inches to 8.5 inches
76 mm to 216 mm (210
mm)
5 inches to 47.2 inches
(11 inches)
127 mm to 1200 mm
(297 mm)
Sets the paper size for the
multipurpose paper tray.
Selects the paper type for
multipurpose paper tray. User type 1
to 5 are only displayed if they have
been registered.
Sets the paper weight for the
multipurpose (MP) paper tray.
custom paper size.
Sets the dimensions of custom
paper. For these dimensions to
work, the MP t ray paper size must be
set custom.
Sets the dimensions of custom
paper. For these dimensions to
work, the MP t ray paper size must be
set to custom.
SETTING UP > 49
Page 50

Colour menu
Item Value Description
AUTO DENSITY
MODE
ADJUST DENSITY
COLOUR TUNING
CYAN, MAGENTA,
YELLOW OR BLACK
HIGHLIGHT
CYAN, MAGENTA,
YELLOW OR BLACK
MID-TONE
CYAN, MAGENTA,
YELLOW OR BLACK
DARK
Auto; Manual. Select whether density adjustment
and Toner Response Curve (TRC)
compensation is automatic.
Auto: Density adjustment is
automatically run under specified
conditions, and reflected in the TRC
compensation.
Manual: The printer does not
automatically run density adjustment.
Execute If EXECUTE is selected, the printer will
immediately adjust density and reflect
it in the TRC compensation. Density
adjustment must be executed when
the printer is idling. It may become
invalid if executed in any other state.
Print pattern Prints the pattern for the user to adjust
TRC. Ordinarily this function is not
needed because TRC is automatically
adjusted to the recommended levels
through density adjustment and TRC
compensation. This function permits
TRC adjustment to your requirement
by using the adjustment menu of
HIGHLIGHT, MID-TONE, and DARK for
each of CMYK. Adjustment results will
be reflected as offset values
(additions) to the corrections made
through the Adjust Density/TRC
Compensation function.
0+1+2+3-3-2-1 Adjusts HIGHLIGHT (light area) of
Cyan, Magenta, Yellow or Black TRC.
Plus indicates adjustment toward a
darker level and minus toward lighter.
0+1+2+3-3-2-1 Adjusts MID-TONE of Cyan, Magenta,
Yellow or BlackTRC.
Plus indicates adjustment toward a
darker level and minus toward lighter
0+1+2+3-3-2-1 Adjusts DARK of Cyan, Magenta,
Yellow or BlackTRC.
Plus indicates adjustment toward a
darker level and minus toward lighter
SETTING UP > 50
Page 51

Item Value Description
CYAN, MAGENTA,
YELLOW OR BLACK
DARKNESS
ADJUST
REGISTRATION
CYAN REGI STRA TIO N
- FINE ADJUST
MAGENTA
REGISTRATION FINE ADJUST
YELLOW
REGISTRATION FINE ADJUST
INK SIMULATION
INK LIMIT
0+1+2+3-4-3-2-1 Adjusts Cyan, Magenta, Yellow or
Execute When this menu is selected, the
0+1+2+3-3-2-1 Makes a fine adjustment to image
0+1+2+3-3-2-1
0+1+2+3-3-2-1
Off; Euroscale The printer has its own process
Dark; Medium; Light Selects the limit of the toner layer
Black
engine density.
The Darkness settings for each of
CMYK will be reflected as offset values
(additions) to the corrections through
the Adjust Density/TRC Compensation
function.
printer performs an Auto Adjust
Registration.
Must be executed in the idle state
(Auto Registration OFF).
registration in Cyan, Magenta or
Yellow against Black in the horizontal
direction. The adjustment is reflected
as an offset (addition) value to the
corrections through Auto Color
Registration Correction. Values are
adjusted in increments of 1/1200th of
an inch. Example: if the paper
movement is upward - if a value is
increased (+) then it means the image
moves downward in relation to it.
simulation generator which simulates
standard colours in the printer.
This function is enabled only with
Postscript language jobs.
thickness. If paper curl occurs in DARK
printing, selecting MEDIUM or LIGHT
sometimes helps reduce curl.
SETTING UP > 51
Page 52

Item Value Description
CMY 100% DENSITY
Disable; enable Selects enable/disable 100% output
against the CMY100% TRC
compensation. Ordinarily, the TRC
compensation function controls the
appropriate print density; thus, 100%
output is not always enabled.
Selecting ENABLE will allow 100%
output. In actual printing, the TRC
values, too, are controlled by Color
Matching. This function is used for
special purposes; for example, to
specify the color for CMYK colour
space in PS.
System configuration menu
Item Value Description
POWER SAVE
DELAY TIME
PERSONALITY
USB
PS-PROTOCOL
!EEE 1394
PS PROTOCOL
NETWORK
PS PROTOCOL
CLEARABLE
WARNING
5 min; 15 min; 30 min;
60 min; 240 min
Auto emulation; PCL;
IBM PPR III XL; Epson
FX; AdobePostScript;
HP-GL2
ASCII
RAW
ASCII
RAW
ASCII
RAW
ON; Job PCL emulation
Sets the time before printer enters
power save mode.
Selects the printer emulation
language. Note: the only printer
languages that can be selected are
those enabled in the Personality
section of the Maintenance menu.
Specifies PostScript (PS)
communication protocol mode of data
from USB. (In RAW mode, Ctrl-T is
invalid.)
Displayed only when IEEE1394 option
board is installed.
Specifies PS communication mode of
data from IEEE1394.
(In RAW mode, Ctrl-T is invalid.)
Specifies PS communication protocol
mode of data from OkiLAN 7300e.
(In RAW mode, Ctrl-T is invalid.)
PCL emulation: Sets the time before
PCL emulationPCL emulation
deleting error messages. If On, press
Error Delete switch to display error. If
Job, error remains displayed until next
print job is received.
PS emulation
PS emulation: Error messages are
PS emulationPS emulation
only shown during job regardless of
setting.
Personality
PersonalityPersonality
Maintenance menu.
Maintenance menu.Maintenance menu.
SETTING UP > 52
Page 53

Item Value Description
AUTO CONTINUE
MANUAL TIMEOUT
WAIT TIMEOUT
LOW TONER
JAM RECOVERY
ERROR REPORT
LANGUAGE
On; Off Sets the printer to recover
60 sec; 30 sec; Off Sets the time between requesting that
Off; 5 sec to 300 sec
(90 sec)
Cont inue; Stop If set to CONTINUE, allows printing to
ON; OFF Sets whether or not printing will
ON; Off When set to ON, prints an error report
English; German;
French; Italian;
Spanish; Swedish;
Norwegian; Danish;
Dutch; Turkish;
Portuguese; Polish
automatically after a memory
overflow or print overrun.
paper is inserted and when the print
job is cancelled should paper not be
inserted.
Only works in PostScript mode.
Sets the time between receiving the
last byte of data and the page being
automatically ejected.
Only works in PCL mode.
In PS mode the job will be cancelled.
continue when Low toner is
displayed. If STOP is selected - when
Low toner is displayed, the printer
goes off line.
continue after a paper jam has been
cleared. If set to OFF, the print job that
was being printed when the paper
jam occurred will be cancelled after
clearing the paper jam. When set to
ON, the print job will continue after
the jam has been cleared.
when internal error occurs.
Only works in PostScript mode.
Selects the printer display language.
SETTING UP > 53
Page 54

PCL emulation
Item Value Description
FONT SOURCE
FONT NO.
FONT PITCH
FONT HEIGHT
SYMBOL SET
A4 PRINT WIDTH
WHITE PAGE SKIP
CR FUNCTION
LF FUNCTION
PRINT MARGIN
TRUE BLACK
Resident; Dimmo;
Downloaded
I000 to 1083 Sets the PCL font number.
0.44 cpi to 99.99 cpi
(10.00 cpi)
4.00 pt to 999.75 pt
(12.00 pt)
PC-8 Selects a PCL character symbol set
78 column; 80 column Selects the number of characters in a
OFF; ON Selects whether or not to print pages
CR; CR+LF Sets functionality on receipt of CR
LF; LF+CR Sets functionality on receipt of LF
Normal; 1/5 inch; 1/6
inch
ON; OFF PCL: Sets whether to use Composite
Selects location of the PCL font used.
Dimmo
Dimmo is displayed only when font
DimmoDimmo
DIMM ROM exists in the slot.
Downloaded
Downloaded only appears if fonts
DownloadedDownloaded
have been down loaded to the printer.
The range of this variable changes
depending on the FONT SOURCE
setting at the time. If the default font
is set for FONT SOURCE, the number
starts at 0. If it is not, the number
starts at 1. The maximum value is
equal to the number of fonts installed
in FONT SOURCE.
Sets the font width in characters per
inch. Only displayed if the font is a
fixed spacing outline font.
Sets the font point size. Only
displayed if the font is a relative
spacing outline font.
line before automatic return (A4
paper), PCL mode.
that contain no data (white pages),
PCL mode.
code in PCL mode.
code in PCL mode.
Sets unprintable paper area (margin).
Normal: PCL emulation compatible
1/5 inch: domestic model emulation.
1/6 inch: HIPER-W emulation.
Black (CMYK mixed) or Pure Black (K
only) for the black (100%) in image
data. OFF: Mode using Composite
Black ON: Mode using Pure Black (not
valid with PostScript).
SETTING UP > 54
Page 55

PPR Emulation
Item Value Description
PEN WIDTH
ADJUST
CHARACTER PITCH
FONT CONDENSE
CHARACTER SET
SYMBOL SET
LETTER 0 STYLE
ZERO CHARACTER
LINE PITCH
WHITE PAGE SKIP
CR FUNCTION
LF FUNCTION
LINE LENGTH
FORM LENGTH
TOF POSITION
LEFT MARGIN
FIT TO LETTER
TEXT HEIGHT
CONT PAPER
MODE
ON; OFF IN PCL, when switched ON,
10 CPI; 12 CPI; 17 CPI;
20 CPI; PROPORTIONAL
12CPI - 20CPI; 12CPI 12CPI
Set 1; Set 2 Specifies a character set.
IBM 437 Specifies a symbol set.
Disable; Enable Specifies the style that replaces 9BH
Normal; Slashed Sets the zero to be slashed or
6 LPI; 8 LPI Specifies the line spacing.
OFF; ON Specifies whether or not the printer
CR; CR+LF Sets functionality on receipt of CR
LF; LF+CR Sets functionality on receipt of LF
80 COLUMN; 136
COLUMN
11 INCH; 11.7 INCH;
12 INCH
0.0 INCH - 1.0 INCH Specifies the distance of print from
0.0 INCH - 1.0 INCH Specifies the distance of print from
Disable; Enable Sets the printing mode that can fit
Same; Diff Sets the height of a character.
Off
Off; On Sets the edit direction of paper to
OffOff
emphasises the pen width to improve
the appearance of lines specified with
minimum width.
Specifies character pitch in IBM PPR
emulation.
Specifies 12CPI pitch for Condense
Mode.
with o and 9DH with a zero.
unslashed.
ejects a blank sheet.
Not available on duplex operation.
code.
code.
Specifies the number of characters
per line.
Specifies the length of paper.
the top edge of the paper.
the left hand edge of the paper.
print data, equivalent to 11 inches
(66 lines), in the LETTER-size printable
area.
SAME: Regardless of CPI, same
height.
DIFF: As CPI, character heights vary.
landscape.
SETTING UP > 55
Page 56

FX Emulation
Item Value Description
CHARACTER PITCH
CHARACTER SET
SYMBOL SET
LETTER 0 STYLE
ZERO CHARACTER
LINE PITCH
WHITE PAGE SKIP
CR FUNCTION
LF FUNCTION
LINE LENGTH
FORM LENGTH
TOF POSITION
LEFT MARGIN
FIT TO LETTER
TEXT HEIGHT
CONT PAPER
MODE
10 CPI; 12 CPI; 17 CPI;
20 CPI; PROPORTIONAL
Set 1; Set 2 Specifies a character set.
IBM 437 Specifies a symbol set.
Disable; Enable Specifies the style that replaces 9BH
Normal; Slashed Sets the zero to be slashed or
6 LPI; 8 LPI Specifies the line spacing.
OFF; ON Specifies whether or not the printer
CR; CR+LF Sets functionality on receipt of CR
LF; LF+CR Sets functionality on receipt of LF
80 COLUMN; 136
COLUMN
11 inch; 11.7 inch;
12 inch
0.0 inch - 1.0 inch Specifies the distance of print from
0.0 inch - 1.0 inch Specifies the distance of print from
Disable; Enable Sets the printing mode that can fit
Same; Diff Sets the height of a character.
Off; On Sets edit direction of paper to
Specifies character pitch in this
emulation.
with o and 9DH with a zero.
unslashed.
ejects a blank sheet.
Not available on duplex operation.
code.
code.
Specifies the number of characters
per line.
Specifies the length of paper.
the top edge of the paper.
the left hand edge of the paper.
print data, equivalent to 11 inches (66
lines), in the LETTER-size printable
area.
SAME: Regardless of CPI, same
height.
DIFF: As CPI, character heights vary.
landscape.
SETTING UP > 56
Page 57

HP-GL/2 Emulation
Item Value Description
ROTATE
AUTO ROTATE
AUTO SCALE
MERGE
PALETTE SOURCE
PEN 0 - 15 WIDTH
0; 90; 180; 270 Specifies the rotation for GL/2
OFF; ON Automatically rotates the print
OFF; ON Automatically enlarges/reduces the
OFF; ON Stipulates the default setting for
SOFTWARE; PALETTE Sets whether to use Menu Palette
0.0 - 12.0 mm
Pen 0: 0.13 mm
Pen 1: 0.18 mm
Pen 2: 0.25 mm
Pen 3: 0.35 mm
Pen 4: 0.50 mm
Pen 5: 0.65 mm
Pen 6: 0.70 mm
Pen 7: 0.80 mm
Pen 8: 0.90 mm
Pen 9: 1.0 mm
Pen 10: 1.4 mm
Pen 11: 2.0 mm
Pen 12: 3.0 mm
Pen 13: 5.0 mm
Pen 14: 8.0 mm
Pen 15: 12.0 mm
drawings.
orientation according to the specified
plot size in GL/2 drawings.
print area (determined by the
specified plot size in GL/2 drawings)
to the paper size.
logical operations in GL/2 drawings.
OFF - overwrite; ON - OR write.
which defines the width and colour of
pen used in GL/2 drawings. When
PALETTE is selected, the pen width and
colour specified by the command is
invalid.
Specifies the width of Pen 0 - 15 for
the menu palette to be used in GL/2
drawings.
The specified width is invalid if
PALETTE is not selected as PALETTE
SOURCE, and the default pen width in
this case is 0.35mm.
This will not affect GL/2 mode in PCL.
SETTING UP > 57
Page 58

Item Value Description
PEN 0 - 15
COLOUR
ORIGIN
PEN 0 FUNCTION
CHARACTER PITCH
SELECT PAPER
0 - 255
Pen 0: 0
Pen 1: 1
Pen 2: 2
Pen 3: 3
Pen 4: 4
Pen 5: 5
Pen 6: 6
Pen 7: 7
Pen 8: 8
Pen 9: 12
Pen 10: 19
Pen 11: 27
Pen 12: 35
Pen 13: 68
Pen 14: 100
Pen 15: 110
Corner
Center
White pen
End plot
6 CPI; 9 CPI Specifies the default size of characters
Edit size; Plotsize all;
Plotsize equip
Specifies the colour of Pen 0 - 15 for
the menu palette to be used in GL/2
drawings.
The specified colour is invalid if
PALETTE is not selected as PALETTE
SOURCE.
This will not affect GL/2 mode in PCL.
Specifies the origin in GL/2 drawings.
This will not affect GL/2 in PCL.
(The origin in GL/2 mode in PCL is in
the lower-left corner.)
Specifies the designation of Pen 0 in
GL/2 drawings. If END PLOT is set, the
command to select PEN 0 will prompt
printing, then ejecting.
This will not affect GL/2 mode in PCL.
in GL/2 drawings.
This will not affect GL/2 mode in PCL.
Specifies the method to determine the
paper size in GL/2 drawings.
EDITSIZE selected - the paper
appropriate for the Edit Size in the
menu will be selected.
PLOTSIZE selected - the paper whose
size is larger than, and closest to, the
specified Plot Size value will be
selected from all the usable paper (all)
or those loaded in the printer (equip).
This will not affect GL/2 mode in PCL.
SETTING UP > 58
Page 59

Parallel menu
Item Value Description
PARALLEL
BI-DIRECTION
ECP
ACK WIDTH
ACK/BUSY
TIMING
I-PRIME
OFFLINE RECEIVE
Enable; Disable Selects parallel (Centronics) interface.
Enable; Disable Selects bi-directional communication.
Enable; Disable Selects ECP mode.
Narrow (0.5µs);
Medium (1.0µs); Wide
(3.0µs)
ACK-in-Busy; ACKwhile-Busy
3 micro-sec; 50 microsec; Disable
Enable; Disable When set to Enable, this function
Sets ACK width for compatible
reception.
Sets output order for ACK and BUSY
during reception.
ACK IN BUSY: BUSY=LOW to the end of
the ACK pulse
ACK WHILE BUSY: BUSY=LOW to the
centre of the ACK pulse.
Sets or disables the i-Prime signal
maintains reception without changing
the interface signal, even though an
alarm occurs.
The interface stays open even if the
operator panel Off-line switch is
pressed.
The interface issues a BUSY signal only
when the receive buffer is full or when a
service call occurs.
USB menu
Item Value Description
USB
SOFT RESET
OFFLINE RECEIVE
Enable; Disable Selects USB interface.
Enable; Disable Selects use of soft reset command.
Enable; Disable When set to Enable, this function
maintains reception without changing
the interface signal, even if an alarm
occurs. The interface stays open even
if the operator panel Off-line switch is
pressed. The interface issues a BUSY
signal only when the receive buffer is
full or when a service call occurs.
SETTING UP > 59
Page 60

IEEE1394 menu
(only displayed if IEEE 1394 is installed)
Item Value Description
SPEED
SBP2
S100; S200; S400 Sets the upper limit of transfer speed
in communication layer.
(S400: 400MB/Sec. or less)
Display is in English only.
Enable; Disable Enables/disables SBP2 protocol.
Network menu
Item Value Description
TCP/IP
NETWARE
ETHERTALK
NETBEUI
FRAME TYPE
DHCP/BOOTP
RARP
IP ADDRESS
SUBNET MASK
GATEWAY
ADDRESS
PRINT SETTINGS
INITIALISE
Enable; Disable Selects TCP/IP protocol.
Enable; Disable Selects Netware protocol.
Enable; Disable Selects EtherTalk protocol.
Enable; Disable Selects NetBEUI protocol.
Auto; 802.2; 802.3
Ether-II; snap
Enable; Disable Selects whether selection of DHCP/
Enable; Disable Selects whether selection of RARP is
xxx.xxx.xxx.xxx Configures IP address of 12
xxx.xxx.xxx.xxx Configures subnet mask of 12
xxx.xxx.xxx.xxx Configures gateway address of 12
ON; OFF Selects printing of network menu map.
ON; OFF Selects network initialisation.
Selects Ethernet frame type.
BOOP is automatic.
automatic.
alphanumeric characters.
alphanumeric characters.
alphanumeric characters.
SETTING UP > 60
Page 61

Memory menu
Item Value Description
RECEIVE BUFF SIZE
RESOURCE SAVE
FLASH INITIALIZE
PS FLASH RESIZE
Auto; 0.5 Mb; 1 Mb; 2
Mb; 4 Mb; 8 Mb; 16
Mb; 32 Mb
Auto; Off; 0.5 Mb; 1
Mb; 2 Mb; 4 Mb; 8
Mb; 16 Mb; 32 Mb
Execute Initialises flash memory if fitted.
1Mb; 0.5Mb; 1.5Mb;
0Mb
Sets the size of the receive buffer and
will depend on the amount of memory
installed in the printer.
Set the size of the font cache area and
will depend on the amount of memory
installed in the printer.
Changes the size of the flash memory
area. NOTE: Special data is stored in
the Flash Memory, therefore you
cannot specify 100%.
Disk maintenance
(Only appears if a hard disk is fitted.)
Item Value Description
HDD INITIALIZE
PARTITION #1
PARTITION #2
PARTITION #3
HDD FORMATTING
Execute Partitions hard disk and formats
each partition.
Common; PCL; PS Sets usage of partition number 1.
Comm on; PCL; PS Sets usage of partition number 2.
Comm on; PCL; PS Sets usage of partition number 3.
Partition 1; Partition
2; Partition 3
Formats specified partition.
System adjust menu
Item Value Description
X ADJUST
Y ADJUST
DUPLEX X ADJUST
DUPLEX Y ADJUST
TRAY 1 A3 NOBI
0.00 mm; +0.25 to +2.0
mm; – 2.0 to –0.25 mm
0.00 mm; +0.25 to +2.0
mm; – 2.0 to –0.25 mm
0.00 mm; +0.25 to +2.0
mm; – 2.0 to –0.25 mm
0.00 mm; +0.25 to +2.0
mm; – 2.0 to –0.25 mm
A3 Nobi; A3 Wide; A3
Tab loi d ex tra
SETTING UP > 61
Adjusts overall print position
horizontally in 0.20 increments.
Adjusts overall print position
vertically in 0.20 increments.
Adjusts overall print position of
print face horizontally in 0.20
increments.
Adjusts overall print position of
print face vertically in 0.20
increments.
Sets Tray 1 large paper size.
Page 62

Item Value Description
TRAY 1 LEGAL 14
TRAY 2 A3 NOBI
TRAY 2 LEGAL 14
TRAY 3 A3 NOBI
TRAY 3 LEGAL 14
TRAY 4 A3 NOBI
TRAY 4 LEGAL 14
TRAY 5 A3 NOBI
TRAY 5 LEGAL 14
PCL TRAY 2 ID#
PCL TRAY 3 ID#
PCL TRAY 4 ID#
PCL TRAY 5 ID#
PCL MP TRAY ID#
DRUM CLEANING
HEX DUMP
Legal 14; Legal 13.5 Sets Tray 1 legal paper size.
A3 Nobi; A3 Wide; A3
Tab loi d ex tra
Legal 14; Legal 13.5 Sets Tray 2 legal paper size.
A3 Nobi; A3 Wide; A3
Tab loi d ex tra
Legal 14; Legal 13.5 Sets Tray 3 legal paper size.
A3 Nobi; A3 Wide; A3
Tab loi d ex tra
Legal 14; Legal 13.5 Sets Tray 4 legal paper size.
A3 Nobi; A3 Wide; A3
Tab loi d ex tra
Legal 14; Legal 13.5 Sets Tray 5 legal paper size.
1 – 59 (5) Sets Tray 2 number for PCL
1 – 59 (20) Sets Tray 3 number for PCL
1 – 59 (21) Sets Tray 4 number for PCL
1 – 59 (22) Sets Tray 5 number for PCL
1 – 59 (4) Sets MP Tray number for PCL
OFF; ON Sets whether to rotate the drum in
Execute Prints out data received from the
Sets Tray 2 large paper size.
Sets Tray 3 large paper size.
Sets Tray 4 large paper size.
Sets Tray 5 large paper size.
(Only displayed if Tray 5 is fitted)
emulation.
emulation.
emulation.
emulation.
emulation.
idle mode before printing to reduce
horizontal white lines effect. This
will shorten image drum life.
host PC in a hexadecimal dump.
SETTING UP > 62
Page 63

Maintenance menu
Item Value Description
EEPROM RESET
SAVE MENU
RESTORE
POWER SAVE
PAPER BLACK
SETTING
PAPER COLOUR
SETTING
TRANSPR BLACK
SETTING
TRANSPR COLOUR
SETTING
Execute Initialises EEPROM for each unit.
Execute Saves the current menu settings.
Execute Reverts to stored menu settings.
Enable; Disable Selects power save mode when no
0; +1; +2; –2; –1
0; +1; +2; –2; –1
0; +1; +2; –2; –1 Adjusts printing to compensate for
0; +1; +2; –2; –1
(Only displayed if there are saved
menu settings).
input is received for a specified time.
See also System adjust menu.
Adjusts printing to compensate for
quality deterioration resulting from
temperature differences when
printing on paper.
quality deterioration resulting from
temperature differences when
printing on transparencies.
Usage menu
Item Value Description
TOTAL PA GE COUNT
TRAY 1 PAGE COUNT
TRAY 2 PAGE COUNT
TRAY 3 PAGE COUNT
TRAY 4 PAGE COUNT
TRAY 5 PAGE COUNT
MP TRAY PAGE
COUNT
COLOUR PAGE
COUNT
MONOCHROME PAGE
COUNT
nnnnnn Shows total number of pages printed.
nnnnnn Shows number of pages printed from Tray 1.
nnnnnn Shows number of pages printed from Tray 2.
Displayed if optional Tray 2 is installed.
nnnnnn Shows number of pages printed from Tray 3.
Displayed if optional Tray 3 is installed.
nnnnnn Shows number of pages printed from Tray 4.
Displayed if optional Tray 4 is installed.
nnnnnn Shows number of pages printed from Tray 5.
Displayed if optional Tray 5 is installed.
nnnnnn Shows number of pages printed from
Multipurpose Paper Tray.
nnnnnn Number of pages printed in colour.
nnnnnn Number of pages printed in monochrome.
SETTING UP > 63
Page 64

Item Value Description
BLACK DRUM LIFE
CYAN DRUM LIFE
MAGENTA DRUM LIFE
YELLOW DRUM LIFE
BELT LIFE
FUSER LIFE
BLACK TONER
CYAN TONER
MAGENTA TONER
YELLOW TONER
Remaining nnn% Displays the remaining life of the black
Remaining nnn% Displays the remaining life of the cyan
Remaining nnn% Displays the remaining life of the magenta
Remaining nnn% Displays the remaining life of the yellow
Remaining nnn% Displays the remaining life of the belt as a
Remaining nnn% Displays the remaining life of the fuser roller
15K = xxx%;
7.5K = xxx%
15K = xxx%;
7.5K = xxx%
15K = xxx%;
7.5K = xxx%
15K = xxx%;
7.5K = xxx%
image drum as a percentage.
image drum as a percentage.
image drum as a percentage.
image drum as a percentage.
percentage.
as a percentage.
Displays black toner remaining.
Displays cyan toner remaining.
Displays magenta toner remaining.
Displays yellow toner remaining.
Administrator menu.
(Only system administrators have access to this menu.)
In order to enter this menu, turn on the printer while holding down the Item +
buttons.
Item +/Item –
Item +Item +
Item –
Item –Item –
Item Value Description
ALL CATEGORY
PRINT JOBS MENU
INFORMATION
MENU
Enable/Disable Enable/Disable all categories of User Menu.
Set to Disable, no user menu is shown
except the PRINT JOB MENU. Panel Lock is
still available.
Enable/Disable Enable/Disable PRINT JOBS MENU.
Set to Disable, PRINT JOBS MENU is not
displayed. (PRINT JOB MENU is displayed
when this MENU setting is set to ENABLE
even though ALL CATEGORY is set to
DISABLE.)
Enable/Disable Enable/Disable INFORMATION MENU.
Set to Disable, INFORMATION MENU is not
displayed.
SETTING UP > 64
Page 65

Item Value Description
SHUTDOWN MENU
PRINT MENU
MEDIA MENU
COLOUR MENU
SYSTEM CONFIG
MENU
PCL EMULATION
MENU
PPR EMULATION
MENU
FX EMULATION
MENU
PARALLEL MENU
USB MENU
IEEE 1394 MENU
NETWORK MENU
MEMORY MENU
Enable/Disable Enable/Disable SHUTDOWN MENU.
Set to Disable, SHUTDOWN MENU is not
displayed.
Enable/Disable Enable/Disable PRINT MENU.
Set to Disable, PRINT MENU is not displayed.
Enable/Disable Enable/Disable MEDIA MENU.
Set to Disable, MEDIA MENU is not
displayed.
Enable/Disable Enable/Disable COLOUR MENU.
Set to Disable, COLOUR MENU is not
displayed.
Enable/Disable Enable/Disable SYSTEM MENU.
Set to Disable, SYSTEM MENU is not
displayed.
Enable/Disable Enable/Disable PCL EMULATION MENU.
Set to Disable, PCL EMULATION MENU is not
displayed.
Enable/Disable Enable/Disable PPR EMULATION MENU.
Set to Disable, PPR EMULATION MENU is not
displayed.
Enable/Disable Enable/Disable FX EMULATION MENU.
Set to Disable, FX EMULATION MENU is not
displayed.
Enable/Disable Enable/Disable PARALLEL MENU.
Set to Disable, PARALLEL MENU is not
displayed.
Enable/Disable Enable/Disable USB MENU.
Set to Disable, USB MENU is not displayed.
Enable/Disable Displayed only when the IEEE 1394 board is
fitted.
Enable/Disable IEEE 1394 MENU.
Set to Disable, IEEE 1394 MENU is not
displayed.
Enable/Disable Displayed only when the Network Interface
Card is fitted.
Enable/Disable NETWORK MENU.
Set to Disable, NETWORK MENU is not
displayed.
Enable/Disable Enable/Disable MEMORY MENU.
Set to Disable, MEMORY MENU is not
displayed.
SETTING UP > 65
Page 66

Item Value Description
DISK
MAINTENANCE
SYSTEM ADJUST
MENU
MAINTENANCE
MENU
USAGE MENU
COLOUR MENU
BLOCK DEVICE
MENU
PEAK POWER
CONTROL
Enable/Disable Enable/Disable DISK MAINTENANCE MENU.
Enable/Disable Enable/Disable SYSTEM ADJUST MENU.
Enable/Disable Enable/Disable MAINTENANCE MENU.
Enable/Disable Enable/Disable USAGE MENU.
Execute This is the menu to reset the TRC data that
Initialise lock YES
NO
Normal/Low Sets PEAK POWER CONTROL.
Set to Disable, DISK MAINTENANCE MENU is
not displayed.
Set to Disable, SYSTEM ADJUST MENU is not
displayed.
Set to Disable, MAINTENANCE MENU is not
displayed.
Set to Disable, USAGE MENU is not
displayed.
had been stored (retained for tracking).
For example, correct values could not be
taken due to “out of order” situation.
This is mainly for maintenance purposes and
not ordinarily used.
Enable/Disable setting changes that involve
Block device (HDD, FLASH) initialisation.
If set to YES, the operator panel does not
show FLASH INITIALISE ITEM and PS FLASH
RESIZE ITEM in DISK MAINTENANCE and
MEMORY MENU.
SETTING UP > 66
Page 67

SWITCHING OFF
In normal circumstances the power save facility should be used to
avoid having to switch the printer off. However if you do wish to switch
the printer off manually, please carry out the following procedure:
Menu
Menu
Item
Online
Online
Item
Ready
Ready
Attention
Attention
CAUTION!
> NEVER turn the printer off while it is printing.
> If the optional hard disk has been fitted, The following procedure
MUST BE FOLLOWED before turning off to protect any data that is
stored on the hard disk.
> It is recommended that you follow this shutdown procedure each
time the printer is switched off for any reason.
> After switching the printer OFF, wait at least 10 seconds before
switching it ON again. This allows the internal power levels to
drop. Switching on too soon could cause the printer to
malfunction.
Value
Value
Select
Select
Cancel
Press the
1.
displayed, then press the
Press the
2.
button until the SHUTDOWN MENU is
Menu
button.
Select
button again to EXECUTE the shutdown
Select
sequence.
When PLEASE POWER OFF SHUTDOWN COMPLETED is
3.
displayed on the LCD, turn the printer off using the power
switch.
SETTING UP > 67
Page 68

INTERFACES
Your printer is equipped with a selection of data interfaces:
1. Parallel
– For direct connection to a PC. This port requires a
bi-directional (IEEE 1384 compliant) parallel cable.
2. USB
– For connection to a PC running Windows 98 or above
(not Windows 95 upgraded to Windows 98) or Macintosh. This
port requires a cable conforming to USB version 1.1 or above.
The operation of a printer is not assured if a USB compatible
device is connected concurrently with other USB-compatible
machines.
When connecting multiple printers of the same type, they
appear as *****, ***** (2), ***** (3), etc. These numbers
depend on the order of connecting or turning on each printer.
3. Ethernet
– For network cable connection. This port is standard
on all “n” models, optional on others.
SETTING UP > 68
2
3
1
Page 69

If you are connecting your printer directly to a stand alone
>
computer proceed to the Chapter headed “Printer Drivers”.
If your printer is to be installed as a network printer, please
>
refer to the relevant section in the User’s Guide for the network
interface card for further details on how to configure the
network connection, before installing the printer drivers.
NOTE
Administrator’s authority is required when installing using a network
connection.
SETTING UP > 69
Page 70

PRINTER DRIVERS
CD1 contains the printer drivers. Please refer to the readme file on this
CD for the latest information on printer driver installation.
WHICH PRINTER DRIVER?
Your printer comes with Windows drivers for PCL and PostScript (PS).
You can install either of these, or both if you wish. Which driver you
choose depends on your application.
If you use TrueType fonts and you do not print PostScript
>
(including “.eps” files) graphics, choose the PCL driver. This
will be more efficient and give good results.
If you use PostScript fonts or you will be printing PostScript
>
graphics, choose the PostScript driver. In this situation
performance will be faster and graphics will be printed at their
best quality.
NOTE
The line art graphics in this manual are PostScript. So if you plan to print
parts of this manual choose the PostScript driver. Otherwise the line art
graphics will only print at low resolution.
If your applications vary so much that neither driver seems to cover all
your needs, you could choose to install both. Then select the one you
plan to use most of the time to be your Windows default driver. Most
applications allow you to choose a different printer from within the
print dialogue, so you can print using the alternative driver whenever
you need to. If you install both drivers, simply select the same printer
port (LPT1 or Network Port) during the installation.
With Windows running, insert the printer driver CD-ROM (CD1)
1.
into your CD-ROM drive.
If the CD does not run automatically, use [Start]-[Run...] and
2.
enter E:\setup (where E is your CD-ROM drive) in the Open
field.
Click on [OK].
3.
PRINTER DRIVERS > 70
Page 71

The setup program will give you a number of options, such as
changing the printer operator panel language and making a test print
to ensure that your printer is operating correctly.
Click on [Driver Installation] then [Install Printer Driver] and
4.
follow the on-screen prompts to complete your printer driver
installation.
NOTE
> Take time to note the facilities available on the CD. For example, the
Help facility briefly describes each of the Software Utilities.
> Network connection provides Printer driver tabs additional to those
for Local connection.
PRINTER DRIVERS > 71
Page 72

INSTALLED OPTIONS
Certain options may have been installed in this printer. For those that
are installed, please check that they appear enabled on the Menu
Map (see “Confirming current settings” in “Setting up”).
This printer has an automatic driver configuration program. However,
for both PostScript (PS) and/or Printer Control Language (PCL), you
can also manually set the following options:
ADDITIONAL MEMORY
Memory size in the Windows PostScript printer driver has to be
changed as follows:
Access the printer settings page via the [Start] menu.
1.
Highlight the printer name and click on [File] then [Properties].
2.
Click on the [Device Settings] tab.
3.
PRINTER DRIVERS > 72
Page 73

In [Installable Options], adjust the amount of memory to be the
4.
same as that now installed in the printer, as shown in the
Menu Map.
Click on [OK].
5.
PRINTER DRIVERS > 73
Page 74

INTERNAL HARD DISK
PostScript
Access the printer settings page via the [Start] menu.
1.
Highlight the printer name and click on [File] then [Properties].
2.
Click on the [Device Settings] tab.
3.
In [Installable Options], click on [Hard Disk], and set it to
4.
Installed.
5.
Click on [OK].
PRINTER DRIVERS > 74
Page 75

PCL
Access the printer settings page via the [Start] menu.
1.
Highlight the printer name and click on [File] then [Properties].
2.
Click on the [Device Options] tab.
3.
Check [Printer Hard Disk].
4.
5.
Click on [OK].
PRINTER DRIVERS > 75
Page 76

DUPLEX UNIT
PostScript
Access the printer settings page via the [Start] menu.
1.
Highlight the printer name and click on [File] then [Properties].
2.
Click on the [Device Settings] tab.
3.
In [Installable Options], click on [Duplex] and set it to Installed.
4.
Click on [OK].
5.
PRINTER DRIVERS > 76
Page 77

PCL
Access the printer settings page via the [Start] menu.
1.
Highlight the printer name and click on [File] then [Properties].
2.
Click on the [Device Options] tab.
3.
Check [Duplex Option Unit].
4.
Click on [OK].
5.
PRINTER DRIVERS > 77
Page 78

ADDITIONAL PAPER TRAYS
PostScript
Access the printer settings page via the [Start] menu.
1.
Highlight the printer name and click on [File] then [Properties].
2.
Click on the [Device Settings] tab.
3.
In [Installable Options], click on [Installed Trays] and select the
4.
number of trays installed.
Click on [OK].
5.
PRINTER DRIVERS > 78
Page 79

PCL
Access the printer settings page via the [Start] menu.
1.
Highlight the printer name and click on [File] then [Properties].
2.
Click on the [Device Options] tab.
3.
Increase the number of [Installed Paper Trays] to the number of
4.
paper trays now installed.
Click on [OK].
5.
PRINTER DRIVERS > 79
Page 80

HIGH CAPACITY FEEDER
PostScript
Access the printer settings page via the [Start] menu.
1.
Highlight the printer name and click on [File] then [Properties].
2.
Click on the [Device Settings] tab.
3.
In [Installable Options], click on [Installed Trays] and select the
4.
high capacity feeder option required.
Click on [OK].
5.
PRINTER DRIVERS > 80
Page 81

PCL
Access the printer settings page via the [Start] menu.
1.
Highlight the printer name and click on [File] then [Properties].
2.
Click on the [Device Options] tab.
3.
Increase the number of [Installed Paper Trays] to the number of
4.
paper trays now installed.
Click on [OK].
5.
PRINTER DRIVERS > 81
Page 82

PAPER FEED, SIZE AND MEDIA - DEFAULTS
The preferred setting for these items is Automatic.
However, they can be set manually, as follows.
If the settings selected manually in the printer differ from those
selected in the printer driver, the printer will not print and the LCD will
display an error message.
The following printer driver instructions are given as a guide only.
Some software applications require the paper feed, size and media
settings to be selected from within the software (Page Setup).
PostScript
Click on [Start] - [Settings] - [Printers].
1.
Highlight the printer name and click on [File] then [Properties].
2.
Click on the [Device Settings] tab.
3.
PRINTER DRIVERS > 82
Page 83

Highlight the required paper feed in [Form To Tray Assignment]
4.
and select the paper size from the list.
Click on [OK] and close the printer dialogue box.
5.
Open the software application to be used.
6.
Click on [File] - [Print], then click on the [Properties] button.
7.
PRINTER DRIVERS > 83
Page 84

Select the required paper settings for [Paper Size], [Paper
8.
Source] and [Media Type].
Click [OK] twice to print the document.
9.
NOTE
> If [Automatically Select] is selected for paper source, the correct
paper tray is automatically selected as the paper feed.
> If [Use Printer Setting] is selected for media type, make sure the
printer has been set to the correct media type.
PRINTER DRIVERS > 84
Page 85

PCL
Open the software application to be used.
1.
Click on [File] - [Print], then click on the [Properties] button.
2.
Click on the [Setup] tab.
3.
Select the required paper size from [Size].
4.
Select the required paper feed from [Source].
5.
NOTE
> If [Auto] is selected, the correct paper tray is automatically selected
as the paper feed.
> If [Multi Purpose Tray] is selected, the Weight field becomes visible.
PRINTER DRIVERS > 85
Page 86

Select the required paper weight from [Weight].
6.
NOTE
If [Printer Setting] is selected, make sure the printer has been set to the
correct media type.
Click on [Paper Feed Options...] and make any other selections
7.
required then click on [OK].
Click on [OK] and close the printer dialogue box.
8.
PRINTER DRIVERS > 86
Page 87

PRINTER DRIVER NETWORK EXTENSION
Available on TCP/IP network connection only.
The printer driver network extension facility is only available if your
printer has been installed using the driver installer program on the
drivers CD.
On selecting [Get Printer Settings], it queries the printer driver for the
installed hardware options and enables the appropriate settings.
The printer driver network extension allows you to view (but not
change) the status of the following on the Status or Device Options
tabs:
paper trays installed and the media assigned to them.
>
total size and percentage used of disk/memory.
>
percentage of toner remaining.
>
PRINTER DRIVERS > 87
Page 88

OPERATION
The preceding section on Printer Drivers explained how to set up the
default operation of the various features. These were accessed via the
Windows program.
This section explains how to change the printers operation for specific
print jobs when required.
This involves using the same Properties page of the printer driver, but
it is accessed directly from within your Windows application program.
In this view the driver properties page may be more simplified than
the illustrations here, showing only those settings that you wish to
adjust.
Most applications allow the printer properties to be accessed from
within the document print dialogue.
COLOUR PRINTING
The PCL and PostScript printer drivers supplied with this machine
provide several controls for changing the colour output of your
printer. For general use the
reasonable default settings that will produce good results for most
documents.
Many applications have their own colour settings, and these may
override the settings in the printer driver. Please refer to the
documentation for your software application for details on how that
particular program’s colour management functions.
settings will suffice, providing
Auto
FACTORS THAT AFFECT THE APPEARANCE OF PRINTS
If you wish to manually adjust the colour settings in your printer
driver, please be aware that colour reproduction is a complex topic,
and there are many factors to take into consideration. Some of the
most important factors are listed below.
OPERATION > 88
Page 89

Differences between the range of colours
a monitor or printer can reproduce
Neither a printer nor a monitor is capable of reproducing the
>
full range of colours visible to the human eye. Each device is
restricted to a certain range of colours. In addition to this, a
printer cannot reproduce all of the colours displayed on a
monitor, and vice versa.
Both devices use very different technologies to represent
>
colour. A monitor uses Red, Green and Blue (RGB) phosphors
(or LCDs), a printer uses Cyan, Yellow, Magenta and Black
(CMYK) toner or ink.
A monitor can display very vivid colours such as intense reds
>
and blues and these cannot be easily produced on any printer
using toner or ink. Similarly, there are certain colours, (some
yellows for example), that can be printed, but cannot be
displayed accurately on a monitor. This disparity between
monitors and printers is often the main reason that printed
colours do not match the colours displayed onscreen.
Viewing conditions
A print can look very different under different lighting conditions. For
example, the colours in a print may look different when viewed
standing next to a sunlit window, compared to how they look under
standard office fluorescent lighting.
Printer driver colour settings
The driver settings for Manual colour can change the appearance of a
print. There are several options available to help match the printed
colours with those displayed onscreen. These options are explained
in subsequent sections of the User Manual.
OPERATION > 89
Page 90

Monitor settings
The brightness and contrast controls on your monitor can change how
your document looks on-screen. Additionally, your monitor colour
temperature influences how "warm" or "cool" the colours look.
NOTE
Several of the Colour Matching options make reference to your monitor’s
Colour Temperature. Many modern monitors allow the colour
temperature to be adjusted using the monitor’s control panel.
There are several settings found on a typical monitor:
5000k
5000k Warmest; yellowish lighting, typically used in graphics
>
5000k5000k
arts environments.
6500k
6500k Cooler; approximates daylight conditions.
>
6500k6500k
9300k
9300k Cool; the default setting for many monitors and
>
9300k9300k
television sets.
(k = degrees Kelvin, a measurement of temperature)
How your software application displays colour
Some graphics applications such as Corel Draw or Adobe Photoshop
may display colour differently from "office" applications such as
Microsoft Word. Please see your application’s online help or user
manual for more information.
Paper type
The type of paper used can also significantly affect the printed colour.
For example, a printout on recycled paper can look duller than one on
specially formulated glossy paper.
OPERATION > 90
Page 91

CHOOSING A COLOUR MATCHING METHOD
There is no correct way to achieve a good match between the
document displayed on your monitor, and it's printed equivalent.
There are many factors involved in achieving accurate and
reproducible colour.
However, the following guidelines may help in achieving good colour
output from your printer. There are several suggested methods,
depending on the type of document you are printing.
NOTE
These suggestions are for guidance only. Your results may vary
depending on the application from which you are printing. Some
applications will override any colour matching settings in the printer
driver without warning.
RGB OR CMYK?
The guidelines for choosing a colour matching method makes
distinctions between Red, Green, Blue (RGB) and Cyan, Magenta,
Yellow, Black (CMYK).
Generally, most documents you print will be in RGB format. This is the
most common, and, if you do not know your document’s colour mode,
assume that it is RGB.
Typically CMYK documents are only supported in professional
Desktop Publishing and Graphics applications.
MATCHING PHOTOGRAPHIC IMAGES
RGB only
Oki Colour Matching is a generally a good choice. Select a matching
method appropriate to your monitor.
OPERATION > 91
Page 92

RGB or CMYK
If you are printing photographic images from a graphics application
such as Adobe Photoshop, you may be able to use Soft-Proofing to
simulate the printed image on your monitor. To do this, you can use
the ICC-Profiles provided by Oki, and then print using the ICC profiles
as the Print Space (or Output space).
MATCHING SPECIFIC COLOURS
(For instance, a Company logo.)
RGB only
Oki Colour Matching, and the sRGB setting (PCL or PS driver).
>
PostScript Colour Matching using the Absolute Colorimetric
>
option.
Use the Colour Swatch Utility to print out a chart of RGB
>
swatches and enter your desired RGB values in your
application's colour picker (PS only).
RGB or CMYK
If you are printing from a graphics application such as Adobe
>
Photoshop, you may be able to use Soft-Proofing to simulate
the printed image on your monitor. To do this, you can use the
ICC-Profiles provided by Oki, and then print using the ICC
profiles as the Print Space (or Output space) (PS only).
Alternatively, use PostScript Colour Matching with the
>
Absolute Colorimetric setting.
PRINTING VIVID COLOURS
RGB only
Use Oki Colour Matching, with either the Monitor 6500k Vivid,
>
sRGB or Digital Camera settings (PCL or PS).
RGB or CMYK
Use PostScript Colour Matching with the Saturation option.
>
OPERATION > 92
Page 93

PCL DRIVER
COLOUR MATCHING OPTIONS
The Colour Matching options in the PCL driver can be used to help
match your printed colours to the ones displayed on your monitor.
NOTE
The PCL driver’s colour options are only designed to work with RGB data.
If you are printing CMYK data, we recommend you use the PostScript
driver.
To use the colour matching options in the driver:
Access the printer settings page via the [Start] menu.
1.
Highlight the printer name and click on [File] then [Properties].
2.
Click the [Colour] tab.
3.
Select [Manual] for Colour Matching.
4.
Choose from the following options:
5.
Monitor (6500k) Perceptual
Optimised for printing photographs when using a monitor with a
colour temperature of 6500K.
Monitor (6500k) Vivid
Optimised for printing bright colours when using a monitor with a
colour temperature of 6500K. Ideal for office graphics.
Monitor (9300k)
Optimised for printing photographs when using a monitor with a
colour temperature of 9300K.
OPERATION > 93
Page 94

Digital Camera
Optimised for printing photographs taken with a digital camera. This
tends to produce prints with lighter and brighter colours. For some
photographs, other settings may be better depending on the subjects
and the conditions under which they were taken.
sRGB
Optimised for matching specific colours, such as a company logo
colour. The colours within the printer's colour gamut are printed
without any modification, and only colours that fall outside the
printable colours are modified.
COLOUR SWATCH
The Print Colour Swatch function allows you to print out charts that
contain a range of sample colours. Listed below each sample colour
are the corresponding RGB (Red, Green, Blue) values. This can be
used to pick specific colours in applications that allow you to choose
your own RGB values.
An example of using the Print Colour Swatch function:
You wish to print a logo in a particular shade of red. The steps you
would follow are:
Print a colour swatch, then select the shade of red that best
1.
suits your needs.
Take a note of the RGB value below the particular shade that
2.
you liked.
Using your program’s colour picker, enter these same RGB
3.
values (from step 2), and change the logo to that colour.
NOTE
The RGB colour displayed on your monitor may not necessarily match
what was printed on the colour swatch. If this is the case, it is probably
due to the difference between how your monitor and printer reproduce
colour.
OPERATION > 94
Page 95

POSTSCRIPT DRIVER
COLOUR MATCHING OPTIONS
The PostScript driver offers several different methods of controlling
the colour output of the printer.
Some of the colour matching options only work on certain types of
data. The table below summarises the various colour-matching
options available in the PostScript driver, and what types of data they
affect.
Colour Matching
RGB data CMYK data
Option
Oki Colour Matching Yes No
PostScript Colour
Matching
CMYK Ink Simulation No Yes
Windows ICM Matching
Using ICC Profiles Yes No
a. Not Windows NT 4
Yes Yes
a
Yes No
OKI COLOUR MATCHING
This is Oki’s proprietary colour matching system, and affects RGB
data only.
Perceptual settings are best for printing photographic images
>
Vivid or Digital Camera settings produce brightest colours.
>
sRGB is the best choice for matching specific colours (such as
>
printing logos).
Monitor (6500k) Perceptual
Optimised for printing photographs when using a monitor with a
colour temperature of 6500K.
Monitor (6500k) Vivid
Optimised for printing bright colours when using a monitor with a
colour temperature of 6500K. Ideal for office graphics and text.
OPERATION > 95
Page 96

Monitor (9300k)
Optimised for printing photographs when using a monitor with a
colour temperature of 9300K.
Digital Camera
Optimised for printing photographs taken with a digital camera. This
tends to produce prints with lighter and brighter colours. For some
photographs, other settings may be better depending on the subjects
and the conditions under which they were taken.
sRGB
Optimised for matching specific colours, such as a company logo
colour.
The colours within the printer's colour gamut are printed without any
modification, and only colours that fall outwith the printable colours
are modified.
POSTSCRIPT COLOUR MATCHING
This uses PostScript Colour Rendering Dictionaries built-in to the
printer, and affects both RGB and CMYK data.
Rendering Intents
When a document is printed, a conversion takes place from the
document's colour space to the printer colour space. The rendering
intents are essentially a set of rules that determine how this colour
conversion takes place.
The rendering intents that the printer driver provides are listed below:
Perceptual
>
Best choice for printing photographs. Compresses the source
gamut into the printer's gamut whilst maintaining the overall
appearance of an image. This may change the overall
appearance of an image as all the colours are shifted together.
OPERATION > 96
Page 97

Saturation
>
Best choice for printing bright & saturated colours if you don't
necessarily care how accurate the colours are. This makes it
the recommended choice for graphs, charts, diagrams etc.
Maps fully saturated colours in the source gamut to fully
saturated colours in the printer's gamut.
Absolute Colorimetric
>
Best for printing solid colours and tints, such as Company
logos etc. Matches colours common to both devices exactly,
and clips the out of gamut colours to their nearest printed
equivalent. Tries to print white as it appears onscreen. The
white of a monitor is often very different from paper white, so
this may result in colour casts, especially in the lighter areas of
an image.
Relative Colorimetric
>
Good for proofing CMYK colour images on a desktop printer.
Much like Absolute Colorimetric, except that it scales the
source white to the (usually) paper white; i.e. unlike Absolute
Colorimetric, this attempts to take the paper white into
account.
CMYK INK SIMULATION
Affects CMYK data only
This option simulates what the output will look on a printing press
using the ink types SWOP, Euroscale or Toyo. If using CMYK Ink
Simulation, it is recommended that you switch off all other Printer
Colour Matching; select the No Colour Matching option under the
Colour Match option in the printer driver.
CMYK data only.
CMYK data onlyCMYK data only
WINDOWS ICM COLOUR MATCHING
Windows 98, Me, 2000, XP only.
>
Affects RGB data only
>
ICM is the colour management system built-in to Windows.
>
RGB data only.
RGB data onlyRGB data only
OPERATION > 97
Page 98

Windows ICM uses ICC profiles for your monitor and printer; these
profiles describe the colours that your device is capable of
reproducing. ICC profiles can be associated with your printer via the
Colour Management
Depending on how you have installed the printer driver, the colour
profiles may already be associated with the driver.
To associate ICC Colour Profiles with the printer driver:
Access the printer settings via the [Start] menu.
1.
Highlight the printer name and click on [File] then [Properties].
2.
Click the Colour Management tab.
3.
Under “Colour Profiles currently associated with this printer”,
4.
you should see the names of profiles that match your printer
model. If you do not see any profiles associated with the
driver, click “Add…” and locate the ICC profiles for your printer.
Windows ICM uses the information in these profiles to convert colours
in your documents to colours that the printer can reproduce. The way
in which this conversion is performed can be controlled via the ICM
Intent control in the printer driver.
tab of the printer driver.
NOTE
Oki also provide an alternative to Windows ICM with the Colour Match
using ICC Profiles
ICC Profiles feature. This is similar to Windows ICM, but offers
ICC ProfilesICC Profiles
several additional features.
Colour Match
Colour MatchColour Match
USING ICC PROFILES
Affects RGB data only
This provides a method of matching RGB colours similar to Windows
ICM matching. The main advantage it has over Windows ICM colour
matching is that it provides a method of printing using both input and
output profiles. Windows ICM matching only allows output profiles to
be chosen.
RGB data only.
RGB data onlyRGB data only
OPERATION > 98
Page 99

Input profiles
provide information about the colour in the original
device that was used to capture or display the image data. For
example, an input device could be a scanner, digital camera, or
monitor.
Output profiles
provide information about the device to which you are
printing.
The Using ICC Profiles function allows both an input profile
digital camera), and an output profile
output profile (e.g. the C7300 printer) to be
output profileoutput profile
input profile (e.g.
input profileinput profile
selected. It uses both these profiles to generate a CRD (Colour
Rendering Dictionary), and this is used to match the colours as closely
as possible.
NOTE
This feature may not work for all application programs. However, many
professional graphics applications offer a similar feature in their print
settings, with the ability to choose a source (input) colour space, and a
print (output) colour space.
OPERATION > 99
Page 100

PostScript printer driver:
Click on the [Colour] tab and select the required settings for
1.
colour matching.
Click on the [Advanced] button and make further settings as
2.
required.
Click on [OK] three times to print the document.
3.
OPERATION > 100
 Loading...