


C
ontents
Ordering Replacement
Supplies ........................................ 2
Loading Print Media .................... 3
Print Media .................................... 5
Standard Paper................................ 5
Recycled Paper ............................... 6
Matte Photo .................................... 7
Labels ............................................. 8
Transparencies................................ 9
Thick Paper (Cards, Index) .......... 10
Changing Default Media
Settings .......................................12
Walk-Up Functions .....................14
Secure Print .................................. 14
Proof & Print ................................ 15
Color Balance Adjust ................... 16
Print the MenuMap ...................... 17
Print a Demo Page........................ 17
Print the File List.......................... 17
Power Save Settings ..................... 18
Control Panel Buttons
& Lights ....................................... 19
Clearing Paper Jams .................. 23
Paper Feed Jam............................. 23
Transport Jam ............................... 24
Exit Jam........................................ 25
Tray X Jam ................................... 27
MP Tray Jam ................................ 28
Duplex Paper Jams ....................... 28
1
Changing Toner Cartridges ......31
Error Messages ...........................34
Service & Support ....................... 37
For more information,
see the on-line OKI C9000 Series
Desktop User’s Guide
(click Start ® Programs ®
OKI C Series ®
Desktop User’s Guide).
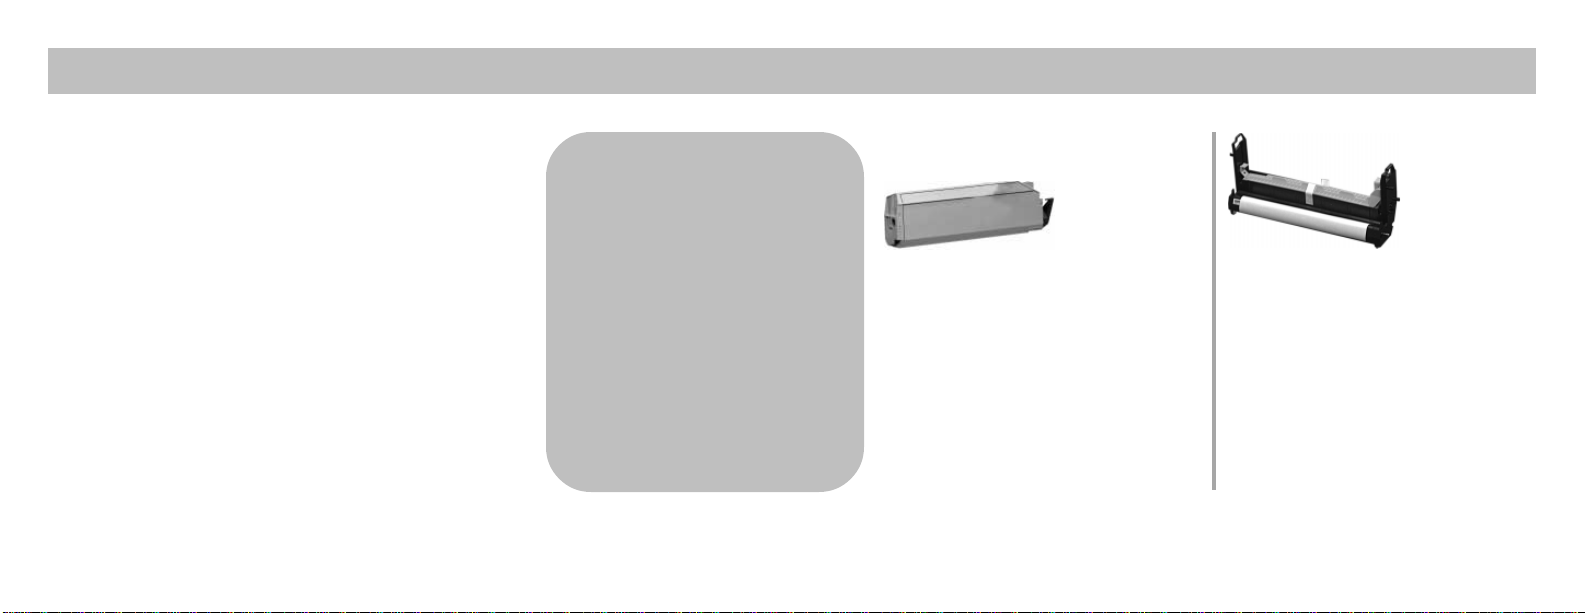
O
rdering Replacement Supplies
How to Order
• Consult the dealer where you purchased your printer.
• Consult an Oki Data Authorized Sales or Service
Dealer. (Call 1-800-OKI-DATA [1-800-654-3282] for
the nearest Authorized Sales and Service location.
Have your ZIP code ready.)
• U.S., Puerto Rico, Guam, and U.S. Virgin Islands only:
Order on the Internet
• U.S. only: Order toll-free at 1-800-OKI-DATA, using
• Check office supply catalogs or your local stationery
®
, MasterCard® or American Express®. $10.00
VISA
minimum purchase required.
store. Most carry OKI brand supplies.
http://www.okidata.com.
Take Advantage of
OKI’s Supply Manager
Don’t run out of supplies again!
• Calculates your usage based on
information you provide.
• Sends you an email reminder
when it’s time to reorder.
As easy as 1-2-3:
1. Go to http://www.okidata.com.
2. Click Buy Online.
3. Click the Supply Manager icon
and register directly on line!
2
Order Numbers
Toner Cartridges
Black ..................OKI #41515208
Cyan ..................OKI #41515207
Magenta .............OKI #41515206
Yellow ................OKI #41515205
Transfer Belt
Transfer Belt......OKI #41531501
Image Drums
Black ..................OKI #41514708
Cyan ..................OKI #41514707
Magenta .............OKI #41514706
Yellow ................OKI #41514705
Fusers
120 V .................OKI #41531401
230 V .................OKI #41531403
oading Print Media
L
Tray 1, Auxiliary
Trays & High
Capacity Feeder
1. Pull the tray out.
2. If necessary, adjust the
media guides:
(Legal size and larger only):
and change the media
indicator:
3. If loading paper, fan it.
3
4. Load the print media, print
side down, keeping the stack
below the PAPER FULL
mark (1), then gently push
the paper tray back into the
printer.
Letterhead stationery
!
(letter, A4 or B5 size) :
Long edge feed—load with
the top aimed toward you:
Short edge feed—load with
the top to the right:
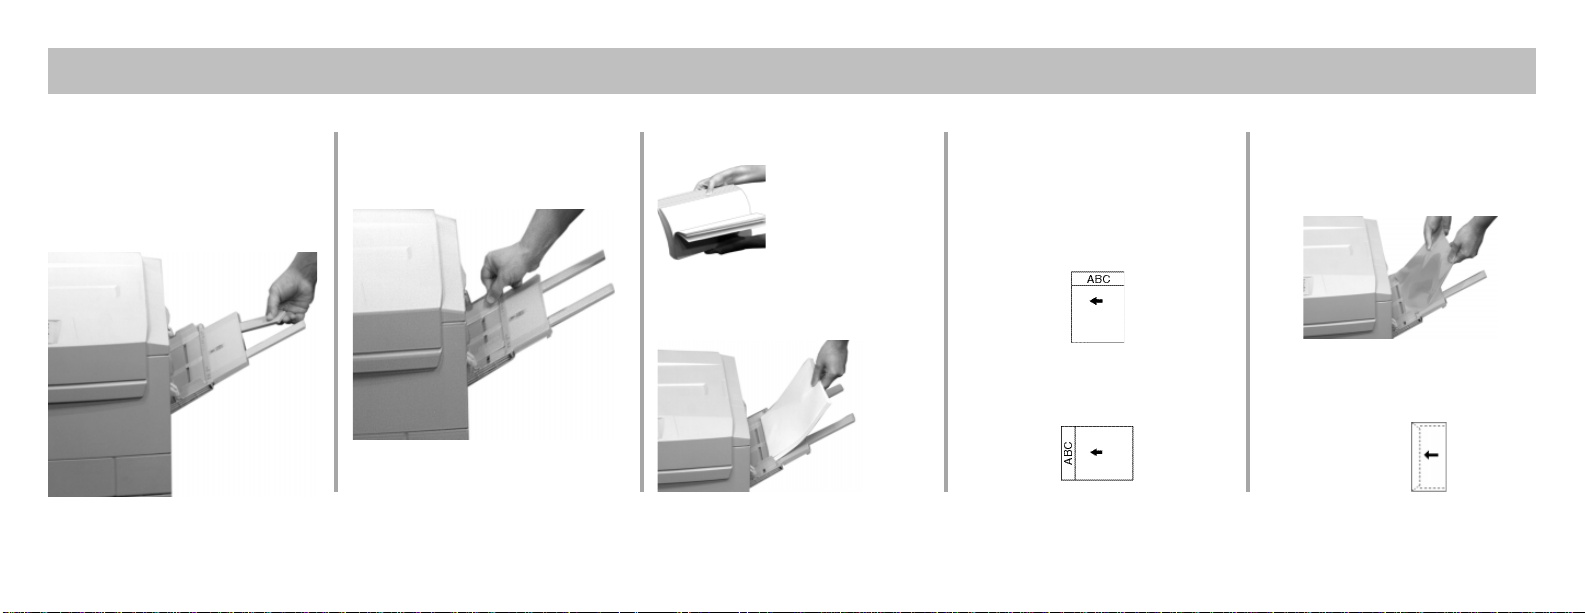
oading Print Media (cont.)
L
Multi-Purpose Tray
1. Open the Multi-Purpose
Tray.
2. Adjust the guides for the
media you are using.
4. If loading paper, fan it.
5. Place the media print side up
on the tray.
4
Letterhead Stationery
!
(Letter, A4 or B5):
Long edge feed, load with
top aimed toward the back
of the printer:
Short edge feed, load with
top nosed into the printer:
Transparencies & Labels:
Print side up. (Remember,
default = long edge feed.)
Envelopes:
Flap down and nosed into
the printer:

rint Media
P
Standard Paper
Recommended
Letter
• HammerMill
24 lb.*
• Xerox
- 4024, 20 lb.*
- 4024DP, 20 lb.*
- Xpressions, 24/28/32 lb.*
- Color Xpressions, 24 lb.*
Legal
• Xerox 4024DP, 20 lb.*
* US Bond ** Not for duplex printing
®
Laser,
®
Tabloid
• HammerMill Laser, 24 lb*.
• Wausau Exact
28 lb.*
®
Color Copy,
Usable Sizes
• Tabloid, Tabloid Extra
• Letter, Executive
• Legal-14, -13.5, -13
• A3 Nobi**, A3 Wide, A3,
A4, A5, A6**
• B4, B5
• Custom** (MP Tray only,
must be defined in driver)
Weight Range
• 16 to 54 lb. US Bond
(60 to 200 g/m
Duplex printing: paper
!
only, 20 to 28 lb US bond.
If you experience curling
in duplex mode with 20 or
24-lb. paper, switch to
28-lb. US Bond.
2
)
5
Feed Paths
• Tray 1 (range to 47 lb US
Bond)
• Multi-Purpose Tray (range
to 110 lb Index or 54 lb. US
Bond)
• Tray 2 or 3 (optional, range
to 47 lb. US Bond)
• High Capacity Feeder
(optional, range to 47 lb. US
Bond)
Exit Paths
• Top (up to 47 lb. US Bond
max.)
• Straight-Through (up to 54
lb. US Bond max.): required
when using Multi-Purpose
Tray

rint Media (cont.)
P
Recycled Paper
Recommended
Letter Size
• Great White
Content 86100, 24-lb.*
• Weyerhaeuser
Copy 3108 20 lb.*
• Xerox
20 lb.*
* US Bond
®
Recycled
®
Husky Zero
®
Recycled, 3 Holes,
Usable Sizes
• Tabloid, Tabloid Extra
• Letter, Executive
• Legal-14, Legal-13.5,
Legal-13
• A3 Nobi, A3 Wide, A3, A4,
A5, A6
• B4, B5
• Custom (MP Tray only;
must be defined in the driver)
Weight Range
• 16 to 54 lb. US Bond
(60 to 200 g/m
Recycled paper is slightly
!
thicker than non-recycled
paper of the same paper
weight (ream weight). If
the toner is not fusing
properly, change the Media
Weight to the next higher
setting.
2
)
6
Feed Paths
• Tray 1 (range to 47 lb US
Bond)
• Multi-Purpose Tray (range to
110 lb Index or 54 lb. US
Bond)
• Tray 2 or 3 (optional, range
to 47 lb. US Bond)
• High Capacity Feeder
(optional, range to 47 lb. US
Bond)
Exit Paths
• Top (up to 47 lb. US Bond
max.)
• Straight-Through (up to 54
lb. US Bond max.): required
when using Multi-Purpose
Tray

rint Media (cont.)
P
Matte Photo
Usable Sizes
• Tabloid, Tabloid Extra
• Letter, Executive
• Legal-14, -13.5, -13
• A3 Nobi, A3 Wide, A4, A5,
A6
• B4, B5
• Custom (MP Tray only;
must be defined in the driver)
Weight Range
• 20 to 54 lb. US Bond
(75 to 200 g/m
2
Feed Paths
• Tray 1 (range to 47 lb US
)
Bond)
• Multi-Purpose Tray (range to
110 lb Index or 54 lb. US
Bond)
• Tray 2 or 3 (optional, range
to 47 lb. US Bond)
• High Capacity Feeder
(optional, range to 47 lb. US
Bond)
Exit Paths
• Top (up to 47 lb. US Bond
max.)
• Straight-Through (up to 54
lb. US Bond max.): required
when using Multi-Purpose
Tray
7

rint Media (cont.)
P
Labels
Precautions
• Use label sheets designated
for laser printers.
• Labels must be able to
withstand 392°F (200°C) for
0.1 second.
• Labels must cover the entire
carrier sheet.
• Label adhesive must not be
exposed; if it is, it will cause
jamming in the printer.
Usable Sizes
• Letter, A4
Feed Path
• Multi-Purpose Tray only
Exit Path
• Straight-Through Only
Maximum depth of label sheet
feed stack: about
3/8-inch (10 mm)
For Individual Print
Jobs
Make the following settings in
the printer driver as you print
the job:
• Source = MP Tray
• Size = Letter or A4
• Type = LABEL1 (Heavy) or
LABEL2 (Ultra Heavy)
• Windows
PostScript® driver only:
Paper Size Check (usually
under Paper Source
Options) = Deselected (Off)
®
Adobe
®
8
Making Labels the
Default
If the MP Tray will normally
be loaded with labels, set the
printer menu as follows (see
page 12):
• MP Tray PaperSize = Letter
or A4
• MP Tray MediaWeight=
Heavy (LABEL1) or Ultra
Heavy (LABEL2)

rint Media (cont.)
P
Transparencies
Caution!
Transparencies must be
able to withstand 392°F
(200°C) for 0.1-second.
Recommended
•3M® CG3720 (Letter)
®
• Folex
Usable Sizes
• Letter, A4
• Tabloid, Tabloid Extra
BG67 (A4)
Feed Paths
• Tray 1 (up to 250, print side
down)
• Multi-Purpose Tray (up to
50, print side up)
Transparencies can not be
!
fed from the optional
Auxiliary Trays or from the
optional High Capacity
Feeder.
Exit Path
• Straight-Through only
For Individual Print Jobs
Make the following settings in
the printer driver as you print
the job:
• Source = Tray 1 or MP Tray
• Size = Letter , A4, Tabloid or
Tabloid Extra
• Type = Transparency
• Windows Adobe PostScript
driver only:
Paper Size Check (usually
under Paper Source
Options) = Deselected (Off)
9
Making Transparencies
the Default
Tray 1
If Tray 1 will normally be
loaded with transparencies, set
the printer menu as follows
(see page 12):
• Tray1 MediaType =
Transparency
Multi-Purpose Tray
If the MP Tray will normally
be loaded with transparencies,
set the printer menu as follows
(see page 12):
• MP Tray PaperSize =
Letter, A4, T abloid or
Tabloid Extra
• MP Tray MediaType =
Transparency

rint Media (cont.)
P
Thick Paper
(Cards, Index)
Caution! Failur e to change
the printer’s media settings
before printing on thick paper
will damage the printer.
Recommended
Letter
• HammerMill
- Cover Copy, 60 & 80 lb.*
- Color Cover Copy
#12002-3 80 lb.*
* Index
®
®
• Springhill
• Wausau Exact
- #49111, 90 lb.
- #49511, 110 lb.
• Weyerhaeuser
Premium Cover #8210, 80
lb.*
• Xerox
- Color Xpressions, 65 lb.*
- Cover Stock, 65 lb.*
- Index, 90 lb.*
Tabloid
• Strobe™ Gloss, 100 lb.*
Index, 110 lb.
®
®
®
Index
First Choice
Usable Sizes
• Tabloid, Tabloid Extra
• Letter, Executive
• Legal-14, -13.5, -13
• A3 Nobi, A3 Wide, A3, A4,
A5, A6
• B4, B5
• Custom (MP Tray only;
must be defined in the driver)
Weight Range
• Up to 110-lb.* (200 g/m2)
10
Feed Path
• Tray 1 (up to 95 lb. Index)
• Multi-Purpose Tray
Exit Path
• Straight-Through only
For Individual Print
Jobs
Make the following settings in
the printer driver as you print
the job:
• Source = Tray 1 or MP Tray
• Size = Tabloid, Tabloid
Extra, Letter, Executive,
Legal-14, Legal-13.5,
Legal-13, A3 Nobi, A3
Wide, A3, A4, A5, A6, B4,
B5, Custom (MP Tray only;
must be defined in the printer
driver)
• Type = Medium Heavy,
Heavy, or Ultra Heavy (see
page 12)

rint Media (cont.)
P
Making Thick Paper the
Default
Set the printer menu as follows
(see page 12):
• MP Tray PaperSize =
Tabloid, Tabloid Extra,
Letter, Executive, Legal-14,
Legal-13.5, Legal-13, A3
Nobi, A3 Wide, A3, A4, A5,
A6, B4, B5, Custom (MP
Tray only; must be defined in
the printer driver)
• MP Tray MediaWeight =
Medium Heavy, Heavy or
Ultra (see page 12)
11

hanging Default Media Settings
C
Media Weight Settings
Media Weight
Setting US Bond Metric Index
Light 16 lb. 62 g/m
Medium Light 17-19 lb. 63-73 g/m
Medium* 20-24 lb. 74-92 g/m
Medium Heavy 25-27 lb. 93-103 g/m
Heavy 28-32 lb. 104-122 g/m258-67 lb.
Ultra Heavy 33-54 lb. 123-200 g/m
* Default
2
2
2
2
33 lb.
34-40 lb.
42-50 lb.
51-56 lb.
2
67-110 lb.
Changing Settings for Tray 1
Transparencies Only: Set Media Type
□ Press MENU repeatedly until MEDIA MENU
appears on the display.
□ Press ITEM repeatedly until
TRA Y1 MEDIATYPE appears on the display.
□ Press VALUE (+ or -) repeatedly until
TRANSPARENCY appears on the second line of
the display.
□ Press SELECT to engage the new setting.
□ Press ON LINE to save the setting and exit the
menu.
12
Other Special Media: Set Media Weight
□ Press MENU repeatedly until MEDIA MENU
appears on the display.
□ Press ITEM repeatedly until
TRA Y1 MEDIAWEIGHT appears on the display.
□ Press VALUE (+ or -) repeatedly until the desired
setting appears on the second line of the display.
□ Press SELECT to engage the new setting.
□ Press ON LINE to save the setting and exit the
menu.

hanging Default Media Settings (cont.)
C
Changing Settings for
the Multi-Purpose Tray
Transparencies Only
First, set the Media Size
□ Press MENU repeatedly until
MEDIA MENU appears on the
display.
□ Press ITEM repeatedly until
MP TRA Y P APERSIZE appears on
the display.
□ Press VALUE (+ or -) repeatedly
until the desired setting displays on
the second line.
□ Press SELECT to engage the new
setting.
Then, set the Media Type
□ Press ITEM repeatedly until
MP TRA Y MEDIA TYPE appears on
the display.
□ Press VALUE (+ or -) repeatedly
TRANSPARENCY appears on
until
the second line of the display.
□ Press SELECT to engage the new
setting.
□ Press ON LINE to save the settings
and exit the menu.
Other Special Media
First set the Media Size
□ Press MENU repeatedly until
MEDIA MENU appears on the
display.
□ Press ITEM repeatedly until
TRA Y PAPERSIZE appears on the
display .
□ Press VALUE (+ or -) repeatedly
until the desired setting appears on
the second line of the display.
□ Press SELECT to engage the new
setting.
13
MP
Then, set the Media Weight
□ Press ITEM repeatedly until
TRA Y MEDIAWEIGHT appears on
the display.
□ Press VALUE (+ or -) repeatedly
until the desired setting appears on
the second line of the display.
□ Press SELECT to engage the new
setting.
□ Press ON LINE to save the settings
and exit the menu.
MP

W
alk-Up Functions
Secure Print
To Print a
Confidential Document
1. Press MENU.
PRINT JOBS MENU appears on
the display.
2. Press SELECT and enter your
personal ID number (PIN) using the
control panel buttons.
SELECT JOB
ALL JOBS
appears on the display.
3. Press VALUE + repeatedly until the
name of the job you wish to print
appears on the display.
4. Press SELECT.
The document prints and is deleted
from the printer’s hard drive. The
printer goes back on line.
To Delete a
Confidential Document before
Printing It
1. Press MENU.
PRINT JOBS MENU appears on the
display.
2. Press SELECT and enter your personal
ID number (PIN) using the control
panel buttons.
SELECT JOB
ALL JOBS
appears on the display.
14
3. Press VALUE + repeatedly until the
name of the job you wish to print
appears on the display.
4. Press CANCEL.
DELETE THE JOB
YES=SELECT/NO=CANCEL
appears on the display.
5. To delete the job, press SELECT.
Otherwise, press CANCEL.
The printer goes back on line.

W
alk-Up Functions (cont.)
Proof & Print
To Print a Proofed Document
1. Press MENU.
PRINT JOBS MENU appears on
the display.
2. Press SELECT and enter your
personal ID number (PIN) using the
control panel buttons.
SELECT JOB
ALL JOBS
appears on the display.
3. Press VALUE + repeatedly until the
name of the job you wish to print
appears.
4. Press SELECT.
The document prints and is deleted
from the printer’s hard drive. The
printer goes back on line.
To Delete a Proofed
Document before Printing it
1. Press MENU.
PRINT JOBS MENU appears on
the display.
2. Press SELECT and enter your
personal ID number (PIN) using
the control panel buttons.
SELECT JOB
ALL JOBS
appears on the display.
15
3. Press VALUE + repeatedly until the
name of the job you wish to print
appears.
4. Press CANCEL.
DELETE THE JOB
YES=SELECT/NO=CANCEL
appears on the display.
5. To delete the job, press SELECT.
Otherwise, press CANCEL.
The printer goes back on line.

W
alk-Up Functions (cont.)
Color Balance
Adjust
To set the Color Balance using
the front panel:
1. Press MENU repeatedly
until COLOR MENU
displays.
2. Press ITEM + repeatedly
until
COLOR BALANCE ADJUST
RESET TO DEF AUL T
displays.
3. Press SELECT. This restores
factory balance settings,
which form a baseline for
the adjustment.
The Color Balance pattern
prints.
4. Check the color of the center
circle in the printout against
the surrounding circles:
• If the center circle matches
the circles labeled 00, the
color balance is okay. Skip
to step 8.
• If the center circle does not
match circle 00, determine
which surrounding circle
the center circle most
closely matches and note
its number.
16
5. Press VALUE (+ to increase
# value or - to decrease #
value) until
COLOR BALANCE ADJUST
SELECT P A TTERN #
displays, where # represents
the number determined in
step 4.
6. Press SELECT.
The new value is engaged
and a new pattern prints.
7. Check the pattern again and
repeat steps 4 through 6
until the color of the center
circle most closely matches
the circles labeled 00.
The Color Balance
!
adjustment is subjective, and
it’s unlikely that you’ll get
an exact match. Repeat steps
4 through 6 up to four times,
then go to step 8.
8. Press ON LINE.
The printer goes back on
line.

W
alk-Up Functions (cont.)
Print the MenuMap
To print out a list of the current menu
settings:
1. Press MENU once or twice until
INFORMA TION MENU appears on
the display.
2. Press ITEM (+ or -).
PRINT MENU MAP appears on the
display.
3. Press SELECT.
The MenuMap prints and the printer
goes back on line.
Print a Demo Page
To print out a demo page:
1. Press MENU once or twice until
INFORMATION MENU appears on
the display.
2. Press ITEM (+ or -) repeatedly until
DEMO1 (the default demo page) or
the file name you wish to print
appears on the display.
3. Press SELECT.
The demo page prints and the printer
returns to the on-line state.
Print the File List
To print out a list of the files stored on
the printer’s hard drive:
17
1. Press MENU once or twice until
INFORMA TION MENU appears on
the display.
2. Press ITEM (+ or -) repeatedly until
PRINT FILE LIST appears on the
display.
3. Press SELECT.
The list of files prints and the printer
goes back on line.

W
alk-Up Functions (cont.)
Power Save Settings
Power save sets how long the printer
waits before going into standby mode.
This saves energy, but when the printer
is in standby mode it takes a few
moments to warm up when it receives a
print job or if you want to enter the
printer menu and change settings.
The default setting is 60 minutes.
!
Other available settings include 5,
15, 30 or 240 minutes; or you can
turn power save off.
Setting the Power Save
Interval
1. Press MENU repeatedly until
SYSTEM CONFIG MENU appears
on the display.
2. Press ITEM (+ or -) until
POWER SA VE DELA Y TIME
appears on the display.
3. Press VALUE (+ or -) repeatedly until
the time interval you wish to select
appears on the display.
4. Press SELECT to engage the new
setting.
5. Press ON LINE to save the setting
and exit the menu.
Disabling/Enabling Power
Save (Default = Enabled)
18
1. Press MENU repeatedly until
MAINTENANCE MENU appears on
the display.
2. Press ITEM (+ or -) repeatedly until
POWER SAVE appears on the
display.
3. Press VALUE + to toggle the setting
between
4. Press SELECT to engage the new
setting.
5 Press ON LINE to save the setting
and exit the menu.
ENABLE and DISABLE.

ontrol Panel Buttons & Lights
C
MENU Button
Printer On Line or Off Line
Press to enter the Menu mode.
Menu mode
• Press to advance to the next the
Category in the Menu.
• Press and hold for 2 seconds or longer
to go back to the previous Category.
Password (PIN) Mode
Press to enter a zero in the password.
ON LINE Button
Printer On Line
Press to take the printer off line.
Printer Off Line
Press to put the printer on line.
Menu Mode
Press to exit the Menu mode and go
back on line.
19
Password (PIN) Mode
Press to enter the number 4 in the
password.
Error Mode (Attention light blinking)
• If the paper size requested by the print
job is different from the paper
specified as in the tray, press the ON
LINE button to force the job to print
despite the paper size error.
• If you have selected manual print in
the driver, press the ON LINE button
to print the job after you load paper in
the Multi-Purpose tray.

ontrol Panel Buttons & Lights (cont.)
C
ITEM + [1] Button
Menu Mode
• Press to advance to the next Item in
the Menu.
• Press and hold to advance through the
menu Items quickly.
Password (PIN) Mode
Press to enter the number 1 in the
password.
ITEM - [5] Button
Menu Mode
• Press to go back to the previous Item
in the Menu.
• Press and hold to advance backward
through the menu Items quickly.
Password (PIN) Mode
Press to enter the number 5 in the
password.
VALUE + [2] Button
Menu Mode
• Press to advance to the next Value for
an Item in the Menu.
• Press and hold to advance through the
Values quickly.
Password (PIN) Mode
Press to enter the number 2 in the
password.
20
VALUE - [6] Button
Menu Mode
• Press to go to the previous Value for
an Item in the Menu.
• Press and hold to advance backward
through the Values quickly.
Password (PIN) Mode
Press to enter the number 6 in the
password.

ontrol Panel Buttons & Lights (cont.)
C
SELECT Button
Menu Mode
• Press to engage a new value for an
Item (An asterisk appears next to the
new setting).
• Press to initiate the action indicated
on the display (e.g., print MenuMap).
Password (PIN) Mode
Press to enter the number 3 in the
password.
CANCEL Button
Printer On Line
Press to delete a job being processed:
• If the job is currently printing, it is
cancelled and deleted.
• If the job is still being received, it
continues until all the data is received,
then is deleted.
21
Menu Mode
Press to exit the Menu mode and place
the printer back on line.
Password (PIN) Mode
Press to enter the number 7 in the
password.
During Error Condition
The CANCEL button is disabled.

ontrol Panel Buttons & Lights (cont.)
C
Lights
READY Light
On
The printer is on line.
Off
The printer is off line.
Blinking
The printer is receiving data.
ATTENTION Light
On
Warning: the printer needs attention, but
can continue to operate.
The display message indicates the
nature of the problem: e.g.,
LOW, CHANGE CYAN IMAGE DRUM,
P APER NEAR END, etc.
Off
Normal.
TONER
22
Blinking
Alarm: the printer needs attention
immediately.
The display message indicates the
nature of the problem: e.g.,
JAM, CLOSE COVER, TONER
EMPTY, INST ALL NEW IMAGE DRUM,
TRAY1 EMPTY, ST ACKER FULL ,
MEDIA MISMATCH, etc.
PAPER

learing Paper Jams
C
Paper Feed Jam
OPEN FRONT COVER
380: P APER JAM
1. Open the side cover.
2. Pull out the jammed sheet.
23
3. Close the side cover.

learing Paper Jams (cont.)
C
Transport Jam
OPEN UPPER COVER
381: P APER JAM
1. Pull up on the handle and lift
the top cover.
2. Lift out image drums/toner
cartridges to gain access to
the jammed sheet(s).
3. Remove the jammed
sheet(s).
24
4. Replace the image drums/
toner cartridges.
5. Close the cover.

learing Paper Jams (cont.)
C
Exit Jam
OPEN UPPER COVER
382: P APER JAM
1. Pull up on the handle and lift
the cover.
2. Remove the jammed sheet.
Warning! The fuser (1) may
be very hot from printing.
3. If the sheet is caught in the
fuser:
a. Lift out the cyan image
drum/toner cartridge.
25
b. Move the blue lock levers
to the left (toward the
open cover).
c. Llift the fuser unit out of
the printer.

learing Paper Jams (cont.)
C
d. Move the fuser roller
release lever (1) as shown
to unlock the fuser roller,
then remove the jammed
sheet.
e. Move the fuser roller
release lever back, and
reinstall the fuser.
f. Replace the cyan imagen
drum/toner cartridge.
26
4. Close the cover.

learing Paper Jams (cont.)
C
Tray X Jam
CHECK TRA Y 1
390: P APER JAM
2. Realign the stack of print
media and check to be sure
that the media guides are
snug against the stack.
27
3. Gently push the tray back in.1. Pull out the tray.

learing Paper Jams (cont.)
C
MP Tray Jam
CHECK MP TRA Y
391: P APER JAM
1. Pull out the jammed sheet.
Duplex Paper Jams
CHECK DUPLEX
370: P APER JAM
CHECK DUPLEX
371: P APER JAM
CHECK DUPLEX
372: P APER JAM
CHECK DUPLEX
383: P APER JAM
28
1. Pull up on the handle and lift
the top cover.
2. Lift out one or two of the
image drums/toner
cartridges and check for
jammed paper.

learing Paper Jams (cont.)
C
3. Remove any jammed sheets
(you may need to lift out all
the image drums/toners to
do this), then replace the
image drums/toner
cartridges.
4. Lift out the paper separator
(to the left of the fuser, just
below the open cover) and
remove any jammed sheets.
5. Put the paper separator back
into the printer.
29
6. Close the top cover. 7. Open the side cover.

learing Paper Jams (cont.)
C
8. Remove any jammed sheets. 9. Close the side cover. 10. Swing down the duplex
access cover, then grasp
the blue handle and pull
out the tray/duplex unit.
30
11. Lift the duplex cover and
remove any jammed
sheets.
12. Close the duplex cover and
gently push the tray/duplex
unit back into the printer.

hanging Toner Cartridges
C
Toner Cartridge Order #s:
• Black = 41515208
• Cyan = 41515207
• Magenta = 41515206
• Yellow = 41515205
When the TONER EMPTY
message appears on the
display, it’s time to replace the
toner cartridge, e.g.:
INST ALL NEW T ONER
413: BLACK TONER EMPTY
1. Turn the printer off.
2. Pull up on the handle and lift
the top cover.
31
3. Locate the cartridge to be
changed and:
a. Move the blue lock lever
all the way to the right
(away from the open
cover).
b. Lift the cartridge, slide it
back (to clear the tube),
then remove it.

hanging Toner Cartridges (cont.)
C
accordance with local
regulations
d. Lower the top cover to
prevent exposure to light.
4. Unpack the new toner
cartridge and shake it back
and forth to distribute the
toner.
Port End
Lock
Lever
End
5. Remove the tape.
32
6. Lift the top cover.c. Discard the cartridge in
7. Slide the port on the toner
cartridge onto the tube on
the drum.

hanging Toner Cartridges (cont.)
C
8. Press the cartridge toward
the tube, then:
a. Lower the opposite end,
aligning the white tab on
the toner cartridge with
the groove in the drum.
b. Push the blue lock lever
to the left (toward the
open cover) as far as it
will go.
Caution!
If the lock lever is not pushed
all the way back and you close
the cover, the lever could
damage the LED printhead.
9. Use the LED lens cleaner
(supplied with the toner) to
wipe the corresponding
LED head clean.
33
10. Close the cover and turn
the printer back on.
Important!
After the new toner is
installed, the TONER LOW
or TONER EMPTY
message should disappear
from the display. If it
doesn't, try printing a page.
If it still doesn't disappear,
reinstall the toner cartridge.

rror Messages
E
Error Messages
Some of the more common
error messages appear below.
For a complete list of error
messages, see “Error Display
Messages” under Problem
Solving in the on-line C9000
Series Desktop User’s Guide.
XXX TONER LOW
Meaning
Appears on the second line of
the display to indicate that
color XXX toner cartridge is
getting low.
What to Do
Be sure you have a
replacement toner cartridge on
hand.
INST ALL NEW T ONER
nnn: XXX TONER EMPTY
Meaning
The toner cartridge indicated
(XXX) has run out of toner.
What to Do
Replace the toner cartridge.
See page 31.
34
CHANGE XXX IMAGE DRUM
Meaning
Appears on the second line of
the display to indicate that
color XXX (e.g., BLACK)
image drum needs to be
replaced.
What to Do
Replace the XXX image drum.
(See the instructions supplied
with the new image drum.)
INST ALL ADDITL MEMORY
420: MEMORY OVERFLOW
Meaning
The amount of data in the file
being printed has exceeded the
printer’s memory.
What to Do
• Reduce the size of the file.
• Install additional memory
(see “Accessories” in the
on-line C9000 Series
Desktop User’s Guide).

rror Messages (cont.)
E
LOAD mmmmmm
500: MANUAL PRINT
Meaning
The printer has received a print
job for printing from the
Multi-Purpose Tray and no
media is loaded in the tray.
What to Do
Load the requested media in
the Multi-Purpose Tray, then
press the ON LINE button.
tttttt NEAR END
Meaning
Appears on the second line of
the display to indicate that the
media in feed path tttttt is
almost out.
What to Do
Load more media before
printing any large print jobs.
REMOVE THE PAPER
480: FINISH ST ACKER FULL
Meaning
The stack of paper in the top
output tray is blocking the
printed sheets trying to exit the
printer.
What to Do
Remove the stack of printed
sheets from the top output tray.
35
REMOVE THE PAPER
470: FINISH ST ACKER FULL
Meaning
The straight-through output
tray is full.
What to Do
Remove the stack of printed
sheets from the
straight-through output tray.
REMOVE THE PAPER
nnn: TRA Y X UNSUITBLE SIZE
Meaning
The paper in Tray X is not a
size that can be fed through the
tray.
What to Do
Replace the paper in the tray
with an appropriate size. See
Print Media on pages 5, ff.

rror Messages (cont.)
E
FUSER MISSING
Meaning
Appears on the second line of
the display to indicate that the
fuser is either not properly
installed or not in the printer.
What to Do
Open the top cover and check
the fuser:
• If the fuser is there, press
down on it to be sure it is
firmly locked in place.
If the message still appears:
a. Push the blue latches at
either end of the fuser
toward the open cover.
b. Lift the fuser out, then
put it back in the printer,
pushing down firmly . You
should feel the latches at
either end engage.
• If the fuser is missing, install
it.
XXX TONER SENSOR ERROR
Meaning
Appears on the second line of
the display to indicate that
there is a problem with the
color XXX toner sensor.
What to Do
Turn the printer off, then on
again. If this does not clear the
message, call your local service
dealer.
36
DISK FILE SYSTEM IS FULL
Meaning
The printer’s internal hard
drive is full.
What to Do
Print out or delete some of the
files on the printer’s hard drive
(see pages 14 and 15).
You can also use OKI
!
Storage Device Manager
to manage the printer’s
hard disk drive: see the
on-line C9000 Series
Desktop User’s Guide.
PRESS ONLINE SW
INV ALID DAT A
Meaning
Invalid data was received.
What to Do
Press the ON LINE button.

ervice & Support
S
• See our multilingual web site:
http://www.okidata.com
• Consult the store where you purchased your printer.
• Visit my.okidata.com 24 hours a day, 7 days a week
(point your browser to my.okidata.com, or go to
http://www.okidata.com and click on Support).
• Call 1-800-OKI-DATA (1-800-654-3282)
24 hours a day, 7 days a week.
Record Your Printer’s
Serial Number Here:
_____________________________
37

OKI is a registered trademark of Oki Electric Industry
Company, Ltd.
3M is a trademark or registered trademark of 3M.
Springhill is a registered trademark of International
Paper.
Strobe is a trademark of Sappi Limited.
Adobe, and PostScript are trademarks of Adobe
Systems, Inc. which may be registered in certain
jurisdictions.
American Express is a registered trademark of
American Express Co.
Folex is a registered trademark of Folex Imaging.
Great White is a registered trademark of Great White
Consumer.
HammerMill is a registered trademark of HammerMill.
MasterCard is a registered trademark of MasterCard
International, Inc.
VISA is a registered trademark of Visa.
Wausau Exact is a registered trademark of
Wausau-Mosinee Paper Corp.
Weyerhaeuser is a trademark or registered trademark of
Weyerhaeuser Company.
Windows is either a registered trademark or trademark
of Microsoft Corporation in the United States and other
countries.
Xerox is a trademark of Xerox Corporation.
 Loading...