

Oki C911, C931, C941, C942, ES9411 User's Manual Troubleshooting/Daily Maintenance Manual
...
1
Troubleshooting
User’s Manual
Troubleshooting/Daily
Maintenance
2
Maintenance Manual
Read for any points that
are not understood, or
for maintenance
Index
C911
C931
C941
C942
ES9411
ES9431
ES9541
ES9542
Pro9431
Pro9541
Pro9542
1
Manual Conguration
z
The following user manuals are enclosed with the product.
The e-manual is stored as software on DVD-ROM.
Step
Read this first
Opening the box and installing the printer
Set-up Guide
This guide uses illustrations to explain the
methods from opening the box to installation.
For the advanced setup guide, see the "Basic".
Preparing the printer to print
Basic
This guide describes the precautions for safe
use of the device. Make sure to read before use.
Further, basic uses from the device installation
methods to initial printing are also explained.
The device functions are described in the
appendix.
• Checking the product
• Parts nomenclature and functions
• Using the device to its fullest
• Installing the device
• Turning ON and OFF the power supply
• Test printing using the printer only
• Connecting to a PC
• Paper
• Printing
• Paper ejection
• Setting Power Save mode
• Setting auto power OFF
• Checking the print quantity,
consumables, remaining maintenance
unit quantity, and remaining service life
• Cancelling a print job
• Adding printers using LPD protocols
(TCP/IP)
• Table of control panel menu items
• Basic Windows procedures
• Printer specifications
Step
Read these guides as necessary
2
Try using various functions
Advanced
This guide explains the various paper print methods
and how to use useful functions. Read to optimize the
printing environment or to adjust the color, etc., using
the enclosed utility software.
Further, this guide also explains the items that can be
set from the control panel, and the network settings.
Read for any points that are not understood, or for maintenance
Troubleshooting/Daily
Maintenance Manual (This manual)
This manual explains the procedures for paper jams, and
troubleshooting method if an error message is displayed.
This manual also explains daily maintenance such as
now to replace consumables and maintenance units, and
cleaning, etc.
Using C941/C942/ES9541/ES9542/Pro9541/Pro9542
Separate Volume Spot Color Guide
This guide explains how to set up the Spot
Color kit and check the printer drivers, and
how to print using Spot Color. Make sure to
read before use.
• Useful print functions
• Adjusting the color
• Using utility software
• Network settings
•
Checking and changing printer settings
using the control panel
• Troubleshooting
• Maintenance
• Consumables, maintenance products,
options, color management server,
etc.
• Setting the Spot Color kit
• Control panel explanation
• Checking the printer drivers
• Table of printer driver functions
• Printing on color paper
• Printing on transparent film
• Specifying and printing Spot Color
toner using the applications
• Fine-tuning white
• Switching Spot Color kits
- 2 -
W
ARNING
CAUTION
Reading the Manual
z
Symbols
Note
These are cautions and restrictions for the correct operation of the device. Make sure to read to avoid misoperation.
z
Memo
Knowledge of the information before using the device is useful and can act as a reference. Reading is recommended.
z
Reference
These are the reference pages. Read to learn detailed information and relevant information.
z
Mishandling due to ignoring this display may cause death or serious injury.
z
Mishandling due to ignoring this display may cause personal injury.
z
Keys, Buttons, and Symbols
This chapter described the following keys, buttons, and symbols.
Inscription Description
The control panel buttons and 10-key pad are described below.
z
E.g.:
[OK] button [BACK] button
[ ] button/key
[Fn] key [CLEAR] key
Indicates your PC keyboard.
z
Describes the menu name on the liquid crystal panel.
[ ]
" "
> Describes the menu level of the printer or PC.
z
Describes the PC menus, windows, and dialog box names.
z
Describes the messages and input text displayed in the liquid crystal
z
panel.
Describes the le and screen names on the PC.
z
Describes the reference title.
z
- 3 -
Illustrations
Screens
The printer illustrations used herein show the
C931 model unless otherwise specied.
Illustrations may differ from the actual product.
The images of the control panel and PC used
herein are examples. The images may differ
from actual products and screens.
- 4 -

Inscriptions
The following inscriptions are used in this manual.
C911dn → C911
z
C931dn → C931
z
C941dn → C941
z
C942dn → C942
z
ES9411dn → ES9411
z
ES9431dn → ES9431
z
ES9541dn → ES9541
z
Microsoft
z
Microsoft
z
Mac OS X10.3.9 or later → Mac OS X
z
The manuals enclosed with the printer use as examples Windows 7 in the case of Windows, and OS X
10.8 in the case of Mac OS X unless otherwise specied.
Depending on the OS and model used, descriptions in this manual may differ.
®
Windows® 7 64-bit Edition operating system → Windows 7 (64-bit Edition)
®
Windows® 7 operating system → Windows 7
- 5 -

Contents
Manual Conguration ........................................................................... 2
Reading the Manual
Symbols .................................................................................................................. 3
Keys, Buttons, and Symbols....................................................................................3
Illustrations
Screens...................................................................................................................4
Inscriptions
............................................................................................................ 4
............................................................................................................ 5
............................................................................. 3
1 Troubleshooting ................................................................... 9
Troubleshooting solutions procedure ................................................. 10
Paper jams
Checking messages (if a paper jam occurs) .......................................................... 11
Removing jammed paper
If paper messages are displayed ....................................................... 36
If replace consumables messages are displayed
If other messages are displayed
Printing Troubles
Unable to print ..................................................................................................... 46
........................................................................................ 11
...................................................................................... 14
............................... 38
....................................................... 40
............................................................................... 46
Printer driver malfunctions
Print quality is poor
Paper feed is poor
When image disturbance occurs
Adjusting the print result
.............................................................................................. 52
................................................................................................ 57
................................................................................... 50
........................................................................... 58
..................................................................................... 58
2 Maintenance ...................................................................... 59
Replacing consumables and maintenance unit ................................... 60
Consumables and maintenance unit service life ...................................................60
When the replacement period is approaching
Replacing toner cartridges.................................................................................... 63
Replacing Image Drums
Replacing belt units and transfer roller units
Replacing fuser units
Replacing waste toner boxes
Replacing paper feed rollers
....................................................................................... 66
............................................................................................ 75
................................................................................ 77
................................................................................. 79
Device Maintenance ........................................................................... 87
Cleaning device surfaces ...................................................................................... 87
....................................................... 62
........................................................ 69
Cleaning LED heads
Cleaning feed rollers
.............................................................................................. 87
............................................................................................. 93
- 6 -

Cleaning the Transfer Roller Unit and Paper Transfer Path ................................... 96
Cleaning the Pinch Roller
...................................................................................... 99
Moving and shipping the device ...................................................... 100
Moving the device ............................................................................................. 100
Shipping the device
.......................................................................................... 100
Index .................................................................................... 102
- 7 -

Memo
- 8 -

1
Troubleshooting
Troubleshooting solutions procedure … 10
1
Troubleshooting
2
Paper jams
If paper messages are displayed
If replace consumables messages
are displayed
If other messages are displayed
Printing Troubles
……………………………………… 11
……… 36
………………………………… 38
………40
…………………………… 46
IndexMaintenance
- 9 -
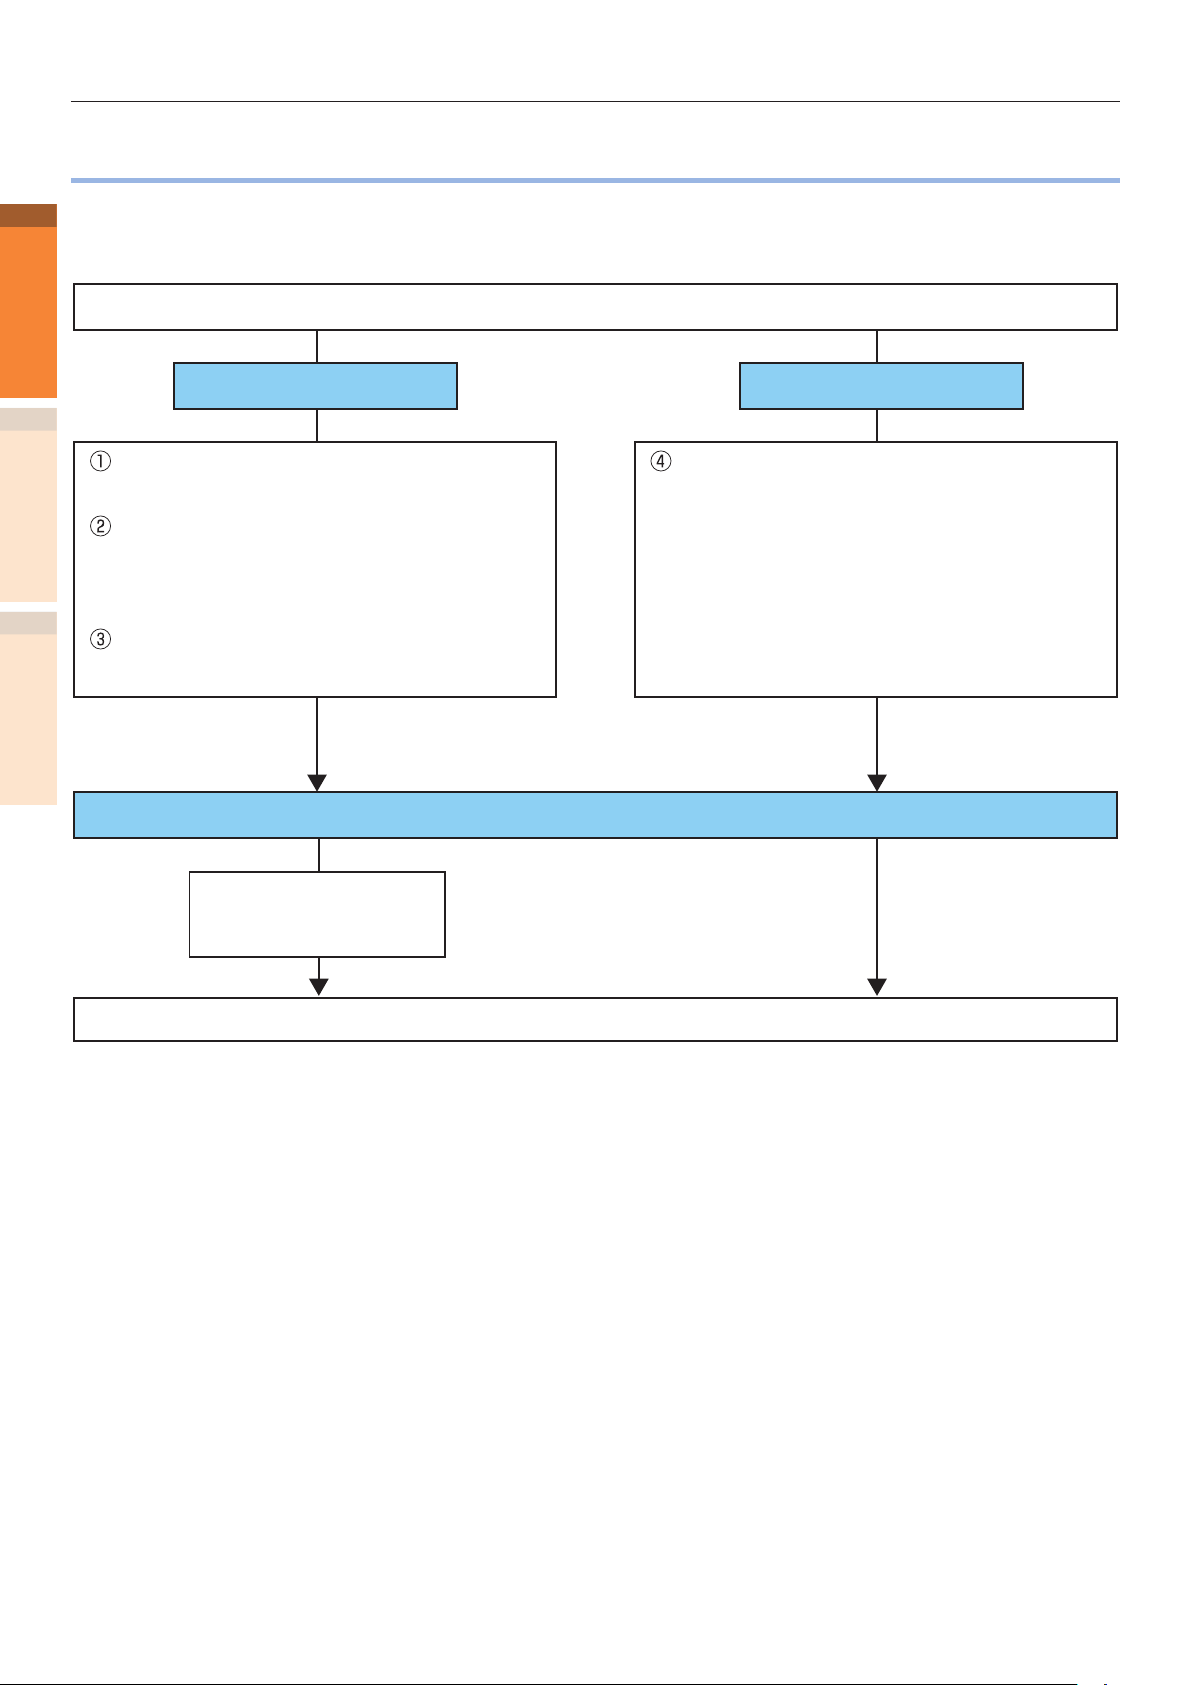
Troubleshooting solutions procedure
Troubleshooting solutions procedure
z
This chapter describes the procedure for solving the problems occurred while using the printer.
1
Troubleshooting
If you are unable to solve the problem with this procedure, contact your dealer.
Is error message or error code displayed on the control panel?
If it is displayed If it is not displayed
2
to the page 11 and solve it.
timing or service life of consumables and
maintenance items, refer to the page 60
and solve it.
refer to the page 36 and solve it.
IndexMaintenance
Call your designated help desk.
When there is a display of paper jam, refer
When there is a display of replacement
When there is a display of other errors,
When you cannot solve
Record the error
message displayed on
the control panel.
In the even to trouble refer to the
following pages for solution.
zUnable to print: page 46
zPrinter drivers cannot be installed: page 50
zUnable to print with ne quality: page 52
zAbnormal paper feeding: page 57
- 10 -

Paper jams
z
Paper jams
This section describes the procedure when a paper is jammed inside the printer, or when paper is
remaining inside the printer even after removing it.
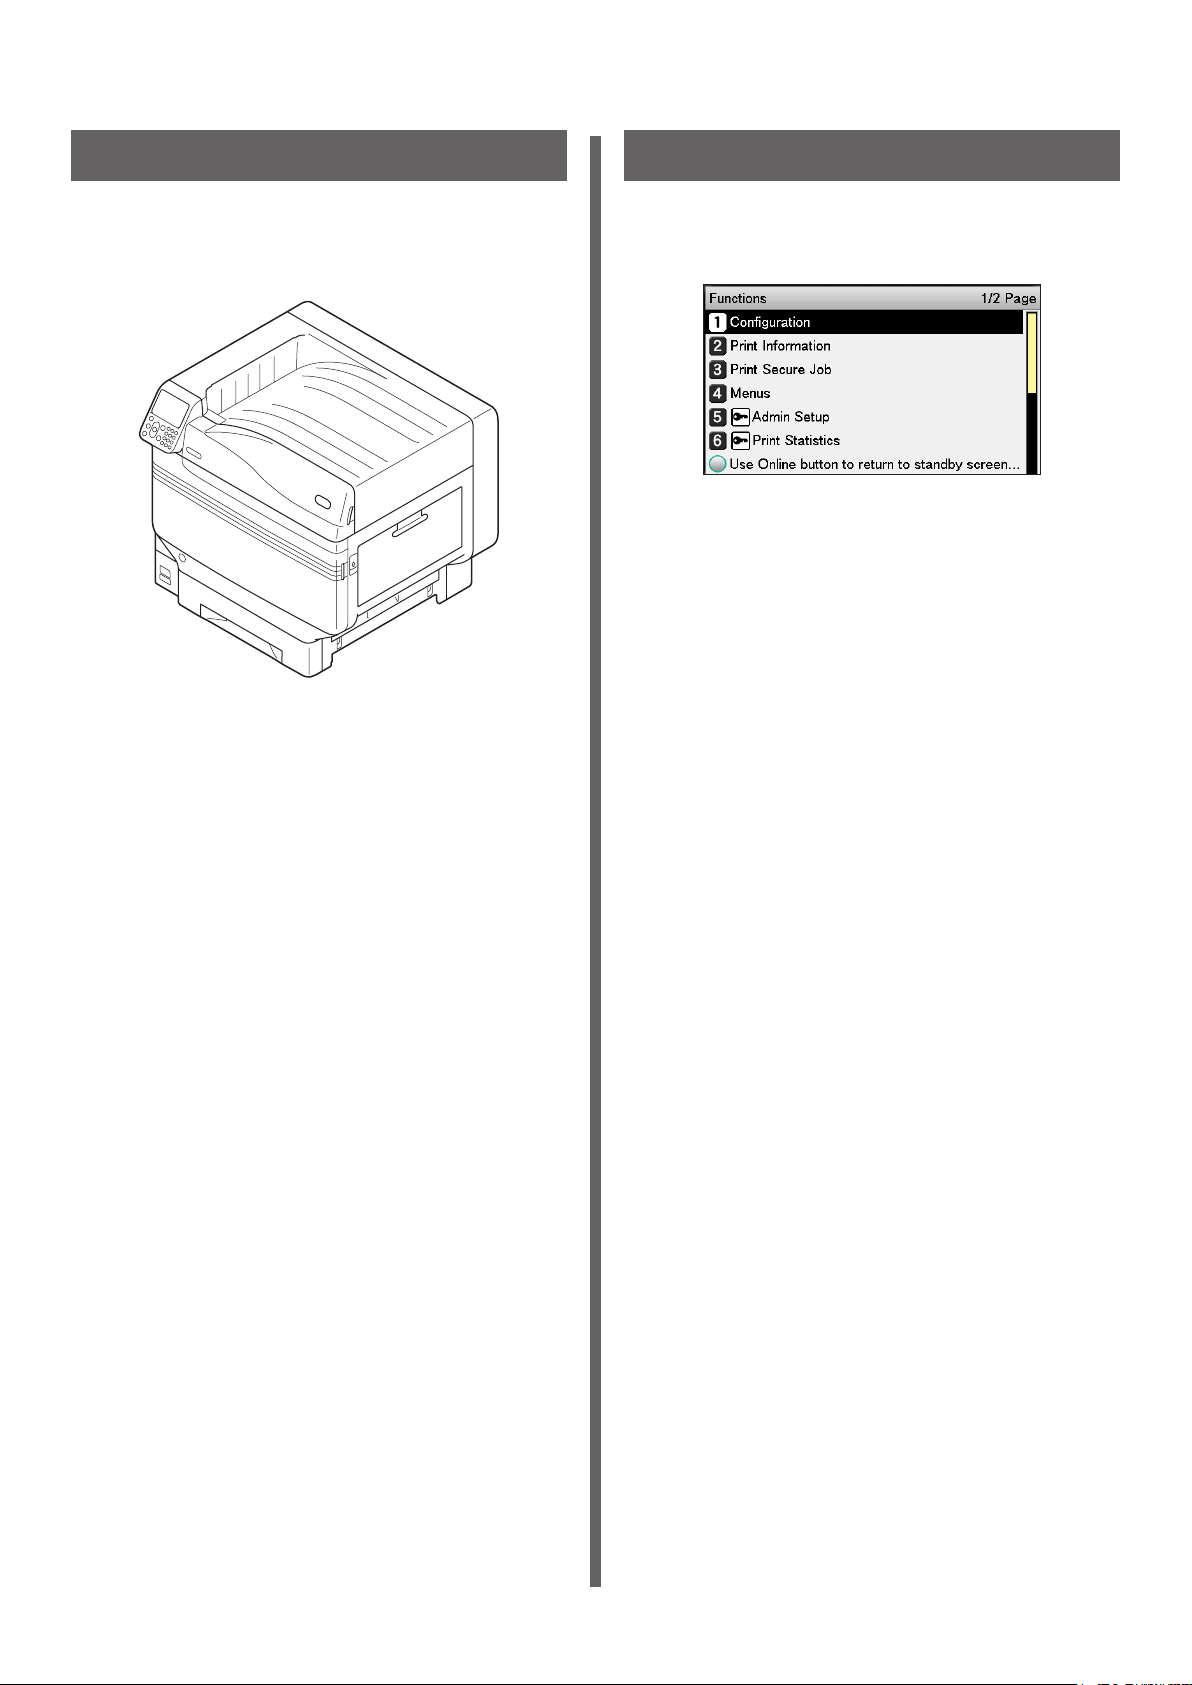
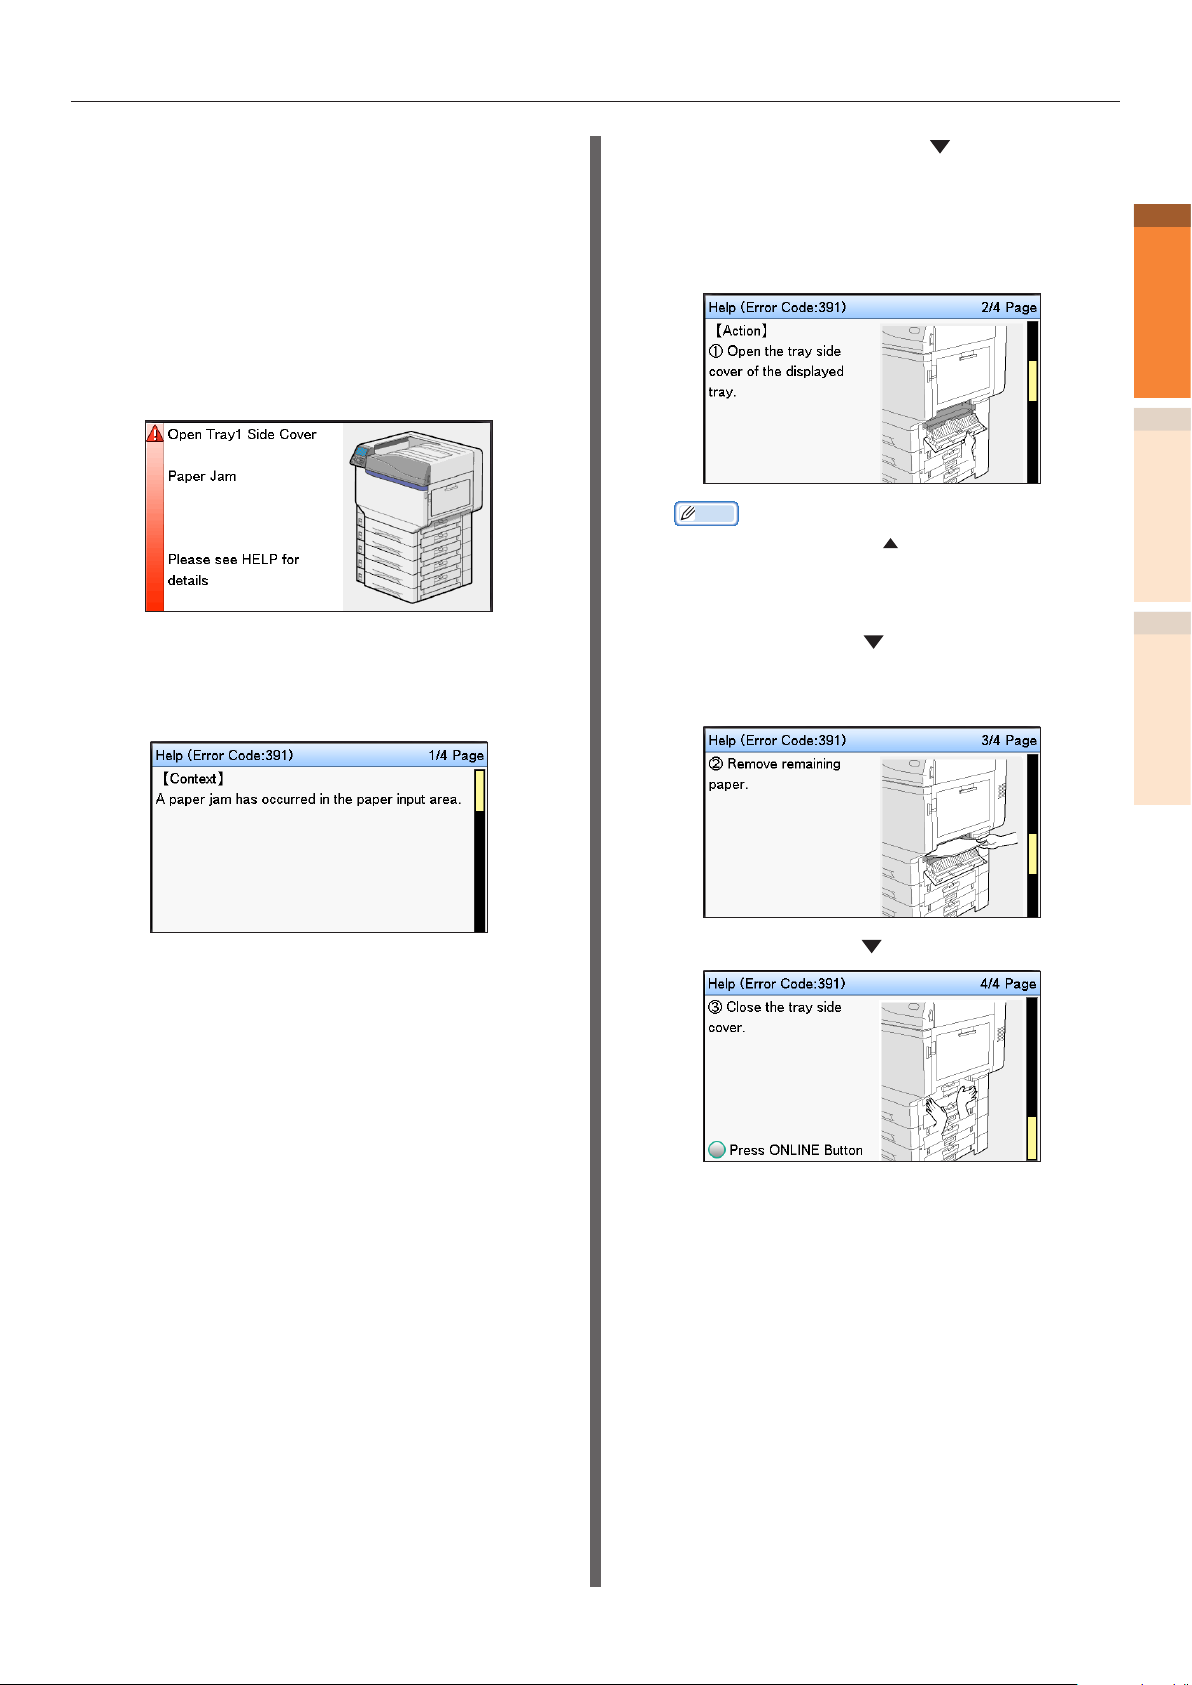
Checking messages (if a paper jam occurs)
When a paper is jammed inside the printer, or when paper is remaining inside the printer even after
removing it, a message notifying paper jam will appear on the liquid crystal panel of the operation
panel, and the <ATTENTION> lamp will blink.
When "Please see HELP for details" is shown in the message, pressing the [HELP] button in the
operation panel will show the troubleshooting procedure, and you can easily solve the process according
to the guidance. For details, refer to “Operating the Help screen”(P.13).
1
Troubleshooting
2
IndexMaintenance
[HELP] button
Liquid crystal panel
<ATTENTION> lamp
The following table shows the messages. Check the message, and remove the jammed paper according
to the procedure described in the reference.
- 11 -

Paper jams
Category
1
Troubleshooting
2
Paper
jam
(When a
paper is
jammed
inside
the
printer)
IndexMaintenance
Message
does not
disappear
(When the
message
does not
disappear
even after
removing
the jammed
paper)
Message displayed on the liquid crystal
panel
Open Right Side Cover
Paper Jam
Please see HELP for details
Open [TRAY]* Side Cover
Paper Jam
Please see HELP for details
Open Left Side Cover
Paper Jam
Please see HELP for details
Check Exit Unit
Paper Jam
Please see HELP for details
Check Exit Unit
Paper Jam
Please see HELP for details
Check Duplex Unit
Paper Jam
Please see HELP for details
Check the lower side of Duplex Unit
Paper Jam
Please see HELP for details
Open [TRAY]* Side Cover
Paper Remain
Please see HELP for details
Open Right Side Cover
Paper Remain
Please see HELP for details
Check Exit Unit
Paper Remain
Please see HELP for details
Check Duplex Unit
Paper Remain
Please see HELP for details
Check the lower side of Duplex Unit
Paper Remain
Please see HELP for details
Check Face Down Stacker
Paper Remain
Please see HELP for details
Location of
paper jam
Paper jam in
the vicinity
of Right Side
Cover
Paper jam in
the vicinity of
tray side cover
Paper jam in
the vicinity of
Left Side Cover
Paper jam in
the exit unit
Paper jam in
the vicinity of
the fuser unit
Paper jam in
the vicinity of
the 2-Sided
Printing unit
Paper jam in
the vicinity of
the lower side
of 2-Sided
Printing unit
Paper jam in
the vicinity
of TRAY Side
Cover
Paper jam in
the vicinity
of Right Side
Cover
Paper jam in
the exit unit
Paper jam in
the vicinity of
the 2-Sided
Printing unit
Paper jam in
the vicinity of
the lower side
of 2-Sided
Printing unit
Paper jam in
the vicinity of
Left Side Cover
Error code
displayed after
pressing the
[HELP] button
380, 390
391, 392, 393,
394, 395
384
381
382, 383, 389
370, 371, 373
375
631, 632, 633,
634, 635
637
638, 639
640, 641, 642
650
651
Reference
pages
page 14
page 24
page 34
page 15
page 20
page 25
page 30
page 24
page 14
page 15
page 25
page 30
page 34
*: Either of Tray 1 to Tray 5 will appear in [TRAY]. (Tray 2 to Tray 5 will be displayed when the option of additional tray units is
mounted.)
Either of Tray 1 Side Cover to Tray 5 Side Cover will appear in [COVER]. (Tray 2 Side Cover to Tray 5 Side Cover will be
displayed when the option of additional tray units is mounted.)
- 12 -
Paper jams
Operating the Help screen
Pressing the [HELP] button in the operation panel
will display the solution method. You can easily
remove the paper according to the guidance.
Example) Paper jam in the vicinity of Tray 1 Side
Cover
The following message will appear on the liquid
crystal panel, and the <ATTENTION> lamp will
blink.
Press the [HELP] button.
1
The error code will appear and the
condition of paper jam will be displayed.
Press the scroll button .
2
The next page will appear, and
solution procedure for paper jam
and corresponding animation will be
displayed.
Memo
Press the scroll button
z
page.
Scroll the pages of the Help screen with
3
the scroll button
paper according to the solution method
for paper jam displayed on the screen.
to return to the previous
, and remove the
1
Troubleshooting
2
IndexMaintenance
- 13 -
Removing the jammed paper will return
the display to the Standby screen and
the remaining printing will start.
Paper jams
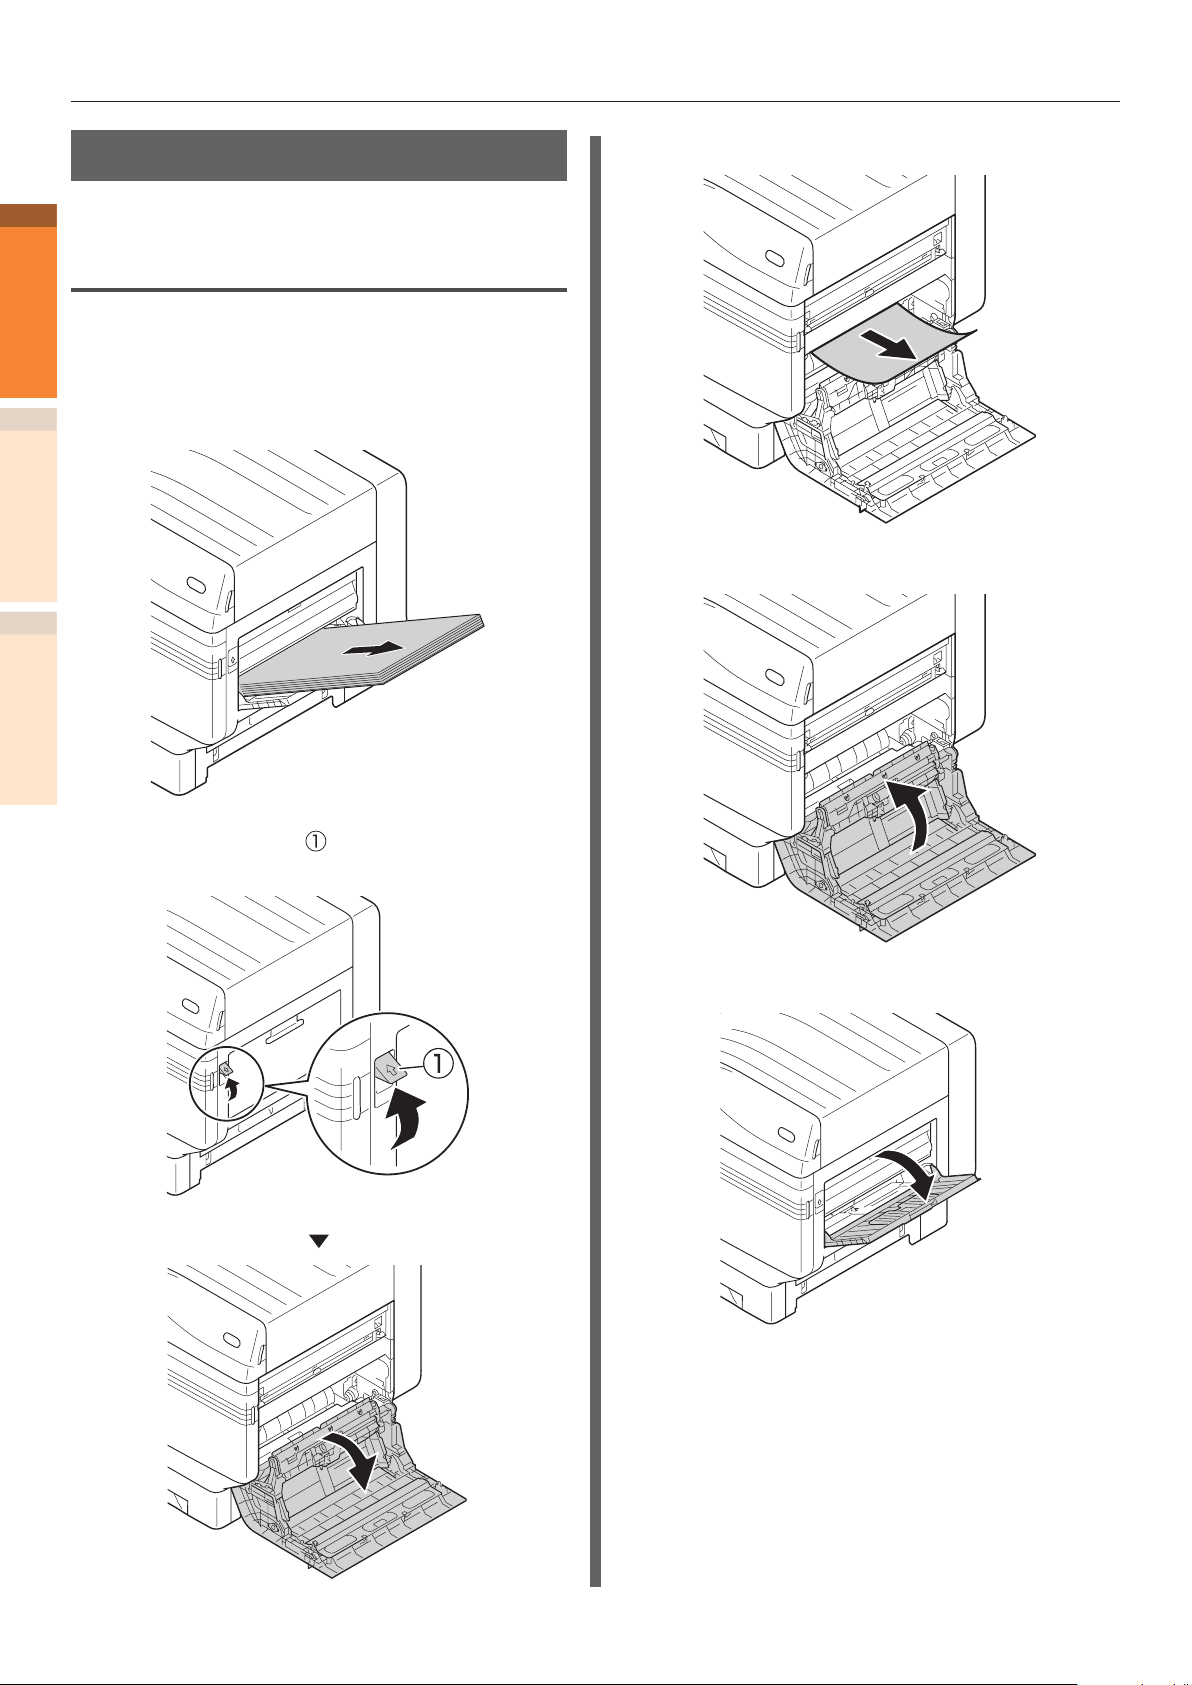
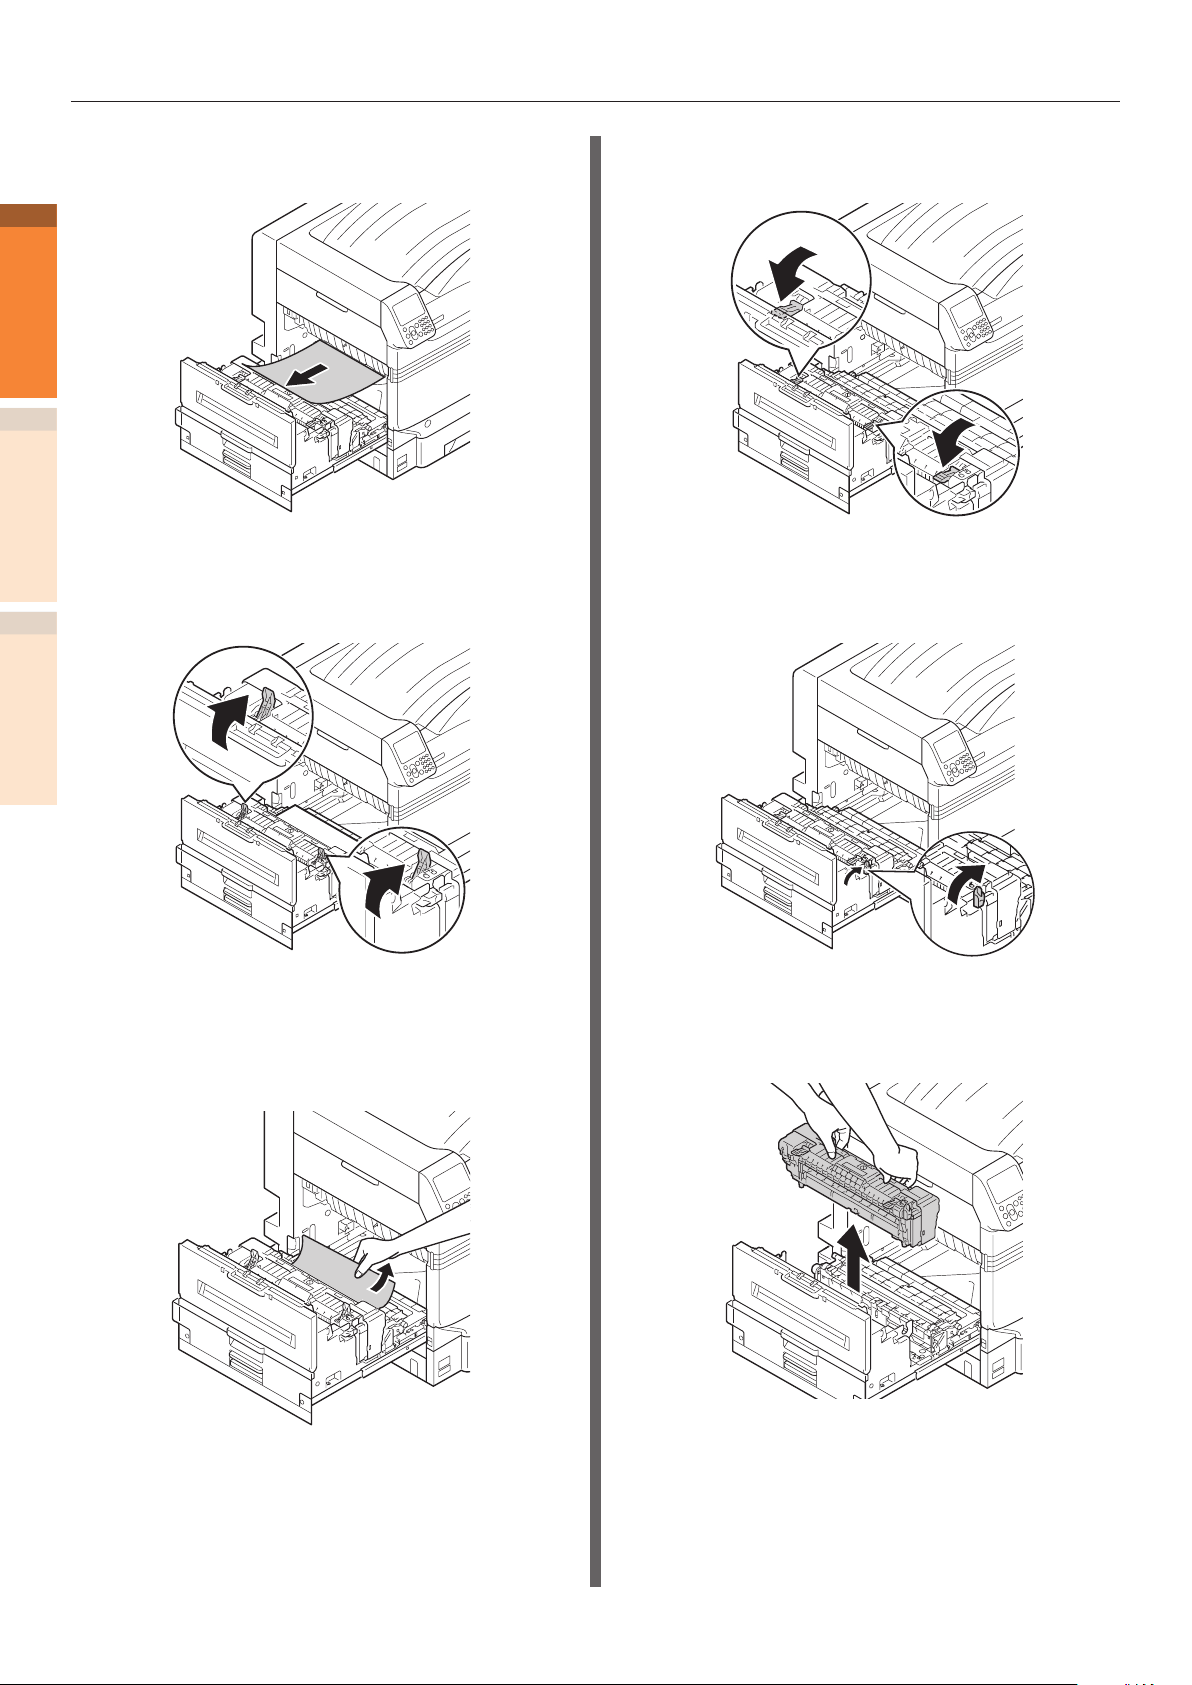
Removing jammed paper
1
Removing paper jam in the
Troubleshooting
vicinity of Right Side Cover
Error code: 380, 390, 637
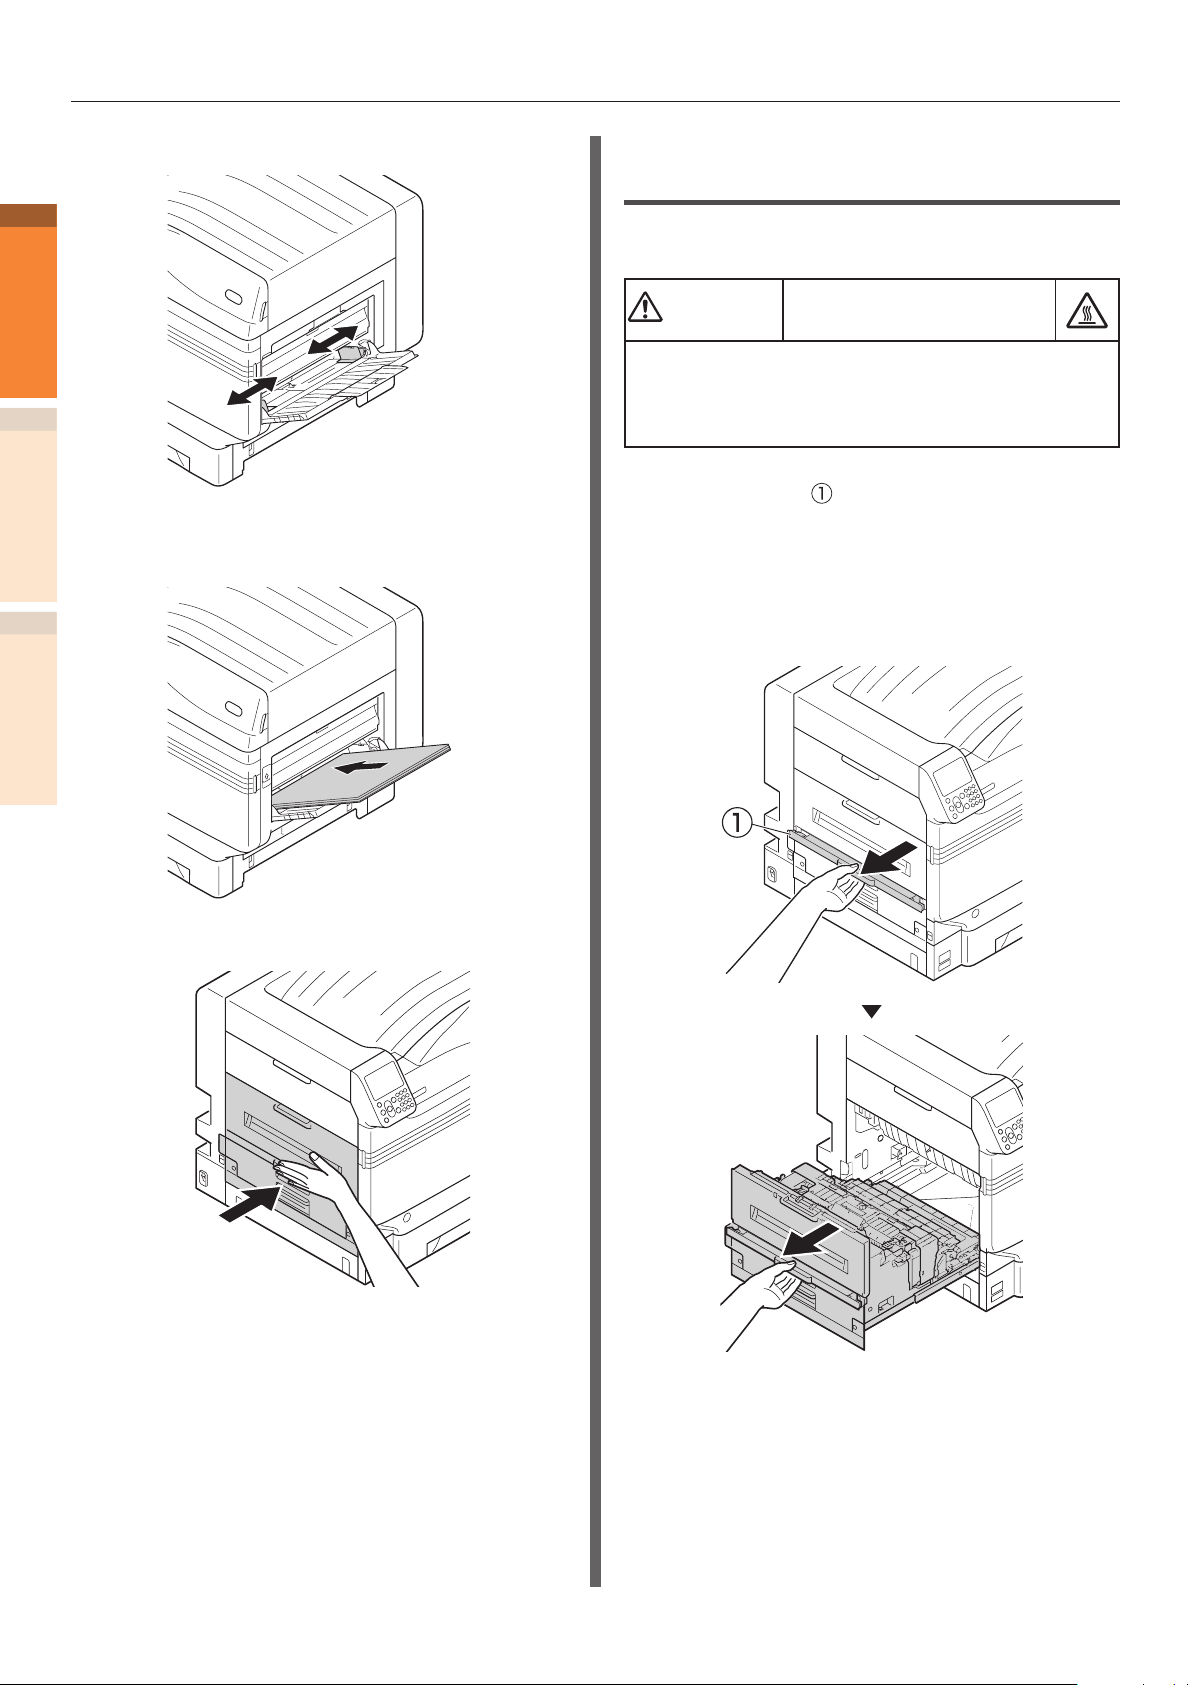
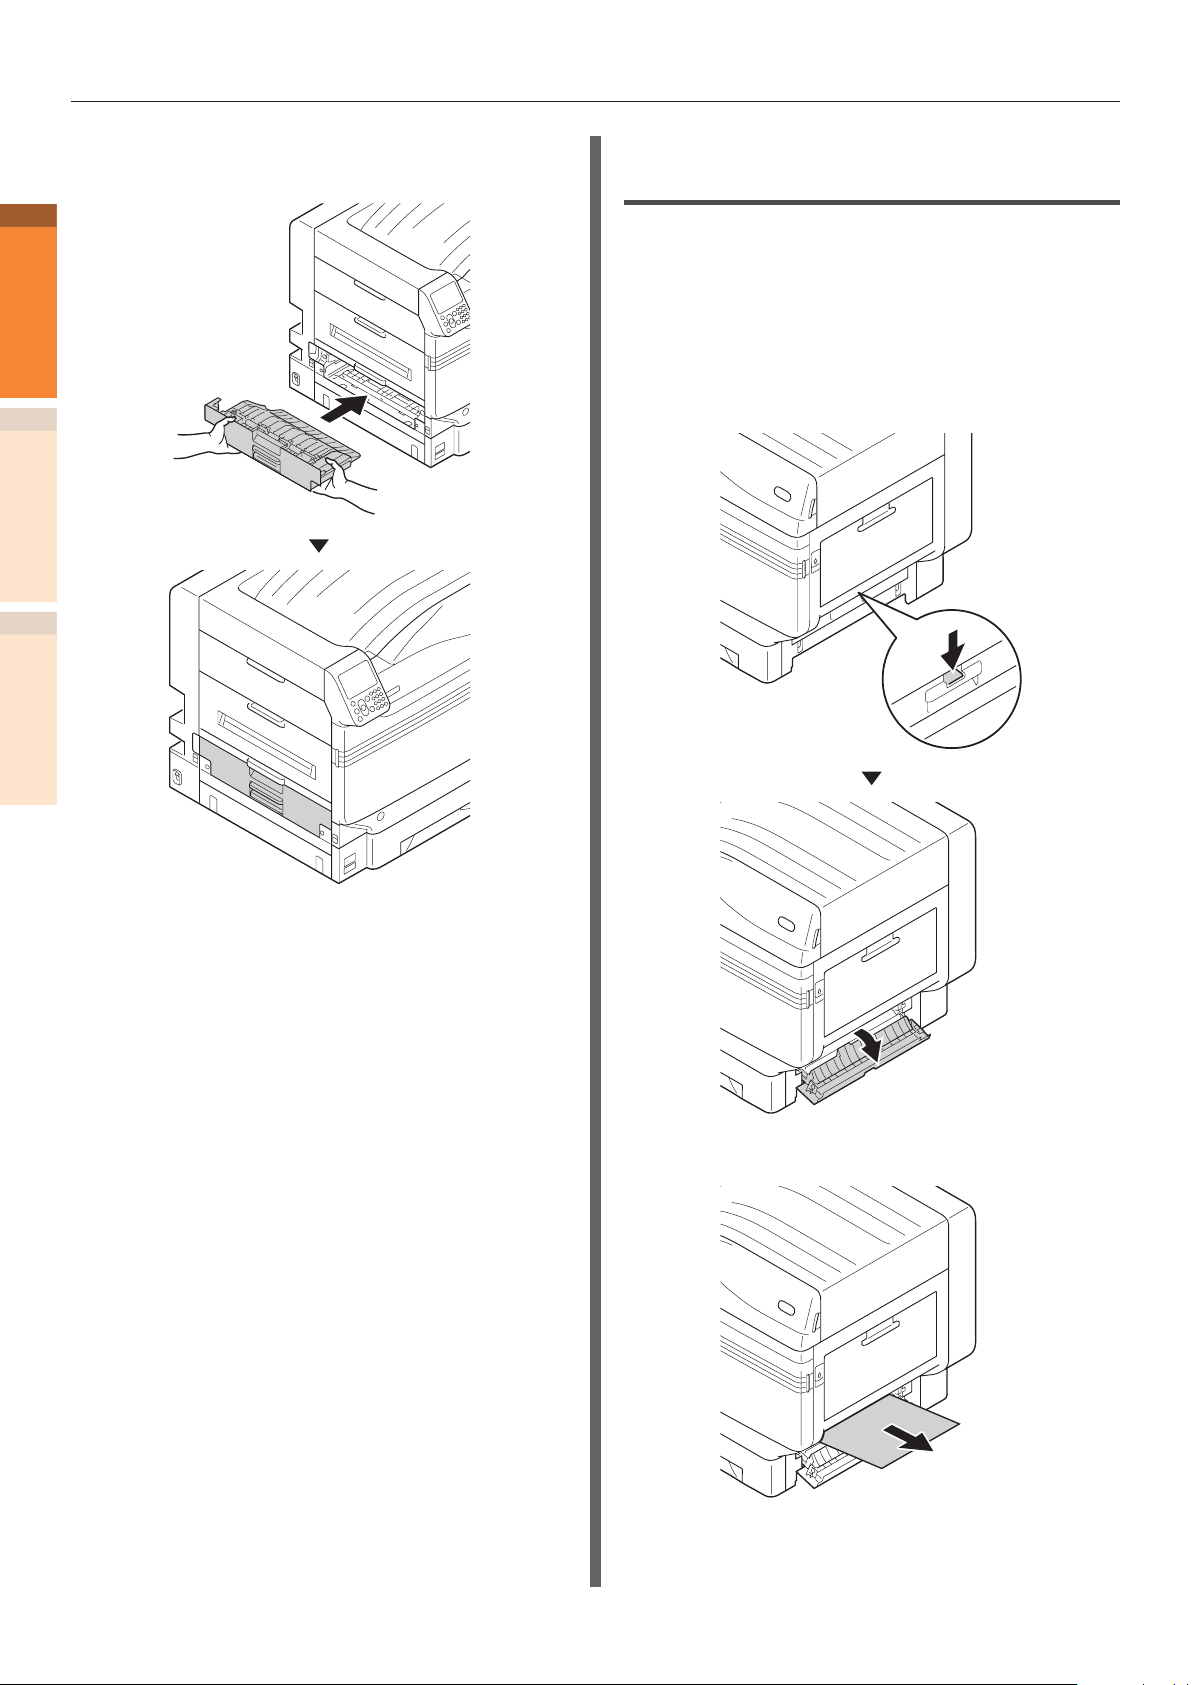
If paper is set in the MP tray, remove it
1
2
IndexMaintenance
and close the tray.
Slowly remove the remaining paper.
3
Close the right side cover.
4
Lift the opening( ), and open the right
2
side cover.
Open the MP tray.
5
- 14 -
Paper jams
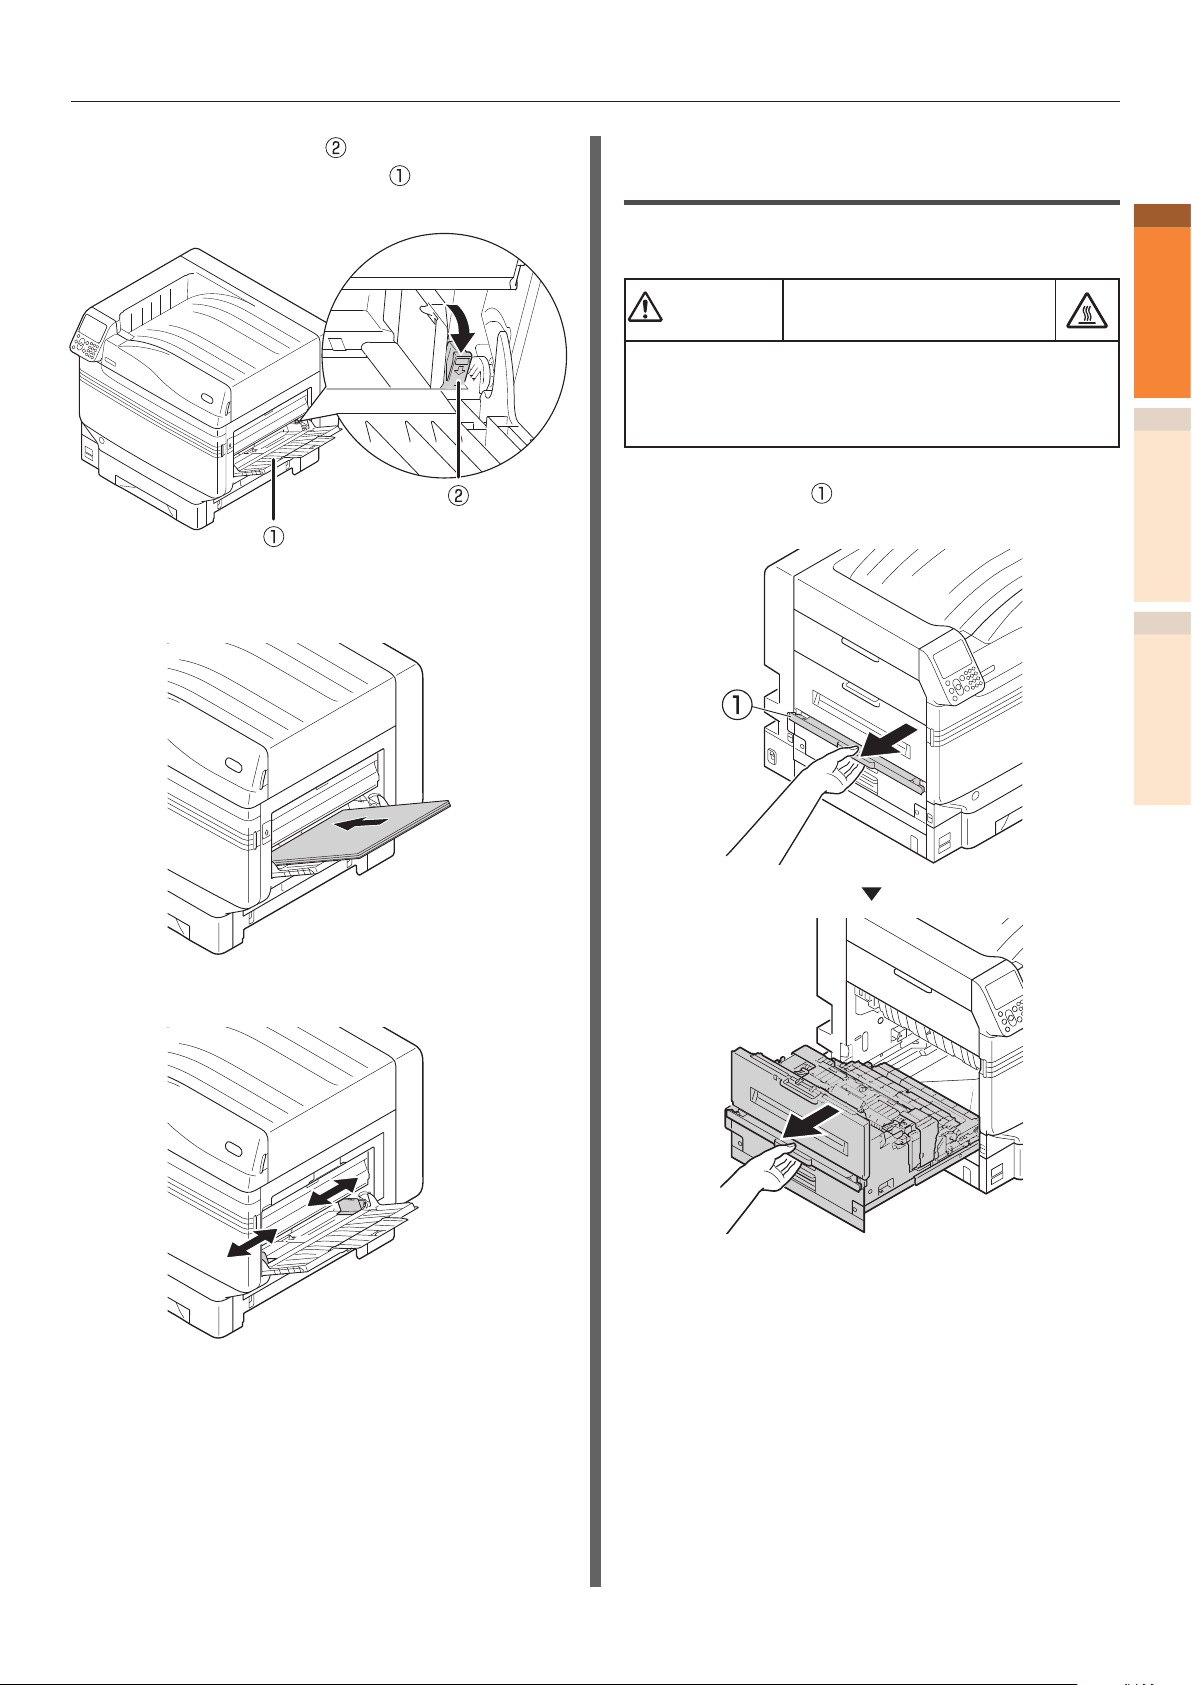
CAUTION
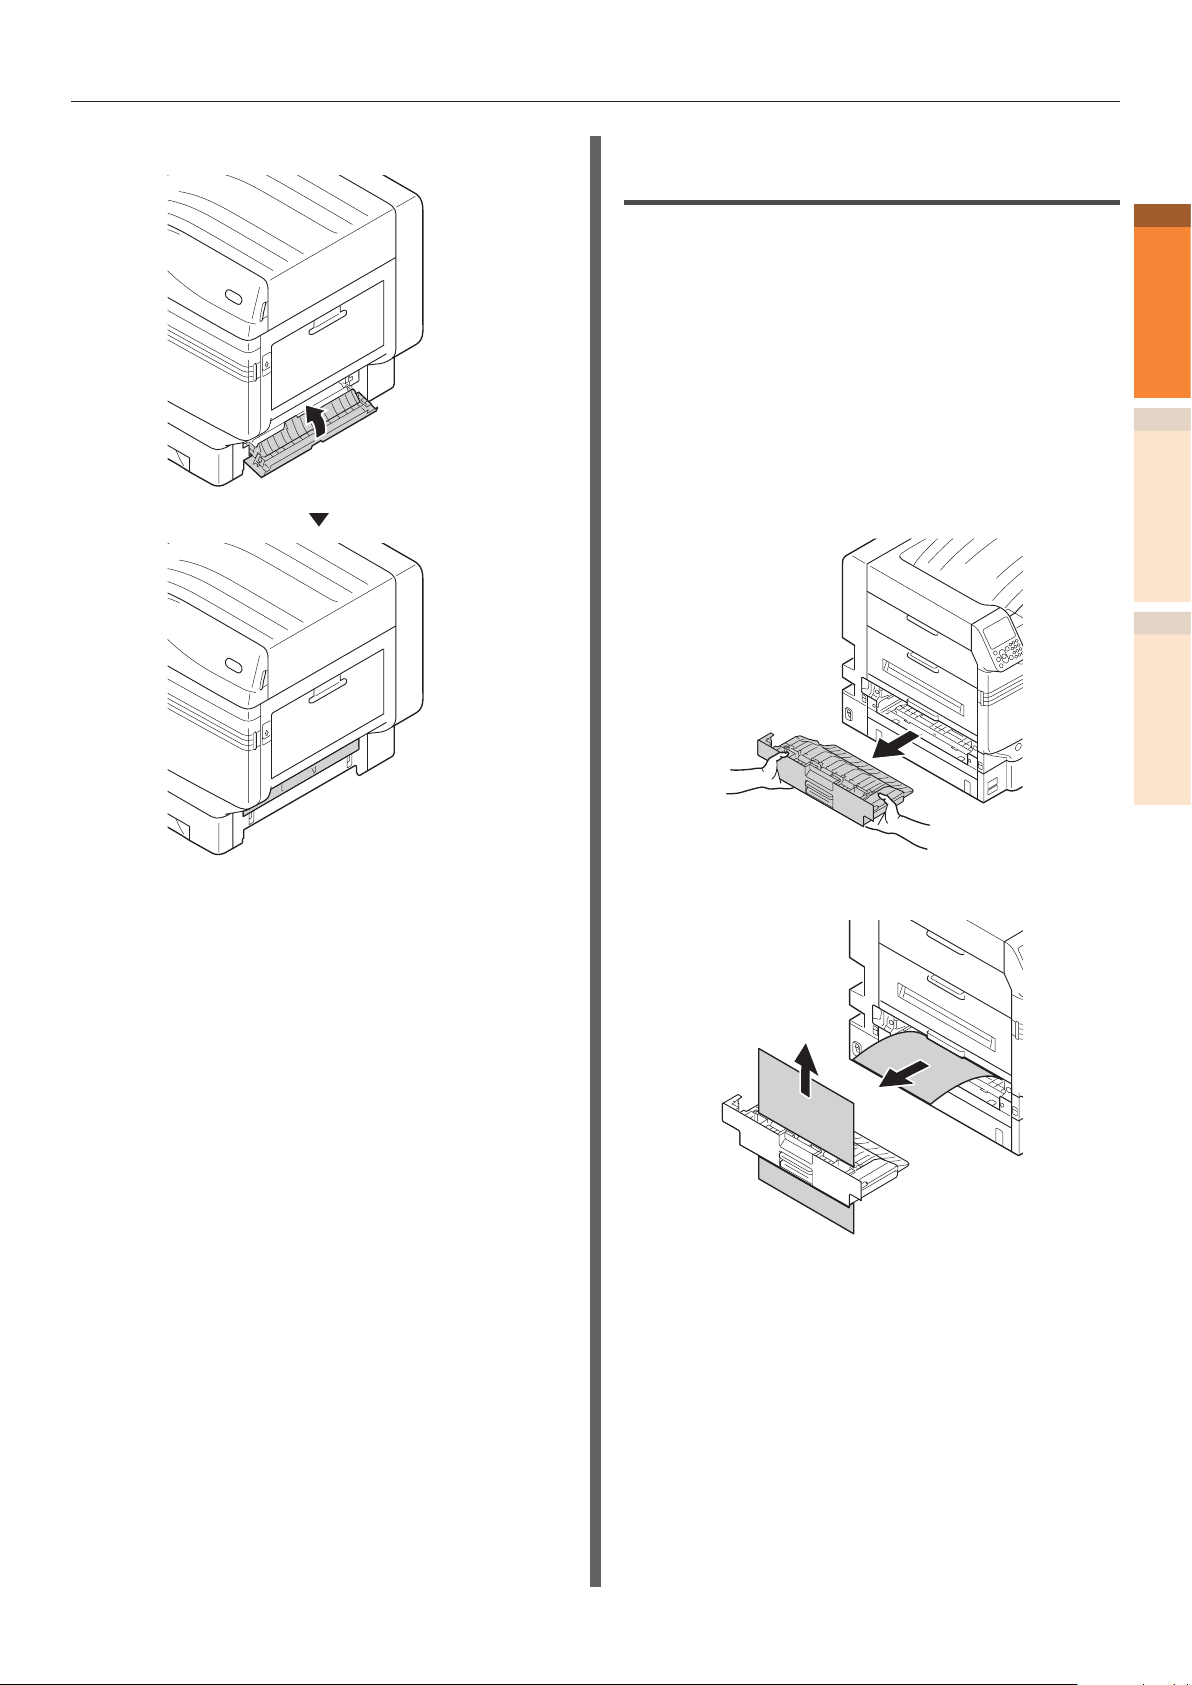
Pull the set lever ( ) on the right side
6
of the paper supporter ( ) towards
yourself.
Set the print side for the removed
7
paper to face up.
Removing paper jam in the exit
unit
Error code: 381, 638, 639
Possible to get burned.
Work carefully as the temperature of fuser unit is
high. Ensure to hold the handle when lifting. When
it is hot, wait until it cools down before starting the
work.
Lift opener ( ) of the exit unit, and pull
1
out the exit unit.
1
Troubleshooting
2
IndexMaintenance
Match the paper guide with the paper.
8
- 15 -
Paper jams
2
1
Troubleshooting
2
3
IndexMaintenance
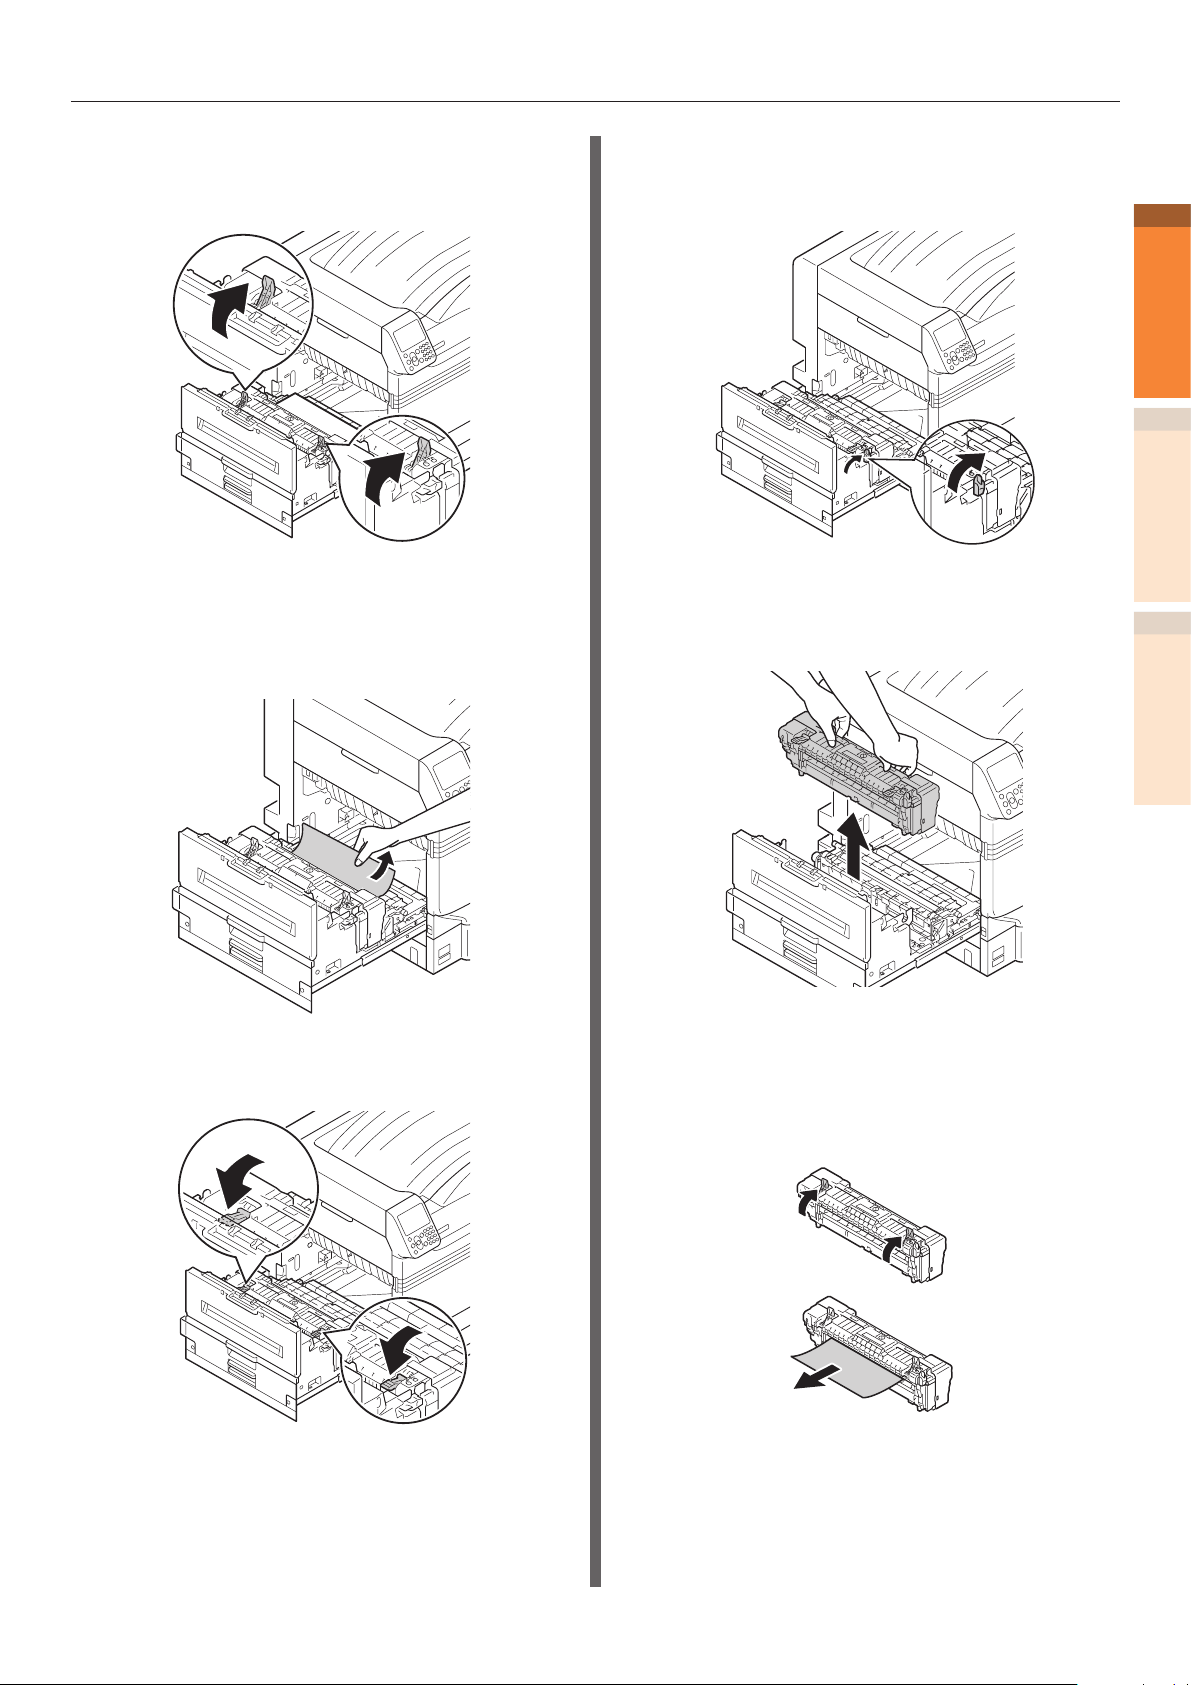
Check inside of the printer, and slowly
remove the remaining paper.
If there is remaining paper in the fuser
unit then pull up the fuser unit's jam
release lever (blue).
Push down the fuser unit's jam release
5
lever (blue).
If there is no remaining paper in the
6
fuser unit then pull up the fuser unit's
lock lever (blue).
Ensure to slowly pull the remaining
4
paper towards the printer body
(opposite to the paper feeding
direction).
Hold the fuser unit handle with both
7
hands, and remove it onto a at
surface.
- 16 -
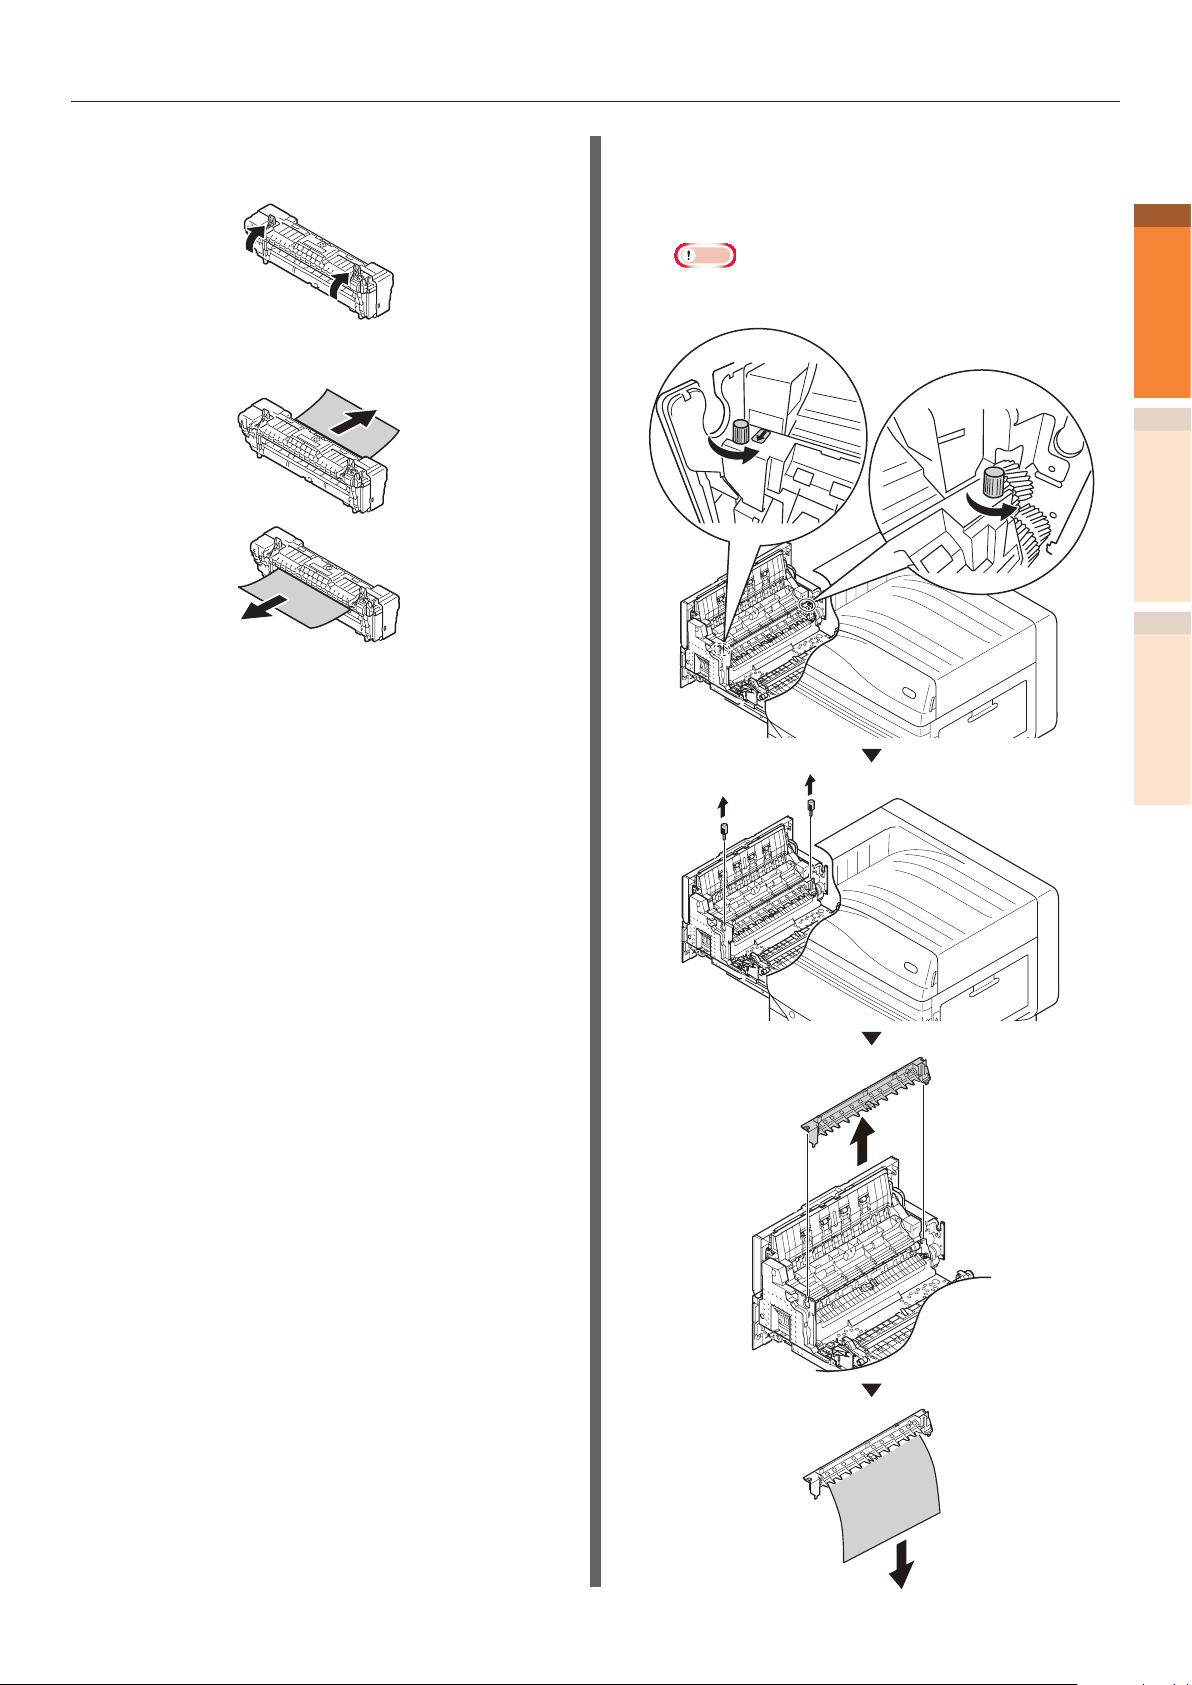
Paper jams
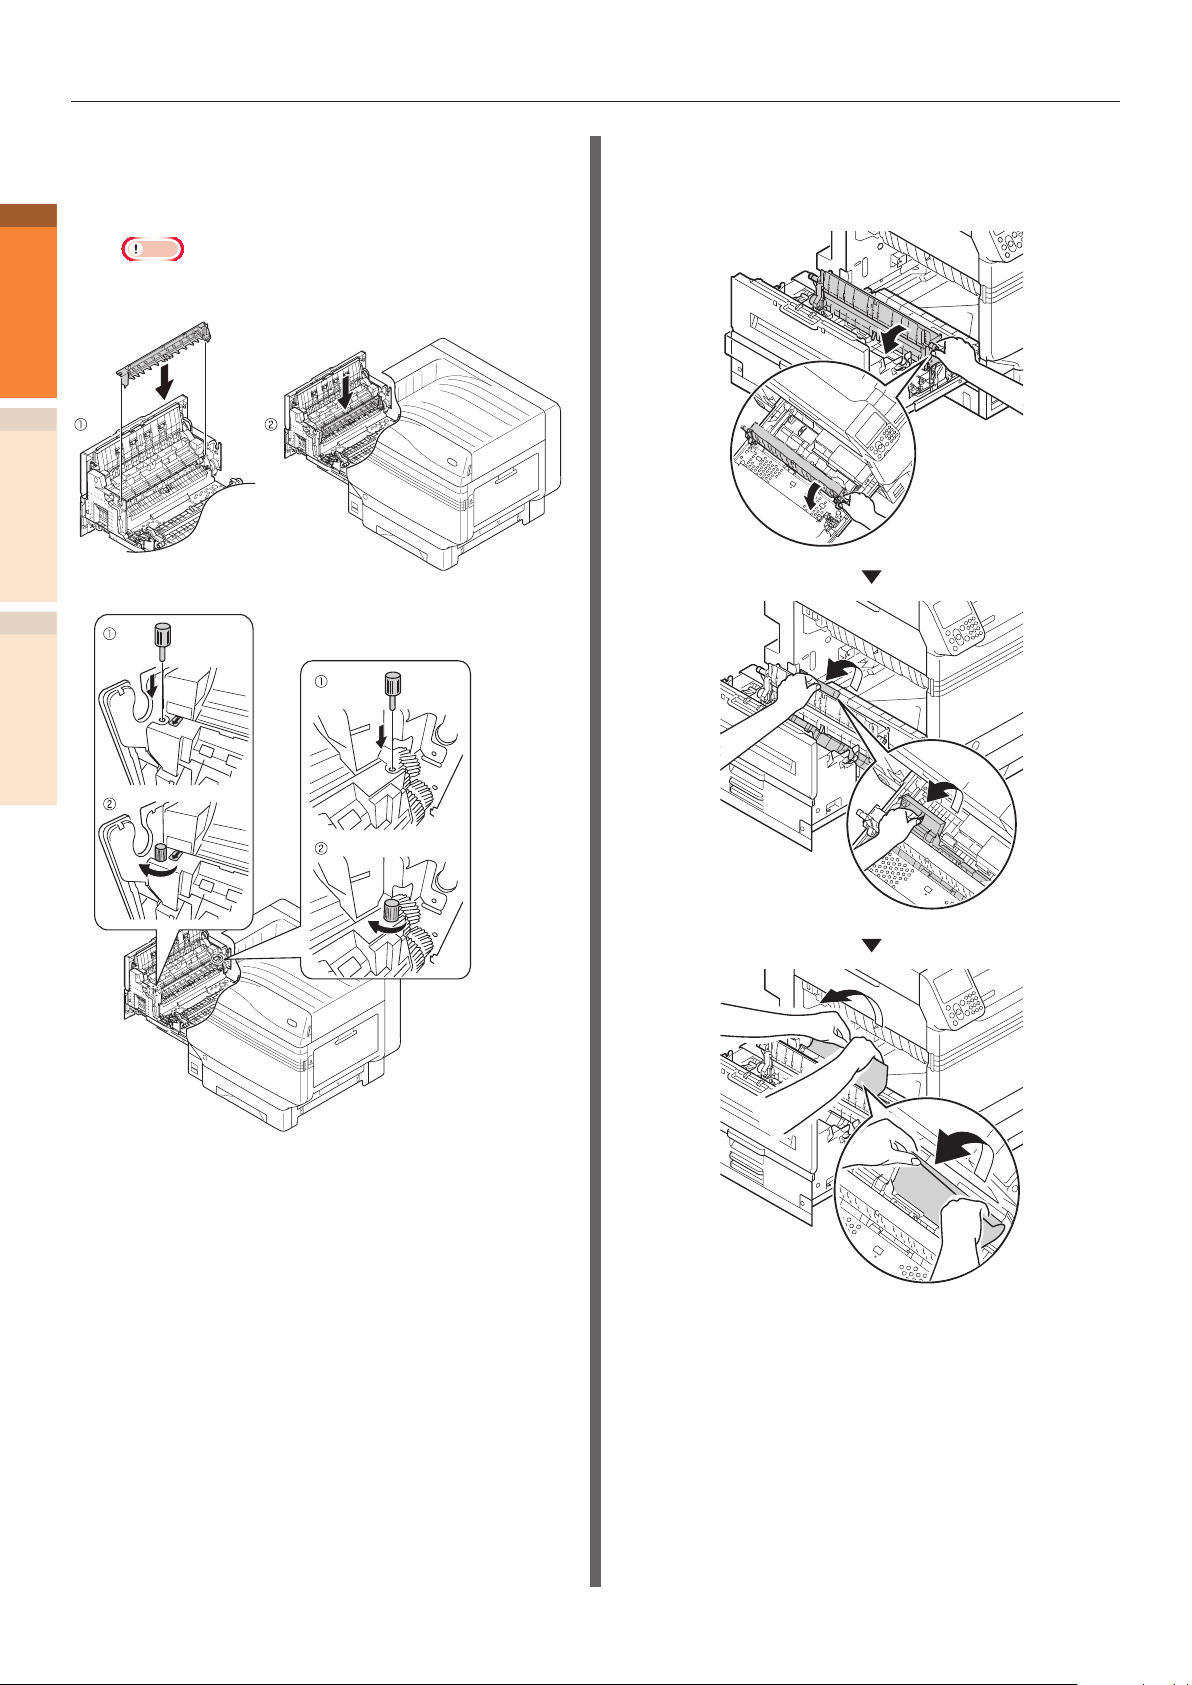
Raise the jam release lever of the fuser
8
unit.
Remove the remaining paper.
9
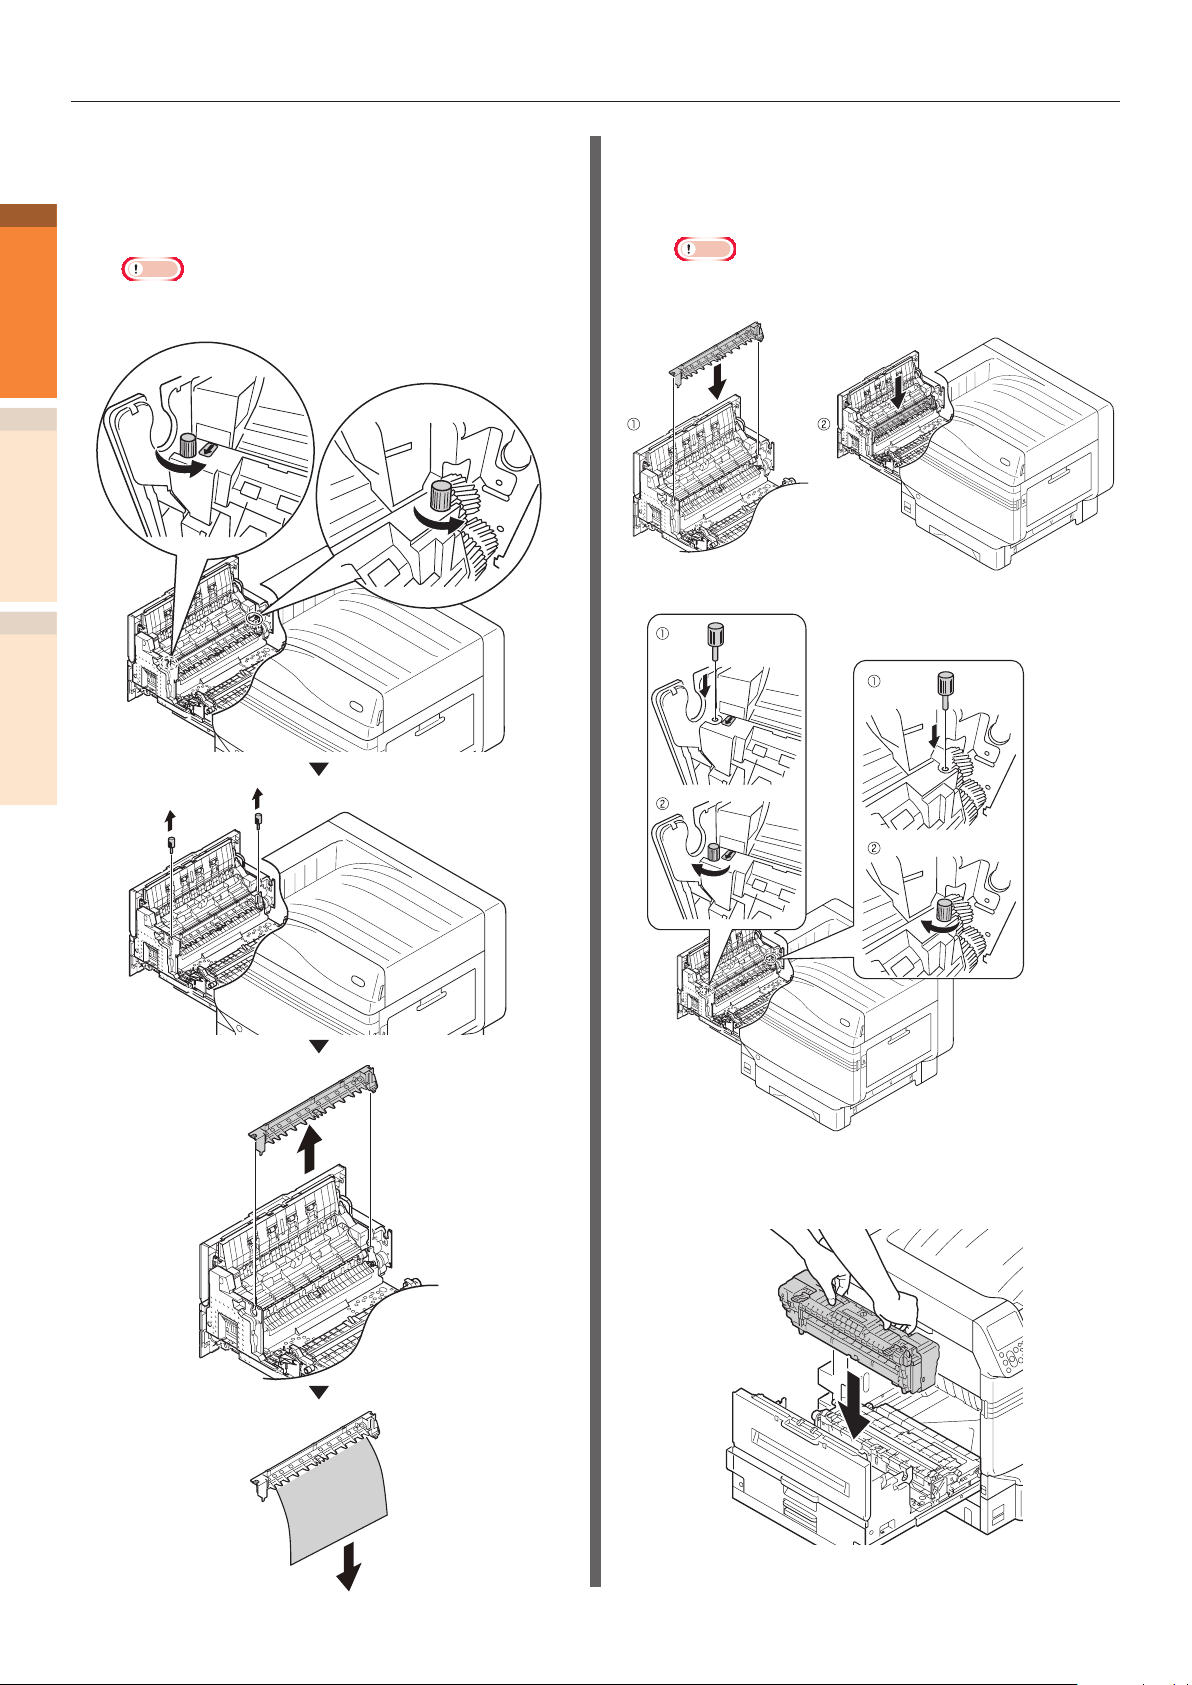
If the paper winds around the decal roller,
remove the decal unit by turning the
10
thumbscrews at both ends of the decal
unit to the left, and remove the paper.
Note
Be careful not to drop the thumbscrew into the
z
device when removing.
1
Troubleshooting
2
IndexMaintenance
- 17 -
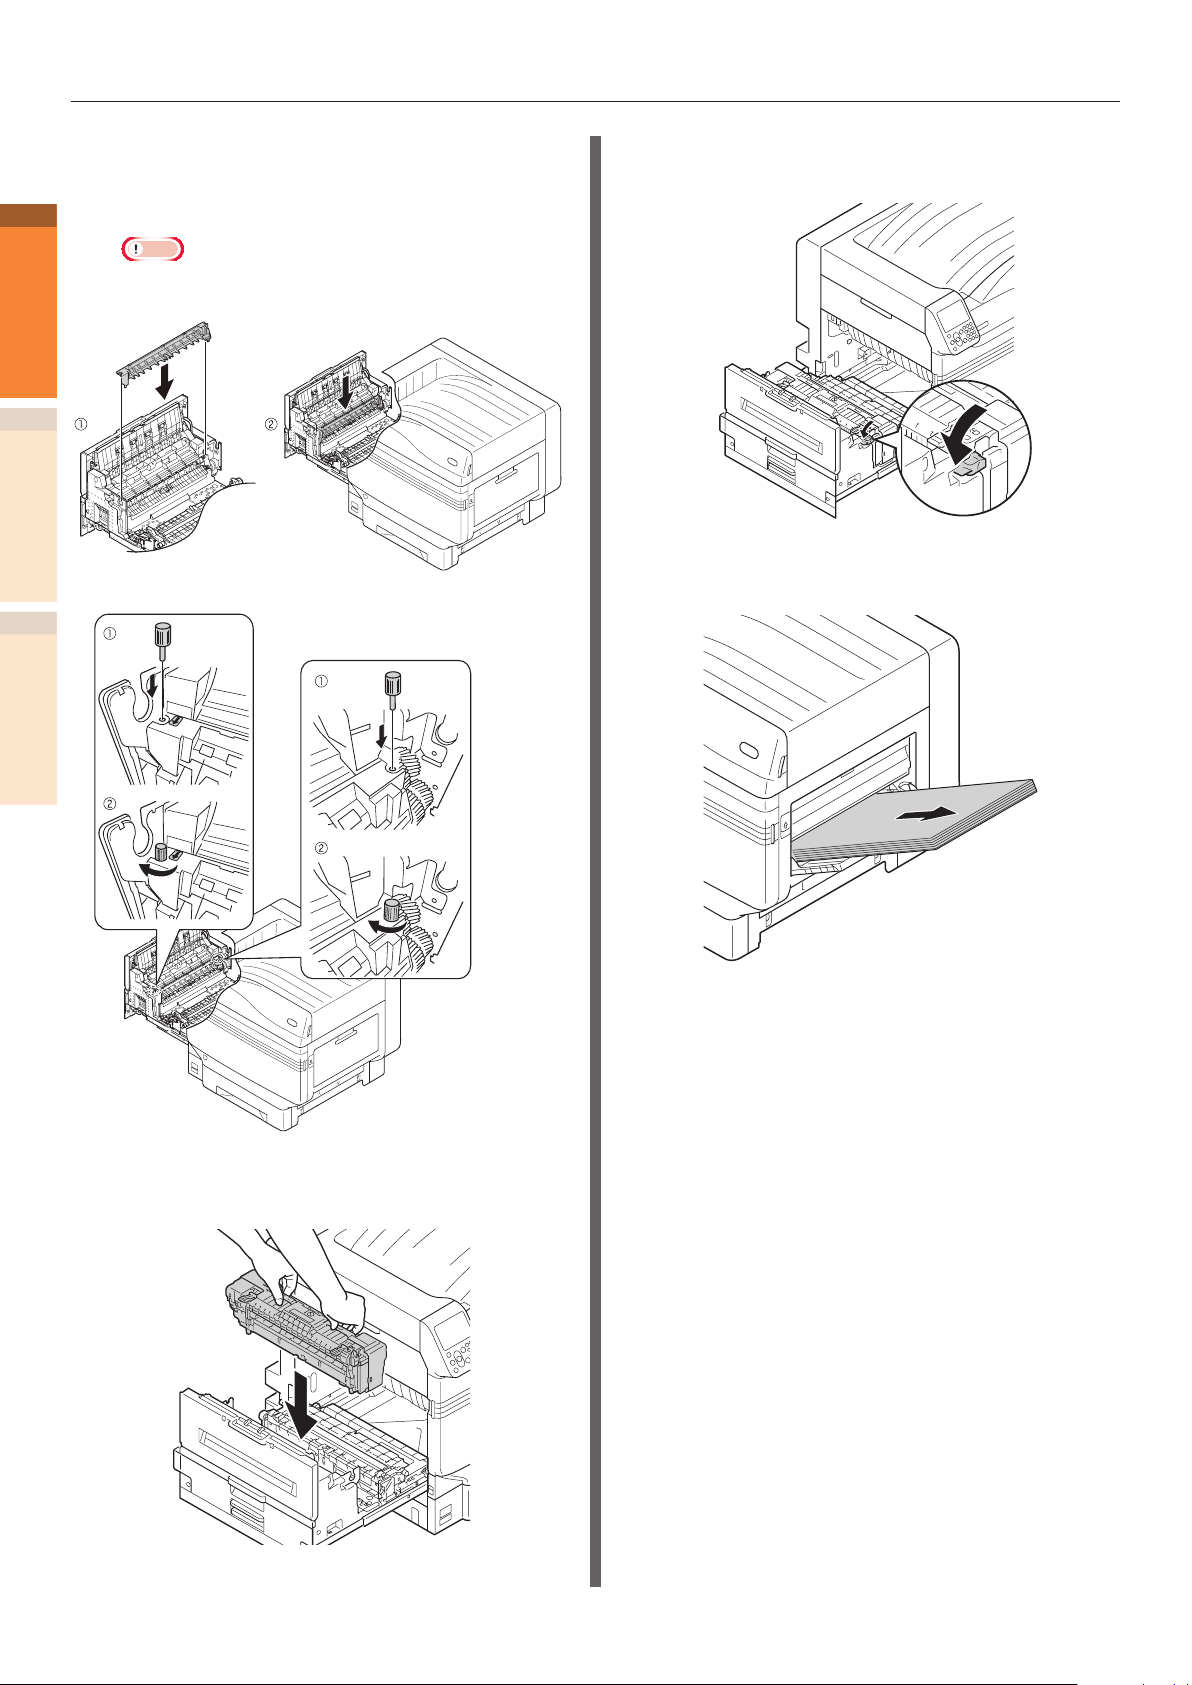
Paper jams
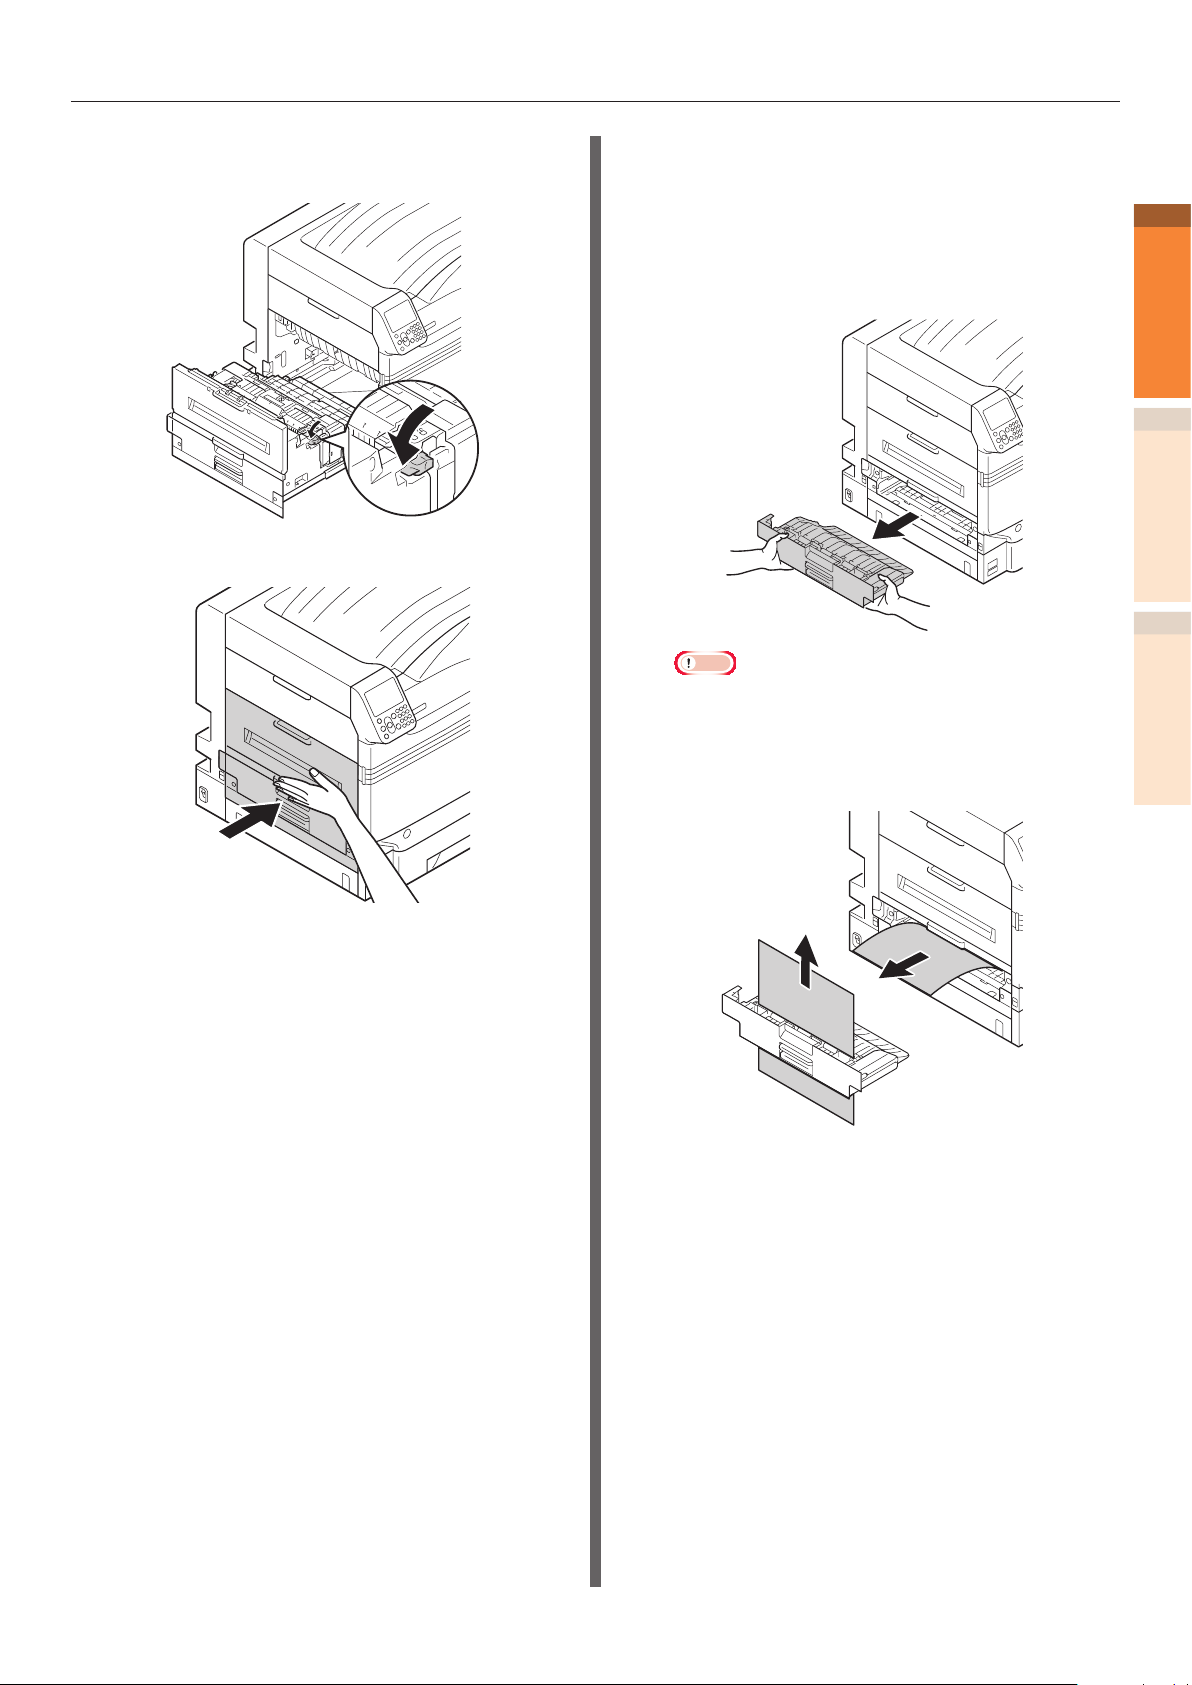
11
1
Troubleshooting
2
IndexMaintenance
Return the decal unit to its original
position, and x it with two
thumbscrews.
Note
Be careful not to drop the thumbscrew into the
z
device when xing.
Push down the fuser unit's lock lever
13
(blue).
If paper is set in the MP tray, remove it
14
and close the tray.
Hold the fuser unit handle with both
12
hands, and set to the output unit.
- 18 -
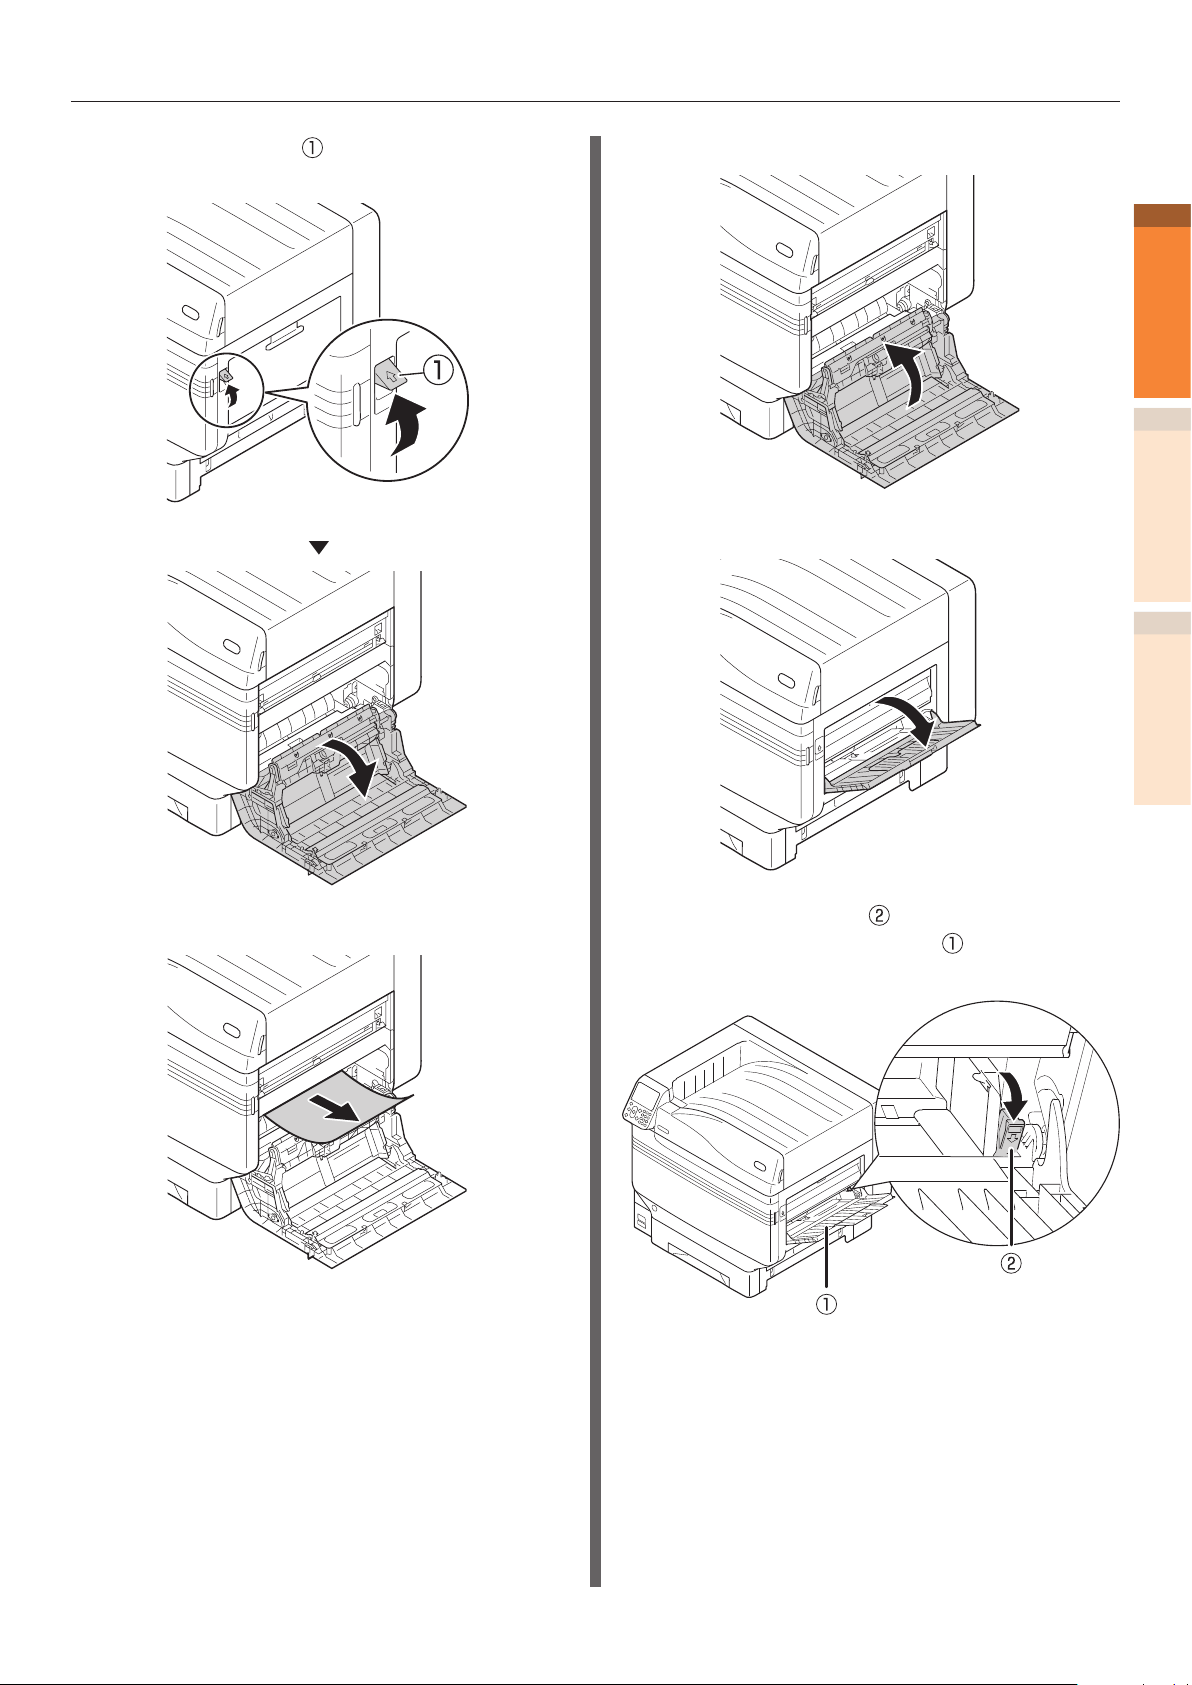
Paper jams
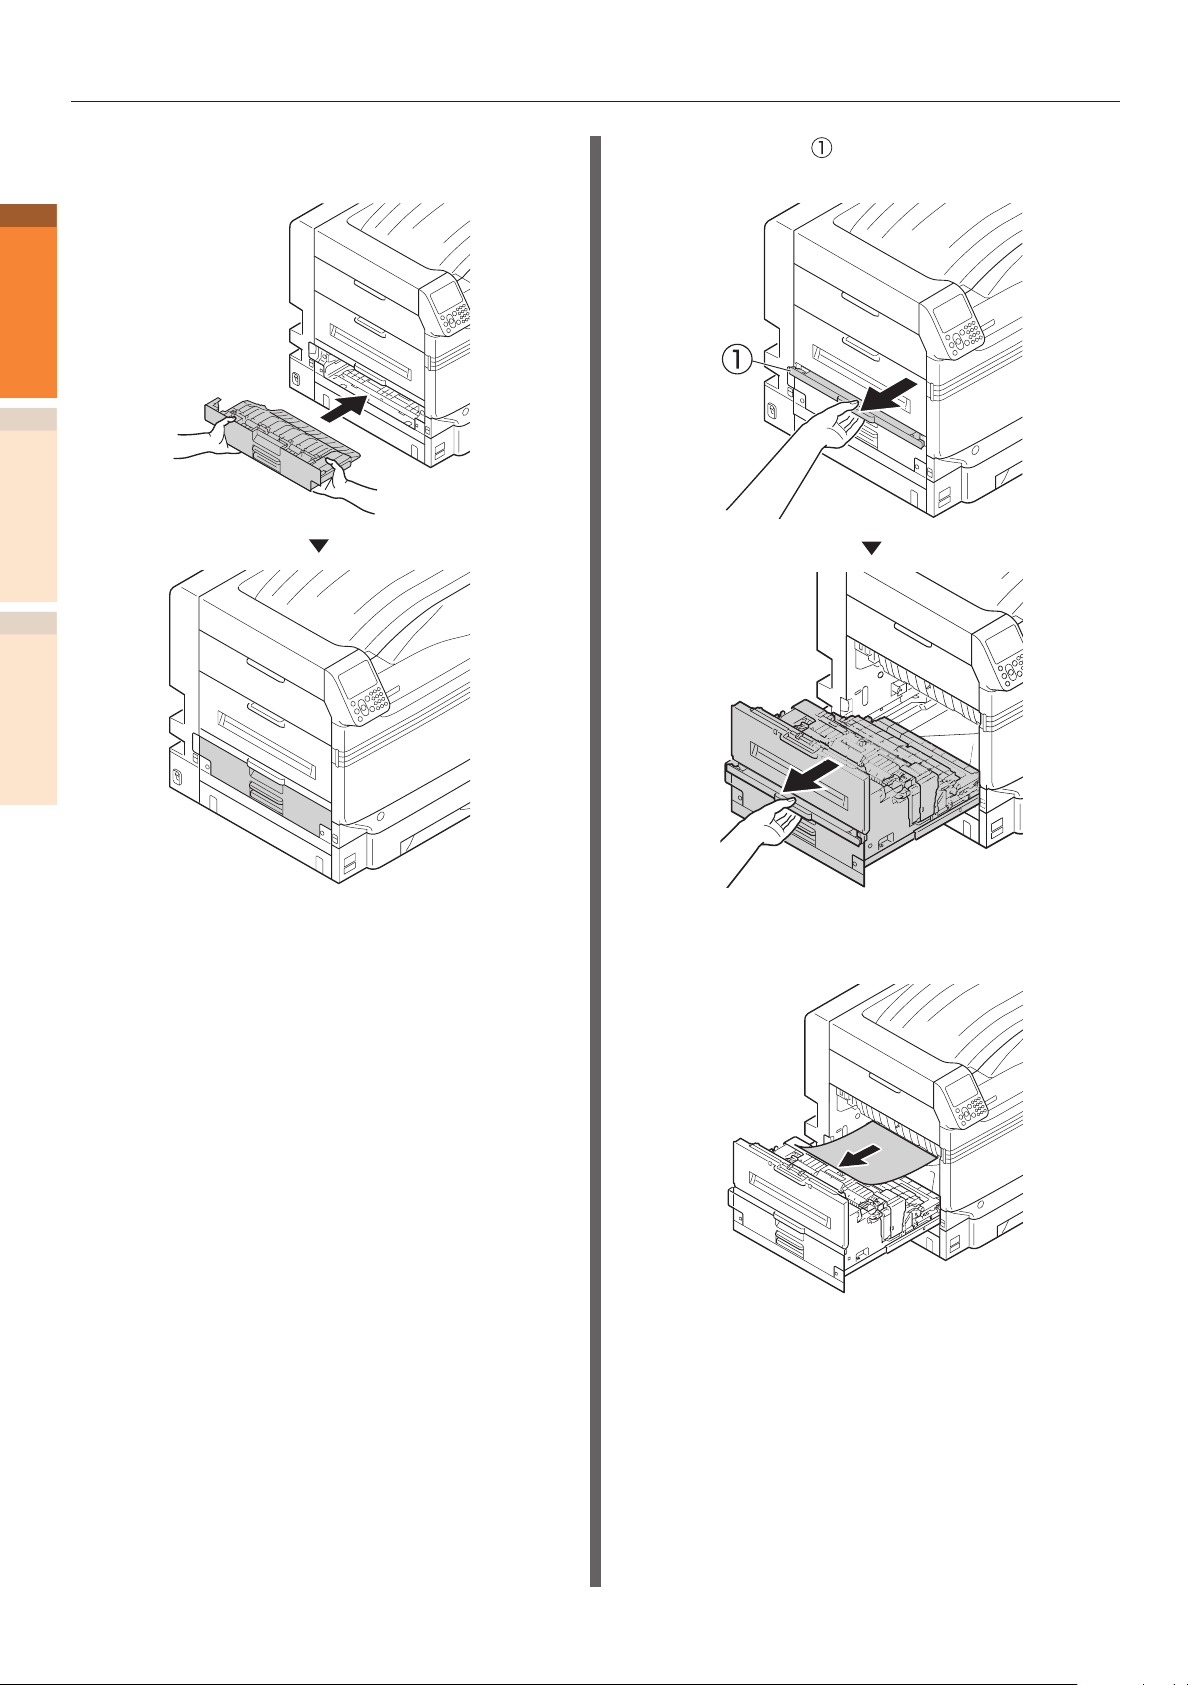
Lift the opener ( ), and open the right
15
side cover.
Close the right side cover.
17
1
Troubleshooting
2
Open the MP tray.
18
IndexMaintenance
Slowly remove the remaining paper.
16
Pull the set leve ( ) on the right side
19
of the paper supporter ( ) towards
yourself.
- 19 -
Paper jams
CAUTION
20
1
Troubleshooting
2
21
IndexMaintenance
Match the paper guide with the paper.
Set the print side for the removed
paper to face up.
Removing paper jam in the
vicinity of the fuser unit
Error code: 382, 383, 389
Possible to get burned.
Work carefully as temperature of fuser unit is high.
Ensure to hold the handle when lifting. When it
is hot, wait until it cools down before starting the
work.
Lift opener ( ) of the exit unit, and pull
1
out the exit unit.
When you cannot see the jammed
paper, return the exit unit to the printer,
and go to “Removing paper from the
2-Sided Printing unit”(P.23).
Put the output unit back into the printer.
22
- 20 -
Paper jams
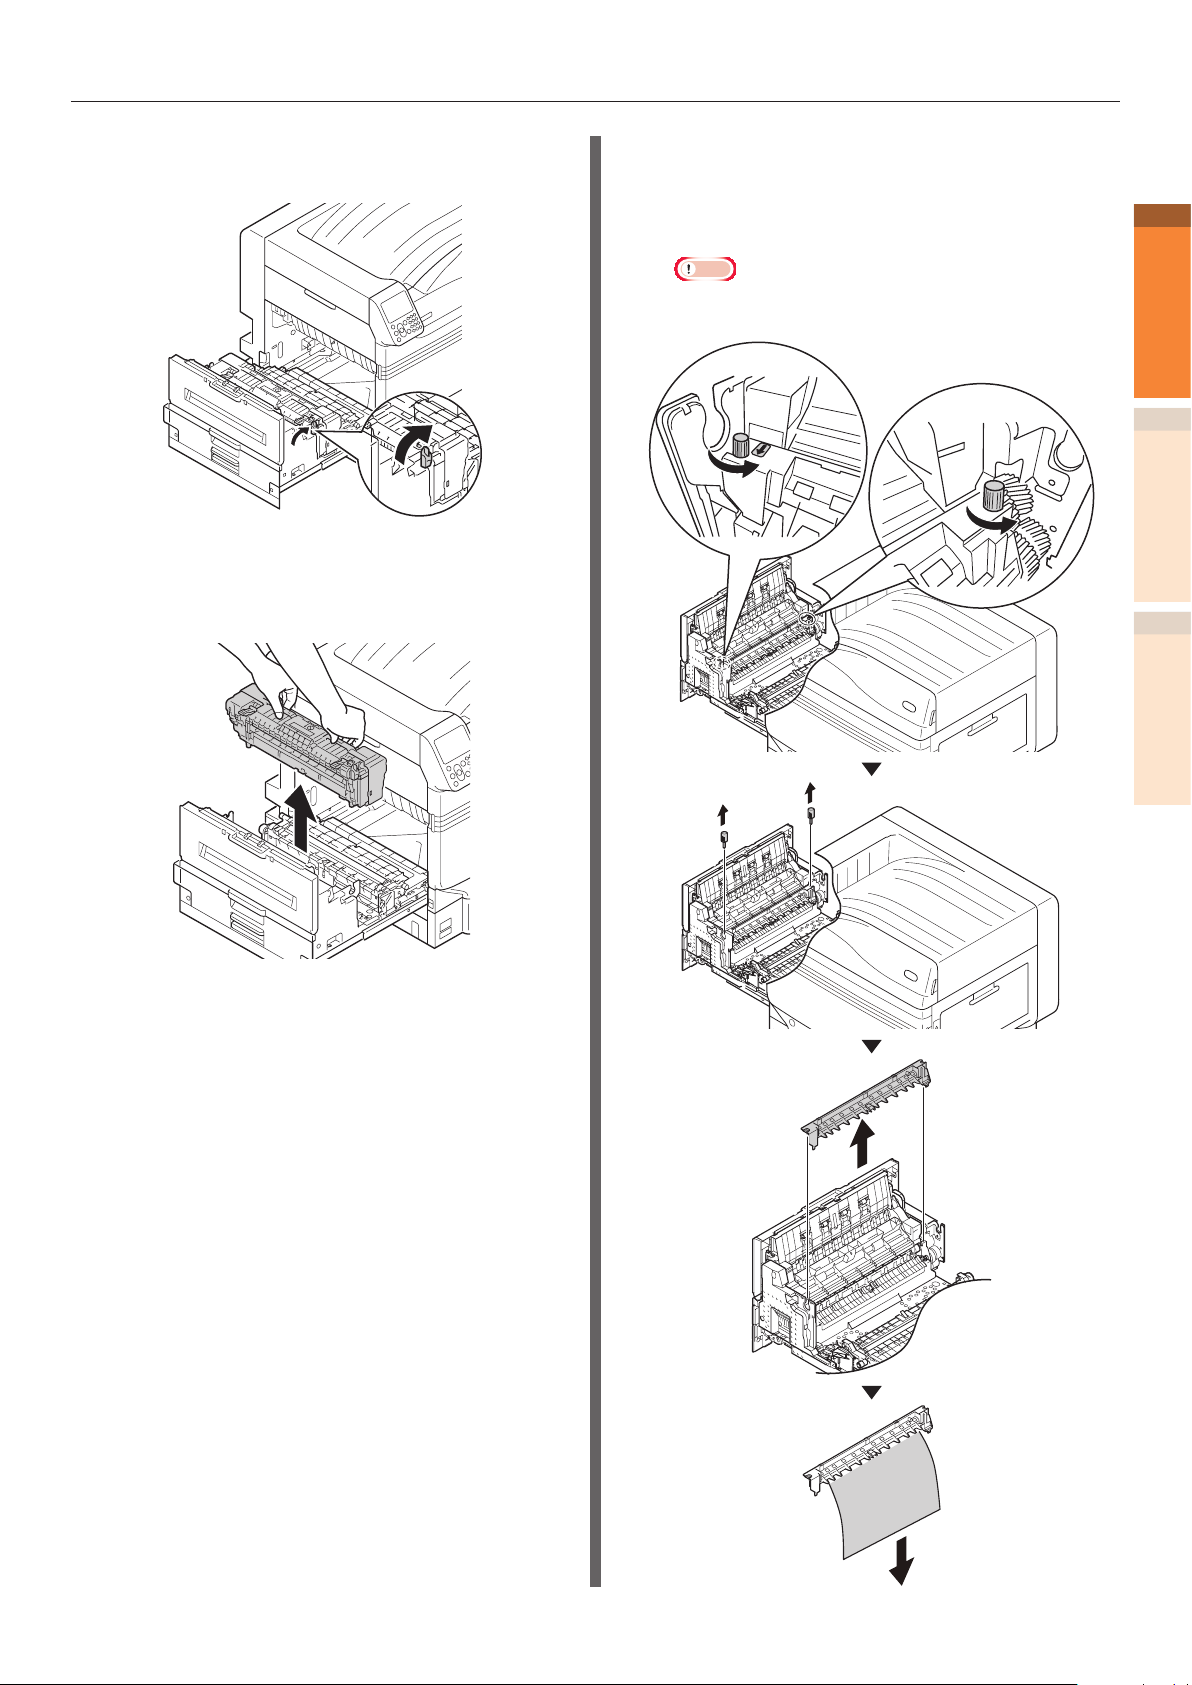
If there is remaining paper in the fuser
2
unit then pull up the fuser unit's jam
release lever (blue).
Ensure to slowly pull the remaining
3
paper towards the printer body
(opposite to the paper feeding
direction).
If there is no remaining paper in the
5
fuser unit then pull up the fuser unit's
lock lever (blue).
Hold the fuser unit handle with both
6
hands, and remove it onto a at
surface.
1
Troubleshooting
2
IndexMaintenance
Push down the fuser unit's jam release
4
lever (blue).
If a paper jam occurred in the fuser
7
unit, raise the jam release lever (blue),
and slowly pull the paper out in the
opposite direction from the paper
operation direction.
- 21 -
Paper jams
8
1
Troubleshooting
2
IndexMaintenance
If the paper winds around the decal roller,
remove the decal unit by turning the
thumbscrews at both ends of the decal
unit to the left, and remove the paper.
Note
Be careful not to drop the thumbscrew into the
z
device when xing.
Return the decal unit to its original
9
position, and x it with two
thumbscrews.
Note
Be careful not to drop the thumbscrew into the
z
device when removing.
- 22 -
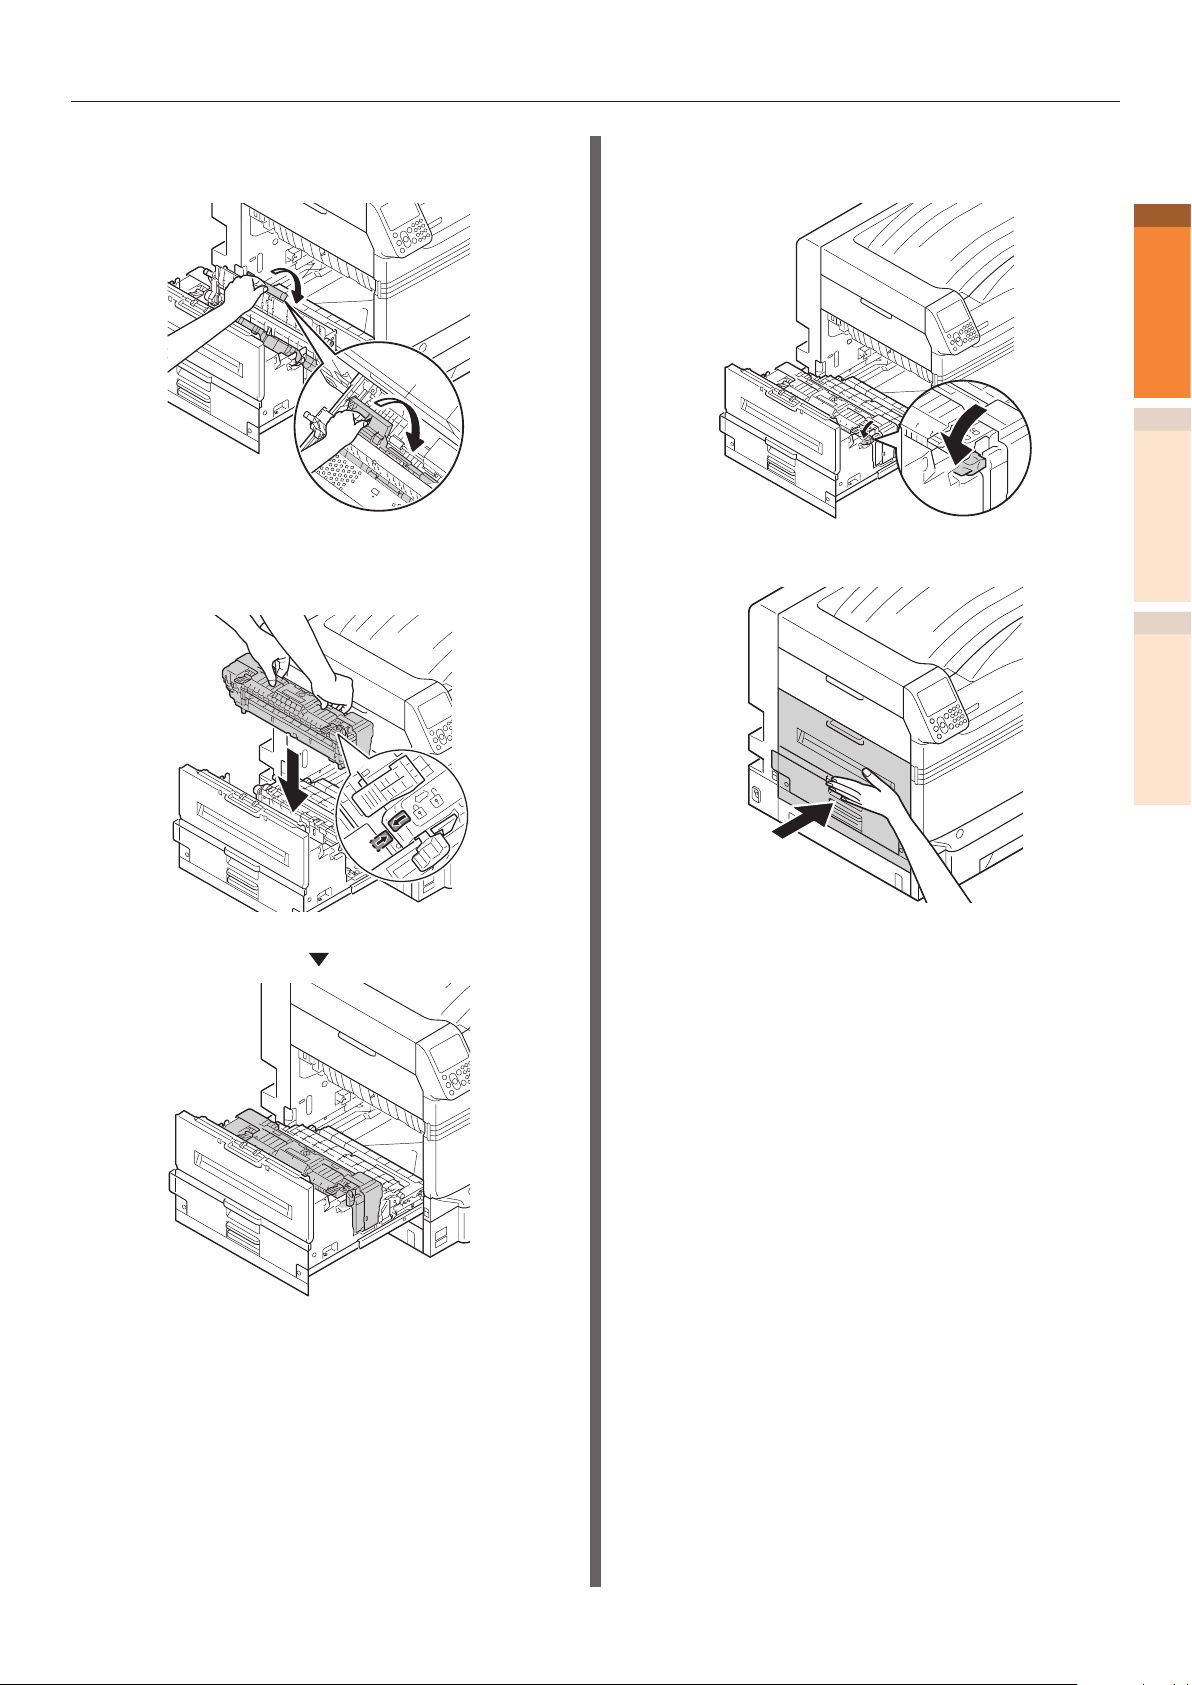
Hold the fuser unit handle with both
10
hands, and set to the exit unit.
Paper jams
Push down the fuser unit's lock lever
11
(blue).
Put the exit unit back into the printer.
12
Removing paper from the 2-Sided
Printing unit
Pull out the 2-Sided Printing unit, lift it
1
up a little with both hands, and remove
it.
Note
Do not pull the 2-Sided Printing unit out in one shot.
z
2-Sided Printing unit may fall down if you pull it out
in one shot, which may damage it.
1
Troubleshooting
2
IndexMaintenance
Remove the remaining paper.
2
- 23 -
Paper jams
3
1
Troubleshooting
2
IndexMaintenance
Put the 2-Sided Printing unit back into
the printer.
Removing paper from the vicinity
of Tray Side Cover
Error code: 391, 392, 393, 394,
395, 631, 632, 633, 634, 635
Example) In the case of Tray 1
Open the tray side cover where the
1
error is displayed.
- 24 -
Remove the remaining paper.
2
Paper jams
Close the Tray 1 side cover.
3
Removing paper from the vicinity
of the 2-Sided Printing unit
Error code: 370, 371, 373, 640,
641, 642
Pull out the 2-Sided Printing unit, lift it
1
up a little with both hands, and remove
it.
When you cannot see the jammed
paper in the 2-Sided Printing unit inside
the printer, put the 2-Sided Printing unit
back into the printer and go to Step 4.
1
Troubleshooting
2
IndexMaintenance
Remove the remaining paper.
2
- 25 -
Paper jams
3
1
Troubleshooting
2
IndexMaintenance
Put the 2-Sided Printing unit back into
the printer.
Lift opener ( ) of the exit unit, and pull
4
out the exit unit.
Check inside of the printer, and slowly
5
remove the remaining paper.
- 26 -
Paper jams
If the paper tip is not visible, pull up
6
the fuser unit's lock lever (blue).
Hold the fuser unit handle with both
7
hands, and remove it onto a at
surface.
If the paper winds around the decal roller,
8
remove the decal unit by turning the
thumbscrews at both ends of the decal
unit to the left, and remove the paper.
Note
Be careful not to drop the thumbscrew into the
z
device when removing.
1
Troubleshooting
2
IndexMaintenance
- 27 -
Paper jams
9
1
Troubleshooting
2
IndexMaintenance
Return the decal unit to its original
position, and x it with two
thumbscrews.
Note
Be careful not to drop the thumbscrew into the
z
device when xing.
Hold the knob, pull up the transfer roller
10
unit, lift the paper guide, and remove
the remaining paper.
- 28 -
Paper jams
Hold the knob, push down the transfer
11
roller unit.
Hold the fuser unit handle with both
12
hands, and set to the exit unit.
Push down the fuser unit's lock lever
13
(blue).
Put the exit unit back into the printer.
14
1
Troubleshooting
2
IndexMaintenance
- 29 -
Paper jams
Removing paper from the
vicinity of the lower side of
1
2-Sided Printing unit
Troubleshooting
Error code: 375, 650
Pull out the 2-Sided Printing unit, lift it
1
up a little with both hands, and remove
it.
2
IndexMaintenance
Put the 2-Sided Printing unit back into
3
the printer.
Remove the remaining paper from the
2
printer.
If no paper remains in visible locations
in the printer, follow the procedure
given below.
- 30 -

Paper jams
Lift opener ( ) of the exit unit, and
4
remove the remaining paper.
If the paper tip is not visible, pull up
5
the fuser unit's lock lever (blue).
Hold the fuser unit handle with both
6
hands, and remove it onto a at
surface.
1
Troubleshooting
2
IndexMaintenance
- 31 -

Paper jams
7
1
Troubleshooting
2
IndexMaintenance
If the paper winds around the decal roller,
remove the decal unit by turning the
thumbscrews at both ends of the decal
unit to the left, and remove the paper.
Note
Be careful not to drop the thumbscrew into the device
z
when removing.
Return the decal unit to its original
8
position, and x it with two
thumbscrews.
Note
Be careful not to drop the thumbscrew into the device
z
when xing.
- 32 -

Paper jams
Hold the knob, pull up the transfer roller
9
unit, lift the paper guide, and remove
the remaining paper.
Hold the knob, push down the transfer
10
roller unit.
Hold the fuser unit handle with both
11
hands, and set to the exit unit.
1
Troubleshooting
2
IndexMaintenance
Push down the fuser unit's lock lever
12
(blue).
- 33 -

Paper jams
13
1
Troubleshooting
2
IndexMaintenance
Put the exit unit back into the printer.
Removing paper from the
vicinity of Left Side Cover
Error code: 384, 651
Open the left side cover.
1
Slowly remove the remaining paper.
2
Close the left side cover.
3
- 34 -

When paper jam occurs frequently
Check the following when paper jam occurs very
frequently.
Paper jams
1
Is the feeding paper roller dirty? (“Cleaning
z
feed rollers”(P.93))
Is the paper guide set correctly? (Refer to
z
"Setting the Paper in the Basic")
Is the paper set after ipping through it
z
carefully? (Refer to "Setting the Paper in the
Basic")
Is the printer installed on a at and stable
z
surface?
Are you using the paper compatible with the
z
printer?
Are there any fragments of paper remaining
z
inside the printer?
Troubleshooting
2
IndexMaintenance
- 35 -

If paper messages are displayed
If paper messages are displayed
z
When paper type/size set in the printer tray differs from the printer driver specication, message such
1
as "Replace paper" and "Paper size error has occurred" will appear, and the <ATTENTION> lamp will
Troubleshooting
blink.
Messages related to paper and error codes, cause of errors and their resolutions, and status of the
<ATTENTION> lamp is described below.
Besides, when "Please see HELP for details" is shown in the message, pressing the [HELP] button in the
operation panel will show the solution procedure, and you can easily solve the process according to the
guidance. Refer to “Operating the Help screen”(P.13) for details.
2
Memo
Meanings of the symbols used in the error messages are as follows.
z
– [TRAY]: Tray 1, Tray 2 to Tray 5 (Displayed when the option of additional tray units is mounted.), either of the MP trays will
be displayed.
– [MEDIA_SIZE]: Paper size is displayed.
– [MEDIA_TYPE]: Paper type is displayed.
Category
IndexMaintenance
Load paper Please change [TRAY] paper
Empty Install [MEDIA_SIZE] in [TRAY]
Message displayed on the
liquid crystal panel
Ensure [MEDIA_SIZE], [MEDIA_TYPE]
is installed.
If printing fails, cancel and re-adjust
tray settings
Pressing OK will print using current
paper tray settings
Please see HELP for details
Change [MEDIA_SIZE], [MEDIA_TYPE]
in [TRAY]
Press OK button
Please see HELP for details
Change [MEDIA_SIZE], [MEDIA_TYPE]
in MPTray
Press OK button
Please see HELP for details
Please see HELP for details
Install [MEDIA_SIZE] in MPTray
Please see HELP for details
Error
code
461
462
463
464
465
661
662
663
664
665
660
460
491
492
493
494
495
490 Blinking The MP tray is empty.
<ATTENTION>
lamp
Blinking The size of the paper in the tray, or
Blinking The type of paper in the tray is
Blinking The type of paper in the MP tray
Blinking Tray shown in the message is empty.
Causes and Troubleshooting
the paper size and the paper type,
are different from the printer driver
specications.
Set the paper having size or type
shown in the message.
Printing will start if the paper size is
matching.
different from the specications of the
printer driver.
Set the paper having size or type
shown in the message.
is different from the print driver
specications.
Set the paper having size or type
shown in the message.
Set the paper having size or type
shown in the message.
Set the paper having size or type
shown in the message.
- 36 -

If paper messages are displayed
Category
Paper size
Error
Message displayed on the
liquid crystal panel
Remove Excess Paper and Reset Tray
[TRAY]
Please see HELP for details
Check Paper in [TRAY]
Paper Thick Error
Please see HELP for details
Check Paper in [TRAY]
Paper Multi Feed
Please see HELP for details
Check Paper in [TRAY]
Paper Size Error
Please see HELP for details
Reset Tray
[TRAY]
Please see HELP for details
Error
code
530
531
532
533
534
323
324
325
326
401 Blinking Multiple sheets of paper have been fed.
400 Blinking Printing has been conducted on paper
520
521
522
523
524
<ATTENTION>
lamp
Blinking The paper in the tray may exceed the
Blinking In the tray shown in the message,
Blinking Paper cannot be fed from the tray
Causes and Troubleshooting
maximum limit, or the paper tray may
need to be reset.
Please remove paper from the tray
shown.
paper of a different thickness is
detected.
To cancel printing, press the [CANCEL]
button. If multiple errors occur, you
can not cancel printing.
Press the [HELP] button, and solve
according to the guidance shown on
the Help screen.
To cancel printing, press the [CANCEL]
button. If multiple errors occur, you
can not cancel printing.
Press the [HELP] button, and solve
according to the guidance shown on
the Help screen.
which is of a different size from the
specications of the printer driver.
To cancel printing, press the [CANCEL]
button. If multiple errors occur, you
can not cancel printing.
Press the [HELP] button, and solve
according to the guidance shown on
the Help screen.
shown in the message.
Reset the paper in the tray shown in
the message.
1
Troubleshooting
2
IndexMaintenance
- 37 -

If replace consumables messages are displayed
If replace consumables messages are displayed
z
When timing for replacement of consumables and maintenance items approaches, or when the
1
replacement becomes necessary, message such as "Time for replacing ABC is approaching" and "ABC is
Troubleshooting
empty / Replace ABC" will appear, and the <ATTENTION> lamp will start blinking.
Messages related to replacement of consumable supplies and error codes, cause of errors and their
resolutions, and status of the <ATTENTION> lamp is described below.
Besides, when "Please see HELP for details" is shown in the message, pressing the [HELP] button in the
operation panel will show the solution procedure, and you can easily solve the process according to the
guidance. For details, refer to “Operating the Help screen”(P.13).
2
IndexMaintenance
Memo
Meanings of the symbols used in the error messages are as follows.
z
– [COLOR]: Either of Only Yellow, Only Magenta, Only Cyan, Only Black, White*1, and Clear*2 will be displayed.
*1: White will appear only for C941/C942/ES9541/ES9542/Pro9541/Pro9542.
*2: Clear will appear only for C941/ES9541/Pro9541.
Category
Toner
Cartridge
Image
Drum
Message displayed on the
liquid crystal panel
Install Toner
Black
Please see HELP for details
Install Toner
[COLOR]
Please see HELP for details
Install Toner Or Press OK Button
[COLOR]
Please see HELP for details
Install Toner Or Press OK Button
[White]/[Clear]
Please see HELP for details
Install [COLOR] New Image Drum
Image Drum Life
Please see HELP for details
Install [COLOR] New Image Drum
Image Drum Life To Exceed the
Life, Press OK Button
Please see HELP for details
Error
code
4103 Blinking Black Toner Empty
Printing
4100
4101
4102
4103*
4104
4105
Powering
on
4100
4101
4102
Powering
on
4104
4105
3500
3501
3502
3503
3504
3505
5600
5601
5602
5603
5604
5605
5640
5641
5642
5643
5644
5645
<ATTENTION>
lamp
Press the [HELP] button, and
solve according to the guidance
shown on the Help screen.
(C911/C931/C941/ES9411/ES9431/
ES9541/Pro9431/Pro9541 only)
Blinking Toner color shown in the
message is empty.
Press the [HELP] button, and
solve according to the guidance
shown on the Help screen.
If you switch the power back on,
please refer to the box below.
*: 4103 will appear only for
Blinking Toner Empty.
If you press the [OK] button,
only mono printing will continue.
Press the [HELP] button, and
solve according to the guidance
shown on the Help screen.
Blinking Toner Empty.
If you press the [OK] button, mono
or 4-color printing will continue.
Press the [HELP] button, and
solve according to the guidance
shown on the Help screen.
Blinking Lifespan of the image drum
shown in the message has
reached.
Press the [HELP] button, and
solve according to the guidance
shown on the Help screen.
Blinking The lifespan of the image drum
has been reached.
If you press [OK], printing will
continue, but the print quality
cannot be guaranteed.
Press the [HELP] button, and
solve according to the guidance
shown on the Help screen.
Causes and
Troubleshooting
C942/ES9542/Pro9542.
Reference
pages
page 64
page 64
-
-
page 66
page 66
- 38 -

If replace consumables messages are displayed
Category
Image
Drum
Waste
Toner Box
Fuser Unit Install New Fuser Unit
Belt Unit Install New Belt Unit
- Caution, unknown Consumable
Message displayed on the
liquid crystal panel
Install [COLOR] New Image Drum
Printing disabled due to low
threshold of Image Drum life
Please see HELP for details
Check Image Drum
[COLOR]
Please see HELP for details
Install New Waste Toner Box
Waste Toner Full
Please see HELP for details
Fuser Unit Life
Please see HELP for details
Belt Unit Life
Please see HELP for details
detected
Go to User Manual "Trouble
Shooting" to restore operation
Error
code
6800
6801
6802
6803
6804
6805
3400
3401
3402
3403
3404
3405
357 Blinking Waste toner is full.
354 Blinking Lifespan of the fuser unit has
355 Blinking Lifespan of the belt unit and
709 Blinking You can use any consumables
<ATTENTION>
lamp
Blinking The lifespan of the image drum
has been reached.
You cannot continue printing.
Press the [HELP] button, and
solve according to the guidance
shown on the Help screen.
Blinking Image drum shown in the
message has not been set
correctly.
Press the [HELP] button, and
solve according to the guidance
shown on the Help screen.
If you re-set and use a waste
toner box that is already used,
there is a risk of the waste toner
overowing, so please replace it
with a new waste toner box.
Press the [HELP] button, and
solve according to the guidance
shown on the Help screen.
reached
Press the [HELP] button, and
solve according to the guidance
shown on the Help screen.
the transfer roller unit has been
reached.
Press the [HELP] button, and
solve according to the guidance
shown on the Help screen.
in your product, but you must
accept the risks of using nongenuine consumables. If the use
of non-genuine consumables
causes damage to the product
or results in your product
not functioning to its full
specication, then such damage
or effect on the product is not
covered by warranty. To accept
these risks and to restore
function;
1. Turn off your product.
2. Press and hold the [CANCEL]
button and turn your product
on.
3. After start up, release the
[CANCEL] button.
Note
This operation will be recorded
for future reference.
Causes and
Troubleshooting
Reference
pages
page 66
-
page 77
page 75
page 69
-
1
Troubleshooting
2
IndexMaintenance
- 39 -

If other messages are displayed
If other messages are displayed
z
Other messages and error codes, cause of errors and their resolutions, and status of the <ATTENTION>
1
lamp are described below.
Troubleshooting
Besides, when "Please see HELP for details" is shown in the message, pressing the [HELP] button in the
operation panel will show the solution procedure, and you can easily solve the problem according to the
guidance. For details, refer to “Operating the Help screen”(P.13).
Memo
Meanings of the symbols used in the error messages are as follows.
z
2
– [COLOR]/[MENUCOLOR]: Either of Only Yellow, Only Magenta, Only Cyan, Only Black, White*, and Clear** will be displayed.
*: White will appear only for C941/C942/ES9541/ES9542/Pro9541/Pro9542.
**: Clear will appear only for C941/ES9541/Pro9541.
– [TRAY]: Tray 1, Tray 2 to Tray 5 (Displayed when the option of additional tray units is mounted.), either of the MP trays will
be displayed.
– [COVER]: Either front cover, Tray 1 side cover to Tray 5 side cover (Tray 2 side cover to Tray 5 side cover will be displayed
when the option of additional tray units is mounted.), or exit unit cover will be displayed.
– [CODE]: Detailed information of the error will be displayed.
IndexMaintenance
Message displayed on the
liquid crystal panel
Power Off/On
[ERRCODE]: Error
Image Drum Not Installed
[COLOR]
Please see HELP for details
Image Drum Sensor Error
Please check [COLOR] image
drum and reset
Please see HELP for details
Remove Paper
[STACKER]
Please see HELP for details
[STACKER]: Either Face Up Stacker or
Face Down Stacker will be displayed.
Press OK Button for Restoration
Memory Overow
Please see HELP for details
A spot color printing error has
occurred. Data will be erased.
Check the paper and paper
settings, then print again. To turn
off the display, press OK
Please see HELP for details
Error
code
6940
6941
6942
6943
6944
6945
5400
5401
5402
5403
5404
5405
480
484
420 Blinking Cannot print. Printing data has
459 Blinking
<ATTENTION>
lamp
- Blinking A fatal error has occurred.
Blinking The image drum shown in the
Blinking Sensor error has occurred in the
Blinking The paper stacker is full.
Causes and Troubleshooting
If the error is not resolved by
restarting the printer, contact your
designated help desk.
message has not been installed.
Press the [HELP] button, and solve
according to the guidance shown on
the Help screen.
image drum shown.
Sensor may be unclean or stopper is
installed.
Press the [HELP] button, and solve
according to the guidance shown on
the Help screen.
Remove Paper from stacker.
exceeded the memory capacity of
the printer.
In the Quality of printer driver, select
[Fine/Detail] or [Normal], and print
once again.
Press the [OK] button for deleting
the display of the liquid crystal
panel.
Printing is stopped because of print
request from an incompatible custom
media, and data is deleted.
Print once again.
Press the [OK] button for deleting the
display of the liquid crystal panel.
Reference
pages
-
-
-
-
[Advanced] >
[Print with
best quality]
-
- 40 -

If other messages are displayed
Message displayed on the
liquid crystal panel
Close Cover
[COVER]
Please see HELP for details
Non Genuine Image Drum
[COLOR]
Please see HELP for details
Incompatible Image Drum
[COLOR]
Please see HELP for details
Error
code
311
312
313
314
315
585
588
589
6840
6841
6842
6843
6844
6845
6900
6901
6902
6903
6904
6905
7000
7001
7002
7003
7004
7005
7040
7041
7042
7043
7044
7045
7100
7101
7102
7103
7104
7105
7200
7201
7202
7203
7204
7205
<ATTENTION>
lamp
Blinking The cover shown in the message is
Blinking The image drum is not intended for
Blinking The image drum is not intended for
Causes and Troubleshooting
open.
Close the cover.
use with this printer model.
Use an image drum intended for use
in this printer model.
use with this printer model.
Use an image drum intended for use
in this printer model.
Reference
pages
-
-
-
1
Troubleshooting
2
IndexMaintenance
- 41 -

If other messages are displayed
1
Troubleshooting
Incompatible Toner
[COLOR]
Please see HELP for details
2
IndexMaintenance
Non Genuine Toner
[COLOR]
Please see HELP for details
Non Genuine Fuser Unit
Please see HELP for details
Incompatible Fuser Unit
Please see HELP for details
Non Genuine Belt Unit
Please see HELP for details
Incompatible Belt Unit
Please see HELP for details
Fuser Unit Not Installed
Please see HELP for details
Message displayed on the
liquid crystal panel
Error
code
5540
5541
5542
5543
5544
5545
6140
6141
6142
6143
6144
6145
6200
6201
6202
6203
6204
6205
6240
6241
6242
6243
6244
6245
7140
7141
7142
7143
7144
7145
5500
5501
5502
5503
5504
5505
6981 Blinking Fuser unit not intended for use
6982
6983
6984
6985
6986
6987
6881 Blinking Belt unit not intended for use with
6882
6883
6884
6885
6886
699 Blinking
<ATTENTION>
lamp
Blinking Toner cartridge is not intended for
Blinking Toner cartridge is not intended for
Blinking Fuser unit not intended for use with
Blinking Belt unit not intended for use with
Causes and Troubleshooting
use with this printer model.
Use a toner cartridge intended for
use in this printer model.
use with this printer model.
Use a toner cartridge intended for
use in this printer model.
with this printer model.
Use a fuser unit intended for use
in this printer model.
this printer model.
Use a fuser unit intended for use in
this printer model.
this printer model.
Use a belt unit intended for use in
this printer model.
this printer model.
Use a belt unit intended for use in
this printer model.
The fuser unit is not installed
properly.
Press the [HELP] button, and solve
according to the guidance shown on
the Help screen.
Reference
pages
-
-
-
-
-
-
-
- 42 -

If other messages are displayed
Message displayed on the
liquid crystal panel
Check Fuser Unit
Please see HELP for details
Receiving Data Timeout
Press OK Button for Restoration
Please see HELP for details
Check Data
Message Data Write Error <[CODE]>
Install Transfer Roller Unit
Re-set the transfer roller unit
Please see HELP for details
A spot color printing error has
occurred. Data will be erased
Check the paper and paper
settings, then print again. To turn
off the display, press OK
Please see HELP for details
The data will be deleted due to an
overprint feature error
Mount the duplex printing unit
and print again. To turn off the
display, press OK
Please see HELP for details
The data will be deleted due to an
overprint feature error
Check the paper and paper
settings, then print again. To turn
off the display, press OK
Please see HELP for details
Spot Color has been replaced
Press OK to change the Spot Color
settings in the menu to [COLOR]
and restart the system
If you do not want to change
settings, return Spot Color toner,
image drum and Spot Color duct
settings to [MENUCOLOR].
Spot Color has been replaced
Check Spot Color menu settings
Current setting is [MENUCOLOR]
Press OK Button
Spot Color settings changes
Shut down and restart to enable
new settings
Error
code
348
320
519 Blinking A data receipt timeout occurred.
334 Blinking The transfer roller unit is not set
459 Blinking
458 Blinking
456 Blinking Paper used for printing is not
679 Blinking Spot Color has been exchanged
678 Blinking Spot Color has been exchanged
677 Blinking
<ATTENTION>
lamp
Blinking The fuser unit is not installed
- - Failed to write the message data to
Causes and Troubleshooting
correctly.
Install the fuser unit correctly.
Increase the length of timeout print
setting.
be updated. Check data.
correctly.
Press the [HELP] button, and solve
according to the guidance shown on
the Help screen.
Because of a print request for paper
unavailable to spot color printing, the
printing has been stopped, and the
data was deleted.
Check the paper and paper settings,
and print again.
Press the [OK] button for deleting the
display of the liquid crystal panel.
Spot Color over printing is specied,
but the 2-Sided Printing unit is not
there. Printing was stopped and the
print data was deleted.
Install the 2-Sided Printing unit and
print once again.
Press the [OK] button for deleting the
display of the liquid crystal panel.
(C941/ES9541/Pro9541 only)
compatible for Spot Color over
printing. Printing was stopped and
the print data was deleted.
Change the paper, or set to Normal
and print once again.
Press the [OK] button for deleting the
display of the liquid crystal panel.
(C941/ES9541/Pro9541 only)
Solve according to the message.
(C941/ES9541/Pro9541 only)
Solve according to the message.
(C941/ES9541/Pro9541 only)
Spot Color setting has been
changed.
Solve according to the message.
(C941/ES9541/Pro9541 only)
Reference
pages
-
[Advanced] >
[List of Setting
Items of
the Device
Settings
Screen] >
[Timeout
Printing]
-
-
-
-
-
-
-
-
1
Troubleshooting
2
IndexMaintenance
- 43 -

If other messages are displayed
1
Troubleshooting
2
IndexMaintenance
Spot Color Duct has not been
installed
Please install the Spot Color Duct
Please see HELP for details
Toner Duct has not been installed
Please install the Toner Duct
Please see HELP for details
Check Image Drum and Toner
Cartridge
[COLOR]
Please see HELP for details
Check Toner Duct
Please see HELP for details
Check Spot Color Duct
Please see HELP for details
Toner Not Installed
[COLOR]
Please see HELP for details
The toner replacement cover is
open
Please see HELP for details
Install Paper Cassette
[TRAY]
Please see HELP for details
Install Exit Unit
Please see HELP for details
Check Waste Toner Box
Please see HELP for details
Reset Waste Toner Box
Waste Toner Transfer Error
Please see HELP for details
Message displayed on the
liquid crystal panel
Error
code
676 Blinking
676 Blinking Toner Duct has not been installed.
5440
5441
5442
5443
5444
5440 Blinking The toner duct is not properly
5444
5445
6100
6101
6102
6103
6104
6105
586 Blinking The toner replacement cover is
430
431
432
433
434
333 Blinking The exit unit is missing.
331 Blinking The waste toner box is not set
359 Blinking A waste toner transfer error has
<ATTENTION>
lamp
*1
Blinking The toner cartridge shown in the
*2
Blinking The spot color duct is not properly
Blinking The toner cartridge shown in the
Blinking There is no paper cassette in the
Causes and Troubleshooting
Spot Color Duct has not been installed.
Please install the Spot Color duct.
(C941/ES9541/Pro9541 only)
Please install the Toner duct.
(C942/ES9542/Pro9542 only)
message is not set correctly.
Press the [HELP] button, and solve
according to the guidance shown on
the Help screen.
*1: 5440 will appear only for C942/
ES9542/Pro9542.
*2: 5444 will appear only for C941/
ES9541/Pro9541.
installed.
Reset the toner duct.
Press the [HELP] button, and solve
according to the guidance shown on
the Help screen.
(C942/ES9542/Pro9542 only)
installed.
Reset the spot color duct.
Press the [HELP] button, and solve
according to the guidance shown
on the Help screen. (C941/ES9541/
Pro9541 only)
message has not been installed.
Press the [HELP] button, and solve
according to the guidance shown on
the Help screen.
open.
Check that the toner cartridge is
pushed in rmly as far as it can go,
and close the toner cover.
tray shown in the message.
Set the paper cassette in the tray
shown in the message.
When the paper cassette is already
there in the tray, pull the cassette
out and set it correctly.
Please install the exit unit.
correctly.
Reset the waste toner box.
occurred.
Press the [HELP] button, and solve
according to the guidance shown on
the Help screen.
Reference
pages
-
-
-
-
-
-
-
-
-
-
-
- 44 -

If other messages are displayed
Message displayed on the
liquid crystal panel
Firmware Update Error
Please retry
If network doesn’t work, please
try rmware update over USB
Open Stacker
Face Up Stacker
Please see HELP for details
Belt Unit Not Installed
Please see HELP for details
Check Belt Unit
Please see HELP for details
Power Off and Wait for a while
126: Condensing Error
Install Duplex Unit
Please see HELP for details
The data was deleted because a
duplex printing error occurred
Check the paper and paper
settings, then print again. To turn
off the display, press OK
Please see HELP for details
Error
code
302 - Firmware update failed.
580 Blinking Face up stacker is closed.
689 Blinking The belt unit is not installed.
330 Blinking The belt unit is not set correctly.
360 Blinking The 2-Sided Printing unit is not set
455 Blinking
<ATTENTION>
lamp
- Blinking Condensation has occurred inside
Causes and Troubleshooting
Follow the contents of the message.
Please open the face up stacker.
Press the [HELP] button, and solve
according to the guidance shown on
the Help screen.
Press the [HELP] button, and solve
according to the guidance shown on
the Help screen.
the printer.
Restart the printer after some time.
If the error is not resolved by
restarting the printer, contact your
designated help desk.
correctly.
Install the 2-Sided Printing unit
correctly.
2-Sided printing cannot be done
because the paper is too thick or it is
small. Printing was stopped and the
print data was deleted.
Change the paper, or set to 1-Sided
Printing and print once again.
Press the [OK] button for deleting
the display of the liquid crystal panel.
Reference
pages
-
-
-
-
-
-
-
1
Troubleshooting
2
IndexMaintenance
- 45 -

Printing Troubles
Printing Troubles
z
This section describes the possible troubles that may occur while operating the printer, and their
1
solution procedure.
Troubleshooting
Memo
If the problem is not solved using the following methods, contact your dealer.
z
For problems arising from the applications, contact the application development company.
z
Unable to print
2
Basic reasons
Common for Windows/Mac OS X
Cause Solution procedure
Power supply of the printer is switched off. Switch on the power supply. Basic
Power supply was switched off due to the auto
power off function.
IndexMaintenance
Printer is in sleep mode.
LAN Cable/USB Cable is disconnected. Check that labels are correctly connected to the
Cables are defective. Replace with new cables. -
Printer is ofine.
Error message has appeared on the liquid
crystal panel of the operation panel.
NBT, EtherTalk, and WSP Print protocols are
used.
Interface settings are disabled. From [Admin Setup]>[Network Setup] on the
There is a problem with the print function. Check whether you can print the printer
Print will be automatically canceled. Print is not allowed when print job accounting
Switch on the power supply.
When you do not want to use the auto power off
function, disable it with [Admin Setup]>[Power
Setup]>[Auto Power Off] in the operation panel.
Touch the [POWER SAVE] button on the operation
panel, and change the status to the standby mode.
When you do not want to use the sleep mode,
disable the sleep mode from [Admin Setup]>[Power
Setup]>[Sleep] in the operation panel.
printer and the computer.
Press the [ON LINE] button on the operation panel.
Press “If paper messages are
displayed”(P.36),”If replace consumables
messages are displayed”(P.38),”If other
messages are displayed”(P.40), or the [HELP]
button on the operation panel.
When the sleep mode is enabled, disable it from
[Admin Setup]>[Power Setup]>[Sleep] in the
operation panel.
operation panel, enable the interface you are
using.
information or not.
client is used. Or, job accounting log buffer may
be full.
Reference
pages
Advanced
Basic
-
-
page 36
page 38
page 40
-
Advanced
Basic
Advanced
- 46 -

For Windows
Printing Troubles
Cause Solution procedure
This printer is not set as default printer. Set it to default printer. -
Output port of printer driver is incorrect. Select the output port where LAN cable/USB
cable is connected.
Printing from other interface is in progress. Wait until the printing is complete. -
Reference pages
Network Connection Problems
Common for Windows/Mac OS X
Cause Solution procedure
Cross cable is used. Arrange straight cable and hub, and connect
Compatibility problem with hub. Select [Admin Setup]>[Network Setup]>[Hub
There is a problem with hub. Insert network cable in the empty hub, or
Network cable is defective. Reconnect with a new or a different network
Incorrect IP address.
Duplicate IP address. Check that IP address of the printer does not
correctly.
Link Setting] from the operation panel, and
change the settings.
another port. If the problem is still not solved,
use another hub.
cable, and check again.
Check that IP address settings of the printer,
z
and IP address of the printer set in the
computer are matching.
If you are using OKI LPR Utility on Windows,
z
check IP address settings in OKI LPR Utility.
Check that IP address is not overlapping with
z
other device.
Check that correct address is set in IP
z
address, Subnet mask, and Gateway address.
overlap with other IP address.
Reference pages
Basic
Advanced
Advanced
1
-
Troubleshooting
2
-
-
-
IndexMaintenance
USB Connection Problems
Common for Windows/Mac OS X
Cause Solution procedure
Cable does not meet the standards. Use USB cable of USB 2.0 specications. Basic
USB hub is used. Directly connect the printer to the computer. -
Printer driver is not installed correctly. Please re-install the printer driver. Basic
For Windows
Cause Solution procedure
Printer is ofine. Right click the OKI C9xx icon in the [Devices and
Switch, buffer, extension cable, and USB hub
are used.
Another printer driver operated through USB
connection is installed.
Printers] folder, and select [See what’s printing]
(When multiple drivers are installed>[OKI C9xx
(*)]). Select the [Printer] menu in the dialog
displayed, and uncheck [Use Printer Ofine].
*: Select the type of required driver.
Directly connect the printer to the computer. -
From the computer, remove other printer
drivers.
Reference pages
Reference pages
Basic
-
- 47 -

Printing Troubles
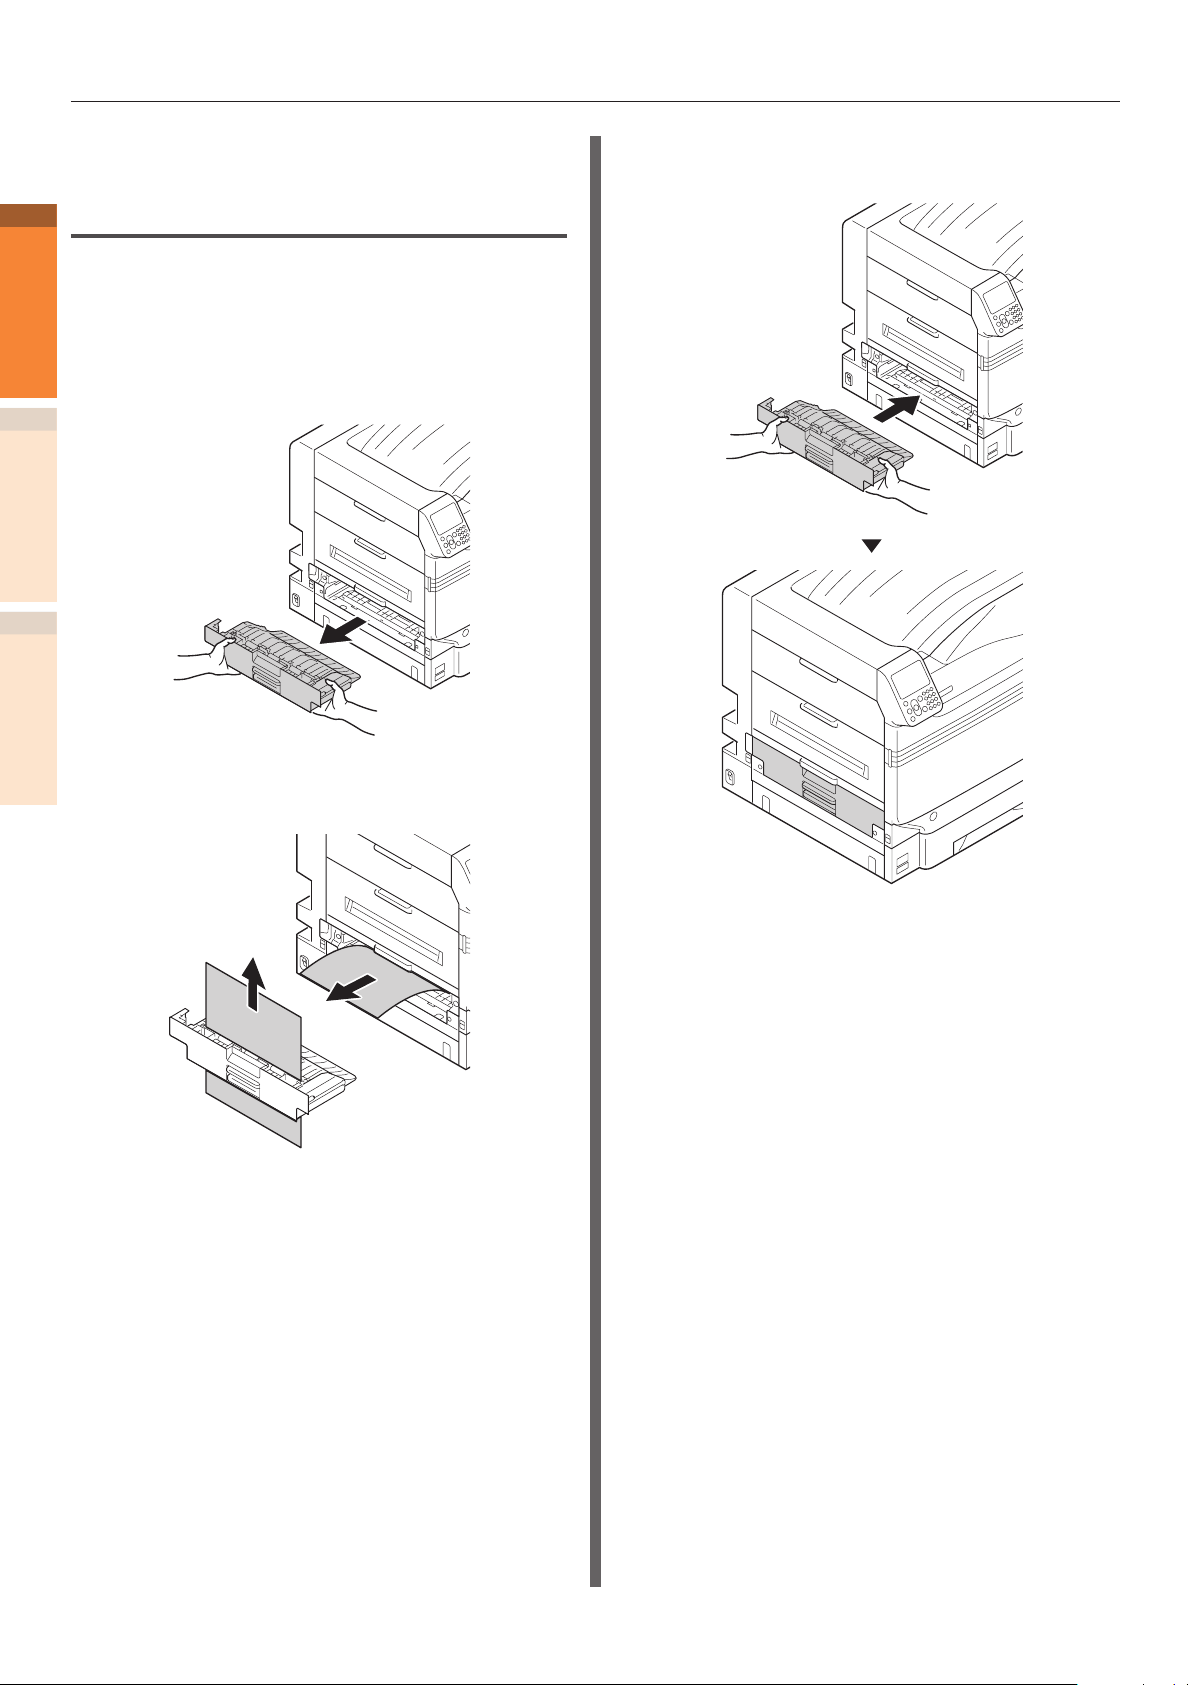
Printer Troubles
1
Troubleshooting
Memo
If the problem is not solved using the following explanation, contact your dealer.
z
Symptom Cause Troubleshooting
Nothing is displayed in the
liquid crystal panel even after
switching on the power supply.
Power supply cord is
disconnected.
Power outage. Check if electricity is owing in
2
Does not function. Power supply cord is not
inserted rmly.
Power supply is not switched
on.
LED lamp of the power supply
switch is blinking at high speed
at about 0.3 seconds interval.
IndexMaintenance
The printer has broken down. Unplug the power cord
Reference
pages
Switch off the power supply, and
rmly insert the power supply
cord.
the power socket.
Firmly insert the power supply
cord.
Switch on the power supply. Basic
immediately, and then
contact your dealer.
Basic
-
Basic
-
Printing process does not start. Error is displayed. Check the error code, and follow
the instructions displayed on the
liquid crystal panel.
LAN Cable/USB Cable is not
connected.
LAN Cable/USB Cable is
defective.
LAN Cable/USB Cable does not
meet the standards.
There may be a problem with
the print function.
Interface is disabled. From [Admin Setup]>[Network
Printer driver is not selected. Set the printer driver to "default
Output port of printer driver is
incorrect.
Liquid crystal display of the
operation panel is blank.
Print data is not sent. LAN Cable/USB Cable is
Abnormal sound. Device is tilted. Install on a stable and a at
Printer is in sleep mode. Touch the [POWER SAVE]
damaged.
Computer had timed out. Increase the length of timeout. -
Firmly insert LAN Cable/USB
Cable.
Use another LAN Cable/USB
Cable.
Use a cable of USB 2.0
z
specications.
Use a cable of LAN Cable
z
1000 BASE-T Specications.
Check whether you can print the
printer information or not.
Setup] on the operation panel,
enable the interface you are
using.
printer".
Specify the output port where
LAN cable/USB cable is to be
connected.
button on the operation panel,
and change the status to the
standby mode.
Connect a new cable. -
surface.
page 36
page 38
page 40
Basic
-
Basic
Basic
Advanced
Basic
Basic
Basic
Basic
- 48 -

Printing Troubles
Symptom Cause Troubleshooting
Resonant sound. While temperature inside the
device has increased, printing
is done on a narrow paper or a
thick paper.
Printing does not start
immediately.
Printing stops in between. Temperature is adjusted
Not enough memory. Inadequate memory of the
Slow printing. Printing process is also done at
Display of the printer driver is
abnormal. (Mac OS X)
Device is warming up for
returning from the power
saving mode or auto power off.
Cleaning of image drum may
be in progress.
Temperature adjustment of the
fuser unit is under progress.
Processing of data from other
interface is in progress.
because temperature of the
fuser unit increased due to
continuous printing.
Temperature is adjusted
because temperature inside
the device increased due to
continuous printing for long
time.
printer due to large printing
data
the computer side.
Select [ProQ/High Quality] in
the [Job Options] tab of the
printer driver.
Complicated print data. Select simple print data. -
Printer driver may not be
functioning correctly.
Reference
pages
Device has not broken down.
Use the device as it is.
Please wait.
When you do not want to use
auto power off, select [Admin
Setup]>[Power Setup]>[Sleep]/
[Auto Power Off], and disable
both the modes.
Please wait. -
Please wait. -
Wait until the printing is
complete.
Please wait.
Printing will automatically
start again once temperature
of the fuser unit has become
appropriate.
Please wait.
Printing will automatically start
again once temperature of the
printer has become appropriate.
Print after lowering the quality
of printer driver.
User a computer with fast
processing speed.
In the [Advanced] tab of the
printer driver,
select [Fine/
Detail(1200x1200dpi)]
or [Normal (600x600dpi)].
Delete the printer driver once,
and re-install it.
Advanced
Advanced
-
1
Troubleshooting
2
-
-
IndexMaintenance
-
-
-
- 49 -

Printing Troubles
Printer driver malfunctions
1
Troubleshooting
Memo
If the problem is not solved using the following explanation, contact your dealer.
z
For problems arising from the applications, contact the application development company.
z
USB Connection Problems
For Windows
2
Cause Solution procedure
Icon of the printer is not created in the [Devices
and Printers] folder.
Even when installation of multiple printer drivers
is selected, only the initial printer driver is
installed.
IndexMaintenance
Reference
pages
Printer driver is not installed correctly. Basic
Install the second and subsequent printer
drivers according to the following procedure.
1. Insert the "Software DVD-ROM" in the
computer.
2. Click [Run Setup.exe], and follow the
instructions provided on the screen.
3. Select [Custom Install], select the printer
drivers you want to install on the [Install
Software] screen, and then click the [Install]
button.
4. When the [Installing] screen appears, click
[Install on other ports].
5. Select [FILE] on the [Select Port] screen, and
then click [Next].
6. Follow the instructions displayed on the
screen to nish the installation.
7. In [Devices and Printers], right click on the
icon of driver you installed, and select [Printer
properties] (or [OKI C9xx (*)] if installing
multiple printer drivers).
8. From the list of the [Port] tab, select
[USBxxx].
9. Click the [OK] button.
-
Error message such as "Printer driver installation
failed" appears.
*: Select the type of driver you would like to set.
Use plug and play. Follow the procedure given
below.
1. Check that power supply of the printer and
computer is turned off.
2. Connect the USB cable.
3. Turn on the power supply of the printer.
4. Turn on the power supply of the computer.
5. When the [Search new software] wizard
appears, set up according to the instructions
displayed on the screen.
- 50 -
-

Problems concerning restrictions of OS
Printing Troubles
Restrictions concerning Windows 7/Windows 8/Windows 8.1/Windows
Vista/Windows Server 2008 R2/Windows Server 2008/Windows Server
2012/Windows Server 2012 R2
Item Symptom Causes and Troubleshooting
Printer driver Help does not appear. The Help function is not supported by the PS printer driver.
The [User Account
Control] dialog appears.
Network Extension Help does not appear. The Help function is not supported.
The [User Account
Control] dialog appears.
The [Program
compatibility assistant]
dialog will appear.
Color Correct Utility The [User Account
Control] dialog appears.
The [Program
compatibility assistant]
dialog will appear.
Color sample print utility The [User Account
Control] dialog appears.
The [Program
compatibility assistant]
dialog will appear.
PS Gamma Adjuster The [User Account
Control] dialog appears.
The [Program
compatibility assistant]
dialog will appear.
When starting installer or utility, the [User Account Control]
dialog may appear. Click [Yes] or [go], and run installer or
utility as administrator. Clicking [No] or [Cancel] will not
start installer or utility.
When starting installer or utility, the [User Account Control]
dialog may appear. Click [Yes] or [go], and run installer or
utility as administrator. Clicking [No] or [Cancel] will not
start installer or utility.
When the [Program compatibility assistant] dialog appears
after completion of installation (including when installation
is aborted in the middle), ensure to click [This program
installed correctly].
When starting installer or utility, the [User Account Control]
dialog may appear. Click [Yes] or [go], and run installer or
utility as administrator. Clicking [No] or [Cancel] will not
start installer or utility.
When the [Program compatibility assistant] dialog appears
after completion of installation (including when installation
is aborted in the middle), ensure to click [This program is
successfully installed].
1
Troubleshooting
2
IndexMaintenance
- 51 -

Printing Troubles
Print quality is poor
1
Troubleshooting
Memo
If the problem is not solved using the following methods, contact your dealer.
z
Symptom Cause Troubleshooting
White stripe in perpendicular
direction.
2
Paper feeding direction
Printing is blurred in
perpendicular direction.
IndexMaintenance
Paper feeding direction
Printing is light.
Printing is blurred in some
parts. Solid printing will result
in the appearance of white dots
or lines.
Stripes in perpendicular
direction.
Reference
pages
LED head is unclean. Wipe LED head with a soft
tissue paper.
Low toner. Replace the toner cartridge. page 64
Deposit of foreign substances. Replace the image drum. page 66
Window lm of image drum is
unclean.
Image drum has not been set
correctly.
LED head is unclean. Wipe LED head with a soft
Low toner. Replace the toner cartridge. page 64
Paper not supported. Use recommended paper. Basic
The toner cartridge is not
installed correctly.
Low toner. Replace the toner cartridge. page 64
Paper is moist. Use paper stored at appropriate
Paper not supported. Use recommended paper. Basic
Paper not supported.
Type and thickness setting of
paper is inappropriate.
Recycled paper is used. Correct [Media Weight] in
Paper contains moisture. Dry it. Use paper stored at appropriate
Inappropriate settings of [Paper
Black Setting] or [Paper Color
Setting].
In the case of transparency
settings, [Trans. Black Setting]
or [Trans. Color Setting] is not
properly set.
There are dents on the image
drum.
Low toner. Replace the toner cartridge. page 64
Wipe window lm with a soft
tissue paper.
Please set the image drum
correctly.
tissue paper.
Re-install the toner cartridge. page 64
temperature and humidity.
Correct [Media Weight] in
the operation panel to the
appropriate value. Or, change
[Media Weight] to a thicker
value than the present value.
the operation panel to the
appropriate value. Or, change
[Media Weight] to a thicker
value than the present value.
temperature and humidity.
Change the value of [Printer
Setting]>[Paper Black Adjust]
or [Paper Color Setting].
In the case of transparency
settings, change the value of
[Trans. Black Setting] or [Trans.
Color Setting].
If printing is blurred, raise the
setting value. If white dots
appear, lower the setting value.
Replace the image drum. page 66
page 87
-
page 66
page 87
-
Basic
Basic
Basic
Advanced
Paper feeding direction
- 52 -

Printing Troubles
Symptom Cause Troubleshooting
The front or rear edge of the
paper is dirty.
Paper feeding direction
Image disturbance occurs to
the printed portion.
Stripes or dots appear
periodically in horizontal
direction.
Paper feeding direction
Portion of white ground is
lightly stained.
Reference
pages
The transfer roller is dirty. Run [Print Adjust] > [Transfer
Roller Cleaning] on the control
panel.
The transfer roller unit or the
paper transfer path is dirty.
The speed of the fuser unit is
incorrect.
In the case of cycle length of
about 125 mm, image drum
may be unclean or there may
be dents on it.
In the case of cycle length of
about 38 mm, there is dirt
inside the image drum.
In the case of cycle length of
about 150 mm, there are dents
on the fuser unit.
Image drum is exposed to light. Return the image drum inside
Dirt has deposited on the paper
transfer path.
Paper has static electricity. Use paper stored at appropriate
Thick paper is used. Use thinner paper. -
Low toner. Replace the toner cartridge. Basic
Wipe the transfer roller unit and
the paper transfer path with a
soft tissue paper.
Feed ve sheets or more of plain
paper of 355.6 mm or above in
length (larger than Legal14 but
including A3 size).
Wipe it lightly with a soft tissue
paper.
If there are dents, replace the
image drum.
Open and close the toner
replacement cover, and repeat
the initial operation.
Replace the fuser unit. page 75
the printer, and do not use the
printer for a few hours. If it
does not rectify even after that,
replace the image drum.
Print few pages as test copies. -
temperature and humidity.
Advanced
page 96
page 58
page 66
Basic
page 66
Basic
1
Troubleshooting
2
IndexMaintenance
Border of characters is blurred.
When printing postcards,
envelopes, or coated papers,
printing will be thinly stained
overall.
LED head is unclean. Wipe it with a soft tissue paper. page 87
Paper not supported. Use recommended paper. Basic
Paper is moist. Replace with a new paper. -
Printing of envelopes and
coated papers will result in
toner deposit overall.
Device has not broken down.
Do not use coated paper to the
extent possible.
-
- 53 -

Printing Troubles
Symptom Cause Troubleshooting
Rubbing it off will remove the
1
toner.
Troubleshooting
2
Specks appear on glossy
papers.
Bold lines appear in horizontal
direction.
IndexMaintenance
Paper feeding direction
Lateral-stripe white dots appear
at the solid printing portion.
Type and thickness setting of
paper is inappropriate.
Recycled paper is used. Correct [Media Weight] in the
Type and thickness setting of
paper is inappropriate.
Type and thickness setting of
paper is inappropriate.
If the hardness of the paper is
high, a shock has occurred at
the time of transportation.
[Transfer Setting] is not
properly set.
Correct [Media Weight] in the
operation panel to appropriate
value. Or, change [Media
Weight] to a thicker value than
the present value.
operation panel to appropriate
value. Or, change [Media
Weight] to a thicker value than
the present value.
Correct [Media Weight] in the
operation panel to appropriate
value. Or, change [Media
Weight] to a thicker value than
the present value.
If a line is printed from the second
page with black & white print,
set the [Media Weight] to an
appropriate value from the control
panel. Or, change [Media Weight]
to a thicker value than the present
value. If [Ultra Heavy1] to [Ultra
Heavy3] has been set and you
want to improve the setting, select
[Admin Setup] > [Print Setup] >
[Mono-Print Mode] > [Color Mode]
on the control panel.
When the clear toner and white
toner are not used, if [Ultra
Heavy1] to [Ultra Heavy5] is
set and the default custom
media setting is used, change
[Media Type] in control panel
to [HQFORUH1] - [HQFORUH5]
depending on the paper weight.
(But, the print speed becomes
lower.)
If a line is printed on 80mm
position from the paper end
with color print, set the [Heavy
Media Adjust] to 0 from the
control panel.
To further improve, set to -5 ~ +5.
If white dots appear in cyan
transfer, lower the setting value
by selecting [Print Adjust] >
[Transfer Setting] > [Cyan
Transfer Setting] on the control
panel.
If white dots appear in other
colors' transfer, lower the
transfer setting value of the
corresponding color.
Reference
pages
Advanced
Advanced
Advanced
Advanced
Advanced
Advanced
- 54 -

Printing Troubles
Symptom Cause Troubleshooting
Border of the solid printing
portion is lightly stained.
Does not print with color
shades as you thought.
CMY 100% solid is thin.
Reference
pages
Paper is too dry. Use paper stored under
appropriate temperature and
humidity.
Recycled paper is used. Select [Recycled] for the media
type.
[Paper Black Setting] or [Paper
Color Setting] is not properly
set.
Low toner. Replace the toner cartridge. page 64
Setting of [Black Finish] is not
matching with the application.
Change color matching options. Change to color matching option
No color balance. Select [Calibration] on the
Misalignment of color. Open the toner replacement
[CMY 100% Density] is set to
[Disable].
Raise the setting value of [Paper
Black Setting] or [Paper Color
Setting] under [Print Adjust] on
the control panel.
In the [Black Finish] of printer
driver, select [True Black (K)] or
[Composite Black (CMYK)].
of the printer driver.
operation panel, and then run
[Adjust Density].
cover at once, and the close it
again.
Select [Calibration] on the
operation panel, and then run
[Adjust Registration].
Select [Admin Setup]>[Color
Setup]>[CMY 100%] in the
operation panel, and select
[Enable].
Basic
Basic
Advanced
Advanced
Advanced
Advanced
Advanced
Advanced
1
Troubleshooting
2
IndexMaintenance
Black spots or white spots
appear.
Stains are printed.
The entire paper is printed
black.
Paper not supported. Use recommended paper. Basic
In the case of cycle length of
about 125 mm, image drum
may be unclean or there may
be dents on it.
Paper is moist. Replace with a new paper. -
Paper not supported. Use recommended paper. Basic
The pinch roller is dirty. If foreign matter is found on
The device might have broken
down.
Gently wipe the image drum
with a soft tissue paper.
If there are dents, replace the
image drum.
the pinch roller, remove the dirt
with a soft cloth or tissue paper.
Contact your dealer. -
page 66
page 99
- 55 -

Printing Troubles
Symptom Cause Troubleshooting
Nothing is printed. Multiple pages were fed in one
1
Troubleshooting
White streaks occur.
round of printing.
The device might have broken
down.
Paper is moist. Replace with a new paper. -
Paper not supported. Use recommended paper. Basic
2
IndexMaintenance
Reference
pages
Re-set the papers after ipping
through.
Contact your dealer. -
-
- 56 -

Paper feed is poor
Printing Troubles
Memo
If the problem is not solved using the following methods, Contact your dealer.
z
Symptom Cause Troubleshooting
Paper jam occurs frequently. Device is tilted.
Feed paper roller is dirty Clean the feed paper roller. -
Position of the paper guide is
not aligned.
Papers are not set correctly. Remove papers from the tray,
Multiple papers are pulled in
simultaneously.
Papers are pulled in inclined
direction.
Paper is not fed. Selection of [Paper Source] of
Device is not restored even after
removing the jammed paper.
Paper gets curled. Creases
appear on the paper.
Paper winds around the roller
of the fuser unit.
Papers are either too thin or
too thick.
Paper contains moisture or
static electricity.
Paper has creases, folds, or
curls.
Paper with the printed back is
used.
Papers are not aligned properly.
Only one paper is set. Set multiple papers. -
Papers are added to the tray
while keeping the existing
papers as it is.
Papers are not set straight. Align the paper guide and paper
In the case of envelopes, there
are curls or bulge.
the printer driver is incorrect.
Manual feeding is specied in
the printer driver.
- Open the toner replacement cover
Paper contains moisture or
static electricity.
Thin paper is used. Correct [Media Weight] in the
Type and thickness setting of
paper is inappropriate.
Thin paper is used. Please use thicker paper. -
Install on a stable and a at surface.
Align the paper guide to the
position of the paper size set.
and set them in tray after ipping
through.
Use the papers compatible with
the device.
Use the papers stored at
appropriate temperature and
humidity.
Use the papers compatible with the
device. Correct if there are curls.
Already printed paper cannot be
printed again from the tray. Print
from the MP tray.
Flip through the papers, and set
after aligning them in all directions.
Remove the papers that are already
there in the tray, and set after
aligning them in all directions with
the papers to be added.
stopper of the tray with the paper.
Or, align the manual feed guide of
the MP tray with the paper.
Use the envelopes compatible with
the device. Use the envelopes
after correcting curls or bulge.
Check the paper tray, and select
the correct tray in [Paper Source]
of the printer driver.
Disable the Multipurpose tray is
handled as manual feed setting.
at once, and the close it again.
Use the papers stored at
appropriate temperature and
humidity.
operation panel to the appropriate
value. Or, change [Media Weight]
to a thicker value than the present
value.
Correct [Media Weight] in the
operation panel to the appropriate
value. Or, change [Media Weight]
to a thicker value than the present
value.
Reference
pages
-
-
-
-
-
-
-
-
-
-
-
Advanced
Advanced
-
-
Advanced
Advanced
1
Troubleshooting
2
IndexMaintenance
- 57 -

Printing Troubles
When image disturbance occurs
If image distortion occurs to the end of printed paper while printing with heavy paper or paper with
1
short feeding length (less than 230 mm), manually change the paper weight according to the paper you
Troubleshooting
are using.
If the condition does not improve after this operation, continuously print 5 pages or more with normal
paper (64-128g/m
Adjusting the print result
2
Adjustment Item What you can do Reference Manual
Correct the print starting position. Corrects the X and Y of print starting
Adjust the scale of print result. Adjusts the scale of print result in the paper
IndexMaintenance
2
) of 355.6 mm or more in length (legal 14 or more, or A3 size).
position.
Correcting Range: -2.0mm ~ +2.0mm (By
0.25mm)
running direction.
Adjusting Range: -0.25% ~ +0.50% (By
0.05%)
Advanced
Advanced
- 58 -

2
Maintenance
1
2
Replacing consumables and maintenance
unit
Device Maintenance
Moving and shipping the device
……………………………………………… 60
………………………… 87
……… 100
Maintenance
IndexTroubleshooting
- 59 -

Replacing consumables and maintenance unit
Replacing consumables and maintenance unit
z
This section describes the replacement method of consumables and maintenance unit and their lifespan.
1
Consumables and maintenance unit service life
Ballpark indicator of replacement of consumables and maintenance unit is as follows.
Toner cartridge (CMYK)
z
2
Maintenance
IndexTroubleshooting
With a standard toner cartridge, the printable pages for continuous printing is about 10,000. With a high
capacity toner cartridge, the printable pages for continuous printing is about 24,000. (A4 1-side printing.
Print density is as far factory default settings and compliant to ISO/IEC19798)
Printing quality will decline after 1 year has passed from opening the package. Therefore, prepare a
new toner cartridge.
Even if the cyan (blue), magenta (red), yellow toner cartridge life has been reached, black&white
printing can be done by specifying “Mono”. See “Printing using monochrome (black and white)” in
“Advanced” for black&white print.
Ballpark indicator of image drum (CMYK) replacement
z
When 3 pages of A4 size documents are printed at once with transverse feed with 1-side printing, it
will reach its service life after printing about 40,000 copies.
When one page is printed at once, it will reach its service life when about half the number of copies
are printed.
Printing quality will decline after 1 year has passed from opening the package. Therefore, prepare a
new image drum.
Fuser unit
z
When A4 size documents are printed with long edge feed with 1-side printing, it will reach its service
life after printing about 150,000 copies.
Belt unit
z
When 3 pages of A4 size documents are printed at once with long edge feed with 1-side printing, it
will reach its service life after printing about 150,000 copies.
When one page is printed at once, it will reach its service life when about half the number of copies are printed.
Waste toner box
z
When 3 pages of A4 size documents with print density* of 5% are printed at once with transverse
feed with 1-side printing, it will reach its service life after printing about 40,000 copies.
Feed roller
z
Feed roller is attached to each tray.
It will reach its service life after printing about 120,000 pages for each tray.
*: Print density is the proportion of area having toner on printable area of 1 page.
Memo
The printable pages/lifespan is for reference. The actual printable pages/lifespan might decrease depending on the print
z
environment such as the details of the document to be printed, usage status, powering ON/OFF, and adjustment operation at
the time of cover opening/closing.
Replacing the toner cartridge may be required after the image drum is replaced when the toner cartridge level is low. It is
z
recommended to get a new toner cartridge along with a new image drum when the toner cartridge level is low.
- 60 -

Replacing consumables and maintenance unit
Only for C941/C942/ES9541/ES9542/Pro9541/Pro9542
Toner cartridge (Clear/White)
z
*2
When A4 size documents with print density
of 5% are printed with long edge feed with continues
1-side printing, the printable pages is about 10,000.
Printing quality will decline after about 1 year from opening the package. Therefore, prepare a new
toner cartridge.
Even if the white, clear toner cartridge life has been reached, cyan (blue), magenta (red), yellow and
black print can be done.
1
In addition, even if the cyan (blue), magenta (red), yellow toner cartridge life has been reached, spot
color printing can be done by specifying [Print only with spot color].
See “Printing using white toner only” in “Separate Volume Spot Color Guide” for spot color printing.
Image drum (Clear/White)
z
When 3 pages of A4 size documents are printed at once with long edge feed with 1-sided printing,
it will reach its service life after printing about 20,000 pages. When one page is printed at once, the
lifespan will be reached with approximately half of printable pages.
Printing quality will decline after about 1 year from opening the package. Therefore, prepare a new
image drum.
*1: Clear can be used only with C941/ES9541/Pro9541.
*2: Print density is the proportion of area having toner on printable area of 1 page.
Memo
The printable pages/lifespan is for reference. The actual printable pages/lifespan might decrease depending on the print
z
environment such as the details of the document to be printed, usage status, powering ON/OFF, and adjustment operation at
the time of cover opening/closing.
Replacing the toner cartridge may be required after the image drum is replaced when the toner cartridge level is low. It is
z
recommended to get a new toner cartridge along with a new image drum when the toner cartridge level is low.
2
Maintenance
IndexTroubleshooting
- 61 -

Replacing consumables and maintenance unit
When the replacement period is approaching
When the replacement period of consumables and maintenance unit approaches, the following message
1
will appear and the <ATTENTION> lamp will blink.
Replace consumables and maintenance unit when "Replace ..." appears in the message.
Pressing the [HELP] button in the operation panel will display the replacement procedure. You can
easily replace the consumables and maintenance unit according to the guidance. For details, refer to
“Operating the Help screen”(P.13).
2
Maintenance
Item
Toner Cartridge
IndexTroubleshooting
Image Drum
Fuser Unit
Belt Unit
Waste Toner Box
Feed Roller - - -
Message displayed on the liquid crystal panel
When the replacement
period approaches
[COLOR]*1 Toner Low
*1
[COLOR]
Life
Fuser Unit Near Life
Belt Unit Near Life
Waste Toner Near Full
Image Drum Near
When it is time for
replacement
Install Toner
[COLOR]*1
Please see HELP for details
Install [COLOR]
Drum
Image Drum Life
Please see HELP for details
Install New Fuser Unit
Fuser Unit Life
Please see HELP for details
Install New Belt Unit
Belt Unit Life
Please see HELP for details
Install New Waste Toner Box
Waste Toner Full
Please see HELP for details
*1
New Image
Number
of pages
that can
be printed
when the
replacement
approaches
time for
replacement
Yellow,
magenta,
cyan, black,
clear
About 1,000
pages
White:
About 700
pages
About 1,000
pages
About 10,000
pages
About 10,000
pages
About 5,000
pages
*2
period
to the
Reference
pages
page 64
page 66
page 75
page 69
page 77
page 79
*1: [COLOR]: Either of Only Yellow, Only Magenta, Only Cyan, Only Black, White, and Clear will be displayed.
(White will appear only for C941/C942/ES9541/ES9542/Pro9541/Pro9542, and Clear will appear only for C941/ES9541/
Pro9541.)
When the message “Waste Toner Full” appears, printing operation is stopped temporarily. In this case, you can continue
*2:
printing about 200 sheets by opening and closing the front cover. And then, printing will be stopped.
- 62 -

Replacing toner cartridges
W
G
CAUTION
Replacing consumables and maintenance unit
ARNIN
● Do not throw toner or toner cartridge
● Do not store toner cartridge in a place
● Do not clean up spilled toner using an
● There are high temperature parts in side
● Keep the toner cartridge away from
in re. Toner may y off causing burn
injury.
with re. It may catch re causing re
damage or burn injury.
electric vacuum cleaner. When spilled
toner is cleaned up using an electric
vacuum cleaner, there is a risk of
re due to sparks from the electrical
contacts. Wipe off and remove the toner
spilled on the oor using a wet cloth.
the device. Do not touch near the places
with "Caution: High Temperature" label.
It may cause burn injury.
children's reach. If children drink toner
cartridge by mistake, immediately
consult the physician.
● Store the used toner cartridge in a bag
such that toner does not scatter.
● If toner is spilled on the oor, wipe
it up carefully using a damp cloth to
prevent the toner from scattering.
1
2
Maintenance
IndexTroubleshooting
● When toner is inhaled, gargle with a
lot of water and move the person to a
place with fresh air. Consult a physician
as necessary.
● When there is toner on skin of hands
etc., wash it off with liquid soap.
● It toner gets into eyes, immediately
wash it off with a large quantity of water.
Consult a physician as necessary.
● When toner is swallowed, dilute the toner
by drinking a large quantity of water.
Consult a physician as necessary.
● When solving paper jam or when
replacing toner cartridge, take care that
your hands and clothes are not stained
with toner. When there is toner on skin of
hands etc., wash it off with liquid soap.
● When clothes are stained with toner,
wash them in cold water. Heating it
such as washing in hot water will dye
the toner on clothes, and it stains may
not remove easily.
● Do not disassemble or forcibly open
the toner cartridge. It may scatter
toner, because of which people may
inhale it, and it may stain clothes and
hand.
- 63 -

Replacing consumables and maintenance unit
Types of toner cartridge
Following toner cartridges can be used with this printer.
1
Item Remarks
Toner Cartridge Black
Toner Cartridge Yellow
Toner Cartridge Magenta
Toner Cartridge Cyan
Toner cartridge Spot Color White Only for C941/C942/ES9541/ES9542/Pro9541/Pro9542.
2
Toner cartridge Spot Color Clear Only for C941/ES9541/Pro9541.
Maintenance
Can not be used in C911/C931/ES9411/ES9431/Pro9431.
Can not be used in C911/C931/C942/ES9411/ES9431/ES9542/
Pro9431/Pro9542.
Replacing Toner Cartridges
Example) In the case of Toner Cartridge Cyan (C)
Prepare a new toner cartridge.
1
IndexTroubleshooting
Open the toner replacement cover.
2
Remove the toner cartridge.
4
Check the position of toner cartridge to
3
be replaced, via the label letters and
color.
- 64 -
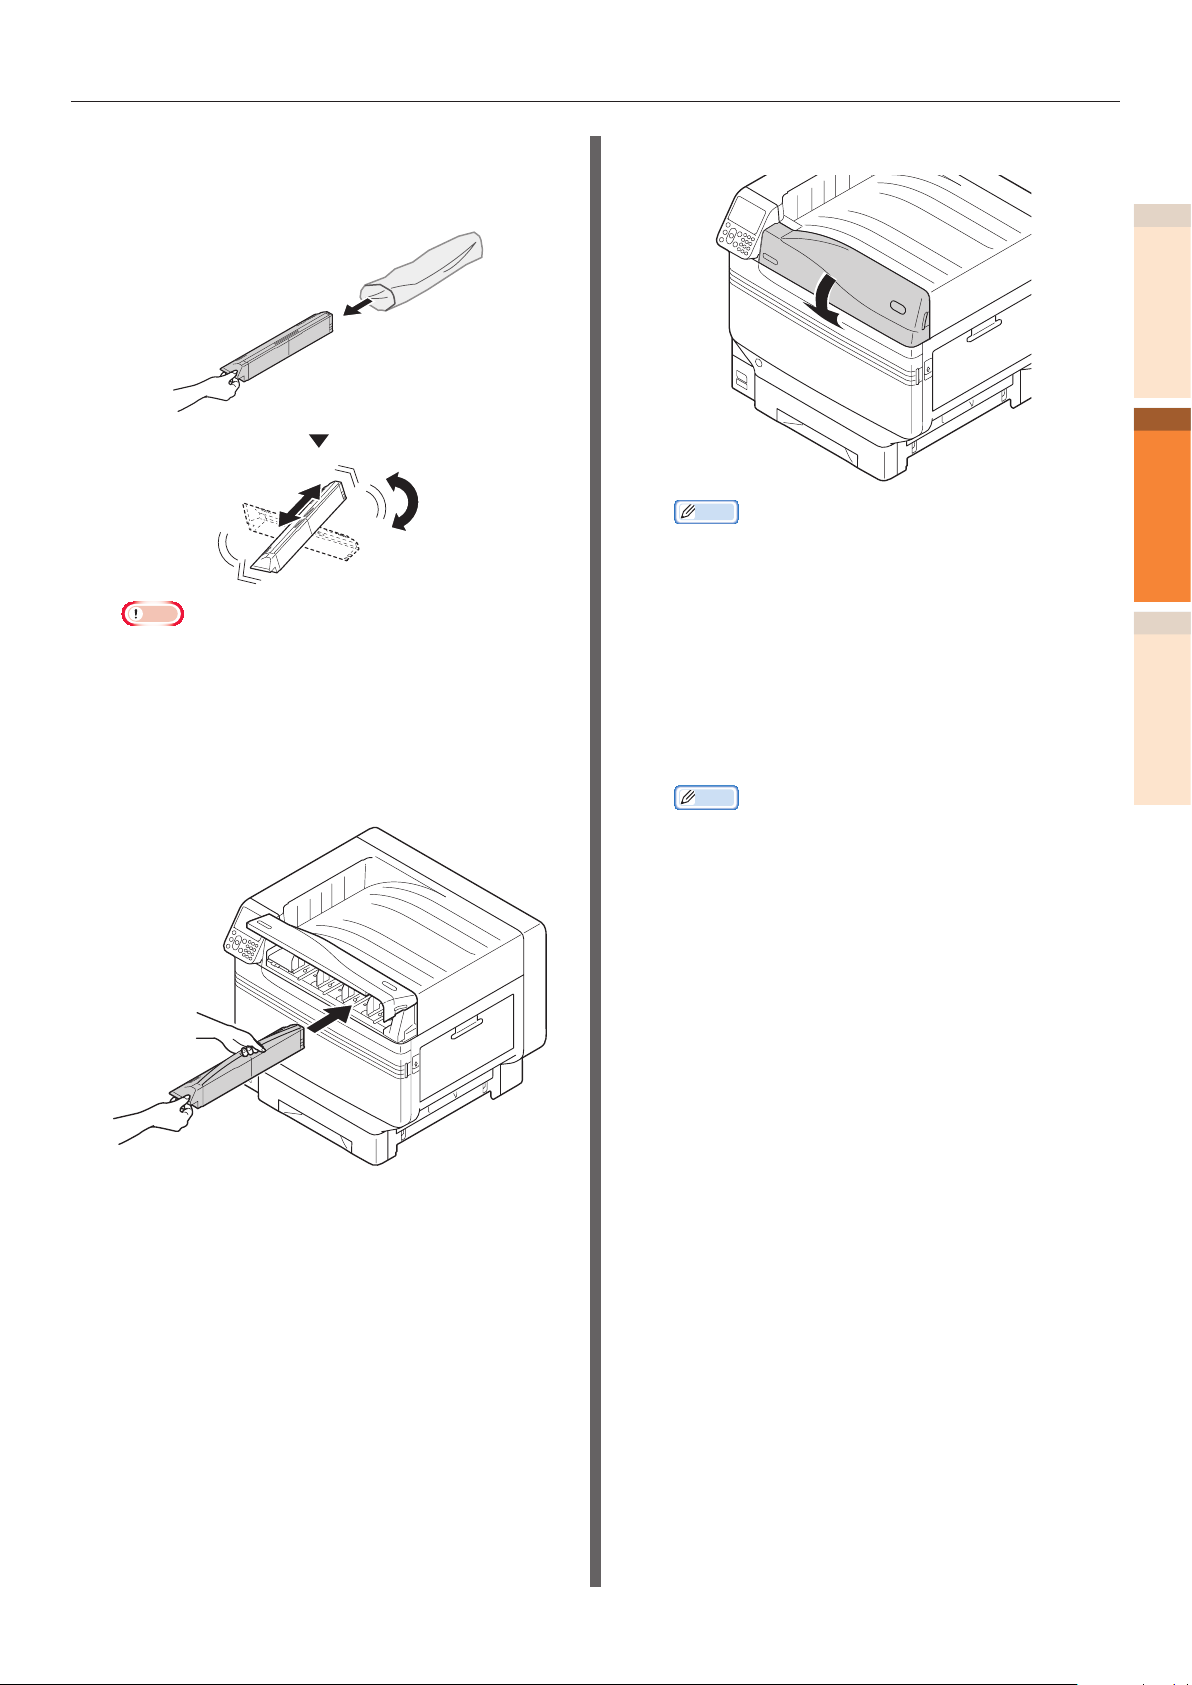
Replacing consumables and maintenance unit
Remove the new toner cartridge from
5
its packaging, and shake it vertically
and horizontally.
Note
Do not drop the toner cartridge or tap it on the
z
oor. Doing so may damage the cartridge.
Check the position of the slot that has
6
a label stuck on it with the same letters
and colors, and rmly push the toner
cartridge in as far as it will go.
Close the toner replacement cover.
7
Memo
Even after replacing the toner cartridge, if the
z
[Replace Toner] message does not disappear, it is
possible that the toner cartridge is not installed
rmly. Reinstall it correctly.
If Error709 appears after replacing the toner
z
cartridge, refer to “If replace consumables
messages are displayed”(P.38) of this manual.
Please support recycling of the used
8
toner cartridges.
Memo
When disposing of the used toner cartridge in
z
unavoidable circumstance, put it in a plastic bag,
and ensure to dispose according to the instructions
provided by the local municipality.
1
2
Maintenance
IndexTroubleshooting
- 65 -

Replacing consumables and maintenance unit
Replacing Image Drums
1
2
Maintenance
IndexTroubleshooting
Types of image drum
Image drums that can be used with this printer are as follows.
Item Remarks
Image Drum Black
Image Drum Yellow
Image Drum Magenta
Image Drum Cyan
Image drum Spot Color White Only for C941/C942/ES9541/ES9542/Pro9541/Pro9542.
Can not be used in C911/C931/ES9411/ES9431/Pro9431.
Image drum Spot Color Clear Only for C941/ES9541/Pro9541.
Can not be used in C911/C931/C942/ES9411/ES9431/ES9542/
Pro9431/Pro9542.
Note
Do not expose the image drum to direct sunlight or strong light (About 1,500 lux or more). Do not keep it for more than 5
z
minutes even under room lighting.
Replacing Image Drums
Example) In the case of Image Drum (K)
Check the position of replacement
3
image drum via the label letters and
color.
Prepare the new image drum.
1
Open the front cover.
2
- 66 -

Replacing consumables and maintenance unit
Gently lift the handle (blue) upwards,
4
and remove the image drum taking care
that your hand does not touch the drum
on the lower side (green cylindrical
section).
Note
Be careful not to touch or scratch the image drum
z
(green cylinder).
Remove the new image drum from its
5
packaging.
1
2
Maintenance
IndexTroubleshooting
Remove the stopper (orange).
6
- 67 -

Replacing consumables and maintenance unit
7
1
2
Maintenance
IndexTroubleshooting
Align the image drum and arrow label
(red) of printer, slowly insert in the slot
taking care that your hand does not
touch the photoreceptor (green) below,
and rmly push it inside.
Close the front cover.
8
Memo
If Error709 appears after replacing the image drum,
z
refer to “If replace consumables messages are
displayed”(P.38) of this manual.
Please support recycling of the used
9
image drums.
Memo
When disposing of the used image drums in
z
unavoidable circumstances, put it in a plastic bag,
and ensure to dispose according to the instructions
provided by the local municipality.
Note
Be careful not to touch or scratch the image drum
z
(green cylinder).
- 68 -

Replacing consumables and maintenance unit
Replacing belt units and transfer roller units
Prepare a new belt unit.
1
New transfer roller unit is supplied with the new
belt unit in the same package.
[Replacing the Belt Unit]
Open the front cover.
2
Remove the waste toner box.
3
1
2
Maintenance
IndexTroubleshooting
- 69 -

Replacing consumables and maintenance unit
4
1
2
Maintenance
5
IndexTroubleshooting
Push the center lever (blue) to the
right.
Rotate the belt unit left/right lock lever
knob (blue) to the left, and push the
lock lever towards yourself.
Hold the handle and pull out the belt
6
unit, hold the left-right label part (blue)
and remove the belt unit.
6.6 kg
Note
Do not touch the belt surface or damage the belt.
z
Removing the belt unit will expose all image drums
z
to light. For preventing the optical deterioration of
image drums, do not leave them as it is for more
than 5 minutes after removing the belt unit.
When leaving for more than 5 minutes, close the
front cover, or remove all image drums and store
them in a safe place where they are not directly
exposed to sunlight or uorescent light.
- 70 -

Never place the removed belt unit in a vertical
z
direction.
Ensure that waste toner does not spill when
z
removing the belt unit.
Take out the new belt unit.
7
Replacing consumables and maintenance unit
Unpack the new belt unit from its
8
packaging.
Note
Do not touch the belt surface or damage the belt.
z
1
2
Maintenance
Align the new belt unit and arrow label
9
(red) of the printer, set it in the printer,
and rmly press it inside.
IndexTroubleshooting
- 71 -

Replacing consumables and maintenance unit
10
1
2
Maintenance
11
IndexTroubleshooting
Raise the belt unit left/right lock lever,
rotate the lock lever knob (blue) to the
right and lock it.
Return the center lever (blue) to the left.
Set the waste toner box on the printer.
12
Close the front cover.
13
- 72 -

Replacing consumables and maintenance unit
CAUTION
[Replacing the transfer roller unit]
Lift opener ( ) of the exit unit, and pull
14
out the exit unit.
Hold the transfer roller unit's label part
16
(blue) and remove it.
Remove transfer roller unit.
17
1
2
Maintenance
IndexTroubleshooting
Pull up both tips of the transfer roller
15
unit's lock lever (blue).
Possible to get burned.
Do not touch the fuser unit because it is hot.
Set the new transfer roller unit to the
18
exit unit.
Note
Do not touch the sponge of the transfer roller unit.
z
- 73 -

Replacing consumables and maintenance unit
Push both sides of the lock lever (blue)
19
down.
1
2
Maintenance
Put the exit unit back into the printer.
20
IndexTroubleshooting
21
Please support recycling of the used
belt unit and transfer roller unit.
Memo
When disposing of the used belt unit and transfer
z
roller unit in uunavoidable circumstances, put them
in a plastic bag, and ensure to dispose according to
the instructions provided by the local municipality.
- 74 -

Replacing fuser units
CAUTION
Replacing consumables and maintenance unit
Replacing fuser units
Prepare a new fuser unit.
1
Lift opener ( ) of the exit unit, and pull
2
out the exit unit.
Pull up the fuser unit's lock lever (blue).
3
Possible to get burned.
Do not touch the fuser unit because it is hot.
Hold the fuser unit's handle with both
4
hands and remove it.
1
2
Maintenance
IndexTroubleshooting
- 75 -
Remove the new fuser unit from its
5
packaging.

Replacing consumables and maintenance unit
Hold the new fuser unit handle with
6
both hands, and set it to the exit unit.
1
2
Maintenance
Push down the fuser unit's lock lever
7
(blue).
IndexTroubleshooting
8
Put the exit unit back into the printer.
Please support recycling of the used
9
fuser units.
Memo
When disposing of the used fuser unit in
z
unavoidable circumstances, put it in a plastic bag,
and ensure to dispose according to the instructions
provided by the local municipality.
- 76 -

Replacing waste toner boxes
Replacing consumables and maintenance unit
Replacing waste toner boxes
Prepare a new waste toner box.
1
Open the front cover.
2
Remove the waste toner box from the
3
printer.
1
2
Maintenance
IndexTroubleshooting
- 77 -
Remove the new waste toner box from
4
its packaging.

Replacing consumables and maintenance unit
Install the new waste toner box to the
5
printer.
1
2
Maintenance
IndexTroubleshooting
6
Close the front cover.
Please support recycling of the used
7
toner boxes.
Memo
When disposing of the used waste toner box in
z
unavoidable circumstances, put it in a plastic bag,
and ensure to dispose according to the instructions
provided by the local municipality.
- 78 -

Replacing paper feed rollers
Replacing consumables and maintenance unit
Rough guide of replacing paper feed rollers is about 120,000 pages for each tray.
Replacing paper feed rollers of
Tray 1 to Tray 5
There are three types of paper feed rollers.
Center is white
With gear
Center is blue
Items to be prepared: Paper feed rollers - 3 nos.
Example) When replacing the paper feed roller of
Tray 1
Remove wrist watch, bracelet, etc.
1
Press and hold the power switch for
2
approximately 1s to switch off the
power supply.
Check that the operation panel is
3
completely turned off, and then switch
off the main power supply.
Pull out Tray 1.
4
1
2
Maintenance
IndexTroubleshooting
- 79 -

Replacing consumables and maintenance unit
5
1
2
Maintenance
IndexTroubleshooting
While expanding the claws of feed
rollers (
them from the axial.
Memo
If the feed roller is not visible due to darkness,
z
open the tray side cover (“Removing paper from the
vicinity of Tray Side Cover”(P.24)).
) in outside direction, remove
Similarly, remove the remaining two
6
paper feed rollers (
, ).
- 80 -

Replacing consumables and maintenance unit
Insert the new feed rollers ( ) in the
7
axial, and rmly insert up to inside.
Similarly, insert the remaining two
8
paper feed rollers (
, ).
1
2
Maintenance
IndexTroubleshooting
- 81 -
Check that no paper feed roller is
9
missing.

Replacing consumables and maintenance unit
10
1
2
Maintenance
11
12
IndexTroubleshooting
Install Tray 1.
Switch on the main power supply, press
the power supply switch and start the
printer.
Please support recycling of the used
paper feed rollers.
Memo
When disposing of the used paper feed rollers in
z
unavoidable circumstances, put them in a plastic
bag, and ensure to dispose according to the
instructions provided by the local municipality.
Replacing the paper feed
rollers and separator of MultiPurpose Tray
There are three types of paper feed rollers.
Center is white
With gear
Tip of the center is black
Items to be prepared: Paper feed rollers 2 nos.,
separation roller 1 no., separator 1 no.
Remove wrist watch, bracelet, etc.
1
Press and hold the power switch for
2
approximately 1s to switch off the
power supply.
- 82 -
Check that the operation panel is
3
completely turned off, and then switch
off the main power supply.

Replacing consumables and maintenance unit
Lift the opener ( ), and open the right
4
side cover.
While expanding the claws of feed
5
rollers (
them from the axial.
) in outside direction, remove
1
2
Maintenance
IndexTroubleshooting
- 83 -

Replacing consumables and maintenance unit
6
1
2
Maintenance
IndexTroubleshooting
Lift Section A, release the claws in the
direction shown in gure, and remove
the paper feed rollers (
).
Pinch the claws (two places) and
7
remove the separator (
Section B, and remove the separation
rollers (
).
). Open
- 84 -

Replacing consumables and maintenance unit
Firmly insert the new separation roller
8
) along the notch, and mount the
(
separator ( ).
Insert the new feed rollers ( ) in the
10
axial, and rmly insert up to inside
while rotating them.
Check that no paper feed roller is
11
missing.
Close the right side cover.
12
1
2
Maintenance
IndexTroubleshooting
Insert the new paper feed rollers ( ),
9
and rmly insert up to inside along the
notch.
Switch on the main power supply, press
13
the power supply switch and start the
printer.
- 85 -

Replacing consumables and maintenance unit
Please support recycling of the used
14
paper feed rollers.
1
2
Maintenance
IndexTroubleshooting
Memo
When disposing of the used paper feed rollers in
z
unavoidable circumstances, put them in a plastic
bag, and ensure to dispose according to the
instructions provided by the local municipality.
- 86 -

Device Maintenance
z
Device Maintenance
This section describes the cleaning method of the respective part of the device.
Cleaning device surfaces
Items to be prepared: Water or neutral washing
agent, soft and dry cotton cloth 2 pieces
Note
Do not use Benzene or thinner as it may damage plastic
z
parts and coating.
Only use water or neutral washing agent.
z
It is not necessary to oil the device. Do not oil it.
z
Press and hold the power switch for
1
approximately 1s to switch off the
power supply.
Cleaning LED heads
Clean LED head when there are stripes or white
creases on the print, or when letters are blurred.
Clean LED head when there is vertical white
line on the output paper or when the images
disappear vertically, or when the border of the
letters is blurred. When LED head is unclean, it
may cause paper jam.
Note
Do not use methyl alcohol or thinner. It may damage the
z
LED head.
Do not expose the image drum to direct sunlight or strong
z
light (About 1,500 lux or more). Do not keep it for more
than 5 minutes even under room lighting.
Items to be prepared: Soft tissue paper
Press and hold the power switch for
1
approximately 1s to switch off the
power supply.
1
2
Maintenance
IndexTroubleshooting
Check that the operation panel is
2
completely turned off, and then switch
off the main power supply.
Take water or neutral washing agent on
3
one piece of cotton cloth, and wipe with
thoroughly squeezed cloth.
Furthermore, wipe off with another dry
cotton cloth.
Check that the operation panel is
2
completely turned off, and then switch
off the main power supply.
\
- 87 -

Device Maintenance
3
1
2
Maintenance
4
IndexTroubleshooting
Open the front cover.
Gently lift the handle (blue) upwards,
and remove the photoreceptor from the
lower side taking care that your hand
does not touch the drum on the lower
side (green cylindrical section).
Note
Ensure not to touch or damage the drum.
z
- 88 -

Device Maintenance
Remove the waste toner box from the
5
printer.
Push the center lever (blue) to the
6
right.
Rotate the belt unit left/right lock lever
7
knob (blue) to the left, and push the
lock lever towards yourself.
1
2
Maintenance
IndexTroubleshooting
- 89 -

Device Maintenance
8
1
2
Maintenance
Hold the handle and pull out the belt
unit, hold the left-right label part (blue)
and remove the belt unit.
Never place the belt units that have you removed in
z
a vertical direction.
Gently wipe the surface of LED head
9
with a soft tissue paper.
IndexTroubleshooting
6.6 kg
Note
Do not touch the belt surface or damage the belt.
z
Removing the belt unit will expose all image drums
z
to light. For preventing the optical deterioration of
image drums, do not leave them as it is for more
than 5 minutes after removing the belt unit.
When leaving for more than 5 minutes, close the
front cover, or remove all image drums and store
them in a safe place where they are not directly
exposed to sunlight or uorescent light.
Ensure that waste toner does not spill when
z
removing the belt unit.
Note
Agents such as methyl alcohol and thinner will
z
damage the LED head, so please do not use them.
- 90 -

Device Maintenance
Set the belt unit to the printer, and
10
push it in rmly.
Return the center lever (blue) to the left.
12
1
2
Maintenance
Set the waste toner box on the printer.
13
IndexTroubleshooting
Raise the belt unit left/right lock lever,
11
rotate the lock lever knob (blue) to the
right and lock it.
- 91 -

Device Maintenance
14
1
2
Maintenance
IndexTroubleshooting
Align the image drum and arrow label
(red) of printer, slowly insert in the slot
taking care that your hand does not
touch the photoreceptor (green) below,
and rmly push it inside.
Close the front cover.
16
Note
Ensure not to touch or damage the drum
z
Similarly, install all image drums.
15
- 92 -

Device Maintenance
Cleaning feed rollers
When paper jam occurs frequently, clean the
paper feed rollers.
Items to be prepared: Soft cotton cloth dipped in
water
Cleaning paper feed rollers of
Tray 1 to Tray 5
Example) When cleaning the paper feed roller of
Tray 1
Remove wrist watch, bracelet, etc.
1
Press and hold the power switch for
2
approximately 1s to switch off the
power supply.
Pull out Tray 1.
4
Wipe off the dirt on paper feed rollers (3
5
places) with the moist soft cloth.
Memo
When it is difcult to wipe, open the tray side cover,
z
and clean it from the tray side cover side.
1
2
Maintenance
IndexTroubleshooting
Check that the operation panel is
3
completely turned off, and then switch
off the main power supply.
Install Tray 1.
6
Switch on the main power supply, press
7
the power supply switch and start the
printer.
- 93 -

Device Maintenance
Cleaning the paper feed rollers
of Multi-Purpose Tray
1
Press and hold the power switch for
1
approximately 1s to switch off the power
supply.
2
Maintenance
Check that the operation panel is
2
IndexTroubleshooting
completely turned off, and then switch
off the main power supply.
Lift the opener ( ), and open the right
3
side cover.
- 94 -

Device Maintenance
While expanding the claws of feed
4
rollers (
them from the axial.
) in outside direction, remove
Wipe off the dirt on paper feed rollers (2
7
places) and on separator with the moist
soft cloth.
Insert the feed rollers ( ) in the axial,
8
and rmly insert up to inside while
rotating them.
Close the right side cover.
9
1
2
Maintenance
IndexTroubleshooting
Wipe off the dirt on paper feed rollers
5
) with the moist soft cloth.
(
Lift Section A.
6
Switch on the main power supply, press
10
the power supply switch and start the
printer.
- 95 -

Device Maintenance
CAUTION
Cleaning the Transfer Roller Unit and Paper Transfer Path
1
If the front or rear edge of the output paper
becomes dirty frequently, clean the transfer
roller unit and paper transfer path.
Periodical cleaning prevents dirt and stains.
Note
Be careful not to touch sponge of the transfer roller unit
z
2
Maintenance
IndexTroubleshooting
or damage the transfer roller unit.
Do not use water or such solvents as neutral detergent
z
and methyl alcohol. It may damage the transfer roller.
Please prepare a soft tissue paper
Press and hold the power switch for
1
about 1 second to turn off the power.
Lift the opener ( ) of the exit unit, and
3
pull out the exit unit.
Check that the control panel has been
2
turned off completely, and then turn off
the main power.
Raise the lock lever (blue) of the fuser
4
unit.
There is a risk of injury.
Do not touch the fuser unit because it is hot.
- 96 -

Device Maintenance
Remove the fuser unit by holding its
5
handle with your hands.
Raise the lock levers (blue) at both
6
ends of the transfer roller unit.
Wipe the dirt off the paper transfer path
8
with a soft tissue paper.
Wipe the dirt off the transfer roller unit
9
with a soft tissue paper.
Note
Be careful not to touch sponge of the transfer roller
z
unit or damage the transfer roller unit.
1
2
Maintenance
IndexTroubleshooting
Remove the transfer roller unit by
7
holding its label part (blue).
Set the transfer roller unit to the exit
10
unit.
Note
Do not touch sponge of the transfer roller unit.
z
- 97 -

Device Maintenance
11
1
2
Maintenance
12
IndexTroubleshooting
Push down the lock levers (blue) at
both ends.
Set the fuser unit to the label position
of the exit unit by holding its handle
with your hands.
Put the exit unit back into the printer.
14
Push down the lock lever (blue) of the
13
fuser unit.
- 98 -

Cleaning the Pinch Roller
Device Maintenance
If foreign matter is found on the pinch roller,
remove the dirt with a soft cloth or tissue paper.
Sticking foreign matter can be easily removed if
cleaned after printing.
1
2
Maintenance
IndexTroubleshooting
- 99 -

Moving and shipping the device
CAUTION
CAUTION
Moving and shipping the device
z
This section describes about transporting or moving the device.
1
Moving the device
There is a risk of injury.
The printer weighs approx. 98 kg* for C911/C931/
2
ES9411/ES9431/Pro9431 models, and approx.
111 Kg* for C941/C942/ES9541/ES9542/Pro9541/
Pro9542 model. Therefore, make sure to use at
Maintenance
least 4 people when lifting.
*: Includes consumables such as the image drum and toner
cartridge, etc.
Press and hold the power switch for
1
approx. 1s. Check that the operation
panel is completely switched off after
IndexTroubleshooting
that, and switch off the main power
supply by pulling the main power supply
switch to the OFF (O) side.
Remove all cables.
2
Power supply cable and earthing cord
z
LAN cable/USB cable
z
Remove paper from the tray.
3
Life the device with 4 people, and move
4
it to the destination.
Shipping the device
There is a risk of injury.
The printer weighs approx. 98 kg* for C911/C931/
ES9411/ES9431/Pro9431 models, and approx.
111 Kg* for C941/C942/ES9541/ES9542/Pro9541/
Pro9542 model. Therefore, make sure to use at
least 4 people when lifting.
*: Includes consumables such as the image drum and toner
cartridge, etc.
Note
Because image drums (green parts) can easily get
z
damaged, handle with adequate care.
Do not expose the image drum to direct sunlight or strong
z
light (About 1,500 lux or more). Do not keep it for more
than 5 minutes even under room lighting.
Press and hold the power switch for
1
approx. 1s. Check that the operation
panel is completely switched off after
that, and switch off the main power
supply by pulling the main power supply
switch to the OFF (O) side.
Remove all cables.
2
Power supply cable and earthing cord
z
LAN cable/USB cable
z
Remove paper from the tray.
3
Remove all toner cartridges.
4
- 100 -
 Loading...