

User's Manual
Convenient
1
print
functions
Matching
2
Colors
Advanced
Try using various functions
Using
Utility
3
Software
Network
4
Setup
Checking and
Changing Printer
5
Settings Using
the Control Panel
Appendix
C911
C931
C941
C942
ES9411
ES9431
ES9541
ES9542
Pro9431
Pro9541
Pro9542
Index
1
Manual Conguration
z
The following user manuals are enclosed with the product.
The e-manual is stored as software on DVD-ROM.
Step
Read this first
Opening the box and installing the printer
Set-up Guide
This guide uses illustrations to explain the
methods from opening the box to installation.
For the advanced setup guide, see the "Basic".
Preparing the printer to print
Basic
This guide describes the precautions for safe
use of the device. Make sure to read before use.
Further, basic uses from the device installation
methods to initial printing are also explained.
The device functions are described in the
appendix.
• Checking the product
• Parts nomenclature and functions
• Using the device to its fullest
• Installing the device
• Turning ON and OFF the power supply
• Test printing using the printer only
• Connecting to a PC
• Paper
• Printing
• Paper ejection
• Setting Power Save mode
• Setting auto power OFF
• Checking the print quantity,
consumables, remaining maintenance
unit quantity, and remaining service life
• Cancelling a print job
• Adding printers using LPD protocols
(TCP/IP)
• Table of control panel menu items
• Basic Windows procedures
• Printer specifications
Step
Read these guides as necessary
2
Try using various functions
Advanced (This manual)
This guide explains the various paper print methods
and how to use useful functions. Read to optimize the
printing environment or to adjust the color, etc., using
the enclosed utility software.
Further, this guide also explains the items that can be
set from the control panel, and the network settings.
Read for any points that are not understood, or for maintenance
Troubleshooting/Daily
Maintenance Manual
This manual explains the procedures for paper jams, and
troubleshooting method if an error message is displayed. This
manual also explains daily maintenance such as now to replace
consumables and maintenance units, and cleaning, etc.
Using C941/C942/ES9541/ES9542/Pro9541/Pro9542
Separate Volume Spot Color Guide
This guide explains how to set up the Spot
Color kit and check the printer drivers, and
how to print using Spot Color. Make sure to
read before use.
• Useful print functions
• Adjusting the color
• Using utility software
• Network settings
•
Checking and changing printer settings
using the control panel
• Troubleshooting
• Maintenance
• Consumables, maintenance products,
options, color management server,
etc.
• Setting the Spot Color kit
• Control panel explanation
• Checking the printer drivers
• Table of printer driver functions
• Printing on color paper
• Printing on transparent film
• Specifying and printing Spot Color
toner using the applications
• Fine-tuning white
• Switching Spot Color kits
- 2 -
Reading the Manual
z
Symbols
Note
These are cautions and restrictions for the correct operation of the device. Make sure to read to avoid misoperation.
z
Memo
Knowledge of the information before using the device is useful and can act as a reference. Reading is recommended.
z
Reference
This are the reference pages. Read to learn detailed information and relevant information.
z
WARNING
Mishandling due to ignoring this display may cause death or serious injury.
z
CAUTION
Mishandling due to ignoring this display may cause personal injury.
z
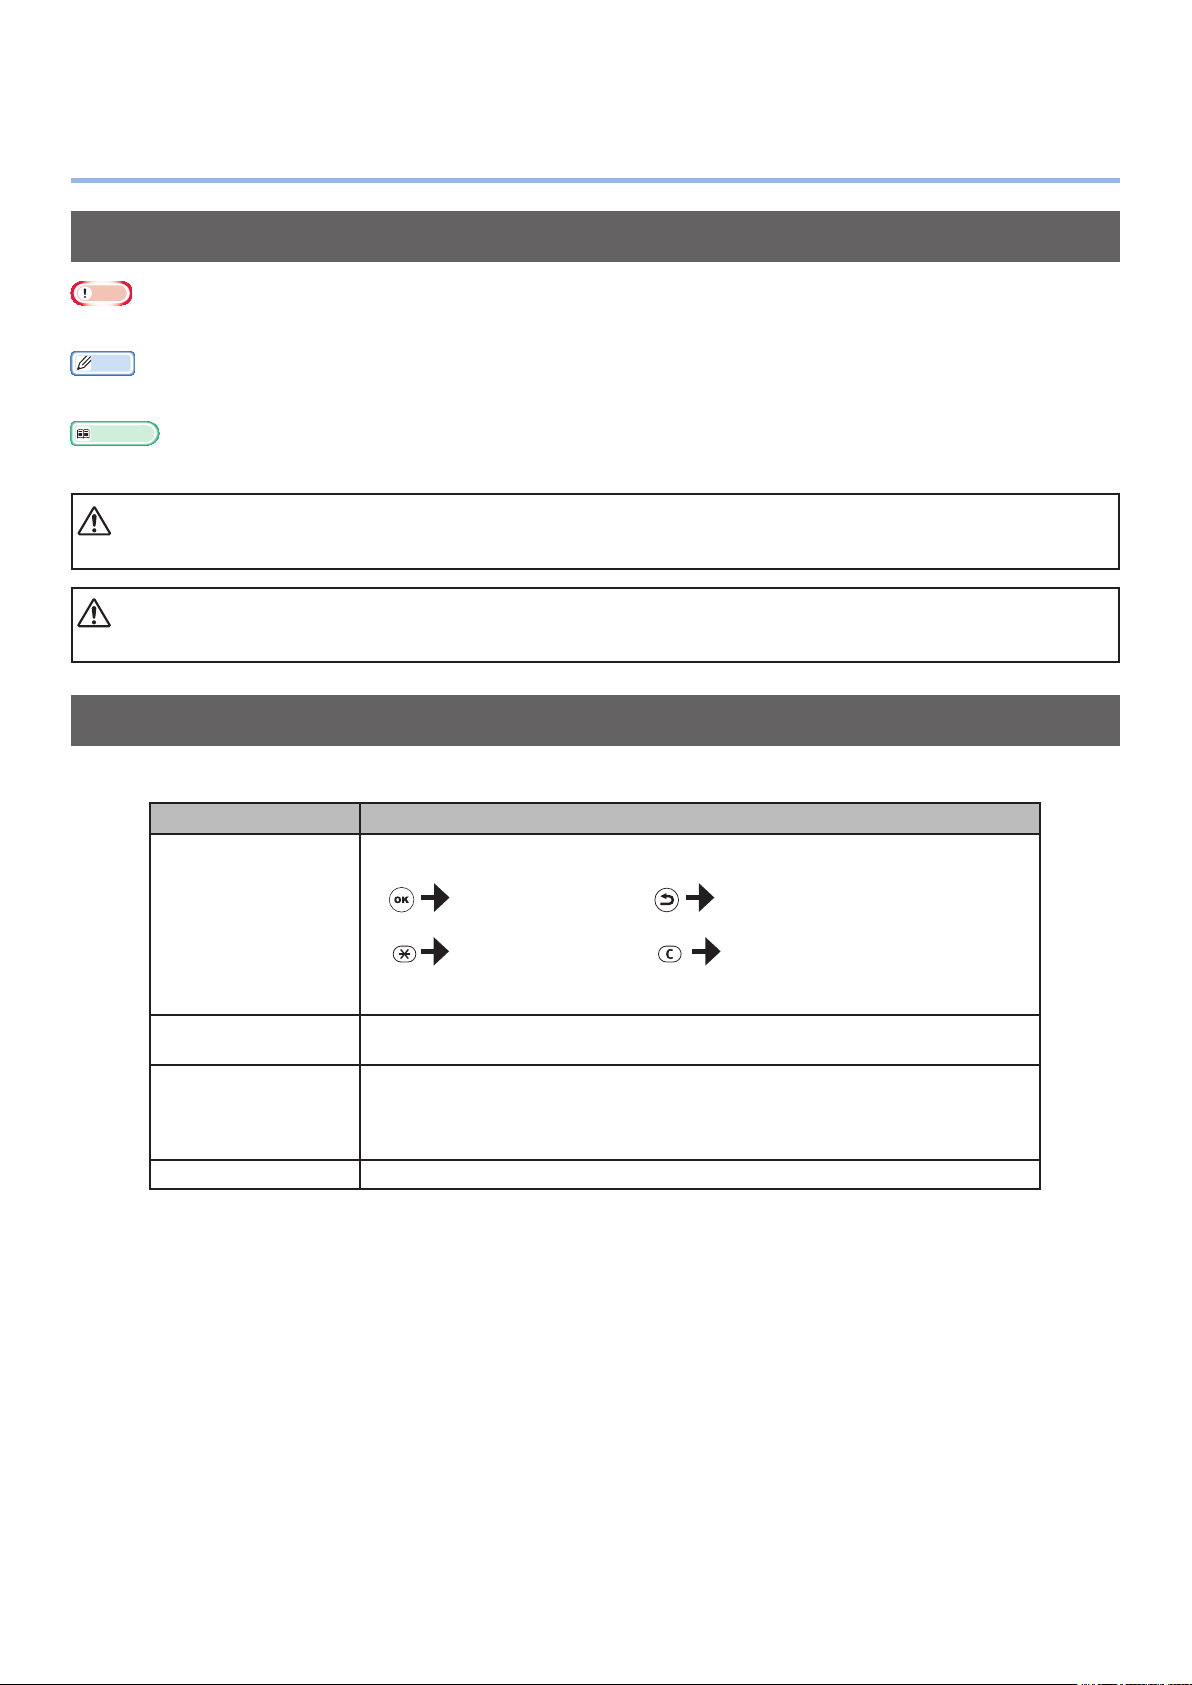
Keys, Buttons, and Symbols
This chapter described the following keys, buttons, and symbols.
Inscription Explanation
The control panel buttons and 10-key pad are described below.
z
E.g.:
[OK] button [BACK] button
[ ] button/key
[Fn] key [CLEAR] key
Indicates your PC keyboard.
z
Describes the menu name on the liquid crystal panel.
[ ]
" "
> Describes the menu level of the device or PC.
z
Describes the PC menus, windows, and dialog box names.
z
Describes the messages and input text displayed in the liquid crystal
z
panel.
Describes the le and screen names on the PC.
z
Describes the reference title.
z
- 3 -
Illustrations
Screens
The device illustrations used herein show the
C931 model unless otherwise specied.
Illustrations may differ from the actual product.
The images of the control panel and PC used
herein are examples. The images may differ
from actual products and screens.
- 4 -

Inscriptions
The following inscriptions are used in this manual.
C911dn → C911
z
C931dn → C931
z
C941dn → C941
z
C942dn → C942
z
ES9411dn → ES9411
z
ES9431dn → ES9431
z
ES9541dn → ES9541
z
Microsoft
z
Microsoft
z
Mac OS X10.3.9 or later → Mac OS X
z
The manuals enclosed with the printer use as examples Windows 7 in the case of Windows, and OS X
10.8 in the case of Mac OS X unless otherwise specied.
Depending on the OS and model used, descriptions in this manual may differ.
®
Windows® 7 64-bit Edition operating system version → Windows 7 (64bit version)
®
Windows® 7 operating system version → Windows 7
- 5 -

Contents
Contents
Manual Conguration ........................................................................... 2
Reading the Manual
Symbols .................................................................................................................. 3
Keys, Buttons, and Symbols....................................................................................3
Illustrations
Screens...................................................................................................................4
Inscriptions
............................................................................................................ 4
............................................................................................................ 5
............................................................................. 3
1 Convenient print functions ................................................. 13
Printer driver functions table ............................................................. 14
Functions explanation .......................................................................................... 14
Windows PS printer driver functions ..................................................................................... 14
Windows PCL printer driver functions
Windows XPS printer driver functions
Mac OS X PS printer driver functions
Printing on various papers ................................................................. 22
Printing on envelopes ........................................................................................... 22
Before setting ................................................................................................................... 22
Printing on standard size envelopes
Printing on irregular size envelopes......................................................................................28
...................................................................................16
................................................................................... 17
.................................................................................... 18
.....................................................................................23
Printing on glossy paper ....................................................................................... 35
Printing on labels and transparencies
Printing on user-selected paper sizes (custom pages and lengthy printing)
Using custom media
............................................................................................. 52
...................................................................41
......... 47
Economy printing ............................................................................... 54
Printing multiple pages on a single sheet (multi-page printing) ........................... 54
2-Sided Printing
Test printing with toner economy (toner economy mode)
................................................................................................... 56
....................................58
Changing sizes to print ...................................................................... 61
Enlarging/reducing pages .................................................................................... 61
Enlarging and printing multiple sheets (poster printing)
Sorting pages to print pamphlets (booklets)
........................................................65
...................................... 63
Clean printing .................................................................................... 67
Changing print quality (resolution) ...................................................................... 67
Printing sharper photos (photo mode)
Printign text and lines sharply
Compensating ne lines........................................................................................ 71
.............................................................................. 69
.................................................................69
Using printer fonts
............................................................................................... 73
- 6 -

Contents
Using PC fonts ...................................................................................................... 75
Printing print results so that people cannot see them ........................ 76
Entering passwords to print (Secure Print) ..........................................................76
Printing secret text (encrypted secure print)
.......................................................78
Correcting the Print Position on the Paper Using the Control Panel ... 81
Correcting the print start position ........................................................................81
Adjusting the Image Stretch (Print Length) Using the Control Panel
Adjusting the stretch of print results .................................................................... 83
... 83
Advanced print functions ................................................................... 85
Setting the page order .......................................................................................... 85
Printing documents in page order ........................................................................................85
Printing documents in reverse page order
Printing single sheets manually ............................................................................ 87
Automatically selecting trays
Printing only covers from a separate tray (cover printing)
Stamping and printing (watermarks)
Collate (sort printing)
Outputting portrait and landscape alternately using batch printing
Saving data for repeat printing
Printing using registered forms (overlay printing)
........................................................................................... 95
............................................................................... 90
............................................................................. 85
................................... 92
...................................................................93
......................97
............................................................................. 99
............................................. 101
Automatically switching trays
Using the printer buffer
Outputting to le without printing
Downloading PostScript les
Printing PostScript errors
Changing emulation modes
Changing settings for mono printing
Saving the printer driver settings
Saving settings ............................................................................................................... 111
Calling and using saved settings
Changing the default printer driver settings ....................................................... 113
...................................................................................... 106
............................................................................ 103
...................................................................... 107
.............................................................................. 108
................................................................................... 109
................................................................................ 109
.................................................................. 110
....................................................................... 111
........................................................................................ 112
Deleting or updating printer drivers ................................................ 114
Deleting the printer drivers ................................................................................ 114
Updating the printer drivers
............................................................................... 115
2 Matching Colors ............................................................... 119
Matching colors using the control panel ........................................... 120
Manually compensating color drift ...................................................................... 120
Automatically compensating density and gradation
Manually compensating density
Watermark adjustment for density compensation
.......................................................................... 121
.............................................. 122
- 7 -
............................................ 120

Contents
Adjusting the color balance (density) ................................................................. 123
Adjusting the color balance
................................................................................ 126
Matching Colors Using the Printer Drivers ....................................... 128
Color matching ................................................................................................... 128
What is color matching? ................................................................................................... 128
Color matching (recommended) ......................................................................... 128
Easy color matching (Ofce colors)
Color matching (GraphicPro)
.............................................................................. 133
Color matching (color matching OFF)
.................................................................... 130
................................................................. 135
Changing black nish.......................................................................................... 137
Printing using monochrome (black and white)
................................................... 140
Rendering white lines between text and background inconspicuous
(black overprint)
Calibrating plate misalignment (trapping)
Simulating print effects
Printing using color analysis (classication printing)
................................................................................................ 142
.......................................................... 143
...................................................................................... 145
......................................... 148
Disabling the Postscript Color Matching.............................................................. 149
Matching Colors Using Utilities ........................................................ 150
Color Correct Utility ............................................................................................ 150
Changing palette colors (Windows) .................................................................................... 150
Changing palette colors (Macintosh)
Changing gamma values and hues (Windows)
Changing gamma values and hues (Macintosh)
Saving color adjustment settings (Windows)
Saving color matching settings (Macintosh)
Importing color matching settings (Windows)
Importing color matching settings (Macintosh)
Deleting color matching settings (Windows)
Deleting color matching settings (Macintosh)
.................................................................................. 154
..................................................................... 158
................................................................... 161
....................................................................... 163
........................................................................ 164
...................................................................... 165
.................................................................... 167
........................................................................ 168
...................................................................... 169
PS Gamma Adjuster ............................................................................................ 170
Registering gamma (Windows) .......................................................................................... 170
Registering gamma (Macintosh)
........................................................................................ 171
Color Swatch Utility ............................................................................................ 172
Operations environment ................................................................................................... 172
Printing RGB color samples
............................................................................................... 172
Prole assistant .................................................................................................. 173
Registering ICC proles
...................................................................................... 174
3 Using Utility Software ...................................................... 175
Utility software that can be used with the printer ............................ 176
Utilities table ...................................................................................................... 176
Windows/Macintosh common utilities ................................................................................. 176
Windows utilities
............................................................................................................. 176
- 8 -

Contents
Macintosh utilities ........................................................................................................... 178
Installing utilities ............................................................................................... 178
Windows ........................................................................................................................ 178
Macintosh
...................................................................................................................... 179
Windows utilities ............................................................................. 180
Conguration Tool .............................................................................................. 180
Operations environment ................................................................................................... 180
Installing
Registering devices
Device Info tab
Network Setting plug-in
Storage Manager plug-in
PDF Print Direct .................................................................................................. 187
Operations environment ................................................................................................... 187
Printing PDF les
Print Job Accounting client ................................................................................. 188
Operations environment ................................................................................................... 188
Installing
Changing job account modes
....................................................................................................................... 180
.......................................................................................................... 182
............................................................................................................... 183
................................................................................................... 183
.................................................................................................. 184
............................................................................................................. 187
....................................................................................................................... 188
............................................................................................ 188
Change the Printer Display Language ................................................................. 192
Operations environment ................................................................................................... 192
Switching the control panel language
................................................................................. 192
Direct Network Printing Utility (LPR) .................................................................. 194
Operations environment ................................................................................................... 194
Starting up
Downloading les to the printer
Checking/deleting/transferring jobs
Checking the printer status
Adding printers
Automatically transferring jobs
Printing using multiple printers simultaneously
Starting the web browser
Adding comments
Setting IP addresses automatically
Uninstalling
..................................................................................................................... 194
......................................................................................... 194
................................................................................... 195
............................................................................................... 195
............................................................................................................... 196
.......................................................................................... 196
.................................................................... 197
................................................................................................. 198
........................................................................................................... 199
.................................................................................... 200
.................................................................................................................... 200
Network Extension ............................................................................................. 201
Operations environment ................................................................................................... 201
Checking the printer settings
Setting options automatically
Uninstalling
.................................................................................................................... 202
............................................................................................ 201
............................................................................................ 202
Web Driver Installer ........................................................................................... 203
- 9 -

Contents
Mac OS X utilities ............................................................................. 204
Panel language setup ......................................................................................... 204
Setting the printer ........................................................................................................... 204
Print Job Accounting client ................................................................................. 205
Installing ....................................................................................................................... 205
Registering user IDs and user names
Registering multiple users simultaneously
Changing user IDs and user names.................................................................................... 206
Deleting user IDs and user names
Network Card Setup Utility ................................................................................. 207
Setting IP addresses ........................................................................................................ 207
Making web settings
Finishing the Network Card Setup Utility
........................................................................................................ 207
................................................................................. 205
........................................................................... 205
..................................................................................... 206
............................................................................. 208
4 Network Setup ................................................................. 209
Network setting items ..................................................................... 210
Initializing network settings
Using DHCP
Setting the DHCP server ................................................................................................... 224
Setting the printer
...................................................................................... 224
........................................................................................................... 225
............................................................ 223
Using SNMP ..................................................................................... 227
About IPv6....................................................................................... 228
Checking IPv6 addresses .................................................................................... 228
Setting the network from the web browser ..................................... 229
Operations environment ..................................................................................... 229
Starting up
Logging in as an administrator
Items table
Changing administrator passwords
Checking printer status from the PC
Changing printer settings from the PC
Encrypting communications (SSL/TLS)
Printing using IPP
......................................................................................................... 229
........................................................................... 230
......................................................................................................... 231
.................................................................... 233
................................................................... 234
................................................................ 234
.............................................................. 235
.............................................................................................. 237
Encrypting communications (IPSec)
Using the access restriction function (IP lter) with IP addresses
Using the access restriction function with MAC addresses
Notifying errors using e-mail
Notifying errors periodically using e-mail
Using SNMPv3
Using IEEE802.1X
Changing EtherTalk printer names (Macintosh)
.................................................................................................... 254
............................................................................................... 256
.............................................................................. 249
................................................................... 239
.................................. 247
........................................................... 251
.................................................. 260
- 10 -
.....................246

Contents
Changing EtherTalk zones (Macintosh) ............................................................... 260
Printing without printer drivers (Direct printing)
Printing PDF les ............................................................................................................. 261
Setting the server to print mail attachments
....................................................................... 262
............................................... 261
5 Checking and Changing Printer Settings Using the
Control Panel
Printing printer information ............................................................. 264
Printable report tables ........................................................................................ 264
Printing printer settings lists
Settings details ............................................................................................................... 265
Printing printer information lists ........................................................................ 266
Network information ........................................................................................................ 266
File list
Demo pages
Error log
Total print results
Total print results Printing print lists .................................................................. 269
Font list ......................................................................................................................... 269
Color prole list
User media list
Test prints
.......................................................................................................................... 267
........................................................................................................................ 268
...................................................................................................................... 270
................................................................... 263
.............................................................................. 265
................................................................................................................... 267
............................................................................................................ 268
.............................................................................................................. 269
................................................................................................................ 270
Registering custom sizes (irregular paper)......................................................... 271
Changing administrator passwords
Restricting button operations (panel lockout)
Restricting menu displays (menu lockout)
.................................................................... 273
................................................... 274
......................................................... 275
Checking print quantities ................................................................. 276
Checking remaining consumables and maintenance unit quantities
... 277
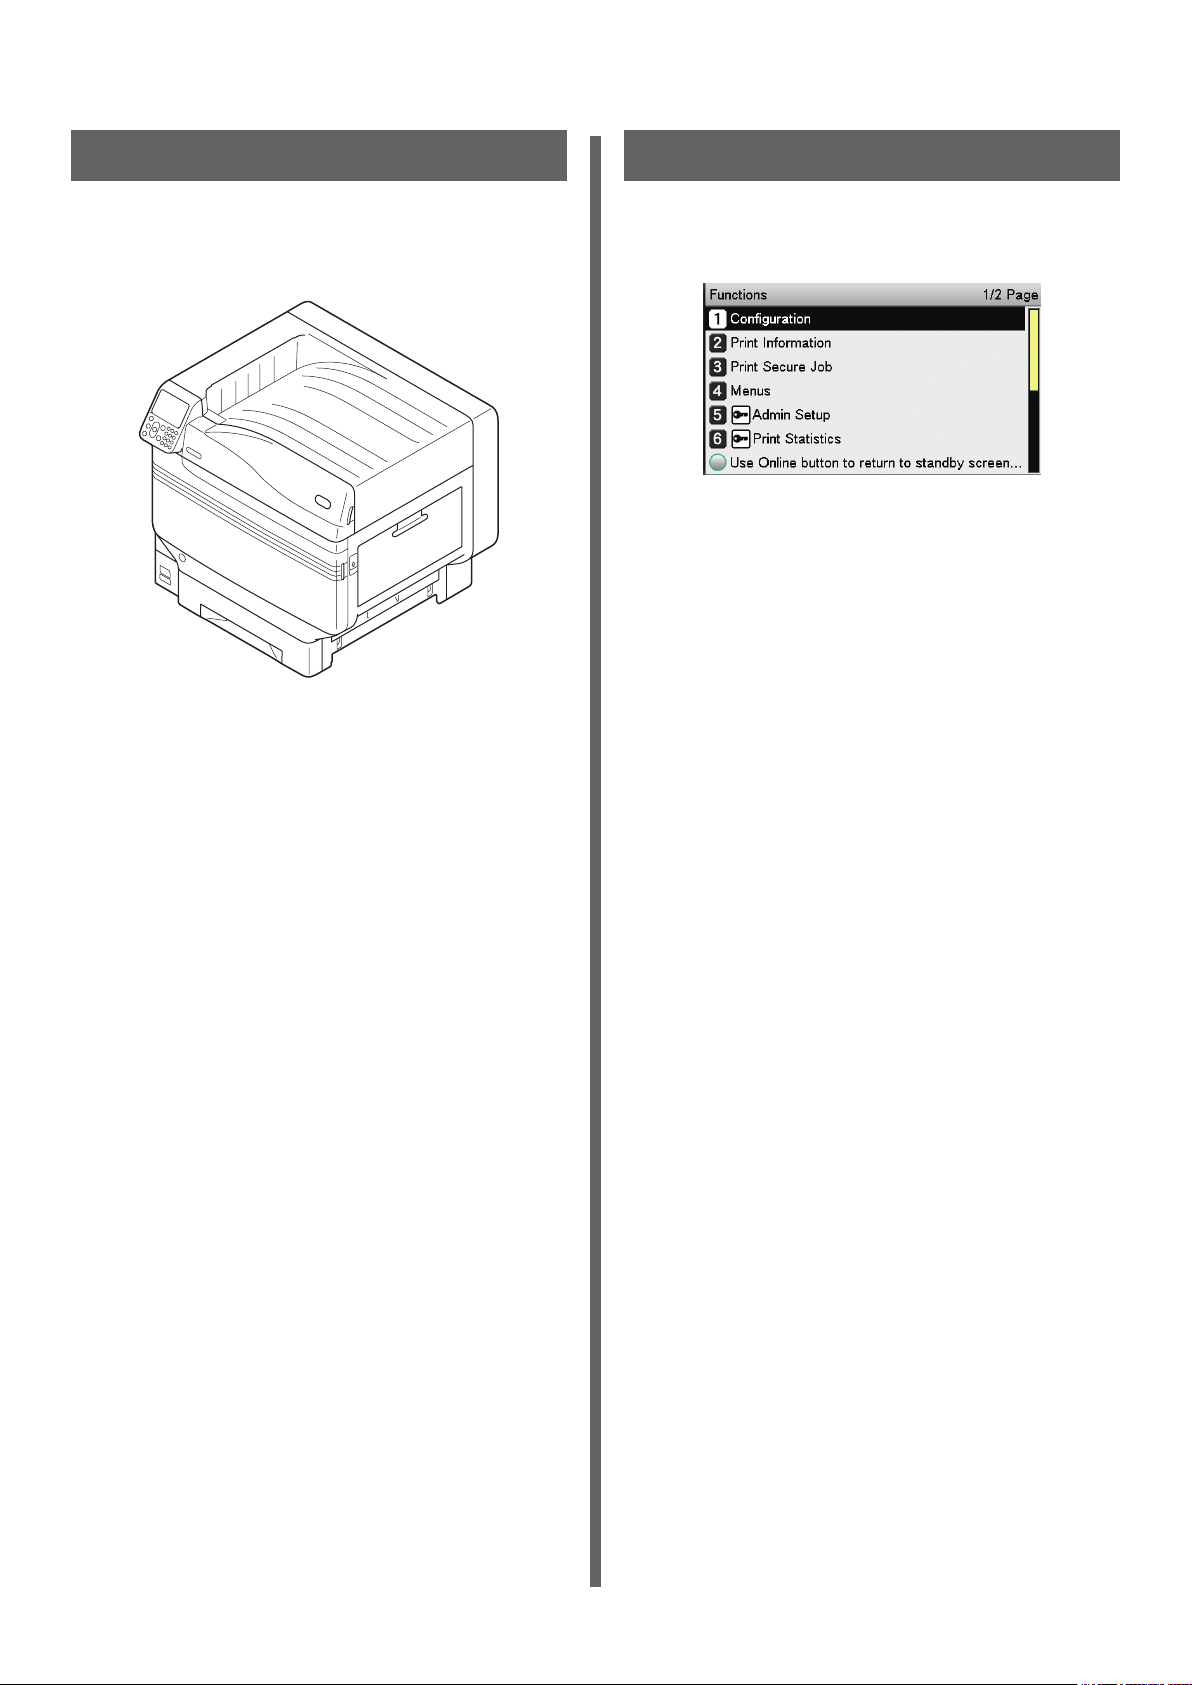
Table of setting items in the device setup screen............................. 278
Device setup screen ............................................................................................ 278
[Conguration]
[Print Information]
[Print Secure Job]
[Menus]
[Admin Setup]
[Print Statistics]
[Calibration]
[Boot Menu]
.............................................................................................................. 284
................................................................................................... 279
............................................................................................ 282
.............................................................................................. 283
.................................................................................................... 297
................................................................................................. 315
....................................................................................................... 316
....................................................................................................... 320
- 11 -

Contents
Appendix ............................................................................... 321
Using Print Job Accounting .............................................................. 322
Number of usable user IDs and logs ................................................................... 322
Character code table ........................................................................ 323
PostScript mode ................................................................................................. 323
PCL mode
........................................................................................................... 326
Index .................................................................................... 329
- 12 -

1
Convenient
print functions
1
Convenient print
functions
2
Matching
Colors
Printer driver functions table …………… 14
Printing on various papers
Economy printing
…………………………… 54
Changing sizes to print
Clean printing
………………………………… 67
……………… 22
…………………… 61
Printing print results so that
people cannot see them
…………………… 76
Correcting the Print Position on
the Paper Using the Control Panel
…… 81
Adjusting the Image Stretch (Print
Length) Using the Control Panel
Advanced print functions
………………… 85
……… 83
the Control Panel
Software
Setup
Settings Using
3
Using Utility
4
Network
5
Changing Printer
Checking and
Appendix Index
Deleting or updating printer drivers
Note
This section uses [WordPad] for its Windows explanations, and [TextEditor] for its Mac OS X
z
explanations. Depending on the application, the screens and operations procedures may differ.
For detailed explanations of the printer driver and utility setup items, see "Online Help".
z
Due to printer driver and utility version upgrades, there may be differences from the descriptions
z
in this manual.
- 13 -
… 114
Printer driver functions table
Printer driver functions table
z
This section explains the convenient functions when printing from a PC.
1
Convenient print
functions
Reference
For detailed explanations of the printer driver setup items, see "Online Help".
z
the Control Panel
2
Colors
3
Software
4
Setup
5
Settings Using
Appendix Index
Functions explanation
Matching
There are three printer driver types for Windows
(PCL, PS, and XPS), and one printer driver type
for Mac OS X (PS). The functions may differ
depending on the printer driver.
Using Utility
Windows PS printer driver
functions
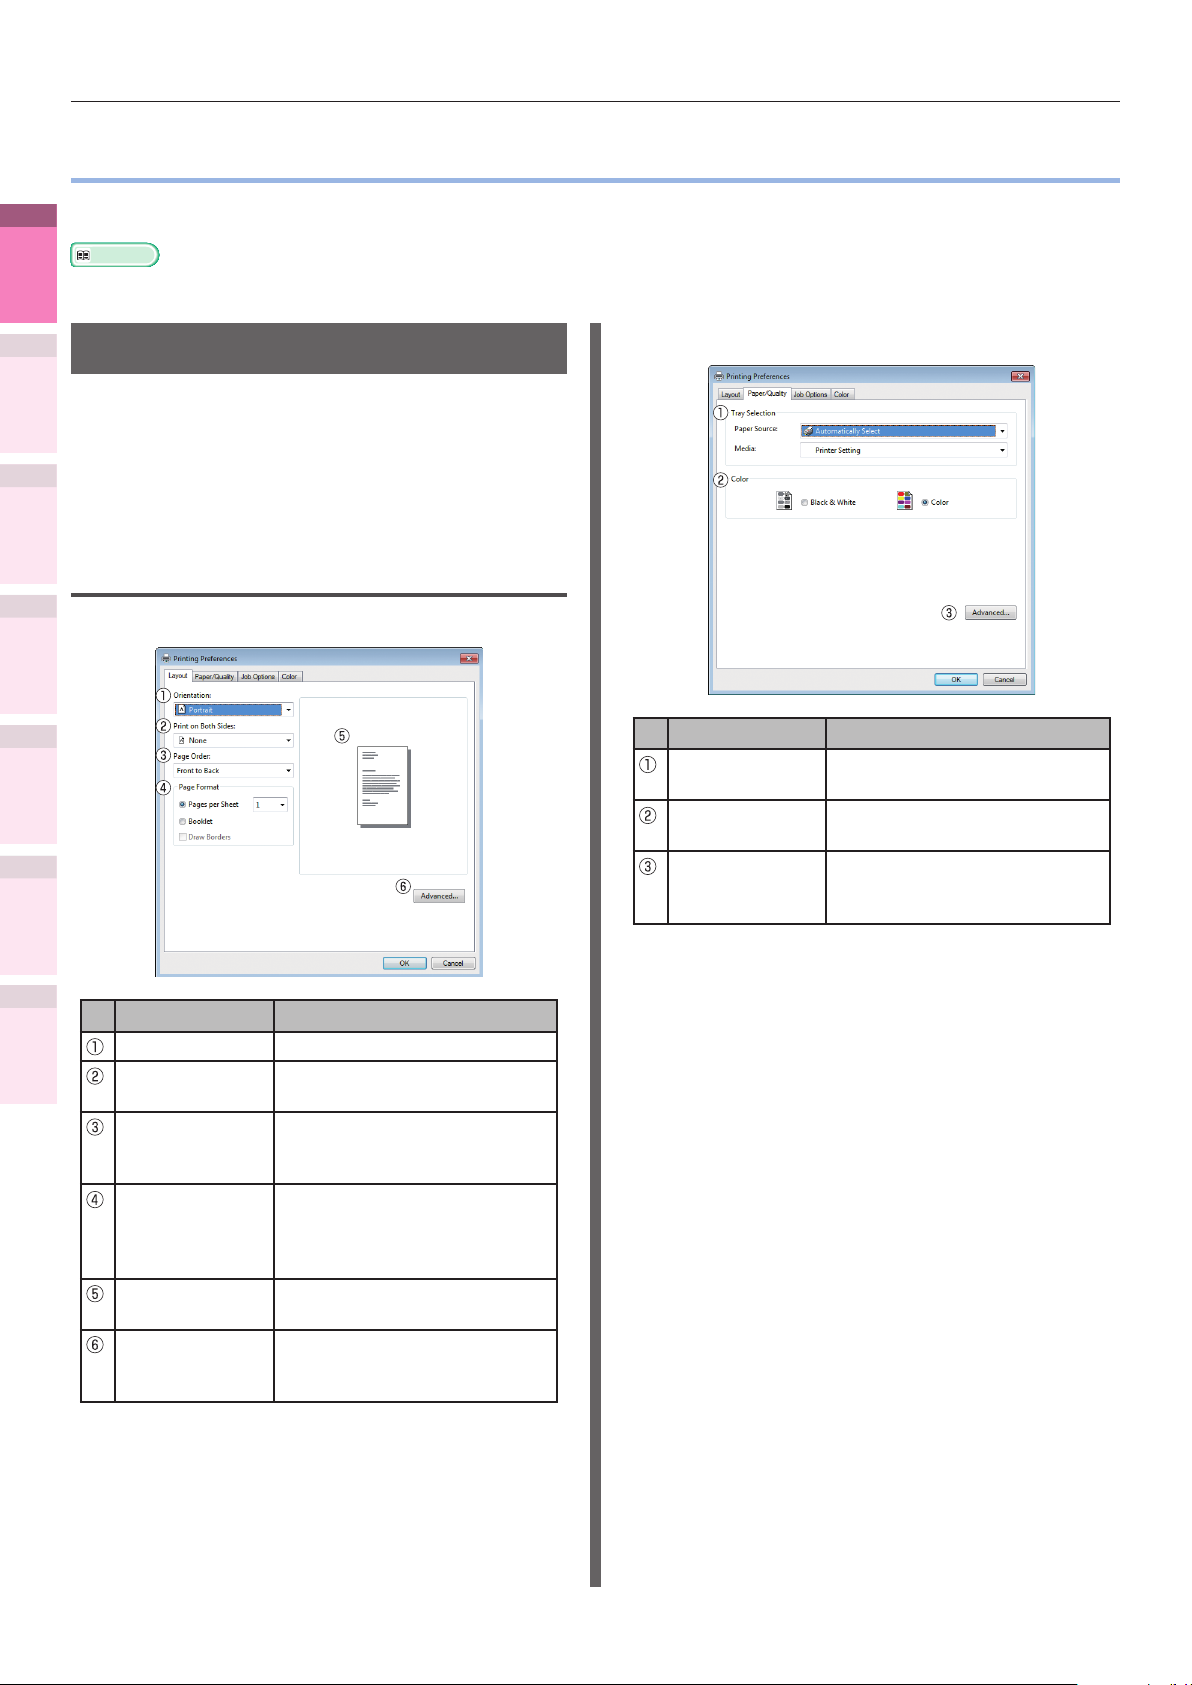
[Layout] tab
Network
Changing Printer
Checking and
[Paper/Quality] tab
Item Explanation
Tray Selection Species the tray to feed the
paper.
Color Species color or
monochrome printing.
Advanced You can make more advanced
setups regarding the print
quality and paper size.
Item Explanation
Orientation Species the print orientation.
Print on Both
Sides
Page Order Species the order of the
Page Format Species the number of pages
Preview window Displays an image of the print
Advanced You can make more advanced
Species to use both sides
printing.
document pages to be
printed.
and small leaet printing
to be printed on 1 sheet of
paper.
results.
setups regarding the print
quality and paper size.
- 14 -
Printer driver functions table
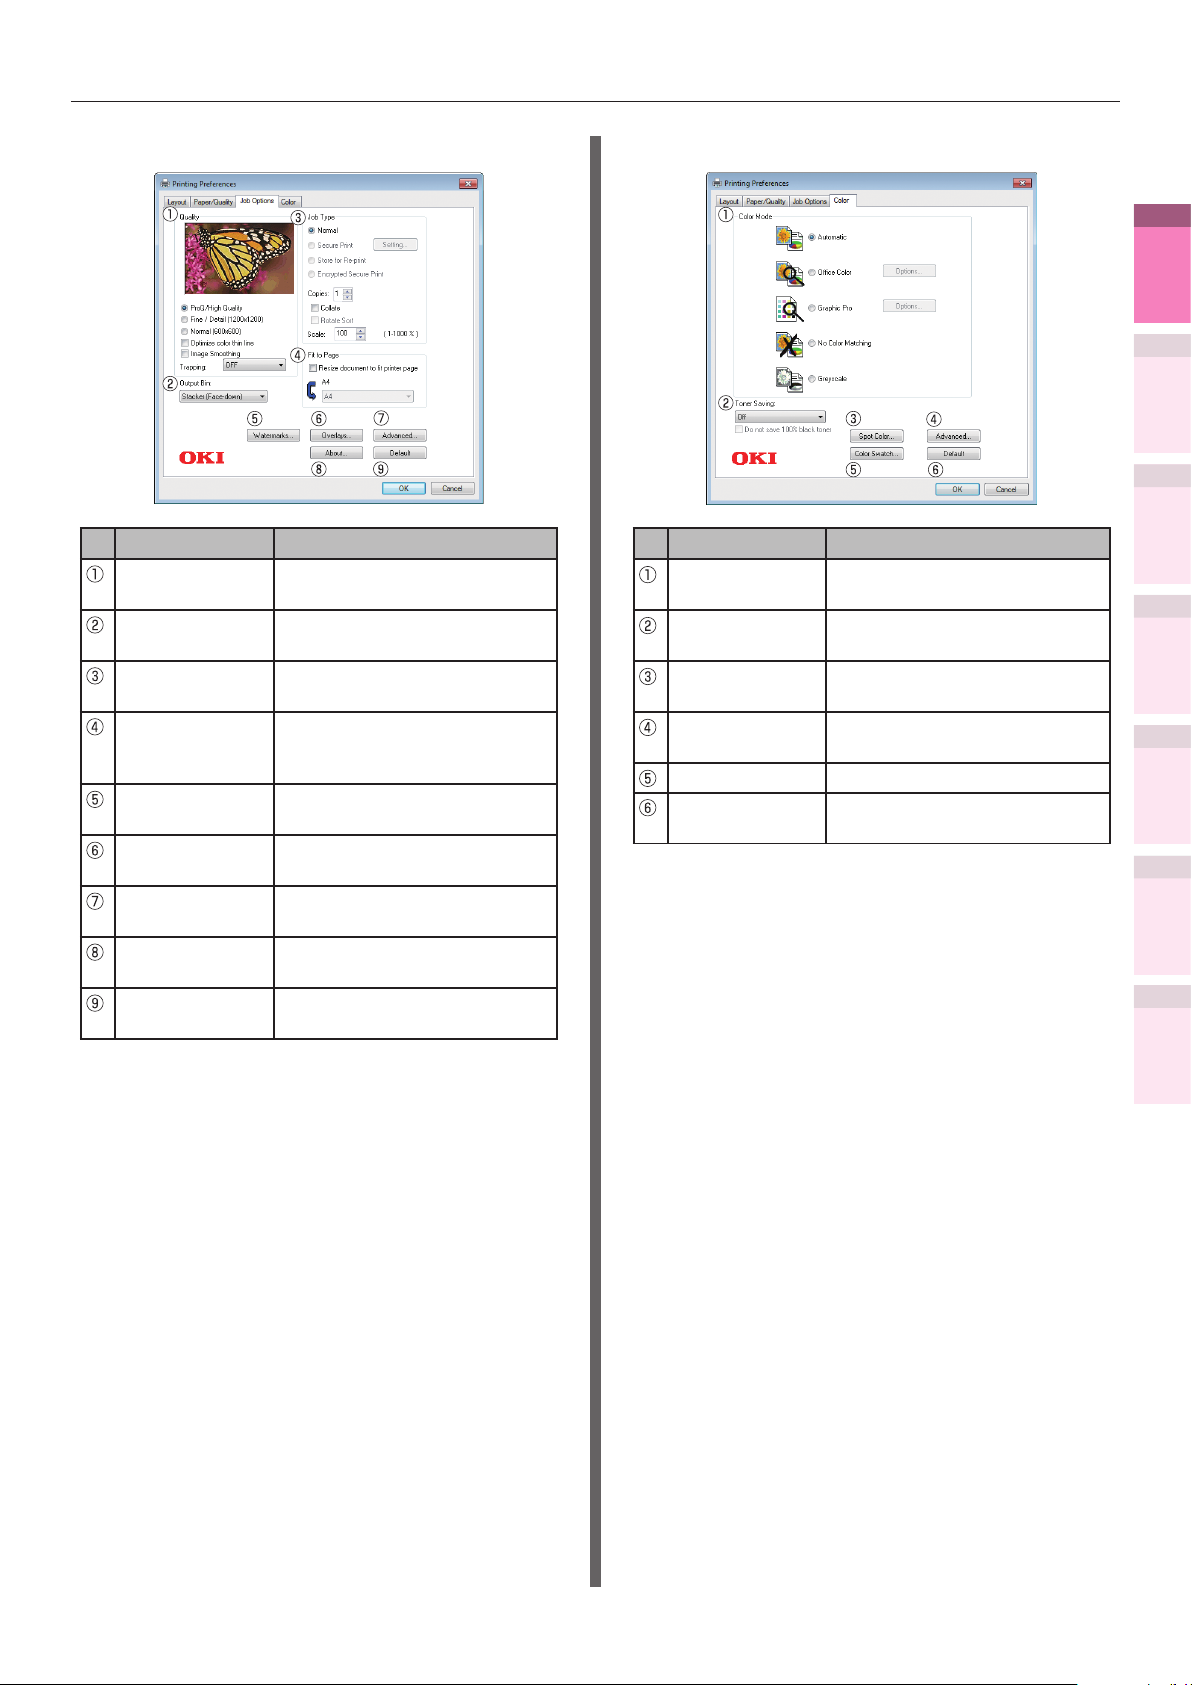
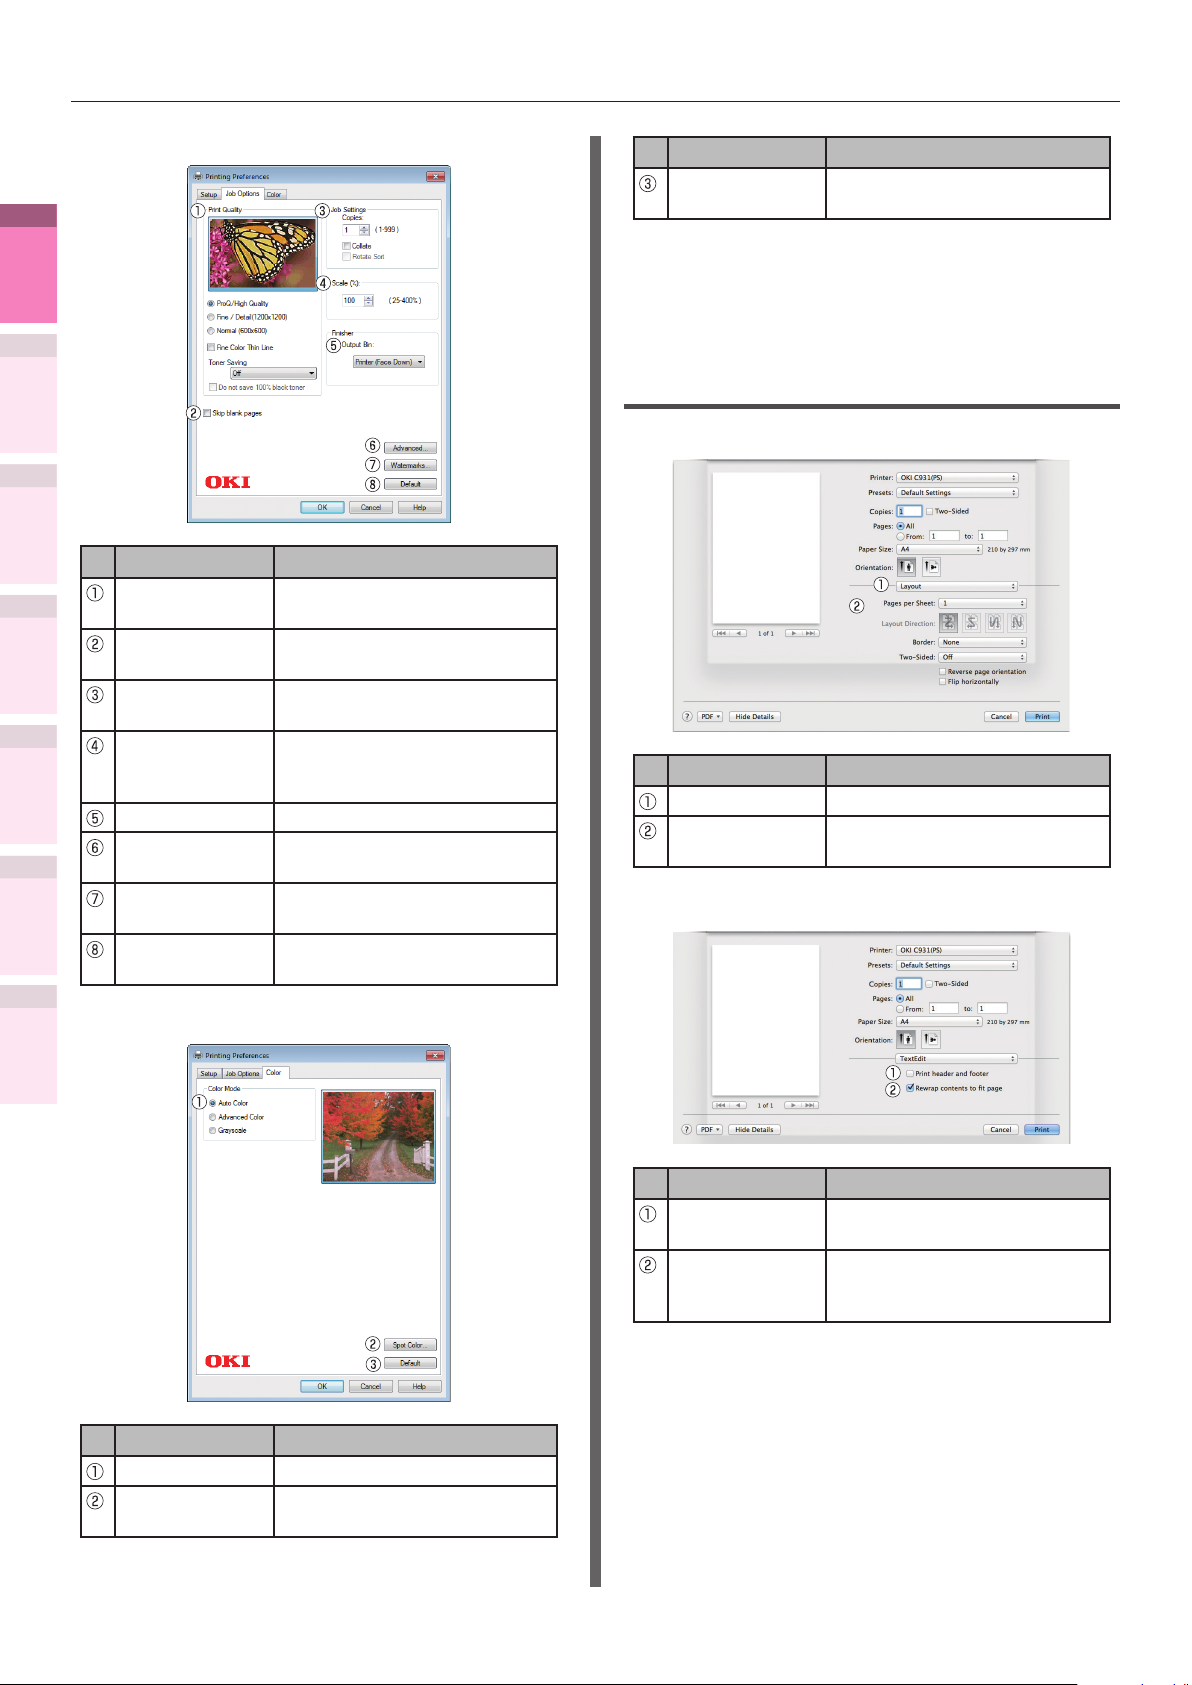
[Job Options] tab
Item Explanation
Quality Species the resolution
during printing.
Output Bin Species the paper output
bin.
Job Type Species the print format and
quantity to be printed.
Fit to Page Species when printing by
converting the paper size of
the document to be printed.
Watermarks Species when implementing
stamp printing.
Overlays Species when implementing
overlay printing.
Advanced You can make other advanced
print setups.
About Displays the printer driver
version information.
Default Restores the tab settings to
the default settings.
[Color] tab
Item Explanation
Color Mode Species color matching, etc.,
in color mode.
Toner Saving Species the print density
when economizing on toner.
Spot Color* Species when implementing
Spot Color printing.
Advanced You can make other advanced
print setups.
Color Swatch Starts the color swatch utility.
Default Restores the tab settings to
the default settings.
*: "Spot Color" is a function for model C941/C942/ES9541/
ES9542/Pro9541/Pro9542 only. For details, see the
"Separate Volume Spot Color Guide".
1
Convenient print
functions
2
Matching
Colors
3
Using Utility
Software
4
Network
Setup
5
the Control Panel
Changing Printer
Settings Using
Appendix Index
Checking and
- 15 -
Printer driver functions table
1
Convenient print
functions
2
Matching
Colors
3
Using Utility
Software
4
Network
Setup
5
the Control Panel
Changing Printer
Settings Using
Appendix Index
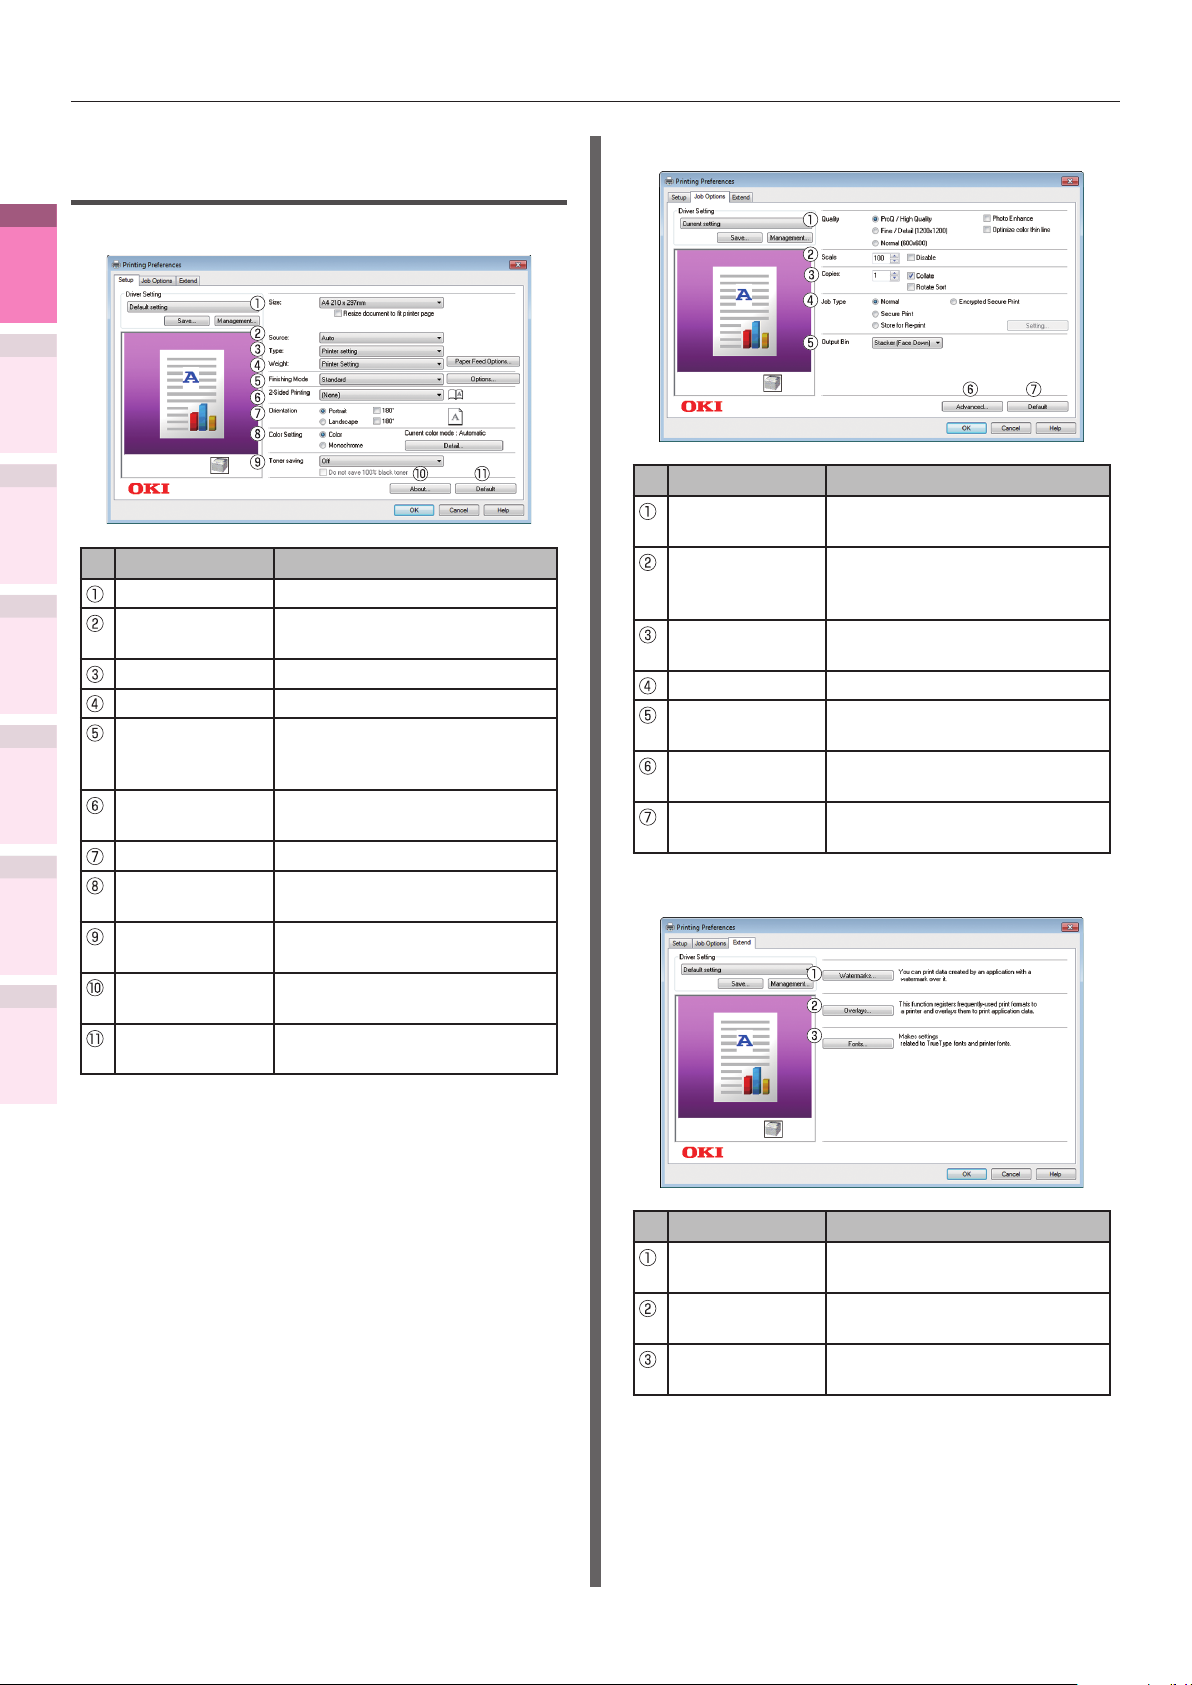
Windows PCL printer driver
functions
[Setup] Tab
Item Explanation
Size Species the paper size.
Source Species the tray to feed the
paper.
Type Species the paper type.
Weight Species the paper thickness.
Finishing Mode Species multi-page printing,
Checking and
2-Sided Printing Species to print on both
Orientation Species the print orientation.
Color Setting Species whether to print in
Toner saving Species the print density
About Displays the printer driver
Default Restores the tab settings to
booklets, and poster printing,
etc.
sides of the paper.
color or monochrome.
when economizing on toner.
version information.
the default settings.
[Job Options] Tab
Item Explanation
Quality Species the resolution
during printing.
Scale Species the rate of
enlargement and contraction
during printing.
Copies Species the quantity to be
printed.
Job Type Species the print format.
Output Bin Species the paper output
bin.
Advanced You can make several other
print setups.
Default Restores the tab settings to
the default settings.
[Extend] Tab
- 16 -
Item Explanation
Watermarks Species when implementing
stamp printing.
Overlays Species when implementing
overlay printing.
Fonts Sets the TrueType fonts and
printer fonts.
Printer driver functions table
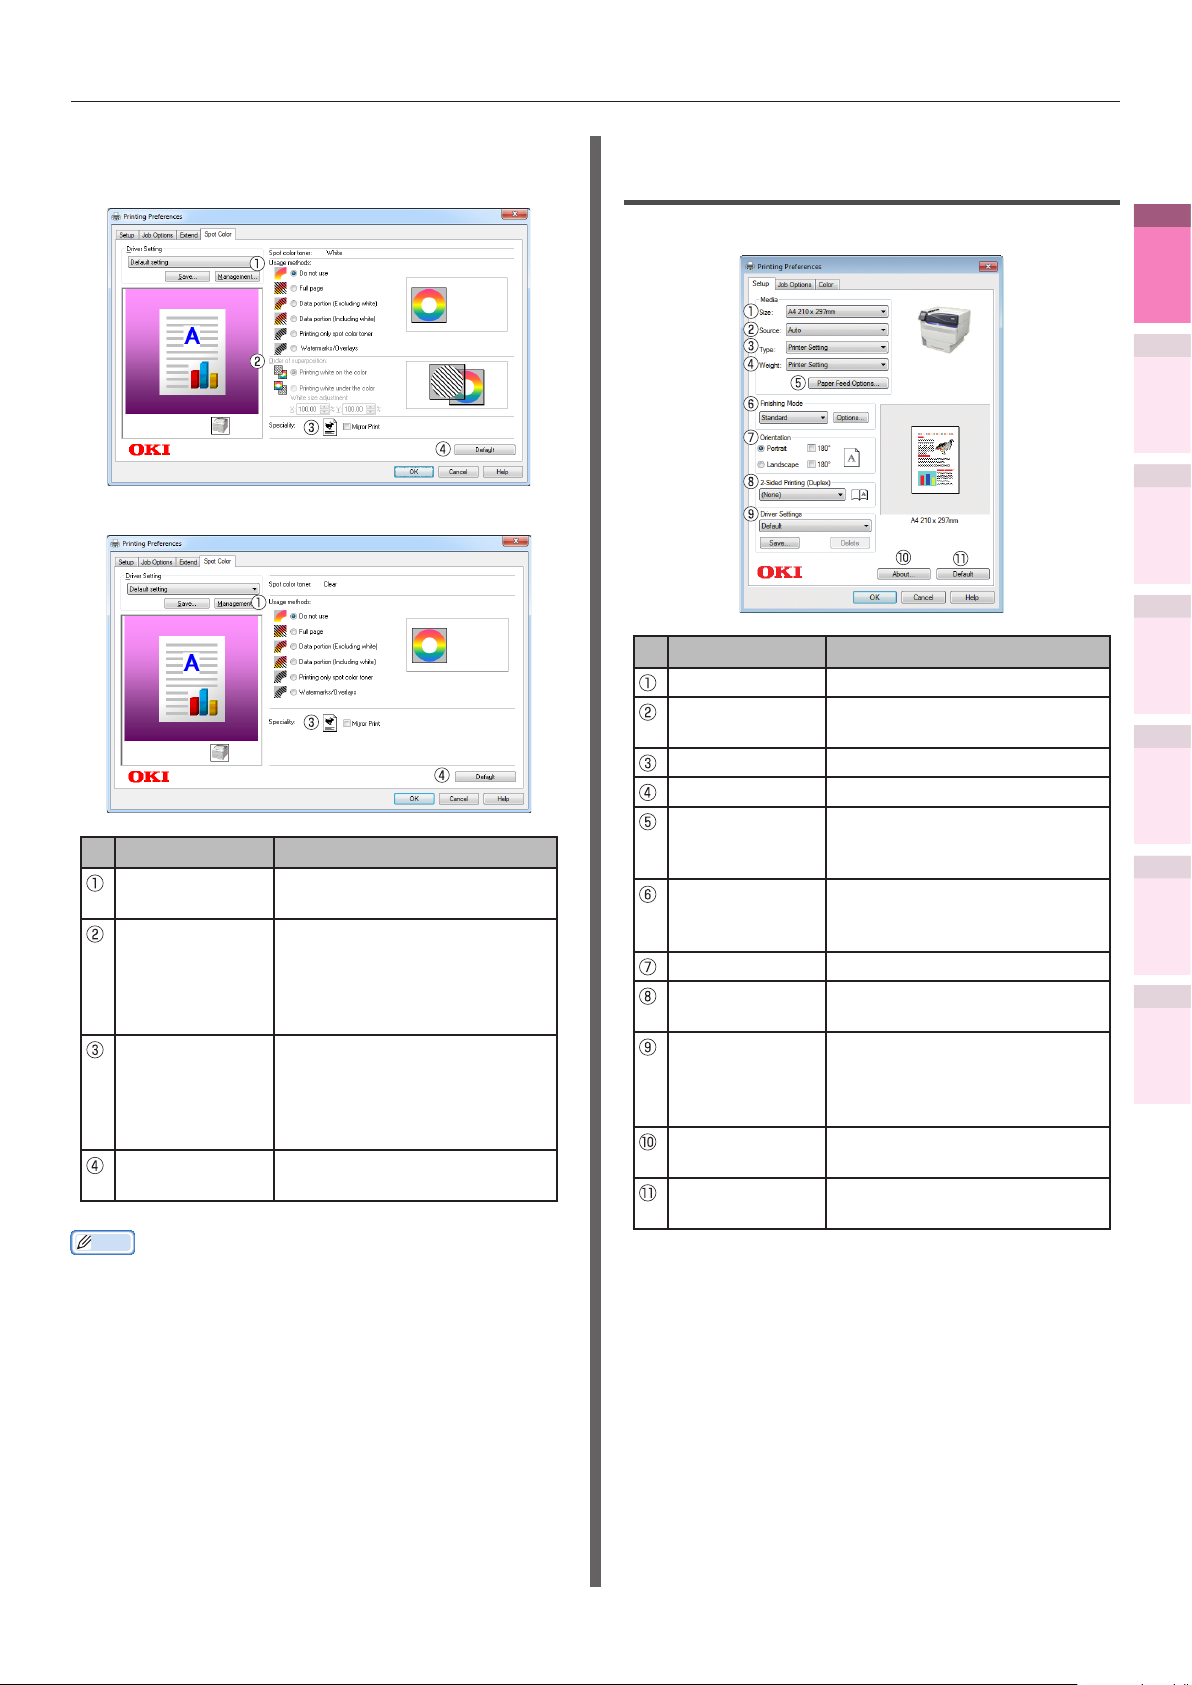
[Spot Color] Tab
In white mode
z
In clear mode
z
Item Explanation
Usage methods Species the range of Spot
Color printing.
Order of
superposition
Mirror Print Sets when to print by
Default Restores the tab settings to
Memo
"Spot Color" is a function for model C941/C942/ES9541/
z
ES9542/Pro9541/Pro9542 only. For details, see the
"Separate Volume Spot Color Guide".
Specify the order of color and
white layering and white size
adjustment when printing
the white under. (white mode
only).
reversing the horizontal
orientation so that the
document is as if reected in
a mirror.
the default settings.
Windows XPS printer driver
functions
[Setup] Tab
Item Explanation
Size Species the paper size.
Source Species the tray to feed the
paper.
Type Species the paper type.
Weight Species the paper thickness.
Paper Feed
Options
Finishing Mode Species multi-page printing,
Orientation Species the print orientation.
2-Sided Printing
(Duplex)
Driver Settings Specied when saving the
About Displays the printer driver
Default Restores the tab settings to
You can set paper feed such
as changing the paper size
and tray switching, etc.
booklets, and poster printing,
etc.
Species to print on both
sides of the paper.
details set in the tab, and
when printing using these
saved settings.
version information.
the default settings.
1
Convenient print
functions
2
Matching
Colors
3
Using Utility
Software
4
Network
Setup
5
the Control Panel
Changing Printer
Settings Using
Appendix Index
Checking and
- 17 -
Printer driver functions table
1
Convenient print
functions
2
Matching
Colors
3
Using Utility
Software
4
Network
Setup
5
the Control Panel
Changing Printer
Settings Using
Appendix Index
[Job Options] tab
Item Explanation
Print Quality Species the resolution
Skip blank
pages
Job Settings Species the quantity to be
Scale Species the rate of
Checking and
Output Bin
Advanced You can make other advanced
Watermarks Species when implementing
Default Restores the tab settings to
during printing.
Prints excluding blank pages.
printed, etc.
enlargement and contraction
during printing.
Species the paper output bin.
print setups.
stamp printing.
the default settings.
Item Explanation
Default Restores the tab settings to
the default settings.
*: "Spot Color" is a function for model C941/C942/ES9541/
ES9542/Pro9541/Pro9542 only. For details, see the
"Separate Volume Spot Color Guide".
Mac OS X PS printer driver
functions
[Print Options] panel
Item Explanation
Print Options Sets various functions.
Setup Items Species the setup items
conforming to the print setup.
[TextEdit] panel
[Color] tab
Item Explanation
Color Mode
Spot Color* Species when implementing
Species the color print method.
Spot Color printing.
Item Explanation
Printing header
and footer
Rewrap
contents to t
page
Enable to print page numbers,
dates, and text titles, etc.
Enable to print by aligning
to the text wrapping method
durign editing.
- 18 -
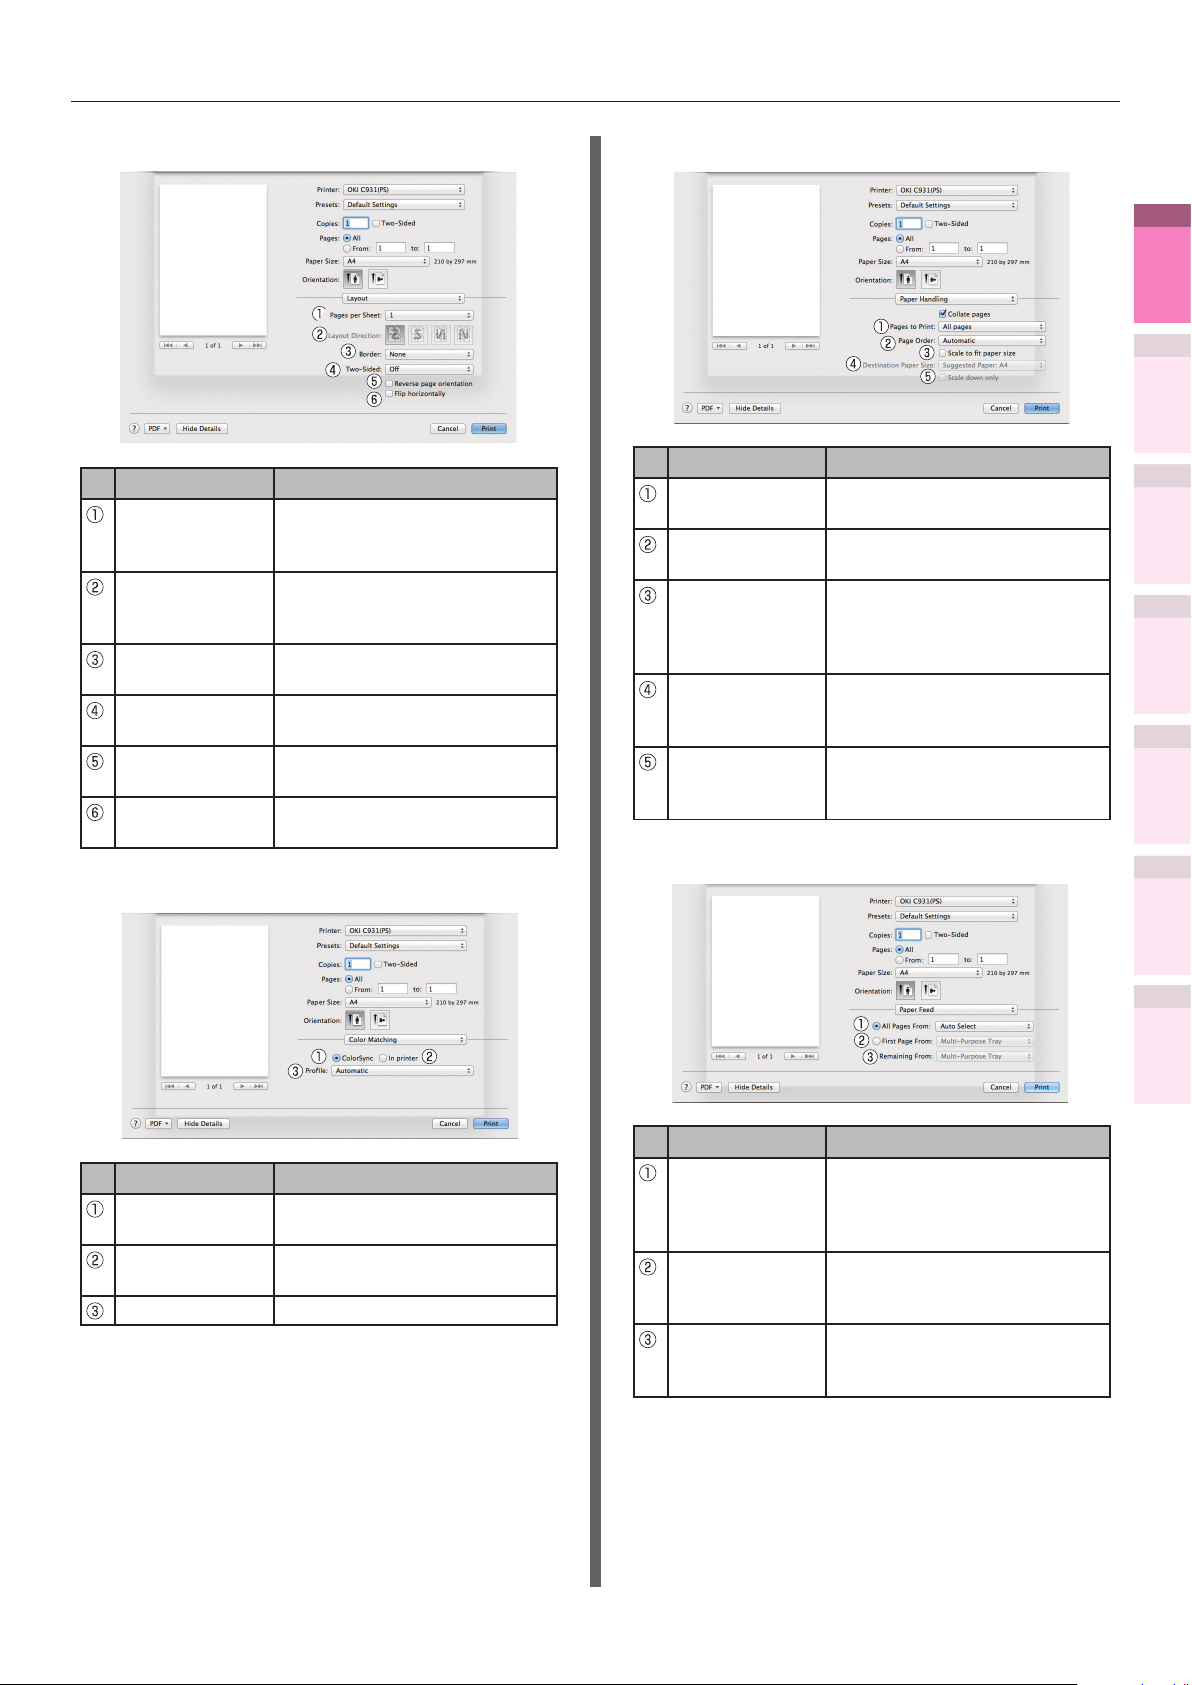
Printer driver functions table
[Layout] Panel
Item Explanation
Pages per Sheet Selects the number of pages
to be printed on 1 sheet of
paper.
Layout Direction Species the layout when
printing multiple pages on a
single sheet of paper.
Border Species the boundary line
type.
Two-Sided Species to use 2-sided
printing.
Reverse page
orientation
Enable to print by reversing
the page orientation.
Flip horizontally Enable to print by reversing
left and right.
[Color Matching] panel
[Paper Handling] panel
Item Explanation
Pages to Print Species the pages to be
printed.
Page Order Species the order of the
pages to be printed.
Scale to t
Paper size
Prints by aligning to the paper
size. Some items may not be
printed correctly depending
on the setup.
Destination
Paper Size
Species to print by scaling to
match the size of the paper
to be output.
Scale down only Species to print by reducing
only to match the size of the
paper to be output.
[Paper Feed] panel
1
Convenient print
functions
2
Matching
Colors
3
Using Utility
Software
4
Network
Setup
5
the Control Panel
Changing Printer
Settings Using
Appendix Index
Checking and
Item Explanation
ColorSync Species the ColorSync
function.
In printer Implements printer color
matching.
Prole Species the prole.
Item Explanation
All Pages From Species the tray for the
paper feed. The tray is
selected automatically when
[Auto Select] is specied.
First Page From Select to print from the tray
that species the header
page.
Remaining From Prints from the tray that
species the remaining
pages.
- 19 -
Printer driver functions table
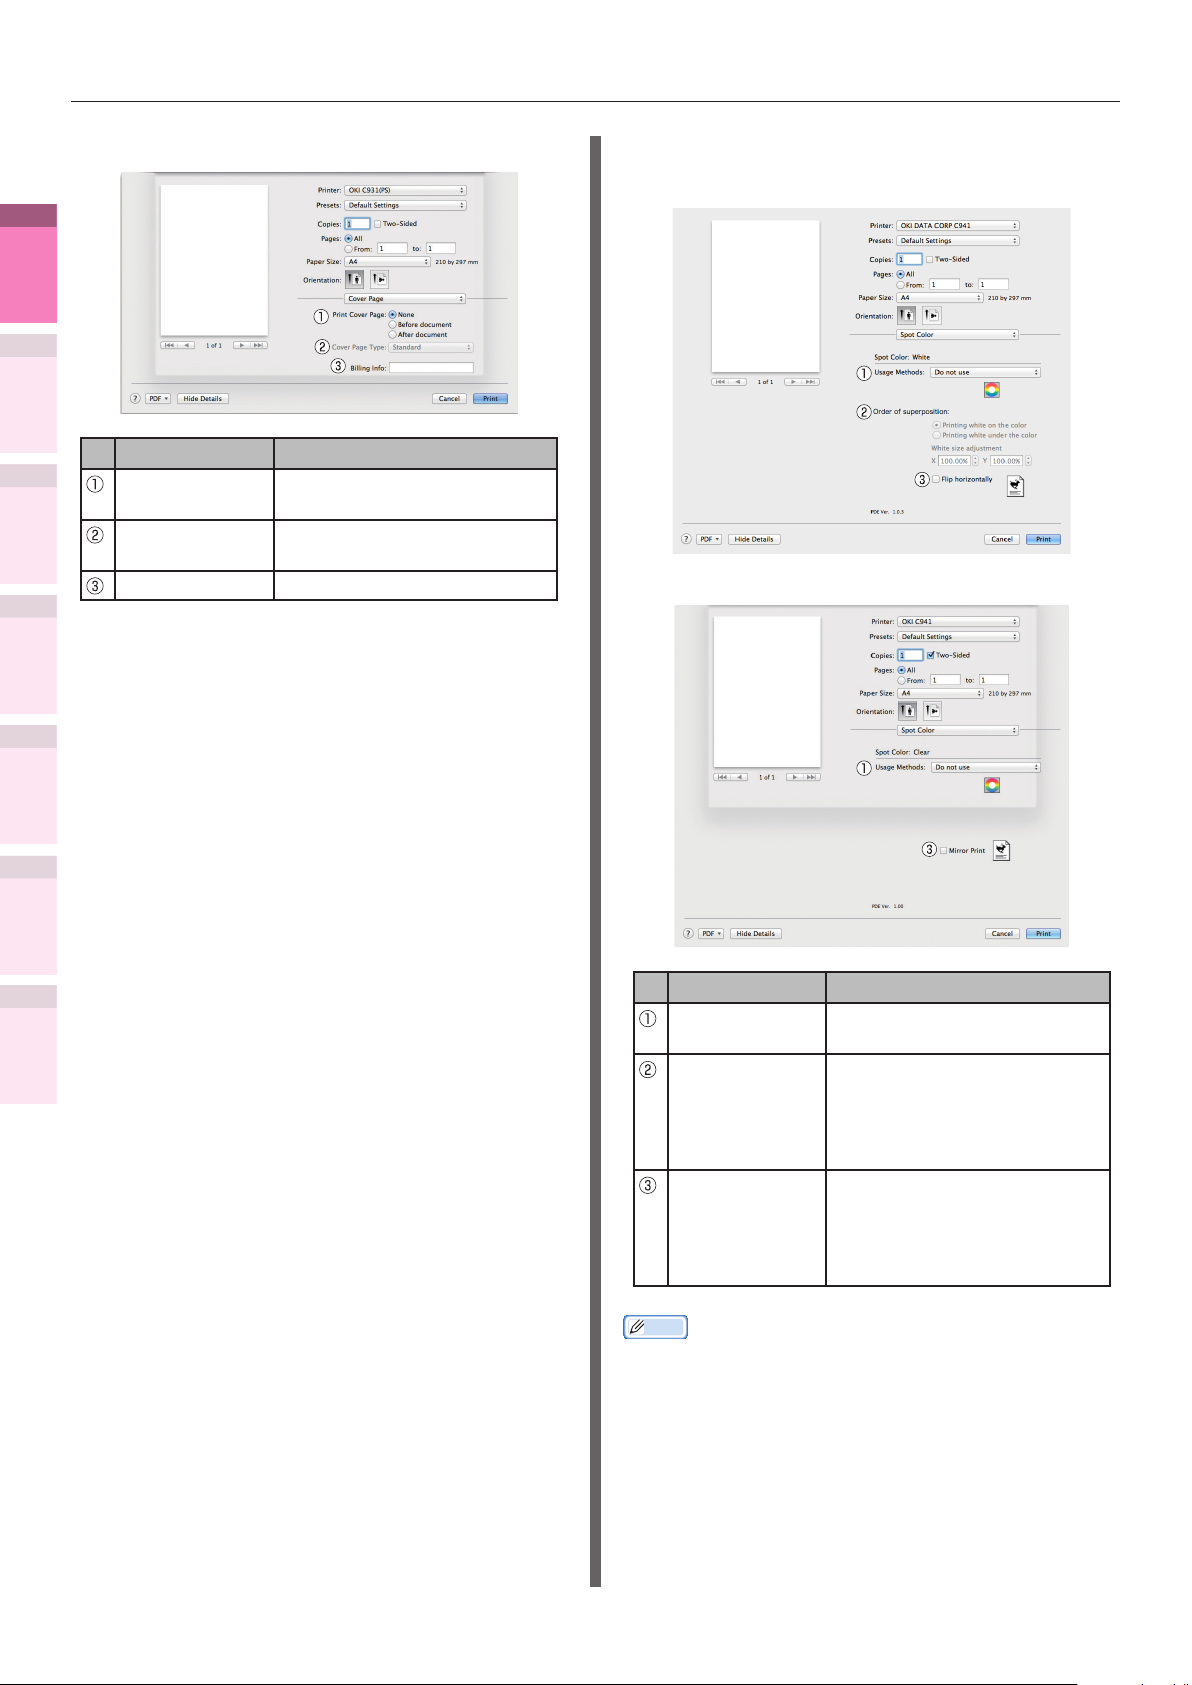
[Cover Page] panel
1
Convenient print
functions
2
Matching
Colors
Software
3
Using Utility
Print Cover
Page
Cover Page
Type
Billing Info This function cannot be used.
4
Network
Setup
Item Explanation
Species cover printing.
Species the text during
printing.
[Spot Color] panel
In white mode
z
In clear mode
z
the Control Panel
5
Changing Printer
Settings Using
Appendix Index
Checking and
Item Explanation
Usage Methods Species the range of Spot
Color printing.
Order of
superposition
Mirror Print Sets when to print by
Specify the order of color and
white layering and white size
adjustment when printing
the white under. (white mode
only).
reversing the horizontal
orientation so that the
document is as if reected in
a mirror.
- 20 -
Memo
"Spot Color" is a function for model C941/C942/ES9541/
z
ES9542/Pro9541/Pro9542 only. For details, see the
"Separate Volume Spot Color Guide".
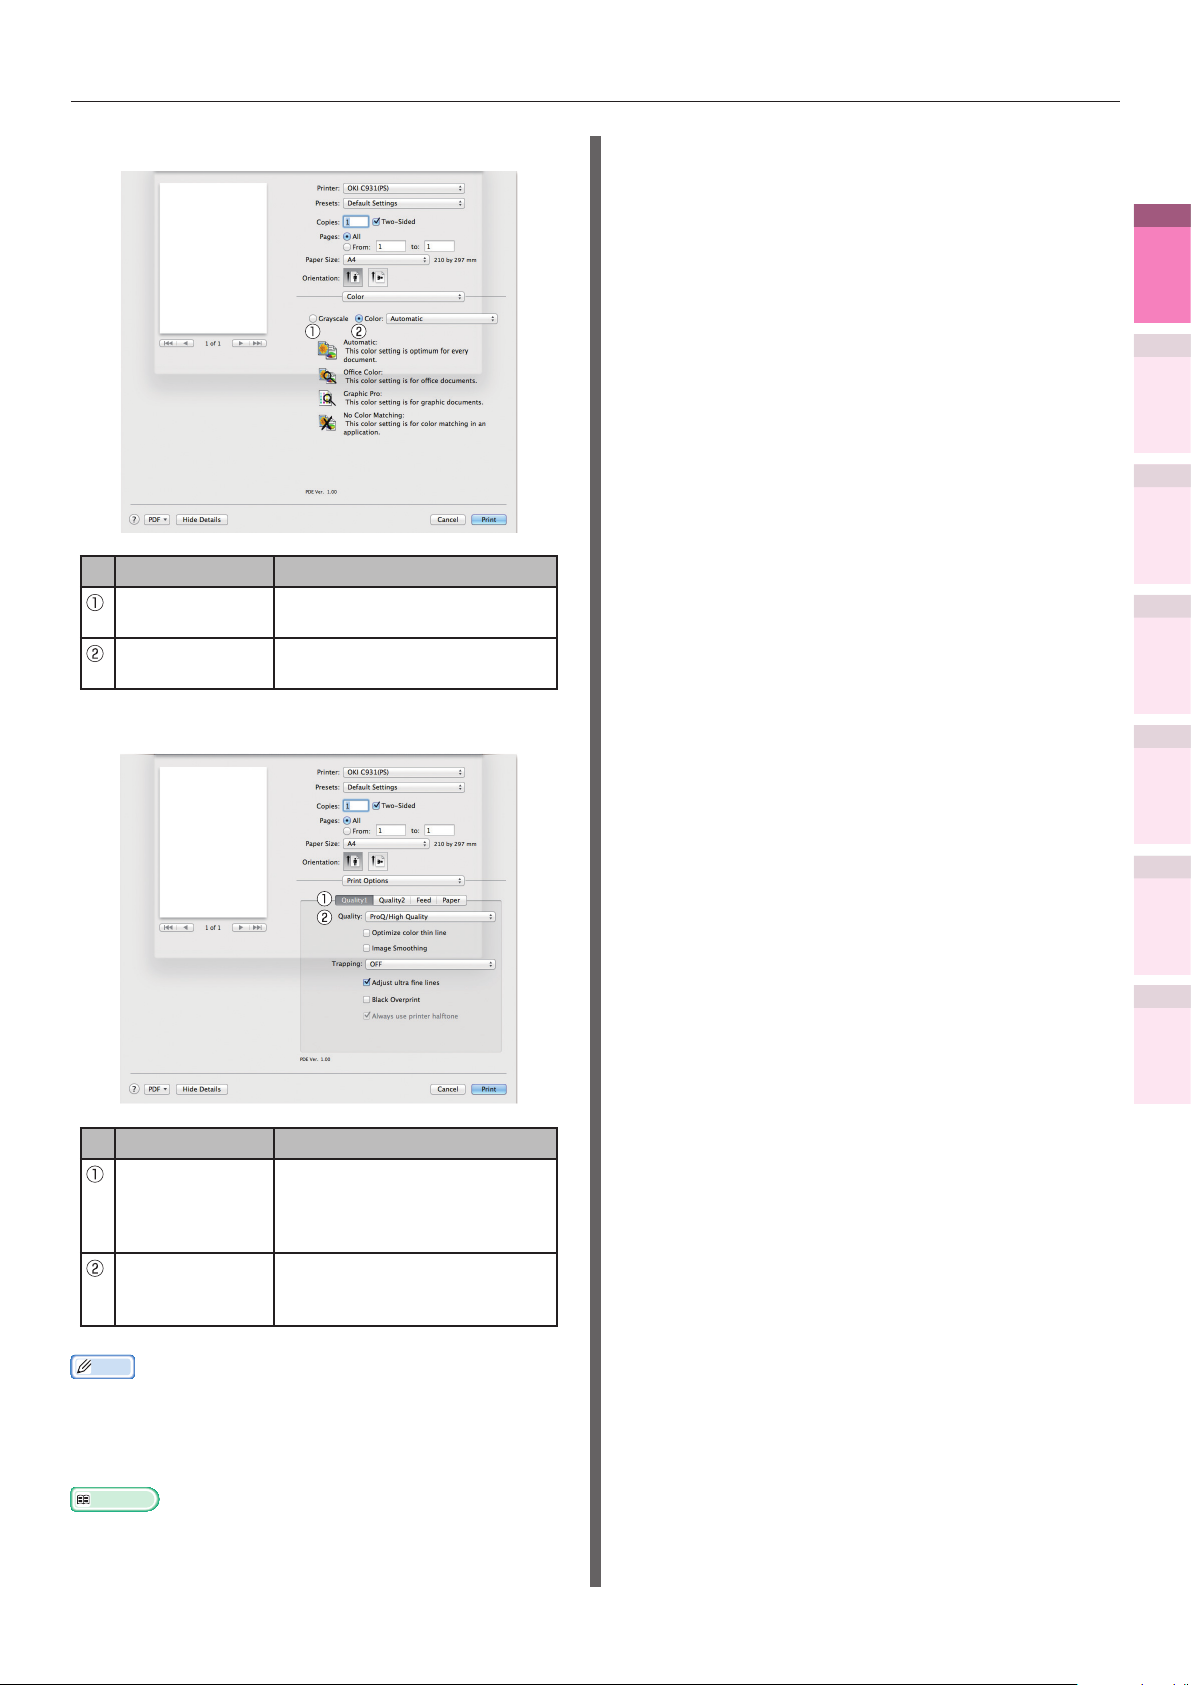
[Color] panel
Item Explanation
Grayscale Species to use monochrome
printing.
Color Species alignment to color
mode when printing in color.
Printer driver functions table
1
Convenient print
functions
2
Matching
Colors
3
Using Utility
Software
4
Network
Setup
[Print Options] panel
Item Explanation
Print Options Species alignment to the
items that have been set such
as print quality, paper type,
etc.
Items Setup Species the setup items
conforming to the print setup
tab.
the Control Panel
5
Changing Printer
Settings Using
Appendix Index
Checking and
Memo
This section uses [MemoPad] for its Windows explanations,
z
and [TextEditor] for its Mac OS X explanations.
Descriptions may differ depending on the applications and
printer drivers used.
Reference
For detailed explanations of the printer driver setup items,
z
see the printer driver "Online Help".
- 21 -
Printing on various papers
Printing on various papers
z
1
Convenient print
functions
Printing on envelopes
Before setting
the Control Panel
2
Colors
3
Software
4
Setup
5
Settings Using
z
Matching
z
z
Using Utility
z
z
Network
Changing Printer
Checking and
Memo
For the types of envelopes that can be used, see “Usable
Paper Types” in “Basic”.
For the Multi-Purpose Tray preparations, see "Setting
paper in the Multi-Purpose Tray" in "Basic".
You can print by manually feeding one page at a time from
the Multi-Purpose Tray. For details, see “Printing single
sheets manually” (P.87).
Note
2-sided printing and printing from paper trays are disabled
for envelopes.
Print speed will be slowed.
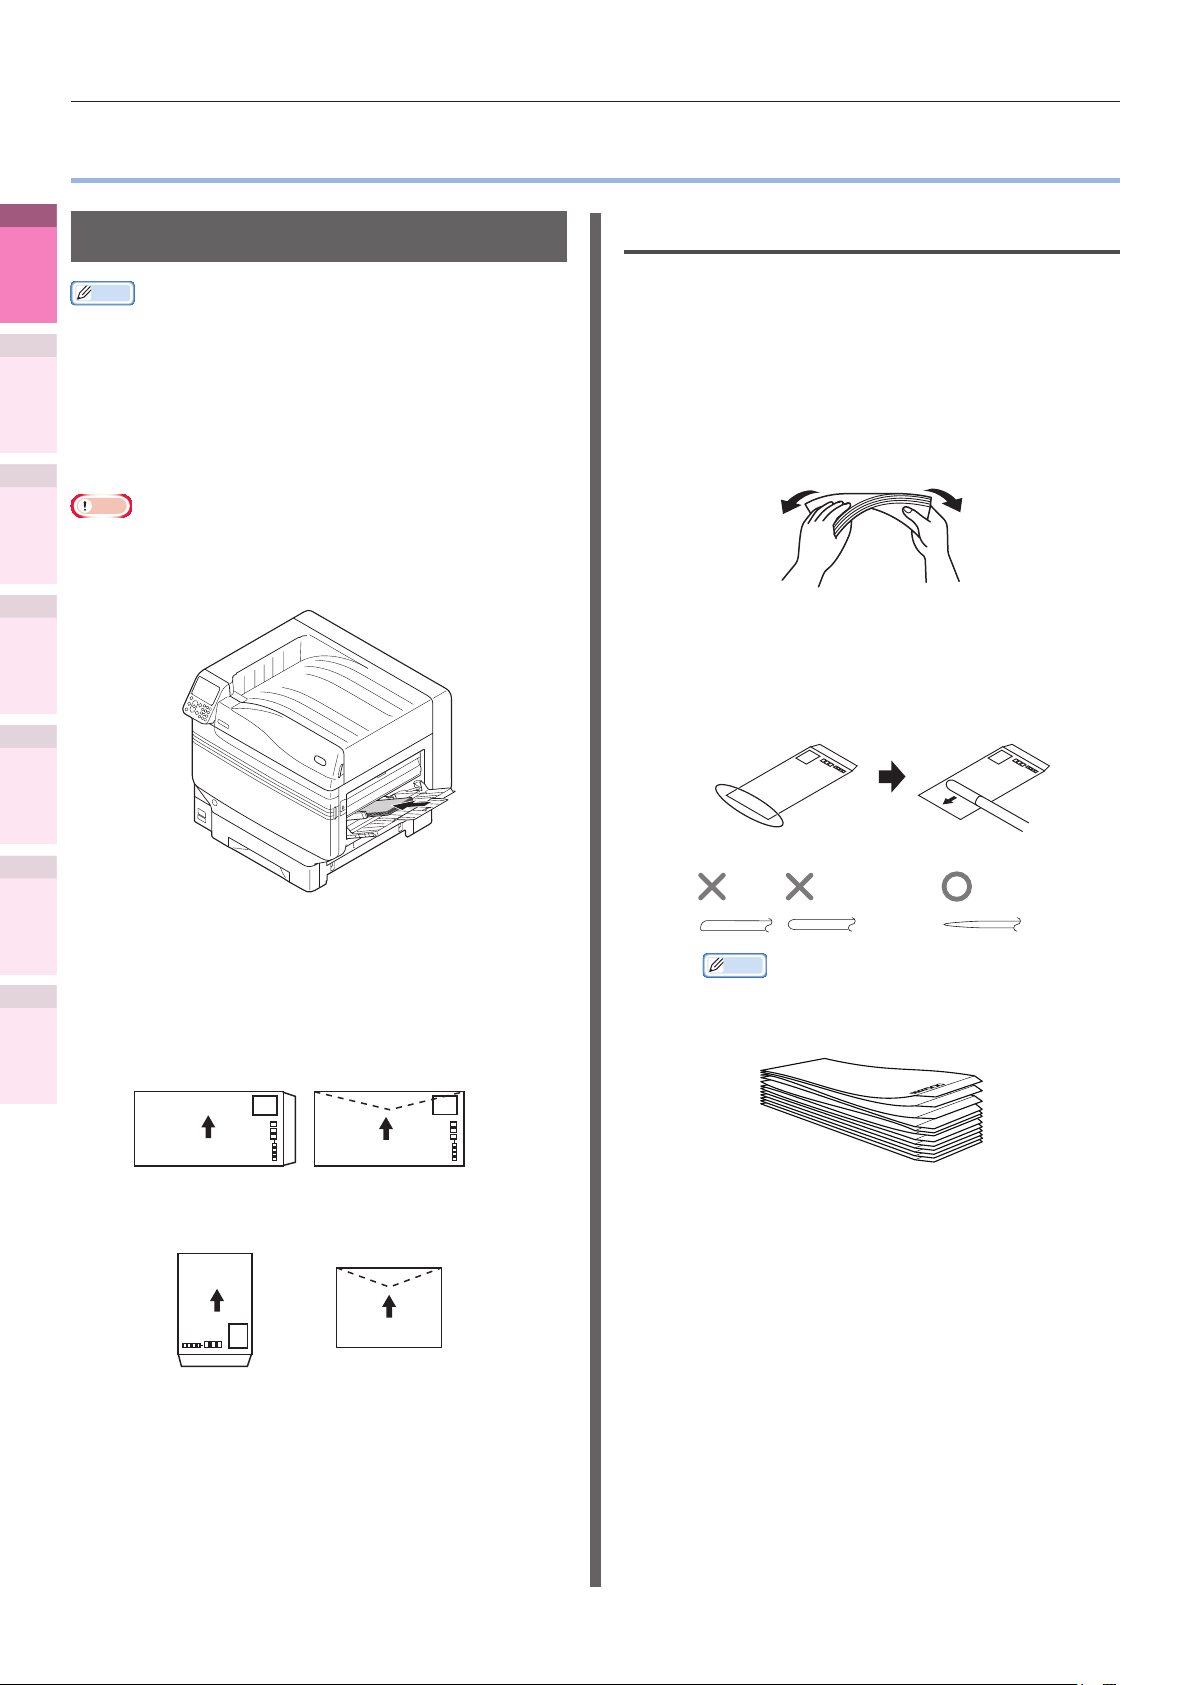
Check that the envelope is not bent or
1
swollen.
If the envelope is bent, hold the
2
diagonally-opposite edges of the
envelope and slowly bend to straighten
the envelope.
If there is a difference in the thickness
3
on the left and right when the envelopes
are stacked, use a rod to make the
thickness universal.
zCross-sectional diagram of an envelope
Appendix Index
Setting the paper orientation
z
Set the print surface face-up.
Set as a diagram to print the addressee.
(Kakugata 3 gou/
6 gou/8 gou
Nagagata 3 gou/
4 gou/40 gou)
(Kakugata
2 gou)
(Yougata 0 gou/2
gou/4 gou
Yougata Long 3 gou)
Com-6 3/4, Com-9, Com-10
DL, C4, C5 Monarch,
A2 Envelope,
A6 Envelope, A7 Envelope
Memo
If the front edge of the envelope is bent or
z
swollen, extend the envelope out at as shown
in the diagram below.
- 22 -
Printing on various papers
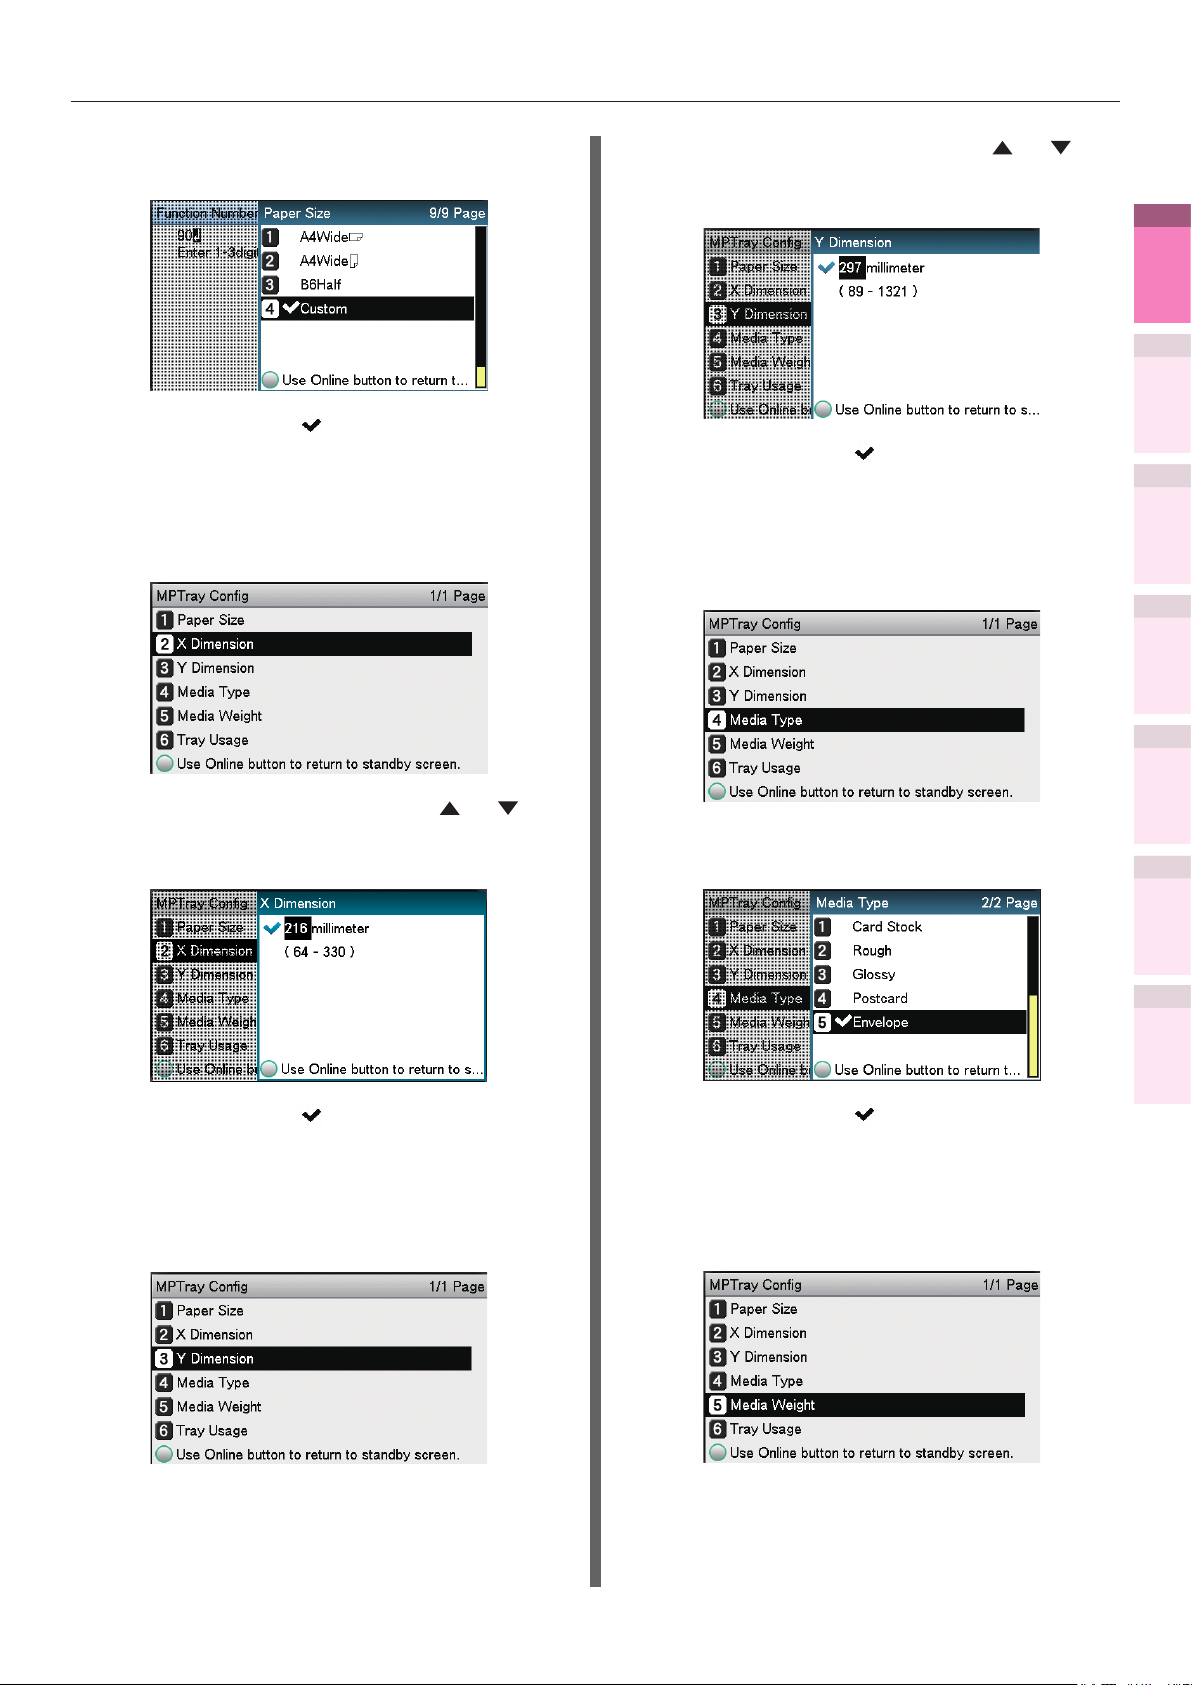
Printing on standard size
envelopes
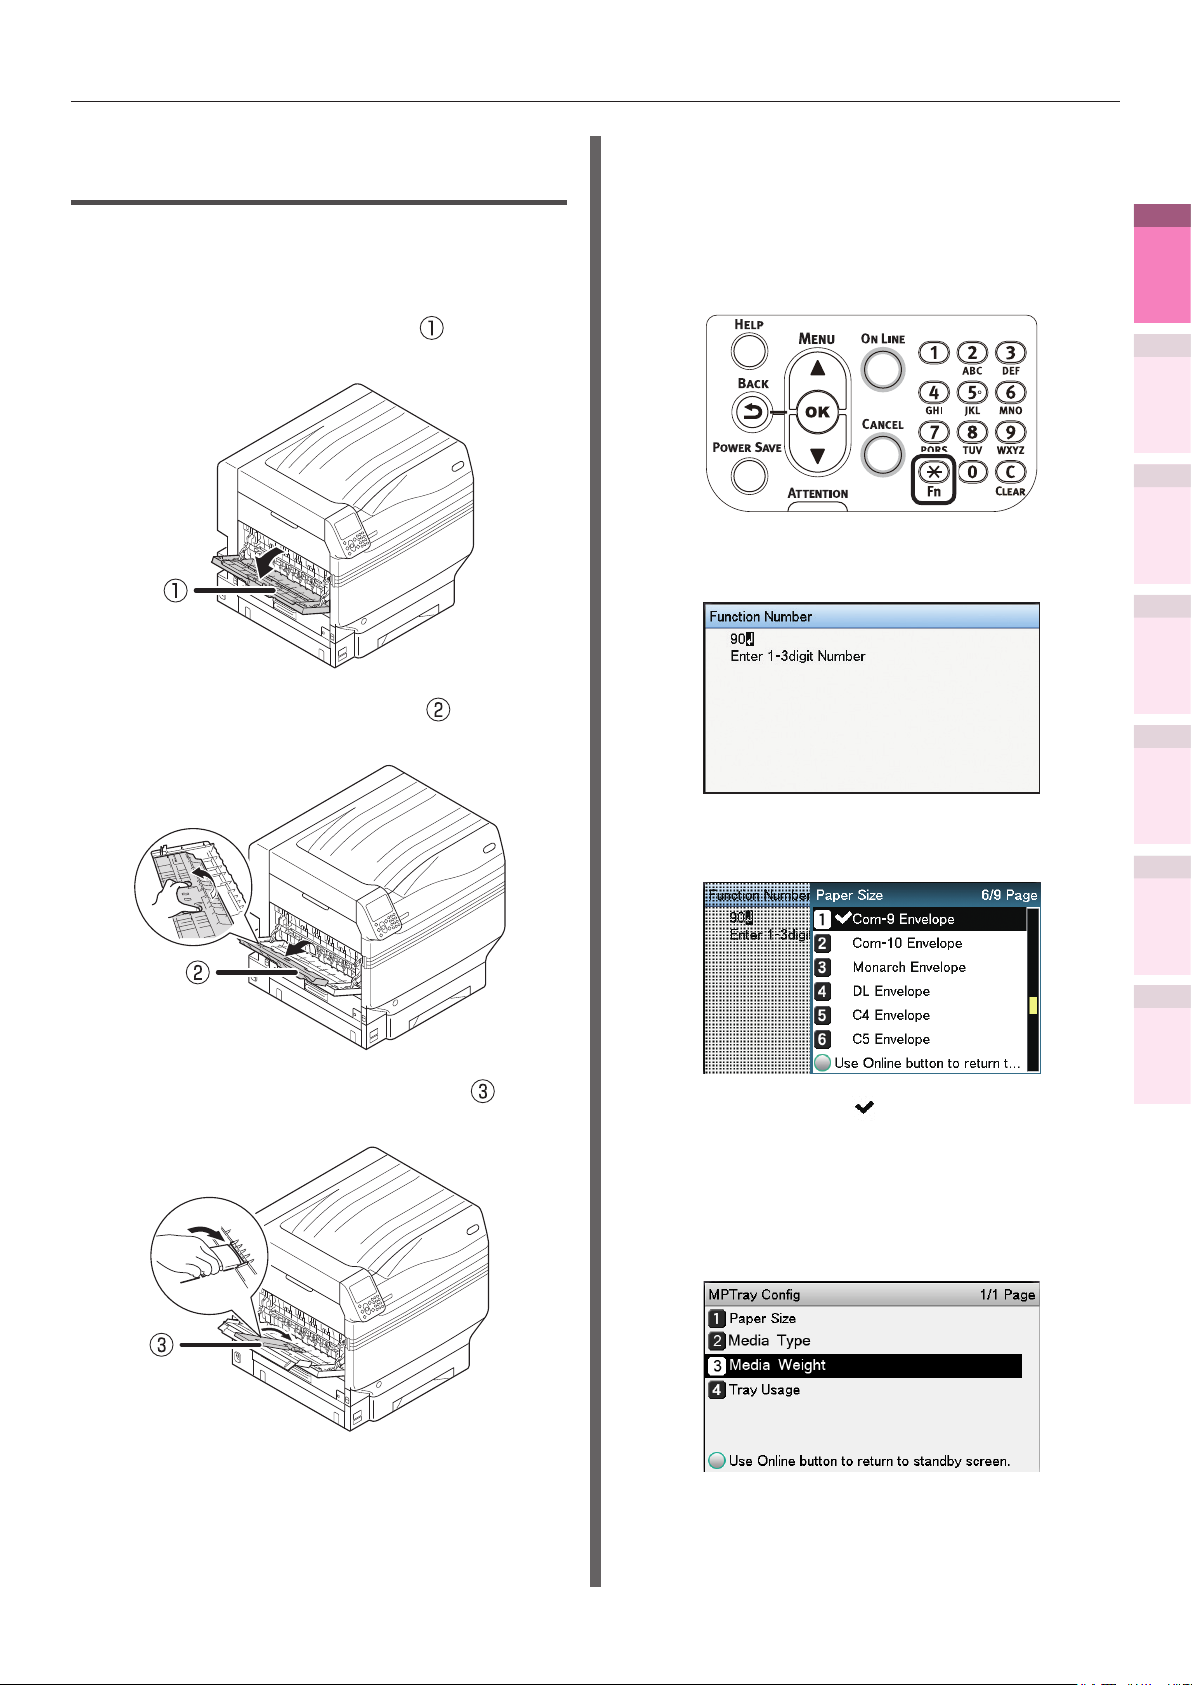
Setting envelopes in the Multi-Purpose
1
Tray.
Open the face-up stacker ( ) on the
2
left side of the machine.
Open the paper supporter ( ) as
3
shown in the following gure.
Set the paper size using the control
5
panel.
Press the [Fn] key.
(1)
The numerical values input screen
will be displayed.
Press [9], [0], and press the [OK]
(2)
button.
1
Convenient print
functions
2
Matching
Colors
3
Using Utility
Software
4
Network
Setup
5
the Control Panel
Changing Printer
Settings Using
Checking and
Rotate the auxiliary supporter ( ) in
4
the arrow direction to the lock position.
Select the envelope type, and
(3)
press the [OK] button.
Check that is displayed to the
(4)
left of the selected envelope, and
press the [BACK] button.
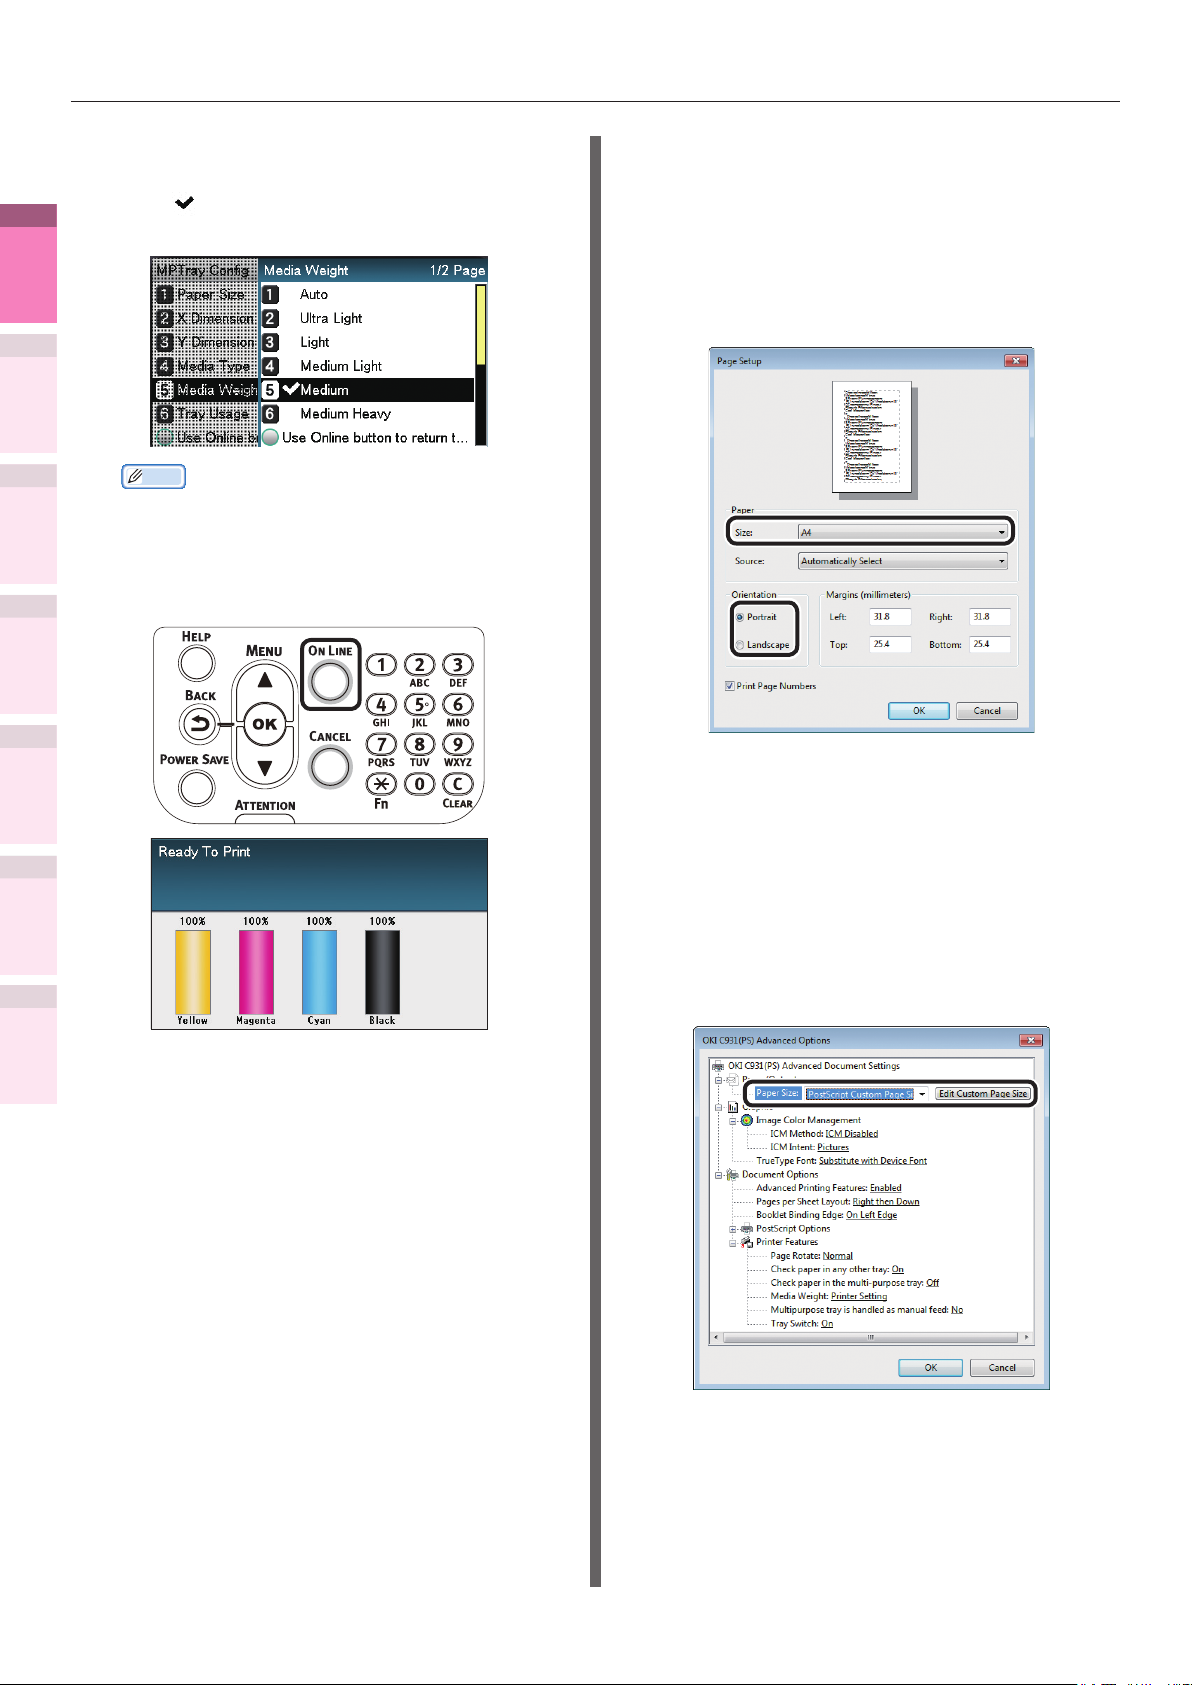
Select [Media Weight], and press
(5)
the [OK] button.
Appendix Index
- 23 -
Printing on various papers
1
Convenient print
functions
2
Matching
Colors
3
Using Utility
Software
4
Network
Setup
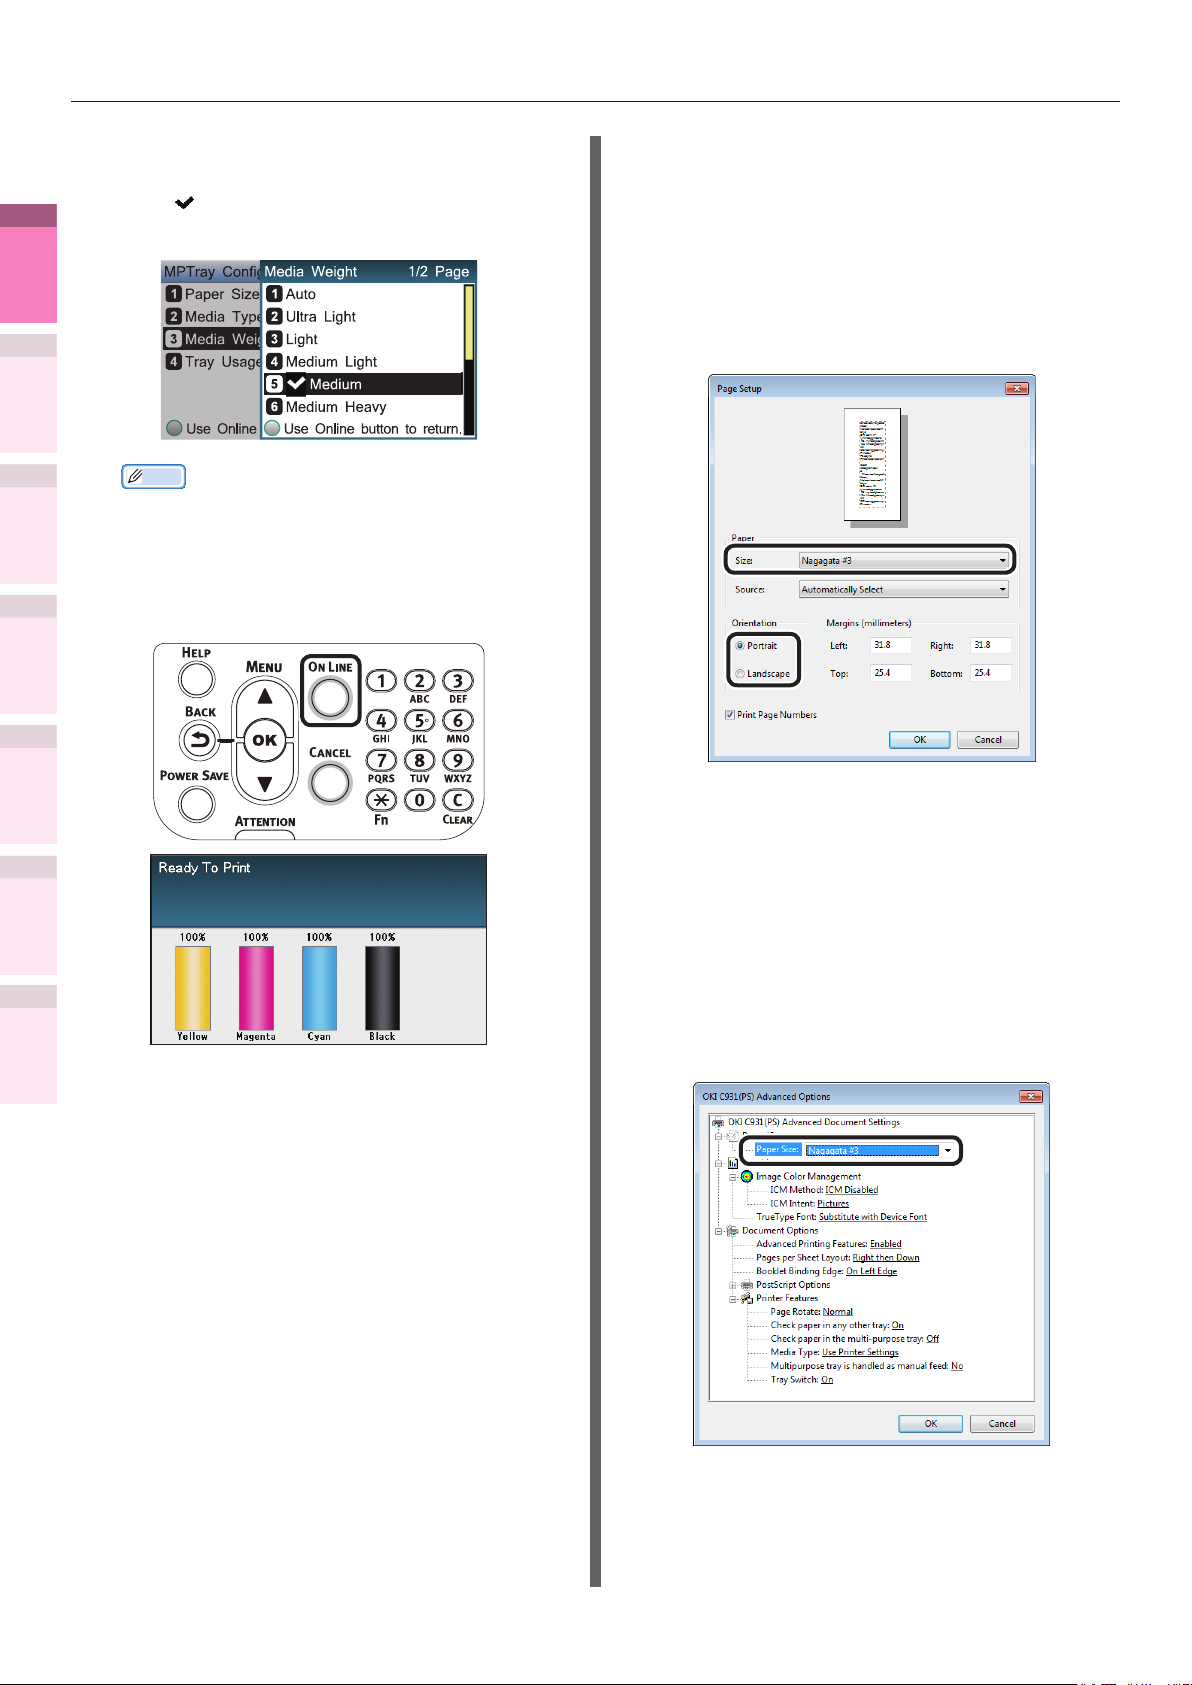
Select a suitable media weight, and
(6)
press the [OK] button. Check that
is displayed to the left of the
selected media weight.
Memo
If you want to print on a thin envelope of 24 lb, the
z
[Light] setting may improve the printing result.
Press the [ON LINE] button to
(7)
return to the standby screen.
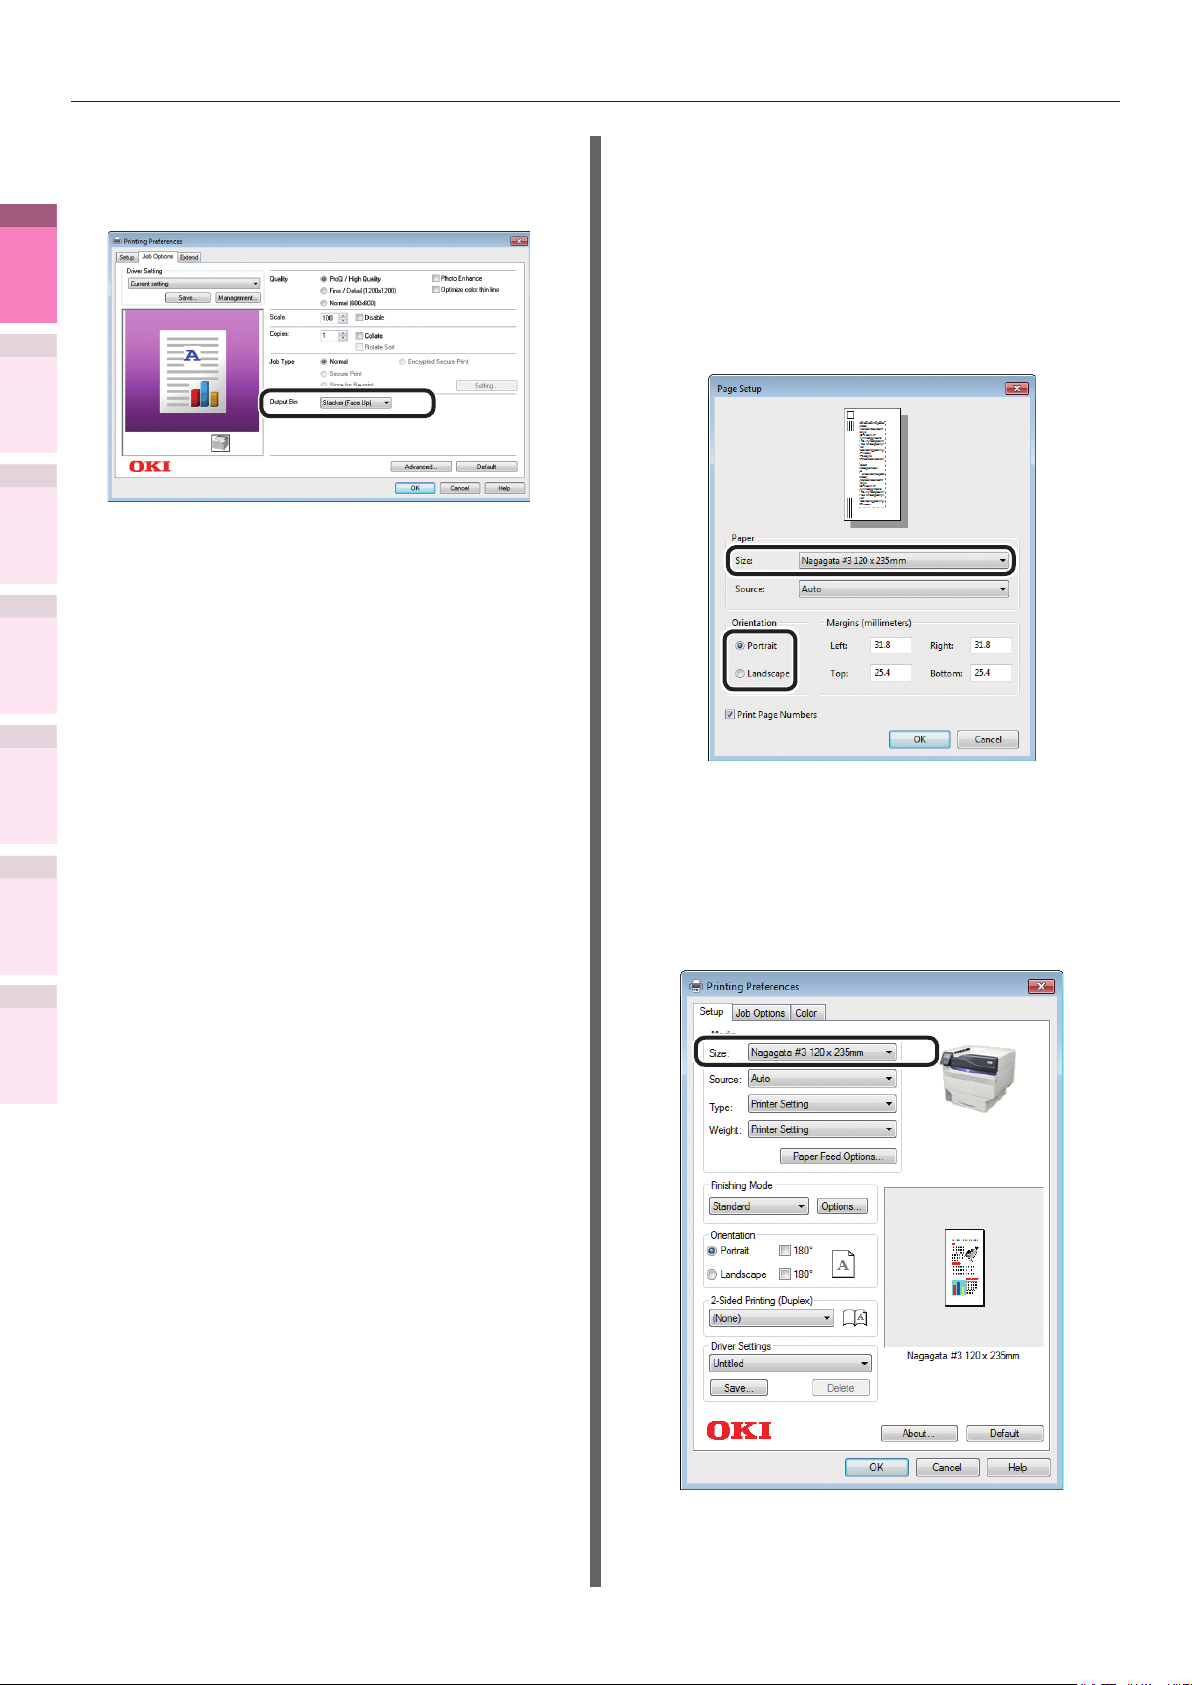
Using Windows PS printer drivers
Select [Page Setup] in the [File] menu.
1
Select [Nagagata* (where * is the
2
envelope type)] in [Size], and [Portrait]
or [Landscape] in [Orientation], and
click [OK].
the Control Panel
5
Changing Printer
Settings Using
Appendix Index
Checking and
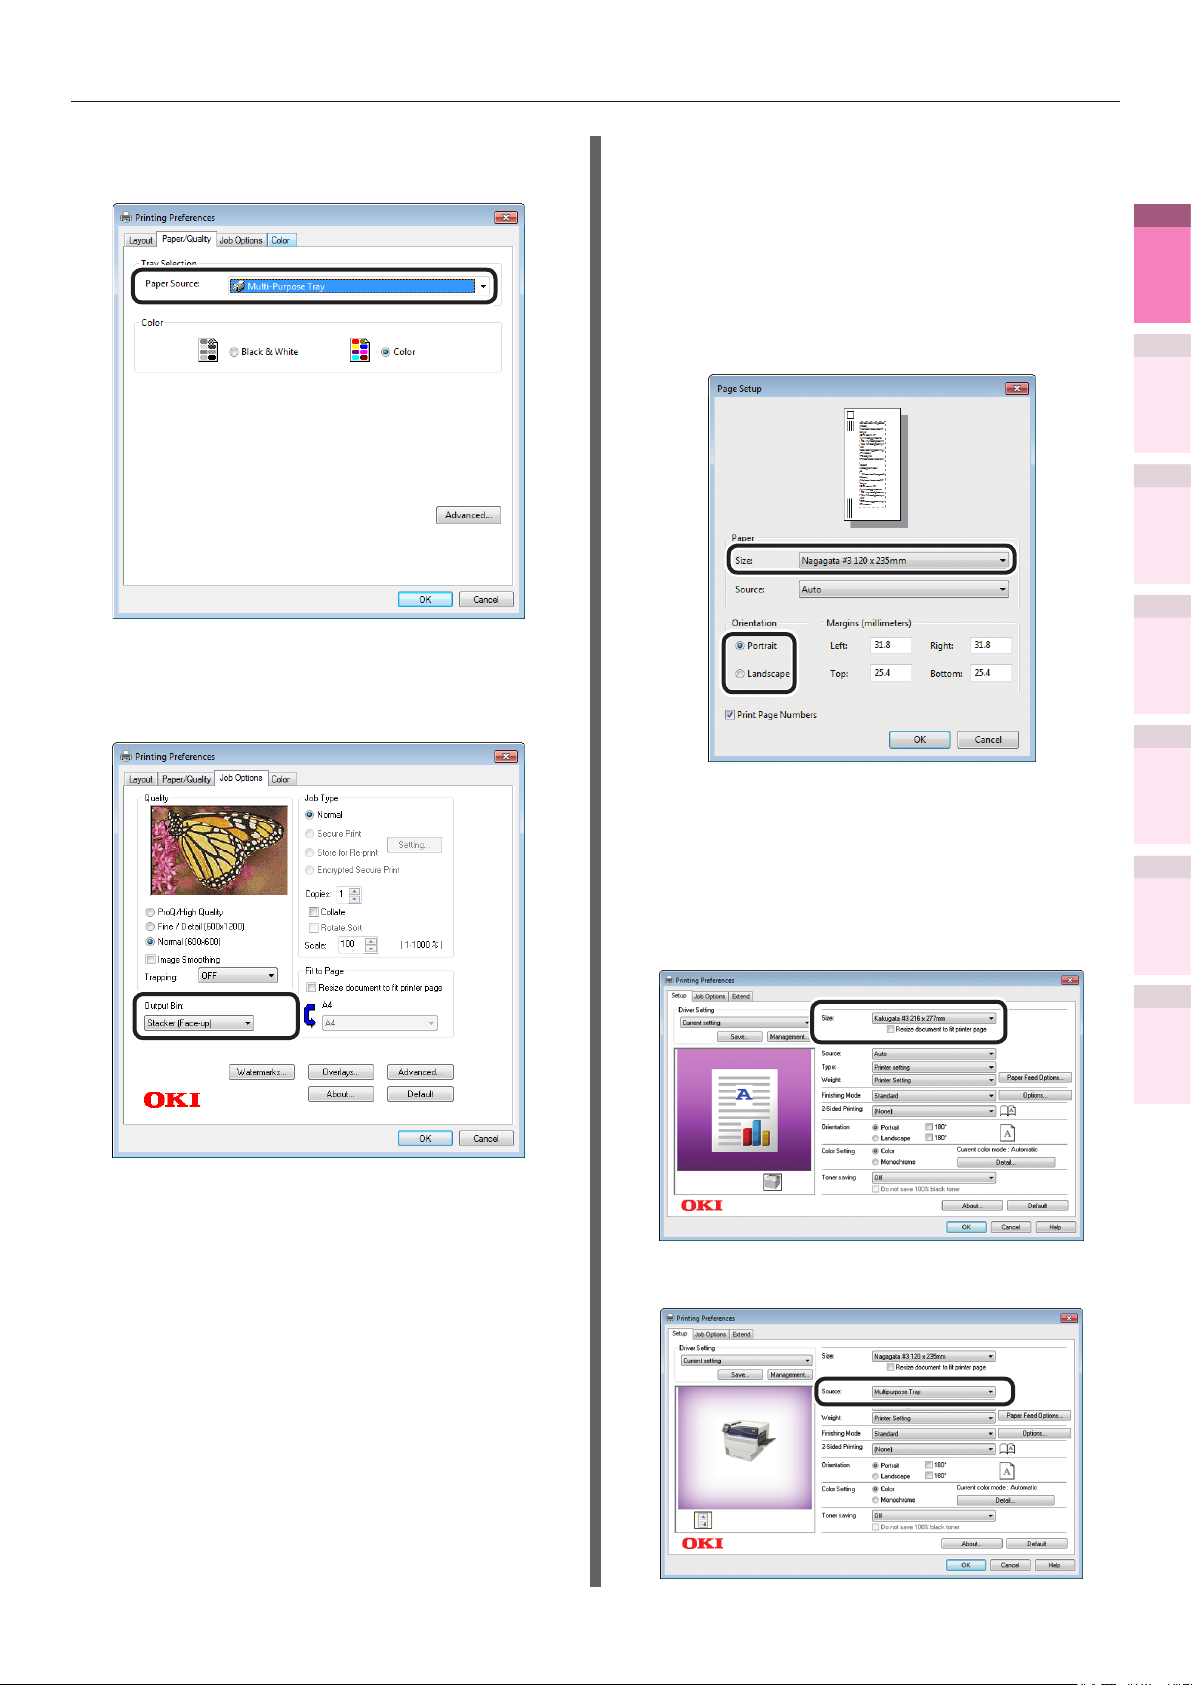
Select [Print] in the [File] menu.
3
Click [Advanced] (or [Preferences]).
4
Click [Advanced] in the [Paper/Quality]
5
tab.
Select the envelope type in [Paper Size]
6
in the "Advanced Options" screen, and
click [OK].
Open the le to be printed.
6
Select [Paper Size], [Paper Source],
7
and [Output Bin] in the printer drivers
to print.
- 24 -
Printing on various papers
Select [Multi-Purpose Tray] in [Paper
7
Source].
Select [Stacker (Face-up)] in [Output
8
Bin] in the [Job Options] tab, and click
[OK].
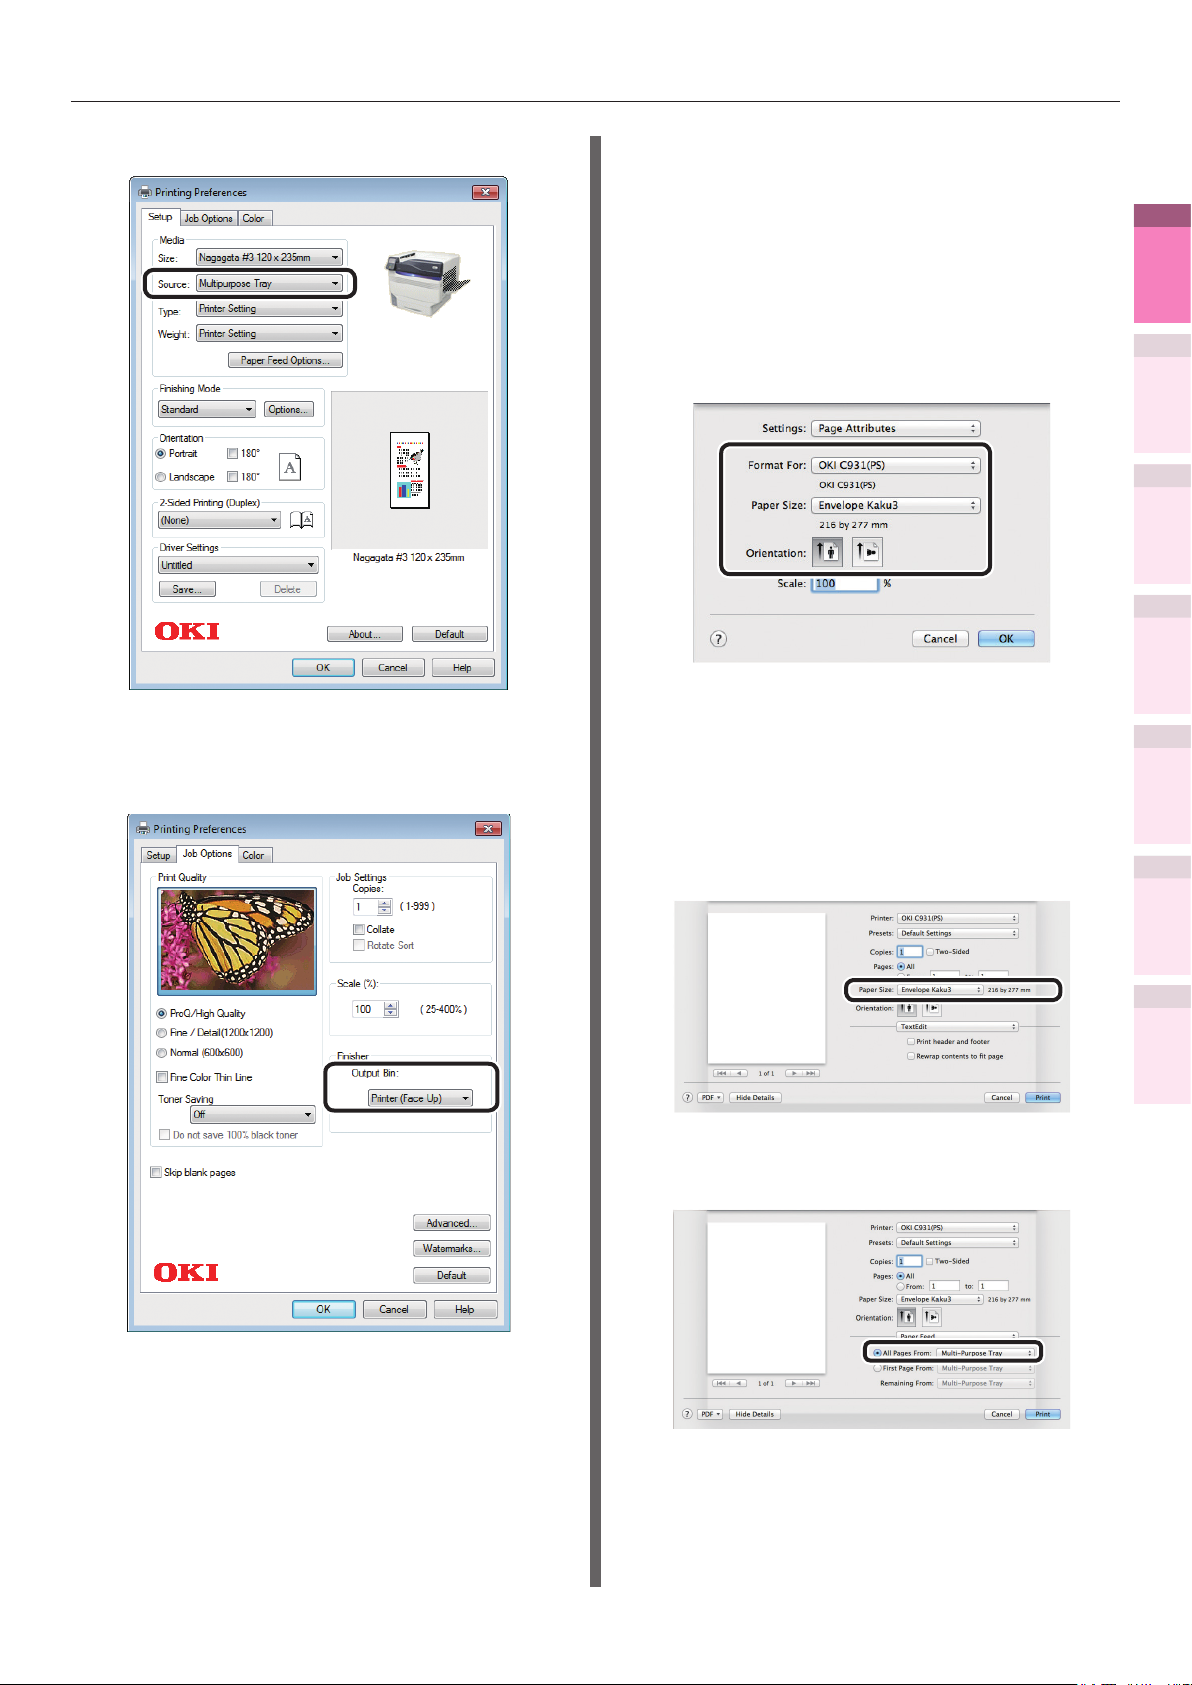
Using Windows PCL printer drivers
Select [Page Setup] in the [File] menu.
1
Select [Nagagata* (where * is the
2
envelope type)] in [Size], and [Portrait]
or [Landscape] in [Orientation], and
click [OK].
1
Convenient print
functions
2
Matching
Colors
3
Using Utility
Software
4
Network
Setup
5
the Control Panel
Changing Printer
Settings Using
Checking and
Click [Print] in the "Print" screen to
9
print.
Select [Print] in the [File] menu.
3
Click [Advanced] (or [Preferences]).
4
Select the envelope type in [Size] in the
5
[Setup] tab.
Select [Multipurpose Tray] in [Source].
6
Appendix Index
- 25 -
Printing on various papers
1
Convenient print
functions
2
Matching
Colors
3
Using Utility
Software
4
Network
Setup
Select [Stacker (Face UP)] in [Output
7
Bin] in the [Job Options] tab, and click
[OK].
Click either [OK] or [Print] in the "Print"
8
screen to print.
Using Windows XPS printer drivers
Select [Page Setup] in the [File] menu.
1
Select [Nagagata* (where * is the
2
envelope type)] in [Size], and [Portrait]
or [Landscape] in [Orientation], and
click [OK].
the Control Panel
5
Changing Printer
Settings Using
Appendix Index
Checking and
Select [Print] in the [File] menu.
3
Click [Advanced] (or [Preferences]).
4
Select the envelope type in [Size] in the
5
[Setup] tab.
- 26 -
Printing on various papers
Select [Multipurpose Tray] in [Source].
6
Select [Printer (Face Up)] in [Output
7
Bin] in the [Job Options] tab, and click
[OK].
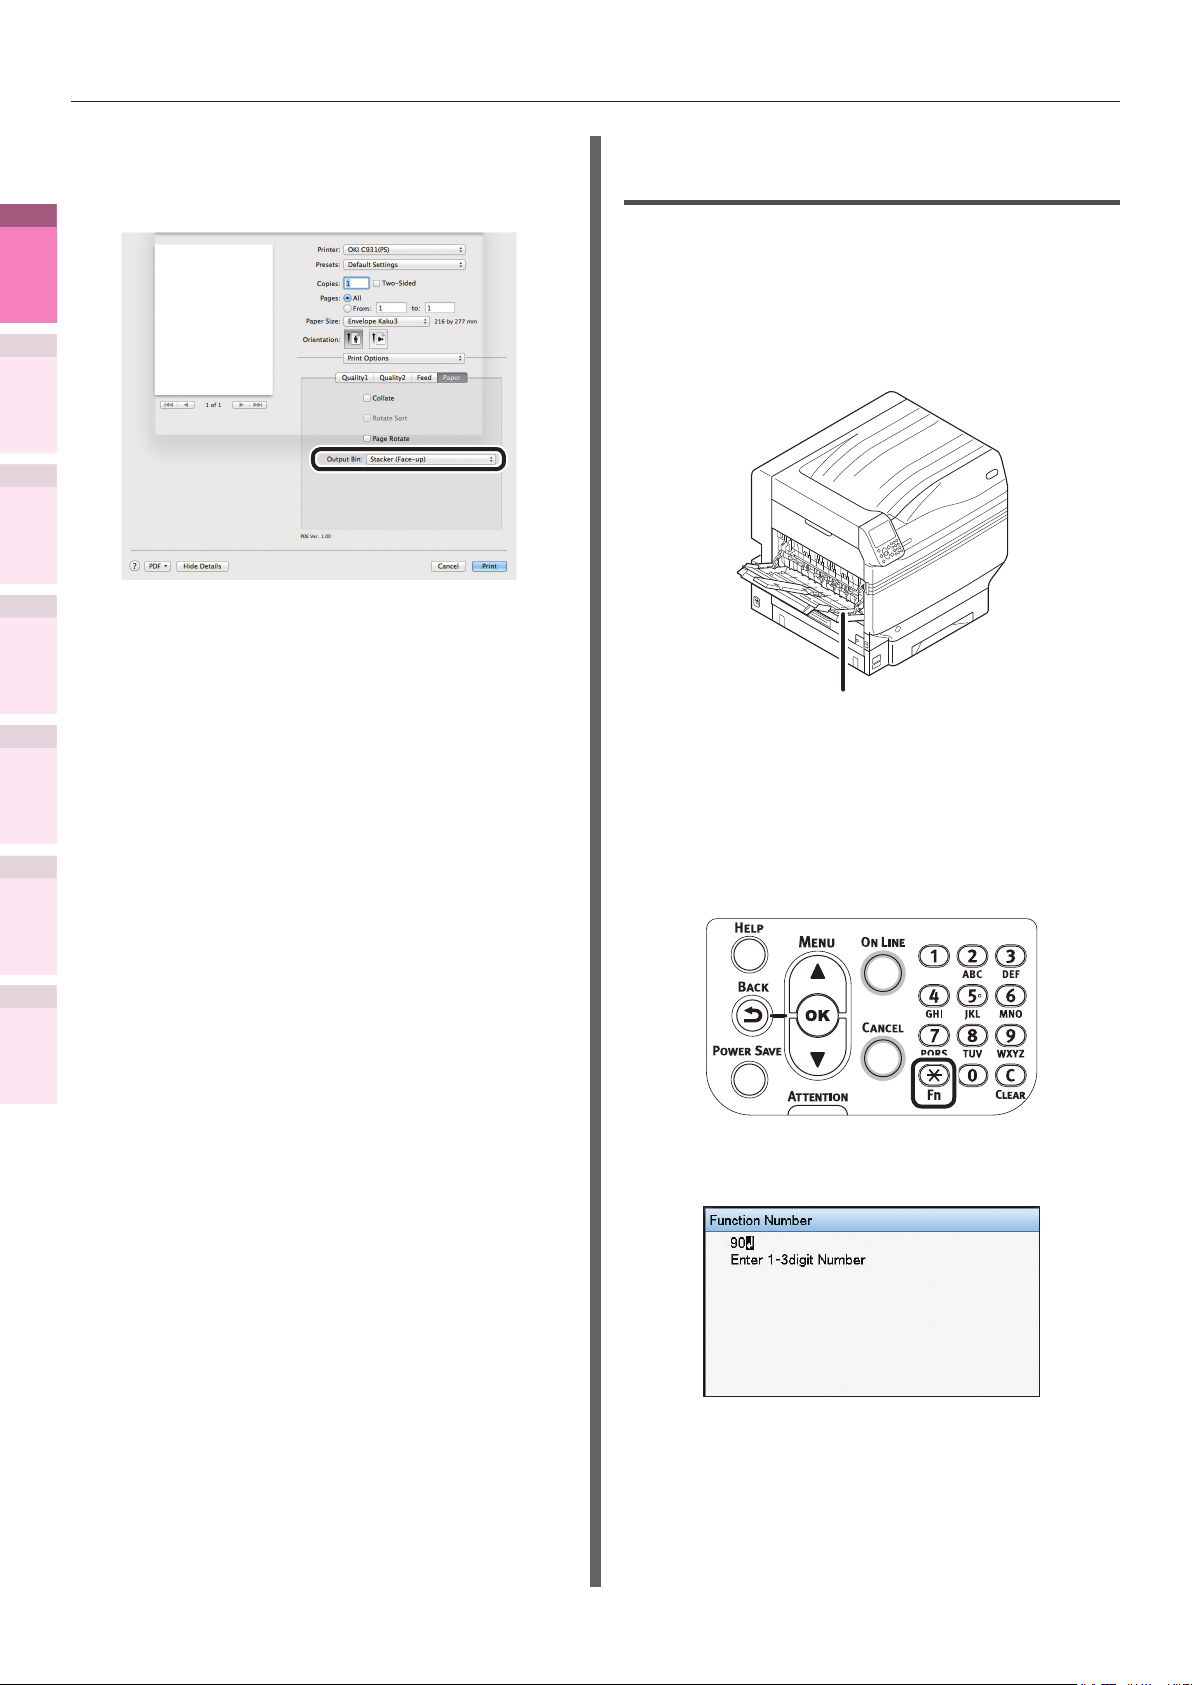
Using Mac OS X printer drivers
Select [Page Setup] in the [File] menu.
1
Select the printer model name in
2
[Format For], and select [Envelope*
(where * is the envelope type)] in
[Paper Size], and a suitable orientation
in [Orientation], and click [OK].
Select [Print] in the [File] menu.
3
Check that the printer model name is
4
selected in [Printer].
1
Convenient print
functions
2
Matching
Colors
3
Using Utility
Software
4
Network
Setup
5
the Control Panel
Changing Printer
Settings Using
Checking and
Click [Print] in the "Print" screen to
8
print.
Select the envelope type in [Paper
5
Size].
Select [Multi-Purpose Tray] in [Paper
6
Feed].
Appendix Index
- 27 -
Printing on various papers
1
Convenient print
functions
2
Matching
Colors
3
Using Utility
Software
4
Network
Setup
Click the [Paper] button in the [Print
7
Options] panel, and select [Stacker
(Face-up)] from [Output Bin].
Click [Print] to print.
8
Printing on irregular size
envelopes
Setting envelopes in the Multi-Purpose
1
Tray.
Open the face-up stacker.
2
Set the print surface face-up to output.
Face-up stacker
the Control Panel
5
Changing Printer
Settings Using
Appendix Index
Checking and
Set the paper size, paper type, and
3
paper weight using the control panel.
Press the [Fn] key.
(1)
The numerical values input screen
will be displayed.
Press [9], [0], and press the [OK]
(2)
button.
- 28 -
Printing on various papers
Select [Custom], and press the
(3)
[OK] button.
Check that is displayed to the
(4)
left of [Custom], and press the
[BACK] button.
Select [X Dimension], and press
(5)
the [OK] button.
Press the scroll buttons or
(9)
to select a suitable size, and then
press the [OK] button.
Check that is displayed to the
(10)
left of the selected size, and press
the [BACK] button.
Select [Media Type], and press the
(11)
[OK] button.
1
Convenient print
functions
2
Matching
Colors
3
Using Utility
Software
4
Network
Setup
Press the scroll buttons or
(6)
to select a suitable size, and then
press the [OK] button.
Check that is displayed to the
(7)
left of the selected size, and press
the [BACK] button.
Select [Y Dimension], and press
(8)
the [OK] button.
Select [Envelope], and press the
(12)
[OK] button.
Check that is displayed to the
(13)
left of [Envelope], and press the
[BACK] button.
Select [Media Weight], and press
(14)
the [OK] button.
the Control Panel
5
Changing Printer
Settings Using
Appendix Index
Checking and
- 29 -
Printing on various papers
1
Convenient print
functions
2
Matching
Colors
3
Using Utility
Software
4
Network
Setup
Select a suitable paper weight, and
(15)
press the [OK] button. Check that
is displayed to the left of the
selected paper weight.
Memo
If you want to print on a thin envelope of 24 lb, the
z
[Light] setting may improve the printing result.
Press the [ON LINE] button to
(16)
return to the standby screen.
Using Windows PS printer drivers
Select [Page Setup] in the [File] menu.
1
Select the paper size in [Size] and a
2
suitable orientation in [Orientation],
and click [OK].
the Control Panel
5
Changing Printer
Settings Using
Appendix Index
Checking and
Select [Print] in the [File] menu.
3
Click [Advanced] (or [Preferences]).
4
Click [Advanced] in the [Paper/Quality]
5
tab.
Select the paper size in [Paper Size] in
6
the "Advanced Options" screen.
Open the le to be printed.
4
Select [Paper Size], [Paper Source],
5
and [Output Bin] in the printer drivers
to print.
- 30 -

Printing on various papers
Select [Multi-Purpose Tray] in [Paper
7
Source].
Select [Stacker (Face-up)] in [Output
8
Bin] in the [Job Options] tab, and click
[OK].
Using Windows PCL printer drivers
Select [Page Setup] in the [File] menu.
1
Select the paper size in [Size] and a
2
suitable orientation in [Orientation],
and click [OK].
Select [Print] in the [File] menu.
3
Click [Advanced] (or [Preferences]).
4
Select the paper size in [Size] in the
5
[Setup] tab.
1
Convenient print
functions
2
Matching
Colors
3
Using Utility
Software
4
Network
Setup
5
the Control Panel
Changing Printer
Settings Using
Appendix Index
Checking and
Click [Print] in the "Print" screen to
9
print.
Select [Multipurpose Tray] in [Source].
6
- 31 -

Printing on various papers
1
Convenient print
functions
2
Matching
Colors
3
Using Utility
Software
4
Network
Setup
Select [Stacker (Face Up)] in [Output
7
Bin] in the [Job Options] tab.
Click [Print] in the "Print" screen to
8
print.
Using Windows XPS printer drivers
Register the paper name and paper size
1
for irregular size envelopes.
Click [Start], and then select
(1)
[Devices and Printers].
Select [OKI (product name)(XPS)],
(2)
and select [Print Server Properties]
in the tool bar.
Enable the [Create a new form]
(3)
check box in the [Forms] tab.
Enter the name of the irregular size
(4)
envelope in [Form name].
the Control Panel
5
Changing Printer
Settings Using
Appendix Index
Checking and
Enter the [Width] and [Height]
(5)
values.
- 32 -
Click [Save Form].
(6)
Click [Close].
(7)

Printing on various papers
Select the [Size], [Source], and [Output
2
Bin] for the registered irregular size
envelope to print.
Select [Page Setup] in the [File]
(1)
menu.
Select the name of the envelope
(2)
registered in [Size] and a suitable
orientation in [Orientation], and
click [OK].
Select [Multipurpose Tray] in
(6)
[Source].
Select [Printer (Face Up)] in
(7)
[Output Bin] in the [Job Options]
tab, and click [OK].
1
Convenient print
functions
2
Matching
Colors
3
Using Utility
Software
4
Network
Setup
5
the Control Panel
Changing Printer
Settings Using
Checking and
Select [Print] in the [File] menu.
(3)
Click [Advanced] (or
(4)
[Preferences]).
Select the envelope name in [Size]
(5)
in the [Setup] tab.
Click [Print] in the "Print" screen to
(8)
print.
Appendix Index
- 33 -

Printing on various papers
1
Convenient print
functions
2
Matching
Colors
3
Using Utility
Software
4
Network
Setup
5
the Control Panel
Changing Printer
Settings Using
Using Mac OS X printer drivers
Select [Page Setup] in the [File] menu.
1
Select the printer model name in
2
[Format For], and select the paper
size in [Paper Size], and a suitable
orientation in [Orientation], and click
[OK].
Select [Print] in the [File] menu.
3
Checking and
Check that the printer model name is
4
selected in [Printer].
Click the [Paper] button in the [Print
7
Options] panel, and select [Stacker
(Face-up)] from [Output Bin].
Click [Print] to print.
8
Appendix Index
Select the paper size in [Paper Size].
5
Select [Multi-Purpose Tray] in [Paper
6
Feed].
- 34 -

Printing on various papers
Printing on glossy paper
Memo
For the Multi-Purpose Tray preparations, see "Setting
z
paper in the Multi-Purpose Tray" in "Basic".
Set the glossy paper.
1
Memo
You can print by manually feeding one page at a
z
time from the Multi-Purpose Tray. For details, see
“Printing single sheets manually” (P.87).
Setting in the Multi-Purpose Tray
Setting the paper
orientation
If outputting to the face-up stacker,
2
open the face-up stacker.
Set the print surface face-up to output.
Memo
You can output to the face-down stacker.
z
Face-up stacker
Set the paper size and paper type using
3
the control panel.
1
Convenient print
functions
2
Matching
Colors
3
Using Utility
Software
4
Network
Setup
Setting in the paper tray
Setting the paper
orientation
Press the [Fn] key.
(1)
The numerical values input screen
will be displayed.
the Control Panel
5
Changing Printer
Settings Using
Appendix Index
Checking and
- 35 -

Printing on various papers
1
Convenient print
functions
2
Matching
Colors
3
Using Utility
Software
4
Network
Setup
Enter a number according to the
(2)
paper to be used.
Using the Multi-Purpose Tray
z
Press [9], [0], and press the [OK]
button.
Using tray 1
z
Press [1], [0], and press the [OK]
button.
Select [Glossy], and press the [OK]
(6)
button. Check that
to the left of [Glossy].
Press the [ON LINE] button to
(7)
return to the standby screen.
is displayed
the Control Panel
5
Changing Printer
Settings Using
Appendix Index
Checking and
Select the paper size, and press
(3)
the [OK] button.
Open the le to be printed.
4
Select [Size], [Source], and [Output
5
Bin] in the printer drivers to print.
Check that is displayed to the
(4)
left of the selected paper size, and
press the [BACK] button.
Select [Media Type], and press the
(5)
[OK] button.
- 36 -

Printing on various papers
Using Windows PS printer drivers
Select [Page Setup] in the [File] menu.
1
Select the paper size in [Size] and a
2
suitable orientation in [Orientation],
and click [OK].
Select the paper tray in [Paper Source].
7
Select [Glossy] in [Media].
8
1
Convenient print
functions
2
Matching
Colors
3
Using Utility
Software
4
Network
Setup
Select [Print] in the [File] menu.
3
Click [Advanced] (or [Preferences]).
4
Click [Advanced] in the [Paper/Quality]
5
tab.
Select the paper size in [Paper Size] in
6
the "Advanced Options" screen.
Select the output bin using [Output Bin]
9
in the [Job Options] tab, and click [OK].
the Control Panel
5
Changing Printer
Settings Using
Appendix Index
Checking and
- 37 -
Click [Print] in the "Print" screen to print.
10

Printing on various papers
1
Convenient print
functions
2
Matching
Colors
3
Using Utility
Software
4
Network
Setup
Using Windows PCL printer drivers
Select [Page Setup] in the [File] menu.
1
Select the paper size in [Size] and a
2
suitable orientation in [Orientation],
and click [OK].
Select the paper tray in [Source].
6
Select [Glossy] in [Type].
7
the Control Panel
5
Changing Printer
Settings Using
Appendix Index
Checking and
Select [Print] in the [File] menu.
3
Click [Advanced] (or [Preferences]).
Select the output bin using [Output Bin]
8
in the [Job Options] tab, and click [OK].
4
Select the paper size in [Size] in the
5
[Setup] tab.
Click [Print] in the "Print" screen to
9
print.
- 38 -

Printing on various papers
Using Windows XPS printer drivers
Select [Page Setup] in the [File] menu.
1
Select the paper size in [Size] and a
2
suitable orientation in [Orientation],
and click [OK].
Select the paper tray in [Source].
6
1
Convenient print
functions
2
Matching
Colors
3
Using Utility
Software
4
Network
Setup
Select [Print] in the [File] menu.
3
Click [Advanced] (or [Preferences]).
4
Select the paper size in [Size] in the
5
[Setup] tab.
Select [Glossy] in [Type].
7
the Control Panel
5
Changing Printer
Settings Using
Appendix Index
Checking and
- 39 -

Printing on various papers
1
Convenient print
functions
2
Matching
Colors
3
Using Utility
Software
4
Network
Setup
5
the Control Panel
Changing Printer
Settings Using
Select the output bin using [Output Bin]
8
in the [Job Options] tab, and click [OK].
Using Mac OS X printer drivers
Select [Page Setup] in the [File] menu.
1
Select the printer model name in
2
[Format For], and select the paper
size in [Paper Size], and a suitable
orientation in [Orientation], and click
[OK].
Select [Print] in the [File] menu.
3
Checking and
Click [Print] in the "Print" screen to print.
9
Check that the printer model name is
4
selected in [Printer].
Appendix Index
Select the paper size in [Paper Size].
5
Select the paper tray in the [Paper
6
Feed] panel.
- 40 -

Printing on various papers
Click [Feed] in the [Print Options]
7
panel, and select [Transparency] from
[Media Type].
Click the [Paper] button in the [Print
8
Options] panel, and select the output
bin from [Output Bin].
Printing on labels and
transparencies
Memo
For the types of labels and transparencies that can be
z
used, see "Usable Paper Types" in "Basic".
For the Multi-Purpose Tray preparations, see "Setting
z
paper in the Multi-Purpose Tray" in "Basic".
Set the paper.
1
Labels and transparencies are printed from
the Multi-Purpose Tray or Tray 1.
Memo
You can print by manually feeding one page at a
z
time from the Multi-Purpose Tray. For details, see
“Printing single sheets manually” (P.87).
Note
Printing from trays 2 to 5 and 2-sided printing are
z
disabled for labels and transparencies.
Print speed will be slowed.
z
Transparency is not available to clear toner printing.
z
Setting in the Multi-Purpose Tray
Set the print surface face-up.
1
Convenient print
functions
2
Matching
Colors
3
Using Utility
Software
4
Network
Setup
5
the Control Panel
Changing Printer
Settings Using
Checking and
Click [Print] to print.
9
Setting the paper
orientation
Appendix Index
Setting in tray 1
Set the print surface face-down.
Setting the paper
orientation
- 41 -

Printing on various papers
1
Convenient print
functions
2
Matching
Colors
3
Using Utility
Software
4
Network
Setup
5
the Control Panel
Changing Printer
Settings Using
Open the face-up stacker.
2
Output labels and transparencies to the
face-up stacker.
Enter a number according to the
(2)
paper to be used.
Using the Multi-Purpose Tray
z
Press [9], [0], and press the [OK]
button.
Using tray 1
z
Face-up stacker
Press [1], [0], and press the [OK]
button.
Set the paper weight, paper size, and
3
paper type using the control panel.
Press the [Fn] key.
(1)
The numerical values input screen
will be displayed.
Checking and
Appendix Index
Select [A4 ], and press the [OK]
(3)
button.
Check that is displayed to the
(4)
left of [A4
], and press the [BACK]
button.
Select [Media Type], and press the
(5)
[OK] button.
- 42 -

Printing on various papers
Select [Labels] or [Transparency],
(6)
and press the [OK] button. Check
that
[Labels] or [Transparency], and
press the [BACK] button.
Press the [ON LINE] button to
(7)
return to the standby screen.
is displayed to the left of
Using Windows PS printer drivers
Select [Page Setup] in the [File] menu.
1
Select [Portrait] or [Landscape] in
2
[Orientation], and click the [OK] button.
1
Convenient print
functions
2
Matching
Colors
3
Using Utility
Software
4
Network
Setup
Open the le to be printed.
4
Select [Size], [Source], and [Output
5
Bin] in the printer drivers to print.
Select [Print] in the [File] menu.
3
Click [Advanced] (or [Preferences]).
4
Click [Advanced] in the [Paper/Quality]
5
tab.
Select the paper size in [Paper Size] in
6
the "Advanced Options" screen.
the Control Panel
5
Changing Printer
Settings Using
Appendix Index
Checking and
- 43 -

Printing on various papers
1
Convenient print
functions
2
Matching
Colors
3
Using Utility
Software
4
Network
Setup
5
the Control Panel
Changing Printer
Settings Using
Appendix Index
Select [Labels] or [Transparency] in
7
[Media]. Select the paper tray in [Paper
Source].
Using Windows PCL printer drivers
Select [Page Setup] in the [File] menu.
1
Select [Portrait] or [Landscape] in
2
[Orientation], and click the [OK] button.
Select [Stacker (Face-up)] in [Output
8
Bin] in the [Job Options] tab, and click
[OK].
Checking and
Select [Print] in the [File] menu.
3
Click [Advanced] (or [Preferences]).
4
Select the paper size in [Size] in the
5
[Setup] tab.
Click [Print] in the "Print" screen to
9
print.
- 44 -

Printing on various papers
Select [Labels] or [Transparency]
6
in [Type]. Select the paper tray in
[Source].
Select [Stacker (Face Up)] in [Output
7
Bin] in the [Job Options] tab, and click
[OK].
Using Windows XPS printer drivers
Select [Page Setup] in the [File] menu.
1
Select [Portrait] or [Landscape] in
2
[Orientation], and click the [OK] button.
1
Convenient print
functions
2
Matching
Colors
3
Using Utility
Software
4
Network
Setup
Click either [OK] or [Print] in the "Print"
8
screen to print.
Select [Print] in the [File] menu.
3
Click [Advanced] (or [Preferences]).
4
Select the paper size in [Size] in the
5
[Setup] tab.
the Control Panel
5
Changing Printer
Settings Using
Appendix Index
Checking and
- 45 -

Printing on various papers
1
Convenient print
functions
2
Matching
Colors
3
Using Utility
Software
4
Network
Setup
5
the Control Panel
Changing Printer
Settings Using
Select [Labels] or [Transparency]
6
in [Type]. Select the paper tray in
[Source].
Using Mac OS X printer drivers
Select [Page Setup] in the [File] menu.
1
Select the printer model name in
2
[Format For], and select the paper
size in [Paper Size], and a suitable
orientation in [Orientation], and click
[OK].
Select [Print] in the [File] menu.
3
Check that the printer model name is
4
Checking and
Select [Printer (Face Up)] in [Output
7
Bin] in the [Job Options] tab, and click
[OK].
selected in [Printer].
Select the paper size in [Paper Size].
5
Appendix Index
Click [Print] in the [Print] screen to
8
print.
Select the paper tray in the [Paper
6
Feed] panel.
- 46 -

Printing on various papers
Click the [Paper] button in the [Print
7
Options] panel, and select [Stacker
(Face-up)] from [Output Bin].
Click [Print] to print.
8
Printing on user-selected
paper sizes (custom pages
and lengthy printing)
Register the desired paper size in the printer
driver, and specify when printing.
[Sizes that can be fed from the MultiPurpose Tray (Settable custom sizes)]
Width: 64 to 330mm
Length: 89 to 1321mm
[Sizes
Purpose Tray]
Trays 1/2/3/4/5
Width: 99 to 330mm
Length: 147 to 457mm
[Sizes where 2-sided printing is possible]
Width: 99 to 330mm
Length: 147 to 483mm
Note
If printing smaller paper than width 99mm and length
z
147mm, feed from the Multi-Purpose Tray and output to
the face-up stacker.
Set the paper size to portrait length, and set in the device.
z
Not usable with some applications.
z
If feeding from the Multi-Purpose Tray, support the paper
z
manually for paper lengths that are not fully supported by
the paper supporter.
If feeding from the paper trays (tray 1, (optional)
z
trays 2 to 5), press the scroll buttons
the device control panel, and select [Menu]>[Tray
Conguration]>[Set Tray 1]>[Paper Size]>[Custom].
If there is no paper in the tray, setting the function to
z
switch automatically to a tray in which paper of the same
size has been set, the default settings will be enabled
(i.e., the check box will be enabled). If the paper runs out
during printing, paper will feed from another tray. Disable
(i.e., uncheck) the check box when printing custom size
paper from a designated tray only.
can be fed from the Multi-
that
or on
1
Convenient print
functions
2
Matching
Colors
3
Using Utility
Software
4
Network
Setup
5
the Control Panel
Changing Printer
Settings Using
Appendix Index
Checking and
- 47 -

Printing on various papers
1
Convenient print
functions
2
Matching
Colors
3
Using Utility
Software
4
Network
Setup
Set the paper.
1
Memo
You can print by manually feeding one page at a
z
time from the Multi-Purpose Tray. For details, see
“Printing single sheets manually” (P.87).
Setting in the Multi-Purpose Tray
Setting in the paper tray
Setting the paper
orientation
Setting the paper
orientation
Set the paper size and paper type using
3
the control panel.
Press the [Fn] key.
(1)
The numerical values input screen
will be displayed.
Enter a number according to the
(2)
paper to be used.
Using the Multi-Purpose Tray
z
Press [9], [0], and press the [OK]
button.
the Control Panel
5
Changing Printer
Settings Using
Appendix Index
Checking and
Using tray 1
z
Press [1], [0], and press the [OK]
button.
If outputting to the face-up stacker,
2
open the face-up stacker.
Set the print surface face-up to output.
Memo
You can output to the face-down stacker.
z
Select [Custom], and press the
(3)
[OK] button.
Face-up stacker
- 48 -
Check that is displayed to the
(4)
left of [Custom], and press the
[BACK] button.

Printing on various papers
Select [X Dimension], and press
(5)
the [OK] button.
Press the scroll buttons or
(6)
to select a suitable size, and then
press the [OK] button.
Press the [ON LINE] button to
(12)
return to the standby screen.
Register the desired paper size in the
4
printer drivers to print.
1
Convenient print
functions
2
Matching
Colors
3
Using Utility
Software
4
Network
Setup
Check that is displayed to the
(7)
left of the selected size, and press
the [BACK] button.
Select [Y Dimension], and press
(8)
the [OK] button.
Press the scroll buttons or
(9)
to select a suitable size, and then
press the [OK] button.
the Control Panel
5
Changing Printer
Settings Using
Appendix Index
Checking and
Check that is displayed to the
(10)
left of the selected size, and press
the [BACK] button.
Set the paper type and paper
(11)
weight as necessary.
- 49 -

Printing on various papers
1
Convenient print
functions
2
Matching
Colors
3
Using Utility
Software
4
Network
Setup
Using Windows PS printer drivers
Click [Start], and then select [Devices
1
and printers].
Right-click the [OKI (product name) (PS)]
2
icon, and select [Printing Preferences]>[OKI
(product name) (PS)].
Click [Advanced] in the [Layout] tab.
3
Select [PostScript Custom Page Size] in
4
[Paper Size].
Enter the [Width] and [Height] in
5
the "PostScript Custom Page Size
Denition" screen.
Using Windows PCL printer drivers
Click [Start], and then select [Devices
1
and printers].
Right-click the [OKI (product name)
2
(PCL6)] icon, and select [Printing
Preferences]>[OKI (product name)
(PCL6)].
Click [Paper Feed Options] in the
3
[Setup] tab.
the Control Panel
5
Changing Printer
Settings Using
Appendix Index
Checking and
Click [Custom Size] in the [Paper Feed
4
Options] screen.
Note
"Offsets Relative to Paper Feed Direction" cannot be set.
z
Enter [Name], [Width], and [Length] in
5
the [Custom Size] screen.
Click [OK] until the "Printing
6
Preferences" screen closes.
Open the le to be printed.
7
Select [Print] in the [File] menu.
8
Specify the registered paper size to print.
9
Memo
If printing is incorrect using large size paper from the PS
z
printer drivers, you can correct the printing by setting
"
Normal" in [Quality].
- 50 -

Printing on various papers
Click [Add].
6
The created paper will be displayed at the
bottom of the [Size] list in the [Setup] tab.
32 types max. can be dened.
Click [OK] until the "Printing
7
Preferences" screen closes.
Open the le to be printed.
8
Specify the registered paper size to
9
print.
Using Windows XPS printer drivers
Click [Start], and then select [Devices
1
and printers].
Select [OKI (product name)(XPS)], and
2
select "Print Server Properties" in the
tool bar.
Enable the [Create a new form] check
3
box in the [Forms] tab.
1
Convenient print
functions
2
Matching
Colors
3
Using Utility
Software
4
Network
Setup
Enter the name and size.
4
Enter the new size name in [Form
(1)
name].
Enter the [Width] and [Height]
(2)
values.
the Control Panel
5
Changing Printer
Settings Using
Appendix Index
Checking and
- 51 -
Click [Save Form].
5
Click [Close].
6
Open the le to be printed.
7
Specify the registered paper size to
8
print.

Printing on various papers
Using Mac OS X printer drivers
Note
1
Custom sizes exceeding the printable range can be
z
Convenient print
functions
2
Matching
Colors
entered using Mac OS X, but printing will be incorrect. Set
within the correct range.
If a custom paper size with the same paper size as
z
registered in the OS is specied, the paper may be
handled as regular paper.
Open the le to be printed.
1
Select [Page Setup] in the [File] menu.
2
3
Using Utility
Software
4
Network
Setup
Select [Manage Custom Sizes] in [Paper
3
Size].
Using custom media
This setting is used in the following cases:
If a lateral stripe stands out in Heavy media, it
z
may be improved by setting [Custom media].
In this case, print speed will be slower.
When you want to print on OKI TRANSPARENCY
z
FILM.
Set the paper size and paper type using
1
the control panel.
Press the [Fn] key.
(1)
The number input screen appears.
the Control Panel
5
Changing Printer
Settings Using
Appendix Index
Checking and
Click [+] in the "Custom Paper Sizes"
4
screen. Double-click [Untitled], and enter
a name in [Custom Paper Sizes]. Enter the
[Width] and [Height] page sizes.
Input the number depending on
(2)
the paper tray being used.
For the multi-purpose tray
z
Press [9] and [0], and press the
[OK] button.
For Tray1
z
Press [1] and [0], and press the
[OK] button.
Click [OK].
5
The created paper will be displayed at the
bottom of the [Paper Size] list in the [Page
Properties] panel.
Printing will be implemented.
6
- 52 -

Printing on various papers
Select the paper size, and press
(3)
the [OK] button.
Check that is displayed to the
(4)
left of the selected paper size, and
press the [BACK] button.
Select [Media Type], and press the
(5)
[OK] button.
Select [HQFORUH1] - [HQFORUH5]
(6)
or [OKITRANSFILM], and press the
[OK] button.
Check that
is displayed to the
left of the selected [HQFORUH].
Press the [ON LINE] button to
(7)
return to the standby screen.
1
Convenient print
functions
2
Matching
Colors
3
Using Utility
Software
4
Network
Setup
* In the default factory settings, paper types are set for [HQFORUH1] - [HQFORUH5] as shown in the following table.
Paper Type Name Media Type Media Weight
HQ_FOR_UH1 Plain Ultra Heavy1
HQ_FOR_UH2 Plain Ultra Heavy2
HQ_FOR_UH3 Plain Ultra Heavy3
HQ_FOR_UH4 Plain Ultra Heavy4
HQ_FOR_UH5 Plain Ultra Heavy5
OKITRANSFILM OKI Special setting
the Control Panel
5
Changing Printer
Settings Using
Appendix Index
Checking and
- 53 -

1
Convenient print
functions
2
Matching
Colors
3
Using Utility
Software
4
Network
Setup
5
the Control Panel
Changing Printer
Settings Using
Economy printing
Economy printing
z
Printing multiple pages
on a single sheet (multipage printing)
You can print by reducing data for multiple pages
on a single sheet.
1 2
4
3
2
1
Note
This function reduces the data to print, so the center of
z
the paper may not be accurately aligned.
Bind width can also be set using Windows PCL/XPS printer
z
drivers.
Checking and
Not usable with some applications.
z
3 4
Using Windows PS printer drivers
Open the le to be printed.
1
Select [Print] in the [File] menu.
2
Click [Advanced] (or [Preferences]).
3
Select the number of pages to pr
4
printed on a single page from [Pages
per Sheet] in the [Layout] tab.
Appendix Index
Memo
If using Windows 8.1/Windows 8/Windows 7/Windows
z
Vista/Windows Server 2012 R2/Windows Server 2012/
Windows Server 2008 R2/Windows Server 2008, make
sure to set [Draw Borders] as necessary. Further, you can
also change the page distribution using [Advanced]>[Page
Layout per Sheet].
Printing will be implemented.
5
- 54 -

Economy printing
Using Windows PCL printer
drivers
Open the le to be printed.
1
Select [Print] in the [File] menu.
2
Click [Advanced] (or [Preferences]).
3
Select [n-up] (where n is the number
4
of pages to be printed on 1 sheet) in
[Finishing Mode] in the [Setup] tab.
Using Windows XPS printer drivers
Open the le to be printed.
1
Select [Print] in the [File] menu.
2
Click [Advanced] (or [Preferences]).
3
Select [n-up] (where n is the number
4
of pages to be printed on 1 sheet) in
[Finishing Mode] in the [Setup] tab.
1
Convenient print
functions
2
Matching
Colors
3
Using Utility
Software
4
Network
Setup
Click [Options], and set [Page Borders],
5
[Page layout], and [Bind Margin] as
necessary. The bind width can be set
from 0 to 30mm left and right.
Printing will be implemented.
6
Click [Options], and set [Page Borders],
5
[Page layout], and [Bind Margin] as
necessary. The bind width can be set
from 0 to 30mm left and right.
Printing will be implemented.
6
the Control Panel
5
Changing Printer
Settings Using
Appendix Index
Checking and
- 55 -

Economy printing
Using Mac OS X printer drivers
2-Sided Printing
1
Convenient print
functions
2
Matching
Colors
3
Using Utility
Software
4
Network
Setup
5
the Control Panel
Changing Printer
Settings Using
Appendix Index
Open the le to be printed.
You can print on both sides of the paper.
1
Select [Print] in the [File] menu.
2
Select [Pages per Sheet], [Layout
3
Direction], and [Border] in the [Layout]
panel.
Printing will be implemented.
1 1
For the types of paper, thicknesses, and sizes
that can be used in 2-sided printing, see "Usable
paper types" in "Basic".
For the range of widths and lengths of custom
sizes that can be used in 2-sided printing, see
“Printing on user-selected paper sizes (custom
pages and lengthy printing)” (P.47).
Note
Not usable with some applications.
z
Using Windows PS printer drivers
2
2
4
Checking and
Open the le to be printed.
1
Select [Print] in the [File] menu.
2
Click [Advanced] (or [Preferences]).
3
Select [Flip on Long Edge] or [Flip on
4
Short Edge] in [2-Sided Printing] in the
[Layout] tab.
- 56 -
Printing will be implemented.
5

Economy printing
Using Windows PCL printer drivers
Open the le to be printed.
1
Select [Print] in the [File] menu.
2
Click [Advanced] (or [Preferences]).
3
Select [Long Edge] or [Short Edge] in
4
[2-Sided Printing] in the [Setup] tab.
Using Windows XPS printer drivers
Open the le to be printed.
1
Select [Print] in the [File] menu.
2
Click [Advanced] (or [Preferences]).
3
Select [Long Edge] or [Short Edge] in
4
[2-Sided Printing] in the [Setup] tab.
1
Convenient print
functions
2
Matching
Colors
3
Using Utility
Software
4
Network
Setup
Printing will be implemented.
5
Printing will be implemented.
5
the Control Panel
5
Changing Printer
Settings Using
Appendix Index
Checking and
- 57 -

Economy printing
1
Convenient print
1
functions
2
3
2
Matching
Colors
Using Mac OS X printer drivers
Open the le to be printed.
Select [Print] in the [File] menu.
Select [Long-Edge binding] or [ShortEdge binding] in [Two-Sided] in the
[Layout] tab.
Test printing with toner economy
(toner economy mode)
You can print by economizing the toner
consumption amount by reducing the page print
density. Separately set whether to enable or
disable toner economy mode over 100% black.
the Control Panel
Software
Setup
Settings Using
3
Using Utility
4
Network
5
Changing Printer
Checking and
Appendix Index
Printing will be implemented.
4
Memo
You can suppress the amount of toner used by reducing
z
the toner density by selecting one of the following four
patterns as necessary.
– Printer setup: Follows the device setup.
– OFF: Prints using regular density without economizing
the toner.
– Save Level Low: Prints using medium light toner.
– Save Level Middle: Prints using light toner.
– Save Level High: Prints using considerably light toner.
[Toner Save] is enabled only if the print quality is specied
z
as [Normal].
Note
Toner save mode is not compatible with Spot Color
z
printing.
- 58 -

Economy printing
Using Windows PS printer drivers
Open the le to be printed.
1
Select [Print] in the [File] menu.
2
Click [Advanced] (or [Preferences]).
3
Select the toner save amount from
4
[Toner Saving] in the [Color] tab.
Using Windows PCL printer drivers
Open the le to be printed.
1
Select [Print] in the [File] menu.
2
Click [Advanced] (or [Preferences]).
3
Select the toner save amount from
4
[Toner saving] in [Setup] tab.
1
Convenient print
functions
2
Matching
Colors
3
Using Utility
Software
4
Network
Setup
Printing will be implemented.
5
Printing will be implemented.
5
the Control Panel
5
Changing Printer
Settings Using
Appendix Index
Checking and
- 59 -

Economy printing
1
Convenient print
functions
2
Matching
Colors
3
Using Utility
Software
4
Network
Setup
Using Windows XPS printer drivers
Open the le to be printed.
1
Select [Print] in the [File] menu.
2
Click [Advanced] (or [Preferences]).
3
Select the toner save amount from
4
[Toner Saving] in [Job Options] tab.
Using Mac OS X printer drivers
Open the le to be printed.
1
Select [Print] in the [File] menu.
2
Click the [Quality 2] button in the [Print
3
Options] panel, and select the toner
save amount from [Toner Saving].
the Control Panel
5
Changing Printer
Settings Using
Appendix Index
Checking and
Printing will be implemented.
4
Printing will be implemented.
5
- 60 -

Changing sizes to print
z
Enlarging/reducing pages
You can print on different paper sizes without
changing the print data.
A4
A6
Changing sizes to print
Enable the [Resize document to t
6
printer page] check box in the [Job
Options] tab, and select the paper size
to be printed.
1
Convenient print
functions
2
Matching
Colors
3
Using Utility
Software
Note
Not normally operable with some applications.
z
Using Windows PS printer drivers
Open the le to be printed.
1
Select [Print] in the [File] menu.
2
Click [Advanced] (or [Preferences]).
3
Click [Advanced] in the [Paper/Quality]
4
tab.
Select the paper size to be edited in
5
[Paper Size].
Printing will be implemented.
7
the Control Panel
Setup
Settings Using
4
Network
5
Changing Printer
Checking and
Appendix Index
- 61 -

Changing sizes to print
1
Convenient print
functions
2
Matching
Colors
3
Using Utility
Software
4
Network
Setup
Using Windows PCL printer drivers
Open the le to be printed.
1
Select [Print] in the [File] menu.
2
Click [Advanced] (or [Preferences]).
3
Select the paper size to be edited in
4
[Size] in the [Setup] tab.
Using Windows XPS printer drivers
Open the le to be printed.
1
Select [Print] in the [File] menu.
2
Click [Advanced] (or [Preferences]).
3
Select the paper size to be edited in
4
[Size] for [Media] in the [Setup] tab.
the Control Panel
5
Changing Printer
Settings Using
Appendix Index
Checking and
Enable the [Resize document to t
5
printer page] check box, and select the
paper size to be printed.
Click [Paper Feed Options].
5
Enable the [Resize document to t printer
6
page] check box, and select the paper size
Printing will be implemented.
to be printed.
6
- 62 -
Printing will be implemented.
7

Using Mac OS X printer drivers
Open the le to be printed.
1
Select [Page Setup] in the [File] menu.
2
Select the printer model name in
3
[Format For], and select the paper size
to be edited in [Paper Size], and click
[OK].
Changing sizes to print
Enlarging and printing multiple
sheets (poster printing)
You can enlarge the source data and print parts
to multiple sheets of paper.
1 2
1
Convenient print
functions
2
Matching
Colors
Select [Print] in the [File] menu.
4
Enable the [Scale to t paper size]
5
in the [Paper Handling] panel, and
select the paper size to be edited using
"Destination Paper Size".
3 4
Note
Cannot be used with Windows PS and Mac OS X printer
z
drivers.
Posters cannot be printed if printing using encrypted
z
secure print functions from the client after creating the
printer drivers using a shared network.
If [Poster Print] is not operating, right-click the [OKI
z
(printer name) (PCL6)] in the [Devices and Printers]
folder, and select [Preferences]>[Advanced]>[Print
Processor]>[OKX04ZPP].
the Control Panel
Software
Setup
Settings Using
3
Using Utility
4
Network
5
Changing Printer
Checking and
Appendix Index
Printing will be implemented.
6
- 63 -

Changing sizes to print
1
Convenient print
functions
2
Matching
Colors
3
Using Utility
Software
4
Network
Setup
Using Windows PCL printer drivers
Open the le to be printed.
1
Select [Print] in the [File] menu.
2
Click [Advanced] (or [Preferences]).
3
Select [Poster Print] in [Finishing Mode]
4
in the [Setup] tab.
Using Windows XPS printer drivers
Open the le to be printed.
1
Select [Print] in the [File] menu.
2
Click [Advanced] (or [Preferences]).
3
Select [Poster Print] in [Finishing Mode]
4
in the [Setup] tab.
the Control Panel
5
Changing Printer
Settings Using
Appendix Index
Checking and
Click [Options], and set [Enlarge],
5
[Add Registrationg Marks], and [Add
Overlap] as necessary.
Printing will be implemented.
Click [Options], and set [Enlarge], [Add
5
Crop Marks], and [Add Overlap] as
necessary.
6
- 64 -
Printing will be implemented.
6

Changing sizes to print
Sorting pages to print
pamphlets (booklets)
You can create pamphlet-like booklets.
two as is
5
6
4
Back
Back
Fold in
12
7
Back
9
8
11
12
4
3
2
1
Note
Not normally operable with some applications.
z
Cannot be used with Mac OS X printer drivers.
z
Watermarks cannot be printed correctly when using
z
[Pamphlet] printing.
Using Windows PS printer drivers
Note
If creating PostScript data using the application itself,
z
pamphlets may not be specied correctly. Whether or not
this method can be avoided depends on the publication.
Check the manual for the application used. For example,
with Adobe Acrobat Professional or Adobe Reader, enable
the "Print as image" check box in the advanced setup
for the print dialog box to implement pamphlet printing
normally.
If [Pamphlets] is not printing, right-click the [OKI (printer
z
name) (PS)] in the [Devices and Printers] folder, and
enable [Enable advanced print functions] in [Printer
Properties]>[Job Options] tab.
10
12
3
1
2
Open the le to be printed.
1
Select [Print] in the [File] menu.
2
Click [Advanced] (or [Preferences]).
3
Select [Booklet] in the [Layout] tab.
4
If using Windows 8.1/Windows 8/
5
Windows 7/Windows Vista/Windows
Server 2012 R2/Windows Server 2012/
Windows Server 2008 R2/Windows
Server 2008, make sure to set "Draw
1
Convenient print
functions
Borders" as necessary.
11
9
7
2
Matching
5
3
1
Colors
3
Using Utility
Software
4
Network
Setup
5
the Control Panel
Changing Printer
Settings Using
Click [Advanced], and select the paper
6
size to be actually used in [Paper Size].
Checking and
Printing will be implemented.
7
Memo
E.g.: Creating A5 size pamphlets using A4 size paper
z
– Select [A4] in [Paper Size] in [Job Options].
If using Windows 8.1/Windows 8/Windows 7/Windows
z
Vista/Windows Server 2012 R2/Windows Server 2012/
Windows Server 2008 R2/Windows Server 2008, and if
creating pamphlets folded on the right (i.e., pamphlets
with the binding on the right when the pages are face-up),
select [Right] in [Pamphlet Binding] in [Job Options].
Appendix Index
- 65 -

Changing sizes to print
1
Convenient print
functions
2
Matching
Colors
3
Using Utility
Software
4
Network
Setup
Using Windows PCL printer drivers
Note
Pamphlets cannot be printed if printing using encrypted
z
secure print functions from the client after creating the
printer drivers using a shared network.
If [Booklet] cannot be printed, right-click the [OKI
z
(printer name) (PCL6)] in the [Devices and Printers]
folder, and select [Preferences]>[Advanced]>[Print
Processor]>[OKX04ZPP].
Open the le to be printed.
1
Select [Print] in the [File] menu.
2
Click [Advanced] (or [Preferences]).
3
Select [Booklet] in [Finishing Mode] in the
4
[Setup] tab, and click [Options].
Using Windows XPS printer drivers
Open the le to be printed.
1
Select [Print] in the [File] menu.
2
Click [Advanced] (or [Preferences]).
3
Select [Booklet] in [Finishing Mode] in
4
the [Setup] tab, and click [Options].
the Control Panel
5
Changing Printer
Settings Using
Appendix Index
Checking and
Set [Signature], [2 pages], [Right to
5
Left], and [Bind Margin] as necessary in
"Booklet".
Signature
z
This is the page unit for booklets.
Right to Left
z
Prints so that the pamphlet opens on the right.
Set [Signature], [2 pages], [Right
5
to Left], and [Bind Margin], etc. as
necessary in "Booklet".
Memo
E.g.: If creating A5 size booklets using A4 size paper,
z
select [A4] in [Paper Size] in the [Setup] tab.
Printing will be implemented.
6
Printing will be implemented.
6
- 66 -

Clean printing
z
Changing print quality
(resolution)
Set [Quality] by aligning to the environment
used.
Memo
If printing is incorrect using large size paper from the PS
z
printer drivers, you can correct the printing by setting
"
Normal" in [Quality].
Select [ProQ / High Quality] to print using the highest
z
printer quality.
– Select [Normal (600x600 dpi)] to print at low resolution.
This mode prioritizes print speed.
– [Fine/Detail(1200x1200 dpi)] is an intermediate mode
between [ProQ / High Quality] and [Normal (600x600 dpi)].
By selecting [Optimize color thin line], characters and/or
z
lines with color will be printed sharply.
Clean printing
Using Windows PCL printer drivers
Open the le to be printed.
1
Select [Print] in the [File] menu.
2
Click [Advanced] (or [Preferences]).
3
Change [Quality] in the [Job Options]
4
tab.
1
Convenient print
functions
2
Matching
Colors
3
Using Utility
Software
4
Network
Setup
Using Windows PS printer drivers
Open the le to be printed.
1
Select [Print] in the [File] menu.
2
Click [Advanced] (or [Preferences]).
3
Change [Quality] in the [Job Options]
4
tab.
Printing will be implemented.
5
the Control Panel
5
Changing Printer
Settings Using
Appendix Index
Checking and
Printing will be implemented.
5
- 67 -

Clean printing
1
Convenient print
functions
2
Matching
Colors
3
Using Utility
Software
4
Network
Setup
Using Windows XPS printer drivers
Open the le to be printed.
1
Select [Print] in the [File] menu.
2
Click [Advanced] (or [Preferences]).
3
Change [Print Quality] in the [Job
4
Options] tab.
Using Mac OS X printer drivers
Open the le to be printed.
1
Select [Print] in the [File] menu.
2
Click the [Quality 1] button in the [Print
3
Options] panel, and change [Quality].
the Control Panel
5
Changing Printer
Settings Using
Appendix Index
Checking and
Printing will be implemented.
4
Printing will be implemented.
5
- 68 -

Clean printing
Printing sharper photos
(photo mode)
You can print more naturally vividly images such
as photos, etc.
Note
Cannot be used with Windows PS, Windows XPS, and Mac
z
OS X printer drivers.
Using Windows PCL printer drivers
Open the le to be printed.
1
Select [Print] in the [File] menu.
2
Click [Advanced] (or [Preferences]).
3
Select [Photo Enhance] in [Quality] in
4
the [Job Options] tab, and click [OK].
Printign text and lines
sharply
Print colored text and lines sharply.
Memo
Not suitable for photo printing.
z
Using Windows PS printer drivers
Open the le to be printed.
1
Select [Print] in the [File] menu.
2
Click [Advanced] (or [Preferences]).
3
Select [Optimize color thin line] in the
4
[Job Options] tab, and click [OK].
1
Convenient print
functions
2
Matching
Colors
3
Using Utility
Software
4
Network
Setup
5
the Control Panel
Changing Printer
Settings Using
Checking and
Printing will be implemented.
5
Appendix Index
Printing will be implemented.
5
- 69 -

Clean printing
1
Convenient print
functions
2
Matching
Colors
3
Using Utility
Software
4
Network
Setup
Using Windows PCL printer drivers
Open the le to be printed.
1
Select [Print] in the [File] menu.
2
Click [Advanced] (or [Preferences]).
3
Select the [Optimize color thin line] in
4
the [Job Options] tab, and click [OK].
Using Windows XPS printer drivers
Open the le to be printed.
1
Select [Print] in the [File] menu.
2
Click [Advanced] (or [Preferences]).
3
Select [Fine Color Thin Line] in the [Job
4
Options] tab, and click [OK].
the Control Panel
5
Changing Printer
Settings Using
Appendix Index
Checking and
Printing will be implemented.
5
Printing will be implemented.
5
- 70 -

Using Mac OS printer drivers
Clean printing
Compensating ne lines
Open the le to be printed.
1
Select [Print] in the [File] menu.
2
Click [Quality 1] in the [Print Options]
3
panel, and enable the [Optimize color
thin line] check box.
You can prevent misaligned lines being printed
when ultra-ne lines are specied from the
application. This function is normally ON.
Memo
Depending on the application, bar code and other intervals
z
will narrow. In this case, turn OFF the function.
Note
Cannot be used with Windows XPS printer drivers.
z
Using Windows PS printer drivers
Open the le to be printed.
1
Select [Print] in the [File] menu.
2
Click [Advanced] (or [Preferences]).
3
Click [Advanced] in the [Job Options]
4
tab.
1
Convenient print
functions
2
Matching
Colors
3
Using Utility
Software
4
Network
Setup
5
the Control Panel
Changing Printer
Settings Using
Checking and
Printing will be implemented.
4
Enable the [Adjust ultra ne lines]
5
check box, and click [OK].
Appendix Index
- 71 -
Printing will be implemented.
6

Clean printing
1
Convenient print
functions
2
Matching
Colors
3
Using Utility
Software
4
Network
Setup
Using Windows PCL printer drivers
Open the le to be printed.
1
Select [Print] in the [File] menu.
2
Click [Advanced] (or [Preferences]).
3
Click [Advanced] in the [Job Options]
4
tab.
Using Mac OS X printer drivers
Open the le to be printed.
1
Select [Print] in the [File] menu.
2
Click [Quality 1] in the [Print Options]
3
panel, and enable the [Adjust ultra ne
lines] check box.
the Control Panel
5
Changing Printer
Settings Using
Appendix Index
Checking and
Select [Adjust ultra ne lines], and then
5
select [On] in [Settings], and click [OK].
Printing will be implemented.
4
Printing will be implemented.
6
- 72 -

Using printer fonts
Clean printing
Using Windows PS printer drivers
You can print by replacing the TrueType fonts
with the fonts stored in the device.
Note
The font replacement function stores the document
z
fonts, but font designs cannot be reproduced. If it is
necessary to print font designs accurately, disable the font
replacement function.
Some of the applications that use unique printer drivers
z
cannot use the font replacement function easily.
If using Windows PS printer drivers, PC administrator
z
privileges are required.
Cannot be used with Windows XPS and Mac OS X printer
z
drivers.
Click [Start], and then select [Devices
1
and Printers].
Right-click the [OKI (product name)
2
(PS)] icon, and select [Printer
Properties].
Select the [Device Settings] tab.
3
Specify the printer font to be used
4
instead of TrueType fonts in [Font
Substitution Table].
To specify a font, click the TrueType font,
and select the replacement printer font
from the drop-down list.
1
Convenient print
functions
2
Matching
Colors
3
Using Utility
Software
4
Network
Setup
5
the Control Panel
Changing Printer
Settings Using
Checking and
Click [OK].
5
Select [Print] from the [File] menu.
6
Click [Advanced] (or [Preferences]).
7
Click [Advanced] in the [Layout] tab.
8
Select [Substitute with Device Font] in
9
[TrueType Font].
Printing will be implemented.
10
Appendix Index
- 73 -

Clean printing
Using Windows PCL printer drivers
1
Convenient print
functions
2
Matching
Colors
3
Using Utility
Software
4
Network
Setup
5
the Control Panel
Changing Printer
Settings Using
Open the le to be printed.
1
Select [Print] in the [File] menu.
2
Click [Advanced] (or [Preferences]).
3
Click [Fonts] in the [Extend] tab.
4
Enable the [Font Substitution] check
5
box in the [Font] screen.
Checking and
Appendix Index
Specify the printer font to replace the
6
TrueType font in [Font Substitution
Table].
Printing will be implemented.
7
- 74 -

Using PC fonts
Clean printing
Using Windows PCL printer drivers
You can output TrueType fonts to the screen
display as is.
Note
Print time may be longer.
z
Cannot be used with Windows XPS and Mac OS X printer
z
drivers.
Using Windows PS printer drivers
Open the le to be printed.
1
Select [Print] in the [File] menu.
2
Click [Advanced] (or [Preferences]).
3
Click [Advanced] in the [Layout] tab.
4
Select [Download as Softfont] in
5
[TrueType Font].
Open the le to be printed.
1
Select [Print] in the [File] menu.
2
Click [Advanced] (or [Preferences]).
3
Click [Font] in the [Extend] tab.
4
Disable the [Font Substitution] check
5
box in the [Font] screen.
Download as outline font
z
Creates font images using the printer.
Download as bitmap font
z
Creates font images using the printer
drivers.
1
Convenient print
functions
2
Matching
Colors
3
Using Utility
Software
4
Network
Setup
5
the Control Panel
Changing Printer
Settings Using
Checking and
Printing will be implemented.
6
Appendix Index
Printing will be implemented.
6
- 75 -

Printing print results so that people cannot see them
Printing print results so that people cannot see them
z
1
Convenient print
functions
Entering passwords to
print (Secure Print)
You can save print jobs to the device HDD, and
2
enter a password in the control panel to print.
Matching
Colors
To use this function, it is necessary to mount the
(optional) HDD to the device.
Note
3
If there is insufcient space on the option built-in
z
Using Utility
Software
4
Network
Setup
HDD storing the print jobs, "File system is full" will be
displayed, and printing will be disabled.
Cannot be used with Windows XPS and Mac OS X printer
z
drivers.
Open the le to be printed, and specify
1
[Secure Print].
If using PS printer drivers, select
(4)
[Secure Print] in [Job Type] in the
[Job Options] tab.
If using PCL printer drivers, select
[Secure Print] in [Job Type] in the
[Job Options] tab.
the Control Panel
5
Changing Printer
Settings Using
Appendix Index
Open the le to be printed.
(1)
Select [Print] in the [File] menu.
Checking and
(2)
Click [Advanced] (or
(3)
[Preferences]).
(Windows 7 PS printer driver screen)
(Windows 7 PCL printer driver screen)
- 76 -

Printing print results so that people cannot see them
Input the "Job Name" and "Job
(5)
Password" in the "JOB PIN" screen,
and click [OK].
Request Job Name for each print job
z
When implementing printing, the
screen to enter the job name will be
displayed.
Job Password
z
Set using 4-digit gures.
Job Name
z
Set using up to 16 single-byte
alphanumeric characters.
Enter the password from the control
2
panel to print.
Press the scroll button or .
(1)
Select [Print Secure Job], and
(2)
press the [OK] button.
1
Convenient print
functions
2
Matching
Colors
3
Using Utility
Software
4
Network
Setup
Printing will be implemented.
(6)
If [Request Job Name for each print
job] is enabled, enter the "Job Name"
in the "Enter Job Name" screen, and
click [OK].
Note
If the user who started the secure print job has
z
forgotten that the job exists, or has forgotten the
password, the job will remain stored on the device
HDD. Use the Conguration Tool to delete secure
print jobs that have been left on the HDD. For
details, see “Deleting unnecessary jobs from the
HDD” (P.186).
Select [Stored Job], and press the
(3)
[OK] button.
Use the 10-key pad to enter the
(4)
4-digit password for the job to be
printed to start the search.
the Control Panel
5
Changing Printer
Settings Using
Appendix Index
Checking and
- 77 -
Memo
If the password is entered incorrectly, press the
z
[BACK] button, and reset.
Press the [CANCEL] button to cancel the search.
z

1
Convenient print
functions
2
Matching
Colors
3
Using Utility
Software
4
Network
Setup
5
the Control Panel
Changing Printer
Settings Using
Appendix Index
Printing print results so that people cannot see them
Select [Print], and press the [OK]
(5)
button.
Memo
Select [Delete], and press the [OK] button to
z
delete a job.
Use 10-key pad or the scroll
(6)
buttons
or to enter the print
quantity, and press the [OK]
button.
Reference
You can use the Conguration Tool to delete the secure
z
print job. For details, see “Deleting unnecessary jobs from
the HDD” (P.186).
Checking and
Printing secret text
(encrypted secure print)
The print job is encrypted before being sent
to the device. Consequently, leaks regarding
the print details can still be prevented even if
print data is stolen from the HDD or the device
communications process. Further, to strengthen
security even more, print jobs spooled on the
HDD are either printed, or deleted after a xed
period of time has elapsed.
To print, it is necessary to enter the password
using the control panel, so theft of the printed
matter can also be prevented.
To use this function, it is necessary to mount the
(optional) HDD to the device.
Note
Cannot be used with Windows XPS and Mac OS X printer
z
drivers.
If using Windows PCL printer drivers to create a print
z
server on a shared network, and printing uses encrypted
secure print from the client, printing posters and booklets
will be disabled.
If there is insufcient space on the built-in HDD storing
z
the print jobs, "File system is full" will be displayed, and
printing will be disabled.
If using Encrypted Secure Print, disable "Job Spool". For
z
details, see “Using the printer buffer” (P.106).
The [Print only encrypted secure print jobs] from the
z
[Device Settings] tab in Windows 8.1/Windows 8/Windows
7/Windows Vista/Windows Server 2012 R2/Windows
Server 2012/Windows Server 2008 R2/Windows Server
2008 with Windows PS printer drivers will be disabled.
- 78 -

Printing print results so that people cannot see them
Open the le to be printed, and specify
1
[Encrypted Secure Print].
Open the le to be printed.
(1)
Select [Print] in the [File] menu.
(2)
Click [Advanced] (or
(3)
[Preferences]).
If using PS printer drivers, select
(4)
[Encrypted Secure Print] in [Job
Type] in the [Job Options] tab.
If using PCL printer drivers, select
[Encrypted Secure Print] in [Job
Type] in the [Job Options] tab.
Input the "Password" in the "Secure
(5)
Print Setting" screen, and click [OK].
(Windows 7 PS printer driver screen)
Password
z
Set using 4 to 12 alphanumeric
characters.
Always ask for password
z
When implementing printing, the
screen to enter the password will be
displayed.
Note
This check box is disabled in Windows 8.1/
z
Windows 8/Windows 7/Windows Vista/Windows
Server 2012 R2/Windows Server 2012/Windows
Server 2008 R2/Windows Server 2008. Enter
the password in the "JOB PIN" screen displayed
when [JOB PIN] is clicked.
1
Convenient print
functions
2
Matching
Colors
3
Using Utility
Software
4
Network
Setup
5
the Control Panel
Changing Printer
Settings Using
Appendix Index
Checking and
(Windows 7 PS printer driver screen)
(Windows 7 PCL printer driver screen)
Keep print job for
z
Set the period in which the print job is
stored on the device HDD from 5 mins,
to 23 hours 59 mins. Print jobs that
exceed the storage period are deleted
from the HDD automatically.
Erase Options
z
Specify the method when deleting
print jobs from the HDD.
– Easy method: Delete the print job from the le
system. This deletion method risks the print job
being recovered from the HDD, but it will delete
in the shortest time.
– Overwrite using 0x00: After overwriting the
specied data once, the print job is deleted. This
is a safer method compared to easy deletion, but
there is a risk that print jobs will be recovered
using special methods.
– Overwrite 3 times: Overwrites the print job
data 3 times before deleting. This is the safest
deletion method, but deletion takes time.
Printing will be implemented.
(6)
If [Always ask for password] is enabled, enter
the "Password" in the "Secure Print Setting"
screen, and click [OK].
- 79 -

Printing print results so that people cannot see them
1
Convenient print
functions
2
Matching
Colors
3
Using Utility
Software
4
Network
Setup
5
the Control Panel
Changing Printer
Settings Using
Enter the password from the control
2
panel to print.
Press the scroll button or .
(1)
Select [Print Secure Job], and
(2)
press the [OK] button.
Memo
After implementing Encrypted Secure Print, the les
z
used in printing are deleted using the specied deletion
method. While a le is being deleted, the message
"Deleting Encrypted Job" will be displayed.
If data is lost during transfer or data falsication is
z
detected, the message [To turn off the display, press OK]
will be displayed.
Checking and
Select [Encrypted Job], and press
(3)
Select [Print], and press the [OK]
(5)
button.
Memo
Select [Delete], and press the [OK] button to
z
delete a job.
All jobs that match the password will be printed
z
in the order they are received by the device.
the [OK] button.
Appendix Index
Enter the print job password using
(4)
either the 10-key pad or the input
screen, and click the [OK] button
to start the search.
Memo
If the password is entered incorrectly, press the
z
[BACK] button, and reset.
Press the [CANCEL] button to cancel the search.
z
- 80 -

Correcting the Print Position on the Paper Using the Control Panel
Correcting the Print Position on the Paper Using
z
the Control Panel
Correcting the print start
position
You can correct the print start position vertically
and horizontally on the paper for each tray.
Please refer to the following procedure.
Paper feed direction
Press the function number of the tray
2
you want to correct, and press the [OK]
button.
Memo
The corresponding function numbers for each tray are
z
listed below.
Target Tray Function No.
MPTray 220
Tray 1 221
Tray 2 222
Tray 3 223
Tray 4 224
Tray 5 225
1
Convenient print
functions
2
Matching
Colors
3
Using Utility
Software
4
Network
Setup
5
the Control Panel
Changing Printer
Settings Using
Appendix Index
Checking and
Paper feed direction
Press the [Fn] key.
1
The numerical values input screen will
be displayed.
Press the scroll button or to select
3
the item to correct.
Memo
Only C941/ES9541/Pro9541 will be displayed for
z
[Overprint X Adjust] and [Overprint Y Adjust].
Press the [OK] button.
4
- 81 -

1
Convenient print
functions
2
Matching
Colors
3
Using Utility
Software
4
Network
Setup
5
the Control Panel
Changing Printer
Settings Using
Correcting the Print Position on the Paper Using the Control Panel
Press the scroll button or to select
5
the adjustment amount, and press the
[OK] button. Check that
is displayed
to the left of the selected value.
Press the [ON LINE] button to return to
6
the standby screen.
Note
Y describes the paper feed direction and X describes its
z
orthogonal position.
Correct with [+] to widen the blank space in the X
z
direction, and [+] to widen the blank space in the Y
direction.
Readjustment might be necessary depending on the usage
z
conditions (temperature and humidity/media type).
Checking and
This function corrects the position and does not improve
z
the writing start position (±2mm).
Appendix Index
- 82 -

Adjusting the Image Stretch (Print Length) Using the Control Panel
Adjusting the Image Stretch (Print Length) Using
z
the Control Panel
Adjusting the stretch of
print results
You can adjust the stretch of print results on the
paper feed direction.
Please refer to the following procedure.
Paper feed direction
Paper feed direction
Press the function number of the tray
2
you want to adjust, and press the [OK]
button.
Memo
The corresponding function numbers for each tray are
z
listed below.
Tray Function No.
MPTray 220
Tray 1 221
Tray 2 222
Tray 3 223
Tray 4 224
Tray 5 225
Press the scroll button or to select
3
[Y Scaling].
1
Convenient print
functions
2
Matching
Colors
3
Using Utility
Software
4
Network
Setup
5
the Control Panel
Changing Printer
Settings Using
Appendix Index
Checking and
Press the [Fn] key.
1
The numerical values input screen will
be displayed.
Press the [OK] button.
4
- 83 -

1
Convenient print
functions
2
Matching
Colors
3
Using Utility
Software
4
Network
Setup
5
the Control Panel
Changing Printer
Settings Using
Adjusting the Image Stretch (Print Length) Using the Control Panel
Press the scroll button or to select
5
the adjustment amount, and press the
[OK] button. Check that
is displayed
to the left of the selected value.
Press the [ON LINE] button to return to
6
the standby screen.
Note
Adjust with [+] to enlarge the print result on the feed
z
direction of the paper and [-] to reduce.
Refer to "Correcting the print start position" (P.81) for
z
correcting the print start position of the paper edge.
Readjustment might be necessary depending on the usage
z
conditions (temperature and humidity/media type).
This function adjusts the scale of image and does not
z
Checking and
improve the image scale precision (±1mm/100mm).
Over-enlarging the print result may stain the back of the
z
paper.
Appendix Index
- 84 -

Advanced print functions
z
Setting the page order
Extracts in page order when printing documents
with multiple pages.
There are two methods.
Printing documents in page
order
The printed documents are output face-down.
Open the document to be printed.
1
Specify the face-down stacker as the
2
Output Bin to print.
Advanced print functions
Printing documents in reverse
page order
The printed documents are output face-up.
Note
Cannot be used with Windows PCL and Windows XPS
z
printer drivers.
Open the face-up stacker at the back of the device.
1
1
Convenient print
functions
2
Matching
Colors
3
Using Utility
Software
4
Network
Setup
Note
For paper weights with GSM 320 to 360g/m
z
275 to 310kg), custom size paper with a length less than
147mm, envelopes, labels, and transparencies, make sure
to open the face-up stacker and output the documents
face-up.
Face-down stacker
Face-up stacker
2
(ream weight
Face-up stacker
Open the paper supporter.
2
the Control Panel
5
Changing Printer
Settings Using
Appendix Index
Checking and
- 85 -
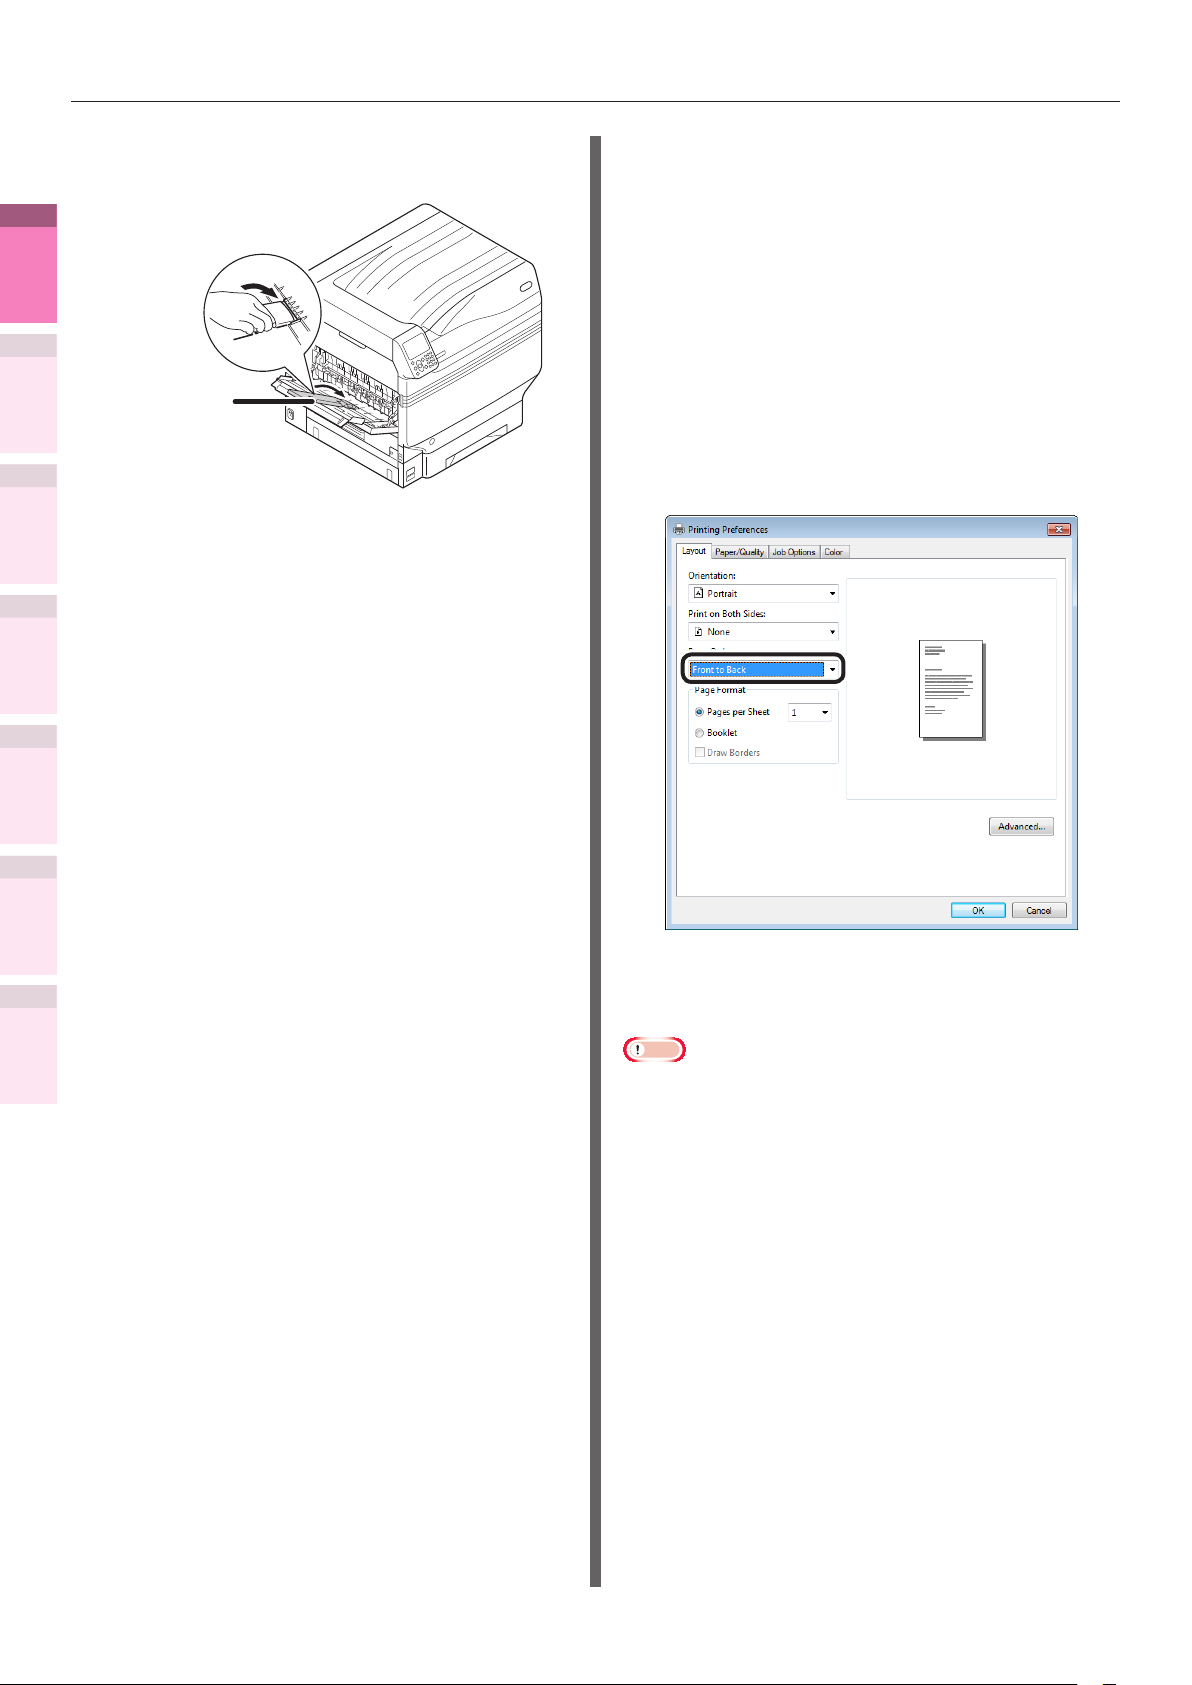
Advanced print functions
1
Convenient print
functions
2
Matching
Colors
3
Using Utility
Software
4
Network
Setup
Rotate the auxiliary supporter in the
3
direction of the arrow into the lock position.
Supplementary
supporter
Using Windows PS printer drivers
Open the le to be printed.
1
Select [Print] in the [File] menu.
2
Click [Advanced] (or [Preferences]).
3
Select [Stacker (Face-up)] in [Output
4
Bin] in the [Job Options] tab.
Select [Front to Back] in [Page Order]
5
in the [Layout] tab.
the Control Panel
5
Changing Printer
Settings Using
Appendix Index
Checking and
Printing will be implemented.
6
Note
If the [Page Order] item is not displayed, right-click the
z
[OKI (printer name) (PS)] in the [Devices and Printers]
folder, and enable [Enable advanced printing features] in
[Printer Properties]>[Advanced] tab.
- 86 -

Using Mac OS X printer drivers
Open the le to be printed.
1
Select [Print] in the [File] menu.
2
Click the [Paper] button on the [Print
3
Options] panel.
Select [Stacker (Face-up)] in [Output
4
Bin].
Select [Reverse] in [Page Order] in the
5
[Paper Handling] panel.
Advanced print functions
Printing single sheets
manually
You can print single pages individually by setting
the paper in the Multi-Purpose Tray. A message
to set the paper in the Multi-Purpose Tray will be
displayed on the control panel screen for each
page to be printed. To continue printing, select
[Restart print].
Set the paper in the Multi-Purpose Tray.
1
Open the le to be printed.
2
Set the manual printing using the
3
printer drivers, and press the [OK]
button on the control panel to print.
Using Windows PS printer drivers
1
Convenient print
functions
2
Matching
Colors
3
Using Utility
Software
4
Network
Setup
Printing will be implemented.
6
Open the le to be printed.
1
Select [Print] from the [File] menu.
2
Click [Advanced] (or [Preferences]).
3
Select the [Paper/Quality] tab.
4
Select [Multi-Purpose Tray] from [Paper
5
Source].
the Control Panel
5
Changing Printer
Settings Using
Appendix Index
Checking and
- 87 -
Click [Advanced].
6

Advanced print functions
1
Convenient print
functions
2
Matching
Colors
3
Using Utility
Software
4
Network
Setup
5
the Control Panel
Changing Printer
Settings Using
Appendix Index
Checking and
Click [Multipurpose tray is handled as
7
manual feed], and select [Yes] from the
drop-down list.
Click [OK].
8
Make other settings as necessary to
9
print.
When a message to set the paper in the
10
Multi-Purpose Tray is displayed in the
control panel LCD, set a single sheet,
and press the [OK] button.
When printing multiple-page
documents, the same message will be
displayed for each page.
Using Windows PCL printer drivers
Open the le to be printed.
1
Select [Print] from the [File] menu.
2
Click [Advanced] (or [Preferences]).
3
Select [Multipurpose Tray] from
4
[Source] in the [Setup] tab.
Click [Paper Feed Options].
5
Enable [Use MP tray as manual feed]
6
in [Multi Purpose Tray Settings], click
[OK].
- 88 -
Make other settings as necessary to
7
print.
When a message to set the paper in the
8
Multi-Purpose Tray is displayed in the
control panel LCD, set a single sheet,
and press the [OK] button.
When printing multiple-page
documents, the same message will be
displayed for each page.

Advanced print functions
Using Windows XPS printer drivers
Open the le to be printed.
1
Select [Print] from the [File] menu.
2
Click [Advanced] (or [Preferences]).
3
Select [Multipurpose Tray] from
4
[Source] in the [Setup] tab.
Using Mac OS X printer drivers
Open the le to be printed.
1
Select [Print] from the [File] menu.
2
Open the [Paper Feed] panel, and select
3
[Multi-Purpose Tray] in [All Pages From].
Click the [Feed] button in the [Print Options]
4
panel, and enable [Multipurpose tray is
handled as manual feed].
1
Convenient print
functions
2
Matching
Colors
3
Using Utility
Software
4
Network
Setup
Click [Paper Feed Options].
5
Enable [Use MP tray as manual feed] in
6
[Multipurpose Tray Settings], click [OK].
Make other settings as necessary to print.
7
When a message to set the paper in the Multi-
8
Purpose Tray is displayed in the control panel LCD,
set a single sheet, and press the [OK] button.
Make other settings as necessary to print.
5
When a message to set the paper in the
6
Multi-Purpose Tray is displayed in the
control panel LCD, set a single sheet,
and press the [OK] button.
When printing multiple-page
documents, the same message will be
displayed for each page.
the Control Panel
5
Changing Printer
Settings Using
Appendix Index
Checking and
When printing multiple-page documents, the
same message will be displayed for each page.
- 89 -

Advanced print functions
Automatically selecting
trays
1
Convenient print
The tray matching the paper size set using the
functions
printer drivers (tray 1, (optional) trays 2 to 5, or
Multi-Purpose Tray) will be selected automatically
for printing.
2
Matching
Colors
Note
Set the paper size and paper type for tray 1, (optional)
z
trays 2 to 5, and the Multi-Purpose Tray using the control
panel. For detailed, see "Setting paper" in "Basic".
Using Windows PCL printer drivers
Open the le to be printed.
1
Select [Print] in the [File] menu.
2
Click [Advanced] (or [Preferences]).
3
Select [Auto] in [Source] in the [Setup]
4
tab.
the Control Panel
Software
Setup
Settings Using
3
Using Utility
4
Network
5
Changing Printer
Checking and
Appendix Index
Using Windows PS printer drivers
Open the le to be printed.
1
Select [Print] in the [File] menu.
2
Click [Advanced] (or [Preferences]).
3
Select [Automatically Select] in [Paper
4
Source] in the [Paper/Quality] tab.
Printing will be implemented.
5
Printing will be implemented.
5
- 90 -

Advanced print functions
Using Windows XPS printer drivers
Open the le to be printed.
1
Select [Print] in the [File] menu.
2
Click [Advanced] (or [Preferences]).
3
Select [Auto] in [Source] in the [Setup]
4
tab.
Using Mac OS X printer drivers
Open the le to be printed.
1
Select [Print] in the [File] menu.
2
Select [Auto Select] in [All Pages From]
3
in the [Paper Feed] panel.
Printing will be implemented.
4
1
Convenient print
functions
2
Matching
Colors
3
Using Utility
Software
4
Network
Setup
Printing will be implemented.
5
the Control Panel
5
Changing Printer
Settings Using
Appendix Index
Checking and
- 91 -

Advanced print functions
Printing only covers from
a separate tray (cover
1
Convenient print
functions
Colors
printing)
When printing multiple-page documents, you can
print just the 1st page from a separate tray. Use
to create covers by changing the paper color and
2
weight of the 1st page.
Matching
Note
Cannot be used with Windows PS printer drivers.
z
Using Windows XPS printer drivers
Open the le to be printed.
1
Select [Print] from the [File] menu.
2
Click [Advanced] (or [Preferences]).
3
Click [Paper Feed Options] in the
4
[Setup] tab.
the Control Panel
Software
Setup
Settings Using
3
Using Utility
4
Network
5
Changing Printer
Checking and
Appendix Index
Using Windows PCL printer drivers
Open the le to be printed.
1
Select [Print] in the [File] menu.
2
Click [Advanced] (or [Preferences]).
3
Click [Paper Feed Options] in the
4
[Setup] tab.
Enable the [Use different source for
5
rst page] in [Cover Printing], and
select the paper feed method for the
1st page from [Paper feed options].
Set the paper type and paper weight as
necessary, and click [OK].
Enable the [Use different source for rst
5
page] in [Cover Printing], and select
the paper feed method for the 1st page
from [Paper feed options]. Set the
[Type] and [Weight] as necessary.
Printing will be implemented.
6
Printing will be implemented.
6
- 92 -

Using Mac OS X printer drivers
Open the le to be printed.
1
Select [Print] in the [File] menu.
2
Enable the [First Page From] in the
3
[Paper Feed] panel, and select each
paper feed method from [First Page
From] and [Remaining From].
Printing will be implemented.
4
Advanced print functions
Stamping and printing
(watermarks)
The details to be printed from the application can
be independently printed overlaying [Samples],
[Condential], etc.
Samples
Note
Cannot be used with Mac OS X printer drivers.
z
Watermarks cannot be printed correctly when using
z
pamphlet printing.
Using Windows printer
drivers
Note
With PS printer drivers, the default settings print by
z
overlaying watermarks on the text and diagrams in
the document. To print watermarks under the text and
diagrams, enable the [Background] check box in the
[Watermarks] dialog box.
Enable the [Background] check box to not print
z
watermarks depending on the application. In this case,
disable the [background] check box.
1
Convenient print
functions
2
Matching
Colors
3
Using Utility
Software
4
Network
Setup
5
the Control Panel
Changing Printer
Settings Using
Appendix Index
Checking and
Open the le to be printed.
1
Select [Print] in the [File] menu.
2
Click [Advanced] (or [Preferences]).
3
- 93 -

Advanced print functions
1
Convenient print
functions
2
Matching
Colors
3
Using Utility
Software
4
Network
Setup
If using PS or XPS printer drivers, click
4
[Watermarks] in the [Job Options] tab.
If using PCL printer drivers, select
[Watermarks] in [Extend] tab.
(Windows 7 PS printer driver screen)
Click [New].
5
(Windows 7 PS printer driver screen)
Enter [Text] in the "Watermarks"
6
screen, and set another [Size].
the Control Panel
5
Changing Printer
Settings Using
Appendix Index
Checking and
(Windows 7 PS printer driver screen)
(Windows 7 PCL printer driver screen)
Click [OK].
7
Printing will be implemented.
8
(Windows 7 XPS printer driver screen)
- 94 -
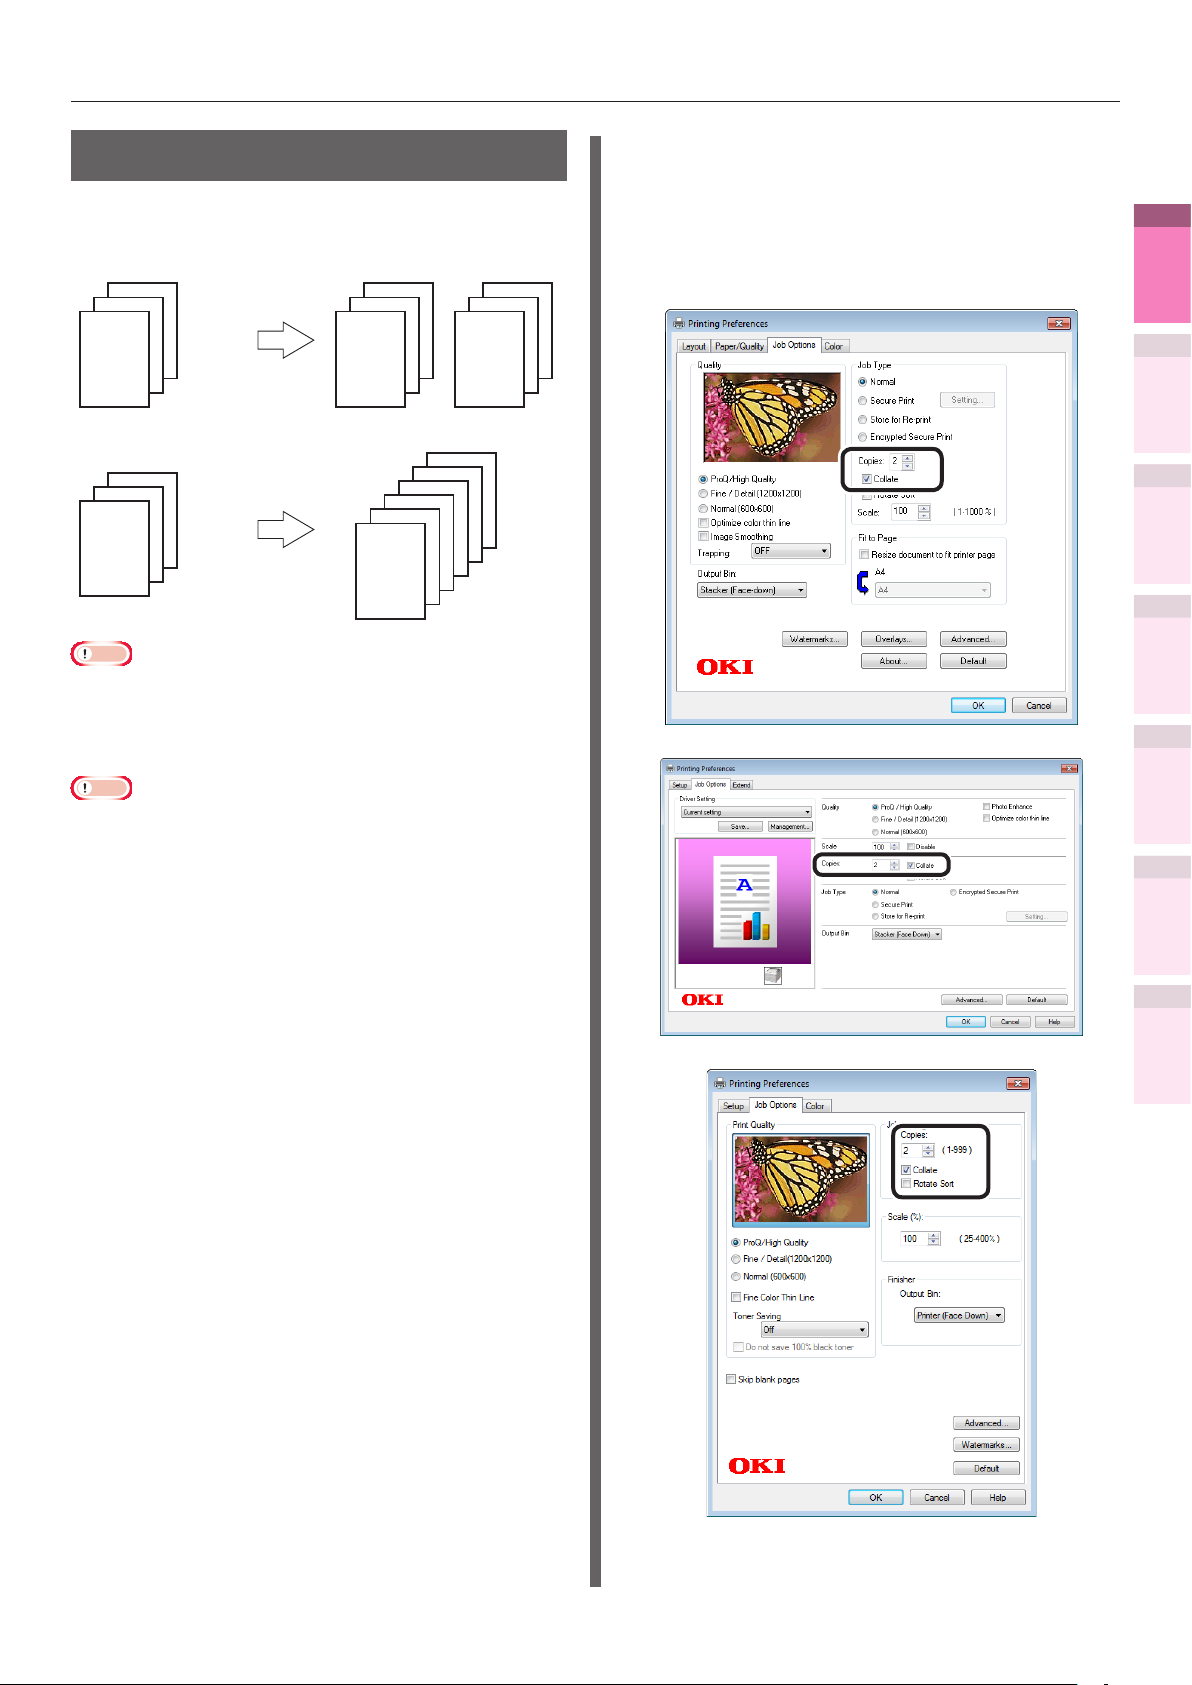
Advanced print functions
Collate (sort printing)
You can store print jobs in the device memory
and collate the printing.
Printing by specifying batches
x2
3
2
1
Printing without specifying batches
x2
3
2
1
Note
Not usable with some applications.
z
3
2
1
2
2
1
1
2
1
3
3
If using PS or XPS printer drivers, enter the
4
print quantity in [Copies] in the [Job Options]
tab, and enable the [Collate] check box.
If using PCL printer drivers, enter the print
quantity in [Copies] in the [Job Options]
1
Convenient print
functions
tab, and enable the [Collate] check box.
2
3
Matching
Colors
3
Using Utility
Software
4
Network
Setup
Using Windows printer drivers
Note
If using PS printer drivers, turn OFF the batch printing
z
function in the application.
Open the le to be printed.
1
Select [Print] in the [File] menu.
2
Click [Advanced] (or [Preferences]).
3
(Windows 7 PS printer driver screen)
(Windows 7 PCL printer driver screen)
the Control Panel
5
Changing Printer
Settings Using
Appendix Index
Checking and
- 95 -
(Windows 7 XPS printer driver screen)
Printing will be implemented.
5

Advanced print functions
Using Mac OS X printer drivers
1
Convenient print
functions
2
Matching
Colors
3
Using Utility
Software
4
Network
Setup
5
the Control Panel
Changing Printer
Settings Using
Open the le to be printed.
1
Select [Print] in the [File] menu.
2
Disable [Collate pages] in the [Paper
3
Handling] panel or print dialog box, and
enter the print quantity in [Copies].
Click the [Paper] button in the [Print
4
Checking and
Options] panel, and enable the [Collate]
check box.
Appendix Index
Memo
If [Collate pages] is enabled in the [Print Handling]
z
panel, do not use the device memory when printing.
Printing will be implemented.
5
- 96 -

Advanced print functions
Outputting portrait and landscape alternately using
batch printing
When outputting for each batch, you can output the pages in portrait and landscape orientations
alternately.
As you can output portrait and landscape alternately, it is easy to arrange print jobs with multiple
pages.
1
Convenient print
functions
2
Matching
Colors
3
1 2 3
Memo
To use the portrait and landscape output function, it is necessary to mount the (optional) HDD to the device.
z
Prepare the paper for portrait and landscape in the paper feed tray beforehand.
z
The usable paper sizes are described below.
z
– A4Wide, A4, A5, B5, letter, 16K (184 x 260mm), 16K (195 x 270mm), 16K (197 x 273mm)
Note
Cannot be used with Mac OS X 10.4.11 or earlier printer drivers.
z
Using Windows PS printer drivers
Open the le to be printed.
1
Select [Print] in the [File] menu.
2
Click [Advanced] (or [Preferences]).
Using Windows PCL printer drivers
1
2
3
Enter the print quantity in [Copies] in [Job
4
Options], and enable the [Collate] check box.
3
4
Enable the [Rotate Sort] check box.
2
1
3rd 2nd 1st
Open the le to be printed.
Select [Print] in the [File] menu.
Click [Advanced] (or [Preferences]).
Enter the print quantity in [Copies] in
the [Job Options] tab, and enable the
[Collate] check box.
3
2
1
5
Enable the [Rotate Sort] check box.
5
3
2
1
the Control Panel
Software
Setup
Settings Using
3
Using Utility
4
Network
5
Changing Printer
Checking and
Appendix Index
Printing will be implemented.
6
Printing will be implemented.
6
- 97 -

Advanced print functions
1
Convenient print
functions
2
Matching
Colors
3
Using Utility
Software
4
Network
Setup
Using Windows XPS printer drivers
Open the le to be printed.
1
Select [Print] in the [File] menu.
2
Click [Advanced] (or [Preferences]).
3
Enter the print quantity in [Copies] in
4
[Job Options], and enable the [Collate]
check box.
Enable the [Rotate Sort] check box.
5
Using Mac OS X printer drivers
Open the le to be printed.
1
Select [Print] in the [File] menu.
2
Enter the print quantity in the print
3
quantity, and then click the [Paper]
button in the [Print Options] panel, and
enable the [Collate] and [Rotate Sort]
check boxes.
the Control Panel
5
Changing Printer
Settings Using
Appendix Index
Checking and
Printing will be implemented.
4
Printing will be implemented.
6
- 98 -

Saving data for repeat
printing
You can save print data to the device HDD, and
enter a password in the control panel to repeat
printing several times.
Advanced print functions
If using PS printer drivers, select
(4)
[Store for Re-print] in [Job Type]
in the [Job Options] tab. If using
PCL printer drivers, select [Store for
Re-print] in [Job Type] in the [Job
Options] tab.
1
Convenient print
functions
Note
If there is insufcient space on the built-in HDD storing
z
the print jobs, "File system is full" will be displayed, and
printing will be disabled.
Cannot be used with Windows XPS and Mac OS X printer
z
drivers.
Save the job to the printer.
1
Open the le to be printed.
(1)
Select [Print] in the [File] menu.
(2)
Click [Advanced] (or
(3)
[Preferences]).
(Windows 7 PS printer driver screen)
the Control Panel
2
Colors
3
Software
4
Setup
5
Settings Using
Appendix Index
Matching
Using Utility
Network
Changing Printer
Checking and
- 99 -
(Windows 7 PCL printer driver screen)
Input the "Job Name" and
(5)
"Personal ID Number" in the "JOB
PIN" screen, and click [OK].
Request Job Name for each job
z
When printing is implemented, a screen to enter
the job name will be displayed.
Personal ID Number
z
Set using 4 digits.
Job Name
z
Set using up to 16 single-byte alphanumeric characters.

Advanced print functions
1
Convenient print
functions
2
Matching
Colors
3
Using Utility
Software
4
Network
Setup
5
the Control Panel
Changing Printer
Settings Using
Printing will be implemented.
(6)
If [Request Job Name for each print
job] is enabled, enter the "Job Name"
in the "Job PIN" screen, and click [OK].
Select [Print], and press the [OK]
(5)
button.
Enter the password to print.
2
Press the scroll button or .
(1)
Memo
Select [Delete], and press the [OK] button to
z
delete a job.
Use 10-key pad or the scroll
(6)
buttons
quantity, and press the [OK]
Select [Print Secure Job], and
(2)
button.
press the [OK] button.
Reference
You can use the Conguration Tool to delete the secure
z
print job. For details, see “Deleting unnecessary jobs from
the HDD” (P.186).
Checking and
or to enter the print
Appendix Index
Select [Stored Job], and press the
(3)
[OK] button.
Use the 10-key pad to enter the
(4)
4-digit password for the job to be
printed to start the search.
Memo
If the password is entered incorrectly, press the
z
[BACK] button, and reset.
- 100 -
 Loading...