


DICOM Embedded Printing Function
User's Guide
OKI DICOM Embedded Printer Version 4 Series
C911/C931 DICOM
ES9411/ES9431 DICOM
Pro9431 DICOM
IMPORTANT:
This manual describes all the functionalities available in the full-option version of OKI
DICOM Embedded Printer V4.00. Available functionalities of your product may be
different from those described in this manual.
Copyright © 2017 Oki Data Corporation. All r ig hts reserved.
1

Introduction
CAUTION!
This is not medical equipment. Do not use the printed images
from this equipment for medical diagnosis.
This manual describes how to print from OKI DICOM Embedded Printer supporting
DICOM Protocol.
Refer to the user manual of the standard printer model for instructions on tasks such
as how to load paper and replace consumables in OKI DICOM Embedded Printer.
OKI DICOM Embedded Printer prints DICOM format images s ent via a network from
medical imaging applications and medical devices.
OKI DICOM Embedded Printer can generate pages in both grayscale and color.
Features of OKI DICOM Embedded Printer
• High quality printing with ProQ2400 © multi-level technology
• Compliant with the DICOM 3.0 standard
• Reliability
• Ergonomic features
• Achieves low-cost DICOM-compatible print ing
About This Manual
1. Unauthorized copying of this manual in whole or in part is strictly prohibited.
2. The contents of this manual may change without prior notice.
3. Every effort has been made to ensure that the information in this document is
complete, accurate and up-to-date. If you should discover any mistakes or
omissions, please contact your local vendor.
4. While all reasonable efforts have been made to make this document as accurate and
helpful as possible, we make no warranty of any kind, expressed or implied, as to
the accuracy or completeness of the information contained herein.
Manual Copyright
Oki Data Corporation owns all copyrights pertaining to this manual. Unauthorized
reproduction, transcription, and translation of this document are prohibited. You must
obtain written permission from Oki Data Corporation to reproduce, transcribe, or
translate any part of this manual.
© 2017 Oki Data Corporation
Copyright © 2017 Oki Data Corporation. All r ig hts reserved.
2

Trademark Information
OKI is a registered trademark of Oki Electric Industry Co., Ltd.
Java, JavaScript and other trademarks that include Java are trademarks or registered
trademarks of Oracle Corporation, its subsidiaries and its affiliates in the United States
of America and other countries.
OKI DICOM Printing Program License Agreement
The details of the software license agreement described below must be agreed by you
before using the software.
Software License Agreement
IMPORTANT:
Please read this Software License Agr eement (“Agreement”) carefully before using
OKI DICOM Printing Embedded Software (“Licensed Software”) contained in OKI
DICOM Embedded Printer (“Product”).
By using the Product, you are indicating your acceptance of these terms and
conditions and this Agreement is d eemed effective between you (“Licensee”) and
Oki Data Corporati on ( “ Licensor”).
If you do not agree to the terms of this Agreement, you may not use the Licensed
Software.
1. Scope of the license
Licensor grants, and Licensee accepts, a non-exclusive license to use the
Licensed Software solely in conjunction with the Product.
2. Ownership and Restriction
(1) Licensor or its suppliers own all the copyright and proprietary rights in and to
the Licensed Software. The structure, organization and code contained in
Licensed Software are the valuable trade secrets of Licensor and its suppliers.
Licensed Software is also protected by United States Copyright Law and
International Treaty provisions. Licensee must treat the Licensed Software just
as Licensee would treat any other copyrighted material, such as a book.
(2) Licensee may not make copies, rent, lease, distribute, transfer or reprint the
Licensed Software, in whole or in part.
(3) Licensee agrees not to modify, alter, translate, reverse engineer, decompile,
disassemble, extract in part or separate in part the Licensed Software.
(4) Licensee agrees not to change the file names of the Licensed Software.
(5) Except as stated in this Agreement, Licensor does not grant Licensee any
intellectual property rights in or to the Licensed Software.
Copyright © 2017 Oki Data Corporation. All r ig hts reserved.
3

3. Term and Termination
(1) This Agreement is effective until the Product is destroyed.
(2) Licensor may terminate this Agreement if Licensee fails to comply with any of
the terms and conditions of this Agreement. Upon termination, Licensee shall
destroy Licensed Software and its copies in Licensee’s possession and control.
4. Warranty
THE LICENSED SOFTWARE IS PROVIDED “AS IS”. NEITHER LICENSOR NOR ITS
SUPPLIERS WARRANT THAT THE OPERATION OF THE LICENSED SOFTWARE
WILL BE UNINTERRUPTED, ERROR FREE, OR WILL MEET LICENSEE’S NEEDS.
LICENSOR AND ITS SUPPLIERS MAKE NO WARRANTY, EXPRESS OR IMPLIED, AS
TO NON-INFRINGEMENT OF ANY THIRD PARTY’S RIGHTS, M ERCHANTABILITY ,
OR FITNESS F O R AN Y PARTICULAR PURPOSE.
5. Disclaimer of Liability
IN NO EVENT WILL LICENSOR OR ITS S UPPLIERS BE LIABLE TO LICENSEE FOR
ANY DIRECT, INDIRECT, INCIDENTAL, SPECIAL, CONSEQUENTIAL OR PUNITIVE
DAMAGES, INCLUDING, BUT NOT LIMITED TO, LOSS OF PROFITS, LOSS OF
SAVINGS, OR LOSS OF DATA, EVEN IF LICENSOR HAS BEEN ADVISED OF THE
POSSIBILITY OF SUC H DAMAGE NOR FOR AN Y C LAIM BY ANY THIRD PARTY
(IES) IN ANY WAY ARISING OUT OF OR RELATING TO THE LICENSED
SOFTWARE, WHETHER THE CLAIM ALLEGES TORTIOUS CONDUCT (INCLUDING,
BUT NOT LIMITED TO, NEGLIGENCE) OR ANY OTHER LEGAL T HEORY, OR FOR
ANY CLAIM BY ANY THIRD PARTY.
6. Governing Law
The license with respect to the Licensed Software will be governed by the laws
in force in Japan.
7. Severability
If any part of this Agreement is found void and unenforceable, it will not affect
the validity of the balance of the Agreement, which shall remain valid and
enforceable according to its terms.
8. Export Restriction
Licensee agrees that the Licensed Software will not be shipped, transferred,
exported or re-exported into any country or used in any manner prohibited by
U.S., Japanese or any other applicable export laws or regulations. Licensee
agrees that it will not export or re-export the Licensed Software or products
produced therefrom in any form without appropriate U.S., Japanese or any other
4
Copyright © 2017 Oki Data Corporation. All r ig hts reserved.

governmental licenses. This Agreement shall automatically terminate upon
failure by Licensee to comply with this Section 8.
9. Entire Agreement
Licensee represents that Licensee reads and understands this Agreement and
that this Agreement constitutes the entire understanding and agreement
between Licensor a nd Licensee as to the license relating to the Licensed
Software, and supersedes and replaces any prior agreement, written or oral.
The Licensee’s obligations in this Agreement constitute the obligations to
Licensor and all owners of the right licensed to Licensee under this Agreement.
10. Notice to U.S. Government End Users
All Software provided to the U.S. Government pursuant to solicitations issued on
or after December 1, 1995 is provided with the commercial license rights and
restrictions described elsewhere herein. All Software provided to the U.S.
Government pursuant to solicitations issued prior to December 1, 1995 is
provided with “Restricted Rights” as provided for in FAR, 48 CFR 52.227-14
(JUNE 1987) or DFAR, 48 CFR 252.227-7013 (OCT 1988), as applicable.
“Software” in this section is deemed to be the Licensed Software defined in this
Agreement.
Some of the Licensed Software may include a separate software license
agreement and if you agree to the separate software license agreement, the
terms of such agreement shall prevail for the use of the software.
11. Licensee acknowledges and agrees that Licensor’s suppliers are third party
beneficiaries of this Agreement, with the right to enforce the obligations set
forth herein with respect to the respective technology of such suppliers and/or
Licensor.
Document Terminology
Control panel and web interface messages are all provided in English in this document.
5
Copyright © 2017 Oki Data Corporation. All r ig hts reserved.

The Apache Software License, Version 1.1
Copyright (c) 1999 The Apache Software Foundation. All rights reserved.
Redistribution and use in source and binary forms, with or without modification, are
permitted provided that the following conditions are met:
1. Redistributions of source code must retain the above copyright notice, this list of
conditions and the following disclaimer.
2. Redistributions in binary form must reproduce the above copyright notice, this list
of conditions and the following disclaimer in the documentation and/or other
materials provided with th e distr ib utio n.
3. The end-user documentation included with the redistribution, if any, must include
the following acknowledgement:
“This product includes software developed by the Apache Software Foundation
(http://www.apache.org/).”
Alternately, this acknowledgement may appear in the software itself, if and
wherever such third-party acknowledgements normally appear.
4. The names “The Jakarta Project”, “Tomcat”, and “Apache Software Foundation”
must not be used to endorse or promote products derived from this software
without prior written permission. For written permission, please contact
apache@apache.org.
5. Products derived from this software may not be called “Apache” nor may “Apache”
appear in their names without prior written permission of the Apache Group.
THIS SOFTWARE IS PROVIDED “AS IS” AND ANY EXPRESSED OR IMPLIED
WARRANTIES, INCLUDING, BUT NOT LIMITED TO, THE IMPLIED WARRANTIES OF
MERCHANTABILITY AND FITNESS FOR A PARTICULAR PURPOSE ARE DISCLAIMED. IN
NO EVENT SHALL THE APACHE SOFTWARE FOUNDATION OR ITS CONTRIBUTORS BE
LIABLE FOR ANY DIRECT, INDIRECT, INCIDENTAL, SPECIAL, EXEMPLARY, OR
CONSEQUENTIAL DAMAGES (INCLUDING, BUT NOT LIMITED TO, PROCUREMENT OF
SUBSTITUTE GOODS OR SERVICES; LOSS OF USE, DATA, OR PROFITS; OR BUSINESS
INTERRUPTION) HOWEVER CAUSED AND ON ANY THEORY OF LIABILITY, WHETHER IN
CONTRACT, STRICT LIABILITY, OR TORT (INCLUDING NEGLIGENCE OR OTHERWISE)
ARISING IN ANY WAY OUT OF THE USE OF THIS SOFTWARE, EVEN IF ADVISED OF
THE POSSIBILITY OF SUCH DAMAGE.
6
Copyright © 2017 Oki Data Corporation. All r ig hts reserved.

The Apache Software License, Version 1.1
Copyright (c) 1999-2003 The Apache Software Foundation. All rights reserved.
Redistribution and use in source and binary forms, with or without modification, are
permitted provided that the following conditions are met:
1. Redistributions of source code must retain the above copyright notice, this list of
conditions and the following disclaimer.
2. Redistributions in binary form must reproduce the above copyright notice, this list
of conditions and the following disclaimer in the documentation and/or other
materials provided w ith the dis tribution.
3. The end-user documentation included with the redistribution, if any, must include
the following acknowledgement:
“This product includes software developed by the Apache Software Foundation
(http://www.apache.org/).”
Alternately, this acknowledgement may appear in the software itself, if and
wherever such third-party acknowledgements normally appear.
4. The names “The Jakarta Project”, “Commons”, and “Apache Software Foundation”
must not be used to endorse or promote products derived from this software
without prior written permission. For written permission, please contact
apache@apache.org.
5. Products derived from this software may not be called “Apache” nor may “Apache”
appear in their names without prior written permission of the Apache Group.
THIS SOFTWARE IS PROVIDED “AS IS” AND ANY EXPRESSED OR IMPLIED
WARRANTIES, INCLUDING, BUT NOT LIMITED TO, THE IMPLIED WARRANTIES OF
MERCHANTABILITY AND FITNESS FOR A PARTICULAR PURPOSE ARE DISCLAIMED. IN
NO EVENT SHALL THE APACHE SOFTWARE FOUNDATION OR ITS CONTRIBUTORS BE
LIABLE FOR ANY DIRECT, INDIRECT, INCIDENTAL, SPECIAL, EXEMPLARY, OR
CONSEQUENTIAL DAMAGES (INCLUDING, BUT NOT LIMITED TO, PROCUREMENT OF
SUBSTITUTE GOODS OR SERVICES; LOSS OF USE, DATA, OR PROFITS; OR BUSINESS
INTERRUPTION) HOWEVER CAUSED AND ON ANY THEORY OF LIABILITY, WHETHER IN
CONTRACT, STRICT LIABILITY, OR TORT (INCLUDING NEGLIGENCE OR OTHERWISE)
ARISING IN ANY WAY OUT OF THE USE OF THIS SOFTWARE, EVEN IF ADVISED OF
THE POSSIBILITY OF SUCH DAMAGE.
Copyright © 2017 Oki Data Corporation. All r ig hts reserved.
7

TABLE OF CONTENTS Page
10
10
11
12
16
18
18
18
18
0
0
0
0
1
1
1
2
3
4
4
5
5
6
6
7
7
8
28
29
29
29
29
0
0
0
1. Setting up OKI DICOM Embedded Printer
1-1 Install the printer
1-2 Open DICOM Embedded Printer home page
1-3 Setup of AETs
1-4 Options for [OKI] print rules on AETs (Table)
1-5 Options for [OKI] print rules on AETs (Description)
(1) AET Name
(2) Activate Max DICOM Log
(3) Print Destination
(4) Use US format paper 2
(5) Printer Tray 2
(6) Copy 2
(7) Page Format 2
(8) Replace Header by Logo 2
(9) Header 2
(10) Footer 2
(11) Booklet Print Mode 2
(12) Border Density 2
(13) Empty Image Density 2
(14) Image Background 2
(15) Polarity 2
(16) Smoothing Filter 2
(17) Smoothing Level 2
(18) Layout Format 2
(19) Black & White Mode 2
(20) Color Mode 2
(21) Contrast 2
(22) Brightness
(23) X Scale
(24) Y Scale
(25) X Offset
(26) Y Offset
(27) Black Gamma 3
(28) Cyan Gamma 3
(29) Magenta Gamma 3
8
Copyright © 2017 Oki Data Corporation. All r ig hts reserved.

(30) Yellow Gamma 3
0
1
3
3
4
4
6
6
7
38
38
39
0
2
5
7
49
0
5. Troubleshooting
0
1-6 Customize ADMIN menu 3
1-7 ADMIN menu (Description) 3
(1) Activate Economy Mode 3
(2) Activate Max DICOM Log Mode 3
(3) Activate DICOM Store to Print Mode 3
(4) Activate Booklet Print Mode 3
(5) Activate Remote Print Mode 3
(6) Footer Font Size 3
2. Related Settings
2-1 CONFIG menu
2-2 BACKUP menu
2-2-1 Create & Download AET Backup File from Printer to PC 4
2-2-2 Upload AET Backup File from PC to Printer 4
2-2-3 Restore AET data from AET Backup File to AET database 4
2-2-4 Delete AET Backup File from Printer 4
3. LOG menu (DICOM Protocol)
4. How to print the test patterns 5
5
9
Copyright © 2017 Oki Data Corporation. All r ig hts reserved.

1. Setting up OKI DICOM Embedded
Printer
1-1 Install the printer
The following procedures are performed in accordance with the Setup Guide/User’s
Guide/Network Guide supplied on CD/DVD with the printer.
(1) Unpack OKI DICOM Embedded Pr int e r (hereinafter referred to as printer) from
the packing box and install it.
(2) Remove the protective tapes and the protective sheets from the printer.
(3) Open the top cover, and rem ove the stopper (orange) of the fuser unit.
(4) Install the image drum.
(5) Load paper on the paper tray.
(6) Connect the AC cord to the printer, and turn on the power.
Note: Do not connect the network cable to the printer yet.
(7) Enter the IP address, which is provided by your network administrator, using
the printer control panel.
(8) Perform test printing, and confirm that the IP address is set for the printer
correctly.
(9) Connect the network cable to the printer.
Next, set up the printer from your PC (Personal Computer) as instructed as follow s.
Prepare a PC connected to the same network as the printer.
Caution: OKI DICOM Embedded Printer does not move from Power Save mode to
Sleep mode.
10
Copyright © 2017 Oki Data Corporation. All r ig hts reserved.
1-2 Open DICOM Embedded Printer home page
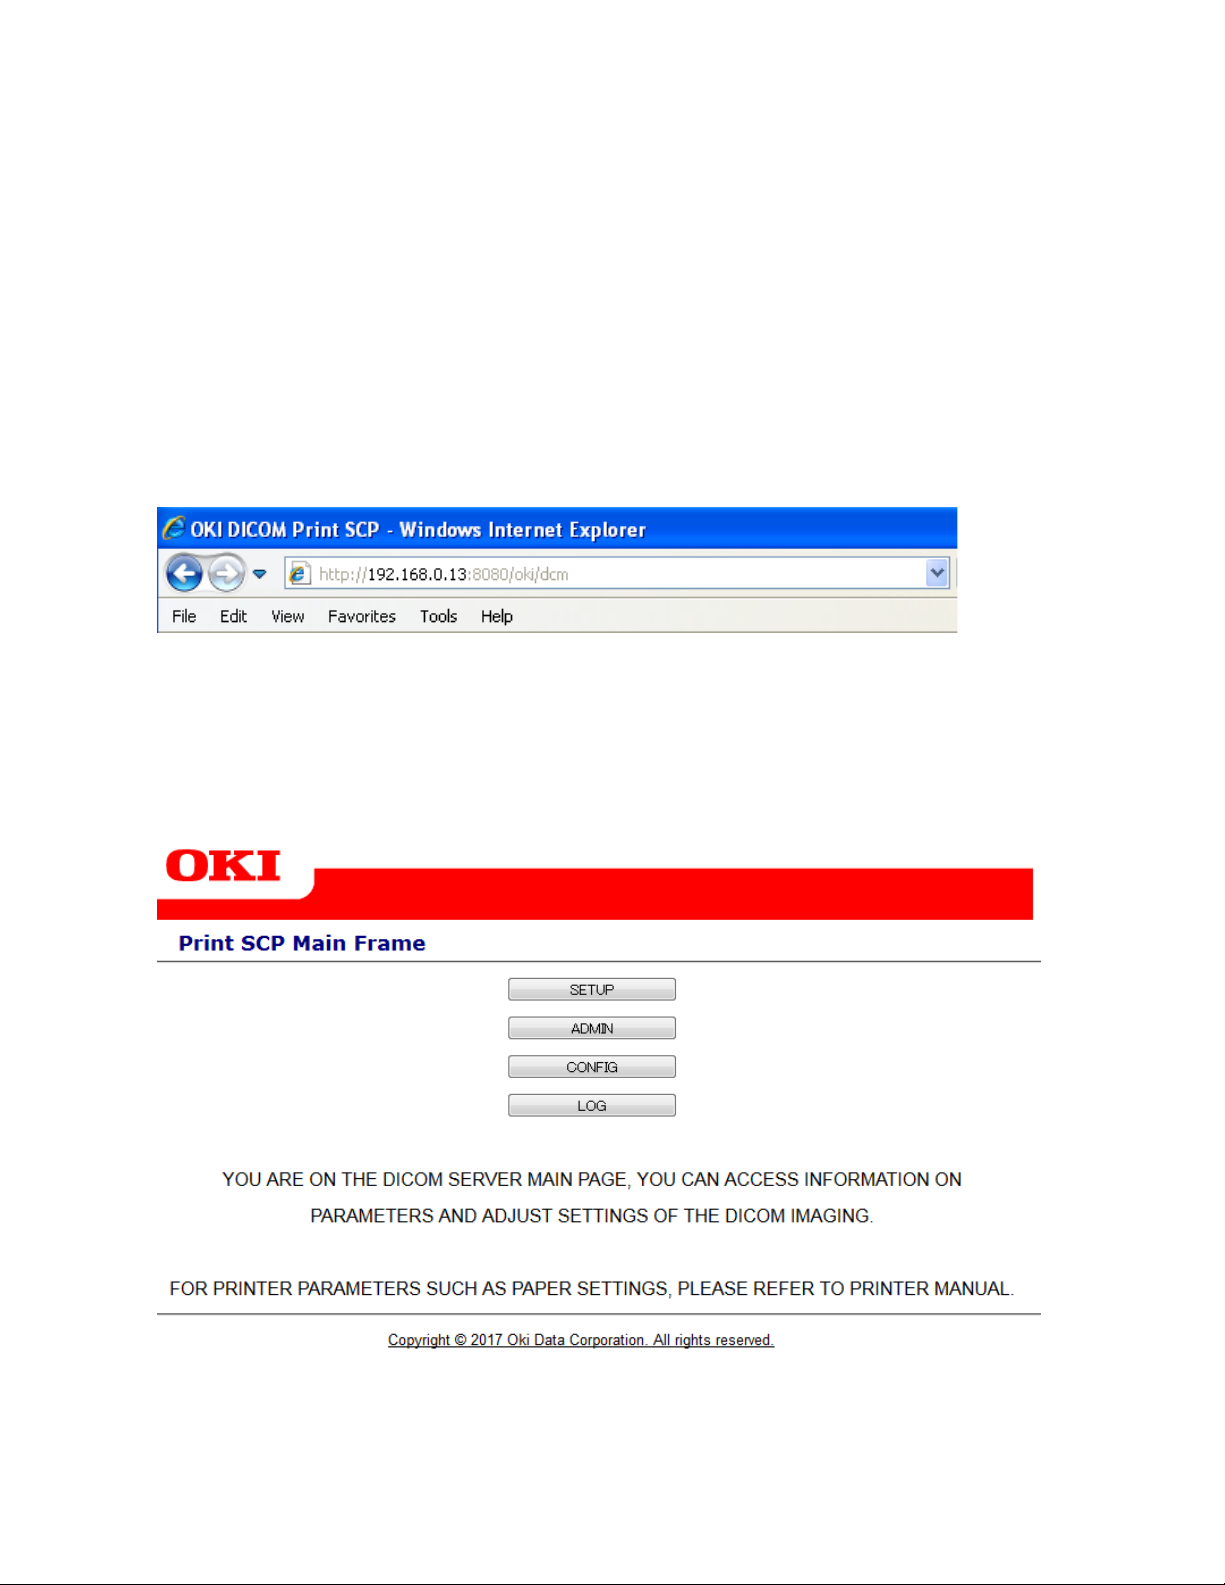
Open the web browser on your PC.
Note: This will work even if the PC is not connected to the Internet.
In the address bar of your web browser, enter the IP address set to the printer as
follows.
Example:
When the IP address set to the printer is 192.168.0.13, enter
“http://192.168.0.13:8080/oki/dcm” in the address bar.
Note: This action might not be successful if done just after “Ready” is displayed on
the printer control panel. In this event, wait for 5 to 10 seconds and try
again.
DICOM Embedded Printer home page is displayed.
11
Copyright © 2017 Oki Data Corporation. All r ig hts reserved.
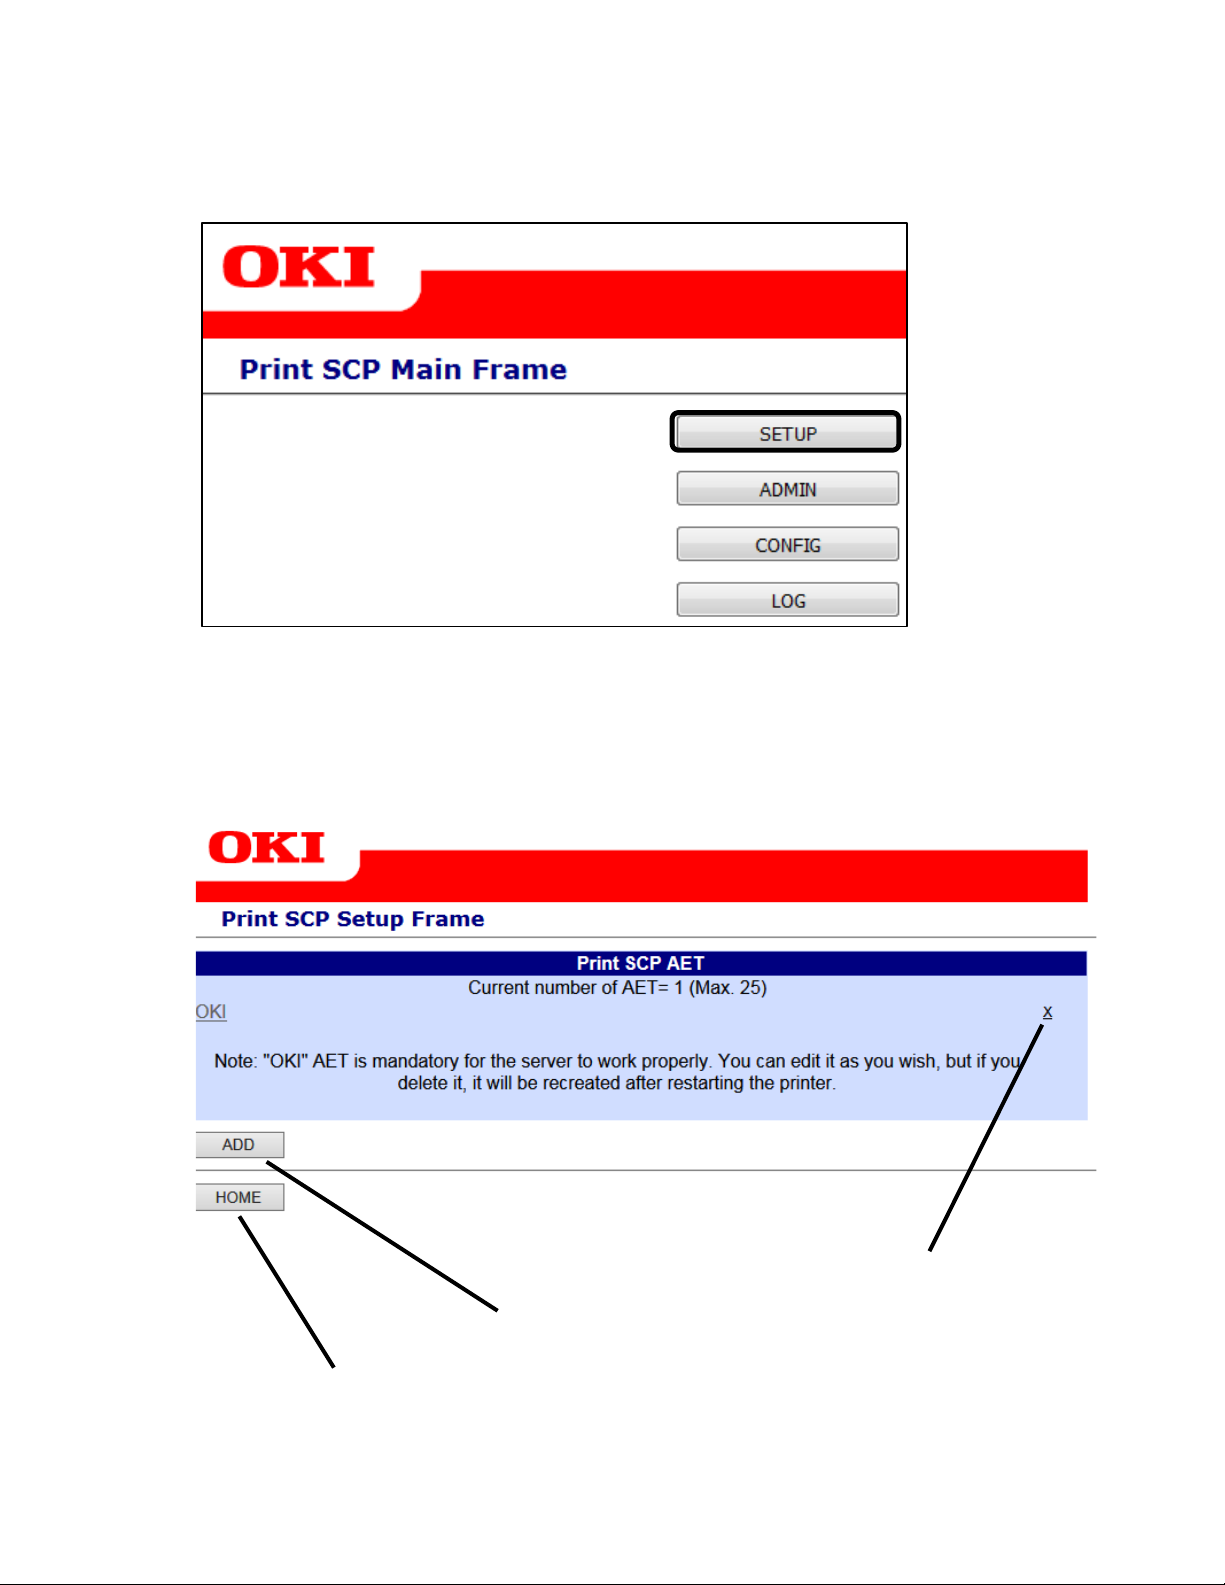
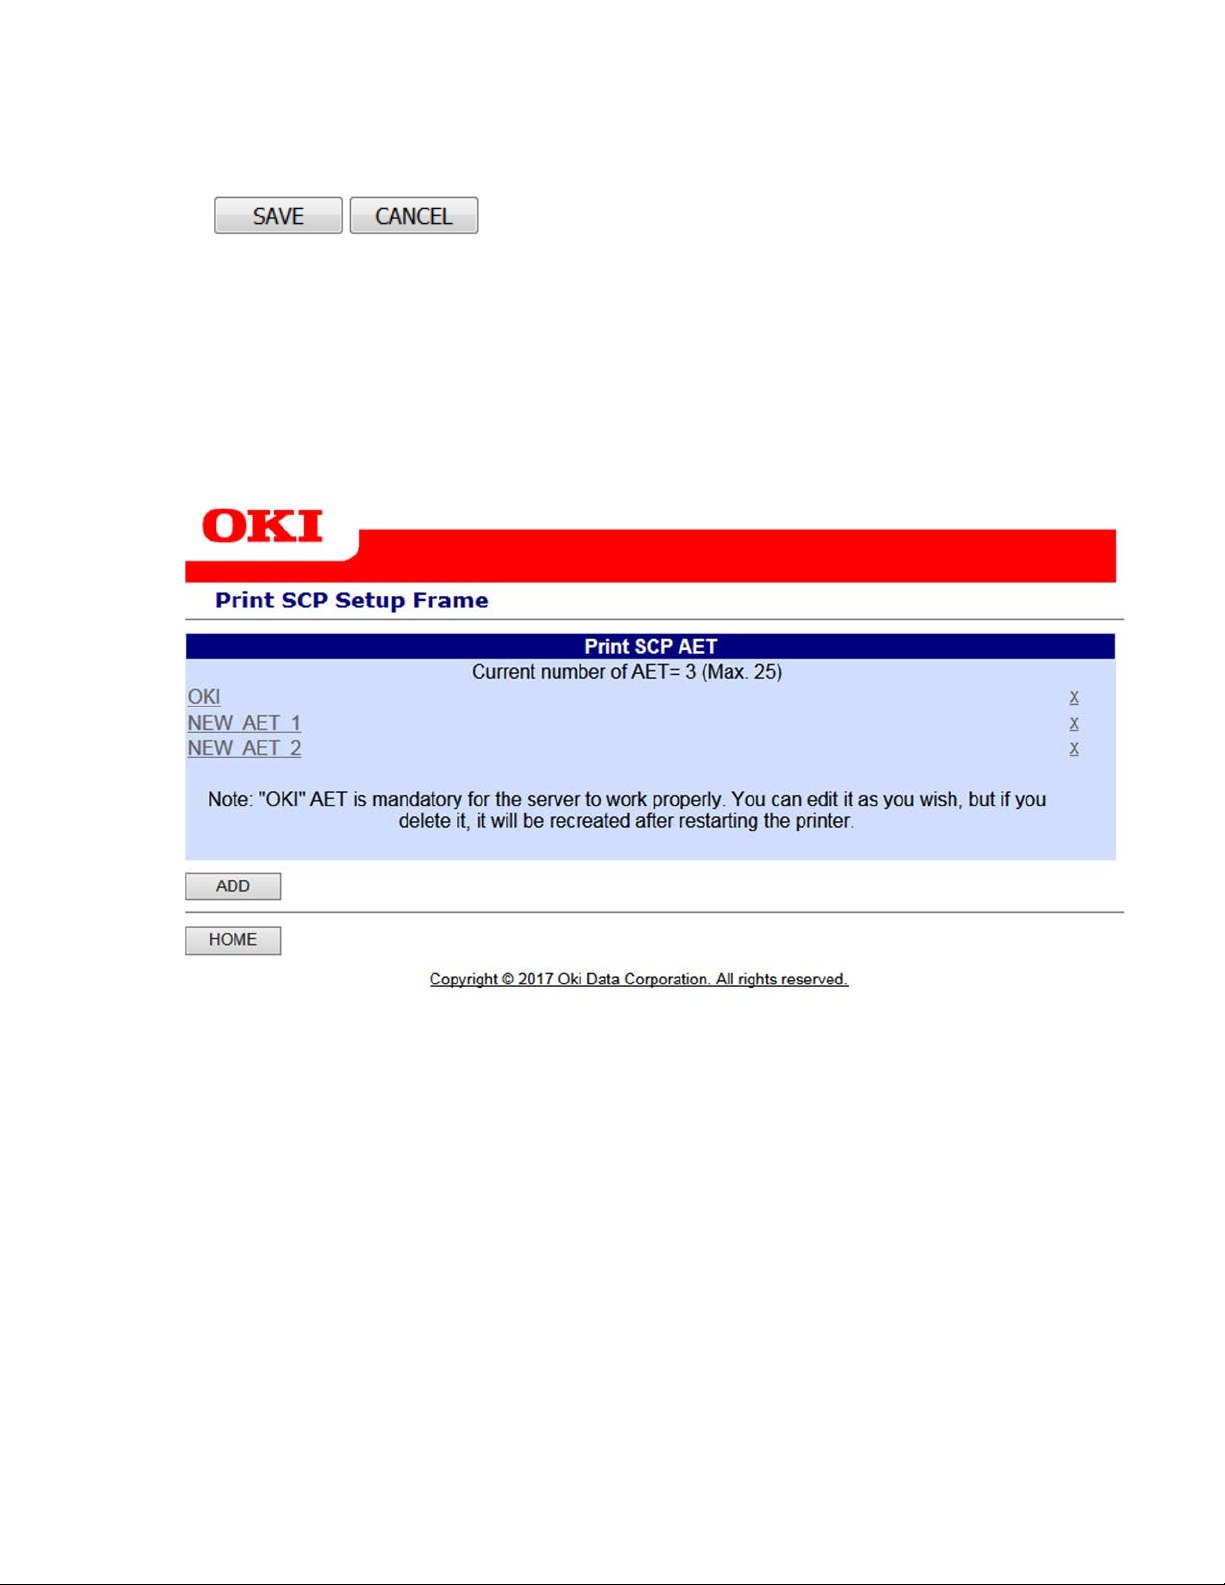
1-3 Setup of AETs
(1) Click [SETUP].
(2) The print rules represented by the AET (Application Entity Title) will be listed.
You can create as many as 25 rules to match your requirements.
You can edit the rules by clicking the rule names (in this case [OKI]).
Return to the home page by clicking [HOME].
Delete the rule by clicking.
Add the new rule by clicking [ADD].
12
Copyright © 2017 Oki Data Corporation. All r ig hts reserved.
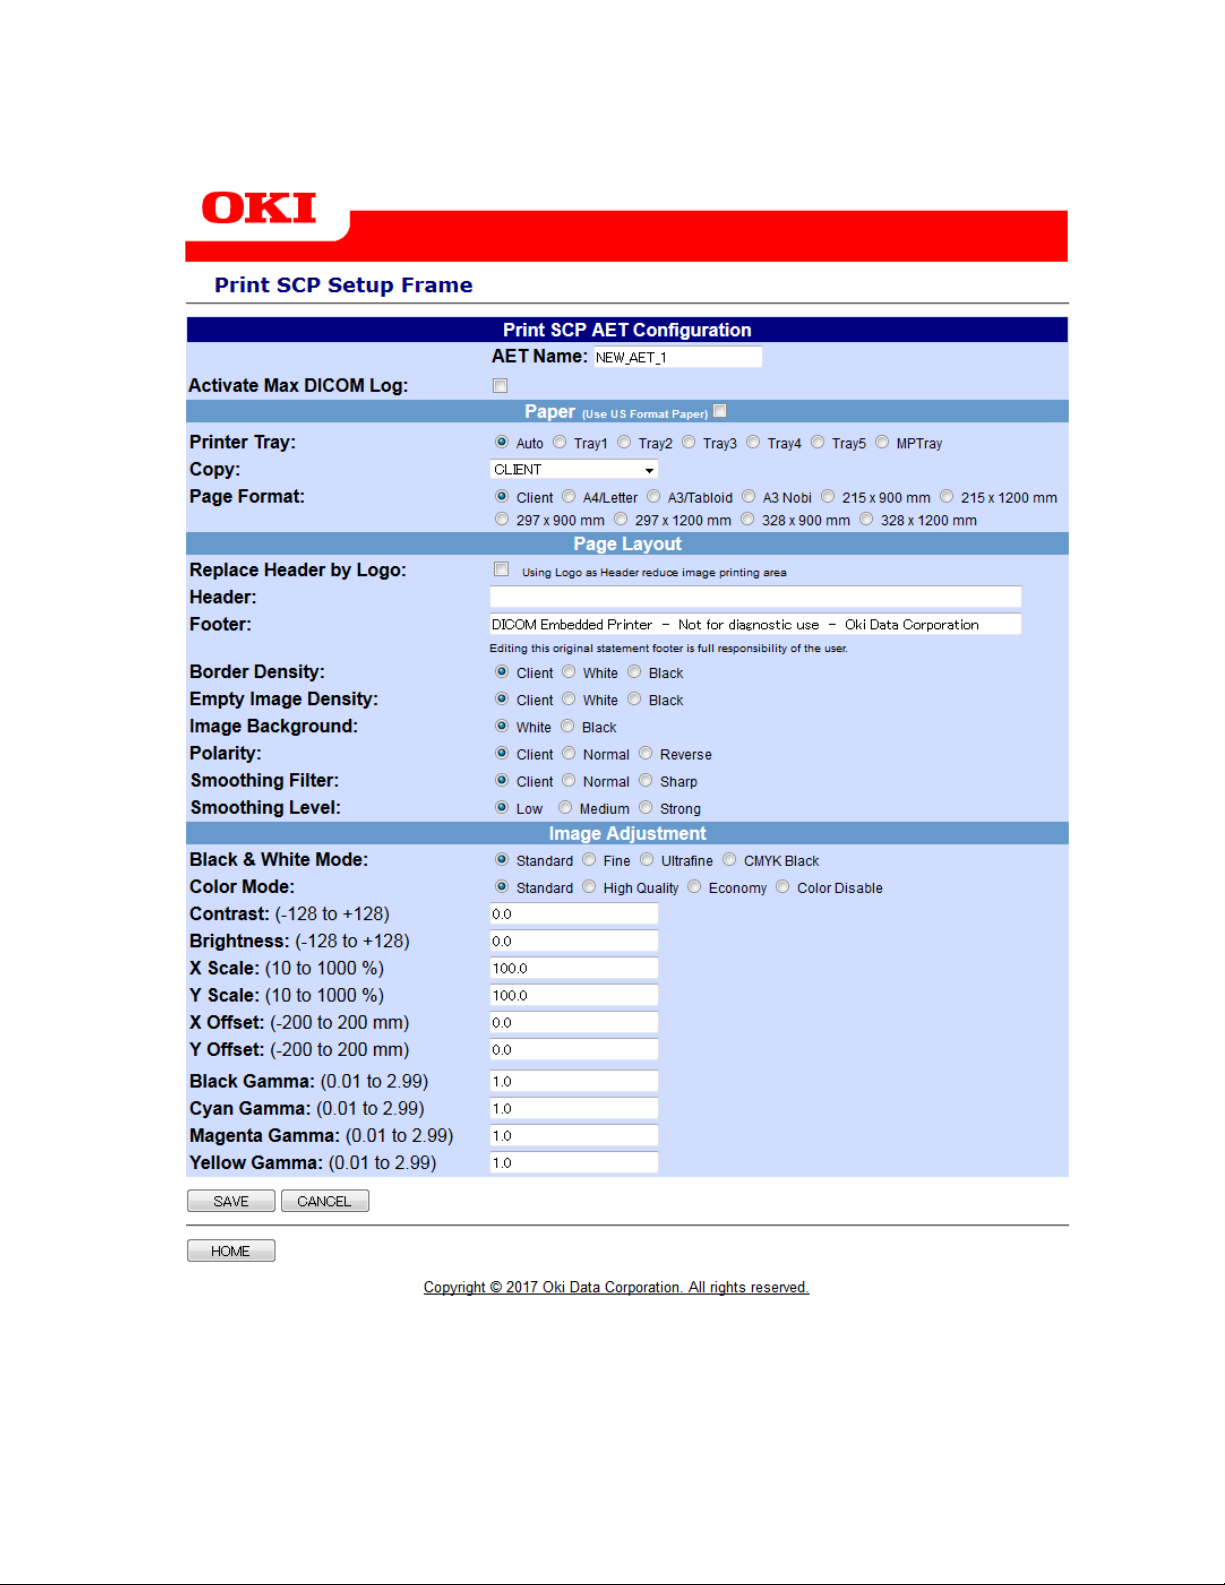
(3) Click [ADD] to get a new AET.
Example of new AET screen
13
Copyright © 2017 Oki Data Corporation. All r ig hts reserved.
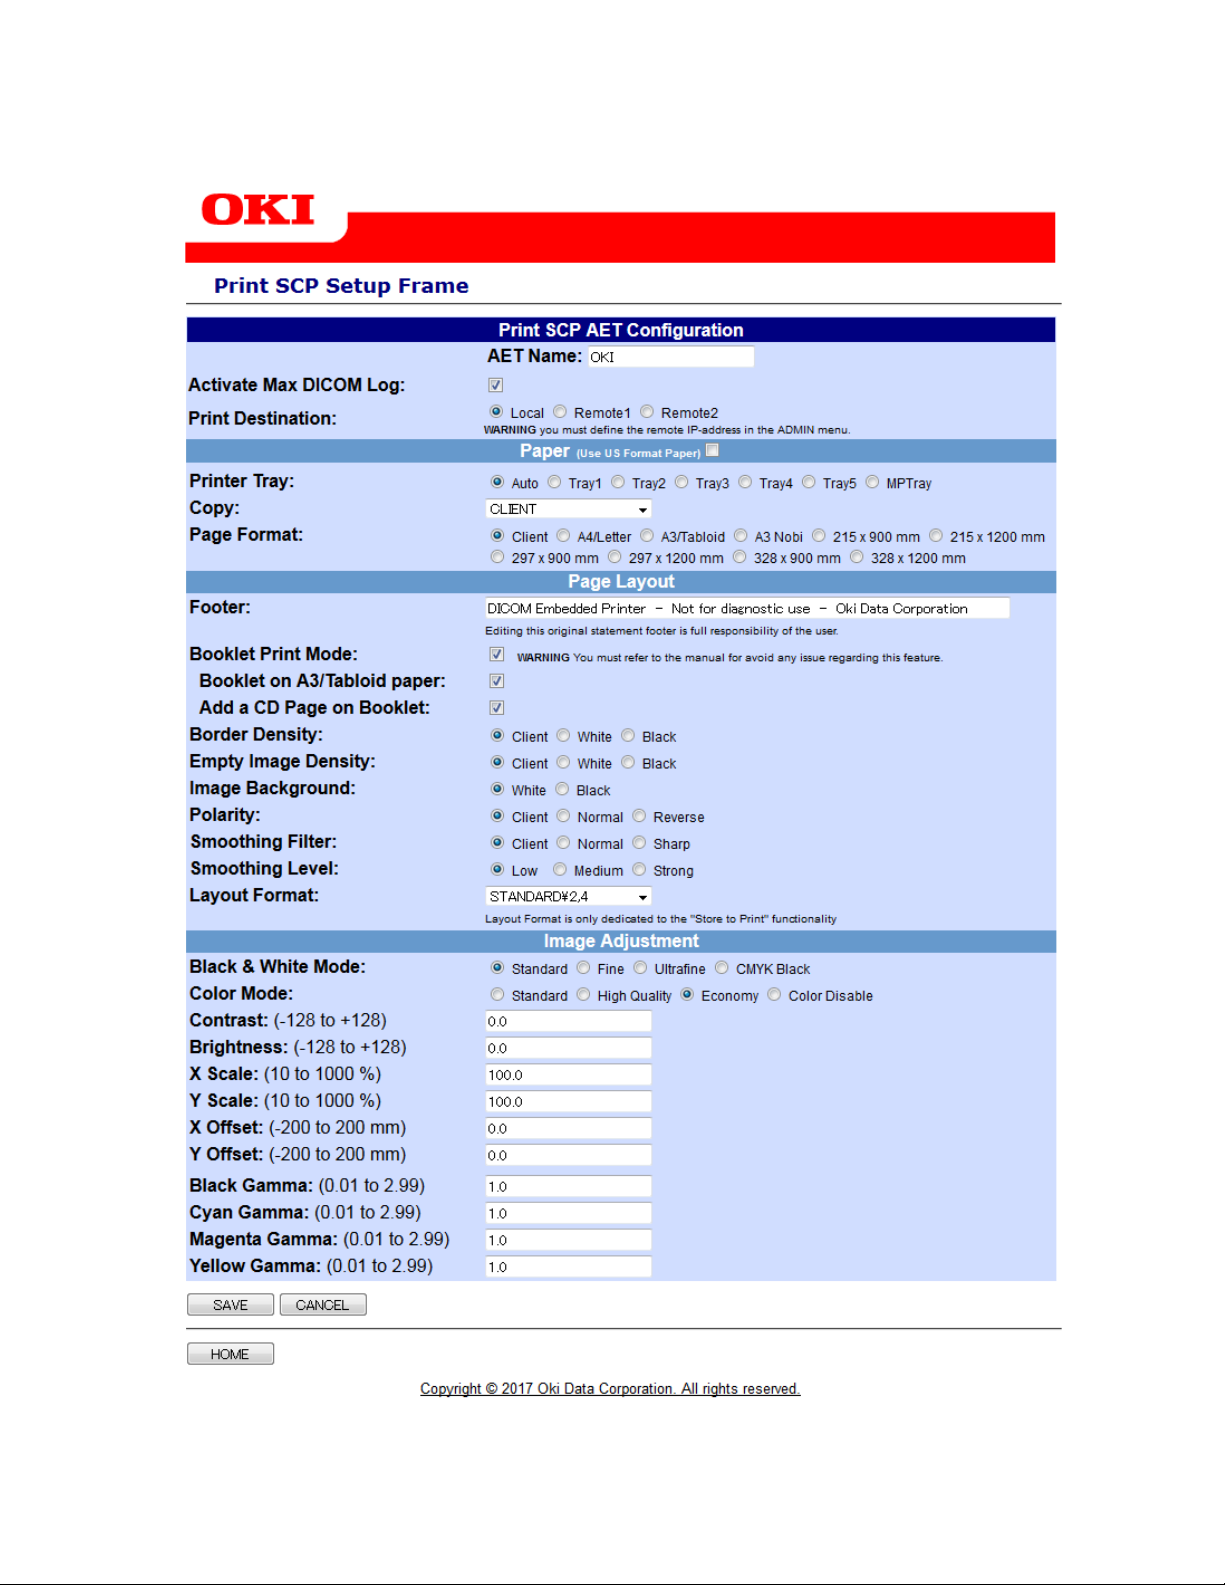
(4) Edit the parameters to fulfill your requirements.
Example of customized menu with all options activated
14
Copyright © 2017 Oki Data Corporation. All r ig hts reserved.
(5) Save the edited settings.
When you have finished editing the values, click [SAVE].
Memo: Click [CANCEL] to undo your editing.
(6) Click [HOME] on the AET list screen to return to the home page.
Copyright © 2017 Oki Data Corporation. All r ig hts reserved.
15

1-4 Options for print rules on AETs (Table)
C911 DICOM
C931 DICOM
ES9411 DICOM
ES9431 DICOM
9431 DICOM
AET Name
“OKI”
X
Activate Max DICOM Log
ON/OFF
X
Use US format paper
ON/OFF (checkbox)
X
Auto
Auto Paper Size Selection.
Tray1
Tray1 is standard cassette tray.
Tray2 ~
Tray2 (and later) are optional tray(s).
MPTray
Standard Multi-Purpose Tray (banner print).
Client
To use Print SCU’s (sender’s) indication.
1 ~ 10
Client
X
A4 or Letter
X
X
X
X
215 x 1200 mm
X
X
X
X
X
Please refer to “Graphic Elements Creation
Manual for DICOM Embedded Printer”.
Header
[text box]
X
Footer
[text box]
X
X
X
Add a CD page
X
Client
To use Print SCU’s (sender’s) indication.
White
Black
Client
To use Print SCU’s (sender’s) indication.
White
Black
Here is presented the full set of options for print rules on AETs.
Depending on the model you purchased, some options may not be available.
Options for [OKI] print rules
on AETs/Models
(Default)
(checkbox)
Local
Print Destination
Printer Tray
Copy
Page Format
Remote1
Remote2
A3 or Tabloid
A3 Nobi
215 x 900 mm
297 x 900 mm
297 x 1200 mm
328 x 900 mm
328 x 1200 mm
X
X
X
Remarks
Pro
Maximum 25 AETs.
For “Remote Print Mode”.
“Local” is for the printer its e lf. “R e mote 1”
and” Remote2” are for remote standard
printers to which DICOM Printer transfers
images.
For LETTER and TABLOID.
To use Print SCU’s (sender’s) indication.
Standard paper of OKI Printer.
Banner paper for banner print.
Note: Only “Black & White Mode” is
available for banner print.
Replace Header by Logo
Booklet Print Mode
Border Density
Empty Image Density
ON/OFF (checkbox)
ON/OFF (checkbox)
Booklet on A3/Tabloid
X
Text header.
Text footer. Default message is a caution.
X
X
Copyright © 2017 Oki Data Corporation. All r ig hts reserved.
16

Options for [OKI] print rules
C911 DICOM
C931 DICOM
9431 DICOM
White
Black
Client
To use Print SCU’s (sender’s) indication.
Normal
Reverse
Client
To use Print SCU’s (sender’s) indication.
Sharp
Low
Medium
STANDARD\1,1
STANDARD\1,2
STANDARD\2.2
STANDARD\2,3
STANDARD\3,3
STANDARD\3,4
STANDARD\4,4
Standard
X
Fine
X
Ultrafine
X
CMYK Black
X
Standard
X
High Quality
X
Economy
X
Color Disable
X
Contrast
X
Brightness
X
X Scale
X
Y Scale
X
X Offset
X
Y Offset
X
Black Gamma
0.01 ~ 2.99
X
Cyan Gamma
X
Magenta Gamma
X
Yellow Gamma
X
on AETs/Models
ES9411 DICOM ES9431 DICOM
Remarks
Pro
Image Background
Polarity
Smoothing Filter
Smoothing Level
Layout Format
Black & White Mode
Color Mode
Normal
Strong
STANDARD\2,4
-128 ~ +128
-128 ~ +128
10 ~ 1000 (%)
10 ~ 1000 (%)
-200 ~ 200 (mm)
-200 ~ 200 (mm)
X
X
X
X
X
To adjust print quality of smoothing.
For “Store to Print Mode”.
Mainly for X-Ray (K toner only).
Mainly for X-Ray (K toner only).
Mainly for CT and MRI (K toner only).
Rich and Glossy black with CMYK toner.
Balanced mode between quality and cost.
High quality with sufficient toner.
Good quality at the lowest toner cost.
To prevent color print.
To adjust contrast.
To adjust brightness.
To enlarge/reduce print image.
To shift printed area of medical image.
* Options in yellow rows are shown if the features are activated in ADMIN menu.
* Options in orange rows are shown if “Economy Mode” is not activated in ADMIN menu.
0.01 ~ 2.99
0.01 ~ 2.99
0.01 ~ 2.99
Copyright © 2017 Oki Data Corporation. All r ig hts reserved.
To adjust print quality with gamma values.
17

1-5 Options for [OKI] print rules on AETs (Description)
A number of rules can be added to the system. The maximum number of AETs is
25. The following information can be configured for each rule:
(1) AET Name:
AET is an abbreviation for Application Entity Title. The call method is assumed
to be compliant with DICOM Print SCU Protocol.
The AETs defined in this rule have a maximum length of 16 characters (a - z,
A - Z, 0 - 9).
Note: ● The names are case-sensitive.
● In the event of an error or if a name is not present, the printer will
use the default setting.
(2) Activate Max DICOM Log:
Check this box if you want DICOM Embedded Printer to report all details of
DICOM exchange. This is useful in case of trouble.
(3) Print Destination:
Select if you want to print locally or to a remote standard printer.
Note: ● You must define the remote printers in ADMIN menu.
● To avoid any quality issue on print out, you must use the indicated
standard printer family on the following diagrams.
18
Copyright © 2017 Oki Data Corporation. All r ig hts reserved.
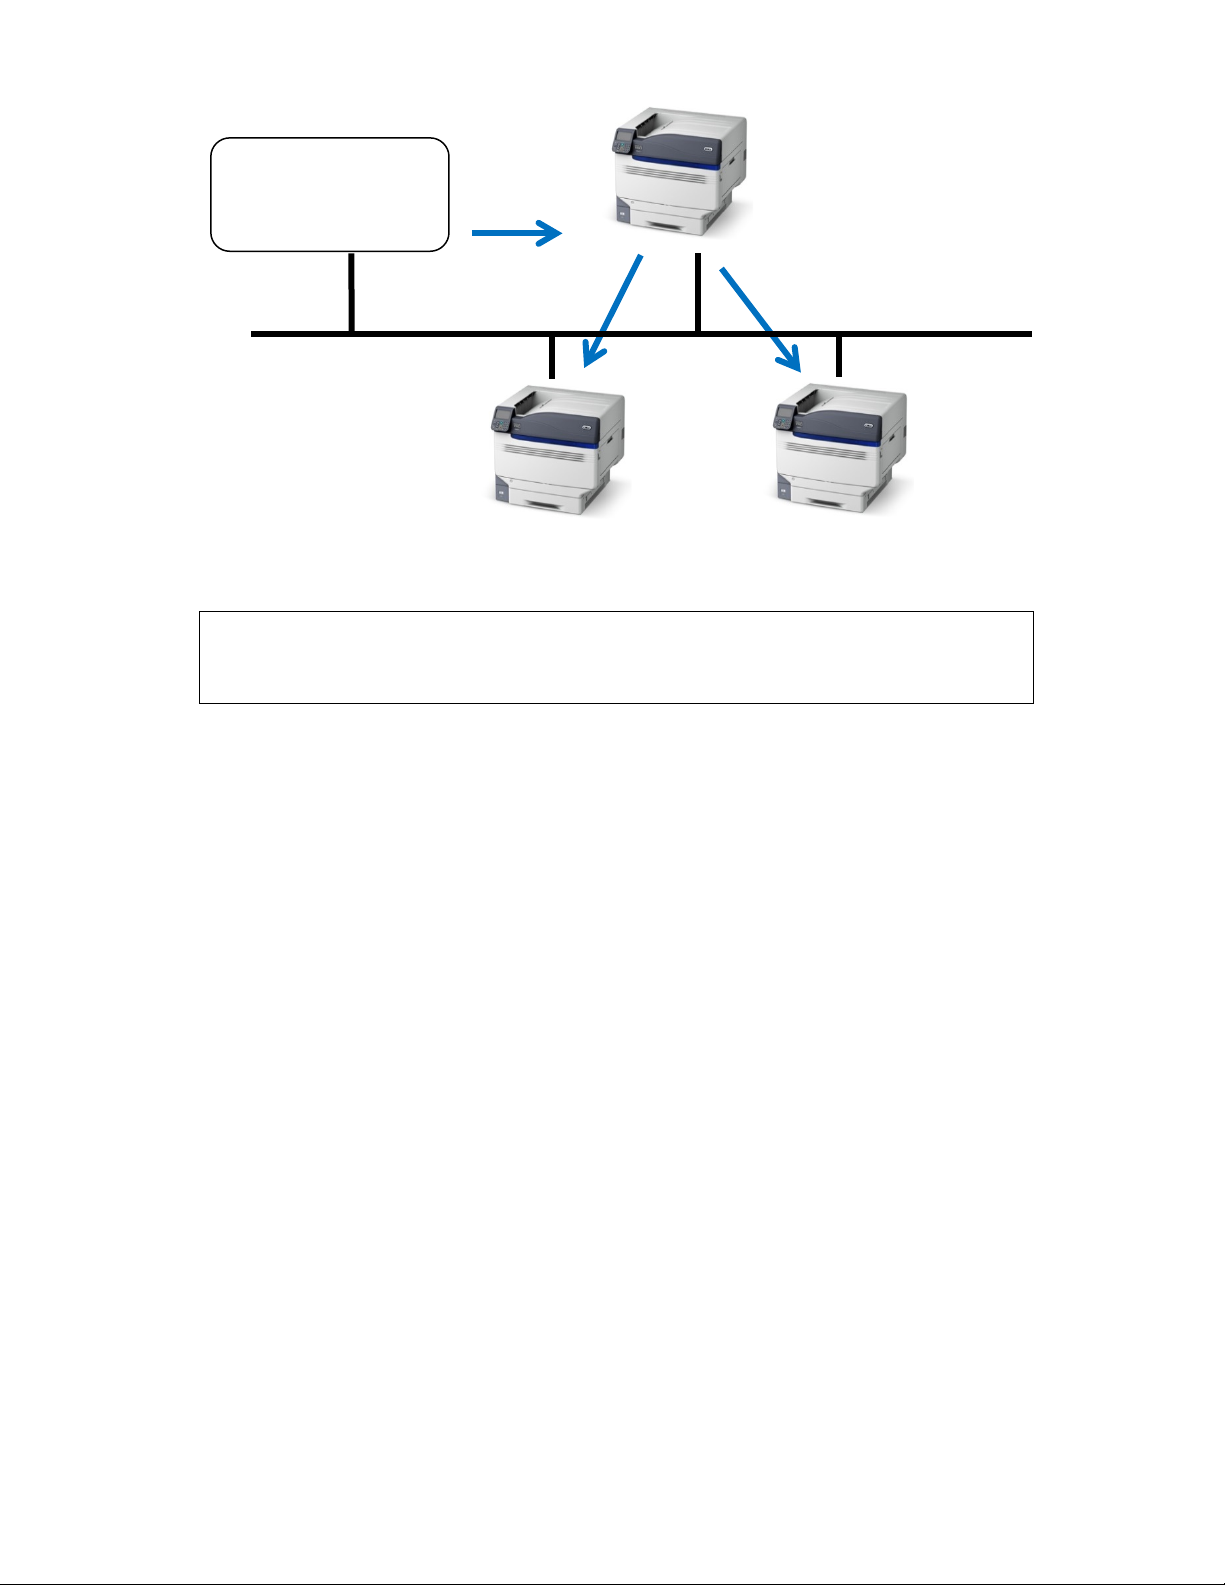
OKI DICOM Printer
Modality/
PACS
DICOM
Protocol
Transfer OKI format
to Remote Printer-2.
Standard model
(*1)
Transfer OKI format
to Remote Printer-1.
Standard model
(*1)
(*1) Standard Model
Print
C911, C931, ES9411, ES9431, Pro9431
as Remote Printer-1.
as Remote Printer-2.
19
Copyright © 2017 Oki Data Corporation. All r ig hts reserved.

(4) Use US format paper:
Check this box if you want DICOM Embedded Printer to print in Letter/Tabloid
size.
(5) Printer Tray:
Auto: Allows DICOM Embedded Printer to select the suitable tray up to the
needed size.
Tray#: Forces the printer to use the selected tray regardless of the needed
format. This is useful when paper of different quality is loaded in the
different trays.
(6) Copy:
Client: Lets the modality ask for the desired number of copies.
1 to 10: Overrides the modality value and always outputs the desired value.
(7) Page Format:
If the printer supports different paper formats, you can force the printout into
the format you wish. In [Client] mode, the printout will be resized to the
nearest paper size. Refer to DCS (DICOM Conformance Statement) for more
details.
Copyright © 2017 Oki Data Corporation. All r ig hts reserved.
20

(8) Replace Header by Logo:
This function is used to customize the header of your printouts.
This function allows free creation. Refer to “Graphic Elements Creation Manual
for DICOM Embedded Printer”.
WARNING:
• This function disables the Header in text mode function.
• This function is deactivated when “Booklet Print Mode” is activated.
(9) Header:
This function is used to quickly customize the header of your printouts. (When
“Replace Header by Logo” or “Booklet Print Mode” is not activated.)
This customization is limited to one line of text only. Typeface is Courier at 18
points size, available length is the width of the page minus 10mm. (For
example, 52 characters for A4 of which width is 210 mm.)
(10) Footer:
This function allows editing the original statement of the footer.
This customization is limited to one line of text only. Typeface is Courier at 6
points size, it is possible to edit font size in ADMIN menu, and the available
length is the width of the page minus 10mm.
WARNING: Editing this original statement footer is full responsibility of the
user.
21
Copyright © 2017 Oki Data Corporation. All r ig hts reserved.

(11) Booklet Print Mode:
When “Booklet Print Mode” is enabled, the printer equipped with a duplex unit
will add a cover page and a back page to your job, and then print all pages in
a booklet. 16 pages (4 sheets) is the maximum number, as Booklet Print.
Note: ● Once this mode is enabled, the maximum of simultaneous DICOM
print association is set to 1.
● When “Booklet Print Mode” is enabled, “Header” function is not
available.
“Booklet on A3/Tabloid paper” will print on A3/Tabloid paper.
“Add a CD Page on Booklet” will insert a page to stick a CD holder. This page
is the first one just after the cover page.
WARNING:
• Booklets will be produced on A4/Letter paper whatever format you ask for
on the modality.
• If your printer supports A3/Tabloid and you activate the selection, all
booklets will be printed on A3/Tabloid paper.
• YOU NEED TO HAVE ONE TRAY CONFIGURED WITH THE DESIRED PAPER
FORMAT. If not, the printout will be discarded WITHOUT WARNING.
To customize the cover page and the back page of your booklets, please refer
to “Graphic Elements Creation Manual for DICOM Embedded Printer”.
22
Copyright © 2017 Oki Data Corporation. All r ig hts reserved.
1
2 3 4 5 7
8
SHEET 1
FRONT
BACK
SHEET 2
FRONT
BACK
6
EXAMPLE of DICOM Booklet Print
OKI DICOM Printer
Modality/
PACS
DICOM Print
Protocol
Booklet: Maximum16 pages (4 sheets) A3/A4
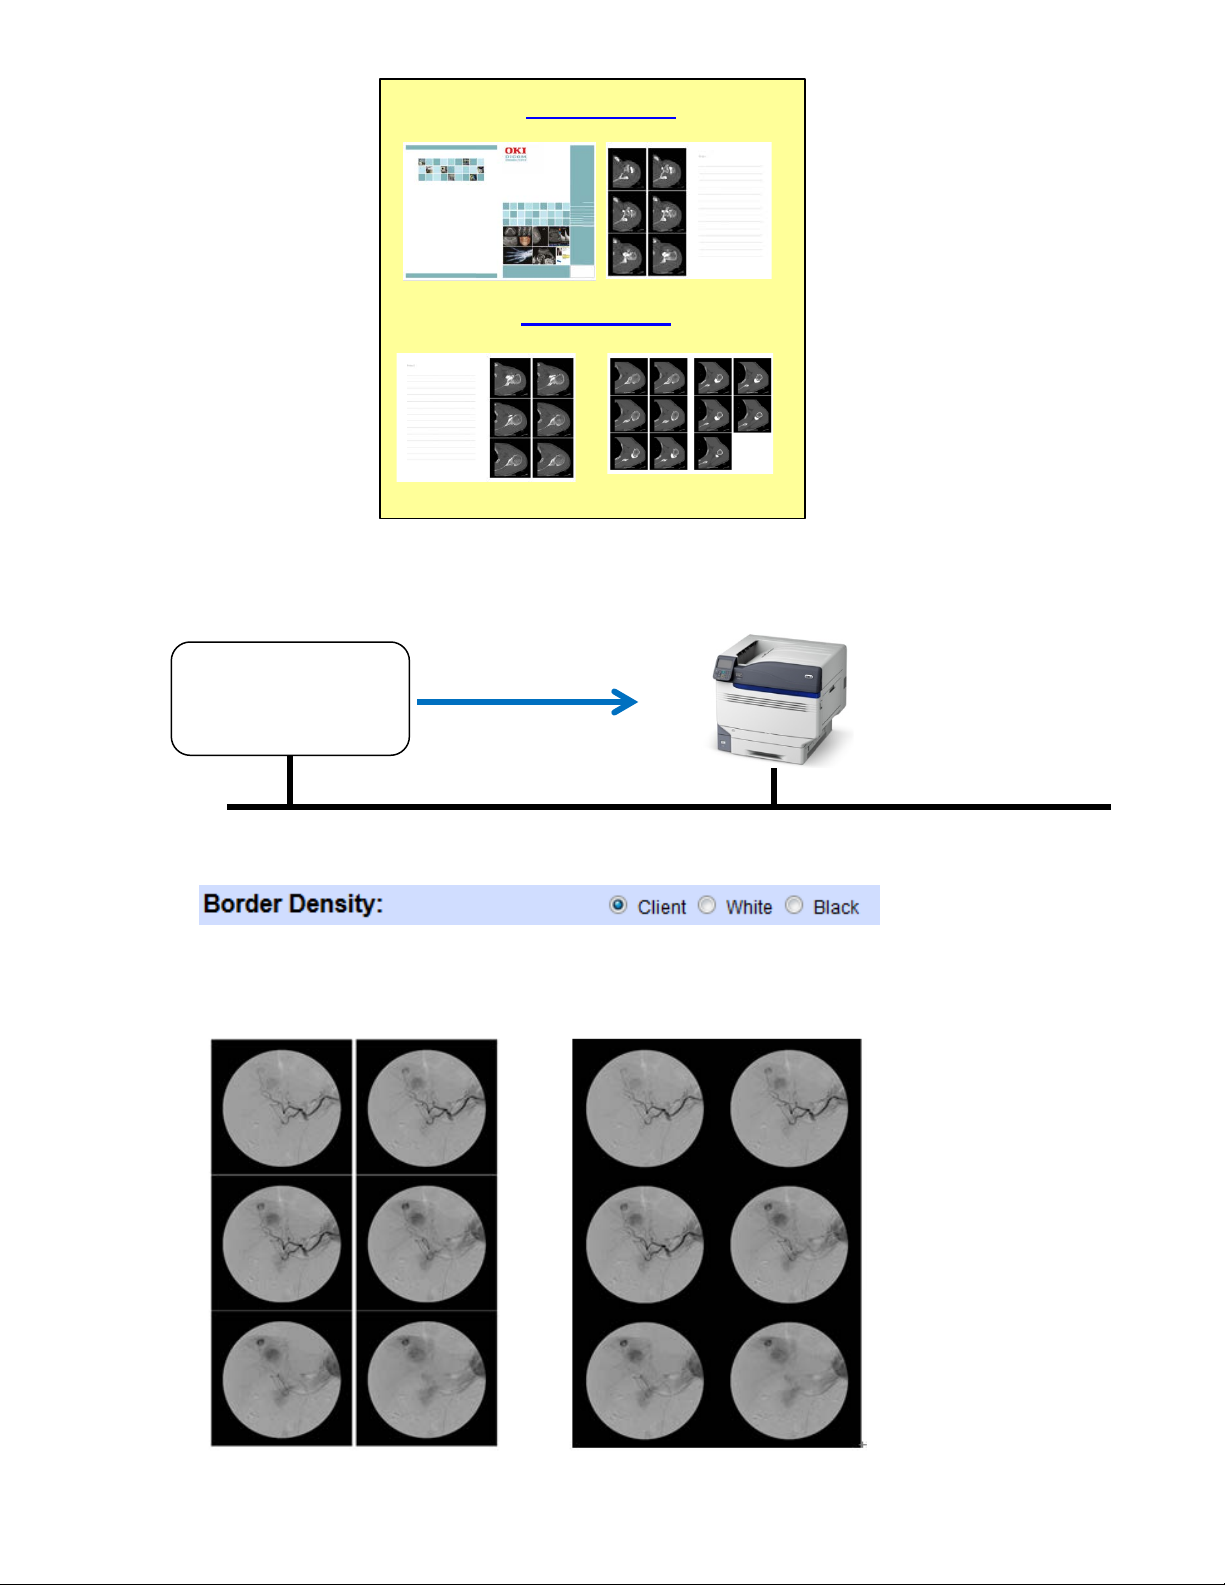
(12) Border Density
This function is used to define the border images to black or white.
[Client]: Manages the settings from the DICOM console.
Border: White Border: Black
Copyright © 2017 Oki Data Corporation. All r ig hts reserved.
23
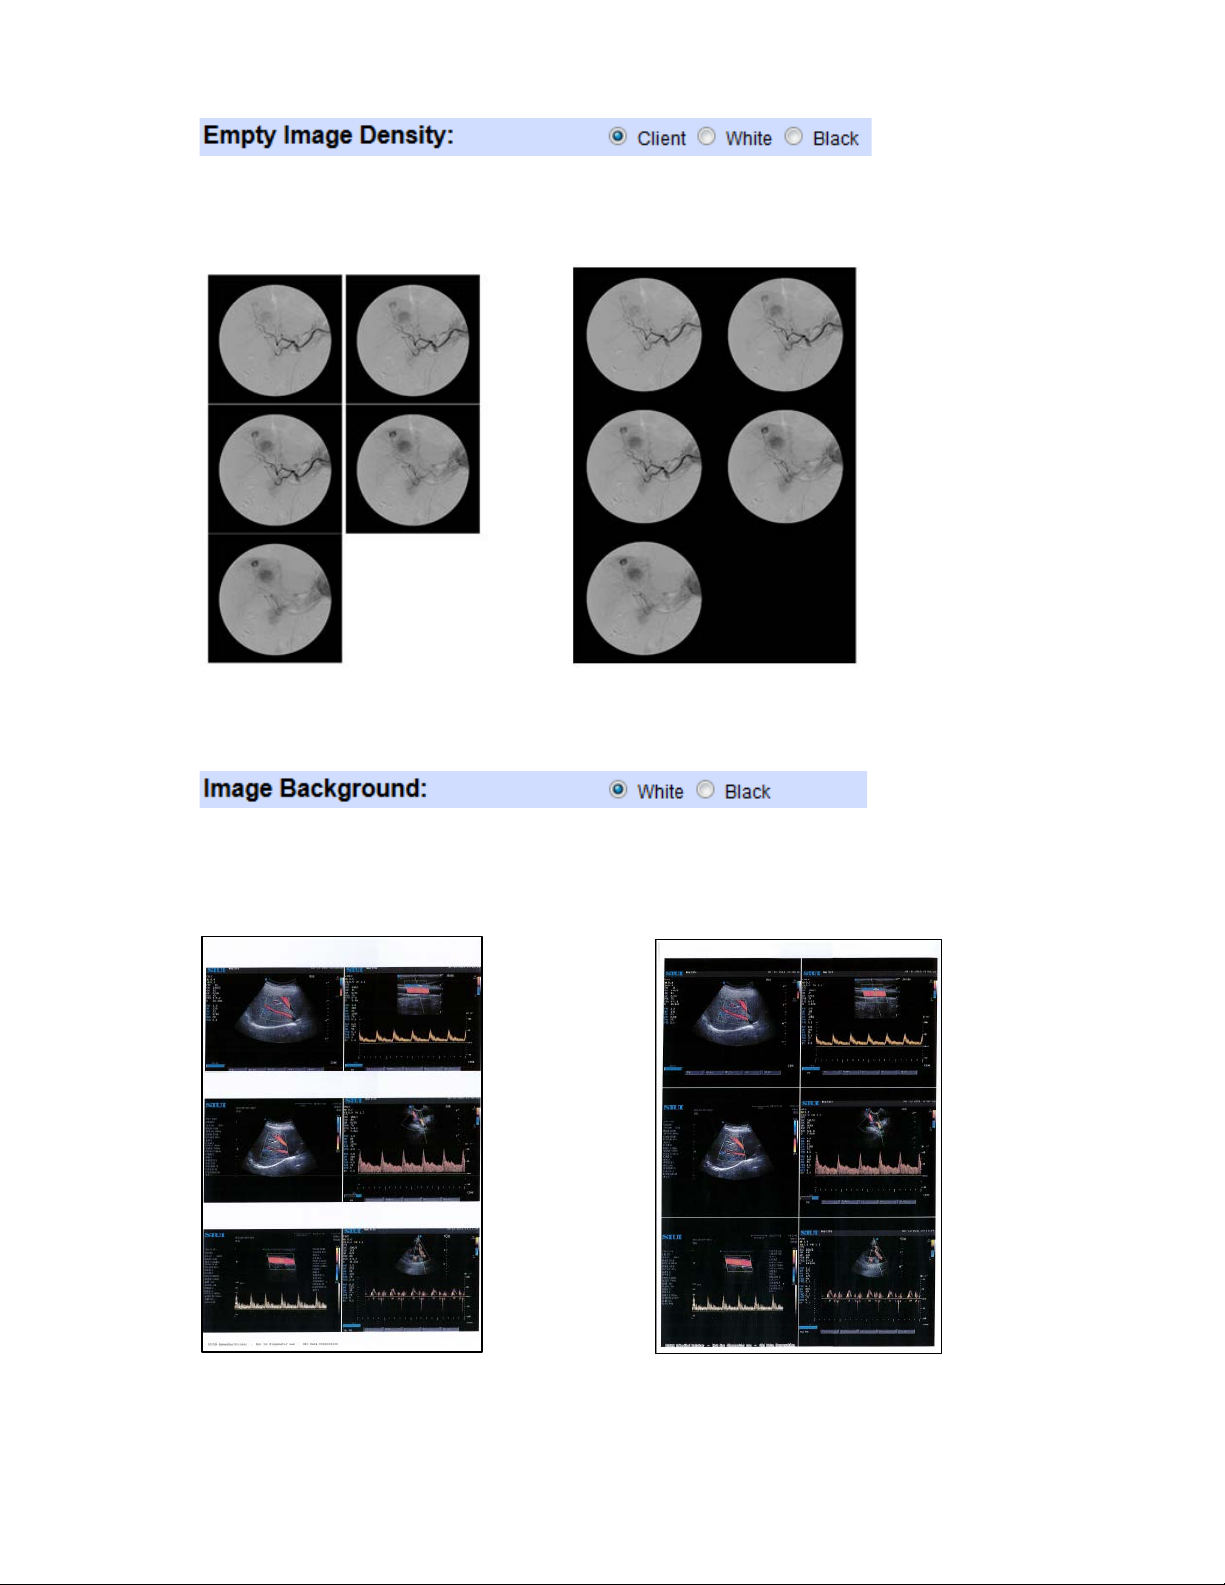
(13) Empty Image Density:
This function is used to define an image-free zone in black or white.
[Client]: Manages the settings from the DICOM console.
Empty Image: White Empty Image: Black
(14) Image Background:
This function is used to define the background of the image zone in black or
white and adds a thin line to define the image area. The choices are [White]
and [Black].
Background Density: White Background Density: Black
Copyright © 2017 Oki Data Corporation. All r ig hts reserved.
24
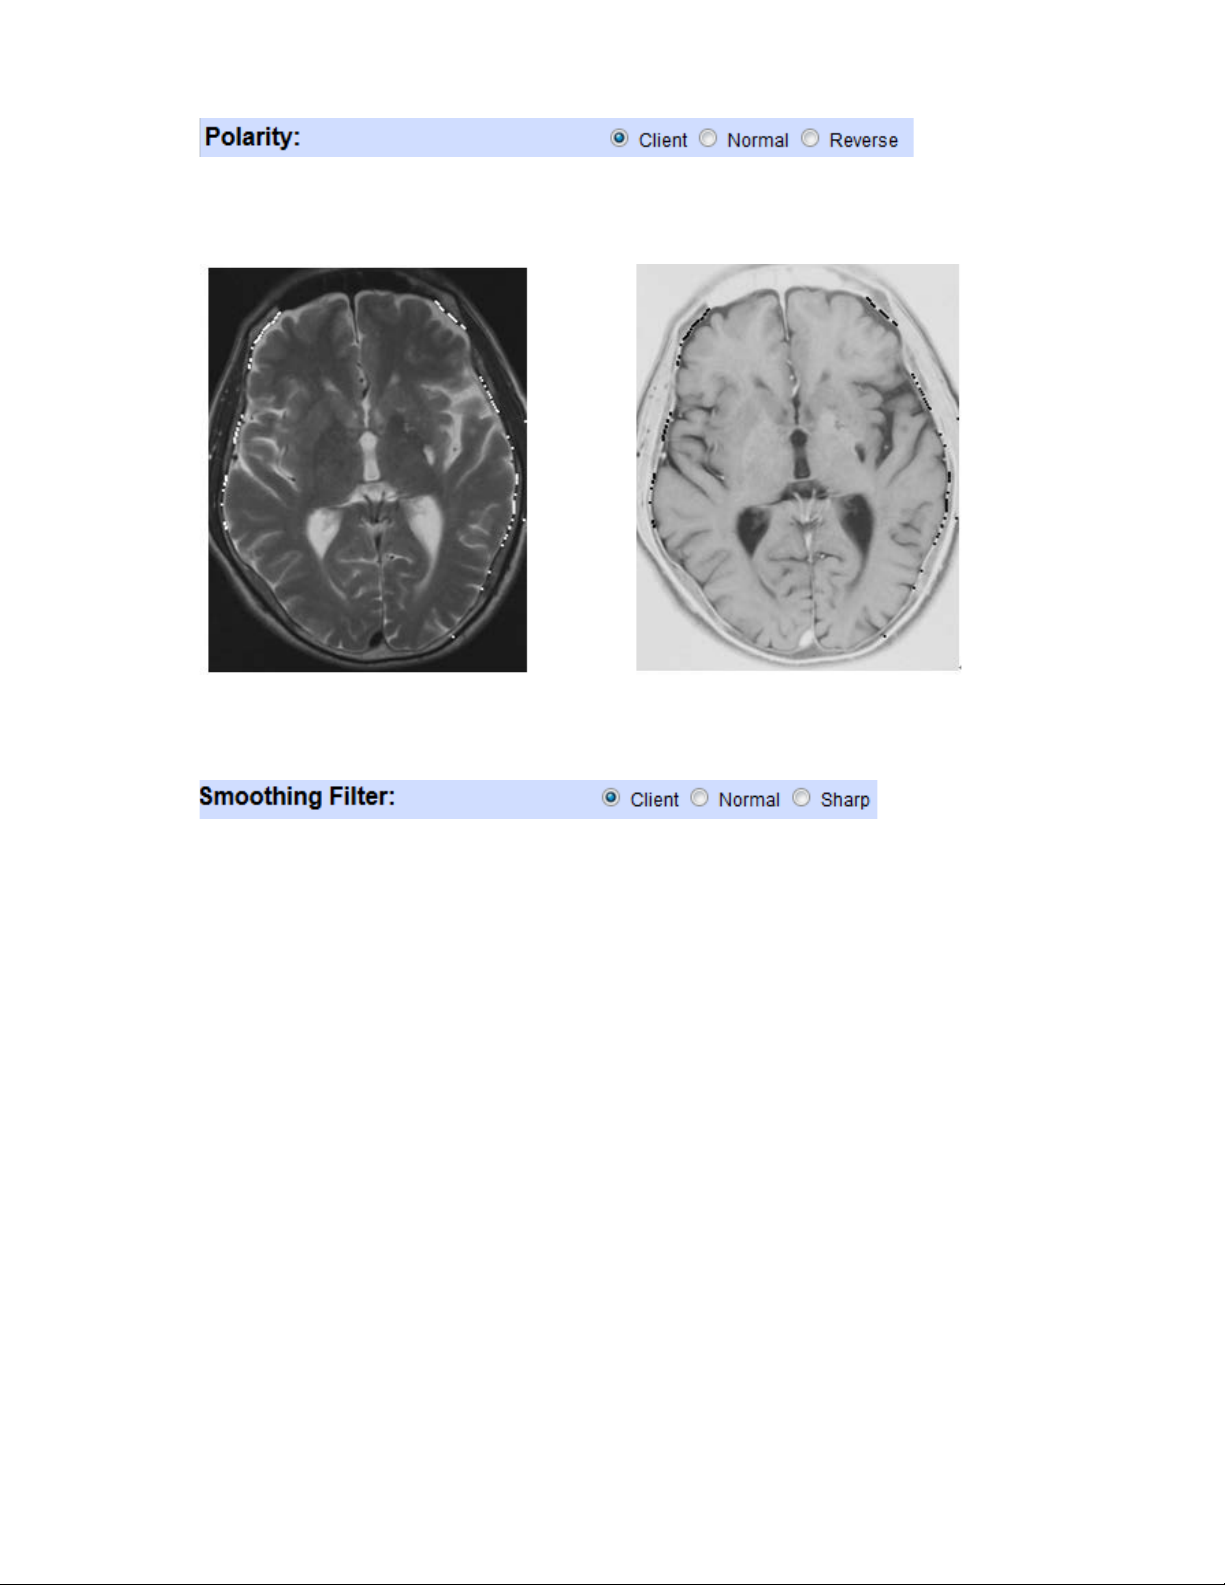
(15) Polarity:
Select [Normal] or [Reverse] mode to print images in positive or negative.
[Client]: Manages the settings from the DICOM console.
Normal Reverse
(16) Smoothing Filter:
This function is used to define the aspect rendering of the printed image. The
choices are [Client], [Normal] and [Sharp]. As default, [Client] is selected.
[Client]: Manages the settings from the DICOM console.
[Normal]: Normal mode.
[Sharp]: Forces the use of the image sharpening filter (which only works
on monochrome images).
25
Copyright © 2017 Oki Data Corporation. All r ig hts reserved.
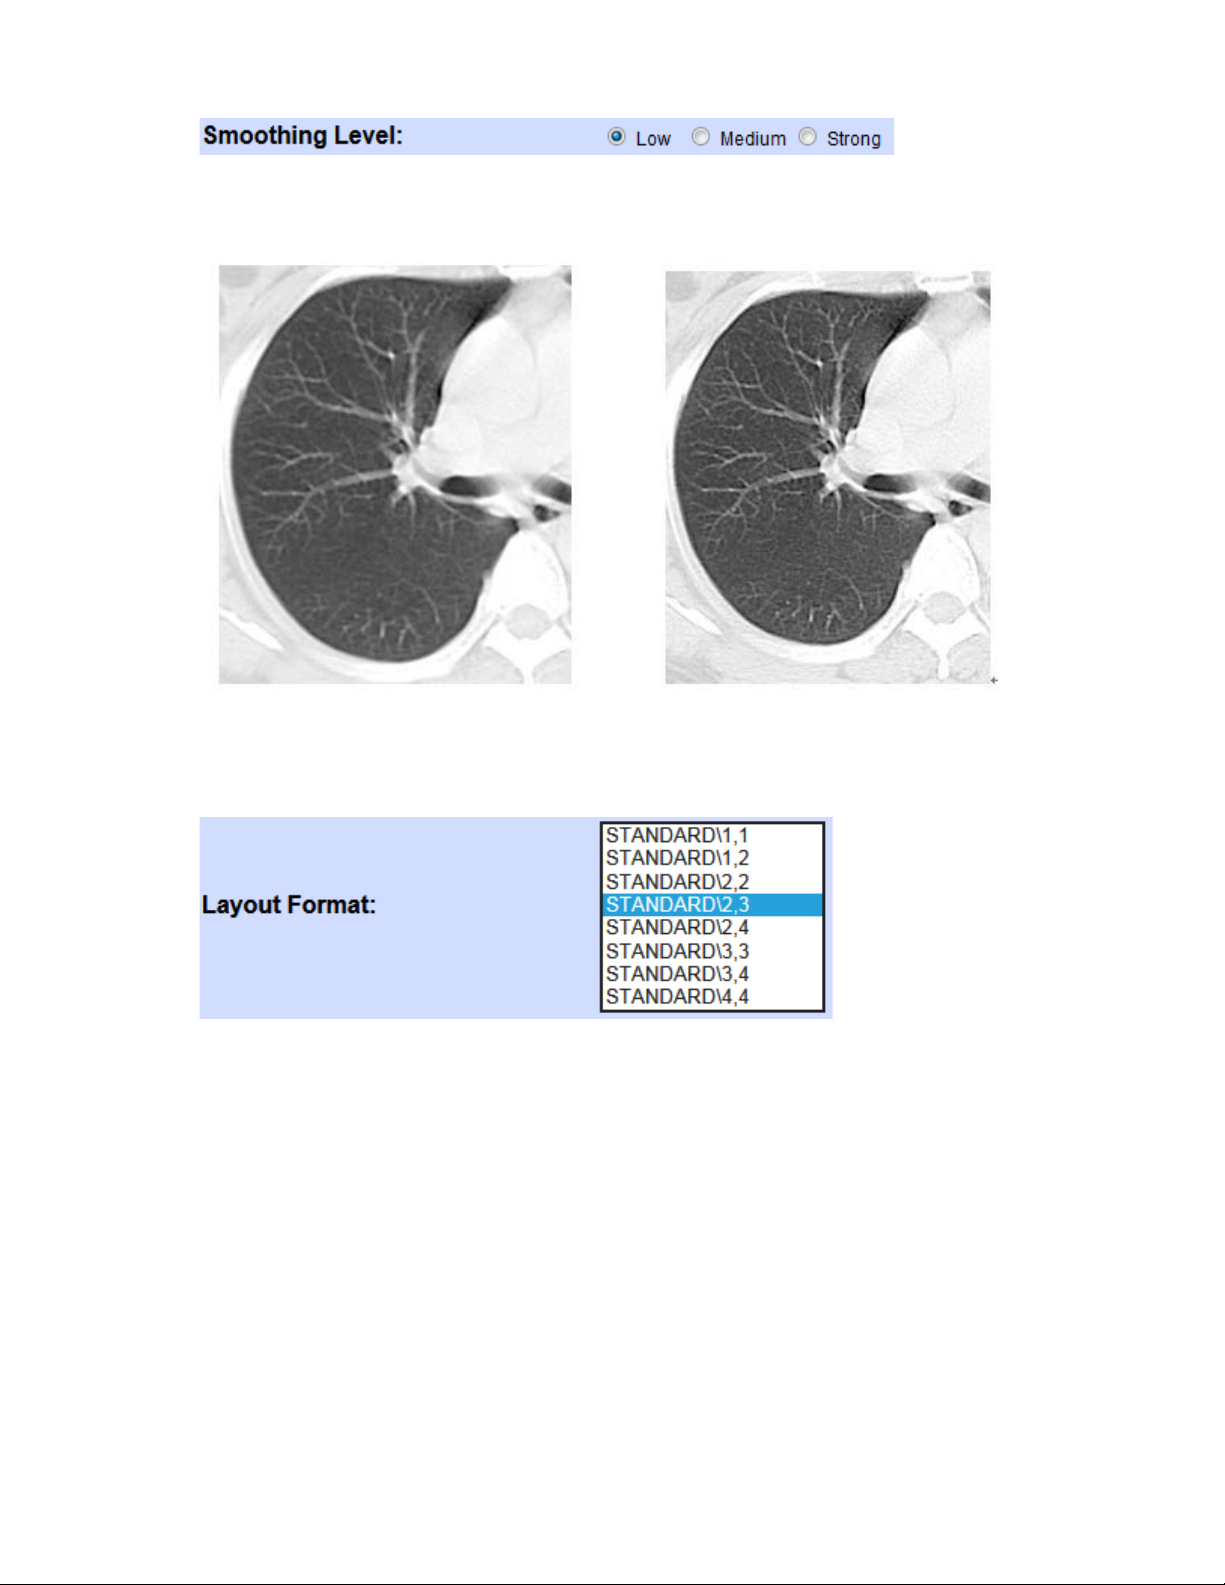
(17) Smoothing Level:
This function is used to define the level of action of the filter. The choices are
[Low], [Medium] and [Strong]. As default, [Low] is selected.
(18) Layout Format:
If you use DICOM Store Protocol from your modality to print to DICOM
Embedded Printer, you need to define the layout for the images to be printed
on the paper.
WARNING:
DICOM Store Protocol supported for printing is restricted to images from
Ultrasound, Eye Care and Endoscopic modalities.
Low Medium
26
Copyright © 2017 Oki Data Corporation. All r ig hts reserved.
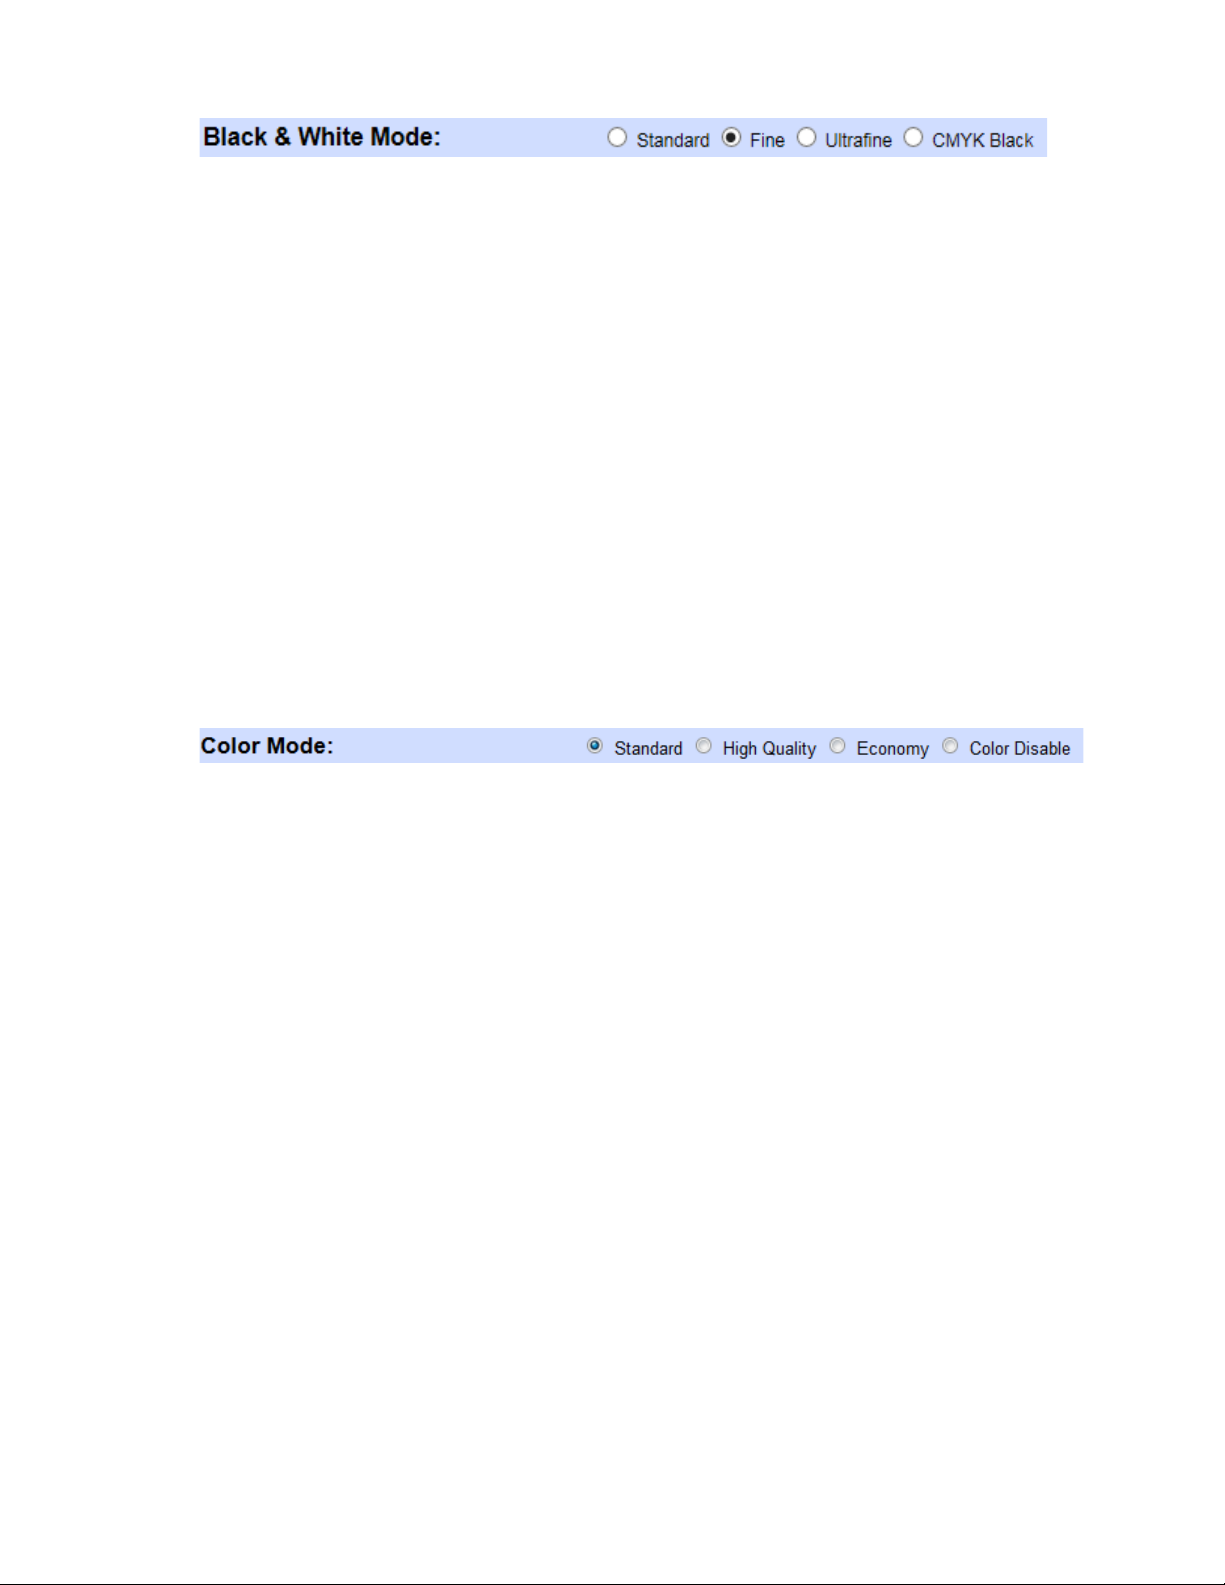
(19) Black & White Mode:
This function is used to define the level of action of the filter.
The choices are [Standard], [Fine], [Ultrafine] and [CMYK Black].
As default, [Standard] is selected.
[Standard]: Defines printing monochrome images in pure black.
[Fine]: Defines printing monochrome images in pure black with more
detailed images.
[Ultrafine]: Defines printing monochrome images in pure black with high
detailed images.
[CMYK Black]: Defines printing monochrome images in Composite black
(CMYK). When "Economy" is selected in "Color Mode", the
image is printed with only black toner.
(20) Color Mode:
This function is used to define the level of action of the filter.
The choices are [Standard], [High Quality], [Economy] and [Color
Disable]. As default, [Standard] is selected.
[Standard]: Defines printing color images in color (CMYK) with average
[High Quality]: Defines printing color images in high color quality (CMYK).
[Economy]: Defines printing color images in color (CMYK) with low usage
[Color Disable]: Disables Color DICOM Print Protocol so that the AET will
usage of toner.
of toner.
only support Monochrome DICOM Print Protocol.
27
Copyright © 2017 Oki Data Corporation. All r ig hts reserved.

(21) Contrast:
This function is used to change the level of contrast of the printouts. The
choices are from [-128] to [+128]. Negative values reduce contrast to
flatten the image, 0 doesn’t change the level of contrast, and positive values
increase contrast to enhance the image.
Contrast: -10 Contrast: 0 Contrast: +10
(22) Brightness:
This function is used to change the level of brightness of the printouts. The
choices are from [-128] to [+128]. Negative values reduce light to darken
the image, 0 doesn’t change the level of brightness, and positive values
increase light to lighten the image.
Brightness: -20 Brightness: 0 Brightness: +20
Copyright © 2017 Oki Data Corporation. All r ig hts reserved.
28
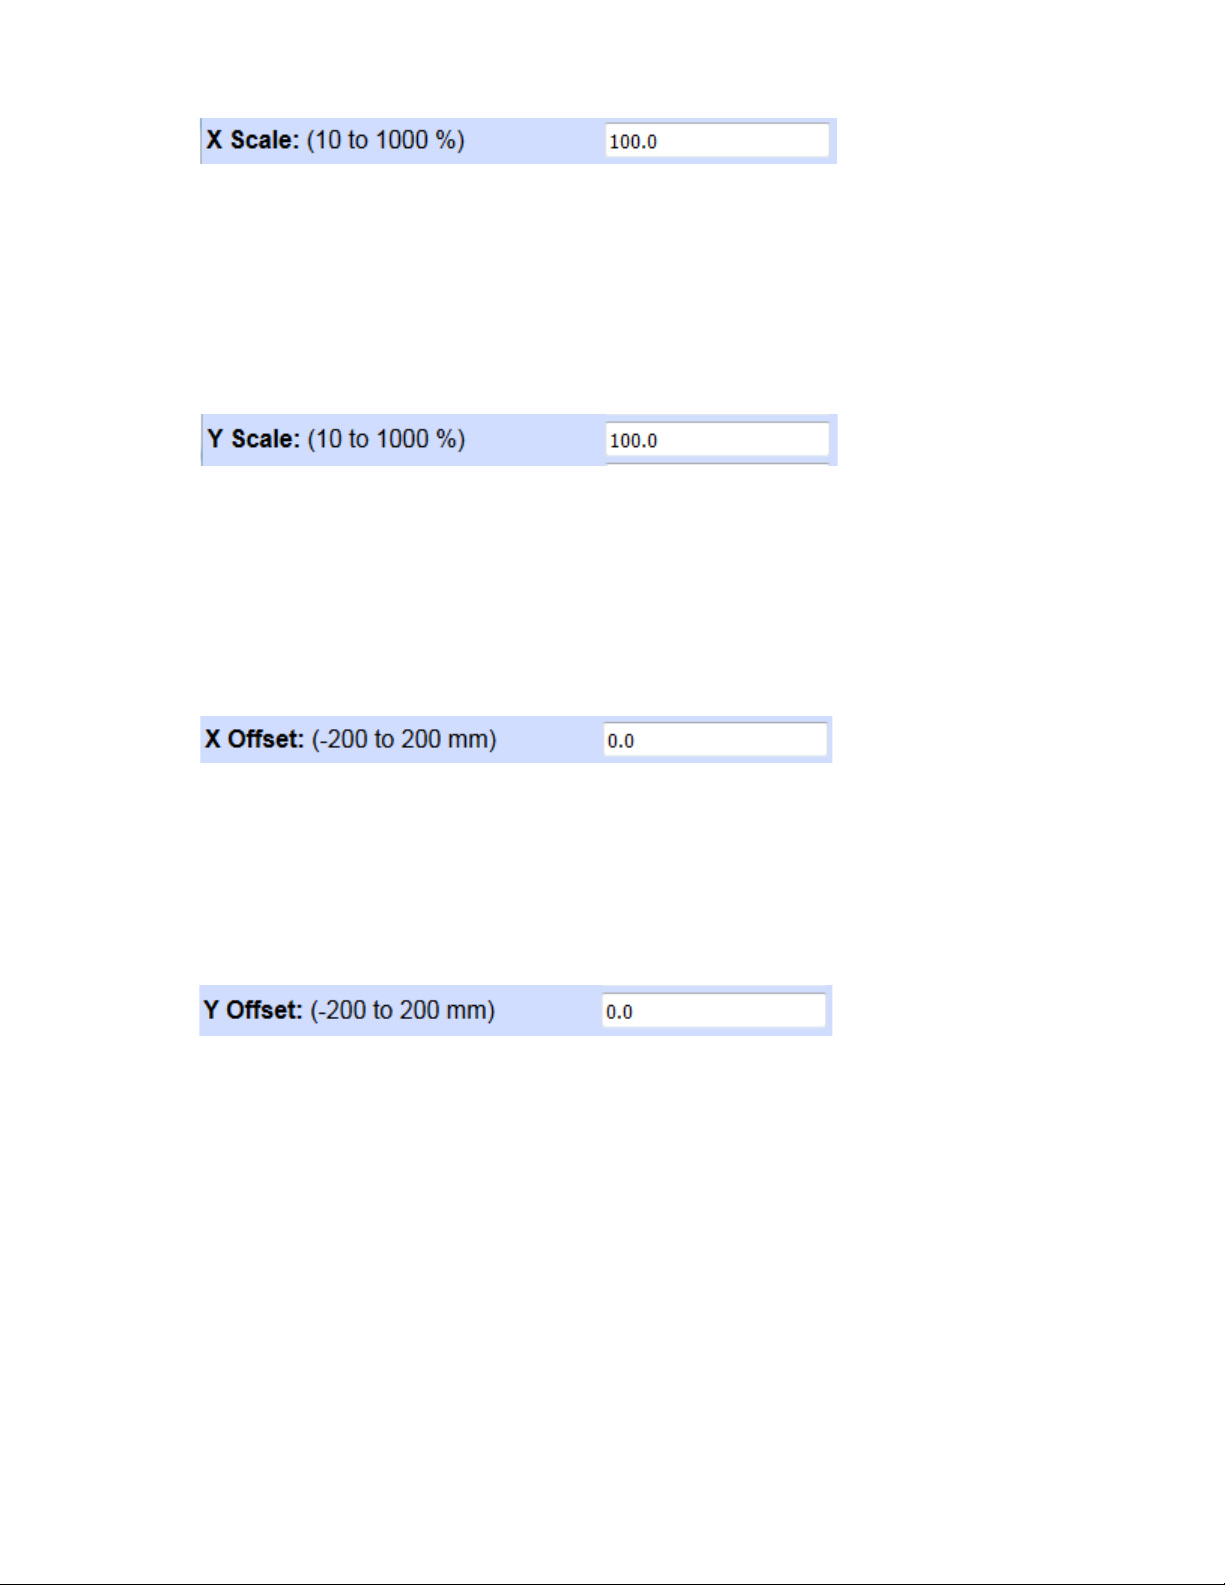
(23) X Scale:
This function is used to define the level of zoom for X from 10 % to 1000%,
values less than 100% reduce size for X, and values more than 100% enlarge
size for X.
As default, [100.0] is selected.
(24) Y Scale:
This function is used to define the level of zoom for Y from 10 % to 1000%,
values less than 100% reduce size for Y, and values more than 100% enlarge
size for Y.
As default, [100.0] is selected.
(25) X Offset:
This function is used to define the level of offset for X in millimeter, negative
values do offset to the left, and positive values do offset to the right.
The range is from -200(mm) to 200(mm). As default, [0.0] is selected.
(26) Y Offset:
This function is used to define the level of offset for Y in millimeter, negative
values do offset down, and positive values do offset up.
The range is from -200(mm) to 200(mm). As default, [0.0] is selected.
29
Copyright © 2017 Oki Data Corporation. All r ig hts reserved.
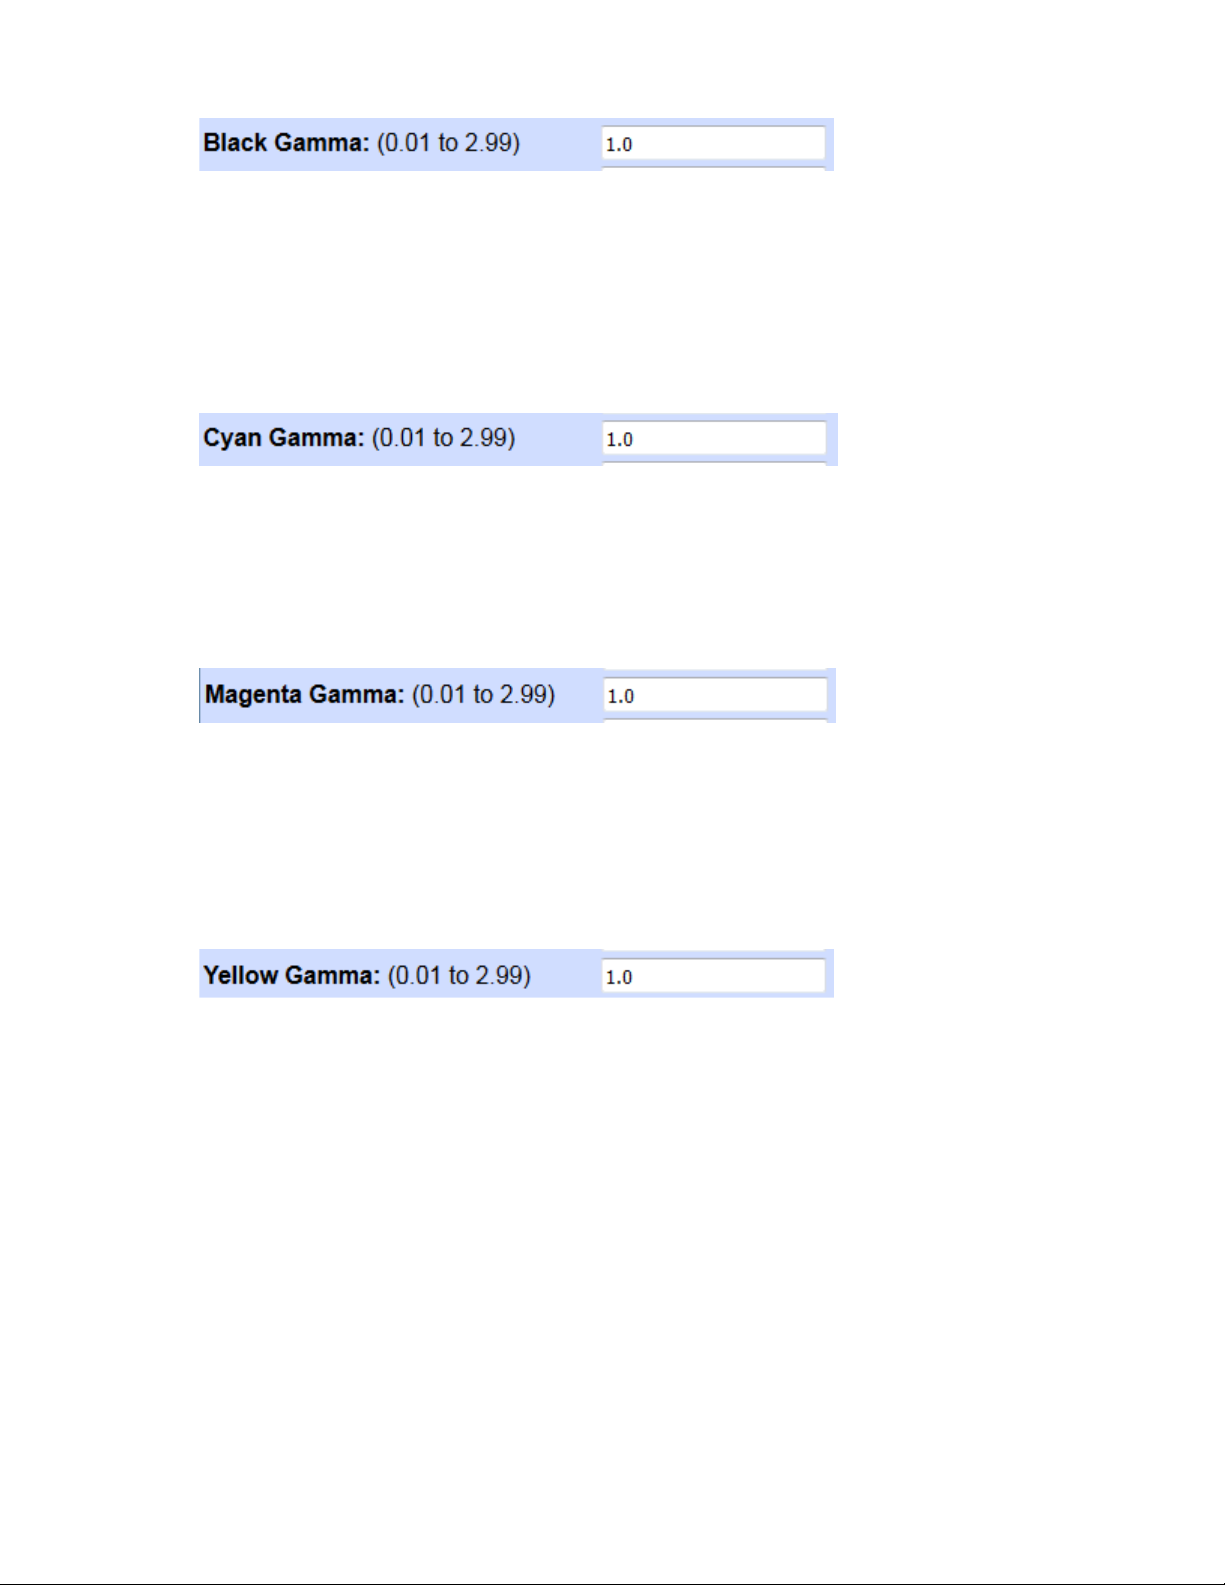
(27) Black Gamma:
This function is used to adjust the gamma for Black, when grey images are
printed in pure black. Values can be within a range from 0.01 to 2.99, in
increments of 0.01. Values below 1.00 will lighten the Black component of the
image, and values above 1.00 will darken it.
(28) Cyan Gamma:
This function is used to adjust the gamma for Cyan. Values can be within a
range from 0.01 to 2.99, in increments of 0.01. Values below 1.00 will lighten
the Cyan component of the image, and values above 1.00 will darken it.
(29) Magenta Gamma:
This function is used to adjust the gamma for Magenta. Values can be within a
range from 0.01 to 2.99, in increments of 0.01. Values below 1.00 will lighten
the Magenta component of the image, and values above 1.00 will darken it.
(30) Yellow Gamma:
This function is used to adjust the gamma for Yellow. Values can be within a
range from 0.01 to 2.99, in increments of 0.01. Values below 1.00 will lighten
the Yellow component of the image, and values above 1.00 will darken it.
Make appropriate settings for test printing.
30
Copyright © 2017 Oki Data Corporation. All r ig hts reserved.
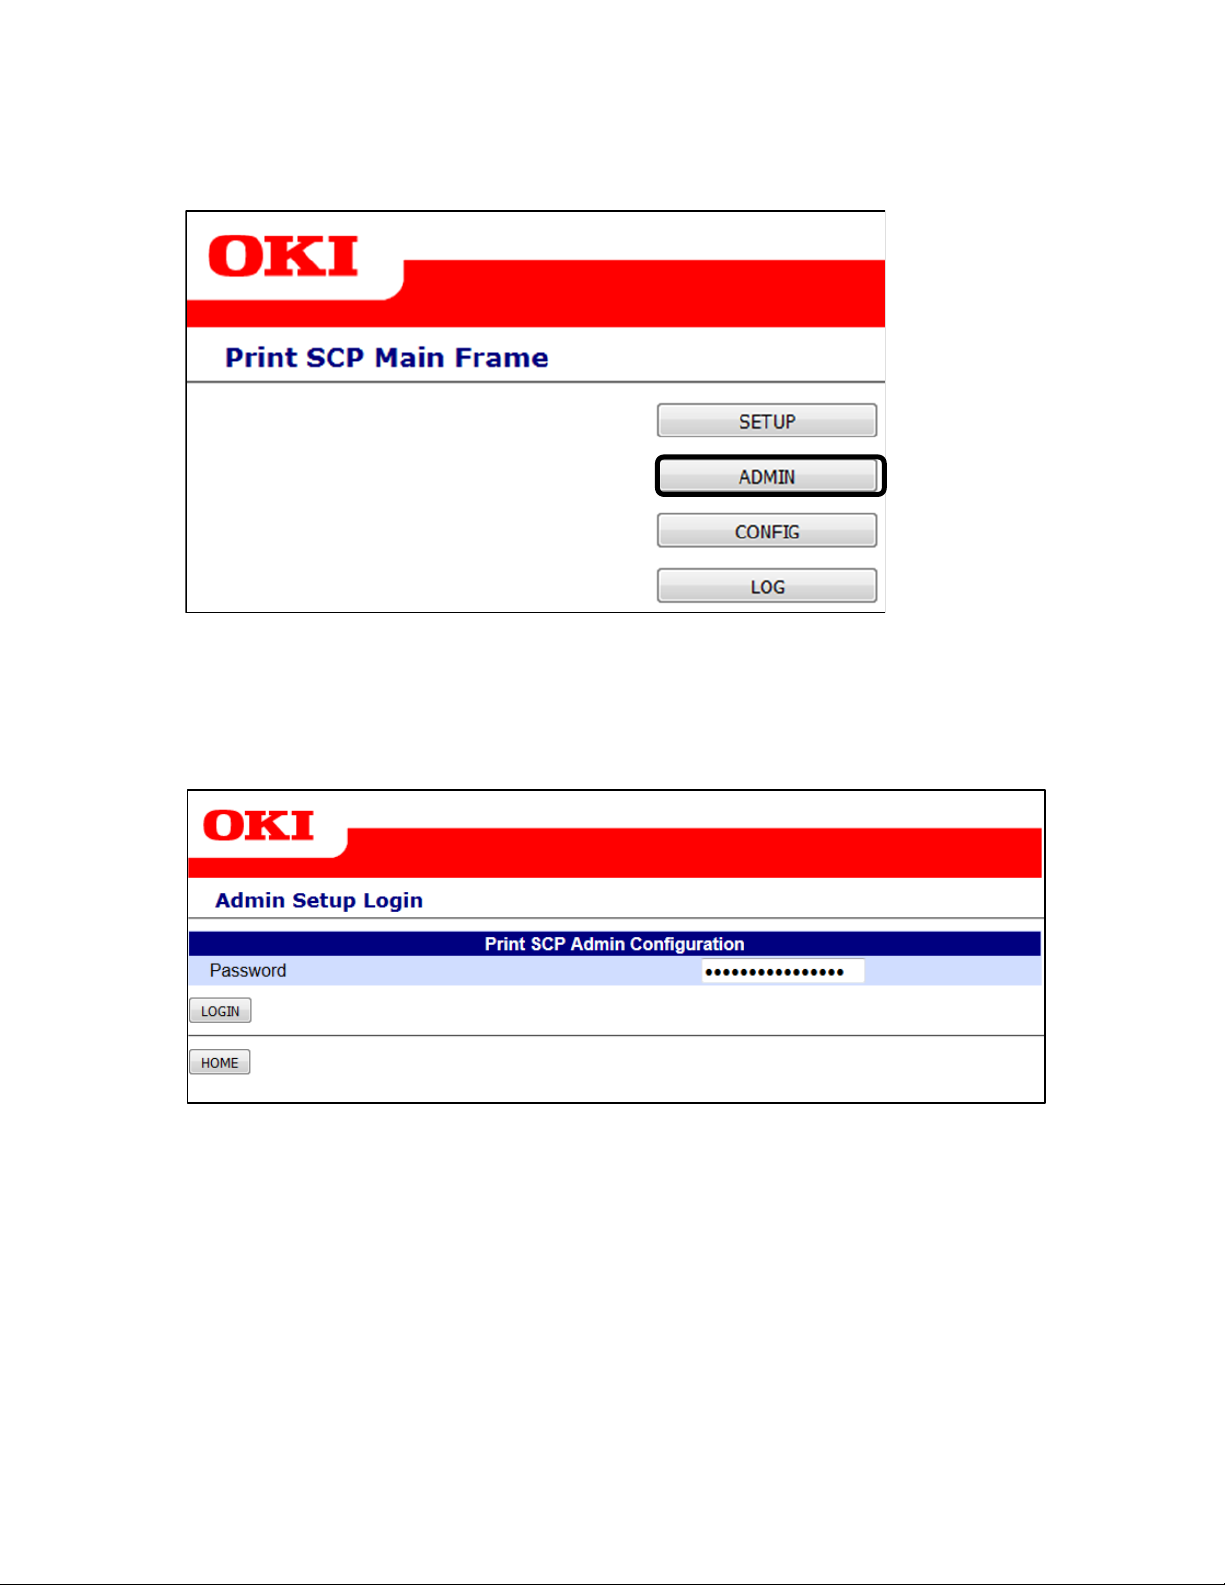
1-6 Customize ADMIN menu
(1) Click [ADMIN] on DICOM Embedded Printer home page.
(2) The Admin Setup Login page is displayed. Enter the OKI Administrator
password and Click [LOGIN]. To edit or change the password, please refer to
the printer manual.
Return to the home page by clicking [HOME].
31
Copyright © 2017 Oki Data Corporation. All r ig hts reserved.

(3) The Print SCP Admin Frame page is displayed. This will give you a summary of
all options.
(4) Save the edited settings.
When you have finished editing the values, save the settings by clicking
[SAVE].
Memo: Click [CANCEL] to restore to the last saved settings.
Copyright © 2017 Oki Data Corporation. All r ig hts reserved.
32
1-7 ADMIN menu (Description)
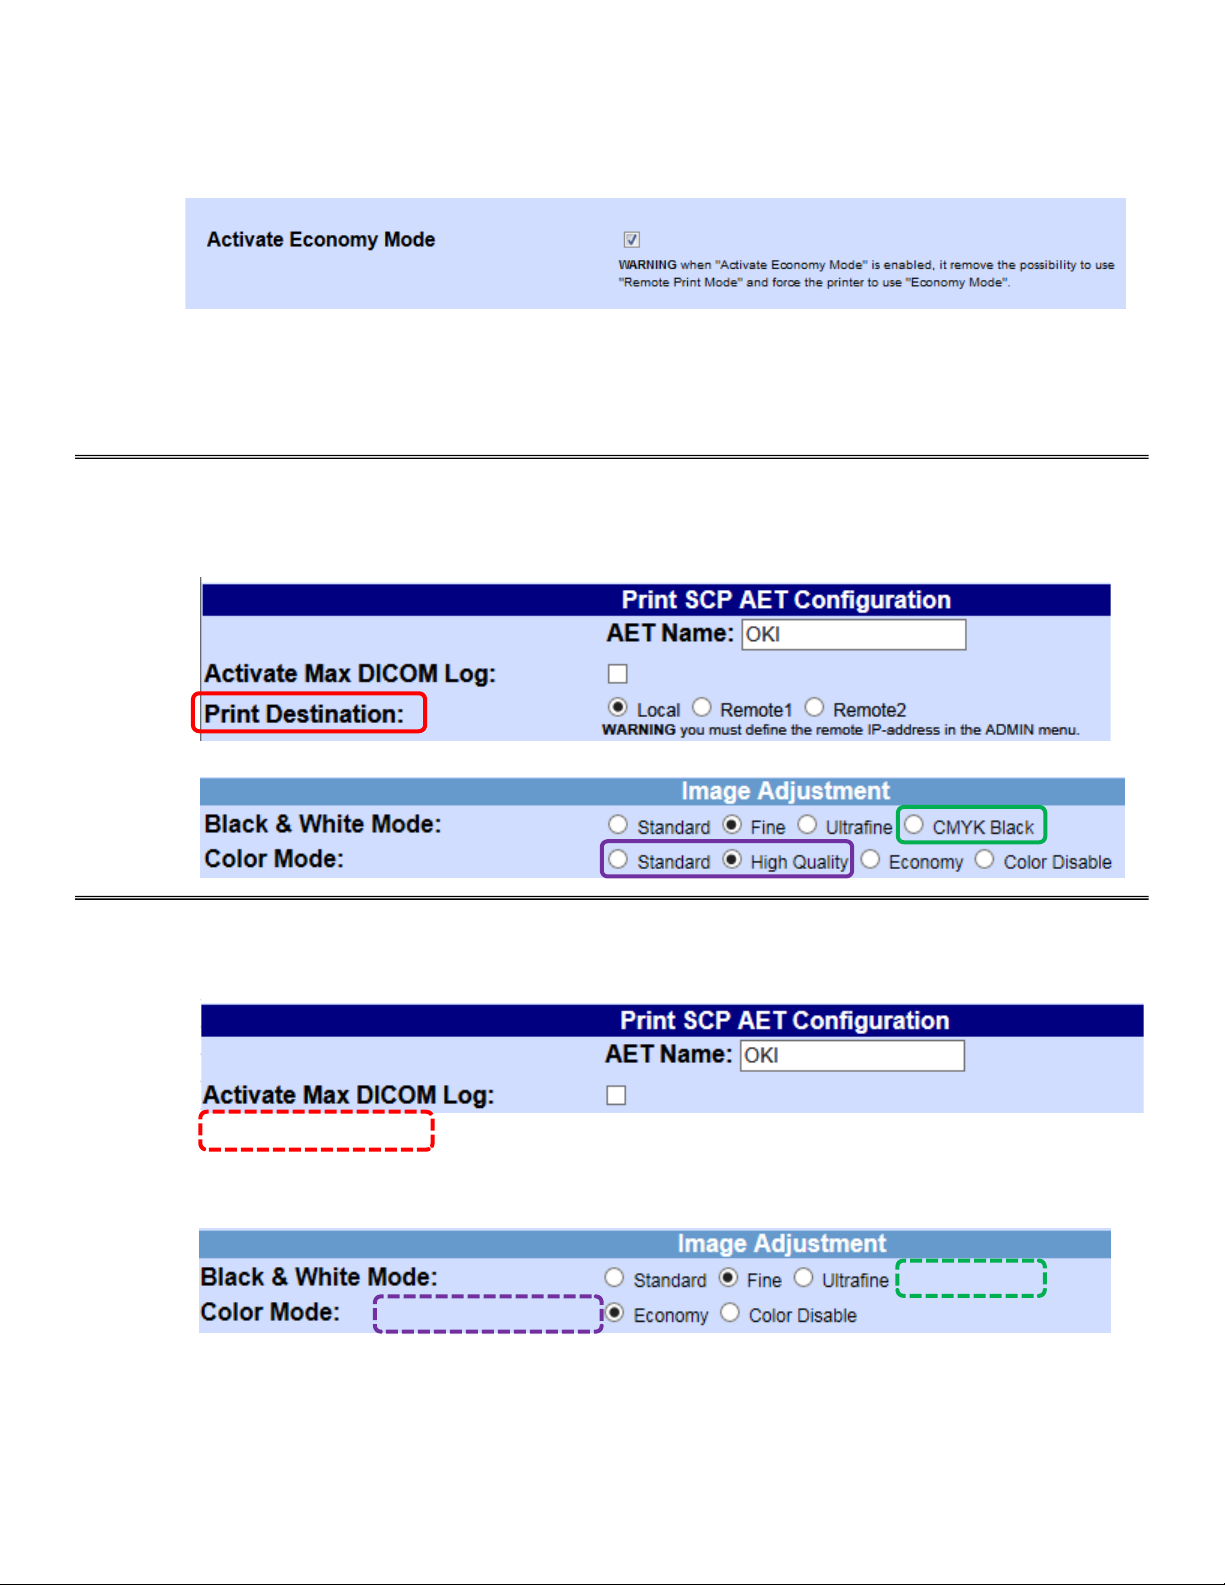
(1) Activate Economy Mode
This function is used to define the level of features of the printer.
When “Active Economy Mode” is enabled, the items in ovals in the following
descriptions are disabled in AET setup options.
■Activate Economy Mode: OFF
(When “Remote Print Mode” is activa ted.)
[AET Setup Menu]
■Activate Economy Mode: ON
[AET Setup Menu]
“Print Destinations” is removed from AET Setup Menu.
“Black & White Mode” provides B/W prin t with only K toner in AET Setup Menu .
“Color Mode” provides only “Economy Mode” in AET Setup Menu.
WARNING: When you activate “Economy Mode”, all AETs will be deleted.
33
Copyright © 2017 Oki Data Corporation. All r ig hts reserved.

(2) Activate Max DICOM Log Mode
This function is used to define whether to show or hide [Activate Max
DICOM Log Mode] in the AET Print rules. As default, the setting is enabled.
■Activate Max DICOM Log Mode: ON
[AET Setup Menu]
■Activate Max DICOM Log Mode: OFF
[AET Setup Menu]
“Activate Max DICOM Log” is removed from AET Setup Menu.
(3) Activate DICOM Store to Print Mode
This function is used to define whether to show or hide [Layout Format] in
the AET Print rules, and gives the possibility to the printer to support DICOM
Store Protocol to print images. As default, the setting is disabled.
■Activate DICOM Store to Print Mode: ON
[AET Setup Menu]
This function defines the layout in use of Store to Print Protocol.
34
Copyright © 2017 Oki Data Corporation. All r ig hts reserved.

1.2.840.10008.5.1.4.1.1.6 UltrasoundImage Storage SOP Class (old version)
■Activate DICOM Store to Print Mode: OFF
[AET Setup Menu]
“Layout Format” is removed from AET Setup Menu.
Note:
● Only Echography, Ophthalmic and Endoscopy images are supported in
DICOM Store Protocol. Details of supported classes are as follows.
1.2.840.10008.5.1.4.1.1.6.1 UltrasoundImage Storage SOP Class
1.2.840.10008.5.1.4.1.1.7 Secondary Capture Image Storage SOP Class
1.2.840.10008.5.1.4.1.1.77.1.1 Endoscopic Image Storage SOP Class
1.2.840.10008.5.1.4.1.1.77.1.4 Photographic Image Storage SOP Class
1.2.840.10008.5.1.4.1.1.77.1.5.1 Ophthalmic Photography 8-Bit Image Storage SOP Class
● The layout is “Portrait” except for Standard\1,1, Standard\2,2, Standard\3,3
and Standard\4,4 which print images in “Landscape”.
35
Copyright © 2017 Oki Data Corporation. All r ig hts reserved.
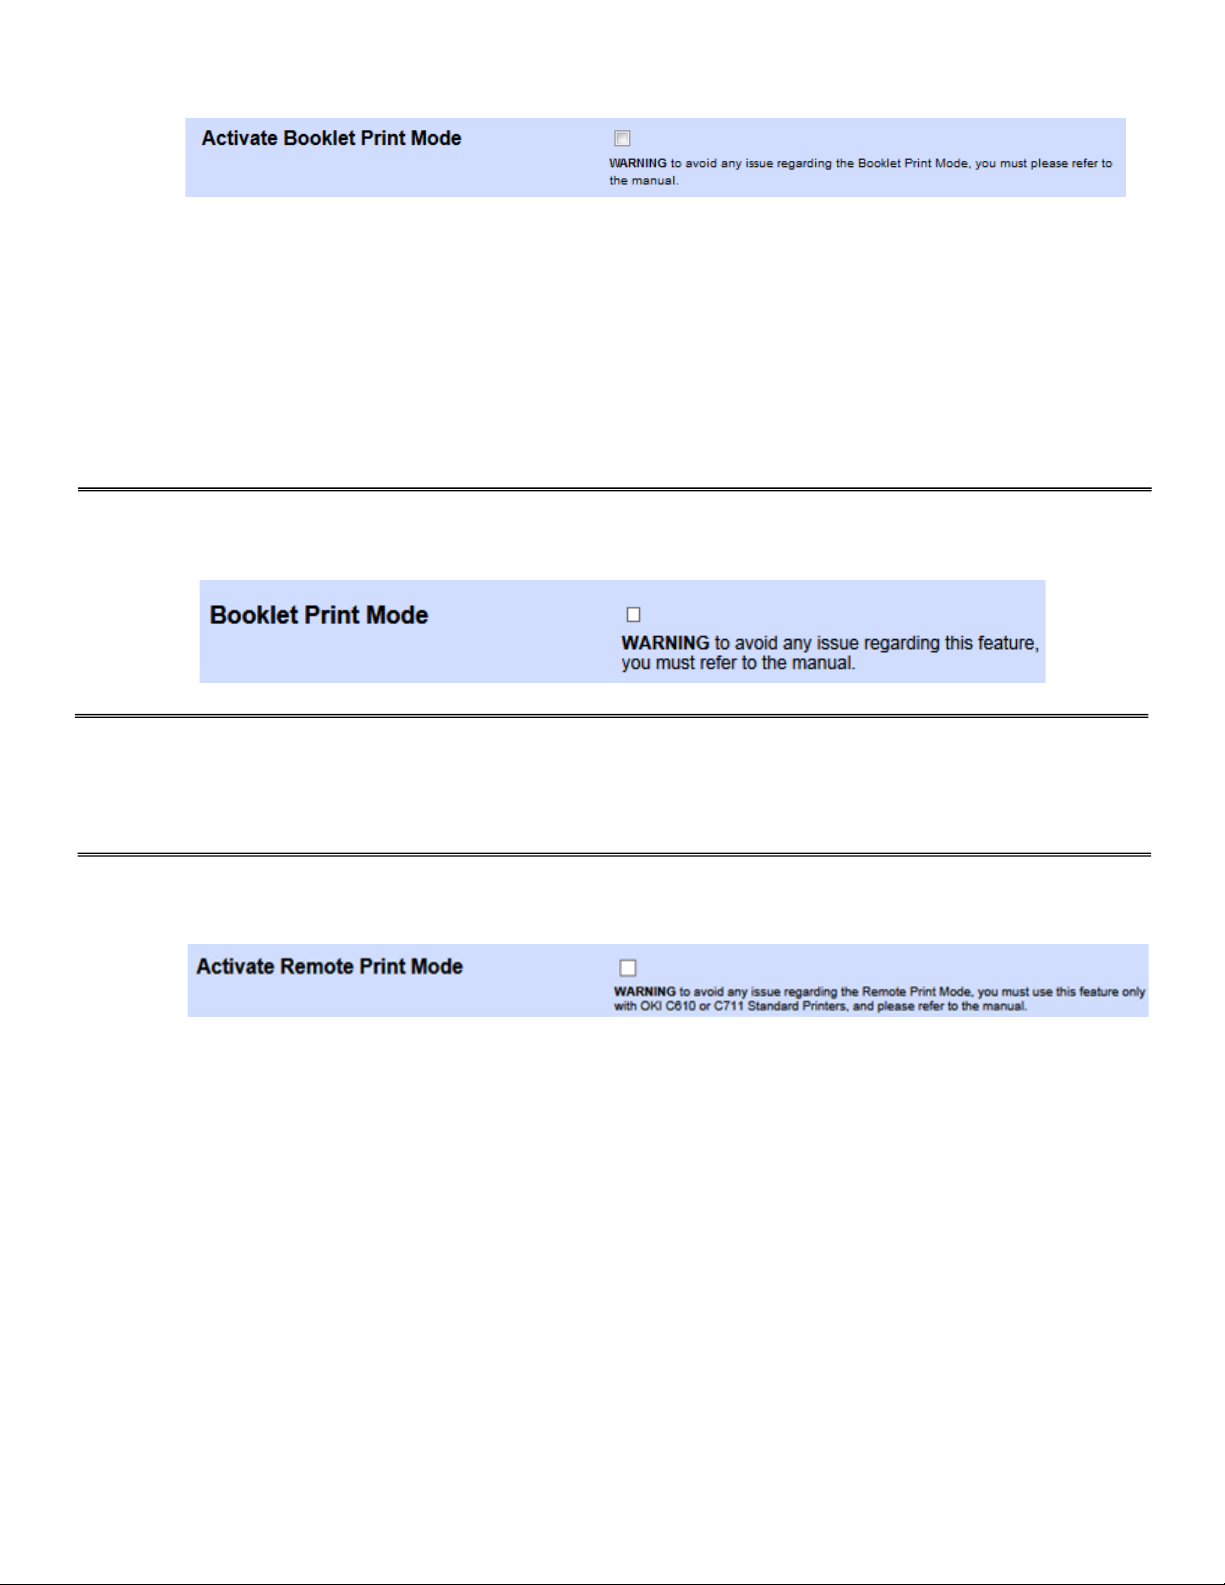
(4) Activate Booklet Print Mode
This function is used to define whether to show or hide [Activate Booklet
Print Mode] in the AET print rules, and gives the possibility to the printer to
print images in a booklet.
As default, this setting is disabled.
Note: ● To avoid any issue regarding printing in booklet, you must use this
feature only with the printer equipped with a duplex unit.
● It is for demo purpose only. No support will be provided by OKI.
■Activate Booklet Print Mode: ON
[AET Setup Menu]
■Activate Booklet Print Mode: OFF
[AET Setup Menu]
“Booklet Print Mode” is removed from AET Setup Menu.
(5) Activate Remote Print Mode
This function is used to define whether to show or hide [Print Destination]
in the AET print rules, and gives the possibility to the printer to send jobs to a
remote standard OKI printer. As default, the setting is disabled.
Note: ● To avoid any issue regarding remote printing, you must only use this
feature with the same standard OKI printers model as the DICOM one.
● It is for demo purpose only. No support will be provided by OKI.
36
Copyright © 2017 Oki Data Corporation. All r ig hts reserved.

(5-1) Remote Printer 1
Enter the IP address of the 1st remote standard OKI printer.
As default, the setting is [127.0.0.1].
Note: To avoid any issue regarding remote printing, you must only use this
feature with the same standard OKI printer model as the DICOM one.
(5-2) Remote Printer 2
Enter the IP address of the 2nd remote standard OKI printer.
As default, the setting is [127.0.0.1].
Note: To avoid any issue regarding remote printing, you must only use this
feature with the same standard OKI printer model as the DICOM one.
■Activate Remote Print Mode: ON
[AET Setup Menu]
Select if you want to print locally or to a remote standard printer.
Note: ● You must define the remote printers in ADMIN menu.
● To avoid any quality issue on print out, you must use the indicated
standard printer family.
■Activate Remote Print Mode: OFF
[AET Setup Menu]
“Print Destination” is removed from AET Setup Menu.
(6) Footer Font Size
This function is used to define the Footer font size for all AETs.
As default, the setting is [6].
37
Copyright © 2017 Oki Data Corporation. All r ig hts reserved.

2. Related Settings
2-1 CONFIG menu
(1) Click [CONFIG] on DICOM Embedded Printer home page.
The Print SCP Config Frame page is displayed. This will give you a summary of
all information.
38
Copyright © 2017 Oki Data Corporation. All r ig hts reserved.

2-2 BACKUP menu
AET Database
CREATE
RESTORE
DICOM Embedded Printer
DOWNLOAD (Clicking File)
UPLOAD
PC
DELETE
(1) Click [BACKUP] on the Print SCP Config Frame page. The BACKUP page is
displayed.
Create AET Backup File by clicking [CREATE].
Upload AET Backup File by clicking [UPLOAD].
Delete AET Backup File by clicking [DELETE].
Click the name of AET Backup File to save it on your PC.
Restore the selected AET Backup File by clicking [RESTORE].
Return to the home page by clicking [HOME].
AET Backup File
Copyright © 2017 Oki Data Corporation. All r ig hts reserved.
AET Backup File
39

2-2-1 Create & Download AET Backup File from
Printer to PC
(1) Click [BACKUP] on the Print SCP Config Frame page.
(2) Click [CREATE].
Copyright © 2017 Oki Data Corporation. All r ig hts reserved.
40

(3) Click [TOP].
(4) You will see the created file named like: "Printer model + serial number +.oki".
Click the name of the created AET Backup File.
You can download the AET Backup File into your PC.
Copyright © 2017 Oki Data Corporation. All r ig hts reserved.
41
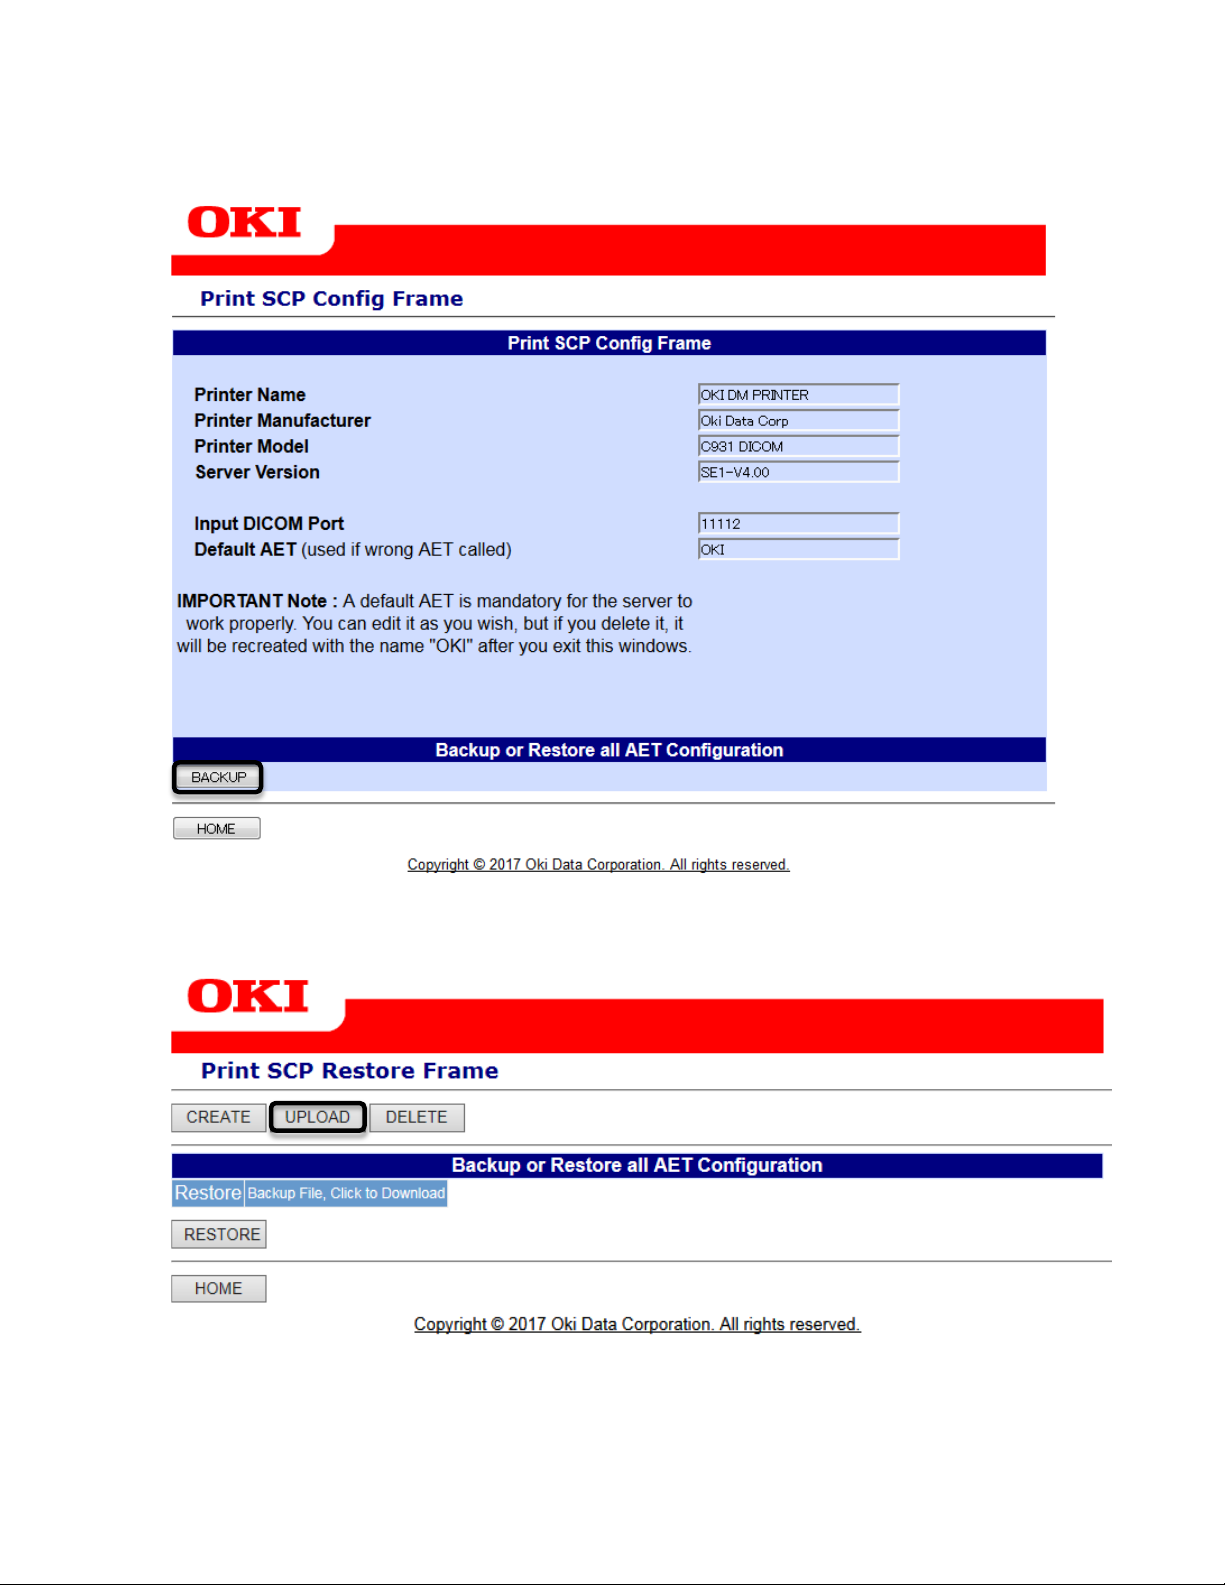
2-2-2 Upload AET Backup File from PC to Printer
(1) Click [BACKUP] on the Print SCP Config Frame page.
(2) Click [UPLOAD].
42
Copyright © 2017 Oki Data Corporation. All r ig hts reserved.

(3) Click [Browse…] and select a saved AET Backup File.
(4) Click [UPLOAD] to upload the selected AET Backup File.
IMPORTANT: You can use only files from the same printer family. Any wrong
(5) Click [TOP].
Copyright © 2017 Oki Data Corporation. All r ig hts reserved.
file is deleted during restoration.
43

(6) The AET Backup File is now in the frame.
44
Copyright © 2017 Oki Data Corporation. All r ig hts reserved.

2-2-3 Restore AET data from AET Backup File to AET
database
(1) Click [BACKUP] on the Print SCP Config Frame page.
(2) Select the AET Backup File by clicking on the checkbox at the left of the file.
Then click [RESTORE] to reload the saved settings.
45
Copyright © 2017 Oki Data Corporation. All r ig hts reserved.
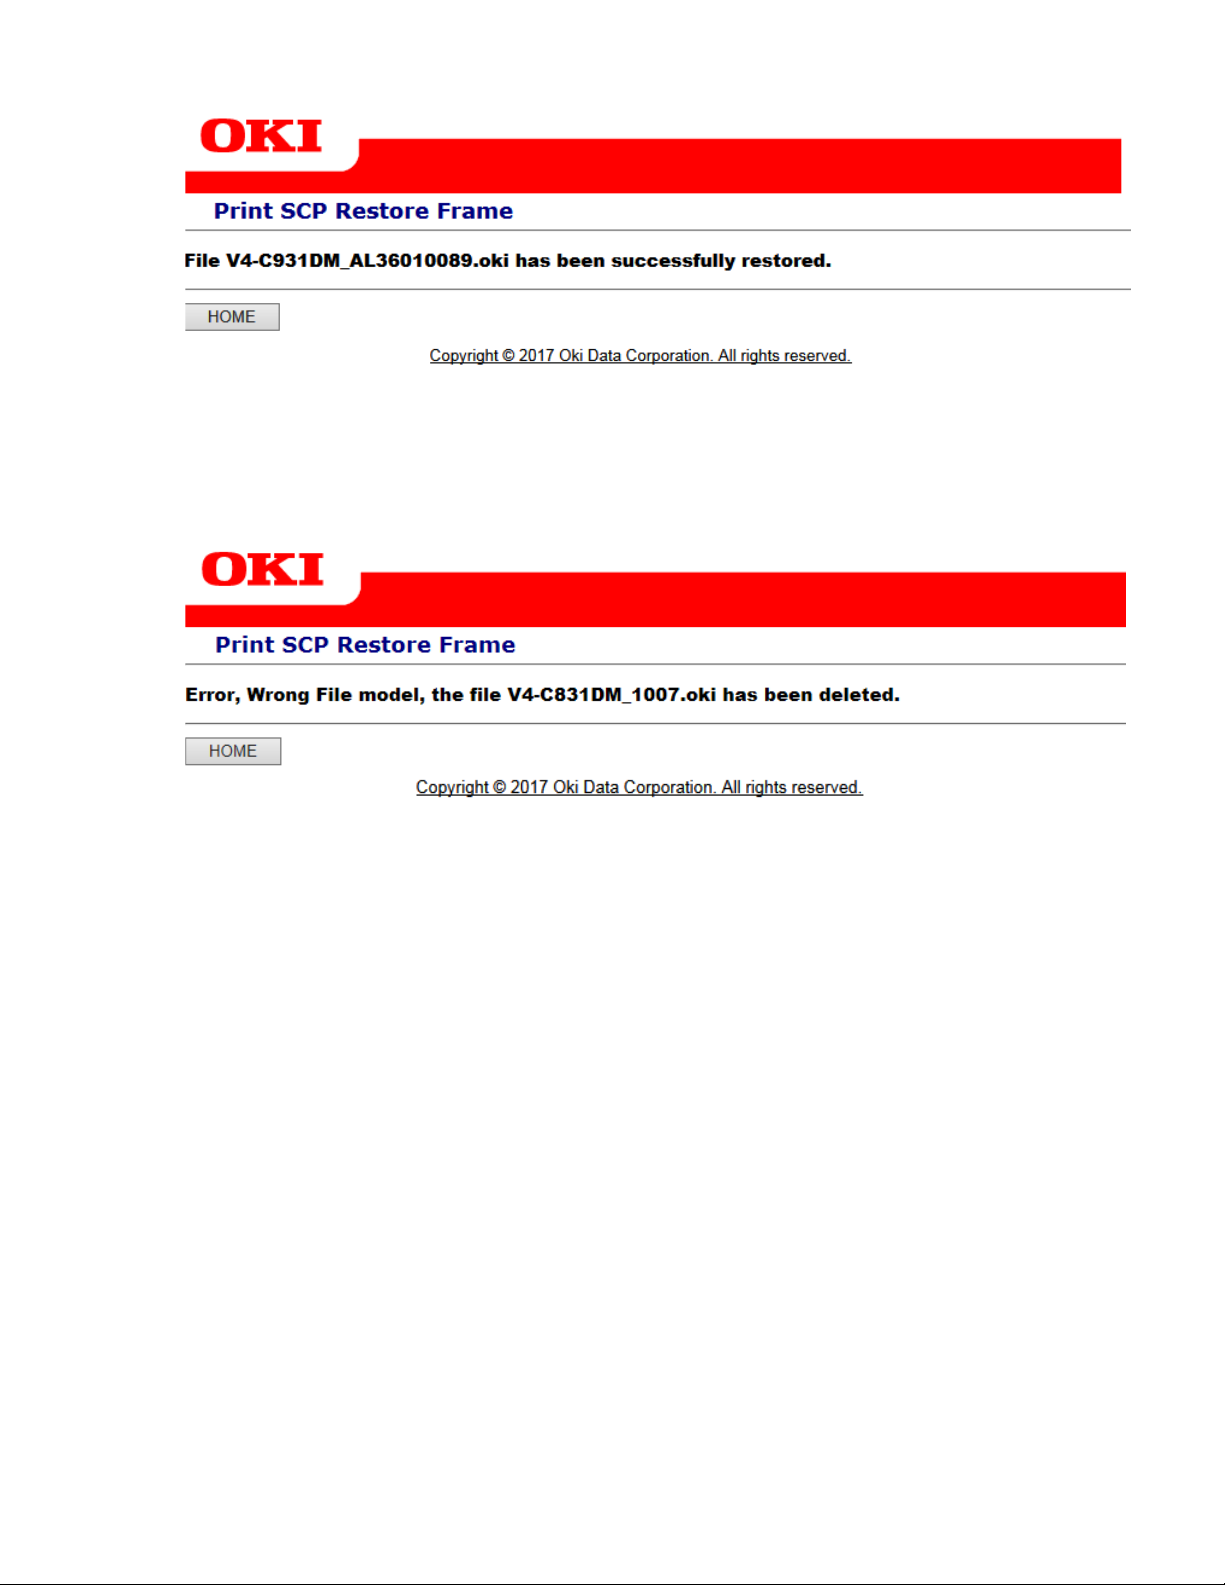
(3) When the saved settings have bee n reloade d, the screen disp lays the fo llowing.
WARNING: In case of wrong AET Backup File, you will see the following message.
46
Copyright © 2017 Oki Data Corporation. All r ig hts reserved.
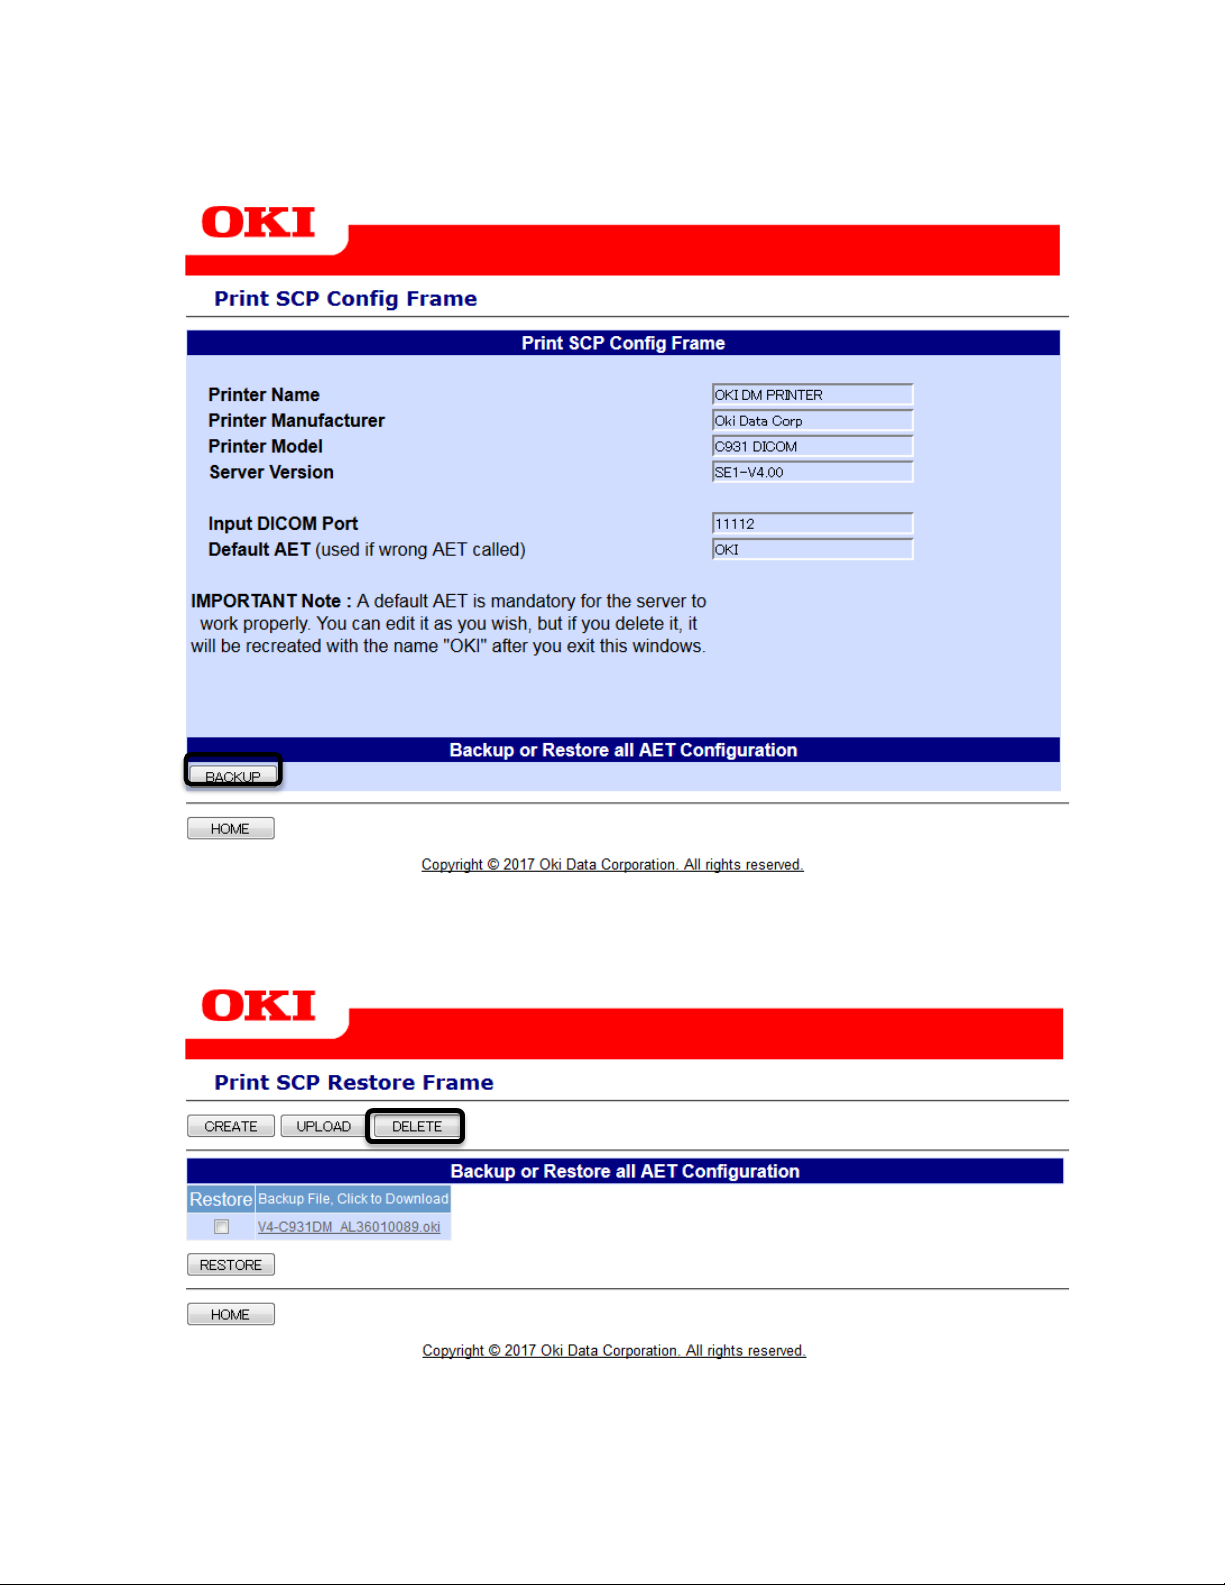
2-2-4 Delete AET Backup File from Printer
(1) Click [BACKUP] on the Print SCP Config Frame page.
(2) Click [DELETE].
47
Copyright © 2017 Oki Data Corporation. All r ig hts reserved.

(3) Select the AET Backup File to delete by clicking on the checkbox at the left of
the file. Then Click [DELETE].
(4) When the selected AET Backup File has been deleted, the screen displays the
following.
48
Copyright © 2017 Oki Data Corporation. All r ig hts reserved.
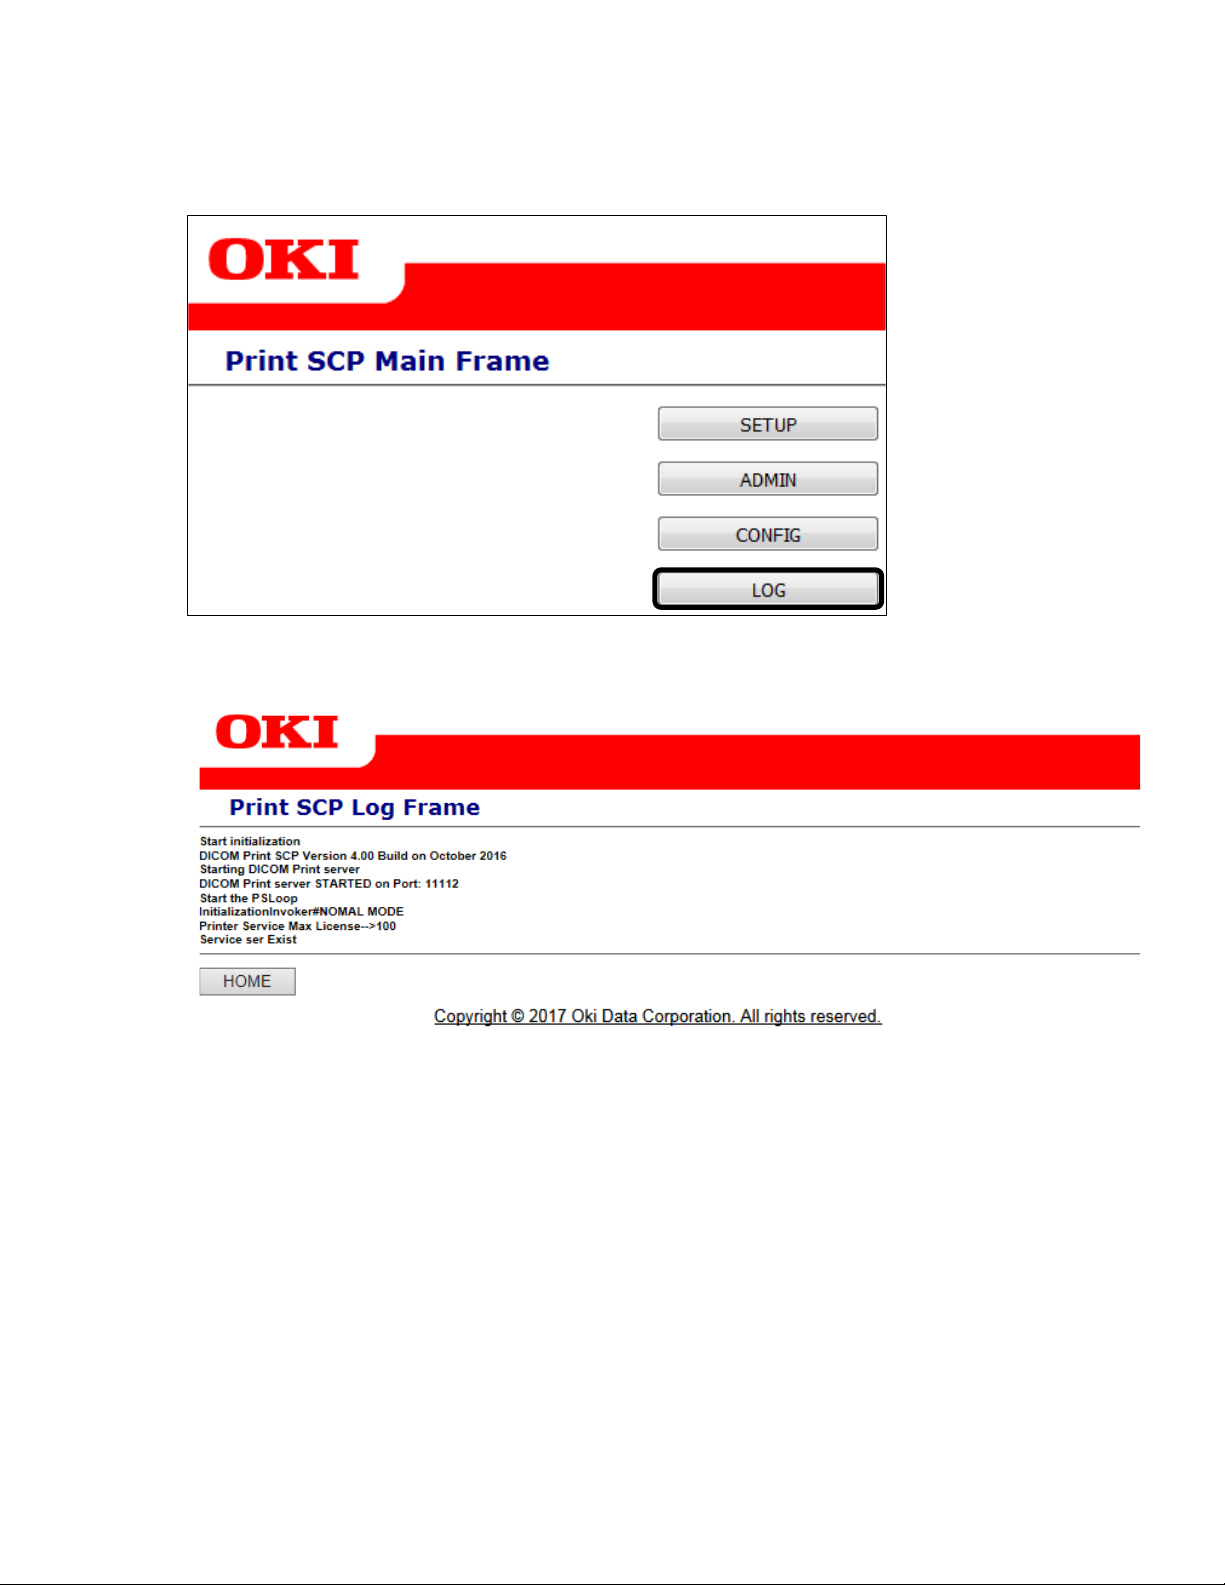
3. LOG menu (DICOM Protocol)
(1) Click [LOG] on DICOM Embedded Printer home page.
(2) The log menu is displayed.
This page lists the DICOM dialogue logs during printing. This is useful for
identifying the source of an error in the event of problems.
Copyright © 2017 Oki Data Corporation. All r ig hts reserved.
49

4. How to print the test patterns
The test patterns are designed to help you to troubleshoot your printer consumables
quality.
(1) Select [Print Information] on the printer control panel.
(2) Select [Demo Page].
(3) Select [CMY test] to check the color imaging units or [K test] for the black
imaging unit.
(4) The test pattern is printed.
5. Troubleshooting
The following procedures are performed in accordance with the Setup Guide/User’s
Guide/Network Guide supplied on CD/DVD with the printer.
When the printer panel displayed "Power Off/On 002 ~ 005:Error, please do the
following action.
1) Turn OFF the printer power supply.
2) Take OFF the Built-in HDD from the printer.
3) Turn ON the printer power supply.
4) Update the printer firmware, using “Firmware Update Tool”.
Example:
http://global.okiprintingsolutions.com/FWInterface.nsf/frmMain?OpenForm&Seq=
1&Lang=en#_RefreshKW_SBUList
5) Turn OFF the printer power supply.
6) Mount the Built-in HDD into the printer.
7) Turn ON the printer power supply.
46660801EE Rev.1
Copyright © 2017 Oki Data Corporation. All r ig hts reserved.
50
 Loading...