


C910
RT322
Setup Guide
Guide d’installation
Guía de Instalación
Guia de instalação
59409201 my.okidata.com


Setup Guide . . . . . . . . . . . . . . . . . . . . . . . . . . . . 7
Guide d’Installation . . . . . . . . . . . . . . . . . . . . . 19
Guía de Instalación. . . . . . . . . . . . . . . . . . . . . . 31
Guia de instalação. . . . . . . . . . . . . . . . . . . . . . . 43
English
Hardware Installation . . . . . . . . . . . .7
Package Contents . . . . . . . . . . . . . . . . . . . 7
Prepare a Location. . . . . . . . . . . . . . . . . . . 7
Environmental Requirements. . . . . . . . . . 7
Space Requirements. . . . . . . . . . . . . . . . 7
Power Requirements. . . . . . . . . . . . . . . . 7
Unpack the Machine. . . . . . . . . . . . . . . . . . 8
Prepare the Image Drums . . . . . . . . . . . . . 9
Install the Toner Cartridges:. . . . . . . . . . . . 9
Load Paper . . . . . . . . . . . . . . . . . . . . . . . 10
Install the Paper Catcher . . . . . . . . . . . . . 10
Connect to Power . . . . . . . . . . . . . . . . . . 11
Print the Demo Page . . . . . . . . . . . . . . . . 11
Making Connections and Installing
Software . . . . . . . . . . . . . . . . . . . . .12
Compatible Operating Systems . . . . . . . . . 12
Windows . . . . . . . . . . . . . . . . . . . . . . . 12
Macintosh . . . . . . . . . . . . . . . . . . . . . . 12
CD Contents . . . . . . . . . . . . . . . . . . . . . . 12
Printer Drivers . . . . . . . . . . . . . . . . . . . 12
Additional Software on the CD . . . . . . . . 12
Downloadable Utilities. . . . . . . . . . . . . . 12
Available Interfaces . . . . . . . . . . . . . . . . . 13
Windows . . . . . . . . . . . . . . . . . . . . . . . 13
Macintosh . . . . . . . . . . . . . . . . . . . . . . 13
Windows Network Installation . . . . . . . . . . 13
Make the Network Connection . . . . . . . . 13
Print the Network Information Page . . . . 14
Install the Driver(s) and Utilities . . . . . . 14
Install the User’s Guide. . . . . . . . . . . . . 14
Windows USB Installation. . . . . . . . . . . . . 15
Install the Driver(s) and Utilities . . . . . . 15
Install the User’s Guide. . . . . . . . . . . . . 15
Windows Parallel Interface Installation. . . . 15
Install the Driver(s) and Utilities . . . . . . 16
Install the User’s Guide. . . . . . . . . . . . . 16
Macintosh Network Installation . . . . . . . . . 16
Make the Network Connection . . . . . . . . 16
Install the Printer Driver(s) and Utilities . 17
Add the Printer . . . . . . . . . . . . . . . . . . . 17
Install the User’s Guide . . . . . . . . . . . . . 17
Macintosh USB Installation . . . . . . . . . . . . 17
Connect the USB Cable . . . . . . . . . . . . . 17
Install the Printer Driver(s) and Utilities . 17
Add the Printer . . . . . . . . . . . . . . . . . . . 18
Install the User’s Guide . . . . . . . . . . . . . 18
-3-

Français
Installation de matériel . . . . . . . . . . 19
Contenu de l’emballage . . . . . . . . . . . . . . 19
Choisir un emplacement. . . . . . . . . . . . . . 19
Exigences environnementales . . . . . . . . 19
Espace requis . . . . . . . . . . . . . . . . . . . 19
Alimentation . . . . . . . . . . . . . . . . . . . . 19
Déballer l’appareil . . . . . . . . . . . . . . . . . . 20
Préparation des tambours d’impression . . . 21
Installation de la cartouche de toner . . . . . 21
Charger le papier . . . . . . . . . . . . . . . . . . 22
Installer la cale du paper.. . . . . . . . . . . . . 22
Alimentation . . . . . . . . . . . . . . . . . . . . . . 23
Impression d’une page de démonstration . 23
Établir des connexions et installer
des pilotes d’imprimante . . . . . . . .24
Systèmes d’exploitation compatibles . . . . . 24
Windows . . . . . . . . . . . . . . . . . . . . . . . 24
Macintosh . . . . . . . . . . . . . . . . . . . . . . 24
Contenu du CD . . . . . . . . . . . . . . . . . . . . 24
Pilotes d’imprimante . . . . . . . . . . . . . . . 24
Logiciels supplémentaires dans le CD . . . 24
Internet Télécharge . . . . . . . . . . . . . . . 24
Interfaces Disponibles . . . . . . . . . . . . . . . 25
Procédures d’installation. . . . . . . . . . . . . . 25
Windows . . . . . . . . . . . . . . . . . . . . . . . 25
Macintosh . . . . . . . . . . . . . . . . . . . . . . 25
Installation réseau Windows . . . . . . . . . . . 25
Connexion réseau . . . . . . . . . . . . . . . . 25
Imprimez la page Network Information
[Infos sur le réseau] . . . . . . . . . . . . . . 26
Installez les pilotes d’imprimante et les
utilitaires . . . . . . . . . . . . . . . . . . . . . . 26
Installer le Guide de l’utilisateur. . . . . . . 26
Installation USB Windows. . . . . . . . . . . . . 27
Installez les pilotes d’imprimante et les
utilitaires . . . . . . . . . . . . . . . . . . . . . . 27
Installer le Guide de l’utilisateur. . . . . . . 27
Installation port interface parallèle
Windows . . . . . . . . . . . . . . . . . . . . . . . . 27
Installez les pilotes d’imprimante et les
utilitaires . . . . . . . . . . . . . . . . . . . . . . 28
Installer le Guide de l’utilisateur. . . . . . . 28
Installation réseau Macintosh . . . . . . . . . . 28
Connexion réseau . . . . . . . . . . . . . . . . . 28
Installez les pilotes d’imprimante et les
utilitaires . . . . . . . . . . . . . . . . . . . . . . 29
Ajout de l’imprimante . . . . . . . . . . . . . . 29
Installer le Guide de l’utilisateur . . . . . . . 29
Installation USB Macintosh . . . . . . . . . . . . 30
Connectez le câble USB . . . . . . . . . . . . . 30
Installez les pilotes d’imprimante et les
utilitaires . . . . . . . . . . . . . . . . . . . . . . 30
Ajout de l’imprimante . . . . . . . . . . . . . . 30
Installer le Guide de l’utilisateur . . . . . . . 30
-4-

Español
Instalación de hardware . . . . . . . . .31
Contenido de la caja . . . . . . . . . . . . . . . . 31
Prepare el lugar . . . . . . . . . . . . . . . . . . . 31
Requisitos medioambientales. . . . . . . . . 31
Requisitos de espacio . . . . . . . . . . . . . . 31
Requisitos de espacio . . . . . . . . . . . . . . 31
Desempacar la máquina . . . . . . . . . . . . . . 32
Prepare los cilindros de imagen. . . . . . . . . 33
Reinstale el cartuchos de tóner . . . . . . . . . 33
Carga de papel . . . . . . . . . . . . . . . . . . . . 34
Instalar el de retención del paper . . . . . . . 34
Conexión de la alimentación . . . . . . . . . . . 35
Imprima la página demo . . . . . . . . . . . . . 35
Cómo hacer conexiones e instalar
los controladores de la impresora .36
Sistemas operativos compatibles. . . . . . . . 36
Windows . . . . . . . . . . . . . . . . . . . . . . . 36
Macintosh . . . . . . . . . . . . . . . . . . . . . . 36
Contenido del CDs . . . . . . . . . . . . . . . . . . 36
Controladores de la impresora . . . . . . . . 36
Software adicional . . . . . . . . . . . . . . . . 36
El interned Descarga . . . . . . . . . . . . . . 36
Interfaces disponible . . . . . . . . . . . . . . . . 37
Procedimientos de instalación . . . . . . . . . . 37
Windows . . . . . . . . . . . . . . . . . . . . . . . 37
Macintosh . . . . . . . . . . . . . . . . . . . . . . 37
Instalación de la red bajo Windows . . . . . . 37
Haga la conexión de redes . . . . . . . . . . 37
Imprima la página Network Information
(Información de red) . . . . . . . . . . . . . 38
Instale los controladores de
la impresora y las utilidades . . . . . . . . . 38
Innstalar la Guía del Usuario . . . . . . . . . 38
Instalación de USB Windows. . . . . . . . . . . 39
Instale los controladores de
la impresora y las utilidades . . . . . . . . . 39
Innstalar la Guía del Usuario . . . . . . . . . 39
Instalación de Interfaz paralela Windows . . 39
Instale los controladores de
la impresora y las utilidades . . . . . . . . . 40
Innstalar la Guía del Usuario . . . . . . . . . 40
Instalación de la red bajo Macintosh. . . . . . 40
Haga la conexión de redes . . . . . . . . . . . 40
Instale los controladores de la
impresora y las utilidades . . . . . . . . . . . 41
Agregue la impresoras. . . . . . . . . . . . . . 41
Innstalar la Guía del Usuario . . . . . . . . . 41
Instalación de USB Macintosh . . . . . . . . . . 42
Conecte el cable USB . . . . . . . . . . . . . . 42
Instale los controladores de la
impresora y las utilidades . . . . . . . . . . . 42
Agregue la impresoras. . . . . . . . . . . . . . 42
Instalar la Guía del Usuario . . . . . . . . . . 42
-5-

Português
Instalação do hardware . . . . . . . . . .43
Conteúdo do pacote. . . . . . . . . . . . . . . . . 43
Prepare o local de instalação. . . . . . . . . . . 43
Requisitos ambientais . . . . . . . . . . . . . . 43
Requisitos de espaço . . . . . . . . . . . . . . 43
Requisitos de energia . . . . . . . . . . . . . . 43
Desembalar a unidade . . . . . . . . . . . . . . . 44
Preparação dos cilindros OPC . . . . . . . . . . 45
Instale dos cartuchos de toner . . . . . . . . . 45
Colocar papel . . . . . . . . . . . . . . . . . . . . . 46
Instalar o retentor do papel . . . . . . . . . . . 46
Conexão da impressora à fonte de energia . 47
Impressão da página de demonstração . . . 47
Conexões e instalação dos drivers
da impressora . . . . . . . . . . . . . . . . .48
Sistemas operacionais compatíveis . . . . . . 48
Windows . . . . . . . . . . . . . . . . . . . . . . . 48
Macintosh . . . . . . . . . . . . . . . . . . . . . . 48
Conteúdo do CD . . . . . . . . . . . . . . . . . . . 48
Drivers da impressora. . . . . . . . . . . . . . 48
Software adicional . . . . . . . . . . . . . . . . 48
Download de software . . . . . . . . . . . . . 48
Interfaces disponíveis . . . . . . . . . . . . . . . 49
Procedimentos de instalação. . . . . . . . . . . 49
Windows . . . . . . . . . . . . . . . . . . . . . . . 49
Macintosh . . . . . . . . . . . . . . . . . . . . . . 49
Instalação em rede Windows . . . . . . . . . . 49
Faça a conexão de rede . . . . . . . . . . . . 49
imprima a página de informações
da rede . . . . . . . . . . . . . . . . . . . . . . . 50
Instale os drivers e utilitários. . . . . . . . . 50
Instalar o Manual do Usuário . . . . . . . . . 50
Instalação USB em Windows. . . . . . . . . . . 51
Instale os drivers e utilitários. . . . . . . . . 51
Instalar o Manual do Usuário . . . . . . . . . 51
Instalação em interface paralela
Windows . . . . . . . . . . . . . . . . . . . . . . . . 51
Instale os drivers e utilitários. . . . . . . . . 52
Instalar o Manual do Usuário . . . . . . . . . 52
Instalação em rede Macintosh . . . . . . . . . 53
Faça a conexão de rede . . . . . . . . . . . . 53
Instale os drivers e utilitários. . . . . . . . . 53
Adição da impressora . . . . . . . . . . . . . . 54
Instalar o Manual do Usuário . . . . . . . . . 54
Instalação USB em Macintosh . . . . . . . . . . 54
Conexão do cabo USB . . . . . . . . . . . . . . 54
Instale os drivers e utilitários . . . . . . . . . 54
Adição da impressora . . . . . . . . . . . . . . 54
Instalar o Manual do Usuário . . . . . . . . . 55
-6-

Hardware Installation
Package Contents
1 Printer
2 Paper Catcher
3 Light shield bags, paper tray media labels
4 LED lens cleaning pad
5 Power cable
6 Ferrite core for network models
7 CD
8 Toner cartridges
9 Documentation (not shown)
Prepare a Location
Environmental Requirements
• Temperature Range: 50 to 90°F (10 to 32°C)
• Humidity: 20 to 80% RH (relative humidity)
If installing your machine where the humidity
is less than 30% RH, use a humidifier or
antistatic mat.
Space Requirements
168 lbs
76
31.5 in.
800 mm
7.9 in.
200 mm
19.7 in.
500 mm
Note
The Ethernet and USB cables are not supplied
with your machine and must be purchased
separately.
We recommend you keep the packing materials,
they are necessary to transport the machine.
7.9 in.
200 mm
Power Requirements
• 110-127 VAC, 60 Hz or 230 VAC, 50 Hz
• 1500 watts maximum.
Important!
Do not connect this product to an
uninterruptible power supply (UPS).
If the power source is unstable, use a
voltage regulator.
7 - English

Unpack the Machine
b
Important!
At least three people are needed to lift the
machine safely.
3 Lift the top cover.
168 lbs.
76
Note
The illustrations below are representative. The
actual tape/packing materials may differ
somewhat from these illustrated.
Keep the packing materials, they are necessary
to transport the machine.
1 Lift printer and place on selected location.
4 Lift the operator panel.
5 Open the front cover and remove any
packing materials.
2 Remove any shipping tape.
6 Close the front cover and adjust the
operator panel angle.
8 - English

Prepare the Image Drums
1 Remove the colored image drum packing
pieces.
2 Remove the tape and the protective sheet.
b
Install the Toner
Cartridges:
1 Shake the toner cartridge from side to side
to distribute toner.
2 Remove the sealing tape from the toner
cartridge bottom.
3 Remove the colored locks (a). Remove the
tape, then remove the colored seals (b).
Note
Be sure all tape is removed from image drum
cartridges.
.
b
a
3 Align the notch on the end of the toner
cartridge with the tab (a) in the image drum,
then lower the toner cartridge into the image
drum. Press down to make sure it is seated
correctly, then lock toner cartridge with
colored lever
4 Repeat these steps for the remaining toner
cartridges.
.
5 Gently close the top cover.
9 - English

Load Paper
1 Pull out the paper tray. Remove the colored
shipping retainer. Insert the appropriate
media size label. This is helpful if optional
trays are installed.
4 Close the paper tray.
b
2 Fan the paper and place it in the tray.
3 Set the guides (a, b) to the paper size.
Make sure the paper guides are snug
against the paper.
Install the Paper Catcher
1 Lift the cover where paper catcher is placed.
2 Align the tabs on catcher in notches on
printer. Press down until catcher is fully
seated.
a
b
10 - English

Connect to Power
Warning!
Be sure to use the AC power cord supplied
with the printer. Use of a power cord NOT
supplied with this printer, or an extension
cord, may result in overheating, and could
be a safety hazard
Print the Demo Page
Caution
Do not connect this product to an
uninterruptible power supply (UPS). For
further information please contact Oki Data
at 1-800-OKIDATA or www.okidata.com.
1 Insert the power cable.
1 Press Menu on the control panel.
2 Press the down arrow to select Print
Information. Press Enter.
3 Press the down arrow to select Demo Page.
Press Enter.
4 Demo1 appears. Press Enter.
5 Execute appears. Press Enter.
2 Turn the printer ON.
11 - English

Making Connections and Installing Software
Compatible Operating
Systems
Your printer supports the following operating
systems:
Windows
•Windows 7
• Windows Server 2008
• Wibndows Vista
• Windows Vista, 64-bit Edition
• Windows Server 2003
•Windows XP
• Windows XP, 64-bit editions
• Windows 2000, Windows 2000/Server
Macintosh
• Mac OS X 10.2.4 to 10.6.
Important!
For Mac OS X 10.6 IntelPC users, install
Rosetta before installing the printer driver.
CD Contents
The CD supplied with your printer includes the
printer drivers, utilities, and a network
connection for downloading additional utilities
from the Oki Data web site.
Additional information on the utilities is provided
on the CD to help you make your selections.
Printer Drivers
•PS
•PCL
Additional Software on the CD
• Color Software
- Color Swatch Utility
- Color Correct Utility
- PS Gamma Adjuster Utility
• Network Software
- Network Card Setup Utility
- Direct Network Printing Utility (LPR)
- Network Extension Utility
• Optional Utilities
- Change Printer Display Language
- PDF Direct Print Utility
Downloadable Utilities
• Print Supervision Utility
• Storage Device Manager Utility
• Print Job Accounting Utility
• Profile Assistant Utility
12 - English
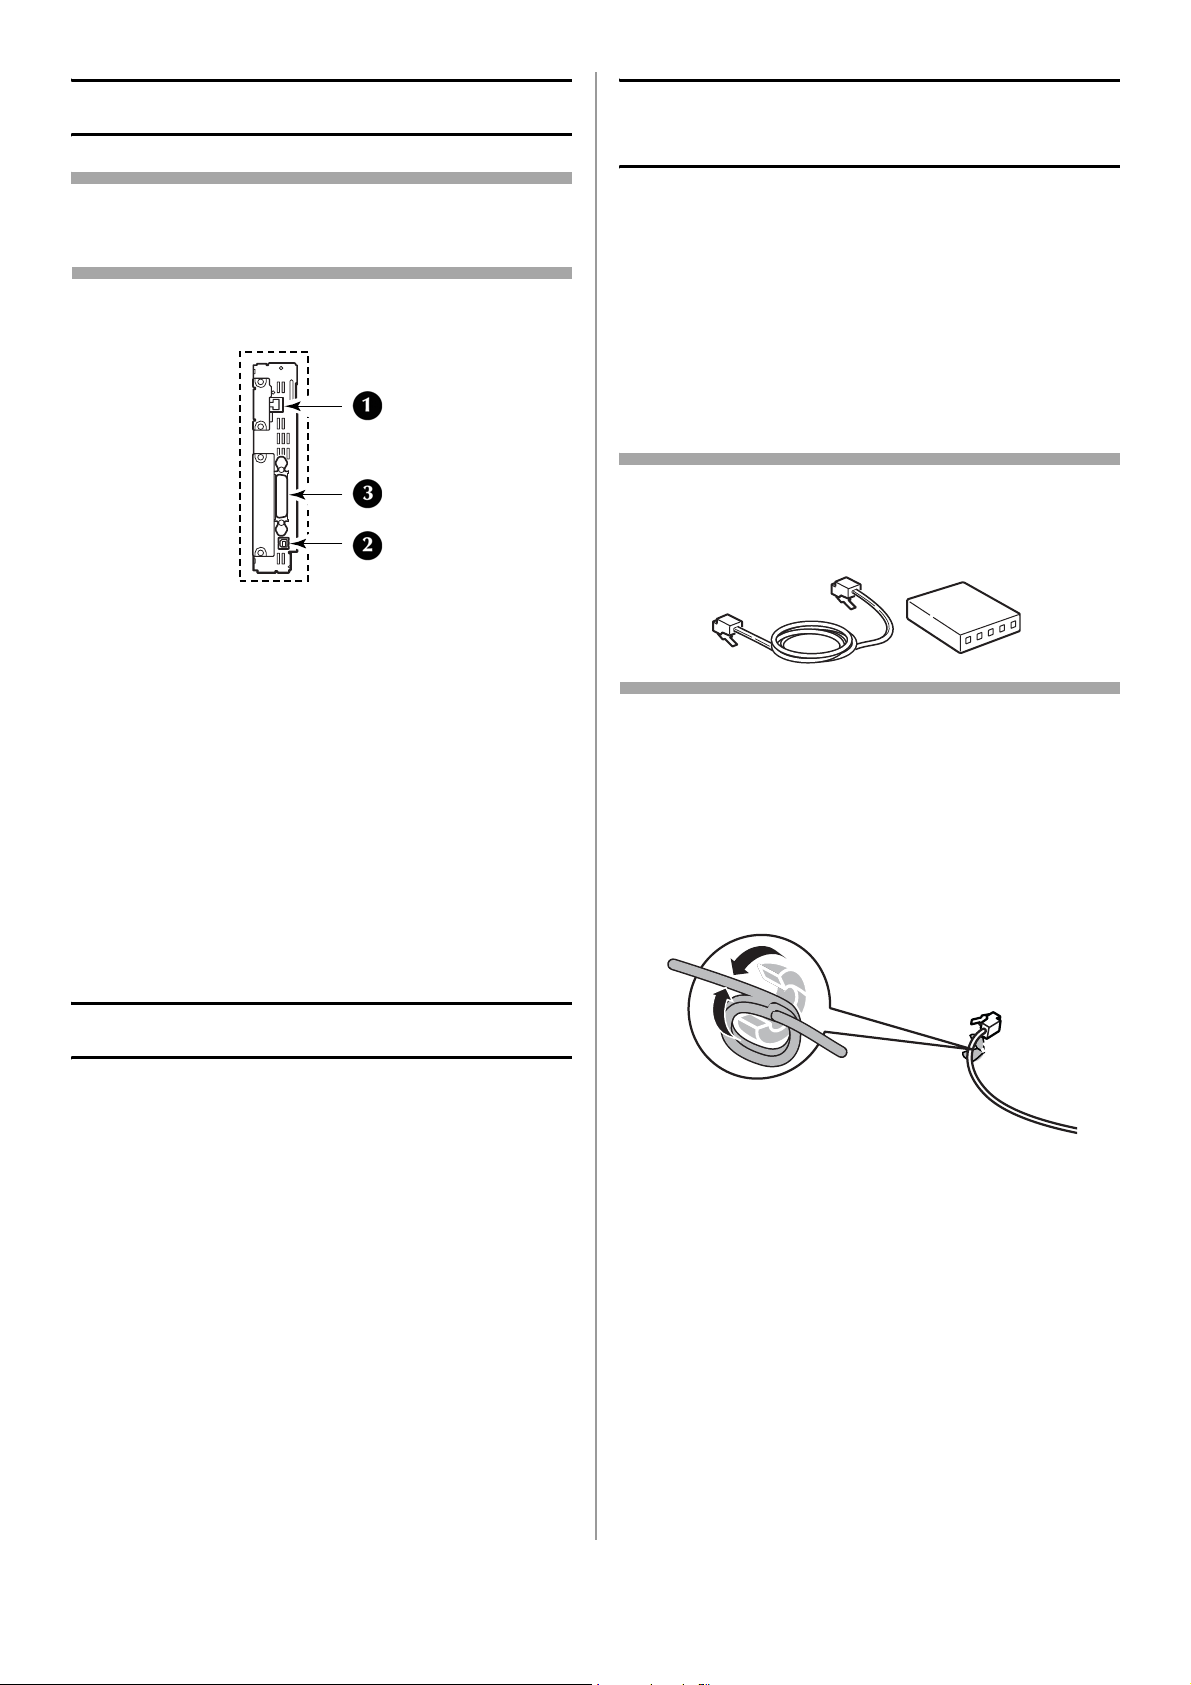
Available Interfaces
Windows Network
Installation
Note
Cables are not supplied with your printer.
Your printer has three interfaces:
1 Ethernet
- For network cable connection of PCs and/or
Macs
- 10Base-T and 100Base-TX
2 USB
- For direct connection to a PC or Mac.
- Requires a cable conforming to USB version
2.0 or above.
3 Parallel (Windows only)
- For direct connection to a PC.
- Requires a bi-directional parallel cable
(compatible with IEEE-1284)
Make the Network Connection
Important!
In order to reduce electromagnetic
interference—”noise” that interferes with
TVs or other appliances—you must install
the included ferrite core on the network
cable.
Note
The Ethernet cable and hub are not included with
your printer.
1 Turn off the printer.
2 Turn off the computer.
3 Loop the cable as shown and place the ferrite
core supplied with the printer about 1 inch
(25 mm) from the connector on the printer
end.
Installation Procedures
Windows
Network Installation, see below.
USB Installation, see page 15.
Parallel Port Installation, see page 15.
Macintosh
Network installation, see page 16.
USB Installation, see page 17.
13 - English

4 Connect the ferrite core end of the Ethernet
cable to the printer.
5 Connect the other end of the Ethernet cable
to a suitable hub.
Install the Driver(s) and Utilities
1 Make sure the printer is off.
2 Insert the CD supplied with the printer in the
CD-ROM drive. The CD will autorun. (If it
doesn’t, go to the CD’s main directory and
double click [setup.exe].)
3 Select your language.
4 Accept the license agreement.
5 Click [Driver Setup].
6 Click [Install Driver].
7 Select network printer. Click [Next].
8 When prompted, select the printer
emulation(s) you wish to install (PS, PCL).
Print the Network Information Page
The Network Information page provides the
information you need to install software and to
set up the network.
1 Make sure the printer is turned on.
2 Press Menu on the control panel.
9 Follow the on-screen instructions.
Install the User’s Guide
If you wish to install the User’s Guide pdf on PCs
connected to the printer:
1 Insert the CD supplied with the printer in the
PC’s CD-ROM drive, and wait for it to
AutoRun. (If it doesn’t, go to the CD’s main
directory and double click [setup.exe].)
2 Select your language and accept the license
agreement.
3 Click [User Guides].
4 Click [Install User Guide] and follow the on-
screen instructions.
3 Press the down arrow to select Print
Information. Press Enter.
4 Press the down arrow to select Network. Press
Enter.
5 Execute appears on the display. Press Enter.
14 - English

Windows USB Installation
Install the Driver(s) and Utilities
1 Make sure the printer is off.
2 Insert the CD supplied with the printer in the
CD-ROM drive. The CD will AutoRun. (If it
doesn’t, Click Start > Run and browse to the
CD’s main directory and double click
[setup.exe], then click [OK].)
3 Select your language.
4 Accept the license agreement.
5 Click [Driver Setup].
Install the User’s Guide
If you also wish to install the User’s Guide pdf:
1 With the CD still in the CD-ROM drive, click
[User Guides].
2 Click [Install User Guide] and follow the on-
screen instructions.
Windows Parallel Interface
Installation
1 Turn off the printer and the computer.
2 Connect a parallel cable between the printer
and the computer.
6 Click [Install Driver].
7 Select local printer.
8 Select the USB port. Click [Next]
9 Select [OKI C910], then select the
emulation(s) to install (PCL, PS).
10 Follow the on-screen instructions.
11 When prompted, connect a USB cable to the
printer (1) and the PC (2).
3 Turn the printer and computer on.
12 Turn the printer on.
15 - English

Install the Driver(s) and Utilities
1 Make sure the printer is off.
2 Insert the CD supplied with the printer in the
CD-ROM drive. The CD will AutoRun. (If it
doesn’t, go to the CD’s main directory and
double click [setup.exe].)
3 Select your language.
4 Accept the license agreement.
5 Click [Driver Setup].
6 Click [Install Driver].
7 Select local printer.
8 Select the LPT1: port. Click Next.
9 Select [OKI C910], then select the
emulation(s) to install (PCL, PS).
Note
The Ethernet cable and hub are not included with
your printer.
1 Turn off the printer and the computer.
2 Loop the cable as shown and place the ferrite
core supplied with the printer about 1 inch
(25 mm) from the connector on the printer
end.
10 Follow the on-screen instructions.
Install the User’s Guide
If you also wish to install the User’s Guide pdf:
1 With the CD still in the CD-ROM drive, click
[User Guides].
2 Click [Install User Guide] and follow the on-
screen instructions.
Macintosh Network
Installation
Make the Network Connection
Important!
In order to reduce electromagnetic
interference—”noise” that interferes with
TVs or other appliances—you must install
the included ferrite core on the network
cable.
3 Connect the end of the Ethernet cable with
the ferrite core to the printer.
4 Connect the other end of the cable to a
suitable hub.
16 - English

Install the Printer Driver(s) and Utilities
1 Turn on the printer, then turn on the
computer.
2 Place the CD supplied with the printer in the
CD-ROM drive.
Macintosh USB Installation
Connect the USB Cable
Note
Printer operation is not assured if another USB
compatible device is connected concurrently with
it.
1 Turn the printer off.
3 Double-click the CD icon that appears on the
desktop.
4 Open the MAC folder.
5 Double-click the Mac C910 Installer icon.
The installer displays with the driver preselected.
6 Select any utilities you want to install.
7 Click [Install].
Add the Printer
1 Run the Print Center or Print Setup Utility.
Click Add.
2 Click [More Printers].
3 Select [OKI TCP/IP] or [Rendezvous/
Bonjour] from the drop-down menu.
4 Enter the printer’s IP address.
5 Select the printer model. Click [Add].
6 Quit the Print Center or Print Setup Utility.
2 Connect the USB cable to the USB port on the
computer.
3 Connect the other end of the USB cable to
the USB port on the printer.
Install the User’s Guide
1 With the CD in your CD-ROM drive,
double-click the CD icon on the desktop.
2 Scroll to the C910_UG_ae.pdf file in the root
directory.
• To load: drag the .pdf file to the desktop
• To view: double-click it.
17 - English
Install the Printer Driver(s) and Utilities
1 Turn on the printer, then turn on the
computer.

2 Place the CD supplied with the printer in the
CD-ROM drive.
3 Double-click the CD icon that appears on the
desktop.
4 Open the MAC folder.
5 Double-click the Mac C910 Installer icon.
The installer displays with the driver preselected.
6 Select any utilities you want to install.
7 Click [Install].
Add the Printer
1 Run the Print Center or Print Setup Utility.
2 Click [Add].
3 Click [More Printers].
4 Select OKI USB from the drop-down menu.
5 Select the printer model. Click [Add].
6 Quit the Print Center or Print Setup Utility.
Install the User’s Guide
1 With the CD in your CD-ROM drive,
double-click the CD icon on the desktop.
2 Scroll to the C910_UG_ae.pdf file in the root
directory.
• To load: drag the .pdf file to the desktop
• To view: double-click it.
18 - English

Installation de matériel
Contenu de l’emballage
1 Imprimante
2 cale du paper
3 Sacs pare-lumière, bac à papier d'étiquette
de rame
4 Tampon de nettoyage de lentille de DEL
5 Cordon d’alimentation
6 Ferrite Core
7 CD
8 Cartucho de toner
9 Documentation (non représenté)
Choisir un emplacement
Exigences environnementales
• Plage de températures : 10 °C à 32 °C (50 °F
à 90 °F)
Humidité : HR de 20 % à 80 % (humidité
•
relative)
Si vous installez votre appareil dans un endroit
où le taux d’humidité est inférieur à 30 % d’HR,
utilisez un humidificateur ou un tapis
antistatique.
Espace requis
168 lbs
31.5 in.
800 mm
76
7.9 in.
200 mm
Remarque
Les câbles Ethernet et USB ne sont pas compris
avec votre appareil et doivent être achetés
séparément.
Nous vous conseillons de conserver le matériel
d’emballage, nécessaire au transport de
l’appareil.
19.7 in.
500 mm
7.9 in.
200 mm
Alimentation
• 110-127 V c.a, 60 Hz ou 230 V c.a, 50 Hz
• 1500 watts maximum.
Important!
Ne jamais brancher ce produit sur un bloc
d’alimentation sans interruption (ASI).
Si la source de courant est instable,
utilisez un régulateur de tension.
19 - Français

Déballer l’appareil
b
Important!
Un minimum de trois personnes est
nécessaire pour lever l’appareil en toute
sécurité
.
3 Levez le tableau de l’opérateur.
168 lbs.
76
Remarque
Les illustrations ci-dessous sont
représentatives. Le véritable matériel, ruban
adhésif ou emballage, peut quelque peu différer
de celui indiqué sur les illustrations.
Conservez le matériel d’emballage, nécessaire
au transport de l’appareil.
4 Ouvrez le capot avant, retirez les sangles.
5 Fermez le capot avant et réglez le panneau
de commande.
1 Soulevez l’imprimante et placez-la à
l’endroit choisi.
2 Retirez les sangles de manutention.
20 - Français

Préparation des tambours
d’impression
Installation de la cartouche
de toner
1 Retirez couleur du tambour d’impression
emballase/matériel de’emballase.
2 Enlevez le bande adhesive . Retirez la feuille
de protection (b).
b
1 Secourez la cartouche de toner d’un côté à
l’autre afin de répartir le toner.
2 Retirez le ruban adhésif d’étanchéitré de la
cartouche de toner..
3 Retirez les verrous de couleur (a). Enlevez
le ruban adhésif puis les sceaux de couleur
(b).
Remarque
Veillez à bien enlever tout le ruban des
cartouches du tambour d'image.
.
b
a
3 Alignez la coche à l'extrémité de la
cartouche de toner avec la languette (a) du
tambour d'image, puis abaissez la cartouche
de toner dans le tambour d'image. Poussez
pour vous assurer qu'elle est bien assise.
Enclenchez la cartouche de toner avec le
levier de couleur.
4 Répétez le processus pour chaque les
5 Refermez le capot supérieur.
21 - Français
tambours cartouches de toner..

Charger le papier
1 Sortez le bac à papier . Retirez l'agrafe de
transport de couleur . Retirez l'agrafe de
transport de couleur. Cela vous sera utile si
des bacs de papier en option sont installés.
b
2 Ventilez le papier. Chargez du papier dans
les bacs.
4 Fermez le bac de papier.
Installer la cale du paper.
1 Soulevez le capot où le déflecteur à papier
est situé.
3 Réglez les guides (a, b) au format du
papier.Veillez à ce que les guides papier
sont reposent contre le papier.
a
b
2 Alignez les languettes du déflecteur avec les
coches dans l'imprimante Poussez sur le
déflecteur jusqu'à ce qu'il soit bien assis.
22 - Français

Alimentation
Avertissement!
Utilisez le cordon d'alimentation fourni
avec l'imprimante. L'utilisation d'un
cordon autre que celui fourni avec le
produit, ou d'une rallonge, peut entraîner
une surchauffe de l'appareil et constituer
un danger
Impression d’une page de
démonstration
Attention
Do not connect this product to an
uninterruptible power supply (UPS). For
further information please contact Oki
Data at 1-800-OKIDATA or
www.okidata.com..
1 Introduisez le cordon d’alimentation.
1 Appuyez sur Menu sur le panneau de
commande.
2 Appuyez sur la flèche vers le bas
poursélectionner Print Information [Infos
d'impression]. Appuyez sur Enter [Entrée]
3 Appuyez sur la flèche vers le bas pour
sélectionner Demo Page [Page démo].
Appuyez sur Enter [Entrée].
4 Demo1 s'affiche. Appuyez sur Enter
[Entrée].
5 Execute [Exécuter] s'affiche. Appuyez sur
Enter [Entrée].
2 Allumez l’imprimante.
23 - Français

Établir des connexions et installer des pilotes d’imprimante
Des renseignements supplémentaires au sujet
Systèmes d’exploitation
compatibles
des utilitaires sont fournis sur le CD afin de vous
aider à faire votre choix.
Votre appareil prend en charge les systèmes
d’exploitation suivants :
Windows
•Windows 7
• Windows Server 2008
•Windows Vista
• Windows Vista, édition 64-bit
• Windows Server 2003
•Windows XP
• Windows XP, édition x64
• Windows 2000, Windows 2000/Server
Macintosh
• Mac OS X 10.2.4 à 10.6.
Important!
Pour les utilisateurs de Mac OS X 10.6
IntelPC, installer Rosetta avant d’installer le
pilote de l’imprimante.
Contenu du CD
Pilotes d’imprimante
•PS
•PCL
Logiciels supplémentaires dans le CD
• Couleur du logiciel
- Color Swatch Utility (Utilitaire Nuancier de
couleurs)
- Color Correct Utility (Utilitaire de correction
des couleurs)
- PS Gamma Adjuster Utility (Utilitaire de
correcteur gamma PS)
• Logiciels réseau
- Network Card Setup Utility (utilitaire de
configuration de carte réseau)
- LPR Utility (utilitaire LPR)
- Network Extension Utility (utilitaire de
extension de réseau)
• Utilities facultatives
- Changer la Printer Display Language (la
langue d’exposition d’imprimante)
- Installer PDF Direct Print (Impression directe
des fichiers PDF)
Le CD fourni avec votre imprimante comprend les
pilotes d'imprimante, des utilitaires et une
connexion réseau pour le téléchargement
d'autres utilitaires du site Web d'Oki Data.
24 - Français
Internet Télécharge
• Print Supervision (Suivi des impressions)
• Storage Device Manager (Gestionnaire des
unités de mémoire)
• Print Job Accounting (Comptabilisation des
travaux d'impression)
• Profile Assistant (Assistant de profils)

Interfaces Disponibles
Remarque
Les câbles d'interface ne sont pas fournis avec
l'imprimante.
Votre imprimante est dotée de trois interfaces :
1 Ethernet
- Pour la connexion par câble à un réseau
- 10Base-T et 100Base-TX
2 USB
- Pour la connexions directe à un PC ou Mac.
- Ce port requiert un câble conforme à la
version 2.0 de l'interface USB ou une version
supérieure..
Installation réseau Windows
Connexion réseau
Important!
Pour réduire le brouillage électromagnétique—le « bruit » qui brouille la
réception des téléviseurs ou autres
appareils—placez le tore magnétique joint
sur le câble de réseau connecté à votre
imprimante.
Remarque
Le câble Ethernet et le concentrateur ne sont pas
fournis avec votre appareil.
1 Éteignez l'imprimanter.
2 Éteignez l'ordinateur.
3 Faites une boucle avec le câble comme
illustré et placez le filtre à environ 25 mm (1
po) du connecteur raccordé à l'imprimante..
3 Parallèle (Windows uniquement)
- Pour la connexions directe à un PC.
- Requiert un câble parallèle bidirectionnel
(conforme IEEE-1284).
Procédures d’installation
Windows
Installation réseau, voir ci-dessous.
Installation USB, consultez la page 27.
Installation pour le port parallèle,
consultez la page 27.
Macintosh
Installation réseau, consultez la page 28.
Installation USB, consultez la page 30.
25 - Français

4 Connectez une extrémité du tore magnétique
au câble Ethernet vers l’imprimante.
5 Branchez l'autre extrémité du câble Ethernet
à un routeur adéquat.
4 Appuyez sur la flèche vers le bas pour
sélectionner Network [Réseau]. Appuyez sur
Enter [Entrée].
5 Execute [Exécuter] s'affiche. Appuyez sur
Enter [Entrée].
Installez les pilotes d’imprimante et les utilitaires
1 Veillez à ce que l’imprimante soit éteinte.
2 Insérez le CD fourni avec votre imprimante
dans le lecteur de CD-ROM. Le CD est lancé
automatiquement. (Si le CD n.est pas lancé
automati-quement, cliquez sur [Start]
(Démarrer) [Run] (Exécuter) > [Browse]
(Parcourier). Accédez à l'unité de CD-ROM et
double-cliquez sur [setup,.exe] puis cliquez
sur [OK].)
Imprimez la page Network Information [Infos sur le réseau]
La page Network Information (Information
réseau) vous donne les renseignements
nécessaires pour installer le logiciel et configurer
le réseau.
1 Assurez-vous que l’imprimante est en
marche.
3 Sélectionnez la langue d’installation.
4 Acceptez le contrat de license.
5 Cliquez sur [Driver Setup] (Paramétrage du
pilote).
6 Cliquez sur [Install Driver] (nstaller le pilote).
7 Sélectionnez imprimante network. Cliquez sur
[Next] (Suivant).
8 À l'invite, sélectionnez émulation
d'imprimante (PS, PCL).
9 Observez les directives à l’écran.
Installer le Guide de l’utilisateur
Si vous souhaitez copier le fichier pdf du Guide
d'utilisation sur les ordinateurs branchés à
l'imprimante :
2 Appuyez sur Menu sur le panneau de
commande.
3 Appuyez sur la flèche vers le bas pour
sélectionner Print Information [Infos
d'impression]. Appuyez sur Enter [Entrée].
26 - Français

10 CInsérez le CD fourni avec votre imprimante
dans le lecteur de CD-ROM. Le CD est lancé
automatiquement. (Si le CD n.est pas lancé
automati-quement, cliquez sur [Start]
(Démarrer) [Run] (Exécuter) > [Browse]
(Parcourier). Accédez à l'unité de CD-ROM et
double-cliquez sur [setup,.exe] puis cliquez
sur [OK].)
11 Sélectionnez la langue d’installation et
acceptez le contrat de license.
12 Cliquez sur [User Guides] (Guides de
l’Utilisateur).
13 Cliquez sur [Install User Guide] (Installer
Guide de l’Utilisateur) et observez les
directives à l’écran.
8 Sélectionnez le port USB. Cliquez sur [Next]
[Suivant].
9 Sélectionnez [OKI C910], puis sélectionnez
émulation d'imprimante (PS ou PCL).
10 Observez les directives à l’écran.
11 Lorsque vous y êtes invité, connecter le câble
USB à l’imprimante (1) et dans l'ordinateur
(2).
Installation USB Windows
Installez les pilotes d’imprimante et les utilitaires
1 Veillez à ce que l’imprimante soit éteinte.
2 Insérez le CD fourni avec votre imprimante
dans le lecteur de CD-ROM. Le CD est lancé
automatiquement. (Si le CD n.est pas lancé
automati-quement, cliquez sur [Start]
(Démarrer) [Run] (Exécuter) > [Browse]
(Parcourier). Accédez à l'unité de CD-ROM et
double-cliquez sur [setup,.exe] puis cliquez
sur [OK].)
3 Sélectionnez la langue d’installation.
4 Acceptez le contrat de license.
5 Cliquez sur [Driver Setup] (Paramétrage du
pilote).
12 Allumez l'imprimante.
Installer le Guide de l’utilisateur
Si vous souhaitez également installer le pdf du
Guide d'utilisation :
1 Après avoir placé le CD dans l'unité de
CD-ROM, cliquez sur [User Guides] (Guide de
l’Utilisateur).
2 Cliquez sur [Install User Guide] (installer
Guide de l’Utilisateur) et observez les
directives à l’écran.
Installation port interface
parallèle Windows
1 Éteignez l’imprimante et l'ordinateur..
6 Cliquez sur [Install Driver] [Installer le
pilote].
7 Cliquez sur imprimante locale.
27 - Français

2 Connectez un câble parallèle pour relier
l'imprimante à l'ordinateur.
8 Sélectionnez le port LPT1:. Cliquez sur [Next]
(Suivant).
9 Sélectionnez [OKI C910], puis sélectionnez
émulation d'imprimante (PS, PCL).
10 Observez les directives à l’écran.
Installer le Guide de l’utilisateur
Si vous souhaitez également installer le pdf du
Guide d'utilisation :
1 Après avoir placé le CD dans l'unité de
CD-ROM, cliquez sur [User Guides] (Guide de
l’Utilisateur).
2 Cliquez sur [Install User Guide] (installer
Guide de l’Utilisateur) et observez les
directives à l’écran.
Installation réseau
Macintosh
3 Allumez l’imprimante et l'ordinateur.
Installez les pilotes d’imprimante et les utilitaires
1 Veillez à ce que l’imprimante soit éteinte.
2 Insérez le CD fourni avec votre imprimante
dans le lecteur de CD-ROM. Le CD est lancé
automatiquement. (Si le CD n.est pas lancé
automati-quement, cliquez sur [Start]
(Démarrer) [Run] (Exécuter) > [Browse]
(Parcourier). Accédez à l'unité de CD-ROM et
double-cliquez sur [setup,.exe] puis cliquez
sur [OK].)
Connexion réseau
Important!
Pour réduire le brouillage électromagnétique—le « bruit » qui brouille la
réception des téléviseurs ou autres
appareils—placez le tore magnétique joint
sur le câble de réseau connecté à votre
imprimante
Remarque
Le câble Ethernet et le concentrateur ne sont pas
fournis avec votre appareil.
1 Éteignez l'imprimanter et l'ordinateur.
3 Sélectionnez la langue d’installation.
4 Acceptez le contrat de license.
5 Cliquez sur [Driver Setup] (Paramétrage du
pilote).
6 Cliquez sur [Install Driver] (Installer le
pilote).
7 Cliquez sur imprimante locale.
28 - Français

2 Faites une boucle avec le câble comme
illustré et placez le filtre à environ 25 mm (1
po) du connecteur raccordé à l'imprimante.
2 Placez le CD fourni avec l’imprimante dans
l’unité de CD-ROM.
3 Double-cliquez sur l’icône de CD qui est
affiché sur le Bureau.
4 Ouvrez le dossier MAC.
3 Connectez une extrémité du tore magnétique
au câble Ethernet vers l’imprimante.
4 Branchez l'autre extrémité du câble Ethernet
à un routeur adéquat..
5 Double-cliquez sur l’icône MAC Installateur
C910.
L'installateur affiche le pilote présélectionné.
6 Sélectionnez tous les utilitaires que vous
voulez installer.
7 Cliquez sur [Install] (Installer).
Ajout de l’imprimante
1 Exécutez l’utilitaire Print Center (Centre
d’impression) ou Print Setup Utility
(Configuration de l’imprimante). Clique sur
[Add] (Ajouter).
2 Cliquez sur [More Printers] (plus imprimante).
3 Sélectionnez le protocole : OKI TCP/IP ou
Rendezvous/Bonjour dans le menu défilant.
4 Entrez l’adresse IP de l’imprimante.
5 Select the printer model. Cliquez sur [Add]
(Ajouter).
6 Quitter l’utilitaire Print Center (Centre
d’impression) ou Print Setup Utility
(Configuration de l’imprimante).
Installez les pilotes d’imprimante et les utilitaires
1 Allumez l’imprimante, puis allumez
l’ordinateur.
29 - Français
Installer le Guide de l’utilisateur
1 Après avoir placé le CD dans l'unité de
CD-ROM, double-cliquez sur l’icône de CD sur
le Bureau.
2 Faites défiler jusqu’à C910_UG_cf.pdf dan le
répertoire racine.
• Pour Installer: glissez le dossier sur le
Bureau pour le copier.
• Pour Visualiser: double-cliquez sur le
fichier.

Installation USB Macintosh
Connectez le câble USB
Remarque
Le fonctionnement de l’imprimante n’est pas
garanti si un autre périphérique copatible USB est
connecté en même temps avec l’imprimante.
2 Placez le CD fourni avec l’imprimante dans
l’unité de CD-ROM.
3 Double-cliquez sur l’icône de CD qui est
affiché sur le Bureau.
4 Uvrez le dossier MAC.
1 Éteignez de l’imprimante.
2 Connectez le câble USB au port USB de
l’ordinateur
3.connectez l’autre extrémité du câble USB au
port USB de l’imprimante.
5 Double-cliquez sur l’icône MAC Installateur
C910.
L'installateur affiche le pilote présélectionné.
6 Sélectionnez tous les utilitaires que vous
voulez installer.
7 Cliquez sur [Install] (Installer).
Ajout de l’imprimante
1 Exécutez l’utilitaire Print Center (Centre
d’impression) ou Print Setup Utility
(Configuration de l’imprimante).
2 Cliquez sur [Add] (Ajouter).
3 Click [More Printers] (plus imprimantes).
4 Sélectionnez OKI USB dans le menu défilant.
5 Select the printer model. Cliquez sur [Add]
(Ajouter).
6 l’utilitaire Print Center (Centre d’impression)
ou Print Setup Utility (Configuration de
l’imprimante).
Installez les pilotes d’imprimante et les utilitaires
1 Allumez l’imprimante, puis allumez
l’ordinateur.
30 - Français
Installer le Guide de l’utilisateur
1 Après avoir placé le CD dans l'unité de
CD-ROM, double-cliquez sur l’icône de CD sur
le Bureau.
2 Faites défiler jusqu’à C910_UG_cf.pdf dan le
répertoire racine.
• Pour Installer: glissez le dossier sur le
Bureau pour le copier.
• Pour Visualiser: double-cliquez sur le
fichier.

Instalación de hardware
Contenido de la caja
1 Impresora
2 De retención del paper
3 Bolsas protectoras contra la luz,, etiquetas
para las bandejas de papel
4 Paño para limpiar lentes LED
5 Cable de alimentación
6 Ferrite Core
7 CD
8 Cartucho de toner
9 Documentación (no se muestran)
Prepare el lugar
Requisitos medioambientales
• Temperatura: 10 a 32 °C (50 a 90 °F)
• Humedad: 20 a 80% HR (humedad relativa))
Si instala su equipo en un lugar donde la
humedad es menor al 30% de HR, utilice un
humidificador o un tapete antiestático.
Requisitos de espacio
168 lbs
76
31.5 in.
800 mm
7.9 in.
200 mm
19.7 in.
500 mm
Nota
Los cables USB y Ethernet no vienen con su
equipo y deben comprarse por separado.
Le recomendamos que guarde los materiales
de embalaje, son necesarios para transportar
el equipo.
7.9 in.
200 mm
Requisitos de espacio
• 110-127 V CA, 60 Hz, o 230 V CA, 50 Hz
• Máximo de 1500 vatios.
¡Importante!
No conecte este equipo a un suministro de
energía ininterrumpible (UPS).
Si la fuente de energía es inestable, utilice
un regulador de voltaje.
31 - Español

Desempacar la máquina
b
¡Importante!
Se necesitan al menos tres personas para
levantar el equipo en forma segura.
3 Levante la panel del operador.
168 lbs.
76
Nota
Las siguientes ilustraciones son descriptivas.
Los materiales de embalaje o la cinta reales
podrían variar un poco respecto de las
ilustraciones.
Guarde los materiales de embalaje, son
necesarios para transportar el equipo.
1 Levante la impresora y colóquela en la
ubicación seleccionada.
4 Abrir la tapa delantera y retire el material
protector y la hoja protectora.
5 Cierre la tapa delantera y ajuste el panel del
operador.
2 Retire las cintas adhevivas de transporte.
32 - Español

Prepare los cilindros de
imagen
Reinstale el cartuchos de
tóner
1 Retire cilindro de imagen protector para
transporte.
2 Retire el cinta adhesiva. Retire la hoja de
protecciôn.
1 Secourez la cartouche de toner d’un côté à
l’autre afin de répartir le toner.
2 Retirez le ruban adhésif d’étanchéitré de la
cartouche de toner..
3 Retirez les verrous de couleur (a). Retire la
cinta adhesiva y luego retire los sellos a
color (b).
Nota
Asegúrese de retirar toda la cinta adhesiva de
los cartuchos del cilindro de imagen.
.
b
a
3 Alinee la muesca en el extremo del cartucho
de tóner con la lengüeta (a) del cilindro de
imagen y luego deslice el cartucho de tóner
dentro del cilindro de imagen. Empuje hacia
abajo para asegurarse de que calza en su
lugar.
avec le levier de couleur..
Enclenchez la cartouche de toner
.
4 Repita estos pasos para instalar los
5 Cierre la cubirta superior.
33 - Español
cartuchos de tóner.

Carga de papel
1 Saque la bandeja del papel. Retire el
retenedor de embarque a color.
Inserte la etiqueta del tamaño del medio
correspondiente. Es útil cuando tiene
instaladas bandejas opcionales.
b
2 Ventile el papel. Coloque el papel en la
bandeja.
4 Cierre la bandeja de papel.
Instalar el de retención del
paper
1 Levante la tapa en donde está colocado el
receptor de papel.
3 Ajuste las guías (a, b) de acuerdo al tamaño
del papel. Asegúrese de que las guías de
papel están bien ajustadas contra el papel.
a
b
2 Alinee las lengüetas del receptor con las
muescas de la impresora. Press down until
catcher is fully seated.
34 - Español

Conexión de la alimentación
¡ADVERTENCIA!
Asegúrese de utilizar el cable de
alimentación 15 A AC que vino con la
impresora. El uso de un cable de
alimentación distinto al suministrado con
este producto, o el uso de un cable de
extensión, puede causar su
recalentamiento y constituir un peligro de
seguridad.
¡PRECAUCION!
Asegúrese de utilizar el cable de
alimentación 15 A AC que vino con la
impresora. El uso de un cable de
alimentación distinto al suministrado con
este producto, o el uso de un cable de
extensión, puede causar su
recalentamiento y constituir un peligro de
seguridad..
1 Enchufe el cable de alimentación.
Imprima la página demo
1 Pulse Menú en el panel de control.
2 Pulse el botón con flecha hacia abajo para
seleccionar Printer Information (Información
sobre impresora). Pulse Enter.
3 Pulse el botón con flecha hacia abajo para
seleccionar Demo Page (Página de
demostración). Pulse Enter.
4 Aparece Demo1. Pulse Enter.
5 Aparece el mensaje Execute (Ejecutar).
Pulse Enter.
2 Encienda la impresora..
35 - Español

Cómo hacer conexiones e instalar los controladores de la impresora
El CD además le proporciona información
Sistemas operativos
compatibles
adicional sobre las utilidades para facilitarle la
elección.
Su equipo es compatible con los siguientes
sistemas operativos:
Windows
•Windows 7
• Windows Server 2008
•Windows Vista
• Windows Vista 64-bit Edition
• Windows Server 2003
•Windows XP
• Windows XP x64 Edition
• Windows 2000, Windows 2000/Server
Macintosh
• Mac OS X 10.2.4 a 10.6.
¡Importante!
Los usuarios de Mac OS X 10.6 Intel PC
deben instalar Rosetta antes de instalar el
controlador de la impresora.
Contenido del CDs
Controladores de la impresora
•PS
•PCL
Software adicional
•Software Color
- Color Swatch Utility (Utilidad de Muestrario
de Colores)
- Color Correct Utility (Utilidad Corrección de
Color)
- PS Gamma Adjuster Utility (Utilidad PS de
Ajuste de Gamma)
•Software de red
- Network Card Setup Utility (Utilidad Config.
de la tarjeta de red)
- Direct Network Printing Utility (LPR) (Utilidad
de Impresión Directa en la Red (LPR))
- Network Extension Utility (Utilidad Extension
de red)
• Utilidads opcionales
- Change Printer Display Language (Cambie el
idioma del Despligue de Impresora)
- PDF Direct Print Utility (Utilidad Impresión
Directa de PDF)
El CD que viene con la impresora incluye los
controladores, utilidades y una conexión a la red
para que pueda bajar utilidades adicionales desde
el sitio Web de Oki Data.
36 - Español
El interned Descarga
• Print Supervision Utility (Utilidad Print
SuperVision)
• Storage Device Manager Utility (Utilidad
Storage Device Manager)
• Print Job Accounting Utility (Utilidad
Contabilidad de trabajos de impresión)
• Profile Assistant Utility (Utilidad Asistente de
Perfiles)

Interfaces disponible
Instalación de la red bajo
Windows
Nota
Los cables de interfaz no se suministran con la
impresora
La impresora tiene tres interfaces:
1 Ethernet
- Para una conexión a redes mediante un
cable, PCs y/o Macs
- 10Base-T y 100Base-TX
2 USB
- Para una conexión directa al PC o Mac.
- Requiere un cable compatible con USB
versión 2.0 o superior.
3 Paralela (solo Windows)
- Para una conexión directa al PC.
- Requiere un cable paralelo bidireccional
(compatible con IEEE 1384).
Haga la conexión de redes
¡Importante!
Para reducir la interferencia
electromagnética—"ruido" que interfiere
con los televisores y otros equipos—debe
conectar el núcleo de ferrita que se incluye,
al cable de redes conectado a su impresora.
Nota
El concentrador y el cable Ethernet no vienen con
su máquina.
1 Apague la impresora.
2 Apague la computadora.
3 Conecte el cable como se muestra colocando
el núcleo de ferrita a unos 25 mm (1
pulgada). del conector en el extremo de la
impresora.
Procedimientos de
instalación
Windows
Instalación en red, ver abajo.
Instalación de USB, ver página 39.
Instalación de Puerto Paralelo, ver
página 39.
Macintosh
Instalación en red, ver página 40.
Instalación de USB, ver página 42.
37 - Español

4 Conectar el extremo del núcleo de ferrita del
cable Ethernet a la impresora.
5 Conecte el otro extremo del cable Ethernet a
un hub (concentrador) apropiado.
5 Aparece el mensaje Execute (Ejecutar). Pulse
Enter.
Instale los controladores de la impresora y las utilidades
1 Asegúrese que la impresora está apagada.
2 Inserte el CD viene con su impresora en la
unidat CD-ROM. El CD se ejecuta
automáticamente. (Si no se ejecuta, haga
clic en [Start] (Inicio) > [Run] (Ejecutar) >
[Browse] (Examinar). Busque la unidad
CD-ROM, haga double clic en [setup.exe] y
haga clic en [OK] (Aceptar).)
3 Seleccione su idioma.
Imprima la página Network Information (Información de red)
La página con Información de redes le suministra
la información necesaria para instalar software y
configurar la red.
1 Assegúrese de que la impresora está
encendida.
4 Aceptar el contrato de licencia.
5 Haga clic en [Driver Setup] (Config. de
controlador).
6 Haga clic en [Install Driver] (Instalar
controlador).
7 Seleccione de impresoras network. Haga clic
en [Next] (Siguiente).
8 Cuando se le indica, seleccione la emulación
de la impresora (PS, PCL) que desea instalar.
9 Siga las instrucciones en pantallas.
Innstalar la Guía del Usuario
Si desea instalar la Guía del usuario (pdf) en las
computadoras conectadas a la impresora:
10 Inserte el CD viene con su impresora en la
unidat CD-ROM. El CD se ejecuta
automáticamente. (Si no se ejecuta, haga
clic en [Start] (Inicio) > [Run] (Ejecutar) >
[Browse] (Examinar). Busque la unidad
CD-ROM, haga double clic en [setup.exe] y
haga clic en [OK] (Aceptar).)
2 Pulse Menú en el panel de control.
3 Pulse el botón con flecha hacia abajo para
seleccionar Printer Information (Información
sobre impresora). Pulse Enter.
4 Pulse el botón con flecha hacia abajo para
seleccionar Network (Red). Pulse Enter.
38 - Español
11 Seleccione su idioma y aceptar el contrato de
licencia.

12 Haga clic en [User Guides] (Guías de
Usuario).
13 Haga clic en [Install User Guide] (Instalar
guía del usuario) y siga las instrucciones en
pantallas.
Instalación de USB Windows
Instale los controladores de la impresora y las utilidades
1 Asegúrese que la impresora está apagada.
2 Inserte el CD viene con su impresora en la
unidat CD-ROM. El CD se ejecuta
automáticamente. (Si no se ejecuta, haga
clic en [Start] (Inicio) > [Run] (Ejecutar) >
[Browse] (Examinar). Busque la unidad
CD-ROM, haga double clic en [setup.exe] y
haga clic en [OK] (Aceptar).)
11 Cuando se le indica, c
puerto USB de la impresora (1) y de la
computadora (2)
onecte el cable USB al
.
3 Seleccione su idioma.
4 Aceptar el contrato de licencia.
5 Haga clic en [Driver Setup] (Config. de
controlador).
6 Haga clic en [Install Driver] (Instalar
controlador).
7 Seleccione de impresoras local.
8 Seleccione el puerto USB. Haga clic en [Next]
(Siguiente).
9 Seleccione [OKI C910], luego seleccione el
tipo de emulación a instalar (PCL, PS).
10 Siga las instrucciones en pantallas.
12 Encienda la impresora.
Innstalar la Guía del Usuario
Si también quiere instalar la Guía del usuario
(pdf):
1 Con el CD en la unidad CD-ROM, haga clic en
[User Guides] (Guías de Usuario).
2 Haga clic en [Install User Guide] (Instalar
guía del usuario) y siga las instrucciones en
pantallas.
Instalación de Interfaz
paralela Windows
1 Apague la impresora y la computadora.
39 - Español

2 Conecte un cable paralelo entre la impresora
y la computadora.
8 Seleccione el puerto LPT1:. Haga clic en
[Next] (Siguiente).
9 Seleccione [OKI C910], luego seleccione el
tipo de emulación a instalar (PCL, PS).
10 Siga las instrucciones en pantallas.
Innstalar la Guía del Usuario
Si también quiere instalar la Guía del usuario
(pdf):
1 Con el CD en la unidad CD-ROM, haga clic en
[User Guides] (Guías de Usuario).
2 Haga clic en [Install User Guide] (Instalar
guía del usuario) y siga las instrucciones en
pantallas.
Instalación de la red bajo
Macintosh
Haga la conexión de redes
3 Encienda la impresora y la computadora.
Instale los controladores de la impresora y las utilidades
1 Asegúrese que la impresora está apagada.
2 Inserte el CD viene con su impresora en la
unidat CD-ROM. El CD se ejecuta
automáticamente. (Si no se ejecuta, haga
clic en [Start] (Inicio) > [Run] (Ejecutar) >
[Browse] (Examinar). Busque la unidad
CD-ROM, haga double clic en [setup.exe] y
haga clic en [OK] (Aceptar).)
3 Seleccione su idioma.
¡Importante!
Para reducir la interferencia
electromagnética—"ruido" que interfiere
con los televisores y otros equipos—debe
conectar el núcleo de ferrita que se incluye,
al cable de redes conectado a su impresora.
Nota
El concentrador y el cable Ethernet no vienen con
su máquina.
1 Apague la impresora y la computadora.
4 Aceptar el contrato de licencia.
5 Haga clic en [Driver Setup] (Config. de
controlador).
6 Haga clic en [Install Driver] (Instalar
controlador).
7 Seleccione de impresoras local.
40 - Español

2 Conecte el cable como se muestra colocando
el núcleo de ferrita a unos 25 mm (1
pulgada). del conector en el extremo de la
impresora.
3 Conectar el extremo del núcleo de ferrita del
cable Ethernet a la impresora.
2 Inserte el CD viene con su impresora en la
unidat CD-ROM.
3 Haga doble clic en el icono del CD que
aparece en su escritorio.
4 Abra la carpeta MAC.
5 Haga doble clic en el icono Instalador Mac
C910.
Aparece [Installer] (Instalador) con el
controlador preseleccionado..
6 Seleccione las utilidades que desea instalar.
7 Haga clic en [Install] (Instalar).
Agregue la impresoras
4 Conecte el otro extremo del cable Ethernet a
un hub (concentrador) apropiado.
Instale los controladores de la impresora y las utilidades
1 Encienda la impresora, luego encienda la
computadora.
1 Ejecute la utilidad Print Center (Centro de
impresión) o Print Setup Utility (Config. de
Impresora. Haga clic en [Add] (Agregar).
2 Haga clic en [More Printers] (Más
impresoras).
3 Seleccione el protocolo: Impresión IP o
Rendezvous/Bonjour del menú desplegable.
4 Entre la dirección IP de la impresora.
5 Seleccione el modelo du su impresora. Haga
clic en [Add] (Agregar).
6 Salga de Print Center (Centro de impresión) o
Print Setup Utility (Config. de Impresora.
Innstalar la Guía del Usuario
1 Con el CD en la unidad CD-ROM, haga doble
clic en el icono del CD en su escritorio.
2 Busque la archivo C910_UG_ls.pdf que se
encuentra en el directorio.
• Para ejecutar: arrastre el archivo .pdf al
escritorio
• Para ver: haga doble clic en el archivo .pdf.
41 - Español

Instalación de USB
Macintosh
Conecte el cable USB
Nota
No se garantiza el funcionamiento de la
impresora si otro dispositivo compatible con USB
está conectado al mismo tiempo.
1 Apague la impresora.
onecte el cable USB al puerto USB de la
2 C
computadora.
2 Inserte el CD viene con su impresora en la
unidat CD-ROM.
3 Haga doble clic en el icono del CD que
aparece en su escritorio.
4 Abra la carpeta MAC.
5 Haga doble clic en el icono Instalador Mac
C910.
Aparece [Installer] (Instalador) con el
controlador preseleccionado..
6 Seleccione las utilidades que desea instalar.
7 Haga clic en [Install] (Instalar).
Agregue la impresoras
3 Conecte el otro extremo del cable al puerto
USB de la impresora
Instale los controladores de la impresora y las utilidades
1 Ejecute la utilidad Print Center (Centro de
impresión) o Print Setup Utility (Config. de
Impresora.
2 Haga clic en [Add] (Agregar).
3 Haga clic en [More Printers] (Más
impresoras).
4 Seleccione OKI USB del menú desplegable.
5 Seleccione el modelo du su impresora. Haga
clic en [Add] (Agregar).
6 Salga de Print Center (Centro de impresión) o
Print Setup Utility (Config. de Impresora.
Instalar la Guía del Usuario
1 Con el CD en la unidad CD-ROM, haga doble
clic en el icono del CD en su escritorio.
2 Busque la archivo C910_UG_ls.pdf que se
encuentra en el directorio.
• Para ejecutar: arrastre el archivo .pdf al
escritorio
• Para ver: dhaga doble clic en el archivo
.pdf.
1 Encienda la impresora, luego encienda la
computadora.
42 - Español

Instalação do hardware
Conteúdo do pacote
1 Impressora
2 Protetor do papel
3 Sacos à prova de luz, etiquetas de
identificação da mídia das bandejas para
papel
4 Almofada de limpeza dos pentes de LED
5 Cabo de Energia Elétrica
6 Núcleo de Ferrite
7 CD
8 Cartucho de toner
Documentação (não ilustrados)
Prepare o local de
instalação
Requisitos ambientais
• Faixa de temperatura: 50 a 90 °F
(10 a 32 °C)
• Umidade: umidade relativa entre 20 e 80 %)
Se a sua unidade for instalada em um local
com umidade relativa inferior a 30 %, use
um umidificador ou tapete antiestático.
Requisitos de espaço
168 lbs
76
31.5 in.
800 mm
7.9 in.
200 mm
19.7 in.
500 mm
Nota
Os cabos Ethernet e USB não são
fornecidos com a unidade e devem ser
adquiridos separadamente.
É recomendável que você guarde as
embalagens, elas são necessárias para o
transporte da unidade.
7.9 in.
200 mm
Requisitos de energia
• 110-127 VAC, 60 Hz, ou 230 VAC, 50 Hz
• 1500 Watts no máximo.
Importante!
Não conecte este produto a um sistema de
energia ininterrupto (UPS).
Se a fonte de alimentação for instável, use
um regulador de voltagem.
43 - Português

Desembalar a unidade
b
Importante!
Pelo menos três pessoas são necessárias
para erguer a unidade com segurança.
3 Abra a tampa superior.
168 lbs.
76
Nota
As ilustrações a seguir são para referência. As
fitas e o material de embalagem podem diferir
um pouco da ilustração.
Guarde as embalagens, elas são necessárias
para transportar a unidade.
1 Coloque a impressora no local seleccionado.
4 Abra a painel do operator.
5 Abra a tampa frontal. Retire as fitas.
2 Retire as fitas de transporte.
6 Feche a tampa frontal e ajuste o painel de
operação.
44 - Português

Preparação dos cilindros OPC
1 Retire o protetor do cilindro usado para
transport.
Instale dos cartuchos de
toner
1 Agite o cartucho de toner no sentido indicado
para distribuir o toner.
2 Remova a fita adesiva. Retire a folha de
proteção.
b
3 Remova as tampas em cores (a). Remova a
fita adesiva e retire os selos em cores (b).
Nota
Certifique-se de que todos os selos em cores
foram removidos dos cilindros OPC.
.
2 Remova o selo protetor na parte inferior do
cartucho.
3 Alinhe a lingüeta na extremidade do cartucho
de toner com a guia no cilindro OPC e, em
seguida, encaixe o cartucho de toner no
cilindro OPC. Pressione-o para baixo para que
se encaixe corretamente. Trave o cartucho de
toner com a alavanca colorida.
b
a
4 Repita estas etapas para os cartuchos de
toner.
5 Feche a tampa superior.
45 - Português

Colocar papel
1 Retire a bandeja de papel. Remova o retentor
colorido usado para transporte. Cole a
etiqueta de identificação de tamanho da
mídia. Isto é útil se bandejas opcionais
estiverem instaladas.
4 Feche a bandeja.
b
2 Ventile o papel e coloque-o papel na bandeja.
3 Ajuste as guias (a, b) de acordo com o
tamanho do papel. As guias do papel devem
estar bem encostadas no papel.
Instalar o retentor do papel
1 Levante a tampa onde o retentor do papel
se encaixa.
2 Alinhe as guias do retentor com os entalhes
na impressora. Pressione para baixo até que
o retentor se encaixe totalmente
a
b
46 - Português

Conexão da impressora à
fonte de energia
Aviso!
Certifique-se de usar o cabo de
alimentação fornecido com a impressora.
O uso de um cabo de alimentação não
fornecido com o produto ou de uma
extensão pode resultar em
superaquecimento e colocar em risco a
segurança.
Cuidado
Não conecte este produto a um sistema de
energia ininterrumto (UPS - no-break).
Para obter mais informações, entre em
contato com a Oki Data pelo número 5511-3444-6747 (Grande São Paulo) 080011-5577 (Demais localidades) ou visite
www.okidata.com.
Impressão da página de
demonstração
1 Pressione o botão Menu no painel de
controle.
2 Pressione a seta para baixo para selecionar
Print Information (Imprimir informações).
Pressione Enter.
3 Pressione a seta para baixo para selecionar
Demo Page (Página de demonstração).
Pressione Enter.
4 Demo1 aparecerá. Pressione Enter.
1 Insira o cabo.
2 Lique a impresora.
5 A opção Execute (Executar) aparecerá.
Pressione Enter.
47 - Português

Conexões e instalação dos drivers da impressora
Informações adicionais sobre os utilitários são
Sistemas operacionais
compatíveis
fornecidas no CD para ajudar o usuário a fazer as
seleções.
A unidade oferece suporte aos
seguintes sistemas operacionais:
Windows
•Windows 7
• Windows Server 2008
•Windows Vista
• Windows Vista 64-bit Edition
• Windows Server 2003
•Windows XP
• Windows XP x64 Edition
• Windows 2000, Windows 2000/Server
Macintosh
• Mac OS X 10.2.4 a 10.6.
Importante!
Os usuários do Mac OS X 10.6 IntelPC
devem instalar o Rosetta antes de instalar o
driver de impressora.
Conteúdo do CD
Drivers da impressora
•PS
•PCL
Software adicional
• Color Software (Software de cores)
- Color Swatch Utility (Utilitário de Amostra de
Cores)
- Color Correct Utility (Utilitário de Correção
de Cores)
- PS Gamma Adjuster Utility (Utilitário de
ajuste PS Gamma)
• Network Software (Software de rede)
- Network Card Setup Utility (Utilitário de
configuração da placa de rede) Direct
Network Printing Utility (LPR)
- Network Extension Utility (Utilitário
Extensões de rede)
• Optional Utilities (Utilitários opcionais)
- Printer Display Language (Alterar o idioma
do painel da impressora)
- PDF Direct Print Utility (Utilitário Impressão
Direta de PDF)
Download de software
• Print SuperVision Utility (Utilitário Print
SuperVision)
• Storage Device Manager Utility (Utilitário para
gerenciar o armazenamento no dispositivo)
• Print Job Accounting Utility (Utilitário
Contabilidade de trabalhos de impressão)
• Profile Assistant Utility (Utilitário Assistente de
Perfis)
O CD fornecido com a impressora inclui os drivers
da impressora, utilitários e um link para baixar
outros utilitários do website da Oki Data.
48 - Português

Interfaces disponíveis
Nota
Não são fornecidos cabos de interface com a
impressora.
A impressora tem três interfaces:
1 Ethernet
- Para conexão de cabo de rede, PCs e/ou
Macs
- 10Base-T e 100Base-TX
2 USB
- Para conexão direta a um PC ou Mac.
- Requer um cabo que esteja em
conformidade com o padrão USB versão 2.0
ou acima.
3 Paralela (apenas Windows)
- Para conexão direta a um PC.
- requer um cabo paralelo bidirecional
(compatível com IEEE 1284).
Instalação em rede Windows
Faça a conexão de rede
Importante!
A fim de reduzir o nível de interferência
eletromagnética—"ruído" que interfere com
televisores ou outros aparelhos
domésticos—é preciso colocar o núcleo de
ferrita fornecido no cabo da rede conectado
à impressora.
Nota
O hub e o cabo Ethernet não são incluídos
na unidade.
1 Desligue a impresora.
2 Desligue o computador.
3 Enrole o cabo como ilustrado, colocando o
núcleo a cerca de 2,5 cm (1 polegada) de
distância do conector na impressora.
Procedimentos de instalação
Windows
Instalação em rede, ver abaixo.
Instalação USB, consulte a página 51.
Instalação em porta paralela, consulte a
página 51.
Macintosh
Instalação em rede, consulte a página
53.
Instalação USB, consulte a página 54.
49 - Português

4 Conecte a extremidade do cabo Ethernet com
o núcleo de ferrita à impressora.
Instale os drivers e utilitários
1 Certifique-se de que a impressora esteja
ligada.
2 Insira o CD dos drivers fornecido com a
impressora na unidade de CD-ROM. O CD
será executado automaticamente. (Se não
for, clique em [Start] (Iniciar) > {run]
(Executar) > [Browse] (Procurar). Localize a
unidade de CD-ROM. Clique duas vezes no
arquivo [setup.exe]. Clique em [OK].)
5 Conecte a outra extremidade do cabo
Ethernet a um hub adequado.
imprima a página de informações da rede
A página de informações da rede fornece as
informações necessárias para instalar o software
e configurar a rede.
3 Selecione o idioma.
4 Aceite o contrato de licença.
5 Clique em [Driver Setup] (Configuração do
driver).
6 Clique em [Install Driver] (Instalar driver).
7 Selecione impressora de rede. Clique em
[Next] (Avançar).
8 Quando solicitado, selecione [Printer
Emulation] (Emulação da Impressora) (PS,
PCL).
9 Siga as instruções exibidas na tela.
Instalar o Manual do Usuário
Para instalar o PDF do Manual do Usuário nos PCs
conectados à impressora:
10 Insira o CD dos drivers fornecido com a
impressora na unidade de CD-ROM. O CD
será executado automaticamente. (Se não
for, clique em [Start] (Iniciar) > {run]
(Executar) > [Browse] (Procurar). Localize a
unidade de CD-ROM. Clique duas vezes no
arquivo [setup.exe]. Clique em [OK].)
1 Certifique-se de que a impressora esteja
ligada.
2 Pressione o botão Menu no painel de controle.
3 Pressione a seta para baixo para selecionar
Print Information (Imprimir informações).
Pressione Enter.
4 Pressione a seta para baixo para selecionar
Network (Rede). Pressione Enter.
5 A opção Execute (Executar) aparecerá.
Pressione Enter.
50 - Português
11 Selecione o idioma e aceite o contrato de
licença.
12 Clique em [User Guides] (Guias de Operador).

13 Clique em [Install User Guide] (Instalar Guia
do Usuário) e siga as instruções exibidas na
tela.
Instalação USB em Windows
Instale os drivers e utilitários
1 Certifique-se de que a impressora esteja
ligada.
2 Insira o CD dos drivers fornecido com a
impressora na unidade de CD-ROM. O CD
será executado automaticamente. (Se não
for, clique em [Start] (Iniciar) > {run]
(Executar) > [Browse] (Procurar). Localize a
unidade de CD-ROM. Clique duas vezes no
arquivo [setup.exe]. Clique em [OK].)
Quando solicitado, conecte o cabo USB à
11
impressora (1), a seguir ao computador (2).
3 Selecione o idioma.
4 Aceite o contrato de licença.
5 Clique em [Driver Setup] (Configuração do
driver).
6 Clique em [Install Drivr] (Instalar driver).
7 Selecione impressora local.
8 Selecione a porta USB. Clique em [Next]
(Avançar).
9 Selecione [OKI C910] e, em seguida
a emulação a ser instalada (PCL, PS).
10 Siga as instruções exibidas na tela.
selecione
igue a impressora.
12 L
Instalar o Manual do Usuário
Para instalar também o PDF do Manual do
Usuário:
1 Com o CD inserido na unidade de CD-ROM do
computador, clique em [User Guides] (Guias
de Operador).
2 Clique em [Install User Guide] (Instalar Guia
do Usuário) e siga as instruções exibidas na
tela.
Instalação em interface
paralela Windows
1 Desligue a impressora e o computador.
51 - Português

2 Conecte um cabo paralelo entre a impressora
e o computador.
Instale os drivers e utilitários
1 Certifique-se de que a impressora esteja
ligada.
2 Insira o CD dos drivers fornecido com a
impressora na unidade de CD-ROM. O CD
será executado automaticamente. (Se não
for, clique em [Start] (Iniciar) > {run]
(Executar) > [Browse] (Procurar). Localize a
unidade de CD-ROM. Clique duas vezes no
arquivo [setup.exe]. Clique em [OK].)
3 Selecione o idioma.
4 Aceite o contrato de licença.
5 Clique em [Driver Setup] (Configuração do
driver).
3 Ligue a impressora e o computador.
6 Clique em [Install Driver] (Instalar driver).
7 Selecione impressora local.
8 Selecione a porta LPT1:. Clique em [Next]
(Avançar).
9 Selecione [OKI C910] e, em seguida
a emulação a ser instalada (PCL, PS).
10 Siga as instruções exibidas na tela.
selecione
Instalar o Manual do Usuário
Para instalar também o PDF do Manual do
Usuário:
1 Com o CD inserido na unidade de CD-ROM do
computador, clique em [User Guides] (Guias
de Operador).
2 Clique em [Install User Guide] (Instalar Guia
do Usuário) e siga as instruções exibidas na
tela.
52 - Português

Instalação em rede
Macintosh
Faça a conexão de rede
Importante!
A fim de reduzir o nível de interferência
eletromagnética—"ruído" que interfere com
televisores ou outros aparelhos
domésticos—é preciso colocar o núcleo de
ferrita fornecido no cabo da rede conectado
à impressora.
Nota
O hub e o cabo Ethernet não são incluídos
na unidade.
3 Conecte a extremidade do cabo Ethernet com
o núcleo de ferrita à impressora.
4 Conecte a outra extremidade do cabo
Ethernet a um hub adequado.
1 Desligue a impresora e o computador.
2 Enrole o cabo como ilustrado, colocando o
núcleo a cerca de 2,5 cm (1 polegada) de
distância do conector na impressora.
Instale os drivers e utilitários
1 Ligue a impressora e, em seguida, ligue o
computador.
2 Coloque o CD fornecido com a impressora na
unidade de CD-ROM.
3 Clique duas vezes no ícone do CD exibido na
área de trabalho.
4 Abra a pasta MAC.
5 Clique duas vezes no ícone do Mac C910
Installer.
O Programa de Instalação será exibido com o
driver pré-selecionado.
6 Selecione os utilitários que deseja instalar.
7 Clique em [Install] (Instalar).
53 - Português

Adição da impressora
1 Execute o Print Center (Centro de impressão)
ou Print Setup Utility (Utilitário de
configuração de impressão).
3.Conecte a outra extremidade do cabo à
porta USB na impressora.
2 Click [Add] (
3 Clique em [More Printers] (Mais impressoras).
4 Selecione o protocolo: [OKI TCP/IP] ou
[Rendezvous/Bonjour] no menu suspenso.
5 Digite o endereço IP da impressora
6 Selecione o modelo da impressora. Click
[Add] (
Saia do Centro de Impressão ou Utilitário de
7
configuração de impressão.
Adicionar).
Adicionar).
Instalar o Manual do Usuário
1 Com o CD inserido na unidade de CD-ROM do
computador, clique duas vezes no ícone do CD
na área de trabalho.
2 Localize o arquivo C910_UG_bp.pdf.
• Para carregar: arraste o arquivo PDF para a
área de trabalho.
• Para exibir: clique duas vezes no arquivo.
Instale os drivers e utilitários
1 Ligue a impressora e, em seguida, ligue o
computador.
2 Coloque o CD fornecido com a impressora na
unidade de CD-ROM.
Instalação USB em
Macintosh
Conexão do cabo USB
Nota
O funcionamento da impressora não é garantido
se outro dispositivo compatível com USB estiver
conectado ao mesmo tempo que ela.
1.Desligue a impresora.
2.Conecte o cabo USB à porta USB no
computador.
3 Clique duas vezes no ícone do CD exibido na
área de trabalho.
4 Abra a pasta MAC.
5 Clique duas vezes no ícone do Mac C910
Installer.
O Programa de Instalação será exibido com o
driver pré-selecionado.
6 Selecione os utilitários que deseja instalar.
7 Clique em [Install] (Instalar).
Adição da impressora
1 Execute o Print Center (Centro de impressão)
ou Print Setup Utility (Utilitário de
configuração de impressão).
2 Click [Add] (
3 Clique em [More Printers] (Mais impressoras).
4 Selecione OKI USB no menu suspenso.
5 Selecione o modelo da impressora. Click
[Add] (
Adicionar).
Adicionar).
Saia do Centro de Impressão ou Utilitário de
6
configuração de impressão.
54 - Português

Instalar o Manual do Usuário
1 Com o CD inserido na unidade de CD-ROM do
computador, clique duas vezes no ícone do CD
na área de trabalho.
2 Localize o arquivo C910_UG_bp.pdf.
• Para carregar: arraste o arquivo PDF para a
área de trabalho.
• Para exibir: clique duas vezes no arquivo.
55 - Português

© 2010 Oki Data Americas, Inc.
 Loading...