


C9000 Scancopier
USER’S GUIDE

PREFACE
Ev ery ef for t ha s be en m ade to ens ure tha t th e in for ma tio n in thi s do cum en t is com ple te,
accurate, and up-to-date. The ma nufacturer assumes no responsibility for the results of
errors beyond its control. The manufacturer also cannot guarantee that changes in
software and equipment made by other manufacturers and referred to in this guide will
not affect the applicability of the information in it. Mention of software products
manufactured by other companies does not necessarily constitute endorsement by the
manufacturer.
While all reasonable efforts have been made to make this document as accurate and
helpful as possible, we make no warranty of any kind, expressed or implied, as to the
accuracy or completeness of the information contained herein.
For latest information please see these web sites:
Oki Europe: http://www.okieurope.com
Oki Americas Inc.: http://www.okidata.com
Asian Pacific: http://www.oki.co.jp
First edition 01/2003.
Copyright © 2003 Oki Europe Ltd. All rights reserved.
Oki and Microline are registered trademarks of Oki Electric Industry Company, Ltd.
Energy Star is a trademark of the United States Environmental Protection Agency.
Other product names and brand names are registered trademarks or trademarks of
their proprietors.
As an Energy Star Partner, the manufacturer has determined that this
product meets the Energy Star guidelines for energy efficiency.
This product complies with the requirements of the Council Directives
89/336/EEC (EMC) and 73/23/EEC (LVD) as amended where applicable
on the approximation of the laws of the member states relating to
electromagnetic compatibility and low voltage.
WARNING!
This is a Class A product. In a domestic environment this product may cause
radio interference, in which case the user may be required to take adequate
measures.
PREFACE > 2

CONTENTS
Preface . . . . . . . . . . . . . . . . . . . . . . . . . . . . . . . . . . . . . . . . . . . . . 2
FCC statement . . . . . . . . . . . . . . . . . . . . . . . . . . . . . . . . . . . . . . . 5
Notes, cautions and warnings . . . . . . . . . . . . . . . . . . . . . . . . . . . 6
Getting started . . . . . . . . . . . . . . . . . . . . . . . . . . . . . . . . . . . . . . . 7
Introduction . . . . . . . . . . . . . . . . . . . . . . . . . . . . . . . . . . . . . . 7
Precautions . . . . . . . . . . . . . . . . . . . . . . . . . . . . . . . . . . . . . . . 7
Scancopier components. . . . . . . . . . . . . . . . . . . . . . . . . . . . . 8
Front view . . . . . . . . . . . . . . . . . . . . . . . . . . . . . . . . . . . . . 8
Rear view . . . . . . . . . . . . . . . . . . . . . . . . . . . . . . . . . . . . . . 8
Control panel. . . . . . . . . . . . . . . . . . . . . . . . . . . . . . . . . . . 9
Setting up your machine . . . . . . . . . . . . . . . . . . . . . . . . . . . . . . 13
Minimum configuration requirements . . . . . . . . . . . . . . . . 13
Checking package contents . . . . . . . . . . . . . . . . . . . . . . . . . 14
Unlocking the scanning unit . . . . . . . . . . . . . . . . . . . . . . . . 15
Locking the scanning unit . . . . . . . . . . . . . . . . . . . . . . . . . . 16
Setting up the ADF (optional). . . . . . . . . . . . . . . . . . . . . . . . 17
Connecting the cables . . . . . . . . . . . . . . . . . . . . . . . . . . . . . 19
Connecting the printer cable . . . . . . . . . . . . . . . . . . . . . 19
Connecting the ADF cable (optional) . . . . . . . . . . . . . . . 19
Connecting the power and turning on the machine . . . 20
Operation . . . . . . . . . . . . . . . . . . . . . . . . . . . . . . . . . . . . . . . . . . 22
Loading paper . . . . . . . . . . . . . . . . . . . . . . . . . . . . . . . . . . . . 23
Placing a document on the glass . . . . . . . . . . . . . . . . . . 23
When using the optional ADF. . . . . . . . . . . . . . . . . . . . . 23
Placing documents in the ADF . . . . . . . . . . . . . . . . . . . . 24
Using the advanced copy features . . . . . . . . . . . . . . . . . . . 25
Changing scaling . . . . . . . . . . . . . . . . . . . . . . . . . . . . . . 26
Setting paper size . . . . . . . . . . . . . . . . . . . . . . . . . . . . . . 27
Selecting Text/Photo/Mixed . . . . . . . . . . . . . . . . . . . . . 28
Adjusting print density . . . . . . . . . . . . . . . . . . . . . . . . . . 29
Increasing copy count. . . . . . . . . . . . . . . . . . . . . . . . . . . 30
Setting copy quality . . . . . . . . . . . . . . . . . . . . . . . . . . . .31
Troubleshooting . . . . . . . . . . . . . . . . . . . . . . . . . . . . . . . . . . . . . 32
LCD Messages. . . . . . . . . . . . . . . . . . . . . . . . . . . . . . . . . . . . 32
LCD Error codes. . . . . . . . . . . . . . . . . . . . . . . . . . . . . . . . . . . 32
PREFACE > 3

Clearing a paper jam in the optional ADF . . . . . . . . . . . . . . 33
Cleaning the glass . . . . . . . . . . . . . . . . . . . . . . . . . . . . . . . . 34
Cleaning the optional ADF . . . . . . . . . . . . . . . . . . . . . . . . . . 35
Replacing the ADF snap-in pad module . . . . . . . . . . . . . . . 36
Disassembling procedure. . . . . . . . . . . . . . . . . . . . . . . . 36
Assembling procedure . . . . . . . . . . . . . . . . . . . . . . . . . . 37
Technical support . . . . . . . . . . . . . . . . . . . . . . . . . . . . . . . . . 38
Appendix. . . . . . . . . . . . . . . . . . . . . . . . . . . . . . . . . . . . . . . . . . . 39
Quick reference guide . . . . . . . . . . . . . . . . . . . . . . . . . . . . . 39
Updating the printer profile . . . . . . . . . . . . . . . . . . . . . . . . . 41
Specifications . . . . . . . . . . . . . . . . . . . . . . . . . . . . . . . . . . . . 42
Optional accessories . . . . . . . . . . . . . . . . . . . . . . . . . . . . . . 43
Oki Europe . . . . . . . . . . . . . . . . . . . . . . . . . . . . . . . . . . . . . . . . . 44
Oki Asian-Pacific . . . . . . . . . . . . . . . . . . . . . . . . . . . . . . . . . . . . 47
Limited warranty:
United States and Canada . . . . . . . . . . . . . . . . . . . . . . . . . . . . . 48
Overnight Exchange:
United States and Canada . . . . . . . . . . . . . . . . . . . . . . . . . . . . . 49
Oki Americas Service Centers . . . . . . . . . . . . . . . . . . . . . . . . . . 50
Index . . . . . . . . . . . . . . . . . . . . . . . . . . . . . . . . . . . . . . . . . . . . . . 51
PREFACE > 4

FCC STATEMENT
This equipment has been tested and found to comply with the limits
for a class A digital device, pursuant to Part 15 of the FCC rules. These
limits are designed to provide reasonable protection against harmful
interference in a residential installation. This equipment generates,
uses, and can radiate radio frequency energy and, if not installed and
used in accordance with the instruction manual, may cause harmful
interference to radio communication. Operation of this equipment in
a residential area is likely to cause harmful interference in which case
the user will be required to correct the interference at his own
expense.
You are cautioned that changes or modifications not expressly
approved by the party responsible for compliance could void your
authority to operate the equipment.
The device complies with part 15 of the FCC Rules.
Operation is subject to the following two conditions:
This device may not cause harmful interference, and
1.
This device must accept any interference received, including
2.
interference that may cause undesired operation.
FCC STATEMENT > 5

NOTES, CAUTIONS AND WARNINGS
NOTE
A note appears in this manual like this. A note provides additional
information to supplement the main text which may help you to use and
understand the product.
CAUTION!
A caution appears in this manual like this. A caution provides
additional information which, if ignored, may result in equipment
malfunction or damage.
WARNING!
A warning appears in this manual like this. A warning provides
additional information which, if ignored, may result in a risk of
personal injury.
NOTES, CAUTIONS AND WARNINGS > 6

GETTING STARTED
INTRODUCTION
Congratulations on purchasing this C9000 Scancopier. The
Scancopier provides you with fast and affordable access to digital
colour copying by simply connecting it to a compatible colour laser
printer: OKI C9200, C9300, C9400 or C9500.
PRECAUTIONS
Keep the machine out of direct sunlight. Direct exposure to the
>
sun or excessive heat may cause damage to the machine.
Do not install the machine near heating or air conditioning
>
units.
Do not install the machine in a humid or dusty place.
>
Be sure to use the proper AC power source.
>
Only use the AC adapter (model ADP-50ZB made by Delta
>
Electronics, Inc.) included with the machine. Using other AC
adapters may damage the machine and void the warranty.
Place the machine securely on an even, flat surface. Tilted or
>
uneven surfaces may cause mechanical or paper-feeding
problems.
Retain the box and packing materials for shipping purposes.
>
GETTING STARTED > 7
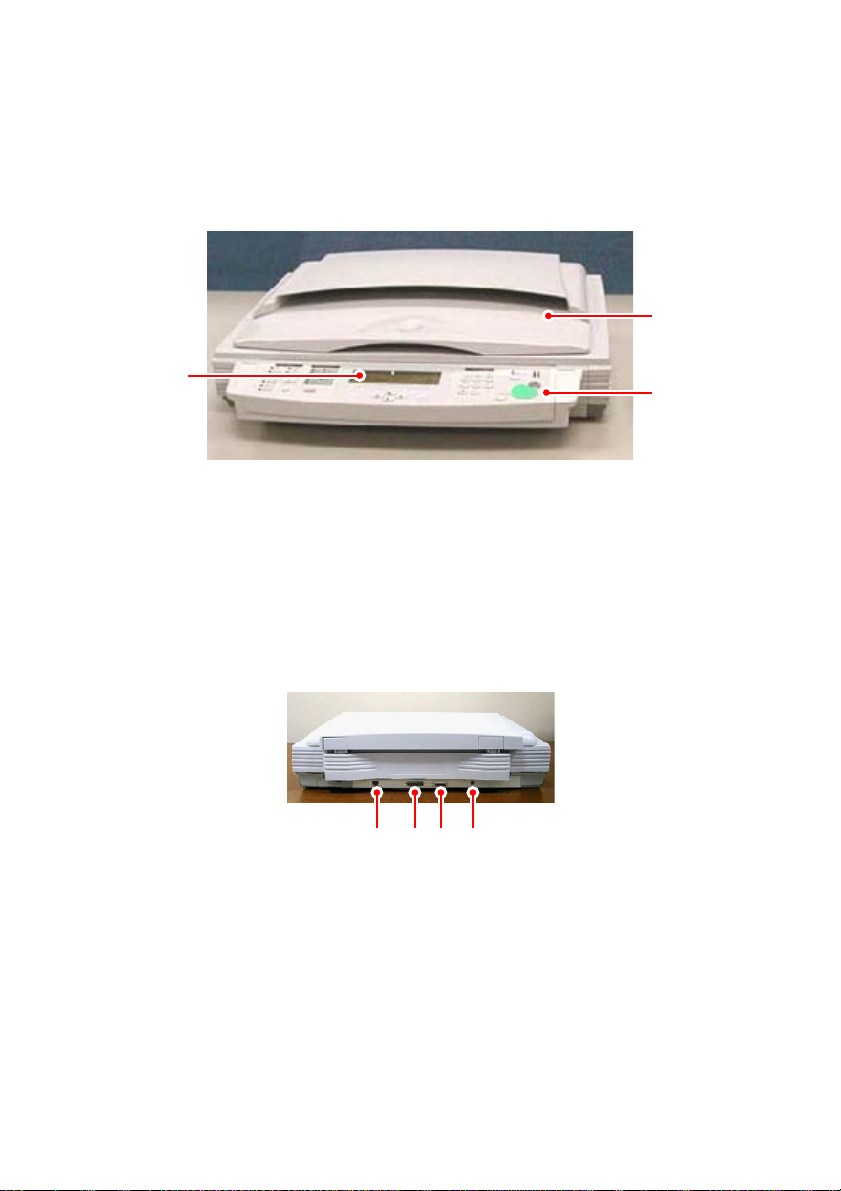
SCANCOPIER COMPONENTS
FRONT VIEW
1
3
Document cover
1.
Control panel
2.
LCD display
3.
REAR VIEW
Service port
1.
Printer port
2.
2
1 2 3 4
Automatic Document Feeder (ADF) (option) port
3.
Power jack
4.
GETTING STARTED > 8
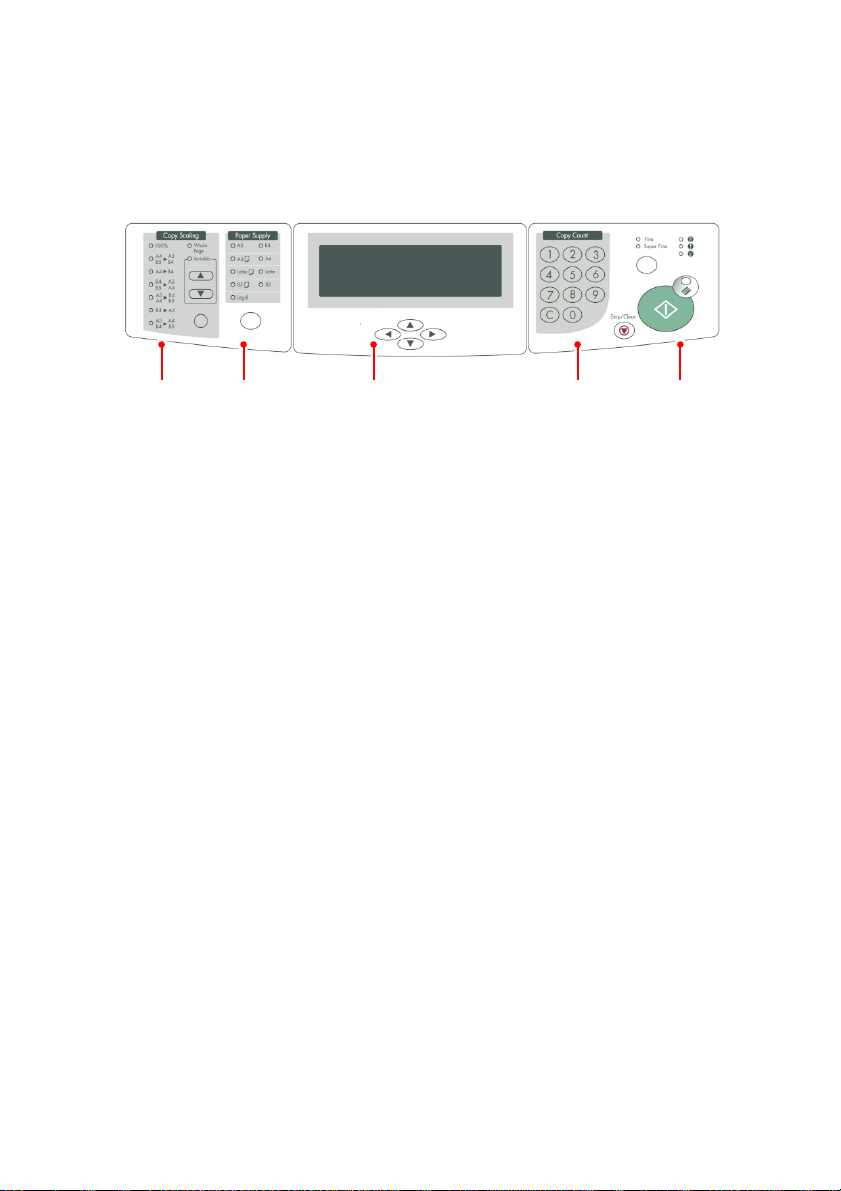
CONTROL PANEL
There are two different but very similar Control Panels, one for use in
Europe (shown below) and one for use in the USA.
1 2 3 4 5
The Control Panel consists of the following sections:
Copy Scaling (1)
>
Paper Supply (2)
>
LCD Display and Arrow Keys (3)
>
Copy Count (4)
>
Copy and other Controls/Indicators (5)
>
A brief overview of the controls is given below, showing the
differences between the Europe and USA versions. More detailed
information is given in the chapter entitled “Operation”.
GETTING STARTED > 9
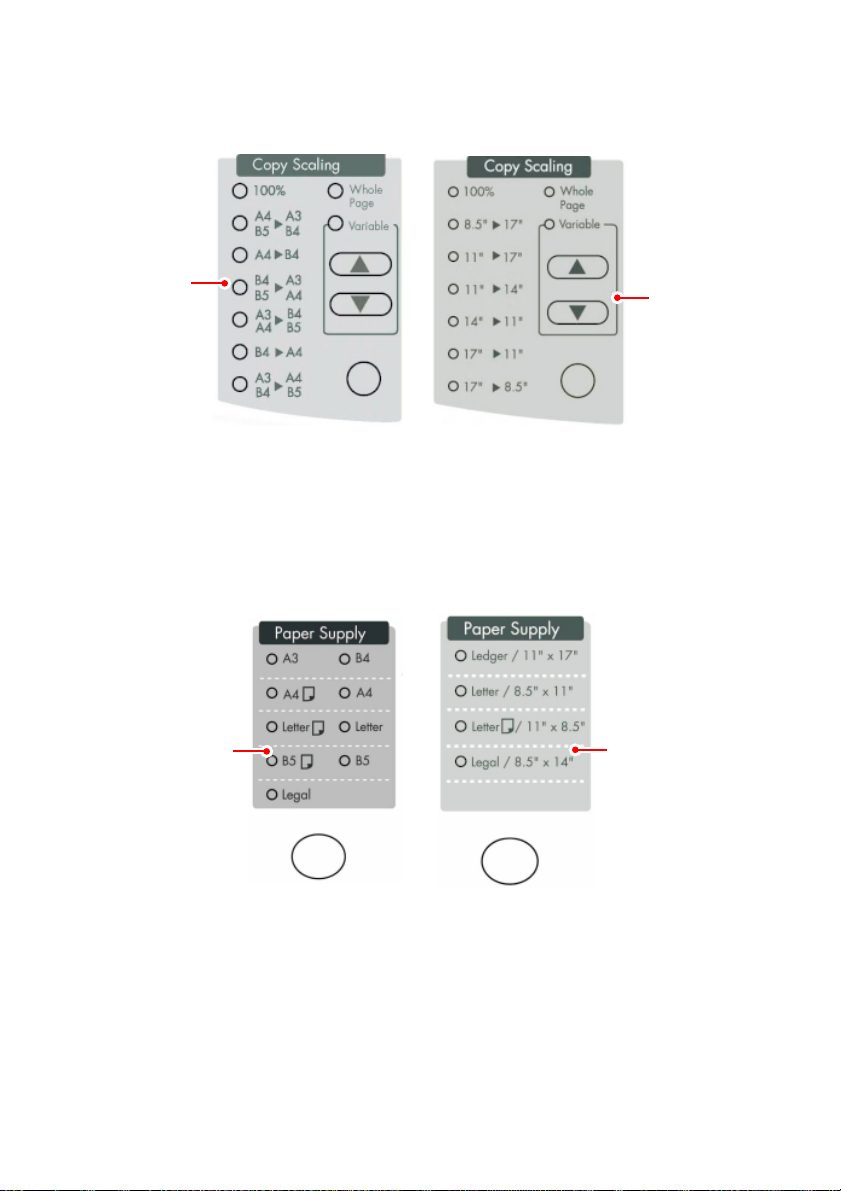
1.
Copy Scaling
1
Refer to the version for Europe (1) or USA (2). Use the button to
select from a range of preset paper size scaling ratios or use
the arrow keys to select scaling in 1% increments or
decrements from 25% to 400%.
Paper Supply
2.
1
2
2
Refer to the version for Europe (1) or USA (2). Use the button to
select your output paper size. For paper sizes where you have
the choice of portrait (tall) or landscape (wide), the paper
symbol beside the paper size denotes portrait (tall).
GETTING STARTED > 10
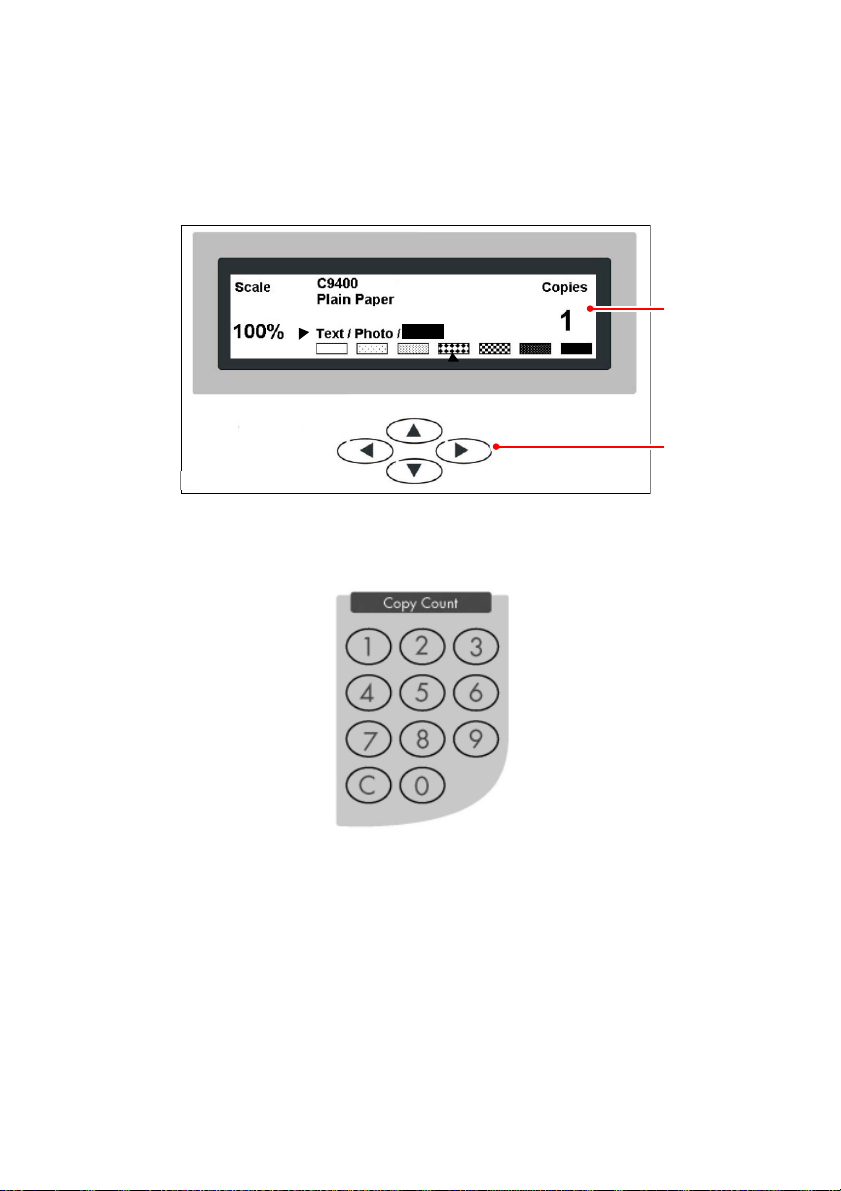
LCD display (1) and arrow keys (2)
3.
These are used to display the current settings and status
information and to select certain modes of operation.
Mixed
Copy Count
4.
1
2
Use these buttons to enter your copy count (maximum 99). The
button marked “C” allows you to clear an entry.
GETTING STARTED > 11

Copy button and other controls/indicators
5.
1
5
Use the button (1) to select copy resolution:
(a)
Fine: 300dpi or Super Fine: 600dpi.
The indicator LEDs have the following meanings when
(b)
illuminated:
The Power LED (2) indicates power on and ready status.
2
3
4
6
7
The Warning LED (3) indicates an error condition exists.
The Power Saving LED (4) indicates the machine is in
power saving mode.
Use the Stop/Clear button (5) to clear previous settings
(c)
or stop the copying process.
To make copies:
(d)
Press the Colour button (6) to toggle between colour
copying (illuminated) and black and white copying (not
illuminated) as required.
To make colour copies, press the Copy button (7) while
the Colour button (6) is illuminated.
To make black and white copies, press the Copy button
(7) while the Colour button (6) is not illuminated.
GETTING STARTED > 12

SETTING UP YOUR MACHINE
MINIMUM CONFIGURATION REQUIREMENTS
To provide the copying function, your Scancopier requires to work
with an OKI C9200, C9300, C9400 or C9500 printer.
NOTE
If your printer is networked and OKI Job Accounting software is installed,
the Job Accounting software can distinguish between printing jobs and
copying jobs (sent to the printer from the Scancopier). This functionality
is only available with the C9300 and C9500 printers.
SETTING UP YOUR MACHINE > 13
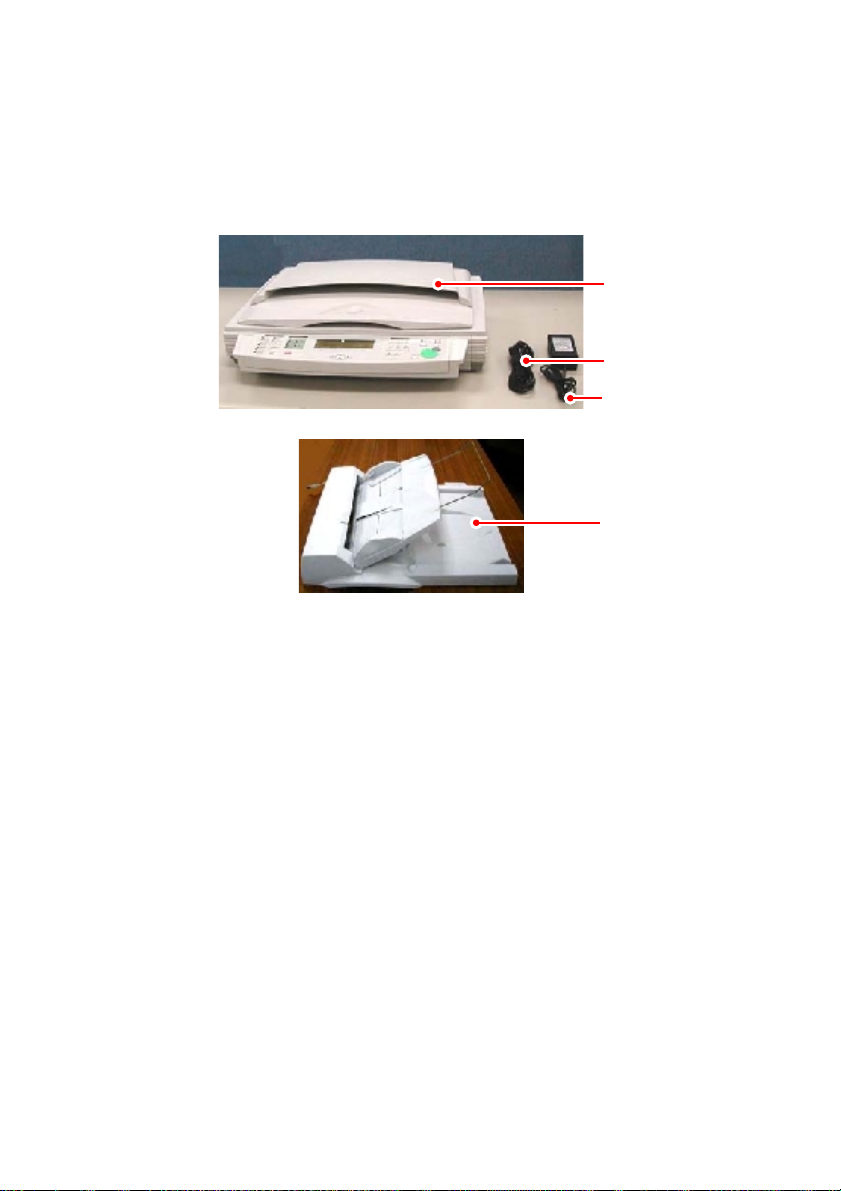
CHECKING PACKAGE CONTENTS
Unpack and check the components. If there is any item missing,
contact your dealer immediately.
1
2
3
4
Scancopier
1.
Power cord
2.
Power adapter
3.
Automatic Document Feeder (ADF), optional (shown set up)
4.
together with, but not illustrated above,
CD (containing Printer Profile Utility service software and user
5.
manuals)
Quick set-up guide
6.
Safety instructions
7.
Cross cable (for service only)
8.
Printer cable
9.
SETTING UP YOUR MACHINE > 14

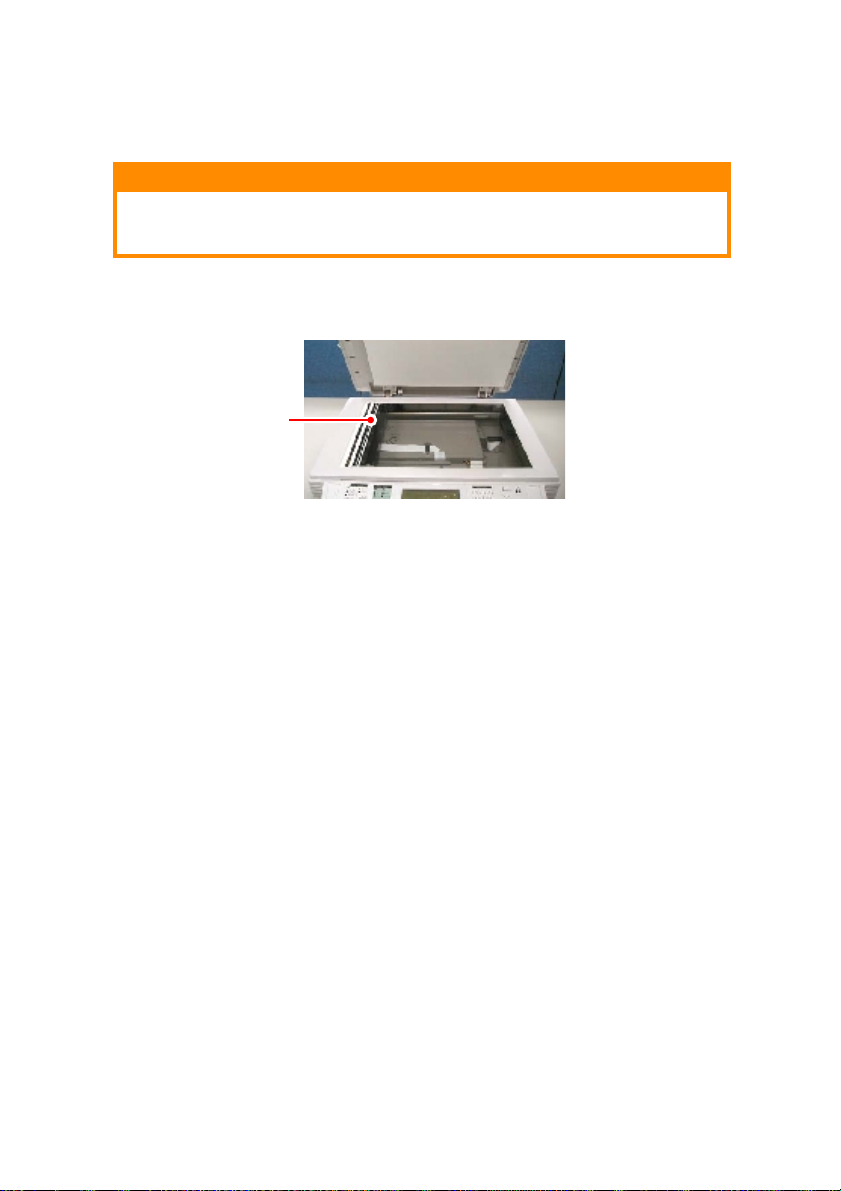
UNLOCKING THE SCANNING UNIT
1
CAUTION!
The scanning unit is locked during transport to protect the scanning
mechanism from being damaged. Be sure to unlock the scanning unit
before using the machine.
Locate the lock switch (1) at the left side of the machine.
1.
Push the lock switch down to unlock the scanning unit.
2.
SETTING UP YOUR MACHINE > 15
LOCKING THE SCANNING UNIT
CAUTION!
If you need to move the Scancopier for repair or any other reason, be
sure to lock the scanning unit before moving the Scancopier.
Turn off the Scancopier.
1.
1
If the scanning head is not located at its home position (1),
2.
turn the Scancopier on to return the scanning head to position
(1). After the scanning head is returned to the home position,
turn the Scancopier off.
Move the lock switch up to the locked position.
3.
SETTING UP YOUR MACHINE > 16
SETTING UP THE ADF (OPTIONAL)
CAUTION!
In some countries the ADF is an optional accessory. As such, it can be
installed at a later time. If the Scancopier has been used previously, be
sure to switch everything off and disconnect AC power from the
Scancopier before installing the ADF.
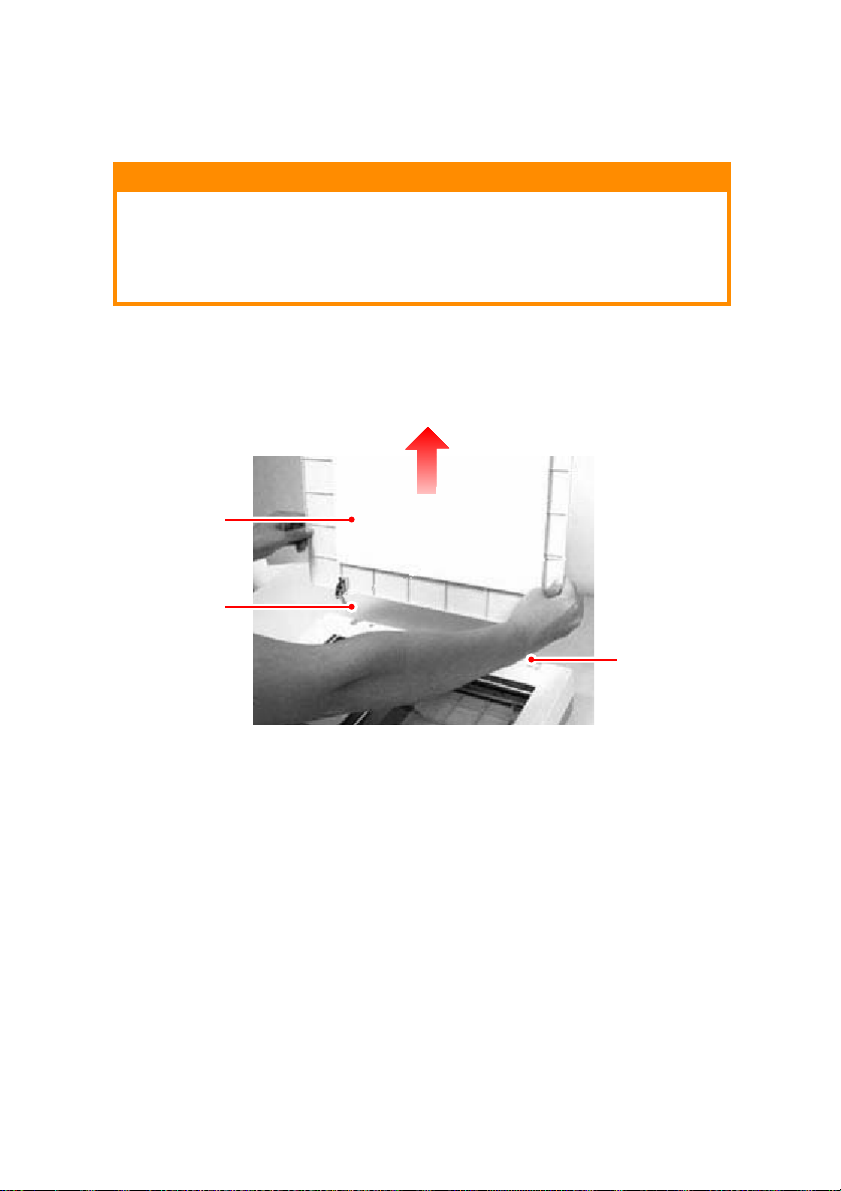
Remove the standard Scancopier document cover (1) by
1.
opening it and lifting upwards to remove the inserts (2) from
the holes at the rear of the Scancopier.
1
2
2
Store the document cover on a flat surface in a safe place.
SETTING UP YOUR MACHINE > 17

Hold the ADF document cover (3) and lower it to engage the
2.
inserts into the holes (4) at the rear of the Scancopier.
3
4
4
Close the ADF cover and raise the ADF Tray (5) to an angle of
3.
about 45 degrees.
7
5
6
Pull down the legs (6) under the ADF Tray and locate them in
4.
their support positions.
Pull the ADF Tray extension (7) out until it is fully extended.
5.
SETTING UP YOUR MACHINE > 18

CONNECTING THE CABLES
CONNECTING THE PRINTER CABLE
Connect one end of the printer cable (supplied with your
1.
Scancopier) to the parallel port on your printer.
Connect the other end of the printer cable to the Scancopier
2.
printer port (1).
1
CONNECTING THE ADF CABLE (OPTIONAL)
Connect the ADF cable which is attached to the ADF document cover to
the Scancopier ADF port (1).
SETTING UP YOUR MACHINE > 19
1

CONNECTING THE POWER AND TURNING ON THE MACHINE
2
Press the Scancopier power switch (1) to the “0” position to
1.
ensure the Scancopier is turned off.
11
Connect the end of the power cable from the Adapter to the
2.
Scancopier power port (2).
Connect the Adapter to an appropriate power outlet with the
3.
power cable supplied and switch on the power.
Press the Scancopier power switch to the “I” position to turn
4.
on your Scancopier.
SETTING UP YOUR MACHINE > 20

As part of the warm up message, the Scancopier LCD display
shows the installed C9000 Firmware version number and the
installed Colour Table version number.
NOTE
The default installed Colour Table is for the C9500 printer. If your
Scancopier is to be used with a C9200, C9300 or C9400 printer you will
have to install the corresponding Colour Table from the CD supplied
with your Scancopier. Full instructions on how to do this are supplied on
the CD.
At the end of the warm up message, the LCD display shows the
system default values in readiness for copying.
NOTE
You can leave your Scancopier ON at all times since it incorporates a
power saving function. If the Scancopier is idle for 4 hours, it
automatically shuts off the scanning lamp.
SETTING UP YOUR MACHINE > 21

OPERATION
The Scancopier has been designed to be easy-to-use. It takes three
basic steps to make a copy:
Place your document on the glass (or in the optional ADF).
1.
Enter your copy count.
2.
To ma ke cop i es:
3.
Press the Colour button to toggle between colour copying
(illuminated) and black and white copying (not illuminated).
The Scancopier is preset for colour copying.
To make colour copies, press the Copy button while the
(a)
Colour button is illuminated.
To make black and white copies, press the Copy button
(b)
while the Colour button is not illuminated.
The following sections describe in detail the things you should know
about the advanced features of the Scancopier.
OPERATION > 22

LOADING PAPER
You can load the document to be copied either on the glass or into the
ADF (Automatic Document Feeder). To copy a multi-page document,
load the document into the ADF. The ADF can hold up to 50 pages at
one time. If you need to copy pages from books, newspaper clippings,
or paper with wrinkles or curls, use the glass.
NOTE
If your printer has a duplex (double-sided) option enabled, multi-page
documents fed from the ADF will be printed in duplex mode.
PLACING A DOCUMENT ON THE GLASS
Open the document cover to reveal the glass.
1.
Place your document with the text FACE DOWN on the glass
2.
and align the top of the document in the upper-left corner (1)
of the glass.
1
Close the document cover.
3.
WHEN USING THE OPTIONAL ADF
Before using the ADF, please make sure that your paper meets the
following specifications:
Documents can range in size from 114 x 139 mm
>
(4.5 by 5.5 inches) to 297 x 420 mm (11.69 by 16.54 inches).
OPERATION > 23

Documents can range in weight from 60 to 105 g/m²
>
(16 to 28 lbs).
Documents should be square or rectangular and in good
>
condition (not fragile or worn).
Documents should be free of curl, wrinkles, tears, wet ink,
>
punch holes or ragged edges.
Documents should be free of staples, paper clips, adhesive
>
notes.
PLACING DOCUMENTS IN THE ADF
Make sure your document meets the requirements above.
1.
If you have multiple pages, fan your document(s) to avoid the
2.
occasional paper jam. The ADF can hold up to 50 pages at one
time.
Place your document(s) (2) with the text FACE UP in the ADF
3.
and make sure that the top of the pages is fed in first.
2
3
Adjust the Paper Guides (3) to centre the document(s) in the
4.
ADF.
OPERATION > 24

USING THE ADVANCED COPY FEATURES
The Scancopier provides the following features:
Changing scaling
>
Setting paper size
>
Selecting Text/Photo/Mixed
>
Adjusting print density
>
Increasing copy count
>
Setting copy quality
>
Using the copy features is outlined on the following pages. (You may
wish to refer to the Control Panel illustrations in the chapter entitled
“Getting started”.)
OPERATION > 25

CHANGING SCALING
The Scancopier scale factor is preset to 100%.
From the Copy Scaling panel, you can change the scaling by reducing
it down to 25% or enlarging it to 400%.
Press the up arrow key to enlarge your document in 1 percent
1.
increments or press the down arrow key to reduce your
document in 1 percent decrements
or
Press the button repeatedly until the LED for your desired
2.
preset scaling (141%, 122%, 115%, 93% (whole page) 86%,
81%) illuminates.
Your chosen scale factor is displayed in the LCD display.
NOTE
After you have made your copies, the settings you have just made will
remain in the LCD display for three minutes. After three minutes, the
machine will automatically return to the factory default settings.
OPERATION > 26

SETTING PAPER SIZE
NOTE
When you set the output paper size in the Scancopier, paper of that size
will be used from the printer. However, since you cannot specify the type
of paper in the Scancopier you should ensure that the correct type is
installed in the printer, especially if the printer is set to take paper from
a different tray in the event that the current tray becomes empty.
The Scancopier is preset to A4 portrait (Europe) and Letter portrait
(USA).
Use the Paper Supply panel to specify your output paper size.
Press the button repeatedly until the LED for your desired
1.
paper size illuminates. For paper sizes where you have the
choice of portrait (tall) or landscape (wide), the paper symbol
beside the paper size denotes portrait (tall).
NOTE
After you have made your copies, the settings you have just made will
remain in the LCD display for three minutes. After three minutes, the
machine will automatically return to the factory default settings.
OPERATION > 27

SELECTING TEXT/PHOTO/MIXED
The Scancopier is preset to the Mixed mode.
You can change to Photo or Text depending on the content of the
document you are copying to optimise your copy result.
Press the up arrow button below the LCD display (if required)
1.
to move the cursor to the Text/Photo/Mixed field in the LCD
display.
Highlight your required setting in the LCD display by using the
2.
left or right arrow buttons.
NOTE
After you have made your copies, the settings you have just made will
remain in the LCD display for three minutes. After three minutes, the
machine will automatically return to the factory default settings.
OPERATION > 28

ADJUSTING PRINT DENSITY
The Scancopier is preset to the normal level of print density.
If your original document comes with a lighter or darker contrast, you
can improve the copy quality by using the density adjusting feature.
Use the down arrow button below the LCD display (if required)
1.
to move the cursor down to the Density field.
Indicate your required setting in the LCD display by using the
2.
left (for lighter) or right (for darker) arrow buttons.
NOTE
After you have made your copies, the settings you have just made will
remain in the LCD display for three minutes. After three minutes, the
machine will automatically return to the factory default settings.
OPERATION > 29

INCREASING COPY COUNT
The Scancopier is preset to 1 copy.
If you wish to increase the number of copies, choose your desired
copy count using the Copy Count panel.
Enter your desired copy count, using the Clear (“C”) button if
1.
required to change the setting. The LCD display shows your
copy count (maximum value 99).
NOTE
After you have made your copies, the settings you have just made will
remain in the LCD display for three minutes. After three minutes, the
machine will automatically return to the factory default settings.
OPERATION > 30

SETTING COPY QUALITY
The Scancopier is preset to Fine copy quality which is suitable for
most business documents. If necessary, this setting can be changed
to Super Fine (enhanced) copy quality.
Use the button adjacent to the Fine/Super Fine LEDs to select
1.
the quality of copy required. The illuminated LED indicates the
quality selected.
NOTE
After you have made your copies, the settings you have just made will
remain in the LCD display for three minutes. After three minutes, the
machine will automatically return to the factory default settings.
OPERATION > 31

TROUBLESHOOTING
Use the following information to assist with solving any problems that
might arise when using your Scancopier.
LCD MESSAGES
LCD Message Action required
Copy function disables Download the printer profile. (See the section
entitled “Updating the printer profile.”)
Check printer cable or status Check if the printer cable has been correctly
LCD ERROR CODES
Info code Meaning Action required
10001 SRAM error
10002 DRAM error
10003, 10004 Lamp error
10005 Home sensor error
10006 Lamp error
10007 Lock error Turn off your Scancop ier.
10201 Z1 access error Restart your Scancopier i.e. switch it OFF and ON
10202 Z1 SRAM error
connected.
Check if the printer is turned on.
Restart the Scancopier and your printer (i.e. switch
OFF and then ON again).
If the message still appears, contact your Oki dealer.
Restart your Scancopier i.e. switch it OFF and ON
again.
If the code still appears, contact your Oki dealer.
Locate the lock switch and unlock the machine.
Restart your Scancopier.
If the code still appears, contact your Oki dealer.
again.
If the code still appears, contact your Oki dealer.
TROUBLESHOOTING > 32

CLEARING A PAPER JAM IN THE OPTIONAL ADF
Lift the ADF release button (1) on the ADF front cover (2) and
1.
open the cover.
1
2
Gently pull out the jammed paper.
2.
Close the ADF cover.
3.
The ADF is now ready for use.
TROUBLESHOOTING > 33

CLEANING THE GLASS
The Scancopier is designed to be virtually maintenance-free.
However, it still needs to be cleaned occasionally to ensure optimum
image quality and performance.
Open the document cover (1).
1.
Moisten a soft, clean cloth with isopropyl alcohol (95%).
2.
Gently wipe the white sheet beneath the document cover (1)
3.
and the document glass (2) to remove any dust or toner
particles.
1
2
Close the document cover.
4.
The Scancopier is now ready for use.
TROUBLESHOOTING > 34

CLEANING THE OPTIONAL ADF
4
From time to time the pad assembly and feeding rollers may become
contaminated with ink, toner particles or paper dust. In this case the
Scancopier may not feed documents smoothly. If this occurs please
follow the cleaning procedures below to return your machine to its
original state.
Moisten a cotton swab with isopropyl alcohol (95%).
1.
1
2
Lift the ADF release button (1).
2.
Open the ADF front cover (2).
3.
3
5
3
Wipe the feeding rollers (3) by moving the swab from side to
4.
side. Rotate the rollers forward with your finger and repeat the
above cleaning procedures until the rollers are clean. Be
careful not to snag or damage the springs (4).
Wipe the pad (5) in the direction from top to bottom. Be careful
5.
not to damage the springs (4).
Close the ADF unit.
6.
The ADF is now ready for use.
TROUBLESHOOTING > 35

REPLACING THE ADF SNAP-IN PAD MODULE
After approximately 20,000 pages have been scanned through the
ADF, the pad may be worn out and you may experience problems with
document feeding. In this case, it is highly recommended that you
replace the pad module by a new one. To order the pad module,
please consult your nearest dealer. Follow the procedure below to
replace the pad module.
DISASSEMBLING PROCEDURE
1
2
Lift the ADF release button (1).
1.
Open the ADF front cover (2).
2.
Press both arms of the ADF snap-in pad module inward with
3.
your fingers and pull out the ADF snap-in pad module.
TROUBLESHOOTING > 36

ASSEMBLING PROCEDURE
Remove the ADF pad module from its box.
1.
Press both arms of the ADF snap-in pad module inward using
2.
your fingers.
Insert it in position until it snaps into place.
3.
TROUBLESHOOTING > 37

TECHNICAL SUPPORT
If your problem still exists after trying the above suggested solutions,
please prepare the following information and contact the Technical
Support organisation listed in this or your printer's manual.
Serial number of the Scancopier
>
Problem or Error Code and its description if any
>
The model number of your printer
>
TROUBLESHOOTING > 38

APPENDIX
QUICK REFERENCE GUIDE
Load the document(s) to be copied
1.
Single page document
(a)
Place the document face down on the glass, aligned to
the top left corner (1) of the glass.
1
Multi-page document
(b)
Place your document (2) face up in the ADF, top of the
document entered first and adjust the paper guides (3)
to centre the document.
APPENDIX > 39
2
3

Enter your copy count via the Copy Count panel.
2.
Make your copies
3.
4
5
Press the Colour button (4) to toggle between colour
(a)
copying (illuminated) and black and white copying (not
illuminated).
Colour copies.
(b)
Press the Copy button (5) while the Colour button (4) is
illuminated.
APPENDIX > 40

Black and white copies
(c)
Press the Copy button (5) while the Colour button (4) is
not illuminated.
UPDATING THE PRINTER PROFILE
The installed printer profile in the Scancopier should match the
printer model for optimum results. It is possible to update the profile
through the service port at the rear of the Scancopier. For further
information, please refer to the CD (which contains the software and
explanatory documentation) supplied with your Scancopier.
APPENDIX > 41

SPECIFICATIONS
System overview
Image sensor Colour CCD
Light source CCFL
Optical resolution 600x600 dpi
Colour depth 36-bit colour
LCD 132x65 dot graphic display
External connections Service port
Copy area 300x422mm (11.8x16.6inches)
CPU 32 bit RISC
Memory size 16MB DRAM
Dimensions Scancopier: 589x428x140mm (23.2x16.9x5.5inches)
Weight Scancopier: 8kg (17.6 lb)
ADF capacity 50 sheets
ADF document weight 60 – 105g/m² (16 –28lb)
ADF paper feed Face up
Glass (flatbed) paper feed Face down
Power supply 24V DC, 2A external power adapter
Power consumption <30W
Operating environment 10 – 35deg C (50 – 95 deg F)
Copy resolution 600x600dpi
Connector interface IEEE 1284, 25 pin parallel port
Features Scaling: 25 – 400% in 1% increments/decrements
Printer port
ADF: 540x210x422mm (21.3x8.3x16.6inches)
ADF: 3.7kg (8.2lb)
Standby: 23W
Power saving mode: 18W
20 – 80% RH
Paper size auto detection (A4 landscape, A4 portrait, A3)
Fine/Super Fine Mode
Colour density control
Copy count: 1 – 99
APPENDIX > 42

OPTIONAL ACCESSORIES
The following optional accessories can be used with your Scancopier.
Optional accessory Order code
C9000 Scancopier Automatic Document Feeder (ADF) 09002988
C9000 Scancopier Stand Kit (requires to be mounted on a
C9000 Finisher cabinet)
09004003
APPENDIX > 43

OKI EUROPE
Oki Systems (UK) Limited
550 Dundee Road
Slough Trading Estate
Slough, SL1 4LE
Tel: +44 (0) 1753 819819
Fax: +44 (0) 1753 819899
http://www.oki.co.uk
Oki Systems Ireland Limited
The Square Industrial Complex
Tallaght, Dublin 24Ireland
Tel: +353 1 4049590
Fax: +353 1 4049591
http://www.oki.ie
OKI Systems (Ireland) Ltd
40 Sydenham Park
Belfast, BT4 1PW
Tel: +44 (0)28 90 20 1110
http://www.oki.ie
Technical Support for all Ireland
Tel: +353 1 4049570
Fax: +353 1 4049555
E-mail: tech.support@oki.ie
Oki Systems (Holland) b.v.
Postbus 6902130 AR, Hoofddorp
Fax: 020 - 6531301
Helpdesk: 0900 - 2025285
http://www.oki.nl
Oki Systems (Belgium)
Schaarbeeklei 49 - 51B-1800 Vilvoorde
Fax: 02 - 2531848
Helpdesk: 0900 - 10610
http://www.oki.be
Oki Systèmes (France) S.A.
44-50 Av. du Général de Gaulle
94240 L'Hay les Roses
Téléphone: 01 46 15 80 00
Télécopie: 01 46 15 80 60
http://www.oki.fr
OKI Systems (Italia) S.p.A.
c.c. “Il Girasole” - Lotto 3.05/B20084
Lacchiarella (MI)
Tel. 02900261
Fax: 029007549
http://www.oki.it
Oki Systems (Deutschland) GmbH
Hansaallee 18740549 Düsseldorf
Tel: +49 (0) 211 52 66-0
Fax: +49 (0) 211 59 33-45
BBS: +49 (0) 211 5266-222
(300-33600 bps, 8, N, 1)
http://www.oki.de
Oki Systems (Ibérica) SA
Sucursal em Portugal
Rua Quinta do Paizinho
Edificio Bepor-Bloco 2-1 Dto.2795
Carnaxide
Tel: 21 424 67 40
Fax: 21 417 29 12
http://www.oki.pt
Oki Service (Portugal)
Serviço de apoio técnico ao cliente
Tel: 808 200 197
OKI EUROPE > 44

Oki Systems (Iberica), S.A.
Paseo de la Habana
17628036 - Madrid, España
Tel: 91-3431620
Fax: 91-3431624
http://www.oki.es
Oki Systems (Magyarország ) Kft.
H1051 Budapest
Bajcsy-Zsilinszky út 12.
Tel: 327 – 4070
Fax: 327 – 4076, 327 – 4072
http://www.okihu.hu
OKI Systems (Norway) A/S
Hvamsvingen 9, P.O.Box 174
N-2013 Skjetten
Telefon: 63 89 36 00
Telefax: 63 89 36 01
Ordrefax: 63 89 36 02
http://www.oki.no
Oki Systems (Danmark) a·s
Park Allé 3822625 Vallensbæk
Tlf: 43 66 65 30
Fax: 43 66 65 90
http://www.oki.dk
OKI Systems (Sweden) AB
BOX 216161 26 BROMMA
Telefonsupport: 0726-101 20
Vardagar: 09.00 - 11.30, 13.00 - 16.00
http://www.oki.se
OKI Systems (Finland) Oy
Kutomotie 18 B, 5. krs, 00380 Helsinki
Puh. (09) 5404 420.
Int. +358 9 5404 420
Fax. 09) 5404 4223
Int. +358 9 5404 4223
Oki Systems (Polska) Sp. z o.o.
ul. Chmielna 132/134
00-805 Warszawa, Polska
Tel: (+48 22) 656-28-03
Fax: (+48 22) 656-27-97
BBS: (+48 22) 656-28-17
Bezpatna infolinia serwisowa:
0-800-1-20066
http://www.okieurope.co.uk
RUSSIA
Oki Europe Ltd.
Business Center “Parus”
7-th floor, office 10,
23, 1-st Tverskaya-Yamskaya Street
125047 Moscow
Tel: (+7 501/095) 258 6065
Fax: (+7 501/095) 258 6070
Email: info@oki.ru
http://www.oki.ru
UKRAINE
Oki Europe Ltd.
Office 24, 34/33 Ivan Franko Street
Kiev 252030
Tel: (+380 44) 462 0575/0576
Fax: (+380 44) 462 0574
Email: info@oki.kiev.ua
OKI EUROPE > 45

GREECE
BULGARIA
Αντιπρόσωπος της Oki Systems στην
Ελλάδα
CPI S.A.
Μεσογείων 348, 153 41 Αγ. Παρασκευή
Τηγ: 65 45 802-5
Fax: 65 45 805
Email: cpi@hol.gr
TURKEY
Oki Europe Ltd. Liason Office
18th Floor No. 35, Harmanci Sok
Harmanci Giz Plaza, Levent
Istanbul 80640
Tel: +90 212 279 2393
Fax: +90 212 279 2366
Алфа Линк О. О. Д.
Булевард “Черни ВрЪх” 51, п.к. 52
София 1407
Тел: (359) 2 689552, 689555
Факс: (359) 2 689556
OKI EUROPE > 46

OKI ASIAN-PACIFIC
SOUTHEAST ASIA
Oki Data (Singapore) Pte. Ltd.
78 Shenton Way, #09-01
Singapore 079120
Tel: +65 221 3722
Fax: +65 421 1688
http://www.okidata.com.sg
OTHER ASIAN AREAS
Oki Data Corporation
4-11-22 Shibaura, Minato-ku
Tokyo 108-8551, Japan
Tel: +81 3 5445 6158
Fax: +81 3 5445 6189
www.okidata.co.jp
AUSTRALIA
The IPL Group
63-85 Victoria Street, Alexandria
NSW 2015, Australia
Tel: +61 2 9690 8200
Fax: +61 2 9690 8300
www.oki.com.au
NEW ZEALAND
Comworth Systems Ltd.
10 Constellation Drive, Mairangi Bay
Auckland, New Zealand
Tel: +64 9 477 0500
Fax: +64 9 477 0549
http://www.comworth.co.nz
OKI ASIAN-PACIFIC > 47

LIMITED WARRANTY: UNITED STATES AND CANADA
Oki Americas, Inc. (Oki) warrants this product to be free from defect in
material and workmanship and will remedy any such defect according to
the terms of this Limited Warranty.
Oki will repair (or at its discretion, replace) at no charge, any defective
part(s) of the product for one (1) year from the date of purchase. This
Limited Warranty extends to the original purchaser only.
To make request or claim for service under this Limited Warranty the
original purchaser has the option to implement the overnight exchange
procedure (U.S. and Canada only; see Overnight Exchange) or return the
Oki product, shipping prepaid, in the original shipping container or
equivalent, to Oki and assume the risk of loss or damage in transit. A
written receipt for the product, showing the date of purchase, dealer’ s
name, and item purchased must accompany any request or claim for work
to be performed under this Limited Warranty.
This Limited Warranty shall not apply if the product has been damaged
due to abuse, misuse, misapplication, accident, or as a result of service
or modification by any other than an authorized Oki service center.
THERE ARE NO EXPRESS WARRANTIES OTHER THAN THOSE ON THE FACE
HEREOF AND DESCRIBED ABOVE. NO WARRANTIES WHETHER EXPRESS OR
IMPLIED, INCLUDING, BUT NOT LIMITED TO, ANY IMPLIED WARRANTIES OF
MERCHANTABILITY OR FITNESS FOR A PARTICULAR PURPOSE, SHALL
EXTEND BEYOND THE RESPECTIVE WARRANTY PERIOD DESCRIBED ABOVE
OF ONE (1) YEAR. Some states do not allow limitations on how long an
implied warranty lasts, so the above limitation may not apply to you.
OKI SHALL NOT BE RESPONSIBLE OR LIABLE FOR ANY SPECIAL,
INCIDENTAL OR CONSEQUENTIAL DAMAGES OR LOSS ARISING FROM THE
USE OF THIS PRODUCT. Some states do not allow the exclusion or
limitation of incidental or consequential damages, so the above
exclusion may not apply to you.
Additional information on obtaining service under this Limited Warranty
is available by contacting the Oki dealer from whom the product was
purchased, by contacting Oki directly at 1-800-OKI-DATA (U.S. and
Canada, English only) or at 1-856-222-5276 (Spanish only), or by
contacting one of the service locations listed later.
This warranty gives you specific legal rights, and you may also have other
rights, which vary from state to state.
LIMITED WARRANTY: UNITED STATES AND CANADA > 48

OVERNIGHT EXCHANGE: UNITED STATES AND CANADA
If you choose to use our Overnight Exchange service, call 1-800-OKIDATA: our trained personnel will try to solve your problem over the
phone. If they determine that your product is defective, an exchange
product will be shipped to you via air express. Have your credit card
available, as our representative will be asking for this information.
You will receive the exchange product the next business day — or no
later than the second business day.
Return the original product to Oki by using the same packaging
materials you received with the exchange product. The product to be
returned must be made available for pickup by Oki’ s representative
within 2 business days of your receipt of the exchange product: failure
to do so may result in your being charged the full price of the
exchange unit.
When Overnight Exchange is used, the returned machine becomes the
property of Oki. Exchange machines may be new or repaired, at the
sole discretion of Oki: the exchange product becomes the property of
the customer when the returned product has been picked up by Oki’s
designated carrier. The exchange product will be warranted for thirty
(30) days or the remaining warranty period of the returned product,
whichever is longer.
For the most up-to-date listing of Oki authorized Service Centers, call:
1-800-OKI-DATA (1-800-654-3282).
OVERNIGHT EXCHANGE: UNITED STATES AND CANADA > 49

OKI AMERICAS SERVICE CENTERS
UNITED STATES
Oki Data Americas, Inc.
2020 Bishops Gate Blvd.
Mt. Laurel, NJ 08054
USA
Tel: 1-800-654-3282 (USA & Canada
only)
Fax: 1-856-222-5247
CANADA
Oki Data Americas, Inc.
2735 Matheson Blvd. East, Unit 1
Mississauga, Ontario L4W 4M8
Canada
Tel: 1-800-654-3282 (USA & Canada
only)
Fax: 1-905-238-4421
MEXICO
BRAZIL
Oki Data do Brasil, Ltda.
Rua Alexandre Dumas, 2220 - 8º andar
Chacara Santo Antonio
04717-004 São Paulo, SP Brazil
Tel: (5511) 3444-3500
Fax: (5511) 3444-3501
Support Center: 0800-11-55-77
e-mail: okidata@okidata.com.br
TECHNICAL SUPPORT
Oki Data Americas, Inc.
2000 Bishops Gate Blvd.
Mt. Laurel, NJ 08054-4620
Tel: 1-800-OKI-DATA
(1-800-654-3282)
Fax: 1-856-222-5320
http://www.okidata.com
Oki Data de Mexico, S.A. de C.V.
Mariano Escobedo No. 748-8 Piso
Col. Anzures, e.p. 11590
Mexico, DF
Tel: 52-55-5263-8780
Fax: 52-55-5263-8785
OKI AMERICAS SERVICE CENTERS > 50

INDEX
A
accessories ................................43
ADF ..............................................8
cable.......................................19
Installing.................................17
loading paper..........................23
setting up................................ 17
snap-in pad.............................36
C
cleaning
ADF .........................................35
glass.......................................34
Control panel
location.....................................8
copy
count ...................................... 30
mode ......................................28
quality ....................................31
D
Document Cover ...........................8
E
error codes .................................32
L
LCD Display ..................................8
loading paper
ADF .........................................24
glass.......................................23
lock............................................16
M
messages
error .......................................32
LCD .........................................32
P
package contents........................14
paper
jam .........................................33
size.........................................27
specifications..........................23
power connection .......................20
Power Jack....................................8
print density ...............................29
printer
cable.......................................19
port...........................................8
printer profile
updating .................................41
Q
quick reference ...........................39
S
scaling ....................................... 26
Service Port ..................................8
specifications .............................42
T
technical support........................38
U
unlock ........................................15
> 51
 Loading...