

Page 1
OKI C9000 Series
Setup Guide
Page 2

Preface
Every effort has been made to ensure that the information in
this document is complete, accurate, and up-to-date. Oki
assumes no responsibility for the results of errors beyond its
control. Oki also cannot guarantee that changes in software
and equipment made by other manufacturers and referred to
in this guide will not affect the applicability of the information
in it. Mention of software products manufactured by other
companies does not necessarily constitute endorsement by
Oki.
While all reasonable efforts have been made to make this
document as accurate and helpful as possible, we make no
warranty of any kind, expressed or implied, as to the accuracy
or completeness of the information contained herein.
Copyright 2000 by Oki. All rights reserved.
Oki is a registered trademark of Oki Electric Industry
Company Ltd.
Energy Star is a trademark of the United States
Environmental Protection Agency.
Microsoft, MS- DOS and Windows are registered trademarks
of Microsoft Corporation.
CAUTION:
This product complies with EN55022 Class B however, when
fitted with either the optional 2nd and/or high capacity feeder
compliance to EN55022 is Class A. In a domestic environment
this product configuration may cause radio interference in which
case the user may be required to take adequate measures.
EEC compatibility
T
his product complies with the
requirements of the Council Directives
89/336/EEC (EMC) and 73/23/EEC
(LVD), as amended where applicable, on
the approximation of the laws of the
member states relating to
Electromagnetic Compatibility and Low
Voltage.
Energy Star
As an Energy Star Partner, Oki has
determined that this product meets the
Energy Star guidelines for energy
efficiency.
ii OKI C9000 Series
Page 3

Table of contents
English
Preface . . . . . . . . . . . . . . . . . . . . . . . . . . . . . . . . . . ii
EEC compatibility. . . . . . . . . . . . . . . . . . . . . . . . . . ii
Energy Star . . . . . . . . . . . . . . . . . . . . . . . . . . . . . . . ii
Table of contents. . . . . . . . . . . . . . . . . . . . . . . . . . . iii
Safety instructions. . . . . . . . . . . . . . . . . . . . . . . . . . .v
Toner cartridge and image drum handling . . . . vi
Emergency first aid . . . . . . . . . . . . . . . . . . . . . vii
Notes, cautions and warnings . . . . . . . . . . . . . . . . vii
Chapter 1 - Printer Setup . . . . . . . . . . . . . . . . . . . . . .1
Features. . . . . . . . . . . . . . . . . . . . . . . . . . . . . . . . . . .1
Unpacking. . . . . . . . . . . . . . . . . . . . . . . . . . . . . . . . .2
Printer components . . . . . . . . . . . . . . . . . . . . . . . . . .3
Control panel. . . . . . . . . . . . . . . . . . . . . . . . . . . . . . .5
Printer location . . . . . . . . . . . . . . . . . . . . . . . . . . . . .6
Setting up . . . . . . . . . . . . . . . . . . . . . . . . . . . . . . . . .6
Packaging and protective sheet removal. . . . . . .6
Toner cartridge installation . . . . . . . . . . . . . . . . .8
Loading paper . . . . . . . . . . . . . . . . . . . . . . . . . . .9
Power cable . . . . . . . . . . . . . . . . . . . . . . . . . . . .10
Switching off. . . . . . . . . . . . . . . . . . . . . . . . . . . . . .11
Menu settings . . . . . . . . . . . . . . . . . . . . . . . . . . . . .11
Changing display language . . . . . . . . . . . . . . . .11
Printing . . . . . . . . . . . . . . . . . . . . . . . . . . . . . . .12
Chapter 2 - Windows Setup . . . . . . . . . . . . . . . . . . . 13
Installation method. . . . . . . . . . . . . . . . . . . . . . . . . 13
Printer driver types. . . . . . . . . . . . . . . . . . . . . . . . . 13
Parallel interface . . . . . . . . . . . . . . . . . . . . . . . . . . 14
Connection . . . . . . . . . . . . . . . . . . . . . . . . . . . . 14
Plug and play configuration . . . . . . . . . . . . . . . 14
Windows 2000 . . . . . . . . . . . . . . . . . . . . . . 14
Windows 98 or Windows Me . . . . . . . . . . . 16
Add printer configuration. . . . . . . . . . . . . . . . . 18
Windows 2000 . . . . . . . . . . . . . . . . . . . . . . 18
Windows 98 or Windows Me . . . . . . . . . . . 20
Windows 95 . . . . . . . . . . . . . . . . . . . . . . . . 22
Windows NT 4.0. . . . . . . . . . . . . . . . . . . . . 24
USB interface. . . . . . . . . . . . . . . . . . . . . . . . . . . . . 27
General . . . . . . . . . . . . . . . . . . . . . . . . . . . . . . . 27
Connection . . . . . . . . . . . . . . . . . . . . . . . . . . . . 27
USB driver . . . . . . . . . . . . . . . . . . . . . . . . . . . . 28
Plug and play configuration . . . . . . . . . . . . . . . 29
Windows 2000 . . . . . . . . . . . . . . . . . . . . . . 29
Windows 98 or Windows Me . . . . . . . . . . . 30
Add printer configuration. . . . . . . . . . . . . . . . . 32
Windows 2000 . . . . . . . . . . . . . . . . . . . . . . 32
Windows 98 . . . . . . . . . . . . . . . . . . . . . . . . 34
Network connection. . . . . . . . . . . . . . . . . . . . . . . . 37
Preface iii
Page 4

Internal hard disk . . . . . . . . . . . . . . . . . . . . . . . . . . 37
Printer. . . . . . . . . . . . . . . . . . . . . . . . . . . . . . . . 37
Printer driver . . . . . . . . . . . . . . . . . . . . . . . . . . 38
Windows 2000/NT 4.0 PostScript . . . . . . . 38
Windows 2000 PCL . . . . . . . . . . . . . . . . . . 38
Windows 98/95 PostScript . . . . . . . . . . . . . 39
Windows 98/95/NT 4.0 PCL . . . . . . . . . . . 39
Duplex unit . . . . . . . . . . . . . . . . . . . . . . . . . . . . . . 40
Printer. . . . . . . . . . . . . . . . . . . . . . . . . . . . . . . . 40
Printer driver . . . . . . . . . . . . . . . . . . . . . . . . . . 40
Windows 2000/NT 4.0 PostScript . . . . . . . 40
Windows 2000 PCL . . . . . . . . . . . . . . . . . . 40
Windows 98/95 PostScript . . . . . . . . . . . . . 41
Windows 98/95/NT 4.0 PCL . . . . . . . . . . . 41
Chapter 3 - Macintosh Setup . . . . . . . . . . . . . . . . . . 43
USB connection . . . . . . . . . . . . . . . . . . . . . . . . . . . 43
Operating environment. . . . . . . . . . . . . . . . . . . 43
Connection . . . . . . . . . . . . . . . . . . . . . . . . . . . . 43
Printer driver installation . . . . . . . . . . . . . . . . . 44
Creating desktop printer. . . . . . . . . . . . . . . . . . 45
Network connection. . . . . . . . . . . . . . . . . . . . . . . . 47
Operating environment. . . . . . . . . . . . . . . . . . . 47
Connection . . . . . . . . . . . . . . . . . . . . . . . . . . . . 47
Printer driver installation . . . . . . . . . . . . . . . . . 47
Internal hard disk . . . . . . . . . . . . . . . . . . . . . . . . . . 48
Printer. . . . . . . . . . . . . . . . . . . . . . . . . . . . . . . . 48
Printer driver . . . . . . . . . . . . . . . . . . . . . . . . . . 49
Macintosh USB connection. . . . . . . . . . . . .49
Macintosh network connection . . . . . . . . . .49
Duplex unit . . . . . . . . . . . . . . . . . . . . . . . . . . . . . . .49
Printer . . . . . . . . . . . . . . . . . . . . . . . . . . . . . . . .49
Printer driver . . . . . . . . . . . . . . . . . . . . . . . . . . .49
Macintosh USB connection. . . . . . . . . . . . .49
Macintosh network connection . . . . . . . . . .50
Index . . . . . . . . . . . . . . . . . . . . . . . . . . . . . . . . . . . . . .51
iv OKI C9000 Series
Page 5

Safety instructions
English
This printer has been carefully designed to give years of
safe, reliable performance. As with all electrical
equipment, however, there are a few basic precautions
that should be taken to avoid personal injury or
damaging the printer:
• Read this setup guide carefully and save it for
future reference.
• Read and follow all warning and instruction
labels on the printer itself.
• Disconnect the printer before cleaning. Use only
a damp cloth. Do not use liquid or aerosol
cleaners to clean the printer.
• Place the printer on a firm, solid surface. If the
printer is placed on something unsteady, it may
fall and become damaged or injure someone. If
the printer is placed on a soft surface, such as a
rug, sofa, or bed, the vents may become blocked
causing the printer to overheat.
• Do not put the printer on or near a heat source,
such as a radiator or heat register. Keep it out of
direct sunlight. Allow enough room around the
printer for adequate ventilation and easy access.
• Do not use the printer near water, or spill liquid
of any kind into it.
• Make sure that the power source matches the
rating listed on the back of the printer. If you are
not sure, check with your dealer or with your
local power company.
• This printer has an earthed, 3-pin plug as a safety
feature and will only connect to an earthed outlet.
If this plug cannot be connected to a power outlet,
then it is possible that the power outlet is of the
older, non-earthed type. Contact an electrician to
have the power outlet replaced. Do not use an
adapter to defeat the earthing.
• To avoid damaging the power cable, do not put
anything on it or place it where it will be walked
on. If the cable becomes damaged or frayed,
replace it immediately.
• If an extension cable or power strip is being used
with the printer, make sure that the total of the
amperage rating required by all the equipment is
less than the rating of the extension cable or
power strip. The total ratings of all equipment
plugged into the outlet should not exceed 13
amperes.
Preface v
Page 6

• The power outlet into which the printer is
connected must remain accessible at all times.
• The printer does not function normally when
following the operating instructions.
• Opening any cover may expose hot surfaces.
These are clearly labelled. Do NOT touch them.
• Do not insert anything into the ventilation slots
on the printer; you could get a shock or cause a
fire.
• Aside from the routine maintenance described in
this user’s guide, do not try to service the printer
yourself. Opening a cover may expose you to
shocks or other hazards.
• Do not make any adjustments other than those
outlined in this users guide as damaged may be
caused to the printer.
If anything happens that indicates that the printer is not
working properly or has been damaged, disconnect the
printer from the power source and contact your dealer.
These are some of the things to look for:
• The power cable or plug is frayed or damaged.
• Liquid has been spilled into the printer, or it has
been exposed to water.
• The printer has been dropped, or the cabinet is
damaged.
Toner cartridge and image drum
handling
• Leave unused toner cartridges and image drum
units in their packages until needed. When
replacing a toner cartridge or image unit, reuse
the packaging to dispose of the old toner cartridge
or image drum unit.
• Do not expose the toner cartridges and image
drum units to light for more than five minutes.
Never expose the green drum (inside the image
drum unit) to direct sunlight.
• Always hold the image drum unit by the ends never by the middle. Never touch the green drum
inside the image drum unit.
• To avoid damage to the image drum unit, always
use original toner cartridges.
• Exercise care when removing the toner cartridge.
Do not let it touch your clothing or porous
materials. The toner powder causes permanent
stains.
vi OKI C9000 Series
Page 7

• Small amounts of toner spilled on skin or
clothing can be readily removed with soap and
cold water. Using heated water will make
removing the stain much more difficult.
Emergency first aid
English
Notes, cautions and warnings
Note:
A note appears in this manual like this. A note
provides additional information to supplement
the main text which may help you to use and
understand the product.
•
IF TONER IS SWALLOWED:
vomiting and seek medical attention. Never
attempt to induce vomiting or give anything by
mouth to a person who is unconscious.
•
IF TONER IS INHALED:
open area for fresh air. Seek medical attention.
•
IF TONER GETS IN THE EYES:
with large quantities of cool, NOT cold, water for
a minimum of 15 minutes keeping eyelids open
with fingers. Seek medical attention.
Preface vii
Take the person to an
Induce
Flush eyes
CAUTION:
A caution appears in this manual like this. A caution
provides additional information which, if ignored, may
result in equipment malfunction or damage.
WARNING
A WARNING APPEARS IN THIS MANUAL LIKE
THIS. A WARNING PROVIDES ADDITIONAL
INFORMATION WHICH, IF IGNORED, MAY
RESULT IN A RISK OF PERSONAL INJURY.
Page 8

viii OKI C9000 Series
Page 9

Chapter 1 - Printer Setup
English
Features
• High speed printing: 21 page per minute LED
colour printer and 26 page per minute LED
monochrome printer with single pass digital
technology for stunning quality, speed and
reliability.
• Four different models to choose from: C9200,
C9200n, C9200dn and the flagship C9400.
• True 1200 dpi resolution (C9400) or 600 x 1200
dpi resolution for very high quality output.
• Duplex printing for fast reliable two sided output
(optional on C9200 and C9200n).
• High speed, bi-directional parallel interface
(IEEE-1284) and USB interface
• Industry standard network connectivity via
internal network interface card (optional on
C9200)
• Automatic interface switching between USB,
parallel and network interfaces.
Chapter 1 - Printer Setup 1
• Spacious 5 Gb hard disc drive (HDD) standard on
C9200dn and C9400, optional on other models.
• PCL5c emulation and genuine Adobe PostScript
3 with automatic switching.
• Versatile paper handling with standard 550 sheet
paper tray and 100 sheet multi purpose tray
• Optional 2nd and 3rd paper trays each with a
capacity of 550 sheets approx and an optional
high capacity feeder that can provided a feed of
1650 sheets of plain paper giving a maximum
capacity of 2850 sheets.
• Paper weight capacity of 75 gm
• 500 sheet output tray (face down) and 100 sheet
face up tray for continuous smooth running
output.
• The C9000 series is designed for a maximum
duty cycle of up to 83 000 prints per month.
• Environmentally friendly: OKI’s advanced power
save mode minimises power consumption and the
separate toner and drum design cuts down on
waste.
2
to 200 gm2.
Page 10
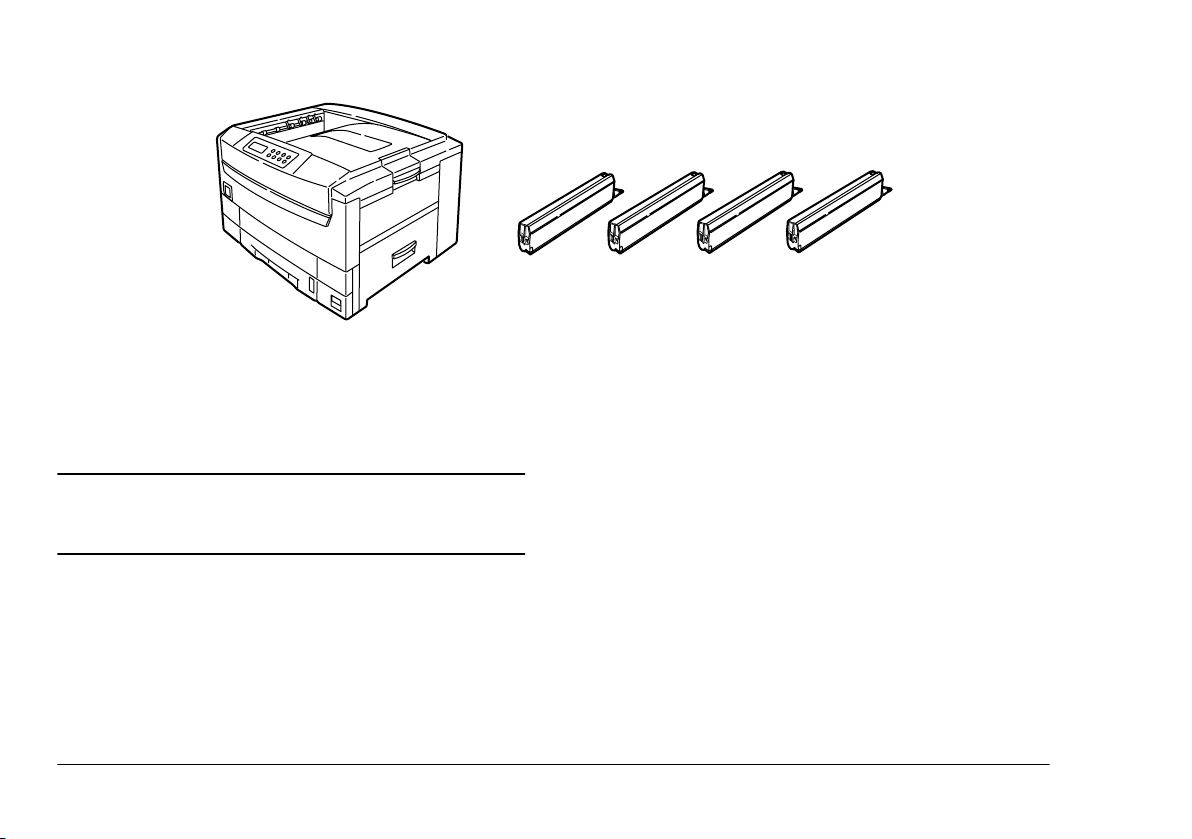
Unpacking
After unpacking the printer and choosing a suitable
place to put it, check that all the necessary parts are
available to continue:
4. Paper size indicator (not illustrated).
5. LED lens cleaner (not illustrated).
6. Lightproof plastic bags (4) (not illustrated).
7. Power cable (not illustrated).
WARNING
THIS PRINTER HAS A WEIGHT OF 72 kg. DO NOT
ATTEMPT TO LIFT IT ALONE.
1. The printer.
2. Four toner cartridges (cyan, magenta, yellow and
black).
3. CD-ROM disk containing printer drivers and
documentation (not illustrated).
2 OKI C9000 Series
8. Setup guide (not illustrated).
Note:
Do not discard the printer box, transport locks,
packaging and lightproof plastic bags as they
are used when transporting the printer.
Page 11
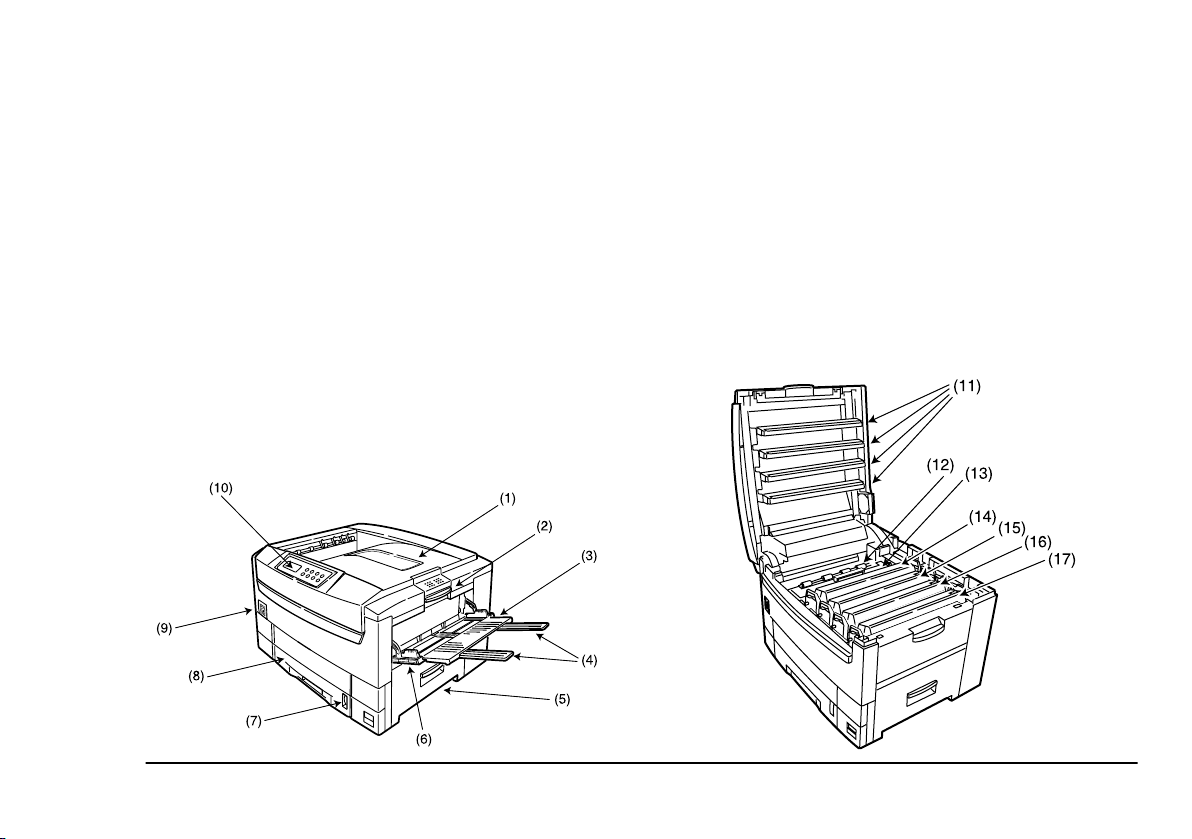
Printer components
1. Top cover
2. Top cover release catch.
3. Multi purpose tray (manual feed).
4. Paper support extension.
5. Side cover.
6. Paper guides.
7. Paper level indicator.
8. Paper tray.
9. Power switch.
English
10. Control panel.
11. LED heads (4of).
12. Discharge roller.
13. Fuser unit.
14. Image drum (cyan).
15. Image drum (magenta).
16. Image drum (yellow).
17. Image drum (black).
Chapter 1 - Printer Setup 3
Page 12
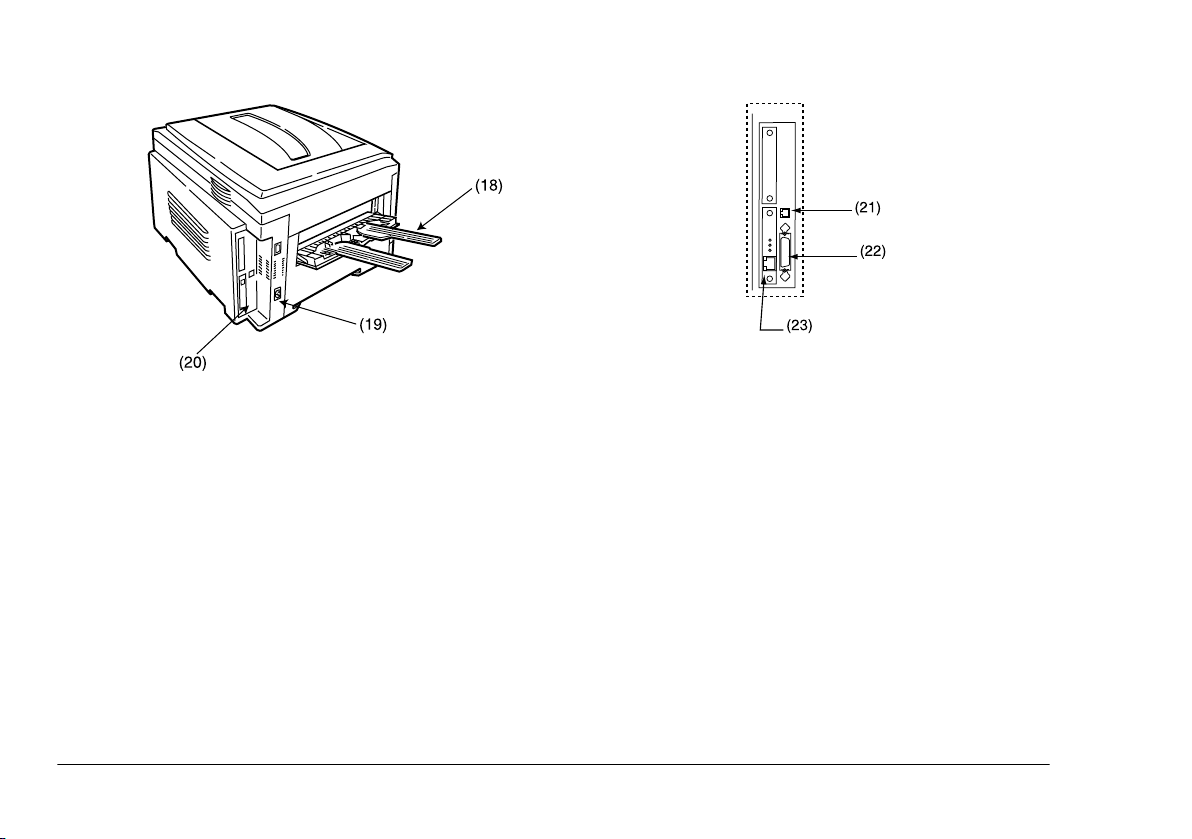
21. USB interface connector.
18. Rear exit paper tray.
19. Power connector.
22. Parallel interface connector.
23. Optional network interface card.
20. Interfaces and option card slot.
4 OKI C9000 Series
Page 13
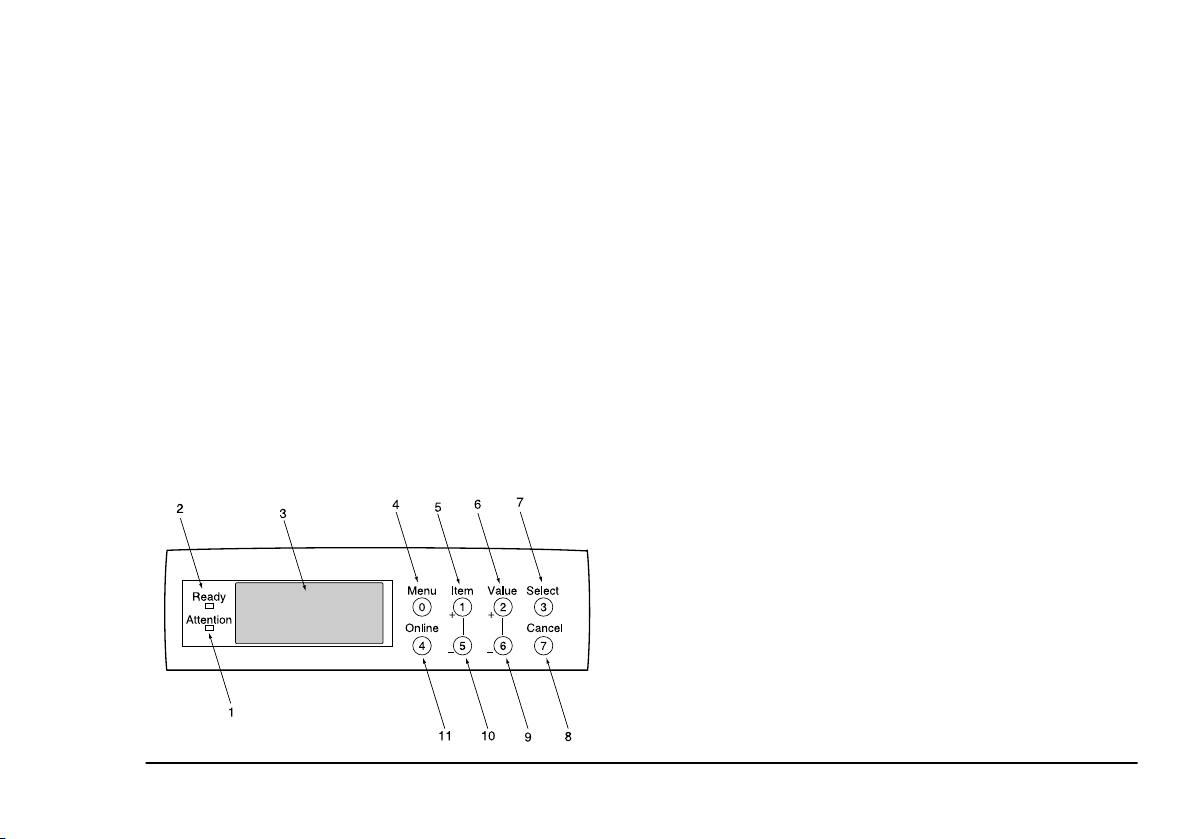
Control panel
1. Attention indicator (red). On indicates there is an
error, but printing will continue. Flashing
indicates there is an error, but printing will stop.
2. Ready indicator (green). On - ready to receive
data. Flashing - processing data or error.
3. Liquid crystal display (LCD) panel. Two rows of
up to 24 alphanumeric digits displaying print
status, menu items in menu mode and error
messages.
English
5. Item + button (1). Press briefly to scroll forward
to the next menu item.
6. Value + button (2). Press briefly to scroll forward
to the next value setting for each menu item.
7. Select button (3). Press briefly to select the menu,
item or value indicated on the LCD.
8. Cancel button (7). Press to cancel a print job.
9. Value – button (6). Press briefly to scroll
backward to the next value setting for each menu
item.
4. Menu button (0). Press briefly to enter Menu
mode. Press briefly again to select the next menu.
Press for more than 2 seconds to scroll through
the different menus.
Chapter 1 - Printer Setup 5
10. Item – button (5). Press briefly to scroll backward
to the next menu item.
11. Online button (4). Switches between online and
offline status. When pressed in Menu mode,
returns printer to online status. When pressed
with DATA PRESENT displayed forces the
printer to print out the remaining data in the
printer. Also when there is an error indicating
wrong paper size, pressing the online button
forces the printer to print.
Page 14
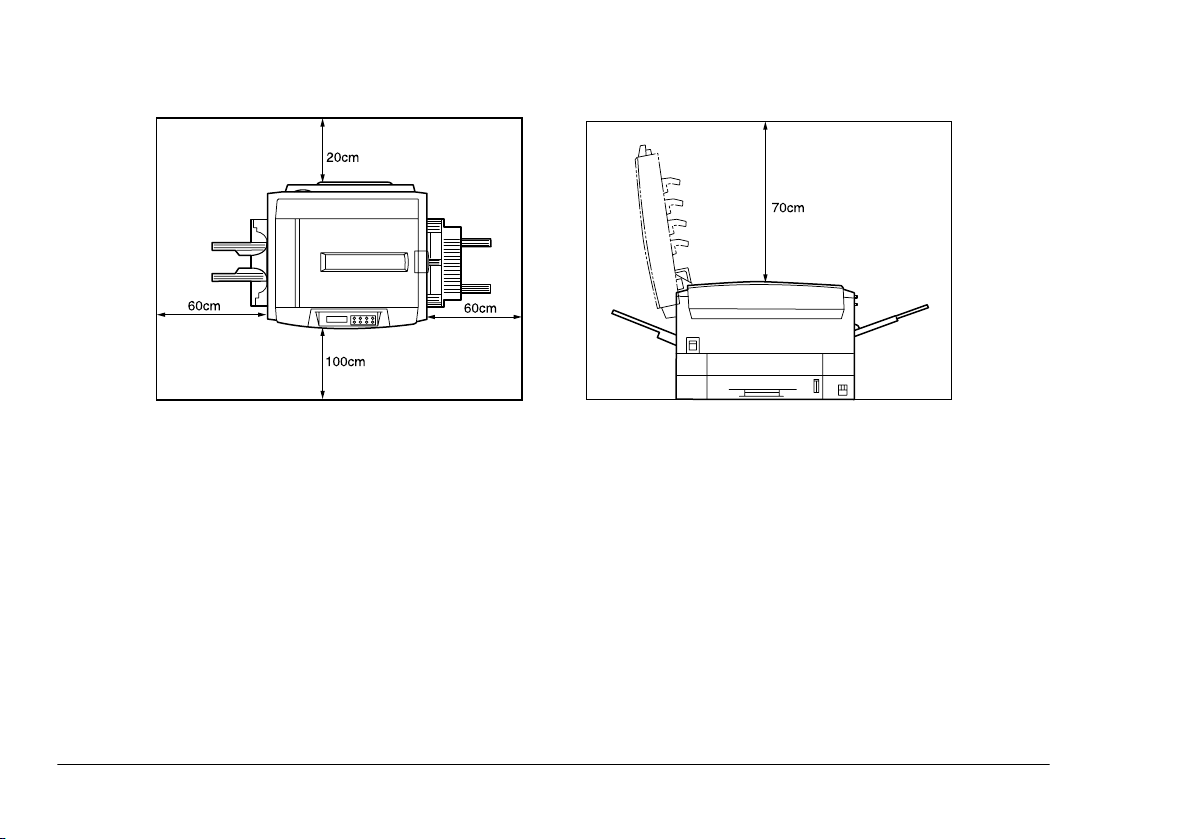
Printer location
Setting up
Place the printer on a flat surface large enough and
strong enough to accept the size and weight of the
printer. The printer has an approximate weight of 72 kg.
There must be sufficient space around the printer to
allow for access and printer maintenance.
6 OKI C9000 Series
Before connecting this printer to a computer and power
supply, the toner cartridge must be installed and paper
inserted in the paper tray.
Packaging and protective sheet removal
1. Remove any adhesive tape and packaging from
the printer.
Page 15
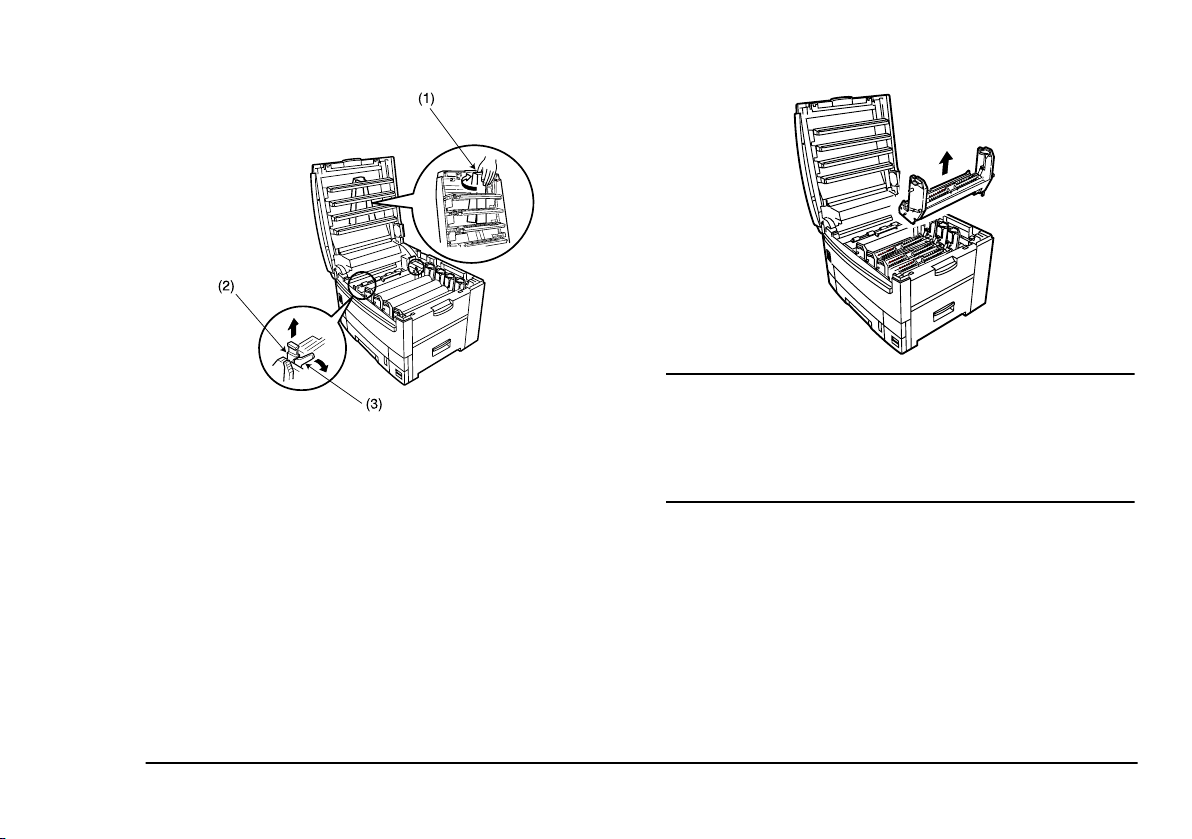
2. Open the top cover.
3. Remove the LED head restrainer (1) from behind
the LED heads in the top cover.
4. Remove the orange transport lock (2) from
behind the coloured lever (3) on top of the fuser
unit.
Note:
To ease removal of the transport lock, it may be
necessary to move the coloured lever (3)
slightly. The coloured lever will return to its
original position under spring loading after it
has been released.
English
CAUTION:
Never expose image drums to light for more than 5
minutes. Never expose image drums to direct sunlight.
Always hold image drums by the ends. Never touch the
surface of the green drum inside the image drum.
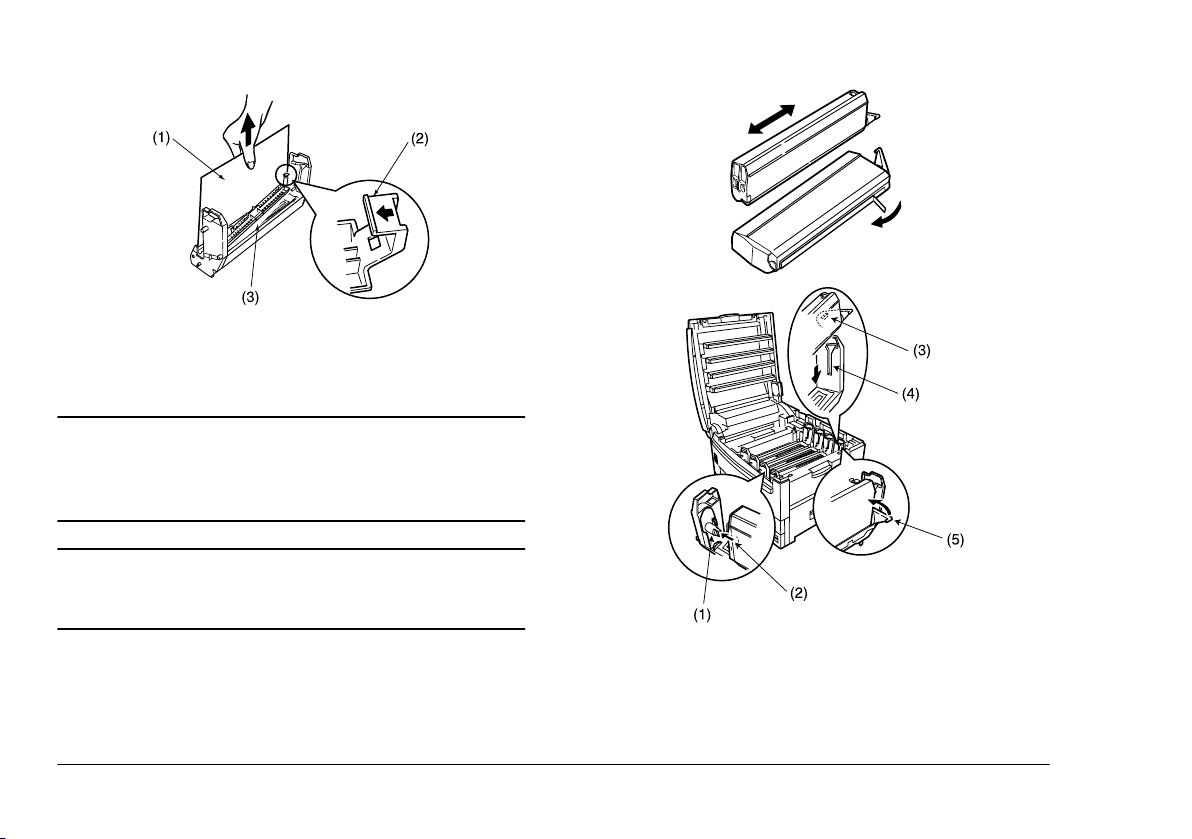
5. Remove the four image drums and place them on
a level surface.
6. Remove the protective sheets (1) from each of the
four image drums.
7. Push the tab (2) inwards and remove the blanking
plate (3) from each of the image drums.
Chapter 1 - Printer Setup 7
Page 16
8. Replace the four image drums into the printer
making sure each image drum is installed in its
correct colour location.
WARNING
BE CAREFUL WHEN HANDLING THE TONER
CARTRIDGE. DO NOT LET TONER SPILL ON YOUR
CLOTHING OR OTHER POROUS MATERIALS.
CAUTION:
Do not use excessive force when installing the toner
cartridge.
2. Shake the toner cartridges back and forth several
Toner cartridge installation
1. Remove the four colour toner cartridges from
their packages.
8 OKI C9000 Series
times.
Page 17
3. To prevent any accidental spillage of toner, hold
the toner cartridge horizontally and remove the
tape carefully and slowly.
4. Make sure the colours of the toner cartridge and
image drum correspond.
5. Insert the toner cartridge into the image drum, left
side first, engaging the drum spigot (1) in the hole
(2) in the toner cartridge.
6. Gently push the toner cartridge down engaging
the locking pin (3) into the groove (4) on the
image drum.
7. Gently push the coloured lever (5) backward until
it stops to release the toner into the image drum.
English
Note:
When the printer is switched on after setting up
the printer, the message TONER LOW or
CHANGE TONER maybe displayed. This
message should disappear after the printer has
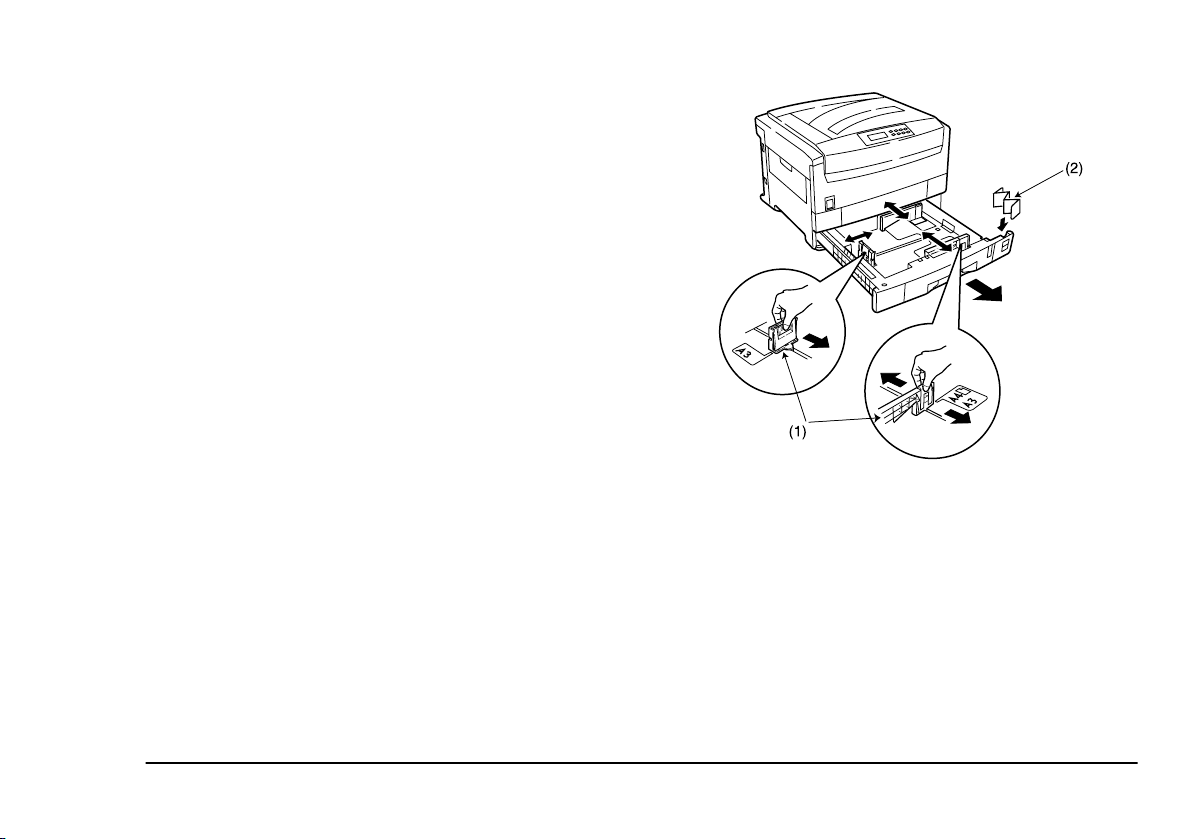
Loading paper
1. Remove the paper tray from the printer.
completed its initialisation sequence. However,
this message sometimes does not disappear until
printing has been carried out. If it still does not
disappear after printing, reinstall the toner
cartridge.
2. Adjust the paper guides (1) for the size of paper
being used.
3. Insert the paper size indicator (2) into the slot on
the paper tray.
4. Insert the paper keeping the level of the paper in
the tray below the guide marks.
Chapter 1 - Printer Setup 9
Page 18
Note:
Do not exceed the maximum capapcity of the
paper tray, which is approximately 550 sheets
depending on paper weight.
5. Replace the tray in the printer. The paper level
indicator provides a visual indication of how
much paper is left in the tray.
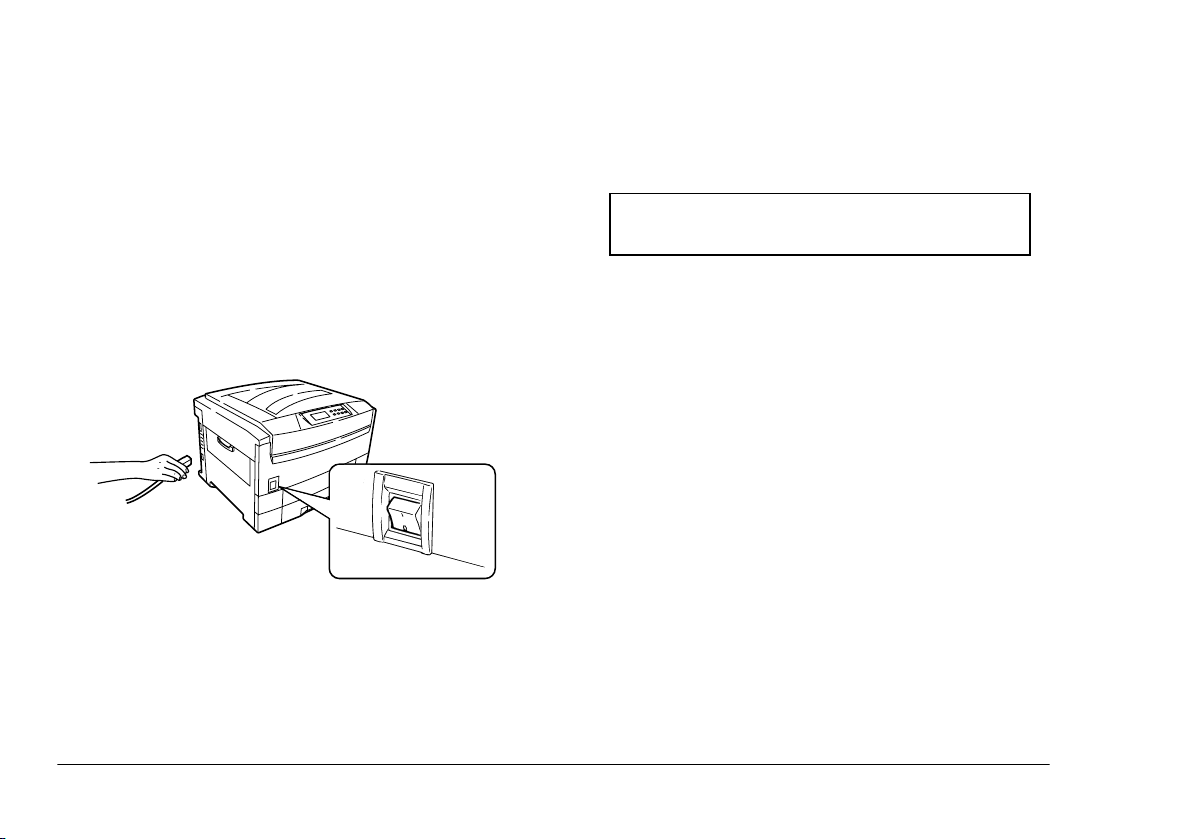
Power cable
1. Connect the power cable into the power socket on
the printer, then into a grounded power supply
outlet.
2. Switch the printer on using the main power
switch.
3. The printer goes through its initialisation and
warm up sequence. When the printer is ready, the
READY indicator comes on and stays on (green)
and the LCD indicates the following:
ONLINE AUTO
TRAY1
10 OKI C9000 Series
Page 19

English
Switching off
Note 1:
Note 2:
Note 3:
Never turn the printer off while it is printing.
If the optional hard disk has been fitted, The
following procedure MUST BE followed before
turning off to protect any data that is stored on
the hard disk.
It is recommended to follow this shutdown
procedure each time the printer is switched off
for any reason.
1. Press
2. Press
3. When PLEASE POWER OFF SHUTDOWN
Menu (0)
MENU is displayed, then press
Select (3)
shutdown sequence.
COMPLETED is displayed on the LCD, turn the
printer off using the power switch.
button until the SHUTDOWN
Select (3)
button again to EXECUTE the
button.
Menu settings
Changing display language
Carry out the following to change the language that is
displayed on the printer’s LCD.
1. Press
2. Press
3. Press
4. Press
5. Press
Menu (0)
MENU is displayed, then press
Item (1)
Val u e (2 )
displayed.
Select (3)
next to the selected language.
Online (4)
display language.
button until SYSTEM CONFIG
Select (3)
until LANGUAGE is displayed.
until the required language is
button. An asterisk (*) appears
button when finished setting the
button.
Chapter 1 - Printer Setup 11
Page 20

Printing
Print a list of menu settings to confirm that the printer
is correctly configured.
1. Make sure there is A4 size paper in the paper tray.
2. Press
3. Confirm PRINT MENU MAP is displayed on the
4. Press
12 OKI C9000 Series
Menu (0)
MENU is displayed, then press
LCD.
Select (3)
button until the INFORMATION
Select (3)
button to print the menu map.
button.
Page 21

Chapter 2 - Windows Setup
English
Installation method
The installation of the Windows printer driver and its
associated software depends upon the interface
connection and the Windows operating system.
Note 1:
Note 2:
Chapter 2 - Windows Setup 13
Windows NT 4.0 drivers cannot be installed
using Windows Plug & Play.
Please refer to the readme file on the software
installation disk that came with the printer for
the latest information on the installation of the
printer driver and its associated software.
Printer driver types
This printer can be operated using a PostScript printer
driver or a PCL printer driver. Both types of printer
drivers have been supplied on the CD-ROM that came
with the printer.
Which printer driver is installed does depend on how
the printer is to be used. For example, if encapsulated
postscript (EPS) files are going to be printed, then it is
recommended to use a PostScript printer driver.
Page 22

Parallel interface
Note 1:
Note 2:
Printer drivers are not supplied for MS-DOS or
Windows NT 3.51 operating systems.
Printer drivers are not provided for Windows
NT4.0 operating system installed on a computer
with an ARC compatible RISC based processor
(MIPS R series, Alpha, Power PC etc.).
2. Connect the parallel interface cable to the printer
parallel interface connector and secure with
spring clips.
3. Connect the parallel interface cable to the parallel
port on the computer and secure with screws.
4. Switch on the printer and then switch on the
computer.
Note 3:
Connection
14 OKI C9000 Series
Parallel interface cable is not included. The
parallel interface cable must be bi-directional
and to standard IEEE 1284-1994.
1. Switch off the power to the printer and computer.
Plug and play configuration
Windows 2000
Note:
Administrator’s authority is required when
installing under Windows 2000.
Page 23

1. When the [Found New Hardware Wizard]
appears, click on [Next].
Note:
If the system has already been configured once,
the printer driver configures automatically and
the Found New Hardware Wizard is not
displayed. Please proceed to Step 9.
2. Select [Search for the best driver for my device
(Recommended)] and click on [Next].
3. Choose [Specify a location] and click on [Next].
English
5. Uncheck [Floppy disk drive] and check [CDROM drive], then click on [Next] to install by
default the PCL printer driver.
OR
To install another printer driver, uncheck both
[Floppy disk drive] and [CD-ROM drive] and
check [Specify a location]. Enter
D:\DRIVERS\WIN2000\
Language
(where D:\ is
the drive letter of the CD-ROM), then click on
[Next] selecting the required printer driver.
4. Insert the printer software CD-ROM into the CDROM drive.
Chapter 2 - Windows Setup 15
6. Confirm that the printer driver is ready to be
installed and click on [Next].
Page 24

9. Choose [Start]-[Settings]-[Printers], then right
click the printer icon and select [Set as Default
Printer].
7. Specify if a test page is to be printed or not, then
click on [Next] and click on [Finish].
8. In the [Digital Signature Not Found] window,
click on [Yes]. File copying starts.
Note:
If the printer icon is not displayed, configure
using the
Add Printer Wizard
.
Windows 98 or Windows Me
1. When the [Add New Hardware Wizard] appears,
click on [Next].
Note 1:
If the [Insert Disk] window is displayed, go to
Step 8 .
Note 2:
If the [Add New Hardware Wizard] does not
appear, go to Add Printer Function.
16 OKI C9000 Series
Page 25

2. Choose [Search for the best driver for your device
(Recommended)] and click on [Next].
3. Insert the printer software CD-ROM into the CDROM drive.
4. Uncheck [Floppy disk drive] and check [CDROM drive], then click on [Next] to install by
default the PCL printer driver.
OR
For Windows 98 - To install another printer
driver, uncheck both [Floppy disk drive] and [CDROM drive] and check [Specify a location]. Enter
D:\DRIVERS\W9598\
Language
(where D:\ is the
drive letter of the CD-ROM), then click on [Next]
selecting the required printer driver.
English
OR
For Windows ME - Select the required driver from
the displayed list in order to install the language
required.
5. Confirm the printer name and specify if the
printer is to be the default printer or not, then
click on [Next].
6. Specify if a test page is to be printed or not, then
click on [Finish].
7. When the printer icon appears in the Printer
folder, configuration is complete.
8. If the [Insert Disk] window is diplayed:
(a) Insert the printer software CD-ROM into the
CD-ROM drive and click on [OK].
Chapter 2 - Windows Setup 17
Page 26
(b) In the [Copy files from] field, enter
D:\DRIVERS\W9598\
PostScript or PCL drivers (where D:\ is the
drive letter of the CD-ROM) and click on
[OK]. File copying starts.
(c) When the printer icon is displayed in the
Printer folder, configuration is complete.
Add printer configuration
Windows 2000
Language
for
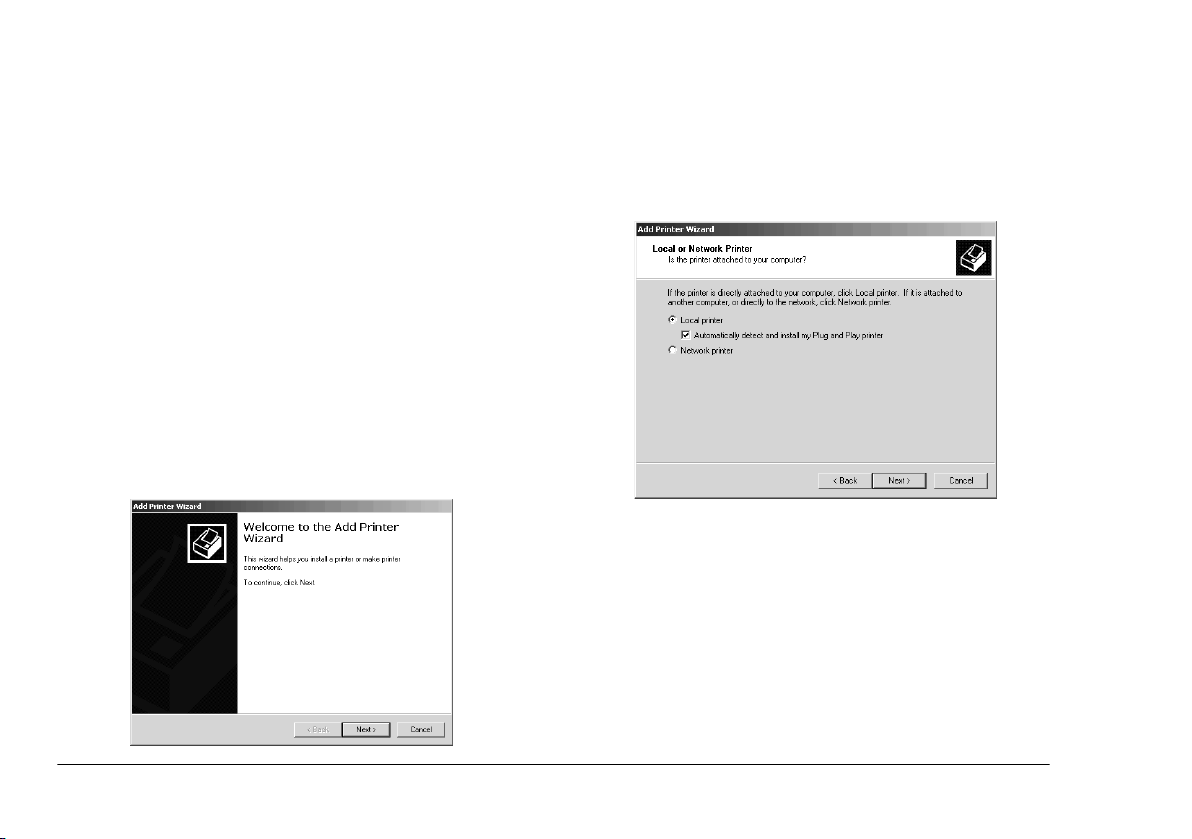
3. When [Add Printer Wizard] appears, click on
[Next].
4. Select [Local Printer], remove the check mark on
[Automatically detect and install my Plug and
Play printer] and click on [Next].
Note:
18 OKI C9000 Series
Administrator’s authority is required when
installing under Windows 2000.
1. Click on [Start]-[Settings]-[Printers].
2. Double-click on [Add Printer].
5. Select [Use the following port] and specify
[LPT1: Printer Port], then click on [Next].
Page 27

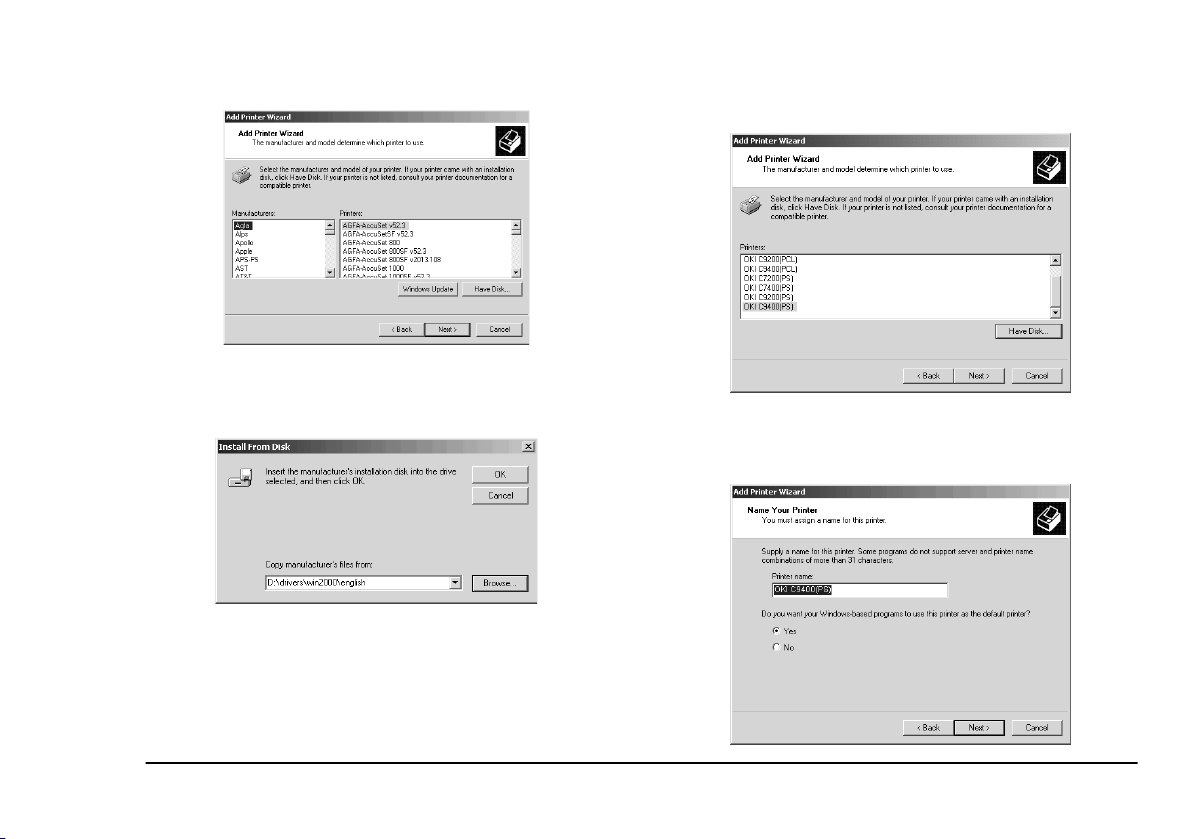
6. Click on [Have Disk...].
English
8. In the [Copy manufacturer’s files from] field,
enter D:\DRIVERS\WIN2000\
Language
for
PostScript or PCL drivers (where D:\ is the drive
letter of the CD-ROM) and click on [OK].
9. Choose the printer model and driver required and
click on [Next].
7. After the [Install from Disk] window appears,
insert the Printer Software CD-ROM disk into the
CD-ROM drive.
Chapter 2 - Windows Setup 19
Page 28

10. Confirm printer name and specify if the printer is
to be used as default printer or not, then click on
[Next].
12. Specify if a test page is to be printed or not, then
click on [Next] and click on [Finish].
13. In the [Digital Signature Not Found] window,
click on [Yes]. File copying starts.
11. Specify if the printer is to be shared or not, then
click on [Next].
14. When the printer icon is displayed in the Printer
folder, configuration is complete.
Windows 98 or Windows Me
1. Click on [Start]-[Settings]-[Printers].
2. Double-click on [Add Printer].
3. When the displayed [Add PrinterWizard], click
on [Next].
20 OKI C9000 Series
Page 29

5. Click on [Have Disk...].
English
4. Select [Local Printer] and click on [Next].
6. After the [Install from Disk] window appears,
insert the Printer Software CD-ROM disk into the
CD-ROM drive.
7. In the [Copy files from] field, enter
D:\DRIVERS\W9598\
Language
for PostScript or
PCL drivers (where D:\ is the drive letter of the
CD-ROM) and click on [OK].
Chapter 2 - Windows Setup 21
Page 30

8. Choose the printer model and driver required and
click on [Next].
10. Confirm printer name and specify if the printer is
to be used as default printer or not, then click on
[Next].
9. Among [Available Ports], select [LPT1:ECP
Printer Port] and click on [Next].
11. Specify if a test page is to be printed or not, then
click on [Finish].
12. When the printer icon appears in the Printer
folder, configuration is complete.
Windows 95
1. Click on [Start]-[Settings]-[Printers].
2. Double-click on [Add Printer].
22 OKI C9000 Series
Page 31

3. When the [Add Printer Wizard] appears, click on
[Next].
English
4. Select [Local Printer] and click on [Next].
insert the Printer Software CD-ROM disk into the
CD-ROM drive.
7. In the [Copy files from] field, enter
6. After the [Install from Disk] window appears,
5. Click on [Have Disk...].
D:\DRIVERS\W9598\
Language
PCL drivers (where D:\ is the drive letter of the
CD-ROM) and click on [OK].
for PostScript or
8. Choose the printer model and driver required and
click on [Next].
Chapter 2 - Windows Setup 23
Page 32

9. Among [Available Ports], select [LPT1:ECP
Printer Port] and click on [Next].
11. Specify if a test page is to be printed or not, then
click on [Finish].
12. When the printer icon appears in the Printer
folder, configuration is complete.
Windows NT 4.0
Note:
Administrator’s authority is required when
installing under Windows NT 4.0.
1. Click on [Start]-[Settings]-[Printers].
2. Double-click on [Add Printer].
10. Confirm printer name and specify if the printer is
to be used as default printer or not, then click on
3. When the [Add PrinterWizard] appears, select
[My computer] and click on [Next].
[Next].
24 OKI C9000 Series
Page 33

4. Among [Available Ports], select [LPT1:ECP
Printer Port] and click on [Next].
English
5. Click on [Have Disk...].
6. After the [Install from Disk] window appears,
insert the Printer Software CD-ROM disk into the
CD-ROM drive.
7. In the [Copy manufacturer’s files from] field,
enter D:\DRIVERS\NT40\
Language
for
PostScript or PCL drivers (where D:\ is the drive
letter of the CD-ROM) and click on [OK].
Chapter 2 - Windows Setup 25
Page 34

8. Choose the printer and click on [Next].
9. Confirm printer name and specify if the printer is
to be used as default printer or not, then click on
[Next].
10. Specify if the printer is to be shared or not, then
click on [Next].
11. Specify if a test page is to be printed or not, then
click on [Next], then click on [Finish].
12. When the printer icon appears in the Printer
folder, configuration is complete.
26 OKI C9000 Series
Page 35

USB interface
Note:
No USB interface cable is supplied with the
printer. Please use a USB interface cable that is
compatible with USB specification 1.1.
English
numbers depend on the order of connecting or
turning on each printer.
• If a USB hub is used, it is necessary to connect
the USB hub directly to the computer.
General
A USB interface has the following restrictions:
• Will not operate using a MS-DOS or Windows
95/3.1/NT 4.0/NT 3.51 operating system.
• Will not operate using a Windows 98 operating
system that has been upgraded from a Windows
95/3.1 operating system.
• Do not disconnect the USB interface cable during
printing.
• Do not immediately disconnect and connect the
USB cable or vice versa. Wait at least 5 seconds
before re-connecting or disconnecting the cable.
• The operation of a printer is not assured if a USB
compatible device is connected concurrently with
other USB-compatible machines.
• When connecting multiple printers of the same
type, they appear in the print folder as *****,
***** (copy2), ***** (copy3), etc. These
Chapter 2 - Windows Setup 27
Connection
1. Make sure the printer and computer are turned
off.
2. Connect the USB interface cable into the USB
port on the computer.
3. Connnect the other end of the USB interface
cable to the USB connector on the printer.
4. Turn the printer on, then turn the computer on.
Page 36
USB driver
Note:
Installation of USB driver is only required for
Windows 98.
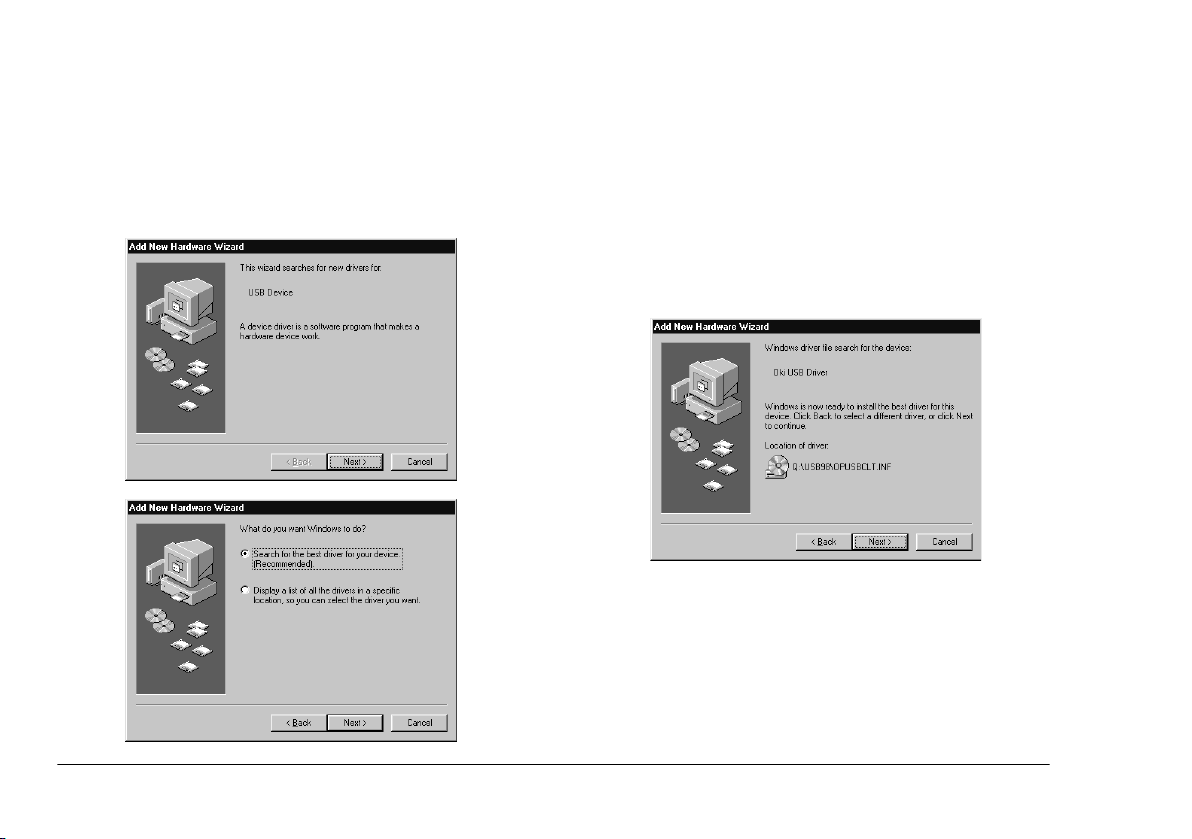
1. After the [Add New Hardware Wizard] window
appears, click on [Next].
2. Select [Search for the best driver for my device
(Recommended)] and click on [Next].
3. Insert the printer software CD-ROM disk into the
CD-ROM drive.
4. Make sure CD-ROM drive is checked and click
on [Next].
5. After Windows finds the USB driver, click on
[Next].
6. After files have finished copying, click on
[Finish].
7. If the [Add New Hardware Wizard] window
appears again, click on [Cancel] and restart the
computer.
28 OKI C9000 Series
Page 37

Plug and play configuration
Windows 2000
English
Note:
Administrator’s authority is required when
installing under Windows 2000.
1. When the [Found New Hardware Wizard]
appears, click on [Next].
2. Select [Search for the best driver for my device
(Recommended)] and click on [Next].
3. Choose [Specify a location] and click on [Next].
4. Insert the printer software CD-ROM disk into the
CD-ROM drive.
5. Uncheck [Floppy disk drive] and check [CDROM drive], then click on [Next] to install by
default the PCL printer driver.
Chapter 2 - Windows Setup 29
Page 38

OR
To install another printer driver, uncheck both
[Floppy disk drive] and [CD-ROM drive] and
check [Specify a location]. Enter
D:\DRIVERS\WIN2000\
Language
(where D:\ is
the drive letter of the CD-ROM), then click on
[Next] selecting the required printer driver.
6. Confirm that the printer driver is ready to be
installed and click on [Next].
7. Specify if a test page is to be printed or not, then
click on [Next] and click on [Finish].
9. Choose [Start]-[Settings]-[Printers], then right
click the printer icon and select [Set as Default
Printer].
Windows 98 or Windows Me
1. After the [Add New Hardware Wizard] window
appears, click on [Next].
8. In the [Digital Signature Not Found] window,
click on [Yes]. File copying starts.
30 OKI C9000 Series
Page 39

2. Choose [Search for the best driver for your device
(Recommended)] and click on [Next].
3. Insert the Printer Software CD-ROM disk into the
CD-ROM drive.
4. Uncheck [Floppy disk drive] and check [CDROM drive], then click on [Next] to install by
default the PCL printer driver.
OR
For Windows 98 - To install another printer
driver, uncheck both [Floppy disk drive] and [CDROM drive] and check [Specify a location]. Enter
D:\DRIVERS\W9598\
Language
(where D:\ is the
drive letter of the CD-ROM), then click on [Next]
selecting the required printer driver.
English
OR
For Windows ME - Select the required driver from
the displayed list in order to install the language
required.
5. After Windows finds the printer driver, click on
[Next].
6. Confirm the printer name and specify if the
printer is to be the default printer or not, then
click on [Next].
7. Specify if a test page is to be printed or not, then
click on [Finish].
8. When the printer icon appears in the Printer
folder, configuration is complete.
Chapter 2 - Windows Setup 31
Page 40

Add printer configuration
Windows 2000
Note:
Administrator’s authority is required when
installing under Windows 2000.
1. Click on [Start]-[Settings]-[Printers].
2. Double-click on [Add Printer].
3. When the [Add Printer Wizard] appears, click on
[Next].
4. Select [Local Printer], remove the check mark on
[Automatically detect and install my Plug and
Play printer] and click on [Next].
5. Select [Use the following port] and specify
[USBxxx], then click on [Next].
32 OKI C9000 Series
Page 41
6. Click on [Have Disk...].
7. After the [Install from Disk] window appears,
insert the Printer Software CD-ROM disk into the
CD-ROM drive.
8. In the [Copy manufacturer’s files from] field,
enter D:\DRIVERS\WIN2000\
Language
for
PostScript or PCL drivers (where D:\ is the drive
letter of the CD-ROM) and click on [OK].
English
9. Choose the printer model and driver, then click on
[Next].
10. Confirm printer name and specify if the printer is
to be used as default printer or not, then click on
[Next].
Chapter 2 - Windows Setup 33
Page 42

11. Specify if the printer is to be shared or not, then
click on [Next].
12. Specify if a test page is to be printed or not, then
click on [Next], then click on [Finish].
13. In the [Digital Signature Not Found] window,
click on [Yes]. File copying starts.
14. Choose [Start]-[Settings]-[Printers], then right
click the printer icon and select [Set as Default
Printer].
Windows 98
1. Click on [Start]-[Settings]-[Printers].
2. Double-click on [Add Printer].
3. When the [Add PrinterWizard] appears, click on
[Next].
34 OKI C9000 Series
Page 43

4. Select [Local Printer] and click on [Next].
5. Click on [Have Disk...].
English
6. After the [Install from Disk] window appears,
insert the Printer Software CD-ROM disk into the
CD-ROM drive.
7. In the [Copy files from] field, enter
D:\DRIVERS\W9598\
Language
for PostScript or
PCL drivers (where D:\ is the drive letter of the
CD-ROM) and click on [OK].
8. Choose the printer model and driver, then click on
[Next].
Chapter 2 - Windows Setup 35
Page 44

9. Among [Available Ports], select [OP1USBx] and
click on [Next].
10. Confirm printer name and specify if the printer is
to be used as default printer or not, then click on
[Next].
11. Specify if a test page is to be printed or not, then
click on [Finish].
12. When the printer icon appears in the Printer
folder, configuration is complete.
36 OKI C9000 Series
Page 45

English
Network connection
Note 1:
Note 2:
An optional Ethernet network interface card
(NIC) is needed for connection to a network. For
information on installing a network interface
card, refer to Chapter 8 Optional Accessories.
Administrator’s authority is required when
installing using a network connection.
1. Confirm that the power is off to the printer.
2. Connect a network interface cable (twisted pair)
into the NIC socket in the printer.
3. Connect the other end of the network interface
cable into the network socket.
4. Switch on the printer.
5. Install the printer driver using the Add Printer
Wizard and configure the printer driver to the
network port the printer is connected to.
6. For further details on how to configure network
connection, refer to the relevant section in the
user’s guide for the network interface card.
Internal hard disk
If your printer includes the hard disk, please use the
following procedure to make sure that the hard disk has
been enabled in the printer and printer driver.
Printer
1. Print a Menu Map as follows to confirm the hard
disk is correctly installed.
(a) Press
(b) Press
(c) Press
(d) Check that HDD now shows installed in the
2. After installation, the hard disk has to be
initialised as follows:
(a) Press
Menu (0)
INFORMATION MENU.
Select (3)
MENU MAP is displayed on the LCD.
Select (3)
map.
printer.
Menu (0)
MAINTENANCE is displayed, then press
Select (3)
button twice to access the
button and confirm PRINT
button to print the menu
button until DISK
button.
Chapter 2 - Windows Setup 37
Page 46

(b) When HDD INITIALISE is displayed, press
Select (3)
(c) Press
printer. The printer has to be switched off
and back on again to initialise the hard disk
before use.
button.
Item (1)
button to shutdown the
3. Click on [Device Settings] tab.
4. Highlight [Hard Disk], then select [Installed] and
click on [OK].
Windows 2000 PCL
1. Click on [Start] - [Settings] - [Printers].
Printer driver
Windows 2000/NT 4.0 PostScript
1. Click on [Start] - [Settings] - [Printers].
2. Highlight the printer name and click on [File]
then [Properties].
38 OKI C9000 Series
2. Highlight the printer name and click on [File]
then [Properties].
3. Click on [General] tab, [Printing Preferences]
button, then [Device Options] button.
OR
Click on [Advanced] tab, [Printing Defaults] button, then [Device Options] button..
4. Check [Printer Hard Disk] and click on [OK]
three times.
Page 47

Windows 98/95 PostScript
English
Windows 98/95/NT 4.0 PCL
1. Click on [Start] - [Settings] - [Printers].
2. Highlight the printer name and click on [File]
then [Properties].
3. Click on the [Device Options] tab.
4. Highlight [Hard Disk], then select [Installed] and
click on [OK].
1. Click on [Start] - [Settings] - [Printers].
2. For Windows 98/95 - Highlight the printer name
and click on [File] then [Properties].
For Windows NT 4.0 - Highlight the printer name
and click on [File] then [Document Default].
3. Click on the [Paper] tab, then the [Device
Options] button.
4. Check [Printer Hard Disk] and click on [OK]
twice.
Chapter 2 - Windows Setup 39
Page 48

Duplex unit
If your printer includes the duplex unit, please use the
following procedure to make sure that duplex printing
has been enabled in the printer and printer driver.
Printer
1. Press
2. Press
3. Press
4. Press
Menu (0)
displayed, then press
Item (1)
displayed.
Value (2)
press
Select (3)
show that duplex has been set to on.
Online (4)
on line.
button until PRINT MENU is
Select (3)
button until DUPLEX is
button until ON is displayed and
button. An asterisk (*) appears to
button to turn the printer back
button.
3. Click on [Device Settings] tab.
4. Highlight [Duplex], then select [Installed] and
click on [OK].
Printer driver
Windows 2000 PCL
Windows 2000/NT 4.0 PostScript
1. Click on [Start] - [Settings] - [Printers].
2. Highlight the printer name and click on [File]
then [Properties].
40 OKI C9000 Series
1. Click on [Start] - [Settings] - [Printers].
2. Highlight the printer name and click on [File]
then [Properties].
Page 49

3. Click on [General] tab, [Printing Preferences]
button, then [Device Options] button.
OR
Click on [Advanced] tab, [Printing Defaults] button, then [Device Options] button..
English
4. Check [Duplex Option Unit] and click on [OK]
three times.
Windows 98/95 PostScript
1. Click on [Start] - [Settings] - [Printers].
2. Highlight the printer name and click on [File]
then [Properties].
3. Click on the [Device Options] tab.
4. Highlight [Duplex], then select [Installed] and
click on [OK].
Windows 98/95/NT 4.0 PCL
1. Click on [Start] - [Settings] - [Printers].
2. For Windows 98/95 - Highlight the printer name
and click on [File] then [Properties].
For Windows NT 4.0 - Highlight the printer name
and click on [File] then [Document Default].
Chapter 2 - Windows Setup 41
Page 50

3. Click on the [Paper] tab, then the [Device
Options] button.
4. Check [Duplex Option Unit] and click on [OK]
twice.
42 OKI C9000 Series
Page 51

Chapter 3 - Macintosh Setup
English
USB connection
Operating environment
• MacOS 8.5 or higher running on a Macintosh
computer with a USB interface.
• Do not disconnect the USB interface cable during
printing.
• Do not immediately disconnect and connect the
USB cable or vice versa. Wait at least 5 seconds
before re-connecting or disconnecting the cable.
• The operation of the printer is not assured if a
USB compatible device is connected
concurrently with other USB compatible
machines.
• When connecting multiple printers of the same
type, the Chooser displays *****1, *****2,
*****3, etc. These numbers depend on the order
of connecting or turning on each printer.
Chapter 3 - Macintosh Setup 43
• If a USB hub is used, it is necessary to connect
the USB hub directly to the computer.
• If the memory setting for the print monitor is low
and depending on the document, background
printing may not be able to be carried out.
Increase the memory setting for the print monitor
to carry out background printing without
problems.
• Depending on the model of computer, updates to
the operating system may be needed, e.g. iMac
Update 1.0, iMac Update 1.1, iMac Firmware
Update, etc. For information on the latest updates
and installation, contact Apple Computers.
Connection
Note:
No USB interface cable is supplied with the
printer. Please use a USB interface cable that is
compatible with USB specification 1.1.
Page 52

1. Make sure the printer and computer are turned
off.
2. Connect the USB interface cable into the USB
port on the computer.
3. Connnect the other end of the USB interface
cable to the USB connector on the printer.
4. Turn the printer on, then turn the computer on.
Printer driver installation
2. Open [Drivers] and open the required language
folder.
3. Double-click on [Adobe PS Installer].
Note:
Switch off antivirus software before installing a
printer driver.
1. Place the software CD-ROM in the CD-ROM
drive.
4. Click on [Continue] in the Adobe PostScript
Driver screen and follow the on screen
instructions.
44 OKI C9000 Series
Page 53

5. When installation of the printer driver is
complete, click on [Restart] button.
6. After the computer has restarted the Adobe PS
icon should appear in the Chooser.
Creating desktop printer
1. In the Adobe PS Components folder at the top
directory level of your hard disk, double- click on
[Desktop Printer Utility].
Note: Installing Adobe PS printer driver also installs
Desktop Printer Utility in the Adobe PS
Components folder.
English
2. Select [Printer (USB)] and click on [OK].
3. Click on [Change] button in [PostScript Printer
Description (PPD) file].
Chapter 3 - Macintosh Setup 45
Page 54

7. Click on [Create] button, enter the printer name ,
then click on the [Save] button.
4. Select the PPD for the printer from the
Drivers:
language
folder on the CD.
Note:
The printer icon should appear on the desktop.
8. Close the Desktop Printer Utility.
5. In [USB printer selection], click on [Change]
button.
6. Select the printer then click on [OK].
46 OKI C9000 Series
Page 55

Network connection
Note 1:
Note 2:
Operating environment
An optional Ethernet network interface card
(NIC) is needed for connection to a network. For
information on installing a network interface
card, refer to Chapter 8 Optional Accessories.
Administrator’s authority is required when
installing using a network connection.
MacOS 8.5 or above, running on a Macintosh computer
with EtherTalk interface.
English
Printer driver installation
Either the Adobe PostScript printer driver or LaserWriter printer driver can be used. However, for the
Adobe PostScript printer driver 8.7, only MacOS 8.5 or
higher can be used.
1. Place the Printer Software CD-ROM in the CDROM drive.
2. Open the [Driver] folder.
3. Double-click on [Adobe PS Installer].
4. Click [Continue] in the Adobe PostScript Diver
screen and follow the on screen instructions.
Connection
1. Confirm that the power is off to the printer.
2. Connect a network interface cable (twisted pair)
into the NIC socket in the printer.
3. Connect the other end of the network interface
cable into the network socket.
4. Switch on the printer.
5. For further details on how to configure network
connection, refer to the relevant section in the
user’s guide for the network interface card.
Chapter 3 - Macintosh Setup 47
5. After installation of the driver, restart the
computer and the Adobe PS icon should appear in
the Chooser.
6. Open [Chooser] in the Apple menu.
7. Click on [Adobe PS] and select Printer name.
Note 1:
Note 2:
If using an Ethernet network interface card, the
printer name is OP and the last six digits of the
Ethernet address.
Printer name is given as Object name in the self
diagnostic test for the network interface card.
Page 56

8. Click on [Create] and an icon should appear
beside the printer name.
9. Close [Chooser].
Note:
The printer icon should appear on the desktop.
Internal hard disk
If your printer includes the hard disk, please use the
following procedure to make sure that the hard disk has
been enabled in the printer and printer driver.
Printer
1. Print a Menu Map as follows to confirm the hard
disk is correctly installed.
(a) Press
(b) Press
(c) Press
(d) Check that HDD now shows installed in the
2. After installation, the hard disk has to be
initialised as follows:
(a) Press
48 OKI C9000 Series
Menu (0)
INFORMATION MENU.
Select (3)
MENU MAP is displayed on the LCD.
Select (3)
map.
printer.
Menu (0)
MAINTENANCE is displayed, then press
Select (3)
button twice to access the
button and confirm PRINT
button to print the menu
button until DISK
button.
Page 57

(b) When HDD INITIALISE is displayed, press
Select (3)
(c) Press
printer. The printer has to be switched off
and back on again to initialise the hard disk
before use.
button.
Item (1)
button to shutdown the
English
Duplex unit
If your printer includes the duplex unit, please use the
following procedure to make sure that duplex printing
has been enabled in the printer and printer driver.
Printer
Printer driver
Macintosh USB connection
1. Drag the printer icon from the desktop into the
waste bin and empty the waste bin.
2. Create a new desktop printer and the settings will
be updated automatically.
Macintosh network connection
1. Open [Chooser], click on [Adobe PS] and select
the printer.
2. Click on [Setup] - [Configure].
3. Select [Hard disk] from [Installable options] and
then select [Installed] from the drop down list.
4. Click on [OK] button twice and close [Chooser]
to complete the re-configuration of the printer
driver.
Chapter 3 - Macintosh Setup 49
1. Press
2. Press
3. Press
4. Press
Menu (0)
displayed, then press
Item (1)
displayed.
Value (2)
press
Select (3)
show that duplex has been set to on.
Online (4)
on line.
button until PRINT MENU is
Select (3)
button until DUPLEX is
button until ON is displayed and
button. An asterisk (*) appears to
button to turn the printer back
button.
Printer driver
Macintosh USB connection
1. Drag the printer icon from the desktop into the
waste bin and empty the waste bin.
2. Create a new desktop printer and the settings will
be updated automatically.
Page 58

Macintosh network connection
1. Open [Chooser], click on [Adobe PS] and select
the printer.
2. Click on [Setup] - [Configure].
3. Select [Duplex] from [Installable options] and
then select [Installed] from the drop down list.
4. Click on [OK] button twice and close [Chooser]
to complete the re-configuration of the printer
driver.
50 OKI C9000 Series
Page 59

Index
English
A
Add printer configuration. . . . . . . . . . . . . . . . . . . 18, 32
C
Components . . . . . . . . . . . . . . . . . . . . . . . . . . . . . . . . . .3
Connection
Parallel interface . . . . . . . . . . . . . . . . . . . . . . . . . .14
Power cable . . . . . . . . . . . . . . . . . . . . . . . . . . . . . .10
USB interface . . . . . . . . . . . . . . . . . . . . . . . . 27
Control panel . . . . . . . . . . . . . . . . . . . . . . . . . . . . . . . . .5
44
,
D
Desktop printer . . . . . . . . . . . . . . . . . . . . . . . . . . . . . . .45
Display language . . . . . . . . . . . . . . . . . . . . . . . . . . . . .11
Duplex printing. . . . . . . . . . . . . . . . . . . . . . . . . . . 40
49
,
H
Hard disk . . . . . . . . . . . . . . . . . . . . . . . . . . . . . . . 37, 48
L
Location . . . . . . . . . . . . . . . . . . . . . . . . . . . . . . . . . . . . .6
Index 51
M
Macintosh
Connection . . . . . . . . . . . . . . . . . . . . . . . . . . . . . . 44
Creating desktop printer . . . . . . . . . . . . . . . . . . . . 45
Duplex option. . . . . . . . . . . . . . . . . . . . . . . . . . . . 49
Hard disk . . . . . . . . . . . . . . . . . . . . . . . . . . . . . . . 49
Network connection . . . . . . . . . . . . . . . . . . . . . . . 47
Printer driver installation . . . . . . . . . . . . . . . . 44
USB interface . . . . . . . . . . . . . . . . . . . . . . . . . . . . 43
Menu settings. . . . . . . . . . . . . . . . . . . . . . . . . . . . . . . . 12
N
Network connection. . . . . . . . . . . . . . . . . . . . . . . . 37, 47
P
Paper
Loading. . . . . . . . . . . . . . . . . . . . . . . . . . . . . . . . . . 9
Parallel interface . . . . . . . . . . . . . . . . . . . . . . . . . . . . . 14
Plug and play configuration. . . . . . . . . . . . . . . . . . 15
Power cable . . . . . . . . . . . . . . . . . . . . . . . . . . . . . . . . . 10
47
,
29
,
Page 60

Printer
Changing display language . . . . . . . . . . . . . . . . . 11
Components . . . . . . . . . . . . . . . . . . . . . . . . . . . . . . 3
Control panel . . . . . . . . . . . . . . . . . . . . . . . . . . . . . 5
Location . . . . . . . . . . . . . . . . . . . . . . . . . . . . . . . . . 6
Menu settings . . . . . . . . . . . . . . . . . . . . . . . . . . . . 12
Setting up . . . . . . . . . . . . . . . . . . . . . . . . . . . . . . . . 6
Unpacking . . . . . . . . . . . . . . . . . . . . . . . . . . . . . . . 2
Printer driver
Installation . . . . . . . . . . . . . . . . . . . . . . . . . . . 13
Parallel interface connection . . . . . . . . . . . . . . . . 14
Types . . . . . . . . . . . . . . . . . . . . . . . . . . . . . . . . . . 13
USB interface connection. . . . . . . . . . . . . . . . . . . 27
Protective sheet removal . . . . . . . . . . . . . . . . . . . . . . . . 6
44
,
S
Setting up
Loading paper. . . . . . . . . . . . . . . . . . . . . . . . . . . . . 9
Power cable . . . . . . . . . . . . . . . . . . . . . . . . . . . . . 10
Protective sheet removal . . . . . . . . . . . . . . . . . . . . 6
Toner cartridge installation . . . . . . . . . . . . . . . . . . 8
T
Toner cartridge installation . . . . . . . . . . . . . . . . . . . . . . 8
U
Unpacking. . . . . . . . . . . . . . . . . . . . . . . . . . . . . . . . . . . .2
USB driver . . . . . . . . . . . . . . . . . . . . . . . . . . . . . . . . . .28
USB interface . . . . . . . . . . . . . . . . . . . . . . . . . . . . 27
43
,
W
Windows
Add printer configuration . . . . . . . . . . . . . . . 18
Duplex option . . . . . . . . . . . . . . . . . . . . . . . . . . . .40
Hard disk . . . . . . . . . . . . . . . . . . . . . . . . . . . . . . . .38
Network connection . . . . . . . . . . . . . . . . . . . . . . .37
Parallel interface . . . . . . . . . . . . . . . . . . . . . . . . . .14
Plug and play configuration . . . . . . . . . . . . . 15
Printer driver installation. . . . . . . . . . . . . . . . . . . .13
Printer driver types . . . . . . . . . . . . . . . . . . . . . . . .13
USB driver. . . . . . . . . . . . . . . . . . . . . . . . . . . . . . .28
USB interface . . . . . . . . . . . . . . . . . . . . . . . . . . . .27
32
,
29
,
52 OKI C9000 Series
Page 61

OKI SYSTEMS COMPANIES
English
Oki Systems (UK) Ltd
550 Dundee Road, Slough Trading Estate
Slough, Berkshire SL1 4LE
UNITED KINGDOM
Tel: +44 (0) 1753 819 819
Fax: +44 (0) 1753 819 899
http://www.oki.co.uk
Oki Systems (Ireland) Limited
The Square Industrial Complex
Tallaght, Dublin 24
EIRE
Tel: +353 (01) 459 8666
Fax: +353 (01) 459 8840
http://www.oki.ie
Hawthorn Business Centre
Adelaide Industrial Estate
Falcon Road, Belfast BT12 6HP
NORTHERN IRELAND
Tel: +44 (028) 9057 2355
Fax: +44 (028) 9057 2350
http://www.oki.ie
Oki Data Corporation
4-11-22, Shibaura, Minato-ku, Tokyo 108-8551
JAPAN
Tel: +81 (0) 3 5445 6111
Fax: +81 (0) 3 5445 6182
Oki Data (Hong Kong) Ltd.
Suite 1909B, Tower 3, China Hong Kong City
33 Canton Road, Tsim Sha Tsui, Kowloon
HONG KONG
Tel: +852 2736 0130
Fax: +852 2736 2395
Oki Data (Singapore) Pte., Ltd.
78 Shenton Way, #09-01
SINGAPORE 079120
Tel: +65 221 3722
Fax: +65 221 9282
Oki Systems (Thailand) CO. Ltd
956 Udomvidhya Building 6th Floor, Rama IV Road
Silom, Bangkok 10500
THAILAND
Tel: +662 636 2535
Fax: +662 636 2536
Index 53
Page 62

54 OKI C9000 Series
 Loading...