

Page 1
Page 2

Contents
Ordering Replacement Supplies .................................................... 3
Media Settings ................................................................................... 4
Why Change Media Settings? .........................................................4
Media Settings for Individual Print Jobs ........................................5
Changing Default Media Settings .................................................. 6
Media Weight Trays 1 & 2 .............................................................6
MP Tray ..........................................................................................7
Loading Media .................................................................................10
Trays 1 & 2 ...................................................................................10
Multi-Purpose Tray .......................................................................11
Selecting/Using ................................................................................12
Paper .............................................................................................12
Transparencies ..............................................................................13
Labels ............................................................................................14
Thick Paper ...................................................................................15
Envelopes ......................................................................................16
Oki Print Media ............................................................................17
Printing Built-In Reports ................................................................19
Setting Power Save Parameters ...................................................20
Control Panel .................................................................................... 22
Buttons ..........................................................................................22
Lights ............................................................................................23
Clearing Media Jams .......................................................................24
Jam 382 .........................................................................................24
Jam 381 .........................................................................................26
Jams 372 & 380 ............................................................................28
Jams 370, 373 & 383 ....................................................................29
Jam 371 .........................................................................................31
Jam 391 .........................................................................................32
Jam 392 .........................................................................................33
Jam 390 .........................................................................................34
59359502
1
Page 3

Changing Toner Cartridges ............................................................35
Error Messages ................................................................................. 37
Service & Support ............................................................................40
2
Page 4
Ordering Replacement Supplies
How to Order
• Consult the dealer where you
purchased your printer.
•Consult an Oki Data Authorized
Sales or Service Dealer. (For the
nearest dealer, call
1-800-654-3282.)
• U.S., Puerto Rico, Guam, U.S.
Virgin Islands only: Order on the
Internet
• U.S. only: Order toll-free by phone
at 1-800-654-3282, using VISA
MasterCard
• Check office supply catalogs.
www.okidata.com.
®
, or AmEx®.
®
,
Order Numbers
Toner Cartridges, Type C6
Type Color Oki Part No.
Standard Black 42804504
Cyan 42804503
Magenta 42804502
Yellow 42804501
High
Capacity
Black 42127404
Cyan 42127403
Magenta 42127402
Yellow 42127401
Image Drums, Type C6
Color Oki Part No.
Black 42126604
Cyan 42126603
Magenta 42126602
Yellow 42126601
Take Advantage of
OKI®’s Supply Manager
Don’t run out of supplies again!
• Calculates your usage based on
information you provide.
• Sends you an email reminder when
it’s time to reorder
To register for Supply Manager, go
to www.okidata.com.
3
Page 5
Media Settings
Why Change Media
Settings?
Improper media settings:
• cause poor quality printing
• cause flaking
• can damage the printer
Default Media Settings
The Default Setting
The default media weight setting for
all trays is Medium.
Changing Defaults
To change the printer’s default settings
for print media, see pages 6 and 7.
Resetting to Original
Defaults
Note: The … which appears in these
steps indicates that you should
keep pressing the button
repeatedly until you see the
display indicated.
To reset the printer menu to its
original default settings:
1. Press to enter the Menu
mode.
2. Press …
MAINTENANCE MENU
ENTER
3. Press .
MENU RESET
EXECUTE
ENTER
4. Press .
The printer resets and returns to the
on-line state.
4
Page 6

Media Settings (cont.)
Media Settings for
Individual Print Jobs
If you are printing a job on special
media, you can temporarily load the
media in a tray and change the media
settings for that tray in the driver as
you print the job.
Ranges for Printer
Media Weight Settings
Note: To determine if a paper weight
is US Bond or Index, check the
metric equivalent. E.g.,
35 lb. US Bond = 132 g/m
35 lb. Index = 64 g/m
For more information, go to
www.paper-paper.com/
weight.html
.
2
2
Table 1: Media Weight Settings,
US Bond
Setting US Bond (Metric)
Light
Medium
Heavy
Ultra Heavy
Table 2: Media Weight Settings,
Setting Index (Metric)
Light
Medium
Heavy
Ultra Heavy
16 to 19 lb.
(60 to 71 g/m
20 to 27 lb.
(75 to 101 g/m
28 to 32 lb.
(105 to 120 g/m
33 to 54 lb.
(124 to 203 g/m
Index
33 to 40 lb.
(60 to 71 g/m
42 to 56 lb.
(75 to 101 g/m
58 to 67 lb.
(105 to 120 g/m
69 to 113 lb.
(124 to 203 g/m
2
)
2
)
2
2
2
)
2
)
2
2
)
)
)
)
5
Page 7
Changing Default Media Settings
Media Weight Trays 1 & 2
To Change the Media Weight
Default for Trays 1 & 2
Note: The default media weight
setting for Trays 1 and 2 is
Medium.
Note: The … which appears in these
steps indicates that you should
keep pressing the button
repeatedly until you see the
display indicated.
1. Press to enter the Menu
mode.
2. Press …
MEDIA MENU
ENTER
3. Press .
TRAY1 PAPERSIZE
LETTER
ENTER
5. Press .
The second line of the display starts
blinking.
6. Press …
TRAYX* MEDIAWEIGHT
YYYY**
ENTER
OLN INE
7. Press , press .
* *X = 1 or 2, depending on which
tray you wish to change.
** YYYY = Your choice of media
weights (see page 5):
Tray1 = Light, Medium, Heavy
Tray2 = Light, Medium, Heavy,
Ultra Heavy [maximum 40 lb.]
4. Press …
TRAYX* MEDIAWEIGHT
MEDIUM
6
Page 8

Changing Default Media Settings
MP Tray
To Set Transparencies
as the Default Media
in the MP Tray
Note: For the MP Tray, the default
Media Type setting is Plain.
Note: The … which appears in these
steps indicates that you should
keep pressing the button
repeatedly until you see the
display indicated.
1. Press to enter the Menu
mode.
2. Press …
MEDIA MENU
ENTER
3. Press .
ENTER
5. Press .
The second line of the display starts
blinking.
6. Press …
MPT MEDIATYPE
TRANSPARENCY
ENTER
7. Press .
An asterisk appears next to your
selection.
MPT MEDIATYPE
TRANSPARENCY *
BACK
8. Press .
4. Press …
MPT MEDIATYPE
PLAIN *
The setting is engaged and the
second line of the display stops
blinking.
OLN INE
9. Press .
7
Page 9
Changing Default Media Settings
MP Tray (cont.)
To Set Heavy Paper, Labels,
or Envelopes as the Default
Media in the MP Tray
Note: For the MP Tray, the default
Media Size setting is Letter and
the default Media Type setting
is Plain.
First, set the Media Size
Note: The … which appears in these
steps indicates that you should
keep pressing the button
repeatedly until you see the
display indicated.
1. Press to enter the Menu
mode.
2. Press …
MEDIA MENU
ENTER
4. Press …
MPT PAPER SIZE
LETTER *
ENTER
5. Press .
The second line of the display starts
blinking.
6. Press …
MP TRAY PAPERSIZE
XXXX†
† XXXX represents your media
size choice (for envelopes, select
COM-10 ENVELOPE).
ENTER
BACK
7. Press , press .
3. Press .
TRAY1 PAPERSIZE
LETTER *
The setting is engaged and the
second line of the display stops
blinking.
8. If you are setting the MP Tray for
envelopes:
OLN INE
Press and you are done.
If you are setting the MP Tray for
heavy paper or labels, keep going.
8
Page 10
Changing Default Media Setting
MP Tray (cont.)
Then, Set the Media Type
(Heavy Paper and Labels
Only)
1. Press .
MPT MEDIATYPE
PLAIN *
ENTER
2. Press .
The second line of the display starts
blinking.
3. Press …
MPT MEDIATYPE
YYYY†
† YYYY = LABELS or CARD
STOCK
.
OLN INE
5. Press .
The printer goes back on line.
6. You’re done!
ENTER
4. Press , press .
The setting is engaged and the
second line of the display stops
blinking.
BACK
9
Page 11
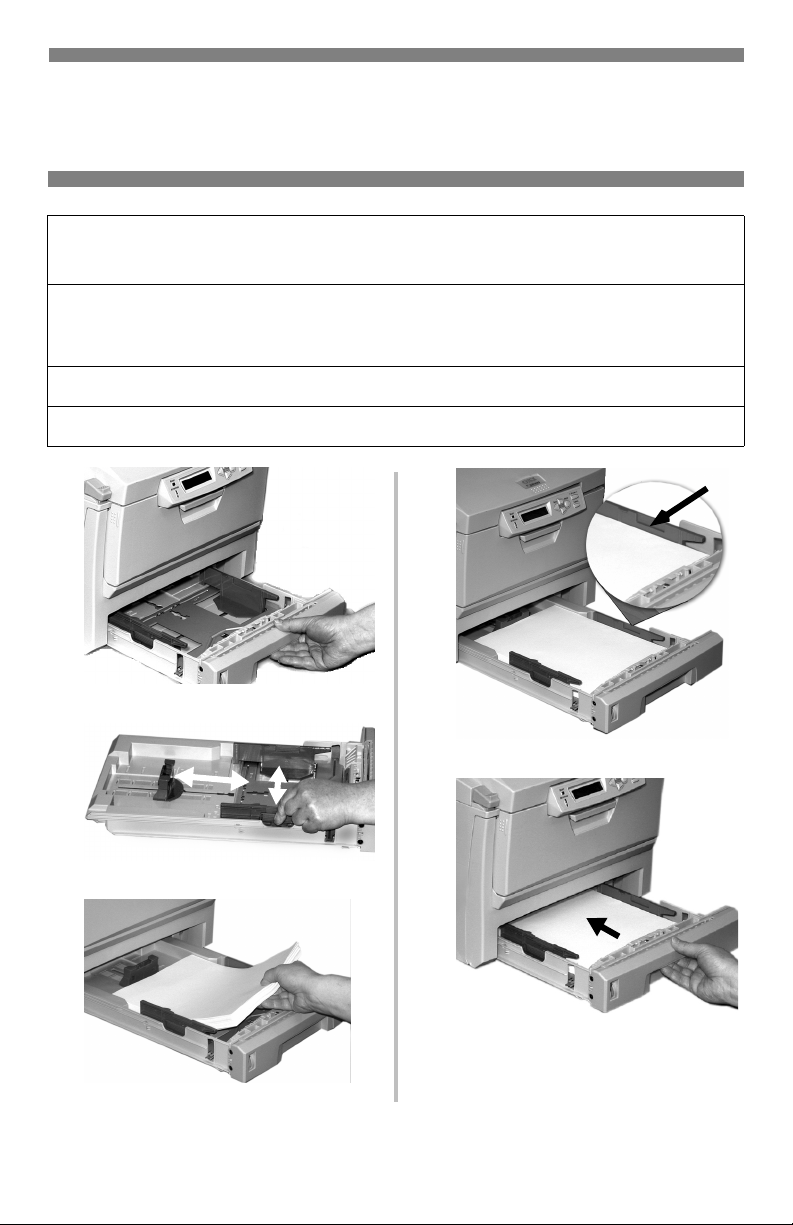
Loading Media
Trays 1 & 2
Media Weight Range
Media Size Range:
Tray 1 Capacity:
Optional Tray 2 Capacity:
1
2
Tray 1:16 to 32 lb. US Bond (60 to 120 g/m2)
2
Tray 2:16 to 47 lb. US Bond (60 to 177 g/m
Letter, Legal-14, Legal-13.5, Legal-13, A4, A5, A6, B5,
Executive, Custom (min. 3.94'' x 5.83'' [100 x 148 mm],
max. 8.5'' x 14'' [215.9 x 355.6 mm])
300 sheets of 20-lb. paper
530 sheets of 20-lb. paper
)
4
5
3
10
Page 12
Loading Media
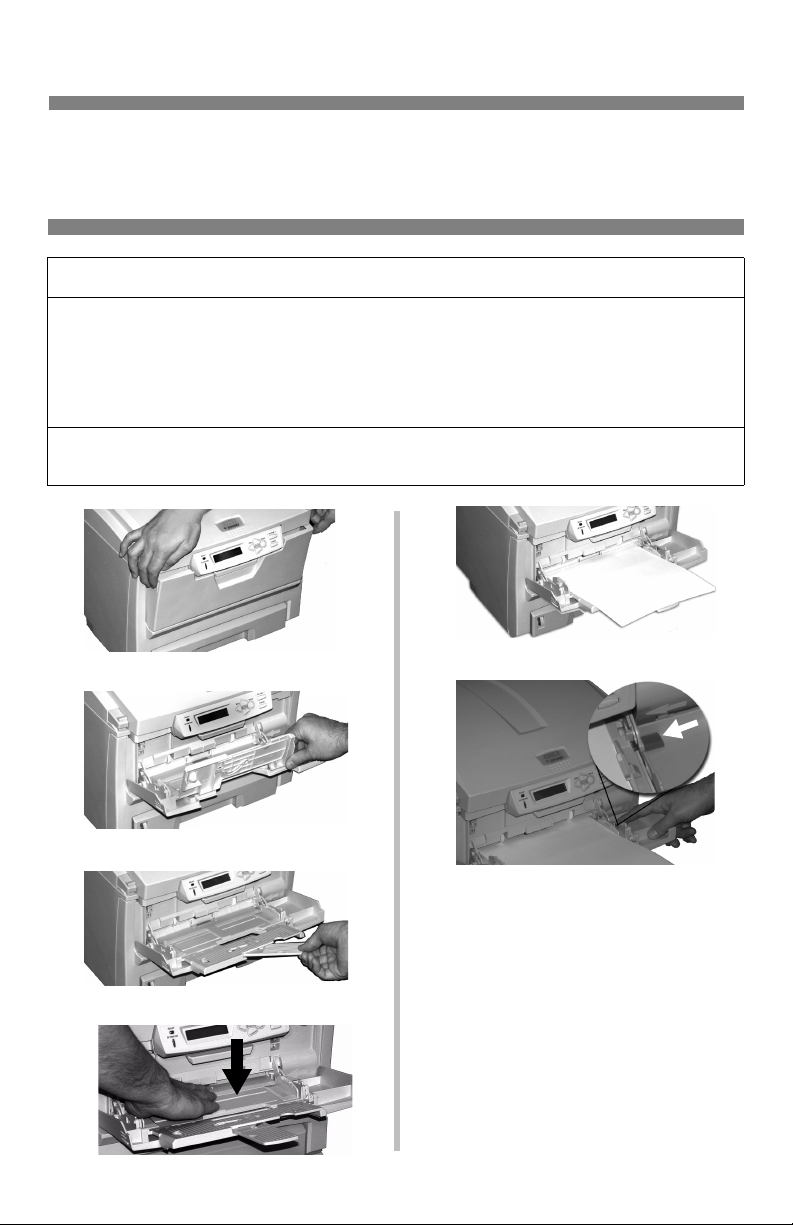
Multi-Purpose Tray
Wei g ht Ra nge
Size Range:
Ta ke s:
1
2
20 to 54 lb. US Bond (42 to 113 lb. Index, 75 to 203 g/m2 metric)
Min. 3.94" x 5.83" [100 to 148 mm], max. 8.5" x 14" [216 x 356 mm]
(Non-standard sizes must be defined in driver before printing: see
your on-line User’s Guide [on the Publications CD].)
Banners: 8.25 to 8.5'' [210 to 216 mm] wide by up to 47.25'' [1.2 m]
long. Must be fed one sheet at a time.
100 sheets of 20-lb. paper, 50 transparencies, 10 envelopes
Labels: max. feed stack = about 3/8-inch (1 cm) high
5
6
3
Letterhead stationery:
• Single-sided printing: load face up,
top edge into the printer.
• Double-sided printing: load face
down with top edge away from the
4
11
printer.
Page 13
Selecting/Using
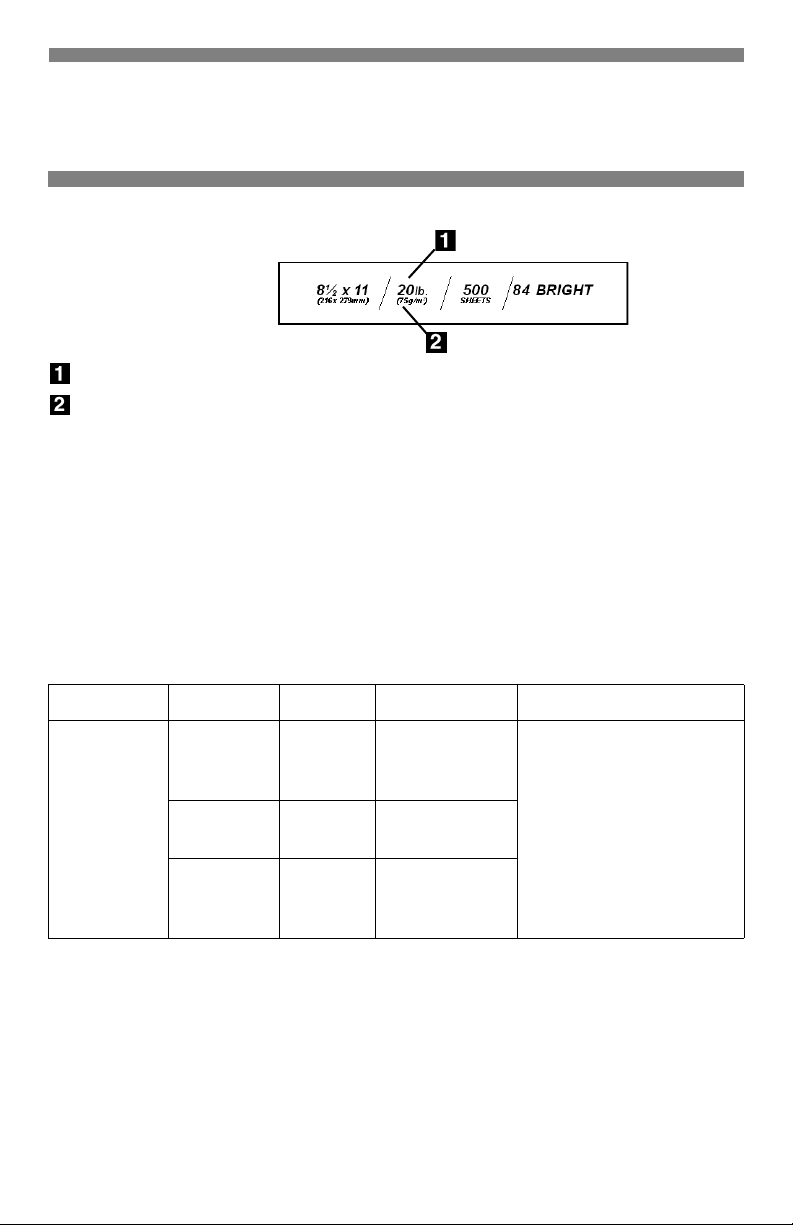
Paper
Sample Ream Label:
Media Weight, US Bond (see page 5) [sometimes given as substance]
Media Weight, Metric: Look for this to confirm US Bond vs Index.
Specifications
Caution!
The ink on pre-printed letterhead stationery must be able to withstand 446°F
(230°C) for 0.2 second, including mechanical pressures to 25 psi (1.8 kg/cm
Important!
If you experience curling when printing a file in duplex mode, switch to 28-lb. US
Bond paper.
2
).
Sizes Feed Tray Exit Tray Media Weight
• Letter
• Executive
•Legal-14
• Legal-13.5
•Legal-13
•A4, A5, A6
•B5
• Custom
a. Weight designations in this column are US Bond.
b. Minimum = 3.94" x 5.83"; maximum = 8.5" x 14".
MP Tray Only: banners, one sheet at a time, 8.25 to 8.5 '' wide by up to
47.25'' long
Custom sizes must first be defined in the printer driver.
Tray 1
MP Tray Rear Only
Tray 2
(optional)
b
Top
Rear
Top
Rear
•Light
•Medium
•Heavy
Medium
Heavy
•Light
•Medium
•Heavy
Recommended Media
• Oki 52206101 Bright
White Proofing Paper,
32 lb. (see page 17 for
more information)
• Hammermill Laser
Printer Radiant White,
24 lb.
• Xerox 4024, 20 lb.
12
a
Page 14

Selecting/Using
Transparencies
Specifications
Caution!
Transparencies must be able to withstand 446°F (230°C) for 0.2 second,
including mechanical pressures to 25 psi (1.8 kg/cm
Important!
Use only recommended transparencies.
2
).
Usable
Sizes
• Letter
•A4
Feed
Tray
MP Tray
Only
Exit
Tray
Rear Only Transparency Ignored.
Media Type
Printing Transparencies
For Individual Print Jobs on
Transparencies
Make the following settings in the
printer driver as you print the job:
• Source = MP Tray
• Media Size = Letter or A4
• Media Type = Transparency
Media
Weight
Recommended
• OKI 52205701
(see page 18)
• 3M CG3720
Making Transparencies the
Default Print Media
If the MP Tray will normally be
loaded with transparencies, set the
printer menu as follows (see page 7):
• MP Tray PaperSize = Letter (the
default) or A4
• MP Tray MediaType =
Transparency
13
Page 15

Selecting/Using
Labels
Specifications
Insert labels in the Multi-Purpose tray:
• label side up
• top edge aimed into the printer.
Caution!
Labels must be able to withstand 446°F (230°C) for 0.2 second, including
mechanical pressures to 25 psi (1.8 kg/cm
2
).
Usable
Sizes
• Letter
•A4
Feed Tray Exit Tray
MP Tray Rear Only Labels
Printing Labels
For Individual Print Jobs on
Labels
Make the following settings in the
printer driver as you print the job:
• Source = MP Tray
• Media Size = Letter or A4
• Media Type = Labels
Media
Type
Media
Weight
•Medium
•Heavy
•Ultra
Heavy
Recommended
• Avery 5161 White
Laser Label, Letter
size
• Avery 7162, 7664,
7666 White Laser
Label, A4 size
Making Labels the Default
Print Media
If the MP Tray will normally be
loaded with labels, set the printer
menu as follows (see page 7):
• MP Tray PaperSize - Letter or A4
• MP Tray MediaType = Labels
14
Page 16

Selecting/Using
Thick Paper
Sample Ream Label:
Media Weight, Index (see page 5).
Media Weight, Metric: Look for
this to confirm Index vs US Bond (see
page 5)
Caution!
To avoid damage to the printer,
always change the printer settings
when printing on thick media.
Specifications
Sizes
• Letter, Executive
• Legal-14, Legal-13.5, Legal-13
• A4, A5, A6, B5
• Custom (must be defined in the
printer driver).
Feed Tray
•Tray 1
•MP Tray
• Optional Tray 2
Exit Tray
• Rear Only
Media Type
•Card Stock
Media Weight
•Tray1: Heavy
• MP Tray & Optional Tray2: Heavy,
Ultra Heavy
Recommended
• Oki Premium Card Stock (see
page 18)
Printing Thick Paper
Printing Individual Jobs on
Thick Paper
Make the following settings in the
printer driver as you print the job:
• Source = Tray1 (
Bond)
, Optional Tray2 (17 lb. to 47
lb. US Bond
54 lb. US Bond
• Size = see sizes at left
• Type = Heavy or Ultra Heavy (see
page 5).
Making Thick Paper the
Default Print Media
Set the printer menu to (see pages 6
and 7):
• PaperSize (Tray1, Tray2, or MP
Tray) = see sizes at left.
•Media Type:
–Tray1 = Heavy
– Optional Tray2 or MP Tray =
Heavy or Ultra Heavy
17 lb. to 32 lb. US
), or MP Tray (20 lb. to
)
15
Page 17

Selecting/Using
Envelopes
Specifications
Caution!
Envelopes must be able to withstand
446°F (230°C) for 0.2 second,
including mechanical pressures to 25
psi (1.8 kg/cm
Size Feed Tray Exit Tray
COM-10
2
)
MP Tray
Only
Rear Only
Printing Envelopes
To Print an Individual Job on
Envelopes
Make the following settings in the
printer driver as you print the job:
• Source = MP Tray
• Size = COM-10
Important!
For the best print results, use only the
recommended envelopes.
Never use envelopes with metal
clasps, snaps, windows, or V-flap
seals:
No!
Media
Type
Any
Setting
Media
Weight
Any
Setting
Recommended
OKI 52206301
OKI 52206302
Making Envelopes the
Default Print Media for the
MP Tray
Set the printer menu to (see page 8):
• PaperSize = COM-10 ENVELOPE
16
Page 18

Selecting/Using
Oki Print Media
Oki® Synflex™
Order # 52205901
Waterproof
Tearproof
White, 8½'' x 11'' (216 x 279 mm)
100 sheets/box
Use Printer Settings
• Feed Tray = MP Tray Only
• Exit Tray = Rear Only
• MediaType = Plain
• MediaWeight = Ultra Heavy
* For best results:
Temperature range Humidity
65 to 77°F
(18 to 25°C)
40 to 65%RH
Oki Bright White
Proofing Paper*
Order # 52206101
White, 32-lb., 8½'' x 11''
500 sheets/box
Use Printer Settings
• Feed Tray = Tray 1, MP Tray,
Optional Tray 2
• Exit Tray = Rear Only
• MediaType = Plain
• MediaWeight = Heavy
Oki Premium Envelopes
Order #s
52206301 (Box 100)
52206302 (Box 500)
COM-10 (#10), white wove
Security tinted, Redi-Strip seal
Use Printer Settings
• Feed Tray = MP Tray Only
• Exit Tray = Rear Only
• MediaType = Envelope
• MediaWeight = Any (ignored)
17
Page 19

Selecting/Using
Oki Media (cont.)
Oki Premium Color
Transparencies
Order # 52205701
Size 8½'' x 11'' (216 x 279 mm)
50 sheets/box
Use Printer Settings
• Feed Tray: MP Tray Only
• Exit Tray: Rear Only
• Media Type: Transparency
• Media Weight: Any (ignored)
Oki Banner Paper
Order # 52206002
70 lb. Index (128 g/m
Size 8½'' x 35.4'' (216 x 899 mm)
100 sheets/box
Use Printer Settings
• Feed Tray: MP Tray Only
• Exit Tray: Rear Only
• Media Type: Plain
• Media Weight: Ultra Heavy
Important!
• Banner paper must be fed in one
sheet at a time.
2
)
Oki Premium Card Stock*
Weight OKI Order #
60 lb. (Cover)
90 lb. (Index)
110 lb. (Index)
Acid-free archival quality
White, 8½'' x 11'' (216 x 279 mm)
250 sheets/box
Use Printer Settings
• Feed Tray: MP Tray Only
• Exit Tray: Rear Only
•Media Type: Plain
• Media Weight:
–60 lb. = Heavy
– 90, 110 lb. = Ultra Heavy
* For best results:
Temperature range Humidity
65 to 77°F
(18 to 25°C)
To purchase Oki media, contact
your local Oki dealer or visit us at
www.okidata.com.
52205601
52205602
52205603
40 to 65%RH
18
Page 20
Printing Built-In Reports
Printing the MenuMap
(Listing of the Current
Menu Settings)
Note: The “…” in these steps
indicates that you should keep
pressing the button repeatedly
until you see the display
indicated.
To print a list of the current menu
settings:
1. Press …
INFORMATION MENU
ENTER
2. Press …
PRINT MENU MAP
EXECUTE
Print the Demo Page
1. Press …
INFORMATION MENU
ENTER
2. Press …
PRINT MENU MAP
EXECUTE
3. Press …
DEMO1
EXECUTE
ENTER
4. Press .
ENTER
3. Press .
The MenuMap prints and the printer
goes back on line.
The Demo page prints and the printer
goes back on line.
19
Page 21

Setting Power Save Parameters
Power Save
Power Save sets how long the printer
waits before going into standby mode.
This saves energy, but the printer
requires time to warm up when it
receives a print job or if you want to
enter the menu and change settings.
Setting the Power Save
Interval
Note: The “…” in these steps
indicates that you should keep
pressing the button repeatedly
until you see the display
indicated.
1. Press …
SYSTEM CONFIG MENU
ENTER
2. Press …
4. Press …
POW SAVE TIME
XX† MIN
† XX = 5, 15, 30, 60 (default), or
240 minutes.
ENTER
BACK
5. Press , press .
The new setting is engaged and the
second line of the display stops
blinking.
OLN INE
☛ .
6.
To Disable/Enable Power
Save
1. Press to enter Menu mode.
2. Press …
POW SAVE TIME
60 MIN *
ENTER
3. Press …
The second line of the display starts
blinking.
MAINTENANCE MENU
ENTER
3. Press .
20
Page 22

Power Save Parameters (cont.)
4. Press …
POWER SAVE
ENABLE†
5. Press .
POWER SAVE
DISABLE†
† Pressing the + button toggles
back and forth between Enable and
Disable.
ENTER
BACK
6. Press , press .
The new setting is engaged and the
second line of the display stops
blinking.
OLN INE
7. Press .
21
Page 23
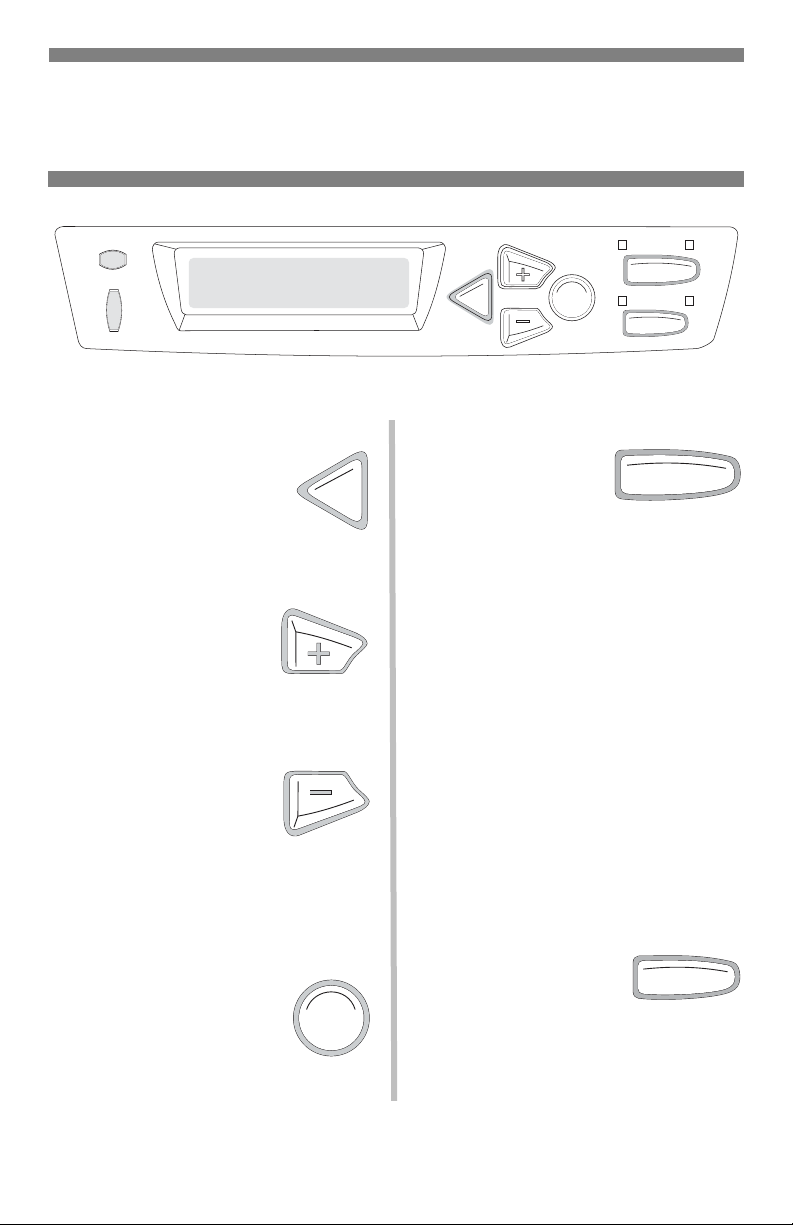
Control Panel
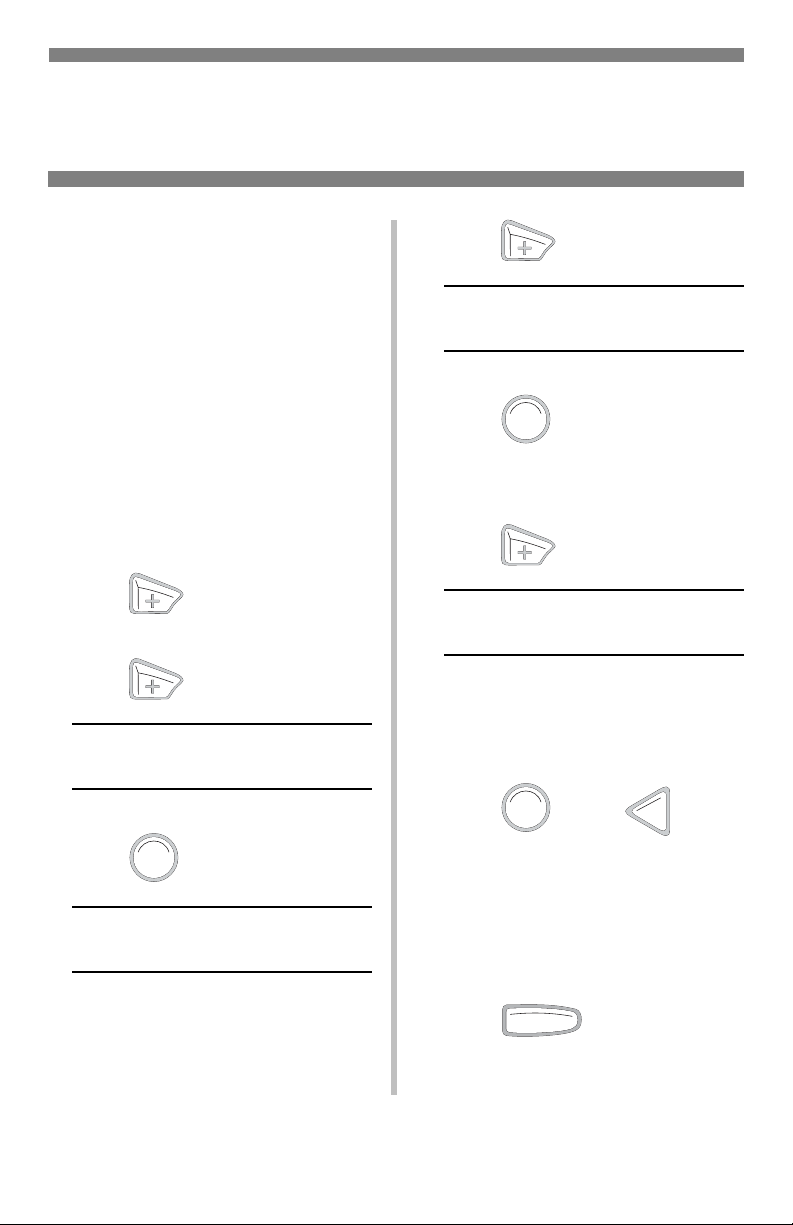
Buttons
READY
ATTENTION
Back
BACK
Press this button to go back
to the previous Item or
Category, or to place the
printer back on line.
Menu +
Press MENU + to enter
the Menu mode or to go
to the next Category in the Menu.
Menu –
Press MENU – to go
back to the previous
Category in the Menu or to exit the
Menu mode.
OL
B
ACK
M
On Line
ENU
E
NTER
N INE
C
ANCEL
OL
N INE
Press ON LINE to
switch the printer
between on line and
off line status.
When the printer is in the Menu mode,
press ON LINE to exit the Menu mode
and return the printer to its previous
status (on or off line).
If there is a paper size mismatch error,
press ON LINE to force the job to
print.
Press ON LINE to start a manual print
job from the MP Tray.
If there is a memory overflow, press
ON LINE to recover and place the
printer back on line.
Enter
Press ENTER to select the
Item or Value.
E
NTER
Cancel
Press CANCEL to
stop printing the
current job.
22
CANCEL
Page 24

Control Panel
Lights
READY
A
TTENTION
READY
Ready LED
(Green)
On: printer is on line.
Off: printer is off line.
Flashing: printer is
receiving data.
BACK ENTER
MENU
ATTENTION
OLN INE
CANCEL
Attention LED
(Red)
On: Warning or Error
status
Off: Normal status.
Flashing: Alarm status.
23
Page 25
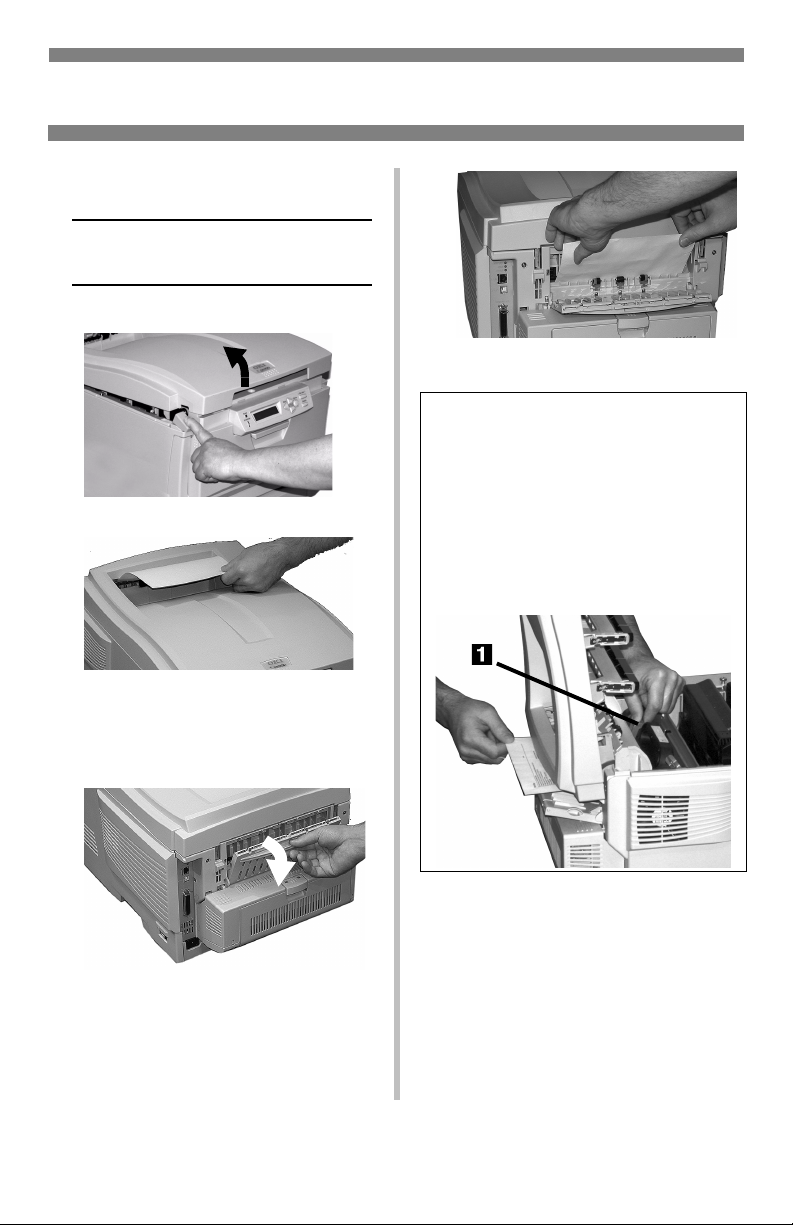
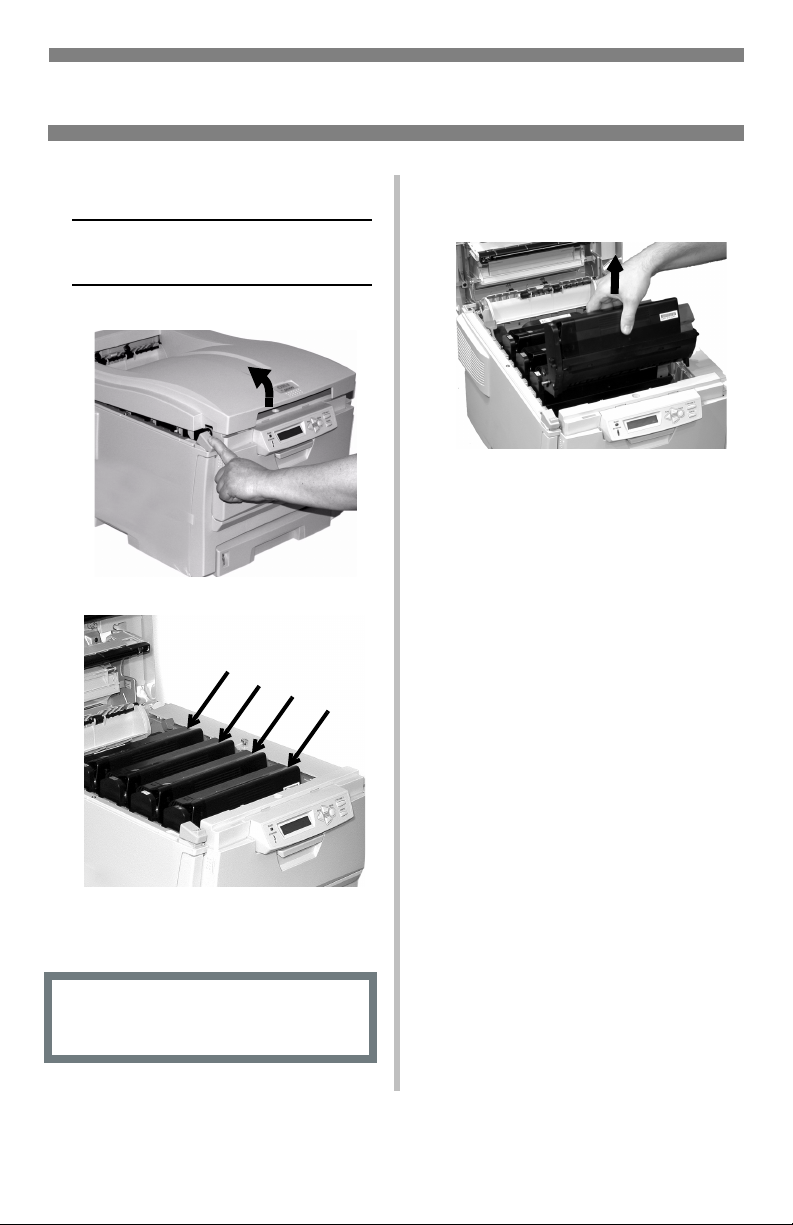
Clearing Media Jams
Jam 382
OPEN TOP COVER
382: PAPER JAM
1
2
• If the sheet does not come out
easily, go to step 3.
• If the sheet does come out
easily, close the cover.
3
4
CAUTION! Fuser may be HOT!
To remove the sheet if it is trapped
in the fuser, reach inside the printer
and push the fuser pressure release
lever (1) towards the front and
down, and pull out the sheet. Then
let go of the fuser pressure release
lever.
24
Page 26

Clearing Media Jams (cont.)
5
6
25
Page 27
Clearing Media Jams (cont.)
Jam 381
OPEN TOP COVER
381: PAPER JAM
1
2
3 Remove the image drums/
toner cartridges:
Caution!
To avoid damage to the drums:
• Be sure to set the drums on a flat
surface.
• Do not touch the shiny green area
on the bottom of the drums.
C
M
Y
K
• Do not expose the drums to light for
more than 5 minutes.
Caution! The fuser (behind cyan
[C] toner) may be hot.
26
Page 28
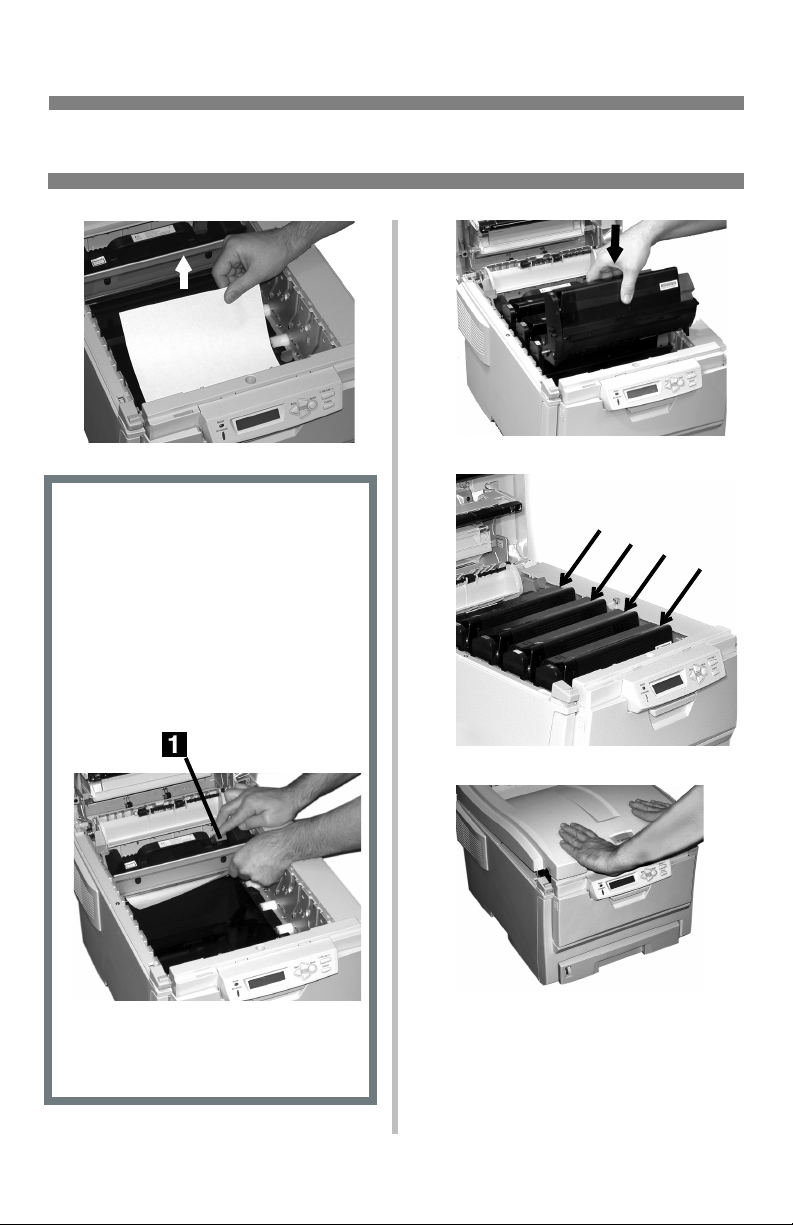
Clearing Media Jams (cont.)
45
War ni ng ! If the printer has been
printing, the fuser will be HOT!
To remove a sheet trapped in the
fuser, grasp the edge of the sheet,
push the fuser pressure release
lever (1) towards the front and
down, and lift out the sheet. Then
let go of the fuser pressure release
lever.
If the sheet is well advanced into
the fuser, see step 4 under “Jam
382.”
6
C
M
Y
K
7
27
Page 29

Clearing Media Jams (cont.)
Jams 372 & 380
OPEN FRONT COVER
nnn: PAPER JAM
nnn = 372 or 380
1
2
3
28
Page 30

Clearing Media Jams (cont.)
Jams 370, 373 & 383
OPEN DUPLEX COVER
nnn: PAPER JAM
nnn = 370, 373, 383
1
2
or
or
29
Page 31

Clearing Media Jams (cont.)
CAUTION! Fuser may be HOT!
If the sheet is trapped in the fuser,
lift the top cover, reach in and
push the fuser pressure release
lever (1) towards the front and
down, and pull out the sheet. Then
let go of the fuser pressure release
lever.
3
30
Page 32

Clearing Media Jams (cont.)
Jam 371
OPEN DUPLEX COVER
371: PAPER JAM
1 Power off!
2
4
5
6
3
7
31
Page 33
Clearing Media Jams (cont.)
Jam 391
OPEN FRONT COVER
391: PAPER JAM
1
2
4
5
6
3
32
Page 34

Clearing Media Jams (cont.)
Jam 392
OPEN FRONT COVER
392: PAPER JAM
1
2
3
4
5
33
6
Page 35

Clearing Media Jams (cont.)
Jam 390
CHECK MP TRAY
390: PAPER JAM
If the Sheet Has Just Begun to
Enter the Printer
1
If the Sheet Can’t Easily Be
Pulled Out from the Front
1
2
3
34
Page 36

Changing Toner Cartridges
3
Toner Cartridge Order #s,
see page 3
Note: Use only Type C6 Toner.
REPLACE TONER
nnn: XXXX* TONER EMPTY
* nnn: XXXX =
410: YELLOW 411: MAGENTA
412: CYAN 413: BLACK
1 Power off!
1 = Cyan 2 = Magenta
3 = Yellow 4 = Black
4 Make sure the lever is pulled
all the way forward before
attempting to remove the
toner cartridge!
2
5
Important!
Discard toner cartridges in accordance
with local regulations!
35
Page 37
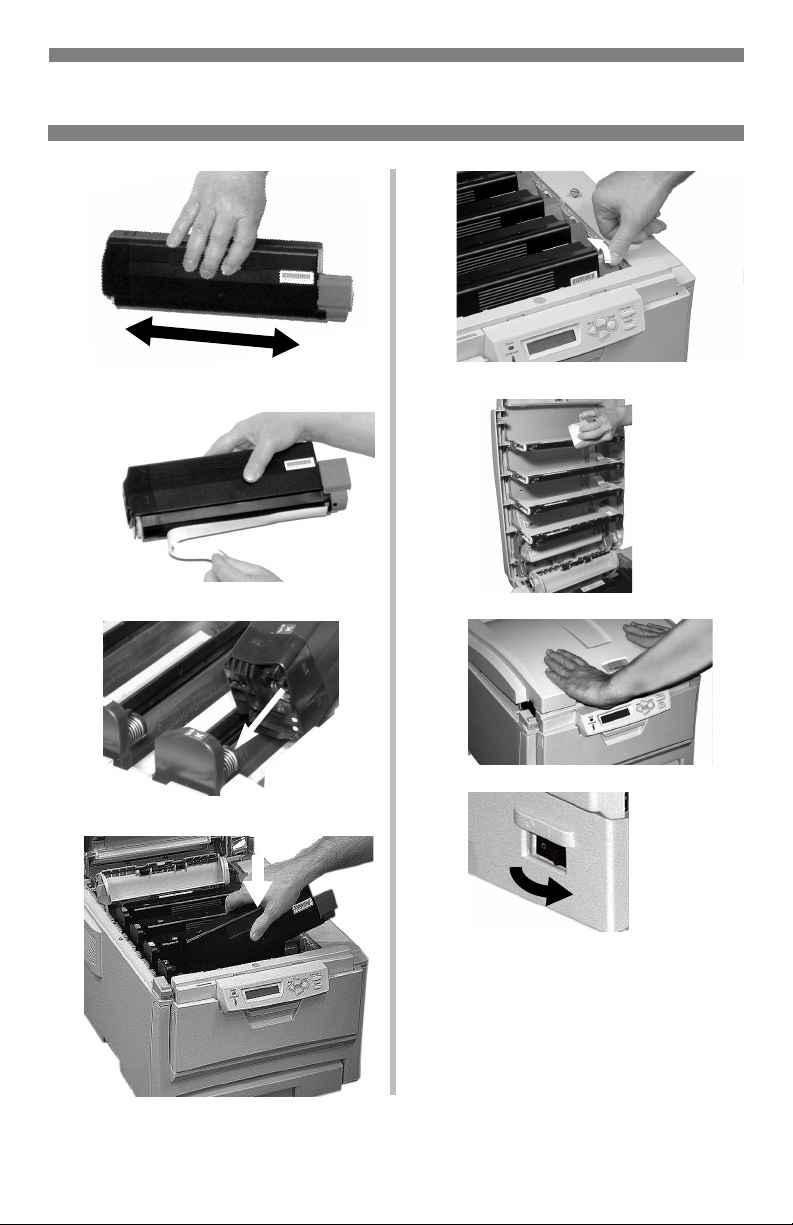
Changing Toner Cartridges (cont.)
6
7
8
10
11
12
13
9
Important!
The TONER LOW message should
disappear from the display. If it
doesn’t, try printing a page. If it still
doesn’t disappear, reinstall the toner
cartridge.
36
Page 38

Error Messages
Some of the more common error
messages appear below. For additional
error messages, see “Error Messages”
under “Troubleshooting” in your
on-line User’s Guide.
XXX TONER SENSOR ERROR
Appears on the second line of the
display to indicate that the lever for
the toner cartridge color indicated is
not pushed all the way back.
What to Do
Open the cover. Push the lock lever
toward the back of the printer as far as
it will go. Close the cover. If this does
not clear the message, call your local
service dealer.
XXX TONER LOW
Appears on the second line of the
display to indicate that color
XXX
toner cartridge is getting low.
Note:If you have changed the LOW
TONER item in the SYSTEM
CONFIG MENU to STOP, the
ATTENTION light will blink and you
must either replace the toner cartridge
immediately or press the ON LINE
button to continue printing.
What to Do
Be sure you have a replacement toner
cartridge (see page 3) on hand.
INSTALL NEW TONER
nnn: XXXX TONER EMPTY
The toner cartridge indicated (XXX)
has run out of toner.
What to Do
Replace the toner cartridge.
XXXX DRUM NEAR LIFE
Appears on the second line of the
display to indicate that color
BLACK) image drum needs to be
(e.g,
XXXX
replaced.
What to Do
Replace the XXXX image drum. (See
the instructions supplied with the new
image drum.)
INSTALL ADDITIONAL MEMORY
420: MEMORY OVERFLOW
The amount of data in the file being
printed has exceeded the printer’s
memory.
What to Do
• Reduce the size of the file being
printed (e.g., print the file as
separate groups of pages instead of
all the pages at one time).
• Install additional memory in the
printer (see your on-line User’s
Guide for more information).
37
Page 39

Error Messages (cont.)
SET XXX ON MPTRAY
AND PUSH ON-LINE SWITCH
The printer has received a job for
printing from the Multi-Purpose Tray
and no media is loaded in the tray.
What to Do
Load the requested media (XXX) in
the Multi-Purpose Tray, then press ON
LINE.
t NEAR END
Appears on the second line of the
display to indicate that the media in
tray t is almost out.
What to Do
Load more media in the tray before
printing any large print jobs from that
tray.
REMOVE THE PAPER
480: STACKER FULL
The stack of paper in the top (face
down) output tray is blocking the
printed sheets trying to exit the printer.
What to Do
Remove the stack of printed sheets
from the top output tray.
REMOVE THE PAPER
nnn: TRAY X UNSUITABLE SIZE
The paper in Tray X (e.g., 450: TRAY
1) is not a size that can be fed through
the tray.
What to Do
Replace the paper in the tray with an
appropriate size.
38
Page 40

Error Messages (cont.)
CHECK FUSER UNIT
320: FUSER UNIT MISSING
The fuser is not properly installed.
What to Do
Open the top cover and check the
fuser:
1. Press down on the fuser to be sure it
is firmly locked in place. The
message should disappear.
Note: If the message still appears,
push the blue latches at
either end of the fuser back
(toward the printer cover
hinge) and lift the fuser out,
then lower it back into the
printer, pushing it firmly
down in place. You should
feel the latches at either end
engage.
2. Close the cover.
PRESS ONLINE SW
INVALID DATA
CANCELLING JOB
(USER DENIED)
The Job Accounting software has
detected a print job from a user who is
either
• not authorized to print
or
• trying to print a color job and only
authorized to print black and white
job.
What to Do
The user should contact the system
Administrator to see if their
authorization can be changed.
The hard disk drive is not available
and job spooling cannot take place.
What to Do
Press the ON LINE button.
39
Page 41

Service & Support
First …
Consult the store where you purchased
your printer.
OKI is a registered trademark of Oki Electric Industry Company, Ltd.
3M is a trademark or registered trademark of 3M.
AmEx is a registered trademark of American Express Co.
Avery is a registered trademark of Avery Dennison Corporation.
HammerMill is a registered trademark of HammerMill.
MasterCard is a registered trademark of MasterCard International, Inc.
VISA is a registered trademark of Visa.
Windows is either a registered trademark or trademark of Microsoft Corporation in
the United States and other countries.
Xerox is a trademark of Xerox Corporation.
Additional OKI
Resources
Available 24 hours a day,
7 days a week
• Visit our multilingual web site:
www.okidata.com.
• Visit
• Call 1-800-654-3282.
my.okidata.com.
40
 Loading...