

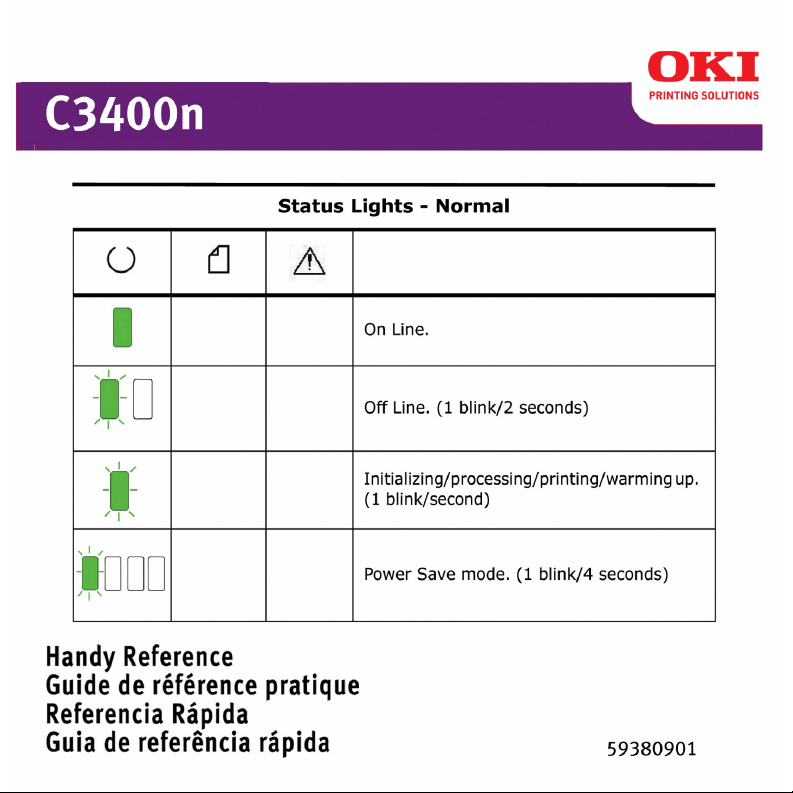
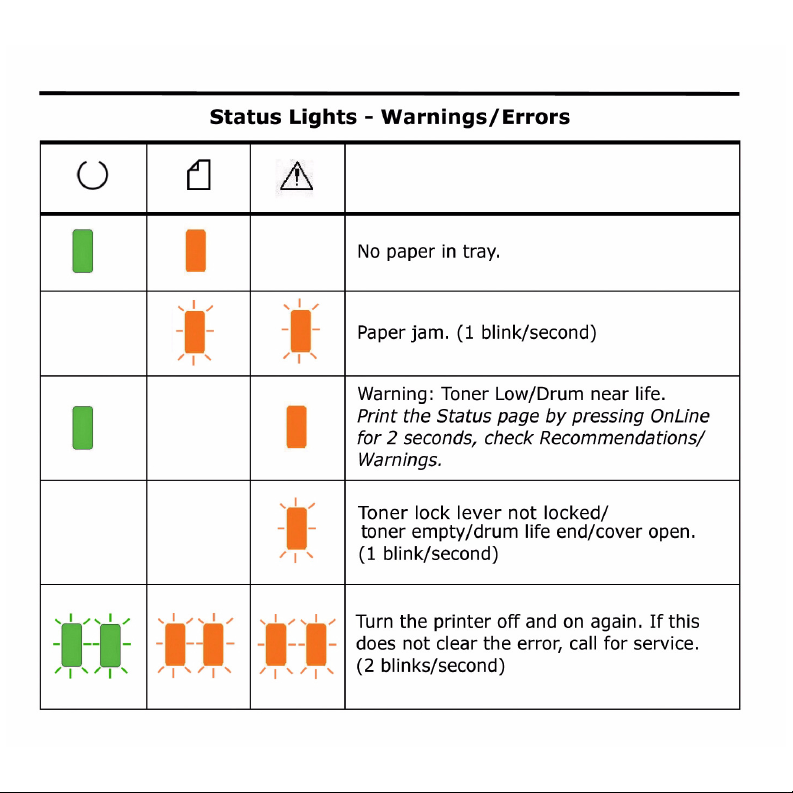
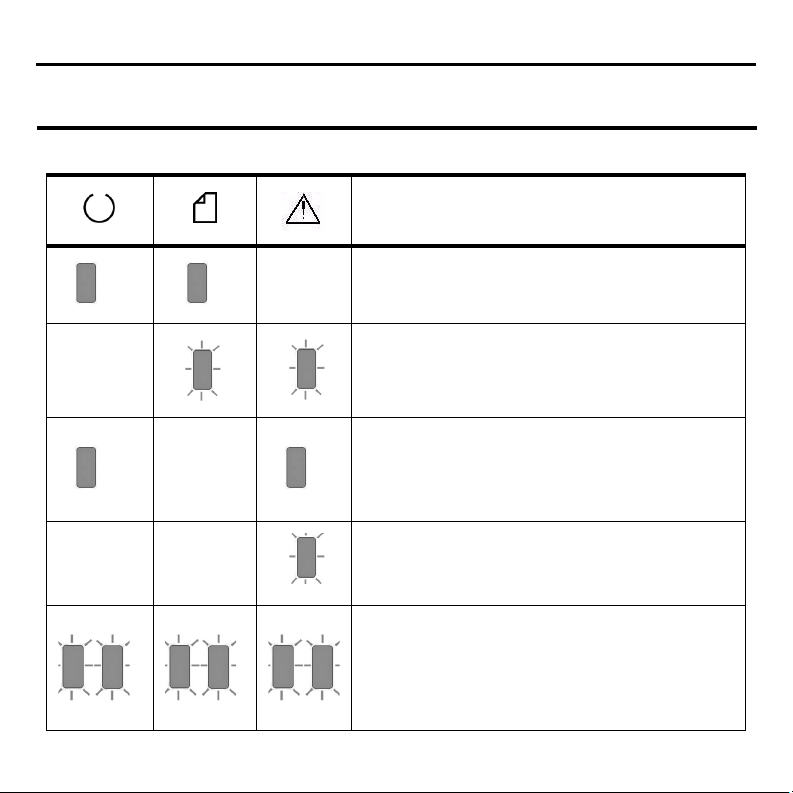
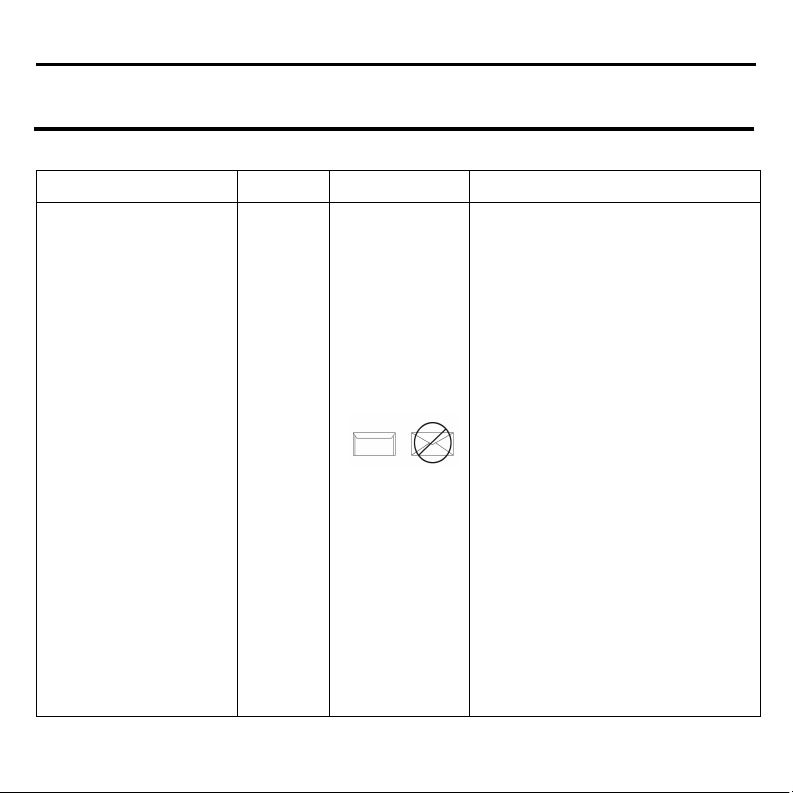
Status Lights and Buttons (cont’d)
Power
Paper
Alarm
Status Lights
1. Normal status (Green): the printer
is operating normally, e.g. it is on
line or processing.
2. Warning status (Amber): you can
continue to use the printer without
intervention but an error may
result.
3. Error status (Amber, blinking):
you cannot continue to use the
printer. Intervention is required to
recover from the error.
Detailed Printer Status
See the Status Monitor if you are
using Windows, or the Printer Driver
in Mac.
Buttons
On Line
Press
1 sec.
Press
2 sec.
Press
5 sec.
Cancel
Press
2 sec.
•Shifts to Off Line.
•When prompted,
begins printing side
2 of a 2-sided
document.
Status Page prints.
Demo Page prints.
Cancels job 2 seconds
after start of switch
operation.
3
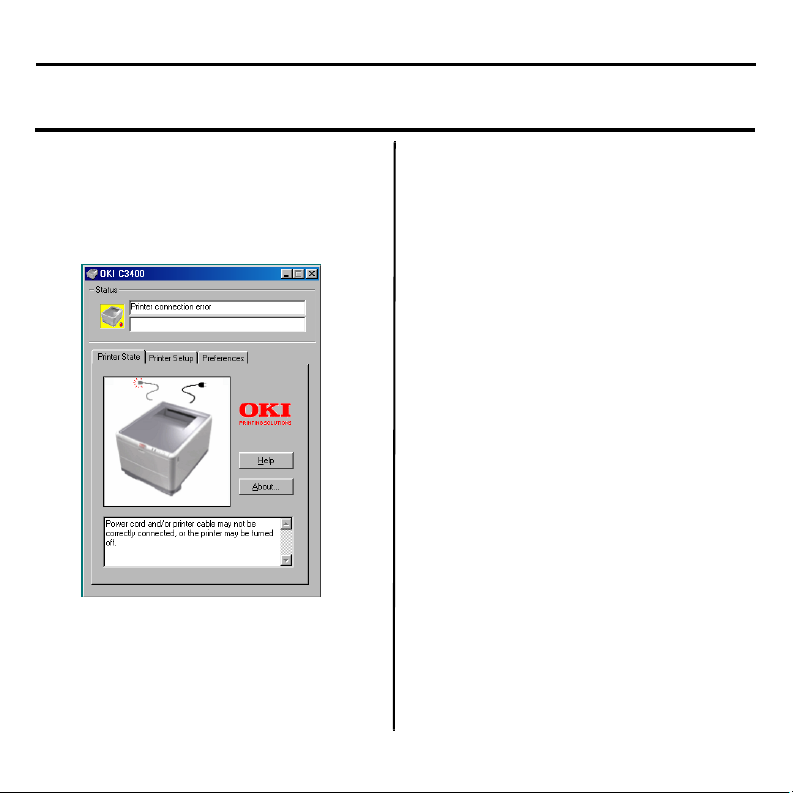
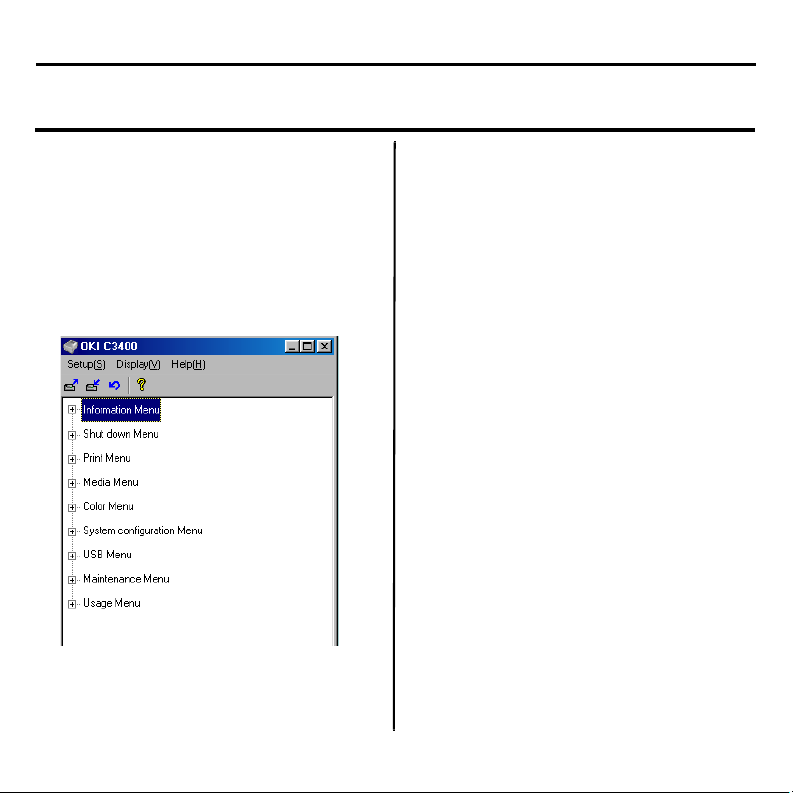
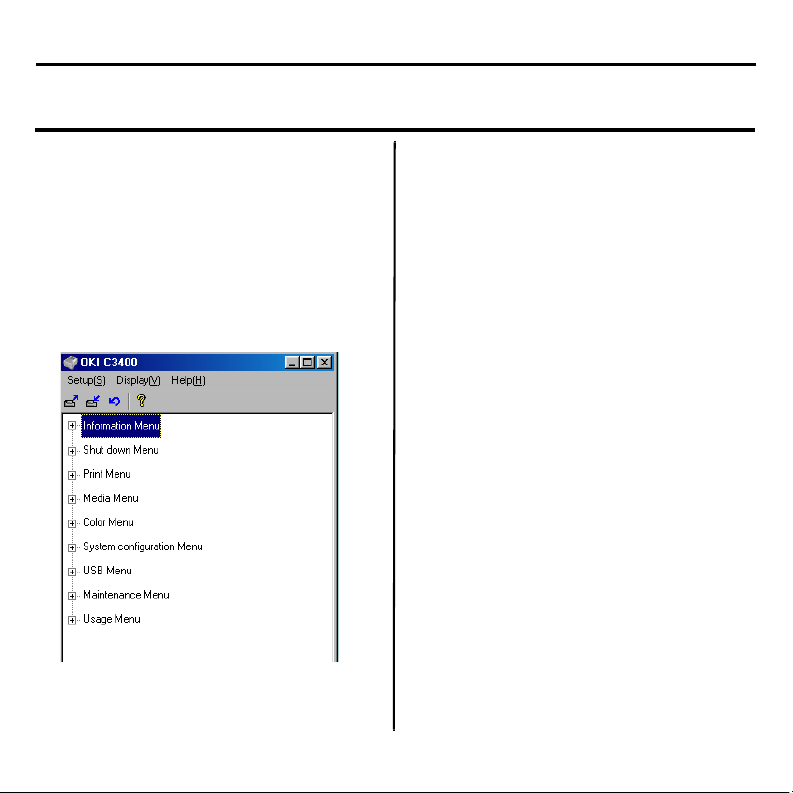
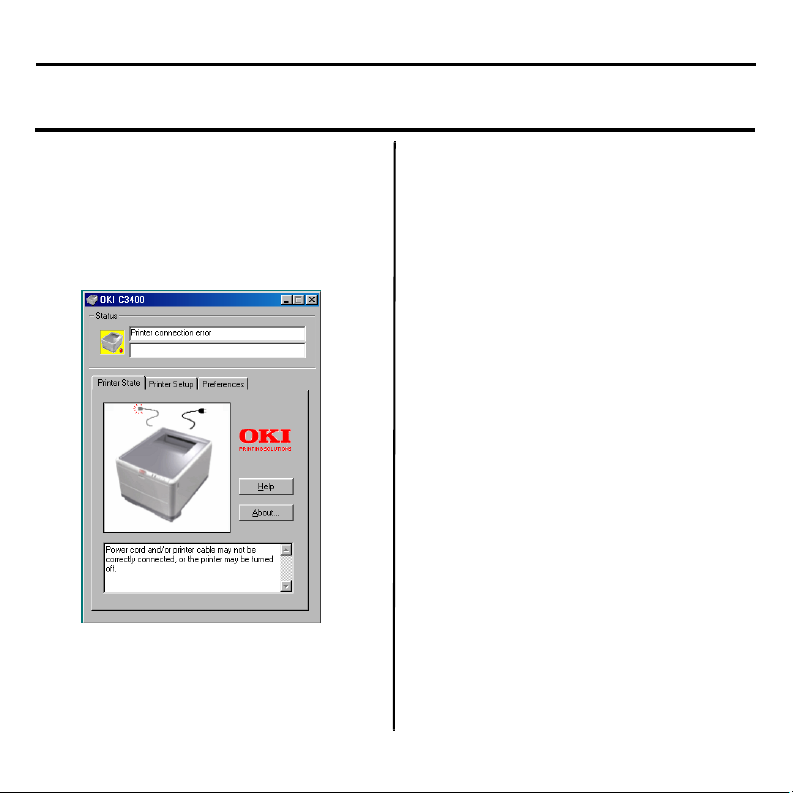
Status Monitor
Double-click the taskbar icon to
maximize the status monitor, or click
on Start > Programs and select
Okidata OKI 3400 Status Monitor. The
current printer status is shown.
Printer State tab
This tab displays detailed information
about the status of the printer.
Printer Setup tab
Selecting this tab provides access to
the following:
Select Printer button
When selected, allows you to
monitor the status of any printer
configured for use with your
computer.
Open Configuration button
This button enables you to access
the printer menu. From the printer
menu, you can configure your
printer settings.
Preferences tab
Selecting this tab allows you to
choose the information displayed by
the Status Monitor and how/when the
Status Monitor appears.
4
Status Monitor (cont’d)
User Settings
On the Status Monitor Setup tab,
click the Open Configuration button.
The User Settings Print Menu
appears. You change user settings
options from this menu.
Printer Menu utility (Mac only)
There is no status monitor in Mac.
You can change printer user settings
through the Printer Menu utility. You
can use Windows Print Control Server
Software to manage your printer in
Mac. For more information, see the
User’s Guide.
5

Printing
Print a demo page
Press and hold On Line for 5 seconds.
Print a Status Page
Press and hold OnLine for 2 seconds.
Manual 2-sided Printing
(Windows only)
1. Ensure that there is enough paper
in the cassette tray to carry out
the print job.
2. Select File > Print and click the
Properties button.
3. Select either “Long Edge” or “
Short Edge”.
Note:
If you require further
information, click the Duplex Help
button.
4. Click the OK button.
5. Every second page of your
document is printed first.
6
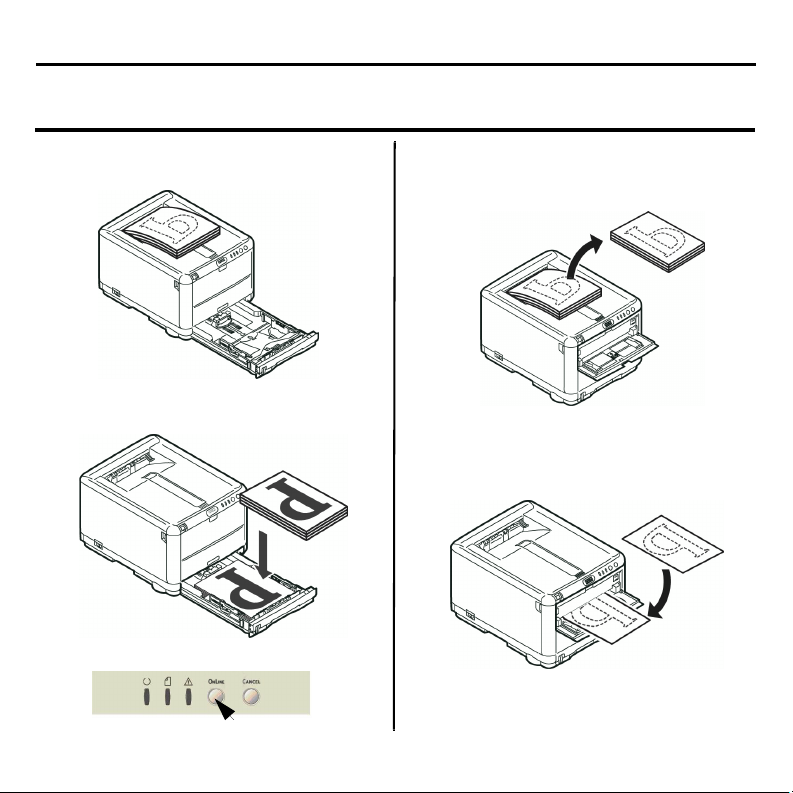
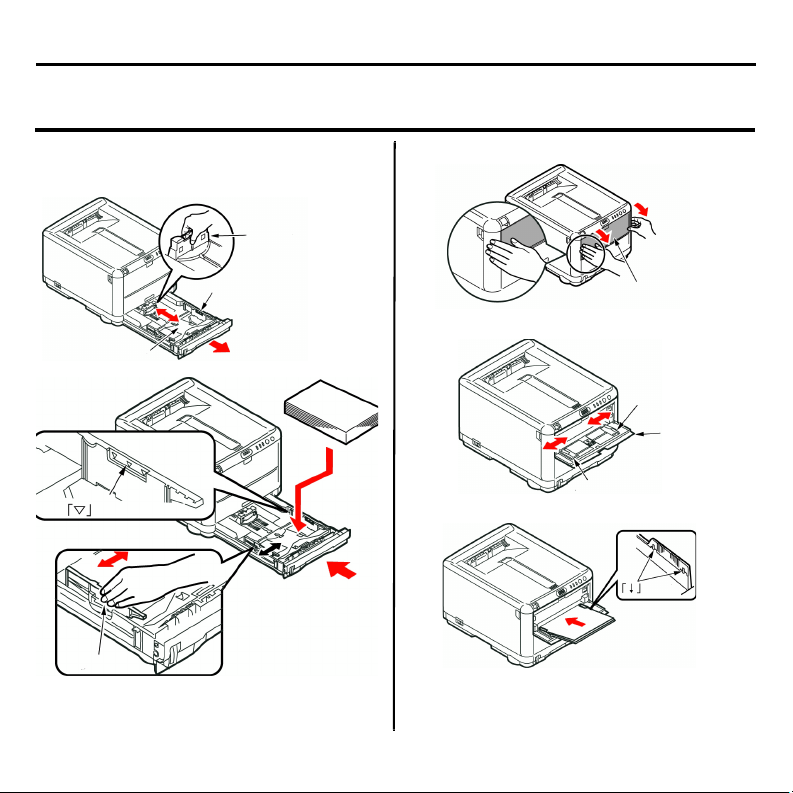
Printing (cont’d)
Using the Cassette Tray
1. Open the cassette tray.
2. Place the printed paper in the tray,
printed side facing up.
3. Press the On Line button.
Using the Multi-Purpose Tray
1. Take the paper from the output
tray.
2. Feed one sheet at a time with the
printed side facing down and the
top of the page facing into the
printer.
3. Press the On Line button.
7
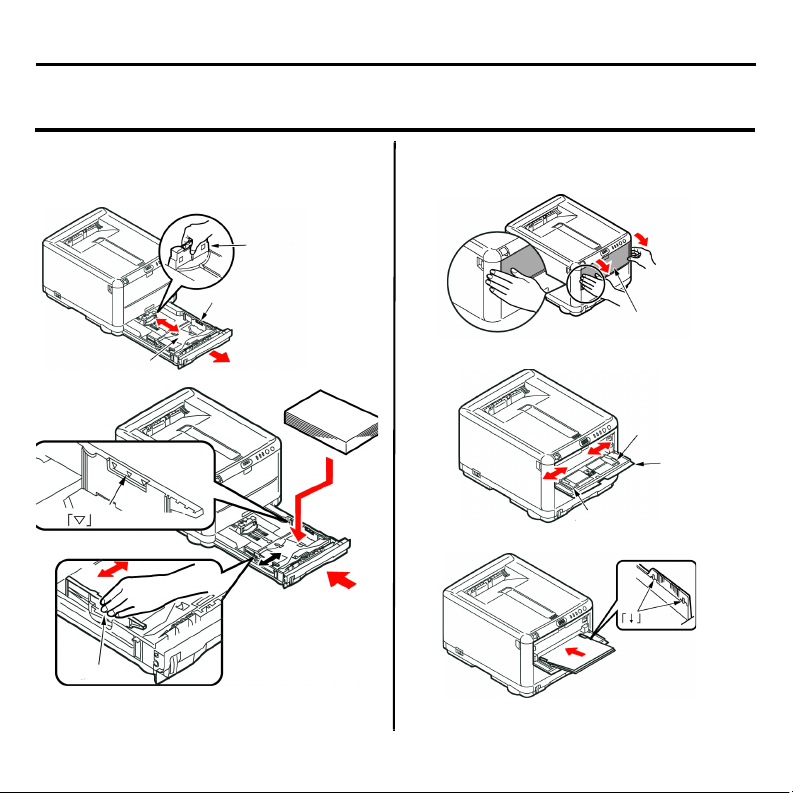
Loading Paper
Loading Paper
Cassette Tray
Multi-Purpose Tray
8
Loading Paper (Cont’d)
Paper Exit
Face Down Stacker
•150 sheets of 20 lb. [80g/m2 ]
•Pages print in reading order (last
page on top, facing down)
Face Up Stacker
•Open the paper support to exit via
this path.
2
g/m
g/m
]
2
•Holds 10 sheets of 20 lb. [80
•Handles stocks up to 54 lb. (203g/
2)
m
•Always use the Face Up Stacker and
the Multi Purpose Tray for paper
stocks heavier than 32 lb. (120
)
9
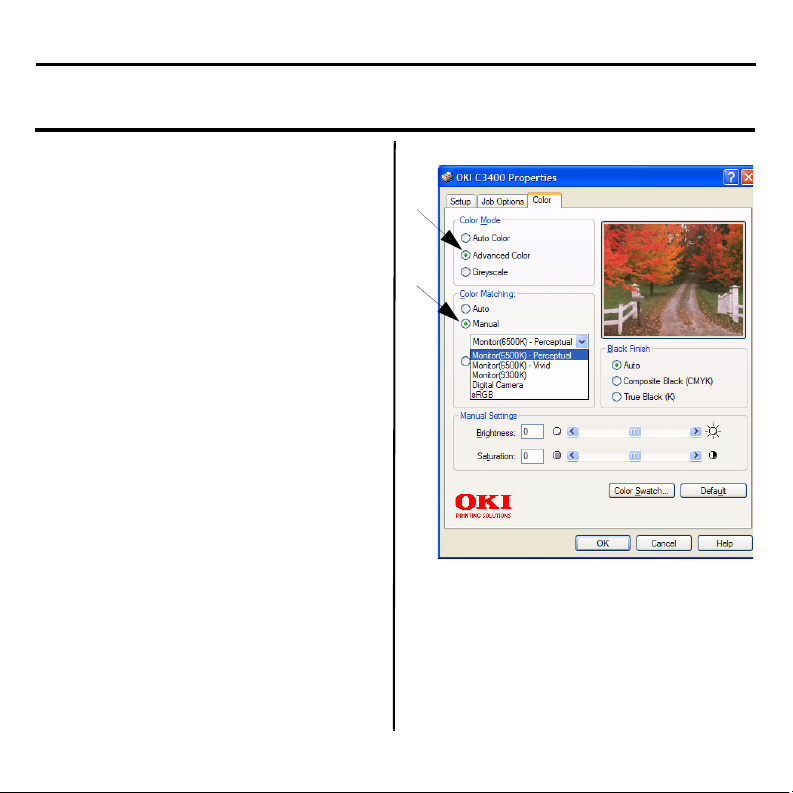
Color Printing
Note:
See the online User’s Guide for
a more complete guide to color
printing on your C3400n Printer.
AUTO Settings
For general use, the automatic
settings will produce good results for
most documents.
Manual Settings
The printer drivers supplied with your
printer provide several controls for
changing the color output
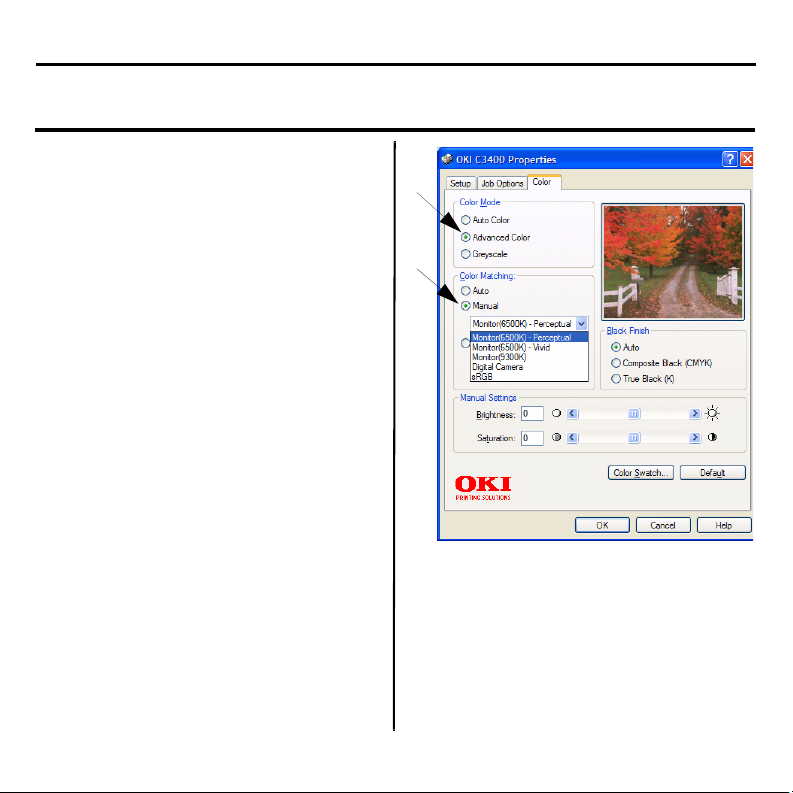
From a Windows application:
1. Choose File > Print.
2. Click the Properties button.
3. On the Color tab select Advanced
Color (1).
4. Choose the Manual color setting
(2).
1
2
10

Color Printing (cont’d)
Color Printing from MAC
1. Open the document you want to
print.
2. Select File > Print.
3. Select your printer.
4. Select the Color option.
Tips for Printing in Color
Printing Photographic images
Use the Monitor (6500k) Perceptual
setting. If the colors look too dull, try
the Monitor (6500k) Vivid or Digital
Camera settings.
Printing from Microsoft Office
Applications
Use the Monitor (9300k) setting. This
may help if you are having problems
with specific colors from applications
such as Microsoft Excel or Microsoft
Powerpoint.
Printing Specific Colors (e g.
company Logo)
There are 2 utilities on your printer
driver CD-ROM that can help match
specific colors:
- Color Swatch Utility
- Color Correct Utility
Adjusting the Brightness or
Intensity of a Print
If the print is too light/dark, use the
Brightness control to adjust it.
If the colors are too intense/not
intense enough, use the Saturation
control.
11
Paper Recommendations
Cassette Tray
Weight Sizes Dimensions
Light: 17-19 lb. (64-74
g/m2)
Medium: 20-27 lb. (7590 g/m2)
Heavy:28-32 lb. (91120 g/m2)
Multi-Purpose Tray
Weight Sizes Dimensions
Medium: 20-27 lb. (7590 g/m2)
Heavy: 28-32lb. (91120 g/m2)
Ultra heavy: 33-54 lb.
(124-203g/m2)
Envelopes
Labels
A6 to
Legal
14in.
A6 to
Legal
14in.
105 x 148mm
to
216 x 356mm
100mm x
1200mm
(banner
printing)
Use paper designed for use in
copiers and laser printers.
Pre-printed stationery must be
designed to use with high fuser
temperatures.
Feed each sheet of paper or
envelope one-by-one.
For very heavy paper stock, always
use the face up (rear) paper stacker.
Envelopes should be the rectangular
flap type, with glue that can
withstand hot roll pressure fusing.
Window envelopes are not suitable.
Use labels recommended for use in
copiers and laser printers in which
the base carrier page is entirely
covered by labels.
12

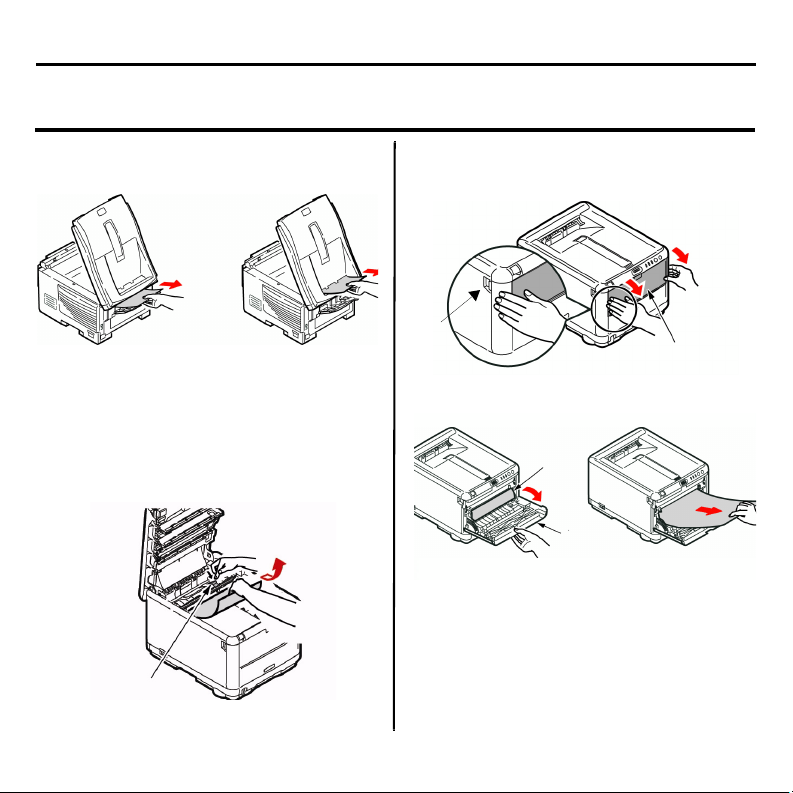
Paper Jams
Clearing from Inside
1.
CAUTION! Do not touch the green
image drum surface or expose it the
light for more than 5 minutes.
2.
3.
WARNING: The fuser will be hot. Do
not touch.
4. If the sheet is well advanced into
the fuser , do not attempt to pull it
back. Follow the next step to
remove it from the rear.
13
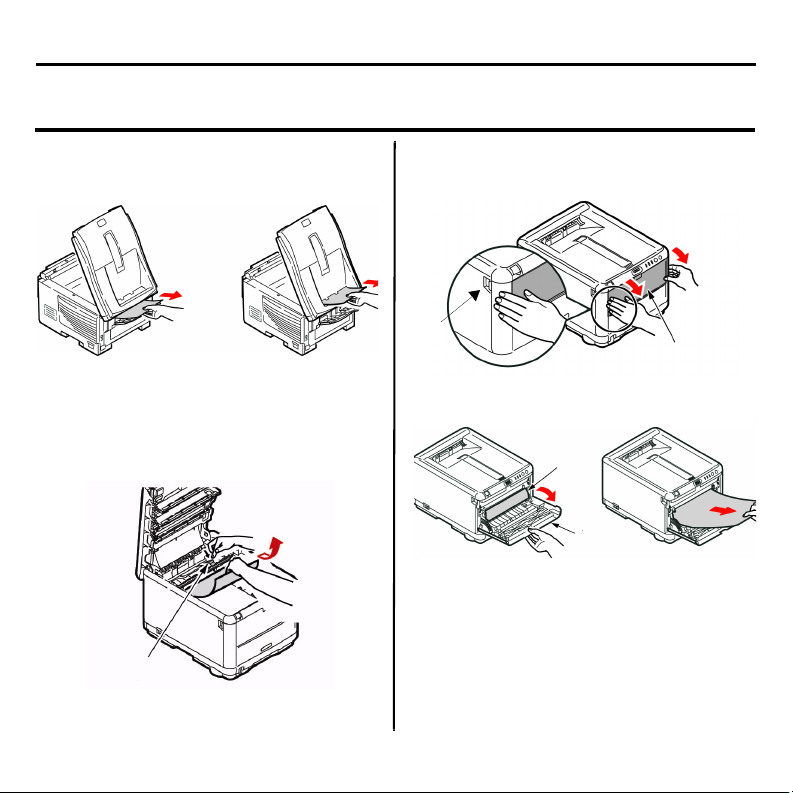
Paper Jams (cont’d)
Clearing at Back
1.
2. If the sheet is difficult to remove,
it is probably still gripped by the
fuser. Raise the top cover, reach
around and press down on the
fuser pressure release lever (1).
1
Clearing at Front
1.
2.
14

Supplies
Where to Purchase
•Consult the dealer where you
purchased your C3400n.
•Consult an Oki Data Authorized
Sales or Service Dealer. For the
nearest dealer, call
1-800-654-3282.
•U.S., Puerto Rico, Guam, U.S. Virgin
Islands: Order on the Internet
www.okiprintingsolutions.com
•U.S. only: Order toll-free at
1-800-654-3282, using
®
, MasterCard® or AMEX®.
VISA
•Check office supply catalogs.
.
Take Advantage of
OKI’s Supply Manager!
•Calculates your usage based on
information you provide.
•Sends you an E-mail when it’s time
to reorder.
To register, go to
www.okiprintingsolutions.com
.
Toner Cartridges
Color OKI Part #
Black............................. 43459304
Cyan ............................. 43459303
Magenta ........................ 43459302
Yellow............................ 43459301
Image Drums
Color OKI Part #
Black............................. 43460204
Cyan ............................. 43460203
Magenta ........................ 43460202
Yellow............................ 43460201
Other Replacement Parts
Item Oki Part #
Fuser, 120 V .................. 43377001
Fuser, 220 V .................. 43377002
Transfer Belt .................. 43378001
15

OKI Print Media
Oki® Synflex™*
•Waterproof, Tear Resistant
•White, 8½'' x 11'' (216 x 279 mm)
OKI Part # Qty
52205901 100/box
Oki Bright White Proofing
Paper
•White, 32-lb.
•8½'' x 11'' (216 x 279 mm)
OKI Part # Qty
52206101 500/box
Oki Premium Envelopes
•COM-10 (#10), white wove
•Security tinted, Redi-Strip seal
OKI Part # Qty
52206301 100/box
52206302 500/box
*
Oki Banner Paper
•70 lb. Index (128 g/m2)
•Size 8½'' x 35.4'' (216 x 899 mm)
OKI Part # Qty
52207901 25/box
52206002 100/box
Oki Premium Card Stock
•Acid-free archival quality
•White, 8½'' x 11'' (216 x 279 mm)
OKI Part # Weight Qty
52205601 60 lb. Cover 250/box
52205602 90 lb. Index 250/box
52205603 110 lb. Index 250/box
*
*
* For best printing results:
Temperature range Humidity
65 to 77°F (18 to 25°C) 40 to 65%RH
16

Service and Support
First …
If an alarm (amber light) displays:
1. Make sure paper is loaded in the
printer.
2. Turn the printer off and on again.
3. Make sure the toner lock levers
are in the locked position.
4. Reinstall the drum/toner units,
making sure the toner lock levers
are in the locked position.
5. Open the status monitor for an
explanation of the alarm.
OKI is a registered trademark of Oki Electric Industry Company, Ltd.
3M is a trademark or registered trademark of 3M.
AmEx is a registered trademark of American Express Co.
AMasterCard is a registered trademark of MasterCard International, Inc.
VISA is a registered trademark of Visa.
Windows is either a registered trademark or trademark of Microsoft Corporation in the
United States and other countries.
Xerox is a trademark of Xerox Corporation.
Consult the store where you
purchased your printer.
OKI Resources
• Available 24 hours a day, 7 days a
week
• Visit our multilingual web site:
WWW.OKIPRINTINGSOLUTIONS.COM
• Visit
• Call 1-800-654-3282.
my.okidata.com
.
17
Guide de référence pratique
Français

Illumination et signification
Fonctionnement Normal
On Line (EN LIGNE).
Off Line (HORS LIGNE). (
Réception de données, impression,
. (
préchauffage
Mode économie d’énergie. (
et 500 ms éteint
cycle de 500 ms
)
cycle de 2 s
4,5 s allumé
1 - Français
)
)
Illumination et signification
Un avertissement est indiqué/Erreur
Une alarme de manque de papier.
bourrage papier. (cycle de 1 secondes)
Advertissement: Toner Bas/Tambour
presque fin. Imprime ou la page d’état;
pression de 2 secondes, (pression 2) pour
afficher Recommendations/Warnings.
Toner non verrouillé/une alarme de
consommables usagés/une erreur de
capot ouvert
Éteignez rallumez puis l’imprimante. Si
cela n’efface pas le message,
comminique avec uncentre de
réparation.
. (cycle de 1 secondes)
(cycle de 2/1 secondes)
2 - Français
Illumination et signification les boutons
tension
papier
Alarmes
Illumination
1. L’etat normal (vert) : l’imprimante
fonctionne normalement; elle est
par exemple en mode EN LIGNE
ou effectue un traitement.
2. État d’avertissement (orange):
vous pouvez continuer l’utiliser
l’imprimante sans effectuer
d’intervention mais une erreur
peut se produire.
3. État d’erreur (orange clignotant):
vous ne pouvez pas continuer
d’utiliser l’imprimante. Une
intervention est requise pour
reprendre sur l’erreur.
Indique en détail
Le Moniteur d’état indique en détail
l’état de l’imprimante dans Windows
ou dans le pilote d’imprimante sous
Mac.
3 - Français
Interrupteurs
En Ligne
•Passe en mode
HORS LIGNE.
Pression
1 sec.
Pression
2 sec.
Pression
5 sec.
•Lorsque demandé,
Pour effectuer une
impresion rectoverso.
Imprime une Status.
Imprime une
démonstration.
Cancel
Pression
2 sec.
Annulele travail.

L’etat de l’imprimante
Windows
Double-cliquez sur l’icône (taskbar)
pour maximiser l’état de
l’imprimante, ou cliquez sur
[Démarrer], [Tous les programmes]
et sélectionnez Okidata > Oki C3400
> Moniteur d’état. Létat actuel de
l’imprimante est affiché.
Onglet État de l’imprimante
Affiche des informations détaillées
sur l’état de l’imprimante.
Onglet Configuration de
l’imprimente
Cliquez sur cet onglet pour accéder
au bouton:
Sélectionner l’imprimante
Vous permet de surveiller l’etat de
toute imprimante configurée pour
être utilisée aavec votre
ordinateur.
Le Bouton Open Configuration
Vous permet d’accéder aux
paramètres du menu de
l’imprimante. Dans le bouton,
vous pourez configurer vos
paramè d’imprimante.
Onglet Préferences
La sélection de cet onglet vous
permet de coisir les informations
affichées par le Moniteur d’etat ainsi
que le moment et la façon dont celuici s’affiche.
4 - Français
L’etat de l’imprimante (suite)
Paramètres utilisateur
Sous l’onglet Configuration du
Moniteur d’état, cliquez sur Open
Configuration. Le menu des
paramètres utilisateur de l’impression
s’affiche. Vous pouvez modifier les
options des paramètres utilisateur à
partir de ce menu.
Mac
Utilitaire Printer Menu
Il n’existe aucun amoniteur d’état
sour Mac. Vous pouvez modifier les
paramètres utilisateur le l’imprimante
à l’aide de l’utilitaire Printer Menu
(Menu Imprimante).
Vous pouvez utiliser le logiciel
Windows Print Control Server pour
dérer votre imprimante sous Mac.
Pour plus d’informations, reportezvous à User’s Guide.
5 - Français

Impression
Imprimer une page de
démonstration
Appuyez sur le bouton On Line (En
Ligne) de votre imprimante,
maintenez-le enfoncé pendant 5
secondes.
Imprimer une page d’état
Maintenez le bouton On Line (En
Ligne) de l’imprimante enfoncé
pendant 2 secondes.
Impression recto-verso
(Windows uniquement)
1. Vérifiez qu’il y a suffisamment de
papier dans le bac pour effectuer
le travail d’impression.
2. Sélectionnez Fichier > Imprimer,
puis cliquez sur le bouton
Propriétés.
3. Sélectionnez soit “Bord Long” ou “
“Bord court”.
Remarque:
informations supplémentaires, cliquez
sur le bouton Aide sur l’impression
duplex.
4. Cliquez ensuite sur le bouton OK.
5. Toutes les pages verso de votre
document sont imprimées en
premier.
Pour obtenir des
6 - Français

Impression (suite)
Utilisant le bac Standard
1. Ouvrez le bac.
2. Réflexion.
3. Cliquez ensuite sur le bouton
On Line.
Utilisant le bac multifonction
1. Prenez les feuilles imrimées dans
l’empileuse de sortie.
2. Placez les feuilles une par une
dans le bac multifonction.
3. Cliquez ensuite sur le bouton
On Line.
7 - Français

Chargement du papier
Bac standard Bac multifonction
8 - Français

Chargement du papier
(suite)
Sorte de papier
Empileuse face vers le bas
•150 feuilles de 20 lb. [80g/m2 ].
•Les pages imprimées dans l’ordre de
lecture (page 1 d’abord) seront
triées dans l’ordre de lecture
(dernière page au-dessus, face en
dessous).
Empileuse face vers le haut
•L’empileuse face vers le haut située
à l’arrière de l’imprimante doit être
ouverte et le support à papier doit
être déployé lorsque l’empileuse
doit être en service.
•Peut contenir 10 feuilles de 20 lb.
[80g/m2]
•Peut accepter du papier de 54 lb.
(203
•Utilisez toujours l’empileuse face
vers le haut et le bac multifonction
pour le papier dont le grammage
dépasse 47 lb. (176g/m2)
g/m
2)
9 - Français
Tirage en couleur
Remarque :
sur les fonctions, voyez le guide de
l’utilisateur en ligue.
Pour plus d’information
Les paramètres automatiques
Les paramètres automatiques par
défaut suffiront pour un usage
général et donneront de bons
résultats pour la plupart des
documents.
Les paramètres manuellement
Les pilotes d’imprimante fournis avec
votre imrimante offrent plusieurs
paramètres permettant de modifier la
couleur d’impression sur papier.
Une application Windows:
1. Choisissez Fichier > Imprimer.
2. Cliquez sur le bouton Propriétés
[Properties].
3. Sous l’onglet Couleur, sélectionnez
Couleur avancée pour la
colorimétrie [Advanced Color] (1).
4. Choisissez le paramètre de
couleur Manuel (2).
5. Sélection parmi les options.
1
2
Tirage en couleur MAC
1. Ouvrez le document à imprimer.
2. Sélectionnez Fichier > Imprimer.
3. Sélectionnez votre imprimante.
4. sélectionnez les option color.
10 - Français

Tirage en couleur (suite)
Conseils our l’impression en
couleur
Impression d’images
photographiques
Utilisez le paramètre Monitor
(6500 k) - Perceptual. Si les couleurs
semblent trop ternes, utilisez les
paramètres Monitor (6500 k) - Vivid
ou Appareil photo numérique.
Impression à partir
d’applications Microsoft Office
Utilisez le paramètre Monitor
(9300 k). Cela peut vous aider si
vous rencontrez des problèmes avec
des couleurs spécifiques dans des
applications comme Microsoft Excel
ou Microsoft PowerPoint.
Impression de couleurs
spécifiques (par exemple le
logo d’une entreprise)
Deux utilitaires se trouvant sur le CDROM de votre pilote d’imprimante
peuvent vous aider à faire
correspondre des couleurs
spécifiques :
•Utilitaire Nuancier de couleurs
•Utilitaire Colour Correct
Réglage de la luminosité ou de
l’intensité d’une impression
Si l’impression est trop claire ou trop
sombre, vous pouvez utiliser la
commande Luminosité pour la régler.
Si les couleurs sont trop intenses ou
pas suffisamment, utilisez la
commande Saturation.
11 - Français

Recommandations le papier
Bac standard
Grammage Format Dimensions
Light (Léger) : 17-19 lb.
(64-74 g/m2)
Medium (Moyen) : 2027 lb. (75-90 g/m2)
Heavy (Lourd) :28-32
lb. (91-120 g/m2)
A6 Legal (14
pouces)
105 x 148mm 216 x 356mm
Vous obtiendrez une performance
optimale en utilisant du papier
standard conçu pour les
photocopieurs et les imprimantes
laser.
Le papier préimprimé peut être
utilisé mais l’encre ne doit pas
causer de maculages lors de son
exposition à la haute température
de l’unité de fusion lors de
l’impression.
12 - Français

Recommandations le papier (suite)
Bac multifonction
Grammage Format Dimensions
Medium (Léger) : 2027 lb. (75-90 g/m2)
Heavy (Moyen) : 2832lb. (91-120 g/m2)
Ultra lourd : 33-54 lb.
(124-203g/m2)
A6 Legal 14
pouces.
100mm x
1200mm
(banner
printing)
Lorsque vous utilisez le bac
multifonction chargez chaque feuille de
papier ou enveloppe une par une, au
lieu de les empiler.
Pour les papiers très lourds, utilisez
toujours l’empileuse de papier (arrière)
face vers le haut.
Les Enveloppes
Les étiquettes
Les enveloppes doivent comporter
également des rabats rectangulaires
dont la colle reste intacet lorsqu’elle
est soumise à la funsion par pression
du cylindre chaud qu’utilise ce type
d’imprimante. Les enveloppes à
fenêtre ne sont pas adaptées.
Les étiquettes doivent être également
adaptées aux photocopieurs et
imprimantes laser, dans lesuelles la
feuille de support des étiquettes est
entièrement couverte d’etiquettes.
13 - Français

Des bourrages de papier
Regardez dans l’imprimante
1.
Avertissement! Ne la touchez pas et
ne l’exposez pas à l’éclairage normal
du local pendant plus de 5 minutes.
2.
3.
Attention!: l’unité de fusion sera très
chaude. Ne pas toucher.
4. Si la feuille est bien avancée dans
l’unité de fusion, n’essayez pas de
la retirer. Suivez l’etape ci-après
pour la retirer depuis l’arrière de
l’imprimante.
14 - Français

Des bourrages de papier (suite)
La retirer depuis d’arrière
1.
2. Si la feuille se trouve très bas
dans cette partie et qu’il est
difficile de la retirer, il est probable
qu’elle soit toujours prise dans
l’unité de fusion. Soulevez le capot
supérieur et enfoncez la manette
à ressort de rappel de l’unité de
fusion (1).
1
Résolution de accès avant
1.
2.
15 - Français

De fournitures
Comment s’y prendre
•Voyez le revendeur qui vous a
vendu votre imprimante.
•Voyez un revendeur ou un service
après-vent Oki Data agréé. (Pour
connaître le revendeur le plus
proche, composez le
1-800-654-3282.
•Voyez les catalogues de fournitures
de bureau.
Numéros de commande
Toners/Tampours
Cartouche de toner
Num.de réf.Oki
Noir............................... 43459304
Cyan ............................. 43459303
Magenta ........................ 43459302
Juane ............................ 43459301
Tambour
Num.de réf.Oki
Noir............................... 43460204
Cyan ............................. 43460203
Magenta ........................ 43460202
Juane ............................ 43460201
Unités de fusion et courroie
de transfert
Item Num.de réf.Oki
Unité de fusion, 120 V .... 43377001
Unité de fusion, 220 V .... 43377002
Courroie de transfert ...... 43378001
16 - Français

D’impression OKI
Oki® Synflex™*
•Étanche, Résistant á la déchirure
•Blanc, 8,5 x 11 po (216 x 279 mm)
No de réf. OKI
52205901 100 feuilles/boîte
Qty
Papier à épreuve blanc
brillant Oki
•Blanc, 32-lb.
•8,5 x 11 po (216 x 279 mm)
No de réf. OKI
52206101 500/boite
Enveloppes Oki Premium
•COM-10 (#10), vélin blanc
•Teinture de sécurité, Redi-Strip
No de réf. OKI
52206301 100/boite
52206302 500/boite
Qty
*
Qty
17 - Français
Bannière Oki
*
•70 lb. Index (128 g/m2)
•Size 8,5 x 35.4 po (216 x 899 mm)
No de réf. OKI
52207901 25/box
52206002 100/box
Carte Oki Premium
Qty
*
•Qualité archives sans acide
•Blanc, 8,5 x 11 po (216 x 279 mm)
No de réf.
OKI
52205601
52205602 90 lb. Index 250/boite
52205603 110 lb. Index 250/boite
* Pour obtenir les meilleurs résultats :
Plage de température Humidité
65 to 77°F (18 to 25°C) 40 to 65%RH
Weight Qty
60 lb.Couverturer
250/boite

Service et Support
D’abord …
Si un temoin (orange )s’alarme :
1. Assurez - vous qu’il y a du papier
dans l’imprimante.
2. Éteignez puis ralumez
l’imprimante.
3. Assurez-vous que tous les leviers
de blocage des cartouches de
toner ont été poussés aussi loin
que possible.
4. Réinstallez la d’image/toner.
OKI est une marque déposée Oki Electric Industry Company, Ltd.
3M est une marque déposée ou une marque de commerce de 3M.
AmEx est une marque déposée American Express Co.
MasterCard est une marque déposée de MasterCard International, Inc.
VISA iest une marque déposée de Visa.
Windows est une marque de commerce ou une marque déposée de Microsoft
Corporation iaux États-Unis et dans d’autres pays.
Xerox est une marque de commerce de Xerox Corporation.
consultez le revendeur qui vous a
vendu votre imprimante.
Ressources Oki
supplémentaires
• Offert 24 heures sur 24, 7 jours
sur 7
• Visitez notre site Web multilingue :
WWW.OKIPRINTINGSOLUTIONS.COM
• Visitez
uniquement).
• Composez le 1-800-654-3282.
my.okidata.com
(Anglais
18 - Français

Guía de referencia rápida
Español

Luces de estado - Normales
en linea.
fuera de linea. (
seg.)
Recepción o impresión de datos,
calentamiento, ajuste de densidad o
temperatura en curso
seg.)
Modo de ahorro de energía
4 seg.)
parpadeo 1/ciclo de 2
. (
Parpadeo 1/
. (
1 - Español
Parpadeo 1/

Luces de estado - Advertencia/errores
Agotamiento de papel.
Atasco de papel. (parpadeo 1/seg.)
Advertencia!: Indica una advertencia o
alarma sobre la duración de los consumibles,
error de instalación de consumibles.
Impresión de una página de estado.
Mantenga pulsado el botón ON Line (en
linea) durante 2 segundos. Consulte
Recommendations/Warnings
Cartucho de tóner no bloqueado/es
necesario reemplazar algún consumible
error al abrir la cubierta
Apaue la impresora y luego vuelva a
encenderia. Si esto no soluciona el problema,
pida assistencia técnica.
(parpadeo 2/seg.)
2 - Español
.
. (parpadeo 1/seg.)
/

Status Lights los Interruptors (cont.)
Energía
Papel
Alarma
El estado luces
1. Estado normal (verde): la
impresora está funcionando con
normalidad, por ejemplo, está
ENCENDIDA o procesando.
2. Estado de advertencia (ámbar):
puede seguir utilizando la
impresora sin intervenir, pero se
puede producir un error.
3. Estado de error (ámbar,
parpadeando): no puede seguir
utilizando la impresora. Es
necesario intervenir para
recuperarse del error. No es
posible la recuperación en caso de
errores graves, es necesario
llamar al servicio técnico.
El estado detallado
El estado detallado de la impresora se
puede conocer en el Monitor de
estado en Windows o en el
controlador de impresora en Mac.
3 - Español
Botones
En linea
Pulsación
breve
Pulsación
de 2
segundos
Pulsación
de 5
segundos
Cancelar
Press
2 sec.
•Cambia a apagad.
• Cuando vea mensaje,
empieza a imprimir
dos caras impresíon
por las dos caras el
documento (sólo en
Windows).
Imprime el página de
estado.
Imprime el página de
demostración.
Cancela el trabajo 2
segundos después del
inicio de la operación
del interuptor.
Monitor de estado (sólo en Windows)
Haga doble clic sobre el icono en la
barra de tareas de Windows. O bien
haga clic en inicio > Programas >
Okidata > Oki C3400n > Monitor de
estado. El monitor de estado muestra
el estado de la impresora en su
monitor.
Ficha Estado de la impresor
Esta ficha muestra información
detallada sobre el estado de la
impresora.
Ficha Configuración de la
impresora
Seleccionar esta ficha roporciona
acceso al botón:
Seleccionar impresora
Le prmite suprvisar el estado de
cualquier impresora configurado
para su uso en el ordenador.
Abierto Configuratión
El botón del menú de impresora le
permite acceder a low ajustes de
la impresora.
Ficha Preferencias
Al seleccionar esta ficha, se puede
seleccionar la información que
aparece en el Monitor de estado,
además de cómo o cuándo aparece
dicho monitor.
4 - Español

Monitor de estado (suite)
Ajustes del usuario
En la ficha Configuración del Monitor
de estado, haga clic en
Preferencias
impresión de Ajustes del usuario.
Puede cambiar las opciones de
ajustes del usuario desde este menú.
. Aparece el menú de
Ficha
Utilidad de menú de impresora
(sólo en Mac)
Mac no dispone de monitor de
estado. Puede cambiar los ajustes del
usuario de impresora a través de la
utilidad de menú de impresora.
Puede utilizar el software de servidor
de control de impresión de Windows
para gestionar las impresoras en
Mac. Para obtener más información
consulte el Guide de User.
,
5 - Español

Impresión
Impresión de una página de
demostración
Pulse el butón On Line y manténgalo
pulsado durante 5 segundos.
Impresión de una página de
estado
Pulse el botón ON LINE (en línea) de
la impresora y manténgalo pulsado
durante 5 segundos.
__________________________
Impresión por las dos caras
(sólo en Windows)
1. Compruebe que hay papel
suficiente en la bandeja de casete
para realizar el trabajo de
impresión.
2. Seleccione Archivo -> Imprimir y
haga clic en el botón Propiedades.
3. seleccione “Borde largo” o “Borde
corto”.
Nota!:
Si necesita más información,
haga clic en el botón Ayuda dúplex
4. Haga clic en el botón OK.
.
6 - Español

Impresión (cont.)
Utilizndo la bandeja de casete
1.
2. Girar la página.
3. Pulse el botón ON LINE.
Utilizando la bandeja multiuso
1.
2. Cargue las hojas de una en una.
3. Pulse el botón ON LINE.
7 - Español
Carga de Papel
Bandeja de casete Bandeja multiuso
8 - Español
Carga de Papel (cont.)
Paper Exit
Apilador boca abajo
•admite un máximo de 150 hojas de
papel estándar de 20 lb. [80
puede utilizar papel de hasta 120 g/
m² (32 lb)
•Las páginas que se impriman en el
orden de lectura (la página 1
primero), saldrán en el mismo orden
(la última página en la parte superior,
boca abajo).
g/m
2
] y
Apilador boca arriba
•Cuando necesite utilizar el apilador
boca arriba de la parte posterior de
la impresora, ábralo y despliegue el
soporte de papel.
•Hasta 10 hojas de papel estándar de
20 lb. [80
•Puede utilizar papel de hasta 203 g/
m² (54 lb.).
•Use siempre este apilador boca
arriba y la bandeja multiuso para
tamaños de papel de más de 176 g/
m² (47 lb.)
g/m
2
]
9 - Español
Impresión en color
Nota!:
Para mayor información,
refiérase a la Guia del Usuario.
los ajustes automáticos
Para el uso general, los ajustes
automáticos son suficientes, ya que
proporcionan ajustes
predeterminados razonables que
producen buenos resultados con la
mayoría de los documentos.
los ajustes Manual
El controlador suministrado con la
impresora proporciona varios
controles para modificar la salida de
color.
From a Windows application:
1. Elija Archivo > Imprimir… en la
barra de menú de la aplicación.
2. Haga clic en el botón Propiedades
situado junto al nombre de la
impresora.
3. En la ficha Color, seleccione Color
avanzado en Concordancia de
color (1).
4. Elija el ajuste de color Manual y
seleccione una de las opciones
(2).
1
2
10 - Español

Impresión en color (cont.)
Impresión en color desde
MAC
1. Abra el documento que desea
imprimir.
2. Seleccione Arcivo > Imprimir.
3. Seleccione la impresora.
4. Seleccione las opcione de color.
Consejos para imprimir en
color
Impresión de imágenes
fotográficas
Utilice el ajuste Monitor (6500k) de
alto contraste.
Si los colores tienen un aspecto
demasiado apagado, pruebe los
ajustes Monitor (6500k) de colores
vivos o Cámara digital.
Impresión desde aplicaciones
de Microsoft Office
Utilice el ajuste Monitor (9300k). Esto
puede ayudarle si está teniendo
problemas con colores específicos en
aplicaciones como Microsoft Excel o
Microsoft PowerPoint.
Impresión de colores
específicos (por ejemplo, el
logotipo de una empresa)
Existen 2 utilidades en el CD-ROM del
controlador de la impresora que
pueden ayudar a concordar colores
específicos:
- Utilidad Color Swatch
- Utilidad Color Correct
Ajuste del brillo o la
intensidad de una impresión
Si la impresión es demasiado clara u
oscura, puede utilizar el control Brillo
para ajustarla.
Si los colores son muy intensos, o
bien no son lo suficientemente
intensos, utilice el control Saturación.
11 - Español

Recomendaciones sobre el papel
Bandeja de Casete
Peso (g/m2)
Ligero: 17-19 lb. (64-74
g/m2)
Medio: 20-27 lb. (75-90
g/m2)
Pesado:28-32 lb. (91120 g/m2)
Tamãno Dimensiones
A6 Legal 14
pulg.
105 x 148mm
216 x 356mm
Utiliz un papel diseñado para
utilizarce en fotocopiadoras e
impresoras láser.
Puede utilizar papel
preimpresopero debe asegurarse
de que la tinta no se corra al
exponerla a las altas temperaturas
que se producen en el fusor durante
la impresión.
12 - Español
Recomendaciones sobre el papel (cont.)
Bandeja multiuso
Peso (g/m2)
Ligero 17-20 lb. 64-74
2
g/m
Medio: 20-27 lb. (75-90
g/m2)
Pesado: 28-32lb. (91-
120 g/m2)
Muy pesado: 33-54 lb.
(124-203g/m2)
Sobre
Labels
Tamãno Dimensiones
A6 - Legal
14 pulg.
100mm x
1.200mm (para
rótulos)
Coloque cada hoja de papel o cada
sobre uno a uno para su
alimentación.
Si desea utilizar ppel muy pesado,
use el apilador de papel siempre
boca arriba (posterior).
Los sobres deben ser de tipo
rctangular plano, con pegamento
que permanezca intacto al
someterio a la presión del rodillo
caliente del fusor que se emplea en
este tipo de impresoras. Los sobres
con ventana no son adecuados.
Las etiquetas también deben ser del
tipo recomendado para utilizar en
fotocopiadoras e impresoras láser,
en el que la hoja portadora base
está totalmente cubierta por las
etiquetas.
13 - Español

Atoscos de papel
Interior
1.
Cuidado! No la toque ni la exponga a
la luz normal de la habitación
durante más de 5 minutos.
14 - Español
2.
3.
Advertencia!: El fusor estará
caliente. No la toque.
4. Si una hoja está casi fuera de la
impresora por la parte superior,
simplemente tire de ella
suavemente para sacarla
totalmente. No emplee demasiada
fuerza. Podrá quitarla más
adelante desde la parte posterior.

Atoscos de papel (cont.)
Posterior
1.
2. Si la hoja se encuentra muy
profunda y es dificil de sacar, es
probable que aún esté sujeta por
el fusor. Levante la cubierta
superior, y alcance y presione la
palanca de liberación de presión
del fusor (1).
1
Frontal
1.
2.
15 - Español

Cómo hacer sus pedidos de suministros
Cómo hacer pedidos
•Consulte el distribuidor donde
compró su impresora.
•Consulte un distribuidor autorizado
o un proveedor de Servicios de Oki
Data. (Para averiguar cual es el
distribuidor más cercano, lame al
1-800-654-3282.)
•Solo en EE.UU., Puerto Rico, Guam,
Islas Virgenes (EE.UU.): Haga sus
pedidos en la Internet
www.okiprintingsolutions.com
•Solo EE.UU.U.S.: Llamada sin cargo
al 1-800-654-3282, y utilice su
tarjeta VISA
AMEX
®
®
, MasterCard® o
.
.
Número de los repudstos
Toners
Color OKI Part #
Negro ............................ 43459304
Cian .............................. 43459303
Magenta ........................ 43459302
Amarillo ......................... 43459301
Cilindros
Color OKI Part #
Negro ............................ 43460204
Cian .............................. 43460203
Magenta ........................ 43460202
Amarillo ......................... 43460201
Fusors y cinta de transporte
Item Oki Part #
Fusor, 120 V .................. 43377001
Fusor, 220 V .................. 43377002
Cinta de transporte ......... 43378001
Instalación
Estos items incluyen las instrucciones
de instalación.
16 - Español
Medios de impresión OKI
Oki® Synflex™*
•Impermeable, Indesgarrable
•Blanco, 8½ x 11 pulgadas (216 x
279 mm)
Pedido # Oki Cantidad
52205901 100/caja
Papel para galeradas blanco
brillante Oki
•Blanco, 32-lb. (120 g/m
•Tamaño 8½ x 11 pulgadas (216 x
279 mm)
Pedido # Oki Cantidad
52206101 500/caja
2
Oki Premium Envelopes
(sobres)
•COM-10 (#10), tejido blanco
• Revestimento de seguridad, Sello Redi-Strip
Pedido # Oki Cantidad
52206301 100/caja
52206302 500/caja
*
Papel para pancartas Oki
*
•70 lb. Indice (128 g/m2)
•Tamaño 8½ x 35.4 pulgadas (216 x
899 mm)
Pedido # Oki Cantidad
52207901 25/caja
52206002 100/caja
Oki Premium Card Stock
*
•Calidad libre de ácidos, para archiva
•Blanco, 8½ x 11 pulgadas (216 x
279 mm)
Pedido #
Oki
52205601 60 lb. Cubierta 250/caja
52205602 90 lb. Indice 250/caja
52205603 110 lb. Indice 250/caja
Peso Cantidad
* For best printing results:
Temperatura Humedad
65 to 77°F (18 a 25°C) 40 a 65%RH
17 - Español

Servicio y Soporte
Primero …
Consulte el almacén donde compró su impresora.
Otros Recursos Oki
•Visite nuestro sitio Web multillingüe:
WWW.OKIPRINTINGSOLUTIONS.COM
•Visite
• Estados Unidos: llame al 1-856-222-7496
• México: llame al (525) 263-8780
OKI es una marca de fábrica registrada de Oki Electric Industry Company, Ltd.
3M es una marca de fábrica o una marca de fábrica registrada de 3M.
AmEx es una marca de fábrica registrada de American Express Co.
MasterCardes una marca de fábrica registrada de MasterCard International, Inc.
VISA es una marca de fábrica registrada de Visa.
Windows es una marca de fábrica registrada o una marca de fábrica de Microsoft
Corporation en los Estados Unidos y en otros países.
Xerox es una marca de fábrica de Xerox Corporation.
my.okidata.com
(Inglés solamente).
18 - Español

Guía de referência rápida
Português

Iluminação - Normales
LIGADA (On Line)
DESLIGADO (Off Line) (
frequência de 1/2s)
A receber dados, imprimir, aquecer,
regulação de densidade/temperatura em
. (
progresso
1s)
Modo de economia de energía
uma frequência de 1/4s)
com uma frequência de 1/
com uma
1 - Português
. (
com

Iluminação - Advertencia/errores
Indica que não há papel ou um pedido de
alimentação manua
Indica que o papel encravou ou que a tampa
está aberta
Indica que a duração do consumível está
terminando ou um erro de instalação do
consumível.
estado. Imprime uma ou Página de Status.
Pressione o botão On Line 2 segundos.
Consulte Recomendações e Aviso
Cartuchos de toner nao locked/es necesario
reemplazar algún consumible /error al abrir
la cubierta
Deslilgue a impress ona e ligue-a novamente.
Se isto não resolver o problema, ligue para a
assistência ténica. (
2/1s
.)
l. (
Impresión de una página de
. (
com uma frequência de 1/1s
l.
com uma frequência de 1/1s
com uma frequência de
.)
.
.)
2 - Português

Iluminação e Botões
P
lAl
ape
Ligada
arme
Botãos
On Line
Iluminação
1. Status normal (verde): a
impressora está funcionando
normalmente, ou seja, está ON
LINE ou processando algum
trabalho de impressão.
2. Status de aviso (amarelo): é
possível continuar usando a
impressora sem intervenção, mas
pode ocorrer um erro.
3. Status de erro (amarelo
intermitente): não é possível
continuar usando a impressora. É
necessário intervir para eliminar o
erro. Erros desse tipo são
irrecuperáveis e requerem
assistência técnica.
Detailed Printer Status
O Status Monitor (Windows) ou o
Printer Driver (Mac) fornece
informações detalhadas sobre a
impressora.
Press.
1 sec.
Press.
2 sec.
Press.
5 sec.
Cancel
Press.
2 sec.
3 - Português
•Desliga a Off Line.
•Quando solicitado,
Imprime o verso
estiver da
documento.
Imprime página de
Status.
Imprime página de
Demo.
Executa o
cancelamento da
impressão 2
segundos após
pressionar o botão.
Monitor de estado
Windows
Para maximizar o monitor de status,
clique duas vezes no icone na barra
de tarefas do Windows. (Ou, clique
em Iniciar > Programas > Okidata >
Oki C3400n > Status Monitor.).
Guia Printer State
Esta guia é exibida quando o Status
Monitor é aberto e mostra
informações detalhadas sobre o
status da impressora.
Guia Printer Setup
Esta guia permite o acesso ao botão:
Selectionar impressora botão
Permite monitorar o status de
qualquer impressora configurada
para uso pelo computador.
Open Configuration Button
Permite o acesso às configurações
do menu da impressora. As
configurações da impressora
podem ser alteradas a partir do
menu da impressora.
Preferences tab
Selecionar esta guia permite escolher
as informações que serão exibidas no
Status Monitor e como/quando o
Status Monitor aparecerá.
4 - Português

Monitor de estado (cont.)
Configurãções do usuário
Na guia Status Monitor Setup
(Configuração do Status Monitor),
clique em Printer Menu (Menu da
impressora). O User Settings Print
Menu (Menu das configurações do
usuário da impressora) aparecerá.
Utilitário Printer Menu (apenas
Mac)
O aplicativo Status Monitor não existe
no Mac. As configurações do usuário
da impressora podem ser alteradas
por meio do utilitário Printer Menu.
É possível usar o software de servidor
de controle de impressão do Windows
para controlar a impressora no Mac.
5 - Português

Impressão
Imprima uma página de
demonstração
Pressione o botão ON LINE da
impressora e mantenha-o
pressionado por 5 segundos.
Imprima uma página de
status
Mantenha pressionado o botão ON
LINE da impressora por 2 segundos.
__________________________
Impressão Duplex Manual
usando a bandeja cassete
(Apenas Windows)
1. Certifique-se de que há papel
suficiente na bandeja cassete para
executar o trabalho de impress
2. Selecione Arquivo -> Imprimir e
clique no botão Propriedades.
3. selecione Long Edge (Borda Maior)
ou Short Edge (Borda Menor).
Nota:
Caso você precise de mais
informações, clique no botão Ajuda
do Duplex.
4. clique no botão OK.
ão.
6 - Português

Impressão (cont.)
Impressão Duplex Manual
Usando a Bandeja Cassete
1.
2. Vivar o página.
3. clique no botão On Line.
Impressão Duplex Manual
Usando a Bandeja Multiuso
1.
2. Alimente uma folha de cada vez.
3. clique no botão OnLine.
7 - Português
Colocar Papel
Tabuleiros (bandejas) tipo
cassete
Tabuleiro (Bandeja) multiusos
8 - Português

Colocar Papel
(Cont.)
Saido do papel
Empilhador de frente para baixo
•máximo de 150 folhas (150 sheets)
de 80g/m
•As páginas impressas pela ordem de
leitura (página 1 primeiro) são
ordenadas por ordem de leitura
(última página em cima, com a face
impressa voltada para baixo)
2
(20 lb.)
.
Empilhador de frente para cima
•É necessário abrir o empilhador de
frente para cima existente na parte
posterior da impressora e puxar a
extensão do tabuleiro (bandeja),
quando for necessário utilizá-lo.
•O empilhador de frente para cima
pode suportar até 10 folhas de
papel normal de 80 g/m
papel até 203 g/
•Sempre use o empilhador de face
para cima e a bandeja
multifuncional para papéis com
gramatura superior a 176 g/m² (47
lb.)
m2.
2
e tipos de
9 - Português

Impressão em cores
Nota:
Consulte o manual do usuário
online da C3400n para obter mais
informações.
definições automáticas
As definições automáticas utilizações
normais, uma vez que fornecem
predefinições razoáveis que permitem
bons resultados para a maior parte
dos documentos.
definições de cor manualmente
Os drivers fornecidos com a
impressora contêm vários controles
para alterar as impressões coloridas.
Uma aplicação do Windows:
1. elecione File>Print… (Arquivo Imprimir…).
2. Clique no botão Properties
(Propriedades).
3. Na guia Cor selecione Cor
Avançada para a Correspondência
de Cores(1).
4. Escolha a definição de cor Manual
e selecione uma das seguintes
opções (2).
1
2
10 - Português

Impressão em cores (cont.)
Impressão a partir de
sistema operacional MAC
1. Abra o documento que deseja
imprimir.
2. Selecione File [Arquivo] > Print
[Imprimir].
3. Selecione a impressora no menu
instantâneo Printer (Impressora).
4. selecione as opções cor.
Sugestões para imprimir em
cores
Imprimir imagens fotográficas
Utilize a definição do Monitor (6500k)
Perceptual.
Se as cores apresentarem pouco
brilho, experimente as definições do
Monitor (6500k) Vivid ou Digital
Cameras.
Imprimir a partir de aplicações
do Microsoft Office
Utilize a definição do Monitor
(9300k). Isto pode ajudar se tiver
problemas com cores específicas em
aplicações como o Microsoft Excel ou
Microsoft Powerpoint.
Imprimir cores específicas (por
exemplo, o logótipo de uma
empresa)
Existem 2 utilitários no CD-ROM do
driver da impressora que podem
ajudar na correspondência de cores
específicas:
Utilitário Color Swatch
Utilitário Color Correct
Ajustar a luminosidade ou
intensidade de uma impressão
Se a impressão for demasiado clara/
escura, é possível utilizar o controle
de Luminosidade para a ajustar.
Se as cores forem demasiado
intensas ou não, utilize o controle de
Saturação.
11 - Português

Recommendações relativas ao papel
Tabuleiro (Bandeja) tipo casete
Weight Sizes Dimensions
Leve: 17-19 lb. (64-74
g/m2)
Médio: 20-27 lb. (75-90
g/m2)
Pesado:28-32 lb. (91120 g/m2)
A6 ofício 14
polegado.
105 x 148mm
to
216 x 356mm
Utilizar fabricado para
fotocopiadoras e impressoras a
laser.
Você pode utilizar papel de carta
pré-impresso, mas a tinta tem de
ser resistente às elevadas
temperaturas de fusão utilizadas no
processo de impressão.
12 - Português

Recommendações relativas ao papel (cont.)
Tabuleiro (Bandeja) multiusos
Weight Sizes Dimensions
Médio: 20-27 lb. (75-90
g/m2)
Pesado: 28-32lb. (91120 g/m2)
Ultra Pesado: 33-54 lb.
(124-203g/m2)
A6 -
ofício 14
polegado
100mm x
1200mm
(impressão de
faixas)
As folhas de papel só podem ser
alimentadas uma de cada vez..
Sempre use o empilhador de face
para cima e a bandeja
multifuncional para papéis com
gramatura superior a 176 g/m² (47
lb.).
Envelopes
Etiquetas (Labels)
Não coloque mais do que 1 envelope
de cada vez.
Também devem ter aba retangular,
com um tipo de cola que não
derreta quando sujeita a uma fusão
a alta temperatura por rolo,
utilizada neste tipo de impressora.
Os envelopes de janela não são
adequados.
As etiquetas também devem ser do
tipo recomendado para
fotocopiadoras e impressoras a
laser, com a página de base
totalmente coberta com etiquetas.
13 - Português

Resolver encravamentos de papel
2.
Perspectiva da impressora
1.
3.
WARNING: A unidade de fusão
CUIDADO! A superfície verde do
cilindro de formação de imagem na
base do cartucho é muito delicada e
sensível à luz. Não a toque e não a
exponha à luz ambiente normal por
mais de 5 minutos.
estará quente. Não toque nesta
área.
4. Se uma folha estiver parcialmente
de fora na superior da impressora,
agarre no folha e puxe-a com
cuidado. Se nã said facilmente, a
partir da parte posterior.
14 - Português
Resolver encravamentos de papel (cont.)
Perspectiva posterior
1.
2. Se a folha estiver num local de
difícil acesso, é provável que
esteja presa à unidade de fusão.
Levante a tampa superior, procure
a folha e pressione a alavanca de
liberação de pressão da unidade
de fusão (1).
1
Perspectiva frontal
1.
2.
15 - Português

Pedidos de suprimentos de reposição
Como fazer pedidos
•Consulte o revendedor onde
adquiriu a impressora.
•Consulte um representante
autorizado de vendas ou assistência
ténica da Oki Data. (Para se
informar a respeito do revendedor
mais próximo, ligue para [5511]
3444-3500).
•Consulte os catálogos de
suprimentos de escritório.
Números para pedidos
Toners
Color OKI Part #
Black............................. 43459304
Cyan ............................. 43459303
Magenta ........................ 43459302
Yellow............................ 43459301
Cilindros OPC
Color OKI Part #
Black............................. 43460204
Cyan ............................. 43460203
Magenta ........................ 43460202
Yellow............................ 43460201
Fusors e esteira de
transferência
Item Oki Part #
Fuser, 120 V .................. 43377001
Fuser, 220 V .................. 43377002
Transfer Belt .................. 43378001
16 - Português

Mídia de impressão Oki
Oki® Synflex™
• A prova d’água, Resistente à ruptura
•Branco, 8½ x 11 polegadas (216 x
279 mm)
No para pedidos OKI
52205901 100/caixa
Quantidade
Papel branco brilhante para
provas Oki
•Branco, 32-lb.
•8½ x 11 polegadas (216 x 279 mm)
No para pedidos OKI
52206101 500/caixa
Qty
Envelopes de alta qualidade
Oki
•COM-10 (#10), fibras trançadas
• Tintura de segurança, selo Redi-stripl
No para pedidos OKI
52206301 100/caixa
52206302 500/caixa
Qty
Papel para faixas Oki
•70 lb. Index (128 g/m2)
•Tamanho 8½ x 35.4 polegadas
(216 x 899 mm)
No para pedidos OKI
52207901 25/caixa
52206002 100/caixa
Qty
Papel cartão de alta
qualidade Oki
•Neutro com qualidade para
arquivamento
•Branco 8½ x 11 polegadas (216 x
279 mm)
No para
pedidos OKI
52205601 60 lb. Cover 250/caixa
52205602 90 lb. Index 250/caixa
52205603 110 lb. Index 250/caixa
Weight Qty
17 - Português

Assistência técnica e suporte
Primeiro …
Consulte a loja onde adquiriu a
impressora.
Outros recursos da OKI
• Visite nosso site multillingüe na
Web:
OKI é uma marca rgistrada da Oki Electric Industry Company, Ltd.
3M é uma marca commercial ou marca registrada da 3M.
AmEx é uma marca rgistrada dais da American Express Co.
MasterCard é uma marca rgistrada da MasterCard International, Inc.
VISA é uma marca rgistrada da Visa.
Windows é uma marca rgistrada ou marca comercial da Microsoft Corporation nos
Estados Unidos e em outros países.
Xerox é uma marca comercial da Xerox Corporation.
WWW.OKIPRINTINGSOLUTIONS.COM
• Visite
• Ligue para 55-11-3444-6747
• e-mail: okidata@okidata.com.br.
my.okidata.com
em inglês).
(grande São Paulo) ou 0800-115577 (demais localidades)
(somente
18 - Português
 Loading...