


Wireless LAN Connection Guide
Precautions When Using Wireless LAN ....................................................... 2
Preparing to Use a Wireless LAN Environment ........................................... 2
Checking the Network Environment to Be Used on the Wireless LAN ...... 2
Selecting a Method to Set Up the Wireless LAN ....................................... 3
Connecting Using WPS ............................................................................... 3
Connecting by Selecting a Wireless LAN Access Point from the Control Panel ....5
Connecting by Manual Setup from Control Panel ........................................ 8
Conrming if Connections Are Normal ...................................................... 11
Connecting in Wireless LAN (AP Mode) .................................................... 12
Glossary ................................................................................................... 14
Precautions When Using Wireless LAN
• Precautions When Using Wireless LAN
•
Carefully read the following precautions before using the machine in a wireless LAN environment.
• In a wireless LAN environment, the machine enters sleep mode, but does not enter deep sleep
mode.
• Do not place any devices (especially microwave ovens or digital cordless telephones) that emit
weak electromagnetic waves near the machine.
• Install the machine near a wireless LAN access point or wireless device with no obstacles between
them (the distance should be within 30 m).
• Wireless connections may be difcult if there is any metal, aluminum framed windows, or reinforced
concrete walls between the machine and the wireless LAN access point.
• Wireless LAN connections may have slower transmission speeds, depending on the environment,
than wired LAN or USB connections. We recommend using a wired LAN or a USB connection to print
large amounts of data, such as photographs.
• The illustrations of the machine and the control panel in this manual use the MC363dnw as an
example. For how to use the actual control panel, see the user manual for the machine you
purchased.
Note
• The wireless LAN function may be disabled in the default factory settings. If this is the case, you need to rst set the wireless
LAN to [Enable] on the control panel.
• Preparing to Use a Wireless LAN Environment
•
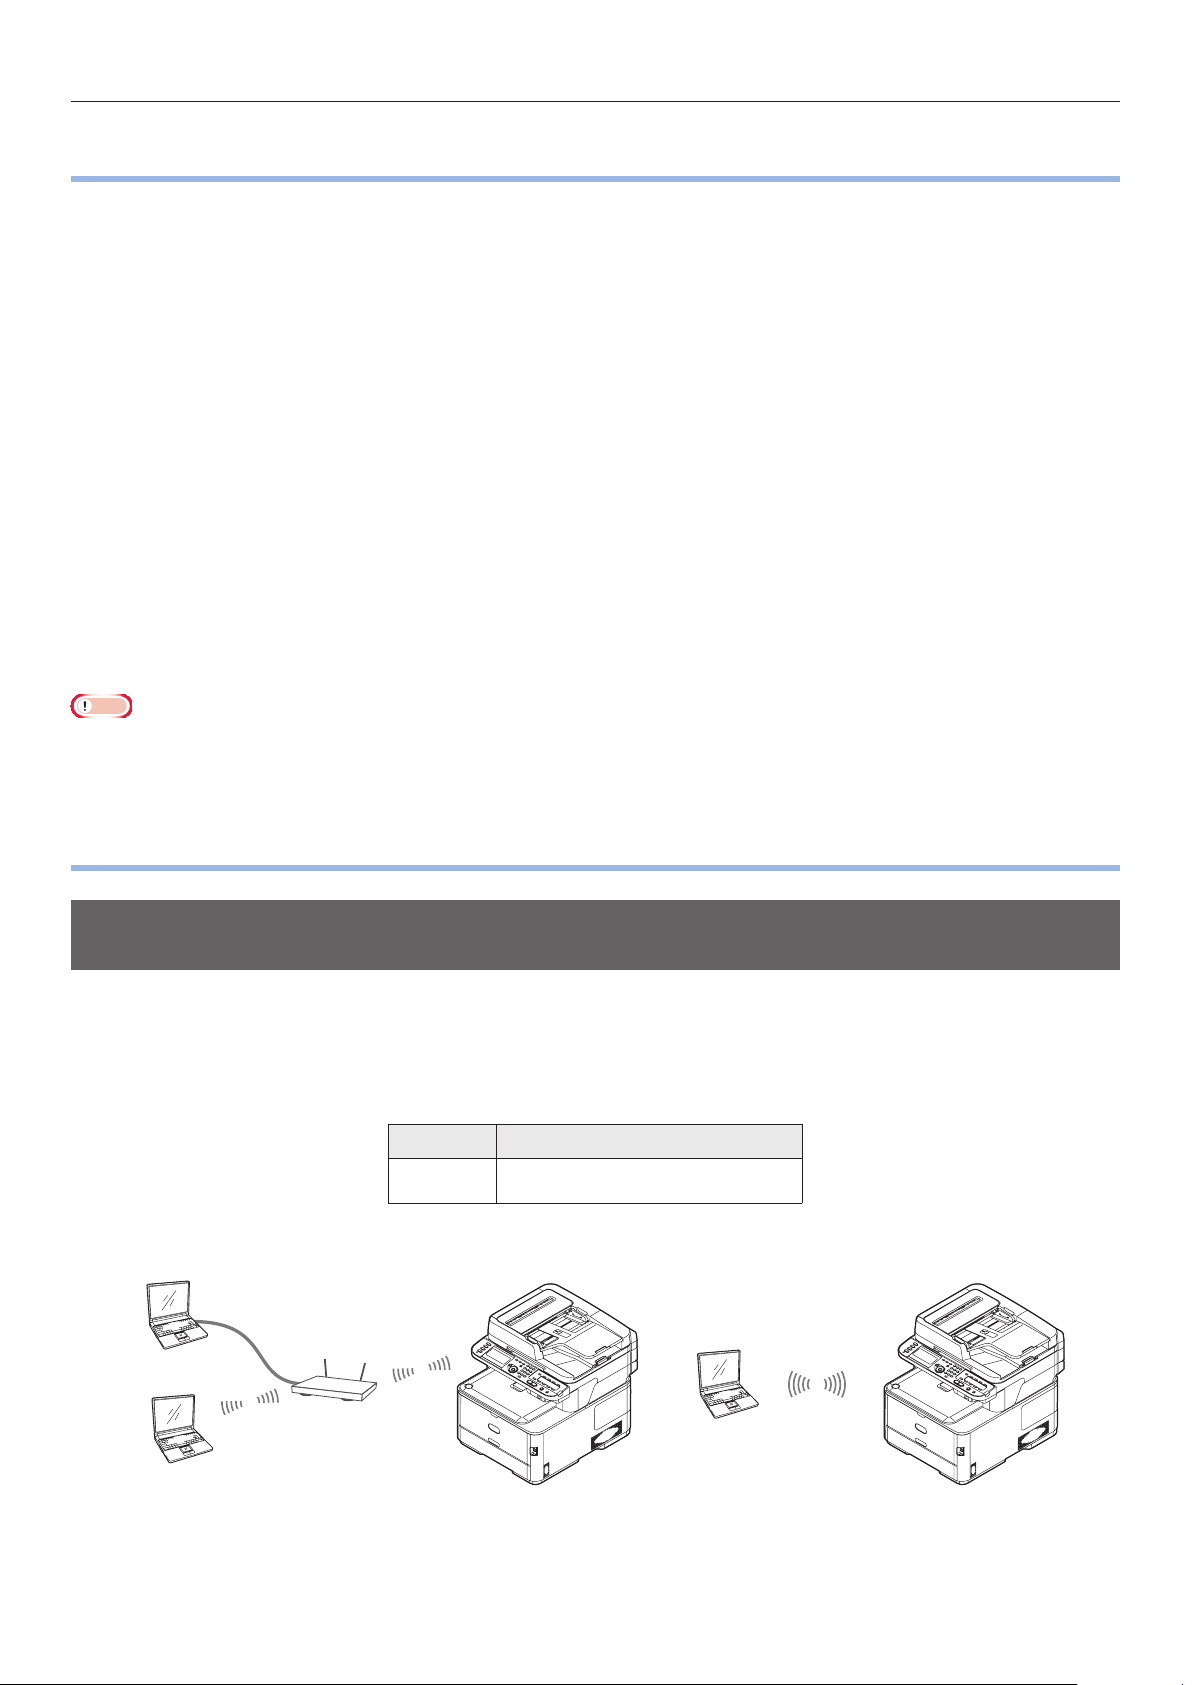
Checking the Network Environment to Be Used on the Wireless LAN
You can communicate via a wireless LAN access point to connect to a wireless LAN environment (WPS
compatible).
Before you start, conrm that the wireless LAN access point you are using supports the following
environment.
Item Value
Standard IEEE 802.11 a/b/g/n
• You cannot use wireless (infrastructure) and the wireless (AP mode) at the same time.
Machine Machine
Computer
Wireless LAN
access point
Infrastructure mode
AP mode
- 2 -

Connecting Using WPS
Selecting a Method to Set Up the Wireless LAN
Conrm that the wireless LAN access point you are using supports WPS and then select the setup
method.
If you do not know whether WPS is supported, use the "WPS not supported" setup method.
• WPS supported → Connecting Using WPS ……………………… P.3
• WPS not supported → Connect by selecting a wireless LAN access
point from the control panel …………………………………………………… P.5
• Connecting Using WPS
•
If the wireless LAN access point supports WPS, the connection to the wireless LAN can be made easily
by using the easy setup button (WPS button).
Follow the procedure below for the setup.
Conrm the position of the easy setup button
1
and when to press the button by referring to
the user manual of the wireless LAN access
point.
Conrm that the wireless LAN access point
2
has been activated and is functioning
normally.
Turn on the power supply to the machine.
3
Memo
• For how to turn on the power, see the user manual for
the machine you purchased.
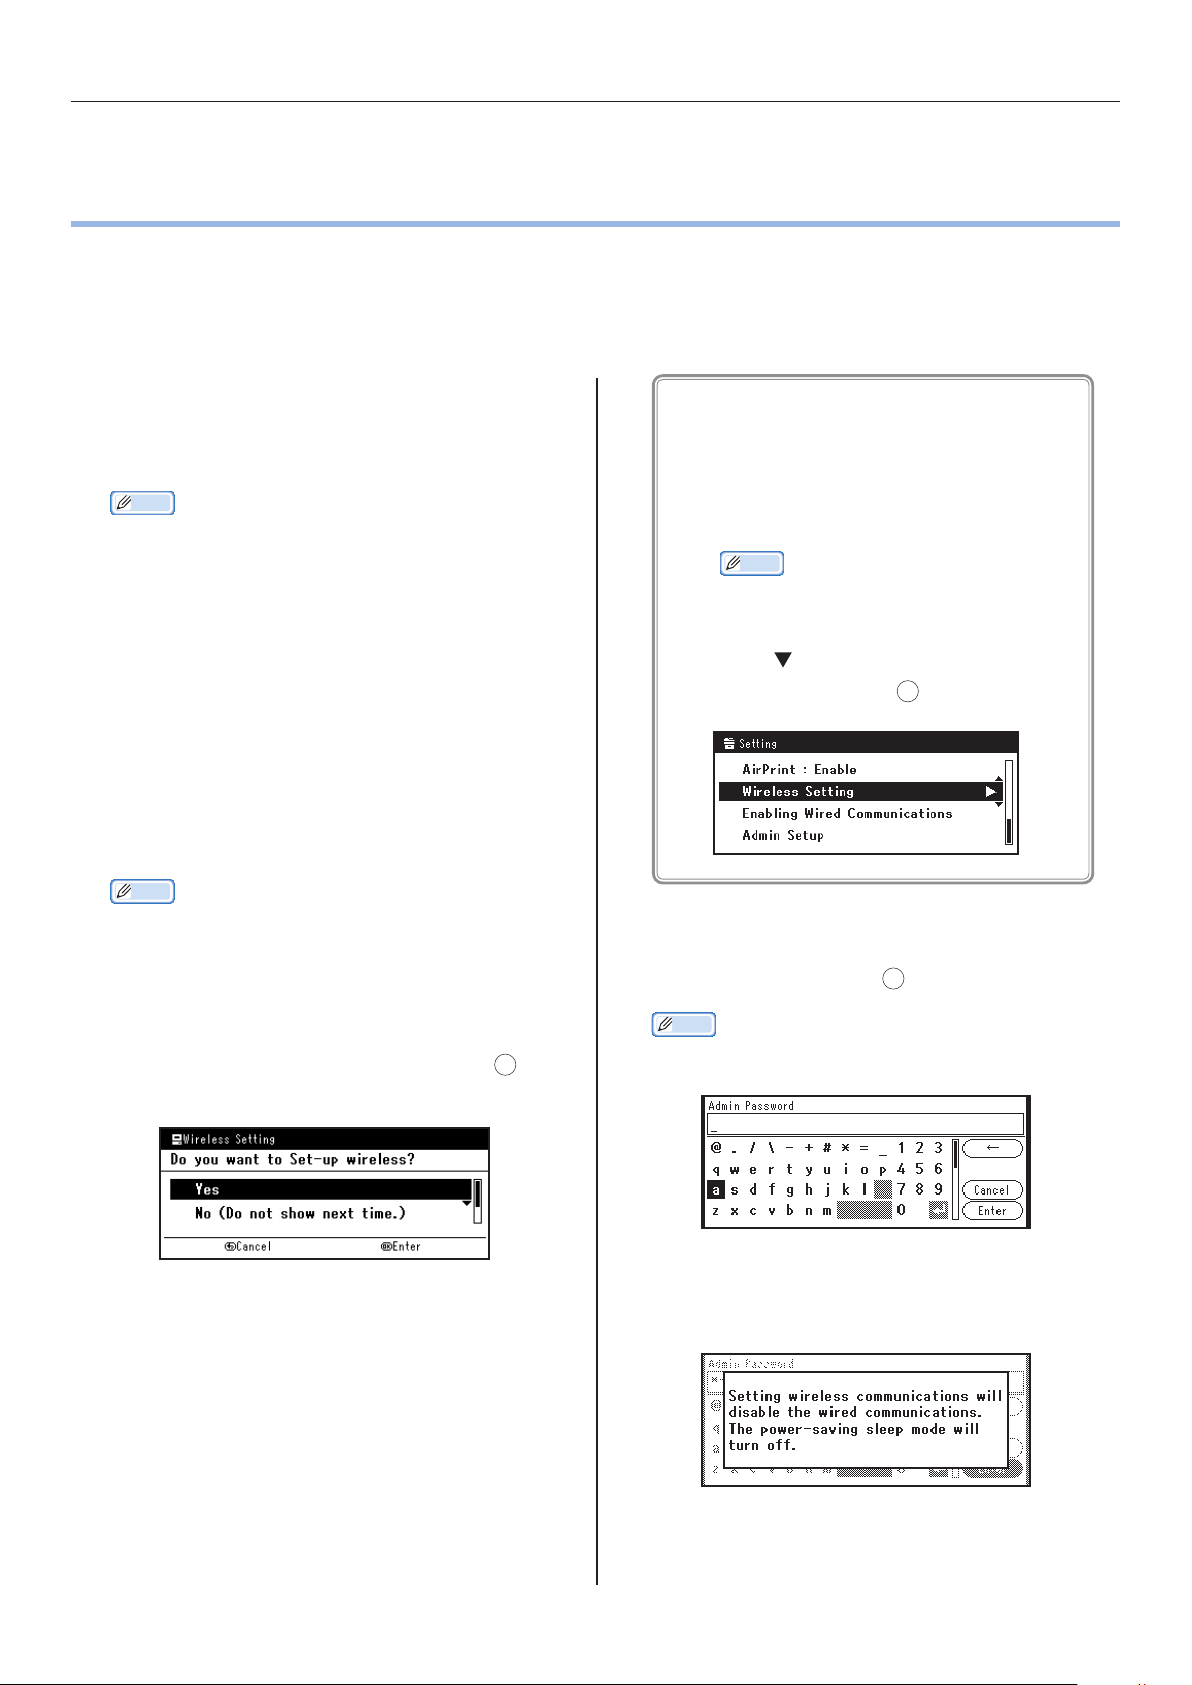
When the [Wireless Setting] screen is
4
displayed, select [Yes], and press the OK
button.
Use the following procedure if the above screen
does not appear or the wireless setup needs to
be reset.
Press the <SETTING> button on the
(1)
control panel.
Memo
• This operation is unnecessary depending
on your model.
- 3 -
Press to select [Wireless Setting],
(2)
and then press the OK button.
Connecting Using WPS
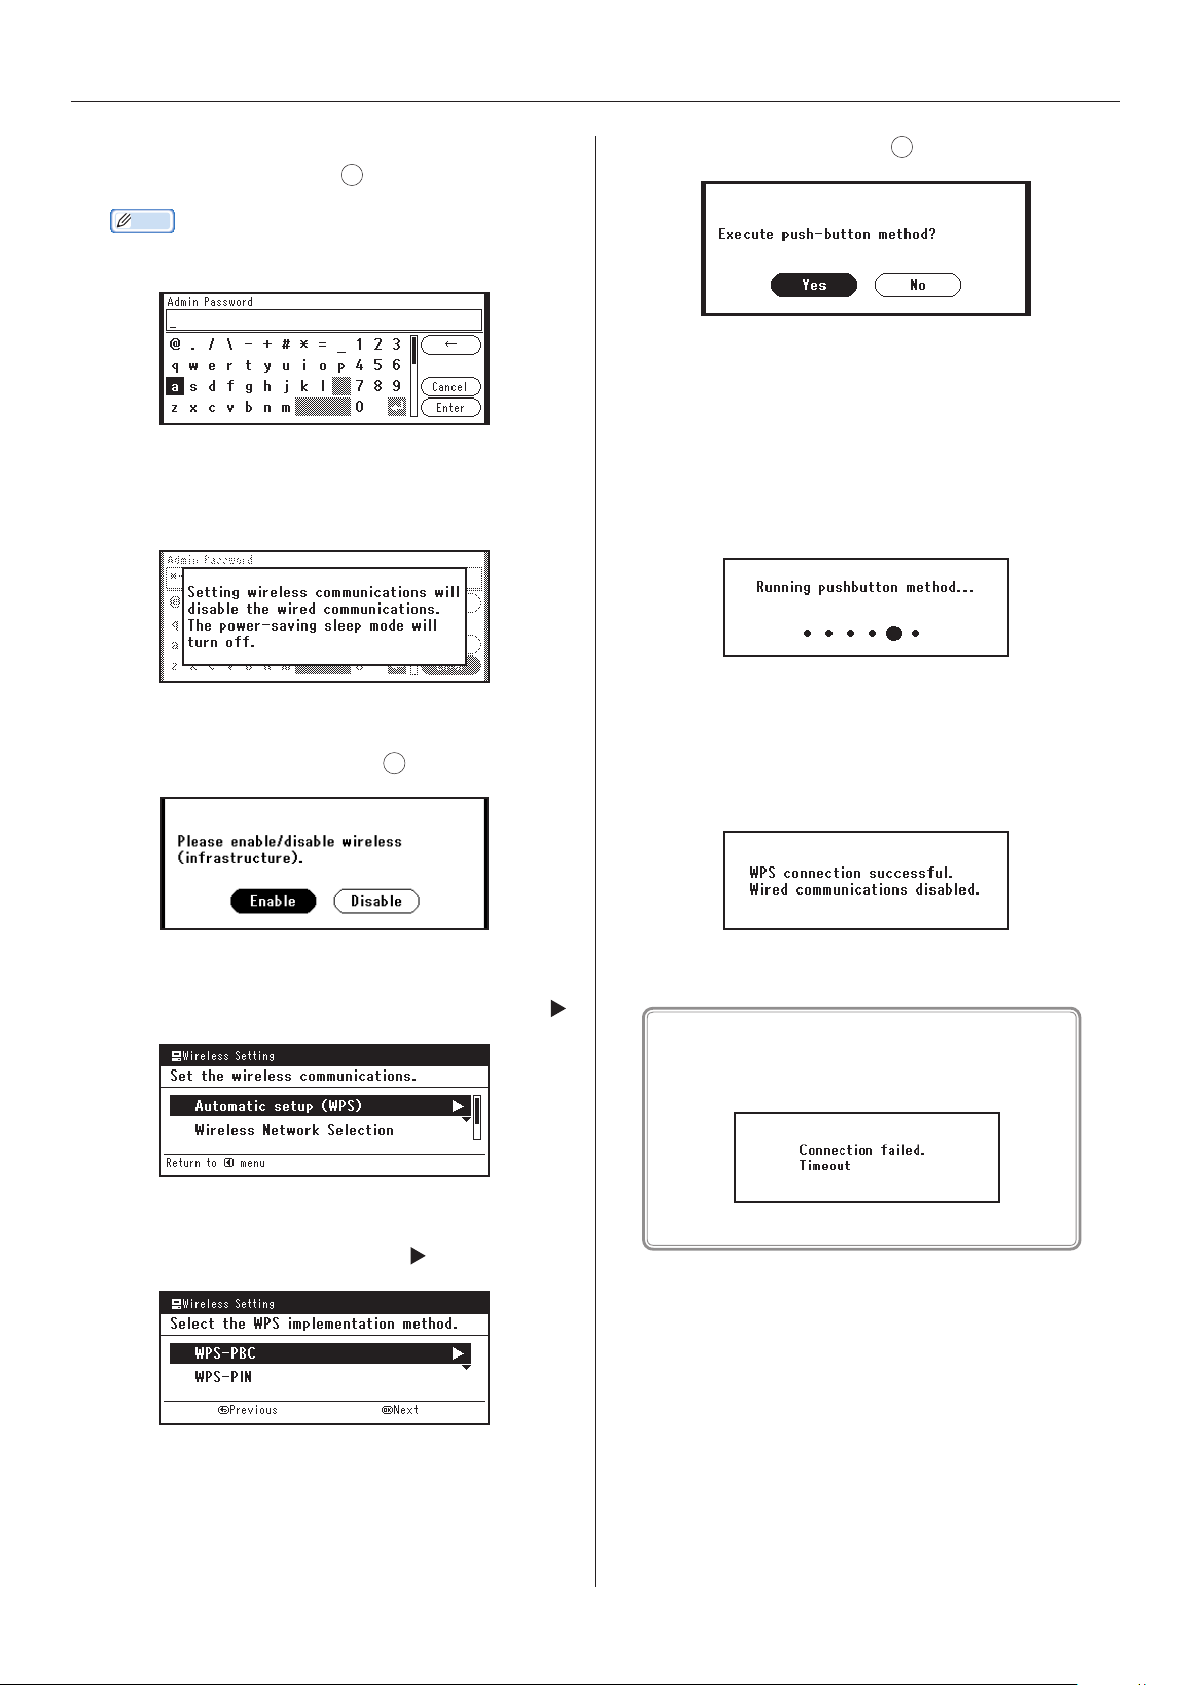
Enter the administrator password, select
5
[Enter], and press the OK button.
Memo
• The default factory-set password is "999999".
The following message will be displayed for
about 5 seconds.
Select [Yes], and press OK.
9
The machine starts searching for wireless
10
LAN access points. The following screen
is displayed for 2 minutes. During those 2
minutes, press the easy setup button for the
wireless LAN access point for a few seconds.
Select [Enable], and press OK.
6
Select [Automatic setup (WPS)], and press .
7
Select [WPS-PBC], and press .
8
When the following screen is displayed, the
11
wireless LAN setup is complete.
If the following screen is displayed, go back to
Step 7 and redo the setup.
Advance to "Conrming if Connections Are
12
Normal" (P.11).
- 4 -
Connecting by Selecting a Wireless LAN Access Point from the Control Panel
• Connecting by Selecting a Wireless LAN Access
•
Point from the Control Panel
If the wireless LAN access point does not support WPS, you can connect by selecting the wireless LAN
access point you want to use from those the machine has detected. To do this, an encryption key is
required.
Follow the procedure below for the setup.
Conrm and write down the SSID and
1
encryption key by referring to the user
manual of the wireless LAN access point.
Memo
• The SSID is also called the network name, ESSID, or
ESS-ID.
• The encryption key is also called the network key,
security key, password, or pre-shared key.
Conrm that the wireless LAN access point
2
has been activated and is functioning
normally.
Turn on the power supply to the machine.
3
Memo
• For how to turn on the power, see the user manual for
the machine you purchased.
Use the following procedure if the above screen
does not appear or the wireless setup needs to
be reset.
Press the <SETTING> button on the
(1)
control panel.
Memo
• This operation is unnecessary depending
on your model.
Press to select [Wireless Setting],
(2)
and then press the OK button.
Enter the administrator password, select
5
[Enter], and press the OK button.
When the [Wireless Setting] screen is
4
displayed, select [Yes], and press the OK
button.
Memo
• The default factory-set password is "999999".
The following message will be displayed for
about 5 seconds.
- 5 -

Connecting by Selecting a Wireless LAN Access Point from the Control Panel
Select [Enable], and press OK.
6
Press to select [Wireless Network
7
Selection], and then press .
The machine starts searching for wireless LAN
8
access points. Please wait.
A screen opens in which to input the
10
encryption key appropriate to the encryption
procedure for the selected wireless LAN
access point; input the encryption key.
Memo
• The encryption key differs depending on the wireless
LAN access point and security.
If [Enter the Pre-shared Key.] is displayed
Item Explanation
Encryption
method
Encryption
key
WPA/WPA2-PSK
Enter the pre-shared key.
If [To make this setting, make the changes
from the web page.] is displayed
A list of available wireless LAN access point
9
SSIDs are displayed. Press / , select a
wireless LAN access point, and press the OK
button.
Note
• If only [Manual Setup] is displayed or the desired
wireless LAN network SSID is not displayed, follow
the procedure in "Connecting by Manual Setup from
Control Panel" (P.8 ) to do the settings.
Item Explanation
Encryption
method
* Congure from the machine's web page.
WPA/WPA2-EAP
If [Input WEP Key] is displayed
Item Explanation
Encryption
method
Encryption
key
WEP
Input the WEP key.
Other settings
Item Explanation
Encryption
method
Encryption
key
Disable
Input is not necessary.
- 6 -

The SSID selected in Step 9 and the
11
encryption method in Step 10 are displayed
as security in of the conrmation screen.
If the SSID is the same as the one set up in
Step 1, select [Yes] and press the OK button.
When the following screen is displayed,
12
the wireless LAN setup is complete.
Connecting by Selecting a Wireless LAN Access Point from the Control Panel
If the following screen is displayed, go back to
Step
Advance to "Conrming if Connections Are
13
Normal" (P.11).
and redo the setup.
4-(2)
- 7 -

Connecting by Manual Setup from Control Panel
• Connecting by Manual Setup from Control Panel
•
Congure the wireless LAN access point information (SSID, encryption method, and encryption key)
manually, and connect to the wireless LAN.
Follow the procedure below for the setup.
Check and write down the SSID, the
1
encryption method and the encryption key by
referring to the user manual of the wireless
LAN access point.
Note
• When the encryption method is WPA-EAP or WPA2-
EAP, congure from the machine's web page.
Memo
• The SSID is also called the network name, ESSID, or
ESS-ID.
• The encryption key is also called the network key,
security key, password, or pre-shared key.
Conrm that the wireless LAN access point
2
has been activated and is functioning
normally.
Turn on the power supply to the machine.
3
Use the following procedure if the above screen
does not appear or the wireless setup needs to
be reset.
Press the <SETTING> button on the
(1)
control panel.
Memo
• This operation is unnecessary depending
on your model.
Press to select [Wireless Setting],
(2)
and then press the OK button.
Enter the administrator password, select
5
[Enter], and press the OK button.
When the [Wireless Setting] screen is
4
displayed, select [Yes], and press the OK
button.
Memo
• The default factory-set password is "999999".
The following message will be displayed for
about 5 seconds.
- 8 -

Connecting by Manual Setup from Control Panel
Select [Enable], and press OK.
6
Press to select [Wireless Network
7
Selection], and then press .
Search for wireless LAN access points starts.
8
Please wait.
When [Set the security.] is displayed, select
12
the encryption method conrmed in Step 1,
and press the OK button.
Note
• If the wireless LAN access point supports Wep, WPA-
PSK and WPA2-PSK, select WPA2-PSK.
Memo
• The encryption key differs depending on the wireless
LAN access point and security.
When [Set the encryption type.] is displayed,
13
select AES.
A list of available wireless LAN access points
9
is displayed. Select [Manual Setup] at the end
of the list, and press the OK button.
When [Enter the SSID.] is displayed, press .
10
Enter the SSID, and select [Enter].
11
Note
• It is case sensitive. Please enter it correctly.
When [Enter the Pre-shared Key.] is
14
displayed, press to display the input screen.
Enter the pre-shared key as the encryption
15
key on the displayed screen.
The SSID entered in Step 11 and the security
16
setting selected in Step 13 are displayed in
of the conrmation screen. If the content
is the same as the one set up in Step 1, select
[Yes] and press the OK button.
Memo
• It will take about 30 seconds for the machine to detect
the wireless LAN access point.
- 9 -

Connecting by Manual Setup from Control Panel
When the following screen is displayed, the
17
wireless LAN setup is complete.
If the following screen is displayed, the machine
cannot connect to the wireless LAN access
point.
The specified wireless LAN access point may not
be functioning properly or the input information
(SSID, encryption method, and encryption key)
may be incorrect. Please check.
Advance to "Conrming if Connections Are
18
Normal" (P.11).
- 10 -

Conrming if Connections Are Normal
• Conrming if Connections Are Normal
•
This section explains the procedure for conrming if connections to the wireless LAN are normal.
Follow the procedure below to conrm the connection.
Press the <SCAN> button on the multi function printer.
1
The connection is normal if the antenna mark appears on the upper right of the control panel.
2
If the wireless LAN connection is unstable
If the wireless LAN connection is unstable, carefully read the precautions in "Precautions When Using
Wireless LAN" (P. 2 ) and then change the position of the machine or the wireless LAN access point.
If that does not resolve the problem, move the machine and the wireless LAN access point closer
together.
- 11 -
Connecting in Wireless LAN (AP Mode)
• Connecting in Wireless LAN (AP Mode)
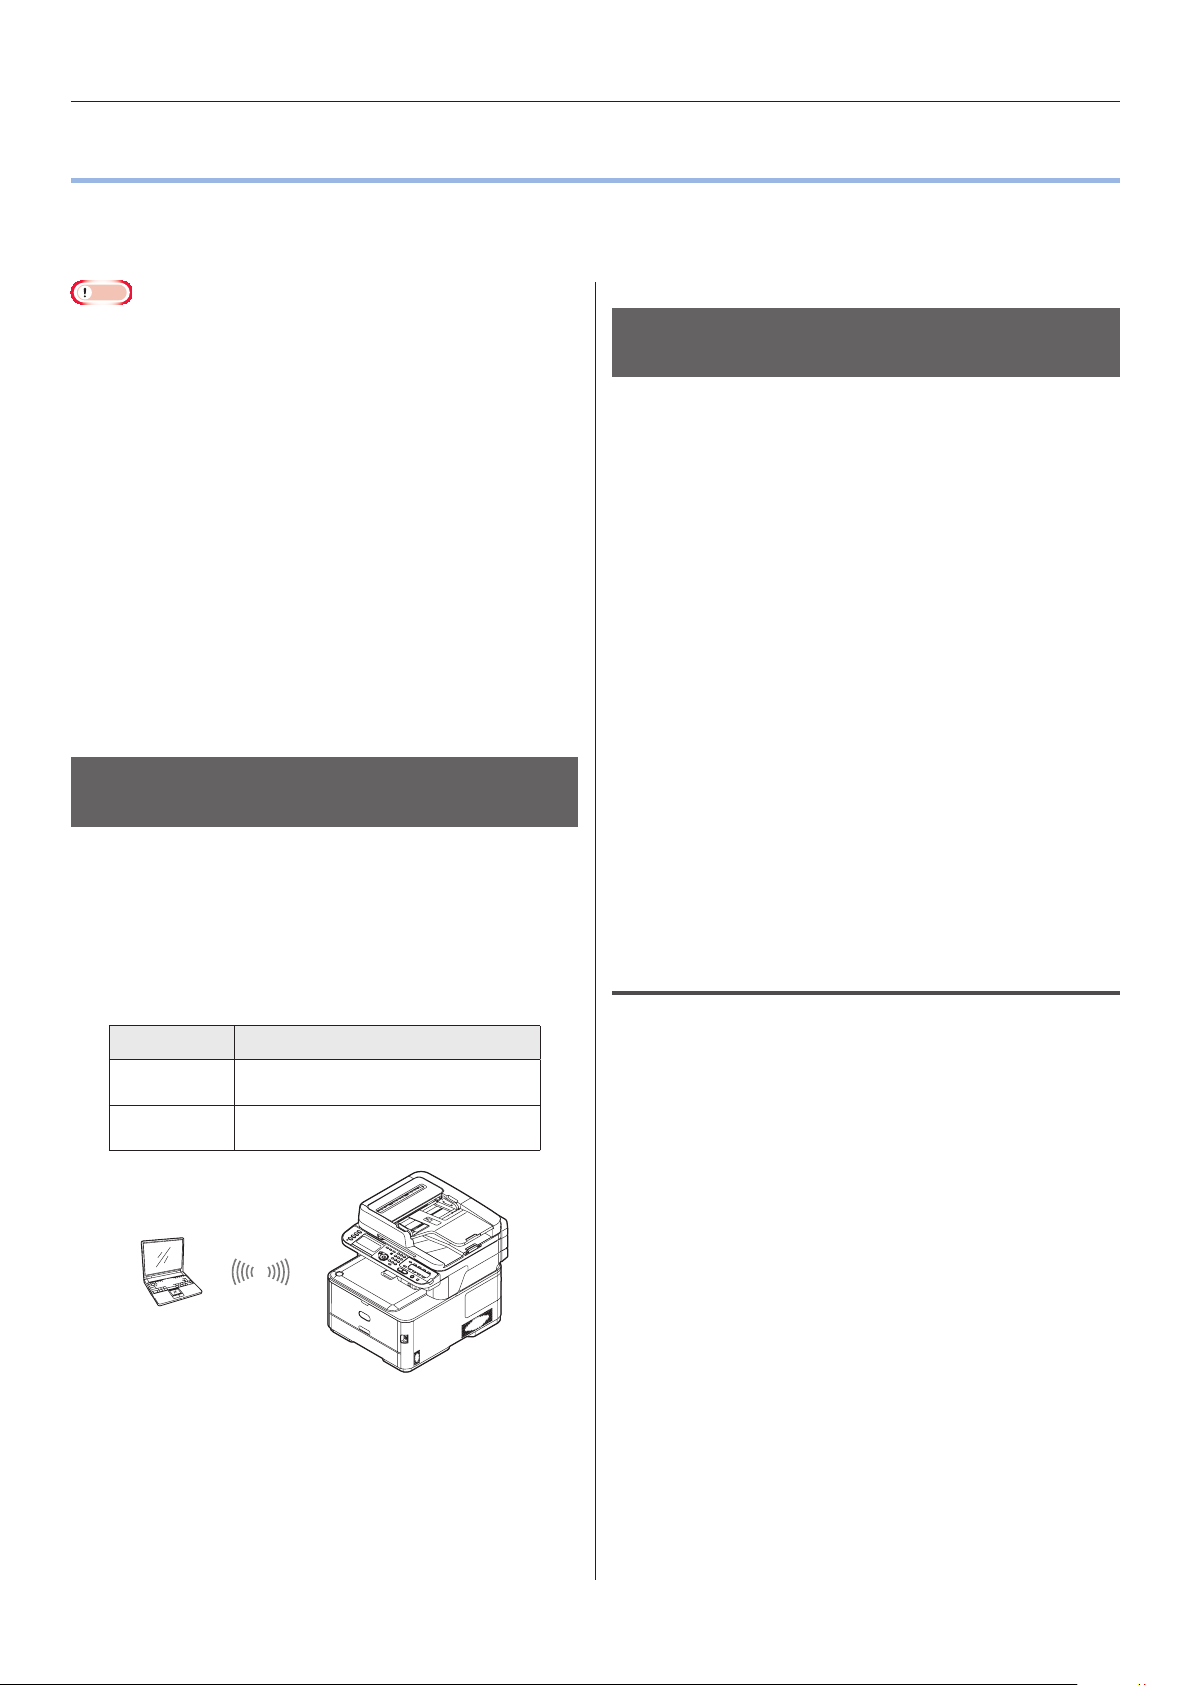
•
The wireless LAN (AP mode) connects directly to a wireless terminal (computer, tablet, smartphone,
etc.) without using a wireless LAN access point.
Note
• You cannot enable wireless LAN (infrastructure) and
wireless LAN (AP mode) at the same time.
Conrm the method to set up
the wireless LAN (AP mode)
• If you enable wireless LAN (AP mode), the machine enters
sleep mode, but does not enter deep sleep mode.
• Do not place any devices (especially microwave ovens or
digital cordless telephones) that emit weak electromagnetic
waves near the machine.
• Wireless connections may be difcult if there is any metal,
aluminum framed windows, or reinforced concrete walls
between the machine and the wireless terminal (computer,
tablet, smartphone, etc.).
• Wireless LAN connections may have slower transmission
speeds than wired LAN or USB connections, depending on
the environment. We recommend using a wired LAN or a
USB connection to print large amounts of data, such as
photographs.
Conrm that the wireless terminal (computer,
tablet, smartphone, etc.) you are using supports
WPS-PBC (push button) and then select the setup
method.
If WPS-PBC is supported, refer to "Automatic
Setup (Push Button)". If you do not know whether
WPS is supported, refer to "Manual connections".
• Automatic Setup (Push Button)
If the wireless terminal (computer, tablet,
smartphone, etc.) supports WPS-PBC (push
button), then you can use the WPS button to
connect via wireless LAN (AP mode).
Preparing to use the wireless
LAN (AP mode)
The machine becomes a simple wireless access
point, and wireless terminals (computer, tablet,
smartphone, etc.) can connect directly to it.
Before you start, conrm that the wireless device
you are using supports the following environment.
Item Value
Standard IEEE 802.11 b/g/n
Security WPA2-PSK(AES)
• Manual connections
If the wireless terminal (computer, tablet,
smartphone, etc.) does not support WPS-PBC
(push button), then you can input the machine's
SSID and password into the wireless terminal
(computer, tablet, smartphone, etc.) to connect.
Automatic Setup (Push Button)
If the wireless terminal (computer, tablet,
smartphone, etc.) supports WPS-PBC (push
button), then you can use the WPS button to
connect via wireless (AP mode).
Follow the procedure below to connect.
Conrm the position of the WPS button in
1
the user's manual provided with the wireless
terminal (computer, tablet, smartphone, etc.).
Turn on the power supply to the machine.
2
3
- 12 -
Press the <SETTING> button on the control
panel.

Connecting in Wireless LAN (AP Mode)
Press [Admin Setup].
4
Memo
• [Wireless(AP Mode) Setting] can be selected here
depending on your model.
Enter the administrator password and
5
press OK.
The default factory-set administrator
password is "999999".
Press to select [Network Menu], and then
6
press OK.
Select [Network], and then press OK.
7
Select [Wireless(AP Mode) Setting], and then
8
press OK.
Turn on the power supply to the machine.
1
Press <SETTING> on the control panel.
2
Select [Admin Setup] and press OK.
3
Memo
• [Wireless(AP Mode) Setting] can be selected here
depending on your model.
Enter the administrator password and
4
press OK.
The default factory-set administrator
password is "999999".
Select [Network Menu], and then press OK.
5
Select [Network], and then press OK.
6
Select [Enable] (or [Yes ]), and then press OK.
9
Select [Automatic Setup (Push Button)], and
10
then press OK.
Press [Yes ].
11
Start WPS-PBC (push button) on the wireless
12
terminal (computer, tablet, smartphone, etc.).
The wireless LAN setup is complete when the
following screen is displayed.
Manual connections
Select [Wireless(AP Mode) Setting], and then
7
press OK.
The following message will be displayed for
about 5 seconds.
Select [Enable], and press OK.
8
Select [Manual Setup], and press OK.
9
Conrm the [SSID] and [Password] that are
10
displayed on the machine.
If the wireless terminal (computer, tablet,
smartphone, etc.) does not support WPS-PBC
(push button), then you can input the machine's
SSID and password into the wireless terminal
(computer, tablet, smartphone, etc.) to connect.
Follow the procedure below to connect.
11
- 13 -
Input the machine's [SSID] and [Password]
that were conrmed in step 10 for the wireless
terminal (computer, tablet, smartphone, etc.).

Glossary
• Glossary
•
• SSID
The ID to identify the connection to a device on a network. Wireless connections are possible by
setting the SSID of the wireless LAN access point for the device to be connected to the machine.
The SSID is also called the network name, ESSID, or ESS-ID.
• Security (encryption method)
This security (encryption method) can be set to prevent illegal access to a network and interception
of transmitted data when using wireless LAN.
The security (encryption method) settings must be the same settings on the machine and on the
wireless LAN access point.
• WPS
This is a wireless LAN setting format standardized by the Wi-Fi Alliance, an industry organization for
wireless LAN.
There are two setup formats, a push button format and a PIN code format.
- Push button format: Wireless LAN can be easily set up by just pressing the WPS button on the
wireless LAN access point.
- PIN code format: Wireless LAN can be easily set up by registering an eight digit number
assigned to the machine.
• Infrastructure mode
This mode communicates via a wireless LAN access point.
• AP mode
This mode allows the machine and the wireless terminal to communicate directly, without using a
wireless LAN access point.
- 14 -

Oki Electric Industry Co., Ltd.
1-7-12 Toranomon, Minato-ku, Tokyo,
105-8460, Japan
www.oki.com/printing/
45553402EE Rev7
 Loading...