


Contents
Table des matières
Printer Overview ........................5
Using the Printer Menu ...............8
Print Media ...............................10
Loading Trays 1 & 2.....................10
Loading the MPT Tray...................12
Loading the HCF Tray...................14
Jams.........................................17
Trays 1-2 ...................................18
Multi-Purpose Tray (MPT) .............20
High Capacity Feeder Tray............22
Additional Jam Locations ..............24
Finisher ....................................34
Troubleshooting .......................37
Replacement Supplies ..............40
Service & Support....................41
Survol de l’imprimante. . . . . . 42
Utilisation du menu
d’impression .......................... 45
Support d’impression ............... 47
Chargement des bacs 1 et 2..........47
Chargement du bac
multifonction.............................49
Chargement de l’alimentateur
haute capacité ..........................52
Bourrages ................................ 55
Bacs 1 et 2 .................................56
Bac multifonction.........................58
Alimentateur haute capacité..........60
Autres emplacements de
bourrages.................................62
L’unité de finition..................... 72
Dépannage............................... 75
Fournitures de remplacement .. 78
Service et support.................... 79
3

Contenido
Sumário
Generalidades de la
Impresora . . . . . . . . . . . . . . 80
Cómo utilizar el menú de la
impresora ...............................83
Medios de impresión.................85
Cómo cargar las Bandejas 1 y 2 ....85
Cómo cargar la Bandeja
Multiuso ...................................87
Bandeja del Alimentador de
Alta Capacidad ..........................90
Atascos.....................................93
Bandejas 1 y 2............................94
Bandeja Multiuso.........................96
Alimentador de Alta Capacidad......98
Otros lugares donde el papel
se atasca................................ 100
Acabador ................................110
Resolución de problemas........113
Suministros ............................116
Servicio y Soporte ..................117
Visão geral da impressora . .118
Utilização dos menus da
impressora ........................... 121
Mídia de impressão ................ 123
Colocação de mídia de impressão
nas bandejas 1 e 2 ..................123
Colocação na bandeja
multifuncional .........................125
Colocação na bandeja do AAC .....128
Atolamentos de papel (mídia de
impressão)........................... 131
Bandejas 1 a 2.......................... 132
Bandeja multifuncional (MF)........ 134
Bandeja do alimentador de
alta capacidade ....................... 136
Outros locais de atolamento........ 138
Alceador................................. 148
Diagnóstico e solução de
problemas ............................ 151
Suprimentos de reposição ...... 154
Assistência técnica e suporte. 155
4

Printer Overview
Front View
1Front Door
2 Paper Trays (1 and 2)
3 Duplex Unit
4 Multi-Purpose Tray (MPT, Tray 5)
5 Standard top bin output tray and transport to
optional finisher
6 Optional High Capacity
Feeder (HCF)
7 Optional tabloid tray or
tandem tray (Trays 3
and 4)
8 Optional finisher
9 Finisher main stacker
(3000 sheets)
10Finisher upper stacker
(500 sheets)
11Exit 2: used in
conjunction with the
optional duplexer and
the optional finisher.
Present only if the
optional duplexer is
installed.
5

Printer Overview
Operator Panel Overview
READY light
Off:
printer is idle
On:
printer is active
Blinking: printer is waiting, processing
ATTENTION light
no error
Off:
On:
there is an error requiring user
intervention
CANCEL Button
Cancel a print job.
ON-LINE Button
Toggles the printer on-line and offline.
MENU Button
Press to enter or exit the menu.
SELECT Button
Press to select the Menu or Submenu
shown on the second line of the
display or choose and save the setting
shown on the second line of the
display.
NEXT/PREVIOUS Buttons
Press to move to the
Previous
Setting within the same level of the
menu structure.
FORWARD/BACK Buttons
Press to move
$
(
the menu shown on the first line of
the display.
(") Menu, Submenu, or
) one level in the menu structure to
Next
Forward
(!) or
(#) or
Back
6

Printer Overview
Basic Operator Panel Functions
Print a Summary of the
Printer’s Settings
Press the
Panel to print a configuration
summary including:
• Status of menu options
• Media selections in trays
• Installed options
Info
button on the Operator
Cancel a Print Job at the
Printer
At the Operator Panel:
1. Press the
2. Press the
Note that pages that are printing at
the moment will finish printing.
Cancel
On-line
button.
button.
Reset Printer to Factory
Defaults
At the Operator Panel:
Menu
1. Press
2. Press
Menu
3. Press
prompted to enter a password.
4. Press
Reset
5. Press
their factory defaults (i.e.,
“execute”).
6. Press
goes back to the Ready to Print
state.
7
.
Next
(!) until
is displayed.
Select
. You may be
Forward
is displayed.
Select
to reset the menus to
Menu
. The printer resets and
Maintenance
(#) until
Menu

Using the Printer Menu
C96_Read
Changing Settings
NETWORK MENU
1. Press
2. Press
Menu
.
Next
(!) and
to scroll through the
Previous
menus
the one you want is displayed.
Select
3. Press
4. Press
to cycle through the
.
Forward
(#) and
submenus
Back
the selected menu until the one
you want is displayed.
Select
Next
.
(!) and
Previous
options
5. Press
6. Press
to scroll through the
the one you want is displayed.
!
$#
"
(")
until
($)
for
(")
until
ToPrint.jpg
7. Press
Select
.
An asterisk appears next to the
setting.
8. To exit Menu mode, press 3 or
press the Menu button.
Note
: If there is a conflict between
settings in the menu, Printing
Preferences, or Embedded Web Server
and printer settings set via your
application, the application settings
supersede any other setting.
8
y

Using the Printer Menu
Entering a Pin Number
How to Enter a Pin Number
at the Operator Panel
!
$#
"
Next
5. Press
Menu
6. Press
document is displayed. Press
Select
7. To print the document: Press
!
) to specify the number of
(
copies. Press
(!) until the
is displayed. Press
Next
(!) until your
.
Select
Print
Select
to print.
.
Next
1. Press
2. Press
3. Use
4. Repeat step 3 until all digits are
Menu
. Press
the
Print Jobs
Select
Press
Forward
prompted to enter a pin number.
Next
(!) and
to specify the first digit in the pin
number, then press
to enter the digit.
entered. Press
Next
(!) until
menu is displayed.
.
(#). You are
Previous
Forward
Select
.
(")
(#)
9

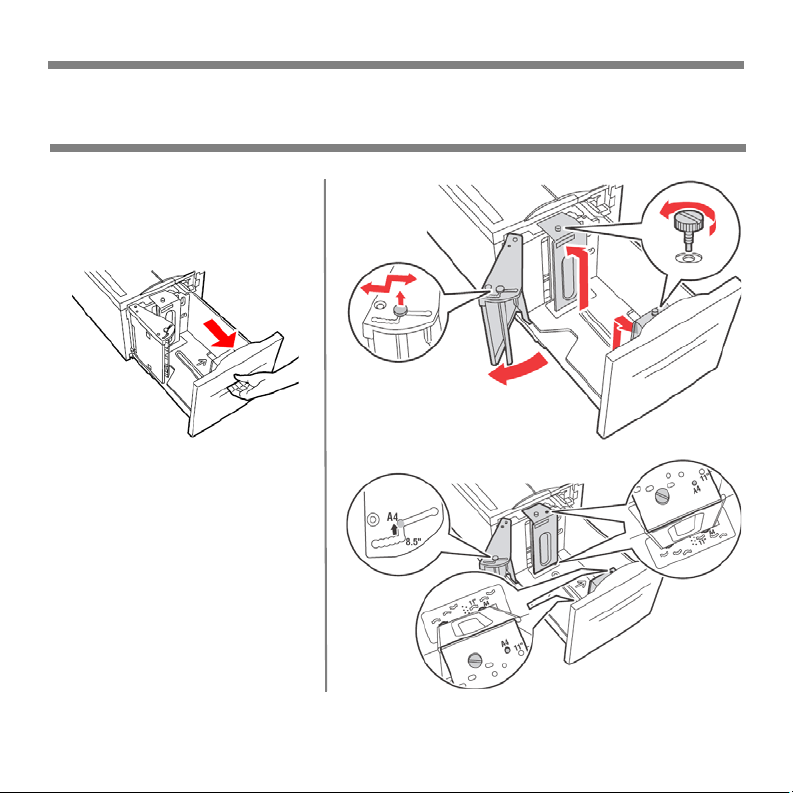
Print Media
Loading Trays 1 & 2
Loading Media in Trays 1-2
1.
2.
Note: Put side to be printed face up.
3.
Slide the paper tray back into the
machine. If custom sizes of paper
are used, make the appropriate
changes in your Printer Properties
and at the Operator Panel as
needed.
For Letterhead stationery:
Long edge feed—face
up, top toward the
front of the printer.
Short edge feed—
face up, top to the
left:
10

Print Media
Loading Trays 1 & 2 (cont.)
For Transparencies:
Long edge feed—face up, top
toward the front of the printer.
For Labels:
Insert the label sheets long-edge
feed and face up. Place the top of
the label page toward the front of
the printer.
11

Print Media
Loading the MPT Tray
Loading the MPT Tray
(Tray 5)
1.
2.
3.
4. Insert paper print side down. If
necessary, adjust the paper guides
to the size of the paper.
For
Letterhead Stationery
(Letter, A4 or B5):
Long edge feed—aim the top
toward the back of the printer:
Short edge feed—aim the top into
the printer:
12

Print Media
Loading the MPT Tray (cont.)
For
Transparencies:
Long-edge feed and print side face
down.
C96_Load
PaperMPT
ray_Labels
_crop.jpg
For Labels:
Insert the label sheets long-edge
feed and face down. Place the top of
the page toward the front of the
printer.
For Envelopes:
Flap side up, aimed into the printer:
1 = Short edge feed
2 = Long edge feed
For Postcards
Place postcards face down.
1 = Large postcards, long edge feed.
2 = Small postcards, short edge feed.
13
Print Media
Loading the HCF Tray
Loading the Optional
High Capacity
Feeder (HCF)
1.
2. If loading paper with a
different width or length,
adjust the paper guides.
14

Print Media
Loading the HCF Tray (cont.)
3.
4.
5.
For Letterhead stationery:
Long edge feed—face
down, top toward the
front of the printer.
Short edge feed—
face down, top to
the left:
15

Print Media
Loading the HCF Tray (cont.)
For Labels:
Insert the label sheets long-edge feed
and face down. Place the top of the
page toward the front of the printer.
16

Jams
In General
If you are experiencing frequent paper
jams, check the following items:
• Is the printer level?
• Is the media you are using within
specification? Media that is too light
or too heavy will often cause jams.
• Are the settings (printer and
driver) appropriate for the media
being used?
• Do not use creased or curled
media.
• Remove the media from the tray.
Fan and align the stack. Replace
the media.
fan_pap
er_F2_1
0.jpg
CAUTION!
To avoid electric shock, never
touch areas labelled “High
Voltage.”
To avoid burns, never touch a
labelled area found on or near
the heat roller.
If a sheet of paper is wrapped
around the heat roller, to avoid
injuries or burns, do not try to
remove it by yourself. Switch
off the machine immediately
and contact your service
provider.
Components inside doors may
be hot.
Note:
For more information, see the
on-line User's Guide on the
Documentation CD.
17

Jams
Trays 1-2
Jam in Trays 1-2
1. Pull out the tray specified on the
Operator Panel.
2. Verify that the length and width
guides are pressed against the
paper
3. Push the tray completely into the
printer. Specify the size of the
paper in the Operator Panel.
18

Jams
Trays 1-2 (cont.)
4. Open Door A.
5. Pull the jammed paper out of the
printer. Press the green handle to
make paper easier to remove. Be
sure that all paper fragments are
removed.
6. Close Door A.
19

Jams
Multi-Purpose Tray (MPT)
Jam in MPT (Tray 5)
1. Verify that the width guides are
pressed against the paper.
2. If the paper size and type shown on
the display match the size and type
of the paper in the tray, press the
ON-LINE button.
If the paper size shown on the
display does not match the size of
the paper in the tray, change the
setting in the printer menu.
3. Open Door A.
20

Jams
Multi-Purpose Tray (cont.)
4. Pull the jammed paper out of the
printer. Press the green handle to
make the paper easier to remove.
Be sure that all paper fragments
are removed.
5. Close Door A.
21

Jams
High Capacity Feeder Tray
Jam in
1. Pull out the HCF tray.
2. Verify that the paper
HCF (
Tray 6)
guides are set correctly.
22

Jams
High Capacity Feeder Tray
3. Push the tray back in.
4. Specify the size of the paper in the
Operator Panel using the Media
Menu.
5. Open Door A.
6. Pull jammed paper out of the
printer. Press the green handle to
make paper easier to remove. Be
sure that all paper fragments are
removed.
7. Close Door A.
This diagram shows the possible jam
locations when used with all the
optional equipment.
23

Jams
Additional Jam Locations
See the following pages for
explanations of how to clear jams at
each of these locations.
24

Jams
Jam at Location “A”
Jam at A
1. Open Door A.
2. Pull the jammed paper out of the
printer. If necessary, press the
green handle to make paper easier
to remove. Be sure that all paper
fragments are removed.
3. Close Door A.
25

Jams
Jam at Location “B”
Jam at B
1. If your printer has the optional HCF
(Tray 6), slide it away from the
printer.
2. Open Door B.
3. Pull the jammed paper out of the
printer. Be sure that all paper
fragments are removed.
4. Close Door B.
5. If your printer has an HCF, slide it
back in until it latches with the
printer.
26

Jams
Jam at Location “C”
Jam at C
1. If your printer has the optional HCF
(Tray 6), slide it away from the
printer.
2. Open Door C.
3. Pull the jammed paper out of the
printer. Be sure that all paper
fragments are removed.
4. Close Door C.
5. If your printer has the optional HCF,
slide it back in the printer until it
latches with the printer.
27

Jams
Jam at Location “D”
Jam at D
1. Open Door D.
2. Pull the jammed paper out of the
printer. Be sure that all paper
fragments are removed.
3. Close Door D.
28

Jams
Jam at Location “E”
Jam at E
1. Open Door A.
2. Open Door E.
3. Pull the jammed paper out of the
printer. Press the green handle to
make paper easier to remove. Be
sure that all paper fragments are
removed.
4. Close Door E.
5. Close Door A.
29

Jams
Jam at Location “F”
Jam at F
1. Open Door F.
2. Pull the jammed paper out of the
printer. Be sure that all paper
fragments are removed.
3. Close Door F.
30
 Loading...