

Page 1

Page 2

Copyright Information ______________________________________
Copyright © 2008 by Oki Data Americas, Inc. All Rights Reserved.
Document Information _____________________________________
B930 User Guide
P/N 59298601, Revision 1.0
January 2008
Disclaimer _______________________________________________
Every effort has been made to ensure that the information in this document is complete,
accurate, and up-to-date. The manufacturer assumes no responsibility for the results of
errors beyond its control. The manufacturer also cannot guarantee that changes in
software and equipment made by other manufacturers and referred to in this guide will
not affect the applicability of the information in it. Mention of software product
manufactured by other companies does not necessarily constitute endorsement by the
manufacturer.
While all reasonable efforts have been made to make this document as accurate and
helpful as possible, we make no warranty of any kind, expressed or implied, as to the
accuracy of completeness of the information contained herein.
The most up-to date driver and manuals are available from the web site:
http:\\okiprintingsolutions.com
Trademark Information _____________________________________
Adobe, the Adobe logo, PostScript, PostScript 3 and the PostScript logo are trademarks
of Adobe Systems Incorporated. Microsoft, Windows, Windows NT, Windows Server are
either registered trademarks or trademarks of Microsoft Corporation in the United
States and/or other countries.
Permission has been obtained from Microsoft Corporation for use of software screen
shots. PCL, HP, HP-GL, HP-GL/2 and HP-UX are registered trademarks of HewlettPackard Corporation. Netware is a registered trademark of Novel, Inc., in the United
States and other countries. Macintosh, MacOS, AppleTalk, EtherTalk and TrueType are
trademarks of Apple Computer, Inc., registered in the U.S. and other countries. Intel
and Pentium are trademarks or registered trademarks of Intel Corporation or its
subsidiaries in the United States and other countries. UNIX is a registered trademark of
the Open Group in the United States and other countries. Solaris, SunOS and NIS
(Network Information Services) are trademarks or registered trademarks of Sun
Microsystems, Inc. in the United States and other countries. All product/brand names
are trademarks or registered trademarks of the respective holders.
B930n User’s Guide> ii
Page 3

Data Loss in Hard Disk/Compact Flash Disk
Saved data may be lost if the hard disk/compact flash in the machine breaks down
due to external shocks or if the power is accidentally cut off in a manner not following
the methods listed in manuals or other documentation. OKI is not responsible for such
data loss and any consequence caused by such data loss.
Damage related to computer virus
OKI is not responsible for any breakdown of machines due to infection of computer
virus.
Important
This manual is copyrighted with all rights reserved. Under the copyright laws, this
manual may not be copied or modified in whole or part, without the written consent
of the publisher.
Parts of this manual are subject to change without prior notice.
We welcome any comments on ambiguities, errors, omissions, or missing pages.
Never attempt any procedure on the machine that is not specifically described in this
manual. Unauthorized operation can cause faults or accidents. OKI is not liable for any
problems resulting from unauthorized operation of the equipment.
B930n User’s Guide> iii
Page 4

P
REFACE
Thank you for choosing this printer. This is a guide on operating this
printer and the important points to note. To understand the features
fully and to use the printer correctly and effectively, please read this
guide before using it.
Keep this guide handy for a quick reference on using the printer.
This guide is written with the assumption that you are familiar with
the basic knowledge and way of operating your computer
environment and the network environment.
In this manual, safety instructions are described with the following
symbol:
Always read and follow these instructions before performing the
required procedure.
This product is a “Class I Laser System” that does not emit
dangerous laser beam. Operate the machine according to the
instructions in the manual. Do not carry out any operation not
mentioned in the manual. Otherwise, it may lead to unforeseen
accident or machine breakdown.
B930n User’s Guide> iv
Page 5

C
ONVENTIONS
1. In this guide, “computer” refers to both the personal
computer and workstation.
2. The following headers are used in this guide:
Important Indicates important information which you
should read.
Note Indicates additional information on operations or
features.
Refer to Indicates reference sources.
3. The following conventions are used in this guide:
Refer to “xxx”The cross-reference is within this guide.
Refer to YYY The cross-reference is not within this guide.
[ ] Indicates items displayed on the computer and
the printer Operator Panel. Also indicates the
title of printed reports/lists from the printer.
< > Indicates items such as hard buttons and
indicators on the keyboard and printer.
B930n User’s Guide> v
Page 6

I
LLEGAL COPIES AND PRINTOUTS
Copying or printing certain documents may be illegal in your
country. Penalties of fines or imprisonment may be imposed on
those found guilty. The following are examples of items that may be
illegal to copy or print in your country.
• Currency
• Banknotes and checks
• Bank and government bonds and securities
• Passports and identification cards
• Copyright material or trademarks without the consent of the
owner
• Postage stamps and other negotiable instruments
This list is not inclusive and no liability is assumed for either its
completeness or accuracy. In case of doubt, contact your legal
counsel.
B930n User’s Guide> vi
Page 7

T
ABLE OF CONTENTS
About This Manual . . . . . . . . . . . . . . . . . . . . . . . . . 5
Conventions. . . . . . . . . . . . . . . . . . . . . . . . . . . . . 6
Safety Notes . . . . . . . . . . . . . . . . . . . . . . . . . . . . 7
Printer Orientation . . . . . . . . . . . . . . . . . . . . . . . . 7
Getting to Know Your Printer . . . . . . . . . . . . . . . . . 8
Front view . . . . . . . . . . . . . . . . . . . . . . . . . . . . . . 8
Rear View . . . . . . . . . . . . . . . . . . . . . . . . . . . . . . 9
Internal Components . . . . . . . . . . . . . . . . . . . . . 10
Turning the Printer On and Off . . . . . . . . . . . . . . . 11
Turning the Printer On . . . . . . . . . . . . . . . . . . 11
Turning the Printer Off . . . . . . . . . . . . . . . . . . 11
Available Printer Drivers . . . . . . . . . . . . . . . . . . . 12
Understanding Printing Options . . . . . . . . . . . . . . 12
Operator Panel Features . . . . . . . . . . . . . . . . . . . 12
LCD Display . . . . . . . . . . . . . . . . . . . . . . . . . . 13
LED Indicators . . . . . . . . . . . . . . . . . . . . . . . . 14
Push buttons . . . . . . . . . . . . . . . . . . . . . . . . . 14
Embedded Web Server . . . . . . . . . . . . . . . . . . . . 15
Driver Printer Properties . . . . . . . . . . . . . . . . . . . 16
Paper Usage. . . . . . . . . . . . . . . . . . . . . . . . . . . . 20
Standard Paper . . . . . . . . . . . . . . . . . . . . . . . . . 21
Special Media Types . . . . . . . . . . . . . . . . . . . . 22
Paper Tray capacity . . . . . . . . . . . . . . . . . . . . 24
Available Paper Sizes . . . . . . . . . . . . . . . . . . . 24
Unusable Paper . . . . . . . . . . . . . . . . . . . . . . . 26
System Settings . . . . . . . . . . . . . . . . . . . . . . . . . 27
Power Saver Modes. . . . . . . . . . . . . . . . . . . . . . . 28
Basic Printing Tasks . . . . . . . . . . . . . . . . . . . . . . . 29
Printing a Configuration Summary . . . . . . . . . . . . 29
Loading Paper . . . . . . . . . . . . . . . . . . . . . . . . . . 29
Loading Trays 1-4 . . . . . . . . . . . . . . . . . . . . . 29
Loading MPF (Tray 5) . . . . . . . . . . . . . . . . . . . 32
Loading Tray 6 HCF . . . . . . . . . . . . . . . . . . . . 33
Printing a Test Page . . . . . . . . . . . . . . . . . . . . . . 35
Basic Printing . . . . . . . . . . . . . . . . . . . . . . . . . . . 36
Selecting Paper Size . . . . . . . . . . . . . . . . . . . . 36
Selecting Number of Copies. . . . . . . . . . . . . . . 36
Collating Copies . . . . . . . . . . . . . . . . . . . . . . . 36
Setting Orientation . . . . . . . . . . . . . . . . . . . . . 37
Skip Blank Pages . . . . . . . . . . . . . . . . . . . . . . 37
Printing in Reverse Order . . . . . . . . . . . . . . . . 38
B930 User’s Guide> 1
Page 8

2-Sided Printing . . . . . . . . . . . . . . . . . . . . . . . . . 38
Binding Preferences . . . . . . . . . . . . . . . . . . . . . . 39
Printing on Special Media. . . . . . . . . . . . . . . . . . . 39
Setting Media Types . . . . . . . . . . . . . . . . . . . . . . 39
Transparencies . . . . . . . . . . . . . . . . . . . . . . . 39
Envelopes . . . . . . . . . . . . . . . . . . . . . . . . . . . 41
Postcards . . . . . . . . . . . . . . . . . . . . . . . . . . . 42
Labels . . . . . . . . . . . . . . . . . . . . . . . . . . . . . . 43
Custom Size Paper . . . . . . . . . . . . . . . . . . . . . . . 45
Tray Settings . . . . . . . . . . . . . . . . . . . . . . . . . . . 46
Source . . . . . . . . . . . . . . . . . . . . . . . . . . . . . 46
Output Destination . . . . . . . . . . . . . . . . . . . . . 46
Input Tray Linking . . . . . . . . . . . . . . . . . . . . . 47
Output Bin linking . . . . . . . . . . . . . . . . . . . . . 47
Manual Feed . . . . . . . . . . . . . . . . . . . . . . . . . 47
Media Check . . . . . . . . . . . . . . . . . . . . . . . . . . . 48
Job Offset . . . . . . . . . . . . . . . . . . . . . . . . . . . . . 48
Driver Settings . . . . . . . . . . . . . . . . . . . . . . . . . . 49
Using the Hole Puncher . . . . . . . . . . . . . . . . . . . . 50
Emptying the Punch Waste Basket . . . . . . . . . . 50
Using the Stapler . . . . . . . . . . . . . . . . . . . . . . . . 51
Cancelling/Checking Printing . . . . . . . . . . . . . . . . 55
Cancelling Printing . . . . . . . . . . . . . . . . . . . . . 55
Advanced Printing Tasks. . . . . . . . . . . . . . . . . . . . 56
Cover Pages. . . . . . . . . . . . . . . . . . . . . . . . . . . . 56
Separator Page . . . . . . . . . . . . . . . . . . . . . . . . . 56
Multiple Pages to Single Sheet (Nup) . . . . . . . . . . 56
Booklets . . . . . . . . . . . . . . . . . . . . . . . . . . . . . . 57
Automatically Resize Paper . . . . . . . . . . . . . . . . . 59
Watermarks . . . . . . . . . . . . . . . . . . . . . . . . . . . . 59
Brightness and Contrast . . . . . . . . . . . . . . . . . . . 60
Quality . . . . . . . . . . . . . . . . . . . . . . . . . . . . . . . 60
E-mail Notifications. . . . . . . . . . . . . . . . . . . . . . . 60
Job Storage and Secure Printing . . . . . . . . . . . . . . 61
Stored Jobs . . . . . . . . . . . . . . . . . . . . . . . . . . 61
Secure Print. . . . . . . . . . . . . . . . . . . . . . . . . . 61
Proof Print . . . . . . . . . . . . . . . . . . . . . . . . . . . . . 62
Time Specified Printing . . . . . . . . . . . . . . . . . . . . 63
Direct PDF Printing . . . . . . . . . . . . . . . . . . . . . . . 65
Overlays . . . . . . . . . . . . . . . . . . . . . . . . . . . . . . 65
Job Accounting . . . . . . . . . . . . . . . . . . . . . . . . . . 66
Sending Files . . . . . . . . . . . . . . . . . . . . . . . . . . . 68
B930 User’s Guide> 2
Page 9

Networking . . . . . . . . . . . . . . . . . . . . . . . . . . . . . . 69
SUPPORTED ENVIRONMENT . . . . . . . . . . . . . . . . . 69
Supported OS and Environment . . . . . . . . . . . 69
CONFIGURATION . . . . . . . . . . . . . . . . . . . . . . . . 70
IP ADDRESS . . . . . . . . . . . . . . . . . . . . . . . . . 70
PRINTER SETUP USING THE EWS . . . . . . . . . . . . . 70
PRINTING FROM A WINDOWS COMPUTER . . . . . . . 71
OVERVIEW . . . . . . . . . . . . . . . . . . . . . . . . . . 71
INSTALLATION OF TCP/IP PROTOCOL . . . . . . . . 72
CONFIGURING AS A NETWORK PRINTER. . . . . . 75
CREATING A SHARED PRINTER . . . . . . . . . . . . 80
OKI LPR . . . . . . . . . . . . . . . . . . . . . . . . . . . . 81
PRINTING FROM UNIX. . . . . . . . . . . . . . . . . . . . . 82
FOR PRINTING FROM UNIX . . . . . . . . . . . . . . . 82
SETTING UP THE WORKSTATION . . . . . . . . . . . 84
Command Format . . . . . . . . . . . . . . . . . . . . . 85
Command Options . . . . . . . . . . . . . . . . . . . . . 85
Command Options . . . . . . . . . . . . . . . . . . . . . 86
JOB NUMBER . . . . . . . . . . . . . . . . . . . . . . . . . 87
INQUIRY (LPSTAT) . . . . . . . . . . . . . . . . . . . . . 88
-C OPTION (LPR COMMAND) . . . . . . . . . . . . . . 89
PRINTING . . . . . . . . . . . . . . . . . . . . . . . . . . . 94
PRINTING FROM A MACINTOSH COMPUTER . . . . . . 94
PRINTING FROM A MACINTOSH COMPUTER. . . . 94
SNMP SUPPORT . . . . . . . . . . . . . . . . . . . . . . . . . 95
PRECAUTIONS AND LIMITATIONS. . . . . . . . . . . . . 95
ON USING TCP/IP. . . . . . . . . . . . . . . . . . . . . . 95
PRINTING FROM WINDOWS. . . . . . . . . . . . . . . 96
PRINTING FROM UNIX . . . . . . . . . . . . . . . . . . 96
Installing Consumables . . . . . . . . . . . . . . . . . . . . 99
Installing the Drum Cartridge. . . . . . . . . . . . . . . . 99
Installing the Toner Cartridge. . . . . . . . . . . . . . . 103
Maintenance . . . . . . . . . . . . . . . . . . . . . . . . . . . . 106
Cleaning the Printer . . . . . . . . . . . . . . . . . . . . . 106
Cleaning the exterior. . . . . . . . . . . . . . . . . . . . . 106
Cleaning the interior . . . . . . . . . . . . . . . . . . . . . 106
When Not in Use for a Long Time . . . . . . . . . . . . 107
Moving the Printer . . . . . . . . . . . . . . . . . . . . . . 107
Fuser Unit . . . . . . . . . . . . . . . . . . . . . . . . . . . . 112
Caution on Handling the Fuser Unit . . . . . . . . 112
Replacing the Fuser Unit . . . . . . . . . . . . . . . . 112
Transfer Roll Cartridge . . . . . . . . . . . . . . . . . . . 114
Caution on Handling the Transfer Roll Cartridge 114
B930 User’s Guide> 3
Page 10

Replacing the Transfer Roll Cartridge . . . . . . . 114
Maintenance Kit . . . . . . . . . . . . . . . . . . . . . . . . 115
Troubleshooting . . . . . . . . . . . . . . . . . . . . . . . . . 116
Poor Print Quality . . . . . . . . . . . . . . . . . . . . . . . 117
No Power. . . . . . . . . . . . . . . . . . . . . . . . . . . . . 122
Cannot Print. . . . . . . . . . . . . . . . . . . . . . . . . . . 122
Printing is Not Clear . . . . . . . . . . . . . . . . . . . . . 123
Paper Incorrectly Fed . . . . . . . . . . . . . . . . . . . . 123
Noise . . . . . . . . . . . . . . . . . . . . . . . . . . . . . . . 124
Network Troubleshooting . . . . . . . . . . . . . . . . . . 124
USING TCP/IP . . . . . . . . . . . . . . . . . . . . . . . 124
USING WINDOWS NT 4.0/2000/XP/VISTA/
SERVER 2003. . . . . . . . . . . . . . . . . . . . . . . 126
When Using Unix . . . . . . . . . . . . . . . . . . . . . 127
USING ETHERTALK . . . . . . . . . . . . . . . . . . . . 129
Error and Warning Messages . . . . . . . . . . . . . . . 132
Clearing Paper Jams . . . . . . . . . . . . . . . . . . . . . . 140
Jam Area Locations . . . . . . . . . . . . . . . . . . . . . . 140
Jam at A . . . . . . . . . . . . . . . . . . . . . . . . . . . . . 140
Jam at B . . . . . . . . . . . . . . . . . . . . . . . . . . . . . 142
Jam at C . . . . . . . . . . . . . . . . . . . . . . . . . . . . . 144
Jam at D . . . . . . . . . . . . . . . . . . . . . . . . . . . . . 147
Jam at E . . . . . . . . . . . . . . . . . . . . . . . . . . . . . 148
Jam at F . . . . . . . . . . . . . . . . . . . . . . . . . . . . . 151
Jam at G . . . . . . . . . . . . . . . . . . . . . . . . . . . . . 152
Jam at H . . . . . . . . . . . . . . . . . . . . . . . . . . . . . 154
Jam at the Stacker Upper Tray . . . . . . . . . . . . . . 155
Paper Jam in Tray 5 (MPF). . . . . . . . . . . . . . . . . 157
Paper Jams in Trays 1-4 . . . . . . . . . . . . . . . . . . 158
Paper Jam in Tray 6 . . . . . . . . . . . . . . . . . . . . . 161
Installing Accessories . . . . . . . . . . . . . . . . . . . . . 164
Duplex Module . . . . . . . . . . . . . . . . . . . . . . . . . 164
Check the contents of the Duplex option . . . . . 164
Installing the Duplex Module . . . . . . . . . . . . . 164
1000 Sheet Feeder or Tandem Tray Module . . . . . 170
2000 Sheet High Capacity Feeder . . . . . . . . . . . . 175
3500 Sheet Finisher . . . . . . . . . . . . . . . . . . . . . 180
Hard Disk Option . . . . . . . . . . . . . . . . . . . . . . . 190
Installing the Memory Option and Compact Flash . 192
Operator Panel . . . . . . . . . . . . . . . . . . . . . . . . . . 194
B930 User’s Guide> 4
Page 11

A
BOUT THIS
Thank you for selecting the B930n 50 ppm Laser printer. This
manual contains all of the information necessary to operate and care
for your printer and accessories. It is intended to be used with the
pictorial unpacking instructions and the Quick Setup Guide, both
included in the printer packaging. If you have not already unpacked
and installed the printer, please refer to these documents. This
manual does not contain instructions for unpacking and installing
the printer.
This printer has the following special features:
• Quality printing at a high speed
Print speed is up to 50 pages per minute at either 600x600 or
True 1200 x 1200 dpi in 1-sided or 2-sided modes.
• Flexible use of paper sources and delivery methods
The B930n printer provides a 100-sheet Tray 5/Multi-Purpose
Feeder (MPF) from which specialty media, card stock, custom
size large, transparencies, and envelopes are fed. Tray 5 also
supports manual feeding.
Two additional trays, Tray 1 and 2, each provide 500 sheets
of capacity for paper sizes up to A3 or 11 X 17 inches.
The Standard Top Bin Output Tray holds 500 sheets face
down.
• Network-readiness
The standard printer includes a 10/100BaseT Ethernet
Network Interface for use with TCP/IP, Apple Ethertalk, and
Novell communications.
• Easy operation
M
ANUAL
Consisting of two LEDs, a display, and nine function buttons,
the easy-to-read Operator Panel display shows the status of
printer operation.
Operator Panel push buttons allow you to access and view
printer menus and status messages.
B930n User’s Guide> 5
Page 12
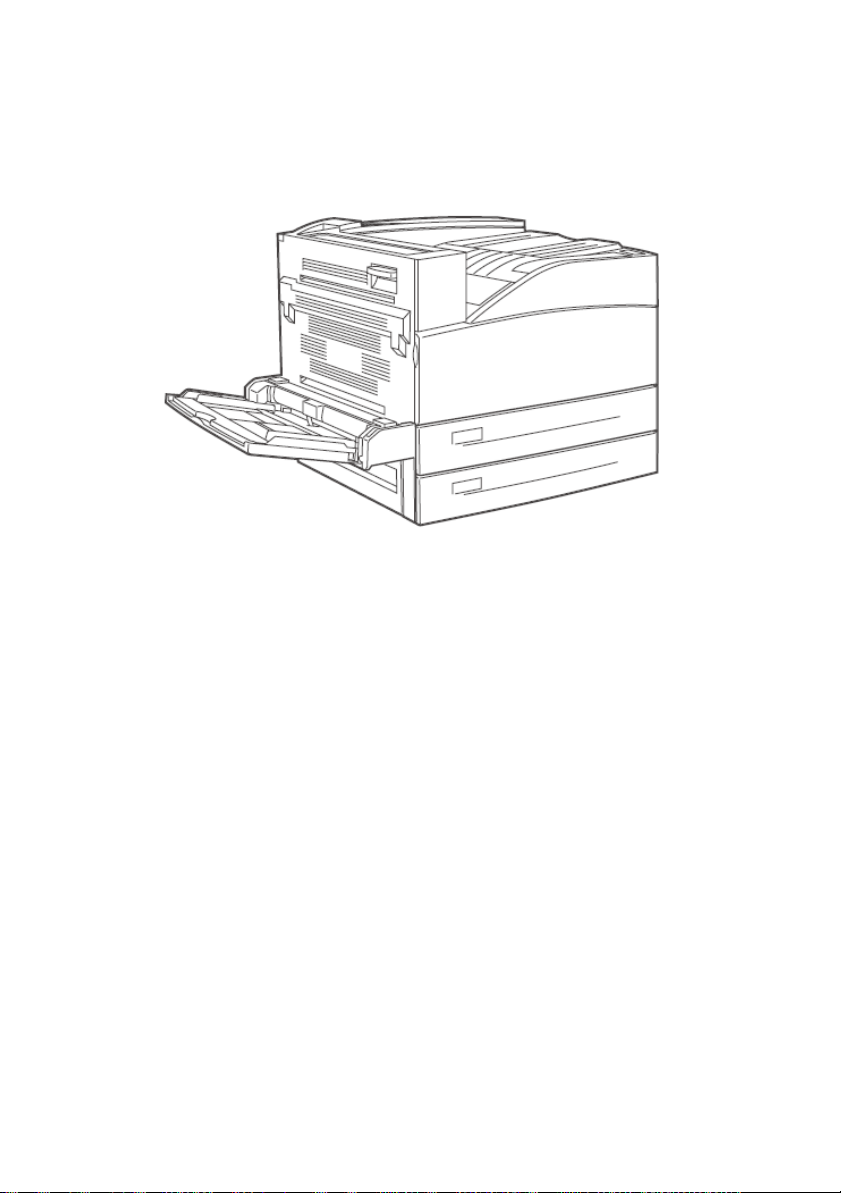
The basic printer consists of the print engine main unit,
consumables, 100 Sheet Multi Purpose Feeder (MPF) as well as Trays
1 and 2 (500 sheet capacity each).
C
ONVENTIONS
This following conventions are used throughout this manual to
emphasize certain procedures or information:
NOTE
> A note is a tip or extra information that may be helpful in
installing or using the printer.
CAUTION
> A caution message provides information that may help
you avoid equipment damage, process failure, or
inconvenience. Read all caution messages carefully.
WARNING!
> WARNING! A warning message indicates the possibility
of personal injury if a specific procedure is not
performed exactly as described in the guide. Pay close
attention to these sections and read them fully to
prevent possible injury.
B930n User’s Guide> 6
Page 13

S
AFETY NOTES
For your own safety, please read this page carefully before using the
machine.
• Do not place the machine in a hot, humid, dusty, or poorly
ventilated environment. Prolonged exposure to these adverse
conditions can cause fire or electric shock.
• Do not place the machine near heaters or volatile,
flammable, or combustible materials such as curtains that
may catch fire.
P
RINTER ORIENTATION
Throughout this guide, the four sides of the printer are referred to
as front, rear, right, and left. The front of the printer is the side near
the Operator Panel, and the rear of the printer is opposite the front.
The left and right sides of the printer are defined as the sides to the
left and right, respectively, of a person who is facing the front of the
printer.
B930n User’s Guide> 7
Page 14
G
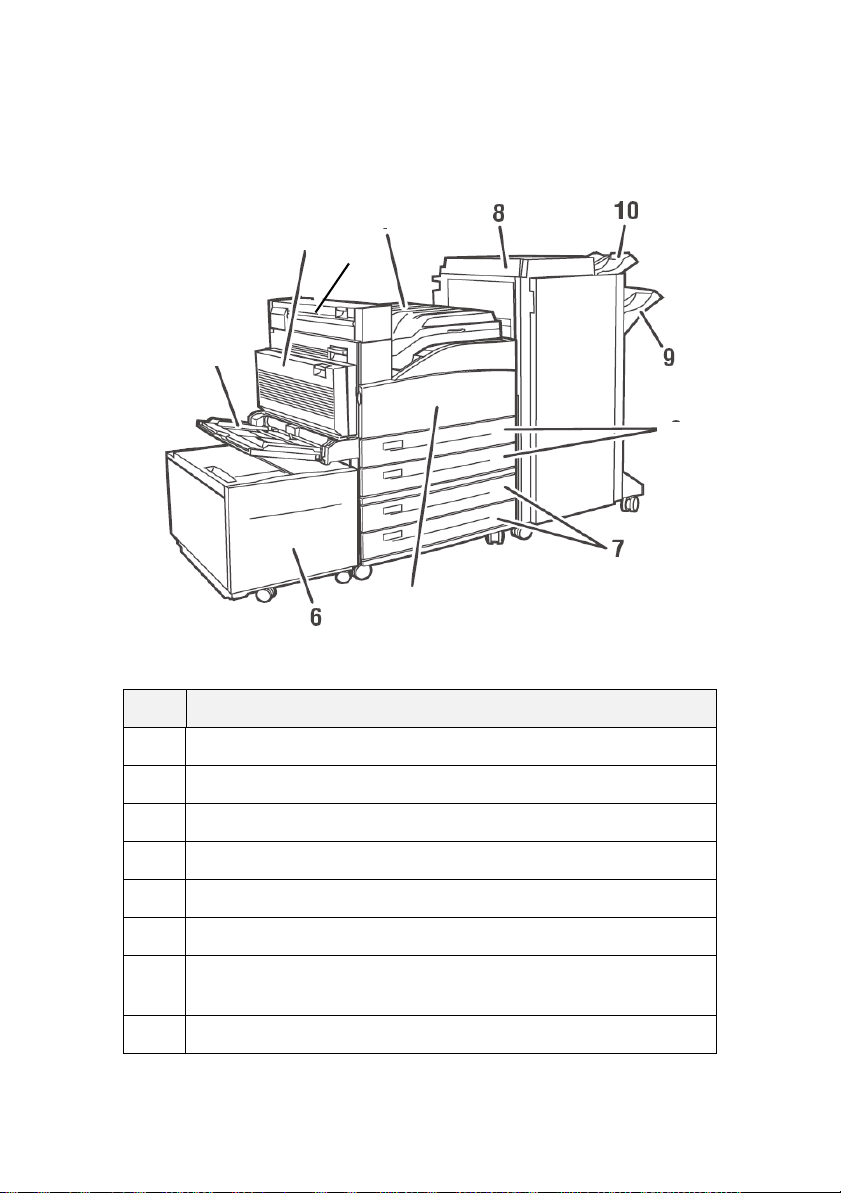
ETTING TO KNOW YOUR PRINTER
F
RONT VIEW
3
11
4
1
No. Name
1 Front Door
2 Two 500-sheet feeders (Trays 1 and 2)
5
2
3 Optional Duplex Unit
4 Multi Purpose Feeder Tray 5
5 Standard top bin output tray and transport to finisher
6 Optional 2000-Sheet Feeder (Tray 6)
7 Optional 2x 500-sheet A3 trays (2TM) or 2000-sheet A4/Letter dual
input trays (TTM)
8 Optional 3500-Sheet Finisher (3 possible configurations)
B930n User’s Guide> 8
Page 15
No. Name
9 Stacker Main Bin (3000 Sheets)
10 Stacker Upper Bin (500 Sheets)
11 Exit 2 is used in conjunction with duplex unit and finisher, comes with
the Duplex unit.
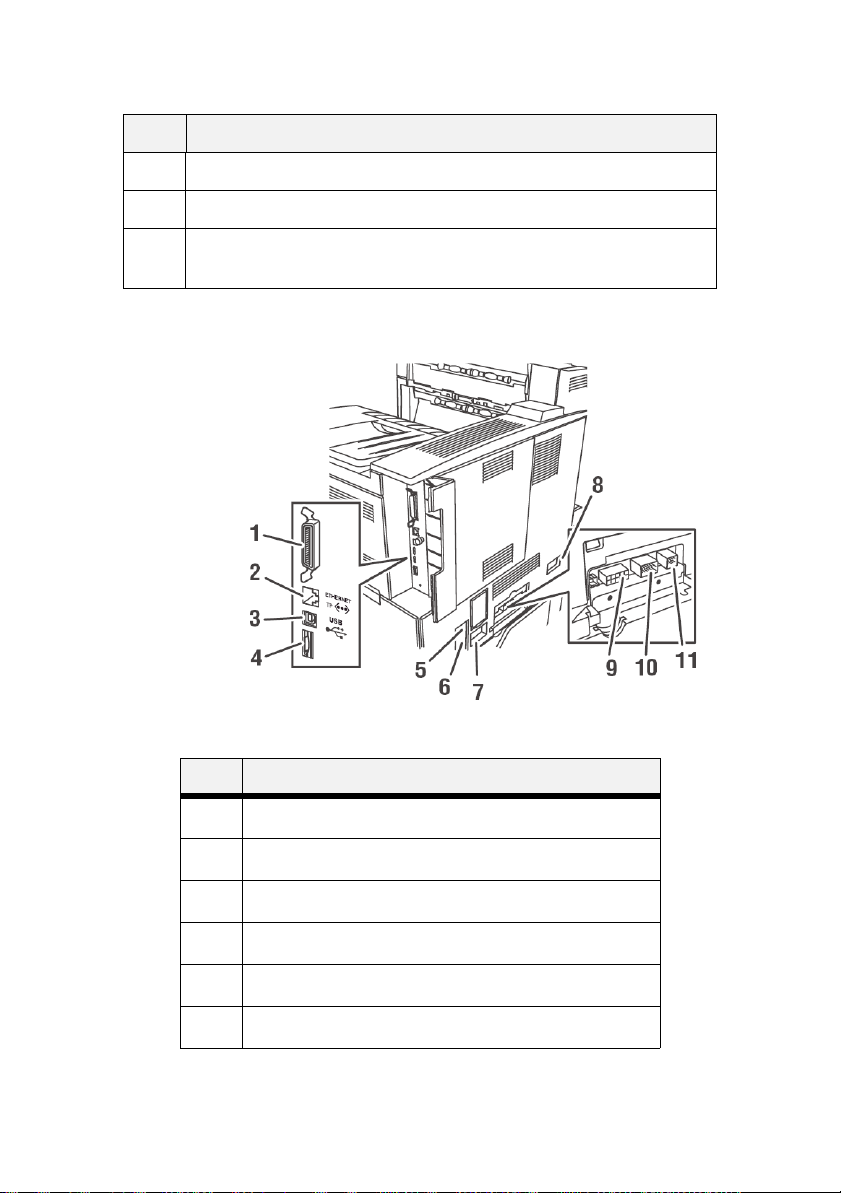
R
EAR VIEW
No. Name
1
2
3
4
5
6
Parallel Port, IEEE 1284
Ethernet 10/100 BaseT connection
USB 2.0 connection
Serial RS232 port
Ground Fault Interrupt (GFI) reset
Power cord connection
B930n User’s Guide> 9
Page 16
No. Name
7
8
9
10
11
Finisher power cord connection
2000-Sheet Feeder (Tray 6) connection
Finisher connection
1000-Sheet Feeder (Trays 3 and 4) connection
Duplex Unit connection
Data I/O connector settings can be configured via the Operator
Panel’s Interface Menu. There are settings for Ports, Parallel Setup,
USB Setup, and Serial Setup See “Operator Panel” on page 194 for
a detailed description of each setting.
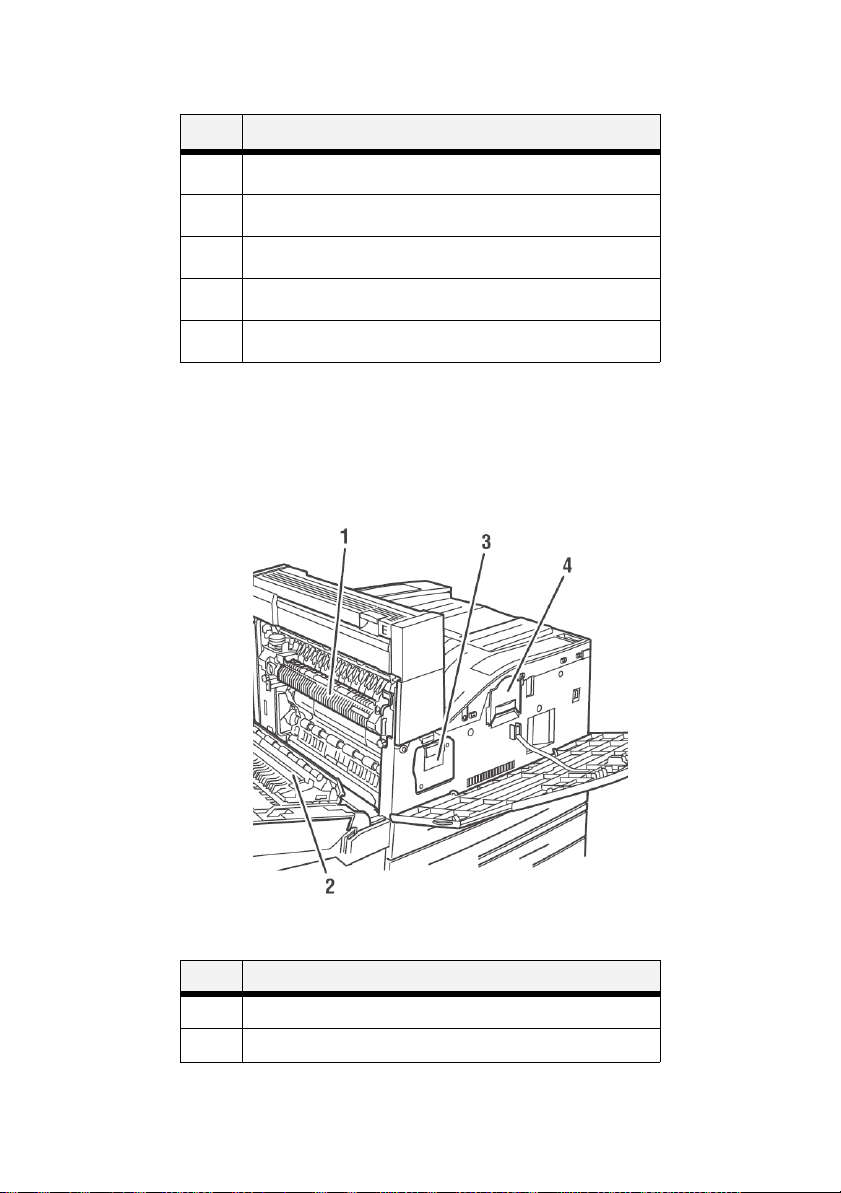
I
NTERNAL COMPONENTS
No. Name
1Fuser
2Transfer Roll
B930n User’s Guide> 10
Page 17
No. Name
3Drum Unit
4Toner Cartridge
T
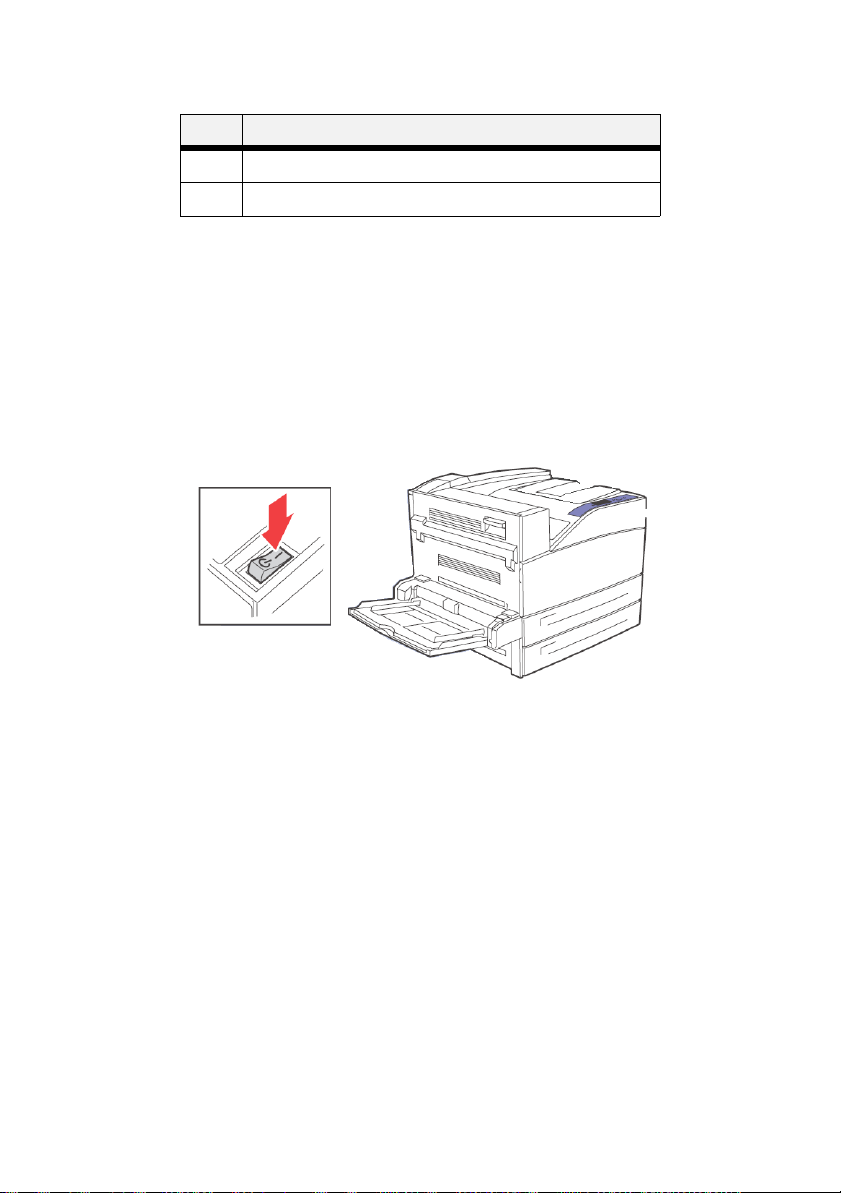
URNING THE PRINTER ON AND OFF
Switch on the power before operating the printer. When you have
finished using the printer for the day or you do not intend to use it
for a long period of time, switch off the power.
T
URNING THE PRINTER ON
1. Press the power switch to the <I> position to turn the power
on.
T
URNING THE PRINTER OFF
1. Make sure that the printer is not processing a print job.
2. Press the power switch to the <{> position to turn the power
off.
Remember to turn off the printer at the end of day or when the
printer will not be used for an extended period of time.
NOTE
> When the printer is turned off, all print data still in
memory will be erased
B930n User’s Guide> 11
Page 18

A
VAILABLE PRINTER DRIVERS
Drivers are available for the following Microsoft operating systems:
Vista 32/64, XP 32/64, Server 2003 32/64, Windows 2000, NT 4,
Windows 98, Windows Me, and Windows 95. Drivers for the following
PDLs are available for each of the above operating systems:
• PostScript 3 Driver
• PCL5e
• PCL6
The printer emulates PCL5c, PCL6, and has a native Adobe processor
for PostScript 3. Configuration options for these emulations are
available via the Operator Panel PS and PCL Menus.
PPDs are provided for Mac OSX (10.2 and later). The installation CD
contains PPDs for use with standard internal Mac drivers.
The installation CD contains PPDs for use with most current Unix
CUPS drivers.
U
NDERSTANDING PRINTING OPTIONS
The printer offers many ways to modify printing options. The
Operator Panel provides an interface at the printer. The Embedded
Web Server (EWS) provides remote access via HTML. You can access
features of the printer driver through your application or through
your Printers and Faxes menu (on Windows). When accessing the
driver through your Printers and Faxes Menu, you reach the Printing
Properties window and are setting global options. When accessing
the driver through an application, the Printing Properties entered
apply only to documents printed through the application. Printing
Properties set through an application supersede settings entered in
any other way.
Certain printer settings, such as number of copies, duplexing, and
collating may be set from the Print window provided by your
application. These settings may be used instead of similar settings
accessed via the driver. The settings from your application’s Print
window are reflected in the Printing Properties accessed from the
driver.
O
PERATOR PANEL FEATURES
The Operator Panel is located on the front of the printer. It contains
the display, indicators, and push buttons that allow you to view and
B930n User’s Guide> 12
Page 19
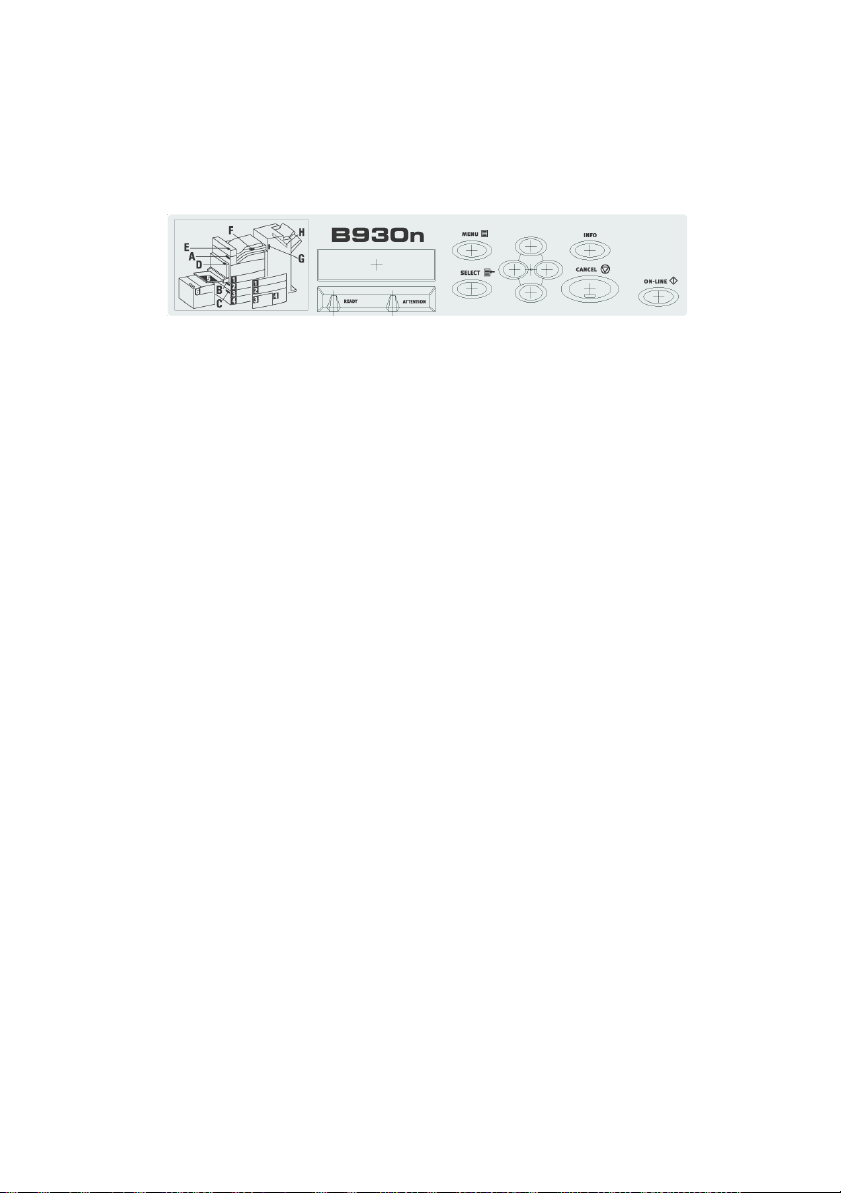
change global printer settings. All features of the printer are
accessible through the Operator Panel. These changes affect all
documents printed unless instructions are provided through your
applications printer settings.
NOTE
> If there is a conflict between settings in the Operator
Panel, Printing Preferences, or Embedded Web Server and
printer settings set via your application, the application
settings supersede any other setting.
LCD D
ISPLAY
The LCD display shows status and error messages that inform you
of the current status of the printer, and also displays menus,
submenus, and printer settings when you are in the menu system.
The display contains two lines of text, each with a maximum of
sixteen characters.
B930n User’s Guide> 13
Page 20
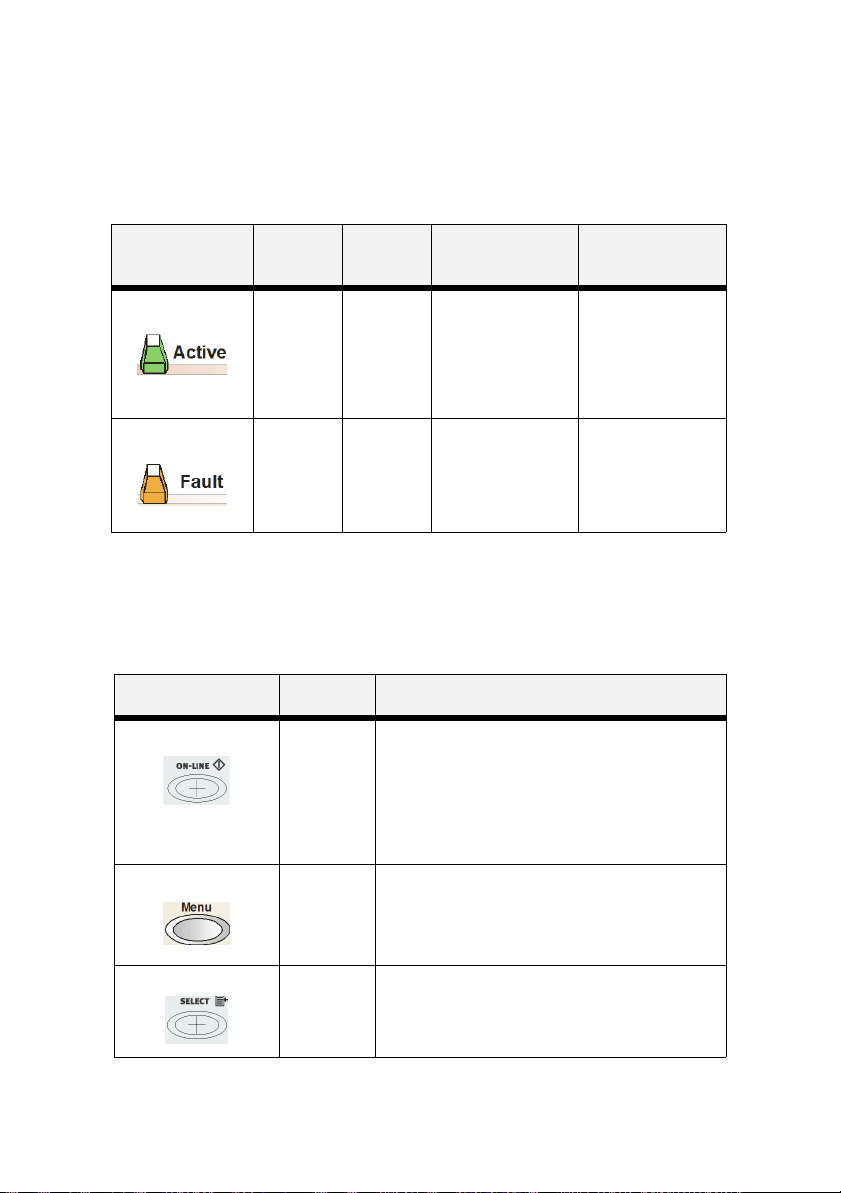
LED I
NDICATORS
The LED indicators also indicate printer status. The three indicators
can each be on, off, or blinking, indicating different phases of printer
operation. The table below explains two of the LED indicators.
LED COLOR WHEN
OFF
P
USH BUTTONS
Green Printer is
Red Printer is
IDLE
not in
error
mode
WHEN ON WHEN
BLINKING
Printer is ACTIVE
(processing a job)
There is an error
that requires user
intervention, such
as a paper jam, a
service call
required, etc.
Printer is WAITING
(a partial job has
been printed, and
the printer is
waiting for
additional job
data)
N/A
The Operator Panel push buttons allow you to access and navigate
menus, and also assist you in recovering from printer errors. The
table below explains the functions of the eight push buttons.
BUTTON NAME FUNCTION
On-Line Press to enter the off-line status. When in the
Menu Enter the menu system.
off-line status, the machine cannot receive data
or process printing. Press again to exit the offline status and enter on-line status (where the
machine can receive data. The LED on the
button is solid green when ready to print. It
flashes green when the printer is in power save
mode
Select Select the menu or submenu that is shown on
the second line of the display or to choose and
save the setting shown on the second line of
the display.
B930n User’s Guide> 14
Page 21
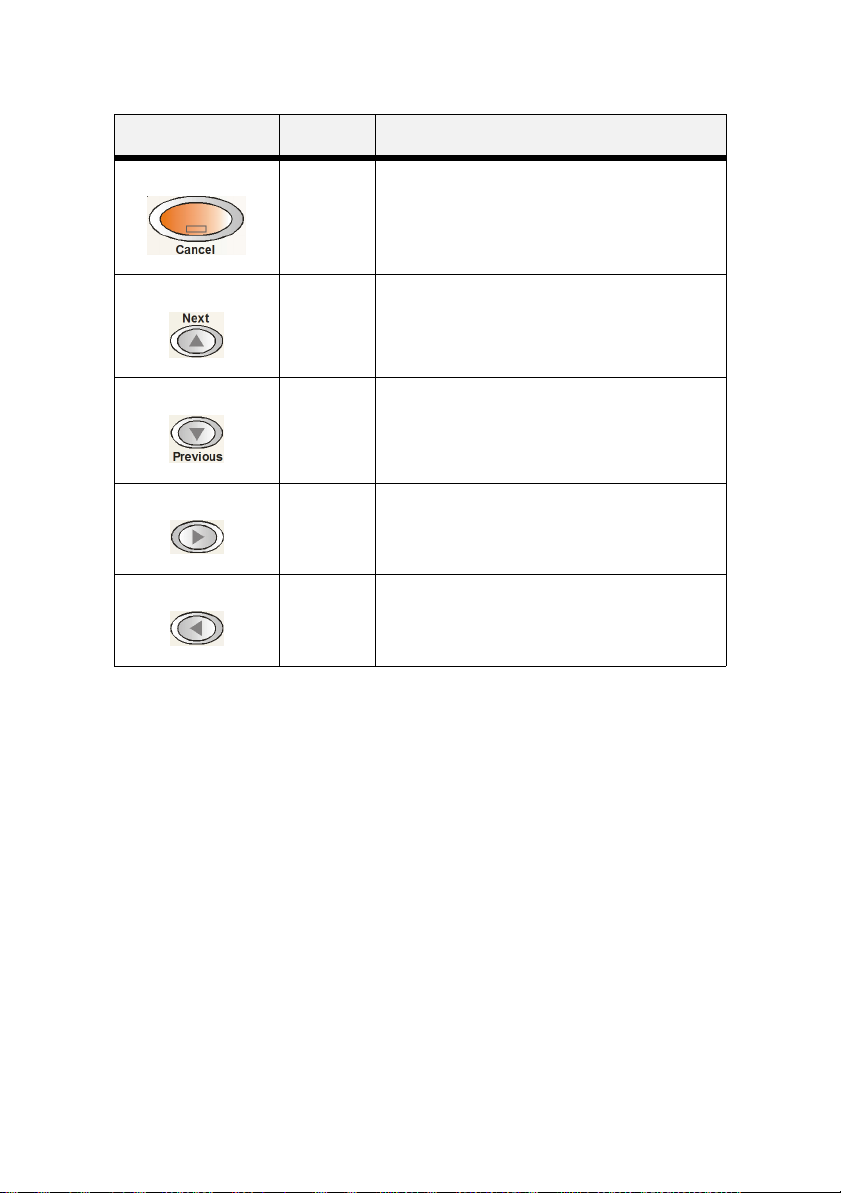
BUTTON NAME FUNCTION
Cancel Cancel a print job.
Next Move to the next menu, submenu, or setting
Previous Return to the previous menu, submenu, or
Forward Move forward one level in the menu structure
Back Move back one level in the menu structure to
within the same level of the menu structure.
option within the same level of the menu
structure.
to the menu shown on the first line of the
display.
the menu shown on the first line of the display.
To navigate the menus, use a combination of the Menu, Select, Next
and Previous buttons to scroll your way through the Menu Map
structure.
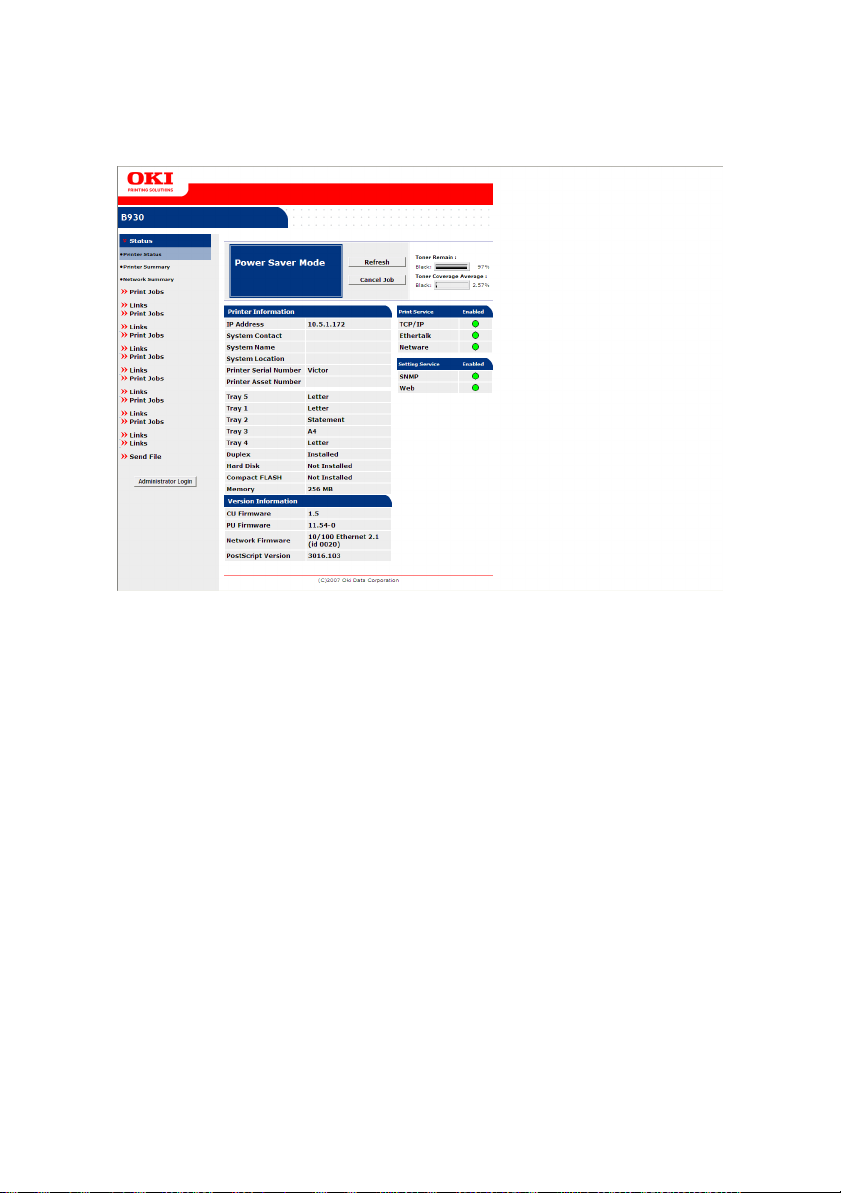
E
MBEDDED WEB SERVER
This printer comes with an embedded web server (EWS). The EWS
resides on the hardware and no installation is required. The EWS can
be used from any remote station via HTTP access. The EWS contains
access to all printer features and presents them as HTML web pages.
The changes made via the EWS change the printer settings in the
same manner as the Operator Panel. To change settings for specific
documents, you should use your Printer Properties options within
the driver.
To access the embedded web server you must be on an IP-based
network and have access to a web browser.
B930n User’s Guide> 15
Page 22
In your web browser, type the IP address assigned to the printer.
For example http://192.0.0.1
NOTE
> If there is a conflict between settings in the Operator
Panel, Printing Preferences, or Embedded Web Server and
printer settings set via your application, the application
settings supersede any other setting.
The EWS interface consists of a left-navigation area and a display
area. Use the left-navigation area to locate the desired items and
make any configuration changes in the display area. The items
available vary depending on your user login permissions. The default
administrator login is “root” and the password is the last four digits
of the printer’s MAC address. Be sure to change this password after
the first administrative login.
NOTE
> The username and password are case sensitive.
D
RIVER PRINTER PROPERTIES
The driver allows you to set Printer Properties when you send a print
job to the printer. These changes apply to the document or program
in which you are currently working. To make changes that apply to
B930n User’s Guide> 16
Page 23

all jobs access Printing properties via your Printers and Faxes Menu.
To make changes that apply to documents printed from a specific
application, access Printer Properties from the application. Using
your Printer Properties is a convenient way to make the most
common printer configuration changes such as number of copies to
print, paper orientation, and 2-sided printing.
NOTE
> If there is a conflict between settings in the Operator
Panel, Printing Preferences, or Embedded Web Server and
printer settings set via your application, the application
settings supersede any other setting.
To access Printer Properties from an application:
1. Select the Print option from your program.
2. Select the desired B930 printer.
3. Click Printer’s Properties button.
B930n User’s Guide> 17
Page 24
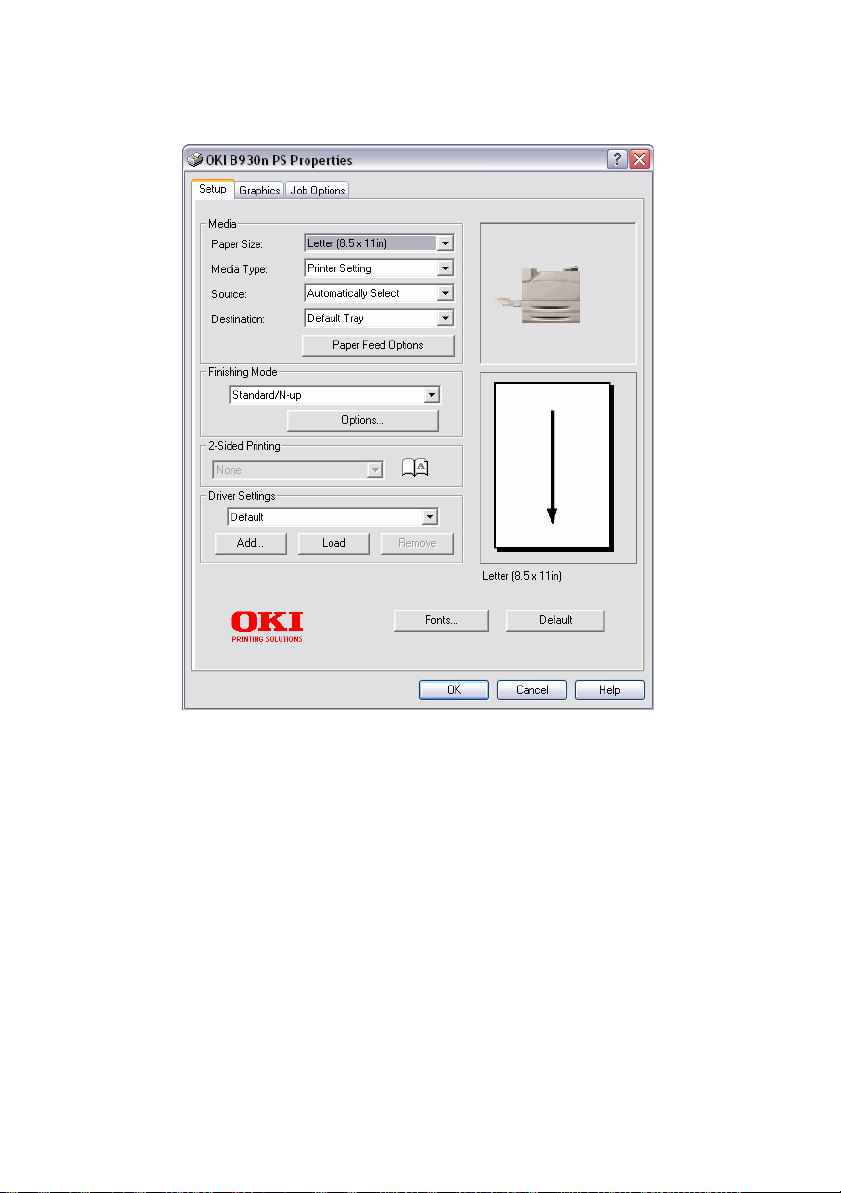
The Printer Properties window appears.
To access Printer Properties from Printers and Faxes (Windows):
1. Select the Printers and Faxes from your Start menu.
2. Right-click the desired B930 printer and select Properties.
B930n User’s Guide> 18
Page 25
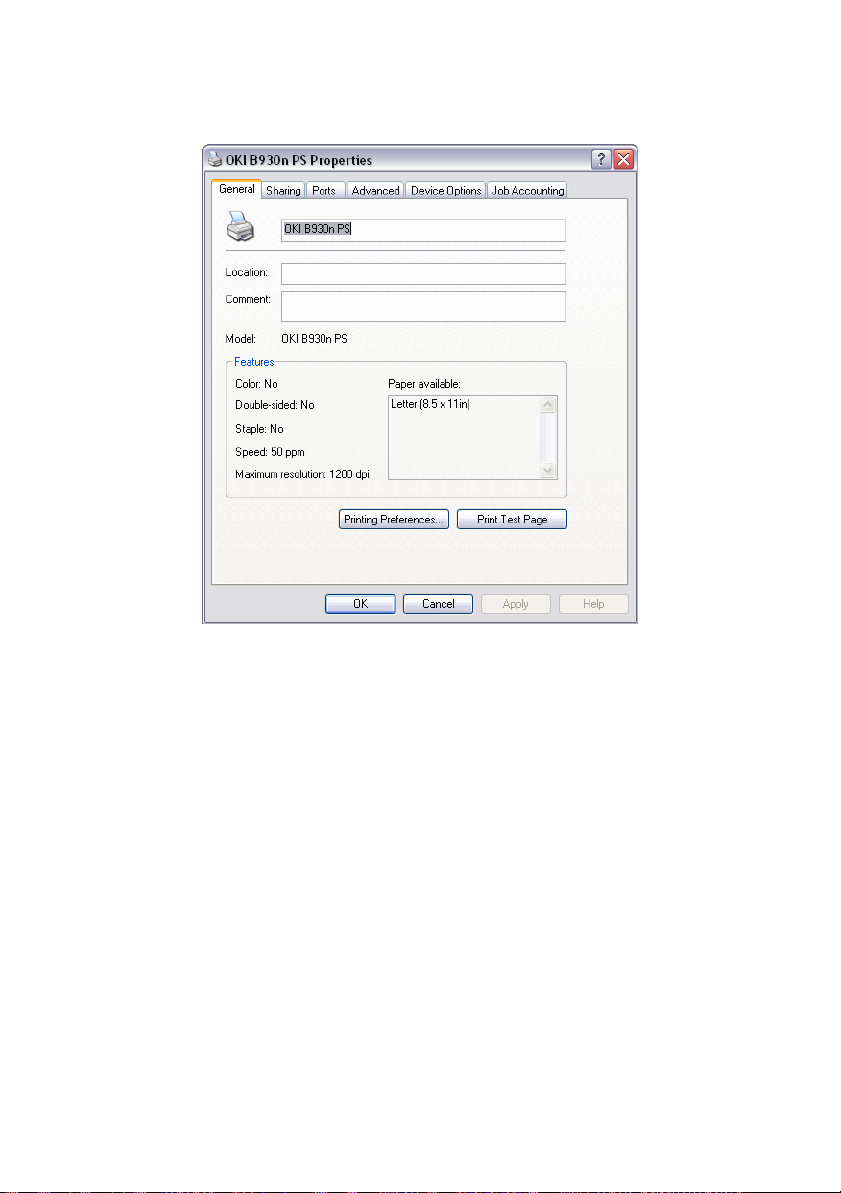
The Printer’s configuration window appears.
3. On the General Tab, click Printing Preferences
B930n User’s Guide> 19
Page 26
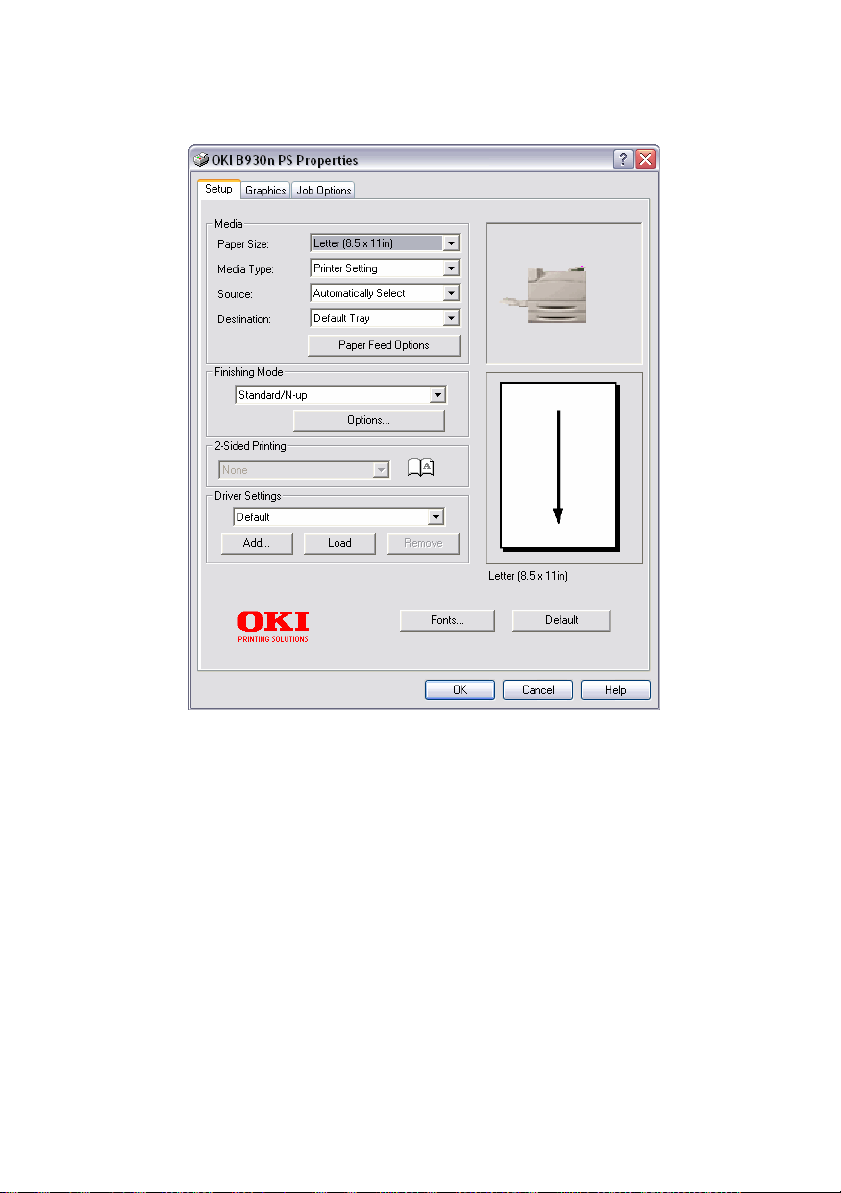
The Printer Properties window appears.
P
APER USAGE
This printer can print on paper that is commonly sold. Select paper
suitable for use by referring to the table below. However, we
recommend the use of the standard paper for clearer printing.
NOTE
> GSM indicates the weight of a 1 m2 sheet of paper
CAUTION
> Using paper that is not suitable for this printer might
lead to paper jams or poor print quality. To make full
use of the printer features, we suggest using only
paper that is recommended here.
B930n User’s Guide> 20
Page 27

S
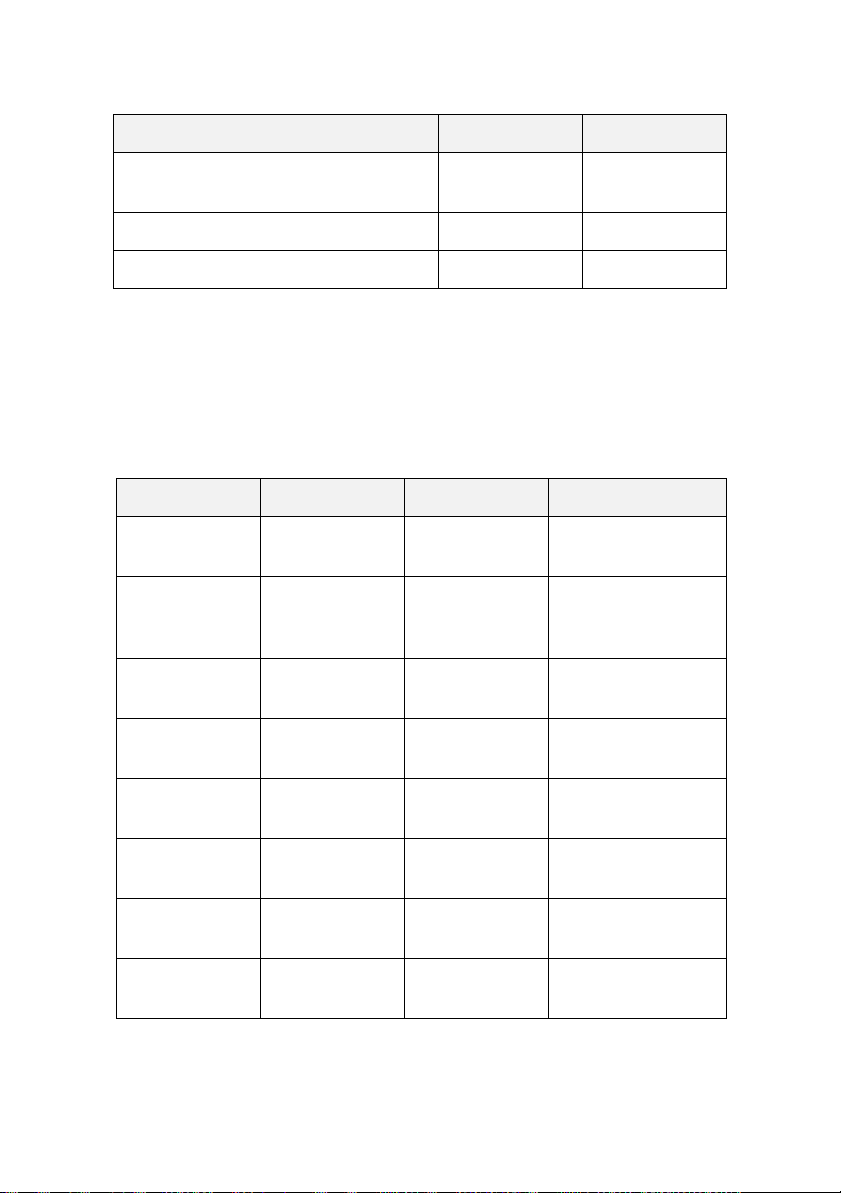
TANDARD PAPER
The standard paper that can be used for this printer is as follows.
Manufacturer Paper size Wei ght
Xerox Business Multipurpose 4200 Letter 20 Lb/75 GSM.
Xerox Business Multipurpose 4200 Legal 20 Lb.
Xerox Business Multipurpose 4200 Tabloid 20 Lb./75 GSM
Hammermill Tidal MP Letter 20 Lb.
Hammermill Tidal MP Legal 20 Lb.
Hammermill Tidal MP Ledger 20 Lb.
Willamette Willcopy, 84 brightness Letter 20 Lb.
Boise Cascade X-9000 Letter 20 Lb.
Georgia-Pacific Microprint Laser Letter 24 Lb.
Xerox 4024 Tabloid 20LB/75G
Xerox 4024 Legal 20 LB/75G
Xerox Business Multipurpose 4200 3
hole
Xerox Business Multipurpose 4200 Statement 20 Lb.
Georgia-Pacific Microprint Laser 1000 (Cut)
Xerox Premier A4 80 GSM
Berga Focus, 265.101 A4 80 GSM
Xerox Business (Saillat) A3 80 GSM
Xerox A5 80GSM Premier A5 80 GSM
Xerox Recycled (Steinbeins) A4 80 GSM
Stra Enso Multicopy A4 100 GSM
B930n User’s Guide> 21
Letter 20 Lb.
Executive 24 Lb.
Page 28
Manufacturer Paper size Wei ght
Arjo Wiggins Conqueror High Speed
Laser Laid
Xerox Business 4-Hole A4 80 GSM
Xerox 4-hole punched Nymolla A4 80 GSM
S
PECIAL MEDIA TYPES
The printer can also print on the following media types. These types
of media are called special media. The printer can also print on
A4 90 GSM
special media types such as transparencies, envelopes, labels, and
postcards. These types of media are called special media
Media Type Size Weight Manufacturer
Envelope COM-10 24 Lb. Columbian No. 10
Envelope Monarch 24 Lb. Strathmore Writing
Transparency Letter Paper Backed
Transparency Letter Xerox Removable
.
(COM 10) Envelope
Bright White Move
Monarch Envelope
Transparency
Stripe Transparency
Specialty Letter Xerox Carbonless
Paper 2-Part
Specialty Legal Xerox Carbonless
Paper 2-Part
Specialty Letter Xerox Carbonless
Paper 3-Part
Specialty Legal Xerox Carbonless
Paper 3-Part
B930n User’s Guide> 22
Page 29

Media Type Size Weight Manufacturer
Heavy media Letter 32 Lb. / 120
GSM
Xerox Digital Color
Xpressions+
Heavy media Letter 32 LB/120G Hammermill Laser
Print
Heavy media Letter 90 Lb. / 163
Xerox 90 lb. - index
GSM
Heavy media Letter 110 Lb. /
Xerox 110 lb. index
179GSM
Heavy media Letter 215 GSM Wausau Bright Cover
White
Label Letter Xerox High-speed
labels 1-up
Label Letter Xerox High-speed
labels 33-up
Envelope DL 80 GSM Riverseries DL
Severn Gummed
Envelope
Envelope C5 80 GSM Riverseries C5
Congo Gummed
Envelope
Transparency A4 3M Type L Desktop
Laser Transparencies
Transparency A4 Xerox Type B
Universal White
Stripe
Heavy media A4 160 GSM Premier 160 GSM
Heavy media A4 200 GSM Premier 200 GSM
Heavy media A3 160 GSM Premier A3 Paper
B930n User’s Guide> 23
Page 30
Media Type Size Weight Manufacturer
Heavy media A4 120GSM Xerox Colotech+ (IP
& Neusideler)
Label A4 Xerox Copier/Laser
24-Up Paper Label
P
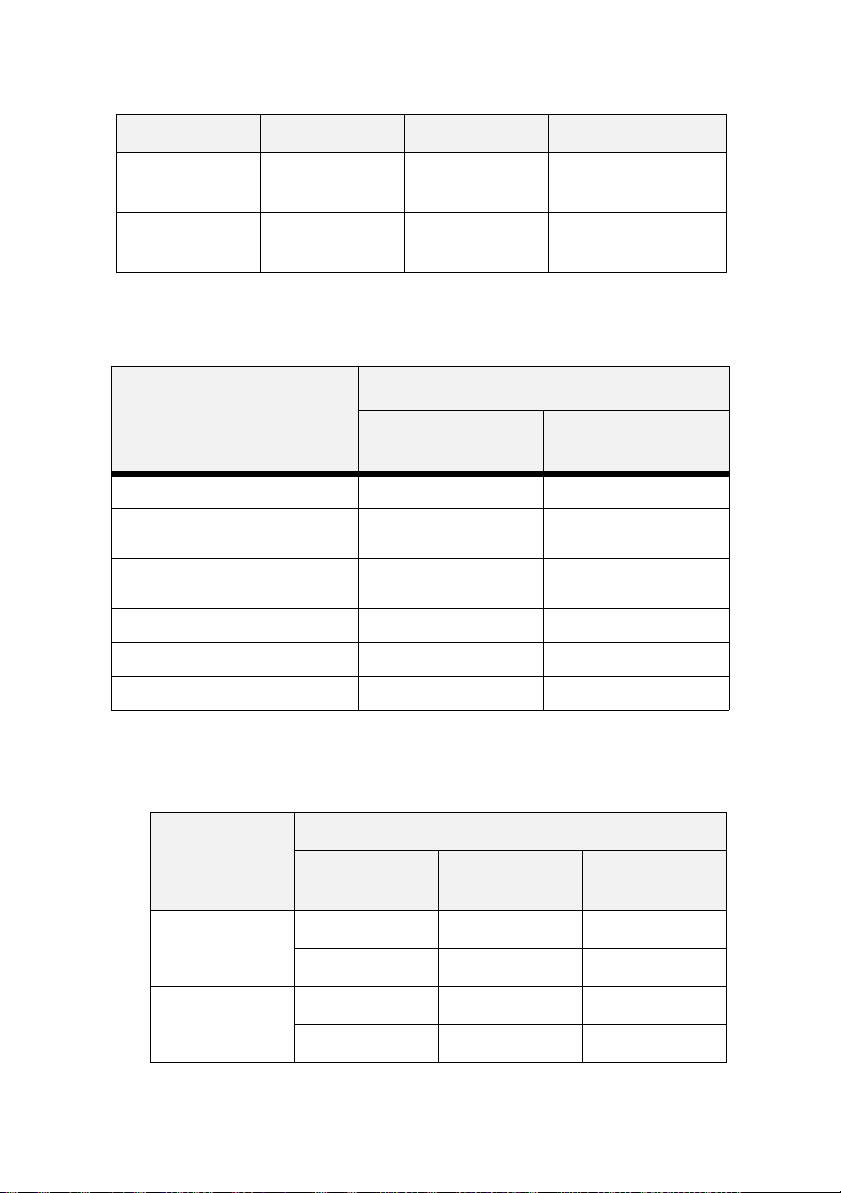
APER TRAY CAPACITY
Paper that can be loaded in the paper trays is as follows:
PAPER TYPE MAXIMUM CAPACITY
MPF (A4/100
SHEETS)
Standard paper 100 sheets 500 sheets
Other paper Up to a height of 17.5 mmUp to a height of 59.4
Envelopes Columbian Com10 15
Labels 100 sheets 350 sheets
Transparencies 100 sheets 100 sheets
Card stock 120 sheets 400 sheets
A
VAILABLE PAPER SIZES
sheets
TRAYS 1-4 (A4/
500 SHEETS)
mm
80 sheets or MAX 49.4
mm
All trays but MPF have paper size sensors to detect sizes.
Paper Size Paper Tray
Trays 1-4 Tray 6 and
MPF
TTM
A4
(210x297 mm)
Letter
OOO
OOO
OOO
(8.5”× 11”)
OOO
B930n User’s Guide> 24
Page 31

Paper Size Paper Tray
B5
(182x257mm)
B4
(257x364)
Legal 13
(8.5”×13”)
Legal 14
(8.5”×14”)
A3
(297x420mm)
Tabloid
(11” ×17”)
B5
(257x182mm)
or
Executive
(7.2" X 10.5")
Trays 1-4 Tray 6 and
MPF
TTM
O-O
O-O
O-O
O-O
O-O
O-O
O-O
O-O
O-O
O-O
O-O
O-O
OOO
OOO
A5
O-O
(148x210mm)
O-O
Statement (5.5"x
O-O
8.5")
O-O
Those listed below are categorized as “Irregular size paper” that cannot be
detected automatically
B930n User’s Guide> 25
Page 32

Paper Size Paper Tray
C5 Envelope
(229x162mm)
COM-10
(4.125" x 9.5")
DL Envelope
(220.2x110mm)
COM-9 (3.875"
x 8.875“)
Monarch
Envelope
(3.875" x 7.5")
A6 LEF
(148x105)mm
C4
(229x324mm)
Trays 1-4 Tray 6 and
MPF
TTM
O-O
---
O-O
---
O-O
---
O-O
---
O-O
---
O-O
--
O-O
---
U
NUSABLE PAPER
Using the following types of paper might cause paper jams,
malfunctions or damage to the printer. Do not use them.
• full-color transparencies
• Paper that is too thick or thin
• Paper that has been printed on before (including color
printing)
• Wrinkled, folded, or torn paper
• Wet paper
B930n User’s Guide> 26
Page 33

• Curled paper
• Paper with static electricity
• Adhesive paper
• Postcards with pictures
• Paper with special coating on its surface
• Treated colored paper
• Paper using ink that will run at a temperature of 150 °C
• Heat sensitive paper
• Carbon paper
• Paper with staples, paper clips, ribbons, or tape
• Paper with rough surfaces such as pulp paper or fibrous
paper
• If acid paper is used, the characters might appear fuzzy.
Replace it with alkaline paper.
• Envelopes that are not flat or have metal fasteners
• Labels which do not fully cover the adhesive backing
• Transparencies that are not compitable for laser printers (i.e.,
inkjet transparencies)
• Paper that cannot be heated.
If background image suppression agent sticks to the feed roll when
feeding postcards with pictures, the postcards may not feed. When
this happens, clean the feed roll by referring to “Cleaning the
Printer” on page 106”.
S
YSTEM SETTINGS
You can set a variety of system settings via the System, Quality, and
Date/Time menus in your Operator Panel. These settings control
items such as power saving, display language, and resolution. For
complete descriptions of these settings see “Operator Panel” on
page 194.
B930n User’s Guide> 27
Page 34

P
OWER SAVER MODES
This printer is equipped with a low power mode to reduce power
consumption when it is left idle.
When no print data is received for 10 minutes, the printer will enter
the power saver. Consumption of power during the Power Saver
mode is 10 W or less. After one hour the printer will enter sleep
mode and the Operator Panel will shut down. The flashing green LED
on the Operator Panel indicates the printer is in Sleep mode.
The printer automatically cancels its power save status once it
receives data from the computer.
B930n User’s Guide> 28
Page 35

B
ASIC PRINTING TASKS
P
RINTING A CONFIGURATION SUMMARY
Your printer can print a configuration summary that lists the
currently selected status of menu options, media selections in trays,
options installed and other relevant information about your printer.
To print a Configuration Summary, press the Info button. A multipage summary prints.
L
OADING PAPER
This section describes how to load paper in each paper tray.
See“Paper Usage” on page 20 for details on the type and size of
paper that can be loaded in each paper tray.
L
OADING TRAYS
Trays 3 and 4 are pictured as the two tray feeder. The Tandem tray
option is loaded in a similar manner.
1. Pull out the Paper Tray(s).
1-4
B930n User’s Guide> 29
Page 36

2. Fan the paper to release sheets that may stick together.
3. Add paper to the tray without exceeding the maximum level.
NOTE
> Do not load paper exceeding the maximum fill line or the
maximum capacity allowed. Align the right width guide
with the paper width correctly. If the right width guide is
not in place, the paper will not be properly fed and may
cause a paper jam.
B930n User’s Guide> 30
Page 37

4. Insert the paper into the tray. If necessary, adjust the paper
guides to the size of the paper.
5. Slide the paper tray back into the machine.
6. If custom sizes of paper are used, make the appropriate
changes in your Printer Properties and at the Operator Panel
as needed.
B930n User’s Guide> 31
Page 38

L
OADING
MPF (T
RAY
5)
The MPF can be used for both manual and automatic feeds. There is
an indicator label on the tray that shows the positioning of each side
of paper. This label addresses long-edge and short-edge orientation.
For custom size paper loaded in the MPF, you must change the paper
type and size on the Operator Panel to match the paper that you
loaded.
Side guides must be set accurately against the sides of paper. The
printer uses the placement of these guides to calculate and verify
the correct paper size.
1. Lower the MPF tray.
2. Adjust the paper guides to the size of the paper.
B930n User’s Guide> 32
Page 39

3. Fan the paper to release sheets that may stick together.
4. Insert the paper into the tray. If necessary, adjust the paper
guides to the size of the paper.
5. If custom sizes of paper are used, make the appropriate
changes in your Printer Properties and at the Operator Panel
as needed
L
OADING TRAY
6 HCF
1. Pull out the tray.
B930n User’s Guide> 33
Page 40

2. If loading paper with a different width or length, adjust the
width and length guides.
3. Fan the paper to release sheets that may stick together.
B930n User’s Guide> 34
Page 41

4. Insert the paper into the tray.
5. Push the tray completely into the printer.
P
RINTING A TEST PAGE
You can print a Demo (test) page to verify printer connectivity and
operation.
The most convenient way to enable this feature is by using your
Printer Properties. You may also enable this feature at the Operator
Panel or by using the EWS.
To print a test page through the driver:
1. Select the Device Options tab within driver.
2. Click Demo Print.
3. Click OK.
B930n User’s Guide> 35
Page 42

B
ASIC PRINTING
When you send a job to the printer, you should select the paper size,
number of copies, orientation, and decide if you want the copies
collated. This can often be done from windows specific to your
application. The instructions in this section refer to setting these
options directly through the driver.
S
ELECTING PAPER SIZE
You can select from a list of standard paper sizes.
The most convenient way to enable this feature is by using your
Printer Properties. You may also enable this feature at the Operator
Panel or by using the EWS.
To select the paper size through your Printer Properties:
1. Select the desired Paper Size from the Paper Size pulldown in
the Setup Tab of your Printer Properties.
2. Click OK.
S
ELECTING NUMBER OF COPIES
You can select the number of copies to print via your Printer
Properties. When selecting the number of copies, you should also
decide if those copies are collated.
To select number of copies:
1. Select the Job Options tab within your Printer Properties.
2. Either enter the number of copies or select from the
pulldown.
3. Click OK.
C
OLLATING COPIES
When printing multiple copies of a job, the output can be
automatically collated if desired. When copies are collated, they are
printed in groups by the print job not by the page. If you do not
select the collate option, your copies will be printed by page. So, 10
page number 1’s will print and then 10 page number 2’s will print.
Collated jobs will print all pagesof the first copy and then all pages
of the next.
B930n User’s Guide> 36
Page 43

The most convenient way to enable this feature is by using your
Printer Properties. You may also enable this feature at the Operator
Panel or by using the EWS.
To select collating through your Printer Properties:
4. Select Collate in the Job Options tab within your Printer
Properties.
5. Select.
6. Click OK.
S
ETTING ORIENTATION
Select portrait or landscape orientation or choose to rotate the
existing orientation 180 degrees.
The most convenient way to enable this feature is by using your
Printer Properties. You may also enable this feature at the Operator
Panel or by using the EWS.
To select collating through your Printer Properties:
1. Select the Job Options tab within your Printer Properties.
2. Select the desired orientation.
3. Click OK.
S
KIP BLANK PAGES
If pages exist in your document that do not contain text, you may
select not to print them.
The most convenient way to enable this feature is by using your
Printer Properties. You may also enable this feature at the Operator
Panel or by using the EWS.
To skip blank pages:
1. Select the Paper Feed button in the Setup tab within your
Printer Properties.
The Paper Feed Options window appears.
2. Select Skip Blank Pages.
3. Click OK.
4. Click OK.
B930n User’s Guide> 37
Page 44

P
RINTING IN REVERSE ORDER
By default the printer prints jobs from back to front placing the first
page of the document on the top of the stack. You may opt to print
in the reverse order, placing the last page of the document on the
top of the stack.
The most convenient way to enable this feature is by using your
Printer Properties. You may also enable this feature at the Operator
Panel or by using the EWS.
To select reverse order through your Printer Properties:
1. Select the Job Options tab within your Printer Properties.
2. Select Reverse.
3. Click OK.
2-S
IDED PRINTING
The printer can automatically print on both sides of paper when the
optional duplex unit is installed.
• Paper size must be at least 89 x 127 mm (3.5 x 5 in.) when
printing from Tray 1. All other sizes that fit Trays 2-6 may be
printed 2-sided.
• Paper weight must be 60-163 gsm (16-43 lb. Bond)
CAUTION
> Never attempt to duplex print on labels, envelopes,
transparencies, or paper that is heavier than 163 gsm
(16-43 lb. Bond)
The most convenient way to enable this feature is by using your
Printer Properties. You may also enable this feature at the Operator
Panel or by using the EWS.
To print on both sides of the paper from the your Printer Properties:
1. Select Long-edge or Short-edge from the 2-sided printing
pull-down in the Setup Tab of your Printer Properties.
2. Select.
3. Verify the page orientation and select the desired tray.
4. Click OK.
B930n User’s Guide> 38
Page 45

B
INDING PREFERENCES
You can select how the printer will orient the page layout when
duplexing. Depending on your page orientation, duplexing on the
long-edge or short-edge of the paper produces different results. The
diagram below illustrates these results.
Portrait
Long-edge
P
RINTING ON SPECIAL MEDIA
The printer can accommodate a variety of special media. Each media
type requires some special handling. Read the sections below for
each special media type, prior to inserting the media into the tray.
The most convenient way to enable this feature is by using your
Printer Properties. You may also enable this feature at the Operator
Panel or by using the EWS.
To select the special media types through your Printer Properties:
1. Select the desired Media Type from the Media Type pulldown
in the Setup Tab of your Printer Properties.
2. Click OK.
S
ETTING MEDIA TYPES
Settings on the Operator Panel and in your Printer Properties are
required for media loaded in all trays trays. Media type settings must
match those of the actual paper loaded in the trays. Otherwise,
image quality cannot be processed accurately. Toner may not fuse
properly on the media, resulting in dirty and poor quality printouts.
Portrait
Short-edge
Landscape
Short-edge
Landscape
Long-edge
T
RANSPARENCIES
Transparencies can be printed from any tray. They should only be
printed on one side.
Before printing transparencies:
B930n User’s Guide> 39
Page 46

• Remove all other media before loading transparencies into
the tray.
• Do not load transparencies above the fill line; this may cause
the printer to jam
• Handle transparencies by the edges to avoid fingerprints and
creases that can cause poor print quality.
• Do not use transparencies with stripes down the side.
• Change the Media type via the Operator Panel or by selecting
the Media type from your Printer Properties Paper Options
Loading Transparencies
1. Fan the transparencies to release sheet that may stick
together.
2. Insert them with long-edge feed.
Tray 5 Trays 1-4
NOTE
> Do not load paper above the fill line.
3. Adjust the paper guide to the size of the transparencies, if
necessary.
4. Change media type at Operator Panel via the Paper Menu’s
Media Type selection.
B930n User’s Guide> 40
Page 47

5. Select Transparency as the Media Type from the Media type
pulldown.
6. Click OK.
E
NVELOPES
Envelopes can be printed using Tray 5. Read the following guidelines
before printing envelopes.
• Use envelopes specifically made for laser printers.
• Make sure that envelopes are stored in a cool dry place and
in their original packaging, if possible. Heat and humidity can
cause the envelopes to seal before or during printing.
• Do not use padded envelopes
• Remove excess air from enveloped before loading into the
feeder.
• Print only on the front of the envelopes.
• Load a maximum stack height of 10mm (.4 in)
• Avoid printing over the area where the envelope seams meet.
• When using commercial flap envelopes with side seams (vs.
diagonal seams) verify that the side seams are cut all the
way to the corner of the envelope.
• Never use envelopes with windows or metal clasps; they can
damage the printer.
Loading and Printing in Tray 5
1. Insert the envelopes in the tray with the following
considerations:
• Place C4 envelopes short-edge feed in the tray.
• Place Monarch, #10, C5, and DL envelopes long-edge feed
in the tray.
• Place the side to be printed facedown.
B930n User’s Guide> 41
Page 48

• Place the envelope with the Flap entering the printer first.
Short-edge Feed Long-edge Feed
2. Adjust the paper guides to the size of the envelopes.
3. Change media type at Operator Panel via the Paper Menu’s
Media Type selection.
4. Select Envelope as the Media Type in the Media Type
pulldown.
5. Click OK.
P
OSTCARDS
Postcards can printed using Tray 5. Read the following guidelines
before printing Postcards.
• Make sure that postcards are stored in a cool dry place and in
their original packaging, if possible. Heat and humidity can
cause the postcards to curl.
• Load a maximum stack height of 10mm (.4 in). No higher
than fill line.
Loading and Printing in Tray 5
1. Insert the postcards in the tray with the following
considerations:
• Insert postcards long-edge feed and facedown. Place the
top of the postcard to enter the printer first (left side of the
printer)
B930n User’s Guide> 42
Page 49

• Insert Small postcards short-edge feed and facedown.
Place the top of the postcard toward the rear of the printer.
Large Postcards
Long-edge
2. Adjust the paper guides to the size of the postcards.
3. Change media type at Operator Panel via the Paper Menu’s
Media Type selection.
4. Select Postcard as the Media Type in the Media Type
pulldown.
5. Click OK.
L
ABELS
Labels can be printed from all trays. Read the following guidelines
before printing Postcards.
• Do not use vinyl labels
• Do not use any labels on a sheet where items are missing; it
may damage the printer.
• Print only on one side of the sheet of labels.
• Make sure that postcards are stored in a cool dry place and in
their original packaging, if possible. Storing them in extreme
conditions can cause jams, curls, or poor print quality.
Loading and Printing
1. Insert the postcards in the tray with the following
considerations:
Small Postcards
Short-edge
• Tray MPF - Insert the label sheets long-edge feed and
facedown. Place the top of the page toward the front of the
printer.
B930n User’s Guide> 43
Page 50

• Trays 1-4 - Insert the label sheets long-edge feed and
faceup. Place the top of the page toward the front of the
printer.
• Tray 6- Insert the label sheets long-edge feed and
facedown. Place the top of the page toward the front of the
printer.
Tray
Trays 1-4 Tray 6
MPF
2. Adjust the paper guides to the size of the label sheets.
3. Change media type at Operator Panel via the Paper Menu’s
Media Type selection.
4. Select Label as the Media Type in the Media Type pulldown.
5. Click OK.
B930n User’s Guide> 44
Page 51

C
USTOM SIZE PAPER
You can print custom size from Trays 1 through 5. Tray 6 only prints
standard paper. The following paper size ranges can be printed from
each tray:
INPUT TRAY OUTPUT TRAY
5 1-4 STANDARD STACKER
Width 89 - 297
Height 98 - 432
mm
(3.5 -
11.70 in.)
mm
(3.87 - 17
in.)
140 - 297
mm
(5.5 -
11.70 in.)
182 - 297
mm
(7.16 -
11.70 in.)
89 - 297 mm
(3.5 - 11.70
in.)
98 - 432 mm
(3.87 - 17.0
in.)
UPPER
203 - 297
mm
(7.9 - 11.70
in.)
182 - 432
mm
(7.16 - 17.0
in.)
STACKER
LOWER
203 - 297
mm
(7.9 - 11.70
in.)
182 - 432
mm
(7.16 - 17.0
in.)
NOTE
> When loading custom size paper in the trays load by the
correct edge (long or short) and to adjust the paper
guides as necessary. See “Loading Paper” on page 29 for
instructions on loading paper into each tray.
The most convenient way to enable this feature is by using your
Printer Properties. You may also enable this feature at the Operator
Panel or by using the EWS.
To load and print custom paper:
1. Load the media in the desired tray.
2. Change media type at Operator Panel via that tray’s Media
Menu option.
3. Select the Paper Feed button in the Setup tab within your
Printer Properties.
The Paper Feed Options window appears.
4. Select Custom Size.
5. Enter the paper parameters and name.
6. Click Add.
B930n User’s Guide> 45
Page 52

7. Click OK.
8. Click OK.
9. Click OK.
T
RAY SETTINGS
You can configure a variety of settings for your input trays and
output bins. The default settings for your source input tray and
output bin are configured through the Operator Panel’s Paper menu,
Default Source and Output Tray selections.
S
OURCE
You can select the input tray from which paper is used to print the
job.
The most convenient way to enable this feature is by using your
Printer Properties. You may also enable this feature at the Operator
Panel or by using the EWS.
To select the paper source through your Printer Properties:
1. Select the desired Source from the Source pulldown in the
Setup Tab of your Printer Properties.
NOTE
> If there are no paper trays that match the automatic tray
selection, an error message prompting for replenishment
of paper will be displayed.
2. Click OK.
O
UTPUT DESTINATION
You can choose the output bin where your print job will be placed.
The most convenient way to enable this feature is by using your
Printer Properties. You may also enable this feature at the Operator
Panel or by using the EWS.
To select the paper destination through your Printer Properties:
1. Select the desired Destination from the Destination pulldown
in the Setup Tab of your Printer Properties.
2. Click OK.
B930n User’s Guide> 46
Page 53

I
NPUT TRAY LINKING
When an input tray runs out of paper, auto tray changing enables
the printer to switch to another available tray that contains the same
size and paper type. You can select auto tray changing via the
operator panel, Printer Properties, or web interface.
The most convenient way to enable this feature is by using your
Printer Properties. You may also enable this feature at the Operator
Panel or by using the EWS.
To select auto tray changing through your Printer Properties:
1. Select the Paper Feed button in the Setup tab within your
Printer Properties.
The Paper Feed Options window appears.
2. Select Auto Tray Change.
3. Click OK.
4. Click OK.
O
UTPUT BIN LINKING
When an output bin reaches capacity, the tray full sensors are
activated. You can select out put bin linking to have remaining pages
sent to an open bin. By default this option is turned on. It is located
in the Operator Panel’s Print Menu.
M
ANUAL FEED
Tray MPF can be used for manual feed. You must also set your
Printer Properties for manual feed. Tray 1 MPF normally operates in
multi-purpose mode, where multiple sheets can be loaded and
printed continuously. In manual mode, you are prompted to press
the Start key for each sheet.
The most convenient way to enable this feature is by using your
Printer Properties. You may also enable this feature at the Operator
Panel or by using the EWS.
To select manual feed through your Printer Properties:
1. Select the Paper Feed button in the Setup tab within your
Printer Properties.
The Paper Feed Options window appears.
B930n User’s Guide> 47
Page 54

2. Select Manual Feed.
3. Click OK.
M
EDIA CHECK
By default the printer selects the input source based on the paper
size requested. If the paper size requested is not loaded in any input
tray, the printer feeds from the default input tray. Media Type is not
a factor in the printer selection of the input tray. When Media check
is enabled, the printer first checks the default input source to see if
it has media loaded that matches both the driver requested media
type and paper size. If the default input tray does not contain the
requested media, the printer searches the other input trays to find
one that has media matching the requirements. If none is found, the
printer stops and asks you to load the requested media in the default
input tray. You can acknowledge this by pressing Start whether the
correct media is in place or not. Or you can put the correct media in
a tray and then use the Operator Panel to set the media type for that
tray. If it is Tray MPF or the size is not auto detectable, you can also
set the paper size. Otherwise, the printer can auto detect the paper
size.
The most convenient way to enable this feature is by using your
Printer Properties. You may also enable this feature at the Operator
Panel or by using the EWS.
To enable media check:
1. Select the Paper Feed button in the Setup tab within your
Printer Properties.
The Paper Feed Options window appears.
2. Select Media Check.
3. Click OK.
4. Click OK.
JOB O
FFSET
The Stacker Main and Standard Top Bincan place sheets in alternate
positions to separate one print job from another. This is called job
offsetting. When selected, the output position changes after the final
sheet of the print job is printed. The next job is the offset (shifted a
bit) to keep it separate from the previous print job.
B930n User’s Guide> 48
Page 55

The most convenient way to enable this feature is by using your
Printer Properties. You may also enable this feature at the Operator
Panel or by using the EWS.
To turn job offset on through your Printer Properties:
1. Select the Paper Feed button in the Setup tab within your
Printer Properties.
The Paper Feed Options window appears.
2. Select Job Offset.
3. Click OK.
4. Click OK.
D
RIVER SETTINGS
As you create groups of settings in your Printer Properties, you can
save that group of settings. You can then select that group of
settings by the name under which you saved them. This can save
you time and effort when printing
The most convenient way to enable this feature is by using your
Printer Properties. You may also enable this feature at the Operator
Panel or by using the EWS.
To save a group of settings in your Printer Properties:
1. Set up your print job by choosing all options in the Printer
Properties you wish to reuse.
2. Select Add in the Driver Settings area in the Setup tab within
your Printer Properties.
3. Enter a Name for the saved settings.
4. Click OK.
5. Click OK.
To use saved settings:
1. Select the desired setting_name from the Driver Settings
pulldown in the Setup tab within your Printer Properties.
2. Click OK.
B930n User’s Guide> 49
Page 56

U
SING THE HOLE PUNCHER
The optional Finisher contains the Hole Puncher. When installed, a
3-hole or 2/4-hole puncher is available. European finishers have the
2/4 hole punch while American finishers have a 3 hole punch. When
hole punching is installed, it must be enabled to punch holes. When
the printer detects that the punch waste box is full, a warning
appears on the Operator Panel. Printing will continue, but punching
will not.
The most convenient way to enable this feature is by using your
Printer Properties. You may also enable this feature at the Operator
Panel or by using the EWS.
To turn hole punching on through your Printer Properties:
1. Select the Paper Feed button in the Setup tab within your
Printer Properties.
The Paper Feed Options window appears.
2. Select the desired Hole Punch type from the Hole Punch
pulldown.
3. Click OK.
4. Click OK.
E
MPTYING THE PUNCH WASTE BASKET
See “Jam Area Locations” on page 140 for a decsription of door
locations.
1. Open Door G.
2. Remove the Punch Waste Box and empty the contents.
B930n User’s Guide> 50
Page 57

3. Place the Punch Waste Box back into the Finisher.
4. Close Door G.
U
SING THE STAPLER
Several stapling options are available. You can staple at different
locations on the paper depending on whether one staple or two
staples is used. The following table displays the location of the
staple(s) based on the staple location selected.
STAPLING
SELECTION
Upper-left Portrait
ORIENTATION STAPLE PLACEMENT
Landscape
A
A
B930n User’s Guide> 51
Page 58

STAPLING
ORIENTATION STAPLE PLACEMENT
SELECTION
Bottom-left Portrait
Landscape
Dual Portrait
Landscape
A
A
A
B930n User’s Guide> 52
A
Page 59

The most convenient way to enable this feature is by using your
Printer Properties. You may also enable this feature at the Operator
Panel or by using the EWS.
To turn stapling on through your Printer Properties:
1. Select the Paper Feed button in the Setup tab within your
Printer Properties.
The Paper Feed Options window appears.
2. Select the desired Stapling type from the Staple pulldown.
3. Click OK.
4. Click OK.
Adding Staples
1. Open Door G.
NOTE
> See instructions on the inside of door G.
2. Slide the stapler toward you, then to the right.
B930n User’s Guide> 53
Page 60

3. Remove the staple unit by lifting it up and out.
4. If present, remove the depleted staple cartridge.
5. Insert a new staple cartridge.
6. Insert the staple unit into the Finisher.
7. Close door G.
B930n User’s Guide> 54
Page 61

C
ANCELLING/CHECKING PRINTING
C
ANCELLING PRINTING
To cancel printing, you can either cancel the print job at the printer
or at the computer.
Cancelling a Print Job at the Printer
Press the CANCEL button then press the ON-LINE button on the
Operator Panel. However, pages being printed at the moment will
continue to be printed.
Cancelling Print Jobs at the Computer
Double-click the printer icon at the bottom right of the taskbar
in Windows.
From the displayed window, click the document name that you wish
to delete and press the Delete key.
B930n User’s Guide> 55
Page 62

A
DVANCED PRINTING TASKS
C
OVER PAGES
A cover page is the first page of the document. The printer enables
you to choose a different paper source for the cover page than for
the rest of the document. You can then use a different stock paper
for the first page of the document while sending the document as a
single print job. The paper must be the same size as the rest of the
document.
The most convenient way to enable this feature is by using your
Printer Properties. You may also enable this feature at the Operator
Panel or by using the EWS.
To enable cover pages through your Printer Properties:
1. Select the Paper Feed button in the Setup tab within your
Printer Properties.
The Paper Feed Options window appears.
2. Check Use Cover Sheet.
3. Select the Cover Source Tray and Cover Media Types form the
pulldowns.
4. Click OK.
5. Click OK.
S
EPARATOR PAGE
The printer can generate a separator page between print jobs. This
page contains the name of the person who generated the print job.
A separator page makes it easy to identify the start or end of a print
job and to make sure the correct job is claimed by the correct
person. You can enable separator pages via the Operator Panel’s
Paper menu.
M
ULTIPLE PAGES TO SINGLE SHEET
You can print multiple pages on a single sheet when printing a multipage document. This can save paper and is handy for draft reviews.
You can print one, two, four, six, nine, or sixteen pages per sheet.
Enable this feature is using your Printer Properties.
To select the number of pages to print on a single page:
B930n User’s Guide> 56
(NUP)
Page 63

1. Select Standard Nup from the Finishing Mode pulldown in
the Setup Tab of your Printer Properties.
2. Click Options.
The Standard Nup window appears.
3. Enter the desired parameters.
Select the desired number of pages per sheet. Check the box
if a page border is desired. Select the page layout option and
enter a bind margin. If you wish to scale the pages to a full
page size, check Fit to page. Enter the units used to calculate
the bind margin, if applicable.
4. Click OK.
B
OOKLETS
With two-sided printing, you can print a document in the form of a
small book. You can use any paper size that duplex printing
supports. The printer automatically reduces pages to fit within the
booklet parameters. It prints two pages per side and prints the
pages in the order needed to accommodate a center fold. You can
specify the binding width to leave enough room in the center to bind
or staple your booklet. The Finisher option can not be used to staple
booklets.
Enable this feature is using your Printer Properties.
To print a booklet:
1. Select Booklet from the Finishing Mode pulldown in the
Setup Tab of your Printer Properties.
2. Click Options.
The Booklet window appears.
3. Enter the desired parameters.
B930n User’s Guide> 57
Page 64

Select the desired number of signature from the pulldown.
Signature sets the number of pages printed on a sheet to form
a booklet. Options are No Limit, or a number which is a
multiple of 4.Enter a bind margin and the units used to
calculate the bind margin. Check the box if right-side binding
is desired
4. Click OK.
5. Click OK.
Poster Print
If you have a large page image that can not be printed on the
available paper sizes, you can print the document in poster print.
Poster Print prints the document to a full bleed (to the edges of
paper) and breaks the document up into multiple pages. The pages
can then be placed together, edge-to-edge, to create a large version
of the print job.
Enable this feature is using your Printer Properties.
To print in poster mode:
1. Select Poster from the Finishing Mode pulldown in the
Setup Tab of your Printer Properties.
2. Click Options.
The Poster window appears.
3. Enter the desired parameters.
Enter the X and y axis enlargement and orientation.
4. Click OK.
5. Click OK.
Fit to Page
You can scale any page image to fit the paper size being used.
The most convenient way to enable this feature is by using your
Printer Properties. You may also enable this feature at the Operator
Panel or by using the EWS.
To scale the print image:
B930n User’s Guide> 58
Page 65

1. Select the Paper Feed button in the Setup tab within your
Printer Properties.
The Paper Feed Options window appears.
2. Click the Scale to fit checkbox.
3. Click OK.
4. Click OK.
A
UTOMATICALLY RESIZE PAPER
The printer can automatically select from the paper available the
paper that is the closest in size to the paper requested by the printer
job. The printer will then scale the print job to fit the available paper.
This includes scaling A4 to letter and letter to A4; and A3 to Tabloid
and Tabloid to A3. You can enable this feature via the Operator
Panel’s Paper menu.
W
ATERMARKS
A Watermark is faded text that appears in the background of all, the
first, or all but the first pages.The text can indicate items that are
draft versions, confidential or other important marking text.
Enable this feature is using your Printer Properties.
Standard Copy, Draft, and Confidential watermarks are provided.
You can view these by clicking on their name in the Watermark Pane
of the Watermark Window. You can edit their settings or the settings
of any configured watermark by clicking the Edit button.
To create a new watermark to be placed on a print job:
1. Select the Job Options tab within your Printer Properties.
2. Click Watermark.
The Watermark Window appears.
3. Click New.
The configurable fields for watermark parameters are
enabled.
4. Enter the position of the text on the page.
The position anchors the left corner of the text to a specific
location regardless of rotation.
B930n User’s Guide> 59
Page 66

5. Enter the text to be displayed.
6. Enter the font, typeface, and size of the text.
7. Enter the angle of rotation of the text.
8. Enter the degree of transparency for the text.
The text should not obscure the actual text on the printed
page.
9. Click OK.
10. Click OK.
Image Options
You can make a variety of adjustments to quality of your printed
pages. This can help improve the clarity of the print job regardless
of the quality of items such as graphics contained in the document.
Enable this feature is using your Printer Properties.
To modify image options:
1. Select the Graphics tab within your Printer Properties.
2. Enter the desired Brightness and Quality settings.
3. Click OK.
B
RIGHTNESS AND CONTRAST
For PCL6 you can use the brightness and contrast sliders to adjust
these settings for all items, text, graphics, or photos.
Q
UALITY
For all Print driver versions, you can adjust quality settings. These
include resolution (600 or 1200 dpi), toner saving (prints lighter
text), and printing all text as black (darkens light text).
E-
MAIL NOTIFICATIONS
You can choose to be notified by e-mail when your job has
successfully printed.
The most convenient way to enable this feature is by using your
Printer Properties. You may also enable this feature using the EWS.
B930n User’s Guide> 60
Page 67

Using the EWS, you must have enabled email send and set the email
server address for this feature to work.
To email notification upon completion:
1. Select the Job Options tab within your Printer Properties.
2. Check email on job completion
3. Enter the e-mail address to which to mail.
4. Click OK.
JOB S
TORAGE AND SECURE PRINTING
You can store print jobs for future use or hold a job at the printer
until you release it with a PIN number for secure printing.
S
TORED JOBS
You can assign a name to a print job and store it for later use.
The most convenient way to enable this feature is by using your
Printer Properties. You may also enable this feature at the Operator
Panel or by using the EWS.
To store a job:
1. Select the Job Options tab within your Printer Properties.
2. Click Stored Job
3. Enter the name of the job.
4. Click OK.
S
ECURE PRINT
You can assign a PIN number to a job. The job will be sent to the
printer but not printed until you enter the PIN number at the
Operator Panel. This helps secure the information printed. It will not
sit on the printer waiting to be picked up, but will be ready to print
as soon as you get there. This is temporary storage. For long-term
storage you need to store the job as described in “Stored Jobs” on
page 61.
Enable this feature is using your Printer Properties.
To create a secure job:
B930n User’s Guide> 61
Page 68

1. Select the Job Options tab within your Printer Properties.
2. Click Secure Print
3. Enter the name of the job
4. Enter PIN number to be entered at the Operator Panel.
5. Click OK.
To print a secure job:
1. At the Operator Panel, press the Menu button.
Print Jobs is displayed.
2. Press the Forward (right) key.
You are requested to enter a pin number.
3. Use the Next and Previous buttons to change a digit.
4. Press Forward (right) key to enter the digit.
5. Repeat steps 3-4 until all Digits are entered.
6. Press Select.
You are asked for the number of copies to print.
7. Use Next to enter the number of copies.
8. Press Select.
The job prints.
P
ROOF PRINT
When the optional hard disk or compact flash has been installed,
Proof Printing automatically prints one copy of the job as it is stored.
You can select these jobs for printing by entering a PIN at the
operator panel. Proof Print is a feature that allows you to store the
print data of multiple copies in the hard disk or compact flash, print
out only the first set to check the print result and if satisfactory, print
the remaining copies from the Operator Panel.
To create a proof print:
1. Select the Job Options tab within your Printer Properties.
2. Set copies to at least 2.
3. Click Proof and Print
B930n User’s Guide> 62
Page 69

4. Enter the name of the job
5. Enter PIN number to be entered at the Operator Panel.
6. Click OK.
To print the proof:
1. At the Operator Panel, press the Menu button.
Print Jobs is displayed.
2. Press the Forward (right) key.
You are requested to enter a pin number.
3. Use the Next and Previous buttons to change a digit.
4. Press Forward (right) key to enter the digit.
5. Repeat steps 3-4 until all Digits are entered.
6. Press Select.
7. Use Next to until the document is displayed.
8. Press Select.
The proof document prints.
9. Use the Next and Previous buttons to print of delete the
saved document.
10. Press Forward (right) key to print the document.
You are asked for the number of copies to print.
11. Use Next to enter the number of copies.
12. Press Select.
The job is printed or deleted as instructed.
T
IME SPECIFIED PRINTING
When the optional hard disk or compact flash has been installed, you
can use the delayed print feature. The delayed print feature allows
you to store the data in the printer and then print it automatically at
the specified time.
To create a time specified job:
1. Select the Job Options tab within your Printer Properties.
B930n User’s Guide> 63
Page 70

2. Click Timed Job.
3. Click Set Time.
4. Enter the elapsed time or real desired.
For elapsed time, specify the number of minutes to delay
before printing. For real time, enter actual date parameters.
5. Click OK.
6. Enter a job name and PIN number.
A PIN number is only needed to cancel a timed job.
7. Click OK.
You can cancel a timed job from the Operator Panel without waiting
for the specified time.
To cancel a timed job:
1. At the Operator Panel, press the Menu button.
Print Jobs is displayed.
2. Press the Forward (right) key.
You are requested to enter a pin number.
3. Use the Next and Previous buttons to change a digit.
4. Press Forward (right) key to enter the digit.
5. Repeat steps 3-4 until all Digits are entered.
6. Press Select.
7. Use Next to until the document is displayed.
8. Press Select.
9. To delete the job, press the Cancel Button. To Print the press
the Forward (right) key
You are asked for the number of copies to print.
10. Use Next to enter the number of copies.
11. Press Select.
The job is printed or deleted as instructed.
B930n User’s Guide> 64
Page 71

D
IRECT
PDF P
The printer’s PDF Direct feature allows you to send a Version 1.3 PDF
file directly to the printer without the use of Adobe Acrobat on the
host computer. You can send a PDF file directly to the printer for
printing without using the printer driver. As the print data is sent
directly to the printer, the printing process is simpler than printing
with the printer driver.
O
VERLAYS
The Overlay window allows you to create, delete, and edit behavior
of overlays. An overlay is a portion of a document that is added to
each page of a print job such as a letterhead or standard form.
(there are no pre-defined overlays). You must create overlays using
your application of choice. Then the application you have created
may be included on future print jobs. You are not allowed to set
create overlay as the default. You are only allowed to set create
overlay from within an application.
Overlay Function provides options to print overlays. No Overlay
mode does not create an overlay, and an overlay will not be printed.
Create New Overlay will create an overlay when the print job is sent.
Each time, you are prompted for the overlay name.
Another set of options available allows you to define when an overlay
should be printed, either All Pages, First Page Only, or All But First
Page.
Front indicates that the overlay is printed in front of the print job
data. Placing the overlay in front of the print data may make
portions of the print job unreadable. The default is Front. Back
indicates that the overlay is printed behind print job data. The
Remove button deletes the selected overlay from the list.
Enable this feature is using your Printer Properties.
To create an overlay:
RINTING
1. Access your printer’s properties from your application.
2. Select the Layout tab within your Printer Properties.
3. Click Overlay.
The Overlay Window appears.
4. Select Create New Overlay as the Overlay Function
B930n User’s Guide> 65
Page 72

5. Click OK to close the Overlay window
6. Click OK to close the printer properties.
When you do, a window will popup asking you for the name of
the overlay. This can be any text you like.
7. Enter a name for the overlay.
8. Click OK.
The popup and entire properties window closes.
9. Click Print in the print dialog and the overlay will be created.
10. Click OK.
To use an overlay:
1. Open any document in any application.
2. Select File>Print>Properties within that application.
3. Select the overlay button from the Job Options tab.
4. Select the overlay in the Overlay list box
5. Select “One Overlay” as the Overlay Function
6. Click OK to close the Overlay window and OK to close the
printer properties.
7. Click Print in the print dialog and the document will be
printed with the overlay added to every page.
JOB A
CCOUNTING
Job accounting stores information about each print job received by
the printer.
Configure this feature is using your Printer Properties. It is enabled
at the Operator Panel or EWS.
To use job accounting:
1. Select the Job Accounting tab within the driver.
2. Enter the User name and Job Account ID.
3. Click OK.
The job accounting information is collected on an internal
accounting file within the printer. It can then be downloaded
B930n User’s Guide> 66
Page 73

as a .csv file by an administrator via the printer EWS and
processed off line by the users accounting application.
B930n User’s Guide> 67
Page 74

S
ENDING FILES
Accessed via the Send File menu in the EWS, this page allows you to
select a file from the client computer (or any file-servers attached to
the client computer) and send the file to the printer. A file is selected
by typing in the name of the file or browsing to locate the file. After
selection of a file, click the Send button to send the file to the printer.
The types of files that are appropriate for sending with this feature
are:
• Print Data files – this includes any file containing:
a) Simple printable text.
b) PJL/PCL5/PCL6/PS/Epson FX print-data.
c) PDF (Version 1.3 and earlier)
• Firmware-Upgrade Files.
B930n User’s Guide> 68
Page 75

N
ETWORKING
SUPPORTED ENVIRONMENT
This printer can be connected to a network through the Ethernet
interface. The printer supports multiple protocols. As a result, one
printer can be shared even from different network environments.
S
UPPORTED
CONNECTION NETWORK
PORT LPD PORT 9100 ETHERTALK
PROTOCOL TCP/IP TCP/IP APPLETALK
OS Windows 95 X X
OS
AND ENVIRONMENT
Windows 98 X X
Windows Me X X
Windows NT 4.0 X
Windows 2000 X X
Windows XP X X
Windows Vista X X
Windows Server
2003
UNIX X X
Macintosh X X X
NOTE
XX
When using Windows 95/98/Me, use OKI LPR.
UNIX Filter are required to print PostScript data. UNIX Filter is
compatible with the OSs in Solaris, HPUX and Linux (Redhat,
SuSE).
Macintosh Supports Mac OS 10.02 or later.
B930n User’s Guide> 69
Page 76

Important
• The EtherTalk port setting in this printer is disabled by
default. To use this port, enable the setting on the
Operator Panel.
CONFIGURATION
The B930 is a fast 100BASE-TX/10BASE-T network capable printer.
It supports major protocols such as TCP/IP and Ethertalk. This
section details configuring the printer's network interface and should
be done prior to configuring your computer.
IP ADDRESS
The factory configuration is for the printer to obtain an IP address
automatically from your networks’ DHCP server. Use the printers’
Operator Panel to determine the printers’ address.
If the DHCP server is not available or not in use, use one of the
following methods to retrieve and set the IP address.
• Set the IP address manually from the Operator panel or EWS
Important:
• Depending on the network environment, you may need to set
the subnet mask and gateway address.
• Please check with your network administrator if you have any
questions concerning your network environment.
PRINTER SETUP USING THE EWS
If the printer is connected to the network using TCP/IP, its settings
can be configured using the EWS.
To apply configuration changes using a Web browser, select the
Administrator Login. You will be prompted for a username and
password. The username is [root] and the default password is the
last six digits of the Ethernet MAC address. The MAC address can be
found on the Network Summary page. Note that the password is
case sensitive and letters should be entered in upper case.
The following explanation uses Windows XP and Internet Explorer
version 6.0 as an example to manually set the printers IP address.
B930n User’s Guide> 70
Page 77

1. Launch the EWS using the IP address for the printer you are
configuring.
2. Enter the username and password for the Administrator
login.
3. Select the Network group.
4. Select the TCP/IP subgroup.
5. Select “Set IP Manually”
6. Configure the IP Address, Subnet Mask and Gateway for the
printers’ network interface. Once the new address is
submitted to the printer, the new address will have to be
entered into the browsers’ address.
Most of the printers’ configuration can be done through the browser
including setting the administrator password.
PRINTING FROM A WINDOWS COMPUTER
OVERVIEW
This chapter provides guidelines on how to print over the network
from various Microsoft Windows platforms. There are numerous
ways of printing from Windows and the exact set-up will vary
depending upon your environment. There are also numerous
versions of Windows, which can be configured as either a client,
server or both.
Although there are many variants of Windows, the principles of
network printing are the same. Microsoft provides on-line help with
all of their operating systems and this is a good reference point for
the exact details of each configuration option within Windows.
B930n User’s Guide> 71
Page 78

The network printer supports TCP/IP protocol that can be used in
conjunction with the Windows operating system.
LPD or Port 9100 (TCP/IP)
Once the printer registered on the Windows NT 4.0/Windows 2000/
Windows XP/Windows Server 2003 computer is shared, you can also
print from Windows 95/Windows 98/Windows Me computers
through this printer.
INSTALLATION OF TCP/IP PROTOCOL
There are a number of options available when printing using TCP/IP
for Windows. The following table lists the options:
WINDOWS VERSION METHOD
95/98/Me OKI LPR Utility
NT 4.0 OKI LPR Utility
1
Microsoft LPR
2000/XP/Vista OKI LPR Utility
Microsoft LPR
Port 9100
1
These functions are built into Windows and are displayed as options
1
1
when using the Add Printer Wizard.
Although there are some differences in configuration options
between the various Windows platforms, the procedure for printing
using TCP/IP is the same.
1. Ensure that the TCP/IP protocol has been installed in
Windows. This can be confirmed by checking the network
settings from within the Operator Panel. If TCP/IP has not
B930n User’s Guide> 72
Page 79

been installed refer to the section below Installation of TCP/
IP protocol.
2. If not already configured, a suitable IP address, Subnet Mask
and Gateway address should be configured. Please refer to
the on-line help if necessary. It is vital that the IP address
entered is unique and valid. Entering an incorrect IP address
may cause severe network problems. Please check the
address with the network administrator.
3. If your network environment uses domain names, DNS
should be enabled and configured on your system. However,
this step is not essential to enable network printing.
4. Restart the operating system.
WINDOWS 95/98/Me
1. Click the [Start] button, select [Settings] and then click
[Control Panel].
2. In the [Control Panel] double-click on the [Network] icon.
3. In the [Network] dialogue box click [Configuration Panel].
4. If the [Client for Microsoft Networks] is not listed, click [Add].
5. In the [Select Network Component Type] dialogue box, select
[Protocol] then click [Add].
6. In the [Select Network Protocol] dialogue box, select
[Microsoft] from the list of manufacturers, then select [TCP/
IP] from the list of network protocols, then click [OK].
7. The Windows installation CD-ROM may be required. Follow
the remaining dialogue box prompts.
WINDOWS NT 4.0
1. Click [Start], select [Settings] and then click [Control Panel].
2. Double-click the [Network] icon.
3. In the Network dialogue box, click the [Protocols] tab.
4. If the [TCP/IP Protocol] is not listed, click [Add].
5. In the [Select Network Protocol] dialogue box, select [TCP/IP
Protocol] and click [OK].
B930n User’s Guide> 73
Page 80

6. The Windows NT installation CD-ROM may be required.
Follow the remaining dialogue box prompts.
WINDOWS 2000
1. Click the [Start] button, select [Settings] and then click
[Network and Dial-up Connections].
2. Double-click the [Local Area Connection] icon. In the [Local
Area Connection Status] dialogue box, click [Properties].
3. In the [Local Area Connection Properties] dialogue box, click
[Install].
4. In the [Select Network Component Type] dialogue box, select
[Protocol] and click [Add].
5. In the [Select Network Protocol] dialogue box, select [TCP/IP
Protocol] and click [OK].
6. Click [Close] button in the [Local Area Connection Properties]
dialogue box.
7. Click [Close] in the [Local Area Connection Status] dialogue
box.
WINDOWS XP AND VISTA
1. Click the [Start] button and select [Control Panel].
2. Select [Network and Internet Connection] and [Network
Connection].
3. Double-click [Local Area Connection] and click [Properties] in
the [Location Area Connection Status] dialogue box.
4. If the [Internet Protocol (TCP/IP)] is not listed, click
[Install.].
5. In the [Select Network Component Type] dialogue box, select
[Protocol] then click [Add].
6. In the [Select Network Protocol] dialogue box, select
[Internet Protocol (TCP/IP)] then click [OK].
7. The Windows XP installation CD-ROM may be required.
Follow the remaining dialogue box prompts.
B930n User’s Guide> 74
Page 81

Once the protocol has been installed and configured in Windows, the
next step is to configure the TCP/IP parameters in the network
printer.
CONFIGURING AS A NETWORK PRINTER
WINDOWS 95/98/ME
When printing using TCP/IP, the Oki LPR utility is the only option to
use. The following procedure should be used. When installing the
driver, ensure it is installed as a local printer and not a network
printer. Ensure the appropriate printer driver has been installed in
Windows.
Install the Oki LPR utility as described in “OKI LPR” on page 81 of
this manual and add the printer installed earlier.
WINDOWS NT 4.0
With Windows NT 4.0, you have two options for printing using TCP/
IP. They are:
• Oki LPR
• Microsoft LPR
In order to use Microsoft LPR, it must first be installed into your
operating system.
NT 4.0 requires administrator privileges.
Oki LPR
Please follow the procedure described in the Windows 95/98/Me
section “OKI LPR” on page 81.
Microsoft LPR
To install this port, the following needs to be carried out.
1. Select [Start], [Settings], [Control Panel] and then select
[Printers].
2. Select [Add Printer] Wizard.
3. Select [My Computer] and then [Next].
4. Select [Add Port].
5. Select [LPR Port] and then [OK].
B930n User’s Guide> 75
Page 82

6. In [Name or address of server providing lpd] type the host
name or IP address of the host for the printer you are adding.
7. In [Name of printer or print queue on that server] type the
logical printer name “lp” and then click [OK].
8. Follow the instructions on the screen to finish installing the
LPR-compatible printer.
If the LPR port is not available, install the Microsoft TCP/IP Printing
Service.
Insert the printer driver for Windows NT4.0.
1. Select [Start].[Settings].[Control Panel] and then doubleclick the [Network] icon.
2. In the Network dialogue box, click the [Services] tab.
3. If [Microsoft TCP/IP Printing] is not listed, click [Add].
4. In the [Select Network Service] dialogue box, select
[Microsoft TCP/IP Printing] and click [OK].
5. The Windows NT installation CD-ROM may be required.
Follow the remaining dialogue box prompts.
WINDOWS 2000
Windows 2000 requires administrator privileges.
With Windows 2000, there are four options for printing using TCP/IP.
• Oki LPR
• Microsoft LPR
• Port 9100
• IPP
In order to use Microsoft LPR, it must first be installed on your
system.
OKI LPR
Please follow the procedure described in the Windows 95/98/Me
section in “OKI LPR” on page 81.
Microsoft LPR
To install this port, the following needs to be carried out:
B930n User’s Guide> 76
Page 83

1. Select [Start], [Settings], [Control Panel and Printers].
2. Open the [Printers] folder.
3. Double-click [Add Printer] and then select [Next].
4. Select [Local Printer], clear the [Automatically detect my
printer] check box, and then select [Next].
5. Select [Create a new port] and then [LPR Port].
6. Select [Next] and then provide the following information:
In [Name or address of server providing LPD] enter the host
name or Internet Protocol (IP) address of the host for the
printer you are adding.
In [Name of printer or print queue on that server] type lp.
Follow the instructions on the screen to finish installing the
TCP/IP printer.
Port 9100
1. Select [Start].[Settings].[Control Panel].
2. Open the [Printers] folder.
3. Double-click [Add Printer] and then select [Next].
4. Select [Local Printer], clear the [Automatically detect my
printer] check box and then click [Next].
5. Select [Create a New Port] and select [Standard TCP/IP Port].
6. Select [Next].
7. The [Welcome to the Add Standard TCP/IP Printer Port
Wizard] will appear.
8. Select [Next] and provide the following information. Enter
[Printer name] or IP address, for example: 172.168.1.31. If
the above IP address is entered, the Port Name will default to
IP_172.168.1.31.
9. Select [Next]. Additional port information will be required.
10. Under [Device Type], select [Custom] then [Settings].
11. Ensure [Protocol] is set to [Raw].
12. Ensure [Port Number] is 9100 and [SNMP Status Enabled] is
deselected.
B930n User’s Guide> 77
Page 84

13. Select [OK].
14. Select [Follow the instructions on the screen to finish
installing the printer.]
WINDOWS XP AND VISTA
Windows XP requires administrator privileges.
With Windows XP, there are four options for printing using TCP/IP.
• Oki LPR
• Microsoft LPR
• Port 9100
• IPP
In order to use Microsoft LPR, it must first be installed on your
system.
OKI LPR
Please follow the procedure described in the Windows 95/98/Me in
“OKI LPR” on page 81.
Microsoft LPR
To install this port, the following needs to be carried out:
1. Select [Start].[Settings].[Control Panel].[Printers and Other
Hardware].
2. Select [Printers and Faxes].
3. Click [Add Printer], then select [Next].
4. Select [Local printer attached to this computer], clear the
[Automatically detect and install my Plug and Play printer]
check box, and then click [Next].
5. Select [Create a New Port] and [Type Standard TCP/IP Port].
6. Click [Next].
7. [Welcome to the Add Standard TCP/IP Printer Port Wizard]
appears.
8. Click [Next] and provide the following information. Enter
[Printer name or IP address], for example: 172.168.1.31. If
B930n User’s Guide> 78
Page 85

the above IP address is entered, the Port Name will default to
IP_172.168.1.31.
9. Click [Next]. [Additional Port Information Required]
displayed.
10. Under [Device Type], select [Custom] then [Settings].
11. Ensure [Protocol] is set to [LPR].
12. Ensure [Queue Name] is lp and [SNMP Status Enabled] is
deselected.
13. Click [OK].
14. Follow on screen instructions to finish installing the printer.
Port 9100
1. Select [Start].[Settings].[Control Panel].[Printers and Other
Hardware].
2. Select [Printers and Faxes].
3. Click [Add Printer] and then click [Next].
4. Select [Local printer attached to this computer], clear the
[Automatically detect and install my Plug and Play printer]
check box, and then click [Next].
5. Select [Create a New Port] and select [Type Standard TCP/IP
Port].
6. Click [Next].
7. [Welcome to the Add Standard TCP/IP Printer Port Wizard]
appears.
8. Click [Next] and provide the following information. Enter
[Printer name or IP address], for example: 172.168.1.31. If
the above IP address is entered, the Port Name will default to
IP_172.168.1.31.
9. Click [Next]. [Additional Port Information Required] is
displayed.
10. Under [Device Type], select [Custom] then [Settings].
11. Ensure [Protocol] is set to [Raw].
12. Ensure [Port Number] is 9100 and [SNMP Status Enabled] is
deselected.
B930n User’s Guide> 79
Page 86

13. Click [OK].
14. Follow the instructions on the screen to finish installing the
printer.
CREATING A SHARED PRINTER
Create a shared printer as required.
Settings Windows NT 4.0/2000/XP/Server 2003
The following procedure explains how to do the settings, using
Windows XP as an example.
1. Click [Start], and then select [Printers and Faxes]. The
[Printers and Faxes] window appears.
2. 2. Select the icon of a printer to set, and then select
[Sharing] from the right-click menu. Then the printer
properties dialogue box is displayed.
3. 3. Click [Share this printer] and enter a share name.
4. Click [Additional Drivers] and select a substitute driver to
install, and then click [OK].
5. When installing a substitute driver, an input screen is
displayed for the printer driver file location. Insert the
attached CD-ROM and specify the appropriate folder.
Settings of Windows 95/98/Me
1. Click [Start], and then select [Settings], followed by
[Printers]. The [Printers] window appears.
2. Double click [Add Printer]. The [Add Printer Wizard] dialog
box appears.
3. Install the printer driver according to the on-screen
instructions. Select [Network Printer] for the printer
connection, then specify the shared printer created on
Windows NT 4.0/Windows 2000/Windows XP/Windows
Server 2003 in the previous section.
B930n User’s Guide> 80
Page 87

OKI LPR
The OKI LPR Utility is network software which supported TCP/IP
printing on Windows Me, Windows 98, and Windows 95. It redirects
print data from the LPR port to the specified IP address.
INSTALLING THE OKI LPR UTILITY
The OKI LPR utility requires that the TCP/IP protocol be installed on
your Windows system. To install the TCP/IP protocol onto your
Windows system, consult your Windows manual.
1. Set up the printer driver and designate the output destination
to be Local Printer (LPT:). For information on setting up your
printer driver, see the printer user manual.
2. Insert the CD-ROM provided with your printer into the CDROM drive. If the Menu Installer doesn’t start automatically,
click Start>Run>Browse. Browse to your CD-ROM and click
Install>Open>OK.
3. Select [Network Software].
4. Select [Installation/Config]
5. Select [Oki LPR].
6. Follow the on-screen instructions.
7. Select [Install Oki LPR].
8. Follow the on-screen instructions.
9. Click [Next] when the [Welcome] screen is displayed.
10. Verify [Destination Folder] and [Spool Folder] and click
[Next].
11. Check [Register in Startup] if you want automatic startup as
Windows boots up. Check [Launch as Minimized] if you want
to startup in the Icon state and click [Next].
12. Verify the program folder name and click [Next]. The
installation starts.
13. When the installation ends, the [Setup complete] screen is
displayed. Check [Yes, I want to launch OKI LPR Utility now]
and click [Finish]. Check [Yes, I want to view the ReadMe
File] if you want to read the Readme file. The OKI LPR utility
starts.
B930n User’s Guide> 81
Page 88

14. Select [Add Printer] on the [Remote Print] menu.
15. Select [Printer] to accept the printer that has been added in
Step 1.
16. Enter an IP address at [IP Address] and click [Ok]. A printer
is added to the main window.
Refer to the On-Line Help for information on how to use the utility.
UNINSTALL
1. Stop the OKI LPR Utility. Right-click the OKI LPR icon in the
system tray and click [Exit].
2. Select Start>Program>Okidata>OKI LPR Utility>Uninstall
OKI LPR Utility
3. Click [Yes] when the [Confirm File Deletion] dialogue is
displayed. Removal of the OKI LPR utility starts.
4. When the removal is complete, the [Uninstall Complete]
screen is displayed. Click [Ok].
PRINTING FROM UNIX
FOR PRINTING FROM UNIX
This section explains the installation procedure for printing from a
UNIX computer.
SYSTEM CONFIGURATION
The printer uses the Line Printer Daemon Protocol (LPD) that
supports TCP/IP as the transport protocol. With the LPD, the printer
can be under a UNIX network environment.
B930n User’s Guide> 82
Page 89

The printer LPD supports Spool Mode where print jobs from clients
are spooled once before output and Non-spool Mode where print
jobs are sequentially output without spooling.
LPD (TCP/IP)
NOTE
When the LPD port is used, the printer can limit print instructions
by IP addresses.
TARGET COMPUTERS
The target computers are as follows:
• Workstation or personal computer with RFC 1179 Line Printer
Daemon Protocol. LPD (TCP/IP) UNIX
INTERFACE
The printer LPD is available on the following interfaces:
• Ethernet 100BaseTX
• Ethernet 10Base-T
The applicable frame types conform to Ethernet II.
SET UP PROCEDURE
The setting procedure is as follows:
1. Setting up the printer
Set the IP address on the printer Operator Panel.
Use the printer Operator Panel or the EWS to set the LPD port
to [Enable] (default: [Enable]).
NOTE
> Before activating the LPD port, set the IP address of the
printer. For details on how to set the IP address and the
port, refer Printer Configuration.
B930n User’s Guide> 83
Page 90

> > The EWS allows more detailed settings.
2. Settings of the workstation
Set the printer in the workstation.
Refer to: “SETTING UP THE WORKSTATION” on page 84
SETTING UP THE WORKSTATION
This section explains the settings of Solaris 2.x workstation for
printing.
BEFORE SETUP
Before setting up the workstation, check the following:
• The setup procedures and commands may vary according to
different versions of OS. Refer to the manuals that came with
the workstation for details.
• To setup the printer, the user must be a superuser. Contact
your network administrator to perform the setup if you do
not have the authority of a superuser.
• Check the IP address set up for the printer in advance. Be
cautious as an incorrect IP address may cause severe errors.
• Before performing any network setup (such as the IP
address) to a host running under NIS (Network Information
Service), consult the NIS administrator.
EXAMPLES OF SETTINGS FOR SOLARIS 2.X
The examples below show printer settings for Solaris 2.6 where the
printer host name is printer1.
1. 1. Registering a printer (printer name: P001) supporting the
PostScript language
#lpadmin -p P001 -s printer1\!PS
2. 2. Registering a printer (printer name: P002) supporting the
PostScript language that feeds paper from an A4-size paper
tray for duplex printing
#lpadmin -p P002 -s printer1\!PS A4_DUP
B930n User’s Guide> 84
Page 91

3. Registering a logical PostScript printer PS01 set using the
EWS.
#lpadmin -p P003 -s printer1\!PS01
NOTE
> Enter the host name and printer name of the remote host
after -s by linking with !. The printer name corresponds to
the print language/mode.
> The output style may be specified at the same time. The
parameters for specifying a style are the same as those
available for the -C option. As the example of (2) shows,
insert "_" between the printer name and output
parameters. You can enter up to 14 characters.
> If PS%n or PLT%nH is specified for the printer name as in
the example of (3), however, the printer does not operate
normally with an output style different from the preset
one.
> Set a printer name corresponding to the print language/
mode and output style.
Refer to:
• Manuals, such as online manuals, that came with various
workstations.
PRINT (LP)
The "lp" command is used for printing.
C
OMMAND FORMAT
lp [-d Printer name] [-n No. of copies] File name
C
OMMAND OPTIONS
The following command options are available:
-d Printer name
Specify the printer name registered by the "lpadmin" command as
the -d option. If this option is omitted, the default printer lp will be
specified.
B930n User’s Guide> 85
Page 92

-n No. of copies
This option specifies the number of copies. If one "lp" command is
issued to print multiple files, the number of copies specified by this
option will apply to all the files.
However, this option is effective when the printer is in the spool
mode. In the non-spool mode, the client must be a Windows NT
machine to use this option.
Precautions
• Among options not listed above (e.g. -m option), those not
processed by the workstation which sends the print
instructions will not be effective.
In the spool mode, up to 32 files can be printed by one "lp"
command. Files that come after the 32nd files will be ignored.
Sample
To print a file named "file1" to a printer set up as "P001", enter the
following command:
%lp -d P001 file1
To output three copies of "file1" and "file2" to "P001", enter the
following:
$lp -d P001 -n3 file1 file2
DELETE (CANCEL)
This cancel command is used to delete print data which has been
sent to print.
Command Format
cancel [Printer name] [Job Number]
C
OMMAND OPTIONS
The following command options are available:
B930n User’s Guide> 86
Page 93

Printer name
This option specifies the printer name. The "cancel" command can
be effectively used with the combined use of -a, -e and -u as shown
below. This option is invalid in the non-spool mode.
-a
Deletes all the print data, sent by a user who issues this command,
from the data which has been received by a specified printer.
-e
Deletes all the print data received by a specified printer.
-u user name
Deletes all the print data sent by a specified user and received by a
specified printer.
JOB NUMBER
This option specifies the job number of the print data to be deleted.
These numbers can be checked by issuing a "lpstat" command.
This option is invalid in the non-spool mode.
Precautions
• Print data that consists of multiple files sent in one print
instruction cannot be deleted file by file. All the files will be
deleted at one go.
• This command will become invalid if it is executed without
options having been specified or if there is no print data
which matches the option.
• A workstation can only delete print data it has sent. It cannot
delete print data sent by other workstations.
• When a command to delete print data is received, the file
concerned will be deleted even if it is in the process of being
printed. Only the print data available prior to file deletion will
be printed.
B930n User’s Guide> 87
Page 94

Sample
To cancel the print data related to the files of printer "P001" (Job
number: P001-27), enter the following command:
%cancel P001-27
To cancel all the printer data of printer "P001", enter the following
command:
%cancel P001 -e
INQUIRY (LPSTAT)
The "lpstat" command is used to inquire about the status of the
printer.
Important:
In the non-spool mode, this function is available to Windows NT
clients but not to Solaris clients.
Command Format
lpstat [Option]
Command Options The following command options are available:
If no option is specified, all the print data-related information will be
displayed.
The sequence of the options does not affect the outcome.
To use more than one argument at the same time, separate them
by commas and enclose all the arguments with " ".
E.g. %lpstat -u "user1,user2,user3"
-o [Printer name]
This option displays the print data received. The printer name is
specified in the argument.
-t
This option displays all the information.
B930n User’s Guide> 88
Page 95

-u [User name]
This option displays received print data information on users of
specified user names.
-v [Printer name]
This option displays the printer name and the device path name. The
printer name is specified in the argument.
Precautions
• Long file names will be truncated.
• Up to 64 print instruction information can be displayed.
• If two or more types of print languages/modes are set up on
a single workstation, identical job numbers may be displayed
when an inquiry command (lpstat) is issued.
Sample
To inquire about the print data received by a printer set up as
"P001", enter the following command:
%lpstat -o P001
-C OPTION (LPR COMMAND)
This section explains the functions which can be specified and
printing operations which will be affected by the -C option.
The -C option is available only when the SunOS directs the printer
to enter the spool mode.
Important:
• When the PostScript logical printer that was configured on
the EWS and -C option of "lpr" command have been specified
simultaneously, some of the actions cannot be guaranteed to
work. Also, when specifying the PostScript logical printer as a
default printer on Unix, it is recommended not to user the -C
option by "lpr" command.
FUNCTION
The following items can be set up by using the -C option:
B930n User’s Guide> 89
Page 96

NOTE
> Any parameter other than below becomes invalid if
specified.
Selecting a Paper Tray
When selecting a paper tray, either the paper size or the tray itself
is specified. If the paper size is specified, the printer automatically
searches and selects the tray where the specified paper is loaded.
The following parameters can be specified:
PARAMETER DESCRIPTION
INTRAY1/intray1 Selects Tray 1
INTRAY2/intray2 Selects Tray 2
INTRAY3/intray3 Selects Tray 3
INTRAY4/intray4 Selects Tray 4
INTRAY5/intray5 Selects Tray 5
INTRAY6/intray6 Selects Tray 6
A4/a4 Selects the tray where A4 paper is loaded.
B5/b5 Selects the tray where B5 paper is loaded.
A5/a5 Selects the tray where A5 paper is loaded.
LETTER/Letter Selects the tray where Letter paper is loaded.
LEGAL/Legal Selects the tray where Legal paper is loaded.
NOTE
> If several parameters are specified in one "lpr" command,
data may not be printed correctly.
> The system default is used if no tray number is specified,
a specified tray is not loaded, or paper of a specified size
is not loaded.
> This option is for specifying a paper size only. Paper is
selected but the document size is not corrected according
to the paper size.
> If the print data specifies a paper tray, the tray
specification by the data becomes valid and that by the -C
option becomes invalid.
B930n User’s Guide> 90
Page 97

> If an unacceptable combination is specified, the printer
may not operate correctly.
> For some print language, the specification may be invalid.
Selecting a Paper Output Tray
The following parameters can be specified:
PARAMETER DESCRIPTION
OUTUP/outup Ejects prints to the rear tray (option).
OUTDOWN/outdown Ejects prints to the center tray.
Selecting a Paper Type
The following parameters can be specified:
PARAMETER DESCRIPTION
PTS/pts Selects Plain paper.
PT1/pt1 Selects Heavy weight paper 1.
PT2/pt2 Selects Heavy weight paper 2.
POH/poh Selects Transparency.
PRC/prc Selects Recycled paper.
Specifying 2 sided Printing
The following parameters can be specified:
PARAMETER DESCRIPTION
DUP/dup 2 sided printing as follows:
B930n User’s Guide> 91
Page 98

PARAMETER DESCRIPTION
TUMBLE/tumble 2 sided printing as follows:
SIMP/simp 1 sided printing
NOTE
> If several parameters are specified in one "lpr" command,
data may not be printed correctly.
> The system default is used if no parameter is specified.
> If the print data specifies 2 sided or 1 sided printing, the
specification by the data becomes valid and overrides that
by -C option.
Specifying Paper Size and 2 sided Printing
Select a paper size and a binding type. The following parameters can
be specified:
PARAMETER DESCRIPTION
A4D/a4d
A4T/a4t 2 sided printing on A4 paper and short-
A5D/a5d 2 sided printing on A5 paper and long-
A5T/a5t 2 sided printing on A5 paper and short-
B5D/b5d 2 sided printing on 85 paper and long-
B5T/b5t 2 sided printing on B5 paper and short-
2 sided printing on A4 paper and longside binding
side binding
side binding
side binding
side binding
side binding
NOTE
> If several parameters are specified in one "lpr" command,
data may not be printed correctly.
B930n User’s Guide> 92
Page 99

> The system default is used if no parameter is specified.
> If the print data specifies 2 sided or 1 sided printing, the
specification by the data becomes valid and overrides that
by -C option.
Specifying Collation
The following parameter can be specified:
PARAMETER DESCRIPTION
COLLATE/collate Sorts prints electronically.
NOTE
> For some print language, the specification may be invalid.
Specifying Color and Print Modes
The following color and print mode parameters can be specified:
PARAMETER DESCRIPTION
CC/cc Selects color for color mode and quality
CB/cb Selects color for color mode and speed
GC/gc Selects monochrome for color mode
GB/gb Selects monochrome for color mode
AC/ac Selects auto (color/monochrome) for
AB/ab Selects auto (color/monochrome) for
priority for print mode.
priority for print mode.
and quality priority for
and speed priority for
color mode and quality
color mode and speed
NOTE
> If several parameters are specified in one "lpr" command,
data may not be printed.
> For some print language, the specification may be invalid.
> The system default is used if no parameter is specified.
> The color setting is not available on this printer.
B930n User’s Guide> 93
Page 100

PRINTING
To specify the output format of printing, enter the following
command:
-C, [Parameter], [Parameter]
Enter a "," (comma) after -C followed by the parameters which
specify the output format. To specify multiple parameters, separate
them with ",".
For example, to output a file named "file1" 2-sided on A4 to printer
"P001", enter the following command:
%lpr -P P001 -C, DUP, A4 file
Important:
> If the command specified by the -C option exceeds 64
characters, the operation may not function correctly.
PRINTING FROM A MACINTOSH COMPUTER
PRINTING FROM A MACINTOSH COMPUTER
This section explains the installation procedure for printing from a
Macintosh computer.
SYSTEM CONFIGURATION
As the printer supports EtherTalk and LPD protocol, you can print
from Macintosh. NOTE > Printing using the LPD protocol is available
only with the Mac OS X.
TARGET COMPUTERS
The printer supports a Macintosh or Power Macintosh with the
following OS:
• Mac OS 10.2 and up
SET UP PROCEDURE
The setting procedure is as follows:
1. Use the printer Operator Panel or EWS to set the following
port to [Enable].
B930n User’s Guide> 94
 Loading...