

Page 1

Page 2

Copyright Information
Copyright © 2006 by Oki Data Americas, Inc. All Rights Reserved
Document Information
B6500 Network Guide
P/N 59388401, Revision 1.0
August, 2006
Disclaimer
Every effort has been made to ensure that the information in this document is
complete, accurate, and up-to-date. The manufacturer assumes no responsibility
for the results of errors beyond its control. The manufacturer also cannot guarantee
that changes in software and equipment made by other manufacturers and referred
to in this guide will not affect the applicability of the information in it. Mention of
software products manufactured by other companies does not necessarily
constitute endorsement by the manufacturer .
While all reasonable efforts have been made to m ake t h i s d o c u men t a s a c c u rat e a n d
helpful as possible, we make no warranty of any kind, expressed or implied, as to
the accuracy or completeness of the information contained herein.
The most up-to-date drivers and manuals are available from the web site:
http://www.www.okiprintingsolutions.com
Trademark Information
Oki and Microline are registered trademarks of Oki Electric Industry Company Ltd.
Apple, Macintosh and Mac OS are registered trademarks of Apple Computers Inc.
ENERGY STAR is a trademark of the United States Environmental Protection Agency.
Microsoft, MS-DOS and Windows are either registered trademarks or trademarks of
Microsoft Corporation in the United States and/or other countries.
Other product names and brand names are registered trademarks or trademarks of
their proprietors.
Regulatory Information
As an ENERGY STAR® Program Participant, the manufacturer has
determined that this product meets the ENERGY STAR guidelines
for energy efficiency.
This product complies with the requirements of the Council
Directives 89/336/EEC (EMC), 73/23/EEC (LVD) and 1999/5/EC
(R&TTE), as amended where applicable, on the approximation of
the laws of the member states relating to Electromagnetic
Compatibility, Low Voltage and Radio & Telecommunications
Terminal Equipment.
B6500 Network Guide> 2
Page 3

P
REFACE
Thank you for choosing this printer.
This Network Guide provides all the necessary information about
installing and operating this printer on the network.
Please read this guide in detail to ensure full and efficient use of this
product on a network and keep it handy for a quick reference should
you encounter any difficulties when using the machine.
B6500 Network Guide> 3
Page 4

B6500 Network Guide> 4
Page 5

C
ONTENTS
Preface . . . . . . . . . . . . . . . . . . . . . . . . . . . . . . . . . . . . 3
Contents . . . . . . . . . . . . . . . . . . . . . . . . . . . . . . . . . . . 5
Using This Guide . . . . . . . . . . . . . . . . . . . . . . . . . . . . . 9
Prerequisite Knowledge . . . . . . . . . . . . . . . . . . . . . . . 9
Organization . . . . . . . . . . . . . . . . . . . . . . . . . . . . . . . 9
Conventions . . . . . . . . . . . . . . . . . . . . . . . . . . . . . . 10
Overview . . . . . . . . . . . . . . . . . . . . . . . . . . . . . . . . . 11
Supported Environment . . . . . . . . . . . . . . . . . . . . . . 11
Supported OS and Environment . . . . . . . . . . . . . . 11
Configuration . . . . . . . . . . . . . . . . . . . . . . . . . . . . . 12
Introduction . . . . . . . . . . . . . . . . . . . . . . . . . . . . . 12
Initial IP Address . . . . . . . . . . . . . . . . . . . . . . . . . 12
Printer Setup using a Browser . . . . . . . . . . . . . . . . . . 13
Printing From a Windows Computer . . . . . . . . . . . . 15
Overview . . . . . . . . . . . . . . . . . . . . . . . . . . . . . . . . 15
Installation of TCP/IP Protocol . . . . . . . . . . . . . . . . . . 16
Windows 95/98/Me . . . . . . . . . . . . . . . . . . . . . . . . 17
Windows NT 4.0 . . . . . . . . . . . . . . . . . . . . . . . . . . 17
Windows 2000 . . . . . . . . . . . . . . . . . . . . . . . . . . . 17
Windows XP . . . . . . . . . . . . . . . . . . . . . . . . . . . . . 18
Configuring As A Network Printer . . . . . . . . . . . . . . . 18
Windows 95/98/Me . . . . . . . . . . . . . . . . . . . . . . . . 18
Windows NT 4.0 . . . . . . . . . . . . . . . . . . . . . . . . . . 19
Windows 2000 . . . . . . . . . . . . . . . . . . . . . . . . . . . 20
Windows XP . . . . . . . . . . . . . . . . . . . . . . . . . . . . . 22
Creating a Shared Printer . . . . . . . . . . . . . . . . . . . . . 24
Settings Windows NT 4.0/2000/XP/Server 2003 . . . . 24
Settings of Windows 95/98/Me . . . . . . . . . . . . . . . . 24
OKI LPR . . . . . . . . . . . . . . . . . . . . . . . . . . . . . . . . . 25
Installing the OKI LPR Utility . . . . . . . . . . . . . . . . . 25
Uninstall . . . . . . . . . . . . . . . . . . . . . . . . . . . . . . . 26
Printing From UNIX . . . . . . . . . . . . . . . . . . . . . . . . . 27
For Printing From UNIX . . . . . . . . . . . . . . . . . . . . . . 27
System Configuration . . . . . . . . . . . . . . . . . . . . . . 27
Target Computers . . . . . . . . . . . . . . . . . . . . . . . . . 27
Interface . . . . . . . . . . . . . . . . . . . . . . . . . . . . . . . 28
Set Up Procedure . . . . . . . . . . . . . . . . . . . . . . . . . 28
B6500 Network Guide> 5
Page 6

Setting Up the Workstation . . . . . . . . . . . . . . . . . . . . 29
Before Setup . . . . . . . . . . . . . . . . . . . . . . . . . . . . 29
Examples of Settings for Solaris 2.X . . . . . . . . . . . . 29
Printing (Solaris) . . . . . . . . . . . . . . . . . . . . . . . . . . . 31
Print (lp) . . . . . . . . . . . . . . . . . . . . . . . . . . . . . . . 31
Command Format . . . . . . . . . . . . . . . . . . . . . . . 31
Command Options . . . . . . . . . . . . . . . . . . . . . . . 31
Precautions . . . . . . . . . . . . . . . . . . . . . . . . . . . . 31
Sample . . . . . . . . . . . . . . . . . . . . . . . . . . . . . . . 32
Delete (Cancel) . . . . . . . . . . . . . . . . . . . . . . . . . . 32
Command Format . . . . . . . . . . . . . . . . . . . . . . . 32
Command Options . . . . . . . . . . . . . . . . . . . . . . . 32
Job Number . . . . . . . . . . . . . . . . . . . . . . . . . . . . . . 33
Precautions . . . . . . . . . . . . . . . . . . . . . . . . . . . . 33
Sample . . . . . . . . . . . . . . . . . . . . . . . . . . . . . . . 33
Inquiry (lpstat) . . . . . . . . . . . . . . . . . . . . . . . . . . . 33
Command Format . . . . . . . . . . . . . . . . . . . . . . . 34
Command Options . . . . . . . . . . . . . . . . . . . . . . . 34
Precautions . . . . . . . . . . . . . . . . . . . . . . . . . . . . 34
Sample . . . . . . . . . . . . . . . . . . . . . . . . . . . . . . . 35
-C Option (lpr Command) . . . . . . . . . . . . . . . . . . . . . 36
Function . . . . . . . . . . . . . . . . . . . . . . . . . . . . . . . 36
Selecting a Paper Tray . . . . . . . . . . . . . . . . . . . . 36
Selecting a Paper Output Tray . . . . . . . . . . . . . . . 37
Selecting a Paper Type . . . . . . . . . . . . . . . . . . . . 37
Specifying 2 sided Printing . . . . . . . . . . . . . . . . . 38
Specifying Paper Size and 2 sided Printing . . . . . . 39
Specifying Collation . . . . . . . . . . . . . . . . . . . . . . 39
Specifying Color and Print Modes . . . . . . . . . . . . . 40
Printing . . . . . . . . . . . . . . . . . . . . . . . . . . . . . . . . 40
-C, [Parameter], [Parameter] . . . . . . . . . . . . . . . 40
Printing From a Macintosh Computer . . . . . . . . . . . . 41
Printing From a Macintosh Computer . . . . . . . . . . . . . 41
System Configuration . . . . . . . . . . . . . . . . . . . . . . 41
Target Computers . . . . . . . . . . . . . . . . . . . . . . . . . 41
Set Up Procedure . . . . . . . . . . . . . . . . . . . . . . . . . 41
SNMP Support . . . . . . . . . . . . . . . . . . . . . . . . . . . . . 43
B6500 Network Guide> 6
Page 7

Network Utility Software . . . . . . . . . . . . . . . . . . . . . 44
Status Monitor . . . . . . . . . . . . . . . . . . . . . . . . . . . . 44
Operating Requirements . . . . . . . . . . . . . . . . . . . . 44
Using the Status Monitor . . . . . . . . . . . . . . . . . . . . 44
Color Of The Icon And Printer Status . . . . . . . . . . . . 45
Precautions and Limitations . . . . . . . . . . . . . . . . . . . 46
On Using TCP/IP . . . . . . . . . . . . . . . . . . . . . . . . . . . 46
Setting Up . . . . . . . . . . . . . . . . . . . . . . . . . . . . . . 46
Setting Up the Printer . . . . . . . . . . . . . . . . . . . . . 46
Setting Up the Computer . . . . . . . . . . . . . . . . . . 46
Switching the Power On/Off . . . . . . . . . . . . . . . . . . 47
Printer Spooling Is Set to [On] Spool Mode . . . . . . 47
Printer Spooling Is Set to [Off] Nonspool Mode . . . 47
Printing From Windows . . . . . . . . . . . . . . . . . . . . . 47
Printing From UNIX . . . . . . . . . . . . . . . . . . . . . . . . 48
Print . . . . . . . . . . . . . . . . . . . . . . . . . . . . . . . . . 48
Delete . . . . . . . . . . . . . . . . . . . . . . . . . . . . . . . 49
Inquiry . . . . . . . . . . . . . . . . . . . . . . . . . . . . . . . 49
Others . . . . . . . . . . . . . . . . . . . . . . . . . . . . . . . 49
Troubleshooting . . . . . . . . . . . . . . . . . . . . . . . . . . . . 50
Using TCP/IP . . . . . . . . . . . . . . . . . . . . . . . . . . . . . . 50
When Using Windows 95/98/Me . . . . . . . . . . . . . . . 50
Using Windows NT 4.0/2000/XP/Server 2003 . . . . . . 52
The Printer Is Not Printing . . . . . . . . . . . . . . . . . . 52
Unable to obtain the desired print results. . . . . . . 53
When Using Unix . . . . . . . . . . . . . . . . . . . . . . . . . 54
The printer is not printing . . . . . . . . . . . . . . . . . . 54
Unable to Obtain the Desired Print Results . . . . . . 55
Using EtherTalk . . . . . . . . . . . . . . . . . . . . . . . . . . . . 56
Setting IP Address . . . . . . . . . . . . . . . . . . . . . . . . . . 60
Appendix A: Setting IP Address . . . . . . . . . . . . . . . . 61
B6500 Network Guide> 7
Page 8

B6500 Network Guide> 8
Page 9

U
SING THIS GUIDE
P
REREQUISITE KNOWLEDGE
Read this guide in detail before using this printer. If you are not
familiar with the machine to which the printer is to be connected or
the basic operations or concepts of the software, read the relevant
manuals first.
Machines and software to which the printer is to be connected refer
to personal computers, workstations, networks, and the respective
operating systems and applications on which these machines run.
O
RGANIZATION
The following is a summary of each chapter.
Overview
This chapter contains information on using the printer as a network
printer.
Configuration
This section details configuring the printer's network interface and
should be done prior to configuring your computer.
Printing from a Windows Computer
This chapter explains the installation procedure for printing from a
Windows NT 4.0/ Windows 2000/Windows XP/Windows Server 2003
computer through LPD or Port9100. This chapter also explains the
installation procedure for printing from another Windows computer
by creating a shared printer on a Windows NT 4.0/Windows 2000/
Windows XP/ Windows Server 2003 computer.
Printing From UNIX
This chapter explains the procedure for printing from a UNIX
computer.
Printing From a Macintosh Computer
This chapter explains the procedure for printing from a Macintosh
computer.
Network Utility Software
This chapter explains how to use the Network Utility Software.
B6500 Network Guide> 9
Page 10

Precautions and Limitations
This chapter explains the operational precautions and limitations
under each network environment.
Troubleshooting
This chapter explains how to solve problems under each network
environment.
Appendix
This chapter explains how to manually set the printer’s IP address.
C
ONVENTIONS
1. In this guide, “computer” refers to both the personal
computer and workstation.
2. The following icons are used in this guide:
Important Indicates important information which you
Note Indicates additional information on operations or
Refer to Indicates reference sources.
3. The following conventions are used in this guide:
Refer to “xxx”: The cross-reference is within this guide.
should read.
features.
Refer to YYY : The cross-reference is not within this guide.
[] : Indicates items displayed on the computer
and the printer control panel. Also indicates
the title of printed reports/lists from the
printer.
<> : Indicates items such as hard buttons and
indicators on the keyboard and printer.
B6500 Network Guide> 10
Page 11

O
VERVIEW
S
UPPORTED ENVIRONMENT
This printer can be connected to a network through the Ethernet
interface.
The printer supports multiple protocols. As a result, one printer can
be shared even from different network environments.
Supported OS and Environment
Connection Network
Port LPD Port 9100 EtherTalk
Protocol TCP/IP TCP/IP Apple Talk
Windows 95 z
Windows 98 z*1 z*1
Windows Me z*1 z*1
Windows NT 4.0 z
OS
Windows 2000 zz
Windows XP zz
*1 z*1
Windows Server
2003
UNIX z
Macintosh z*4 z*3
*1: When using Windows 95/98/Me, use OKI LPR.
*2: UNIX Filter are required to print PostScript data. UNIX Filter is compatible
with the OSs in Solaris, HPUX and Linux (Redhat, SuSE).
*3: Supports Mac OS 9.0 or later.
*4: Supports only Mac OS X.
Important
The EtherTalk port setting in this printer is disabled by default. To use this
port, enable the setting on the control panel.
B6500 Network Guide> 11
zz
*2
Page 12

C
ONFIGURATION
I
NTRODUCTION
The B6500 is a fast 100BASE-TX/10BASE-T network capable printer.
It supports major protocols such as TCP/IP and Ethertalk. This
section details configuring the printer's network interface and should
be done prior to configuring your computer.
I
NITIAL
IP A
DDRESS
The factory configuration is for the printer to obtain an IP address
automatically from your networks’ DHCP server.
Use the printers’ console to determine the printers’ address.
1. Press the <MENU> button on the control panel.
2. Press the <T> button until the text “Network Menu” is
shown on the first line of the display.
3. Press the <X> button to enter the Network menu.
4. Press the <S> or <T> buttons to move through the
submenus until the text “IP Address” is shown on the first
line of the display.
5. Note the IP address shown on the second line of the display.
If your network does not have a DHCP server, the IP address will
have to be set manually.
Use the printers’ console to manual set the printers’ address.
1. Press the <MENU> button on the control panel.
2. Press the <T> button until the text “Network Menu” is
shown on the first line of the display.
3. Press the <X> button to enter the Network menu.
4. Press the <S> or <T> buttons to move through the
submenus until the text “IP Address Set” is shown on the first
line of the display.
5. Press the <X> button to enter the submenu
B6500 Network Guide> 12
Page 13
6. Press the <S> or <T> buttons to toggle between Automatic
and Manual, select manual. Press <SELECT> to save the
selection
7. Press the <S> or <T> buttons to move through the
submenus until the text “IP Address” is shown on the first
line of the display.
8. Press the <X> button to enter the submenu
9. The first set of numbers blinks. Press the <S> or <T>
buttons to scroll to the desired number. Press the <X>
button to save the current set of numbers and move to the
next set. Repeat the procedure for each set of numbers.
When the last set of numbers is set, press <SELECT> to
save the IP address.
10. Repeat steps 7 through 9 to set the Subnet Mask.
11. Repeat steps 7 through 9 to set the Gateway Address.
P
RINTER SETUP USING A BROWSER
If the printer is connected to the network using TCP/IP, its settings
can be configured using a Web browser such as Internet Explorer or
FireFox. Refer to the relevant manuals for details on how to launch
and use the browser.
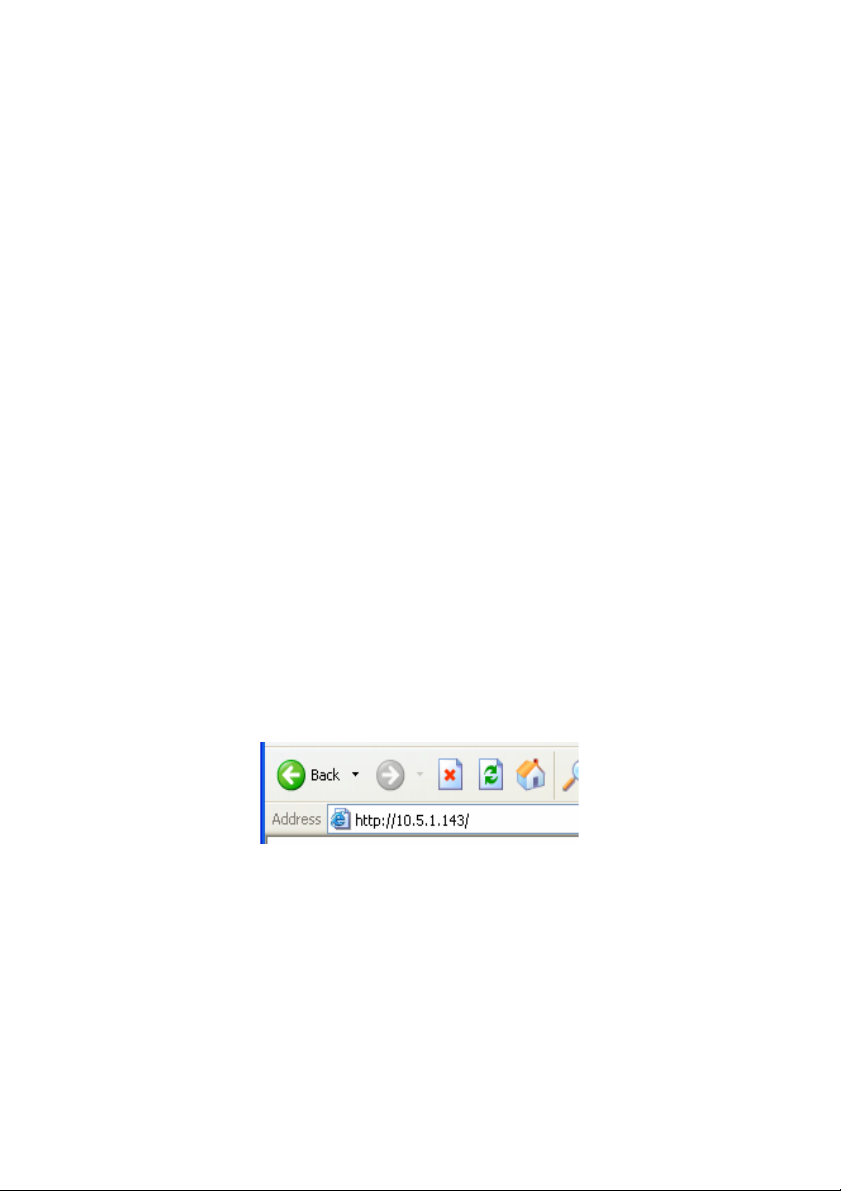
Set the browsers address to the IP address found in the prior
section.
The network addresses used in this manual are shown as examples
only. Use the address found in the prior section.
To apply configuration changes using a Web browser, select the
Administrator Login. You will be prompted for a username and
password. The username is [root] and the default password is the
last six digits of the Ethernet MAC address. The MAC address can be
B6500 Network Guide> 13
Page 14
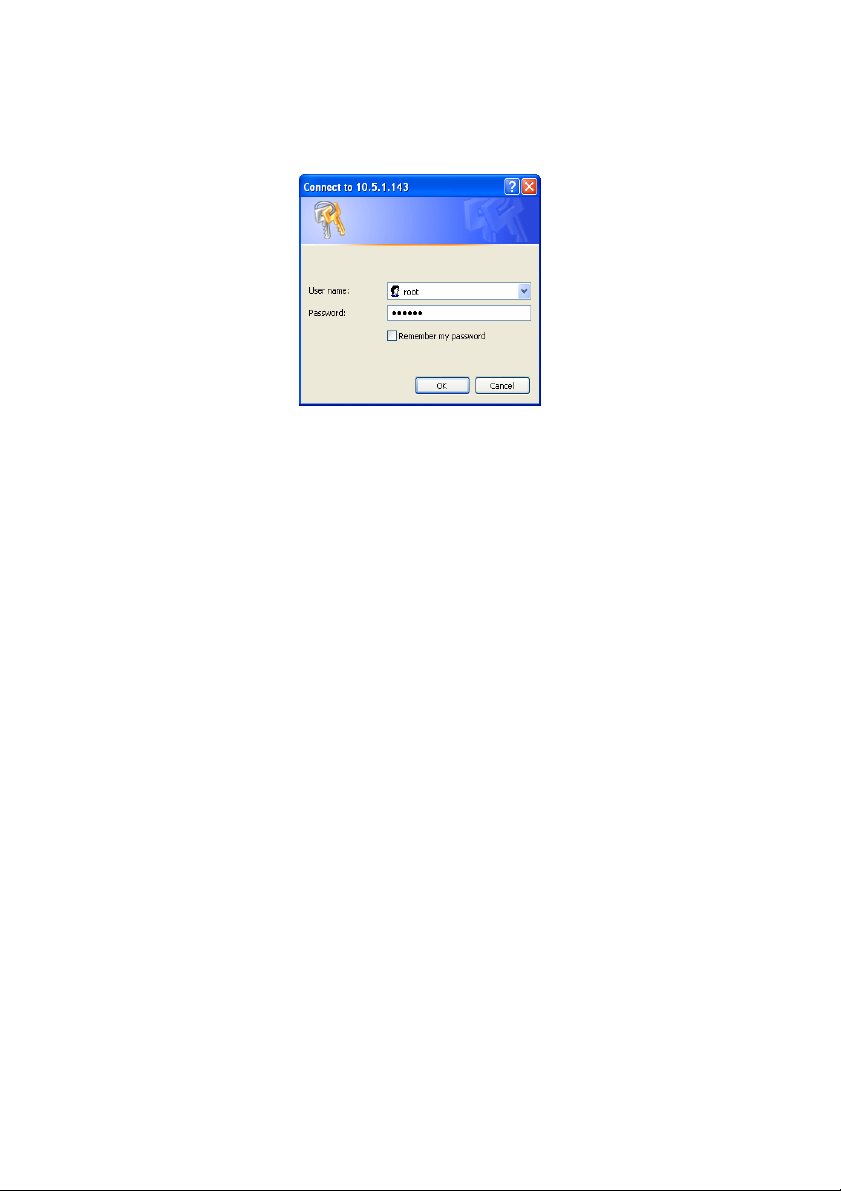
found on the Network Summary page. Note that the password is
case sensitive and letters should be entered in upper case.
The following explanation uses Windows XP and Internet Explore
version 6.0 as an example to manually set the printers IP address.
1. Launch the Web browser
2. Select Administrator Login, enter the username and
password.
3. Select the Network group.
4. Select the TCP/IP subgroup.
5. Select “Set IP Manually”
6. Configure the IP Address, Subnet Mask and Gateway for the
printers’ network interface. Once the new address is
submitted to the printer, the new address will have to be
entered into the browsers’ address.
Most of the printers’ configuration can be done through the browser
including setting the administrator password.
B6500 Network Guide> 14
Page 15
P
RINTING FROM A
O
VERVIEW
This chapter provides guidelines on how to print over the network
from various Microsoft Windows platforms. There are numerous
ways of printing from Windows and the exact set-up will vary
depending upon your environment. There are also numerous
versions of Windows, which can be configured as either a client,
server or both.
Although there are many variants of Windows, the principles of
network printing are the same. Microsoft provides on-line help with
all of their operating systems and this is a good reference point for
the exact details of each configuration option within Windows.
The network printer supports TCP/IP protocol that can be used in
conjunction with the Windows operating system.
W
INDOWS COMPUTER
Windows NT 4.0/Windows 2000/Windows XP/
Once the printer registered on the Windows NT 4.0/Windows 2000/
Windows XP/Windows Server 2003 computer is shared, you can also
print from Windows 95/Windows 98/Windows Me computers
through this printer.
Windows Server 2003
LPD or Port9100 (TCP/IP)
B6500 Network Guide> 15
Page 16

I
NSTALLATION OF
TCP/IP P
ROTOCOL
There are a number of options available when printing using TCP/IP
for Windows. The following table lists the options:
WINDOWS VERSION METHOD
Win 95/98/Me OKI LPR Utility
NT 4.0 OKI LPR Utility
Microsoft LPR
Windows 2000/ Windows XP OKI LPR Utility
Microsoft LPR
Port 9100
1
These functions are built into Windows and are displayed as options when
using the Add Printer Wizard.
1
1
1
Although there are some differences in configuration options
between the various Windows platforms, the procedure for printing
using TCP/IP is the same.
1. Ensure that the TCP/IP protocol has been installed in
Windows. This can be confirmed by checking the network
settings from within the Control Panel. If TCP/IP has not been
installed refer to the section below Installation of TCP/IP
protocol.
2. If not already configured, a suitable IP address, Subnet Mask
and Gateway address should be configured. Please refer to
the on-line help if necessary. It is vital that the IP address
entered is unique and valid. Entering an incorrect IP address
may cause severe network problems. Please check the
address with the network administrator.
3. If your network environment uses domain names, DNS
should be enabled and configured on your system. However,
this step is not essential to enable network printing.
4. Restart the operating system.
B6500 Network Guide> 16
Page 17

W
INDOWS
1. Click the [Start] button, select [Settings] and then click
2. In the [Control Panel] double-click on the [Network] icon.
3. In the [Network] dialogue box click [Configuration Panel].
4. If the [Client for Microsoft Networks] is not listed, click [Add].
5. In the [Select Network Component T ype] dialogue box, select
6. In the [Select Network Protocol] dialogue box, select
7. The Windows installation CD-ROM may be required. Follow
W
INDOWS
1. Click [Start], select [Settings] and then click [Control Panel].
2. Double-click the [Network] icon.
3. In the Network dialogue box, click the [Protocols] tab.
4. If the [TCP/IP Protocol] is not listed, click [Add].
5. In the [Select Network Protocol] dialogue box, select [TCP/IP
6. The Windows NT installation CD-ROM may be required.
95/98/M
[Control Panel].
[Protocol] then click [Add].
[Microsoft] from the list of manufacturers, then select [TCP/
IP] from the list of network protocols, then click [OK].
the remaining dialogue box prompts.
E
NT 4.0
Protocol] and click [OK].
Follow the remaining dialogue box prompts.
W
INDOWS
1. Click the [Start] button, select [Settings] and then click
2. Double-click the [Local Area Connection] icon. In the [Local
3. In the [Local Area Connection Properties] dialogue box, click
2000
[Network and Dial-up Connections].
Area Connection Status] dialogue box, click [Properties].
[Install].
B6500 Network Guide> 17
Page 18

4. In the [Select Network Component T ype] dialogue box, select
[Protocol] and click [Add].
5. In the [Select Network Protocol] dialogue box, select [TCP/IP
Protocol] and click [OK].
6. Click [Close] button in the [Local Area Connection Properties]
dialogue box.
7. Click [Close] in the [Local Area Connection Status] dialogue
box.
W
INDOWS
1. Click the [Start] button and select [Control Panel].
2. Select [Network and Internet Connection] and [Network
3. Double-click [Local Area Connection] and click [Properties] in
4. If the [Internet Protocol (TCP/IP)] is not listed, click
5. In the [Select Network Component T ype] dialogue box, select
6. In the [Select Network Protocol] dialogue box, select
XP
Connection].
the [Location Area Connection Status] dialogue box.
[Install.].
[Protocol] then click [Add].
[Internet Protocol (TCP/IP)] then click [OK].
7. The Windows XP installation CD-ROM may be required.
Follow the remaining dialogue box prompts.
Once the protocol has been installed and configured in Windows, the
next step is to configure the TCP/IP parameters in the network
printer.
C
ONFIGURING AS
W
INDOWS
When printing using TCP/IP, the Oki LPR utility is the only option to
use. The following procedure should be used.
95/98/M
A N
ETWORK PRINTER
E
B6500 Network Guide> 18
Page 19

When installing the driver, ensure it is installed as a local printer and
not a network printer. Ensure the appropriate printer driver has been
installed in Windows.
Install the Oki LPR utility as described on page 25 of this manual and
add the printer installed earlier.
W
INDOWS
NT 4.0
With Windows NT 4.0, you have two options for printing using TCP/
IP. They are:
•Oki LPR
•Microsoft LPR
In order to use Microsoft LPR, it must first be installed into your
operating system.
NT 4.0 requires administrator privileges.
Oki LPR
Please follow the procedure described in the Windows 95/98/Me
section on page 18.
Microsoft LPR
To install this port, the following needs to be carried out.
1. Select [Start], [Settings], [Control Panel] and then select
[Printers].
2. Select [Add Printer] Wizard.
3. Select [My Computer] and then [Next].
4. Select [Add Port].
5. Select [LPR Port] and then [OK].
6. In [Name or address of server providing lpd] type the host
name or IP address of the host for the printer you are adding.
7. In [Name of printer or print queue on that server] type the
logical printer name "lp" and then click [OK].
8. Follow the instructions on the screen to finish installing the
LPR-compatible printer.
B6500 Network Guide> 19
Page 20

If the LPR port is not available, install the Microsoft TCP/IP Printing
Service.
Insert the printer driver for Windows NT4.0.
1. Select [Start].[Settings].[Control Panel] and then doubleclick the [Network] icon.
2. In the Network dialogue box, click the [Services] tab.
3. If [Microsoft TCP/IP Printing] is not listed, click [Add].
4. In the [Select Network Service] dialogue box, select
[Microsoft TCP/IP Printing] and click [OK].
5. The Windows NT installation CD-ROM may be required.
Follow the remaining dialogue box prompts.
W
INDOWS
2000
Windows 2000 requires administrator privileges.
With Windows 2000, there are four options for printing using TCP/IP.
• Oki LPR
• Microsoft LPR
• Port 9100
• IPP
In order to use Microsoft LPR, it must first be installed on your
system.
OKI LPR
Please follow the procedure described in the Windows 95/98/Me
section on page 18.
Microsoft LPR
To install this port, the following needs to be carried out:
1. Select [Start], [Settings], [Control Panel and Printers].
2. Open the [Printers] folder.
3. Double-click [Add Printer] and then select [Next].
B6500 Network Guide> 20
Page 21

4. Select [Local Printer], clear the [Automatically detect my
printer] check box, and then select [Next].
5. Select [Create a new port] and then [LPR Port].
6. Select [Next] and then provide the following information:
In [Name or address of server providing LPD] enter the host name
or Internet Protocol (IP) address of the host for the printer you are
adding.
In [Name of printer or print queue on that server] type lp.
Follow the instructions on the screen to finish installing the TCP/IP
printer.
Port 9100
1. Select [Start].[Settings].[Control Panel].
2. Open the [Printers] folder.
3. Double-click [Add Printer] and then select [Next].
4. Select [Local Printer], clear the [Automatically detect my
printer] check box and then click [Next].
5. Select [Create a New Port] and select [ Standard TCP/IP
Port].
6. Select [Next].
7. The [Welcome to the Add Standard TCP/IP Printer Port
Wizard] will appear.
8. Select [Next] and provide the following information. Enter
[Printer name] or IP address, for example: 172.168.1.31. If
the above IP address is entered, the Port Name will default to
IP_172.168.1.31.
9. Select [Next]. Additional port information will be required.
10. Under [Device Type], select [Custom] then [Settings].
11. Ensure [Protocol] is set to [Raw].
12. Ensure [Port Number] is 9100 and [SNMP Status Enabled] is
deselected.
13. Select [OK].
14. Select [Follow the instructions on the screen to finish
installing the printer.]
B6500 Network Guide> 21
Page 22

W
INDOWS
XP
Windows XP requires administrator privileges.
With Windows XP, there are four options for printing using TCP/IP.
•Oki LPR
•Microsoft LPR
• Port 9100
•IPP
In order to use Microsoft LPR, it must first be installed on your
system.
OKI LPR
Please follow the procedure described in the Windows 95/98/Me
section on page 18.
Microsoft LPR
To install this port, the following needs to be carried out:
1. Select [Start].[Settings].[Control Panel].[Printers and Other
Hardware].
2. Select [Printers and Faxes].
3. Click [Add Printer], then select [Next].
4. Select [Local printer attached to this computer], clear the
[Automatically detect and install my Plug and Play printer]
check box, and then click [Next].
5. Select [Create a New Port] and [Type Standard TCP/IP Port].
6. Click [Next].
7. [Welcome to the Add Standard TCP/IP Printer Port Wizard]
appears.
8. Click [Next] and provide the following information. Enter
[Printer name or IP address], for example: 172.168.1.31. If
the above IP address is entered, the Port Name will default to
IP_172.168.1.31.
9. Click [Next]. [Additional Port Information Required]
displayed.
10. Under [Device Type], select [Custom] then [Settings].
B6500 Network Guide> 22
Page 23

11. Ensure [Protocol] is set to [LPR].
12. Ensure [Queue Name] is lp and [SNMP Status Enabled] is
deselected.
13. Click [OK].
14. Follow on screen instructions to finish installing the printer.
Port 9100
1. Select [Start].[Settings].[Control Panel].[Printers and Other
Hardware].
2. Select [Printers and Faxes].
3. Click [Add Printer] and then click [Next].
4. Select [Local printer attached to this computer], clear the
[Automatically detect and install my Plug and Play printer]
check box, and then click[Next].
5. Select [Create a New Port] and select [Type Standard TCP/IP
Port].
6. Click [Next].
7. [Welcome to the Add Standard TCP/IP Printer Port Wizard]
appears.
8. Click [Next] and provide the following information. Enter
[Printer name or IP address], for example: 172.168.1.31. If
the above IP address is entered, the Port Name will default to
IP_172.168.1.31.
9. Click [Next]. [Additional Port Information Required] is
displayed.
10. Under [Device Type], select [Custom] then [Settings].
11. Ensure [Protocol] is set to [Raw].
12. Ensure [Port Number] is 9100 and [SNMP Status Enabled] is
deselected.
13. Click [OK].
14. Follow the instructions on the screen to finish installing the
printer.
B6500 Network Guide> 23
Page 24

C
REATING A SHARED PRINTER
Create a shared printer as required.
Settings Windows NT 4.0/2000/XP/Server 2003
The following procedure explains how to do the settings, using
Windows XP as an example.
1. Click [Start], and then select [Printers and Faxes].
The [Printers and Faxes] window appears.
2. Select the icon of a printer to set, and then select [Sharing]
from the right-click menu. Then the printer properties
dialogue box is displayed.
3. Click [Share this printer] and enter a share name.
4. Click [Additional Drivers] and select a substitute driver to
install, and then click [OK].
5. When installing a substitute driver, an input screen is
displayed for the printer driver file location. Insert the
attached CD-ROM and specify the appropriate folder.
Settings of Windows 95/98/Me
1. Click [Start], and then select [Settings], followed by
[Printers]. The [Printers] window appears.
2. Double click [Add Printer]. The [Add Printer Wizard] dialog
box appears.
3. Install the printer driver according to the on-screen
instructions. Select [Network Printer] for the printer
connection, then specify the shared printer created on
Windows NT 4.0/Windows 2000/Windows XP/Windows
Server 2003 in the previous section.
B6500 Network Guide> 24
Page 25

OKI LPR
The OKI LPR Utility is network software which supported TCP/IP
printing on Windows Me, Windows 98, and Windows 95. It redirects
print data from the LPR port to the specified IP address.
I
NSTALLING THE
The OKI LPR utility requires that the TCP/IP protocol be installed on
your Windows system. To install the TCP/IP protocol onto your
Windows system, consult your Windows manual.
1. Set up the printer driver and designate the output destination
to be Local Printer (LPT:). For information on setting up your
printer driver, see the printer user manual.
2. Insert the CD-ROM provided with your printer into the CDROM drive. If the Menu Installer doesn’t start automatically,
click Start?Run?Browse. Browse to your CD-ROM and click
Install?Open?OK.
3. Select [Network Software].
4. Select [Installation/Config]
5. Select [Oki LPR].
6. Follow the on-screen instructions.
7. Select [Install Oki LPR].
OKI LPR U
TILITY
8. Follow the on-screen instructions.
9. Click [Next] when the [Welcome] screen is displayed.
10. Verify [Destination Folder] and [Spool Folder] and click
[Next].
11. Check [Register in Startup] if you want automatic startup as
Windows boots up. Check [Launch as Minimized] if you want
to startup in the Icon state and click [Next].
12. Verify the program folder name and click [Next]. The
installation starts.
13. When the installation ends, the [Setup complete] screen is
displayed. Check [Yes, I want to launch OKI LPR Utility now]
and click [Finish]. Check [Yes, I want to view the ReadMe
File] if you want to read the Readme file. The OKI LPR utility
starts.
B6500 Network Guide> 25
Page 26

14. Select [Add Printer] on the [Remote Print] menu.
15. Select [Printer] to accept the printer that has been added in
Step 1.
16. Enter an IP address at [IP Address] and click [Ok]. A printer
is added to the main window.
Refer to the On-Line Help for information on how to use the utility.
U
NINSTALL
1. Stop the OKI LPR Utility. Right-click the OKI LPR icon in the
system tray and click [Exit].
2. Select Start ?Program?Okidata?OKI LPR Utility?Uninstall OKI
LPR Utility
3. Click [Yes] when the [Confirm File Deletion] dialogue is
displayed. Removal of the OKI LPR utility starts.
4. When the removal is complete, the [Uninstall Complete]
screen is displayed. Click [Ok].
B6500 Network Guide> 26
Page 27

P
RINTING FROM
FOR P
RINTING FROM
This section explains the installation procedure for printing from a
UNIX computer.
S
YSTEM CONFIGURATION
The printer uses the Line Printer Daemon Protocol (LPD) that
supports TCP/IP as the transport protocol. With the LPD, the printer
can be under a UNIX network environment.
The printer LPD supports Spool Mode where print jobs from clients
are spooled once before output and Non-spool Mode where print
jobs are sequentially output without spooling.
UNIX
NOTE
When the LPD port is used, the printer can limit print instructions
by IP addresses. For details, refer to the User’s Guide.
UNIX
UNIX
LPD (TCP/IP)
T
ARGET COMPUTERS
The target computers are as follows:
• Workstation or personal computer with RFC 1179 Line
Printer Daemon Protocol.
B6500 Network Guide> 27
Page 28

I
NTERFACE
The printer LPD is available on the following interfaces:
• Ethernet 100BaseTX
• Ethernet 10Base-T
The applicable frame types conform to Ethernet II.
SET UP P
ROCEDURE
The setting procedure is as follows:
1. Setting up the printer
Set the IP address on the printer control panel.
Use the printer control panel or printer web page to set the
LPD port to [Enable] (default: [Enable]).
NOTE
> Before activating the LPD port, set the IP address of the
printer. For details on how to set the IP address and the
port, refer Printer Configuration.
> The printer web page allows more detailed settings.
2. Settings of the workstation
Set the printer in the workstation.
Refer to:
“Setting Up the Workstation” on page 29
B6500 Network Guide> 28
Page 29

S
ETTING UP THE WORKSTATION
This section explains the settings of Solaris 2.x workstation for
printing.
B
EFORE SETUP
Before setting up the workstation, check the following:
• The setup procedures and commands may vary according
to different versions of OS. Refer to the manuals that
came with the workstation for details.
• To setup the printer, the user must be a superuser.
Contact your network administrator to perform the setup
if you do not have the authority of a superuser.
• Check the IP address set up for the printer in advance. Be
cautious as an incorrect IP address may cause severe
errors.
• Before performing any network setup (such as the IP
address) to a host running under NIS (Network
Information Service), consult the NIS administrator.
E
XAMPLES OF SETTINGS FOR SOLARIS
The examples below show printer settings for Solaris 2.6 where the
printer host name is printer1.
2.X
1. Registering a printer (printer name: P001) supporting the
PostScript language
#lpadmin -p P001 -s printer1\!PS
2. Registering a printer (printer name: P002) supporting the
PostScript language that feeds paper from an A4-size paper
tray for duplex printing
#lpadmin -p P002 -s printer1\!PS A4_DUP
3. Registering a logical PostScript printer PS01 set using the
printer web page.
#lpadmin -p P003 -s printer1\!PS01
B6500 Network Guide> 29
Page 30

NOTE
> Enter the host name and printer name of the remote host
after -s by linking with !. The printer name corresponds to
the print language/mode.
> The output style may be specified at the same time. The
parameters for specifying a style are the same as those
available for the -C option. As the example of (2) shows,
insert "_" between the printer name and output
parameters. You can enter up to 14 characters.
> If PS%n or PLT%nH is specified for the printer name as in
the example of (3), however, the printer does not operate
normally with an output style different from the preset
one.
> Set a printer name corresponding to the print language/
mode and output style.
Refer to:
• Manuals, such as online manuals, that came with various
workstations.
• For details about the -C option: see “-C Option (lpr
Command)” on page 36.
B6500 Network Guide> 30
Page 31

P
RINTING
This section describes the procedure for printing from workstations
running or Solaris.
Refer to:
P
RINT (LP
The "lp" command is used for printing.
Command Format
lp [-d Printer name] [-n No. of copies] File name
Command Options
The following command options are available:
-d Printer name
Specify the printer name registered by the "lpadmin" command as
the -d option. If this option is omitted, the default printer lp will be
specified.
-n No. of copies
This option specifies the number of copies. If one "lp" command is
issued to print multiple files, the number of copies specified by this
option will apply to all the files.
However, this option is effective when the printer is in the spool
mode. In the non-spool mode, the client must be a Windows NT
machine to use this option.
(S
OLARIS
Manuals that came with the workstations.
)
)
Precautions
• Among options not listed above (e.g. -m option), those not
processed by the workstation which sends the print
instructions will not be effective.
In the spool mode, up to 32 files can be printed by one "lp"
command. Files that come after the 32nd files will be ignored.
B6500 Network Guide> 31
Page 32

Sample
To print a file named "file1" to a printer set up as "P001", enter the
following command:
%lp -d P001 file1
To output three copies of "file1" and "file2" to "P001", enter the
following:
$lp -d P001 -n3 file1 file2
D
ELETE
(C
ANCEL
)
This cancel command is used to delete print data which has been
sent to print.
Command Format
cancel [Printer name] [Job Number]
Command Options
The following command options are available:
Printer name
This option specifies the printer name. The "cancel" command can
be effectively used with the combined use of -a, -e and -u as shown
below. This option is invalid in the non-spool mode.
-a
Deletes all the print data, sent by a user who issues this command,
from the data which has been received by a specified printer.
-e
Deletes all the print data received by a specified printer.
-u user name
Deletes all the print data sent by a specified user and received by a
specified printer.
B6500 Network Guide> 32
Page 33

JOB N
UMBER
This option specifies the job number of the print data to be deleted.
These numbers can be checked by issuing a "lpstat" command.
This option is invalid in the non-spool mode.
Precautions
• Print data that consists of multiple files sent in one print
instruction cannot be deleted file by file. All the files will be
deleted at one go.
• This command will become invalid if it is executed without
options having been specified or if there is no print data
which matches the option.
• A workstation can only delete print data it has sent. It cannot
delete print data sent by other workstations.
• When a command to delete print data is received, the file
concerned will be deleted even if it is in the process of being
printed. Only the print data available prior to file deletion will
be printed.
Sample
To cancel the print data related to the files of printer "P001" (Job
number: P001-27), enter the following command:
%cancel P001-27
To cancel all the printer data of printer "P001", enter the following
command:
%cancel P001 -e
I
NQUIRY (LPSTAT
The "lpstat" command is used to inquire about the status of the
printer.
Important:
In the non-spool mode, this function is available to Windows NT
clients but not to Solaris clients.
)
B6500 Network Guide> 33
Page 34

Command Format
lpstat [Option]
Command Options
The following command options are available:
If no option is specified, all the print data-related information will be
displayed.
The sequence of the options does not affect the outcome.
To use more than one argument at the same time, separate them
by commas and enclose all the arguments with " ".
E.g. %lpstat -u "user1,user2,user3"
-o [Printer name]
This option displays the print data received. The printer name is
specified in the argument.
-t
This option displays all the information.
-u [User name]
This option displays received print data information on users of
specified user names.
-v [Printer name]
This option displays the printer name and the device path name. The
printer name is specified in the argument.
Precautions
• Long file names will be truncated.
• Up to 64 print instruction information can be displayed.
• If two or more types of print languages/modes are set up on
a single workstation, identical job numbers may be displayed
when an inquiry command (lpstat) is issued.
B6500 Network Guide> 34
Page 35

Sample
To inquire about the print data received by a printer set up as
"P001", enter the following command:
%lpstat -o P001
B6500 Network Guide> 35
Page 36

-C O
PTION (LPR COMMAND
)
This section explains the functions which can be specified and
printing operations which will be affected by the -C option.
The -C option is available only when the SunOS directs the printer
to enter the spool mode.
Important:
• When the PostScript logical printer that was configured on
the printer web page and -C option of "lpr" command have
been specified simultaneously , some of the actions cannot be
guaranteed to work. Also, when specifying the PostScript
logical printer as a default printer on Unix, it is recommended
not to user the -C option by "lpr" command.
F
UNCTION
The following items can be set up by using the -C option:
NOTE
Any parameter other than below becomes invalid if specified.
Selecting a Paper Tray
When selecting a paper tray, either the paper size or the tray itself
is specified. If the paper size is specified, the printer automatically
searches and selects the tray where the specified paper is loaded.
The following parameters can be specified:
PARAMETER DESCRIPTION
INTRAY1/intrayl Selects Tray 1.
INTRAY2/intray2 Selects Tray 2.
INTRAY3/intray3 Selects Tray 3 (option).
INTRAY4/intray4 Selects Tray 4 (option).
A4/a4 Selects the tray where A4 paper is loaded.
B5/b5 Selects the tray where B5 paper is loaded.
A5/a5 Selects the tray where A5 paper is loaded.
LETTER letter Selects the letter size.
LEGAL/legal Selects the legal size (8.5 x 14).
B6500 Network Guide> 36
Page 37

NOTE
> If several parameters are specified in one "lpr" command,
data may not be printed correctly.
> The system default is used if no tray number is specified,
a specified tray is not loaded, or paper of a specified size
is not loaded.
> This option is for specifying a paper size only. Paper is
selected but the document size is not corrected according
to the paper size.
> If the print data specifies a paper tray, the tray
specification by the data becomes valid and that by the -C
option becomes invalid.
> If an unacceptable combination is specified, the printer
may not operate correctly.
> For some print language, the specification may be invalid.
Selecting a Paper Output Tray
The following parameters can be specified:
PARAMETER DESCRIPTION
OUTUP/outup Ejects prints to the rear tray (option).
OUTDOWN/outdown Ejects prints to the center tray.
Selecting a Paper Type
The following parameters can be specified:
PARAMETER DESCRIPTION
PTS/pts Selects Plain paper.
PT1/pt1 Selects Heavy weight paper 1.
PT2/pt2 Selects Heavy weight paper 2.
POH/poh Selects Transparency.
PRC/prc Selects Recycled paper.
B6500 Network Guide> 37
Page 38

Specifying 2 sided Printing
The following parameters can be specified:
PARAMETER DESCRIPTION
DUP/dup 2 sided printing as follows:
TUMBLE/tumble 2 sided printing as follows:
SIMP/simp 1 sided printing
NOTE
> If several parameters are specified in one "lpr" command,
data may not be printed correctly.
> The system default is used if no parameter is specified.
> If the print data specifies 2 sided or 1 sided printing, the
specification by the data becomes valid and overrides that
by -C option.
B6500 Network Guide> 38
Page 39

Specifying Paper Size and 2 sided Printing
Select a paper size and a binding type. The following parameters can
be specified:
PARAMETER DESCRIPTION
A4D/a4d 2 sided printing on A4 paper and long-side binding
A4T/a4t 2 sided printing on A4 paper and short-side binding
A5D/a5d 2 sided printing on A5 paper and long-side binding
A5T/a5t 2 sided printing on A5 paper and short-side binding
B5D/b5d 2 sided printing on 85 paper and long-side binding
B5T/b5t 2 sided printing on B5 paper and short-side binding
NOTE
> If several parameters are specified in one "lpr" command,
data may not be printed correctly.
> The system default is used if no parameter is specified.
> If the print data specifies 2 sided or 1 sided printing, the
specification by the data becomes valid and overrides that
by -C option.
Specifying Collation
The following parameter can be specified:
PARAMETER DESCRIPTION
COLLATE/collate Sorts prints electronically.
NOTE
> For some print language, the specification may be invalid.
B6500 Network Guide> 39
Page 40

Specifying Color and Print Modes
The following color and print mode parameters can be specified:
PARAMETER DESCRIPTION
CC/cc Selects color for color mode and quality priority for print mode.
CB/cb Selects color for color mode and speed priority for print mode.
GC/gc Selects monochrome for color mode and quality priority for
print mode.
GB/gb Selects monochrome for color mode and speed priority for
AC/ac Selects auto (color/monochrome) for color mode and quality
AB/ab Selects auto (color/monochrome) for color mode and speed
NOTE
print mode.
priority for print mode.
priority for print mode.
> If several parameters are specified in one "lpr" command,
data may not be printed.
> For some print language, the specification may be invalid.
> The system default is used if no parameter is specified.
> The color setting is not available on this printer.
P
RINTING
To specify the output format of printing, enter the following
command:
-C, [Parameter], [Parameter]
Enter a "," (comma) after -C followed by the parameters which
specify the output format. To specify multiple parameters, separate
them with ",".
For example, to output a file named "file1" 2-sided on A4 to printer
"P001", enter the following command:
%lpr -P P001 -C, DUP, A4 file1
Important:
> If the command specified by the -C option exceeds 64
characters, the operation may not function correctly.
B6500 Network Guide> 40
Page 41

P
RINTING FROM A
P
RINTING FROM A MACINTOSH COMPUTER
This section explains the installation procedure for printing from a
Macintosh computer.
S
YSTEM CONFIGURATION
As the printer supports EtherTalk and LPD protocol, you can print
from Macintosh.
NOTE
> Printing using the LPD protocol is available only with the
Mac OS X.
T
ARGET COMPUTERS
The printer supports a Macintosh or Power Macintosh with the
following OS:
> Mac OS 9 and up
> Mac OS X
Refer to:
> User Guide (PostScript Driver)
M
ACINTOSH COMPUTER
SET UP P
The setting procedure is as follows:
1. Setting up the printer
ROCEDURE
Use the printer control panel or printer web page to set the
following port to [Enable].
• Printing through LPD: LPD port (default: [Enable])
• Printing through EtherTalk: EtherTalk port (default:
[Disable])
NOTE
> For details on how to set the port, refer to the User Guide.
> The printer web page allows more detailed settings.
B6500 Network Guide> 41
Page 42

2. Setting up the Macintosh
Install the printer driver (Adobe PS) for Macintosh. Install the
screen font if necessary.
Refer to:
• User Guide (PostScript Driver)
B6500 Network Guide> 42
Page 43

SNMP S
The printer can be managed via a standard SNMP management
station. The printer supports SNMP-v1, SNMP-v2c, MIB-II, Host
Resources MIB, Printer MIB and OKI Data Private MIB.
The OKI Data Private MIB file can be found in the MIB folder on the
CD-ROM included with the printer. Please refer to the readme file in
the MIB folder for further information.
UPPORT
B6500 Network Guide> 43
Page 44
N
ETWORK UTILITY SOFTWARE
S
TATUS MONITOR
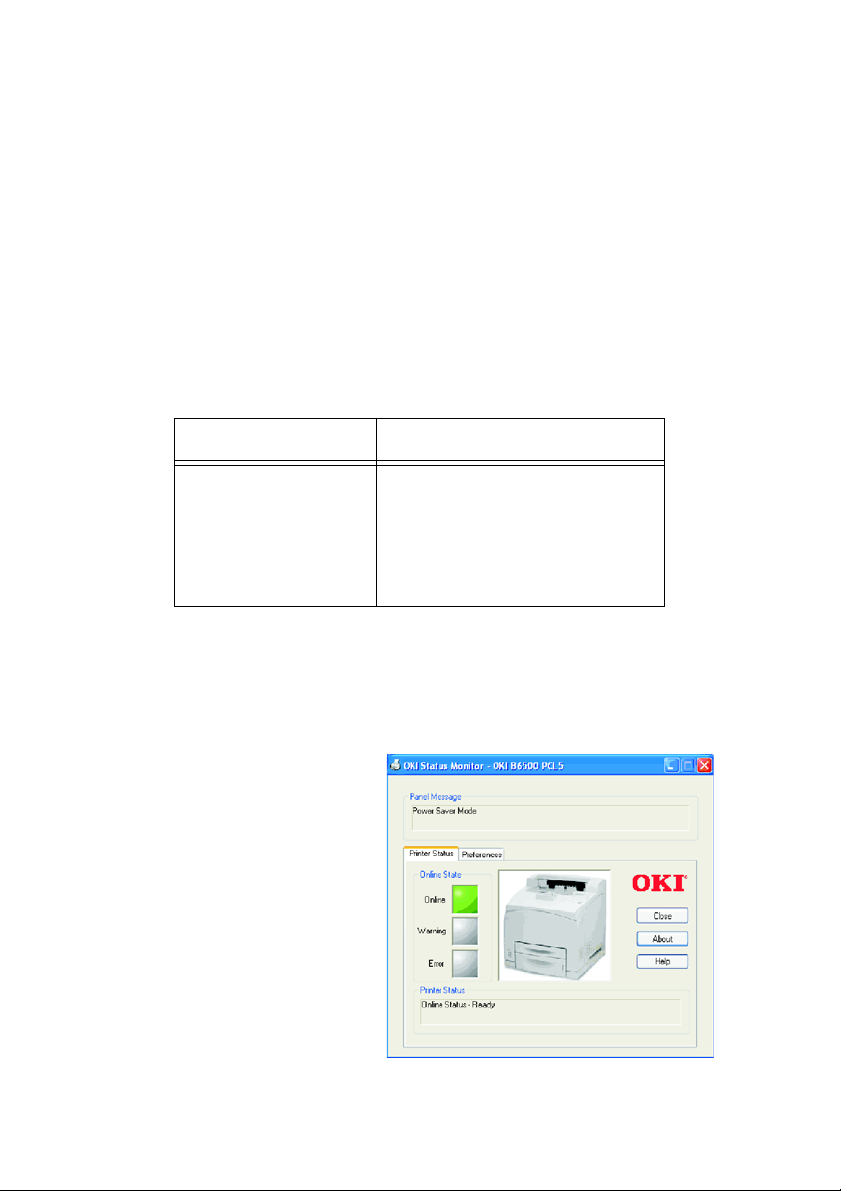
The Status Monitor is a tool that enables users to monitor the
network printer status by an icon or a dialog box on the computer.
The Status Monitor can be installed from the CD-ROM that was
bundled with your printer.
O
PERATING REQUIREMENTS
The following is a list of computer operating systems that are
supported by the Status Monitor.
OS PRINTER
Windows 95
Windows 98
Windows ME
Windows NT 4.0
Windows 2000
Windows XP
U
SING THE STATUS MONITOR
Printer with drivers installed and
configured.
The procedure here explains with Windows XP as an example
1. Start the Status
Monitor.
2. The Status Monitor
dialog will appear
and will
automatically
discover the printer
and display its status
3. Minimize the dialog
to use the Status
Monitor as an icon.
The icon will be
displayed at the
bottom right corner
B6500 Network Guide> 44
Page 45
of the task bar. The icon’s color will change according to the
printer’s status.
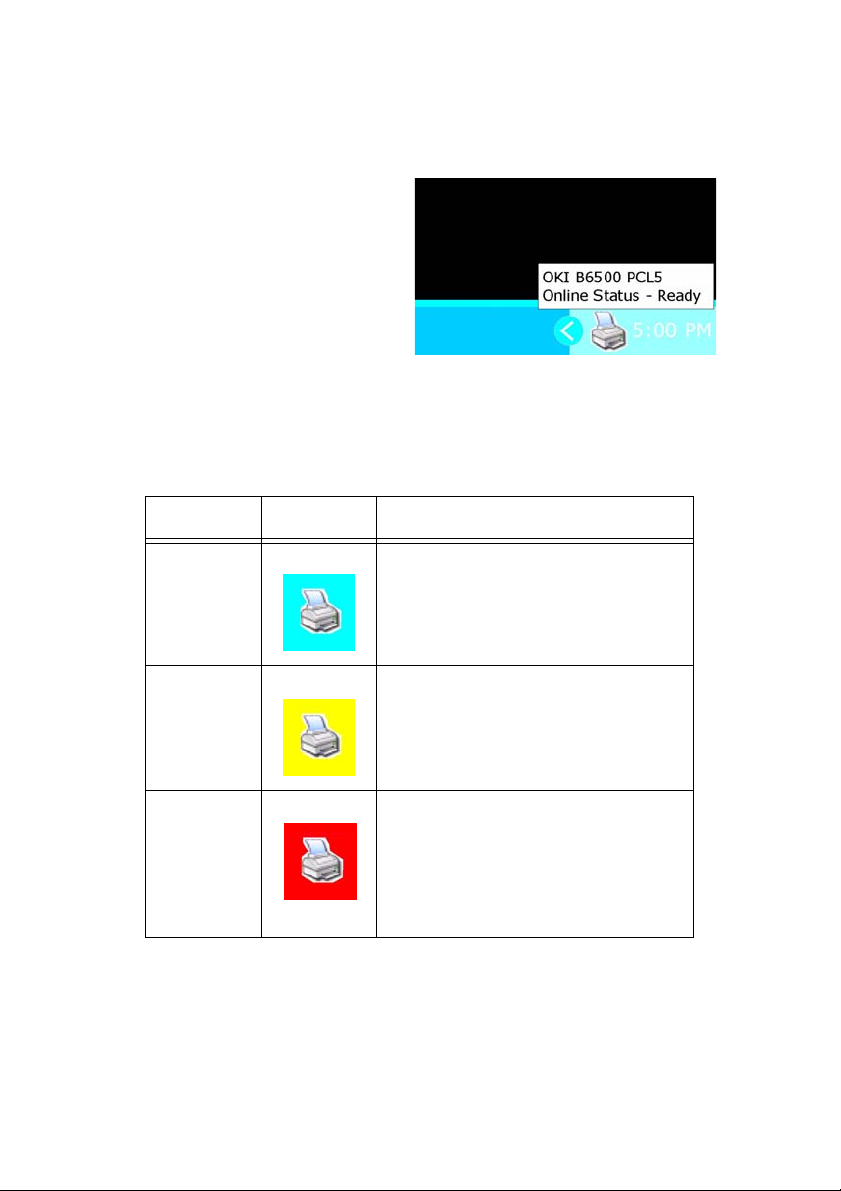
4. Place the mouse cursor
over the icon and the
status of the printer will
be displayed.
5. Double click the icon to
display the Status
Monitor dialog box.
C
OLOR OF THE ICON AND PRINTER STATUS
The color icon indicates the printer’s status.
COLOR DISPLAY PRINTER STATUS
Blue Ready, printer is ready to print
Yellow Warming, printer requires user
Red Error, printer requires user intervention
B6500 Network Guide> 45
intervention
Page 46

P
RECAUTIONS AND LIMITATIONS
ON U
SING
TCP/IP
This section explains the precautions and limitations of using this
printer with TCP/IP.
S
ETTING UP
Setting Up the Printer
• Be very careful in setting up IP addresses which are
controlled as an entire system. Consult your network
administrator before performing any setup on IP addresses.
• Depending on the network environments, some require
subnet mask and gateway to be set up. Consult your network
administrator and set up the necessary items.
Setting Up the Computer
• Be very careful in setting up IP addresses which are
controlled as an entire system. Consult your network
administrator before performing any setup on IP addresses.
• Before performing any network setup (such as the IP
address) to a host running under NIS (Network Information
Service), consult the NIS administrator.
When setting a UNIX workstation, note the following also:
• The setup procedures and commands may vary according to
different versions of OS. Refer to the manuals that came with
the workstation for the details.
• To setup the printer, the user must be a superuser. Contact
your network administrator to perform the setup if you do
not have the authority of a superuser.
• The print language/mode is determined by the printer model
and configuration. Before setting a UNIX workstation, check
the available languages/modes.
• To specify multiple entries for the logical printer, make sure
each printer entry is assigned its own unique spool directory.
If a single spool directory is used for multiple printer entries,
the printer select option may not function correctly.
B6500 Network Guide> 46
Page 47

S
WITCHING THE POWER ON/OFF
Take note of the following when switching off the printer:
Printer Spooling Is Set to [On] Spool Mode
All the spooled print data, including print data which is being printed,
will be saved. When the power is switched on again, the stored print
data will be printed first even if new print data has been instructed.
Printer Spooling Is Set to [Off] Nonspool Mode
All the print data spooled in the printer receive buffer, including print
data which is being output, will be deleted. When the printer is
switched on again, the print data will not be found.
However, if the power is switched off immediately after the print
data has been sent, the data may be stored on the computer. In this
case, when the power is switched on again, the stored print data will
be printed first even if new print data has been sent.
P
RINTING FROM WINDOWS
Take note of the following when printing from Windows:
• In the spool mode, if the print data is bigger than the
remaining capacity of the hard disk or the memory at the
point of receiving, the data will not be received by the printer .
NOTE
> Some client computers may re-send immediately when
the print data has exceeded the receiving capacity. When
this occurs, the client appears as if it has crashed. To
rectify this situation, the client computer must be stopped
from sending print data.
> In the non-spool mode, printing will commence once data
starts to be received by the printer. Therefore, if the
printer has accepted a print request from a computer, it
will not receive another print request from another
computer.
> For PCL and DUMP, the specification for the number of
copies is invalid.
B6500 Network Guide> 47
Page 48

P
RINTING FROM
UNIX
Take note of the following when printing from UNIX:
• In the spool mode, up to 32 files can be printed by one
command. Files that come after the 32nd file will be ignored.
An instruction with more than 32 files will be treated by the
printer as a print request of up to 32 files.
• In the spool mode, if the print data is bigger than the
remaining capacity of the hard disk or the memory at the
point of receiving, the data will not be received by the printer .
NOTE
> Some client workstations may re-send immediately when
the print data has exceeded the receiving capacity. When
this occurs, the client workstation appears as if it has
crashed. To rectify this situation, the client must be
stopped from sending print data.
> In the non-spool mode, multiple files can be printed by
issuing one command. Furthermore, the number of files is
not limited.
> In the non-spool mode, printing will commence once the
data starts to be received by the printer. Therefore, if the
printer has accepted a print request from a client
workstation, it will not receive another print request from
another client workstation.
> Options, such as -m option, not processed by the
workstation which sends the print instructions will not be
valid.
> For PCL and DUMP, the specification for the number of
copies is invalid.
B6500 Network Guide> 48
Page 49

Delete
• Print data which consists of multiple files sent in one print
instruction, cannot be deleted file by file. All the files will be
deleted at one go.
• This command will become invalid if it is executed without
options having been specified or if there is no print data
which matches the option.
• A workstation can only delete print data it has sent. It cannot
delete print data sent by other workstations.
• Print data which is in the process of printing may not be
deleted.
Inquiry
• Long file names will be truncated.
• Up to 64 print instructions can be displayed.
• If two or more types of print languages/modes are set up on
a single workstation, identical job numbers may be displayed
when an inquiry command is issued.
• In the non-spool mode, the client must be a Windows NT
machine to use this option.
Others
• When the IP address or the computer name of a workstation
is changed, the printer may not process inquiries or deletions
correctly . Make sure the printer is free of all spooled data and
switch off/on the printer.
NOTE
The function to stop/eject print data spooled to the printer spool
can be operated from the printer control panel. Refer to the Setup
Guide for information on this operation.
B6500 Network Guide> 49
Page 50

T
ROUBLESHOOTING
U
SING
TCP/IP
This section provides information on the possible causes, verifying
methods and recommended actions pertaining to errors which may
occur when the printer is used with TCP/IP.
W
HEN USING WINDOWS
CAUSE TREATMENT
95/98/M
E
The printer and the
computer are connected to different networks.
An error has occurred
on the network
between the computer
and the printer. Connection cannot be
established.
The printer is switched
off after the print
instruction has been
sent from the computer. Or the print
instruction is sent to
the printer which is
switched off
Print instructions from
multiple computers are
sent to the printer at
the same time.
Status Display Unable to print (Network Error)
Verification Check with the system adminis-
Action Connect the printer directly to the
Status Display Unable to print (Network Error)
Verification Action Ask the system administrator of
Status Display Unable to print (Network Error)
Verification Check whether or not the printer
Action Switch on the printer.
Status Display Unable to print (Network Error)
Verification Action (Print will be reprocessed auto-
trator of the network verify that
the network connecting the computer and that connecting the
printer are linked by a router or a
gateway.
network connecting the computer.
the network to check the network
for errors.
is switched on.
matically.)
B6500 Network Guide> 50
Page 51

CAUSE TREATMENT
Printing cannot be
spooled due to insufficient disk capacity of
the computer.
Status Display Double click [My Computer] and
Verification Select [Properties] from the menu
Action After erasing unnecessary files to
right click the disk installed with
Windows 95/98/Me (e.g. C-drive)
displayed and check the free
space available.
increase the free space available,
select [Pause Printing] from the
[Document] menu of the printer
window to enable printing to
restart
B6500 Network Guide> 51
Page 52

U
SING WINDOWS
NT 4.0/2000/XP/S
ERVER
2003
The Printer Is Not Printing
Cause Verification Action
Incorrect IP address. Ask the network admin-
If LPD spool is set to
[On], the print data
sent by the user in a
single print instruction
has exceeded the
remaining storage
capacity of the destination device.
An irrecoverable error
has occurred during
printing.
The data format of the
print data to be processed by the printer
and that sent by the
computer are different.
istrator to check that the
IP address is correct.
Check the remaining
storage capacity of the
destination device.
Check the error message
on the printer control
panel.
- Disable the output func-
Set up the correct IP
address for the printer.
1. If single print data has
exceeded the storage
capacity of the destination device, free space
on the device, or split
the file into smaller ones
to keep them below the
remaining storage space.
2. If multiple files have
exceeded the storage of
the destination device,
reduce the number of
files which can be sent at
a time.
Switch off the printer,
then switch it on agai n.
tion of Ctrl-D.
B6500 Network Guide> 52
Page 53

Unable to obtain the desired print results.
CAUSE VERIFICATION ACTION
The specified print language and that of the
print data are different.
The printer driver for
this printer is not used.
(The printer driver of
another company is
used)
Check the specified print
language and that of the
print data.
Check that the printer
driver which came with
this printer has been
selected.
Specify the print language consistent with
that used in the print
data.
Select the printer driver
which came with this
printer. If it does not
appear on the selection
list, install and select the
printer driver. If a printer
driver from another
maker is used, the
printer may not print
properly.
B6500 Network Guide> 53
Page 54

W
HEN USING UNIX
The printer is not printing
CAUSE VERIFICATION ACTION
Incorrect IP address. Ask the network admin-
Error occurs on the
network connecting
the workstation and
the printer.
Unable to set the correct printer entry on
the workstation.
The printer is in the
offline status.
If LPD spool is set to
[On], the print data
sent by the user in a
single print instruction
has exceeded the
remaining storage
capacity of the destination device.
istrator to check if the IP
address is correct.
Activate the network test
mode (ping) on the
workstation to check the
communication status.
Check and correct the
printer entry settings on
the workstation. Check
the/etc/printcap file on
the workstation or use
the “lpstat” command to
troubleshoot.
Check whether “Off-line”
is displayed on the
printer control panel.
Check the remaining
storage capacity of the
destination device.
Set up the correct IP
address for the printer.
As the network administrator to look into the
network failure.
Re-enter the correct
printer entry.
Press the <ON LINE>
button.
1. If single print data has
exceeded the storage
capacity of the destination device, free space
on the device, or split
the file into smaller ones
to keep them below the
remaining storage space.
2. If multiple files have
exceeded the storage of
the destination device,
reduce the number of
files which can be sent at
a time.
An irrecoverable error
has occurred during
print.
The data format of the
print job does not conform to the printing
environment of the
workstation. (Print
data from the client
contains TBCP.)
Check the error message
on the printer control
panel.
- Specify PSASC on the cli-
B6500 Network Guide> 54
Switch off the printer,
then switch it on agai n.
ent side to print data
containing TBCP by the
PostScript language.
Page 55

CAUSE VERIFICATION ACTION
The data format of the
print job does not conform to the printing
environment of the
workstation. (Print
data from the client is
of a binary format.)
The printer has run out
of paper.
- Specify PSBIN on the cli-
Check the message on
the printer control panel
ent side for the printer
name on the remote host
to print a binary file in
the PostScript language.
Load paper into the
paper tray.
Unable to Obtain the Desired Print Results
CAUSE VERIFICATION ACTION
The indicated print language and the print
language used in the
print data are different.
Check that the print language specified is the
print language used in
the print data.
Specify the print language consistent with
that used in the print
data.
B6500 Network Guide> 55
Page 56

U
SING ETHERTALK
This section provides information on the possible causes, verifying
methods and recommended actions pertaining to errors which may
occur when the printer is used with EtherTalk.
PROBLEM TREATMENT
The name (or the
default name) of the
printer has been
changed.
The printer does not
appear in Chooser.
Continued
Cause The Apple Talk function of the printer
Verification Check Chooser to confirm that the
Action Change the name of the printer or
Cause 1 In Chooser , only the NBP en tity name
Verification 1 Use of a network management appli-
Action 1 If the type of NBP entity name of the
Cause 2 The Macintosh printer driver searches
name if it detects that a printer of the
same name exists on the network.
printer name has been changed.
change the name of the other printer
to avoid duplicate printer names on
the network.
of which entity type is Laser/Writer is
displayed.
The printer is set up as a slave of the
Apple Share Print Server or the Windows NT Server and the NBP entity
name of the printer has been
changed from LaserWriter.
cation software, such as Apple InterPole, and check that the type of the
NBP entity name of the printer has
been changed from LaserWriter.
printer has been changed from
Laser/Writer, the printer cannot be
selected in the Chooser . If the printer
must be selected, open the printer
using the Apple Share Print Server or
the Windows NT Server.
for a printer with the printer name
specified in the Chooser and the zone
name of Apple Talk.
If the network is not connected correctly, the printer cannot be found.
B6500 Network Guide> 56
Page 57

PROBLEM TREATMENT
The printer does not
appear in Chooser.
Continued
Unable to obtain
desired print results.
Verification 2 Use of a network management appli-
Action 2 If the printer cannot be found on the
Cause 1 The print language of the printer and
Verification 1 Check the print language set up for
Action 1 Ensure that PostScript and Adobe PS
Cause 2 The printer driver which came with
Verification 2 Check the installation procedure for
cation software, such as Apple InterPole, and check that the printer
exists on the network.
Check that the network is connected
correctly.
network, the printer may be off or
the network cable maybe faulty.
If the printer is on and the network
cable normal, contact our Printer
Support Desk.
that of the print drawer are different.
the printer and that for the printer
driver for Macintosh.
are set up as the print language for
the printer and printer driver respectively.
If the print language of the printer is
the dump mode, the print data sent
from Macintosh will be output in hexadecimal notations.
the printer is not set up on the Macinotosh. A printer driver of another
maker has been used instead.
the printer driver which came with
the printer again and confirm that
the printer driver is installed on the
Macintosh.
Check that the printer driver which
came with the printer appears in the
Chooser.
Action 2 If garbled characters are still printed
B6500 Network Guide> 57
after the printer driver for the printer
has been selected, contact service.
If a printer driver of another maker is
used, the printer may not print properly.
Page 58

PROBLEM TREATMENT
The printer is not connected.
Cause 1 On the Macintosh, the printer is not
Verification 1 Check that the printer is selected cor-
Action 1 If the printer is still not connected
Cause 2 The EtherTalk port of the printer is
Verification 2 Check that the port used is set to
Action 2 If the printer still cannot be con-
selected correctly in the Chooser. Or,
the printer is processing another job.
rectly on the Macintosh. If the printer
is processing another job, the job
must be completed before the printer
can be connected.
though it is selected correctly and is
not processing another job, check the
following causes.
set to [Disable]. Or, the Start/Stop
setting for EtherTalk has been set to
Off by the PostScript command. Or,
the printer is in the offline status.
[Enable] and that the Start/ Stop
setting is set to [Start]. Check
whether “Off-line” is displayed on the
printer control panel.
nected although all the above conditions are normal, contact service.
B6500 Network Guide> 58
Page 59

PROBLEM TREATMENT
Although it is connected, the printer
does not print.
“Please reboot printer”
is displayed on the
printer control panel.
Cause 1 The printer is in the offline status.
Verification 1 Check whether “Off-line” is disp layed
Action 1 Press the <ON LINE> button.
Cause 2 The print language of the printer and
Verification 2 Check the print language set up for
Action 2 If the print language of the printer
Cause 3 After the Macintosh was connected to
Verification 3 Check that the printer is switched on.
Action 3 If the pr oble m remains , contact serv-
Cause The AppleTalk function of the printer
Verification Switch off the printer, then switch it
Action If “Please reboot printer” still appears
on the printer control panel.
that of the printer driver are different.
the printer and that for the printer
driver for Macintosh.
and that of the printer driver are different, set the same language for
them. If the problem remains, check
the following causes.
the printer, the power to the printer
was shut off. Or, paper jam has
occurred in the printer. Or, the network is faulty.
Select the printer again from Macintosh and reprint.
ice.
has failed.
on again.
on the printer control panel, contact
service.
B6500 Network Guide> 59
Page 60

S
ETTING
When the printer is connected to the network, it retrieves the IP
address automatically from the DHCP server once it is switched on.
If the DHCP server is not available or not in use, use one of the
following methods to retrieve and set the IP address.
Important:
Refer to:
IP A
DDRESS
• Set the IP address from the control panel
• Use the IP address Setup Tool in the CD-ROM bundled with
this printer.
• When using the DHCP server, use WINS (Windows
Internet Name Service) server at the same time.
• The address information can also be retrieved
automatically via the BOOTP or RARP servers. For such
cases, change the [Get IP Address] selection on the
control panel to [BOOTP] or [RARP].
• Depending on the network environment, you may need to
set the subnet mask and gateway address.
• Please check with your network administrator if you have
any questions concerning your network environment.
• Details on retrieving IP address: Reference Guide
• IP Address Setup Tool: Network Print Environment User
Guide
• Web browser: Reference Guide
NOTE
> You can change the IP address using a web browser.
> You can check the current IP address, subnet mask and
gateway address settings from the [System Settings List].
> This section explains how to set IP address from the
control panel.
NOTE
• If you have made a mistake when operating the control
panel, press the <MENU> button to restart.
B6500 Network Guide> 60
Page 61

A
PPENDIX
1. Press the <MENU> button to display the Menu screen.
2. Press the <S> or <T> button until [Network Menu] is
displayed, then press the <X> button.
3. Check that [TCP/IP] is displayed, then press the <X> button.
4. Press the <S> or <T> button until TCP/IP is set for
[Enable], then press the <SELECT> button.
5. Press the <S> or <T> button until [IP Address Set] is
displayed, then press the <X> button.
6. Press the <S> or <T> button until [Manual] is displayed,
then press the <SELECT> button.
7. Press the <S> or <T> button until [IP Address] is
displayed, then press the <X> button.
8. The first set of numbers of the IP address will blink. Press the
<S> or <T> button to scroll to the desired number.
9. Press the <X> button to save the current set of numbers and
move to the next set.
10. Repeat steps 8 and 9 until all numbers have been set, then
press the <SELECT> button.
11. Press the <S> or <T> button until [Subnet Mask] is
displayed, then press the <X> button.
12. The first set of numbers of the Subnet Mask will blink. Press
the <S> or <T> button to scroll to the desired number.
A: S
ETTING
IP A
DDRESS
13. Press the <X> button to save the current set of numbers and
move to the next set.
14. Repeat steps 12 and 13 until all numbers have been set, then
press the <SELECT> button.
15. Repeat steps 11, 12, 13, & 14 to set the Gateway Address as
necessary.
16. Press the <CANCEL>
17. Reboot the printer.
button. To exit the menus.
B6500 Network Guide> 61
Page 62

B6500 Network Guide> 62
 Loading...