

Page 1

Page 2

Every effort has been made to ensure that the information in this document
is complete, accurate, and up-to-date. Oki Data assumes no responsibility
for the results of errors beyond its control. Oki Data also cannot guarantee
that changes in software and equipment made by other manufacturers and
referred to in this guide will not affect the applicability of the information in
it. Mention of software products manufactured by other companies does not
necessarily constitute endorsement by Oki Data.
© 2005 by Oki Data Americas, Inc. All rights reserved.
Written and produced by the Oki Data Training & Publications Department.
Please address any comments on this publication to
Training & Publications Dept.
Oki Data Americas, Inc.
2000 Bishops Gate Blvd.
Mt. Laurel, NJ 08054-4620
USA
For the latest product information, printer drivers, manuals, special offers,
etc., go to
OKI is a registered trademark/marque déposée/marca registrada Oki Electric Industry
Company, Ltd. CompactFlash is a registered trademark of Sandisk Corp. Adobe and
PostScript are trademarks of Adobe Systems, Inc., which may be registered in certain
jurisdictions. HP and PCL are US registered trademarks of Hewlett-Packard Company.
Internet Explorer, Windows and Windows NT are either registered trademarks or
trademarks of Microsoft Corporation in the United States and other countries. Macintosh is
a trademark of Apple Computer, Inc., registered in the U.S. and other countries. Netscape
Navigator is a registered trademark of Netscape Communications Corporation in the United
States and other countries.
http://my.okidata.com
.
59367201 B6200/B6300 CompactFlash Instructions, Rev. 1.1
2
Page 3

Contents
Introduction . . . . . . . . . . . . . . . . . . . . . . . . . . . . . . . . . . . . . . . . . . . . . . 4
Features . . . . . . . . . . . . . . . . . . . . . . . . . . . . . . . . . . . . . . . . . . . . . 5
Storable Font Formats . . . . . . . . . . . . . . . . . . . . . . . . . . . . . . . . . . . 5
Storable Forms (Macros/Overlays). . . . . . . . . . . . . . . . . . . . . . . . . . . 5
Overview . . . . . . . . . . . . . . . . . . . . . . . . . . . . . . . . . . . . . . . . . . . . 5
Downloading Fonts and Forms . . . . . . . . . . . . . . . . . . . . . . . . . . . . 5
Printing Using Fonts and Forms . . . . . . . . . . . . . . . . . . . . . . . . . . . 5
Installing the CompactFlash . . . . . . . . . . . . . . . . . . . . . . . . . . . . . . . . . . 6
Downloading Fonts and Forms . . . . . . . . . . . . . . . . . . . . . . . . . . . . . . . 13
The Font and Form Downloader Utility . . . . . . . . . . . . . . . . . . . . . . . 13
Installing the Utility . . . . . . . . . . . . . . . . . . . . . . . . . . . . . . . . . . 13
Running the Utility . . . . . . . . . . . . . . . . . . . . . . . . . . . . . . . . . . . 14
Using the Utility: PCL Fonts . . . . . . . . . . . . . . . . . . . . . . . . . . . . . 15
Using the Utility: PCL Forms (Macros/Overlays) . . . . . . . . . . . . . . . 18
OkiWebRemote . . . . . . . . . . . . . . . . . . . . . . . . . . . . . . . . . . . . . . . 21
Accessing OkiWebRemote . . . . . . . . . . . . . . . . . . . . . . . . . . . . . . 21
Using OkiWebRemote: Fonts . . . . . . . . . . . . . . . . . . . . . . . . . . . . 22
Using OkiWebRemote: Forms (Overlays). . . . . . . . . . . . . . . . . . . . 23
Generating a Lists of Fonts . . . . . . . . . . . . . . . . . . . . . . . . . . . . . . . . . . 24
Printing Using Fonts and Forms . . . . . . . . . . . . . . . . . . . . . . . . . . . . . . 25
Using Downloaded Fonts. . . . . . . . . . . . . . . . . . . . . . . . . . . . . . . . . 25
Selecting Fonts by Font Attribute . . . . . . . . . . . . . . . . . . . . . . . . . 25
Selecting Fonts by FontID . . . . . . . . . . . . . . . . . . . . . . . . . . . . . . 26
Switching Fonts . . . . . . . . . . . . . . . . . . . . . . . . . . . . . . . . . . . . . 27
Using Resident Bar Code Fonts . . . . . . . . . . . . . . . . . . . . . . . . . . . . 29
Select Barcode Font by Font Attribute. . . . . . . . . . . . . . . . . . . . . . 29
Using Forms (Macros/Overlays). . . . . . . . . . . . . . . . . . . . . . . . . . . . 30
3
Page 4
Introduction
Important!
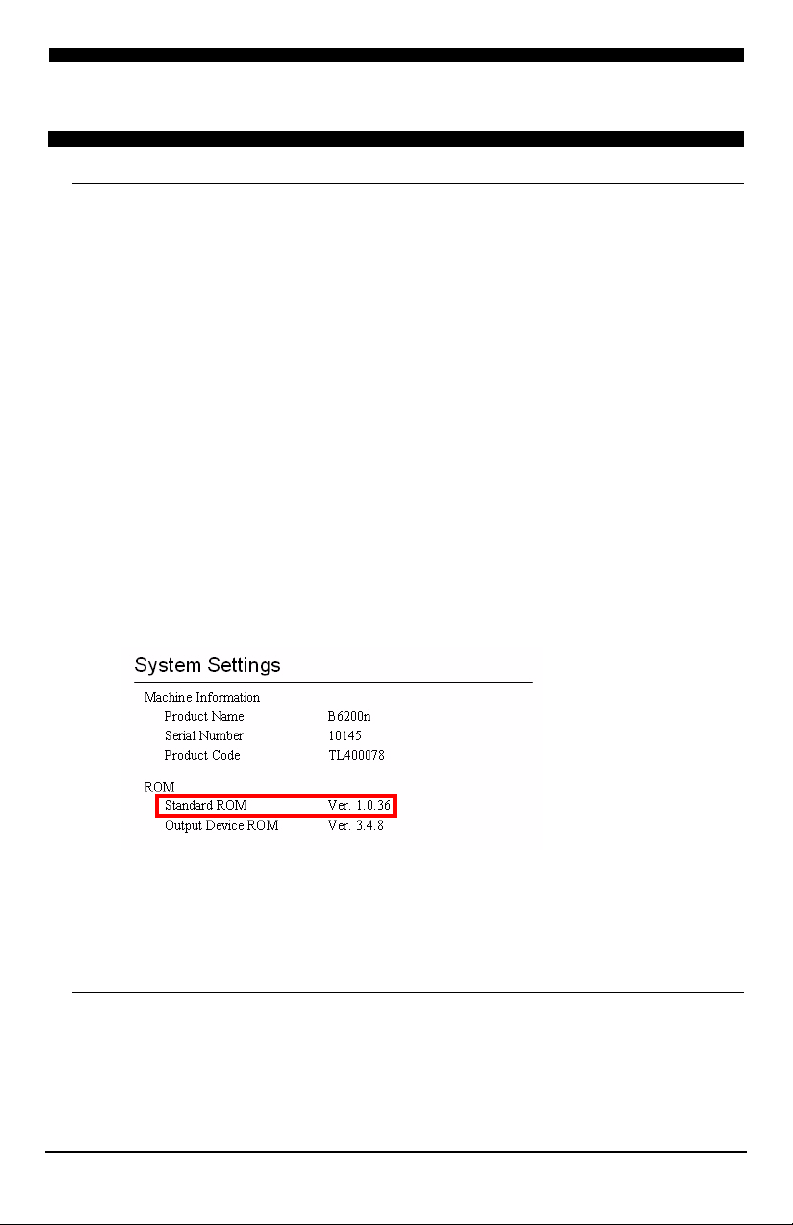
Your printer’s firmware must be version 1.0.52 or higher for the
CompactFlash to work properly.
To determine the firmware version you have, print the System Settings
list:
1. Press the <
2. Press the <
on the second line of the display.
3. Press the <
4. Press the <
on the second line of the display.
5. Press the <
6. Press the <
The System Settings list prints.
7. Check the version number beside “Standard ROM” under “ROM” in
the left column.
MENU
> button to enter the printer menu
▼
> button one or more times until you see “Report/List”
䊳
> button once to enter the Report/List sub menu.
▼
> button repeatedly until you see “System Settings”
䊳
> button once to select System Settings.
FEED/SELECT
> button.
MENU
8. Press the <
“Ready to print” appears on the display.
If you need to upgrade your firmware, have your System Settings list
printout handy and call 1-800-OKI-DATA (1-800-654-3282).
> button to exit the printer menu.
4
Introduction
Page 5

Features
• Use custom fonts and forms for documents printed from legacy systems.
• Apply overlays for invoices, shipping tickets and other documents in
non-Windows environments.
• Manage and modify font lists and forms across multiple printers.
Storable Font Formats
• PCL bitmap fonts: .hpp, .sfp, .sfl, .sfs
• True Type fonts: .ttf, .otf
Storable Forms (Macros/Overlays)
Use common PostScript® or PCL® forms generated by third party electronic
forms software such as Cardinal’s PlanetPress Suite, Optio MedEx™, Verity
LiquidOffice™, Microsoft
The following print file formats are storable:
• .pcl, .prn, .ps
®
InfoPath® (XDocs), etc.
®
Overview
Downloading Fonts and Forms
The CompactFlash module can be used to store fonts and electronic forms,
downloaded in the following ways:
Font and Form Downloader Utility (see page 13)
•
Use the Font and Form Downloader utility on the CD supplied with the
CompactFlash.
OkiWebRemote (see page 21)
•
Use the OkiWebRemote web page built into the printer and accessed
through your internet browser.
Printing Using Fonts and Forms
Once the fonts and/or forms are stored on the CompactFlash, PJL and PCL5
commands are used to engage them when printing (see page 25).
5
Introduction
Page 6
Installing the CompactFlash
Careful!
To protect the CompactFlash, please keep it in its packaging until
you're ready to install it.
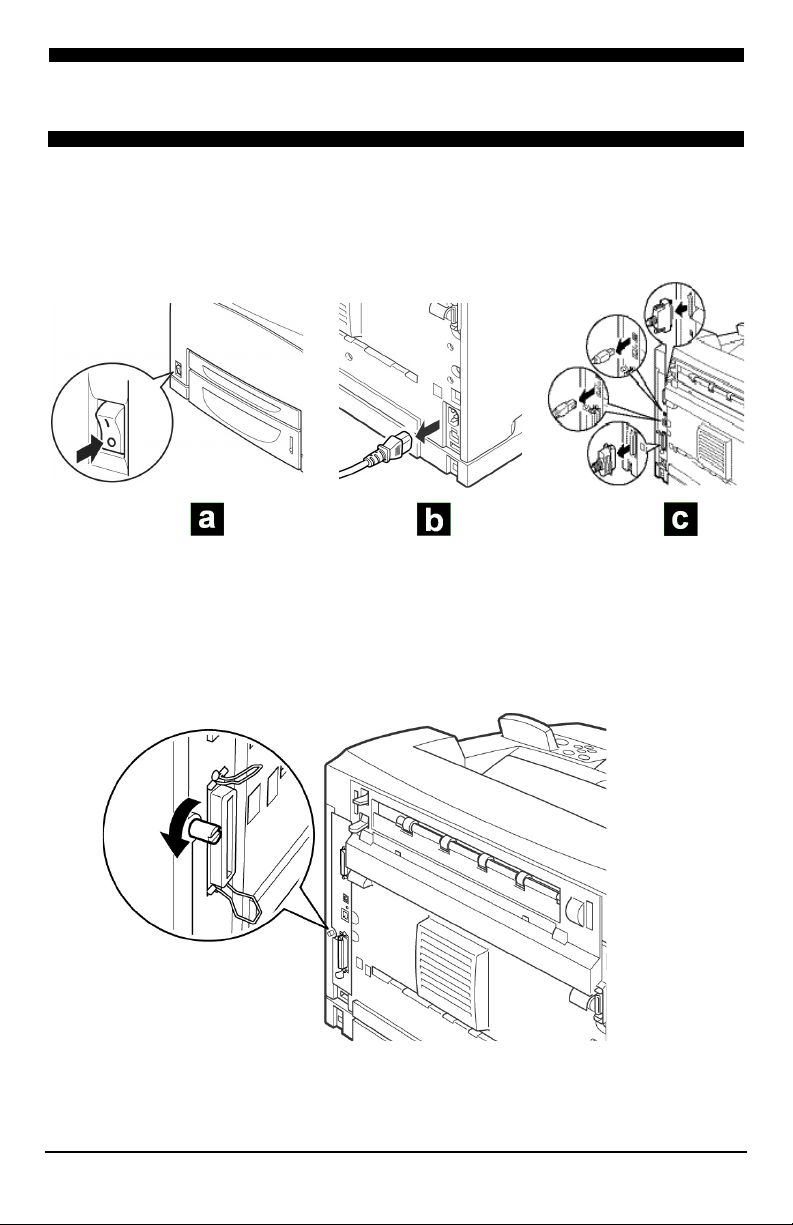
1. Before continuing:
TJ037_crop.jp
g
TJ034b_crop.j
pg
TJ171_rev_outp.jp
g
a. Turn off the printer.
b. Remove the power cord.
c. Remove the interface cable.
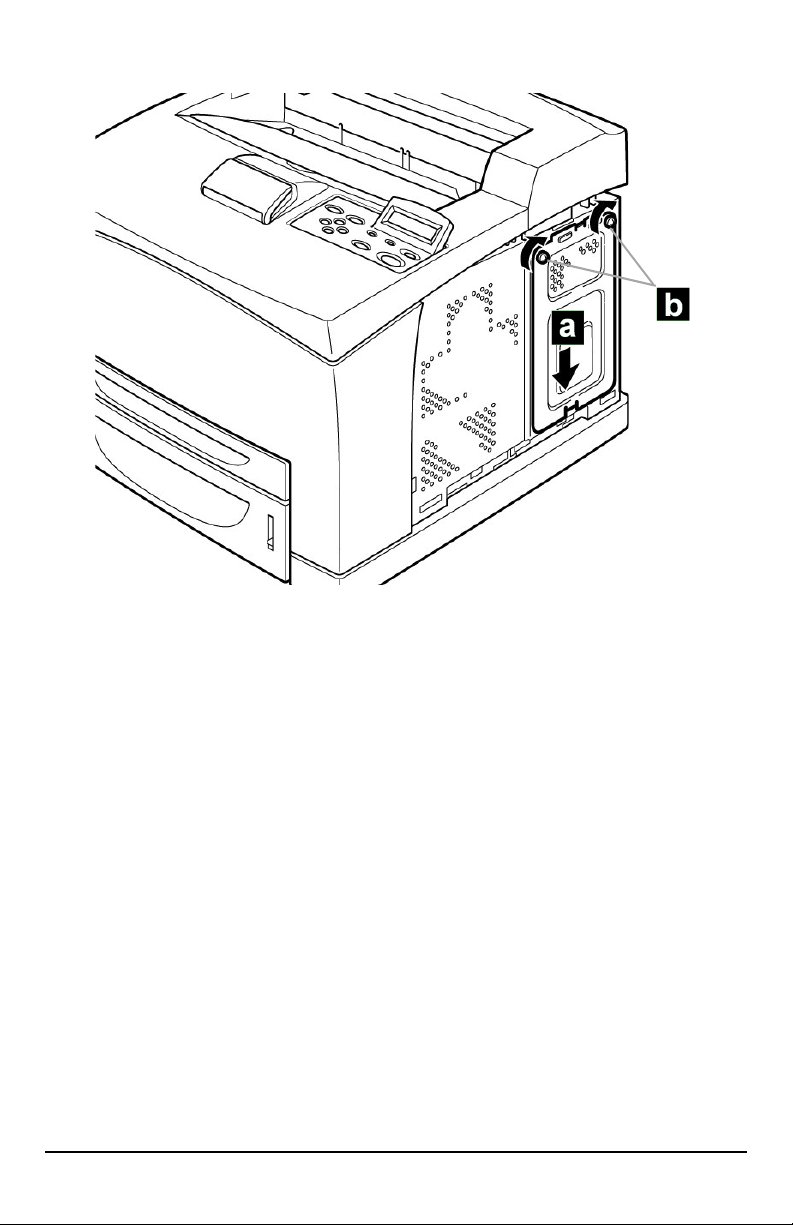
2. Loosen the thumbscrew at the back of the right side cover.
TJ154.jpg
6
Installing the CompactFlash
Page 7
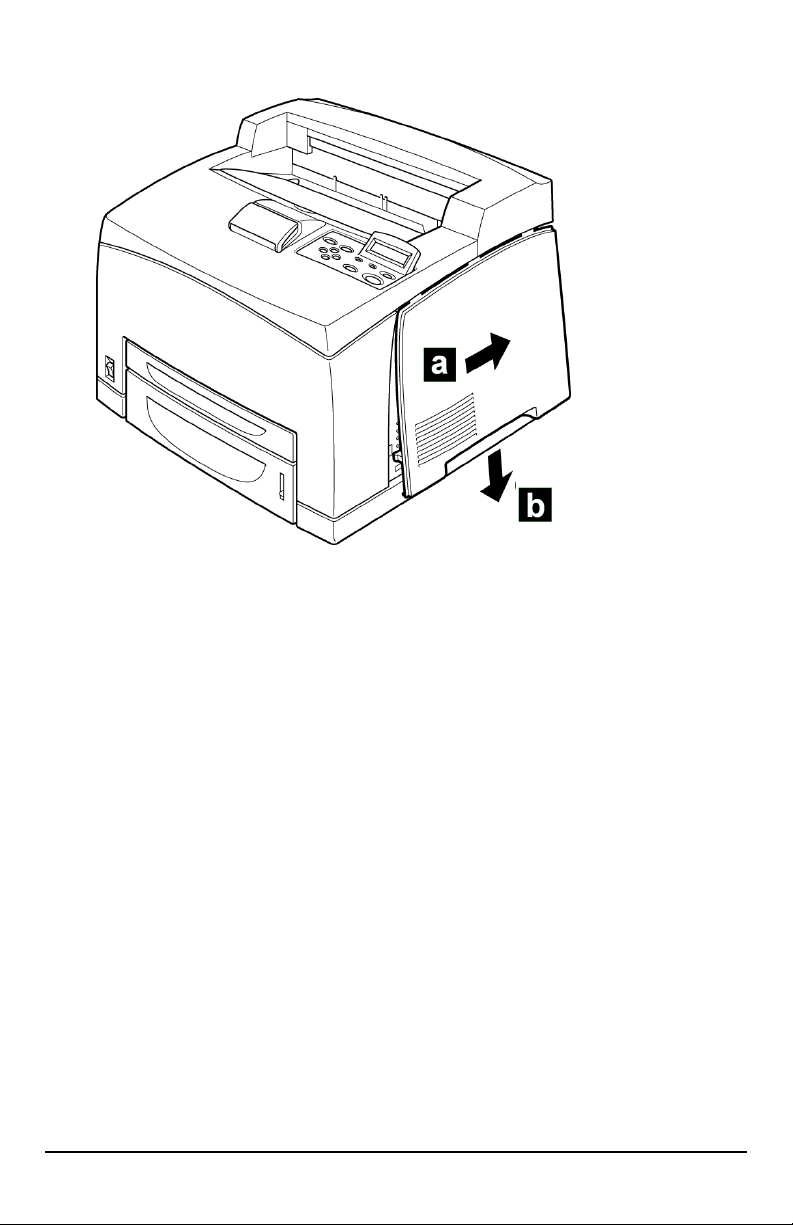
3. Remove the right side cover:
a. Slide the cover toward the rear of the printer.
b. Slide the cover down to remove it.
TJ155a.jpg
TJ155a.jpg
7
Installing the CompactFlash
Page 8
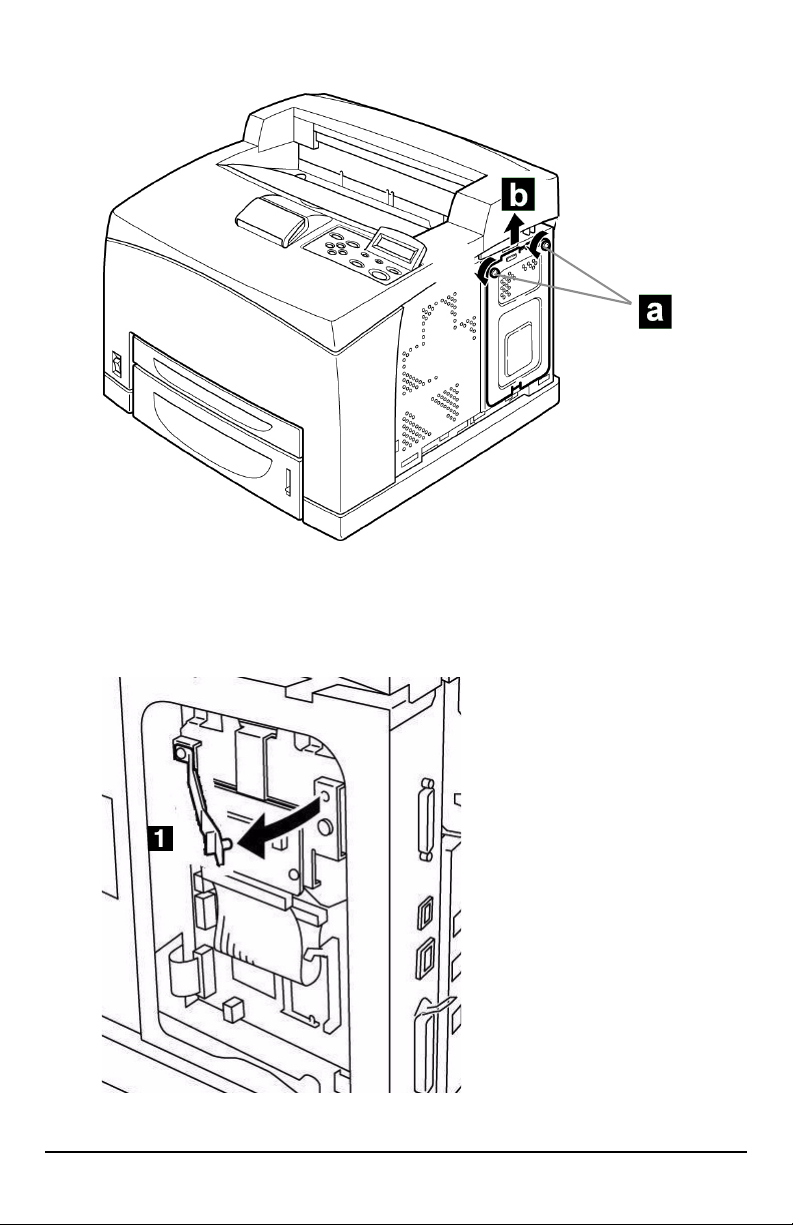
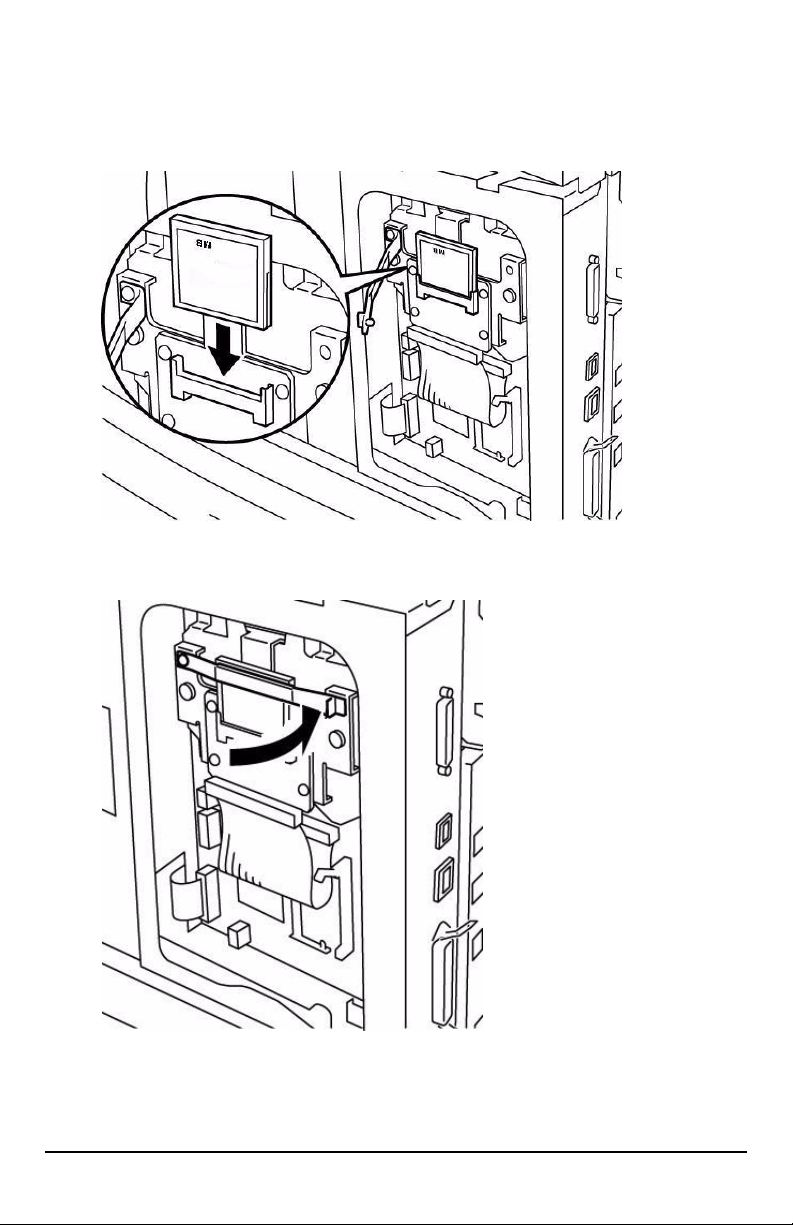
4. Remove the bracket:
a. Loosen the two screws at the top.
b. Pull up to remove.
TJ162a.jpg
5. Unfasten and swing out the retaining strap (
8
1
).
TJ168_rev.jpg
Installing the CompactFlash
Page 9
Alert!
To be on the safe side, please ground yourself (touch metal) before
handling the CompactFlash.
6. Remove the CompactFlash from its packaging and insert it in the slot.
TJ169a.jpg
7. Refasten the retaining strap.
TJ170.jpg
9
Installing the CompactFlash
Page 10
8. Replace the metal bracket:
a. Slide it down into the printer.
b. Tighten the two screws at the top.
TJ158a_crop.jpg
10
Installing the CompactFlash
Page 11

9. Reinstall the right side cover:
TJ159a.jpg
a. Slide the tabs on the top of the cover into the channel on the printer.
b. Fit the tabs at the bottom of the cover into the printer.
c. Slide the cover firmly towards the front of the printer.
d. Tighten the thumbscrew at the back of the printer.
11
TJ154_rev.jp
g
Installing the CompactFlash
Page 12

10. Finish the installation:
TJ171_rev.jpg
TJ034a_crop.j
pg
TJ036_crop.jp
a. Reattach the interface cord.
b. Reattach the power cable.
c. Turn on the printer.
11. Generate a “System Settings List” report to confirm proper installation:
a. Press the <
b. Press the <
MENU
> button to enter the printer menu
▼
> button one or more times until you see “Report/List”
on the second line of the display.
䊳
c. Press the <
d. Press the <
> button once to enter the Report/List sub menu.
▼
> button repeatedly until you see “System Settings”
on the second line of the display.
䊳
e. Press the <
f. Press the <
> button once to select System Settings.
FEED/SELECT
> button.
The System Settings List prints.
g. Check for “Compact Flash” under “Machine Configuration” in the left
column.
h. Press the <
MENU
> button to exit the printer menu.
“Ready to print” appears on the display.
12
Installing the CompactFlash
Page 13

Downloading Fonts and
Forms
The Font and Form Downloader Utility
Use the Font and Form Downloader utility to download PCL fonts and forms.
Note:
To download PostScript forms, use OkiWebRemote: see page 23.
Installing the Utility
1. Close all open applications.
2. Place the CD supplied with the CompactFlash Kit in your CD-ROM drive.
3. Click [Start]
folder.
4. Double click the [SETUP.EXE] file.
The
OKI Font and Form Downloader
5. Follow the on-screen instructions to load the utility.
→
[Run], then browse to the [FontFormDownloader1001]
installation wizard opens
.
13
Downloading Fonts and Forms
Page 14

Running the Utility
Click [Start]→[Programs]→[Okidata]→[Font and Form
→
Downloader]
[Font and Form Downloader: ]
Make sure the printer is discovered and appears in the [Select a printer] box.
14
Downloading Fonts and Forms
Page 15

Using the Utility: PCL Fonts
Downloading Fonts
1. Open the Font and Form Downloader utility.
2. Click [Add to List].
The
Open
window appears
.
3. Browse to the folder where the font you wish to download is located.
4. In the [Files of type:] drop down list, select the type of font to be
downloaded.
15
Downloading Fonts and Forms
Page 16

5. Click the font you wish to download, then click [Open].
The
Add to list w
indow appears
.
6. Select [Download as PCL5 font].
a. Enter the name under which you wish to store the font.
b. Enter the Control ID you wish to use for the font.
c. Click [OK].
The utility returns to the main screen with the font you selected
now listed in the box
:
7. Repeat the process for each font you wish to download.
16
Downloading Fonts and Forms
Page 17

8. When you are done selecting fonts, click the printer name in the [Select
a printer] box.
Note:
If you wish to have the printer automatically print out a sample of
the fonts, select [Print] under [Print font sample].
9. Click [Download].
Deleting Downloaded Fonts (and Forms)
Caution!
1. In the main utility window, click [Delete fonts and forms].
This command
CompactFlash. To delete individual fonts or forms, use
OkiWebRemote: see pages 23 and 23.
deletes ALL fonts and forms
from the
2. Click [Yes] to confirm the deleting of
CompactFlash.
17
all
fonts and forms from the
Downloading Fonts and Forms
Page 18

Using the Utility: PCL Forms (Macros/Overlays)
Downloading PCL Forms
1. Open the Font and Form Downloader utility.
2. Click [Add to List].
The
Open
window appears
3. Browse to the folder where the form you wish to download is located.
.
4. Select [PCL5 Macro File [*.pcl]] or [All Files (*.*)] from the [Files of
type:] drop down list.
5. Click the form you wish to download, then click [Open].
The
Add to list w
6. Select [Download as PCL5 macro].
a. Enter the name under which you wish to store the form.
indow appears
18
.
Downloading Fonts and Forms
Page 19

b. Enter the Control ID you wish to use for the form.
the Control ID you set for future reference
7. Click [OK].
The utility returns to the main screen with the form you selected
now listed in the box
:
Keep a record of
.
8. Repeat the process for each form you wish to download.
9. When you are done selecting forms, click the printer name in the
[Select a printer] box.
10. Click [Download].
Running a Test Print for a Downloaded Form
With the Font and Form Downloader utility open and the printer highlighted
in the [Select a printer] box:
19
Downloading Fonts and Forms
Page 20

1. Click [Test Form].
The Test Form dialog box appears
2. Enter the Control ID number for the form you wish to print, then click
[Print].
The form prints
.
.
Deleting Downloaded Forms
To delete all fonts and forms, see “Deleting Downloaded Fonts (and Forms)”
on page 17.
To delete individual forms, use OkiWebRemote: see page 23.
20
Downloading Fonts and Forms
Page 21

OkiWebRemote
Note:
The OkiWebRemote web page is built into your printer. Use it for
Accessing OkiWebRemote
Use of the CompactFlash with OkiWebRemote requires a web browser
such as Microsoft Internet Explorer
Netscape
• downloading fonts and forms (macros/overlays) to the CompactFlash
• deleting fonts and forms (macros/overlays) from the CompactFlash
• changing printer settings
• resetting the printer, etc.
1. Open your web browser.
2. Under Address, type in the printer’s IP address (e.g., http://
192.11.11.11), then press
OkiWebRemote opens with the Status tab displayed
®
version 6.2 and higher.
Enter
®
version 5.5 and higher, or
.
.
okiweb_01.bmp
Note:
You will need the Mac address to log in. If you do not already have
it, click [Network Summary] in the left column and record the last
six digits, minus the colons.
21
Downloading Fonts and Forms
Page 22

3. Click [Login].
The “Connect to” screen appears.
okiweb_02.bmp
a. Type “root” as the [User name] (be sure to use
letters
).
all lower case
b. Type the last six digits of the Mac address (without the colons) for
the [Password].
4. Click [OK].
You are now ready to download to the CompactFlash.
Using OkiWebRemote: Fonts
If you wish to include an ID for fonts downloaded using OkiWebRemote,
follow the instructions in your PCL5 Command Reference Guide to assign the
ID before proceeding.
Downloading Fonts
1. In the left column on the Maintenance tab, click
→
[Font Maintenance]
2. Download a font:
a. Click [Browse].
The [Choose file] dialog box opens.
b. Check the [Files of Type] setting.
c. Browse to the folder containing the font(s) you wish to download.
d. Highlight the font to be included, then click [Open].
The font file path and name appear in the [Font File Name] box.
e. Click [Submit].
“Settings have been changed.” appears.
[Font Registration].
okiweb_0
4_FontRe
g.bmp
3. Repeat the process for each font you wish to download.
22
Downloading Fonts and Forms
Page 23

Deleting Downloaded Fonts
1. In the left column on the Maintenance tab, click
[Font Maintenance]
2. Highlight the font to be deleted.
3. Click [Delete].
4. Repeat the process for each font you wish to delete.
→
[Font Listings].
Using OkiWebRemote: Forms (Overlays)
If you wish to include an ID for forms downloaded using OkiWebRemote,
follow the instructions in your PCL5 Command Reference Guide to assign the
ID before proceeding.
Downloading Forms
1. In the left column on the Maintenance tab, click
→
[Form Maintenance]
2. Download a form:
a. Click [Browse].
The Choose file dialog box opens.
b. Check the [Files of Type] setting.
c. Browse to the folder containing the Form(s) you wish to download.
d. Highlight the form to be included, then click [Open].
The file name appears in the [Form File Name] box.
e. Click [Submit].
“Settings have been changed.” appears.
[Form Registration].
okiweb_05_
3. Repeat the process for each form you wish to download.
Deleting Downloaded Forms
1. In the left column on the Maintenance tab, click
[Form Maintenance]
2. Highlight the form to be deleted.
3. Click [Delete].
4. Repeat the process for each form you wish to delete.
→
[Form Listings].
23
Downloading Fonts and Forms
Page 24

Generating a Lists of Fonts
To generate a list of the downloaded fonts stored on the CompactFlash,
including the escape sequence for each font:
MENU
1. Press the <
2. Press the <
the second line of the display.
3. Press the
4. Press the <
second line of the display.
5. Press the
6. Press the <
The Fonts List prints. The fonts stored on the CompactFlash are
found at the bottom of the list.
7. Press the <
“Ready to print” appears on the display.
<䊳>
<䊳>
> button to enter the printer menu
▼
> button one or more times until you see “Report/List” on
button once to enter the Report/List sub menu.
▼
> button repeatedly until you see “Fonts List” on the
button once to select Fonts List.
FEED/SELECT
MENU
> button to exit the printer menu.
> button.
24
Generating a Lists of Fonts
Page 25

Printing Using Fonts and
Forms
Using Downloaded Fonts
The B6200n and B6300n CompactFlash cards support fonts of many types.
Important!
The examples below are provided to help guide you through the process
of using commands to employ downloaded fonts and forms in printed
documents. Using commands requires experience with PCL5 programming
language and an understanding of embedding the commands.
Selecting Fonts by Font Attribute
Select a downloaded font using its escape sequence. The escape sequences
for downloaded fonts are given in the Fonts List report. See “Generating a
Lists of Fonts” on page 24.
Example
To select a downloaded font whose escape sequence is
<ESC>(10U<ESC>(s1p8.0v0s0b23T:
<ESC>%-12345X@PJL ENTERLANGUAGE=PCL<0D><0A>
[D
ATA STRING
<ESC>(10U<ESC>(s1p8.0v0s0b23T
[D
ATA STRING
<0C>
<ESC>%-12345X
](Printer Default)<0D><0A>
]<0D><0A>
25
Printing Using Fonts and Forms
Page 26

Selecting Fonts by FontID
Commands used:
Command ASCII Hexadecimal
Assign FontID <ESC> * c # D 1B 2A 63 # 44
Assign FontID to FontFile in storage <ESC> & n # W [01] 1B 26 6E # 57 [01]
Select primary font by FontID <ESC> ( # X 1B 28 # 58
Example
To select downloaded fonts Font1.sfp and Font12.sfp:
<ESC>%-12345X@PJL ENTERLANGUAGE=PCL<0D><0A>
<ESC>*c1000D<ESC>&n10W
<ESC>*c1001D<ESC>&n11W
<ESC>(1000X
<ESC>(1001X
[D
ATA STRING
[D
ATA STRING
<0C>
<ESC>%-12345X
<01>Font1.sf
/ * assign Font ID 1000 to Font1.sfp*/
<01>Font12.sfp
/ * assign Font ID 1001 to Font12.sfp */
]<0D><0A>
]<0D><0A>
/ * select Font1.sfp at ID 1000*/
/ * select Font12.sfp at ID 1001*/
26
Printing Using Fonts and Forms
Page 27

Switching Fonts
Set a Primary and Secondary Font
For PCL5, you can set one Primary and one Secondary font, then use the SI
and SO commands to switch between them.
Commands used:
Command ASCII Hexadecimal
Assign FontID <ESC> * c # D 1B 2A 63 # 44
Assign FontID to FontFile in storage <ESC> & n # W [01] 1B 26 6E # 57 [01]
Set primary font by FontID <ESC> ( # X 1B 28 # 58
Set secondary font by FontID <ESC> ) # X 1B 29 # 58
Switch to primary font SI 0F
Switch to secondary font SO 0E
Example
To set the default resident font Courier as the Primary font and the
downloaded font Download1.bin as the Secondary font, then switch
between them:
<ESC>%-12345X@PJL ENTERLANGUAGE=PCL<0D><0A>
<ESC>*c1000D<ESC>&n12W<01>
Download1.bin
/ * assign Font ID 1000 to Download1.bin */
<ESC>)1000X /* Set Downloaded font as Secondary font */
<0F>
[D
<0E>
<0F>
<0E>
ATA STRING
[D
ATA STRING
[D
ATA STRING
[D
ATA STRING
].<0D><0A>
].<0D><0A>
/ * Select Secondary font */
].<0D><0A>
].<0D><0A>
/ * Select Secondary font */
/ * Select Primary font */
/ * Select Primary font */
<0C>
<ESC>%-12345X
27
Printing Using Fonts and Forms
Page 28

Set the Font as the Primary Font Each Time You Switch
If you prefer, you can set the font you wish to use as the Primary font each
time you call it up in the program.
Commands used:
Command ASCII Hexadecimal
Assign FontID <ESC> * c # D 1B 2A 63 # 44
Assign FontID to FontFile in storage <ESC> & n # W [01] 1B 26 6E # 57 [01]
Select primary font by FontID <ESC> ( # X 1B 28 # 58
Select secondary font by FontID <ESC> ) # X 1B 29 # 58
Example
To switch between the resident font CG Times and the downloaded font
Download1.bin:
<ESC>%-12345X@PJL ENTERLANGUAGE=PCL<0D><0A>
<ESC>*c1000D<ESC>&n12W<01>
<1B>(8U<1B>(s1p8.0v0s0b5T
[D
ATA STRING
].<0D><0A>
<ESC>(1000X / * Set Downloaded font as Primary font */
[D
ATA STRING
].<0D><0A>
<1B>(8U<1B>(s1p8.0v0s0b5T
[D
ATA STRING
].<0D><0A>
<ESC>(1000X / * Set Downloaded font as Primary font */
[D
ATA STRING
].<0D><0A>
<0C>
<ESC>%-12345X
Download1.bin
/ * assign Font ID 1000 to Download1.bin */
/ * Set CG Times as Primary font */
/ * Set CG Times as Primary font */
28
Printing Using Fonts and Forms
Page 29

Using Resident Bar Code Fonts
Available Bar Code Fonts
Bar Code Escape Sequence
Interleaved 2 of 5
Code 128
Code 3 of 9
USPS Zip
EAN/UPC
<ESC> ( 4 Y <ESC> ( s
<ESC> ( 9 Y <ESC> ( s
<ESC> ( 0 Y <ESC> ( s
<ESC> ( 15 Y <ESC> ( s
<ESC> ( 8 Y <ESC> ( s
SIZE
SIZE
SIZE
SIZE
SIZE
a
v 64 T
a
v 124 T
a
v 94 T
a
v 505 T
a
v 44 T
a. Fill in point size: range = 0.25 to 999.
Select Barcode Font by Font Attribute
Use the escape sequence to select barcode fonts.
Example 1
To select Code 3 of 9 using the escape sequence:
<ESC>%-12345X@PJL ENTERLANGUAGE=PCL<0D><0A>
1-23456<20><20>
<0C>
ESC%-12345X
<ESC>(0Y<ESC>(s18v94T
1-23456<0D><0A>
29
Printing Using Fonts and Forms
Page 30

Example 2
To set Code 3 of 9 as a Secondary font:
<ESC>%-12345X@PJL ENTERLANGUAGE=PCL<0D><0A>
<ESC>)0Y<ESC>)s18v94T
<0F>
<20><20>1-23456<20><20><0E>1-23456
<0F>
<20><20>1-65432<20><20><0E>1-65432<0D><0A>
<0C>
ESC%-12345X
Using Forms (Macros/Overlays)
Important!
The examples below are provided to help guide you through the process
of using commands to employ downloaded fonts and forms in printed
documents. Using commands requires experience with PCL5 programming
language and an understanding of embedding the commands.
Command ASCII Hexadecimal
Macro ID <ESC> & f # Y 1B 26 66 # 59
Macro Control <ESC> & f 4 X 1B 26 66 34 58
30
Printing Using Fonts and Forms
Page 31

Example
• The form file name is hello70.prn. It has been stored on the
CompactFlash using Control ID = 2.
• The print job file name is hello71.prn.
To print the file hello71.prn with the hello70.prn form included:
<ESC>%-12345X@PJL ENTERLANGUAGE=PCL<CF><RF>
<1B>&f2Y
<1B>&n12W<05>hello70.prn
<1B>&f2Y
<1B>&f4X
[PCL
DATA
]
<ESC>%-12345X
31
Printing Using Fonts and Forms
Page 32

Oki Data Americas, Inc.
2000 Bishops Gate Blvd.
Mt. Laurel, NJ 08054-4620
Phone: (800) 654-3282
FAX: (856) 222-5320
WWW.OKIPRINTINGSOLUTIONS.COM
59367201
 Loading...