

Ohsung Electronics URCKP900 Users Manual

Test Report No.: GETEC-E3-08-001
FCC Part 15 Subpart B,C
APPENDIX I
: USER’S MANUAL
EUT Type: RF Remote Controller
FCC ID.: OZ5URCKP900

Operating Your System
With The KP-900 Wireless
Keypad/Remote
COMPLETE
COMPLETE
CONTROL
Universal Remote Control
™
®

This remote control was
Custom Programmed for you by:
For questions about your Custom Programming call:
Custom Programming of a complex home theater and/or a multi-room
system is one of the most challenging tasks within an audio/video installation. It involves an intimate knowledge of how the components interact
and exact details on the proper sequences of control.
Only a Complete Control dealer has the requisite experience and training
to quickly and effectively customize a remote control for true automated
operation.
Congratulations on your choice!
KP-900 Owners Manual © 2007 Universal Remote Control, Inc.
The information in this manual is copyright protected. No part of this manual may
be copied or reproduced in any form without prior written consent from Universal
Remote Control, Inc.
UNIVERSAL REMOTE CONTROL, INC. SHALL NOT BE LIABLE FOR OPERATIONAL,
TECHNICAL OR EDITORIAL ERRORS/OMISSIONS MADE IN THIS MANUAL.
The information in this manual may be subject to change without prior notice.
Complete Control is a registered trademark of Universal Remote Control, Inc.
Entertainment Made Simple is a trademark of Universal Remote Control, Inc.
All other brand or product names are trademarks or registered trademarks of their
respective companies or organizations.
Universal Remote Control, Inc.
500 Mamaroneck Avenue, Harrison, NY 10528
Phone: (914) 835-4484 Fax: (914) 835-4532

TABLE OF CONTENTS
Introduction 1
Understanding LCD Labeled Buttons 1
Optional RF “No Rules” Operation 2
Securing the Wall Bracket 3
Installing Batteries 3
Programming the KP-900 4
Selecting a New “Activity” 5
Using the KP-900 to Control an “Activity” 6
Displaying the Setup Screen 7
Selecting from the Setup Screen 7
Setting the LCD 8
Sound Volume 10
Light Settings 10
System Settings 11
Version Information Displays 11
Factory Default 12
USA Limited Warranty Statement 12
Specifications 14
Contact Universal Remote Control 14
Notes: Your Listen Activities 15
Notes: Your Watch Activities 16
KP-900 OWNERS MANUAL
Congratulations!
You’ve purchased a unique wireless control. The KP-900 can be used as both
a wall mounted keypad and as a hand-held remote control. The KP-900
achieves a magnificent combination of power and flexibility, simplifying and
automating operation of even the most complex system.
Wall Mounted Keypad and Hand-Held Remote Control
Once the wall bracket is securely installed on the wall, simply place the
KP-900 into the bracket. Magnets snap the KP-900 into place. To use as a
hand-held remote control, grasp the KP-900 from the top edge and pull it
away from the bracket.
One Touch Multi-Colored Backlighting
Press any button to backlight the screen and the hard buttons.
Integrated Sound Signaling
The KP-900 incorporates a small speaker for beeps. Anytime you press a
button, the KP-900 signals that it has understood your command with a
beep sound.
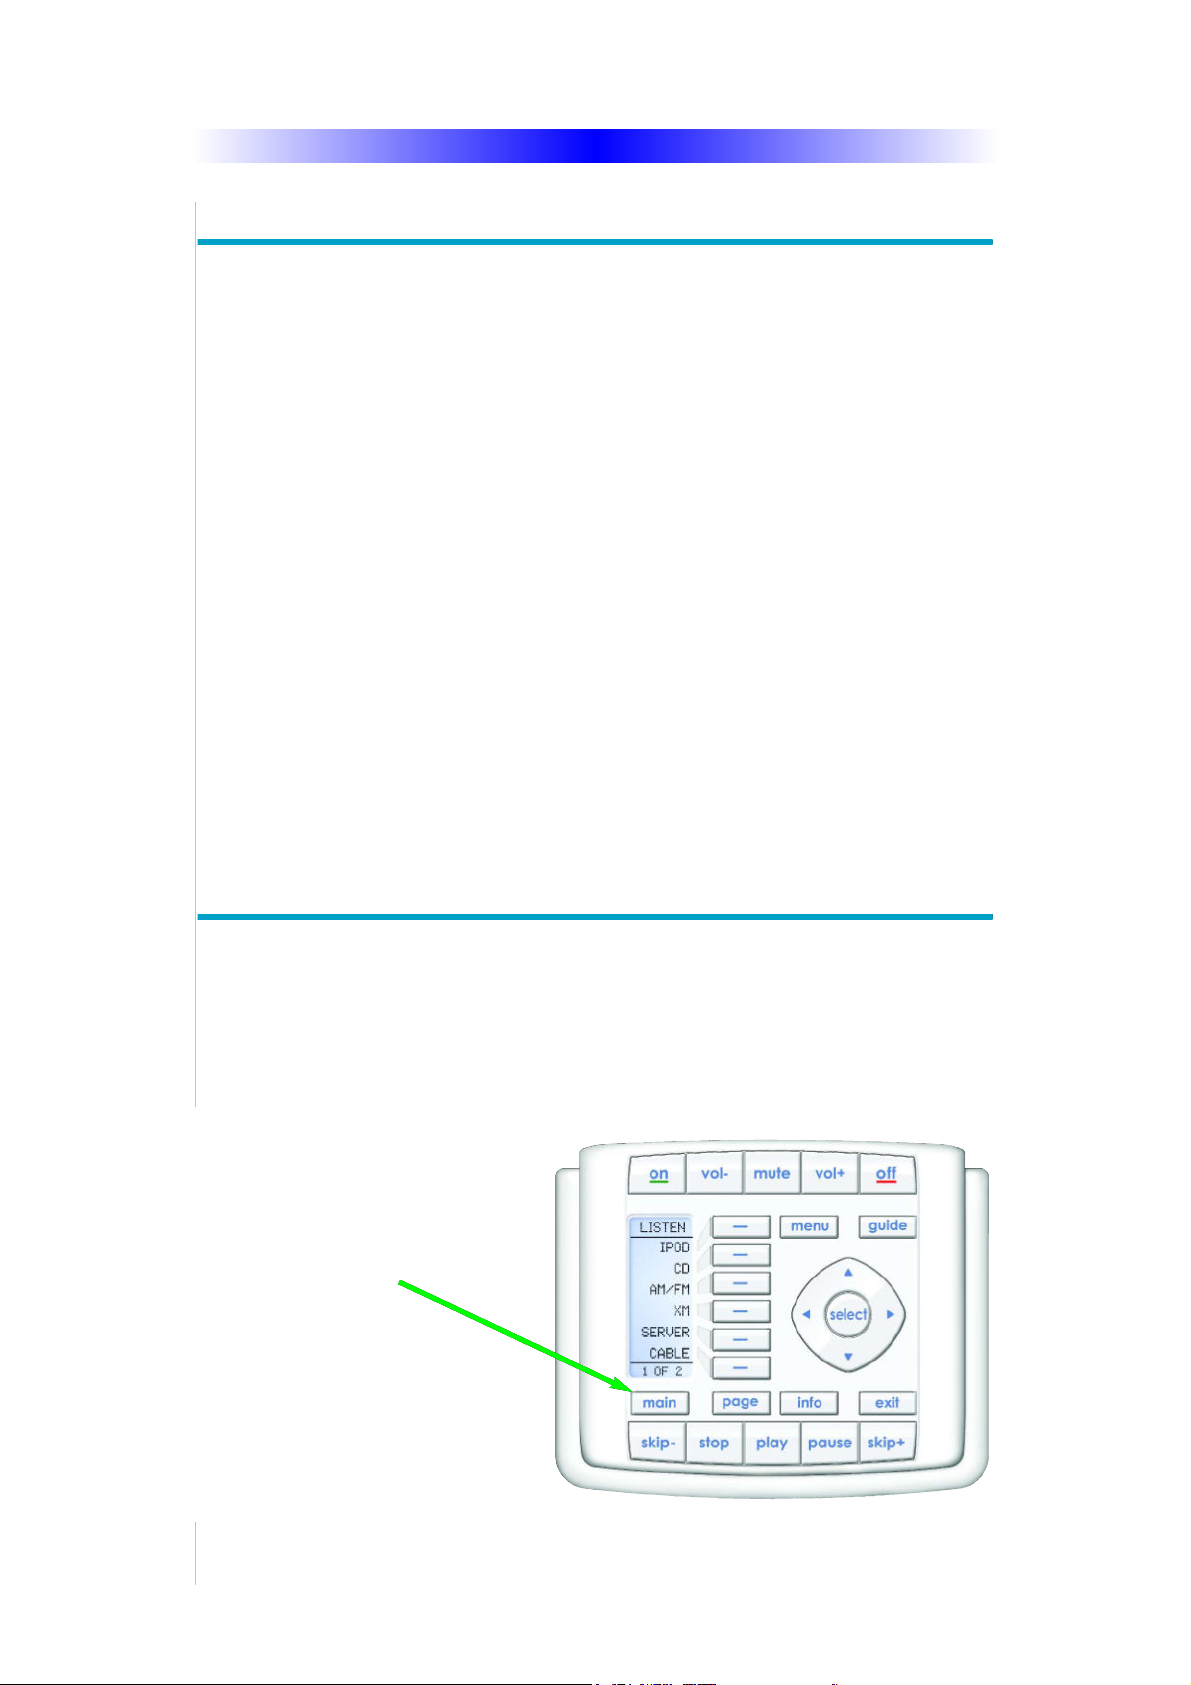
Custom Labeled Buttons
The KP-900 is equipped with a bright easy to read LCD screen which
labels the six buttons to the right of the screeen. These button labels
change based on what you are watching or listening to. Thus, if you have
selected Watching TV, you will see a list of buttons that are useful to that
activity, while if you select DVD, the buttons will control the DVD.
Pressing the MAIN button displays
the Main Menu pages of the KP-900.
When you select one of the activities listed, the entire functionality of
all the buttons changes to operate
the selected device.
Page 1

KP-900 OWNERS MANUAL
Optional RF “No Rules” Operation
In combination with a Complete Control RF Base Station, the KP-900 can
control your system without being in line-of-sight of the equipment.
The MSC-400, the MRF-350 or the MRF-260 RF base station are compatible
with the KP-900. All incorporate RF addressing. RF Addressing gives you the
ability to control equipment locations throughout your home, even if they are
concealed in other rooms or are behind closed doors.
1. The KP-900 sends radio waves
in every direction, so you don’t
have to point the remote anymore!
2. The RFX-250 RF Sensor can be freely
positioned for optimal reception.
3. The MSC-400 routes IR commands to the correct IR
Flasher.
4. Self-adhesive “Flashers” affix to the
Infrared sensors on the front panels of your
components. The Flashers relay commands
to components out of sight of the MRF350’s Front Blaster. The flashers plug in to
the MRF-350’s rear flasher line outputs via
their 10 foot cables. Uniquely, the MRF-350
can also connect to rear panel IR Inputs via
its adjustable IR Line Outputs.
Page 2

KP-900 OWNERS MANUAL
Securing the Wall Bracket
The KP-900 includes a wall bracket, four screws and four plastic caps to
conceal the screwheads. Consult with a professional installer before
attempting to secure the bracket to your wall. The included screws may
not be appropriate for your walls.
Before making a hole in your wall, gather the family and evaluate the best
height. Like a thermostat, the KP-900 should be at comfortable eye level
for most of the family, typically between 54” to 62” from the floor to the
top of the bracket (60” is typical).
Use a bubble level and a pencil to draw a line on the wall, then hold the
bracket in place. Screw in the four screws and cover the screw heads with
the included self adhesive caps.
Magnets in the bracket and the keypad keep the KP-900 securely in place,
yet make it easy to remove when you need a hand-held remote control.
Installing Batteries
There are two battery compartments on the rear of the KP-900. Each compartment holds two AAA batteries for a total of four AAA batteries.
Open each battery cover by pressing the release and pulling back the
cover on the back of the control. Remove the cover.
Observe the + and - polarity indicators on the batteries.
Drop a battery into the compartment with the - indicator up. Slide the
battery up into the top position and insert the second battery into place.
Now, replace the battery cover by inserting the hinged end in first, then
snapping the cover back into place.
Repeat the process with the second battery compartment.
Page 3
 Loading...