

Page 1
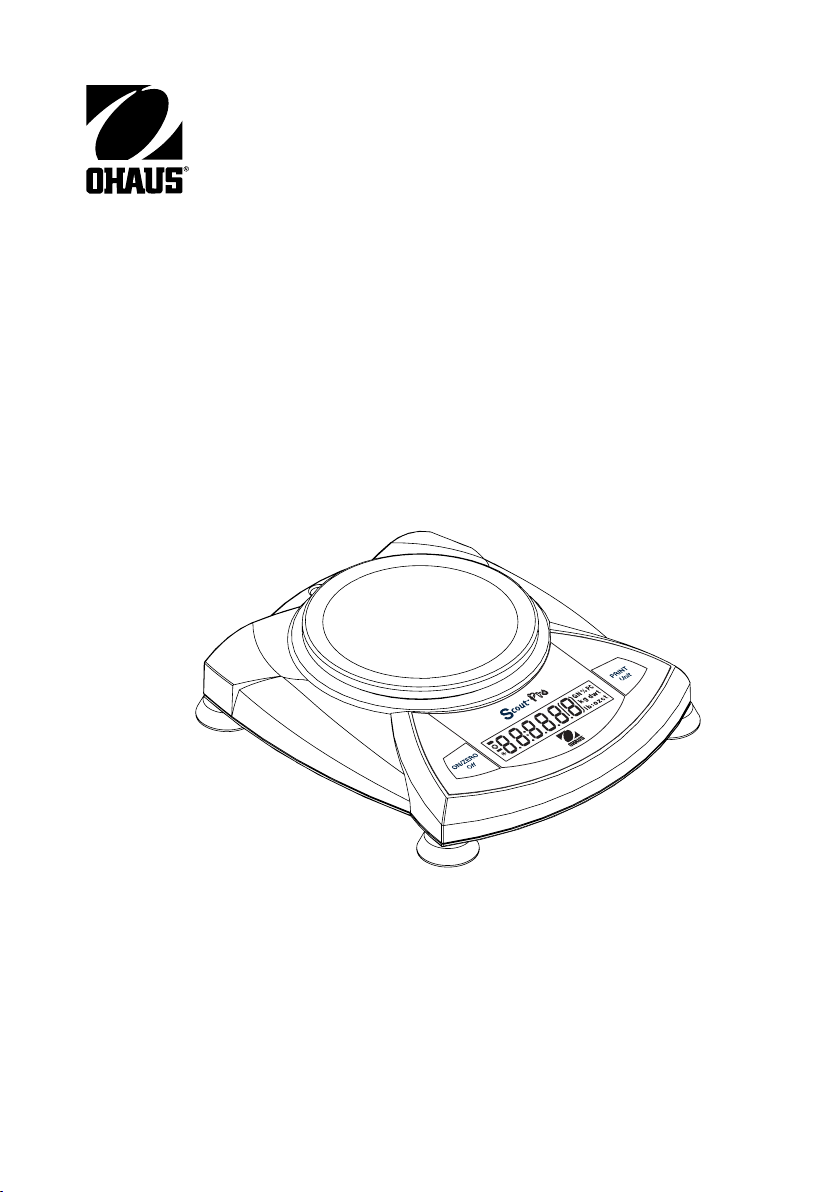
Scout®
Instruction Manual
Pro
Balance
Page 2

Page 3
This product conforms to the EMC Directive 89/336/EEC and the Low
Voltage Directive 73/23/EEC.
The complete Declaration of Conformity is available from Ohaus
Corporation.
Disposal
In conformance with the European Directive 2002/96 EC on Waste
Electrical and Electronic Equipment (WEEE) this device may not be
disposed of in domestic waste. This also applies to countries
outside the EU, per their specific requirements.
Please dispose of this product in accordance with local regulations
at the collecting point specified for electrical and electronic
equipment.
If you have any questions, please contact the responsible authority
or the distributor from which you purchased this device.
Should this device be passed on to other parties (for private or
professional use), the content of this regulation must also be
related.
Thank you for your contribution to environmental protection.
Page 4

FCC NOTE: This equipment has been tested and found to comply with the
limits for a Class B digital device, pursuant to Part 15 of the FCC Rules. These
limits are designed to provide reasonable protection against harmful
interference in a residential installation. This equipment generates, uses and
can radiate radio frequency energy and, if not installed and used in
accordance with the instructions, may cause harmful interference to radio
communications. However, there is no guarantee that interference will not
occur in a particular installation. If this equipment does cause harmful
interference to radio or television reception, which can be determined by
turning the equipment off and on, the user is encouraged to try to correct the
interference by one or more of the following measures:
— Reorient or relocate the receiving antenna.
— Increase the separation between the equipment and receiver.
— Connect the equipment into an outlet on a circuit different from that to which
the receiver is connected.
— Consult the dealer or an experienced radio/TV technician for help.
CANADIAN NOTE:
This class B digital apparatus complies with Canadian ICES-003.
Cet appariel numérique de la classe B est conforme à la norme NMB-003 du
Canada.
AS/NZS4251.1 AS/NZS4252.1 Emission and Immunity
13123
ISO 9001 Registration
In 1994, Ohaus Corporation, USA, was awarded a certificate of registration to
ISO 9001 by Bureau Veritus Quality International (BVQI), confirming that the
Ohaus quality management system is compliant with the ISO 9001 standard’s
requirements. On May 15, 2003, Ohaus Corporation, USA, was re-registered to
the ISO 9001:2000 standard.
Page 5

SCOUT
PRO
TABLE OF CONTENTSTABLE OF CONTENTS
TABLE OF CONTENTS
TABLE OF CONTENTSTABLE OF CONTENTS
1. INTRODUCTION ................................................................................ EN-3
Safety Precautions ............................................................................ EN-3
2. INSTALLATION .................................................................................. EN-3
Unpacking ...................................................................................... EN-3
Installing Components...................................................................... EN-4
Releasing the Shipping Lock ......................................................... EN-4
Platform Installation ..................................................................... EN-4
Draft Shield Installation (120g Model)............................................ EN-4
Security Bracket ........................................................................... EN-4
Selecting the Location ...................................................................... EN-5
Balances with Level Adjustment ....................................................... EN-5
Connecting Power............................................................................ EN-5
Battery Installation ....................................................................... EN-5
AC Adapter Installation ................................................................. EN-5
3. OPERATION .................................................................................... EN-6
Overview of Controls and Display Functions ........................................ EN-6
Button Functions.......................................................................... EN-8
Symbols Used for Operation of the Balance ..................................... EN-9
Turning the Balance On ................................................................ EN-9
Turning the Balance OFF ............................................................. EN-10
Navigating the Menus .................................................................... EN-10
Menu Structure .......................................................................... EN-11
Entering the Menus .................................................................... EN-11
Accepting/Bypassing an Individual Menu Item ............................... EN-11
Entering the .S.E.T.U.P. Menu ...................................................... EN-12
Turning Display Hold, Totalize or Specific Gravity Mode On ............. EN-13
Exiting the .S.E.T.U.P. Menu ........................................................ EN-13
Entering the .U.N.I.T. Menu ......................................................... EN-13
Parts Counting .......................................................................... EN-14
EN-1
Page 6

EN-2 SCOUT
TABLE OF CONTENTS (Cont.)TABLE OF CONTENTS (Cont.)
TABLE OF CONTENTS (Cont.)
TABLE OF CONTENTS (Cont.)TABLE OF CONTENTS (Cont.)
Calibration .................................................................................... EN-14
Span Calibration ......................................................................... EN-14
Linearity Calibration .................................................................... EN-15
Applications .................................................................................. EN-16
Weighing ................................................................................... EN-16
Weighing with Tare .................................................................. EN-16
Parts Counting ........................................................................... EN-17
Percent Weighing ....................................................................... EN-18
Establishing a New Reference Weight ......................................... EN-19
Exiting Percent Weighing .......................................................... EN-19
Display Hold .............................................................................. EN-19
Exiting Display Hold ................................................................. EN-20
Totalize ..................................................................................... EN-20
Clear Exit Totalize .................................................................... EN-21
Specific Gravity ........................................................................... EN-21
Clear Exit Specific Gravity ........................................................... EN-22
Additional Features........................................................................ EN-22
Weigh Below .............................................................................. EN-22
Lock Switch ............................................................................... EN-23
PRO
4. MAINTENANCE ................................................................................ EN-24
Cleaning ....................................................................................... EN-24
Troubleshooting ............................................................................. EN-24
Error Codes List ............................................................................. EN-25
Accessories................................................................................... EN-26
5. TECHNICAL DATA ............................................................................. EN-27
Specifications ................................................................................ EN-27
Warranty ...................................................................................... EN-29
Page 7

SCOUT
PRO
EN-3
1. INTRODUCTION
The Scout
weighing and specific gravity mode. Models are available with ranges from 120g to
6000g.
Scout
• Battery or AC operation (AC adapter included)
• Density/Specific Gravity determination (certain models)
• Integral security bracket
• Programmable auto shut-off
• Span calibration masses included on certain models
• Optional USB or RS232 interface available
Safety Precautions
Please follow the safety precautions as listed:
Pro
offers parts counting with auto optimization, display hold, totalize, %
Pro
standard features include:
CAUTION:
• Do not operate the balance around corrosive fumes.
• Use only the adapter provided with the balance.
• Do not try to service the Scout
Pro
balance.
• Before plugging in the balance, make sure that the voltage rating of the
power adapter and the AC Adapter match.
2. INSTALLATION
Unpacking
Inform your Ohaus dealer if parts are missing.
Your Scout
• Scout
• Instruction Manual • Calibration Masses ( on certain models)
• Draft shield (120g Model only) • Specific Gravity Kit (on certain models)
Pro
package contains:
Pro
Balance • Warranty card • AC Power Adapter • Platform
Store the packaging material for future transport.
Page 8
EN-4 SCOUT
Installing Components
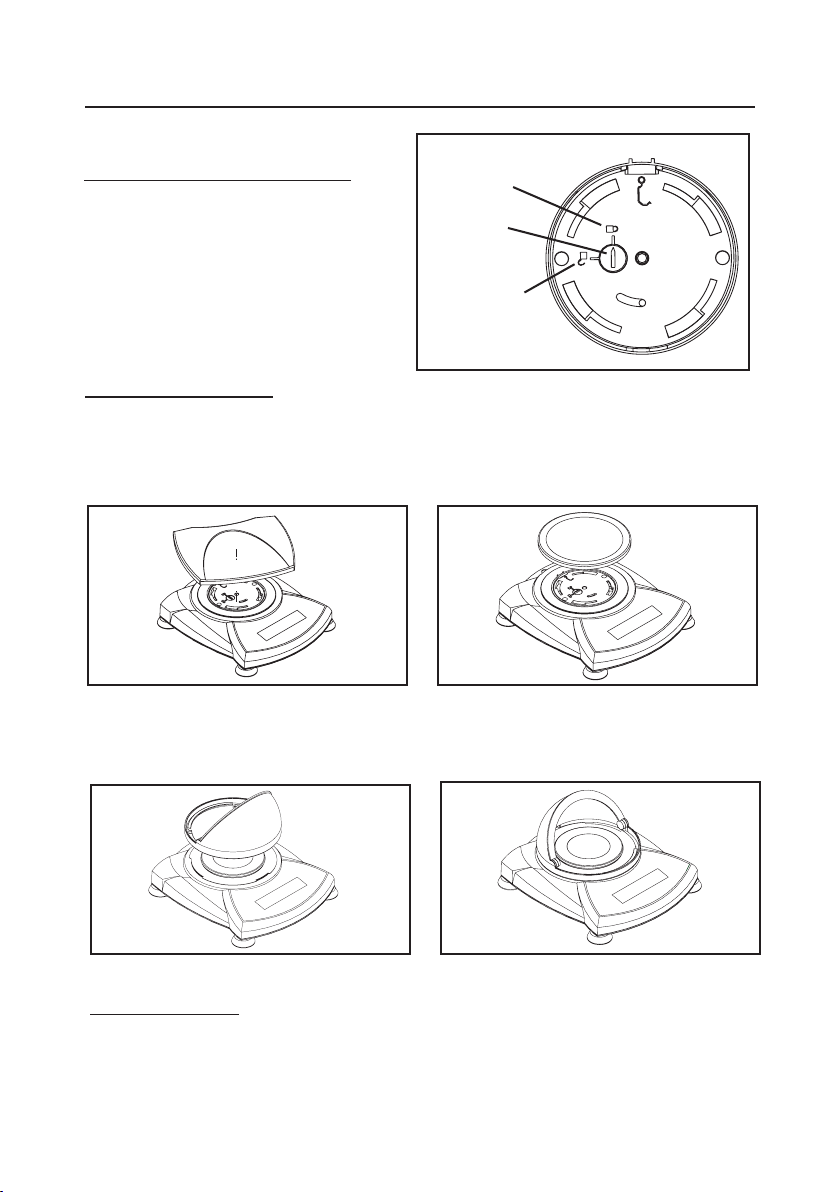
Releasing the Shipping Lock
On top of the balance, turn the pointer 90
degrees counter-clockwise to unlock.
Locked
Position
Pointer
Unlocked
Position
PRO
Platform Installation
Balances with a rectangular platform are placed into the subplatform as shown and
rotated counter-clockwise until it locks. Round platforms are placed straight down
on subplatform.
Platform Installations.
Releasing the Shipping lock.
Draft Shield Installation (120g Model)
Position the keyed draft shield on top of the balance and rotate it until it faces forward.
Installing Draft Shield.
Security Bracket
A security bracket is provided at the rear of the balance allowing the balance to be
secured by an optional cable and lock accessory.
Page 9
SCOUT
PRO
EN-5
Selecting the Location
For best performance, the Scout
environment. Do not use the balance in environments with excessive drafts, with
rapid temperature changes, near magnetic fields or near equipment that generates
magnetic fields, or vibrations.
Pro
balance should be used in a clean, stable
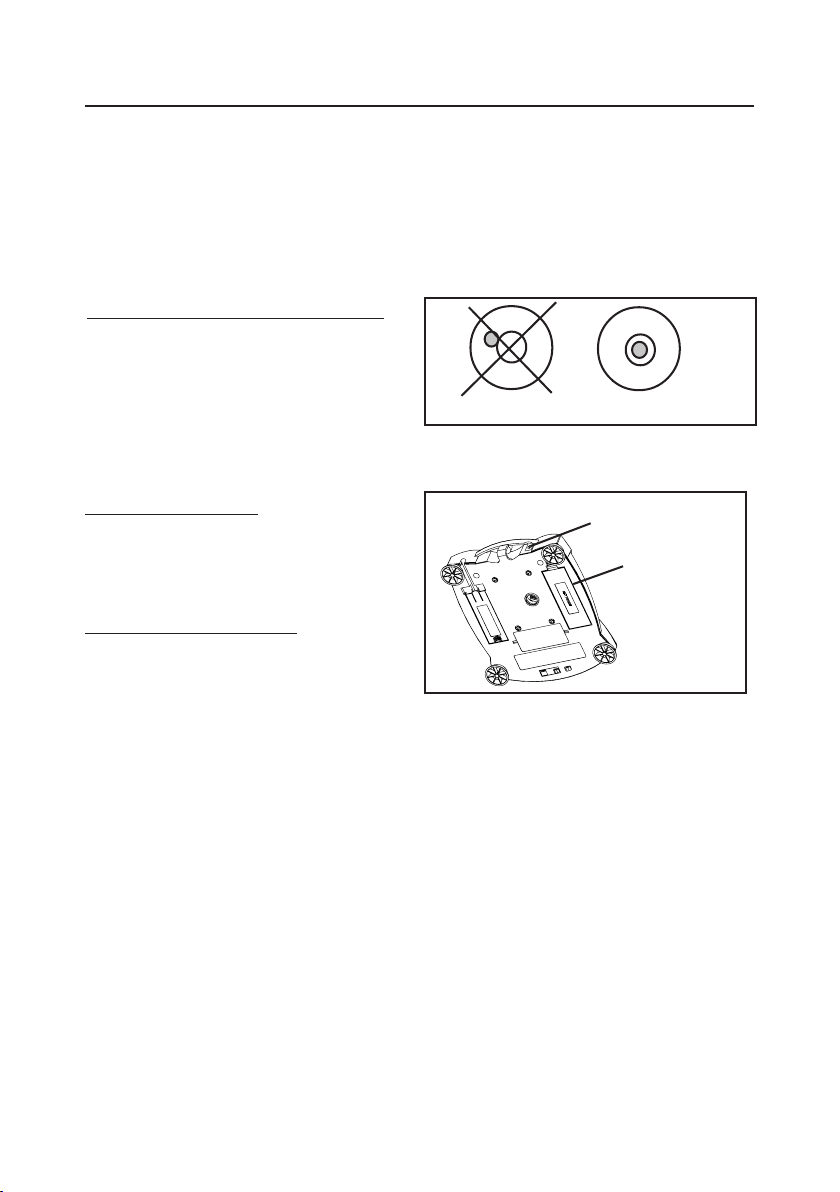
Balances with Level Adjustment
Balances containing leveling feet and a
bubble level must be leveled before using.
See illustration for correct leveling.
Incorrect Correct
Bubble Level indicator
Connecting Power
Battery Installation
Install the Four “AA” batteries with polarity
as shown in the battery compartment.
AC Adapter Input Jack
Battery
Compartment
Cover
AC Adapter Installation
Plug the AC adapter into the jack at the
rear of balance.
Battery and AC Power Connections
Page 10
EN-6 SCOUT
3. OPERATION
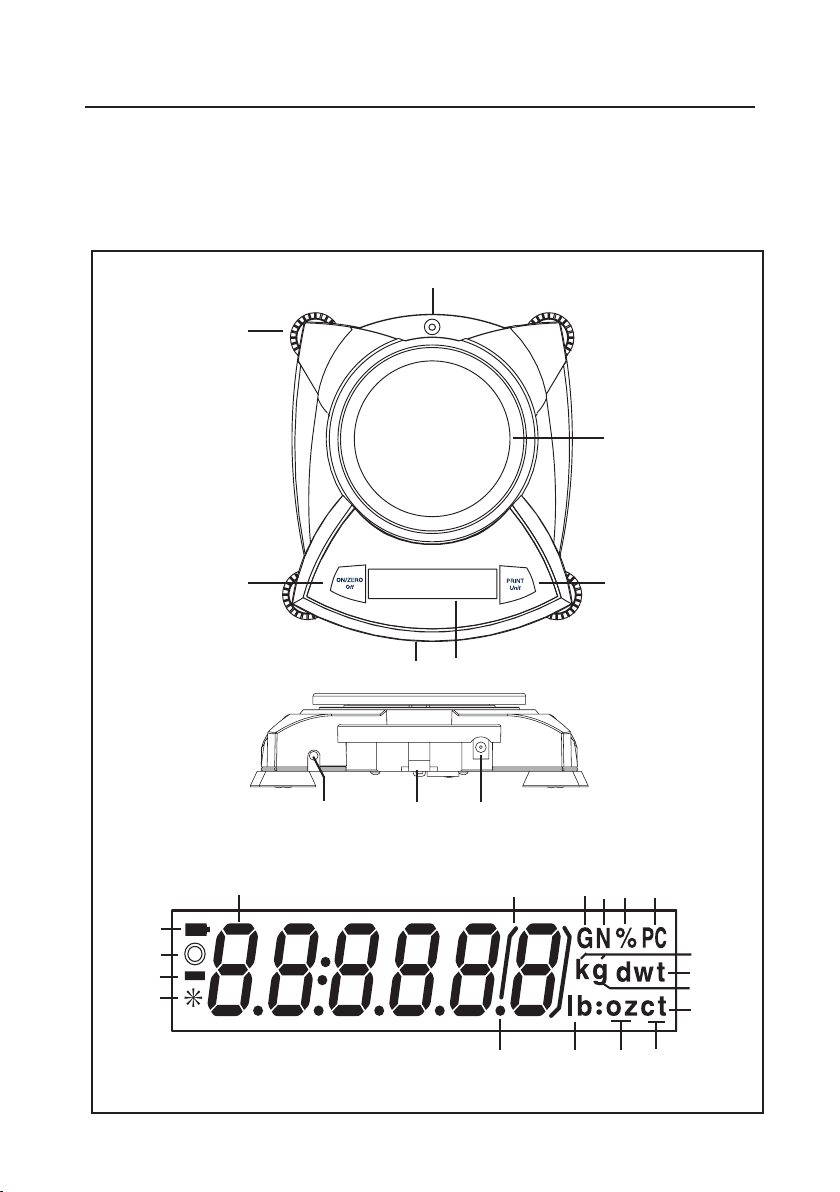
Overview of Controls and Display Functions
2
PRO
Top of Balance
Rear of Balance
Display
1
7
11
5
6
89
10
12
3
4
131415 16
28
27
26
25
17
18
19
20
2324
2122
Page 11
SCOUT
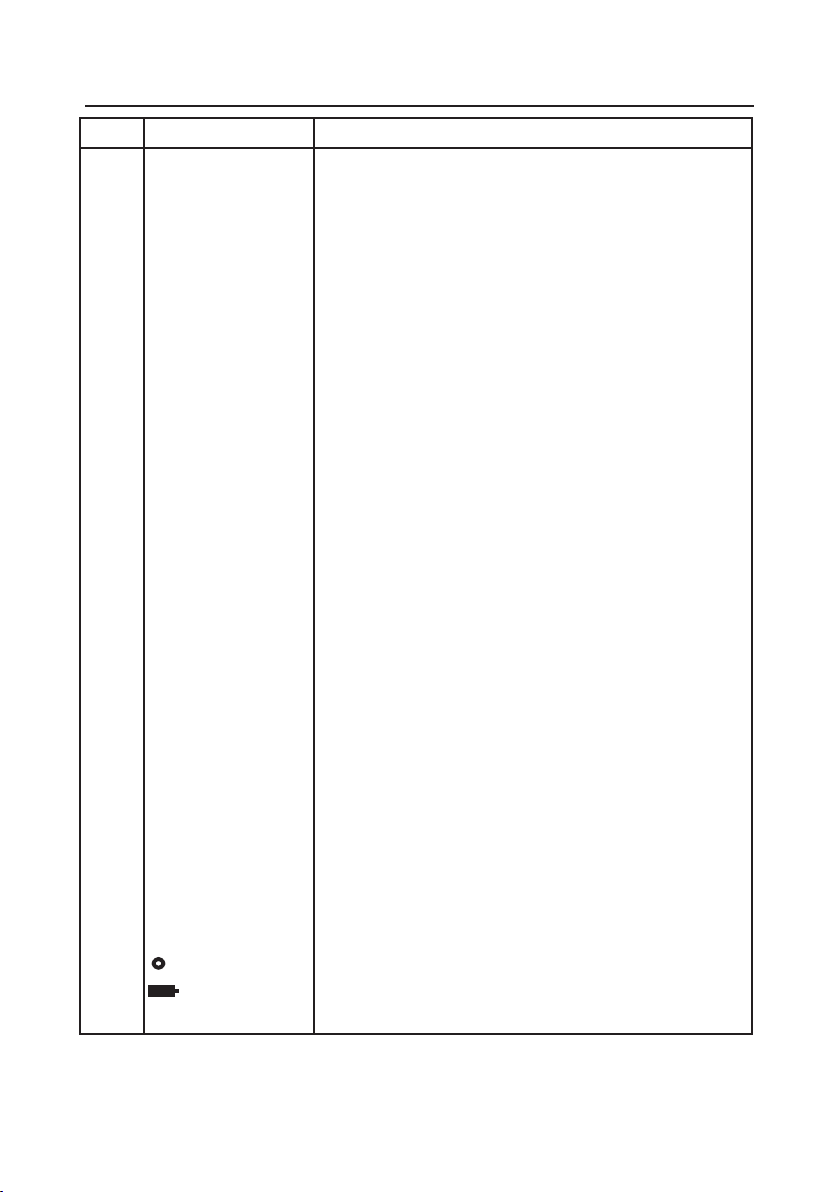
No. Designation Function
1. Feet
2. Spirt Level
3. Platform Weighing platform, either round or rectangular.
4. PRINT
5. Display LCD display with icons.
6. Lockswitch Locks certain menu functions, located under balance.
8. USB or RS232 port Optional kit for either RS232 or USB operation.
9. Security Bracket Part of balance for optional external cable and lock.
10. Power Input Jack Connector for AC adapter.
11. 7-segment LCD Part of 6-digit LCD display.
12. Brackets Auxilliary indication.
13. G Indicates specific gravity
14. N Indicates weight in Newtons.
15. % Indicates percent weighing.
16. PC Indicates pieces during parts counting.
17. kg Indicates weight in kilograms. (certain models)
18. dwt (not used)
19. g Indicates weight in grams.
20/22. oz t (not used)
20. t Indicates weight in totalize mode (or taels in certain
21. ct (not used)
22. oz Indicates weight in ounces.
23/22. lb:oz (not used)
23. lb Indicates weight in pounds. (certain models)
24. Decimal point.
25 Stability indicator, indicates stable weight and Display
26. Negative sign.
27. (not used)
28. Battery indicator flashes when battery is down to
PRO
1
Unit
7. ON/ZERO
•
*
-
EN-7
Provides leveling for certain models.
1
button Prints data, scrolls through units, steps through menu
Off
button On/Off, Zero, enters menu, accepts menu settings.
Provides level indication.
options.
models).
hold when flashing.
approximately 20 minutes of power remaining.
NOTES: 1. Certain models are provided with leveling feet and spirit level.
2. Unit measurement varies by model.
Page 12
EN-8 SCOUT
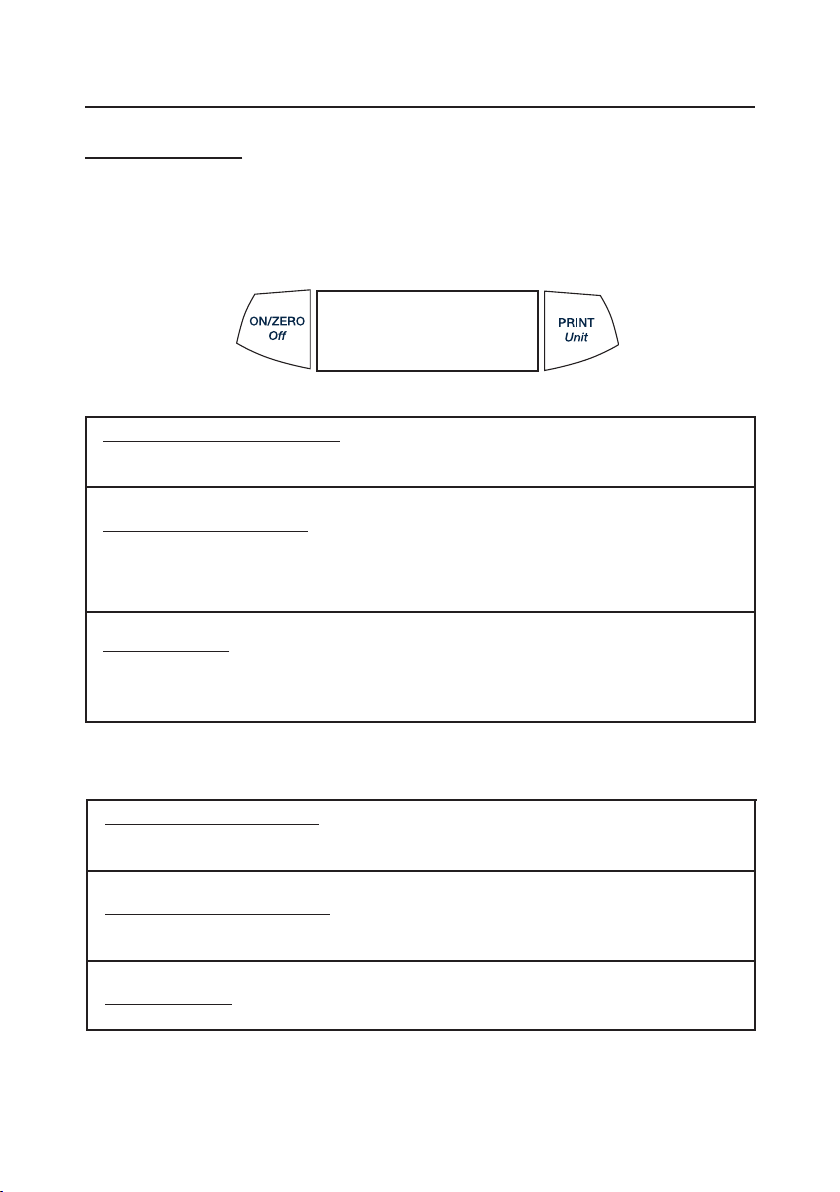
Button Functions
Two switches provide the necessary functions to access a given menu, select a function
and to turn it on or off. Functions are listed as follows:
PRO
ON/ZERO
Primary Function (ON/ZERO)- Turns on balance. If balance is on, zeros the
display.
Secondary Function (Off)- Turns balance off, OFF will be displayed after button is
held for 3 seconds. In Display Hold or Totalize mode, a long press exits the mode
without turning the balance off.
Menu Function- An extended long press (>5 seconds) during power up will cause
the balance to enter the Menu mode. A short press is used to accept a setting on a
display.
PRINT
Primary Function (PRINT)- Sends print command to interface port. If Display Hold
or Totalize mode is active, a short press will enter that mode.
Secondary Function (Unit)- Press and hold scrolls through units. Release on
Off
Button
Unit
Button
desired unit.
Menu Function- Will bypass setting shown on display.
Page 13
SCOUT
PRO
EN-9
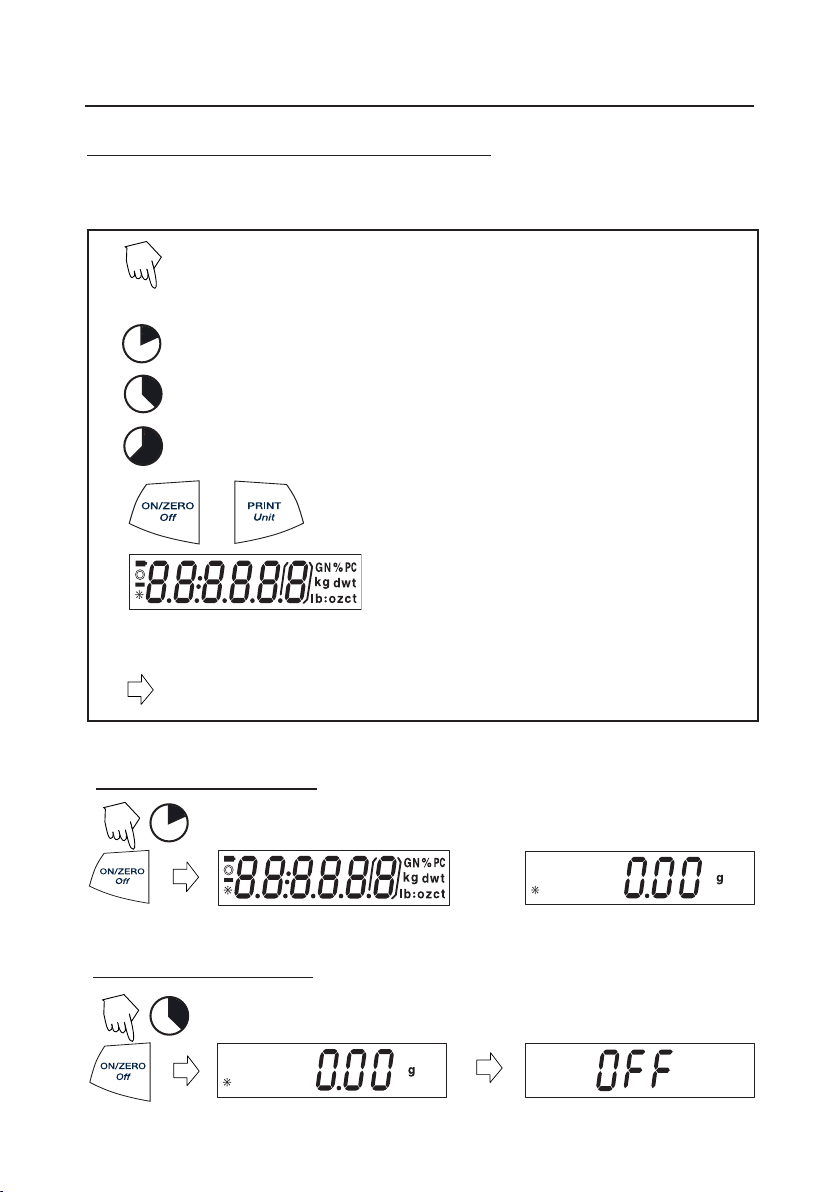
Symbols Used for Operation of the Balance
Symbols are used to simplify the setup and operation of the balance. A description of
each symbol follows:
Press
The clock symbols adjacent to the finger symbol indicates the
length of time to press a button.
1
1 second momentary press.
3
5
•••
3 second extended press.
5 second extended press.
Indicates scrolling to a final display. The first and last displays are shown.
Indicates advances to next display.
Turning the Balance On
1
Turning the Balance Off
Panel control buttons used to intiate actions.
Displays are shown as they actually appear on
the balance. A model with 200g capacity was
used for the displays shown in this manual.
•••
3
Page 14
EN-10 SCOUT
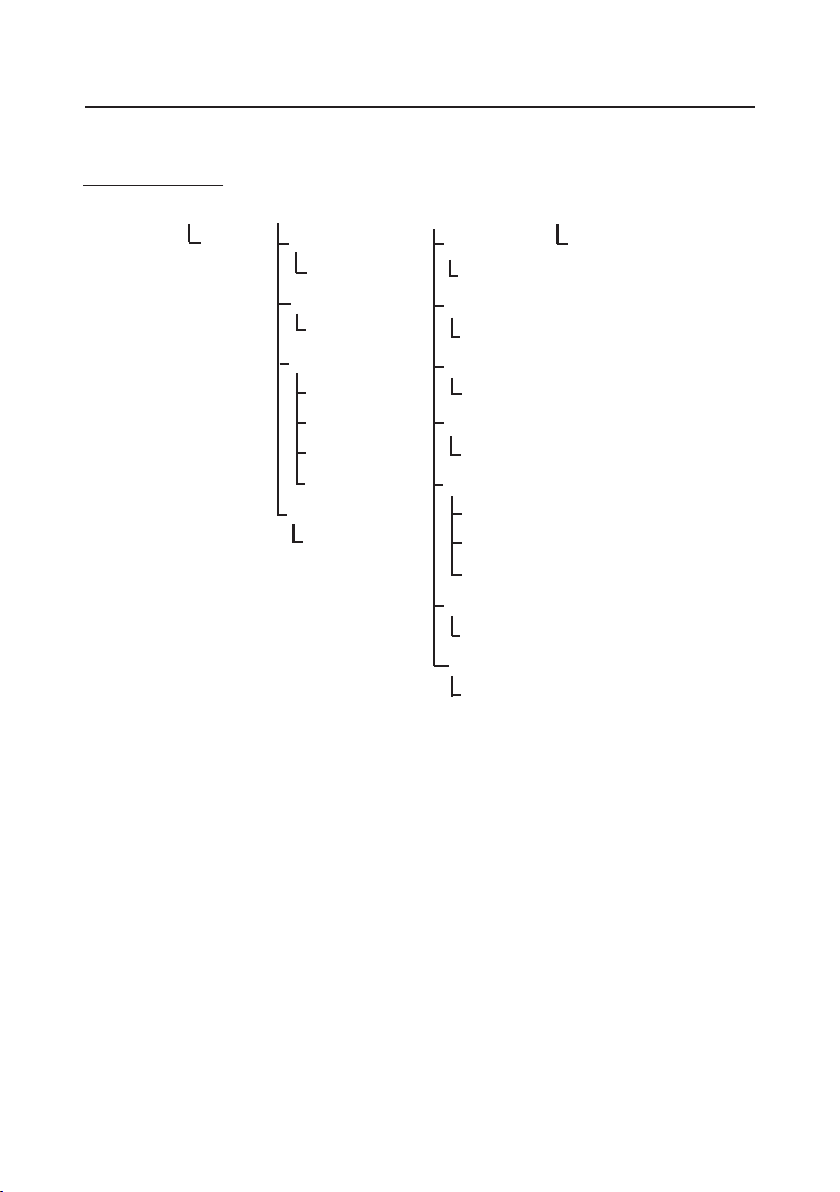
Navigating the Menus
Menu Structure
Cal
Yes/No
Setup
Auto-Off
On/Off
Lin Cal
Yes/No
Mode
Hold
Totalize
Specific Gravity
Off
End
Yes/No
Units
g
kg
oz
lb
PC
%
End
1
On/Off
On/Off
On/Off
On/Off
Count
Cnt. Enh
Off
On/Off
Yes/No
End
Yes/No
PRO
NOTES:
1. Refer to specification table for available units.
Page 15
SCOUT
PRO
EN-11
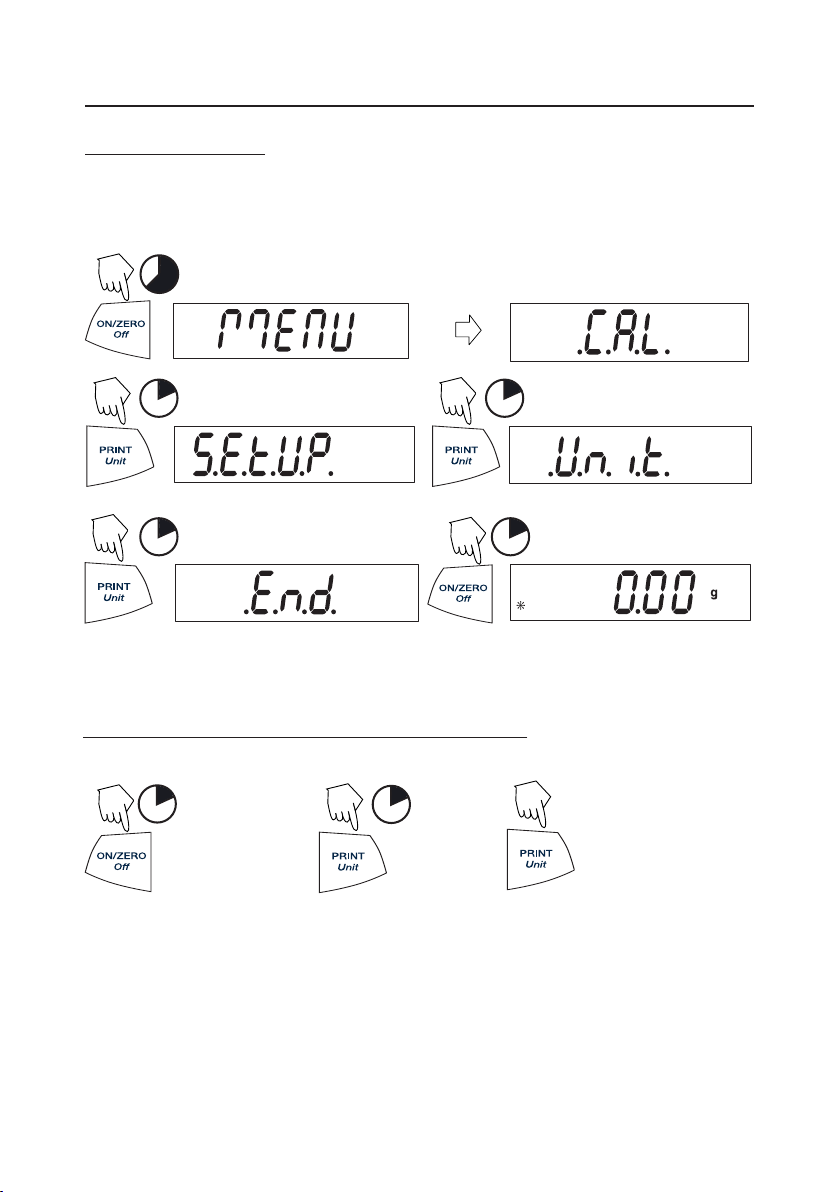
Entering the Menus
There are four main menus in the balance: .C.A.L., .S.E.T.U.P., .U.N.I.T.S. and .E.N.D.
Start with the balance off and the Lock Switch off
The sequence is shown below.
(see page 23).
5
(Release button)
N
1 1
N
1 1
N
Y
Accepting / Bypassing an Individual Menu Item
Start with menu item displayed.
Y
1
= YES Accept
N
1
= NO
(Weigh Mode)
(Short presses
N
advances through
menu)
Page 16
EN-12 SCOUT
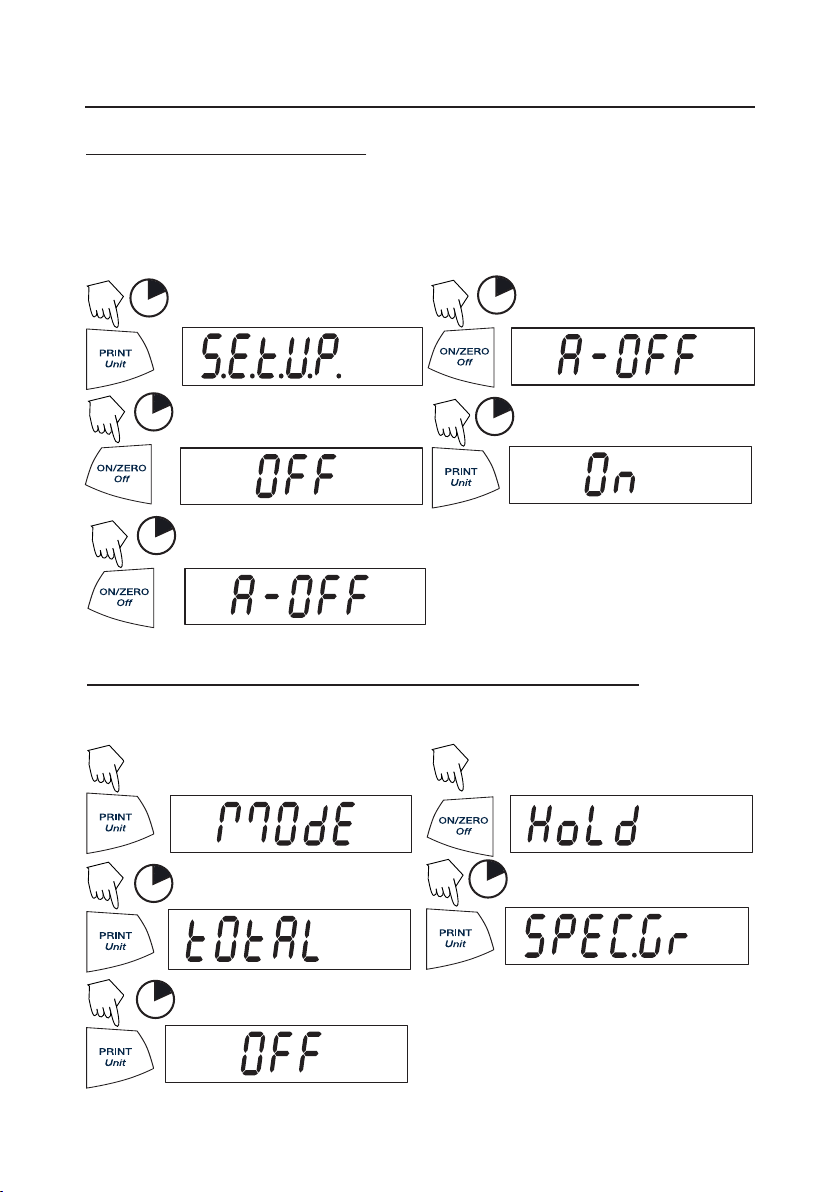
Entering the .S.E.T.U.P. Menu
The .S.E.T.U.P. menu contains Auto-Off, Linearity Calibration, Mode (Display Hold,
Totalize, Specific Gravity) and END. Auto-Off can be turned on or off. Display Hold,
and Totalize require entering the Mode submenu.
Starting from the .C.A.L. menu.
N
1
Y
1
(First menu)
PRO
Y
1
Y
(To exit and save)
1
N
1
Select ON or OFF for Auto-Off. To enter
Display Hold, Totalize or Specific Gravity,
you must first enter the Mode sub-menu.
Turning Display Hold, Totalize or Specific Gravity Mode On
NOTE:
Only one mode can be active at one time.
Start at the .S.E.T.U.P. menu.
(Press repeatedly to)
N
N
1
N
1
Y
N
1
Press YES to desired mode, then continue.
Page 17
SCOUT
PRO
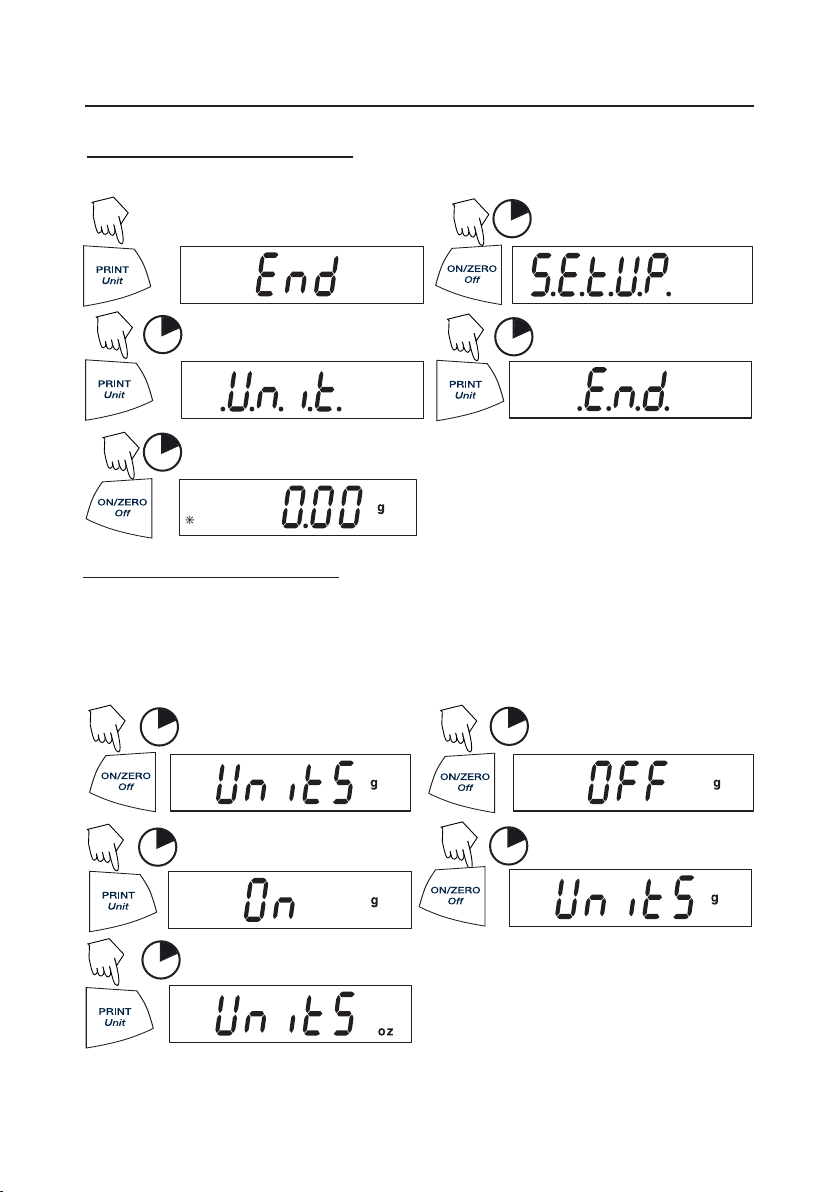
Exiting the .S.E.T.U.P. Menu
Select ON/OFF or YES/NO to desired menu items, proceed to .E.N.D. menu.
EN-13
N
(Short presses)
•
••
N
1
Y
1
Y
1
N
1
Entering the .U.N.I.T. Menu
The .U.N.I.T. menu contains units of measure, PC (parts counting), % weighing and
END. Units vary with the model type. Determine which units are to be turned on or off.
Start in the .U.N.I.T. menu. Select either ON or OFF for each unit.
Y
1
Y
1
N
1
N
1
(Turn ON)
(To advance)
NOTE: Repeated presses of PRINT
Unit
button will go though all units, you then may
Y
select ON or OFF. Parts Counting is slightly different.
1
(To accept)
Page 18
EN-14 SCOUT
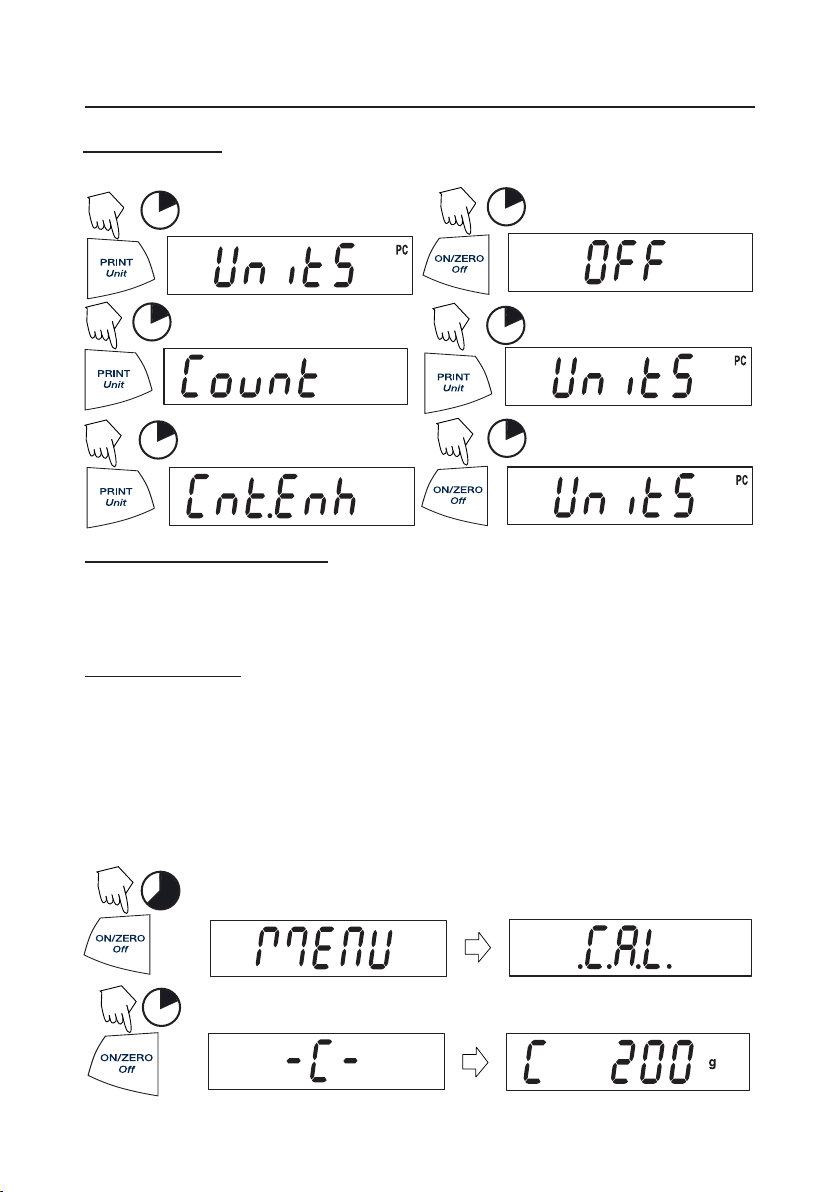
Parts Counting
Two types of counting modes are available, standard or enhanced.
N
1
Y
1
PRO
N
1
N
1
(See page 17 for details)
OR
N
1
Y
1
Exiting the .U.N.I.T. Menu
Use the same procedure as Exiting the .S.E.T.U.P. Menu.
Calibration
Span Calibration
Span calibration uses two calibration points, zero and a specified calibration weight.
Before beginning calibration, make sure the Lock Switch is off. Clear the platform.
NOTE:
Value of calibration mass depends on capacity of balance
balance returns to the currently selected weigh mode.
Start with the balance OFF.
5
(Release button)
•••
. After calibration, the
Y
1
(Acquiring zero value)
(Place mass value on platform)
(Example)
Page 19

SCOUT
PRO
EN-15
Span Calibration (Cont.)
Y
1
(Remove mass)
Linearity Calibration
Linearity calibration uses three calibration points; zero, mid-scale and full scale.
Lin Cal must be selected and set to YES in the .S.E.T.U.P. Menu. Before beginning
calibration, make sure the menu Lock Switch is off. Clear the platform.
Start with the balance OFF.
5
•••
N
1
N
1
(Place mass value on platform)
(Place mass value on platform)
(Remove mass)
Y
1
Y
1
Y
1
Y
1
Page 20
EN-16 SCOUT
PRO
Applications
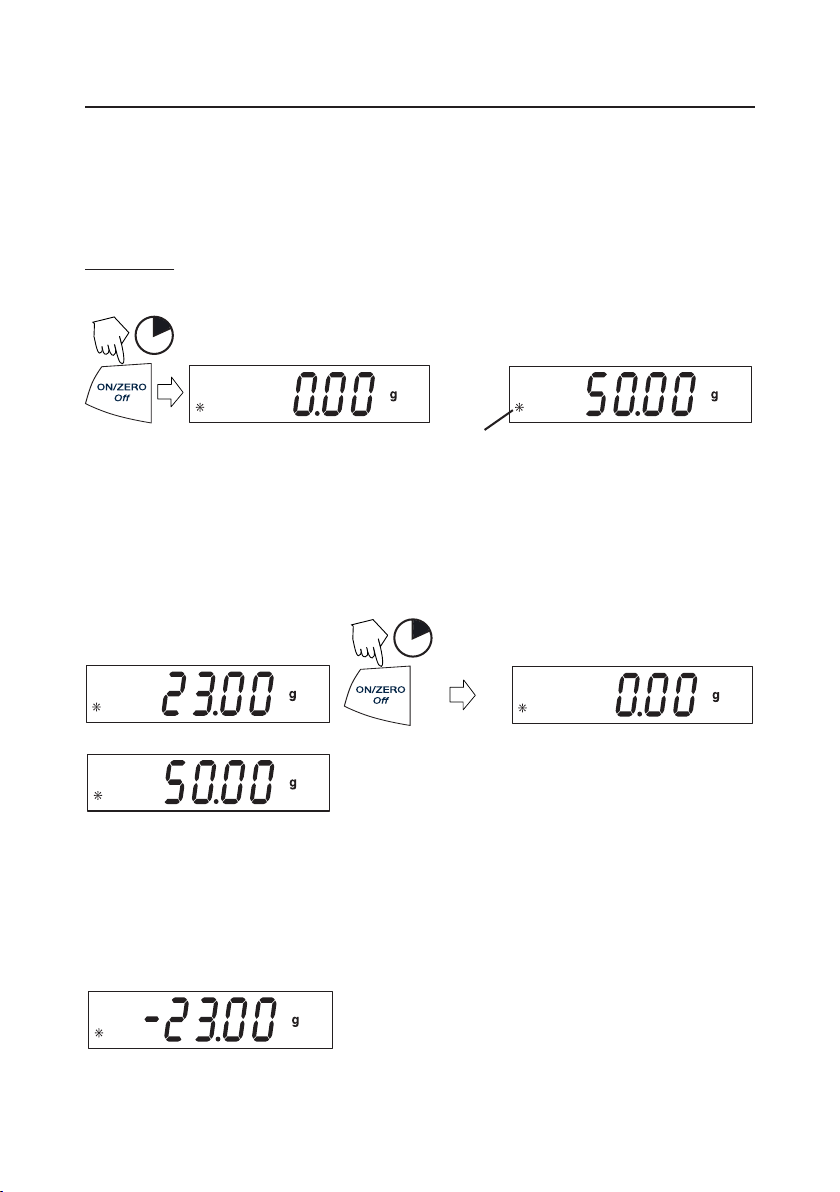
Scout Pro applications include: Weighing, Parts Counting, Percent Weighing, Display
Hold, Totalize and Specific Gravity.
Weighing
Start with the balance on.
1
(Rezero the display)
(Stable reading)
(Place sample on platform)
(Example 50g)
Weighing with Tare
Taring zeros the container weight. With the balance on, place an empty container on
the platform. (Display example indicates a container weight of 23g.)
(Container weight)
(Place material in container)
(50g sample)
NOTE: Removing the container and material from the platform will cause the balance to
display the container’s weight as a negative number. The tared weight remains until
ON/ZERO
Off
button is pressed again or the balance is turned off.
1
(Container weight tared)
(Remove container with material)
Page 21
SCOUT
PRO
EN-17
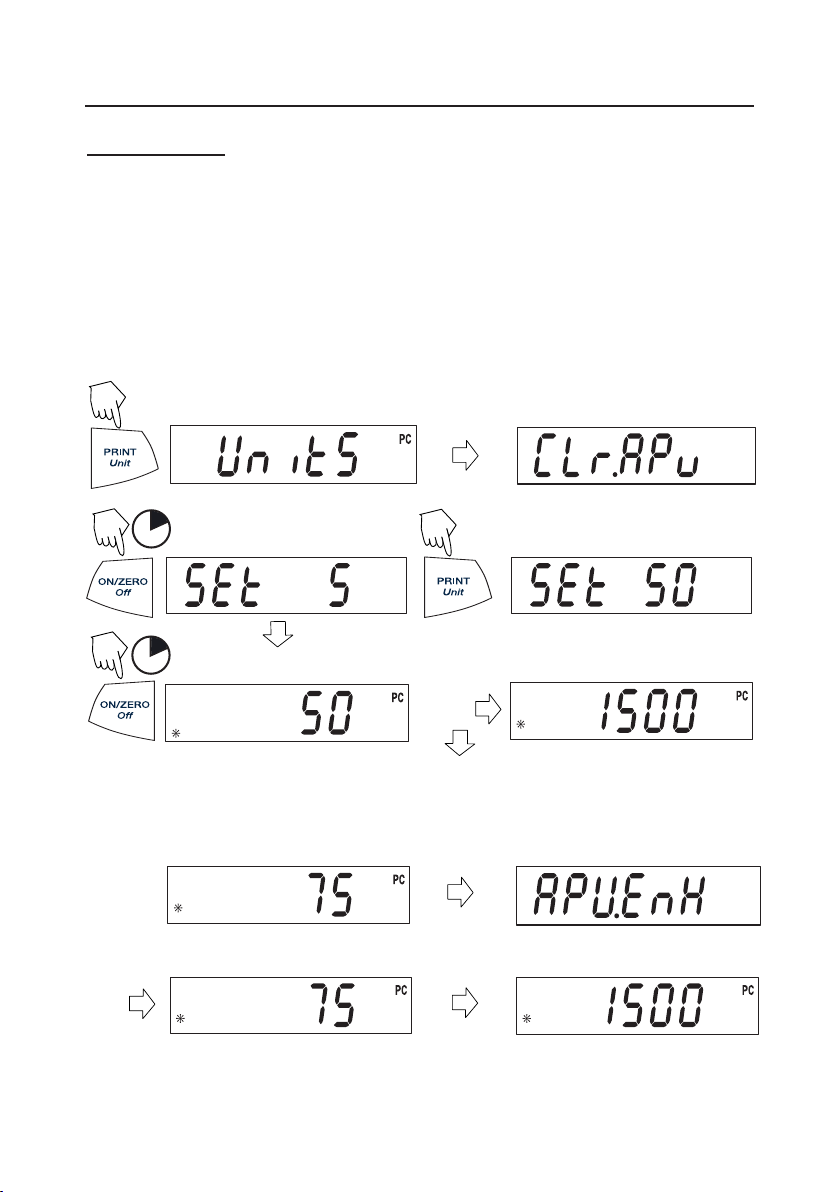
Parts Counting
Parts Counting is
enabled only
counting mode, there are two modes of parts counting, normal and enhanced. In
normal parts counting, the balance determines the quantity based on the average weight
of the parts in the original reference quanitity. In the enhanced mode, additional parts
can be added to the platform equal to or less than the original number. The additional
reference quantity produces a more accurate average part weight.
Standard Parts Counting
when PC is turned ON in the .U.N.I.T. menu. In parts
(Press and hold until PC is displayed)
Y
1
Y
1
(Place 50 parts)
Enhanced Parts Counting
(Add less than 50)
(Clear average part weight)
(Press repeatedly to
N
change to 10, 20 or 50)
(Add parts to be counted)
or
(Add parts to be counted)
NOTE: The preceding procedure for enhanced counting can be repeated as many times
as necessary providing the quantity added is less than the original entry.
Page 22
EN-18 SCOUT
PRO
Parts Counting (Cont.)
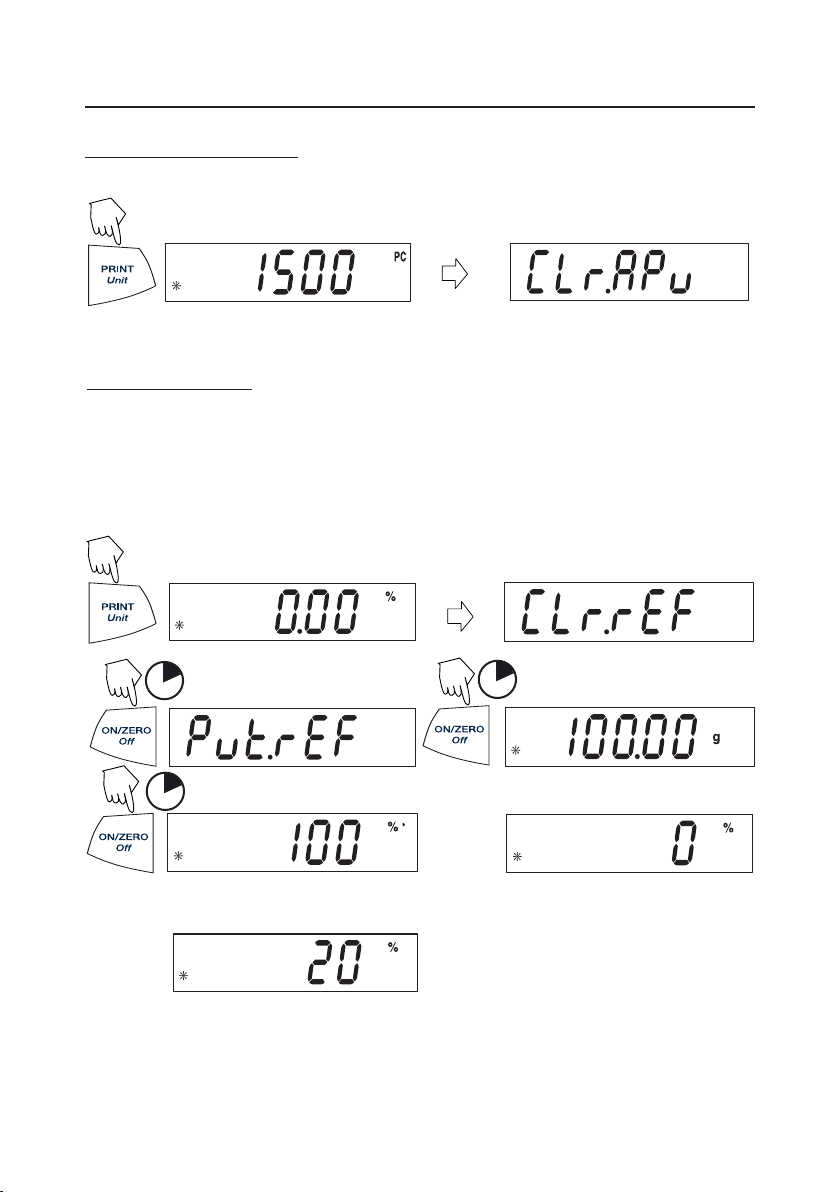
To count different parts, press and hold, until PC reappears, release Unit button.
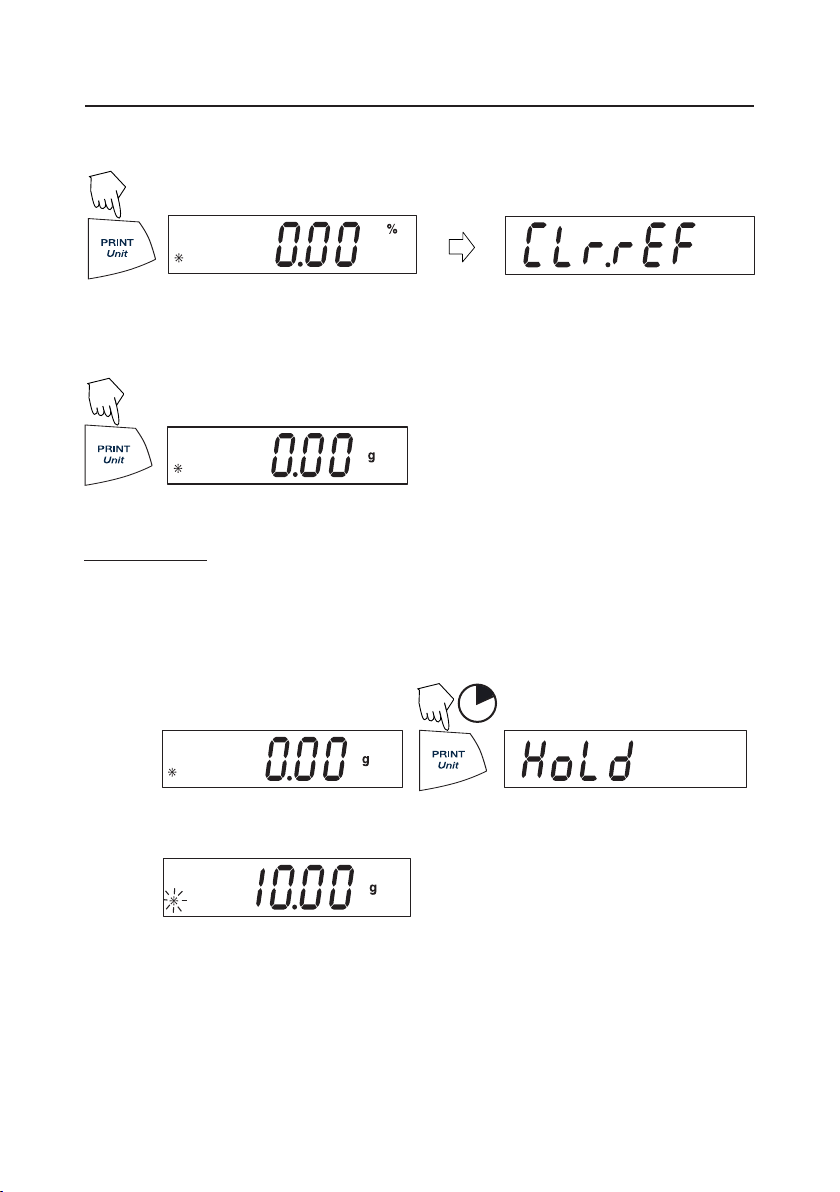
Percent Weighing
Percent Weighing is
Percent weighing permits placing a reference weight on the balance, then viewing
other loads as a percentage of the reference. The reference weight equals100%. Start
in the weighing mode and zero the display.
(Press and hold until % is displayed)
enabled only
when Percent is turned ON in the .U.N.I.T. menu.
Y
1
(Place reference weight)
Y
1
Y
1
(Stores reference weight 100g)
(Example)
(Remove reference weight)
(Place load on the platform, display indicates percentage of reference weight.)
Page 23
SCOUT
PRO
EN-19
Establishing a New Reference Weight
Press and hold until % on the display reappears, then release.
Repeat above procedure for new a reference weight.
Exiting Percent Weighing
Press and hold until desired unit is displayed.
Display-Hold
Display-Hold is
.S.E.T.U.P. menu. Display-Hold mode captures and stores the highest stable value.
When displayed, the stable icon will blink. NOTE: Units cannot be changed when in
Display-Hold mode.
enabled only
when Hold is turned ON in the Mode submenu in the
Place item(s) on platform.
1
Page 24
EN-20 SCOUT
PRO
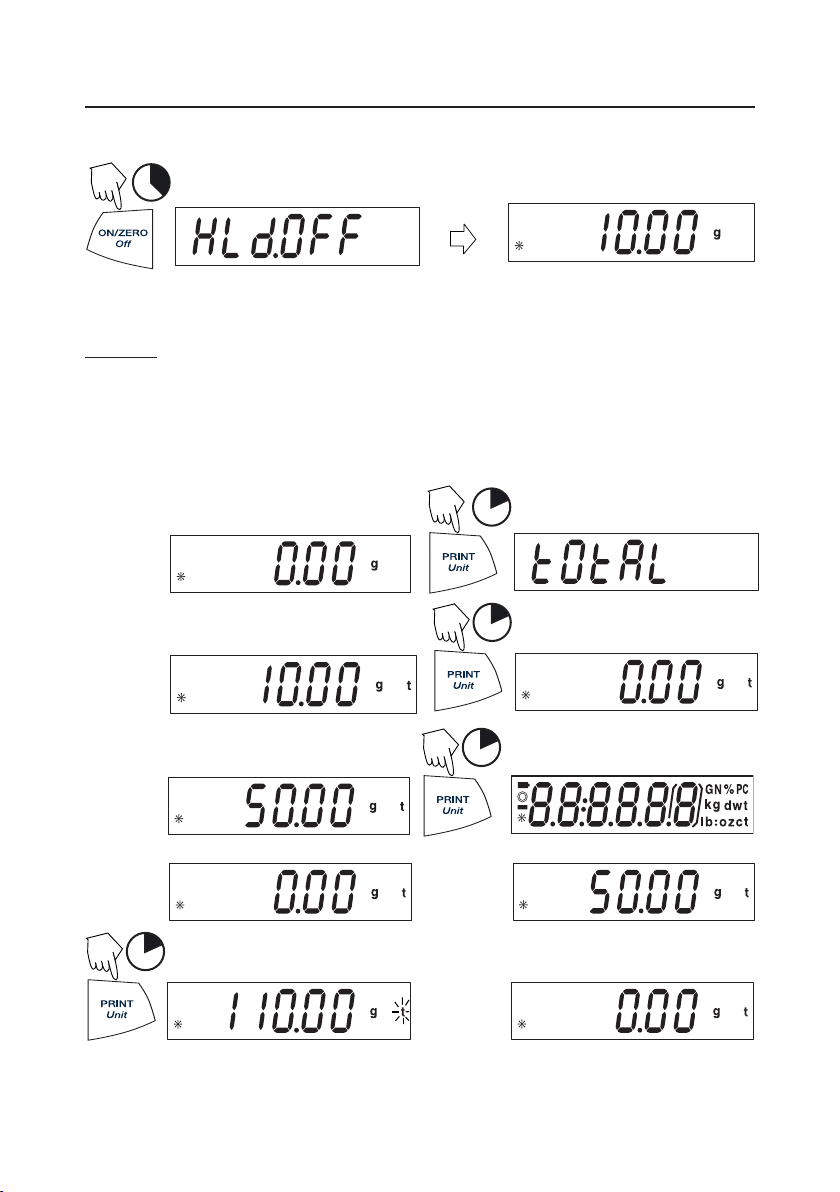
Exiting Display Hold
3
To return to display hold, repeat above procedure.
Totalize
Totalize is
menu. Totalize allows storage of a series of weight measurements. Totalize mode has
been initiated when “t” and the current unit, i.e. (g) is displayed. When totalized
weight is shown, the “t” indicator will blink. NOTE: Units cannot be changed when
in Display-Hold mode.
enabled only
when Total is turned ON in the Mode submenu in the .S.E.T.U.P.
1
(Place 1st weight on platform)
1
(Remove weight)
(Example 10g)
(Place 2nd weight on platform)
1
(Total weight shown)
(Remove weight) (Place 3rd weight on platform)
1
(Total weight shown)
(Remove weight)
Total weight will remain on the display until weight is removed. The total weight remains
in memory. Total is limited to 999999.
Page 25
SCOUT
PRO
EN-21
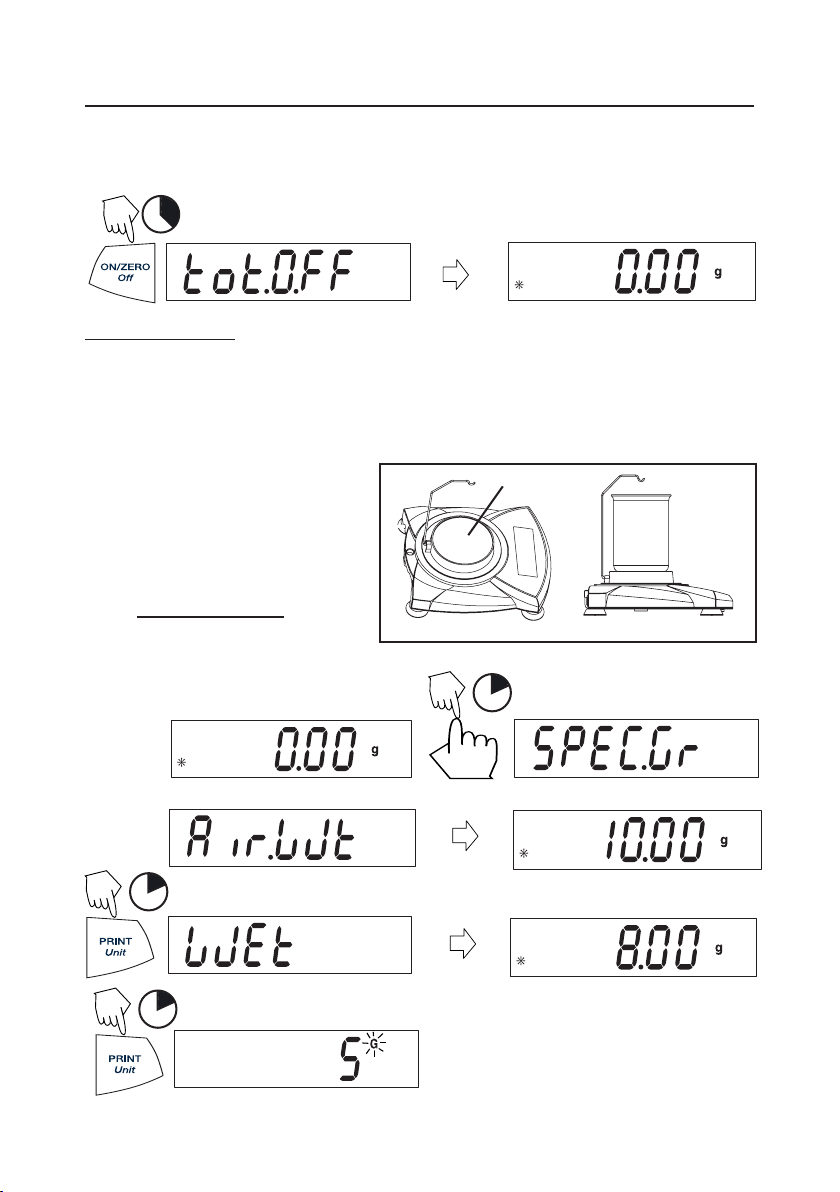
Clear/Exit Totalize
Performing this next step will erase all totalized memory.
Y
3
Specific Gravity (on certain models)
Specific gravity is
the .S.E.T.U.P. menu. The Specific Gravity mode allows calculating the specific
gravity of a sample. SPEC.GR mode must be turned ON before removing platform
and installing hook. Prepare the balance as shown. Remove the balance platform,
insert the hook and install the beaker stand.
The sample is weighed in air
suspended from the hook and then
weighed in water. The formula is
dry wt
dry wt - wet wt.
enabled only
when SPEC.Gr is turned ON in the Mode submenu in
Beaker is not supplied.
Beaker Stand
Top View Side View
Specific Gravity Setups
(See note)
(With print on, air weight is printed)
1
(With print on, wet weight is printed)
1
1
Place weight on hook
Place weight in water
Specific Gravity Value
NOTE: “G” indicates a specific gravity value.
Specific Gravity has no unit of measure.
Page 26
EN-22 SCOUT
PRO
Clear/Exit Specific Gravity
3
Additional Features
Weigh Below
Scout Pro permits below balance weighing for applications such as specific gravity/
density determination. The balance is normally elevated, supported on all feet and
leveled. A fine wire is attached to the built-in hook at the bottom of the balance (see
illustration).
Weigh
Below
Hook
Page 27
SCOUT
PRO
EN-23
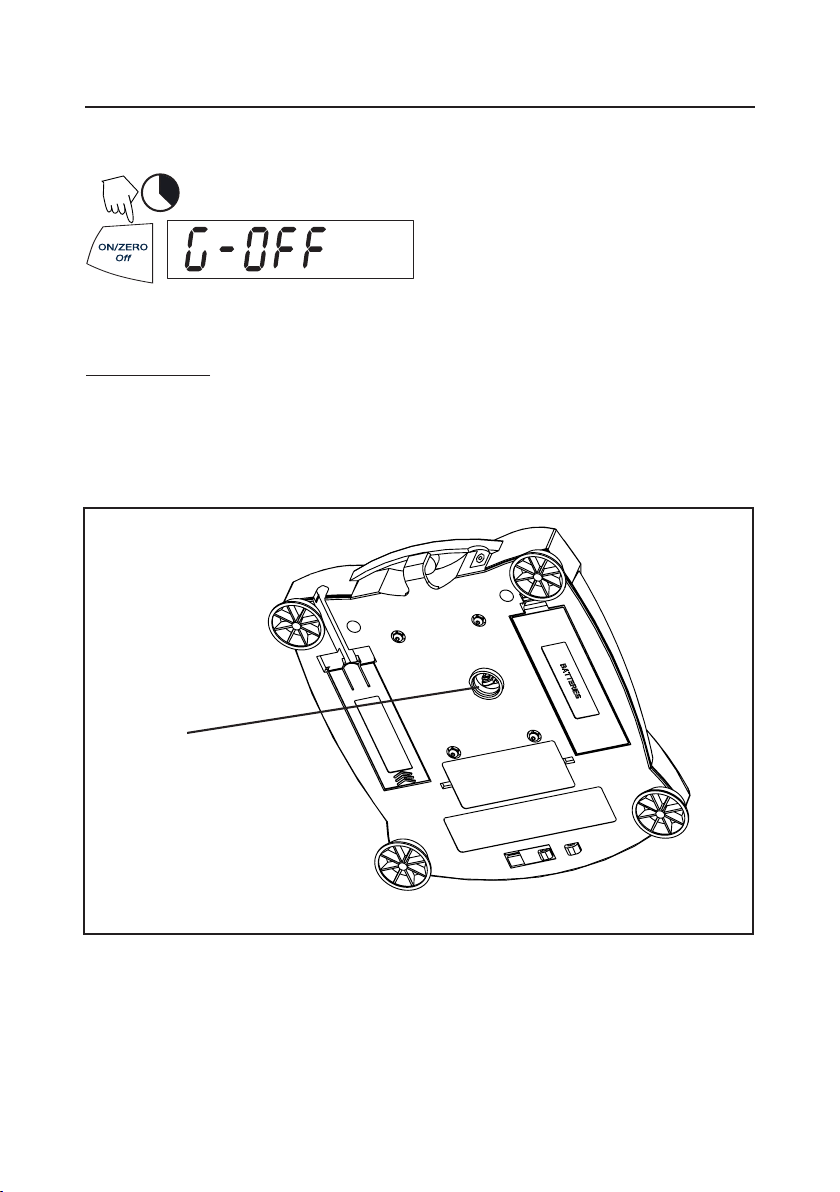
Lock Switch
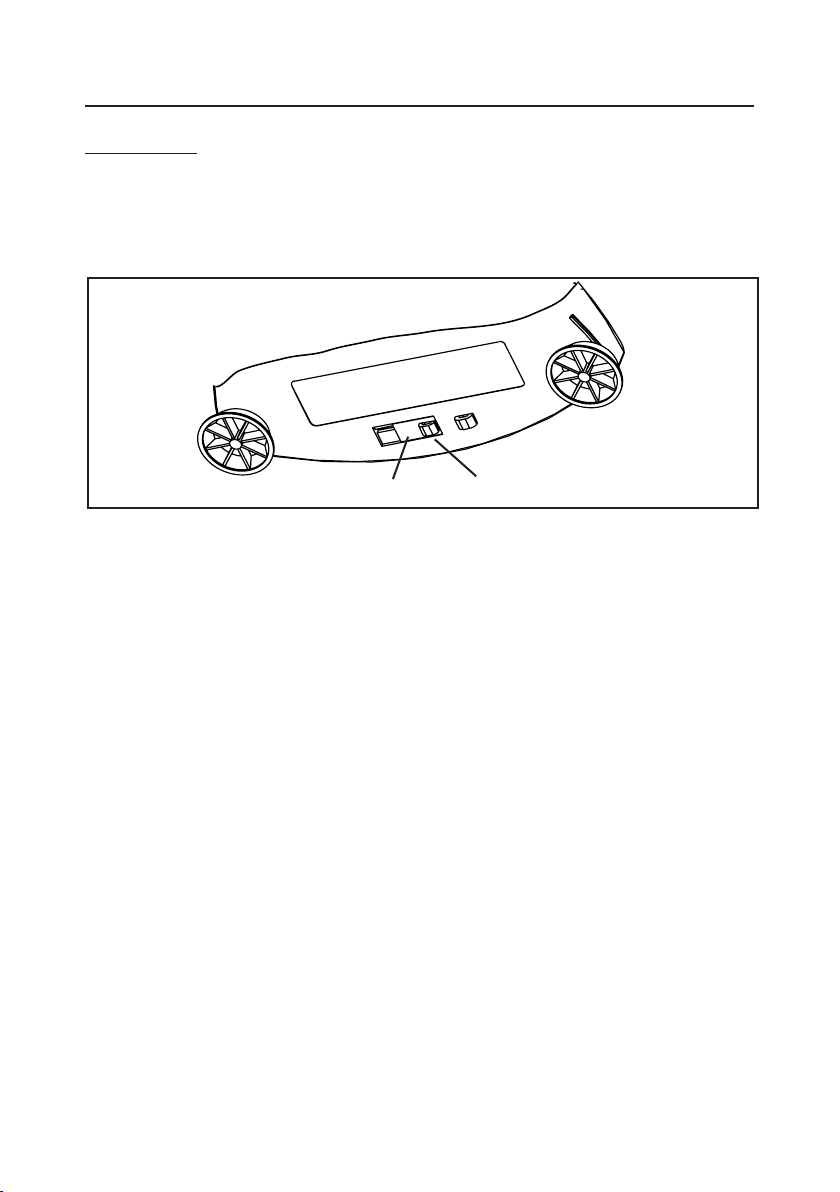
The Lock Switch is used to lock out the menu mode preventing unauthorized changes.
To lock the menus, position the Lock Switch next to the tab on the bottom of the balance
as shown.
Locked positionUnlocked
Lock Switch
Page 28

EN-24 SCOUT
PRO
4. MAINTENANCE
Cleaning
To ensure proper balance operation, keep the housing and platform clean. If necessary,
a cloth dampened with a mild detergent may be used. Check under the platform for
debris and remove. Keep calibration masses in a safe dry place. Unplug the AC
Adapter when not in use. For long term storage, remove the batteries.
Troubleshooting
SYMPTOM
No display.
Battery Indicator is flashing.
Incorrect weight reading.
Calibration procedures do
not work.
Unable to display weight in
a particular weighing unit.
Balance readings unstable.
Error code is displayed.
PROBABLE CAUSE
1. Power Adapter not
connected.
2. Batteries are exhausted.
Batteries are weak.
1. Balance out of calibration.
2. Balance was not
rezeroed before weighing.
Incorrect calibration
masses being used.
1. Weighing unit not
activated in menu.
2. Mode prevents unit
change.
Balance location may
have drafts from air
conditioning vents or
vibration from other
appliances nearby
affecting operation.
Various internal and
external problems
REMEDY
1. Connect AC Adapter.
2. Replace batteries.
Replace batteries.
1. Calibrate the balance.
2. Press the ON/ZERO Off
button with no weight on the
platform, then weigh item.
1. Use correct masses.
2. See error codes note ERR4.
1. Use Units menu to set
desired units ON.
2. Exit Hold or Totalize mode.
Either move or shield
the balance from external
air currents or vibration.
Review error code table
and take appropriate
action.
Page 29

SCOUT
PRO
EN-25
Error Codes List
When internal and some external problems occur with the balance, the internal software
will display messages as error codes. Explanations are given for possible problems.
Try remedies in order indicated.
Error Codes
Err 1 chEct Invalid checksum data
a) Cycle balance ON/OFF,
b) Return balance for servicing.
Err 2 LoAd Overload (>cap+90d) or Underload
a) Remove load,
b) Check shipping lock,
c) Recalibrate.
Err 4 WEIght Incorrect calibration weight
a) Use correct calibration weights,
b) Check environmental conditions.
Err 5 999999 Displayed value >99999
a) Exit application,
b) Rezero balance.
Err 6 count Parts counting error - balance exits parts counting
a) Exit application,
b) Rezero balance.
Err 8 FULL RS232 buffer is full
a) Cycle ON/OFF,
b) Check RS-232 settings in balance and computer.
Err 9 dAtA Internal data error. The next button press or a 5 second time-out
causes the balance to turn off
a) Cycle ON/OFF,
b) Return balance for servicing.
Page 30

EN-26 SCOUT
Accessories
Part No.
RS232 Interface Kit (includes cable) 71147376
USB Interface Kit (includes cable) 71147377
Security Device 76288-01
Hard Shell Carrying Case 77256-01
Impact Printer SF42
Impact Printer Paper 5 pack 78204-01
Cable for SF42 Printer AS017-06
Scoops: Aluminum,
3.62 x 4.50 x 1.0”/9.20 x 11.34 x 2.54 cm 4590-10
Black anodized, aluminum,
3.62 x 4.50 x 1.0”/9.20 x 11.34 x 2.54 cm 4590-30
Aluminum,
1.5 x 2.00 x 0.43”/3.81 x 5.08 x 1.11 cm 5076-00
Gold anodized aluminum,
2.25 x 3.00 x 0.75”/5.71 x 7.62 x 1.90 cm 5077-00
Calibration Masses:
See specification table for required masses.
50g 53054-00
100g 51015-05
200g 51025-06
300g 51035-05
500g 51055-06
1000g 51016-06
2000g 51026-02
AC Adapters:
120V/60Hz USA 12102320
230V/50Hz Europe 12102321
230V/60Hz Australian 12102323
230V/50Hz UK 12102322
100V/50Hz Japan 12102324
230V/60 Hz China 12104881
PRO
Page 31
SCOUT
PRO
EN-27
5. TECHNICAL DATA
Specifications
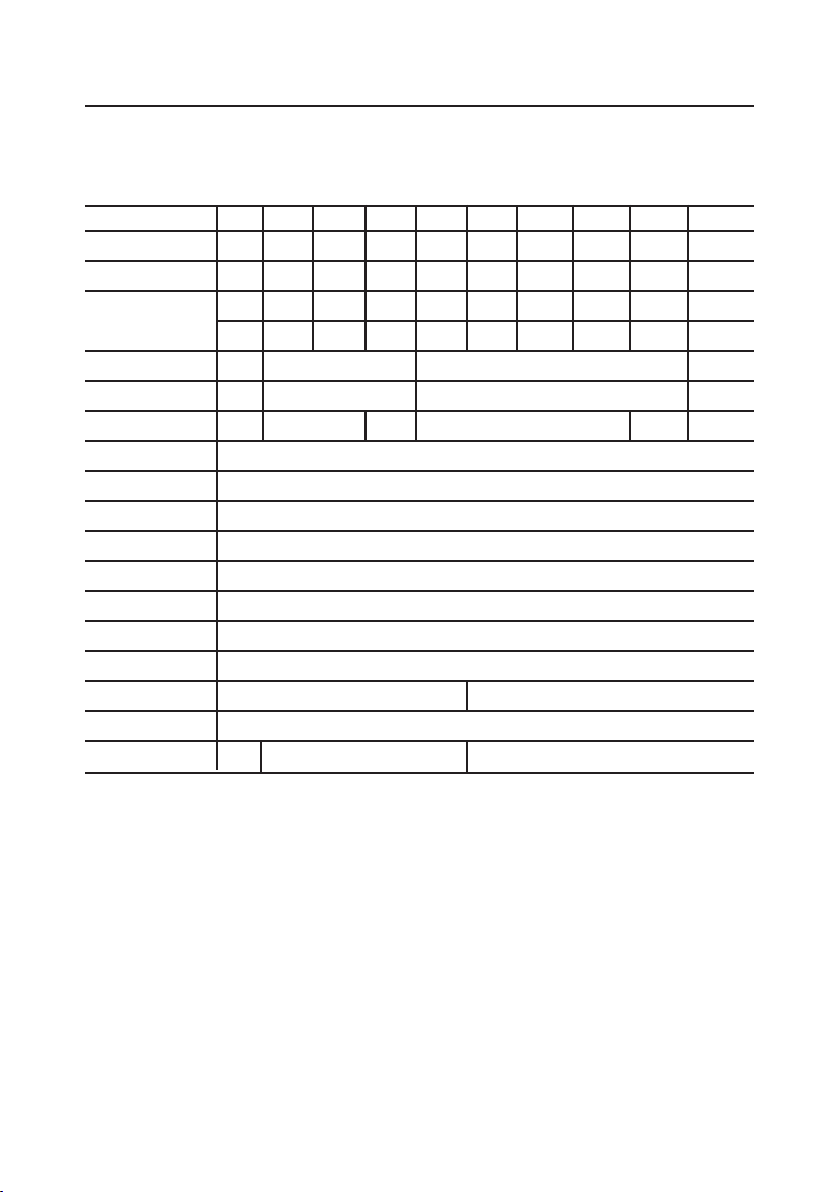
Item No. SPx123 SPx202 SPx402 SPx602 SPx401 SPx601 SPx2001 SPx4001 SPx6001 SPx6000
Capacity (g) 120 200 400 600 400 600 2000 4000 6000 6000
Span Calibration Mass (g) 100 200 200 300 200 300 2000 4000 6000 4000
Linearity Calibration Mass (g) 50 100 200 300 200 300 1000 2000 3000 3000
100 200 400 600 400 600 2000 4000 6000 6000
Readability (g) 0.001 0.01 0.1 1.0
Repeatability (Std. dev.(g) 0.003 0.01 0.1 1.0
Linearity (g) ±0.003 ±0.01 ±0.02 ±0.1 ±0.2 ±1.0
Weighing modes %, Parts Counting - Units, see capacity/readability table
Tare range To capacity by subtraction
Over range capacity Capacity +90d
Stabilization time 3 seconds
Operating temp. range 50° - 104°F / 10° - 40°C
Power requirements AC Adapter (supplied) or 4 AA batteries (not included)
Calibration digital calibration from keypad
Display (in/mm) LCD (0.6 / 15 high digits)
Pan size (in/mm) 4.7 / 120 diam. 6.5 x 5.6 / 165 x 142
Dimensions WxHxD (in/mm) 7.5 x 2.2 x 8.3 / 192 x 54 x 210
Net Weight (lb/kg) 2.0 / 1.5 / 0.7 1.8 / 0.8
0.9
Page 32
EN-28 SCOUT
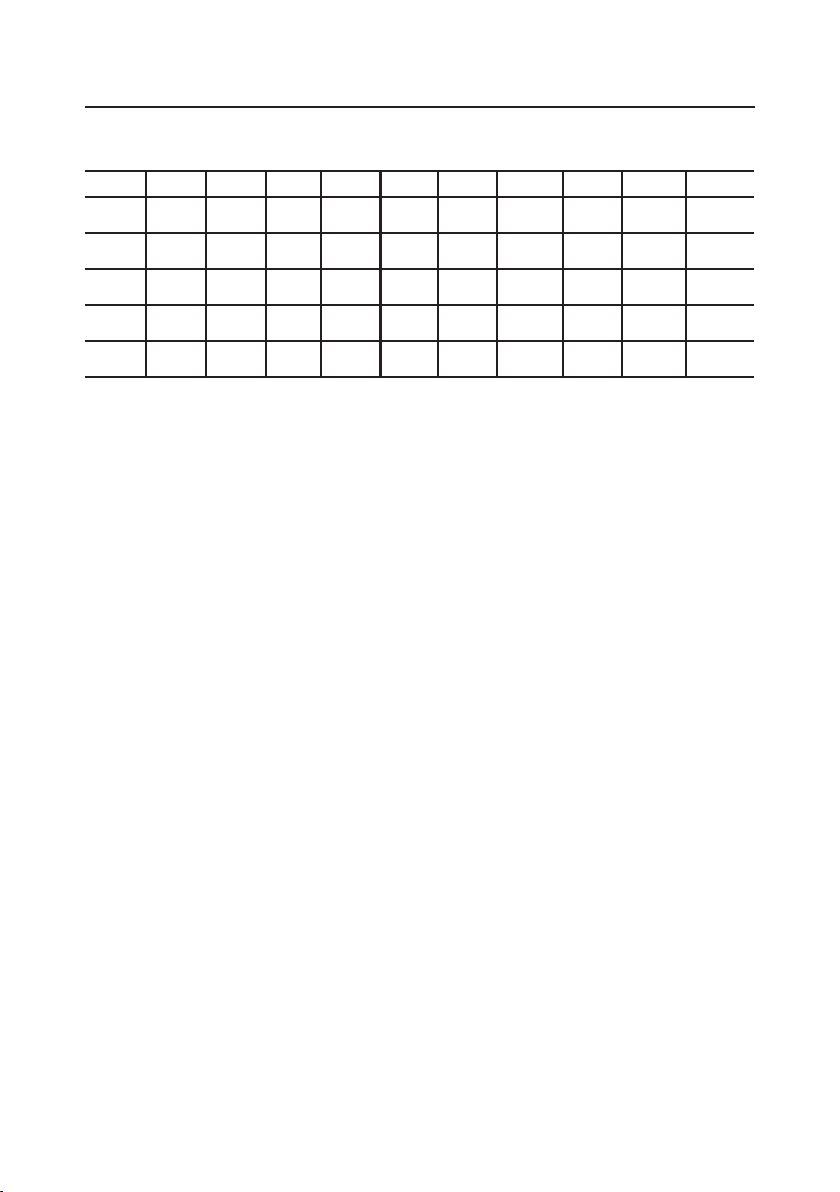
Capacity x Readability
SPx123 SPx202 SPx402 SPx602 SPx401 SPx601 SPx2001 SPx4001 SPx6001 SPx6000
gram g 120.00 200.00 400.00 600.00 400.0 600.0 2000.0 4000.0 6000.0 6000.0
x 0.001 x 0.01 x 0.01 x 0.01 x 0.1 x 0.1 x 0.1 x 0.1 x 0.1 x 1
ounce oz 4.23290 7.0550 14.1095 21.1645 14.110 21.165 70.550 141.095 211.645 211.65
avoirdupois x 0.00005 x 0.0005 x 0.0005 x 0.005 x 0.0005 x 0.005 x 0.005 x 0.005 x 0.005 x 0.05
pound lb 1.32280 1.3230 4.4090 8.8185 13.2280 13.230
avoirdupois x 0.00005 x 0.0005 x 0.0005 x 0.005 x 0.0005 x 0.005
kilogram kg 2.0000 4.0000 6.0000 6.000
x 0.0001 x 0.0001 x 0.0001 x 0.001
newton N 1.17680 1.9613 3.9227 5.8840 3.923 5.884 19.613 39.227 58.884 58.84
x 0.00001 x 0.0001 x 0.0001 x 0.0001 x 0.001 x 0.001 x 0.001 x 0.001 x 0.001 x 0.01
NOTE: SPGxxxx models only contain SI units.
PRO
Page 33

SCOUT
PRO
EN-29
LIMITED WARRANTY
Ohaus products are warranted against defects in materials and workmanship from
the date of delivery through the duration of the warranty period. During the warranty
period Ohaus will repair, or, at its option, replace any component(s) that proves to
be defective at no charge, provided that the product is returned, freight prepaid, to
Ohaus.
This warranty does not apply if the product has been damaged by accident or misuse,
exposed to radioactive or corrosive materials, has foreign material penetrating to the
inside of the product, or as a result of service or modification by other than Ohaus. In
lieu of a properly returned warranty registration card, the warranty period shall begin
on the date of shipment to the authorized dealer. No other express or implied warranty
is given by Ohaus Corporation. Ohaus Corporation shall not be liable for any
consequential damages.
As warranty legislation differs from state to state and country to country, please
contact Ohaus or your local Ohaus dealer for further details.
Page 34

EN-30 SCOUT
PRO
Page 35

SCOUT
PRO
FR-31
Page 36

FR-32 SCOUT
PRO
Ohaus Corporation
19A Chapin Road
P.O. Box 2033
Pine Brook, NJ 07058, USA
Tel: (973) 377-9000
Fax: (973) 944-7177
www.ohaus.com
With offices worldwide
*71160418*
P/N 71160418 D © Ohaus Corporation 2006, all rights reserved
Printed in China
 Loading...