

Page 1
High Denition
Digital Video Camera
User’s Manual
Page 2

Contents
Section 1 Getting to Know Your Camera .............................................. 2
Section 2 Getting Started .......................................................................6
Section 3 Record Mode .......................................................................... 9
Section 4 Playback Mode..................................................................... 38
Section 5 Viewing Movie on PC .......................................................... 48
Section 6 Viewing Pictures and Movies on a TV ............................... 49
Section 7 Video File Converter ...........................................................51
Section 8 Burning the Recorded Clip into DVD ................................. 55
Section 9 Uploading Video Files to YouTube ..................................... 57
Section 10 Installing Bundled Software ............................................. 61
Section 11 Specications .................................................................... 62
Section 12 Troubleshooting ................................................................ 64
1
EN
Page 3

2
EN
Section 1
Getting to Know Your Camera
Overview
The camera with 5 Mega-pixel sensor can take H.264 movies. By the way of using H.264 technology,
more videos can be taken within certain amount of memory. High quality images with up to 8 mega pixels
can also be delivered smoothly. With a color LCD monitor, users can compose images and examine
them easily.
The camera also features movie recording at HD resolution of 1280x720. You can also connect camera
to an HDTV by HDMI cable, and easily playback recorded high-denition videos on the wide screen of
an HDTV.
Exposure and color balance can either be adjusted automatically or allowed to be changed manually.
A 5x optical zoom increases user control over the movies and pictures you take.Built-in memory allows
you to take pictures and movies without memory card. The memory card slot allows users to increase
the storage capacity.
Note
Partial memory of the built-in memory is used for Firmware code.
Check the Components
Unpack the package and make sure all standard accessories listed are included:
• Camera
• USB Cable
• AV Cable
• HDMI Cable
• Lithium-ion Rechargeable Battery
• Quick Start Guide
• CD-ROM(Software, User’s Manual)
• AC Adapter
Page 4

3
EN
Safety Instructions
1. Do not drop, puncture or disassemble the camera; otherwise the warranty will be voided.
2. Avoid all contact with water, and dry hands before using.
3. Do not expose the camera to high temperature or leave it in direct sunlight. Doing so may damge
the camera.
4. Use the camera with care. Avoid pressing hard on the camera body.
5. For your own safety, avoid using the camera when there is a storm or lightning.
6. Do not use batteries of different specications. Doing so may lead to the potential for serious
damage.
7. Remove the battery during long periods between usage, as a deteriorated battery may
affect the functionality of the camera.
8. Remove the battery if it shows signs of leaking or distortion.
9. Use only the accessories supplied by the manufacturer.
10. Keep the camera out of the reach of infants.
11. Risk of explosion if battery is replaced by an incorrect type.
12. Dispose of used batteries according to the instructions.
Page 5
4
EN
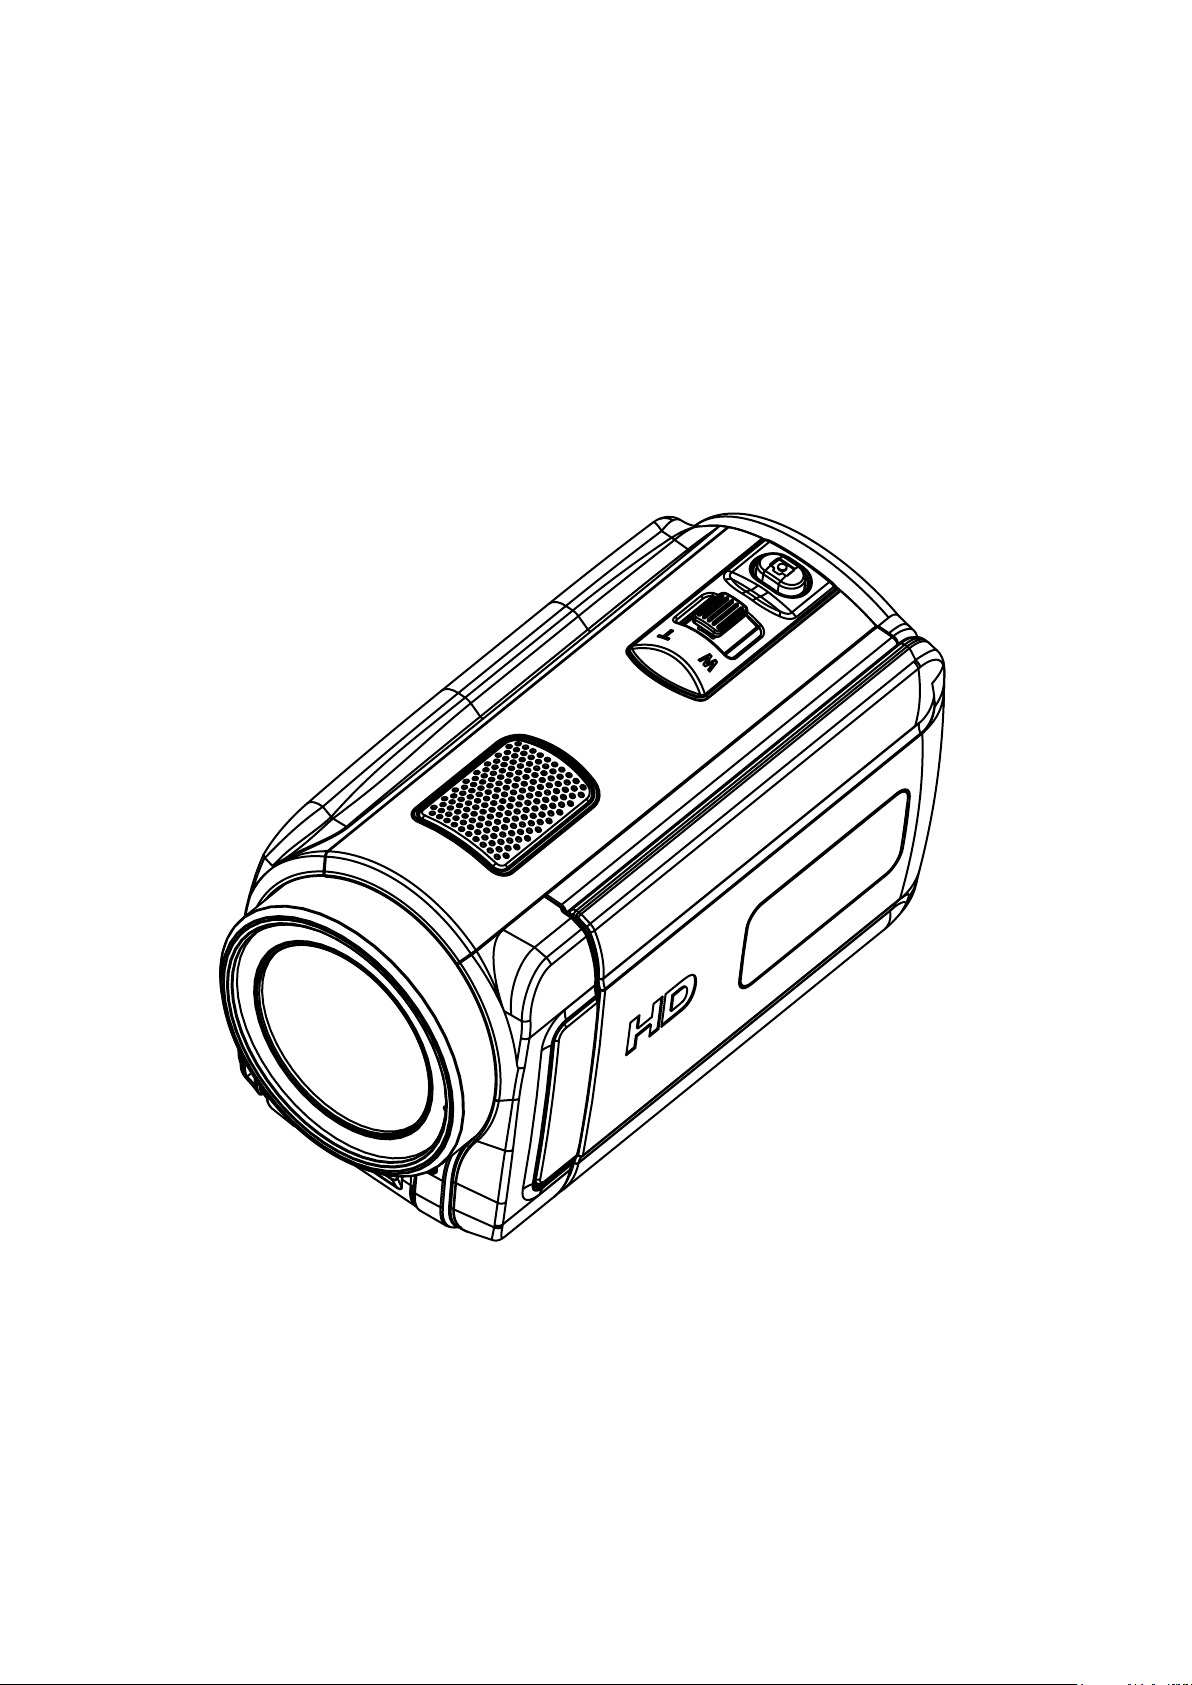
Front View
Picture Shutter Button
Speaker
Lens
Flash
Rear View
Tele/Wide Button
Microphone
Self-timer LED
Direction Button
OK/Enter Button
Movie Shutter Button
Record/Play Button
Page 6
5
EN
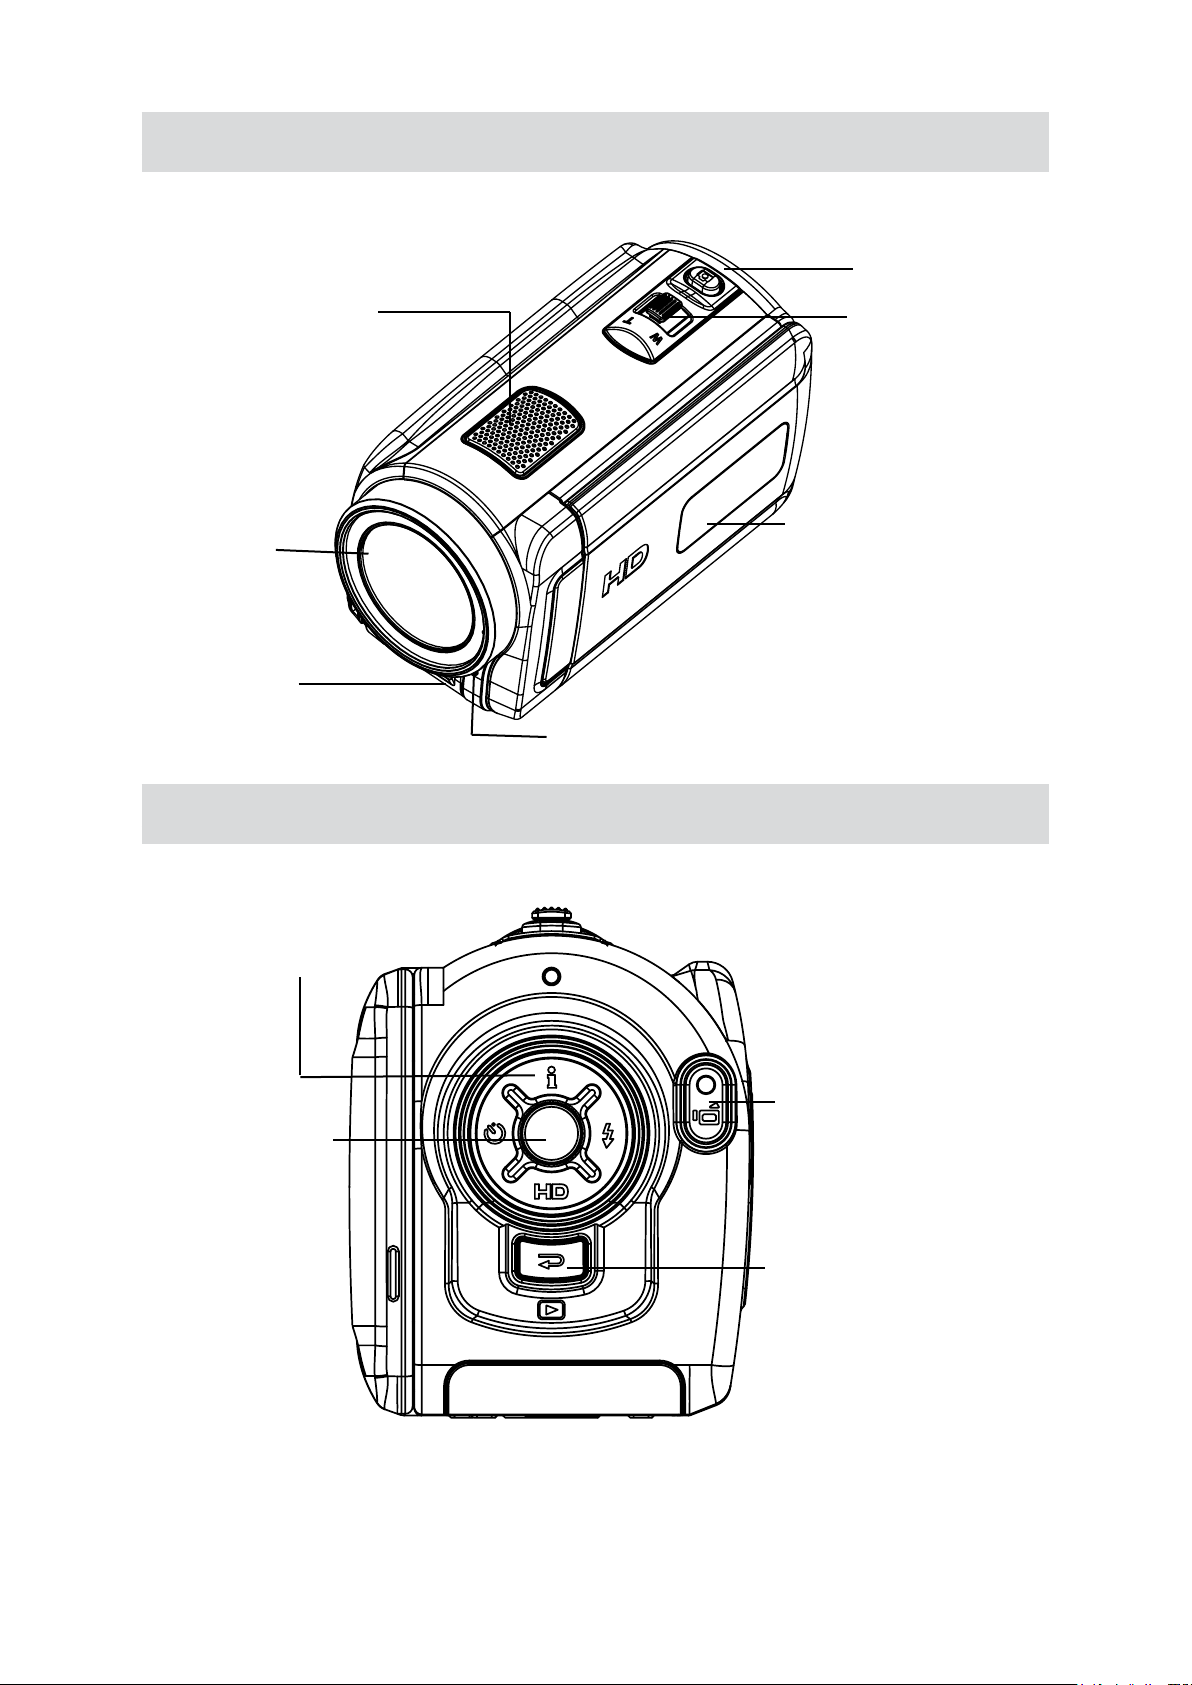
Side View
Ports Slide Cover
Mini USB2.0/Battery Charging Port
Bottom View
LCD Panel
TV Port
HDMI Port
Power Button
Tripod Socket
Battery/ SD Card Cover
Page 7
6
EN
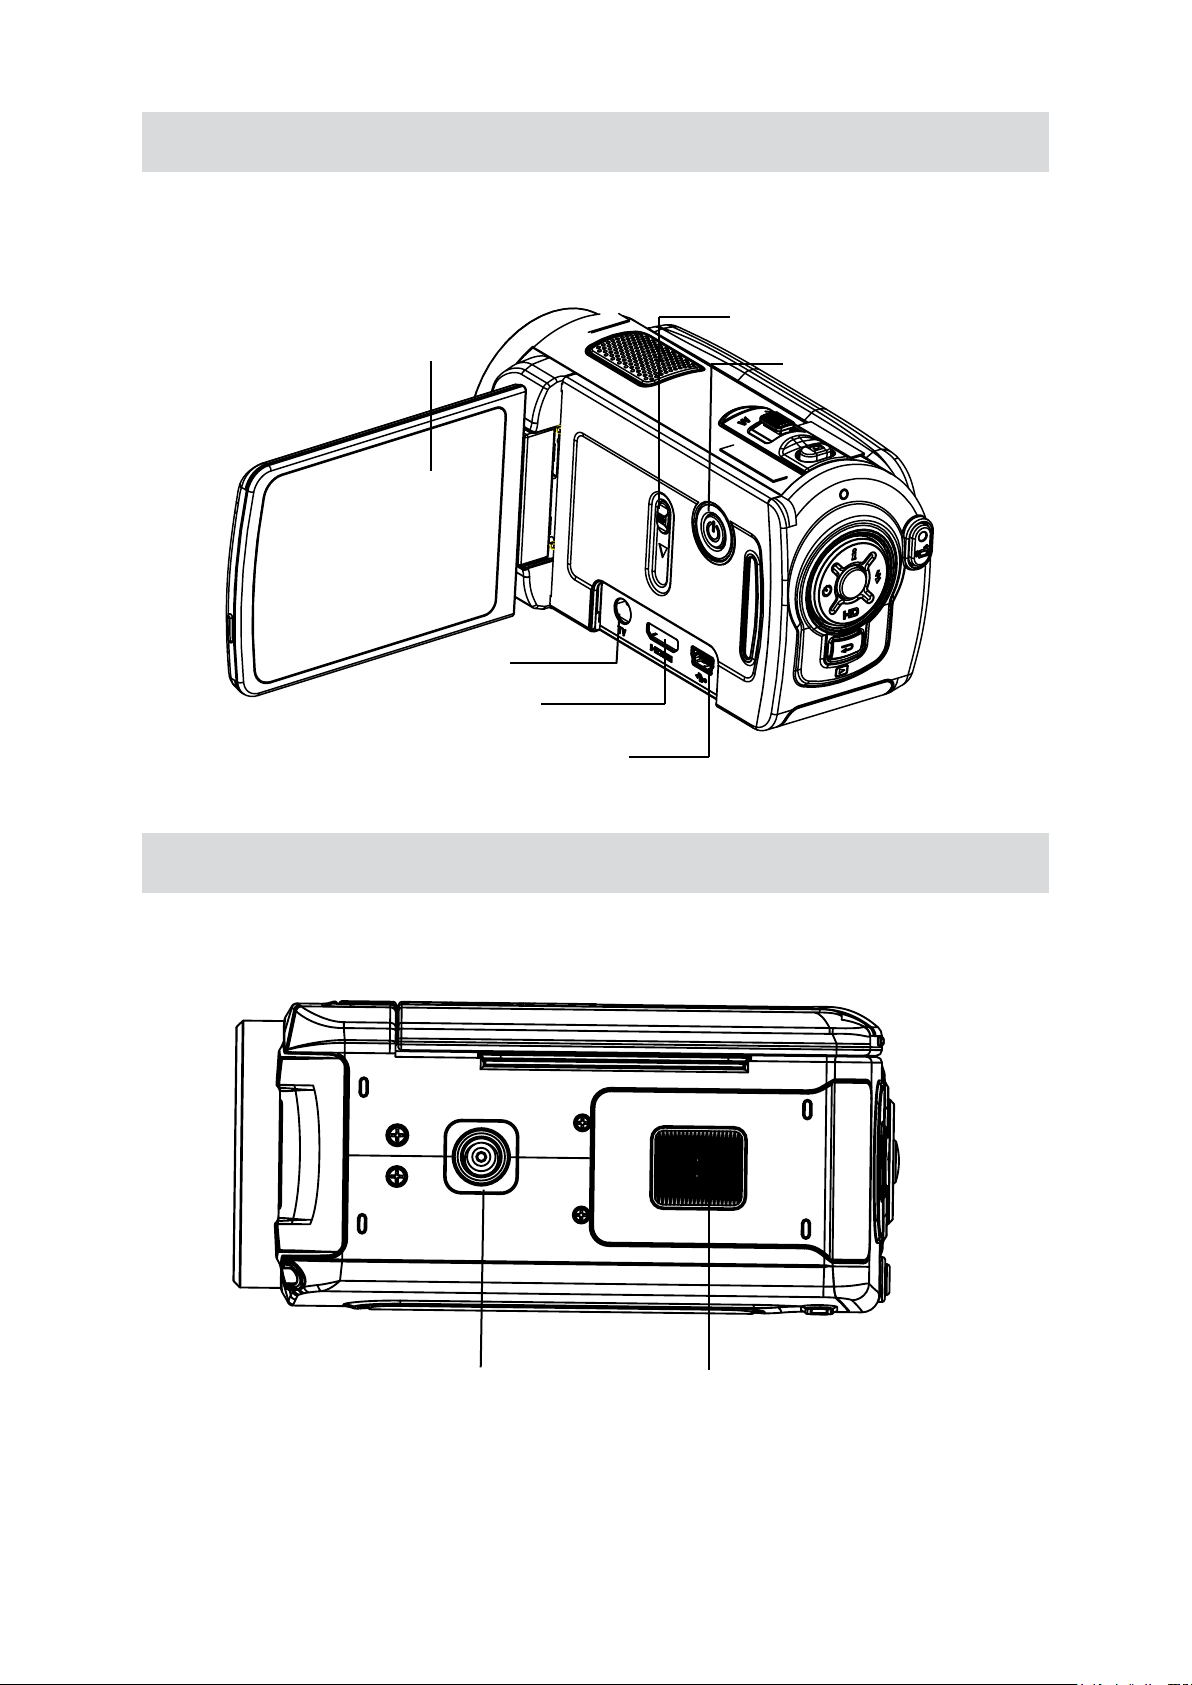
Getting Started
Loading the Battery
Before using the camera, users must load Lithium-ion Rechargeable Battery.
Insert the battery according to the correct polarity 1.
marks ( + or -).
Close the battery cover rmly.2.
Section 2
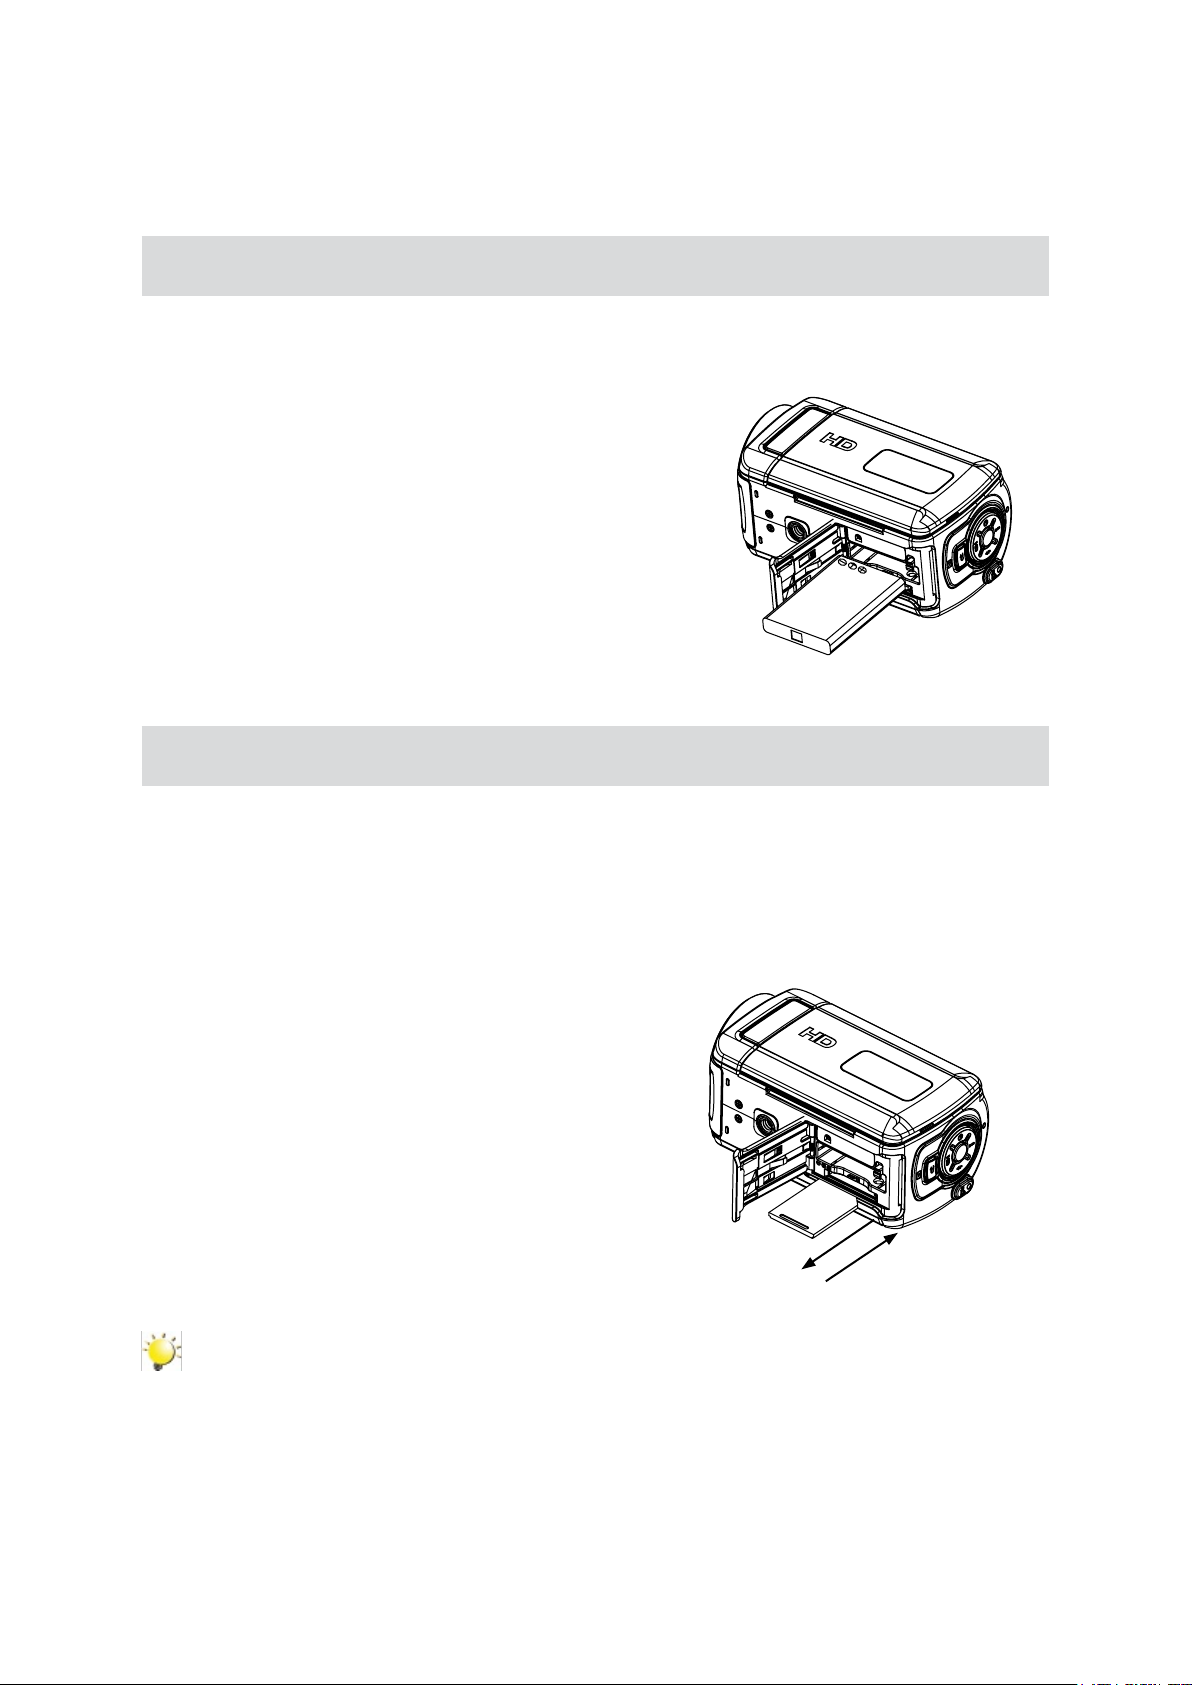
Inserting and Removing an SD Card (Optional)
The camera comes with internal memory which allows you to store pictures and movies. You can expand
the memory capacity by using an optional SD memory card. To insert a memory card, refer to the gure
as below:
Insert the memory card into the right position.1.
To remove an installed card, press the card 2.
inwards to release it.
When the card pops out, remove it from its slot.3.
Note
When a memory card is tted, movies and pictures are saved on card rather than on the built-in
memory.
Page 8
7
EN
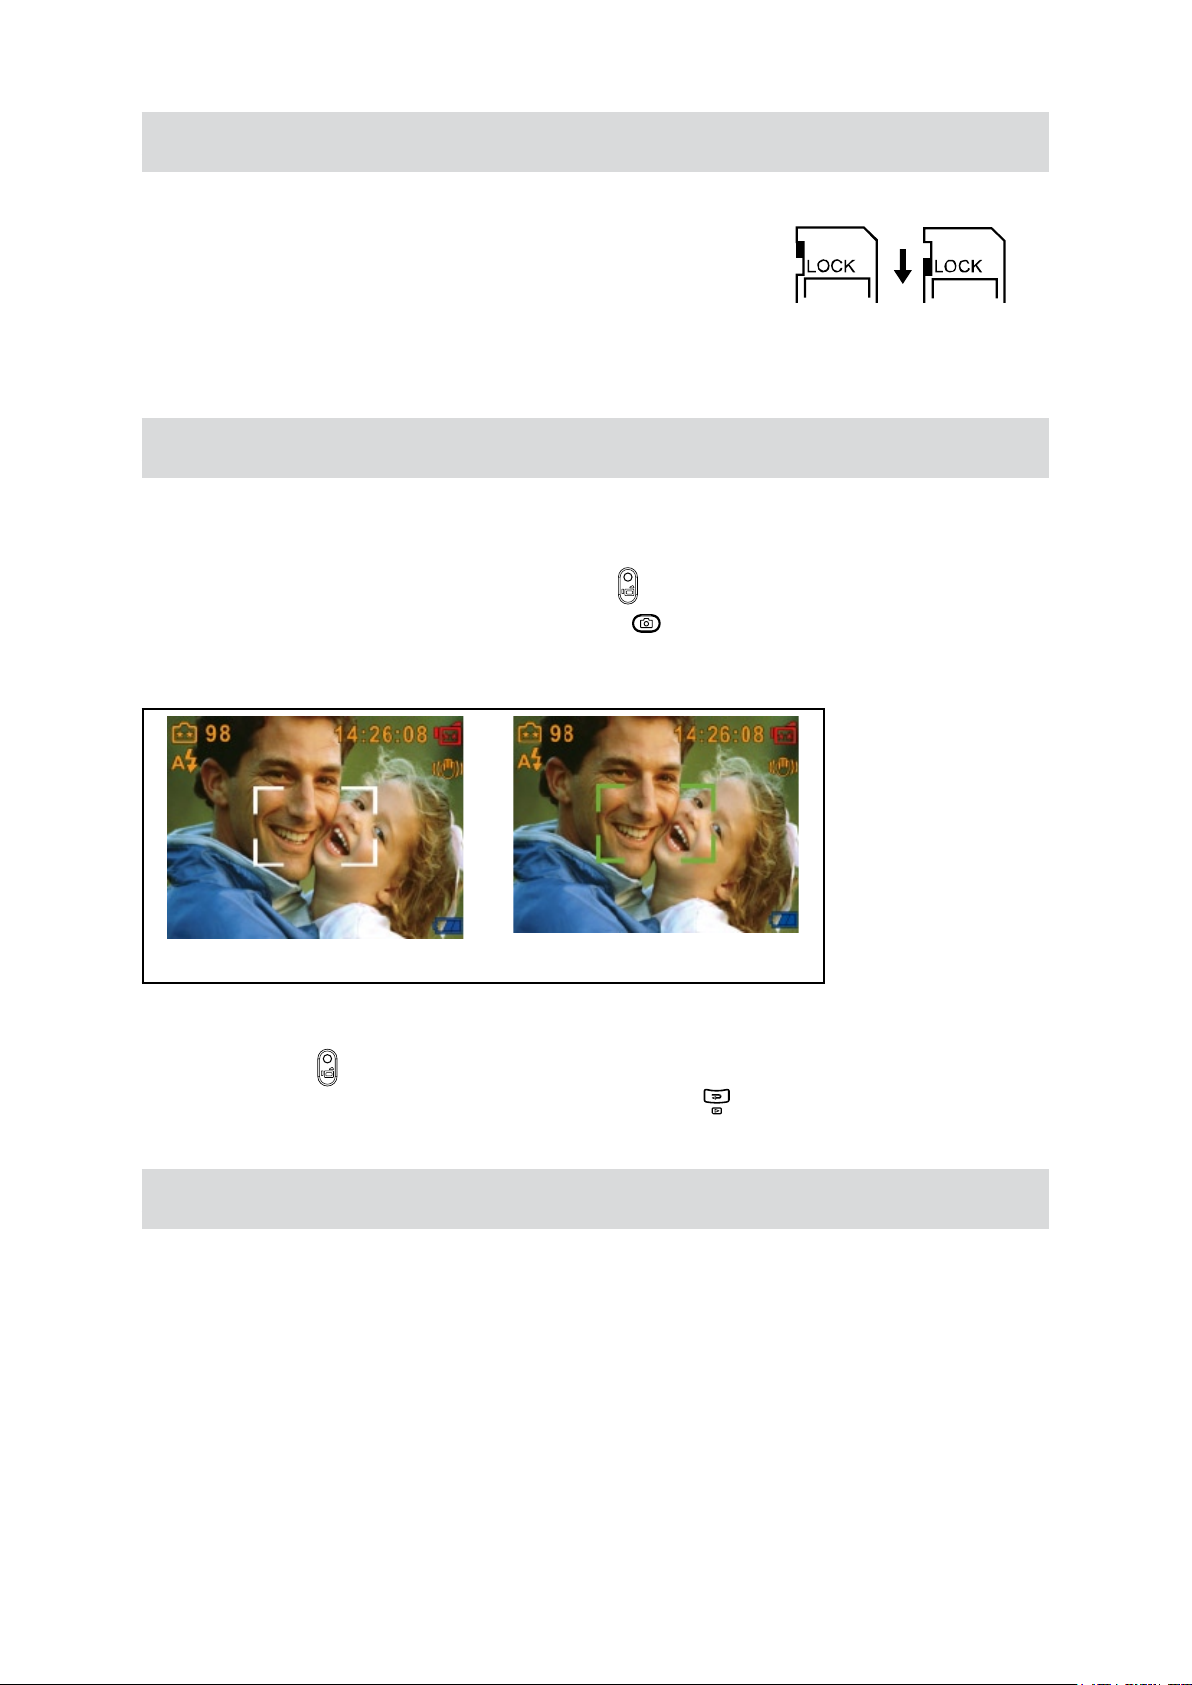
Protecting Data on an SD Card
SD card is read-only by locking the SD card. No pictures and
movies can be recorded when the SD card is locked. Make sure
the lock is on writeable position before recording.
Writeable
position
Turning the Camera On and Getting Started
To turn on the camera: Flip out the LCD panel or press Power Button for one second. When the •
camera is turned on, the green LED will light up.
To take a movie, press the Movie Shutter Button ( •
To take a picture: P• ress the Picture Shutter Button (
from white to green. Then, press the Picture Shutter Button fully down to take picture.
).
) halfway down till the focusing frame turns
Write-Protected
Position
Focusing Frame: White
To take movie at HD resolution, press Down Button to switch to HD mode, then press the Movie •
Shutter Button (
To view stored movies, pictures, press Record/Play Button ( •
Press a second time to return to Record Mode.
).
Focusing Frame:Green
) once to switch to Playback Mode.
Turning the Camera Off
To turn off the camera: Return the LCD panel back to its original position or press the Power Button for
one second.
Page 9

8
EN
Selecting Interface Language
The Setting submenu contains options for conguring your camera set up.
To change advanced setting:
1. In Movie/Picture Record Mode, press OK Button to switch to record menu screen.
2. Use Right/Left Buttons to move to Setting option, then Setting Submenu will pop out on the screen.
3. Use Up/Down Buttons to select Langauge option and press OK button to switch to Language
Option.
4. Select language for your country and press OK button to validate the setting.
Submenu Display Screen
Language
Page 10
9
EN
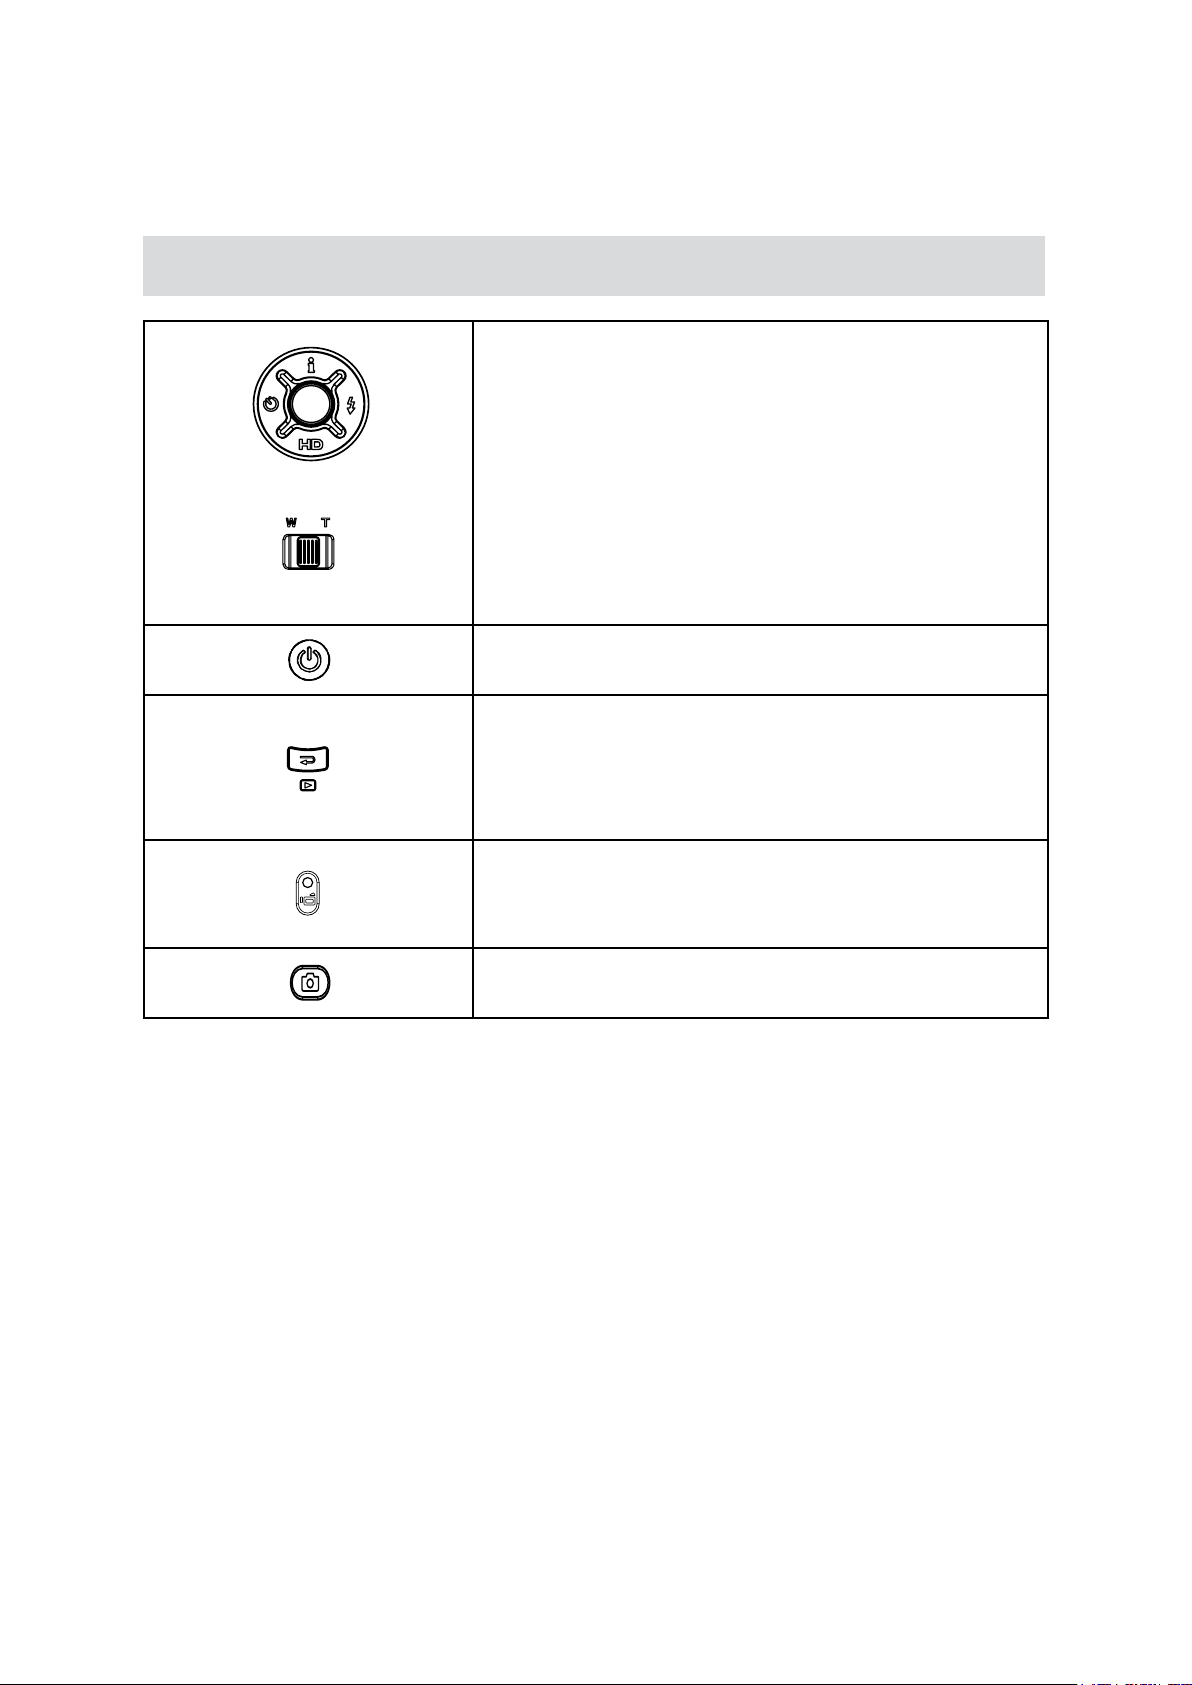
Button Function
Section 3
Record Mode
Right Button: Flash Auto/Red Eye Reduction/OFF
Left Button: Self timer ON/OFF
Up Button: Intelligent Lighting ON/OFF
Down Button: HD Mode
OK/Enter Button: Menu ON
Tele Button : Zoom In
Wide Button : Zoom out
Power Button: Press down for one second to turn on or turn
off the camera.
Record/Play Button functions:
Switch between Record and Playback Mode.1.
Exit the Menu.2.
Return to the previous page.3.
Movie Shutter Button:
Start to take movie.1.
To stop recording, press it again.2.
Picture Shutter Button: Start to take picture.
Page 11
10
EN
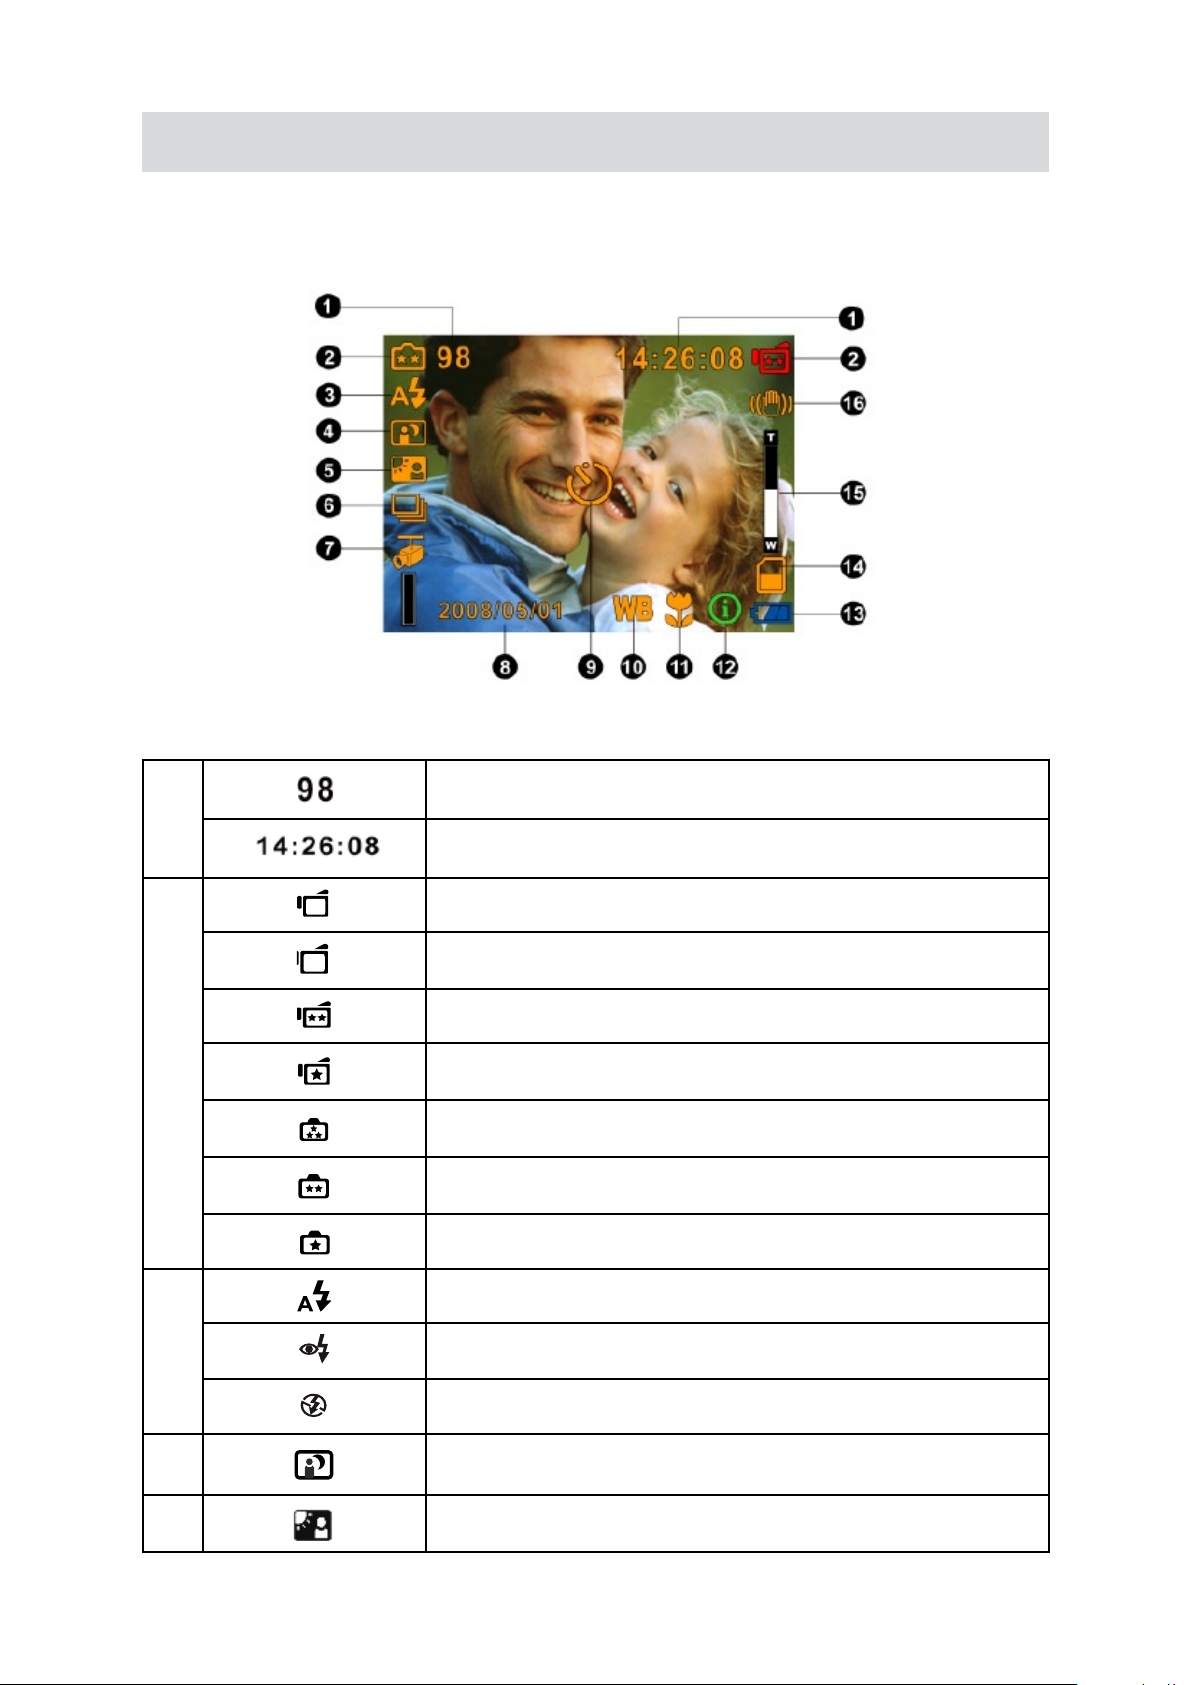
LCD Monitor Information
HD
D1
The indicator shows below may display on LCD when movies and pictures are recorded:
(1)
(2)
(3)
Number of images that can still be taken at current resolution
Recording time of movie that can still be taken at current resolution
HD
D1
VGA
QVGA
High
Standard
Low
Auto Flash
Red Eye Reduction
(4)
(5)
Flash Off
Night Mode
Backlight Mode
Page 12
11
EN
(6) Multi-snap Mode
HD
D1
(7)
(8)
(9)
(10)
(11)
(12)
(13)
(14)
Motion Detection
Date/Time: YYYY/MM/DD HH: MM
Self timer enabled
Manual White Balance
Macro Position Focusing
Intelligent Lighting On
Battery: full power
Battery: medium power
Battery: low power
Battery: power empty
SD Card inserted
(15)
(16)
20X zoom(5X optical zoom and 4X digital zoom)
Motion Stabilization
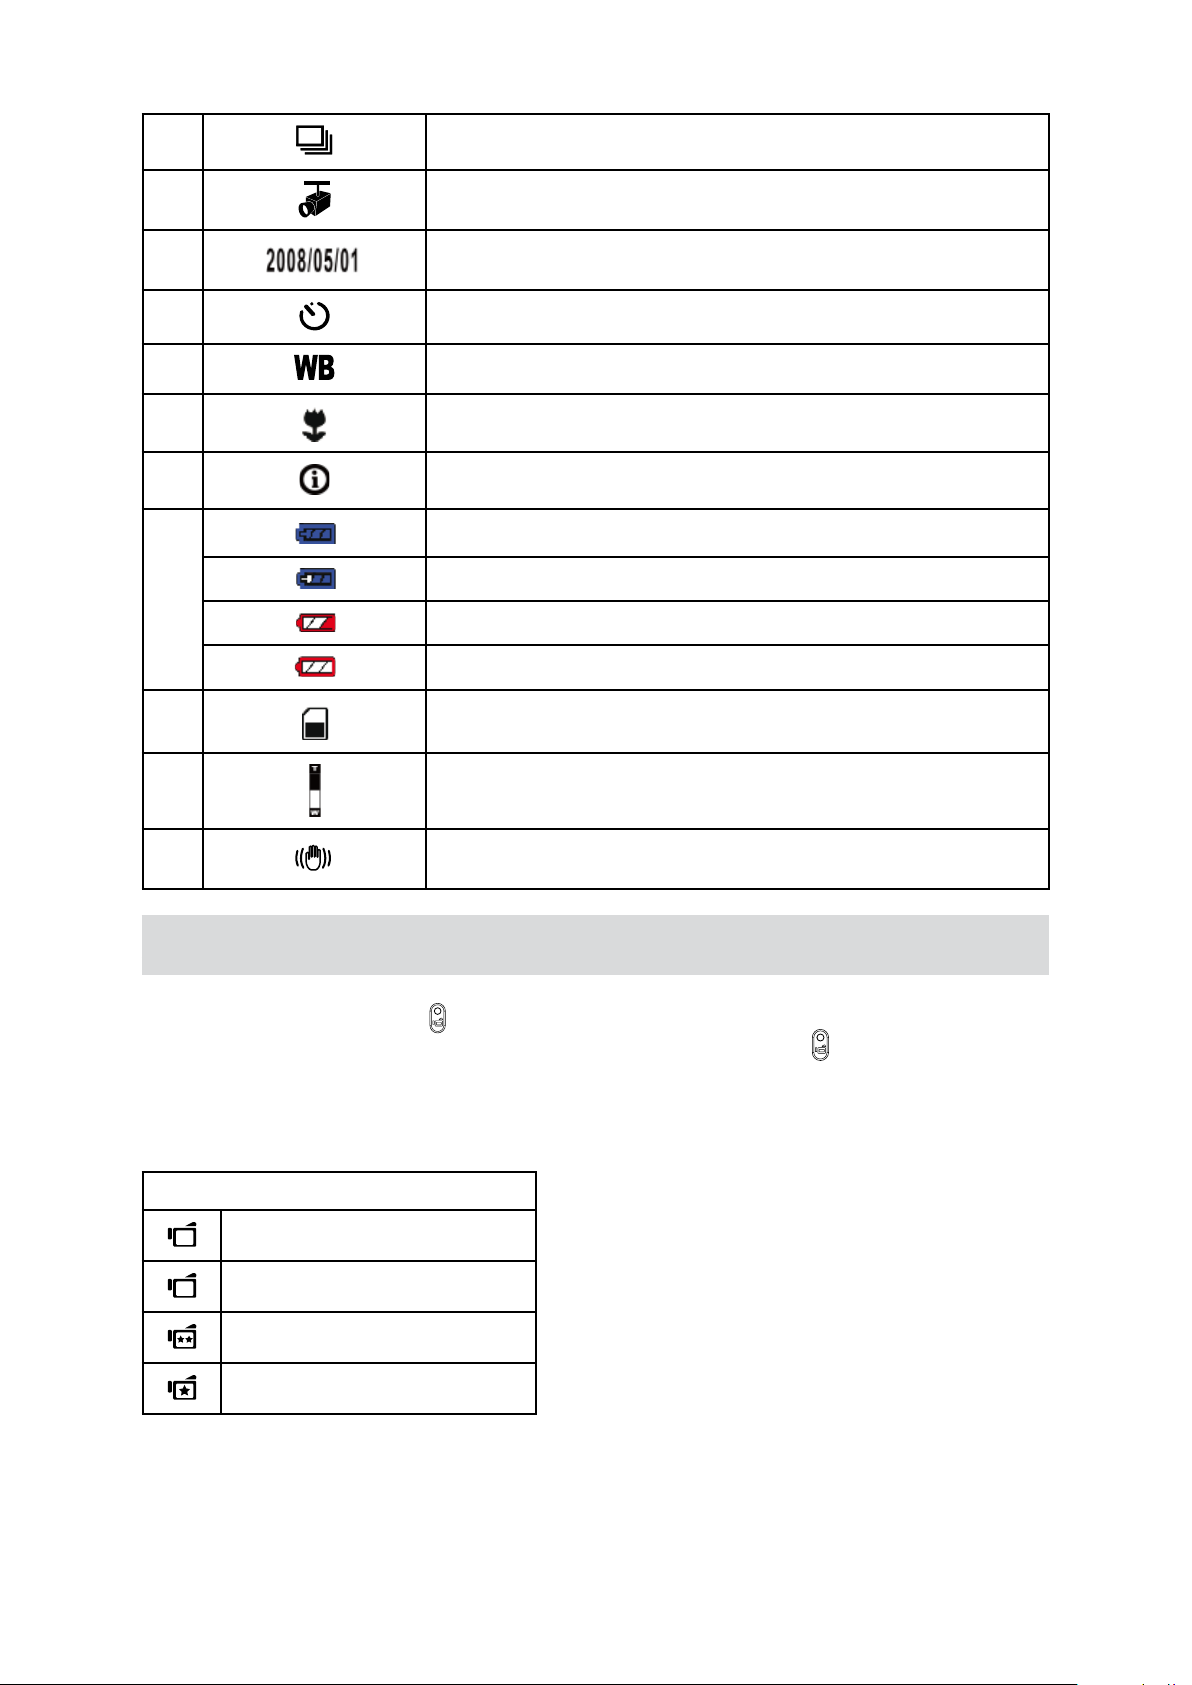
H.264 Movie Recording
Press Movie Shutter button (• ) to start recording. When a movie is recording, a time indicator will
display on LCD monitor. To stop recording, press Movie Shutter Button ( ) again.
Press Record/Play Button to view the recorded movie.•
Four resolution settings are available: •
Video Quality
HD(1280X720)
D1(720X480)
VGA(640X480)
QVGA(320X240)
Page 13
12
EN
Picture Recording
P• ress the Picture Shutter Button ( ) halfway down till the focusing frame turns from white to
green. Then, press the Picture Shutter Button fully down to take picture.
Press Record/Play Button to view the picture.•
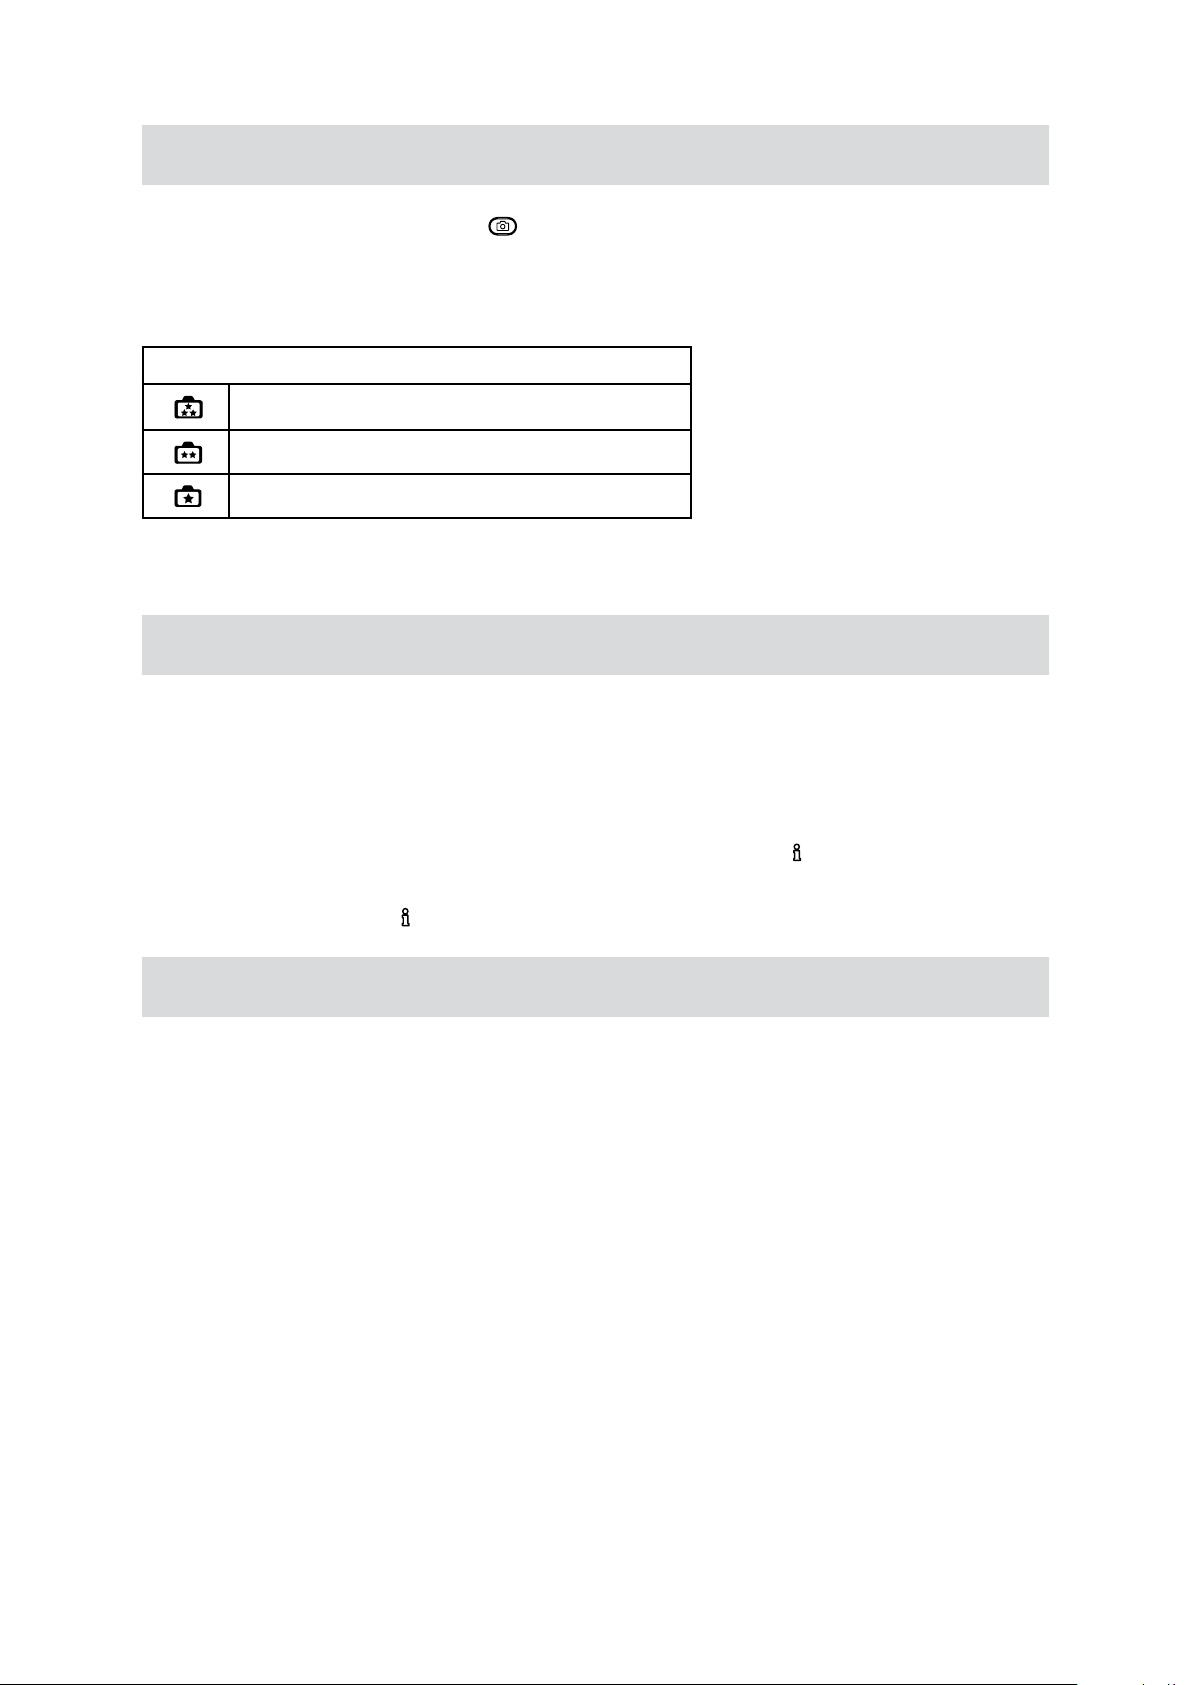
Three resolution settings are available: •
Image Quality
High Quality:11 Mega Pixels
Standard Quality:5 Mega Pixels
Low Quality:2 Mega Pixels
Using Intelligent Lighting Function
The camera has one mode to allow you to extend the brightness of the objects that is dark or in the
shadow.
To use Intelligent Lighting Button:
1. When recording movies or taking pictures, press Intelligent Lighting (
range for backlight and high contrast sense so that the objects will be brighter and clearer.
2. Press Intelligent Lighting (
) Button again to exit.
) Button to extend dynamic
Using Zoom Function
The zoom function magnies images, when recording movies or taking pictures.
To zoom in/out, press the Tele/Wide Button.1.
It can be set from 1x to 20x(5x optical zoom and 4X digital zoom).2.
Page 14
13
EN
Options for Record Menu
Movie Mode Camera Mode Motion Detect Effect Setting
Resolution•
Macro Mode•
Exposure•
Sharpness•
White Balance•
Stabilization•
Night Mode•
Exit•
Resolution•
Macro Mode•
Exposure•
Two in One•
Photo Frame•
Flash•
Selftimer•
Sharpness•
White Balance•
Multi-snap•
Backlight•
Date Printing•
Night Mode•
Exit•
Operations for Record Mode
On•
Off•
Normal•
B/W•
Classic•
Negative•
Exit•
Sound•
Time Setting•
Format Memory •
/Format Card
TV System•
Language•
Information•
Default Setting•
Exit•
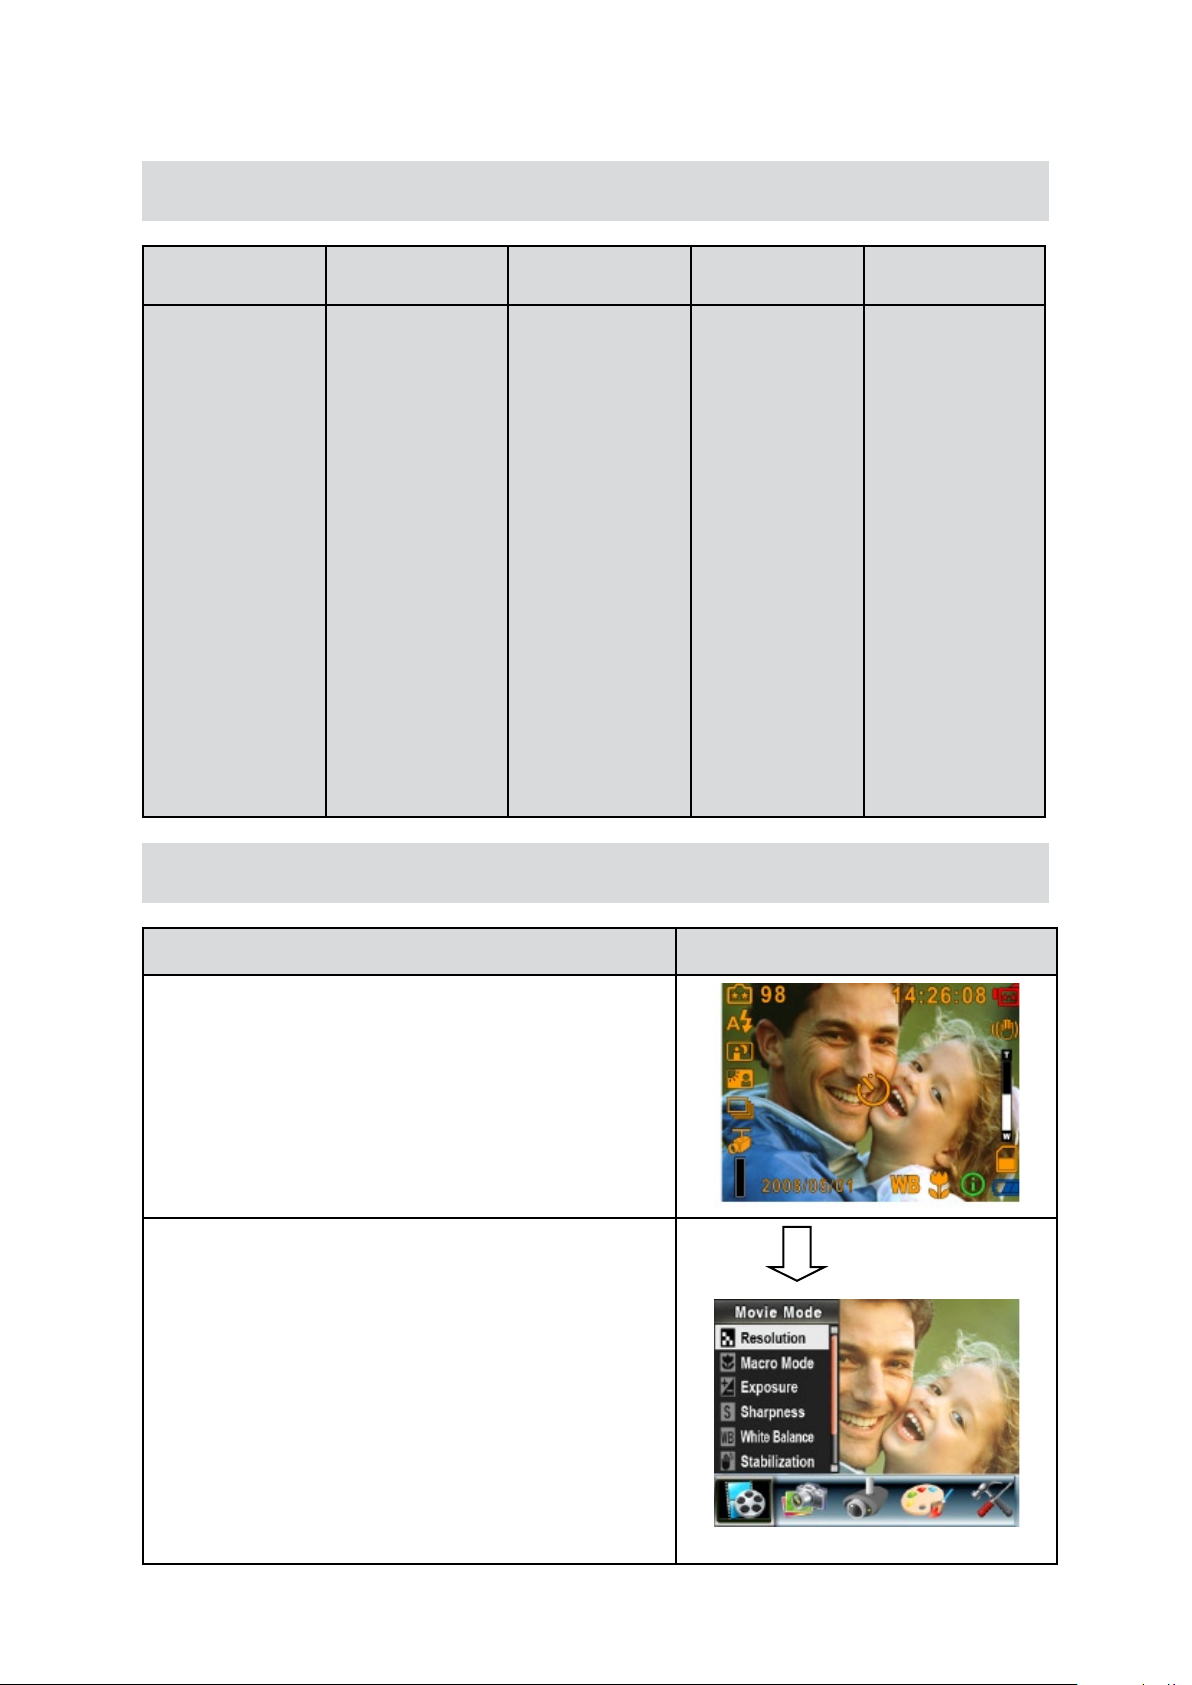
Operation Display Screen
Press OK Button when in Movie/Picture Record Mode.1.
Use Right/Left Buttons to move between main menu 2.
options, which are Movie Mode, Camera Mode, Motion
Detect, Effect, and Setting. Submenu will pop out while
move to each main option.
Press OK Button to validate sub option you select.3.
OK Button
Page 15

14
EN
Default Setting and Validation
The following table indicates the camera’s default setting as well as its validation.
Always:1. The setting always keeps valid.
One Time: 2. The setting is only valid either once or till camera power off.
Setting Validation Default Factory Setting
Resolution Always HD for Movie
Standard for Picture
Stabilization Always Off
Flash Always Off
Date Printing Always Off
Night Mode Always Off
Sound Always On
TV System Always Depends on shipping area
Language Always Depends on shipping area
Volume Always Level 8
Macro One Time Normal
Exposure One Time 0EV
Sharpness One Time Level 5
White Balance One Time Auto
Two in One One Time Off
Photo Frame One Time Off
Self timer One Time Off
Multi-snap One Time Off
Backlight Mode One Time Off
Motion Detect One Time Off
Effect One Time Normal
Format Memory / Format Card One Time Off
Information One Time On
Intelligent Lighting One Time Off
Page 16
15
EN
Movie Mode submenu Settings
Record main menu includes camera setting and other advanced settings. You can use Right/Left Buttons
to move between options and press OK Button to validate the settings.
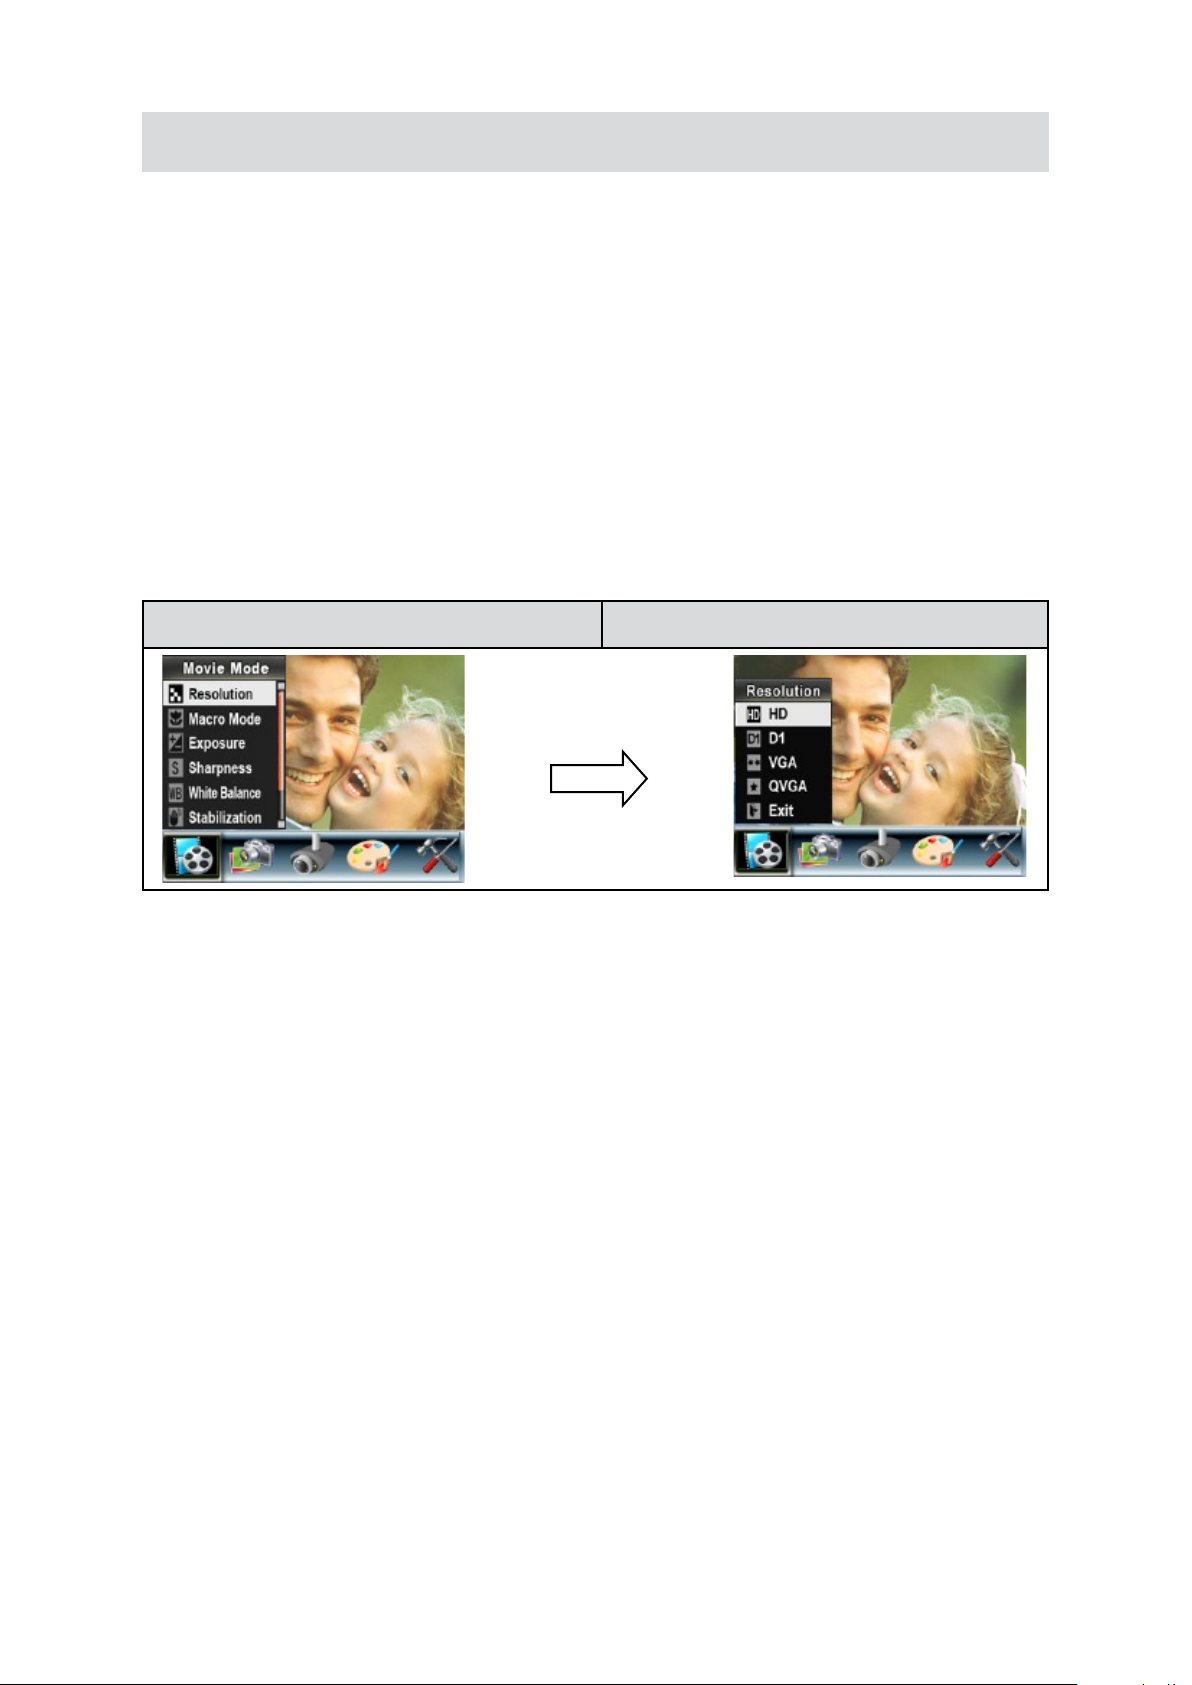
Movie Resolution
To change Movie Resolution:
In Movie/Picture Record Mode, press OK Button to switch to record menu screen. 1.
Use Right/Left Buttons to select Movie Mode. Submenu of Movie Mode will pop out on the screen.2.
Use Up/Down Buttons to select Resolution then press OK Button to switch to Resolution submenu.3.
Use Up/Down Buttons to move between four settings.4.
Press OK Button to validate the settings and exit.5.
Display Screen Video Resolution Option
OK Button
Page 17
16
EN
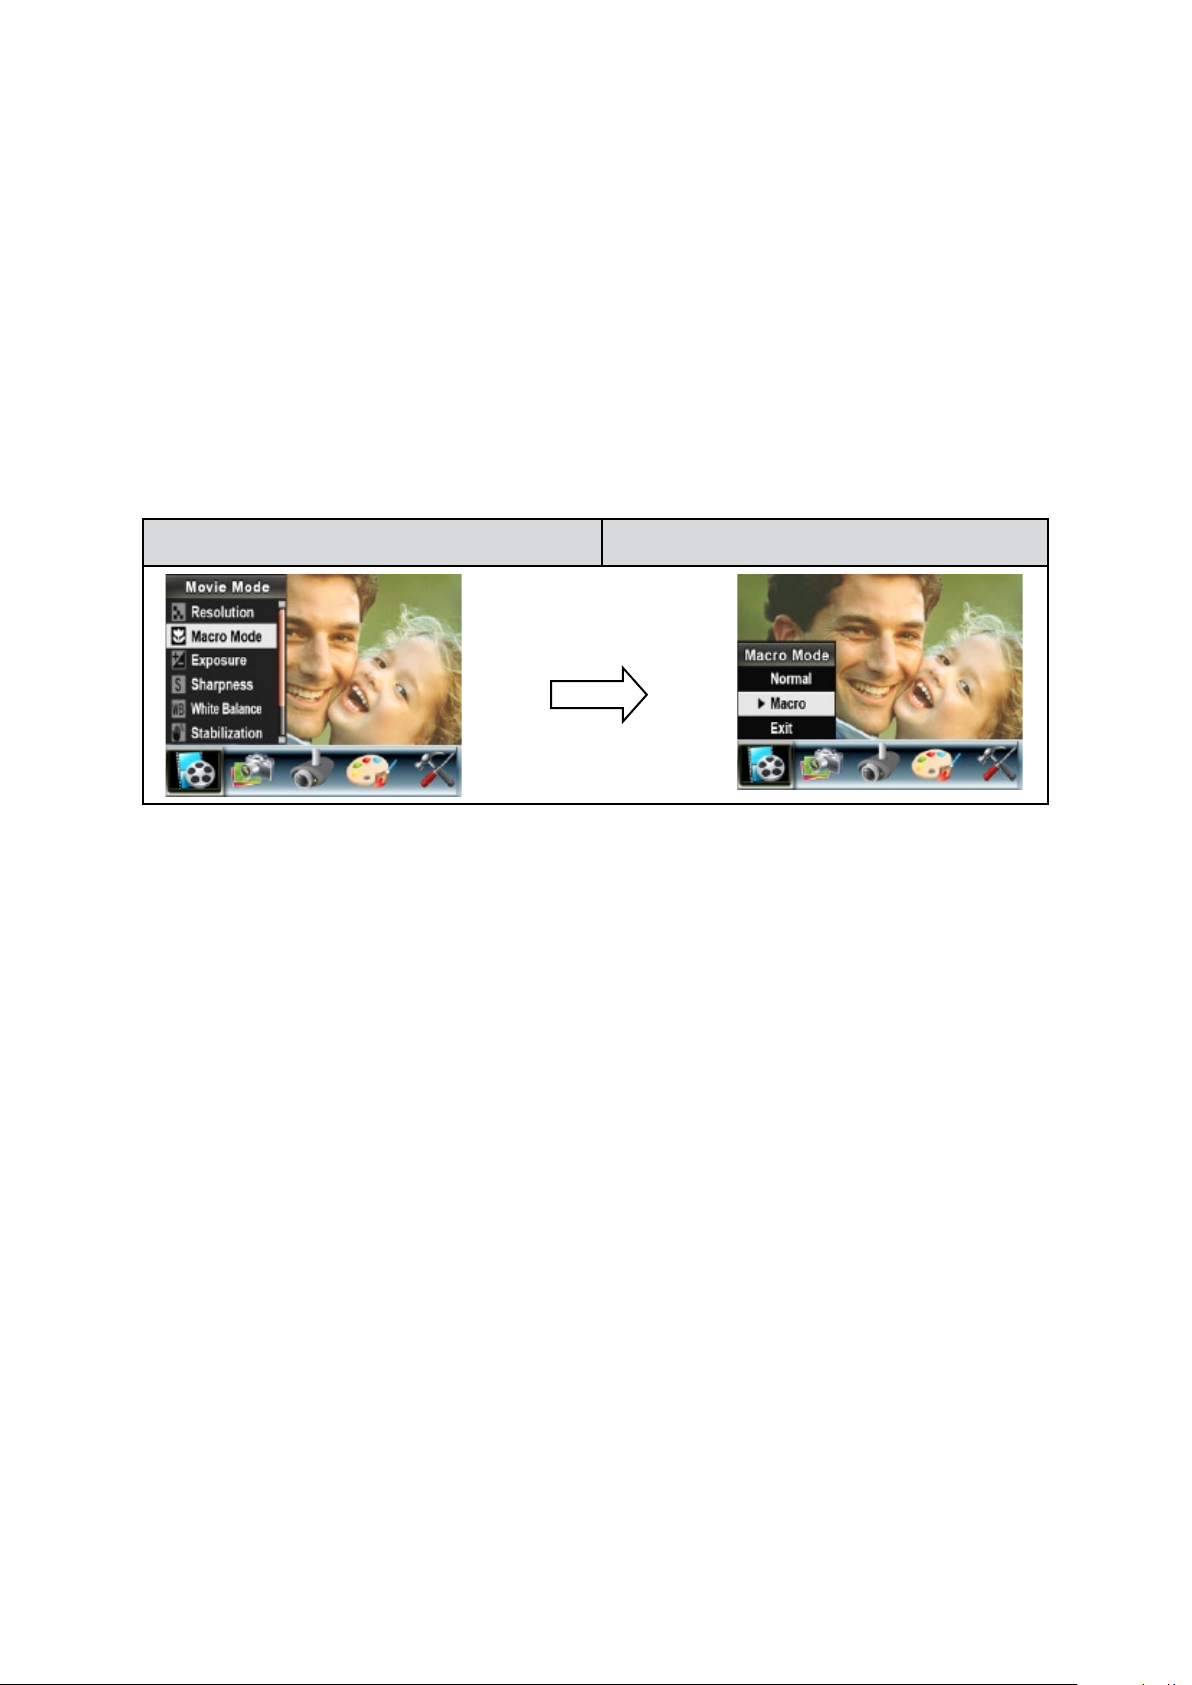
Macro Mode
With Macro Mode set to Macro, you could take closer images of objects in distance of 1cm to 30cm.
To enable Macro Mode:
1. In Movie/Picture Record Mode, press OK Button to switch to record menu screen.
2. Use Right/Left Buttons to select Movie Mode. Submenu of Movie Mode will pop out on the screen.
3. Use Up/Down Buttons to select Macro Mode then press OK Button to switch to Macro Mode
submenu.
4. Use Up/Down Buttons to move between two settings.
5. Press OK Button to validate the setting and exit.
6. To switch back to the default value, select ‘Normal’ in the Macro Mode submenu.
Display Screen Macro Mode Option
OK Button
Page 18
17
EN
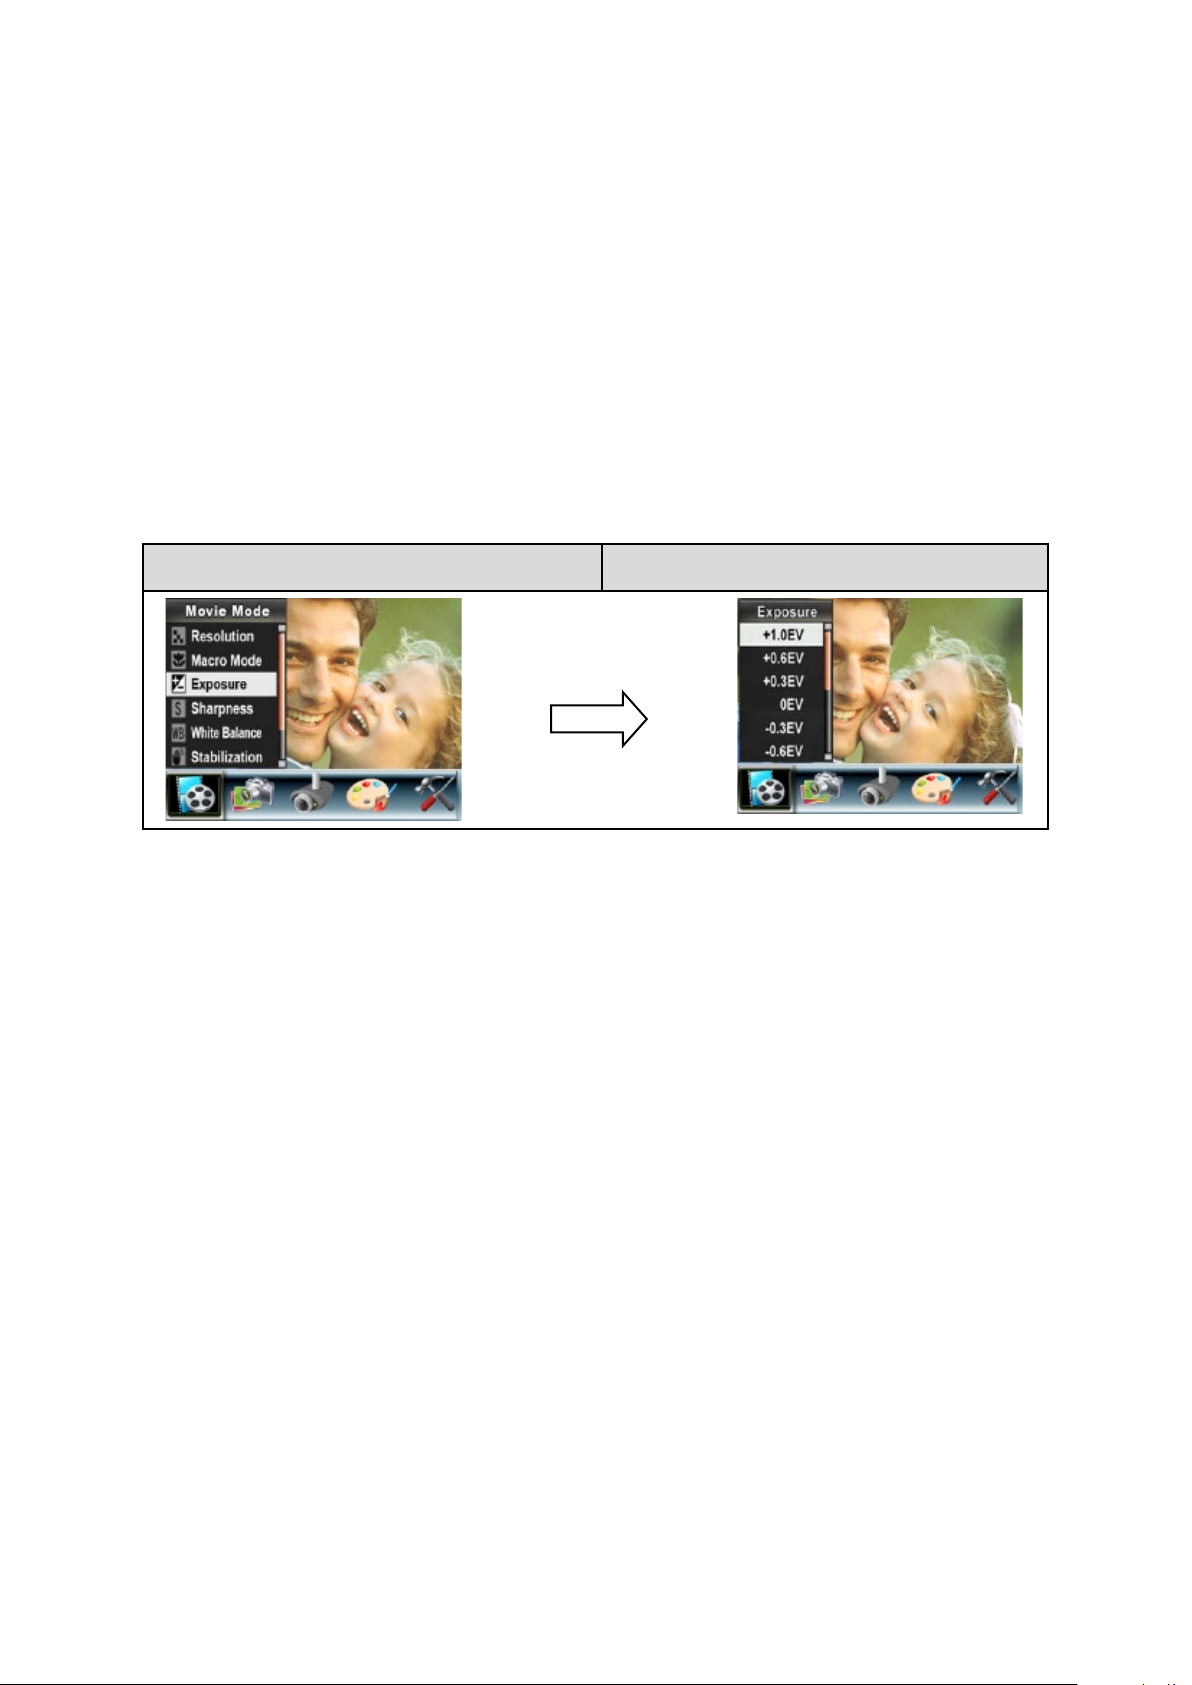
Exposure
The camera adjusts image exposure automatically. In certain circumstances you may wish to adjust the
exposure compensation setting.
To change Exposure setting:
In Movie/Picture Record Mode, press OK Button to switch to record menu screen. 1.
Use Right/Left Buttons to select Movie Mode. Submenu of Movie Mode will pop out on the screen.2.
Use Up/Down Buttons to move to Exposure Option. Press OK Button and then Exposure Submenu 3.
will pop out on the screen.
Use Up/Down Buttons to choose preferred EV value. The change can be previewed immediately.4.
Press OK Button to validate the setting and exit.5.
Display Screen Exposure Option
OK Button
Page 19
18
EN
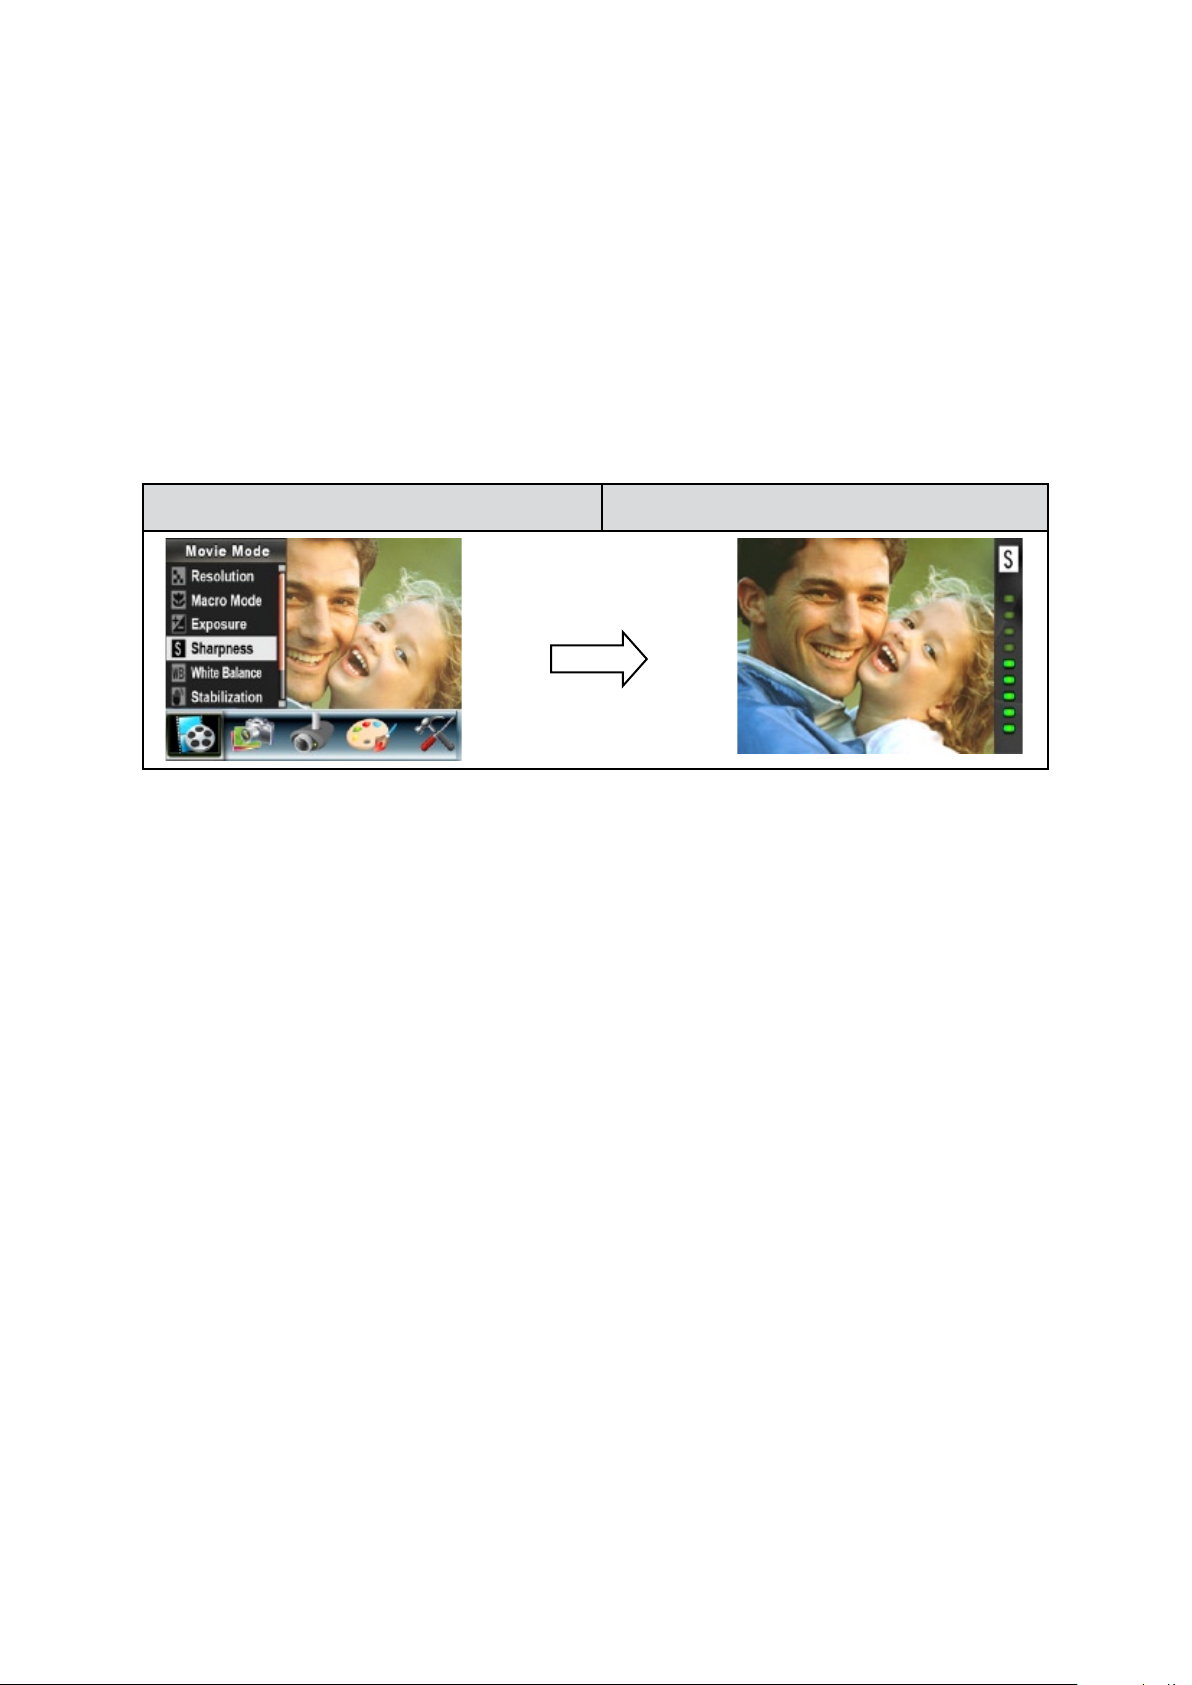
Sharpness
You can soften and sharpen images to achieve different effects.
To change Sharpness setting:
In Movie/Picture Record Mode, press OK Button to switch to record menu screen. 1.
Use Right/Left Buttons to select Movie Mode. Submenu of Movie Mode will pop out on the screen.2.
Use Up/Down Buttons to select Sharpness then press OK Button to switch to Sharpness submenu.3.
Use Up/Down Buttons to move between nine levels. The change can be previewed immediately.4.
Press OK Button to validate the setting and exit.5.
Display Screen Sharpness Option
OK Button
Page 20
19
EN
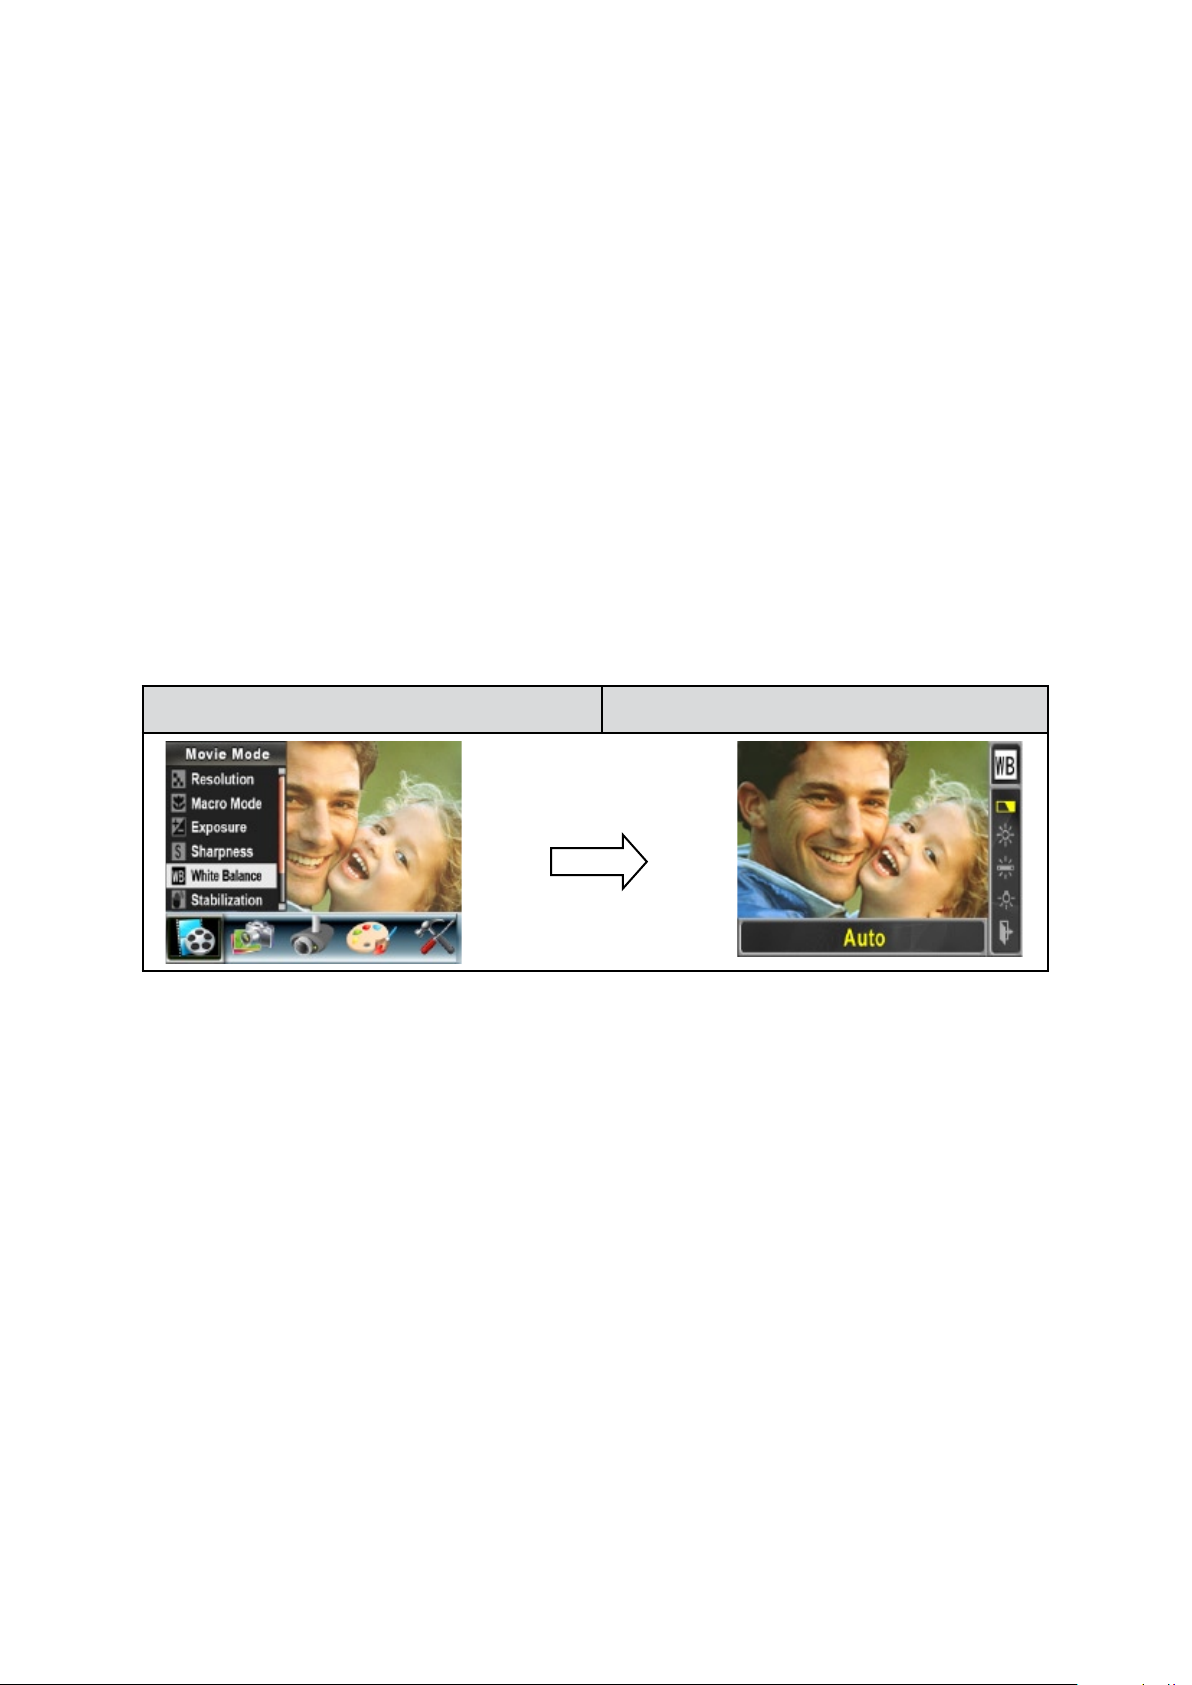
White Balance
The camera adjusts the color balance of images automatically. Three manual white balance settings are
available:
Auto: • The camera automatically adjusts white balance.
Daylight: • Under outdoors
Fluorescent: • Under uorescent light condition.
Tungsten: • Under tungsten light condition.
To change White Balance Setting:
In Movie/Picture Record Mode, press OK Button to switch to record menu screen. 1.
Use Right/Left Buttons to select Movie Mode. Submenu of Movie Mode will pop out on the screen.2.
Use Up/ Down Buttons to select White Balance, then press OK Button to switch to White Balance 3.
submenu.
Use Up/Down Buttons to move between four settings. The change can be previewed immediately.4.
Press OK Button to validate the setting and exit.5.
Display Screen White Balance Option
OK Button
Page 21
20
EN
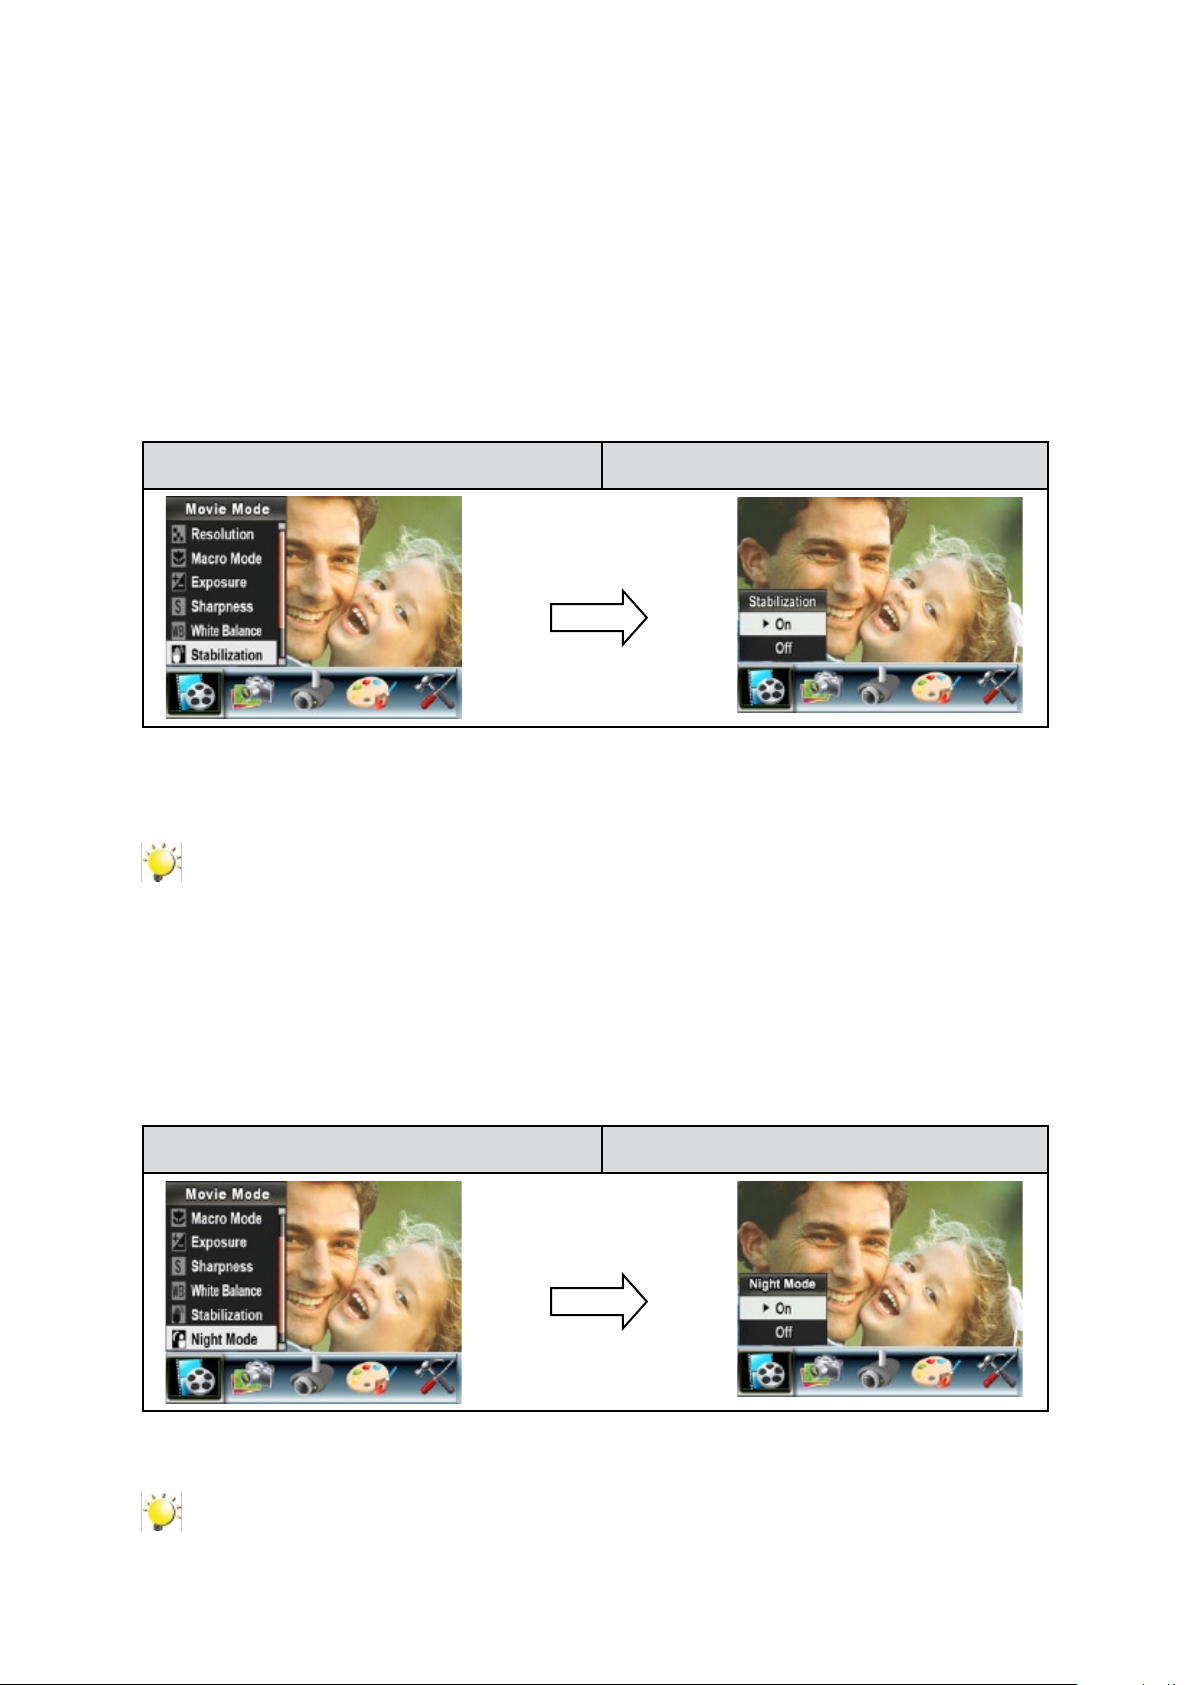
Stabilization
To enable Stabilization:
In Movie/Picture Record Mode, press OK Button to switch to record menu screen. 1.
Use Right/Left Buttons to select Movie Mode. Submenu of Movie Mode will pop out on the screen.2.
Use Up/Down Buttons to select Stabilization then press OK Button to switch to Stabilization 3.
submenu.
Use Up/Down Buttons to choose ON or OFF.4.
Press OK Button to validate the setting and exit.5.
Display Screen Stabilization Option
OK Button
Note
The captured screen will be smaller when stabilization is enabled. •
Digital Zoom is disabled when stabilization is activated. •
Night Mode
Use Night Mode for night scenes or low light conditions.
Display Screen Night Mode Option
OK Button
Note
To avoid blurry pictures, place the camera on a at, steady surface, or use a tripod.
Page 22

21
EN
Camera Mode Settings
Picture Resolution
To change Picture Resolution:
In Movie/Picture Record Mode, press OK Button to switch to record menu screen.1.
Use Right/Left Buttons to select Camera Mode. Submenu of Camera Mode will pop out on the 2.
screen.
Use Up/Down Buttons to select Resolution then press OK Button to switch to Resolution submenu.3.
Use Up/Down Buttons to move between three settings.4.
Press OK Button to validate the setting and exit.5.
Display Screen Image Resolution Option
OK Button
Page 23

22
EN
Macro Mode
With Macro Mode set to Macro, you could take closer images of objects in distance of 1cm to 30cm.
To enable Macro Mode:
1. In Movie/Picture Record Mode, press OK Button to switch to record menu screen.
2. Use Right/Left Buttons to select Camera Mode. Submenu of Movie Mode will pop out on the screen.
3. Use Up/Down Buttons to select Macro Mode then press OK Button to switch to Macro Mode
submenu.
4. Use Up/Down Buttons to move between two settings.
5. Press OK Button to validate the setting and exit.
6. To switch back to the default value, select ‘Normal’ in the Macro Mode submenu.
Display Screen Macro Mode Option
OK Button
Page 24

23
EN
Exposure
The camera adjusts image exposure automatically. In certain circumstances you may wish to adjust the
exposure compensation setting.
To change Exposure setting:
In Movie/Picture Record Mode, press OK Button to switch to record menu screen. 1.
Use Right/Left Buttons to select Camera Mode. Submenu of Camera Mode will pop out on the 2.
screen.
Use Up/Down Buttons to move to Exposure Option. Press the OK Button and then Exposure Submenu 3.
will pop out on the screen.
Use Up/Down Buttons to choose preferred EV value. The change can be previewed immediately.4.
Press OK Button to validate the setting and exit.5.
Display Screen Exposure Option
OK Button
Page 25

24
EN
Two in One (Picture Record Mode Only)
With camera set to Two in One mode, you can combine two snapshots into one picture.
To enable Two in One:
In Movie/Picture Record Mode, press OK Button to switch to record menu screen.1.
Use Right/Left Buttons to select Camera Mode. Submenu of Camera Mode will pop out on the 2.
screen.
Use Up/Down Buttons to select Two in One then press OK Button to switch to Two in One submenu.3.
Use Up/Down Buttons to choose ON or OFF.4.
Press OK Button to validate the setting and exit. 5.
Display Screen Two in One Option
Press Picture Shutter Button to 1.
take rst picture.
Press Picture Shutter Button to 2.
take second picture.
Press the Record/Play Button to 3.
view the Two in One picture.
OK Button
Page 26

25
EN
Photo Frame (Picture Record Mode Only)
Your camera features popular electronic photo frame. You can take your picture with preferred electronic
photo frame.
To enable Photo Frame:
When in Camera Mode, use Up/Down Buttons to select Photo Frame option, then press OK Button 1.
to switch to Photo Frame submenu.
Use Up/Down Buttons to locate preferred photo frame. Then select Set option and press OK Button 2.
to validate the setting and exit.
Display Screen Photo Frame Option
OK Button
Page 27

26
EN
Flash (Picture Record Mode Only)
This camera has three ash settings. To change ash setting by either hot key (Right Button) or Option
Setting.
Auto Flash ( •
general photography.
Red Eye Reduction ( •
Flash off ( •
in a place where ash photography is prohibited, or when the subject is distant (beyond the range of
the ash).
To change Flash setting:
When in Camera Mode, use Up/Down Buttons to select Flash Option, then press OK Button to switch 1.
to Flash submenu.
Use Up/Down Buttons to move between 3 settings.2.
Press OK Button to validate the setting and exit.3.
): The ash res automatically according to light conditions. Use this mode for
): The pre-ash will re to reduce the red-eye effect.
): The ash will not re under any circumstances. Use this mode when taking images
Note
The ash will be disabled automatically when battery power is low ( ).
Display Screen Flash Option
OK Button
Page 28

27
EN
Selftimer (Picture Record Mode Only)
The selftimer allows you to take pictures with a ten-second time delay. The Self-timer LED on the front
of the camera will also blink. The speed of blinking will increase just before the picture is taken.
To enable Selftimer:
When in Camera Mode, use Up/Down Buttons to select Selftimer, then press OK Button to switch to 1.
Selftimer submenu.
Use Up/Down Buttons to choose On or Off. 2.
Press OK Button to validate the setting and exit.3.
Display Screen Selftimer Option
OK Button
Page 29

28
EN
Sharpness
You can soften and sharpen images to achieve different effects.
To change Sharpness setting:
When in Camera Mode, use Up/Down Buttons to select Sharpness Option, then press OK Button to 1.
switch to Sharpness submenu.
Use Up/Down Buttons to move between nine levels. The change can be previewed immediately.2.
Press OK Button to validate the setting and exit.3.
Display Screen Sharpness Option
OK Button
Page 30

29
EN
White Balance
The camera adjusts the color balance of images automatically. Three manual white balance settings are
available:
Auto: • The camera automatically adjusts white balance.
Daylight: • Under outdoors.
Fluorescent: • Under uorescent light condition.
Tungsten: • Under tungsten light condition.
To change White Balance Setting:
When in Camera Mode, use Up/Down Buttons to select White Balance, then press OK Button to 1.
switch to White Balance submenu.
Use Up/Down Buttons to move between four settings. The change can be previewed immediately.2.
Press OK Button to validate the setting and exit.3.
Display Screen White Balance Option
OK Button
Page 31

30
EN
Multi-snap (Picture Record Mode Only)
With the camera set to Multi-Snap Mode, you can take ve continuous pictures.
To enable Multi-snap:
When in Camera Mode, use Up/Down Buttons to select Multi-snap, then press OK Button to switch 1.
to Multi-snap submenu.
Use Up/Down Buttons to choose On or Off. 2.
Press OK Button to validate the setting and exit.3.
Display Screen Multi-Snap Option
OK Button
Backlight (Picture Record Mode Only)
With the camera set to backlight Mode, you can take shots when bright light is behind the subject.
To enable Backlight:
When in Camera Mode, use Up/Down Buttons to select Backlight, then press OK Buttons to switch 1.
to Backlight submenu.
Use Up/Down Buttons to choose On or Off. 2.
Press OK Button to validate the setting and exit.3.
Display Screen Backlight Option
OK Button
Page 32

31
EN
Date Printing (Picture Record Mode Only)
To enable Date Printing:
When in Camera Mode, use Up/Down Buttons to select Date Printing, then press OK Button to switch 1.
to Date Printing submenu.
Use Up/Down Buttons to choose On or Off. 2.
Press OK Button to validate the setting and exit.3.
Display Screen Date Printing Option
OK Button
Note
Date would be shown on the picture once date printing is enabled.
Night Mode
Use Night Mode for night scenes or low light conditions.
Display Screen Night Mode Option
OK Button
Note
To avoid blurry pictures, place the camera on a at, steady surface, or use a tripod.
Page 33

32
EN
Motion Detection
To enable Motion Detection:
In Movie/Picture Record Mode, press OK Button to switch to record menu screen. 1.
Use Right/Left Buttons to move to Motion Detect Option. Submenu of Motion Detect will pop out on 2.
the screen.
Use Up/Down Buttons to choose ON or OFF.3.
Press OK Button to validate the setting and exit.4.
Camera will start to record video automatically if it detects a movement. Stop recording if it does not 5.
detect a movement.
Display Screen
Page 34

33
EN
Effect Setting
The effects can be Normal, B/W(Black/White), Classic and Negative.
To change Effect setting:
In Movie/Picture Record Mode, press OK Button to switch to record menu screen.1.
Use Right/Left Buttons to move to Effect Option. Then Effect Submenu will pop out on the screen.2.
Use Up/Down Buttons to move between four settings. The change can be previewed immediately.3.
Press OK Button to validate the setting and exit.4.
Display Screen
Page 35

34
EN
Setting Menu
The Setting submenu contains options for conguring your camera set up.
To change advanced setting:
In Movie/Picture Record Mode, press OK Button to switch to record menu screen.1.
Use Right/Left Buttons to move to Setting option, then Setting Submenu will pop out on the screen.2.
Use Up/Down Buttons to move between settings.3.
Display Screen Setting Option
Sound (operation sound)•
Time Setting•
Format Memory/ Format Card•
TV System•
Language•
Information•
Default Setting•
Note
Please refer to Format Memory/Card on page 34.
Sound
Enable or disable operation sound by using Up/Down Buttons then press OK Button to validate the
setting.
Display Screen Sound Option
OK Button
Page 36

35
EN
Time Setting
Move between Date, Time, Set and Exit by using Left/Right Buttons.•
Adjust date and time by using Up/Down Buttons, then select Set to validate each change.•
Select Exit to leave Time Setting without any change.•
Display Screen Time Setting
OK Button
Format Memory (when there is no SD Card in the camera)
Display Screen Format Memory Option
OK Button
Format Card (when there is an SD Card in the camera)
Display Screen Format Card Option
OK Button
Note
All the data will be erased if the SD card is formatted. Make sure all the data are duplicated to PC
before formatting SD card.
Page 37

36
EN
TV System
Ensure that the appropriate TV standard of your area is selected – either NTSC or PAL.
Wrong TV system setting may cause image icker.
NTSC standard: USA, Canada, Japan, South Korea and Taiwan etc.
PAL standard: UK, Europe, China, Australia, Singapore and Hong Kong etc.
Display Screen TV System Option
OK Button
Language
Use this option to select the language of user interface which you want.
Display Screen
Page 38

37
EN
Information
On: Show the indicator(s) on the LCD screen.
Off: Do not show the indicator(s) on the LCD screen.
Display Screen Information Option
OK Button
Default Setting
To restore the default factory setting, select this option.
Display Screen Default Setting Option
OK Button
Page 39

38
EN
Section 4
Playback Mode
Press Record/Play Button to switch from Record Mode to Playback Mode.
The Playback Mode is for viewing and managing movies and pictures on the built-in memory or on an
optional memory card.
Operation Display Screen
Press Record/Play Button (
Record Mode to Playback Mode Main Menu.
There are 2 options in the Playback Mode, movie •
and picture.
Direction Buttons can be used to select the •
specic option.
Press OK Button to view movies or pictures.•
) to switch from
Button Function
The Direction Buttons have the following functions in Movie and Picture Playback Modes.
Right Button: Go to the next movie/picture.
Left Button: Go to the previous movie/picture.
OK/Enter Button: Enter to movie or picture option menu.
Tele Button : Zoom in. (only Picture Mode)
Wide Button : Zoom out. (only Picture Mode)
Record/Play Button functions:
Switch between Record and Playback modes.1.
Return to the previous page.2.
Movie Shutter Button:
Start playing the recorded movie.
Page 40

39
EN
LCD Monitor Information
5/10
HD
D1
Indicators on the LCD screen while in Playback Mode:
(1)
(2)
(3)
(4)
(5)
Current Number/ Total number of movie or picture.
Magnication Indicator.
Indicate the screen is in Playback Mode
HD
D1
VGA
QVGA
High
Standard
Low
Indicate the selected movie/picture is locked.
Page 41

40
EN
Movie Playback
Operation Display Screen
Press Record/Play Button to select Playback 1.
Mode. Use Direction Buttons to select the Movie
option.
Press OK Button to go to Movie Playback Mode.2.
Use Right/Left Buttons to go to the next or last 3.
movie.
Press Movie Shutter Button to play and press it 4.
again to pause.
While playing movie, press Right/Left Buttons to 5.
fast forward/backward, then release the button to
stop.
Use Up/Down Buttons to adjust volume.6.
Press OK Button to go to the movie option menu. 7.
Use Right/Left Buttons to select six options, 8.
Delete, Thumbnail, Lock, Repeat One, Repeat
All, or Exit.
Page 42

41
EN
Delete Movies
Operation Display Screen
Use Right/Left Buttons to select the Delete option 1.
).
(
Press OK Button to go to the Delete menu.2.
Use Right/Left Buttons to select the movie.3.
Use Up Button to delete all movies and Down 4.
Button to delete single movie.
Before a movie is deleted, a conrmation screen 5.
will appear; choosing “Yes” will execute the
operation and “No” to cancel the operation.
Press OK Button to exit. 6.
Note
If a memory card is tted, you can delete only those movies stored on the card. •
Movies on a written-protected memory card cannot be deleted.•
The delete function will only erase unlocked movies. Locked movies must be unlocked before •
being deleted.
Page 43

42
EN
Thumbnail Function
Operation Display Screen
Use Right/Left Buttons to select the Thumbnail 1.
option (
Press OK Button to view nine thumbnail movies. 2.
To play a movie, use Right/Left Buttons to select 3.
the movie and press OK Button to view.
).
Lock Movies
Single or all movies can be locked. This function can prevent the movies from being deleted
accidentally.
Operation Display Screen
Use Right/Left Buttons to select the Lock option 1.
).
(
Press OK Button to go to the Lock menu. 2.
Use Right/Left Buttons to select the movie.3.
Use Up Button to lock/unlock all movies and Down 4.
Button to lock/unlock single movie.
Before a movie is locked/unlocked, a conrmation 5.
screen will appear; choosing “Yes” will execute
the operation, “No” will cancel the operation.
Press OK Button to exit.6.
Page 44

43
EN
Repeat Movies
This function automatically repeats playing single movie or all movies in order.
Operation Display Screen
Use Right/Left Buttons to select the Repeat One 1.
option (
Press OK Button to start repeating, press it again 2.
to stop.
) or Repeat All option ( ).
Page 45

44
EN
Picture Playback
Operation Display Screen
Press Record/Play Button to select Playback 1.
Mode. Use Right/Left Buttons to select the Picture
option.
Press OK Button to go to Picture Playback Mode.2.
Use Right/Left Buttons to go to the next or last 3.
picture.
While the picture is selected, use Tele/Wide 4.
Buttons to magnify.
To navigate the magnied picture, use Direction 5.
Buttons to navigate the magnied picture. Press
Record/Play Button again to exit navigation
mode.
Press OK Button to go to the picture option 6.
menu.
Use Right/Left Buttons to select ve options, 7.
Delete, Thumbnail, Lock, Slideshow, or Exit.
Page 46

45
EN
Delete Picture
Operation Display Screen
Use Right/Left Buttons to select the Delete option 1.
).
(
Press OK Button to go to the Delete menu. 2.
Use Right/Left Buttons to select the picture.3.
Use Up Button to delete all pictures and Down 4.
Button to delete single picture.
Before a picture is deleted, a conrmation screen 5.
will appear; choosing “Yes” will execute the
operation, “No” will cancel the operation.
Press OK Button to exit.6.
Note
If a memory card is tted, you can delete only those pictures stored on the card. •
Pictures on a written-protected memory card cannot be deleted.•
The delete function will only erase unlocked pictures. Locked pictures must be unlocked before •
being deleted.
Page 47

46
EN
Thumbnail Function
Operation Display Screen
Use Direction Buttons to select the Thumbnail 1.
option (
While selecting Thumbnail option, press OK 2.
Button to view nine thumbnail pictures.
To view a picture, use Direction Buttons to select 3.
the picture.
Press OK Button to view the selected picture.4.
).
Lock Pictures
Single or all pictures can be locked. This function can prevent the pictures from being deleted
accidentally.
Operation Display Screen
Use Right/Left Buttons to select the Lock option 1.
( ).
Press OK Button to go to the Lock menu. 2.
Use Right/Left Buttons to select the picture.3.
Use Up Button to lock/unlock all pictures and 4.
Down Button to lock/unlock single picture.
Before a picture is locked/unlocked, a conrmation 5.
screen will appear; choosing “Yes” will execute the
operation, “No” will cancel the operation.
Press OK Button to exit.6.
Page 48

47
EN
Make Slide Show
This function automatically repeats all pictures in order.
Operation Display Screen
Use Right/Left Buttons to select the Slideshow 1.
option (
Press OK Button to start the slide show; press it 2.
again to stop.
).
Page 49

48
EN
Section 5
Viewing Movie on PC
Transferring Pictures or Movies to a Computer
You can transfer pictures or movies stored on your camera to a computer and send them in emails to
friends or post them on websites.
To do this you should:
Connect the computer and camera with the supplied mini USB 2.0 cable. The LED will light up and 1.
blink.
After the LED stops blinking, movies can be found on your computer at “My Computer\Removable 2.
Disk\DCIM\200MOVIE”, while picture(s) can be found on your computer at “My Computer\Removable
Disk\DCIM\100PHOTO”
Under these folders, you can read, delete, move, or copy any movie/picture you want. 3.
Use the bundled ArcSoft application software to edit the movies or pictures. 4.
View Movie on PC
When playing a movie for the rst time, Video Codec should be installed in PC. To do this:
Insert the CD-ROM into the computer’s CD-ROM drive. Click “Install Video Codec” and follow the on-1.
screen instructions to complete the installation.
Start video player such as Windows Media Player to view AVI Movies.2.
Share Movie
You can share the recorded movies to your friends via internet or CD. Make sure Video Codec is
installed in your friends’ PC. Video Codec is available in the provided CD.
Page 50

49
EN
Viewing Pictures and Movies on a TV
Connecting to a high-denition TV
Connect HDMI cable to an HD TV.1.
Set video input source of a TV to “ HDMI” option.2.
The steps for viewing stored pictures and movie on a TV are exactly the same as for viewing them 3.
on the LCD monitor.
Section 6
Note
The camera can not run movie recording and picture taking when it is connected to a high-denition
TV. The LCD Panel does not work when the camera is connected to a high-denitionTV.
Page 51

50
EN
Connecting to a non-high-denition 16:9 (Wide) or 4:3 TV
Connect one end of the AV cable to your camera’s AV Out port.1.
Connect the other end of the cable to a TV.2.
The steps for viewing stored pictures and movie on a TV are exactly the same as for viewing them 3.
on the LCD monitor.
Note
The LCD Panel does not work when the camera is connected to a TV.
Page 52

51
EN
Section 7
Video File Converter
Bundled software CD contains ArcSoft MediaConverter that features video le converter to convert
multiple video formats into compatible format with your camera. In this way, you can convert various
video les formats and playback your favorite movies on your camera.
Media Converter
To convert a video le:
Install ArcSoft MediaConverter ( Refer to section 10).1.
Click [ Start ] 2. g [ (All) Programs ] g [ ArcSoft MediaConverter ] g [ MediaConverter] .
MediaConverter main Screen will appear on your desktop.3.
Click [ Add File] .4.
Preview Window
Page 53

52
EN
Select Video le you want to convert.5.
Page 54

53
EN
You can preview your media les before converting. To preview media les, use the following control 6.
functions.
Click •
Click •
Make sure your media les can be previewed before converting.
to start previewing.
to stop previewing.
Page 55

54
EN
Click on [ Start ] to begin converting les.7.
Preview Window
Task Report window will pop out after the task is completed.8.
Before transferring the converted le to your camera, rename the converted le to “ CLIPXXXX.avi”. 9.
(XXXX should be a four gures,eg 0001 to 9999)
Connect your camera to PC and copy the converted video to “My Computer\Removable Disk\10.
DCIM\200MOVIE” in your camera.
After transferring the converted video to the camera, press Record/Play Button to enjoy your favorite 11.
movie.
Page 56

55
EN
Section 8
Burning the Recorded Clip into DVD
Bundled software CD contains ArcSoft MediaImpression also features burning the movie clip into DVD.
You can preserve your precious movies on DVD to share with family and friends.
To create a DVD:
Install ArcSoft MediaImpression (Refer to Section 10)1.
Click [ Start ] 2. g[ (All) Programs ] g[ ArcSoft MediaImpression ]
ArcSoft MediaImpression main Screen will appear on your desktop.3.
Click [ Make Movie ] .4.
Page 57

56
EN
The operation screen will appear:5.
1
2
3
4
1
2
3
4
Select the folder that contains the le(s) you want to use.•
Select the le(s) •
Click button to put the le(s) into slide•
Click [Burn to Disc] •
Click [ Start ] to start DVD burning.6.
Page 58

57
EN
Section 9
Uploading Video Files to YouTube
The bundled software CD contains ArcSoft MediaImpression which features uploading the recorded
videos to YouTube. It will help you to share them with your family and friends on YouTube website.
ArcSoft MediaImpression
To upload video les to YouTube:
Install ArcSoft MediaImpression (Refer to Section 10)1.
Click [Start] 2. g [ (All) Programs ] g[ ArcSoft MediaImpression ]
ArcSoft MediaImpression main Screen will appear on your desktop.3.
Click [ Video] Option.4.
Page 59

58
EN
Select the video le you want to upload and click [ Upload to YouTube] option at the bottom menu.5.
If this is your rst time using of this function, please follow the instruction on YouTube Setting Panel. 6.
Page 60

59
EN
Go to http://www.youtube.com/login, then Log onto your YouTube account.7.
(If you do not have a YouTube account, sign up here rst.)
After you log onto your YouTube account, Click [ Get Authorization ] button below.8.
Page 61

60
EN
Then, Click [Allow] Button shown on YouTube website.
Click [Save] Button to upload the video. 9.
Page 62

61
EN
Section 10
Installing Bundled Software
Installing Video Codec to view movies correctly on PC
Before connecting this camera to a computer for the rst time, you should install Video Codec on the
computer in order to view movies correctly on PC. The Video Codec is on the CD-ROM disc provided
in the package.
To install Video Codec:
Insert the CD-ROM into the computer’s CD-ROM drive. The autorun screen will appear.1.
Click “Install Video Codec”. Follow the on-screen instructions to complete the installation. Depending 2.
on your operating system, you may have to restart your computer after installing it.
Installing Bundled ArcSoft Software
The CD-ROM supplied with this camera contains the other 2 pieces of software.
ArcSoft MediaConverter• can convert multiple video formats into compatible format with your
camera.
ArcSoft MediaImpression • is a user-friendly application that helps you managing your media for you,
and gives you funny and exciting ways to create and share projects featuring your photo and video
les. Support the feature of uploading videos easily to YouTube.
The detailed information can be found in online help of all the bundled software.
To install the bundled software:
Insert the CD-ROM into your computer’s CD-ROM drive. The autorun screen appears.1.
Select the piece(s) of software you want to install from the list, then click 2. Install Application Software.
Follow the on-screen instructions to complete the installation.
Page 63

62
EN
Section 11
Specications
Specication
Image Sensor 5 Mega-pixel CMOS Sensor
Operation Modes Movie Record, Picture Record
Lens F3.5 - 3.7 (f = 6.8 - 34 mm)
Focus Range Macro:1 cm ~30cm
Normal:30 cm ~ innite
Optical Zoom 5X
Shutter Electrical Shutter
LCD monitor 3” LCD
Storage Media Built-in 64 MB Memory (partial memory is used for Firmware code);
SD Card Slot
Image Resolution High: 3744x2808
Standard: 2592x1944
Low: 1600 x1200
Movie Resolution HD: 1280 x 720, 30 fps
D1: 720 x 480, 30 fps
VGA: 640 x 480, 30 fps
QVGA: 320 x 240, 30 fps
White Balance Auto/Manual (Daylight, Fluorescent, Tungsten)
Exposure ± 1EV in 0.3 steps
Self-timer Approx. 10 second delay
Flash (for still) Auto/Red Eye Reduction/Off
File Format Image: JPEG
Movie: AVI (H.264)
Image play Single Image/Thumbnails/Slideshow
PC Interface Mini USB2.0
TV out Digital: HDMI
Analog: Composite Video ( NTSC/PAL Selectable)
Battery Lithium-ion Rechargeable Battery
Dimension 112 * 53 * 65 mm
Weight 314g (without battery), 340g(with battery)
Page 64

63
EN
System requirements
Microsoft Windows 2000/XP/Vista•
Intel Pentium III 800MHz or above•
256 MB RAM •
CD-ROM Drive•
700 MB free HDD space•
Available USB port•
16-bit Color Display•
Note
The LCD screen is manufactured using extremely high-precision technology. However, some
tiny black and/or bright dots (white, red, blue or green) may appear on the LCD screen.
These dots are a normal result of the manufacturing process, and do not affect the recording.
Page 65

64
EN
Section 12
Troubleshooting
Troubleshooting
1.If the LCD image is not clear when shooting, how can the focus be adjusted?
Try to switch between Macro and Normal Mode in order to check the lens whether on the proper position
or not for the object(s).(Macro Mode: For object(s) in distance of 1cm-30cm, Normal Mode: For object(s)
in distance beyond 30 cm)
2.How to shoot correctly?
First properly adjust the focus, then after pressing the shutter button, the LCD shows a “funnel” marking
in the center of the screen to record the image. Firmly hold your camera before the “funnel” marking
disappears, then you can get a clear picture.
3.The ash is not working.
The camera is in Macro Mode.
The battery power is low.
4.When recording, the digital zoom does not function.
If the “Stabilization” function is activated when recording movies, the “Tele/Wide” button for digital
zooming will be disabled.
5.The les on the memory card do not display smoothly when the LCD shows the “!” or “funnel”
marking.
The “!” means the le format is not supported and the “funnel” marking indicates the le is not read
smoothly. Delete these les and the others can then be played normally. It is recommended that you rst
format the memory card before using it and avoid placing les with different formats in the same folder.
6.Why is camera Flash not active when taking pictures?
Make sure that the focus range is NOT set at Macro mode, as ash is disabled in this mode. Scroll
through Camera modes and set Flash as Auto; note that Flash OFF is the default pre-set mode for normal
picture -taking. In Auto mode camera ash res ONLY when necessary (in dark setting as example).
7.Why do some of my indoor pictures look blurry and dark?
Camera extends pictures exposure time under low light/ indoor condition. Keep camera (and photographed
subject) steady for several seconds when taking pictures. Shutter will sound when picture has been
taken.
8.How do I charge battery?
Computer will not charge battery when connected. You must use ONLY the supplied AC charger.
Camera must be turned OFF; blinking light conrms charging, but light is constant when charging has
been completed.
Page 66

65
EN
FCC statement
FCC part 15.21
Warning: Changes or modications to this unit not expressly approved by the party responsible
for compliance could void the user’s authority to operate the equipment.
FCC part 15.105
NOTE: This equipment has been tested and found to comply with the limits for a Class B digital
device, pursuant to Part 15 of the FCC Rules. These limits are designed to provide reasonable
protection against harmful interference in a residential installation. This equipment generates,
uses, and can radiate radio frequency energy and, if not installed and used in accordance with
the instructions, may cause harmful interference to radio communications. However, there is no
guarantee that interference will not occur in a particular installation. If this equipment does cause
harmful interference to radio or television reception, which can be determined by turning the
equipment off and on, the user is encouraged to try to correct the interference by one or more of
the following measures:
- Reorient or relocate the receiving antenna.
- Increase the separation between the equipment and receiver.
- Connect the equipment into an outlet on a circuit different from that to which the receiver is
connected.
- Consult the dealer or an experienced radio TV technician for help.
- Pertinent testing documentation is available for verication.
Page 67

66
EN
Warranty condition
The following conditions comprise the requirements and scope of our warranty conditions and do not affect our legal and
contractual warranty obligations.
We offer a warranty on our products in accordance with the following conditions:
1.Odys products are covered by a 24 month warranty. We will resolve damages or defects on Odys products free of charge
within 12 months of the purchase date under the following warranty conditions. For any damage or defect determined later than
12 months after the purchase date, proof of a manufacturing fault must be submitted for repair under warranty.
The warranty does not cover batteries and other parts, which are considered consumables, parts that break easily such as
glass or plastic or defects based on normal wear and tear. There is no warranty obligation in the event of marginal differences
compared to the target appearance and workmanship provided these have a negligible effect on the product’s tness for use, in
the event of damage caused by chemical or electrochemical effects, by water or generally from abnormal conditions.
2.The warranty will be performed in such a way that we shall decide whether to repair the defective parts or to replace them with
working parts free of charge. AXDIA reserves the right to exchange the product for a replacement product of equal value if the
product that is sent in cannot be repaired within a reasonable time or at reasonable cost. The product can also be exchanged
for a different model of the same value. Requests cannot be made for repairs to be carried out on site. Parts that have been
replaced or exchanged become our property.
3.The warranty claim does not apply if repairs or other work is carried out by unauthorized persons or if our products are
equipped with additional parts or accessories that are not approved for our products.
4.Warranties that have been activated do not cause the warranty period to be extended, nor do they trigger a new warranty
period. The warranty period for any replacement parts installed ends with the warranty period for the entire product.
5.Any other or further claims are excluded, especially those for replacement due to damage caused outside of the product,
provided there is no obligatory legal liability. We therefore accept no liability for accidental, indirect or other consequential
damage of any kind, which leads to usage restrictions, data loss, loss of earnings or interruption to business.
Asserting a warranty claim
1.To make use of the warranty service, you must contact the AXDIA Service Center by e-mail, fax or phone (see below for
contact details). You can also use the service form on our website or on the back of the warranty conditions.
2.AXDIA Service Center will try to diagnose and solve your problem. If it is determined that a warranty claim exists, you will be
given an RMA number (Return Material Authorization) and you will be asked to send the product to AXDIA.
IMPORTANT: AXDIA will only accept parcels that have an RMA number.
Please observe the following when sending the product:
1.Send the product suitably packaged with carriage and insurance paid. Do not enclose any accessories with the products (no
cables, CD’s, memory cards, manuals, etc.), unless the AXDIA Service Centre species otherwise.
2.Mark the RMA number on the outside of the package in such a way that it is visible and clearly legible.
3.You must enclose a copy of the sales slip as proof of purchase.
4.Once AXDIA has received the product, it will meet its warranty obligations in accordance with the warranty conditions and will
return the product to the sender with carriage and insurance paid.
Service outside of warranty
AXDIA can refuse any service claim made that is not covered by the warranty. If AXDIA agrees to provide a service outside the
warranty, the customer will be invoiced for all repair and transport costs.
AXDIA will not accept any packages that have not rst been approved by AXDIA by means of an RMA (Return Material
Authorization).
Page 68

67
EN
Tips regarding environmental protection
At the end of its operating life, this product may not be disposed of by way of
your normal household waste. Instead it must be delivered to a collection point
for recycling electrical and electronic equipment. The icon on the product, in the
operating instructions or on the packaging, indicates this.
The materials used in manufacturing this product are recyclable, depending
on their identifying markings. By recycling this equipment, by recycling its
components, or through other procedures of re-using outdated equipment, you
are making an important contribution to protection our environment. Please
ask you local municipal administration for the location of the corresponding
recycling point.
Battery Recycling
In order to ensure the environmently friendly disposal of batteries, please do
NOT dispose of used batteries through normal household waste. Please take
the batteries to your local retail or community collection point for recycling.
The following may be an indication of a discharged battery: The device cannot
be switched on. The device switches off automatically and “Battery Empty” is
shown in the display. The device and or battery do not function properly.
 Loading...