


Table of Content
Table of Content...........................................................................1
Safety Precautions.......................................................................2
Conformity....................................................................................5
Listening Cautions........................................................................6
Support ........................................................................................7
Appropriate use............................................................................ 8
Cleaning.......................................................................................8
Firmware updates (OTA update)..................................................9
Feature Summary ......................................................................10
Accessories................................................................................10
Buttons & Ports..........................................................................11
Charging Battery........................................................................13
Installing Memory Card ..............................................................14
Connect via USB........................................................................15
Transferring Files.......................................................................16
Turning On/Off............................................................................17
Screen Lock...............................................................................17
Home Screen.............................................................................18
Using the Touch Screen.............................................................23
Bluetooth Connection.................................................................25
Access Internet - Wifi.................................................................26
Virtual Keyboard.........................................................................34
Using the Web Browser..............................................................35
Sending/Receiving E-Mails ........................................................37
Playing Music.............................................................................41
Photo Playback..........................................................................44
Camera usage............................................................................46
ES File Explorer......................................................................... 49
Manage Third-party Applications................................................54
System Settings.........................................................................56
Troubleshooting .........................................................................59
Specifications.............................................................................62
License conditions......................................................................65
Warranty Conditions...................................................................66

Safety Precautions
z Do not subject the device to severe impact or drop it from
heights.
z Do not use the device in extreme hot or cold, dusty or damp
conditions. Do not expose it to direct sunlight.
z Avoid using the device near strong magnetic fields.
z Keep the device away from water and other liquids. In the
event that water or other liquids enter the device, power off
the product immediately and clean the device.
z Do not use chemicals to clean the device in order to avoid
corrosion. Clean it with a dry cloth.
z We are not responsible for damage or lost data caused by
malfunction, misuse, modification of the device or battery
replacement.
z Do not attempt to disassemble, repair or modify the product.
This will invalidate the warranty.
z If the device will not be used for an extended period of time,
please charge the battery at least once per month to maintain
battery life.
z Charge the battery if:
a) The battery level icon displays (An empty battery)
b) The device powers off automatically when restarted.
c) There is no response when pressing keys with keys
unlocked and battery full.
z When the device is being formatted or transferring a file, do
not interrupt the connection. Otherwise, data may be
corrupted of lost.
z When the device is used as a portable HD, please use only
per the instructions. Otherwise, permanent data loss could
occur.
z Please use and install data using the attachments/accessories
provided and only according to the manufacturer’s instruction.
z Please refer to the information on the bottom of the device for
electrical and safety information before installing data or
operating the device.
z To reduce the risk of fire or electric shock, do not expose this
device to rain or moisture. The device should not be exposed
to dripping or splashing. Never place objects filled with liquids,
such as vases, on the device.
2
z
There is danger of explosion if the battery is replaced
incorrectly. Replace only with the same or equivalent type.
z The battery (battery or batteries or battery pack) should not be
exposed to excessive heat such as sunlight, fire or the like.
z Please follow responsible procedures for battery disposal.
z If the power adaptor is disconnected from the device, the
device will remain operable as long as the battery has
sufficient charge.
z The power adaptor is a CLASS II apparatus with double
insulation, and no external ground is provided.
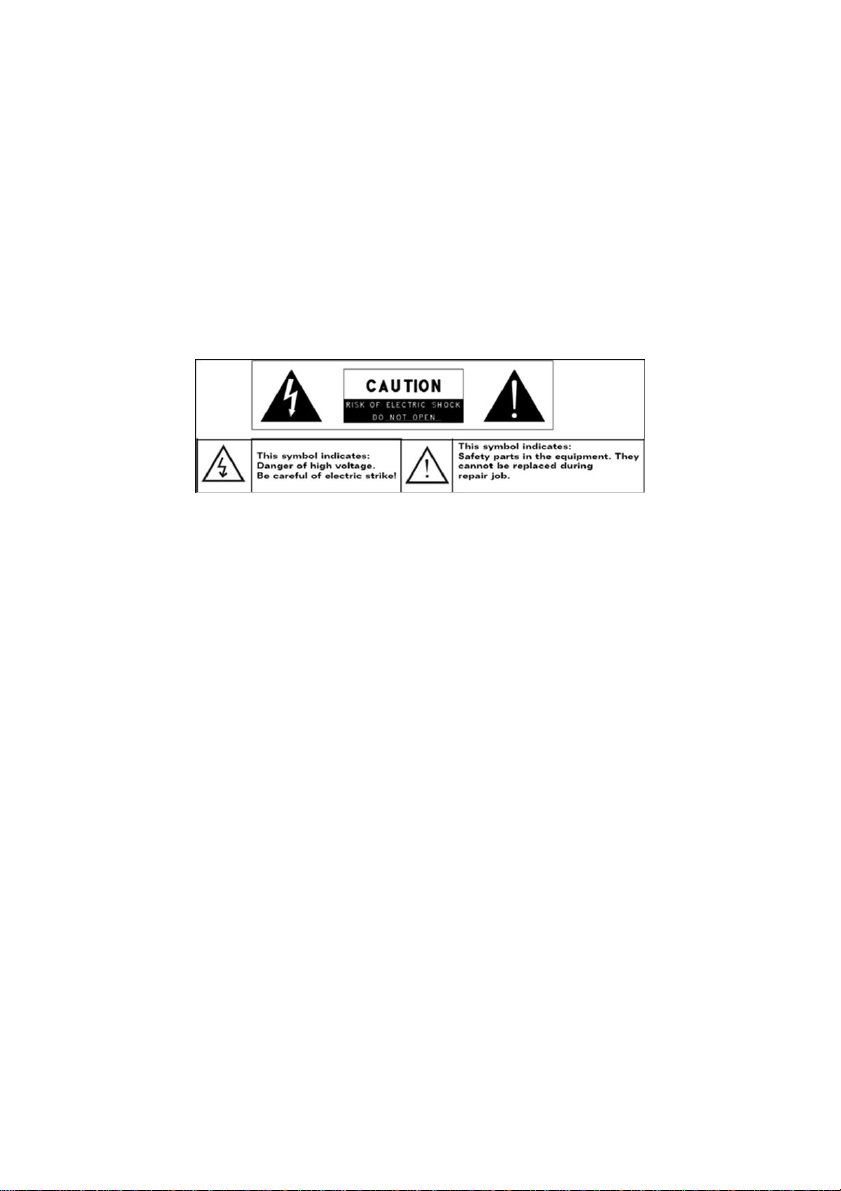
z Safety symbol explanation:
- The lightning flash with arrowhead symbol within an
equilateral triangle is intended to alert the user to the
presence of non-insulated “dangerous voltage” within the
product’s enclosure that may be of sufficient magnitude to
constitute a risk of electric shock.
- To reduce the risk of electric shock, do not remove the
cover (or back) as there are no user-serviceable parts
inside. Refer servicing to qualified personnel.
- The exclamation point within an equilateral triangle is
intended to alert the user to the presence of important
operating and maintenance instructions in the literature
accompanying the device.
z Do not leave the device on in a confined space such as a
book case or similar. The ventilation should not be impeded by
covering the ventilation openings with items such as
newspaper, table-cloths, curtains, etc.
z No open flames, such as lighted candles, should be placed on
the device.
z Use the device in moderate climates.
z Never disconnect the USB cable from your e-book reader to
the PC during a data transfer or formatting. Correctly
disconnect the device from the operating system. Information
loss and malfunctions can occur.
3
Note
Please only charge the battery while the device is turned off.
The charging time will be shorter and the lifetime of the
battery will be enlarged. Please fully charge the battery
before first use.
Note
Please note that the internal battery can only be replaced by
qualified personnel.
If necessary please contact to the ODYS customer service at
www .odys.de.
Disposal
Correct Disposal of this product. This marking indicates that
this product should not be disposed of with other household
waste in the EU. To prevent possible harm to the environment
or human health from uncontrolled waste disposal, recycle it
responsibly to promote the sustainable reuse of material
resources. To dispose of your used device, please use the
return and collection systems available in your area or contact
the retailer where the product was purchased. They can take
this product for safe environmental recycling.
4

Conformity
We, Axdia International GmbH, hereby declare
that this Android Tablet corresponds to
the basic requirements and relevant regulations
outlined in guideline 1999/5/EG, 2004/18/EC,
2006/96/EC.
The CE declaration of conformity for this product may be found
on the following link:
www .odys.de – Service – Downloads
(http://www.odys.de/web/downloads_de.html)
This device uses a non harmonized frequency and is suitable for
operation in the following European countries:
Germany, Belgium, Netherlands, Luxembourg, Austria,
Switzerland, France, Spain, Portugal, Italy, Greece, Norway,
Sweden, Finland, Denmark, Liechtenstein
Within the European Union, operation of the WLAN/Bluetooth
function in buildings is not restricted. Operation outside of
buildings is restricted.
5

Listening Cautions
Hearing Safety
Listen at a moderate volume: Using headphones at a high
volume can impair your hearing. This product can produce
sounds in decibel ranges that may cause hearing loss for a
normal person, even for exposure less than a minute. The
higher decibel ranges are offered for those that may have
already experienced some hearing loss. Sound can be
deceiving. Over time your hearing ‘comfort level’ adapts to
higher volumes of sound. So after prolonged listening, what
sounds ‘normal’ can actually be loud and harmful to your
hearing. To guard against this, set your volume to a safe
level before your hearing adapts and leave it there. To
establish a safe volume level: Set your volume control at a
low setting. Slowly increase the sound until you can hear it
comfortably and clearly, without distortion. Listen for
reasonable periods of time: prolonged exposure to sound,
even at normally ‘safe’ levels, can also cause hearing loss.
Be sure to use your equipment reasonably and take
appropriate breaks. Be sure to observe the following
guidelines when using your headphones. Listen at
reasonable volumes for reasonable periods of time. Be
careful not to adjust the volume as your hearing adapts.
Do not turn up the volume so high that you can’t hear what’s
around you. You should use caution or temporarily
discontinue use in potentially hazardous situations. Do not
use headphones while operating a motorized vehicle,
cycling, skateboarding, etc.; it may create a traffic hazard
and is illegal in many areas.
6

Support
http://www.odys.de support@odys.de
On our website you will find the latest information about this
product, other products of our enterprise, our company itself and
valid warranty terms. The latter you will find under Service Downloads. Firmware upgrades for this device are also offered
on our website. For questions or problems read our FAQs on our
website or contact our after sales service.
The product includes software components licensed under GNU
General Public License (GPL). If you would like to receive more
information about the appropriate source code, please refer to
our Service Center.
Manufacturer
Axdia International GmbH
Formerweg 9
D-47877 Willich (Germany)
Tel: +49(0) 2154 / 8826-0
Fax: +49(0) 2154 / 8826-100
Web: www.odys.de
Support-Hotline: +49 (0)2154 / 8826-101
E-Mail: info@axdia.de
7

A
Device is designed for playing music and video files in commonly
used formats, showing photos and access internet functions
using the build in Wi-Fi function. It is exclusively meant for this
purpose and must only be used for the same.
This also includes paying attention to all information contained in
this operating manual, especially in the safety instructions. Any
other usage is considered to be improper and may lead to
material damages and even personal injuries. Moreover, it will
result in the immediate loss of guarantee. The manufacturer does
not bear any liability for damages caused due to improper use.
This manual may not reflect your actual device’s operation.
All information is subject to change without prior
notification. Please follow your actual device’s operational
procedures.
Cleaning
• Please only clean the device using a cloth.
• Please don’t use any chemicals or solvents.
ppropriate use
8
Firmware updates (OTA update)
ODYS would like to offer an easy and most
comfortable way to keep the operating system of
your device up-to-date.
Using this specially for ODYS Tablet PCs designed
App, which you can download from the Google Play Store; you
can easily update the system.
The ODYS Update App is preins talled at your ODYS Device.
Select, if you would like to update manually or if the system
update should be done automatically.
Please note that updates improve the capability oft that device.
Therefore updates are highly recommended.
Settings und saved Data will not be influenced by a successful
update. However it is highly recommended to save your data
before making an update.
Note
Take care to save your data regularly in a suitable way at
another device.
ODYS is not responsible for any lost data.
Caution
Please connect the power supply while charging.
9

Feature Summary
Wi-Fi Connectivity
With the latest Wi-Fi technology, this device can connect you to
the Internet wherever you are.
Touch Screen
Touch or slide your finger on the screen, the screen responds
instantly.
Third-party Application Support
With the built-in Android
TM
OS, you can install a large number of
third-party applications in this device. Please note that you need
to insert a Micro SD-Card for it.
Built-in G-sensor
The screen changes to landscape or portrait automatically when
the device rotates.
Entertainment
You can enjoy music, movies, pictures and e-books with the
Mobile Tablet.
Accessories
z USB Cable
z Power Adaptor
z Quick start
10
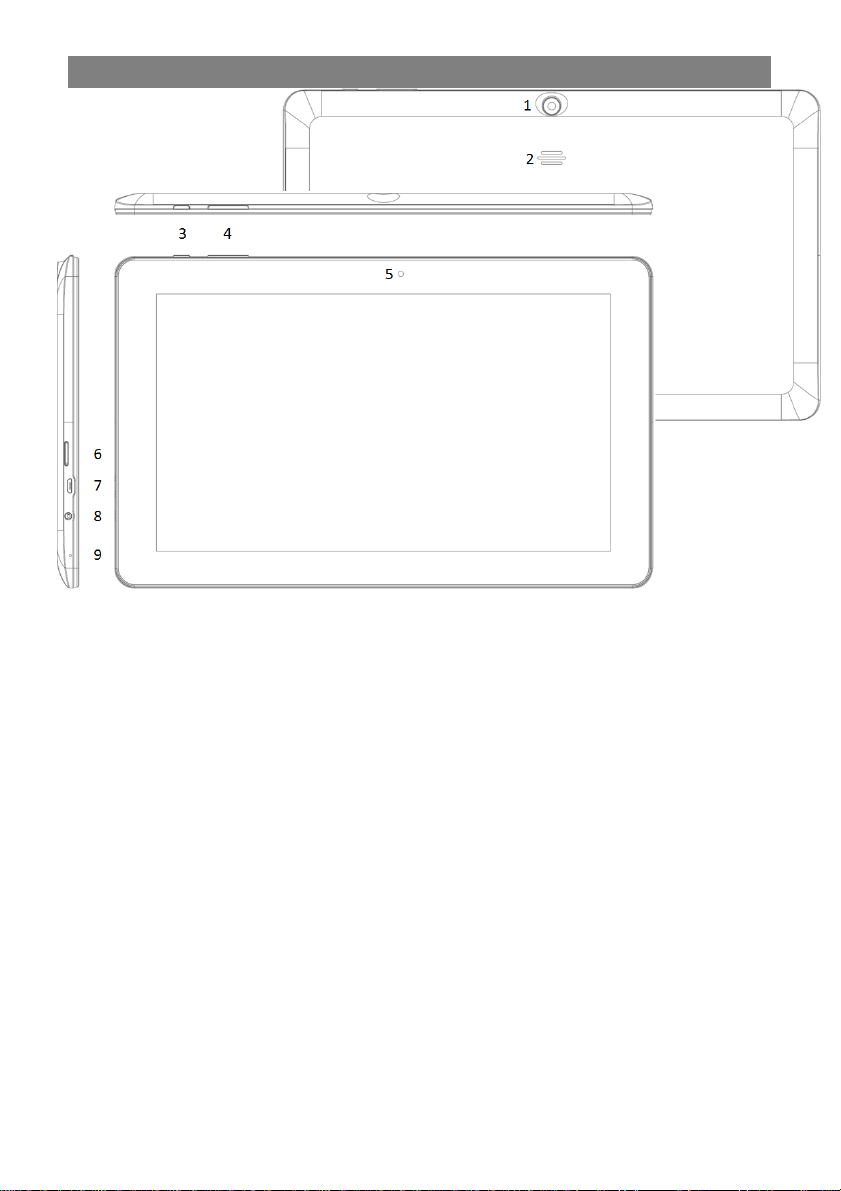
1. Rear camera
2. Speaker
3. Power button
4. Volume key + /
-
5. Front camera
6. Micro SD slot
7. Micro USB
Buttons & Ports
Rear-facing camera for taking pictures.
Press and hold the [Power] button to turn on
or off the device; briefly press the button to
turn the screen on or off. Press and hold for
15 seconds to turn off the device if it freezes
or behaves otherwise abnormally (Reset).
Press briefly to increase / decrease the
volume level.
Front-facing camera for taking avatar
pictures.
For use with standard Micro SD/SDHC
memory card.
Support for USB stick, Surf stick, Keyboards
and Mouse.
Note: An OTG supporting adapter cable is
required (optional)
Charge and power the tablet with the
included power adapter.
11

8. Headphone
jack
Audio output connection for headphones.
Note: The integrated speaker is
automatically disabled when headphones
are connected to the device.
9. Microphone
Hint:
Simultaneously press the On/Off key and the Volume-Minus-Key
together for 2 seconds to take a screenshot of the current view.
12

Charging Battery
The device has a built-in rechargeable battery. No extra battery
installation is required. Just charge the device when it indicates
low battery.
To charge the battery, connect the device to any standard wall
outlet via the DC-IN port using the power adaptor. It takes about 6
hours to fully charge the battery.
Note:
a. We advice to use only the delivered power adapter with this
tablet.
b. You can operate the device even when it is being charged. But
for extended battery life, it is suggested NOT to use the device
when it is charging.
c. It is recommended to charge the battery before you use the
device for the first time.
d. For maximum performance, lithium-ion batteries need to be
used often. If you don’t use the device often, be sure to
recharge the battery at least once per month.
e. Should the rechargeable battery of the device discharge
completely, connect the device to the main power source for
approximately 5-10 minutes before attempting normal
operation.
f. In some cases, devices which have been charged for longer
periods of time may not be able to be switched back on.
Should this occur, mak e a Reset.
13

Installing Memory Card
- To use a memory card, find the card slot
at the side of the device and then insert
the memory card into the slot in the
correct orientation as shown. Check that
the Micro SD card is in the correct
position with the contact pin facing
downwards directed to the backside as
illustrated. You may damage the card
and the reader if Micro SD card is not
inserted in correct position.
- Push the Micro SD card into the card slot until it clicks.
- To access the files stored in the memory card, enter the
Explorer mode by tapping the Explorer icon and select the “SD
Card” directory.
- To remove Micro SD card, push the card once again until it
clicks.
Note: We recommend using only Micro SD or SDHC cards up to
32GB capacity.
- When a Micro SD card is inserted in or ejected from the device,
it may take few seconds for the
device to update the content.
- Please avoid inserting or ejecting Micro SD card when other
operation is running as this may cause
the system hang.
- Do Not remove the card if the content inside the card is being
played. This will halt the
operation of the device and might cause a system hang.
- Please use your fingernails to properly insert or remove the
card.
14
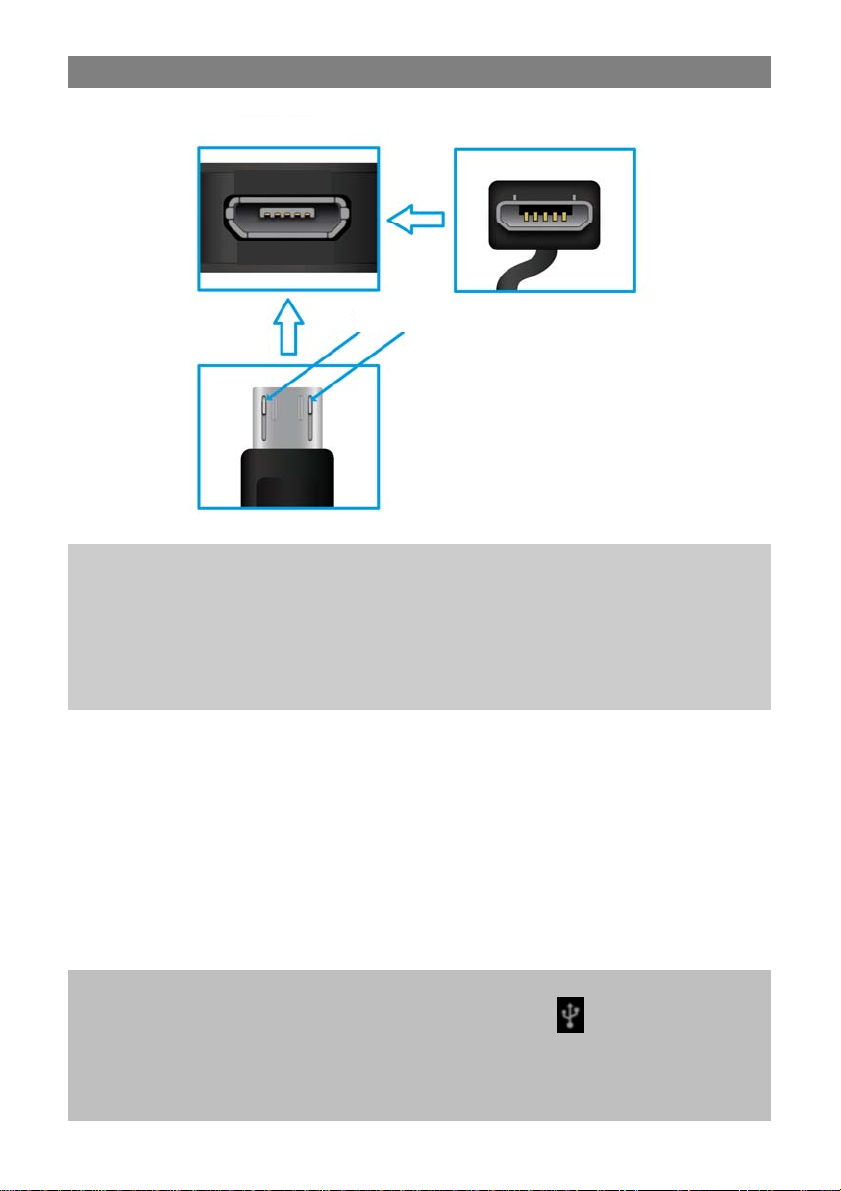
p
Connect via USB
Connect a USB Cable
Screen
To
Bottom
Hooks
Please note:
Only use connecting cable with a maximum length of 80cm.
Please make sure when connecting the USB adapter or
connector cables attention to the correct alignment of the
connector before inserting it into the USB socket on the unit.
Incorrect insertion may cause damage to plug and socket.
On the side of the plug there are usually small sizes of hooks that
secure the fixation.
Pay special attention on the position of the hooks, they show
upward when connecting cables while the screen is above.
Establish a USB connection
The device will be recognized as a media device from your
computer.
Note:
While connected to USB, the USB Symbol is shown at the
top left corner of the screen.
Please drag down the status bar if the above dialog window does
not appear and tap at the below notice to open it manually.
15

Transferring Files
Before reading or playing files, you need to transfer media files
from a computer to the device.
(1) Connect the device to a computer with the supplied USB
cable.
(2) Once connected, a MTP media device will show on your
computer. Containing the internal memory of the device, and
the memory card inserted into the device. Now you can copy
files from or to these disk drives just as you would on your
hard drive.
(3) Disconnect the device from the PC safely.
Note: The pre-installed applications and Android OS occupy a
considerable part of capacity – nearly more than 1GB, it is normal
that you see huge difference between available memory space
and total capacity.
16
Turning On/Off
To turn on the device, press and hold the Power button on the
unit until you see the boot-up screen then release. It may take a
few minutes to start up the system, please wait before you
proceed.
To turn off the device, press and hold the Power button until
you see the option “Power Off”, tap on “Power Off” and then tap
on “OK”.
Tip: This device will sleep with the screen off if it stays inactive
for a few seconds. Yo u can briefly press the Power button to turn
on the screen and wake it up.
Screen Lock
The screen automatically turns off and locks itself after a set
period of time.
When the screen turned off, press the Power button to light up
the screen.
To unlock, push the lock symbol upward.
17
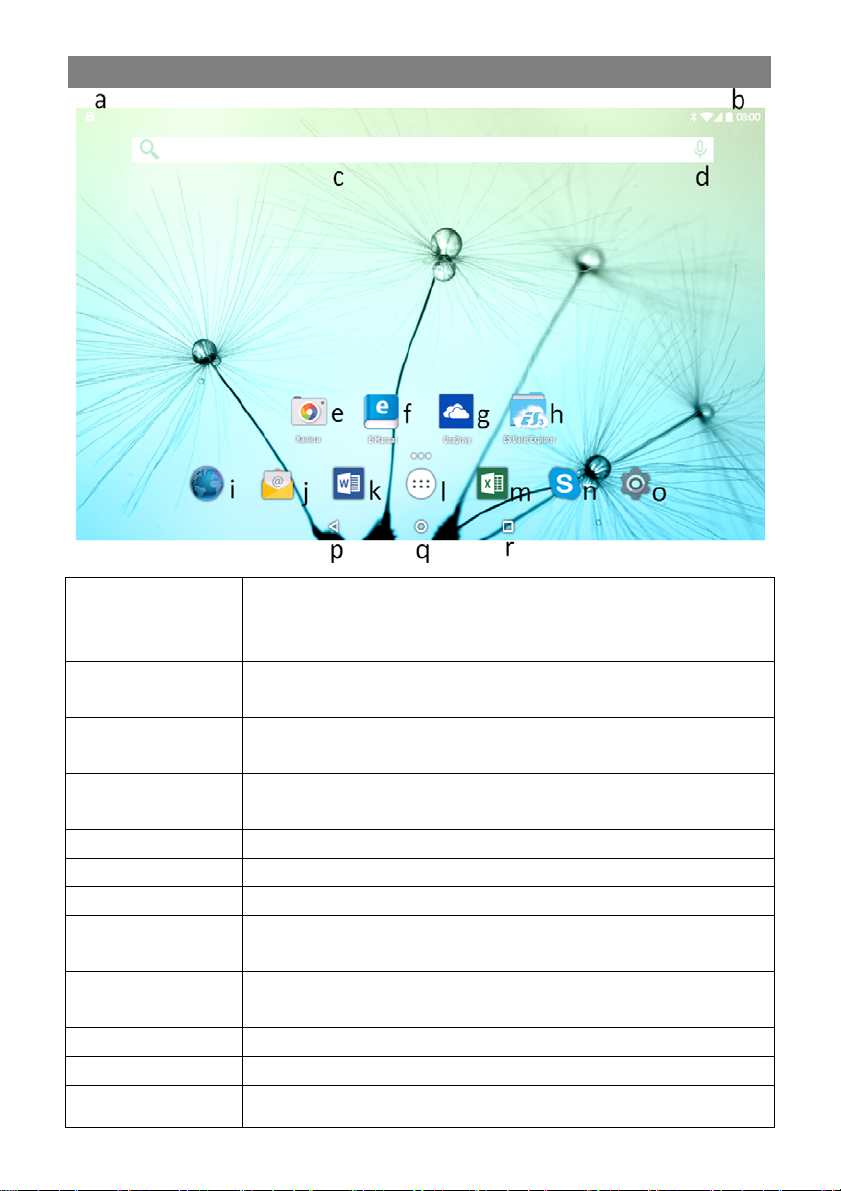
Home Screen
a. System Hints Informs the user if attached memory or updates
are available and other system status
information’s
b. System
settings
c. Google
Search Bar
d. Google Voice
Search
e. Camera To open the camera app
f. eManual Manual in ebook format
g. OneDrive To open the cloud app
h. ES File
To open the File Explorer
Explorer
i. Browser Tap to launch the Browser to visit your favorite
websites.
j. E-Mail To open the mail client
k. Word To open the word processing
18
l. Applications
icon
Tap on this icon to reveal all applications installed on your Tablet
• You can copy the applications onto the
Home screen by pressing
and holding on their
icons.
① You can delete the
application from the Home Screen by dragging
their icons to the Cross that
appears at the top of the screen .
m. Excel To open the spreadsheet program
n. Skype To open the messenger program
o. System
Settings
p. Back soft key Tap to return to the previous screen. If the
keyboard is on the screen, tap to close the
keyboard.
q. Home soft
Tap to return to the home screen.
key
r. Running
apps
Menu soft
Key
Show apps which are currently running in
background.
Tap to view the option menu
Note: When you Tap the Menu key from within
an application, you will see the options for that
application. But you will not see them on start
screen.
Caution! Some apps may show this icon at the
top right corner.
19
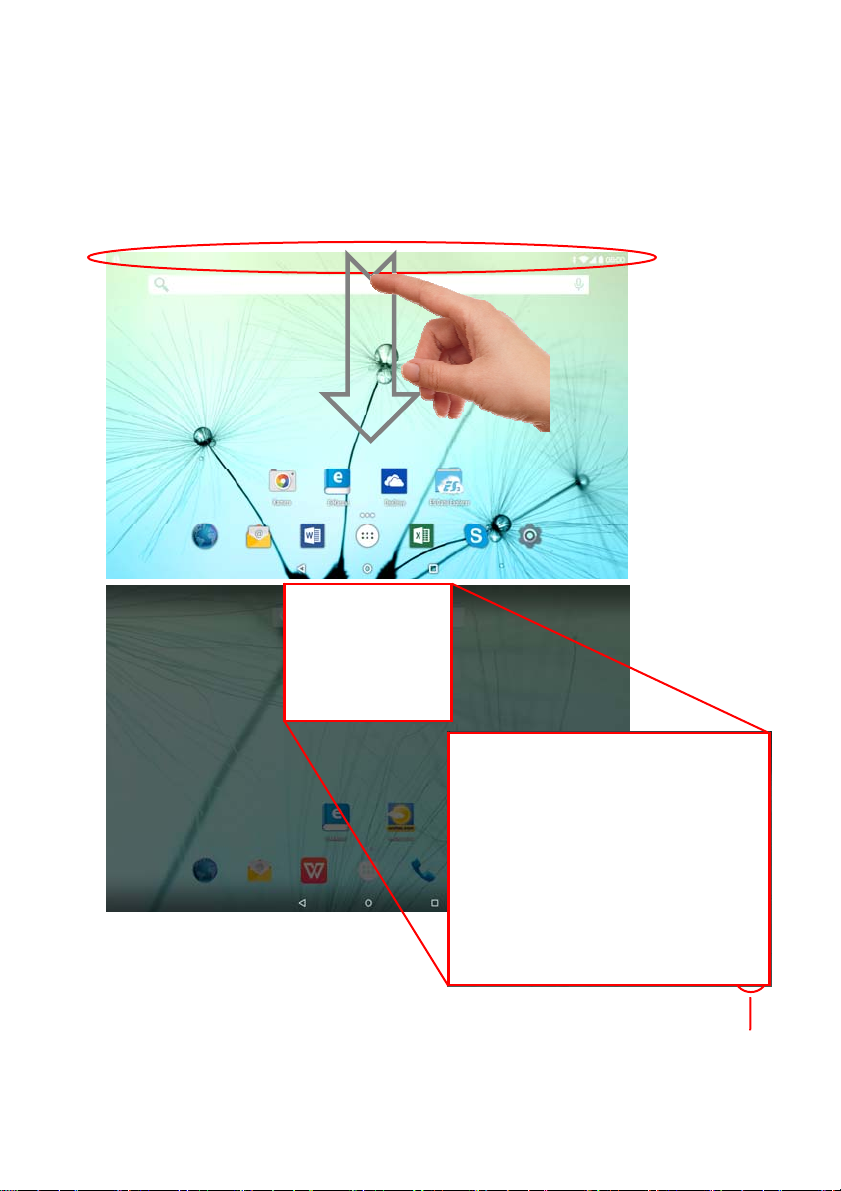
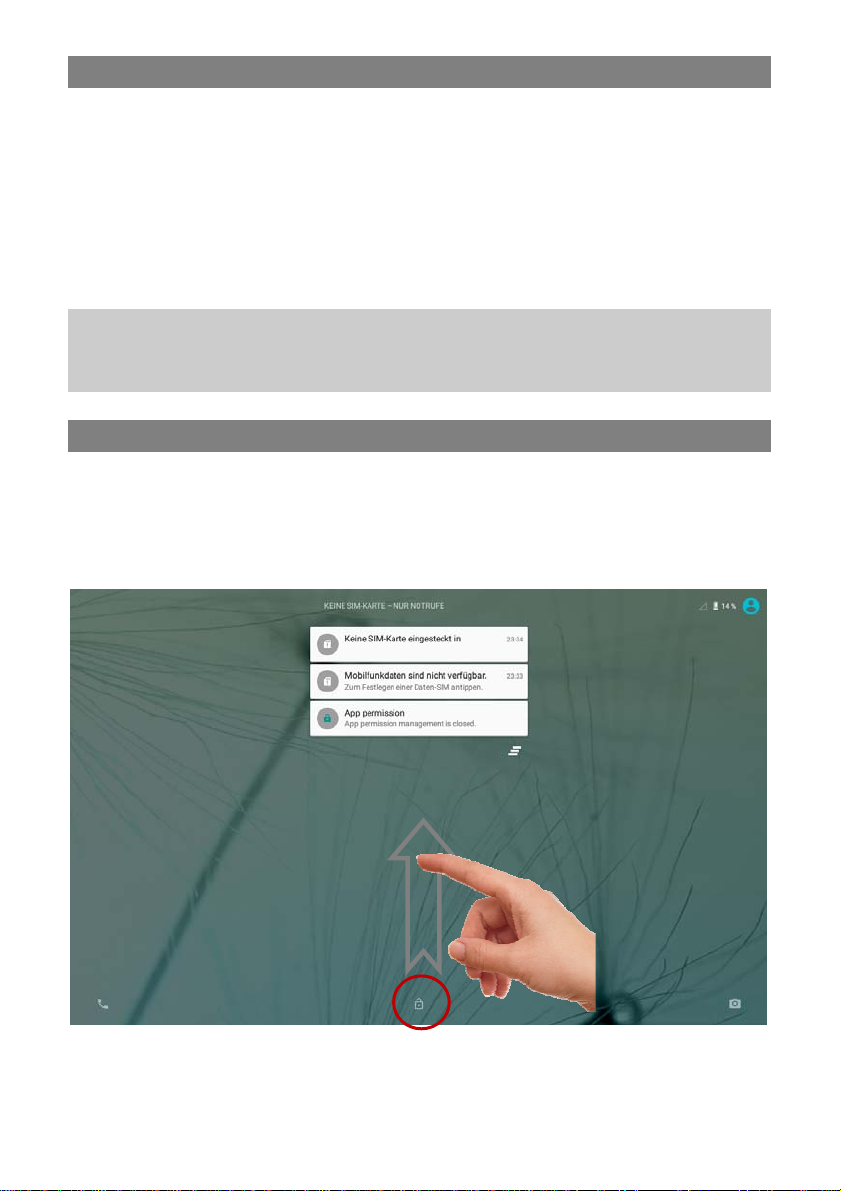
Status bar areas
The status bar at the top of the screen is divided into two areas.
1. System hints
Wipe from the upper edge towards the centre to open the bar.
Here status information and system messages are diplayed.
Current notification’s
and indications
Clear list
20
f
2. System settings
Wipe the screen top down again to provide direct accedd to the
most important system settings. System information’s like wifi
and battery status and the current time will be shown here.
Caution!
This view may vary
and could show
different or less
elements at your
device.
System settings
Battery status
Current user
information
Brightness setting
Wifi status
Turn Bluetooth on
or off
Status of mobile phone
network (3G)
Turn off/on
automatic screen
rotation
GPS positioning on or of
Set Volume
Wireless screen
transmission
(Miracast)
Mobile data connection
on or off
Airplan mode.
Note:
All wireless
connections will
be canceled.
21

Display all Applications
The device supports most of popular third-party applications. It
has many useful applications pre-installed, such as music player,
video player, photo viewer, alarm clock, calculator, etc.
Furthermore, you can add more applications to the device by
installing them manually.
To display all applications installed on your device, tap the
Application Tab. Refer to the figure below.
Note: Installed on this unit are various third-party applications
(Apps), whose author is not Axdia International. All rights and
obligations remain the sole responsibility of the author of these
applications. Axdia accepts no liability for any malfunction of
third-party apps. For support or license inquiries please contact
the respective owners directly.
Contact information may usually be found within the application.
22

Using the Touch Screen
This device is equipped with a touch-screen. Following are a few
tips on how to use the touch screen.
Tip: For a proper usage please use your finger.
Main Touch Screen Actions
- In many applications, you can go back one level in the interface
by tapping on the Back icon (see below center of the
screen).
- Wherever you are in the interface, you can go back directly to
the Home Screen by tapping on the Home icon (see below
center of the screen).
- Tap on to display the recent opened applications. Wipe the
bar upwards or downwards to search for running programs.
Tap the program to open it.
Note: The shown applications run in the background. Thereby
system resources are used, which reduces the battery runtime.
23

Other Touch Screen Actions
y When watching a video or listening to
music, you can tap the progression bar
to go directly to a different location in
the video or song. You can also use
your finger to drag the cursor in the
progression bar to another location in
the video or song.
y In the file browsers (File, Music, Video,
Photo, etc.), you can drag your finger
up and down to scroll the file list up
and down.
y In the Web browser, you can scroll up
and down by tapping on the page and
dragging it up or down (be careful not
to tap a link until you are ready!).
y Tap the link to open the page.
Note: DON’T use a pen or pencil or other sharp items to tap on
the screen! This may damage the screen. DON’T place heavy or
sharp edged items on the screen. Clean it carefully with a soft
cloth. DON’T use cleaner.
24

Bluetooth Connection
Your tablet is equipped with an integrated Bluetooth technology
to enable your device be connected with other Bluetooth devices
such as other tablets, mobile phones, headsets or Bluetooth
keyboards.
Pair other devices
(1) Touch the icon for the „Settings“ on the home screen.
(2) Tap on “Bluetootth” and if necessary activate the function by
tapping on “OFF”.
Bluetooth is “ON“ will be displayed.
(3) Select the device that you want to pair from the list.
(4) Follow the pairing wizard. You may have typed on both or
only one of the devices for a PIN code.
Please note:
The device is only visible as long as the Bluetooth settings are
active. When exiting the men the visibility is disabled.
Depending on the device, another procedure code can be applied.
For some devices, you will find a four digit pin number in the
manual of this device. Newer devices will be shown the code to
be used on one or both devices.
Notice:
The Bluetooth status and received data is displayed at the top
bar.
Advanced setting
To access the advanced settings, first press the menu button
( ) at top right.
It enables you to refresh the device list, to change the Bluetooth
name or to display files received via Bluetooth.
25

Access Internet - Wifi
Your Tablet features built-in Wi-Fi technology so that you can
access the internet via Wi-Fi network.
First of all, you need to configure a Wi-Fi network. For the Wi-Fi
configuration procedure to work, you need to be in a Wi-Fi zone
that will allow you to connect to it. Every time Your Tablet is in
range of a network that you have already configured once, it will
attempt to make a connection.
Note: In order to establish a Wi-Fi connection it is required to
know the encryption password of the desired Wi-Fi network.
Be sure that you are allowed to use this network and that no
other settings of this network like MAC address filter will deny the
connection.
The MAC Address of your device can be found at: “Settings” –
“About device” – “ Status”.
26

Connect to a WPS capable router
This device also supports Wi-Fi Protected Setup (WPS), if your
router is WPS capable, you can use WPS button to connect this
player to your router.
Note:
- Consult the user manual of the router and learn how to add a
WPS device to the router.
- Please use the manual setup if WPS does not work.
1. Press the WPS button on the wireless router.
Note: Some router use the WLAN key also for WPS
Connections. Please press the WLAN-Key of your Router for 6
Seconds in these cases.
2. In the Home screen, tap on the Settings icon.
27

3. Tap on “Wi-Fi”.
4. Activate the function by tapping on “OFF”, if necessary. “Wi-Fi
ON” is displayed.
28

5. Open the “Advanced Wi-Fi Settings by tapping on at the
right hand at the top.
6. Push the “WPS-Push-Button”.
7. Please wait until the pairing is completed.
29

Manual WIFI Configuring
(1) In the Home screen, tap on the Settings icon.
(2) Tap on “Wi-Fi”.
30

(3) Activate the function by tapping on “OFF”, if necessary. “Wi-Fi
ON” is displayed.
Note:
The available network list is constantly refreshed automatically.
When the Wi-Fi is enabled, Your Tablet will connect automatically
to your configured networks when they are in range.
If Your Tablet finds a network that has never been configured, it
will display a notification icon.
31

(4)Tap on the network you want to connect to, enter the required
network information (password) and then tap on “Connect”.
Your Tablet will now attempt to establish a connection to that
WiFi hot spot with the network parameters you entered. If the
connection is successful, the message Connected to XXX will
appear under the WIFI setting.
c
d
Advanced Connection
To manually scan for available Wi-Fi networks, in the
“WIRELESS&NETWORKS” screen, tap the SCAN icon (at top
right corner).
If the Wi-Fi network you want to connect does not appear in the
list, then tap “ADD NETWORK.” Enter the required settings, then
tap “Save.”
32

Launching the Web browser
Tap the Applications icon to display all applications, and then tap
the Browser icon
to launch the Web browser.
If you are already connected to a network, the Web browser will
simply open and you can start browsing the Web. To access a
new website, tap the Menu icon
to display the menu, and input another address.
Note: Not all wireless networks offer access to the Internet.
Some Wi-Fi networks only link several computers together,
without any Internet connection.
33

Virtual Keyboard
Tapping on any text input field opens the virtual keyboard. Enter
a website address or any required text with the virtual keyboard.
a. Back-space
b. OK / Enter Tabulator
c. Shift
d. Shift
Special character
Some or the keys provide the possibility
to enter special character.
(1) Press the corresponding key and keep
pressing.
(2) While pressing move your finger to the
desired character.
(3) Release to write the selected symbol.
Select Input Method
Open the Android keyboard settings and select the input method if
more than one input method is installed.
Please note: The keyboard layout changes according to OSD
language settings.
e. Switch between Numbers
and Characters
f. Space bar
g. Emoticons
h. Close keyboard
34

Using the Web Browser
y You can scroll the screen up and down by tapping on the page
and dragging it up or down (be careful not to tap a link until you
are ready!).
y To open a link, simply tap it.
y You can open several web pages at a time, view them all at
once on the screen, and then tap one of them to view it in full
screen.
y To go back to the previous page that you browsed, tap the
Back icon
y To display the available menu items, tap the Menu icon
y To go back directly to the Home screen, tap the Home icon
y Depending on where you are in the web browser, holding down
on an item will give you access to more options.
y To fill in a text field, tap in the field, then use the virtual
keyboard to type in the required text.
y You can tap on the screen to enlarge or diminish the page.
Web browser options
While a Web page is prompted press the menu key at the top
right corner, to open the browser settings.
Refresh / Stop
Forward
NewTab
New incognito
tab
Share page
Find on page
Request
desktop site
Never sleep
when browsing
Save for offline
reading
Refresh the current page after it was fully loaded /
Stops refreshing
To open the next page if existing.
Open a new tab
Open a new tab that will not be saved in the history.
There will also be no cookies crated.
Share the current page by mail.
Find a word at the page.
To view the pages in desktop style.
Screen stays on while browsing.
Stores the current page at the internal memory for
later offline use.
Note: Containing functions or links may not work
35

Page info
Settings
using the offline version.
Information about the current page.
Additional browser settings:
General Select start-up page and
auto-fill text functions
Privacy &
security
Accessibility Text settings and contrast
Advanced Advanced browser settings
Bandwidth
management
Labs Experimental functions
To manage formulary data,
cache, cookies and history
Settings for data transfer
36

Sending/Receiving E-Mails
This device has an email app pre-installed. You can send or
receive emails via the Internet. Make sure that you have an
Internet connection before using the email service.
In the Home screen, tap the email icon to access the email app.
alternatively, tap on the app shortcut to display all apps and then
tap on the email icon to launch the email app.
37

Setup Email Account
First you need to setup an email account for receiving or sending
emails.
(1) Start up the email app and you are prompted to setup an
account. Tap on “Next”.
(2) Enter your email address and login password. You can set
the account as default by selecting the option “Send email
from this account by default”. Tap on “Next”.
(3) Enter the required information for POP3/IMAP server.
Contact your service provider, network administrator or
search for information on the Internet.
(4) The device verifies the settings. After “Your account is set up,
and email is on its way” is displayed your account is set up
successfully.
(5) Enter your name to be displayed on emails and tap on
“Done” to finish.
Please note: If you have more than one account, every time
when you start up the email app, you enter the default email
account.
Caution!
Please check correctness of inbox and outbox server! Depending
on your service provider, there are sometimes problems with
automatic settings.
38

Email Menu
Email functions are displayed on the right side of the email
header.
Create new email.
Search inbox.
Delete current email.
Check settings
Manage Accounts
You can setup more than one account and manage these
accounts by checking information about the account, adding a
new account or deleting an account.
Add New Account
Follow these steps to add a new account.
(2) Launch the email app, press the Menu icon and tap on
“Settings” in the top right corner to display the menu items.
Select “Accounts”.
(3) In the top right corner tap on “Add Account”.
(4) Follow the steps to set up an email account.
Delete Email Account
(1) Launch the email app, press the Menu icon and tap on
“Settings” in the top right corner to display the menu items.
Select “Accounts”.
(2) Select the account to be deleted and navigate in the settings
list for this account all the way to the bottom.
(3) Tap on “Remove Account” and tap on “OK” to confirm.
Check Account Settings
(1) Launch the email app, press the Menu icon and tap on
“Settings” in the top right corner to display the menu items.
Select “Accounts”.
(2) Select the desired account.
(3) The settings list for this account is displayed.
39

View Emails
Access your mailbox when you start up the email app.
y In the mailbox, wipe with your finger up and down to scroll
through the email list.
y Tap on an email to open it.
40

Playing Music
Tap the Applications shortcut to display all applications and then
tap the Music icon to enter the music mode.
Music Library
You should enter the music library once you start the music
player. The Music Library shows your music files sorted by categories (Artist, Album, Title, Genre, etc.) if your music files
contain these song information tags. If some of your music files
do not contain information tags, they will be classified as
(Unknown) in the Music Library. When new music is copied to the
device, the Music Library will be updated automatically.
y You can drag your finger up and down on the file list to scroll
through the list.
y Tap a track to play a track.
y To return to the Home Screen, tap / .
41

Playback Screen
a. Shows that the player app is running, if running in background.
b. Show current playlist.
c. Random playback on / off.
d. Change replay mode
e. Search for tracks
f. Menu button – Further functions
g. Back to Music Library
h. CD cover (if any)
i. ID3 informations (Performer, Album)
j. Short press – Previous track
Keep pressing – Fast rewind
l
k. Play/Pause
l. Short press – Next track
Keep pressing – Fast forward
m. Progress bar
42

y To pause or resume the playback, tap on the Pause /
Play
y To play the previous/next song, tap on
icon.
/ .
y You can tap on the progression bar to go directly to a
different location in the song. You can also drag the cursor in
the progression bar to another location in the song.
y Tapping continuously on the ID3 information tag will search
for the information about the track from the Internet.
y To go back to the music library, tap on
y To go back directly to the Home screen, tap on the Home
icon or Return icon .
43

Photo Playback
Tap on the app icon to access all apps and tap on the photo icon
to launch the photo folder.
Thumbnails
The first screen in photo mode shows all photos/videos and sub
folders in the device or on memory card as thumbnails.
Tap on a photo thumbnail to view the photo in full screen mode.
Open the sub folder if the photo is stored in a sub folder to
display the photo/video contents as thumbnails.
44

App
View Photo
Back to
previous
view
Edit image
Share image Open
While viewing photos tap on the screen to show the status bar at
top and bottom.
y Press the menu button or tap on the respective icon ( ) in the
top right corner and then on “Slide Show” to start the slide
show.
y Tap on the screen again to end the slide show.
y Wipe with your finger to the left or right over the image to
display the previous/next photo.
y To zoom in or out tap with two fingers on the display
and pinch the image between thumb and pointer finger.
y Tap on and then “Rotate Left” or “Rotate Right” to rotate
the image 90° left or right.
-Menu
y Tap on again and then on “Details” to show image details.
y Tap on and then on “Set Image As” to use the image as
wallpaper or contact image.
45

g
Camera usage
The camera can be used for capturing photos or videos of for
internet video calls.
Normal mode
Live Photo mode
Face beauty mode
Panorama mode
Exposure
Zoom
Simultaneously tap with two fingers at the screen. Drag the
fingers together or apart to zoom out or in.
Smile recognition HDR capture
Image settings
Color effect
Zoomout
Zoomin
White balance
Switch Camera
Shutter
Video
recordin
Settings
Szenen mode
46

Change the camera
Tap at
to toggle between front and rear facing camera.
Camera settings
Tap at to open the settings.
Tap at the desired symbol to open.
Setting Value
GPS Location Info Ein /Aus
Image Properties Settings for
sharpness, colour
and saturation (high,
middle, low)
Anti - Flicker Ein /Aus
Restore defaults
Setting Value
ZSD ON / OFF
Voice Capture ON / OFF
Face Detection ON / OFF
Self Timer OFF, 2 sec, 10 sec.
Continuous shot 40 shots, 99 shots
Picture size Resolution according
to the used camera
Preview size Standard 4:3 / Full
screen
Please note: The Picture size may not be set to all possible
values if the preview size was changed.
47

Setting Value
Noise reduction ON / OFF
EIS ON / OFF
Microphone ON / OFF
Audio Mode Normal
Time lapse interval OFF, 1 sec, 1,5 sec
or 2 sec
Video quality Medium, Low, high
48

ES File Explorer
On the Home screen tap on the app icon to access all apps and
tap on the explorer icon to launch the ES Explorer
Screen elements
Quick Access
Quick Access
hidden
path
Higher level of the file current file
App configuration
Menu bar
Quick Access
The main elements and places of memory are accessible directly
from the rapid access at the left edge.
Favorites Access memory locations marked
as favorites
Local Navigate to the location of local
memories
Library Media library
Network Access to network elements
Tools Aditional features
By pressing the toolbar bar will be hidden.
49

Progress
From the path at the top, you could follow the file in which you
are.
- Press the left side of the progress bar to exit the current file.
- Press the right side to access the path or select another
location
Note
If you reached already the lowest level of the file, the left side is
no longer present.
Window management
If a new item is opened via a quick access, it will be opened in a
new window.
The open windows are displayed in the upper part of the screen
between the windows, you can change by wiping the left or right.
Press to close the current window.
Opened window
Close this
window
50

General
Standard path is the internal SD card. Tap on the history above
to toggle between connected storage media.
External storage devices are in folder “mnt”:
sdcard Usable internal device memory.
external_sd Connected microSD memory card.
usb_storage USB storage media, which are
connected via USB adaptor.
Navigate Files and Folders
y Wipe with your finger up and down to scroll through the file list.
y To open a file or folder, tap the file/folder.
y Go back one level in the directory by pressing the left side of
the path
y Tap on the Return or Home button anywhere in the app to
return to the Home screen.
y Touch to navigate "local" in the fast access and "Home" directly
in the directory
Menu Bar
You can use the toolbar to navigate in the internal memory of
your device or memory card and delete or copy files
Add files / Folders
Search by file type.
Update
Sort
Change the view
51

Press and hold for (ca. 3 Seconds) on a file or folder to select it
and to show other functions.
.
Below you can select multiple files or other folders
Copy selected items
Cut selected items.
Delete selected items
Rename selected items
Additional features
Copy/Move Files and Folders
(1) In the file list, scroll up and down by wiping with
your finger to select the file/folder to be copied or
moved.
(2) Hold your finger on the selected file/folder until a
pop-up menu appears.
(3) Select “Copy” or “Move” from the pop-up menu.
Navigate to the location where you wish to copy
or move the file/folder to.
(4) Press on to add into it the file or data
(5) You may open the field at the left
side of the window to have more
options.
52

Delete Files and Folders
(1) In the file list, scroll up and down by wiping with your finger to
select the file/folder to be deleted.
(2) Hold your finger on the selected file/folder until a pop-up menu
appears.
(3) Select “Delete” from the pop-up menu, then select “Delete” to
confirm or “Cancel” to cancel deleting.
Rename Files and Folders
(1) In the file list, scroll up and down by wiping with your finger to
select the file/folder to be renamed.
(2) Hold your finger on the selected file/folder until a pop-up menu
appears.
(3) Select “Rename” from the pop-up menu.
(4) Tap on the input field to display the virtual keyboard, then
enter the letters from the virtual keyboard to rename the
file/folder.
(5) Tap “OK” to confirm the new name.
53

Manage Third-party Applications
Your Tablet provides support to many useful third-party
applications. You can purchase the applications to add more
functions to your device. They are available online at the Internet
or directly on your product.
Pre-installed Applications
The device has pre-installed applications when it was
manufactured. You can see them by tapping Application Tab.
They are video player, audio player, photo browser, calculator
etc.
Install Applications
You can install applications manually following these steps:
(1) Download the installation file to your computer. Make sure
the file is in format of .apk which is supported by your Tablet
system.
(2) Connect your Tablet to computer with the USB cable.
(3) Copy the installation file to your Tablet.
(4) Disconnect your Tablet form the computer.
(5) Turn on your Tablet and enter the file explorer mode with the
Explorer.
(6) Locate the installation file and open it.
(7) Follow the on-screen instructions to install the application.
(8) Once the application is installed successfully, you can find it
in the application tab.
54 55

Uninstall Applications
(1) Tap the Settings shortcut in the Home Screen to display all
system settings.
(2) Select “Applications”.
(3) Tab on the application that you want to uninstall.
(4) Tab on “Uninstall” to uninstall the application.
Note: You cannot uninstall the pre-installed applications.
Some of the applications developed for Android mobile might not
run properly in the Tablet. Please consult the respective software
developer for further information or support.
Installed on this unit are various third-party applications (Apps),
whose author is not Axdia International.
All rights and obligations remain the sole responsibility of the
author of these applications.
Axdia accepts no liability for any malfunction of third-party apps.
For support or license inquiries please contact the respective
owners directly.
Contact information may usually be found within the application.
Caution! Please note that the installation of third-party
application occurs on your own risk! Any up normal behavior or
damage that is caused by installing third-party applications will
not be an integral part of the warranty.

System Settings
On the Home screen tap on the “Settings” icon and
select the category “Wireless & Networks”, “Sound
and Display”, “Date and Time”, etc.
y Tap on the function to change the settings.
y Tap on the tick box on the right side of the parameter to enable
this option.
y Wipe with your finger over the screen to display further settings
outside the screen.
y After completing your settings tap on the icon to return to
the setting menu or tap on the icon to return to the Home
screen. Your changes are saved.
Wireless & Networks
Wi-Fi
Bluetooth
SIM card
Data usage
More…
Tap to enable/disable the Wi-Fi
connection.
Press the menu button or tap on the
icon in the top right corner and then on
“Advanced” in the top right corner to
manually set up and manage your Wi-Fi
networks.
Tap to activate/deactivate the Bluetooth
function.
SIM card information if SIM card is
inserted.
List of the Data usage of installed apps
Here you find the advanced network
settings such as for VPN or mobile use.
56

Device
Display
Brightness
Wallpaper
Auto Display
Rotation
Sleep
Set screen brightness.
Select wallpaper.
Automatic display rotation
when rotating the device.
Set auto off delay and
screen lock. Press On/Off
once to switch on again and
tap on the screen once to
unlock the screen.
Sound and
notifications
Storage
Daydream
Settings for the screen
saver “Daydreams”.
Font Size
Rotating the
device
Coordinate
system of
the
acceleration
sensor
Predefined
profiles
Change the menu font size.
Behaviour of the device
when rotating
Choose a predefined profile
and set the volume for
music, videos, notificationsand button tones. With the
volume keys at the right
side of your device you can
modify volume levels.
Notifications
and other
Further settings for sound
and notfications.
This setting allows the verification of the
memory capacity of the internal memory
and SD card.
You can also set media content of
connected external USB devices or
microSD cards to be searched.
57 58

Battery
Apps
User
Personal
Location
Services
Security
Accounts
Language
& Input
Method
Backup &
Reset
System
Date & Time
Display of the current consumption and
status of the battery.
This screen allows Android™ apps
management. Info display of apps installed
on your device.
Setting for installation and synchronization
with different user accounts.
This screen allows certain Android™ apps
to determine their current location.
Set security parameters and screen locks.
Settings for installation and
synchronization of E-Mail accounts
Set your language and region and
configure text settings for faster and more
accurate text input.
This setting allows system or data backup
or recovery.
Caution! All previous settings are reset
and your data is deleted.
Set date, time, time zone and time format.
Switch on/off
on time
Accessibility
Print
Developer
Options
About
Switch - depending on time - the device on
or off
Set operating aid such as Auto Display
Rotate or the touch screen response time.
Setting up of a suitable, internet-based
print service
Display information about your tablet
system.
Display information about your tablet
system.

Troubleshooting
Touch screen does not respond
y Ensure that the app provides full touch screen support.
y Do not tap too hard on the screen; this can cause malfunctions.
No sound from earphones
y Ensure that the volume setting is not too low and that the
connection is ok. Ensure that the earphones are clean.
Corrupted MP3 files can cause different noise or cannot be
played. Ensure that the files are not damaged. Try different
earphones. Ensure that the Wi-Fi function is enabled and that a
wireless network is within range.
Characters are corrupted
y Ensure that the language is set properly.
No Wi-Fi connection
y Ensure that the Wi-Fi function is enabled and that a wireless
network is within range.
y Enter the correct password. Observe special characters and
case sensitivity. Characters must be entered accordingly.
y Follow the hints on the next page.
59

Solve Wi-Fi connection problems
1. Open Wi-Fi settings.
2. Select and remove Wi-Fi.
3. Tick “Display Password” and enter password.
4. Look out for status messages below the network name:
Status
Problem
messages
(below network
name in Wi-Fi
Possible
cause
Solution
settings)
- Enable SSID in
router configuration
- Decrease distance
to router
- Firmware update or
change channel
- Deactivate filter in
router configuration
- Check and re-enter
password
- Delete list of
connected devices
on router
- Decrease distance
to router
- Activate DHCP in
router configuration
Network
not found
No
Internet
No
Internet
No
Internet
Network not
found
-> Connecting
-> Not
connected
-> Connecting
->
Authenticatio
n…
-> Not
connected
-> Connecting
->
Authenticati
on…
-> Retrieving
IP
address…
-> Not
connected
- SSID not
visible
- Wi-Fi too
weak
- MAC
filter
active
Password
wrong or
wrong
spelling
- Router
configurat
ion faulty
or
- Wi-Fi too
weak
- DHCP
server off
60 61

Reset this device
y If the Power button does not reset your device, use the
“pinhole reset” button, located on the back the device.
Touch-screen Problems
y Check if the Application you are using has full touch-screen
support.
y Don’t press too hard on the screen. This might cause a wrong
behavior.
No Wifi connection
y Take care that Wifi is enabled and a wireless network is in
range.
y Be sure that you entered the correct password. Take care of
special characters and capital letters. They need to be entered
as is.
Without sound inside earphone
y Please confirm the volume is not in the status of Zero and the
connection of earphone is ok. Please confirm the earphone is
clean. The broken MP3 will produce noise with different grades
even cannot play music. Please confirm the complete files. Try
another pair of headphones.Take care that Wifi is enabled and
a wireless network is in range.
The character on the display screen is in abnormal shape
y Please confirm the language that you selected is correct.
No USB connection is established to the PC
y Check cable/plug connection to the PC, Windows system
configuration and USB driver. Restart PC, remove and
reconnect the USB cable, reinstall drivers.
It is not possible to store anything at the inserted SD card
y Please confirm that the inserted SD card is not write protected.
It is not possible to download e-books from odysbook.de.
y Please disable any popup blocker.

Specifications
Configurations
CPU
DDR 1GB DDRIII Ram
Built-in
operating
system
Hardware
Internal
Memory
Memory Card Micro SD card: up to 32GB(SDHC)
System Requirements
Operation
System
USB Interface USB2.0 High speed
Features
Output Port 3.5mm earphone port, built-in speaker
Built in microphone
E-book Format EPUB, PDF
1,3 GHz Quad Core Processor
Allwinner A33
Android OS 5.0
IBM PC or compatible PC, Notebook or
Macintosh with USB port
16GB
Windows2000/XP/Vista/windows 7and
MAC OS 10.4 or above
MP3 (MPEG1/2/2.5 Audio Layer 1/2/3);
Audio
WAV (MS-ADPCM,IMA-ADPCM,PCM)
AVI (Xvid, Divx 4/5/6 except
GMC&QPEL, Divx for License, Audio
Codec: MP3, AC3)
Video Format
MKV (H.264, MPEG4, XVID, DIVX4/5/6)
MOV (MPEG4, H.264, Audio
Codec:MP3)
3GP/MP4(H.264/H.263/MPEG4/XVID/DI
VX4/5/6)
Photo Format JPEG, BMP, GIF(static), PNG
WI-FI Available
Language Multinational languages
62

Technical Parameter
Read speed 8.7-9MB/S (MLC flash)
Write speed 4.5-4.8MB/S (MLC flash)
MP3: 8~320Kbps
Audio Bit Rate
OGG: 16~320 Kbit/s
WAV: 8~48 kHz
Video
Resolution
AVI (Max.1280X720); (Max.1280X720);
MKV (Max. 1280X720); MOV (Max.
1280X720)
Max. 6Mbps (MPEG4, XVID, DIVX4/5/6);
Video Bit rate
Max. 2.5Mbps (H.264, Real video
8/9/10);
Max. 2Mbps (Sorenson H.263).
Photo
Resolution
Network
Connection
Media
Battery Charge
Time
JPEG (Baseline) (Max.8000*8000),
GIF(Static) (Max.1000*1000)
Wi-Fi (802.11 b/g/n)
GSM/GPRS/EDGE: 900/1800/1900 MHz
WCDMA/HSDPA/HSUPA: 900/2100
MHz
About 6 Hours
Battery Life About 6 hours
10,1” TFT HD LED, Touchpad
Display
(capacitive touch pad),
1280 x800 pixels.
SNR 65dB above
Frequency
Response
20Hz—20KHz
Range
Rechargeable lithium-ion polymer
battery;
Power Supply
AC Adapter: AC Input 100-240V~
50/60Hz, DC Output 5V/2A
63

Physical Parameters
Storage Temp.
Ambient Temp.
Operation
Relative
Humidity
Storage
Relative
Humidity
-20°C ~ +65°C
0°C ~ +50°C
20% ~ 90%(40°C)
20% ~ 93%(40°C)
64

License conditions
Copyright (c) 2013 AXDIA International GmbH
License terms of AXDIA Internat ional GmbH, hereinafter referred
to as AXDIA:
The firmware packages provided by AXDIA contain files that are
made available under various licenses, especially one or various
open source licenses (GNU General Public License, GNU Lesser
General Public License, or FreeBSD License). AXDIA grants you
the right to use the firmware packages, which are made available
as object code format. The licensee may make copies of the
firmware only for the purpose of backup (backup copy). You can
request the source code of files provided as open source under
info@axdia.de. The firmware package may not be reproduced,
redistributed, or be made publicly available in any other way, or
be decompiled, disassembled, translated, or edited in any way
and then made public, without the prior written consent of AXDIA.
The Software and documentation have been created with great
care and verified for correctness according to the current state of
the art. AXDIA assumes, neither explicit nor implied, the
representation or responsibility for the performance, quality, and
marketability of the product for any purpose, which deviates from
the performance specifications contained in the product
description. The licensee bears all risk concerning hazards and
loss of quality, which may arise in the use of the product. AXDIA
is responsible only in case of gross negligence or intent for
damages arising directly or indirectly from the use of the software
or documentation, and for incidental consequential loss or
damages. All warranty claims are expressly excluded for loss or
damage to hardware or software or data as a result of direct or
indirect errors or destruction and for any costs which are related
to the documentation or the software and are due to improper
installation, not performed by AXDIA.
65

Warranty Conditions
The following conditions comprise the requirements and scope of
our warranty conditions and do not affect our legal and
contractual warranty obligations.
We offer a warranty on our products in accordance with the
following conditions:
1. AXDIA products are covered by a 24 month warranty. We
will resolve damages or defects on AXDIA products free of
charge within 12 months of the purchase date under the
following warranty conditions. For any damage or defect
determined later than 12 months after the purchase date,
proof of a manufacturing fault must be submitted for repair
under warranty.
The warranty does not cover batteries and other parts, which
are considered consumables, parts that break easily such as
glass or plastic or defects based on normal wear and tear.
There is no warranty obligation in the event of marginal
differences compared to the target appearance and
workmanship provided these have a negligible effect on the
product's fitness for use, in the event of damage caused by
chemical or electrochemical effects, by water or generally
from abnormal conditions.
2. The warranty will be performed in such a way that we shall
decide whether to repair the defective parts or to replace
them with working parts free of charge. AXDIA reserves the
right to exchange the product for a replacement product of
equal value if the product that is sent in cannot be repaired
within a reasonable time or at reasonable cost. The product
can also be exchanged for a different model of the same
value. Requests cannot be made for repairs to be carried out
66

on site. Parts that have been replaced or exchanged become
our property.
3. The warranty claim does not apply if repairs or other work is
carried out by unauthorized persons or if our products are
equipped with additional parts or accessories that are not
approved for our products.
4. Warranties that have been activated do not cause the
warranty period to be extended, nor do they trigger a new
warranty period. The warranty period for any replacement
parts installed ends with the warranty period for the entire
product.
5. Any other or further claims are excluded, especially those
for replacement due to damage caused outside of the
product, provided there is no obligatory legal liability. We
therefore accept no liability for accidental, indirect or other
consequential damage of any kind, which leads to usage
restrictions, data loss, loss of earnings or interruption to
business.
Asserting a warranty claim
1. To make use of the warranty service, you must contact the
AXDIA Service Center by e-mail, fax or phone (see below for
contact details). You can also use the service form on our
website or on the back of the warranty conditions.
2. AXDIA Service Center will try to diagnose and solve your
problem. If it is determined that a warranty claim exists, you
will be given an RMA number (Return Material Authorization)
and you will be asked to send the product to AXDIA.
IMPORTANT: AXDIA will only accept parcels that have an
RMA number.
Please observe the following when sending the product:
1. Send the product suitably packaged with carriage and
insurance paid. Do not enclose any accessories with the
67 68

products (no cables, CD's, memory cards, manuals, etc.),
unless the AXDIA Service Centre specifies otherwise.
2. Mark the RMA number on the outside of the package in
such a way that it is visible and clearly legible.
3. You must enclose a copy of the sales slip as proof of
purchase.
4. Once AXDIA has received the product, it will meet its
warranty obligations in accordance with the warranty
conditions and will return the product to the sender with
carriage and insurance paid.
Service outside of warranty
AXDIA can refuse any service claim made that is not covered by
the warranty. If AXDIA agrees to provide a service outside the
warranty, the customer will be invoiced for all repair and transport
costs.
AXDIA will not accept any packages that have not first been
approved by AXDIA by means of an RMA (Return Material
Authorization).
 Loading...