

Page 1

PrintShop Web
Skinning Guide
Page 2

PrintShop Web Skinning Guide
Document version: PSW 2.2 R4300
Date: May, 2008
Objectif Lune - Contact Information
Objectif Lune Inc.
2030 Pie IX, Suite 500
Montréal, QC
Canada H1V 2C8
Tel.: 514-875-5863
Fax: 514-342-5294
www.objectiflune.com
To find an Objectif Lune office near you and for more information on our products and services, visit:
www.objectiflune.com
Page 3

Table of Contents
Introduction.................................................................................................................................................5
Skinning....................................................................................................................................................... 5
Templates and styles.................................................................................................................................. 6
Getting started...........................................................................................................................................7
Creating your own skin............................................................................................................................... 7
Tools............................................................................................................................................................ 7
File organization..................................................................................................................................... 10
Template.php.............................................................................................................................................10
Style.php....................................................................................................................................................10
Images....................................................................................................................................................... 10
Web design parameters............................................................................................................................11
The template file..................................................................................................................................... 12
Function blocks..........................................................................................................................................12
Page title....................................................................................................................................................14
CSS includes.............................................................................................................................................14
Header....................................................................................................................................................... 14
User information........................................................................................................................................ 15
Menu..........................................................................................................................................................15
Crumbs.......................................................................................................................................................15
Messages...................................................................................................................................................15
Content.......................................................................................................................................................16
Sub menus.................................................................................................................................................16
Search........................................................................................................................................................16
Summary....................................................................................................................................................17
Preview...................................................................................................................................................... 17
Footer.........................................................................................................................................................17
Style.php.....................................................................................................................................................18
Tags, IDs and classes...............................................................................................................................18
CSS Syntax............................................................................................................................................... 19
Global styles..............................................................................................................................................20
Page specific styles...................................................................................................................................20
Browser exceptions................................................................................................................................... 21
Header..........................................................................................................................................................23
Replacing content......................................................................................................................................23
User information..................................................................................................................................... 24
CSS Lists...................................................................................................................................................24
Adding additional information....................................................................................................................25
Highlighting "hovered" items......................................................................................................................25
Menu bar.....................................................................................................................................................26
Styling the menu items..............................................................................................................................26
Creating a Tabbed menu..........................................................................................................................28
Styling the selected menu item.................................................................................................................28
Background...............................................................................................................................................29
Adding a background image.....................................................................................................................29
PrintShop Web Skinning Guide | 3
Page 4

Overview tables.......................................................................................................................................30
Head...........................................................................................................................................................31
Subhead.....................................................................................................................................................31
Content.......................................................................................................................................................32
Footer.........................................................................................................................................................32
Buttons.......................................................................................................................................................32
Edit forms...................................................................................................................................................33
Form head................................................................................................................................................. 35
Form lines..................................................................................................................................................35
Warnings and Errors................................................................................................................................. 35
Group head................................................................................................................................................36
Sub menus.................................................................................................................................................37
Multiple sub menus................................................................................................................................... 38
Special variables.....................................................................................................................................39
Variables for Template.php.......................................................................................................................39
Variables for Style.php..............................................................................................................................40
PrintShop Web Skinning Guide | 4
Page 5

Introduction
With the introduction of version 2.0 the PrintShop Web (PSW) web site is fully skinnable, everything
except the actual textual content of the page can - and will - vary from skin to skin. A skin is a series
of files that control the presentation of the web site. To allow PSW to be skinnable, style is completely
separated from contents. The web page use standard HTML elements, user defined classes and
unique IDs. The style information is stored in Cascading Style Sheets documents, allowing the styles to
be changed and manage the styles without the need to change the source code.
Skinning
The term Skinning refers to a software architecture which provides you with a manageable way of
separating application logic and content from its presentation. This abstraction of form and function
is sometimes referred to as a two-tiered presentation model. This allows web designers and system
integrators to customize the user interface without the risk of interfering with the functionality of the
application. Skins are used to define colors, fonts, images, borders and the placement of various
components in the web site.
PrintShop Web skin examples
PrintShop Web Skinning Guide | 5
Page 6

PSW can use different skins for each company, allowing your customers to use the system in their
own house style or a style that closely matches their house style (depending on the time and effort
you have spend to match there corporate site). Users of that company can access the PSW web
site via a personalized URL which will invoke their skin. Personalized URL is controlled by the PSW
administrators by defining an URL variable for each company.
For example: http:/www.yourprintshopweb.com/yourclientscompanyname.
Templates and styles
Skinning involves the use of templates. A template is a series of files within the PSW web site that
control the presentation of the content and their position on the page. An embedded skinning engine is
used to assemble the dynamically generated content into the final HTML pages.
Skins are used in combination with Cascading Style Sheets (CSS). This is a mechanism for adding
style (e.g. fonts, colors, spacing) to Web documents, standard by the World Wide Web Consortium
(W3C). A skin combines uses HTML, JavaScript and PHP to define the look & feel of PSW. To create a
new skin or modify an existing skin some experience with these techniques is necessary.
PrintShop Web Skinning Guide | 6
Page 7

Getting started
Creating a skin for the first time can be a daunting and sometimes a time consuming task. This section
gives you an overview of useful tools and sources on the web.
Creating your own skin
Before creating your own skins you should have some basic knowledge of HTML and CSS. There are
fine books on these subjects and you will find a lot of information on the web. The web is probably your
best source. If you're not familiar with HTML and CSS please visit the following web sites:
http://www.w3schools.com
•
http://www.htmldog.com/guides/
•
Tools
What is a craftsman without a good set of tools. Below you'll find a list of tools that will help you with
skin development.
PrintShop Web demo version
Download and install the demo version of PSW on your local machine. This allows you to develop
your skins offline without the risk of interfering with your production environment. The demo version
is limited regarding printing and previewing PrintShop Mail documents but has a fully functioning user
interface. A demo version can be downloaded from the Objectif Lune web site (www.objectiflune.com)
Design
Before you start creating a skin you should have a visual theme which determines the look & feel of
your web site. This can be the design of your current corporate site, your customers web site or a
new design. You'll probably start your design in an application like Adobe Photoshop ending up with a
bunch of sliced images (background images, icons, button backgrounds etc). On the web you can find
several samples and downloadable .psd files which will get you up and running in no time.
Text editor
There are several specialized CSS editors available. The PSW style sheet documents are a
combination of CSS and PHP so we advise you to use a text editor like Notepad++. This is an open
source editor (a Notepad replacement) that support coding in several programming languages. The
application runs under the MS Windows and can be downloaded for free at the following location:
http://notepad-plus.sourceforge.net/
PrintShop Web Skinning Guide | 7
Page 8

The style.php file in Notepad++
Browser extensions
The toughest part will be to keep your skin compatible with the various browsers and browser versions.
You can download and install additional browser extensions that will help you during skin creation.
Typically these extensions expose the hierarchical structure of your web page allowing you to identify
tag names, ids and CSS classes quickly. These extensions are available for all popular web browsers
and can be downloaded for free. Below you'll find a list of popular extensions:
Web Developer extension for Fire Fox
•
https://addons.mozilla.org/firefox/
Firebug for Fire Fox (our personal favorite)
•
https://addons.mozilla.org/firefox/
Microsoft Internet Explorer Developer Toolbar
•
http://www.microsoft.com/downloads/
Microsoft Internet Explorer Developer Toolbar
PrintShop Web Skinning Guide | 8
Page 9
The ID and class details are exposed by the Web Developer extension
PrintShop Web Skinning Guide | 9
Page 10
File organization
Skins are organized under the Templates folder located in the PSW web site folder. Each skin has its
own directory tree. The name of this folder will be visible in the Skin-pull down menu in the Web design
section of a company and in the web design page in the Settings-menu.
Skin folders stores the items required to render a skin and can contain an unlimited number of files and
sub folders. A skin consists of the following elements:
Template.php
•
Cascading Style Sheet documents
•
Images
•
Web design parameters stored in the PSW database
•
The contents of skin folder
Template.php
The Template.php file is the main file for your skin and can be compared with an index.html file of a
regular HTML web site. The file calls the different functions of the skinning engine that assembles
the final HTML output. The Template.php file controls the logical positions of the page elements and
processes the items in the order that they appear in that file.
Style.php
As stated before skins are used in combination with Cascading Style Sheets (CSS). PSW uses a PHP
file that generates a CSS structure. To be able to call special functions that insert special variables like
color information or an image file. The variable information is retrieved from the PSW database and
can be set by the administrator in the Edit Web Design page. This can be done per company (f.e. to
match the companies color scheme) or for the system wide web design settings.
PSW comes with a browser detection mechanism. This allows you to make style exceptions for specific
browsers, browser versions and operation systems.
Images
To enhance your skin even more you might want to add custom images and icons. You can place
these images inside your skins folder and refer to them from within your style documents.
PrintShop Web Skinning Guide | 10
Page 11
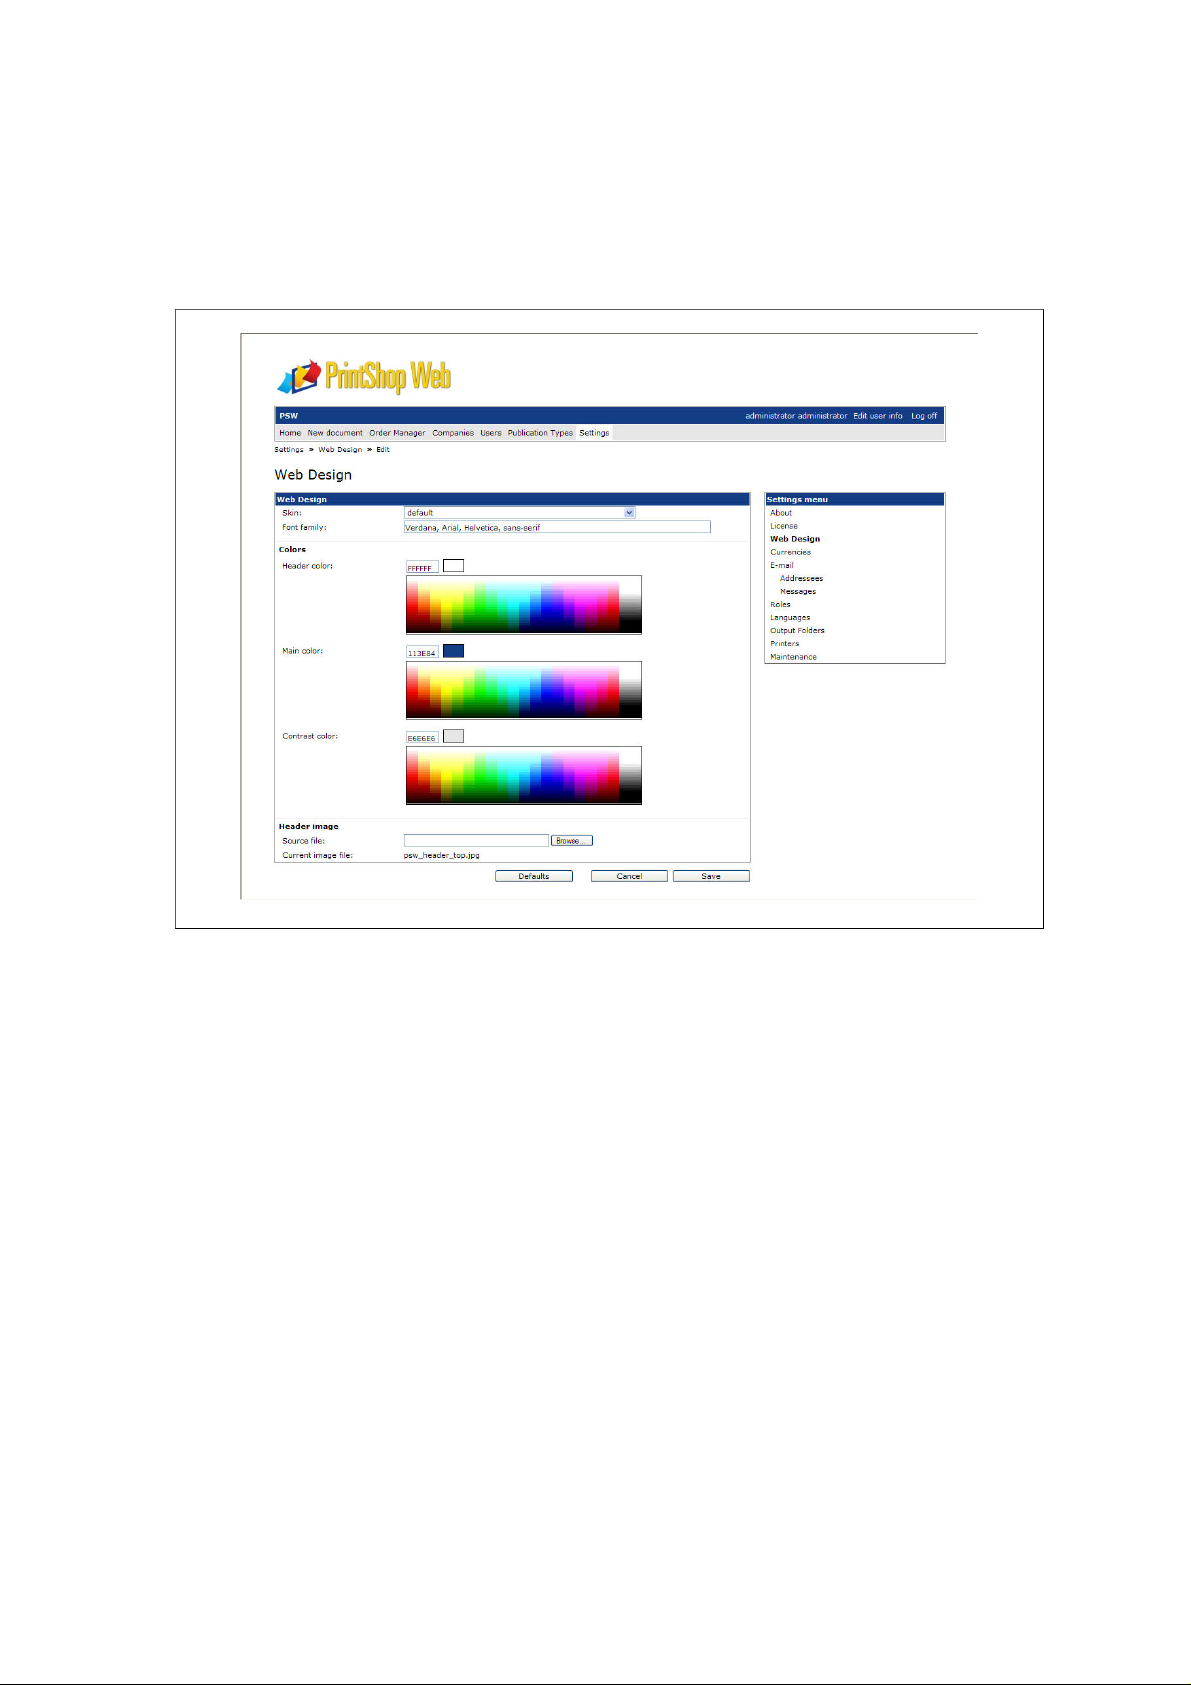
Web design parameters
By editing the web design settings of a company you can specify company specific colors, fonts and
logo. Using special functions a skin can retrieve these parameters and use them in the Style.php file.
The Edit Web Design page
PrintShop Web Skinning Guide | 11
Page 12
The template file
The Template.php file contains HTML code with a few snippets of PHP. These PHP snippets control
the rendering of PSW function blocks on apage by page basis. Examples of functions blocks are: the
menu bar, sub menus, the user info bar, the main content area.
A sample PSW web page showing various function blocks
Function blocks
The design and positions of these blocks can be changed by altering the Style.php file and changing
the code and its position in Template.php. Typically function blocks are placed inside HTML <div>
tags. The following sections describe the main function blocks. Please note that the structure of the
Template.php will probably be different for each skin. The following code snippets are derived from the
default PSW skin.
<!DOCTYPE HTML PUBLIC "-//W3C//DTD HTML 4.01 Transitional//EN">
<html>
<head>
<title><? generateSystemName(); ?>: <? generateTitle(); ?></title>
<link rel="shortcut icon" href="/favicon.ico" type="image/x-icon" />
<meta http-equiv="Content-Type" content="text/html; charset=UTF-8">
<? generateCSSIncludes(); ?>
<? generateJavaScriptIncludes(false); ?>
</head>
<body class="<? generatePageID(); ?>">
<div id="header"><h1>PrintShop Web</h1></div>
<? if(function_exists("generateUserInfo")) { ?>
<div id="userinfo">
<div>
<h3><? generateAdditionalInfo(); ?></h3>
<? generateUserInfo(); ?>
</div>
PrintShop Web Skinning Guide | 12
Page 13

</div>
<? } ?>
<? if(function_exists("generateMenu")) { ?>
<div id="menu">
<div>
<? generateMenu(); ?>
</div>
</div>
<? } ?>
<? if(function_exists("generateCrumbs")) { ?>
<div id="crumbs">
<? generateCrumbs(); ?>
</div>
<? } ?>
<? if(function_exists("generateMessages")) { ?>
<div id="messages">
<? generateMessages(); ?>
</div>
<? } ?>
<div id="content">
<? if (getFormCount() > 0){ ?>
<? generateContent(); ?>
<? } ?>
</div>
<? if(function_exists("generateSubMenu")) { ?>
<div id="submenu">
<? generateSubMenu(); ?>
</div>
<? } ?>
<? if(function_exists("generateSubMenu1")) { ?>
<div id="submenu1">
<? generateSubMenu1(); ?>
</div>
<? } ?>
<? if(function_exists("generateSubMenu2")) { ?>
<div id="submenu2">
<? generateSubMenu2(); ?>
</div>
<? } ?>
<? if(function_exists("generateSearch")) { ?>
<div id="search">
<? generateSearch(); ?>
</div>
<? } ?>
<? if(function_exists("generatePreview")) { ?>
<div id="preview">
<? generatePreview(); ?>
</div>
<? } ?>
PrintShop Web Skinning Guide | 13
Page 14

<? if(function_exists("generateSummary")) { ?>
<div id="summary">
<? generateSummary(); ?>
</div>
<? } ?>
<? if(function_exists("generateFooter")) { ?>
<div id="footer"><? generateFooter(); ?></div>
<? } ?>
</body>
</html>
As you can see the PHP snippets perform a function_exists check. You should not alter these checks
but you may add HTML tags and information inside or outside these checks. To meet your design you
will probably need to add additional <div> and/or <table> tags to change the positioning of the function
blocks.
Page title
The <title> tag is part of the <head> and contains the name of the web page. The contents of this tag
are shown in the browser title bar - at the very top of the window. The title bar shows the name of your
browser and the name of the page. When a visitor adds your page to their favorites or bookmarks, the
page title is the default name it will assign to the bookmark. Search engines use the page title as the
listing name for their results.
You can enter a custom title or use the predefined PHP functions to set the title dynamically. By default
the <title> tag will be populated with the systems name and the title of the current section/subsection.
These two values are separated by a colon as follows:
<title><? generateSystemName(); ?>: <? generateTitle(); ?></title>
The generateSystemName returns the value of the cSystemName string and depends on the selected
language. You can change the value for this string in the Edit Language page of the Settings section.
The generateTitle will return the name of the current PSW section.
CSS includes
This function retrieves the proper location of your skin and its accompanying CSS files. This PHP
function is required to dynamically load your CSS files. You should not remove this.
<? generateCSSIncludes(); ?>
Header
The information stated in the header div is used to display the main page header or title (not to be
confused with the browser window title). Using the Style.php you can replace the contents of this
element with the logo uploaded through the Edit Web Design page. It allows the skin to show a
company specific image or logo.
<div id="header"><h1>PrintShop Web</h1></div>
PrintShop Web Skinning Guide | 14
Page 15

User information
This function will add the User Info block to your site. This block shows the name of the logged on user,
an option that lets the user edits his or her personal information and the Log off option. The Edit user
info is optional and depends on the role of the logged on user.
In the default the user User Info block is dark blue and placed just above the menu bar
In the picture above additional text is added to the user info bar (the text PSW). You may hard code
this text, in this case it is retrieved using the generateAdditionalInfo function. The returned value
depends on the selected language and can be changed by editing the cAddiontalInfo string in the Edit
Language page (Settings).
Menu
This function generates the main menu bar.
Crumbs
On a Web site, a bread crumb trail is a navigation tool that allows a user to see where the current page
is in relation to the Web site's hierarchy. The term bread crumb trail comes from the story of Hansel
and Gretel, who left a trail of bread crumbs as they walked through the forest so they could trace their
way back home.
Bread crumbs in action
Messages
The generateMessages inserts the main headline and descriptive text for each page.
PrintShop Web Skinning Guide | 15
Page 16

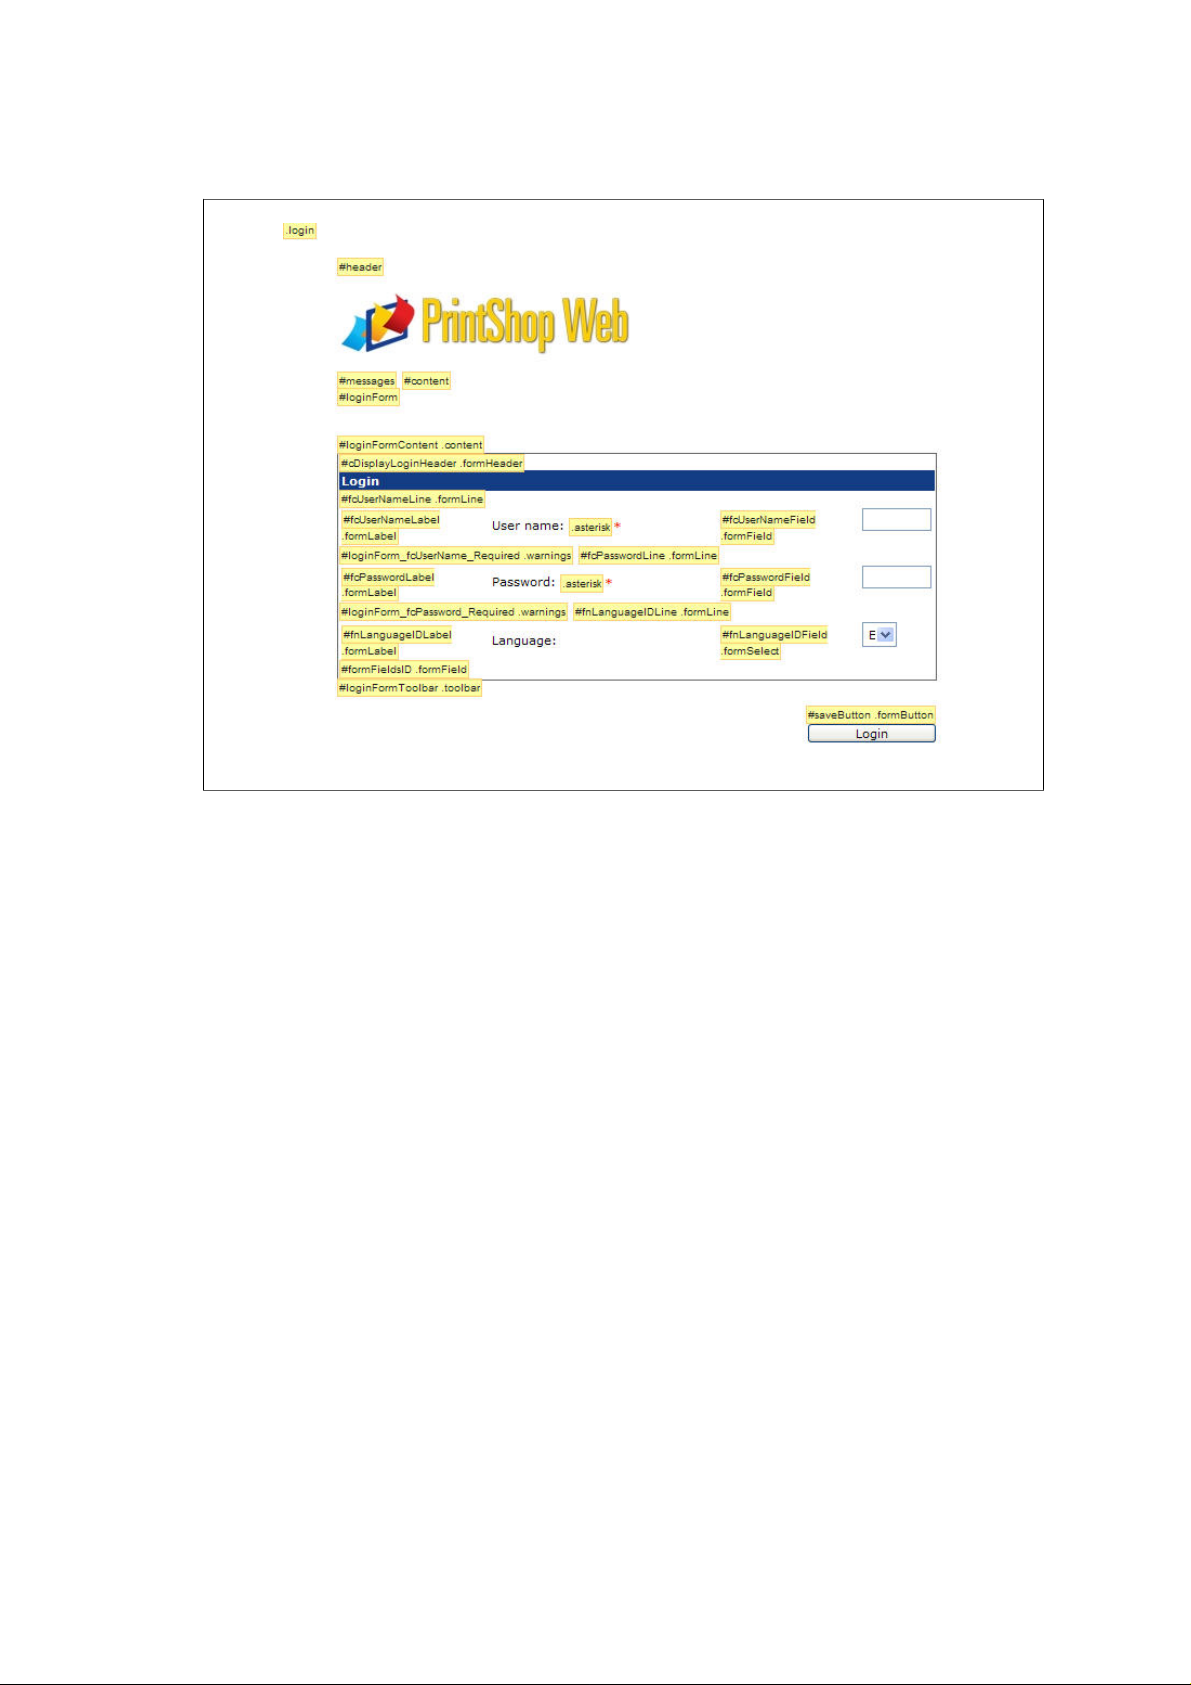
The login page showing a headline and descriptive text
Content
The generateContent function renders the main area. It holds the overview information, forms, buttons
and the main process functionality of the PSW system. At the Login page shown previously the login
details and the Login button are part of the information rendered by the generateContent function.
Sub menus
Sub menus are uses throughout the PSW web site. A good example is the Settings sub menu and sub
menus inside the Publication Types and Companies sections. These sub menus typically show a list
of items that can be used to navigate to a sub item of that section. Using the Style files you will be able
to alter the look of these list items, for example changing the color of the list item when you place the
mouse over the item (hover).
Because some sections have multiple sub menus, there are multiple generateSubmenu blocks in the
template file.
A part of the company section showing the Company sub menu
Search
Many overview pages have a search option. The generateSearch functions renders this block
depending on the section the contents of this block can change.
PrintShop Web Skinning Guide | 16
Page 17

Summary
The summary is a special block in the Order Manager that shows summary information regarding the
orders in a specific order folder.
Preview
The generatePreview function renders the sidebar items that hold preview information. This can be the
part of the site that hold the thumbnail when previews are requested or hold the thumbnail information
and download link in the Order Manager section.
Footer
This functions lets you render a site wide footer. You may also place static information in this area to
state your address and Internet information.
PrintShop Web Skinning Guide | 17
Page 18

Style.php
The style files hold the styling parameters for your skin. It defines the fonts,colors, borders,
backgrounds, width and height specifications of the user interface elements. The styles that come with
PSW are organized using the following structure:
Global styles (generic)
•
Page specific styles (exceptions)
•
Browser exceptions
•
The contents of skin folder
Tags, IDs and classes
Each element on the page is rendered using standard HTML tags or by using <div> and <span> tags
that have a unique identifier and/or a class.
IDs are used when there is only one occurrence on a page, classes are used when there are one or
more occurrences on a page. CSS IDs are similar to classes in that they define a special case for an
element. In other words, they assign an identifier. Standards specify that any given id name can only
be defined once within a page or document.
You can reveal ID and class information by viewing the source of the web page or by using additional
web developer browser extensions. Your style files will need to refer to these elements to set their
formatting.
<div class="formLine formLineGroupHead" id="cAdditionalInformationLine">
<span class="formLabel formLabelGroupHead" id="cAdditionalInformationLabel">Additional
information</span>
<span class="formStatic" id="cAdditionalInformationField"
name="cAdditionalInformation"></span>
</div>
PrintShop Web Skinning Guide | 18
Page 19

CSS Syntax
The CSS syntax is made up of the following parts: a selector, a property and a value:
selector {property: value}
Normally the selector is the HTML element/tag you wish to style, the property is the attribute you wish
to change, and each property can take a value. A colon is used to separate the property and its value.
They are surrounded by curly braces, see the snippet below:
h1 {color: lime}
You can specify more than one property, the properties should be separated by a semicolon.
fieldset {
width: 70%;
margin-left: 1.25em;
}
Selectors can be grouped by separating each selector with a comma.
a:hover, a:visited, a:link{
color: black;
outline-style: none;
}
With the class selector you can define different styles for the same type of element. The class selector
is defined using a point.
.totalprice {
font-weight: bold;
}
You can also define styles for HTML elements using the id selector. The id selector is defined as a #
followed by the id.
#tableOverview td {
padding: 2px;
border-width: 0 0 1px 0;
border-color: black;
border-style: solid;
}
PrintShop Web Skinning Guide | 19
Page 20

You can insert comments in CSS to explain your settings. Like HTML comments, CSS comments will
be ignored by the browser. A CSS comment begins with "/*", and ends with "*/".
/* Submenu and Search items start here */
#search, #submenu, #submenu1, #submenu2, #preview, #summary {
width: 100%;
}
/*
multi-line
comment here
*/
Global styles
The Style.php file holds the style definitions that apply to all pages in the system. At the beginning
of the file the skin_customization.php file is included using the PHP include_once function. The
skin_customization.php allows you to use web design parameters like colors and fonts that can be
specified per company (Edit Web Design). Please refer to the Special Variables chapter for more
information regarding this option.
<?php include_once "../../functions/skin_customization.php" ?>
At the end of the Style.php a separate style document is included. That document holds the page
specific styles (exceptions). You could also add your exceptions to the main style file.
/* Page Specific Items */
<? include_once "style-pagespecific.php" ?>
Page specific styles
Each page comes with a body tag that has a unique class (there can only be one body tag in a HTML
page). This class set on the <body> tag allows you to create page specific exceptions. In the skins
supplied with PSW the page specific styles are stored in the style-pagespecific.php file. This file is
included at the end of the style.php file.
/* The width of the required date field is changed for the order_information and
order_edit page*/
body.order_information #fdRequiredDateField,
body.order_edit #fdRequiredDateField{
width: 10em;
}
PrintShop Web Skinning Guide | 20
Page 21

Browser exceptions
To solve browser specific rendering issues you can create style exceptions for a specific browser or
browser version. Below a snippet from the style-moz.php exception file (FireFox).
/*
** Mozilla specific style sheet entries
*/
* {
-moz-box-sizing: border-box;
}
.formLabel, .downloadLineLabel, .formStatic, .fieldComment, .formStaticUnits,
.formStaticPrice, .formLink, .formStaticFlex, .formSelect, .formField,
.formFieldNoWidth, .progressLabel, .progressBarWrapper, .progressBarItemDone,
.progressBarItemTodo, .warningLabel, .warningIcon, .warningItem{
display: table-cell;
}
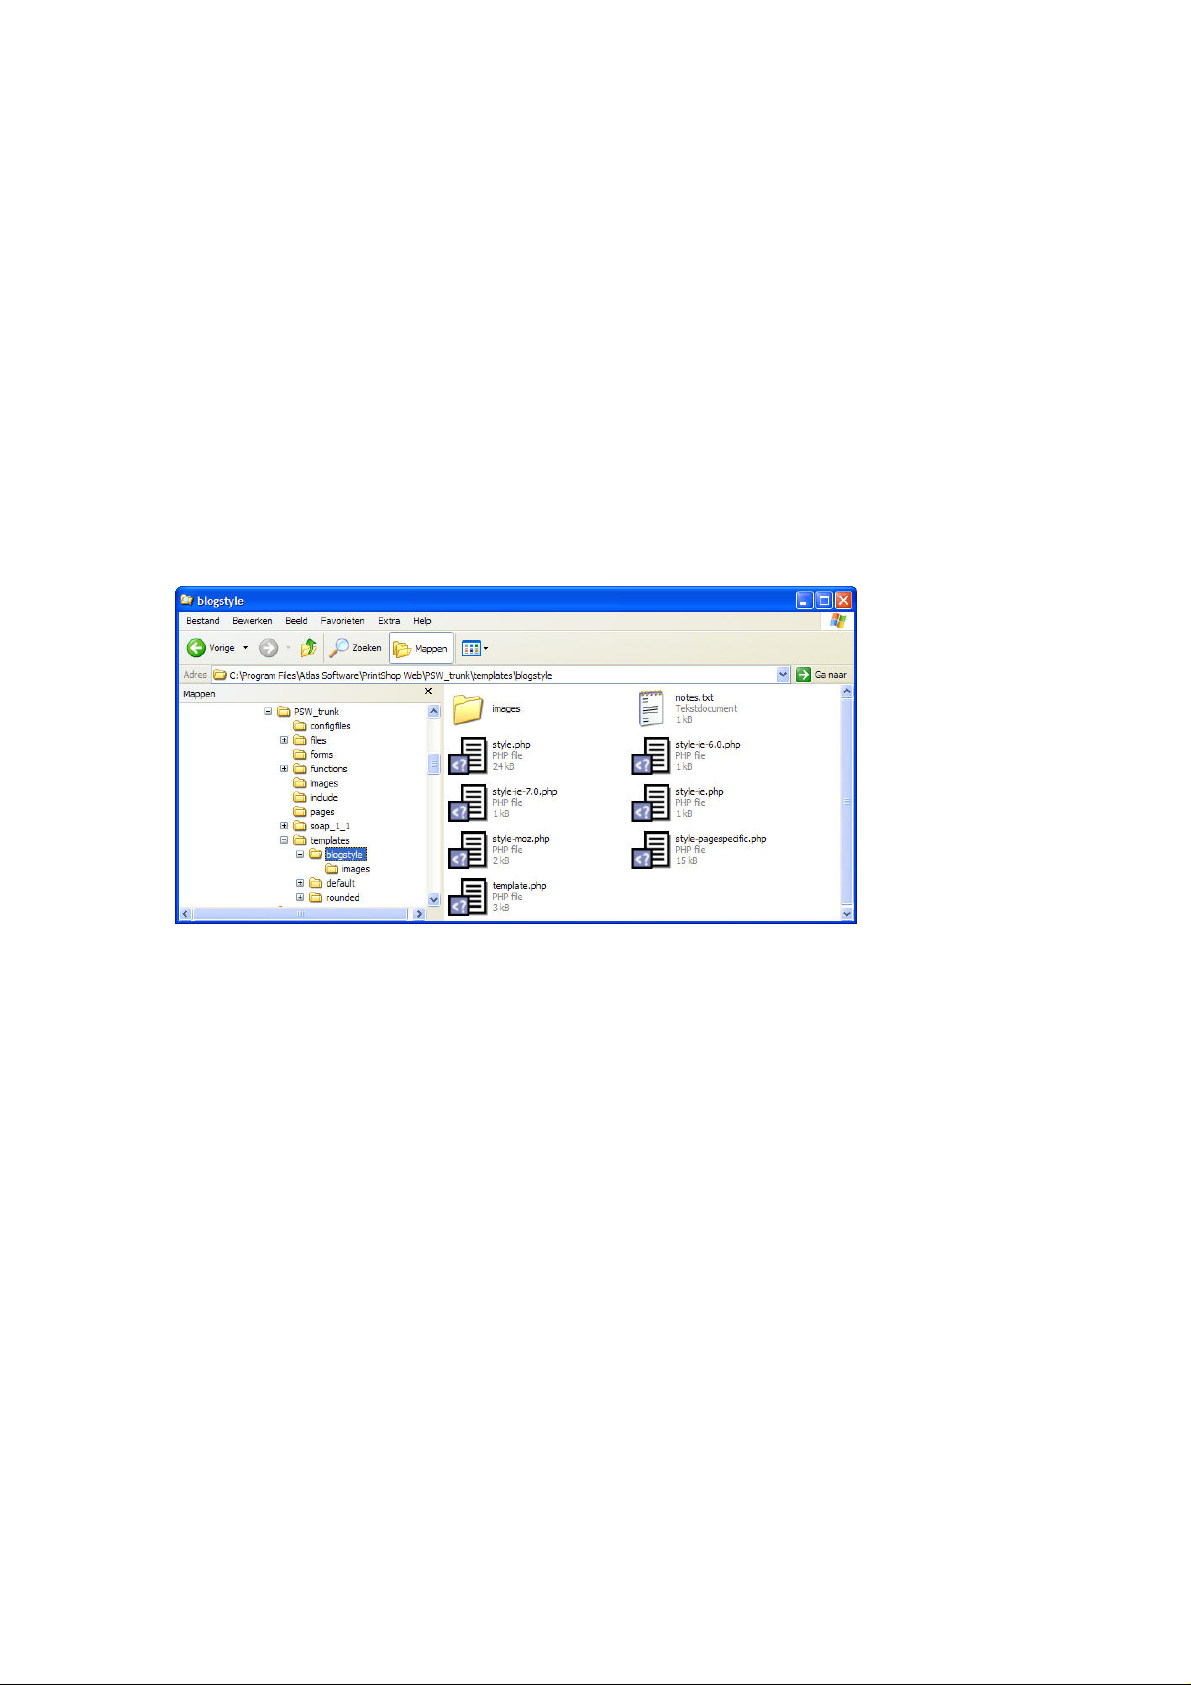
The contents of skin folder showing the various style files
Search order
The search order is as follows:
1 browsername
2 browsername-version
3 browsername-os
4 browsername-os-version
Browser names
The browser names use the following abbreviations:
ie = Internet Explorer
•
moz = Mozilla
•
saf = Safari
•
PrintShop Web Skinning Guide | 21
Page 22

Operating systems
The operations system names use the following abbreviations:
nt = Windows XP
•
nt = Windows 2003 Server
•
nt = Windows NT
•
mac = Mac OS X
•
Note: Exceptions made for FireFox are stored in a moz exception file. When making an
exception for a specific version of FireFox the version number should refer to the Mozilla engine,
this number differs from the FireFox version number.
PrintShop Web Skinning Guide | 22
Page 23

Header
The information stated in the header div is used to display the main page header or title. This is the
place to show a system wide logo or the logo of your customer.
The default skin showing the PSW logo as the header image
Replacing content
The HTML snippet below shows the header div containing a < h1> tag. Using the Style.php you can
replace its contents by a logo uploaded in the Edit Web Design page. This allows the system to show a
company specific image or logo.
<div id="header"><h1>PrintShop Web</h1></div>
The first style sets the width and height for the header div and sets a background image. The
generateSkinLogo function (PHP) retrieves the path of the company logo which can be set in the
Edit Web Design page. Of course this can be replaced by a hard coded path a custom image. The
generateSkinHeaderColor retrieves the header color specified in the Edit Web Design page. This color
can be used to fill up the background to match the color of your background image.
/* header */
#header {
height: 90px;
width: 100%;
background-image: url(<? generateSkinLogo(); ?>);
background-position: center left;
background-repeat: no-repeat;
background-color: <? generateSkinHeaderColor();?>;
}
#header h1 {
display: none;
}
The second style hides the contents of the <h1> tag (display: none;).
PrintShop Web Skinning Guide | 23
Page 24

User information
The User Info block displays the name of the logged on user, an option that lets the user edit his or her
personal information and the Log off option. The Edit User Info is optional and depends on the users
role.
In the default the user User Info block is dark blue and placed just above the Menu bar
In the default skin the User Info bar is placed just above the Menu bar. Using styling parameters the
two seem to be surrounded by border. This is achieved by adding a border to the top, left and right of
the User Info bar and a border to the bottom, left and right of the Menu bar.
CSS Lists
The User Info bar is created using an HTML list. This allows you to easily change its orientation from
horizontal to vertical using CSS styling. Below the CSS code for the user info items in the Style.php file.
#userinfo ul{
padding-right: 5px;
float: right;
}
#userinfo li{
display: inline;
border: 1px;
margin: 0;
}
#userinfo li a{
text-decoration: none;
line-height: 2em;
padding: 5px 5px;
color: #FFFFFF;
}
#userinfo li a:hover{
background-color: <? generateSkinMainColorHighLight(0.8); ?>;
}
By removing the display: inline attribute of the <li> tag the orientation is changed from horizontal to
vertical.
PrintShop Web Skinning Guide | 24
Page 25

Adding additional information
The User Info bar has additional information. The code in the template file uses generateUserInfo to
retrieve the cAdditionalInfo text from the language strings. The value for this string can be changed
using the Edit language page in the Settings section. This variable is used for a global language
dependent message. In the default setup the value for this string is PSW. Hard coded text and other
elements can be added to the HTML code.
<? if(function_exists("generateUserInfo")) { ?>
<div id="userinfo">
<div>
<h3><? generateAdditionalInfo(); ?></h3>
<? generateUserInfo(); ?>
</div>
</div>
<? } ?>
A variant of the User Info bar showing additional information (you're logged on as).
Highlighting "hovered" items
The hover attribute set for the a tag will render a different background color when the user places the
cursor over this item. Additional parameters can be added to change the style of the text (for example
the text color, font weight, text decoration or font style). Below you'll see a variant of the User Info bar.
In this case the orientation is placed vertical and a custom string was added.
PrintShop Web Skinning Guide | 25
Page 26

Menu bar
The Menu bar provides access to the main sections of PSW. Like the User Info bar the items of the
Menu bar are created using HTML lists, which means that you can change its orientation by altering
the CSS file.
In the default skin the Menu bar is placed directly beneath the User Info bar
Styling the menu items
The Menu bar is generated using HTML lists, within the list items hyperlinks (<a> tags) are used to
define the target when the user clicks the item. The code snippet below shows a HTML code generated
for a menu bar.
<div id="menu">
<div>
<ul>
<li class='selected'>
<a href="site.php?pageid=welcome&page=1&init=true">Home</a>
</li>
<li>
<a href="site.php?pageid=storefront_overview&page=1&init=true">New document</a>
</li>
<li>
<a href="site.php?pageid=ordermanager_overview&page=1&init=true">Order Manager</a>
</li>
<li>
<a href="site.php?pageid=company_overview&page=1&init=true">Companies</a>
</li>
</ul>
</div>
</div>
PrintShop Web Skinning Guide | 26
Page 27

Below you'll the menu items in the Style.php file. The following CSS code is used to show a horizontal
menu bar. By removing the display: inline attribute of the <li> tag the orientation is changed from
horizontal to vertical.
/* menu */
#menu {
background-color: #FFFFFF;
border-width: 0 1px 1px 1px;
border-color: #666666;
border-style: solid;
padding: 0 1px 1px 1px;
width: 100%;
}
#menu div {
background-color: <? generateSkinContrastColor(); ?>;
padding: 1px;
color: #000000;
}
#menu ul {
list-style: none;
margin: 0;
display: inline;
}
#menu li {
display: inline;
line-height: 2em;
margin: 0;
}
#menu .selected a {
background-color: <? generateSkinContrastColorHighLight(1.1); ?>;
}
#menu li a {
text-decoration: none;
padding: 5px 5px;
}
#menu li a:hover {
background-color: <? generateSkinContrastColorHighLight(0.8); ?>;
}
PrintShop Web Skinning Guide | 27
Page 28

Creating a Tabbed menu
Below is a sample of the Menu bar where the menu items have a tabbed style. To achieve this a
repeating background image is added to the <li> tag. Space is added between the items by adding a
right margin. To complete the design border attributes are set for top, left and right sides of the <li> tag.
The Menu bar with repeated background image
#menu li {
display: inline;
border-width: 1px 1px 0 1px;
border-color: #666666;
border-style: solid;
padding-top: 5px;
padding-bottom: 5px;
padding-left: 5px;
padding-right: 5px;
line-height: 2em;
margin-right: 3px;
margin-left: 0;
background-image: url("images/btn-bg.gif");
background-repeat: x;
}
Styling the selected menu item
PSW will add an additional class to the selected menu item. This allows the style for the selected menu
item to change to make it stand out. The color, font-weight, background color or background image can
be used to create various effects.
#menu .selected a {
color: black;
}
The following code snippet shows how both the font color and background color of the selected item
can be changed.
#menu .selected a {
color: black;
background-color: <? generateSkinContrastColorHighLight(1.1); ?>;
}
PrintShop Web Skinning Guide | 28
Page 29

Background
The <body> tag has two attributes to specify backgrounds. The background can be a color and/or an
image. These attributes can be added directly in the Template.php file (bgcolor and background) or to
the Style.php file.
Adding a background image
Background-images can be used in most HTML elements - not just for the whole page (body) and can
be used for simple but effective results, such as rounded corners. Example:
body {
background-image: url("images/main-bg.gif");
}
PrintShop Web Skinning Guide | 29
Page 30

Overview tables
Overview pages show tabular data (for example the Companies, Users and Publication Types pages).
An overview table is build using the table tag and follows the regular HTML <table> tag structure.
The Companies overview table
An overview table consists of the following elements:
Head (dark blue bar)
•
Subhead
•
Content (the actual records)
•
Footer (navigation/browse bar)
•
Buttons (tool bar)
•
Looking at the source of an overview table page you can see that the table is part of a more complex
hierarchy. The following code snippet shows a stripped version of an overview page:
<div id="content">
<form method='POST' name='companyOverviewForm' action='site.php?
formid=company_overview_form' id="companyOverviewForm">
<div id="companyOverviewFormContent" class="content">
<table class="cCompanyOverview" id="tableOverview">
<tr>
<th id="cCompanyOverviewHeader" colspan="8">Company overview</th>
</tr>
<tr class="subhead">
<td id="select_header" class="checkbox" >
<input type="checkbox" onClick='doSelectAll()' class="formCheckbox "
id="headerField" name="select" value=""/>
</td>
<td id="cName_header" class="static">Name</td>
<td id="cCompanyCode_header" class="static" >Company code</td>
</tr>
<tr class="record level0">
<td id="fnCheckCompanyID[]_3" class="checkbox">
<input type="checkbox" class="formCheckbox " id="3Field" name="fnCheckCompanyID[]"
value="3"/>
</td>
<td id="cCompanyName_3" class="text"><a href='site.php?
pageid=company_properties&id=3'>4x4 Parts & Co</a></td>
PrintShop Web Skinning Guide | 30
Page 31

<td id="cCompanyCode_3" class="text" ><a href='site.php?
pageid=company_properties&id=3' >44p</a></td>
</tr>
<tr class="record level0">
<td id="fnCheckCompanyID[]_1" class="checkbox" >
<input type="checkbox" class="formCheckbox " id="1Field" name="fnCheckCompanyID[]"
value="1"/>
</td>
<td id="cCompanyName_1" class="text" ><a href='site.php?
pageid=company_properties&id=1'>Objectif Lune</a></td>
<td id="cCompanyCode_1" class="text" ><a href='site.php?
pageid=company_properties&id=1'>olu</a></td>
</tr>
<tr class="footer">
<td id="cPageNavigation_" class="pager" colspan="3"><div class="navigator"> </
div></td>
</tr>
</table>
</div>
<div id="companyOverviewFormToolbar" class="toolbar">
<input class="formButton" type="submit" id="addButton" name="add" value="Add"/>
<input class="formButton" type="submit" id="deleteButton" name="delete"
value="Delete"/>
</div>
</form>
</div>
The content is enclosed by a <div> element. Each page contains a <form> tag, which is used to catch
information entered by the user or to perform an action when the user clicks a button.
The <form> tag has two main components: the actual table and the toolbar/buttons to perform specific
actions. A page will only contain a single overview table.
Head
The <th> tag indicates that the table cell(s) of the first row is a header cell, in this case the title for the
table. In the Style.php file an id selector with a subselector of <th> is created to avoid styling conflicts
with other tables.
#tableOverview th {
background-color: <? generateSkinMainColor(); ?>;
padding: 2px;
font-weight: bold;
text-align: left;
border-width: 0 0 1px 0;
border-color: #FFFFFF #FFFFFF #FFFFFF #FFFFFF;
border-style: solid;
color: #FFFFFF
}
Subhead
The second row shows the names for the columns. Often the first column contains a check box to
select and deselect (toggle) the records of the current page in the overview.
PrintShop Web Skinning Guide | 31
Page 32

Content
The rows (<tr> tag) that form the body of the table have the record class selector. In hierarchical
overviews a second class selector is used to specify the level in the hierarchy. The <td> tags contained
by the table row can have different class selectors. This depends on the type of content, examples are:
text, icon and check box.
In the skins supplied with PSW the background color for the element is set when the user places the
cursor over a specific row (hovers).
#tableOverview tr.level0:hover,
#tableOverview tr.level1:hover,
#tableOverview tr.record:hover {
background-color: #E6E6FF;
}
Footer
The last table row is used to display navigation options. The navigation options become visible when
the overview contains more than the number of records set in the setRowsPerPage variable (default
15). Please refer to chapter for more information about this function.
#tableOverview tr.level0:hover,
#tableOverview tr.level1:hover,
#tableOverview tr.record:hover {
background-color: #E6E6FF;
}
Buttons
The buttons below the overview table are created using the <input> tag with a class formButton. The
buttons have a unique id allowing you the specify the style per button. The buttons are enclosed by a
<div> tag with a class of toolbar.
PrintShop Web Skinning Guide | 32
Page 33

Edit forms
A form is an area that can contain form fields. Form fields are objects that allow the visitor to enter
information - for example text boxes, drop-down menus or radio buttons. When the visitor clicks a
submit or save button, the content of the form is sent to PSW.
The Edit User Info form
The following sample shows a stripped down source code of an edit form. Like the overview pages all
elements are surrounded by a content <div> tag. The first child of this tag is the <form> tag.
<div id="content">
<form method='POST' name='personEditInfoForm' action='site.php?
formid=person_edit_info_form' id="personEditInfoForm">
<div id="personEditInfoFormContent" class="content">
<div class="formHeader" id="cEditUserInfoHeader">Edit user info</div>
<!-- Static information -->
<div class="formLine" id="fcUserNameLine">
<span class="formLabel" id="fcUserNameLabel">User name:</span>
<span class="formStatic" id="fcUserNameField" name="fcUserName">administrator</
span>
</div>
<!-- A regular input form field -->
<div class="formLine" id="fcPasswordLine">
<span class="formLabel" id="fcPasswordLabel">Password: <span class="asterisk">*</
span></span>
<input type="password" class="formField" id="fcPasswordField" name="fcPassword"
value="administrator">
PrintShop Web Skinning Guide | 33
Page 34

</div>
<!-- A warning item, by default this node is invisible to the user -->
<div id="personEditInfoForm_fcPassword_Required" class="warnings">
<div class="warningTable">
<span class="warningLabel"> </span><span class="warningIcon">
<span class="warningItem">Password is a required field!</span></span>
</div>
</div>
<!-- A pulldown menu -->
<div class="formLine" id="fnLanguageIDLine">
<span class="formLabel" id="fnLanguageIDLabel">Language:</span>
<select class="formSelect" id="fnLanguageIDField" name="fnLanguageID" >
<option value="3"/>Deutsch
<option value="1" selected/>English
<option value="4"/>Français
</select>
</div>
<!-- A grouphead -->
<div class="formLine formLineGroupHead" id="cAdditionalInformationLine">
<span class="formLabel formLabelGroupHead"
id="cAdditionalInformationLabel">Additional information</span>
<span class="formStatic" id="cAdditionalInformationField"
name="cAdditionalInformation"></span>
</div>
<div class="formLine" id="fcFirstNameLine">
<span class="formLabel" id="fcFirstNameLabel">First: <span class="asterisk">*</
span></span>
<input type="text" class="formField" id="fcFirstNameField" name="fcFirstName"
value="administrator">
</div>
</div>
</form>
</div>
The <form> tag is used to process the information entered by the user. The contents of the <form> tag
are captured by a <div> with a unique id.
PrintShop Web Skinning Guide | 34
Page 35

Form head
The first content element is the form header. In the default skin the information in this tag is used to
visually group the elements in the form.
.formHeader {
display: block;
width: 100%;
background-color: <? generateSkinMainColor(); ?>;
color: #FFFFFF;
padding: 2px;
font-weight: bold;
}
Form lines
Each line in an edit form is enclosed by a <div> tag. This element has an unique id and a Formline
class. Normally each line contains two child elements: a label and a field. The form fields can be of
various types, for example: plain text input, a pull down menu, radio buttons or a range of check boxes.
The following snippet shows a form line containing a form label and a regular text input field. As the
field requires input an additional <span> tag is added for the asterisk symbol.
<div class="formLine" id="fcPasswordLine">
<span class="formLabel" id="fcPasswordLabel">Password:
<span class="asterisk">*</span>
</span>
<input type="password" class="formField" id="fcPasswordField" name="fcPassword"
value="administrator">
</div>
Warnings and Errors
Warnings and errors are hidden elements for which the visibility is changed when the actual warning/
error occurs. A warning line has two child element: a warning label and a container element for the
warning icon and message.
<div id="personEditInfoForm_fcPassword_Required" class="warnings">
<div class="warningTable">
<span class="warningLabel"> </span>
<span class="warningIcon">
<span class="warningItem">Password is a required field!</span>
</span>
</div>
</div>
PrintShop Web Skinning Guide | 35
Page 36

The warningLabel <span> is used as spacer to make sure that the warning icon and message align
with the field of the accompanying form line. The warningIcon <span> holds the actual warning
message which is stored in a separate <span> tag. The warning icon is set using CSS. The following
snippet shows background-image attributes for the warning icon.
.warningIcon {
display: inline-block;
width: 73%;
background-image: url(../../images/icon_alert.gif);
background-repeat: no-repeat;
background-position: 0px 3px;
display: inline-block;
vertical-align: top;
}
In this case the icon is coming from the image folder stored in the PSW web site root. You can use
you own icon by placing an image within the skins folder (or an images folder in your skin folder) and
changing the path to that image file.
A required field warning
Group head
Like the form header, group headers are used to visually group the elements. In the default skin this
element has a separator line above the item.
Group headers are used to visually group elements
The following source code snippet shows that the elements have two class selectors:
<div class="formLine formLineGroupHead" id="cAdditionalInformationLine">
<span class="formLabel formLabelGroupHead" id="cAdditionalInformationLabel">Additional
information</span>
<span class="formStatic" id="cAdditionalInformationField"
name="cAdditionalInformation"></span>
</div>
The formline class and an additional grouphead class. This allows you to inherit style attributes of
regular form elements and adding specific information to make the group head stand out.
PrintShop Web Skinning Guide | 36
Page 37

Sub menus
Several sections have one or multiple sub menus. Sub menus are used to navigate to sub sections of
that specific section. Sub menus have their own classes and styles.
The sub menu of the Settings section
Like the Main menu and the User Info block the sub menus are created using HTML lists (<ul> tag and
<li> tags). The following code snippet shows source code of a sub menu (Settings section):
<div id="submenu">
<div class="content" id="cSettingsSubmenuID">
<div class="formHeader">Settings menu</div>
<span class="submenu">
<ul>
<li class="level0 selected">
<a href="site.php?pageid=setting_overview"><span class="label">About</span></a>
</li>
<li class="level0">
<a href="site.php?pageid=setting_currency&init=true"><span
class="label">Currencies</span></a>
</li>
<li class="level0">
<a href="site.php?pageid=setting_email"><span class="label">E-mail</span></a>
</li>
<li class=" level1">
<a href="site.php?pageid=setting_email_addressees_overview"><span
class="label">Addressees</span></a>
</li>
<li class=" level1">
<a href="site.php?pageid=setting_email_message_overview"><span
class="label">Messages</span></a>
</li>
</ul>
</span>
</div>
</div>
PrintShop Web Skinning Guide | 37
Page 38

The list items have two class selectors. The first defines the indent level. The sub menu of the Settings
section uses sub levels for the items that relate to the Email subsection. The second selector is
optional and will only be set to mark the selected menu item. This allows you to visually mark the
selected item by changing its style in the style documents.
#submenu li.level0{
}
#submenu li.level1{
padding-left: 1.5em;
}
#submenu .selected{
font-weight: bold;
}
Multiple sub menus
The Template.php file allows pages to have multiple sub menus. The source code of such a page
has a unique id for each sub menu. In the style documents these IDs are grouped by separating each
selector with a comma:
#submenu li.level0, #submenu1 li.level0, #submenu2 li.level0{
}
#submenu li.level1, #submenu1 li.level1, #submenu2 li.level1{
padding-left: 1.5em;
}
#submenu .selected, #submenu1 .selected, #submenu2 .selected {
font-weight: bold;
}
PrintShop Web Skinning Guide | 38
Page 39

Special variables
In this section we list the special variables you can use in the Template.php and Style.php files.
Variables for Template.php
The functions in this section can be used in the Template.php file.
generateString
The generateString function retrieves a language string based on the supplied parameter. It is used to
insert language dependent text.
<? generateString(cSystemName); ?>
/* Renders to following text */
PrintShop Web
Custom strings can be added to the language strings. A string is made up of a name and a value,
which are seperated by the = symbol.
cSystemName=PrintShop Web
cAdditionalInfo=PSW
cFooter=PrintShop Web 2.0, www.objectiflune.com
setRowsPerPage
The setRowsPerPage function can be used to change the number of rows shown in overview tables.
The function can added to the Template.php file and should be insert before the generateContent
function. By default overview tables show 15 rows per page.
<? setRowsPerPage(25); ?>
<div id="content">
<? if (getFormCount() > 0){ ?>
<? generateContent(); ?>
<? } ?>
</div>
PrintShop Web Skinning Guide | 39
Page 40

Variables for Style.php
The Style.php is not a regular CSS file. Its a PHP file that renders a CSS file. By including
theskin_customization.php line at the beginning of your Style.php file the values entered in the Edit
Web Design pages can be used in your style. Once included special PHP functions can be used to
retrieve style information that is entered in the Edit Web Design page of the companies in PSW.
The edit Web Design page
These values are retrieved from the PSW database and or calculated based on these values. You can
set these values per company in the companies Web Design page. The first few lines of the Style.php
document are as follows:
<?php include_once "../../functions/skin_customization.php" ?>
* {
margin:0;
padding:0;
}
h1,h2,h3,h4,h5,h6,p,blockquote,form,label,ul,ol,dl,fieldset,address {
margin: 0;
}
li,dd {
margin-left:1em;
}
PrintShop Web Skinning Guide | 40
Page 41

generateSkinFont
The generateSkinFont function retrieves the font information set in the Edit Web Design page of the
PSW site. The value entered in the Edit Web Design page (Font family) can be a single font name or a
comma separated list. Below an example on how the Font family can be set using this function:
input, select, body, textarea {
font-size: 70%;
line-height: 1.3em;
font-family: <? generateSkinFont(); ?>;
}
generateSkinMainColor
The generateSkinMainColor function retrieves the main color set in the Edit Web Design page of the
PSW site. The value entered in the Edit Web Design page can be entered manually or selected in
the color picker. Below an example on how this color can be set using this function. In this case the
background color is set for the edit forms header bar class (or title bar).
.formHeader {
display: block;
width: 100%;
background-color: <? generateSkinMainColor(); ?>;
color: #FFFFFF;
padding: 2px;
font-weight: bold;
}
generateSkinMainColorHighLight
The generateSkinMainColorHighLight function retrieves the skins main color set in the Edit Web
Design page. The parameter of this functions lets you change the tint of the color. Fractional values are
used, where 0.0 will be black, 1.0 the original color and higher values will result in a lighter tint of the
main color.
Below an example on how this color can be set using this function. In this case the background color of
the user info bar will have a darker tint when the user places the cursor over these items (hover).
#userinfo li a:hover{
background-color: <? generateSkinMainColorHighLight(0.6); ?>;
line-height: 2em;
}
generateSkinContrastColor
The generateSkinContrastColor function retrieves the contrast color information set in the Edit Web
Design page of the PSW site. In the default skin this color is used for the menu bar items, table
subheads and table footers. Below an example on how this color can be set using this function:
#tableOverview .subhead td {
background-color: <? generateSkinContrastColor(); ?>;
border-width: 0 1px 0 0;
border-color: #FFFFFF;
}
PrintShop Web Skinning Guide | 41
Page 42

generateSkinContrastColorHighLight
The generateSkinContrastColorHighLight function retrieves the skins contrast color set in the Edit Web
Design page. A parameter can be supplied to change the tint of the color. Fractional values are used,
where 0.0 will be black, 1.0 the original color and higher values will result in a lighter tint of this color.
Below an example on how this color can be set using this function. In this case the background color of
the selected menu item will have a lighter color:
#menu .selected a {
background-color: <? generateSkinContrastColorHighLight(1.1); ?>;
}
generateSkinHeaderColor
The generateSkinHeaderColor function retrieves the header color information set in the Edit Web
Design page of the PSW site. The value entered in the Edit Web Design page can be entered manually
or selected in the color picker. Typically this color will match the background color of the company logo.
This color can be used to set the background so the logo or background image nicely blends in wich
the overall design.
Below an example on how this color can be set using this function:
#header {
height: 90px;
background-image: url(<? generateSkinLogo(); ?>);
background-position: center left;
background-repeat: no-repeat;
background-color: <? generateSkinHeaderColor();?>;
width: 100%;
}
generateSkinHeaderColorHighLight
The generateSkinHeaderColorHighLight function retrieves the skins header color set in the Edit Web
Design page. A parameter llows the tint of the color to be changed. Fractional values are used, where
0.0 will be black, 1.0 the original color and higher values will result in a lighter tint of this color.
Below an example on how this color can be set using this function:
#tableOverview td {
padding: 2px;
border-width: 0 0 1px 0;
border-color: background-color: <? generateSkinHeaderColorHighLight(1.1); ?>;
border-style: solid;
}
PrintShop Web Skinning Guide | 42
Page 43

generateSkinLogo
The generateSkinLogo retrieves the path to the header image specified in the Edit Web Design page. If
no image is specified the path of the header image from the system default skin will be returned. Below
an example on how this function can be used in your Style.php file:
#header {
height: 90px;
background-image: url(<? generateSkinLogo(); ?>);
background-position: center left;
background-repeat: no-repeat;
background-color: <? generateSkinHeaderColor();?>;
width: 100%;
}
PrintShop Web Skinning Guide | 43
Page 44

ELECTRONIC END USER LICENSE AGREEMENT
FOR PRINTSHOP WEB
NOTICE TO USER: THIS IS A CONTRACT. BY INSTALLING THIS SOFTWARE YOU ACCEPT ALL THE
TERMS AND CONDITIONS OF THIS AGREEMENT.
This Objectif Lune End User License Agreement accompanies the PrintShop Web product and related
explanatory materials ("Software"). The term "Software" also shall include any upgrades, modified versions
or updates of the Software licensed to you by Objectif Lune. Please read this Agreement carefully. Upon your
acceptance of this Agreement, Objectif Lune grants to you a nonexclusive license to use the Software, provided
that you agree to the following:
1 Use of the Software.
a You may install the Software on a hard disk or other storage device; install and use the Software on a
file server for use on a network for the purposes of:
(i) permanent installation onto hard disks or other storage devices or
(ii) use of the Software over such network; and make backup copies of the Software.
b You may make and distribute unlimited copies of the Software, including copies for commercial
distribution, as long as each copy that you make and distribute contains this Agreement, the
PrintShop Web installer, and the same copyright and other proprietary notices pertaining to this
Software that appear in the Software. If you download the Software from the Internet or similar online source, you must include the Objectif Lune copyright notice for the Software with any on-line
distribution and on any media you distribute that includes the Software.
c Once you have purchased a licensed dongle, you need to register that dongle to receive technical
support.
2 Copyright and Trade Secret
The Software is owned by Objectif Lune, its parent companies and its suppliers, and its structure,
organization and code are the valuable trade secrets of Objectif Lune, its parent companies and its
suppliers. The Software also is protected by Dutch Copyright Law.
You acknowledge that the Software in source code, its structure and organization form remain
confidential valuable trade secrets of Objectif Lune, its parent companies and its suppliers and therefore
you agree not to modify the Software or attempt to reverse engineer, decompile or disassemble or
otherwise attempt to discover the source code of the Software. You may not alter or modify in any way
the installer program or create a new installer for the Software.
3 Restrictions.
Software is licensed and distributed by Objectif Lune for creating optimized print jobs.
(You agree not to use the Software for revenue generating or commercial activities unless you have
purchased a PrintShop Web hardware key (dongle license) from Objectif Lune or one of its resellers.)
Except as provided in this License Agreement, you agree not to use the Software for any Application
Service Provider (ASP) purposes. You also agree not to subcontract the Software as/under a service
model for several print providers. You may not transfer, rent, lease, lend, sublicense or time-share in any
manner the Software or any part hereof.
4 No Warranty.
The Software is being delivered to you AS IS and Objectif Lune makes no warranty as to its use or
performance.
OBJECTIF LUNE, ITS PARENT COMPANIES AND ITS SUPPLIERS DO NOT AND CANNOT
WARRANT THE PERFORMANCE OR RESULTS YOU MAY OBTAIN BY USING THE SOFTWARE
OR DOCUMENTATION. OBJECTIF LUNE, ITS PARENT COMPANIES AND ITS SUPPLIERS MAKE
NO WARRANTIES, EXPRESS OR IMPLIED, AS TO NONINFRINGEMENT OF THIRD PARTY
RIGHTS, MERCHANTABILITY, OR FITNESS FOR ANY PARTICULAR PURPOSE. IN NO EVENT WILL
OBJECTIF LUNE, ITS PARENT COMPANIES OR ITS SUPPLIERS BE LIABLE TO YOU FOR ANY
CONSEQUENTIAL, INCIDENTAL OR SPECIAL DAMAGES, INCLUDING ANY LOST PROFITS OR
LOST SAVINGS, EVEN IF AN OBJECTIF LUNE REPRESENTATIVE HAS BEEN ADVISED OF THE
POSSIBILITY OF SUCH DAMAGES, OR FOR ANY CLAIM BY ANY THIRD PARTY.
Some states or jurisdictions do not allow the exclusion or limitation of incidental, consequential or special
damages, or the exclusion of implied warranties or limitations on how long an implied warranty may last,
so the above limitations may not apply to you.
PrintShop Web Skinning Guide | 44
Page 45

5 Governing Law and General Provisions.
This Agreement will be governed by the laws of the Netherlands, excluding the application of its conflicts
of law rules. This Agreement will not be governed by the United Nations Convention on Contracts for the
International Sale of Goods, the application of which is expressly excluded. If any part of this Agreement
is found void and unenforceable, it will not affect the validity of the balance of the Agreement, which shall
remain valid and enforceable according to its terms. You agree that the Software will not be shipped,
transferred or exported into any country or used in any manner prohibited by any export laws, restrictions
or regulations. This Agreement shall automatically terminate upon failure by you to comply with its terms.
This Agreement may only be modified in writing signed by an authorized officer of Objectif Lune.
YOUR ACCEPTANCE OF THE FOREGOING AGREEMENT WAS INDICATED DURING INSTALLATION.
PrintShop Web Skinning Guide | 45
 Loading...