

Page 1

PrintShop Mail Web
Administrator Guide
Page 2
Copyright Information
Copyright © 1994-2010 Objectif Lune Inc. All Rights Reserved.
No part of this publication may be reproduced, transmitted, transcribed, stored in a retrieval system, or
translated into any other language or computer language in whole or in part, in any form or by any means,
whether it be electronic, mechanical, magnetic, optical, manual or otherwise, without prior written consent of
Objectif Lune Inc.
Objectif Lune Inc. disclaims all warranties as to this software, whether expressed or implied, including without
limitation any implied warranties of merchantability, fitness for a particular purpose, functionality, data
integrity or protection.
PlanetPress and PrintShop Mail are registered trademarks of Objectif Lune Inc.
PostScript and Acrobat are registered trademarks of Adobe Systems Inc.
Pentium is a registered trademark of Intel Corporation.
Windows is a registered trademark of Microsoft Corporation.
Adobe, Adobe PDF Library, Adobe Acrobat, Adobe Distiller, Adobe Reader, Adobe Illustrator, Adobe Photoshop,
Optimized Postcript Stream, the Adobe logo, the Adobe PDF logo are either registered trademarks or
trademarks of Adobe Systems Incorporated in the United States and/or other countries.
Trademarks of other companies mentioned in this documentation appear for identification purposes only and
are the property of their respective companies.
Title PrintShop Mail Web - Administrator Guide
Revision 2010/01/05
Page 3

Table of contents
1 Introduction ..................................................................................................................................................................................................... 1
1.1 Benefits for you and your customers ................................................................................................................................................................... 2
1.1.1 Serve your customers ............................................................................................................................................................................... 2
1.1.2 Benefits ................................................................................................................................................................................................... 2
1.2 Features............................................................................................................................................................................................................ 3
1.3 Key Concepts..................................................................................................................................................................................................... 4
1.3.1 Workflow ................................................................................................................................................................................................. 4
1.3.2 User roles ................................................................................................................................................................................................ 5
1.3.3 Companies and Departments..................................................................................................................................................................... 7
1.3.4 Publication types ...................................................................................................................................................................................... 7
1.3.5 Web forms ............................................................................................................................................................................................... 8
1.3.6 Skins ....................................................................................................................................................................................................... 9
1.3.7 Order statuses.......................................................................................................................................................................................... 9
1.4 Quick start guide ............................................................................................................................................................................................. 10
2 How to ............................................................................................................................................................................................................ 11
2.1 Common Tasks ................................................................................................................................................................................................ 12
2.1.1 Remember me ....................................................................................................................................................................................... 12
2.1.2 Lost password ........................................................................................................................................................................................ 12
2.1.3 Modify user info ..................................................................................................................................................................................... 13
2.1.4 Set New Password .................................................................................................................................................................................. 14
2.1.5 Change the language of the web site ....................................................................................................................................................... 14
2.2 Company Tasks ............................................................................................................................................................................................... 16
2.2.1 Add companies....................................................................................................................................................................................... 16
2.2.2 Modify properties.................................................................................................................................................................................... 17
2.2.3 Add or modify address ............................................................................................................................................................................ 18
2.2.4 Add departments.................................................................................................................................................................................... 19
2.2.5 Add users .............................................................................................................................................................................................. 19
2.2.6 Modify user info ..................................................................................................................................................................................... 20
2.2.7 Assign users to a department .................................................................................................................................................................. 21
2.2.8 Assign a publication type to a department ................................................................................................................................................ 22
2.2.9 Change web design settings .................................................................................................................................................................... 24
2.2.10 Modify Pricing and Ordering parameters ................................................................................................................................................. 25
2.2.11 Delete company.................................................................................................................................................................................... 26
2.3 Publication Type and Document Tasks............................................................................................................................................................... 27
2.3.1 Add publication types.............................................................................................................................................................................. 27
2.3.2 Modify the publication type properties...................................................................................................................................................... 28
2.3.3 Delete a publication type folder ............................................................................................................................................................... 29
2.3.4 Adding documents to a publication type ................................................................................................................................................... 29
2.3.5 Delete documents from a publication type ................................................................................................................................................ 31
2.3.6 Edit document properties ........................................................................................................................................................................ 32
2.3.7 Manage production settings..................................................................................................................................................................... 33
2.3.8 Output options ....................................................................................................................................................................................... 34
2.3.9 Manage linked files ................................................................................................................................................................................. 37
2.3.10 Setting up web forms............................................................................................................................................................................ 38
2.3.11 Define file upload settings ..................................................................................................................................................................... 47
2.3.12 Setting up pricing ................................................................................................................................................................................. 48
2.4 Image Collection Tasks..................................................................................................................................................................................... 52
2.4.1 Create an image collection ...................................................................................................................................................................... 52
2.4.2 Add images to a collection....................................................................................................................................................................... 53
2.4.3 Delete image from a collaction ................................................................................................................................................................ 54
2.5 Order Manager Tasks ....................................................................................................................................................................................... 55
2.5.1 Select an order status overview ............................................................................................................................................................... 55
2.5.2 Change the status of an order ................................................................................................................................................................. 56
2.5.3 Add a price to a quote request ................................................................................................................................................................ 58
2.5.4 Export order data ................................................................................................................................................................................... 59
2.5.5 Print a document .................................................................................................................................................................................... 60
2.5.6 Print to file ............................................................................................................................................................................................. 63
2.5.7 Create PDF output .................................................................................................................................................................................. 65
2.5.8 Send to folder ........................................................................................................................................................................................ 67
2.5.9 Preflight a PrintShop Mail document......................................................................................................................................................... 69
2.5.10 Send a document to PlanetPres Watch ................................................................................................................................................... 70
2.5.11 Context menus ..................................................................................................................................................................................... 71
I
Page 4

Table of contents
3 Ordering workflow ......................................................................................................................................................................................... 73
3.1 The shopping cart ............................................................................................................................................................................................ 74
3.1.1 Automatic price calculation...................................................................................................................................................................... 75
3.1.2 No price calculation ................................................................................................................................................................................ 75
3.1.3 Price Quotes .......................................................................................................................................................................................... 77
3.2 Shipping Options.............................................................................................................................................................................................. 78
3.2.1 Restore address ..................................................................................................................................................................................... 79
3.2.2 Shipping Date and Rush Rate handling..................................................................................................................................................... 79
3.2.3 Shipping Methods ................................................................................................................................................................................... 80
3.3 Order summary................................................................................................................................................................................................ 81
3.4 Manage the Terms and Conditions .................................................................................................................................................................... 82
4 Settings .......................................................................................................................................................................................................... 83
5 General Settings............................................................................................................................................................................................. 84
5.1 About.............................................................................................................................................................................................................. 85
5.2 License............................................................................................................................................................................................................ 86
5.2.1 Activate Upgrade .................................................................................................................................................................................... 86
5.2.2 License information ................................................................................................................................................................................ 86
5.2.3 Redeem Voucher .................................................................................................................................................................................... 87
5.2.4 Upgrade Request.................................................................................................................................................................................... 87
5.3 Roles .............................................................................................................................................................................................................. 88
5.3.1 Create a new role ................................................................................................................................................................................... 88
5.3.2 Delete a role .......................................................................................................................................................................................... 88
5.3.3 Modifying a role...................................................................................................................................................................................... 89
5.4 Languages..................................................................................................................................................................................................... 102
5.4.1 Create a new language ......................................................................................................................................................................... 102
5.4.2 Delete a language ................................................................................................................................................................................ 102
5.4.3 Edit a language .................................................................................................................................................................................... 103
5.5 Web Design................................................................................................................................................................................................... 105
5.5.1 Changing the Web Design parameters ................................................................................................................................................... 105
5.6 Maintenance.................................................................................................................................................................................................. 107
5.6.1 Remove unused items........................................................................................................................................................................... 107
6 Pricing and Ordering .................................................................................................................................................................................... 108
6.1 Settings......................................................................................................................................................................................................... 109
6.2 Currencies ..................................................................................................................................................................................................... 111
6.2.1 Add a new currency.............................................................................................................................................................................. 111
6.2.2 Delete a currency ................................................................................................................................................................................. 112
6.3 Tax Rates...................................................................................................................................................................................................... 113
6.3.1 Add a new tax rate ............................................................................................................................................................................... 114
6.3.2 Delete a tax rate .................................................................................................................................................................................. 115
6.3.3 Edit a tax rate ...................................................................................................................................................................................... 116
6.4 Shipping Rates............................................................................................................................................................................................... 117
6.4.1 Add a Rate to a Shipping Rate Profile..................................................................................................................................................... 118
6.4.2 Add a new Shipping Rate Profile ............................................................................................................................................................ 119
6.4.3 Delete a Rate ....................................................................................................................................................................................... 119
6.4.4 Delete a Shipping Rate Profile ............................................................................................................................................................... 119
6.4.5 Edit a Rate ........................................................................................................................................................................................... 120
6.4.6 Edit a Shipping Rate Profile ................................................................................................................................................................... 120
6.4.7 Import and Export a Rates table ............................................................................................................................................................ 120
6.5 Calendar ....................................................................................................................................................................................................... 122
6.5.1 Add a Restricted Order Date.................................................................................................................................................................. 123
6.5.2 Change the Working Days ..................................................................................................................................................................... 123
6.5.3 Delete Restricted Order Dates ............................................................................................................................................................... 124
6.5.4 Import and Export Restricted Order Dates .............................................................................................................................................. 124
7 Production .................................................................................................................................................................................................... 126
7.1 Production Settings ........................................................................................................................................................................................ 127
7.2 User Input Field Defaults ................................................................................................................................................................................ 128
7.2.1 Add a new User Input Field Default item ................................................................................................................................................ 128
7.2.2 Arrange User Input Field Defaults items ................................................................................................................................................. 129
7.2.3 Delete an User Input Field Default item.................................................................................................................................................. 129
7.2.4 Import and Export an User Input Field Default list................................................................................................................................... 129
7.3 Output Folders............................................................................................................................................................................................... 131
7.3.1 Add a new output folder ....................................................................................................................................................................... 131
II
Page 5

Table of contents
7.3.2 Delete an output folder ......................................................................................................................................................................... 131
7.3.3 Enable the download link ...................................................................................................................................................................... 132
7.4 Job options.................................................................................................................................................................................................... 133
7.4.1 Add a new job options file ..................................................................................................................................................................... 133
7.4.2 Delete job options files.......................................................................................................................................................................... 133
7.5 Printers ......................................................................................................................................................................................................... 135
7.5.1 Change the status of a printer ............................................................................................................................................................... 135
8 E-mail ........................................................................................................................................................................................................... 136
8.1 E-mail Settings .............................................................................................................................................................................................. 137
8.1.1 Configure the E-mail settings................................................................................................................................................................. 137
8.1.2 Test the E-mail settings ........................................................................................................................................................................ 137
8.2 E-mail Addressees.......................................................................................................................................................................................... 139
8.3 Managing E-mail Templates ............................................................................................................................................................................ 141
8.3.1 Edit a default e-mail template................................................................................................................................................................ 141
8.3.2 Template names................................................................................................................................................................................... 142
8.3.3 Using functions in e-mail templates........................................................................................................................................................ 142
9 Modules ........................................................................................................................................................................................................ 145
9.1 Add a new Module ......................................................................................................................................................................................... 146
9.2 Configure a module........................................................................................................................................................................................ 147
9.3 Delete a Module............................................................................................................................................................................................. 148
10 Enabling B2C (Business to Customer)........................................................................................................................................................ 149
11 Introduction to Regular Expressions ......................................................................................................................................................... 152
11.1 Syntax......................................................................................................................................................................................................... 153
11.2 Examples..................................................................................................................................................................................................... 155
III
Page 6
1 Introduction
PrintShop Mail Web is a modern and versatile software package which integrates workflow processes and
introduces a whole new way of thinking about your customers and their print jobs!
This section contains answers to the following questions:
• What are the benefits for you and your customers?
• How does a typical PSM Web workflow look like?
Objectif Lune Inc. © 2010 1
Page 7

1.1 Benefits for you and your customers
PrintShop Mail Web organizes the print flow processes of your customers and integrates these processes
seamlessly within your own production environment.
1.1.1 Serve your customers
PrintShop Mail Web gives your customers far more control and flexibility over print production. With PrintShop
Mail Web you can better serve your customers by
• Simplifying your customers print order procedure
• Making it possible to create variable data print orders
• Providing a pre-flight and preview capability so your customer can verify what you will print
• Giving your customers the possibility to Print on Demand: create and order print work, 7 days a week,
24 hours a day
• Safeguarding your customers corporate identity
• Providing your customers with web-entrance to the PrintShop Mail Web System that matches the look
and feel of their corporate website
• Managing your customers documents, so they always use the latest version
• Costs lowering for your customers due the compact and efficient ordering and production methods
• Addressing each contact in their preferred language
1.1.2 Benefits
The benefits for your organization:
• No training needed
• No need to build your own web application
• Automatic e-mail notification whenever an order is placed on changes status
• Semi-automated quote process
• Customers produce and approve their own soft proofs
• Clear overview of all print orders in your organization and the status they have
• Export data possibilities
• Easy integration into MIS systems using XML
• Cost savings due the compact and efficient ordering and production methods
Objectif Lune Inc. © 2010 2
Page 8

1.2 Features
PrintShop Mail Web provides you with a state of the art package, enabling you to promote your own company
with unique selling points, with increased added value to your customer!
The key features of PrintShop Mail Web are:
• Multi lingual:
▪ Chinese (Simplified and Traditional)
▪ Dutch
▪ English
▪ French
▪ German
▪ Italian
▪ Portuguese
▪ Russian
▪ Spanish
▪ Turkish
▪ Japanese
• With an option to add additional languages
• Intuitive, easy-to-use web interface
• Free PrintShop Mail design software included
• Automatically generates a web site for each customer
• B2B (Business to Business) as well as B2C (Business to Customer) capabilities
• Order and print PDF documents using the web
• Order and print variable documents using the web
• Simple print order procedure
• Real time preview, preflight and soft-proof
• Support for industry-standard optimized output formats:
▪ Optimized Postscript
▪ Creo VPS
▪ Fiery Freeform
▪ PPML/VDX
▪ Xerox VIPP
• Extensive user management with custom rights management.
Objectif Lune Inc. © 2010 3
Page 9

1.3 Key Concepts
To use PrintShop Mail Web effectively, you need to understand a few basic concepts. Read this section if you
are new to PrintShop Mail Web or if you need a quick refresher. If you are new to PrintShop Mail Web, we
recommend that you read the How to... (Page 11) sections, to familiarize yourself with the individual features
of PrintShop Mail Web.
1.3.1 Workflow
The following diagram shows the overall workflow with the following roles:
• Designer: The Designer produces documents and publishes the documents to the web, taking into
account any corporate branding. Designers add companies and subsequently place the documents in a
folder specific to each individual company.
• Production Manager: The Production Manager is able to make modifications to a web form, assigning
documents to departments and making documents available to users. The production manager
automatically receives an e-mail notification every time an adjustment to the job status is made.
• Customer: Customers select documents, enter data, connect database-files to documents and order or
release print jobs. The Customers are able to monitor their print job at any stage during the production
process.
• Operator: The Production Manager or Operator places any ordered print jobs in the In-plant folder. The
Operator prints and on completion dispatches the print jobs. Either the customer or the printer marks
the print job as Completed.
The PrintShop Mail Web workflow
Objectif Lune Inc. © 2010 4
Page 10

Introduction - Key Concepts
1.3.2 User roles
PrintShop Mail Web has two main groups of users:
• Customers
• People within your own organization
Each role has certain privileges assigned to it; therefore assigning a role to users determines not only their
level of authority but also the start-up screen they will be able to view when they log in.
PrintShop Mail Web system comes with nine pre defined roles. Five roles are intended for customers, the
remaining for people within your own organization. Administrators can create new roles in the Settings
section. The section provides more information regarding user roles.
Customer roles
Below a list of the predefined customer roles:
• Customer: These users can:
▪ Retrieve a new password
▪ Create and order print jobs
▪ Edit job content
▪ Request a quote
▪ Adjust the job status (on hold and shipping)
▪ Request an overview of print jobs
▪ Re-order print jobs
▪ Search for specific print jobs
• Customer Plus: Has the same privileges as the Customer and can also:
▪ Approve their own print jobs
• Power User: Users with this role have the same privileges as the Customer Plus role with the following
addition:
▪ Approve print jobs for users in the same department (or company if there are no departments)
• Department Manager: Department Managers have control over one or several departments, have the
same privileges as power users and can also:
▪ Add, assign and delete users within their department(s)
▪ Modify details within their department(s)
• Company Manager: Have control over one company and its departments, have the same privileges as
department managers and can also:
▪ Add, assign and delete customers, customers plus, power users, department managers and
company managers within the company and within departments
▪ Add departments
▪ Assign publication types to a department
▪ Modify the company, departments and users settings
• Public Customer: This role is given to new customers who created an account before proceeding
with an order they placed while shopping in a public company (which allows any visitor to use the
shopping cart, but requires a logged-in user to proceed with checkout). These users have the lowest
functionality. They can:
▪ Create and order print jobs
▪ Approve their own print jobs
Objectif Lune Inc. © 2010 5
Page 11

Introduction - Key Concepts
Roles within your organization
Within your own organization it is possible to assign four different user roles (functions), ordered from lowest
(less rights) to highest (most rights):
• Designer: The Designer is responsible for manufacturing and managing the documents and is able to
do the following:
▪ Add new companies
▪ Add new publication types
▪ Modify and remove existing publication types
▪ Publish documents to PrintShop Mail Web
▪ Print "one-off" PrintShop Mail jobs
▪ Modify settings of a web form
▪ Add operator instructions
• Operator: The Operator is responsible for taking print jobs in production and is able to:
▪ Adjust the job status (to approved, in-plant, shipping or completed)
▪ Request an overview of print jobs
▪ Preflight print jobs
▪ Print PrintShop Mail documents to file
▪ Print "one-off" PrintShop Mail jobs
▪ Send File upload documents to an output folder
▪ Send PrintShop Mail documents to PlanetPress Watch
▪ Send print jobs to the printer
▪ Re-print a part of a print job
• Production Manager: This role is similar to that of an Order Planner. A Production Manager is able to
perform the following tasks:
▪ Adjust the job status (approved, in-plant, shipping, completed and on hold)
▪ Request an overview of print jobs
▪ Search for specific print jobs
▪ Add companies
▪ Add, assign and delete customer level users in a company or department
▪ Add, assign and delete operators and designers to a company and a department
▪ Define publication types within a company
▪ Add departments to a company
▪ Modify users, department and companies settings
▪ Set a price for quote request
▪ Add pricing information to publication types and documents
• Administrator: The administrator manages all privileges previously mentioned and is able to:
▪ Set the Terms and Conditions of the print shop
▪ Delete users, departments, companies and documents
▪ Change system settings
▪ Define output folders
▪ Add the companies web design
▪ Change the pre defined user roles
▪ Add new user roles
▪ Connectivity management
▪ Job options management
▪ Enable/disable printers
▪ Add/delete tax rates
▪ Add/delete shipping rates
▪ Customize the look-and-feel of the e-mail messages
Objectif Lune Inc. © 2010 6
Page 12

Introduction - Key Concepts
1.3.3 Companies and Departments
A company is an organization that purchases printed material produced by the print shop. Companies may
contain one or multiple departments. A department is an organizational unit and are used to define territorial
and/or administrative divisions of a company.
1.3.4 Publication types
A publication type is a folder in which template documents of your customers are grouped. These publication
type folders can contain multiple documents. For example: a publication type folder to store different
language variants of a brochure (e.g. Dutch and English-versions), a publication type folder for house style
related document (e.g. Business cards, letterheads, envelopes). Each customer has his own publication types.
Pricing details and/or volume discount tables are linked to the publication type's folders. Pricing details and/or
volume discount tables can apply to all documents which are in the publication types folder if the inherit
option is selected.
PrintShop Mail for windows can publish PrintShop Mail documents to a publication type folder in PrintShop Mail
Web. The free designer version of PrintShop Mail can be used for that. From PrintShop Mail you can also
create new publication type folders.
The publication types overview shows all enabled and disabled publication types.
Objectif Lune Inc. © 2010 7
Page 13
Introduction - Key Concepts
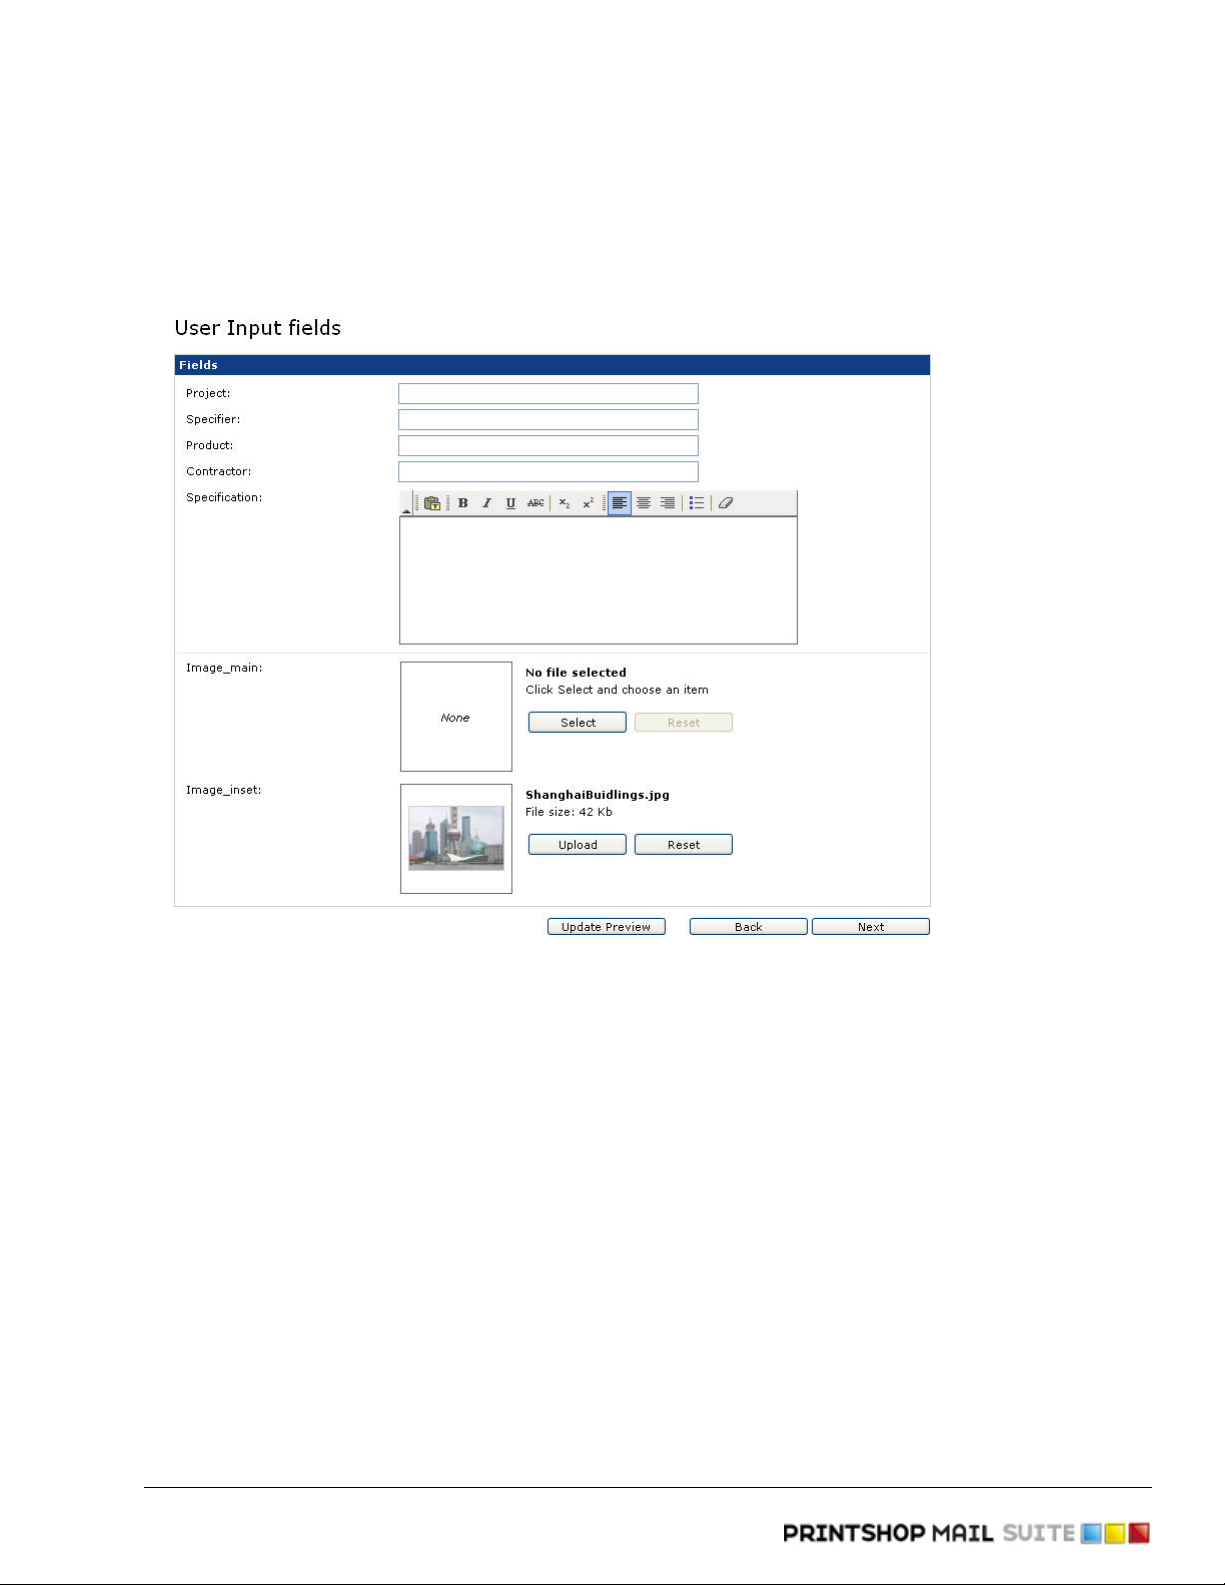
1.3.5 Web forms
Documents that require user input use a web form to collect information entered by the customer. Such a
form consists of one or more modifiable elements called input fields (e.g. text fields, checkboxes, radio
buttons, etc.).
A sample web form
Therefore web forms specify what your customer sees and which fields require data entry when selecting
certain documents. The provides more information regarding modifying the web form settings.
Objectif Lune Inc. © 2010 8
Page 14

Introduction - Key Concepts
1.3.6 Skins
The PrintShop Mail Web web site is fully skinnable. A skin is a series of files that control the presentation of
the web site. Everything except the actual textual content of the page can - and will - vary from skin to skin.
To allow PrintShop Mail Web to be skinnable, style is completely separated from contents. The web page use
standard HTML elements, user defined classes and unique IDs. The style information is stored in Cascading
Style Sheets (CSS) documents, allowing the styles to be changed and manage the styles without the need to
change the source code.
1.3.7 Order statuses
A customer orders documents to be printed by the print shop. An order can contain multiple documents. Every
order goes through the following stages:
• Ordered
• Approved
• In-plant
• Shipping
• Completed
In addition to this there is the On hold status. This folder contains orders that require a quote from the print
shop, these orders remain in this status until pricing is agreed.
Objectif Lune Inc. © 2010 9
Page 15

1.4 Quick start guide
Perform the following steps to set up PrintShop Mail Web:
1. After login as administrator click Settings in the Menu bar and register your version of PrintShop Mail
Web. For more information see Settings.
2. Add a company to the system. For more information see Add companies.
3. Add departments to a company if necessary. For more information see Add departments.
4. Add users to a company and assign them to a department. For more information see Add users and
Assign users to a department.
5. Add publication types and assign them to a company and/or department. For more information see Add
publication types and Assign a publication type to a department.
6. Define user roles within your own company (Designer, Production Manager and Operator) and assign
these roles to the companies you have defined. For more information see Add users.
7. The Designer can now publish documents to PrintShop Mail Web and assign them to the companies and
the publication types folder that are in the system already. For more information see the PrintShop Mail
guide.
8. Edit the documents-web form: define pricing details, add a volume discount table and enable the
document for the users. For more information see Setting up Web Forms.
9. Setup e-mail messaging to communicate with your customers. For more information see Settings.
10. Enable the company, publication type(s) and documents.
Your system is now ready for your customers to use. There are many other settings that can be modified.
Please see the other chapters in this manual for the possibilities.
Objectif Lune Inc. © 2010 10
Page 16

2 How to
Company related tasks are typically performed by Product Managers and some of them by Company and
Department Manager. This chapter desrcibes common tasks in the Company section of PrintShop Mail Web.
These tasks include:
• Common Tasks (Page 12)
• Company Tasks (Page 16)
• Publication Type and Document Tasks (Page 27)
• Image Collection Tasks (Page 52)
• Order Manager Tasks (Page 55)
Objectif Lune Inc. © 2010 11
Page 17
2.1 Common Tasks
This section describes how to perform some common tasks in PrintShop Mail Web.
2.1.1 Remember me
The Login page lets the user log on to the system. The Remember me option is found on the Login page. By
default the remember me checkbox is unchecked.
When the Remember me checkbox is checked a cookie is created. This cookie stores the user name and password of the user. The next time the PrintShop Mail Web web site is visited by the user the system will check for the cookie and automatically log in the user in order to show the appropriate content.
Cookies are in fact only data, not program code. Cookies cannot erase or read information from the user's
computer. A cookie is a piece of text that a Web server can store on a user's hard disk. Cookies allow a Web
site to store information on a user's machine and later retrieve it. Internet Explorer and other browsers store
cookies on your computer. If you use Microsoft's Internet Explorer to browse the Web, you can see all of the
cookies that are stored on your machine. The most common place for them to reside is in a directory called
c:\windows\cookies. You can see which Web site placed the file on your machine by looking at the file name
(the information is also stored inside the file). You can open each file by clicking on it.
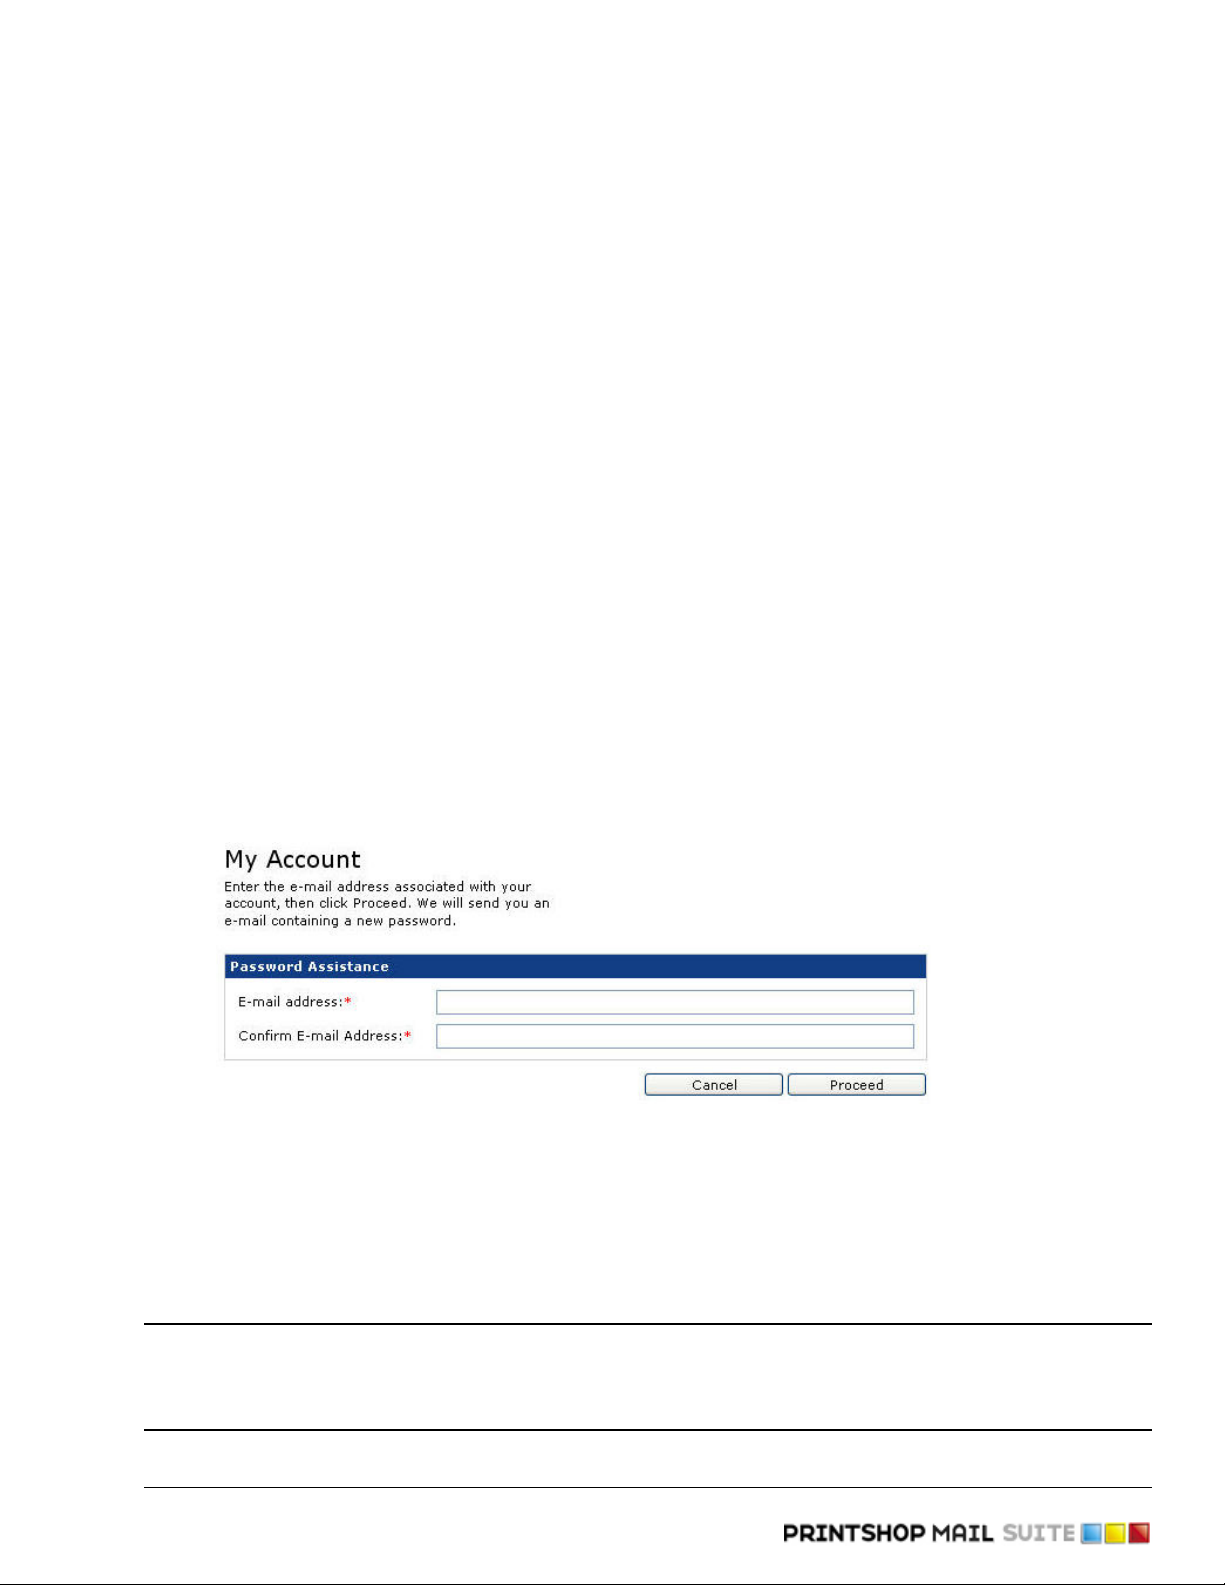
2.1.2 Lost password
The I lost my password option allows users to retrieve a new password for their account and is based on the
users e-mail address. An e-mail with the new password is send to the e-mail address of the given user. To get
a new password:
1. Click the I lost my password link on the login screen. The following screen appears:
Enter the e-mail address of your account to receive a new password
2. Enter the e-mail address associated with your account.
3. Confirm the entered e-mail address.
4. Click Proceed to generate a new password.
The user receives on the entered e-mail address a new password. The user can use this password to logon.
Once logged on the user can decide to change the password or keep using this new password.
Note: It is not possible to reset the PrintShop Mail Web password if the PrintShop Mail Web
installation authenticates against a LDAP directory. Reset the password in the corporate LDAP
system. When the password is changed in the corporate LDAP system, it is automatically
changed in PrintShop Mail Web.
Objectif Lune Inc. © 2010 12
Page 18
How to - Common Tasks
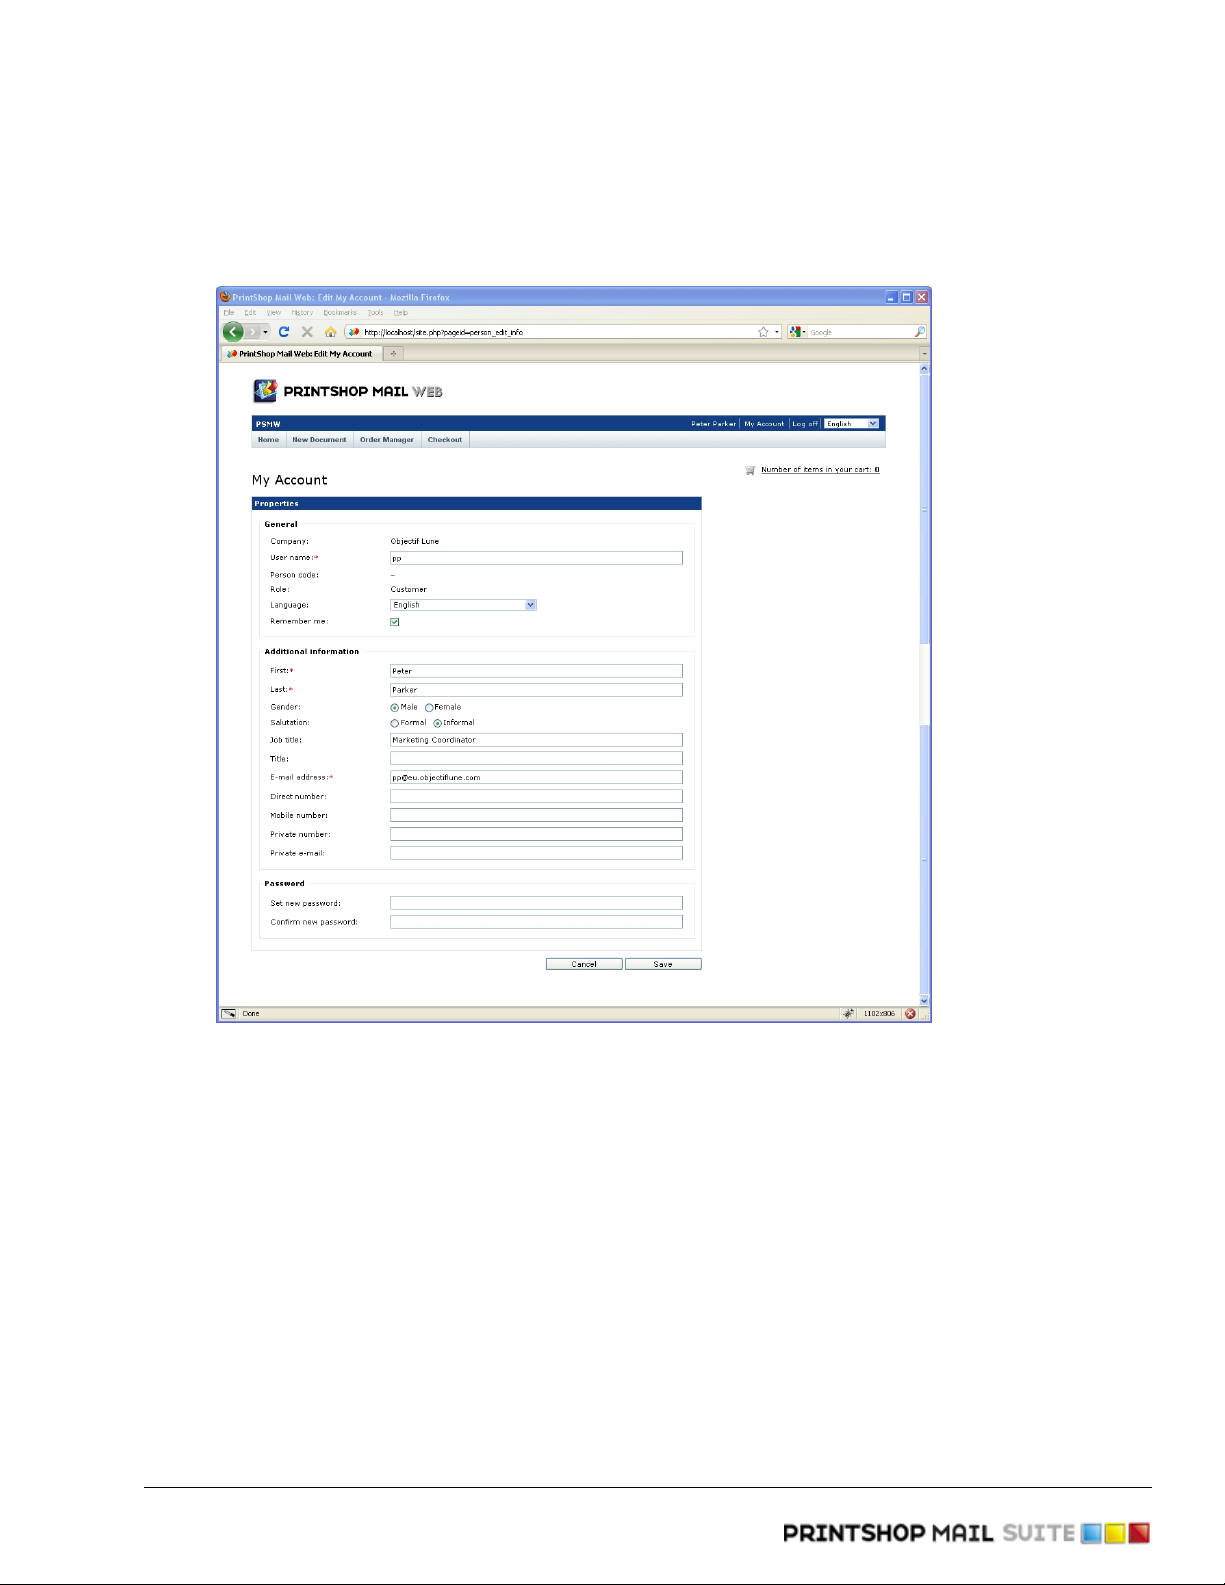
2.1.3 Modify user info
Each user can modify his personal account information. To change these parameters:
1. Click My Account in the Menu bar. The following screen appears:
Change user information in this screen
2. The following items can be changed:
▪ User name: This field defines the user name required to logon to the system.
▪ Language: The selected language is used for the e-mail message the user receives when creating
an order or when the status of an order is changed. The language selected in the login window
defines the application language.
▪ Person Code: This value is a unique code which can be used to link to an administration or
ordering system. Users with the appropriate privilege (role) can edit this field.
▪ Remember me: When the Remember me checkbox is checked a user is recognized by the system
and automatically logged in and re-direct to the Welcome page.
▪ Additional Information: The fields in this section are used in the ordering processs and can be
used as default values for user input fiields in the New Document section.
3. Click Save to store the changes.
Objectif Lune Inc. © 2010 13
Page 19

2.1.4 Set New Password
Each user can set a new password. To set a new password :
1. Click My Account in the Menu bar. The following screen appears:
How to - Common Tasks
Set a new password in this screen
2. Enter a new password.
3. Confirm the new added password.
4. Click Save to store the changes.
2.1.5 Change the language of the web site
When using PrintShop Mail Web the user can specify which language is displayed in the menus, dialogs and
pages. This allows the customer to work in the language they are most familiar with. The customer can choose
the language from any of the available languages.
To specify the interface language:
1. Launch a web browser and enter the URL of the system. The Login page appears.
2. Choose a language from the Language pop-up-menu, the interface will be change accordingly. The
selected language will be stored with your web browser (cookie). The next time the customer visits the
system the language of the interface is automatically set based on the stored value.
Objectif Lune Inc. © 2010 14
Page 20

The Login page.
It is also possible to change the language of the web site in the User info bar.
How to - Common Tasks
Objectif Lune Inc. © 2010 15
Page 21

2.2 Company Tasks
Company related tasks are typically performed by Production Managers and Company Managers. This chapter
describes common tasks in the Company section of PrintShop Mail Web.
2.2.1 Add companies
To add a new company in PrintShop Mail Web:
1. Click Companies in the Menu bar. The Companies overview page is shown.
2. Click Add. The following dialogappears:
Enter company name to create a new company
3. Enter the Company name.
4. Click Save to create the new company. You have now added a company, which is added directly to the
Companies overview.
Notes:
• Newly created companies are initially disabled and must be enabled once user accounts and publication
types are added. Users belonging to a disabled company will not be able to access the items in the Menu
bar. A company can be enabled via the summary abd/or properties page of that company. Typically
Administrators, Production Managers and Designers can test the templates of these disabled companies
via the New Document section.
• About Company Type:
▪ The Company Type can be set to Public to enable B2C (Business to Customer), so that visitors
(i.e. non logged-in users) are able to view the company's enabled publication types and
documents without logging in to PrintShop Mail Web, and add items to their shopping cart. Visitors
of a public company will nevertheless have to create an account in order to proceed to checkout.
▪ Companies of type Private can only be accessed by users who have been either created within the
company or assigned to it. This is for regular B2B (Business to Business) transactions.
Objectif Lune Inc. © 2010 16
Page 22
How to - Company Tasks
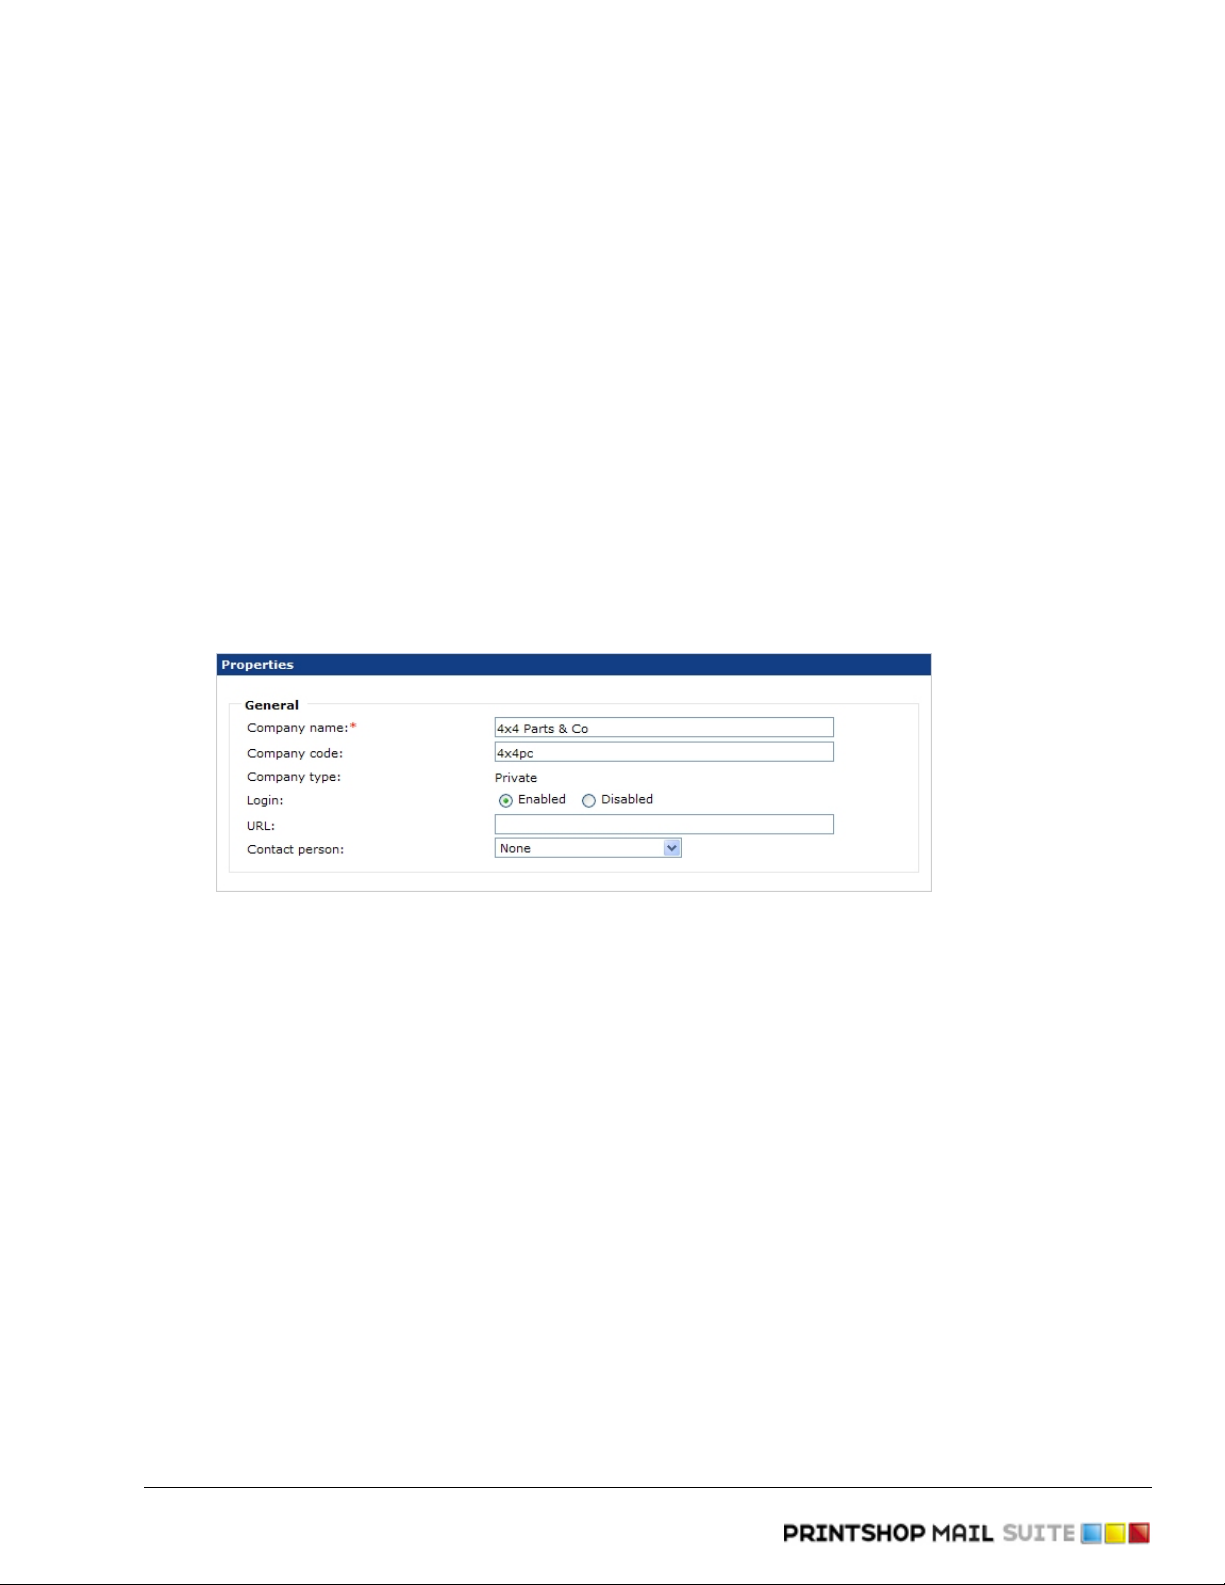
2.2.2 Modify properties
After creating a new company or department it is possible to modify all company or department properties. To
modify the company properties:
1. Click Companies in the Menu bar. The Companies overview page is shown.
2. Select a company from the overview by clicking on the company name. The Companies Summary page
is shown and on the right hand side a menu is displayed. This side menu allows management of the
following items of the currently selected company:
▪ Properties
▪ Addresses
▪ Users
▪ Publication Types
▪ Web Design
▪ Departments
▪ Pricing and Ordering.
3. On the Company Summary page the basic company information is displayed in the Properties section.
To modify the information in the Properties section click the Edit link or click Properties in the side
menu.
4. Click Edit. The following screen appears:
Change the company properties in this screen
5. Enter additional information for the company:
▪ Company Code: This value is a unique code which can be used to link to an administration or
ordering system.
▪ URL: The customers company URL can be entered here.
▪ Contact Person: When users have been added to the company, a company contact person
should be selected in the Contact person pull-down-menu.
6. Click Save to store the changes. The company properties page is shown.
Objectif Lune Inc. © 2010 17
Page 23
How to - Company Tasks
Note: The Company Type is a static value indicating whether the company has been defined as Private (for
B2B) or Public (for B2C).
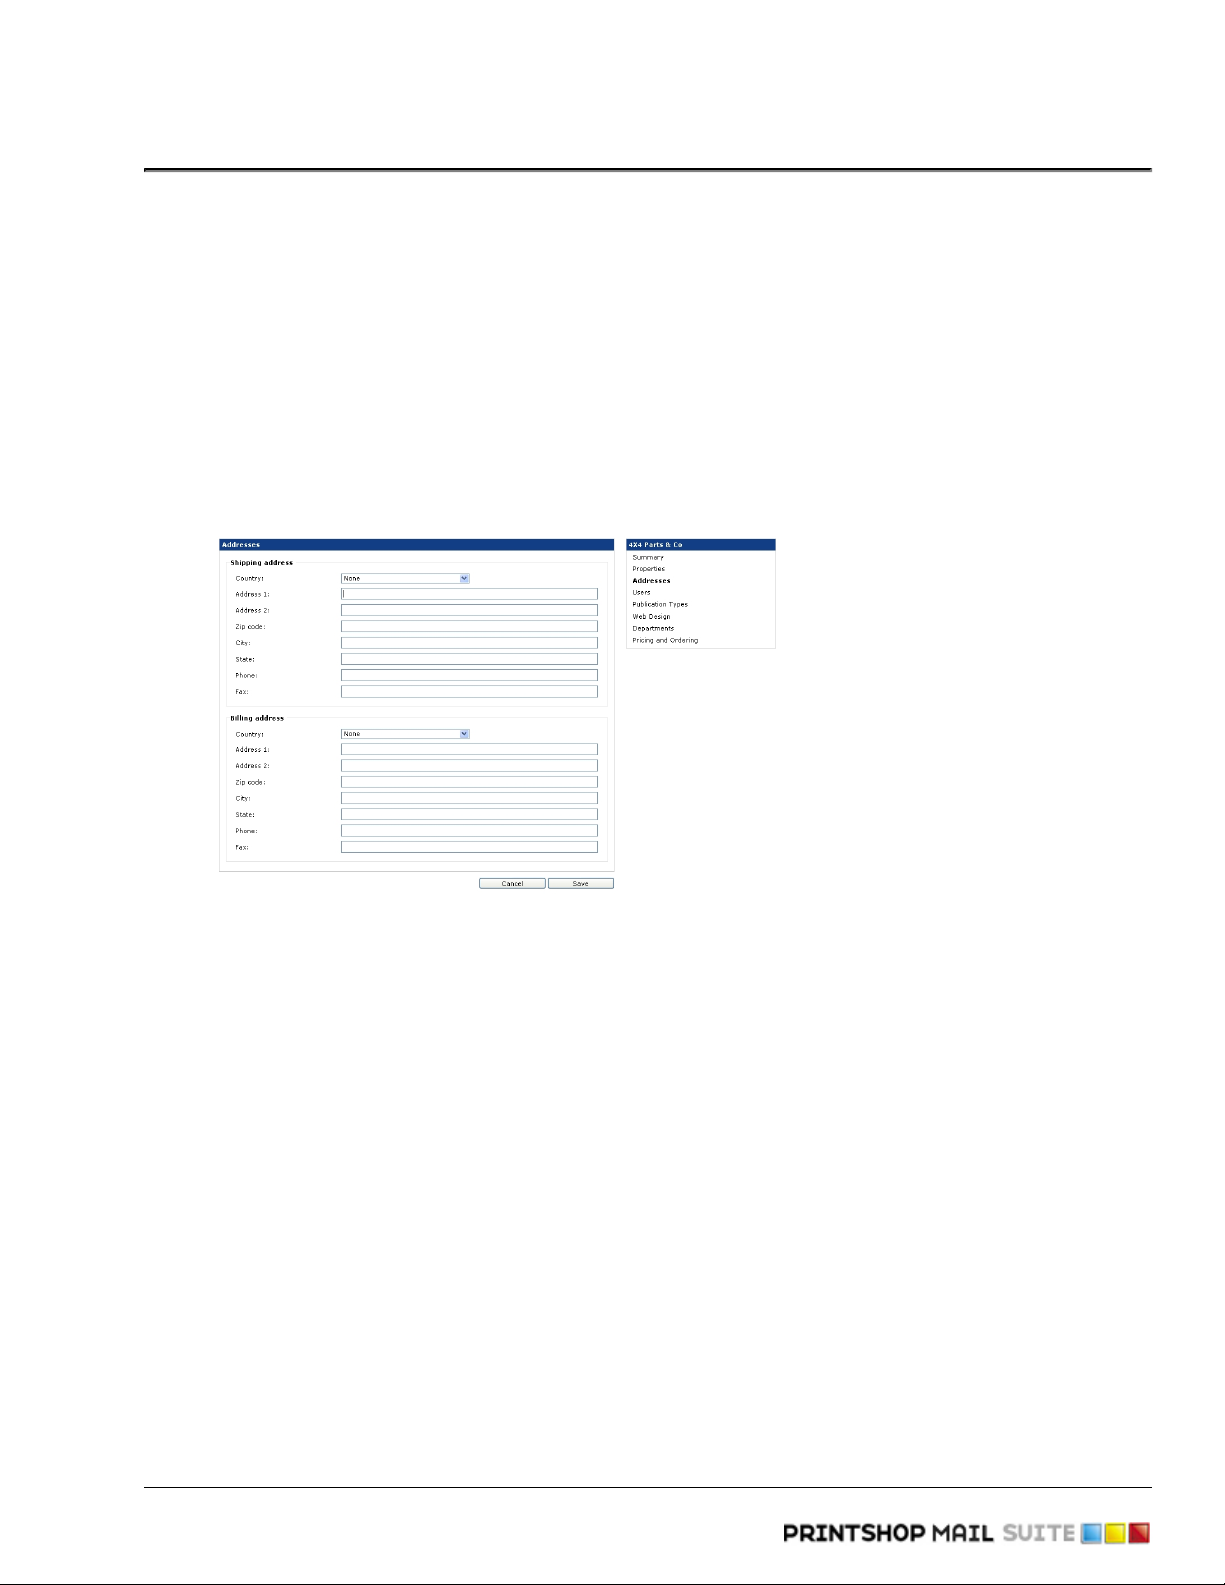
2.2.3 Add or modify address
To add the company address in PrintShop Mail Web:
1. Click Companies in the Menu bar. The Companies overview page is shown.
2. Select a company from the overview by clicking the company name. The Company Summary page is
shown. On the company summary page the basic company information is displayed. The Company
Address is placed in a collapsible information window.
3. To make the Address information visible, click the text. The address information can add or modified by
clicking the Edit link or click Addresses in the side menu.
4. Click Edit. The following screen appears:
Enter or modify the company address information in this screen
5. The Shipping and Billing address information is used during the ordering process and can be used as
default value for input fields in the New Document section. Enter the required information:
▪ Country: Select a country in the pull-down-menu. By default the value None is selected.
▪ Address Fields: Enter the address information in this fields. Maximal 255 characters can be typed
or pasted in this fields.
▪ Zip code: The Zip code is related to the selected country. In some cases a regular expression is
added to check the entered zip code.
▪ State: The State is also related to the selected country. When selecting US or Canada a pull-
down-menu is shown, presenting the states of the US or Canada. State is a required field than. In
all other cases an entry field is visible.
6. Click Save to store the changes.
Objectif Lune Inc. © 2010 18
Page 24
How to - Company Tasks
2.2.4 Add departments
To add a department to a company:
1. Click Companies in the Menu bar. The Companies overview page is shown.
2. Select a company from the overview by clicking on the company name.
3. Click Departments in the side menu. The Departments overview page is shown.
4. Click Add. The Add Department dialog appears.
5. Enter the Department name.
6. Click Save to store the changes. You have now added a department, which is added directly to the
companies' Departments overview.
Note: After creating a new department it is possible to modify the Department Properties and add the
Department Address information. On the department's address page the checkboxes for Use
company address are enabled by default; the system automatically takes shipping and billing
addresses from the company. If this option is not required, please click in the checkbox to allow
different shipping and billing addresses to be entered.
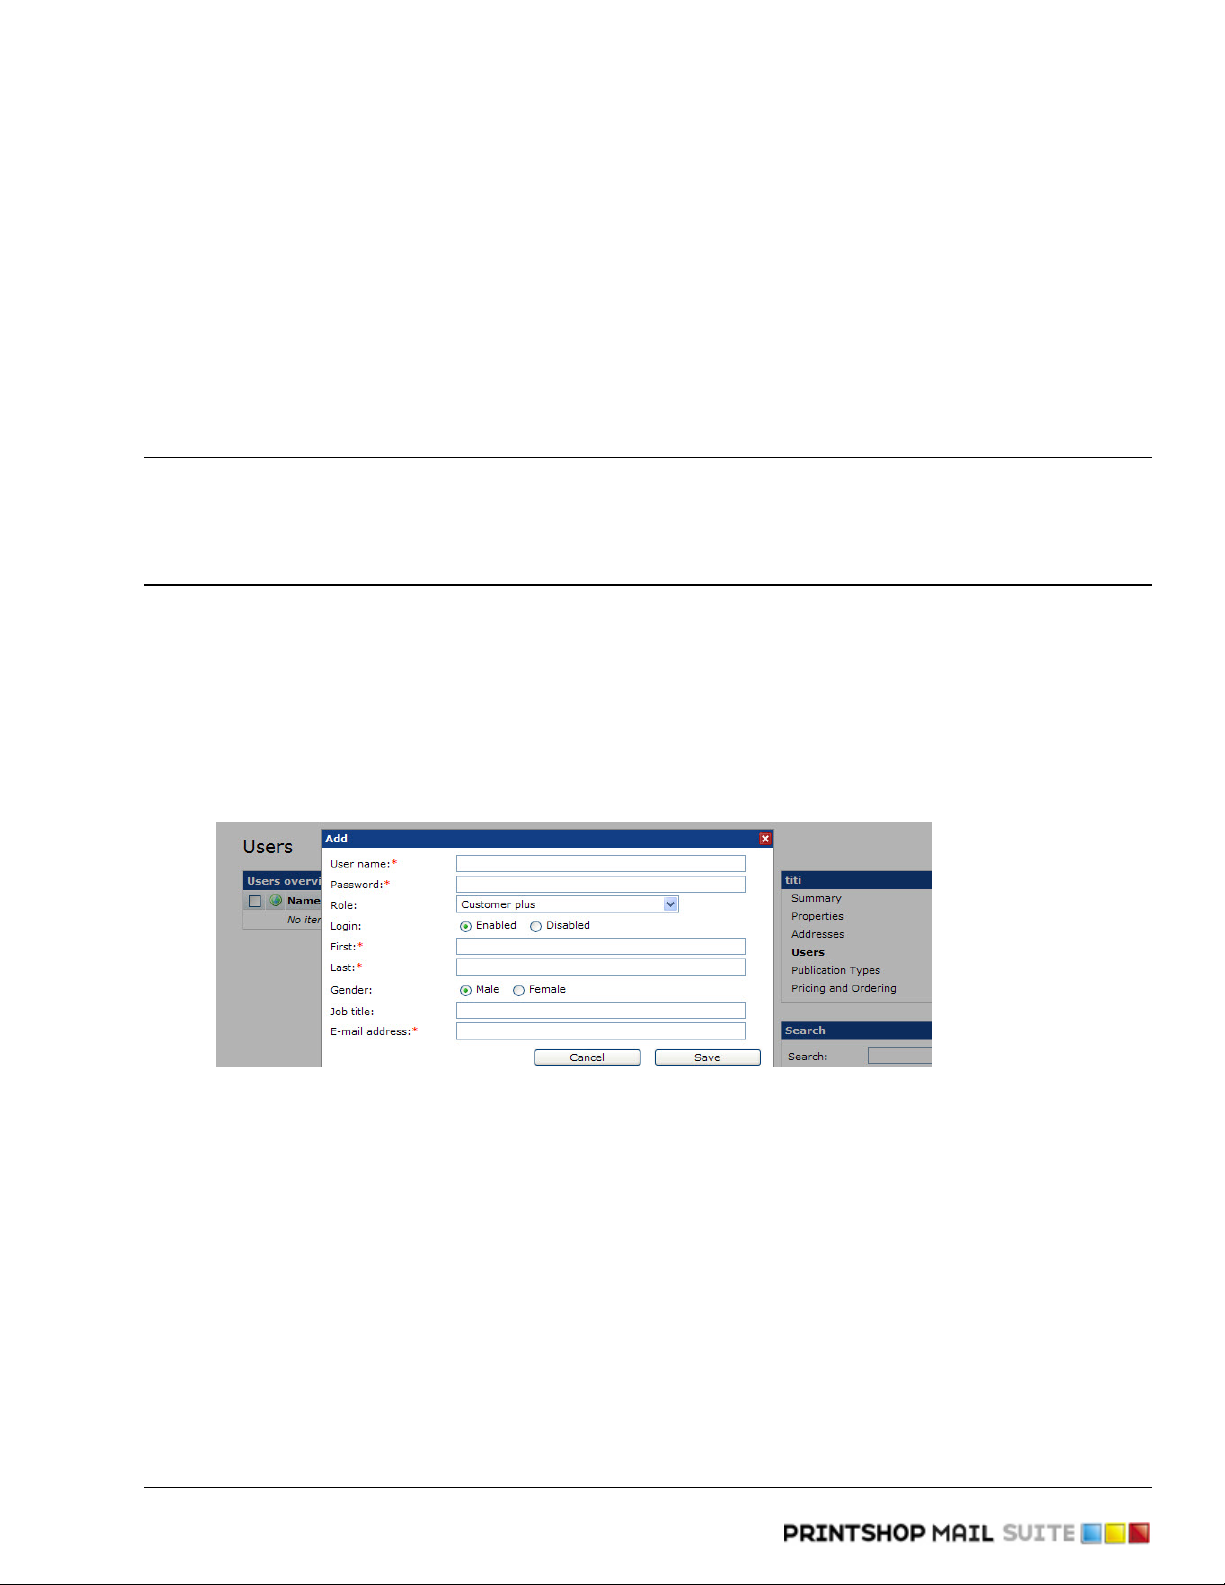
2.2.5 Add users
To create a new user account for a company:
1. Click Companies in the Menu bar. The Companies overview page is shown.
2. Select a company from the overview by clicking on the company name.
3. Select Users in the side menu.
4. Click Add. The following dialog appears:
Enter basic information about the user
5. Enter the required information:
▪ User Name and Password: These fields define the information required to logon to the system
and need to be entered in the Login page.
▪ Role: The selected role defines the privileges and access level of the user.
▪ Department: Select a department to which the user belongs (if available). It is possible to assign
users to more than one department, by holding the shift key and clicking all the departments to
which the users belongs.
▪ Login: Set this option to Enabled to allow the user logon to the system.
▪ First, Last, Gender, Job Title and E-mail address: The values of these fields are used in the
ordering process and can be used as default values for user input fields in the New Document
section.
6. Click Save. You have now added a user, which is added directly to the companies’ User overview. When
more users need to be added click Add again.
Objectif Lune Inc. © 2010 19
Page 25

How to - Company Tasks
Important: When users have been assigned to departments, a department contact person should be
selected: click on Departments in the side menu, select a department from the overview, click
Properties in the side menu and click Edit. This will open the Department Properties page, where
the correct contact person can be selected from a pull-down-menu. Click Save to store the
changes.
2.2.6 Modify user info
To modify the user information:
1. Click Companies in the Menu bar. The Companies overview page is shown.
2. Select a company from the overview by clicking on the company name.
3. Click Users in the side menu.
4. Select a user from the overview by clicking the user name.
5. Click Edit. The Edit Account page appears:
Change the user information
6. Enter the required user information:
▪ Person Code: This value is a unique code which can be used to link to an administration or
ordering system.
▪ Language: The selected language defines the language used for the e-mail messages send by
PrintShop Mail Web. The language of the web site is defined by the language selected in the Login
page.
▪ Login: Set this option to Enabled to allow the user logon to the system.
▪ Additional Information: The values of these fields are used in the ordering process and can be
used as default values for user input fields in the New Document section.
7. Click Save to store the changes.
Objectif Lune Inc. © 2010 20
Page 26

How to - Company Tasks
2.2.7 Assign users to a department
To assign a user account to a department:
1. Click Companies in the Menu bar. The Companies overview page is shown.
2. Select a company from the overview by clicking its name.
3. Click Departments in the side menu and select a department from the overview.
4. Click Users in the side menu. An overview shows the user accounts in that department:
With the assign button users can be assigned to a department
5. Click Assign. The following dialog appears:
Users can be assigned to a department
6. Select a user from the Unassigned list and click Assign or double click a name to assign.
The Unassigned Users are those users that are not part of the department. The users shown in the list
depend on the role of the currently logged on user. A role defines which roles the user can assign when
creating new accounts. The list shows those users of which the role can be assigned by the current user.
7. Click Save to store the changes. The assigned user(s) will be visible from the Users overview of the
department.
User accounts can be added directly to a department. To create a new account at department level:
1. Click Companies in the Menu bar. The Companies overview page is shown.
2. Select a company from the overview by clicking its name.
3. Click Departments in the side menu and select a department from the overview.
4. Click Users in the side menu. An overview is shown with the user accounts of the department.
5. Click Add and fill in the required user info (see Add users and Modify user info). Users who are added
directly to a department can be (re)assigned to other departments later.
Objectif Lune Inc. © 2010 21
Page 27

How to - Company Tasks
2.2.8 Assign a publication type to a department
Documents published by a Designer, are automatically assigned to a company as a whole. In order to assign
these documents to a department:
1. Click Companies in the Menu bar. The Companies overview page is shown.
2. Select a company from the overview by clicking the company name.
3. Click Departments in the side menu and select a department.
4. Click Publication types in the side menu.
5. Click Assign. The following dialog appears:
In this dialog publication types can be assigned to a department
6. Select a publication type in the Unassigned window and click the Assign button to move the selected
publication type to the Assigned window. Double clicking the selected name will also assign or unassign
the selected publication type.
7. Click Save to store the changes and return to the Publication Types overview.
To assign a publication type to a department via the Publication Type section:
1. Click Publication Types in the Menu bar. The Publication Types overview page is shown.
2. Select a publication type from the overview by clicking the publication type name. The Publication Types
Summary page appears:
On the Publication Types Summary page publication types can be assigned to a department
Objectif Lune Inc. © 2010 22
Page 28

How to - Company Tasks
3. Click Assign and select a department in the Unassigned window and click the Assign button to move the
selected department to the Assigned window. Double clicking the selected name will also assign or
unassign the selected department.
4. Click Save to store the changes and to return to the Summary page of the selected publication type.
Objectif Lune Inc. © 2010 23
Page 29
How to - Company Tasks
2.2.9 Change web design settings
PrintShop Mail Web can use different skins for each company, allowing your customers to use the system in
their own house style or a style that closely matches their house style. Users of that company can access the
PrintShop Mail Web web site via a personalized URL which will invoke their skin. The web design settings of a
company control the skin, global style settings and the personalized URL variable of the company. For
example: http:/www.yourprintshopweb.com/yourclientscompanyname.
To change the web design settings of a company:
1. Click Companies in the Menu bar. The Companies overview page is shown.
2. Select a company from the overview.
3. Click Web Design in the side menu.
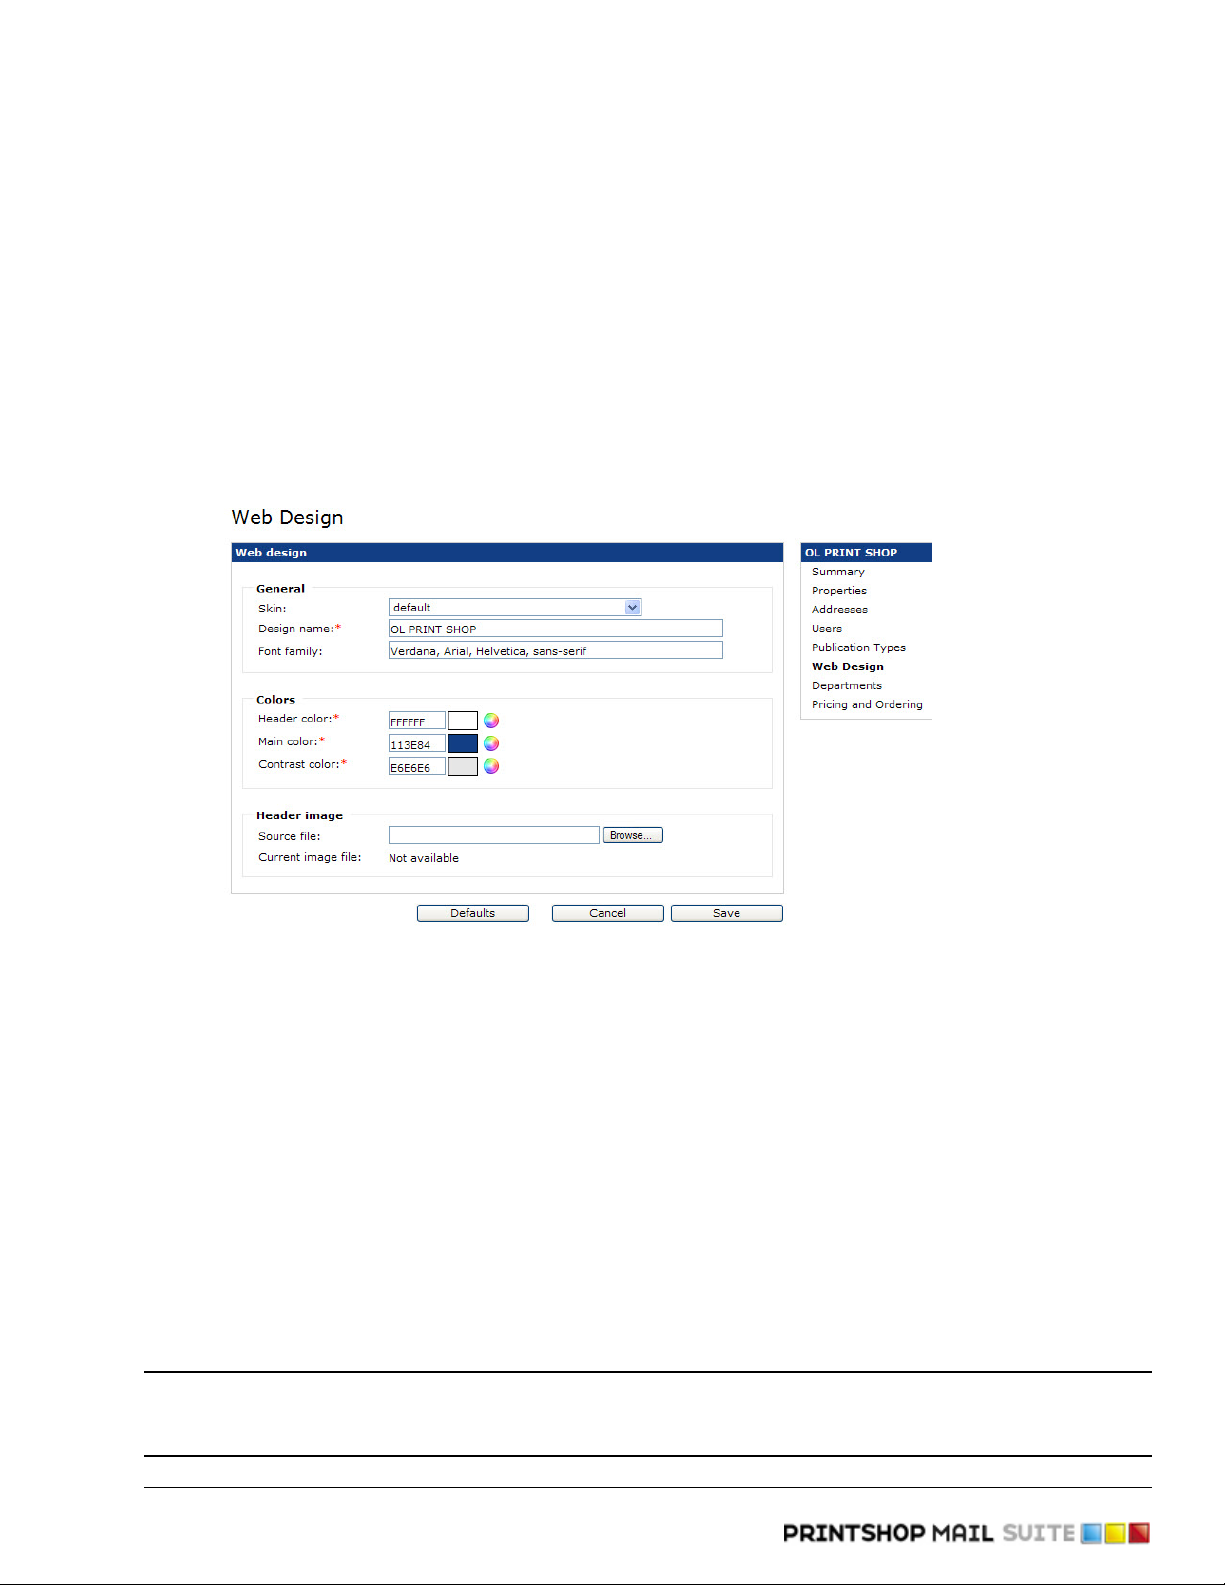
4. Click Edit. The following screen appears:
Upload a company logo and change the colors in this window
5. The Web Design page contains the following fields:
▪ Skin: This pop-up menu lets you select one of the available skins. For more information about
creating skins refer to the Skinning Guide.
▪ Design Name: The Design Name defines the URL suffix to invoke the selected skin and web
design settings.
▪ Font Family: The font-family property is a prioritized list of font family names and/or generic font
family names. The browser will use the first value it recognizes. Separate each value with a
comma, and always offer a generic-family name as the last alternative.
▪ Colors: These color pickers are used to select colors for various parts of the web site.
▪ Header Image: Use the Browse button to select an image file on your local machine (jpg or gif).
In the Default skin this image is used in the area above the Menu bar.
6. Click Save to store the changes and to upload the company logo (if applicable).
To Restore the default PrintShop Mail Web skin click the Defaults button. A warning dialog is shown. After
clicking OK the default PrintShop Mail Web skin is restored. Click Save to store the changes.
Note: If the selected skin does not make use of the custom font family, colors and header image,
changes to these fields will have no effect. The Skinning Guide explains how a skin can be made
dependent on these parameters.
Objectif Lune Inc. © 2010 24
Page 30
How to - Company Tasks
Note: You might need to refresh the cache of your browser in order to see the changes.
2.2.10 Modify Pricing and Ordering parameters
In the Pricing and Ordering section of a company or department a tax rate profile can be selected. The
calculation of shipping rates can be enabled and a payment module can be selected. In addition to this it
defines the shipping rate profiles visible in the order working. If multiple profiles are available the end user
can select the preferred method. The calculation of shipping rates has the following prerequisites:
• The administrator should create one or multiple shipping rate profiles in the Shipping Rates page of the
Settings section. For more information see the Settings section.
• The Calculate Shipping Charges option of the company should be enabled (described below).
• Pricing should be enabled for the company's publication types and documents.
To set the pricing and ordering settings for a company:
1. Click Companies in the Menu bar. The Companies overview page is shown.
2. Click Pricing and Ordering in the side menu, the Pricing and Ordering Settings page appears.
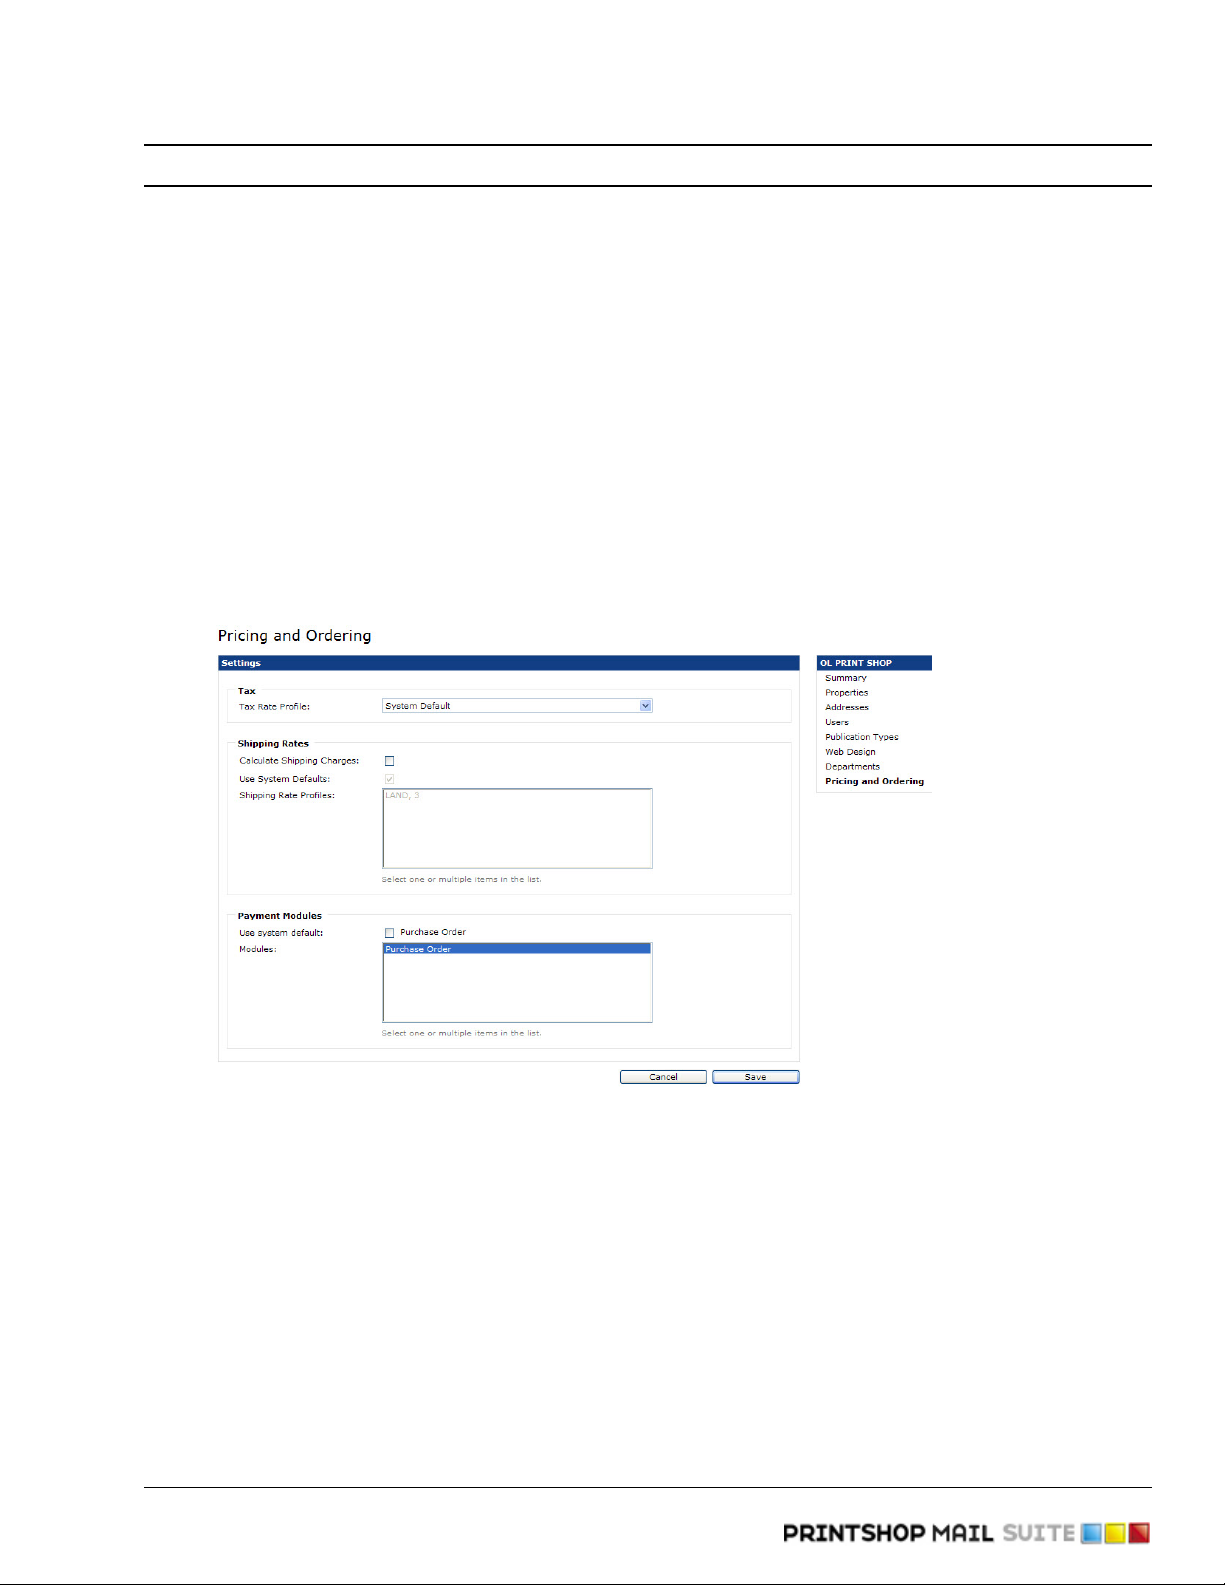
3. Click Edit. The following screen appears:
Edit the pricing and ordering settings and manage the company shipping rate profiles and payment modules in
this window.
4. This page contains the following sections and lets you set the following items:
▪ Tax: Defines the Tax Rate Profile that applies to this company (or department).
▪ Shipping Rates: This section defines the following shipping charge options:
▪ Calculate Shipping Charges: Check the Calculate Shipping Charges checkbox to enable
the calculation of shipping rates for this company (or department). This enables the options
below.
▪ Use System Defaults: If selected the system default rates are used in the ordering
workflow. If this option is selected the Shipping Rate Profile area is enabled.
▪ Shipping Rate Profiles: The shipping rate profiles become available when the Use System
Default checkbox is unchecked. To select one or multiple contiguous profiles use shift click.
Non contiguous items can be selected with alt click.
When multiple shipping rate profiles are assigned, the customer is able to select the
preferred shipping method in the ordering workflow.
Objectif Lune Inc. © 2010 25
Page 31

How to - Company Tasks
Shipping charges can be defined for the company and/or departments. These are managed
independently; the profile list of a department can be completely different from the list for
the company (e.g. when located in a different country or region).
▪ Payment Modules: This section controls the settings used for the payment modules.
▪ Use System Defaults: If selected the system default module is used. If this option is
deselected the Module area becomes available.
▪ Modules: The modules become available when the Use System Default checkbox is
unchecked. To select one or multiple contiguous modules use shift click. Non contiguous
items can be selected with alt click.
When multiple modules are assigned, the customer is able to select the preferred payment
method in the ordering workflow.
Modules can be defined for the company and/or departments. These are managed
independently; the module list of a department can be different from the list for the
company (e.g. when located in a different country or region).
5. Click Save to store the changes.
2.2.11 Delete company
On the Companies overview page it is possible to delete a company. When a company is deleted the company
and the linked departments, orders, publication types and collections are removed from the system. In the
database these items will be marked as deleted. When performing the delete companies process on the
Maintenance page in the Settings section the company and all linked items will be deleted from the database
and the file system.
To delete a company from the Companies overview page:
1. Click Companies in the Menu bar. The Companies overview page is shown.
2. Select the checkbox next to the company name:
The Companies overview page
3. Click Delete. First after click OK in the warning dialog the company is removed from the overview.
Objectif Lune Inc. © 2010 26
Page 32

2.3 Publication Type and Document Tasks
This chapter describes tasks related to publication types and docments. Typically these tasks are performed
by the designer, operator or the production manager. Read the Designer Guide and PrintShop Mail User Guide
for detailed information on PrintShop Mail related tasks and how to publish a PrintShop Mail document to
PrintShop Mail Web.
2.3.1 Add publication types
There are two ways to create publication types:
• Using the PrintShop Mail Web website
• Using the PrintShop Mail application
For more information on how to create publication types via PrintShop Mail please refer to the PSM User
Guide.
Create a publication type in PrintShop Mail Web
To create a new publication type in PrintShop Mail Web:
1. Click Publication Types in the Menu bar. The Publication Types overview page is shown.
2. Click Add. The following dialog appears:
Give the publication type’s folder a name
3. Complete the following fields:
▪ Publication Type: Enter the name for the new publication type.
▪ Status: The selected status defines if end users can view this folder in the New Document section
and start creating new documents based on the contained templates. Typically administrators and
designers can view these publications types in the New Document section allowing them to test
the preview and job generation. Disabled folders are marked with a red background in the New
Document section and have a stop-symbol next to their name.
▪ Company Name: Select a company in this pull-down-menu to assign the publication type folder
to that company. A publication type folder is always assigned to a company.
4. Click Save to add the folder.
Objectif Lune Inc. © 2010 27
Page 33

How to - Publication Type and Document Tasks
Create a publication type in the Companies section
To create a publication type folder in the Companies section:
1. Click Companies in the Menu bar. The Companies overview page is shown.
2. Select a company by clicking its name.
3. Click Publication Types in the side menu.
4. Click Add to display the Add dialog.
2.3.2 Modify the publication type properties
After a publication type folder is created the folders properties can be changed and additional information can
be added. To modify the publication type properties:
1. Click Publication Types in the Menu bar. The Publication Types overview page is shown.
2. Select a publication type from the overview by clicking on the publication type name. The Publication
Type Summary page is shown and on the right hand side a menu is displayed. This side menu allows
management of the following items of the selected publication type folder:
▪ Summary
▪ Properties
▪ Documents
▪ Settings
▪ Volume Discount Table.
3. On the Publication Type Summary page the most relevant publication type information is displayed. To
modify the Publication Type Properties click the Edit link or click Properties in the side menu
4. Click Edit. The following screen appears:
Change the publication type properties and add a custom thumbnail on the properties page
5. It is possible to complete the following fields:
▪ Product Code: This value is a unique code which can be used to link to an administration or
ordering system.
▪ Description: A text describing the publication type folder and/or additional information.
▪ Company Name: Select the company to be associated with the publication type.
▪ Use Custom Thumbnail: Check the Use custom thumbnail checkbox to display a custom logo,
icon or image for the publication type.
▪ Browse: Click Browse to locate the image file to be used as the thumbnail on your local hard
drive.
6. Click Save to store the changes. The Publication Type Properties page is shown.
Objectif Lune Inc. © 2010 28
Page 34

How to - Publication Type and Document Tasks
2.3.3 Delete a publication type folder
It is possible to delete one or multiple publication type folders on the Publication Types overview page. To
delete a publication type folder:
1. Click Publication Types in the Menu bar. The Publication Types overview page is shown.
2. Select the checkbox next to the publication type name
3. Click Delete. First after click OK in the warning dialog the publication type(s) is removed from the
overview.
Note: A publication type can only be deleted when there are no orders using one of the containing
documents.
2.3.4 Adding documents to a publication type
A publication type folder can contain various document types. There are three documents types:
• Database file upload documents
• User input file documents
• Static documents (PDF and PrintShop Mail documents without variables)
• File Upload documents (job submission)
Adding a file upload document
The File Upload option lets the end user upload a document from the local hard drive to PrintShop Mail Web.
This often referred to as ‘One-Off-Jobs’ or Job Submission (non repetitive jobs). The file upload documents are
assigned to publication types just like PrintShop Mail and Static PDF documents and are recognized by a File
upload icon in the publication types and documents overview. A publication type can contain multiple template
documents of different types.
The administrator/designer can setup multiple file upload documents in the Publication Type section. The
document name and description can be used to distinguish document types and their production method (e.g.
color mode, folding method and finishing options). The administrator/designer can configure parameters for
the actual file upload. These parameters include the maximum file size and the permitted file types.
Typically the file upload documents will be quote orders but normal pricing options can be applied.
To add a file upload document to a publication type folder:
1. Click Publication Types in the Menu bar. The Publication Types overview page is shown.
2. Select a publication type from the overview by clicking the publication type name
3. Click Documents in the side menu.
4. Click Add.
5. Select in the Document Type pull-down-menu the File Upload document type. The following screen
appears:
Objectif Lune Inc. © 2010 29
Page 35

How to - Publication Type and Document Tasks
The document add dialog to define file upload documents templates
On this page the following fields are found:
▪ Document Type: In the Document Type it is possible to select the document type in the pull-
down-menu (Static PDF or File upload).
▪ Document Name: Enter a Name for the document. The name for the document should be
unique. To create a multilingual document name (a document name that switches with the
language of the PrintShop Mail Web user interface), add a document name according to the
internal PrintShop Mail Web language string format. Language strings start with the percentage
character %, followed by the document name in which the words are joined without spaces and
are capitalized within the compound. The string should end with the percentage character % (e.g.
%ServiceManual%). Subsequently you should add this string to the various languages via the
Languages section of the Settings section.
▪ Status: The selected status defines if end users can see the document in the New Document
section and start creating new documents based on it. Typically administrators and designers can
view these documents allowing them to test the preview and job generation. Disabled documents
are marked with a red background in the New Document section and have a stop-symbol next to
their name.
▪ Product Code: This value is a unique code which can be used to link to an administration or
ordering system.
▪ Description: Enter a descriptive text for the document in the Description field, this is optional.
The description field can be used now to add additional information for end users according to the
file upload document template. Use the <!--break--> breakpoint to split the information. Text
before the breakpoint is shown in the New Document overview and document pages. The text
after the breakpoint is shown on the File Upload page in the ordering process.
6. Click Save to add the document to the publication type’s folder. The Document's overview page will be
shown.
Adding a static PDF
To add a static PDF document to a publication type folder:
1. Click Publication Types in the Menu bar. The Publication Types overview page is shown.
2. Select a publication type from the overview by clicking the publication type name
3. Click Documents in the side menu.
4. Click Add. The following dialog appears:
The document Add dialog to import PDF documents
5. Select the Static PDF type in the Document Types pull-down-menu.
On this page the following fields are found:
▪ Document Type: In the Document Type section it is possible to select the document type (Static
PDF or File upload).
▪ Document Name: Enter a name for the document.
Objectif Lune Inc. © 2010 30
Page 36

How to - Publication Type and Document Tasks
▪ Status: The selected status defines if end users can see the document in the New Document
section and start creating new documents based on it. Typically administrators and designers can
view these documents allowing them to test the preview and job generation. Disabled documents
are marked with a red background in the New Document section and have a stop-symbol next to
their name.
▪ Product Code: This value is a unique code which can be used to link to an administration or
ordering system.
▪ Description: A text describing the document or additional document information.
▪ PDF files: Click Browse to navigate to a PDF document on your local hard drive. This will be the
High Resolution version for this document. Afterwards an optional Low Resolution can be uploaded
via the properties page of the document.
6. Enter a name for the document.
7. Click Save to add the document to the publication type’s folder. The Document's overview page will be
shown.
Adding a variable data document
The PrintShop Mail application lets design variable data documents. From within PrintShop Mail these
documents can be published to PrintShop Mail Web. Please refer to the PrintShop Mail User Guide for detailed
information on these subjects.
2.3.5 Delete documents from a publication type
To delete documents from a publication type folder:
1. Click Publication Types in the Menu bar. The Publication Types overview page is shown.
2. Select a publication type by clicking its name.
3. Click Documents in the side menu. The following screen appears:
The Documents overview window
4. Select the checkbox in front of the document's name.
5. Click Delete to remove the document from the overview.
Note: A document can not be deleted while there are orders in the Order Manager that are based on
this document. The number of print jobs referring to this document is displayed in the column
with the -symbol.
Objectif Lune Inc. © 2010 31
Page 37

How to - Publication Type and Document Tasks
2.3.6 Edit document properties
To modify the properties of a document:
1. Click Publication Types in the Menu bar. The Publication Types overview page is shown.
2. Select a publication type by clicking its name
3. Click Documents in the side menu.
4. Select a document from the overview, the Documents Summary page is shown.
5. Click Properties in the side menu.
6. Click Edit. The following screen appears:
In the properties window from a document the documents’ properties can be modified
7. The document properties page contains the following sections:
▪ General: In this section you can change the name of the document, the status, and the product
code.
Check the Attach Softproof to e-mail checkbox to make it possible to send a softproof with the email sent on status change (Ordered and Approved). Attach softproof is only available for static
PDF and PrintShop Mail documents.
On the Softproof page (New document) customers can choose to check the Attach softproof to e-
mail checkbox and receive the softproof as an e-mail attachment than. This check box will only be
shown for templates where the softproof attachment option is enabled. If the attach softproof
option is enabled and the softproof is too large to send the e-mail is not send.
▪ Other: In this section it is possible to select Use custom thumbnail to display a custom logo, icon
or image for the document. Click Browse to locate the image file to be used as the thumbnail on
your local hard drive.
8. Click Save to store the changes and upload the image file (if applicable).
Note: For the user to receive the e-mail with attachment the attachment size must not exceed the
SMTP server or the user's e-mail box capacity.
Objectif Lune Inc. © 2010 32
Page 38

How to - Publication Type and Document Tasks
2.3.7 Manage production settings
The Production Settings lets you change default values for production specific parameters on document level.
The document production settings are related to the Shipping date calendar in the ordering process. To modify
the Settings in the Production section:
1. Click Publication Types in the Menu bar. The Publication Types overview page is shown.
2. Select a publication type by clicking its name
3. Click Documents in the side menu.
4. Select a PDF document from the overview, the Documents Summary page is shown.
5. Click Settings in the Production section from the side menu.
6. Click Edit. The following screen appears:
On the production settings page from a document the documents’ production parameters can be modified
7. The document production settings page contains the following sections:
▪ Use System Defaults: The Use system default checkbox is on by default, which causes the
remaining options of this section to be disabled. If selected the system default values are used.
▪ Standard Production Time: In the Standard production time pull-down-menu the number of
days to produce documents can be defined. The values ranges from 0 to 15. The standard
production time is used to calculate the first possible shipping date during the ordering process.
The end user has the option to select a different date (via a calendar) but cannot select any of the
data marked as standard production time. The values specified in this section are automatically
applied to new templates.
▪ Rush Order Production Time: The Rush order production time pull-down-menu represents the
time frame to produce the document measured in days for rush orders. The end user will be able
to select a date between the Standard Production Time and Rush Order Production Time. If such a
date is selected as the shipping date the rush rate of the document is added to the price
calculation (surcharge) and the order is marked as a rush order.
If the value is set to same value as the Standard Production Time, customers cannot request a
rush order.
▪ Include Today In Production Time: When checked, this option determines if the current date is
counted as a production day for orders placed before the time specified in the orders placed before
pull-down-menu.
▪ Orders Placed Before: The Orders placed before option defines the time slot for the Include
today for production option. If an order is placed before the stated time and the Include Today In
Production Time option is selected, the current day is counted as production day. The default value
of the Orders placed before pull-down-menu is 13:00 hours.
When no Standard production time is specified and the Include today in production time checkbox is
cheked it is possible for customers to order print jobs for the same day (when ordered before the
specified Orders placed before time).
8. Click Save to store the changes.
Objectif Lune Inc. © 2010 33
Page 39

How to - Publication Type and Document Tasks
2.3.8 Output options
The Output Options of a document depend on the document type. The output options of a static PDF document differ from the output options of an PrintShop Mail document. The following sections explain the output options of both document types.
Output options for a PrintShop Mail document
To modify the document Output Options:
1. Click Publication Types in the Menu bar. The Publication Types overview page is shown.
2. Select a publication type from the overview by clicking its name.
3. Click Documents in the side menu.
4. Select a PrintShop Mail document from the overview, the Document Summary page is shown.
5. Click Output Options in the side menu.
6. Click Edit. The following screen appears:
In the output options window from a PrintShop Mail document the documents’ output settings can be modified
7. The document output options page contains the following sections:
▪ General:
▪ Operator Instructions: Enter a note or reminder for the operator regarding, duplex
settings, paper type, paper weight etc. This information is visible when the operator views a
job in the Order Manager section.
▪ Document's Printer: This static field states the printer that was saved with the document
upon publishing.
▪ Output Printer: The selected driver defines the default item for the Printer list in the Print
page (Order Manager section). Defines the printer driver that is used to create PDF
softproofs.
▪ Operator Defaults:
▪ Job Option File: Defines the default item for the Job Options list in the Create PDF page
(Order Manager section). Via this page the operator can output the page to PDF. By default
the Job Option File field is set to None, in this case the job options file installed with
PrintShop Server is applied.
A Job Options file defines the characteristics of the resulting PDF document. The
administrator can add and remove Job Options in the Settings section.
▪ Folder Name: This option defines the default Output folder when the operator creates PDF
documents in the Order Manager section (In-Plant status). The operator can override the
value in the Create PDF page. For more information see Output Folders.
Objectif Lune Inc. © 2010 34
Page 40

How to - Publication Type and Document Tasks
▪ Softproof Options:
▪ Job Options File: Select a Job Options file from the list a Job Options files define the
characteristics of the resulting PDF document. The administrator can add and remove Job
Options in the Settings section. By default this is set to None, in this case the Job Options
file installed with PrintShop Server is applied.
▪ Print Permissions: The Print permissions option controls the print permission for the PDF
softproof. There are three options: None, Low resolution and High resolution. Selecting None
will prevent printing the softproof; the print icon in the softproof window is disabled.
Selecting the Low resolution option allows customers to print the softproof with a resolution
of 150 dpi.
8. Click Save to store the changes and upload the image file (if applicable).
Important: If a non-PostScript printer is selected in the Printer section, users may experience
rendering engine errors when a softproof is created!
Output options for a static document (PDF)
To modify the document Output Options:
1. Click Publication Types in the Menu bar. The Publication Types overview page is shown.
2. Select a publication type from the overview by clicking its name.
3. Click Documents in the side menu.
4. Select a static document (PDF) from the overview, the Document Summary page is shown.
5. Click Output Options in the side menu.
6. Click Edit. The following screen appears:
In the output options window from a static document the documents’ output settings can be modified
7. The document output options page contains the following sections:
▪ General:
▪ Operator Instructions: Enter a note or reminder for the operator regarding, duplex
settings, paper type, paper weight etc. This information is visible when the operator views a
job in the Order Manager section.
▪ Printer: The selected Printer defines the selected printer item for the Printer list in the Print
page (Order Manager section.
▪ Operator Defaults:
▪ Folder Name: This option defines the default Output folder when the operator creates PDF
documents in the Order Manager section (In-Plant status).
Objectif Lune Inc. © 2010 35
Page 41

▪ Documents: The Document section lets you replace the High Resolution version of the PDF and
optionally add a Low Resolution version. If the View Low Resolution PDF preview is enabled the
end user will see this document in the ordering process.
Especially for large PDF documents this options should be enabled and a Low Resolution PDF
should be uploaded. Using a Low Resolution PDF will reduce network bandwith and will reduce the
respons time of the system.
8. Click Save to store the changes.
How to - Publication Type and Document Tasks
Objectif Lune Inc. © 2010 36
Page 42

How to - Publication Type and Document Tasks
2.3.9 Manage linked files
When a document is published the designer has the option to include the variable images required to print the
document. Examples of variable images are: logo’s, stock photos, signatures etc. The PrintShop Mail Web
interface allows the designer to manage these files online once the document is published. New files can be
added by the designer, he can add this via PrintShop Mail Web instead of re-publishing the document using
PrintShop Mail.
To add a new file:
1. Click Publication Types in the Menu bar. The Publication Types overview page is shown.
2. Select a publication type from the overview by clicking its name.
3. Click Documents in the side menu.
4. Select a document from the overview.
5. Click Linked Files in the side menu. The following screen appears:
The Linked Files overview showing all files related to the document
6. Click Add the Add dialog appears:
The Add dialog to upload new files
7. Click Browse and select a file on your local hard drive.
8. Click Save to upload the new file. The new file is added to the Linked Files Overview.
Important: When a new linked file is added with the same name a warning is shown. It is possible
than to replace the existing file by clicking the Replace button.
Objectif Lune Inc. © 2010 37
Page 43

How to - Publication Type and Document Tasks
2.3.10 Setting up web forms
Documents that require user input use a web form to collect information entered by the customer. Such a
form contains of one or multiple modifiable elements called input fields (e.g. text fields, checkboxes, radio
buttons, etc.). This section describes how to set the entry method and appearance of these fields.
A sample web form
User Input Fields
To make modifications to a user input field:
1. Click Publication Types in the Menu bar. The Publication Types overview page is shown.
2. Click the + symbol next to the publication type to view a list of its documents. Documents containing
user input fields have a value in the User Input Fields column ( ).
The Publication Type overview showing a document that requires user input
3. Select a document that requires user input from the overview. The Document's Properties page is
shown.
4. Select User Input Fields in the side menu. The User Input Fields page is shown, this overview displays
information about the input fields (e.g. name, default value, input type):
Objectif Lune Inc. © 2010 38
Page 44

How to - Publication Type and Document Tasks
In the User Input fields overview information about input fields is shown
5. Select an input field from the overview. The following screen appears:
The options in the Item page define the appearance of the input field
6. The Item Properties page consists of following sections:
▪ General: The Name of the entry field can be modified and it is possible to add an informative text
which appears below the data entry field.
▪ Web Form Parameters: The options found in the Web form parameter section are used to define
the appearance of the field. They depend on the selected field type. PrintShop Mail Web supports
the following field types (described separately):
▪ Plain text
▪ Pull-down
▪ Phone
▪ Image upload
▪ Collection
▪ Checkbox
▪ Rich text editor
▪ Regular expression.
Objectif Lune Inc. © 2010 39
Page 45

How to - Publication Type and Document Tasks
▪ Default Value: The options in this section define the initial value of the field. The value can be
overwritten by the end user.
7. Click Save to store your changes.
When User Input Field Default items are specified in the Settings section it is not necessary to define the
settings of a specific item. With the Apply Default button it is possible to select a user input field default item
which setting should be applied to the current user input field. Clicking Save will replace the current user input
field settings.
Plain Text field
Plain text fields are the most commonly used input type and are used when you want the user to type letters,
numbers, etc. in a form. The height is measured in lines, by default the field allows a single line of input.
A required plain text field showing a description
Web Form Parameters
A plain text field has the following properties:
• Required: Defines the plain text option as a required field.
• Read Only: Customers can not edit the information, the value is static.
• Separator Line: Controls whether a separator line will be shown before this field. With this option web
forms that have more complex variable data can be arranged more logically.
• Field Width: The width of the data entry field can be modified. The minimum width of the data entry
field is 1 pixel, the maximum width is 2048 pixels. By default the value is set to 300 pixels.
• Field Height: The height of the data entry field can be modified. The minimum height of the input field
is 1 line and the maximum height is 255 lines. By default the value is set to 1 line.
• Max. Input Characters: Defines the maximum number of characters that the user may enter. The
number of characters is unlimited. By default the value is set to 256 characters.
Default Value
This field type has the following Default Value options:
• Default Value: This pop-up menu contains a list of items referring to company information and account
details. The selected value defines the initial value for the field and it's retrieved automatically when
creating new jobs. This is very useful for business cards, letterheads and other versioned documents as
it will automatically populate the field with user specific information.
• Custom Value: Enter an initial value for the field. If a value is entered this will overwrite the selected
Default Value.
Checkbox field
Checkboxes are used to allow the user to select one or more options of a limited number of choices. Based on
the status of the checkbox a 0 (zero) or 1 (checked) is set as the value of the user input field. This value can
be used in an expression in the PSM document to implement a specific condition (e.g. print or skip layouts). A
data field can have only one checkbox, if a range of checkboxes is required one data field should be created
per option.
Objectif Lune Inc. © 2010 40
Page 46

How to - Publication Type and Document Tasks
A range of checkboxes.
Web Form Parameters
• Separator Line: Controls whether a separator line will be shown before this field. With this option web
forms that have more complex variable data can be arranged more logically.
Default Value
• Custom Value: Defines the initial status of the checkbox (checked or unchecked).
A layout condition to skip or print a layout
Collection field
Image Collections allows the end user to select an image by browsing a collection of predefined images. The
PrintShop Mail document should contain a variable image box, with an expression that refers to a (user input)
data field. The Scale property of this box defines how the image is resized relative to the box. Make sure that
Objectif Lune Inc. © 2010 41
Page 47

How to - Publication Type and Document Tasks
the Source of the data field is set to User Input. Collections can be assigned to data fields across multiple
documents and are managed in the Collection section. Collections examples are: a set of stock images used
for backgrounds or a group of company logo variants.
An image collection
Web Form Parameters
When the Field Type is set to Collection the following options are shown:
• Required: Defines the collection field as a required field, requiring customers to select an image then.
• Separator line: A separator line between two data entry fields. With this option it is possible to arrange
web forms that have more complex variable data more logically.
• Collection: Select one of the available collections.
Image Upload field
The Image Upload field type enables the end user to upload an image file for the job. The PrintShop Mail
document should contain a variable image box, with an expression that refers to a (user input) data field. The
Scale property of this box defines how the image is resized relative to the box. Make sure that the Source of
the data field is set to User Input. For more information about variable images refer to the Designer Guide.
The supported image formats are: JPEG, GIF, PDF.
An image upload field
Web Form Parameters
The Image Upload field has the following parameters:
• Required: Defines the image upload option as a required field requireing upload an image.
Objectif Lune Inc. © 2010 42
Page 48

How to - Publication Type and Document Tasks
• Separator Line: Controls whether a separator line will be shown before this field. With this option web
forms that have more complex variable data can be arranged more logically.
The image box in PrintShop Mail, the expression of this box is referring to a data field
Phone field
This field type is used to restrict the user supplied data to a pattern for a phone number.
Web Form Parameters
This field type has the following parameters:
• Required: Defines the phone option as a required field.
• Separator Line: Controls whether a separator line will be shown before this field. With this option web
forms that have more complex variable data can be arranged more logically.
• Phone Template: This field defines the pattern for the phone number. Use a #-symbol for each digit.
The number of # -symbol defines the maximum numbers of digits a telephone number can consist of.
Regular Expression field
Regular expressions allow text strings such as names, addresses, phone numbers, and other user information
to be validated. Regular Expressions can be used to constrain input and check lengths. PrintShop Mail Web
allows the designer to enter a custom expression or to pick one from the expression library. For more
information about this subject refer to the Regular Expressions chapter.
Web Form Parameters
This field type has the following parameters:
• Required: Marks the field as a required, the user needs to enter data in order to proceed.
Objectif Lune Inc. © 2010 43
Page 49

How to - Publication Type and Document Tasks
• Separator Line: Controls whether a separator line will be shown before this field. With this option web
forms that have more complex variable data can be arranged more logically.
• Field Width: The width of the field in the web form. The minimum width of the data entry field is 1
pixel, the maximum width is 2048 pixels. By default the value is set to 300 pixels.
• Field Height: The height of the field in the web form. The minimum height of the input field is 1 line
and the maximum height is 255 lines. By default the value is set to 1 line.
• Max. Input Characters: Defines the maximum number of characters that the user may enter. The
number of characters is unlimited. By default the value is set to 256 characters.
• Regular Expression: Type or paste the expression in this field. Click the -icon to display the
Regular Expression Library. This dialog shows a list of predefined expressions. Double click an
expression to copy it to the Item Properties page. This action will also copy the description to the
Description field.
• Test Data: Enter a sample string in this field and hit the -icon to test the expression.
Default Value
This field type has the following Default Value options:
• Default Value: This pop-up-menu contains a list of items referring to company information and account
details. The selected value defines the initial value for the field and it's retrieved automatically when
creating new jobs. This is very useful for business cards, letterheads and other versioned documents as
it will automatically populate the field with user specific information.
• Custom Value: Enter an initial value for the field. If a value is entered this will overwrite the selected
Default Value is ignored.
Enter three digits (0 through 9)
[0-9]{3}
Dutch postal code (e.g. 2718RP or 2718 RP)
Four digits where the first cannot be a 0.
An optional space
And two uppercase characters
[1-9]{1}[0-9]{3}\s?[A-Z]{2}
Rich Text Editor field
The Rich Text Editor input field allows the end user to apply basic formatting to the entered text. Such as:
bold, italic, underline, alignment options and lists.
The entered data is converted into a RTF file. The user input field will contain the path to the RTF file. The
PrintShop Mail document should have a variable with the TEXT_FILE() expression. The value parameter of this
expression should state the name of the user input data field, e.g. TEXT_FILE([Specification]). For more
information about the TEXT_FILE() expression refer to the PrintShop Mail User Guide.
Objectif Lune Inc. © 2010 44
Page 50

A rich text field
How to - Publication Type and Document Tasks
Web Form Parameters
• Required: Defines the Rich Text Editor field as a required field.
• Separator Line: Controls whether a separator line will be shown before this field. With this option web
forms that have more complex variable data can be arranged more logically.
• Max. Input Characters: Defines the maximum number of characters that the user may enter. The
number of characters is unlimited. By default the value is set to 256 characters.
• Field Width: The width of the field in the web form. The minimum width of the data entry field is 1
pixel, the maximum width is 2048 pixels. By default the value is set to 300 pixels.
• Field Height: The height of the field in the web form. The minimum height of the input field is 1 line
and the maximum height is 255 lines. By default the value is set to 1 line.
Rich Text Defaults
When the field type is set to Rich Text an additional group of options becomes available. These options are
used to set basic formatting of the content or to specify additional parameters of the online editor. The Rich
Text Defaults section contains the following properties:
• Font: Enter the name of the font for text. All text will have the same font applied. Note that this font
should be installed and activated on the PrintShop Mail Web server.
• Font Size: The fonts size applied to the text in the RTF file.
• Line Spacing: Space between lines of text measured fom baseline to baseline. The value is measured
in points.
• Default Color: Enter the base color for the text (hexadecimal value, e.g. 0099FF).
• Color Palette: This field defines the contrast colors that can be used to mark ranges of text in the
online editor. Colors should be entered using hexadecimal values. The values are comma separated, the
#-symbol is not required (e.g. 0099FF, FF0000, 00CC00).
• Background Color: Enter the background color for the text editor (hexadecimal value, e.g. 0099FF).
Change this value when the Default Color is set to white (#FFFFFF) or a light color, to enable the end
user to see the entered text clearly.
Default Value
This field type has the following Default Value option:
• Custom Value: Enter the initial value for the field.
Objectif Lune Inc. © 2010 45
Page 51

How to - Publication Type and Document Tasks
Data conversion
The entered data is converted into a RTF file, which is achieved using a XSLT style sheet. If a document
requires specific RTF output an experienced user could change this XSLT style sheet. The xhtml2rtf.xsl is
located in the include folder of the PrintShop Mail Web web site.
To create a document specific conversion one should copy this file to the folder of the PrintShop Mail
document. The preview process will automatically detect and apply this file. The path to the document folder
is stated in the property page of that document.
Note: Before editing the XSLT style sheet create a backup of the file first.
A variable in PrintShop Mail with the TEXT_FILE expression
Arrange Fields
The order of the fields shown when a user creates a new job can be changed using the PrintShop Mail Web
interface. This is applicable for user input fields and database input fields.
User Input Fields
To change the order of the user input fields:
1. Click Publication Types in the Menu bar. The Publication Types overview page is shown.
2. Select a publication type from the overview by clicking the publication type name.
3. Click Documents in the side menu.
4. Select a document containing user input fields from the overview.
5. Click User Input Fields in the side menu. This will show an overview of the available input fields.
6. Click Arrange. The following page appears:
Objectif Lune Inc. © 2010 46
Page 52

How to - Publication Type and Document Tasks
Drag and drop an item to change its position
7. The order of the items can be changed by dragging and dropping an item name.
8. Click Save to store the changes.
Database Input Fields
To change the order of the database input fields:
1. Click Publication Types in the Menu bar. The Publication Types overview page is shown.
2. Select a publication type from the overview by clicking the publication type name.
3. Click Documents in the side menu.
4. Select a document containing database input fields from the overview.
5. Click Database Fields in the side menu. An overview with the database input fields appears.
6. The order of the items can be changed by dragging and dropping an item name.
7. Click Save to store the changes.
2.3.11 Define file upload settings
When a file upload template is added to PrintShop Mail Web the administrator and the designer can
configure parameters for the actual file upload. These parameters include the maximum file size and the
permitted file types.
To define the file upload settings:
1. Click Publication Types in the Menu bar. The Publication Types overview page is shown.
2. Select a publication type that contains a file upload template from the overview by clicking its name.
3. Click Documents in the side menu.
4. Select a document from the overview by clicking its name.
5. Click Files Upload Setting in the side menu.
6. Click Edit. The following screen appears:
Objectif Lune Inc. © 2010 47
Page 53

How to - Publication Type and Document Tasks
The File upload settings page
7. The items found in this section controls the following options:
▪ Operator Instructions: Enter a note or reminder for the operator. This information is visible on
the Job Properties page in the Order Manager.
▪ Visitor Instructions: Enter instructions for the file upload procedure if necessary. This
information becomes visible on the File Upload page from the ordering process.
▪ Permitted File Type(s): In the Permitted File Type entry field can be defined which default
extensions can be uploaded. Separate the extensions with a space and do not include the leading
dot. The following file types are supported:
▪ jpg/jpeg
▪ gif
▪ png
▪ psd
▪ tiff
▪ pdf
▪ zip
▪ rar
▪ txt
▪ rtf
▪ doc
All other file types are only checked by the file extension. The default value of the permitted file
type field is PDF.
▪ Max File Size Per Upload: The Max File Size Per Upload option state the max file size of the
uploaded files measured in megabytes (Mb). The default max file size per upload is 2 Mb.
2.3.12 Setting up pricing
In order to calculate the cost of a document the price calculation option of that document should be enabled
and a volume discount table should be available.
Pricing options
To enable pricing for a document:
1. Click Publication Types in the Menu bar. The Publication Types overview page is shown.
2. Select a publication type from the overview by clicking the publication type name.
3. Click Documents in the side menu.
4. Select a document from the overview, the Documents' Summary page is shown. The Pricing field on this
page states the current calculation method.
5. Click Settings in the Pricing and Ordering section from the side menu.
6. Click Edit. By default the document pricing is disabled.
7. Click Enable Pricing to display the pricing options:
Objectif Lune Inc. © 2010 48
Page 54

How to - Publication Type and Document Tasks
The documents’ pricing options
8. The items found in this section control the following options:
▪ General: The items in this section let you enter a pricing comment and inherit pricing information
from the publication type.
▪ Inherit Pricing: If selected the pricing settings of the publication type are used.
▪ Inherit Volume Discount Table: Check this field to inherit the volume discount table of
the publication type.
▪ Comment: The comment text is shown in the checkout overview (shopping cart) and can be
used to point out pricing information to the end user.
▪ Quantities: The Quantity section defines the entry method of quanties. Quantities for documents
that require a database upload are determined by the number of records in the database file.
▪ Entry Method: The selected option defines the quantity entry method in the shopping cart.
▪ Free entry: If selected customers can enter a custom quantity. The Minimum and Maximum
fields specify a minimum and maximum quantity.
▪ Predefined list: Customers can select a quantity from a predefined list (pull-down-menu).
The quantities in the list are defined by the volume discount table.
▪ Minimum: The smallest quantity a customer is allowed to order. By default this value is 1.
▪ Maximum: The maximum quantity a customer is allowed to order. If set to 0 or a value
smaller than the Minimum than there is no limit to the number of copies. By default this
value is 0.
▪ Costs: These options control various surcharges:
▪ Use System Default: Check this option to use the system default settings for the items in
the Costs section. The administrator can setup these default values in the Settings section
(Pricing and Ordering).
▪ Setup Costs: A surcharge incurred each time a document is produced.
▪ Rush Rate: The Rush Rate is a surcharge for rush orders.
▪ Tax: This section controls document specific tax settings.
▪ Taxable: If checked the document is subject to taxation.
▪ Tax Rate Profile: Defines the tax profile applicable to this document. This is used when
specific document types have a special tax rate.
By default this field set to Default. In this case the rate is defined by the tax profile assigned
to the department or company of the logged on user.
Objectif Lune Inc. © 2010 49
Page 55

How to - Publication Type and Document Tasks
▪ Shipping Rates: Shipping Rates are calculated based on the total weight of the shopping cart and
the shipping rate profiles assigned to the company or the department of the logged on user. The
options found in this section control the document specific properties regarding the calculation of
shipping charges.
▪ Calculate Shipping Charges: Selects whether shipping charges should be calculated for
the print job related to this document.
▪ Weight Per Unit: Enter the weight per unit for the document. In the checkout cart this unit
is multiplied with the quantity of the job to calculate its total weight.
9. Click Save to store the changes.
Volume Discount Tables
In order to calculate pricing a volume discount table is required. The entries in this table define the reduction
in price based on the ordered quantity. In PrintShop Mail Web this table is managed in the Volume Discount
Tables page of a document or publication type. When pricing is enabled and no volume discount table is
defined, the system will not be able to calculate a price and price quote will be requested for the document.
The Volume Discount Table defines the volume range and the price per record what applies. Please note that
for database upload jobs the number of pages printed may differ from record to record due to conditional
layouts. The pricing should be adjusted accordingly.
Add an entry
To add an entry to the volume discount table:
1. Click Publication Types in the Menu bar. The Publication Types overview page is shown.
2. Select a publication type containing a document from the overview.
3. Click Documents in the side menu.
4. Select a document from the overview by clicking the document's name.
5. Click Volume Discount Table in the side menu.
6. Click Add to show the Add dialog:
Enter a Quantity and Price for the new entry
7. Enter a Quantity and Price.
8. Click Save to store the changes and to return to the Volume Discount Table overview.
Delete an entry
To delete entries from the Volume Discount Table:
1. Click Publication Types in the Menu bar. The Publication Types overview page is shown.
2. Select a publication type containing a document from the overview.
3. Click Documents in the side menu.
4. Select a document from the overview.
5. Click Volume Discount Table in the side menu, the Volume Disount Table overview is shown.
6. Select one or multiple checkboxes in the first column.
7. Click Delete.
Objectif Lune Inc. © 2010 50
Page 56

How to - Publication Type and Document Tasks
Import
The Volume Price Table is easy to create from a spreadsheet. The spreadsheet is easy to maintain offline, and
when the Volume Discount Table needs to be updated, a simple upload will replace the data.
To import a price table:
1. Create a tab delimited file containing two columns in the application of your choice. Column 1 needs to
state the quantity, the second column the price per piece.
2. Logon to PrintShop Mail Web.
3. Click Publication Types in the Menu bar. The Publication Types overview page is shown.
4. Select a publication type containing a document from the overview.
5. Click Documents in the side menu.
6. Select a document from the overview.
7. Click Volume Discount Table in the side menu.
8. Click Import to import a volume discount table. With the Browse button you can locate the file.
9. Click Save to process the tab delimited file.
Objectif Lune Inc. © 2010 51
Page 57

2.4 Image Collection Tasks
This chapter describes tasks related to image collections. Typically these tasks are performed by the designer,
operator or the production manager.
2.4.1 Create an image collection
Image Collections allows the end user to select an image for a user input field by browsing a collection of
predefined images. The PrintShop Mail document should contain a variable image box, with an expression that
refers to a (user input) data field.
To create an image collection:
1. Click Collections in the Menu bar. The Collections overview page is shown.
2. Click the Add button to display the Add dialog:
The Add collection dialog
3. The input fields of this dialog control the following items:
▪ Collection Name: The name of the collection. This name is visible in the Collection pop-up-menu
in the Edit Item page of data fields (Publication Type section).
▪ Company Name: The name of the company to which this collection belongs. The collection can
be used across all PrintShop Mail templates of that company.
▪ Description: A text describing the images in the collection.
4. Click Save to create the collection and close the dialog
The collections overview
Objectif Lune Inc. © 2010 52
Page 58

How to - Image Collection Tasks
2.4.2 Add images to a collection
To add an image to a collection:
1. Click Collections in the Menu bar.
2. Select a collection from the Collections overview. The Collections Properties page is shown. This page
displays the properties of the collection and a list of the images belonging to this collection.
The Collection Properties page
3. Click the Add button, the Add asset dialog appears.
The Add asset dialog
4. Click the Browse button to locate an image file on your local hard drive (jpg, gif, pdf).
5. Click Save to process the selected file.
Objectif Lune Inc. © 2010 53
Page 59

How to - Image Collection Tasks
2.4.3 Delete image from a collaction
To remove an image from a collection:
1. Click Collections in the Menu bar.
2. Select a collection from the Collections overview by clicking the collection name. The Collections
Properties page is shown. This page displays the properties of the collection and a list of the images
belonging to this collection.
3. Select a checkbox next to one of the images in the Assets overview.
4. Click Delete to remove the image. First after click OK in the warning dialog the image is removed.
To remove all images from a collection at once:
1. Select the checkbox in the header from the Assets overview.
2. Click Delete. First after click OK in the warning dialog all images are removed.
Note: Collections and/or images that are used in active print jobs can not removed from the system.
The checkbox is greyed out than.
The Collection Properties page
Objectif Lune Inc. © 2010 54
Page 60

2.5 Order Manager Tasks
This chapter explains tasks performed by the operator or production manager.
2.5.1 Select an order status overview
PrintShop Mail Web can generate detailed order overviews, allowing a user to view all orders at each stage of
the production process. Orders with the Approved status are ready for production. Those orders have been
approved by the customer and are released for print production.
To view the orders of a specific status:
1. Click Order Manager in the Menu bar. The Order Manager page is shown:
By clicking on an order in the Order Manager overview, details of the order can be viewed
2. Click an item in the General section of the Order Manager side menu to view the orders of that
production status. The orders of this status are shown in the orders overview table. The colored cubes at
the beginning of each row indicate the status of the order and refer to the status folder.
The Approved item in the Order Manager side menu, shows the orders that are released for print. If
you're logged on using an operator role this folder is the initial view of the Order Manager.
Orders with the status Rush have a mark ( ) behind the order ID. Overdue orders are colored red.
3. Click the + symbol next to the order ID to view the jobs belonging to that order. The job overview
shows the name of the document, the ordered quantity and the current print status.
Job overview page
Objectif Lune Inc. © 2010 55
Page 61

2.5.2 Change the status of an order
To change the status of an order in the Order Manager:
1. Click Order Manager in the Menu bar. The Order Manager page is shown:
The Order Manager overview
2. Click the ID of an order. The Order Information page is shown:
How to - Order Manager Tasks
The Order Information page
3. Click on the status option under Order Information section tiltle bar.
The status available will depend on the user who is log - in.The Order Information page consists of an
order information section and a jobs overview of the jobs belonging to this order. The Action bar along
the top contains a range of buttons to change the status of the order, edit the order details and delete
the order. The set of status change icons that are visible depends on the current status of the order.
4. Click a status item in the Action bar to change the status of the order.
An order with the status Ordered can be set to the On hold-status by the customer and will be placed in
the On hold-folder. Orders with the quote request status are also placed in the On hold folder, waiting
for a price to be set. If a price is added the customer can accept the print job by ordering or approving
the order or reject the print job by deleting the order. For more information see Add a price to a quote
request.
Objectif Lune Inc. © 2010 56
Page 62

How to - Order Manager Tasks
Orders residing in the Ordered or On Hold status folders are typically orders created by other users.
Users with the appropriate privilege can approve orders with the ordered status. It is assumed that the
person that is approving orders (created by different users) wants to verify the quantities, the contents
of the job and the shipping details of the order. For this the order is restored to the Checkout for
approving.
As soon as an order is placed in the Approved folder, your customers can no longer change the status of
the order. It is possible for your customers to track their personal orders via the My orders folder, or (if
they have the necessary access rights) via the My departments or My company folder.
Important: When the order reaches the Shipping state the customer can set the status of the order
to Completed. When an order is not delivered to your customer, the job status should be
changed to Completed by the operator or production manager when the order is dispatched.
Objectif Lune Inc. © 2010 57
Page 63

How to - Order Manager Tasks
2.5.3 Add a price to a quote request
A print job with a quote request is automatically placed in the On hold folder. The production manager will
receive an e-mail message when a price quote is requested.
To add a price to a quote request:
1. Click Order Manager in the Menu bar. The Order Manager page is shown.
2. Select the On hold folder in the Order Manager side menu. This will show the orders contained in this
folder. Orders with the quote request status show Price Quote in the Price column.
3. Select the order to show its properties page. The Jobs Overview section shows a list of the jobs
belonging to this order. The jobs that require a price quote are marked in yellow and state Price Quote
in the Price column.
4. Click the pencil icon next to the Price Quote text to display the Edit Price Quote dialog.
The Price Quote dialog
5. Enter a price and click Save. The dialog is closed.
Repeat the steps 4 and 5 for every job that requires a price quote.
6. Click the Send Quote button in the Action bar once all prices are set. This will notify the customer.
Objectif Lune Inc. © 2010 58
Page 64

How to - Order Manager Tasks
2.5.4 Export order data
To export order data of completed print jobs:
1. Click Order Manager in the Menu bar. The Order Manager page is shown.
2. Select the Completed folder in the Order Manager side menu. This will show the orders contained by this
folder.
The completed orders overview
3. Select one of the predefined queries on the left side of the Order overview. The available options are:
▪ Today
▪ Yesterday
▪ This week
▪ Last week
▪ This month
▪ Last month
▪ Year overview with sub selections per month
4. Click the Export button in the Action bar to instruct your browser to download and save the Excel file
containing the requested order date.
5. Open Excel to view the downloaded document.
Objectif Lune Inc. © 2010 59
Page 65

How to - Order Manager Tasks
2.5.5 Print a document
PrintShop Mail Web introduces various output options. The Output options are:
• Print
• Print to file
• Create PDF
• Preflight
• Send to Planet Press Watch.
In PrintShop Mail Web it is possible to print PrintShop Mail documents, static PDF files and File upload
documents (only PDF documents) to a selected printer.
In order to create output the status of the order should be changed to In-plant. To print a document in the In-
plant folder:
1. Click Order Manager in the Menu bar. The Order Manager page is shown.
2. Click In-plant in the side menu.
3. Click the plus-symbol next to the order ID to view the jobs of this order.
4. Select a job by clicking its ID or document name. The Job Properties page is displayed and shows job
details.
The Job Properties page
Objectif Lune Inc. © 2010 60
Page 66

5. Click Generate Output in the Action bar. The Output dialog is shown:
The Output options dialog with information sheet
How to - Order Manager Tasks
6. Select Print in the Method pull-down-menu. In the Output dialog the following sections becomes visible:
▪ Information Sheet: Along the top of the dialog a Sheet is added. The sheet contains additional
information (e.g. the version of the PrintShop Mail application which is used to create the
document, used technology, document's printer and operator instructions). The information is
shown by clicking the handle of the sheet. Default the information sheet is hidden.
▪ General:
▪ Method: Select the Output Method here.
▪ Printer: Select the Output Printer in the pull-down-menu. The printers shown in the pull-
down-menu are set by PrintShop Server. Stopping and starting PrintShop Server will refresh
the actual printer list. An overview of available printers is also visible in the Settings section.
Blacklisted printers are not shown. Printers can be blacklisted/disabled in the Printers section
of the Settings section.
▪ Copies and Range:
▪ Copies: Define the number of Copies to be printed.
▪ Range method: The Range method determines the range of records that should be printed.
Default All is selected. In case of a document with user input the Selection option can be
used to provide extra records for the repetition option (Preference dialog in PrintShop Mail).
For example: enter 1 to 10 to populate a single sheet of business cards with 10 cards.
▪ Range: Specify the Range if needed.
7. Click OK to start printing.
Output History
For each print request an entry is added to the output history of the job. The Output History overview is
shown on the Job Properties page. Every successfully outputted document shows a green flag symbol in the
Print Status column. If problems are encountered during the output process a warning icon is shown.
The Destination column states the name of the printer. The #-column states the number of records outputted
(not the number of copies).
Objectif Lune Inc. © 2010 61
Page 67

The Output history overview
How to - Order Manager Tasks
Objectif Lune Inc. © 2010 62
Page 68

How to - Order Manager Tasks
2.5.6 Print to file
The Print to File option generates an optimized output file according to the print technology set in the PrintShop Mail template document. The operator can download the resulting output file on the Job Properties page and sent the document to the printer on the local network of the print shop. The print to file method prints the job to a printer file in a seleted Output folder and is only available for PrintShop Mail Documents.
In order to print to file the status of the order should be changed to In-plant. To print to file in the In-plant
folder:
1. Click Order Manager in the Menu bar. The Order Manager page is shown.
2. Click In-plant in the side menu.
3. Click the plus-symbol next to the order ID to view the jobs of this order.
4. Select a job by clicking its ID or document name. The Job Properties page is displayed showing job
details and an Output history overview.
5. Click Generate Output in the Action bar. The Output dialog is shown.
The Output options dialog with information sheet
6. Select Print to File in the Method pull-down-menu. In the Output dialog the following sections become
visible:
▪ Information Sheet: Along the top of the dialog a Sheet is added. The sheet contains additional
information. The information is shown by clicking the handle of the sheet. Default the information
sheet is hidden.
▪ General:
▪ Method: Select the Output Method here.
▪ Printer: Select the Output Printer in the pull-down-menu. The printers shown in the pull-
down-menu are set by PrintShop Server. Stopping and starting PrintShop Server will refresh
the actual printer list. An overview of available printers is also visible in the Settings section.
Blacklisted printers are not shown. Printers can be blacklisted/disabled in the Printers section
of the Settings section.
▪ Output folder: Select a target folder in the Output Folder pull-down-menu. The Output
folder pull-down-menu shows a list of the available output folders. The file will be stored in
the selected folder. Output folders are managed in the Settings section of the system.
▪ Copies and Range:
▪ Range method: The Range method determines the range of records that should be printed.
Default the All option is selected.
▪ Range: Specify the Range if needed.
7. Click OK to start printing to file.
Objectif Lune Inc. © 2010 63
Page 69

How to - Order Manager Tasks
Output History
For each print request an entry is added to the output history of the job. The Output History overview is
shown on the Job Properties page. Every successfully outputted document shows a green flag symbol in the
Print Status column. If problems are encountered during the output process a warning icon is shown.
The Output history overview shows the 5 most recent output tasks. The Destination column states the path to
the outputted file. The most recent outputted file shows a download icon and has a hyperlink allowing the
operator to download the file. The #-column states the number of records outputted (not the number of
copies).
Note: By default the download link will only work on the localhost, this is due to the tight security
settings of printShop Mail Web. For more information see the Output Folders information in the
Settings section.
Objectif Lune Inc. © 2010 64
Page 70

How to - Order Manager Tasks
2.5.7 Create PDF output
The new print option for static PDF documents allows the operator to print the High Resolution PDF document
via one of the printers on the PrintShop Mail Web server. In order to create PDF output the status of the order
should be changed to In-plant. PDF output can be created for PrintShop Mail jobs, static PDF jobs and File
upload documents (PDF documents only):
1. Click Order Manager in the Menu bar. The Order Manager page is shown.
2. Click In-plant in the side menu.
3. Click the plus-symbol next to the order ID to view the jobs of this order.
4. Select a job by clicking its ID or document name. The Job Properties page is displayed showing job
details and an Output history overview.
5. Click Generate Output in the Action bar. The Output dialog is shown.
6. Select Create PDF in the Method pull-down-menu:
The Output dialog with Create PDF options
7. In the Output dialog the following sections becomes visible:
▪ Information Sheet: Along the top of the dialog a Sheet is added. The sheet contains additional
information. The information is shown by clicking the handle of the sheet. Default the information
sheet is hidden.
▪ General:
▪ Method: Select the Output Method here.
▪ Printer: Select the Output Printer in the pull-down-menu. The printers shown in the pull-
down-menu are set by PrintShop Server. Stopping and starting PrintShop Server will refresh
the actual printer list. An overview of available printers is also visible in the Settings section.
Blacklisted printers are not shown. Printers can be blacklisted/disabled in the Printers section
of the Settings section. The output printer is used to generate the PostScript that will be
converted into PDF.
▪ Job Option File: Select a Job Option File. The selected file is used in the conversion from
PostScript to PDF.
▪ Output folder: Select a target folder in the Output Folder pull-down-menu. The file will be
stored on this location. Output folders are managed in the Settings section of the system.
▪ Copies and Range:
▪ Range methode: The Range methode determines the range of records that should be
printed. Default All is selected.
▪ Range: Specify the Range if needed.
8. Click OK to create PDF output. Once completed the PDF will be created in the selected output folder and
a new entry is added to the Output History overview of the job.
Objectif Lune Inc. © 2010 65
Page 71

How to - Order Manager Tasks
Output History
For each print request an entry is added to the output history of the job. The Output History overview is
shown on the Job Properties page. Every successfully outputted document shows a green flag symbol in the
Print Status column. If problems are encountered during the output process a warning icon is shown.
The Output history overview shows the 5 most recent output tasks. The Destination column states the path to
the outputted file. The most recent outputted file shows a download icon and has a hyperlink allowing the
operator to download the file. The #-column states the number of records outputted (not the number of
copies).
Note: By default the download link will only work on the localhost, this is due to the tight security
settings of printShop Mail Web. For more information see the Output Folders informatin in the
Settings section.
Objectif Lune Inc. © 2010 66
Page 72

How to - Order Manager Tasks
2.5.8 Send to folder
The Send to Folder option is only available for static PDF documents and file upload documents. This method
creates a copy of the High Resolution version of the PDF document in the selected Output folder. In order to
send a PDF to folder the status of the order should be changed to In-plant. To send a document to folder:
1. Click Order Manager in the Menu bar. The Order Manager page is shown.
2. Click In-plant in the side menu.
3. Click the plus-symbol next to the order ID to view the jobs of this order.
4. Select a job by clicking its ID or document name. The Job Properties page is displayed showing job
details and an Output history overview.
5. Click Generate Output in the Action bar. The Output dialog is shown.
6. Select Send to Folder in the Method pull-down-menu:
The Output dialog with Send to Folder options
7. In the Output dialog the following sections becomes visible:
▪ Information Sheet: Along the top of the dialog a Sheet is added. The sheet contains additional
information (e.g. document name, file name and operator instructions). The information is shown
by clicking the handle of the sheet.
▪ General:
▪ Method: Select the Output Method here.
▪ Output folder: Select a target folder in the Output Folder pull-down-menu. The file will be
stored on this location. Output folders are managed in the Settings section of the system.
8. Click OK. Once completed the PDF will be created in the selected output folder and a new entry is added
to the Output History overview of the job.
Output History
For each request an entry is added to the output history of the job. The Output History overview is shown on
the Job Properties page. Every successfully outputted document shows a green flag symbol in the Print Status
column. If problems are encountered during the output process a warning icon is shown.
The Output history overview shows the 5 most recent output tasks. The Destination column states the path to
the outputted file. The most recent outputted file shows a download icon and has a hyperlink allowing the
operator to download the file. The #-column states the number of records outputted. When PrintShop Mail
Web doesn't have information regarding the number of pages in the docment a dash is shown in this column.
Objectif Lune Inc. © 2010 67
Page 73

How to - Order Manager Tasks
Note: By default the download link will only work on the localhost, this is due to the tight security
settings of printShop Mail Web. For more information see the Output Folders informatin in the
Settings section.
Objectif Lune Inc. © 2010 68
Page 74

How to - Order Manager Tasks
2.5.9 Preflight a PrintShop Mail document
The Preflight method is only available for PrintShop Mail documents and will verify the database and the
PrintShop Mail document. This process checks for possible errors on the layouts (e.g. text that doesn't fit its
bounding box). To preflight a print job before printing the jobs:
1. Click Order Manager in the Menu bar. The Order Manager page is shown.
2. Click In-plant in the side menu.
3. Click the plus-symbol next to the order ID to view the jobs of this order.
4. Select a job by clicking its ID or document name. The Job Properties page is displayed showing job
details and an Output history overview.
5. Click Generate Output in the Action bar. The Output dialog is shown.
6. Select Preflight in the Method pull-down-menu.
Preflight dialog
7. In the Output dialog the following sections becomes visible:
▪ Information Sheet: Along the top of the dialog a Sheet is added. The sheet contains additional
information. The information is shown by clicking the handle of the sheet.
▪ General:
▪ Method: Select the Output Method here.
▪ Printer: Select the Output Printer in the pull-down-menu. The printers shown in the pull-
down-menu are set by PrintShop Server. Stopping and starting PrintShop Server will refresh
the actual printer list. An overview of available printers is also visible in the Settings section.
Blacklisted printers are not shown. Printers can be blacklisted/disabled in the Printers section
of the Settings section.
▪ Copies and Range:
▪ Range method: The Range method determines the range of records that should be
checked. Default All is selected.
▪ Range: Specify the Range if needed.
8. Click OK to start preflighting the file. Once the process is completed the Preflight Result dialog is shown.
Any problems with the print job will be shown here.
Important: If images are used in PrintShop Mail based upon conditions, and these conditions
determine that the image should not be displayed (empty file name as a result), a notification
will be included in the preflighting data for each empty image. The notification displayed is "No
image specified". In order to avoid this notification you may want to use in PrintShop Mail a
transparent image as an alternative for the empty file name.
Objectif Lune Inc. © 2010 69
Page 75

How to - Order Manager Tasks
2.5.10 Send a document to PlanetPres Watch
The new Send to PlanetPress Watch option allows the operator to send a PrintShop Mail job to PlanetPress
Watch and let PlantetPress Watch handle the printing of PrintShop Mail documents. PlanetPress Watch will
have a new helper service that will query PrintShop Mail Web to know if there are jobs for it. PrintShop Mail
Web provides the paths to the PrintShop Mail template and the database file to PlanetPress Watch using an
XML message.
In the PlanetPress Watch process the user can then either use the PrintShop Mail plug-in, send the job to
another sub process upon conditions to spread the load or even concatenate the data file per unique
document to later do batch printing at scheduled item. To concatenate the data a user can use the XSLT plugin.
The Send to PlanetPress Wacht option is only available for PrintShop Mail documents. In order to sent a job to
PlanetPress Watch and prepare an output request for PlanetPress Watch:
1. Click Order Manager in the Menu bar. The Order Manager page is shown.
2. Click In-plant in the side menu.
3. Click the plus-symbol next to the order ID to view the jobs of this order.
4. Select a job by clicking its ID or document name. The Job Properties page is displayed showing job
details.
5. Click Generate Output in the Action bar. The Output dialog is shown.
6. Select Sent to PlanetPress in the Method pull-down menu:
The Output options dialog with Sent to PlanetPress Watch options
7. In the Output dialog the following sections becomes visible:
▪ Information Sheet: Along the top of the dialog a Sheet is added. The sheet contains additional
information. The informations is shown by clicking the handle of the sheet.
▪ General: Select the Output Methode here.
▪ Copies and Range: Define the number of Copies to be sent to PlanetPress Watch.
8. Click OK to sent the job to PlanetPress Watch.
Output History
For each PlanetPress Watch request an entry is added to the output history of the job. The Output History
overview is shown on the Job Properties page. The Destination column states PlanetPress Watch.
Objectif Lune Inc. © 2010 70
Page 76

How to - Order Manager Tasks
2.5.11 Context menus
A Context menu (also called shortcut) is a menu in a graphical user interface (GUI) that appears upon user
interaction, such as a right mouse click. A context menu offers a limited set of items that are available in the
current state, or context, of the application. A context menu can help you save time while working with
documents, because it requires less mouse movement and menu searching. This chapter explains how to
ascess context menus and what types of options are available in different context menus. Context menus
drop-down when users right-click on an object that supports a context menu.
To display a context menu right click the object you want to affect.
Order Manager Overview
Richt click an order to invoke the Order Context menu. The available links in the context menu depend on the
users' role and the current status of the order. The Order context menu contains the following items:
• Send To: The Send to... context menu item status the name of the next order status in the workflow
(e.g. Send to Shipping for orders in the In-plant folder).
• Edit: Click the Edit context menu item to display the Order Edit page of the selected order. By default all
roles have this right for the Ordered status.
• Delete: Click the Delete context menu item to display the Delete confirmation dialog. By default all roles
have this access right.
Click the plus-symbol next to an order. The jobs of this order are shown. Right click a job to invoke the Job
Context menu. The available links in the context menu depend on the users' role and the current status of the
order. The Job context menu contains the following items:
• Generate Output: The Generate output context menu item will display the Generate Output dialog. The
Generate Output dialog lets the operator output/print the selected job. The Generate Output context
menu by-passes various pages in order to invoke the Generate Output dialog.
• View Softproof: Click the Softproof context menu item to display the low resolution PDF or softproof in
a new window. This context menu is only applicable for PrintShop Mail and static PDF documents and is
not available for File upload documents as this document type doesn't have a softproof document.
Order Properties page
Click an order. The Order properties page appears. Right click a job on the Order Properties page in the Job
overview to invoke the Job Context menu. The available links in the context menu depend on the users' role
and the current status of the order. The Job context menu contains the following items:
• Generate Output: The Generate output context menu item will display the Generate Output dialog. The
Generate Output dialog lets the operator output/print the selected job. The Generate Output context
menu by-passes various pages in order to invoke the Generate Output dialog.
• View Softproof: Click the Softproof context menu item to display the low resolution PDF or softproof in
a new window. This context menu is only applicable for PrintShop Mail and static PDF documents and is
notavailable for File upload documents as this document type doesn't have a softproof document.
Order Manager Completed Overview
Right click an order in the Order Manager Completed overview to invoke the Order Context menu. The Order
context menu contains the following items:
• Delete: Click the Delete context menu item to display the Delete confirmation dialog. By default all roles
have this access right.
Objectif Lune Inc. © 2010 71
Page 77

How to - Order Manager Tasks
Right click a job in the Order Manager Completed overviewto invoke the Job Context menu. The Job context
menu contains the following items:
• View Softproof: Click the Softproof context menu item to display the low resolution PDF or softproof in
a new window. This context menu is only applicable for PrintShop Mail and static PDF documents and is
notavailable for File upload documents as this document type doesn't have a softproof document.
• Re-order: Click the Re-order link to place a copy of the order in the current checkout. In the checkout
the user can choose to edit the job content. The re-order context menu item is available to all document
types.
Objectif Lune Inc. © 2010 72
Page 78

3 Ordering workflow
This chapter explains the various ordering workflows and price calculation methods of PrintShop Mail Web. The
ordering workflow incorporates a shopping cart as seen in common ecommerce Internet sites.
The ordering process step by step:
1. Document Creation: The New Document section is a store front listing the documents available to the
customer. Based on the selected document the system invokes a wizard like interface guiding the
customer through the steps of the document creation process. At the end of this process the customer is
shown a PDF softproof. If the customer is satisfied with this document it can be added to the shopping
cart. The customer can continue creating more documents and add those documents to the cart.
2. Shopping Cart: The shopping cart (or basket) allows customers to collect documents created via or
selected from the New Document section. The pricing configuration controls whether the customer may
enter a user definable quantity, pick a quantity from a predefined list or whether the uploaded database
determines the quantity.
The orders that are approved from the Ordered folder in the Order Manager section, are also placed in
the Shopping Cart. Users can verify the quantities, the content of the job and the shipping details of the
order.
3. Shipping Options: This step allows the customer to select one of the available shipping methods (if
applicable), select a preferred shipping date, verify the shipping address information and add comments.
4. Payment Options: The Payment Options page requires the customer to select a payment method (if
applicable), add a order reference number and verify the billing address.
5. Order Summary: This page summarizes the order. The documents in the cart, the address the order
will be shipped to, and the payment information are shown.
6. Order Confirmation: If the order has been processed successfully, the order confirmation page is
shown. This page includes the PrintShop Mail Web order number and transaction information if
applicable.
Pricing parameters are set per document or publication type. These parameters define the quantity entry
method the customer sees and whether automatic price calculation is performed. In order to calculate prices a
volume discount table needs to be specified per document or publication type.
Tax Rate profiles can be setup per tax rate system and are created in the Settings section. These profiles can
be assigned to documents, companies and departments. Profiles assigned to a document have the highest
priority. If no tax rate is specified for a document, the system will use the tax rate assigned to the company or
department. If no tax rate is specified at all the system will use the system default tax rate profile.
Price calculation can also include the following items:
• Shipping charges
• Rush rate charges
Note: Changes to the pricing parameters of a document (or publication type) do not effect the items
stored in the shopping cart of logged on customers.
Objectif Lune Inc. © 2010 73
Page 79

3.1 The shopping cart
The shopping cart allows customers to collect multiple documents in the cart before placing an order.
Documents created by a customer stay in the shopping cart even if the customer leaves the web site. There is
no need for the customer to complete the ordering process. The next time the customer logs on the shoppping
cart will list the documents created in a previous session. The contents of the documents can be changed (Edit
job content), the documents can be removed from the cart and new documents can added.
In PrintShop Mail Web it is possible to edit the content of PrintShop Mail documents in the Checkout or
Shopping cart. These PrintShop Mail documents must contain data fields and/or variables. In the shopping
cart, next to the documents name a pencil icon is shown. Customers can click the pencil icon to edit the
content of the job. It is possible now to change the data entered for user input fields, change the field
mapping of an uploaded databae file or replace the database file.
Each item in the cart can have a different pricing setup and quantity entry method. The appearance of the
quantity field depends on the entry method set for the document or is defined by the document type.
Documents that require a database file upload have quantity, which is determined by the number of records in
the database file. Documents that require a file upload are placed in the shopping cart as a quote order.
The shopping cart containing multiple documents with different quantity entry methods
The quantity entry method could be one of the following:
• Free entry field: The customer can enter a custom quantity within the minimum and maximum
quantity range (Pricing Options page).
• Predefined list: The customer can select a quantity from a predefined list. This list is derived from the
volume discount table.
Objectif Lune Inc. © 2010 74
Page 80

Ordering workflow - The shopping cart
3.1.1 Automatic price calculation
In order to automatically calculate the price of a job a volume discount table should be available and the
pricing calculation option must be enabled (Edit Pricing page).
The shopping cart with documents that have price calculation enabled
The prices shown in the shopping cart include setup costs (optional), these costs are defined separately.
When the quantity entry is set to Free Entry, a custom quantity can be entered. The entered value should be
between the minimum and maximum quantity range. Whenever the user changes the quantity in the shopping
basket the price of that document and the subtotal will be updated automatically. If the entered quantity does
not meet the minimum and maximum requirements a warning will be shown.
Prerequisites
Prerequisites for automatic price calculation:
• Enable pricing for the document
• Create a volume discount table for the document
3.1.2 No price calculation
Automatic price calculation is defined per document and is disabled by default. The initial entry method for
these document is Free Entry and no quantity restrictions are set. In this case the pricing column shows the
Not Applicable (N/A) message. The Quantities options on the Edit Pricing page control the entry method and
quantity restrictions of the document.
Objectif Lune Inc. © 2010 75
Page 81

Ordering workflow - The shopping cart
The shopping cart containing multiple documents without pricing
When the quantity entry method is set to Predefined List the customer will choose the quantity from a pop-upmenu. The available quantities are retrieved from the volume discount table of that document. If there is only
one entry in the discount table this value is used as the quantity for the document, the customer will not be
able to change this value. If automatic price calculation is disabled the prices in the volume discount table are
ignored but still define the quantities the user will be able to choose from.
The shopping cart containing multiple documents with different quantity entry methods
Prerequisites
To disable automatic price calculation:
• Disable pricing for the template
Objectif Lune Inc. © 2010 76
Page 82

Ordering workflow - The shopping cart
3.1.3 Price Quotes
A document will require a price quote when pricing is enabled for the document but no entries are found in the
volume discount table. In this case no subtotals and totals will be shown in the shopping basket. After placing
the order the production manager needs to enter a price quote. The customer will not be able to approve the
order until a price quote is given.
Prerequisites
Prerequisites to enable price quotes:
• Enable pricing for the document
• Do not create a volume discount table
Objectif Lune Inc. © 2010 77
Page 83

3.2 Shipping Options
The Shipping page lets the customer edit the shipping address and specify shipping related items like the
shipping method (if applicable) and the preferred shipping date. Shipping methods are managed in the
Settings section of the system. The calculation of shipping charges can be enabled and disabled per company.
Profiles need to be assigned to companies and departments to enable the customer to select a shipping
method in the ordering workflow.
The Shipping Options page
The Shipping page contains the following sections:
• Address: The Address the order will be shipped to. This information is automatically retrieved from the
company or department the customer belongs to. In case the customer belongs to multiple departments
or companies the information is based on the company/department of the first document in the cart.
The selected country in the pull-down-menu defines the checks of the zip code and defines the
presentation and values of the state field.
• Options:
▪ Shipping Methode: The preferred shipping method.
▪ Shipping Date: The preferred or estimated shipping date.
▪ Comment Field: In this field the customer can enter a descriptive text or note.
▪ Reference Field: The Reference field can be used by end users to enter a company reference.
This reference can be used than in correspondence with the print supplier.
• Terms and Conditions: The ordering workflow requires the customer to view and accept the Terms
and Conditions of the print shop. The text for the terms and conditions can changed by the print shop.
The terms and conditions are required. First after checking the terms and conditions checkbox the
Proceed button is enabled.
Click the Terms and Conditions link to open the Terms and Conditions dialog. For more information see
Managing the Terms and Conditions.
Objectif Lune Inc. © 2010 78
Page 84

Ordering workflow - Shipping Options
3.2.1 Restore address
Click the Restore address button if the address information was modified on the Shipping page. The address information is restored from the address information section from the company/department.
3.2.2 Shipping Date and Rush Rate handling
PrintShop Mail Web automatically calculates an estimated shipping date based on the longest Standard
Production Time set for the documents in the cart. The customer can select a different date by clicking the
calendar icon. The calendar marks the current date, production dates and non working days. None of the
dates marked as production day or non working day can be selected.
The system will check if Rush Order Production Time is applicable. Shipping dates that require a rush order
are marked behind the calendar icon. The rush rate charges for those documents that require a rush order are
added to the final price calculation.
The Shipping Date calendar
The Standard Production Time, Rush Order Production Time and Rush Rate are set in the Settings page from
the Production section of a document.
Prerequisites
Prerequisites for automatic rush rate calculation:
• Setup working days and restricted order dates in the Settings section.
• Set the Standard Production Time and Rush Production Time of the templates. To accept rush orders the
Rush Production Time should be set to a lower value than the Standard Production Time.
• Enter a Rush Rate on the Settings page from the Pricing and Ordering section of the document.
Objectif Lune Inc. © 2010 79
Page 85

Ordering workflow - Shipping Options
3.2.3 Shipping Methods
To allow a customer to select a shipping method the administrator should enable the calculation of shipping
charges for the company (or department). When the customer has access to multiple companies or
departments the entries of the shipping method list is defined by the selected company or department on the
Shipping page.
The Shipping Options page
When a shipping rates table is available, the shipping rate is calculated based on the total weight of the items
in the cart. If no rates table is specified the base fee of the shipping rate profile is used as a flat fee for all
items in the cart. In case both a base rate and a rates table are available, the base rate will be added to the
price that is calculated based on the total weight.
The actual shipping rate is shown on the Order Summary page.
Prerequisites
Prerequisites for charging shipping rates:
• Create one or multiple shipping rate profiles.
▪ Set a base rate and/or create a rates table for the profile.
• Enable the Calculate Shipping Charges option in the Pricing and Ordering page of companies or
departments.
• Enable the Calculate Shipping Charges option in the Pricing and Ordering page of templates.
▪ To use a rates table a value needs to be entered in the Weight Per Unit field of the template.
Objectif Lune Inc. © 2010 80
Page 86

3.3 Order summary
Once all order information is collected the summary page is shown. This page summarizes the order
information and shows the final pricing including shipping charges, rush rates and tax. Based on the
customers role the Place Order and Approve buttons are shown.
PrintShop Mail Web invokes a workflow specific to the selected payment connector. The default payment
connector (Purchase Order), pops up a processing dialog and no user interaction is required to place the
order. Once the order is placed a confirmation page is shown and a e-mail notification message is sent.
The Order Summary page
Objectif Lune Inc. © 2010 81
Page 87

3.4 Manage the Terms and Conditions
The Terms and Conditions template is a HTML document and is stored on the file system of the PrintShop Mail
Web web server. The terms and conditions document can be altered using a plain text editor (e.g. Note
Pad++). The terms and conditions document can be add per language and/or per skin allowing the look and
feel of the message to be changed according to that skin.
In order to create language specific terms and condition documents (in the termsandconditions folder) the
name of these language specific terms and conditions documents should match the iso code as specified in the
Language section of the Settings section.
The document is read from the following location, sorted by priority and language of the current logged in
user:
• C:\Program Files\PrintShop
Web\Website\templates\<skinname>\misc\termsandconditions\<languageiso>\termsandconditions.php
• C:\Program Files\PrintShop
Web\Website\templates\<skinname>\misc\termsandconditions\termsandconditions.php
• C:\Program Files\PrintShop
Web\Website\misc\termsandconditions\<languageiso>\termsandconditions.php
• C:\Program Files\PrintShop Web\Website\misc\termsandconditions\termsandconditions.php
The administrator can simply place a copy of the terms and conditions document in the folder of the skin and
start customizing the file. The isocode used in the folder path is in lowercase.
To edit the default Terms and Conditions document:
1. Select the Terms and Conditions document on the following location:
C:\Program Files\PrintShop Web\Website\misc\termsandconditions\termsandconditions.php and open
the document in a plain text editor.
2. Add your terms and conditions to the document.
It is possible to use PHP statements in the terms and conditions document. The builtin function getString
is available and returns the given string from the language strings in the Language section from the
Settings section.
3. Click Save to store the changes.
Objectif Lune Inc. © 2010 82
Page 88

4 Settings
The administrator is the only user that can modify the system settings. The Settings section can be accessed from the Menu bar. Click Settings in the Menu bar. The following screen appears:
By selecting Settings in the Menu bar the Setting Summary page appears
Objectif Lune Inc. © 2010 83
Page 89

5 General Settings
In the General section of the Settings menu general system settings can be defined. This section covers the
following topics:
Objectif Lune Inc. © 2010 84
Page 90

5.1 About
The About window is the window that opens when the Settings tab in the Menu bar is selected. The Summary window shows the following information:
• General: The General section shows information regarding the version of the software.
• System Information: The System Information section shows information about the technical
components of the system (e.g. the IP-address of the PrintShop Mail Web-server, version information of
the web server software and information about the database server software.
• PHP Info: The PHP-info button shows all PHP-settings which are important in case technical support is
required.
• Backup Database: The Backup Database button allows an administrator to get a backup of the
database used by PSM Web over the internet.
Clicking on the small grey bar a sliding sheet shows the statistic information about the number of logged on
users, user accounts, companies, templates, orders and printers. If no printers are found a warning is shown
telling you to restart the PrintShop Server.
The About page with slide sheet
Objectif Lune Inc. © 2010 85
Page 91

5.2 License
PrintShop Mail Web includes options to invoke a PrintShop Mail Web specific upgrade request page and a
dialog to activate an upgrade code.
Furthermore PrintShop Mail Web works in demo mode when no dongle /invalid dongle is found. With the demo
version of the PrintShop Mail Web software, only two records per print job can be printed. Each print will have
a watermark printed. IN demo mode access to the system is limited to the local network. For an unlimited/
production version of the PrintShop Mail Web software, a software license with a hardware key (dongle) is
required.
The License information page shows an overview of the dongle/license information. When no dongle or an
invalid is found a warning is shown on the License Information page:
A warning is shown on the License information page when no dongle is found.
5.2.1 Activate Upgrade
The License information page shows an overview of the active dongle/license information. To activate an upgrade:
1. Click Settings in the Menu bar.
2. Click License in the side menu.
3. Click the Activate Upgrade button. The Activate Upgrade dialog appears.
4. The Activate Upgrade dialog allows the administrator to upgrade the PrintShop Mail Web dongle using
the upgrade code provided by OL. Enter (or copy and paste) the Activation code in the Activation code
entry field.
5. Click Activate. Once the upgrade process is completed the dialog is closed and the license page is
refreshed to reflect the new dongle information.
5.2.2 License information
The License information page shows an overview of the dongle/license information (Serial number, Credits, OL
Care license, etc.) including the licensed plug-ins. The License Information page includes options to invoke the
online update request page allowing the administrator to renew the OL care maintenance agreement and/or
acquire additional PrintShop Mail Web modules/plug-ins. To show the License information page:
1. Attach the hardware key to an USB-port.
2. Click Settings in the Menu bar.
3. Click License in the side menu. The following screen appears.
4. When the License information page is shown the license information from the memory is read. The
License information is read every hour (automitically). To manually refresh the dongle information click
the License Information button. When no dongle/invalid dongle is found the system is falling back to the
demo modus.
Objectif Lune Inc. © 2010 86
Page 92

General Settings - License
5.2.3 Redeem Voucher
The License information page shows an overview of the active dongle/license information. To redeem your
voucher:
1. Click Settings in the Menu bar.
2. Click License in the side menu.
3. Click the Voucher button. The Voucher dialog appears.
4. Select "I would like to redeem my voucher"
5. Enter the Voucher Code provided and click on Redeem my voucher and follow the instructions to
receive the activation code.
5.2.4 Upgrade Request
The License information page shows an overview of the active dongle/license information. When no dongle/ invalid dongle is found the Upgrade Request button is disabled. To do an upgrade request:
1. Attach the hardware key to an USP-port.
2. Click Settings in the Menu bar.
3. Click License in the side menu.
4. Click the Upgrade Request button. The Upgrade Request dialog appears.
5. The PrintShop Mail Web upgrade request pages resides on the Objectif Lune web server and allows the
PrintShop Web owner to renew the OL Care license and obtain licenses for commercial modules. Enter
name and address information before submitting the form. A Thank you page is shown and it is possible
to print the confirmation of the upgrade request.
Objectif Lune Inc. © 2010 87
Page 93

5.3 Roles
Roles are assigned to user accounts and define which sections and resources users in PrintShop Mail Web are
allowed to access. PrintShop Mail Web has nine predefined roles which can be modified by the administrator
(not deleted). The administrator may add and delete custom roles. The administrator role itself can not be
modified or deleted.
5.3.1 Create a new role
To add a new role:
1. Click Settings in the Menu bar and click Roles in the side menu. The Roles overview page appears.
2. Click the Add button. This will show the Add dialog:
The Add role dialog
3. Enter a Name for the new role. Select on which role the new role will be based. The new role will receive
all settings of the selected role.
4. Click Save to create the new role and close the dialog. The new role is added to the Roles overview.
5.3.2 Delete a role
1. Click Settings in the Menu bar and click Roles in the side menu.
2. Select one or multiple user defined roles by clicking the checkbox in front of a role.
3. Click the Delete button. The Delete dialog appears:
The Delete role dialog
4. The application will ask you to select a replacement role for the user accounts that have one of the
selected roles.
5. Click the Delete button to remove the roles and assign the replacement role to the affected user
accounts.
Note: The system defined roles cannot be deleted.
Objectif Lune Inc. © 2010 88
Page 94

5.3.3 Modifying a role
Modifying a role
To modify a role:
1. Click Settings in the Menu bar.
2. Click Roles in the side menu. An overview of the available roles is shown.
The users column of each row represents the numbers of users with that particular role.
3. Select a role from the overview. The Properties of that role are shown:
General Settings - Roles
The Role properties page with collapsible sections
In the Role Properties screen you see the collapsible sections for which you can define user rights. In
each section you can specify whether a user with the selected role may perform a given function or not.
The settings for the following sections can be modified:
▪ General
▪ New Document section
▪ Order Manager section
▪ Companies section
▪ Users section
▪ Assign Roles section
▪ Publication Types section
▪ Collections section
▪ PrintShop Mail section.
If one or all sections are collapsed it is possible to close all sections at once with the Collapse all button.
The role properties screen with the collapsible sections is visible than.
Objectif Lune Inc. © 2010 89
Page 95

General Settings - Roles
General
In the General section you can specify if a user may see the option My Account in the Menu bar.
• Edit My Account: The My Account option is, by default, enabled for each role. This function allows
users to change their own user settings. The My Account option appears in the Menu bar.
New document
The New document section controles whether users are allowed to see disabled companies, departments,
publication types and documents in the New document section of PrintShop Mail Web.
New Document section
• View disabled...: These checkboxes are normally switched off for almost al roles. These options allows
users to see disabled companies, departments, publication types and documents. These options are
useful for testing documents before making them available for ordering.
• View company wide publication types: The View company wide publication types option allows users
to view all publication types of a company which contains departments. Normaly both, the user and
publication type, need to be assigned to a department. This option is typically used for the
administrator, product manager, operator, designer and company manager.
Order Manager
In the Order Manager section each option group is related to a part of the side menu in the Order Manager.
When the Access checkbox is checked the other options are available.
Objectif Lune Inc. © 2010 90
Page 96

General Settings - Roles
Objectif Lune Inc. © 2010 91
Page 97

General Settings - Roles
Order Manager section
• Access: The Access checkbox in this section is normally on for all user roles and controls whether users
see the Order Manager tab in the Menu bar or not. The Access all orders option allows users to view and
edit all orders (within all statuses and companies) in the Order Manager. The Limited access checkbox
limits users access to their own print orders. If this checkbox is not selected, users can see all print jobs
from the departments and/or companies that the user belongs to.
• Edit Order Reference: The Edit order reference option allows users to edit the reference field in the
order information window of the new document section. The customer roles have this checkbox switched
on.
• The Order Manager section has the following sub sections:
▪ Set Order Status
▪ View Status Folders
▪ View Personal Order Folder
Set Order Status
The Set Order Status section defines whether users have access to a folder to adjust a print job to the
selected statuses.
The Set Order Status checkboxes enables a user to set the status of a print job to the statuses with a checked
checkbox. The Quote price checkbox controls the right to add a price to an order with a quote request.
Set order status section
View status folders
The checkboxes in this section controls a users right to view print jobs in a given status.
Objectif Lune Inc. © 2010 92
Page 98

General Settings - Roles
View status folders section
• Status folders: The …folders checkboxes controls a users right to view print jobs in a given status.
• Edit options: The Edit... checkboxes controls the users right to edit print jobs or the print job's quantity
in a specific folder.
• Delete options: The Delete… checkboxes controls the users right to delete print jobs in a specific
folder.
• Print Orders: The Print orders checkbox controls the users right to print jobs in the In-plant folder. By
default the designer, operator and administrator roles have this option checked.
• Export Report: If the Export report function in the Completed folder is enabled, the user can sort and
export a file with all order information from a specific year and/or month.
• Re-Order: This checkbox controls the users right to re-order existing print jobs from the Completed
folder.
View Personal Order Folder
This section controls whether users have right to see specific order folders and the jobs in these folders.
Objectif Lune Inc. © 2010 93
Page 99

General Settings - Roles
View personal order folders section
• My Orders Folder: This option controls whether users can get an overview of all their orders that have
not yet been completed. The My Orders Folder is by default enabled for every user allowing the user to
see his own orders.
• My Approved Order Folder: This option enables users to view the print jobs they have approved,
included the print jobs that they approved of other users. By default this folder is visible for power
users, because they can approve orders from other users. All approved orders can be viewed in the
Approved folder.
• My Departments Folder: This option controls whether users can view all print jobs from the
departments they have access rights to. In the default setup this folder is visible for the department
manager.
• My Companies Folder: This option enables users to view all print jobs from the company or companies
they have access rights to. In the default setup company managers and production managers can see
this folder.
Companies
In the Companies section each block is related to an item of the side menu. When the Access checkbox is
checked the other options are available.
Objectif Lune Inc. © 2010 94
Page 100

General Settings - Roles
Companies section
• Access: The Access checkbox in the Companies section controls whether users see the Companies tab
in the Menu bar or not and is off by default for all user roles, except the department manager, company
manager, production manager and administrator.
• View All Companies: The View all companies checkbox allows users to view all company and company
related items (users and publication types). When deselected you'll need to assign the user to a
company first.
• Web Design: The Web Design checkbox give users the right to change the Web design for a company.
This option allows a user to change the color settings, upload another custom logo or select another skin
for the company the user belongs to.
• Add and Delete: The Add and delete option allows users to add and delete companies. The options
Enable/disable and Edit are directly related to the Add and delete option.
Objectif Lune Inc. © 2010 95
 Loading...