

Page 1

PrintShop Mail Web
User Guide
Page 2

Copyright Information
Copyright © 1994-2010 Objectif Lune Inc. All Rights Reserved.
No part of this publication may be reproduced, transmitted, transcribed, stored in a retrieval system, or
translated into any other language or computer language in whole or in part, in any form or by any means,
whether it be electronic, mechanical, magnetic, optical, manual or otherwise, without prior written consent of
Objectif Lune Inc.
Objectif Lune Inc. disclaims all warranties as to this software, whether expressed or implied, including without
limitation any implied warranties of merchantability, fitness for a particular purpose, functionality, data
integrity or protection.
PlanetPress and PrintShop Mail are registered trademarks of Objectif Lune Inc.
PostScript and Acrobat are registered trademarks of Adobe Systems Inc.
Pentium is a registered trademark of Intel Corporation.
Windows is a registered trademark of Microsoft Corporation.
Adobe, Adobe PDF Library, Adobe Acrobat, Adobe Distiller, Adobe Reader, Adobe Illustrator, Adobe Photoshop,
Optimized Postcript Stream, the Adobe logo, the Adobe PDF logo are either registered trademarks or
trademarks of Adobe Systems Incorporated in the United States and/or other countries.
Trademarks of other companies mentioned in this documentation appear for identification purposes only and
are the property of their respective companies.
Title PrintShop Mail Web - User Guide
Revision 2010/01/05
Page 3

Table of contents
1 PrintShop Mail Web.......................................................................................................................................................................................... 1
2 In practice ........................................................................................................................................................................................................ 2
2.1 Login to the system............................................................................................................................................................................................ 3
2.2 Lost password ................................................................................................................................................................................................... 5
2.3 Modify my account............................................................................................................................................................................................. 6
2.4 Create a static document.................................................................................................................................................................................... 7
2.5 Create a file upload document ............................................................................................................................................................................ 8
2.6 Create a variable document .............................................................................................................................................................................. 10
2.6.1 Uploading a database file ........................................................................................................................................................................ 11
2.6.2 Defining the preview range ..................................................................................................................................................................... 11
2.7 Create an order ............................................................................................................................................................................................... 12
2.7.1 The Shopping Cart.................................................................................................................................................................................. 12
2.7.2 Shipping Options .................................................................................................................................................................................... 12
2.7.3 Order Summary...................................................................................................................................................................................... 13
2.8 Select an order status overview ........................................................................................................................................................................ 14
2.9 Change the status of an order........................................................................................................................................................................... 15
2.10 Re-order print jobs ......................................................................................................................................................................................... 17
2.11 Add departments ........................................................................................................................................................................................... 19
2.12 Modify department properties ......................................................................................................................................................................... 20
2.13 Add or modify address.................................................................................................................................................................................... 21
2.14 Add users ...................................................................................................................................................................................................... 22
2.15 User roles ...................................................................................................................................................................................................... 23
2.16 Modify user info ............................................................................................................................................................................................. 24
2.17 Assign users to a department.......................................................................................................................................................................... 25
I
Page 4

1 PrintShop Mail Web
PrintShop Mail Web is a modern and versatile software package which integrates workflow processes and
enables you to order and/or create your own (variable) print work.
PrintShop Mail Web:
• Simplifies print order procedures
• Simplifies the creation of variable data print orders
• Provides a pre-flight and preview capability to verify what will be printed
• Addresses each contact in their preferred language
• Is available to create and order print work, 7 days a week, 24 hours a day
• Safeguards the corporate identity
• Can be configured to match the look and feel of the corporate website
• Manages the companies documents, so users always use the correct version
• Lowers cost due to the compact and efficient ordering and production method
• Enables Business to Business (B2B) as well as Business to Customer (B2C) transactions
PrintShop Mail Web gives you more control and flexibility in print production!
Objectif Lune Inc. © 2010 1
Page 5

2 In practice
This chapter explains the various ordering workflows of PrintShop Mail Web. The ordering workflow
incorporates a shopping cart as seen in common ecommerce internet sites.
The ordering process step by step:
1. Document Creation: The New Document section is a store front listing the documents available to the
customer. Based on the selected document the system invokes a wizard like interface guiding the
customer through the steps of the document creation process. At the end of this process the customer is
shown a PDF softproof. If the customer is satisfied with this document it can be added to the shopping
cart. The customer can continue creating more documents and add those documents to the cart.
2. Shopping Cart: The shopping cart (or basket) allows customers to collect documents created via or
selected from the New Document section. The pricing configuration controls whether the customer may
enter a user definable quantity, pick a quantity from a predefined list or whether the uploaded database
determines the quantity.
3. Shipping Options: This step allows the customer to select one of the available shipping methods (if
applicable), select a preferred shipping date, verify the shipping address information and add comments.
4. Order Summary: This page summarizes the order. The documents in the cart, the address the order
will be shipped to, and the payment information are shown.
5. Order Confirmation: If the order has been processed successfully, the order confirmation page is
shown. This page includes the PrintShop Mail Web order number and transaction information if
applicable.
Objectif Lune Inc. © 2010 2
Page 6

2.1 Login to the system
In order to access PrintShop Mail Web, direct your browser to the URL provided by your Print Service Provider.
The Login page lets the user log on to the system. Here you can enter your name and password and you can
select a language. Also found on the login page is the Remember me option. If the Remember me option
checkbox is checked a cookie is created. This cookie stores the user name and password. The next time the
PrintShop Mail Web web site is visited by the user, the system will check for the cookie and automatically log
you in.
To log in to PrintShop Mail Web:
1. Enter your user name and password
2. Select a language
3. Click Login. The following screen appears:
The welcome screen
Selecting My Account next to the name in the Menu bar allows modification of your settings. Depending on the
privileges of each user will the tabs in the Menu bar enable the user to:
• Create a new print job
• Request a quote
• Approve and order print jobs
• Place print jobs on hold
• Mark print jobs as completed
• Re-order print jobs
• Request detailed order information
• Execute a job search
• Add users and departments
Objectif Lune Inc. © 2010 3
Page 7

Note: Screen dumps are based on the default skin of PrintShop Mail Web.
In practice - Login to the system
Objectif Lune Inc. © 2010 4
Page 8
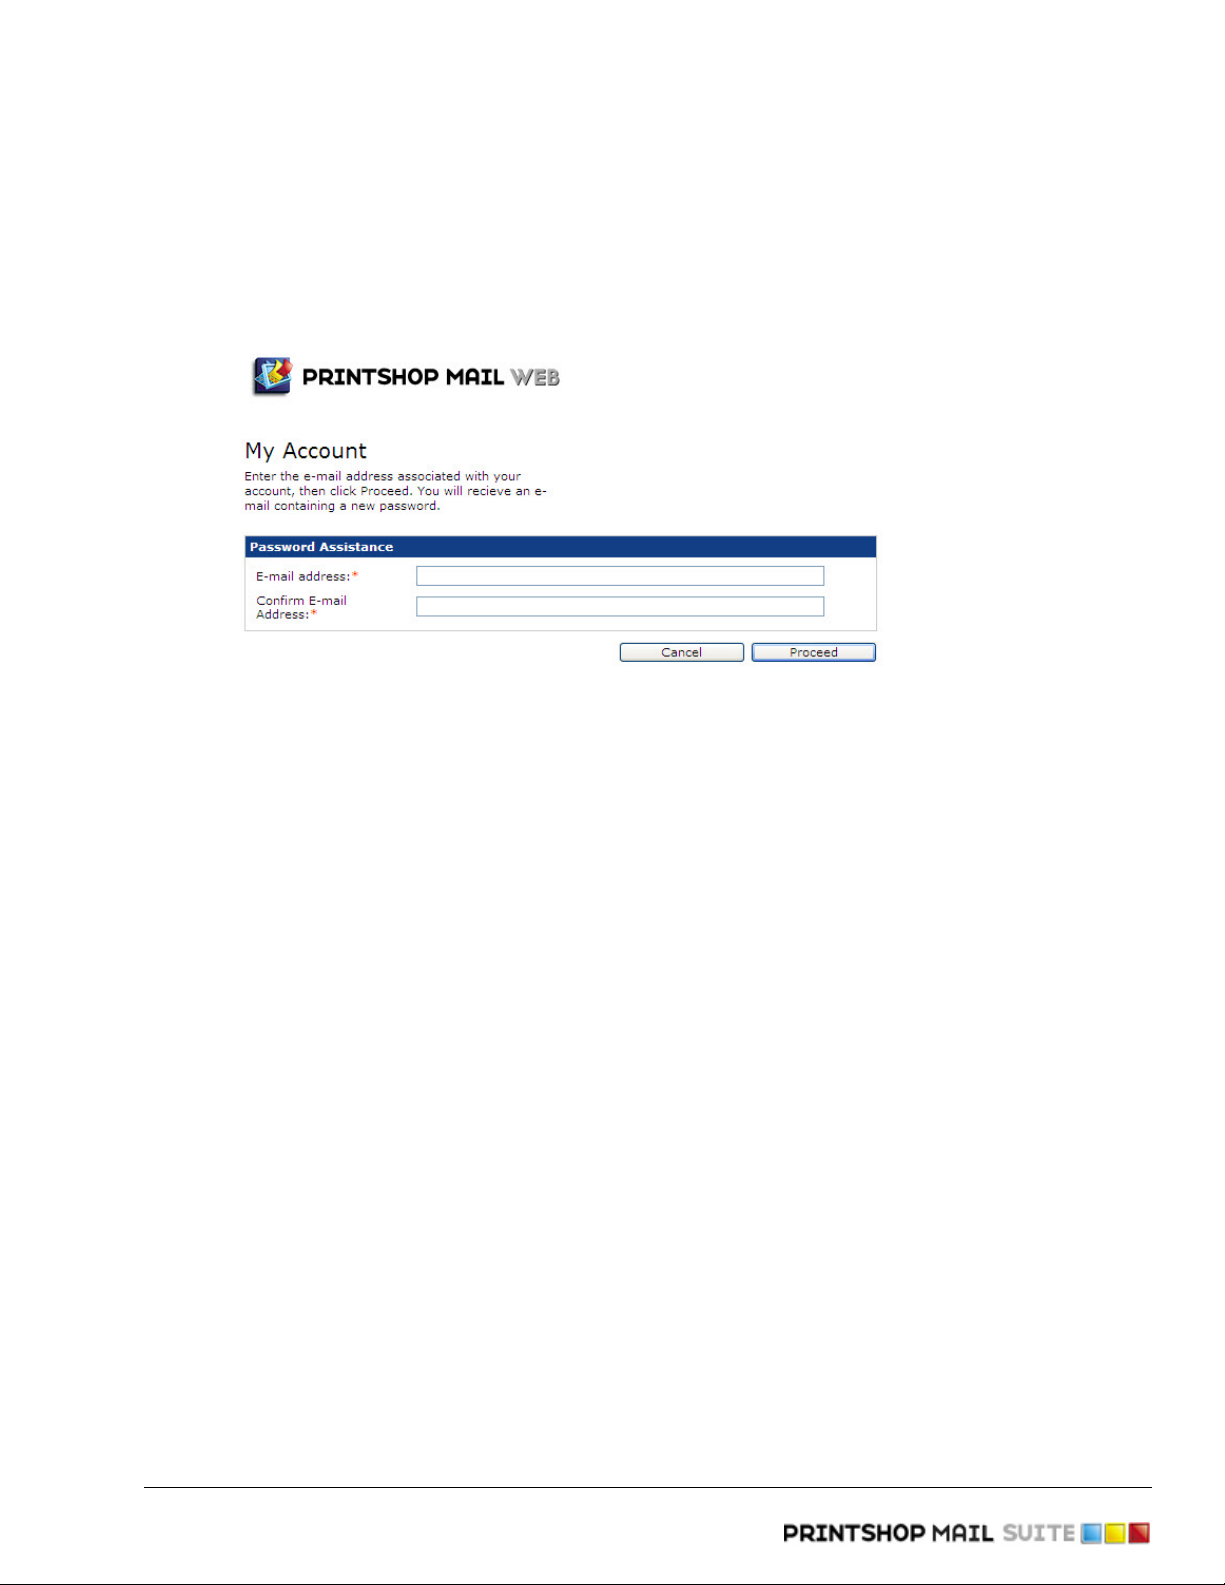
2.2 Lost password
The I lost my password option allows you to retrieve a new password for your account and is based on the
your e-mail address. An e-mail with the new password is send to the e-mail address of the given user. To get
a new password:
1. Click the I lost my password link on the login screen. The following screen appears:
Enter e-mail address to receive a new password
2. Enter the e-mail address associated with your account.
3. Confirm the entered e-mail address.
4. Click Proceed to generate a new password.
You receive, on the entered e-mail address, a new password. You can use this password to logon. Once
logged on you can decide to change the password or keep using this new password.
Objectif Lune Inc. © 2010 5
Page 9

2.3 Modify my account
Each user can modify his personal account information:
1. Click My Account in the Menu bar. The following screen appears:
Change user information in this screen
2. The following items can be changed:
▪ General:
▪ Username and Password: These fields define the information required to logon to the
system.
▪ Person Code: This value is a unique code which can be used to link to an administraton or
ordering system. Users with the appropriate privilege (role) can edit this field.
▪ Language: The selected language is used for the e-mail message you receives when
creating an order or when the status of an order is changed. The language selected in the
login window defines the application language.
▪ Remember me: When the Remember me checkbox is checked you are recognized by the
system and automatically logged in and re-direct to the Welcome or last visited page.
▪ Additional Information: The fields in this section are used in the ordering processs.
▪ Password: Each user can set a new password. Enter a new password in the Set new password
entry field and confirm the password in the Confirm new password entryfield.
3. Click Save to store the changes.
Objectif Lune Inc. © 2010 6
Page 10

2.4 Create a static document
A static document is a document where no data entry is required by the user and no database file is required.
PDF documents and PrintShop Mail documents without variables or database upload fields are static
documents.
In order to create and order a static print job:
1. Click New Document in the Menu bar. An overview of documents is shown from which the document can
be selected.
The new document page
The information below each document indicates the type of data that must be supplied. A symbol behind
the Publication Type folder name indicates that there are several documents available in that publication
type.
2. Select a static document from the overview by clicking on the document. A PDF softproof of the
document is shown to allow the user to verify that the output is correct
3. Click Add to Cart to add the document to your shopping cart.
Objectif Lune Inc. © 2010 7
Page 11

2.5 Create a file upload document
A File Upload document requires you to upload a document from your local hard drive to PrintShop Mail Web.
The uploaded document is added to the checkout as part of an order.
In order to create and order a file upload print job:
1. Click New Document in the Menu bar. An overview of documents is shown from which the document can
be selected.
The information below each document indicates the type of data that must be supplied. A symbol below
the Publication Type folder name indicates that there are several documents available in that particular
publication type.
The new document page
2. Select a document from the overview by clicking on the document.
Objectif Lune Inc. © 2010 8
Page 12

In practice - Create a file upload document
The file upload page
3. Reed the Instructions in the File Upload section from the File Upload page (if available).
4. Check if the file you will upload has a permitted file type and if the file file size not exceeds. In case no
file types are specified it is only possible to upload PDF documents.
5. Click Browse to select the file which is located on your computer.
6. Click Upload to upload the file and proceed to the next step. After a succesful upload the File Upload
Summary page is visible. You can check on this page the file name and file size of the document. In
case of a PDF document a thumbnail is created and visible.
7. Click Add to Cart to add the document to your shopping cart.
Objectif Lune Inc. © 2010 9
Page 13

2.6 Create a variable document
A variable document requires, the user to provide data. This can be done by uploading a database file or by
manually inputting data. Documents that require user input use a web form to collect information entered by
the customer. Such a form consists of one or more modifiable elements called input fields (e.g. text fields,
checkboxes, radio buttons, etc.).
In order to create and order a variable print job:
1. Click New Document in the Menu bar. An overview of documents is shown from which the document can
be selected.
2. Select a document from the overview by clicking on the document.
The information below each document indicates the type of data that must be supplied. A symbol behind
the Publication Type folder name indicates that there are several documents available in that particular
publication type.
If the document requires the user to enter data the following screen appears:
Sample of a user input page.
3. Enter the data in the entry fields and click Update Preview to check if all user data fields have been filled
in correctly.
4. Click Next to save the data and to proceed to the next step.
Objectif Lune Inc. © 2010 10
Page 14

In practice - Create a variable document
2.6.1 Uploading a database file
If the selected document requires a database file to be uploaded the following screen will be shown:
Upload database file page
The list of variable data fields which occur in the document are shown. The database file to be uploaded
should contain at least these fields. The database file can be in Excel, DBF or CSV format. The first row in the
database file is solely intended for the column headings and must not contain any information which is to be
published. Uploading the database file may take some time depending on the size of the database file and the
speed of the internet connection
1. Click Browse to select the database file which is located on your computer.
2. Click Upload to upload the database file and proceed to the next step.
3. After the database file has been uploaded the data in the database can be matched to the fields needed
in the document. PrintShop Mail Web automatically matches field names from the uploaded data with
names in the document.
If the database fields do not correspond with the database fields from the database file, it is possible to
drag them to the correct spot.
The Live update option is checked by default; ensuring that the preview is immediately refreshed if a
different record is selected. This can be achieved by clicking the Previous or Next buttons. It is also
possible to directly enter the record number in the Record entry field.
Click the Preflight link to check the uploaded data for possible problems. A report is shown that states
the problematic records in the data if applicable.
4. Click the Next button to proceed to the next step.
2.6.2 Defining the preview range
After mapping the database fields the user can select the range of records to use for the softproof:
1. Clicking Previous or Next allows specific records to be examined
2. Preview range allows you to check specific records. For example: 1 to 10, 50 to 59, 63 to 90 etc.
3. Clicking the Next button request a proof of the selected records. A PDF rendition of the document is
shown to allow the user to verify that the output is correct.
4. Click Add to Cart to add the document to your shopping cart.
Note: Creating a softproof can take some time depending on the size of the uploaded database, the
speed of the server and internet connection. While the softproof is being created a progress bar
is shown.
Objectif Lune Inc. © 2010 11
Page 15

2.7 Create an order
The shopping cart allows customers to collect multiple documents in the cart before placing an order. This
section describes the steps to create an order for the documents in the cart.
2.7.1 The Shopping Cart
The Checkout page shows the documents added to the Shopping Cart. Each item in the cart can have a
different pricing setup and quantity entry method.
The shopping cart containing multiple documents with different quantity entry methods
1. Define the quantity for each document. The appearance of the quantity field depends on the entry
method set for the document or is defined by the document type. Documents that require a database
file upload have quantity, which is determined by the number of records in the database file. The
quantity entry method could be one of the following:
▪ Free EntryField: The customer can enter a custom quantity within the minimum and maximum
quantity range (Pricing Options page).
▪ Predefined List: The customer can select a quantity from a predefined list. This list is derived
from the volume discount table.
Click the the thumbnail of a document to view the softproof.
Click the pencil icon next to the document name to edit the content of that document. Edit content is
only available for PrintShop Mail documents with variables. Edit content allows you to upload a new
database file replacing the active one.
2. Click Continue Shopping to add additional document to the checkout or click Proceed to move to the
next step.
2.7.2 Shipping Options
The Shipping page lets the customer edit the shipping address and specify shipping related items like the
shipping method (if applicable) and the preferred shipping date. Shipping methods are managed in the
Settings section of the system. The calculation of shipping charges can be enabled and disabled per company.
1. Select the preferred Shipping Method (if available). The printshop can setup shipping methods and
accompanying shipping rates.
2. Click the calendar icon to display a calendar dialog to select a preferred shipping date.
Objectif Lune Inc. © 2010 12
Page 16

In practice - Create an order
The Shipping Date calendar
The system will check if Rush Order Production Time is applicable. In this case the calendar icon shows a
notification triangle ( ). Shipping dates that require a rush order are marked in the calendar and
are selectable by the customer. The rush rate charges for those documents that require a rush order are
added to the final price calculation.
3. Enter a remark in the Comments field.
4. Verify or edit the shipping address information.
5. Check the I accept the Terms and Conditions checkbox if you agreed. If you want to read the terms and
conditions before checking the checkbox, click the Terms and Conditions link to open the terms and
conditions dialog. First after checking the terms and conditions checkbox the Proceed button is enabled
and is it possible to continue the ordering process.
6. Click Proceed to continue.
2.7.3 Order Summary
Once all order information is collected the summary page is shown. This page summarizes the order
information and shows the final pricing including shipping charges, rush rates and tax. Based on the
customers role the Order and Approve buttons are shown.
1. Click the Order or Approve button to create the order. PrintShop Mail Web invokes a workflow specific to
the selected payment connector. The default payment connector (Purchase Order), pops up a processing
dialog and no user interaction is required to place the order.
Once the order is placed a confirmation page is shown and a email notification message is sent.
Objectif Lune Inc. © 2010 13
Page 17

2.8 Select an order status overview
PrintShop Mail Web can generate detailed order overviews, allowing a user to view all orders at each stage of
the production process. Orders with the Approved status are ready for production. Those orders have been
approved by the customer and are released for print production.
Every order goes through the following stages:
• Ordered
• Approved
• In-plant
• Shipping
• Completed
In addition to this there is the On hold status. This folder contains orders that require a quote from the print
shop, these orders remain in this status until pricing is agreed.
To view the orders of a specific status:
1. Click Order Manager in the Menu bar. The Order Manager page is shown:
By clicking on an order in the Order Manager overview, details of the order can be viewed
2. Click an item in the Status section of the Order Manager side menu to view the orders of that production
status. The orders of this status are shown in the orders overview table. The colored cubes at the
beginning of each row indicate the status of the order and refer to the status folder.
The Approved item in the Order Manager side menu, shows the orders that are released for print.
Rush orders have a mark ( ) behind the order ID. Overdue orders are colored red.
3. Click the + symbol next to the order ID to view the jobs belonging to that order. The job overview
shows the name of the document, the ordered quantity and the current print status.
Objectif Lune Inc. © 2010 14
Page 18

2.9 Change the status of an order
To change the status of an order in the Order Manager:
1. Click Order Manager in the Menu bar. The Order Manager page is shown:
By clicking on an order in the Order Manager overview, details of the order can be viewed
2. Click the ID of an order. The order properties page is shown.
The Order Properties page
The Order Properties page consists of a details section and an overview of the jobs belonging to this
order. The Action bar along the top contains a range of buttons to change the status of the order, edit
the order details and delete the order. The set of status change icons that are visible depends on the
current status of the order.
3. Click a status item in the Action bar to change the status of the order.
An order with the status Ordered can be set to the On hold-status by the customer and will be placed in
the On hold-folder. Orders with the quote request status are placed in the On hold folder, waiting for a
price to be set. If a price is added the customer can accept the print job by ordering or releasing the
order or reject the print job by deleting the order.
Objectif Lune Inc. © 2010 15
Page 19

In practice - Change the status of an order
As soon as an order is placed in the Approved folder, customers can no longer change the status of the
order. It is possible for customers to track their personal orders via the My orders folder, or (if they
have the necessary access rights) via the My departments or My company folder.
Note: When the order reaches the Shipping state the customer can set the status of the order to
Completed. When an order is not delivered to your customer, the job status should be changed
to Completed by the operator or production manager when the order is dispatched.
Objectif Lune Inc. © 2010 16
Page 20

2.10 Re-order print jobs
Each user can re-order print jobs:
1. Click Order Manager in the Menu bar. The Order Manager overview appears.
2. Select the Completed status folder in the side menu.
3. Select one of the predefined queries on the left side of the Order overview to locate the order. The
available options are:
▪ Today
▪ Yesterday
▪ This week
▪ Last week
▪ This month
▪ Last month
▪ Year overview with sub selections per month
In the addition to this the Search item in the side menu can be used to look for specific jobs. The
available search parameters are:
▪ Order ID
▪ Job ID
▪ Content of user input fields
4. Click the plus-symbol next to the order ID to view the jobs of this order.
5. Select a job by clicking its ID or document name. The Job Properties page is shown.
Objectif Lune Inc. © 2010 17
Page 21

In practice - Re-order print jobs
The Job Properties page
6. Click the Re-order item in the Action bar to add the document to the checkout. In case of a variable
document a pencil icon is shown and allows the customer to change the user input and/or database file
of the new job.
Objectif Lune Inc. © 2010 18
Page 22

2.11 Add departments
To add a department to a company:
1. Click Companies in the Menu bar. The Companies overview page is shown.
2. Select a company from the overview by clicking on the company name.
3. Select Departments in the side menu.
4. Click Add. The following dialog appears:
Add a department to a company page
5. Enter the Department name.
6. Click Save to store the changes.
Objectif Lune Inc. © 2010 19
Page 23

2.12 Modify department properties
After creating a new department it is possible to modify all department properties. To modify the department
properties:
1. Click Companies in the Menu bar. The Companies overview page is shown.
2. Select a company from the overview by clicking on the company name.
3. Click Departments in the side menu. The Departments overview page is shown.
4. Select a department from the overview by clicking on the department name. The Departments Summary
page is shown and on the right hand side a menu is displayed. This side menu allows management of
the following items of the currently selected department:
▪ Properties
▪ Addresses
▪ Users
▪ Publication Types.
5. On the Documents Summary page the basic department information is displayed in the Properties
section. To modify the information in the Properties section click the Edit link or click Properties in the
side menu.
6. Click Edit. The following screen appears:
Change the department properties in this screen
7. Enter basic information about the department:
▪ Department Code: This value is a unique code which can be used to link to an administration or
ordering system.
▪ Url: The customers company URL can be entered here.
▪ Contact Person: When users have been added to the department, a department contact person
should be selected in the Contact person pull-down-menu.
8. Click Save to store the changes. The department properties page is shown.
Objectif Lune Inc. © 2010 20
Page 24

2.13 Add or modify address
To add the department address in PrintShop Mail Web:
1. Click Companies in the Menu bar. The Companies overview page is shown.
2. Select a company from the overview by clicking the company name.
3. Click Departments in the side menu.
4. Select a department from the overview by clicking the department name. The Department Summary
page is shown. On the summary page the basic department information is displayed. By default the
Company Address is placed in a collapsible information window.
5. To make the Address information visible, click the text. The address information can add or modified by
clicking the Edit link or click Addresses in the side menu.
6. Click Edit. The following screen appears:
Enter or modify the department address information in this screen
7. The Shipping and Billing address information is used during the ordering process and can be used as
default value for input fields in the New Document section. Enter the required information. By default
the company address information is entered and the Use company address checkbox is checked. When
you uncheck the Use company address checkbox it is possible to edit the Shipping and Billing
information:
▪ Country: Select a country in the pull-down-menu. By default the value None is selected.
▪ Address Fields: Enter the address information in this fields. Maximal 255 characters can be typed
or pasted in this fields.
▪ Zip code: The Zip code is related to the selected country. In some cases a regular expression is
added to check the entered zip code.
▪ State: The State is also related to the selected country. When selecting US or Canada a pull-
down-menu is shown, presenting the states of the US or Canada. State is a required field than. In
all other cases an entry field is visible.
8. Click Save to store the changes.
Objectif Lune Inc. © 2010 21
Page 25

2.14 Add users
To create a new user account for a department:
1. Click Companies in the Menu bar. The Companies overview page is shown.
2. Select a company from the overview by clicking on the company name.
3. Click Departments in the side menu.
4. Select a department from the overview by clicking on the department name.
5. Select Users in the side menu.
6. Click Add. The following dialog appears:
Enter basic information about the user in this screen
7. Enter the required information:
▪ User Name and Password: These fields define the information required to logon to the system
and need to be entered in the Login page.
▪ Role: The selected role defines the privileges and access level of the user.
▪ Login: Set this option to Enabled to allow the user logon to the system.
▪ First, Last, Gender and E-mail address: The values of these fields are used in the ordering
process and can be used as default values for user input fields in the New Document section.
8. Click Save. You have now added a user, which is added directly to the departments’ User overview.
More users can be added by clicking on Add again.
Note: When users have been assigned to departments, a department contact person should be
selected: click on Departments in the side menu, select a department from the overview and
click Edit. This will open the Edit department info page, where the correct contact person can be
selected from a pull-down-menu. Click Save to store the changes.
Objectif Lune Inc. © 2010 22
Page 26

2.15 User roles
Each user account has certain privileges assigned to it; therefore assigning a role to users determines not only
their level of authority but also the start-up screen they will be able to view when they log in.
• Customer: These users can:
▪ retrieve a new password
▪ create and order print jobs
▪ edit job content
▪ request a quote
▪ adjust the job status (on hold and shipping)
▪ request an overview of print jobs
▪ re-order print jobs
▪ search for specific print jobs
• Customer Plus: Has the same privileges as the Customer and can also:
▪ approve their own print jobs
• Power User: Users with this role have the same privileges as the Customer Plus role with the following
addition:
▪ approve print jobs for users in the same department (or company if there are no departments)
• Department Manager: Department Managers have control over one or several departments, have the
same privileges as power users and can also:
▪ add, assign and delete users within their department(s)
▪ modify details within their department(s)
• Company Manager: Have control over one company and its departments, have the same privileges as
department managers and can also:
▪ add, assign and delete customers, customers plus, power users, department managers and
company managers within the company and within departments
▪ add departments
▪ assign publication types to a department
▪ modify the company, departments and users settings
• Public Customer: This role is given to new customers who created an account before proceeding
with an order they placed while shopping in a public company (which allows any visitor to use the
shopping cart, but requires a logged-in user to proceed with checkout). These users have the lowest
functionality. They can:
▪ Create and order print jobs
▪ Approve their own print jobs
Objectif Lune Inc. © 2010 23
Page 27

2.16 Modify user info
To modify the user information:
1. Click Companies in the Menu bar. The Companies overview page is shown.
2. Select a company from the overview by clicking on the company name.
3. Click Departments in the side menu.
4. Select a department from the overview by clicking on the department name.
5. Select Users in the side menu.
6. select a user from the overview by clicking the user name.
7. Click Edit. The following screen appears:
Enter or edit the basic information about the user in this screen
8. Enter the required information:
▪ Person Code: This value is a unique code which can be used to link to an administration or
ordering system.
▪ Language: The selected language defines the language used for the e-mail messages send by
PrintShop Web. The language of the web site is defined by the language selected in the Login
page.
▪ Login: Set this option to Enabled to allow the user logon to the system.
▪ Additional Information: The values of these fields are used in the ordering process and can be
used as default values for user input fields in the New Document section.
9. Click Save to store the changes.
Objectif Lune Inc. © 2010 24
Page 28

2.17 Assign users to a department
To assign a user account to a department:
1. Click Companies in the Menu bar. The Companies overview page is shown.
2. Select a company from the overview by clicking its name.
3. Select Departments in the side menu and select a department from the overview.
4. Select Users in the side menu. An overview is shown with the user accounts in that department:
With the assign button users can be assigned to a department
5. Click Assign. The following screen appears:
Users can be assigned to a department
6. Select a user from the Unassigned list and click Assign or double click a name to assign. The Unassigned
Users are those users that are not part of the department. The users shown in the list depend on the
role of the currently logged on user. A role defines which roles the user can assign when creating new
accounts. The list shows those users of which the role can be assigned by the current user.
7. Click Save to store the changes. The assigned user(s) will be visible from the users overview of the
department.
Objectif Lune Inc. © 2010 25
 Loading...