

Page 1
UM11184
QN9080-001-M17 DK User’s Guide
Rev. 0 — January 2019
UM11184
Document information
Info
Content
Keywords
QN9080-001-M17 DK, QN9080-001-M17, BLE.
Abstract
This document is an introduction to the QN9080-001-M17 DK board.
Page 2

NXP Semiconductors
UM11184
QN9080-001-M17 DK User’s Guide
UM11184
All information provided in this document is subject to legal disclaimers.
© NXP B.V. 2019. All rights reserved.
User Manual
Rev. 0 — January 2019
2 of 27
1. Introduction
The QN9080-001-M17 DK board is designed to ease the evaluation of the chip's
functions and performance on customer side to make it easy to control, connect, and
debug the extension hardware and make it easy for the customer to develop and debug
firmware.
1.1 Purpose
This document introduces all functions of the QN9080-001-M17 DK board and describes
all its parts in detail.
1.2 Kit contents
QN9080-001-M17 DK includes the following:
QN9080-001-M17 DK board.
QN9080 USB dongle.
NFC antenna.
USB cable.
Page 3
NXP Semiconductors
UM11184
QN9080-001-M17 DK User’s Guide
UM11184
All information provided in this document is subject to legal disclaimers.
© NXP B.V. 2019. All rights reserved.
User Manual
Rev. 0 — January 2019
3 of 27
2. Hardware description
The QN9080-001-M17 DK board provides easy access to peripherals, such as buttons
and LEDs. The board also provides useful interfaces, such as the USB port for UART
communication, the CMSIS-DAP debugger, and the standard Arduino and Pmod
connector. The USB dongle is a Bluetooth® device powered by QN9080. It acts as a
master/slave when communicating with QN9080-001-M17 devices.
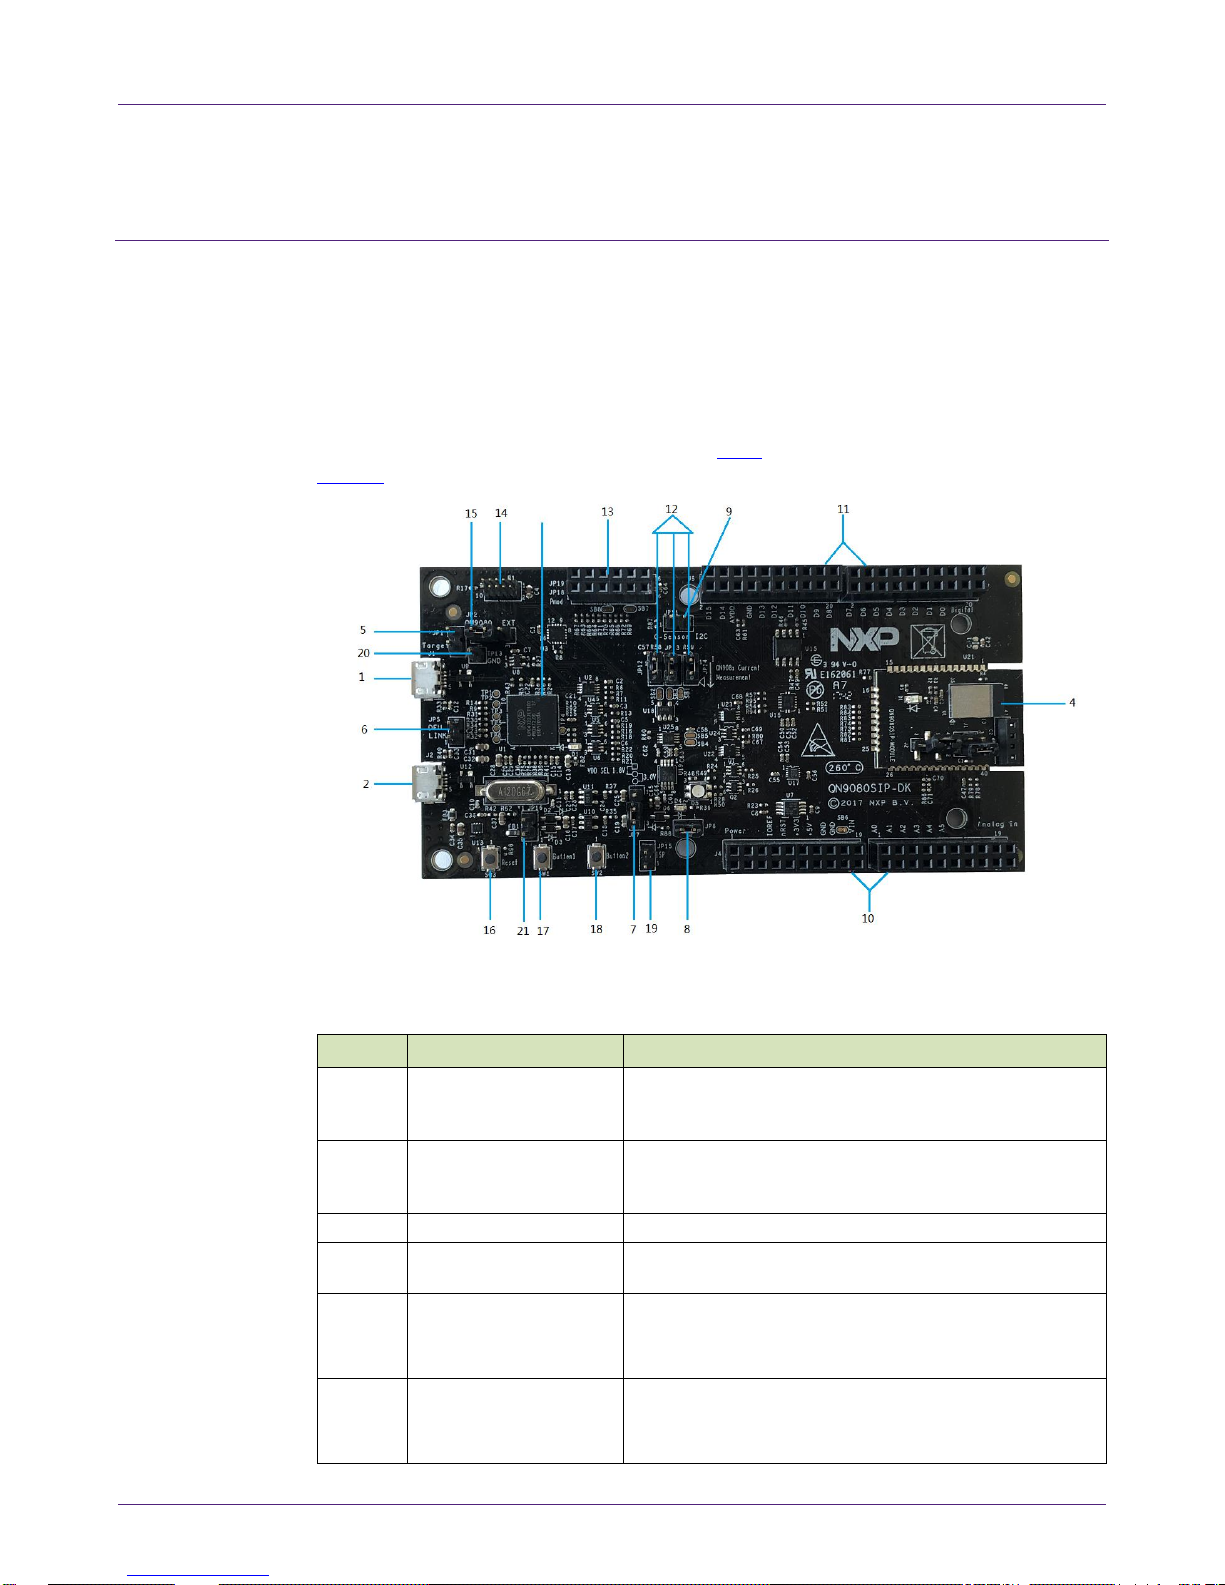
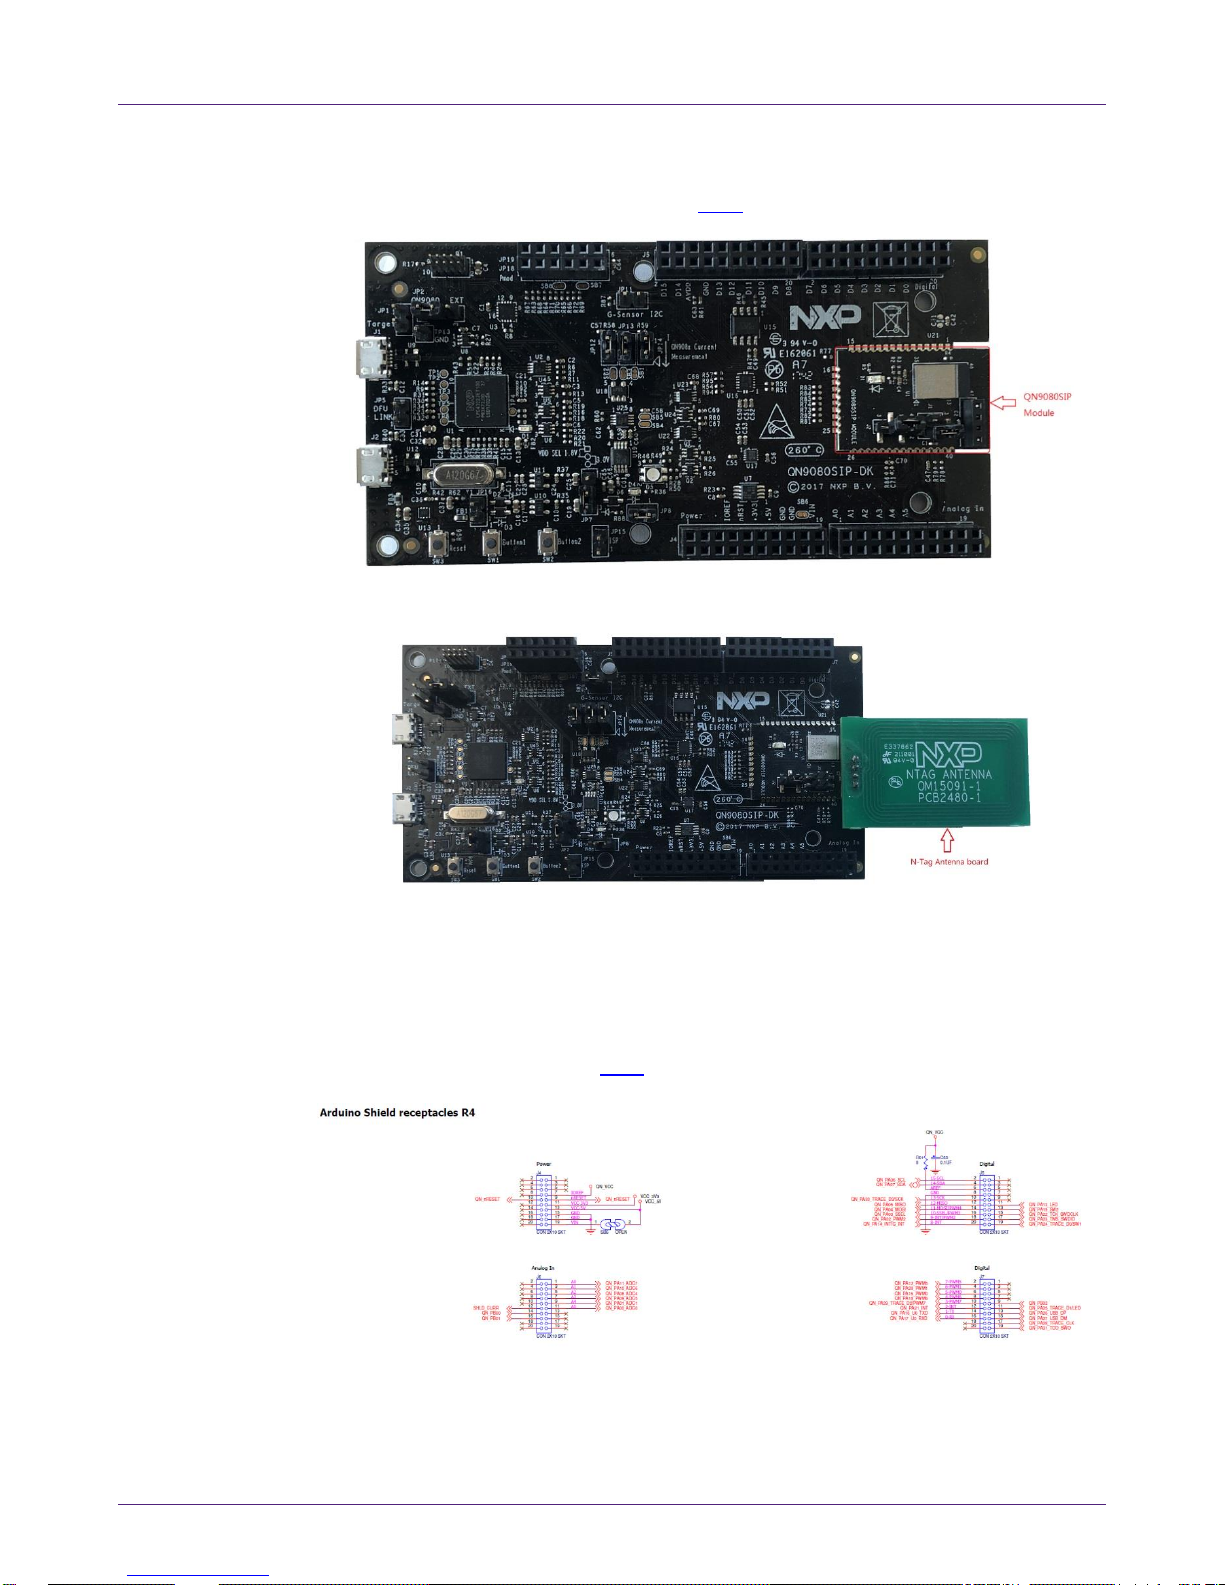
2.1 Hardware overview
The QN9080-001-M17 DK board is shown in Fig 1. The detailed information is listed in
Table 1.
Fig 1. Board overview
Table 1. QN9080-001-M17 DK board’s mark information list
Number
Name
Description
1
QN9080-001-M17 USB
port
The QN9080-001-M17 USB port provides power supply
to the whole board and the USB interface of the
QN9080-001-M17 chip.
2
LPC4322 USB port
The LPC4322 USB port provides power supply to the
whole board and the USB interface is connected to
LPC4322.
3
LPC4322
LPC4322 works as a JTAG/SWD debugger.
4
QN9080-001-M17
module
The QN9080-001-M17 module board.
5
Jumper JP1
This jumper selects the JTAG/SWD debugging target:
• Open: on-board target (default).
• Short: off-board target.
6
Jumper JP5
This jumper selects the LPC4322 working mode:
• Short: DFU mode enabled.
• Open: normal mode (default).
Page 4
NXP Semiconductors
UM11184
QN9080-001-M17 DK User’s Guide
UM11184
All information provided in this document is subject to legal disclaimers.
© NXP B.V. 2019. All rights reserved.
User Manual
Rev. 0 — January 2019
4 of 27
Table 1. QN9080-001-M17 DK board’s mark information list
Number
Name
Description
7
Jumper JP7
This jumper selects the QN9080-001-M17 module power
supply voltage:
• 1-2: 1.8 V power supply.
• 2-3: 3.0 V power supply (default).
8
Jumper JP8
This jumper selects the transceiver mode to QN9080001-M17 UART:
• Short: UART interface enabled (default).
• Open: UART interface disabled.
9
Jumper JP11
This jumper selects the transceiver mode to the QN9080001-M17 I2C interface:
• Short: I2C interface enabled (default).
• Open: I2C interface disabled.
10
Header J5 and J7
QN9080-001-M17 GPIO for testing and compatible with
the Arduino interface.
11
Header J4 and J6
QN9080-001-M17 GPIO for testing and compatible with
the Arduino interface.
12
Jumper JP12, JP13,
JP14
These jumpers are used for the power consumption test.
13
Header J8
PMod interface connector, compatible with PMod.
14
Debugger connector
Used to offer the JTAG/SWD interfaces to the off-board
target.
15
Jumper JP2
This jumper selects the QN9080-001-M17 power supply
source: on-board power or EXT power.
16
Button3 SW3
Button3 resets the QN9080-001-M17 chip.
17
Button1 SW1
Button1 is used for user-defined function.
18
Button2 SW2
Button2 is used for user-defined function.
19
Jumper JP15
Jumper used to enable the QN9080-001-M17 ISP
function.
20
GND Pin
GND pin used as the test point of ground.
21
Jumper JP16
Jumper used to eliminate the leakage from the USB
interface when the DK board is powered by a battery.
2.2 Default jumper settings on the DK board
As shown in Fig 2, the power, JTAG/SWD, UART, and I2C enable jumpers are connected
by default. Table 2 and Table 5 show the jumpers’ functions and correct connection.
Page 5

NXP Semiconductors
UM11184
QN9080-001-M17 DK User’s Guide
UM11184
All information provided in this document is subject to legal disclaimers.
© NXP B.V. 2019. All rights reserved.
User Manual
Rev. 0 — January 2019
5 of 27
Fig 2. Board jumper default settings
Table 2. QN9080-001-M17 DK board’s default jumper settings
Jumper
Jumper setting
Function
JP2
Pin 1, 2 shorted
QN9080-001-M17’s on-board target.
JP7
Pin 2, 3 shorted
QN9080-001-M17’s power (3 V).
JP8
Pin 1, 2 shorted
UART path enabled.
JP11
Pin 1, 2 shorted
I2C path enabled.
JP16
Pin 1, 2 shorted
When the DK board is powered by a
battery, leave it open.
J1 (on-module board)
Pin 1, 2 shorted
Internal NTAG powered on.
J2 (on-module board)
Pin 1, 2 shorted
When the module board is powered from
the main board.
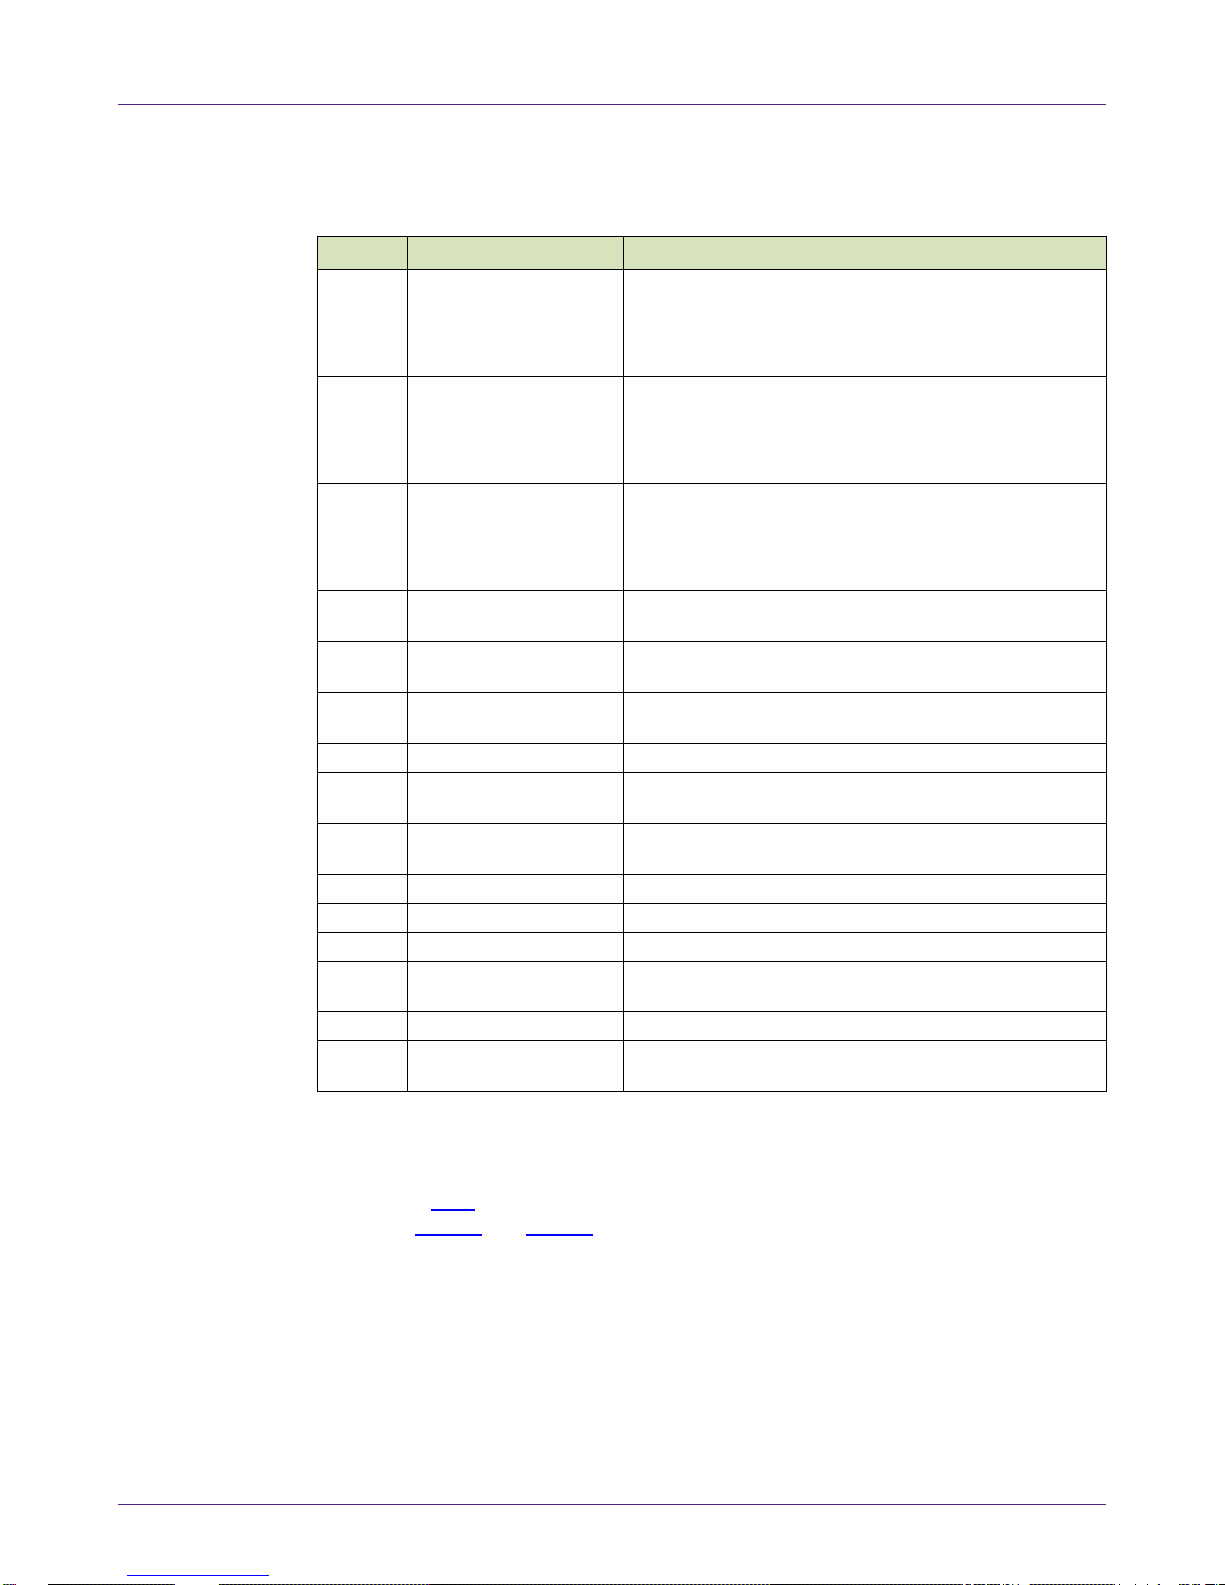
2.3 LPC4322 debugger
The LPC4322 debugger supports both the CMSIS-DAP (default) and the J-Link interface.
It provides both the SWD/JTAG and UART interfaces. See section 4.4 in document
UM11097 on how to change the debug interface to J-Link and the other way round. You
may download or update the firmware to the QN9080-001-M17 device using UART or
JTAG/SWD interfaces. There is a debugger connector to program and debug an
off-board target (shown in Fig 3).
Page 6
NXP Semiconductors
UM11184
QN9080-001-M17 DK User’s Guide
UM11184
All information provided in this document is subject to legal disclaimers.
© NXP B.V. 2019. All rights reserved.
User Manual
Rev. 0 — January 2019
6 of 27
Fig 3. Debugger connector
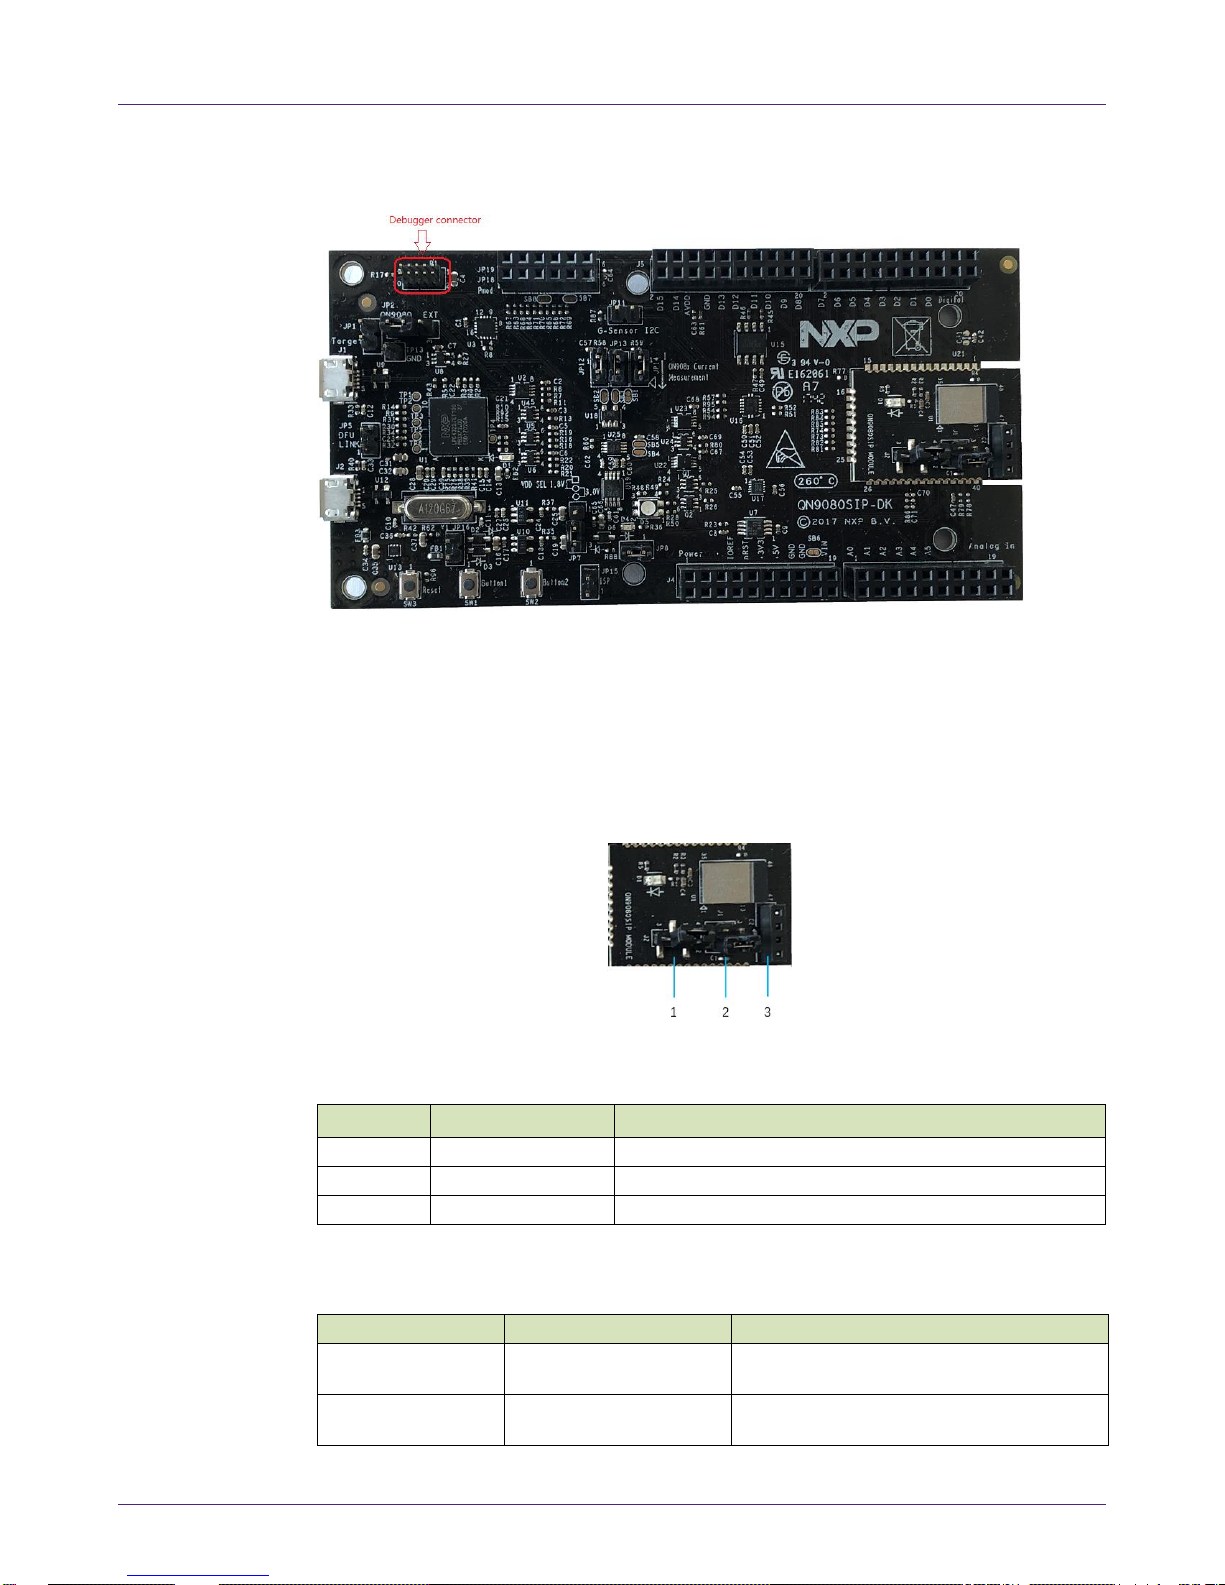
2.4 QN9080-001-M17 module
The QN9080-001-M17 module integrates the BLE radio, controller, protocol stack, BLE
antenna, NTAG, clocks, and profile software on a single chip, which provides a flexible
and easy usage of the BLE SoC solution. It includes a high-performance MCU (32-bit
Arm® Cortex®-M4F), on-chip memory, and peripherals for users to develop a truly
single-chip wireless MCU solution.
Fig 4. Module board details
Table 3. QN9080-001-M17 module board’s mark information list
Number
Name
Description
1
Jumper J2
Jumper used to select the power NTAG inside.
2
Jumper J1
Jumper used to select the power for QN9080-001-M17.
3
Connector J4
Connector used to connect the NTAG antenna.
Table 4. QN9080-001-M17 DK module’s default jumper settings
Jumper
Jumper setting
Function
J1
Pin 1, 2 shorted
The NTAG inside shares the same power
supply with the QN9080 inside.
J2
Pin 1, 2 shorted
QN9080-001-M17 is powered by an
on-board power supply.
Page 7
NXP Semiconductors
UM11184
QN9080-001-M17 DK User’s Guide
UM11184
All information provided in this document is subject to legal disclaimers.
© NXP B.V. 2019. All rights reserved.
User Manual
Rev. 0 — January 2019
7 of 27
The QN9080-001-M17 module is shown in Fig 5.
Fig 5. QN9080-001-M17 module board
Fig 6. NTAG antenna board
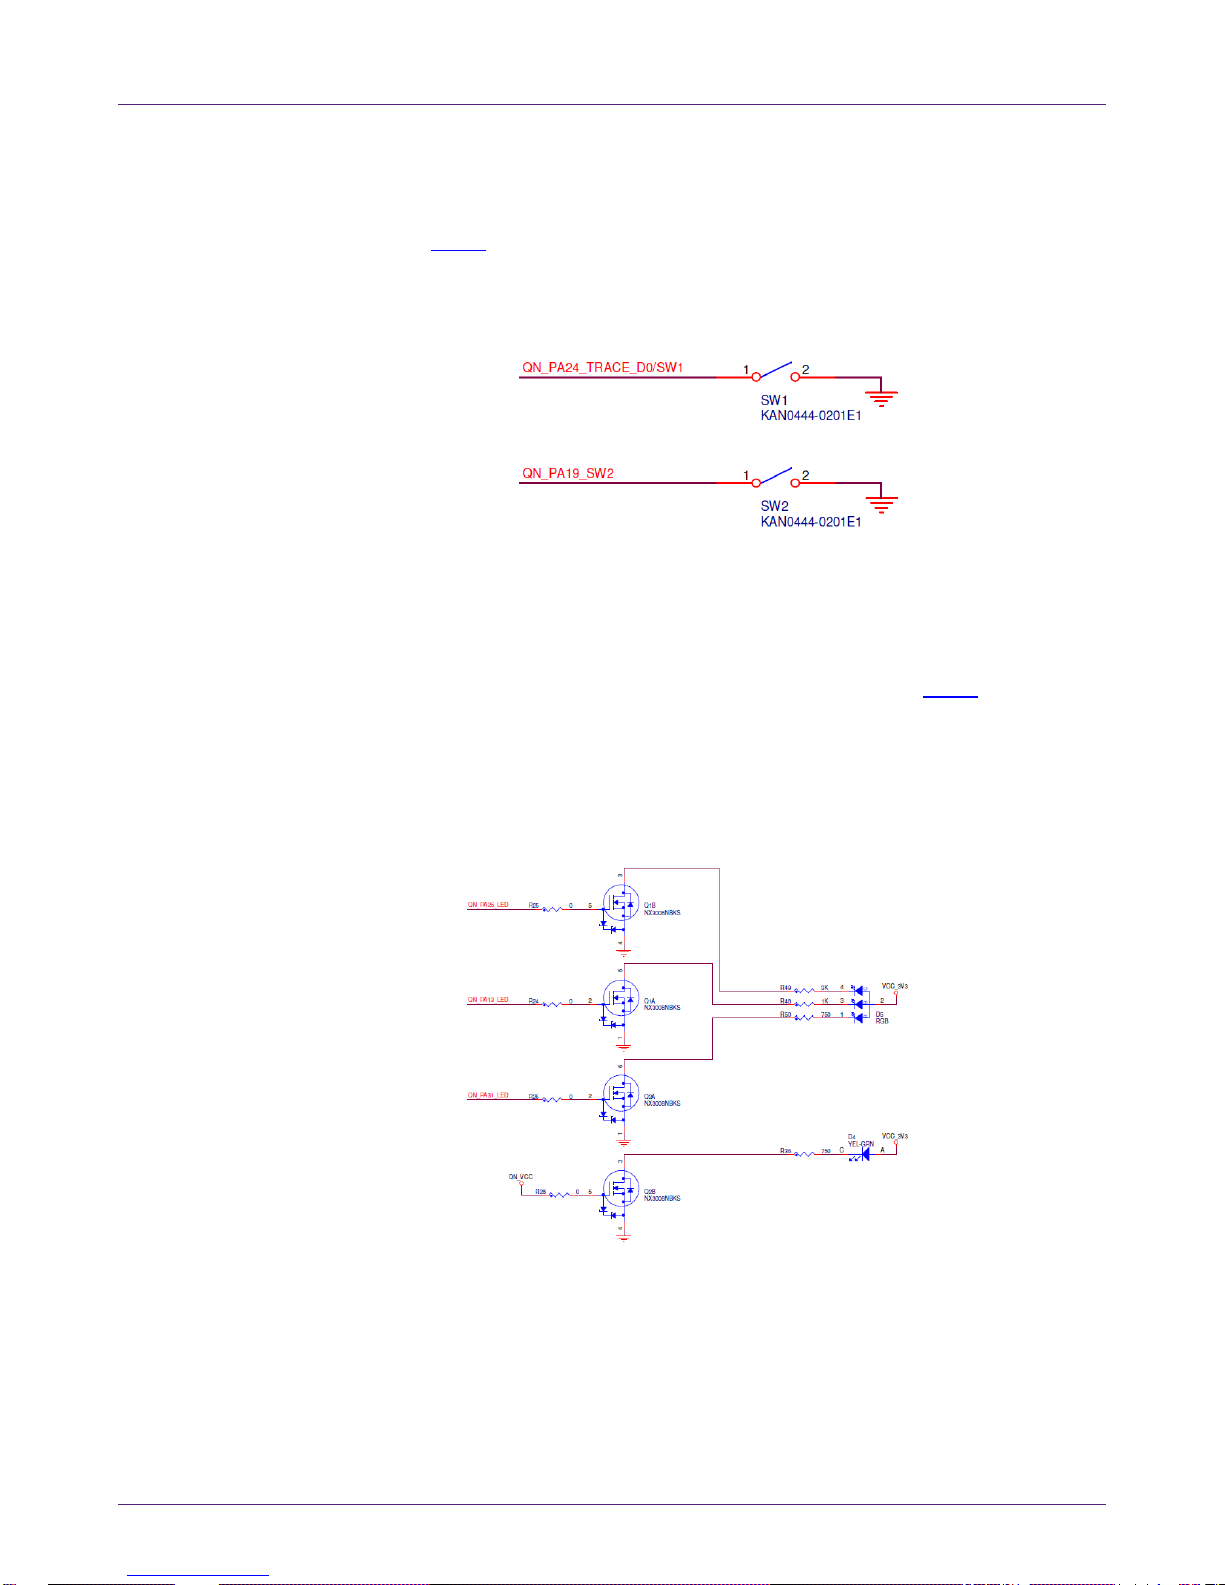
2.5 GPIO and Arduino interfaces
On the QN9080-001-M17 DK board, the J4, J5, J6, and J7 connectors all provide GPIO
connection outputs. The board is also compatible with the Arduino board interface. The
interface schematic is shown in Fig 7.
Fig 7. QN9080-001-M17 DK board GPIO and Arduino interface
Page 8

NXP Semiconductors
UM11184
QN9080-001-M17 DK User’s Guide
UM11184
All information provided in this document is subject to legal disclaimers.
© NXP B.V. 2019. All rights reserved.
User Manual
Rev. 0 — January 2019
8 of 27
2.6 QN9080-001-M17 reset button
The reset button provides a hardware reset to the QN9080-001-M17 device, as shown in
Fig 8.
Fig 8. Reset button
2.7 ISP mode jumper
JP15 is the ISP mode jumper used to set the QN9080-001-M17 mode. When the jumper
is shorted, the PB02 chip mode pin is connected to the GND and this function is enabled.
When the jumper is open, the ISP mode function is disabled, as shown in Fig 9.
Fig 9. Chip mode jumper
2.8 SWD/JTAG interface
The board provides a SWD/JTAG interface to be used by an external debugger, as
shown in Fig 10.
Fig 10. Debugger interface
Page 9
NXP Semiconductors
UM11184
QN9080-001-M17 DK User’s Guide
UM11184
All information provided in this document is subject to legal disclaimers.
© NXP B.V. 2019. All rights reserved.
User Manual
Rev. 0 — January 2019
9 of 27
2.9 Buttons
As shown in Fig 11, the DK board offers three buttons. When using the SW1 and SW2
buttons, the GPIO must be configured as the input. The logic LOW input is applied to the
GPIO when a button is pressed.
Fig 11. Buttons
The SW3 button is used to reset the QN9080-001-M17 chip. Press the button to reset the
QN9080-001-M17.
2.10 LED
The board offers a 3-color RGB LED. The connections are shown in Fig 12. The LED
lights up when the corresponding GPIO outputs switch to the logic high level. The GPIO
control pins are QN_PA13, QN_PA25, and QN_PA31. The GPIO QN_PA13 can work in
the PWM out mode. Therefore, the brightness of the LED can change with the PWM
pulse width.
Fig 12. LED
Page 10

NXP Semiconductors
UM11184
QN9080-001-M17 DK User’s Guide
UM11184
All information provided in this document is subject to legal disclaimers.
© NXP B.V. 2019. All rights reserved.
User Manual
Rev. 0 — January 2019
10 of 27
3. DK board application function
3.1 CMSIS-DAP interface
The QN9080-001-M17 DK board offers the JTAG/SWD interface either to on-board or
off-board QN9080-001-M17 targets. It also provides the USB-to-UART interface for
QN9080-001-M17.
To change to the CMSIS-DAP interface, see Chapter 4.4 in document UM11097.
3.1.1 CMSIS-DAP to on-board QN9080-001-M17
When programing or debugging a QN9080-001-M17 device using the CMSIS-DAP
interface, JP1 and JP2 must be configured according to Table 5.
Table 5. On-board debugger jumper setting
JP1
Open, CMSIS-DAP target is on the QN9080-001-M17 board.
JP2
Short pin 1, 2, QN9080-001-M17 power enable.
When downloading firmware to QN9080-001-M17 with the ISP mode, enable the UART
path and set the chip mode pin to ground. The jumper setting is shown in Table 6.
Table 6. ISP mode jumper setting
JP8
Short, UART path enable.
JP15
Short, ISP mode enable.
The ISP download operation flow is shown in Fig 13.
Fig 13. ISP download operation flow
After the ISP download operation, remove the jumper cap on jumper JP15 and leave the
JP15 open. Then, the QN9080-001-M17 can go into the normal mode normally.
3.1.2 CMSIS-DAP to off-board target
When using the QN9080-001-M17 DK board to program or debug off-board targets using
the JTAG/SWD interface, JP1 and JP2 must be configured according to Table 7.
Table 7. Off-board jumper setting
JP1
Short, CMSIS-DAP target is off-board target.
JP2
Short pin 2,3, 3 V power disable on JTAG/SWD connector.
3.2 Current consumption test
The QN9080-001-M17 DK board provides two ways to measure the QN9080-001-M17
chip current consumption. One way is to measure the current by the on-board precise
resistor used for the I-to-V conversion. The small voltage signal is amplified by the
operation amplifier and fed to the ADC. Then, it can be calculated by LPC4322 and
shown in the MCUXpresso IDE. Another way is to measure the current by an external
ammeter on jumper JP14.
UART
Enable
Short ISP
Jumper
ISP
Loading
Press
QN9080-001-
M17 RST
Page 11

NXP Semiconductors
UM11184
QN9080-001-M17 DK User’s Guide
UM11184
All information provided in this document is subject to legal disclaimers.
© NXP B.V. 2019. All rights reserved.
User Manual
Rev. 0 — January 2019
11 of 27
On the QN9080SIP module board, remove the jumper on J1 and short Pin1 and Pin2 of
the J2 to measure the QN9080 current draw only.
3.2.1 Current test using LPC4322
The QN9080-001-M17 DK board has an on-board current measurement circuit consisting
of the MAX9634T (U18) current monitor chip and the 12-bit ADC (ADC122S021, U19)
with 12-bit sampling from 50 ksps to 200 ksps. The on-board MAX9634T current monitor
measures the voltage across the QN9080-001-M17 VCC V-sense resistors; either 8.24 Ω
or 4.12 Ω if JP13 is installed. MAX9634 multiplies the sense voltage 25 times to provide a
voltage range suitable for the ADC to measure.
A 2-input analog mux is used to select the channel to be measured; either the
QN9080-001-M17 or the devices from the expansion board on the DK extension
connectors. The current measurement circuit is controlled by the Link2 processor and is
not user-programmable. The power-measurement utilities with this feature are available
only after installing the MCUXpresso IDE.
Due to the input offset voltage variations in MAX9634, the current-measurement circuit is
not recommended for measuring currents below 150 A.
The QN9080-001-M17 current can be measured by the voltage across a sense resistor
in series with the supply. The voltage across a series 4.12-Ω resistor with the target
QN9080-001-M17 VCC can be manually measured at JP12 on the PCB. Use the Ohm’s
law to calculate the current (QN9080-001-M17 current = measured voltage / 4.12 Ω). For
example, if the measured voltage is 10 mV, then 10e-3 / 4.12 Ω = 2.44 mA. Note that the
current consumed by MAX9634 used in the on-board current measurement is included in
the voltage measured on this resistor. The detailed schematic is shown in Fig 14.
Fig 14. Current test using the LPC processor
When performing the current test using the Link2 processor, jumpers JP12, JP13, and
JP14 must be set according to Table 8 .
Table 8. Current test jumper setting
JP12
Open when used for the Link2 processor current test.
JP13
Open when used for the Link2 processor current test.
JP14
Short when no digital ammeter in series.
Page 12

NXP Semiconductors
UM11184
QN9080-001-M17 DK User’s Guide
UM11184
All information provided in this document is subject to legal disclaimers.
© NXP B.V. 2019. All rights reserved.
User Manual
Rev. 0 — January 2019
12 of 27
3.2.2 Current test using a digital ammeter
When performing the current test using an external digital ammeter, jumpers JP12, JP13,
and JP14 must be set according to Table 9. Use a jumper cap to short the pins. The
schematic is shown in Fig 15.
Fig 15. Current test using an ammeter
When performing the current test using an ammeter, jumpers JP12, JP13, and JP14
must be set according to Table 9.
Table 9. Current test jumper setting
JP12
Short when used for Ammeter current test.
JP13
Short when used for Ammeter current test.
JP14
Need an ammeter in series.
3.2.3 Current test using a DC power analyzer
Measure the current using a DC power analyzer in these two ways: one way is to use the
DC power analyzer as an ammeter that shares the same settings as the ammeter test,
and the other way is to use the DC power analyzer as the power supply for the DUT.
In this case, the QN9080-001-M17 module is powered by the DC power analyzer. The
QN_VCC power pin is on jumper JP14, where a triangle symbol indicates the pin. The
GND pin near jumper TP13 can be also used as the power ground.
Fig 16. QN_VCC power pin
Page 13

NXP Semiconductors
UM11184
QN9080-001-M17 DK User’s Guide
UM11184
All information provided in this document is subject to legal disclaimers.
© NXP B.V. 2019. All rights reserved.
User Manual
Rev. 0 — January 2019
13 of 27
4. QN9080 USB dongle
4.1 Dongle hardware
Fig 17. Dongle hardware
The QN9080 USB dongle works together with the Connectivity QTool and behaves either
as a master or a slave when talking to the QN9080-001-M17 DK (or other devices). As
shown in Fig 18, the USB dongle receives commands from the Connectivity QTool via a
virtual COM port, which initializes the QN9080 dongle either as a master device or a
slave device. All tests can be performed by the Connectivity QTool after the initialization.
To update the firmware of the QN9080 USB dongle, see Chapter 4.3 in document
UM11097.
Fig 18. Connection as virtual COM port
4.2 Dongle connection
The QN9080 USB dongle is a USB-interfaced device with the QN9080 built in. With the
driver and SDK installed on your computer (See Chapter 4.2 in document UM11097),
use the Connectivity QTool in the SDK to control the QN9080 in the dongle to work as a
central/peripheral device. The DK board is supplied from the USB port and works as a
peripheral/central device. The dongle connection is illustrated in Fig 18. See the
Connectivity QTool user manual for information about the Connectivity QTool usage.
Page 14

NXP Semiconductors
UM11184
QN9080-001-M17 DK User’s Guide
UM11184
All information provided in this document is subject to legal disclaimers.
© NXP B.V. 2019. All rights reserved.
User Manual
Rev. 0 — January 2019
14 of 27
5. Appendix
5.1 Schematics
5.1.1 QN9080-001-M17 DK main board
The QN9080-001-M17 DK board schematic has five parts: power, LPC processor,
QN9080-001-M17-BLE, QN9080-001-M17-function, and Arduino interface.
Fig 19. Power schematic of the QN9080-001-M17 DK board
Page 15

NXP Semiconductors
UM11184
QN9080-001-M17 DK User’s Guide
UM11184
All information provided in this document is subject to legal disclaimers.
© NXP B.V. 2019. All rights reserved.
User Manual
Rev. 0 — January 2019
15 of 27
Fig 20. LPC processor schematic of the QN9080-001-M17 DK board
Page 16

NXP Semiconductors
UM11184
QN9080-001-M17 DK User’s Guide
UM11184
All information provided in this document is subject to legal disclaimers.
© NXP B.V. 2019. All rights reserved.
User Manual
Rev. 0 — January 2019
16 of 27
Fig 21. QN908x-BLE schematic of the QN9080-001-M17 DK board
Fig 22. QN908x-function schematic of the QN9080-001-M17 DK board
Page 17

NXP Semiconductors
UM11184
QN9080-001-M17 DK User’s Guide
UM11184
All information provided in this document is subject to legal disclaimers.
© NXP B.V. 2019. All rights reserved.
User Manual
Rev. 0 — January 2019
17 of 27
Fig 23. Arduino interface schematic of the QN9080-001-M17 DK board
5.1.2 QN9080-001-M17 module board
Fig 24. QN9080-001-M17 module board
Page 18

NXP Semiconductors
UM11184
QN9080-001-M17 DK User’s Guide
UM11184
All information provided in this document is subject to legal disclaimers.
© NXP B.V. 2019. All rights reserved.
User Manual
Rev. 0 — January 2019
18 of 27
5.2 PCB layout
5.2.1 QN9080-001-M17 DK main board
Fig 25. Top etch
Fig 26. GND plane
Page 19

NXP Semiconductors
UM11184
QN9080-001-M17 DK User’s Guide
UM11184
All information provided in this document is subject to legal disclaimers.
© NXP B.V. 2019. All rights reserved.
User Manual
Rev. 0 — January 2019
19 of 27
Fig 27. PWR plane
Fig 28. Bottom etch
Page 20

NXP Semiconductors
UM11184
QN9080-001-M17 DK User’s Guide
UM11184
All information provided in this document is subject to legal disclaimers.
© NXP B.V. 2019. All rights reserved.
User Manual
Rev. 0 — January 2019
20 of 27
Fig 29. Top silkscreen
Fig 30. Bottom silkscreen
Page 21

NXP Semiconductors
UM11184
QN9080-001-M17 DK User’s Guide
UM11184
All information provided in this document is subject to legal disclaimers.
© NXP B.V. 2019. All rights reserved.
User Manual
Rev. 0 — January 2019
21 of 27
5.2.2 QN9080-001-M17 board
Fig 31. Top etch
Fig 32. GND plane
Page 22

NXP Semiconductors
UM11184
QN9080-001-M17 DK User’s Guide
UM11184
All information provided in this document is subject to legal disclaimers.
© NXP B.V. 2019. All rights reserved.
User Manual
Rev. 0 — January 2019
22 of 27
Fig 33. PWR plane
Fig 34. Bottom etch
Page 23

NXP Semiconductors
UM11184
QN9080-001-M17 DK User’s Guide
UM11184
All information provided in this document is subject to legal disclaimers.
© NXP B.V. 2019. All rights reserved.
User Manual
Rev. 0 — January 2019
23 of 27
Fig 35. Top silkscreen
5.3 Dimensions of the PCB board
5.3.1 QN9080-001-M17 DK board
Fig 36. Dimensions of the QN9080-001-M17 DK board
Page 24

NXP Semiconductors
UM11184
QN9080-001-M17 DK User’s Guide
UM11184
All information provided in this document is subject to legal disclaimers.
© NXP B.V. 2019. All rights reserved.
User Manual
Rev. 0 — January 2019
24 of 27
5.3.2 QN9080-001-M17 module
Fig 37. Dimensions of the QN9080-001-M17 module board
5.4 Notes for using a lithium battery
When using a lithium battery as the power supply for the QN9080-001-M17 module, pay
attention to the following:
To avoid current leakage from the QN9080-001-M17 USB data line, leave JP16 open.
To avoid current leakage from the 3-color LED, remove resistors R48, R49, and R50.
Fig 38. Lithium battery on the QN9080-001-M17 DK board
Page 25

NXP Semiconductors
UM11184
QN9080-001-M17 DK User’s Guide
UM11184
All information provided in this document is subject to legal disclaimers.
© NXP B.V. 2019. All rights reserved.
User Manual
Rev. 0 — January 2019
25 of 27
5.5 Statements
5.5.1 FCC compliance statement
Changes or modifications not expressly approved by the party responsible for
compliance could void the user's authority to operate the equipment.
This equipment has been tested and found to comply with the limits for a Class B digital
device, pursuant to Part 15 of the FCC Rules. These limits are designed to provide
reasonable protection against harmful interference in a residential installation. This
equipment generates, uses and can radiate radio frequency energy and, if not installed
and used in accordance with the instructions, may cause harmful interference to radio
communications. However, there is no guarantee that interference will not occur in a
particular installation.
If this equipment does cause harmful interference to radio or television reception, which
can be determined by turning the equipment off and on, the user is encouraged to try to
correct the interference by one or more of the following measures:
Reorient or relocate the receiving
antenna.
Increase the separation between the
equipment and receiver.
Connect the equipment into an outlet
on a circuit different from that to which
the receiver is connected.
Consult the dealer or an experienced
radio/TV technician for help.
IC Compliance Statement
This device complies with Industry Canada license-exempt RSS standard(s). Operation
is subject to the following conditions: (1) this device may not cause interference, and (2)
this device must accept any interference, including interference that may cause
undesired operation of the device.
Page 26

NXP Semiconductors
UM11184
QN9080-001-M17 DK User’s Guide
UM11184
All information provided in this document is subject to legal disclaimers.
© NXP B.V. 2019. All rights reserved.
User Manual
Rev. 0 — January 2019
26 of 27
6. Legal information
6.1 Definitions
Draft — The document is a draft version only. The content is still under
internal review and subject to formal approval, which may result in
modifications or additions. NXP Semiconductors does not give any
representations or warranties as to the accuracy or completeness of
information included herein and shall have no liability for the consequences
of use of such information.
6.2 Disclaimers
Limited warranty and liability — Information in this document is believed to
be accurate and reliable. However, NXP Semiconductors does not give any
representations or warranties, expressed or implied, as to the accuracy or
completeness of such information and shall have no liability for the
consequences of use of such information. NXP Semiconductors takes no
responsibility for the content in this document if provided by an information
source outside of NXP Semiconductors.
In no event shall NXP Semiconductors be liable for any indirect, incidental,
punitive, special or consequential damages (including - without limitation lost profits, lost savings, business interruption, costs related to the removal or
replacement of any products or rework charges) whether or not such
damages are based on tort (including negligence), warranty, breach of
contract or any other legal theory.
Notwithstanding any damages that customer might incur for any reason
whatsoever, NXP Semiconductors’ aggregate and cumulative liability
towards customer for the products described herein shall be limited in
accordance with the Terms and conditions of commercial sale of NXP
Semiconductors.
Right to make changes — NXP Semiconductors reserves the right to make
changes to information published in this document, including without
limitation specifications and product descriptions, at any time and without
notice. This document supersedes and replaces all information supplied prior
to the publication hereof.
Suitability for use — NXP Semiconductors products are not designed,
authorized or warranted to be suitable for use in life support, life-critical or
safety-critical systems or equipment, nor in applications where failure or
malfunction of an NXP Semiconductors product can reasonably be expected
to result in personal injury, death or severe property or environmental
damage. NXP Semiconductors and its suppliers accept no liability for
inclusion and/or use of NXP Semiconductors products in such equipment or
applications and therefore such inclusion and/or use is at the customer’s own
risk.
Applications — Applications that are described herein for any of these
products are for illustrative purposes only. NXP Semiconductors makes no
representation or warranty that such applications will be suitable for the
specified use without further testing or modification.
Customers are responsible for the design and operation of their applications
and products using NXP Semiconductors products, and NXP
Semiconductors accepts no liability for any assistance with applications or
customer product design. It is customer’s sole responsibility to determine
whether the NXP Semiconductors product is suitable and fit for the
customer’s applications and products planned, as well as for the planned
application and use of customer’s third party customer(s). Customers should
provide appropriate design and operating safeguards to minimize the risks
associated with their applications and products.
NXP Semiconductors does not accept any liability related to any default,
damage, costs or problem which is based on any weakness or default in the
customer’s applications or products, or the application or use by customer’s
third party customer(s). Customer is responsible for doing all necessary
testing for the customer’s applications and products using NXP
Semiconductors products in order to avoid a default of the applications and
the products or of the application or use by customer’s third party
customer(s). NXP does not accept any liability in this respect.
Export control — This document as well as the item(s) described herein
may be subject to export control regulations. Export might require a prior
authorization from competent authorities.
Translations — A non-English (translated) version of a document is for
reference only. The English version shall prevail in case of any discrepancy
between the translated and English versions.
Evaluation products — This product is provided on an “as is” and “with all
faults” basis for evaluation purposes only. NXP Semiconductors, its affiliates
and their suppliers expressly disclaim all warranties, whether express,
implied or statutory, including but not limited to the implied warranties of noninfringement, merchantability and fitness for a particular purpose. The entire
risk as to the quality, or arising out of the use or performance, of this product
remains with customer.
In no event shall NXP Semiconductors, its affiliates or their suppliers be
liable to customer for any special, indirect, consequential, punitive or
incidental damages (including without limitation damages for loss of
business, business interruption, loss of use, loss of data or information, and
the like) arising out the use of or inability to use the product, whether or not
based on tort (including negligence), strict liability, breach of contract, breach
of warranty or any other theory, even if advised of the possibility of such
damages.
Notwithstanding any damages that customer might incur for any reason
whatsoever (including without limitation, all damages referenced above and
all direct or general damages), the entire liability of NXP Semiconductors, its
affiliates and their suppliers and customer’s exclusive remedy for all of the
foregoing shall be limited to actual damages incurred by customer based on
reasonable reliance up to the greater of the amount actually paid by
customer for the product or five dollars (US$5.00). The foregoing limitations,
exclusions and disclaimers shall apply to the maximum extent permitted by
applicable law, even if any remedy fails of its essential purpose.
6.3 Licenses
Purchase of NXP <xxx> components
<License statement text>
6.4 Patents
Notice is herewith given that the subject device uses one or more of the
following patents and that each of these patents may have corresponding
patents in other jurisdictions.
<Patent ID> — owned by <Company name>
6.5 Trademarks
Notice: All referenced brands, product names, service names and
trademarks are property of their respective owners.
<Name> — is a trademark of NXP Semiconductors N.V.
Page 27

NXP Semiconductors
UM11184
QN9080-001-M17 DK User’s Guide
Please be aware that important notices concerning this document and the product(s)
described herein, have been included in the section 'Legal information'.
© NXP B.V. 2019. All rights reserved.
For more information, visit: http://www.nxp.com
Date of release: January 2019
Document identifier: UM11184
7. Contents
1. Introduction ......................................................... 2
1.1 Purpose .............................................................. 2
1.2 Kit contents ........................................................ 2
2. Hardware description .......................................... 3
2.1 Hardware overview ............................................ 3
2.2 Default jumper settings on the DK board ........... 4
2.3 CMSIS-DAP debugger ....................................... 5
2.4 QN9080-001-M17 module .................................. 6
2.5 GPIO and Arduino interfaces ............................. 7
2.6 QN9080-001-M17 reset button ........................... 8
2.7 ISP mode jumper ............................................... 8
2.8 JTAG interface ................................................... 8
2.9 Buttons ............................................................... 9
2.10 LED .................................................................... 9
3. DK board application function ......................... 10
3.1 CMSIS-DAP interface ...................................... 10
3.2 Current consumption test ................................. 10
4. QN9080 USB dongle .......................................... 13
4.1 Dongle hardware .............................................. 13
4.2 Dongle connection ........................................... 13
5. Appendix ............................................................ 14
5.1 Schematics ....................................................... 14
5.2 PCB layout ....................................................... 18
5.3 Dimensions of the PCB board .......................... 23
5.4 Notes for using a lithium battery ....................... 24
5.5 Statements ....................................................... 25
6. Legal information .............................................. 26
6.1 Definitions ........................................................ 26
6.2 Disclaimers ....................................................... 26
6.3 Licenses ........................................................... 26
6.4 Patents ............................................................. 26
6.5 Trademarks ...................................................... 26
7. Contents ............................................................. 27
 Loading...