

Page 1

MCUXDQS
Quick Start Guide for MCUXpresso Config Tools
Rev. 0 — 1/2021
Contents
1 Introduction
MCUXpresso Config Tools set is a suite of evaluation and configuration tools
that help you from initial evaluation to production software development. With
MCUXpresso Config Tools you can configure NXP Cortex-M processors and
generate initialization of SDK-drivers. The MCUXpresso Config Tools is intended for general use and aims to help hardware
designers, software engineers, embedded engineers, and field application engineers (FAEs).
The tool is distributed free of charge. The installer for Windows, Linux or Mac can be downloaded from http://nxp.com.
To compile the generated code, an MCUXpresso SDK package is required. You can download SDK packages from http://
mcuxpresso.nxp.com. The SDK package contains many example projects that can help you get started.
Use the link in the installation folder to start the tool. As the first step in the tool, you will need to create a configuration. The following
use cases are described in the document:
• Starting with SDK example or existing project - This is useful for new users to start with the example project for NXP evaluation
board of for users that alredy have toolchain project with sources generated by th etool. Supported toolchain are Keil μVision,
IAR Embedded Workbench and Arm GCC.
1 Introduction......................................1
2 Select Tool...................................... 3
3 Generate code................................ 8
User's Guide
• Starting with new configuration - This is useful to start with new configuration for a custom board or with existing toolchain
project that does not contain any tool configuration yet.
1.1 Creating a new configuration
If you start creating your development for any NXP board or kit, we recommended you start with example to create a new
configuration for a board or a kit. Such configuration contains board-specific settings. If you select a processor, the configuration
will be empty.
1.1.1 Cloning an SDK example
You can create a new configuration by cloning an SDK example project for IAR Embedded Workbench, Keil μVision and/or GCC
ARM Embedded (command line). The resulting project contains all source files and libraries to build the project and can be easily
customized, shared or put under control version system.
SDK example cloning is supported for SDK 2.2 and higher.
NOTE
To be able to clone an SDK example or create a “hello_world” project, you must first download an SDK package.
For more information about SDK packages offered by NXP Semiconductors, refer to the MXUXpresso Software
Development Kit website.
NOTE
If the server is unavailable, and device data is not cached, creating the project will fail.
Page 2
NXP Semiconductors
Introduction
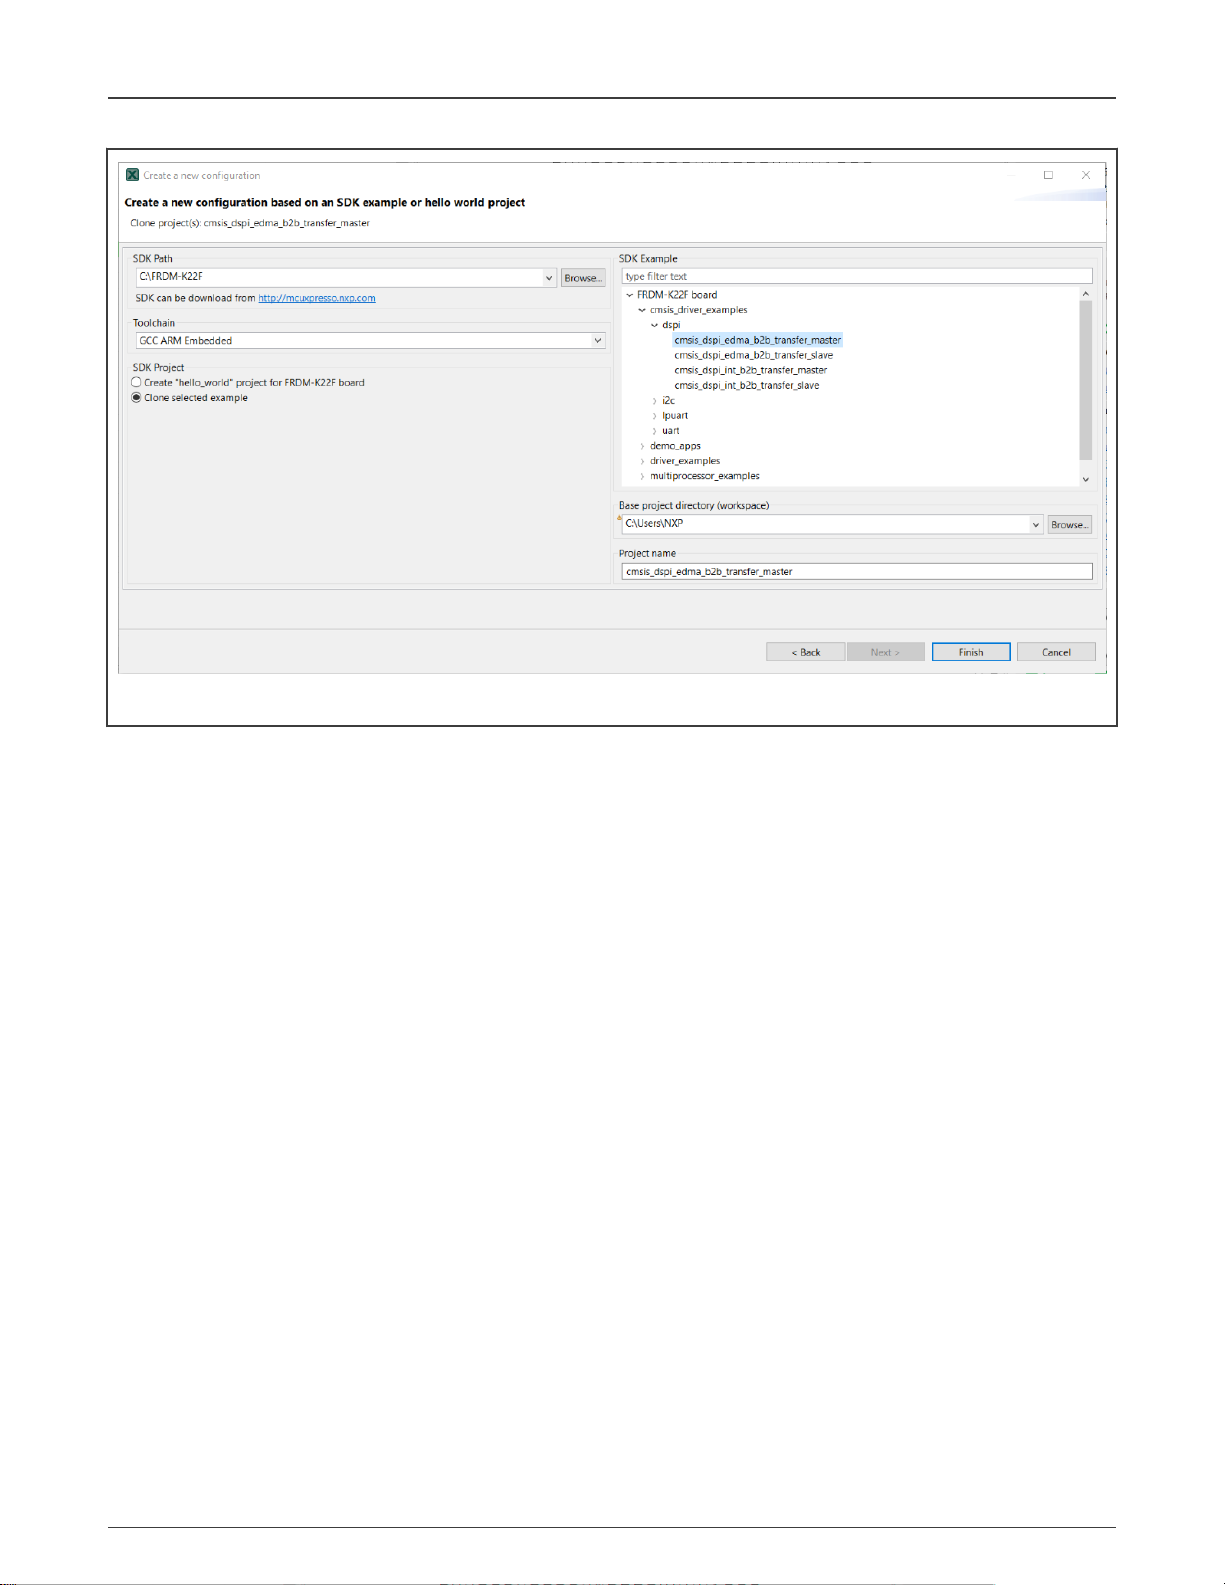
Figure 1. Cloning SDK
To clone an SDK example, do the following:
1. In the Start development wizard, select Create a new configuration based on an SDK example or hello world project.
Alternatively, in the Menu bar, select File > New.
2. Click Next.
3. Specify the path to your locally-saved SDK package.
4. Choose the toolchain you want to create the project for.
5. Choose the SDK example you want to clone.
6. Specify a base project directory to save your project to.
7. Specify project name.
8. Click Finish.
You can also create a basic, minimally-customized “hello_world” project without having to select an SDK example from the
package.To create a “hello_world” project, do the following:
1. In the Start development wizard, select Create a new configuration based on an SDK example or hello world project.
Alternatively, in the Menu bar, select File > New.
2. Click Next.
3. Specify the path to your locally-saved SDK package.
4. Choose the toolchain you want to create the project for.
5. Select Create “hello_world”.
6. Specify a base project directory to save your project to.
7. Specify project name.
8. Click Finish.
Quick Start Guide for MCUXpresso Config Tools, Rev. 0, 1/2021
User's Guide 2 / 10
Page 3

NXP Semiconductors
Select Tool
1.1.2 Creating a new toolchain configuration
You can create a configuration for an already existing toolchain project. Once done, configuration files associated with the project
will be updated directly.
NOTE
MCUXpresso Config Tools currently supports the following third-party toolchains:
• IAR Embedded Workbench
• Keil MDK uVision
• ARM GCC
To create a configuration based on an existing IDE/Toolchain project, do the following:
1. In the Start development wizard, select the Create a new configuration based on an existing IDE/Toolchain projectelect
Create a new configuration based on an SDK example or hello world project. Alternatively, in the Menu bar, select File
> New.
2. Click Browse.
3. Select the project file and confirm by clicking OK.
4. Click Finish.
1.1.3 Creating a new standalone configuration
You can create a new configuration that isn’t part of any toolchain project.
To create a standalone configuration, do the following:
1. In the Start development wizard select Create new standalone configuration for processor, board or kit. Alternatively, in the
Menu bar, select File > New.
2. Click Next.
3. Select the processor, board, or kit from the list.
NOTE
If you’re working offline, you will only see locally-saved options. For more information, see the Working
offline section.
4. Name your configuration. Optionally, you can select processor package, core, and SDK version.
5. Click Finish.
2 Select Tool
The right-hand side of the toolbar contains tool-selection buttons. Use these buttons to switch between the tools.
Table 1. Config Tools
Name Description
Pins Tool
Enables you to configure the pins of a device. Pins tool enables you to create, inspect, change, and modify
any aspect of the pin configuration and muxing of the device.
Clocks Tool
Enables you to configure initialization of the system clock (core, system, bus, and peripheral clocks) and
generates the C code with clock initialization functions and configuration structures.
Peripherals Tool Enable you to configure the intilization for the SDK drivers.
Table continues on the next page...
Quick Start Guide for MCUXpresso Config Tools, Rev. 0, 1/2021
User's Guide 3 / 10
Page 4

NXP Semiconductors
Table 1. Config Tools (continued)
Select Tool
Device
Configuration Tool
TEE Tool Enables you to configure security policies of memory areas, bus masters, and peripherals, in order to
Enables you to generate a Device Configuration Data (DCD) image using the format and constrains
specified in the Boot ROM reference manual.
isolate and safeguard sensitive areas of your application.
2.1 Pins Tool
Pins Tool allows to display and configure the pins of the processor. Basic configuration can be done in either of these views Pins,
Peripheral Signals or Package.
More advanced settings (pin electrical features) can be adjusted in Routed Pins view.
Figure 2. Pins Tool user interface
2.2 Clocks Tool
In the Clocks tool, you can display and modify clock sources and outputs. Use the Clocks Table view to set clock sources
and outputs, More advanced settings can be adjusted via Clocks Diagram and Details views. Global settings of the clocking
environment such as run modes, MCG modes and SCG modes can be modified in Clocks Table, Clocks Diagram, in Functional
group properties, and in the Details view.
Quick Start Guide for MCUXpresso Config Tools, Rev. 0, 1/2021
User's Guide 4 / 10
Page 5

NXP Semiconductors
Select Tool
Figure 3. Clocks Tool
2.3 Peripherals Tool
In the Peripherals tool, you can configure initialization of selected peripherals and generate code for them. In the Peripherals view,
select the peripherals to configure and confirm addition of the configuration component. Then you can select the mode of the
peripheral and configure the settings within the settings editor.
Quick Start Guide for MCUXpresso Config Tools, Rev. 0, 1/2021
User's Guide 5 / 10
Page 6

NXP Semiconductors
Select Tool
Figure 4. Peripherals Tool
2.4 Device Configuration Tool
Device Configuration tool allows you to configure the initialization of memory interfaces of your hardware. Use the Device
Configuration Data (DCD) view to create different types of commands and specify their sequence, define their address, values,
sizes, and polls.
Quick Start Guide for MCUXpresso Config Tools, Rev. 0, 1/2021
User's Guide 6 / 10
Page 7

NXP Semiconductors
Select Tool
Figure 5. Device Configuration tool
2.5 Trusted Execution Environment Tool
In the Trusted Execution Environment, or TEE tool, you can configure security policies of memory areas, bus masters, and
peripherals, in order to isolate and safeguard sensitive areas of your application.
You can set security policies of different parts of your application in the Security Access Configuration and its sub-views, and
review these policies in the Memory Attribution Map and Access Overview views. Use the User Memory Regions view to create
a convenient overview of memory regions and their security levels.
You can also view registers handled by the TEE tool in the Registers view, and inspect the code in the Code Preview tool.
NOTE
In order for your configuration to come into effect, make sure you have enabled the relevant enable secure check
option in the Miscellaneous sub-view of the Security Access Configuration view.
Quick Start Guide for MCUXpresso Config Tools, Rev. 0, 1/2021
User's Guide 7 / 10
Page 8

NXP Semiconductors
Generate code
Figure 6. TEE Tool User Interface
3 Generate code
You can update source files generated by the MCUXpresso Config Tools by clicking the Update Code button. The command
opens dialog with list of files that will be re-generated and allows to select which tools will generate the code.
Figure 7. Update Code button
Alternatively, you can also export a selected source file by clicking the export button in the Code Preview view.
Quick Start Guide for MCUXpresso Config Tools, Rev. 0, 1/2021
User's Guide 8 / 10
Page 9

NXP Semiconductors
Generate code
Figure 8. Code Preview
Quick Start Guide for MCUXpresso Config Tools, Rev. 0, 1/2021
User's Guide 9 / 10
Page 10

How To Reach Us:
Home Page:
nxp.com
Web Support:
nxp.com/support
Information in this document is provided solely to enable system and software implementers
to use NXP products. There are no express or implied copyright licenses granted hereunder
to design or fabricate any integrated circuits based on the information in this document. NXP
reserves the right to make changes without further notice to any products herein.
NXP makes no warranty, representation, or guarantee regarding the suitability of its products
for any particular purpose, nor does NXP assume any liability arising out of the application
or use of any product or circuit, and specifically disclaims any and all liability, including
without limitation consequential or incidental damages. “Typical” parameters that may be
provided in NXP data sheets and/or specifications can and do vary in different applications,
and actual performance may vary over time. All operating parameters, including “typicals,”
must be validated for each customer application by customer's technical experts. NXP does
not convey any license under its patent rights nor the rights of others. NXP sells products
pursuant to standard terms and conditions of sale, which can be found at the following address:
nxp.com/SalesTermsandConditions.
While NXP has implemented advanced security features, all products may be subject to
unidentified vulnerabilities. Customers are responsible for the design and operation of their
applications and products to reduce the effect of these vulnerabilities on customer’s applications
and products, and NXP accepts no liability for any vulnerability that is discovered. Customers
should implement appropriate design and operating safeguards to minimize the risks associated
with their applications and products.
NXP, the NXP logo, NXP SECURE CONNECTIONS FOR A SMARTER WORLD, COOLFLUX,
EMBRACE, GREENCHIP, HITAG, I2C BUS, ICODE, JCOP, LIFE VIBES, MIFARE, MIFARE
CLASSIC, MIFARE DESFire, MIFARE PLUS, MIFARE FLEX, MANTIS, MIFARE ULTRALIGHT,
MIFARE4MOBILE, MIGLO, NTAG, ROADLINK, SMARTLX, SMARTMX, STARPLUG, TOPFET,
TRENCHMOS, UCODE, Freescale, the Freescale logo, AltiVec, C‑5, CodeTEST, CodeWarrior,
ColdFire, ColdFire+, C‑Ware, the Energy Efficient Solutions logo, Kinetis, Layerscape, MagniV,
mobileGT, PEG, PowerQUICC, Processor Expert, QorIQ, QorIQ Qonverge, Ready Play,
SafeAssure, the SafeAssure logo, StarCore, Symphony, VortiQa, Vybrid, Airfast, BeeKit,
BeeStack, CoreNet, Flexis, MXC, Platform in a Package, QUICC Engine, SMARTMOS, Tower,
TurboLink, and UMEMS are trademarks of NXP B.V. All other product or service names
are the property of their respective owners. AMBA, Arm, Arm7, Arm7TDMI, Arm9, Arm11,
Artisan, big.LITTLE, Cordio, CoreLink, CoreSight, Cortex, DesignStart, DynamIQ, Jazelle, Keil,
Mali, Mbed, Mbed Enabled, NEON, POP, RealView, SecurCore, Socrates, Thumb, TrustZone,
ULINK, ULINK2, ULINK-ME, ULINK-PLUS, ULINKpro, µVision, Versatile are trademarks or
registered trademarks of Arm Limited (or its subsidiaries) in the US and/or elsewhere. The related
technology may be protected by any or all of patents, copyrights, designs and trade secrets. All
rights reserved. Oracle and Java are registered trademarks of Oracle and/or its affiliates. The
Power Architecture and Power.org word marks and the Power and Power.org logos and related
marks are trademarks and service marks licensed by Power.org.
©
NXP B.V. 2017-2021. All rights reserved.
For more information, please visit: http://www.nxp.com
For sales office addresses, please send an email to: salesaddresses@nxp.com
Date of release: 1/2021
Document identifier: MCUXDQS
 Loading...