

Page 1

AN13027
EdgeLockTM SE05x Quick start guide with i.MX 8M
Rev. 1.1 — 7 December 2020 Application note
Document information
Information Content
Keywords EdgeLock SE05x, Plug & Trust middleware, i.MX 8M
Abstract This document explains how to get started with the EdgeLock SE05x Plug &
Trust middleware using the EdgeLock SE05x development boards and i.MX
8M board. It provides detailed instructions for connecting the boards, installing
the software, running the EdgeLock SE05x Plug & Trust project examples and
executing the ssscli tool
Page 2

NXP Semiconductors
EdgeLockTM SE05x Quick start guide with i.MX 8M
Revision history
Revision history
Revision number Date Description
1.0 2020-10-21 First document release.
1.1 2020-12-07 Updated to latest template and fixed broken links
AN13027
AN13027 All information provided in this document is subject to legal disclaimers. © NXP B.V. 2020. All rights reserved.
Application note Rev. 1.1 — 7 December 2020
2 / 26
Page 3

NXP Semiconductors
1 How to use this document
The Plug & Trust middleware includes a set of project examples that demonstrate the use
of EdgeLock SE05x product family in the latest IoT security use cases. This document
provides detailed instructions to run project examples for EdgeLock SE05x in i.MX 8M
board. The main body of this document should be used in this sequence:
1. Order board samples. Section 2 contains the ordering details of the demo boards
required in this document;
2. Prepare the hardware. Section 3 describes how to setup the OM-SE05xARD and i.MX
8M boards.
3. Flash the microSD card image. Section 4 describes how to create a micro-SD card
with the Linux image with the pre-installed Plug & Trust middleware.
4. Run project examples. Section 5 describes how to run EdgeLock SE05x included in
Plug & Trust middleware.
Supplementary material is provided in the appendices.
AN13027
EdgeLockTM SE05x Quick start guide with i.MX 8M
AN13027 All information provided in this document is subject to legal disclaimers. © NXP B.V. 2020. All rights reserved.
Application note Rev. 1.1 — 7 December 2020
3 / 26
Page 4
NXP Semiconductors
2 Hardware required
The EdgeLock SE05x works as an auxiliary security device attached to a host controller,
communicating with through an I²C interface. To follow the instructions provided in this
document, you need an EdgeLock SE05x development board and a i.MX 8M MCU
board, acting as a host controller.
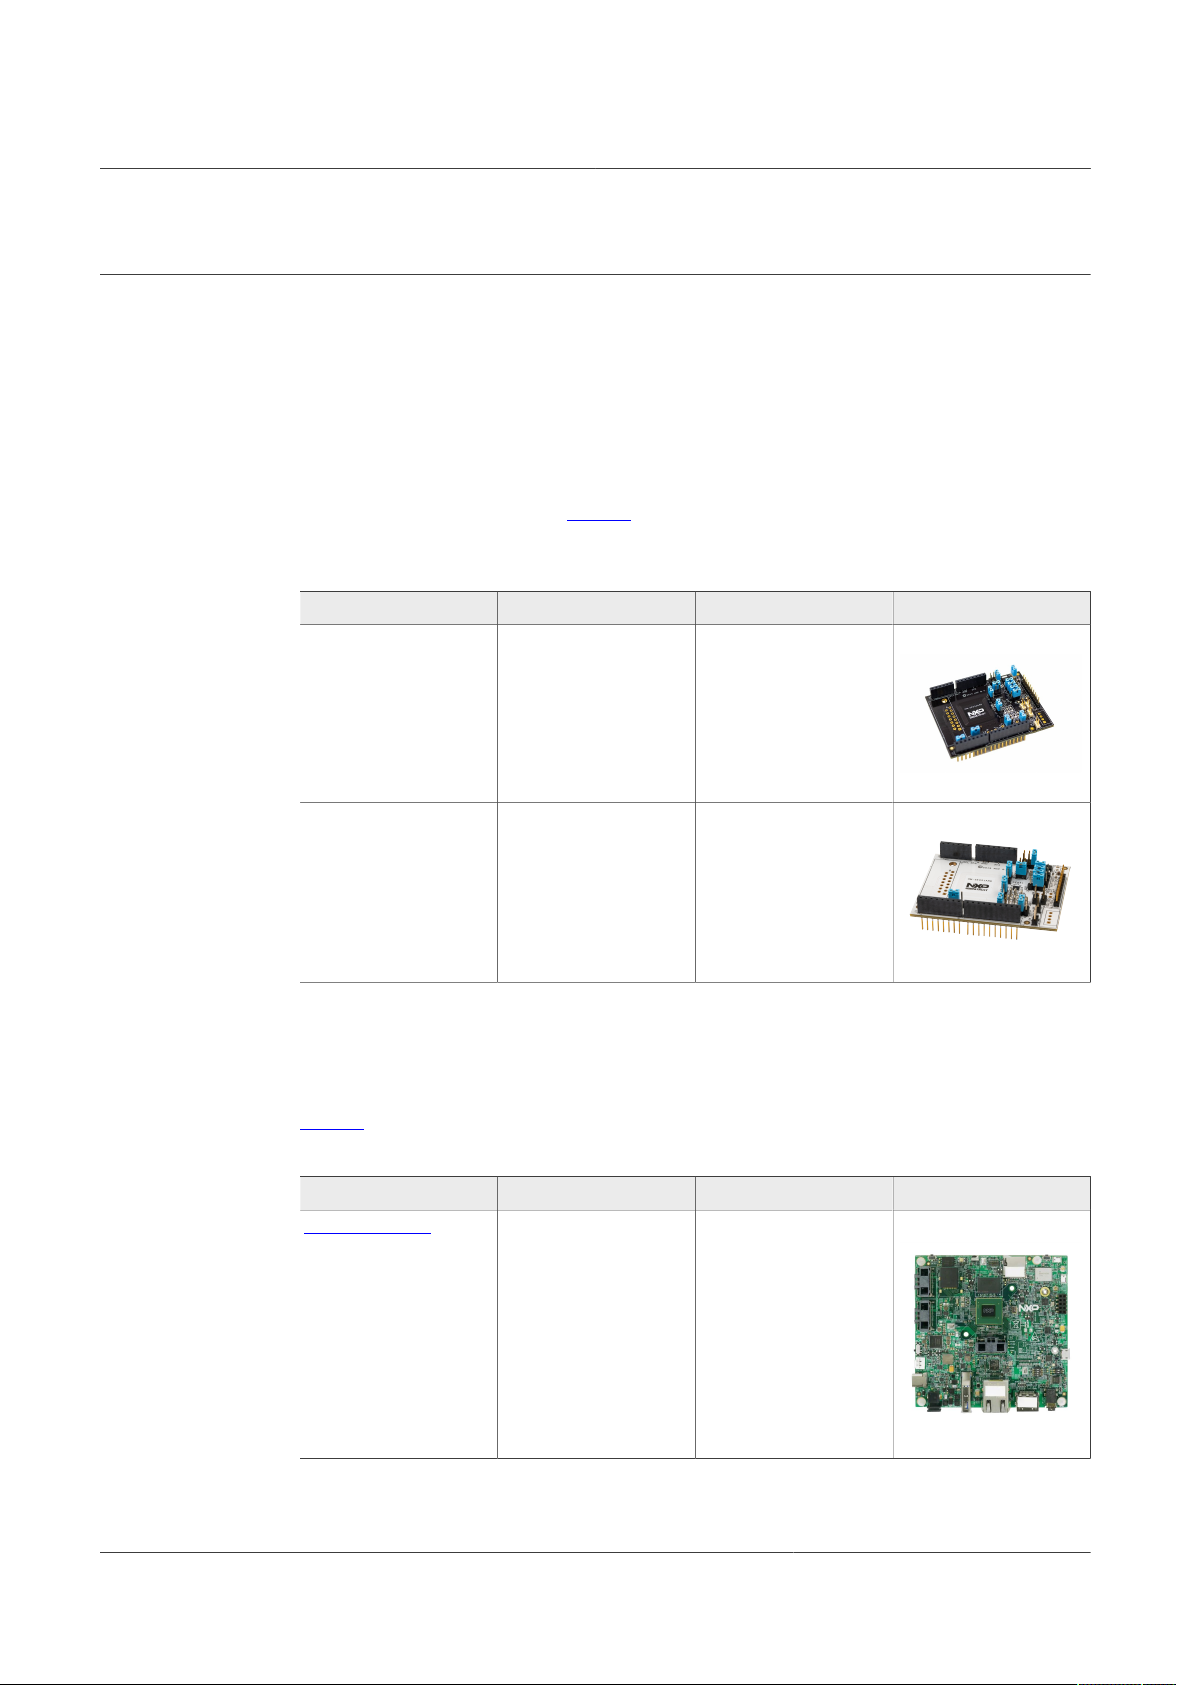
EdgeLock SE05x development boards ordering details
The EdgeLock SE05x support package provides development boards for evaluating
EdgeLock SE050 and EdgeLock SE051 features. Select the development board of the
product you want to evaluate. Table 1 details the ordering details of the EdgeLock SE05x
development boards.
Table 1. EdgeLock SE05x development boards.
Part number 12NC Description Picture
OM-SE050ARD 935383282598 SE050 Arduino
AN13027
EdgeLockTM SE05x Quick start guide with i.MX 8M
®
compatible
development kit
OM-SE051ARD 935399187598 SE051 Arduino
compatible
development kit
®
Note: The pictures in this guide will show OM-SE050ARD, but OM-SE051ARD can be
used as well with the same configuration.
i.MX 8M MCU board ordering details
Table 2 details the ordering details for the i.MX 8M board.
Table 2. i.MX 8M development kit details
Part number 12NC Content Picture
MCIMX8M-EVK 935378743598 i.MX 8M evaluation kit
AN13027 All information provided in this document is subject to legal disclaimers. © NXP B.V. 2020. All rights reserved.
Application note Rev. 1.1 — 7 December 2020
4 / 26
Page 5
NXP Semiconductors
3 Boards setup
This section explains how to prepare the OM-SE05xARD boards and i.MX 8M board to
run the EdgeLock SE05x Plug & Trust middleware project examples. Follow these steps:
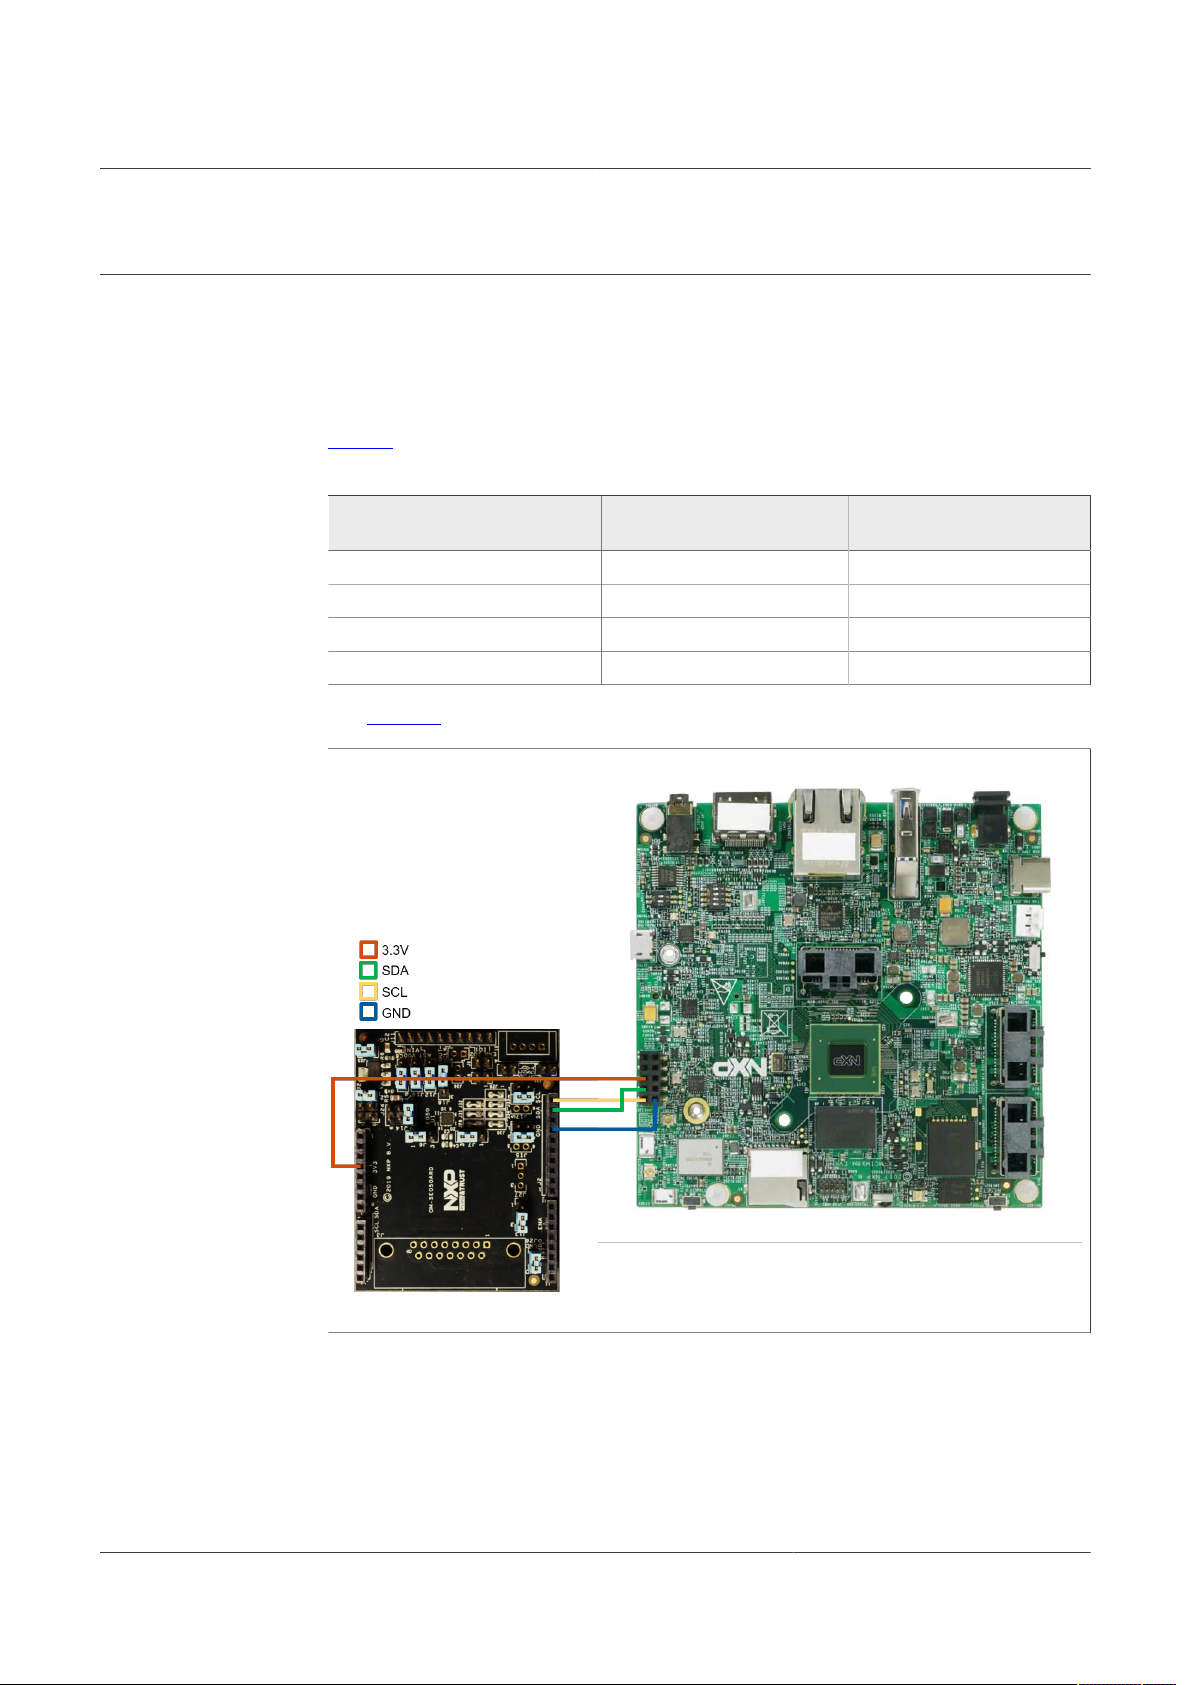
1. Connect the OM-SE05xARD to the i.MX 8M board. The i.MX 8M board does not
AN13027
EdgeLockTM SE05x Quick start guide with i.MX 8M
come with an Arduino connector, so you have to connect the Arduino shield of the
OM-SE05xARD board to the J801_I2C connector of the i.MX 8M board using wires.
Table 3 details the jumper connection
Table 3. Wire connection OM-SE05xARD - i.MX 8M
OM-SE05xARD (# jumper - #
pin)
J2 - Pin 10 J801 - Pin 1 SCL
J2 - Pin 7 J801 - Pin 2 Ground
J2 - Pin 9 J801 - Pin 3 SDA
J8 - Pin 3 J801 - Pin 5 3.3 Volt supply
I.MX 8M (# jumper - # pin) Description
and Figure 1 illustrate the wiring between boards.
Figure 1. Connection between OM-SE05xARD and i.MX 8M boards
AN13027 All information provided in this document is subject to legal disclaimers. © NXP B.V. 2020. All rights reserved.
Application note Rev. 1.1 — 7 December 2020
5 / 26
Page 6
NXP Semiconductors
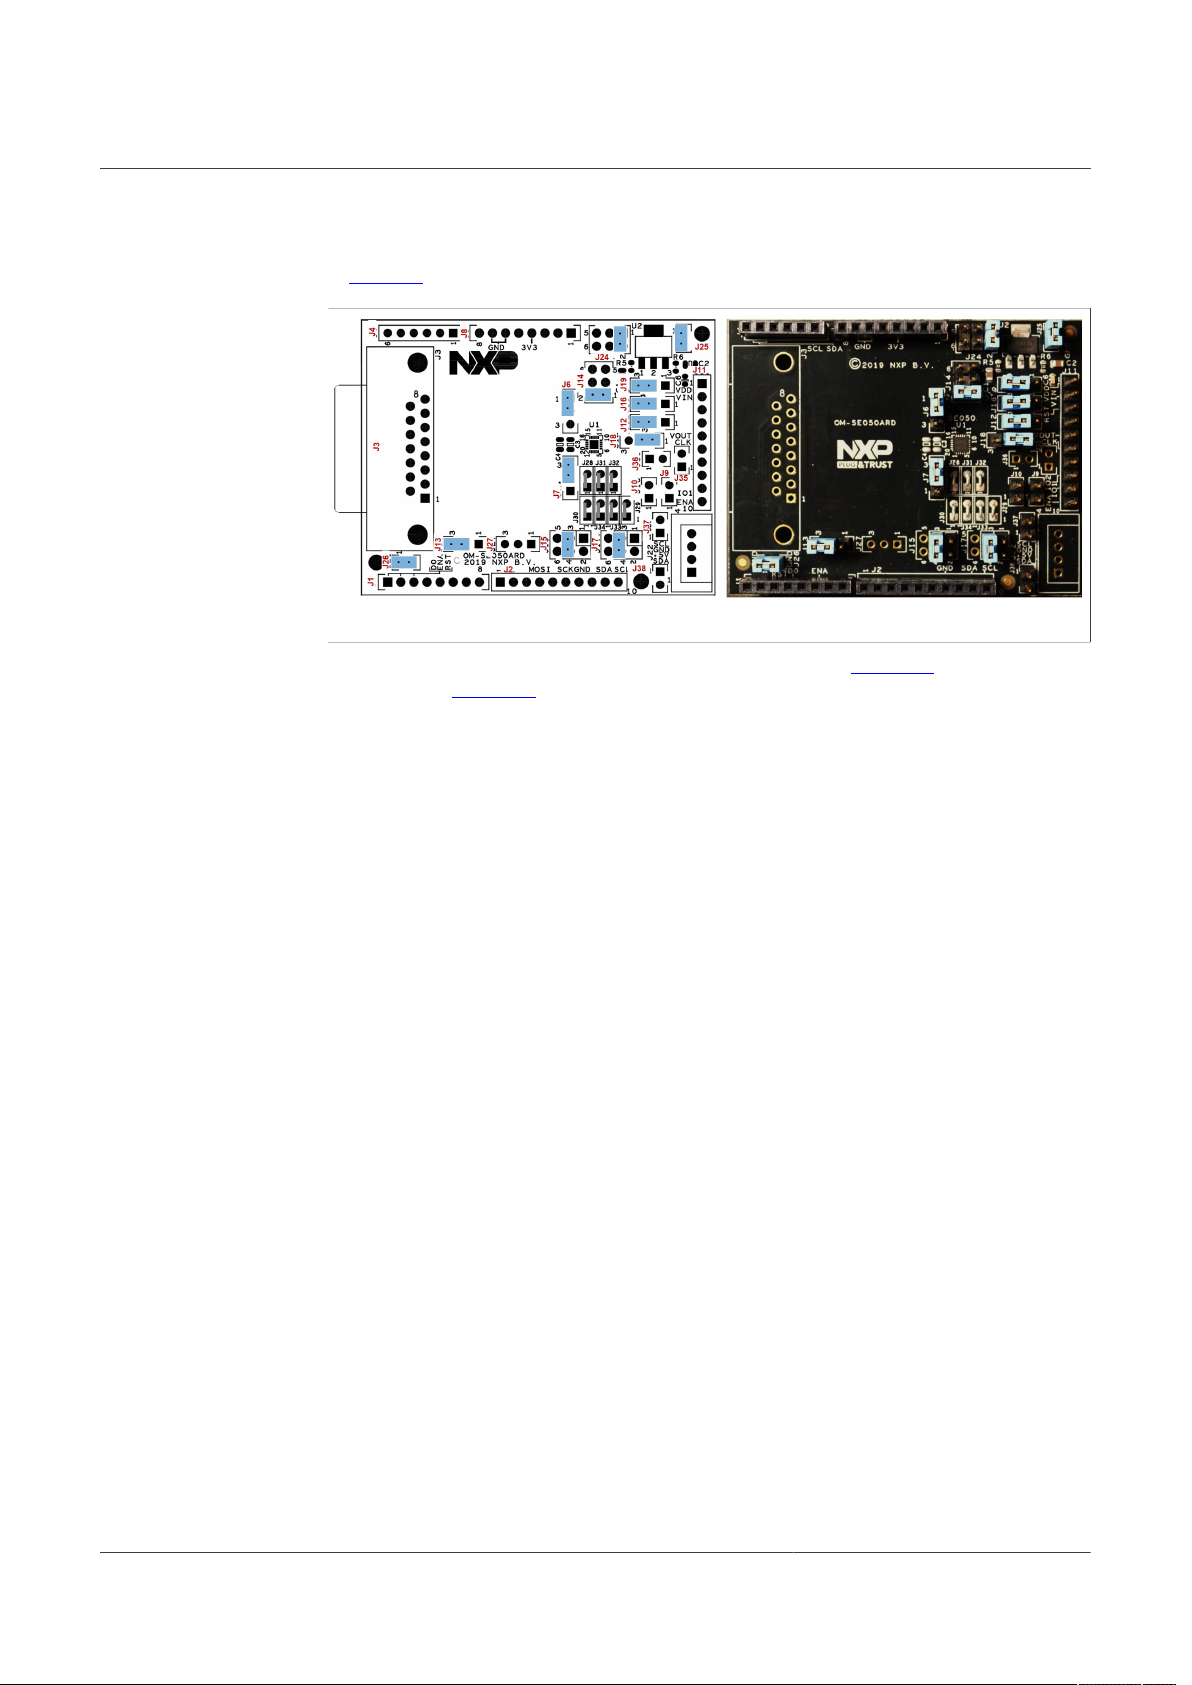
2. Make sure the jumper settings in your OM-SE05xARD board are configured as shown
Note: For more information about the jumper settings, refer to AN12395 (OM-
SE05xARD) and AN13016 (OM-SE051ARD) respectively.
AN13027
EdgeLockTM SE05x Quick start guide with i.MX 8M
in Figure 2:
Figure 2. Jumper configuration for i.MX 8M board
AN13027 All information provided in this document is subject to legal disclaimers. © NXP B.V. 2020. All rights reserved.
Application note Rev. 1.1 — 7 December 2020
6 / 26
Page 7

NXP Semiconductors
4 Software setup
The software setup consists of:
1. Preparing a micro-SD card with the pre-compiled Linux image with the preinstalled
Plug & Trust middleware for i.MX 8M board, as described in Section 4.1.
2. Installing the USB to UART Bridge VCOM driver in your laptop, as described in
Section 4.2.
3. Installing TeraTerm terminal application, as described in Section 4.3.
4. Booting the i.MX 8M board, as described in Section 4.4.
4.1 Micro-SD card preparation
To prepare the micro-sd card with the pre-compiled Linux image that includes the Plug &
Trust middleware, you need to:
1. Download from NXP website the Plug & Trust middleware SD Card Image. This
image contains the Plug & Trust middleware pre-installed with already some
examples on a bootable SD Card Image.
Note: In case the image provided by NXP does not suit your use case, you can
find the explanation of how to create an card image using Yocto in the Plug & Trust
middleware documentation (simw-top/doc/dev-platforms/platform_imx8_linux.html) .
2. Download and install Win32 Disk Imager software. Win32 Disk Imager is a Windows
open source program to format SD card images. Instead of Win 32 Disk Imager, you
could also use any other software for this operation.
3. Plug your micro-SD card in your laptop.
AN13027
EdgeLockTM SE05x Quick start guide with i.MX 8M
AN13027 All information provided in this document is subject to legal disclaimers. © NXP B.V. 2020. All rights reserved.
Application note Rev. 1.1 — 7 December 2020
7 / 26
Page 8
NXP Semiconductors
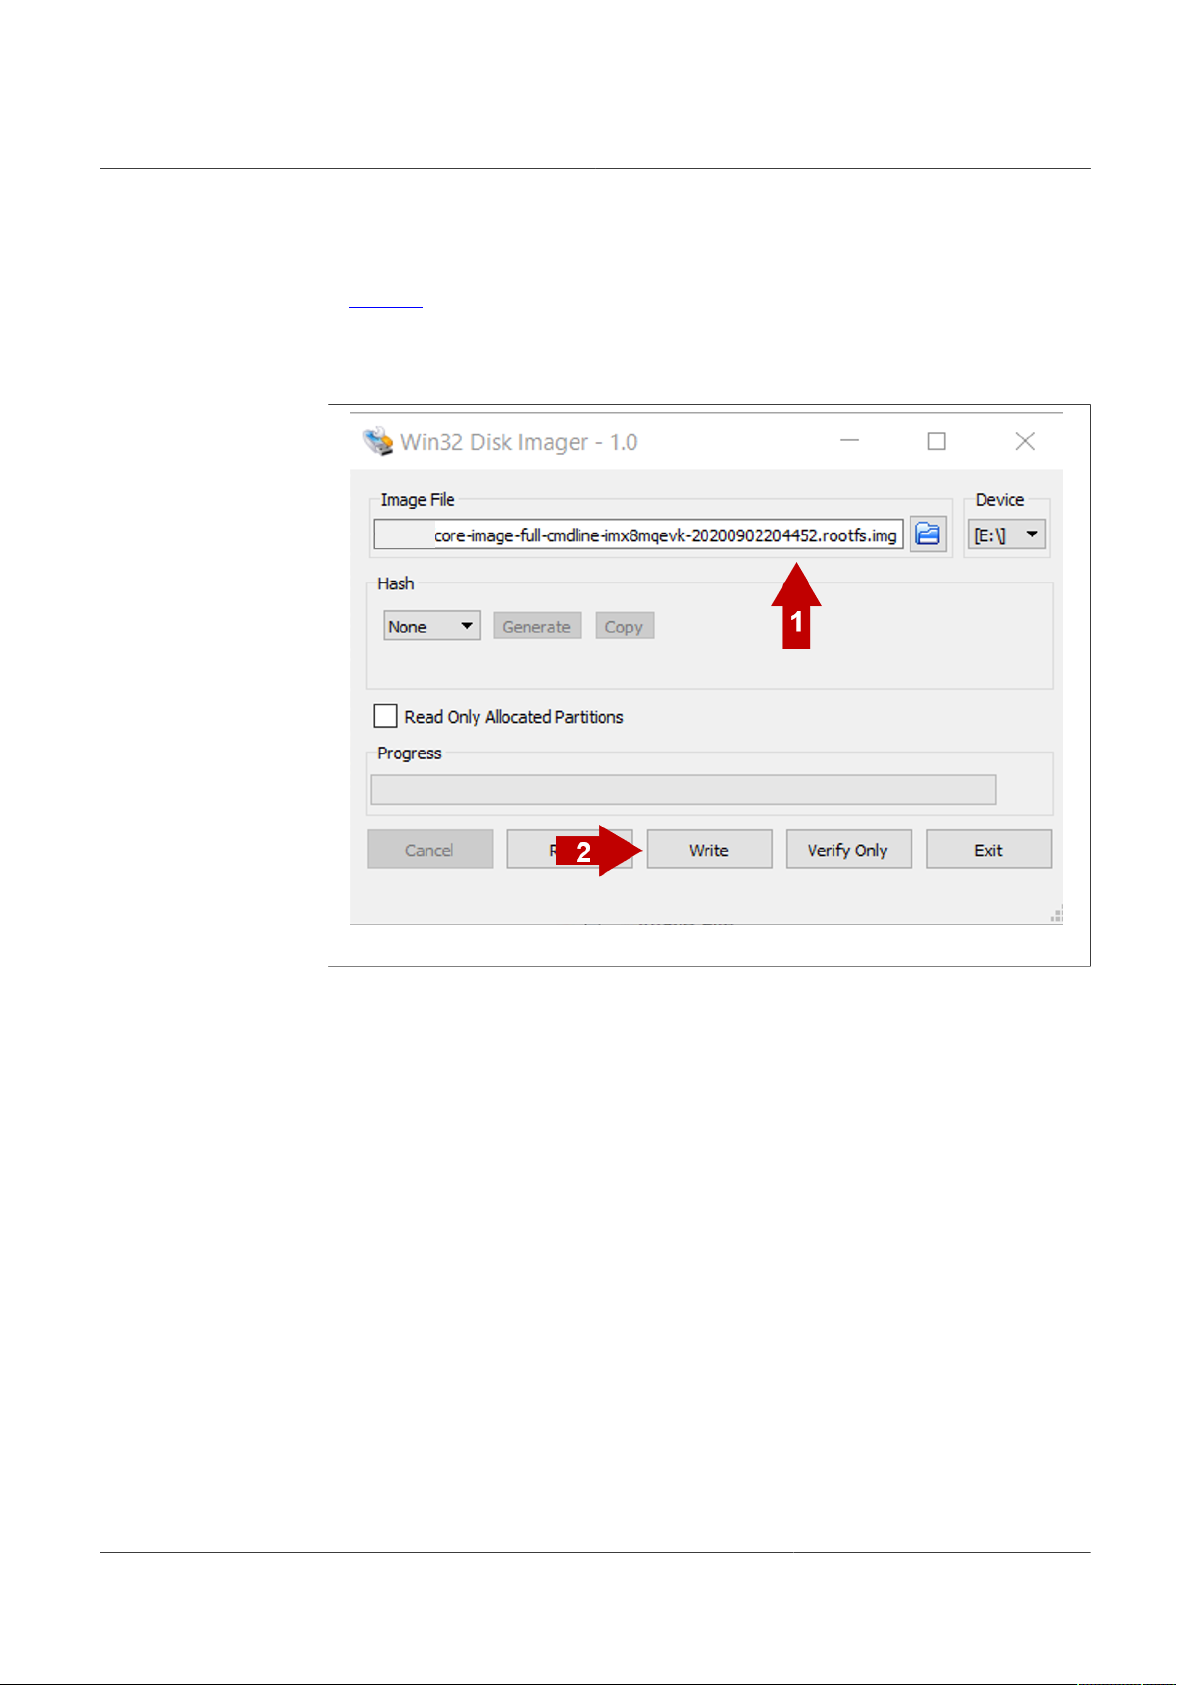
4. Open Win32 Disk Imager, (1) select from your file system the pre-compiled Linux
AN13027
EdgeLockTM SE05x Quick start guide with i.MX 8M
image you downloaded from the website, and (2) click on the Write button as shown
in Figure 3.
Note: the SD card image might come in a ZIP package. Make sure to unzip the
package and change the extension to .img before selecting the image file in Win32
Disk Imager.
Figure 3. Micro-SD card preparation with Win32 Disk Imager software
4.2 Drivers
To install the i.MX 8M drivers, follow these steps:
AN13027 All information provided in this document is subject to legal disclaimers. © NXP B.V. 2020. All rights reserved.
Application note Rev. 1.1 — 7 December 2020
8 / 26
Page 9

NXP Semiconductors
1. Plug the power supply and connect the USB cable to your laptop as shown in
AN13027
EdgeLockTM SE05x Quick start guide with i.MX 8M
Figure 4.
Figure 4. Plug the power supply and connect the USB cable to your laptop
2. Download the USB to UART Bridge VCOM driver for your processor (either 32 or 64
bits). Install the driver by following the setup wizard until it is finished.
3. Unplug and plug your board.
AN13027 All information provided in this document is subject to legal disclaimers. © NXP B.V. 2020. All rights reserved.
Application note Rev. 1.1 — 7 December 2020
9 / 26
Page 10

NXP Semiconductors
4. Go to your Device Manager, and check that your board is recognized and assigned
AN13027
EdgeLockTM SE05x Quick start guide with i.MX 8M
to a port number (COMxx). Write down the assigned port number (COMxx) as it is
needed in the next steps. Your Device Manager should look like Figure 5.
Note: if you see more than one COM port, use the one denoted as Enhanced COM
port.
Figure 5. Check that i.MX 8M board is recognized in Device Manager
4.3 Terminal setup
We need to install a terminal application, for instance TeraTerm, to communicate
and view the serial output of the i.MX 8M board from our laptop. To setup TeraTerm
application:
1. Download TeraTerm and run the installer.
2. Launch TeraTerm, click the Serial option and select from the dropdown list the
Enhanced COM port number assigned to your i.MX 8M board (In this case COM11)
as shown in Figure 6. Click the OK button to confirm the setup. If you cannot see the
AN13027 All information provided in this document is subject to legal disclaimers. © NXP B.V. 2020. All rights reserved.
Application note Rev. 1.1 — 7 December 2020
10 / 26
Page 11

NXP Semiconductors
AN13027
EdgeLockTM SE05x Quick start guide with i.MX 8M
serial port of the board, your i.MX 8M board might not be recognized. In that case,
please repeat the driver installation process described in Section 4.2.
Note: if you can't see the serial port in TeraTerm, make sure that the board is plugged
in with the USB cable to the PC and restart TeraTerm.
Figure 6. Open a TeraTerm serial connection
3. Go to Setup → Serial Port and configure the terminal to 115200 Speed, 8 data bits,
no parity and 1 stop bit as shown in Figure 7. Click on New Setting to confirm the
configuration.
Figure 7. Configure TeraTerm serial port connection
4.4 Booting the i.MX 8M
To boot the i.MX 8M, follow the steps shown in Figure 8 and Figure 9:
1. Insert the micro-SD card with the pre-compiled Linux image into the i.MX 8M card slot.
2. Configure the board switches as follows:
• SW801 (Boot Device Select Switch): ON, ON, OFF, OFF (from 1-4 bit)
• SW802 (Boot Mode Select Switch): ON, OFF (from 1-2 bit)
AN13027 All information provided in this document is subject to legal disclaimers. © NXP B.V. 2020. All rights reserved.
Application note Rev. 1.1 — 7 December 2020
11 / 26
Page 12

NXP Semiconductors
3. Connect the board tot he power supply
4. Connect the board to your laptop using a USB cable and make sure that TeraTerm
5. Turn on the power supply switch to boot up the board.
AN13027
EdgeLockTM SE05x Quick start guide with i.MX 8M
serial port is configured (see Section 4.3).
Figure 8. Booting the i.MX 8M
AN13027 All information provided in this document is subject to legal disclaimers. © NXP B.V. 2020. All rights reserved.
Application note Rev. 1.1 — 7 December 2020
12 / 26
Page 13

NXP Semiconductors
6. During the boot process, the operating system status information will be displayed in
AN13027
EdgeLockTM SE05x Quick start guide with i.MX 8M
TeraTerm as shown in Figure 9. When the process is complete, the user can login with
the following credentials:
• Account name: root
• Password: not required
Figure 9. Sign in in the OS
Note: In the case that the precompiled Plug & Trust middleware version does not suit
your use case and a different version is needed, it must be downloaded and build into
the device. For more information refer to Appendix B.
AN13027 All information provided in this document is subject to legal disclaimers. © NXP B.V. 2020. All rights reserved.
Application note Rev. 1.1 — 7 December 2020
13 / 26
Page 14

NXP Semiconductors
EdgeLockTM SE05x Quick start guide with i.MX 8M
5 Run preinstalled Plug & Trust middleware test examples
The Plug & Trust middleware comes with several test examples used to verify atomic
EdgeLock SE05x security IC features. This section explains how to run the Plug & Trust
middleware test example called se05x_Minimal.
1. After booting the board, you will be in the /usr/local/bin directory of the file system. To
see the list of examples that are available in this directory use the following command:
Send > ls -l /usr/local/bin.
The TeraTerm window should be similar to Figure 10:
AN13027
Figure 10. Go to the Plug & Trust middleware test example directory
2. Execute the se05x_Minimal test example. This test example outputs the memory
left in EdgeLock SE05x security IC.
Send > se05x_Minimal.
The TeraTerm logs should indicate the available memory in EdgeLock SE05x security
IC as can be seen in Figure 11 (in this case, 20820).
Figure 11. Run se05x_minimal test example
AN13027 All information provided in this document is subject to legal disclaimers. © NXP B.V. 2020. All rights reserved.
Application note Rev. 1.1 — 7 December 2020
14 / 26
Page 15

NXP Semiconductors
6 Appendix A: Using the ssscli tool
In Section 3 and Section 4 we have prepared the hardware setup and the software
setups respectively. To validate that the whole process was done correctly and that your
setup is fully operational, we are going to run the ssscli tool. This tool can be used to
interact with the EdgeLock SE05x security IC without having to write any code.
To start the ssscli tool, send the commands shown in Figure 12:
1. Open the connection:
Send: >ssscli connect se05x t1oi2c none
2. Send the reset command:
Send: >ssscli se05x reset
AN13027
EdgeLockTM SE05x Quick start guide with i.MX 8M
Figure 12. Start the ssscli tool
Note: If you see the following message: WARNING:sss.connect:Session already
open, close current session first as shown in Figure 13, it means that you have a
session open. To close it, send: (1) > ssscli disconnect and then send once
again (2) >ssscli connect se05x t1oi2c none and later (3) >ssscli se05x
reset:
Figure 13. Close an already openned session
AN13027 All information provided in this document is subject to legal disclaimers. © NXP B.V. 2020. All rights reserved.
Application note Rev. 1.1 — 7 December 2020
15 / 26
Page 16

NXP Semiconductors
3. The SE05x ssscli tool supports several operations. To check which commands are
AN13027
EdgeLockTM SE05x Quick start guide with i.MX 8M
supported by the ssscli tool:
(Figure 14) Send: > ssscli --help
Figure 14. ssscli info
4. Once you are done using the ssscli tool, close the session with the EdgeLock SE05x
security IC:
(Figure 15) Send: > ssscli disconnect
Figure 15. ssscli disconnect
The ssscli tool uses the installed sss library (/usr/local/lib/libsssapisw.so) for
communication with the secure element. In order to be able to connect with ssscli to
a specific interface type (e.g. T1oI2C or JRCP) or secure element type (A71CH or
SE05x) the ssslibrary needs to be compiled and installed with this specific interface/
secure element type selected in the compilation options. This can be done by
recompiling the Plug & Trust middleware as shown in the third step of the Appendix B
(Section 7.2) .
AN13027 All information provided in this document is subject to legal disclaimers. © NXP B.V. 2020. All rights reserved.
Application note Rev. 1.1 — 7 December 2020
16 / 26
Page 17

NXP Semiconductors
EdgeLockTM SE05x Quick start guide with i.MX 8M
7 Appendix B: Update Plug & Trust middleware
In this section it will be described the process needed for downloading, compiling and
building a different Plug & Trust middleware version from the one preinstalled in the SD
card image seen at Section 5.
7.1 Obtain the latest Plug & Trust middleware version
We need to compile the Plug & Trust middleware into the Linux software image we
flashed before. Follow these steps:
1. Download latest version of the Plug & Trust middleware using this link.
2. Connect to the board using a terminal application such as TeraTerm and run the
ifconfig command to determine the IP address of your board as shown in
Figure 16. We will use the board IP address to transfer the Plug & Trust middleware
using the SCP protocol.
AN13027
Figure 16. Obtain board IP address
3. Download and install a file transfer software supporting SCP such as WinSCP in case
you are using a Windows host machine.
AN13027 All information provided in this document is subject to legal disclaimers. © NXP B.V. 2020. All rights reserved.
Application note Rev. 1.1 — 7 December 2020
17 / 26
Page 18

NXP Semiconductors
4. Windows host: open WinSCP and configure the SCP connection as shown in
AN13027
EdgeLockTM SE05x Quick start guide with i.MX 8M
Figure 17. The Host name corresponds to the IP address of the board obtained
previously. Click on the Login button to establish the connection.
Figure 17. Connect to the board using SCP with WinSCP
5. Once the connection is established, you should see on the right pane the board file
system and, on the left pane the file system of the host machine. It is recommended
to delete the folder named se05x_mw_vxxx in order to avoid confusion. Navigate to
the folder where you downloaded the Plug & Trust middleware package and then drag
AN13027 All information provided in this document is subject to legal disclaimers. © NXP B.V. 2020. All rights reserved.
Application note Rev. 1.1 — 7 December 2020
18 / 26
Page 19

NXP Semiconductors
AN13027
EdgeLockTM SE05x Quick start guide with i.MX 8M
and drop the package to the right pane as shown in Figure 18. A copy of the Plug &
Trust middleware file should now be in the /home/root folder of the board.
Figure 18. Copy the middleware to the board
7.2 Build the Plug & Trust middleware
To build the Plug & Trust middleware, open the TeraTerm and follow the steps listed
below:
AN13027 All information provided in this document is subject to legal disclaimers. © NXP B.V. 2020. All rights reserved.
Application note Rev. 1.1 — 7 December 2020
19 / 26
Page 20

NXP Semiconductors
1. Unzip the Plug & Trust middleware file that you have transferred to the board in
AN13027
EdgeLockTM SE05x Quick start guide with i.MX 8M
Section 7.1.
Send unzip <middleware_file_name>.zip as shown in Figure 19.
Figure 19. Unzip the middleware
AN13027 All information provided in this document is subject to legal disclaimers. © NXP B.V. 2020. All rights reserved.
Application note Rev. 1.1 — 7 December 2020
20 / 26
Page 21

NXP Semiconductors
2. A new folder called simw-top should have been created in the root directory. You can
AN13027
EdgeLockTM SE05x Quick start guide with i.MX 8M
now create the middleware CMake projects for the board as shown in Figure 20 :
(1) Navigate to the simw-top/scripts folder.
Send cd simw-top/scripts/.
(2) Send the command python3 create_cmake_projects.py and wait until the
command is finished executing.
Note: This command may take a few seconds to complete.
Figure 20. Create CMake projects for the board
AN13027 All information provided in this document is subject to legal disclaimers. © NXP B.V. 2020. All rights reserved.
Application note Rev. 1.1 — 7 December 2020
21 / 26
Page 22

NXP Semiconductors
3. Finally, compile and install the project as shown in Figure 21:
AN13027
EdgeLockTM SE05x Quick start guide with i.MX 8M
(1) Navigate to the folder where the project has been generated.
Send cd ../simw-top_build/imx_native_se050_t1oi2c
(2) Build the project. This might take some time.
Send cmake --build .
Note: in the default CMake configuration the SCP03 protocol is not active. If you want
to activate SCP, send cmake -DSE05X_Auth=PlatfSCP03 -DSCP=SCP03_SSS .
before building the project with cmake --build .
(3) Install the project.
Send make install
Figure 21. Build and install the project
AN13027 All information provided in this document is subject to legal disclaimers. © NXP B.V. 2020. All rights reserved.
Application note Rev. 1.1 — 7 December 2020
22 / 26
Page 23

NXP Semiconductors
8 Legal information
8.1 Definitions
Draft — A draft status on a document indicates that the content is still
under internal review and subject to formal approval, which may result
in modifications or additions. NXP Semiconductors does not give any
representations or warranties as to the accuracy or completeness of
information included in a draft version of a document and shall have no
liability for the consequences of use of such information.
8.2 Disclaimers
Limited warranty and liability — Information in this document is believed
to be accurate and reliable. However, NXP Semiconductors does not
give any representations or warranties, expressed or implied, as to the
accuracy or completeness of such information and shall have no liability
for the consequences of use of such information. NXP Semiconductors
takes no responsibility for the content in this document if provided by an
information source outside of NXP Semiconductors. In no event shall NXP
Semiconductors be liable for any indirect, incidental, punitive, special or
consequential damages (including - without limitation - lost profits, lost
savings, business interruption, costs related to the removal or replacement
of any products or rework charges) whether or not such damages are based
on tort (including negligence), warranty, breach of contract or any other
legal theory. Notwithstanding any damages that customer might incur for
any reason whatsoever, NXP Semiconductors’ aggregate and cumulative
liability towards customer for the products described herein shall be limited
in accordance with the Terms and conditions of commercial sale of NXP
Semiconductors.
Right to make changes — NXP Semiconductors reserves the right to
make changes to information published in this document, including without
limitation specifications and product descriptions, at any time and without
notice. This document supersedes and replaces all information supplied prior
to the publication hereof.
Suitability for use — NXP Semiconductors products are not designed,
authorized or warranted to be suitable for use in life support, life-critical or
safety-critical systems or equipment, nor in applications where failure or
malfunction of an NXP Semiconductors product can reasonably be expected
to result in personal injury, death or severe property or environmental
damage. NXP Semiconductors and its suppliers accept no liability for
inclusion and/or use of NXP Semiconductors products in such equipment or
applications and therefore such inclusion and/or use is at the customer’s own
risk.
Applications — Applications that are described herein for any of these
products are for illustrative purposes only. NXP Semiconductors makes
no representation or warranty that such applications will be suitable
for the specified use without further testing or modification. Customers
are responsible for the design and operation of their applications and
products using NXP Semiconductors products, and NXP Semiconductors
accepts no liability for any assistance with applications or customer product
design. It is customer’s sole responsibility to determine whether the NXP
Semiconductors product is suitable and fit for the customer’s applications
and products planned, as well as for the planned application and use of
customer’s third party customer(s). Customers should provide appropriate
design and operating safeguards to minimize the risks associated with
their applications and products. NXP Semiconductors does not accept any
liability related to any default, damage, costs or problem which is based
AN13027
EdgeLockTM SE05x Quick start guide with i.MX 8M
on any weakness or default in the customer’s applications or products, or
the application or use by customer’s third party customer(s). Customer is
responsible for doing all necessary testing for the customer’s applications
and products using NXP Semiconductors products in order to avoid a
default of the applications and the products or of the application or use by
customer’s third party customer(s). NXP does not accept any liability in this
respect.
Export control — This document as well as the item(s) described herein
may be subject to export control regulations. Export might require a prior
authorization from competent authorities.
Evaluation products — This product is provided on an “as is” and “with all
faults” basis for evaluation purposes only. NXP Semiconductors, its affiliates
and their suppliers expressly disclaim all warranties, whether express,
implied or statutory, including but not limited to the implied warranties of
non-infringement, merchantability and fitness for a particular purpose. The
entire risk as to the quality, or arising out of the use or performance, of this
product remains with customer. In no event shall NXP Semiconductors, its
affiliates or their suppliers be liable to customer for any special, indirect,
consequential, punitive or incidental damages (including without limitation
damages for loss of business, business interruption, loss of use, loss of
data or information, and the like) arising out the use of or inability to use
the product, whether or not based on tort (including negligence), strict
liability, breach of contract, breach of warranty or any other theory, even if
advised of the possibility of such damages. Notwithstanding any damages
that customer might incur for any reason whatsoever (including without
limitation, all damages referenced above and all direct or general damages),
the entire liability of NXP Semiconductors, its affiliates and their suppliers
and customer’s exclusive remedy for all of the foregoing shall be limited to
actual damages incurred by customer based on reasonable reliance up to
the greater of the amount actually paid by customer for the product or five
dollars (US$5.00). The foregoing limitations, exclusions and disclaimers shall
apply to the maximum extent permitted by applicable law, even if any remedy
fails of its essential purpose.
Translations — A non-English (translated) version of a document is for
reference only. The English version shall prevail in case of any discrepancy
between the translated and English versions.
Security — Customer understands that all NXP products may be subject
to unidentified or documented vulnerabilities. Customer is responsible
for the design and operation of its applications and products throughout
their lifecycles to reduce the effect of these vulnerabilities on customer’s
applications and products. Customer’s responsibility also extends to other
open and/or proprietary technologies supported by NXP products for use
in customer’s applications. NXP accepts no liability for any vulnerability.
Customer should regularly check security updates from NXP and follow up
appropriately. Customer shall select products with security features that best
meet rules, regulations, and standards of the intended application and make
the ultimate design decisions regarding its products and is solely responsible
for compliance with all legal, regulatory, and security related requirements
concerning its products, regardless of any information or support that may
be provided by NXP. NXP has a Product Security Incident Response Team
(PSIRT) (reachable at PSIRT@nxp.com) that manages the investigation,
reporting, and solution release to security vulnerabilities of NXP products.
8.3 Trademarks
Notice: All referenced brands, product names, service names and
trademarks are the property of their respective owners.
AN13027 All information provided in this document is subject to legal disclaimers. © NXP B.V. 2020. All rights reserved.
Application note Rev. 1.1 — 7 December 2020
23 / 26
Page 24

NXP Semiconductors
Tables
AN13027
EdgeLockTM SE05x Quick start guide with i.MX 8M
Tab. 1. EdgeLock SE05x development boards. ............ 4
Tab. 2. i.MX 8M development kit details ....................... 4
Tab. 3. Wire connection OM-SE05xARD - i.MX 8M ...... 5
AN13027 All information provided in this document is subject to legal disclaimers. © NXP B.V. 2020. All rights reserved.
Application note Rev. 1.1 — 7 December 2020
24 / 26
Page 25

NXP Semiconductors
Figures
AN13027
EdgeLockTM SE05x Quick start guide with i.MX 8M
Fig. 1. Connection between OM-SE05xARD and
i.MX 8M boards .................................................5
Fig. 2. Jumper configuration for i.MX 8M board ........... 6
Fig. 3. Micro-SD card preparation with Win32 Disk
Imager software ................................................ 8
Fig. 4. Plug the power supply and connect the
USB cable to your laptop .................................. 9
Fig. 5. Check that i.MX 8M board is recognized in
Device Manager .............................................. 10
Fig. 6. Open a TeraTerm serial connection .................11
Fig. 7. Configure TeraTerm serial port connection ......11
Fig. 8. Booting the i.MX 8M ....................................... 12
Fig. 9. Sign in in the OS ............................................ 13
Fig. 10. Go to the Plug & Trust middleware test
example directory ............................................14
Fig. 11. Run se05x_minimal test example ................... 14
Fig. 12. Start the ssscli tool ..........................................15
Fig. 13. Close an already openned session ................. 15
Fig. 14. ssscli info .........................................................16
Fig. 15. ssscli disconnect ............................................. 16
Fig. 16. Obtain board IP address ................................. 17
Fig. 17. Connect to the board using SCP with
WinSCP ........................................................... 18
Fig. 18. Copy the middleware to the board .................. 19
Fig. 19. Unzip the middleware ......................................20
Fig. 20. Create CMake projects for the board .............. 21
Fig. 21. Build and install the project .............................22
AN13027 All information provided in this document is subject to legal disclaimers. © NXP B.V. 2020. All rights reserved.
Application note Rev. 1.1 — 7 December 2020
25 / 26
Page 26

NXP Semiconductors
Contents
1 How to use this document ................................. 3
2 Hardware required .............................................. 4
3 Boards setup ....................................................... 5
4 Software setup .................................................... 7
4.1 Micro-SD card preparation ................................ 7
4.2 Drivers ................................................................8
4.3 Terminal setup ................................................. 10
4.4 Booting the i.MX 8M ........................................11
5 Run preinstalled Plug & Trust middleware
test examples .................................................... 14
6 Appendix A: Using the ssscli tool ...................15
7 Appendix B: Update Plug & Trust
middleware .........................................................17
7.1 Obtain the latest Plug & Trust middleware
version ............................................................. 17
7.2 Build the Plug & Trust middleware ...................19
8 Legal information ..............................................23
AN13027
EdgeLockTM SE05x Quick start guide with i.MX 8M
Please be aware that important notices concerning this document and the product(s)
described herein, have been included in section 'Legal information'.
© NXP B.V. 2020. All rights reserved.
For more information, please visit: http://www.nxp.com
For sales office addresses, please send an email to: salesaddresses@nxp.com
Date of release: 7 December 2020
 Loading...