

Page 1

176-0002-000
Page 2

Page 3

Page 4

NVIDIA Quadro G-Sync II
Page 5

Page 6

Table of Contents
Introduction ................................................................................1
About This Guide .......................................................................... 1
NVIDIA Quadro G-Sync II ...........................................................3
System Requirements .................................................................... 3
Implementing SLI Technology ........................................................ 3
NVIDIA Frame Synchronization ...................................................... 4
Unpacking .................................................................................... 4
NVIDIA Quadro G-Sync II Equipment ......................................... 5
Safety Instructions ........................................................................ 6
Installing NVIDIA Quadro G-Sync II Card ........................................ 7
NVIDIA Frame Synchronization Under Windows XP ...................9
How To Set Up Genlock ............................................................... 10
Set Up the Hardware ............................................................... 10
Set Up the Software ................................................................ 12
How To Set Up Frame Lock .......................................................... 16
Set Up the Hardware ............................................................... 17
Set Up the Server Software ..................................................... 18
Changing the Timing Signal Frequency ..................................... 19
Set Up the Client Software ...................................................... 20
Swap Sync Setup .................................................................... 22
Setting Up Genlock + Frame Lock ................................................ 23
Checking the Connection Status ................................................... 24
Swap Sync ............................................................................. 25
NVIDIA Frame Synchronization Under Linux ........................... 27
Using the nvidia-settings Utility .................................................... 28
How To Set Up Genlock ............................................................... 28
Set Up the Hardware ............................................................... 29
Set Up the Software ................................................................ 30
How to Set Up Frame Lock .......................................................... 34
Set Up the Hardware ............................................................... 34
Set Up the Server Software ..................................................... 35
Test the Connections ............................................................... 37
Page 7

Swap Sync ............................................................................. 38
Setting Up Genlock + Frame Lock ................................................ 39
Leveraging Frame Lock/Genlock in OpenGL ................................... 40
Frame Lock Restrictions........................................................... 40
Supported Frame Lock Confi gurations ...................................... 41
Confi guring Frame Sync Using nvidia-settings Command ................ 42
General Steps ......................................................................... 42
Sample Confi gurations ............................................................ 42
Writing a Frame Lock NV-CONTROL Client .................................... 49
Writing a Frame Lock Client for NV-CONTROL 1.8 ..................... 49
Writing a Frame Lock Client for NV-CONTROL 1.9 ..................... 51
Using the OpenGL Extensions .................................................. 55
Frame Synchronization Using the OpenGL Extensions .................... 56
About Buffer Swaps ................................................................ 56
Confi guring for Swap Sync ....................................................... 58
OpenGL Extensions ..................................................................... 59
References and Resources ....................................................... 63
Getting Driver Updates ................................................................ 63
Registration, Support and Warranty ........................................ 65
Registering Your Quadro G-Sync II ............................................... 65
Warranty and Support ................................................................. 66
Compliance and Certifi cations .................................................. 67
8
Page 8

Introduction to
NVIDIA Quadro G-Sync II
The NVIDIA® Quadro® G-Sync™ II is an option card for the NVIDIA
Quadro FX 5600 and Quadro FX 4600 graphics boards. Featuring
frame lock and genlock functionality, the Quadro G-Sync II delivers
unprecedented levels of realism, visualization and collaborative capabilities
by enabling advanced multi-system and multi-device visualization
environments.
Note: It is important to register your NVIDIA Quadro G-Sync II in order to receive
NVIDIA Customer Care online and phone support. You can register your
Quadro G-Sync II at www.nvidia.com/register
About This Guide
This User Guide discusses the installation and confi guration of the
NVIDIA Quadro G-Sync II option card.
1
Page 9

NVIDIA Quadro G-Sync II User Guide
2
Page 10

NVIDIA Quadro G-Sync II
System Requirements
Operating System (32-bit or 64-bit)
Microsoft Windows XP
¾
Microsoft Windows Professional x64 Edition
¾
Linux
¾
Solaris x86
¾
Processor
Intel Pentium 4 or Xeon processor or higher
¾
AMD Opteron processor or higher
¾
RAM
1 GB minimum, 2 GB recommended
¾
System Interface
1 open expansion slot
¾
Implementing SLI
Technology
To take advantage of NVIDIA’s SLI™ technology combined with
Genlock/Frame lock functionality, you must install one NVIDIA Quadro
G-Sync II card in conjunction with two NVIDIA Quadro FX 4600 or
Quadro FX 5600 graphics boards.
3
Page 11

NVIDIA Quadro G-Sync II User Guide
NVIDIA Frame
Synchronization
Visual computing applications that involve multiple displays or even
multiple windows within a display can require special signal processing and
application controls in order to function properly.
For example, in order to produce quality video recording of animated
graphics, the display graphics must be synchronized with the video camera.
As another example, applications presented on multiple displays must be
synchronized in order to complete the illusion of a larger, virtual canvas.
The NVIDIA Quadro G-Sync II option card and Frame Synchronization
software lets you synchronize windows and displays for various visual
computing applications.
Unpacking
Prior to unpacking your new NVIDIA Quadro G-Sync II option card, it is
a good idea to make sure you meet all the system requirements (page 3) for
a smooth installation.
Be sure to inspect each piece of equipment shipped in the packing box. If
anything is missing or damaged, contact your reseller
4
.
Page 12
NVIDIA Quadro G-Sync II
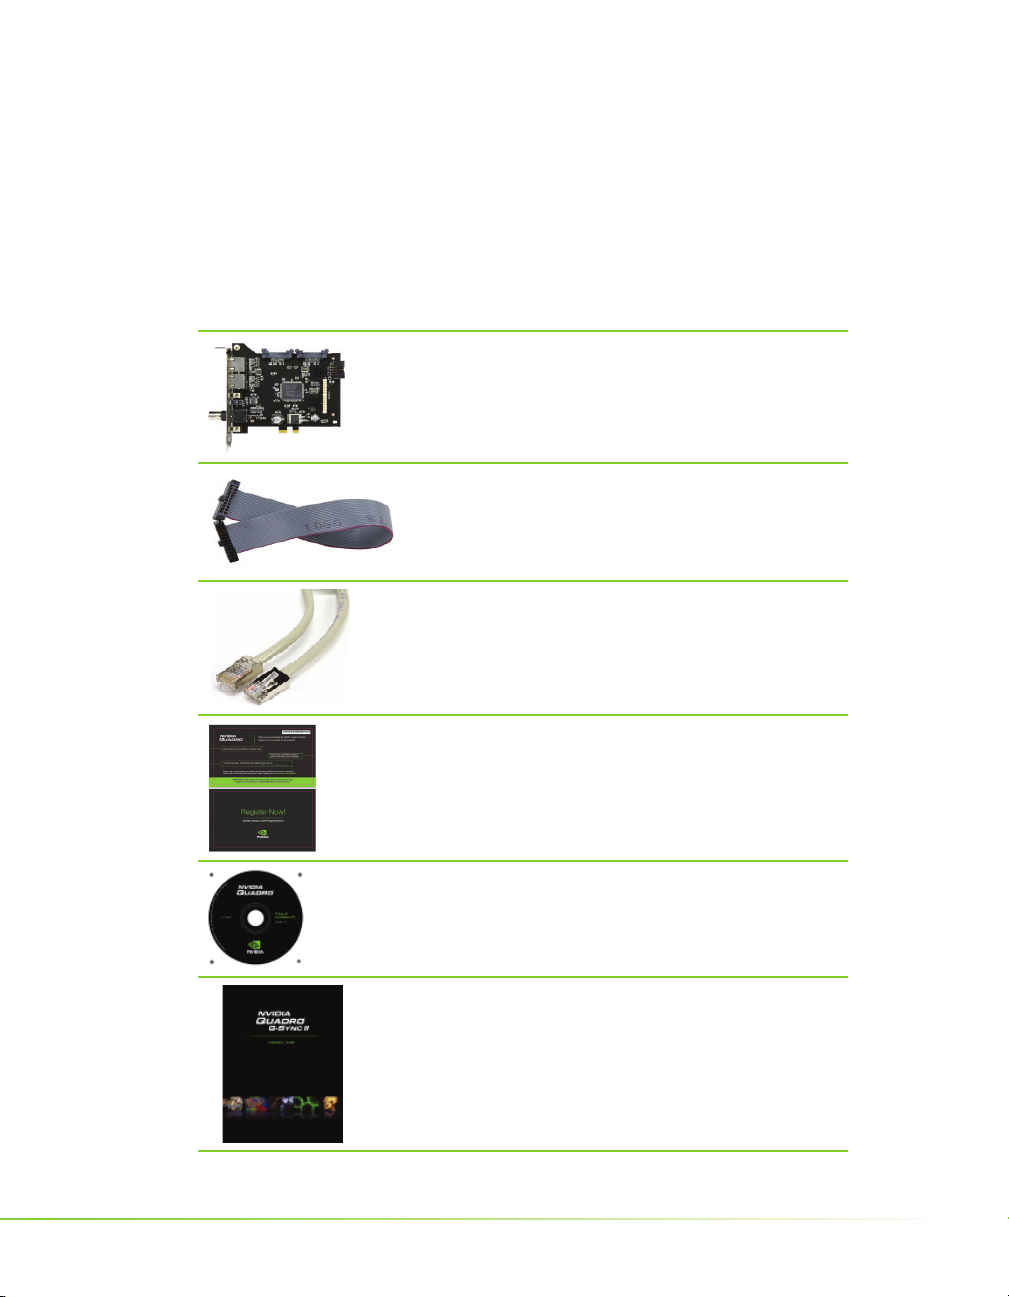
NVIDIA Quadro G-Sync II Equipment
The following equipment is included in the NVIDIA Quadro G-Sync II
box.
One (1) NVIDIA Quadro G-Sync II Option Card
Installs into an open expansion slot in your computer.
Two (2) Ribbon Cables
Used to connect the primary G-Sync connector on the GSync II option card to the G-Sync connector on the Quadro
FX graphics board.
One (1) Quadro G-Sync Cable
Used to connect multiple Quadro G-Sync II enabled
systems.
One (1) Registration Card
Register to gain priority access to NVIDIA’s Customer Care
One (1) NVIDIA Quadro G-Sync II Installation CD
Contains all the necessary drivers to enable the Quadro
G-Sync II option card.
One (1) Installation Guide
The Installation Guide provides the basic procedures
necessary to install and bring up the Quadro G-Sync II
option card.
5
Page 13

NVIDIA Quadro G-Sync II User Guide
Safety Instructions
To reduce the risk of fi re, electric shock, and injury always follow basic
safety precautions.
Note: All hardware must be installed prior to installation of the drivers.
Remove power from your computer by disconnecting the AC main
source before cleaning. Do not use liquid or aerosol cleaners. Use a
soft, damp cloth from cleaning exposed surfaces.
Do not operate this product near water or when your hands or body
are wet.
Do not place this product on soft surfaces that could block the
ventilation slots and cause overheating.
Do not place this product near a heating register or radiator.
Place this product securely on a stable surface. Serious damage to this
product may result if it falls.
Do not allow anything to rest on the power cord. Do not place
this product where a person can step or trip on the power cord or
telephone cords.
Do not disassemble this product. There are no user-serviceable parts
inside.
Do not put lighted candles, cigarettes, cigars, and so forth, on this
product.
Do not overload the AC main source and power extension cords.
Doing so increases the risk of fi re and electric shock.
6
Page 14

Installing NVIDIA
Quadro G-Sync II Card
Before you begin, make sure that the Quadro FX 4600 and/or Quadro FX
5600 graphics board and NVIDIA drivers are correctly installed.
The following is additional information concerning installation of the
NVIDIA Quadro G-Sync II card.
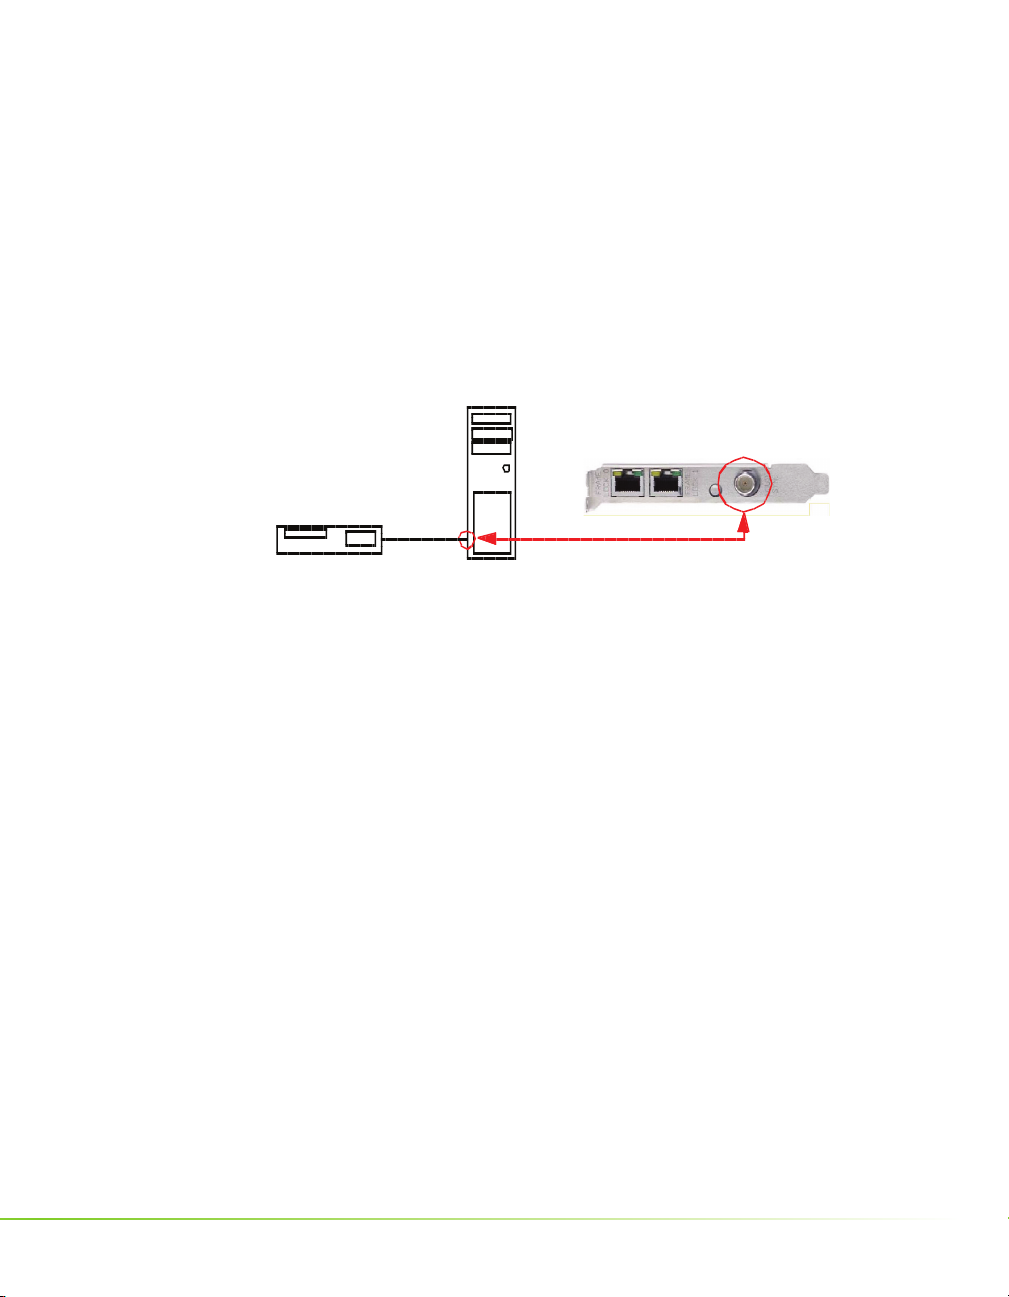
NVIDIA Quadro G-Sync II
Note: The NVIDIA Quadro G-Sync II option card must be used only in
1.
2.
conjunction with an NVIDIA Quadro FX 4600 or an NVIDIA Quadro FX 5600
graphics board.
Install the Quadro G-Sync II option card into any available expansion
slot within six inches of the G-Sync connector on the appropriate
Quadro FX 4600 and/or Quadro FX 5600 graphics board.
Use the cable that comes with your Quadro G-Sync II option card to
connect the primary G-Sync connector to the Quadro FX graphics
board G-Sync connector shown on page 8.
7
Page 15

NVIDIA Quadro G-Sync II User Guide
Quadro FX 4600 or Quadro FX 5600
graphics board
Cable connecting the Quadro G-Sync
card to the Quadro FX 4600 or Quadro
FX 5600 card
Quadro G-Sync II
8
Page 16

NVIDIA Frame Synchronization
Under Windows XP
This section describes how to set up frame synchronization under
Windows XP. It contains the following sections:
How To Set Up Genlock
How To Set Up Frame Lock
Setting Up Genlock + Frame Lock
9
Page 17

NVIDIA Quadro G-Sync II User Guide
How To Set Up Genlock
The following are the basic steps to genlocking a system. Detailed
instructions are provided in the related sections:
Set Up the Hardware
Connect the external sync source to the BNC connector on the
graphics board.
Set Up the Software
Use the NVIDIA Control Panel Workstation->Synchronize displays
page to establish the system as the server, to choose the sync source,
and confi gure the sync pulse.
Set Up the Hardware
Start the system, then connect the external source signal to the House
1.
Sync connector (BNC) of the Quadro G-Sync II option card.
The Quadro G-Sync II supports the following external
synchronization signal types:
¾
TTL (3.3 volt level)
¾
Composite Bi-level (NTSC or PAL sources use bi-level composite
signals)
¾
Composite Tri-level (HDTV sources commonly use tri-level
composite signals)
10
Page 18
NVIDIA Frame Synchronization Under Windows XP
Check the LED on the connector panel.
1.
A green LED means the hardware has detected the timing signal
and you can proceed to the next step.
An occasional red fl ash is OK.
A red LED means the hardware can’t detect the timing signal.
Check the signal source and correct the problem before
proceeding.
NVIDIA Quadro G-Sync II
Connector Bracket
Sync Source
Server
11
Page 19
NVIDIA Quadro G-Sync II User Guide
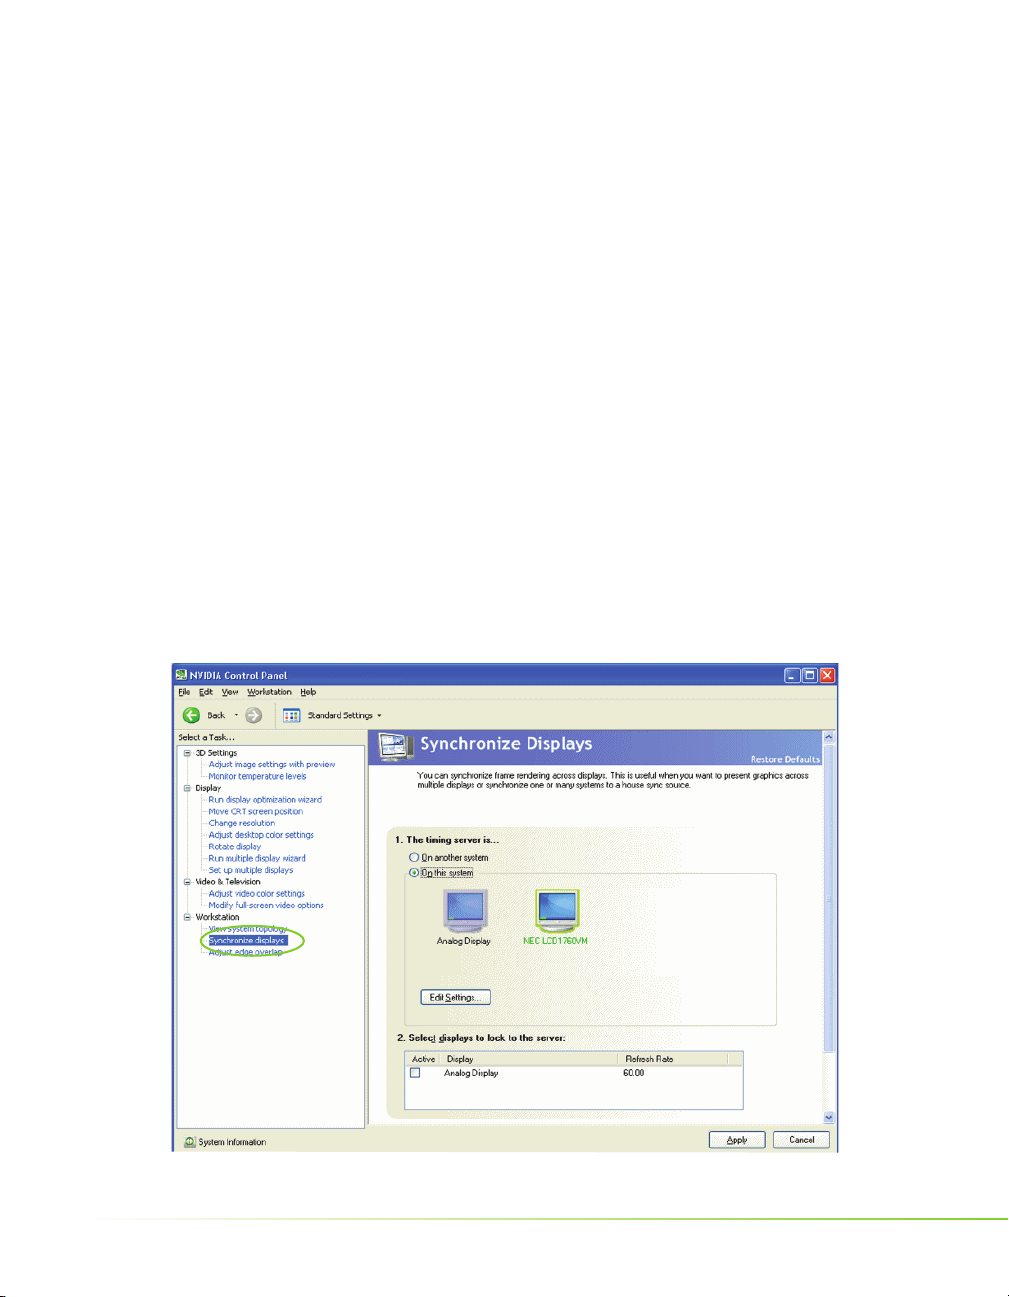
Set Up the Software
This section provides intructions for using the NVIDIA Control Panel to
set up the genlock system.
Basic Genlock Setup
Detecting the House Sync Signal
Using the House Sync Signal
Restoring an Unstable Display
Basic Genlock Setup
Right-click the desktop and then from the pop-up menu click
1.
NVIDIA Control Panel.
From the NVIDIA Control Panel Select a Task pane, under the
2.
Workstation heading, click Synchronize displays to open that page
3.
12
Page 20

NVIDIA Frame Synchronization Under Windows XP
3. Under The timing server is, click the On this system radio button.
4. Click Apply.
The graphics board should automatically detect the sync signal and no
further action is needed.
The following sections provide information on other tasks such as how to
adjust the synchronization to the external house sync. You can also consult
the online help by pressing F1 to open the Help fi le and then opening the
Workstation->Frame Synchronization contents.
Detecting the House Sync Signal
Normally, the software automatically detects the signal type that is being
used. If necessary, you can force the software to detect the signal type as
follows:
1.
On the system that you have
set up to be the server, rightclick the desktop and then
from the pop-up menu click
NVIDIA Control Panel.
2.
From the NVIDIA Control
Panel Select a Task pane,
under the Workstation
heading, click Synchronize
displays to open that page,
then click Edit Settings to
open the Server Settings dialog
box.
3.
Click the Sync signal
detection list arrow and then
click the item corresponding
to the house signal source.
4.
Click OK to save the settings.
13
Page 21
NVIDIA Quadro G-Sync II User Guide
Using the House Sync Signal
This section describes how to:
Select which edge of the house sync signal to use as the trigger
Double the trigger frequency from the house sync signal
Properly handle interlaced house sync signals
Introduce a timing delay to the house sync signal
From the NVIDIA Control Panel Select a Task pane, under
1.
Workstation, click Synchronize Displays.
Make sure that the On this system radio button under The timing
2.
server is selected.
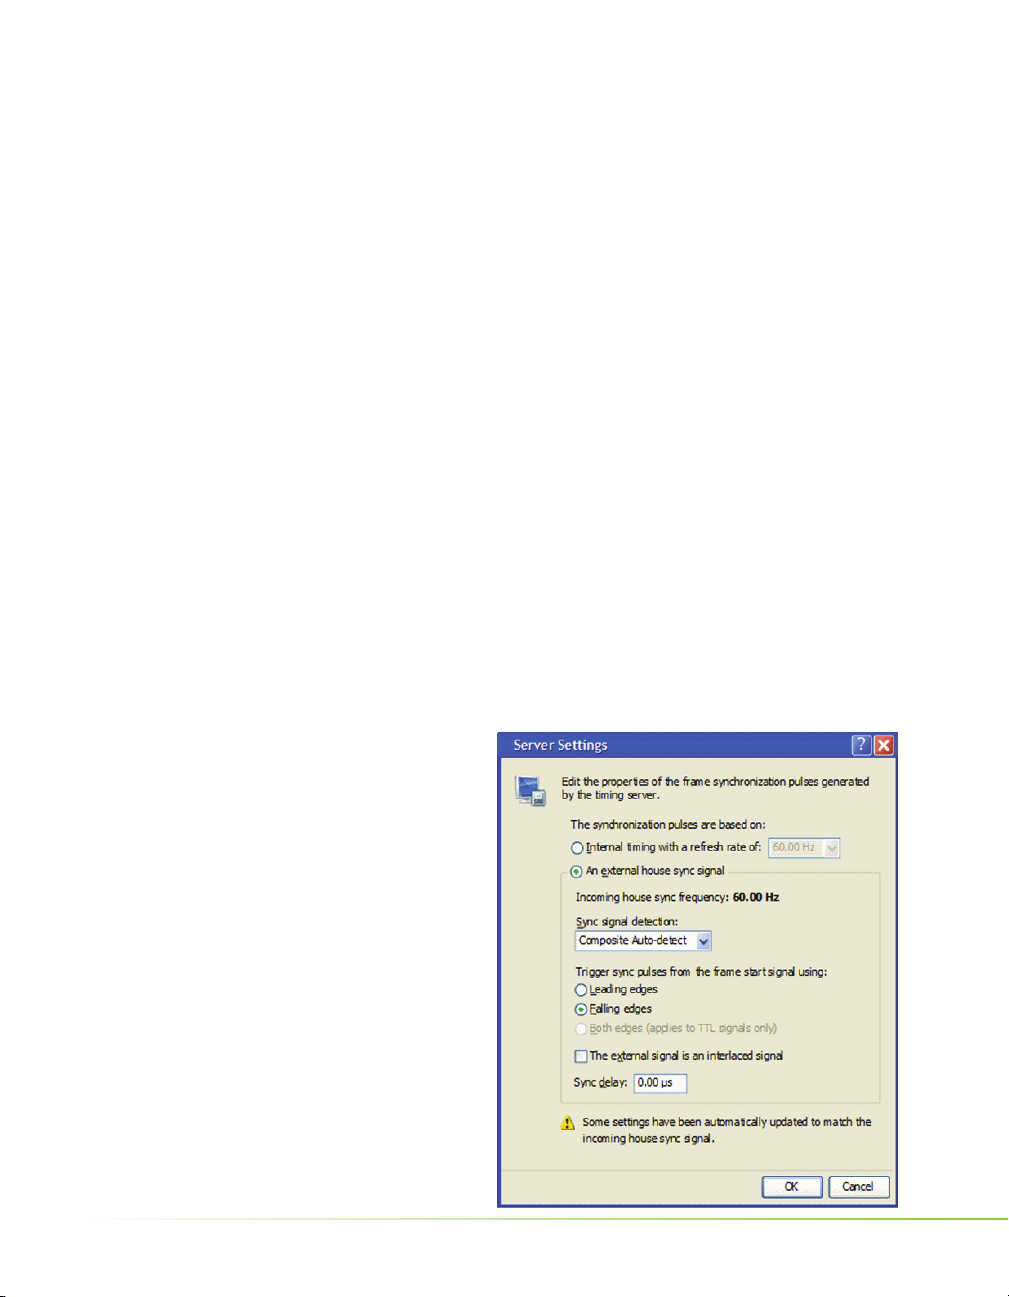
Open the Server Settings dialog box using one of the following
3.
methods:
From the Synchronize Displays page, click Edit Settings, or
From the NVIDIA Control Panel navigation tree pane, under
Workstation, click View System Topology, then right click the
display icon that is
designated to be
the server and click
Server Settings
14
4. Under The
synchronization pulses
are based on, click the
An external house sync
signal radio button.
The Server Settings dialog
box will show the
incoming house sync
frequency. A frequency
of 0.00 Hz indicates that
the system has not yet
been set as the server.
Page 22

NVIDIA Frame Synchronization Under Windows XP
5. Confi gure additional synchronization settings as needed:
Select which edge of the sync signal to use to trigger the sync
pulses - leading or falling edge.
If necessary, you can double the sync frequency by clicking the
Both edges radio button under Trigger sync pulses from the frame
start signal using.
Note: This control is available only for TTL signals.
House signal
Sync Pulse
Outgoing Sync triggered from leading and falling edge
If the external signal is an interlaced signal - such as is used to
drive a 1080i display - then click the The external signal is an
interlaced signal check box.
This causes the fi rst fi eld of an interlaced signal to be used to
synchronize the display. For example, for a 60Hz interlaced
signal, the effective 120 Hz fi eld sync is converted to a 60 Hz
frame-sync signal.
To introduce a timing delay to the house sync signal:
In the Sync delay text box enter the delay (in microseconds) that
you want to introduce.
6. Click OK.
A Monitor Settings dialog box appears, asking if you want to keep the
changed settings
.
7. Click Yes to keep the new settings, or click No to revert to the
previous settings.
15
Page 23

NVIDIA Quadro G-Sync II User Guide
Restoring an Unstable Display
If your display becomes unstable and you want to restore it to its original
confi guration, do one or more of the following:
Click Restore Defaults and then click Apply.
Disconnect the external house sync.
Viewing the Connection Status
See the section Checking the Connection Status (page 24).
How To Set Up Frame
Lock
The following are the basic steps to frame locking several systems. Detailed
instructions are provided in the section Set Up the Hardware (page 17).
Set Up the Hardware
Connect all the systems together using standard CAT5 patch cabling.
Note: WARNING! The voltage and signal on the frame lock ports are different from
16
Ethernet signals. Do not connect a Frame lock port to an Ethernet card
or network hub. Doing so can cause damage to the hardware.
Set Up the Server Software
Use the NVIDIA Control Panel Synchronize Displays page to
establish the system as the server.
Set Up the Client Software
Use the NVIDIA Control Panel Synchronize Displays page for each
client to enable frame lock on that system and to add an optional delay
to the sync pulse before transmitting to other clients.
Page 24

NVIDIA Frame Synchronization Under Windows XP
Set Up the Hardware
Daisy chain the graphics cards together using a standard CAT5 patch
1.
cable plugged into the external RJ45 connector.
You can connect to any of the two RJ45 connectors located on
the graphics card bracket.
Each connector automatically confi gures itself as an input or
output after all the connections are made and one system is
confi gured as a synchronization server (see Set Up the Server
Software on page 18). A fl ashing green LED indicates an input and
a fl ashing yellow LED indicates an output.
If there is no server assigned and connected, then both LEDs are
a steady green.
Note: WARNING! The voltage and signal on the frame lock ports are different from
Ethernet signals. Do not connect a Frame lock port to an Ethernet
card or network hub. Doing so can cause damage to the hardware.
2. Designate one of the cards to be the server device. The remaining
cards are client devices.
The server determines the trigger pulse for the client devices.
The trigger pulse is derived from the V-sync of the server video.
Out
In In
Client
Client
In
Client
Out
Out
Server
17
Page 25

NVIDIA Quadro G-Sync II User Guide
Set Up the Server Software
This section provides instructions for using the NVIDIA Control Panel
to set up the frame lock server.
Basic Server Setup
1.
On the system that you have designated to be the timing server, rightclick the desktop and then from the pop-up menu, click NVIDIA
Control Panel.
2.
From the NVIDIA
Control Panel Select a
Task pane, under the
Workstation heading, click
Synchronize displays to
open that page.
3.
Under The timing server
is, click the On this
system radio button. If
the system has multiple
displays, the driver
automatically selects the
primary display to be the
timing server and all other
displays are the clients. To
change the confi guration,
click the icon of the
display that you want to
be the timing server, then
under Select displays to be active clients, select the check boxes for
any displays that you want to be clients.
18
4.
Click Apply.
Page 26

NVIDIA Frame Synchronization Under Windows XP
The following sections provide information on other tasks. You can also
consult the online help by pressing F1 to open the Help fi le and then
opening the Workstation->Frame Synchronization contents.
Changing the Timing Signal Frequency
Follow these instructions if you are using the server to generate the timing
signals and you want to change the timing signal frequency.
1.
From the NVIDIA Control Panel Select a Task pane, under the
Workstation heading, click Synchronize displays.
2.
Make sure that the On this system radio button under The timing
server is selected.
3.
Click Edit Settings to
open the Server Settings
dialog box.
4.
Under The
synchronization
pulses are based
on, click the Internal
timing signal with a
refresh rate of radio
button.
5.
Click the list arrow and
select a refresh rate, then
click OK.
The refresh rate of the server display as well as the frequency of the timing
signal will change based on your selection.
19
Page 27

NVIDIA Quadro G-Sync II User Guide
Set Up the Client Software
This section provides instructions for using the NVIDIA Control Panel
to set up the frame lock client systems.
Basic Client Setup
Perform the following steps for each client system:
1.
Right-click the desktop and then from the pop-up menu click
NVIDIA Control Panel.
2.
From the NVIDIA Control Panel Select a Task pane, under the
Workstation heading, click Synchronize displays to open that page.
3.
Under The timing server is, the On another system radio button
should already be selected.
4.
Under Select
displays to lock to
the server, select
the check boxes for
the displays that you
want to be clients.
You can select only
displays whose
refresh rates match
that of the server.
Selected displays
will be synchronized
to the server.
20
5.
Click Apply.
Page 28

Sync Delay (Skew)
NVIDIA Frame Synchronization Under Windows XP
The following sections provide information on other tasks. You can also
consult the online help by pressing F1 to open the Help fi le and then
opening the Workstation->Frame Synchronization contents.
Introducing a Timing Delay at Client Systems
You can introduce a sync offset, or a delay between the source trigger
point coming into the client system and the actual sync pulse. The value
can be in the range of 0 to the time needed to display an entire frame.
Source signal
Sync Pulse
Perform the following steps wherever you want to introduce a delay in the
timing signal transmission chain:
From the NVIDIA Control Panel Select a task pane, under
1.
Workstation, click View System Topology.
Right-click the G-Sync image, then click G-Sync settings from the
2.
pop-up menu to open the G-Sync Settings dialog box.
21
Page 29

NVIDIA Quadro G-Sync II User Guide
3. In the Sync delay text box, enter the delay (in microseconds) that you
want to introduce to the timing signal, then click OK.
Viewing the Connection Status
See the section Checking the Connection Status (page 24).
Swap Sync Setup
The application controls synchronization of buffer swaps (swap sync)
between applications. Proper connection and synchronization of the
timing signal are required for proper synchronization of buffer swaps.
See Using the OpenGL Extensions (page 55) for instructions on how an
application can use the extensions to accomplish swap sync.
22
Page 30

NVIDIA Frame Synchronization Under Windows XP
Setting Up Genlock +
Frame Lock
The procedures in the previous two sections describe the more common
uses of the Quadro G-Sync II. A third use involves a combination of
genlock and frame lock.
In this setup, a set of client systems are connected to a system that is
designated as the server, as described in How To Set Up Frame Lock. The
difference is that the server system is genlocked to an external house sync,
as described in How To Set Up Genlock..
In
Client
Out
Out
Server
Sync Source
Out
In In
Client
Example of Genlock + Frame Lock Confi guration
Client
23
Page 31

NVIDIA Quadro G-Sync II User Guide
Checking the Connection
Status
The View System Topology page provides a graphical view of the status
of your frame-sync environment. It shows all the displays in your system
and provides frame-lock status information for each display as well as
connection status information for the Quadro G-Sync II option card.
In addition to viewing status information, you can also change various
settings using the View System Topology page.
Right-click the desktop and then from the pop-up menu click
1.
NVIDIA Control Panel.
From the NVIDIA Control Panel Select a Task pane, under the
2.
Workstation heading, click View System Topology to open that page.
The View System Topology page shows the displays and graphics
cards connected within that system.
24
Page 32

3. Click any of the display icons to view the status box that appears at the
bottom of the page.
The display status box shows whether the:
4. Click the G-Sync II card icon to view the status box that appears at
the bottom of the page.
The G-Sync II card status box shows:
Swap Sync
The application controls synchronization of buffer swaps (swap sync)
between applications. Proper connection and synchronization of the
timing signal are required for proper synchronization of buffer swaps.
Display is using internal timing
Display is locked to a house sync signal
Display is locked to a frame lock sync pulse
Display stereo signal is in phase with the server
Whether or not the frame lock ports are used
The direction of the timing signal at each frame lock port - either
IN or OUT
Whether or not a house sync signal is present
See Using the OpenGL Extensions (page 55) for instructions on how an
application can use the extensions to accomplish swap sync..
25
Page 33

NVIDIA Quadro G-Sync II User Guide
26
Page 34

NVIDIA Frame Synchronization
Under Linux
This section describes how to set up frame synchronization under Linux. It
contains the following sections:
Using the nvidia-settings Utility
How To Set Up Genlock
How To Set Up Frame Lock
Setting Up Genlock + Frame Lock
Leveraging Frame Lock/Genlock in OpenGL
Writing a Frame Lock NV-CONTROL Client
27
Page 35

NVIDIA Quadro G-Sync II User Guide
Using the nvidia-settings
Utility
Confi gure frame lock and genlock using the nvidia-settings utility. After
booting the system starting X Windows, run nvidia-settings as follows:
% nvidia-settings
From the nvidia-settings frame lock panel, you can add or remove GSync (and display) devices to the frame lock/genlock group, monitor the
status of that group, and enable or disable frame lock and genlock.
For information about the page, click Help at the lower right corner of
the interface.
How To Set Up Genlock
28
The following are the basic steps to genlocking a system. Detailed
instructions are provided in the related sections:
Set Up the Hardware
Connect the external sync source to the BNC connector on the
graphics boards.
Set Up the Software
Use the nvidia-settings frame lock panel to establish the system as
the server, to choose the sync source, and confi gure the sync pulse.
Page 36

Set Up the Hardware
Start the system, then connect the external source signal to the House
1.
Sync connector (BNC) of the Quadro G-Sync II option card.
The Quadro G-Sync II supports the following external
synchronization signal types:
TTL (3.3 volt level)
Composite Bi-level (NTSC or PAL sources use bi-level composite
signals)
Composite Tri-level (HDTV sources commonly use tri-level
composite signals)
2. Check the LED on the connector panel.
A green LED means the hardware has detected the timing signal,
and you can proceed to the next step
An occasional red fl ash is OK.
A red LED means the hardware can’t detect the timing signal.
NVIDIA Frame Synchronization Under Linux
Check the signal source and correct the problem before
proceeding.
NVIDIA Quadro G-Sync II
Connector Bracket
Server
29
Page 37

NVIDIA Quadro G-Sync II User Guide
Set Up the Software
Basic Genlock Setup
Go to the nvidia-settings frame lock panel.
1.
Click Add Devices, then add the X Server that contains the display
2.
and G-Sync II cards that you want to sync to this external source.
An X Server is typically specifi ed in the format:
For example: mycomputer.domain.com:0 or localhost:0
After adding an X Server, the G-Sync Devices section shows the
X server name, the graphics card attached to the X server, and the
displays attached to the graphics board.
3.
Check the Server check box for one of the displays connected to the
system in order to designate the
system as the frame lock server.
4.
Click the Use House Sync if
Present checkbox.
system:m
30
5.
Click Enable Frame Lock.
The display device(s) may take a
moment to stabilize. If it does
not stabilize, you may have
selected a synchronization signal
that the system cannot support–
click Disable Frame Lock and then check the external sync signal.
Note: Any time you modify the genlock settings (for example, by clicking Use
House Sync if Present or Add Devices), you must fi rst click Disable
Frame Lock to disable synchronization.
Page 38

NVIDIA Frame Synchronization Under Linux
The G-Sync section shows the status of the sync signals for the X server
After connecting the house sync, the external sync signal frequency is
displayed in the section Rate.
The Receiving, Timing, Stereo, and House indicators should be green.
If the Timing LED is red—indicating the display is not synchronized
to the timing signal—then see Synchronizing to the External House
Signal for further instructions.
See “Understanding the Status Indicators” for more information about
the status indicators.
Synchronizing to the External House Signal
This section describes other steps you may need to take after connecting a
house sync signal.
Adjusting for Interlaced External House Signals
If the external signal is an interlaced signal, then check the Sync to
fi eld 1 check box and click Apply.
Generating a Sync Frequency Slower than the External House Signal
If the external sync frequency is not support by your display because
it is too high or if you are using an interlaced signal, you can generate
a sync signal of a reduced frequency by entering a number in the Sync
interval box
This number represents the number of external sync pulses to receive
before generating the synchronization pulse. For example, if the
house sync frequency is 120 Hz, then entering 1 in the Outgoing sync
interval box results in a 60 Hz sync pulse
31
Page 39

Ou tgoing Sync
NVIDIA Quadro G-Sync II User Guide
House signal
Sync Pulse
This action overrides any refresh rate that you may have selected from the
refresh rate list.
Generating a Sync Frequency Faster than the External House Signal
You can double the sync frequency by triggering the sync pulse off
both the leading and falling edge of the source sync signal. This works
only with TTL level signals.
Click the Sync Edge list arrow and then select both leading and falling
edges.
House signal
Interval value of 1
32
Sync Pulse
Ou tgoing Sync triggered from leading and falling edge
Detecting the Incoming Signal Type
Quadro G-Sync II supports the following external synchronization
signal types:
TTL (3.3 volt level)
¾
Composite Bi-level (NTSC or PAL sources use bi-level composite
¾
signals)
Composite Tri-level (HDTV sources commonly use tri-level
¾
composite signals)
Page 40

s
NVIDIA Frame Synchronization Under Linux
Normally, the software automatically detects the signal type that is being
used. If necessary, you can force the software to detect the signal type as
follows:
1.
Click Detect to force detection of the signal type.
2.
The software tests each signal type and stops when it detects a match.
3.
If the signal type cannot be detected, click the Video Mode list box
arrow and then click the item corresponding to the signal source.
4.
Click Composite, Auto if you want the frame lock board to classify
the signal as bi-level or tri-level.
Understanding the Status Indicators
The G-Sync Devices section displays the status of the sync signals as
well as the status of the RJ45 ports. The two ports are represented by
connector icons.
NVIDIA Quadro G -Sync II Port
.
33
Page 41

NVIDIA Quadro G-Sync II User Guide
Sync and Connection Status for the Genlock Server
Sync Status
Receiving - Green indicates that a sync pulse is present.
¾
House - Green indicates that a signal is present at the BNC
¾
connector
Timing - Indicates whether the timing is locked to the sync signal
¾
Green: The timing is locked to the house sync.
Grey: The timing is locked to the internal V-Sync.
Red: The display is not synchronized to the timing signal
Stereo - Always green indicates that it is in sync with a timing signal.
¾
Port Status
Out/Out is the normal indicator for the server device.
¾
In/In indicates that the system is not selected as a server or client
¾
and is not frame-lock enabled.
How To Set Up Frame
Lock
Set Up the Hardware
Daisy chain the graphics cards together using a standard CAT5 patch
1.
cable plugged into the external RJ45 connector.
You can connect to any of the two RJ45 connectors located on
the G-Sync II card bracket.
Each connector automatically confi gures itself as an input or
output after all the connections are made and one system is
confi gured as a synchronization server. A fl ashing green LED
indicates an input and a fl ashing yellow LED indicates an output.
If there is no server assigned and connected, then both LEDs are
a steady green.
34
Page 42

t
NVIDIA Frame Synchronization Under Linux
Note: WARNING! The voltage and signal on the frame lock ports are different
from Ethernet signals. Do not connect a Frame lock port to an Ethernet card
or network hub. Doing so can cause damage to the hardware.
2. Designate one of the displays to be the server device. The remaining
displays are client devices.
The server determines the trigger pulse for the client devices. The
trigger pulse is derived from the V-Sync signal of the server video.
Out
In
Client
Out
Server
In In
Four frame locked systems
Set Up the Server Software
Frame Lock is supported across an arbitrary number of Quadro G-Sync II
systems.
Out
Client
C lien
Note: All displays connected to the same GPU to be included in the frame lock
group must be confi gured with identical display-mode timings and refresh
rates.
Go to the nvidia-settings frame lock panel.1.
35
Page 43

NVIDIA Quadro G-Sync II User Guide
2. Add the X server that contains the display devices that you would like
to include in the frame lock group by clicking Add Devices.
Any X Server can be added to the frame lock group, provided that:
The system supporting the X Server is confi gured to support
frame lock and is connected via RJ45 cable to the other systems in
the frame lock group.
The system driving nvidia-settings can locate and has display
privileges on the X server that is to be included for frame lock.
An X Server is typically specifi ed in the format:
system:m
For example: mycomputer.domain.com:0 or localhost:0
Like the genlock status indicators, the Port0 and Port1 columns in the table
on the frame lock panel contain indicators whose states mirror the states
of the physical LEDs on the RJ45 ports. This lets you monitor the status
of the ports from the software interface.
3. Select the Server check box for the display that you want to use as the
frame lock server.
4. To gain display privileges on a remote system, execute
% xhost + on the remote system.
See the xhost (1) main page for details. Typically, frame lock is
controlled through one of the systems that will be included in the
frame lock group. While this is not a requirement, note that nvidiasettings will only display the frame lock panel when running on an X
server that supports frame lock.
36
Page 44

NVIDIA Frame Synchronization Under Linux
5. To enable synchronization on these display devices, click Enable
Frame Lock.
The screens may take a moment to stabilize. If they do not stabilize,
you may have selected mode timings that one or more of the systems
cannot support.
In this case, you should disable synchronization by clicking Disable
Frame Lock, and then fi x the mode timings.
Note: Any time you modify the genlock settings (for example, by clicking Use House
Sync if Present or Add Devices), you must fi rst click Disable Frame Lock to
disable synchronization.
Test the Connections
To test the connections, click Test Link on the nvidia-settings frame lock
panel.
The G-Sync Devices section displays the status of the sync signals as
well as the status of the RJ45 ports. The two ports are represented by
connector icons.
NVID IA Quadro G-Sync II Ports
.
37
Page 45

NVIDIA Quadro G-Sync II User Guide
Sync and Connection Status for the Server
Sync Status
Receiving - Green indicates that a sync pulse is present.
¾
Timing - Indicates whether the timing is locked to the sync signal
¾
Grey: The timing is locked to the internal V-Sync.
Stereo - Always green indicates that it is in sync with a timing signal.
¾
Port Status
Out/Out is the normal indicator for the server device.
¾
In/In indicates that the system is not selected as a server or client
¾
and is not frame-lock enabled.
Sync and Connection Status for the Client
Sync Status
Receiving - Green indicates that a sync pulse is present.
¾
Timing - Indicates whether the timing is locked to the sync signal
¾
Green: The timing is locked to the signal on the frame lock
conector.
Red: Either no signal on the frame lock connector is detected, or
the lock to the signal has been lost
Stereo - Steady green indicates that the client’s stereo timing is
¾
locked to the server’s stereo signal.
Port Status
Out/Out is the normal indicator for the server device.
¾
In/In indicates that the system is not selected as a server or client
¾
Swap Sync
The application controls synchronization of buffer swaps (swap sync)
between applications. Proper connection and synchronization of the
timing signal are required for proper synchronization of buffer swaps.
38
and is not frame-lock enabled.
Page 46

See Using the OpenGL Extensions (page 55) for instructions on how an
t
application can use the extensions to accomplish swap sync.
Setting Up Genlock +
Frame Lock
The procedures in the previous two sections describe the more common
uses of the Quadro G-Sync II option card. A third use involves a
combination of genlock and frame lock.
In this setup, a set of client systems are connected to a system that is
designated as the server, as described in How To Set Up Frame Lock. The
difference is that the server system is genlocked to an external house sync,
as described in How To Set Up Genlock.
NVIDIA Frame Synchronization Under Linux
Out
In
Client
1.
Follow the instructions under How To Set Up Frame Lock and then
Out
Server
Out
In In
Client
C lien
attach an external sync source to one of the systems included in the
frame lock group.
2.
Check the Server check box of the display that is connected to that
same system.
3.
Check the Use House Sync if Present check box.
4.
Enable synchronization by clicking Enable Frame Lock.
As with other frame lock/genlock controls, you must select the signal
server while synchronization is disabled.
39
Page 47

NVIDIA Quadro G-Sync II User Guide
Leveraging Frame Lock/
Genlock in OpenGL
With the GLX_NV_swap_group extension, OpenGL applications can
be implemented to join a group of applications within a system for
local swap sync, and bind the group to a barrier for swap sync across a
frame lock group. A universal frame counter is also provided to promote
synchronization between systems.
Frame Lock Restrictions
The following restrictions apply when enabling frame lock:
All frame lock display devices that are connected to the same Quadro
must have the same display-mode timings.
All display devices set as the frame lock client must have the same
refresh rate as the frame lock server (master) display device. If a
House Sync signal is used (instead of internal timings), all client
display devices must have the same refresh rate as the incoming house
sync signal.
40
All X Screens (driving the selected client/server display devices) must
have the same stereo setting. Refer to the Linux README.TXT fi le
for instructions on how to set the stereo X option.
The frame lock server (master) display device must be on a Quadro on
the primary connector to the Quadro G-Sync II option card.
If connecting a single Quadro to a Quadro G-Sync II option card, the
primary connector must be used.
In confi gurations with more than one display device per Quadro,
we recommend enabling frame lock on all display devices on those
Quadros.
Page 48

NVIDIA Frame Synchronization Under Linux
Supported Frame Lock Confi gurations
The following frame lock confi gurations are supported:
Basic Frame Lock: Single Quadro, Single X Screen, Single Display
Device with or without OpenGL applications that make use of QuadBuffered Stereo and/or the
Frame Lock + TwinView: Single Quadro, Single X Screen, Multiple
Display Devices with or without OpenGL applications that make use
of Quad-Buffered Stereo and/or the
Frame Lock + Xinerama: One or more Quadro(s), Multiple
X Screens, Multiple Display Devices with or without OpenGL
applications that make use of Quad-Buffered Stereo and/or the
NV_swap_group extension.
Frame Lock + TwinView + Xinerama: One or more Quadro(s),
Multiple X Screens, Multiple Display Devices with or without
OpenGL applications that make use of Quad-Buffered Stereo and/or
the
GLX_NV_swap_group extension.
Frame Lock + SLI SFR, AFR, or SLIAA: Two Quadros, Single
X Screen, Single Display Device with either OpenGL applications
that make use of Quad-Buffered Stereo or the
extension.
GLX_NV_swap_group extension.
GLX_NV_swap_group extension.
GLX_NV_swap_group
GLX_
For Frame Lock + SLI Frame Rendering, applications that make use of
both Quad-Buffered Stereo and the
GLX_NV_swap_group extension
are not supported.
41
Page 49

NVIDIA Quadro G-Sync II User Guide
Confi guring Frame Sync
Using the nvidia-settings
Command Line
You can also confi gure frame lock using the nvidia-settings command line.
This method is useful in a scripted environment for automating the setup
process.
General Steps
1.
Disable frame lock on all Quadros.
2.
Make sure all display devices that are to be frame-locked have the same
refresh rate.
3.
Confi gure which Quadro/display device is to be the master.
4.
Confi gure the house sync (if applicable).
5.
Confi gure the slave display devices.
6.
Enable frame lock on the master Quadro.
7.
Enable frame lock on the slave Quadros.
8.
Test the hardware connections using the test signal on the master
Quadro.
Sample Confi gurations
Use the examples in this section as a guideline. The exact scripts that you
use will depend on your hardware confi guration.
For a full list of the nvidia-settings frame lock attributes, see the
settings
42
(1) main page.
nvidia-
Page 50

Genlock Example
Hardware Confi guration
System 1
One Quadro G-Sync II Option Card
One Quadro
One Display
Sync Source
House Sync
Genlock Example Script
Make sure frame lock sync is disabled.
1.
nvidia-settings -a [gpu:0]/FrameLockEnable=0
nvidia-settings -q [gpu:0]/FrameLockEnable
NVIDIA Frame Synchronization Under Linux
2.
Query the enabled displays on the Quadro.
nvidia-settings -q [gpu:0]/EnabledDisplays
3.
Check that the refresh rate is the one we want.
nvidia-settings -q [gpu:0]/RefreshRate
4.
Set the master display device to CRT-0.
nvidia-settings -a [gpu:0]/FrameLockMaster=0x00000001
nvidia-settings -q [gpu:0]/FrameLockMaster
The desired display device(s) to be set are passed in as a hexadecimal
number in which specifi c bits denote which display devices to set
43
Page 51

NVIDIA Quadro G-Sync II User Guide
Examples:
0x00000001 - CRT-0
0x00000002 - CRT-1
0x00000003 - CRT-0 and CRT-1
0x00000100 - TV-0
0x00000200 - TV-1
0x00020000 - DFP-1
0x00010101 - CRT-0, TV-0 and DFP-0
0x000000FF - All CRTs
0x0000FF00 - All TVs
0x00FF0000 - All DFPs
Note: You can use the command:
nvidia-settings -q [gpu:0]/EnabledDisplays
to see all the available displays on a given Quadro.
5. Enable use of the house sync signal.
nvidia-settings -a [framelock:0]/
FrameLockUseHouseSync=1
6. Confi gure the house sync signal video mode
nvidia-settings -a [framelock:0]/FrameLockVideoMode=0
7. Set the slave display device to none.
This is to avoid having unwanted display devices locked to the sync
signal.
nvidia-settings -a [gpu:0]/FrameLockSlaves=0x00000000
nvidia-settings -q [gpu:0]/FrameLockSlaves
8. Enable framelocking.
nvidia-settings -a [gpu:0]/FrameLockEnable=1
44
9. Toggle the test signal.
nvidia-settings -a [gpu:0]/FrameLockTestSignal=1
nvidia-settings -a [gpu:0]/FrameLockTestSignal=0
Page 52

Frame Lock Example 1
Hardware Confi guration
System 1
One Quadro G-Sync II Option Card
Two Quadros
Two Displays (one per Quadro)
System 2
One Quadro G-Sync II Option Card
Two Quadros
Two Displays (one per Quadro)
Sync Source
NVIDIA Frame Synchronization Under Linux
First display from system 1
Frame Lock Example Scripts
Disable frame lock.
1.
nvidia-settings -a myserver:0[gpu:0]/
FrameLockEnable=0
nvidia-settings -a myserver:0[gpu:1]/
FrameLockEnable=0
nvidia-settings -a myslave1:0[gpu:0]/
FrameLockEnable=0
nvidia-settings -a myslave1:0[gpu:1]/
FrameLockEnable=0
45
Page 53

NVIDIA Quadro G-Sync II User Guide
1.
Query the enabled displays on the Quadros.
nvidia-settings -q myserver:0[gpu:0]/EnabledDisplays
nvidia-settings -q myserver:0[gpu:1]/EnabledDisplays
nvidia-settings -q myslave1:0[gpu:0]/EnabledDisplays
nvidia-settings -q myslave1:0[gpu:1]/EnabledDisplays
3. Check the refresh rate is the same for all displays.
nvidia-settings -q myserver:0[gpu:0]/RefreshRate
nvidia-settings -q myserver:0[gpu:1]/RefreshRate
nvidia-settings -q myslave1:0[gpu:0]/RefreshRate
nvidia-settings -q myslave1:0[gpu:1]/RefreshRate
4. Make sure the display device we want as master is masterable
nvidia-settings -q myserver:0[gpu:0]/
FrameLockMasterable
5. Set the master display device (CRT-0).
nvidia-settings -a myserver:0[gpu:0]/FrameLockMaster=
0x00000001
46
6. Disable the house sync signal on the master device.
nvidia-settings -a myserver:0[framelock:0]/
FrameLockUseHouseSync=0
7. Set the slave display devices.
nvidia-settings -a myserver:0[gpu:1]/FrameLockSlaves=
0x00000001
nvidia-settings -a myslave1:0[gpu:0]/FrameLockSlaves=
0x00000001
nvidia-settings -a myslave1:0[gpu:1]/FrameLockSlaves=
0x00000001
8. Enable frame lock on server.
nvidia-settings -a myserver:0[gpu:0]/
FrameLockEnable=1
Page 54

9. Enable frame lock on slave devices.
nvidia-settings -a myserver:0[gpu:1]/
FrameLockEnable=1
nvidia-settings -a myslave1:0[gpu:0]/
FrameLockEnable=1
nvidia-settings -a myslave1:0[gpu:1]/
FrameLockEnable=1
10. Toggle the test signal.
nvidia-settings -a myserver:0[gpu:0]/
FrameLockTestSignal=1
nvidia-settings -a myserver:0[gpu:0]/
FrameLockTestSignal=0
Frame Lock Example 2
Hardware Confi guration
NVIDIA Frame Synchronization Under Linux
System 1
Two Quadro G-Sync II Option Cards
Four Quadros
Eight Displays (two per Quadro)
Sync Source
First display on the fi rst Quadro
Frame Lock Example 2 Scripts
1. Make sure frame lock is disabled for all Quadros.
nvidia-settings -a [gpu:0]/FrameLockEnable=0
nvidia-settings -a [gpu:1]/FrameLockEnable=0
nvidia-settings -a [gpu:2]/FrameLockEnable=0
47
Page 55

NVIDIA Quadro G-Sync II User Guide
nvidia-settings -a [gpu:3]/FrameLockEnable=0
2. Query the enabled displays on the Quadros.
nvidia-settings -q [gpu:0]/EnabledDisplays
nvidia-settings -q [gpu:1]/EnabledDisplays
nvidia-settings -q [gpu:2]/EnabledDisplays
nvidia-settings -q [gpu:3]/EnabledDisplays
3. Verify that the refresh rate is the same for all displays.
nvidia-settings -q [gpu:0]/RefreshRate
nvidia-settings -q [gpu:1]/RefreshRate
nvidia-settings -q [gpu:2]/RefreshRate
nvidia-settings -q [gpu:3]/RefreshRate
4. Make sure the display device we want as master is masterable.
nvidia-settings -q myserver:0[gpu:0]/
FrameLockMasterable
5. Set the master display device (CRT-0).
48
nvidia-settings -a [gpu:0]/FrameLockMaster=0x00000001
6. Disable the house sync signal on the master device.
nvidia-settings -a [framelock:0]/
FrameLockUseHouseSync=1
7. Set the slave display devices.
nvidia-settings -a [gpu:0]/FrameLockSlaves=0x00000002
# CRT-1
nvidia-settings -a [gpu:1]/FrameLockSlaves=0x00000003
# CRT-0 and CRT-1
nvidia-settings -a [gpu:2]/FrameLockSlaves=0x00000003
# CRT-0 and CRT-1
nvidia-settings -a [gpu:3]/FrameLockSlaves=0x00000003
# CRT-0 and CRT-1
8. Enable frame lock on the master Quadro.
Page 56

nvidia-settings -a [gpu:0]/FrameLockEnable=1
9. Enable frame lock on the slave devices.
nvidia-settings -a [gpu:1]/FrameLockEnable=1
nvidia-settings -a [gpu:2]/FrameLockEnable=1
nvidia-settings -a [gpu:3]/FrameLockEnable=1
10. Toggle the test signal.
nvidia-settings -a [gpu:0]/FrameLockTestSignal=1
nvidia-settings -a [gpu:0]/FrameLockTestSignal=0
Writing a Frame Lock
NV-CONTROL Client
The NVIDIA X driver exposes the nv-control X extension that allows
the user to confi gure various features–including frame lock–from an X
windows client.
NVIDIA Frame Synchronization Under Linux
This is a brief summary of some of the requirements for writing a Frame
Lock NV-CONTROL client.
Writing a Frame Lock Client for NV-CONTROL
1.8 (and earlier)
See the sample NV-CONTROL clients in the samples directory for basic
examples of how to set integer attributes. See the fi le ctkframelock.
for a much more involved example of how the nvidia-settings utility
c
programs the frame lock attributes.
The constants referenced below are defi ned in
comments in that fi le for an explanation of each attribute. It may also be
useful to search the ctkframelock.c fi le using a grep utility to see how
each attribute is used.
NVCtrl.h. See the
49
Page 57

NVIDIA Quadro G-Sync II User Guide
The following are the basic steps:
1.
Open a display connection to each X Screen you want to control in
your frame lock cluster.
Make sure you have privileges to establish the X connection.
2.
Query the NV_CTRL_FRAMELOCK attribute to determine if frame
lock is supported on each X screen.
3.
Set
NV_CTRL_FRAMELOCK_MASTER to NV_CTRL_FRAMELOCK_
MASTER_TRUE on one node in the cluster; set it to NV_CTRL_
FRAMELOCK_MASTER_FALSE on every other node in the cluster.
NV_CTRL_FRAMELOCK_POLARITY for each slave node in the
¾
Set
cluster.
Most likely, you want NV_CTRL_FRAMELOCK_POLARITY_RISING_
EDGE.
Set
¾
NV_CTRL_FRAMELOCK_SYNC_DELAY as appropriate for each
node.
Most likely, you want 0.
¾
Set
NV_CTRL_FRAMELOCK_SYNC_INTERVAL as appropriate if you
are using a house sync.
Most likely, you want 0.
¾
Set
NV_CTRL_FRAMELOCK_SYNC to NV_CTRL_FRAMELOCK_SYNC_
ENABLE on each X screen to enable frame lock.
¾
(Optional) Set
FRAMELOCK_TEST_SIGNAL_ENABLE followed immediately by
NV_CTRL_FRAMELOCK_TEST_SIGNAL_DISABLE.
NV_CTRL_FRAMELOCK_TEST_SIGNAL to NV_CTRL_
This guarantees accuracy of the Universal Frame Count (as
returned by glXQueryFrameCountNV()).
¾
When you are done, set
FRAMELOCK_SYNC_DISABLE on each X screen to disable frame
lock.
NV_CTRL_FRAMELOCK_SYNC to NV_CTRL_
50
Page 58

NVIDIA Frame Synchronization Under Linux
During operation, you can also query any of these on each X screen:
NV_CTRL_FRAMELOCK_PORT0_STATUS
NV_CTRL_FRAMELOCK_PORT1_STATUS
NV_CTRL_FRAMELOCK_HOUSE_STATUS
NV_CTRL_FRAMELOCK_SYNC_READY
NV_CTRL_FRAMELOCK_STEREO_SYNC
NV_CTRL_FRAMELOCK_ETHERNET_DETECTED
NV_CTRL_FRAMELOCK_SYNC_RATE
NV_CTRL_FRAMELOCK_TIMING
nvidia-settings registers a gtk+ timeout function and queries the state of
these on each X screen every few seconds.
Writing a Frame Lock Client for NV-CONTROL
1.9 (and later)
These are the two major changes to frame lock confi guration in NV-
CONTROL 1.9:
Display devices (instead of X Screens) are now selected as the clients
and slaves of a frame lock group.
Frame lock attributes should now be set/queried on Quadros
(
NV_CTRL_TARGET_TYPE_GPU) and Quadro G-Sync II (frame lock)
devices (NV_CTRL_TARGET_TYPE_FRAMELOCK) using the new NVCONTROL targeting API.
See the sample NV-CONTROL clients in the samples directory for basic
examples of how to use the new targeting API (
c) and a basic frame lock client (nv-control-framelock.c). See the fi le
ctkframelock.c for a much more involved example of how the nvidia-
nv-control-targets.
settings utility programs the frame lock attributes.
The constants referenced below are defi ned in
NVCtrl.h.. See the
comments in that fi le for an explanation of each attribute. It may also be
useful to search the ctkframelock.c fi le using a grep utility to see how
each attribute is used.
51
Page 59

NVIDIA Quadro G-Sync II User Guide
Querying the Frame Lock Capabilities of a System
Query the number of Quadro G-Sync II devices on the
1.
system by passing NV_CTRL_TARGET_TYPE_FRAMELOCK to
XNVCTRLQueryTargetCount().
Query the Quadros attached to each Quadro G-Sync II device by
2.
querying the
NV_CTRL_GPUS_USING_FRAMELOCK attribute for each
Quadro G-Sync II device.
3.
Query the enabled (available) displays on each Quadro using the
CTRL_ENABLED_DISPLAYS attribute.
Confi guring the Frame Lock Group
This must be done while frame lock is disabled on the Quadro G-Sync II
device:
1.
Set the frame lock master display on one of the Quadros using the
NV_CTRL_FRAMELOCK_MASTER attribute.
NV_
52
2.
Set the rest of the display devices as slaves using the
FRAMELOCK_SLAVES attribute.
3.
Set
NV_CTRL_USE_HOUSE_SYNC to NV_CTRL_USE_HOUSE_SYNC_
TRUE or NV_CTRL_USE_HOUSE_SYNC_FALSE on the master Quadro
NV_CTRL_
G-Sync II device, depending on whether or not you will be using a
House Sync signal.
This refers to the G-Sync device that is attached to the Quadro that
contains the display device currently set as the frame lock master.
4.
Set
NV_CTRL_FRAMELOCK_POLARITY for each slave Quadro G-Sync
II device in the cluster.
Most likely, you want NV_CTRL_FRAMELOCK_POLARITY_RISING_
EDGE.
5.
Set
NV_CTRL_FRAMELOCK_SYNC_DELAY as appropriate for each
Quadro G-Sync II device.
Most likely, you want 0.
Page 60

NVIDIA Frame Synchronization Under Linux
Set NV_CTRL_FRAMELOCK_SYNC_INTERVAL as appropriate if you are
6.
using a house sync.
Most likely, you want 0.
Enabling/Disabling Frame Lock
Enable frame lock on each Quadro by setting NV_CTRL_FRAMELOCK_
1.
SYNC to NV_CTRL_FRAMELOCK_SYNC_ENABLE.
(Optional) Set
2.
FRAMELOCK_TEST_SIGNAL_ENABLE followed immediately by
NV_CTRL_FRAMELOCK_TEST_SIGNAL_DISABLE (on the Quadro that
contains the master frame lock display).
This guarantees accuracy of the Universal Frame Count (as returned
by glXQueryFrameCountNV()).
3.
When you are done, set
FRAMELOCK_SYNC_DISABLE on each Quadro to disable frame lock.
During operation you can also query any of these on each Quadro or
frame lock device:
NV_CTRL_FRAMELOCK_TEST_SIGNAL to NV_CTRL_
NV_CTRL_FRAMELOCK_SYNC to NV_CTRL_
NV_CTRL_FRAMELOCK_PORT0_STATUS
NV_CTRL_FRAMELOCK_PORT1_STATUS
NV_CTRL_FRAMELOCK_HOUSE_STATUS
NV_CTRL_FRAMELOCK_SYNC_READY
NV_CTRL_FRAMELOCK_STEREO_SYNC
NV_CTRL_FRAMELOCK_ETHERNET_DETECTED
NV_CTRL_FRAMELOCK_SYNC_RATE
NV_CTRL_FRAMELOCK_TIMING
53
Page 61

NVIDIA Quadro G-Sync II User Guide
54
Page 62

Using the OpenGL Extensions
This chapter explains how to use the OpenGL extensions supported by the
NVIDIA driver for accomplishing frame synchronization of applications.
Frame Synchronization Using the OpenGL Extensions explains the principles
behind swap groups, and describes the OpenGL extensions to use to
control frame lock and swap sync functions.
OpenGL Extensions details the API calls for the extensions.
55
Page 63

NVIDIA Quadro G-Sync II User Guide
Frame Synchronization
Using the OpenGL
Extensions
Swap sync refers to the synchronization of buffer swaps of multiple
application windows. By means of swap sync, applications running on
multiple systems can synchronize the application buffer swaps between all
the systems.
Swap sync requires
Proper connection and synchronization of the timing signals
A mechanism for binding several windows together so that buffer
swaps can be synchronized across all windows
About Buffer Swaps
Key Points and Defi nitions
Buffer swaps are performed on windows.
Swap Groups
If buffer swaps must be synchronized across several windows on a
single Quadro, you can defi ne a “group” that consists of the specifi ed
windows.
Swap Barriers
If buffer swaps must be synchronized across several Quadros, you can
defi ne a “barrier” that consists of the specifi ed Quadros.
56
Page 64

Buffer Swap Criteria
The criteria for buffer swaps involves when a window is ready to swap and
when a group is ready to swap.
Window Buffer Swaps
Any rendering surface that is not a window—such as a non-visible
rendering buffer—is always ready, otherwise the following criteria must be
satisfi ed before a buffer swap for a window can be performed:
The window itself must be ready, meaning:
A buffer swap command has been issued for it.
Its swap interval has elapsed.
If the window belongs to a group, all the windows in the group must
be ready.
If the window belongs to a group and that group is bound to a barrier,
all groups bound to that barrier must be ready.
Using the OpenGL Extensions
Group and Barrier Buffer Swaps
Buffer swaps for all windows in a swap group take place concurrently
and buffer swaps for all groups using a barrier take place concurrently.
For barrier swaps, the vertical retraces of the screens of all the
groups must also be synchronized, otherwise there is no guarantee of
concurrency between groups.
An implementation may support a limited number of swap groups and
barriers and may have restrictions on where the users of a barrier can
reside.
For example, an implementation may allow the users to reside on
different display devices or even hosts. An implementation may
return zero for any of maxGroups and maxBarriers returned by
QueryMaxSwapGroupsNV if swap groups or barriers are not available
in that implementation or on that host.
57
Page 65

NVIDIA Quadro G-Sync II User Guide
Frame Counter
The implementation provides a universal counter, or frame counter, among
all systems that are locked together by swap groups/barriers. It is based on
the internal synchronization signal which triggers the buffer swap.
To obtain the current frame count, call
wglQueryFrameCountNV(),glxQueryFrameCountNV()().
To reset the frame count back to zero, call,
wglResetFrameCountNV(),glxResetFrameCountNV()().
In a system that has a Quadro G-Sync II device installed and enabled,
ResetFrameCountNV() succeeds only when the frame lock device is
confi gured as a master device.
Confi guring for Swap Sync
Confi guring Swap Groups
58
You can assign an OpenGL window to a swap group. There is a maximum
number of allowable swap groups that can be created for any particular
implementation. With the current hardware, the maximum number of
swap groups is one.
To determine the maximum swap group number, call
QueryMaxSwapGroupsNV()
To assign a window to a swap group, call
JoinSwapGroupNV()
and specify the swap group number.
If rendering surface is already a member of a different group, it is
implicitly removed from that group. If the swap group number is zero,
the rendering surface is removed from the current group.
To query the current swap group, call
QuerySwapGroupNV().
Page 66

Confi guring Swap Barriers
You can bind a group to a barrier. There is a maximum number of barriers
that can be created. With the current hardware, the maximum number of
barriers is one.
To determine the maximum barrier number, call
QueryMaxSwapGroupsNV()
To bind a group to a barrier, call
BindSwapBarrierNV()
and specify the group and barrier numbers.
If the barrier number is zero, then the group in unbound from the
current barrier.
To query the current barrier, call QuerySwapGroupNV().
OpenGL Extensions
Using the OpenGL Extensions
This section describes the relevant OpenGL NV_swap_group extensions
supported by the NVIDIA display driver and shipped with the Quadro
G-Sync II hardware.
These are exported in the WGL extension string which on Windows can
be queried by
This section covers both the
wglGetExtensionsStringARB.
WGL_NV_swap_group extensions (exported
on Microsoft WindowsNT/XP systems) and the GLX_NV_swap_group
extensions (exported on Linux systems).
wglJoinSwapGroupNV(), glxJoinSwapGroupNV()
wglBindSwapBarrierNV(), glxBindSwapBarrierNV()
wglQuerySwapGroupNV(), glxQuerySwapGroupNV()
wglQueryMaxSwapGroupsNV(), glxQueryMaxSwapGroupsNV()
wglQueryFrameCountNV(),glxQueryFrameCountNV()
wglResetFrameCountNV(),glxResetFrameCountNV()
59
Page 67

NVIDIA Quadro G-Sync II User Guide
wglJoinSwapGroupNV(), glxJoinSwapGroupNV()
This call adds the OpenGL window with the device context hDC to the
swap group specifi ed by group. If hDC is already a member of a different
group, it is implicitly removed from that group fi rst.
Function B00L JoinSwapGroupNV (HDC hDC, GLuint group);
Parameters In hDC - Device context for the frame lock card, or a
Parameters Out N/A
Return Values TRUE: Success
window residing on the frame lock card.
group - Swap group number to which the device
context is to be assigned.
The value must be between 0 and maxGoups
(see wglQueryMzxSwapGroupsNV (),
glxyQueryMaxSwapGroupsNV ()
FALSE: Failure
wglBindSwapBarrierNV(),
glxBindSwapBarrierNV()
This call binds a swap group to a barrier.
Function B00L BindSwapBarrierNV (GLuint group, GLuint
Parameters In hDC - Device context for the frame lock card, or a
Parameters Out N/A
Return Values TRUE: Success
60
barrier);
window residing on the frame lock card.
group - Swap group number that is bound to a
barrier.
barrier - Barrier number to which the swap group
is to be bound. Value must be between 0 and
maxBarrier
(see wglQueryMzxSwapGroupsNV (),
glxyQueryMaxSwapGroupsNV ()
FALSE: Failure
Page 68

wglQuerySwapGroupNV(),
glxQuerySwapGroupNV()
This call returns the swap group number and barrier number to which the
device context is bound.
Using the OpenGL Extensions
Function B00L QuerySwapGroupNV (HDC hDC, GLuint *group,
Parameters In hDC - Device context for the frame lock card, or a
Parameters Out *group - The group number to which the device
Return Values TRUE: Success
GLuint *barrier);
window residing on the frame lock card.
context is bound, or assigned.
*barrier - The barrier number to which the device
context is bound.
FALSE: Failure. In this case *group and *barrier are
undefi ned.
wglQueryMaxSwapGroupsNV(),
glxQueryMaxSwapGroupsNV()
This call returns the maximum number of swap groups and swap barriers
that are supported by the implementation.
Function B00L QueryMaxSwapGroupsNV (HDC hDC, GLuint
Parameters In hDC - Device context for the frame lock card, or a
Parameters Out *maxGroups - The maximum group number
Return Values TRUE: Success
*maxGroup, GLuint *maxBarrier);
window residing on the frame lock card.
supported by the implementation.
*maxBarriers - The maximum barrier number
supported by the implementation.
FALSE: Failure. In this case *maxGroups and
*maxBarriers are undefi ned.
61
Page 69

NVIDIA Quadro G-Sync II User Guide
wglQueryFrameCountNV(),glxQueryFrameCount
NV()
QueryFrameCountNV returns in count the current frame counter for
swapGroup.
This call returns the current frame count of the swap group.
Function B00L QueryFrameCountNV (HDC hDC, GLuint
Parameters In hDC - Device context for the frame lock card, or a
Parameters Out *count - The current frame count of the swap group.
Return Values TRUE: Frame count successfully retrieved.
*carrier);
window residing on the frame lock card.
FALSE: Frame count retrieved failed.
wglResetFrameCountNV(),glxResetFrameCount
NV()
This call resets to zero the frame count of the swap group. The call
succeeds only on the master device.
Function B00L ResetFrameCountNV (HDC hDC);
Parameters In hDC - Device context for the frame lock card, or a
Parameters Out N/A
Return Values TRUE: Frame counter successfully reset.
window residing on the frame lock card.
FALSE: Frame counter not successfully reset.
62
Page 70

References and Resources
Getting Driver Updates
During NVIDIA software installation, the installation wizard provides
an option to check for updated software online. You can also download
software updates by visiting: http://www.nvidia.com/content/drivers/
drivers.asp
63
Page 71

NVIDIA Quadro G-Sync II User Guide
64
Page 72

Registration, Support and
Registering Your Quadro
G-Sync II
After you register your Quadro G-Sync II option card, you have priority
access to NVIDIA Customer Care by using your assigned user ID and
password to log on. You can also elect to receive automatic notifi cation
of special promotions and software updates through e-mail to ensure that
your Quadro G-Sync II option card continues to operate optimally.
Warranty
65
Page 73

NVIDIA Quadro G-Sync II User Guide
Warranty and Support
NVIDIA warranty and support (Customer Care) information is available
at:
www.nvidia.com/support
www.nvidia.com/warranty
You may also access these sites from NVIDIA’s main Web site at:
www.nvidia.com
Upon registration, you will receive an acknowledgement e-mail that
includes a toll-free phone number, sign-on information for NVIDIA
Customer Care, and other information.
The NVIDIA support site allows you to search our extensive knowledge
base and communicate with our Customer Care staff.
66
Page 74

Compliance and Certifi cations
Bureau of Standards, Metrology, and Inspection (BSMI)
C-Tick
China Compulsory Certifi cation (CCC)
Conformité Européenne (CE)
Federal Communications Commission (FCC) - Class B
Interference-Causing Equipment Standard (ICES)
Ministry of Information and Communication (MIC)
Underwriters Laboratories (UL, CUL)
Voluntary Control Council for Interference (VCCI)
67
Page 75

Notice
ALL NVIDIA DESIGN SPECIFICATIONS, REFERENCE BOARDS, FILES, DRAWINGS,
DIAGNOSTICS, LISTS, AND OTHER DOCUMENTS (TOGETHER AND SEPARATELY,
“MATERIALS”) ARE BEING PROVIDED “AS IS.” NVIDIA MAKES NO WARRANTIES,
EXPRESSED, IMPLIED, STATUTORY, OR OTHERWISE WITH RESPECT TO THE
MATERIALS, AND EXPRESSLY DISCLAIMS ALL IMPLIED WARRANTIES OF
NONINFRINGEMENT, MERCHANTABILITY, AND FITNESS FOR A PARTICULAR
PURPOSE.
Information furnished is believed to be accurate and reliable. However, NVIDIA
Corporation assumes no responsibility for the consequences of use of such
information or for any infringement of patents or other rights of third parties that
may result from its use. No license is granted by implication or otherwise under
any patent or patent rights of NVIDIA Corporation. Specifi cations mentioned in this
publication are subject to change without notice. This publication supersedes and
replaces all information previously supplied. NVIDIA Corporation products are not
authorized for use as critical components in life support devices or systems without
express written approval of NVIDIA Corporation.
Product Handling
Do not spill liquid over the circuit board, expose it to fi re, submerse it in water, or
tamper with it. Keep the board out of reach of children. Dispose this product in
accordance with relevant national or local laws.
Trademarks
NVIDIA, the NVIDIA logo, SLI, G-Sync and Quadro are trademarks or registered
trademarks of NVIDIA Corporation. Other company and product names may be
trademarks of the respective companies with which they are associated.
68
Copyright
© 2007 NVIDIA Corporation. All rights reserved.
Document Number
DU-02796-001_v01
Page 76

69
 Loading...