

Page 1

ForceWare Graphics Drivers
Frame Synchronization
User’s Guide
Version 3.0
NVIDIA Corporation
August 14, 2006
Page 2

NVIDIA ForceWare Graphics Drivers Frame Synchronization User’s Guide v3.0
Published by
NVIDIA Corporation
2701 San Tomas Expressway
Santa Clara, CA 95050
Notice
ALL NVIDIA DESIGN SPECIFICATIONS, REFERENCE BOARDS, FILES, DRAWINGS, DIAGNOSTICS,
LISTS, AND OTHER DOCUMENTS (TOGETHER AND SEPARATELY, “MATERIALS”) ARE BEING
PROVIDED “AS IS.” NVIDIA MAKES NO WARRANTIES, EXPRESSED, IMPLIED, STATUTORY, OR
OTHERWISE WITH RESPECT TO THE MATERIALS, AND EXPRESSLY DISCLAIMS ALL IMPLIED
WARRANTIES OF NONINFRINGEMENT, MERCHANTABILITY, AND FITNESS FOR A PARTICULAR
PURPOSE.
Information furnished is believed to be accurate and reliable. However, NVIDIA Corporation assumes no
responsibility for the consequences of use of such information or for any infringement of patents or other rights of
third parties that may result from its use. No license is granted by implication or otherwise under any patent or patent
rights of NVIDIA Corporation. Specifications mentioned in this publication are subject to change without notice.
This publication supersedes and replaces all information previously supplied. NVIDIA Corporation products are not
authorized for use as critical components in life support devices or systems without express written approval of
NVIDIA Corporation.
Trademark s
NVIDIA, the NVIDIA logo, 3DFX, 3DFX INTERACTIVE, the 3dfx Logo, STB, STB Systems and Design, the STB
Logo, the StarBox Logo, NVIDIA nForce, GeForce, NVIDIA Quadro, NVDVD, NVIDIA Personal Cinema,
NVIDIA Soundstorm, Vanta, TNT2, TNT, RIVA, RIVA TNT, VOODOO, VOODOO GRAPHICS, WAVEBAY,
Accuview Antialiasing, the Audio & Nth Superscript Design Logo, CineFX, the Communications & Nth Superscript
Design Logo, Detonator, Digital Vibrance Control, DualNet, FlowFX, ForceWare, GIGADUDE, Glide, GOFORCE,
the Graphics & Nth Superscript Design Logo, Intellisample, M-BUFFER, nfiniteFX, NV, NVChess, nView,
NVKeystone, NVOptimizer, NVPinball, NVRotate, NVSensor, NVSync, the Platform & Nth Superscript Design
Logo, PowerMizer, Quincunx Antialiasing, Sceneshare, See What You've Been Missing, StreamThru, SuperStability,
T-BUFFER, The Way It's Meant to be Played Logo, TwinBank, TwinView and the Video & Nth Superscript Design
Logo are registered trademarks or trademarks of NVIDIA Corporation in the United States and/or other countries.
Other company and product names may be trademarks or registered trademarks of the respective owners with which
they are associated.
Intel, Indeo, and Pentium are registered trademarks of Intel Corporation. Microsoft, Windows, Windows NT,
Direct3D, DirectDraw, and DirectX are trademarks or registered trademarks of Microsoft Corporation. OpenGL is a
registered trademark of Silicon Graphics Inc.
Other company and product names may be trademarks or registered trademarks of the respective owners with which
they are associated.
Copyright
© 2003–2006 by NVIDIA Corporation. All rights reserved.
NVIDIA Corporation
Page 3

NVIDIA Drivers Frame Synchronization User’s Guide Version 3.0
Table of Contents
1.About NVIDIA Frame Synchronization . . . . . . . . . . . . . . . . . . . . . . . . . . . . . . . . . 1
2.NVIDIA Frame Synchronization . . . . . . . . . . . . . . . . . . . . . . . . . . . . . . . . . . . . . . . 3
Frame Synchronization Principles. . . . . . . . . . . . . . . . . . . . . . . . . . . . . . . . . . . . . . . . . 4
Genlock . . . . . . . . . . . . . . . . . . . . . . . . . . . . . . . . . . . . . . . . . . . . . . . . . . . . 4
Frame Lock (with Swap Sync) . . . . . . . . . . . . . . . . . . . . . . . . . . . . . . . . . . . . . . . . . 4
Frame Lock + Genlock . . . . . . . . . . . . . . . . . . . . . . . . . . . . . . . . . . . . . . . . . . . . . 4
Before You Begin . . . . . . . . . . . . . . . . . . . . . . . . . . . . . . . . . . . . . . . . . . . . . . . . . 5
How To Set Up Genlock . . . . . . . . . . . . . . . . . . . . . . . . . . . . . . . . . . . . . . . . . . . . . . 6
Genlock Quick Start Guide . . . . . . . . . . . . . . . . . . . . . . . . . . . . . . . . . . . . . . . . . . . 6
Detailed Setup Instructions. . . . . . . . . . . . . . . . . . . . . . . . . . . . . . . . . . . . . . . . . . . 7
Additional Setup Instructions. . . . . . . . . . . . . . . . . . . . . . . . . . . . . . . . . . . . . . . . . .10
How To Set Up Frame Lock . . . . . . . . . . . . . . . . . . . . . . . . . . . . . . . . . . . . . . . . . . . .13
Frame Lock Quick Start Guide . . . . . . . . . . . . . . . . . . . . . . . . . . . . . . . . . . . . . . . . .13
Detailed Setup Instructions. . . . . . . . . . . . . . . . . . . . . . . . . . . . . . . . . . . . . . . . . . .14
Testing the Connections . . . . . . . . . . . . . . . . . . . . . . . . . . . . . . . . . . . . . . . . . . . .18
Swap Sync . . . . . . . . . . . . . . . . . . . . . . . . . . . . . . . . . . . . . . . . . . . . . . . . . . .19
Setting Up Genlock + Frame Lock . . . . . . . . . . . . . . . . . . . . . . . . . . . . . . . . . . . . . . . .20
3.Using the OpenGL Extensions . . . . . . . . . . . . . . . . . . . . . . . . . . . . . . . . . . . . . . . 22
Frame Synchronization Using the OpenGL Extensions. . . . . . . . . . . . . . . . . . . . . . . . . . . . . .23
About Buffer Swaps . . . . . . . . . . . . . . . . . . . . . . . . . . . . . . . . . . . . . . . . . . . . . .23
Enabling and Configuring Genlock . . . . . . . . . . . . . . . . . . . . . . . . . . . . . . . . . . . . . . .24
Configuring for Swap Sync. . . . . . . . . . . . . . . . . . . . . . . . . . . . . . . . . . . . . . . . . . .26
OpenGL Extensions . . . . . . . . . . . . . . . . . . . . . . . . . . . . . . . . . . . . . . . . . . . . . . . .28
Exported WGL_I3D_genlock Functions . . . . . . . . . . . . . . . . . . . . . . . . . . . . . . . . . . . .28
Exported WGL_NV_swap_group Functions . . . . . . . . . . . . . . . . . . . . . . . . . . . . . . . . . .34
NVIDIA Corporation i
Page 4

NVIDIA Drivers Frame Synchronization User’s Guide Version 3.0
NVIDIA Corporation
Page 5

HAPTER 1
About NVIDIA Frame Synchronization
C
C HAPTER
A
BOUT
When presenting applications across multiple displays or projection systems, it is
important that the displays operate in unison to create the appearance of a single display.
Seamless presentation requires the following processes:
NVIDIA F
RAME
S
YNCHRONIZATION
• Synchronizing the rendering of frames across all displays
• Synchronizing the swapping of front and back buffers
About This Document
This document explains how to use NVIDIA Frame Lock hardware and software to
enable you to create one large virtual canvas using multiple displays. It contains the
following main sections::
• “NVIDIA Frame Synchronization” on page 3
explains how to set up the hardware and software on multiple systems for frame
synchronization.
• “Using the OpenGL Extensions” on page 22
explains how to use the OpenGL extensions supported by NVIDIA for synchronizing
the display of frames among multiple displays as well as synchronizing buffer swaps
among multiple application windows.
Other Documents
For details on using the NVIDIA Display Properties, see the latest version of the
ForceWare Graphics Drivers User’s Guide.
NVIDIA Corporation
Frame Synchronization User’s Guide – Version 3.0 1
Page 6

HAPTER 1
C
About NVIDIA Frame Synchronization
System Requirements
•Windows® 2000 or Windows® XP.
• Frame Synchronization Capable NVIDIA Graphics Product:
• NVIDIA Quadro FX 3000G
• NVIDIA Quadro G-Sync (must be used in conjunction with an NVIDIA Quadro FX
4400, NVIDIA Quadro FX 4500, or an NVIDIA Quadro FX 5500 graphics card)
• NVIDIA Forceware Graphics Driver version 52.72 or later.
NVIDIA Quadro FX 4500 support requires version 77.77 or later.
NVIDIA Quadro FX 5500 support requires version 91.36 or later.
Implementing SLI Technology
To take advantage of SLI technology combined with Genlock/Frame Lock functionality,
you must install one Quadro G-Sync card in conjunction with two Quadro FX 4500/5500
SLI cards.
2 Frame Synchronization User’s Guide– Version 3.0
NVIDIA Corporation
Page 7

HAPTER 2
NVIDIA Frame Synchronization
C
C HAPTER
NVIDIA F
Visual computing applications that involve multiple displays, or even multiple windows
within a display, can require special signal processing and application controls in order to
function properly.
For example, in order to produce quality video recording of animated graphics, the
display graphics must be synchronized with the video camera. As another example,
applications presented on multiple displays must be synchronized in order to complete
the illusion of a larger, virtual canvas.
This chapter explains how the NVIDIA Frame Lock graphics cards and Frame
Synchronization software lets you synchronize windows and displays for various visual
computing applications. It contains the following sections:
• “Frame Synchronization Principles” on page 4
• “Before You Begin” on page 5
• “How To Set Up Genlock” on page 6
• “How To Set Up Frame Lock” on page 13
• “Setting Up Genlock + Frame Lock” on page 20
RAME
S
YNCHRONIZATION
NVIDIA Corporation
Frame Synchronization User’s Guide – Version 3.0 3
Page 8

HAPTER 2
C
NVIDIA Frame Synchronization
Frame Synchronization Principles
NVIDIA Frame Synchronizing actually involves two main processes:
• Genlock—Synchronizing the displays to an external sync source
• Frame Lock and Swap Sync—Synchronizing applications across multiple systems.
Genlock
Genlock is the process of synchronizing the pixel scanning of one or more displays to an
external synchronization source. NVIDIA genlock requires the external signal to be either
TTL or composite, such as used for NTSC, PAL, or HDTV.
Frame Lock (with Swap Sync)
Proper synchronization of an application running on multiple displays involves the
following two processes:
• Frame Lock
Frame lock involves the use of hardware to synchronize the frames on each display in a
connected system.
When an application is displayed across multiple monitors, frame locked systems help
maintain image continuity to create a virtual canvas. Frame lock is especially critical for
stereo viewing, where the left and right fields must be in sync across all displays.
• Swap Sync
Swap sync refers to the synchronization of buffer swaps of multiple application
windows. By means of swap sync, applications running on multiple systems can
synchronize the application buffer swaps between all the systems. Swap sync requires
that the systems are frame locked.
Frame Lock + Genlock
Genlock can also be combined with frame lock. When several systems are connected
together, a sync signal is fed from a master system to the other systems in the network and
the displays are synchronized with each other.
4 Frame Synchronization User’s Guide– Version 3.0
NVIDIA Corporation
Page 9
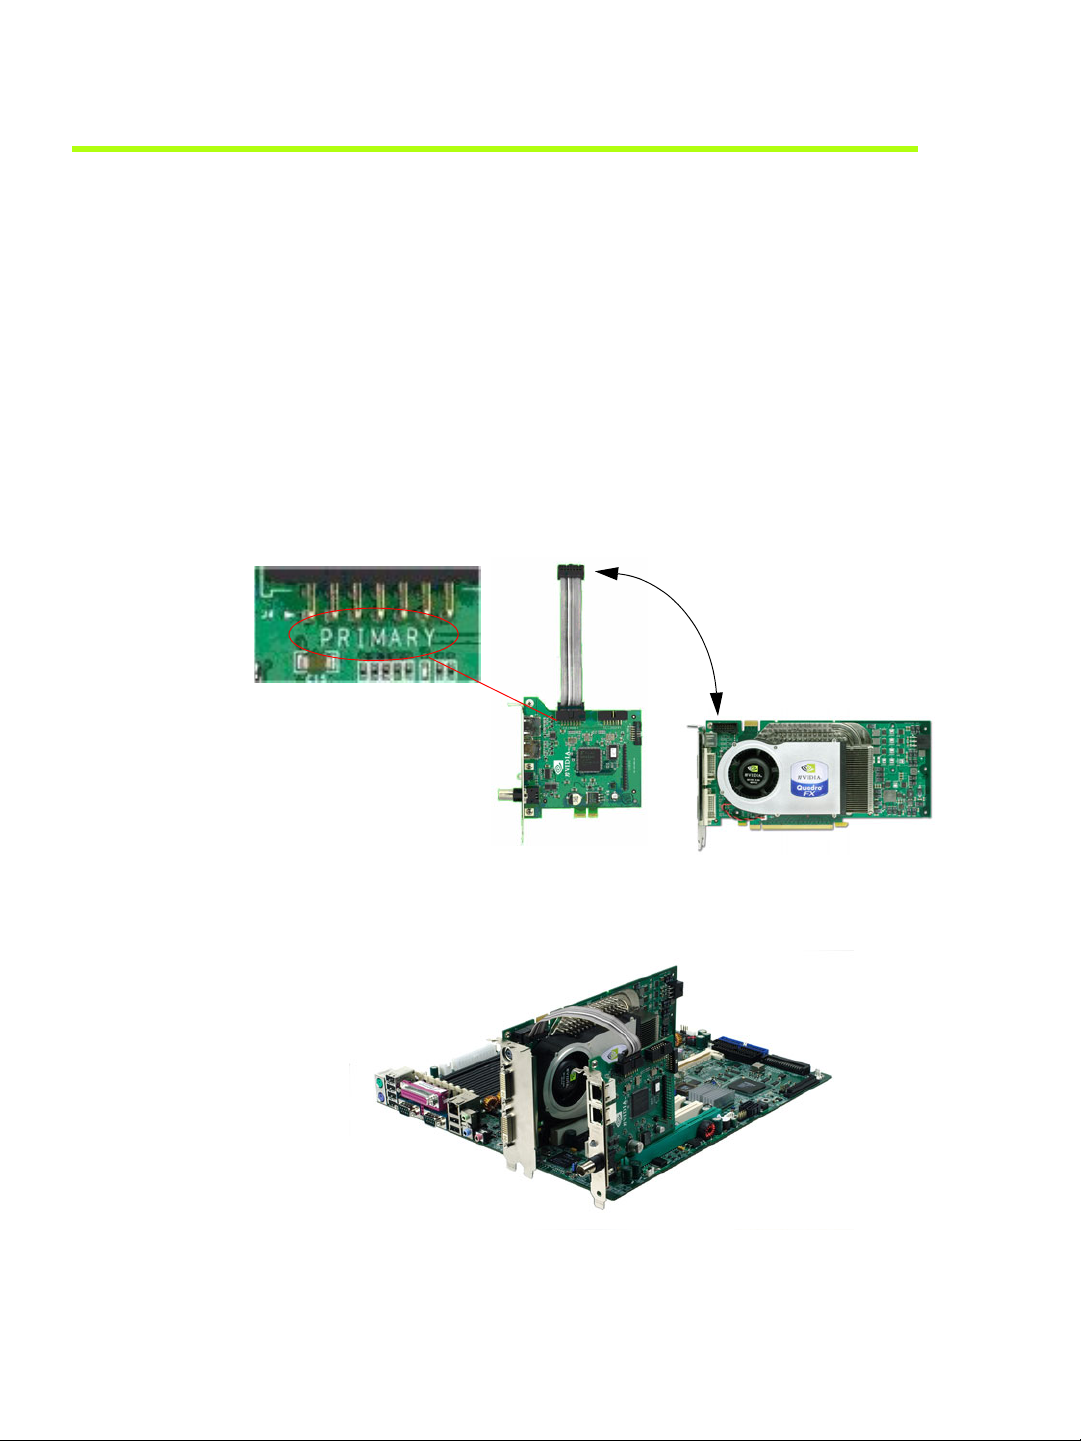
Before You Begin
• Make sure that the graphics card and NVIDIA drivers are correctly installed. Refer to
the instructions that came with your graphics card or drivers.
• The following is additional information concerning installation of the NVIDIA Quadro
G-Sync card:
• The NVIDIA Quadro G-Sync card must be used in conjunction with an NVIDIA
Quadro FX 4400, 4500, or 5500 graphics card.
• Install the NVIDIA Quadro G-Sync card into any available expansion slot within six
inches of the G-Sync connector on the appropriate Quadro FX graphics card.
• Use the cable that comes with your Quadro G-Sync card to connect the primary G-
Sync connector to the Quadro FX graphics card G-Sync connector as shown in
Figure 2.1.
HAPTER 2
NVIDIA Frame Synchronization
Connect Quadro G-Sync to the
G-Sync connector on the
Quadro FX card.
C
Quadro G-Sync Quadro FX 4400, 4500, or 5500
Quadro G-Sync connected to the Quadro FX graphics card
Figure 2.1
NVIDIA Corporation
Frame Synchronization User’s Guide – Version 3.0 5
Connecting the NVIDIA Quadro G-Sync Card
Page 10

HAPTER 2
C
NVIDIA Frame Synchronization
How To Set Up Genlock
Genlock Quick Start Guide
The following are the basic steps to genlocking a system. Detailed instructions are
provided in the section “Detailed Setup Instructions” on page 7.
1 Set Up the Hardware
Connect the external sync source to the BNC connector on the graphics card.
2 Set Up the Software
Use the Frame Synchronization property page to establish the system as the server, to
choose the sync source, and configure the sync pulse.
6 Frame Synchronization User’s Guide– Version 3.0
NVIDIA Corporation
Page 11
Detailed Setup Instructions
Set Up the Hardware
1 Start the system, then connect the external source signal to the House Sync connector
(BNC) of the graphics card.
2 Check the LED on the connector panel.
• A green LED means the hardware has detected the timing signal, and you can
proceed to the next step.
An occasional red flash is OK.
• A red LED means the hardware can’t detect the timing signal.
Check the signal source and correct the problem before proceeding.
Figure 2.2 illustrates a system that is connected to an external sync source.
HAPTER 2
NVIDIA Frame Synchronization
C
Server
Sync Source
Figure 2.2
Example of Genlock Hardware Connections
Quadro FX 3000G
Quadro G-Sync
Connector Bracket
NVIDIA Corporation
Frame Synchronization User’s Guide – Version 3.0 7
Page 12
HAPTER 2
C
NVIDIA Frame Synchronization
Set Up the Software
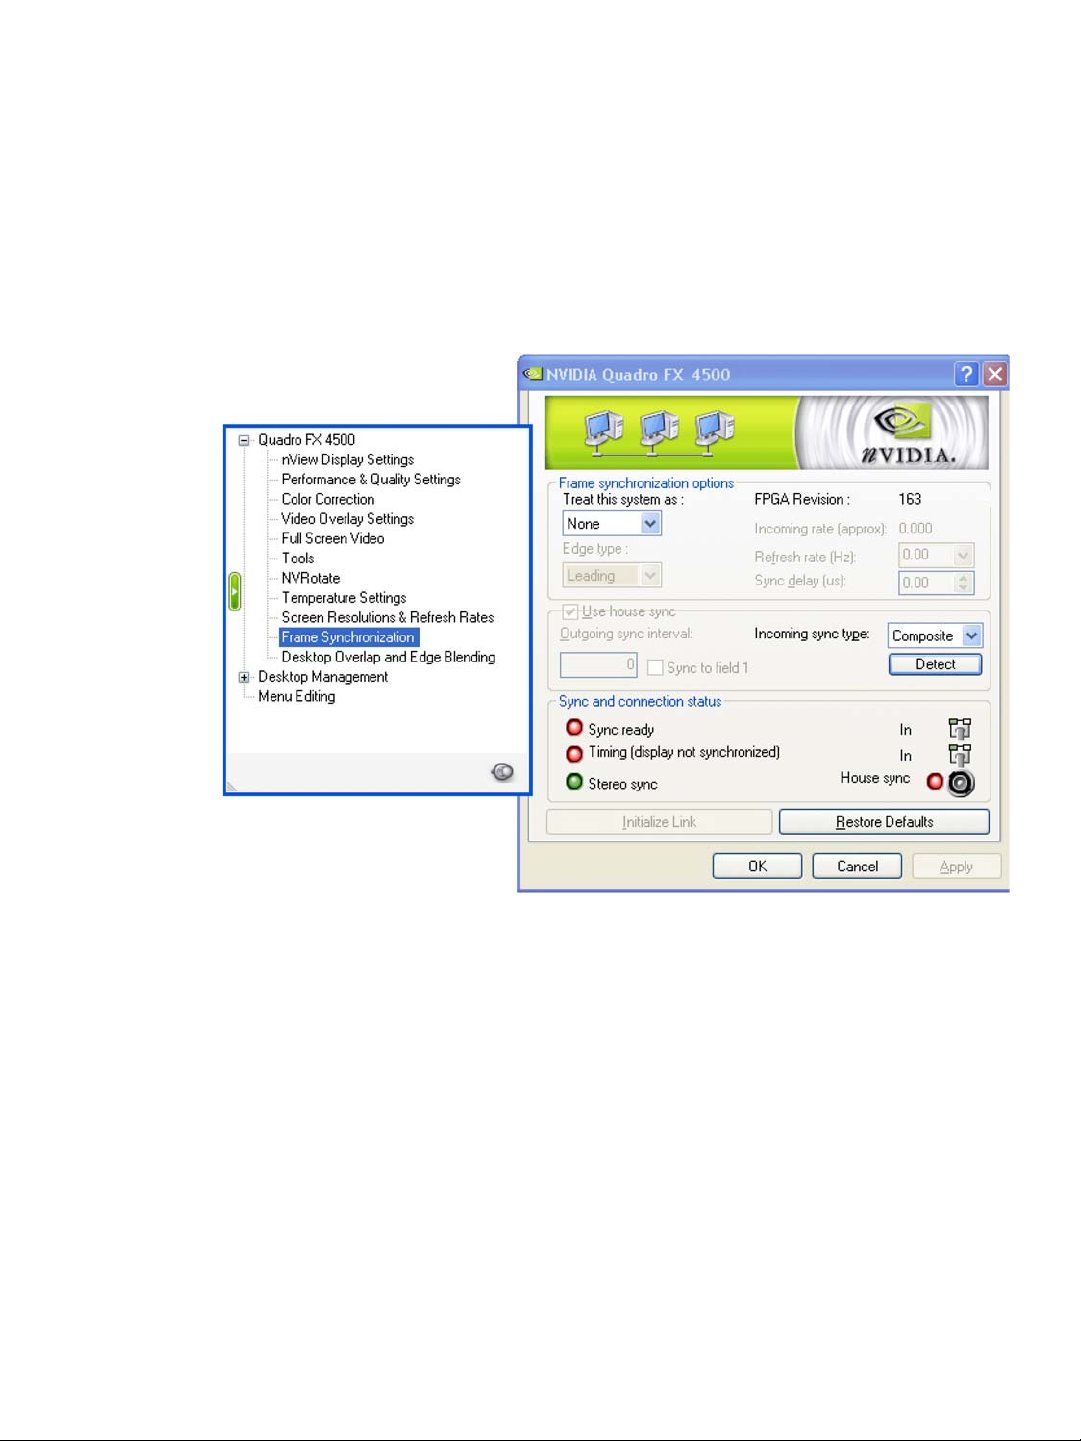
Using the NVIDIA Classic Control Panel
1 Open the Windows Display Properties control panel and click Settings>Advanced to
navigate to the NVIDIA graphics display properties page.
2 Click the Frame Synchronization tree item from the slide-out tray.
Figure 2.3
Frame Synchronization Page
3 Click the Treat this system as list arrow and then click Server.
4 Click the Use house sync check box.
5 If the external signal is an interlaced signal—such as used to drive a 1080i60 display—
then click the Sync to field 1 check box.
For example, when the Sync to field 1 check box is checked, then only the first field of a
60Hz interlaced signal is used to synchronize the display. In this way the effective
120Hz field sync is converted to a 60Hz frame sync.
6 Click the Refresh rate (Hz) list arrow and choose a refresh rate that matches the
external sync frequency.
If you do not know the external sync frequency, then pick a reasonable frequency from
the list.
8 Frame Synchronization User’s Guide– Version 3.0
NVIDIA Corporation
Page 13

HAPTER 2
NVIDIA Frame Synchronization
C
7 Click Apply.
The Sync and connection status group box indicates whether the display is genlocked to
the external signal. The status LEDs should be green, as shown in Figure 2.4.
Figure 2.4
Sync and Connection Status for a Genlocked System
• If the Timing LED is red—indicating the display is not synchronized to the timing
signal—then see Synchronizing to the External House Signal for further instructions.
• See “Understanding the Sync and Connection Status Indicators” on page 12 for more
information about the status indicators.
Using the New NVIDIA Control Panel
If your driver version includes the new NVIDIA Control Panel, you can set up the
software as follows:
1 Right-click the desktop and then from the pop-up menu click NVIDIA Control Panel.
2 From the NVIDIA Control Panel Select a Category page, click Workstation.
3 From the Workstation page, click Synchronize Displays.
4 Under The timing server, click the On this system radio button.
5 Click Apply.
The graphics card should automatically detect the sync signal and no further action is
needed.
For further assistance on this or other tasks such as how to adjust the synchronization to
the external house sync, consult the online help by pressing F1 to open the Help file and
then opening the Workstation->Frame Synchronization contents.
NVIDIA Corporation
Frame Synchronization User’s Guide – Version 3.0 9
Page 14

HAPTER 2
C
NVIDIA Frame Synchronization
Additional Setup Instructions
This section discusses the following topics that provide additional information and steps
that may be needed to achieve successful genlock:
• “Restoring an Unstable Display” on page 10
• “Synchronizing to the External House Signal” on page 10
• “Understanding the Sync and Connection Status Indicators” on page 12
Restoring an Unstable Display
If your display becomes unstable and you want to restore it to its original configuration,
do one or more of the following:
•Click Restore Defaults and then click Apply.
• Disconnect the external house sync.
Synchronizing to the External House Signal
This section describes other steps you may need to take after connecting a house sync
signal for the first time, or after clicking Restore Defaults and then Apply.
Matching the External House Signal Frequency
After connecting the house sync, the external sync signal frequency is displayed in the
section Incoming Rate in the control panel.
• If the rate that you previously selected from the list is different, then locate the
matching frequency from the list and click Apply.
• If the rate is not listed, but the listed values are within 0.5 Hz of the actual signal, then
enter the frequency directly into the list box and click Apply.
Adjusting for Interlaced External House Signals
If the external signal is an interlaced signal, then check the Sync to field 1 check box and
click Apply.
Generating a Sync Frequency Slower than the External House
Signal
If the external sync frequency is not support by your display because it is too high, you
can use the external house signal to generate a sync signal of a reduced frequency by
sampling the external signal.
10 Frame Synchronization User’s Guide– Version 3.0
NVIDIA Corporation
Page 15

HAPTER 2
NVIDIA Frame Synchronization
C
• Enter a number in the Outgoing sync interval box, then click Apply.
This number represents the number of external sync pulses to receive before generating
the synchronization pulse. For example, if the house sync frequency is 120 Hz, then
entering 1 in the Outgoing sync interval box results in a 60 Hz sync pulse.
House signal
Sync Pulse
Outgoing Sync Interval value of 1
This action overrides any refresh rate that you may have selected from the refresh rate list.
Generating a Sync Frequency Faster than the External House
Signal
You can double the sync frequency by triggering the sync pulse off both the leading and
falling edge of the source sync signal. This works only with TTL level signals.
In the Sync Options section, click both the leading and falling edge check box.
House signal
Sync Pulse
Outgoing Sync triggered from leading and falling edge
This action overrides any refresh rate that you may have selected from the refresh rate list.
Detecting the Incoming Signal Type
NVIDIA Genlock supports the following external synchronization signal types:
• TTL (3.3 volt level):
• Composite Bi-level (NTSC or PAL sources use bi-level composite signals.)
• Composite Tri-level (HDTV sources commonly use tri-level composite signals.)
Normally, the software automatically detects the signal type that is being used. If
necessary, you can force the software to detect the signal type as follows:
1 Click Detect to force detection of the signal type.
The software tests each signal type and stops when it detects a match.
2 If the signal type cannot be detected, click the Incoming sync type list box arrow and
then click the item corresponding to the signal source.
Click Composite Auto-Detect if you want the frame lock board to classify the signal as
bi-level or tri-level.
3 Click Apply to activate the changes.
NVIDIA Corporation
Frame Synchronization User’s Guide – Version 3.0 11
Page 16

HAPTER 2
C
NVIDIA Frame Synchronization
Understanding the Sync and Connection Status Indicators
The Sync and connection status group box displays the status of the sync signals as well
as the status of the BNC connection. See Figure 2.5.
Figure 2.5
Sync Status Indicators
• House Sync - Green indicates that a signal is present at the BNC connector.
• Sync Ready - Green indicates that a sync pulse is present.
• Timing - Indicates whether the timing is locked to the sync signal.
• Green: The timing is locked to the house sync.
• Grey: The timing is locked to the internal V-Sync.
• Red: The display is not synchronized to the timing signal.
• Stereo Sync - Always green indicates that it is in sync with a timing signal.
Note: The Quadro FX 3000G card typically takes a couple of seconds to achieve stereo
sync. The Quadro G-Sync card, because it provides more accurate
synchronization, typically requires about 30 seconds to achieve stereo sync.
12 Frame Synchronization User’s Guide– Version 3.0
NVIDIA Corporation
Page 17

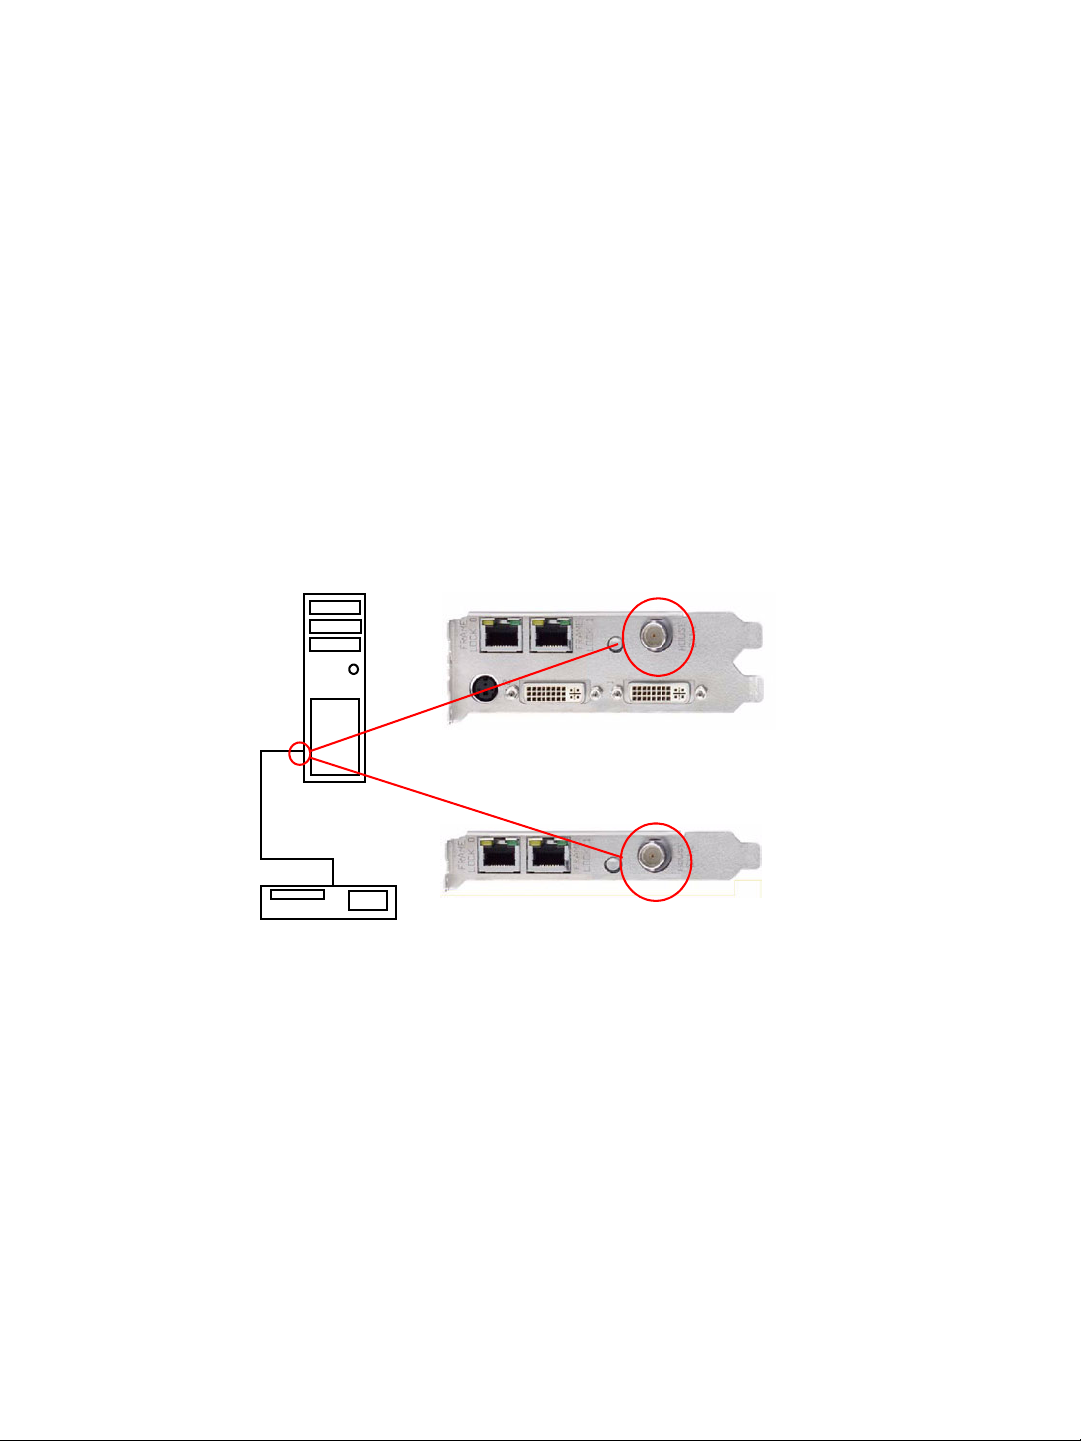
How To Set Up Frame Lock
Frame Lock Quick Start Guide
The following are the basic steps to frame locking several systems. Detailed instructions
are provided in the section “Detailed Setup Instructions” on page 14.
1 Set Up the Hardware
Connect all the systems together using standard CAT5 patch cabling.
WARNING! The voltage and signal on the frame lock ports are different from Ethernet
signals. Do not connect a Frame lock port to an Ethernet card or network hub. Doing so
can cause damage to the hardware.
2 Set Up the Server
Use the Frame Synchronization property page to establish the system as the server.
HAPTER 2
NVIDIA Frame Synchronization
C
3 Set Up the Clients
Use the Frame Synchronization property page for each client to enable frame lock on
that system, and to add an optional delay to the sync pulse before transmitting to other
clients.
NVIDIA Corporation
Frame Synchronization User’s Guide – Version 3.0 13
Page 18

HAPTER 2
C
NVIDIA Frame Synchronization
Detailed Setup Instructions
Set Up the Hardware
1 Daisy chain the graphics cards together using a standard CAT5 patch cable plugged
into the external RJ45 connector.
• You can connect to any of the two RJ45 connectors located on the graphics card
bracket.
• Each connector automatically configures itself as an input or output after all the
connections are made and one system is configured as a synchronization server (see
“Set Up the Server” on page 15). A flashing green LED indicates an input and a
flashing yellow LED indicates an output.
If there is no server assigned and connected, then both LEDs are a steady green.
WARNING! The voltage and signal on the frame lock ports are different from Ethernet
signals. Do not connect a Frame lock port to an Ethernet card or network hub. Doing so
can cause damage to the hardware.
2 Designate one of the cards to be the server device. The remaining cards are client
devices.
The server determines the trigger pulse for the client devices. The trigger pulse is
derived from the V-sync of the server video.
Figure 2.6 shows an example of four frame locked systems.
Out
In
In
Figure 2.6
Out
Out
Client
Example of Frame Lock Hardware Connections
Server Client
In
Client
14 Frame Synchronization User’s Guide– Version 3.0
NVIDIA Corporation
Page 19

Set Up the Server
Using the NVIDIA Classic Control Panel
1 Start the system that you have designated as the server, then open the Windows
Display Properties control panel and click Settings>Advanced to navigate to the
NVIDIA graphics display properties page.
2 Click the Frame Synchronization tree item from the slide-out tray.
HAPTER 2
NVIDIA Frame Synchronization
C
Figure 2.7
Frame Synchronization Page
3 Click the Treat this system as list arrow and then click Server.
4 Configure the Sync Pulse Frequency
Click the Refresh rate (Hz) list box arrow and then click the frequency you want to use
for the sync pulse.
The sync pulse frequency (refresh rate) must be supported by all the displays that are
frame locked to the server.
5 Click Apply to activate the changes.
NVIDIA Corporation
Frame Synchronization User’s Guide – Version 3.0 15
Page 20

HAPTER 2
C
NVIDIA Frame Synchronization
The Sync and connection status group box indicates the type of timing used for the frame
lock server system. The Timing LED should be gray, as shown in Figure 2.8.
Figure 2.8
Sync and Connection Status for a Frame Lock Server
Using the New NVIDIA Control Panel
If your driver version includes the new NVIDIA Control Panel, you can set up the
software as follows:
1 Right-click the desktop and then from the pop-up menu click NVIDIA Control Panel.
2 From the NVIDIA Control Panel Select a Category page on the system that you have
designated to be the timing server, click Workstation.
3 From the Workstation page, click Synchronize Displays.
4 Under The timing server, click the On this system radio button.
• If the system has multiple displays, the driver automatically selects the primary
display to be the timing server and all other displays are the clients.
• To change the configuration, click the icon of the display that you want to be the
timing server, then under Select displays to be active clients, select the check boxes
for any displays that you want to be clients.
5 Click Apply.
For further assistance on this or other tasks such as viewing the connection and sync
status, consult the online help by pressing F1 to open the Help file and then opening the
Workstation->Frame Synchronization contents.
Set Up the Clients
Using the OpenGL Extensions
You can set up the client devices using the OpenGL extensions. See “Using the OpenGL
Extensions” on page 22.
16 Frame Synchronization User’s Guide– Version 3.0
NVIDIA Corporation
Page 21

HAPTER 2
NVIDIA Frame Synchronization
C
Using the NVIDIA Classic Control Panel Frame Synchronization
Page
1 For each client system, start the system and then open the Windows Display Properties
control panel and click Settings>Advanced to navigate to the NVIDIA graphics display
properties page.
2 Click the Frame Synchronization tree item from the slide-out tray.
3 Click the Treat this system as list arrow and then click Client.
4 If the next display downstream requires a slight delay, enter the sync offset (in
microseconds) in the Sync delay (us) box.
The sync offset is the delay between the source trigger point and the actual sync pulse.
See Figure 2.9. The value can be in the range of 0 to the time needed to display an entire
frame.
Source signal
Sync Pulse
Sync Delay (Skew)
Figure 2.9
Offset Applied to Sync Pulse
5 Click Apply to activate the changes.
Using the New NVIDIA Control Panel
Perform the following steps for each client system:
1 From the NVIDIA Control Panel Select a Category page, click Workstation.
2 From the Workstation page, click Synchronize Displays.
3 Under Select the timing server, the On another system radio button should already be
selected.
4 Under Select displays to be active clients, select the check boxes for the displays that
you want to be clients.
You can select only displays whose refresh rates match that of the server. Selected
displays will be synchronized to the server.
5 Click Apply.
For further assistance on this or other tasks such as viewing the connection and sync
status or inserting a timing delay, consult the online help by pressing F1 to open the Help
file and then opening the Workstation->Frame Synchronization contents.
NVIDIA Corporation
Frame Synchronization User’s Guide – Version 3.0 17
Page 22

HAPTER 2
C
NVIDIA Frame Synchronization
Testing the Connections
To test the connections, click Initialize Link on the Server control panel.
The Sync and connection status group box displays the status of the sync signals as well
as the status of the RJ45 ports. The two ports are represented by connector icons. See
Figure 2.10.
Quadro FX 3000G
The panel icon layout
corresponds to the layout
of the physical connectors.
.
In
The connector is receiving the sync signal from another card.
Out The connector is sending the sync signal to another card.
Quadro G-Sync
Figure 2.10
18 Frame Synchronization User’s Guide– Version 3.0
Sync and Connection Status
NVIDIA Corporation
Page 23

Sync and Connection Status for the Server
• Sync Status
• Sync Ready - Green indicates that a sync pulse is present.
• Timing - Indicates whether the timing is locked to the sync signal.
Grey: The timing is locked to the internal V-Sync.
• Stereo - Always green indicates that it is in sync with a timing signal.
• Connection Status
• Out/Out is the normal indicator for the server device.
• In/In indicates that the system is not selected as a server or client, and is not Frame-
lock enabled.
Sync and Connection Status for the Client
• Sync Status
• Sync Ready - Green indicates that a sync pulse is present.
HAPTER 2
NVIDIA Frame Synchronization
C
Swap Sync
• Timing - Indicates whether the timing is locked to the sync signal.
Green: The timing is locked to the signal on the frame lock connector.
Red: Either no signal on the frame lock connector is detected, or the lock to the signal
has been lost.
• Stereo - Steady green indicates that the client’s stereo timing is locked to the server’s
stereo signal.
Note: The Quadro FX 3000G card typically takes a couple of seconds to achieve stereo
sync. The Quadro G-Sync card, because it provides more accurate
synchronization, typically requires about 30 seconds to achieve stereo sync.
• Connection Status
• In/Out or Out/In is the normal indicator for client devices.
• In/In indicates that there is no connection at any of the connectors of the client
device, or the system is not selected as a server or client, and is not Frame-lock
enabled.
The application controls synchronization of buffer swaps (swap sync) between
applications. Proper connection and synchronization of the timing signal are required for
proper synchronization of buffer swaps.
See “Using the OpenGL Extensions” on page 22 for instructions on how an application
can use the extensions to accomplish swap sync.
NVIDIA Corporation
Frame Synchronization User’s Guide – Version 3.0 19
Page 24

HAPTER 2
C
NVIDIA Frame Synchronization
Setting Up Genlock + Frame Lock
The procedures in the previous two sections describe the more common uses of NVIDIA
Frame Sync. A third use involves a combination of genlock and frame lock.
In this setup, a set of client systems are connected to a system that is designated as the
server, as described in “How To Set Up Frame Lock” on page 13. The difference is that the
server system is genlocked to an external house sync, as described in “How To Set Up
Genlock” on page 6.
In
Figure 2.11
Out
Out
Client
Example of Genlock + Frame Lock Configuration
Server Client
Sync Source
Out
In
In
Client
20 Frame Synchronization User’s Guide– Version 3.0
NVIDIA Corporation
Page 25

HAPTER 3
C
Using the OpenGL Extensions
This chapter explains how to use the OpenGL extensions supported by the NVIDIA
driver for accomplishing frame synchronization of applications.
• “Frame Synchronization Using the OpenGL Extensions” on page 23 explains the
principles behind swap groups, and describes the OpenGL extensions to use to control
frame lock and swap sync functions.
U
SING THE
O
PEN
C HAPTER
GL E
XTENSIONS
• “OpenGL Extensions” on page 28 details the API calls for the extensions.
22 Frame Synchronization User’s Guide– Version 3.0
NVIDIA Corporation
Page 26

Using the OpenGL Extensions
Frame Synchronization Using the OpenGL Extensions
Swap sync refers to the synchronization of buffer swaps of multiple application windows.
By means of swap sync, applications running on multiple systems can synchronize the
application buffer swaps between all the systems.
Swap sync requires
• proper connection and synchronization of the timing signals
• a mechanism for binding several windows together so that buffer swaps can be
synchronized across all windows
About Buffer Swaps
Key Points and Definitions
Buffer swaps are performed on windows.
HAPTER 3
C
•Swap Groups
If buffer swaps must be synchronized across several windows on a single system, you
can define a “group” that consists of the specified windows.
• Swap Barriers
If buffer swaps must be synchronized across several systems, you can define a
“barrier” that consists of the specified groups.
Buffer Swap Criteria
The criteria for buffer swaps involves when a window is ready to swap and when a group
is ready to swap.
Window Buffer Swaps
Any hDC that is not a window—such as a non-visible rendering buffer—is always ready,
otherwise the following criteria must be satisfied before a buffer swap for a window can
be performed:
• The window itself must be ready, meaning:
• A buffer swap command has been issued for it.
• Its swap interval has elapsed.
• If the window belongs to a group, all the windows in the group must be ready.
NVIDIA Corporation
Frame Synchronization User’s Guide – Version 3.0 23
Page 27

HAPTER 3
C
Using the OpenGL Extensions
• If the window belongs to a group and that group is bound to a barrier, all groups
bound to that barrier must be ready.
Group and Barrier Buffer Swaps
• Buffer swaps for all windows in a swap group take place concurrently, and buffer
swaps for all groups using a barrier take place concurrently.
For barrier swaps, the vertical retraces of the screens of all the groups must also be
synchronized, otherwise there is no guarantee of concurrency between groups.
• An implementation may support a limited number of swap groups and barriers, and
may have restrictions on where the users of a barrier can reside.
For example, an implementation may allow the users to reside on different display
devices or even hosts. An implementation may return zero for any of maxGroups and
maxBarriers returned by QueryMaxSwapGroupsNV if swap groups or barriers are not
available in that implementation or on that host.
Frame Counter
The implementation provides a universal counter, or frame counter, among all systems
that are locked together by swap groups/barriers. It is based on the internal
synchronization signal which triggers the buffer swap.
• To obtain the current frame count, call
• To reset the frame count back to zero, call,
In a system that has an NVIDIA frame-lock device installed and enabled,
ResetFrameCountNV()
Master device.
succeeds only when the frame lock device is configured as a
Enabling and Configuring Genlock
See the section “OpenGL Extensions” on page 28 for detailed API descriptions of the
extensions referred to in this section.
Enabling Genlock
Each display that is intended to be part of a frame-lock network must be enabled.
• To enable, call
wglEnableGenlockI3D()
QueryFrameCountNV
ResetFrameCountNV
().
().
•To disable, call
wglDisableGenlockI3D()
24 Frame Synchronization User’s Guide– Version 3.0
NVIDIA Corporation
Page 28

This call should be made before changing frame sync parameters in order to avoid
synchronization problems.
• To query the state of a display, call
wglIsEnabledGenlockI3D()
Configuring the Sync Trigger
The start of each frame1 is synchronized to the sync trigger pulse. This pulse can be based
on the vertical retrace signal of the frame lock device configured as the Master device, or it
can be derived from an external video signal, like a house sync signal. Configuring the
trigger pulse involves:
• Selecting the sync source signal
• Deriving the trigger pulse from the sync source based on the sync source edge,
sampling frequency, and an optional delay
Select the Sync Source
HAPTER 3
Using the OpenGL Extensions
C
• To select the source signal upon which to base the trigger pulse, call
wglGenlockSourceI3D()
and specify either the internal sync signal or an external sync signal.
• To query the sync source, call
wglGetGenlockSourceI3D()
Configure the Trigger Pulse
The trigger pulse is derived from the sync source, and is the signal to which all frame-lock
enabled boards are synchronized. Specify the trigger pulse as follows:
• Set An Edge Mode
Set the sync pulse to coincide with the leading edge, the falling edge, or both the
leading and falling edge of the source sync signal, by calling
wglGenlockSourceEdgeI3D()
and specifying either the rising edge, the falling edge, or both edges.
To query the edge mode, call
• Set a Sampling Value
Set the sync pulse as a function of samplings of the source signal, by calling
wglGenlockSampleRateI3D()
wglGetGenlockSourceEdgeI3D().
1. The current hardware does not support triggering on field data, so you cannot specify triggering on leftonly or right-only frames.
NVIDIA Corporation
Frame Synchronization User’s Guide – Version 3.0 25
Page 29

HAPTER 3
C
Using the OpenGL Extensions
and specifying every nth source pulse to use for the trigger pulse. The minimum value
is 1. The maximum value is 6. As an example, if a value of 2 is used, then every other
source pulse would generate a trigger pulse.
To query the sample value, call
• Set an Optional Delay Value
If the next display downstream requires a slight delay, delay the trigger pulse (in
pixels) by calling
wglGenlockSourceDelayI3D()
and specify a delay. The minimum delay value is 0. The maximum delay value is the
number of pixel clocks needed to display an entire frame.
To determine the maximum delay value:
1 Call the function wglQueryGenlockMaxSourceDelayI3D
values for maxLineDelay and maxPixelDelay.
2 Calculate the maximum delay using the equation
maxDelay = (maxLineDelay) x (maxPixelDelay)
Configuring for Swap Sync
Configuring Swap Groups
You can assign an OpenGL window to a swap group. There is a maximum number of
allowable swap groups that can be created for any particular implementation.
wglGetGenlockSampleRateI3D().
() and obtain the
• To determine the maximum swap group number, call
QueryMaxSwapGroupsNV()
• To assign a window to a swap group, call
JoinSwapGroupNV()
and specify the swap group number.
If hDC is already a member of a different group, it is implicitly removed from that
group. If the swap group number is zero, the hDC is removed from the current group.
To query the current swap group, call
26 Frame Synchronization User’s Guide– Version 3.0
QuerySwapGroupNV
().
NVIDIA Corporation
Page 30

Configuring Swap Barriers
You can bind a group to a barrier. There is a maximum number of barriers that can be
created.
• To determine the maximum barrier number, call
QueryMaxSwapGroupsNV()
• To bind a group to a barrier, call
BindSwapBarrierNV()
and specify the group and barrier numbers.
If the barrier number is zero, then the group in unbound from the current barrier.
To query the current barrier, call
QuerySwapGroupNV
Using the OpenGL Extensions
().
HAPTER 3
C
NVIDIA Corporation
Frame Synchronization User’s Guide – Version 3.0 27
Page 31

HAPTER 3
C
Using the OpenGL Extensions
OpenGL Extensions
This section describes the relevant OpenGL extensions supported by the NVIDIA display
driver (to be shipped with the NVIDIA frame-lock hardware). The set of extensions
supported for frame lock are exported as WGL_I3D_genlock and
WGL_NV_swap_group.
These are exported in the WGL extension string which can be queried by
wglGetExtensionsStringARB. This documentation covers the WGL versions of the
extensions which are exported on Microsoft WindowsNT/XP systems. There is an
equivalent Unix version of these extensions: GLX_NV_swap_group.
Exported WGL_I3D_genlock Functions
The exported functions for this extension are:
•
wglEnableGenlockI3D
•
wglDisableGenlockI3D
•
wglIsEnabledGenlockI3D
•
wglGenlockSourceI3D
•
wglGetGenlockSourceI3D
•
wglGenlockSourceEdgeI3D
•
wglGetGenlockSourceEdgeI3D
•
wglGenlockSampleRateI3D
•
wglGetGenlockSampleRateI3D
•
wglGenlockSourceDelayI3D
•
wglGetGenlockSourceDelayI3D
•
wglQueryGenlockMaxSourceDelayI3D
28 Frame Synchronization User’s Guide– Version 3.0
NVIDIA Corporation
Page 32

wglEnableGenlockI3D
HAPTER 3
Using the OpenGL Extensions
C
This call enables genlock for all monitors connected to a device (device context
OpenGL window. There is only a single genlock device for each graphics adapter
regardless of the number of monitors supported by the adapter.
Function
Parameters In
Return Values
BOOL wglEnableGenlockI3D(HDC hDC)
hDC
- Device context for the frame lock card, or a window residing on the
frame lock card.
TRUE: Success
FALSE: Failure
wglDisableGenlockI3D
This call disables genlock for a monitor.
Function
Parameters In
Return Values
BOOL wglDisableGenlockI3D(HDC hDC)
hDC
- Device context for the frame lock card, or a window residing on the
frame lock card.
TRUE:
Success
FALSE:
Failure
wglIsEnabledGenlockI3D
This call queries the current genlock enable/disable state
hDC
) of an
Function
Parameters In
Parameters Out
Return Values
NVIDIA Corporation
Frame Synchronization User’s Guide – Version 3.0 29
BOOL wglIsEnabledGenlockI3D(HDC hDC, BOOL *pFlag)
hDC
- Device context for the frame lock card, or a window residing on the
frame lock card.
*pFlag
: -
0 = Genlock is disabled.
1 = Genlock is enabled.
TRUE:
Success
FALSE:
Failure
Page 33

HAPTER 3
C
Using the OpenGL Extensions
wglGenlockSourceI3D
This call sets the sync source upon which the frame lock sync trigger is based.
Function
Parameters In
BOOL wglGenlockSourceI3D(HDC hDC, UINT uSource)
hDC
- Device context for the frame lock card, or a window residing on the
frame lock card.
uSource
WGL_GENLOCK_SOURCE_MULTIVIEW_I3D
Select the internal sync signal as the sync source.
WGL_GENLOCK_SOURCE_EXTERNAL_SYNC_I3D
Select the external house sync as the sync source.
-
Parameters Out
TRUE:
Return Values
Success
FALSE:
Failure
wglGetGenlockSourceI3D
This call queries the current sync source.
Function
Parameters In
Parameters Out
Return Values
BOOL wglGetGenlockSourceI3D(HDC hDC, UINT *uSource)
hDC
- Device context for the frame lock card, or a window residing on the
frame lock card.
*uSource
WGL_GENLOCK_SOURCE_MULTIVIEW_I3D
The internal sync signal is the sync source.
WGL_GENLOCK_SOURCE_EXTERNAL_SYNC_I3D
The external house sync is the sync source.
TRUE:
FALSE:
-
Success
Failure
30 Frame Synchronization User’s Guide– Version 3.0
NVIDIA Corporation
Page 34

wglGenlockSourceEdgeI3D
This call synchronizes the trigger pulse to the edge or edges of the source signal.
HAPTER 3
Using the OpenGL Extensions
C
Function
Parameters In
BOOL wglGenlockSourceEdgeI3D(HDC hDC, UINT uEdge)
hDC
- Device context for the frame lock card, or a window residing on the
frame lock card.
uEdge
-
WGL_GENLOCK_SOURCE_EDGE_FALLING_I3D
Selects the falling edge of the source.
WGL_GENLOCK_SOURCE_EDGE_RISING_I3D
Selects the rising edge of the source.
WGL_GENLOCK_SOURCE_EDGE_BOTH_I3D
Selects both edges of the source.
Parameters Out
TRUE:
FALSE
Success
: Failure
Return Values
wglGetGenlockSourceEdgeI3D
This call queries the current trigger pulse edge mode.
Function
Parameters In
Parameters Out
Return Values
BOOL wglGetGenlockSourceEdgeI3D(HDC hDC, UINT *uEdge)
hDC
- Device context for the frame lock card, or a window residing on the
frame lock card.
*uEdge
-
WGL_GENLOCK_SOURCE_EDGE_FALLING_I3D
Selects the falling edge of the source.
WGL_GENLOCK_SOURCE_EDGE_RISING_I3D
Selects the rising edge of the source.
WGL_GENLOCK_SOURCE_EDGE_BOTH_I3D
Selects both edges of the source.
TRUE:
Success
FALSE:
Failure
NVIDIA Corporation
Frame Synchronization User’s Guide – Version 3.0 31
Page 35

HAPTER 3
C
Using the OpenGL Extensions
wglGenlockSampleRateI3D
This call sets the trigger pulse as a function of the specified sync source sampling rate.
Function
Parameters In
BOOL wglGenlockSampleRateI3D(HDC hDC, UINT uRate)
hDC
- Device context for the frame lock card, or a window residing on the
frame lock card.
uRate
- Specifies every nth pulse of the sync source signal to use for the
trigger pulse.
For example, if
source pulse would generate a trigger pulse.
range of 1–6.
uRate
Parameters Out
TRUE:
Return Values
Success
FALSE:
Failure
wglGetGenlockSampleRateI3D
This call queries the current sync source sampling rate for the trigger pulse.
Function
Parameters In
Parameters Out
Return Values
BOOL wglGetGenlockSampleRateI3D(HDC hDC, UINT *uRate)
hDC
- Device context for the frame lock card, or a window residing on the
frame lock card.
*uRate
- The nth pulse of the sync source used for the trigger pulse.
For example, if
source pulse would generate a trigger pulse.
TRUE:
Success
FALSE:
Failure
uRate
were set to a value of 2, every other sync
uRate
must be in the
were set to a value of 2, every other sync
wglGenlockSourceDelayI3D
This call specifies the delay to apply to the trigger pulse.
Function
Parameters In
Parameters Out
Return Values
32 Frame Synchronization User’s Guide– Version 3.0
BOOL wglGenlockSourceDelayI3D(HDC hDC, UINT uDelay)
hDC
- Device context for the frame lock card, or a window residing on the
frame lock card.
uDelay
- The delay, in pixels, from the sync source trigger edge to the
actual trigger pulse.
TRUE:
Success
FALSE:
Failure
NVIDIA Corporation
Page 36

wglGetGenlockSourceDelayI3D
This call queries the current trigger pulse delay.
HAPTER 3
Using the OpenGL Extensions
C
Function
Parameters In
Parameters Out
Return Values
BOOL wglGetGenlockSourceDelayI3D(HDC hDC, UINT *uDelay)
hDC
- Device context for the frame lock card, or a window residing on the
frame lock card.
*uDelay
actual trigger pulse.
TRUE:
FALSE:
- The delay, in pixels, from the sync source trigger edge to the
Success
Failure
wglQueryGenlockMaxSourceDelayI3D
This call queries the maximum line and pixel delay. Use these values to calculate the
maximum trigger pulse delay (
maxDelay
Function
Parameters In
Parameters Out
Return Values
= (
maxLineDelay
BOOL wglQueryGenlockMaxSourceDelayI3D(HDC hDC,
UINT *uMaxLineDelay,
UINT *uMaxPixelDelay)
hDC
- Device context for the frame lock card, or a window residing on the
frame lock card.
*uMaxLineDelay
This includes all visible and non-visible lines—such as
vertical blanking lines— for all fields.
*uMaxPixelDelay
line. This includes all visible and non-visible pixels
such as horizontal blank.
TRUE:
FALSE:
Success
Failure
maxDelay
) x (
maxPixelDelay
- The maximum number of raster scan lines per frame.
), using the equation
).
- The maximum number of pixels per raster scan
NVIDIA Corporation
Frame Synchronization User’s Guide – Version 3.0 33
Page 37

HAPTER 3
C
Using the OpenGL Extensions
Exported WGL_NV_swap_group Functions
The exported functions for this extensions are:
•
JoinSwapGroupNV
•
BindSwapBarrierNV
•
QuerySwapGroupNV
•
QueryMaxSwapGroupsNV
•
QueryFrameCountNV
•
ResetFrameCountNV
JoinSwapGroupNV
This call adds the OpenGL window with the device context hDC to the swap group
specified by group. If hDC is already a member of a different group, it is implicitly
removed from that group first.
Function
Parameters In
Parameters Out
Return Values
BOOL JoinSwapGroupNV(HDC hDC, GLuint group);
hDC
- Device context for the frame lock card, or a window residing on the
frame lock card.
group
The value must be between 0 and
(see “
context is unbound from its current group.
TRUE:
FALSE:
BindSwapBarrierNV
This call binds a swap group to a barrier.
Function
Parameters In
Parameters Out
Return Values
BOOL BindSwapBarrierNV(GLuint group, GLuint barrier);
hDC
- Device context for the frame lock card, or a window residing on the
frame lock card.
group
barrier
must be between 0 and
(see “
TRUE:
FALSE:
- Swap group number to which the device context is to be assigned.
QueryMaxSwapGroupsNV
Success
Failure
- Swap group number that is to be bound to a barrier.
- Barrier number to which the swap group is to be bound. Value
QueryMaxSwapGroupsNV
Success
Failure
maxGroups
” on page 35). If 0, the device
maxBarrier
” on page 35).
34 Frame Synchronization User’s Guide– Version 3.0
NVIDIA Corporation
Page 38

QuerySwapGroupNV
This call returns the swap group number and barrier number to which the device context
is bound.
HAPTER 3
Using the OpenGL Extensions
C
Function
Parameters In
Parameters Out
Return Values
BOOL QuerySwapGroupNV(HDC hDC,
GLuint *group,
GLuint *barrier);
hDC
- Device context for the frame lock card, or a window residing on the
frame lock card.
*group
or assigned.
*barrier
TRUE:
FALSE:
- The group number to which the device context is bound,
- The barrier number to which the device context is bound.
Success
Failure. In this case,
QueryMaxSwapGroupsNV
This call returns the maximum number of swap groups and swap barriers that are
supported by the implementation.
Function
Parameters In
Parameters Out
Return Values
BOOL QueryMaxSwapGroupsNV(HDC hDC,
GLuint *maxGroups,
GLuint *maxBarriers);
hDC
- Device context for the frame lock card, or a window residing on the
frame lock card.
*maxGroups
implementation.
*maxBarriers
implementation.
TRUE:
Success
FALSE:
undefined.
Failure. In this case,
*group
- The maximum group number supported by the
- The maximum barrier number supported by the
*maxGroups
and
*barrier
and
are undefined.
*maxBarriers
are
QueryFrameCountNV
QueryFrameCountNV returns in count the current frame counter for swapGroup.
This call returns the current frame count of the swap group.
Function
Parameters In
Parameters Out
Return Values
NVIDIA Corporation
Frame Synchronization User’s Guide – Version 3.0 35
BOOL QueryFrameCountNV(HDC hDC, GLuint *count);
hDC
- Device context for the frame lock card, or for a window residing on
the frame lock card.
*count - The current frame count of the swap group.
TRUE:
Frame count successfully retrieved.
FALSE:
Frame count retrieval failed.
Page 39

HAPTER 3
C
Using the OpenGL Extensions
ResetFrameCountNV
This call resets to zero the frame count of the swap group. The call succeeds only on the
master device.
Function
Parameters In
Parameters Out
Return Values
BOOL ResetFrameCountNV(HDC hDC);
hDC
- Device context for the frame lock card, or a window residing on the
frame lock card.
TRUE:
Frame counter is successfully reset.
FALSE:
Frame counter not successfully reset.
36 Frame Synchronization User’s Guide– Version 3.0
NVIDIA Corporation
 Loading...