


NV-T2SIR
Dual SIRIUS®-Ready/AM/FM Tuner
Installation Guide


FRENCH
Danger
L‘exposition a des niveaux eleves de bruit peut provoquer une perte permanente de l’audition, Chaque organisme humain reagit differemment quant a la perte de l’audition, mais quasiment tout le monde subit une diminution de I’acuite auditive lors d’une exposition suffisamment longue au bruit intense. Les autorites competentes en reglementation de bruit ont defini les expositions tolerees aux niveaux de bruits:
DURE EN HEURES PAR JOUR |
8 6 |
4 3 2 |
1 |
INIVEAU SONORE CONTINU EN dB |
90 93 |
95 97 100 |
103 |
Selon les autorites, toute exposition dans les limites citees ci-dessus, peuvent provoquer certaines pertes d’audition. Des bouchons ou protections dans l’appareil auditif ou sur l’oreille doivent etre portes lors de l’utilisation de ce systeme d’amplification afin de prevenir le risque de perte permanente de l’audition, Dans le cas d’expositions superieures aux limites precitees il est recommande, afin de se premunir contre les expositions aux pressions acoustiquese I evees potentielIement dangeure u ses, aux personnes exposees aux equipements capables de delivrer de telles puissances, tels ce systeme d’amplification en fonctionnement, de proteger l’appareil auditif.
ATTENTION
RISQUE DE CHOC ELECTRIQUE
NE PAS OUVRIR.
ATTENTION: AFIN DE LlMlTER LE RISQUE DE CHO ELECTR/QUE, NE
PAS ENLEVER LE CHASSIS. NE CONTIENT PAS DE
PIECES POUVANT ETRE REPAREE PAR L’UTILISATEUR.
CONFER LE SERVICE APRES-VENTE AUX
REPARATEURS
CE SYMBOLE A POUR BUT D'AVERTIR L'UTILISATEUR DE LA PRESENCE DE VOLTAGE DANGEREUX NON-ISOLE A L'INTERIEUR DE CE PRODUIT QUI PEUT ETRE DE PUISSANCE SUFFISAMMENT IMPORTANTE POUR PROVOQUER UN CHOC ELECTRIQUE AUX PERSONNES.
CE SYMBOLE A POUR BUT D'AVERTIR L'UTILISATEUR DE LA PRESENCE
D'INSTRUCTIONS D'UTILISATION ET DE MAINTENANCE DANS LES
DOCUMENTS FOURNIS AVEC CE PRODUIT.
AFIN DE REDUIRE LES RISQUÉ D'INCENDIE ET DE DECHARGE
ELECTRIQUE, NE PAS EXPOSER CET APPAREIL A LA PLUIE OU A
L'HUMIDITE.
IMPORTANTES INSTRUCTIONS DE SECURITE
1.Lire avec attention toutes les recommandations et précautions d'emploi avant d'utiliser ce produit.
2.Toutes les recommandations et précautions d'emploi doivent être conservées afin de pouvoir s'y reporter si nécessaire.
3.Lire et comprendre tous les avertissements énumérés dans les précautions d'emploi.
4.Suivre toutes les précautions d'emploi pour utiliser ce produit.
5.Ce produit ne doit pas être utilisé près d'eau, comme par exemple baignoires, éviers, piscine, sous-sol humides ... Etc.
6.Utiliser exclusivement un chiffon sec pour nettoyer ce produit.
7.Ne bloquér aucune ouverture de ventilation. Ne pas placer le produit tout contre un mur ou dans une enceinte fernée, cela gênerait le flux d'air nécessaire au refroidissement.
8.Ne pas placer le produit près de toute source de chaeur telle que radiateurs, arrivées d'air chaud, fourneaux ou autres appareils générant de la chaleur (incluant les amplificateurs producteurs de chaleur) .
9.Ne pas négliger la sécurité que procure un branchement polarisé ou avec raccordement à la terre, Un branchement polarisé comprend deux fiches dont l'une est plus large que l'autre. Un branchement à la terre comprend deux fiches plus une troisième reliée à la terre. Si la fiche secteur fournie ne s'insert pas dans votre prise de courant. consulter un 'électricien afin de remplacer votre prise obsolète.
10.Protéger le cordon d'alimentation de tout écrasement ou pincement, particulièrement au niveau des fiches, des réceptacles utilisés et à l'endroit de sortie de l'appareil. Ne pas casser la fiche de terre du cordon d'alimentation.
11.Utiliser uniquement les accessoires spécifiés par le constructeur.
12.Utiliser uniquement avec le chariot de transport, le support, le trépied, la console ou la table spécifiés par le constructeur ou vendus avec l'appareil. Lors de l'utilisation d'un chariot, bouger avec précaution l'ensemble chariotlappareil afin d'éviter les dommages d'un renversement.
13Débrancher cet appareil lors d'orages ou s'il n'est pas utilisé pendant une longue période.
14.Des précautions doivent être prises afin qu'aucun objet ne tombe et qu'aucun liquide ne se répande à l'intérieur de l'appareil par les orifics de ventilation ou n'importe quelle autre ouverture.
15.Pour toutes interventions techniques s'adresser à un technicien qualifié.L'intervention technique est nécessaire lorsque l'appareil a été endommagé de n'importe quelle façon, comme par exemple si le cordon secteur ou sa fiche sont détériorés,si du liquide a coulé ou si des objets sont tombés à l'intérieur de l'apparei1,si l'appareil a été exposé à la pluie ou à l'humidité, s'il ne fonctionne pas normalement ou s'il est tombé.
16.ATTENTI0N:Pour réduire le risque d'incendie ou de choc electrique ne pas exposer l'appareil à la pluie ou à l'humidité.

|
ANTENNA |
|
LEAD-IN |
|
WIRE |
GROUND |
|
CLAMPS |
|
|
ANTENNA |
|
DISCHARGE UNIT |
|
NEC SECTION |
|
810-20 |
ELECTRIC |
GROUNDING |
SERVICE |
CONDUCTORS |
ENTRANCE |
GROUND CLAMPS |
|
POWER SERVICE |
|
GROUPING ELECTRODE |
NEC NATIONAL ELECTRICAL CODE |
SYSTEM NEC ART 250 |
PART H |

Introduction
CongratulationsonyourpurchaseoftheNuVoT2SIRDualSIRIUSReady/AM/FMTuner.Enjoyingbroadcastmusicthroughouthe
st
homehasmovedintothe21centurywithNuVo'sT2DualTunersolutions.WhetheryourprfrenceistraditionalAM/FMlisteing, orSIRIUSateliteRadio,theT2SIRofersanafordable,specialydesignedcompoentforwhole-homedistribution.
TheT2SIR'sinternalNuVoNetcomunicationalowsforveryuniqueandcompltefedbacktoaloftheNuVoControlPads.
Table of Contents:
T2SIR Quick Setup Guide for Use with NuVoNet |
page2 |
Basic Features |
|
FrontPanel |
page4 |
BackPanel |
page5 |
NV-T2RC4RemoteControl |
page6 |
I. Installing the T2SIR in the Home |
|
ConectingtheAudioOutputs page7 SetingtheAudioOutputsforNuVoNetor Standaloneuse page7 AM/FMAntenaInstalation page7 ConectingforNuVoNetUse page8 IRContrloftheT2SIR page8 RS32SerialControl page9
II. T2SIR Use with SIRIUS Radio |
|
TheSIRIUS8-pinConector |
page9 |
SIRIUSModulesandSubscription |
page9 |
InstalingtheSIRIUSAntena |
page10 |
III. T2SIR Front Panel Menu |
|
Bands |
page10 |
Chanels |
page1 |
SIRIUSInfo |
page1 |
T2SIROptions |
page1 |
EditPrsets |
page1 |
TuingMode |
page12 |
SkipedChanels |
page12 |
T2SIRSetings |
page13 |
OperatingMode |
page13 |
EnabledBands |
page13 |
Tuing |
page13 |
Diagnostics |
page14 |
AudioTest |
page14 |
RsetMemory |
page14 |
IV. NuVoNet Control of the T2SIR |
|
TuingUpandDown |
page15 |
SlectingaLockedChanel |
page15 |
ChangingBands |
page15 |
TuingModes |
page15 |
SlectingTunerAandB |
page15 |
ControlPadMainMenu |
page16 |
T2SIROptions |
page16 |
V. Using the Tuner Configurator Software |
|
1.0Start |
page18 |
2.0Config |
page18 |
3.0Prsets |
page20 |
Advanced Settings |
|
4.0AdvancedConfig |
page2 |
5.0UpdateSystem |
page23 |
NV-T2SIR Specifications |
page24 |
1
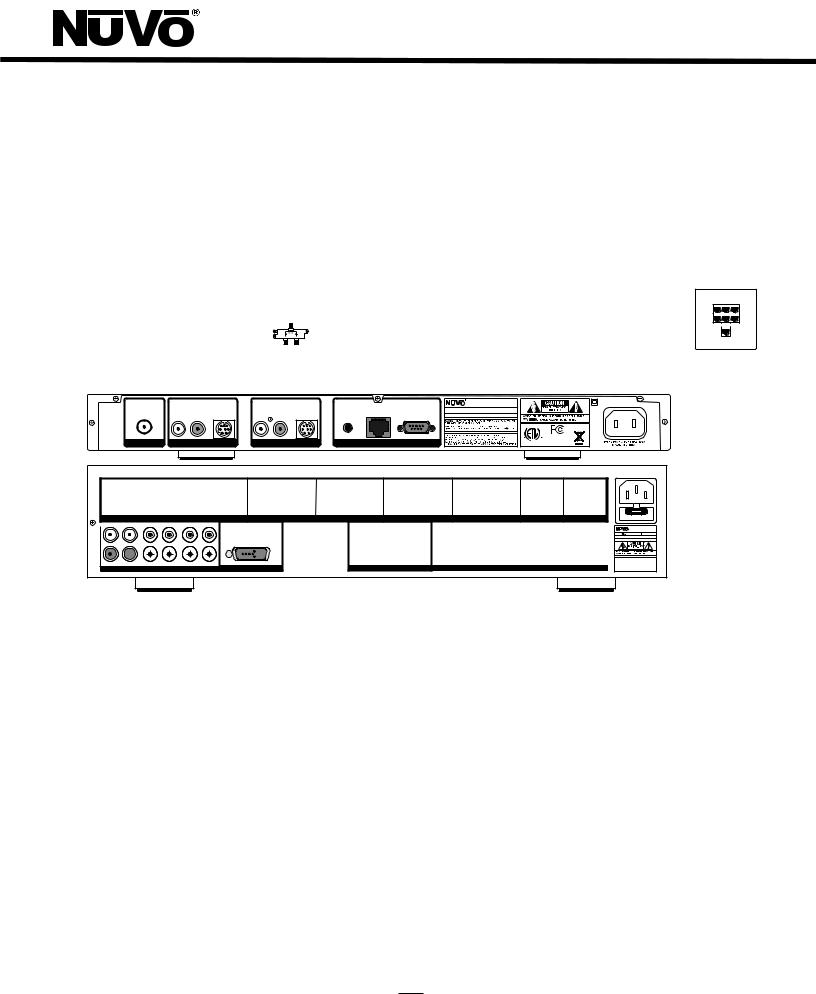
T2SIR Wiring Diagram
AM/FM |
3:09 pm |
Modern Rock
Drift-Follow Th
Living For
Diagram shown using an optional NV-SCH-ANT SIRIUS Outdoor Antenna and two SIRIUS NV-SCH1 Home Tuners.
0728
Concerto EZ Port
Model NVI8GEZP
Device 1 |
Device 2 |
Device 3 |
Device 4 |
Device 5 |
Device 6 |
|
Connect to |
|
|
NVI8GM |
|
USE NV-T2DAA WITH |
|
|
|
|
|
|
Model NV-T2SIR |
|
|
OPTIONAL NV-T2FXC |
|
|
|
|
|
|
Dual SIRIUS Ready AM/FM Tuner |
|
|
AND SIRIUS ANTENNA |
AUDIO |
|
AUDIO |
|
|
|
NuVo Technologies LLC•Hebron, KY USA |
|
|
IN |
SIRIUS |
L |
SIRIUS |
IR INPUT |
NuVoNet |
RS 232 |
www.nuvotechnologies.com |
|
|
L |
R |
R |
|
|
|
|
|
|
|
|
|
|
|
|
|
|
N |
K |
RoHS |
|
|
|
|
|
|
|
TE RTE |
|
|
|
|
|
|
|
|
|
|
|
CM |
CONFORMS TO UL
STD. 60065 CERTIFIED
|
ANTENNA |
|
|
TUNER A |
|
TUNER B |
|
|
|
SYSTEM |
|
|
|
|
|
3033118 |
TO CAN/CSA STD . |
|
|
|
|
|
||||
|
|
|
|
|
|
|
|
|
|
|
|
C22. 2 No .60065:06 |
|
|
|
|
|
|||||||||
|
|
|
|
|
|
|
|
|
|
|
|
|
|
|
|
|
|
|
||||||||
|
VARIABLE |
|
|
|
VARIABLE |
|
VARIABLE |
|
|
VARIABLE |
|
|
VARIABLE |
|
|
|
VARIABLE |
|
VARIABLE |
|
|
|
|
|
||
|
OUTPUT |
OUTPUT POWER |
|
OUTPUT |
|
OUTPUT |
OUTPUT POWER |
|
OUTPUT |
OUTPUT POWER |
OUTPUT |
|
OUTPUT POWER |
|
OUTPUT |
|
|
OUTPUT |
|
|
|
|
|
|||
|
TIP=L |
|
TIP=L |
OUTPUT POWER |
|
TIP=L |
TIP=L |
|
|
TIP=L |
OUTPUT POWER |
|
|
|
RS-232 |
|
|
|
|
|||||||
|
20W/6OHM X2 |
|
|
20W/6OHM X2 |
TIP=L |
|
|
|
|
|
20W/6OHM X2 |
|
20W/6OHM X2 |
|
TIP=L |
|
|
|
|
|
||||||
|
RING=R |
|
|
|
RING=R |
|
RING=R |
|
|
RING=R |
|
|
RING=R |
|
|
|
RING=R |
|
|
RING=R |
|
|
|
|
|
|
|
FIXED |
|
|
|
FIXED |
|
FIXED |
|
|
FIXED |
|
|
FIXED |
|
|
|
FIXED |
|
|
FIXED |
|
|
|
|
|
|
|
OUTPUT |
|
|
|
OUTPUT |
|
OUTPUT |
|
|
OUTPUT |
|
|
OUTPUT |
|
|
|
OUTPUT |
|
|
OUTPUT |
|
|
|
|
|
|
|
ZONE 1 |
|
|
ZONE 2 |
|
ZONE 3 |
|
|
ZONE 4 |
|
|
ZONE 5 |
|
|
ZONE 6 |
|
ZONE 7&8 |
PROGRAM |
USE CNLY WITH 250V FUSE |
|||||||
|
|
|
|
|
|
|
|
|
|
|
|
|
|
|
||||||||||||
1 |
2 |
3 |
4 |
5 |
6 |
|
CONNECT TO |
1 |
2 |
3 |
1 |
2 |
3 |
4 |
1 |
2 |
3 |
SUM1 |
SYS ON |
|
CONNECT TO |
CONNECT TO |
|
|
MODEL NV-I8DM |
|
|
|
|
|
|
|
|
|
|
|
|
|
|
|
|
|
|
|
|
|
|
|
SIX SOURCE EIGHT ZONE |
||||
|
|
|
|
|
|
|
|
|
|
|
|
|
|
|
|
|
|
|
|
|
AUDIO DISTRIBUTION SYSTEM |
|||||
|
L |
L |
|
|
L |
|
NV-I8X |
|
|
|
|
|
|
|
|
|
|
|
|
|
NV-I8EZP1 |
NV-I8X |
120V |
60Hz 500W |
FUSE:T5 A |
|
|
|
|
|
USE NV-SLC1 |
|
|
|
|
|
|
|
|
|
|
|
|
|
USE NV-NC1 |
USE NV-SLC1 |
NuVo Technologies Cincinnati Ohio USA |
||||||
|
|
|
|
|
|
|
|
|
|
|
|
|
|
|
|
|
|
|
|
www.nuvotechnologies.com |
||||||
|
|
|
|
|
|
|
CABLE |
|
|
|
|
|
|
|
|
|
|
|
|
|
CABLE |
CABLE |
|
|
|
|
|
R |
R |
|
|
R |
|
|
|
|
|
|
|
|
|
|
|
|
|
|
|
|
|
|
|
|
|
1 |
2 |
3 |
4 |
5 |
6 |
|
|
4 |
5 |
6 |
5 |
6 |
7 |
8 |
4 |
5 |
6 |
SUM2 |
EXT. MUTE |
|
|
|
|
|
CONFORMS TO |
|
|
|
|
|
|
|
|
UL STD.6500 |
|||||||||||||||||||
|
|
SOURCE INPUTS |
|
|
|
SOURCE LINK |
SOURCE STATUS INPUTS |
|
ZONE TRIGGER OUTPUTS |
|
|
EMITTER OUTPUTS |
SYSTEM |
|
NETWORK |
DIGITAL LINK |
C |
US |
CERTIFIED TO |
|||||||
|
|
|
|
|
|
|
|
|
3033118 |
CAN/CSA STD.E60065 |
||||||||||||||||
Diagram shown using the Grand Concerto System
T2SIR Quick Setup Guide for Use With NuVoNet
TheT2SIRDualTuneristheperfectbroadcastmusicsolutionforwhole-homeaudio.TheinternalNuVoNetcapablityoftheT2SIR alowsitoeasilycomunicateinrealtimewiththeNuVoGrandConcertoandEsentiaE6GControlPads.Thefolowingisastep- by-stepguideforsetingupandinstalingtheT2SIRforusewiththeGrandConcertoandEsentiaNuVoNetSuites.
Step 1: UponunpackingyourT2SIRTuner,establishwhichaudioinputs,1-6,theT2'sAandBaudioutputswilreprsent.Plug theT2intoanACpowersource.
Step 2: AtachtheaudioutputsAandBoftheTunertotheapropriatenumbredinputsontheGrandConcertorEsentia
System.
Step 3: ConectheCAT5fromtheNuVoNetoutputontherearpaneloftheTunertoneoftheDeviceinputsontheGrandConcerto EZPortortheEsentiaAlport.ThiswilenablecomunicationtotheSystem'sControlPads.NotethatasingleCAT5conection providesinformationfrombothTunersAandB.AfinalCAT5ConectionshouldthenbemadetotheNuVoNetCAT5inputonthe backpaneloftheGrandConcertorEsenitamainamplifierfortheNuVoNetRJ45ontheGrandConcertoEZPortortheEsentia Alport.ThiscompltesthencesaryconectionfortheNuVoNetcomunication.
2

Step 4: CompltetheantenaconectionsonthebackpaneloftheTunerusingstandardRG6coaxialcable.Quadshieledcableis recomened.Whentheantenasareconected,theTunerwilbeginrceivingasignalforbothTunersAandB.
Step 5: WhentheTunerisplugedintoanACpowersource,thefrontpaneldisplaywilmovethroughabotprocedure.Whenthis procedureiscomplted,amesage,“UinitializedStateDtected”wilapear.
Step 6: Folowingthepromptfromthedisplay,touchtheOKbutonontheTuner'sfrontpanelcontrol.Thiswildisplayaregional tuingslection:USAandCanada,WesternEurope,Australia,andNewZeland.Maketheapropriateslectiontomatchthe Tuner’sgeographiclocation.
Step 7: TouchingOKonthefrontpanelcontrolswilpromptasecondscrenonthedisplay.ThiswilrSetad,Tuner A Mode, Standalone, Source 1, Source 2, Source 3, Source 4, Source 5, and Source 6. ThetopslectiStandalone,n wilbehighlighted.This choiceisusedforanypurposethatisnotNuVoNetcomunication.Usingthedownarowonthefarightofthefrontpanel controls,scroltothedesiredsourceinputnumberandtouchOKtoslect.ThedisplaywilautomaticalygotoTunerBsetup. RepeatheabovestepsforsetingTunerB.IfNuVoNetisnotconectedoralailablevsourceshavebenasigned,thanthe sourceslectionswilbegrayedout.
Step 8: Whenthedesiredsourcenumberisected,lthedisplaywilreturntothefirstscren.BothoutputsAandBwildisplay thelowestFMbandfrequencybydefault.Athispoint,fultuingcapablitycanbedonefromtheTuner'sfrontpaneloran adresedNuVoControlPad.
Step 9: WhenbothTuneroutputsareset,makesurethe“NuVoNet”CAT5conectionbetwentheTuner’sbackpanelandthe systemEZPortiscomplted.
TheT2SIRTunerisnowreadyforNuVoNetcomunicationwitheithertheGrandConcertorEsentiaE6Gdistributedaudio systems.
PleasesethecomplteinstalationguideforunderstandingthefuluseofyourT2SIRTuner.
3

NV-T2SIR
|
Dual SIRIUS Ready AM/FM Tuner |
Sr6 |
P103 |
|
|
|
|
|
MENU |
A/B |
DISP |
||
|
|
Give Me The Night |
||||
|
|
|
|
|
||
STANDBY |
|
FM 103.5 |
P104 ST |
|
|
|
|
|
Ticket To Ride |
|
BAND |
OK |
|
RADIO DATASYSTEM
123456789101121314
Front Panel Features
1.Standby: ThisblueLEDwilightwhentheT2SIRisplugedintoanACpoweroutlet.
2.Tuner Highlight: ThishighlightbarshiftsbetwentheTunerAandBdisplaytoindicatewhichTunerisbeingcontroled.
3.Broadcast Band Display: Thislineofthefrontpaneldisplayshowstheslectedbroadcastbandandfrequencyorchanel.The bandsailablevareAM,FMandoptionalSIRIUS.
4.Metadata Display: ThislineofthedisplayscrolsRDS,RadioDtaService,informationforFMandSIRIUSRadiobroadcast informationwhenaSIRIUS-Readyrceiverisconected.
5.Preset Number: TheT2SIRfeaturesupto5banksof20prsetseach.Thisindicatesthenumberoftheprsetbankofthe slectedprset.
6.Antenna Signal: Thlvelofsignalvelisindicatedwithuptofivebars,fivebeingthebest.WhenlisteingtoFM,fulstreo rceptionisindicatedwithanabreviatedST.
7.Menu: ThiscapacitivetouchpanelalowsfrontacestotheT2SIR'scontrolsaswelasprsetlisteingslectionsandtuing pramters.
8.Power: Thisbutonturnsthepowerforthefrontpanelofwhentaped,andcausesasoftrebotoftheoperatingsystemwhen itisheldfor3seconds.
9.A/B: BytapingtheA/Bbuton,thehighlightedTuneroutputandcontroltoglesbetwenAandB.
10.Band: TheBandbutontoglesbetwenAM,FMandSIRIUSwhenitisactivatedforthehighlightedTunerAorB.
11.IR Window: TheT2SIRwilbecontrolviaIRthroughitsfrontpanelIRrceiver.
12.OK: OkinitiatesahighlightedMenuchoice.
13.Disp: ThisbutontoglesthroughthetuingchoicesforSIRIUS.ThisisonlyfunctionalwhenSIRIUSrceptionisactivated.
14.Up and Down Arrows: ThsearowbutonsprovidemultiplefunctionsdependingonthemodeoftheTuner.Inormal operation,theyinitiatetuingupandownthroughtheslectedband.Whenimenumode,theyscrol upandownthroughthemenuchoices.
4
 Loading...