

Page 1

The Intelligent Surveillance Solution
Crystal Titan
User Manual
Ver. 2.0.0.131031.00
Page 2

NUUO Crystal 2.0 User Manual
Table of Contents
1
1. Introduction ........................................................................................................... 5
2. Installation ............................................................................................................. 7
2.1 Installation Process ........................................................................................ 7
2.2 LED Status Definitions .................................................................................. 21
3. Web Settings ........................................................................................................ 24
3.1Login ................................................................................................................ 24
3.2 Web Server ..................................................................................................... 25
3.2.1 RAID & File System .............................................................................. 26
3.2.2 Network Setup .................................................................................... 37
3.2.3 Management ....................................................................................... 52
3.2.4 System ................................................................................................. 56
3.3 Management Server ...................................................................................... 68
4. Application Installation ............................................................................................ 69
4.1 NuClient ......................................................................................................... 69
4.1.1 Install on Windows OS ........................................................................ 69
4.1.2 Install on MAC OS ................................................................................ 77
5. Log in ........................................................................................................................ 83
6. Log out ..................................................................................................................... 85
7. Exit ........................................................................................................................ 87
8. Version information ............................................................................................. 88
9. Interface Overview ............................................................................................... 90
9.1 Menu– The Global .......................................................................................... 91
9.2. Live View ....................................................................................................... 92
9.3. Playback ........................................................................................................ 93
9.4. Config ............................................................................................................ 94
9.5 Graphic Icon on Tree list ................................................................................. 95
10. Settings ................................................................................................................. 97
10.1 Physical Configuration .................................................................................. 98
10.1.1. Configure Management Server ...................................................... 100
10.1.2. Configure Recording Server ........................................................... 121
10.1.3. Configure Metadata Server ............................................................ 171
10.1.4 Configure Matrix ............................................................................. 214
10.2. System Configuration ................................................................................ 224
10.2.1. User Group ..................................................................................... 226
2
Page 3

NUUO Crystal 2.0 User Manual
10.2.2. Role ................................................................................................ 240
10.2.3. Schedule ......................................................................................... 260
10.2.4. Layout ............................................................................................. 282
11 Application Configuration .................................................................................. 290
11.1 Image Fusion .............................................................................................. 290
11.1.1. Create an Image Fusion.................................................................. 292
11.1.2 Delete An Image Fusion .................................................................. 298
11.2 E-Map ......................................................................................................... 299
11.2.1. Create an E-Map ............................................................................ 302
11.2.2 Delete an E-Map ............................................................................. 307
11.3 View ........................................................................................................... 308
11.3.1 Add A View ...................................................................................... 310
11.3.2 Add Cameras to View ...................................................................... 312
11.3.3 Delete a Camera from View ............................................................ 315
11.3.4 Add A View Group ........................................................................... 317
11.3.5 Add A View Tour .............................................................................. 320
11.3.6 Duplicate A View ............................................................................. 323
11.3.7 Search A View ................................................................................. 326
11.3.8 Delete A View .................................................................................. 328
11.3.9 Assign stream profile ...................................................................... 330
11.4 Client Configuration ................................................................................... 333
11.4.1. The General Menu ......................................................................... 335
11.4.2 The User Interface Menu ................................................................ 338
11.4.3 The Function Menu ......................................................................... 350
12. Live View ............................................................................................................ 361
12.1 View List ..................................................................................................... 363
12.2 Content List ................................................................................................ 363
12.2.1 Watch Live Video ............................................................................. 363
12.2.2 Toolbar Content .............................................................................. 363
12.3 PTZ Panel .................................................................................................... 370
12.3.1 PTZ ................................................................................................... 370
12.4 I/O Control Panel ........................................................................................ 377
12.5 Content Properties Panel ........................................................................... 378
12.6 Event List .................................................................................................... 380
12.7 I/O .............................................................................................................. 381
12.8 View Panel .................................................................................................. 381
12.9 Status Bar ................................................................................................... 381
12.10 Toolbar ..................................................................................................... 382
3
Page 4

NUUO Crystal 2.0 User Manual
12.11 Fisheye Camera Dewarp .......................................................................... 383
12.11.1 NUUO Fisheye Camera Dewarp .................................................... 383
12.12 Connection Settings ................................................................................. 389
13. Playback ............................................................................................................. 390
13.1 Content Properties Panel ........................................................................... 390
13.2 Content List ................................................................................................ 391
13.2.1 Watch Recorded Video.................................................................... 391
13.2.2 Toolbar Content .............................................................................. 391
13.3 Event List .................................................................................................... 392
13.4 Search Panel ............................................................................................... 392
13.4.1 Motion Search ................................................................................. 392
13.5 Timeline ...................................................................................................... 396
13.5.1 Search in Timeline ........................................................................... 396
13.6 Time Navigation / View Toolbar ................................................................. 402
13.6.1 The Playback Control Panel ............................................................. 402
13.6.2 The Playback Control ...................................................................... 403
13.6.3 The Date / Time Display .................................................................. 404
13.6.4 Event browsing control ................................................................... 404
13.6.5 The Toolbar Icons ............................................................................ 405
13.7 Export Video ............................................................................................... 406
13.8 Snapshot / Print ......................................................................................... 408
14. Log Export .......................................................................................................... 409
15. Backup ................................................................................................................ 411
16. Export Config ...................................................................................................... 415
17. Import Config ..................................................................................................... 418
18. Video Wall .......................................................................................................... 422
18.1 Matrix Application ...................................................................................... 422
18.2 Matrix Console ........................................................................................... 424
18.2.1 Add camera to Matrix ..................................................................... 427
18.2.2 Add view to Matrix .......................................................................... 428
18.3 Matrix Profile List ....................................................................................... 429
19. Help .................................................................................................................... 434
4
Page 5
NUUO Crystal 2.0 User Manual
1. Introduction
Crystal 2.0 is a Linux-based enterprise solution. It is designed for the management of
large projects with multiple servers, or single server with high throughput megapixel
recording.
Crystal 2.0 provides centralized management for unlimited devices, servers, users,
with the unlimited channels of video wall display for centralized viewing(Ultimate
level only), to help users manage a big system efficiently.
There are two levels of the camera channel—Ultimate and Enterprise. Ultimate level
support full function of Crystal 2.0, and Enterprise level support full functions except
for the video wall application.
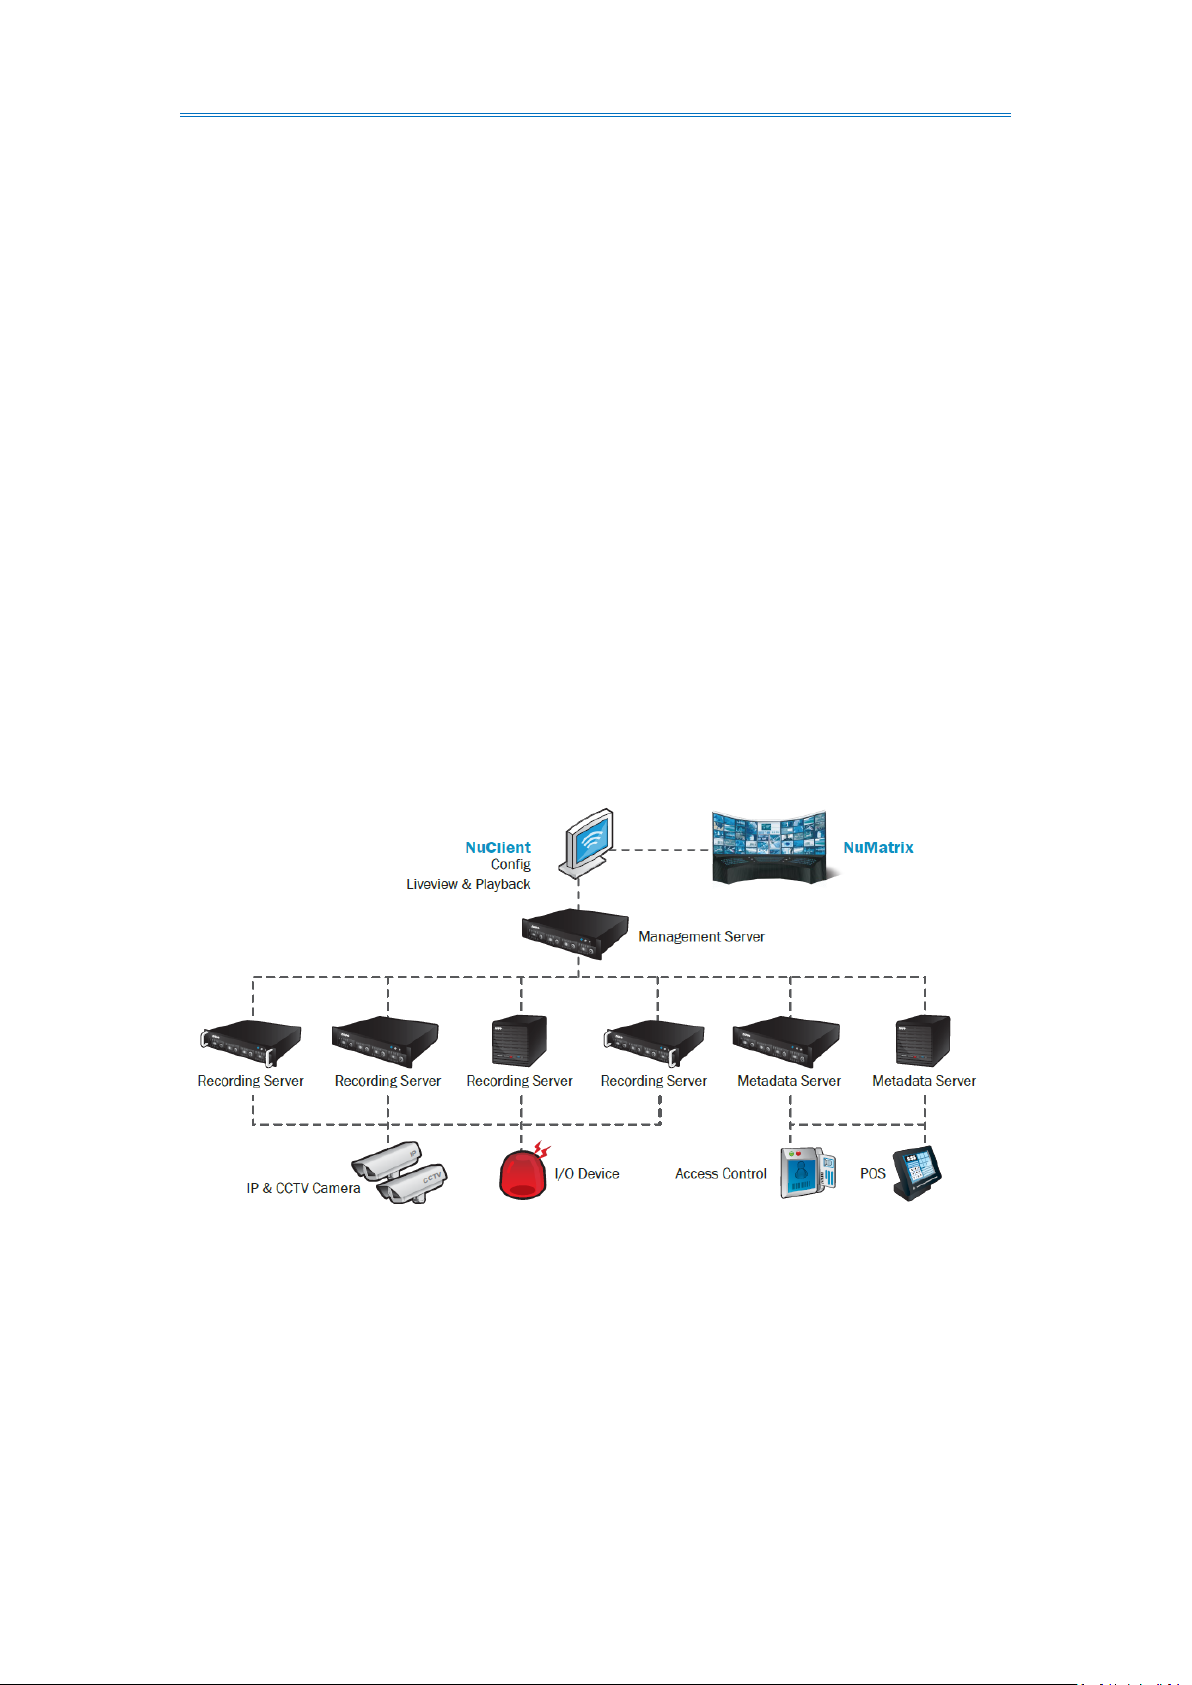
The following is the system structure.
5
Page 6

NUUO Crystal 2.0 User Manual
Component
Description
Management Server
The Management Server controls and
configures the Recording Server and the
Metadata Server.
Recording Server
The Recording Server controls the cameras.
Metadata Server
The Metadata Server controls third-party
device such as a POS server, Access Control
server, and so on.
NuClient
The software that login Management Server
for Live View (instant video playback),
Playback (recorded video playback) and Config
(system configuration).
NuMatrix (Ultimate only)
The software that control by NuClient and
display unlimited number of live viewing
videos.
The whole Crystal 2.0 system contains the following components:
6
Page 7

NUUO Crystal 2.0 User Manual
The electronic components within the unit can be damaged by Electrostatic Discharge
(ESD). Please take precautions at all times when handling the unit or its
sub-assemblies.
To configure the unit, you must install the software onto a desktop/ laptop running
Windows XP-SP3 32bit, Windows 7 32/64bit, Mac OS X v10.6/10.7
2. Installation
2.1 Installation Process
Step 1: Unpack the Unit
This package contains the following items:
The unit
Quick Start Guide
Screws for disk drives
Key
Power cord
Warranty card
CD with Install Wizard, NuClient and Offline License Tool application, user
manual, and quick start guide
7
Page 8
NUUO Crystal 2.0 User Manual
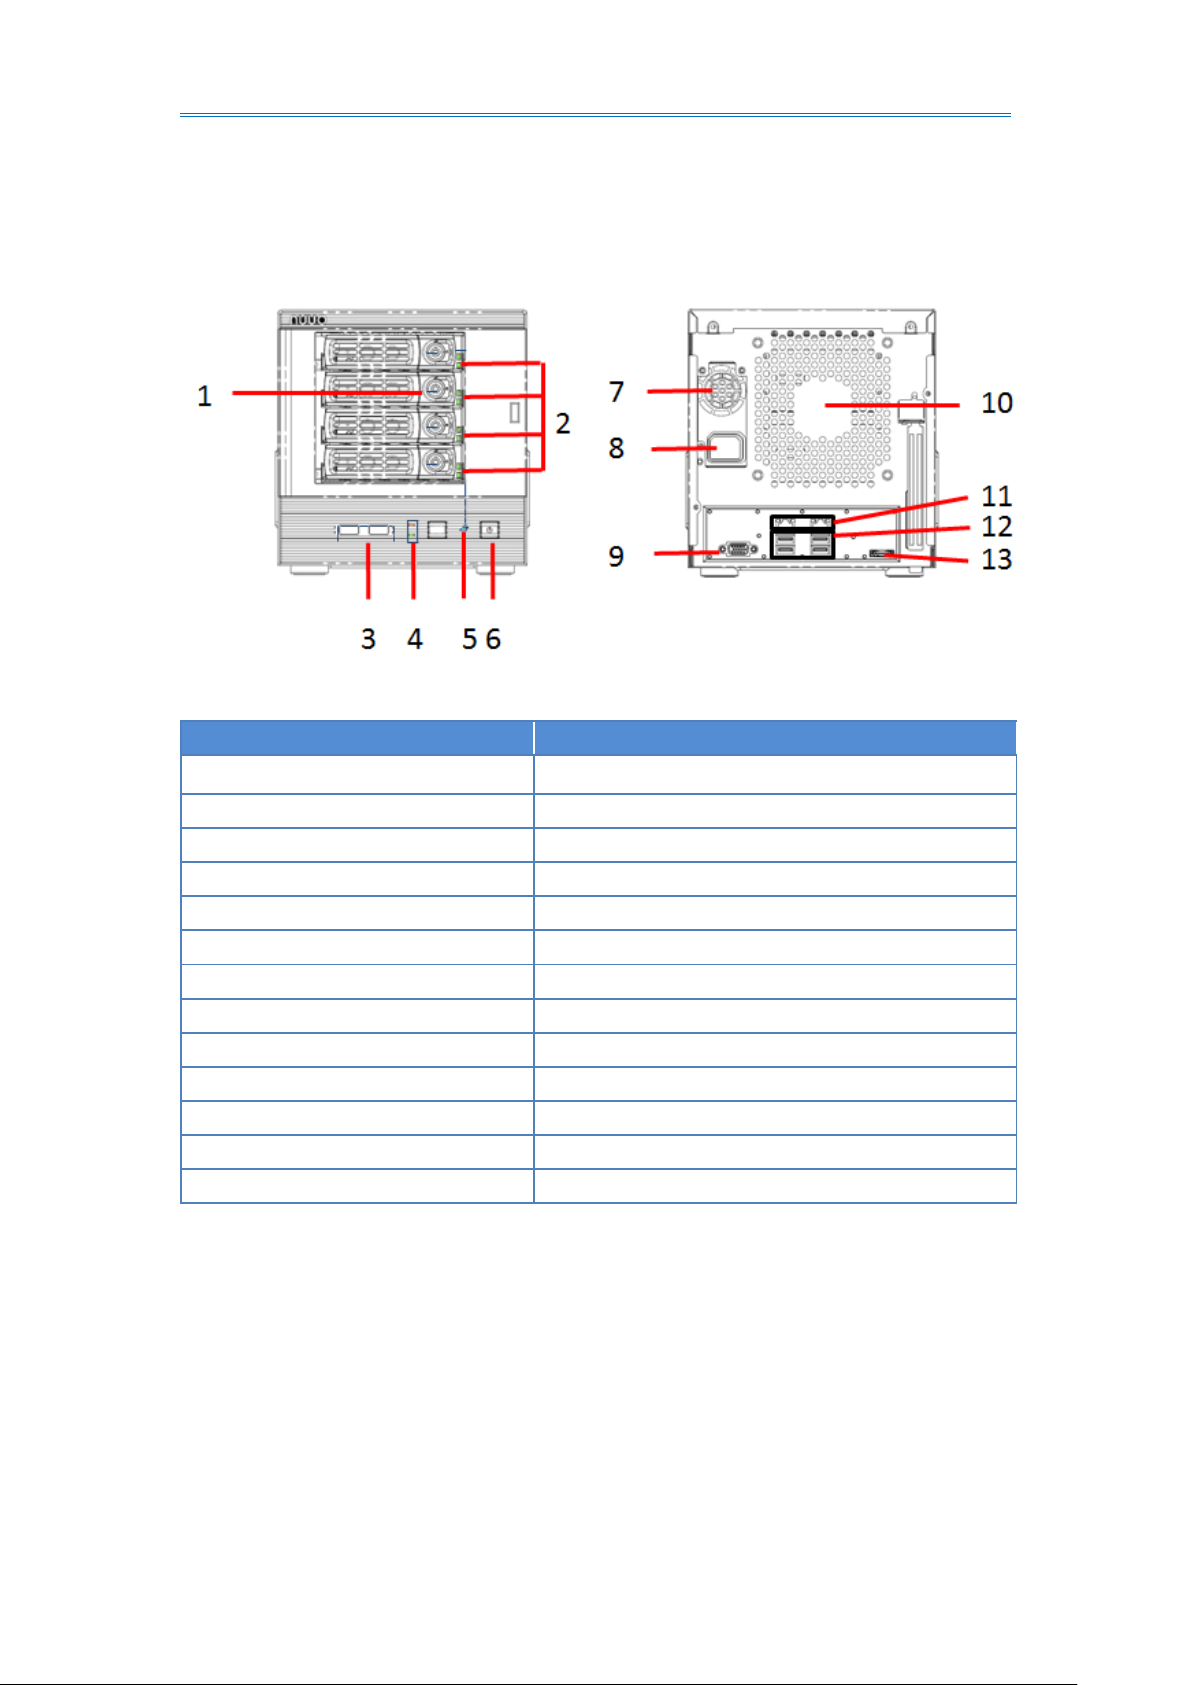
Setting
Description
1
Key Lock
2
LED Indicators: HDD1-4
3
USB x2
4
LED Indicators: LAN1-2
5
LED Indicators: Power
6
Power Button
7
PSU Cooling Fan
8
Power Connector
9
VGA
10
System Cooling Fan
11
Gigabit LAN x 2
12
USB x 4
13
eSATA Connector
Unit front/rear view
(CT-4000: Tower)
8
Page 9
NUUO Crystal 2.0 User Manual
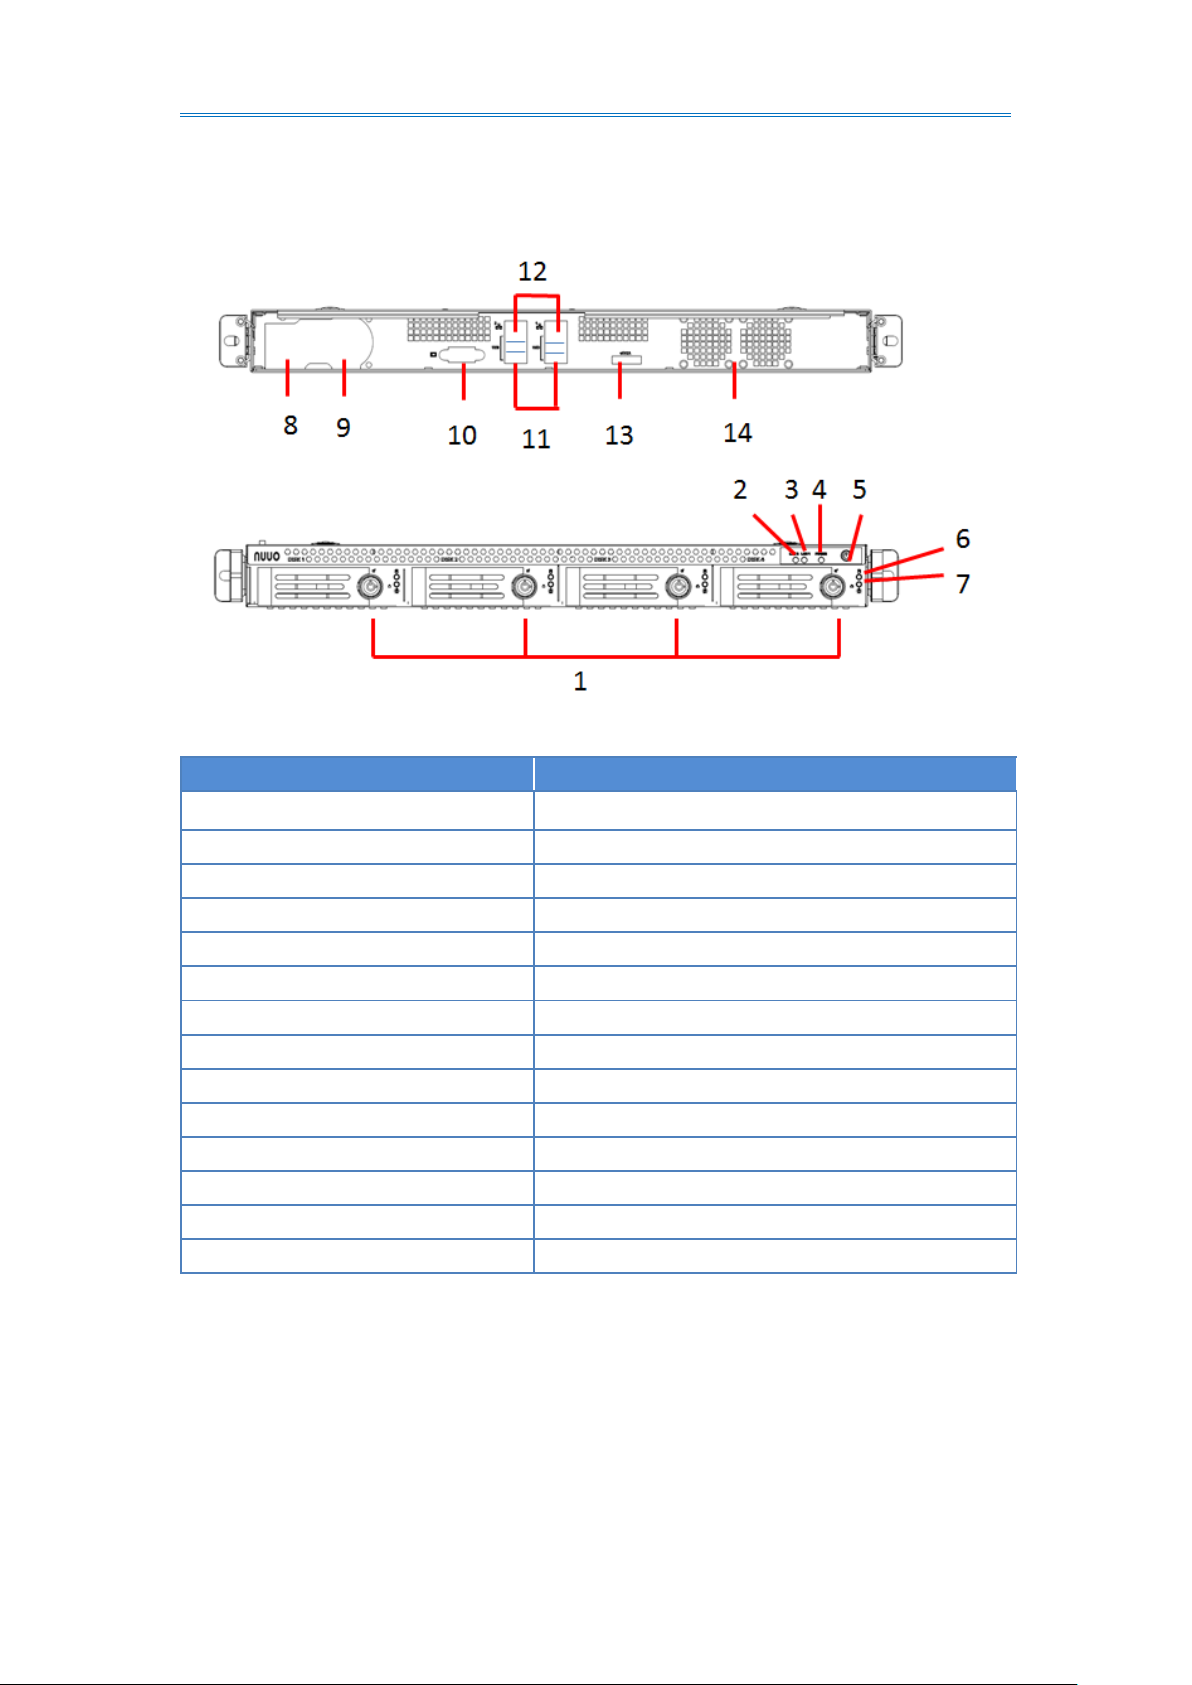
Setting
Description
1
Key Lock
2
LED Indicators: LAN2
3
LED Indicators: LAN1
4
Power LED
5
Power Button
6
HDD Power LED
7
HDD Access LED
8
Power Connector
9
PSU Cooling Fan
10
VGA
11
USB x 4
12
Gigabit LAN x 2 (LAN2 / LAN1)
13
eSATA Connector
14
System Cooling Fan
(CT-4000R: 4 bay rackmount)
9
Page 10
NUUO Crystal 2.0 User Manual
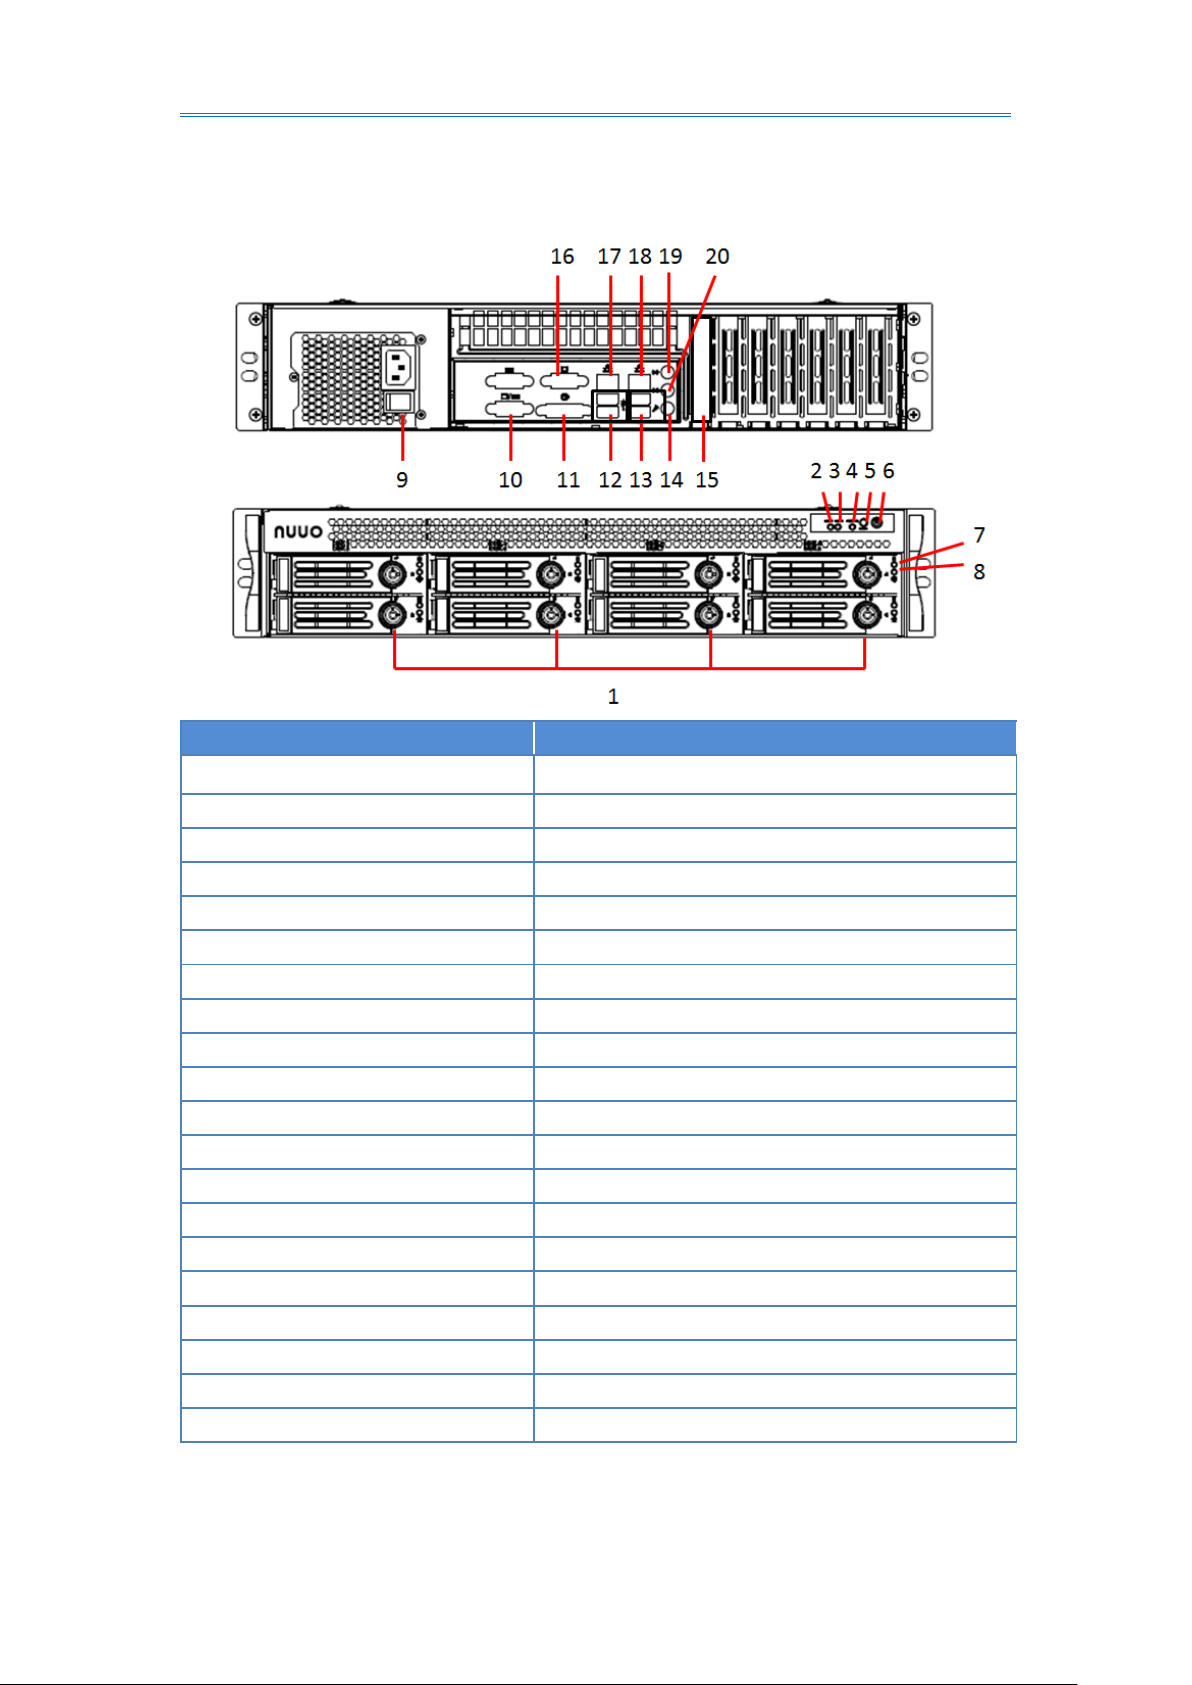
Setting
Description
1
Key Lock
2
LED Indicators: LAN2
3
LED Indicators: LAN1
4
Power LED
5
Reset Button
6
Power Button
7
HDD Power LED
8
HDD Access LED
9
Power Supply Switch
10
COM port
11
DVI
12
USB 2.0 x 2
13
USE 3.0 x 2
14
Microphone in
15
eSATA Connector
16
VGA
17
LAN 2
18
LAN 1
19
Line-in
20
Line-out
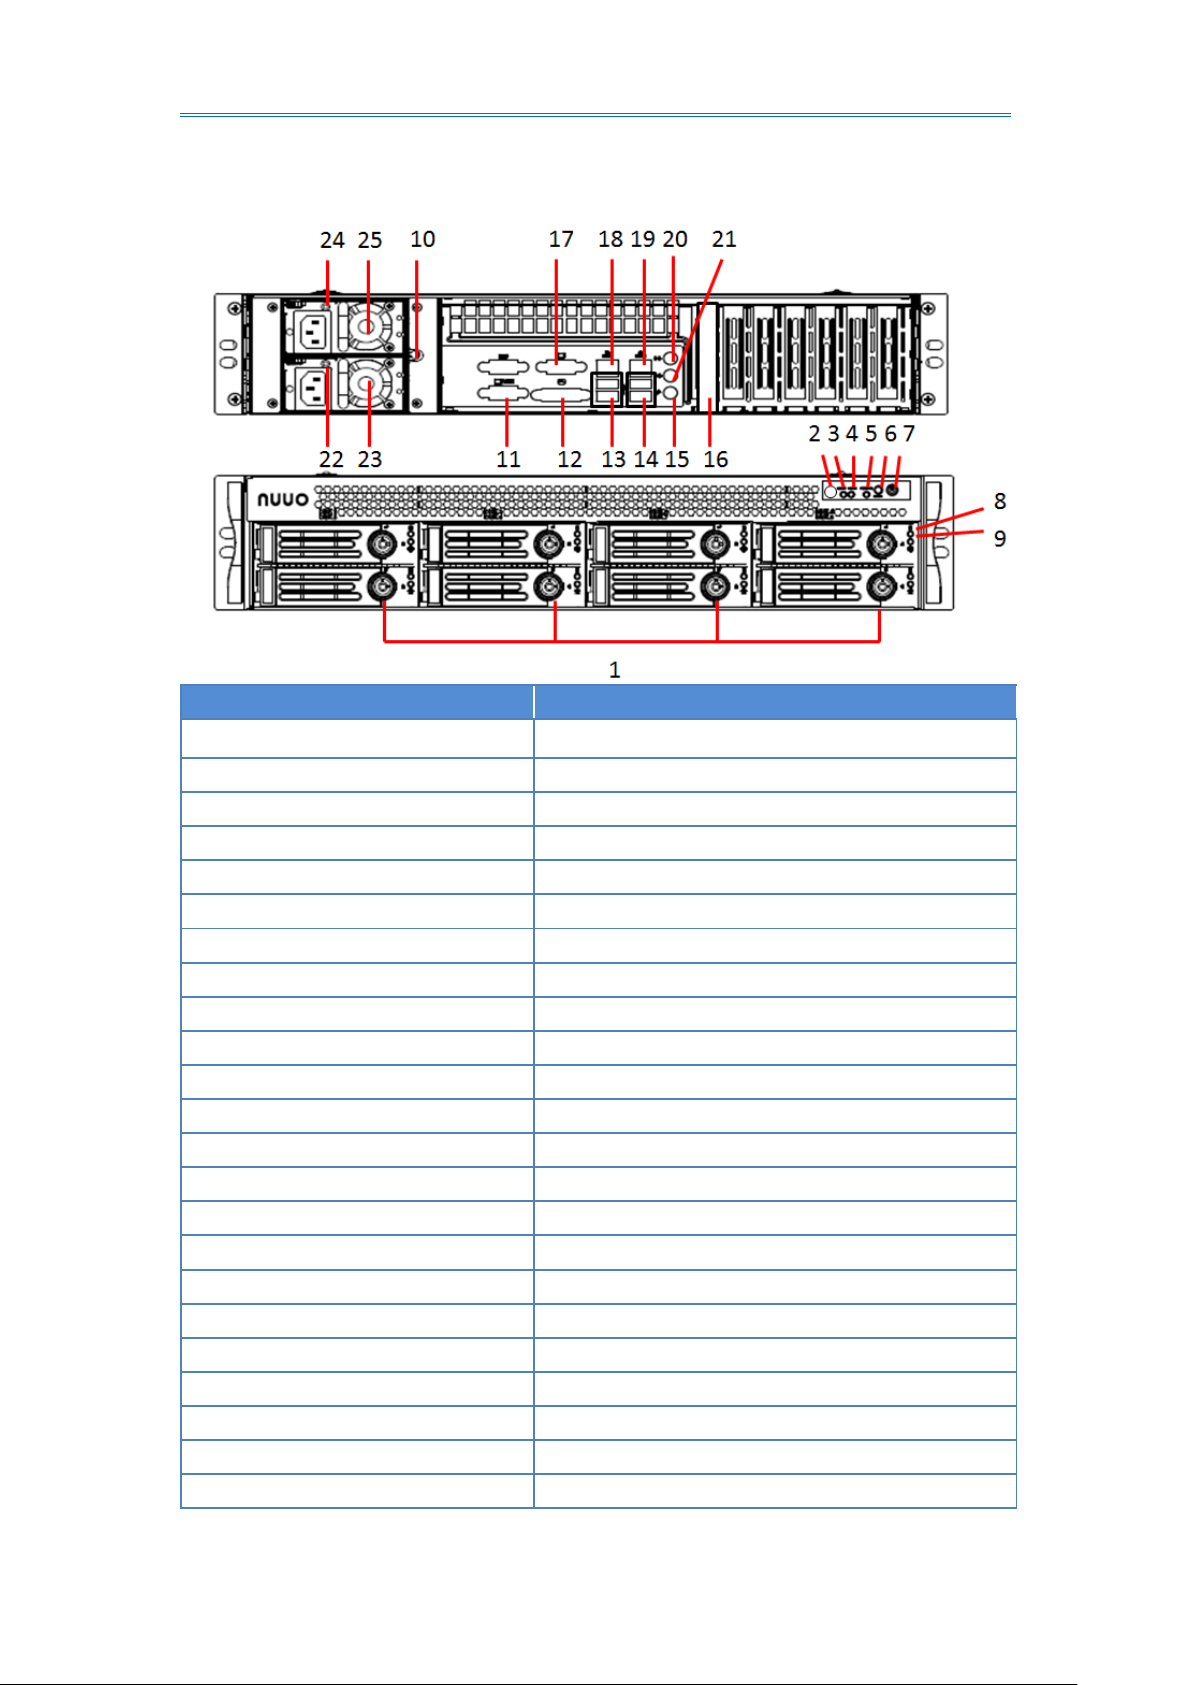
(CT-8000R:8 bay rackmount)
10
Page 11
NUUO Crystal 2.0 User Manual
Setting
Description
1
Key Lock
2
Power Fail LED
3
LED Indicators: LAN2
4
LED Indicators: LAN1
5
Power LED
6
Reset Button
7
Power Button
8
HDD Power LED
9
HDD Access LED
10
Power Supply Mute Button
11
COM port
12
DVI
13
USB 2.0 x 2
14
USE 3.0 x 2
15
Microphone in
16
eSATA Connector
17
VGA
18
LAN 2
19
LAN 1
20
Line-in
21
Line-out
22
LED Indicators: PSU1
23
PSU 2
(CT-8000RP: 8 bay rackmount with redundant power)
11
Page 12
NUUO Crystal 2.0 User Manual
24
LED Indicators: PSU2
25
PSU1
If there are multiple networks at your facility, note the network to which you connect
the unit. You will need this information during the setup process. Please also enable
the DHCP function within the network, as the unit will retrieve an IP address through
DHCP by default.
Step 2: Install Hard Drives
Refer to compatibility list and install HDDs. For optimal performance consideration,
install disks with the same model and storage capacity. The available RAID level
depends on the amount of disks installed.
1. Open the lid on the front of the unit enclosure.
2. Pull a HDD tray from the enclosure. See the front view figure.
3. Carefully lock the disks into the HDD tray with screws and 3 screws for each disk.
We recommend locking the screws on the bottom of the disk, instead of the side of
tray. Put the HDD tray back once you finished.
Step 3: Connect to the Network
1. Attach one end of the network cable to the RJ45 network connection. See the rear
view figure.
2. Attach the other end of the network cable to your Ethernet hub or switch.
Step 4: Connect the Power
1. Attach the power cord to the power source.
2. Connect the power cord to the back of the unit enclosure. See the rear view figure.
3. On the front of the unit, press the power button. See the front view figure.
It takes about a minute for the unit to fully power up. Once it is powered up, the
Power Status LED turns blue. See the front view figure.
Step 5: Install the Software
1. Insert the CD into your CDROM.
2. Double-click Setup.exe to begin installation.
12
Page 13
NUUO Crystal 2.0 User Manual
3. Follow the instruction of Setup.exe, and click the Finish button to close the
installer.
Step 6: Set up the Unit
The software Installation Wizard performs the setup procedures on the unit.
Once a Crystal Titan, the hardware for the Management Server, is set up and
connects to the network, proceed to set up the management service. Launch the
Install Wizard to set up the management service for your surveillance network.
To set up the management service:
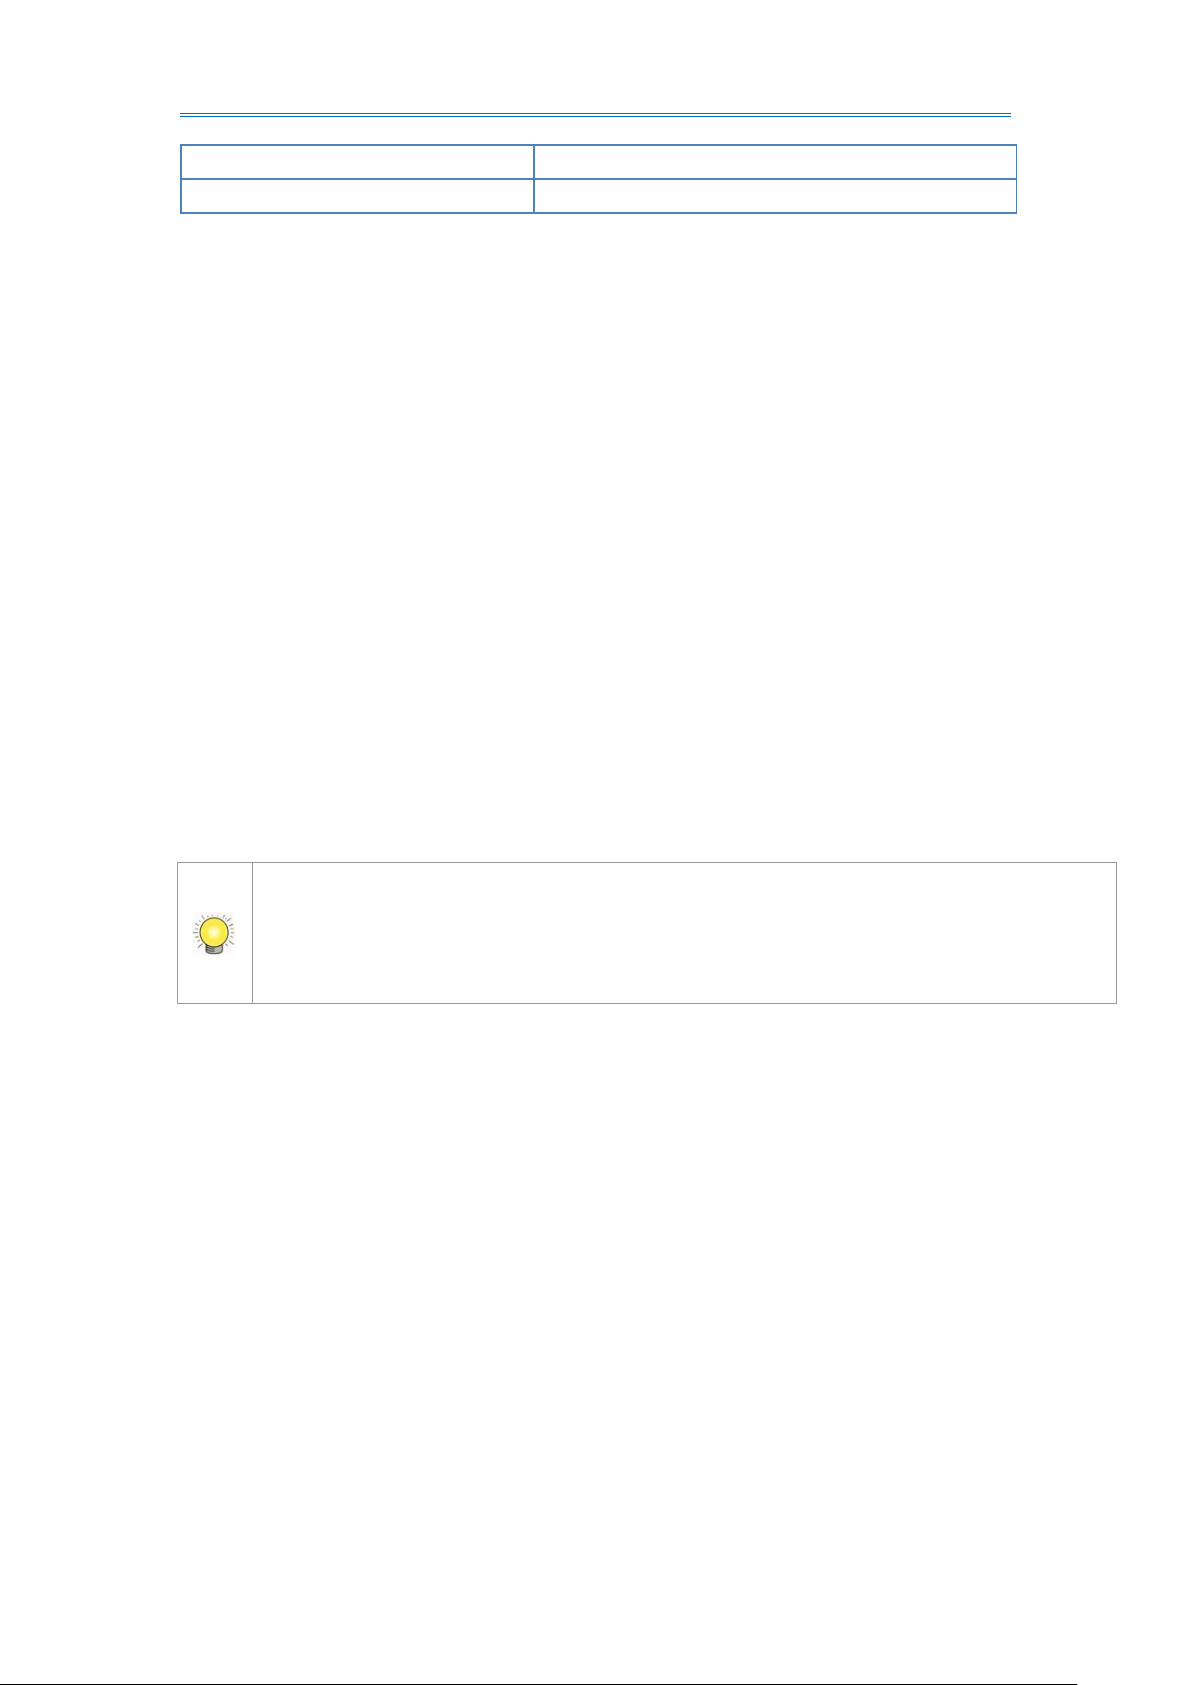
1. Go to Start and select NUUO Crystal Series
2. Run the executable file InstallationWizard.
The NUUO Crystal Installation Wizard opens.
13
Page 14
NUUO Crystal 2.0 User Manual
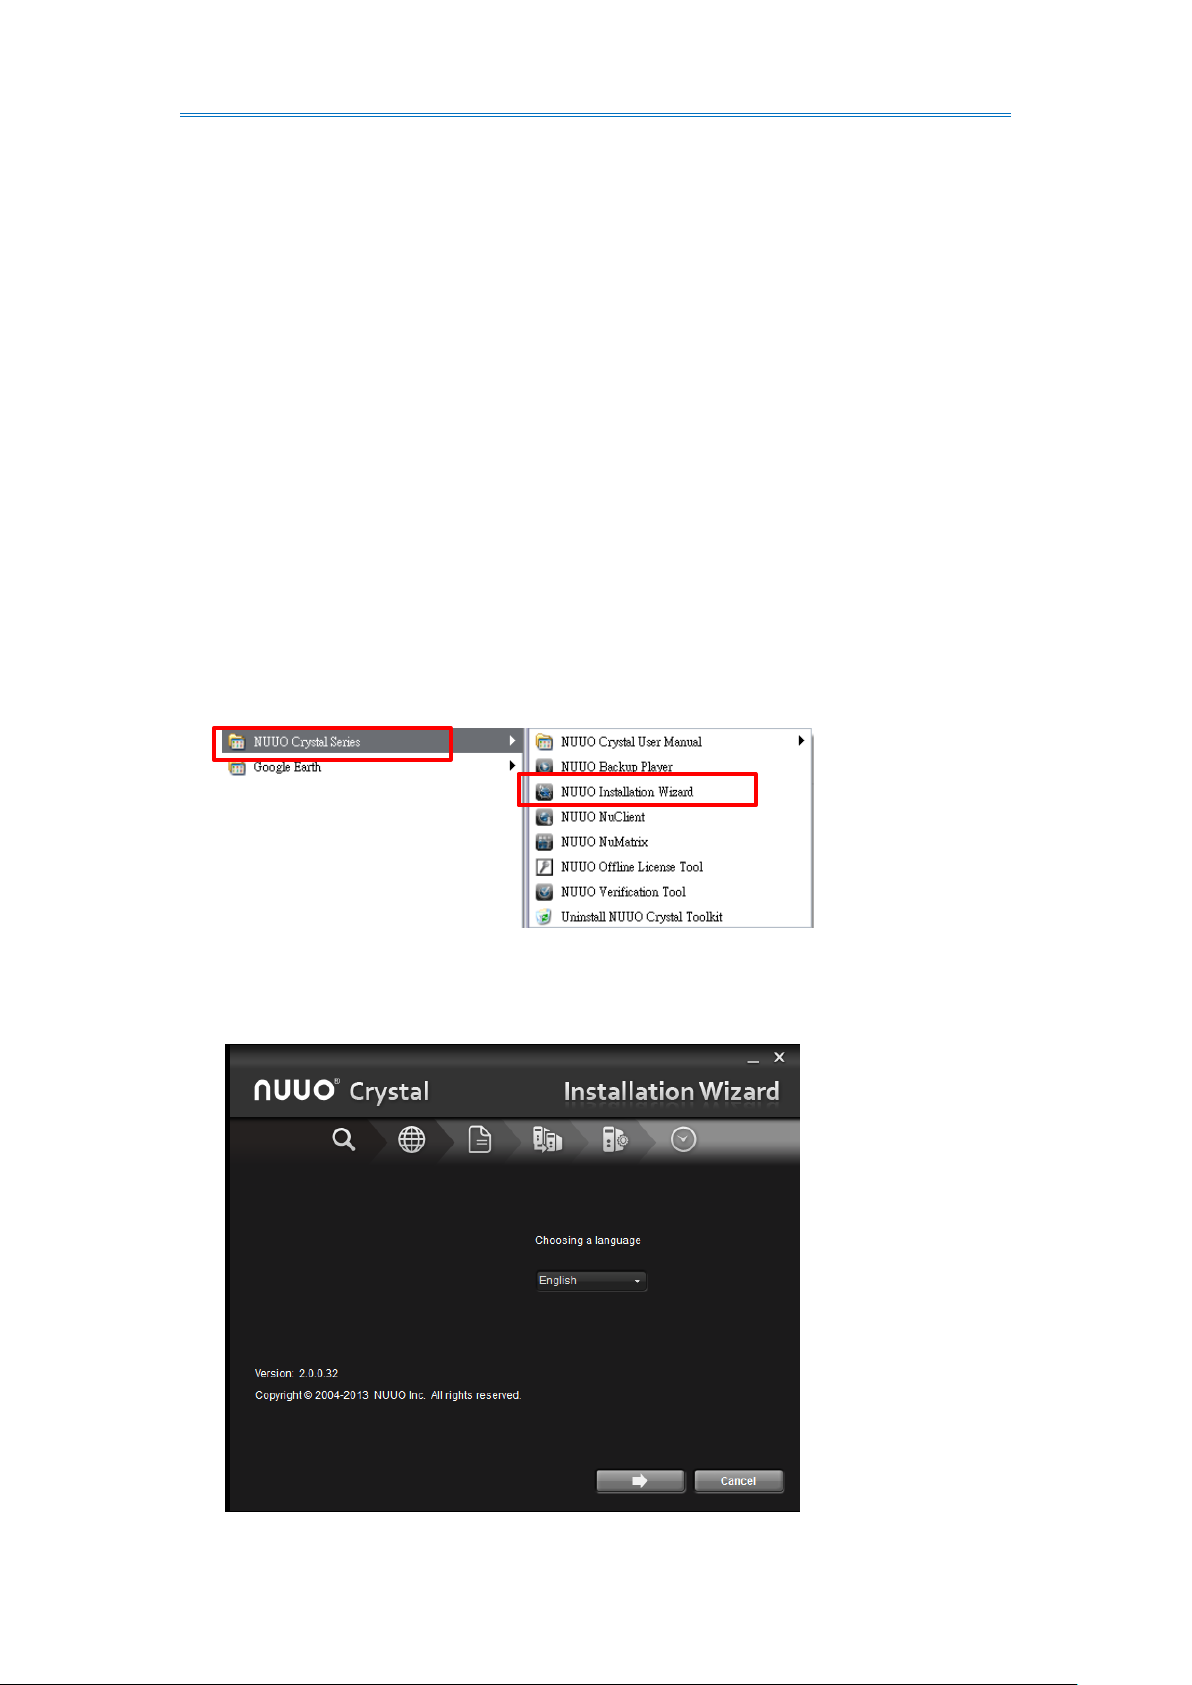
3. Select a language and click the button to proceed.
4. A Search page opens.
5. On the Search page, click the Search button to search for any Crystal Titan
within the network.
(Click the bottom-left question mark icon to see the tips.)
14
Page 15
NUUO Crystal 2.0 User Manual
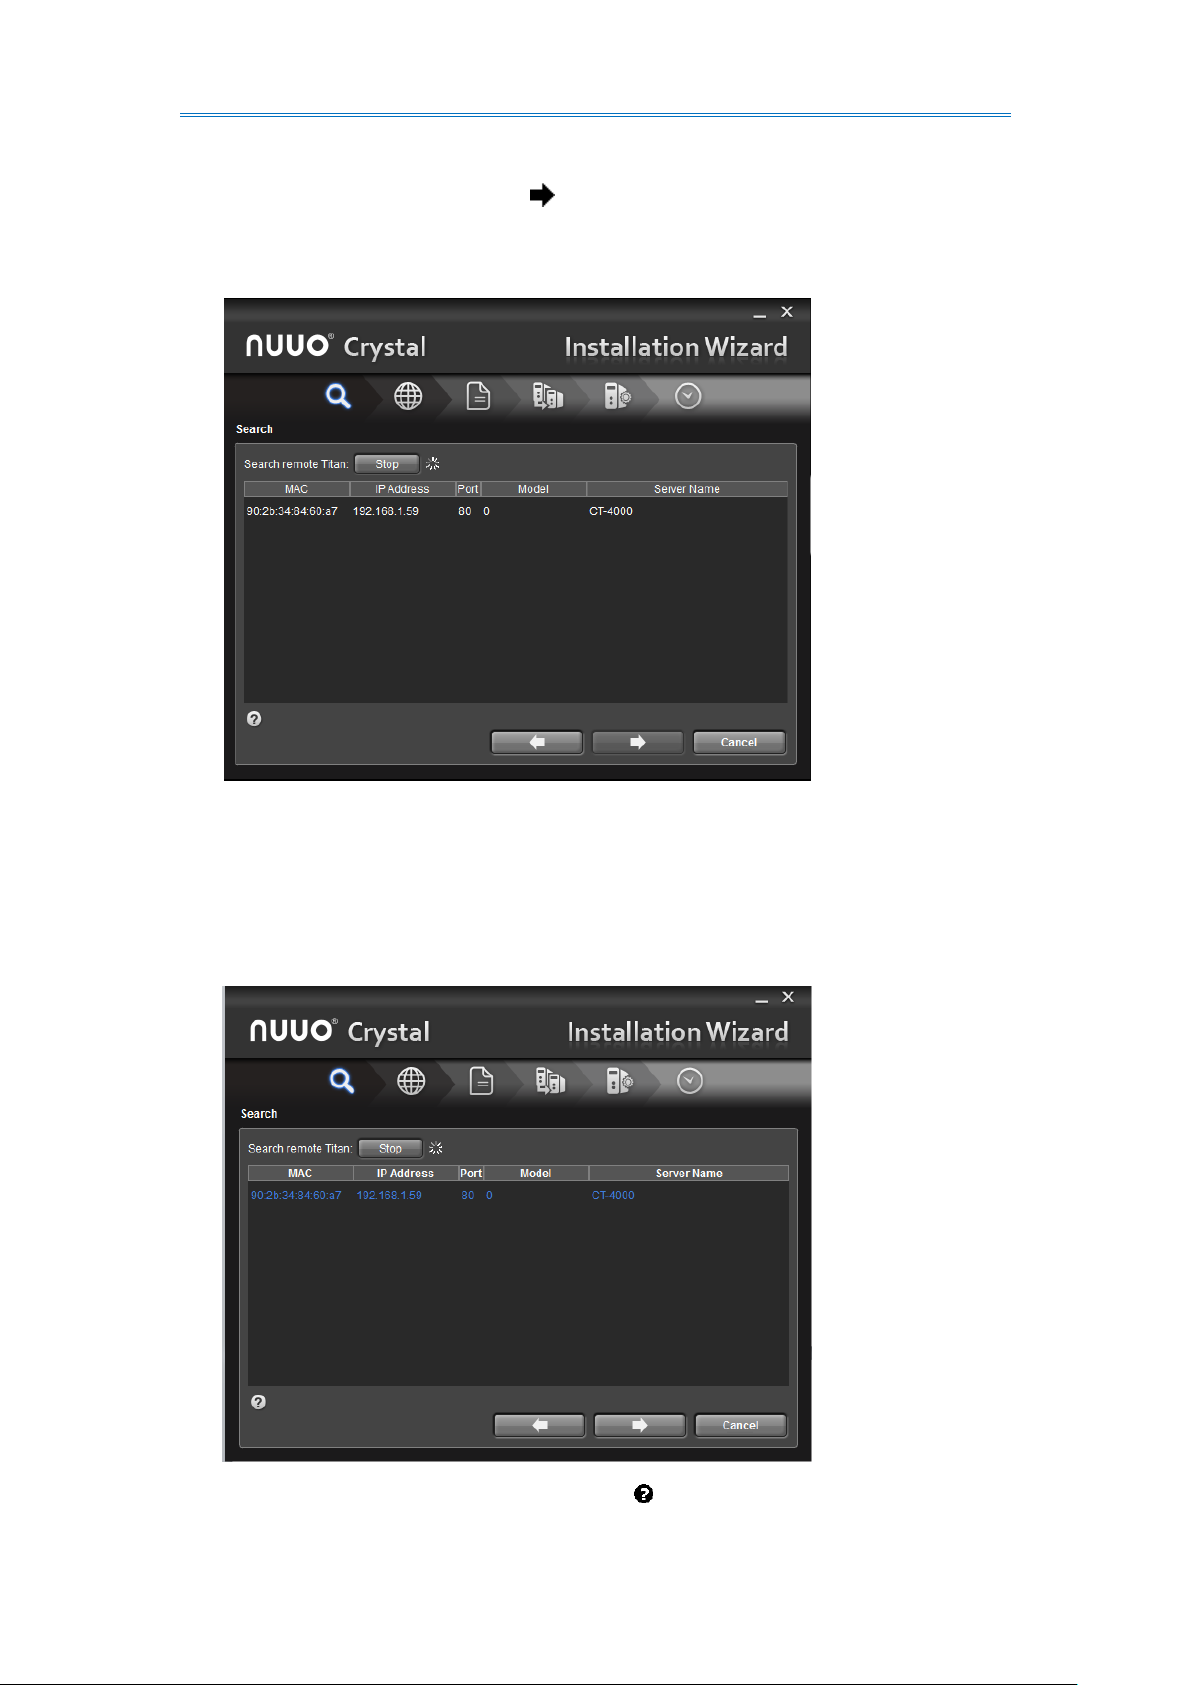
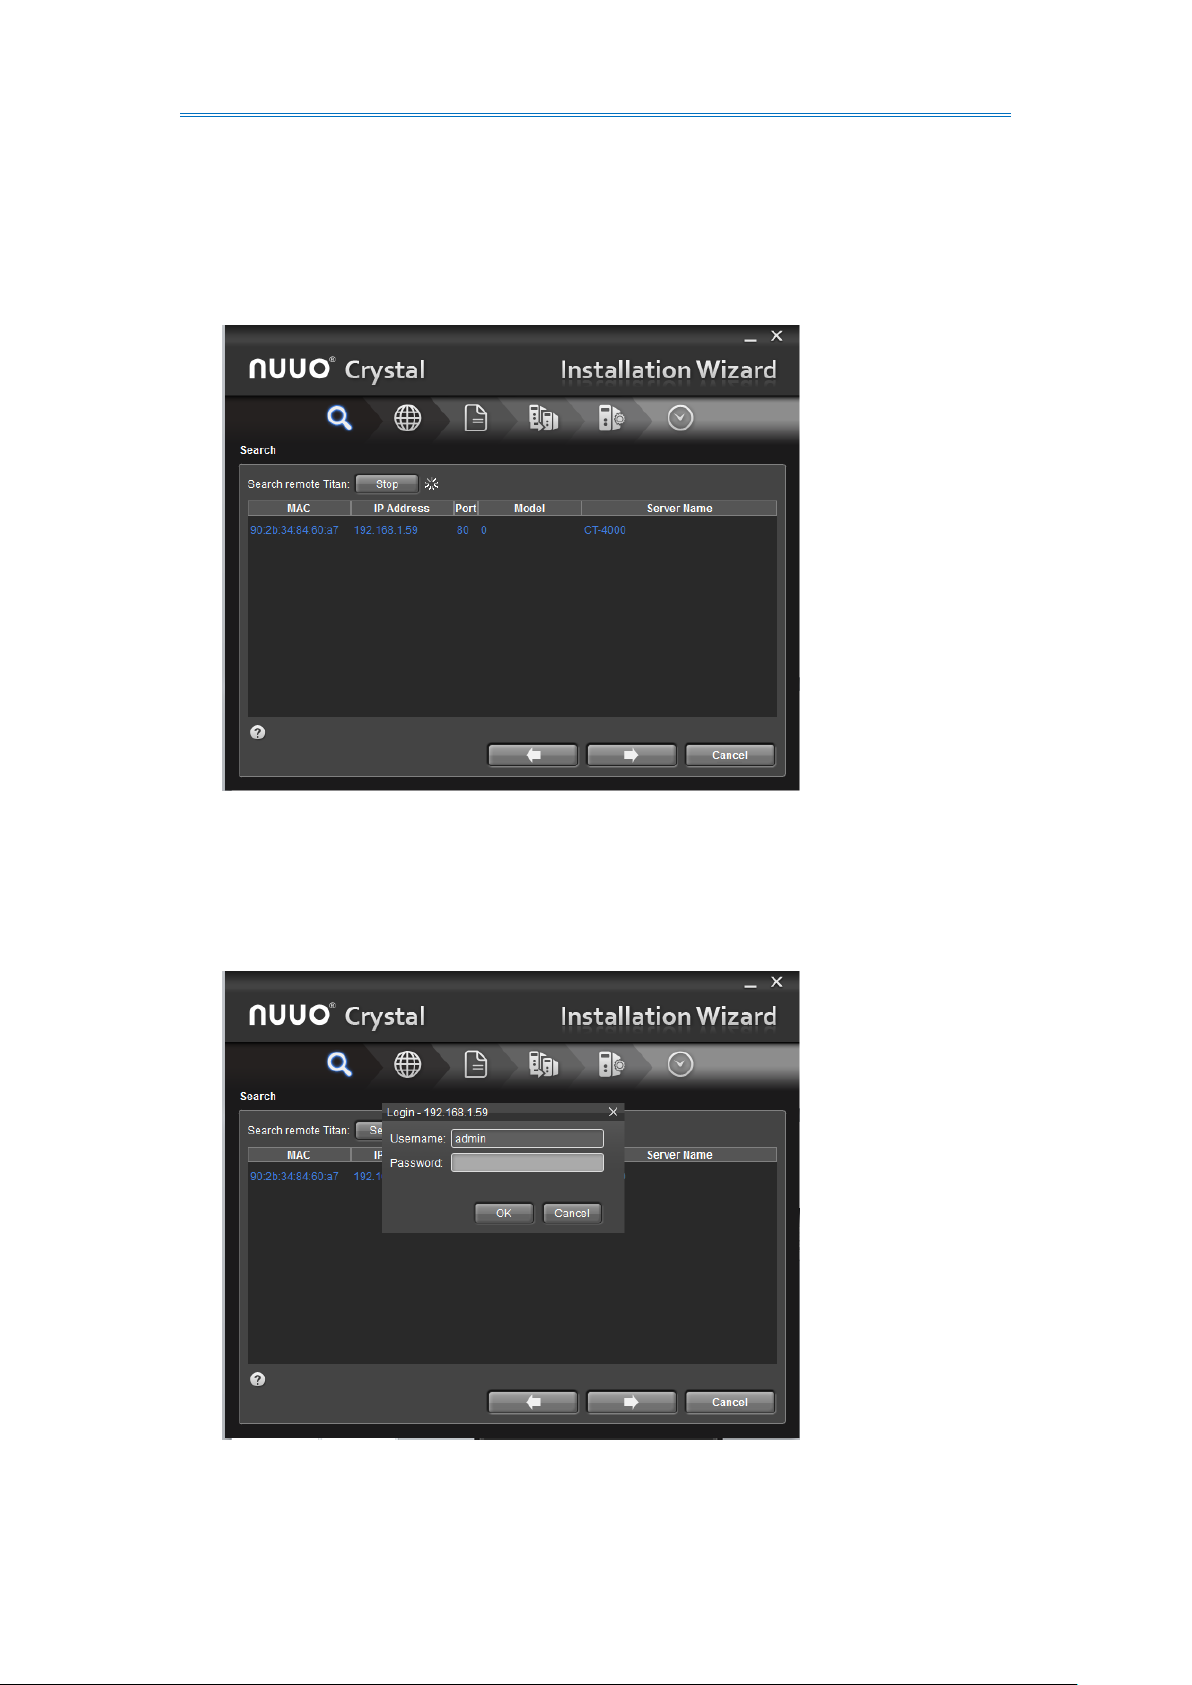
Any Crystal Titan discovered within the network will be displayed on the Search page,
with the information about the MAC address, IP address, port, model and the Crystal
Titan’s server name.
6. Double click the discovered Crystal Titan.
A Login dialog opens.
15
Page 16
NUUO Crystal 2.0 User Manual
For web default Port is 80(TCP).
7. Enter the username and the password. Click the OK button to submit. Then click
the button to proceed.
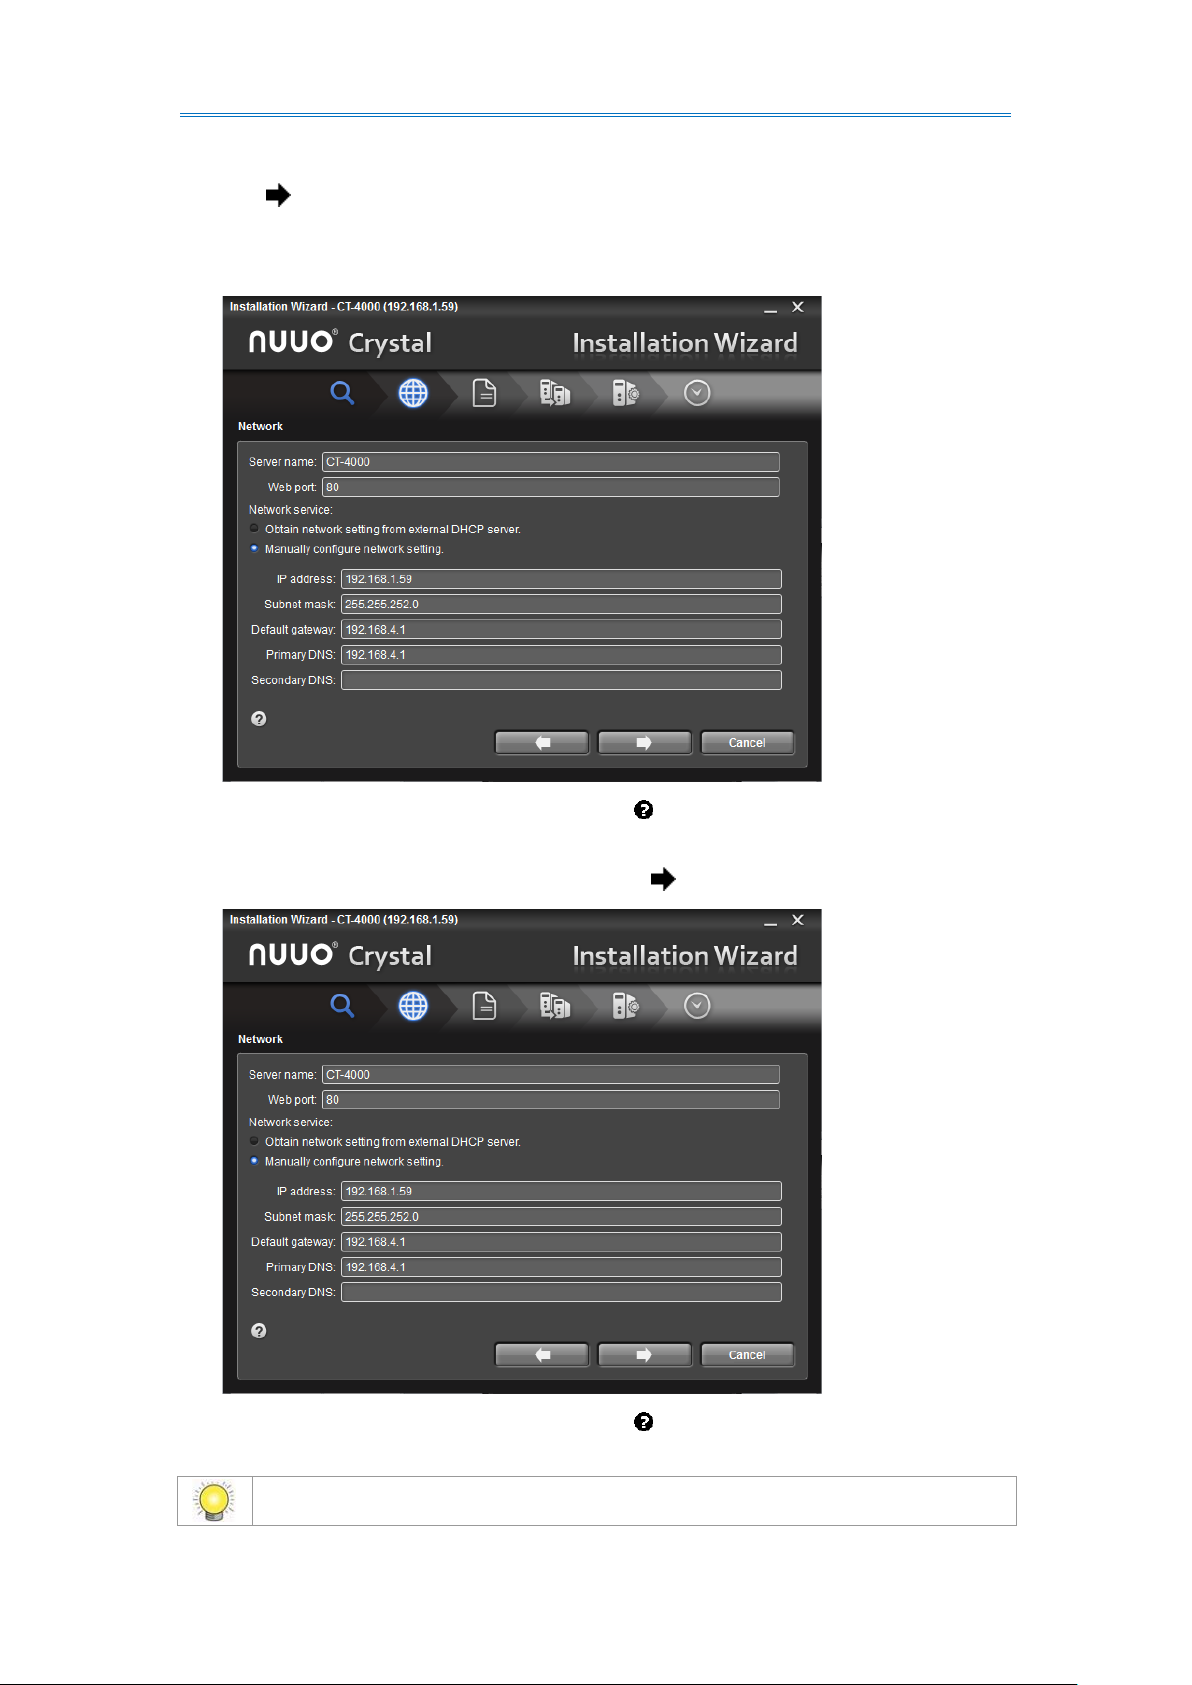
The Network page opens.
(Click the bottom-left question mark icon to see the tips.)
8. Make your network settings. Then click the button to proceed.
(Click the bottom-left question mark icon to see the tips.)
16
Page 17

NUUO Crystal 2.0 User Manual
Crystal Titan hardware password is for Crystal Titan hardware only.
A Modify Password* page then opens.
(Click the bottom-left question mark icon to see the tips.)
9. Modify the password to access the Crystal Titan hardware. Then click the
button to proceed.
17
Page 18
NUUO Crystal 2.0 User Manual
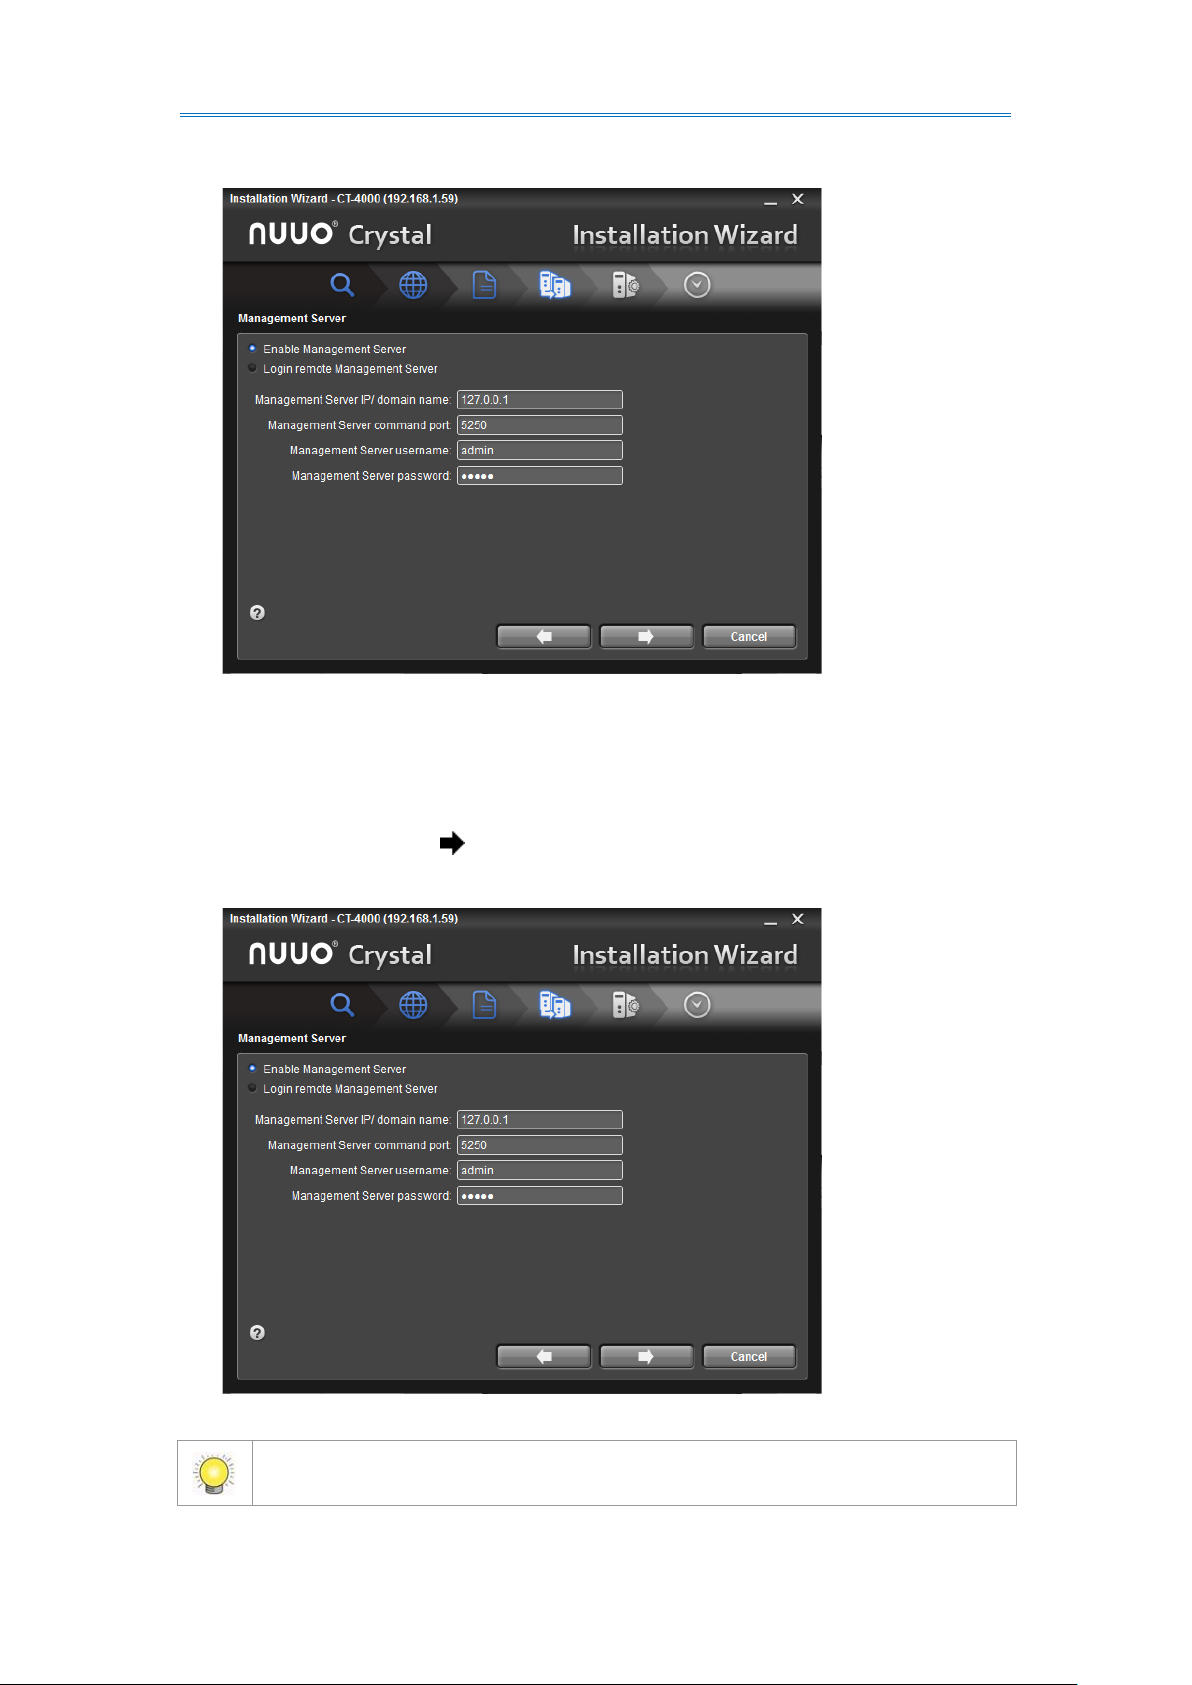
For Management Server default Port is 5250(TCP) and the server port should
be larger than 1000. Also the command port cannot be the same.
A Management Server page opens.
10. On the Management Server page, enable the management service on the
previously discovered Crystal Titan or login to another remote Management
Server. Then click the button to proceed.
18
Page 19
NUUO Crystal 2.0 User Manual
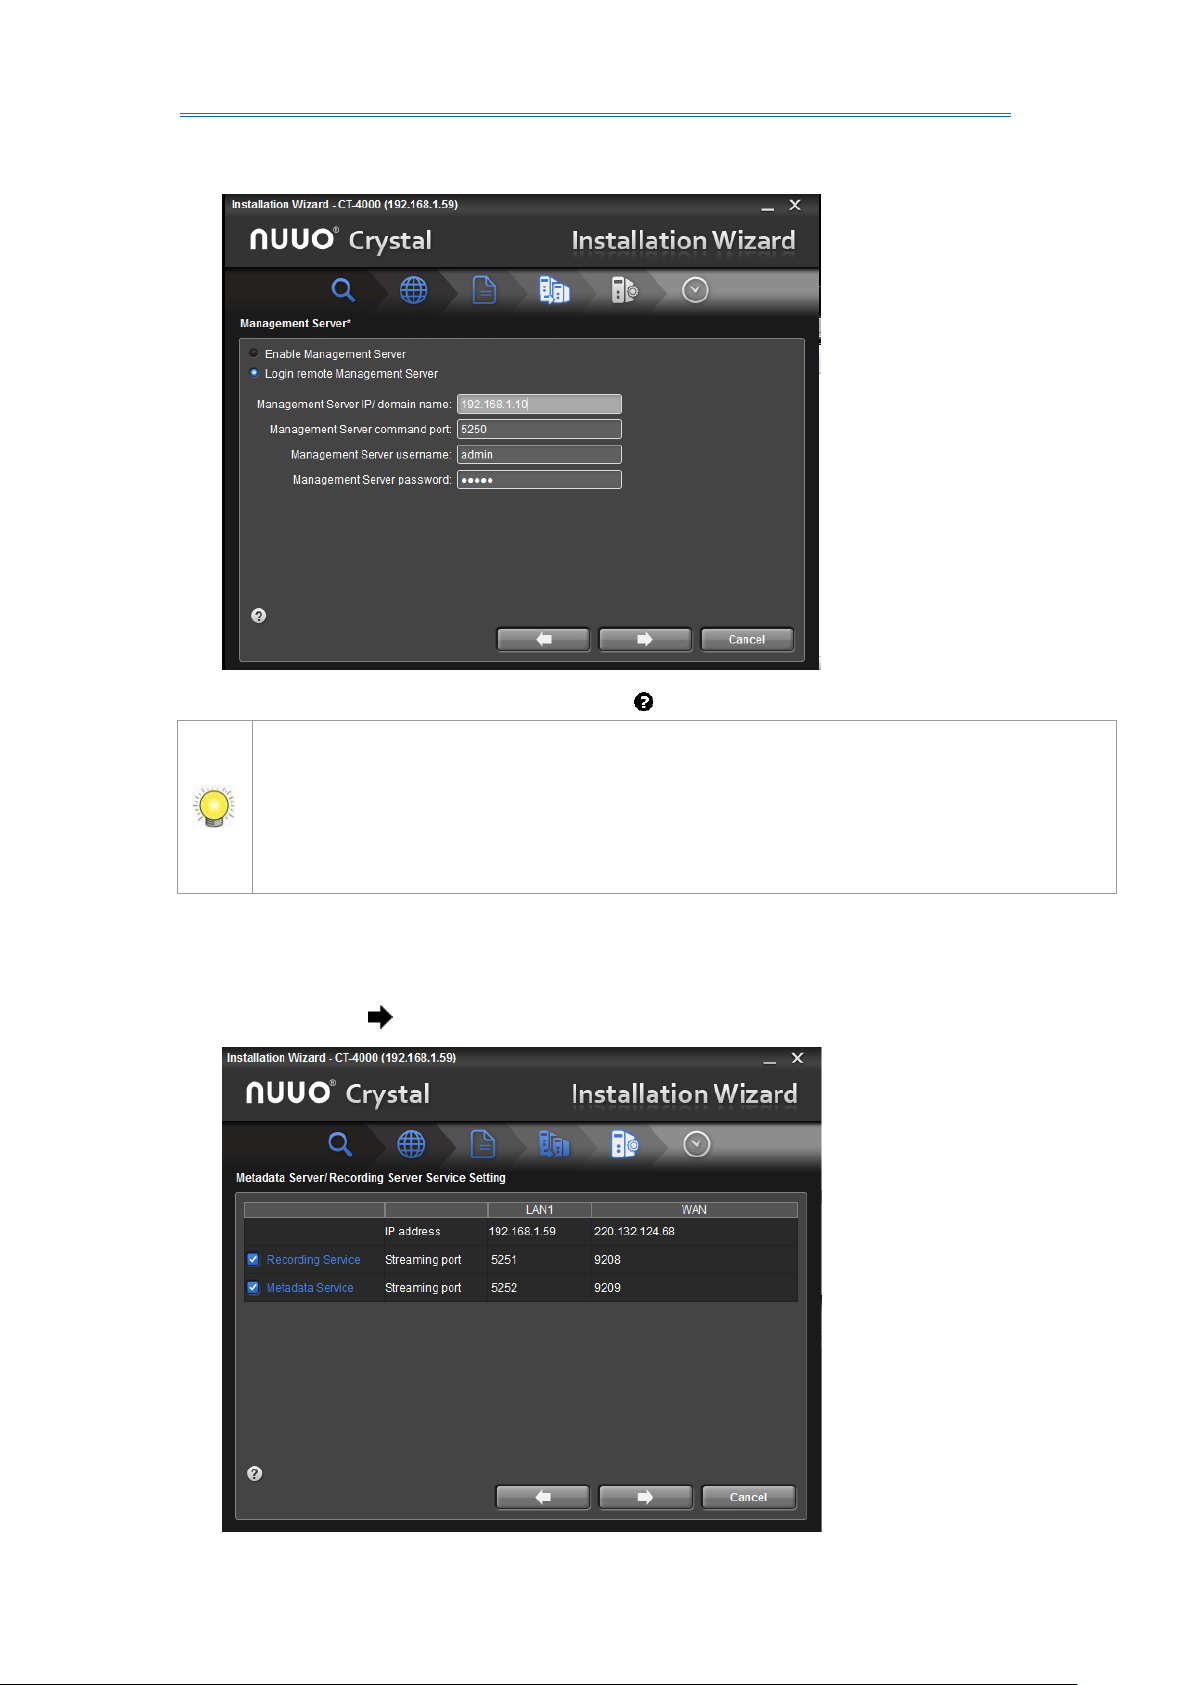
If you enable Management Server on the previously discovered Crystal Titan, the
Crystal Titan will assign as Management Server. If enable login remote Management
Server, you can enter Management Server IP, port, username and password to assign
the previously discovered Crystal Titan as recording server or Metadata Server to
Management Server.
(Click the bottom-left question mark icon to see the tips.)
The Metadata Server/Recording Server Service Setting* page opens.
11. Enable/disable the recording service or metadata service on the Crystal Titan.
Then click the button to proceed.
19
Page 20
NUUO Crystal 2.0 User Manual
For Recording Server default Port is 5251(TCP) and Metadata Server default
Port is 5252(TCP). The server port should be larger than 1000. Also the
command port cannot be the same.
(Click the bottom-left question mark icon to see the tips.)
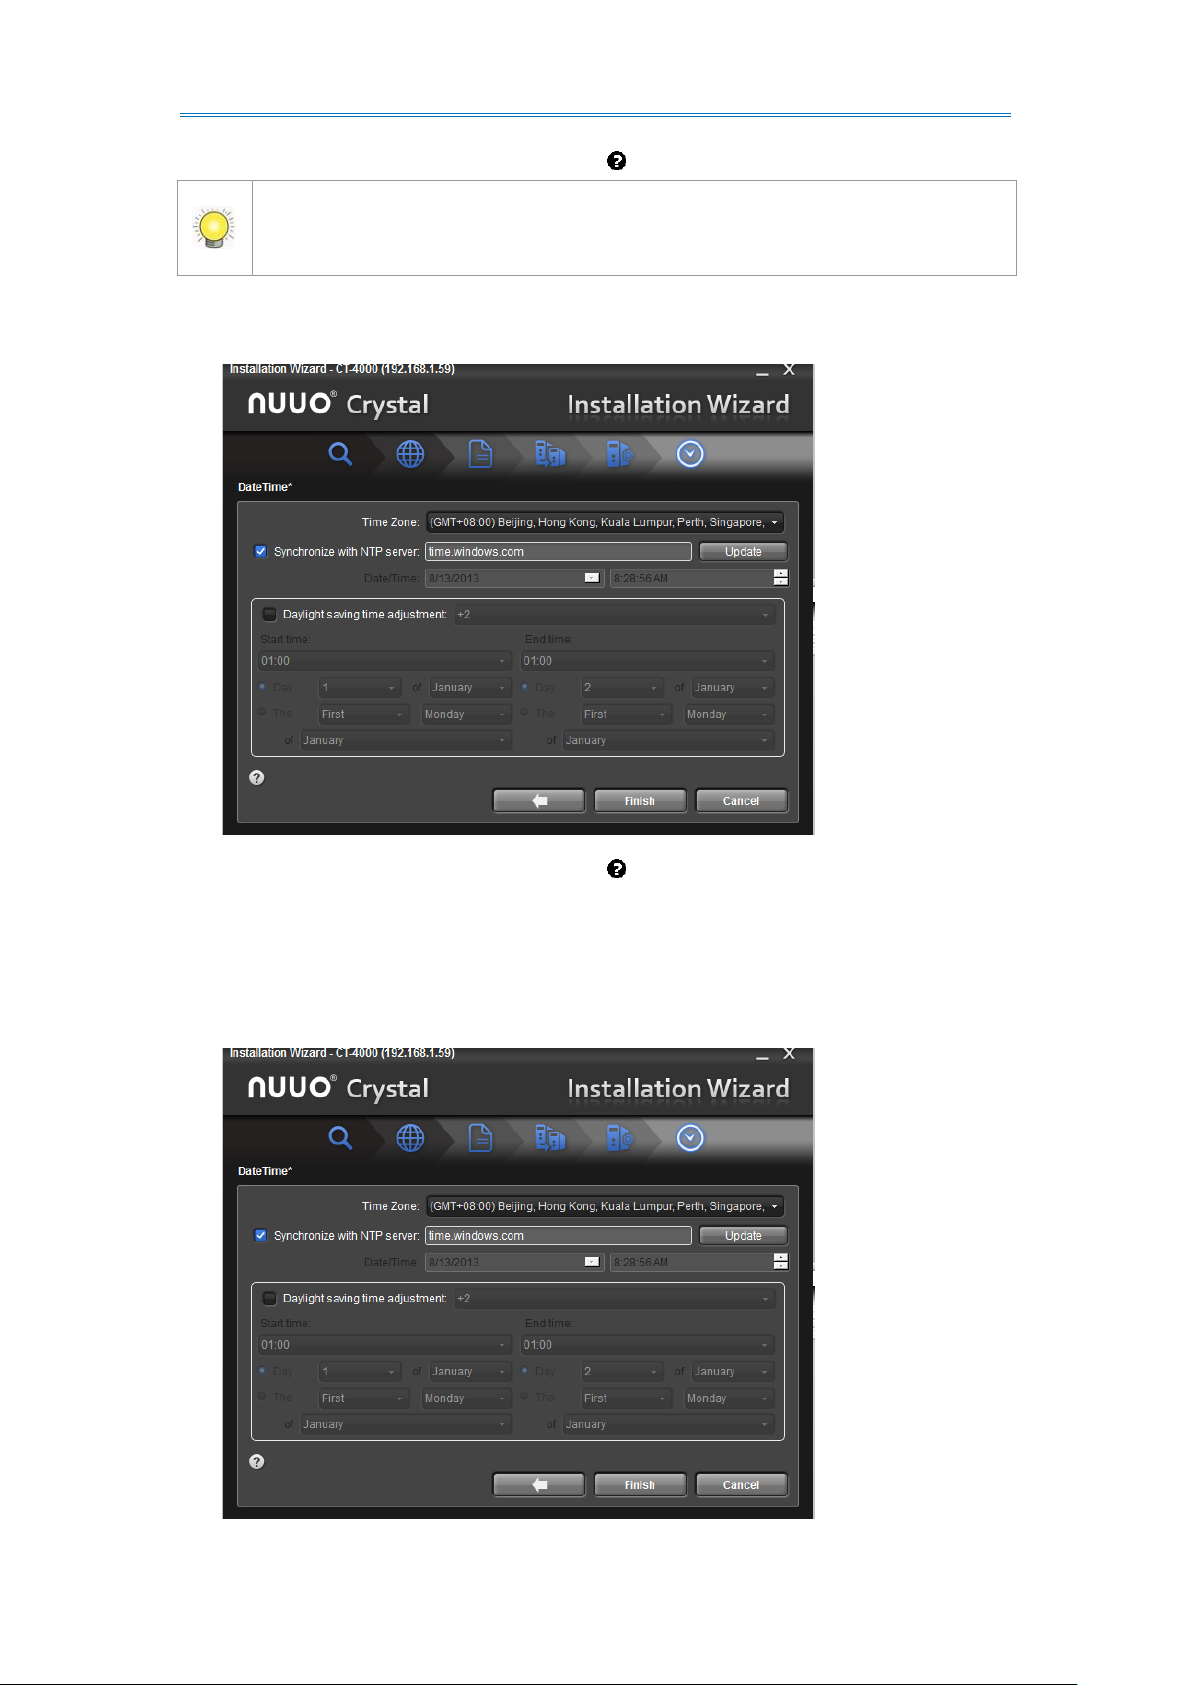
A Date Time page opens.
(Click the bottom-left question mark icon to see the tips.)
12. Select Synchronize with NTP server to synchronize date/time with the Internet
time server, or deselect Synchronize with NTP server to enables manual
date/time settings.
20
Page 21
NUUO Crystal 2.0 User Manual
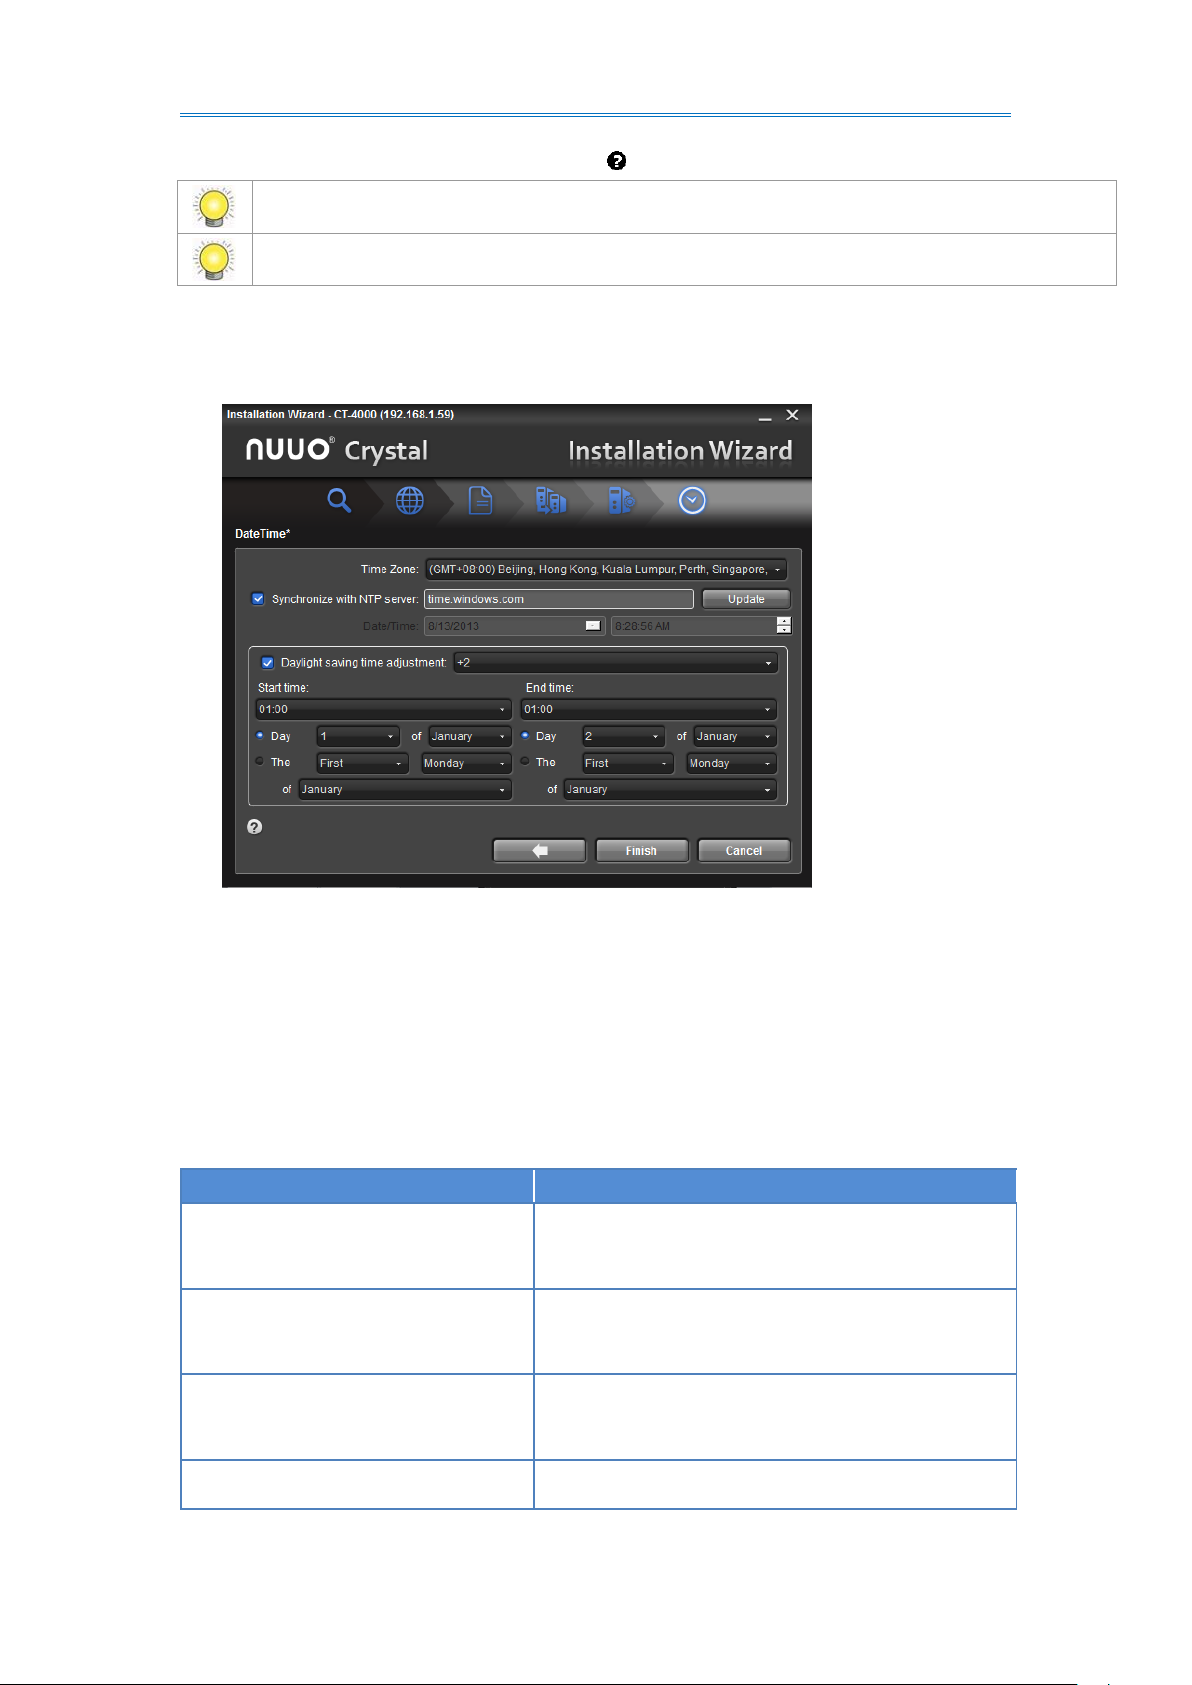
To connect to the NTP server, access the Internet by LAN1.
For NTP Server default Port is 123(UDP).
Function
LED Status
Power Status
Power-on: blue
Power-off: dark
HDD Status (top)
Power-on: blue
Power-off: dark
HDD Activity Status (bottom)
Healthy: blue with blinking
No disk: dark
Ethernet Status
Linking: blue
(Click the bottom-left question mark icon to see the tips.)
Select Daylight saving time adjustment to set daylight saving time zone, start
time and end time.
13. Click the Finish button to finish the setup of management service.
2.2 LED Status Definitions
CT-4000
21
Page 22

NUUO Crystal 2.0 User Manual
Accessing: blue with blinking
No linking: dark
Function
LED Status
Power Status
Power-on: blue
Power-off: dark
HDD Status (top)
Power-on: blue
Power-off: dark
HDD Activity Status (bottom)
Healthy: blue with blinking
No disk: dark
Ethernet Status
Linking: blue
Accessing: blue with blinking
No linking: dark
Function
LED Status
Remark
Power Status
(front)
Power-on: blue
Power-off: dark
HDD Status
(front; HDD Tray)
Power-on: blue
Power-off: dark
Access: blink (Green)
Two LEDs on HDD tray
LED1: Power indicator (Blue/
always turn on)
LED2: Access indicator
(Green/blink)
Ethernet Status x2
(front)
Connected: blue
Accessing: blue with blinking
the other one for LAN2 status
Ethernet Activity x2
(rear)
Link Rate indicator (Left side)
Setting
Description
Green
=1000Mbps
Orange
=100Mbps
Dark
=10Mbps or no link
Two LEDs for each Ethernet port
CT-4000R
CT-8000R
22
Page 23

NUUO Crystal 2.0 User Manual
Link status indicator(Right side)
1) Accessing: Green with blinking
Function
LED Status
Remark
Power Status
(front)
Power-on: blue
Power-off: dark
Power Fail
Power-fail: red
Normal: dark
HDD Status
(front; HDD Tray)
Power-on: blue
Power-off: dark
Access: blink (Green)
Two LEDs on HDD tray
LED1: Power indicator (Blue/
always turn on)
LED2: Access indicator
(Green/blink)
Ethernet Status x2
(front)
Connected: blue
Accessing: blue with blinking
the other one for LAN2 status
Ethernet Activity x2
(rear)
Link Rate indicator (Left side)
Setting
Description
Green
=1000Mbps
Orange
=100Mbps
Dark
=10Mbps or no link
Link status indicator(Right side)
2) Accessing: Green with blinking
Two LEDs for each Ethernet port
CT-8000RP
23
Page 24
NUUO Crystal 2.0 User Manual
3. Web Settings
The web settings enable users to set up web server or Management Server through
the web-based interface.
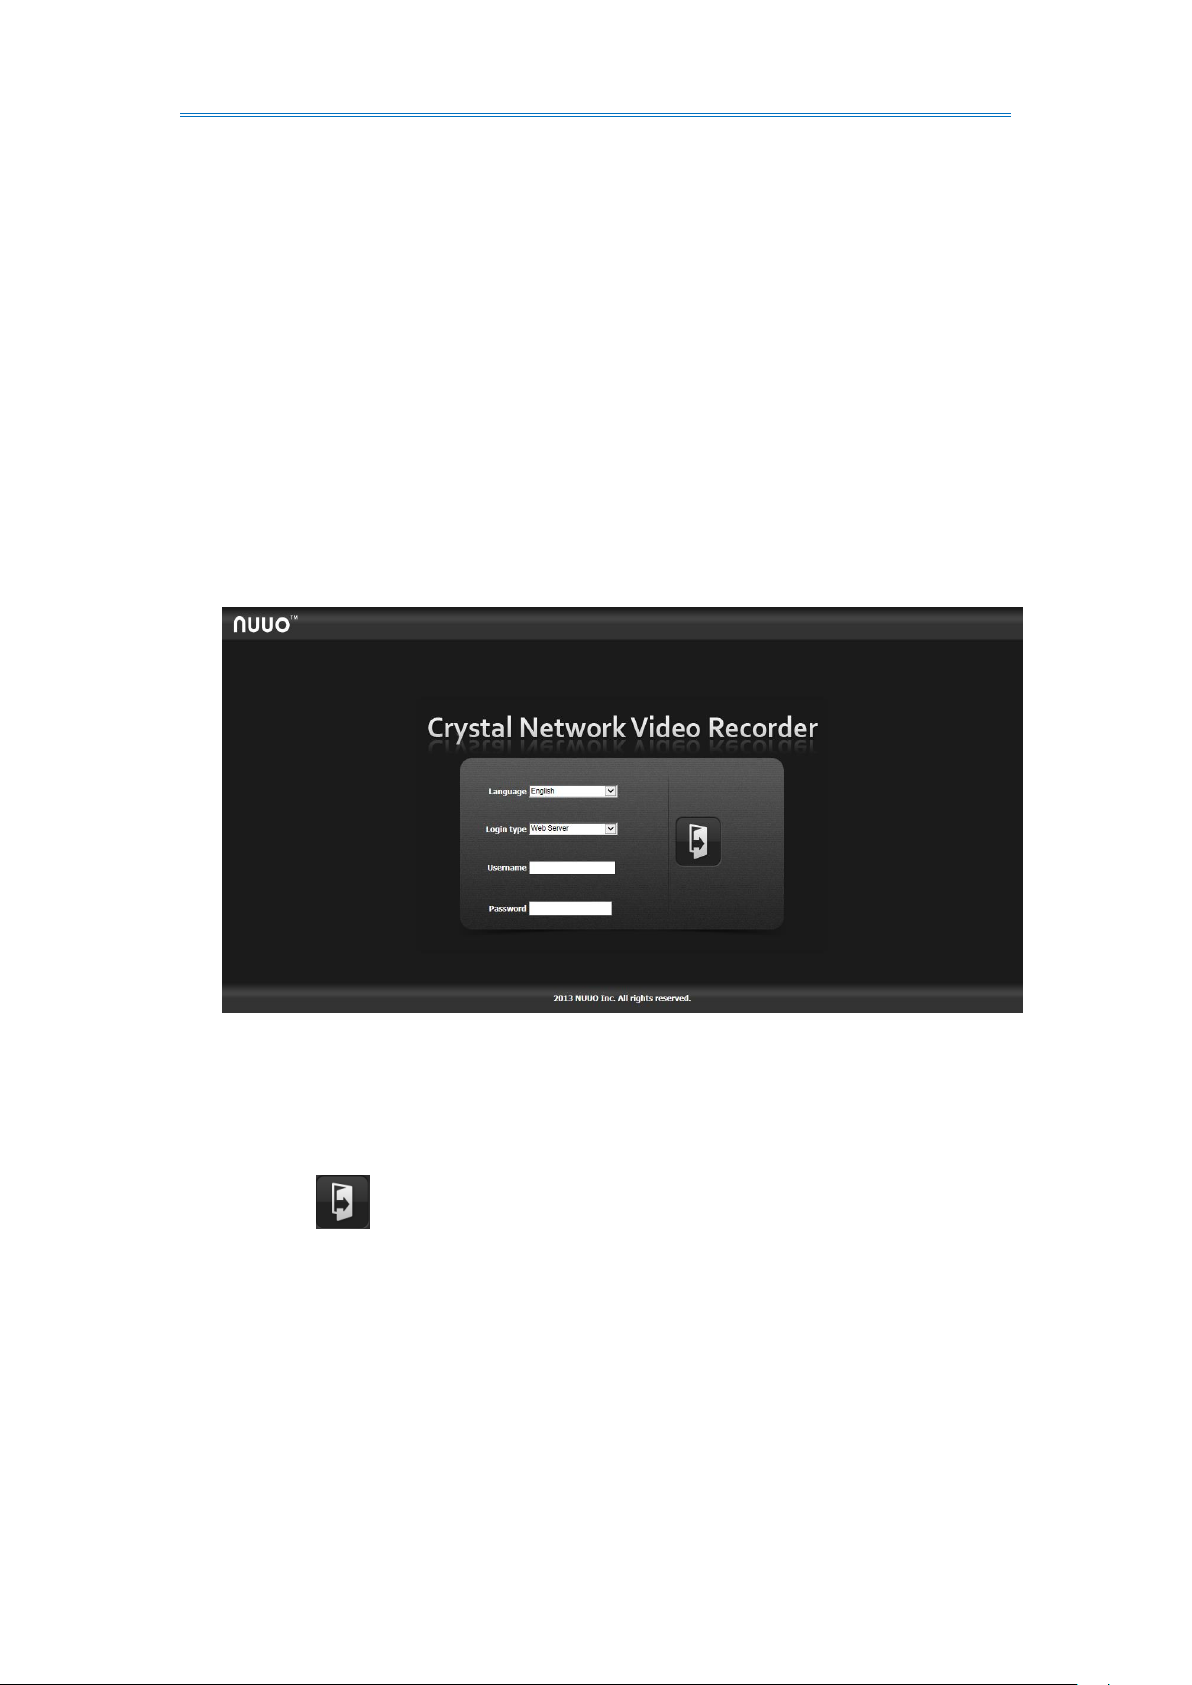
3.1Login
1. Open the NUUO Crystal Network Video Recorder Login page.
2. Select a language and select the login type.
Web server will lead to Crystal Titan hardware setting and Management Server
will lead to Management Server web setting.
3. Enter the username and password.
4. Click the button to log in.
5. The web settings open.
24
Page 25
NUUO Crystal 2.0 User Manual
Username and password is Crystal Titan hardware’s username and password.
3.2 Web Server
The features settings are: RAID & File System, Network Setup, Management and
System, which will be explicated in the following sections.
25
Page 26

NUUO Crystal 2.0 User Manual
The RAID & File System menu unfolds the RAID Management and iSCSI
3.2.1 RAID & File System
Use the RAID & File System menu to configure the system’s RAID features and file
settings.
To access the RAID & File System menu:
1. Login to NUUO Crystal Network Video Recorder web page as described in Login.
The web settings open.
2. From the Config Catalog, click the RAID & File System.
The RAID & File System menu unfolds the RAID Management and iSCSI Initiator
submenus.
The features submenus are: RAID Management and iSCSI Initiator, which will be
Initiator submenus.
explicated in the following sections.
3.2.1.1 RAID Management
As the name suggest, the RAID Management tabbed page manages the system’s
RAID (Redundant Array of Independent Disks), a storage that combines multiple disk
26
Page 27

NUUO Crystal 2.0 User Manual
The RAID Management
menu unfolds the RAID Management and iSCSI Initiator submenus.
drives into a logical unit.
To access the RAID Management submenu:
1. Login to NUUO Crystal Network Video Recorder web page as described in Login.
2. The web settings open.
3. From the Config Catalog, click the RAID & File System | RAID Management.
The RAID Management submenu displays in the Configuration Pane.
submenu The RAID & File System
The RAID Management menu features five tabbed pages, RAID Status, Modify,
Create, Delete and Format, which will be explicated in the following sections.
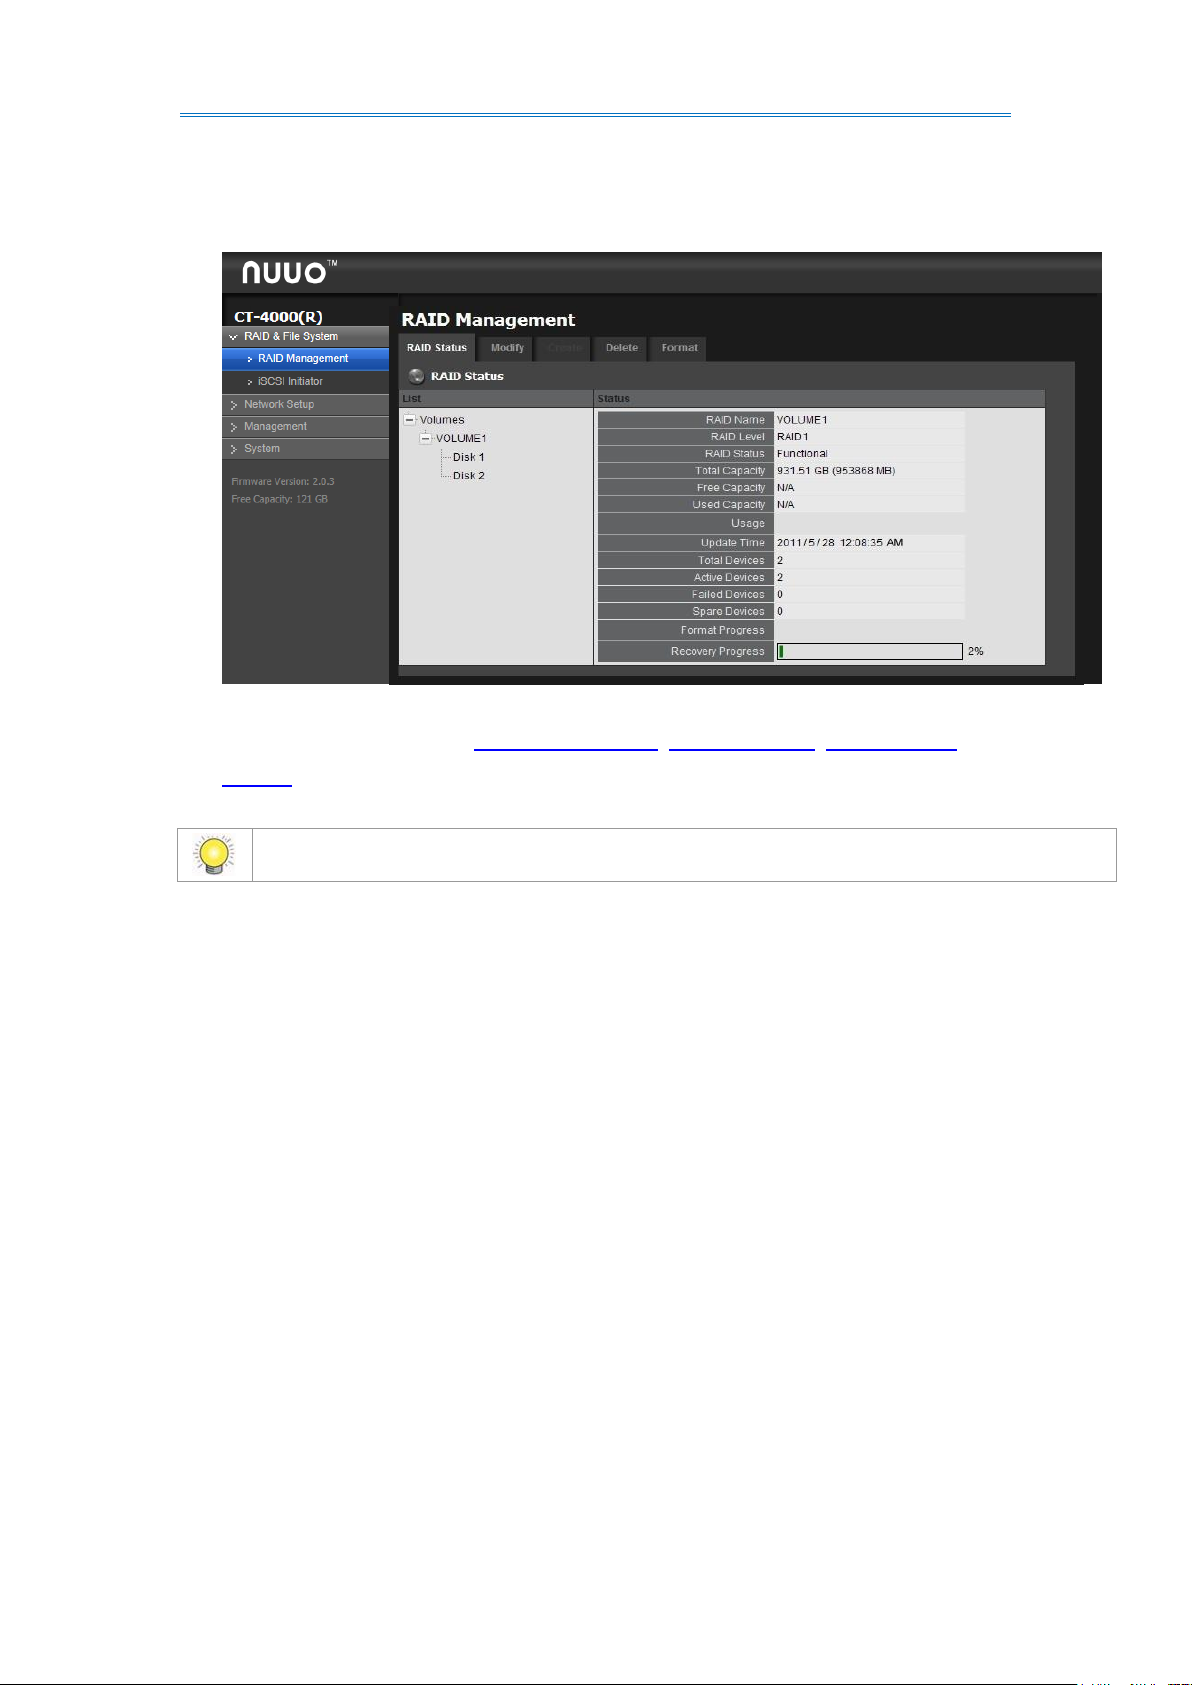
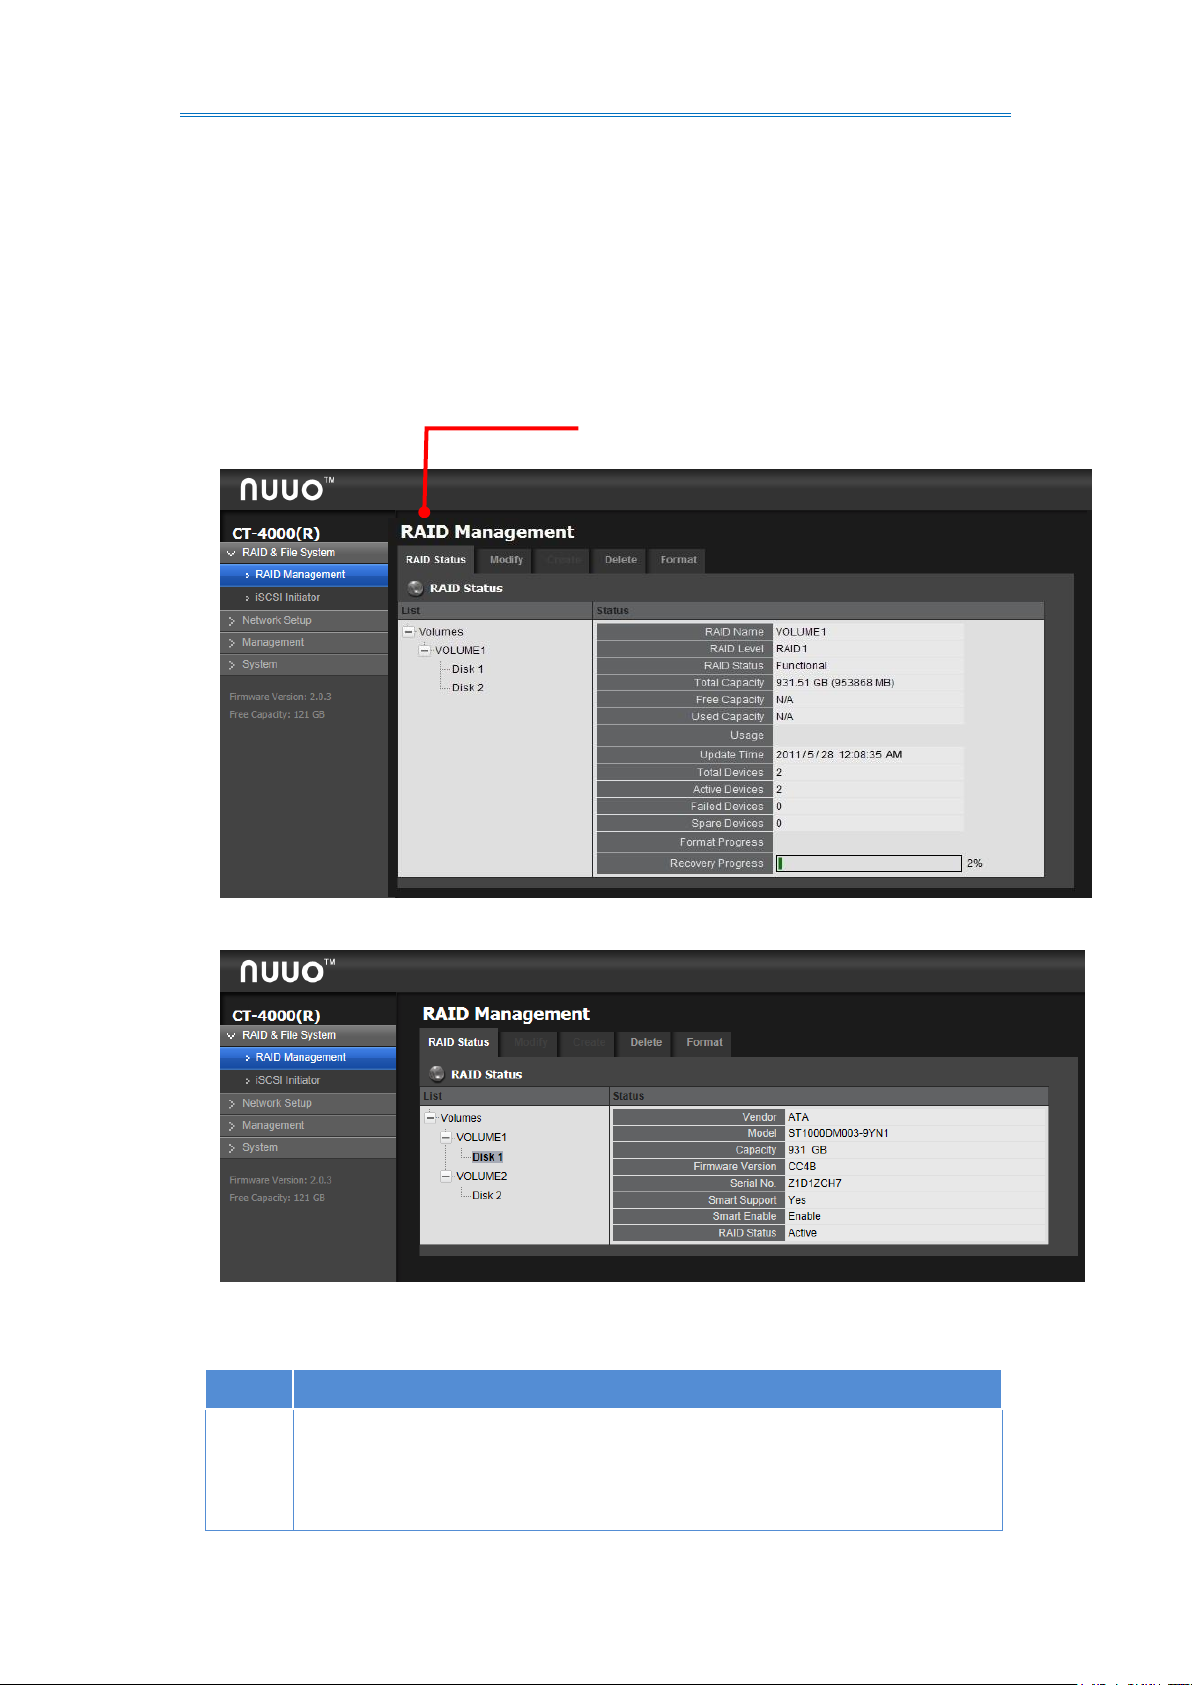
3.2.1.1.1RAID Status
The Status tabbed page delivers the status of RAID “volume”, which means one or
more disk drives working together as a logical drive. Video recording requires a
volume to be created first.
To access the Status tabbed page:
1. Login to NUUO Crystal Network Video Recorder web page as described in Login.
27
Page 28
NUUO Crystal 2.0 User Manual
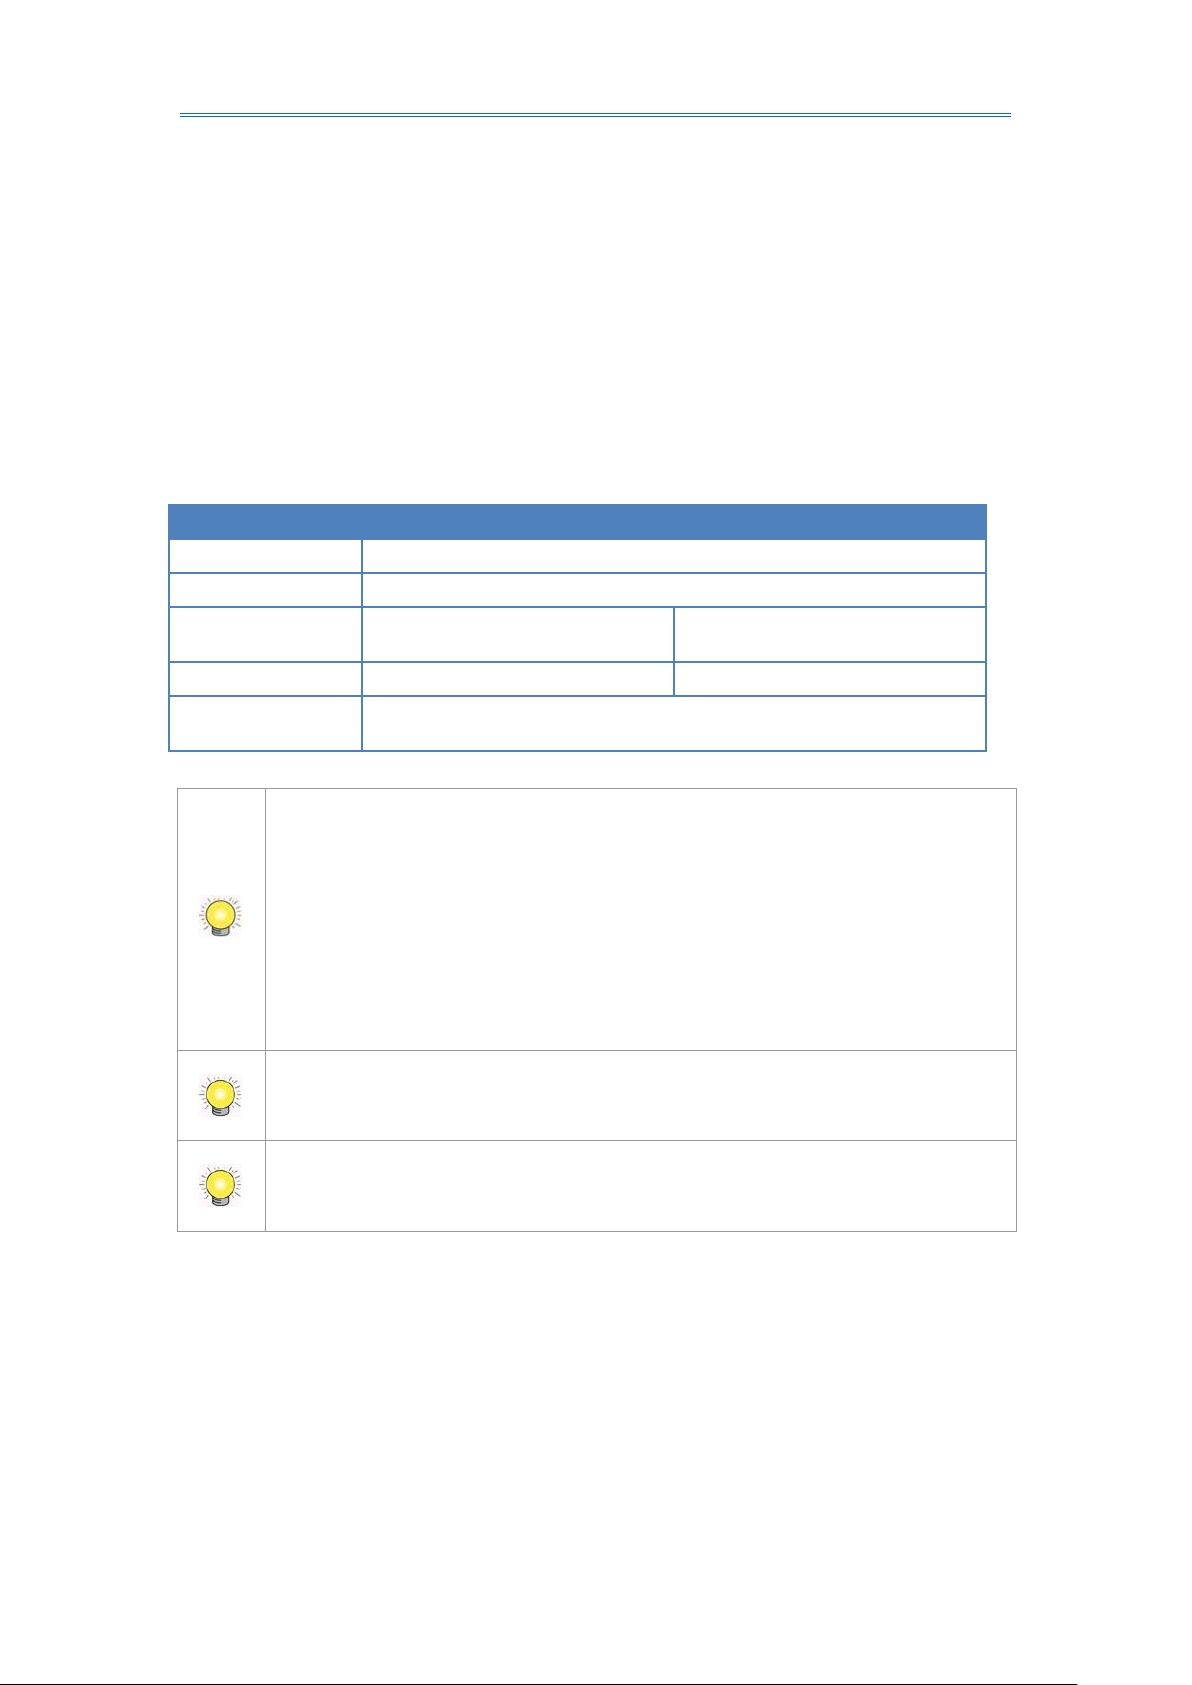
Group
Description
Disk
Delivers the present volume(s) in the system.
Click Volume # or Disk# to switches the status info between the present volume(s)
and disk(s).
If there hasn’t been any volume created yet, “No Volume” is displayed here. The
status info delivered for a present disk is:
RAID Status tabbed page
The web settings open.
2. From the Config Catalog, click the RAID & File System | RAID Management |
RAID Status tab.
The RAID Status tabbed page opens and shows the created volume(s) in the
system.
The RAID status info delivered is:
28
Page 29

NUUO Crystal 2.0 User Manual
Info
Description
Vendor
Delivers the manufacturer of the disk.
Model
Delivers the model number of the disk.
Capacity
Delivers the total capacity of the disk.
Firmware
Delivers the firmware version of the
disk.
Serial No.
Delivers the serial number of the disk.
Smart Support
Delivers the smart support of the disk.
Smart Enabled
Delivers the disk’s support of
S.M.A.R.T. (Self-Monitoring, Analysis
and Reporting Technology), which
enables a hard disk drive to detect and
report on various indicators of reliability,
in order to anticipate failures.
RAID Status
Delivers the status of the RAID that the
disk belongs to.
Volume
Shows the status of the selected volume:
Info
Description
RAID Name
Delivers the name of the volume, which is auto-assigned
when the volume is created.
RAID Level
Delivers the RAID level, which is defined when the volume is
created.
The selectable levels depend on the number of drives
present in the system.
See Create to know how to define the RAID level.
RAID Status
Delivers the following statuses of the volume:
Message
Description
Functional
The volume is normally operating.
Critical
There are some problems with the
volume, but video recording is normal.
Offline
The volume cannot be found. Hence
video recording is stopped and the
storage cannot be accessed.
File system
error
Volume is found but isn’t mounted so
video recording is stopped and storage
cannot be accessed.
Free Capacity
Delivers the free space on the volume.
Used Capacity
Delivers the used space on the volume.
Usage
Delivers the percentage of the volume’s usage.
Update Time
Delivers the time when the volume is created /updated.
Total Devices
Delivers the total number of the disk(s) covered by the
volume and also the number of the disk(s) that is active,
failed or spare.
Active Devices
Delivers the number of the active disk(s) covered by the
volume at the moment.
Failed Devices
Delivers the number of the failed disk(s) covered by the
29
Page 30

NUUO Crystal 2.0 User Manual
volume at the moment.
Spare Devices
Delivers the number of the spare disk(s) covered by the
volume at the moment.
Format Progress
Delivers the formatting progress if the volume is being
formatted at the moment.
Recovery Progress
Delivers the recovery progress if the volume is being
recovered at the moment.
Setting
Description
Default
RAID Level
Defines the RAID level.
It depends on
the number of
drives present
in the system
Assigned Disk(s)
Disk #
Selects a disk to assign it to the volume to be
created.
Deselected
Create tabbed page
3.2.1.1.1.1Create
It relies on the Create tabbed page to create one or more volumes in the system.
To access the Create tabbed page:
1. Login to NUUO Crystal Network Video Recorder web page as described in Login.
The web settings open.
2. From the Config Catalog, click the RAID & File System | RAID Management |
Create tab.
The Create tabbed page opens and shows the created volume(s) in the system.
On the Create tabbed page, the featured settings are:
30
Page 31

NUUO Crystal 2.0 User Manual
Create button
Creates the configured volume.
--
Reset button
Reset the configured volume.
--
The RAID Volume will be functional on another unit if all disks of this volume are
moved to the unit.
After setting RAID level, you are not allowed to change neither the RAID level nor the
number of disks containing in this volume.
If you choose Express Mode when using the Installation Wizard, the disk(s) will be
set to RAID 1 (2 bay) or RAID 5 (4 bay) automatically unless the number of disks is not
enough for this RAID level.
3. Click Create button and a confirmation dialog pops up.
4. Check the Yes, I want to create volume with those disk(s) box, and click the Yes,
create it button.
5. Finish the setup of Create.
3.2.1.1.1.2 Modify
It relies on the Modify tabbed page to replace a broken hard drive with a new one,
instead of modifying the RAID level.
In the case of “Critical” RAID status, a warning message will notice that one of the
volume’s disks may be damaged. Although the video recording won’t be impacted,
an immediate replacement is recommended to protect the volume from data loss.
To access the Modify tabbed page:
1. Login to NUUO Crystal Network Video Recorder web page as described in Login.
31
Page 32

NUUO Crystal 2.0 User Manual
This function isn’t applicable to RAID 0, which has no data protection
mechanism by nature.
This function is recommended for any unexpected disk damage. Use this
function to safely unplug the running HDD.
Modify tabbed page
The web settings open.
2. From the Config Catalog, click the RAID & File System | RAID Management |
Modify tab.
The Modify tabbed page opens and shows the created volume(s) in the system.
1. Modify a volume:
(1) Select the damaged disk to remove.
(2) Click Remove button to remove the selected disk.
(3) After the system remove the disk successfully, replace it with a new disk, and
back to the Modify tabbed page to add this new free disk.
32
Page 33

NUUO Crystal 2.0 User Manual
The Delete tabbed page
3.2.1.1.1.3 Delete
It relies on the Delete tabbed page to delete one or more volumes.
To access the Delete tabbed page:
1. Login to NUUO Crystal Network Video Recorder web page as described in Login.
The web settings open.
2. From the Config Catalog, click the RAID & File System | RAID Management |
Delete tab.
The Delete tabbed page opens and shows the created volume(s) in the system.
3. Delete a volume:
(1) Select a volume.
(2) Click the Delete button to delete the selected volume.
OR
Click the Reset button to clear the selection.
33
Page 34

NUUO Crystal 2.0 User Manual
The Format tabbed page
3.2.1.1.1.4 Format
It relies on the Format tabbed page to format the volumes functioning in the system.
To access the Format tabbed page:
1. Login to NUUO Crystal Network Video Recorder web page as described in Login.
The web settings open.
2. From the Config Catalog, click the RAID & File System | RAID Management |
Format tab.
The Format tabbed page opens and shows the created volume(s) in the system.
1. Format a volume:
(1) Select a volume.
(2) Click the Format button,
The formatting starts and progresses.
34
Page 35

NUUO Crystal 2.0 User Manual
The iSCSI Initiator submenu
3.2.1.2 iSCSI Initiator
It relies on the iSCSI Initiator tabbed page to create an external storage on iSCSI,
which means “Internet Small Computer System Interface”, an IP-based protocol for
transmitting data and linking data storage facilities.
To access the iSCSI Initiator submenu:
1. Login to NUUO Crystal Network Video Recorder web page as described in Login.
The web settings open.
2. From the Config Catalog, click the RAID & File System | iSCSI Initiator.
The iSCSI Initiator submenu displays in the Configuration Pane.
3. Create an external storage on iSCSI.
4. Fill in the IP address and the port number (default 3260) for iSCSI
5. Click the Discover button.
The discovered iSCSI will show.
6. Log on each disk on Target. If you have set password on iSCSI, choose CHAP to
log on. If not, choose “None”.
35
Page 36

NUUO Crystal 2.0 User Manual
We suggest that you use more than one HD to create one volume. DO NOT use only one
HD to divide to more than 2 volumes.
If you log off the disk that has been created as a RAID, the current recording file may be
destroyed.
7. Open the RAID Status tabbed page as described in RAID Status, the iSCSI disk will
show under the Free Disks.
8. Creates a volume for it as described in Create. You can only create a volume with
purely iSCSI disk.
36
Page 37

NUUO Crystal 2.0 User Manual
The Network Setup menu unfolds the Network Setup
and Network Service submenus.
3.2.2 Network Setup
It relies on the Network Setup menu to configure the systems’ networking so the
system can connect and communicate with associated devices within the network.
To access the Network Setup menu:
1. Login to NUUO Crystal Network Video Recorder web page as described in Login.
The web settings open.
2. From the Config Catalog, click the Network Setup.
The Network Setup menu unfolds the Network Setup and Network Service
submenus.
The features submenus are Network Setup and Network Service, which will be
explicated in the following sections.
37
Page 38

NUUO Crystal 2.0 User Manual
The Network Setup submenu
3.2.2.1 Network Setup
The Network Setup submenu features the network settings including IP address,
subnet mask, default gateway and primary/secondary DNS.
To access the RAID Management submenu:
1. Login to NUUO Crystal Network Video Recorder web page as described in Login.
The web settings open.
2. From the Config Catalog, click the Network Setup | Network Setup.
The Network Setup submenu displays in the Configuration Pane.
The Network Setup menu features three tabbed pages, Information, Setup and
DDNS Setup, which will be explicated in the following sections.
38
Page 39

NUUO Crystal 2.0 User Manual
Group
Item
Description
Connection
Information
Server
Name
Delivers the hardware’s server name.
Ethernet
Adapter 1 / 2
Information
IP Address
Delivers the IP address assigned to this adapter.
Subnet
Mask
Delivers the subnet mask assigned to the IP address used on the
adapter.
Default
Gateway IP
Delivers the IP address assigned to the adapter as gateway.
The Information tabbed page
3.2.2.1.1 Information
The Information tabbed page allows users to view the system’s Ethernet networking
settings.
To access the Information tabbed page:
1. Login to NUUO Crystal Network Video Recorder web page as described in Login.
The web settings open.
2. From the Config Catalog, click the Network Setup | Network Setup |
Information tab.
The Information tabbed page opens and shows the network configuration of the
system’s LAN ports.
On the Information tabbed page, the info delivered is:
39
Page 40

NUUO Crystal 2.0 User Manual
Address
Primary
DNS
Delivers the IP address assigned to the adapter as the primary DNS
(Domain Name System).
Secondary
DNS
Delivers the IP address assigned to the adapter as the secondary
DNS (Domain Name System).
To access the settings, see Setup tabbed page.
When an adapter isn’t in use, the network information isn’t available.
For web default Port is 80(TCP).
40
Page 41

NUUO Crystal 2.0 User Manual
Group
Setting
Description
Default
Common
Setting
Server
Name
Sets the hardware’s server name.
--
Ethernet
Internet
Sets whether to automatically obtain an IP address
--
The Setup tabbed page
3.2.2.1.2 Setup
It relies on the Setup tabbed page to configure the system’s networking.
To access the Setup tabbed page:
1. Login to NUUO Crystal Network Video Recorder web page as described in Login.
The web settings open.
2. From the Config Catalog, click the Network Setup | Network Setup | Setup tab.
The Setup tabbed page opens and shows the system’s Ethernet adapters in use
and the settings thereof..
The featured settings on the Setup tabbed page are:
41
Page 42

NUUO Crystal 2.0 User Manual
Adapter 1 / 2
Setting
Protocol
(DHCP) or manually specify one (static) for the
adapter.
IP Address
Assigns an IP address for the adapter.
This setting is only available when the Internet
Protocol is set to Specify an IP address.
192.168.1.100
Subnet
Mask
Assigns the subnet mask for the adapter’s IP
address.
This setting is only available when the Internet
Protocol is set to Specify an IP address.
255.255.255.0
Default
Gateway
Assigns the IP address for adapter’s the gateway.
This setting is only available when the Internet
Protocol is set to Specify an IP address.
192.168.1.1
Primary
DNS
Assigns the IP address for the primary DNS (Domain
Naming System).
This setting is only available when the Internet
Protocol is set to Specify an IP address.
192.168.1.1
Secondary
DNS
Assigns the IP address for the secondary DNS
(Domain Naming System).
This setting is only available when the Internet
Protocol is set to Specify an IP address.
-OK button
Applies the change(s)
--
Cancel button
Recovers the defaults.
--
There are two Ethernet adapters per Crystal Titan unit. We recommend
that you use them under the scenario of two subnets, one for the
cameras/devices, and the other for the remote access. If you deploy two
Ethernet adapters within the same subnet, it’s likely to cause parts of the
cameras disconnected as either one of the adapters disconnected.
42
Page 43

NUUO Crystal 2.0 User Manual
The DDNS Setup tabbed page
3.2.2.1.3 DDNS Setup
The DDNS Setup tabbed page enables/disables DDNS, which allows the system to
use dynamic IP address. This page also sets the DDNS profile.
To access the DDNS Setup tabbed page:
1. Login to NUUO Crystal Network Video Recorder web page as described in Login.
The web settings open.
2. From the Config Catalog, click the Network Setup | Network Setup | DDNS
Setup tab.
The DDNS Setup tabbed page opens.
43
Page 44

NUUO Crystal 2.0 User Manual
Setting
Description
Default
DDNS
Enables/disables DDNS for the system
Deselected
(Disabled)
Ethernet
Interface
LAN 1 and LAN 2
LAN 1
Provider
Sets the provider of the DDNS service.
Options available are DynDns and DtDNS.
DynDns
Username
Sets the username to login to the DDNS service.
--
Password
Sets the password to login to the DDNS service.
--
Host Name
Enters the sub domain name.
--
Update Period
Since the IP is dynamic, sets how often to refresh the DNS to
point to the server’s changing IP address.
16 minutes
The featured settings on the DDNS Setup tabbed page are:
44
Page 45

NUUO Crystal 2.0 User Manual
The Network Service submenu
3.2.2.2 Network Service
The Network Service submenu controls the remote accesses to the system for live
view streaming, playback and management.
To access the Network Service submenu:
1. Login to NUUO Crystal Network Video Recorder web page as described in Login.
The web settings open.
2. From the Config Catalog, click the Network Setup | Network Service.
The Network Service submenu displays in the Configuration Pane.
The Network Service menu features three tabbed pages, Management Service,
Recording Service, Metadata Service and Web Service which will be explicated in the
following sections.
45
Page 46

NUUO Crystal 2.0 User Manual
Setting
Description
Default
Management
Service
Enables/disables the Crystal Titan for the Management
Server.
Selected
(Enabled)
command port
Sets the management port.
5250
Save button
Applies the change.
--
For Management Server default Port is 5250(TCP) and the server port should
be larger than 1000. Also the command port cannot be the same.
The Management Service tabbed page
3.2.2.2.1 Management Service
It relies on the Management Service tabbed page to enable the Crystal Titan for the
Management Server.
To access the Management Service tabbed page:
1. Login to NUUO Crystal Network Video Recorder web page as described in Login.
The web settings open.
2. From the Left Toolbar, click the Network Setup | Network Service |
Management Service tab.
The Management Service tabbed page opens.
The featured settings on the Management Service tabbed page are:
46
Page 47

NUUO Crystal 2.0 User Manual
Group
Setting / Info
Description
Default
Recording
service
Recording service
Enables/disables the Crystal Titan
for the Recording Server.
Selected
(Enabled)
Login
Management
Server
IP address
Sets the IP address of the
Recording Server.
--
command port
Sets the recording port.
5250
The Recording Service tabbed page
3.2.2.2.2 Recording Service
It relies on the Recording Service tabbed page to enable the Crystal Titan for the
Recording Server.
To access the Recording Service tabbed page:
1. Login to NUUO Crystal Network Video Recorder web page as described in Login.
The web settings open.
2. From the Left Toolbar, click the Network Setup | Network Service | Recording
Service tab.
The Recording Service tabbed page opens.
The featured settings on the Recording Service tabbed page are:
47
Page 48

NUUO Crystal 2.0 User Manual
username
Enters the username to login the
Recording Server.
admin
password
Enters the password to login the
Recording Server.
admin
LAN Settings
LAN 1 Port
Sets the LAN port for the Recording
Server.
5251
WAN Settings
IP Address
Sets the IP address of the WAN for
the Recording Server.
This setting can only work when
port forwarding is done.
To use WAN settings, the
Management Server, Recording
Server and Metadata Server all
require port forwarding.
Port
Sets the WAN port for the Recording
Server.
This setting can only work when
port forwarding is done.
To use WAN settings, the
Management Server, Recording
Server and Metadata Server all
require port forwarding.
12
Save button
Applies the change.
--
To use WAN settings, the Management Server, Recording Server and
Metadata Server all require port forwarding.
For Recording Server default Port is 5251(TCP) and the server port should
be larger than 1000. Also the command port cannot be the same.
48
Page 49

NUUO Crystal 2.0 User Manual
The Metadata Service tabbed page
3.2.2.2.3 Metadata Service
It relies on the Metadata Service tabbed page to enable the Crystal Titan for
Metadata Server.
To access the Metadata Service tabbed page:
1. Login to NUUO Crystal Network Video Recorder web page as described in Login.
The web settings open.
2. From the Left Tool bar, click the Network Setup | Network Service | Metadata
Service tab.
The Metadata Service tabbed page opens.
49
Page 50

NUUO Crystal 2.0 User Manual
Group
Setting / Info
Description
Default
Metadata
service
Metadata service
Enables/disables the Crystal Titan
for Metadata Server.
Selected
(Enabled)
Login
Management
Server
IP address
Sets the IP address of the Metadata
Server.
--
command port
Sets the metadata port.
5250
username
Enters the username to login the
Metadata Server.
admin
password
Enters the password to login the
Metadata Server.
admin
LAN Settings
LAN 1 Port
Sets the LAN port for the Metadata
Server.
5252
WAN Settings
IP Address
Sets the IP address of the WAN for
the Recording Server.
This setting can only work when
port forwarding is done.
To use WAN settings, the
Management Server, Recording
Server and Metadata Server all
require port forwarding.
Port
Sets the WAN port for the Recording
Server.
This setting can only work when
port forwarding is done.
To use WAN settings, the
Management Server, Recording
Server and Metadata Server all
require port forwarding.
12
Save button
Applies the change.
--
To use WAN settings, the Management Server, Recording Server and
Metadata Server all require port forwarding.
For Metadata Server default Port is 5252(TCP) and the server port should
be larger than 1000. Also the command port cannot be the same.
The featured settings on the Metadata Service tabbed page are:
50
Page 51

NUUO Crystal 2.0 User Manual
Setting
Description
Default
command port
Sets the web port.
80
Save button
Applies the change.
--
For Web Server default Port is 80. Also the command port cannot be the
same. If utilizing Firefox, it's suggested not to modify the web service port due
to Firefox limitation.
The Web Service tabbed page
3.2.2.2.4 Web Service
It relies on the Web Service tabbed page to setup the Crystal Titan web server port.
To access the Web Service tabbed page:
3. Login to NUUO Crystal Network Video Recorder web page as described in Login.
The web settings open.
4. From the Left Tool bar, click the Network Setup | Network Service | Web Service
tab.
The Web Service tabbed page opens.
The featured settings on the Management Service tabbed page are:
51
Page 52

NUUO Crystal 2.0 User Manual
The Management menu unfolds the Change Password,
Log System and Load Configuration submenus.
3.2.3 Management
It relies on the Management menu to change the password to the system, to view
the system’s hardware logs, and to recover factory defaults.
To access the Management menu:
1. Login to NUUO Crystal Network Video Recorder web page as described in Login.
The web settings open.
5. From the Left Toolbar, click the Management.
The Management menu unfolds the Change Password, Log System and Load
Configuration submenus.
The features submenus are Change Password, Log System and Load Configuration
which will be explicated in the following sections.
52
Page 53

NUUO Crystal 2.0 User Manual
The Change Password tabbed page
3.2.3.1 Change Password
Use the Change Password to change the password to login the Management Server.
To access the Change Password submenu:
1. Login to NUUO Crystal Network Video Recorder web page as described in Login.
The web settings open.
2. From the Left Toolbar, click the Management | Change Password.
The Change Password tabbed page displays in the Configuration Pane.
Use the Change Password tabbed page to change the password to login the Crystal
Titan.
53
Page 54

NUUO Crystal 2.0 User Manual
The Hardware Log tabbed page
3.2.3.2 Log System
The Log System submenu allows users to view the Management Server’s hardware
logs including power-on, shutdown, storage activity and so on.
To access the Log System submenu:
1. Login to NUUO Crystal Network Video Recorder web page as described in Login.
The web settings open.
2. From the Left Toolbar, click the Management | Log System.
The Hardware Log tabbed page opens in the Configuration Pane showing a list of
the Management Server’s hardware logs.
54
Page 55

NUUO Crystal 2.0 User Manual
Group
Setting / Info
Description
Default
Load Default
Settings
Network Settings
Enables/disables the restoration of
the network settings.
Selected
(Enabled)
Load button
Runs the restoration of system
settings.
--
The Load Configuration tabbed
3.2.3.3 Load Configuration
The Load Configuration submenu allows users to restore the system settings to
factory defaults.
To access the Load Configuration submenu:
1. Login to NUUO Crystal Network Video Recorder web page as described in Login.
The web settings open.
2. From the Left Toolbar, click the Management | Load Configuration.
The Load Configuration tabbed page opens in the Configuration Pane.
The featured settings are:
55
Page 56

NUUO Crystal 2.0 User Manual
The System menu unfolds the System Information, System
Settings, Upgrade, Date / Time and Reboot / Shutdown
submenus.
3.2.4 System
Use the System menu to view system information, configure system settings and
manage system upgrade. This menu also enables re-opening the Install Wizard which
launches during the system’s very first power-on.
To access the System menu:
1. Login to NUUO Crystal Network Video Recorder web page as described in Login.
The web settings open.
2. From the Left Toolbar, click the System.
The System menu unfolds the System Information, System Settings, Upgrade,
Date/ Time and Reboot / Shut down submenus.
The features submenus are System Information, System Settings, Upgrade, Date /
Time and Reboot / Shut down which will be explicated in the following sections.
56
Page 57

NUUO Crystal 2.0 User Manual
The System Information tabbed page
3.2.4.1 System Information
The Information submenu enables viewing some important system information
including the hardware information and firmware information.
To access the System Information submenu:
1. Login to NUUO Crystal Network Video Recorder web page as described in Login.
The web settings open.
2. From the Left Toolbar, click the System | System Information.
The System Information tabbed page displays in the Configuration Pane.
57
Page 58

NUUO Crystal 2.0 User Manual
The System Settings submenu opens and shows
the Fan Control tabbed page by default.
3.2.4.2 System Settings
Use the System Settings submenu to configure and optimize the system for your
applications.
To access the System Settings submenu:
1. Login to NUUO Crystal Network Video Recorder web page as described in Login.
The web settings open.
2. From the Left Toolbar, click the System | System Settings.
The System Settings submenu opens in the Configuration Pane and shows the
Fan Control tabbed page by default.
The featured tabbed pages are Fan Control and APC UPS which will be explicated in
the following sections.
58
Page 59

NUUO Crystal 2.0 User Manual
Group
Setting
Description
Default
Fan Control
System
Temperature
Delivers the system temperature.
--
System Fan
Speed
Delivers the system fan speed.
--
Setting
Delivery the setting status
disable
OK button
Applies the change.
--
Cancel button
Clears the change.
--
The Fan Control tabbed page
3.2.4.2.1 Fan Control
The Fan Control tab page enables viewing some important system information
including system temperature, system fan speed and setting information.
To access the Fan Control tabbed page:
1. Login to NUUO Crystal Network Video Recorder web page as described in Login.
2. The web settings open.
3. From the Left Toolbar, click the System | System Settings |Fan Control tabbed
page.
The Fan Control tabbed page opens.
The featured settings and delivered info are:
59
Page 60

NUUO Crystal 2.0 User Manual
3.2.4.2.2 APC UPS
If the Management Server is used with an UPS module, it is able to deal with
accidental power failure or unstable power supply. The APC UPS tabbed page
configures how the system reacts to such scenario by defining the timing for auto
shutdown with APC Uninterruptable Power Supply (UPS) battery power. This tabbed
page also delivers the info about the APC UPS module used.
To access the APC UPS setting:
1. Attach the APC UPS to one of the unit’s USB ports.
2. Login to NUUO Crystal Network Video Recorder web page as described in Login.
3. The web settings open.
4. From the Left Toolbar, click the System | System Settings |APC UPS tabbed page.
The APC UPS tabbed page opens.
60
Page 61

NUUO Crystal 2.0 User Manual
Group
Setting
Description
Default
Information
Manufacturer
Delivers the manufacturer of the UPS
module.
--
Product Name
Delivers the model name of the UPS
module.
--
Serial Number
Delivers the serial number of the UPS
module.
--
Services Status
Delivers if the UPS module is servicing.
--
Power Failure
Action
Disable
Enables/disables the operating system’s
actions to deal with power failure.
Selected
(Disabled)
Shutdown as
power of the
UPSremains _ %
Sets how low does the UPS battery power
drain down to before the operating system
shuts down.
--
Shutdown as
power of the
UPSremains_Min
Sets how long should the unit run on UPS
battery power before the operating system
shuts down.
-OK button
Applies the change.
--
Exit button
Clears the change.
--
For Power Failure Action, an USB connection is needed between the unit
and the UPS to check the status of UPS.
The featured settings and delivered info are:
61
Page 62

NUUO Crystal 2.0 User Manual
The Firmware Upgrade tabbed page.
3.2.4.3 Upgrade
Exactly as the title advertises, the Upgrade tabbed page enables system upgrade to
bring the system to a newer version that promises better performance or new
functions. Besides, this tabbed page also delivers the current firmware version and
device pack version.
To access the Upgrade setting:
1. Login to NUUO Crystal Network Video Recorder web page as described in Login.
2. The web settings open.
3. From the Left Toolbar, click the System | Upgrade.
4. Go to www.nuuo.com for FW download, browse the FW for upgrading and click
the OK button.
5. A confirmation dialog pops up. Click the OK button to start upgrade process.
6. After upgrade, the system will restart. You need to re-access the unit again after
this.
The Firmware Upgrade tabbed page opens in the Configuration Pane.
62
Page 63

NUUO Crystal 2.0 User Manual
Info / Facility
Description
Current NVR Version
Delivers the server’s current firmware version.
Current Device Pack Version
Delivers the server’s current device pack version.
Select File (and the Browse button)
Browses for the firmware and runs the upgrade.
The FW upgrade includes Crystal Titan server FW upgrade and device pack upgrade.
You can only upgrade camera device pack to add camera in device pack new version
without upgrade Crystal FW.
The network bandwidth should be more than 4 mbps when upgrading firmware.
The featured facility and delivered info are:
63
Page 64

NUUO Crystal 2.0 User Manual
3.2.4.4 Date / Time
Access the Date/Time submenu to configure the date, time, time zone of your locale
and other time-related parameters for the server.
To access the Date/Time setting:
1. Login to NUUO Crystal Network Video Recorder web page as described in Login.
2. The web settings open.
3. From the Left Tool bar, click the System | Date Time.
4. Choose the time zone.
5. Configure the year, month, day and time manually, or enable Network Time to
synchronize time automatically. When Network Time enabled, the date/time
settings will be grayed out.
6. Assign time server and update interval if choosing Network Time. You can also
click “Update Now” to update date/ time right away.
7. Check the Adjust clock for daylight saving changes option and select the time
change of daylight saving time in your location. Choose the start time and end
time of recurrence.
8. Click the OK button to restart the system.
64
Page 65

NUUO Crystal 2.0 User Manual
The Setup tabbed page.
The Setup tabbed page opens in the Configuration Pane.
65
Page 66

NUUO Crystal 2.0 User Manual
Group
Setting
Description
Default
Time Zone
Time Zone
Sets the time zone of your locale.
GMT+08:00
NTP
Setup
Network Time
Enable check box
Enables/disables network
time.
Deselected
(Disabled)
Synchronize with
internet time server
Enables/disables the
synchronization with
internet time server.
This setting is only
available when network
time is enabled.
When enabled, the
Date/Time group box
become unavailable.
Deselected
(Disabled)
Works as internet
time server
Time Server
Sets the time server name or IP address.
This setting is only available when network time
is enabled.
--
Update Now
button
Updates the system time immediately.
This setting is available only when network time
is enabled.
Updating system time will cause the system to
restart.
Weekly on
Sunday, at
01:00 o’clock
Date /
Time
Year
Sets system date and time.
Month
Day
Time
Daylight
Saving
Time
Daylight
Saving Time
Adjust the
clock for
daylight
saving
changes
Enables/disables daylight saving
time.
Deselected
(Disabled)
hours
drop box
Defines how much time should the
system time be adjusted
forward/backward for.
+ 2 hours
Start Time
Defines the date to start applying daylight saving
time.
This setting is available only when daylight
saving time is enabled.
January the
1st, 1:00 AM
End Time
Defines the date to stop applying daytime saving
time.
This setting is available only when daylight
saving time is enabled.
January the
2nd, 1:00 AM
Save button
Applies the change.
--
Exit button
Clears the change.
--
The featured settings are:
66
Page 67

NUUO Crystal 2.0 User Manual
The Options tabbed page
3.2.4.5 Reboot / Shut down
Access this Reboot / Shutdown submenu to safely turn off or restart the system.
To access the Reboot / Shutdown submenu:
1. Login to NUUO Crystal Network Video Recorder web page as described in Login.
2. The web settings open.
3. From the Left Tool bar, click the System | Reboot / Shutdown.
The Options tabbed page displays in the Configuration Pane.
4. Select Reboot or Shutdown and click the OK button to restart or power off the
system.
67
Page 68

NUUO Crystal 2.0 User Manual
Username and password is Management Server’s username and password.
Install CrystalNuClientWeb.cab first to view the video on web.
3.3 Management Server
The feature settings are same with NuClient, please refer to Interface Overview.
68
Page 69

NUUO Crystal 2.0 User Manual
Please note that only when have an "Ultimate level" license will you be able to see the
Matrix interface on NuClient.
Client PC Minimum Requirements
CPU
Intel Core 2 Duo, 2.6GHz
Display Card
OpenGL 2.0 and later
OS Supported
Windows XP 32 bit
Windows 7 32/64 bit
RAM
1GB
2GB
User Interface
HTTP Web browser - Internet Explorer 8 and later
NUUO client application program
4. Application Installation
NuClient is the software that enables Management Server for Live View (instant
video playback), Playback (recorded video playback) and Config (system
configuration). NuMatrix is the software that enables video wall for Live View.
This section will walk you through the installations of the NuClient and NuMatrix, in
both Windows O.S. and Mac O.S.
4.1 NuClient
4.1.1 Install on Windows OS
This section will walk you through the installation of the NuClient in Windows
operating system.
4.1.1.1 System Requirement
The NuClient requires the following hardware and software to run properly in
Windows O.S.:
69
Page 70

NUUO Crystal 2.0 User Manual
4.1.1.2 Proceed to Install
1. Insert the CD into your CD-ROM drive and double-click Setup.exe.
The installer then opens.
70
Page 71

NUUO Crystal 2.0 User Manual
6. Click the Next button to proceed.
The License Agreement opens.
7. Select I accept the terms of the license agreement.
A Customer Information window opens.
8. Enter your name and the name of your company. Then click the Next button.
A Setup Type window then opens and presents two types of installation,
Complete and Custom.
71
Page 72

NUUO Crystal 2.0 User Manual
9. Select Complete and click the Next button to proceed.
OR
Select Custom and click the Next button to proceed.
Complete: To install everything in this package.
Custom: To install a custom selection of applications and to configure the
installation directory.
72
Page 73

NUUO Crystal 2.0 User Manual
10. Click the Next button to install the software to the default folder.
OR
Click the Change button and browse for some other folder to install the software
to. Then click the Next button to proceed.
73
Page 74

NUUO Crystal 2.0 User Manual
A Select Features window then opens.
11. Select the feature(s) to install and deselect the feature(s) that you don’t want.
Then click the Next button to proceed. Then click the Install button.
74
Page 75

NUUO Crystal 2.0 User Manual
The installation then starts, progresses and finishes.
As soon as the installation finishes, the installer disables the UAC on your
Windows O.S. If the UAC isn’t disabled, O.S. restart is required.
75
Page 76

NUUO Crystal 2.0 User Manual
12. Click Yes to restart the O.S. immediately or No to restart it later. Then click the
Finish button to finish and quit the installation.
4.1.1.3 Launch NuClient in Windows OS
After the O.S. restarts, the installation is done. As soon as the system is successfully
installed, a shortcut to launch the software becomes available at the Start button |
All Programs.
76
Page 77
NUUO Crystal 2.0 User Manual
Client PC Minimum Requirements
CPU
Intel Core 2 Duo, 2.6GHz
Display Card
OpenGL 2.0 and later
OS Supported
Windows XP 32 bit
Windows 7 32/64 bit
Mac 10.6/10.7
RAM
1GB
2GB
User Interface
HTTP Web browser - Internet Explorer 8 and later and Firefox 7.0.1
NUUO client application program
We suggest that you avoid using on-board graphics card which will give you
a poor performance. NuClient may pop up an error dialog saying “Videos
cannot be displayed on the Client PC with on-board graphic card” for using
an on-board graphics card.
We also recommend that the drivers of graphics cards be upgraded to the
latest versions.
The system requires OpenGL 2.0 or higher versions to be installed. An error
message will pop up if OpenGL 2.0 or higher versions are not found.
The minimum supported screen resolution 1024x768. NuClient will not run
under the minimum resolution.
4.1.2 Install on MAC OS
This section will walk you through the installation of the NuClient in MAC operating
system.
4.1.2.1 System Requirement
The NuClient requires the following hardware and software to run properly in MAC
O.S.:
77
Page 78
NUUO Crystal 2.0 User Manual
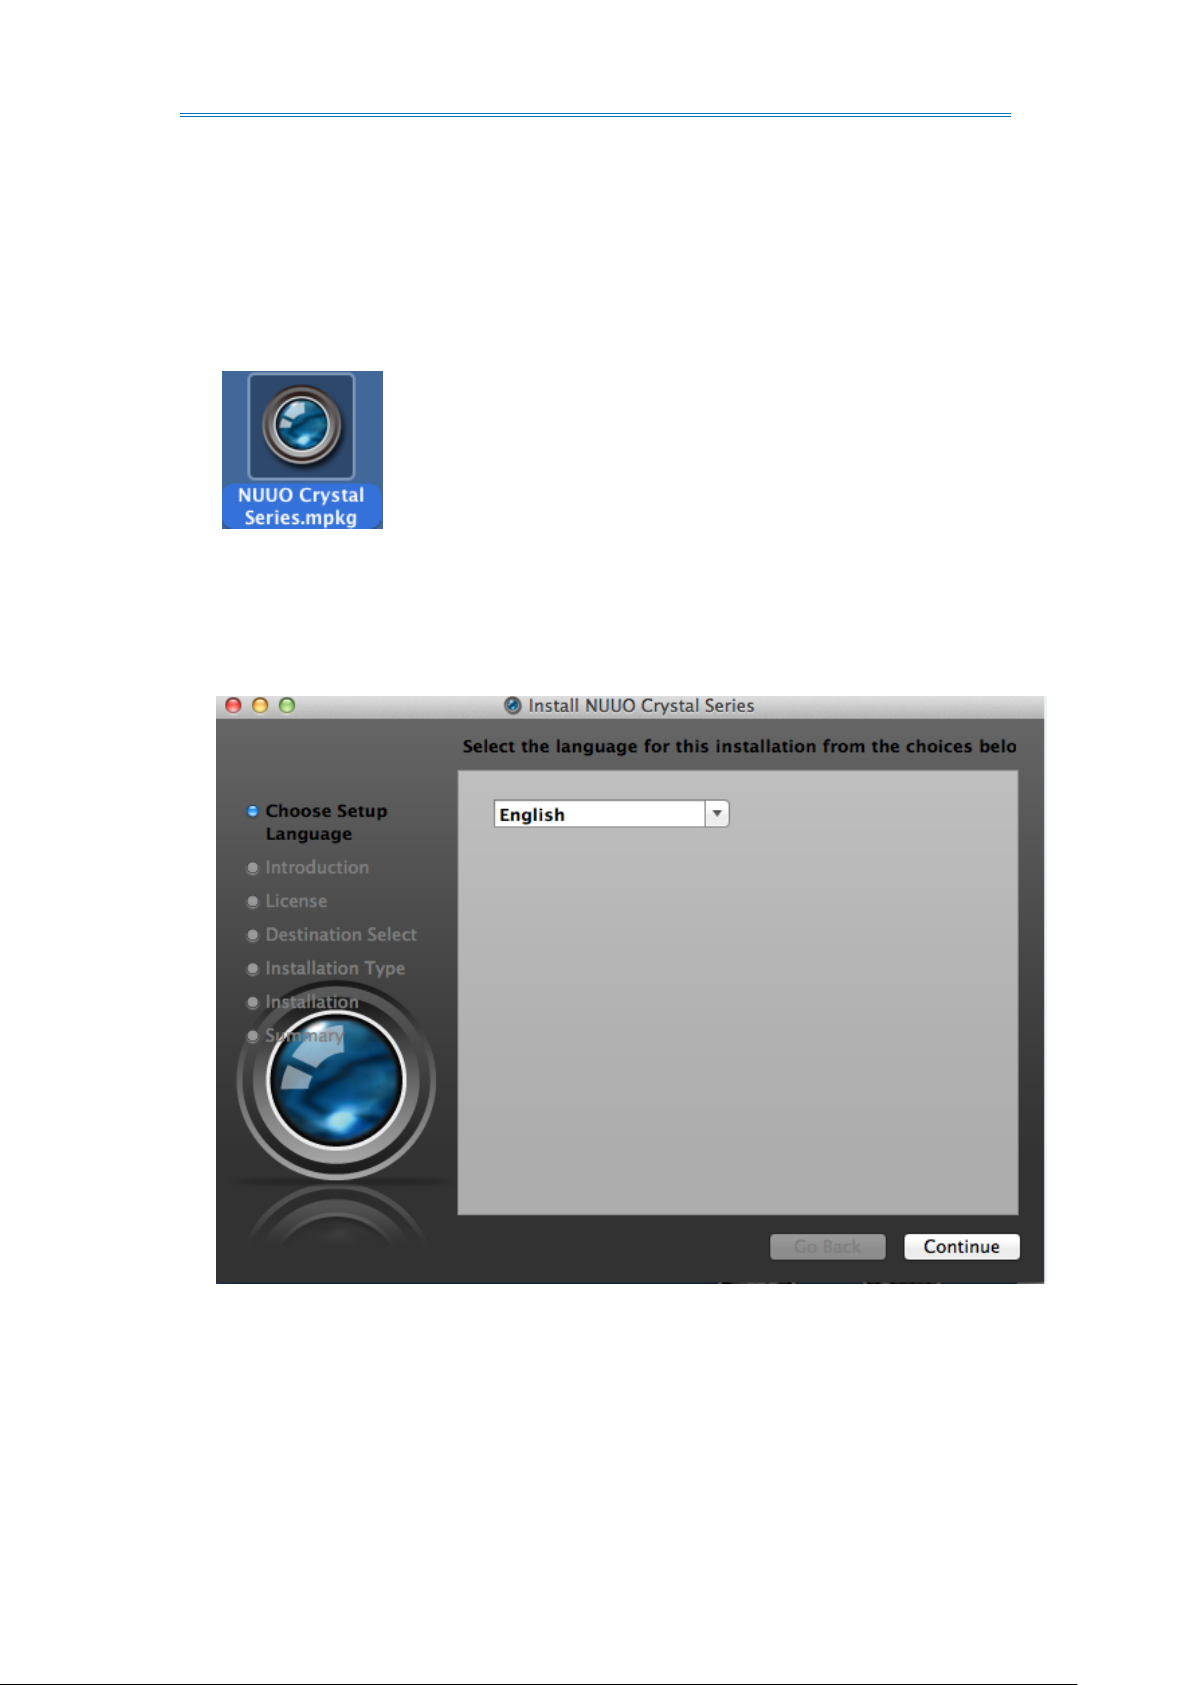
4.1.2.2 Proceed to Install
1. Insert the CD into your CD-ROM drive and double-click NUUO Crystal Titan
Series.mpkg to begin installation.
The installer then opens.
2. Choose your language and click Continue button.
78
Page 79
NUUO Crystal 2.0 User Manual
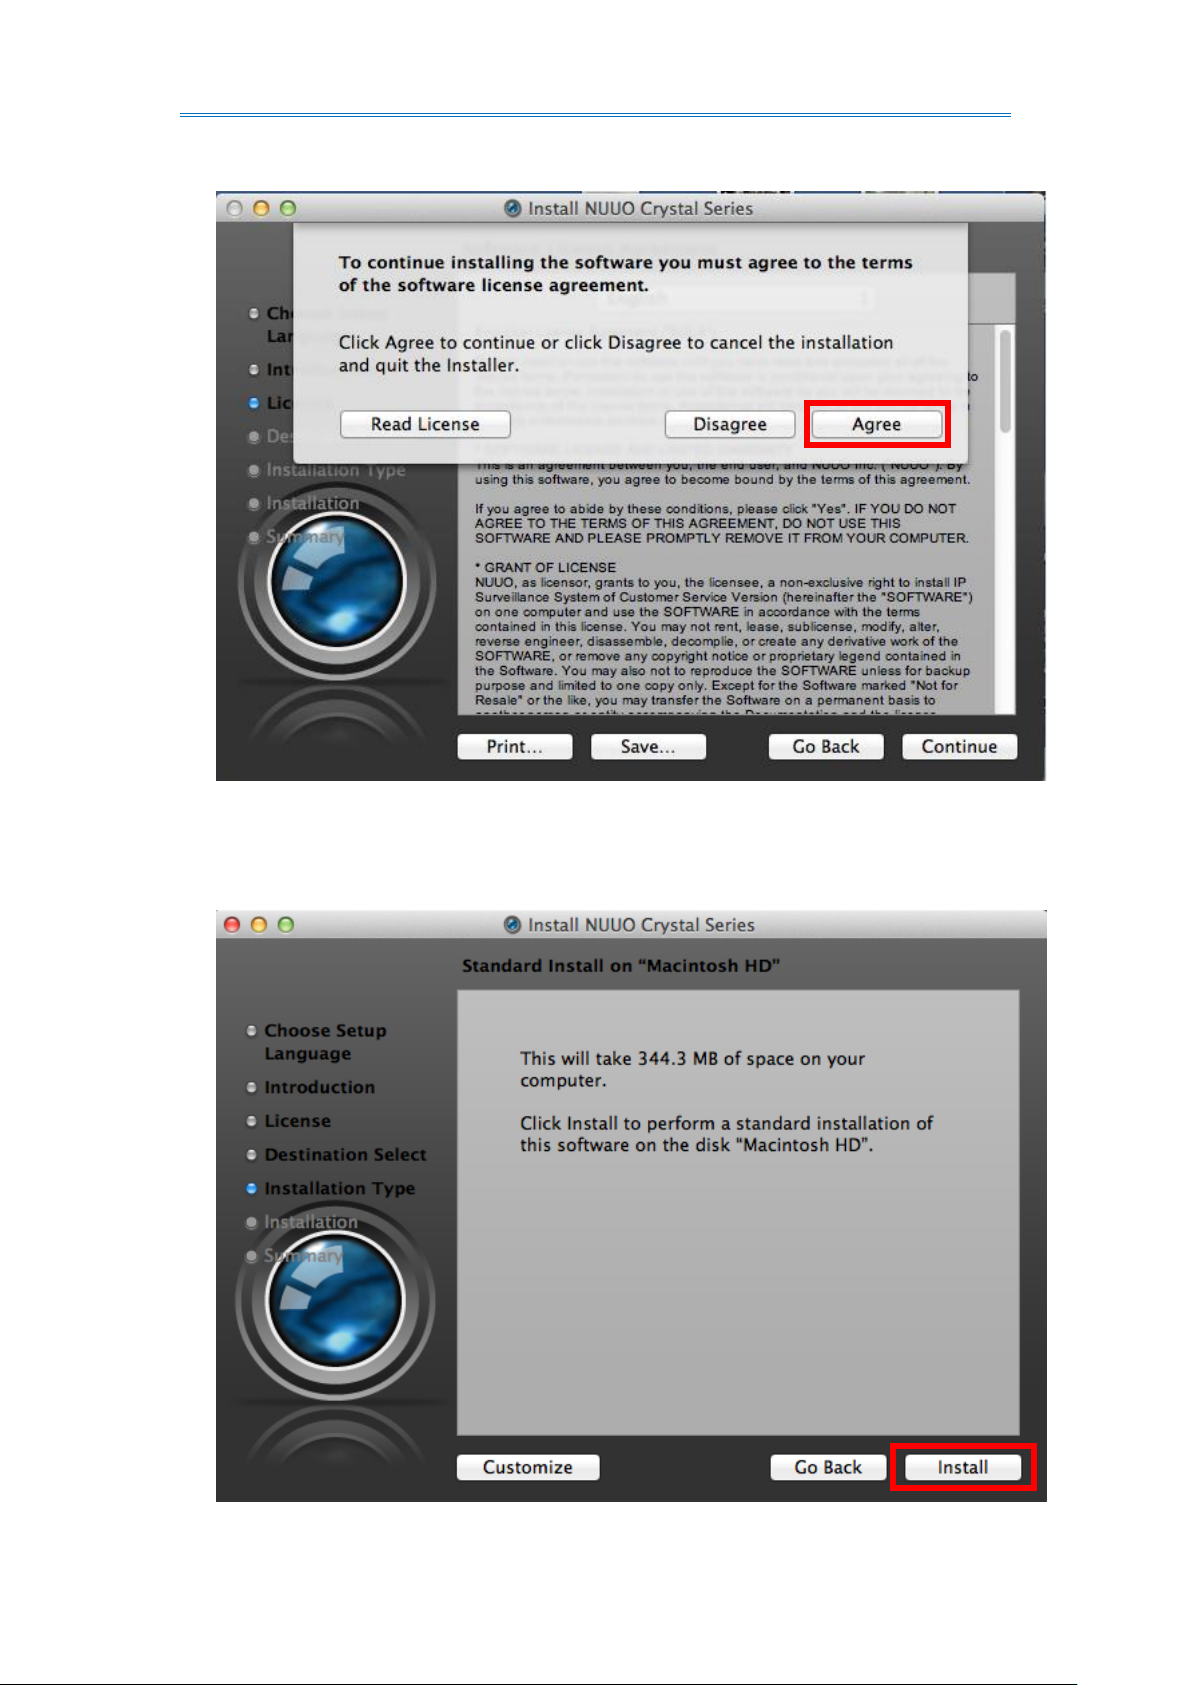
3. Click the Continue button and accept the License Agreement.
4. You can choose two types of installation, Install and Customize.
Install: Install everything in this package.
79
Page 80

NUUO Crystal 2.0 User Manual
The install destination only supports the system hard drive at this version.
Customize: Install a custom selection of applications.
5. Select the applications you want to install
80
Page 81

NUUO Crystal 2.0 User Manual
6. Click on the Install button to start the installation.
7. The system is being installed.
81
Page 82

NUUO Crystal 2.0 User Manual
8. Choose Close to finish installation.
4.1.2.3 Launch NuClient in MAC OS
After the O.S. restarts, the installation is done. As soon as the system is successfully
installed, a shortcut to launch the software becomes available in your Applications.
82
Page 83

NUUO Crystal 2.0 User Manual
5. Log in
To log in to the system:
1. Launch the NuClient as described in Launch NuClient in Window OS or Launch
NuClient in Mac OS .
1. NuClient launches and a login dialog opens.
2. Enter the server address you are going to connect to, the user name, and the
password. Then click the OK button.
Once you’re logged in, the main interface of the NuClient shows.
83
Page 84

NUUO Crystal 2.0 User Manual
If too many clients are trying to connecting to a remote server, then an error
message will pop up saying the number of maximum connections has been
reached.
NuClient can only login Management Server, cannot login Recording
Server(s), Metadata Server(s) and Matrix.
84
Page 85

NUUO Crystal 2.0 User Manual
6. Log out
To log out from the system:
1. Access NuClient.
2. From the Top Toolbar of the NuClient, click the “global” icon .
The menu opens.
85
Page 86

NUUO Crystal 2.0 User Manual
Both your primary monitor and secondary monitors will be closed when you log out.
3. Click Logout.
If you have made any change to the configuration, a dialogs will show and
request for your confirmation whether to write the change(s) to the
configuration when you log out. To write the change(s) to the server, click the
Yes button in the dialog.
A progress bar will appear to show the writing status.
Once the update is through, the login dialog will re-appear and you are logged
out from the system.
86
Page 87

NUUO Crystal 2.0 User Manual
7. Exit
The NuClient still runs and stays in main memory after you log out from it. To close
the software:
1. Access NuClient.
2. From the Top Toolbar of the NuClient, click the “global” icon .
The menu opens.
3. Click Exit.
The NuClient is quit.
87
Page 88

NUUO Crystal 2.0 User Manual
8. Version information
To see the software version of NuClient:
1. Access NuClient.
2. From the Top Toolbar of the NuClient, click the “global” icon .
The menu opens.
88
Page 89

NUUO Crystal 2.0 User Manual
Visit NUUO’s technical support site at http://www.nuuo.com/eHelpdesk.php. You may
find all sorts of technical information including FAQs, product specifications, and
technical contact information.
3. Click About.
An About NuClient window then opens and shows the software’s version,
copyright information and the links to NUUO’s homepage and its technical
support site.
89
Page 90

NUUO Crystal 2.0 User Manual
The Global
Live View, Playback and Config tab
9. Interface Overview
Understanding the NuClient’s user interface helps you navigate the software without
any problem. Once you are familiar with the NuClient’s UI, you can jump seamlessly
within the software.
90
Page 91

NUUO Crystal 2.0 User Manual
Command
Description
Commit Config
Applies the change(s).
This command is efficacious as the commit config on the Config tab, Top
Toolbar.
See also Screen Terminology.
Restore Config
Refresh the change(s).
Request Server provides the configuration which saved in Management Server.
This command is efficacious as the restore config on the Config tab, Top
Toolbar.
See also Screen Terminology.
Log Export
Opens a Log Viewer tool to export the log of a desired period of time.
Backup Tool
Launches the Backup Tool to save the videos recorded in a desired period of time
to a desired local storage.
E-Map Editor
Opens the E-Map Editor that inserts multiple maps that mark the locations of
cameras and I/O.
The “E-map” is a graphical way to present cameras and I/O devices to give the
administrator an idea of where a camera is located, and the relationship among
those devices. Cameras and I/O are overlaid on a street map, a floor plan, or any
other custom image files.
9.1 Menu– The Global
To access the NuClient’s menu:
1. From the Top Toolbar of the NuClient, click the “global” icon .
The menu opens.
The featured commands are:
91
Page 92

NUUO Crystal 2.0 User Manual
Image Fusion
Editor
Open the Image Fusion Editor to create a panoramic view by stitching multiple
camera images together.
Client
Configuration
Access the preference configuration for the software.
Export Config
Save the NuClient configuration to a file.
Import Config
Load a NuClient configuration file.
About
Views the developer and version of the software, NuClient.
Logout
Signs out from the current account. (NuClient will still be running.)
Exit
Quits the software, NuClient.
9.2. Live View
When the system starts and users log in, it is the Live View that opens onscreen. If it
isn’t the Live View screen that shows at the moment, click the Live View tab from
the NuClient’s Top Toolbar to open the Live View screen.
Exactly as its name communicates, the Live View is the screen where the instant
videos are displayed. Most of the Live View screen is occupied by a predominant
video area. See Live View to know more about the Live View screen.
92
Page 93

NUUO Crystal 2.0 User Manual
9.3. Playback
To open the NuClient’s Playback screen, click the Playback tab from the Top Toolbar.
The Playback is the screen to play the recorded videos. Same as the Live View screen,
the Playback screen is occupied by a predominant video area as well. See Playback to
know more about the Playback screen.
93
Page 94

NUUO Crystal 2.0 User Manual
Number
Title
Description
1
Top Toolbar
The Top Toolbar features the following onscreen facilities:
Facility
Title
Description
the
“global”
Opens the menu of the NuClient.
See NuClient Menu for more details.
apply
button
Applies the change(s).
restore
button
Refresh the change(s).
the tabs
Switch the NuClient between the Live
View, Playback and Config features.
2
Config Catalog
Switches the NuClient between System Config, Physical Config, and
Help.
3
Tree Console
Provides the tree menu.
Features the following onscreen facilities:
○
1
○
2
○
3
○
4
○
5
9.4. Config
From the Top Toolbar of the NuClient, click the Config tab to open the NuClient’s
“configuration” feature which includes “system configuration”, “physical
configuration” and the help file of the NuClient.
See Settings for the “system configuration” and “physical configuration” featured by
the NuClient.
94
Page 95

NUUO Crystal 2.0 User Manual
Icon
Title
Description
add sign
Adds a user group/device.
delete sign
Deletes the selected user
group/device.
ascending button
Sorts all the user group(s)/device
in an ascending order.
search button
Searches for an user group/ a
device.
Restore system/
physical button
Restore system/physical setting.
4
Status Bar
Deliver system date, system time, user ID, server address, CPU
loading, memory usage, and download/upload speed.
5
Configuration
Pane
Opens the settings featured by a subject of the menu tree when the
subject is clicked.
Graphic icon
Description
Management Server
Recording Server
Video Device
Camera
Camera DI/DO
IO device
Metadata Server
Metadata Source
Metadata channel
Matrix
9.5 Graphic Icon on Tree list
The following icon will display on tree from Physical configuration.
95
Page 96

NUUO Crystal 2.0 User Manual
Icon
Description
User group
User
Role
Schedule
Layout
Graphic icon
Description
Configuration is modified but haven’t commit to Management Server.
Click the apply button on the Top Toolbar to apply the change(s).
The device is disabled.
The device is disconnect
Can’t get device information.
The following icon will display on tree from System configuration page.
Special notification will overlay on icon from tree list include:
96
Page 97

NUUO Crystal 2.0 User Manual
The Live View tabbed page
10. Settings
The Config tab features two types of configuration. One is the “system configuration”;
the other is the “physical configuration”. The “system configuration” means to
configure Management Server basic profile setting such as user group, role, schedule
and layout while the “physical configuration” means to configure the Management
Server in order to configure all the physical devices within the network such as
recording server, Metadata Server, Matrix Server, video device, camera and I/O
devices . Generally the “system configuration” should be done prior to the “physical
configuration”.
To access the NuClient settings:
1. Launch the NuClient as described in Launch NuClient in Window OS or Launch
NuClient in Mac OS.
The NuClient opens onscreen and shows the Live View tabbed page by default.
97
Page 98

NUUO Crystal 2.0 User Manual
The Config tab opens
2. From the Top Toolbar, click the Config tab.
The Config tab opens.
10.1 Physical Configuration
The Management Server runs the administrative software to control all the
networked devices including the Recording Server, Metadata Server and Matrix.
Hence, it relies on the Management Server to configure all the networked devices.
To access the Physical Config (“physical configuration”):
1. Open the NuClient settings as described in Settings.
The NuClient settings open.
1. Click the Physical Config icon from the Config Catalog.
The physical configuration then opens onscreen and shows the Management
Server settings by showing the Properties tabbed page in the Configuration
Pane.
98
Page 99

NUUO Crystal 2.0 User Manual
Setting
Description
Recording Server
Configures the Recording Server to control one or more “video device(s)” that
further controls one or more camera(s) or camera DI/DO.
See Configure Recording Server for the settings.
Metadata Server
1. Configures the Metadata Server to host the third-party device servers and
archive their data.
2. Configures the Metadata Server to stream and archive the data from the
third-party device servers (such as POS server, Access Control server, and LPR
server) so the NuClientis able to combine the data with video images for more
sophisticated application such as theft investigation.
See Configure Metadata Server for the settings.
Matrix
Enables an unlimited number of video walls and video displays.
See Configure Matrix for the settings.
Please note that only when have an "Ultimate level" license will you be able to see the
Matrix interface on NuClient.
The physical configuration opens and shows Management Server settings by showing the
Properties tabbed page in the Right Pane..
The physical configuration features the following settings:
99
Page 100
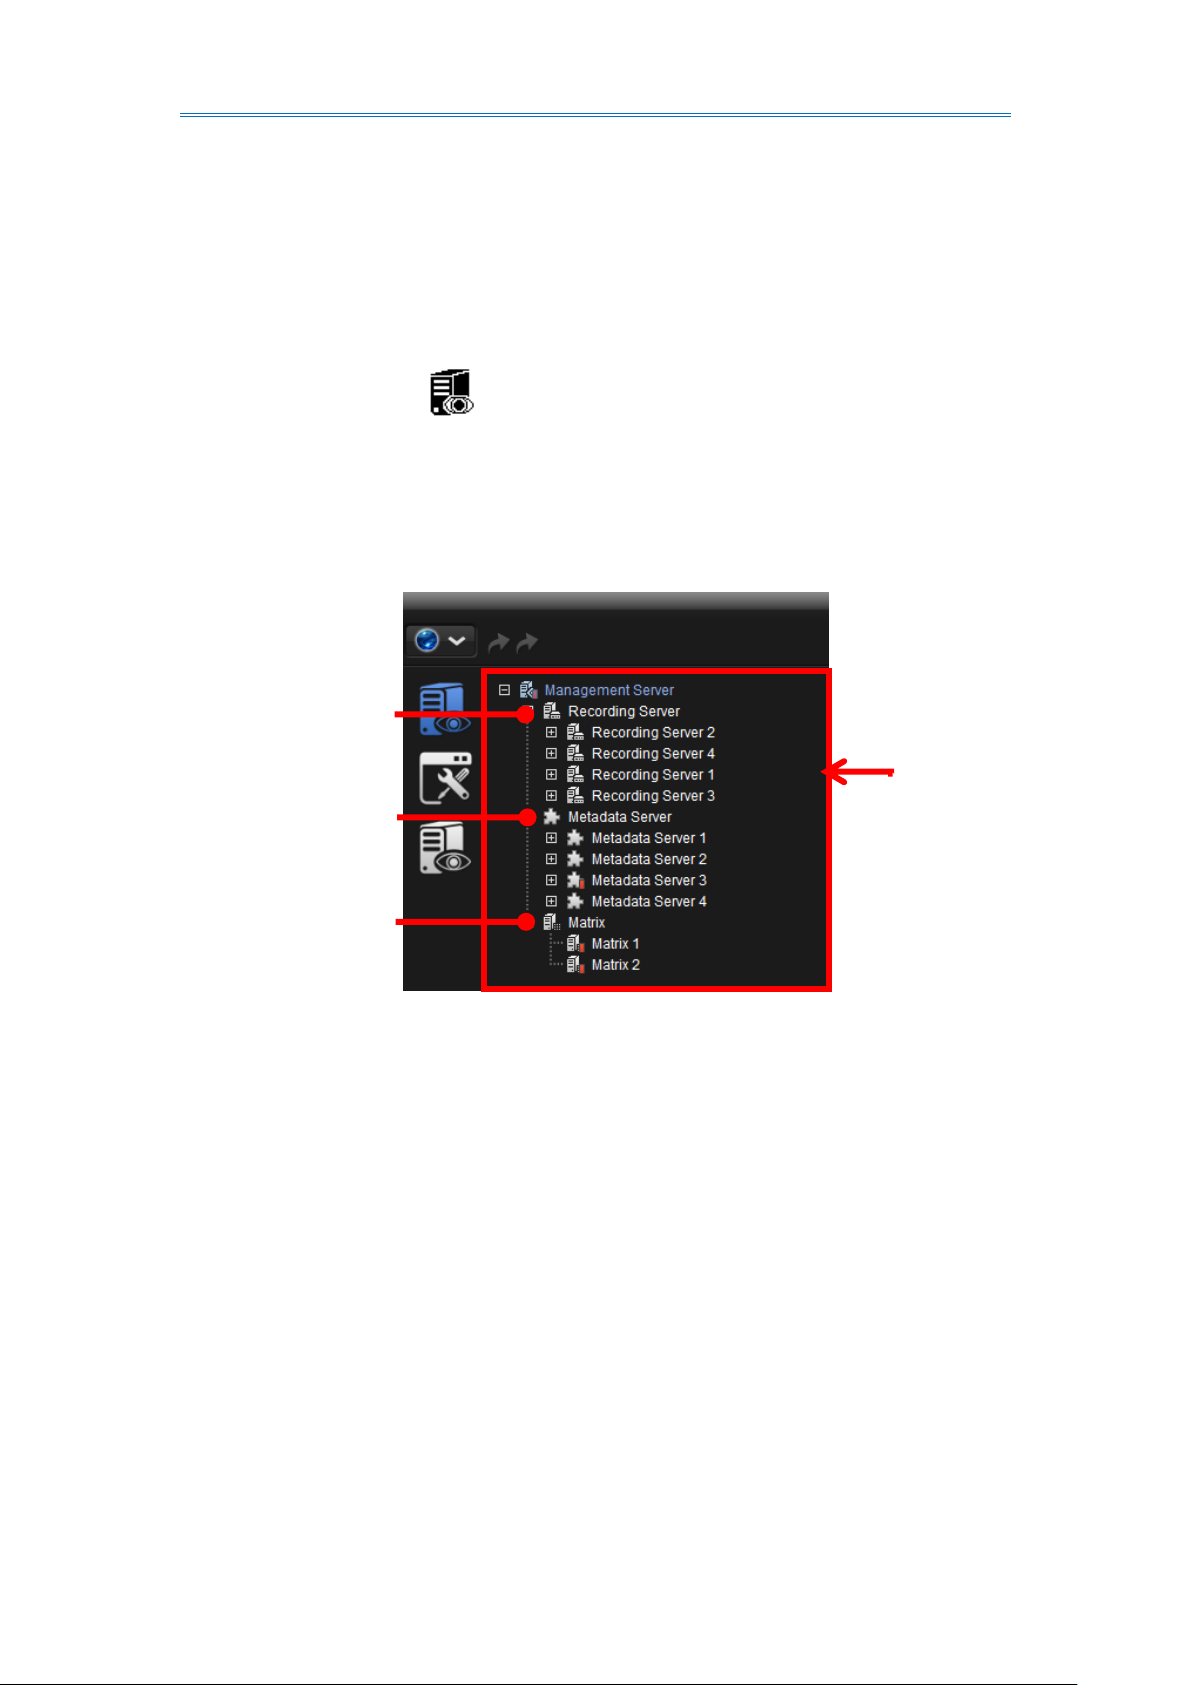
NUUO Crystal 2.0 User Manual
The Tree Console
Recording Server
Metadata Server
Matrix
10.1.1. Configure Management Server
To configure the Management Server:
1. Run the NuClient. Click the Config tab from the Top Toolbar. Then click the
Physical Config icon from the Config Catalog.
2. The Tree Console then shows three setting groups: Recording Server, Metadata
Server and Matrix.
100
 Loading...