

Page 1

9
SYSTEM OPERATING CONTROLS
PM
21
22
20
19
18 17 16 15 14
13
12 11
1
2
3
4 5
6
7
8
9 10
Master Station Controls
1
END CALL: Ends intercom communication and returns system
to audio source.
2 DOOR TALK: Initiates intercom communication to the door
speakers.
3
INSIDE/PATIO: Initiates intercom communication to remote
stations.
4 TIMER: Enables or disables the radio timer. The indicator
light will illuminate next to the timer button when the Radio
timer is enabled.
5 PROGRAM AUDIO SOURCE: Selects the program audio
source: AM, FM, CD/TAPE and AUX. The indicator light will
illuminate next to the selected program audio source.
6 PROGRAM OFF: Turns off the selected program audio source.
NOTE: The Program Off key does not affect the intercom
operation.
7 MASTER VOLUME: Adjusts the volume at the master
station.
8 MEMORY 1-6 KEYS: Provides direct access to stored radio
frequencies.
9 ▲ ▼ UP/DOWN TUNING: Provides manual tuning of the
AM/FM radio.
10 SCAN: Activates scan tuning during AM/FM operation.
11 DOOR RELEASE KNOCKOUT: Mounting hole for optional
door release push button.
12 MICROPROCESSOR RESET: Initiates a reset of the micro-
processor. NOTE: A reset of the microprocessor will erase the
system’s memory.
13 MEMORY SET: Stores desired radio frequency into a selected
memory location.
14 TIME SET/HOUR/MIN: Used when setting the timer and
clock.
15 TREBLE: Adjusts the high frequency audio content of the
source audio.
16 BASS: Adjusts the low frequency audio content of the source
audio.
17 SYSTEM VOLUME: Adjusts the program audio level
throughout the system.
18 LOUDNESS: Compensates for the loss of bass and treble
response the human ear has when listening to audio at low
volume levels.
19 INTERCOM VOLUME: Adjusts intercom audio level
throughout the system.
20 MASTER STATION STATUS SWITCH: Sets the master station
in one of the following modes: RADIO INTERCOM,
INTERCOM ONLY, OFF or MONITOR.
21 REMOTE STATION STATUS SWITCHES: Sets the remote
stations in one of the following modes: RADIO INTERCOM,
INTERCOM ONLY, OFF or MONITOR.
22 ELECTRONIC CHIME TUNE SELECTION: Selects the tune
of the optional IA-29 Electronic chime.
FIGURE 20
Page 2
10
SYSTEM OPERATING CONTROLS
Digital Clock
SETTING THE TIME
1.
Press the TIME SET key one time. The display will begin
flashing, and the words SET TIME will be displayed.
2. Within 5 seconds, press the HOUR key to advance the hours.
Use the HOUR key
to select AM/PM by
advancing past
12:00 on the
display.
3. Within 5 seconds,
press the MIN key to advance the minutes.
4. After entering the correct time, release the key. The display will
stop flashing after 5 seconds, and the time will be set.
Operational Checkout
If the Radio-Intercom does not operate according to the
following instructions, refer to the Installer's Troubleshooting
Guide.
1. Set STATION STATUS SWITCHES to the RADIO/
INTERCOM position.
2. Set the MASTER VOLUME control to maximum.
3. Set each individual station VOLUME control to maximum.
4. Set the SYSTEM VOLUME control to
1
⁄2 position.
5. Set the INTERCOM VOLUME to
3
⁄4 position.
6. Set the BASS and TREBLE controls to the
1
⁄2 position.
7. Tune in a strong FM radio station as follows:
A. Press the FM key
B. Use the ▲ ▼ keys to locate a strong FM radio station.
Beginning with the master station, check each station in the
system for proper operation using the following procedure:
1. Adjust the station's Volume Control (Master Volume
on the master station) between maximum and minimum,
making sure the audio is completely muted in the minimum
position and no noise is created by the volume control
during adjustment.
2. Press the INSIDE/PATIO key. Radio audio will mute and
audio from the station will be heard at all stations in the
system, except the door speaker(s).
3. Release the INSIDE/PATIO key to hear the reply.
NOTE: To reply to an intercom call initiated at a remote
station, the Inside/Patio key must be pressed at the station
responding to the intercom call. If, however, an intercom
call is initiated at the master station, the Inside/Patio key
does not
need to be pressed at the station responding to
the intercom call. Audio from the responding stations and
all stations in the system will be heard at the master station
when the INSIDE/PATIO key is released.
4. Press the END CALL key. Intercom communication will end,
and radio audio will return to all stations in the system.
5. Press the DOOR TALK key. Radio audio will mute, and audio
from the station will be heard at the door speaker(s) and all
stations in the system.
6. Release the DOOR TALK key. Audio from the door speakers
will be heard at all stations in the system.
7. Press and hold the END CALL key. Door communication will
end, and radio audio will return to all stations in the system.
8. Press and hold the END CALL key for 2 seconds. The radio
will turn off.
9. Press and hold the END CALL key for 2 seconds.
The radio will turn on. See page 5 for information on
controlling the radio from a remote station.
10. Repeat procedure at next station.
Setting System Volume
The volume levels required at each Station may vary with the
locations of the speaker and the size of the room where the
speaker is located. Spend some time experimenting with
volume levels, and adjust each speaker so that you can clearly
hear the radio and intercom. Use the following procedures to set
your system’s volume levels:
1. At each remote station, turn the volume control completely
clockwise to maximum volume.
2. At the master station, set the REMOTE and MASTER
SPEAKER STATUS switches to the RADIO INTERCOM
position.
3. Turn the MASTER VOLUME control to maximum volume.
4. Turn the SYSTEM VOLUME control on the master station to
approximately one-third volume.
5. Select an AM or FM radio station with a strong, clear signal.
6. Adjust the master station's SYSTEM VOLUME control until
you have enough volume at the remote station that requires
the highest volume (i.e. a large living room, family room,
basement, etc.).
NOTE: The Master Station and all Remote Stations
(except the door speakers) are equipped with their own
volume controls. Although the Master Station SYSTEM
VOLUME sets the System's Volume level, you may adjust
an individual speaker's volume level as desired.
7. Adjust the MASTER VOLUME control and all remote
stations' VOLUME controls to the volume level you
desire. Do not set the remote stations' volume controls
below
1
⁄2 volume.
Setting Intercom Volume
1. Initiate Intercom call from the master station by pressing the
INSIDE PATIO key.
2. Speak with a normal voice about 2-3 feet from the station
speaker.
3. Adjust the INTERCOM VOLUME control until the initiating
station’s audio is clearly heard at all stations in the system.
NOTE: The volume control at all stations should be set
between
1
⁄2 to maximum volume for proper intercom
operation.
4. Repeat the above procedure at several locations until an
acceptable intercom audio level is achieved at all stations.
PM
Page 3
11
OPERATIONAL CHECKOUT
The following diagnostic test have been incorporated into
the NuTone IMA-3303 Radio Intercom to assist in system
troubleshooting.
1. Master station keyboard test
2. Control line voltage test
3. Display test
The following applies to all three diagnostic tests:
1. To access any of the diagnostic tests, the system must
be in the quiescent state (radio off and intercom in the
standby mode).
2. Pressing the MEMORY SET key will end the current
diagnostic test.
3. The current diagnostic test will end after one minute of
inactivity.
NOTE: An incorrect control line voltage caused by miswiring
or a defective remote station may prevent the unit from entering
the diagnostic mode. This condition, however, can
be circumvented by first placing all station selector switches
into the OFF mode and then disconnecting CN701 from the
terminal board. The voltage on the control line can then be
measured by activating the control line voltage test mode and
then reconnecting CN701.
1. MASTER STATION’S KEYBOARD TEST – Verifies that
all keys on the master station are functioning properly.
To Activate: Press and HOLD
1. ▲ key
2. ▼ key
3. MEMORY 1 key.
In this mode the hours in the display represent the current
diagnostic test and the minutes indicate the current key
being pressed. The following will be displayed as each key
is pressed.
2. CONTROL LINE VOLTAGE TEST – Displays the voltage
on the control line.
To activate: Press and HOLD
1. ▲ key
2. ▼ key
3. MEMORY 2 key.
Example:
In this mode, the hours represent the diagnostic test,
and the minutes indicate the voltage on the control line.
The control line voltage windows for the three intercom modes
are listed above. For proper intercom operation, the control
voltage produced when an intercom key is pressed at a remote
station should fall between the voltages indicated.
NOTE: Pressing END CALL, DOOR TALK or INSIDE/PATIO
keys at the master station will not change the voltage on the
control line.
If a remote station does not produce a voltage within the above
windows for a specific intercom function, check the following:
• Make sure all connectors from the master station are properly
installed into the terminal PC board.
• Check IWA-3 connections at the terminal PC board and at
each remote station.
• Confirm that the suspect remote speaker station functions
properly by replacing it with a known good Remote Station.
3. DISPLAY TEST – Displays all of the segments in the display.
To Activate: Press and HOLD
1. ▲ key
2. ▼ key
3. MEMORY 3 key
Pressing the ▲ key toggles the display on and off.
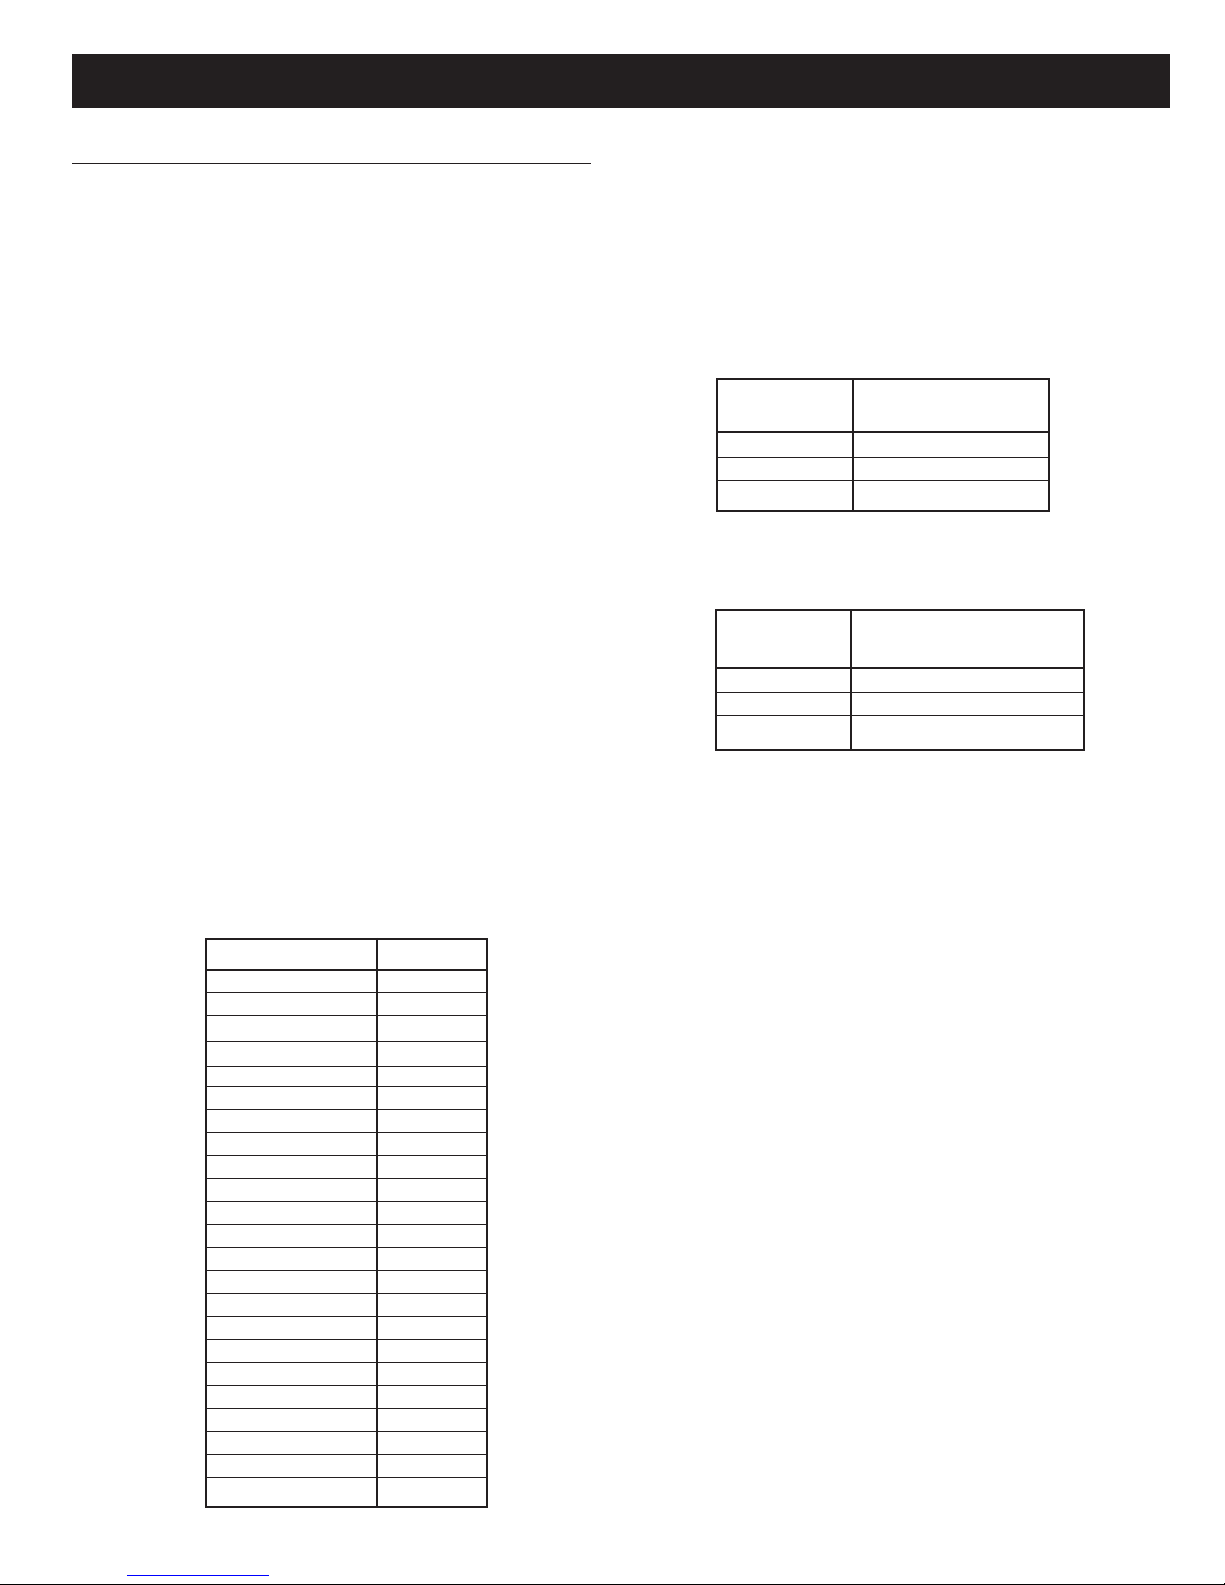
Diagnostic Tests
KEY DISPLAY
No key pressed 1:00
SCAN 1:01
▲
1:02
▼ 1:03
PROGRAM OFF 1:04
AM 1:05
FM 1:06
CD/TAPE 1:07
AUX 1:08
TIMER 1:09
INSIDE/PATIO 1:10
DOOR TALK 1:11
END CALL 1:12
MEMORY 1 1:13
MEMORY 2 1:14
MEMORY3 1:15
MEMORY 4 1:16
MEMORY 5 1:17
MEMORY 6 1:18
TIME SET 1:19
HOUR 1:20
MIN 1:21
MEMORY SET
1:22
VOLTAGE ON
DISPLAY CONTROL LINE
2:34 3.4 volts
2:17 1.7 volts
2:06 .6 volts
VOLTAGE WINDOW
MODE MAX MIN
End Call 4.5V - 2.4V
Door Talk 2.4V - 1V
Inside/Patio 1.0V - 0
11
Page 4

12
TROUBLE
No radio, no intercom.
(No Display).
No radio, intercom working.
(AM/FM indicator on.).
Low or distorted radio
volume.
Low or no intercom volume
from remote speaker in
MONITOR mode.
System squeals when using
intercom.
No electrical power.
Defective transformer.
Faulty Master Station.
Installation problem.
Antenna problem.
Incorrect volume setting.
Improper operation.
Program and Intercom Volume
Control adjustment.
Shorted wire on master or
remote terminal board.
Tw o or more Remote Stations on
same wire run to Master.
Speakers in adjacent rooms
mounted on common wall, or
mounted back to back.
Improper wire used in
installation.
Improper double connections
of Remote Stations on terminal
screws 1, 2, 6 & 7.
Be certain 120VAC, 60Hz power has been provided to the primaries of
both 301T Transformers. No less than 16VAC should be measured on
the secondary of either Transformer.
Replace transformer.
Isolate Master Station from installation by removing ribbon cables from
terminal board and wait one minute for timeout. With power on, radio
should be playing at Master. If no radio, Master is probably faulty. If
radio plays, reconnect ribbon cables.
Check terminal board for shorted terminals or miswired cables.
Remove one 3-wire cable at a time to locate faulty line. When radio
comes on, check speaker connections and run continuity check of
speaker wiring.
Check for shorted antenna connection. Remove antenna connector
from tuner board and touch each pin with metallic object. If radio plays,
antenna is not functioning; be sure it is installed properly. In weak
signal areas, an outside antenna may be necessary. Also see
Connecting Auxiliary AM Antenna
Follow “Setting Volume” instructions under OPERATIONAL
CHECKOUT.
Be sure remote speaker set for MONITOR has its volume control set
between
1
⁄2 and max, and receiving speakers have volume controls set
between
1
⁄2 and max. Follow “SETTING VOLUME” instructions in
Operation Checkout.
Follow these instructions whenever the radio tends to overpower
transmissions from a remote speaker in the MONITOR mode. These
instructions will help you get the proper balance between the radio and
the monitored speaker.
1. Set system volume control to midpoint.
2. Set master to CD/TAPE or AUX position.
3. Adjust volume control for each remote station and speaker in
master station
3
⁄4
position.
4. Set master to AM or FM and tune to a strong AM or FM station.
5. Adjust program volume control for a desired listening level.
6. Increase Intercom volume control setting. Adjust clockwise to
desired monitor volume.
Check for short between terminals or loose wire.
Make separate cable (IWA-3) runs from each Remote Station to the
Master.
If speakers are mounted directly back to back, one speaker will have to
be relocated. If speakers are in a common wall, try placing fiberglass
insulation behind each speaker, or isolate the speakers from the wall
by placing rubber washers or weather stripping between speaker and
wall.
NuTone Model IWA-3-conductor, flat-ribbon cable must be used.
Follow “Connecting the Remote Speaker Wiring” under
INSTALLATION.
POSSIBLE CAUSE POSSIBLE REMEDY
INSTALLER'S TROUBLESHOOTING GUIDE
Page 5

Opitional Electronic Chime
(Models IA-28 or IA-29) does
not operate or operates at a
low level.
Wire installation.
Improper volume setting.
13
TROUBLE
Hum in speakers.
Static.
Remote Station not working.
No door communication.
Cannot receive radio station
which is received by another
radio in home.
Intercom wiring run too close to
household AC power wiring.
Shorted intercom power wiring
or power wiring shorted to
ground.
Interference from household
electrical fixtures.
Loose ground connection.
Interference from household
electrical fixtures.
Interference from household
electrical appliances.
Wire installation.
Speaker.
Wire installation.
Speaker.
Wire installation.
Improper volume setting.
Faulty antenna connection.
Keep intercom wiring as far as practical from household AC power
wiring. Do not run intercom wiring parallel to AC power wiring.
Check power connections to Master and connections to transformers.
A dimmer may cause interference. For dimmer and fluorescent lighting
interference, use filters (G.E. 89G635 or equivalent; NuTone Part No.:
1559A-000).
Check ground connection to Master and connection to earth ground
source.
A dimmer may cause interference. For dimmer and fluorescent lighting
interference, use filters (G.E. 89G635 or equivalent; NuTone Part No.:
1559A-000).
Correct interference at the source: fish tank, heater, hand tool, coffee
pot, etc.
Check terminal board for broken wire or loose connection. Check
continuity of wire.
Check continuity of speaker. Clean switch controls. Substitute with
speaker known to be in working order.
Check continuity of wiring. Check connections at speaker and Master.
Check with a speaker known to be in working order.
Be certain the chime is properly connected to the master station. Also,
be certain the front, side and rear buttons are properly connected to
the chime board.
Adjust the volume of the chime module by turning the volume
potentiometer located on the chime module. NOTE: Chime Audio will
NOT be heard at stations selected to the OFF or MONITOR.
Be certain the electronic chime is properly connected to the master
station's electronic chime input screw terminals.
Adjust the volume of the electronic chime by turning volume
potentiometer located on the chime.
Antenna should be located in attic and connected to tuner in Master.
Check antenna connector to be sure it is connected to header on tuner
board.
POSSIBLE CAUSE POSSIBLE REMEDY
INSTALLER'S TROUBLESHOOTING GUIDE
Electronic chime can't be
heard through the master
station or remote speakers.
Page 6

14
Page 7

15
Page 8

Product specifications subject to change without notice.
4820 Bank Road, Cincinnati, Ohio 45227
Printed in China, 10/03, Part No. 83068
Two Year Limited Warranty
WARRANTY OWNER: NuTone warrants to the original consumer purchaser of its products that such products will be free from defects in materials or workmanship for a period
of two (2) years from the date of original purchase. THERE ARE NO OTHER WARRANTIES, EXPRESS OR IMPLIED, INCLUDING, BUT NOT LIMITED TO, IMPLIED
WARRANTIES OF MERCHANTABILITY OR FITNESS FOR A PARTICULAR PURPOSE.
During this two year period, NuTone will, at its option, repair or replace, without charge, any product or part which is found to be defective under normal use and service.
THIS WARRANTY DOES NOT EXTEND TO FLUORESCENT LAMP STARTERS OR TUBES, FILTERS, DUCT, ROOF CAPS, WALL CAPS AND OTHER ACCESSORIES
FOR DUCTING. This warranty does not cover (a) normal maintenance and service or (b) any products or parts which have been subject to misuse, negligence, accident,
improper maintenance or repair (other than by NuTone), faulty installation or installation contrary to recommended installation instructions.
The duration of any implied warranty is limited to the one year period as specified for the express warranty. Some states do not allow limitation on how long an implied warranty
lasts, so the above limitation may not apply to you.
NUTONE’S OBLIGATION TO REPAIR OR REPLACE, AT NUTONE’S OPTION, SHALL BE THE PURCHASER’S SOLE AND EXCLUSIVE REMEDY UNDER THIS
WARRANTY. NUTONE SHALL NOT BE LIABLE FOR INCIDENTAL, CONSEQUENTIAL OR SPECIAL DAMAGES ARISING OUT OF OR IN CONNECTION WITH
PRODUCT USE OR PERFORMANCE. Some states do not allow the exclusion or limitation of incidental or consequential damages, so the above limitation or exclusion may
not apply to you. This warranty gives you specific legal rights, and you may also have other rights, which vary from state to state. This warranty supersedes all prior warranties.
WARRANTY SERVICE: To qualify for warranty service, you must (a) notify NuTone at the address stated below or telephone 1/800-543-8687, (b) give the model
number and part identification and (c) describe the nature of any defect in the product or part. At the time of requesting warranty service, you must present
evidence of the original purchase date.
Date of Installation Builder or Installer
Model No. and Product Description
IF YOU NEED ASSISTANCE OR SERVICE:
For the location of your nearest NuTone Independent Authorized Service Center:
Residents of the contiguous United States Dial Free 1-800-543-8687
Please be prepared to provide:
Product model number • Date and Proof of purchase • The nature of the difficulty
Residents of Alaska or Hawaii should write to: NuTone Inc. Attn: Department of National Field Service, 4820 Red Bank Road, Cincinnati Ohio 45227-1599.
Residents of Canada should write to: Broan-NuTone Canada, 1140 Tristar Drive, Mississauga, Ontario, Canada L5T 1H9.
Rev. 03/2001
 Loading...