

Page 1
NuTone
RADIO
SYSTEM
MODEL
INTERCOM
IM-4006
SERIES
HOMEOWNER'S
OPERATING
INSTRUCTIONS
Page 2
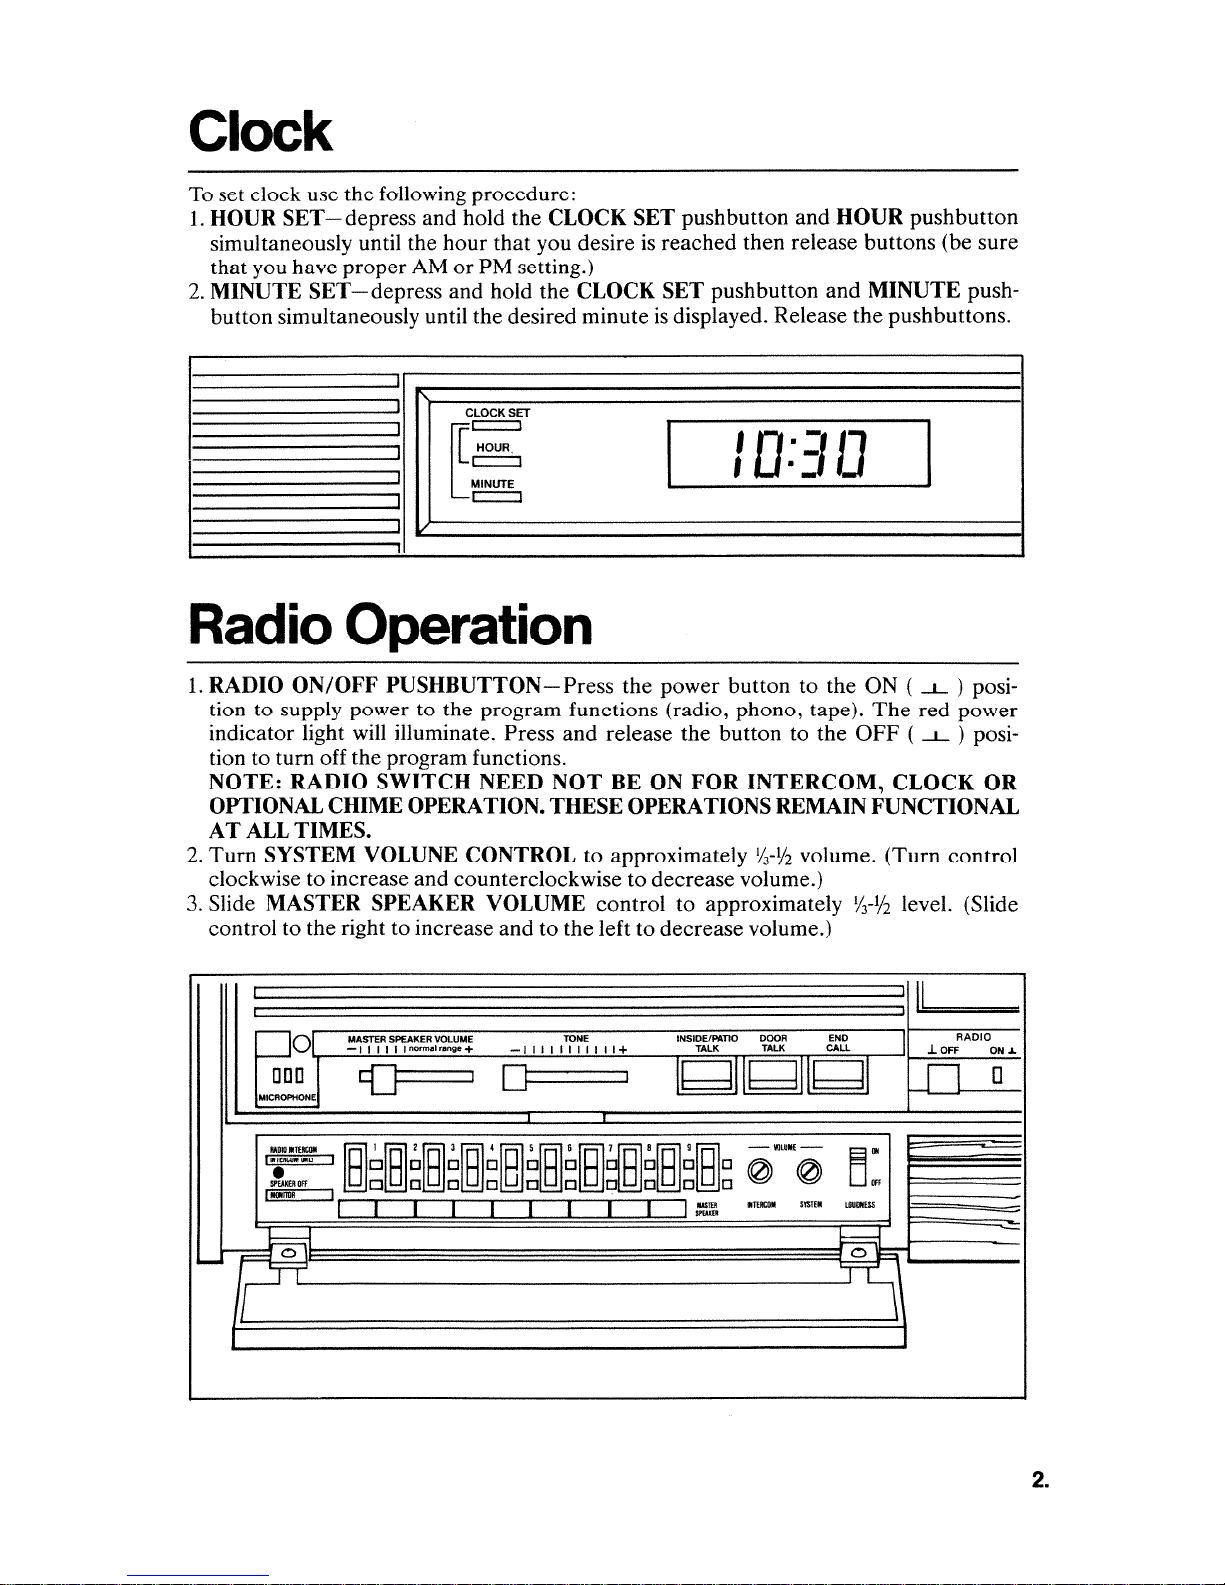
Clock
following
the
usc
clock
set
To
HOUR
1.
simultaneously until the hour that you desire
that
MINUTE
2.
button simultaneously until the desired minute
Radio
RADIO ON/OFF
1.
tion
indicator light will illuminate. Press and release the button to
tion to turn off the program functions.
NOTE:
OPTIONAL CHIME OPERATION. THESE OPERATIONS REMAIN FUNCTIONAL
AT
Turn
2.
clockwise to increase and counterclockwise to decrease volume.)
3. Slide
control to the right to increase and to the left to decrease volume.)
SET-depress
proper
have
you
SET-depress
I
I
I
I
Operation
PUSHBUTTON-
supply
to
RADIO
ALL TIMES.
SYSTEM VOLUNE CONTROL
MASTER SPEAKER VOLUME
power
SWITCH
procedure:
PM
or
CLOCK SET
MINUTE
c:::::::::J
program
NEED
the
setting.)
and hold
AM
and hold the
"'
~~
I/
the
to
CLOCK SET
CLOCK SET
Press the power button to the ON (
functions
BE ON FOR
NOT
approximately
to
control to approximately
pushbutton and
reached then release buttons (be sure
is
pushbutton and
displayed. Release
is
I
(radio,
/Q::/1]
phono,
INTERCOM,
-½
1/
3
HOUR
the
tape).
OFF
the
volume.
½-½
MINUTE
pushbutton
pushbuttons.
I
)
_L_
power
red
The
)
_L_
(
CLOCK OR
(Turn
control
level. (Slide
push-
posiposi-
SPEAKER
MASTER
tnormal,ange+
111
:]o
MIC~!~..I
IIADIO
l111T?J1WM11fu
Sl'WEROff
•
l•ITDR
-11
c[}===l
TEM:OI
•
j~~~~~~~~~~~~[E]~~~~~~
I .
I I I I I I I I I
~~
·,..:n::
VOLUME
-11111111111+
•
TONE
INSIDE/PATIO
TALK
I
1~11~11~1
DOOR
TALI(
-WLUIIE-
0
I:
•TIRCIIII
0
SYSlEM
END
CALI.
~:
""""'"'
~
7
II
.l.
n
OFF
RADIO
ON.L
•
-
2.
Page 3
light will illuminate
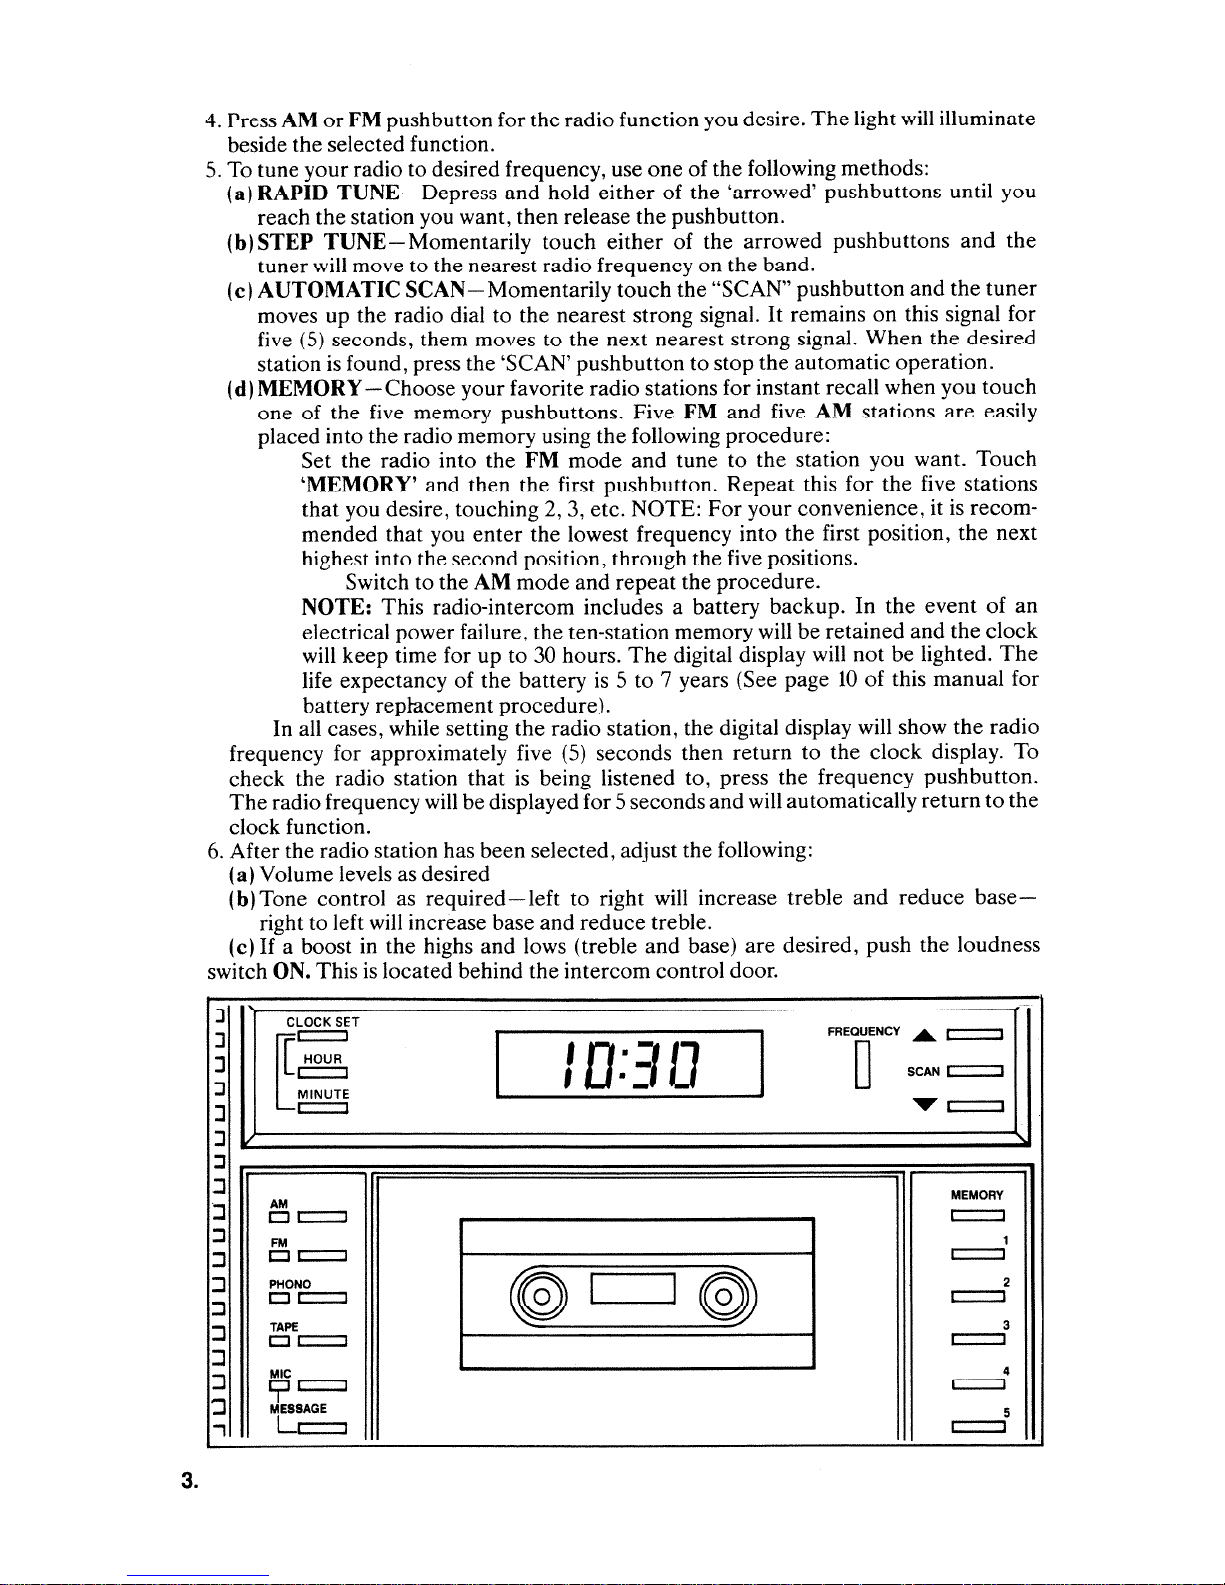
pushbutton for the radio function you desire.
FM
or
AM
Press
4.
beside the selected function.
To tune your radio to desired frequency, use one of the following methods:
5.
RAPID
(a)
reach the station you want, then release the pushbutton.
STEP
b)
(
tuner
AUTOMATIC
( c)
moves up the radio dial to the nearest strong signal. It remains
five
station
MEMORY
(d)
one
placed into the radio memory using the following procedure:
In all cases, while setting the radio station, the digital display will show the radio
frequency for approximately five
check the radio station that
radio frequency will be displayed for 5 seconds and will automatically return to the
The
clock function.
After the radio station has been selected, adjust the following:
6.
Volume levels as desired
(a)
(b)Tone control as
right to left will increase base and reduce treble.
(c) If a boost
switch
ON.
J
J
J
J
~=
J
V
J
:::J
:J
AM
::J
•
::J
FM
•
::J
PHONO
::J
•
::J
TAPE
::J
•
:::J
MIC
:::J
t,:J
MESSAGE
:J
,
TUNE - Depress and hold either of the 'arrowed' pushbuttons until you
TUNE-
will
seconds, them moves to the next nearest strong
(5)
found, press the 'SCAN' pushbutton to stop the automatic operation.
is
the five memory pushbuttons. Five
of
Set the radio into the
'MEMORY'
that you desire, touching 2, 3,
mended that you
highest into the second position, through the five positions.
Switch to the
NOTE:
electrical power failure, the ten-station memory will be retained and the clock
will keep time for up to 30 hours.
life expectancy of the battery
battery replacement procedure).
This
SET
CLOCK
HOUR
~
c:::::::J
c:::::::J
c:::::::J
Momentarily touch
move to the nearest radio frequency on the band.
SCAN-
-Choose
and then the first pushbutton.
This radio-intercom includes a battery backup. In the event of an
required-left
the highs
in
located behind
is
Momentarily touch the "SCAN" pushbutton and
your favorite radio stations for instant recall when you touch
FM
the lowest frequency into the first position, the next
enter
mode and repeat the procedure.
AM
being listened to, press the frequency pushbutton.
is
lows (treble and base)
and
the
I
either
mode
etc
is
seconds then return to
(5)
to right will increase treble
intercom control door.
10::10
I
~
c:::::::J
c:::::::J
Lc:::::::J
of the arrowed pushbuttons
and five
FM
tune to the station you want. Touch
and
Repeat
your convenience, it
. NOTE:
The
5 to 7 years (See page
For
digital display will
are
I
©»
The
on
signal_
this for the five stations
desired, push the loudness
When the desired
stations are easily
AM
not
of
10
clock display. To
the
and
FREQUENCY
D
I
the
and
tuner
the
this signal for
recom-
is
base-
c::::::::::J
c=:::::]
c=:::::]
MEMORY
c::::::J
c::::::J
c::::::J
c::::::J
c:::=::J
c::::::J
The
--·
'-
1
2
3
4
5
be lighted.
this manual for
reduce
A.
SCAN
....
3.
Page 4
Intercom
Controls
And
Operation
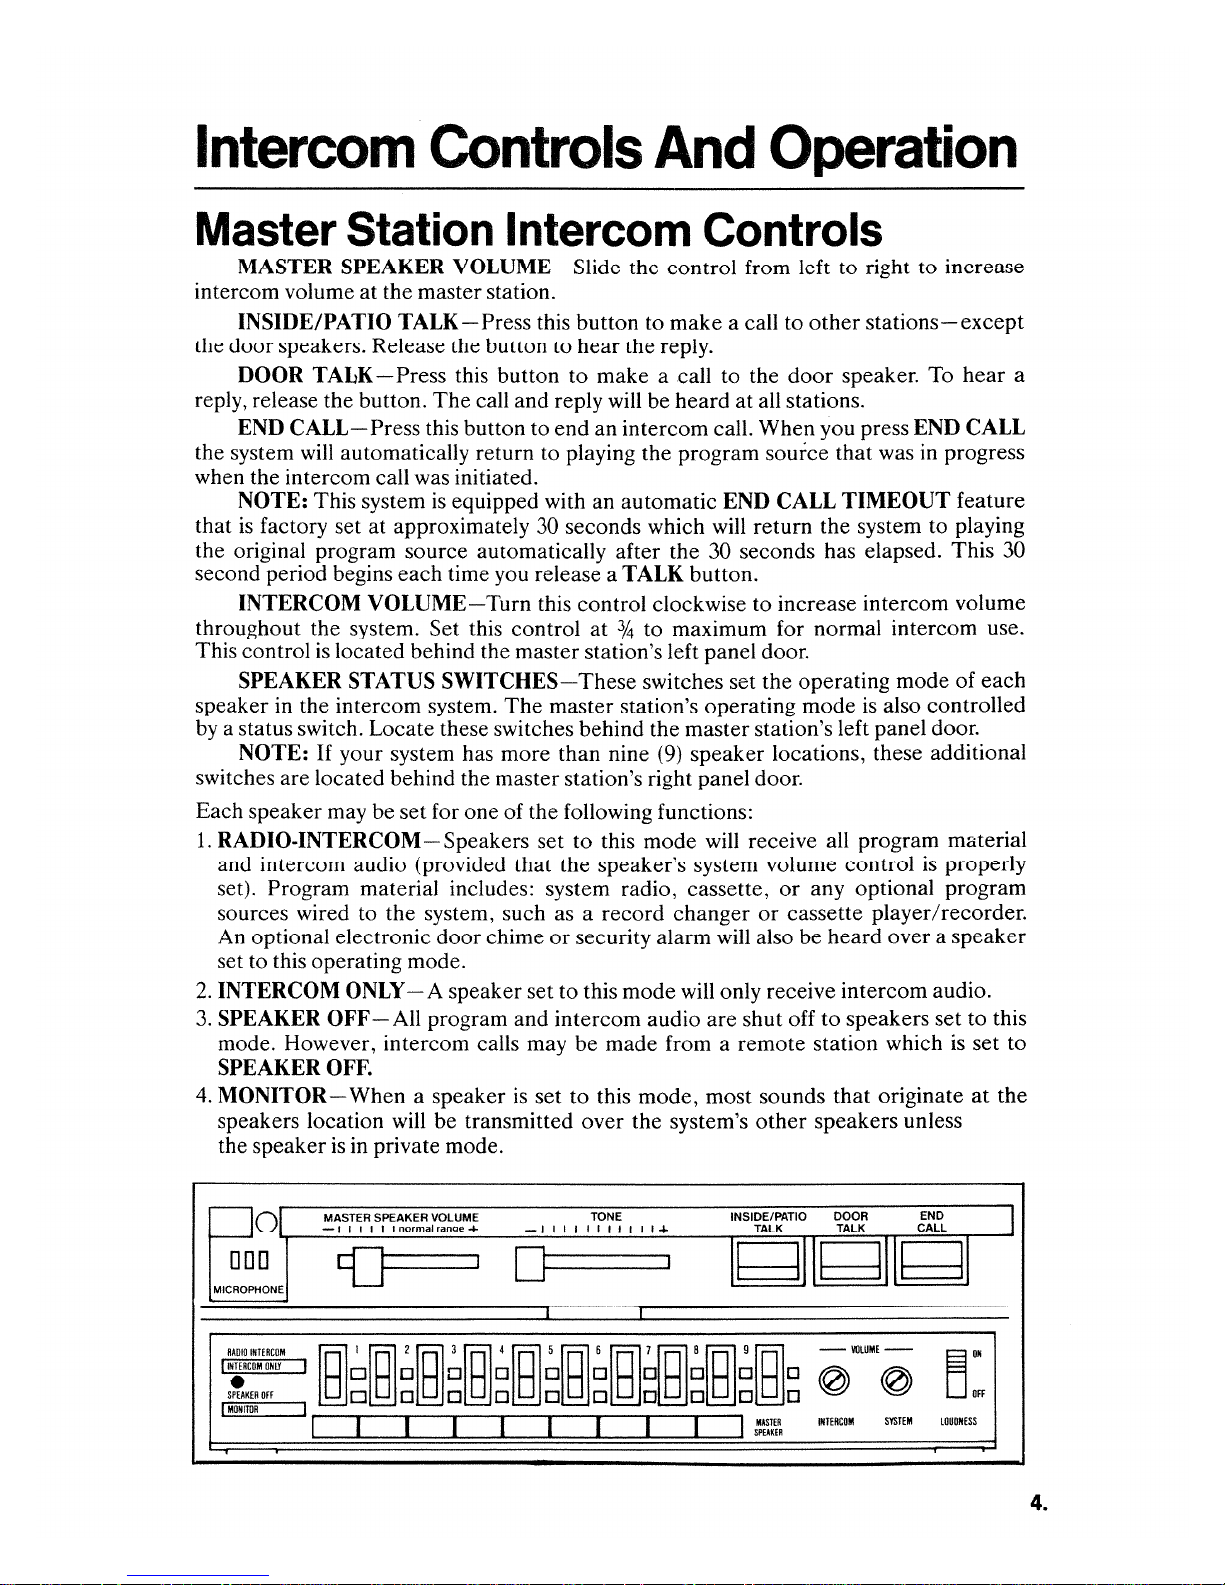
Master Station Intercom Controls
MASTER SPEAKER VOLUME--Slide the control from left to right to increase
intercom volume
INSIDE/PATIO
the door speakers. Release lhe bullon lo
DOOR
reply, release the button.
END
CALL-
the system will automatically return to playing the program source that was
when the intercom call was initiated.
NOTE: This system
that
is
factory set at approximately 30 seconds which will return the system to playing
the original program source automatically after the 30 second s has elapsed. This 30
second period begins each time you release a
INTERCOM VOLUME-Turn this control clockwise to increase intercom volume
throughout the system. Set this control at
This control
SPEAKER STATUS
speaker in the intercom system.
by
a status switch. Locate these switches behind the master station's left panel door.
NOTE: If your system has more than nine
switches are located behind the master station 's right panel door.
at
the master station.
TALK-Press
TALK-Press
Press this button to end an intercom call. When you press END CALL
this button to make a call to the
The
call and reply will be heard at all stations.
is
equipped with an automatic END CALL TIMEOUT feature
this button to make a call to
hear
lhe reply.
door
TALK button.
other
stations-except
speaker. To
¾ to maximum for normal intercom use.
is
located behind the master station's left panel
SWITCHES-These
The
master station's operating mode
switches set the operating mode of each
(9)
speaker locations, these additional
door
.
is
also controlled
hear
in
progress
a
Each speaker may be set for one of the following functions:
1.
RADIO-INTERCOM-Speakers set
and inlercom audio (provided lhal lhe speaker's syslem volume control
set). Program material includes: system radio, cassette,
sources wired to the system, such as a record changer
An optional electronic door chime
set to this operating mode.
2.
INTERCOM
3.
SPEAKER OFF
mode. However, intercom calls may be made from a remote station which
SPEAKER
4.
MONITOR- When a speaker
speakers location will be transmitted over the system's
the speaker
0
DD
•
MICROPHONE
DIO INTERC
OM
RA
I IN
TERCOM ON
LY
S
PEAK
ER O
ff
•
I
MONITOR
ONLY
OFF.
is
MASTER SPEAKER VOLUME
-I
~
1~~~~~~~~~~~~18]~~~~~~~
I
-A
speaker set to this mode will only receive intercom audio.
-All
program and intercom audio are shut off to speakers set to this
in private mode.
I I I 1
1normalran9e4
is
•
I
to
this mode will receive all program material
or
any optional program
or
cassette player/ recorder.
or
security alarm will also be heard over a
set to this mode, most sounds that originate
other
speakers unless
-1
TONE INSIDE/PATIO DOOR
I I I I I
II
I I
I+
TALK
I
s~~~~
TALK
-llllUME-
~
INTERCOM
~
SYSTEM
is
properly
speaker
is
END
CALL
~:
LOUONESS
set to
at
the
4.
Page 5

Determining Speaker Locations
Each
SPEAKER
determine the location
blank label that
locations, use the following procedure:
1.
Set
all
the
REMOTE
2.
Set the
3.
Tune
(full clockwise).
4.
Slide the
each remote speaker's
volume.
5.
One at a time, set a
and locate the speaker
procedure until you locate and label every speaker in your system.
MASTER
in
a radio station, then turn the
MASTER
STATUS
of
is
below the switch that controls
SPEAKER
SPEAKER
SWITCH
each
speaker in your
STATUS
switch to
is
RADIO
SYSTEM
SPEAKER
VOLUME
REMOTE
by
VOLUME
control is turned completely clockwise for maximum
SPEAKER
sound. Write
the
numbered
home
switches to
and labeled. You will want to
and write each location on the
that
speaker. To determine speaker
SPEAKER
OFF.
INTERCOM.
VOLUME
control to minimum volume(-). Make sure
STATUS
speaker's location on its label.
switch to
co::itrol to maximum
RADIO
INTERCOM
Repeat
Setting System Volume Controls
The
volume levels required at each station may vary with the location
and the size of the room where the
with volume levels and adjust each
intercom. Use the following procedure to
1.
At
each remote station, turn the
volume.
2.
At the master station, set all
INTERCOM
3.
Slide the
4.
Turn th6
5.
Select an AM
6.
Adjust the master station's
at the remote station that requires the highest volume (i.e. , a large living room
family room, a basement etc.).
NOTE:
are equipped with their own volume controls. Although the master station's
VOLUME
volume level within the set range.
7.
Adjust the
control to the volume level you desire.
below the
position. Set
MASTER
SYSTEM
or
FM radio station with a strong, clear signal.
SPEAKER
VOLUME
MASTER
SYSTEM
The
master station's speaker
sets the system's volume level, you may adjust an individual speaker's
MASTER
NORMAL
STATION
RANGE
speaker
speaker
VOLUME
REMOTE
STATION
VOLUME
control
on
VOLUME
and
VOLUME
setting.
is
located. Spend some time experimenting
so that you
set
your system's volume levels:
control completely clockwise to maximum
SPEAKER
switch to
control to maximum (
the master station to approximately
control until you have enough volume
all remote stations (except the
control and all remote station's
Do
not set the remote station's volume controls
can
clearly hear the radio
STATUS
RADIO
switches to the
+)
of
the
INTERCOM.
volume.
1
/2
door
speakers)
SYSTEM
VOLUME
the
speaker
and
RADIO
volume.
or
I
I
MASTER SPEAKER VOLUME
-I
:JOI
••
a
MICROPHONE
RADIO
IIITEIICOM
I
IIITEIICOM
IJII!
SPEAKER
Off
•
I
•1111TIJR
I I I I I
~
1~~~~~~~~~~~18]~~18]~~~
I
I I I I I I I I I
5.
normal
range+
-11111111111+
•
TONE
INSIDE/MTIO
TALK
I
I
1g11g11g1
I:.
DOOR
TALK
-lOlUME-
0
IIITERCOM
0
SmEM
END
CALL
~:
UJUIIIESS
I
Page 6

Important Reminders
1.
The
master
entire
speakers
on the
2.
If
the
SYSTEM
stations volume levels
3.
If
the
VOLUME
4. A
remote
set
at
the
station's
system.
master
remote
If
will receive no
station is set to a
station's
VOLUME
voice level during
control
station
master
SYSTEM
Lhis
control
control
turned
to increase
will only
station.
VOLUME
b
sel
program
reasonably
VOLUME
is
to
NORMAL
intercom
intercom
perform
Lo
minimum
audio.
set
Make
controls
too
high,
high level.
RANGE.
conversations
volume
as its
REMOTE
Intercom Operation
NOTE:
pushbutton
you
A
PUSHED
to
hear
CALL
All
OR
AND
remote
is
pushed
door
chime,
IF
YOU
RELEASED
speakers
in, it insures
are
intercom
MAKE
BEFORE
equipped
no
calls,
A
CALL,
with a
one
can
and
music if you so desire.
THIS PUSHBUTTON
YOU
CAN
control
volume (full
sure
are
set
distortion
throughout
PRIVATE
hear
you; while
TALK.
governs
the
SYSTEM
too
low
is
too
SPEAKER
the
volume level for
counterclockwise),
VOLUME
and
the rnasler
may result.
low, use the
the
system.
pushbutton.
at
the
WILL
Keep
INTERCOM
STATUS
same
time
IF
YOU
NEED
switch
When
RECEIVE
the
remote
control
station's
remote
is
this
allowing
TO
BE
How
1.
2.
3.
4.
How
This
When
entire
How
1.
2.
3.
To
Depress
speak.
the
door
Release the
Continue
Press
END
the
program
return
the
to
INSIDE/PATIO
To
system
you
intercom
To
Depress
Release
Press
END
NOTE:
intercom
Make A
the
INSIDE/PATIO
(The
radio
will be muted.) Your voice will
speaker.
INSIDE/PATIO
depressing
CALL
playing
to
source.
the
Receive A
has
HANDS-FREE
receive
a call,
conversation
Answer
the
DOOR
the
DOOR
CALL
Both
stations.
to
your
Call
the
button
end
the
If
you
program
TALK
make
Your
TALK
TALK
end
the call.
call
to
TALK
TALK
to
intercom
do
not
source
button.
Call
answering
your
is
controlled
Door
button
button
the
door
button
button
speak
press
approximately
And
reply
and
to
hear
to
and
conversation
END
Make A
at
all
without
from
hold
it
the
and
the
and
hold the
be
heard
hear
the
releasing it
and
CALL,
30
seconds
Reply
remote
the
down
door
door
stations
touching
station
while you
caller's
caller's reply will be
button
at
all
speakers
reply.
to
listen.
return
the system will
that
any
initiated
speak.
reply.
the
after
and
of
the
down
system to playing
you
the
while you
except
automatically
have
released
master
the
station.
controls.
call.
heard
at
for
The
all
0
I
VOLUME PRIVATE
J.
OFF
D
"""=""
ON_.
INSIDE/PATIO
TALK TALK
•
DOOR
DD
END
CALL
©
6.
Page 7

How
The monitor function lets
It
is
MONITOR, most sounds
RADIO/INTERCOM mode. (The monitor function
desire to monitor
1 .
2.
To
Use The Monitor Function
you
use the intercom to listen
most frequently used
is
Set the remote station's REMOTE SPEAKER STATUS switch to MONITOR.
monitor the master station, set the MASTER STATION STATUS switch
Reset the REMOTE SPEAKER
longer want to monitor that station.
You
may use the monitor function as a security device during the night.
your home from the bedroom, set all stations to MONITOR (except your bedroom).
to
minitor a 'sickroom' or a child's room. When a station is set
in
that room will be transmitted
in the PRIVATE mode.)
or
MASTER STATION STATUS switch when
to
the sounds from a certain location.
to
all other stations
will
not operate if the station
in
to
MONITOR.
the
you
To
To
monitor
you
to
no
Cassette
NOTE: RADIO ON/OFF PUSHBUTTON
I.
STOP /EJECT insertion
111
progress.
2.
PLAY-Push
mute
J.
RECORD-Push
(Simply
also used for
4.
PAUSE-Push
material (always use PAUSE for
recording
5. F
FWD-Push
6.
REWIND-Push
AM
•
=
FM
•
=
PHONO
•
=
TAPE
•
=
MIC
,::i=
MESSAGE
L=
or
removal of
this
any PROGRAM SOURCE
push
AM, FM, PHONO,
recording
this
continuity).
this
~
I
Controls
Push
this
button
the
tape. Puish
button
this
button
button
this
to play any
that
button
Push
button
C:=J
to
record
messages (See MESSAGE CENTER).
to
temporarily
temporary
thus
button
to move
to rewind tapes.
©»
twice
is
TAPE)
the
tape
I
And
must
be on for
and
the
cassette
the
button
recorded
in progress.
any PROGRAM SOURCE
stop
again to release from
tape.
then
the
the
tape
stops
while
forward rapidly.
Operation
cassette
once
When
RECORD
and
operation.
door
to
stop
you
button.
avoid
recording
the
will slow ly
the
tape
push
PLAY it will
from
your
This
recording
to
obtain
PAUSE
mode.
open
for
while it
system.
button
unwanted
proper
is
is
.l.OFF
J
RADIO
l
ON~
D
RECORD
PU\Y
REW1NO
ICJCJCJCJCJCJ
I
7.
FFWO
PAUSE
STOP
EJECT
Page 8

Message Center
How
1.
2.
3.
4.
5.
To
Record
A
Message
Insert a tape that can be recorded on into the cassette.
Push the
at
the
Speak into the
When the message
Push the
MIC
pushbutton (this will mute any
MASTER
MESSAGE
STATION
only
MICROPHONE
is
complete
button, then push the
PROGRAM
) t
hen
push
th
e
RECORD
located to the far left hand side of the master station.
REWIND
the tape .
MIC
blink indicating a message has been recorded.
How
1.
2.
3. Push
To
Receive A Message
Push
PLAY
to receive a message.
After the message has been received push
MESSAGE
TAPE
c:::J
c:::::::J
MIC
C?
c:::::::J
MESSAGE
L=
RADIO
.lOFF
•
-
ON
•
-L
button to stop indicator light from blinking.
,--=---
I
RF.
C
ORO
PLA
JCJCJCJCJ
I
Y
REW>NO
r:s:wo
t
-
STOP.
SOURCE
button.
button , the
001
MI
C
~O~~J
RA
DIO
I
1
HTERC
SPE.
•
I
MON
"c..._J
that
is
in
progress
MIC
indicator light will
MASTER SPEAKER VOLUME
-I
JI
I I 1normalra
nge+
~
INTER
C
OM
OM
ON
lJ
h
,EROFF
'~~~~~~~~
llUR
I
I
I
I
I I
8.
Page 9

Optional
Accessories
ELECTRONIC
to yo
ur
IM-4006 Series
system.
SECURITY -
Station,
the
TELEPHONE
RECORD
(
Not
available
1.
To
connect
PHONO
master
2.
To play
into
3. To play
plug
4. To use
tape
5. To use
master
panel.
the
the
master
into
the
player
either
panel.
INPUT~
the
the
TAPE
DOOR
If
you
security
alarm
AND
CHANGER
from
NuTone)
an
optional
TAPE
phonograph
panel's
cassette
master
radio
as a
's
input
plug
of
these
CHIME
Master
connect
(fire
a
or
CRADLE-
OR
CASSETTE
Record
INPUT
over
the
PH
ONO
player
panel's
program
over
TAPE
into
the
functions, push
PHONO
INPUT
-
When
Station,
NuTone
intruder)
The
phone
Changer
and
intercom
INPUT
the
INPUT
source
rµaster
JACK~
a NuTone
the
chime
Security
will
and
Electronic
is played
System
sound
cradle
to
over
mount
your
the
PLAYER/RECORDER
or
RECORD
system,
jack.
intercom
jack.
for
recording
panel's
the
PHONO
Cassette
OUTPUT
system, insert
RECORD
insert
on
the
or
Player
the
OUTPUT
Door
Chime
throughout
IM-4006 Series
intercom
next to the
/
Recorder,
jacks
in
accessory's
the
accessory's
cassette
jack.
TAPE
pushbutton
is
the
system.
master
the
back
output
player.,
connected
intercom
Master
station.
locate
insert
the
of
the
plug
output
the
on
the
INPUT
JACK~
RECORD
OUTPUT JACK
NOTE:
with
Phono
"magnetic"
input
~
jack
cartridges
will
will
accept
require
levels from a ·'
an
interface
ceramic
amplifier
"
(not
type
cartridge
supplied
.
Turntables
by NuTone).
9.
Page 10

Placing
In
Service
1.
Remove the two screws which secure the master station to the rough-in frame.
2.
The
master
is
secure so that it holds the master panel at approximately a 90° angle
The
station
Master
Position
can
now
be
opened
on
its hinges.
Station
Make
sure
the
to
support
the wall.
strap
Battery
To purchase a new battery write to: NuTone Inc.,
45227-
To replace battery use the following procedure:
1.
2.
Disconnect
3.
4.
5.
Plug battery into terminal board being sure red wire goes to the pin marked red.
6.
Place Master Station back into operating position.
Attention: Parts Department.
Place Master Station in Service Position and locate battery in upper left hand
of radio.
Remove screw and lift old battery out.
Install new battery and secure with previously removed screw.
Replacement
battery
plug
from
terminal
board.
5410
Hetzel Avenue, Cincinnati, Ohio
corner
10.
Page 11

Product specifications subject
NuTone
.
Madison
Printed
in
and
U.
Red
S.A.
Bank
Rev.
Roads,
6/90,
to
change without
Cincinnati, Ohio
Part
No.
43460
notice.
45227
 Loading...