

Page 1

MODEL NO. SIZE FINISH
755272 24” x 24” White
755280 30” x 26” White
755288 36” x 28” White
755296 48” x 28” White
Register your product online at www.NuTone.com
INSTRUCTIONS FOR WALL-MOUNT INSTALLATIONS
Prepare cabinet
1. Carefully remove all packing material. Place hardware package aside until
the contents are needed.
Determine location
1. The commonly accepted height of bath cabinets is 64” from the finished
floor to the center of the mirror area. However, height may be adjusted to
individual preference.
2. For maximum security, mount cabinet directly to wall studs.
Mount cabinet
NOTE: For ease of installation, the assistance of one or two additional
persons is recommended.
1. Measure and mark four (4) mounting holes on the wall corresponding to the
pre-drilled hole locations in the mounting bars on the inside back panel of the
cabinet. (FIG 1) Draw horizontal lines connecting the two
top and two bottom marked locations. The lines should be level. Adjust to
level if necessary. Repeat this process with vertical lines connecting the two
left and two right marked hole locations. After insuring the marks are level,
verify the mounting holes in the cabinet back match the marked wall
locations.
2. Drill 9/64“ diameter holes at the marked locations on the wall. If
mounting holes are not located at a stud, the hole diameter, in the
wall, must be increased to accommodate wall anchors. Position
wall anchors as required.
3. Hold cabinet in place and make sure it is level.
4. Attach the cabinet to the wall with the four mounting screws from
the hardware pack.
NOTE: Do not use nails to mount the cabinet.
Irregularities in wall surface may cause distortion of cabinet
NOTE:
body when mounted. Place shims between cabinet and wall
as necessary.
SERVICE PARTS
FIG 1
TOP
MOUNTING
HOLES
BOTTOM
MOUNTING
HOLES
(Double hinge shown)
Door Adjustment
1. Check for clearance and alignment between mirror doors. Mirror doors should
be approximately 1/8” apart and parallel. It may be necessary to adjust
individual doors.
2. Loosen the two screws in the top and bottom hinge leaf on the inside of the
door (FIG 2) by a 1/2 turn for door(s) needing to be adjusted.
3. Realign so the doors are “square” and swing without interference.
4. Retighten the screws carefully by the same 1/2 turn. Do not over tighten.
Cabinet Back
Inside View
(without doors)
ASHLAND CABINET
FIG 2
HINGE
BRACKET
CABINET TOP (SHOWN)
or BOTTOM
HINGE
LEAF
MIRROR
DOORS
FIG 2
DESCRIPTION
Accessory Bag “T” Hinge Set
(2 double / 1 single top & 1 single bottom)
Mounting Screw 8 X 1-3/4” PPH Type A *
Wall Anchors *
* Standard Hardware – may be purchased locally.
Broan-NuTone Storage Solutions warrants to the original consumer purchaser of its products that such products will be free from defects in materials or workmanship for a period of one (1) year
from the date of original purchase. THERE ARE NO OTHER WARRANTIES, EXPRESS OR IMPLIED, INCLUDING, BUT NOT LIMITED TO, IMPLIED WARRANTIES OF MERCHANTABILITY
OR FITNESS FOR A PARTICULAR PURPOSE.
During this one year period, Broan-NuTone Storage Solutions will, at its option, repair or replace, without charge, any product or part which is found to be defective under normal use and service.
This warranty does not cover (a) normal maintenance and service or (b) any products or parts which have been subject to misuse, negligence, accident, improper maintenance or repair (other
than by Broan-NuTone Storage Solutions), faulty installation or installation contrary to recommended installation instructions. Labor to remove and replace products is not covered.
The duration of any implied warranty is limited to the one year period as specified for the express warranty. Some states do not allow limitation on how long an implied warranty lasts, so the above
limitation may not apply to you.
BROAN-NUTONE STORAGE SOLUTIONS” OBLIGATION TO REPAIR OR REPLACE, AT BROAN-NUTONE STORAGE SOLUTIONS’ OPTION, SHALL BE THE PURCHASER’S SOLE AND
EXCLUSIVE REMEDY UNDER THIS WARRANTY. BROAN-NUTONE STORAGE SOLUTIONS SHALL NOT BE LIABLE FOR INCIDENTAL, CONSEQUENTIAL OR SPECIAL DAMAGES
ARISING OUT OF OR IN CONNECTION WITH PRODUCT USE OR PERFORMANCE. Some states do not allow the exclusion or limitation of incidental or consequ e ntial dama ges, so the above
limitation or exclusion may not apply to you. This warranty gives you specific legal rights, and you may also have other rights, which vary from state to state. This warranty supersedes all prior
warranties.
Date of Installation __________________________________________________________________________________________________________________________________________
Model No and Product Description _____________________________________________________________________________________________________________________________
Broan-NuTone Storage Solutions, 501 S. Wilhite Street, Cleburne, TX 76031 www.nutone.com (1-800-325-8351)
628035 1
PART NUMBER
B2650003
ONE YEAR LIMITED WARRANTY
IF YOU NEED ASSISTANCE OR SERVICE - CONTACT:
Page 2
NO MODELO TAMAÑO ACABADOR
755272 24” x 24” Blanco
755280 30” x 26” Blanco
755288 36” x 28” Blanco
755296 48” x 28” Blanco
Registre su producto en línea en www.NuTone.com
INSTRUCCIONES PARA LAS INSTALACIONES DE WALL-MOUNT
Prepare el gabinete
1. Quite cuidadosamente todo el material de emalaje. Ponga
el paquete de hardware a un lado hasta que el contenido
sea necesitado.
Determine la localización
1. La altura comúnmente aceptada de los gabinetes del baño
es 64” del piso terminado al centro del área del espejo.
Sin embargo, altura puede ser ajustado a preferencia
individual.
2. Para mayor seguridad monte el gabinete directamente a
los barrotes de la pared.
Montar el gabinete
NOTA: Para la facilidad de la instalación, la ayuda de una o
dos persona adicional es recomendado.
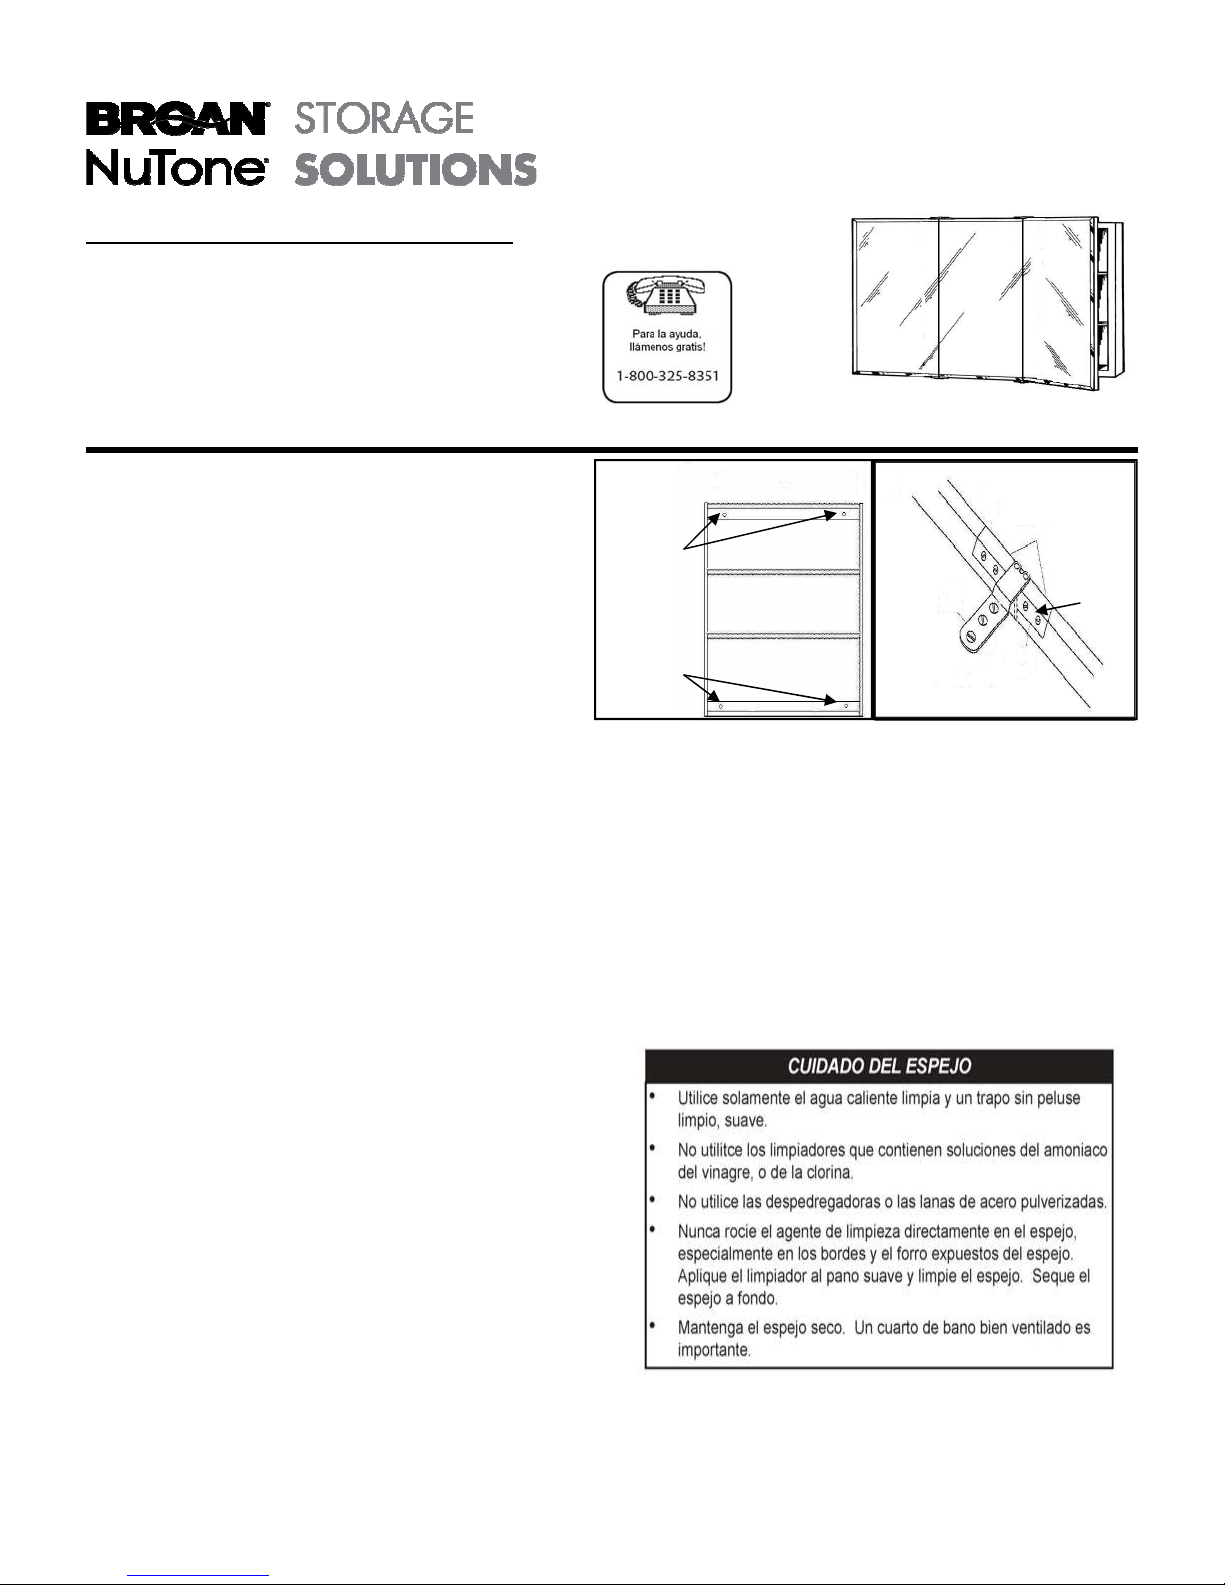
1. Medir y marcar cuatro agujeros de montaje en la pared
correspondiente a la pre-orificio localizado en el montaje
de los lugares bares en el interior del panel posterior del
gabinete. (FIG 1) Dibuje lineas horizontals para conectar
las dos localizaciones marcadas en el superior y inferior.
Las lineas deben ser nivel. Ajuste a nivel en caso de
necesidad. Repite este proceso con lineas verticales que
conectan los localizaciones marcadas, las dos a la
izquierda y las dos a la derecha. Despues de asegurar
que las marcas estan nivel, verifique si los hoyos en la
espalda del gabinete emparajen con las ubicaciones
marcadas en la pared.
2. Taladro 9/64“ agujeros de diámetro en las localizaciones
marcadas en la pared. Si los agujeros para montar el
gabinete no se localizan en un barrote de la pared el
diámetro del agujero, en la pared, se debe aumentar para
acomodar las anclas de la pared. Posicione las anclas de
pared como sea necesario.
3. Sostenga el gabinete en lugar y cerciórese de que esta a
nivel.
4. Una el gabinete a la pared con los cuatro tornillos de
montaje de el paquete del hardware
NOTA: No utilice los clavos para montar el gabinete.
NOTA: Las irregularidades en superficie de la pared pueden
causar la distorsión del cuerpo del gabinete cuando
está montado. Coloque las calzas entre el gabinete y
la pared cuanto sea necesario.
.
GABINETE de ASHLAND
FIG 1
AGUJEROS DE
MONTAJE
SUPERIOR
AGUJEROS DE
MONTAJE
INFERIOR
(Bisagra doble demostrada)
Ajuste de la puerta
Parte posteriora del
gabinete
(visión interior)
(sin las puertas)
1. Compruebe para saber si hay separación y alineación entre
las puertas del espejo. Las puertas del espejo deben ser
aproximadamente 1/8” aparte y paralelo. Puede ser
necesario ajustar las puertas individualmente.
2. Afloje los dos tornillos en la parte superior e inferior de la
bisagra en el interior del la puerta (FIG 2) por una 1/2 vuelta
para las puertas que necesitan ser ajustado.
3. Realinee así que las puertas sean “cuadradas” y hacen
pivotar sin interferencia.
4. Vuelva a apretar los tornillos cuidadosamente por la misma
1/2 vuelta. No aprieta en exceso.
FIG 2
PUERTAS
DEL
ESPEJO
SOPORTE
DE BISAGRA
SUPERIOR DEL GABINETE
(DEMOSTRADA) O INFERIOR
HOJA DE
LA
BISAGRA
628035 2
Page 3

MODÈL# TAILLE FINITION
755272 24” x 24” Blanc
755280 30” x 26” Blanc
755288 36” x 28” Blanc
755296 48” x 28” Blanc
Enregistrez votre produit en ligne chez www.NuTone.com
INSTRUCTIONS POUR DES INSTALLATIONS AU MUR
Préparez le cabinet
1. Enlevez soigneusement tout les matériaux d'emballage.
Mettre le sac de pièces de côté pour une utilisation plus
tard.
Déterminez l'endroit
1. La hauteur recommandé, pour les cabinets au-dessus
du lavabo, est généralement 64 pouces. Cependant,
l'emplacement pourrait être ajusté pour convenir des
préférences individuelles.
2. Pour la sécurité maximum, monter les cabinets
directement aux éléments du mur structurels.
Montez le cabinet
NOTE: Pour simplifier l'installation, l'aide de 1 ou 2 personnes
supplémentaires est recommandée.
1. Marquer 4 endroits sur le mur correspondant aux
trous pré-perces dans les barres montant du cabinet.
(FIG 1) Dessinez des lignes horizontales entre les
marques a gauche et les marques a droite. Les lignes
doivent être au niveau. Ajustez sur niveau au besoin.
Répétez ce procédure par dessinent les lignes verticales
entres les deux marques a gauche and les deux marque a
droite. Après vérifier les marques sont au niveau, vérifier
que les emplacements égalent toujours les trous dans les
barres montant.
2. Percez les trous de 9/64 pouces diamètre aux endroits
marques sur le mur. Si, les trous ne sont pas directement
dans une poutre au mur, le diamètre du trou, doit être
augmente pour adapter a des ancres de mur. Position
ancres de mur au besoin.
3. Tenez le cabinet en place et assurez-vous que il est a
niveau.
4. Attachez le cabinet au mur avec les quatre vis contenu
dan le sac de pièces.
NOTE : N’employez pas les clous pour monter le cabinet.
NOTE: Les irrégularités dans la surface de mur peuvent
causer la déformation du cabinet corps une fois
monté. Placez les cales entre le cabinet et le mur
selon les besoins.
SERIE ASHLAND
FIG 1
BARRE
MONTANT AVEC
TROUS PRE-PERCES
Dos de Cabinet
Vue intérieure
BARRE
MONTANT
AVEC
TROUS PREPERCES
(Double charnière montrée)
Ajustement de porte
(sans portes)
FIG 2
PORTES DE
MIROIR
CHARNIÈRE
PARENTHÈSE
LE HAUT (MONTRE) OU
LE BAS DE LA CABINET
AILLE DE
CHARNIÈRE
1. Vérifiez le dégagement et l'alignement entre les portes de
miroir. les portes doivent être d'environ 1/8 de pouce à part et
parallèle. Il peut être nécessaire d'ajuster individuellement les
portes.
2. Desserrez les deux vis dans le dessus et l’aille inférieure de
charnière, trouver a l'intérieur du porte (2), à un demi tour pour
des portes devant être ajusté.
3. Réalignez ainsi que les portes sont droit et balancent sans
interférence.
4. Resserrez les vis soigneusement au même demi tour. Ne pas
trop serrer la vis.
628035 3
Page 4

Sistema accesorio de la bisagra del bolso “T”
(2 dobles / 1 sola superior y 1 sola inferior
Tornillo de montaje 8 x 1-3/4” tipo A de PPH
Pared Anclas
PIEZAS DE SERVICIO
DESCRIPCIÓN
NÚMERO DE
PARTE
B2650003
*
*
*Hardware estándar - puede ser comprado localmente.
UNA GARANTÍA LIMITADA DEL AÑO
Autorizaciones de Broan-NuTone Storage Solutions al comprador original del consumidor de sus productos que tales productos estarán libres de defectos en
materiales o de la ejecución por un período de un (1) año a partir de la fecha de la compra original. NO HAY OTRAS GARANTÍAS, EXPRESAS O IMPLICADO,
INCLUYENDO, PERO NO LIMITADO A, GARANTÍAS IMPLICADAS DEL MERCHANTABILITY O APTITUD PARA UN PROPÓSITO PARTICULAR.
Durante este período de un año, de Broan-NuTone Storage Solutions, en su opción, reparación o substituir, sin carga, cualquier producto o la parte que se
encuentren para ser defectuosos bajo uso normal y servicio. Esta garantía no cubre (a) mantenimiento normal y no lo mantiene o (b) ningunos productos o piezas que
han estado conforme a uso erróneo, negligencia, accidente, mantenimiento o reparación incorrecta (con excepción por de Broan-NuTone Storage Solutions), I
nstalación culpable o instalación contraria a las instrucciones de instalación recomendadas. Trabaje para quitar y substituir productos no se cubre.
La duración de cualquier garantía implicada se limita al un período del año según lo especificado para la garantía expresa. Algunos estados no per miten l a lim itac ió n
en cuánto tiempo una garantía implicada dura, así que la limitación antedicha puede no aplicarse a usted.
LA OBLIGACIÓN DE BROAN-NUTONE STORAGE SOLUTIONS PARA REPARAR OR REEMPLAZAR, EN OPCION DE BROAN-NUTONE STORAGE
SOLUTIONS, SERÁ LA SUELA DEL COMPRADOR' Y REMEDIO EXCLUSIVO BAJO ESTA GARANTÍA. BROAN-NUTONE STORAGE SOLUTIONS NO SERÁ
OBLIGADAS PARA LOS DAÑOS FORTUITOS , CONSECUENTES O ESPECIALES QUE SE PRESENTAN FUERA O CON RESPECTO A USO DE PRODUCTO
O FUNCION AMIENTO. Algunos estados no permiten la exclusión o la limitación de daños fortuitos o consecuentes, así que la limitación o la exclusión antedicha
puede no aplicarse a usted. Esta garantía le da las derechas legales específicas, y usted puede también tener otras derechas, que varían de estado al estado. Esta
garantía reemplaza todas las garantías anteriores.
Fecha de la instalación _______________________________________________________________________________________________________________
No modelo. y descripción del producto ___________________________________________________________________________________________________
Broan-NuTone Storage Solutions, 501 S. Wilhite Street, Cleburne, TX 76031 www.NuTone.com (1-800-325-8351)
SI USTED NECESITA AYUDA O SERVICIO - CONTACTO:
PIÈCES DE REMPLACEMENTS
DESCRIPTION
Ensemble accessoire de charnière
(2 doubles/1 haut simple et 1 bas simple)
Vis de support 8 x 1-3/4” type A de PPH *
Mur Ancres *
*Matériel standard - peut être acheté localement.
UNE GARANTIE LIMITÉE D'AN
Garanties de Broan-NuTone Storage Solutions à l'acheteur original du consommateur de ses produits que de tels produits seront exempts des défauts en matériaux
ou de l'exécution pendant une période d'un (1) an de la date de l'achat original. IL N'Y A AUCUNE AUTRE GARANTIE, EXPRÈS OU IMPLICITE, Y COMPRIS,
MAIS NON LIMITÉ À, GARANTIES IMPLICITES DE VALEUR MARCHANDE OU FORME PHYSIQUE POUR UN BUT PARTICULIER.
Pendant cette période d'un an, de Broan-NuTone Storage Solutions, à son option, réparation ou remplacer, sans frais, n'importe quel produit ou partie qui s'avèrent
défectueux sous l'utilisation et le service normaux. Cette garantie ne couvre pas (a) l'entretien normal et ne l'entretient pas ou (b) aucuns produits ou pièce qui ont
été sujets à l'abus, la négligence, l'accident, l'entretien ou la réparation inexacte (autre que par de Broan-NuTone Storage Solutions), l'installation défectueuse ou
l'installation contraire aux instructions d'installation recommandées. Travaillez pour enlever et remplacer des produits n'est pas couvert.
La durée de n'importe quelle garantie implicite est limitée à l'une période d'an comme indiquée pour la garantie exprès. Quelques états ne permettent pas la limitation sur combien de temps une garantie implicite dure, ainsi la limitation ci-dessus peut ne pas s'appliquer à toi.
OBLIGATION DE BROAN-NUTONE STORAGE SOLUTIONS “DE RÉPARER OU REMPLACER, AUX OPTION DE BROAN-NUTONE STORAGE SOLUTIONS,
SERA L'ACHETEUR' REMÈDE UNIQUE ET EXCLUSIF DE S SOUS CETTE GARANTIE. DE BROAN-NUTONE STORAGE SOLUTIONS NE SERONT PAS
RESPONSABLES DES DOMMAGES FORTUITS , CONSÉCUTIFS OU SPÉCIAUX SURGISSANT HORS OU EN LIAISON AVEC DE L'UTILISATION D'UN PRODUIT OU EXÉCUTION. Quelques états ne permettent pas l'exclusion ou la limitation des dommages fortuits ou consécutifs, ainsi la limitation ou l'exclusion ci-
dessus peut ne pas s'appliquer à toi. Cette garantie te donne des droits légaux spécifiques, et vous pouvez également avoir d'autres droits, qui changent de l'état à
l'état. Cette garantie remplace toutes les garanties antérieures.
Date d'installation ___________________________________________________________________________________________________________________
Non modèle. et description de produit ____________________________________________________________________________________________________
NUMÉRO DE
LA PIÈCE
B2650003
Broan-NuTone Storage Solutions, 501 S. Wilhite Street, Cleburne, TX 76031 www.NuTone.com (1-800-325-8351)
628035 4
SI VOUS AVEZ BESOIN D'AIDE OU DE SERVICE - CONTACT :
 Loading...