

Page 1
MODEL NO. SIZE FINISH
740589 24” x 24” White
740957 30” x 26” White
740605 36” x 30” White
740613 48” x 30” White
740621 24” x 24” Oak
740639 30” x 26” Oak
740647 36” x 30” Oak
740655 48” x 30” Oak
Register your product online at www.NuTone.com
INSTRUCTIONS FOR WALL-MOUNT INSTALLATIONS
Prepare cabinet
1. Carefully remove all packing material. Place hardware
package and doors aside until needed.
Determine location
1. The commonly accepted height of bath cabinets is 64”
from the finished floor to the center of the mirror area.
However, height may be adjusted to individual
preference.
2. For maximum security, mount cabinet directly to wall
studs.
Mount cabinet
NOTE: For ease of installation, the assistance of one or two
additional persons is recommended.
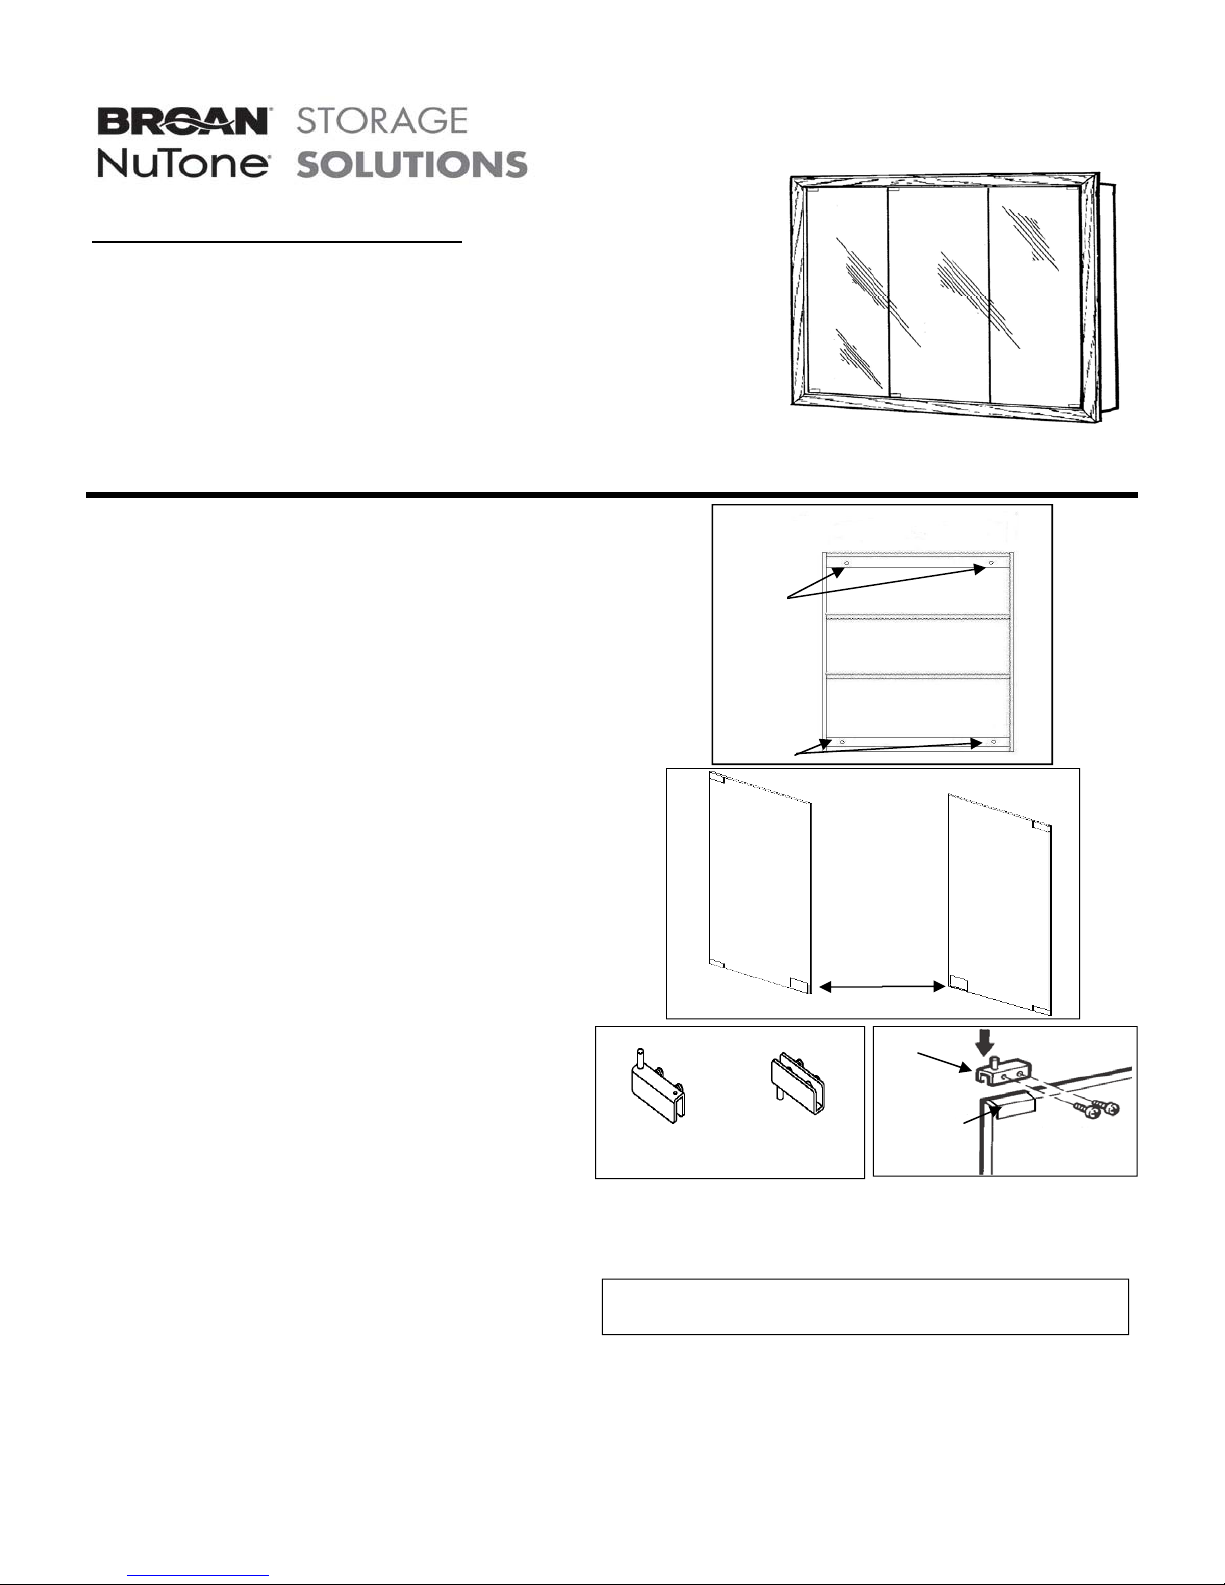
1. Measure and mark four (4) mounting holes on the wall
corresponding to the pre-drilled hole locations in the
mounting bars on the inside back panel of the cabinet.
(FIG 1) Draw horizontal lines connecting the two top and
two bottom marked locations. The lines should be level.
Adjust to level if necessary. Repeat this process with
vertical lines connecting the two left and two right
marked hole locations. After insuring the marks are
level, verify the mounting holes in the cabinet back
match the marked wall locations.
2. Drill 9/64“ diameter holes at the marked locations on the
wall. If mounting holes are not located at a stud, the hole
diameter, in the wall, must be increased to accommodate
wall anchors. Position wall anchors as required.
3. Hold cabinet in place and make sure it is level.
4. Attach the cabinet to the wall with the four mounting
screws from the hardware pack.
NOTE: Do not use nails to mount the cabinet.
NOTE: Irregularities in wall surface may cause distortion of
cabinet body when mounted. Place shims between
cabinet and wall as necessary.
Attach mirror door
NOTE: For ease of door assembly the assistance of an
additional person is recommended.
1. Identify and separate the doors by type (B or C).
Although the mirror doors appear to be identical, there
are two door configurations. The doors are left or right
side locations by the striker plate on the door backs.
(FIG 2) Position the door with the striker plate at the
bottom.
GRANVILLE CABINET
FIG 1
Top
Mounting
Holes
Bottom
Mounting
Holes
Back View
of Door
“C”
(2 EA)
FIG 3
Pivot Hinge
type “c” (3 EA)
Pivot Hinge
type “d” (3 EA)
2. Remove the six pivot hinges from the hardware bag. There
are two hinge configurations. Separate hinges into two sets
of three based on the pin direction and screw locations.
(FIG 3)
CAUTION: Do not over tighten the set screws. Screws
turned down too tight will break the mirror.
3. Slide a pivot hinge type “d” over pressure pad at the top of
door type “C”. Lightly tighten the two screws to keep the
hinge in place. (FIG 4) Repeat this process for the second
door type “C”.
4. Place a pivot hinge type “c” over the pressure pad at the top
of door type “B”. Lightly tighten the screws to keep hinge in
place.
Cabinet Back
Inside View
(without doors)
FIG 2
Striker
Plates
Pivot Hinge
Hinge
Pressure
Pad
Back View
of Door
“B”
(1 EA)
FIG 4
Backside of
Mirror Door
628033A 1
Page 2
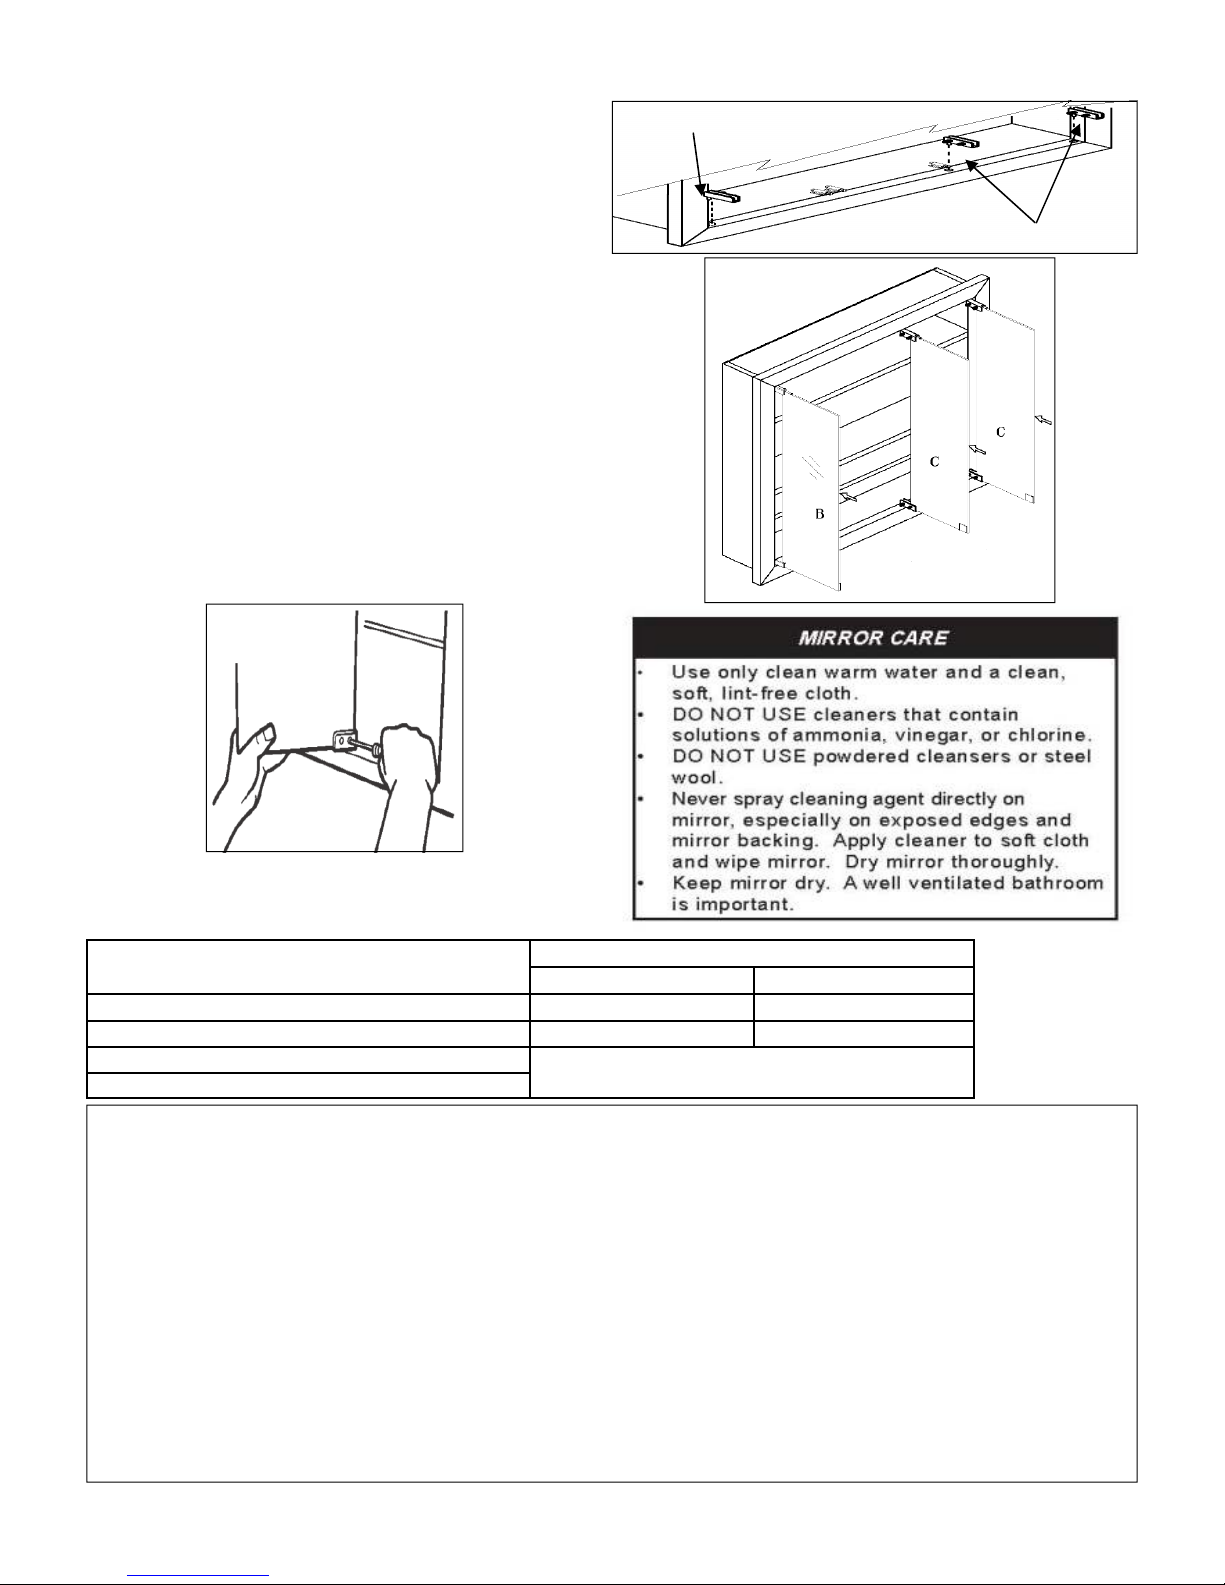
5. Place the remaining pivot hinges (two of type “c” and one of
type “d”) into the holes on the bottom of the cabinet frame.
(FIG 5) Make sure the screws in the pivot hinge are clear
of the mirror channel.
6. Assemble one door at a time to the cabinet, positioning
door types “B” and “C” as shown in (FIG 6). Lift the mirror
door and insert the pin of the top hinge into the hole in the
top of the cabinet frame. Slide bottom of mirror door into
the channel of the lower hinge. Lightly tighten the two
screws of the bottom hinge .
7. Confirm that the striker plate position is opposite a magnetic
catch when the door is closed and that no hinge screws are
on the mirror side of the door.
Door Adjustment
1. Check for clearance and alignment between mirror doors. It
may be necessary to adjust individual doors. Loosen the
set screws on the inside of the door hinges about a 1/4”
turn for door(s) needing to be adjusted. (FIG 7)
2. Realign so the doors are “square” and swing without
interference.
3. Lightly retighten the set screws.
FIG 7
Pivot Hinge type “d”
FIG 6
Door
Front
FIG 5
Pivot Hinge type “c”
Door
Back
Door
Back
SERVICE PARTS
DESCRIPTION
Hinge Set ( 1 ea Top & Bottom) S7175 S7175
Magnetic Latch SB4247903 S7174
Mounting Screw 8 X 1-3/4” PPH Type A
Wall Anchors
Broan-NuTone Storage Solutions warrants to the original consumer purchaser of its products that such products will be free from defects in materials or workmanship
for a period of one (1) year from the date of original purchase. THERE ARE NO OTHER WARRANTIES, EXPRESS OR IMPLIED, INCLUDING, BUT NOT LIMITED
TO, IMPLIED WARRANTIES OF MERCHANTABILITY OR FITNESS FOR A PARTICULAR PURPOSE.
During this one year period, Broan-NuTone Storage Solutions will, at its option, repair or replace, without charge, any product or part which is found to be defective
under normal use and service. This warranty does not cover (a) normal maintenance and service or (b) any products or parts which have been subject to misuse,
negligence, accident, improper maintenance or repair (other than by Broan-NuTone Storage Solutions), faulty installation or installation contrary to recommended
installation instructions. Labor to remove and replace products is not covered.
The duration of any implied warranty is limited to the one year period as specified for the express warranty. Some states do not allow limitation on how long an implied
warranty lasts, so the above limitation may not apply to you.
BROAN-NUTONE STORAGE SOLUTIONS” OBLIGATION TO REPAIR OR REPLACE, AT BROAN-NUTONE STORAGE SOLUTIONS’ OPTION, SHALL BE THE
PURCHASER’S SOLE AND EXCLUSIVE REMEDY UNDER THIS WARRANTY. BROAN-NUTONE STORAGE SOLUTIONS SHALL NOT BE LIABLE FOR
INCIDENTAL, CONSEQUENTIAL OR SPECIAL DAMAGES ARISING OUT OF OR IN CONNECTION WITH PRODUCT USE OR PERFORMANCE. Some states do
not allow the exclusion or limitation of incidental or consequential damages, so the above limitation or exclusion may not apply to you. This warranty gives you specific
legal rights, and you may also have other rights, which vary from state to state. This warranty supersedes all prior warranties.
Date of Installation
_____________________________________________________________________________________________________________________________
Model No and Product Description
_____________________________________________________________________________________________________________________________
IF YOU NEED ASSISTANCE OR SERVICE - CONTACT:
Broan-NuTone Storage Solutions, 501 S. Wilhite Street, Cleburne, TX 76031 www.nutone.com (1-800-325-8351)
Standard Hardware - may be purchased locally
ONE YEAR LIMITED WARRANTY
PART NUMBER
OAK WHITE
628033A 2
Page 3

NO MODELO TAMAÑO ACABADOR
740589 24” x 24” Blanco
740957 30” x 26” Blanco
740605 36” x 30” Blanco
740613 48” x 30” Blanco
740621 24” x 24” Roble
740639 30” x 26” Roble
740647 36” x 30” Roble
740655 48” x 30” Roble
Registre su producto en línea en www.NuTone.com
INSTRUCCIONES DE INSTALACIONES EMPOTRADAS
BOTIQUÍN GRANVILLE
Preparar el botiquín
1. Retire con cuidado todo el material de embalaje. Coloque el
paquete de hardware y las puertas a un lado hasta necesitarlos.
Determinar la ubicación
1. La altura comúnmente aceptada de los botiquines de baño es de
AGUJEROS DE
MONTAJE
SUPERIOR
64 " desde el piso terminado hasta el centro del área del espejo.
Sin embargo, la altura puede ser ajustada según preferencias
individuales.
2. Para mayor seguridad, monte el botiquín directamente en los
montantes de la pared.
Montaje del botiquín
NOTA: Para facilitar la instalación, se recomienda la asistencia de
una o dos personas adicionales.
1. Mida y marque cuatro (4) agujeros de montaje en la pared
correspondientes a la ubicación de los agujeros previamente
perforados de montaje en las barras de montaje del botiquín en el
panel interior trasero del botiquín. (Figura 1) Dibuje líneas
horizontales que conecten las dos ubicaciones superiores y las
dos inferiores marcadas. Las líneas deben estar al mismo nivel.
Ajuste el nivel si es necesario. Repita este proceso con líneas
verticales que conecten las dos ubicaciones de lo agujero
superiores y las dos inferiores marcadas. Tras asegurar que las
marcas estén al mismo nivel, compruebe que los agujeros de
montaje en la parte posterior del botiquín coincidan con las
ubicaciones marcadas en la pared.
2. Perfore un agujero de 9 / 64" de diámetro en los lugares
marcados en la pared. Si los agujeros de montaje no se
encuentran en un poste, el diámetro del agujero en la pared, debe
ser incrementado para colocar anclajes de pared. Coloque los
anclajes de pared según se requiera.
3. Sostenga el botiquín en su lugar y asegúrese de que esté
nivelado.
4. Fije el botiquín a la pared con los cuatro tornillos de montaje del
paquete de hardware.
NOTA: No use clavos para montar el botiquín.
NOTA: Las irregularidades en la superficie de la pared pueden
provocar una distorsión de la estructura del botiquín cuando
se monta. Coloque cuñas entre el botiquín y la pared si es
necesario.
Bisagra pivote
tipo “c” (3 EA)
2. Retire los seis bisagras de pivote de la bolsa de hardware. Hay dos
configuraciones de la bisagra. Se parar las b isa gra s en do s grupos d e
tres en base a la dirección del perno y ubicaciones de los tornillos.
(Figura 3)
PRECAUCIÓN: No apriete los tornillos de fijación en exceso.
Los tornillos muy ajustados romperán el spejo.
Acople puerta espejada
NOTA: Para facilitar el montaje de la puerta se recomienda la
asistencia de una persona adicional se recomienda.
1. Identificar y separar las puertas por tipo (“B” o “C”). Aunque las
puertas espejadas parezcan ser idénticas, existen dos configuraciones. Las puertas se colocan en posición izquierda o derecha
de la placa percutora en la parte de atrás de la puerta. (Figura 2)
3. Deslice una bisagra pivote de tipo “d“ sobre el cojín de presión en la
parte superior de la puerta tipo “C” Apriete ligeramente los dos tornillos
para mantener la bisagra en su lugar. (Figura 4) Repita este proceso
para la segunda puerta de tipo "C".
4. Coloque una bisagra pivote tipo "c" sobre el cojín de presión en la
parte superior de la puerta de tipo "B". Apriete ligeramente los tornillos
para mantener la bisagra en su lugar.
trasera de
FIG 3
Parte trasera de botiquín
Vista interna
(sin puertas)
Vista
puerta
“C”
(2EA)
Bisagra pivote
tipo “d” (3 EA)
FIG 1
FIG 2
Placas
percutoras
Bisagra
pivote
Almohadilla
de presión
de bisagra
AGUJEROS DE
MONTAJE
INFERIOR
Vista
trasera
de puerta
“B”
(1 EA)
FIG 4
Parte trasera
de puerta
espejada
628033A 3
Page 4

5. Coloque las bisagras de pivote restantes (dos de tipo "c" y una de
tipo "d") en los orificios en la parte inferior de la estructura del
botiquín. (Fig. 5) Asegúrese de que los tornillos de la bisagra de
pivote se encuentren fuera del canal del espejo.
6. Monte una puerta por vez al botiquín, colocando tipos de puerta
"B" y "C" tal y como se muestra en la (Figura 6). Levante la puerta
espejada e inserte el pasador de la bisagra superior en el agujero
en la parte superior de la estructura del botiquín. Deslice la parte
inferior de la puerta espejada en el canal de la bisagra inferior.
Apriete ligeramente los dos tornillos de la bisagra inferior.
7. Confirme que la posición de la placa propulsora sea opuesta a un
cierre magnético cuando la puerta está cerrada y que no haya
tornillos de bisagra d el lado espejado de la puerta.
Ajuste de la puerta
1. Verifique espacios y alineación entre los espejos de la puerta.
Puede ser necesario ajustar las puertas individuales. Afloje los tornillos de fijación en la parte interna de las bisagras de la puerta alrededor de 1/4" de vuelta para puerta(s) que requieren ajuste.
(Figura 7)
2. Realinee para que las puertas sean cuadradas y se balanceen sin
interferencias.
3. Reajuste levemente los tornillos de fijación.
Bisagra pivote tipo “d”
FIG 6
Frente
puerta
FIG 5
Bisagra pivote tipo “c”
Parte
trasera
Parte
trasera
puerta
puerta
FIG 7
CUIDADO DEL ESPEJO
• Utilice sólo agua tibia y limpia y un trapo limpio, suave y
libre de pelusa.
• NO UTILICE limpiadores que contengan soluciones a
base de amoníaco, vinagre o cloro.
• NO UTILICE limpiadores en polvo o estopa de acero.
• N unca pu lv erice un agent e limp iado r direct ame nte sob re el
espejo, especialmente sobre los bordes expuestos y la
parte trasera del espejo. Aplique limpiador a un trapo
suave y limpie el espejo. Seque cui dad osamen te el espej o.
• Mantenga el espejo seco. Es importante que el baño se
encuentre bien ventilado.
REPUESTOS
DESCRIPCIÓN
Juego de bisagras ( 1 ea techo & fondo) S7175 S7175
Pestillo magnético SB4247903 S7174
Tornillos de montaje 8 X 1-3/4” PPH tipo A
Equipo físico estándar - se puede adquirir
Anclajes de pared
UNA GARANTÍA LIMITADA DEL AÑO
Autorizaciones de Broan-NuTone Storage Solutions al comprador original del consumidor de sus productos que tales productos estarán libres de defectos en
materiales o de la ejecución por un período de un (1) año a partir de la fecha de la compra original. NO HAY OTRAS GARANTÍAS, EXPRESAS O IMPLICADO,
INCLUYENDO, PERO NO LIMITADO A, GARANTÍAS IMPLICADAS DEL MERCHANTABILITY O APTITUD PARA UN PROPÓSITO PARTICULAR.
Durante este período de un año, de Broan-NuTone Storage Solutions, en su opción, reparación o substituir, sin carga, cualquier producto o la parte que se
encuentren para ser defectuosos bajo uso normal y servicio. Esta garantía no cubre (a) mantenimiento normal y no lo mantiene o (b) ningunos productos o piezas que
han estado conforme a uso erróneo, negligencia, accidente, mantenimiento o reparación incorrecta (con excepción por de Broan-NuTone Storage Solutions), I
nstalación culpable o instalación contraria a las instrucciones de instalación recomendadas. Trabaje para quitar y substituir productos no se cubre.
La duración de cualquier garantía implicada se limita al un período del año según lo especificado para la garantía expresa. Algunos estados no pe rmite n la li mit ació n
en cuánto tiempo una garantía implicada dura, así que la limitación antedicha puede no aplicarse a usted.
LA OBLIGACIÓN DE BROAN-NUTONE STORAGE SOLUTIONS PARA REPARAR OR REEMPLAZAR, EN OPCION DE BROAN-NUTONE STORAGE
SOLUTIONS, SERÁ LA SUELA DEL COMPRADOR' Y REMEDIO EXCLUSIVO BAJO ESTA GARANTÍA. BROAN-NUTONE STORAGE SOLUTIONS NO SERÁ
OBLIGADAS PARA LOS DAÑOS FORTUITOS , CONSECUENTES O ESPECIALES QUE SE PRESENTAN FUERA O CON RESPECTO A USO DE PRODUCTO
O FUNCION AMIENTO. Algunos estados no permiten la exclusión o la limitación de daños fortuitos o consecuentes, así que la limitación o la exclusión antedicha
puede no aplicarse a usted. Esta garantía le da las derechas legales específicas, y usted puede también tener otras derechas, que varían de estado al estado. Esta
garantía reemplaza todas las garantías anteriores.
Fecha de la instalación _______________________________________________________________________________________________________________
No modelo. y descripción del producto ___________________________________________________________________________________________________
NÚMERO DE PARTE
ROBLE BLANCO
localmente
Broan-NuTone Storage Solutions, 501 S. Wilhite Street, Cleburne, TX 76031 www.nutone.com (1-800-325-8351)
628033A 4
SI USTED NECESITA AYUDA O SERVICIO - CONTACTO:
Page 5

NO DE MODÈLE DIMENSION FINITION
740589 24” x 24” Blanc
740957 30” x 26” Blanc
740605 36” x 30” Blanc
740613 48” x 30” Blanc
740621 24” x 24” Chêne
740639 30” x 26” Chêne
740647 36” x 30” Chêne
740655 48” x 30” Chêne
Enregistrez votre produit en ligne au www.NuTone.com
INSTRUCTIONS POUR DES INSTALLATIONS MURALES
ARMOIRE GRANVILLE
Préparation de l’armoire
1. Retirez soigneusement tout le matériel d’emballage. Mettre de
côté l’emballage de fixations et les portes.
Déterminez un emplacement
TROUS DE
MONTAGE
SUPÉRIEURS
1. La hauteur généralement acceptable des cabinets de salle de
bain est de 64 po à partir du sol fini jusqu’au centre du miroir. Par
contre, la hauteur peut être ajustée selon la préférence des
individus.
2. Pour plus de sécurité, le montage de l’armoire doit être fait
directement sur les poteaux muraux.
Montage de l’armoire
REMARQUE : Pour faciliter l’installation, il est préférable d’être aidé
1. Mesurez et marquez quatre (4) points de montage sur le mur et
correspondants aux trous de montage déjà présents dans les
barres de fixation de l’armoire, sur la partie interne du panneau
arrière de l’armoire (FIG 1). Dessinez les marques pour les
emplacements inférieurs. Les lignes devraient être au niveau.
Mettre au niveau si nécessaire. Répétez cette étape pour les
lignes verticales reliant les deux marques gauche et droite. Après
s’être assuré que les marques sont au niveau, assurez-vous que
les trous de fixation situés à l’arrière de l’armoire correspondent
aux emplacements indiqués sur le mur.
2. Percez des trous d’un diamètre de 9/64 po aux marques
indiquées sur le mur. Si les trous de fixation ne sont pas situés
sur un poteau mural, le diamètre du trou, dans le mur, devra être
augmenté afin qu’un ancrage mural puisse y être inséré.
Positionnez les ancrages muraux comme requis.
3. Soutenez l’armoire en place et assurez-vous qu’elle soit au
niveau.
4. Fixez l’armoire au mur à l’aide des quatre vis de fixation fournies.
REMARQUE : N’utilisez pas de clous pour fixer l’armoire.
REMARQUE : Toutes irrégularités du mur peuvent causer une
distorsion de l’armoire lors du montage. Installez, si
nécessaire, des entretoises entre l’armoire et le mur.
Fixer les portes à miroirs
REMARQUE : Pour faciliter l’assemblage, il est recommandé de
demander l’aide d’une autre personne.
1. Identifiez et séparez les portes selon le type (“B” ou “C”). Même
les si les portes à miroirs semblent identiques, il existe deux
types de configurations de portes. Les portes vont du côté
gauche ou du côté droit selon l’emplacement de la charnière
installée à l’arrière. (FIG. 2) Positionnez la porte selon la gâche
inférieure
d’une autre personne.
.
Charnière à pivot
de type “c” (3 ch.)
2. Retirez les six charnières à pivot du sac de fixations. Il existe deux
configurations de charnières. Séparez les charnières en deux ens
embles de trois en vous basant sur la direction des axes et les
emplacements des vis. (FIG. 3)
MISE EN GARDE : ne pas trop serrer les ensembles de
vis. Les vis trop serrées pourraient briser le miroir.
3. Faites glisser une charnière à pivot “d” contre le coussin d’appui de la
partie supérieure d’une porte de type C. Serrez légèrement les deux
vis en place afin de maintenir la charnière en place. (FIG. 4) Répétez
cette étape pour la seconde porte de type C.
4. Déposez une charnière à pivot de type “c” contre le coussin d’appui
de la partie supérieure d’une porte de type B. Serrez légèrement les
vis pour maintenir la charnière en
Vue
arrière de
la porte
“C”
(2 ch.)
FIG 3
Charnière à pivot
de type “d” (3 ch.)
FIG 1
Arrière de l’armoire
Vue de l’intérieur
(sans les portes)
FIG 2
Gâches
Charnière à
pivot
Coussin
d’appui de
charnière
place.
TROUS DE
MONTAGE
INFÉRIEURS
Vue
arrière de
la porte
“B”
(1 ch.)
FIG 4
Arrière de la
porte à miroirs
628033A 5
Page 6

5. Déposez les charnières restantes (deux de type “c” et une de type
“d”) dans les orifices de la partie inférieure du cadre de l’armoire.
(FIG. 5) Assurez-vous que les vis de la charnière à pivot dégagent
le passage du miroir.
6. Assemblez une porte à la fois à l’armoire, positionnant les portes
de type B et C comme indiquées à la FIG. 6. Soulevez la porte à
miroir et insérez les axes de la charnière supérieure dans l’orifice
supérieure du cadre de l’armoire. Faites glisser la partie inférieure
de la porte à miroirs dans le passage de la charnière inférieure.
Serrez légèrement les deux vis à la charnière inférieure.
7. Assurez-vous que la position de la gâche est opposée au loquet
aimanté lorsque la porte est fermée et qu’aucune vis de charnière
ne se trouve du côté de miroir.
Ajustement de la porte
1. Assurez-vous d’un aligne men t et écart adéq uat en tre le s port es à
miroirs. Il sera peut-être nécessaire d’ajuster individuellement les
portes. Desserrez d’environ ¼ de tour les ensembles de vis situés
sur la partie interne des charnières de portes nécessitant un
ajustement. (FIG. 7)
2. Réalignez les portes afin que celles-ci soient bien à l’équerre et
s’ouvrent et se ferment sans problème.
3. Resserrez un peu les ensembles de vis.
Charnière à pivot
de type “d”
FIG 6
Avant
de la
porte
FIG 5
Arrière
de la
porte
Charnière à
pivot de type “c”
Arrière
de la
porte
FIG 7
SOINS AUX MIROIRS
• N’utilisez que de l’eau tiède et un linge doux, propre et
non pelucheux.
• NE PAS UTILISER d’agents nettoyants contenants de
solutions à base d’ammoniac, de vinaigre ou de chlore.
• NE PAS UTILISER d’agents nettoyants en poudre ou de
laine d’acier.
• Ne jamais vaporiser un agent nettoyant directement sur le
miroir, particulièrement sur les rebords exposés et l’arrière
du miroir. Appliquez le nettoyant sur un linge doux et essuyez
le miroir. Laissez le miroir sécher en entier.
• Le miroir doit toujours être sec. Il est important que la salle
PIÈCES DE REMPLACEMENT
DESCRIPTION
Ensemble de charnières (1 pour chaque partie sup. et inf.)
de bain soit bien aérée.
NUMÉRO DE PIÈCE
Chêne Blanc
S7175 S7175
Loquet aimanté SB4247903 S7174
Vis de fixation 8 x 1 ¾ po PPH Type A
Ancrages muraux
UNE GARANTIE LIMITÉE D'AN
Garanties de Broan-NuTone Storage Solutions à l'acheteur original du consommateur de ses produits que de tels produits seront exempts des défauts en matériaux
ou de l'exécution pendant une période d'un (1) an de la date de l'achat original. IL N'Y A AUCUNE AUTRE GARANTIE, EXPRÈS OU IMPLICITE, Y COMPRIS,
MAIS NON LIMITÉ À, GARANTIES IMPLICITES DE VALEUR MARCHANDE OU FORME PHYSIQUE POUR UN BUT PARTICULIER.
Pendant cette période d'un an, de Broan-NuTone Storage Solutions, à son option, réparation ou remplacer, sans frais, n'importe quel produit ou partie qui s'avèrent
défectueux sous l'utilisation et le service normaux. Cette garantie ne couvre pas (a) l'entretien normal et ne l'entretient pas ou (b) aucuns produits ou pièce qui ont
été sujets à l'abus, la négligence, l'accident, l'entretien ou la réparation inexacte (autre que par de Broan-NuTone Storage Solutions), l'installation défectueuse ou
l'installation contraire aux instructions d'installation recommandées. Travaillez pour enlever et remplacer des produits n'est pas couvert.
La durée de n'importe quelle garantie implicite est limitée à l'une période d'an comme indiquée pour la garantie exprès. Quelques états ne permettent pas la limitation sur combien de temps une garantie implicite dure, ainsi la limitation ci-dessus peut ne pas s'appliquer à toi.
OBLIGATION DE BROAN-NUTONE STORAGE SOLUTIONS “DE RÉPARER OU REMPLACER, AUX OPTION DE BROAN-NUTONE STORAGE SOLUTIONS,
SERA L'ACHETEUR' REMÈDE UNIQUE ET EXCLUSIF DE S SOUS CETTE GARANTIE. DE BROAN-NUTONE STORAGE SOLUTIONS NE SERONT PAS
RESPONSABLES DES DOMMAGES FORTUITS , CONSÉCUTIFS OU SPÉCIAUX SURGISSANT HORS OU EN LIAISON AVEC DE L'UTILISATION D'UN PRODUIT OU EXÉCUTION. Quelques états ne permettent pas l'exclusion ou la limitation des dommages fortuits ou consécutifs, ainsi la limitation ou l'exclusion ci-
dessus peut ne pas s'appliquer à toi. Cette garantie te donne des droits légaux spécifiques, et vous pouvez également avoir d'autres droits, qui changent de l'état à
l'état. Cette garantie remplace toutes les garanties antérieures.
Date d'installation ___________________________________________________________________________________________________________________
Non modèle. et description de produit ____________________________________________________________________________________________________
Fixation standard – peuvent être achetés
localement
Broan-NuTone Storage Solutions, 501 S. Wilhite Street, Cleburne, TX 76031 www.NuTone.com (1-800-325-8351)
628033A 6
SI VOUS AVEZ BESOIN D'AIDE OU SERVICE - CONTACT :
 Loading...