

Page 1
REFERENCE MANUAL
Page 2

INTRODUCTION...........................................................................................................................................................................3
FEATURES ...................................................................................................................................................................................3
IMPORTANT MESSAGES............................................................................................................................................................ 4
CONNECTION DIAGRAM ............................................................................................................................................................4
TOP PANEL - GLOBAL CONTROLS...........................................................................................................................................9
TOP PANEL - MIXER CONTROLS ............................................................................................................................................11
TOP PANEL - DECK CONTROLS..............................................................................................................................................12
LOOPING CONTROLS ........................................................................................................................................................13
iPod DIRECT MODE CONTROLS .......................................................................................................................................14
HOW TO WORK WITH iDJ²........................................................................................................................................................15
THE GRAPHICAL INTERFACE..................................................................................................................................................17
Switching On and Off ...........................................................................................................................................................17
The Display ..........................................................................................................................................................................17
Deck Displays.......................................................................................................................................................................17
Menu Bar..............................................................................................................................................................................18
Work Area ............................................................................................................................................................................18
Progress Bar ........................................................................................................................................................................18
Using Lists............................................................................................................................................................................19
Using Dialogs .......................................................................................................................................................................19
Responding to Questions.....................................................................................................................................................19
Changing Settings................................................................................................................................................................ 20
Entering Text........................................................................................................................................................................20
THE LIBRARY ............................................................................................................................................................................21
PREPARING YOUR STORAGE DEVICE ............................................................................................................................21
CREATING A LIBRARY .......................................................................................................................................................21
Building with Librarian ...................................................................................................................................................21
Building with iDJ²...........................................................................................................................................................21
LOADING A LIBRARY..........................................................................................................................................................22
USING A LIBRARY ..............................................................................................................................................................22
Searching......................................................................................................................................................................23
Browsing .......................................................................................................................................................................23
File View........................................................................................................................................................................25
Working with Playlists....................................................................................................................................................25
EJECTING A LIBRARY........................................................................................................................................................ 26
THE CRATE................................................................................................................................................................................27
WORKING WITH THE CRATE ............................................................................................................................................27
LOADING AND SAVING THE CRATE................................................................................................................................. 28
DECK MODE SETTINGS (A AND B) ...................................................................................................
PITCH RANGE..................................................................................................................................................................... 29
KEY LOCK ...........................................................................................................................................................................29
TRACK LOADING................................................................................................................................................................30
TIME DISPLAY.....................................................................................................................................................................30
FADER START ....................................................................................................................................................................30
iPod MODE ..........................................................................................................................................................................31
VIEWS......................................................................................................................................................................................... 32
TRACK VIEW.......................................................................................................................................................................32
PROFILE VIEW.................................................................................................................................................................... 32
Creating Track Profiles..................................................................................................................................................32
Working with Track Profiles...........................................................................................................................................32
UTILITY....................................................................................................................................................................................... 33
Display ...............................................................................................................................................................................33
Restore ...............................................................................................................................................................................33
Calibrate...............................................................................................................................................................................34
Updates ...............................................................................................................................................................................34
iDJ² SOFTWARE UPGRADES...................................................................................................................................................35
UPGRADE PROCEDURE....................................................................................................................................................35
KEYBOARD SHORTCUTS.........................................................................................................................................................36
USB DEVICE COMPATIBILITY..................................................................................................................................................37
USB CONNECTION............................................................................................................................................................. 37
SUPPORTED STORAGE DEVICES.................................................................................................................................... 37
IDENTIFYING LIBRARIES................................................................................................................................................... 37
SUPPORTED FILE SYSTEMS ............................................................................................................................................38
AVOIDING AND FIXING ERRORS ......................................................................................................................................38
DEFRAGMENTATION .........................................................................................................................................................38
KEEPING YOUR DATA SAFE .............................................................................................................................................38
EXPLANATION OF DIGITAL AUDIO.........................................................................................................................................39
COMPRESSION ..................................................................................................................................................................39
TAGGING.............................................................................................................................................................................39
FORMATS............................................................................................................................................................................ 39
MIXING TUTORIAL.....................................................................................................................................................................41
TECHNICAL SPECIFICATIONS.................................................................................................................................................43
LICENSING INFORMATION.......................................................................................................................................................43
ACKNOWLEDGEMENTS.....................................................................................................................................................43
......................................29
Page 3

INTRODUCTION
The iDJ² is a dual-deck console designed for the needs of the modern DJ. With a ground-breaking
and easily accessible user interface, the plug and play design empowers the DJ to quickly find,
organize and perform tracks from connected USB storage devices or docked Apple iPod* players.
Songs can be directed manually to decks or automatically played, jukebox-style.
Powerful tools such as the Crate and Profile View offer a digital slant on traditional DJ methods. The
Crate can be used to prepare and arrange your set in advance, during your performance or a mixture
of both. The Profile View offers a fast visual cueing aid, much like looking at the grooves on a record,
but better!
iDJ² boasts two USB connections and an iPod dock for a wide variety of storage options. These
include the Apple iPod, thumb drives and external hard drives. Searching for artists, albums or tracks
is made super fast with a USB keyboard (not included).
iDJ² can play MP3, WAV and AAC** music formats stored on FAT16, FAT32, NTFS and HFS+ file
systems.
In addition to its impressive playback capabilities, the iDJ² functions as a complete DJ mixer
workstation and is outfitted with all the familiar DJ controls, such as a crossfader, comprehensive
EQ/gain section for each channel, headphone cueing, and analog inputs for connecting additional
sound sources, such as turntables and CD players.
FEATURES
2 channel mixer with EQ and gain controls
Crossfader with adjustable curve setting
2 analog stereo inputs for connecting additional sound sources, such as turntables and CD players
2 stereo Master Out channels (balanced and unbalanced)
Stereo Record Out channel (unbalanced)
Microphone input with gain and tone controls
2 headphone outputs (1/4” and 1/8”) with gain and tone controls
Support for iPod, Flash keys, thumb drives, and external USB hard drives
Scratching and Pitch-Bending
Seamless looping, stuttering
Pitch control
Key Lock
Large color display with revolutionary easy-to-use interface
Search quickly through songs
Track Profile visualizations
iPod docking station for mixing directly from your iPod
S-Video output for displaying content from a video iPod (in iPod Direct Mode only)
2 USB ports for connecting USB thumb drives, hard drives or a keyboard
Formats supported: MP3, WAV and AAC**
Beatkeeper technology with TAP override function
Fader Start
USB computer keyboard support for fast searching - on USB drives or iPods
Computer playlist support including many popular formats
Safe Software Updates for future enhancements. Go to www.numark.com for support.
* iPod is a trademark of Apple, Inc., registered in the U.S.A. and other countries.
** Protected AAC audio files downloaded from the iTunes Music Store cannot be accessed.
3
Page 4
IMPORTANT MESSAGES
The iDJ² works best with the latest software installed. We strongly recommend that you check for software
updates right away, and continue to check regularly so you don't miss out on any of the good stuff! See “iDJ²
Software Upgrades” section for details.
Don't Force It
USB devices fit into the USB socket one way around only. If the device does not push in
easily, don't force it – check that you have it the right way around!
Eject Before Pulling
When you're finished with a storage device, always properly eject it before unplugging, just
like with your home computer! Unplugging without ejecting can damage your data. See
“Ejecting a Library” section for details.
USB Hubs
You can plug a hub into each of your iDJ²’s USB ports, but you must not plug a hub into a hub!
We recommend you use only powered hubs for maximum reliability.
USB Gizmos
Mice, trackpads and other input devices will do nothing for your iDJ². Most USB keyboards are
supported.
CONNECTION DIAGRAM
1. Make sure the following items were in the box:
• iDJ²
• Power adapter
• USB key drive
• Quickstart Guide
• Safety Instruction Booklet
2. READ SAFETY INSTRUCTION BOOKLET BEFORE USING THE PRODUCT.
3. Study this connection diagram.
4. Place the iDJ² in an appropriate position for operation.
5. Make sure all devices are turned off and all faders and gain knobs are set to their lowest level.
6. Connect the stereo outputs to mixer and/or other audio devices.
7. Plug all devices into AC power.
8. Switch everything on in the following order:
• iDJ²
• amplifiers or output devices
9. Always reverse this operation by turning off devices in the following order:
• amplifiers or output devices
• iDJ²
More information about this product may be found at http://www.numark.com/iDJ2
4
Page 5
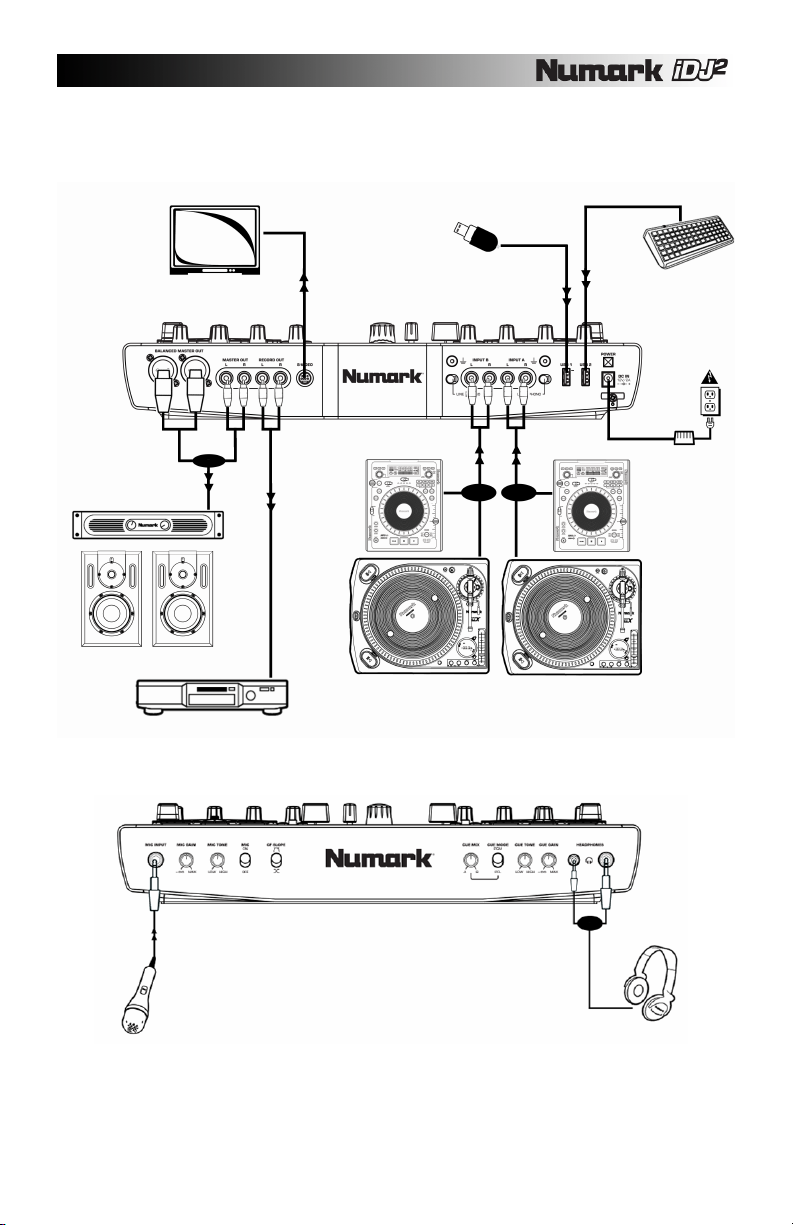
Please study the connection diagram below:
TV OR PROJECTION SYSTEM
USB MASS STORAGE DEVICE
USB KEYBOARD
(REAR PANEL OF iDJ²)
CD PLAYER CD PLAYER
OR
TO AMP OR OR OR
SPEAKER SYSTEM
(FRONT PANEL OF iDJ²)
OR
MICROPHONE
HEADPHONES
TO CD BURNER
TURNTABLE TURNTABLE
5
Page 6
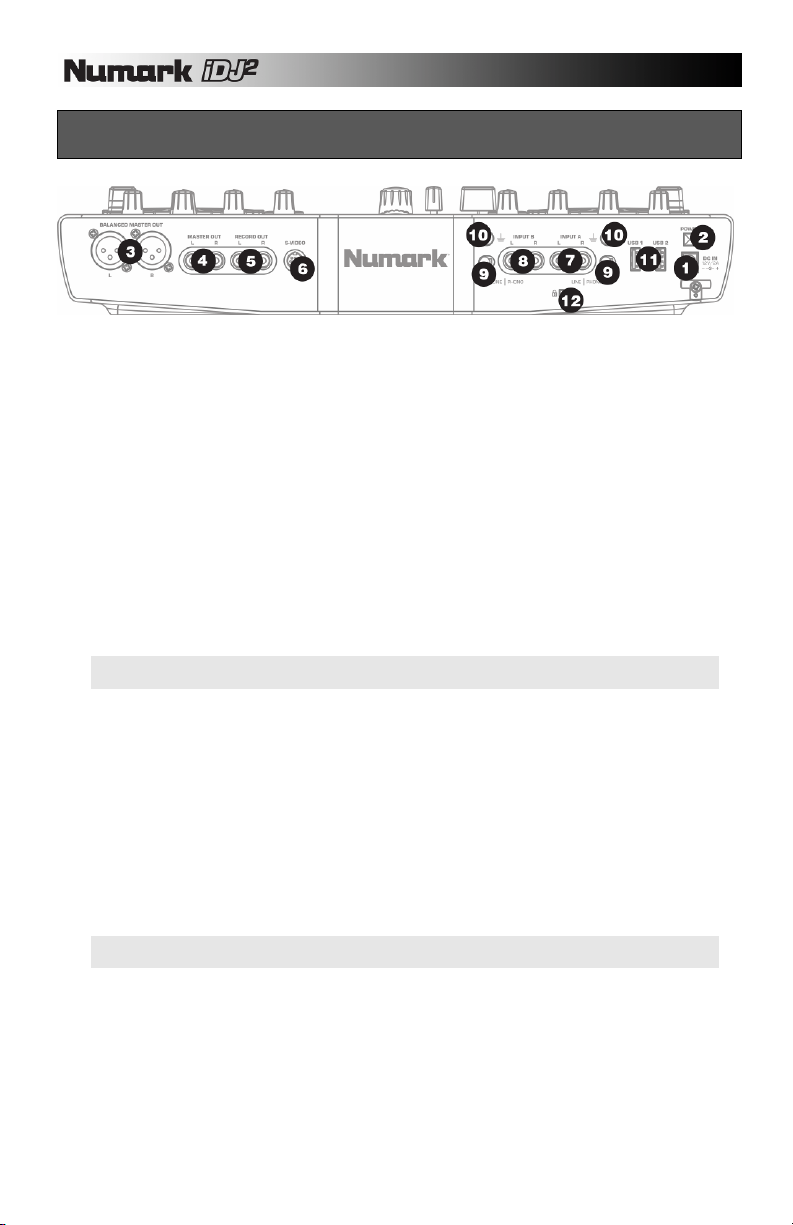
REAR PANEL OVERVIEW
1. DC IN – Please connect the supplied power adapter (DC 12V 2A) to this power input and connect it o a
power source. Please only use the supplied power adapter – using an alternate power adapter may
result in damage to the iDJ². You may secure the adapter cable to the restraint directly below to
prevent from accidental unplugging.
2. POWER – Use this switch to turn the iDJ² on and off. To turn on, press the button momentarily. To
turn off, press and hold down the button until the unit has powered down completely.
3. MASTER BALANCED OUT – These line-level balanced XLR connections output the stereo mix and
should be connected to an amplifier or speaker system. Please use balanced XLR (TRS) to connect to
your speakers or amplifier.
4. MASTER OUT – This line-level stereo RCA connection outputs the stereo mix. Please use a stereo
RCA cable to connect to a stereo system or amplifier.
5. RECORD OUT – This is an additional line-level stereo RCA connection which outputs the stereo mix.
If you would like to record your mix as you are performing or output to additional speakers, please use
a stereo RCA cable to connect to your recording device or speaker system.
6. S-VIDEO – If using a video iPod, the iDJ² can output the video signal through this S-video port. Please
use a standard S-video cable to connect to a TV, monitor, or projection device. This will enable you to
display videos from your iPod.
Note: Video from your iPod can only be output when Deck A is in iPod Direct Mode. See “iPod
Direct Mode” for details.
7. INPUT 1 – Use a stereo RCA cable to connect a line or phono-level audio source to this input.
8. INPUT 2 – Use a stereo RCA cable to connect a line or phono-level audio source to this input.
9. LINE | PHONO – Each input features a Line | Phono switch. This switch should be set to either Line or
Phono, depending on the input signal. If using phono-level turntables, set this switch to Phono. If
using line-level sources, such as digital turntables and CD-players, set this switch to Line.
10. GROUND CONNECTORS – If you are using phono-level turntables, please make sure that you attach
the grounding wires of the turntables to these ground connectors. This will ensure that there is no
ground hum while you perform.
11. USB INPUTS – Please attach your mass storage media to these two available USB ports – a hub can
be used to expand to more USB inputs. You may also connect a USB keyboard to one of these ports
for quick navigation of the iDJ². (See “Keyboard Navigation and Shortcuts” section to learn about
keyboard shortcuts).
Note: The iDJ² supports the FAT and HFS+ file systems. Please make sure that the media you are
attempting to play is formatted in one of these file system formats.
12. KENSINGTON LOCK – Use this lock to attach and secure the iDJ² to a table or surface.
6
Page 7
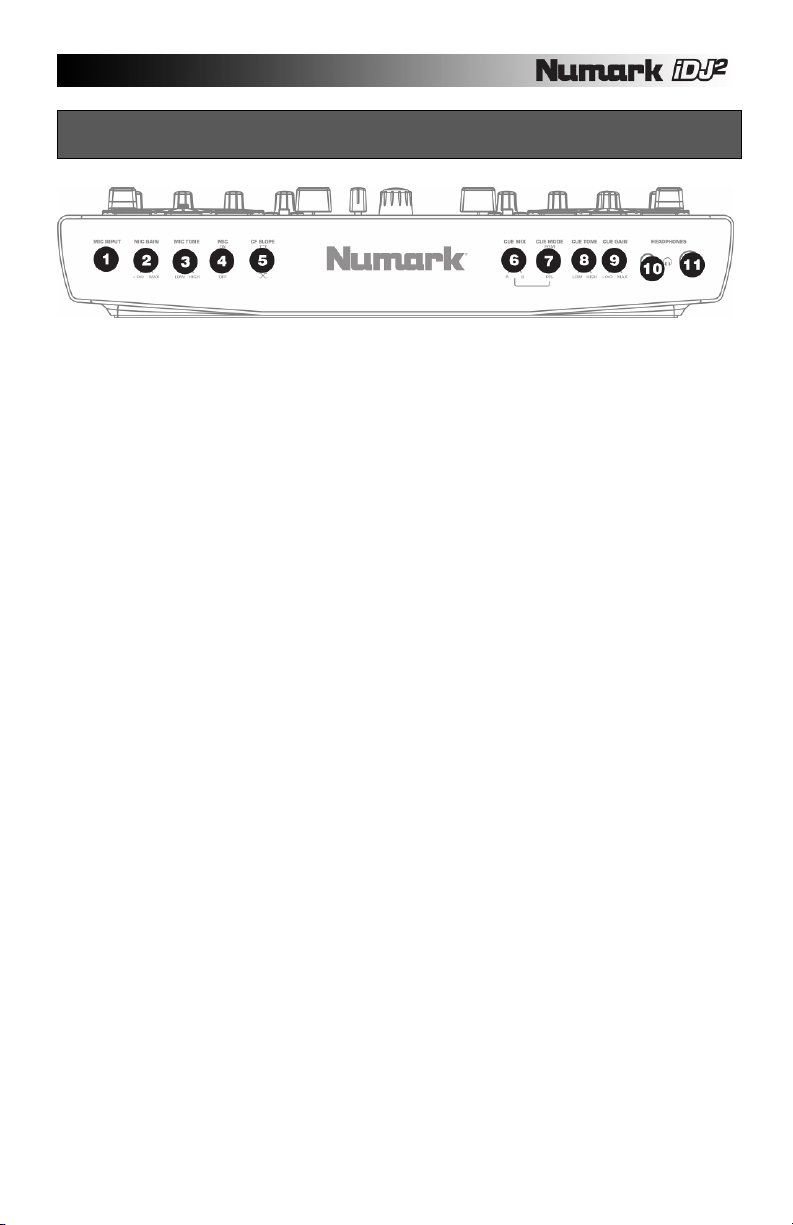
FRONT PANEL OVERVIEW
1. MIC INPUT – Connect a 1/4” inch microphone to this input.
2. MIC GAIN – This knob adjusts the level of the microphone signal.
3. MIC TONE – This knob can be used to adjust the tone of the microphone signal. Turning the knob
toward “High” will accentuate the high frequencies of the microphone signal and produce a brighter
sound. Turning the knob toward “Low” will accentuate the low frequencies of the microphone signal
and result in a sound with more bass frequencies.
4. MIC – This switch turns the microphone signal on and off.
5. CF SLOPE – This switch can be used to adjust the slope of the crossfader’s transition curve.
Flipping the switch up results in a sharper curve, allowing you to use the crossfader for quick
transitions and scratching. Flipping the switch down will result in a smoother curve, allowing you to
use the fader for slower transitions. Experiment with the two different settings to find out which one
works best for you.
6. CUE MIX – Controls the relative loudness of each deck in the Cue channel. If the knob is all the
way down (A), you will only hear the audio playing on deck A, while if the knob is all the way up (B)
you will only hear the audio playing on deck B. If the knob is in the middle position, you will hear the
audio from both decks A and B.
7. CUE MODE – This switch is used to alternate between auditioning the Pre Fader Levels (PFL) of
decks A and B, or the Program (PGM) in the Cue channel.
8. CUE TONE – This knob adjusts the tone of the headphone output without affecting any other output.
9. CUE GAIN – You can use this knob to adjust the level of the audio signal in the headphones.
10. HEADPHONES (1/8”) – Connect your 1/8” headphones to this output to hear the Cue channel.
11. HEADPHONES (1/4”) – Connect your 1/4” headphones to this output to hear the Cue channel.
7
Page 8
TOP PANEL OVERVIEW
iDJ²’s top panel can be generally split into three categories of controls:
GLOBAL CONTROLS, MIXER CONTROLS, DECK CONTROLS.
Please read the next three sections of this manual to learn about the function of these controls. If you need
help identifying where the controls are located on the panel, refer to the following illustration:
8
Page 9
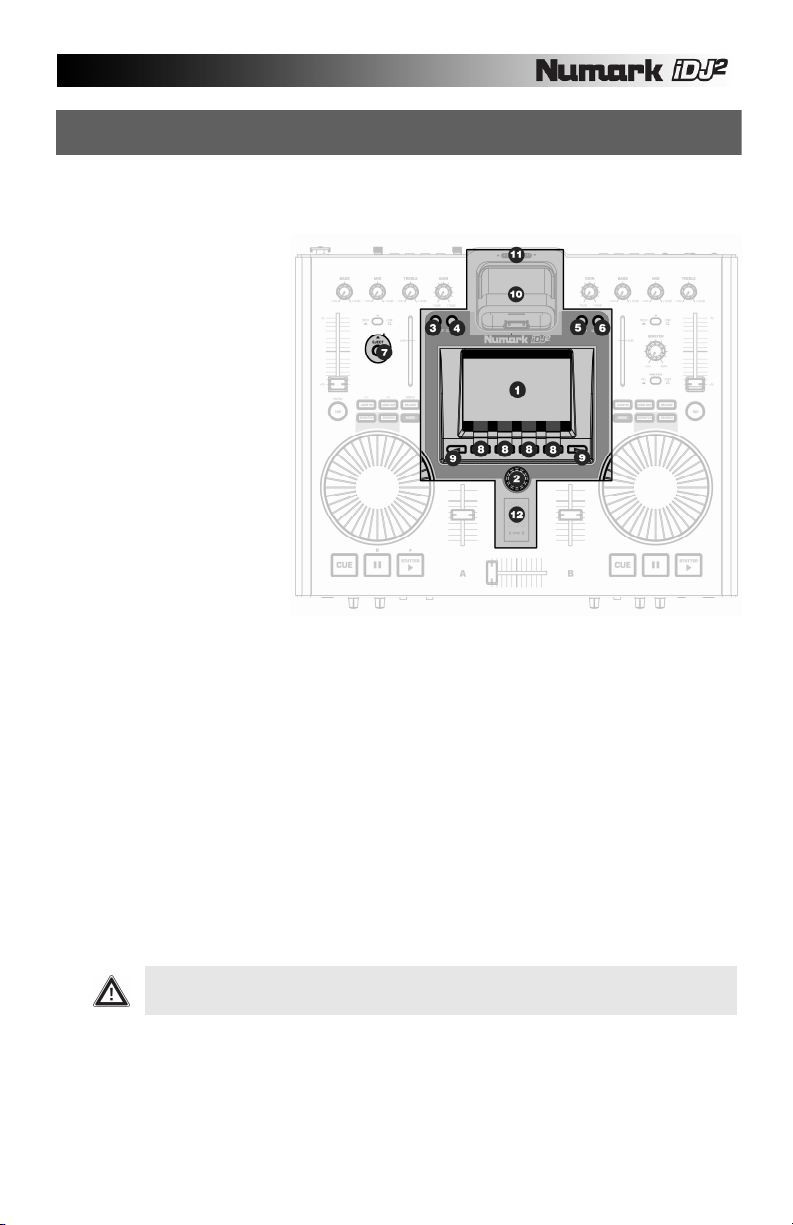
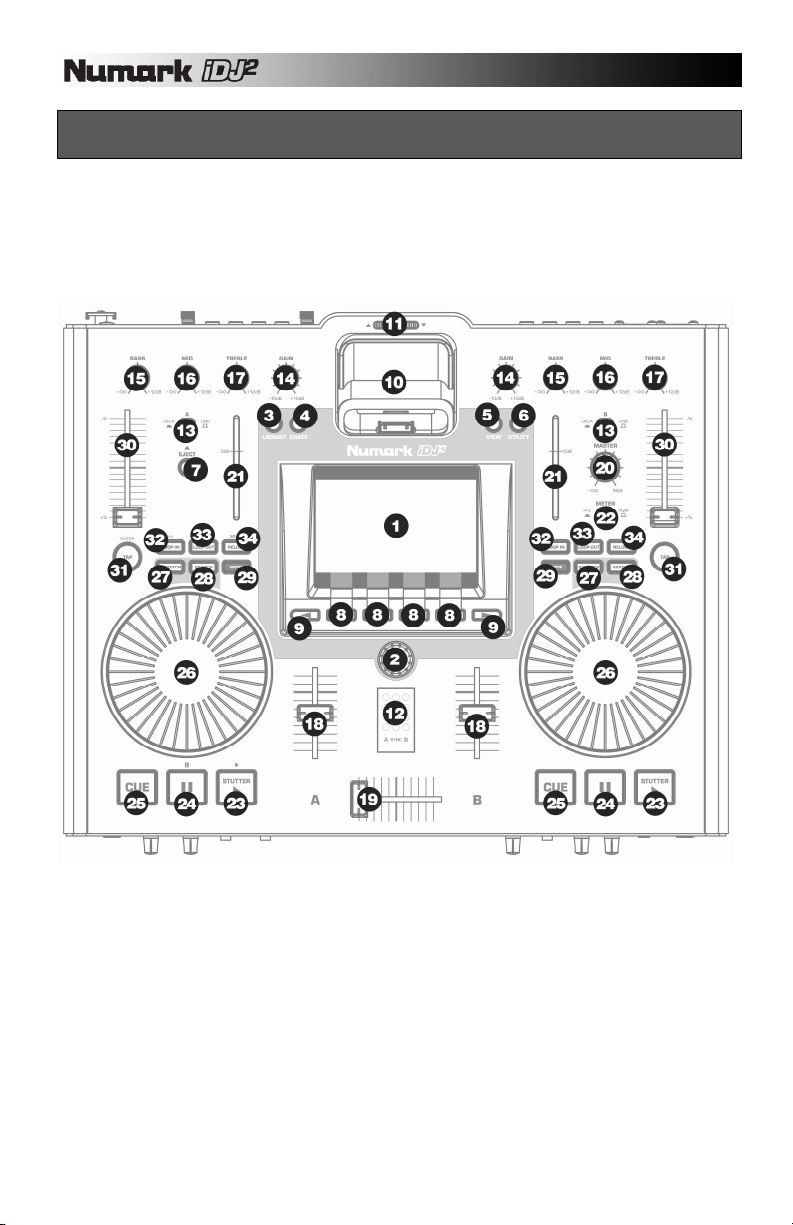
TOP PANEL - GLOBAL CONTROLS
The global controls on the iDJ² allow you to access and navigate many of the unit’s features, such as the
Library, the Crate, and various other options.
1. LCD – The large color
screen displays information
about the iDJ², the decks,
your attached removable
media and different menu
options.
2. PUSH TO ENTER – This
knob is used to navigate
lists, change settings, and
operate various parts of the
User Interface. It can be
pressed to select or change
the highlighted item, when
appropriate.
3. LIBRARY – This button
allows you to access the
library of music stored on
the removable media
connected to the iDJ².
Please refer to the
“Navigating the Library”
section of this manual for
more information on how to
browse and load music from
your removable media.
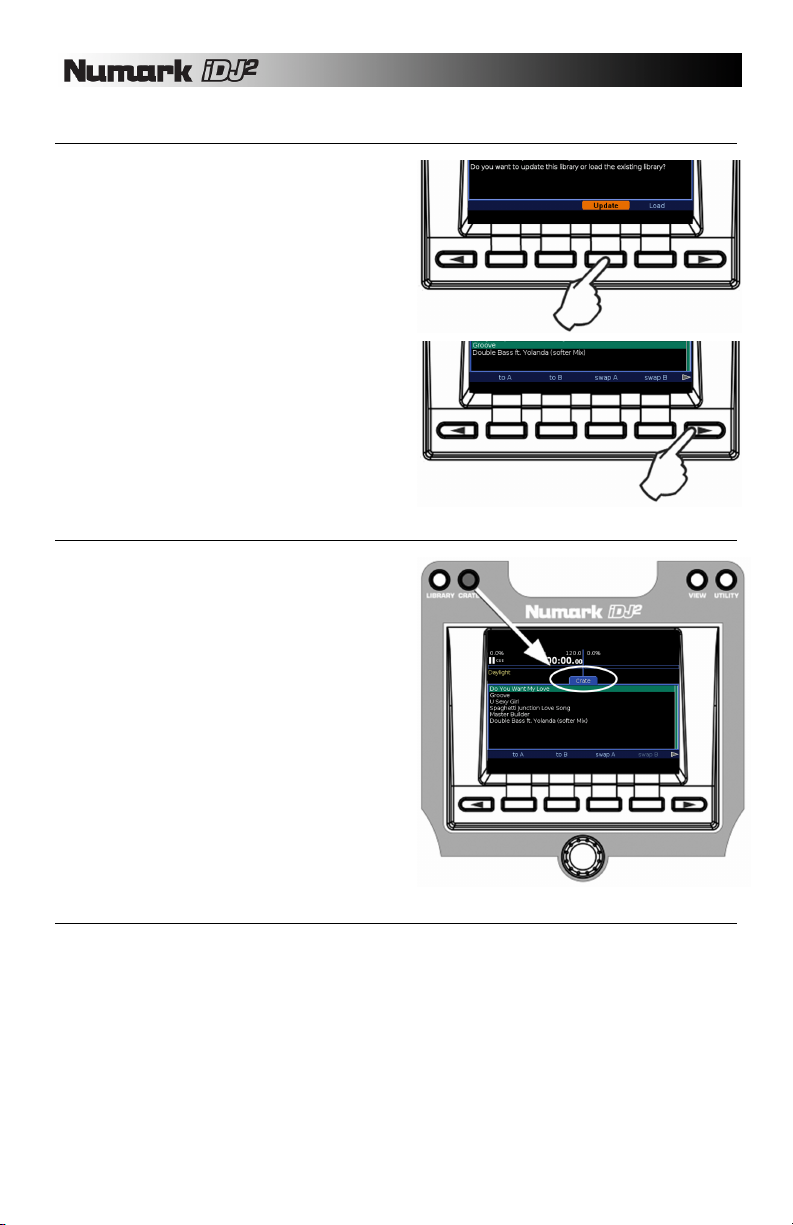
4. CRATE – This button allows you to view the “Crate”. Any tracks that you send to the Crate will appear
in this list. While you are viewing the Crate, you can use the FUNCTION buttons below the screen to
send tracks to either deck for mixing, pull them back into the Crate for later use if they are already
playing, or remove them from the Crate altogether. You may also switch the track order in the Crate, if
you would like, by pressing and releasing the PUSH TO ENTER knob on a track and then rotating the
knob– this will move the selected track up or down in the list. Then push and release ENTER again to
accept the new position. Please see “The Crate” section of this manual for more information on the
Crate feature.
5. VIEW – You may use this button to access different information about the music playing on the decks.
The VIEW button will toggle between Track View and Profile View. Please see “Views” section for
more information.
6. UTILITY – Pressing this button will take you to the Utility menu where you can adjust display
preferences, restore settings to their factory default state and calibrate the pitch sliders. Please see the
“Utility” section for details.
7. EJECT – Press this button to select which mass storage device you would like to eject. When you
press this button, you will see a list of the devices currently attached to the iDJ². Select which device
you would like to eject by rotating the PUSH TO ENTER knob and pressing the appropriate FUNCTION
button below the display to eject the highlighted device.
Please note: Always eject your devices before physically removing them from the iDJ². If you
fail to eject a device before removing it, the data on the device may become corrupt and
unusable.
8. FUNCTION BUTTONS – These four buttons are used to select from available menu items displayed on
the screen. Depending on the menu that you are viewing, the functionality of these buttons will change.
The screen will display the function of the button directly above it.
9. < / > BUTTONS – These two buttons are used to scroll through available pages of selections, when
available. If there are additional pages to be viewed, the arrow segments above the buttons will be
highlighted. These buttons are also used to move the cursor when entering text.
9
Page 10

10. iPOD DOCK – This docking station can be used to dock iPod players. When docked, you can browse
the contents of your iPod using iDJ²’s browser and load tracks to each deck or organize them in the
Crate. The iDJ² allows you to simultaneously play 2 tracks from your iPod on decks A and B. In
addition, the dock will also charge your iPod while the iDJ² is powered on.
11. DOCK ADJUSTMENT – Depending on the kind of iPod you are using, you can adjust this control so
the player fits snuggly into the dock.
12. THE BEATKEEPER™ - The Beatkeeper™ automatically tracks beats based upon a combination of
frequencies and rhythm patterns in the music. It shows BPM in the display and outputs 4-count (a.k.a.
one measure) information about the music in a marching bar graph. The left bar represents the beat of
the music playing on the left channel, while the right bar represents the beat of the music playing on the
right channel. The middle bar will light up blue when the downbeats of the music playing on both
channels occur at the same time. However, please note that in order for the two songs to mix well
together, the downbeats should not only line up now and then, but should occur simultaneously over a
continuous period of time.
The Bar Graph: Most dance music and rock is set up in 4 beat increments called
measures. The bottom LED represents the 1
not be correct or you may wish to reset it. To reset the downbeat on either channel simply
tap the TAP button at the new downbeat location as the music is playing or while paused.
st
beat or “Down Beat”. Occasionally this may
10
Page 11
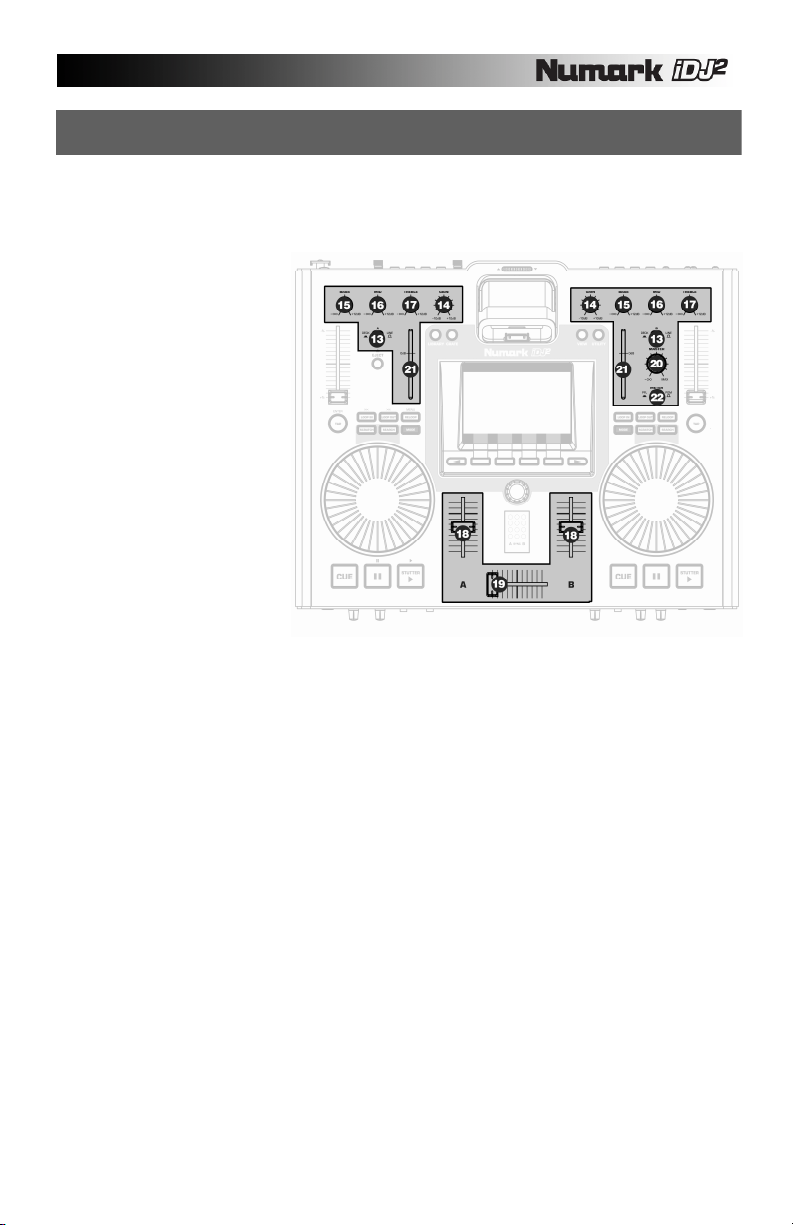
TOP PANEL - MIXER CONTROLS
iDJ² sports a full-featured DJ mixer which can be used to mix audio from USB mass storage devices and
iPod players, as well as any additional input devices, such as CD players and turntables connected to the
RCA inputs on the rear of the unit.
Each mixer channel features an
input selector. The input selector
switch (DECK/LINE) will select
which signal is being routed to the
mixer panel:
• In Deck position (in), the
mixer channel will output the
audio from an attached iPod
or USB mass storage
devices. Tracks can be
“sent” to the virtual deck via
the menus on the screen.
• In Line position (out), the
mixer channel will output the
audio signal from the RCA
inputs on the rear of the unit
(CD player, turntable, etc.)
Whichever option you choose, you
will be able to use familiar DJ
controls (gain, EQ, metering,
volume and crossfader) to create
your mixes.
Each mixer channel features:
13. INPUT SELECTOR (DECK/LINE) – Selects the input of the channel (DECK = USB device or iPod, LINE
= external source through RCA input).
14. GAIN – Adjust the overall gain of the audio signal on the channel.
15. BASS – Adjusts the low (bass) frequencies of the audio signal on the channel.
16. MID – Adjusts the mid frequencies of the audio signal on the channel.
17. TREBLE – Adjusts the high (treble) frequencies of the audio signal on the channel.
18. VOLUME FADER – Adjusts the volume of the audio signal on the channel.
Also on the top panel you will see:
19. CROSSFADER – Fades the audio signal between channels A and B.
20. MASTER LEVEL KNOB – Controls the output level of the master mix.
21. LEVEL METERS – Represent the Pre Fader or Program audio levels.
22. METER BUTTON – Toggles the level meters between displaying Pre Fader (PFL) or Program (PGM).
11
Page 12
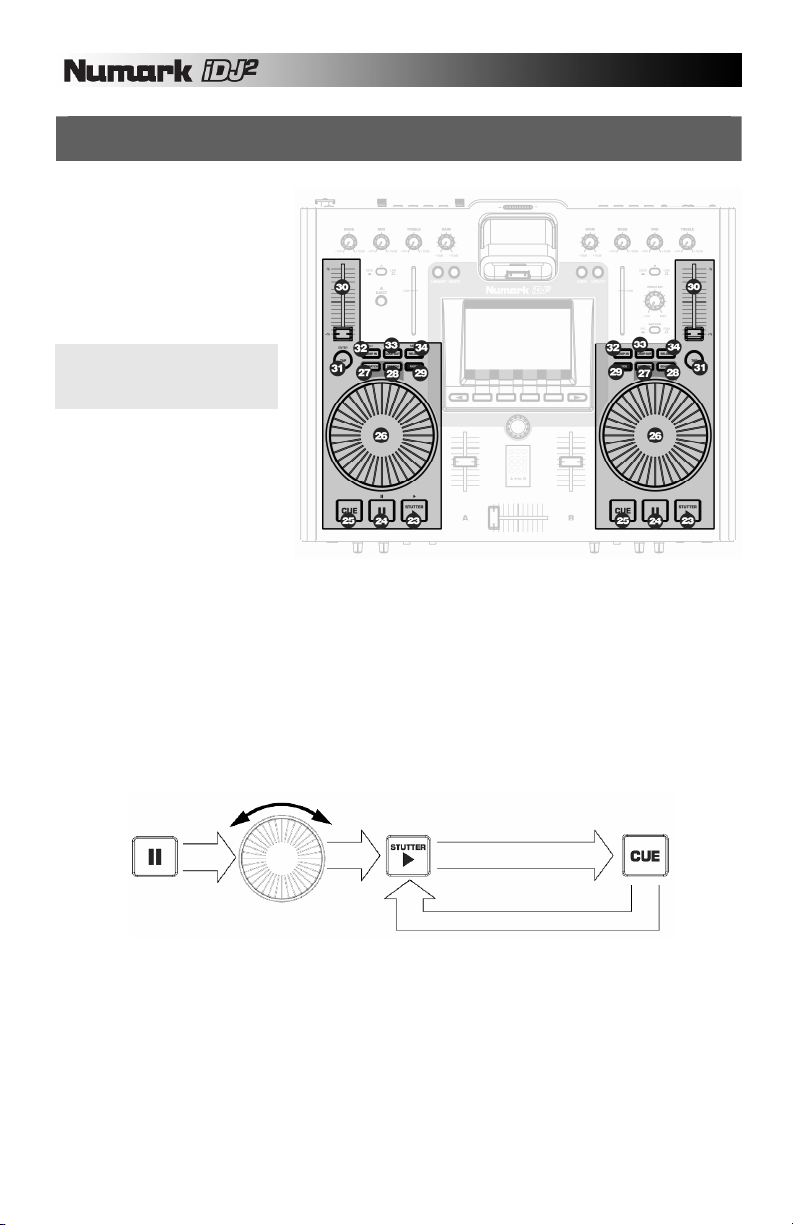
TOP PANEL - DECK CONTROLS
The deck controls become
available when a channel’s input
selector has been set to Deck.
Using these controls you can play,,
cue, scratch, pitch bend and loop
music from attached USB mass
storage devices, such as hard
drives, thumb drives and iPod
players.
Please note: If the channel has
been set to Line, the deck controls
will have no effect on the audio
playing on the channel.
23. PLAY/STUTTER – Pressing
this button starts the music
loaded on the corresponding
deck. A cue point is set at
the current position and the
music begins playing.
Pressing this button while
the unit is playing will restart
the song from the cue point,
which can be used to create
a "stutter" effect.
24. PAUSE – Stops the music playing on the corresponding deck. If you press and hold the PAUSE
button down for 1 second while paused, you will go back to the beginning of the track.
25. CUE – Returns and pauses the music at the last set Cue Point. The Cue Point is the last place where
PLAY/STUTTER was pressed or the start of the track, if it has not yet been pressed. You can audition
the music, starting at the Cue Point, by pressing and holding down the CUE button again – the music
will play for as long as the button is held down and once the button is released, will jump back and
pause at the Cue Point. You can also easily edit the cue point by spinning the jog wheel to a new
position while paused. As you spin the jog wheel, the music will sound. By stopping the jog wheel and
pressing PLAY, a new Cue Point is set.
Press
“PAUSE” Press “PLAY/STUTTER” Press “CUE”
Rotate to new cue point
26. JOG WHEEL – This wheel can be used for pitch bending, scratching and searching through the music
playing on the deck. The functionality of the wheel is determined by the two accompanying buttons –
SCRATCH and SEARCH. While a track is playing on the deck and Scratch and Search modes are
disabled, the jog wheel functions as a pitch bend. Pitch bending temporarily speeds up (turn clockwise)
or slows down (turn counter-clockwise) the music. This technique is used when you are mixing two
tempo-matched tracks which may not be completely synchronized. Hence, with pitch bending you can
temporarily slow down or speed up the track you are mixing so its beats “lock” with the beats of the
track that is already playing. While a track is paused, you can use the jog wheel to seek through the
music to a new cue point location. Pressing PLAY/STUTTER following this will set the cue point at this
location.
Returns and pauses at new Cue Point
12
Page 13
27. SCRATCH – Use this button to engage Scratch Mode. Scratch Mode allows you to “scratch” the music
on the deck by moving the jog wheel forward and backward. When you stop the wheel, normal
playback will resume. To resume with no gap in the audio, “push off” by scratching forward at
approximately normal playback speed before releasing the wheel.
28. SEARCH – Use this button to engage Search Mode. Search Mode allows you to use the jog wheel to
quickly scan through the current track. When Search Mode is enabled, turning the jog wheel will
quickly fast forward and rewind. If you do not touch the wheel for 8 seconds you will automatically exit
Search Mode.
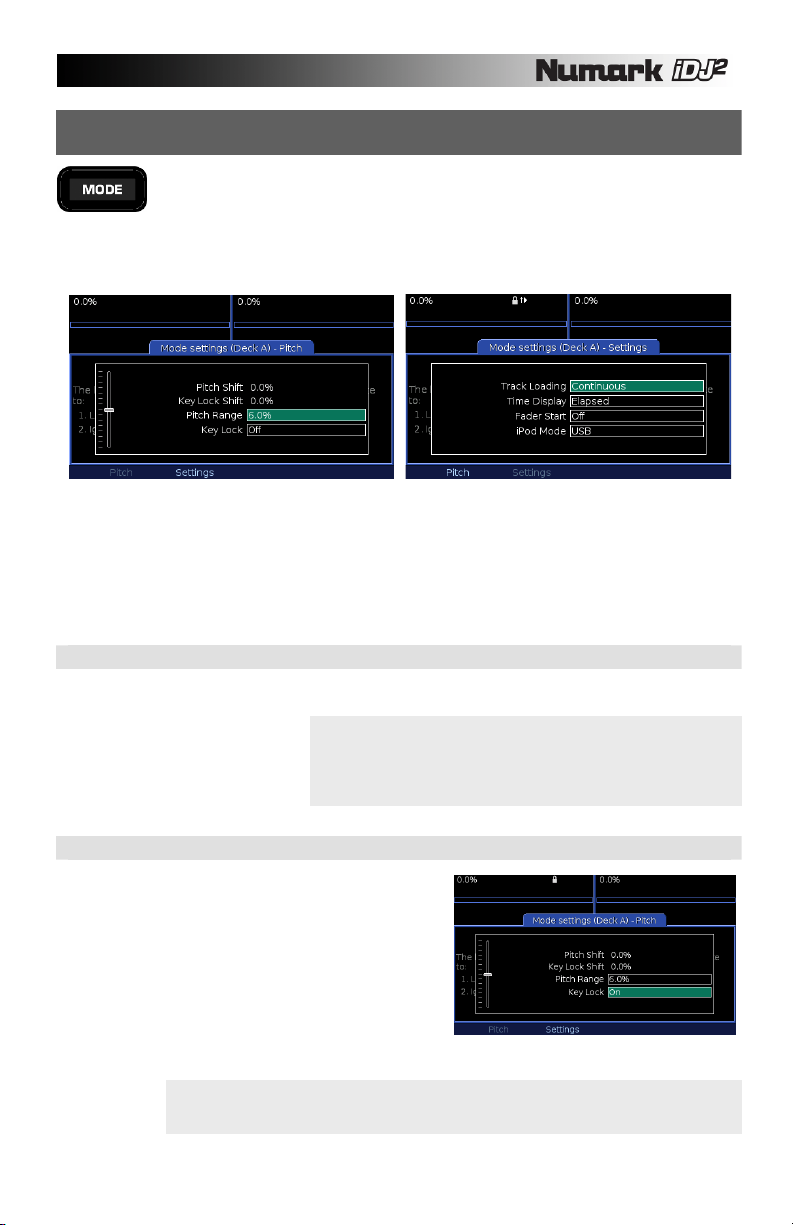
29. MODE – Pressing this button will bring up deck options, such as Pitch Range, Key Lock, Track
Loading, Time Display, Fader Start and iPod Mode. These options are split into two different pages
(Pitch, Settings) which can be accessed via the function buttons below the display. You can use the
PUSH TO ENTER knob to dial in the desired values and pressing down on the knob will move on to the
next option of the selected page. Pressing MODE button again will exit the deck options dialog.
PITCH PAGE
Pitch Shift – shows the value of the pitch shift applied to the deck.
Key Lock Shift – shows the amount of tempo shift applied to the deck while Key Lock is engaged.
Pitch Range – selects the desired pitch range (0%, ±6%, ±12%, ±25%, +25/-100%).
Key Lock – engages and disengages the Key Lock feature.
SETTINGS PAGE
Track Loading – specifies how tracks in the crate will be loaded and played (Manual, Automatic,
Continuous, Cyclic)
Time Display – toggles between the different time display modes (Elapsed, Remaining)
Fader Start – specifies how fader start will be used on the deck (Off, Cue, Pause)
iPod Mode – specifies the function of the deck (Direct, USB). See “iPod Direct Mode” for
information on iPod Direct Mode – this mode allows you to control your iPod directly from the
deck A controls, as well as display video content from your iPod through the S-Video connection
on the rear of the iDJ².
30. PITCH SLIDER – Each channel features a pitch slider which is used to control the speed of the music.
Moving the slider toward “-” results in a lower pitch (and slower tempo) of the music, while moving the
slider toward “+” results in a higher pitch (and faster tempo) of the music.
31. TAP – Pressing this button in time with the beat will help the Beatkeeper detect the proper tempo.
Holding the button for 1 second will cause the BPM counter to reset and recalculate.
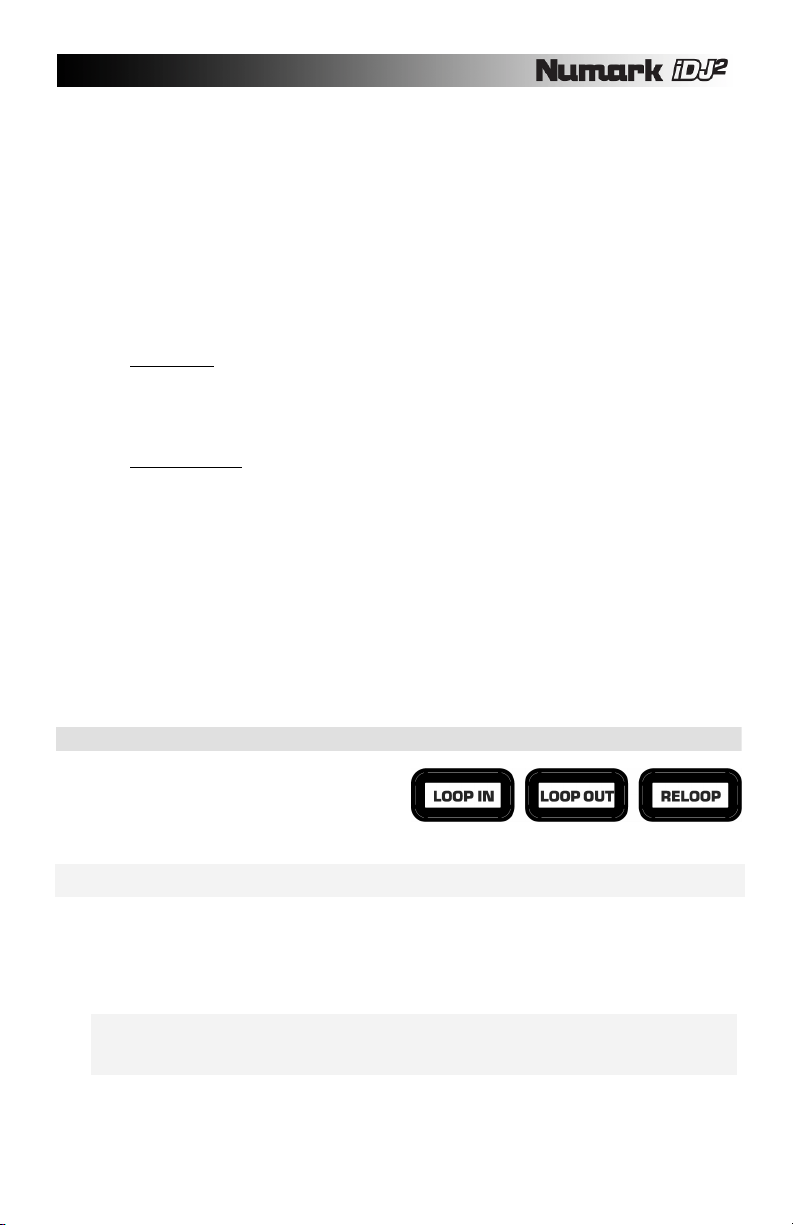
LOOPING CONTROLS
As part of the Deck controls, you will see the looping
controls – LOOP IN, LOOP OUT, RELOOP buttons.
The iDJ² features seamless looping, which means that
if you define a loop, there is no delay when the music
loops back to the beginning.
Please note: When Deck A is in iPod Direct Mode, the deck’s looping controls will control your iPod’s
navigation and menu buttons.
32. LOOP IN - This is the point where you would like a loop to start. By default, a “loop in” point is automatically
set to the current cue point (defaulting to the the beginning of the track) unless a new “loop in” point is set. To
define a new "loop in" point, press the LOOP IN button when the song reaches the desired point where you
would like a loop to begin. The LOOP IN button will light, indicating a new "loop in" point has been set. You
can now press the RELOOP button to immediately go back to the "loop in" point and begin playing. If you wish
to change the "loop in" point, just press the LOOP IN button again.
Please note: The LOOP IN button can also be used to create a live cue point. Once you press LOOP IN, a
cue point will be set at that location in the music. You can always return to this cue point by holding down CUE
and pressing the LOOP IN button – the deck will pause and return to the LOOP IN point. You can resume
playback from this point by pressing the PLAY button.
:
:
13
Page 14

33. LOOP OUT - Sets the end point of the loop. The first time you press LOOP OUT while a song is playing, the
LOOP OUT button will blink and the song will begin playing in a seamless loop starting from the “loop in” point
and ending at the “loop out” point. To release or end the loop, press LOOP OUT a second time and play will
continue forward when the song passes the previously set loop out point. The LOOP IN button will then be
continuously lit, indicating that the loop is now in memory for re-looping purpose.
Please note: The LOOP OUT button can also be used to create a live cue point. Once you press LOOP OUT,
a cue point will be set at that location in the music. You can always return to this cue point by holding down
CUE and pressing the LOOP OUT button – the deck will pause and return to the LOOP OUT point. You can
resume playback from this point by pressing the PLAY button.
34. RELOOP - Repeats play “stutters” from the “Loop In” point. If a loop has been set, it plays and repeats a
previously set loop, until it is released by pressing LOOP OUT a second time.
LOOPING EXAMPLES
Press LOOP IN to set the beginning of the loop, then press LOOP OUT
to set the end point of the loop. Once you press LOOP OUT, the iDJ²
will loop between these two points. If you press LOOP OUT again, the
iDJ² will exit the loop and continue playing normally.
If you press LOOP IN but then decide you
want to set a different "Loop In" point, just
press LOOP IN again. Then press LOOP
OUT to start looping between the in and out
points.
The "Loop In" point can also be used as a way to "stutter"
play beginning from a certain point in a song. Just press
LOOP IN to set the "Stutter” point, then press RELOOP to
begin play from the “Stutter” point. Each time you press
RELOOP, the iDJ² will jump back to the “Stutter” point and
play from that point.
iPod DIRECT MODE CONTROLS
In iPod Direct Mode, some of the controls on Deck A become iPod controls,
allowing you to browse and play content from your iPod.
TAP – Functions as “Enter” command on your iPod.
LOOP IN – Functions as “<<” on your iPod.
LOOP OUT – Functions as “>>” on your iPod.
RELOOP – Functions as “Menu” on your iPod.
JOG WHEEL – Functions as your iPod’s touchwheel controller.
PAUSE – Functions as “Pause” on your iPod.
PLAY – Functions as “Play” on your iPod.
Please note: iPod Direct Mode can only be used on Deck A. To
enable iPod Direct Mode, press the Mode button and change the
iPod Mode setting to Direct. See “iPod Direct Mode” for more
information on this mode.
14
Page 15
HOW TO WORK WITH iDJ²
iDJ² introduces some revolutionary concepts for the Digital DJ, however working with the product is quick and
easy. Many of the digital features reflect traditional DJ techniques that you'll already be familiar with. In fact
there is no one correct way to work with iDJ² as you'll discover the more you experiment, but here are the
basics...
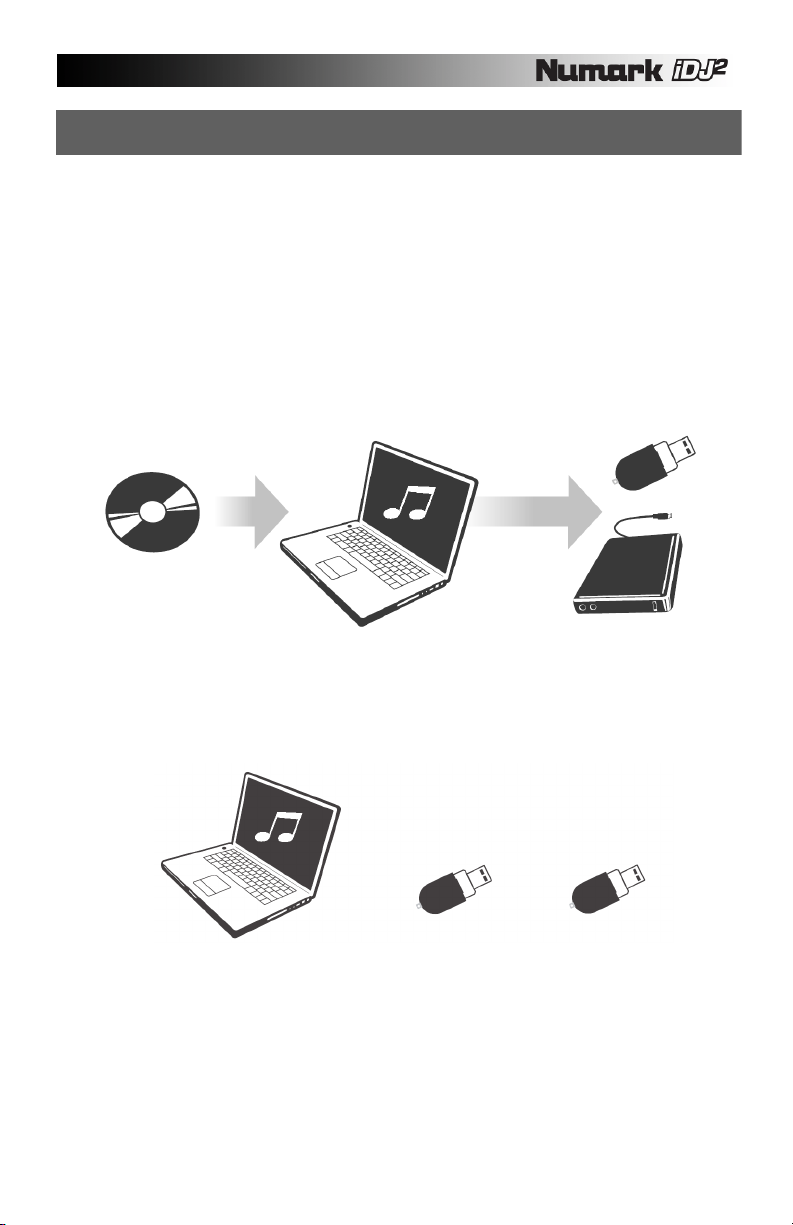
È Get Digital!
Before you can start with iDJ² you need to get your content into one of the supported digital formats.
“USB Device Compatibility” section of this manual covers this process in detail, but in brief you should
use your PC or Mac to convert your CDs, records and tapes into WAV, MP3 or AAC format. If you
already use digital media products such as personal MP3 players or PC DJ packages, then you may
already have your tracks in a suitable format. It's worth taking some care at this stage to ensure your
content is converted to a high standard. You might find products such as Numark's TTUSB computerattached turntable useful for getting your traditional media converted.
È Get Ready!
Before the gig, you should check that your portable media device or devices are loaded with the
content you need. To save time, you can use the Librarian tool in your PC to prepare a library for each
device (see “Creating a Library” section). It's always a good idea to carry a backup copy of your
content, a precaution which is really easy in the digital world.
MASTER LIBRARY WORKING LIBRARY BACKUP LIBRARY
15
Page 16

È Gig!
You got your content ready, now it's time to plug and play!
1. Prepare your Crate
iDJ² contains your virtual record Crate. Send tracks from the Library to the Crate to start building
your set, just like pulling and tilting records. Refer to “Using the Library” section of this manual for
more details. You can do this (and the next step) well in advance if you want and as long as your
media is not write protected your Crate will be automatically saved.
2. Order it how you want
Refine your set by ordering tracks in the Crate - or if you prefer to pick out the next track on the fly
then you can. Use the Crate in any way that suits your style.
3. Cue tracks out of the Crate
Send tracks from the Crate to decks as needed. If your Crate is carefully ordered then iDJ² can
automatically cue the next track when a deck runs out. If you want to leave your set unattended
you can use a continuous mode to automatically play each track in turn. Refer to the “Track
Loading” section for information on automatic track loading and playback.
4. Change the set any time you need to
The Crate is dynamic - change your mind at any time, insert requested tracks, re-order your set use the Crate as a tool to organize your performance.
5. Bypass the Crate for one-offs and last minute cues
You can send tracks from the Library direct to a deck if you want. This doesn't affect what's in the
Crate so you can mix your methods of working any way you like.
6. Perform the way you always did
Once a track is on a deck, you can cue, beat match, scratch and loop using familiar Numark deck
controls. iDJ² is fully multi-tasking, so you can work on your set using the Library and Crate at any
time, even while mixing on both decks.
7. Mix it up and get creative
The iDJ² is a complete mixer, equipped with all the familiar mixing controls – Crossfader, Volume,
Gain, EQ and comprehensive metering and cueing controls.
Read on to learn how to get the most from your iDJ²!
16
Page 17
THE GRAPHICAL INTERFACE
iDJ² boasts a ground breaking graphical interface, set to revolutionize your DJ experience. The interface
provides fast and friendly access to the advanced features of the product, and is designed to fit with how you
work. To make this possible, iDJ² is fully multitasking - you can instantly switch between functions, and if one
of them is busy for a while (perhaps building a new library) everything else remains accessible.
In this section we'll explore the graphical interface, which takes no more than a few minutes to master, then
in later sections we can focus on the DJ features of iDJ².
Switching On and Off
Use the power button on the rear panel of the iDJ² to switch on and off.
To switch on, press and release the power button. It will light up red and the iDJ² will start up. Take care not to hold the
power button down when switching on, as this will invoke Upgrade Mode (see “iDJ² Software Upgrades” section).
To switch off, press and hold the power button. A timer bar will appear on screen, filling from left to right as long as the
power button is held. The iDJ² will power off when the bar reaches the right hand side, which takes about three
seconds. This is to prevent accidental power down during a performance.
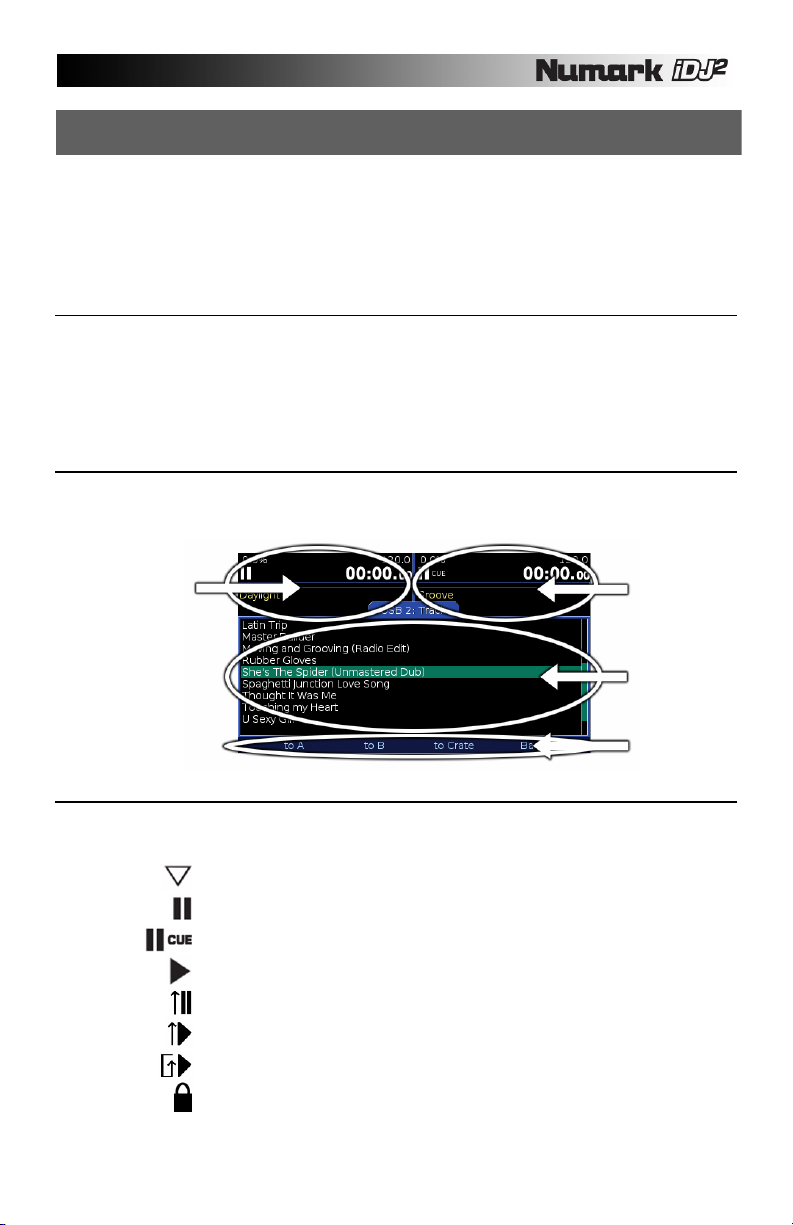
The Display
Central to iDJ² is the large graphical display. Some parts of this are dedicated to certain functions, while others change
depending on what you're doing.
DECK DISPLAY (A) DECK DISPLAY (B)
Deck Displays
Playback information for each deck is always visible, no matter what you're doing. Here you can check what tracks are
cued, time information, pitch adjustment and other important data. See “Views” section for details.
WAIT – this symbol means that the deck is currently busy.
PAUSE – this symbol means that the deck is currently paused.
CUE – this symbol means that the deck is currently paused at the cue point.
PLAY – this symbol means that the deck is currently playing.
AUTOMATIC – indicates that Automatic track loading option is enabled. See
“Track Loading” section for more information.
CONTINUOUS – indicates that Continuous track loading option is enabled. See
“Track Loading” section for more information.
CYCLIC – indicates that Cyclic track loading option is enabled. See “Track
Loading” section for more information.
KEY LOCK – indicates that the Key Lock feature has been engaged. The icon
will blink if Key Lock is disengaged but there is still a Key Lock Shift applied.
WORK AREA
MENU
17
Page 18
Menu Bar
At the bottom is the Menu Bar which shows any menu
options that are available. Each menu option is
displayed above its physical menu button - simply press
the button to activate that option. The option will briefly
highlight to confirm you have selected it.
There are four physical menu buttons but a menu is not
restricted to just four options. When more options are
available an arrow will appear indicating that the next
(right) or previous (left) menu buttons may be pressed to
move to a different page of options.
Work Area
The largest part of the display is dedicated to the function
you are currently using. The four main functions Library, Crate, View and Utility - each have their own
button to select them. The buttons light up bright when
their function is selected.
You can always identify what you see in the Work Area
from its title bar.
Progress Bar
When a large library is being created or updated (see “The Library” section) a Progress Bar will appear just above the
Menu Bar. The indicator fills from left to right to indicate how much work remains to be done.
Most functions of your iDJ² are instantaneous, but some intensive actions such as sending a large list of tracks to the
Crate can take a few seconds. If a function is expected to take more than a couple of seconds a spinning work indicator
is shown so you know work is in progress.
18
Page 19
Using Lists
iDJ² makes extensive use of lists to give you fast access
to your tracks. Lists are displayed within the Work Area
and are navigated using the rotary PUSH TO ENTER
knob and the Menu Bar.
To move up and down through a list simply rotate the
PUSH TO ENTER knob. A highlight on screen indicates
which item is currently selected, and if the list is too long
to fit on screen all at once it will move up and down as
you rotate at the top or bottom of the Work Area. For
long lists a bar at the right of the Work Area shows how
much of the list you can see, and how far through the list
you are.
If the currently highlighted item is something that can be
selected simply push the PUSH TO ENTER knob. Other
options relating to the list or to the currently highlighted
item may appear in the Menu Bar.
The best way to get familiar with lists is to build and
experiment with a Library. See “The Library” section for
details.
Using Dialogs
A Dialog can appear in part or all of the Work Area and is used to provide information, to get a response, to allow you to
enter information or to change settings. Sometimes a Dialog may have its own Menu Bar, other times not. There will
always be a title so you know to what the Dialog refers.
Responding to Questions
When iDJ² needs to send you a message or ask you a question
it will do so with a Dialog. If a response is required the options
will appear in the Menu Bar. Select the desired option to
answer the question and the Dialog will close, returning you to
whatever you were doing.
In this example, iDJ² is responding to the DJ's command to
clear all tracks from the Crate by checking if he is really sure.
19
Page 20
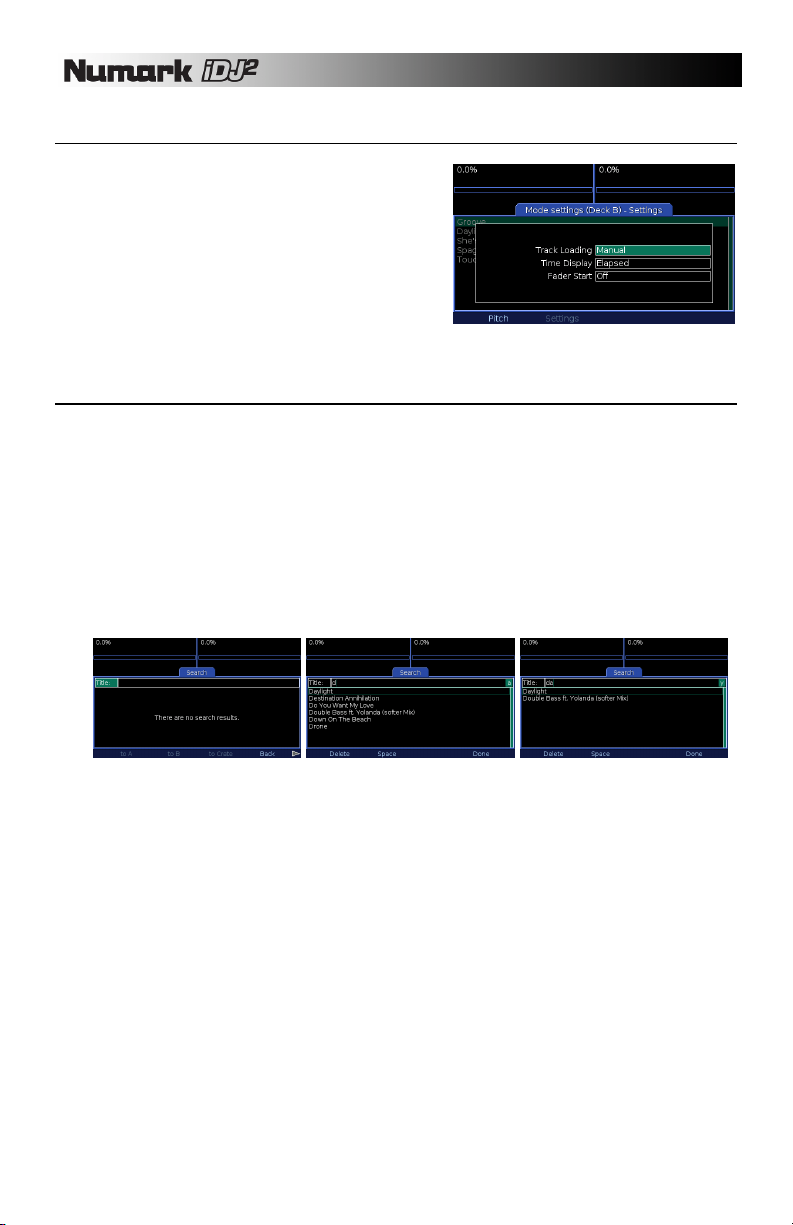
Changing Settings
A Dialog can be used to change settings, in which case each
setting is shown with the active setting highlighted. Its value
can be changed simply by rotating the PUSH TO ENTER knob some settings have a textual description for each value, others
have a sliding bar. To change a different setting, press the
PUSH TO ENTER knob. Keep pressing to cycle through all the
settings in turn. Settings usually take effect immediately.
In this example the DJ is changing the mode settings for Deck
B.
Entering Text
A text entry box is used whenever you need to get some text into iDJ², for example while searching for a track or naming
a playlist. Unlike other kinds of settings the text entry box has its own menu which works along with the PUSH TO
ENTER knob to make it easy to enter text with or without a keyboard. A highlighted box on the right shows the character
which you are about to enter and the menu can be used to delete the previous character (Delete), insert a space
(Space), switch between lower and upper case (Caps), and finish entering text (Done).
If you have a USB keyboard connected to your iDJ² you can simply type text directly into a text entry box. This is the
fastest way to enter text. Use the left and right cursor keys to move around within the text you have entered. The Enter
and Tab keys complete text entry the same as the Done menu option.
If you do not have a keyboard connected you can enter characters using the PUSH TO ENTER knob. Rotate left or
right to move through each letter, numeral and symbol. To select the desired character press the PUSH TO ENTER
knob. When you're finished, select Done.
20
Page 21
THE LIBRARY
The Library is a collection of tracks which you can browse or search in many different ways. iDJ² allows you
to work with several libraries at the same time, either by connecting multiple storage devices or by having
multiple file partitions on one device. Whether you prefer to work with one hard disk with all your tracks, or
several flash memory keys with different themes, the choice is yours.
PREPARING YOUR STORAGE DEVICE
iDJ² works with most USB storage devices that support the Mass Storage Class standard. See “USB
Device Compatibility” section for full details.
Use your PC or Macintosh computer to copy your WAV, MP3 and AAC format audio files to your USB
Storage Device. If your tracks are well tagged, you need not organize these in any particular way. iDJ² will
make it easy to find the tracks you need. However, if your tracks are not well tagged, or if you prefer to
access them by folders, you should organize them in a way that makes most sense to you. Playlists in
PLS or M3U format will be included in the library, if present. It's OK to have other kinds of files on the
storage device - iDJ² will simply ignore them. However, large quantities of unrelated files will slow down
creation of the library so we recommend you use devices that are dedicated to your audio collection.
CREATING A LIBRARY
When your collection is prepared, the next step is to build a library. To access your tracks quickly later,
iDJ² will take time to scan your device to note the tracks and playlists you have. The library is stored in a
special folder on the device titled ".library" which may be invisible depending on your computer settings. If
you want to erase a library, use the Librarian application or simply delete this folder, but in general you
should leave it alone.
There are two ways to build a library: either on the iDJ² itself or on your PC or Mac using the Librarian tool.
Building with Librarian
The Librarian program, which runs on your PC or Mac computer, is the fastest way to build a library and offers
advantages such as building profiles (see “Profile View” section for details). Full documentation is included
with the program, which can be downloaded from http://www.numark.com/iDJ2/.
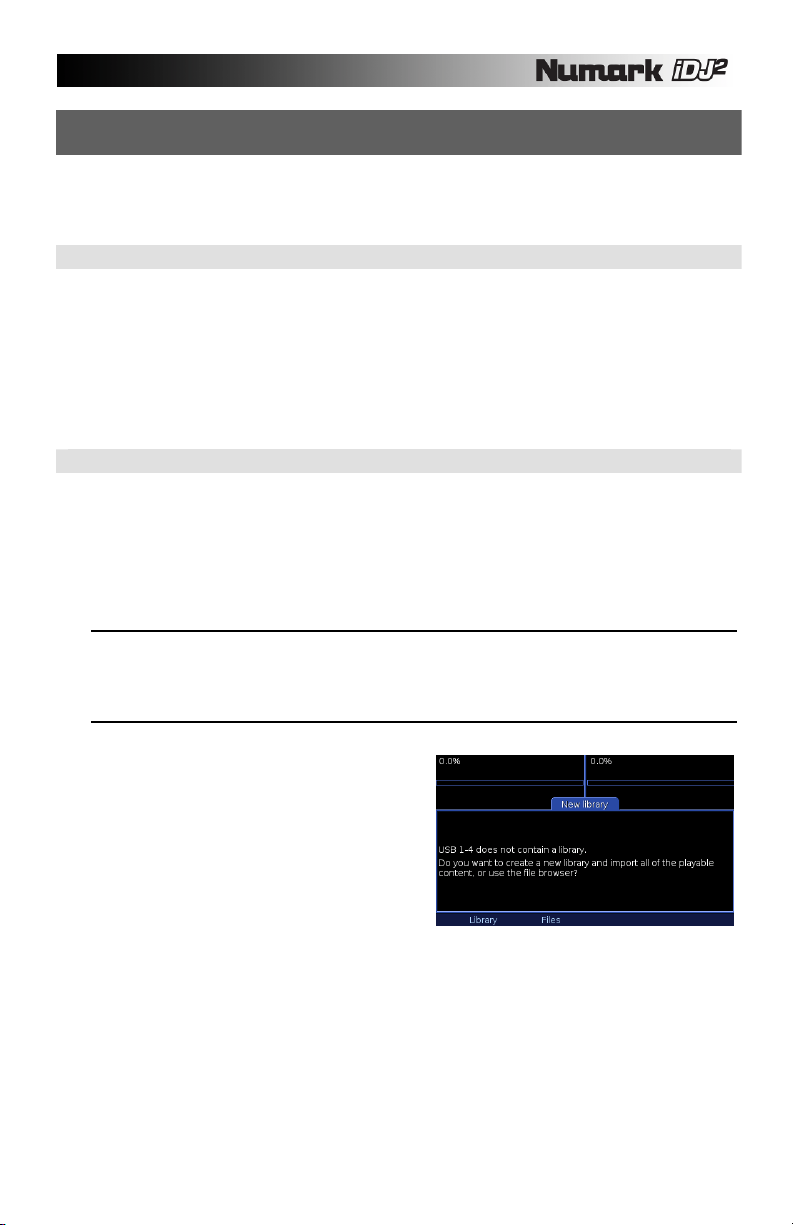
Building with iDJ²
If you need to build a library away from your computer,
you can use the iDJ² itself. If your storage device has a
Write Protect switch, make sure it is in the off position,
then insert the device into one of the USB ports. Take
care to get it the right way around - the connection
should be smooth, do not force it! After a few seconds
the New Library dialog will appear...
To build a library, select Library. The process will take
anywhere from a couple of seconds to a few hours,
depending on how many tracks are on your device.
While the library is being built, you can play tracks from
other devices connected to different USB ports. Once
the library has started building, a progress bar will
appear to show how much work is remaining.
If the device is full, you will be warned and it will not be possible to build a library. If it is almost full, you will be
given the option to build a library but should be aware that you might run out of space. In either case it is
recommended that you eject the device, erase a few tracks using your PC/Mac and try again. In general, we
suggest that you do not fill devices beyond about 98% of capacity so iDJ² will have space for the library and
any playlists you may create later.
You could choose to skip building a library by selecting Files. In this case you will be able to access the device
immediately but only with the Files view - you will not have access to the advanced search and browsing
features. This could be useful if the device is on loan to play a request, or if you don't have time to build a
library.
When the library is built (or skipped) it is automatically loaded ready for use.
21
Page 22
LOADING A LIBRARY
The library is saved onto its storage device so next time you insert the device it isn't necessary to go
through the entire procedure again. When a writable device which already contains a library is inserted,
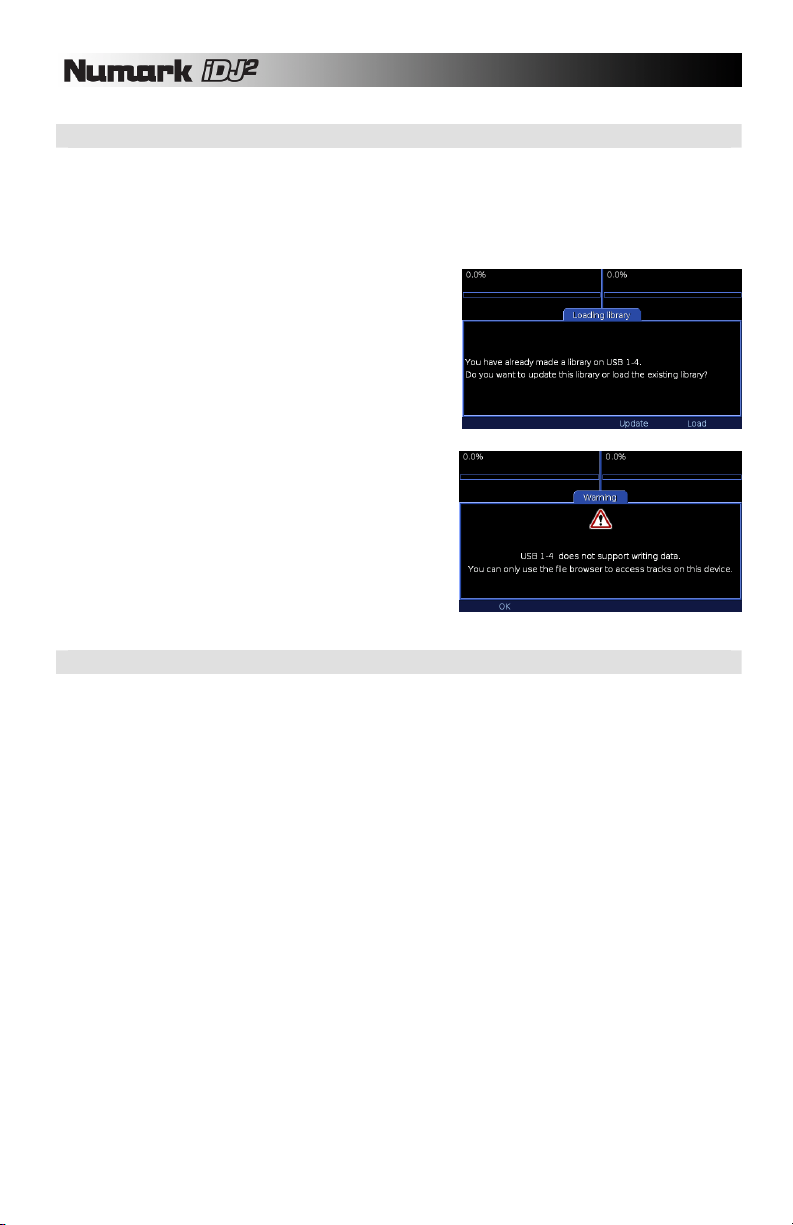
the Loading Library dialog appears...
To load the existing library without checking for any changes, select Load. The device is immediately
available for use.
If the contents of the device have changed, for example
because you transferred some new tracks onto the device,
or deleted some old ones, you can update the library by
selecting Update. iDJ² will scan the device for changes
and update the library as needed. If you have added many
new tracks, this could take a while and the progress bar
will appear. Your library will be available for use when the
update is complete.
If a write-protected or NTFS device is connected a dialog
will appear to warn you about this. The dialog will note
whether the device contains a library (in which case it will
be loaded) or no library (in which case only Files view will
be available).
USING A LIBRARY
Press the Library button to open the Library work area. If no library is loaded, you will be prompted to
insert some media (see “Loading a Library” above). Otherwise, each available library will be listed in the
menu bar. If you have several devices or partitions connected, there will be several libraries to choose
from.
Although you can interact with one library at a time, you can instantly switch between libraries by selecting
them from the Library menu. Each library has a unique name within the menu which indicates how it is
connected such as "USB 1" (see “Identifying Libraries” section for details). There is also a device name,
such as "Flash Key", which is displayed as the title of the currently selected library.
At the top level the library offers a list of methods to access your content. These are:
¸ Search Text search on Title, Album, Artist or All tags
¸ Track Browse by Track Title
¸ Album Browse by Album Title
¸ Artist Browse by Artist Name
¸ Genre Browse by Genre
¸ BPM Browse by BPM Range
¸ Year Browse by Year
¸ Playlist Browse by or Manage Playlists
¸ Files Browse by File View
Move through this list using the PUSH TO ENTER knob and press to select your desired option. Deeper
levels of the library all offer a Back option on the menu to return to the previous level.
22
Page 23

Searching
Searching provides fast, direct access to a track or tracks by matching text that you enter. First, select
the type of search you want to perform...
Rotate the PUSH TO ENTER knob or use the arrow keys on the keyboard (if connected) to select the
type of search. The search type can be:
¸ All The text is matched against all the tags (not just Title, Album and Artist)
¸ Title The text is matched against track titles only
¸ Album The text is matched against album titles only
¸ Artist The text is matched against artist names only
Once you have selected the desired type of search,
press the PUSH TO ENTER knob (or Tab on the
keyboard) to move to the text entry box. Now start to
enter the search text, either by rotating the PUSH TO
ENTER knob or with an attached USB keyboard. The
character you are entering is previewed on the right
side of the text box. Once you have entered the
desired search text, select Done from the text entry
menu (Tab or Enter on the keyboard). The results will
be displayed on the screen. You can now move
through the list using the PUSH TO ENTER knob, or
press again to move back to the search type option.
Please note that the first character you enter is a special case - it is always matched against the first
character of each tag. So, for example, to list all tracks with a title starting with the letter "D", select a
Title search and enter "D".
If a second character is entered, the search text is matched to any position within each tag. So, to
search for tracks on an album containing the word "Love", select an Album search, enter "LOVE"
(upper or lower case is not important) and select Done. The search will match tracks on any album with
the word "Love" in its title, such as "The Greatest Love Songs", "Love Boat" and "A Lovely Collection".
Note that searching always returns a list of tracks - you can narrow down by artist, album or other tags
and you will see the tracks that are contained within that album or by that artist, etc.
Except when entering text, the search screen offers a set of menu options which refer to the currently
highlighted track. If no track is highlighted then only the Back option is available.
¸ to A Send the track direct to deck A
¸ to B Send the track direct to deck B
¸ to Crate Send the track to the Crate
¸ Back Return to the Library top level
¸ Playlist Send the track to a playlist
¸ Info Get detailed info about the track
Menu options to send a track direct to a deck are not available if that deck is currently playing back.
You should first pause the deck and then select the option. This will reduce the chance of accidentally
replacing a track that could be in the mix.
Browsing
Browsing offers a different method to find tracks within your library, by navigating through structured lists. Six
browsing options are available, each of them narrowing down toward a list of tracks:
¸ Track Browse by Track Title
¸ Album Browse by Album Title then Track Title
¸ Artist Browse by Artist Name then Album Title then Track Title
¸ Genre Browse by Genre then Artist Name then Album Title then Track Title
¸ BPM Track Title (first in range)
¸ Year Browse by Year then Artist Name then Album Title then Track Title
23
Page 24
Each list is navigated using the PUSH TO ENTER knob in the usual way, pressing to move to the next level, or
selecting the Back option from the menu to move to the previous level. At the top of each intermediate list is an
option "All". This means "All Tracks at this Level", so for example could mean "All tracks by this artist" if you
previously selected an artist and are viewing a list of albums by that artist. Sometimes there will be an option
"<Unknown>" for content where the particular tag has not been filled in.
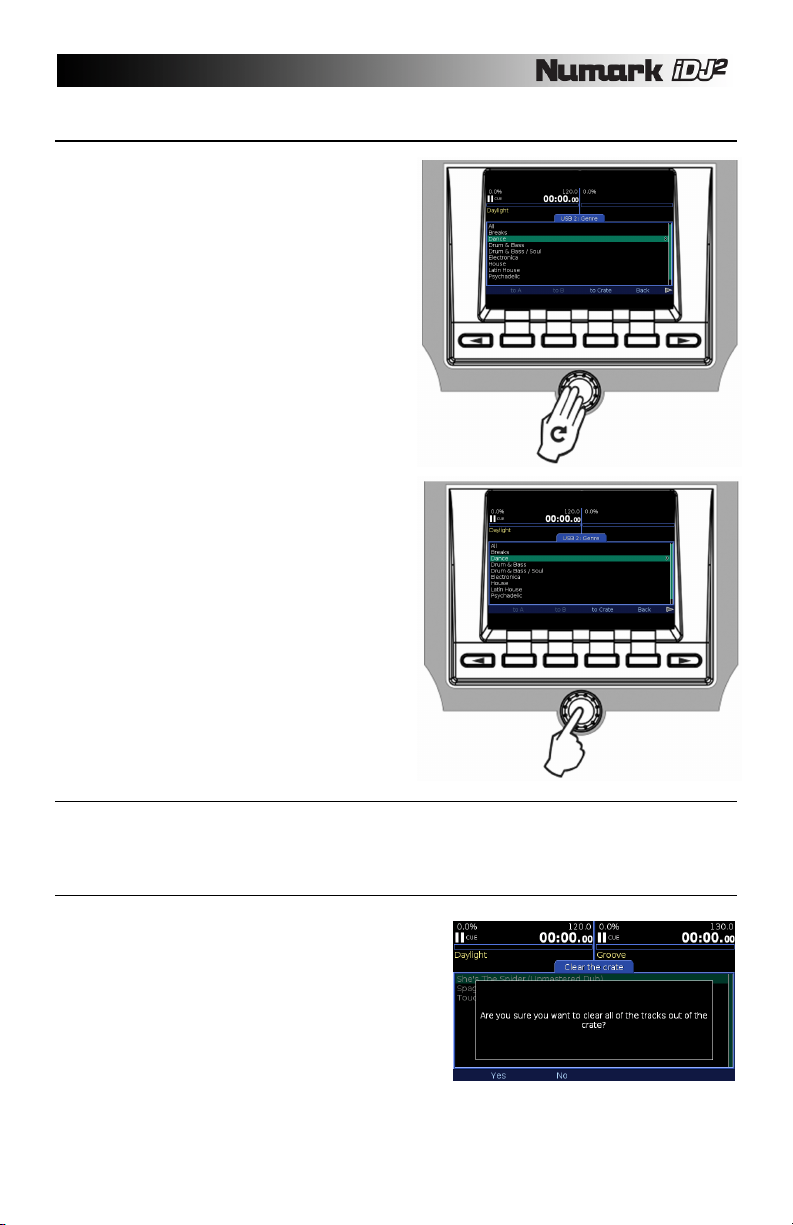
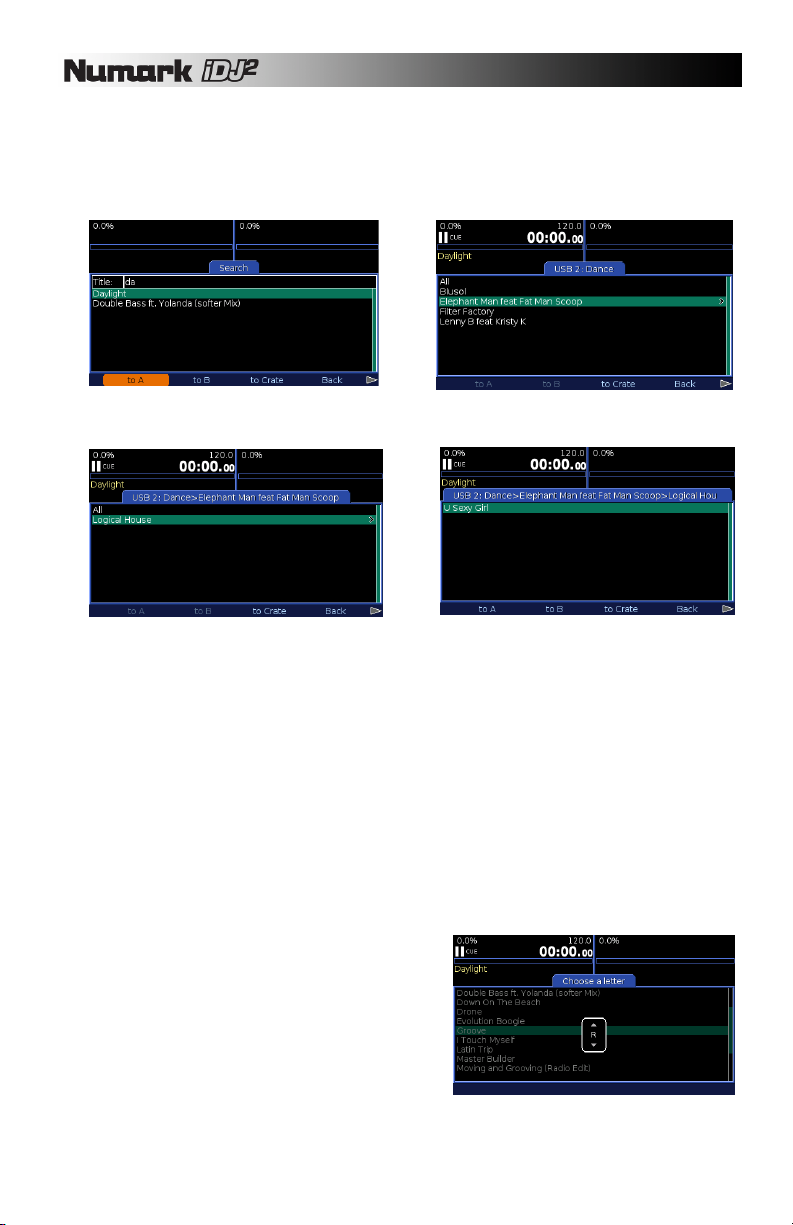
As an example, let's browse for some dance music.
1. From the library top level select Genre, then move to
highlight and select Dance.
3. A list of albums by that artist (and within the Dance
genre) will appear. Select an album from the list.
Browse screens offer a set of menu options which refer to the currently highlighted item. If nothing is
highlighted, then only the Back option is available; if the item is a collection of tracks then to Crate and Playlist
are also available; or if the item is a track then all options are available.
¸ to A Send the track direct to deck A
¸ to B Send the track direct to deck B
¸ to Crate Send the track or collection of tracks to the crate
¸ Back Return to the previous level
¸ Playlist Send the track or collection of tracks to a playlist
¸ Info Get detailed info about the track
Please note that, as always, menu options to send a track direct to a deck are not available if that deck is
currently playing back. The deck will have to be paused before you can load a track to it.
You will have noticed that, unlike the search function, browsing offers the possibility to work with collections of
tracks at a time. For example, you could choose to send an entire album to a playlist, or an entire genre to the
crate. However, a collection of tracks can never be sent to a deck, which accommodates just one track at a
time. Use the crate if you want to play a collection of tracks in turn.
When you choose to send content to a playlist a list of
playlists in the library will pop up. Move the highlight to the
playlist you want, and select Add from the menu, or select
Cancel to change your mind. If there are no playlists you
must first create one using the Playlist option from the top
level of the Library (see Working with Playlists below).
You may also use the convenient Letter Picker feature to
browse and navigate large lists in the Library more quickly.
Press and rotate (while holding in) the PUSH TO ENTER
knob to bring up the Letter Picker – each click moves by
one initial letter at a time and only letters actually used in
the list will appear. Then release the PUSH TO ENTER
knob to jump to the first entry with the selected initial letter.
2. A list of artists with dance tracks will appear. Select an
artist from the list.
4. A list of dance tracks by your chosen artist (and from the
selected album) will appear. You can load the tracks to
either deck or send them to the crate.
24
Page 25

File View
File view ("Files" from the top level of the library) is
available for any device, whether or not a library has
been built. It uses folder and filenames so is
particularly useful if you prefer to organize your content
on disk instead of (or as well as) with tags.
The view starts at the top level (root) of the device and
lists folders followed by tracks. Navigate with the
PUSH TO ENTER knob, pressing to move into folders
and selecting Back from the menu to return to the
previous level.
The file view offers a set of menu options which refer to the currently highlighted track. If no track is
highlighted then only the Back option is available. Playlist is only available if the device has a library
(please note that entire albums or all tracks by an artist may not be sent to a playlist – only individual
tracks are allowed at a time).
¸ to A Send the track direct to deck A
¸ to B Send the track direct to deck B
¸ to Crate Send the track to the crate
¸ Back Return to the previous level
¸ Playlist Send the track to a playlist
Working with Playlists
Playlists are list of tracks in a particular order. You can create as many playlists as you wish using iDJ²,
and you can also create them on your PC or Mac in one of the supported formats (see "Preparing your
Storage Device" above). You might use them to save sets, or to organize tracks in a personalized way.
You can access and manage playlists from the Playlist option at the top level of the library.
• To add a new playlist select Add. A new playlist will appear in the list, with the default name
"New playlist 1/2/3/etc". Any playlists imported into the library from the storage device will
also appear in the list.
• To delete a playlist select Delete and then Remove to confirm. Once confirmed this cannot
be undone so take care!
• To rename a playlist select Rename. A dialog will pop up with a text box containing the
playlist name. Edit the text in the usual way, select Done to confirm.
• To copy the contents of one playlist to another select Playlist. It is possible to send a
playlist to itself in which case the contents will be duplicated once. The contents of a playlist
can be sent to the Crate by selecting the to Crate option.
• To browse a playlist, highlight it and press the PUSH TO ENTER knob. A list of tracks in
order is displayed with a set of menu options which refer to the currently highlighted track.
¸ to A Send the track direct to deck A
¸ to B Send the track direct to deck B
¸ to Crate Send the track or collection of tracks to the crate
¸ Back Return to the previous level
¸ Remove Remove the track from the playlist
¸ Clear Remove all tracks from the playlist (requires confirmation)
¸ Info Get detailed info about the track
The order of tracks within the playlist is saved so it is possible to re-order them using the PUSH TO
ENTER knob. Highlight the track to be moved and press the control. Rotate to move the track through
the list to its new position and press again or select Done to complete the operation. To drop the track
back at its original position select Undo.
25
Page 26
EJECTING A LIBRARY
As with a PC or Mac computer it is very important to always eject a storage device
before unplugging it or cutting the power. This ensures that all files are properly
closed and that all data has been saved to the device. Failure to follow this instruction
can cause file system corruption which might render the device unusable (if this
happens, connect the device to your PC or Mac and follow the file system recovery
procedure for your particular operating system – see “Avoiding and Fixing Errors”
section).
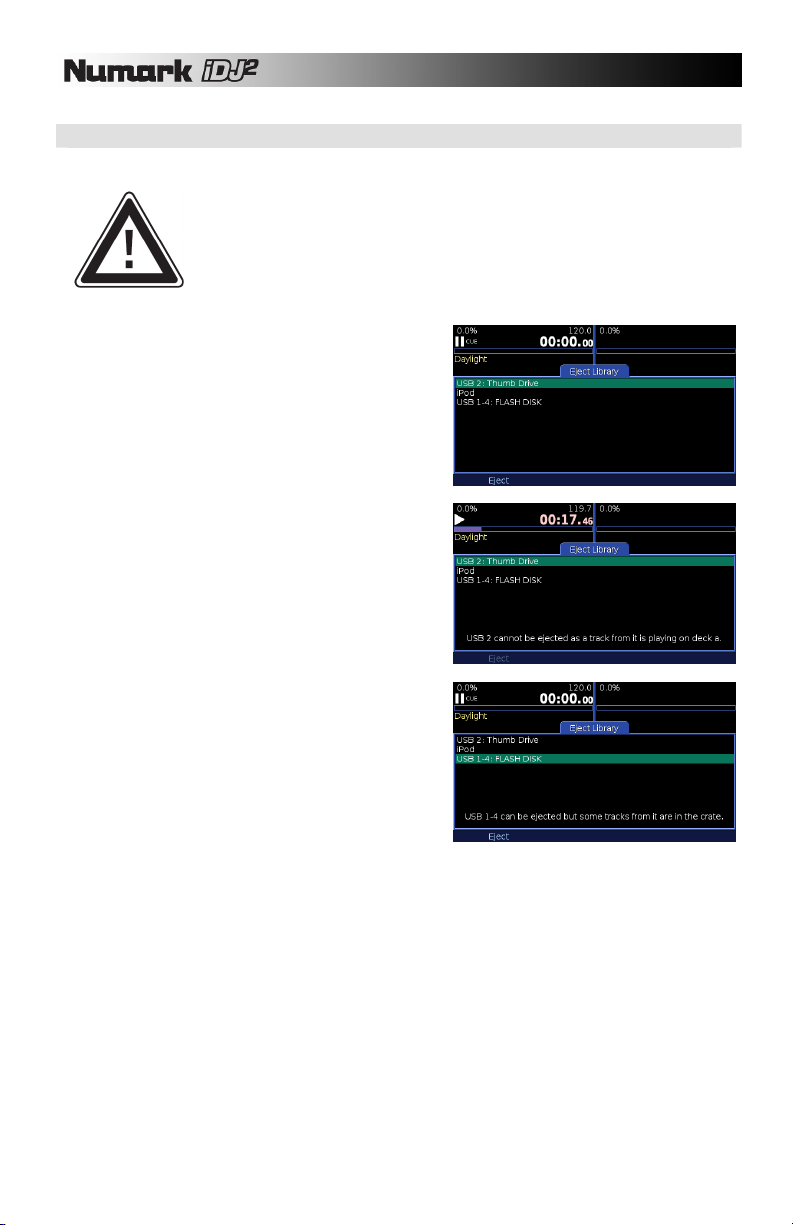
To eject a library press the Eject button. This causes a
list of each active library to open...
Each library is listed with its short location name and
longer device name. Identify which library you wish to
eject and move the highlight over it. A message might
appear at the bottom of the work area:
In this case you must stop playback of the track or tracks
from that library before you can eject. This is to prevent
accidental ejection of a library which could be in the mix.
Another warning might appear:
In this case you are warned that some of the tracks in the
crate are stored on the library you have selected. If you
continue to eject, these tracks will be removed from the
crate.
To proceed with ejecting, select Eject from the menu. If
there are tracks in the crate you will be asked to confirm
the operation. Once the library or libraries for a particular
device have been ejected and are no longer present in
the list it is safe to physically remove the device. If you
have more than one device connected take care to
remove the right one!
If you are going to switch off the player there is no need to
eject the libraries first, provided you switch off by holding
the power button for three seconds and not by cutting the
power.
26
Page 27
THE CRATE
The crate is an innovative tool for the digital DJ based upon one of the oldest tricks of the trade...
For decades the vinyl DJ has used his record crate as a scratchpad for organizing a set. Records to be
played - or to be considered for play - are pulled out, turned and propped above the rest. When no longer
needed, the record is dropped back out of sight. Between mixes the DJ can spend time flicking through the
collection to find more records to pull out, or to locate requests.
The crate feature of the iDJ² can be viewed much like a conventional
record crate. In other words, the crate contains the tracks that you would
like to play in your session. You do not necessarily need to have tracks
loaded in your crate - you can always directly load them to either deck however, the crate offers a good way to keep all the music that you
would like to use in your session organized and easily accessible.
You might have many thousands of tracks using several different
devices as your music sources. Having to browse each library every
time you want to select the next track can be time-consuming and
confusing. Instead, you can send the tracks to your crate and then easily
access them while you perform.
The crate also helps to prevent situations where you might reach for a
track that you have already played. When a track is replaced on deck it
is thrown out unless you specifically choose to pull it back into the crate.
WORKING WITH THE CRATE
In “The Library” we considered several different methods to load tracks into the crate, whether by
searching, browsing, from playlists or directly from folders on disk. Now we will discover how to work with
that crate.
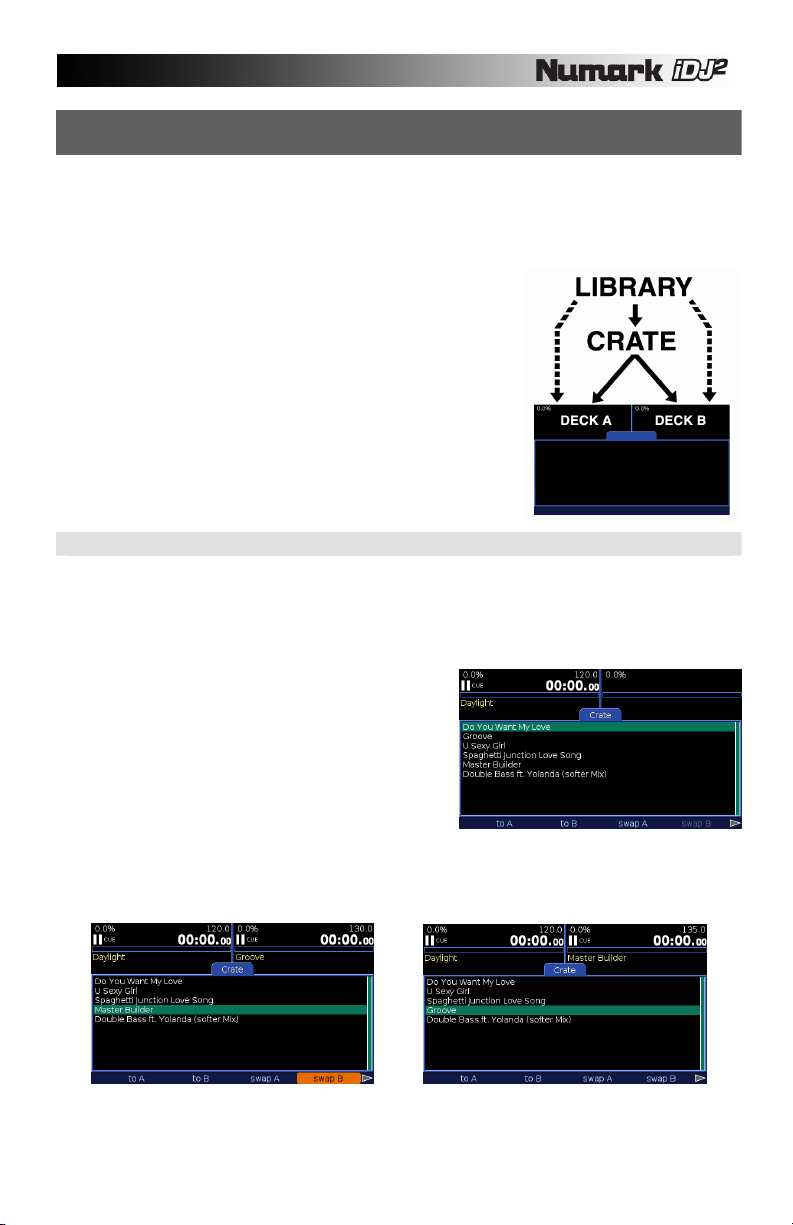
Press the Crate button to open the crate work area.
The crate comprises a list of tracks and a menu as follows:
¸
to A Send the track to deck A
¸ to B Send the track to deck B
¸ swap A Swaps highlighted track with track on deck A
¸ swap B Swaps highlighted track with track on deck B
¸ pull A Pull the track on deck A back into the crate
¸ pull B Pull the track on deck B back into the crate
¸ Shuffle Shuffles the tracks in the crate
¸ Info Get detailed info about the track
¸ Remove Remove the track from the crate
¸ Clear Remove all tracks from the crate
A track can be sent to, swapped or pulled from an inactive deck only. If a track is playing on the deck you
must first pause it before sending, swapping or pulling. An example of swapping a track is shown below.
Pause Deck B and select “swap B” Music loaded on Deck B is swapped with selected track.
27
Page 28

The order of the crate is significant to iDJ² only in continuous play modes (see “Track Loading” section).
However, you may choose to maintain a play order as an aid to organizing your set. To change a track’s
position in the crate, first highlight it, then press the PUSH TO ENTER knob. Rotate to move the track
through the list to its new position and press again or select Done to complete the operation. To drop the
track back at its original position select Undo. Note that a track pulled from a deck is always sent to the
top of the crate whereas tracks sent from the library always go to the bottom.
The Clear operation, which completely empties the crate, prompts for confirmation as it could be a little
inconvenient to do this by mistake during a performance!
You may also reorder tracks in the crate by holding down the PUSH TO ENTER knob on a selected track
and turning the knob to select its new position within the crate. When you release the PUSH TO ENTER
knob, the track will be moved to the selected location. If you are using a keyboard the same operation
may be achieved by pressing the Return key on the highlighted track and using the arrow keys to select its
new location. Pressing Return again will put the selected track at this location.
LOADING AND SAVING THE CRATE
The crate is stored automatically within the library from which its tracks have been sent. Each time a
library is loaded iDJ² checks whether it previously had tracks in the crate and, if so, offers the option to
restore them.
Select Load to restore tracks to the crate or select Ignore
to discard them. Once you have selected Ignore the crate
data is lost forever (of course the tracks are still in the
library and can be sent to the crate all over again).
You may be wondering what happens if your crate
contains tracks from multiple libraries. In this case parts of
the crate are stored within each library. To fully restore the
crate, all of the libraries must be reloaded by making sure
that all the devices used are connected to the iDJ². If one
library is not connected, or should you choose to ignore the crate for that library, a partial crate will be
restored from the other libraries. iDJ² will attempt to recreate the crate in the original order, even if the
libraries are loaded in no particular order. If this all sounds a little confusing then rest assured that, in brief,
iDJ² will simply try to do the most logical thing!
It is intended that the crate is a somewhat short term entity by nature. If you want to save a more
permanent running order you should consider using playlists which can easily be sent to the crate in one
operation (see “Working With Playlists”).
28
Page 29
DECK MODE SETTINGS (A AND B)
MODE buttons, located near the jog wheels of each deck, can be pressed to pop up the
settings dialog for Deck A or B. The appropriate button lights up blue while active. Press
Use the Mode Settings dialogs to adjust those settings for each deck which do not have their own dedicated
again to close the dialog.
button. Mode settings are organized under 2 different pages which can be accessed via the function buttons
below the display.
PITCH AND KEY LOCK PAGE SETTINGS PAGE
If you select Pitch, you will be able to view Pitch and Key Lock settings for the deck. If you select Settings,
you will be able to view additional settings, such as Track Loading, Time Display, Fader Start and iPod Mode
(deck A only).
Turn the PUSH TO ENTER knob to change the selected setting and press down on the knob to move to the
next field.
PITCH RANGE
Select the desired pitch range for the pitch slider. Available pitch range settings are:
KEY LOCK
Enabling Key Lock will “hold” the key of the music playing on
0.0%
Disabled the pitch slider.
±6.0%
±12.0%
±25.0%
-100%/+25%
Note: Different pitch ranges allow for different precision over the speed of
the music. Selecting a smaller pitch range, such as ±6%, allows you to
have more precise control over the speed of the music. Selecting a larger
pitch range, such as +25/-100%, allows for more extreme speed
adjustments and can be used for interesting effects.
the corresponding deck. While Key Lock is enabled,
adjusting the pitch of the music playing on the deck will only
influence its tempo independent of its musical pitch.
On
Turns Key Lock on. You will notice the Key Lock
icon becomes illuminated in the deck display area.
Off
Turns Key Lock off. If there is still a Key Lock shift
applied to the deck when Key Lock has been
disengaged, you will notice that the Key Lock icon
will blink.
Note: Using extreme pitch settings while Key Lock is activated may result in unwanted audio artifacts.
To avoid choppy audio playback please use modest pitch modifications while Key Lock is activated.
29
Page 30
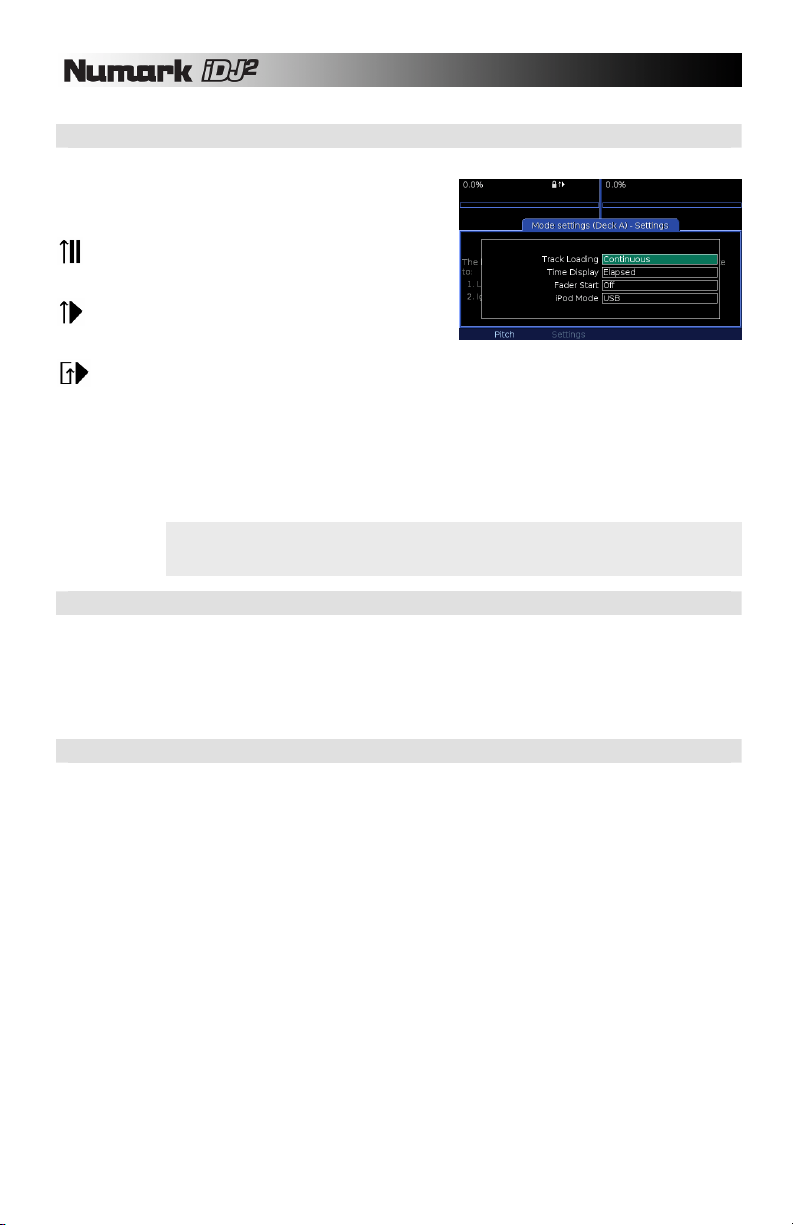
play
TRACK LOADING
Choose how you want songs loaded and played from the Crate.
Manual
Tracks are loaded to deck manually, by you. When
songs are finished they return to the start and pause.
Automatic
The next song (at the top of the Crate) will be loaded
to deck, and cued at the start.
Continuous
Like Automatic, but the next song will automatically
start to play.
Cyclic
Like Continuous, but after each song has played it is sent back to the bottom of the Crate, creating a
never ending sequence of playback.
For the modes which automatically load the deck, the following conditions must be met for iDJ² to load the
next song:
The previous song has fully played out - or - The previous song is paused having played more than 75% through
This is to prevent automatic loading while you're cueing or mixing on the deck.
TIME DISPLAY
Set the time code display mode.
Elapsed
Display time elapsed (count up) on the deck.
Remaining
Tip: For continuous looping play of a collection of songs, send your collection to the crate then choose
Cyclic from the list of Track Loading options. This works for either or both decks at once! The songs
will
continuously from the crate until you pause the decks.
Display time remaining (count down) on the deck.
FADER START
Fader Start allows you to start playback on either deck directly from the crossfader. With this feature, every
time you move the crossfader toward either side, the track loaded on that deck will begin playing.
Off
Ignore fader start signals.
Cue
Return the play position to the cue point and pause after fading away from the deck. Resume
playback when starting to fade back toward the deck.
Pause
Similar to Cue, but pauses at the current position instead of the Cue point.
30
Page 31

iPod MODE
This field allows you to specify the functionality of Deck A
when using an iPod. You will notice that there are two
different options: USB or Direct.
In USB Mode, your iPod will functions as a USB mass
storage device. In terms of operation, USB Mode will allow
you to load songs from your iPod to the decks and
manipulate them in a variety of different ways. This includes
scratching, looping, pitch bending, etc. Please note,
however, that in this mode you cannot play video files from
your iPod.
In iPod Direct Mode, you can control an attached iPod directly from Deck A's controls and play music as you
normally would on your iPod. Please note that in this mode you will not be able to pitch-bend, scratch or loop
the audio from your iPod - Deck A will simply act as an iPod player. However, this mode does allow you to
output video content from a videocompatible iPod through the S-Video
output on the rear of the unit. This will
enable you to display video on attached
monitor, projection system or TV which
supports S-Video.
Tip: iPod Direct Mode does not require that a library is built
before you can access your iPod’s contents. Therefore, iPod
Direct Mode is highly useful when trying to quickly cue up and
play material from your iPod without having to wait.
USB
Selects iPod USB Mode. In
this mode, you can manipulate
music from your iPod as you
would music from any other
USB device.
DIRECT
Important: When switching from Direct to USB Mode, you
may need to physically remove the iPod and replace it in the
dock.
Selects iPod Direct Mode. In this mode, Deck A will simply function as an iPod player and not allow
you to manipulate the music from your iPod. In this mode you can, however, display video content.
For information on iPod Direct Mode controls, please see “iPod Direct Mode Controls” section.
31
Page 32

VIEWS
You may use the VIEW button to access different information about the music playing on the
decks. The VIEW button will toggle between Track View and Profile View, as explained below.
TRACK VIEW
Track View displays extra information about the tracks loaded on
each deck, other than that shown on the deck displays at the top
of the screen.
¸ Artist Name of the Artist
¸ Album Title of the Album
¸ Year Year of release
¸ Device The device on which the track is stored
PROFILE VIEW
A track profile is a visual representation of a song, designed for
quick and easy identification of phrases within that song,
differentiated by their "energy". Distinct from a waveform, a profile
doesn't show every small detail of the track, just the big changes in
terms of energy.
The profile is split into three shades of blue, with black making up
the total number of variations to four. The bright blue portions of
the track indicate high energy and volume, graduating down to the
black sections representing quieter phrases. The length of each
profile is scaled to exactly fit the available work area, so the entire
track is always visible.
Tip: Use Track Profiles to identify the breaks in a song, much like the changes you see on a vinyl record when viewed using a
light across the grooves. Skipping to these breaks is quick and easy using the PUSH TO ENTER knob.
Creating Track Profiles
Profiles can only be generated using the Librarian tool (see “Building With Librarian” section). For a
large library this can take a while, as the entire track must be analysed. Allow several seconds per
track on a fast computer.
Working with Track Profiles
The work area is split into two sections, the upper for Deck
A, and the lower for Deck B.
• Time Indicators
Above and below the profiles are markers which indicate
the length of each track separated by minutes, with
smaller indents for 30 seconds and 15 seconds.
• Skipping through phrases
Use the PUSH TO ENTER knob to seek through the song, having first selected the deck (see
below). With each rotation of the control, you can skip through to the next change in the song. You
will see a flashing vertical cursor for the deck which is currently selected. Its position in the profile is
representative of the playback position in the song.
• Selecting the deck
The decks are, by default, not selected (locked) to prevent accidental seeking through a track which
might be in the mix. Choose Select A or Select B to unlock the required deck. Relock a deck by
selecting Deselect A or Deselect B.
32
Page 33

UTILITY
The Utility button gives access to System information and settings.
The main utility work area displays the unit serial number.
This information is useful if you need to contact Customer
Care or check for firmware updates at the Numark web site.
Further utility screens are accessed from the menu as follows.
Tip: It is strongly advised that you periodically
compare your firmware version with that available at
the Numark web site, and install any more recent
version that may be available. New software will be
posted regularly to add features and fix problems. See
“iDJ² Software Upgrades” section for details.
Display
From here the display brightness can be adjusted.
Also, a scale of shades from black to white is shown on
screen as an aid to setting the display contrast. Adjust the
contrast by rotating the PUSH TO ENTER knob until the left
most segment of the scale is black, the right most is white,
and three shades can be identified in between.
Restore
This operation will reset the unit to default settings. Select
Restore to proceed, or press Utilty or another function
button to cancel. Just to be really sure, you will be asked one
more time if this is something you want to do. Select Yes or
No as appropriate.
The default settings are:
Pitch Range 12%
Track Loading - Manual
Time Display - Elapsed
Fader Start - Off
Display Brightness - Center position
Note that the calibration (see below) will not be reset by this operation.
33
Page 34

Calibrate
This function is used to calibrate the pitch sliders. Your iDJ²
has been pre-calibrated at the factory, but the characteristics
of the sliders may change slightly over time. If the top, center
and bottom positions no longer align with the expected pitch
range you should run this calibration routine.
Select Calibrate, then when prompted:
1. Move both sliders to the fully upward position (to the
-% symbol)
2. Select Next
3. Move both sliders to the center position
4. Select Next
5. Move both sliders to the fully downward position (to the +% symbol)
6. Select Next
Calibration is now complete. Press the Utility button to exit.
Note: If you mix up the calibration procedure by mixing up the minus and plus ends of the scale,
the pitch slider will have no effect! Simply re-run the calibration.
Updates
The Updates page shows the current software version of the
iDJ². Please check http://www.numark.com/idj2/ regularly
for available software upgrades. If the version of the
software upgrade on the website is higher than the version
of the current software on your iDJ², please follow the
upgrade procedure outlined in the next section of this
manual.
34
Page 35

iDJ² SOFTWARE UPGRADES
As we continue to improve and add functionality to iDJ² for the best user experience, software upgrades may
be released at our web site. Please check www.numark.com/idj2
regularly for software upgrades and the
latest news from Numark.
UPGRADE PROCEDURE
iDJ² features a failsafe upgrade procedure. Should an upgrade fail part way through for any reason
(including loss of power) the upgrade process should be restarted from the beginning. However, for
your convenience we recommend that you take care to ensure that power is not interrupted until the
process is complete.
1. Download the software upgrade (.UPG) file to your computer.
2. Copy the .UPG file to the top level of a USB storage device compatible with iDJ². You should
erase any earlier .UPG files from the device. If more than one upgrade file is present the
upgrader will use the first one it finds.
3. With the iDJ² powered off, connect the USB device to any USB port.
4. Remove any other connected storage devices.
5. With the DC power jack connected, press and hold the power button until you see the message
"Waiting for Media" on screen. This will take about four seconds, after which you can release the
power button. If the unit does not display this message switch off and try again, taking care not to
release the power button too early.
6. After a few seconds, provided iDJ² is able to locate the connected .UPG file, the message "Any
key updates to version ..." will be displayed.
7. The version of the firmware upgrade is indicated.
8. Press any button (except power!).
9. The firmware upgrade will be loaded, a process which can take up to about a minute. After
several seconds a progress indicator will be shown to give you an idea of the work remaining.
10. Once the update procedure has completed a message will confirm successful loading. Select OK
and the unit will switch off.
11. The upgrade procedure is now complete. Now you may power on the iDJ² as you would normally.
Be sure to read the release notes at the Numark web site so you'll know what's new!
Note: If iDJ² detects that the upgrade file is identical to the firmware already loaded, it will not load
the update.
IMPORTANT INFORMATION ABOUT UPGRADING
The iDJ² upgrade procedure may only be performed with a FAT-formatted USB device.
To check if your USB device is formatted with the FAT file system;
• Under Windows, right-click the device in your Explorer, select Properties and check the File System
category. Please make sure that it says FAT, FAT16, or FAT32.
• Under MacOS, hold down Apple, click the device and select Get Info. Check the Format category and
make sure that it says “MS-DOS File System (FAT16)” or “MS-DOS File System (FAT32)”.
If your device is not formatted with the FAT file system, you will need to reformat it before using it for
upgrading:
• Under Windows, right-click the device in your Explorer and select Format. Under the File system tab
select FAT and click Start to format the device.
• Under MacOS(10.4), go to Applications -> Utilities and double-click on Disk Utility. Select the
device from the browser on the left and then select the Erase tab. Under Volume Format, please
select “MS-DOS File System” and then press the Erase button below to format the device.
PLEASE NOTE: Formatting a device will erase any of the data which is currently on the device. Please make
sure you save all data you wish to keep to your hard-drive first.
35
Page 36

KEYBOARD SHORTCUTS
If you have a USB keyboard connected to your iDJ², you can access some handy shortcuts:
TEXT ENTRY
Used in the text entry 'widget'; when searching and during renaming playlists etc.
(When not editing)
• Return = starts editing
(When editing)
• Cursor left / right = Moves caret
• Return / Enter = DONE and move focus to next field
• Escape = Clears or cancels entered text
• Home / End = beginning / end of string
• Backspace = Delete backwards
• Delete = Delete forwards
• Caps-lock and number-lock are honoured
LISTS
Used when browsing the library
• Left (or) Up = Same as rotating PUSH TO ENTER knob anti-clockwise
• Right (or) Down = Same as rotating PUSH TO ENTER knob rotary clockwise
• Return = Select (same as PUSH TO ENTER press)
• Page up / down = Page up / down
• Ctrl-Page up / down = Top / bottom of list
• Escape = Go back up one level
SLIDER
• Left (or) Up = Move slider left
• Right (or) Down = Move slider right
• Ctrl-left / right / up / down = Move to beginning / end of slider
COMBO BOX
GENERAL
MENU BUTTONS
GENERAL SHORTCUTS
• Left / Up = Previous item
• Right / Down = Next item
• Tab = Move focus to next field
• Shift-tab = Move focus to previous field
• CTRL + 1,2,3,4 = Buttons one through four of the function buttons
• CTRL + Cursor Left / Right = Pages left and right for available menu pages.
• Ctrl + F = Begins a “Title” search, similar to pressing F2
• Ctrl + L = Goes to Library window
• Ctrl + C = Goes to Crate window
• Ctrl + U = Goes to Utility window
• Ctrl + V = Goes to View window
• Ctrl + E = Goes to Eject window
• Escape - Cancel any popup windows
• F1 = Open search browser for current library, set to "All" and put keyboard focus in the text entry widget
• F2 = Begins a "Title" search
• F3 = Begins an "Album" search
• F4 = Begins an "Artist" search
• F5 = Browse by Genre
• F6 = Browse by BPM (with correctly tagged tracks)
• F7 = Browse by Year
• F8 = Playlist menu
• F9 = Files (File browse the device directly)
• F10 = Library (press again to change to next library, if available)
36
Page 37

USB DEVICE COMPATIBILITY
This section explores the technical aspects of connecting USB devices to iDJ². For many users much of the
detail will be irrelevant - the player will simply do the expected thing. However, it is a good idea to familiarize
yourself with this information so you are prepared for any unexpected issue that might occur while working.
USB CONNECTION
SUPPORTED STORAGE DEVICES
IDENTIFYING LIBRARIES
iDJ² is a USB Media player. It has no storage of its own, but rather external storage is connected via up to three
USB ports (one at the front, two at the rear). This allows three devices to be connected directly to the unit, which is
ample for most situations. However, USB hubs are also supported for extending the possibilities to at least twelve
devices. Hubs must be connected directly to the iDJ²; connecting a hub to a hub is not supported.
The USB specification limits the amount of power a USB port can provide. Some devices, particularly motorized
devices such as hard drives, require more power than can be taken from one port and so ship with an AC Adapter
or a second USB cable. Please be sure to use the adapter or cable to ensure reliable operation. We recommend
that hubs should be of the powered type to ensure that sufficient power is available for the devices connected to
them, especially if any of those devices are motorized.
When connecting to the USB ports, take care to get the plug the right way around. Forcing a plug the wrong way
could damage the connectors both of your device and iDJ². For your convenience you may choose to connect
USB extension cables to the iDJ² ports, and your devices to the cables. This is fine however you should avoid the
use of excessively long (greater than 1 meter / 40 inch) extensions as these can cause unreliable operation.
iDJ² is compatible with most USB storage devices that support the Mass Storage Class standard. This includes
USB hard drives, flash memory keys, flash card adapters and personal music players. Devices that require device
driver installation on your PC or Mac might not be compatible. Devices must comply with the USB 1.0, 1.1 or 2.0
standards including the specification for bus powering (no device may draw more than 500mA from one port).
Although iDJ² has been tested with a wide variety of devices, it is of course impossible to test with all of the
thousands of variants that exist. If you discover a compatibility issue, please let us know, stating the type, make
and model of the device and where and when you bought it. It is likely that any problem is due to the device
deviating from the USB standard, however sometimes it is possible to accommodate even these devices in a
future firmware update.
iDJ² supports devices with multiple partitions. Each partition that contains a supported file system will show up as
a separate library. When ejecting, be sure to eject all of the partitions before removing such a device.
If your device has a Write Protect switch we recommend setting it to Off. iDJ² can work with write protected
devices but some functionality will be lost, such as creation of playlists and saving of the crate. A device must be
write enabled to create a library, however an existing library on a write protected device can be loaded.
Each library in use has a unique name which indicates how it is connected, like this:
¸ USB 1 USB Port 1 on rear panel
¸ USB 2, USB Port 2 on rear panel
¸ iPod, iPod connected to the iPod dock on the top panel
¸ USB1: iPod iPod connected to the USB1 Port on the rear panel
¸ USB 1-1 Port 1 of a hub connected to USB Port 1
¸ USB 1-4 Port 4 of a hub connected to USB Port 1
¸ USB 1b The second partition on USB Port 1
¸ USB 1-2c The third partition on Port 2 of a hub connected to USB Port 1
In most cases, for simple devices connected direct to the unit, you will simply see USB 1, USB 2 or iPod.
37
Page 38

Each library also has a device name which is displayed within the user interface. This name is taken from the
storage device itself and will vary from device to device, manufacturer to manufacturer. Examples include:
¸ USB DISK
¸ Hard Disk Drive
¸ iPod
Some badly behaved devices, often flash memory keys, provide gibberish titles. For your convenience, you can
set your own title by creating a file named volume_name.txt in the top level directory. The file should contain your
desired title in plain text up to 20 characters.
SUPPORTED FILE SYSTEMS
AVOIDING AND FIXING ERRORS
DEFRAGMENTATION
KEEPING YOUR DATA SAFE
Supported file systems are FAT16, FAT32, HFS+ and NTFS (the latter is supported read-only). The FAT16 and
FAT32 file systems are commonly used by pre-formatted media devices and are compatible with the vast majority
of computer systems. NTFS is commonly used by Windows computers, especially for larger drives. HFS+ is the
default format for the Apple Macintosh computer, and is also the default file system for the Apple iPod personal
music player. Another Macintosh file system is HFS, which is older and not compatible with the iDJ². Some
Macintosh computers still allow you to format your media with HFS (“Mac OS Standard”). To ensure that your
device will work with the iDJ², we recommend formatting with HFS+ “Extended” or “Journaled”.
Important: When formatting your media on a Mac, some systems default to formatting with “Mac OS
Standard (HFS)”. This file system is not supported by the iDJ² and should not be used. Please make
sure that you are formatting with either the “Extended” or “Journaled” file system format.
In general, we recommend formatting devices with FAT32 whenever possible, as this is the most widely supported
format. Windows XP does not support formatting hard drives larger than 32GB with FAT32. However, there are
free programs available that do support this.
Note for NTFS: The NTFS file system is supported Read-Only on iDJ². This limits the functionality
slightly, and requires that you use the Librarian tool to build a library (see below). When possible we
recommend formatting FAT32 instead.
If none of this means very much to you, don't panic! Most USB storage devices come ready formatted in a format
likely to be compatible with iDJ².
The most important advice to remember is ALWAYS EJECT THE LIBRARY before removing it or switching off
(see “Ejecting a Library” section for details). Failure to do so can and will lead to file system corruption which could
be extremely inconvenient while working. This advice applies equally when disconnecting media from your PC both Windows and MacOS provide methods to safely remove devices.
This is particularly important for HFS+ media which must be connected to a Macintosh computer after unsafe
removal before it can be used again with iDJ².
If you think your media may have become corrupted you should connect it to your PC or Macintosh computer for
maintenance. Under Windows, bring up the device properties and select "Check Now" on the Tools tab. Under
MacOS, run the Disk Utility application.
During normal use a storage device can become fragmented. Fragmentation is a condition whereby files become
split up into many parts. This is invisible to the user but degrades performance, potentially slowing down library
access and causing glitches during playback. From time to time you should defragment your media to ensure
reliable operation. Under Windows, run the Disk Defragmenter program. MacOS does not include a
defragmentation program as HFS+ does not suffer from this problem. However, both commercial and free
programs are available to perform this task for non HFS+ media.
Just as it is important to backup your PC hard drive, it is equally critical to always backup your data for iDJ². No
media is infallible - every flash key, hard drive or flash card has a finite life and it is your responsibility to ensure
your data is safe and secure. Never ever gig with the sole copy of your content, always work with a backup and
preferably carry another backup with you in case a device fails (or is lost or stolen) while you work.
While you take the time to make your backups, consider how lucky you are to be able to carry two complete
copies of all your tracks in your pocket or a small bag. Take simple precautions and embrace the digital age!
38
Page 39

EXPLANATION OF DIGITAL AUDIO
This section aims to explain a few techie details of digital audio technology. We feel it is important for a DJ to
have an understanding of how this technology can be applied, particularly if it is to be used professionally.
With the right knowledge you will be able to make informed choices and ensure that your performances meet
the highest standard.
COMPRESSION
TAGGING
FORMATS
High quality audio files take up a lot of space, limiting the amount of music that can be stored on media such as a
USB flash drive. To fit more music the files must be compressed, but traditional techniques work poorly with audio,
barely saving any space at all. To solve this problem a new generation of technology has emerged, and it has
taken the music industry by storm!
Modern compressed audio formats such as MP3 and AAC use a technique known as psycho-acoustic
compression to reduce the size of an audio file. Not all data in an audio track is significant to the human ear, so it's
possible to discard certain parts of the wave or combine other parts without significantly changing our perception
of the sound. Furthermore, some parts of a wave mask other parts so those too can be discarded. What's left can
then be represented in a very efficient format, resulting in a file many times smaller than the original while barely
altering our perception of the audio. Because some of the original information has been lost these formats are
sometimes known as "lossy". By choosing how aggressively to apply the compression we can trade off between
the size of the file and the quality of the audio.
Apart from audio data most formats also contain information about the track, known as tags. Such tags as track
title, artist name, album title, BPM (Beats Per Minute) and Genre are often included. The best audio applications
offer a feature to automatically fill in these tags when converting your CDs, and some can even identify tracks
which have been recorded from vinyl or other sources. Otherwise, you can type in and edit tags manually.
We strongly recommend that you take the time to ensure your music collection is well tagged. While this could
involve significant effort for a large poorly tagged collection, it will pay back many times over when you perform.
iDJ² makes extensive use of tags to organize your music collection and provides powerful methods to find tracks
quickly and effectively.
iDJ² supports three of the most popular audio formats - two compressed (lossy) and one non-compressed
(lossless).
MP3
This is the format that started the revolution. Invented in the early 90s for the broadcast industry, it
exploded into the music industry several years later with the invention of the portable MP3 player. Now it
has become almost a generic term for digital music, although MP3 is just one of many compressed music
formats in use today.
MP3 in particular can draw criticism over sound quality. In its early years storage was expensive so
tracks were often compressed heavily, degrading sound quality. Now, with large flash memory keys and
hard disks more affordable than ever, there's no reason to over compress, especially for professional
use. It has been demonstrated that with a bitrate of 256K bits per second (bps) the vast majority of
listeners cannot distinguish from an uncompressed original. This gives a file size approximately 20% of
an uncompressed recording.
A popular option offered by many encoders is Variable Bit Rate (VBR). The bitrate will change throughout
the track so that simple parts take less space while more complex parts take more to ensure high quality.
Most encoding programs allow you to select an "average bitrate" for VBR - choosing 192K, for example,
will lead to a file about the same size as a Constant Bit Rate (CBR) 192K file, but the quality will be better
overall.
39
Page 40

Some encoders offer a choice of sample rates from 8KHz to 48KHz, however iDJ² always resamples to
44.1KHz so there's nothing to be gained from encoding at a higher rate than that.
iDJ² can extract tags from MP3 files using the popular ID3 format. We recommend using ID3v2, as this
offers greater flexibility in the length of tags and types of information that can be stored (BPM for
example).
Many packages support encoding to MP3, some commercial and some free. Some suppliers charge an
additional fee for MP3 encoding above 64Kbps (which is far too low a bitrate for professional use).
AAC
This format, invented in the late 90s, also started out in the broadcast industry. Its breakthrough in the
music industry came with its adoption as the default format for Apple iTunes and the iPod portable music
player. Sometimes this format is known as MP4 or MPEG-4 although more correctly it is Part 3 of the
MPEG-4 standard. The most common file extension is .M4A.
AAC has improved performance over the older MP3 format leading to superior sound reproduction for the
size of file. The greatest improvement is with low bitrate files, but this is less relevent to the professional
user and at higher bitrates the formats are considered about equal in sound quality.
iDJ² can extract tags from AAC files using the M4A format, supported by many popular audio
applications.
If you use iTunes to encode your music collection, chances are it is in AAC format (using the M4A file
extension). However if you purchased music from the online iTunes Music Store you should be aware
that this protected content cannot be played by iDJ², or by any other digital music player other than the
Apple iPod at this time. This limitation is imposed by Apple.
WAV
WAV (or Wave) format has been in use for many years and is a simple (usually uncompressed) audio
format. Although the file extension is the same, WAV files can contain various formats of digital audio iDJ² can play the popular 16-bit PCM format. At 44.1KHz sample rate this is a faithful reproduction of CD
audio. The format is useful if you want to be sure of the best possible sound quality, but as a result the
files are large (typically five to ten times larger than an MP3 file).
There is no standard for tagging within WAV files and at this time iDJ² will use only the filename to
identify a track (this is represented as the track title).
40
Page 41

MIXING TUTORIAL
Now that you have familiarized yourself with the iDJ², let’s try a quick mixing tutorial. This tutorial will help
you better understand the process and steps required to blend one track into the next. For the purposes of
this tutorial, let’s assume that you are mixing music from an attached USB mass storage device or iPod. The
fundamental concepts can be applied to mixing music from external sources, such as turntables and CD
players, just as well.
1. Load a track to Deck A by selecting To A while viewing a
track in the Crate or Library.
2. With the crossfader in the left-most
position (Deck A), press PLAY to begin
playing the track.
3. While the track is playing on Deck A, select another track
and load it to Deck B.
4. Set the CUE MIX knob on the front panel to audition Deck
B in the headphones.
5. Use Deck B’s jog wheel to cue the first downbeat of the track in the
headphones.
6. Press PLAY on Deck B when the music on Deck A hits a downbeat.
41
Page 42
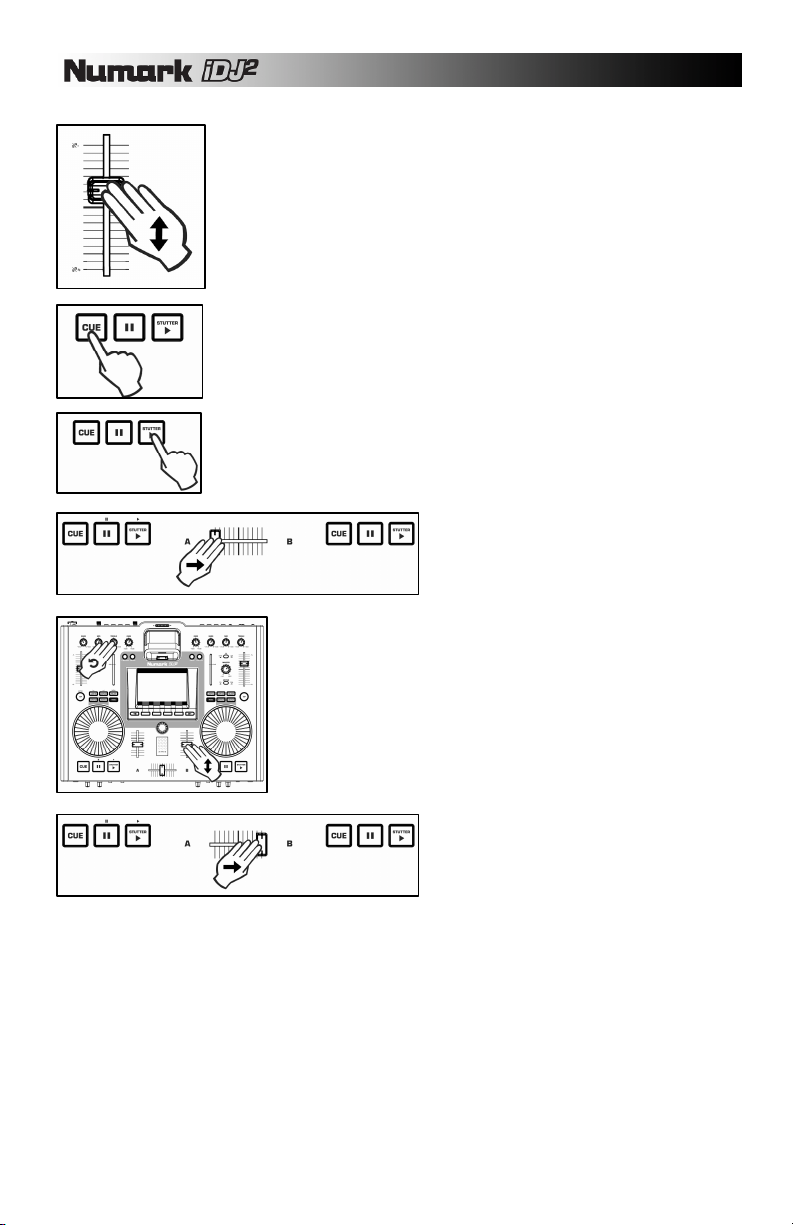
7. Use Deck B’s pitch slider to match the tempo of the track to the music on
Deck A.
8. When you have matched the tempo, press CUE on Deck B to return and
pause at the cue point.
9. When you are ready to start your mix, press PLAY on Deck B.
10. Use the crossfader to transition from
Deck A to Deck B.
11. As you are transitioning to Deck B with the crossfader, use the
volume sliders, gain and EQ knobs for each channel to adjust
the sound. If the incoming track is starting to drift in time, use
Deck B’s jog wheel to make adjustments to the tempo so Deck
B’s music “locks” with the beat playing on Deck A.
12. When you wish to complete the
transition, move the crossfader all the
way to the right (Deck B). You have
successfully completed a mix! Repeat
the procedure to continue mixing.
As you can see, mixing is not too difficult! Good mixing, however, does take some time to perfect. As you
practice, you will get a better sense of which musical material goes well together and how you can create
smooth transitions between tracks using the volume, EQ and crossfader controls. Do not get discouraged
if your mixes are not sounding professional right away – practice makes perfect!
42
Page 43

TECHNICAL SPECIFICATIONS
Output Level 1.4V RMS 0dBFS
SNR 80dB A-weighted
THD+N 0.06% -6dBFS 1kHz
Frequency Response 20Hz – 20kHz +/- 1.5dB
Audio Path 24-bit 44.1kHz
Pitch Ranges +/- 6%, +/- 12%, +-25%, +25%/-100%
Weight 6.5lbs (2.948kg)
Dimensions 402mm (W) x 77mm (H) x 329mm (D)
LICENSING INFORMATION
iDJ² firmware © Numark Industries, Inc. 2007. All Rights Reserved.
iDJ² is built on a Linux platform to ensure high reliability and performance. Linux and related portions of this software
are provided under the GNU Public Licence (GPL) and the Lesser GNU Public License (LGPL). Numark has made
available for download the source code for those portions of the software at:
http://www.numark.com/idj2/
ACKNOWLEDGEMENTS
The following software is included subject to the GNU Public License (GPL):
The following software is included subject to the Lesser GNU Public License (LGPL):
The following software is included subject to the Mozilla Public License (MPL):
Certain software is included subject to the RealNetworks Community Source License (RCSL):
Linux © Linus Torvalds
Busy Box © Erik Andersen
Red Boot © Red Hat
CDfs © Michiel Ronsse
GNU C Library © Free Software Foundation
id3lib © Scott Thomas Haug
mp4v2 © MP4IP Project
Helix DNA Client technology included.
© RealNetworks, Inc., 1995-2007.
All rights reserved.
43
Page 44

MANUAL DE REFERENCIA
44
Page 45

INTRODUCCIÓN.........................................................................................................................................................................46
CARACTERÍSTICAS ..................................................................................................................................................................46
DIAGRAMA DE CONEXIÓN.......................................................................................................................................................47
PANEL SUPERIOR – CONTROLES GLOBALES .....................................................................................................................52
PANEL SUPERIOR – CONTROLES DE MEZCLA ....................................................................................................................54
PANEL SUPERIOR – CONTROLES DE BANDEJA ..................................................................................................................55
CONTROLES DE LOOP ......................................................................................................................................................56
CONTROLES DEL MODO DIRECTO DE iPod:...................................................................................................................57
CÓMO TRABAJAR CON iDJ²....................................................................................................................................................58
INTERFAZ GRÁFICA .................................................................................................................................................................60
Encendido y apagado...........................................................................................................................................................60
Pantalla ...............................................................................................................................................................................60
Pantallas de bandeja............................................................................................................................................................60
Barra de menú......................................................................................................................................................................61
Área de trabajo.....................................................................................................................................................................61
Barra de progreso ................................................................................................................................................................61
Cómo usar las listas.............................................................................................................................................................62
Cómo usar los diálogos........................................................................................................................................................ 62
Cómo responder las preguntas...........................................................................................................................................62
Cómo cambiar los valores de parámetros............................................................................................................................ 63
Cómo introducir texto ...........................................................................................................................................................63
LA BIBLIOTECA......................................................................................................................................................................... 64
CÓMO PREPARAR EL DISPOSITIVO DE ALMACENAMIENTO........................................................................................64
CÓMO CREAR UNA BIBLIOTECA......................................................................................................................................64
Cómo construir una biblioteca con Librarian.................................................................................................................64
Cómo construir una biblioteca con iDJ².........................................................................................................................64
CÓMO CARGAR UNA BIBLIOTECA ...................................................................................................................................65
CÓMO USAR LA BIBLIOTECA............................................................................................................................................65
Búsqueda......................................................................................................................................................................66
Navegación ...................................................................................................................................................................67
Vista de archivos........................................................................................................................................................... 68
Cómo trabajar con listas de reproducción..................................................................................................................... 69
CÓMO EXPULSAR UNA BIBLIOTECA................................................................................................................................70
LA CAJA DE DISCOS ................................................................................................................................................................71
CÓMO TRABAJAR CON LA CAJA DE DISCOS .................................................................................................................71
CÓMO CARGAR Y GUARDAR LA CAJA DE DISCOS........................................................................................................72
PARÁMETROS DE MODO DE LAS BANDEJAS (A Y B) .........................................................................................................73
RANGO ................................................................................................................................................................................73
KEY LOCK .......................................................................................................................
CARGA DE PISTAS.............................................................................................................................................................74
PANTALLA DE TIEMPO ......................................................................................................................................................74
FADER START ....................................................................................................................................................................74
iPod MODE (Modo de iPod)................................................................................................................................................. 75
VISTAS .......................................................................................................................................................................................76
TRACK VIEW (Vista de pistas) ............................................................................................................................................76
PROFILE VIEW (Vista de perfil)........................................................................................................................................... 76
Cómo crear perfiles de pista .........................................................................................................................................76
Cómo trabajar con perfiles de pista...............................................................................................................................76
UTILIDAD....................................................................................................................................................................................77
Display (Pantalla) .................................................................................................................................................................77
Restore (Restaurar)..............................................................................................................................................................77
Calibrate (Calibración)..........................................................................................................................................................78
Updates (Actualizaciones)....................................................................................................................................................78
ACTUALIZACIONES DEL SOFTWARE DE D2 .........................................................................................................................79
PROCEDIMIENTO DE ACTUALIZACIÓN............................................................................................................................79
ACCESOS DIRECTOS DEL TECLADO..................................................................................................................................... 80
COMPATIBILIDAD DE DISPOSITIVOS USB.............................................................................................................................81
CONEXIÓN USB.................................................................................................................................................................. 81
DISPOSITIVOS DE ALMACENAMIENTO SOPORTADOS .................................................................................................81
CÓMO IDENTIFICAR LAS BIBLIOTECAS...........................................................................................................................81
SISTEMAS DE ARCHIVOS SOPORTADOS .......................................................................................................................82
CÓMO EVITAR Y REPARAR ERRORES............................................................................................................................ 82
DESFRAGMENTACIÓN.......................................................................................................................................................82
CÓMO MANTENER SEGUROS SUS DATOS.....................................................................................................................82
EXPLICACIÓN DEL AUDIO DIGITAL........................................................................................................................................83
COMPRESIÓN..................................................................................................................................................................... 83
ETIQUETADO......................................................................................................................................................................83
FORMATOS.........................................................................................................................................................................83
TUTORIAL SOBRE LA MEZCLA...............................................................................................................................................85
ESPECIFICACIONES TÉCNICAS..............................................................................................................................................87
INFORMACIÓN SOBRE LICENCIAS......................................................................................................................................... 87
RECONOCIMIENTOS..........................................................................................................................................................87
....................................................73
45
Page 46

INTRODUCCIÓN
iDJ² es una consola de dos bandejas diseñada para las necesidades del DJ moderno. Con una
interfaz de usuario de avanzada y fácil acceso, el diseño “plug and play” permite al DJ encontrar,
organizar e interpretar rápidamente pistas de los dispositivos de almacenamiento USB conectados o
los reproductores Apple iPod* acoplados. Los temas se pueden dirigir manualmente a las bandejas o
reproducir automáticamente, al estilo de una rocola.
Herramientas poderosas, tales como la vista Crate (Caja de discos) y Profile (Perfil), ofrecen un
sesgo digital a los métodos tradicionales de los DJ. Crate se puede usar para preparar y disponer su
conjunto de temas anticipadamente, durante su función o una mezcla de ambas opciones. La vista
Profile ofrece una ayuda visual rápida de cue, muy similar a la observación de los surcos de un
disco, ¡pero mucho mejor!
iDJ² ofrece dos conexiones USB y una estación de acoplamiento de iPod, lo que brinda una amplia
variedad de opciones de almacenamiento. Entre ellas, se incluyen el iPod
de Apple, unidades de
almacenamiento miniatura y discos duros externos. Es posible buscar artistas, álbumes o temas
muy rápidamente con el teclado USB (no incluido).
2
iDJ
puede reproducir formatos de música MP3, WAV y AAC** almacenados en sistemas de archivos
FAT16, FAT32, NTFS y HFS+.
Además de sus impresionantes capacidades de reproducción, iDJ² funciona como estación de
trabajo de mezcla para DJ completa y cuenta con los controles familiares para el DJ, tal como un
crossfader, una sección de ecualización/ganancia completa para cada canal, cue con auriculares y
entradas analógicas para conectar fuentes de sonido adicionales, tales como giradiscos y
reproductores de CD.
CARACTERÍSTICAS
Mezclador de 2 canales con controles de ecualización y ganancia.
Crossfader con parámetros de curva ajustables
2 entradas estéreo analógicas para conectar fuentes de sonido adicionales, tales como giradiscos y
reproductores de CD.
2 canales de salida maestra estéreo (balanceada y sin balancear)
Canal de salida para grabación estéreo (sin balancear)
Entrada de micrófono con controles de ganancia y tono
2 salidas para auriculares (de 1/4” y 1/8”) con controles de ganancia y tono
Soporte de iPod, llaves Flash Key, unidades de almacenamiento miniatura y discos duros USB externos
Scratch (Rayado) y Pitch-Bend (Inflexión de pitch)
Generación de ciclos sin discontinuidades, tartamudeo
Control del pitch
Key Lock (bloqueo de tono)
Pantalla de gran tamaño con retroiluminación y una revolucionaria interfaz fácil de usar.
Búsqueda rápida entre los temas
Visualizaciones de perfil de pistas
Estación de acoplamiento de iPod para mezclar directamente desde el iPod
Salida de S-Video para mostrar el contenido de un iPod de video (sólo en modo directo de iPod)
2 puertos USB para conectar unidades de almacenamiento miniatura USB, discos duros o un teclado
Formatos soportados: MP3, WAV y AAC**
Tecnología Beatkeeper™ con función de anulación de TAP
Fader Start (Arranque del fader)
Soporte de teclado de computadora USB para búsqueda rápida —en unidades USB o iPods
Soporte de lista de reproducción de computadora, incluidos muchos formatos populares
Actualizaciones de software seguras para mejoras futuras Visite www.numark.com para obtener apoyo.
** No se puede acceder a los archivos de audio AAC protegidos descargados desde iTunes Music Store.
* iPod es una marca de Apple Inc., registrada en EE.UU. y otros países.
46
Page 47

DIAGRAMA DE CONEXIÓN
1. Asegúrese de que la caja contenga los siguientes elementos.
• iDJ²
• Adaptador de alimentación
• Llave USB
• Guía de inicio rápido
• Folleto de instrucciones de seguridad
2. LEA LAS INSTRUCCIONES DEL FOLLETO DE SEGURIDAD ANTES DE UTILIZAR EL
PRODUCTO.
3. Estudie este diagrama de conexión.
4. Coloque la consola iDJ2 en una posición adecuada para su funcionamiento.
5. Asegúrese que todos los dispositivos estén apagados y que todos los faders y perillas de
ganancia estén en la posición de mínimo.
6. Conecte las salidas estéreo al mezclador y/o a otros dispositivos de audio.
7. Enchufe todos los dispositivos al suministro de corriente alterna.
8. Encienda todo en el siguiente orden:
• iDJ²
• los amplificadores o dispositivos de salida
9. Invierta siempre esta operación apagando los dispositivos en el siguiente orden:
• los amplificadores o dispositivos de salida
• iDJ²
Para más información sobre este producto, visite http://www.numark.com/iDJ2
47
Page 48

Estudie el diagrama de conexión de abajo:
TV O SISTEMA DE PROYECCIÓN
DISPOSITIVO DE
ALMACENAMIENTO MASIVO USB
TECLADO USB
(PANEL TRASERO DE LA iDJ²)
REPRODUCTOR DE CD REPRODUCTOR DE CD
O
AL AMPLIFICADOR O O O
SISTEMA DE ALTAVOCES
(PANEL FRONTAL DE LA iDJ²)
O O
MICRÓFONO
AURICULARES
AL GRABADOR DE CD
GIRADISCOS GIRADISCOS
48
Page 49
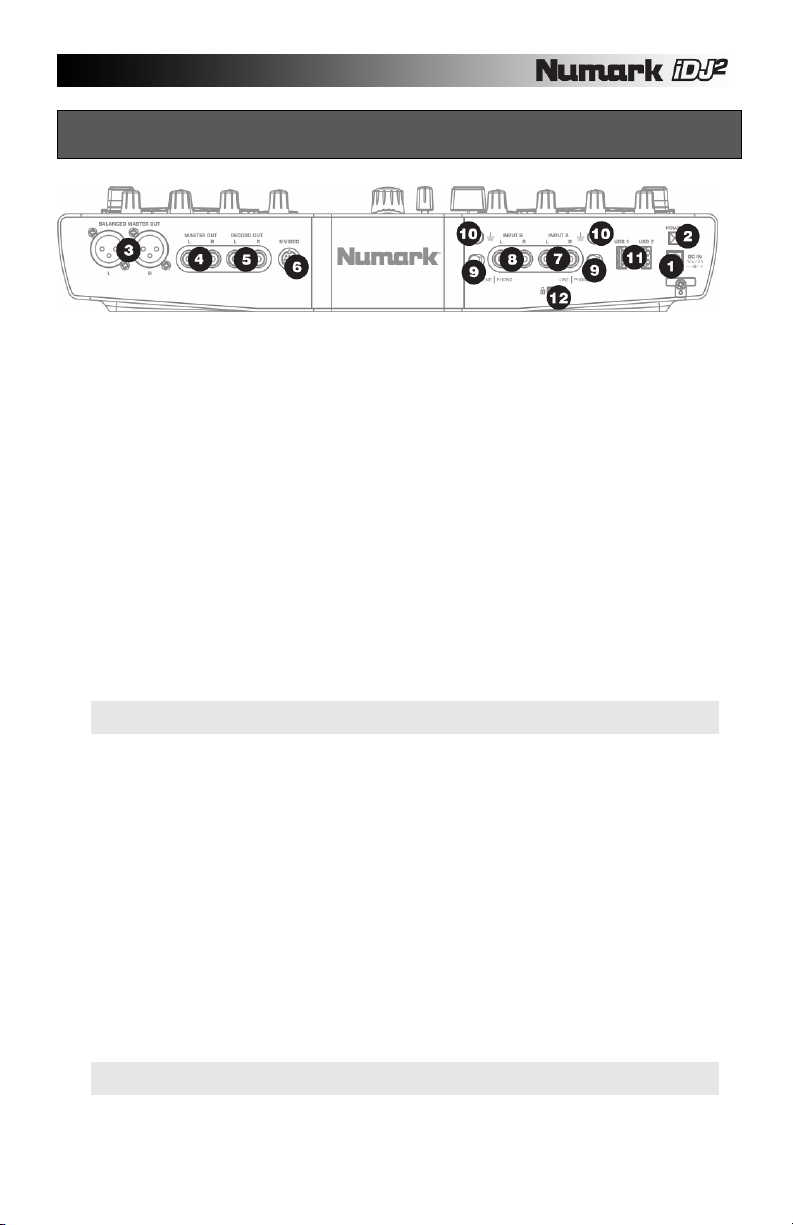
VISTA DEL PANEL TRASERO
1. ENTRADA DE CC – Conecte el adaptador de alimentación suministrado (CC 12 V 2 A) a esta entrada
de alimentación y conéctelo al suministro eléctrico. Use únicamente el adaptador de alimentación
provisto – si usa un adaptador de alimentación alternativo, puede dañarse la iDJ
cable del adaptador al aliviador de tensión directamente abajo para evitar que se desenchufe
accidentalmente.
2. ENCENDIDO – Use este interruptor para encender y apagar la unidad iDJ2. Para encenderla, pulse
momentáneamente el botón. Para apagarla, pulse y mantenga pulsado el botón hasta que la unidad
se haya apagado completamente.
3. SALIDA MAESTRA BALANCEADA – Estas conexiones XLR balanceadas de nivel de línea entregan
la mezcla estéreo y se deben conectar a un amplificador o sistema de altavoces. Se debe usar la
salida balanceada XLR (TRS) para conectar a los altavoces o amplificador.
4. SALIDA MAESTRA – Esta conexión RCA estéreo de nivel de línea entrega la mezcla estéreo. Se
debe usar un cable RCA estéreo para conectar a un sistema o amplificador estéreo.
5. SALIDA PARA GRABACIÓN – Esta es conexión RCA estéreo de nivel de línea adicional que entrega
la mezcla estéreo. Si desea grabar su mezcla mientras la interpreta o tener una salida para altavoces
adicionales, use un cable RCA estéreo para conectar a su dispositivo de grabación o sistema de
altavoces.
6. S-VIDEO – Si usa un iPod de video, la iDJ² puede entregar la señal de video a través de este puerto
de S-video. Se debe usar un cable de S-video estándar para conectar a un televisor, monitor o
dispositivo de proyección. De esta forma puede exhibir videos desde el iPod.
Nota: Es posible tener salida de video de iPod sólo cuando la bandeja A está en modo directo de
iPod. Consulte los detalles en “Modo directo de iPod”.
7. ENTRADA 1 – Use un cable RCA estéreo para conectar una fuente de audio de nivel de línea o
fonográfico a esta entrada.
8. ENTRADA 2 – Use un cable RCA estéreo para conectar una fuente de audio de nivel de línea o
fonográfico a esta entrada.
9. NIVEL DE LÍNEA | FONOGRÁFICO – Cada entrada cuenta con un conmutador de línea/nivel
fonográfico. Este conmutador se debe colocar en Line (Línea) o Phono (Nivel fonográfico) según
corresponda a la señal de entrada. Si usa giradiscos de nivel fonográfico, coloque este conmutador en
Phono. Si usa fuentes de nivel de línea, tales como giradiscos digitales y reproductores de CD,
coloque este conmutador en Line.
10. CONECTORES DE TIERRA – Si está usando giradiscos de nivel fonográfico, asegúrese de conectar
los cables de tierra de los mismos a estos conectores de tierra. De esta forma se asegura de que no
haya zumbido durante la reproducción.
11. ENTRADAS USB – Conecte su medio de almacenamiento masivo a estos dos puertos USB
disponibles —se puede usar un hub (concentrador) para expandir a más entradas USB. También es
posible conectar un teclado USB a uno de estos puertos para una rápida navegación de la iDJ². (Para
saber acerca de los accesos directos con el teclado, consulte “Navegación y accesos rápidos con el
teclado).
Nota: La iDJ² soporta los sistemas de archivos HFS+ y FAT. Asegúrese de que los medios que
intenta reproducir estén formateados en uno de estos formatos de sistemas de archivos.
12. BLOQUEO KENSINGTON – Use este bloqueo para fijar y asegurar LA iDJ² a una mesa o superficie.
2
. Se puede sujetar el
49
Page 50

VISTA DEL PANEL FRONTAL
1. ENTRADA DE MICRÓFONO – Conecte un micrófono de 1/4” a esta entrada.
2. GANANCIA DE MICRÓFONO – Esta perilla ajusta el nivel de la señal de micrófono.
3. TONO DE MICRÓFONO – Esta perilla se puede usar para ajustar el tono de la señal de micrófono.
Al girar la perilla hacia “High”, se acentúan los agudos de la señal del micrófono y se produce una
señal más brillante. Al girar la perilla hacia “Low”, se acentúan los graves de la señal de micrófono
y se produce una señal con más frecuencias bajas.
4. MIC – Este interruptor conecta y desconecta la señal del micrófono.
5. PENDIENTE DE CROSSFADER – Este conmutador se puede usar para ajustar la pendiente de la
curva de transición del crossfader. Si el conmutador se ajusta hacia arriba, se obtiene una curva
más afilada, lo que permite usar el crossfader para transiciones rápidas y rayado. Si se ajusta hacia
abajo, se obtiene una curva más suave, que permite usar el crossfader para transiciones más
lentas. Experimente con los dos ajustes diferentes para encontrar el que se adapte mejor a su
estilo.
6. MEZCLA DE CUE – Controla la intensidad sonora de cada bandeja en el canal de cue. Si la perilla
está totalmente hacia abajo (A), sólo oirá el audio que se reproduce en la bandeja A, mientras que
se está totalmente hacia arriba (B), sólo oirá el audio que se reproduce en la bandeja B. Si está en
la posición central, oirá el audio de ambas bandejas A y B.
7. MODO DE CUE – Alterna entre la audición de los niveles pre-fader (PFL) de las bandejas A y B, o
el programa (PGM) en el canal de cue.
8. TONO DE CUE – Esta perilla ajusta el tono de la salida para auriculares sin afectar ninguna otra
salida.
9. GANANCIA DE CUE – Esta perilla se puede usar para ajustar el nivel de la señal de audio en los
auriculares.
10. AURICULARES (1/8”) – Conecte sus auriculares de 1/8” a esta salida para oír el canal de cue.
11. AURICULARES (1/4”) – Conecte sus auriculares de 1/4” a esta salida para oír el canal de cue.
50
Page 51
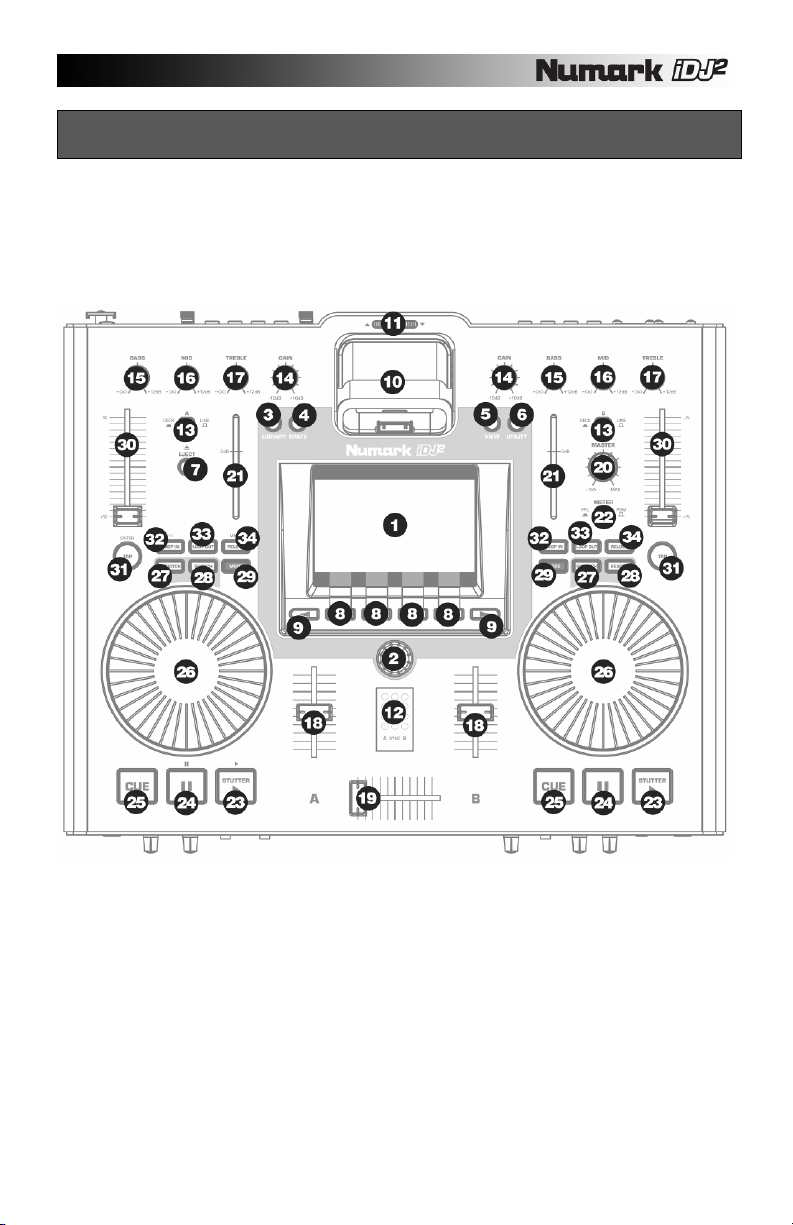
VISTA DEL PANEL SUPERIOR
El panel superior de la iDJ²’ se puede dividir en general en tres categorías de controles:
CONTROLES GLOBALES, DE MEZCLA Y DE BANDEJA.
Lea las tres secciones siguientes de este manual para saber acerca de la función de estos controles. Como
ayuda para identificar dónde están los controles en el panel, consulte la ilustración siguiente:
51
Page 52

PANEL SUPERIOR – CONTROLES GLOBALES
Los controles globales de la iDJ² permiten acceder y navegar por muchas de las características de la
unidad, tales como Library (Biblioteca), Crate (Caja de discos) y otras opciones diversas.
1. LCD – Esta pantalla color de
gran tamaño muestra
información acerca de la
iDJ², las bandejas, sus
medios removibles
conectados y diferentes
opciones de menú.
2. PULSAR PARA ENTRAR –
Esta perilla “PUSH TO
ENTER” se usa para
navegar por las listas,
cambiar valores de
parámetros y operar
diversas partes de la interfaz
de usuario. Se puede pulsar
para seleccionar o cambiar
el elemento resaltado
cuando sea necesario.
3. BIBLIOTECA – Este botón
le permite acceder a la
biblioteca de música
almacenada en el medio
removible conectado a la
iDJ². Para más información
sobre cómo examinar y cargar música de sus medios removibles, consulte la sección “Cómo navegar
por la biblioteca” de este manual.
4. CAJA DE DISCOS – Este botón le permite ver la “Crate”. Aparecen en esta lista todas las pistas que
usted envía a la caja de discos. Cuando está viendo la caja de discos, puede usar los botones de
FUNCIÓN de abajo de la pantalla para enviar pistas a cualquiera de las bandejas para mezclarlas,
extraerlas para colocarlas de nuevo en la caja de discos para uso posterior si ya se están
reproduciendo o removerlas de la caja de discos. También puede cambiar el orden de pistas en la
caja de discos, si lo desea, pulsando y soltando la perilla PUSH TO ENTER en una pista y girando
luego la perilla —de esta forma se sube o baja la pista seleccionada en la lista. Luego, pulse y suelte
ENTER nuevamente para aceptar la nueva posición. Para más información acerca de la función Crate,
consulte la sección “La caja de discos” de este manual.
5. VER – Puede usar este botón para acceder a diferentes informaciones acerca de la música que se
reproduce en las bandejas. El botón VIEW permite conmutar entre la vista de pistas y la vista de perfil.
Para más información, consulte la sección “Vistas”.
6. UTILIDAD – Pulsando este botón accede al menú Utility (Utilidad), donde puede ajustar las
preferencias de pantalla, restaurar los parámetros a su estado predeterminado de fábrica y calibrar los
cursores de pitch. Consulte los detalles en la sección “Utilidad”.
7. EXPULSAR – Pulse este botón para seleccionar qué dispositivo de almacenamiento masivo desea
expulsar. Cuando pulse este botón, verá una lista de los dispositivos conectados a la iDJ² en ese
momento. Seleccione el dispositivo que desea expulsar girando la perilla PUSH TO ENTER y
pulsando el botón de FUNCIÓN apropiado debajo de la pantalla para expulsar el dispositivo resaltado.
Para tener en cuenta: Expulse siempre el medio de sus dispositivos antes de removerlos
físicamente de la iDJ². En caso, contrario, los datos que contiene el dispositivo pueden
corromperse e inutilizarse.
8. BOTONES DE FUNCIÓN – Estos cuatro botones se usan para seleccionar entre los elementos
disponibles del menú que aparece en la pantalla. Según sea el menú que esté viendo, cambia la
funcionalidad de estos botones. La pantalla muestra la función del botón directamente arriba de él.
52
Page 53

9. BOTONES < / > – Estos dos botones se usan para desplazarse por las páginas disponibles de
selecciones, cuando están disponibles. Si hay páginas adicionales para ver, se resaltan los
segmentos de flechas que están arriba de los botones. Estos botones se usan también para mover el
cursor cuando se introduce texto.
10. ESTACIÓN DE ACOPLAMIENTO DE Ipod - Esta estación de acoplamiento se puede usar para
conectar reproductores iPod. Cuando está conectado, usted puede examinar el contenido del iPod
usando el navegador de iDJ² y cargar pistas en cada bandeja u organizarlas en la Crate. La iDJ² le
permite reproducir simultáneamente 2 pistas de su iPod en las bandejas A y B. Además, la estación
también carga el iPod mientras el iDJ² está encendido.
11. AJUSTE DE LA ESTACIÓN DE ACOPLAMIENTO – Según la clase de iPod que esté usando, puede
ajustar este control de modo que el reproductor calce en forma ceñida en la estación.
12. BEATKEEPER™ - El Beatkeeper™ sigue los beats automáticamente en función de una combinación
de frecuencias y patrones de ritmo en la música. Muestra los BPM en la pantalla y da 4 números (una
medida) de información sobre la música en un diagrama de barras. La barra izquierda representa el
beat de la música que se reproduce en el canal izquierdo, mientras que la barra derecha representa el
de la música que se reproduce en el canal derecho. La barra del medio se ilumina con luz azul cuando
los downbeats de la música que se reproduce en ambos canales se produce al mismo tiempo. No
obstante, tenga en cuenta que a fin de que los dos temas se mezclen correctamente, los downbeats
no sólo deben alinearse de vez en cuando, sino que deben producirse simultáneamente durante un
período continuo.
Gráfico de barras: La mayoría de la música dance y rock se ajusta en incrementos de 4
beats llamados medidas. El LED inferior es para el 1
Ocasionalmente esto puede no ser correcto o puede desear cambiarlo. Para reajustar el
downbeat en cualquier canal, simplemente pulse el botón “TAP” en el nuevo lugar del
downbeat mientras la música se reproduce o está en pausa.
er
beat o “Down Beat”.
53
Page 54

PANEL SUPERIOR – CONTROLES DE MEZCLA
iDJ² soporta un mezclador para DJ con características completas, que se puede usar para mezclar audio
proveniente de dispositivos de almacenamiento masivo USB y reproductores iPod, como también de
cualquier otro dispositivo de entrada adicional, como reproductores de CD y giradiscos conectados a las
entradas RCA de la parte trasera de la unidad.
Cada canal del mezclador
contiene un selector de entrada.
El conmutador selector de entrada
(DECK/LINE) selecciona la señal
que se encamina al panel del
mezclador:
En la posición Deck
En la posición Line (Línea),
Cualquiera sea la opción que elija, puede usar los controles familiares para el DJ, (ganancia, ecualización,
medición, volumen y crossfader) para crear sus mezclas.
Cada canal del mezclador incluye:
13. SELECTOR DE ENTRADA (BANDEJA/LÍNEA) – Selecciona la entrada del canal (DECK = dispositivo
14. GANANCIA – Ajusta la ganancia general de la señal de audio del canal.
15. GRAVES – Ajusta las bajas frecuencias (graves) de la señal de audio del canal.
16. MEDIOS – Ajusta las frecuencias medias de la señal de audio del canal.
17. AGUDOS – Ajusta las altas frecuencias (agudos) de la señal de audio del canal.
18. FADER DE VOLUMEN – Ajusta el volumen de la señal de audio del canal.
En el panel superior también verá:
19. CROSSFADER – Funde la señal de audio entre los canales A y B.
20. PERILLA DE NIVEL MAESTRO – Controla el nivel de salida de la mezcla maestra.
21. MEDIDORES DE NIVEL – Representan los niveles de audio pre-fader o de programa.
22. BOTÓN DE MEDIDORES – Conmuta los medidores de nivel entre pre-fader (PFL) o programa (PGM).
(Bandeja), (hacia adentro),
el canal del mezclador
entrega el audio de un iPod
o dispositivo de
almacenamiento masivo
USB conectado. Las pistas
se pueden “enviar” a la
bandeja virtual mediante los
menús de la pantalla.
(hacia afuera), el canal del
mezclador entrega la señal
de audio de las entradas
RCA de la parte trasera de
la unidad (reproductor de
CD, giradiscos, etc.)
USB o iPod, LINE = fuente externa a través de entrada RCA).
54
Page 55

PANEL SUPERIOR – CONTROLES DE BANDEJA
Los controles de bandeja están
disponibles cuando el selector de
entrada de un canal se coloca en Deck
(Bandeja). Usando estos controles se
puede reproducir, hacer cue, pitch bend
(inflexión de pitch) y loops (ciclos) de
música desde dispositivos de
almacenamiento masivo USB
conectados, tales como discos duros,
unidades de almacenamiento miniatura
y reproductores de iPod.
Para tener en cuenta: Si el canal se
colocó en Line, los controles de la
bandeja no tienen efecto sobre el audio
que se reproduce en el canal.
23. REPRODUCIR/STUTTER
(Tartamudeo) – Al pulsarse este
botón se inicia la música cargada
en la bandeja correspondiente.
Se establece un punto de cue
(inicio) en la posición actual y comienza a reproducirse la música. Pulsando este botón cuando la
unidad está reproduciendo, el tema se reinicia desde el último punto cue establecido, lo que puede
usarse para crear un efecto de “tartamudeo”.
24. PAUSA – Detiene la música que se reproduce en la bandeja correspondiente. Si pulsa y mantiene
pulsado el botón de PAUSA durante 1 segundo mientras está en pausa, vuelve al comienzo de la
pista.
25. CUE - Vuelve y para la música en el último punto de partida (cue) determinado. El punto de cue es el
último lugar donde se pulsó REPRODUCIR/STUTTER o el comienzo de la pista, si aún no se ha
pulsado. Puede probar la música, comenzando en el punto de cue, pulsando y manteniendo pulsado
el botón CUE nuevamente —la música se reproduce mientras el botón se mantiene pulsado y una vez
que se suelta, salta de regreso y queda en pausa en el punto de cue. También es posible editar
fácilmente el punto de cue haciendo girar la rueda de avance lento a la nueva posición durante la
pausa. Al girar la rueda de avance lento, se escuchará la música. Al parar la rueda y presionar
REPRODUCIR, se establece un nuevo punto de cue (inicio).
Pulse
“PAUSA” Pulse “REPRODUCIR/STUTTER” Pulse “CUE”
Gire al nuevo punto de referencia “cue”
Vuelve y queda en pausa en el nuevo punto de cue
26. RUEDA DE AVANCE LENTO – Esta rueda se puede usar para inflexión del pitch, rayado y búsqueda
por la música que se reproduce en la bandeja. La funcionalidad de la rueda la determinan los dos
botones que la acompañan —SCRATCH (Rayado) y SEARCH (Búsqueda). Cuando se está
reproduciendo una pista en la bandeja y se desactivan los modos de rayado y búsqueda, la rueda de
avance lento funciona como pitch bend. La inflexión de pitch acelera (giro en sentido horario) o
enlentece (giro en sentido antihorario) temporalmente la música. Esta técnica se usa cuando se
mezclan dos pistas con tempos coincidentes que pueden no estar completamente sincronizadas. Por
lo tanto, con la inflexión de pitch usted puede enlentecer o acelerar temporalmente la pista que está
mezclando, de modo que sus beats se "enganchen" con los de la pista que ya se está reproduciendo.
Mientras una pista está en pausa, puede usar la rueda de avance lento para buscar por la música
hasta una nueva posición del punto de cue. Pulsando REPRODUCIR/STUTTER a continuación, se
establece el punto de cue en esta posición.
55
Page 56

27. RAYADO – Use este botón para activar el modo de rayado. Este modo le permite “rayar" la música en
la bandeja moviendo la rueda en ambos sentidos. Cuando detiene la rueda, se reanuda la
reproducción normal. Para reanudar sin brechas en el audio, “empújelo” rayando hacia delante a
aproximadamente la velocidad de reproducción normal antes de soltar la rueda.
28. BÚSQUEDA – Use este botón para activar el modo de búsqueda. Este modo le permite usar la rueda
de avance lento para explorar rápidamente la pista actual. Cuando se activa el modo de búsqueda, al
girar la rueda se avanza rápidamente y se rebobina. Si no toca la rueda durante 8 segundos, sale
automáticamente del modo de búsqueda.
29. MODO – Al pulsar este botón, se activan las opciones de bandeja, como rango de pitch, bloqueo de
tonalidad, carga de pistas, pantalla de tiempo, Fader Start y modo de iPod. Estas opciones se dividen
en dos páginas diferentes (Pitch y Settings (parámetros)) a las que se puede acceder mediante los
botones de función que están debajo de la pantalla. Puede usar la perilla PUSH TO ENTER para
introducir los valores deseados y al pulsarla se avanza a la opción siguiente de la página seleccionada.
Al pulsar el botón de MODO otra vez, se sale del diálogo de opciones de bandeja.
PÁGINA PITCH:
Pitch Shift – muestra el valor del desplazamiento de pitch aplicado a la bandeja.
Key Lock Shift – muestra la magnitud del desplazamiento de tempo aplicado a la bandeja
mientras Key Lock (Bloqueo de tonalidad) está activado.
Pitch Range (Rango de pitch) – selecciona el rango de pitch deseado (0%, ±6%, ±12%, ±25%,
+25/-100%).
Key Lock – activa y desactiva la característica Key Lock (Bloqueo de tonalidad).
PÁGINA SETTINGS
Track Loading (Carga de pistas) – especifica cómo se cargan las pistas de la caja de discos y se
reproducen (modos manual, automático, continuo y cíclico).
Time Display (Pantalla de tiempo) – conmuta entre los distintos modos de visualización
(transcurrido y remanente).
Fader Start – especifica cómo se usa el fader start en la bandeja (desactivado, cue y pausa)
iPod Mode (Modo iPod) – especifica la función de la bandeja (directa y USB). Para información
del modo directo de iPod, consulte “Modo iPod” – este modo permite controlar el iPod
directamente desde los controles de la bandeja A, como también mostrar el contenido de video
del iPod a través de la conexión de S-Video de la parte trasera de la iDJ².
30. CURSOR DE PITCH – Cada bandeja cuenta con un cursor de pitch que se usa para controlar la
velocidad de la música. Moviendo el cursor hacia “-” el pitch de la música es más bajo (y el tempo más
lento), mientras que moviéndolo hacia “+” el pitch de la música es más alto (y el tempo más rápido).
31. GOLPE – Pulsando este botón al ritmo del beat, se ayuda al Beatkeeper a detectar el tempo correcto.
Manteniendo pulsado el botón por 1 segundo, el contador de BPM se pone a cero y recalcula.
CONTROLES DE LOOP
Como parte de los controles de la bandeja, verá los
botones de control de loop (ciclos) – LOOP IN, LOOP
OUT y RELOOP. La iDJ² cuenta con una función de
looping (creación de ciclos) sin discontinuidades, lo
que significa que si usted define un loop, no hay
retardo cuando la música vuelve al comienzo.
Para tener en cuenta: Cuando la bandeja A está en modo directo de iPod, los controles de creación de loops
de la misma controlan los botones de navegación y de menú del iPod.
32. LOOP IN - Es el punto donde desea iniciar un ciclo. Por defecto, se establece automáticamente un punto de
“loop in” en el punto de cue actual (pasando por defecto al comienzo de la pista) a menos que se establezca
un nuevo punto de “loop in”. Para definir un nuevo punto de "loop in", pulse el botón LOOP IN cuando el tema
llega al punto deseado en el que desea que comience el ciclo. El botón LOOP IN se enciende para indicar que
se estableció un nuevo punto de "loop in". Ahora puede pulsar el botón RELOOP para volver inmediatamente
al punto de “loop in” y comenzar la reproducción. Si desea cambiar el punto de “loop-in”, simplemente pulse el
botón LOOP IN otra vez.
Para tener en cuenta: El botón LOOP IN se puede usar también para crear un punto de cue vivo. Una vez
que pulse LOOP IN, se establece un punto de cue en esa posición de la música. Puede volver siempre a este
punto de cue manteniendo pulsado CUE y pulsando el botón LOOP IN —la bandeja queda en pausa y vuelve
al punto de LOOP IN. Puede reanudar la reproducción desde este punto pulsando el botón REPRODUCIR.
:
56
Page 57

33. LOOP OUT – Determina el punto final del ciclo o loop. La primera vez que pulse LOOP OUT mientras se
reproduce un tema, el botón parpadea y el tema comienza a reproducirse en un ciclo sin discontinuidades,
empezando en el punto de “loop in” y terminando en el punto de “loop out”. Para soltar o terminar el ciclo,
presione LOOP OUT una segunda vez y la reproducción continuará hacia adelante cuando el tema pase el
punto de “loop out” establecido anteriormente. El botón LOOP IN permanece iluminado continuamente, para
indicar que el ciclo está ahora en memoria para fines de repetición.
Para tener en cuenta: El botón LOOP OUT se puede usar también para crear un punto de cue vivo. Una vez
que pulse LOOP OUT, se establece un punto de cue en esa posición de la música. Puede volver siempre a
este punto de cue manteniendo pulsado CUE y pulsando el botón LOOP OUT —la bandeja queda en pausa y
vuelve al punto de LOOP OUT. Puede reanudar la reproducción desde este punto pulsando el botón
REPRODUCIR.
34. RELOOP – Repite la reproducción (tartamudea) desde el punto inicial del ciclo (“loop in”). Si ha establecido un
loop, se reproduce y repite un loop establecido anteriormente, hasta que se libere pulsando “LOOP OUT” por
segunda vez.
EJEMPLOS DE LOOPS
Pulse IN para establecer el comienzo del ciclo y luego OUT para
establecer el final. Una vez que pulse LOOP OUT, la iDJ² efectúa el
ciclo entre esos dos puntos. Si pulsa LOOP OUT otra vez, la iDJ² sale
del ciclo y continúa la reproducción normal.
CONTROLES DEL MODO DIRECTO DE iPod:
El punto de "loop in" se puede usar como una manera de
reproducir con "tartamudeo" a partir de un cierto punto de
un tema. Simplemente pulse LOOP IN para establecer el
"punto de tartamudeo" y luego RELOOP para comenzar a
reproducir desde este punto. Cada vez que pulse
RELOOP, la iDJ² salta de vuelta al punto de tartamudeo y
reproduce desde ese punto.
Si pulsa LOOP IN pero luego decide que
desea establecer un punto de "loop in"
diferente, simplemente pulse LOOP IN otra
vez. Luego, pulse LOOP OUT para iniciar el
ciclo entre los puntos de inicio (IN) y de fin
(OUT).
En el modo directo de iPod, algunos de los controles de la bandeja A se transforman en controles de iPod,
permitiendo navegar y reproducir el contenido del iPod.
TAP – Funciona como "Enter" en el iPod.
LOOP IN (Entrada al ciclo) – Funciona como "<<" en el iPod.
LOOP OUT (Salida del ciclo) – Funciona como ">>" en el iPod.
RELOOP (Repetición del ciclo) – Funciona como "Menu" en el iPod.
RUEDA DE AVANCE LENTO – Funciona como controlador al tacto del iPod.
PAUSA – Funciona como “Pausa” en el iPod.
REPRODUCIR – Funciona como "Reproducir" en el iPod.
Para tener en cuenta: El modo directo de iPod se puede usar sólo
en la bandeja A. Para activar el modo directo de iPod, pulse el botón
MODE (Modo) y cambie el ajuste del modo de iPod a Direct (Directo)
Para más información sobre este modo, consulte “Modo directo de
iPod”.
57
Page 58
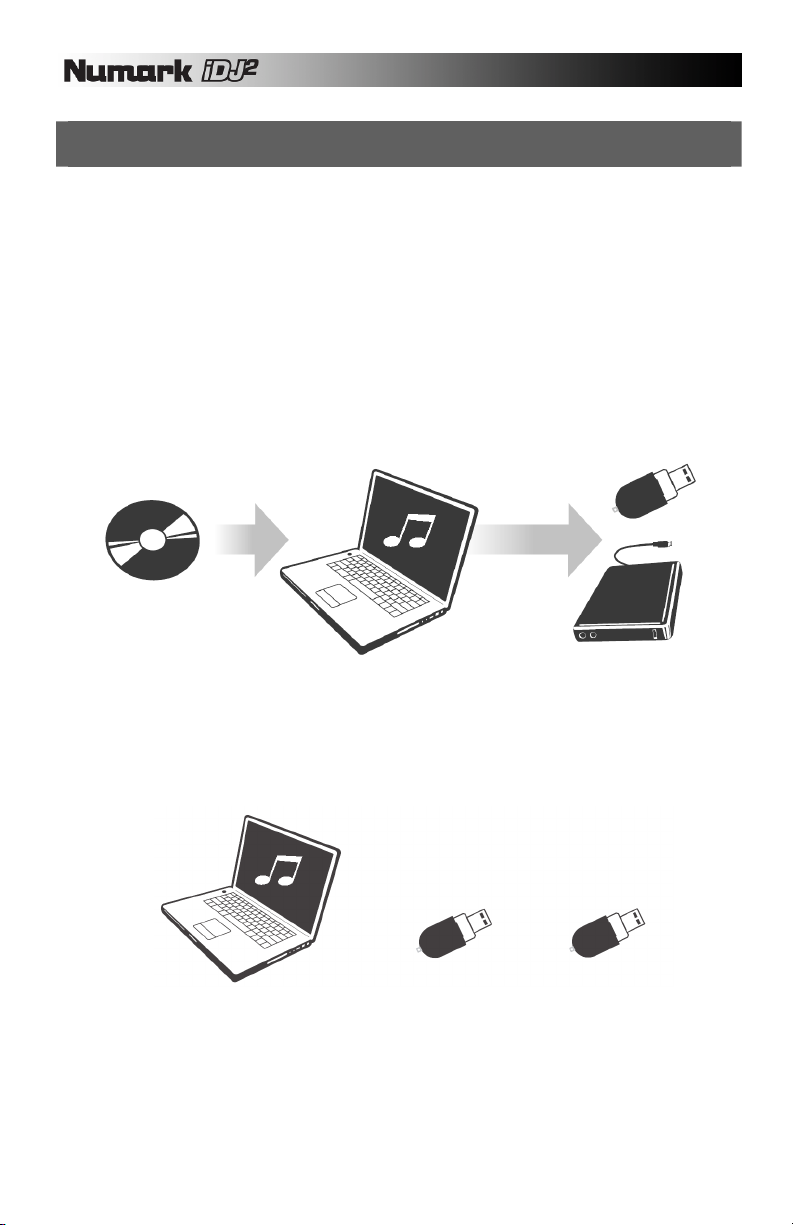
CÓMO TRABAJAR CON iDJ²
iDJ² introduce algunos conceptos revolucionarios para el DJ Digital, pero no obstante ello, trabajar con el
producto es fácil y rápido. Muchas de las características digitales reflejan las técnicas de los DJ tradicionales
con las que usted ya está familiarizado. De hecho, no hay una sola manera correcta de trabajar con iDJ², tal
como descubrirá cuanto más experimente, pero he aquí lo básico…
È ¡Hágase Digital!
Para poder trabajar con iDJ², es necesario que tenga su contenido en uno de los formatos digitales
soportados. La sección “Compatibilidad con dispositivos USB” de este manual cubre este proceso en
detalle, pero en síntesis, usted debe usar su PC o Mac para convertir sus CD, discos y cintas al
formato WAV, MP3 o AAC. Si ya usa productos de medios digitales, como los reproductores
personales MP3 o los paquetes de PC para DJ, es posible que ya tenga sus temas en un formato
adecuado. Vale la pena poner un poco de atención en esta etapa para asegurarse de que su
contenido se convierta con un nivel de alta calidad. Puede encontrar útiles para convertir su medio
tradicionales productos como el giradiscos conectado a computadora TTUSB de Numark.
È ¡Prepárese!
Antes del recital, debe verificar que su o sus dispositivos de medios portátiles estén cargados con el
contenido que necesita. Para ahorrar tiempo, puede usar la herramienta Librarian (Bibliotecario) de su
PC para preparar una biblioteca para cada dispositivo (consulte la sección “Cómo crear una
biblioteca”). Es siempre buena idea hacer una copia de seguridad de su contenido, una precaución
que es realmente sencilla en el mundo digital.
BIBLIOTECA MAESTRA BIBLIOTECA DE BIBLIOTECA DE
TRABAJO RESPALDO
58
Page 59

È ¡El recital!
Con su contenido preparado, ¡es hora de enchufar y reproducir!
1. Prepare su caja de discos
iDJ² contiene su caja de discos virtual “Crate”. Envíe los temas desde Library (Biblioteca) a Crate
(Caja de discos) para comenzar a construir el repertorio de su sesión, tal como extrayendo e
inclinando discos para ver los títulos. Para más detalles, consulte la sección “Cómo usar la
biblioteca” de este manual. Puede cumplir este paso (y el siguiente) con buena anticipación si lo
desea y, siempre que sus medios no estén protegidos contra escritura, su caja de discos se
guarda automáticamente.
2. Ordénelos como desee
Refine el repertorio de su sesión ordenando las pistas en la caja de discos —o si prefiere tomar
la pista siguiente sobre la marcha, también puede hacerlo. Use la función Crate de cualquier
manera que se adapte a su estilo.
3. Extraiga pistas de la caja de discos
Envíe las pistas de la caja de discos a las bandejas según lo necesite. Si su caja de discos está
ordenada cuidadosamente, iDJ² puede realizar automáticamente el cue de la pista siguiente
cuando se acaba una bandeja. Si desea dejar su repertorio sin atención durante la sesión, puede
usar un modo continuo para reproducir automáticamente cada pista a su vez. Consulte la
información sobre la carga y reproducción automáticas de pistas en la sección “Carga de pistas”.
4. Cambie el repertorio de la sesión cada vez que lo necesite
La caja discos es dinámica –cambie de idea en cualquier momento, inserte las pistas requeridas,
reordene el repertorio de su sesión— Crate puede usarse como herramienta para organizar su
recital.
5. Ignore la caja de discos para reproducciones únicas y cues de último minuto
Puede enviar pistas desde la biblioteca directamente a una bandeja, si lo desea. No afecta a lo
que está en la caja de discos, de modo que puede mezclar sus métodos de trabajo de cualquier
manera que desee.
6. Trabaje de la manera en que siempre lo hizo
Una vez que hay una pista en la bandeja, puede cumplir las funciones de cue, igualación de
beat, rayado y loop (ciclo) usando los controles de bandeja Numark que usted ya conoce. iDJ² es
completamente multitareas, de modo que puede trabajar en el repertorio de la sesión usando
Library y Crate en cualquier momento, incluso cuando mezcla en ambas bandejas.
7. Mezcle y sea creativo
La consola iDJ² es un mezclador completo, equipado con todos los controles de mezcla
familiares – crossfader, volumen, ganancia, ecualización y controles completos de medición y
cue.
¡Siga leyendo para aprender a obtener lo máximo de su iDJ²!
59
Page 60

INTERFAZ GRÁFICA
iDJ² ofrece una interfaz gráfica de avanzada, preparada para revolucionar su experiencia como DJ. La
interfaz brinda un acceso rápido y amistoso a las características avanzadas del producto y está diseñada
para adaptarse a su forma de trabajo. Para hacerlo posible, iDJ² es totalmente multitareas —usted puede
conmutar instantáneamente entre funciones y, si una de ellas está momentáneamente ocupada (tal vez
construyendo una nueva biblioteca), todo lo demás sigue estando accesible.
En esta sección exploraremos la interfaz gráfica —sólo se requieren algunos minutos para dominarla— y en
las secciones posteriores nos enfocaremos en las características de iDJ² para el DJ.
Encendido y apagado
Use el botón del panel trasero de la consola iDJ² para encenderla y apagarla.
Para encender, pulse y suelte el botón de encendido. Se ilumina con luz roja y la iDJ² se enciende. Tenga cuidado de
no retener el botón de encendido pulsado al encender, porque de esa manear activará el modo Upgrade (Actualización)
(consulte la sección "Actualizaciones del software de iDJ²").
Para apagar, pulse y mantenga oprimido el botón de encendido. Aparece en la pantalla una barra temporizadora que
se llena de izquierda a derecha mientras se mantiene oprimido el botón de encendido. La iDJ² se apaga cuando la
barra llega al extremo derecho, lo que demora unos tres segundos. Esto es para prevenir apagados accidentales
durante un recital.
Pantalla
Una parte fundamental de iDJ² es la gran pantalla gráfica. Algunas partes de ella están dedicadas a ciertas funciones,
mientras que otras cambian en función de lo que usted esté haciendo.
PANTALLA DE PANTALLA DE
BANDEJA (A) BANDEJA (B)
Pantallas de bandeja
La información de la reproducción correspondiente a cada bandeja está siempre visible, independientemente de lo que
usted esté haciendo. Puede verificar aquí qué pistas están señaladas, la información de tiempo, el ajuste de pitch y
otros datos importantes. Consulte los detalles en la sección “Vistas”.
ESPERE – este símbolo significa que la bandeja está ocupada en ese momento.
PAUSA – este símbolo significa que la bandeja está en pausa en ese momento.
CUE – este símbolo significa que la bandeja está en pausa en el punto de cue
(inicio) en ese momento.
REPRODUCIR – este símbolo significa que la bandeja está reproduciendo en
ese momento.
AUTOMÁTICO – indica que está activada la opción de carga automática de
pistas. Para más información, consulte la sección “Carga de pistas”.
CONTINUO – indica que está activada la opción de carga continua de pistas.
Para más información, consulte la sección “Carga de pistas”.
CÍCLICA – indica que está activada la opción de carga cíclica de pistas. Para
más información, consulte la sección “Carga de pistas”.
BLOQUEO DE TONALIDAD – indica que se activó la característica Key Lock. El
icono parpadea si se desactiva el bloqueo de tonalidad pero aún hay un
desplazamiento de Key Lock aplicado.
ÁREA DE
TRABAJO
BARRA DE
MENÚ
60
Page 61

Barra de menú
En la parte inferior está la barra de menú que muestra
las opciones de menú disponibles. Cada opción de
menú se muestra arriba de su botón de menú físico —
pulse simplemente el botón para activar esa opción. La
opción se resalta brevemente para confirmar que usted
la seleccionó.
Hay cuatro botones de menú físicos pero el menú no
está restringido a sólo cuatro opciones. Cuando hay más
opciones disponibles, aparece una flecha que indica que
se pueden pulsar los botones de menú siguiente (a la
derecha) o anterior (a la izquierda) para pasar a una
página de opciones diferente.
Área de trabajo
La parte más grande de la pantalla está dedicada a la
función que usted está usando en ese momento. Las
cuatro funciones principales —Library (Biblioteca), Crate
(Caja de discos), View (Vista) y Utility (Utilidad)— tienen
cada una su propio botón para seleccionarlas. Los
botones se iluminan con luz brillante cuando se
selecciona su función.
Barra de progreso
Cuando se está creando o actualizando una biblioteca grande (consulte la sección “La biblioteca”), aparece una barra
de progreso inmediatamente arriba de la barra de menú. El indicador se llena de izquierda a derecha para indicar
cuánto trabajo falta hacer.
La mayoría de las funciones de iDJ² son instantáneas, pero ciertas acciones intensivas, tales como enviar una larga
lista de pistas a la caja de discos, pueden demorar algunos segundos. Si se espera que una función demore más que
un par de segundos, aparece un indicador de trabajo giratorio que le hace saber que se está realizando el trabajo.
Siempre es posible identificar lo que
usted ve en el área de trabajo con su
barra de título.
61
Page 62
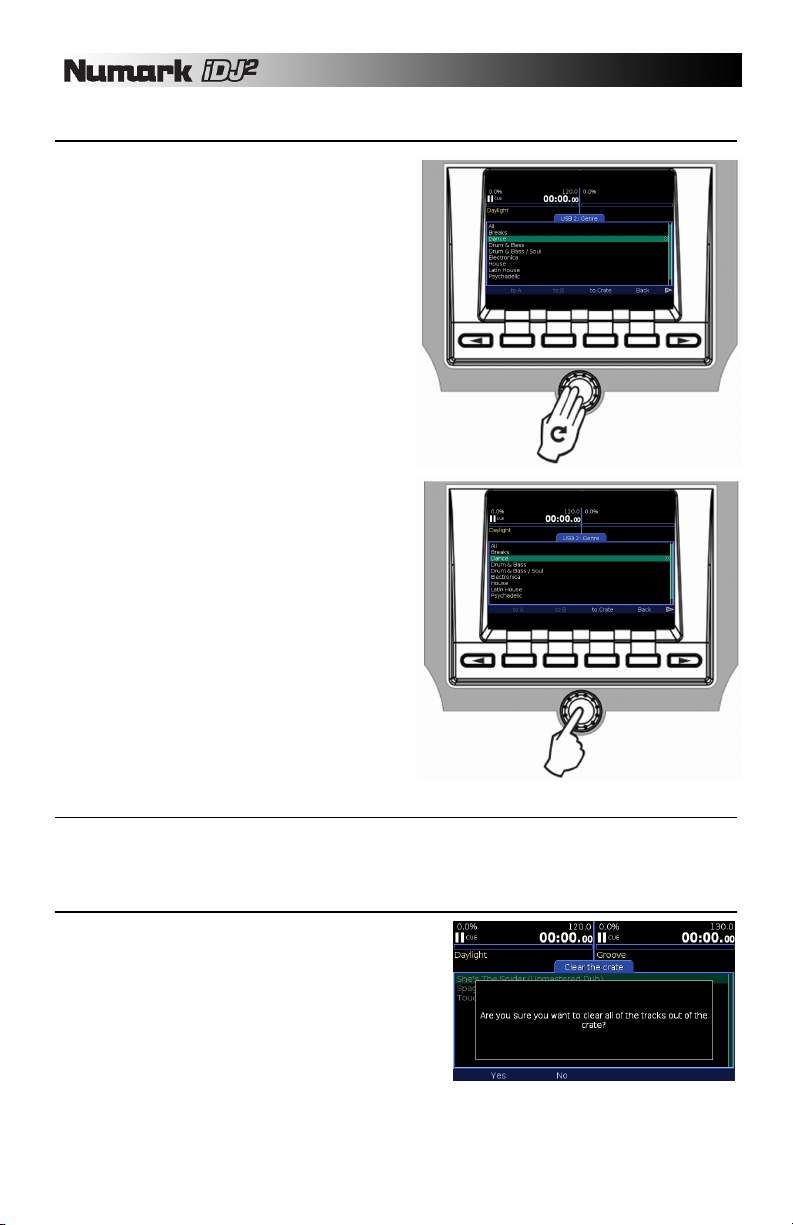
Cómo usar las listas
iDJ² usa intensivamente listas para brindarle acceso
rápido a sus pistas. Las listas se muestran dentro del
área de trabajo y se navega por ellas usando la perilla
giratoria PUSH TO ENTER y la barra de menú.
Para subir o bajar por una lista, gire simplemente la
perilla PUSH TO ENTER. El resaltado en la pantalla
indica qué elemento está seleccionado en ese momento
y, si la lista es demasiado larga para caber en la pantalla
toda de una vez, sube y baja cuando usted gira en la
parte superior o inferior del área de trabajo. Para las
listas largas, una barra a la derecha del área de trabajo
muestra qué parte de la lista puede ver y en qué posición
se encuentra dentro de la misma.
Si el elemento resaltado es algo que se puede
seleccionar, simplemente pulse la perilla PUSH TO
ENTER. Pueden aparecer en la barra de menú otras
opciones relativas a la lista o al elemento resaltado en
ese momento.
La mejor manera de familiarizarse con las listas es
construir y experimentar con una biblioteca. Consulte los
detalles en la sección “La biblioteca”.
Cómo usar los diálogos
Puede aparecer en toda o parte del área de trabajo un diálogo que se usa para enviarle información, obtener una
respuesta, permitirle introducir información o cambiar valores de parámetros. A veces, un diálogo puede tener su propia
barra de menú y en otros casos no. Siempre existe un título para que usted sepa a qué se refiere el dialogo.
Cómo responder las preguntas
Cuando iDJ² necesita enviarle un mensaje o preguntarle algo,
siempre lo hace con un diálogo. Si se requiere respuesta, las
opciones aparecen en la barra de menú. Seleccione la opción
deseada para responder la pregunta y el diálogo se cierra para
volver a lo que usted estaba haciendo.
En este ejemplo, iDJ² responde al comando del DJ para borrar
todas las pistas de la caja de discos verificando si está
realmente seguro de ello.
62
Page 63
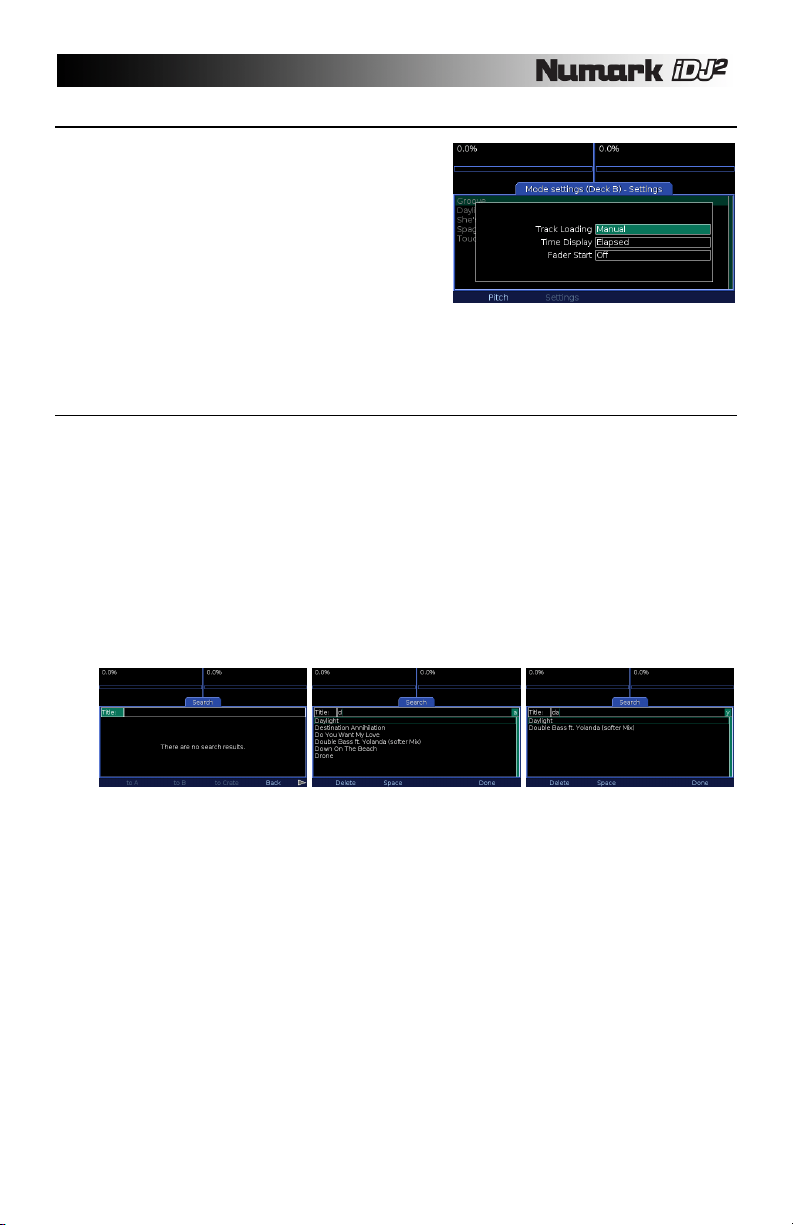
Cómo cambiar los valores de parámetros
Puede usarse un diálogo para cambiar los valores de
parámetros, en cuyo caso cada parámetros se muestra con el
valor activo resaltado. El valor del parámetro se puede cambiar
simplemente girando la perilla PUSH TO ENTER —algunos
parámetros tienen una descripción textual para cada valor,
otros una barra de cursor. Para cambiar a un valor diferente,
pulse la perilla PUSH TO ENTER. Manténgala oprimida para
recorrer cíclicamente todos los valores. Dichos valores en
general entran en vigencia inmediatamente.
En este ejemplo, el DJ está cambiando los parámetros de modo
de la bandeja A.
Cómo introducir texto
Se usa un cuadro de entrada de texto toda vez que usted necesite introducir texto en iDJ², por ejemplo cuando busca
una pista o pone nombre a una lista de reproducción. A diferencia de otras clases de parámetros, el cuadro de entrada
de texto tiene su propio menú que funciona junto con la perilla PUSH TO ENTER para facilitar la introducción de texto
con o sin teclado. Un cuadro resaltado a la derecha muestra el próximo carácter que va a introducir y se puede usar el
menú para eliminar el carácter anterior (Delete), insertar un espacio (Space), cambiar entre minúsculas y mayúsculas
(Caps) y terminar la entrada de texto (Done).
Si tiene un teclado USB conectado al iDJ², simplemente puede escribir directamente en un cuadro de entrada de texto.
Ésta es la manera más rápida de escribir texto. Use las teclas de cursor izquierda y derecha para desplazarse por el
texto que introdujo. Las teclas Enter y Tab completan la entrada de texto de la misma manera que la opción de menú
Done.
Si no tiene un teclado conectado, puede introducir caracteres usando la perilla PUSH TO ENTER. Gírela a la izquierda
o derecha para desplazarse por cada letra, numeral y símbolo. Para escribir el carácter deseado, pulse la perilla PUSH
TO ENTER. Cuando termine, seleccione Done.
63
Page 64

LA BIBLIOTECA
Library (la biblioteca) es un conjunto de pistas que usted puede examinar o buscar de muchas maneras
diferentes. iDJ² le permite trabajar con varias bibliotecas al mismo tiempo, ya sea conectando varios
dispositivos de almacenamiento o teniendo varias particiones de archivos en un dispositivo. Ya sea que
prefiera trabajar con un disco duro con todas sus pistas o varias llaves de memoria flash con temas
diferentes, usted es quien elige.
CÓMO PREPARAR EL DISPOSITIVO DE ALMACENAMIENTO
iDJ² funciona con la mayoría de los dispositivos de almacenamiento USB que soportan la norma Mass
Storage Class (Clase de almacenamiento masivo). Consulte los detalles completos en la sección
“Compatibilidad con dispositivos USB”.
Use su PC o computadora Macintosh para copiar sus archivos de audio con formato WAV, MP3 y AAC a
su dispositivo de almacenamiento USB. Si sus pistas están bien etiquetadas, no es necesario
organizarlas de ninguna manera particular. iDJ² le facilita la búsqueda de las pistas que necesita. En
cambio, si sus pistas no están bien etiquetadas o si prefiere acceder a ellas mediante carpetas, debe
organizarlas de la manera que sea más útil para usted. Las listas en formato PLS o M3U se incluyen en la
biblioteca, si están presentes. No hay problema en tener otras clases de archivos en el dispositivo de
almacenamiento —iDJ² simplemente las ignora. No obstante, las grandes cantidades de archivos no
relacionados enlentecen la creación de la biblioteca, de modo que le recomendamos usar dispositivos
que estén dedicados a su colección de audio.
CÓMO CREAR UNA BIBLIOTECA
Cuando su colección esté preparada, el paso siguiente es construir una biblioteca. Para acceder a sus
pistas rápidamente más tarde, iDJ² se toma tiempo para explorar su dispositivo a fin de tomar nota de las
pistas y listas de reproducción que usted tiene. La biblioteca se almacena en una carpeta especial del
dispositivo llamada ".library" que puede ser invisible dependiendo de los valores de parámetros de su
computadora. Si desea borrar una biblioteca, use la aplicación Librarian o simplemente elimine esta
carpeta, pero en general debería dejarla sola.
Hay dos maneras de construir una biblioteca: ya sea en iDJ² propiamente dicho o en su PC o Mac usando
la herramienta Librarian.
Cómo construir una biblioteca con Librarian
El programa Librarian, que se ejecuta en su computadora PC o Mac, es la manera más rápida para construir
una biblioteca y ofrece ventajas tales como la construcción de perfiles (para más detalles, consulte la sección
"Vista de perfil"). Se incluye con el programa la documentación completa, que se puede descargar de
http://www.numark.com/idj2/.
Cómo construir una biblioteca con iDJ²
Si necesita construir una biblioteca fuera de su
computadora, puede usar el iDJ² propiamente dicho. Si
su dispositivo de almacenamiento tiene un interruptor
de protección contra escritura, asegúrese de que esté
en la posición de desconexión e inserte el dispositivo
en uno de los puertos USB. Tenga cuidado de colocarlo
de la manera correcta —la conexión debe ser suave,
¡no lo fuerce! Después de algunos segundos, aparece
el diálogo New Library (Nueva biblioteca)…
Para construir una biblioteca, seleccione Library. El
proceso demorará entre un par de segundos y unas
cuantas horas, según cuántas pistas haya en su
dispositivo. Mientras se construye la biblioteca, usted
puede reproducir pistas de otros dispositivos conectados a puertos USB diferentes. Una vez que haya
comenzado la construcción de la biblioteca, aparece una barra de progreso para mostrar cuánto trabajo falta.
Si el dispositivo está lleno, el sistema se lo advierte y no es posible construir la biblioteca. Si está casi lleno, se
le da la opción de construir la biblioteca pero debe ser consciente de que puede quedarse sin espacio. En
ambos casos, se recomienda que expulse el dispositivo, borre unas cuantas pistas usando su PC/Mac e
64
Page 65

intente de nuevo. En general, sugerimos que no llene los dispositivos más allá de alrededor del 98% de la
capacidad de modo que iDJ² tenga espacio para la biblioteca y las listas de reproducción que usted pueda
desear crear más tarde.
Puede elegir saltear la creación de una biblioteca seleccionando Files (Archivos). En este caso, puede
acceder al dispositivo inmediatamente pero sólo con la vista Files —no tiene acceso a las funciones de
búsqueda y navegación avanzadas. Esto puede ser útil si el dispositivo está prestado para reproducir a pedido
o si no tiene tiempo para construir una biblioteca.
Cuando la biblioteca está construida (o salteada), se carga automáticamente, lista para usar.
CÓMO CARGAR UNA BIBLIOTECA
La biblioteca se guarda en su dispositivo de almacenamiento,
de modo que la próxima vez que inserte el dispositivo no sea
necesario ejecutar el procedimiento completo nuevamente.
Cuando se inserta un dispositivo escribible que ya contiene una
biblioteca, aparece el diálogo Loading Library… (Cargando
biblioteca).
Para cargar la biblioteca existente sin verificar cambios,
seleccione Load (Cargar). El dispositivo está disponible
inmediatamente para el uso.
Si el contenido del dispositivo cambió, por ejemplo porque
usted transfirió algunas pistas nuevas al mismo o eliminó
algunas pistas viejas, puede actualizar la biblioteca
seleccionando Update (Actualizar). iDJ² explora el dispositivo
para detectar los cambios y actualizar la biblioteca según sea
necesario. Si agregó muchas pistas nuevas, el proceso puede
demorar cierto tiempo y puede aparecer la barra de progreso.
Su biblioteca estará disponible para el uso cuando termine la
actualización.
Si se conecta un dispositivo protegido contra escritura o NTFS,
aparece un diálogo que le advierte acerca de ello. El diálogo
indica si el dispositivo contiene una biblioteca (en cuyo caso
se cargará) o no (en cuyo caso sólo estará disponible la vista
Files).
CÓMO USAR LA BIBLIOTECA
Pulse el botón Library para abrir el área de trabajo de la biblioteca. Si no hay cargada ninguna biblioteca, se le
solicitará que inserte algún medio (Consulte “Cómo cargar una biblioteca” más arriba). De lo contrario, se
enumera en la barra de menú cada biblioteca disponible. Si tiene varios dispositivos o particiones conectadas,
existirán varias bibliotecas para elegir.
Si bien puede interactuar con una biblioteca por vez, puede conmutar instantáneamente entre bibliotecas
seleccionándolas desde el menú Library. Cada biblioteca tiene un nombre exclusivo dentro del menú, que indica
cómo se conecta, tal como "USB 1" (consulte los detalles en la sección “Cómo identificar las bibliotecas”). Hay
también un nombre de dispositivo, tal como "Flash Key", que se muestra como título de la biblioteca seleccionada
en ese momento.
En el nivel superior, la biblioteca ofrece una lista de métodos para acceder a su contenido- Son los siguientes:
¸ Search (Búsqueda) Buscar texto en título, álbum, artista o todas las etiquetas
¸ Track (Pista) Examinar por título de pista
¸ Album (Álbum) Examinar por título de álbum
¸ Artist (Artista) Examinar por nombre de artista
¸ Genre (Género) Examinar por género
¸ BPM Examinar por rango de BPM
¸ Year (Año) Examinar por año
¸ Playlist (Lista de reproducción) Examinar o manejar listas de reproducción
¸ Files (Archivos) Examinar por vista File
65
Page 66

Recorra la lista usando la perilla PUSH TO ENTER y pulse para seleccionar la opción deseada. Los niveles más
profundos de la biblioteca ofrecen todos una opción Back (Volver) en el menú para volver al nivel anterior.
Tenga en cuenta que al pulsar la perilla PUSH TO ENTER mientras se resalta una pista, se invoca la función Info
(Información) correspondiente a la pista seleccionada. Para volver al navegador de la biblioteca, simplemente
pulse la tecla PUSH TO ENTER otra vez para volver.
Búsqueda
La búsqueda brinda un acceso rápido y directo a una o más pistas comparando y haciendo coincidir el
texto que usted introduce. Primera, seleccione el tipo de búsqueda que desea realizar…
Gire la perilla PUSH TO ENTER o use las teclas de flecha del teclado (si está conectado) para
seleccionar el tipo de búsqueda. El tipo de búsqueda puede ser:
¸
All (Todos) El texto se compara con todas las etiquetas (no sólo título, álbum y artista)
¸ Title (Título) El texto se compara sólo con las etiquetas de título
¸ Album (Álbum) El texto se compara sólo con las etiquetas de álbum
¸ Artist (Artista) El texto se compara sólo con las etiquetas de artista
Una vez seleccionado el tipo de búsqueda deseado,
pulse la perilla PUSH TO ENTER (o Tab en el teclado)
para acceder al cuadro de entrada de texto. Comience
ahora a introducir el texto de búsqueda, ya sea rotando
la perilla PUSH TO ENTER o con un teclado USB
conectado. El carácter que va a introducir puede verse
previamente a la derecha del cuadro de texto. Una vez
introducido el texto de búsqueda deseado, seleccione
Done en el menú de entrada de texto (Tab o Enter en
el teclado). El resultado aparece en la pantalla. Puede
ahora moverse por la lista usando la perilla PUSH TO
ENTER o pulsar nuevamente para volver a la opción
de tipo de búsqueda.
Tenga en cuenta que el primer carácter que introduce es especial —se compara siempre con el primer
carácter de cada etiqueta. De esta forma, por ejemplo, para enumerar todas las pistas con título que
comienza con la letra "D", seleccione la búsqueda por título e introduzca "D".
Si introduce un segundo carácter, el texto de búsqueda se compara con cualquier posición dentro de
cada etiqueta. De esta forma, para buscar pistas de un álbum que contengan la palabra "Love",
seleccione la búsqueda por álbum, introduzca "AMOR" (no importa si es con mayúsculas o
minúsculas) y seleccione Done. La búsqueda compara las pistas de cualquier álbum con la palabra
“Love” en su título, como "The Greatest Love Songs", "Love Boat" y "A Lovely Collection".
Tenga en cuenta que la búsqueda encuentra siempre una lista de pistas —usted puede estrecharla por
artista, álbum u otras etiquetas para ver las pistas que contiene ese álbum o que interpreta ese artista,
etc.
Excepto cuando se introduce texto, la pantalla de búsqueda ofrece un conjunto de opciones de menú
que se refieren a la pista resaltada en ese momento. Si no hay ninguna pista resaltada, sólo está
disponible la opción Back (Volver).
¸
¸ to B (a B) Para enviar la pista directamente a la bandeja B
¸ to Crate (a la caja de discos) Para enviar la pista a la caja de discos
¸ Back (Volver) Para volver al nivel superior de Library
¸ Playlist (Lista de reproducción) Para enviar la pista a una lista de reproducción
¸ Info Para obtener información detallada acerca de la pista
Las opciones de menú para enviar una pista directamente a una bandeja no están disponibles si dicha
bandeja está reproduciendo en ese momento. Debe poner primero la bandeja en pausa y luego
seleccionar la opción. De esta forma se reduce la probabilidad de reemplazar accidentalmente una
pista que podría estar en la mezcla.
to A (a A) Para enviar la pista directamente a la bandeja A
66
Page 67

Navegación
La navegación ofrece un método diferente para encontrar pistas dentro de su biblioteca, navegando por listas
estructuradas, Se dispone de seis opciones de navegación, cada una de las cuales se estrecha hacia una lista
de pistas:
¸ Track (Pista) Examinar por título de pista
¸ Album (Álbum) Examinar por título de álbum
¸ Artist (Artista) Examinar por nombre de artista
¸ Genre (Género)
luego Track Titles (Títulos de pistas)
¸ BPM Examinar por rango de BPM
¸ Year (Año) Examinar por año
Examinar por BPM ofrece un criterio rápido para encontrar pistas dentro de ciertos rangos de BPM.
Si elige examinar por BPM, aparece en la pantalla una lista de rangos de BPM correspondientes a
las pistas presentes en el dispositivo actual. Una vez que seleccionó el rango de BPM, aparece en
la pantalla una lista de todas las pistas del dispositivo, ordenadas por BPM, con la primera pista de
dicho rango resaltada.
Se navega en cada lista usando la perilla PUSH TO ENTER de la manera normal, pulsando para moverse al
siguiente nivel o seleccionando la opción Back del menú para volver al nivel anterior. En la parte superior de
cada lista intermedia está la opción "All" (Todas). Esto significa "todas las pistas de este nivel", de modo que
por ejemplo puede significar "todas las pistas de este artista" si previamente seleccionó un artista y está viendo
una lista de álbumes del mismo. A veces hay una opción "<Unknown>" (Desconocido) para el contenido
cuando no se llenó la etiqueta particular.
Como ejemplo, examinemos algo de música dance.
luego por título de pista
luego por título de álbum
luego por título de pista
Para examinar por rango de BPM
luego por nombre de artista
luego por título de álbum
título de pista
luego por nombre de artista
luego por título de álbum
luego por título de pista
1. En el nivel superior de la biblioteca, seleccione Genre
y luego recorra para resaltar y seleccionar Dance.
. Aparece una lista de álbumes de ese artista (y dentro
del género Dance). Seleccione un álbum de la lista.
3
2. Aparece una lista de artistas con pistas de
dance. Seleccione un artista de la lista.
4. Aparece una lista de pistas de dance de su
artista elegido (y del álbum seleccionado). Puede
cargar las pistas en cualquier bandeja o enviarlas
a la caja de discos.
67
Page 68
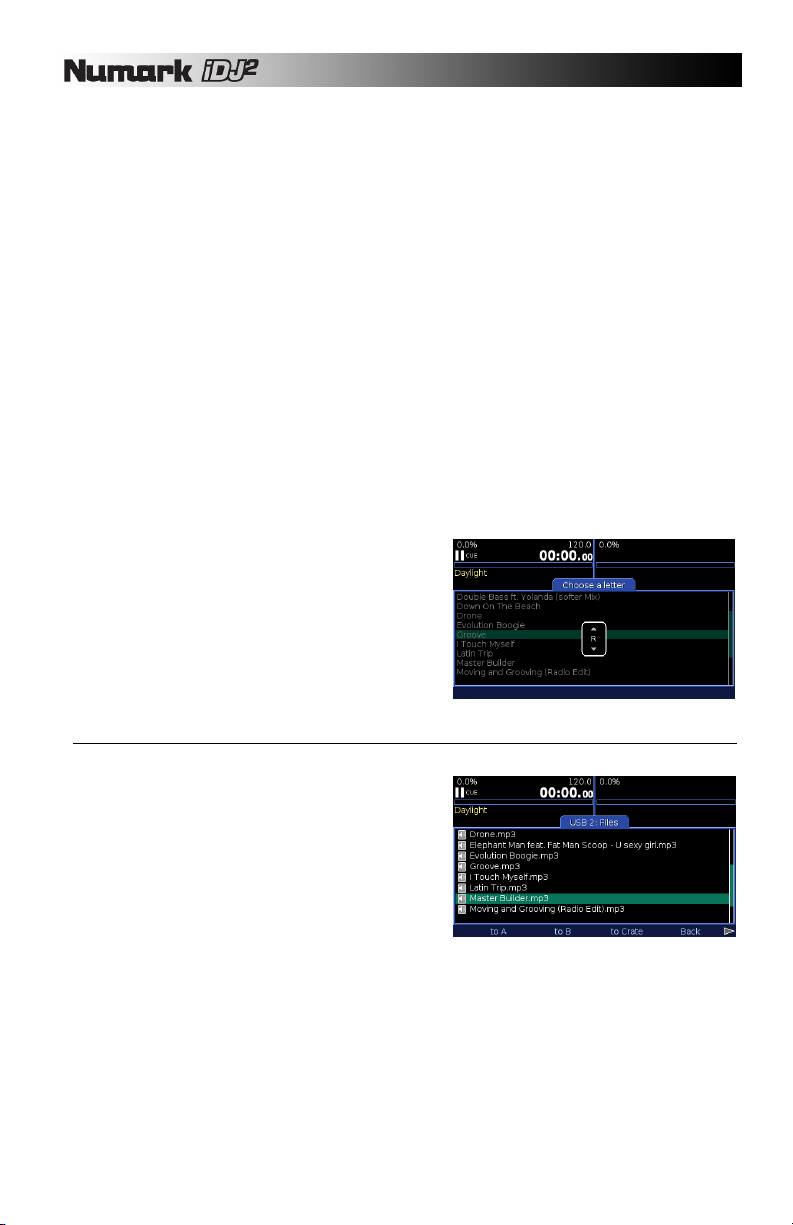
Las pantallas de navegación ofrecen un conjunto de opciones de menú que se refieren al elemento resaltado
en ese momento. Si no hay nada resaltado, sólo está disponible la opción Back; si el elemento es una
colección de pistas, también están disponibles to Crate y Playlist o, si el elemento es una pista, están
disponibles todas las opciones.
¸ to A (a A) Para enviar la pista directamente a la bandeja A
¸ to B (a B) Para enviar la pista directamente a la bandeja B
¸ to Crate (a la caja de discos) Para enviar la pista o colección de pistas a la caja de discos
¸ Back (Volver) Para volver al nivel anterior
¸ Playlist (Lista de reproducción) Para enviar la pista o colección de pistas a una lista de reproducción
¸ Info Para obtener información detallada acerca de la pista
Tenga en cuenta que, como siempre, las opciones de menú para enviar una pista directamente a una bandeja
no están disponibles si esa bandeja está reproduciendo en ese momento. La bandeja debe ponerse en pausa
para poder cargar una pista en ella.
Habrá notado que, a diferencia de la función de búsqueda, la navegación ofrece la posibilidad de trabajar con
colecciones de pistas a la vez. Por ejemplo, puede elegir enviar un álbum completo a una lista de reproducción
o un género entero a la caja de discos. En cambio, no se puede enviar una colección de pistas a una bandeja,
que aloja sólo una pista por vez. Use la caja de discos si desea reproducir una colección de pistas una por
vez.
Cuando elige enviar el contenido a una lista de reproducción, emerge una lista de las listas de reproducción de
la biblioteca. Desplace el resaltado a la lista de reproducción que desea y seleccione Add (Agregar) en el
menú o Cancel (Cancelar) si cambió de idea. Si no hay listas de reproducción, debe crear primero una usando
la opción Playlist (Lista de reproducción) en el nivel superior de la biblioteca (Consulte Cómo trabajar con
listas de reproducción más abajo).
Puede usar también la conveniente función Letter Picker
(Selector de letra) para examinar y navegar más
rápidamente por las listas grandes de la biblioteca.
Presione y gire (mientras la mantiene presionada) la perilla
PUSH TO ENTER para activar el selector de letra —cada
clic avanza en una letra inicial por vez y sólo aparecen las
letras usadas realmente en la lista. Luego, suelte la perilla
PUSH TO ENTER para saltar a la primera entrada con la
letra inicial seleccionada.
Vista de archivos
La vista de archivos ("Files" del nivel superior de la
biblioteca) está disponible para cualquier dispositivo,
ya sea que se haya construido una biblioteca o no.
Usa carpetas y nombres de archivo, de modo que es
particularmente útil si prefiere organizar su contenido
en el disco en lugar de (o en conjunto con) etiquetas.
La vista comienza en el nivel superior (raíz) del
dispositivo y enumera las carpetas seguidas por
pistas. Navegue con la perilla PUSH TO ENTER,
pulsando para entrar en las carpetas y seleccionando
Back del menú para volver al nivel anterior.
La vista de archivos ofrece un conjunto de opciones de menú que se refieren a la pista resaltada en
ese momento. Si no hay ninguna pista resaltada, sólo está disponible la opción Back (Volver). La
opción Playlist está disponible sólo si el dispositivo tiene una biblioteca.
¸ to A (a A) Para enviar la pista directamente a la bandeja A
¸ to B (a B) Para enviar la pista directamente a la bandeja B
¸ to Crate (a la caja de discos) Para enviar la pista a la caja de discos
¸ Back (Volver) Para volver al nivel anterior
¸ Playlist (Lista de reproducción) Para enviar la pista a una lista de reproducción
68
Page 69

Cómo trabajar con listas de reproducción
Las listas de reproducción son listas de pistas en un orden particular. Puede crear con iDJ² tantas listas de
reproducción como desee, como también puede crearlas en su PC o Mac en uno de los formatos soportados
(consulte "Cómo preparar su dispositivo de almacenamiento" arriba). Puede usarlas para guardar repertorios
de sesiones u organizar pistas de manera personalizada. Puede acceder y manejar las listas de reproducción
desde la opción Playlist del nivel superior de la biblioteca.
• Para agregar una nueva lista de reproducción, seleccione Add. Aparece en la lista una nueva lista
de reproducción, con el nombre predeterminado "New playlist 1/2/3/etc". También aparecen en la
lista las listas de reproducción que se importaron a la biblioteca desde el dispositivo de
almacenamiento.
• Para eliminar una lista de reproducción, seleccione Delete y luego Remove para confirmar. Una
vez confirmado, esto no se puede deshacer, de modo que ¡tenga cuidado!
• Para cambiar el nombre a una lista de reproducción, seleccione Rename (Cambiar nombre).
Emerge un diálogo con un cuadro de texto que contiene el nombre de la lista de reproducción.
Edite el texto de la manera normal, seleccione Done y luego Rename para confirmar.
• Para copiar el contenido de una lista de reproducción en otra, seleccione Playlist. Es posible
enviar una lista de reproducción a sí misma, en cuyo caso el contenido se duplica una vez. El
contenido de una lista de reproducción se puede enviar a la caja de discos seleccionando la
opción to Crate.
• Para examinar una lista de reproducción, resáltela y pulse la perilla PUSH TO ENTER. Aparece
una lista de pistas en orden con un conjunto de opciones de menú que se refieren a la pista
Se guarda el orden de las pistas dentro de la lista de reproducción, de modo que es posible reordenarlas
usando la perilla PUSH TO ENTER. Resalte la pista a mover y pulse el control. Gire para mover la pista por la
lista a su nueva posición y pulse nuevamente o seleccione Done para completar la operación. Para dejar caer
la pista de nuevo en su posición original, seleccione Undo.
resaltada en ese momento.
¸ to A (a A) Para enviar la pista directamente a la bandeja A
¸ to B (a B) Para enviar la pista directamente a la bandeja B
¸ to Crate (a la caja de discos) Para enviar la pista o colección de pistas a la caja de
¸ Back (Volver) Para volver al nivel anterior
¸ Remove (Remover) Para remover la pista de la lista de reproducción
¸ Clear (Borrar) Para remover todas las pistas de la lista de
¸ Info Para obtener información detallada acerca de la pista
discos
reproducción (requiere confirmación)
69
Page 70

CÓMO EXPULSAR UNA BIBLIOTECA
Para expulsar una biblioteca, pulse el botón Eject
(Expulsar). Esto causa que se abra una lista de cada
biblioteca activa…
Se enumera cada biblioteca con el nombre de su
ubicación abreviado y el nombre de dispositivo largo.
Identifique qué biblioteca desea expulsar y mueva el
resaltado sobre ella. Puede aparecer un mensaje al pie
del área de trabajo:
En este caso, debe detener la reproducción de la o las
pistas de esa biblioteca para poder expulsarla. Esto es
para evitar la expulsión accidental de una biblioteca que
podría estar en la mezcla.
Puede aparecer otra advertencia:
En este caso, se le advierte que algunas de las pistas
existentes en la caja de discos están almacenadas en la
biblioteca que seleccionó. Si continúa expulsando estas
pistas se removerán de la caja de listas.
Para continuar con la expulsión, seleccione Eject en el
menú. Si hay pistas en la caja de discos, se le solicita
que confirme la operación. Una vez que la o las
bibliotecas de un dispositivo particular se expulsaron y ya
no están presentes en la lista, es seguro remover
físicamente el dispositivo. Si tiene más de un dispositivo
conectado, ¡tenga cuidado de remover el correcto!
Si va a apagar el reproductor, no es necesario expulsar
primero las bibliotecas, siempre que lo apague
manteniendo oprimido el botón de encendido por tres
segundos y no cortando la alimentación eléctrica.
Como con las computadoras PC o Mac, es muy importante expulsar siempre un
medio de almacenamiento antes de desenchufarlo o cortar la alimentación eléctrica.
De esta forma se asegura que todos los archivos estén correctamente cerrados y que
se hayan guardado todos los datos en el dispositivo. El incumplimiento de esta
instrucción puede causar la corrupción del sistema de archivos e inutilizar el
dispositivo (si esto sucede, conecte el dispositivo a su PC o Mac y siga el
procedimiento de recuperación del sistema de archivos correspondiente a su sistema
operativo particular —consulte la sección “Cómo evitar y reparar errores”).
70
Page 71

LA CAJA DE DISCOS
“Crate” (la caja de discos) es una herramienta novedosa para el DJ digital, basada en uno de los más viejos trucos
del oficio…
Durante décadas, el DJ de vinilos usó su caja de discos como borrador para organizar el repertorio de una sesión.
Los discos a reproducir —o a ser considerados para reproducir— se extraen, se dan vuelva y se colocan arriba del
resto. Cuando no se necesita más, el disco se saca de la vista. Entre mezclas, el DJ dispone de tiempo para hojear
la colección y encontrar más discos para extraer o localizar pedidos.
La función Crate del iDJ² se puede considerar muy similar a una caja de discos
convencional. En otras palabras, la caja de discos contiene las pistas que desearía
reproducir en su sesión. No necesariamente debe tener pistas cargadas en su caja
de discos —siempre puede cargarlas directamente a cualquier bandeja— pero la
caja de discos ofrece una buena manera para mantener organizada y fácilmente
accesible toda la música que desearía usar en su sesión.
Puede tener muchos miles de pistas si usa varios dispositivos diferentes como
fuentes de música. Tener que examinar cada biblioteca todas las veces que desea
seleccionar la próxima pista puede demandar mucho tiempo y generar confusión.
En cambio, puede enviar las pistas a su caja de discos y luego acceder a ellas
fácilmente durante la sesión.
La caja de discos ayuda también a evitar situaciones en las que puede tomar una
pista que ya reprodujo, Cuando se reemplaza la pista de la bandeja, la misma se
desecha a menos que usted elija volver a colocarla en la caja de discos.
CÓMO TRABAJAR CON LA CAJA DE DISCOS
En “La biblioteca” consideramos diversos métodos diferentes de
cargar pistas en la caja de discos, ya sea buscando, navegando,
desde listas de reproducción o directamente desde las carpetas del
disco. Descubriremos ahora cómo trabajar con esa caja de discos.
Pulse el botón Crate para abrir el área de trabajo de la caja de
discos.
Esta área comprende una lista de pistas y el siguiente menú:
¸
to A (a A) Para enviar la pista a la bandeja A
¸ to B (a B) Para enviar la pista a la bandeja B
¸ swap A (cambiar por A) Para cambiar la pista resaltada por la
¸ swap B (cambiar por B) Para cambiar la pista resaltada por la pista de la bandeja B
¸ pull A (extraer A) Para extraer la pista de la bandeja A a la caja de discos
¸ pull B (extraer B) Para extraer la pista de la bandeja B a la caja de discos
¸ Shuffle (entremezclar) Para entremezclar las pistas de la caja de discos
¸ Info Para obtener información detallada acerca de la pista
¸ Remove (Remover) Para remover la pista de la caja de discos
¸ Clear (Borrar) Para remover todas las pistas de la caja de discos
Se puede enviar, cambiar o extraer una pista únicamente desde una bandeja inactiva. Si se está reproduciendo
una pista en la bandeja, debe ponerla en pausa antes de enviarla, cambiarla o extraerla. Se muestra abajo un
ejemplo de cambio de pistas.
Se puede enviar o extraer una pista únicamente desde una bandeja inactiva. Si se está reproduciendo una pista
en la bandeja, debe ponerla en pausa antes de enviarla o extraerla. Se muestra a continuación un ejemplo de
extracción de una pista para volver a colocarla en la caja de discos: Tenga en cuenta que la pista que se vuelve
a colocar en la caja de discos irá al tope de la lista de la caja.
pista de la bandeja A
Ponga en pausa la bandeja B y seleccione “swap B” La música cargada en la bandeja B se cambia con la pista
seleccionada
71
Page 72
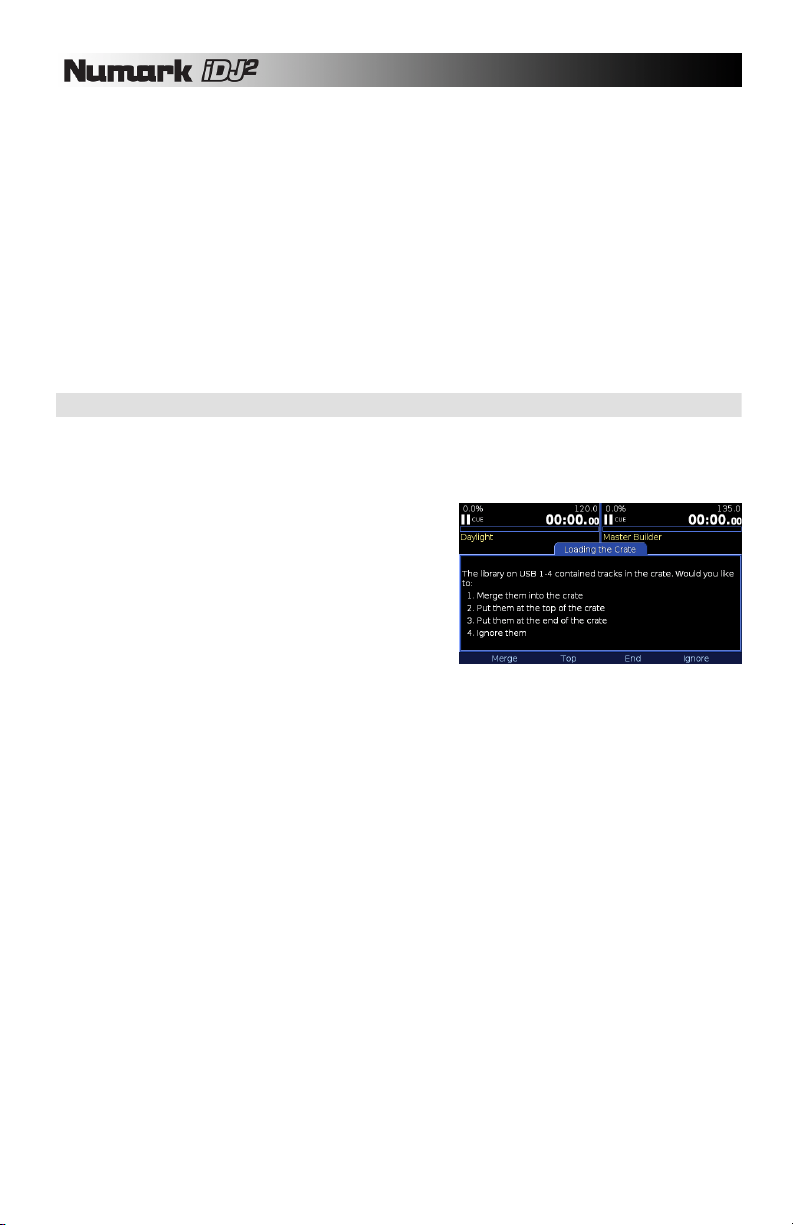
El orden de la caja de discos es significativo para iDJ² sólo en los modos de reproducción continua (consulte la
sección “Carga de pistas”). No obstante, puede elegir mantener un orden de reproducción como ayuda para
organizar el repertorio de su sesión. Para mover una pista en la caja de discos, resáltela primero y luego pulse la
perilla PUSH TO ENTER. Gire para mover la pista por la lista a su nueva posición y pulse nuevamente o
seleccione Done para completar la operación. Para dejar caer la pista de nuevo en su posición original,
seleccione Undo. Tenga en cuenta que una pista extraída de una bandeja se envía siempre al tope de la caja de
discos mientras que las enviadas desde la biblioteca van siempre al fondo.
La operación Clear (Borrar), que vacía completamente la caja de discos, solicita confirmación puesto que puede
ser un poco inconveniente hacerlo por error durante un recital.
Puede también reordenar las pistas de la caja de discos manteniendo presionada la tecla PUSH TO ENTER
sobre una pista seleccionada y girando la perilla para seleccionar su nueva posición dentro de la caja de discos.
Cuando suelte la perilla PUSH TO ENTER, la pista se mueve a la posición seleccionada. Si está usando un
teclado, puede realizar la misma operación pulsando la tecla de retorno sobre la pista resaltada y seleccionando
su nueva posición con las teclas de flecha. AL pulsar la tecla de retorno otra vez, se coloca la pista seleccionada
en su posición
CÓMO CARGAR Y GUARDAR LA CAJA DE DISCOS
La caja de discos se almacena automáticamente dentro de la biblioteca desde la cual se enviaron sus pistas.
Cada vez que se carga una biblioteca, iDJ² verifica si tenía previamente pistas en la caja de discos y, en caso
afirmativo, ofrece la opción de restaurarlas.
Seleccione Load (Cargar) para restaurar las pistas en la caja
de discos o Ignore (Ignorar) para descartarlas. Una vez que
seleccionó Ignore, los datos de la caja de discos se pierden
definitivamente (desde luego, las pistas están aún en la
biblioteca y se pueden enviar nuevamente a la caja).
Posiblemente se pregunte qué pasa si su caja de discos
contiene pistas de varias bibliotecas. En este caso, se
almacenan partes de la caja dentro de cada biblioteca. Para
restaurar la caja de discos, se deben volver a cargar todas las
bibliotecas asegurándose de que todos los dispositivos usados
estén conectados al iDJ². Si una biblioteca no está conectada
o si usted elige ignorar la caja de discos en relación con esa biblioteca, se restaura una caja parcial desde las
demás bibliotecas. iDJ² intenta recrear la caja de discos en el orden original, aunque las bibliotecas no se cargan
en ningún orden particular. ¡Si todo esto suena un poco confuso, quédese tranquilo de que, en síntesis, iDJ²
simplemente trata de hacer lo más lógico!
La caja de discos está prevista como una entidad de plazo relativamente corto por naturaleza. Si desea guardar
un orden de ejecución más permanente, debe considerar el uso de listas de reproducción que se puedan enviar
fácilmente a la caja de discos en una operación (consulte “Cómo trabajar con listas de reproducción”).
72
Page 73
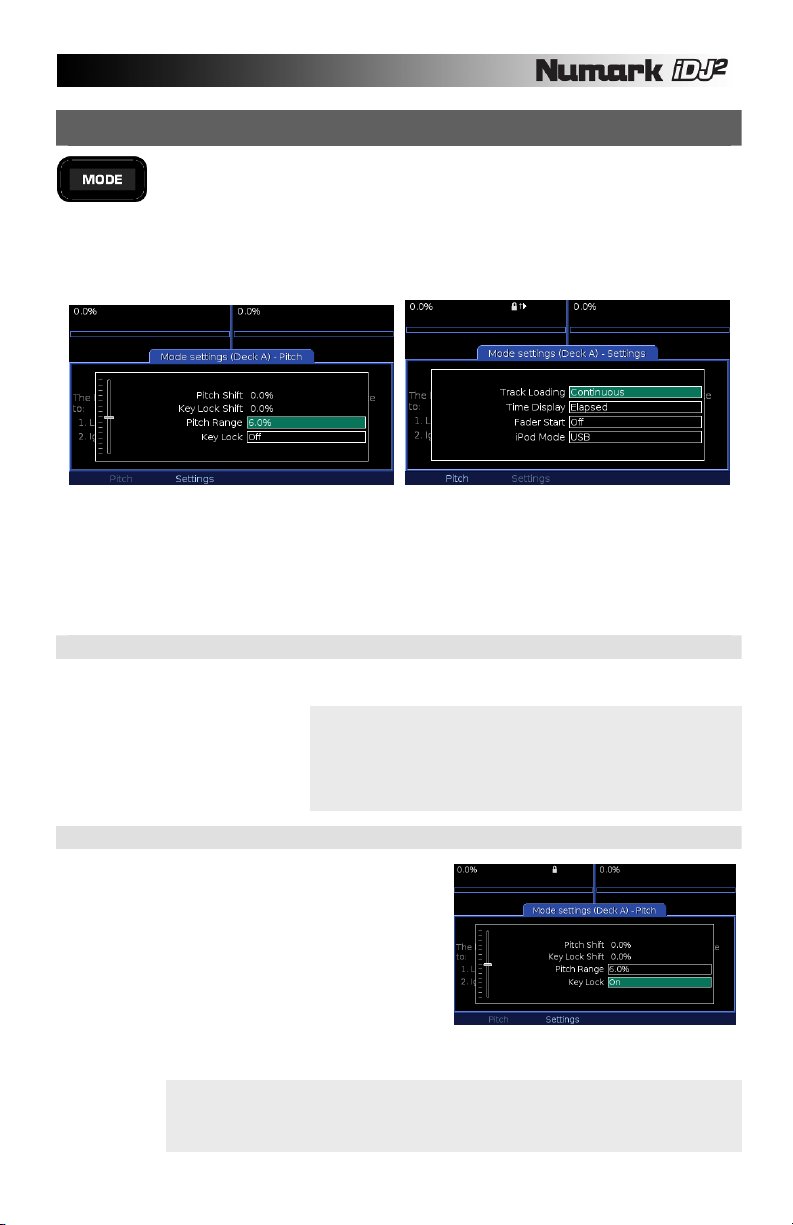
PARÁMETROS DE MODO DE LAS BANDEJAS (A Y B)
Los botones de MODO, que se encuentran cerca de los cursores de pitch de cada bandeja,
se pueden pulsar para hacer emerger el diálogo de parámetros de las bandejas A o B. El
botón apropiado se ilumina con luz azul mientras está activo. Púlselos nuevamente para
cerrar el diálogo.
Use los diálogos de parámetros de modo para ajustar los valores de aquellos parámetros de cada bandeja
que no tienen su propio botón dedicado. Los parámetros de modo están organizados bajo 2 páginas
diferentes a las que se puede acceder mediante los botones de función que están debajo de la pantalla.
PÁGINA PITCH Y KEY LOCK PÁGINA SETTINGS
Si selecciona Pitch, podrá ver los parámetros de pitch y Key Lock (Bloqueo de tonalidad) de la bandeja. Si
selecciona Settings, podrá ver parámetros adicionales, como Track Loading (Carga de pistas), Time Display
(Pantalla de tiempo), Fader Start e iPod Mode (Modo de iPod) (sólo en la bandeja A).
Gire la perilla PUSH TO ENTER para cambiar el parámetro seleccionado y presiónela para pasar al campo
siguiente.
RANGO
Seleccione el rango de pitch deseado para el cursor. Los valores de rango de pitch disponibles son:
KEY LOCK
Si se activa el Key Lock, se “retiene” la tonalidad de la
0.0%
Cursor de pitch desactivado.
±6.0%
±12.0%
±25.0%
-100%/+25%
Nota: Los diferentes rangos de pitch permiten distintas precisiones sobre
la velocidad de la música. La selección de un rango de pitch más pequeño,
como ±6%, le permite tener un control más preciso sobre la velocidad de la
música. La selección de un rango de pitch más grande, como +25/-100%,
permite ajustes más extremos de la velocidad y se puede usar para lograr
efectos interesantes.
música que se reproduce en la bandeja correspondiente.
Mientras esta función está activada, el ajuste del pitch de la
música que se reproduce en la bandeja solo influye sobre
su tempo independientemente del pitch musical.
On (Activado)
Activa el Key Lock. Notará que se ilumina el icono
de Key Lock en el área de pantalla de la bandeja.
Off (Desactivado)
Activa el Key Lock. Si hay aún un desplazamiento
de Key Lock aplicado a la bandeja cuando se
desactivó el bloqueo de tonalidad, notará que el
icono de Key Lock parpadea.
Nota: Si se usan valores extremos de pitch mientras Key Lock está activado, pueden producirse
artefactos de audio no deseados. Para evitar la reproducción de audio recortada, se deben usar
modificaciones modestas del pitch cuando Key Lock está activado.
73
Page 74
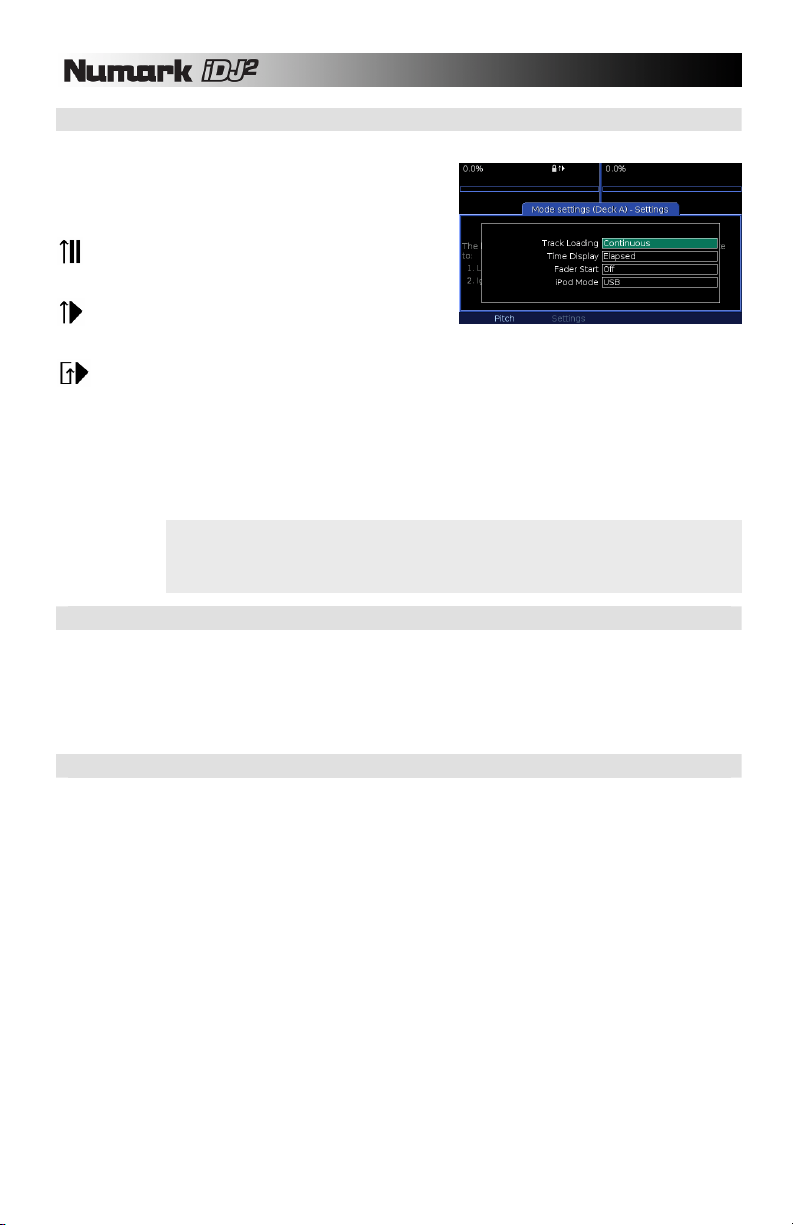
CARGA DE PISTAS
Elija cómo desea que se carguen y se reproduzcan los temas de la caja de discos.
Manual
Usted carga manualmente las pistas en la bandeja.
Cuando terminan los temas, vuelven al comienzo y
la bandeja queda en pausa.
Automatic (Automática)
Se carga en la bandeja el tema siguiente (que está
al tope de la caja de discos) y comienza en el inicio.
Continuous (Continua)
Como la carga automática, pero la reproducción del
tema siguiente comienza automáticamente.
Cyclic (Cíclica)
Como la carga continua, pero después de reproducirse cada tema, se envía al fondo de la caja de
discos, creando así una secuencia de reproducción sin fin.
En los modos que cargan automáticamente la bandeja, se deben cumplir las siguientes condiciones para
que iDJ² cargue el tema siguiente:
El tema anterior se reprodujo en su totalidad - o – El tema anterior está en pausa, habiéndose reproducido en más de un 75%
Esto es para evitar la carga automática mientras usted está haciendo cue o mezclando en la bandeja.
PANTALLA DE TIEMPO
Establece el modo de visualización del código de tiempo.
Elapsed (Transcurrido)
Se muestra el tiempo transcurrido (cuenta progresiva) en la bandeja.
Remaining (Remanente)
Consejo: Para reproducir en un ciclo continuo una colección de temas, envíe la colección a la caja de
discos y luego elija Cyclic en la opción Track Loading. ¡Esto funciona para cada una o ambas
bandejas a la vez! Los temas se reproducen continuamente desde la caja de discos hasta que usted
ponga las bandejas en pausa.
Se muestra el tiempo remanente (cuenta regresiva) en la bandeja.
FADER START
La función Fader Start permite comenzar la reproducción en cualquier bandeja directamente desde el
crossfader. Con esta función, cada vez que mueve el crossfader hacia cualquier lado, comenzará a
reproducirse la pista cargada en esa bandeja.
Off (Desactivado)
Se ignoran las señales de fader start.
Cue
Vuelve la posición de reproducción al punto de cue y queda en pausa después de la fusión de
salida de la bandeja. Se reanuda la reproducción cuando se comienza la fusión de regreso hacia la
pantalla.
Pausa
Similar a Cue, pero se hace la pausa en la posición actual en lugar del punto de cue.
74
Page 75

q
p
iPod MODE (Modo de iPod)
Este campo permite especificar la funcionalidad de la
bandeja A cuando se usa un iPod. Notará que hay dos
opciones diferentes: USB o Direct (Directo).
En modo de USB, el iPod funciona como dispositivo de
almacenamiento masivo USB. En términos de operación, el
modo USB permite cargar temas desde el iPod a las
bandejas y manipularlos en una variedad de maneras
diferentes. Entre ellas se incluyen rayado, generación de
ciclos, inflexión de pitch, etc. Tenga en cuenta, sin embargo,
que en este modo no se pueden reproducir archivos de
video desde el iPod.
En modo directo de iPod, puede controlar un iPod conectado directamente desde los controles de la bandeja
A y reproducir la música tal como lo haría normalmente en el iPod. Tenga en cuenta que en este modo no
puede generar efectos de inflexión de pitch, rayado o ciclo en el audio del iPod – la bandeja A actúa
simplemente como un reproductor iPod. No obstante, este modo le permite tener una salida de contenido
de video de un iPod compatible con
video a través de la salida S-Video de la
parte trasera de la unidad. Esto le
permite ver el video en el monitor,
pantalla de proyección o televisor
conectado que soporten S-Video.
Para información sobre los controles del
modo directo de iPod, consulte la
sección “Controles del modo directo de
iPod”.
Consejo: El modo directo de iPod no requiere que se
construya una biblioteca antes de poder acceder al contenido
de su iPod. Por lo tanto, el modo directo de iPod es muy útil
USB
Selecciona el modo USB de iPod. En este modo, puede manipular la música del iPod como lo haría
con la de cualquier otro dispositivo USB.
DIRECT (Directo)
Selecciona el modo directo de iPod. En este modo, la bandeja A funciona simplemente como
reproductor de iPod y no permite manipular la música del mismo. Sin embargo, en este modo
puede visualizar el contenido de video.
cuando se trata de hacer cue rápidamente y reproducir
material de su iPod sin tener
ue esperar.
Importante: Cuando se conmuta del modo directo a USB, es
posible que necesite retirar físicamente el iPod y volver a
colocarlo en la estación de aco
lamiento.
75
Page 76

VISTAS
Puede usar el botón VIEW (Ver) para acceder a diferentes informaciones acerca de la música que
se reproduce en las bandejas. Este botón conmuta entre Track View (Vista de pistas) y Profile
View (Vista de perfil).
TRACK VIEW (Vista de pistas)
La vista de pistas muestra información adicional acerca de las pistas
cargadas en cada bandeja, además de la que se muestra en la parte
superior de la pantalla.
¸ Artist (Artista) Nombre del artista
¸ Album (Álbum) Título del álbum
¸ Year (Año) Año de lanzamiento
¸ Device (Dispositivo) Dispositivo en el que está
PROFILE VIEW (Vista de perfil)
El perfil de una pista es una representación visual del tema, diseñada
para una rápida y fácil identificación de frases dentro del mismo,
diferenciados por su “energía”. A diferencia de la forma de onda, el
perfil no muestra todos los pequeños detalles de la pista, sino sólo
los cambios grandes en términos de energía.
El perfil se divide en tres tonos de azul, que constituyen con el negro
un número total de variaciones de cuatro. Las porciones blancas
brillantes de la pista indican alta energía y volumen, con una
graduación descendente a las secciones negras que representan las
frases más silenciosas. La longitud de cada perfil se pone en escala para ajustarlo exactamente al área de
trabajo disponible, de modo que siempre esté visible la pista completa.
Consejo: Use los perfiles de pista para identificar las interrupciones de un tema, en forma muy similar a lo que ve en un disco
de vinilo cuando se observa con una luz a través de los surcos. Saltar a estas interrupciones es rápido y sencillo usando la
perilla PUSH TO ENTER..
Cómo crear perfiles de pista
Los perfiles se pueden generar sólo usando la herramienta Librarian (consulte la sección “Cómo
construir una biblioteca con Librarian”). Para una biblioteca grande, esto puede demorar cierto tiempo,
puesto que se debe analizar la pista entera. En una computadora rápida, cada pista toma varios
segundos.
Cómo trabajar con perfiles de pista
El área de trabajo se divide en dos secciones, la superior para
la bandeja A y la inferior para la B.
• Indicadores de tiempo
Arriba y debajo de los perfiles son marcadores que indican
la longitud de cada pista separados por minutos, con
muescas más pequeñas para 30 segundos y 15 segundos.
• Cómo saltar por las frases
Use la perilla PUSH TO ENTER para buscar a lo largo del
tema, habiendo desbloqueado primero la bandeja (consulte más abajo). Con cada rotación del
control, puede saltar hasta el cambio siguiente del tema. Verá un cursor vertical destellante
correspondiente a la bandeja que está seleccionada en ese momento. Su posición en el perfil
representa la posición de reproducción en el tema.
• Cómo seleccionar la bandeja
Por defecto, las bandejas están deseleccionadas (bloqueadas) para evitar la búsqueda accidental
en una pista que puede estar en la mezcla. Seleccione Select A (Seleccionar A) o Select B para
desbloquear la bandeja requerida. Para volver a bloquear una bandeja, seleccione Deselect A o
Deselect B.
almacenada la pista
76
Page 77
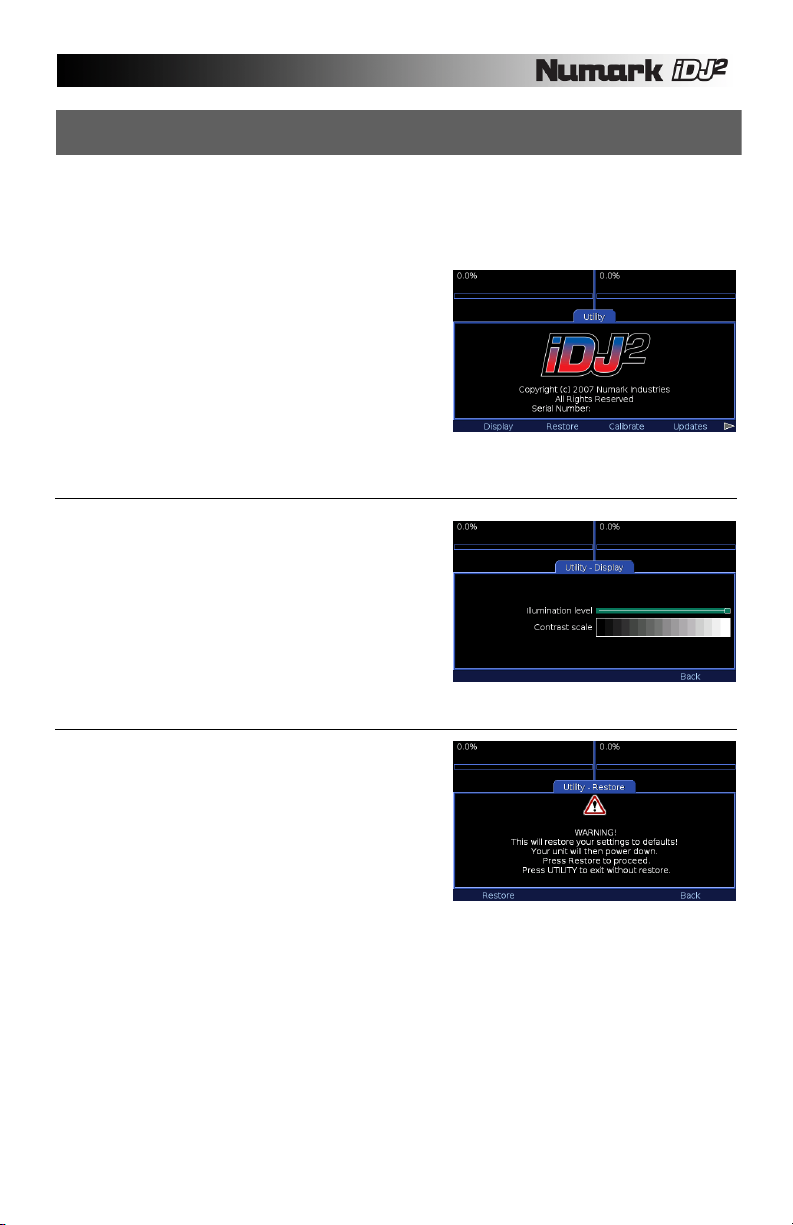
UTILIDAD
El botón Utility (Utilidad) permite acceder a la información y los valores de parámetros del sistema.
El área de trabajo principal de la utilidad muestra el número de serie de la unidad. Esta información es útil si
necesita contactarse con el Servicio al Cliente o verificar si hay actualizaciones de firmware en el sitio web
de Numark.
A las demás pantallas de la utilidad se accede desde el
menú de la siguiente manera:
Consejo: Se recomienda especialmente comparar
periódicamente su versión de firmware con la que está
disponible en el sitio web de Numark e instale la
versión más reciente que pueda estar disponible. Se
colocará regularmente software nuevo para agregar
características y solucionar problemas. Consulte los
detalles en la sección “Actualizaciones del software de
iDJ² ”.
Display (Pantalla)
Desde aquí se puede ajustar el brillo de la pantalla.
Además, se muestra en la pantalla una escala de tonos de
negro a blanco, como ayuda para ajustar el contraste. Ajuste
el contraste girando la perilla Display Contrast (Contraste
de la pantalla) ubicada a la izquierda de la pantalla hasta
que el segmento de más a la izquierda de la escala sea
negro, el de más a la derecha blanco, y se puedan
identificar tres tonos entre ambos extremos.
Restore (Restaurar)
Esta operación reinicializa la unidad a sus valores de
parámetros predeterminados. Seleccione Restore para
continuar o Utilty u otro botón de función para cancelar. Para
estar realmente seguro, se le preguntará una vez más si
esto es algo que desea hacer. Seleccione Yes o No según
corresponda.
Los valores de parámetros predeterminados son:
Rango de pitch 12%
Carga de pistas - Manual
Pantalla de tiempo - Transcurrido
Fader Start - Desactivado
Brillo de la pantalla – A mitad de camino
Tenga en cuenta que esta operación no reinicializa la calibración (vea más abajo).
77
Page 78
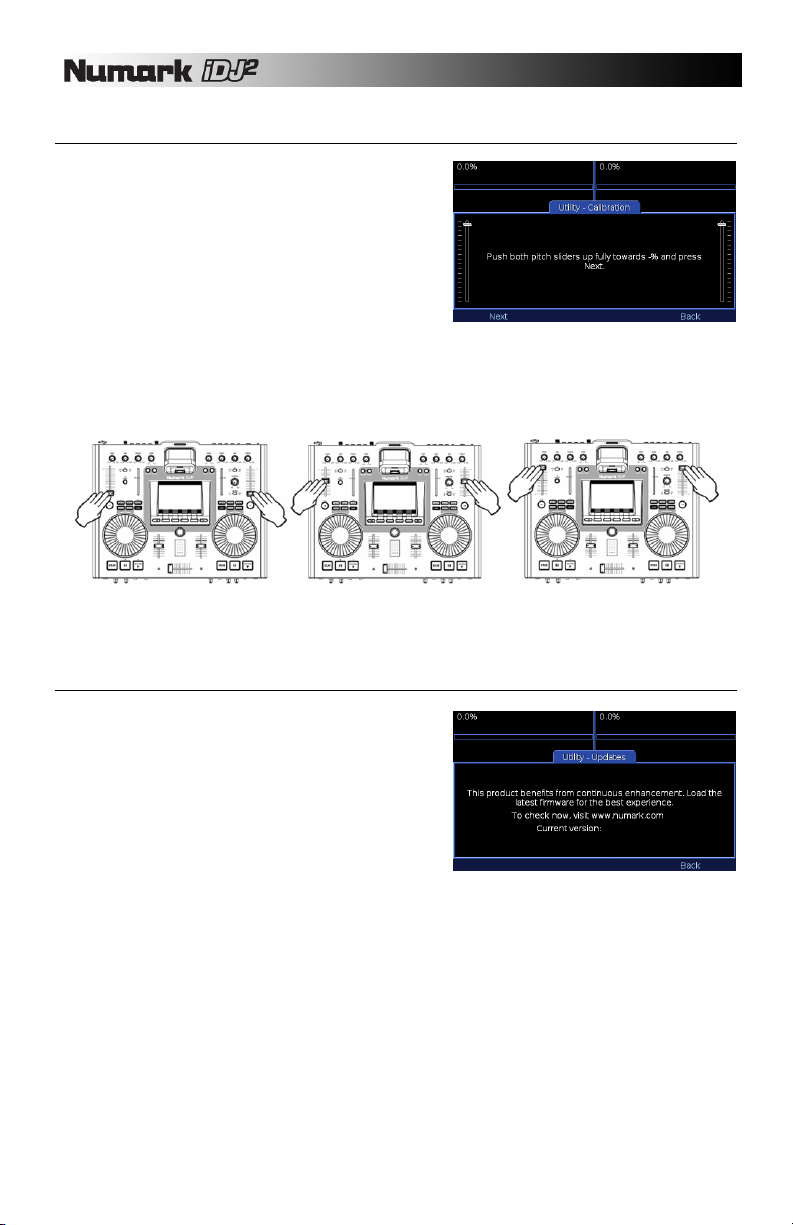
Calibrate (Calibración)
Esta función se usa para calibrar los cursores de pitch. Su
iDJ² ha sido precalibrado en la fábrica, pero las
características de los cursores pueden cambiar levemente
con el tiempo. Si las posiciones superior, central e inferior no
se alinean más con el rango de pitch esperado, debe
ejecutar esta rutina de calibración.
Seleccione Calibrate y cuando se le solicite:
1. Mueva ambos cursores a la posición totalmente
hacia arriba (hacia el símbolo -%)
2. Seleccione Next (Siguiente)
3. Mueva ambos cursores a la posición central
4. Seleccione Next (Siguiente)
5. Mueva ambos cursores a la posición totalmente hacia abajo (hacia el símbolo +%)
6. Seleccione Next (Siguiente)
De esta forma se completa la calibración. Pulse el botón Utility para salir.
Nota: ¡Si mezcla el procedimiento de calibración permutando los extremos más y menos de la
escala, el cursor de pitch no tendrá ningún efecto! Simplemente, vuelva a ejecutar la calibración.
Updates (Actualizaciones)
La página Updates muestra la versión de software actual del
iDJ². Visite regularmente http://www.numark.com/idj2/ para
obtener las actualizaciones de software disponibles. Si la
versión de la actualización de software que está en el sitio
web es superior a la del software existente en su iDJ², siga
el procedimiento de actualización explicado en la sección
siguiente de este manual.
78
Page 79

ACTUALIZACIONES DEL SOFTWARE DE iDJ²
Como continuamente mejoramos y agregamos funcionalidad a iDJ² para que la experiencia de los usuarios
sea óptima, podemos publicar actualizaciones de software en nuestro sitio web. Visite regularmente
www.numark.com/idj2
PROCEDIMIENTO DE ACTUALIZACIÓN
iDJ² cuenta con un procedimiento de actualización protegido contra fallas. En caso de que una
actualización falle a mitad de camino por cualquier razón (incluida la interrupción de la alimentación
eléctrica), el proceso se reinicia desde el comienzo. No obstante, para su conveniencia le
recomendamos que tenga cuidado de asegurarse de que no se interrumpa la alimentación eléctrica
hasta que termine el proceso.
1. Descargue el archivo de la actualización de software (.UPG) a su computadora.
2. Copie el archivo .UPG al nivel superior de un dispositivo de almacenamiento USB compatible con iDJ².
Debe borrar los archivos .UPG anteriores que existan en el dispositivo. Si hay presente más de un
archivo de actualización, el programa actualizador utiliza la primera que encuentra.
3. Con el iDJ² apagado, conecte el dispositivo USB a cualquier puerto USB.
4. Remueva todos los demás dispositivos de almacenamiento conectados.
5. Con el jack de alimentación de CC conectado, pulse y mantenga pulsado el botón de encendido hasta
que vea en la pantalla el mensaje "Waiting for Media" (Esperando el medio). Este paso demora
alrededor de cuatro segundos, después de los cuales puede soltar el botón de encendido. Si no aparece
este mensaje en la unidad, apague y pruebe otra vez, teniendo en cuenta de no soltar el botón de
encendido demasiado pronto.
6. Después de algunos segundos, siempre que iDJ² pueda localizar el archivo .UPG conectado, aparece el
mensaje "Any key updates to version ..." (Pulsando cualquier tecla se actualiza a la versión).
7. Se indica la versión de la actualización de firmware.
8. Pulse cualquier botón (¡excepto el de encendido!).
9. Se carga la actualización de firmware, proceso que puede demorar hasta alrededor de un minuto.
Después de algunos segundos, aparece un indicador de progreso que le da una idea del trabajo
remanente.
10. Después de que se ha completado el proceso de actualización, un mensaje confirma la carga exitosa.
Seleccione OK (Aceptar) para que la unidad se apague.
11. De esta forma termina el proceso de actualización. Ahora, puede encender el iDJ² como lo haría
normalmente. Asegúrese de leer las notas de edición en el sitio web de Numark, de modo de saber qué
es lo nuevo.
Nota: Si iDJ² detecta que el archivo de actualización es idéntico al firmware ya cargado, no carga la
actualización.
para obtener las actualizaciones de software y las últimas noticias de Numark.
INFORMACIÓN IMPORTANTE ACERCA DE LA ACTUALIZACIÓN
El proceso de actualización de iDJ² se puede realizar sólo con un dispositivo USB con formato FAT.
Para verificar si su dispositivo USB está formateado con el sistema de archivos FAT;
• Bajo Windows, haga clic derecho en el dispositivo en su Explorador, seleccione Properties (Propiedades) y
marque la categoría File System (Sistema de archivos). Asegúrese de que diga FAT, FAT16 o FAT32.
• Bajo MacOS, mantenga pulsado Apple, haga clic en el dispositivo y seleccione Get Info (Obtener información).
Marque la categoría Format (Formato) y asegúrese de que diga “MS-DOS File System (FAT16)” o “MS-DOS
File System (FAT32)”.
Si su dispositivo no está formateado con el sistema de archivos FAT, es necesario que lo reformatee antes de usarlo
para la actualización:
• Bajo Windows, haga clic derecho en el dispositivo en su Explorador y seleccione Format. Bajo la ficha File
system seleccione FAT y haga clic en Start (Inicio) para formatear el dispositivo.
• Bajo MacOS(10.4), vaya a Applications -> Utilities (Aplicaciones -> Utilidades) y haga doble clic en Disk
Utility (Utilidad de disco). Seleccione el dispositivo desde el navegador de la izquierda y luego seleccione la
pestaña Erase (Borrar). Bajo Volume Format (Formato del volumen), seleccione “MS-DOS File System”
(Sistema de archivos MS-DOS) y pulse luego el botón Erase (Borrar) de abajo para formatear el dispositivo.
PARA TENER EN CUENTA: Al formatearse un dispositivo, se borran todos los datos existentes en el mismo.
Asegúrese de guardar primero en su disco duro todos los datos que desee conservar.
79
Page 80

ACCESOS DIRECTOS DEL TECLADO
Si tiene un teclado USB conectado a su iDJ², puede acceder a algunos cómodos accesos directos:
ENTRADA DE TEXTO
Usado en el 'artefacto' de entrada texto, durante la búsqueda y el cambio de nombre de listas de reproducción, etc.
(Cuando no se está editando)
• Retorno = inicia la edición
(Cuando se está editando)
• Cursor izq / der = mover el signo de intercalación
• Retorno / Enter = HECHO y mover el foco al campo siguiente
• Escape = Borra o cancela el texto introducido
• Inicio / Fin = comienzo / final de la cadena
• Retroceso = Eliminar hacia atrás
• Delete (Supr) = Eliminar hacia adelante
• Se cumplen el bloqueo de mayúsculas y números
LISTAS
Se usan cuando se examina la biblioteca
• Izquierda (o) Arriba = Lo mismo que girar la perilla PUSH TO ENTER en sentido antihorario
• Derecha (o) Abajo = Lo mismo que girar la perilla PUSH TO ENTER en sentido horario
• Retorno = Seleccionar (lo mismo que pulsar PUSH TO ENTER)
• RePág / AvPág = Retroceso / avance de página
• Ctrl-RePág / AvPág = Tope / pie de la lista
• Escape = volver al nivel superior
CURSOR
• Izquierda (o) Arriba = Mover el cursor a la izquierda
• Derecha (o) Abajo = Mover el cursor a la derecha
• Ctrl-izquierda / derecha / arriba / abajo = Mover al comienzo / fin del cursor
CUADRO COMBINADO
• Izquierda / Arriba = Elemento anterior
• Derecha / Abajo = Elemento siguiente
GENERALES
• Tab = mover el foco al campo siguiente
• Mayús-tab = mover el foco al campo anterior
BOTONES DE MENÚ
• CTRL + 1,2,3,4 = Botones uno a cuatro de los botones de función
• CTRL + Cursor izq / der = Páginas izquierda y derecha de páginas de menú disponibles.
ACCESOS DIRECTOS GENERALES
• Ctrl + F = Comenzar una búsqueda por “Título” igual que si se pulsa F2
• Ctrl + L = Ir a la ventana de biblioteca
• Ctrl + C = Ir a la ventana de caja de discos
• Ctrl + U = Ir a la ventana de la utilidad
• Ctrl + V = Ir a la ventana de vista
• Ctrl + E = Ir a la ventana de expulsión
• Escape – Cancelar ventanas emergentes
• F1 = Abrir navegador de búsqueda en la biblioteca actual, configurar como “Todo” y enfocar el teclado en el
artefacto de entrada de texto
• F2 = comenzar una búsqueda por “Título"
• F3 = Comenzar una búsqueda por "Álbum"
• F4 = Comenzar una búsqueda por "Artista"
• F5 = Examinar por género
• F6 = Examinar por BPM (en pistas etiquetadas correctamente)
• F7 = Examinar por año
• F8 = Menú de listas de reproducción
• F9 = Archivos (Examinar por archivo el dispositivo directamente)
• F10 = Biblioteca (pulsar otra vez para cambiar a la biblioteca siguiente, si está disponible)
80
Page 81

COMPATIBILIDAD DE DISPOSITIVOS USB
En esta sección se exploran los aspectos técnicos de la conexión de dispositivos USB a iDJ². Para muchos
usuarios, la mayor parte del detalle es irrelevante —el reproductor hace simplemente lo esperado. No
obstante, es buena idea familiarizarse con esta información de modo de estar preparado para cualquier
problema inesperado que pueda surgir durante el trabajo.
CONEXIÓN USB
DISPOSITIVOS DE ALMACENAMIENTO SOPORTADOS
CÓMO IDENTIFICAR LAS BIBLIOTECAS
iDJ² es un reproductor de medios USB. No tiene almacenamiento propio, sino que se conecta almacenamiento
externo mediante tres puertos USB (uno en el panel frontal, dos en el trasero). Esto permite conectar tres
dispositivos directamente a la unidad, lo que es ampliamente suficiente para la mayoría de las situaciones. No
obstante, también se soportan hubs USB para extender las posibilidades hasta por lo menos doce dispositivos.
Los hubs se deben conectar directamente al iDJ², no se soporta la conexión de un hub a otro hub.
Las especificaciones USB limitan la magnitud de la alimentación que puede proporcionar un puerto USB. Algunos
dispositivos, particularmente los motorizados como los discos duros, requieren más potencia que la que se puede
tomar de un puerto y por lo tanto se usa un adaptador de CA o un segundo cable USB. Asegúrese de usar el
adaptador o el cable para garantizar una operación confiable. Recomendamos que los hubs sean del tipo
alimentado, para asegurar que se disponga de suficiente potencia para los dispositivos conectados a ellos,
especialmente si algunos de ellos son motorizados.
Cuando conecte a los puertos USB, tenga cuidado de colocar el enchufe de la manera correcta. Si se fuerza un
enchufe colocado de manera incorrecta, se pueden dañar los conectores de su dispositivo y D2. Para su
conveniencia, puede elegir conectar cables de extensión USB a los puertos de iDJ² y sus dispositivo a los cables.
Esto es correcto, pero sin embargo debe evitar el uso de extensiones excesivamente largas (de más de 1 metro /
40 pulgadas) puesto que éstas pueden causar un funcionamiento no confiable.
iDJ² es compatible con la mayoría de los dispositivos de almacenamiento USB que soportan la norma Mass
Storage Class (Clase de almacenamiento masivo). Se incluyen los discos duros, llaves de memoria flash,
adaptadores de tarjeta flash y reproductores de música personales USB. Las dispositivos que requieren la
instalación de drivers en su PC o Mac pueden no ser compatibles. Los dispositivos deben cumplir las normas
USB 1.0, 1.1 ó 2.0 incluida la especificación de alimentación por bus (ningún dispositivo puede absorber más de
500 mA del puerto).
Si bien iDJ² se probó con una amplia variedad de dispositivos, por supuesto es imposible probarlo con todas las
miles de variantes existentes. Si descubre algún problema de compatibilidad, infórmenos, indicando el tipo, marca
y modelo del dispositivo y dónde y cuándo lo compró. Es probable que los problemas se deban a la desviación
del dispositivo con respecto a la norma USB; pero no obstante, a veces es posible adaptar incluso estos
dispositivos en una actualización de firmware futura.
iDJ² soporta dispositivos con varias particiones. Cada partición que contiene un sistema de archivos soportado se
muestra como una biblioteca por separado. Al realizar la expulsión, asegúrese de expulsar todas las particiones
antes de remover el dispositivo en cuestión.
Si su dispositivo tiene un interruptor de protección contra escritura, le recomendamos ponerlo en Off
(Desactivado). iDJ² puede funcionar con dispositivos protegidos contra escritura, pero se pierden algunas
funcionalidades, tales como la creación de listas de reproducción y el archivo de la caja de discos. El dispositivo
debe estar habilitado para escritura para crear una biblioteca, pero no obstante, se puede cargar en una biblioteca
existente en un dispositivo protegido contra escritura.
Cada biblioteca en uso tiene un nombre exclusivo que indica cómo está conectada, tal como éste:
¸ USB 1 Puerto USB frontal
¸ USB 2, USB 3 Puertos USB traseros 2/3
¸ USB 1-1 Puerto 1 de un hub conectado al puerto USB frontal
¸ USB 1-4 Puerto 4 de un hub conectado al puerto USB frontal
¸ USB 1b Segunda partición en el puerto USB frontal
¸ USB 1-2c Tercera partición en el puerto 2 de un hub conectado al puerto USB frontal
En la mayoría de los casos, los dispositivos sencillos conectados directamente a la unidad, usted verá
simplemente USB 1, USB 2 o USB 3.
81
Page 82

Cada biblioteca tiene también un nombre de dispositivo que aparece dentro de la interfaz de usuario Este nombre
se toma del dispositivo de almacenamiento propiamente dicho y varía según el dispositivo y el fabricante. Entre
los ejemplos se incluyen:
¸ USB DISK (Disco USB)
¸ Hard Disk Drive (Disco duro)
¸ iPod
Algunos dispositivos descarriados, a menudo llaves de memoria flash, aparecen con frecuencia con títulos
indescifrables. Para su conveniencia, puede configurar su propio título creando un archivo denominado
volumen_nombre.txt en el directorio de nivel superior. El archivo debe contener su título deseado en texto simple
de hasta 20 caracteres
SISTEMAS DE ARCHIVOS SOPORTADOS
CÓMO EVITAR Y REPARAR ERRORES
DESFRAGMENTACIÓN
CÓMO MANTENER SEGUROS SUS DATOS
Los sistemas de archivos soportados son FAT16, FAT32, HFS+ y NTFS (este último para sólo lectura). Los
sistema FAT16 y FAT32 los usan habitualmente los dispositivos de medios preformateados y son compatibles
con la amplia mayoría de los sistemas de computadoras. NTFS lo usan habitualmente las computadoras de
Windows, especialmente para las unidades grandes. HFS+ es el formato por defecto para la computadora Apple
Macintosh y también el sistema de archivos predeterminado para el reproductor de música personal iPod de
Apple.
En general, recomendamos formatear los dispositivos con FAT32 toda vez que sea posible, puesto que éste es el
formato soportado más ampliamente. Windows XP no soporta el formateo de discos duros de más de 32 GB con
FAT32. No obstante, hay programas gratuitos disponibles que lo soportan
Nota for NTFS:
El sistema de archivos NTFS se soporta en iDJ² sólo para lectura. Esto limita levemente la funcionalidad
y requiere que usted use la herramienta Librarian para construir una biblioteca (vea más abajo). Cuando
sea posible, recomendamos formatear con FAT32 en cambio.
Si nada de esto significa mucho para usted, ¡no entre en pánico! La mayoría de los dispositivos de
almacenamiento USB ya vienen formateados en un formato que probablemente sea compatible con iDJ².
El consejo más importante para recordar es EXPULSAR SIEMPRE LA BIBLIOTECA antes de removerla o apagar
el equipo (consulte los detalles en la sección “Cómo expulsar una biblioteca”). El incumplimiento de este paso
puede causar (y seguramente causará) la corrupción del sistema de archivos, lo que puede ser extremadamente
inconveniente durante el trabajo. Este consejo se aplica igualmente a la desconexión de medios de su PC —tanto
Windows como MacOS proporcionan métodos para remover dispositivos con seguridad.
Esto es particularmente importante para los medios HFS+, que se deben conectar a una computadora Macintosh
después de una remoción no segura, para que se puedan usar nuevamente con iDJ².
Si piensa que sus medios se corrompieron, debe conectarlos a su computadora PC o Macintosh para
mantenimiento. Bajo Windows, abra las propiedades del dispositivo y seleccione "Check Now" (Comprobar ahora)
en la ficha Tools (Herramientas). Bajo MacOS, ejecute la aplicación Disk Utility (Utilidad de disco).
Durante el uso normal, un dispositivo de almacenamiento puede fragmentarse. La fragmentación es una
condición en la que los archivos se dividen en muchas partes. Esto es invisible para el usuario pero degrada el
rendimiento, porque potencialmente enlentecen el acceso a la biblioteca y causan interrupciones durante la
reproducción Periódicamente, debe desfragmentar sus medios para asegurar un funcionamiento confiable Bajo
Windows, ejecute el programa Disk Defragmenter (Desfragmentador de discos). MacOS no incluye un programa
de desfragmentación, puesto que HFS+ no sufre este problema. No obstante, hay disponibles programas
comerciales y gratuitos para realizar esta tarea en los medios que no son HFS+.
Tal como es importante tener una copia de seguridad del disco duro de su PC, es igualmente esencial hacer
siempre copias de seguridad de sus datos correspondientes a iDJ². Ningún medio es infalible —todas las llaves
flash, discos duros o tarjetas flash tienen una vida útil finita y es su responsabilidad asegurar que sus datos estén
protegidos y seguros. Nunca vaya a una sesión con una sola copia de su contenido, trabaje siempre con una
copia de seguridad y preferentemente lleve otra en caso de que falle (o pierda o le roben) un dispositivo mientras
trabaja.
Mientras se toma el tiempo de hacer sus copias de seguridad, consideré qué afortunado es de poder llevar dos
copias completas de todas sus pistas en su bolsillo o un pequeño bolso. ¡Tome estas sencillas precauciones y
abrace la era digital!
82
Page 83

EXPLICACIÓN DEL AUDIO DIGITAL
En esta sección se explican unos cuantos detalles técnicos de la tecnología del audio digital. Pensamos que
para un DJ es importante comprender cómo se puede aplicar esta tecnología, particularmente si la va a usar
profesionalmente. Con los conocimientos correctos, puede tomar decisiones informadas y asegurarse de
que sus sesiones sean de máxima calidad.
COMPRESIÓN
ETIQUETADO
FORMATOS
Los archivos de audio de alta calidad ocupan un montón de espacio, limitando la cantidad de música que se
puede almacenar en medios tales como una unidad flash USB. Para hacer caber más música, se deben
comprimir los archivos, pero las técnicas tradicionales no funcionan bien con el audio y prácticamente no permiten
ahorrar ningún espacio. Para resolver este problema, ha emergido una nueva generación de tecnología, que tomó
la industria de la música por asalto.
Los formatos de audio comprimidos modernos, como MP3 y AAC, usan una técnica conocida como compresión
psicoacústica para reducir el tamaño de los archivos de audio. No todos los datos que contiene una pista de audio
son significativos para el oído humano, de modo que es posible descartar ciertas partes de la onda o combinar
otras sin cambiar significativamente su percepción del sonido. Además, algunas partes de la onda enmascaran a
otras, de modo que esas también se pueden descartar. Lo que queda se puede representar entonces en un
formato muy eficiente, resultando un archivo muchas veces menor que el original, alterando muy poco nuestra
percepción del audio. Puesto que algo de la información original se ha perdido, estos formatos se denominan a
veces “con pérdidas”. Al elegir la agresividad con que se aplica la compresión, podemos hacer un compromiso
entre el tamaño del archivo y la calidad del audio.
Aparte de los datos de audio, la mayoría de los formatos contienen también información acerca de la pista,
conocida como “etiquetas”. Se incluyen con frecuencia etiquetas tales como título de la pista, nombre del artista,
título del álbum, BPM (beats por minuto) y género. Las mejores aplicaciones de audio ofrecen una característica
para llenar automáticamente estas etiquetas cuando se convierten CD, y algunas pueden identificar incluso las
pistas que se grabaron desde vinilos u otras fuentes. De lo contrario, puede escribir y editar manualmente las
etiquetas.
Recomendamos especialmente que se tome tiempo para asegurar que su colección musical esté bien etiquetada.
Si bien esto podría involucrar un esfuerzo significativo en el caso de una colección etiquetada deficientemente,
brindará un rédito significativo durante sus sesiones. iDJ² hace uso intensivo de las etiquetas para organizar su
colección musical y brinda métodos poderosos para encontrar las pistas rápida y eficazmente.
iDJ² soporta tres de los formatos de audio más populares —dos comprimidos (con pérdidas) y no sin comprimir
(sin pérdidas).
MP3
Es el formato que inició la revolución. Inventado a principios de los 90 para la industria de la difusión, se
extendió explosivamente a la industria de la música algunos años después, con la invención del
reproductor MP3 portátil. Se ha convertido ahora en un término casi genérico para la música digital,
aunque MP3 es sólo uno de los muchos formatos de música comprimidos en uso actualmente.
MP3 en particular puede sufrir críticas acerca de la calidad del sonido. En sus primeros años, el
almacenamiento era caro, de modo que las pistas con frecuencia se comprimían fuertemente,
degradando la calidad del sonido. Ahora, con las llaves de memoria flash y los discos duros de gran
capacidad de costo más accesible que nunca, no hay ninguna razón para sobrecomprimir,
especialmente para uso profesional. Se ha demostrado que con una velocidad en bits de 256K bits por
segundo (bps) la amplia mayoría de los escuchas no pueden distinguir con respecto a un original sin
compresión. Esto proporciona un tamaño de archivo de aproximadamente el 20% de una grabación sin
comprimir.
Una opción popular ofrecida por muchos codificadores es la velocidad en bits variable (VBR). La
velocidad en bits varía a lo largo de la pista, de modo que las partes sencillas ocupan menos espacio,
mientras que las más complejas ocupan más para asegurar una alta calidad. La mayoría de los
programas de codificación le permiten seleccionar una "velocidad en bits promedio" para VBR —elegir
192K, por ejemplo, lleva a un archivo de aproximadamente el mismo tamaño que un archivo de
velocidad en bits constante (CBR) de 192K, pero la calidad la calidad general es mejor.
83
Page 84

Algunos codificadores ofrecen una selección de frecuencias de muestro de 8 a 48 kHz, pero sin
embargo iDJ² siempre muestrea a 44.1 kHz, de modo que no hay nada que ganar codificando a una
velocidad superior a ésta.
iDJ² puede extraer etiquetas de archivos MP3 usando el popular formato ID3. Recomendamos usar
ID3v2, porque ofrece mayor flexibilidad en la longitud de las etiquetas y los tipos de información que se
pueden almacenar (BPM por ejemplo).
Muchos paquetes soportan la codificación a MP3, algunos son comerciales y otros gratuitos. Algunos
proveedores cobran un derecho adicional por la codificación MP3 superior a 64 kbps (que es una
velocidad en bits demasiado baja para uso profesional).
AAC
Este formato, inventado a fines de los 90, se inició también en la industria de la difusión. Su irrupción en
la industria de la música se produjo con su adopción como formato por defecto para iTunes y el
reproductor portátil de música iPod de Apple. A veces, este formato se conoce como MP4 o MPEG-4 si
bien más correctamente es la Parte 3 de la norma MPEG-4. La extensión de archivos más común es
.M4A.
AAC mejoró el rendimiento con respecto al antiguo formato MP3 al producir una reproducción superior
del sonido para el tamaño del archivo. La mejora más grande es con archivos de baja velocidad en bits,
pero esto es menos relevante para el usuario profesional y, a velocidades en bits más altas, los formatos
se consideran aproximadamente iguales en calidad sonora.
iDJ² puede extraer etiquetas de archivos AAC usando el formato M4A, soportado por muchas
aplicaciones de audio populares.
Si usa iTunes para codificar su colección musical, hay probabilidades de que sea en formato AAC
(usando la extensión de archivo M4A). En cambio si compró música en la tienda en línea iTunes Music
Store, debe tener en cuenta que ni iDJ² ni ningún otro reproductor de música digital que no sea iPod de
Apple pueden reproducir actualmente este contenido protegido. Apple es quien impone esta limitación.
WAV
El formato WAV (o Wave) ha estado en uso durante muchos años y es un formato de audio sencillo
(normalmente sin comprimir). Si bien la extensión de los archivos es la misma, los archivos WAV pueden
contener diversos formatos de audio digital —iDJ² puede reproducir el popular formato PCM de 16 bits.
A una frecuencia de muestreo de 44.1 kHz, ésta es una fiel reproducción del audio de CD. Este formato
es útil si desea asegurar la mejor calidad de sonido posible, pero como resultado los archivos son
grandes (típicamente cinco a diez veces mayores que un archivo MP3).
No hay ninguna norma para etiquetar dentro de los archivos WAV y en este momento iDJ² usa sólo el
nombre de archivo para identificar una pista (esto se representa como título de la pista).
84
Page 85

TUTORIAL SOBRE LA MEZCLA
Ahora que se familiarizó con la consola iDJ², probemos este rápido tutorial sobre la mezcla. Este tutorial le
ayudará a entender mejor el proceso y los pasos requeridos para combinar una pista con la siguiente. A los
fines de este tutorial, supongamos que está mezclando música desde un dispositivo de almacenamiento
masivo USB o iPod conectado. Los conceptos fundamentales se pueden aplicar a la mezcla de música
proveniente de fuentes externas, tales como giradiscos y reproductores de CD.
1. Cargue una pista en la bandeja A seleccionando To A
mientras ve una pista de Crate (Caja de discos) o Library
(Biblioteca).
2. Con el crossfader en el extremo
izquierdo (bandeja A), pulse
REPRODUCIR para comenzar a
reproducir la pista.
3. Mientras se reproduce la pista en la bandeja A, seleccione
otra pista y cárguela en la bandeja B.
4. Ajuste la perilla CUE MIX del panel frontal para escuchar
la bandeja B en los auriculares.
5. Use la rueda de avance lento de la bandeja B para desplazarse al primer
downbeat de la pista en los auriculares.
6. Pulse REPRODUCIR en la bandeja B cuando la música de la bandeja A
golpee un downbeat.
85
Page 86

7. Use el cursor de pitch de la bandeja B para hacer coincidir el tempo de la
pista con la música de la bandeja A.
8. Cuando haya hecho coincidir el tempo, pulse CUE en la bandeja B para
volver y hacer una pausa en el punto de cue.
9. Cuando esté listo a iniciar la mezcla, pulse REPRODUCIR en la bandeja
B.
10. Use el crossfader para hacer la
transición de la bandeja A a la B.
11. Cuando hace la transición desde la bandeja B con el
crossfader, use los cursores de volumen y las perillas de
ganancia y ecualización de cada canal para ajustar el sonido.
Si la pista entrante comienza a derivar en el tiempo, use la
rueda de avance lento de la bandeja B para hacer ajustes al
tempo de modo que la música de la bandeja B se “enganche”
con el beat que se reproduce en la bandeja A.
12. Cuando desee terminar la transición,
mueva el crossfader en todo su
recorrido a la derecha (Bandeja B).
¡Ha realizado exitosamente la mezcla!
Repita el procedimiento para continuar
la mezcla.
Como puede ver, ¡mezclar no es tan difícil! No obstante, se necesita algo de tiempo para perfeccionarse.
A medida que practique, logrará una mejor sensación acerca de qué materiales musicales van bien juntos
y cómo puede crear transiciones suaves entre pistas usando los controles de volumen, ecualización y
crossfader. No se desanime si sus mezclas no suenan profesionales desde el vamos —¡la práctica las
hará perfectas!
86
Page 87

ESPECIFICACIONES TÉCNICAS
Nivel de salida 1.4 V efic 0 dBFS
Relación S/R 80 dB con ponderación A
THD+N (Distorsión armónica total + ruido) 0.06% -6 dBFS 1 kHz
Respuesta en frecuencia 20 Hz – 20 kHz +/- 1.5 dB
Trayecto de audio 24 bits 44.1 kHz
Rangos de pitch +/- 6%, +/- 12%, +-25%, +25%/-100%
Peso 2.948kg
Dimensiones 402mm (W) x 77mm (H) x 329mm (D)
INFORMACIÓN SOBRE LICENCIAS
Firmware de iDJ² © Numark Industries, Inc. 2007. Todos los derechos reservados.
iDJ² está construido sobre una plataforma Linux para asegurar alta confiabilidad y rendimiento. Linux y las partes
relacionadas de este software se proveen bajo la Licencia Pública (GPL) y la Licencia Pública Menor (LGPL) de
GNU. Numark ha puesto a disposición para descarga el código fuente de estas partes del software en:
http://www.numark.com/idj2/
RECONOCIMIENTOS
El siguiente software se incluye sujeto a la Licencia Pública de GNU (GPL):
El siguiente software se incluye sujeto a la Licencia Pública Menor de GNU (LGPL):
El siguiente software se incluye sujeto a la Licencia Pública de Mozilla (MPL):
Cierto software se incluye sujeto a la Licencia de Fuente Comunitaria de RealNetworks (RCSL):
Linux © Linus Torvalds
Busy Box © Erik Andersen
Red Boot © Red Hat
CDfs © Michiel Ronsse
GNU C Library © Free Software Foundation
id3lib © Scott Thomas Haug
mp4v2 © MP4IP Project
SE incluye tecnología Helix DNA Client.
© RealNetworks, Inc., 1995-2007.
Todos los derechos reservados.
87
Page 88
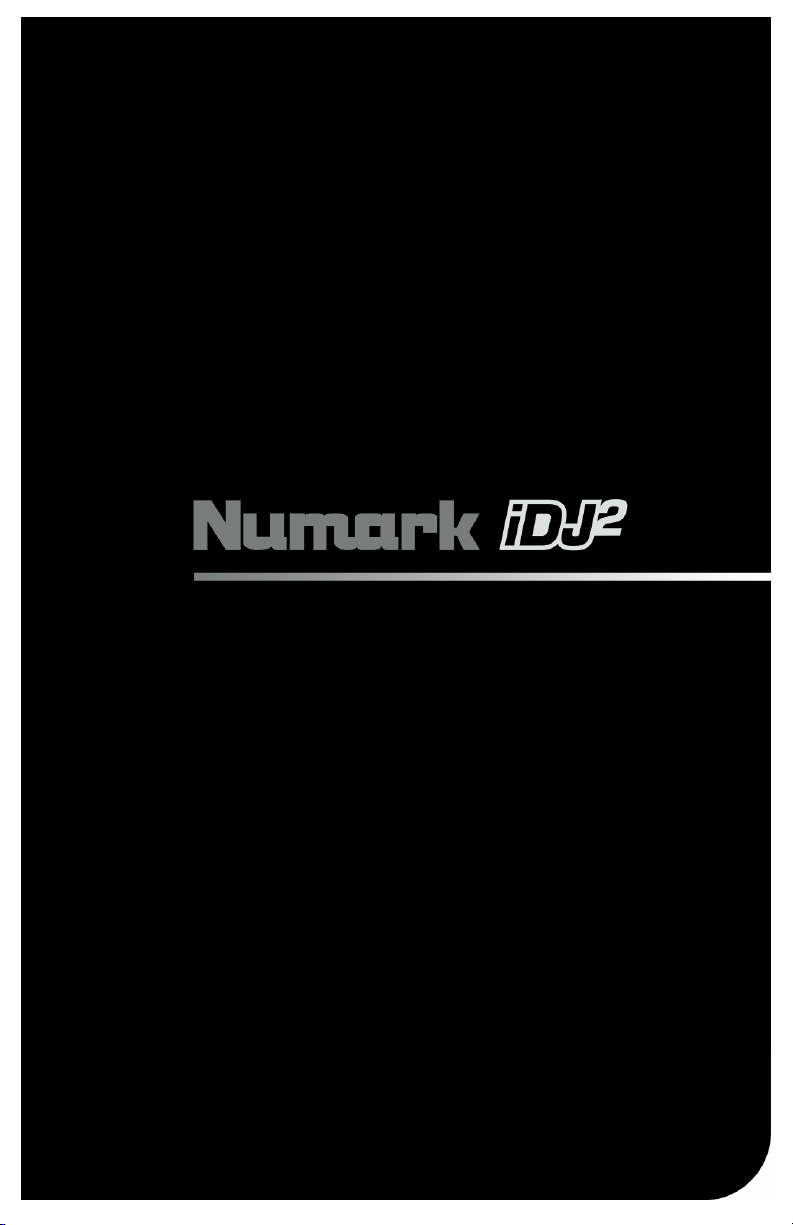
GUIDE D’UTILISATION
88
Page 89

INTRODUCTION.........................................................................................................................................................................90
CARACTÉRISTIQUES................................................................................................................................................................90
RENSEIGNEMENTS IMPORTANTS ..........................................................................................................................................91
SCHÉMA DE CONNEXION ........................................................................................................................................................91
PANNEAU SUPÉRIEUR COMMANDES GÉNÉRALES............................................................................................................. 96
PANNEAU SUPÉRIEUR COMMANDES DE LA CONSOLE DE MIXAGE.................................................................................98
PANNEAU SUPÉRIEUR COMMANDES DES MODULES......................................................................................................... 99
COMMANDES DU BOUCLAGE.........................................................................................................................................101
COMMANDES DU IPOD DIRECT MODE..........................................................................................................................102
UTILISATION DU iDJ² .............................................................................................................................................................103
L’interface graphique..........................................................................................................................................................105
Marche/Arrêt.......................................................................................................................................................................105
L’écran .............................................................................................................................................................................105
Affichage des modules.......................................................................................................................................................106
Barre du menu....................................................................................................................................................................106
Espace de travail................................................................................................................................................................107
Barre de progression.......................................................................................................................................................... 107
Utilisation des listes............................................................................................................................................................ 108
Utilisation des dialogues.....................................................................................................................................................108
Répondre aux questions.....................................................................................................................................................109
Modification des paramètres ..............................................................................................................................................109
L’entrée de texte.................................................................................................................................................................110
LA BIBLIOTHÈQUE..................................................................................................................................................................111
PRÉPARATION DE VOTRE MÉMOIRE ............................................................................................................................111
CRÉATION D’UNE BIBLIOTHÈQUE .................................................................................................................................111
Création avec Librarian ...............................................................................................................................................111
Création avec le iDJ²................................................................................................................................................... 112
CHARGEMENT D’UNE BIBLIOTHÈQUE...........................................................................................................................113
UTILISATION D’UNE BIBLIOTHÈQUE.............................................................................................................................. 113
Searching (Recherche) ...............................................................................................................................................114
Browsing (Survol)........................................................................................................................................................ 115
File View (Affichage fichier).........................................................................................................................................116
Utilisation des listes d’écoute ......................................................................................................................................117
ÉJECTER UNE BIBLIOTHÈQUE.......................................................................................................................................118
LE CRATE.................................................................................................................................................................................119
UTILISATION DU CRATE.................................................................................................................................................. 120
CHARGEMENT ET SAUVEGARDE DU CRATE ..............................................................................................
RÉGLAGE DES MODES POUR LES MODULES (A ET B).....................................................................................................122
PITCH RANGE................................................................................................................................................................... 122
KEY LOCK .........................................................................................................................................................................123
TRACK LOADING..............................................................................................................................................................123
TIME DISPLAY...................................................................................................................................................................124
FADER START ..................................................................................................................................................................124
IPOD MODE....................................................................................................................................................................... 124
VIEWS....................................................................................................................................................................................... 125
TRACK VIEW.....................................................................................................................................................................125
PROFILE VIEW.................................................................................................................................................................. 125
Création de profiles de pistes...................................................................................................................................... 125
Travaillez avec les profiles de pistes........................................................................................................................... 125
UTILITAIRE...............................................................................................................................................................................126
Display (écran) ...................................................................................................................................................................126
Restore (Restaurer)............................................................................................................................................................126
Calibrate (Calibration).........................................................................................................................................................127
Updates (Mises à jour) .......................................................................................................................................................127
MISES À JOUR DU LOGICIEL D2 ...........................................................................................................................................128
PROCÉDURE DE MISE À JOUR.......................................................................................................................................128
RACCOURCIS CLAVIER..........................................................................................................................................................129
COMPATIBILITÉ DE MÉMOIRE USB ......................................................................................................................................130
BRANCHEMENT USB .......................................................................................................................................................130
MÉMOIRES SUPPORTÉES ..............................................................................................................................................130
IDENTIFICATION DES BIBLIOTHÈQUES.........................................................................................................................131
SYSTÈMES DE FICHIERS SUPPORTÉS.........................................................................................................................131
ÉVITER ET RÉPARER LES ERREURS ............................................................................................................................132
DÉFRAGMENTATION .......................................................................................................................................................132
GARDER VOS DONNÉES EN SÉCURITÉ........................................................................................................................132
EXPLICATION DE L’AUDIO NUMÉRIQUE.............................................................................................................................. 133
COMPRESSION ................................................................................................................................................................133
TAGGAGE..........................................................................................................................................................................133
FORMATS.......................................................................................................................................................................... 134
TUTORIEL DE MIXAGE ...........................................................................................................................................................136
SPÉCIFICATIONS TECHNIQUES............................................................................................................................................138
INFORMATIONS DE LICENCE ................................................................................................................................................138
REMERCIEMENTS............................................................................................................................................................ 138
.................121
89
Page 90

INTRODUCTION
Le iDJ2 est une console à double module conçue pour les besoins du DJ moderne. Avec une
interface innovatrice et très conviviale et la conception prêt à utiliser, le DJ peut facilement trouver,
organiser et jouer les pistes se trouvant sur les périphériques de stockage USB ou sur les iPod*
ancrés sur le socle. Les chansons peuvent être manuellement ou automatiquement dirigées aux
modules, tel un jukebox.
Des outils puissants tels que le Crate et le Profile view propose une vision numérique des méthodes
traditionnelles de DJing. Le Crate peut être utilisé pour préparer et arranger votre programme à
l'avance, durant la prestation ou moitié-moitié. Le Profile View offre une aide visuelle rapide pour le
repérage, comme si vous regardiez les rainures d'un disque vinyle.
2
Le iDJ
est doté de deux connexions USB et d'un socle pour iPod qui vous offrent plusieurs options
de stockage. Celles-ci incluent les iPods d'Apple, les clés USB et les disques durs externes. La
recherche par artiste, album ou par titre de piste est grandement facilité grâce à la possibilité
d'utiliser un clavier USB (non inclus).
2
Le iDJ
peut lire des fichiers musique de format MP3, WAV et AAC** sauvegardés sur des systèmes
de fichiers FAT16, FAT32, NTFS et HFS+.
En plus de son impressionnante capacité de lecture, le iDJ
2
fonctionne également comme console de
mixage complète dotée de toutes les fonctionnalités que l'on retrouve sur une console de mixage
traditionnelle, tel que crossfader, section égalisation/gain pour chaque canal, pré-écoute avec
casque-d'écoute, entrées analogiques permettant de brancher des sources audio supplémentaires,
telles que tourne-disque et lecteur CD.
CARACTÉRISTIQUES
Console de mixage 2 canaux avec commandes d'égalisation et de gain
Crossfader avec courbe de la répartition de la vitesse réglable
2 entrées analogiques stéréo permettant de brancher des sources audio supplémentaires telles que
tourne-disques et lecteurs CD
2 canaux de sortie stéréo principaux (symétrique et asymétrique)
Canal de sortie d'enregistrement stéréo (asymétrique)
Entrée microphone avec commande du gain et de tonalité
2 sorties casque (¼ po et • po) avec commande du gain et de tonalité
Supporte les iPods, les clés USB, les clés USB à mémoire flash, et les disques durs externes
Scratching et réglage de la vitesse de lecture
Boucle parfaite et bégaiement
Commande de vitesse de lecture
Verrouillage du ton (Key Lock)
Large écran de couleur avec interface conviviale révolutionnaire
Recherche rapide des chansons
Visualisation du profil des pistes
Socle de synchronisation afin de mixer directement d'un iPod
Sortie S-Vidéo pour l'affichage du contenu vidéo provenant d'un iPod (en iPod Direct Mode seulement)
2 ports USB permettant de brancher des clés USB, disques durs ou un clavier
Formats supportés MP3, WAV et AAC**
Technologie Beatkeeper™ avec fonction TAP
Commande à distance
Support clavier USB pour accélérer la recherche sur clés USB ou iPods
Permet la création de liste d'écoute de différents formats sur ordinateur
Mises à jour logiciel sécuritaires Allez au www.numark.com pour enregistrer le produit.
*iPod est une maque de commerce de Apple, Inc., enregistrée aux États-Unis et dans d'autres pays.
**Fichiers de format AAC audio protégés téléchargés de iTunes ne peuvent être lus.
90
Page 91

RENSEIGNEMENTS IMPORTANTS
Le iDJ² fonctionne mieux si la dernière version du logiciel est installée. Nous recommandons fortement de vérifier que
vous possédez les dernières mises à jour du logiciel, et de continuer à vérifier régulièrement afin de ne pas laisser
passer quoi que ce soit! Consultez la section « Mises à jour du logiciel iDJ² » pour de plus amples détails.
SCHÉMA DE CONNEXION
1. Assurez-vous que les articles suivants sont dans la boîte :
2. LIRE LE LIVRET DES CONSIGNES DE SÉCURITÉ AVANT D'UTILISER LE PRODUIT.
3. Examinez bien le schéma de raccordement.
4. Placez le iDJ² en position de fonctionnement.
5. Assurez-vous que tous les appareils sont hors tension et que tous les atténuateurs et le gain
6. Branchez toutes les sorties stéréo à la console de mixage et/ou aux autres appareils audio.
7. Branchez tous les appareils à une prise de courant alternatif (AC).
8. Mettre tous les appareils sous tension dans l'ordre suivant :
9. Pour mettre hors tension, toujours inverser l'opération de la façon suivante :
Ne forcez pas
Les dispositifs USB se logent dans les ports USB d’une seule façon. Si le dispositif ne s’enfonce pas
facilement, ne le forcez pas - vérifiez que vous l’entrez du bon côté!
Éjectez avant de tirer
Lorsque vous avez terminé avec une mémoire, éjectez-la toujours de façon appropriée avant de la
débrancher, tout comme vous le faites pour votre ordinateur à la maison. Débrancher sans avoir au
préalable éjecté peut endommager vos données. Consultez la section « Éjecter une bibliothèque » pour
de plus amples détails.
Concentrateurs USB
Vous pouvez brancher un concentrateur dans chacun des ports USB de votre iDJ², mais ne branchez
pas un concentrateur dans un concentrateur! Nous recommandons d'utiliser uniquement les
concentrateurs alimentés pour un maximum de fiabilité.
Gadgets USB
Les souris, les pavés tactiles et les autres unités d’entrées ne seront d’aucune utilité pour votre iDJ². La
plupart des claviers USB sont supportés, mais nous recommandons d’utiliser le super clavier Numark
inclus.
• iDJ²
• Adaptateur CA
• Clé USB
• Guide d’utilisation simplifié
• Livret des consignes de sécurité
sont réglés au minimum.
• iDJ²
• amplificateurs ou appareils de sortie
• amplificateurs ou appareils de sortie
• iDJ²
Plus d'information sur ce produit est disponible au site internet http://www.numark.com/iDJ2.
91
Page 92

Examinez bien le schéma de raccordement ci-dessus :
SYSTÈME TÉLÉ OU DE PROJECTION
PÉRIPHÉRIQUE DE STOCKAGE USB
CLAVIER USB
(PANNEAU ARRIÈRE DU iDJ²)
LECTEUR CD LECTEUR CD
OOU U
VERS AMPLI OU OU OU
SYSTÈME DE SONORISATION
(PANNEAU AVANT DU iDJ²)
OU
MICROPHONE
CASQUE D'ÉCOUTE
GRAVEUR CD
TOURNE-DISQUE TOURNE-DISQUE
92
Page 93

CARACTÉRISTIQUES DU PANNEAU ARRIÈRE
1. DC IN – Branchez l'adaptateur (AC 12 V 2 A) à cette entrée et à une prise secteur. Veuillez utiliser
l'adaptateur fourni seulement; l'utilisation d'un autre adaptateur pourrait endommager le iDJ². Vous
pouvez fixer le câble d'alimentation à ce verrou afin d'éviter de le débrancher accidentellement.
2. POWER – Utilisez cet interrupteur pour mettre le iDJ² sous et hors tension. Enfoncez cette touche
pour mettre sous tension. Pour mettre hors fonction, appuyez et maintenez la touche enfoncée jusqu'à
ce que l'appareil se soit éteint complètement.
3. SORTIE PRINCIPALE SYMÉTRIQUE – Ces sorties ligne XLR symétriques doivent être branchées au
mix stéréo et à un amplificateur ou système de sonorisation. Veuillez utiliser des câbles XLR (TRS)
pour raccorder vos haut-parleurs ou votre amplificateur.
4. MASTER OUT – Cette sortie ligne RCA permet d’acheminer le signal de sortie du mix stéréo.Veuillez
utiliser un câble RCA stéréo pour brancher cette sortie à un système de sonorisation ou à un
amplificateur.
5. RECORD OUT – C'est une sortie ligne RCA supplémentaire qui permet d’acheminer le signal de sortie
du mix stéréo. Si vous désirez enregistrer votre mix durant votre prestation ou raccorder des hautparleurs supplémentaires, veuillez utiliser un câble RCA pour raccorder votre appareil d'enregistrement
ou système de haut-parleur.
6. S-VIDEO – Si vous utilisez un iPod vidéo, le iDJ² peut acheminer le signal vidéo via le port S-vidéo.
Veuillez utiliser un câble S-vidéo standard pour raccorder un téléviseur, moniteur ou appareil de
projection. Ceci vous permettra d'afficher les vidéos à partir d'un iPod.
Remarque : Les vidéos de votre iPod peuvent être affichés uniquement lorsque le module A est en
iPod Direct Mode. *Voir le iPod Direct Mode pour les détails.
7. INPUT 1 – Veuillez utiliser un câble RCA stéréo pour brancher cette entrée à une source audio à
niveau ligne ou phono.
8. INPUT 2 – Veuillez utiliser un câble RCA stéréo pour brancher cette entrée à une source audio à
niveau ligne ou phono.
9. LINE | PHONO – Chaque entrée est dotée d'un commutateur Line | Phono. Ce commutateur doit être
réglé à Line ou à Phono en fonction du signal entrant. Si vous utilisez des tourne-disques phono,
veuillez vous assurer que le commutateur Line | Phono est réglé à « Phono ». Si vous utilisez des
tourne-disques ligne, veuillez vous assurer que le commutateur Line | Phono est réglé à « Line ».
10. BORNES DE MISE À LA TERRE – Si vous utilisez des tourne-disques phono, veuillez brancher les
fils de mise à la terre de vos tournes-disques à ces bornes de mise à la terre. Ceci a pour effet de
minimiser le ronflement et le bourdonnement durant vos prestations.
11. ENTRÉES USB – Veuillez brancher un périphérique de stockage USB à l'un ou l'autre des ports USB;
un répéteur peut être utilisé afin d'augmenter les entrées USB. Vous pouvez également brancher un
clavier USB à l'un de ces ports pour afin de faciliter la navigation des menus du iDJ². (Veuillez
consulter la section Navigation avec clavier et raccourcis pour connaître les raccourcis clavier.)
Remarque : Le iDJ² support les systèmes de fichiers FAT et HFS+. Veuillez vous assurer que le
média que vous désirez lire est formaté dans l’un des ces deux systèmes de fichiers.
12. VERROU KENSINGTON – Système de verrouillage qui permet de fixer le iDJ² à une table ou à une
autre surface.
93
Page 94

CARACTÉRISTIQUES DU PANNEAU AVANT
1. MIC INPUT – Cette entrée permet de brancher un microphone de 1/4 po.
2. MIC GAIN – Permet d'ajuster le niveau du signal audio de l’entrée microphone.
3. MIC TONE – Ce bouton permet d’ajuster la tonalité du signal audio du microphone. Plus le réglage
du bouton est près de « High », plus les hautes fréquences du signal microphone sont accentuées,
plus le son est clair. Plus le réglage du bouton est près de « Low », plus les basses fréquences du
signal microphone sont accentuées, plus puissantes sont les basses.
4. MIC – Ce commutateur permet d'ouvrir et de fermer le signal microphone.
5. CF SLOPE – Ce commutateur permet de régler l'intensité de la courbe de transition du
potentiomètre. La position du haut permet d'avoir une courbe plus prononcée, pratique pour des
transitions rapides et le scratch. La position du bas permet d'avoir une courbe plus en douceur,
parfaite pour des transitions plus lentes. Expérimentez avec des valeurs différentes afin de trouver
celle qui convient le mieux à votre style.
6. CUE MIX – Permet de régler le volume relatif des deux modules pour le canal de pré-écoute. Si le
bouton est tout en bas (A), vous n'entendrez que l'audio du module A, alors que si le bouton est tout
en haut (B), vous n'entendrez que l'audio du module B. Si le crossfader est au milieu, vous
entendrez l'audio provenant du module A et du module B.
7. CUE MODE – Permet d'alterner l'écoute entre les niveaux préatténuation (PFL) des modules A et B
ou le programme (PGM) dans le canal de la pré-écoute.
8. CUE TONE – Ce bouton permet de régler la tonalité de la sortie du casque d’écoute sans affecter
les autres sorties.
9. CUE GAIN – Permet d'ajuster les niveaux du signal audio du casque d'écoute.
10. HEADPHONES (• po) – Votre casque d'écoute • po peut être branché à ce terminal pour la pré-
écoute.
11. HEADPHONES (¼ PO) – Votre casque d'écoute ¼ po peut être branché à ce terminal pour la pré-
écoute.
94
Page 95
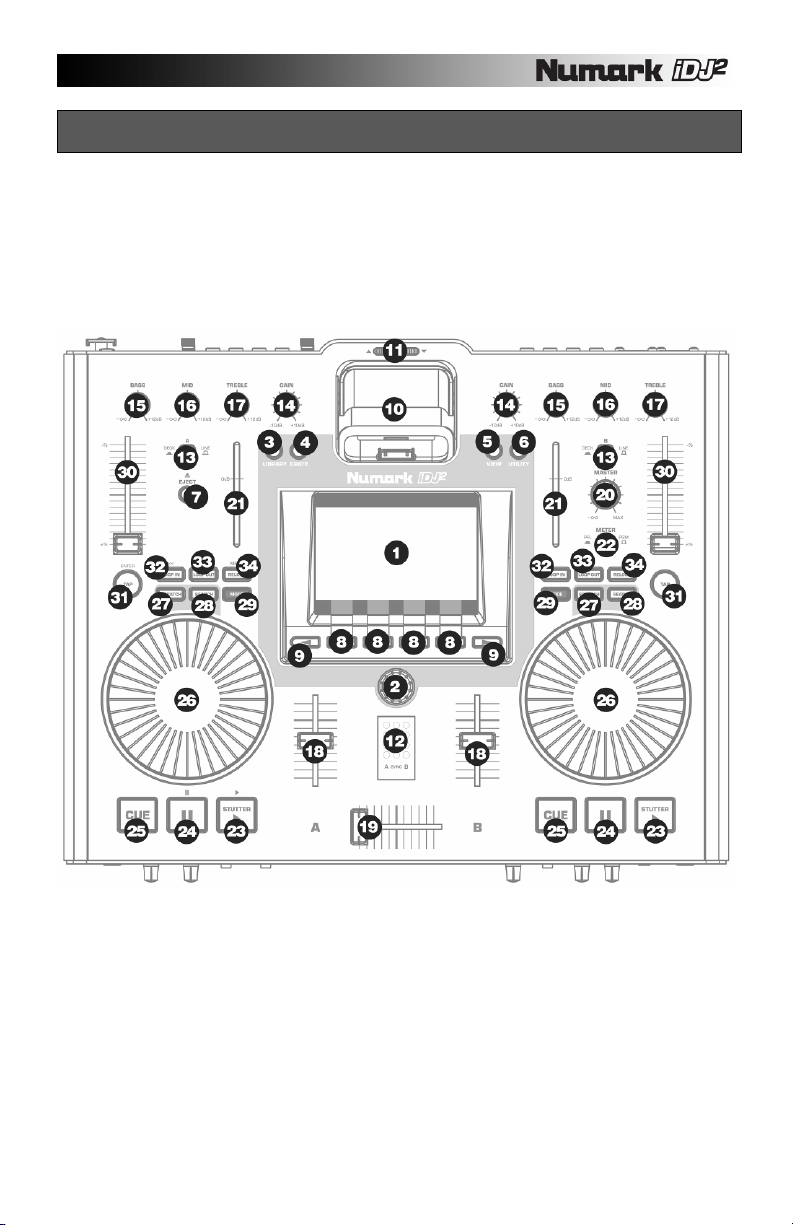
CARACTÉRISTIQUES DU PANNEAU SUPÉRIEUR
Le panneau supérieur du iDJ² peut être divisé en trois catégories de commandes :
COMMANDES GÉNÉRALES, COMMANDES DE LA CONSOLE DE MIXAGE ET COMMANDES DES
MODULES.
Vous trouverez plus d‘information concernant les fonctions de ces commandes dans les trois sections
suivantes de ce guide. Si vous avez besoin d'aide pour trouver où sont situées les commandes sur le
panneau, veuillez consulter l'illustration suivante :
95
Page 96

PANNEAU SUPÉRIEUR COMMANDES GÉNÉRALES
Les commandes générales du iDJ² permettent d'accéder et de parcourir plusieurs des fonctions de
l'appareil, telles que le Library, le Crate et autres différentes options.
1. ÉRAN ACL – Large écran
couleur affiche l'information
concernant le iDJ², les
modules, les appareils
amovibles et les différentes
options du menu.
2. APPUYEZ POUR ENTRER
– Ce bouton permet de
parcourir les listes, modifier
les configurations et
d'utiliser différentes parties
de l'interface utilisateur. Il
peut être enfoncé pour
sélectionner ou changer un
item en surbrillance lorsque
nécessaire.
3. LIBRARY – Cet touche
permet d'accéder à la
bibliothèque de musique
sauvegardée sur le
périphérique de stockage
amovible branché au iDJ².
Veuillez consulter la section
Navigation de la
bibliothèque de ce guide afin d'en savoir plus sur comment parcourir et charger la musique du
périphérique de stockage amovible.
4. CRATE – Cette touche vous permet d'afficher le « Crate ». Toute piste que vous envoyez sur le Crate
se retrouve sur cette liste. Lors de l'affichage du Crate, vous pouvez utiliser les touches de fonctions
en dessous de l'écran pour envoyer les pistes à l'un des modules, les remettre dans le Crate pour les
réutiliser si elles sont en cours de lecture, ou les effacer du Crate. Vous pouvez également modifier
l'ordre des pistes dans le Crate si vous le désirez, en enfonçant et en relâchant le bouton PUSH TO
ENTER sur une piste, puis en le tournant, ceci permet de déplacer la piste en haut ou en bas de la
liste. Enfoncez et relâchez le bouton ENTER de nouveau pour accepter la nouvelle position. Vous
trouverez plus d’information dans la section Le Crate de ce guide.
5. VIEW – Vous pouvez utiliser cette touche pour accéder à différentes informations concernant les pistes
en cours de lecture sur les modules. La touche VIEW permet de commuter entre l'affichage de
l'identification de la piste (Track View) et l'affichage du profile de la piste (Profile View). Voir la section
Présentation de l'affichage pour plus d’information.
6. UTILITY – Cette touche permet d'accéder au menu Utility où il est possible de modifier les préférences
d'affichage, restaurer les configurations d'usine et de calibrer les potentiomètres. Voir la section Menu
Utility pour plus détail.
7. EJECT – Appuyez sur cette touche pour sélectionner le périphérique de stockage que vous désirez
éjecter. Lorsque vous enfoncez cette touche, une liste des appareils présentement raccordés au iDJ²
s'affiche. Sélectionnez l'appareil que vous désirez éjecter en tournant le bouton PUSH TO ENTER et
en appuyant sur la touche de fonction appropriée en dessous de l'écran pour éjecter l'appareil en
surbrillance.
Remarque : Prenez garde de toujours éjecter vos appareils avant de les débrancher du iDJ².
À défaut de les éjecter correctement avant de les débrancher, les données qui s’y retrouvent
pourraient être corrompues et inutilisables.
8. TOUCHES FONCTIONS – Ces quatre touches permettent de sélectionner parmi les différentes options
disponibles affichées à l'écran. Selon le menu affiché, la fonction de ces touches est différente.
L'écran affiche la fonction au-dessus de la touche.
96
Page 97

9. TOUCHES < / > – Ces deux touches permettent de parcourir les pages de sélections, lorsque
disponibles. S'il y a des pages supplémentaires à afficher, les flèches au-dessus des touches seront
en surbrillance. Ces touches permettent également de déplacer le curseur lorsque vous entrez du
texte.
10. SOCLE IPOD – Ce socle peut être utilisé par les lecteurs iPod. Lorsque l’iPod est sur le socle, il est
possible de parcourir le contenu du iPod à l'aide du navigateur de la iDJ² et de charger des pistes sur
chacun des modules ou de les organiser dans le Crate. La iDJ² vous permet de jouer 2 pistes
simultanément de votre iPod sur les modules A et B. De plus, le socle peut également recharger la pile
de votre iPod lorsqu'il est sous tension.
11. RÉGLAGE DU SOCLE – Vous pouvez régler la grandeur du socle à l'aide de cette commande selon le
iPod que vous utilisez.
12. LE BEATKEEPER™ - Le Beatkeeper™ détecte automatiquement le rythme en se basant sur des
combinaisons de fréquences et de rythmes dans la musique. L'écran affiche le BPM et offre de
l’information en 4 points, une mesure, sous forme de bar-graph. Le bar-graph gauche représente le
rythme de la musique sur le canal gauche, alors que le bar-graph droit représente le rythme de la
musique sur le canal droit. Le bar-graph du milieu devient bleu lorsque les premiers battements de la
musique des deux modules se produisent en même temps. Cependant, veuillez noter que pour que
les deux chansons se mixent bien, les premiers battements ne doivent pas seulement s'aligner de
temps en temps, mais pendants une centaine durée de temps.
Le Bar-graph : La musique Dance et Rock se compose plus souvent qu’autrement de 4
divisions égales appelées mesures. Le DEL inférieur représente le 1
arriver que ce soit incorrect ou que vous désiriez le reprogrammer. Il est possible de
reprogrammer le premier battement simplement en tapant la touche TAP au nouvel endroit
lorsque l’appareil est en mode lecture ou pause.
er
battement. Il peut
97
Page 98

PANNEAU SUPÉRIEUR COMMANDES DE LA CONSOLE DE MIXAGE
Le iDJ² est doté d'une console de mixage haute de gamme qui peut être utilisée pour mixer de l'audio
provenant de périphériques de stockage de masse et d'appareils sources, tel que lecteurs CD et tournedisques branchés aux entrées RCA à l'arrière du iDJ².
Chaque canal de la console de
mixage est doté d'un sélecteur
d’entrée. Le sélecteur d'entrée
DECK/LINE permet de
sélectionner le signal acheminé au
panneau de la console de
mixage :
• En position Deck, le canal
de la console de mixage
achemine la sortie audio
d'un périphérique raccordé
tel qu'un iPod ou une unité
de stockage USB. Les
pistes peuvent être
acheminées au module
virtuel via les menus à
l'écran.
• En position Line, le canal de
la console de mixage
achemine le signal audio
des sorties RCA stéréo
situées à l'arrière de
l'appareil (lecteur CD, tourne-disque, etc.
Peu importe l'option que vous sélectionnez, vous pourrez utiliser les commandes DJ habituelles (gain,
égalisation, vumètres, volume et enchaînements fondus) afin de créer vos mix.
Chaque canal de la console de mixage est doté des caractéristiques suivantes :
13. SÉLECTION D’ENTRÉE (DECK/LINE) – Permet de sélectionner l'entrée pour le canal (DECK =
appareil USB ou iPod, LINE = Source d'entrée RCA externe).
14. GAIN – Permet de régler le gain général du signal audio sur le canal.
15. BASS – Permet de régler les fréquences basses du signal audio sur le canal.
16. MID – Permet de régler les fréquences moyennes du signal audio sur le canal.
17. TREBLE – Permet de régler les fréquences aiguës du signal audio sur le canal.
18. VOLUME FADER – Permet de régler le volume du signal audio sur le canal.
Également sur le panneau supérieur :
19. CROSSFADER – Effectue un fondu du signal audio entre les canaux A et B.
20. BOUTON MASTER LEVEL – Permet de modifier le niveau de la sortie principale de la console de
mixage.
21. LEVEL METERS – Représente les niveaux audio préatténuateur ou programme.
22. TOUCHE METER – Permet de commuter entre l'affichage préatténuation (PFL) ou programme (PGM).
98
Page 99

PANNEAU SUPÉRIEUR COMMANDES DES MODULES
Les commandes du module
deviennent disponibles lorsque le
sélecteur d'entrée du canal est réglé
sur DECK. À l'aide de ces
commandes, vous pouvez faire
jouer, programmer des points de
repère, scratcher, modifier la vitesse
de lecture, créer des boucles sur la
musique provenant d'appareils de
stockage USB tels que disques durs
externes, clés de mémoire et
lecteurs iPod.
Remarque : Si le canal est réglé sur
LINE, les commandes du module
n'auront pas d'effet sur l'audio en
cours de lecture.
23. PLAY/STUTTER –
Permet de lancer la lecture de la
piste chargée sur le lecteur
correspondant. Le point de repère
est l’endroit où redémarre la lecture
une fois que la touche lecture est enfoncée. En appuyant sur cette touche lorsque l’appareil est en mode
lecture, cela lance la lecture à partir du dernier point de repère, qui peut être utilisé pour créer un effet de
bégaiement (stutter).
24. PAUSE – Permet d'arrêter la lecture de la piste en cours sur le module correspondant. Si vous
appuyez et maintenez la touche PAUSE enfoncée pendant une seconde lorsque le lecteur est en
pause, il reviendra au début de la piste.
25. CUE – Retourne et pause sur le dernier point de repère mémorisé. Le point de repère est la dernière
place où la touche PLAY/STUTTER fût enfoncée, ou encore le début de la piste si elle n'a pas été
encore enfoncée. Vous pouvez écouter la musique à partir du point de repère en maintenant la
touche CUE de nouveau enfoncée, la musique joue jusqu'à ce que vous relâchiez la touche, une fois
relâchée, le module retourne au point de repère et passe en mode pause. Vous pouvez facilement
modifier le point de repère en tournant la molette jog en mode pause. Lorsque vous tournez la molette,
la musique se fait entendre. Lorsque vous arrêtez la molette et appuyez sur la touche PLAY, un
nouveau point de repère est programmé.
Tournez jusqu’au
nouveau point de repère
Appuyez sur Appuyez sur Appuyez sur « CUE »
« PAUSE » « PLAY/STUTTER »
Permet de retourner et de faire un arrêt de lecture de la
musique sur le point de repère
99
Page 100

26. MOLETTE – Cette molette permet de régler la vitesse de lecture, faire du scratch et de parcourir toute
la musique en cours de lecture sur le module. La fonctionnalité de la molette est déterminée par les
deux touches qui l'accompagnent – SCRATCH et SEARCH. Alors que la piste est en cours sur le
module et que les modes Scratch et Search sont désactivés, la molette permet de modifier la vitesse
de lecture de la musique. Il permet d'accélérer (sens horaire) ou de ralentir (sens antihoraire)
temporairement la vitesse de lecture de la musique. Cette technique est utilisée pour mixer deux
pistes au tempo semblable, mais qui ne sont pas tout à fait synchronisées. Il est alors possible
d'accélérer (sens horaire) ou de ralentir (sens antihoraire) temporairement la vitesse de lecture de la
musique à mixer afin de verrouiller les tempos des pistes. Lorsqu'une piste est en pause, vous pouvez
utiliser la molette pour parcourir la musique afin de trouver un nouvel emplacement comme point de
repère. Appuyer sur la touche PLAY/STUTTER ensuite permet de programmer un point de repère à
cet emplacement.
27. SCRATCH – Utilisez cette touche pour activer le mode Scratch. Le mode Scratch vous permet de
« scratcher » la musique qui joue sur le module en basculant la molette vers l'avant et l'arrière.
Lorsque la molette s'arrête, la lecture normale reprend. Pour reprendre sans qu'il y ait un écart, faites
un scratch vers l'avant à approximativement la vitesse de lecture normale avant de relâcher la molette.
28. SEARCH – Utilisez cette touche pour activer le mode Search. Lorsqu’activé, le mode recherche vous
permet d’utiliser la molette pour faire défiler la piste en cours. Tourner la molette rapidement en mode
Search, permet de faire avancer et reculer rapidement. Si vous ne touchez pas la molette à l’intérieur
de 8 secondes, vous quitterez le mode recherche.
29. MODE – Changez les options du module telles que le chargement de piste, l'affichage de la durée, la
variation de la vitesse, verrouillage tonal, la lecture automatique et le mode iPod. Ces options sont
divisées en deux pages différentes (Vitesse de lecture, Configurations) qui peuvent être accédé par le
biais des touches de fonction en dessous de l'écran. Vous pouvez utiliser le bouton PUSH TO ENTER
afin d'entrer les valeurs, enfoncer le bouton permet d'accéder à l'option suivante sur la page
sélectionnée. Appuyer sur la touche MODE de nouveau permet de quitter le dialogue des options pour
le module choisi.
PAGE PITCH :
Pitch Shift – indique la valeur des modifications appliquées à la vitesse de lecture du module.
Key Lock Shift – indique la valeur des modifications appliquées au tempo du module alors que la
fonction de verrouillage tonal est activée.Pitch Range - permet de sélectionner la variation de
vitesse désirée (0 %, ±6 %, ±12 %, ±25 %, +25/-100 %).
Key Lock – active la fonction de verrouillage tonal.
PAGE SETTNGS :
Track Loading – spécifie comment les pistes dans le Crate seront chargées et jouées (manuel,
automatique, continu, cyclique).
Time Display – commute entre les différents modes d'affichage du temps (écoulé, restant).
Fader Start – spécifie comment la lecture automatique sera utilisée sur le module (arrêt, point de
repère, pause).
iPod Mode – spécifie la fonction du module (direct, USB). Voir la section iPod Mode pour plus
d'information concernant le iPod Direct Mode – ce mode permet de commander l'iPod ainsi que
le contenu vidéo directement à partir des commandes du module A grâce à la connexion S-vidéo
à l'arrière du iDJ².
30. POTENTIOMÈTRE DE VITESSE DE LECTURE – Chaque canal est doté d'un potentiomètre qui
permet de faire des ajustements à la vitesse de la musique. Déplacer le potentiomètre plus près du « » résulte en une vitesse plus lente (tempo également plus lent) de la musique, alors que le déplacer
plus près du « + » résulte en une vitesse plus rapide (tempo plus rapide) de la musique.
31. TAP – En appuyant sur cette touche au rythme vous permet d'aider le Beatkeeper à détecter le bon
tempo. Si la touche Tap est maintenue enfoncée pendant une seconde, le compteur BPM se
réinitialise et recalcule automatiquement le BPM.
100
 Loading...