


QUICKSTART MANUAL
ENGLISH ( 1 - 3 )
GUÍA DE INICIO RÁPIDO
ESPAÑOL ( 4 - 6 )
GUIDE D'UTILISATION RAPIDE
FRANÇAIS ( 7 - 9 )
KURZANLEITUNG
DEUTSCH ( 10 - 12 )
GUIDA RAPIDA
ITALIANO ( 13 - 15 )


INTRODUCTION
Welcome to the Fitness Rack-mount Player. The Fitness Rack-mount Player is a 2u rack-mountable media
center for iPod*, allowing you to control content from your iPod with the integrated controls on the front panel
or with the included remote from a distance. The Fitness Rack-mount Player allows you to output audio from
your iPod to up to three different locations, such as P.A. speakers and amplifiers. Equipped with balanced
XLR outputs, the Fitness Rack-mount Player ensures pristine, superb audio quality.
As an added bonus, we have also included MixMeister Express, a software application which enables you to
create great-sounding fitness mixes right on your computer (PC only). Simply install the software from the
included CD and follow the quick video tutorial to learn how to create flawless transitions. With MixMeister
Express you can even dynamically change the tempo of the music, independent of its pitch. Once you have
created your mix, you can load it onto your iPod and play it from the Fitness Rack-mount Player.
*
iPod is a trademark of Apple, Inc., registered in the U.S.A. and other countries.
BOX CONTENTS
Make sure that all items listed here can be located in the box:
Fitness Rack-mount Player RCA Cable Quickstart Guide
IEC Power Cable Software CD Safety and Warranty Instructions
Remote Control (w/ battery)
READ THE SAFETY & WARRANTY INSTRUCTION BOOKLET BEFORE USING THIS PRODUCT!
QUICK SETUP
1. Study the setup diagram below.
2. Place the unit in an appropriate position for operation.
3. Make sure all devices are turned off and all faders are at zero.
4. Connect the audio outputs to the power amplifier(s), monitors and/or projectors.
5. Plug the unit and other devices into AC power.
6. Switch everything on in the following order:
iPod
Fitness Rack-mount Player
Last, any amplifiers
7. When turning off, always reverse this operation by powering down in the following order:
Any amplifiers
Fitness Rack-mount Player
iPod
8. Go to www.numark.com
product registration.
for
AMP AND SPEAKER
SYSTEM
AMP AND SPEAKER
SYSTEM
AMP AND SPEAKER
SYSTEM
1

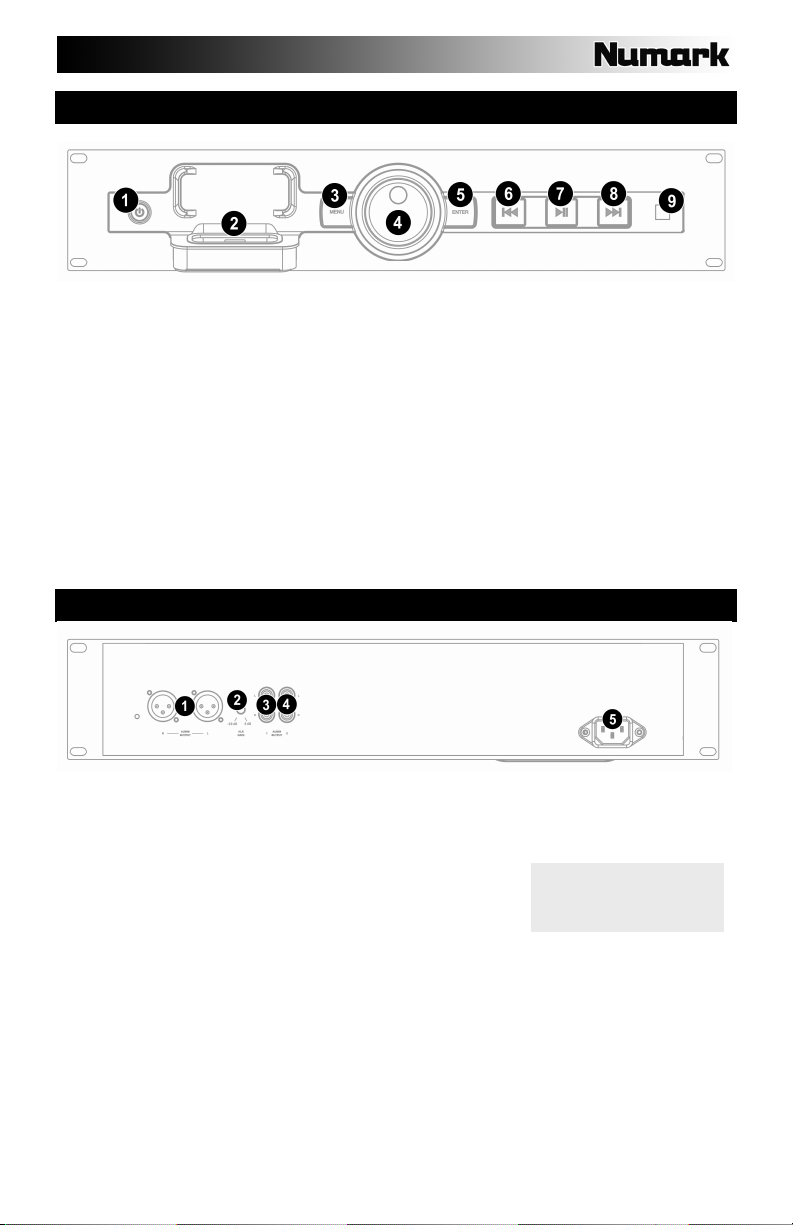
FRONT PANEL OVERVIEW
1. POWER – This button turns the unit on and off. Power off the unit when not in use for extended
periods of time.
2. iPod DOCK – Dock your iPod in this slot. Make sure that your iPod fits snuggly over the connector but
do not force it. When docked, your iPod will be charging at all times.
3. MENU – This buttons functions as the ‘MENU’ button of your iPod.
4. JOG WHEEL – This wheel functions as the touchwheel control of your iPod.
5. ENTER – This button functions as the ‘ENTER’ command of your iPod.
6. |<< - This button functions as the ‘|<<’ button of your iPod.
7. >|| - This button functions as the ‘>||’ button of your iPod.
8. >>| - This button functions as the ‘>>|’ button of your iPod.
9. REMOTE CONTROL SENSOR – This sensor detects commands from the included remote control.
REAR PANEL OVERVIEW
1. AUDIO OUTPUT (XLR) – These balanced XLR outputs should be connected to a power amplifier,
mixer, or speakers system.
2. XLR GAIN – This knob can be used to make adjustments to the gain of the XLR audio outputs.
3. AUDIO OUTPUT 1 (RCA) – Use a stereo RCA cable to connect
these outputs to a power amplifier, mixer, or speaker system.
4. AUDIO OUTPUT 2 (RCA) – Use a stereo RCA cable to connect
these additional outputs to a power amplifier, mixer, or speaker
system.
5. POWER INPUT – Use the included power cable to connect this input to a power source.
Please note that both the
XLR and RCA connections
will output the same audio
signal from your iPod.
2

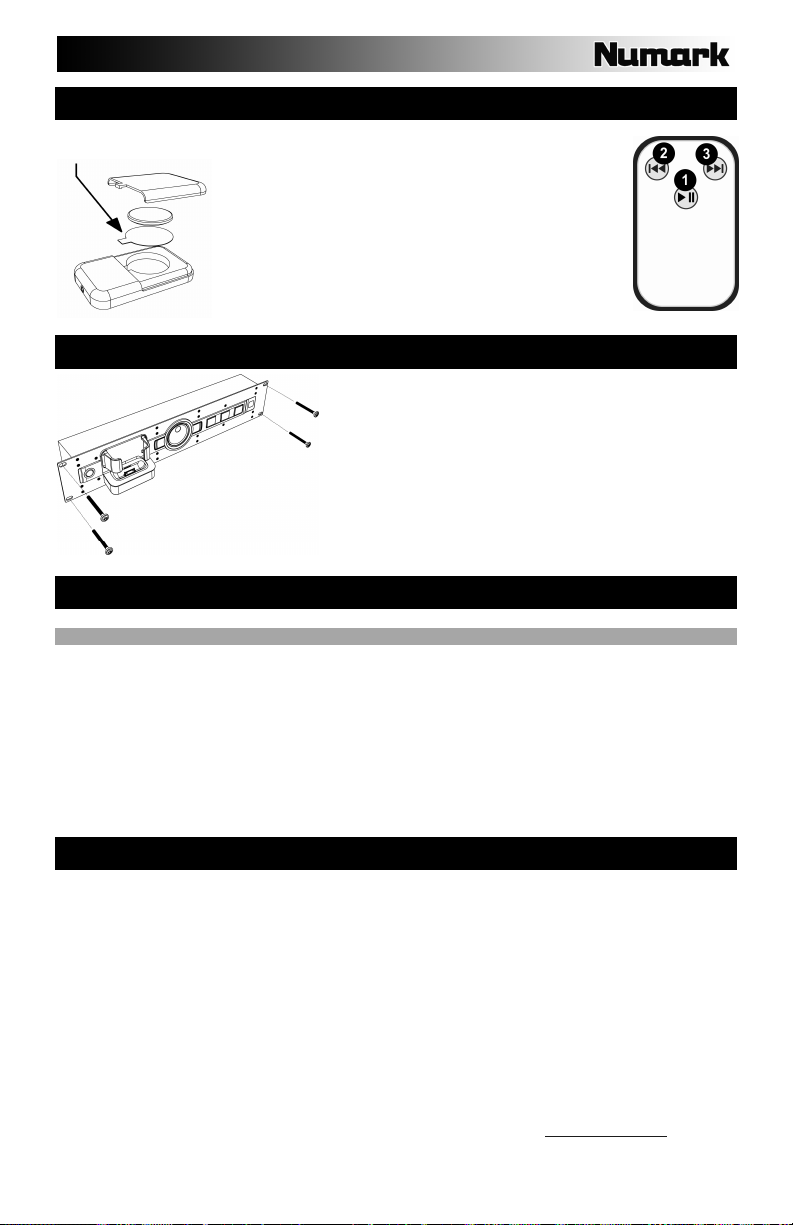
THE REMOTE CONTROL
ATTENTION
Open compartment and
remove safety tab prior to use.
The remote control offers a quick way to access the unit’s most
essential playback functions from a distance.
1. >|| - This button functions as the ‘>||’ button of your iPod.
2. |<< - This button functions as the ‘|<<’ button of your
iPod.
3. >>| - This button functions as the ‘>>|’ button of your
iPod.
MOUNTING INSTRUCTIONS
This device may be mounted in a standard 19” rack taking up
2 spaces. Please use 4 rack screws (not included) to secure
the unit to the rack.
TROUBLESHOOTING
PROBLEM: SOLUTION:
I can’t hear any audio. Check to make sure that your iPod is playing.
Make sure that the unit is powered on.
The unit is not turning on. Make sure that the power cable is connected to the rear of the unit and
The remote control is not working. Make sure that the safety tab in the remote control’s battery
My iPod does not fit well in the dock. Use the iPod Universal Dock which was included with your iPod.
Make sure that the unit’s audio outputs are connected to a speaker or
amplifier system and that the system is turned on.
that it is plugged into a live power source.
compartment is removed prior to using the remote.
SPECIFICATIONS
Dimensions: 3.5” (H) x 19” (W) x 4.7” (D)
Weight: 3.775 lbs
Audio Outputs: Balanced XLR
Unbalanced RCA (x2)
Inputs: 4G iPod and later (with dock connector)
Power: AC IN, 100 ~ 240V
50/60 Hz, 17W
Accessories: Stereo RCA Cable (x2)
Software CD
Quickstart Manual
Remote Control
Power Cable
Safety and Warranty Information
FOR TECHNICAL SUPPORT AND ADDITIONAL INFORMATION ABOUT THIS PRODUCT, VISIT WWW.NUMARK.COM
3
RCA outputs:
Output Level: 8.2dBv +/-1dBv
THD: Less than 0.01%
S/N Ratio: Better than 85dBr
Frequency Response: Flat within 2dB from 20Hz to
20kHz
XLR outputs:
With trim set to 0dB:
Output Level: 22.5dBu +/- 1dBu
THD: Less than 0.01%
S/N Ratio: Better than 85dBr
Frequency Response: Flat within 2dB from 20Hz to
20kHz

INTRODUCCIÓN
Bienvenido al Reproductor Fitness paara montaje en rack. El reproductor Fitness para montaje en rack es un centro de medios
2u para iPod* montable en rack, que le permite controlar el contenido de su iPod con los controles integrados en el panel
frontal, o a distancia con el control remoto incluído. El reproductor Fitness para montaje en rack le permite envíar señal de
audio de su iPod hasta a tres ubicaciones diferentes, como pueden ser bocinas con potencia y a amplificadores. Equipado con
salidas balanceadas XLR, el reproductor fitness para montaje en rack asegura una calidad de sonido prístina.
Como un bono adicional, también hemos incluído MixMeister Express, un programa que le permite crear mezclas con gran
sonido directamente en su computadora (solamente PC). Simplemente instale el programa que viene en el CD incluído, y vea
el rápido tutorial en video para aprender como crear transiciones perfectas. Con MixMeister Express usted puede incluso
cambiar dinámicamente el tiempo de la música, independientemente de su tono. En cuanto haya creado su mezcla, puede
cargarla en su iPod y reproducirla desde el reproductor Fitness para montaje en rack.
* iPod es una marca registrada de Apple, Inc., registrada en los Estados Unidos y en otros países.
CONTENIDO DE LA CAJA
Revise que todos los artículos mencionados a continuación se encuentren en la caja:
Reproductor Fitness de montaje en rack Cables RCA estereo Instrucciones de seguridad y garantía
Cable de alimentación IEC CD con software Guía de inicio rápido
Control Remoto (c/batería)
LEA EL FOLLETO CON INSTRUCCIONES DE SEGURIDAD Y LA GARANTÍA
ANTES DE USAR ESTE PRODUCTO!
MONTAJE RÁPIDO
1. Analice el diagrama de montaje que se muestra debajo.
2. Coloque la unidad en una posición apropiada de operación.
3. Asegúrese que todos los dispositivos están apagados, y que todos los faders estén en cero.
4. Conecte las salidas de audio al amplificador de potencia, monitor o proyector que utilice.
5. Conecte la unidad y los demás dispositivos a la toma de corriente AC.
6. Encienda todo en el siguiente orden:
iPod
Reproductor Fitness de montaje en rack
Al final, cualquier amplificador
7. Cuando apague el sistema, realice siempre esta operación en el orden contrario a como los encendio:
Cualquier amplificador
Reproductor Fitness de montaje en rack
iPod
8. Visite www.numark.com para
registrar su producto.
SISTEMA DE AMPLIFICADOR
Y ALTAVOCES
SISTEMA DE AMPLIFICADOR
Y ALTAVOCES
SISTEMA DE AMPLIFICADOR
4
Y ALTAVOCES
VISTA GENERAL DEL PANEL FRONTAL
1. POWER – Este botón enciende y apaga la unidad. Apague la unidad cuando no la vaya a usar durante
períodos de tiempo prolongados.
2. Bahía del iPod – Coloque su iPod en esta bahía. Asegúrese que su iPod encaje firmemente sobre del
conector, pero no lo force. Cuando esté en la bahía, su iPod estará siendo permanentemente cargado.
3. MENU – Este botón realiza las funciones del botón ‘MENU’ de su iPod.
4. RUEDA DE SELECCIÓN – Esta rueda realiza las funciones de la rueda sensible al tacto de su iPod.
5. ENTER – Este botón realiza las funciones del comando ‘ENTER’ de su iPod.
6. |<< - Este botón realiza las funciones del botón ‘|<<’ de su iPod.
7. >|| - Este botón realiza las funciones del botón ‘>||’ de su iPod.
8. >>| - Este botón realiza las funciones del botón ‘>>|’ de su iPod.
9. SENSOR DEL CONTROL REMOTO – Este sensor recibe los comandos enviados desde el control remoto
incluído.
VISTA GENERAL DEL PANEL POSTERIOR
1. AUDIO OUTPUT (XLR) – Estas salidas balanceadas XLR deben ser conectadas a un amplificador de
potencia, una mezcladora o a un sistema de altavoces.
2. XLR GAIN – Esta perilla puede ser usada para hacer ajusten a la ganancia de las salidas de audio XLR.
3. AUDIO OUTPUT 1 (RCA) – Use un cable estereo RCA para conectar
estas salidas a un amplificador de potencia, mezcladora o sistema de
altavoces.
4. AUDIO OUTPUT 2 (RCA) – Use un cable estereo RCA para conectar
estas salidas a un amplificador de potencia, mezcladora o sistema de
altavoces.
5. POWER INPUT – Use el cable de alimentación incluído para conectar esta salida a una fuente de corriente.
Por favor considere que tanto
la salida XLR como la RCA
enviarán la misma señal de
audio desde su iPod.
5

EL CONTROL REMOTO
ATENCIÓN
Abra el compartimiento y retire
la muesca de seguridad antes
de usar
El control remoto le ofrece una manera única de accesar las
funciones de reproducción más esenciales a distancia.
1. >|| - Este botón sirve como el botón ‘>||’ de su iPod.
2. |<< - Este botón sirve como el botón ‘|<<’ de su iPod.
3. >>| - Este botón sirve como el botón‘>>|’ de su iPod.
INSTRUCCIONES DE MONTAJE
Este dispositivo puede ser montado en un rack convencional de 19”
(48.25 cm), usando dos espacios. Por favor use cuatro (4) tornillos
para rack (no incluídos) para asegurar la unidad al rack.
SOLUCIÓN DE PROBLEMAS
PROBLEMA: SOLUCIÓN:
No puedo escuchar ningún sonido. Asegúrese que su iPod esté enviando señal de sonido.
Asegúrese que la unidad se encuentre encendida.
La unidad no enciende. Asegúres que el cable de alimentación esté bien conectado en la parte
El control remoto no funciona. Asegúrese de haber retirado la muesca de seguirdad del alojamiento de
Mi iPod no encaja bien en la bahía. Use la bahía universal para iPod que venía incluída en su iPod.
Asegúrese que las salidas de sonido de la unidad estén conectadas a
los altavoces o al sistema de amplificador, y que el sistema se encuentra
encendido.
posterior de la unidd, y que está conectado a una toma viva de corriente.
batería del control remoto antes de usarlo.
ESPECIFICACIONES
Dimensiones: 3.5” (alto) x 19” (ancho) x 4.7” (prof.)
Peso: 3.775 lbs (1.71 kgs)
Salidas de Audio: XLR balanceada
RCA desbalanceadas (x2)
Entradas: iPod 4G y posterior (con conector de bahía)
Alimentación: AC IN, 100 ~ 240V
50/60 Hz, 17W
Accessorios: Cable estereo RCA (x2)
CD con software
Manual de inicio rápido
Control Remoto
Cable de alimentación
Información de seguridad y garantía
PARA SOPORTE TÉCNICO Y MÁS INFORMACIÓN RESPECTO A ESTE PRODUCTO, VISITE WWW.NUMARK.COM
Salidas RCA:
Nivel de salida: 8.2dBv +/-1dBv
THD: Menos del 0.01%
Razón S/R: Mejor que 85dBr
Respuesta en frecuencia: Plana dentro de 2dB, de
20Hz a 20kHz
Salidas XLR:
Umbral ajustado a 0dB:
Nivel de salida: 22.5dBu +/- 1dBu
THD: Menos del 0.01%
Razón S/R: Mejor que 85dBr
Respuesta en frecuencia: Plana dentro de 2dB, de
20Hz a 20kHz
6

INTRODUCTION
Voici le lecteur montable sur support Fitness. Le lecteur Fitness est un centre multimédia pour iPod montable sur support
(2 unités), qui permet de commander le contenu d'un iPod grâce aux commandes intégrées du panneau avant ou avec la
télécommande incluse. Le lecteur Fitness vous permet des sorties audio provenant de votre iPod vers de multiples appareils,
tels qu'un système de sonorisation et amplificateurs. Équipé de sorties XLR symétriques, le lecteur Fitness vous assure une
reproduction audio de grande qualité.
Nous avons également inclus le logiciel MixMeister Express afin de vous permettre de créer de super mixes fitness à partir de
votre ordinateur (sur PC uniquement). Il suffit d'installer le logiciel à partir du CD inclus et suivre le tutoriel vidéo afin
d'apprendre comment créer des transitions parfaites. Avec le MixMeister Express, vous pouvez dynamiquement modifier le
tempo de la musique, sans en modifier la tonalité. Une fois votre mix créé, vous pouvez le télécharger sur votre iPod et le faire
jouer à partir du lecteur Fitness.
*iPod est une maque de commerce enregistrée de Apple, inc., enregistrée aux États-Unis et dans d'autres pays.
CONTENUE DE LA BOÎTE
Assurez-vous que tous les articles énumérés ci-dessous se retrouvent dans la boîte :
Lecteur Fitness Câble RCA stéréo Guide d’utilisation simplifié
Câble d'alimentation CEI CD d'installation du logiciel Télécommande (pile incluse)
Consignes de sécurité et
information sur la garantie
LIRE LE LIVRET DES CONSIGNES DE SÉCURITÉ ET L'INFORMATION SUR LA GARANTIE AVANT D'UTILISER LE
PRODUIT.
INSTALLATION RAPIDE
1. Examiner le schéma d’installation ci-dessus.
2. Placez l'appareil en position de fonctionnement.
3. Assurez-vous que tous les appareils sont hors tension et que tous les atténuateurs sont réglés à « zéro ».
4. Reliez les sorties audio aux amplificateurs de puissance, aux moniteurs et/ou aux projecteurs.
5. Branchez l'appareil et les autres appareils à une prise d’alimentation CA.
6. Mettre tous les appareils sous tension dans l'ordre suivant :
iPod;
Lecteur Fitness;
et en dernier, les amplificateurs
7. Pour mettre hors tension, toujours inverser l'opération de la façon suivante :
Amplificateurs
Lecteur Fitness;
iPod.
8. Allez au www.numark.com pour enregistrer le produit.
SYSTÈME DE SONORISATION
ET AMPLI
SYSTÈME DE SONORISATION
ET AMPLI
7
SYSTÈME DE SONORISATION
ET AMPLI

CARACTÉRISTIQUES DU PANNEAU AVANT
1. INTERRUPTEUR MARCHE/ARRÊT – Permet de mettre l'appareil sous et hors tension. Assurez-vous de mettre
l'appareil hors tension lorsque vous ne prévoyez pas l'utiliser pendant de longues périodes.
2. SOCLE iPod – Dock your iPod in this slot.
3. Assurez-vous que l'iPod est bien ajusté sur le connecteur, mais ne le forcez pas. Lorsque l'iPod est sur le socle, il se
recharge.
4. MENU – Fonctionne de la même manière que la touche « MENU » de votre iPod.
5. MOLETTE – Fonctionne de la même manière que la molette cliquable de votre iPod.
6. ENTER – Fonctionne de la même manière que la touche « ENTER » de votre iPod.
7. |<< - Fonctionne de la même manière que la touche |<< de votre iPod.
8. >|| - Fonctionne de la même manière que la touche >|| de votre iPod.
9. >>| - Fonctionne de la même manière que la touche >>| de votre iPod.
10. CAPTEUR DE COMMANDE À DISTANCE – Ce capteur capte les signaux provenant de la télécommande.
CARACTÉRISTIQUES DU PANNEAU ARRIÈRE
1. AUDIO OUTPUT (XLR) – Ces sorties XLR symétriques doivent être branchées à un amplificateur, à une console de
mixage ou à un système de sonorisation.
2. XLR GAIN – Ce bouton permet d’ajuster le gain des sorties audio XLR.
3. AUDIO OUTPUT 1 (RCA) – Veuillez utiliser un câble RCA stéréo pour brancher
ces sorties à un amplificateur, une console de mixage ou à un système de
sonorisation.
4. AUDIO OUTPUT 2 (RCA) – Veuillez utiliser un câble RCA stéréo pour brancher
ces sorties supplémentaires à un amplificateur, une console de mixage ou à un
système de sonorisation.
5. ENTRÉE D'ALIMENTATION – Utilisez le câble d’alimentation fourni pour brancher cette entrée à une source
d’alimentation.
Veuillez noter que les deux
connexions XLR et RCA
transmettent le même signal
au iPod.
8
LA TÉLÉCOMMANDE
La télécommande permet d'accéder rapidement aux fonctions de lecture de l'appareil à distance.
1. >|| - Fonctionne de la même manière que la touche >|| de votre
iPod.
2. |<< - Fonctionne de la même manière que la touche |<< de votre
iPod.
3. >>| - Fonctionne de la même manière que la touche >>| de votre
iPod.
CONSIGNES DE MONTAGE
Cet appareil peut être monté dans un support standard de 19 po,
nécessitant 2 unités. Veuillez utiliser 4 vis à (non incluses) pour fixer
l'appareil au support.
DÉPANNAGE
PROBLÈME : SOLUTION :
Je n’étends aucun signal audio. Assurez-vous que l'iPod est en mode lecture.
Assurez-vous que l'appareil est sous tension.
L'appareil ne se met pas sous tension. Assurez-vous que le câble d’alimentation à l'arrière de l'appareil est
La télécommande ne fonctionne pas. Assurez-vous que la languette de sécurité dans le compartiment de la
Mon iPod s'insère mal sur le socle. Utilisez le socle universel pour iPod inclus avec votre iPod.
Assurez-vous que les sorties audio de l'appareil sont branchées à un
haut-parleur ou à un système de sonorisation et qu'il est sous tension.
branché correctement et qu’il est alimenté.
pile de la télécommande est retirée avant d'utiliser la télécommande.
SPÉCIFICATIONS
Dimensions : 3,5 po (H) x 19 po (L) x 4,7 po (P)
Poids : 3,775 lb
Sorties audio : XLR symétriques
RCA asymétrique (x2)
Entrées : iPod 4 Go et plus (avec connecteur pour socle)
Alimentation électrique : ENTRÉE CA, 100 V ~ 240 V
50/60 Hz - 17 W
Accessoires : Câbles RCA stéréo (x2)
Logiciel
Guide d'installation simplifié
Télécommande
Câble d'alimentation
Consignes de sécurité et information sur la garantie
POUR DE PLUS AMPLES RENSEIGNEMENTS SUR CE PRODUIT, VISITEZ WWW.NUMARK.COM
9
Sorties RCA :
Niveaux de sortie : 8,2 dBv +/-1 dBv
THD : inférieur à 0,01 %
Ratio signal/bruit : supérieur à 85 dB
Réponse en fréquence : Plat dans 2 dB à
20 Hz jusqu’à 20 KHz
Sorties XLR :
Compensation réglée à 0 dB :
Niveaux de sortie : 22,5 dBu +/- 1 dBu
THD : inférieur à 0,01 %
Ratio signal/bruit : supérieur à 85 dB
Réponse en fréquence : Plat dans 2 dB à
20 Hz jusqu’à 20 KHz

EINFÜHRUNG
Willkommen beim 19” Rack Fitness-Player. Der 19” Rack Fitness-Player ist ein iPod* Media Center mit 2
Höheneinheiten, über das Sie auf Multimedia-Dateien Ihres iPods über die integrierten Bedienelemente des Gerätes
oder über die Fernbedienung zugreifen können. Der 19” Rack Fitness-Player besitzt Audioausgänge, über die Sie
Audiosignale Ihres iPods auf bis zu 3 Geräte, wie Verstärker, oder PA-Lautsprecher, verteilen können. Da der
Fitness-Player mit symmetrischen XLR Ausgängen ausgerüstet ist, wird eine kristallklare Audioqualität gewährleistet.
Ein weiterer Bonus ist die im Lieferumfang enthaltene Software MixMeister Express, mit der sich auf dem Computer
schnell großartig klingende Audiomixes für Fitnessübungen erstellen lassen (nur PC). Installieren Sie die Software
von der beiliegenden CD und folgen Sie dem kurzen Einführungsvideo, um zu erfahren, wie Sie auf einfache Weise
ineinander überblendende Musikstücke erzeugen können. Mit MixMeister Express können Sie auch dynamisch das
Tempo der Musik anpassen, ohne dass sich die Tonhöhe ändert. Wenn Sie Ihren Mix fertig haben, können Sie ihn
auf Ihren iPod laden und die Musik im 19” Rack Fitness-Player abspielen.
* iPod ist eine eingetragene Marke von Apple, Inc., registriert in den U.S.A. und in anderen Ländern.
INHALT DER VERPACKUNG
Überprüfen Sie bitte, dass sich die folgenden Gegenstände in der Verpackung befinden:
19“ Rack Fitness-Player Stereo RCA Kabel Kurzanleitung
Netzkabel Software CD Sicherheits- und Garantiehinweise
Fernbedienung (mit Batterie)
BITTE LESEN DIE SICHERHEITS- UND GARANTIEHINWEISE; BEVOR SIE DAS PRODUKT VERWENDEN!
SCHNELLAUFBAU
1. Sehen Sie sich die Anschlussübersicht weiter unten an.
2. Stellen Sie das Gerät in einer geeigneten Betriebsposition auf.
3. Überprüfen Sie, dass alle Geräte ausgeschaltet sind und alle Lautstärkeregler auf „Null“ stehen.
4. Verbinden Sie die Audioausgänge mit den Verstärkern, Lautsprechern oder Projektoren.
5. Schließen Sie das Gerät und alle andere Geräte an das Stromnetz an.
6. Nehmen Sie Ihr System in der folgenden Reihenfolge in Betrieb:
iPod
19“ Rack Fitness-Player
Zuletzt die Verstärker
7. Gehen Sie zum Ausschalten in genau der umgekehrten Reihenfolge vor und schalten Sie zuerst:
Verstärker
19“ Rack Fitness-Player
Und zuletzt den iPod aus
8. Registrieren Sie Ihr Produkt online auf
www.numark.de
VERSTÄRKER UND
LAUTSPRECHERSYSTEM
VERSTÄRKER UND
LAUTSPRECHERSYSTEM
SYSTEM
VERSTÄRKER UND
LAUTSPRECHERSYSTEM
10

BEDIENELEMENTE DER VORDERSEITE
1. NETZSCHALTER – Dieser Taster schaltet das Gerät ein und aus. Schalten Sie das Gerät besser aus,
wenn Sie es über einen längeren Zeitraum nicht einsetzen wollen.
2. iPod DOCK – Legen Sie hier den iPod ein. Achten Sie darauf, dass der Dockanschluss des iPods
leicht in den Dock-Connector gleitet und Sie nur wenig Kraft aufwenden müssen. Ihr iPod wird über
das Dock geladen, wenn er richtig sitzt.
3. MENU – Diese Taste besitzt die gleiche Funktion wie die ‘MENU’ Maste an Ihrem iPod.
4. JOG WHEEL – Dieses Rad funktioniert wie das Touchwheel an Ihrem iPod.
5. ENTER – Diese Taste besitzt die gleiche Funktion wie die ‘ENTER’ Taste Ihres iPod.
6. |<< - Diese Taste besitzt die gleiche Funktion wie die ‘|<<’ Taste Ihres iPod.
7. >|| - Diese Taste besitzt die gleiche Funktion wie die ‘>||’ Taste Ihres iPods.
8. >>| - Diese Taste besitzt die gleiche Funktion wie die ‘>>|’ Taste Ihres iPod.
9. SENSOR FÜR DIE FERNBEDIENUNG – Dieser Sensor empfängt die Befehle Ihrer mitgelieferten
Fernbedienung.
BERBLICK ÜBER DIE RÜCKSEITE
1. AUDIOAUSGANG (XLR) – An diese symmetrischen XLR-Ausgänge können Sie einen Verstärker,
einen Mixer oder ein Lautsprechersystem anschließen.
2. XLR GAIN – Dieser Regler wird verwendet, um die Lautstärke des XLR-Ausgangssignals anzupassen.
3. AUDIO AUSGANG 1 (RCA) – Verbinden Sie diesen Ausgang mit
einem Stereo RCA-Kabel mit einem Verstärker, Mixer oder
Lautsprechersystem.
4. AUDIO AUSGANG 2 (RCA) – Verbinden Sie diesen Ausgang mit
einem Stereo RCA-Kabel mit einem Verstärker, Mixer oder
Lautsprechersystem.
5. NETZANSCHLUSS – Schließen Sie hier das mitgelieferte Netzkabel zur Stromversorgung des Gerätes
an.
Bitte beachtenSie, dass
sowohl der XLR- als auch
die RCA Ausgänge immer
dasselbe iPod Audiosignal
wiedergeben.
11

DIE FERNBEDIENUNG
ACHTUNG!
Öffnen Sie die Abdeckung und
entfernen Sie die
Sicherungslasche vor dem
Gebrauch.
Die Fernbedienung ermöglicht die Steuerung der wichtigsten
Funktionen des Gerätes, ohne unmittelbar das Gerät zu
berühren zu müssen.
1. >|| - Diese Taste funktioniert wie die ‘>||’ Taste Ihres
iPods.
2. |<< - Diese Taste funktioniert wie die ‘|<<’ Taste Ihres
iPods.
3. >>| - Diese Taste funktioniert wie die ‘>>|’ Taste Ihres
iPods.
HINWEISE ZUR MONTAGE
Dieses gerät lässt sich in ein Standard 19” Rack montieren, in dem
es 2 Höheneinheiten einnimmt. Bitte verwenden Sie zur
Rackmontage 4 Rackschrauben (nicht im Lieferumfang enthalten).
FEHLERHILFE
PROBLEM: LÖSUNG:
Ich höre kein Audiosignal. Überprüfen Sie, dass der iPod einen Titel abspielt.
Überprüfen Sie, dass das Gerät eingeschaltet ist.
Das Gerät lässt sich nicht einschalten. Sehen Sie nach, ob das Netzkabel in der Netzkabelbuchse auf der
Die Fernbedienung funktioniert nicht. Achten Sie darauf, dass die Sicherheitslasche aus der
Mein iPod passt nicht richtig in das Dock. Verwenden Sie das iPod Universal Dock, welches bei Ihrem iPod
Überprüfen Sie, ob die Audioausgänge des Gerätes mit einem
Lautsprecher- oder Verstärkersystem verbunden und ob dieses in
Betrieb ist.
Rückseite des Gerätes angeschlossen und mit einer funktionierenden
Stromquelle verbunden ist.
Batterieabdeckung der Fernbedienung vor dem Gebrauch entfernt wird.
mitgeliefert wurde.
SPEZIFIKATIONEN
Abmessungen: 88,9mm (H) x 482,6mm (B) x 119,4mm (T)
Gewicht: 1,71 kg
Audioausgänge: Symmetrisch XLR
Unsymmetrisch RCA (x2)
Eingänge: 4G iPod und neuer (mit dock Anschluss)
Stromaufnahme: AC IN, 100 ~ 240V
50/60 Hz, 17W
Zubehör: Stereo RCA Kabel (x2)
Software CD
Kurzanleitung
Fernbedienung
Netzkabel
Sicherheits- und Garantiehinweise
TECHNISCHEN SUPPORT UND WEITERE PRODUKTINFORMATIONEN ERHALTEN SIE AUF WWW.NUMARK.COM
ODER WWW.NUMARK.DE
12
RCA Ausgänge:
Ausgangspegel: 8.2dBv +/-1dBv
Klirrfaktor: weniger als 0.01%
Rauschabstand: besser als 85dBr
Frequenzgang: +/- 2dB von 20Hz bis 20kHz
XLR Ausgänge:
Bei Gain auf 0dB:
Ausgangspegel: 22.5dBu +/- 1dBu
Klirrfaktor: weniger als 0.01%
Rauschabstand: besser als 85dBr
Frequenzgang: +/- 2dB von 20Hz bis 20kHz
k
INTRODUZIONE
Benvenuti al Fitness Rack-mount Player. Il Fitness Rack-mount Player è un media center 2u iPod* installabile su
rack, che vi permette di controllare il contenuto del vostro iPod tramite i comandi integrati a livello del pannello
anteriore o a distanza, grazie al telecomando in dotazione. Il Fitness Rack-mount Player vi permette di convogliare
l’audio dal vostro iPod a tre diversi dispositivi, quali un impianto PA, casse e amplificatori. Dotato di uscite XLR
bilanciate, il Fitness Rack-mount Player garantisce una qualità audio pura, inimitabile.
Come bonus aggiuntivo, abbiamo inoltre incluso il MixMeister Express, un’applicazione software che vi permette di
creare mix dal suono fantastico direttamente sul vostro computer (unicamente PC). Sarà sufficiente installare il
software dal CD in dotazione e seguire la guida rapida video per imparare a creare trasferimenti perfetti. Grazie a
MixMeister Express si può perfino modificare dinamicamente il tempo della musica, indipendentemente dal suo pitch.
Una volta creato il vostro mix, potete caricarlo sul vostro iPod e riprodurlo dal lettore Fitness Rack-mount Player.
* iPod è un marchio di fabbrica di Apple, Inc., registrato negli Stati Uniti e in altri paesi..
CONTENUTI DELLA CONFEZIONE
Assicurarsi che tutti gli elementi elencati di seguito si trovino nella confezione:
Fitness Rac
Cavo di alimentazione IEC CD recante il Software Istruzioni di sicurezza e garanzia
Telecomando (con batteria)
PRIMA DI UTILIZZARE IL PRODOTTO, LEGGERE ATTENTAMENTE IL LIBRETTO DI ISTRUZIONI DI SICUREZZA E GARANZIA!
-mount Player Cavo Stereo RCA Guida rapida
IMPOSTAZIONE RAPIDA
1. Studiare attentamente lo schema di montaggio di cui sotto.
2. Sistemare l’apparecchio in una posizione adeguata all’uso.
3. Assicurarsi che tutti i dispositivi siano spenti e che tutti i fader siano impostati su zero.
4. Collegare le uscite audio agli amplificatori di alimentazione, ai monitor e/o ai proiettori.
5. Collegare l’apparecchio e gli altri dispositivi alla corrente ca.
6. Accendere tutto nel seguente ordine:
iPod
Fitness Rack-mount Player
Infine, eventuali amplificatori
7. Al momento dello spegnimento, invertire sempre questa operazione spegnendo, nell’ordine:
Eventuali amplificatori
Fitness Rack-mount Player
iPod
8. Recarsi alla pagina www.numark.com
la registrazione del prodotto.
per
SISTEMA AMP E CASSA
SISTEMA AMP E CASSA SISTEMA AMP E CASSA
13

PANORAMICA PANNELLO ANTERIORE
1. POWER – Questo pulsante accende e spegne l’apparecchio.
2. iPod DOCK – Dock per il collegamento dell’iPod. Assicurarsi che l’iPod si inserisca agevolmente nel
connettore, ma non forzarlo. Una volta collegato, l’iPod verrà caricato costantemente.
3. MENU – Questi pulsanti funzionano come il tasto “MENU” dell’iPod.
4. JOG WHEEL – Questa rotella funziona come il comando touchwheel del vostro iPod.
5. ENTER – Questo pulsante funziona come il tasto “ENTER” dell’iPod.
6. |<< - Questo pulsante funziona come il tasto “|<< ” dell’iPod.
7. >|| - Questo pulsante funziona come il tasto “>||” dell’iPod.
8. >>| - Questo pulsante funziona come il tasto “>||” dell’iPod.
9. SENSORE TELECOMANDO – Questo sensore localizza i comandi del telecomando in dotazione.
PANORAMICA PANNELLO POSTERIORE
1. USCITA AUDIO (XLR) – Queste uscite bilanciate XLR vanno collegate ad un amplificatore, un mixer o
un sistema di casse.
2. XLR GAIN – Questa manopola può essere utilizzata per apportare regolazioni al guadagno delle uscite
audio XLR.
3. USCITA AUDIO 1 (RCA) – Servirsi di un cavo stereo RCA per
collegare questa uscita ad un amplificatore, un mixer o un sistema di
casse.
4. USCITA AUDIO 2 (RCA) – Servirsi di un cavo stereo RCA per
collegare queste uscite aggiuntive ad un amplificatore, un mixer o un
sistema di casse.
5. INGRESSO DI ALIMENTAZIONE – Servirsi del cavo di alimentazione in dotazione per collegare
questo ingresso ad una sorgente di alimentazione.
Va notato che sia i
collegamenti XLR che RCA
emetteranno lo stesso
segnale audio dall’iPod.
14

TELECOMANDO
ATTENZIONE
Aprire lo scomparto e
rimuovere la linguetta di
Il telecomando offre un modo rapido di accedere alle funzioni
principali di riproduzione dell’apparecchio a distanza.
1. >|| - Questo pulsante funziona come il tasto “>>|”
dell’iPod.
2. |<< - Questo pulsante funziona come il tasto “|<< ”
dell’iPod.
3. >>| - Questo pulsante funziona come il tasto “>>|”
dell’iPod.
ISTRUZIONI DI MONTAGGIO
Questo dispositivo può essere montato su un rack standard da 19”
occupando due spazi. Servirsi di 4 viti da rack (non incluse) per
fissare l’apparecchio al rack stesso.
RISOLUZIONE DI PROBLEMI
PROBLEMA: SOLUZIONE:
Non si sente l’audio. Assicurarsi che l’iPod stia suonando.
Assicurarsi che l’apparecchio sia acceso.
L’apparecchio non si accende. Assicurarsi che il cavo di alimentazione sia collegato a livello della parte
Il telecomando non funziona. Assicurarsi che la linguetta di sicurezza dello scomparto batterie del
Il mio iPod non si inserisce bene nel dock. Servirsi del dock universale per iPod in dotazione con l’iPod.
Assicurarsi che le uscite audio dell’apparecchio siano collegate ad un
altoparlante o ad un sistema di amplificatori e che tale sistema sia
acceso.
posteriore dell’apparecchio e che sia inserito in una sorgente di
alimentazione funzionante.
telecomando venga rimossa prima di utilizzare il telecomando.
SPECIFICHE TECNICHE
Dimensioni: 8,9 cm (H) x 48,2 cm (L) x 11,9 (P)
Peso: 1,7 kg
Uscite audio: Bilanciate XLR
Non bilanciate RCA (x2)
Ingressi: 4G iPod e successivi (con connettore dock )
Alimentazione: AC IN, 100 ~ 240V
50/60 Hz, 17W
Accessori: Cavo stereo RCA (x2)
Software CD
Manuale rapido
Telecomando
Cavo di alimentazione
Istruzioni di sicurezza e garanzia
PER SUPPORTO TECNICO E ULTERIORI INFORMAZIONI SU QUESTO PRODOTTO, VISITARE LA PAGINA
WWW.NUMARK.COM
15
Uscite RCA :
Livello uscita: 8.2dBv +/-1dBv
THD: inferiore a 0,01%
Gamma S/N: superiore a 85dBr
Risposta di frequenza: piatta entro 2dB da 20Hz a
20kHz
Uscite XLR:
Con trim set a 0dB:
Livello uscita: 22,5dBu +/- 1dBu
THD: inferiore a 0,01%
Gamma S/N: superiore a 85dBr
Risposta di frequenza: piatta entro 2dB da 20Hz a
20kHz


MANUAL VERSION 2.0

www.numark.com
2
 Loading...