

Page 1
QuickReferenceGuide
Page 2

2
Page 3

Why are PDF files popular?
The Portable Document Format has become a de-facto standard for
document exchange across platforms and computing environments. More
than 200 million PDFdocuments are posted on the World Wide Web. Key
benefits that have driven this popularity are:
• Integrity: PDF files look like the original documents they were
created from. They conserve their appearance after sharing regardless of platform, operating system or local settings on each
computer or device.
• File size: In many cases, PDF files can be more compact than their
source documents - ideal for file transfer.
• Security: PDF files can be digitally signed and password protected to
prevent unauthorized changes.
• Sharing: While the basic document content can be frozen,
commenting and mark-up tools allow collective authoring and
document review.
What PDF Professional does for you
ScanSoft®PDF Converter Professional 4 from Nuance Communications
Inc., offers the full circle of functionality for handling PDF files. It can open
PDF files from versions 1.3 to 1.6 for viewing, editing, annotation and reassembly. It can create PDF files from versions 1.3 to 1.6 (PDF/A format is
also supported). It can unlock PDF files for repurposing in other
applications.
This professional product has three parts for creating, editing and unlocking
PDF files. These are all installed and activated with a single procedure.
3
Page 4
CreatePDFFiles
read from page 7
ScanSoft®PDF Create! 4 lets you create PDF files from a wide
range of file types. The Print dialog box in your print-capable
applications will offer a printer named ScanSoft PDF Create!
The PDF Create! Assistant lets you compile a list of files generated by
different applications. Each file can be converted to a separate PDF file, or
they can be combined into a single file. When working in Microsoft
®
WordTM, Excel®or PowerPoint you can call on the program to create a
PDF file directly from your current document. When converting from
Microsoft Word, hyperlinks and comments can be transferred and you can
set bookmarks to be generated from the structure of the Word document.
Files can be protected by passwords and can include watermarks.
Compression and font settings give you control over PDF file size and
appearance.
EditPDFFiles
read from page 14
ScanSoft PDF Converter Professional gives you extensive control
over your PDF files through an easy-to-use browsing and reading
interface. You can edit pages and documents, annotate and review
them, adjust document security, sign your documents and more. PDF
documents can be compiled from different sources and pages can be
rearranged. The program delivers a powerful document management
system: use it to create archives from related documents to index and search
them later.
ExportPDFFiles
read from page 17
The ScanSoft®PDF Converter 4 lets you unlock PDF files to edit
them as Microsoft®WordTM, Microsoft®Excel®, Corel
®
WordPerfectTM, and generic RTF files. It also lets you open PDF
files directly from these applications, edit them and save them in the
appropriate file type. It converts PDF files up to and including version 1.6.
Encrypted PDF files can be opened if the required password is provided.
The program offers four types of conversions: standard documents, legal
documents, forms and spreadsheets.
4
Page 5

Installation and Activation
Please remove any previous version of PDF Converter Professional before
the installation. You should have administrator rights on the computer to
install and activate the program. You need web access for activation.
1. Insert the CD-ROM in your CD-ROM drive
The installation program will start automatically. If it does not, locate your
CD-ROM drive in Microsoft®Windows®Explorer and double-click the
converter's setup.exe file. Select a language for installation. The
InstallShield®Wizard will appear.
(If you have downloaded the converter from the Nuance web site, doubleclick its setup.exe file.)
2. License and Serial Number
You must accept the license agreement in order to proceed. You must enter
a serial number. You will find this on the CD sleeve or on the Nuance web
site at the download location. Be sure to keep the serial number in a safe
place; it is fully checked only during product activation and is also needed
for any re-installations.
3. Location and Setup Type
The installer offers a default location for the program. Accept it or define a
different one. Select Complete or Custom Setup. Choose Custom to accept
or decline installation of the PDF unlocking component. Choose Custom
also to enable or disable the integration of PDF Converter and PDF Create!
in other programs. By default, all the programs offered in the PDF
Converter Professional Integration panels of theInstallShield Wizard will be
enabled. (You can change integration settings later by choosing the program
under Add or Remove Programs in the Control Panel and clicking Change
and then Repair.)
4. Click Finish
Registration runs at the end of installation. Select Register Online to
establish a connection to the Nuance web site. We provide an easy
electronic form that can be completed in a few moments. When the form is
filled, clickSubmit. If you decide not to register or to be reminded later, you
5
Page 6

can go to http://www.nuance.com to register online any time later. Click on
Support and from the main support screen choose Register in the left-hand
column. For a statement on the use of your registration data, please see
Nuance's Privacy Policy.
5. Activate
You will be invited to activate the product at the end of installation. Please
ensure that web access is available. Provided your serial number is found at
its storage location and has been correctly entered, no user interaction is
required and no personal information is transmitted. If you do not activate
the product at installation time, you will be invited to do this each time you
invoke the program. PDF Converter Professional can be launched only five
times without activation. We recommend Automatic Activation. If you
choose Manual Activation, you have to activate both PDF Converter and
PDF Converter Professional separately.
Any earlier version of PDF Converter or PDF Create! or of a Docucom
PDF printer driver should be removed before installing version 4. Keep the
serial number of the earlier version, to retain the option of installing it on a
different computer.
You will be allowed to re-install the program a reasonable number of times
without having re-activation problems, because un-installation includes a
de-activation step. The serial number is needed for re-installation and web
access is needed for de-activation and re-activation.
How to Get Help
This printed Quick Reference Guide accompanies the ScanSoft PDF
Professional when it is supplied on a CD. This guide is also available in a
PDF file on the CD and after installation in the program folder. It can also
be accessed from the About panel. When the program is delivered
electronically, this PDF document should be consulted. It is available at the
download site.
ScanSoft PDF Converter Professional has a comprehensive HTML online
Help system. Use the Help Menu to open it at its Introduction.
Press F1 to open Help: typically at the topic describing the
currently open panel. Some dialog boxes have Help buttons.
6
Page 7
A Release Notes file with latest information is available on the CD and in
the program folder. The Nuance web site offers program information, with
a regularly updated knowledge base and user forums.
Note: System requirements are presented on the product box and in online Help.
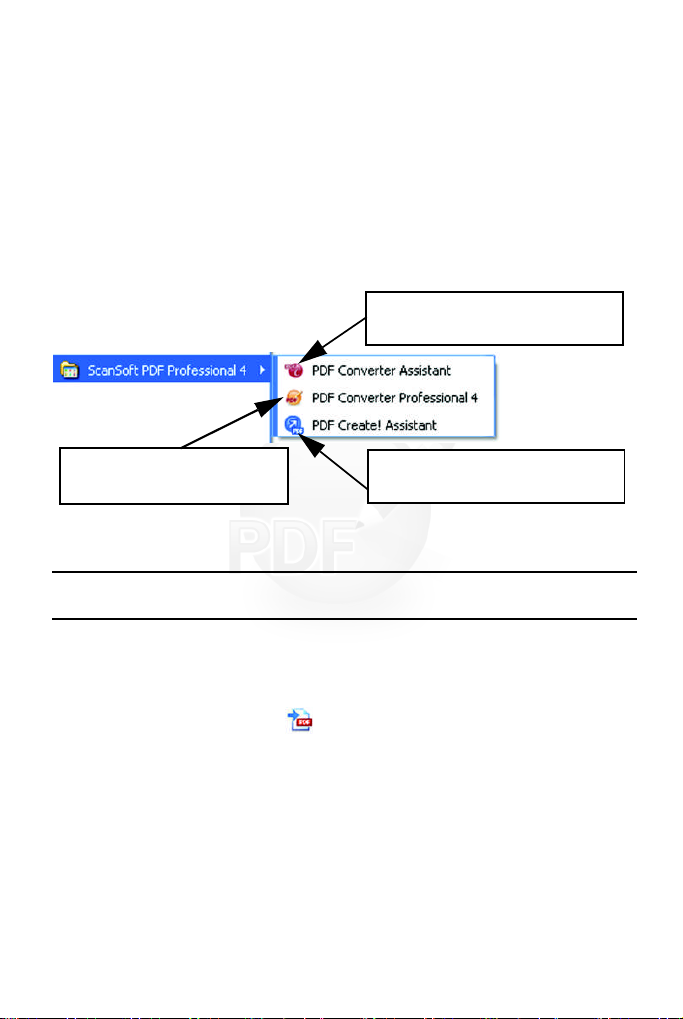
Starting the Program
Choose ScanSoft PDF Professional 4 from the Windows Start Menu. This
offers the following items:
Choose this to convert PDF files to
freely editable documents.
Choose this to start the main
program and edit PDF files.
Choose this to create PDF files
from one or more source files.
CreatePDFFiles
Create PDFs from PDF Professional
Click the PDF Create button in the Main toolbarof PDF Professional,
or select New PDF from the File menu. See the picture on the next page.
You can create a blank PDF or choose From File... to select one or more
files from an Open dialog box, even if they were created in different
applications. The next three commands lead to the PDF Create! Assistant
giving you full control over the creation process. You can also drag-anddrop files created in a print-capable application onto the PDF Converter
Professional workspace. In this case the behavior is the same as when
choosing From File... .
7
Page 8
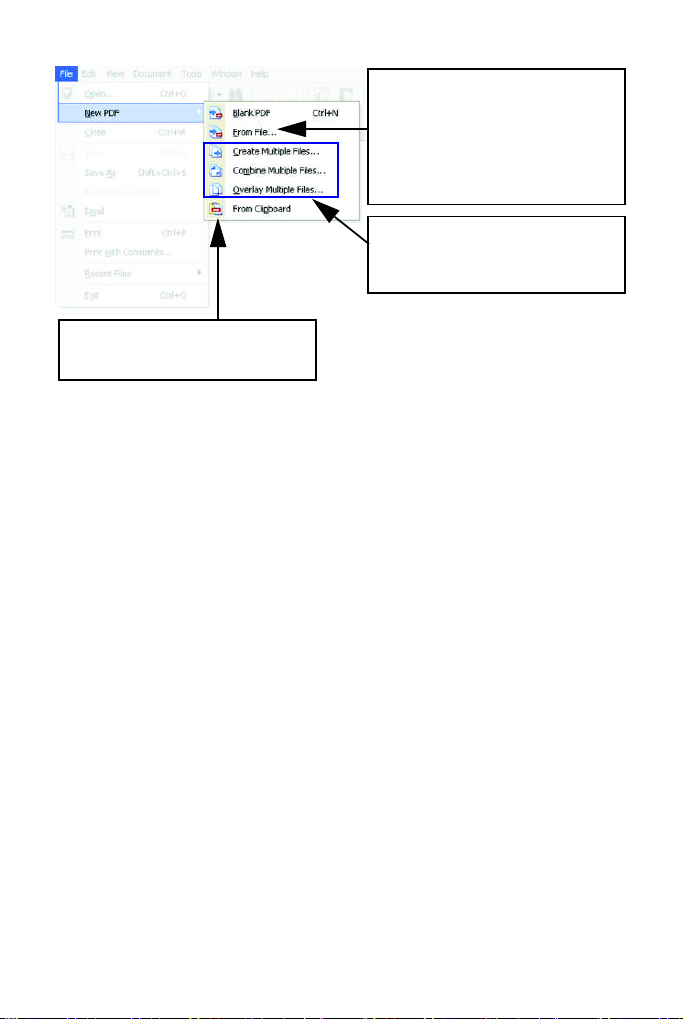
Multiple selection is possible, one
PDF is created for each file using
the existing settings from the
ScanSoft PDF Create! Properties
dialog box that you can access
from File/Print.
These commands work through
the Create Assistant where settings
are made through profiles.
This makes one PDF file from the
active clipboard contents.
Create PDFs from Print dialogs
The Print dialog box appearing in your print-capable applications will
include a PDF Create! printer. Load a file you want to make a PDF from,
then select File/Print. Select ScanSoft PDF Create! as the name of your
printer. Specify a page range and other settings as desired. One PDF file is
created; the number of copies value is ignored. Click Properties to check or
change PDF Create! settings. Click OK to start the creation. By default the
Save As dialog appears, but you can give automated saving instructions
under Properties/PDF Settings.
Use the PDF Create! Assistant
The Assistant is called from the Windows Start menu. It lets you compile a
list of files to be converted. These files may have been created in different
applications. Choose to combine the files in the given order to create a
single PDF file or have each file converted separately. Files can also be
overlaid for the conversion. The Assistant lets you use profiles to control the
PDF creation. Profiles contain a group of settings designed for a particular
outcome. The program includes six profiles; you can create more for your
own needs.
8
Page 9
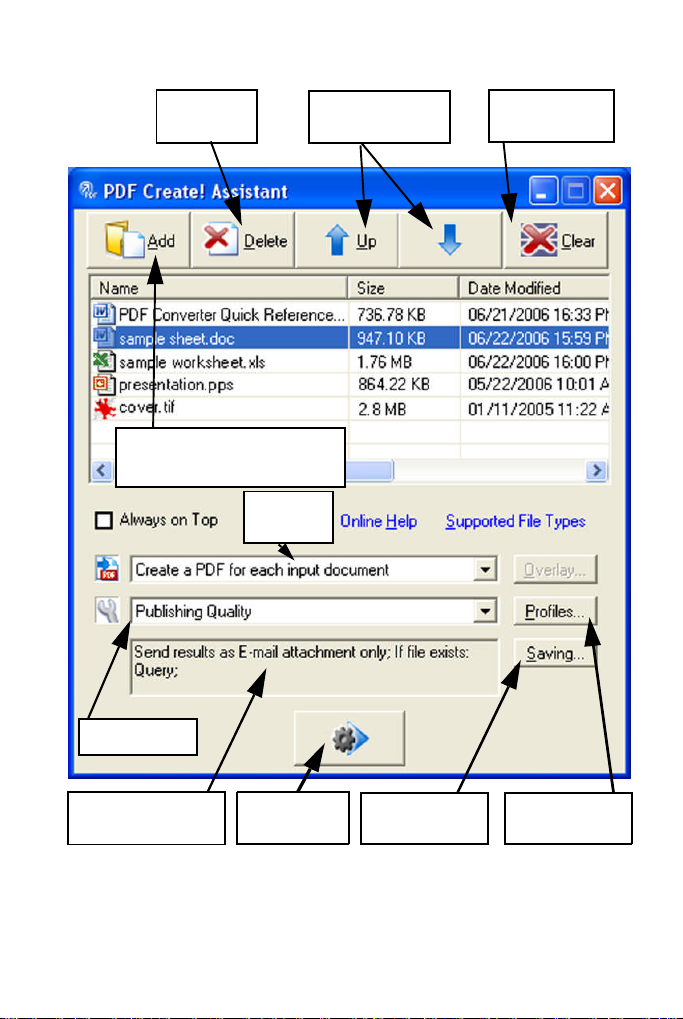
Remove
selected files
Drag and drop input files onto
this area, or use the Add button
Assembly
instruction*
Move selected files
up or down
Remove all files
from the list
Select a profile
This displays current
saving settings
Click to start
PDF creation
Click to change
saving settings
* other assembly instructions are:
• Combine files into a single PDF (in the listed order)
• Overlay files (according to the current overlay options).
Change profile
settings
9
Page 10
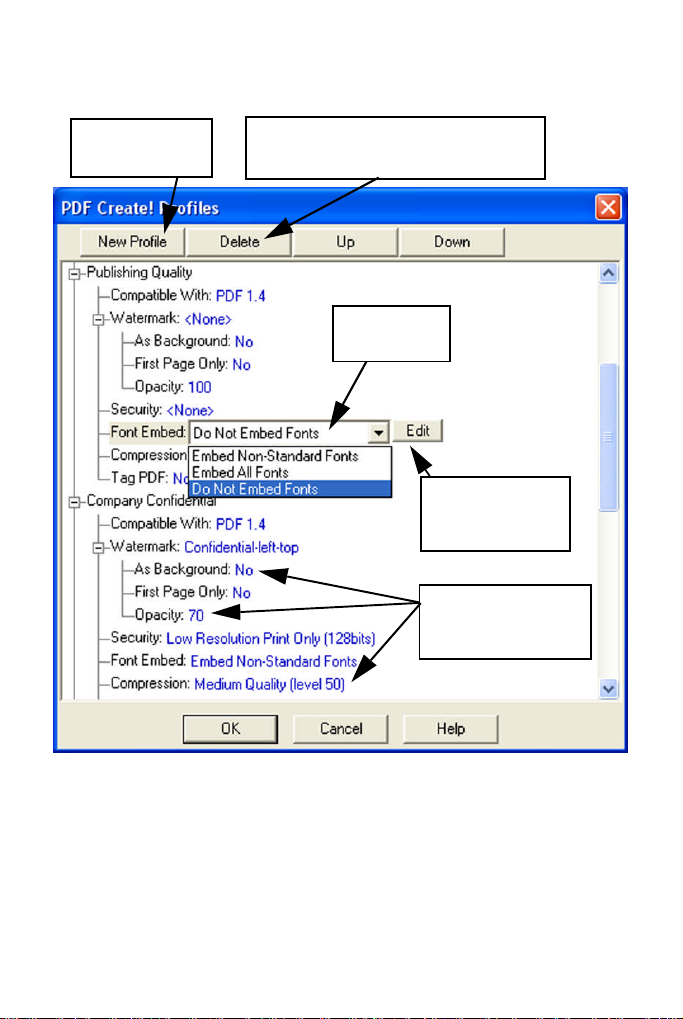
Click Profiles to change settings for your chosen profile, or to create a new
profile.
Click this to name
a new profile
Click this to delete the profile containing
the selected item (after a warning)
Choose an item
from the list
Click this to change
the settings for the
chosen item
Click the end of a
control for an edit box
or dropdown list
Click OK to close the PDF Create Profiles dialog box.
Then press the Go button in the Assistant. The Print Info dialog box
appears, listing the input and output files and showing the conversion
status. Double-click any PDF name to view the created PDF.
10
Page 11

Create PDFs from Windows Explorer
Right click on a single file. The shortcut menu includes:
Choose a profile from the first item's sub menu. The current settings for
that profile will be used for the PDF creation. Click Edit… to modify
profile settings or create a new one before PDF creation. The second item
shows the current saving instruction. Click on it to set a different
instruction.
If you select a group of files and right click, the shortcut menu includes:
Choose the first option and then a profile to create one PDF from each
selected file. To generate a single PDF, choose the second or third option,
along with a profile. The last option displays the current saving instruction.
Click it to change this.
Create PDFs from Microsoft Word
1. Open the Word document.
2. Select Create PDF from the PDF Create menu or click .
3. Accept or change the default target folder and file name in the Save As
dialog box that appears.
11
Page 12

4. Optionally, add document information (keywords etc.).
To create a PDF and attach a copy of it to an e-mail message, click .
PDF Links dialog box
Access this
menu. It lets you define settings that are applicable only when creating a
PDF from a Word document. Define which paragraph styles in the Word
document should be converted to bookmarks in the PDF, which comments
should be transferred and how hyperlinks should appear.
from a toolbar button or an item in the PDF Create!
Create PDFs from Microsoft Excel and PowerPoint
1. Open the Excel file or PowerPoint presentation.
2. Select Create PDF from the PDF Create menu or click .
3. Accept or change the default target folder and file name in the Save As
dialog box that appears.
4. To create a PDF and attach a copy of it to an e-mail message, click .
To change creation properties, click .
NOTE: If you do not see the buttons in Word, Excel or
PowerPoint, go to View > Toolbars and select ScanSoft PDF.
ScanSoft PDF Create! Properties dialog box
This gives you full control over the conversions. In the General panel you
define page size, orientation, resolution for the PDF and choose whether or
not to view it after creation. The PDF Settings panel lets you define the
PDF version, control font embedding, set compression types and severity,
define passwords and add watermarks. It gives you choices for naming the
created PDF file(s) and defining properties such as title, author, subject and
keywords. The created file(s) can also be directed as attachments to an
E-mail message, ready for distribution.
12
Page 13

The ScanSoft PDF Create! Properties dialog box can be accessed from the
Print dialog box in your applications. When working from the Create!
Assistant or Windows Explorer,these settings aremade through theprofiles.
If you need to access these settings from Microsoft Word, choose File/Print
instead of the PDF Create! button.
How to overlay PDF files
Overlay options let you place artwork or other fixed items onto just the first
page of your PDF files, together with items that change from file to file.
Overlay example for a cover page:
To have this result, deselect the option 'Repeat the last page of the shortest
document for page overlay'.
You can also use an overlay to add a company logo or other fixed item to
every page of PDF files you create. To do this select the option named
above.
For more information on overlay choices, please consult online Help.
13
Page 14

EditPDFFiles
The main screen areas of PDF Converter Professional are as shown below:
To view and edit PDF files
PDF Converter Professional groups its controls in several toolbars. You can
undock these and drag them into your working area. Here we present the
main toolbars, in two cases describing the individual tools from left to right.
14
Page 15

This toolbar presents basic operations,
such as creating, opening, saving,
printing, e-mailing and searching PDF
files. The drop-down list of the PDF
Converter tool is displayed. Use it to
unlock the current PDF targetting the
selected format.
Use the Hand tool for PDF viewing and
scrolling. Selection tools let you select
pieces of text and document areas.
Use this toolbar to zoom in and out on
your PDF, magnify areas of interest or the
whole page dynamically.
Touch-up text: Make limited text edits, even over
multiple lines of text.
Touch-up object: Select objects to move, resize,
rotate, group or prioritize them.
Select object: Use this to modify object properties and alignment.
Link: Use this to define a rectangle that will become a hyperlink.
Crop: Draw a rectangle to define the area to remain after cropping; double click
in it to set cropping instructions.
Auto-FormTyper: Use this to have form elements detected and activated and
turn a static PDF into a fillable form.
Digital Signature: Apply a signature to protect the document from
unauthorized changes.
Form controls drop-down list: You can add the displayed form controls
to a PDF form.
15
Page 16

Attach: Attach a file or a sound file to the PDF with an icon at a specified
location.
Drawing: Draw different shapes on the page. Use a shortcut menu to signal
‘complete’ when drawing multi-sided shapes.
Highlight: Select from the shown highlighting tools.
Note: Click this to add a note to the PDF; note conversations are possible when
PDF files are shared. Sort notes by author, type, date and more.
Text Box: Click this to add a text box above the other content on the PDF page.
Stamp: Click this for a stamp gallery; select one to place it on the page.
Document Security
To modify the security settings for your document, click Document >
Document Properties and choose the Security tab. This will always display
your current settings. You can choose to protect your document by
passwords or Certificate security at different levels.
Searching and Archiving Documents
You can carry out text searches in the currently open PDF, a given folder or
on a pre-built index file. Use the Organizer to specify the search criteria.
A PDF Index file (.zpi) is a searchable archive of PDF documents. Click
Document > Catalog to create a new index or to modify an existing one.
Reading Text Aloud
Use the command Read PDF in the Tools menu to have the PDF text read
aloud. Choose the current page or the whole remaining document. Choose
Properties to set the rate and volume. You can also save the PDF text to a
sound file in the wav format. This facility is powered by the Nuance
RealSpeak Solo TTS engine.
16
Page 17

Document Management Systems
DMS support is provided for file input and storage. See System
Requirements in online Help for a list of supported products.
PDF Optimizer
Optimize your PDF to best fit its purpose. Click Tools > Optimize PDF
and specify target requirements such as fast web view, object and image
compression, scanned page settings, font embedding and more. You canalso
add tags to PDF files, to have their logical structure (paragraphs, titles,
pictures, tables, cells, etc.) identified and logged.
PDF Printing
In addition to the usual print choices you can choose to print the PDF with
or without comments. You can also print form fields only, allowing you to
print an empty form, fill it electronically, and then print your responses
onto the empty form.
ExportPDFFiles
Exporting PDF from the Professional program
The component that lets you export the content of PDF files to editable
formats is called PDF Converter. Access it from the Save As button in the
File toolbar. Choose a direct conversion to be performed with current
settings or choose the last item to open the PDF Converter Assistant for
full control.
17
Page 18

You can also perform direct conversions by selecting the Save As command
from the File menu.
The PDF Converter Assistant
Start this from the Windows Start Menu or from your desktop if you placed
a shortcut there. The Assistant lets you prepare and control conversions. Its
Full view shows you a preview of PDF files to be converted and lets you set
page ranges. The panel on the right lists all files selected for conversion;
icons show loading or conversion status. Online help explains the meanings
of the icons.
PDF Converter 4 offers four levels of control:
Quick View:
This allows quick conversions using current settings for everything beyond
four basic choices.
Full View:
This presents the same four buttons from Quick View, but also displays
page previews and offers all settings that influence the conversions. Choose a
mode to see its settings. Choose a target (or click the Output tool when
there is no choice) to set saving options. Full view lists all files in the current
conversion session along with status information for each of them.
Left View:
This appears when PDF Converter is called from inside a target application.
Then only a single file can be converted, so just the left preview panel and its
controls are needed.
No Assistant:
From starting places where the input file and target are pre-defined, you can
by-pass the Assistant altogether and perform a direct conversion using
existing settings. See Starting the Program from other places.
18
Page 19

Converting with Quick View
Choose Quick View in the View menu. Then your conversions are an easy
4-step process, using current settings for everything else:
1. File Open:
Select one or more PDF files
or drag and drop them onto
Mode
Tool
Output
Tool
Convert All
Tool
the Quick View window.
2. Choose a processing mode:
Standard Document, Legal,
Spreadsheet or Form.
3. Choose a target: Microsoft Word, Excel,
Corel WordPerfect or Rich Text Format.
4. Start the conversion.
During conversion, the buttons are grayed. If View Result in the Output
Options panel is selected, the converted file appears in its target program.
Turn off the Quick View toggle to return to Full view to see the processing
summary, inspect and change settings or view PDF page previews. If you
close the program with Quick View active, it will reappear when the
program is next started.
19
Page 20

Converting with Full View
Here is the Assistant in Full View. Three sample files are loaded, the sample
form is displayed in the Preview panel on the left.
Restore
preview
Open
files
Preview panel
showing current
page of selected file
Select conversion mode
and target and display
their settings
Convert all
listed files
Convert
selected file
List of loaded or
converted files.
Icons show file
status. You can
add files by dragand-drop.
This icon
shows that the
page has a text
layer.
Pages without
a text layer
display this
icon:
Remove files
from list
Move files
up ordown
in the file
list
View source
or result file
of selected
item.
Preview each page of
your PDF using these
navigation buttons.
Specify a page range
here. By default all
pages are converted.
Page 21

Starting the Program from other places
To make the services of PDF Converter 4 easy to call on, it can be started
from several locations, as described in the following procedures:
The Windows Start Menu
Choose PDF Converter Assistant from the ScanSoft PDF Professional 4
group in Programs or All Programs. All conversions started from the Start
menu use the PDF Converter Assistant. It allows you to name input PDF
files and decide how to handle output files. Display of the created file is
optional.
The Open PDF button in a Microsoft Word Toolbar
1. Use the Open PDF button in a Microsoft Word toolbar or the
Open PDF… item in the Word File menu to call an Open dialog box
with PDF selected as file type.
2. Choose a single PDF file, browsing if necessary. Click Open.
3. TheConverter Assistant preview panel displays the firstpage of the PDF.
View other pages and set a page range if desired.
4. Select the processing mode with the Mode tool or from the Options
Menu. This calls the settings panel for the chosen mode. Make settings as
desired.
5. Click the Output tool or select Word Document (the only possible
target) in the Options menu to select saving options.
6. Press to start conversion, with a progress monitor. The
resulting file is displayed in Microsoft Word ready for editing.
Note: If you do not see the Open PDF button in a toolbar, go to View > Toolbars
and select ScanSoft PDF, or open the Preferences dialog box of the PDF Converter
Assistant to enable Microsoft Word integration and restart Word.
21
Page 22

The Open Dialog Box in Microsoft Word
1. Click Word's File Open button or go to the Microsoft Word File
menu and click Open...
2. Select PDF (Portable Document Format) (*.pdf) in the Files of type box.
3. Select the PDF file you want to convert. Multiple selection is possible;
then files are converted one after the other.
4. Click Open. (The picture shows steps 2, 3 and 4.)
5. Conversion starts withor without the Converter Assistant, as specified in
the PDF Converter 4.0 Settings dialog box, found in Word's Tools
menu.
6. Ifthe PDF Converter Assistant is enabled, the PDF is previewed and you
can change mode settings before starting the conversion. If the PDF
Converter Assistant is disabled, conversion starts immediately, using the
existing settings for the pre-defined mode.
7. Converted, editable documents are displayed in Microsoft Word.
22
Page 23

8. A converted document will display as if it were still the PDF file. You
must save it as a Word document with the command Save As.... If you
use Save or Close without saving, you will lose either the converted
document or the original PDF. The program warns you of this:
WordPerfect
Use the Open PDF item in the File menu of WordPerfect. Select a single
PDF file and click Open. View pages in the PDF Converter Assistant in Left
view. Set a page range if desired. Select a mode (standard or legal document)
and its settings. Set output settings. Click the Convert All button. The
resulting file is displayed in WordPerfect, ready for editing.
Microsoft Excel
Use the Open PDF button in a Microsoft Excel toolbar or the Open
PDF item in the File menu. Select a PDF file and click Open. View the
PDF in the PDF Converter Assistant left view. Set a page range if desired.
Click the Spreadsheet button (the only possible mode) to set conversion
options, (including one worksheet per table or per page). Set output
settings. Click the Convert All button. The resulting file is displayed in
Microsoft Excel ready for editing.
23
Page 24

Microsoft Outlook
1. Select a message that has a PDF attachment. The PDF Converter
buttons will become active.
2. Click the PDF Converter button in the
Outlook toolbar or in the message toolbar.
3. If the message has more than one PDF, select which PDF to convert
and click OK.
4. Here you can choose to use the PDF Converter Assistant for conversion
or unlock your PDF file without it. If you prefer automatic conversion,
you choose the mode and target immediately.
Microsoft Internet Explorer
1. Right-click on a hyperlink leading to a PDF file or an HTML page
hosting a PDF.
2. Choose Open with ScanSoft PDF Converter 4.0.
3. Conversion is performed through the Assistant.
Windows Explorer
1. Right-click on a PDF icon or file name in Windows Explorer or a PDF
icon on your desktop.
2. Choose a conversion mode and target from the shortcut menu. If you
choose to use the Assistant, you make these choices in its Preview panel.
24
Page 25

Processing modes and outputs
Choose from four processing modes, depending on the content of the PDF
file to be converted and the type of output you want. Here are your choices:
Mode Output
Standard Document
Word WordPerfect RTF
Legal Document
Word WordPerfect RTF
Spreadsheet
Excel
Forms
Word RTF
The settings for each mode are displayed on the left panel of the Assistant
when you make a mode selection. The values are stored separately for each
mode - this includes the image-only processing and graphic handling
options that are common to all modes.
The output settings are displayed in theleft panelwhen you make an output
selection. The settings are the same for all targets and only one set of values
is stored for use with all saving.
Next we summarize the choices unique to each mode.
25
Page 26

Standard Document conversions
Choose how the layout should be maintained:
• True Page
TM
places all elements in text boxes or frames.
• Flowing Column uses text boxes and frames only when necessary,
allowing body text to flow from one column to another.
Legal conversions
Choose to retain or drop legal-specific features:
• Pleading numbers - these typically appear in left margins to define
line numbers.
• Images - these are typically stamps, seals, signatures or
company logos.
Spreadsheet conversions
This mode can be used for PDF files containing partly or mainly tables.
Choose what should be placed in each Excel Worksheet:
• Per Page: Each page from the PDF will enter a separate worksheet.
This will happen even if page content is not tabular; you can specify a
page range to exclude unneeded pages.
• Per Table: Each detected table is converted and placed in a separate
worksheet. All content not detected as a table is placed in a separate
worksheet at the end. The detected tables do not appear here, but are
replaced by hyperlinks leading to the relevant worksheet table.
When you do Standard Document conversions, tables in the PDF become
tables in the output file.
26
Page 27

Form conversions
This uses Logical Form Recognition™ technology to detect form elements
and conv
ert them correctly. Choose from:
•
No form controls: The result will be a fillable form with static form
elements. Y
modify the for
•
Create form controls: The result will be a fillable and editable form.
Y
ou can change field labels and modify the form design.
ou can use form handling tools in the target application to
m design.
Handling Mixed PDF Files
PDF files often have mixed content: flowing text, tables and forms. In many
case
s you can process these files with the setting Standard Document and
r
eceive good results. For more precise control, your can use page ranges to
separate forms and tab
unlock
a PDF with two pages of illustrated text, followed by a one-page
tabl
e you want to do calculations on, and finally a three-page form - convert
pa
ges 1 and 2 as Standard Document, page 3 as Spreadsheet and pages 4-6
as F
orm.
les and convert them separately. For example, to best
How do PDF files work?
PDF files display texts correctly wherever they are viewed because they carry
their
typographic information with them. Fonts in the document are
embedded in the PDF
docum
ent. The display does not depend on the needed font files being
av
ailable on the viewing machine, nor on the language of its operating
sys
tem.
file and are used after distribution to reconstruct the
27
Page 28

PDF documents present their pages as images. They can be marked-up and
commented, but the ability to change the basic text is limited. Most PDF
files can be searched, because the file has two layers. There is an image layer
that is presented on-screen. Behind that there is usually a text layer that can
be matched to the characters displayed on the screen.
Display layer
Text layer
When the starting point for a PDF file is a set of images, or a scanning
process, this text layer is not present and the result is an image-only PDF.
When the starting point is an editable document, the text layer can be
created and the PDF is called 'Normal' or 'Searchable'. The creator of a
PDF can require provision of a password to allow access the text layer.
How does PDF Converter work?
PDF Converter has the ability to perform Optical Character Recognition
(OCR). This is the process of extracting text from an image. It does not
need to use OCR to unlock PDF files with an accessible text layer - it must
capture the page layout and arrange the given text and other elements
correctly on each page in the new document.
28
Page 29

Optical Character Recognition (OCR) is normally used only for PDF pages
without an accessible text layer or when non-standard character encoding is
detected, but you can require it for any conversion.
Handling Image-only PDF Files
PDF files without a text layer are a special case for conversion. You can
decide how the program should handle these pages: convert them with the
built-in Optical Character Recognition (OCR), transfer them as images to
the target document or skip them. You can require inspection of the first
pages (up to ten) in PDF files you open. Optionally, you can set conversion
to be stopped, if no text-layer pages are detected. If you have ScanSoft
OmniPage®, you can use this to have more control over the
recognition process.
®
Language Support
PDF Converter supports over 100 languages, including Danish, Dutch,
English, Finnish, French, German, Italian, Norwegian, Polish, Portuguese,
Spanish and Swedish. The program can convert multi-lingual documents. A
full list of supported languages is provided in online Help. Correct language
choice is important for converting image-only pages and handling
non-standard encoding.
29
Page 30

These last two topics relate to PDF Converter Professional.
Web Updates
Select Automatic Web Updates under the Help menu to be informed
whenever a program update is available for any of the three components.
You can also get the latest program updates directly from the Help menu.
Please ensure that web access is available.
Un-installation
1. Select Add/Remove Programs from the Control Panel.
2. Select ScanSoft PDF Professional 4.0.
3. Click Remove to uninstall the program or Change to auto-repair it.
This removes all three components of PDF Converter Professional.
A de-activation step is performed at the start of uninstallation, allowing you
to reinstall the program later without re-activation problems. De-activation
requires web access.
30
Page 31

www.nuance.com
Copyright © 2006 Nuance Communications, Inc. All rights reserved. Subject to change without
prior notice. Nuance, the Nuance logo, Logical Form Recognition, OmniPage, ScanSoft and
True Page are trademarks or registered trademarks of Nuance Communications, Inc. or its
affiliates in the United States of America and/or other countries. All other trademarks are the
property of their respective owners. The software accompanying this document is based, in
part, on the work of the Independent JPEG Group, Colosseum Builders, Inc., and the FreeType
Team. The software was developed using Kakadu software. Zlib compression library
copyright © 1995-1998 Jean-loup Gailly and Mark Adler. The software is protected by US and
International copyright laws.
31
Page 32

32
 Loading...