


 Loading...
Getting Started Guide
L E G A L N O T I C E S
Copyright © 2011 Nuance Communications, Inc. All rights reserved. No part of this publication may be transmitted, transcribed, reproduced, stored in any retrieval system or translated into any language or computer language in any form or by any means, mechanical, electronic, magnetic, optical, chemical, manual, or otherwise, without prior written consent from Nuance Communications, Inc., 1 Wayside Road, Burlington, Massachusetts 01803-4609, U.S.A. The software described in this book is furnished under license and may be used or copied only in accordance with the terms of such license.
IMPORTANT N OTI CE
Nuance Communications, Inc. provides this publication “AS IS” without warranty of any kind, either express or implied, including but not limited to the implied warranties of merchantability or fitness for a particular purpose. Some states or jurisdictions do not allow disclaimer of express or implied warranties in certain transactions; therefore, this statement may not apply to you. Nuance reserves the right to revise this publication and to make changes from time to time in the content hereof without obligation of Nuance to notify any person of such revision or changes.
TRADE MAR KS AN D C RE DITS
Please see the listing at the end of this Guide.
END -U SER L IC ENSE A GR EEME NT
Please see this text via the About PaperPort panel, accessible from the Help ribbon.
Nuance Communications, Inc.
1 Wayside Road, Burlington, Massachusetts 01803-4609, U.S.A.
Nuance Communications International BVBA
Guldensporenpark 32, Building D, BE-9820 Merelbeke, Belgium
PaperPort 14 Getting Started Guide, July, 2011
C O N T E N T S
Welcome to PaperPort |
5 |
Installing PaperPort |
6 |
Activating PaperPort |
7 |
Registration |
7 |
Learning PaperPort |
8 |
Using this Guide |
8 |
Technical Support |
9 |
Minimum System Requirements |
9 |
What’s new in PaperPort 14 |
10 |
Key features |
11 |
Getting to Know PaperPort |
14 |
The PaperPort desktop |
14 |
The PaperPort Ribbon |
15 |
PaperPort items |
15 |
The Folders pane |
17 |
PaperPort item thumbnails |
18 |
PaperPort page thumbnails |
20 |
Two-part desktop |
21 |
Bookmarks |
21 |
The Image View window |
23 |
Customizable Quick Access Toolbar |
24 |
PDF Viewer Plus |
24 |
Acquiring Items |
25 |
Scan to the PaperPort desktop |
25 |
Set up your scanner with PaperPort |
26 |
Using Scan Profiles |
27 |
Print to PaperPort |
27 |
Capture web pages |
28 |
Add PaperPort folders |
28 |
Import pictures from your camera |
30 |
Touching Up Images |
30 |
Edit multiple images |
35 |
PaperPort Getting Started Guide |
iii |
Annotating Pages |
36 |
Annotation tools |
36 |
Protecting Items |
38 |
Add search criteria to items |
40 |
Finding Items |
41 |
Find items by their properties |
41 |
Find words in an item |
42 |
Add items to the All-in-One Search index |
42 |
Use the All-in-One Search pane |
43 |
Schedule Indexing Tasks |
45 |
Sharing Files |
45 |
Connecting to the Cloud |
46 |
Sending Items to Other Programs |
48 |
Customize the Send To bar |
49 |
Converting Items |
51 |
Convert items to image formats |
51 |
Stacking documents |
51 |
Combining documents |
51 |
Convert images to text |
52 |
Filling Forms |
52 |
PDF File Support |
53 |
Creating PDF Documents |
56 |
Creating PDF Documents with PDF Create |
56 |
Using ScanDirect |
58 |
Uninstalling PaperPort |
60 |
iv Contents
Welcome to PaperPort
Welcome to the Nuance® PaperPort® Getting Started Guide. It is supplied as a PDF file, suitable for use with screen readers. If you print it to paper, we recommend double-sided printing with two pages per sheet.
PaperPort provides the easiest way to turn paper into organized digital documents that everybody in an office can quickly find and use. PaperPort works with scanners, multifunction printers, and networked digital copiers to turn paper documents into digital documents. It then helps you to manage them along with all other electronic documents in one convenient and easy-to-use filing system.
PaperPort’s large, clear item thumbnails allow you to visually organize, retrieve and use your scanned documents, including Word files, spreadsheets, PDF files and even digital photos. PaperPort’s Scanner Enhancement Technology tools ensure that scanned documents will look great while the annotation tools let you add notes and highlights to any scanned image.
Accompanying programs
PaperPort 14 includes a PaperPort image printer, a ScanDirect application, (described later), a Scanner Setup Wizard, an ImageViewer application (for viewing and working with page images in a window separate from PaperPort) and PDF Viewer Plus (for viewing and working with PDF files).
Added components are PaperPort Anywhere, providing web storage in a Nuance cloud site, the Nuance Cloud Connector for accessing other cloud sites and a MAX file to PDF Converter.
In PaperPort Professional, the PDF Viewer Plus includes Nuance PDF Create, providing high-level support for PDF creation from a wide variety of source files.
PaperPort Getting Started Guide |
5 |

Installing PaperPort
You can install PaperPort from a CD, a DVD, or from the Web. The installation program provides easy step-by-step instructions. Follow the guidance on each screen to install the software. Installation and un-installation require Administrator rights. PaperPort installation comprises five elements that are installed in a single process:
•PaperPort program (includes ImageViewer, ScanDirect, MAX to PDF Converter, an Evernote connector and the Scanning Wizard)
•PDF Viewer Plus (in PaperPort Professional this includes PDF Create)
•The PaperPort image printer
•The PaperPort Anywhere component
•The Nuance Cloud Connector (optional install)
PDF Viewer Plus is not installed if the top-line Nuance product PDF Converter Professional is detected on the computer (version 6 or above) because it provides all the functionality of PDF Viewer Plus, and much more additionally.
The latest PDF Viewer Plus cannot co-exist with Nuance PDF Converter Professional 5 or below, you must choose which program to keep. To use an old PDF Converter Professional with PaperPort, it must be the application associated to PDF files in your Windows system, and PaperPort must be set to open PDF files with that associated program (see page 53).
To install PaperPort and its key components:
1.Click Autorun.
2.Select an installation language.
3.Accept or change the program location.
If PDF Viewer Plus/Create is to be installed, the following checkmarks appear:
Set Nuance PDF as your default viewer for Windows and Internet Explorer
This sets PDF Viewer Plus as your system default PDF viewer. PDF files on the PaperPort desktop are by default opened in a Nuance PDF product. If you select this option, PDF files that are double-clicked anywhere on your system will open in PDF Viewer Plus.
PaperPort Getting Started Guide |
6 |
Install all Nuance PDF button and menu application add-ins
This choice appears only in PaperPort Professional. It places a Nuance PDF ribbon or toolbar in Microsoft Word, Excel, PowerPoint, Outlook and Internet and Windows Explorer and Corel WordPerfect, allowing PDF Create to make PDF files from the current document or mail attachment or web page. Go to Control Panel Add/Remove programs to later enable or disable these add-ins individually.
Install the Nuance Cloud Connector
This optional application provides convenient file transfer to and from the most popular web-based storage sites. By default it is not installed.
Autorun then starts the installer. It offers a Complete or a Custom installation. Choose Custom only if you want to add your own folders to the supplied PaperPort folders during installation. You can add folders later (see page 28).
 Activating PaperPort
Most versions of PaperPort 14 require activation. For activation and deactivation you need web access. You will be invited to activate the product at the end of installation. Choose from automatic or manual activation. The recommended choice is automatic. Provided your serial number is found at its storage location and has been correctly entered, no user interaction is required and no personal information is transmitted.
If you do not activate the product at installation time, you will be invited to do this each time you invoke the program. PaperPort 14 can be launched only a limited number of times without activation.
Registration
Registration enables you to take full advantage of Nuance® product support and to receive notifications of product updates.
When you finish installing PaperPort, you are prompted to register online. If you want to update your registration information, you can always go to the Nuance web site at http://www.nuance.com.
PaperPort Getting Started Guide |
7 |

Learning PaperPort
This guide introduces you to PaperPort and shows you how PaperPort can help you manage your information. Additional sources of information to help you learn how to use PaperPort include a comprehensive Help system, the How-to- Guides, Release Notes, and the Nuance web site. Access these from the Help ribbon.
Using this Guide
This guide is written with the assumption that you know how to work in the
Microsoft® Windows® environment. Please refer to your Windows documentation if you have questions about how to use dialog boxes, menu commands, scroll bars, drag and drop functionality, shortcut menus, and so on.
Using Help
The PaperPort Help includes detailed information on features, settings, and procedures. Help is available from the PaperPort Help ribbon.
Additional technical support, including technical notes, software updates, product information and product support issues and more is available also from the PaperPort Help ribbon.
PDF Viewer Plus, and also PDF Converter Professional, have their own Help systems that include guidance on PDF creation.
Using release notes
PaperPort Release Notes provide important information about this release of the program. This document is included on the installation CD, from the PaperPort Help ribbon, and as a sample document on the PaperPort desktop.
PaperPort Getting Started Guide |
8 |
Technical Support
Nuance offers both complimentary and fee-based technical support options designed to meet your individual needs. Our services offer person-to-person telephone and e-mail technical support. We also offer self-service, 24-hour access to our Knowledge Base.
Visit http://www.nuance.com for information about your support policy, local support contacts, and product updates. Before contacting Nuance, be sure to read the user documentation and review the Release Notes.
Minimum System Requirements
• Minimum hardware requirements:
― Intel PentiumTM compatible, or higher processor ― 1 GB of memory (RAM)
― 700 MB free hard disk space for the application files and installation ― 30 MB for the Nuance Cloud Connector
― 1024 x 768 resolution display with 16-bit (High Color) or higher
• Supported operating systems:
― Windows XP 32-bit with SP3 or above
― Windows Vista 32-bit and 64-bit with SP2 or above ― Windows 7 in 32-bit and 64-bit versions
• Supported web browsers: ― Internet Explorer 7, 8 and 9 ― Firefox 3, 4 and 5
― Chrome: current (versions 4 through 12 were tested)
A CD or DVD drive or web access is needed for installation. An Internet connection and web access are necessary for online activation, registration, technical support, and live updates.
PaperPort Getting Started Guide |
9 |
Performance and speed will be enhanced if your computer’s processor, memory, and available disk space exceed minimum requirements. This is especially true when handling very large color image and PDF files.
What’s new in PaperPort 14
PaperPort 14 includes a number of valuable new features to help you manage your documents:
PaperPort Anywhere
This service allows PaperPort folders to be linked to web storage folders maintained by Nuance, so that the contents of a linked PaperPort folder is uploaded to the Cloud, and documents added to the Cloud folder are delivered to the linked PaperPort folder. This cloud storage can be accessed through client
applications developed for mobile devices such as the Apple iPadTM and
AndroidTM tablet devices. In this way PaperPort items can be accessed on the move and remotely captured documents can be delivered to PaperPort.
Nuance Cloud Connector
This service connects your computer and PaperPort with other popular webbased storage sites, including Microsoft Live SkyDriveTM, GoogleDocsTM,
Box.netTM, multiple FTP sites, and many more. The Connector can integrate directly with Microsoft Windows providing easy drag-and-drop access directly to cloud services. The Nuance Cloud Connector is also upgradeable to a more feature-rich version of the product called Gladinet Cloud Desktop Pro. This enhanced version adds additional functionality for using cloud services with automatic backup and file synchronization.
Evernote Connector
The Send To bar offers a link to the Evernote web storage facility, so that PaperPort items can be transferred to this Cloud service.
PaperPort Getting Started Guide |
10 |
Bookmark Web Pages
In addition to theability to bookmark workspaces, PaperPort Professional allows favorite web pages to be bookmarked so they can be accessed with a single click. The bookmarks supplied with your default browser also appear in PaperPort.
Windows Shortcut menu inside PaperPort
Choose at installation time whether to allow the Windows shortcut menu for files of particular types to be available in the item’s PaperPort shortcut menu.
New SET tools
Manual despeckling with a wide choice of algorithms yield better black-and- while images for optimum OCR results.
New edge cleaning tools include automated punch-hole removal, auto-cropping pages, and border cleaning.
Access recently scanned and viewed documents
New controls in the Desktop ribbon or in a Windows 7 jump list let you quickly home in on documents that were recently viewed or created.
Key features
High-quality PDF performance
PDF files can be opened quickly and displayed in PDF Viewer Plus, a Nuance PDF handling application that is fully compatible with all leading PDF creation products. PDF Viewer Plus opens files faster than the general-purpose ImageViewer, reducing memory requirements and permitting smaller file sizes. The viewer optimizes the rendering resolution for each element on the page yielding a cleaner display and optimum print resolution.
PDF Viewer Plus provides annotations and dynamic or transparent stamps. Images within a PDF document processed by PDF Viewer Plus can be sent to the ImageViewer to be enhanced using SET tools, with the modified image returned to the PDF.
PaperPort Getting Started Guide |
11 |
Fill and e-mail PDF forms and create new ones, either from scratch or using FormTyper in PDF Viewer Plus to instantly make any static form fillable. It uses Logical Form RecognitionTM technology to detect the form elements and also allows their properties to be managed efficiently.
Searchable PDF files are available through Scanner Profiles, through a right click ‘Save As’ operation on the PaperPort Desktop, or directly in PDF Viewer Plus. This makes the content of your scanned paper documents or image files
accessible to search engines such as Windows Desktop SearchTM or GoogleTM.
Accurate OCR
Language settings can be applied to Optical Character Recognition to increase accuracy in all supported languages.
Digital camera input
It is possible to take a picture of a document with a digital camera and accurately convert it into a text document. This is done by applying special 3D-deskewing algorithms that flatten page images and correct distortions to increase the accuracy of the resulting text document.
Making PaperPort more reliable
Sometimes PDF files may become corrupted so that they can no longer be opened. In these cases PaperPort may not be able to generate a desktop thumbnail and this may prevent PaperPort from launching properly.
A utility program CheckPPFolders.exe is supplied in the PaperPort program folder, along with a short Help file. Run this program to identify and remove any corrupt files so that PaperPort will work properly.
PaperPort Getting Started Guide |
12 |

The following advanced features are available only in PaperPort Professional:
Folder Management
You can automatically create multiple folders by importing a list of folder names from a text file. This option is available when you right-click on any folder. See the Help topic About PaperPort folders for the required syntax.
PDF Create Assistant
You can create industry-standard text-based PDF documents from any application directly with a right-click through the Windows or PaperPort Desktops (up to PDF version 1.7), using the PDF Create Assistant or by printing directly from any application with the printer driver called ‘ScanSoft PDF Create!’. You can create PDF packages, batch create PDF files and much more using the PDF Create Assistant. A table in the Help topic About creating PDF files summarizes which starting places, inputs, options and targets are available.
Support for SharePoint
PaperPort Professional is able to communicate with the Microsoft SharePoint Services 2003, SharePoint Portal 2003, SharePoint Services 2007 and SharePoint Server 2007 document management systems: get files from there, process them as desired, and then save the results by sending the output files back through the Send To bar. ScanDirect supports scanning to PDF with the results directed to SharePoint.
PaperPort is also supplied in Special Editions to selected scanner manufacturers and other resellers. The feature set in these editions may vary, in line with each vendor’s requirements.
PaperPort Getting Started Guide |
13 |
Getting to Know PaperPort
This section introduces you to the different parts of PaperPort. Refer to the PaperPort Help for detailed information about all these topics.
The PaperPort desktop
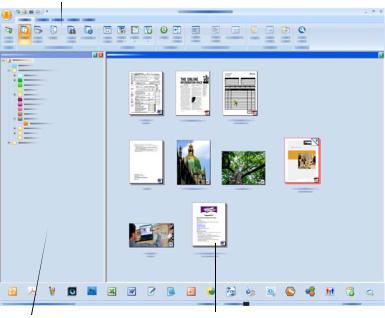
The PaperPort desktop appears with the Folders pane when you first start the program. It displays the documents in the chosen folder as thumbnails and provides tools to manage them. PaperPort offers all the tools necessary to organize, find, and use documents and images. Choose Options from the Desktop ribbon and go to the Desktop panel to choose a color scheme for the desktop and its elements.
Ribbons with command buttons
Desktop
showing item thumbnails
Function Pane
showing folders |
Access to |
|
|
|
other pages in |
|
this multi- |
|
page item |
|
|
|
|
|
|
|
|
|
|
|
|
|
|
|
|
The Fun |
pane can present: |
Image item |
Text item |
Send To bar |
|||
• |
Folders |
|
thumbnail |
thumbnail |
|
|
|
• |
Scan Settings |
|
|
|
|
|
|
• |
Thumbnails |
|
|
|
|
|
|
• |
All-in-One Search |
|
|
|
|
|
|
• |
Properties |
|
|
|
|
|
|
PaperPort Getting Started Guide |
14 |

The PaperPort Ribbon
PaperPort 14 and ImageViewer have a modern tab and ribbon interface. The main elements are:
1.The PaperPort button
2.Quick Access Toolbar (see page 24)
3.Tab
4.Ribbon associated with the tab
5.Group inside the ribbon
6.Button within the group
7.A button drop-down list.
PaperPort items
The documents and photographs you acquire in PaperPort are called items. There are two types of items: image items and text items.
•Image items are scanned documents, photographs, drawings and other digital items in an image format, such as PDF Image, PDF Searchable, JPEG, TIFF, or PaperPort Image files (these MAX files are read-only). They can be scanned, copied or imported into the PaperPort desktop.
•Text items are documents that contain editable text, such as Word (.doc), HTML, and Excel files, and are created by word processing and other text-based applications. Normal PDF files are considered to be text items.
Image items when double-clicked open by default in Image View that offers many image-handling tools, including the SET tools. Go to Options > Desktop to change this behavior. You can choose ImageViewer; this offers the same functionality as Image View, but in a separate window so you can still view the PaperPort desktop as you edit the chosen item. This is especially useful in a dual-screen environment. You can also choose to open the item in the application associated with the file type.
Getting to Know PaperPort |
15 |
You can use any flavor of PDF file: PDF Image, PDF Searchable, and PDF Formatted Text and Graphics (PDF Normal) with PaperPort. PDF files by default open in PDF Viewer Plus or (if available) PDF Converter Professional. Go to Options > Desktop to change this behavior. You can open PDF Image or PDF Searchable files in ImageViewer in order to use the SET tools to improve the quality of PDF image-only items.
Use PaperPort to view non-PaperPort items that reside on your computer. Simply copy or move the document file or photo into a PaperPort folder.
You can quickly send an item to another program without leaving the PaperPort program. Just drag an item onto the link icon in the Send To bar at the bottom of the desktop. PaperPort supports a wide variety of programs including word processing, spreadsheet, fax, Internet e-mail, graphics, optical character recognition (OCR), and online services programs.
 The MAX to PDF converter
MAX files have long been the proprietary PaperPort image item format. This functionality has now been taken over by the universal PDF file type. In PaperPort 14, MAX files retain limited functionality: they can be viewed page-by-page but cannot be annotated, stacked or otherwise edited. Metadata (author, subject, keywords...) cannot be added in PaperPort 14, only already existing texts remain. In other words, MAX files are now read-only.
Therefore, Nuance offers a Wizard-like program to convert MAX files to PDF. Find the MAX to PDF converter in the PaperPort sub-menu in the Windows Start menu. It can create PDF Image or PDF Searchable files by running OCR on text in the MAX file. The converter allows annotations to be transferred to the resulting PDF. Language choices are available separately for the MAX file content and for its annotations. The converter can automatically find all MAX files within your PaperPort folders.
MAX files can be detected and imported into PaperPort Professional by DesktopDelivery. They can be exported to some other programs (for instance to mailing applications, or to OmniPage for OCR).
PaperPort Getting Started Guide |
16 |

The Folders pane
The Folders pane presents a hierarchical view of your PaperPort folders, similar to the view you see in Windows Explorer. Use the Folder Tools to access its commands quickly.
PaperPort installs a PaperPort folder named My PaperPort Documents into your My Documents folder. If you are using a multi-user system, each user has their own My PaperPort Documents folder.
The My PaperPort Documents folder contains several subfolders whose names – such as Articles, Business Cards, Photographs, and Receipts – illustrate the different ways you can organize your items in PaperPort.
The Samples folder contains sample documents and photographs to help you get started using PaperPort. This Getting Started Guide is placed in the Samples folder as a read-only PDF file. We recommend you copy the item and remove the read-only property from the copy if you want a text file (PDF Normal) for experimentation.
Choose Folders  to view the Folders pane to view the pre-supplied folders. Select a folder, right click and choose Create New folder to add an empty subfolder with a name and color you choose. You can use the Folder Manager to add existing folders and sub-folders from your file system.
This lets you set up a different view of folders than exists on your computer – tailoring it to work you will do via PaperPort.
Choose  Folder Manager on the Tools ribbon or right click in the Folders pane and choose Folder Manager. Click Add and browse to an existing folders or sub-folder. They are added as top-level folders to the PaperPort desktop along with their sub-folders and content. For instance, if you chose ‘C:\MyReports\Fourth Quarter’, this appears in PaperPort as 'Fourth Quarter on C'. To later see the full path of an added folder, rightclick and choose Properties.
Right-click on a folder to change folder color, add folder notes, create new sub-folders, and (in PaperPort Professional) set DesktopDelivery options.
Getting to Know PaperPort |
17 |

The Folder Manager lets you rename, remove and reorder the top-level folders it manages. This does not affect the names, locations or existence of those mapped folders in your computer. Sub-folders that you rename or reorder which were not added using the Folder Manager are really renamed or moved in your system.
Deleting folders
Any sub-folder in PaperPort can be deleted using its shortcut menu or the Delete key. This means it disappears from PaperPort and also from your computer's disk system. Any sub-folders of the chosen folder are also deleted. A warning message asks you to confirm this deletion. Only toplevel folders cannot be deleted inside PaperPort. The folder 'My PaperPort Documents' is a sub-folder.
Removing folders
Any folder or sub-folder added to PaperPort via the Folder Manager becomes a top-level folder and it can be later removed using the Folder Manager again. This means it disappears from PaperPort but remains on your computer’s disk system. When a top-level folder is removed, all its sub-folders are also removed.
PaperPort item thumbnails
There are two kinds of thumbnails in PaperPort: item and page thumbnails. Each item thumbnail is a small, graphic representation of your document or photo. Page thumbnails show pages of image items and PDF files in the Page Thumbnails pane both on your PaperPort desktop and in the ImageViewer.
One quick way to locate your PaperPort items is to visually browse through the item thumbnails on your PaperPort desktop. Thumbnails show you what’s in a document without having to open it. Thumbnails give you the ability to scroll through the pages of a document without opening it.
PaperPort Getting Started Guide |
18 |

PaperPort shows large, clear thumbnails of all your documents and photos, including:
•Scanned pages and photos
•Photos from your digital camera
•Image files in formats such as BMP, TIFF, JPEG, GIF, and MAX (read-only)
•Microsoft Word, PowerPoint®, Excel®, Word PerfectTM , and other documents created in popular software programs
•PDF documents
•PDF Image items
•HTML documents
Each item thumbnail appears with an icon that identifies the program in which it was created or is currently associated.
Click on a thumbnail to see image attributes:
indicates that the Read-only attribute is set for that item. indicates that the image has annotations.
icon information on author, keywords, tips and features.
indicates that the PDF file has searchable text.
Multi-page image items (TIFF, DCX, PDF, MAX, etc.) show  to let you scroll through the pages even with the Page Thumbnails pane closed.
Before you can work with an item, you must first select its thumbnail on the PaperPort desktop. A red border appears around an item to indicate that it is selected. Multiple selections are possible. While working with item thumbnails, you can:
•Drag a thumbnail to reposition it on the PaperPort desktop.
•Drag a thumbnail to a folder to move the item to that folder.
•Drag a thumbnail to another open Workspace to move the item to that open folder.
Getting to Know PaperPort |
19 |
Loading...