

Page 1
Page 2

OPYRIGHTS
C
Copyright © 1999–2001 by ScanSoft®, Inc. All rights reserved. No part of this publication
may be transmitted, transcribed, reproduced, stored in any retrieval system or translated into
any language or computer language in any form or by any means, mechanical, electronic,
magnetic, optical, chemical, manual, or otherwise, without prior written consent from the
Legal Department at ScanSoft, Inc., 9 Centennial Drive, Peabody, Massachusetts 01960.
Printed in the United States of America and the Netherlands.
The software described in this book is furnished under license and may be used or copied
only in accordance with the terms of such license.
MPORTANT NOTICE
I
ScanSoft, Inc. provides this publication "as is" without warranty of any kind, either express or
implied, including but not limited to the implied warranties of merchantability or fitness for a
particular purpose. Some states or jurisdictions do not allow disclaimer of express or implied
warranties in certain transactions; therefore, this statement may not apply to you. ScanSoft
reserves the right to revise this publication and to make changes from time to time in the
content hereof without obligation of ScanSoft to notify any person of such revision or
changes.
RADEMARK REFERENCES
T
ScanSoft, PaperPort, PaperPort Deluxe, ScanDirect, FormTyper, OmniPage, OmniForm, and SimpleSearch
are registered trademarks or trademarks of ScanSoft, Inc. in the United States and or other
countries.
All other products mentioned herein may be trademarks of their respective holders and are
hereby recognized.
Copies of pages 120 & 121 of "The Innocents Abroad" by Mark Twain, copyright 1911 by
Publisher Grosset & Dunlap that appear in Figure 39 are used with permission of the
publisher.
ScanSoft, Inc.
9 Centennial Drive
Peabody, Massachusetts 01960
ScanSoft Europe BV
Randstad 22-139
1316 BW Almere
The Netherlands
PaperPort Deluxe Getting Started Guide
Part Number 50-688001-00A
September, 2001
Page 3

ONTENTS
C
Preface v
Using This Guide vi
Chapter 1
Chapter 2
Chapter 3
Installing PaperPort 7
System Requirements 7
Installing PaperPort 8
Introduction 9
What is PaperPort? 9
The PaperPort Desktop 11
The Page View Window 11
The Desktop Menus and Toolbars 13
The Page View Menus and Toolbars 14
The Folders Pane 15
16
Using PaperPort 17
Using Thumbnails 18
Acquiring Items 20
Filing Items 26
PaperPort Deluxe Getting Started Guide
iii
Page 4

Finding Items 30
Viewing Pages 34
Annotating Pages 35
Touching Up Images 37
Sending Items to Another Program 39
Sending Items as E-mail Attachments 42
Converting Images to Text 43
Filling Out Scanned Forms 44
Creating Web Pages 45
Using ScanDirect 46
Chapter 4
Chapter 5
Sample Sessions 47
Scan and Save Documents 47
Get and Touch Up Photos 54
Send Items as E-mail Attachments 58
Find Items 59
Other Programs to Use with PaperPort 65
OmniPage 65
OmniForm 66
Index 67
iv
Contents
Page 5

Preface
Welcome to the PaperPort Deluxe Getting Started Guide. PaperPort is a paper
management tool for home and business use that helps you manage and use
scanned documents and digital photos. Designed for home and business use, it
provides all the basics of desktop organization in one easy-to-learn and easy-to-use
program.
From PaperPort, you can:
Scan documents and photos to your desktop for easy access and use with your
◆
favorite programs. Simply drag and drop a file onto the program icon and
PaperPort automatically converts the file to the preferred format.
Get photos from your digital camera and then make your photos picture
◆
perfect. Image editing tools provide all the basics to enhance, crop, rotate,
remove red eye and add special effects.
View large, clear thumbnail images of your scanned documents, photos, and
◆
other files to quickly find files based on their appearance.
Find all your documents and photos using PaperPort's powerful search tool.
◆
Using SimpleSearch™, you can search by content, keywords, or annotations.
With scanned documents, PaperPort runs the OCR process to read the
documents and then indexes the content to enable quick searching.
Eliminate the need to retype documents. Simply drag a scanned document to
◆
your word processing program on PaperPort's Send To bar and PaperPort
automatically turns it into editable text.
Easily group related documents and photos as stacked pages, just as you would
◆
with papers on top of your desk.
Add annotations, sticky notes, highlights, arrows, and stamps to your
◆
documents and photos.
Scan and fill in forms using the FormTyper™ feature. Simply scan in a blank
◆
form and PaperPort automatically detects the form fields and lets you fill them
in for a perfect form every time.
View electronic documents such as spreadsheet documents in PaperPort even if
◆
you do not have the spreadsheet program on your computer.
v
Page 6

Use the Explorer-like folder system to organize all your documents and photos
◆
on your computer or on the network. You can color-code your folders and add
any existing folder to PaperPort without moving it within your file system.
Easily capture web pages on the Internet and place them as PaperPort image
◆
items (.max files) on your PaperPort desktop.
This guide introduces you to PaperPort and shows you how to get started managing
your information. Additional information includes:
Online Help — Comprehensive information on features, settings, and
◆
procedures. Help is available on the PaperPort Help menu.
Release Notes — Important information about this release of PaperPort. It is
◆
included on the installation CD and on the PaperPort Help menu.
Product Support — Additional technical support, including technical notes,
◆
frequently asked questions, software updates, and more is available on the
PaperPort Help menu.
Using This Guide
This guide provides you with an overview of PaperPort and how you can use it to
meet your scanning and document management needs. It also provides first-time
PaperPort users with enough information to install and get started using PaperPort.
It assumes you are familiar with basic Windows operations and can install and set up
devices such as scanners, printers, and digital cameras.
vi Preface
This guide contains the following chapters:
Chapter 1 — Installation Instructions. Explains how to install PaperPort on
◆
your PC.
Chapter 2 — Introduction. Introduces you to PaperPort, its capabilities, and
◆
describes the various elements, such as the window panes, menu commands,
and toolbars.
Chapter 3 — Using PaperPort. Explains the basic steps to acquire, annotate
◆
or edit, and store and send items.
Chapter 4 — Sample Sessions. Describes real-life examples of using
◆
PaperPort and includes step-by-step instructions.
Chapter 5 — Other Programs to Use with PaperPort. Introduces you to
◆
other ScanSoft programs you can use with PaperPort.
Page 7

Chapter 1
Installing PaperPort
This chapter provides information on installing and starting PaperPort. It presents
the following topics:
System Requirements
◆
Installing PaperPort
◆
System Requirements
To install and run PaperPort, your Windows-compatible PC must be equipped with
the following:
An Intel Pentium or equivalent processor.
◆
Microsoft Windows 95, 98, Me, Windows NT 4.0, 2000, or Windows XP.
◆
32 MB of RAM for Windows 95, 98, and Me; 64 MB is recommended.
◆
64 MB of RAM for Windows NT, 2000, and XP; 128 MB is recommended.
◆
80 MB of free space on your hard drive.
◆
SVGA monitor with 800 x 600 pixel resolution.
◆
7
Page 8

Installing PaperPort
The PaperPort installation program provides easy step-by-step instructions on every
screen.
▼ Before you install PaperPort
1. Close all other programs, including any anti-virus programs.
2. If you are installing PaperPort on Windows NT or 2000, log onto your
computer with administrator privileges.
You can install PaperPort from a CD or from the Web.
▼ To install PaperPort from a CD
1. Insert the CD into your CD-ROM drive. The installation program should start
automatically. If it does not start, locate your CD-ROM drive in Windows
Explorer and double-click the Setup.exe program at the top-level of the drive.
2. Follow the instructions on each screen to install the software.
▼ To install PaperPort from the Web
1. After you have purchased PaperPort and downloaded the installation program
to your computer, double-click the PaperPort icon on your Windows desktop
to begin the installation.
8 Installing PaperPort
2. Follow the instructions on each screen.
Page 9

Chapter 2
Introduction
This chapter introduces you to PaperPort in the following sections:
What is PaperPort? — Presents an overview and explains some of the ways
◆
PaperPort can help you in both your home and office.
The PaperPort Desktop — Presents the interface to the product.
◆
The Page View Window — Presents that part of the interface you use to
◆
work on individual items.
The Desktop Menus and Toolbars— Presents the PaperPort commands and
◆
tools.
The Folder Pane — Presents PaperPort folders, that part of the interface you
◆
use to organize and maintain your items.
What is PaperPort?
PaperPort is a document management software program. With PaperPort you can:
Collect information from a wide variety of sources such as scanners, digital
◆
cameras, e-mail, and the Web.
Organize and store this information on your computer as PaperPort items in
◆
folders.
Edit, annotate, and search these items by title and content.
◆
In short, PaperPort can help you manage the information you use both at work and
at home.
9
Page 10

Using PaperPort in the office
Here are two scenarios that show ways PaperPort can help you manage the
mountains of paper connected with your business.
Collect data from remote offices for everyone to share
◆
You work for an agency charged with collecting legal paperwork from all across
the country. Each local office scans in the paperwork from a case and stores it
in an individual folder, adding notations as needed.
When information from a case needs to be shared or reviewed, the local office
selects the information, then faxes it to the central office.
Keep track of your expenses
◆
Using PaperPort with a scanner you can scan in all your business-related
receipts and store them in folders by date and/or type (meals, airfare, gas, and
mileage). At the end of the month pull it all together, transfer the information
onto the electronic version of your expense sheet, and e-mail it to the
accounting department!
Using PaperPort at home
Everyone from hobbyists to home-office professionals can rely on PaperPort to
help manage their photographs and documents. Here are two of the ways PaperPort
can help you.
10 Introduction
Store and share all your photographs
◆
Collect all your photographs into virtual albums by storing them in PaperPort
folders. Scan printed photos and download digital images. Once in PaperPort
you can edit the images and move them around into different folders for later
viewing. PaperPort helps you share your photos with friends and family by
making it easy to attach them to e-mail messages.
Scan magazine and newspaper articles of interest for easy access
◆
Whether your passion is cooking, wooden boat building, photography or
knitting, PaperPort makes your life easier. Scan your favorite magazine and
journal articles into a PaperPort folder. Months later, when you are in the
middle of a project and remember reading an article that contained just the
information you need, use PaperPort’s SimpleSearch tool to find the article in
question quickly, even if you can’t remember the title!
Page 11
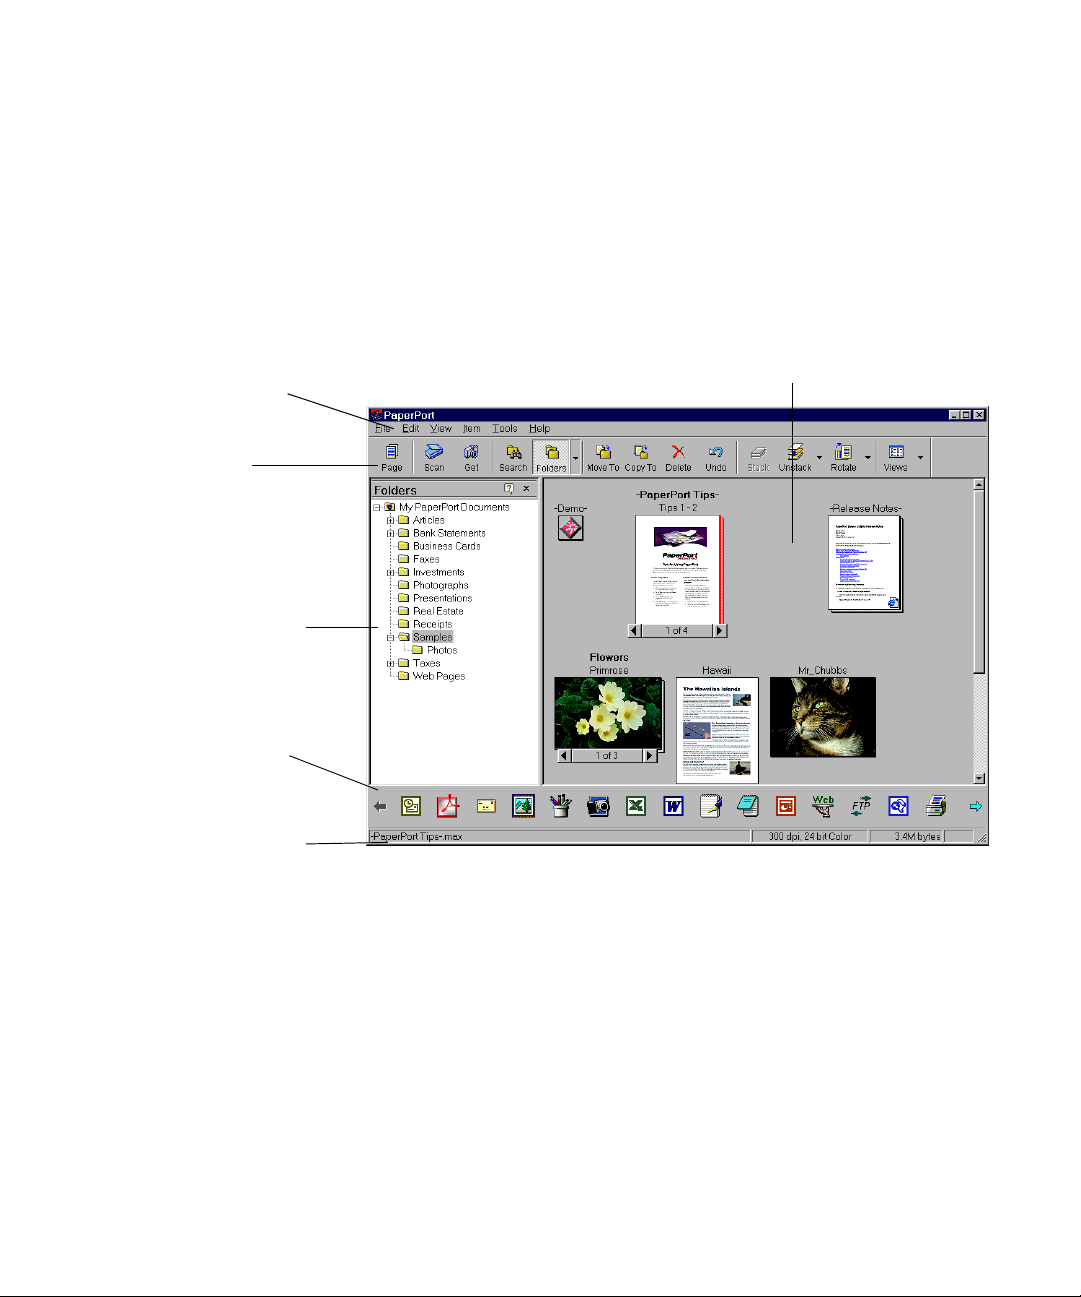
Menu Bar
Open menus to display
commands.
Command Bar
Click the buttons to
choose commands
quickly.
Folders Pane
Show the organization of
your PaperPort folders.
Chapter 2
The PaperPort Desktop
When you start PaperPort the Desktop appears. Figure 1 describes the various parts
of the Desktop.
Desktop Pane with Thumbnails
View, open, arrange, move, copy, and send
items in the current folder.
Send To Bar
Send items to other
programs and people.
The Status Bar
See information about the
selected item or button.
Figure 1.
The PaperPort Desktop
The Page View Window
Double-click a PaperPort item thumbnail to view the item. PaperPort displays the
item in the Page View window for viewing. You can enlarge or reduce the view for
easy reading. You can also annotate and touch up images. Figure 2 shows the Page
View window.
The PaperPort Desktop 11
Page 12
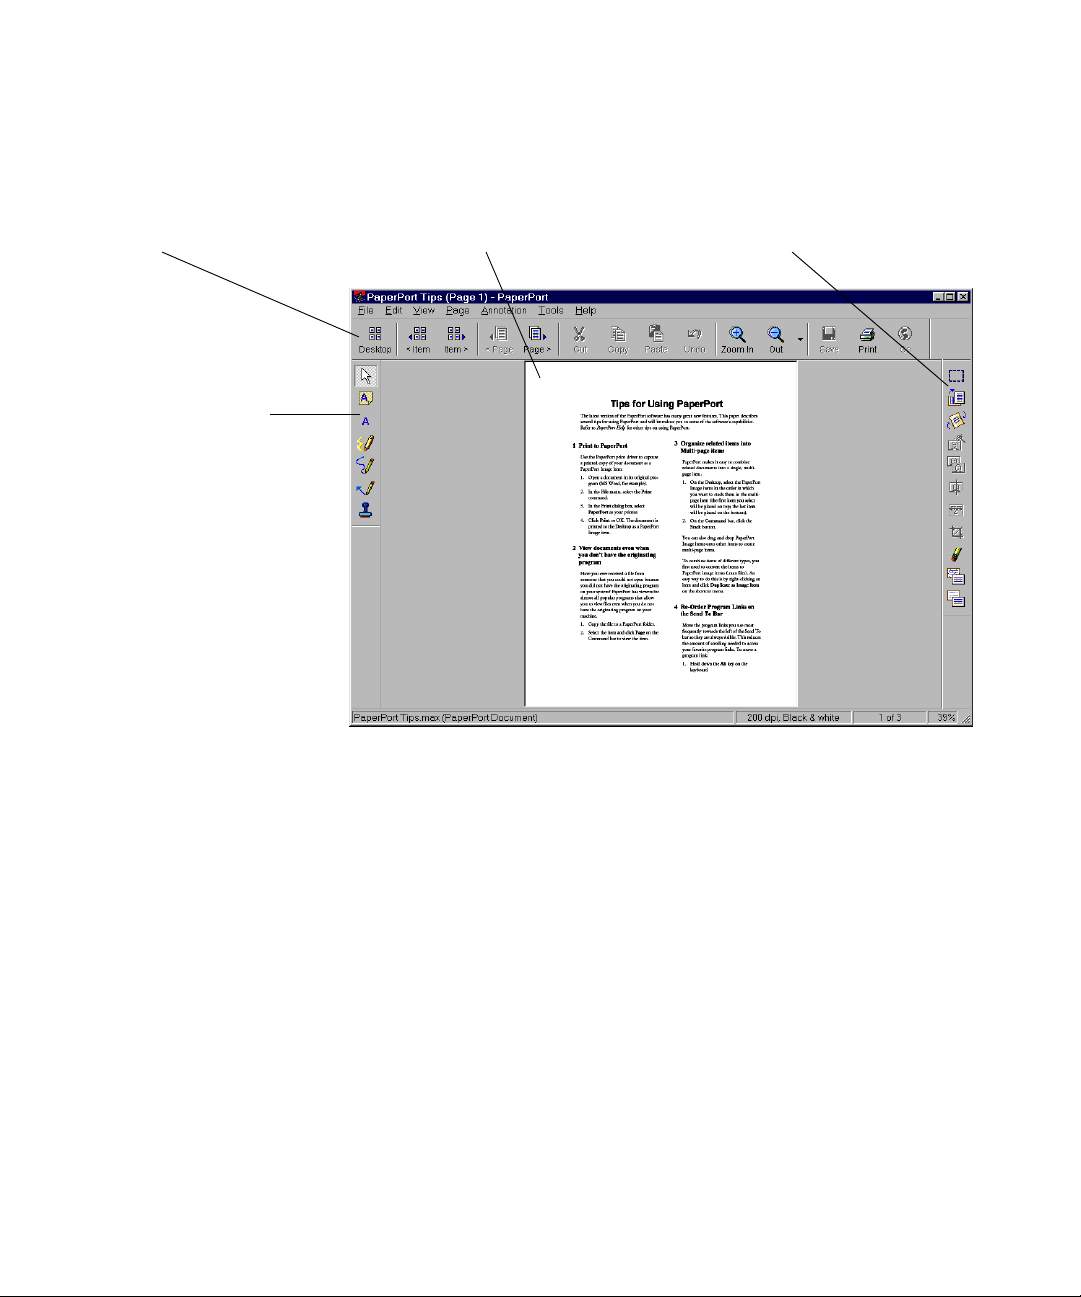
A
Command Bar
Choose commands
quickly.
nnotation Toolbar
Add notes and other
annotations to your
items.
PaperPort item
Zoom to enlarge or reduce.
Image Editing Toolbar
Touch up and crop your images.
Figure 2.
The Page View Window
The various documents and photographs you acquire in PaperPort are referred to as
items. Images saved in the PaperPort format are referred to as PaperPort image
items.
You can also use PaperPort with most other common types of documents such as
word documents and spreadsheets. These documents are referred to as text items.
Sample items are included with PaperPort to demonstrate some of the types of
items you can keep on the Desktop. One of the sample items, PaperPort Tips,
includes current and useful information about PaperPort itself. Double-click its
thumbnail to open the item in Page View and read the contents.
You can also use the Desktop to view non-PaperPort items that reside on your
computer. Simply copy or move the document or photo into a PaperPort folder.
12 Introduction
Page 13
The Desktop Menus and Toolbars
Menus contain the commands you use to perform the PaperPort functions.
Toolbars contain graphical “shortcuts” for those commands.
The Menus
The File Menu — Commands to create, file, print, or send items.
◆
The Edit Menu — Commands to cut, copy, paste and delete selected items.
◆
You c an also Select or Deselect all items in the Desktop or Undo your last
edit.
The View Menu — Commands to change how items and parts of your
◆
Desktop are displayed.
The Item Menu — Commands to manipulate items.
◆
The Tools Menu — Commands to search for items, add or remove PaperPort
◆
folders, and customize PaperPort.
The Help Menu — Commands that give you access to information about
◆
PaperPort.
Chapter 2
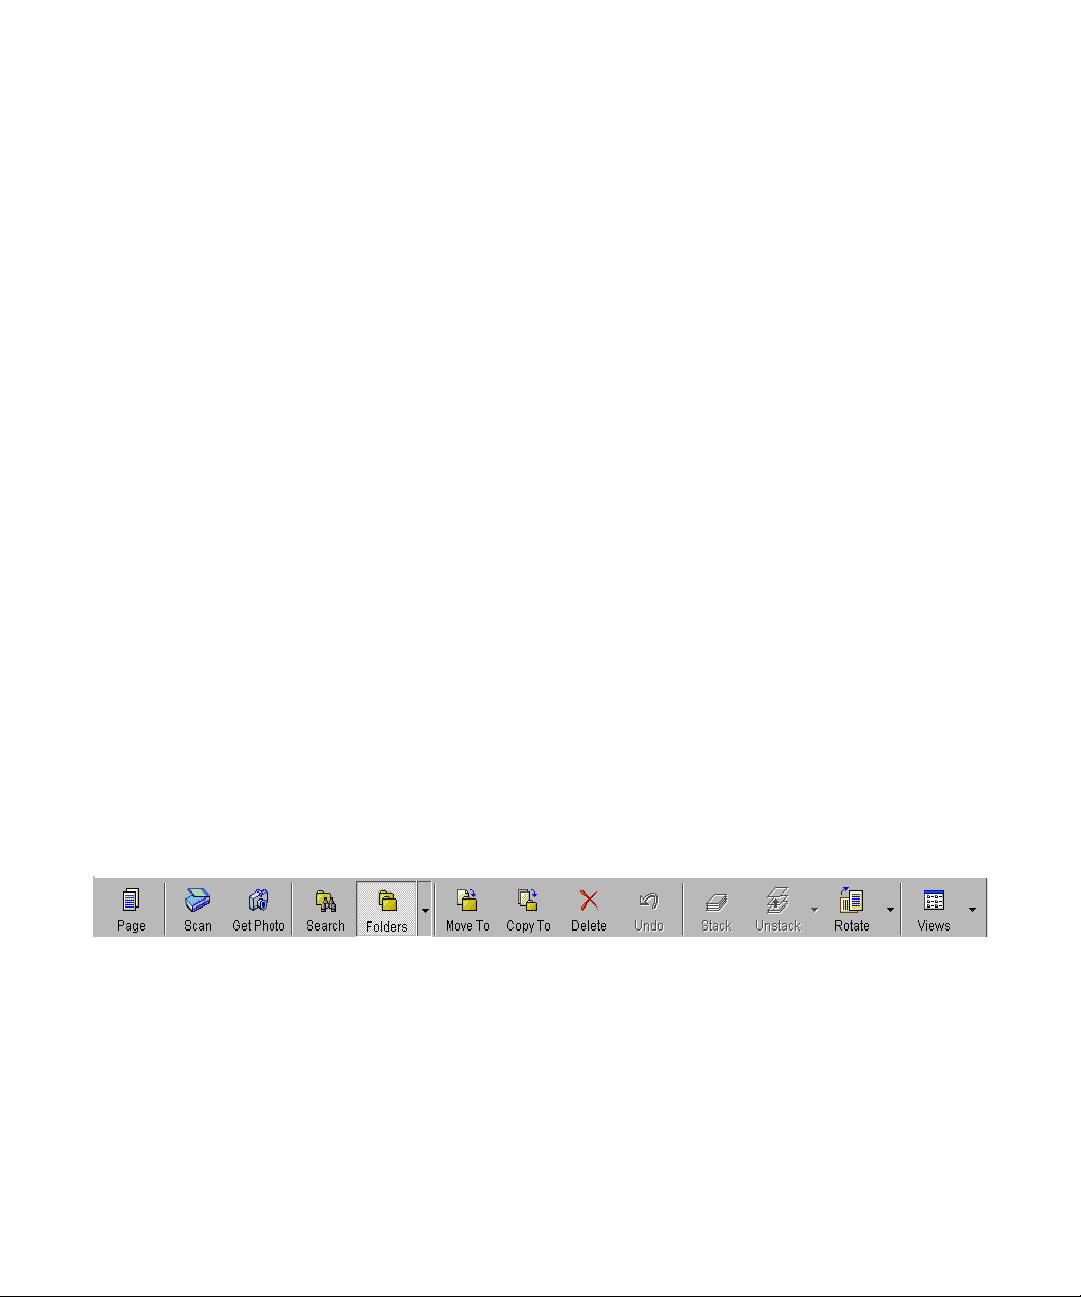
The Toolbars
The Command Bar — Contains shortcuts and drop-down lists for the most
◆
commonly-used commands. Additional information about each command
appears in the Status bar at the bottom of the Desktop when you place your
cursor over the button.
Figure 3.
◆
The Command Bar
The Send To Bar — Runs along the bottom of the Desktop and shows
programs you can send items to.
You can send an item to another program by dragging and dropping the item
onto the desired program’s icon.
The Desktop Menus and Toolbars 13
Page 14
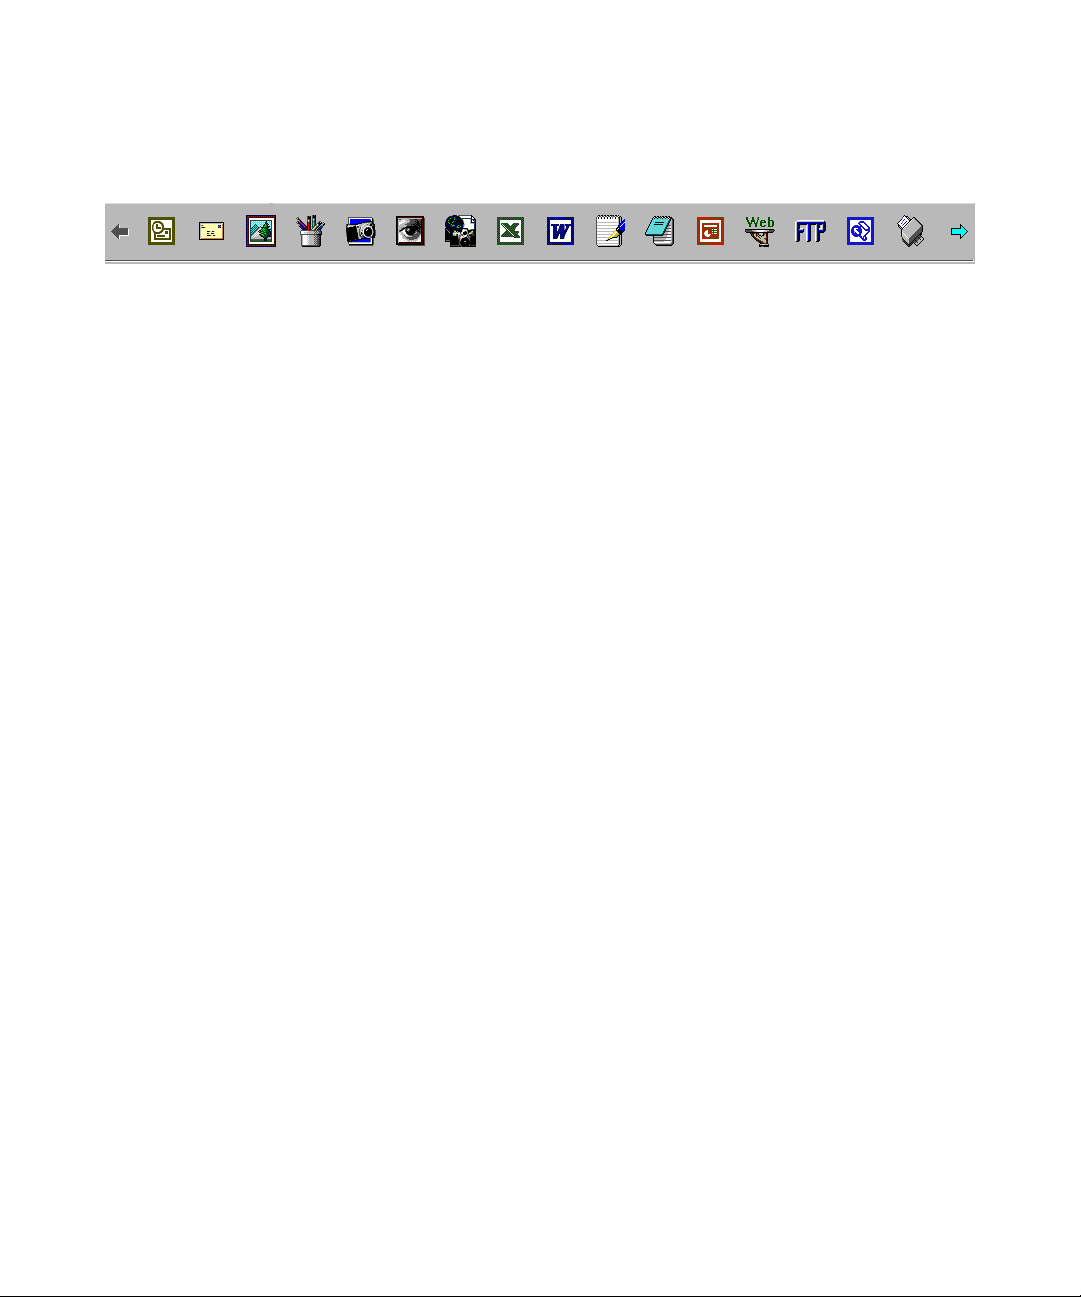
Figure 4.
The Send To Bar
You can add, remove, and rearrange the program icons on the Send To bar.
The Page View Menus and Toolbars
This section describes the menus and toolbars available to you in the Page View
window.
The Menus
The File Menu — Commands to create, file, print, or send items.
◆
The Edit Menu — Commands to select either the Image or Annotation
◆
toolbars.
The View Menu — Commands to change the view of the item.
◆
The Page Menu — Commands to edit the current page.
◆
The Annotation Menu — Commands to annotate the current page.
◆
The Tools Menu — Commands to find words and set PaperPort options.
◆
The Help Menu — Commands that give you access to information about
◆
PaperPort.
14 Introduction
The Toolbars
The Image Editing Tools — Tools to adjust and edit the quality, color, and
◆
other aspects of a PaperPort image. Among other things you can:
• Straighten a page
•Sharpen an image
• Remove red eye
•Crop
Page 15
Chapter 2
A brief description of each tool appears in the Status bar along the bottom of
your pane when you place your cursor over an icon.
The Annotation Tools — Tools to add a note, add or highlight text, draw lines
◆
and arrows, or paste a picture into PaperPort image items.
A brief description of each tool appears in the Status bar along the bottom of
your pane when you place your cursor over an icon.
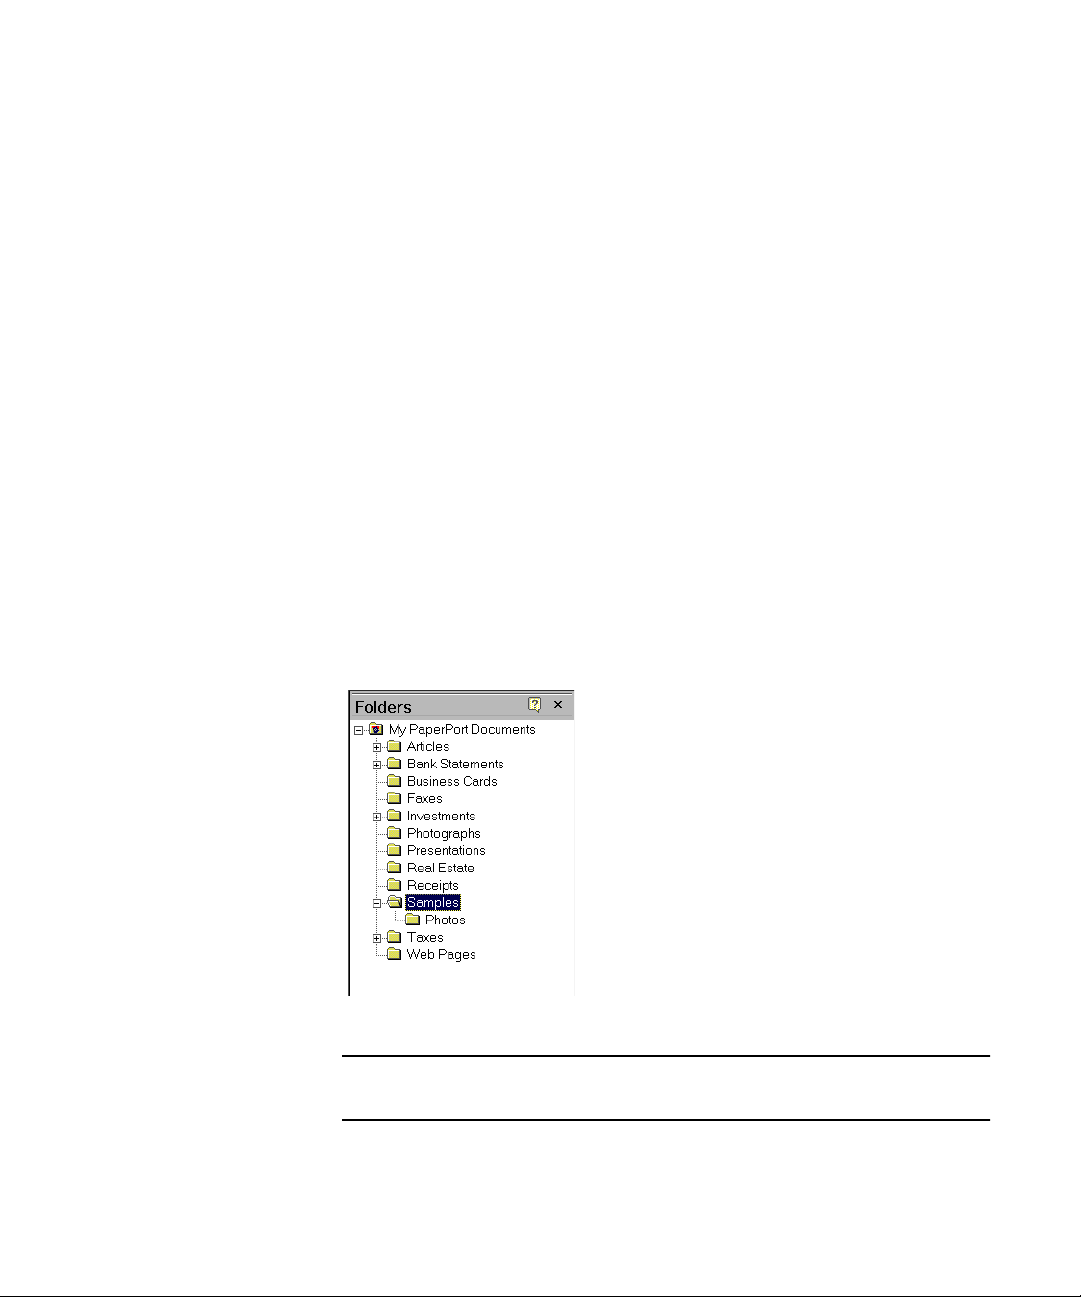
The Folders Pane
The Folders Pane presents a hierarchical view of your PaperPort folders, like the
view you see in Windows Explorer. When you open PaperPort for the first time, you
will not have any of your own items yet, of course, but PaperPort does come with
samples to help you get started.
PaperPort adds the My PaperPort Documents to your Windows My Documents
folder. The My PaperPort Documents folder includes sample folders and items,
including the Samples subfolder which is opened by default.
Figure 5.
Note
The Folders Pane
To show or hide the Folders pane, click the Folders button on the
Command bar.
The Folders Pane 15
Page 16

16 Introduction
Page 17

Chapter 3
Using PaperPort
This chapter introduces you to the many different things you can do with PaperPort
and is organized as follows:
Using Thumbnails
◆
Acquiring Items
◆
Filing Items
◆
Finding Items
◆
Viewing Pages
◆
Annotating Pages
◆
Touching Up Images
◆
Sending Items to Another Program
◆
Sending Items as E-mail Attachments
◆
Converting Images to Text
◆
Filling Out Scanned Forms
◆
Creating Web Pages
◆
Using ScanDirect
◆
Note
Refer to the PaperPort Help for detailed information about all these
topics.
17
Page 18
Using Thumbnails
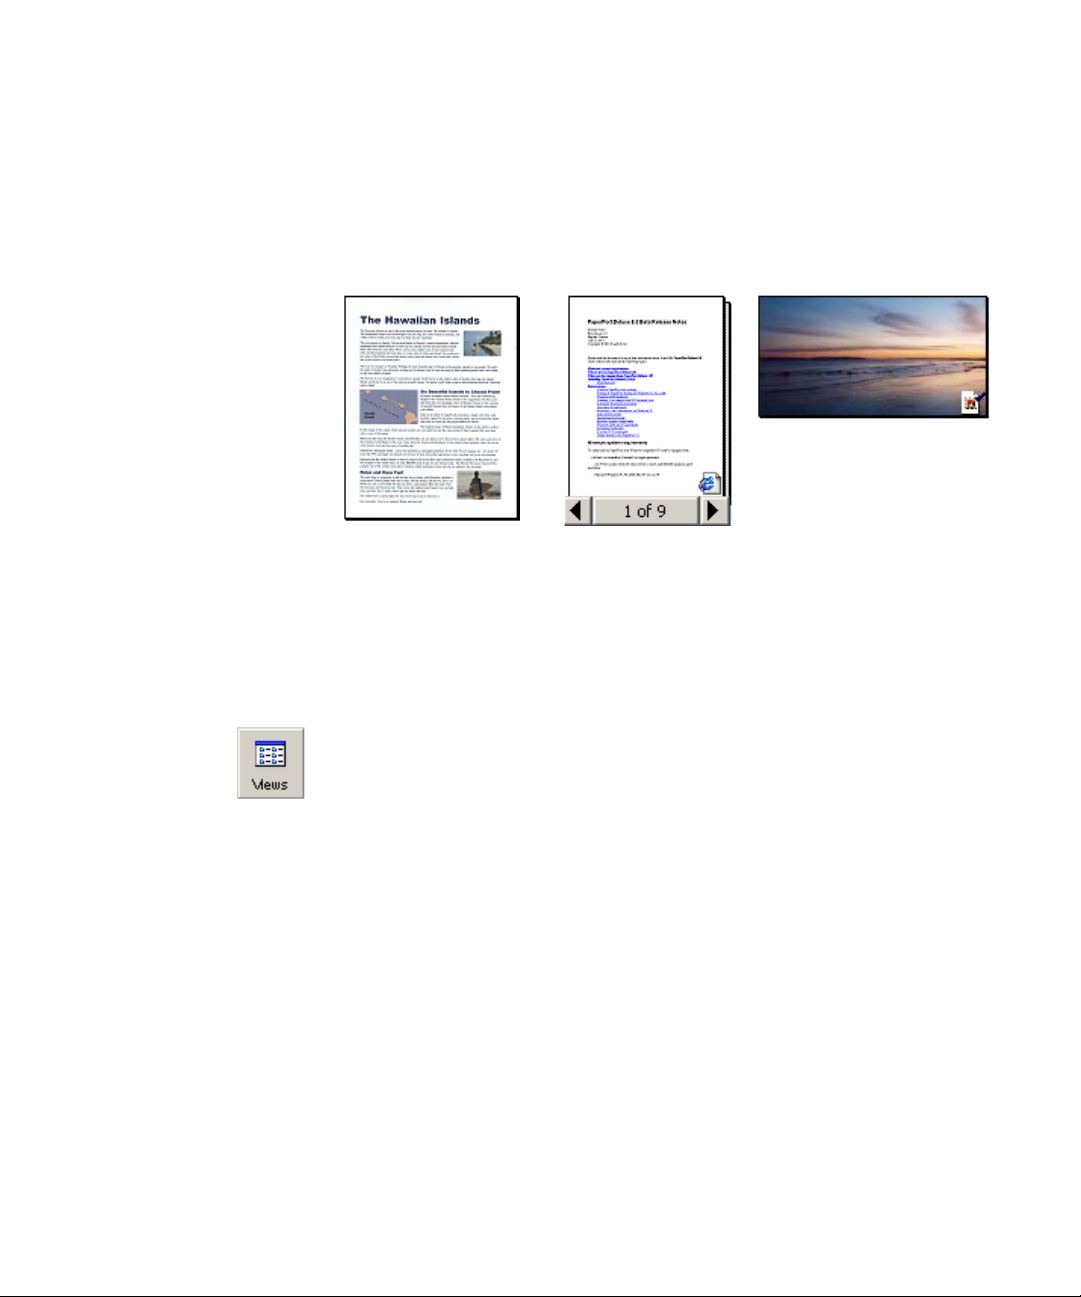
One quick way to locate your PaperPort items is to visually browse through the
thumbnails on your Desktop. Each thumbnail is a small, graphic representation of
your document or photo (Figure 6).
Figure 6.
PaperPort shows large, clear thumbnails of all your documents and photos.
With the exception of PaperPort image items (.max) files, each thumbnail appears
with an icon that identifies the program in which it was created or is currently
associated. This makes it easy and convenient to quickly see and find all different
types of items on your computer.
To display thumbnails, on the Command bar, click the Views button and then click
Thumbnails.
Before you can work with an item, you must first select its thumbnail on the
Desktop. A red line appears around an item to indicate that it is selected.
While working with thumbnails, you can:
◆
◆
◆
◆
◆
◆
◆
PaperPort Thumbnails
Click a thumbnail to select it.
Drag a thumbnail to reposition it on the Desktop.
Drag a thumbnail to a folder to move the item to that folder.
Double-click a thumbnail to view the item.
Press the Ctrl key and double-click a thumbnail to open the item in its source
program.
Right-click a thumbnail to display the item's shortcut menu.
Drag a thumbnail to the Send To bar to send a copy of the item to another
program.
18 Using PaperPort
Page 19
Chapter 3
If your Desktop becomes cluttered and disorganized, you can quickly clean up or
rearrange one, two, or all the items on the Desktop.
To straighten up items, right-click the Desktop, and then, on the shortcut
◆
menu, click Line Up Items.
To rearrange all items, right-click an empty area of the Desktop, and on the
◆
shortcut menu, point to Arrange Items. Then click By Name, By Size, By
Type, or By Date.
PaperPort rearranges the thumbnails in neat rows, starting from the upper-left
corner of the Desktop, sorted by the selected attribute.
If you scan an item upside down, you can rotate the item. Simply select the
thumbnail, and then, on the Command bar, click the Rotate button.
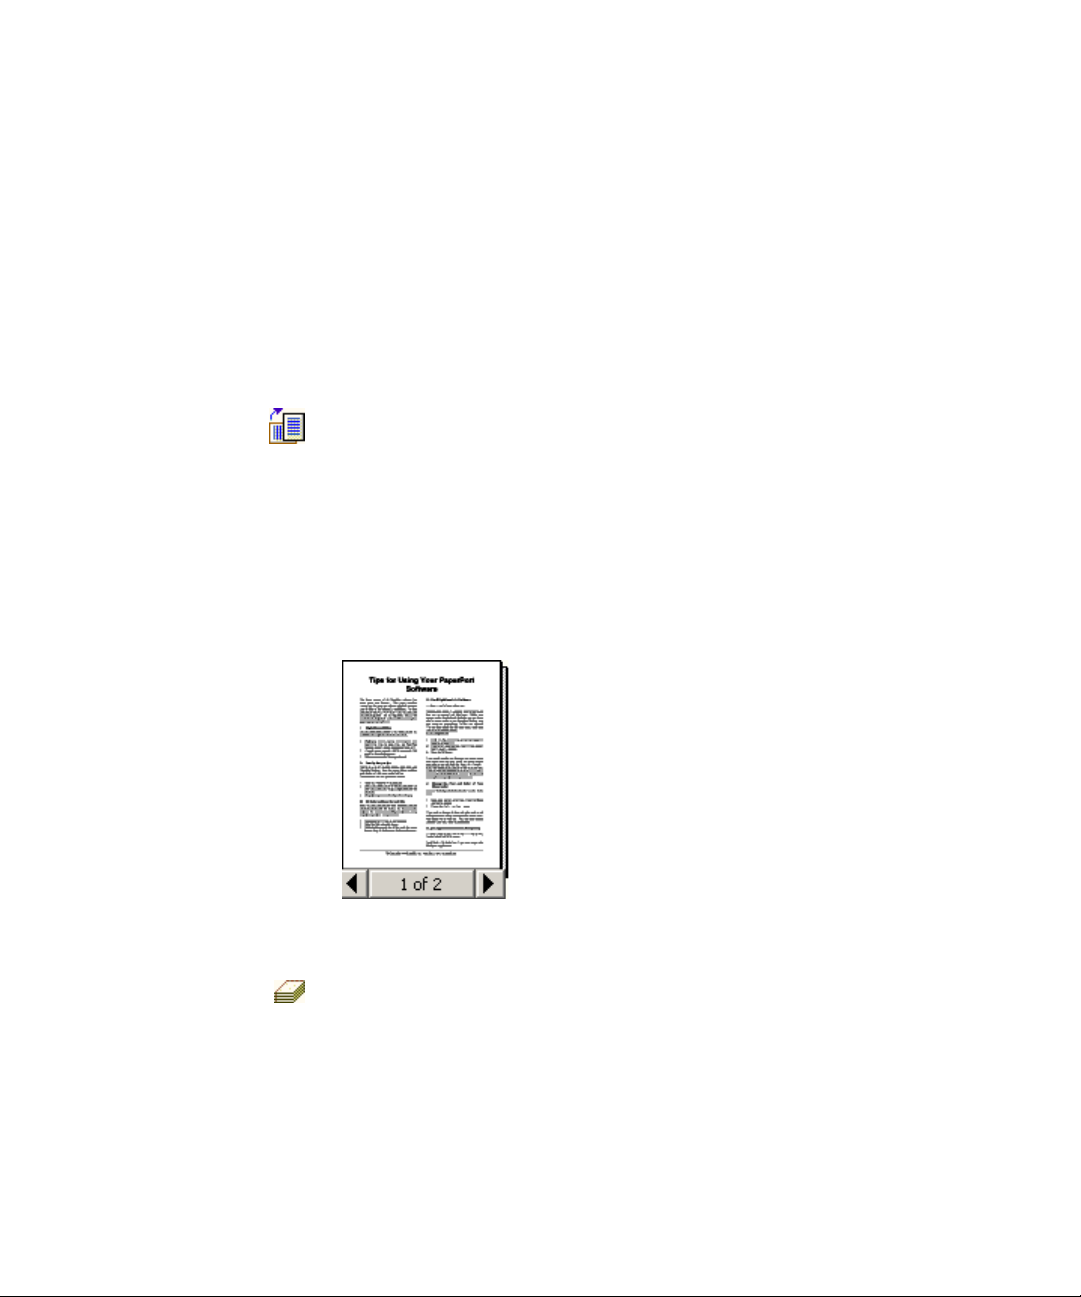
Using thumbnails on the Desktop, you can also easily combine individual PaperPort
image items into multi-page items.
This feature is useful as an organizational tool and if you are using a scanner that can
only scan a page as a separate item.
To create a multi-page item, simply select a thumbnail and drag it onto another
thumbnail.
Figure 7.
A Multi-page Item
If you prefer, you can also select items in the order in which you want to stack them
in the multi-page item and then click the Stack button on the Command bar.
The first item you select will be placed on top; the last item will be placed on the
bottom.
Using Thumbnails 19
Page 20

Acquiring Items
There are many ways to bring images and pages into PaperPort so that you can use
PaperPort’s viewing, editing, annotation, indexing, OCR, and file management tools.
For example, you can:
Scan photos, pages, and other images on a scanning device.
◆
Download photos from a digital camera.
◆
Add folders to PaperPort that already contain images and documents.
◆
Capture a snapshot of a web page.
◆
Import and print files from other programs on your computer.
◆
You can also drag and drop files from other programs to the Desktop, and use
Windows Explorer and other Windows tools to help manage your PaperPort items.
Scanning to the Desktop
Use the Scan pane to bring images and documents into PaperPort so that you can
use PaperPort’s features.
PaperPort is designed to work with all TWAIN- and WIA-compatible scanners.
Simply place the item you want to scan in or on the scanner, start PaperPort, and in
the Folders pane, click the folder in which you want to scan your item.
20 Using PaperPort
On the Command bar, click the Scan button.
Page 21
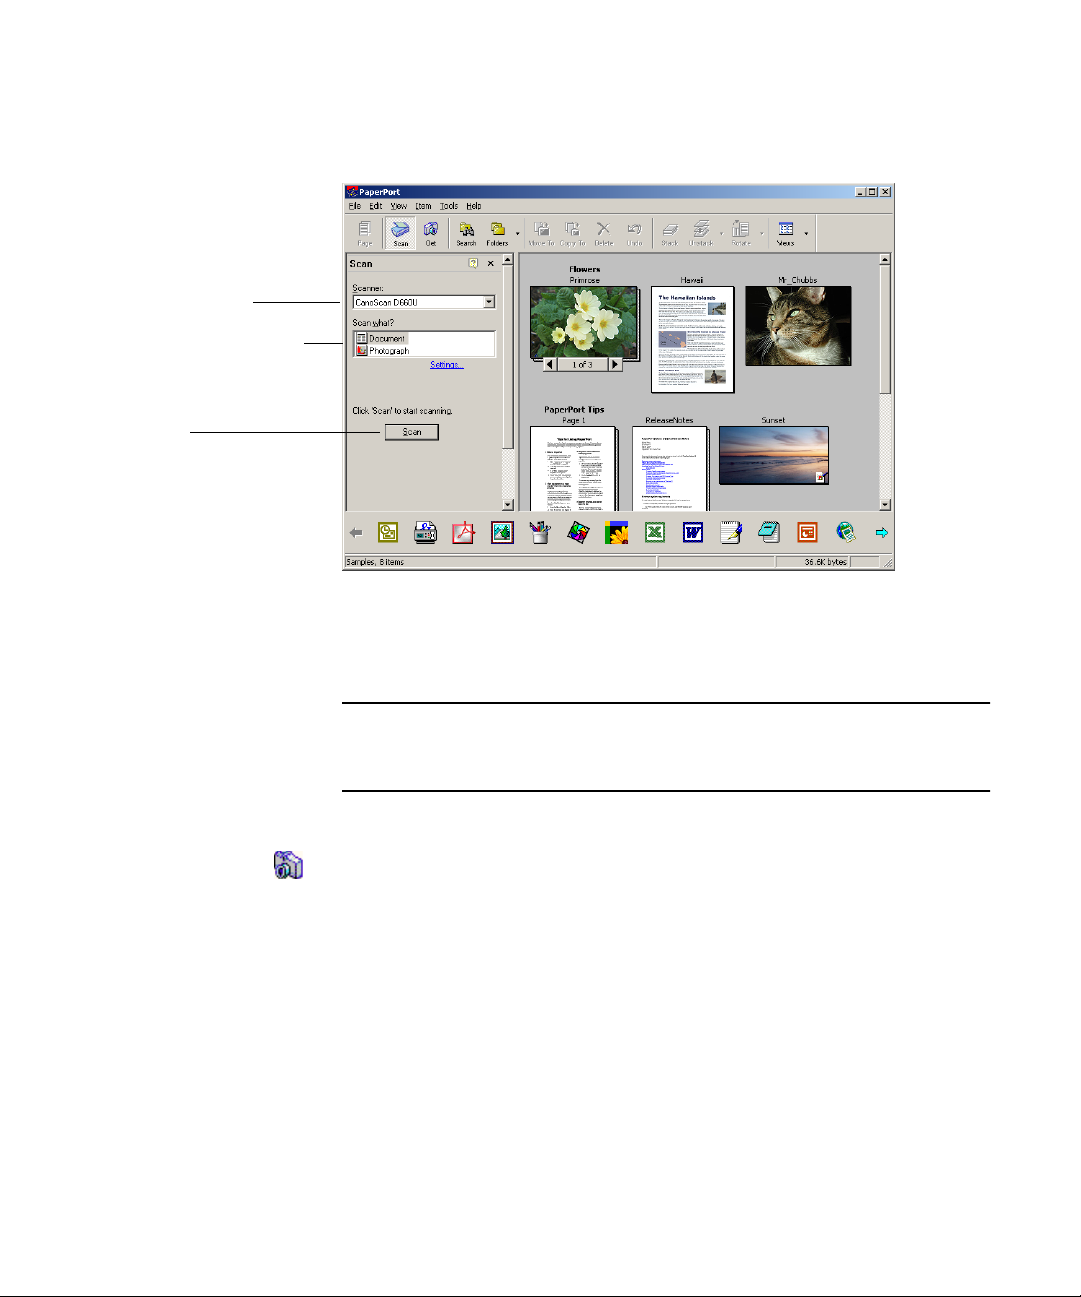
Select your scanner
Specify the document type
Click Scan
Chapter 3
The Scan pane appears in the left panel, as shown in Figure 8.
Figure 8.
Use your scanner’s program to scan the item. When the scan is complete, you will
see your item on the Desktop.
Note
The Scan Pane
If your scanner does not use a TWAIN or WIA device driver, use the
program that came with your scanner to get your items into PaperPort.
Refer to the PaperPort Help for more information.
Downloading pictures from your camera
To get digital photos from a camera to the Desktop, you can download your photos
from a TWAIN- or WIA-compatible camera.
Install the software driver that came with your camera, connect the camera to your
computer, and use the Get Photos pane to download the images to the Desktop.
Then, start the PaperPort program, and in the Folders pane, click the folder in
which you want to place your photos.
Acquiring Items 21
Page 22

Select your digital camera
Click to specify a file type
other than JPEG
Click Download
Click the Get Photos button on the Command bar. The Get Photos pane appears
in the left panel as shown in Figure 9.
Figure 9.
PaperPort starts the camera’s software program. Use the program to copy images
from the camera to your computer.
Note
The Get Photos Pane
If your camera does not use a TWAIN or WIA device driver, use the
photo download program that came with your camera to get your photos
into PaperPort, or drag and drop the photos from digital storage media.
Refer to the PaperPort Help for more information.
Printing to PaperPort
To bring items in from other programs, you can print them to the Desktop.
PaperPort will automatically convert the files to PaperPort image items (.max files)
and place them on the Desktop.
This feature lets you quickly import spreadsheets, pictures, database files, word
processing files, and other files into PaperPort as image items.
Simply open the file in the source program and on the program’s File menu, choose
the command for setting up the printer. For color documents, choose the
PaperPor t Color printer; otherwise select the PaperPort printer.
22 Using PaperPort
Page 23

Select the PaperPort printer
Click OK to print to PaperPort
Chapter 3
Figure 10 shows the Print dialog box for Microsoft Word.
Figure 10.
Selecting the PaperPort Printer
Use the source program’s command to print the file to the Desktop, where it will
appear as a new item on the Desktop.
Capturing web pages
You can use Web Capture to easily capture web pages on the Internet as PaperPort
image items (.max files) on your Desktop.
Once you capture a web page, you can perform a variety of activities. For example,
you can:
View the page.
◆
Save the page for archive purposes.
◆
Quickly go to the actual web page on the Internet.
◆
Print a hard copy.
◆
Send the page as an e-mail attachment.
◆
Annotate the page.
◆
Update the page automatically the next time you connect to the Internet.
◆
When you want to capture a web page, start PaperPort and select Web Capture from
the Tools menu.
Acquiring Items 23
Page 24

Click for Web Capture menu
The Web Capture icon appears in the Windows taskbar to indicate that it is running
as a background task (Figure 11).
Click to capture part of a
page or all of a page
Figure 11.
The Web Capture Icon in the Taskbar
Connect to the Internet, and then display the web page you want to capture. Then,
click the Web Capture icon to display the Web Capture menu (Figure 12).
Figure 12.
The Web Capture Menu
Adding PaperPort folders
PaperPort provides an easy-to-use filing system for organizing your items. Like
Windows Explorer, the Folders pane shows you a hierarchical view of folders on
your computer.
In the Folders pane, you can:
Add existing folders on your computer to the Folders pane.
◆
24 Using PaperPort
Create new folders, mapped network drives, and folders on external devices
◆
attached to your computer.
Initially, the Folders pane shows a set of folders designed to help you get started
using PaperPort. You can move or delete these folders whenever you prefer.
You can add folders already on your computer to the Folders pane, including
network folders and folders on external devices attached to your computer.
To add a folder, right-click on the Folders pane and click PaperPort Folders. Use
the PaperPort Folders (Figure 13) and the Add Folder (Figure 14) dialog boxes to
select the folder you want to add.
Page 25

List of current PaperPort
folders
Click to open the Add
Folders dialog box
Chapter 3
Select the folder you want
to add
Click OK
Figure 13.
Figure 14.
The PaperPort Folders Dialog Box
The Add Folders Dialog Box
Refer to the PaperPort Help for more information about adding and using
PaperPort folders.
Acquiring Items 25
Page 26

Select the file you want
to import
Specify the file type
Click to import the file
Importing files
You can use the Import file feature to bring an image file, such as those in the BMP,
JPEG, and TFF format, created in another program to the Desktop. The image file
you import becomes a PaperPort image item (.max) file on the Desktop.
To import an image file to PaperPort, select the Import command from the File
menu and display the Import As PaperPort Image Item dialog box (Figure 15).
26 Using PaperPort
Figure 15.
The Import As PaperPort Image Item Dialog Box
Filing Items
Once you have acquired PaperPort folders and the items within them, you can:
Copy, move, rearrange, and rename folders to better group and organize your
◆
items.
Color-code your folders to help identify or classify your folders.
◆
Drag and drop items from the Desktop to any folder, as well as drag and drop
◆
folders to other folders.
Specify Search criteria to help you find your items later.
◆
Page 27

Select a folder
Click to move up or down
Click to rename
Close the window
Chapter 3
Working with PaperPort folders
Using the PaperPort Folders dialog box, you can move and rename PaperPort
folders that you have added to the Folders pane.
In the Folders pane, right-click any folder and select PaperPort Folders to display
the PaperPort Folders dialog box, where you can select the folder you want to move
or rename (Figure 16).
Figure 16.
Use the Move Up and Move Down buttons to move the selected folder one
position at a time. Use the Rename button to activate the edit box and type a new
folder name.
Note
When you rename a PaperPort folder, you change only the PaperPort name for the
folder. The Windows name for the PaperPort folder remains the same.
The PaperPort Folders Dialog Box
My PaperPort Documents is always the first PaperPort folder in the
Folders pane and cannot be rearranged.
Working with subfolders
Using drag and drop, you can copy or move subfolders and their content to other
subfolders or PaperPort folders.
To copy a subfolder, select the subfolder you want to copy in the Folders pane.
Then, hold down the Ctrl key as you drag and drop the subfolder to the new
location. The original subfolder and its content remains in the original location.
Filing Items 27
Page 28

To move subfolders to other subfolders or to other PaperPort folders, simply click
the subfolder and drag it to a new location in the Folders pane. However, subfolders
within a folder are always listed in alphabetical order.
To rename a subfolder, click on the folder name and edit it. When you rename a
subfolder, you also change the Windows name for that folder.
Color-coding folders
Although the default folder color is Manila yellow, you can change the color of any
existing folder to one that helps you organize your items. Color-coding is useful
when you want to find items quickly by importance, based on your own personal
color preferences.
In the Folders pane, select the folder or subfolder whose color you want to change.
Then, right-click to select the Properties command from the shortcut menu and
display the Folder Properties dialog box (Figure 17).
Select a color
Click OK
28 Using PaperPort
Figure 17.
The Folder Properties Dialog Box
Working with items
The key to organizing items in PaperPort is filing items in appropriate folders. You
can drag and drop items from one folder to another or from the Desktop into any
folder you want.
To move an item to a folder, select the item you want to move on the Desktop, and
then drag and drop the item onto the folder in the Folders pane.
Page 29

Chapter 3
To copy items from one folder to another folder or to the Desktop, select the item
you want to copy on the Desktop. Hold down the Ctrl key as you drag and drop the
item to the folder you want. The original item remains in the original location.
The name of each item appears above the thumbnail when you display the
thumbnail view. In a multi-page item, the name appears above the individual page
names.
The more descriptive the name, the easier it is for you to quickly locate the item.
To rename an item on the Desktop, select the item. Click the name to display an edit
box around the name. Enter the new name. Click outside of the name area or press
Enter.
Adding search criteria to items
You can assign item properties to PaperPort image items (.max files), and then use
the properties as search criteria to find items in PaperPort.
On the Desktop, select the item, right-click, and select Properties to display the
Item Properties dialog box.
Specify properties
Click OK
Figure 18.
Item Properties Dialog Box
Filing Items 29
Page 30

Specify the search criteria as follows:
Page Name — The name of the item, generated when the item was first
◆
created. You can edit the name in the Summary tab whenever necessary.
Author — The name of the individual who created the item or who is
◆
responsible for its content.
Keywords — Any words that you want to assign to the item for search and
◆
retrieval purposes. Use a comma or a space to separate multiple keywords.
Comments — Any comment text that you want to assign to the item. You can
◆
copy text from any file or document and insert it into this field.
Finding Items
PaperPort provides different features to help you find your PaperPort items. For
example, you can quickly find an item by visually browsing through thumbnails on
your Desktop, as described on page 18.
When you have many folders and items, PaperPort provides more powerful
capabilities with SimpleSearch.
SimpleSearch is one of PaperPort’s most powerful features. It provides many
options for specifying where and what to look for when finding an item, including
indexed text content. The information you want to find is referred to as search
criteria.
30 Using PaperPort
You can look for items either by:
Item properties
◆
Text content
◆
Finding items by their properties
When you search by item properties, you can specify criteria of an item name, the
author, added comments or keywords, text in annotations, or the URL of a captured
web page. This is the same information you can enter for an item as discussed in
“Adding search criteria to items” on page 29.
Page 31

Chapter 3
Finding words in an item
To search for words within an item, you need to add the item to the SimpleSearch
index and check Use Index for searching. When you search using the index, you
can find items by their properties, or content, or both.
Adding items to the SimpleSearch index
The SimpleSearch index uses PaperPort’s OCR software to extract and copy textual
content from your items, and creates a database of the words or phrases in those
items, much like the index of a book.
Item properties, such as name and author, are also added to the index.
Although creating an index is time consuming, searching for items in the index may
be much faster than searching file by file.
Using PaperPort Options available from the Too l s menu, you can specify whether
you want SimpleSearch to run automatically each time you add a new item or
modify an existing item. You can also set how long PaperPort should wait before
starting the update process.
If you prefer, you can manually update the SimpleSearch index for all items, a single
item, or all items in one or more folders. It is good practice to update the
SimpleSearch index on a regular basis to shorten the length of time required to
complete the process.
To add a single item, on the Desktop, right-click the item and click Add to
◆
SimpleSearch.
To add all items in a folder, in the Folders pane, right-click the folder and click
◆
Add to SimpleSearch.
To add all PaperPort image items during a search, select Use index for
◆
searching, and then click Update Now.
Finding Items 31
Page 32
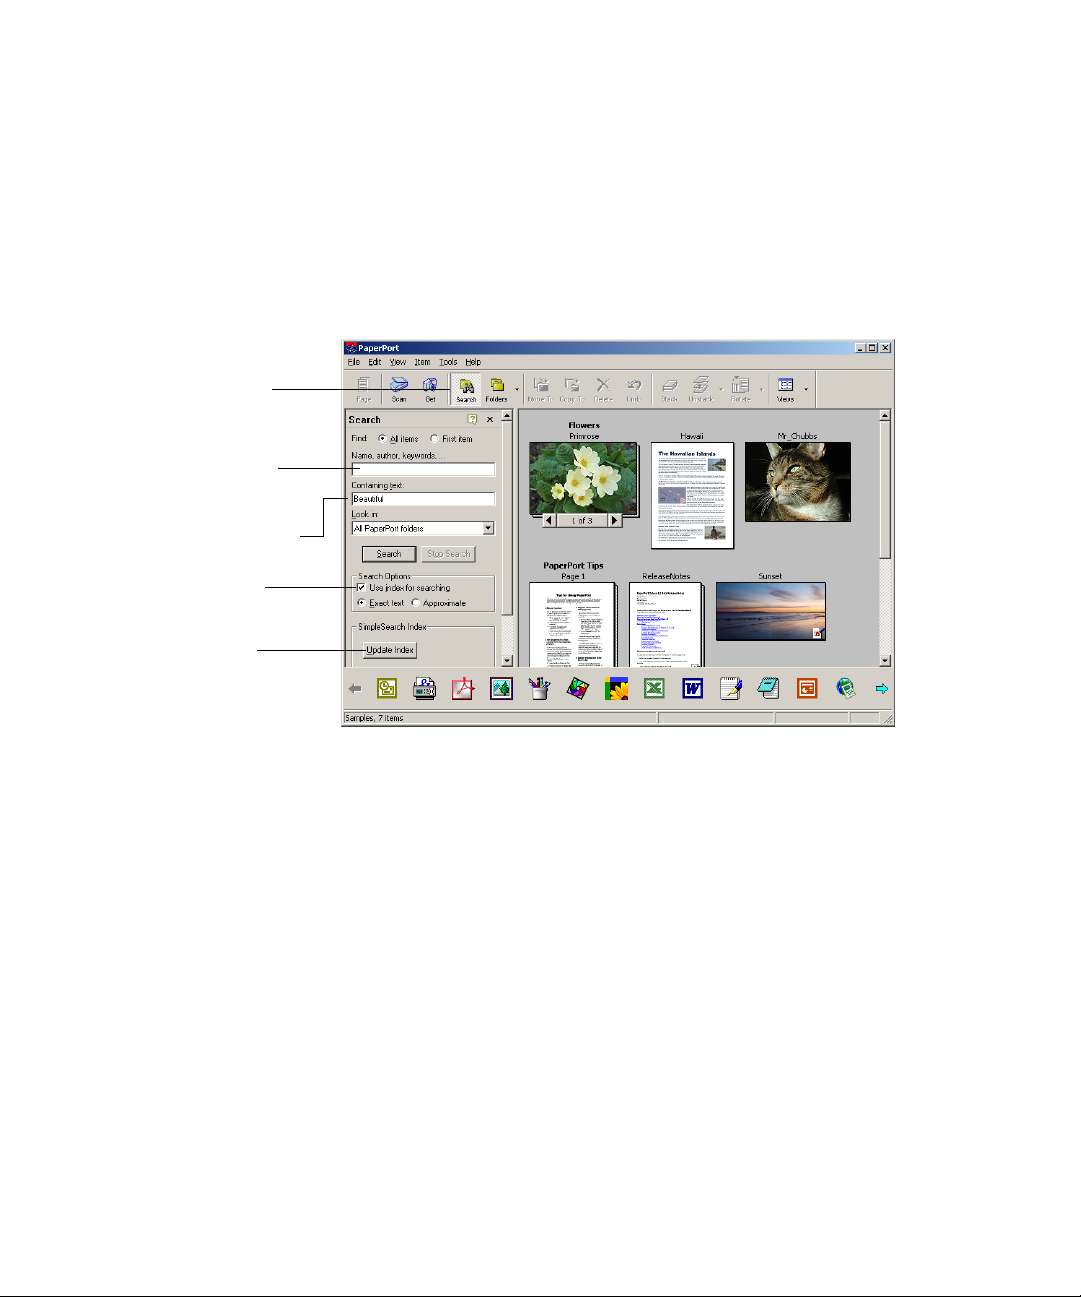
Click the Search button
Enter file search criteria
Enter index search criteria
Click to enable index
search
Click to update index
Using the Search Pane
Use the Search pane to enter search criteria and select options for finding your
PaperPort items.
On the Command bar, click the Search button to display the Search pane and
specify your search criteria as shown in Figure 19. Then, click Search to start the
search.
32 Using PaperPort
Figure 19.
The Search Pane
A file search is based on item properties only. You enter the item properties in the
Name, author, keyword box.
An index search references PaperPort's SimpleSearch index to find item properties
or actual text contained within an item. You enter the item properties in the Name,
author, keyword box and the text content in the Containing text box.
SimpleSearch returns a list of all the items that match the criteria you specify.
If you select First item, PaperPort finds the first item that matches the search
criteria and automatically selects it on the Desktop. To find the next item, press F3,
or on the Tools menu, click Find Next.
Page 33
Properties of first item in list
List of items found using
search criteria
Chapter 3
If you select All items, PaperPort displays the Search Results pane in the Desktop
and lists all the found items (Figure 20).
Figure 20.
◆
◆
Search Results
Double-click a listed item to select it on the Desktop.
Right-click a listed item to display a shortcut menu, where you can select Open
in Folder, View, or Properties for that item.
Click View Text to see the words found in the text of the item.
◆
Finding Items 33
Page 34

Viewing Pages
Using the Page View window, PaperPort enables you to display a full-size view of a
page or image item, where you can adjust and edit the quality of images, as well as
add comments, notes, and annotations.
34 Using PaperPort
Figure 21.
Select the item on the Command bar and click the Page button. You can also
double-click the PaperPort item.
Note
You can zoom in to display the details of a page or zoom out to make the page
smaller on the screen.
To zoom a p a g e , click the Zoom In or Zoom Out button on the Command bar.
Other commands are available when you click the arrow next to the Zoom Out
button: Best Fit, Fit Width, Fit Height, or Actual Size.
You can open an item in a separate PageViewer program by holding down the Ctrl
key and double-clicking the item.
PaperPort also offers the PaperPort MiniViewer, which enables you to share
PaperPort items with others who do not have PaperPort on their computer. The
PaperPort MiniViewer is available as a free download program from the ScanSoft
web site. The MiniViewer allows others to view and print PaperPort image items
(.max files) that you send to them via e-mail.
The Page View Window
Click the Desktop button to toggle back to the Desktop at any time.
Page 35
Chapter 3
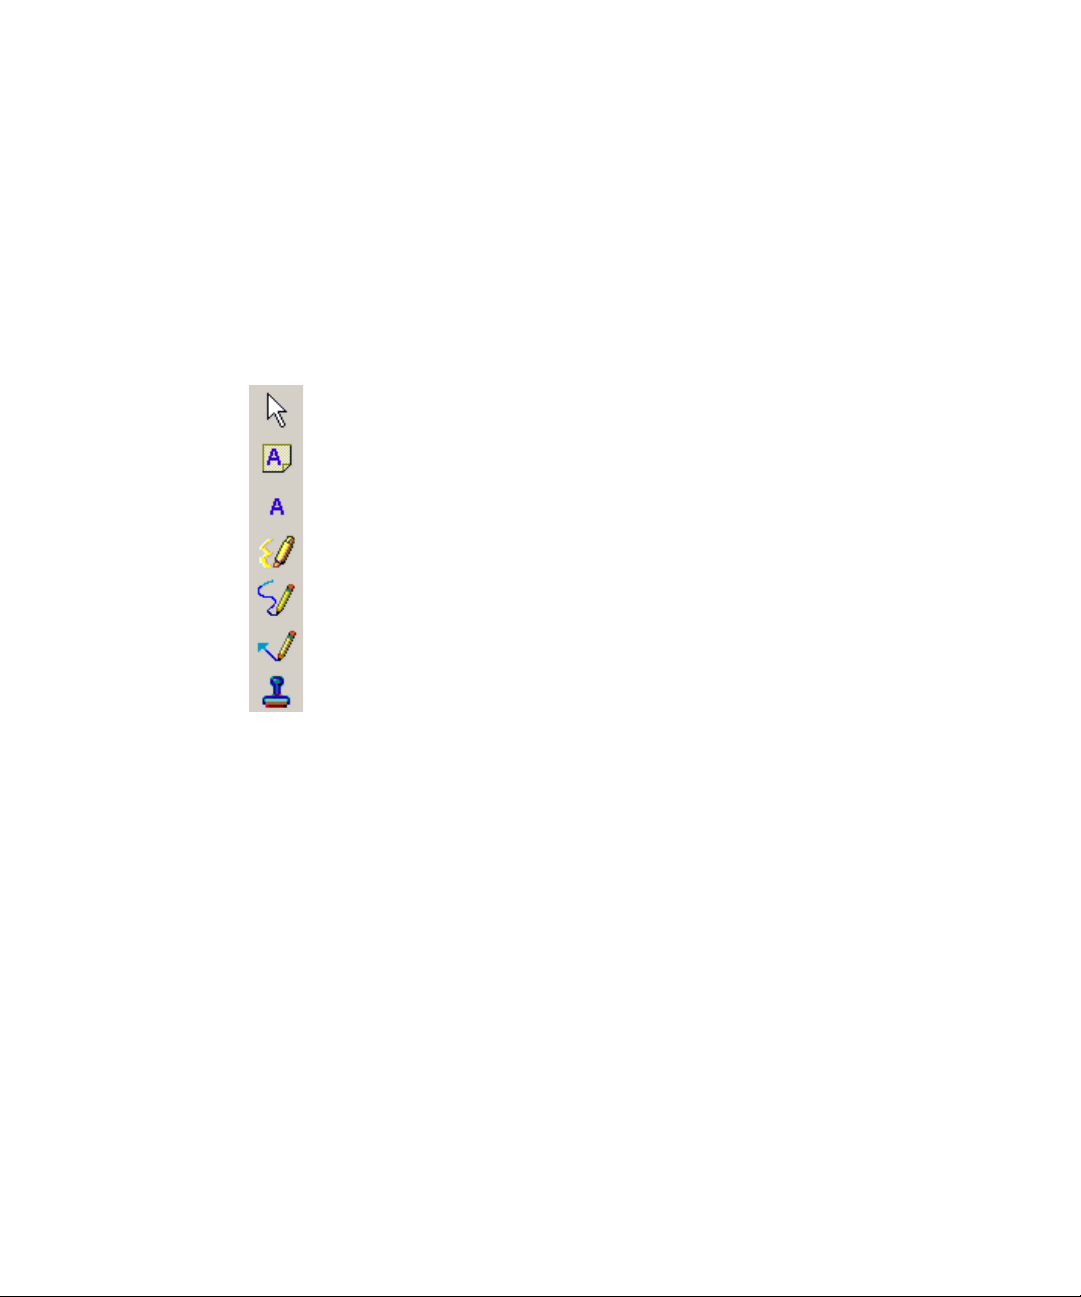
Annotating Pages
Using PaperPort’s annotation tools, you can add notes and text, highlight text, draw
lines and arrows, or stamp a picture onto a PaperPort image item.
You can select an annotation tool from the Annotation toolbar whenever you
display a PaperPort image item in the Page View window.
The annotation tools include:
Select Annotation. Selects, moves, or resizes annotations on the page.
◆
Note. Adds a resizable note much like a sticky note that you write on and then
◆
stick on paper documents.
Tex t. Adds a line of text with a transparent background.
◆
Highlighter. Highlights any part of the page.
◆
Scribble. Draws freehand lines or marks on the page.
◆
Arrow or Line. Draws straight lines, with or without arrowheads, on a page.
◆
Stamp. Pastes a graphic on the page, much like using a rubber stamp.
◆
All annotation tools work similarly. For example, to add a note, display the
PaperPort image item in the Page View window (Figure 22), and then click the Note
button on the Annotation toolbar.
Annotating Pages 35
Page 36

Click the Note button
Click anywhere on the item
Type the note text
.
Figure 22. Adding a Note
Turn off the Note tool when you are done. You can click one of the other
annotation tools, such as the Select Annotation button, or an image editing tool.
36 Using PaperPort
Tip
All notes have a shortcut menu you can use to perform a variety of
commands, such as Cut, Copy, and Collapse. Simply right-click the note
to display the shortcut menu.
Page 37

Chapter 3
Touching Up Images
When you display an image item in the Page View window, PaperPort provides
several tools you can use to adjust or improve your image.
For example, you can straighten a scanned page, lighten an underexposed
photograph that is too dark, adjust the color in a color picture, remove “dirt spots”
from a page, or sharpen fuzzy pictures. In addition, you can rotate an item, remove
stray dots, enhance lines, remove red eye, and crop part of an image.
Located on the Image Editing toolbar, the image editing tools are:
Select Image. Selects part of an image.
◆
Rotate. Rotates the item 90 degrees to the right.
◆
Straighten. Aligns the page to a straight line.
◆
Auto Enhance. Automatically improves the quality of the image and lets you
◆
make additional enhancements.
Enhance Image. Displays a dialog box in which you can adjust the brightness
◆
and contrast, color, or tint of an image.
Sharpen. Displays a dialog box in which you can adjust the sharpness of a
◆
picture or blur it.
Remove Red Eye. Removes the red-eye effect that occurs when
◆
photographing people or animals in low light or with a flash. This tool works
only with color images.
Crop. Leaves the selected area and deletes the rest of the image from the page.
◆
Erase. Erases the area of the image that you draw over with the pointer.
◆
Remove Stray Dots. Removes stray dots or “speckles” from a page. This tool
◆
works only with black-and-white images, such as text documents.
Enhance Lines. Darkens lines and connects broken lines in a table or form to
◆
appear darker and straighter. This tool works only with black-and-white images,
such as scanned forms and text documents.
Touching Up Images 37
Page 38

Click the Select Image
button
Click and drag to select
the area you want to keep
lick the Crop button
Cropping an image
To save or work with part of a page or image, you can crop the portion you do not
want to keep (Figure 23).
38 Using PaperPort
Figure 23.
Cropping an Image
Enhancing an image
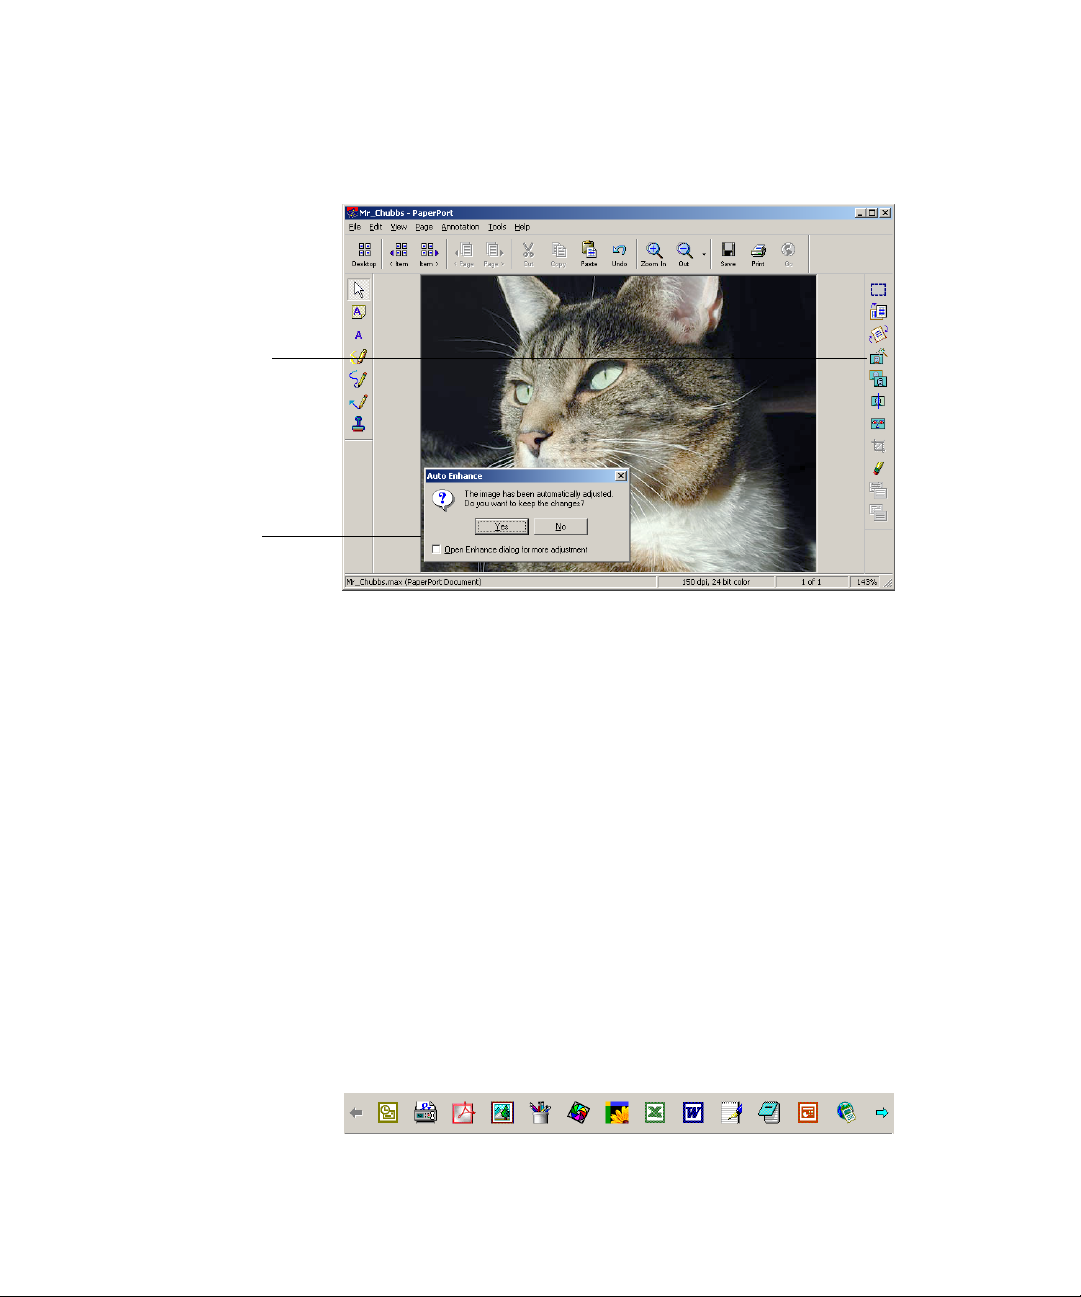
The Auto Enhance feature enables you to quickly adjust the brightness and contrast,
color, and tint of an image. PaperPort will analyze the image and try to correct
whatever is wrong with the image.
Page 39
Click the Auto Enhance
button
Accept or reject the
changes
Chapter 3
Click the Auto Enhance button and, in the Auto Enhance dialog box, click Yes or
No (Figure 24).
Figure 24.
Before you accept or cancel the automatic enhancement, you can manually adjust
your image. In the Auto Enhance dialog box, select Open Enhance dialog box for
more adjustment. Then, manually adjust the brightness and contrast, color, and tint.
Enhancing an image
Sending Items to Another Program
Using one of PaperPort’s most important features, you can quickly send an item to
another program without leaving PaperPort.
PaperPort supports a wide variety of programs including word processing,
spreadsheet, fax, Internet e-mail, graphics, optical character recognition (OCR), and
online services programs.
Icons in the Send To bar identify the programs to which you can send your
PaperPort items (Figure 25). These programs are often referred to as linked
programs. The program link on the Send To bar does any necessary conversion and
may provide options for sending the item.
Figure 25.
The Send To Bar
Sending Items to Another Program 39
Page 40

Select an item
Drag it to the program icon
To send a PaperPort item to another program, select the item on the Desktop, and
then drag and drop the item onto the program icon on the Send To bar (Figure 26).
Figure 26.
The linked program opens, and you can use it as usual.
Using the Send To Bar
Adjusting Send To options
You can tune Send To options to specify how you want to use a certain program on
the Send To bar. For example, you can specify the file format in which PaperPort
will save an item.
On the Send To bar, right-click the icon for the program you want to tune, and then
on the shortcut menu, click Options.
40 Using PaperPort
Page 41

Select the options you want
Save your changes
Chapter 3
PaperPort displays the Send To Options dialog box for that program (Figure 27).
Figure 27.
The Send To Options Dialog Box
Customizing the Send To bar
You can change the way program icons appear on the Send To bar in a number of
ways. Specifically, you can:
Add a program. If you have a program on your computer that is not shown on
◆
the Send To bar, you can add it to the Send To bar by using the Add to Send To
Bar wizard.
Remove a program icon. You can also remove seldom-used program icons
◆
from the Send To bar, and then include removed programs later if needed. In
addition, you can delete program icons that you have added to the Send To bar.
Rearrange program icons. If you do not like the arrangement of the program
◆
icons on the Send To bar, you can move them to new positions.
Refer to the PaperPort Help for detailed information.
Sending Items to Another Program 41
Page 42
Enter e-mail recipient(s)
Type your message
Attachment
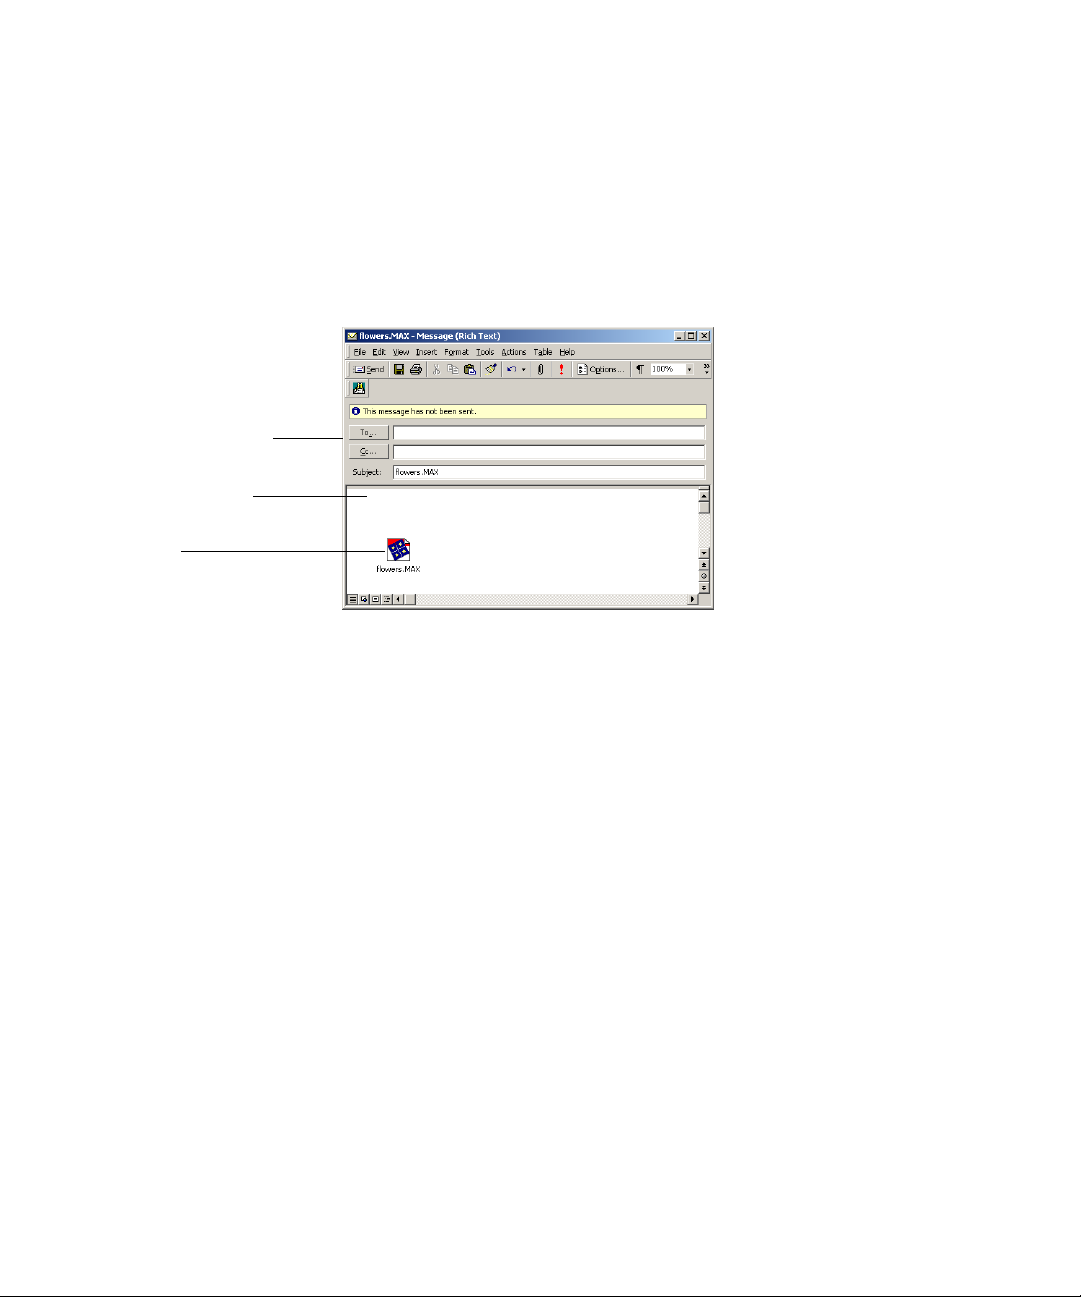
Sending Items as E-mail Attachments
PaperPort works with many popular e-mail programs.
To e-mail an item, simply drag and drop the item to your e-mail program on the
Send To bar. The e-mail program starts, and PaperPort attaches the item to the new
e-mail message (Figure 28).
Figure 28.
The e-mail recipient receives the message and can open the attachment to view the
item you sent.
An E-mail Message with Attachment
Viewing e-mail attachments
Windows does not provide a viewer for a PaperPort image item (.max file). When
you send a PaperPort image item (.max file) as an e-mail attachment:
A recipient who has PaperPort on their computer can view the item you send.
◆
A recipient without PaperPort can download the free PaperPort MiniViewer
◆
from the ScanSoft web site. Once the recipient downloads and installs the
MiniViewer, the recipient can view all .max file attachments.
For recipients without PaperPort or the PaperPort MiniViewer, you can convert
PaperPort image items (.max files) to a common image format, such as JPEG, BMP,
or TIFF.
PaperPort also provides two special formats that make it easy for a recipient to view
PaperPort image items:
42 Using PaperPort
Page 43

Chapter 3
PaperPor t Browser-Viewable (.htm) format lets the recipient view the
◆
PaperPort image item in their Internet web browser. The first time the recipient
opens a Browser-Viewable attachment, the recipient is prompted to confirm
the automatic download of the PaperPort image viewer plug-in. The plug-in
enables the user to view the PaperPort Browser-Viewable items in their web
browser.
PaperPort Self-Viewing (.exe) format includes the PaperPort MiniViewer
◆
and the PaperPort image item as a single file. The recipient does not need to
download the MiniViewer from the ScanSoft web site.
For more guidelines on sending PaperPort image items, see the PaperPort Help.
Converting Images to Text
You can convert scanned documents to text by a simple drag-and-drop of the
thumbnail to your word processor program. PaperPort automatically processes your
scanned document using PaperPort’s OCR software, launches your word processing
program, and loads the scanned text into a document ready for editing.
In the Page View window, PaperPort also allows you to copy text from part of an
image item for use in a text editing, word processing, or spreadsheet program
(Figure 29).
Click the Select Image tool
Draw a box around the
image part to copy
Right-click and select
Copy Text
Figure 29.
Copying Part of an Image to Text
Converting Images to Text 43
Page 44

The OCR software processes the text and copies it to the Windows Clipboard.
Open the program in which you want to insert the text, and use Paste to paste the
text in a file.
Filling Out Scanned Forms
FormTyper is a PaperPort program that enables you to fill in forms, such as
insurance forms, registration cards, and medical forms, that you scan to the
Desktop.
You simply drag a form from the Desktop to the FormTyper program on the Send
To bar. FormTyper automatically analyzes the form, recognizes the blank areas in
which data can be entered, and creates blank fields for the data. So that you can
easily see where to enter data, FormTyper underlines each field in color (Figure 30).
44 Using PaperPort
Figure 30.
You can quickly reposition fields, insert new fields, and remove fields as necessary.
After you enter data and complete the form, save the form to the Desktop so that
you can print or e-mail the form in its entirety with its completed data.
The PaperPort FormTyper Window
Page 45
Chapter 3
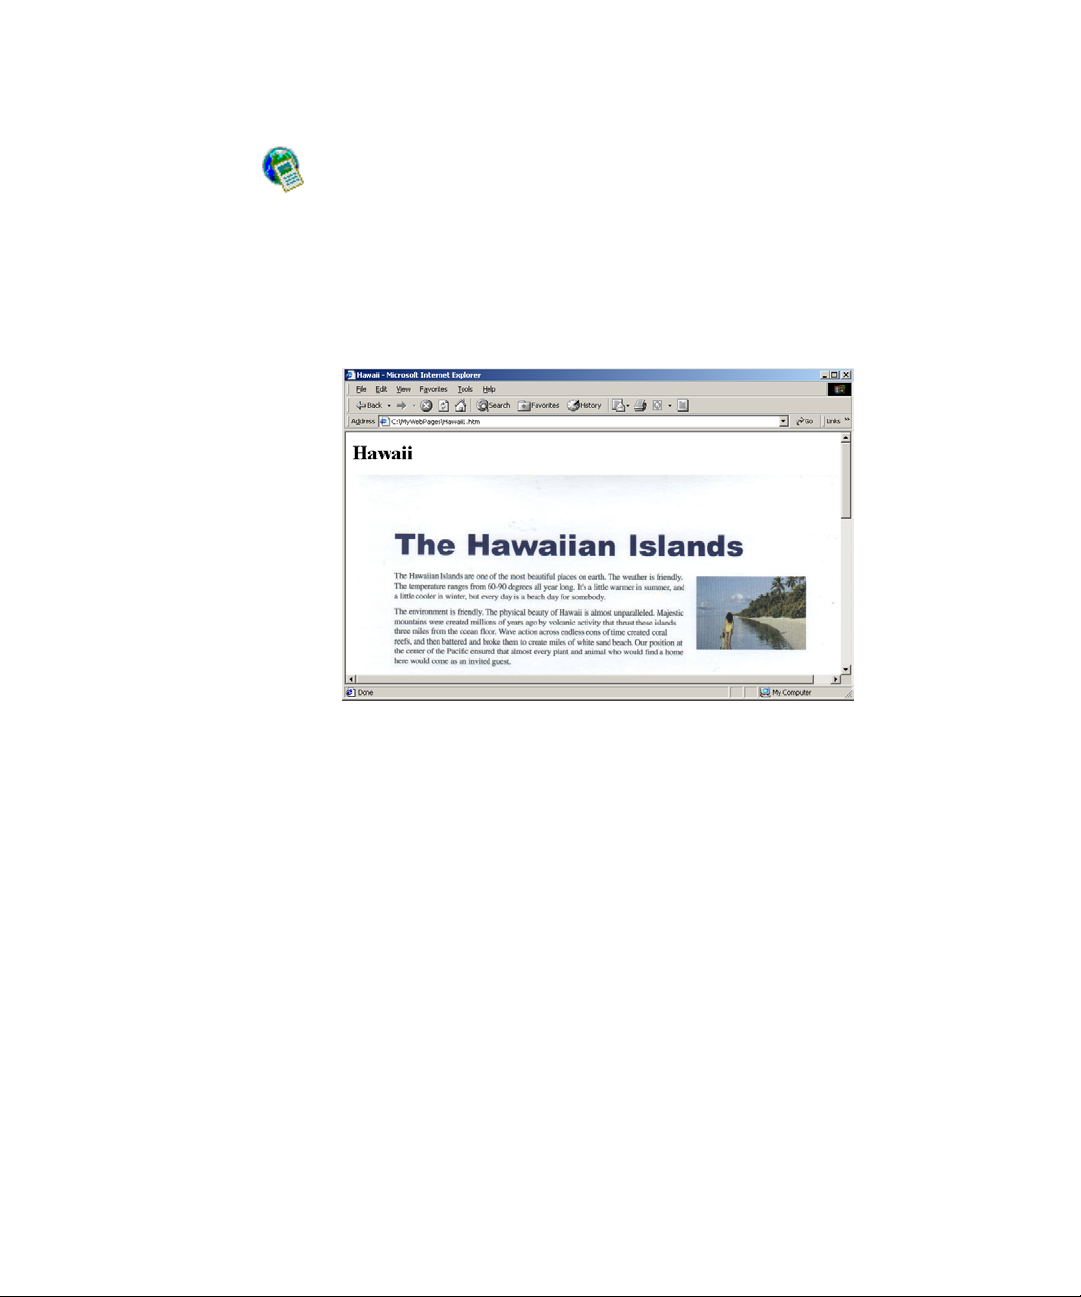
Creating Web Pages
PaperPort’s Web Publisher program enables you to create an HTML file that
contains one or more PaperPort image items.
Simply drag and drop items to the Web Publisher icon on the Send To bar and
follow the on-screen steps to create an HTML file ready for viewing as a web page
in a web browser (Figure 31).
Figure 31.
Using Web Publisher, you can:
◆
◆
◆
◆
◆
Before dragging an item to the Web Publisher icon, you can adjust the Web
Publisher Send To options.
A Web Page Created by Web Publisher
Create HTML files in which your PaperPort image items are converted to
JPEG files or to text.
Insert your items as thumbnail links, text links, or embed them directly in the
web page.
Insert the HTML files you create into an existing web page.
View your completed HTML files in a web browser or in an HTML editing
program.
Copy your HTML files to a web server using the FTP option, if you have an
existing web site.
Creating Web Pages 45
Page 46
Select PaperPort or
another program
Scan the item
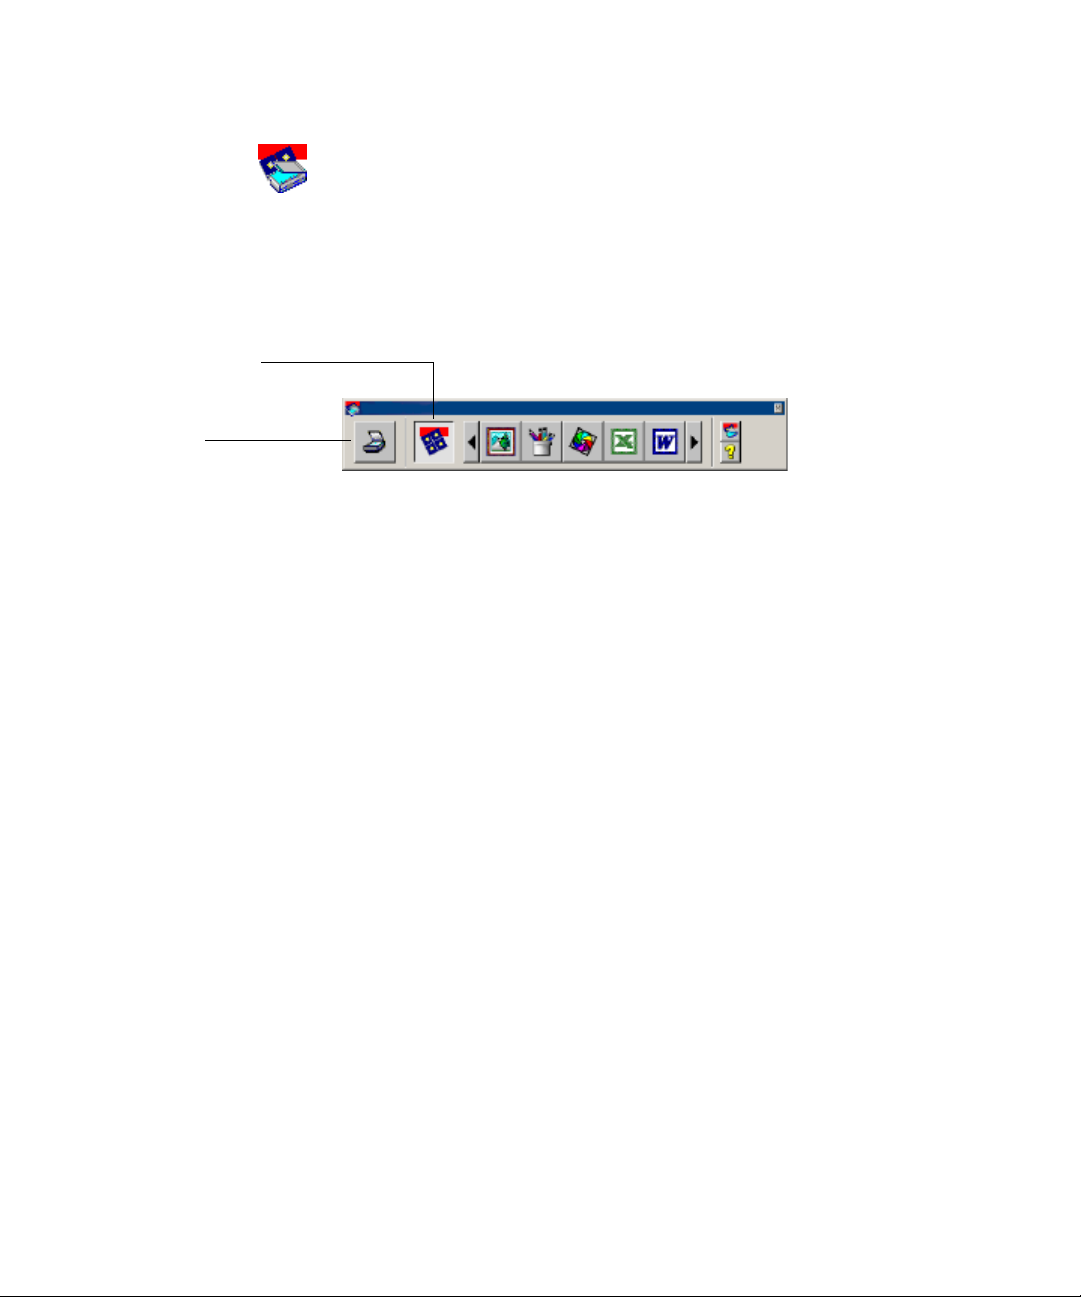
Using ScanDirect
ScanDirect is a PaperPort program that enables you to scan items and send them
directly to PaperPort or other programs on your computer without first running
PaperPort.
ScanDirect runs as a separate program from the Windows Start Menu and displays
the ScanDirect bar (Figure 32).
Figure 32.
Using ScanDirect, you can scan an item and immediately send the item to either:
◆
◆
Refer to the PaperPort Help for more information about using ScanDirect.
The ScanDirect Bar
A program on the ScanDirect Send To bar — Icons on the ScanDirect bar
represent the programs that are linked to PaperPort and to ScanDirect. To scan
and then send an item to a certain program, click the program icon, and then
scan the item. ScanDirect will automatically start that program when the scan is
complete.
The Desktop — To scan and then work with the item in PaperPort, click the
PaperPort icon, and then scan the item. When the scan is complete, PaperPort
starts and displays the item in PaperPort. You can then use all of PaperPort's
features on the item.
46 Using PaperPort
Page 47

Chapter 4
Sample Sessions
The previous chapters introduced you to PaperPort and some of its many
capabilities. This chapter shows you some real-life examples of using PaperPort.
The chapter presents the following topics:
Scan and Save Documents
◆
Get and Touch Up Photos
◆
Send Items as E-mail Attachments
◆
Find Items
◆
Scan and Save Documents
This section teaches you how to acquire items using your scanner and is presented
as follows:
Scan and Save Session 1 — Scan a Magazine Article
◆
Scan and Save Session 2 — Capture Text from a Book
◆
Scan and Save Session 1 — Scan a Magazine Article
In this session you will learn how to:
Create a new folder
◆
Scan a magazine article
◆
Highlight text and add a note to your scanned page
◆
Save and file your document
◆
47
Page 48

Have you ever highlighted or added notes to a magazine article that you thought
important? And have you ever then lost the magazine or forgotten the issue in
which you saw it? PaperPort makes it easy to scan articles and documents, highlight
passages, add notes, and file the information for easy retrieval.
▼ Create a new folder
1. On the Desktop, make sure the Folders pane is displayed. Click Folders on the
Command bar if it is not visible.
2. Right-click on the folder in which you want to create a subfolder and click New
Folder. The New Folder dialog box appears.
48 Sample Sessions
Figure 33.
3. Enter a name in the Folder name field.
4. The Folder color defaults to a color of Manila. Change it to Blue so it will
5. Click OK. PaperPort creates the folder and it appears in the Folders pane.
6. Click on the new folder to open it.
▼ Scan a magazine article
1. Check that your scanner is connected to your PC and is in working order.
2. On the Desktop, click the Scan button on the Command bar. The Scan pane
3. Select your scanner from the Scanner drop-down list.
The New Folder Dialog Box
stand out from the rest of the folders.
replaces the Folders pane.
Page 49

4. Select the type of item you are scanning. In this case it is a Document.
Documents are scanned to PaperPort in the PaperPort image item (.max)
format by default. You can change the default file format by clicking on
Settings.
Chapter 4
Figure 34.
5. Click the Scan button to start the scanner software.
6. Close your scanner software.
Note
Your article appears as a thumbnail on your Desktop as shown in Figure 35.
The Scan Pane
For most magazine articles, 300 dpi black and white produces good results. If
your article includes pictures, you may want to scan at 200 dpi grayscale or
color.
If your scanner does not use a TWAIN or WIA device driver, use the
program that came with your scanner to get your items into PaperPort.
Refer to the PaperPort Help for more information.
Scan and Save Documents 49
Page 50

Figure 35.
▼ Highlight text and add a note to your scanned page
1. Double-click the thumbnail to open it in the Page View window. If the text in
The Desktop with Thumbnail
the sample is a little small, use the Zoom tool to enlarge the view until you can
read the text.
50 Sample Sessions
Tip
Figure 36.
The Fit Width command makes most documents readable. Figure 36
shows you how your document will look when you enlarge it.
The Scanned Page
Page 51

Chapter 4
2. Click the Highlighter tool to highlight some of the text in the article.
3. Position the Highlighter cursor on the target text and drag it to highlight.
4. Click the Note tool to add a yellow sticky-type note.
5. Click once on the page where you want the note to appear and move your
cursor into the note box where you can type. The size of the box expands as
you type.
6. Turn off the Note tool when you are done. You can click one of the other
annotation tools, such as the Select Annotation button, or an image editing
tool to turn off the note tool.
Figure 37.
7. Click the Desktop button to return to the Desktop. You are asked if you want
8. Click Yes.
Annotated Text
to save the changes.
Scan and Save Documents 51
Page 52

▼ Add summary information
PaperPort makes it easy for you to keep track of and find items later with summary
information you can add to your items.
1. Right-click on the item and choose Properties. The Item Properties dialog
box appears.
52 Sample Sessions
Figure 38.
2. Enter Author, Keywords, and Comments information in the fields provided
Note
▼ Save and file your document
Your modified document is saved in the current folder by the previous step. You
may want to file it in another folder to better organize your documents. Let’s file this
document in the Samples\Photos folder.
1. Click the Folders button to open the Folders pane.
2. Click the plus sign to expand the Samples folder.
The Item Properties Dialog Box
to help you locate the item at later dates.
You can only add Author, Keywords, and Comment information to
PaperPort image item (.max) files.
Page 53

3. Drag the thumbnail of your document to the Samples\Photos subfolder.
Scan and Save Session 2 — Capture Text from a Book
In this session you will learn how to:
Scan in a page from a book
◆
Crop the page to get just the text you want
◆
Send the text to your word processor
◆
▼ Scan in a page from a book
1. Click the Scan button to open the Scan pane.
2. Place the book on your scanner.
3. Scan your document. (Refer to Scan a magazine article section on page 48.) A new
thumbnail appears on the Desktop.
▼ Crop the page to get just the text you want
Chapter 4
1. Select the item and click the Page View button to view the pages. Notice that
the sample in Figure 39 shows facing pages. The target text in this session is the
first two paragraphs of the left-hand page.
Figure 39.
Scanned Pages From a Book
Scan and Save Documents 53
Page 54
2. Click the Select Image tool, move the cursor to the text you want, and drag to
T
select it.
3. Click the Crop tool to remove all but the selected text.
4. Click the Desktop button to return to the Desktop.
▼ Send the text to your word processor
PaperPort can automatically convert the image text to actual text you can edit in
your word processor.
1. Drag the item on the Desktop to your word processor icon on the Send To
bar.
arget icon
Figure 40.
The PaperPort OCR program converts the image to actual text and opens it in your
word processor. You are done at this point, but it is a good idea to check the copied
text. The example shown in Figure 39 used a very old book with yellowed pages,
which is not always the best source for an extremely accurate OCR process.
Target icon on the Send To Bar
Get and Touch Up Photos
In this session you will learn how to download photographs from a digital camera.
You will also learn how to touch up the image using the Image Editing tools.
If you do not have a digital camera, you can still use this session to learn how to
adjust pictures with the Image Editing tools by using any of the pictures included
with PaperPort. The photograph of the dory in this session is included as a JPEG
image in the My PaperPort Documents\Samples\Photos folder.
Get and Touch Up Photos Session
In this session you will learn how to:
Download pictures from the camera
◆
54 Sample Sessions
Page 55

Touch u p t h e i m a g e
◆
▼ Download pictures from the camera
1. Attach your camera to your computer and turn the camera on.
2. Open the folder in which you wish to store the pictures.
3. On the Desktop, click the Get Photos button on the Command bar. The Get
Photos pane replaces the Folders pane.
4. Select your camera’s driver in the Camera drop-down list.
Chapter 4
Note
If your camera does not use a TWAIN or WIA device driver, use the
photo download program that came with your camera to get your photos
into PaperPort, or drag and drop the photos from digital storage media.
Refer to the PaperPort Help for more information.
5. PaperPort downloads photos in JPEG format by default. If you want to
convert to a different format or change the default name your camera will give
each photo, click Settings.
6. Click Download to start your camera’s software.
7. Follow the instructions in your camera’s software dialog boxes. In general, the
camera’s download software gives you a chance to pick which pictures on the
camera to download. Thumbnails of the images you select appear on the
Desktop when the download is complete.
▼ Touch up the image
Note
The following steps use HunkyDory.jpg included in the My PaperPort
Documents\Samples\Photos folder.
1. In the Folders pane, click the Samples\Photos folder.
2. Select the HunkyDory.jpg image and click Page on the Command bar. The
image opens in the Page View window.
Get and Touch Up Photos 55
Page 56

Figure 41.
3. Click the Auto Enhance tool. PaperPort automatically adjusts brightness,
Untouched Photo
The picture looks too dark and slightly out of focus. Let’s use the image editing
tools to touch up the photo.
color, and tint. You are asked to accept the changes.
56 Sample Sessions
Figure 42.
Tip
Enhanced Image
Click the Enhance Image tool if you want to make more adjustments
yourself.
Page 57

Chapter 4
The picture looks a lot better now, but the bow is still out of focus.
4. Click the Sharpen Image tool. A slider appears in the upper left corner of the
window.
5. Use the slider to sharpen the image. Click OK when you are done.
Figure 43.
6. Use the Select Image tool to select the area you want to keep.
7. Click Crop to keep the selected portion.
Figure 44.
Sharpening the Focus
Now let’s crop out the portion of the dock at the bottom of the picture.
The Cropped Photo
Get and Touch Up Photos 57
Page 58

8. Click the Desktop button to return to the Desktop.
Send Items as E-mail Attachments
By now you have acquired a couple of text items and several photographs. The
following sessions teach you how easy it is to share these items with your friends and
family by sending your items as e-mail attachments.
In these sessions you will learn to
Send a photo
◆
Send a document
◆
Send Session 1 - Send a photo
1. On the Desktop, open the folder containing the image you want to mail.
2. Select and drag the image to the icon for your e-mail program in the Send To
bar.
PaperPort opens the program, creates a new message and attaches the
enhanced image. All you have to do now is address the message, add a note, and
send it off!
58 Sample Sessions
Send Session 2 - Send a document
Sending articles, even one you have annotated, is just as easy as sending a
photograph. However, you should think about who you are going to send it to and if
they will be able to view your PaperPort image item (.max). Just in case someone on
your list does not have either PaperPort or PaperPort’s MiniViewer (which allows
them to view .max files), you can send it as a PaperPort Browser-Viewable (*.htm)
file which they will be able to view with their default web browser.
The easiest way to send the item in a format other than the MAX format is to have
PaperPort automatically attach it in a different format. You do this with the Send To
options.
▼ Set the Send To options
1. On the Desktop, right-click the e-mail icon on the Send To bar and choose
Options in the shortcut menu. The Send To Options dialog box appears.
Page 59

Chapter 4
Figure 45.
2. In the Comment box, click PaperPort image items (MAX) only.
3. In the File type window, select PaperPort Browser-Viewable (.htm) and then
▼ Send the item
1. On the Desktop, click the item’s thumbnail and drag it to your e-mail icon on
2. Address your message, add whatever text you want, and then send it off!
The person who receives your mail will be asked to download a plug-in for the
PaperPort MiniViewer when they open your mail, which they must do before they
can view your item. The download takes very little time.
The Send To Options Dialog Box
OK.
the Send To bar. A new message opens with the item already attached.
Find Items
PaperPort thumbnails make it easy to search for items on the Desktop. However, if
you have a large number of items and do not remember where you placed a certain
item, you can use SimpleSearch.
SimpleSearch works in two different ways to help you locate information:
Find Items 59
Page 60
File search - Searches the file attributes for your search criteria.
◆
Index search - Searches the file attributes and any text within an item for your
◆
search criteria. An index search requires you to build and periodically update
the SimpleSearch index.
In these sessions you will learn to:
Perform a file search
◆
Update the SimpleSearch Index
◆
Perform an index search
◆
Find Items Session 1 — File Search
You know that somewhere, in one of your folders, is a reference to “hunkydory”.
▼ Perform a file search
1. On the Desktop, click the Search button. The Search pane replaces the
Folders pane.
60 Sample Sessions
Figure 46.
The Search Pane
2. Enter “HunkyDory” in the Name, author, or keywords field.
3. Check the Look in box to make sure that All PaperPort folders is selected.
4. Check that the Use index for searching box is not checked.
Page 61
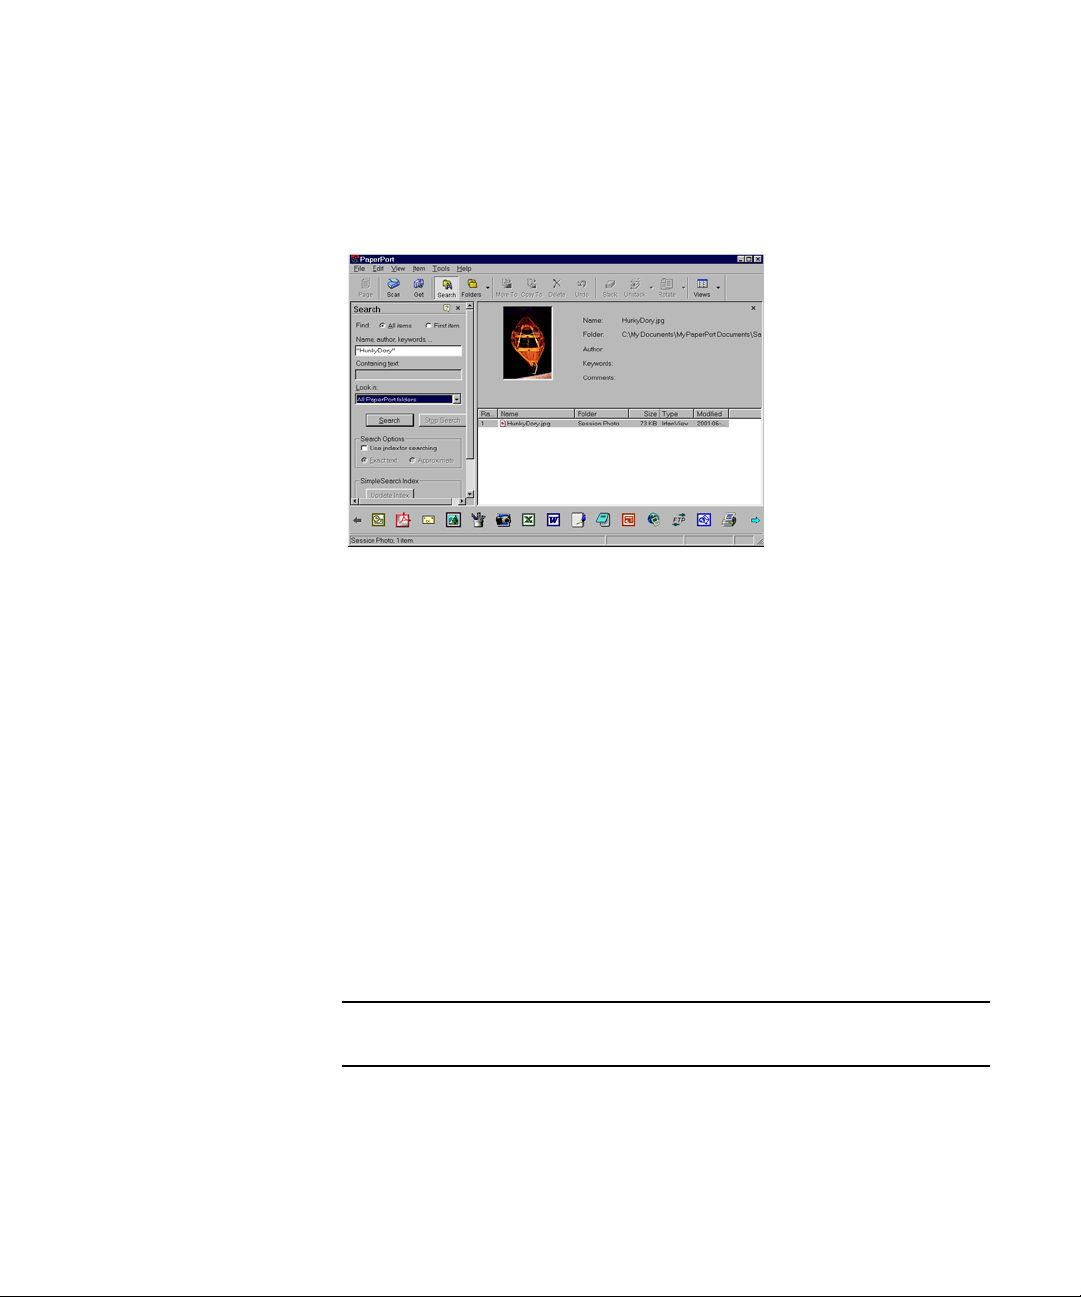
Chapter 4
5. Click Search. The results are displayed in the Search Results pane. Figure 47
shows the results.
Figure 47.
6. Double-click the first item in the lower part of the Search Results pane to open
The Search Results Pane
the image.
Find Items Session 2 - Update the SimpleSearch index
Sometimes you cannot remember an item’s name, but do remember words within
the document. Index Search lets you find items by specifying words in the
document, as well as the name of the document and other properties.
Before you can perform an Index Search you must add your items to the
SimpleSearch index. The PaperPort OCR program converts the items to text and
builds an index of words.
Initially you need to build the index and update it periodically. You can update the
index yourself or let PaperPort do it for you whenever your program is idle. See the
PaperPort Help for more information.
Note
SimpleSearch can extract text from PaperPort image items (.max) and
electronic file types only.
Find Items 61
Page 62

▼ Add items to the SimpleSearch index
You can add items to the SimpleSearch index on a folder-by-folder basis. Use these
steps to add the items in the My PaperPort Documents\Samples folder to your
index.
1. In the Folders pane, open the My PaperPort Documents folder if it is not
expanded.
2. Right-click the Samples folder and select Add to SimpleSearch. A progress
dialog box appears to show you the progress of the indexing.
You can now search for indexed items.
▼ Update the SimpleSearch index
You can also index all items in all PaperPort folders at once. However, if you have a
lot of documents in any of these folders (like your My PaperPort Documents
folder, for example), this could take a long time.
1. On the Desktop, click the Search button. The Search pane replaces the
Folders pane.
2. In Search Options, select the Use Index for Searching check box.
3. Click Update Index. The time it takes to complete depends on how many
items you have and how long it has been since your last update.
62 Sample Sessions
Find Items Session 3 - Perform an Index Search
Now that you have built or updated your SimpleSearch index, let’s try to find an
article about whales.
1. On the Desktop, click the Search button. The Search pane replaces the
Folders pane.
2. In Search Options, select the Use Index for Searching check box.
Page 63
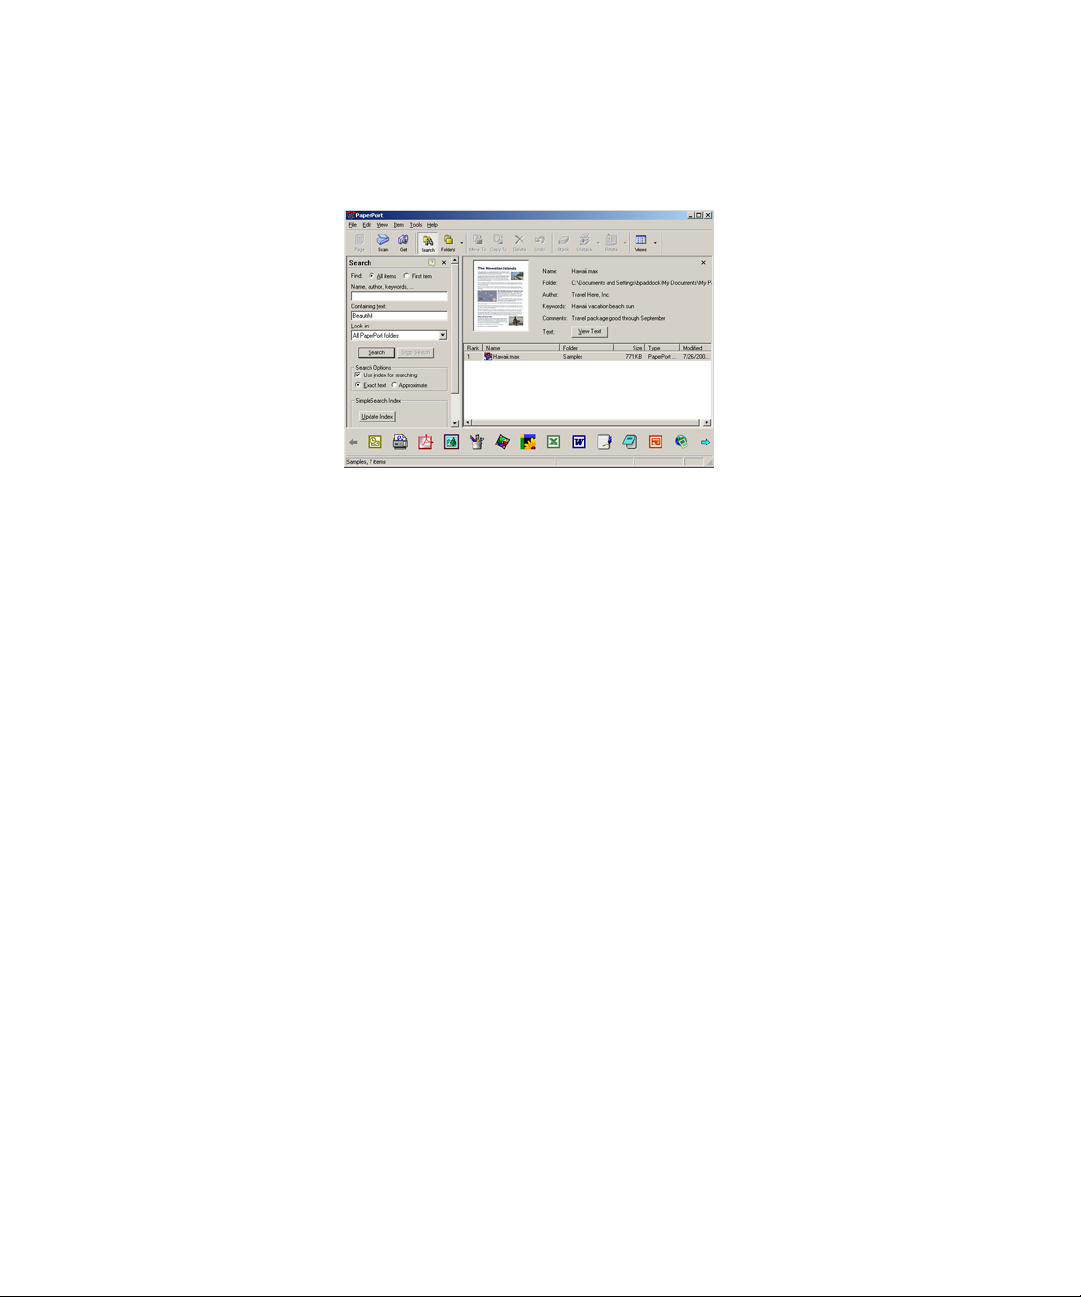
Chapter 4
3. In the Containing text box, enter humpback whales and then click Search. The
search results are displayed in the Search Results pane.
Figure 48.
4. Double-click the thumbnail, or, if multiple items were found, one of the entries
Successful Search Results
listed. The selected item appears on the Desktop.
Find Items 63
Page 64

64 Sample Sessions
Page 65

Chapter 5
Other Programs to Use with PaperPort
The previous chapters introduced you to the most popular PaperPort features. This
chapter introduces you to two additional Scansoft products that can also help you
manage and use scanned documents and digital forms.
The chapter is organized as follows:
OmniPage® — Move up to the most powerful and accurate OCR program
◆
on the market.
OmniForm® — OmniForm is the easiest way to create digital forms and
◆
collect data.
OmniPage
If you find yourself using PaperPort to perform large amounts of Optical Character
Recognition (OCR), consider OmniPage Pro 11, the best-selling OCR software in
the world. OmniPage 11 has the following features:
Unmatched accuracy — OmniPage 11 has an accuracy rate of over 99% for
◆
most documents and contains a feature, the Despeckle Module, that can take
degraded documents like faxes and recognize them with unbelievable accuracy.
IntelliTrain Proofer — Takes note of the changes you make while proofing
◆
and automatically applies them to the rest of your document.
Deskew Process — Straightens crooked pages automatically.
◆
65
Page 66

Powerful format retention — Retains every aspect of your original document
◆
including columns, tables, type styles, color text and backgrounds. This format
retention feature even applies to spreadsheets and other tables.
PDF Conversion — Converts PDF files into your favorite program.
◆
PDF Output — Converts documents to PDF files for archiving and sharing.
◆
Visit the ScanSoft web site at www.scansoft.com/products/omnipage/pro/ to learn
more about OmniPage.
OmniForm
The days of creating and distributing paper forms - and then re-keying the data into
a database - are over! OmniForm significantly reduces the time and expense
associated with creating forms and collecting form data. It streamlines the process
of designing, editing, managing, and distributing forms, and makes it simple for
companies to collect data from employees, vendors, customers, and prospects.
OmniForm also simplifies the process of filling in forms - automatically filling in
data that has been provided previously, thereby eliminating time and keystrokes.
OmniForm enables you to:
Automatically convert paper forms into digital forms easily and accurately.
◆
Create forms from scratch using pre-designed templates.
◆
Post your forms to the web, via e-OmniForm, for worldwide data collection -
◆
with the click of a button.
Streamline the process of filling in forms by automatically entering information
◆
that the user has provided on previous forms.
Create intelligent PDF forms that you can distribute to anyone via e-mail.
◆
Instantly add attachments, such as receipts, to your digital forms.
◆
Add digital signatures to forms - making them legally binding.
◆
Visit the ScanSoft web site at http://www.scansoft.com/products/omniform/ to
learn more about OmniForm.
66 Other Programs to Use with PaperPort
Page 67

Index
A
Actual Size command
Add Folders dialog box
Add to SimpleSearch command
31, 62
All PaperPort folders check box
annotating
pages
, 35
tools
, 35
Annotation menu
Annotation toolbar
Annotation tools
Arrow tool
arrows, draw
Author (item property)
, 35
, 15
60
Auto Enhance button
Auto Enhance tool
, 34
, 25
, 14
, 12, 35
, 15
, 30, 32, 52,
, 39
, 37, 56
B
Best Fit command
BMP format
, 34
, 42
C
camera
downloading from
drop-down list
Capture Text
Collapse command
color-coding folders
Command bar (Desktop)
, 53
48, 55
, 55
, 55
, 36
, 28
, 11, 13,
,
, 60
Command bar (Page View)
Comment box
Comments (item property)
Containing text box
copy
folders
items
Copy command
create command
Crop
command
tool
crop
, 14
images
text
Cut command
, 59
, 63
, 27
, 29
, 13, 36
, 13
, 57
, 37, 54
, 38
, 53
, 13, 36
D
Delete command
Deselect command
Deskew Process
Desktop
described
menus
toolbars
Desktop button
digital camera
document
file
, 52
save
, 47, 52
scan
, 47
scan setting
send
, 58
, 13
, 13
, 65
, 11
, 13
, 13
, 51, 54, 58
, 54
, 49
, 12
, 30, 52
Download command
, 55
E
Edit menu (Desktop)
Edit menu (Page View)
e-mail Attachments
e-mail attachments
viewing
Enhance Image tool
Enhance Lines tool
enhancing images
manually
Erase tool
, 42
, 39
, 37
, 13
, 14
, 58
, 42
, 37, 56
, 37
, 38
F
File menu (Desktop)
File menu (Page View)
File search
File type window
files, importing
filing items
find items
Fit Height command
Fit Width command
Folder
folder
Folder Properties dialog box
Folders
, 60
, 26
, 30, 59
name field
pane
, 55
color field
create
, 48
, 13
, 14
, 59
, 26
, 34
, 34, 50
, 48
, 48
, 28
67
Page 68

button
, 52
command
folders
adding
color-coding
copy
move
using
Folders pane
show/hide
forms, filling out
FormTyper
, 48
, 24
, 28
, 27
, 28
, 27
, 11, 15, 24
, 15
, 44
, 44
G
Get Photos
button
, 22, 55
pane
, 21, 55
H
Help
, vi
Help menu
highlight text
Highlighter tool
HunkyDory
, 13, 14
, 15, 50
, 35, 51
, 55
I
image
enhancing
sharpen
touch up
Image Editing
toolbar
Tools
images
converting to text
cropping
touching up
Import command
Importing files
Index search
IntelliTrain Proofer
, 38
, 14
, 55
, 12, 37
, 14
, 38
, 37
, 26
, 60
, 26
, 65
, 43
Internet
Item menu
items
, 23
, 13
acquiring
adding search criteria to
copy
filing
finding
finding with words
move
rearrange
rotate
sending
sending to another program
straighten
using
, 20
, 29
, 26
, 30
, 31
, 28
, 19
, 19
, 42
, 19
, 28
J
JPEG format
, 42, 55
K
Keywords (item property)
52, 60
L
Line tool
lines, draw
Look in box
, 35
, 15
, 60
M
MAX format
Menu Bar (Desktop)
menus (Desktop)
menus (Page View)
MiniViewer
move
folders
items
multi-page items, creating
My Documents folder
, 58
, 11
, 13
, 14
, 34, 42, 58, 59
, 28
, 28
, 15
, 29
, 39
, 30, 32,
, 19
My PaperPort Documents folder
15, 62
N
Name (item property)
Name field
New Folder
note
Note tool
, 60
command
dialog box
add
, 15, 50
sticky-type
, 35, 51
, 48
, 32
, 48
, 51
O
OCR
, 31, 44, 65
OmniForm
OmniPage
Options command
, 66
, 65
, 58
P
Page button
Page menu
Page Name (item property)
Page View
button
menus
window
page, straighten
pages
annotating
viewing
PageViewer program
PaperPort
defined
Desktop
Folders
home use
image items (.max files)
installing
MiniViewer
, 55
, 14
, 30
, 53
, 14
, 11, 34, 55
, 14
, 35
, 34
, 34
, 9
, 11
, 24
, 10
, 42, 52
, 8
, 34, 42
,
68 Index
Page 69

office use
Options
printer assignment
using
with other programs
PaperPort Browser-Viewable (.htm)
files
PaperPort Color, printer assign-
ment
PaperPort Folders
dialog box
using
PaperPort image item (.max)
, 10
, 31
, 22
, 17
, 65
, 43, 58, 59
, 22
, 25
, 27
, 49,
58
defined
, 12
PaperPort image items
PaperPort Self-Viewing (.exe) files
, 15
43
PaperPort Tips
Paste command
PDF
Conversion
Output
photos
getting
send
touch up
picture, paste
print command
Printing to PaperPort
Product Support
program
add to Send To bar
rearranging in Send To bar
removing from Send To bar
program icons
Properties command
properties, finding items with
Properties, item
, 12
, 13
, 66
, 66
, 54
, 58
, 54
, 15
, 13
, 22
, vi
, 41
, 41
, 41
, 14
, 28
, 30
, 52
R
red eye
, 14
Release Notes
Remove Red Eye tool
Remove Stray Dots tool
rotate items
Rotate tool
, vi
, 19
, 37
S
Sample Sessions
Samples folder
Samples Photos folder
save documents
Scan
button
pane
scan
,
a magazine article
button
from a book
to the Desktop
ScanDirect
scanner list
Scribble tool
Search
button
command
Options
pane
pane, using
search
file
, 60
index
search criteria, adding to items
Search Results pane
Select Annotation button
Select Annotation tool
Select command
Select Image tool
send
items
items to another program
Send To bar
customizing
, 62
, 47
, 20, 53
, 21, 48, 53
, 48, 49
, 46
, 48
, 35
, 60, 62
, 61
, 62
, 60, 62
, 32
, 60
, 42
, 11, 13, 39, 58, 59
, 41
, 37
, 37
, 47
, 52, 55
, 47, 48
, 53
, 20
, 33, 61, 63
, 51
, 35
, 13
, 37, 54, 57
, 29
, 39
Send To options
Session Photo folder
Settings
get photos
scanning
Sharpen Image tool
SimpleSearch
add to
index
SimpleSearch index
update
Stack button, for multi-page items
, 58
, 54
, 55
, 49
, 57
, 31, 59
, 62
, 60
, 31
, 61, 62
19
Stamp tool
starting PaperPort
Status bar
Straighten tool
subfolders, using
summary information
system requirements
, 35
, 7
, 11, 15
, 37
, 27
, 52
, 7
T
text items
Text tool
thumbnails
TIFF format
toolbars (Desktop)
toolbars (Page View)
Tools menu (Desktop)
Tools menu (Page View)
TWAIN device driver
TWAIN-compatible scanners
, 12
, 35
, 11, 59
defined
, 18
displaying
using
, 18
, 18
, 42
, 13
, 14
, 13
, 14
, 21, 22
, 20
U
undo command
Update Index command
Use Index for Searching check box
62
, 13
, 62
,
,
PaperPort Deluxe Getting Started Guide 69
Page 70

Use index for searching check box
60
V
View menu (Desktop)
View menu (Page View)
viewing pages
, 34
, 13
, 14
,
W
Web Capture
icon
Menu
web pages
capturing
web pages, creating
Web Publisher
, 24
, 24
, 23
, 23
, 45
, 45
WIA device driver
WIA-compatible scanners
word processor
words, finding items with
, 21, 22
, 54
Z
Zoom commands, using
Zoom tool
, 50
, 20
, 31
, 34
70 Index
 Loading...