

Page 1

PageKeeper® Pro
User’s Manual
Page 2

Caere Corporation
100 Cooper Court
Los Gatos, California
95032-7603 USA
Caere GmbH
Innere Wiener Strasse 5
81667 München, Germany
Caere UK Information Centre
Abbey House
4 Abbey Orchard Street
Westminster, London SW1P 2JJ
Centre d’informations Caere
72, rue Baratte-Cholet
94100 Saint-Maur, France
Please Note
In order to use this application, you should know how to work in the Microsoft Windows
environment. Please refer to Windows documentation if you have questions about how to use menu
commands, dialog boxes, scroll bars, edit boxes, and so on.
PageKeeper Pro
Version 3
Copyright© 1999 by Caere Corporation. All rights reserved. Folder Watch is a trademark of Caere
Corporation. The Caere logo, Caere, PageKeeper, PageKeeper Standard, PageKeeper Pro, OmniPage,
and OmniPage Pro are registered trademarks of Caere Corporation.
All other trademarks are the property of their respective companies.
ii
800-1304-030A
Page 3

Welcome
Using This Manual................................................................................................................2
Getting Online Help..............................................................................................................3
Help Menu ......................................................................................................................3
Context-Sensitive Help..................................................................................................3
Getting Product Support ......................................................................................................4
Chapter 1 Installation and Setup
Minimum System Requirements ........................................................................................6
If You Have a Previous Version of PageKeeper or Visioneer PaperPort Installed .....6
Installing PageKeeper ..........................................................................................................7
Setting Up Your Scanner with PageKeeper ......................................................................8
Starting PageKeeper .............................................................................................................9
Registering PageKeeper ....................................................................................................10
Chapter 2 Introduction to PageKeeper
PageKeeper Features ..........................................................................................................12
PageKeeper User Interface.................................................................................................14
PageKeeper Desktop....................................................................................................14
PageKeeper View .........................................................................................................15
PageKeeper Find ..........................................................................................................16
PK Scan Button .............................................................................................................16
Selecting PageKeeper Settings ..........................................................................................17
General Settings............................................................................................................18
Scanner Settings............................................................................................................18
OCR Language Settings .............................................................................................19
New Document Settings .............................................................................................19
Folder Watch Settings .................................................................................................20
Table of Contents
Chapter 3 Getting Started Exercises
Getting Started.....................................................................................................................22
Exercise 1: Add a Document to PageKeeper..................................................................23
Exercise 2: Work with Folders..........................................................................................25
Exercise 3: Work in PageKeeper View ............................................................................30
Exercise 4: Work with a Clipped Group.........................................................................34
iii
Page 4

Exercise 5: Find a Document ............................................................................................36
Chapter 4 Organizing and Working with Documents
Adding Documents to PageKeeper .................................................................................40
Scanning Documents into PageKeeper ....................................................................41
Scanning Documents Automatically with an ADF ................................................43
Adding Existing Documents to PageKeeper ..........................................................44
Adding Documents Automatically with Folder Watch ........................................45
Adding Web Page Links to PageKeeper ..................................................................47
Organizing Documents .....................................................................................................49
Creating Folders ..........................................................................................................49
Clipping Documents Together ..................................................................................50
Rearranging Items .......................................................................................................53
Renaming Items ...........................................................................................................54
Removing Items ..........................................................................................................54
Automatically Organizing Documents ...........................................................................56
Viewing Documents ..........................................................................................................60
Annotating Documents .....................................................................................................62
Opening Documents ..........................................................................................................65
Opening Documents in Their Own Applications ...................................................65
Opening Web Pages ....................................................................................................65
Opening Documents in Other Applications ...........................................................66
Printing, Faxing, and Mailing Documents ......................................................................67
Chapter 5 Finding Documents
Starting a Search .................................................................................................................70
Search Tips ..........................................................................................................................72
Entering Search Text ...................................................................................................72
Searching for Similar Documents .............................................................................72
Searching Within Search Results ..............................................................................73
Searching for Old Documents to Discard ................................................................73
Sorting Search Results by Relevancy .......................................................................73
Locating Search Words in Retrieved Documents....................................................73
Reusing Search Criteria ..............................................................................................73
Saving Search Criteria to a Smart Folder .................................................................73
Storing Search Results in a Folder ............................................................................73
Specifying Multiple Criteria for Your Search .................................................................74
Modifying Search Criteria .................................................................................................76
Changing the Search Conditions .....................................................................................77
Saving Search Criteria .......................................................................................................80
PageKeeper Find Options .................................................................................................82
Content Tab ..................................................................................................................82
Properties Tab ..............................................................................................................84
Image Tab .....................................................................................................................85
Look in Tab ..................................................................................................................86
iv
Page 5

Chapter 6 Technical Information
Troubleshooting Solutions ................................................................................................88
Solutions to Try First ...................................................................................................88
Low Disk Space Problems ..........................................................................................89
Low Memory Problems ..............................................................................................89
Problems Connecting PageKeeper to Your Scanner ..............................................90
System Crash Occurs While Scanning .....................................................................90
Converting Databases for Use in PageKeeper Pro ........................................................91
PageKeeper Standard and Lite 3.0 Conversions .....................................................93
PageKeeper 2.0 or 2.1 Conversions ...........................................................................93
Visioneer PaperPort Conversions .............................................................................94
Keeping Track of Document Changes .............................................................................95
Performing Background OCR on Images .......................................................................96
Image Quality Required for OCR..............................................................................96
Improving OCR Accuracy .........................................................................................97
Sending Documents from PageKeeper ............................................................................98
Customizing the Application Toolbar .............................................................................99
Document Thumbnails ....................................................................................................101
Checking PageKeeper Jobs .............................................................................................102
Uninstalling PageKeeper .................................................................................................104
Index
v
Page 6

vi
Page 7

Welcome
Welcome to PageKeeper, and thank you for using our software!
The following documentation has been provided to help you learn
about PageKeeper.
This User’s Manual
This manual introduces you to the basics of using PageKeeper. It
includes installation and setup instructions, an introduction to the
product, exercises for getting started, task-oriented instructions, and
technical information.
This manual is also available as an electronic file in PDF format. To open
the file after installation, click
Programs
PageKeeper Online Help
The online Help contains information on features, settings, and
procedures. It has been designed for quick and easy information
retrieval. Please see “Getting Online Help” on page 3 for more
information.
PageKeeper Readme File
Caere ApplicationsCaere DocumentsPageKeeper Pro Manual
in the Windows taskbar and choose
Start
.
The
PageKeeper Readme
software. To open the
Windows taskbar and choose
Documents
Scanner Setup Notes
The
Scanner Setup Notes
about the Caere Scan Manager and supported scanners. To open this
PDF file after installation, click
Programs
PageKeeper Pro Readme
Caere ApplicationsCaere Documents
file contains last-minute information about the
Readme
file after installation, click
Programs
is an electronic file that contains information
Start
Caere ApplicationsCaere
.
in the Windows taskbar and choose
Scanner Setup Notes
Start
in the
.
1
Page 8

Using This Manual
Using This Manual
This manual is written with the assumption that you know how to work
in the Windows environment. Please refer to your Windows
documentation if you have questions about how to use dialog boxes,
menu commands, scroll bars, drag and drop functionality, shortcut
menus, and so on.
The following conventions are used in this manual.
Convention Purpose
Italicized text
monospaced text Indicates physical file names
Note symbol Introduces a tip or an item of
Warning symbol Introduces important
• Emphasizes menu commands,
dialog box options, and
labeled buttons
For example:
“Choose
menu.”
• Emphasizes new terms the
first time they are used
• Emphasizes important words
in a sentence
and folder locations
note about the current topic
information about the current
topic
Open...
in the File
2
Page 9
Getting Online Help
In addition to using this manual, you can use PageKeeper’s online Help
to learn about features, settings, and procedures. Online Help is
available after you install PageKeeper.
Getting Online Help
Choose
on using Windows Help.
How to Use Help...
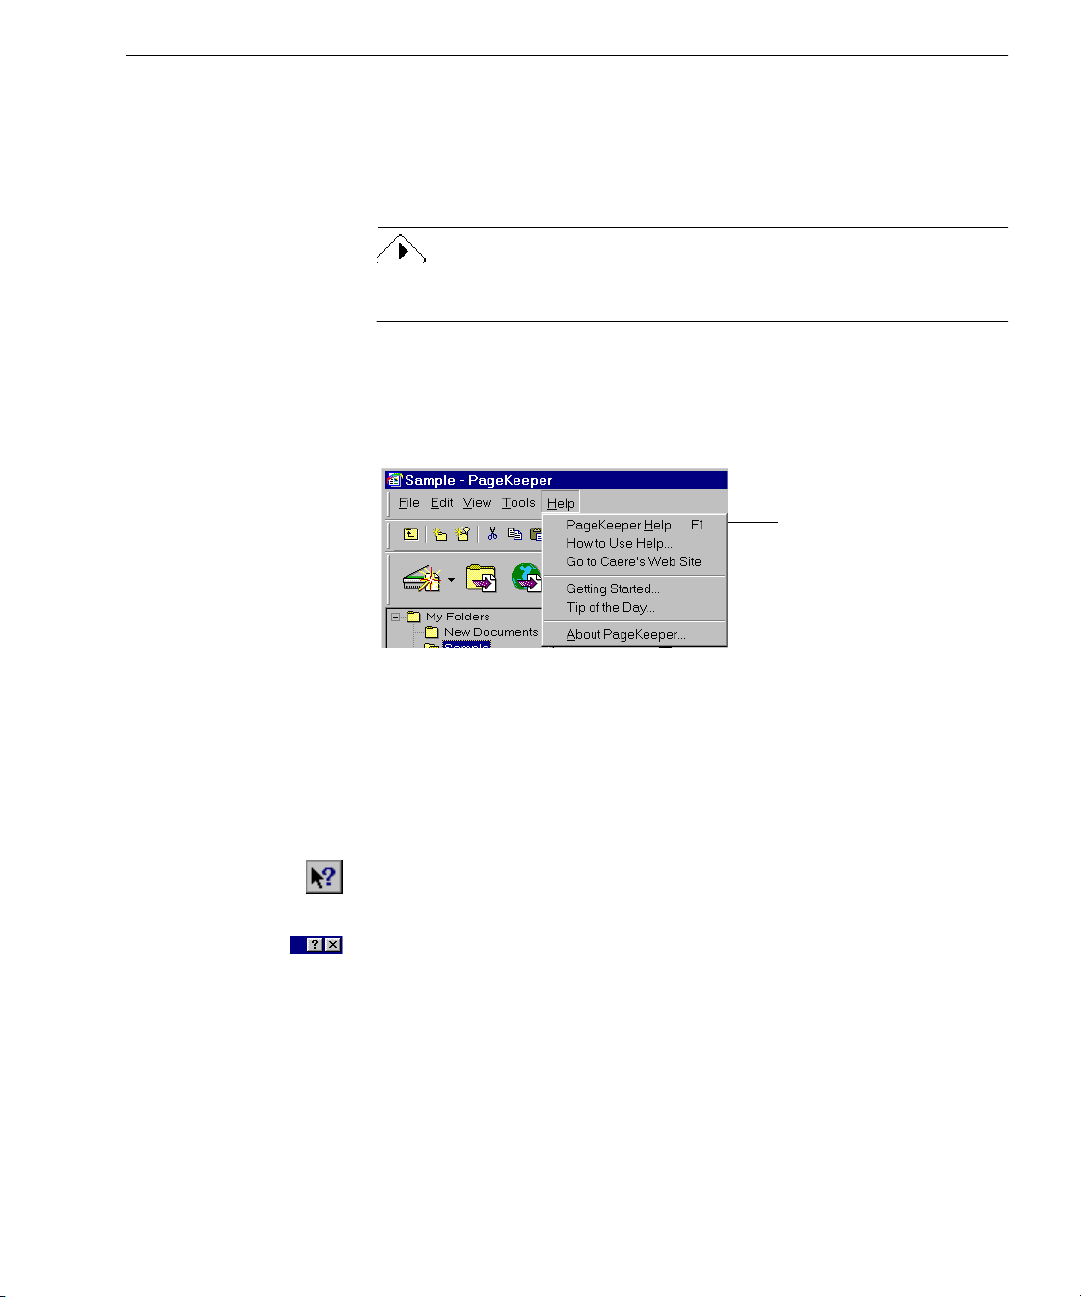
Help Menu
One way to open PageKeeper’s online Help is to choose commands in
the Help menu.
The Help menu commands will vary depending on if you are in the
PageKeeper desktop, PageKeeper View, or PageKeeper Find.
Context-Sensitive Help
You can get on-the-spot information about a particular PageKeeper
command, toolbar button, or dialog box option in the following ways:
in PageKeeper’s Help menu to get information
PageKeeper Help
first command in the
Help menu. Choose it to
get contents and index
listings for all Help
topics.
is the
• Click the Help button in the Standard toolbar and then click any
toolbar button, menu command, or area of the screen to display a
Help topic explaining that item.
• Click the question-mark button in the upper-right corner of a
dialog box and then click an item in the dialog box to get a popup explanation for that item.
Welcome 3
Page 10
Getting Product Support
Getting Product Support
For the fastest and easiest way to get help, please look for solutions in
this manual or in the online Help. See page 88 for troubleshooting tips.
If you need additional help, please use the following resources.
• Caere’s World Wide Web site
Go to Caere’s World Wide Web site for common questions and
answers, updates, patches, troubleshooting procedures, and
product information. Caere’s Web site address:
www.caere.com
If you are currently connected to the Web, you can choose
commands in PageKeeper’s Help menu to get to Caere’s Web
site.
• PageKeeper Readme file
Read the
the software, including known problems and work-around
solutions. To open this file after installing PageKeeper, click
in the Windows taskbar and choose
Applications
• Caere Product Support document
Read the
numbers you can call for product support, including ones for
international customers. This document has been provided to
you as an electronic document in PDF format. To open it, click
in the Windows taskbar and choose
Start
Applications
PageKeeper Readme
Caere DocumentsPageKeeper Pro Readme
Caere Product Support
Caere DocumentsProduct Support
file for last-minute information about
Programs
document to get a list of telephone
Programs
Caere
.
.
Caere
Start
You must have Adobe Acrobat Reader 3.01 or greater installed in
order to read PDF documents. To install the reader, click
Windows taskbar and choose
DocumentsAcrobat Reader
4
Programs
.
Caere ApplicationsCaere
Start
in the
Page 11

Chapter 1
Installation and Setup
This chapter provides information on installing and starting
PageKeeper.
Please continue reading for information on these topics:
• Minimum System Requirements
• If You Have a Previous Version of PageKeeper or Visioneer
PaperPort Installed
• Installing PageKeeper
• Setting Up Your Scanner with PageKeeper
• Starting PageKeeper
• Registering PageKeeper
5
Page 12
Minimum System Requirements
Minimum System Requirements
These are the minimum system requirements to install and run
PageKeeper:
• Computer with a Pentium or higher processor
• Microsoft Windows 95, Windows 98, or Windows NT 4.0
• 16MB of memory (RAM) for Windows 95
32MB of memory for Windows 98 and Windows NT
• 150MB of free hard disk space during installation (at least 100MB
must be on the drive where Windows is installed)
• VGA monitor with 256 colors
• CD-ROM drive for installation
• Windows-compatible pointing device
• A compatible scanner if you plan to scan documents
Please read the
Performance and speed will be enhanced if your computer’s processor,
memory, and available disk space exceed the minimum requirements.
Scanner Setup Notes
for a list of tested scanners.
If You Have a Previous Version of PageKeeper or Visioneer PaperPort Installed
PageKeeper Pro can convert document databases from these versions of
PageKeeper and Visioneer PaperPort:
• PageKeeper Standard 3.0 and PageKeeper Lite 3.0
• PageKeeper 2.0, 2.01, and 2.1
• Visioneer PaperPort Deluxe 4.0 and 5.1 - 5.3
During conversion, PageKeeper Pro transfers documents to its own
folder system. Please see “Converting Databases for Use in PageKeeper
Pro” on page 91 for instructions on starting the conversion process and
information on what to expect for different product conversions.
Previous Versions of PageKeeper
If you have PageKeeper Standard 3.0, PageKeeper Lite 3.0, or
PageKeeper 2.x installed, it is recommended that you uninstall it and
restart your computer before installing PageKeeper Pro. If you want to
transfer your current PageKeeper database to PageKeeper Pro, you
6 Chapter 1
Page 13

must keep the database folder structure intact. You can safely uninstall
your older version of PageKeeper without altering its database folder
structure as long as you do not manually delete or move the database
folders or their contents.
Visioneer PaperPort
If you have PaperPort Deluxe 4.0 or 5.1 - 5.3 installed, and you want to
transfer your current database to PageKeeper Pro, you must keep the
full application installed and keep the database folder structure intact
until conversion is complete. You can uninstall PaperPort after
successfully converting its database, if you no longer plan to use it.
Installing PageKeeper
PageKeeper’s Setup program takes you through installation with
instructions on the screen at every step.
Before installing PageKeeper:
• Make sure your scanner is connected, turned on, and compatible
with your system.
• Close all other applications, especially anti-virus programs.
• Log into your computer with administrator privileges if you are
installing on Windows NT.
Installing PageKeeper
To install PageKeeper:
1 Insert PageKeeper’s CD-ROM in the CD-ROM drive.
PageKeeper’s Setup program should start automatically. If it
does not start, locate your CD-ROM drive in Windows
Explorer and double-click the Setup.exe program at the top-
level of the CD-ROM.
2 Click
3 Follow the instructions on the screen to finish installation.
The Post-it® Software Notes application is automatically installed with
PageKeeper. You can use Post-it
documents in PageKeeper View. See “Annotating Documents” on page
62 for more information.
Installation and Setup 7
Install PageKeeper Pro
By default, PageKeeper installs all its program files in this
folder location:
c:\Program Files\Caere\PageKeeperPro30\System
in the first setup screen.
®
Notes to add text annotations to
Page 14

Setting Up Your Scanner with PageKeeper
Setting Up Your Scanner with PageKeeper
Caere Scan Manager is installed during PageKeeper installation. This
sets up your scanner (or another input device such as a digital camera)
so you can use it with PageKeeper. During installation, Caere Scan
Manager prompts you to select your scanner manufacturer and model
or other input device.
Read the
Manager and supported scanners. You can open the
after PageKeeper has been installed by clicking
taskbar and choosing
DocumentsScanner Setup Notes
After installation, you can use Caere Scan Manager to set up additional
scanners with PageKeeper and change various scanner settings. Caere
Scan Manager is located in the Windows Control Panel.
To open Caere Scan Manager:
To change your scanner selection in PageKeeper:
Scanner Setup Notes
1 Click
Settings
2 Double-click the
1 Open PageKeeper.
2 Choose
The Select Scanner dialog box appears.
in the Windows taskbar and choose
Start
Control Panel
Select Scanner...
for more information on Caere Scan
Start
Programs
Caere Scan Manager
Caere ApplicationsCaere
.
.
icon.
in the File menu.
Scanner Setup Notes
in the Windows
3 Select the scanner or other input device you want to use with
PageKeeper in the drop-down list.
8 Chapter 1
Page 15
The list contains all the scanners and other input devices (such
as digital cameras) that are set up in Caere Scan Manager.
4 Click OK after making your selection.
The selected scanner or other input device will be used in
PageKeeper until you change it again.
Starting PageKeeper
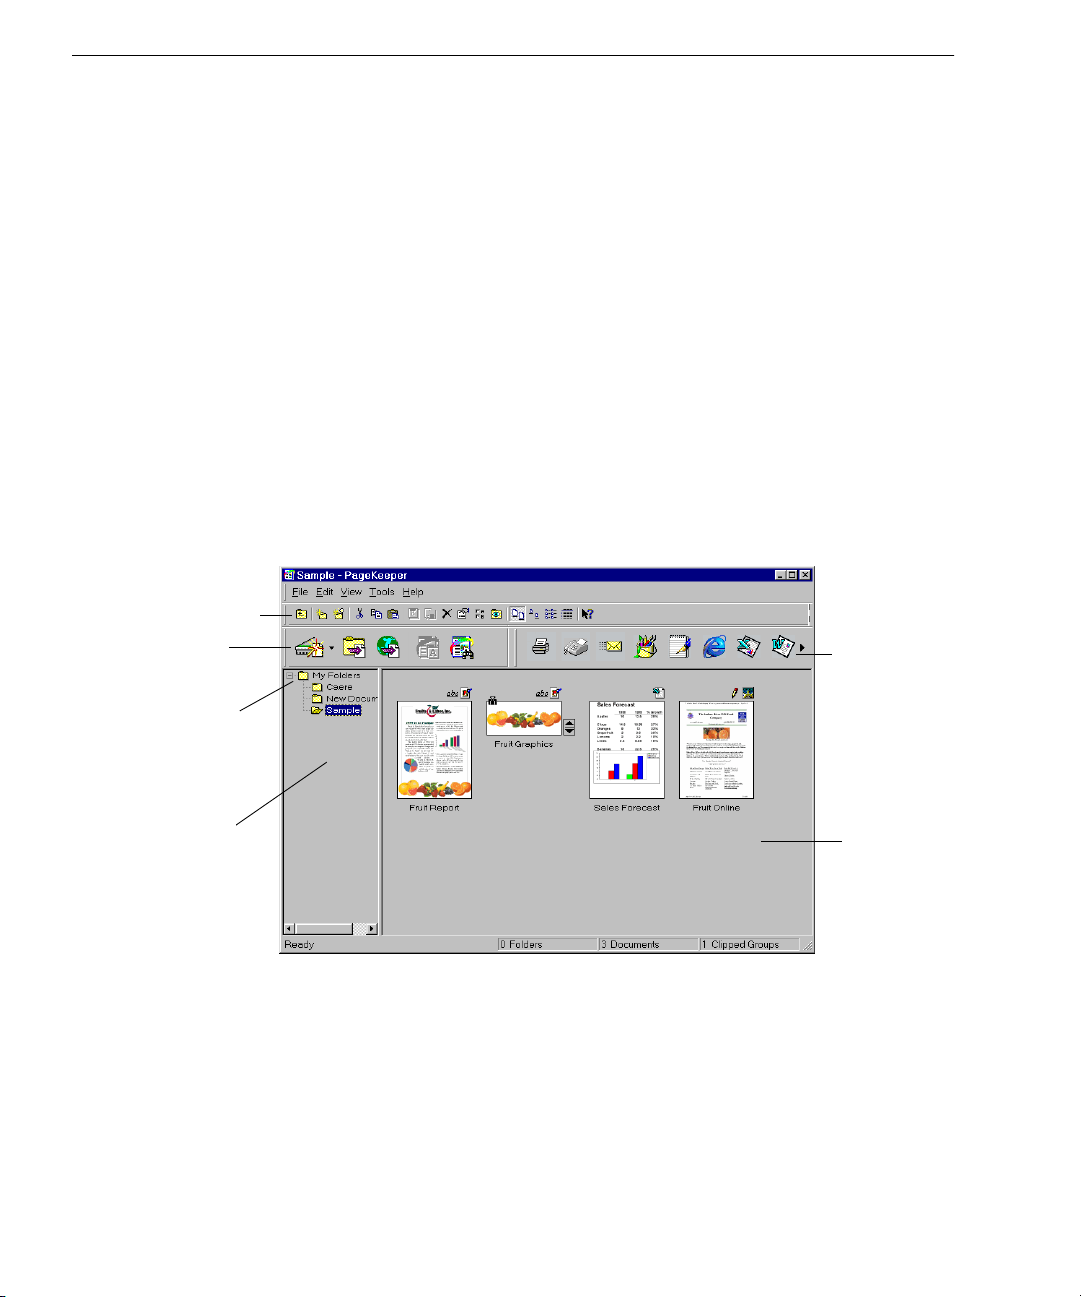
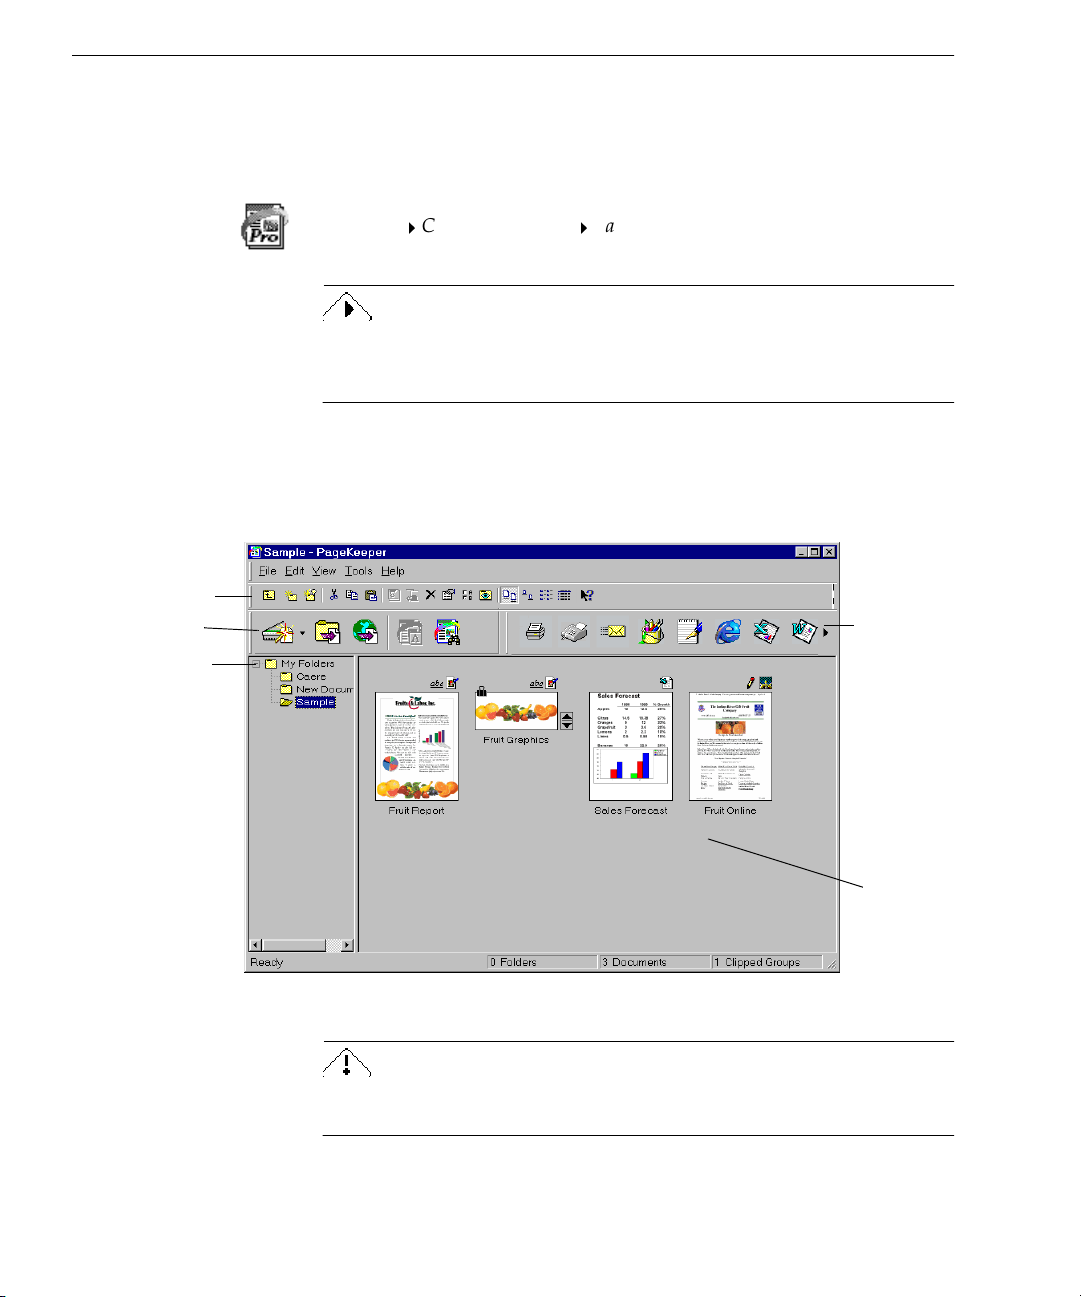
Starting PageKeeper
Standard toolbar
Action toolbar
The left side of the
desktop displays
PageKeeper’s
entire folder
structure.
To start PageKeeper, click
Programs
Caere ApplicationsPageKeeper Pro
in the Windows taskbar and choose
Start
. Or, double-click the
PageKeeper Pro icon on your Windows desktop.
PageKeeper takes some extra time to launch the very first time it starts
because it customizes the Application toolbar with the applications that
it finds installed on your system.
PageKeeper’s desktop displays all of the folders and documents it
contains. The top-level folder is named
My Folders.
Application
toolbar
The right
side of the
desktop
displays the
contents of
the currently
open folder.
The
folder contains sample documents. You can work with these
Sample
documents in Chapter 3, Getting Started Exercises, to familiarize
yourself with PageKeeper.
Installation and Setup 9
Page 16
Registering PageKeeper
Registering PageKeeper
Register your copy of PageKeeper with Caere Corporation to receive
access to product support, notification of special offers, and the best
prices on product upgrades.
Some versions of PageKeeper will only launch 25 times if you do not
register.
You may not need to register some versions of PageKeeper. Your
version of PageKeeper will not display a
need to register it.
To register PageKeeper:
Register
menu if you do not
1 Click the
2 Click
3 Fill out the information requested on the screen and then click
Next
4 Follow the instructions on the screen.
PageKeeper decides on the best method of registration
according to your country and computer system. It may try
using your modem, linking to a remote FTP (file transfer)
location, or visiting a Web site to transmit your registration
information directly. In other cases, it may prompt you to call a
telephone number or print out and mail in your registration
information.
After registration is complete, you will be given a registration number.
Be sure to write that number down and keep it handy in case you need
to use it for reinstallation.
To re-register PageKeeper after reinstallation:
1 Click the
2 Click
Register
Register Now
.
Register
Re-register
menu to open the Register dialog box.
.
menu to open the Register dialog box.
.
3 Type in your registration number and click OK.
10 Chapter 1
Page 17

Chapter 2
Introduction to
PageKeeper
PageKeeper helps you easily organize, find, and use documents on your
computer. You can get paper documents off your desk by scanning them
into PageKeeper. You can also keep track of other computer documents,
such as word-processing files, spreadsheet files, and Web pages, by
adding them to PageKeeper’s folder system.
Once you have added documents to PageKeeper, you can organize them
into folders, arrange related documents into groups, preview and copy
the contents of documents, make annotations on documents, open
documents in their own and other applications, and find documents
whenever you need them.
Please continue reading for information on these topics:
• PageKeeper Features
• PageKeeper User Interface
• Selecting PageKeeper Settings
11
Page 18

PageKeeper Features
PageKeeper Features
PageKeeper is designed to help you easily organize, find, and use all the
documents on your computer. This section provides an overview of
PageKeeper’s major features.
Scanning and Managing Paper Documents
Scan paper documents directly into PageKeeper and organize their
electronic images in PageKeeper’s folder system. PageKeeper uses OCR
technology to recognize text in scanned documents and other image
documents so you can easily find documents by searching for words in
their content. See “Scanning Documents into PageKeeper” on page 41
for more information.
Managing Word-Processing Files and Other Documents
Add word-processing files, spreadsheet files, and any other computer
documents to PageKeeper’s folder system. PageKeeper uses advanced
indexing technology to keep track of each document’s content so you
can easily find documents by searching for words and other criteria. See
“Adding Existing Documents to PageKeeper” on page 44 for more
information.
Watching Folders for New Documents to Manage
Use the Folder Watch
hard drive and network drives that you want PageKeeper to watch. As
PageKeeper detects documents, it automatically adds them to its default
folder. See “Adding Documents Automatically with Folder Watch” on
page 45 for more information.
™
feature to specify folders on your computer’s
Capturing Web Pages
Add Web pages to PageKeeper’s folder system and maintain a live link
to their Web addresses. See “Adding Web Page Links to PageKeeper” on
page 47 for more information.
Displaying Thumbnail Representations of Documents
PageKeeper provides thumbnail views of documents so you can easily
identify them as you look through PageKeeper’s folder system.
Organizing Documents into Folders and Clipped Groups
Create your own system of folders in which to arrange your documents.
You can also “clip” documents together to associate them in groups. See
“Organizing Documents” on page 49 for more information.
12 Chapter 2
Page 19

PageKeeper Features
Automatically Organizing Documents with Smart Folders
Set up Smart Folders to have PageKeeper file your documents
automatically according to specified criteria. This allows you to avoid
spending time filing documents manually. See “Automatically
Organizing Documents” on page 56 for more information.
Finding Documents with Advanced Searching Technology
Quickly retrieve your documents based on the information you are
seeking. You can use Boolean (
must, should, must not
) logic to search over
multiple criteria including words and phrases, keywords, dates,
document names, document types, and other document properties. See
“Starting a Search” on page 70 for more information.
Ranking Search Results and Highlighting Search Words
After a search, view returned documents in a prioritized ranking
according to how relevant they are to your search criteria. See “Sorting
Search Results by Relevancy” on page 73 for more information.
You can easily locate search words that were found in a document by
opening it in PageKeeper View. The first occurrence of a search word is
highlighted. Use the
Go to Next Search Word
or
Go to Previous Search Word
commands in the Edit menu to navigate through the rest of the search
words. See “Search Tips” on page 72 for more search tips.
Previewing Documents
Open documents in PageKeeper View to preview their content and add
annotations to them. See “Viewing Documents” on page 60 for more
information.
Marking Up Documents with 3M Post-it
®
Notes and Other
Annotations
Use 3M Post-it
®
Notes to add searchable text annotations to documents.
Use different colors to highlight areas of documents that you want to set
off. Draw lines and free-hand scribbles to mark up documents.
PageKeeper annotations do not affect the actual physical documents.
They are only visible in PageKeeper View. See “Annotating
Documents” on page 62 for more information.
Getting Editable Text from Images
Get editable and searchable text out of your scanned documents and
other image files with award winning OCR technology (optical
character recognition). You will be able to find images based on their
textual content and open images in text-based applications. See
“Performing Background OCR on Images” on page 96 for more
information.
Introduction to PageKeeper 13
Page 20
PageKeeper User Interface
Opening Documents Directly from PageKeeper
Open documents for editing in their own applications, open documents
in other applications by converting them to different file types, and open
live Web pages. See “Opening Documents” on page 65 for more
information.
PageKeeper User Interface
These are the main parts of the PageKeeper user interface:
• PageKeeper Desktop
• PageKeeper View
• PageKeeper Find
• PK Scan Button
PageKeeper Desktop
The PageKeeper desktop displays all of the folders and documents it
contains. The top-level folder is named
Standard toolbar
Action toolbar
My Folders
the top-level
folder; it cannot
be deleted.
is
My Folders.
Application
toolbar
The left side of
the desktop
displays
PageKeeper’s
entire folder
structure.
The right
side of the
desktop
displays the
contents of
the currently
open folder.
Please see “Organizing Documents” on page 49 for more information on
organizing documents and folders on the PageKeeper desktop.
14 Chapter 2
Page 21
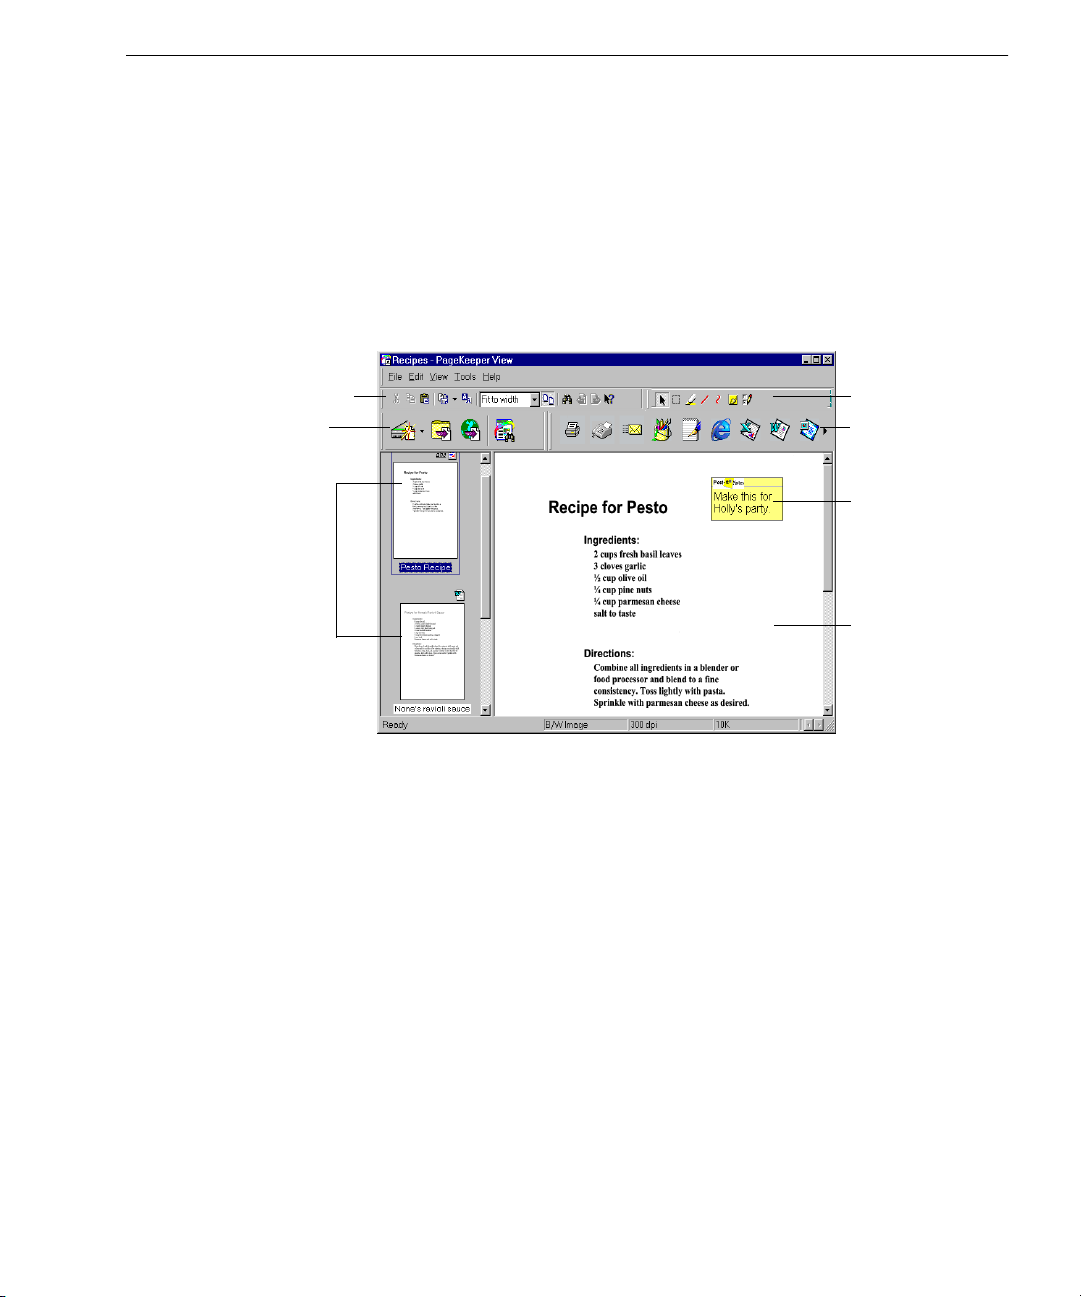
PageKeeper View
PageKeeper View allows you to view the contents of documents without
having to open their own applications.
In PageKeeper View, you can annotate documents with Post-it
add color highlights, and draw lines and scribbles to mark up your
documents. All of these annotations are stored in PageKeeper View;
they do not affect your actual documents.
You can also copy the content of documents to the Clipboard and open
documents in other applications from PageKeeper View.
PageKeeper User Interface
®
Notes,
Standard toolbar
Action toolbar
Thumbnails represent
each document in a
clipped group. Click
the thumbnail of the
document you want
to display.
Annotation toolbar
Application toolbar
You can add
Post-it® Notes to
annotate your
document.
This area
displays the
content of the
current
document.
Please see “Viewing Documents” on page 60 for more information.
Introduction to PageKeeper 15
Page 22
PageKeeper User Interface
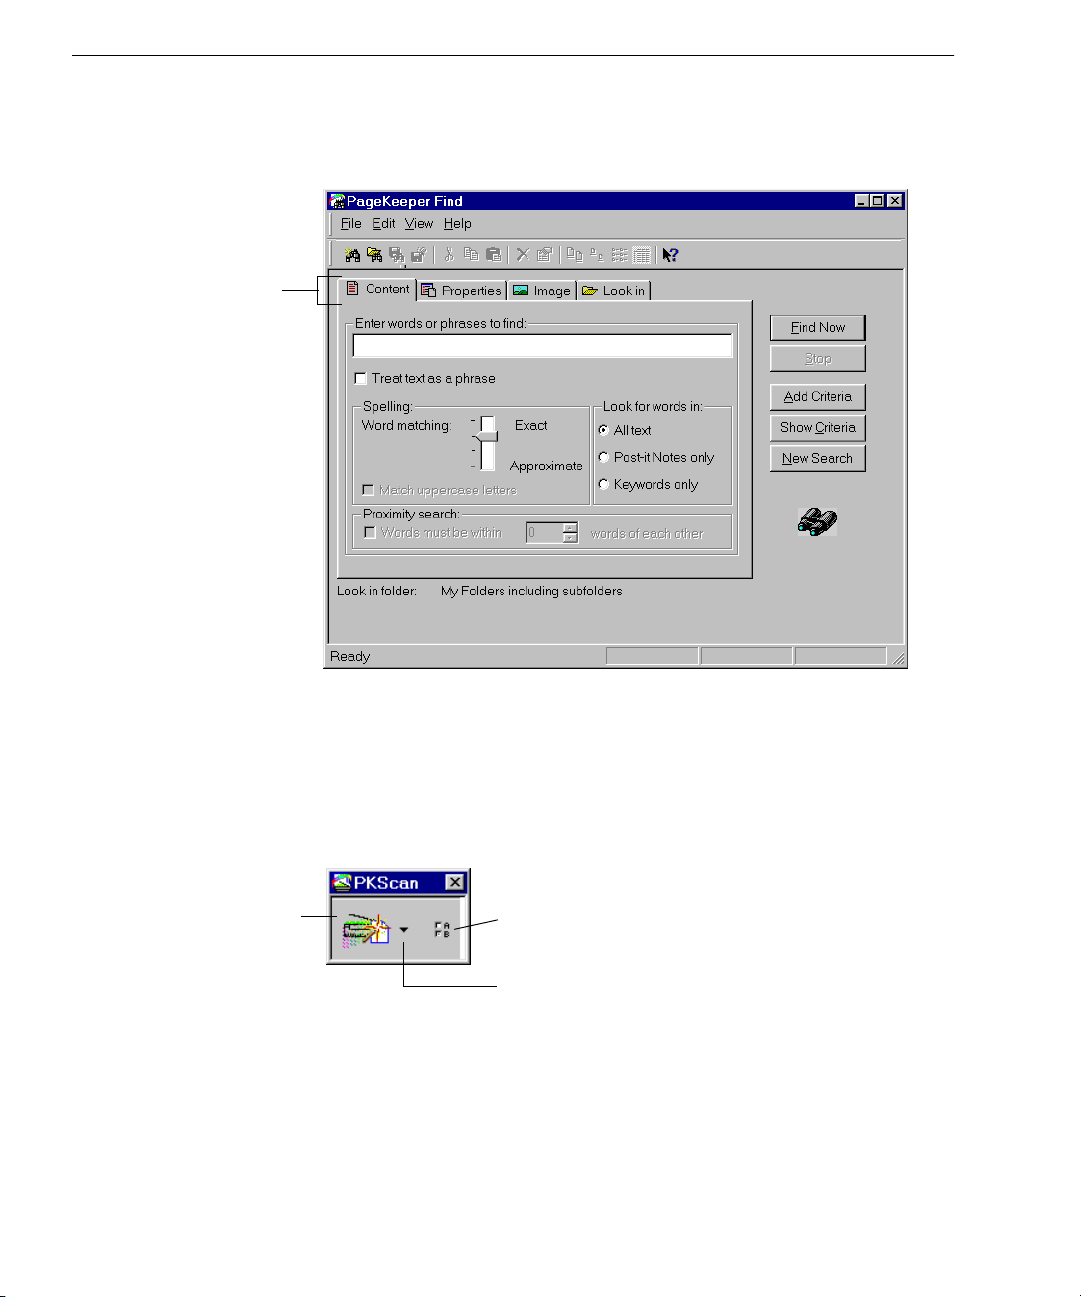
PageKeeper Find
Click each tab to view
and select different
search options.
PageKeeper Find allows you to search for documents based on the
criteria that you specify.
Please see “Finding Documents” on page 69 for more information.
PK Scan Button
The PK Scan button is one way that you can scan paper documents into
PageKeeper. When you open the PK Scan button, it sits on the Windows
desktop.
Click here to
start scanning.
Please see page 42 for more information on scanning with the PK Scan
button.
16 Chapter 2
Click here to select options
before scanning.
Click here to select an option for
scanning in the drop-down list.
Page 23
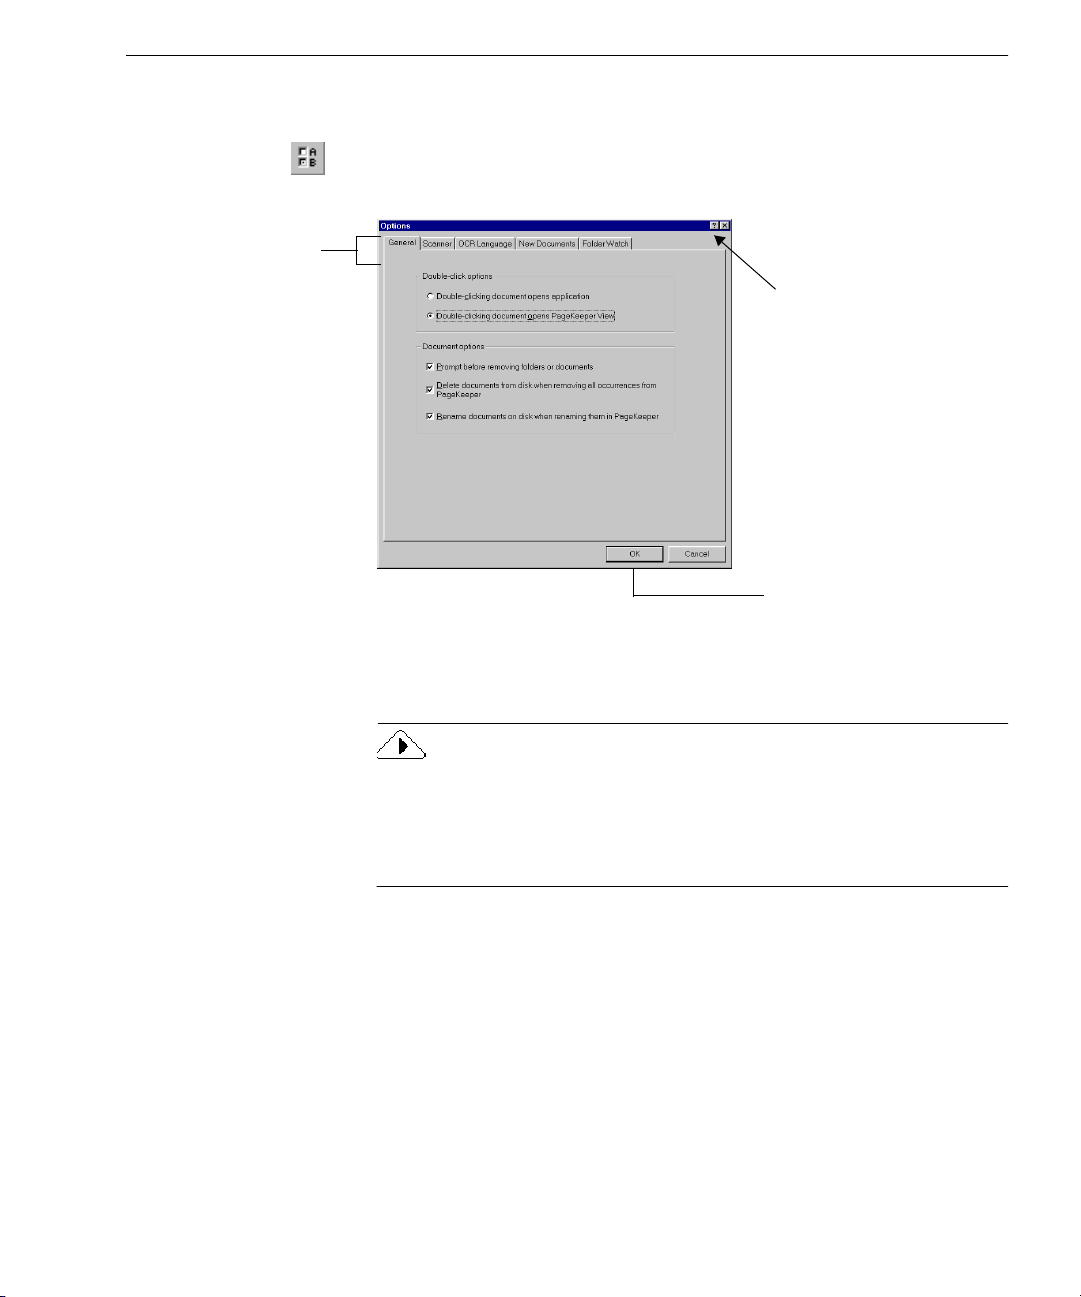
Selecting PageKeeper Settings
You can select settings for PageKeeper in the Options dialog box. To
open this dialog box, click the Options button in the Standard toolbar or
choose
Options...
in the Tools menu.
Selecting PageKeeper Settings
Click each tab to
view and select
different settings.
To get information
about a particular
setting, click this button
and then click the
setting. An explanation
will pop up.
After selecting the desired
OK
settings, click
Options dialog box.
to close the
For more detailed information on settings, please look in PageKeeper’s
online Help.
Certain setting selections affect the ability to select other settings. For
example, if you select *.PCX as the file format for saving images in the
New Documents
tab, you will not be able to select the setting for saving
multiple pages as one file. This is because the *.PCX format does not
support multiple pages. Settings that are unavailable are grayed out.
Introduction to PageKeeper 17
Page 24
Selecting PageKeeper Settings
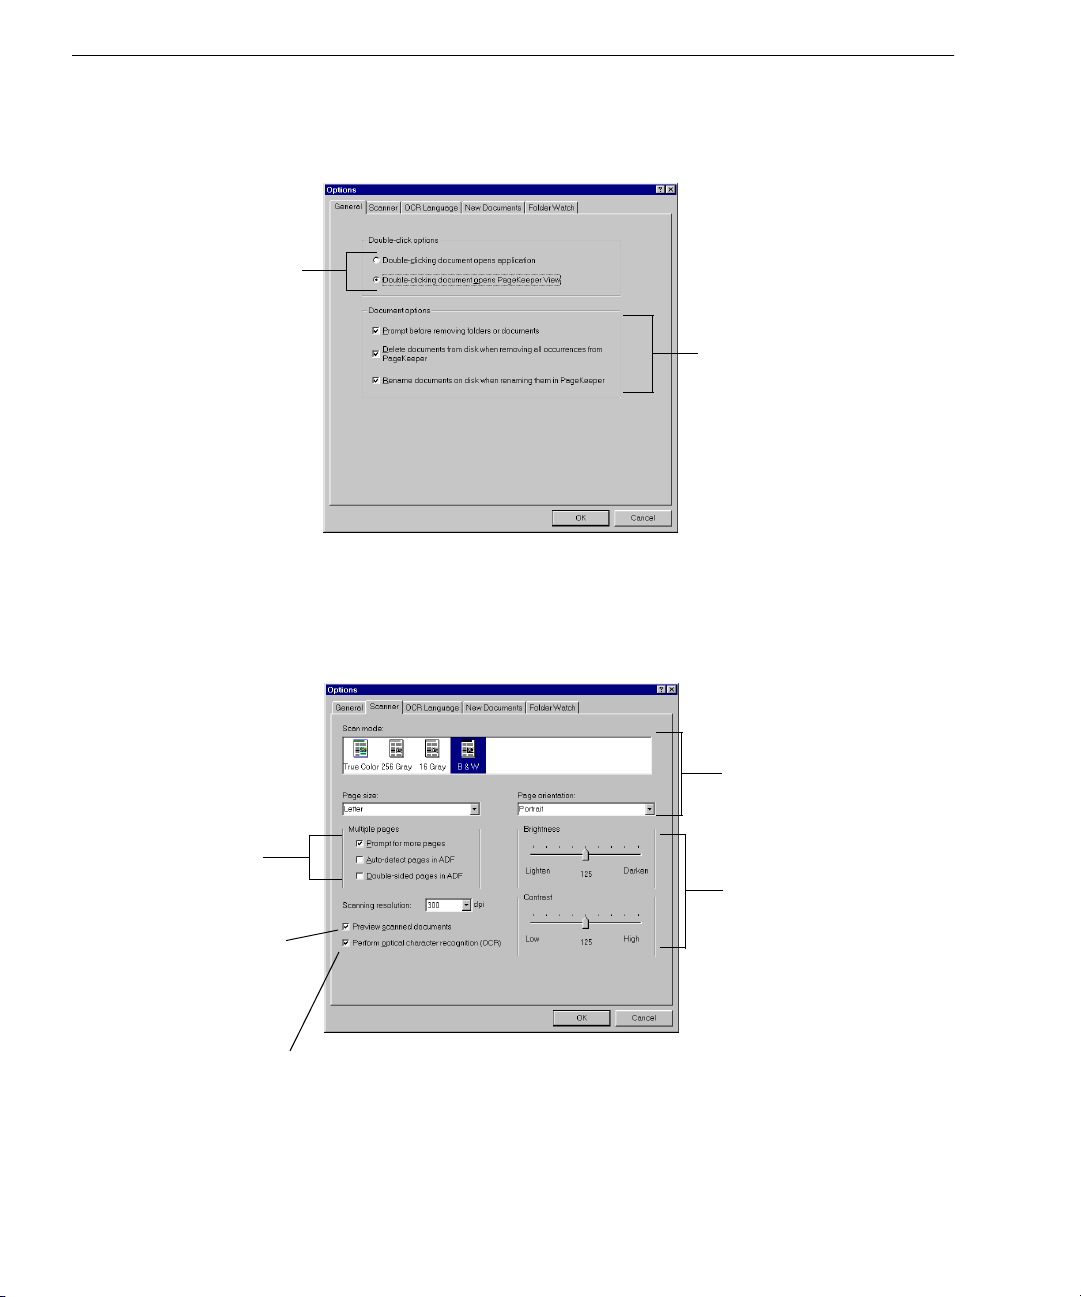
General Settings
Select how you want
documents to be
opened when you
double-click them.
Scanner Settings
Click the
General
tab in the Options dialog box to select preferences for
working in PageKeeper.
Click the
Scanner
tab in the Options dialog box to select settings for
scanning documents into PageKeeper.
Select options for removing
and renaming documents.
Select options for the pages
you are going to scan.
Select options for
scanning multiple
pages and using
an ADF.
Select this if you want
to preview scanned
documents before
adding them to
PageKeeper.
Select this if you want to perform
OCR on scanned documents.
Select brightness and
contrast settings for the
pages you are going to
Brightness
scan.
the intensity of a color or
Contrast
tone.
the relationship between the
light and dark areas of the
image.
determines
determines
Please see page 41 for more information on scanning in PageKeeper.
18 Chapter 2
Page 25
OCR Language Settings
Select the main language
in the document you are
scanning or adding. This
setting is used for OCR.
Select any additional
languages that are in the
document you are
scanning or adding.
For best results, select
only the languages that
are in the document you
are scanning or adding.
Selecting PageKeeper Settings
Click the
OCR Language
tab in the Options dialog box to select language
settings for OCR (optical character recognition). OCR is the technology
that allows text information to be extracted from images.
New Document Settings
Select whether you
want Smart Folders to
move or copy
documents from the
default folder.
Select options for
saving image files when
you scan or paste them
into PageKeeper.
Please see page 96 for more information on OCR.
Click the
New Documents
tab in the Options dialog box to select settings
for adding new documents to PageKeeper.
Specify the default
PageKeeper folder.
Documents are added to
the default folder when no
other folder is directly
specified.
Introduction to PageKeeper 19
Page 26
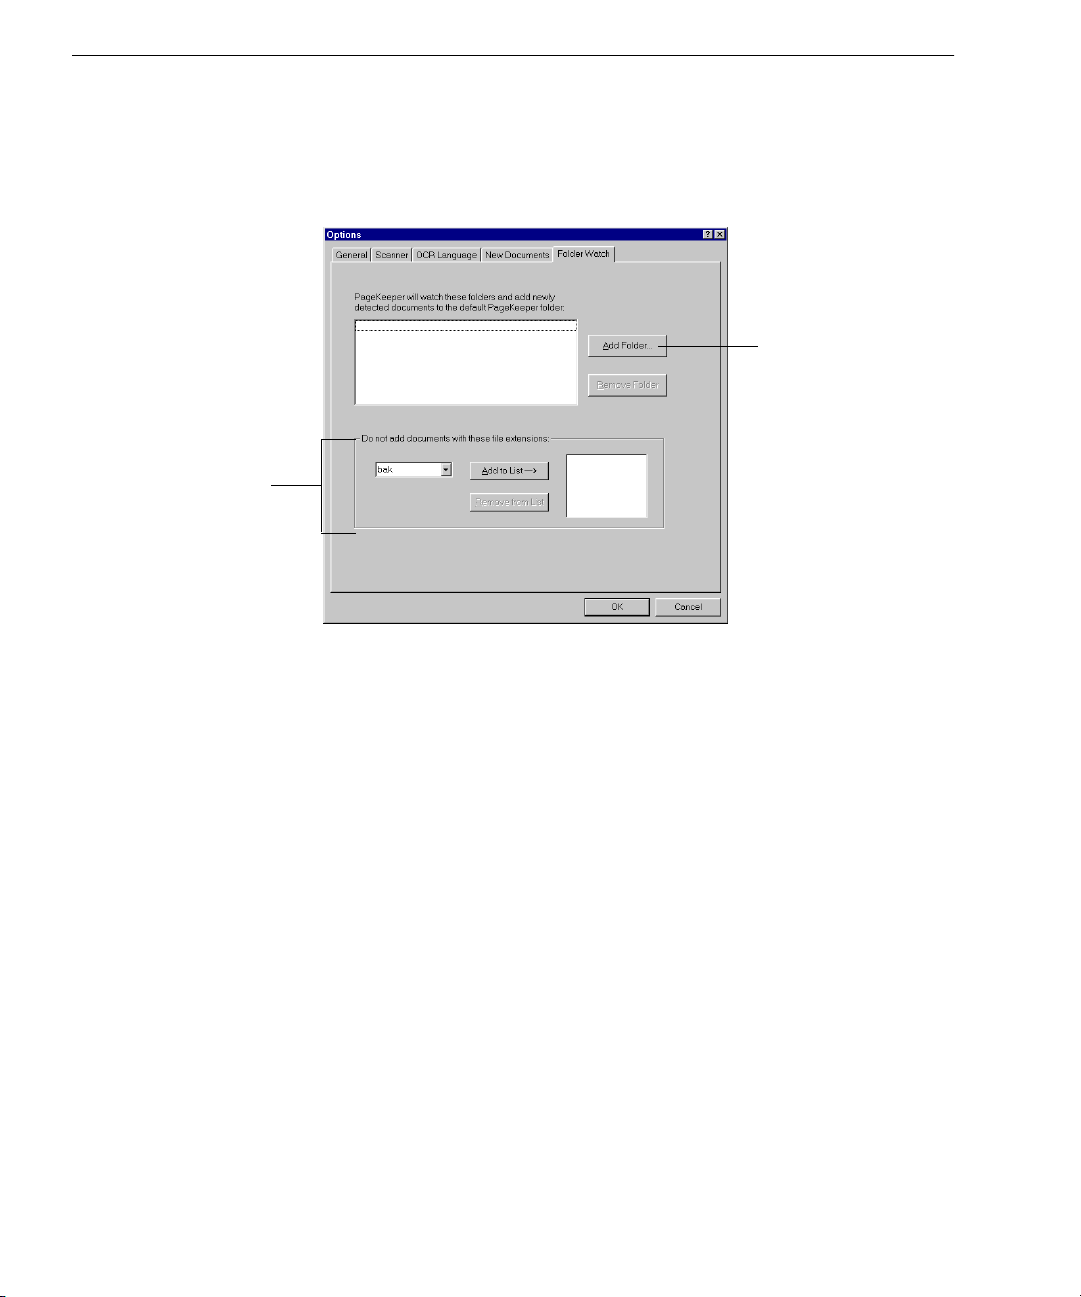
Selecting PageKeeper Settings
Folder Watch Settings
You can specify
document types that
you do not want
PageKeeper to add.
Click the
Folder Watch
tab in the Options dialog box to specify folders on
your hard drive and network drives that you want PageKeeper to watch
for incoming documents. Detected documents will be automatically
added to PageKeeper’s default folder.
Click this to select the
folders you want
PageKeeper to watch.
Please see page 45 for more information on adding documents
automatically with Folder Watch.
20 Chapter 2
Page 27

Chapter 3
Getting Started Exercises
This chapter includes the following exercises to help familiarize you
with PageKeeper:
•Getting Started
• Exercise 1: Add a Document to PageKeeper
• Exercise 2: Work with Folders
• Exercise 3: Work in PageKeeper View
• Exercise 4: Work with a Clipped Group
• Exercise 5: Find a Document
21
Page 28
Getting Started
Getting Started
All of the exercises in this chapter are started from the PageKeeper
desktop, which appears when you start PageKeeper.
Standard toolbar
Action toolbar
My Folders
top-level folder.
is the
To start PageKeeper, click
Programs
Caere ApplicationsPageKeeper Pro
in the Windows taskbar and choose
Start
. Or, double-click the
PageKeeper Pro icon on the Windows desktop.
PageKeeper takes some extra time to launch the very first time it starts
because it customizes the Application toolbar with the applications that
it finds installed on your system.
PageKeeper’s top-level folder is named
another folder named
default, the
folder is open the first time you start PageKeeper.
Sample
Sample,
which contains sample documents. By
My Folders.
This contains
Application
toolbar
The
sample
documents
are in the
Sample
folder.
Some exercises in this chapter rely on tasks accomplished in previous
exercises. Therefore, you should complete all exercises in order.
22 Chapter 3
Page 29
Exercise 1: Add a Document to PageKeeper
Exercise 1: Add a Document to PageKeeper
PageKeeper keeps track of any document that you add to its folder
system. Follow these instructions to add a document to PageKeeper.
1 Click the
desktop to open it.
You can add documents to any PageKeeper folder. In this
exercise, you are adding a document to the
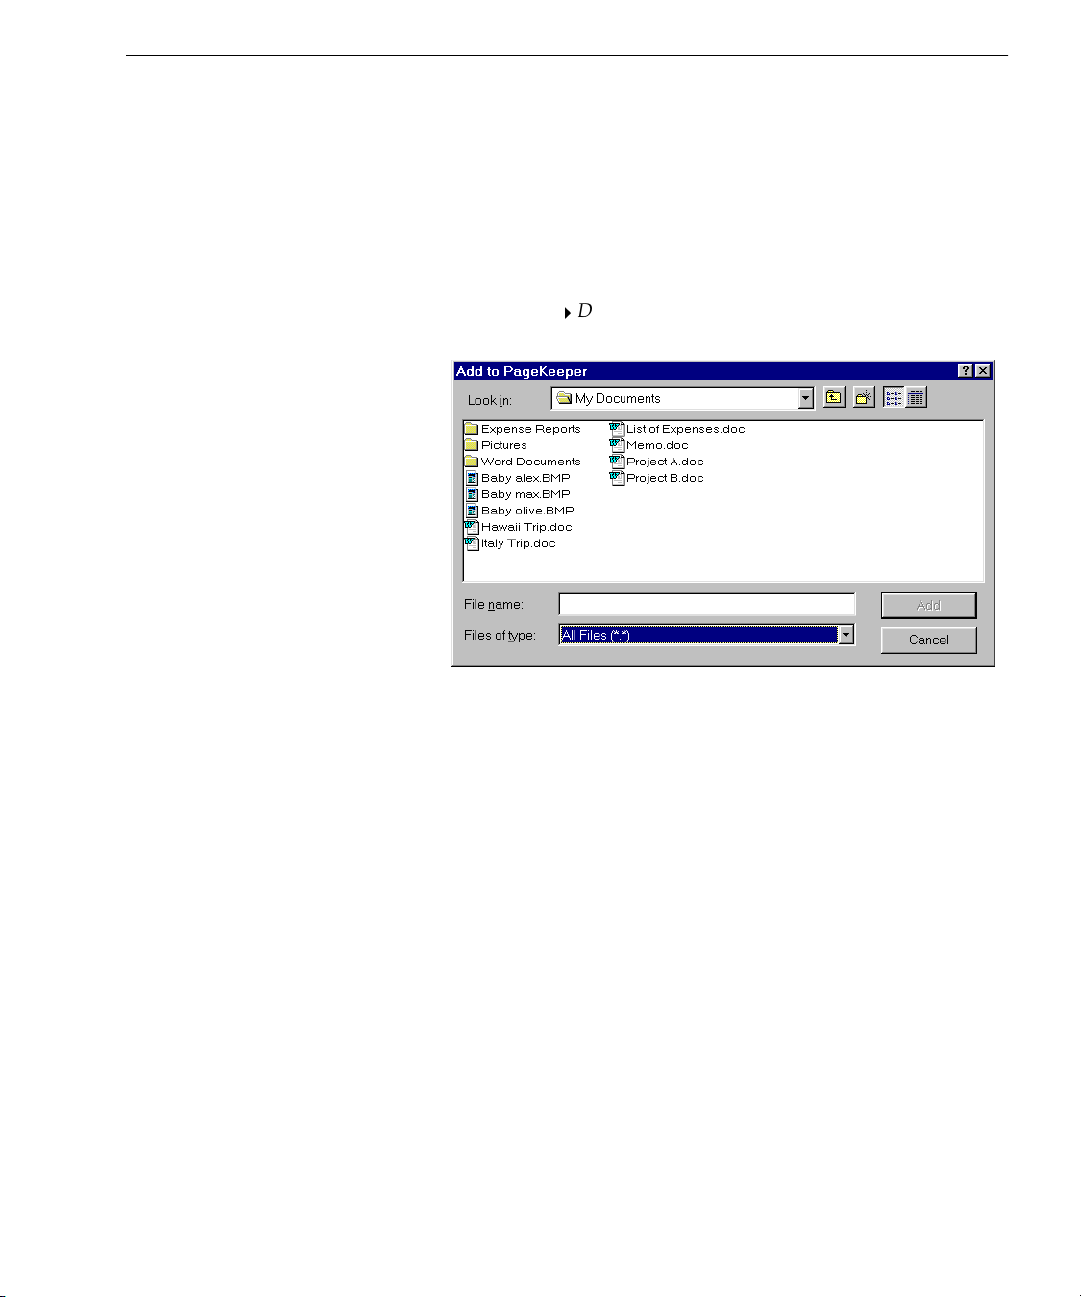
2 Choose
The Add to PageKeeper dialog box appears.
3 Locate PageKeeper’s installation folder.
The default location of PageKeeper’s installation folder is:
c:\program files\caere\PageKeeperPro30
4Open the document folder within PageKeeper’s installation
folder, and then open the sample folder.
Sample
New
folder on the left area of the PageKeeper
Sample
Document from Disk...
in the File menu.
folder.
5 Select the
A thumbnail representing the document is added to
PageKeeper’s
6 Select the
Getting Started Exercises 23
Sales Memo.rtf
Sample
Sales Memo
document and click
folder.
document on the PageKeeper desktop.
Add
.
Page 30

Exercise 1: Add a Document to PageKeeper
7 Click the PageKeeper View button in the Action toolbar.
The document is displayed in PageKeeper View.
8 Choose
You can set up a
in the File menu to close PageKeeper View.
Exit
Folder Watch
in PageKeeper so that it monitors selected
folders on your computer’s hard drive and network drives. Folder
Watch will automatically add newly detected documents to
PageKeeper’s default folder. For more information on adding
documents to PageKeeper, see page 40.
24 Chapter 3
Page 31

Exercise 2: Work with Folders
You can create folders to organize documents on the PageKeeper
desktop. You can also set up special
automatically. This section contains three exercises that will familiarize
you with folders in PageKeeper.
2a: Create a Folder
Follow these instructions to create a folder.
Exercise 2: Work with Folders
Smart Folders
that file documents
1 Click the
desktop to open it.
You can create new folders anywhere in PageKeeper. In this
exercise, you are creating a new folder directly under
Folders
2 Choose
A folder icon appears with its default name highlighted.
3Type
Enter key.
The PageKeeper desktop now displays the
My Folders
.
New
Fresh Fruit
folder on the left area of the PageKeeper
in the File menu.
Folder
to replace the folder name and then press the
Fresh Fruit
My
folder.
Getting Started Exercises 25
Page 32

Exercise 2: Work with Folders
2b: Move Documents into a Folder
Follow these instructions to move the sample documents into the
folder you created in exercise 2a.
Fruit
1 Click the
desktop to open it.
The contents of the
of the desktop.
Sample
folder on the left area of the PageKeeper
Sample
folder are displayed in the right area
Fresh
2 Select the document named
3 Hold down the Ctrl key and click the following so they are all
selected:
Fruit Graphics
Sales Forecast
Sales Memo
Fruit Online
4 Choose
The selected items are placed on the Clipboard.
5 Click the
desktop to open it.
26 Chapter 3
clipped group
document
document
document
in the Edit menu.
Cut
Fresh Fruit
folder on the left area of the PageKeeper
Fruit Report
by clicking it once.
Page 33

Exercise 2: Work with Folders
6 Choose
The selected documents are placed in the
in the Edit menu.
Paste
Fresh Fruit
folder.
For more information on organizing documents in PageKeeper, see
page 49.
Getting Started Exercises 27
Page 34

Exercise 2: Work with Folders
2c: Create a Smart Folder
Smart Folders
automatically file documents based on criteria that you
specify. Follow these instructions to create a
documents based on their content.
1 Click the
My Folders
folder on the left area of the PageKeeper
desktop to open it.
2 Choose
New
Smart Folder
in the File menu.
The New Smart Folder dialog box appears.
3Type
orange
in the first text box of the
This specifies that you want this Smart Folder to file all
documents that contain
in their content.
orange
Smart Folder
Content
tab.
that will file
Type
orange
in
this text box
28 Chapter 3
Page 35

Exercise 2: Work with Folders
4 Click
Save Smart Folder
.
A Smart Folder icon appears with its default name highlighted.
5Type
Oranges
to replace the folder name and then press the
Enter key.
6 Double-click the
Oranges
The Smart Folder should contain the
Sales Forecast
, and
Sales Memo
PageKeeper Manual
because it refers to
Any other documents that have
folder to open it.
Fruit Report, Fruit Online
documents. (The online
will also be filed in this Smart Folder
in this tutorial.)
orange
in their content will
orange
automatically be filed in this Smart Folder when they are
added to PageKeeper.
For more information on creating Smart Folders, see page 56.
,
Getting Started Exercises 29
Page 36

Exercise 3: Work in PageKeeper View
Exercise 3: Work in PageKeeper View
PageKeeper View allows you to preview documents, add annotations to
them, and copy their content. This section contains three exercises that
will familiarize you with PageKeeper View.
3a: Open a Document in PageKeeper View
Follow these instructions to open a document in PageKeeper View.
thumbnail
view
1Open the
Fresh Fruit
2 Select the document named
3 Choose
Open in PageKeeper View
folder.
Fruit Online
in the File menu.
The document opens in PageKeeper View.
4 Double-click the yellow Post-it
®
Note to open it.
.
Post-it® Note
content
view
®
5 Click outside the Post-it
6 Choose
The
Fruit Online
in the File menu to close PageKeeper View.
Exit
document is a Web page that was captured in
Note to close it.
PageKeeper. You can open the live Web page directly from PageKeeper
if you are connected to the World Wide Web. For more information on
opening Web pages from PageKeeper, see page 65.
30 Chapter 3
Page 37

Exercise 3: Work in PageKeeper View
3b: Add a Post-it® Note to a Document
Follow these instructions to add a Post-it® Note to a document in
PageKeeper View.
1Open the
Fresh Fruit
2 Select the document named
folder.
Fruit Report.
3 Click the PageKeeper View button in the Action toolbar.
The document opens in PageKeeper View.
Annotation
toolbar
content area
4 Click the Post-it Note button in the Annotation toolbar.
5 Click anywhere in the content area of the document to create
the Post-it
®
Note.
A yellow text box appears with the cursor ready for typing.
6 Type in this text:
7 Click outside the Post-it
A yellow text icon representing the Post-it
Oranges and vitamins
®
Note box when you are done typing.
®
Note appears in the
document.
Getting Started Exercises 31
Page 38

Exercise 3: Work in PageKeeper View
8 Double-click the text icon to open the Post-it® Note.
®
9 Click outside the Post-it
Note box to close it again.
Post-it® Note
10 Choose
in the File menu to close PageKeeper View.
Exit
32 Chapter 3
Page 39

3c: Copy Text to the Clipboard
Follow these instructions to copy text information from a document to
the Clipboard.
Exercise 3: Work in PageKeeper View
The
Fruit Report
document is a scanned image that normally would not
be editable in a text-editing application such as Microsoft Word. This
exercise illustrates how PageKeeper’s OCR technology can produce
editable text from image documents. For more information, see
“Performing Background OCR on Images” on page 96.
1Open the
Fruit Report
document in PageKeeper View.
Annotation
toolbar
content area
2 Click the Select Content button in the Annotation toolbar.
3 Hold down your mouse button and drag the mouse pointer to
select an area of text in the document.
For example, you could select the first paragraph. A box
surrounds the items you select.
4 Choose
in the Edit menu to copy text from the selected
Copy
area to the Clipboard.
5 Open a text-editing application, such as Microsoft Word, and
paste the Clipboard contents into a document.
6 Choose
in the File menu to close PageKeeper View.
Exit
For more information on working in PageKeeper View, see page 60.
Getting Started Exercises 33
Page 40

Exercise 4: Work with a Clipped Group
Exercise 4: Work with a Clipped Group
A
clipped group
associated together in PageKeeper. This section contains three exercises
that will familiarize you with clipped groups.
is a collection of individual documents that have been
4a: Clip Documents Together
1Open the
2 Select the
3 Hold down the Ctrl key and select the
and the
4 Choose
A thumbnail for the clipped group appears with its default
name highlighted.
5Type
Enter key.
Fresh Fruit
Fruit Report
Sales Forecast
Clip Documents Together
Fruits & Labor
folder you created in exercise 2a.
document.
Fruit Online
document.
in the Tools menu.
to replace the default name and press the
document
For more information on clipped groups, see page 50.
34 Chapter 3
Page 41

Exercise 4: Work with a Clipped Group
4b: Open a Clipped Group in PageKeeper View
Click the thumbnail of
the document you
want to display.
1Open the
Fresh Fruit
2 Double-click the clipped group named
folder.
Fruits & Labor
that you
created in exercise 4a.
The clipped group opens in PageKeeper View.
3 Click thumbnails on the left side of the viewer to display
different documents in the clipped group.
4 Choose
in the File menu to close PageKeeper View.
Exit
4c: Unclip Documents
1Open the
2 Select the
3 Choose
Fresh Fruit
Fruits & Labor
Unclip Documents
The documents are unclipped. Separate documents named
Fruit Report, Fruit Online,
individually in the
Getting Started Exercises 35
folder.
clipped group.
in the Tools menu.
and
Sales Forecast
Fresh Fruit
folder.
are displayed
Page 42

Exercise 5: Find a Document
Exercise 5: Find a Document
PageKeeper can find any document that has been added to it, regardless
of the document’s type. Your search can be as simple as looking for a
word in the content of documents or searching for a document name.
Or, you can perform sophisticated searches by specifying multiple
attributes to find.
Follow these instructions to find a document in PageKeeper based on a
search word.
Enter the search
text here
The starting point
for the search is
listed here. You
can change this
Look in
in the
tab.
1Open the
My Folders
folder.
PageKeeper Find defaults to the folder you currently have open as
the starting point for a search. Starting from
My Folders
means
PageKeeper will search through all folders.
2 Choose
PageKeeper Find...
in the Tools menu.
The PageKeeper Find window opens.
3 Type the following search text in the first text box:
vitamin
4 Click
Find Now
The document named
to start the search.
Fruit Report
will appear in the list of
search results.
36 Chapter 3
Page 43

Exercise 5: Find a Document
Each search word
is highlighted as it
is found.
5Select
Fruit Report
in PageKeeper View
in the list of search results, and choose
in the File menu.
The document opens in PageKeeper View. The first occurrence
of the search word is highlighted in the document.
6 Choose
Go to Next Search Word
in the Edit menu to locate the
next occurrence of the search word in the document.
7 Choose
in the File menu to close PageKeeper View.
Exit
Open
8 Choose
in the File menu to close PageKeeper Find.
Exit
For more information on finding documents, including search tips, see
page 69.
Getting Started Exercises 37
Page 44

Exercise 5: Find a Document
38 Chapter 3
Page 45

Chapter 4
Organizing and Working
with Documents
This chapter describes how to organize and work with documents in
PageKeeper.
Please continue reading for information on these topics:
• Adding Documents to PageKeeper
• Organizing Documents
• Automatically Organizing Documents
• Viewing Documents
• Annotating Documents
• Opening Documents
• Printing, Faxing, and Mailing Documents
To familiarize yourself with PageKeeper, go through the Getting Started
exercises in Chapter 3. For the most complete information on working in
PageKeeper, please use its online Help. See “Getting Online Help” on
page 3 for more information.
39
Page 46

Adding Documents to PageKeeper
Adding Documents to PageKeeper
PageKeeper is designed to help you organize, retrieve, and use any
document on your computer. To do this, PageKeeper adds documents
to its own folder system. You can scan paper documents into
PageKeeper’s folder system and add existing computer documents such
as word-processing files, spreadsheet files, and Web pages.
When documents are added to PageKeeper, it indexes them and creates
thumbnail representations of them. The thumbnails are linked to the
location where the documents reside on your computer, similar to
Windows shortcuts.
During the process of scanning or adding a document to PageKeeper, a
temporary thumbnail is displayed on the PageKeeper desktop.
When the job is complete, the temporary thumbnail is replaced by a
thumbnail representing the first page of the document.
For more information on thumbnails, see “Document Thumbnails” on
page 101.
The rest of this section describes how to add documents to PageKeeper,
including:
• Scanning Documents into PageKeeper
• Scanning Documents Automatically with an ADF
• Adding Existing Documents to PageKeeper
• Adding Documents Automatically with Folder Watch
• Adding Web Page Links to PageKeeper
40 Chapter 4
Page 47

Scanning Documents into PageKeeper
You can scan paper documents directly into a folder on the PageKeeper
desktop. Or, you can use the PK Scan button to scan documents into
PageKeeper’s default folder.
When you scan a document into PageKeeper, the document is saved as
an image file to a default location on your computer. A thumbnail link
is added to PageKeeper’s folder system.
Adding Documents to PageKeeper
The defaults for saving images are specified in the
PageKeeper’s Options dialog box. See page 19 for more information.
To scan from the PageKeeper desktop:
The picture on the Scan
button changes depending
on the current setting.
Select this to use the Scan
Wizard to select options
before scanning.
Select this to scan with the
options currently selected in
the Options dialog box.
New Documents
1 Open the PageKeeper folder where you want to add the
scanned document.
2 Place the document you want to scan in your scanner.
3 Locate the Scan button in the Action toolbar and select an
option in its drop-down list.
Select the type of document
you plan to scan. PageKeeper
will use preset scanning
options that are appropriate
for that document.
tab of
You can use the
New
Document from Scanner
command in the File
menu to scan with the options that are currently selected in the
Options dialog box. (This is the same as using the
Custom
option in
the Scan button.)
Organizing and Working with Documents 41
Page 48

Adding Documents to PageKeeper
Enter a disk location
and file name for saving
the image file if you do
not want to use the
default settings.
4 Click the Scan button to begin scanning.
By default, you will see a preview of your scanned image
before it is added to PageKeeper.
Click this to save
any modifications
and add the image.
Click this to cancel
any modifications
and add the image.
Type in some keywords
that describe the image,
if desired.
The preview of the
image appears here.
Click this to rotate
the image 90
degrees clockwise.
Click this to
reverse the light
and dark elements
of the image.
5 Make any desired adjustments in the Preview dialog box and
click
Save Modifications
Or, click
Cancel Modifications
.
if you want to undo your
modifications and continue with the page as it originally was.
By default, you will be asked if you want to scan more pages.
6 Click
to continue scanning additional pages. (Be sure to put
Ye s
the next page in the scanner first.)
Or, click No to end the scanning session and add the scanned
document to PageKeeper.
The scanned document is added to the currently open folder.
To scan with the PK Scan button:
1 Choose
Scan
Start
Programs Caere Applications PageKeeper
in the Windows taskbar to open the PK Scan button.
Click here to
start scanning.
Click here to select custom
options before scanning.
Click here to select an option for
scanning in the drop-down list.
2 Place the document you want to scan in your scanner.
3 Select an option in the PK Scan button drop-down list.
42 Chapter 4
Page 49

Adding Documents to PageKeeper
4 Click the Options button if you want to open the Options
dialog box and select settings.
If you selected
Custom
in step 3, use the Options dialog box to
customize scanner settings for your document.
5 Click the Scan button to start scanning.
By default, you will see a preview of your scanned image
before it is added to PageKeeper.
6 Make any desired adjustments in the Preview dialog box and
click
Save Modifications
Or, click
Cancel Modifications
.
if you want to undo your
modifications and continue with the page as it originally was.
By default, you will be asked if you want to scan more pages.
7 Click
to continue scanning additional pages (be sure to put
Ye s
the next page in the scanner first).
Or, click No to end the scanning session and add the scanned
document to PageKeeper.
The scanned document is added to PageKeeper’s default
folder.
Scanning Documents Automatically with an ADF
If your scanner has an automatic document feeder (ADF), you can set up
PageKeeper to automatically scan and add pages that you put in the
ADF.
To set up automatic scanning:
1 Choose
2 Click the
3Select
Options...
Scanner
Auto-detect pages in ADF
4 Click OK.
To start automatic scanning:
1 Choose
Scan
Start
in the Windows taskbar to open the PK Scan button.
in the Tools menu.
tab in the Options dialog box.
.
Programs Caere Applications PageKeeper
The PK Scan button must be open to use the automatic
scanning feature. However, the PageKeeper desktop does
not
need to be open.
Organizing and Working with Documents 43
Page 50

Adding Documents to PageKeeper
2 Place one or more pages in your scanner’s ADF.
PageKeeper starts scanning as soon as the pages are detected.
The scanned document is added to PageKeeper’s default
folder.
Adding Existing Documents to PageKeeper
You can add existing computer documents, such as word-processing
and spreadsheet files, to PageKeeper’s folder system. When you add
documents to PageKeeper, you are not adding actual physical files. You
are creating links to wherever the files exist on your computer.
PageKeeper keeps track of these links even when you edit documents
and move them around.
To add an existing document to PageKeeper:
Select the folder from which you
want to add documents.
When the
Auto-detect pages in ADF
option is selected and the PK
Scan button is open, PageKeeper takes control over your scanner. To
use your scanner with other applications, deselect
in ADF
or close the PK Scan button.
Auto-detect pages
1 Open the PageKeeper folder where you want to add the
document.
2 Choose
New
Document from Disk
in the File menu.
Or, click the New Document from Disk button in the Action
toolbar.
The Add to PageKeeper dialog box appears.
Select the file type you want to add.
3 Select the folder location where your files exist and the type of
files you want to add.
44 Chapter 4
Page 51

Adding Documents to PageKeeper
4 Select the document files you want to add.
Ctrl-click to select more than one document in a folder.
5 Click
Add
.
Thumbnails representing the selected documents are added to
the currently open folder.
Shortcuts for Adding Documents:
• Drag a document from the Windows desktop or Windows
Explorer directly into a PageKeeper folder.
• Click your right mouse button over a document on the Windows
desktop or Explorer and choose
Send To
PageKeeper
in the
shortcut menu to send the document to PageKeeper’s default
folder.
• Drag a document onto the PageKeeper application icon to send
the document to PageKeeper’s default folder.
• Drag a selected area of an image from any graphic application
that supports OLE drag and drop onto a PageKeeper folder. The
dragged image will be saved as a file using the options specified
in the
New Document
section of the Options dialog box. A link to
the new image file will be added to the PageKeeper folder.
Adding Documents Automatically with Folder Watch
PageKeeper’s
Folder Watch
your various computer drives that you want PageKeeper to watch for
incoming documents. Any documents that are detected will be
automatically added to PageKeeper’s default folder.
™
feature allows you to specify folders on
You can set up an automatic filing system using PageKeeper’s Folder
Watch and Smart Folder features. Folder Watch will automatically add
documents to PageKeeper and Smart Folders will automatically file the
documents for you. For more information on Smart Folders, see
“Automatically Organizing Documents” on page 56.
Organizing and Working with Documents 45
Page 52

Adding Documents to PageKeeper
To set up Folder Watch for adding documents:
1 Choose
Options
in the Tools menu and click the
tab.
Or, click the Folder Watch button in the Standard toolbar.
2 Click
Add Folder...
to select the folders you want PageKeeper to
watch.
Folder Watch
Click this to
browse for
and select the
folders you
want
PageKeeper
to watch.
Click the plus sign next
to a drive to display
folders you can select.
For example, you might want to select the
My Documents
folder
on your hard drive.
You can Ctrl-click to select multiple folders.
PageKeeper only watches the top-level of the selected folder.
Subfolders will not be watched unless you separately specify those
folders.
46 Chapter 4
Page 53

Adding Documents to PageKeeper
3 Click OK after you have selected the folders you want
PageKeeper to watch.
The folders that PageKeeper will watch are added to the list in
the
Folder Watch
tab.
In this example, PageKeeper is
set up to watch the
Documents
Select or type in the extension of
a document type you do not
want PageKeeper to add. Then
click
folder on the C drive.
Add to List
My
.
If you decide
you do not want
PageKeeper to
watch a folder,
select the folder
and click this.
4 Select (or type in) the file extensions of any document types
you do
want PageKeeper to add and click
not
Add to List
.
For example, if you do not want PageKeeper to add application
files or temporary files, you would add
exe
and
tmp
to the
exclusion list.
5 Click OK to close the Options dialog box.
Documents in the selected folders are added to PageKeeper’s
default folder immediately. PageKeeper will continue to watch
the selected folders and add documents as they are detected.
Adding Web Page Links to PageKeeper
If you have access to the World Wide Web, you can add Web page links
to PageKeeper. PageKeeper captures the text and graphic content of a
Web page at the point in time that you add it. You can also update a Web
page link or change its address in PageKeeper any time.
To open a live Web page directly from PageKeeper, see “Opening Web
Pages” on page 65.
Organizing and Working with Documents 47
Page 54

Adding Documents to PageKeeper
To add Web pages to PageKeeper:
1 Make sure your computer is currently connected to the Web.
2 Open the PageKeeper folder where you want to add the
document.
3 Choose
Document from Web
New
in the File menu.
Or, click the New Document from Web button in the Action
toolbar.
The Add Document from Web dialog box appears.
4 Type in the full address of the Web page you want to add.
You can also copy and paste the address into the edit box.
5 Click
to add the page to the current folder.
Add
A thumbnail representing the Web page is added to
PageKeeper.
You can also use the shortcut icons that are available in some versions of
Microsoft Internet Explorer and Netscape Navigator to add Web pages
to PageKeeper. Drag the icons onto the PageKeeper application icon or
into an open PageKeeper folder.
To update Web pages in PageKeeper:
1 Make sure your computer is currently connected to the Web.
2 Click your right mouse button over the Web page you want to
update in PageKeeper.
3 Choose
Update Document
in the shortcut menu that appears.
PageKeeper updates the indexed content and thumbnail for
that Web page.
To change the address for a Web page link in PageKeeper:
1 Make sure your computer is currently connected to the Web.
2 Click your right mouse button over the Web page you want to
change in PageKeeper.
3 Choose
48 Chapter 4
Properties
in the shortcut menu that appears.
Page 55

Organizing Documents
4 Type the new Web page address in the
You can also copy and paste the address into the edit box.
5 Click OK.
PageKeeper changes its link to the updated Web address.
Organizing Documents
Once documents are added to PageKeeper, you can organize them into
folders and clipped groups. You can also copy, move, rename, and
remove items.
To find out how PageKeeper can file documents automatically for you,
see “Automatically Organizing Documents” on page 56.
The rest of this section describes organizational tasks, including:
• Creating Folders
• Clipping Documents Together
• Rearranging Items
• Renaming Items
• Removing Items
Web address
edit box.
Creating Folders
My Folders
deleted, but it can be renamed. You can create a structure of folders
within
The folder structure in PageKeeper looks similar to Windows Explorer.
However, these two folder systems are not related in any way. They are
independent of each other.
To create a folder in PageKeeper:
Organizing and Working with Documents 49
is PageKeeper’s top-level folder. This folder cannot be
My Folders
1 Start PageKeeper to display the PageKeeper desktop.
2 Open the folder in which you want to create a new folder.
.
Page 56

Organizing Documents
3 Choose
New
Folder
Or, click the New Folder button in the Standard toolbar.
The new folder appears with its default name highlighted.
4 Type in a new name for the folder if desired.
To open a folder, do one of the following:
• Click the folder name on the left side of the PageKeeper desktop.
• Double-click the folder name on the right side of the PageKeeper
desktop.
The contents of the currently open folder are displayed on the
right side of the PageKeeper desktop.
For information on creating
Organizing Documents” on page 56.
Clipping Documents Together
Documents can be associated in PageKeeper by “clipping” them
together. For example, if you did an expense report in your spreadsheet
application and then scanned some receipts related to the report, you
could clip all these documents together in PageKeeper without altering
anything about the individual documents.
in the File menu.
Smart Folders
, see “Automatically
Clipping documents together gives you the advantage of keeping
particular documents in a group without having to create a lot of
different folders. For example, you can have one folder called
Expenses
that contains many different clipped groups of expense reports.
To clip documents together:
1 Click a document on the PageKeeper desktop to select it.
2 Ctrl-click to select additional documents.
50 Chapter 4
Page 57

Organizing Documents
The first page of the first
document is displayed in
the clipped group’s
thumbnail.
3 Choose
Clip Documents Together
in the Tools menu.
Or, click the Clip Documents Together button in the Standard
toolbar.
The new clipped group appears with its default name
highlighted.
Click these arrows to browse
back and forth between the
documents in the clipped group.
4 Type in a new name for the clipped group if desired.
To view all the documents in a clipped group, open it in
PageKeeper View. See “Viewing Documents” on page 60 for
more information.
You can also clip documents and existing clipped groups together
by selecting the document or clipped group and dragging it onto
another document or clipped group.
Organizing and Working with Documents 51
Page 58

Organizing Documents
Drag the thumbnail to
the desired position.
To reorder documents in a clipped group:
1 Double-click the clipped group to open it in PageKeeper View.
2 Click the thumbnail of the document you want to move and
drag it above or below another document in the group.
Or, click your right mouse button over the thumbnail and
choose one of these commands:
Down One Position, Move to Top
Move Up One Position, Move
, or
Move to Bottom.
3 Repeat step 2 to reorder other documents as desired.
To remove an individual document from a clipped group:
1 Double-click the clipped group to open it in PageKeeper View.
2 Click the thumbnail of the document you want to remove from
the group.
3 Choose
Remove from Clipped Group
in the File menu.
The selected document is removed from the clipped group and
placed as a single document in the same folder.
To unclip documents:
1 Select the clipped group on the PageKeeper desktop.
2 Choose
Unclip Documents
in the Tools menu.
Or, click the Unclip Documents button in the Standard toolbar.
The thumbnail for the clipped group disappears and
thumbnails for each individual document appear.
52 Chapter 4
Page 59

Rearranging Items
You can rearrange documents, folders, and clipped groups in different
PageKeeper folders by copying or moving them.
Copying a folder in PageKeeper is similar to copying a folder in
Windows Explorer. The selected folder and all its contents are copied.
The copied folder becomes an independent entity when pasted
elsewhere.
However, copying documents and clipped groups in PageKeeper is
different than copying documents in Windows Explorer. All copies of a
document or clipped group are linked together. If you modify (such as
by renaming or annotating) a document or clipped group, the changes
are reflected in all other copies. Linking allows you to put documents
and clipped groups in as many folders as you want without taking up
additional hard disk space.
The only time an action will be independently applied to one instance of
a clipped group is if you unclip it. Other copies of the clipped group will
remain intact.
Organizing Documents
To copy items on the PageKeeper desktop:
1 Select the items that you want to copy.
2 Choose
Standard toolbar.
A copy of the selected items is placed on the Clipboard.
3 Open the folder where you want to place the items.
4 Choose
Standard toolbar.
The items are placed into the open folder.
To move items on the PageKeeper desktop:
1 Select the items that you want to move.
2 Choose
Standard toolbar.
The selected items are placed on the Clipboard.
3 Open the folder where you want to move the items.
4 Choose
Standard toolbar.
The items are moved into the open folder.
in the Edit menu. Or, click the Copy button in the
Copy
in the Edit menu. Or, click the Paste button in the
Paste
in the Edit menu. Or, click the Cut button in the
Cut
in the Edit menu. Or, click the Paste button in the
Paste
Organizing and Working with Documents 53
Page 60

Organizing Documents
Renaming Items
You can also move items by dragging them into other folders. To make
copies of items, press the Ctrl key as you drag them.
You can rename folders, documents, and clipped groups in PageKeeper.
When you rename a document in PageKeeper, by default, the actual
physical document is renamed as well. You can turn off this option in
the
General
rename the actual documents on your disk when renaming them in
PageKeeper, then separate names will be maintained for the documents.
Document names are listed in the document properties.
To rename an item:
section of the Options dialog box. If you choose not to
1 Select the item you want to rename.
2 Choose
Or, click inside the selected item’s name box to make it active.
3 Type in the desired name.
4 Press the Enter key or click outside the item’s name box.
If there are copies of a document or clipped group in other
PageKeeper folders, all copies are renamed.
Removing Items
You can remove documents, folders, and clipped groups from
PageKeeper. The only item you cannot remove is PageKeeper’s toplevel folder.
Copies of documents and clipped groups can be kept in multiple folders,
so you have the choice of removing just the selected occurrence of an
item or all occurrences of the item from PageKeeper. When you remove
all occurrences of a document from PageKeeper, by default, the actual
physical document is removed as well. You can turn off this option in
the
General
remove the actual physical documents when removing them from
PageKeeper, then only the links in PageKeeper are deleted.
Rename
section of the Options dialog box. If you choose not to
in the File menu.
54 Chapter 4
Page 61

Organizing Documents
To remove one occurrence of an item from PageKeeper:
1 Select the item on the PageKeeper desktop.
If you select a folder to remove, all the items within the folder
are also removed.
2 Do one of the following:
• Press the Delete key.
• Choose
Remove
This Occurrence
in the File menu.
• Click the Remove This Occurrence button in the Standard
toolbar.
If you selected a document or clipped group, only that
occurrence of the item is removed. Copies in other folders and
the actual physical file remain as is.
To remove all occurrences of a document or clipped group
from PageKeeper (and your computer):
1 Select the document or clipped group on the PageKeeper
desktop.
2 Choose
Remove
All Occurrences
in the File menu.
All copies of the item are removed from PageKeeper.
When you remove all occurrences of a document from PageKeeper, by
default, the actual physical document is also deleted. (It will be sent to
the Windows Recycle bin if you have that option enabled for Windows.)
If you prefer not to delete the physical document, you can deselect that
option in the
General
section of the Options dialog box.
Organizing and Working with Documents 55
Page 62

Automatically Organizing Documents
Automatically Organizing Documents
PageKeeper
Smart Folders
automatically file documents based on criteria
you specify. You can set up Smart Folders that automatically file
documents based on their names, content, document type, and other
document properties. Smart Folders use the same advanced search
technology that PageKeeper Find uses. For more information on
PageKeeper Find, please read Chapter 5.
Documents that are automatically added to PageKeeper’s
default folder
(such as with the Folder Watch feature) can be either copied or moved
to applicable Smart Folders. Select your preference in the
Documents
tab of the Options dialog box.
New
However, documents in other folders are always copied (rather than
moved) to applicable Smart Folders.
To create a Smart folder in PageKeeper:
1 Start PageKeeper to display the PageKeeper desktop.
2 Open the folder in which you want to create a Smart Folder.
3 Choose
New
Smart Folder
in the File menu.
Or, click the New Smart Folder button in the Standard toolbar.
The New Smart Folder dialog box appears.
Click each tab to
view and select
different options.
56 Chapter 4
Click here to
add multiple
entries from
one tab or to
change the
search
operators
should
,
(
must, must
).
not
Page 63

Automatically Organizing Documents
4 Specify the desired criteria for the Smart Folder in the
5 Click the
Select the area where you
want the Smart Folder to
look for documents.
Select this if you want the
Smart Folder to delete or
move documents that no
longer conform to its
criteria.
Content
Properties
, and
Image
tabs.
The options in these tabs are identical to the ones in
PageKeeper Find. Please see “PageKeeper Find Options” on
page 82 for detailed information on those options.
Smart Folder
tab and select the desired options for the
Smart Folder.
This setting determines how selective the Smart Folder will be
Few
when it is first created.
relevant documents.
All
means it will only file the most
means it will file any relevant documents.
Click this if
you want to
test your
criteria
before
saving the
Smart
Folder.
,
6 Click
Tes t Cr i te r ia
if you want to test the criteria you have
specified for the Smart Folder.
The documents that the Smart Folder will file are displayed in a
results list.
7 Make any desired adjustments to the criteria.
8 Click
Save Smart Folder
when you are satisfied with the criteria
you have specified.
A Smart Folder icon appears on the PageKeeper desktop with
its default name highlighted.
9 Type in a new name for the folder, if desired, and then press the
Enter key.
Organizing and Working with Documents 57
Page 64

Automatically Organizing Documents
To make an existing PageKeeper folder into a Smart folder:
1 Select the PageKeeper folder that you want to make into a
Smart Folder.
2 Choose
3Select
Make this a Smart Folder
Properties
in the File menu.
folder into a Smart Folder.
in the
A Smart Folder tab appears.
4 Click
Modify Smart Folder...
in the
The New Smart Folder dialog box appears.
Select this to make your
General
Smart Folder
tab.
tab.
5 Specify the desired criteria for the Smart Folder in the
Properties
, and
Image
tabs.
Content
The options in these tabs are identical to the ones in
PageKeeper Find. Please see “PageKeeper Find Options” on
page 82 for detailed information on those options.
6 Click the
Smart Folder
tab and select the desired options for the
Smart Folder.
7 Click
Save Smart Folder
when you are satisfied with the criteria
you have specified.
8 Click OK in the Properties dialog box to close it.
58 Chapter 4
,
Page 65

Automatically Organizing Documents
To modify a Smart folder:
1 Select the Smart Folder you want to modify.
2 Choose
Modify Smart Folder
in the Edit menu.
The Modify Smart Folder dialog box appears. The currently
specified criteria are listed on the right side of the dialog box.
Double-click
an item that
you want to
modify.
Criteria for
the Smart
Folder are
listed here.
3 Double-click an item that you want to modify.
A separate dialog box appears in which to make changes for
that item. To delete an item, select it and then press the Delete
key.
4 Add criteria as desired using the
Content, Properties
, and
tabs.
After entering or selecting options in any of the tabs, click the
Add Criteria
button. The criteria will be added to the list on the
right.
Image
5 Click
Save Smart Folder
when you are satisfied with the criteria
you have modified.
Organizing and Working with Documents 59
Page 66

Viewing Documents
Viewing Documents
PageKeeper View allows you to look at the contents of documents
without having to open their own applications. When documents are
open in PageKeeper View, you can add annotations to them, copy their
content to the Clipboard, and open them in other applications.
Thumbnails represent
each document in a
clipped group. Click
the thumbnail of the
document you want
to display.
Annotation
toolbar
You can add
®
Notes
Post-it
to annotate
your
document.
The content of
the current
document is
displayed on
the right side.
To open a document or clipped group in PageKeeper View:
1 Select the document or clipped group that you want to open.
2 Choose
Open in PageKeeper View
in the File menu. Or, click the
PageKeeper View button in the Action toolbar.
PageKeeper View opens. If you selected multiple documents,
each document is displayed in a separate viewer. If you
selected a clipped group, all documents in the group are
displayed in the same viewer.
If you double-click a document on the PageKeeper desktop, it will
either open in PageKeeper View or in its own application. You can
set the option you prefer in the
General
section of the Options dialog
box.
60 Chapter 4
Page 67

Viewing Documents
To find text in a document in PageKeeper View:
1 Choose
in the Edit menu. Or, click the Find Text button
Find…
in the Standard toolbar.
The Find dialog box appears.
2 Enter the exact text you want to find.
The search is not case-sensitive, so you will get the same results
using uppercase or lowercase letters.
3Select
4 Click
Search in annotations
within Post-it
Find Next
®
Notes.
to locate the first occurrence of the search word.
5 Continue clicking
Find Next
if you also want to search for text
to find subsequent occurrences of
the word.
6 Click
to close the Find dialog box.
Cancel
To copy the contents of a document to the Clipboard:
1 Open the document in PageKeeper View.
2 Click the Select Content button in the Annotation toolbar.
Select Content button
3 Select the area of the document you want to copy.
If you are viewing an image document, the selected area has a
box around it. If you are viewing a text document, the selected
area is highlighted.
4 Click the Copy button in the Standard toolbar.
A copy of the selected area is placed on the Clipboard.
• When you copy an area of a text-based document, you can
paste it into text applications.
• When you copy an area of an image document that has
background OCR information, you can paste the contents into
text applications or graphic applications. A text application
will receive the contents as editable text. A graphic
application will receive the contents as a graphic.
Organizing and Working with Documents 61
Page 68

Annotating Documents
• When you copy an area of an image that does not have
background OCR information, you can only paste the
contents into applications that support graphics.
Annotating Documents
You can mark up documents in PageKeeper View using the following
types of annotations:
•Post-it
• Colored highlights
•Lines
• Freehand scribbles
Use the buttons in the Annotation toolbar to make annotations:
®
Notes
Select Annotation
The annotations that you make on documents in PageKeeper View do
not affect the actual physical documents. Annotations are only visible in
PageKeeper View.
To add Post-it
Click here to open a menu for
selecting font and color
options for the Post-it
®
Note.
Select
Content
Highlight
®
Notes to a document:
1 Click the Post-it
Line
Scribble
®
Note button in the Annotation toolbar.
Post-it
®
Note
Annotation Options
2 Click the area of the document where you want the annotation
marker to appear.
A Post-it
®
Note text box appears with the cursor ready for
typing.
3 Type in the desired text.
62 Chapter 4
Page 69

Annotating Documents
4 Click outside of the text box when you are done.
®
A yellow text icon represents the Post-it
the icon to open the Post-it
®
it
Note to close it again.
®
Note. Click outside the open Post-
Note. Double-click
To view the text in all Post-it® Notes at once, deselect
Notes as Icons
in the View menu.
To highlight areas of a document:
1 Click the Highlight button in the Annotation toolbar.
2 Select the area of the document you want to highlight.
A highlight appears over the areas you select. The color and
type of the highlight depend on the currently selected
Options
. See page 64 for more information.
3 Click the Select Annotation button (or another annotation
button) to turn off the highlighting tool.
To draw lines:
1 Click the Line button in the Annotation toolbar.
2 Draw lines wherever you want in the document.
The color and thickness of the line depend on the currently
selected
Line Options
. See page 64 for more information.
3 Click the Select Annotation button (or another annotation
button) to turn off the drawing tool.
To draw freehand scribbles:
Show Post-it
Highlight
1 Click the Scribble button in the Annotation toolbar.
2 Draw free-hand circles, scribbles, and other shapes wherever
you want in the document.
The color and thickness of the scribbles depend on the
currently selected
Scribble Options
. See page 64 for more
information.
3 Click the Select Annotation button (or another annotation
button) to turn off the drawing tool.
Organizing and Working with Documents 63
Page 70

Annotating Documents
To select options for highlight, line, and scribble annotations:
1 Click the Annotation Options button in the Annotation toolbar.
The Annotation Options dialog box appears.
2 Click the
Highlight Options, Line Options
, and
Scribble Options
tabs to make selections for those annotation tools.
3 Click OK when you are done selecting options.
The selections that you make will be applied to all future
annotations. Current annotations will not be altered.
To delete annotations:
1 Click the Select Annotation button in the Annotation toolbar.
2 Select the annotation you want to delete by clicking it.
You can select line, scribble, and highlight annotations all at once by
holding down your mouse button and drawing a box around them.
However, Post-it® Notes must be selected and deleted separately.
3 Press the Delete key.
The selected annotations disappear.
64 Chapter 4
Page 71

Opening Documents
You can open documents directly from PageKeeper in a variety of ways,
including:
• Opening Documents in Their Own Applications
• Opening Documents in Other Applications
• Opening Web Pages
Opening Documents in Their Own Applications
You can open a document in its original application (the one in which it
was created) directly from PageKeeper. For example, you can open a
Word document in Microsoft Word. PageKeeper keeps track of the edits
that you make to a document as long you do not save the document as
a different file.
PageKeeper determines a document’s original application by its file
name extension and the application that is associated with that
extension in Windows.
Opening Documents
You can open a document in its original application in the
following ways:
• Choose
PageKeeper desktop.
• Choose
document is selected in a PageKeeper Find results list.
• Choose
document is open in PageKeeper View.
• Choose
open in PageKeeper View.
Open
Open Document for Editing
Open Document for Editing
Open Current Document for Editing
Opening Web Pages
If you have access to the World Wide Web and have added Web page
links to PageKeeper, you can open a live Web page directly from
PageKeeper.
For information on adding Web pages to PageKeeper, see “Adding Web
Page Links to PageKeeper” on page 47.
in the File menu if the document is selected on the
in the File menu if the
in the File menu if the
if a clipped group is
Organizing and Working with Documents 65
Page 72

Opening Documents
To open a Web page from PageKeeper:
1 Make sure your computer is currently connected to the Web.
2 Select the Web page you want to open in PageKeeper.
3 Choose
in the File menu. Or, click the button representing
Open
your Web browser on the Application toolbar.
Your Web browser launches and goes to the selected Web page.
Opening Documents in Other Applications
Use the buttons on PageKeeper’s Application toolbar to open
documents in various applications.
These are application buttons. To add or remove
application buttons, see “Customizing the Application
Toolbar” on page 99.
The way an application opens documents depends on the properties
that are set for the application and the file types it supports. You can set
up an application to try and open all documents in their native file types
or to convert documents to different file types. See “Customizing the
Application Toolbar” on page 99 for information on changing
application properties.
To open a document using the application toolbar:
1 Select the document you want to open.
2 Click the button of the application in which you want to open
the document.
Or, drag the document onto the application button.
The application opens the document if it supports the
document’s file type (or can convert the document to a
supported file type).
66 Chapter 4
Page 73

Printing, Faxing, and Mailing Documents
Printing, Faxing, and Mailing Documents
You can print, mail, and fax documents from PageKeeper if you have the
appropriate applications set up on your computer.
To print documents from PageKeeper, you need a printer and an
appropriate print driver. To fax documents, you need a fax modem or
multi-function device and a fax application that provides a standard
print driver. To send documents to other users, you need a MAPIcompliant mail application such as Microsoft Outlook.
Printing and faxing a document from PageKeeper will not be as exact as
printing and faxing from the document’s source application. Documents
printed or faxed from PageKeeper will appear as they would in
PageKeeper View.
To print a document or clipped group:
1 Select the document or clipped group you want to print.
If a clipped group of documents is open in PageKeeper View,
click the thumbnail of the document you want to print.
2 Choose
If you have a clipped group of documents open in PageKeeper
View, choose
Documents
Click the Print button in the Application toolbar if you want to send
your print job directly to your printer without selecting print
options.
3 Select the desired print options in the Print dialog box.
If you select
a separate page after your document is printed.
4 Click OK to start printing.
Print…
in the File menu.
Print...
.
Print annotations
Current Document
, Post-it
or
Print...All
®
Notes will be printed on
Organizing and Working with Documents 67
Page 74

Printing, Faxing, and Mailing Documents
To fax a document:
1 Make sure the correct fax driver is selected for faxing.
2 Select the document or clipped group you want to fax.
To check that the correct fax driver is selected, right-click over
the Send Fax button in the Application toolbar and choose
Properties
...
If a clipped group of documents is open in PageKeeper View,
click the thumbnail of the document you want to fax.
3 Choose
Send To
Fax Recipient
in the File menu.
Or, click the Send Fax button in the Application toolbar if you
want to send your fax job without selecting fax options.
4 Select the desired options in the Fax dialog box and click OK.
An interface to your fax application appears.
5 Enter the recipient information and then send the fax.
To mail a document:
1 Select the document or clipped group you want to mail.
If a clipped group of documents is open in PageKeeper View,
click the thumbnail of the document you want to mail.
2 Click the Send Mail button in the Application toolbar.
Or, choose
Send to
Mail Recipient
in the File menu.
The Send To dialog box appears.
3 Select an option for sending your document.
You can send the document by itself. Or, you can send
PageKeeper information, such as annotations, along with the
document.
If you send a document with PageKeeper information, a special
PageKeeper Send File
(*.stp) will be sent. The recipient of the
PageKeeper Send File must have PageKeeper installed to view the
file. See “Sending Documents from PageKeeper” on page 98 for
more information.
4 Click OK.
An interface to your mail application appears with the
document attached.
5 Enter the recipient information and send the mail message.
68 Chapter 4
Page 75

Chapter 5
Finding Documents
This chapter describes how to find documents on your computer using
PageKeeper’s powerful search technology.
PageKeeper indexes information so it can quickly and easily retrieve the
documents you are seeking. Finding documents can be as simple as
typing in a word and clicking a button. Or, you can set up sophisticated
searches by specifying multiple criteria to find, such as words and
phrases, names, dates, file types, and other document properties.
Please continue reading for information on these topics:
• Starting a Search
•Search Tips
• Specifying Multiple Criteria for Your Search
• Modifying Search Criteria
• Changing the Search Conditions
• Saving Search Criteria
• PageKeeper Find Options
69
Page 76

Starting a Search
Starting a Search
PageKeeper can find any document that has been added to it, regardless
of the document’s type. Your search can be as simple as looking for a
word in the content of documents or searching for a document name.
Or, you can perform sophisticated searches by specifying multiple
attributes to find.
In this chapter, the entries or selections you make for finding documents
are referred to as
You can open PageKeeper Find in the following ways:
search criteria
.
• Click the PageKeeper Find button on the Action toolbar.
To start a search:
Click each tab to view
and select different
search options.
The folder location where
PageKeeper will search is
listed here. This can be
changed in the
Look in
tab.
• Choose
• Click
PageKeeper Find...
• Click
Programs
• Choose
PageKeeper Find...
in the Windows taskbar and choose
Start
.
in the Windows taskbar and choose
Start
Caere ApplicationsPageKeeper Find
Find
PageKeeper Find
Explorer.
1 Open PageKeeper Find.
in the Tools menu.
Find
.
in the Tools menu of Windows
Click
Criteria
if you want
to add
multiple
entries from
the same
tab.
Add
only
70 Chapter 5
Page 77

Starting a Search
When you open PageKeeper Find from the PageKeeper desktop, the
folder will be set to whatever folder was open at the time.
Look in
You can sort the results
list in different ways by
choosing commands in
the View menu.
2 Specify the desired criteria in the
Look in
tabs.
Content, Properties, Image
See “PageKeeper Find Options” on page 82 for more
information on the options you can select in each tab. See
“Search Tips” on page 72 for helpful hints on searching with
PageKeeper.
3 Click
Find Now
when you have specified all of the desired
search criteria.
The PageKeeper Find window expands to display a list of all
the documents that it finds.
When search
results are
displayed in
Detail
you can click
columns to
sort
documents
by different
properties.
, and
view,
PageKeeper helps you locate the most important documents by
ranking them in order of relevance. To show search results by their
relevance, choose
Finding Documents 71
Arrange Icons
by Relevance
in the View menu.
Page 78

Search Tips
Search Tips
Entering Search Text
4 Click
This section contains search tips that may be helpful when you are using
PageKeeper Find.
These are tips for entering search text in the
• Use meaningful search words that describe the information you
are seeking.
PageKeeper indexes documents so that they can be quickly
retrieved. To make document indexes more efficient and
meaningful, PageKeeper filters out
as
and, on
document. PageKeeper ignores stopwords during a search.
• Do not use punctuation marks such as quotation marks or
commas to denote your search entries. Use spaces to separate
multiple word entries.
•Select
words be found in their exact order. This excludes stopwords
such as
• Use the
exact you want PageKeeper to be when it looks for words. See
“Word matching” on page 83 for more information.
• Use an asterisk (*) to perform wildcard searches if you are not
sure of the spelling for particular words. For example, if you are
trying to find someone’s name, and you are not sure of the exact
spelling, you could use a wildcard within your search text. The
search entry
Hansen
New Search
All the current criteria will be cleared from the tabs so you can
enter new criteria.
and
Treat text as a phrase
and, on
Word matching
or
Hanson
if you want to start a brand new search.
Content
stopwords
, that do not add significant meaning to a
the
if you want to require that all search
or
, which are ignored during a search.
the
Hans*n
.
settings in the
would return documents that contained
Content
tab:
. These are words, such
tab to select how
Searching for Similar Documents
If PageKeeper retrieves a document that you are interested in, you can
use that document as a model for another search. Select the document in
the results list and click
PageKeeper will look for and retrieve all other documents that are
similar to that document.
72 Chapter 5
Find more like this
above the results list.
Page 79

Searching Within Search Results
If PageKeeper retrieves a lot of documents and you want to focus
another search within those documents, select
documents
click
above the results list. Modify your criteria as desired and then
Find Now
.
Search only within these
Searching for Old Documents to Discard
You can use PageKeeper to find old documents that you no longer use
by searching by document date in the
want to delete documents that are older than a certain date, you can
specify that date in your search. After PageKeeper retrieves the
documents, you can delete them directly from the search results list.
Select the documents and click the Remove All Occurrences button in
the Standard toolbar.
Properties
tab. For example, if you
Sorting Search Results by Relevancy
After a search, you can view returned documents in a prioritized
ranking according to how relevant they are to your search criteria. To
show search results by their relevancy, choose
Relevance
in the View menu.
Arrange Icons
Locating Search Words in Retrieved Documents
If you open a document in PageKeeper View directly from PageKeeper
Find’s search results list, you can easily locate search words that were
found in the document. Use the
Search Word
words.
commands in the Edit menu to navigate through the search
Go to Next Search Word
Search Tips
by
or
Go to Previous
Reusing Search Criteria
You can save search criteria that you have specified in PageKeeper Find
in a
search file
searches. See page 80 for more information.
. This allows you to use the same criteria for future
Saving Search Criteria to a Smart Folder
You can save search criteria you have specified to a
will reside on the PageKeeper desktop and automatically file documents
that fit the criteria. See page 81 for more information.
Smart Folder,
which
Storing Search Results in a Folder
After a search, you can copy and paste documents from the results list
into a folder on the PageKeeper desktop. Or, drag the documents into a
folder on the PageKeeper desktop.
Finding Documents 73
Page 80

Specifying Multiple Criteria for Your Search
Specifying Multiple Criteria for Your Search
You can specify multiple criteria for your search using the various
PageKeeper Find tabs and then click
However, if you want to enter multiple criteria from the same tab, you
must use the
For example, if you wanted to find two documents with different names
during the same search, you would enter the first document’s name in
the
second document’s name and click
be possible using the default
Search Conditions” on page 77 for more information on search
operators.)
To enter multiple criteria from the same tab:
Click each tab to view
and select different
search options.
button.
Add Criteria
Properties
Add Criteria
tab and click
should
1 Open PageKeeper Find.
Find Now
. Then you would enter the
Add Criteria
search operator. See “Changing the
to start your search.
. (This search would only
Click here to
enter the
currently
selected
criteria.
Tabs will be
cleared for
additional
entries.
2 Specify the desired criteria in the
Look in
tabs.
Content, Properties, Image
, and
See “PageKeeper Find Options” on page 82 for more
information on the options you can select.
74 Chapter 5
Page 81

Specifying Multiple Criteria for Your Search
The PageKeeper
Find tabs are
cleared after
adding criteria so
you can add more
criteria as desired.
3 Click
Add Criteria
.
The PageKeeper Find window expands to display a tree view
of all the criteria you have entered so far. All PageKeeper Find
tabs are cleared so you can enter additional criteria.
Search
criteria are
listed in the
criteria tree.
4 Specify additional criteria in the desired tabs and click
Criteria
.
5 Repeat step 4 to continue adding criteria as desired.
6 Click
Find Now
when you are ready to start your search.
Add
Finding Documents 75
Page 82

Modifying Search Criteria
Modifying Search Criteria
You can modify the search criteria that you have entered in PageKeeper
Find any time before you start your search. If you have not clicked the
Add Criteria
directly in the tabs. If you have clicked
existing criteria in the criteria tree.
To modify search criteria in the criteria tree:
button, then the existing search criteria can be altered
Add Criteria
, you must modify
1 Click
Show Criteria...
if PageKeeper Find is not already
expanded to show the criteria tree.
The PageKeeper Find window expands to display a tree view
of all the criteria you have entered so far.
Double-click
the item that
you want to
modify.
Search
criteria are
listed in the
criteria tree.
2 Double-click the item that you want to modify in the criteria
tree.
A separate dialog box appears in which to make changes for
that item.
3 Make the desired changes for that item and click OK.
76 Chapter 5
Page 83

Changing the Search Conditions
4 Repeat steps 2 and 3 to modify other criteria as desired.
5 Click
Find Now
when you are ready to start your search.
To delete search criteria from the criteria tree:
1 Click
Show Criteria...
if PageKeeper Find is not already
expanded to show the criteria tree.
The PageKeeper Find window expands to display a tree view
of all the criteria you have entered so far.
2 Select the item you want to delete and press the Delete key.
Or, right-click the item and choose
Remove Nod
e in the shortcut
menu.
The selected item disappears.
Select the
item you want
to delete and
press the
Delete key.
Search
criteria are
listed in the
criteria tree.
Changing the Search Conditions
The
should/must/must not
your search:
•
means that PageKeeper will retrieve documents that
Should
contain the specified criteria, but will not require that criteria if
other criteria are satisfied.
•
means that PageKeeper will only retrieve documents that
Must
contain the specified criteria.
•
Must not
means that PageKeeper will not retrieve documents that
contain the specified criteria. (The
used if criteria are also entered under the
condition.)
Finding Documents 77
search operators determine the conditions for
Must not
condition can only be
Should
or
Must
Page 84

Changing the Search Conditions
By default, all search criteria is entered under the
condition. You
should
must expand PageKeeper Find to show its criteria tree if you want to
change the default search operator or the search operator for specific
criteria.
To change the default search operator in PageKeeper Find:
1 Click
Show Criteria...
if PageKeeper Find is not already
expanded to show the criteria tree.
The PageKeeper Find window expands to display a tree view
of all the criteria you have entered so far.
Select the desired default
search operator here.
Search
criteria are
listed in the
criteria tree.
2 Select the search operator that you want to make the default.
The new default will be applied to search criteria that you enter
in the future. Existing search criteria will not be affected by the
change.
78 Chapter 5
Page 85

Changing the Search Conditions
To change the search operator for specific criteria:
1 Click
Show Criteria...
if PageKeeper Find is not already
expanded to show the criteria tree.
The PageKeeper Find window expands to display a tree view
of all the criteria you have entered so far.
Drag an item
under the
desired
search
operator.
Search
criteria are
listed in the
criteria tree.
2 Select the desired item in the criteria tree and drag it under the
desired search operator.
3 Click
Find Now
when you are ready to start your search.
Finding Documents 79
Page 86

Saving Search Criteria
Saving Search Criteria
You can save search criteria that you have specified in PageKeeper Find
in a
search file
without having to specify it all over again. You can also save the criteria
you have specified to a
PageKeeper desktop and automatically file documents that fit that
criteria.
To save search criteria to a search file:
1 Open PageKeeper Find and specify the desired search criteria.
. This allows you to use the same criteria for future searches
Smart Folder,
which will reside on the
2 Choose
Or click the Save Search button in the Standard toolbar.
The Save As dialog box appears.
3 Type in a file name and select a folder location for the search
file.
Search files are saved with a .srh extension.
4 Click
The search file is saved and you are returned to PageKeeper
Find.
To open a search file in PageKeeper Find:
1 Open PageKeeper Find.
Save Search...
.
Save
in the File menu.
2 Choose
Or click the Open Search button in the Standard toolbar.
80 Chapter 5
Open Search File...
in the File menu.
Page 87

Saving Search Criteria
The Open dialog box appears.
3 Locate and select the search file (*.srh) you want to open.
To save search criteria to a Smart Folder:
Select the PageKeeper
folder where the Smart
folder will be saved.
Select the area where you
want the Smart Folder to
look for documents.
Select this if you want the
Smart Folder to delete or
move documents that no
longer conform to its
criteria.
4 Click
Open
.
The search file opens and loads its search criteria into
PageKeeper Find.
1 Open PageKeeper Find and specify the desired criteria.
2 Choose
Save Search to Smart Folder...
in the File menu.
Or click the Save Search to Smart Folder button in the Standard
toolbar.
The Save As Smart Folder dialog box appears.
Type in a name for
the Smart folder.
This setting determines
how selective the Smart
Folder will be when it is
first created.
will file only the most
relevant documents.
means it will file any
relevant documents.
Few
means it
All
3 Select the desired options for the Smart Folder and click OK.
The Smart Folder is saved and you are returned to PageKeeper
Find. For more information on Smart Folders, see
“Automatically Organizing Documents” on page 56.
Finding Documents 81
Page 88

PageKeeper Find Options
PageKeeper Find Options
This section describes the search options you can select in each
PageKeeper Find tab, including:
• Content Tab
• Properties Tab
•Image Tab
• Look in Tab
By default, all search criteria are entered under a
This means that PageKeeper will retrieve documents that contain the
specified criteria, but will not require that criteria if other criteria are
satisfied. See “Changing the Search Conditions” on page 77 for more
information.
Content Tab
Click the
you want to find in documents.
Content
search condition.
should
tab in PageKeeper Find to specify textual content that
Entering words or phrases
Enter the text you want PageKeeper to look for within documents. By
default, PageKeeper will retrieve documents that contain one or more of
the search words in any order.
82 Chapter 5
Page 89

PageKeeper Find Options
Stopwords
are insignificant words such as
and
or
. PageKeeper ignores
the
stopwords during a search, so try to use words that are more descriptive
about the information you are seeking. For other tips on entering text,
see “Entering Search Text” on page 72.
Treat text as a phrase
Select
Treat text as a phrase
found in their exact order. This excludes stopwords such as
, which are ignored during a search.
the
if you want to require that all search words be
and, on
Word matching
Use the
Word matching
scale to select how exact you want PageKeeper to
be when it looks for words within documents. The scale has four levels,
ranging from exact to “fuzzy” (approximate) word matching:
•Select
for the highest level of word matching. This will not
Exact
allow for word variations in your search text.
For example, the search word
match,
color
.
would retrieve only its exact
color
• Select the second level in the sliding scale to allow for variations
of the same root word in your search text.
For example, the search word
would retrieve
color
colors
• Select the third level in the sliding scale to allow for word and
spelling variations in your search text.
For example, the search word
.
colour
•Select
Approximate
for the fuzziest level of word matching. This
would retrieve
color
colors
will allow for word, spelling, and OCR (error) variations in your
search text.
For example, the search word
and
(where ~ is an OCR reject character).
col~r
would retrieve
color
colors, colour
or
.
and
,
Match uppercase letters
Select
Match uppercase letters
if you have the
word matching option
Exact
selected and you want to apply case-sensitivity to uppercase letters in
your search text. For example, if you enter
Match uppercase letters
The
Match uppercase letters
selected,
option is only available with
would not be found.
grace
as your search text with
Grace
Exact
word
matching.
Finding Documents 83
Page 90

PageKeeper Find Options
Look for words in
Select the areas within which you want PageKeeper to search for text.
includes document content, Post-it
text
are text annotations you can attach to documents in PageKeeper
Notes
View.
Keywords
page.
Proximity search
Use proximity searching if you want to require that search words be
within a maximum number of words of each other. Select
and then type in the desired number. The proximity requirement
within
is applied between all search words. If any words are separated by more
than the specified number, then they will not satisfy the search criteria.
For example, if you want to find certain words within the same sentence,
you would enter the desired search words and then set the proximity
setting to the approximate number of words in the sentence.
Proximity searching is available if you have entered at least two search
words. Proximity searching will be disabled if
selected because phrases already have a set proximity requirement.
Properties Tab
Click the
properties that you want to find.
®
Notes, and keywords.
are words you can enter on a document’s properties
Treat text as a phrase
Properties
tab in PageKeeper Find to specify document
All
®
Post-it
Words must be
is
Document name
Enter the name of the document you want to find. This is not casesensitive, so it does not matter if you use uppercase or lowercase letters.
84 Chapter 5
Page 91

PageKeeper Find Options
If you do not know the exact document name, use an asterisk (*) as a
wildcard. For example, you could enter
Dave’s Resume
Document type
Select the file type of the document you want to find in the drop-down
list.
Document size
Use the drop-down list to specify the way you want PageKeeper to look
for file sizes (such as applying a
the number that you want to use for comparison.
Document date
.
Greater than
to find a document named
Dave*
condition) and then enter
Use the drop-down lists to specify the
to find. You can select general dates such as
specify particular dates that you want to find.
Image Tab
Images, such as TIFF files, have special attributes that you may want to
find. Click the
want to find in image documents.
or
created
tab in PageKeeper Find to specify the attributes you
Image
modified
Last month
dates you want
, or you can
Image type
Select the type (black and white, grayscale, or color) of the image
document you want to find in the drop-down list.
Finding Documents 85
Page 92

PageKeeper Find Options
Look in Tab
Image size
Select the size (dimensions) of the image document you want to find in
the drop-down list. Select
non-standard image size.
Image resolution
Select the resolution (dpi) of an image document you want to find by
selecting a condition in the drop-down list and then entering the
number that you want to use for comparison.
Click the
your search within PageKeeper.
When you open PageKeeper Find from the PageKeeper desktop, the
Look in
Look in
folder will be set to whatever folder was open at the time.
tab in PageKeeper Find to specify the starting point of
Custom size
in the list if you want to enter a
PageKeeper folder
Select the PageKeeper folder within which you want to search. The
folder that was open on the PageKeeper desktop when you launched
PageKeeper Find will be selected by default. If you started PageKeeper
Find outside of the PageKeeper desktop, it will default to the top-level
folder,
Search in subfolders
Select this if you want to search all folders within the selected
PageKeeper folder.
86 Chapter 5
My Folders
.
Page 93

Chapter 6
Technical Information
This chapter provides troubleshooting tips and other technical
information about using PageKeeper.
Please also read the
information on PageKeeper. To open this file, click
taskbar and choose
Documents
Please continue reading this chapter for information on these topics:
• Troubleshooting Solutions
• Converting Databases for Use in PageKeeper Pro
• Keeping Track of Document Changes
• Performing Background OCR on Images
• Sending Documents from PageKeeper
• Customizing the Application Toolbar
• Document Thumbnails
• Checking PageKeeper Jobs
• Uninstalling PageKeeper
PageKeeper Pro Readme
PageKeeper Pro Readme
Programs
Caere ApplicationsCaere
.
file, which contains the latest
in the Windows
Start
87
Page 94

Troubleshooting Solutions
Troubleshooting Solutions
Although PageKeeper is designed to be easy to use, problems may
sometimes occur. Many of the on-screen error messages contain selfexplanatory descriptions of what to do — check connections, close other
applications to free up memory, and so on. Sometimes that is all the
troubleshooting help you will need.
Topics in this section include:
• Solutions to Try First
• Low Disk Space Problems
• Low Memory Problems
• Problems Connecting PageKeeper to Your Scanner
• System Crash Occurs While Scanning
Please refer to your Windows documentation for information on
optimizing your system and application performance.
Solutions to Try First
Try these possible solutions if you experience problems using
PageKeeper:
• Make sure that your system meets all the minimum requirements
listed on page 6.
• Make sure that your scanner is plugged in and that all cable
connections are secure.
• Turn off your computer and scanner. Restart the scanner, and
then restart the computer.
• Make sure other applications are functioning properly after
restarting your computer.
• Resolve low memory problems. See page 89 for suggestions.
• Resolve low disk space problems. See page 89 for suggestions.
• Run ScanDisk for Windows 95 or 98 or Check Disk for Windows
NT to check your hard disk for errors. See Windows online Help
for more information.
• Defragment your hard disk. See Windows online Help for more
information.
• Make sure you have the correct drivers for your scanner, printer,
and video card. Contact their manufacturers for more
information.
88 Chapter 6
Page 95

• Uninstall and reinstall PageKeeper and Caere Scan Manager. See
“Uninstalling PageKeeper” on page 104 for instructions.
Low Disk Space Problems
Problems may occur if your system runs low on free disk space. Try
these solutions for low disk space problems:
• Empty the Windows Recycle Bin.
• Delete the *.tmp files in the Temp folder located in your
Windows folder.
• Delete the *.tmp files in the Temp folder located in PageKeeper’s
installation folder.
• Run ScanDisk for Windows 95 or 98 or Check Disk for Windows
NT to check for errors that may be using up disk space. See
Windows online Help for more information.
• Defragment your hard disk. See Windows online Help for
instructions.
• Remove applications that you do not use.
Low Memory Problems
PageKeeper may run poorly under low memory conditions. This may be
indicated by out-of-memory messages, unexpected errors, or operations
that take a long time. Try these solutions for low memory conditions:
• Close other open applications to free up memory.
• Close unnecessary PageKeeper windows.
• Restart your computer.
• Defragment your hard disk. See Windows online Help for
instructions.
• Increase the amount of free hard disk space on your computer.
• Increase your computer’s physical memory (RAM).
Troubleshooting Solutions
If you are running PageKeeper under Windows NT, increase your
computer's virtual-memory allotment to 100 MB or more for optimum
performance. Windows NT will not allow you to set your virtual
memory higher than the disk space you have available.
Technical Information 89
Page 96

Troubleshooting Solutions
Problems Connecting PageKeeper to Your Scanner
Try these solutions if you cannot get your scanner to work with
PageKeeper.
• Make sure the scanner is supported by PageKeeper with your
version of Windows 95, Windows 98, or Windows NT.
• Make sure Caere Scan Manager is installed and that you selected
the correct scanner in it.
Please refer to the
Scanner Setup Notes
for more information.
The
Scanner Setup Notes
supported scanners. To open this file, click
taskbar and choose
Documents
documentation for information on resolving scanner problems.
• Make sure you have installed the correct scanner driver supplied
by the scanner manufacturer.
• Make sure your scanner is turned on and connected securely
before you start PageKeeper.
Some scanner drivers must be loaded at startup. In this case,
restart your scanner and then restart your computer.
• Make sure your scanner works outside of PageKeeper, with its
own application.
• Make sure the scanner is not in use by another application. Close
other applications that might be conflicting.
• Uninstall and then reinstall Caere Scan Manager. See page 105 for
more information.
Scanner Setup Notes
PDF file contains the latest information on
Programs
Caere ApplicationsCaere
. Please also refer to your scanner
System Crash Occurs While Scanning
Try these solutions if a crash occurs during a scan:
• Turn your scanner off and on again to return the scanner to its
default state. Then restart your computer.
• Check your scanner setup. See the previous section, “Problems
Connecting PageKeeper to Your Scanner,” for more information.
• Close any applications that might be conflicting with scanning in
PageKeeper.
• Resolve low memory problems. See “Low Memory Problems” on
page 89 for more information.
in the Windows
Start
90 Chapter 6
Page 97

Converting Databases for Use in PageKeeper Pro
• Resolve low disk space problems. See “Low Disk Space
Problems” on page 89 for more information.
•Check the
you are using a TWAIN scanner.
• Check with the scanner manufacturer to make sure you have the
correct driver for your scanner.
TWAIN Scanner Settings
tab in Caere Scan Manager if
Converting Databases for Use in PageKeeper Pro
PageKeeper Pro 3.0 can convert document databases from these
applications:
• PageKeeper Standard 3.0 and PageKeeper Lite 3.0
• PageKeeper 2.0, 2.01, and 2.1
• Visioneer PaperPort Deluxe 4.0 and 5.1 - 5.3
Converting these databases to PageKeeper Pro is an automated process,
but it may take some time. You will be able to use your computer for
other tasks, but processing may be slowed by the conversion process.
For best results, start the conversion process at a time when you do not
plan to use your computer.
PageKeeper Pro does not alter your original database during
conversion. It copies all data and adds it to its own folder system. Your
original database will remain as is.
Before starting a database conversion, please read the important
information and expected results provided for your particular database.
This information is available starting on page 93.
Technical Information 91
Page 98

Converting Databases for Use in PageKeeper Pro
To convert a database for use in PageKeeper Pro:
Databases that will
be converted from
respective versions
of PageKeeper are
shown here.
1 Open PageKeeper Pro.
2 Choose
Convert...
The Convert to PageKeeper Pro dialog box appears.
PageKeeper identifies the databases that it has found on your
system and makes them available for conversion.
3 Select the databases you want to convert.
PageKeeper can convert databases from PageKeeper Standard/
Lite, PageKeeper 2.x, and Visioneer PaperPort all at the same
time.
in the File menu.
Click this to look
for and select a
PageKeeper
Standard/Lite
database
manually.
Click this to look
for and select a
PageKeeper 2.x
database
manually.
If the conversion options for PageKeeper Standard/Lite or
PageKeeper 2.x are not selectable, and you have those databases on
your computer, use the respective
Browse...
buttons to look for and
select your PageKeeper databases manually.
4 Click
Convert Now
.
A screen shows the progress during conversion and reports
when conversion is finished.
92 Chapter 6
Page 99

Converting Databases for Use in PageKeeper Pro
PageKeeper Standard and Lite 3.0 Conversions
Please read this section before converting a PageKeeper Standard or Lite
database to PageKeeper Pro. When you are ready to start conversion, see
page 92 for instructions.
Important information:
• You do not need to have PageKeeper Standard or Lite installed to
convert your old database.
• You will need free disk space that is approximately 1.5 times the
disk space that the current database occupies.
Expected results after PageKeeper Standard or Lite
conversions:
• A folder named
PageKeeper Pro desktop. All of your PageKeeper 3.x folders are
added to this folder in their original folder structure. Document
links remain in their original folder locations.
• Internal PageKeeper names are preserved as is.
• Clipped groups are preserved as is.
• PageKeeper annotations are preserved as is, except for text
annotations, which are converted to Post-it
PageKeeper 3.x Conversion
is created on the
®
Notes.
PageKeeper 2.0 or 2.1 Conversions
Please read this section before converting a PageKeeper 2.x database to
PageKeeper Pro. When you are ready to start conversion, see page 92 for
instructions.
Important information:
• You do not need to have PageKeeper 2.x or the pagekeep.trn
file installed to convert your old database.
• You will need free disk space that is approximately 3 times the
disk space that the current database occupies.
If you do not have enough disk space on the drive where
PageKeeper Pro is installed, you can use disk space on another
drive for saving converted TIFF files and text files. (These files
use approximately half of the total disk-space requirement.) To
do so, change the default folder in the
PageKeeper Pro’s Options dialog box to a folder on the desired
drive. Make sure you have write access to that drive.
• PageKeeper Pro can convert one PageKeeper 2.x database at a
time. The Convert to PageKeeper Pro dialog box displays the
path of the database it finds first. To select a different database for
conversion, use the
Technical Information 93
Browse...
button in the dialog box.
New Documents
tab of
Page 100

Converting Databases for Use in PageKeeper Pro
Expected results after PageKeeper 2.x conversions:
• A folder named
PageKeeper Pro desktop. All of the documents from your
PageKeeper 2.x database are added to this folder with their
original PageKeeper names. (The original 2.x folder structure is
not preserved.)
• Folders for subsequent database conversions are named
PageKeeper 2.x Conversion
• PageKeeper Documents are converted to TIFF (Packbits) files or
text files, depending on whether they are image-based or textbased. The physical files are saved to a physical folder named
PageKeeper 2x Documents.
Pro’s default folder for new documents, which is specified in the
New Document
• PageKeeper Documents that contain images with text
information (through OCR) are saved as TIFF (Packbits) files and
corresponding text files. These files are saved as clipped groups
in PageKeeper Pro.
• Links to external files (external file indexes) are not preserved
during conversion. However, you can use PageKeeper Pro’s
Folder Watch
See “Adding Documents Automatically with Folder Watch” on
page 45 for more information.
• PageKeeper notes are converted to 3M Post-it
PageKeeper 2.x Conversion
is created on the
followed by a sequential number.
This folder is created under PageKeeper
tab of the Options dialog box.
feature to quickly add links back to your documents.
®
Notes.
Visioneer PaperPort Conversions
Please read this section before converting a PaperPort database to
PageKeeper Pro. When you are ready to start conversion, see page 92 for
instructions.
Important information:
• You must have Visioneer PaperPort installed on your computer
in order to convert your PaperPort database.
• You will need free disk space that is approximately 3 times the
disk space that the current database occupies.
If you do not have enough disk space on the drive where
PageKeeper Pro is installed, you can use disk space on another
drive for saving converted TIFF files. (These files use
approximately half of the total disk-space requirement.) To do so,
change the default folder in the
New Documents
PageKeeper Pro’s Options dialog box to a folder on the desired
drive. Make sure you have write access to that drive.
94 Chapter 6
tab of
 Loading...