

Page 1

Page 2

LEGAL NOTICES
Copyright © 2013 Nuance Communications, Inc. All rights reserved. No part of this publication may be transmitted, transcribed, reproduced,
stored in any retrieval system or translated into any language or computer language in any form or by any means, mechanical, electronic,
magnetic, optical, chemical, manual, or otherwise, without prior written consent from Nuance Communications, Inc., 1 Wayside Road,
Burlington, Massachusetts 01803-4609.
The software described in this book is furnished under license and may be used or copied only in accordance with the terms of such license.
IMPORTANT NOTICE
Nuance Communications, Inc. provides this publication "As Is" without warranty of any kind, either express or implied, including but not
limited to the implied warranties of merchantability or fitness for a particular purpose. Some states or jurisdictions do not allow disclaimer of
express or implied warranties in certain transactions; therefore, this statement may not apply to you. Nuance reserves the right to revise this
publication and to make changes from time to time in the content hereof without obligation of Nuance to notify any person of such revision
or changes.
TRADEMARKS AND CREDITS
Nuance, ScanSoft, OmniPage, PaperPort, True Page, Direct OCR, Logical Form Recognition, RealSpeak, Vocalizer Expressive and
DocuDirect are registered trademarks or trademarks of Nuance Communications, Inc., in the United S tates of America and/or other countries.
All other company names or product names referenced herein may be the trademarks of their respective holders.
THIRD PARTY LICENSES/NOTICES
Please see acknowledgements/notices at the end of this guide.
Nuance Communications, Inc.
1 Wayside Road
Burlington, MA 01803-4609
U.S.A.
Nuance Communications Ireland Limited
Ireland (international headquarters)
20 Merrion Road, Ballsbridge,
Dublin 4
Ireland
LID:OPU/030413
Page 3

C ONTENTS
WELCOME . . . . . . . . . . . . . . . . . . . . . . . . . . . . . . . . . . . . . . . . . . . 1
New Features in OmniPage Ultimate ................................................................................................. 2
Key Features in OmniPage Ultimate .................................................................................................. 4
INSTALLATION AND SETUP . . . . . . . . . . . . . . . . . . . . . . . . . . . . . . 6
System Requirements ......................................................................................................................... 6
Installing OmniPage ........................................................................................................................... 7
Setting up Your Scanner with OmniPage ...........................................................................................8
How to Start the Program ................................................................................................................... 10
Registering your Software .................................................................................................................. 12
Activating OmniPage ......................................................................................................................... 12
Uninstalling the Software ................................................................................................................... 13
USING OMNIPAGE . . . . . . . . . . . . . . . . . . . . . . . . . . . . . . . . . . . . . 14
OmniPage Documents ........................................................................................................................ 14
The OmniPage Desktop and Views .................................................................................................... 15
Basic Processing Steps .......................................................................................................................20
How to Use OmniPage with PaperPort ............................................................................................ ..21
PROCESSING DOCUMENTS . . . . . . . . . . . . . . . . . . . . . . . . . . . . . . . 22
Processing Methods ............................................................................................................................22
Defining the Source of Page Images .................................................................................................. 25
Describing the Layout of the Document ............................................................................................29
Preprocessing Images ......................................................................................................................... 31
Zones and Backgrounds ..................................................................................................................... 38
PROOFING AND EDITING . . . . . . . . . . . . . . . . . . . . . . . . . . . . . . . . 44
The Editor Display and Formatting Levels ........................................................................................ 44
Proofreading OCR Results ........................................................................................ ......................... 45
Verifying Text .................................................................................................................................... 45
The Character Map ............................................................ ................................................................. 46
User Dictionaries ................................................................................................................................ 47
Languages ........................................................................................................................................... 47
Training .............................................................................................................................................. 49
Text and Image Editing ......................................................................................................................51
On-the-Fly Editing ..............................................................................................................................53
Marking and Redacting ..................................................... ............................................. .................... 53
Reading Text Aloud ........................................................................................................................... 54
Creating and Editing Forms ....................................... ............................................. ............................ 55
O m n i P a g e U l t i m a t e U s e r ’ s G u i d e C O N T E N T S i
Page 4

SAVING AND EXPORTING . . . . . . . . . . . . . . . . . . . . . . . . . . . . . . . 58
Saving and Exporting ....................................... .............................................. .................................... 58
Saving Original Images ............................... .......................................................................................58
Saving Recognition Results .................................................. .............................................................. 59
Sending Pages by Mail ....................................................................................................................... 64
Sending to eBook Readers ..................................................................................................................64
Other Export Targets ..........................................................................................................................66
WORKFLOWS . . . . . . . . . . . . . . . . . . . . . . . . . . . . . . . . . . . . . . . . . 68
Workflow Assistant ............................................................................................................................ 70
DocuDirect ......................................................................................................................................... 72
Creating New Jobs ..............................................................................................................................72
Watched Folders ....................................................................................... ... .......................................76
Watched Mailboxes ........................................................... ................................................................. 77
Barcode Processing ............................................................................................................................ 77
File-it Assistant ...................................................................................................................................79
TECHNICAL INFORMATION . . . . . . . . . . . . . . . . . . . . . . . . . . . . . . 81
Troubleshooting .................................................................................................................................. 81
Supported File Types .............................................................................................. ............................ 84
INDEX . . . . . . . . . . . . . . . . . . . . . . . . . . . . . . . . . . . . . . . . . . . . . . 86
O m n i P a g e U l t i m a t e U s e r ’ s G u i d e C O N T E N T S i i
Page 5

Welcome
W elcome to this OmniPage® Ultimate text recognition program, and thank you for choosing our
software! The following documentation has been provided to help you get started and give you
an overview of the program.
This User’s Guide
This guide introduces you to using OmniPage Ultimate. It includes installation and setup
instructions, a description of the program’s commands and working areas, task-oriented
instructions, ways to customize and control processing, and technical information. Descriptions
are based on the Windows 7
In line with Nuance’s environmenta l policy, the Guide is supplied a s a PDF file only. To have a
printed copy on normal sized paper, we recommend double-sided printing with two pages per
sheet.
This guide is written with the assumption that you know how to work in the Microsoft Windows
environment. Please refer to your Windows documentation if you have questions about how to
use dialog boxes, menu commands, scroll bars, drag and drop functionality , shortcut menus, and
so on. Throughout the document references made to newer versions of Microsoft Office output
file types (2007, 2010, 2013) are written with the year numbers omitted.
TM
operating system.
We also assume you are familiar with your scanner and its supporting software, and that the
scanner is installed and working correctly before it is setup with OmniPage Ultimate. Please
refer to the scanner’s own documentation as necessary.
How-to-Guides
The How-to-Guides can be accessed from the Help menu. They are a series of mini-guides that
help you get started easily by providing concise overviews of key program areas, such as getting
input, image improvement, zoning, recognition, editing, proofreading, new features, and the
like.
Welcome 1
Page 6

Electronic Help
OmniPage Help contains information on features, settings, and procedures. It also
has a comprehensive glossary, with its own alphabetical index and a table of
contents. The HTML help system has been designed for quick and easy
information retrieval. Help is available after you install OmniPage.
Comprehensive context-sensitive help aims to provide just enough assistance to let you keep
working without delay
or click the help button if the dialog box has one.
. It is available from dialog boxes. Press F1 in any dialog box to access it,
Readme File
The Readme file contains last-minute information about the software. Please read it before
using OmniPage. To open this HTML file, choose Readme in the OmniPage Installer or
afterwards in the Help menu.
Scanning and Other Information
The Nuance® web site at www.nuance.com provides timely information on the program. The
Scanner Guide (http://www.nuance.com/scannerguide/ ) contains up-dated information about
supported scanners and related issues; Nuance tests the 25 most widely used scanner models.
Access Nuance’ s web site from the OmniPage Ultimate Installer or afterwards from the Help
menu.
Tech Notes
The web site at www.nuance.com contains Tech Notes on commonly reported issues using
OmniPage. Web pages may also offer assistance on the installation process and troubleshooting.
New Features in OmniPage Ultimate
This section summarizes the main features introduced in OmniPage Ultimate.
• Launchpad: This is a Windows 8 styled program letting you quickly set up and run
recognition tasks. Make just three basic choices to create a Go-flow, fine-tune key
settings as desired. The Go-flow runs with minimal need for your intervention. Ideal for
quick completion of similar recurring tasks without using the full OmniPage Ultimate or
the Workflow Assistant. See “How to Start the Program” on page 10.
Welcome New Features in OmniPage Ultimate 2
Page 7

• DocuDirect: This is a powerful workflow management tool – previously known as the
Batch Manager . Technical improvements make lar ge-scale processing more robust, with
better reporting and separation of problematic documents and improved recovery from
critical situations. Differing default settings for Workflow Assistant and DocuDirect are
introduced to better match their purposes.
• Make PDF file searchable: A new workflow step is available inside DocuDirect. Input
See “At a later time” on page 23.
is a set of PDF files of any flavor. This step discovers image-only parts or pages, runs
OCR and adds the text to the PDF, leaving notes and annotations intact. This
functionality exists in the ‘eDiscovery Assistant for searchable PDF’, but is now
available for a job, allowing for timed, recurring and unattended job running, plus the
use of watched folders.
• Electronic book support: The widely-used ePub file type is now supported with three
See “eDiscovery Assistant for searchable PDF” on page 63.
output converter choices. Export your scanned documents or image files to your favorite
portable devices. This augments the existing ability to save texts to Amazon’s Kindle
book reader.
• Augmented audio support: The premium speech product Nuance Vocalizer Expressive
See “Sending to eBook Readers” on page 64.
is supplied with OmniPage. It provides support for exporting to mp3 files in English,
French and German – listen to your documents on the go! The existing Nuance
RealSpeak Solo remains available with language support boosted from 9 to 14
(Japanese, Polish, Russian, Turkish and Australian English). It allows recognized texts
to be read aloud, and also provides for saving to mp3 files.
See “Reading T ext Aloud” on
page 54.
• Automated handling of digital camera images: OmniPage now detects whether an
image came from a digital camera by reading the EXIF-data that digital cameras
generate. The auto-deskew option can be turned on or off. If it is on, the program applies
2D or 3D deskewing (for normal or camera images). Resolution enhancement and the
straightening of text lines are applied to images coming from a digital camera.
See
“Input from digital camera” on page 26.
• Support for Windows 8 and Office 2013: Support for Windows 8 and Office 2013.
OmniPage Ultimate runs with this latest operating system and its applications. The
updated PDF Create product (version 8) supplied with OmniPage is also Windows 8
compliant.
A more complete list of features, and the differences between various OmniPage versions
appears in Help.
Welcome New Features in OmniPage Ultimate 3
Page 8

Key Features in OmniPage Ultimate
Click the links for more information.
• Customize Windows Explorer shortcut menus: The OmniPage items in the W indows
Explorer shortcut menus of input files allow direct conversion to popular file formats,
and the addition of user-defined workflows to the menu; the Convert Now Wizard
makes it easy to customize the conversion process.
• Handling multiple documents: Multiple document handling allows you to work on
more than one document at a time. Page thumbnails can be displayed from another open
document, for drag-and-drop copying or moving of pages between documents.
• Cloud support: Download input files from web storage sites and return recognition
results there. The included Nuance Cloud Connector (NCC) application provides access
to a number of cloud services including Microsoft SkyDrive, GoogleDocs, Box and
many more. The Connector integrates into Microsoft Windows providing easy drag-anddrop access directly to cloud services. OmniPage provides separate integration with
Evernote and Dropbox.
• Scanner enhancement (SET) tools: Recent innovation includes more control over
despeckling, better margin cleaning and a control for when whiteboard content is
captured by digital camera; the text and diagrams can be enhanced for maximum
readability.
See “Preprocessing Images” on page 31.
See “Input from the Cloud” on page 25.
• Asian recognition: OCR services are provided for Japanese, Korean, Simplified
Chinese and Traditional Chinese, with support for both horizontal and vertical text flow
and embedded English texts. Results can be viewed and verified in the Text Editor.
“Asian language recognition” on page 48.
• Automatic Language Detection: Allow the program assign a single language to each
incoming page during unattended processing. It chooses from the languages with
dictionary support that use a Latin-based alphabet. When this feature is enabled, no
manual language selection is possible.
• Easy Loader: This provides a Windows Explorer-like display of the file system in one
See “Languages” on page 47.
of the OmniPage windows, to keep files visible during your work and deliver full
Explorer functionality, yielding quick file selections; a dialog box with a lock facility
lets a file set be built up before loading starts. With Quick Convert View, Easy Loader
allows not only fast file loading but also 'one-click' total processing: load > recognize >
save.
See “Input via Easy Loader” on page 26.
Welcome Key Features in OmniPage Ultimate 4
See
Page 9

•
Linking workflows to scanner buttons: OmniPage functions and workflows can be
associated with scanner buttons, so the whole pre-processing, recognition and storage of
documents can be launched from the scanner. See “Scanning to OmniPage and
workflows” on page 29.
Features in OmniPage Ultimate only
This icon is used throughout the guide to denote features that are available only in
OmniPage Ultimate.
• Enterprise Content Management (ECM) links are available to Hummingbird (Open
Text) and iManage (Interwoven). When using SharePoint, the server, login and
password information must be provided only once per session, and is offered in each
subsequent session.
• Extracting data from filled forms: A workflow step allows data to be extracted from
sets of forms and exported to databases, based on a PDF form template. The forms to be
processed can be active PDF forms, static forms in a range on image formats or scanned
paper forms.
• File-it Assistant: A more efficient aid for creating and using barcode cover page
workflows. These allow for automatic processing and storage of documents driven by
the push of just one scanner button.
• Marking and redacting: Text can be highlighted, strikeout or redacted (made
unreadable) in the Text Editor. This can be done by selection or by searching for
specified words. Redacting is useful for legal documents or for those with confidential
content.
Welcome Key Features in OmniPage Ultimate 5
Page 10

Installation and Setup
This chapter provides information on installing and starting OmniPage.
System Requirements
Supported Operating Systems:
• Microsoft Windows
• Microsoft Windows
• Microsoft Windows
• Windows Server 2008 R2
• Windows Server 2012
The minimum hardware requirements to install and run OmniPage Ultimate are:
• A computer with a 1 GHz Intel
• 1GB of memory (RAM), 2GB recommended
• Microsoft Internet Explorer 8 or above
• 2.7 GB total hard drive space for all components:
• 300 MB for application components plus 100 MB during installation
• 250MB for all Nuance RealSpeak
English language module, additional 10-15MB per other RealSpeak Solo
language modules; languages can be custom installed)
• 30MB for the Nuance Cloud Connector
• 200 MB for Nuance PDF Create (Supplied with OmniPage Ultimate only).
• 700MB for PaperPort
• 1.2GB for Vocalizer Expressive
® 8TM
® 7TM
®
32-bit and 64-bit Editions
32-bit and 64-bit Editions
XPTM 32-bit Edition with Service Pack 3
®
Pentium® or higher, or equivalent processor
®
Solo (90MB for RealSpeak® Solo American
®
(Supplied with OmniPage Ultimate only).
®
speech modules (120-500 MB per language)
• 1024x768 pixel color monitor
• A DVD drive for installation, unless utilizing a digital download
• A sound card and speaker for reading text aloud.
• A Windows compatible pointing device.
Installation and Setup System Requirements 6
Page 11

• 2-megapixel digital camera with auto-focus or higher for digital camera text capture.
See Help for details.
• A compatible scanner with its own scanner driver software for scanning documents
(WIA, TWAIN, or ISIS scanner driver). See the Scanner Guide at Nuance’s web site
(www.nuance.com ) for a list of supported scanners
• Web access needed for online Activation, Registration, Live Update, Nuance Cloud
Connectors, and Scanner Wizard database updating
• East Asian language handling must be installed in the operating system to view
Japanese, Chinese or Korean documents. (Control Panel / Regional and Language
Options).
Note: Performance and speed is enhanced if your computer's processor, memory, and available
disk space exceed minimum requirements. This is especially true when converting very large
color PDF files.
Installing OmniPage
OmniPage Ultimate’s installation program takes you through installation with instructions on
every screen.
Before installing OmniPage:
• Close all other applications, especially anti-virus programs.
• Log into your computer with administrator privileges.
• If you own a previous version of OmniPage, or if you are upgrading from demonstration
software or an OmniPage Special Edition, you must uninstall that product first.
To install OmniPage:
1. Download the program file and choose Run when the download is completed, or insert the
OmniPage DVD-ROM in your DVD-ROM drive. The installation program should start
automatically. If it does not start, locate your DVD-ROM drive in Windows Explorer and
double-click the Autorun.exe program at the top-level of the DVD-ROM.
2. Choose a language to use during installation. Before installing, accept the End-User License
Agreement and enter the serial number you receive by e-mail or find on the DVD envelope.
3. Choose a complete or a custom installation. A complete installation installs all RealSpeak
Text-to-Speech language modules (currently 14) and Vocalizer Expressive
®
(four voice
®
modules: British and American English, French and German). Custom installation lets you
Installation and Setup Installing OmniPage 7
Page 12

exclude or add modules. To exclude a module, click its down arrow and select ‘This feature
will not be available’.
4. Follow the instructions on each screen to install the software. All files needed for scanning
are copied automatically during installation.
Unless deselected in the OmniPage Ultimate installation, Nuance PDF Create 8 installation
starts as soon the installation of OmniPage is completed. Document-to-document conversions
depend on PDF Create being present.
OmniPage Ultimate is supplied with a complimentary copy of the Nuance PaperPort
®
14
Professional document management product. This must be installed separately and has its own
system requirements.
Setting up Your Scanner with OmniPage
All files needed for scanner setup and support are copied automatically during the program’s
installation, but no scanner setup occurs at installation time. Before using OmniPage for
scanning, your scanner should be installed with its own scanner driver software and tested for
correct functionality. Scanner driver software is not included with OmniPage.
Scanner setup is done through the Scanner Setup Wizard. You can start this yourself, as
described below. Otherwise, it appears when you first attempt to perform scanning.
Proceed as follows:
• Choose Start > All Programs > Nuance OmniPage Ultimate> Scanner Setup Wizard
or click the Setup button in the Scanner panel of the Options dialog box.
or choose Scan in the Get Page drop-down list in the OmniPage Toolbox and click the
Get Page button.
• The Scanner Setup Wizard starts. If you have a web connection, the first panel invites
you to update the scanner database supplied with the wizard. Choose Yes or No and
click on Next.
• Choose ‘Select and test scanner or digital camera’, then click Next. If you have a single
installed scanner, it appears, along with any scanners previously set up with OmniPage.
If the required scanner is not listed, click Add Scanner... .
• You see a list of all detected scanner drivers in the selected categories. This can include
network devices. Select one and click OK. To install a second device, you must run the
Scanner Wizard again.
Installation and Setup Setting up Your Scanner with OmniPage 8
Page 13

• The wizard reports whether the chosen scanner model already has settings in the scanner
database. If it does, you do not need to test it. If it does not, you should test it. Click on
Next.
• If you chose not to test, click Finish. If you chose testing, click Next to have the scanner
connection tested. If the connection is in order, you see a menu of further tests. Choose
which testing steps you want to run. The Basic test scan is recommended.
• By default OmniPage uses its own scanning interface, located in the Scanner panel of
the Options dialog box. If you want to use your scanner’s own interface instead, choose
Advanced settings... and select this. Click Hint editor... and choose Edit hints... only if
you are experienced in configuring scanners or have been advised by Technical Support
to do so.
• Click Next to start the tests. For the Basic scan test, insert a test page into your scanner.
The wizard will scan using your scanner manufacturer’s software. Click on Next. Your
scanner’s native user-interface will appear.
• Click on Scan to begin the sample scan.
• If necessary, click on Missing Image… or Improper Orientation... and make the
appropriate selections.
• Once the image appears correctly in the window, click on Next.
• Move through the remaining requested tests, following the instructions on the screen.
• When all the requested tests have been completed successfully, the Scanner Wizard
reports and invites you to click on Finish.
• You have successfully configured your scanner to work with OmniPage Ultimate!
To change the scanner settings at a later time, or to setup or remove a scanner, reopen the
Scanner Setup Wizard from the Windows Start menu or from the Scanner panel of the Options
dialog box.
To test and repair an improperly functioning scanner, open the wizard and select ‘Test the
current scanner or digital camera’ in the second panel, then work through the procedure
described above, maybe using advice received from Technical Support.
To specify a different default scanner, open the wizard to reach the list of setup scanners. Move
the highlight to the desired scanner and be sure to close the wizard with Finish.
To get updated settings for your current scanner, open the wizard, request a fresh database
download in the first screen, then choose ‘Use current settings with current device’, click Next
and then Finish.
Installation and Setup Setting up Your Scanner with OmniPage 9
Page 14
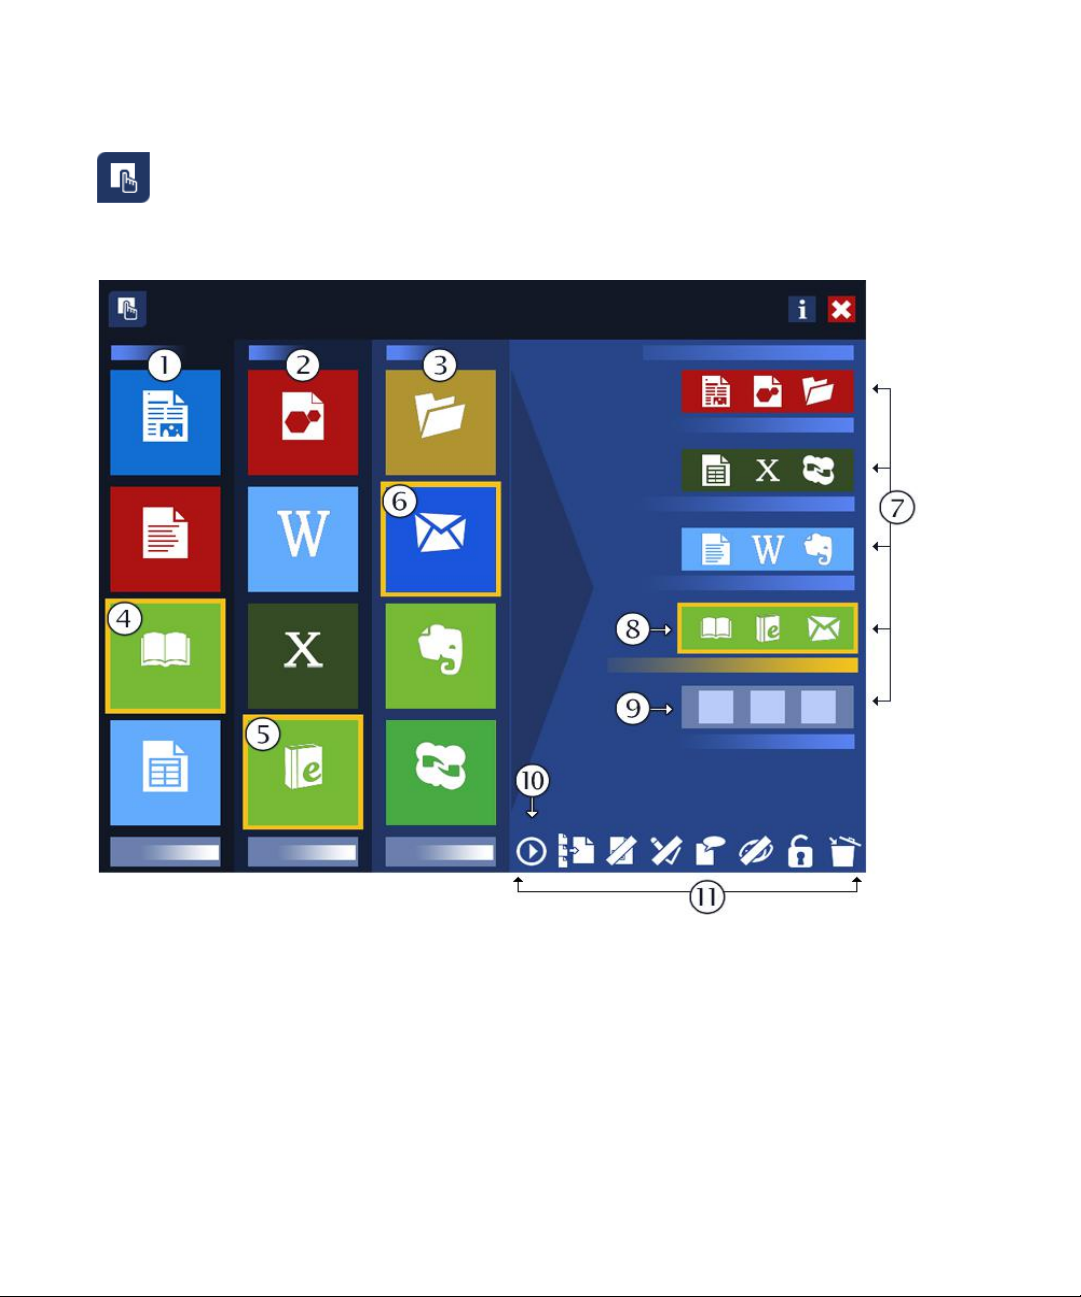
How to Start the Program
OmniPage Ultimate features OmniPage Launchpad, a new clear-cut metro-style start
page for simplified, faster conversions. Click S
All Programs > Nuance OmniPage Ultimate>OmniPage Launchpad for accessing it.
The OmniPage Launchpad looks like this:
tart in the Windows taskbar and choose
1. The Build panel column ‘Convert’ – choose a page type that best describes the layout of the
input document.
2. The Build panel column ‘To’ – choose the output file type you desire.
3. The Build panel column ‘Save’ – choose a destination for the recognition results.
4. The currently selected ‘Convert’ tile.
5. The currently selected ‘To’ tile.
Installation and Setup How to Start the Program 10
Page 15

6. The currently selected ‘Save’ tile. These three form the Go-flow in the fourth slot.
7. The Go-flow slots.
8. The currently selected Go-flow, just compiled from the selected Build Panel tiles.
9. The last unfilled Go-flow slot.
10. Run the selected Go-flow.
11. The Settings bar – collection of eight buttons (six of them with two different states) for
managing the prepared Go-flows. The buttons are the following in left to right order: Run
Go-flow , File separation, Zoning (on or off), Proofing, Language, Display results (on or of f),
Unlocked / Locked, Clear Go-flow.
To start OmniPage Ultimate do one of the following:
• Click Start in the Windows taskbar and choose All Programs > Nuance OmniPage
Ultimate.
• Double-click the OmniPage icon in the program’ s installation folder or on
the Windows desktop if placed there.
• Double-click an OmniPage Document (OPD) icon or file name; the
clicked document is loaded into the program. See “OmniPage Documents” on
page 14.
• Right-click one or more image file icons or file names for a shortcut menu.
Select Open With... OmniPage application. The images are loaded into the
program.
On opening, OmniPage’s title screen is displayed and then a view selection panel. OmniPage
has three basic view types. For details, See “The OmniPage Desktop and V
provides an introduction to the program’
s main working areas.
iews” on page 15. It
There are several ways of running the program with a limited interface:
• Use the DocuDirect program. Click Start in the Windows taskbar and choose All
Programs > Nuance OmniPage Ultimate > OmniPage DocuDirect. See “Workflows” on
page 68.
• Click Acquire Text from the File menu of an application registered with the Direct
OCR™ facility. See “How to set up Direct OCR” on page 24.
• Right-click on one or more image file icons or file names in Windows Explorer for a
shortcut menu. Select OmniPage Ultimate and choose a target format, or the Convert
Now Wizard or a workflow from its sub-menu. The files will be processed according to
the workflow instructions. See “Workflows” on page 68.
Installation and Setup How to Start the Program 11
Page 16

• Click the OmniPage Agent icon on the taskbar. Choose a workflow to start the
program and run the workflow.
• Use OmniPage Ultimate with Nuance’s PaperPort document management product, to
add OCR services. See “How to Use OmniPage with PaperPort” on page 21.
Registering your Software
Nuance’s online registration runs at the end of installation. Ensure web access is available. We
provide an easy electronic form that can be completed in less than five minutes. When the form
is filled, click Submit. If you did not register the software during installation, you will be
periodically invited to register later. Y ou can go to www .nuance.com to register online. Click on
Support and from the main support screen choose Register in the left-hand column. For a
statement on the use of your registration data, please see Nuance’s Privacy Policy.
Activating OmniPage
• Trial User: If you downloaded a trial version of OmniPage Ultimate from the Nuance
website, no serial number is necessary for using the program until the trial period ends.
You can buy one any time during the trial period or after it. If you do not activate the
product at installation time, you are prompted to do this at the end of installation and
each time you invoke the program. Once your serial number has been entered correctly,
you can use the program without any limitations. OmniPage Ultimate can be launched
any number of times within the trial period.
• Licensed User: If you purchased a retail copy of OmniPage Ultimate either in a store or
via downloading from the Nuance website, you already have a serial number in the
packaging of your DVD disc or in your email inbox folder . Enter this when prompted by
the program. Until you activate the product, it runs in trial mode as explained above.
The program offers only automatic activation; manual activation is more cumbersome and is
only of
fered if internet access is not available. No personal information is transmitted during
activation or product use neither in trial mode nor in licensed mode.
Installation and Setup Registering your Software 12
Page 17

Uninstalling the Software
Sometimes uninstalling and then reinstalling OmniPage will solve a problem. The OmniPage
Uninstall program will not remove files containing recognition results or any of the following
user-created files:
Zone templates (*.zon)
Image enhancement templates (*.ipp)
Training files (*.otn)
User dictionaries (*.ud)
OmniPage Documents (*.opd)
Job files (*.opj)
Workflow files (*.xwf)
To uninstall you must be logged into your computer with administrator privileges.
To uninstall or reinstall OmniPage:
• Close OmniPage.
• Click Start in the Windows taskbar and choose the Control Panel and then Uninstall a
program (in earlier Windows versions: Add/Remove Programs).
• Select OmniPage and click Uninstall (in earlier Windows versions: Remove).
• Click Yes in the dialog box that appears to confirm removal.
• Select Yes to restart your computer immediately, or No if you plan to restart later.
• Follow instructions until the process is finished.
When you uninstall OmniPage, the link to your scanner is also uninstalled. You must setup your
scanner again with OmniPage if you reinstall the program. All RealSpeak
®
and Vocalizer
Expressive® modules that were installed with the program will also be uninstalled. With
OmniPage Ultimate, Nuance PDF Create 8 and PaperPort must be uninstalled separately.
Installation and Setup Uninstalling the Software 13
Page 18

Using OmniPage
OmniPage Ultimate uses optical character recognition (OCR) technology to transform text
from scanned pages or image files into editable text for use in your favorite computer
applications.
In addition to text recognition, OmniPage can retain the following elements and attributes of a
document through the OCR process.
Graphics (photos, logos)
Form elements (checkboxes, radio buttons, text fields)
Text formatting (character and paragraph)
Page formatting (column structures, table formats, headings, placing of graphics)
Documents in OmniPage
A document in OmniPage consists of one image for each document page. After you perform
OCR, the document will also contain recognized text, displayed in the T
along with graphics, tables and form elements
.
OmniPage Documents
ext Editor, possibly
An OmniPage Document (.opd) contains the original page images (optionally preprocessed) with any zones placed on them. After recognition, the OPD also contains
the recognition results.
An OmniPage Document can contain an embedded user dictionary
template file, or an image enhancement template file. This can increase file size considerably
but makes the OPD more portable. To embed a file, open the relevant dialog box from the
T ools menu, select the desired fi le and click Embed. Use the Extract button to get a local copy
of an embedded file inside an OPD you have received.
When you open an OmniPage Document, its settings are applied, replacing those existing in
the program.
Using OmniPage OmniPage Documents 14
, training file, zone
Page 19

The OmniPage Desktop and Views
OmniPage comes with three different views to suit your task.
• Classic View - This view has a similar look and feel to previous versions of
OmniPage.
• Flexible View - This view provides an alternate layout of the OmniPage function
panels stacked in a tabbed view to give each panel more space.
• Quick Convert View - This view is designed for quick and easy document conversion
without having to learn a lot. The most important conversion options are clearly
visible on one screen.
Use the Window menu to switch between views and to save your own custom view (see later).
On starting a new session you receive the view and screen arrangement that was in force
when the program was last closed.
All three views can be reset to default values using ‘Reset Current View’ in the Windows
menu.
Program Panels
OmniPage has a set of panels that can be docked (tabbed or tiled), floated, resized, minimized
and restored separately. These include: Thumbnails, Page Image, Text Editor, Document
Manager, Easy Loader, Workflow Status, and Help. To float a panel double-click its title bar
or tab. To restore the floating panel to its previous docked position, double-click its title bar.
To dock it to a new location, drag it to that location. A colored rectangle shows the docking
position - release the mouse button to dock it. To see all possible docking positions one after
the other (tiles and tabs), drag the panel over the OmniPage main window, holding down the
left mouse button and pressing the spacebar repeatedly . When the desired location is indicated
by coloring, release the mouse button. To move a floating panel without docking displays,
keep CTRL pushed while dragging.
Classic View
In Classic View, the default OmniPage Desktop has four main tiled working areas, separated
by splitters: the Document Manager, the Page Image, Thumbnails and the Text Editor. The
Page Image has an Image toolbar and the Text Editor has a Formatting toolbar.
Using OmniPage The OmniPage Desktop and Views 15
Page 20
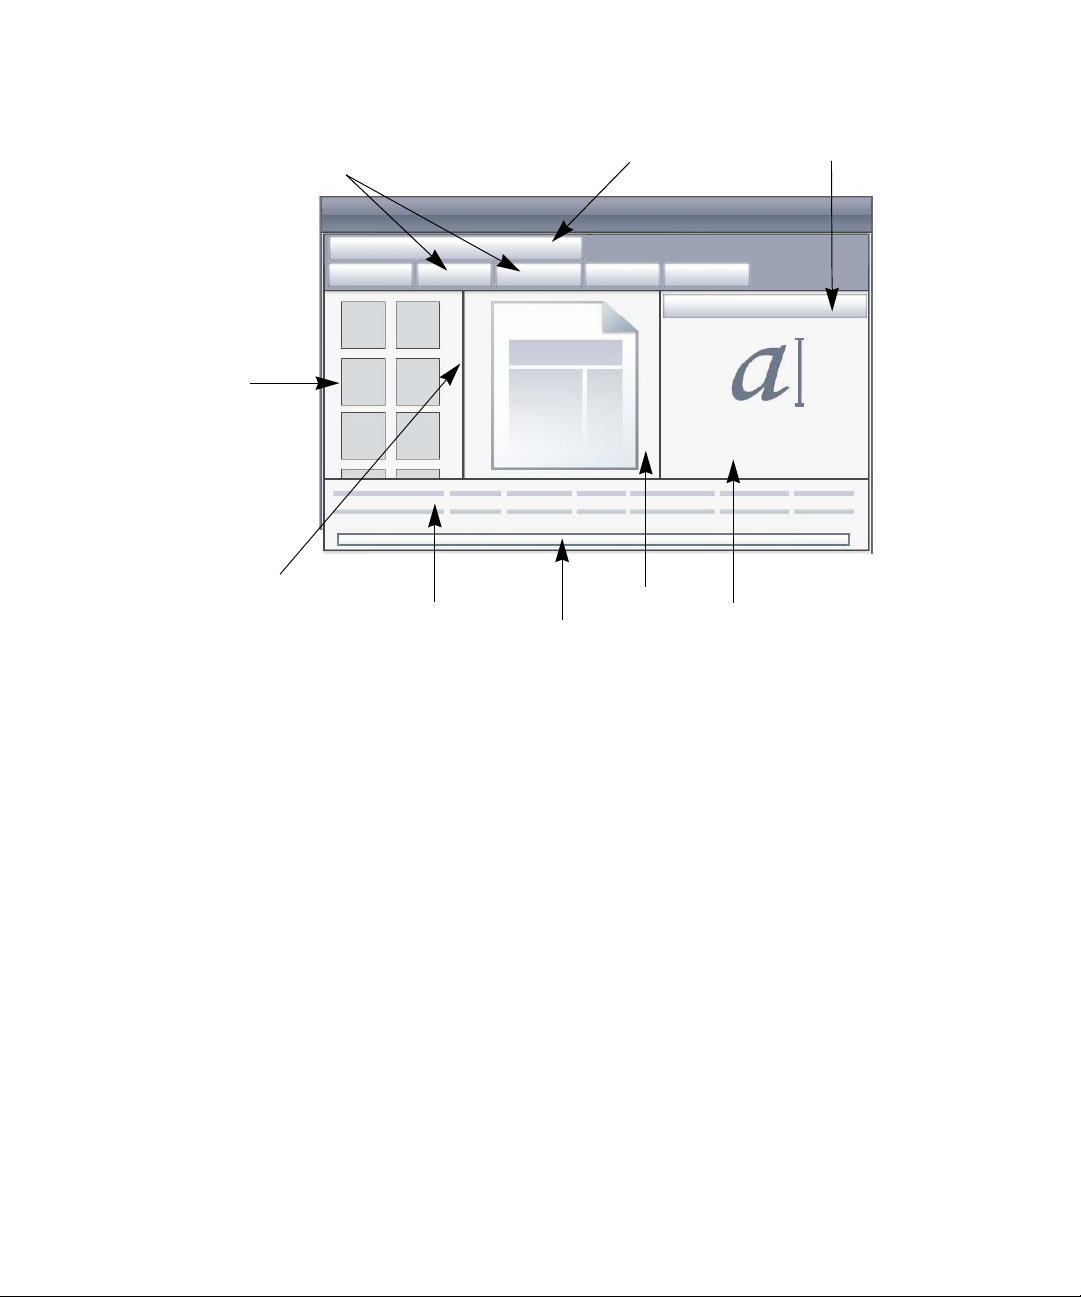
Standard
Toolbar
Formatting toolbar
Page Image
Text Editor
Document
Manager
OmniPage
Toolbox
Thumbnails
Status bar
Image
toolbar
OmniPage toolbox: This Toolbox lets you drive the processing.
Thumbnails panel: This displays page thumbnails.
Document Manager: This provides an overview of your document with a table. Each row
represents one page. Columns present statistical or status information for each page, and
(where appropriate) document totals.
Page Image: This
displays the image of the current page with its zones. When a page is
displayed, the Image toolbar is available.
Text Editor: Displays recognition results from the current page.
Panels can be re-arranged freely - horizontally or vertically; use the W
Easy Loader, Workflow Status or Help panels. Panels can be minimized or closed, but not
indow menu to open the
tabbed. To restore the default Classic View appearance, choose Reset Current View in the
Window menu.
Using OmniPage The OmniPage Desktop and Views 16
Page 21
Flexible View
Use this view to set up the OmniPage workspace so that it fits your task optimally. By default
all panels appear. There are five tabs: Page Image (including Thumbnails), Text Editor, Easy
Loader, Workflow Status and Help. The Document Manager appears in a horizontal panel at
the base of the working area. You can undock, move, minimize, group or close panels as
already described. Drag a tab onto the working area to convert it to a Classic-type tiled panel.
Drag it back to the tab bar to revert to a tabbed panel, or use the Spacebar as already
described. If panels are grouped, the tab name shows the active one. To restore the default
Flexible View appearance, choose Reset Current View in the Window menu.
Easy Loader provides a Windows Explorer type file listing and functionality that can remain
open during the session, allowing quick file selection and assembly (see Chapter 4, page 26).
Suggested scenarios:
Maximizing workspace (single screen)
Load a document. Open the panels you want to use. Grab them by their
captions one by one, and drag them so that they dock beside the active
one as tabs. Y
ou can also dock Help to avoid handling two separate
windows.
Working with recognition results (single screen)
Load a document and have it recognized. Close all panels except the
Document Manager and the Text Editor
. Maximize both horizontally,
scale down the Document Manager and dock it to the top or bottom.
You can now step through the pages double-clicking them one by one
in the Document Manager, inspecting recognition results in the Text
Editor. The number of suspect words and reject characters in the
Document Manager will help you identify problematic pages.
Handling large documents (dual-screen)
Load the document you want to work on. Move its Thumbnail V
iew to
your second monitor and maximize it for a large scale overview of
your document and far more space for thumbnail operations.
Using OmniPage The OmniPage Desktop and Views 17
Page 22
Verifying (dual-screen)
Quick Convert Options:
document source and layout
output text format, formatting level
output folder and file name
saving options
page range
Page Image
Quick
Convert
toolbar
Processing
buttons
Page Image
panel title
Quick
Convert
Options on
toggled tab
with Easy
Loader
Place the Page Image on one screen and the Text Editor on the other.
This gives you more space for editing and proofing.
The Page Image is always available for verifying recognition and for
performing on-the-fly zoning and editing.
The scenarios presented above are only examples to give you an
idea of what you can do in Flexible View.
Quick Convert View
Use the Quick Convert View for fast recognition and saving. You can switch to Quick View
only when you have no opened document and it can handle only one input file and one output
document at a time.
The picture shows the default appearance.
Using OmniPage The OmniPage Desktop and Views 18
Page 23

The Easy Loader is by default on a tab that toggles with the Quick Convert Options panel. A
Help panel can be added, but further panels are not available in this view . You can change tabs
to separate panels and minimize them, as in other views.
After loading a file, you should convert it before loading the next file. When an image
conversion is finished, you do not need to explicitly close the image; just load a new file.
The Easy Loader in Quick View provides an additional feature: ‘one-click’ processing.
Choose the Easy Loader sub-menu in the Process menu and choose either Load Files or Get
and Convert. When the latter is chosen, multiple files can be selected – these files are loaded,
recognized and saved using the current settings. For this, set the output file names to be the
same as the source file names. See
Chapter 4, page 26 and the Help for details.
The Quick View Page Image panel includes the Quick Convert toolbar, offering the most
useful image handling operations. T o access advanced functionality, such as image file saving,
SET tools, on-the-fly zoning, zone reordering and manual zone drawing for vertical text, a
different view should be used.
Custom views
For a custom view, arrange the panels and toolbars as you wish, then choose Window >
Custom Views > Manage. Click Add and name your view. Your screen layouts will be
displayed in the Custom V iews submenu with a checkmark beside the active one. Resetting to
a default is not available for custom views.
Changing views
Use the Window menu to change views. Panels are shown or hidden and arranged as they
were when the chosen view was last used. The Help topic on display remains unchanged
regardless of view. Easy Loader retains its file location regardless of view and the Workflow
Status continues to display information on the last workflow run. On program restart, Help
displays the Welcome topic, Easy Loader the default folder location and Workflow status is
empty.
The Toolbars
The program has eleven main toolbars. Use the View menu to show, hide or customize them.
Status bar texts at the bottom edge of the OmniPage program window explain the purpose of
all tools.
Standard toolbar: Performs basic functions.
Using OmniPage The OmniPage Desktop and Views 19
Page 24

Image toolbar: Performs image, zoning and table operations. Three of its tool groups can
now be handled separately (mini-toolbars):
• Zones toolbar: Offers zoning tools.
• Rotate toolbar: Provides rotating tools.
• Table toolbar: Inserts, moves and removes row and column dividers.
Formatting toolbar: Formats recognized text in the Text Editor.
Verifier toolbar: Controls the location and appearance of the verifier.
Reorder toolbar: Modifies the order of elements in recognized pages.
Mark Text toolbar: Performs text marking and redacting.
Form Drawing toolbar: Creates new form elements.
Form Arrangement toolbar: Arranges and aligns form elements.
All toolbars can be moved and customized in each view to your particular needs, including
use of a secondary monitor
.
The Form toolbars and the Mark Text toolbar (for details see Chapter 4, page 53)
appear only in OmniPage Ultimate.
Basic Processing Steps
There are three ways of handling documents: with automatic, manual or workflow processing.
The basic steps for all processing methods are broadly the same:
1. Bring a set of images into OmniPage. You can scan a paper document with or
without an Automatic Document Feeder (ADF) or load one or more image files
from your file system, storage sites in the Cloud, FTP and more.
2. Perform OCR to generate editable text. After OCR, you can check and correct
errors in the document using the OCR Proofreader and edit the document in the
T
ext Editor.
3. Export the document to the desired location. You can save your document to a
specified file name and type, place it on the Clipboard, send it as a mail attachment
or publish it. Y
ou can save the same document repeatedly to different destinations,
different file types, with different settings and levels of formatting.
Using OmniPage Basic Processing Steps 20
Page 25
Using OmniPage, you can choose from the following processing methods: Automatic,
Manual, Combined, or Workflow. You can start recognition from other applications, using
Direct OCR and can also schedule processing to run at a later time.
Processing methods are detailed in the next chapter and in the Help.
Settings
The Options dialog box is the central location for OmniPage settings. Access it from the
Standard toolbar or the Tools menu. Context-sensitive help provides information on
each setting.
How to Use OmniPage with PaperPort
The PaperPort® program is a paper management software product from
Nuance. It lets you link pages with suitable applications. Pages can
contain pictures, text or both. If PaperPort exists on a computer with
OmniPage, its OCR services become available and amplify the power of
PaperPort. Y
application’s PaperPort link, selecting Preferences and then selecting
OmniPage Professional 19 as the OCR package. OCR settings can be
specified, as with Direct OCR.
PaperPort
documents that everybody in an office can quickly find and use.
PaperPort works with scanners, multifunction printers, and networked
digital copiers to turn paper documents into digital documents. It then helps you to manage
them along with all other electronic documents in one convenient and easy-to-use filing
system.
PaperPort’s large, clear item thumbnails allow you to visually or
scanned documents, including Word files, spreadsheets, PDF files and even digital photos.
PaperPort’s Scanner Enhancement Technology tools ensure that scanned documents will look
great while the annotation tools let you add notes and highlights to any scanned image.
ou can choose an OCR program by right-clicking on a text
provides the easiest way to turn paper into organized digital
ganize, retrieve and use your
PaperPort is included in the OmniPage Ultimate package. For application
information, refer to PaperPort’s own documentation. PaperPort must be installed
and uninstalled separately from OmniPage.
When PaperPort is available, its folder struc
ture is offered in OmniPage’s Load from File and
Save to File dialog boxes.
Using OmniPage How to Use OmniPage with PaperPort 2 1
Page 26

Processing Documents
This tutorial chapter describes different ways you can process a document and also provides
information on key parts of this processing.
Processing Methods
Using OmniPage, you can choose from the following processing methods:
Automatic
A fast and easy way to process documents is to let OmniPage do it automatically for you.
Select settings in the Options dialog box and in the OmniPage Toolbox dropdown lists and then click Start. It will take each page through the whole process
from beginning to end, when possible running in parallel. It will typically autozone the pages.
Manual
Manual processing gives you more precise control over the way your pages
are handled. You can process the document page-by-page with dif
settings for each page. The program also stops between each step: acquiring
images, performing recognition, exporting. This lets you, for instance, draw
zones manually or change recognition language(s). You start each step by
clicking the three buttons on the OmniPage Toolbox.
ferent
1. Use button one to get a set of images.
2. Manually zone pages where you want to process only part of the page or if you want to
give precise zoning instructions. Use Ignore backgrounds or zones to exclude areas from
processing. Use process backgrounds or zones to specify areas to be auto-zoned.
3. Use button two to have the pages recognized.
4. Do proofing and editing as desired.
5. Use button three to save your results.
Processing Documents Processing Methods 22
Page 27

The default for manual processing is to have all entered pages automatically selected. This
way you can have all new pages recognized by a single mouse click. You can remove this
default in the Process panel of the Options dialog box.
Combined
You can process a document automatically and view results in the Text Editor. If most pages
are in order, but a few have not turned out as expected, you can switch to manual processing to
adjust settings and re-recognize just those problem pages. Alternatively, you can acquire
images with manual processing, draw zones on some or all of them, and then send all pages to
automatic processing by pressing the Start button and choosing to process existing pages.
Workflow
A workflow consists of a series of steps and their settings. Typically it will include a
recognition step, but it does not have to. It does not have to conform to the 1-2-3
pattern of traditional processing. Workflows are listed in the Workflow drop-down
list – sample workflows plus any you create. Workflows allow you to handle
recurring tasks more efficiently, because all the steps and their settings are pre-defined. You
can choose to place the OmniPage Agent icon on your taskbar. Its shortcut menu lists your
workflows. Click a workflow to launch OmniPage and have it run.
Let the W orkflow Assistant guide you in creating new workflows. It provi des a choice of steps
and the settings they need. Click Next after each step to add another one. Y
Assistant just to get more guidance when doing automatic processing. See “Workflow
Assistant” in Chapter 4, page 70
.
ou can use the
At a later time
You can schedule OCR jobs or other processing jobs in OmniPage DocuDirect to be
performed automatically at a later time, when you may not even be present at your
computer
turned off after the job is set up, so long as it is running at job start time. If you are scanning
pages, your scanner must be functioning at job start time, with the pages loaded in the ADF.
When you choose New Job, first the Job Wizard, and then the Workflow Assistant appears the latter with a slightly modified set of choices and settings. In the first panel of the Job
Wizard, you define your job type and name your job; next you are to specify a starting time, a
recurring job or watched folder instructions.
A job incorporates a workflow with timing instructions added. See “DocuDirect” on page 72.
Processing Documents Processing Methods 23
. This is done through DocuDirect.
It does not matter if your computer is
Page 28

Processing from other applications
You can use the Direct OCR™ feature to call on the recognition services of OmniPage while
you work in the following applications: Microsoft Office XP or higher, Corel WordPerfect 12
or X3. First you must check the Enable Direct OCR check box under Tools > Options >
General. Then, two buttons in the Office 2010 or 2013 Nuance OCR tab, or in an OmniPage
toolbar open the door to OCR facilities.
How to set up Direct OCR
Start the application you want connected to OmniPage. Start OmniPage, open the Options
dialog box at the General panel and select Enable Direct OCR.
In the target application, use the
Acquire T ext Settings button in the OmniPage toolbar (in
Office 2010 or 2013 go to the Nuance OCR tab). Select options in the following panels:
• OCR: languages, dictionaries, layout, fonts.
• Process: Image pre-processing, choices for PDF opening, feature retention.
• Output format: Set a formatting level
• Direct OCR: Automatic or manual zoning, perform or skip proofing, image source.
• Scanner: Set-up or change scanner settings.
These function for future Direct OCR work until you change them again; they are not applied
when OmniPage is used on its own.
How to use Direct OCR
Open your application and work in a document. To acquire recognition results from
1.
scanned pages, place them correctly in the scanner.
2. Use the OmniPage toolbar button Acquire T ext Settings or the same item in the target
application’s File menu (or the Nuance OCR tab in Of
fice 2010 and 2013) to review your
recognition settings, if necessary; the Direct OCR panel lets you specify input from
scanner, image file or digital camera image files.
3. Use the OmniPage toolbar button Acquire T ext or the same item in the File menu (use
the Nuance OCR tab in Office 2010 or 2013) to acquire images from the specified source.
4. If you selected Draw zones automatically in the Direct OCR panel of the Options dialog
box, under Acquire Text Settings, recognition proceeds immediately.
5. If Draw zones automatically is not selected, each page image will be presented to you,
allowing you to draw zones manually. Click the Perform OCR button to continue with
recognition.
Processing Documents Processing Methods 24
Page 29

6. If proofing was specified, this follows recognition. Then the recognized text is placed at
the cursor position in your application, with the formatting level specified in the Output
Format panel under Acquire Text Settings.
Defining the Source of Page Images
There are three possible image sources: from image files, from a digital camera and from a
scanner. There are two main types of scanners: flatbed or sheetfed. A scanner may have a
built-in or added Automatic Document Feeder (ADF), which makes it easier to scan multipage documents. The images from scanned documents can be input directly into OmniPage or
may be saved with the scanner’s own software to an image file, which OmniPage can later
open.
The minimum width or height for an image file is 16 by 16 pixels; the maximum is 8400
pixels (71cm or 28 inches at the resolution 201 to 600 dpi). See Help for pixel limits.
You can govern how PDF files are opened under T
layer or as image, import tag information to assist layout retention and whether to use PDF
fonts or the mapped system fonts. See the eDiscovery Assistant for searchable PDF section
on how to make image-only PDF files searchable.
ools / Options / Process: open with the text
Input from image files
You can create image files from your own scanner, or receive them by e-mail or as fax files.
OmniPage can open a wide range of image file types. Select Load Files in the Get Pages dropdown list. Files are specified in the Load Files dialog box. This appears when you start
automatic processing. In manual processing, click the Get Page button or use the Process
menu. The lower part of the dialog box provides advanced settings, and can be shown or
hidden.
Input from the Cloud
The Get Pages drop-down list offers direct connections to the following web-based storage
sites: Evernote and Dropbox.
OmniPage Ultimate is delivered with a Nuance Cloud Connector component
that can be easily configured by choosing it from the W
the OmniPage group. Specify which further Cloud sites you wish to access, and
also which FTP sites you want to use for file input.
When taking files from the cloud you may have to provide login information.
indows Start menu in
Processing Documents Defining the Source of Page Images 25
Page 30

In OmniPage Ultimate, files can also be imported from Microsoft SharePoint
2003, 2007 and 2010, Hummingbird, iManage and ODMA-compliant
Enterprise Content Management sources.
Input from digital camera
Digital camera files are auto-detected in OmniPage Ultimate, hence there is
no need to use Load Digital Camera Files button. Auto-detection of camera
files means that now they can be processed as camera files from any source,
even from the cloud. However, in case a non-camera file whose content is similar to a camera
file is to be processed, the Load Digital Camera Files button can be used. For tips and advice
on working with digital camera images see the How-to-Guides and the Help.
Input via Easy Loader
This provides the Windows Explorer interface in an OmniPage window. In Flexible and Quick
Views it appears by default. Choose Easy Loader in the Window menu to add it to Classic
V iew or to show or hide it in other views. It functions as an alternative to the File Open dialog
box; letting you browse your whole file system and efficiently select files to be loaded into
OmniPage. Choose Process / Easy Loader / Folder to view files as Lists, Thumbnails, Tiles,
Icons (arranged as desired) or Details, as you do in Explorer. The Loader can remain
displayed as you work.
Easy Loader is driven from the Process menu. Instead of selecting files to send them straight
to OmniPage you can choose Queue W
to build up and re-order a list of files, maybe coming from different folders. The lock applies
to all files collected to enter the currently open document. When the list is ready, turn the lock
off to start loading. If the lock is off from the start, files are listed only if they are selected
faster than OmniPage can load them. Practically, you can load a few files, send them to
recognition and while that is underway, build up the rest of the input list.
Turning on the menu item Show/hide Queue W
appear whenever files are listed but not yet loaded and to be closed as soon as the list is empty.
Easy Loader can be used in Classic and Flexible Views to compile files for multiple
documents. Engage the lock, make document 1 active and collect files. Then make document
2 active and collect its files, and so on. When all is ready , remove the lock. Each document has
its own lock, but the Process menu offers Lock all and Unlock all to lock or release all files
destined for all documents. You can remove selected files with Delete, or all files in the
indow to get a dialog box with a lock. Turn the lock on
indow automatically causes the window to
Processing Documents Defining the Source of Page Images 26
Page 31

current document’s list with Delete All or Clear in the Process menu. Use Clear all to clear all
files destined for all open documents. See a tutorial in Help on loading files for multiple
documents.
Easy Loader is available as a panel in Quick Convert View. The Process menu has two
commands unique to Quick View.
• Get and Convert offers 'one-button' processing - files are loaded, passed through
recognition and saved to files using existing settings. Only in this case, multiple file
selection is allowed with Quick V iew; the result is one output document for each input
file – before starting you should choose Same as the source file name under Output
file name.
• Load Files performs file loading without recognition, as in other views. In Quick
View it allows only one file to be loaded at a time - it should be processed before
selecting a new input file. In this case the Queue Window and its lock play no useful
role.
Easy Loader can process digital camera images. Set this in the Quick Convert Options panel
before invoking Easy Loader. If Scan is set as input, this setting is temporarily ignored and
pages are loaded as normal (non-camera) images.
All Windows Explorer functionality is available in Easy Loader. For instance, you can also
select files and use the shortcut menu item OmniPage Ultimate to send them via background
processing to MS Excel, MS Word, PDF, RTF, Text and WordPerfect. Existing settings are
used and by default generated files are placed in the input folder. Use the Convert Now
Wizard to access basic settings, such as whether or not to view results in the tar get application.
This wizard lets you do immediate conversions or call the Workflow Assistant to access all
settings, for instance to change target file names and locations. This shortcut menu item also
offers all workflows that have image file input.
Input from scanner
You must have a functioning, supported scanner correctly installed with OmniPage Ultimate.
You have a choice of scanning modes. In making your choice, there are two main
considerations:
• Which type of output do you want in your export document?
• Which mode will yield best OCR accuracy?
Processing Documents Defining the Source of Page Images 27
Page 32

Scan black and white
Select this to scan in black-and-white. Black-and-white images can be scanned and
handled qu
Scan grayscale
Select this to use grayscale scanning. For best OCR accuracy
varying or low contrast (not much difference between light and dark) and with text
on colored or shaded backgrounds.
Scan color
Select this to scan in color . This will function only with color scanners. Choose this
if you want colored graphics, texts or backgrounds in the output document. For
OCR accuracy
much more time, memory resources and disk space.
Brightness and contrast
icker than others and occupy less disk space.
, use this for pages with
, it offers no more benefit than grayscale scanning, but will require
Good brightness and contrast settings play an important role in OCR accuracy
Scanner panel of the Options dialog box or in your scanner’s interface. After loading an
image, check its appearance. If characters are thick and touching, lighten the brightness. If
characters are thin and broken, darken it. Then rescan the page. If your scanning results are
still not satisfactory, open the scanned image in the Image Enhancement window to edit it
using a range of different tools.
. Set these in the
Scanning with an ADF
The best way to scan multi-page documents is with an Automatic Document Feeder (ADF).
Simply load pages in the correct order into the ADF. You can scan double-sided documents
with an ADF. A duplex scanner will manage this automatically.
Scanning without an ADF
Using OmniPage’s scanner interface, you can scan multi-page documents efficiently from a
flatbed scanner, even without an ADF. Select Automatically scan pages in the Scanner panel
of the Options dialog box, and define a pause value in seconds. Then the scanner will make
scanning passes automatically, pausing between each scan by the defined number of seconds,
giving you time to place the next page.
Processing Documents Defining the Source of Page Images 28
Page 33

Scanning to OmniPage and workflows
Go to Tools / Options / Scanners to choose an action to be performed when a button on your
local scanner is pushed. This can be simple scanning resulting in images loaded into
OmniPage. It is also possible to select a scanner-based workflow from those you have created
or choose to be prompted to select a workflow whenever the button is pressed. Use the
Control Panel button to associate OmniPage with a scanner event (a scanner button being
pressed). Then a button press launches OmniPage, runs the workflow and sends the results to
the defined target, with or without interaction.
In OmniPage Ultimate this feature can also be used to initiate barcode-driven workflows (see
Chapter 4, page 73).
Document-to-document conversion
In OmniPage Ultimate you can open not only image files, but
also documents created in word-processing and similar
applications. Supported file types include .doc, .xls, .ppt, .rtf,
.wpd and others. Click the Load Files button in the OmniPage
T
oolbox or select the Load Files command under Get Page, in the File
menu. In the Load Files dialog box, choose Documents. When you are
finished, you can choose from a wide variety of document file types for
saving. These conversions require Nuance PDF Create to be installed.
Describing the Layout of the Document
Before starting recognition you are requested to describe the layout of the incoming pages to
assist the auto-zoning process. When you do automatic processing, auto-zoning always runs
unless you specify a template that does not contain a process zone or background. When you
do manual processing, auto-zoning sometimes runs. See online Help: When does auto-zoning
run? Here are your input description choices:
Automatic
Choose this to let the program make all auto-zoning decisions. It decides whether
text is in columns or not, whether an item is a graphic or text to be recognized and
whether to place tables or not.
Processing Documents Describing the Layout of the Document 29
Page 34

Single column, no table
Choose this setting if your pages contain only one column of text and no table.
Business letters or pages from a book are normally like this.
Multiple columns, no table
Choose this if some of your pages contain text in columns and you want this
decolumnized or kept in separate columns, similar to the original layout.
Single column with table
Choose this if your page contains only one column of text and a table.
Spreadsheet
Choose this if your whole page consists of a table which you want to export to a
spreadsheet program, or have treated as single table.
Form
Choose this if your whole page consists of a form and you want form elements
auto-recognized. After recognition, you can modify form element properties,
create new ones, or edit form layout. This option is available in OmniPage
Ultima
te only.
Legal pleading
Choose this to recognize legal documents. Legal headers are detected and
removed. Choose to have pleading numbers retained or dropped.
Custom
Choose this for maximum control over auto-zoning. Y
ou can prevent or encourage
the detection of columns, graphics and tables. Make your settings in the OCR
panel of the Options dialog box.
Template
Choose a zone template file if you wish to have its background value, zones and
properties applied to all acquired pages from now on. The template zones are also
applied to the current page, replacing any existing zones.
If auto-zoning yielded unexpected recognition results, use manual processing to rezone
individual pages and re-recognize them.
Processing Documents Describing the Layout of the Document 30
Page 35

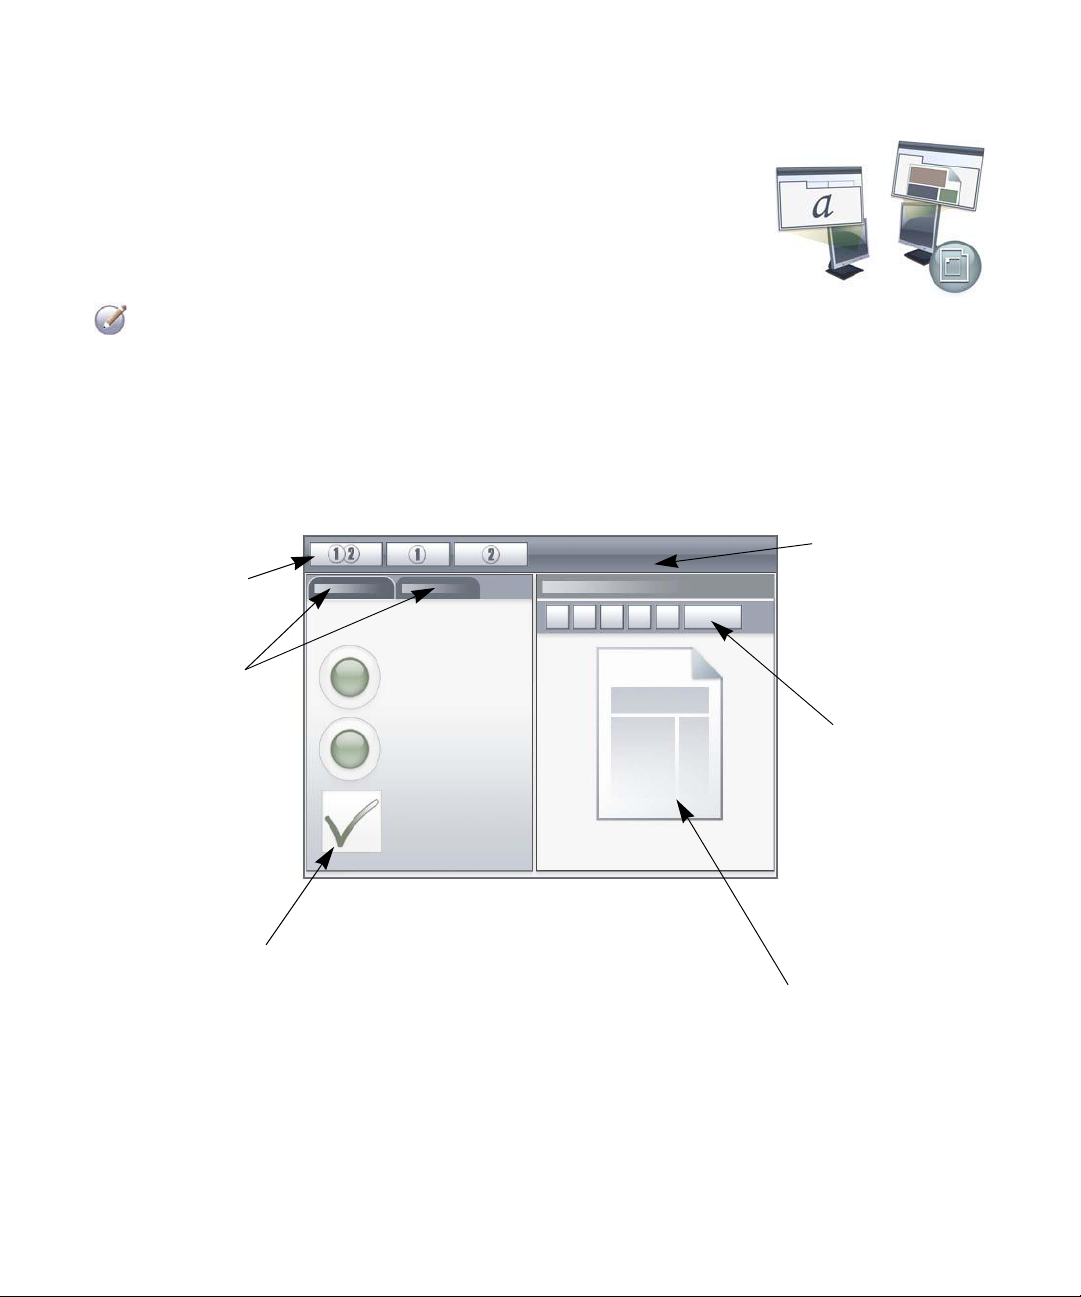
Preprocessing Images
To improve OCR results, you can enhance your images before zoning and
recognition using the Image Enhancement tools.
Click the SET - Enhance Image button in the Image T
Enhancement window . This window has a starting image panel (1) on the left and a
result panel (2) on the right. Choose a tool (see following topics), then move sliders and adjust
controls (3). When the result is good, click Apply (4). Discard last change (5) or Discard all
changes (6) provide emergency exits. When you click Apply, the result image moves to the
left panel to become the new starting image for further enhancement. Changes are listed in the
History panel (7). When all changes are in order, click Page Ready (8) to have the next page
loaded or Document Ready (9) to finish enhancing.
oolbar to open the Image
We must distinguish three types of images:
Original image: The image created by your scanner or contained in a file before it enters the
program.
Primary image: The state of the original image after it has been loaded into OmniPage,
possibly modified by automatic or manual pre-processing operations.
OCR image: A black-and-white image derived from the primary image, optimized for good
OCR results.
Processing Documents Preprocessing Images 31
Page 36

The input for Image Enhancement is the Primary image
Unsuitable
Tolerable
Good
Best
Good
Tolerable
Unsuitable
This tool lets you switch between the Primary and the OCR image.
Some tools affect the Primary image, others the OCR image. Be sure you know which image
you are editing.
Good brightness and contrast settings play an important role in OCR accuracy
. Set these in the
Scanner panel of the Options dialog box or in your scanner’s interface. The diagram illustrates
an optimum brightness setting. After loading an image, check its appearance. If characters are
thick and touching, lighten the brightness. If characters are thin and broken, darken it. Use the
OCR Brightness tool to optimize the image.
Image Enhancement tools
The Image Enhancement tools can also be used to edit primary images to save and use them as
image files. The following tools are accessible on the toolbar from left to right; their usage is
detailed as follows:
P - affects Primary image only.
O - affects OCR image only.
PO - can be applied to either the Primary or OCR image (or both)
P+O - a single action is applied to both the Primary and OCR image.
Processing Documents Preprocessing Images 32
Page 37

P/O - affects both images.
WH - applies to whole images only.
AR - can be applied to selected image areas.
Pointer (F5) - the Pointer is a neutral tool carrying out different operations under
different circumstances (for example, to pick a color for the Fill operation, or to catch the
deskew line.) PO.
Zoom (F6) - click the tool then use the left mouse button to zoom in on your image or the
right mouse button to zoom out. You can also use the mouse wheel for zooming in and
out - even in the inactive view
. In the active view the "+" and "-" buttons serve the same
purpose. P+O. WH.
Select Area (F7) - click this, then on a tool that can work on a page area (marked AR)
and draw your selection on the image. Image enhancement tools by default work on the
whole page. Selection has three modes (in the V
iew menu): Normal, Additive, and
Subtractive. PO. AR.
Primary/OCR Image - click this tool to switch between the primary and the OCR image
in the active view . Primary images can be of any image mode , while an OCR image is its
black-and-white version, generated purely for OCR purposes. P/O. WH.
Synchronize Views - click this tool to zoom and scroll the inactive view to the same
zoom value and scroll position as the active view
. T o make the inactive view dynamically
follow the focus of the active one, click View then choose the Keep Synchronized
command. PO. WH.
The following SET tools allow you to modify image contents:
Brightness and Contrast - click this tool to adjust the brightness and contrast of your
primary image or a selected part of it. Use the s
liders in the tool area to achieve the
desired effect. P. AR.
Hue / Saturation / Lightness - click this tool then use the sliders to modify the hue,
saturation and lightness of your primary image. P
. AR.
Crop - to use only a part of your image, click the Select Area tool, then the Crop tool
and select the area to keep – the rest of the image will be removed. P+O. WH > AR
Rotate - click this tool to rotate (by 90, 180 or 270 degrees) and/or flip your image.
P+O. WH.
Processing Documents Preprocessing Images 33
Page 38

Despeckle - click this tool to remove stray dots from your image. Despeckle works on
the OCR image at 4 levels of severity. You can also use this tool not to remove noise
from the page but to strengthen letter outlines: to do this mark the checkbox Inverse
despeckling. O. AR.
OCR Brightness - use this tool the set Brightness and Contrast of your OCR image. See
the diagram of optimum brightness under Preprocessing Images above. O. AR.
Drop-out color - click this tool and select Red, Green, Blue or choose a color from the
primary image with the Select Area tool. Sections of the s
canned image in this color will
be set transparent. The tool has its effect on the OCR image. This feature enables a chosen
color to be dropped when preprinted color forms are scanned or loaded. Then the fixed texts,
boxes and other elements can be dropped from the images, leaving only the respondent data
visible and ready for OCR. P/O. WH.
Resolution - use this tool to decrease the resolution of your primary image in
percentages. Note that you cannot adjust a resolution higher than that of the original one.
P.
WH.
Deskew - sometimes pages are scanned crookedly. To straighten the lines of text
manually, use the Deskew tool. (Auto-deskew is also available in the Process panel of
Options.) P+O. WH.
3D Deskew - use this tool to remove perspective distortion from digital camera images.
This is particularly useful when you want to check the results of automatic 3D Deskew
or you prefer to do 3D deskew manually after a Load Files step. P+O. WH.
3D Deskew works by snapping the distorted image to a grid. All you need to do is to
manually straighten this grid, and image coordinates will follow - see illustration below
(before - after 3D Deskew).
Fill - use this tool to apply a color to the image or a selected part of it. PO. AR.
Processing Documents Preprocessing Images 34
Page 39

Auto-crop - automatically detects margin areas on the page and reduces this to a
minimum. This is a way of unifying the margins on a set of pages with dif
ferent sized
text areas. P+O. WH > AR
Clean borders - removes scanning shadows, spots and marginal notes from page edges
P+O. WH but relates only to the border area.
Punch-hole remover - replaces punch holes with the background page color. P+O. WH
but relates only to the border area.
Enhance whiteboard photo - Provides a slider control to let you improve the
readability of text and diagrams on whiteboards or blackboards, when captured by
digital camera. The following pictures show the pos
sible difference when using this tool
along with the 3D Deskew tool.
Here is a typical digital photo of a white board, taken from the side with low contrast:
Processing Documents Preprocessing Images 35
Page 40

Here the 3D deskew is being applied, with the result on the right.
The Enhance whiteboard photo tool’s slider is being used to improve the contrast of the
image. On the left is the starting image; on the right is the result.
Processing Documents Preprocessing Images 36
Page 41

Some of these tools are also available for automatic pre-processing of all incoming images.
These are shown on the Process panel of the Options dialog box.
Using Image Enhancement history
To commit or undo your image edits (one by one or all the steps), use the History panel in the
Image Enhancement window. Once you have modified the starting image, the result window
displays the changes.
Click the Apply button next to the History list to commit the change. Modifications not
added to the History by clicking the Apply button are not performed.
Click the Reset button to discard changes you have performed with a given tool, before
they are applied.
Click the Discard all changes button to restore the image as it was before you started the
current enhancement session.
Any time you want to see what output a certain step resulted in, double-click it in the History
list. The display shows the result of that action, removing all actions performed afterwards. If
you apply a new change to the displayed image, that replaces all changes that were made in
the History list after the chosen one.
Saving and applying templates
If you have a number of similar images to enhance, you can build up a list of enhancement
steps to apply to all of them.
To create and store an image enhancement template
Enhancement window , then carry out your preprocessing steps and add them to the History by
clicking the Apply button. When you are done, choose Save Enhancement Template from the
Image Enhancement window’s File menu. Browse to your preferred destination and save the
template file (with the extension .ipp).
To carry out the set of modification
the new image in the Image Enhancement window and choose Load Enhancement Template
from the same File menu.
s saved in the template file on another image, simply open
, first bring an image file into the Image
Image Enhancement in workflows
T o incorporate image enhancement in a workflow choose its icon in the Workflow
Assistant.
Processing Documents Preprocessing Images 37
Page 42

The following options are available:
Display images for manual enhancement - during the execution of a workflow
image will be displayed for manual editing.
Apply enhancement template - an already saved enhancement template will be applied
au
tomatically to the image while being processed by the workflow.
Apply enhancement tem
enhancement template, and will also display the image so that you can make further edits to it.
plate and display - the workflow will apply the selected image
, each loaded
Zones and Backgrounds
Zones define areas on the page to be processed or ignored. Zones are rectangular or irregular,
with vertical and horizontal sides. Page images in a document have a background value:
process or ignore (the latter is more typical). Background values can be changed with the tools
shown. Zones can be drawn on page backgrounds with the tools shown under Zone Types and
Properties (see later).
Process areas (in process zones or backgrounds) are auto-zoned when they are sent to
recognition.
Ignore areas (in ignore zones or backgrounds) are dropped from processing. No text is
recognized and no image is transferred.
Automatic zoning
Automatic zoning allows the program to detect blocks of text, headings, pictures and other
elements on a page and draw zones to enclose them.
You can Auto-zone a whole page or a part of it. Automatically drawn zones and template
zones have solid borders. Manually drawn or modified zones have dotted borders.
Auto-zone a page background
Acquire a page. It appears with a process background. Draw a zone. The background
changes to ignore. Draw text, table or graphic zones to enclose areas you want manually
zoned. Click the Process background tool (shown) to set a process background. Draw ignore
zones over parts of the page you do not need. After recognition the page returns with an ignore
background and new zones round all elements found on the background.
Auto-zoning vertical text
If you set Japanese, Korean or Chinese as the recognition language, auto-zoning will find text
blocks and detect the text direction.
Processing Documents Zones and Backgrounds 38
Page 43

Vertical Asian text appears horizontally in the Text Editor, but can be exported as vertical - see
Chapter 4, page 47.
Auto-zoning detects vertical texts in non-Asian languages in table cells and anywhere on
Normal PDF or XPS pages. Multi-line detection is possible in these cases.
For image-only PDF and XPS files, and for all other image file or scanner input, autodetection works with the following conditions:
• It must be only a single line of text
• It must be on the left or right of a diagram or picture or
• It must be situated on the left or right edge of the page - it does not have to extend
over the full height of the page.
Vertical text outside tables can be manually zoned, as described below
. This allows multiple
vertical lines to be handled correctly.
Vertical texts can be viewed and edited with a vertical cursor in the T
ext Editor using True
Page. In other formatting levels the text is placed horizontally.
Zone types and properties
Each zone has a zone type. Zones containing text can also have a zone contents setting:
alphanumeric or numeric. The zone type and zone contents together constitute the zone
properties. Right-click in a zone for a shortcut menu allowing you to change the zone’s
properties. Select multiple zones with Shift+clicks to change their properties in one move.
The Image toolbar provides zone drawing tools, one for each type.
Process zone
Use this to draw a process zone, to define a page area where auto-zoning will run.
After recognition, this zone will be replaced by one or more zones with
auto
matically determined zone types.
Ignore zone
Use this to draw an ignore zone, to define a page area you do not want transferred to
the T
ext Editor.
Text zone
Use this to draw a text zone. Draw it over a single block of text. Zone contents will
be treated as flowing text, without columns being found. Use it for texts using the
Latin, Greek or Cyrillic alphabets and for horizontal texts in the Asian languages.
Processing Documents Zones and Backgrounds 39
Page 44

Vertical Asian text zone
Use this to draw text zones for vertical text in Japanese or Chinese. Zones should be
rectan
gular.
Vertical left-rotated text zone
Use this to draw text zones for vertical text that is left rotated (non-Asian languages
only). The zones should be rectangular
.
Vertical right-rotated text zone
Use this to draw a text zone for vertical text tha
t is right rotated (non-Asian
languages only). The zones should be rectangular.
Table zone
Use this to have the zone contents treated as a tab
le. Table grids can be
automatically detected or placed manually. Table zones should be rectangular.
Vertical texts in tables cannot be zoned manually – they can be auto-detected in
gridded tables.
Graphic zone
Use this to enclose a picture, diagram, drawing, signature or anything you want
transferred to the T
ext Editor as an embedded image, and not as recognized text.
Form zone
Use this to enclose an area of your document containing form elements such as a
checkbox, radio button, text field or anything you want transferred to the T
ext
Editor as a form element. Afterwards, in True Page, you can edit form layout, and
modify the properties of form elements. Form zones are available in OmniPage
Ultimate only.
Working with zones
The Image toolbar provides zone editing tools. Grouped tools can be
undocked/floated and re-docked as a separate mini toolbar for convenience.
One is always selected. When you no longer want the service of a tool, click a
dif
ferent tool. Some tools on this toolbar are grouped. If docked as a single
tool, only the last selected tool from the group is visible. To select a visible tool,
click it.
To draw a single zone select the zone drawing tool of the desired type, then click and drag the
cursor
.
Processing Documents Zones and Backgrounds 40
Page 45

To resize a zone, select it by clicking in it, move the cursor to a side or corner, catch a handle
and move it to the desired location. It cannot overlap another zone.
To make an irregular zone by addition draw a partially overlapping zone of the same type.
To join two zones of the same type draw an overlapping zone of the same type (drawn zones
on the left, resulting zone on the right).
To make an irregular zone by subtraction draw an overlapping zone of the same type as the
background.
To split a zone, draw a splitting zone of the same type as the background.
A full set of zoning diagrams appear in Help.
When you draw a new zone that partly overlaps an existing zone of a dif
ferent type, it does not
really overlap it; the new zone replaces the overlapped part of the existing zone.
The following zone types are prohibited:
Speed zoning lets you do manual zoning quickly. Activate the zone selection cursor, and then
move the cursor over the page image. Shaded areas will appear showing the auto-detected
zones. Double-click to transform a shaded area into a zone.
Processing Documents Zones and Backgrounds 41
Page 46

Table grids in the image
After automatic processing you may see table zones placed on a page. They are
denoted with a table zone icon in the top left corner of the zone. To change a
rectangular zone to or from a table zone, use its shortcut menu. Y
ou can also draw table
type zones, but they must remain rectangular.
You draw or move table dividers to determine where gridlines will appear when the
table is
placed in the T ext Editor. You can draw or resize a table zone (provided it stays
rectangular) to discard unneeded columns or rows from the outer edges of a table.
Using the table tools you can insert row and column dividers; move and remove
dividers. Click the Place/Remove all dividers tool to have divider
s in a table auto-detected and
placed.
You can specify line formatting for table borders and grids from a shortcut menu. Y
ou will
have greater choice for editing borders and shading in the Text Editor after recognition.
Using zone templates
A template contains a page background value and a set of zones and their properties, stored in
a file. A zone template file can be loaded to have template zones used during recognition.
Load a template file in the Layout Description drop-down list or from the Tools menu. You
can browse to network locations to load templates created by others.
When you load a template, its background and zones are placed:
• on the current page, replacing any zones already there
• on all further acquired pages
• on pre-existing pages sent to (re-)recognition without any zones.
With manual p rocessing the templa te zones in the first two cases can be viewed and modified
before recognition.
With automatic processing the template zones can be viewed and modified only after
recognition.
With workflow processing, use the zone images step. This combines two steps: load templates
and manual zoning. T
o use a zone template, click the Add button in the appropriate panel of
the Workflow Assistant, and select the zone template file to use. Then make your choice
between displaying images for manual zoning; applying the zone template; or applying it and
display the images.
Templates accept ignore and process zones and backgrou
nds. They can therefore be useful to
define which parts of the pages to process with auto-zoning, and which parts to ignore.
Processing Documents Zones and Backgrounds 42
Page 47

Process zones or process background areas from a template may be replaced during
recognition by a set of smaller zones; specific zone types will be assigned to these zones.
How to save a zone template
Select a background value and prepare zones on a page. Check their locations and properties.
Click Zone Template... in the Tools menu. In the dialog box, select [zones on page] and
click Save, then assign a name and optionally a different path. Choose a network location to
share the template file. Click OK. The new zone template remains loaded.
How to modify a zone template
Load the template and acquire a suitable image with manual processing. The template zones
appear. Modify the zones and/or properties as desired. Open the Zone Template Files dialog
box. The current template is selected. Click Save and then Close.
How to unload a template
Select a non-template setting in the Layout Description drop-down list. The template zones
are not removed from the current or existing pages, but template zones will no longer be used
for future processing. You can also open the Zone Template Files dialog box, select [none]
and click the Set As Current button. In this case, the layout description setting returns to
Automatic.
How to replace one template with another
Select a different template in the Layout Description drop-down list, or open the Zone
Template Files dialog box, select the desired template and click the Set As Current button.
Zones from the new template are applied to the current page, replacing any existing zones.
They are also applied as explained above.
How to remove a template file
Open the Zone Template Files dialog box. Select a template and click the Remove button.
Zones already placed by this template are not removed. Template files can be deleted only
from the operating system.
How to include a template file in an OPD
Open a document, then click Tools and choose Zone Template. Select the one you want to
include and click Embed. Then save the document to the OPD format. This means the
template will travel with the OPD if it is sent to a new location. When the OPD file is opened
later, the included zone template will be shown in the Zone Template Files dialog box as
[embedded] and can be saved to a new named template file at the new location by using the
Extract button.
Processing Documents Zones and Backgrounds 43
Page 48

Proofing and Editing
Recognition results are placed in the Text Editor. These can be recognized texts, tables, forms
and embedded graphics. This WYSIWYG (What-You-See-Is-What-You-Get) editor is
detailed in this chapter. Asian text handling is in some respects dif ferent from other languages.
See “Asian language recognition” on page 48.
The Editor Display and Formatting Levels
The Text Editor displays recognized texts and can mark words that were suspected during
recognition with red, wavy underlines. They are displayed with red characters in the OCR
Proofreader.
A word may be suspect because it was not found in any active dictionary: standard, user or
Ultimate. It may also be suspect as a result of the OCR process, even if it is found in the
dictionary
yellow highlight, both in the Editor and the OCR Proofreader.
Choose to have non-dictionary words marked or not in the Proofing panel of the Options
dialog box. All markers can be shown or hidden as selected in the T
Options dialog box. You can also show or hide non-printing characters and header/footer
indicators. The Text Editor panel also lets you define a unit of measurement for the program
and a word wrap setting for use in all Text Editor formatting levels except Plain Text.
. If the uncertainty stems from certain characters in the word, these are shown with a
ext Editor panel of the
OmniPage can display pages with three levels of formatting. Y
them with the three buttons at the bottom left of the Text Editor or from the View menu.
Plain Text
This displays plain decolumnized left-aligned text in a single font and font size, with the
same line breaks as in the original document.
Formatted Text
This displays decolumnized text with font and paragraph styling.
True Page
True Page® tries to conserve as much of the formatting of the original document as
possible. Character and paragraph styling is retained. Reading order can be displayed by
arrows.
Proofing and Editing The Editor Display and Formatting Levels 44
ou can switch freely between
Page 49

Proofreading OCR Results
After a page is recognized, the recognition results appear in the Text Editor. Proofreading
starts automatically if that was requested in the Proofing panel of the Options dialog box. You
can start proofing manually any time. Work as follows:
1. Click the Proofread OCR tool in the Standard toolbar, or choose Proofread OCR... in the
Tools menu.
2. Proofing starts from the current page, but skips text already proofed. If a suspected error is
detected, the OCR Proofreader dialog box colors the suspect word in its context, adds a
yellow highlight to any suspect characters and provides a picture of how the word
originally looked in the image. The explanation says ‘Suspect word’ or ‘Non-dictionary
word’.
3. If the recognized word is correct, click Ignore or Ignore All to move to the
next suspect word. Click Add to add it to the current user dictionary and move
to the next suspect word.
4. If the recognized word is not correct, modify the word in the Edit panel or select a
dictionary suggestion. Click Change or Change All to implement the change and move to
the next suspect word. Click Add to add the changed word to the current user dictionary
and move to the next suspect word.
5. As an alternative to clicking a suggestion to select it and Change to accept it, hold down
the Ctrl key and enter the suggestion number.
6. Color markers are removed from words in the Text Editor as they are proofread. You can
switch to the Text Editor during proofing to make corrections there. Use the Resume
button to restart proofing. Click Page Ready to skip to the next page and Document Ready
or Close to stop proofreading before the end of the document is reached.
7. A page is marked with the proofed icon on its thumbnail and in the Document
Manager if proofing ran to the end of the page. Choose Recheck Current Page... from the
T
ools menu to re-proof a page.
Verifying Text
After performing OCR, you can compare any part of the recognized text against the
corresponding part of the original image, to verify that the text was recognized correctly.
The verifier tool is in the Formatting toolbar. The verifier can also be controlled from
the Tools menu. Hover the cursor over a verifier display to obtain the verifier toolbar
Use it as follows:
Proofing and Editing Proofreading OCR Results 45
.
Page 50

zoom in/out
How much context for
dynamic verifier?
• one word
• three words (current + neighbors)
• whole image line
To turn the Verifier on, click the Verifier tool or press F9. To turn it off, click the Verifier tool
again, press F9 again, or press Esc.
A full list of verifier keyboard shortcuts is available in Help.
The Character Map
The Character Map is a dockable tool giving you aid in proofing. It is used for
essentially two purposes:
• to insert characters during proofing and editing that are not or not easily accessible
from your keyboard. In this respect, it is very similar to the system Character Map.
• to show all characters validated by the current recognition languages.
To access the Character Map, click its button in the Formatting Toolbar, or choose Character
Map from the View menu and click Show.
Under the Character Map menu item, you can also choose to display recent characters only
, or
different character sets (by default only two are displayed). Asian characters are not
supported.
You can access the Character Map in other ways, such as:
• Click Tools > Options and choose the OCR tab. Click the Additional Characters
button to select characters to be included in proofing. Similarly, you can modify the
Reject Character by using the Character Map.
• Select Train Character under the Tools menu. Click the (...) button beside the Correct
field.
• Select Train Character from the shortcut menu of a suspect or non-dictionary word in
the Text Editor.
Proofing and Editing The Character Map 46
Page 51

User Dictionaries
The program has built-in dictionaries for many languages. These assist during recognition and
may offer suggestions during proofing. They can be supplemented by user dictionaries. You
can save any number of user dictionaries, but only one can be loaded at a time. A dictionary
called Custom is the default user dictionary for Microsoft Word.
Starting a user dictionary
Click Add in the OCR Proofreader dialog box with no user dictionary loaded or open the User
Dictionary Files dialog box from the Tools menu and click New.
Loading or unloading a user dictionary
Do this from the OCR panel of the Options dialog box or from the User Dictionary Files dialog
box.
Editing or removing a user dictionary
Add words by loading a user dictionary and then clicking Add in the OCR Proofreader dialog
box. You can add and delete words by clicking Edit in the User Dictionary Files dialog box. You
can also import words from OmniPage user dictionaries (*.ud). While editing a user dictionary,
you can import a word list from a plain text file to add words to the dictionary quickly. Each
word must be on a separate line with no punctuation at the start or end of the word. The Remove
button lets you remove the selected user dictionary from the list.
To embed a user dictionary in an OmniPage Document, load your input file, choose Tools >
User Dictionary; select the user dictionary you want to use, click Embed, and name it. Then
save to the file type OmniPage Document.
Languages
The program can read over 120 languages with multiple alphabets: Latin, Greek, Cyrillic,
Chinese, Japanese and Korean. See the full language list in the OCR panel of the Options
dialog box. It shows which languages have dictionary support. Select the language or
languages that will be in documents to be recognized. Selecting a large number of languages
may reduce OCR accuracy.
A language listing is also provided on the Nuance web site.
The option Detect single language automatically removes the need to select languages. It is
designed for unattended processing when documents or forms in different languages are
expected. OmniPage then examines each incoming page and assigns a single recognition
Proofing and Editing User Dictionaries 47
Page 52

language to the whole page. That means this feature is not suitable for pages containing
multiple languages.
The program chooses from the languages with dictionary support that use a Latin-based
alphabet (meaning Russian and Greek are excluded) plus optionally Asian languages. Choose
from three language groups:
• Latin-alphabet languages (choose it to see the enabled languages)
• Asian languages (Japanese, Korean and Chinese – Traditional and Simplified)
• Latin-alphabet and Asian languages.
When this feature is enabled, no manual language selection is possible and the option Verify
language choices (see below) is not available.
In addition to user dictionaries, specialized dictionaries are available for certain professions
(currently medical, legal and financial) for some languages. See the list and make selections in
the OCR panel of the Options dialog box.
Asian language recognition
Four languages with Asian alphabets are supported: Japanese, Korean, Traditional Chinese
and Simplified Chinese. The ideal font size for body text is 12 points, scanned at 300 dpi,
resulting in characters with around 48x48 pixels. Minimum is 30x30, that is 10.5 points at 300
dpi. For smaller characters, 400 dpi should be used. Asian texts can be horizontal (left-toright) or vertical (top-to-bottom, right-to-left). Operating systems supported by OmniPage
Ultimate can handle Asian languages, but if East Asian language support was not selected
during system install, it must be added from Control Panel / Regional and Language Settings /
Languages / Supplemental language support / Install files for East Asian languages. You may
be required to insert a Windows system disk.
The four Asian languages are listed alphabetically with the others in the Options/OCR panel.
You should select only one of these languages at a time and avoid a multiple selection with
other languages. Asian OCR can handle short embedded English texts without English being
explicitly set; this is not designed for longer English texts or for texts in other Western
languages. Vertical text is typical in Japanese and Chinese - English may be embedded there
in different orientations. The program can handle these; in the output they appear rightrotated.
Beside the language list the option Verify language choices invokes automatic language
detection that warns of differences between a detected language and the language setting. It
works at page-level and identifies four categories: Japanese, Chinese, Korean and non-Asian.
It cannot distinguish between Traditional and Simplified Chinese or between non-Asian
Proofing and Editing Languages 48
Page 53

languages. The last category means Japanese, Chinese or Korean characters were not
detected. Verification takes place during image pre-processing, so the required recognition
language must be set before image loading.
Auto-layout and auto-zoning are recommended for Asian pages. This places all detected
into text zones; by choosing an Asian recognition language you set Asian OCR to run in these
zones and that can automatically detect and transmit the text direction, coping with mixed
areas of horizontal and vertical texts on a page.
However, the zoning tool
Draw rectangular zones with this tool. T
text zone type. Do not use the two other vertical-text tools on Asian texts. Drawing a vertical
Asian zone does not automatically enable an Asian language, nor influence the language
auto-detection.
Digital camera images are accep
algorithm is unlikely to be useful - certainly not for vertical texts. Preferably use the standard
image loading command and perform manual 3D deskewing with the relevant SET tool if
required. In general, SET tools can be used on Asian images.
Recognized Asian pages appear in the T
Asian languages - always with horizontal text direction. There is no need to specify Asian
fonts under Options/OCR, a default font is automatically applied - typically Arial Unicode
MS. Other Asian-capable fonts on your system can be chosen in the Text Editor. Editor
support allows text viewing and verifying - Formatted Text is recommended as formatting
level. Large-scale editing and spell-checking are better done in the target application.
Proofing, training and dictionary support are not available for Asian texts. Therefore, prior to
performing Asian OCR, go to the Proofing panel under Options and disable dictionary word
marking, automatic proofreading and IntelliTrain and ensure that no training file is loaded.
Redaction can be applied to Asian texts, either by selection or searching. The workflow step
Form Data Extraction should not be applied to Asian pages.
lets you force vertical Asian recognition by manual zoning.
o manually zone horizontal Asian text, use the usual
ted for Asian languages. However, the automatic 3D deskew
ext Editor, provided your system has support for East
texts
Typical output converters for Asian texts are R
The text direction will be as detected during pre-processing. Changes made in the T ext Editor
- where text is horizontal - will be exported, also to vertical text. Plain Text converters are
available (Unicode TXT, Notepad) but here text direction is always horizontal.
TF, Microsoft Word, Searchable PDF or XPS.
Training
Training is the process of changing the OCR solutions assigned to character shapes in the
image. It is useful for uniformly degraded documents or when an unusual typeface is used
Proofing and Editing Training 49
Page 54

throughout a document. OmniPage offers two types of training: manual training and
automatic training (IntelliTrain). Data coming from both types of training are combined and
available for saving to a training file.
When you leave a page on which training data was generated, you will be asked how to apply
it to other existing pages in the document
.
Manual training
To do manual training, place the insertion point in front of the character you want to train, or
select a group of characters (up to one word) and choose Train Character... from the Tools
menu or the shortcut menu. You will see an enlarged view of the character(s) to be trained,
along with the current OCR solution. Change this to the desired solution and click OK. The
program takes this training and examines the rest of the page. If it finds candidate words to
change, the Check Training dialog box lists these. Incorrect words should be re-trained before
the list is approved.
IntelliTrain
IntelliTrain is an automated form of training. It takes input from the corrections you make
during proofing. When you make a change, it remembers the character shape involved, and
your proofing change. It searches other similar character shapes in the document, especially in
suspect words. It assesses whether to apply the user correction or not.
You can turn IntelliTrain on or off in the Proofing panel of the Options dialog box.
IntelliTrain remembers the training data it collects, and adds it to any manual training you
have done. This training can be saved to a training file for future use with similar documents.
For examples of IntelliTrain, see Help.
Training files
Whenever you close a document or switch to another one when unsaved training data exists, a
dialog box appears allowing you to save it. To save a training file into an OPD, load it from
Tools > Training File, click Embed, and save to the file type OmniPage Document.
Saving training to file, loading, editing and unloading training files are all done in the Training
Files dialog box.
Unsaved training can be edited in the Edit Training dialog box; an asterisk is displayed in the
title bar in place of a training file name. Save it in the Training Files dialog box.
Proofing and Editing Training 50
Page 55

A training file can be also edited; its name appears in the title bar. If it has unsaved training
You are
editing your
unsaved
training.
This frame has
been deleted.
To undelete it,
select it again
and press the
Delete key.
This frame is
selected.
Top par t: imag e shape.
Bottom part: OCR
Double-click frame or
press Enter to change its
OCR solution.
added to it, an asterisk appears after its name. Both the unsaved and the modified training are
saved when you close the dialog box.
The Edit Training dialog box displays frames containing a character shape and an OCR
solution assigned to that shape. Click a frame to select it. Then you can delete it with the
Delete key
, or change the assignation. Use arrow keys to move to the next or previous frame.
Text and Image Editing
OmniPage has a WYSIWYG Text Editor, providing many editing facilities. These work very
similarly to those in leading word processors.
Editing character attributes
In all formatting levels except Plain Text, you can change the font type, size and attributes (bold,
italic and underlined) for selected text.
Editing paragraph attributes
In all formatting levels except Plain Text, you can change the alignment of selected paragraphs
and apply bulleting to paragraphs.
Paragraph styles
Paragraph styles are auto-detected during recognition. A list of styles is built up and presented
in a selection box on the left of the Formatting toolbar. Use this to assign a style to selected
paragraphs.
Proofing and Editing Text and Image Editing 51
Page 56

Graphics
You can edit the contents of a selected graphic if you have an image editor in your computer.
Click Edit Picture With in the Format menu. Here you can choose to use the image editor
associated with BMP files in your Windows system, and load th e graphic. Alternatively , you can
use the Choose Program... item to select another program. This will replace the Default Image
Editor item. Edit the graphic and then close the editor to have it re-embedded in the Text Editor.
Do not change the graphic’ s size, resolution or type, because this will prevent the re-embedding.
You can also edit images before recognition using the Image Enhancement tools.
Tables
Tables are displayed in the Text Editor in grids. Move the cursor into a table area. It changes
appearance, allowing you to move gridlines. You can also use the T ext Editor’ s rulers to modify
a table. Modify the placement of text in table cells with the alignment buttons in the Formatting
toolbar and the tab controls in the ruler.
Hyperlinks
Web page and e-mail addresses can be detected and placed as links in recognized text. Choose
Hyperlink... in the Format menu to edit an existing link or create a new one.
Editing in True Page
Page elements are contained in text boxes, table boxes and picture boxes. These usually
correspond to text, table and graphic zones in the image. Click inside an element to see the box
border; they have the same coloring as the corresponding zones. The Help topic
T rue Page
provides details on the operations summarized here.
Frames have gray borders and enclose one or more boxes. They are placed when a visible
border is detected in an image. Format frame and table borders and shading with a shortcut
menu or by choosing Table... in the Format menu. Text box shading can be specified from its
shortcut menu.
Multicolumn areas have orange borders and enclose one or more boxes. They are autodetected and show which text will be treated as flowing columns when exported with the
Flowing Page formatting level.
Reading order can be displayed and changed. Click the Show reading order tool in the
Formatting toolbar to have the order shown by arrows. Click again to remove the arrows.
Click the Change reading order tool for a set of reordering buttons in place of the
Formatting toolbar. A changed order is applied in the formatting levels Plain T
ext and
Formatted T ext. It modifies the way the cursor moves through a page when it is exported
as True Page.
Proofing and Editing Text and Image Editing 52
Page 57

On-the-Fly Editing
This allows you to modify a recognized page through re-zoning, without having to re-process
the whole page. When on-the-fly editing is enabled, zone changes (deleting, drawing,
resizing, changing type) immediately make changes in the recognized page. Conversely , when
you modify elements in the Text Editor’s True Page formatting level, this changes the zones
on that page.
Two linked tools on the Image toolbar control on-the-fly zoning. One of these tools is always
active whenever no recognition is in progress.
Click this to activate on-the-fly editing. The red signal shows there are no stored zoning
changes.
Click this to turn on-the-fly editing off. Your zoning changes are stored; the on-the-fly tool
displays a green signal to show there are stored changes. T o activate these changes, do one
of the following:
Click the on-the-fly tool with a green signal. The zoning changes will cause changes in
the Text Editor.
Click the Perform OCR button to have the whole page (re)recognized, including your
zone changes.
For details on how changes are handled in on-the-fly zoning and their
see
On-the-fly processing
in Help.
effects in the Text Editor,
Marking and Redacting
The Mark Text toolbar gives you tools to mark (highlight or strike-out);
and to redact text. Use the V iew menu to have this toolbar displayed. Y
can float or dock this tool group. Each tool has its equivalent menu item in
the Format menu or the Text Editor shortcut menu.
Redacting is blacking out confidential information. It is unreadable and
unsearchable. T
Redacting tool and use its cursor to select all the text parts you want to redact. They appear
with a gray highlight. When you are ready, click the Redact Document tool. Choose to do
redaction in a copy (safer) or the original document. If you choose to redact a copy, both the
copy and the original remain open in OmniPage, ready to be saved.
WARNING: If you redact the original document, you cannot retrieve the information you
have blacked out.
Proofing and Editing On-the-Fly Editing 53
o mark and redact text manually, click the Mark for
ou
Page 58

T o find and redact text by searching, select Find and Mark Text from the Edit menu to display
the Find, Replace and Mark Text dialog box. Search for text to be marked for redaction. Step
through all occurrences and decide for each case whether to redact immediately or mark for
redaction. In the latter case, perform the redaction by choosing Close and Redact Document in
the Mark Text dialog box or later click the Redact Document button.
You can apply highlighting and striking out either by selection or searching.
Reading Text Aloud
The Nuance RealSpeak® speech facility is provided for the visually impaired, but it can also
be useful to anyone during text checking and verification. The speaking is controlled by
movements of the insertion point in the Text Editor which can be mouse or keyboard driven.
T o hear text: Use these keys:
One character at a time, forward or back Right or left arrow. Letter, number or punctuation names are spoken.
Current word Ctrl + Numpad 1
One word to the right Ctrl + right arrow
One word to the left Ctrl + left arrow
A single line Place the insertion point in the line
Next line Down arrow
Previous line Up arrow
Current sentence Ctrl + Numpad 2
From insertion point to end of sentence Ctrl + Numpad 6
From start of sentence to insertion point Ctrl + Numpad 4
Current page Ctrl + Numpad 3
From top of current page to insertion point Ctrl + Home
From insertion point to end of current page Ctrl + End
Previous, next or any page Ctrl + PgUp, PgDown or navigation buttons
Typed characters Each typed character is pronounced separately.
The Text-to-Speech facility is enabled or disabled with the Tools menu item Speech Mode or
with the F10 key. A second menu item Speech Settings... allows you to select a voice (for
Proofing and Editing Reading Text Aloud 54
Page 59

example, male or female for a given language), a reading speed and the volume. You must
ensure the language selection is appropriate for the text you want to hear.
You also have the following keyboard controls:
To do this: Use this:
Pause/Resume Ctrl + Numpad 5
Set speed higher Ctrl + Numpad +
Set speed lower Ctrl + Numpad –
Restore speed Ctrl + Numpad *
All speech systems will be installed with OmniPage if you choose a complete installation. If
you perform a custom installation, you can choose the languages you need.
®
Note that Vocalizer Expressive
can only be used for saving premium quality MP3 files and
not for having text read out aloud.
Creating and Editing Forms
You can bring paper or static electronic forms (distributed mainly as PDF in an
office environment) into OmniPage Ultimate,
content, layout or both - in True Page. Draw form zones over the relevant areas of
your image before recognition, or choose Form as recognition layout, then use the
two toolbars: Form Drawing and Form Arrangement to make modifications and produce a
fillable form and save it in the following formats: PDF, RTF, or XSN (Microsoft Office
InfoPath 2003 format). Static forms can be saved to HTML. OmniPage Ultimate uses the
Logical Form Recognition
TM
technology to create fillable forms from static ones.
recognize them and edit their
Note that OmniPage supports form creation and editing, however the tools available here are
not designed to fill in forms.
The Form Drawing toolbar
This is a dockable toolbar, displayed in the Text Editor that allows you to create a range of
form elements using the following tools:
Selection:
Text:
headers.
Proofing and Editing Creating and Editing Forms 55
Click this tool to be able to select, move, or resize elements in your form.
Use the text tool to add fixed text descriptions on your form such as titles, labels and
Page 60

Line:
The Line tool is mainly used in layout design: click it and draw lines to separate
distinct sections in your form.
Rectangle:
Click this tool to create rectangles in your form for design purposes.
Graphic:
Fill text:
Use this tool to select areas of your form that are to be treated as graphics.
Click this tool to create fillable text fields. These are fields where you want
people to enter text.
Comb:
Use this tool to create a text field consisting of boxes. This is typically used for
information such as ZIP codes.
Checkbox:
Click this tool and draw checkboxes - typically for Yes/No questions and
marking one or more choices.
Circle text:
Its function is similar to the checkbox element (above): the Circle text tool
creates elements that get encircled when selected.
Table:
This tool creates tables in your form.
You can also create form elements by right-clicking an existing form element in your
recognized form, and choose the Insert Form Object menu item.
The Form Arrangement toolbar
The tools on this toolbar can be used to line up form elements or to set which one is on top of
the others when they overlap. This latter function is useful for example if you want to create a
background graphic design for your form.
To set the order of overlapping elements, use the “Bring to Front” and “Send
to Back” buttons.
To align the right/left, top/bottom edges or the centers of the s
elected form elements:
horizontally - use the horizontal alignment tools
vertically - use the vertical arrangement tools.
The commands of the Form Arrangement toolbar are also acces
sible from the shortcut menu
of any form element.
Proofing and Editing Creating and Editing Forms 56
Page 61

Editing Form object properties
T o edit a form object d irectly select it then r ight-click the given element to display its shortcut
menu. You can edit the appearance or the properties of any form element here. Use the
following commands:
Form Object Appearance - use the tabs Borders, Shading and Shadow to design the look of
your form elements in a similar way as you would do in a text-editing application.
Form Object Properties - this
command gives you access to the element properties such as
size, position, name. Properties dynamically vary depending on what type of element you
select.
Extracting Form Data
Form data extraction (FDE) is a workflow step. Data is extracted from elements
such as fillable fields, check boxes, and option buttons. FDE is a simplified
implementation of the full Logical Form Recognition technology
To create a workflow that contains form data extraction:
• Define the processing input and its settings. Input types include: image PDF, PDF
form, image files and forms scanned from paper.
• Choose Extract Form Data in place of recognition, and specify its settings. This
includes a language choice. The option Detect single language automatically can be
useful for unattended processing of forms when the language used to fill each of the
forms cannot be determined beforehand. See “Languages” on page 47.
• Set an active PDF form as template. It can be single or multi-page, filled or unfilled.
The program determines the location and type of the form fields based on this form
template.
• Finish the workflow with a saving step.
OmniPage extracts data from incoming forms, using the specified template. Export is to a
mma-separated value text file (.csv) ready to be loaded into a spreadsheet.
co
Once you select Form Data Extraction in a workflow, only saving steps will follow.
.
Proofing and Editing Creating and Editing Forms 57
Page 62

Saving and Exporting
Once you have acquired at least one image for a document, you can export the image to file.
Once you have recognized at least one page, you can export recognition results. After further
recognition you can save a single page, selected pages or the whole document by saving to
file, copying to Clipboard or sending to a mailing application. Saving as an OmniPage
Document is always possible. OmniPage provides comprehensive support for Office 2010 and
2013 applications and formats.
A document remains in OmniPage after export. This allows you to save, copy or send its
pages repeatedly, for example with different formatting levels, using different file types,
names or locations. You can also add or re-recognize pages or modify the recognized text.
With automatic processing and in DocuDirect jobs, you specify where to save first before
processing starts.
A workflow may contain one or more saving steps, even to different targets (for instance, to
file and to mail). A DocuDirect job must contain at least one saving step.
on page 72.
Saving and Exporting
See “DocuDirect”
If you want to work with your document again in OmniPage in a later session, save it as an
OmniPage Document. This is a special output file type. It saves the original images together
with the recognition results, settings and training.
Exporting is done through button 3 on the OmniPage T oolbox. It lists available export tar gets.
Some appear only if access to the target is detected on your computer . Select the desired tar get
then click the Export Results button to begin export. You can also perform exporting through
the Process menu.
Saving Original Images
You can save original images to disk in a wide variety of file types with or without image
enhancement (using the Image Enhancement Tools).
Saving and Exporting Saving and Exporting 58
Page 63

1. Choose Save to Files in the Export Results drop-down list. In the dialog box that appears,
select Image under Save as.
2. Choose a folder location and a file type. Type in a file name.
3. Select to save the selected zone image(s) only, the current page image, selected page
images or all images in the document. For multiple zones or multiple pages, you can have
all images in a single multi-page image file, providing you set TIFF, MAX, DCX, JB2 or
Image-only PDF or XPS as file type. Otherwise each image is placed in a separate file.
OmniPage adds numerical suffixes to the file name you provide, to generate unique file
names.
4. Click Options... if you want to specify a saving mode (black-and-white, grayscale, color or
‘As is’), a maximum resolution and other settings. For TIFF files, you specify the
compression method here.
5. Click OK to save the image(s) as specified. Zones and recognized text are not saved with
the file.
Saving Recognition Results
You can save recognized pages to disk in a wide variety of file types.
1. Choose Export Results... in the File menu, or click the Export Results button in the
OmniPage Toolbox with Save to Files selected in the drop-down list.
2. The Save to Files dialog box appears. Select Text under Save as.
3. Select a folder location and a file type for your document. Select a page range, file options,
naming options and a formatting level for the document. See “Selecting a formatting
level” on page 60.
4. Type in a file name. Click Options... if you want to specify precise settings for the export.
See “Selecting converter options” on page 61.
5. Click OK. The document is saved to disk as specified. If View Result is selected, the
exported file will appear in its target application; that is the one associated with the
selected file type in your Windows system or in the advanced saving options for your
selected file type converter.
Saving and Exporting Saving Recognition Results 59
Page 64

Selecting a formatting level
The formatting level for export is defined at export time, in the saving dialog box (Save to
Files, Copy to Clipboard, Send in Mail or other dialog box). Three of the levels correspond to
the format views of the same name in the Text Editor. However, the level to be applied for
saving is independent of the formatting view displayed in the Text Editor. When exporting to
file or mail, first specify a file type. This determines which formatting levels are available.
The formatting levels are:
Plain Text
This exports plain decolumnized left-aligned text in a single font and font size.
When exporting to T
supported. You can export plain text to nearly all file types and target applications;
in these cases graphics, tables and bullets can be retained.
Formatted Text
This exports decolumnized text with font and paragraph styling, along with
graphics and tables. This is availa
Flowing Page
This keeps the original layout of the pages, including columns. This is done
wherever possible with column and indent settings, not with text boxes or frames.
T
ext then flows from one column to the other, which does not happen when text
boxes are used.
ext or Unicode file types, graphics and tables are not
ble for nearly all file types.
True Page
This keeps the original layout of the pages, including columns. This is done with
text, picture and table boxes and frames. This is of
fered only for target
applications capable of handling these. True Page formatting is the only choice for
XML export and for all PDF export, except to the file type ‘PDF Edited’.
Spreadsheet
This exports recognition results in tabular form, suitable for use in spreadsheet
applications. This places each document page onto a separate worksheet.
When exporting to Microsoft Excel, 'Spreadsheet' is good for saving whole-page tables. Prefer
'Formatted T
Saving and Exporting Saving Recognition Results 60
ext' if your document contains smaller tables: each table is placed on a separate
Page 65

worksheet with non-table parts placed in an index worksheet with hyperlinks to each relevant
worksheet.
Selecting converter options
Click the Options... button in a saving dialog box to have precise control over the export. This
brings up a dialog box with the name of the converter associated with the current file type. It
presents a series of options tailored to this file type. First, confirm or change the formatting
level, because this influences which other options are presented. Select options as desired.
Help details how to do this.
To make changes apply to all future export done with the given converter
, select the
checkmark Make changes permanent. If this is not selected, changes are applied to the
current export only and are not saved for future use. Export settings can be changed and saved
without a document save – choose Tools/Saving Preferences...
.
Using multiple converters
Multiple converters allow you to export to two or more file types in one export step. Choose
Multiple in the saving dialog box:
T o make your own multiple converter, open the Saving Preferences dialog box from the Tools
menu. Choose the heading Multiple converters. Select a converter and click Create from... .
This will make a copy of the selected converter that you can freely modify without
overwriting the original one.
The new converter appears in the list. Select it and click Options... to specify its settings. Y
receive a list of all text converters, followed by all image converters. Checkmark the desired
ones. Optionally specify sub-folder paths for each file type.
You can save pages with different formatting levels or file options to th
e different file types, as
defined in their simple converters. A few saving operations cannot be done with multiple
converters. These are:
ou
Saving OmniPage Documents
OmniPage workflows cannot be saved via multiple converters. Use the File menu or a
workflow with a step Save to OPD.
Saving to two targets
For instance, you cannot use a multiple converter to save a document to file and also send it in
mail. Use a workflow with two saving steps, or perform two separate saves.
Saving and Exporting Saving Recognition Results 61
Page 66

Saving different page ranges
You cannot save different page ranges to different file types, because only one set of selected
pages can exist at saving time. For the same reason, a single workflow cannot be used either.
Perform two separate saves or use two workflows.
Saving to PDF
You have five choices when saving to Portable Document Format (PDF) files. The first four
are presented as Text converters, the last one is listed among the Image converters.
PDF (Normal)
Pages are exported as they appeared in the T e xt Editor in T rue Page view. The PDF file can be
viewed and searched in a PDF viewer and edited in a PDF editor.
PDF Edited
Use this if you have made significant editing changes in the recognition results. You have
three formatting level choices, including True Page. The PDF file can be viewed, searched
and edited.
PDF Searchable Image
The PDF file is viewable only and cannot be modified in a PDF editor. The original images
are exported, but there is a linked text file behind each image, so the text can be searched. A
found word is highlighted in the image.
PDF with image substitutes
As for PDF (Normal), but words containing reject and suspect characters have image
overlays, so these uncertain words display as they were in the original document. The PDF
file can be viewed, searched and edited.
PDF Image
The original images are exported. The PDF file is viewable only and cannot be modified in a
PDF editor and text cannot be searched.
Besides the above flavors, you can use other parameters in defining your PDF output by
clicking Options.
PDF 1.6 or 1.7
Save to PDF version 1.6 or 1.7 for enhanced security, markup and attachment embedding
functionality.
PDF/A
Choose to create PDF/A compliant files to be confident that files display identically
regardless of the computer environment and remain readable even after many years of
technological evolution.
Saving and Exporting Saving Recognition Results 62
Page 67

Tagged PDF
Create a tagged PDF file to preserve its structure. This will ensure logical reading order,
correct table structure and more.
PDF MRC
Use this high compression technology for good quality and smaller file size; available for
color and grayscale PDF Images or PDF Searchable Images.
Linearized PDF
Choose this to create PDF files optimized for fast loading and display when embedded in web
pages.
Password protection
In OmniPage Ultimate you can set a type and level of encryption and then define an Open
password and/or a Permissions password for PDF files.
A smaller range of choices is available for saving to XPS files.
Converting from PDF
To extract text content from a PDF file, load it into OmniPage, recognize it, and save the
results to a text format.
A variety of outputs is also available from a PDF file shortcut menu: Word, Excel, RTF,
WordPerfect or text. For more options, use the Convert Now Wizard.
eDiscovery Assistant for searchable PDF
Access this Assistant from the Tools menu or from a PDF file’s shortcut menu in Windows
Explorer. The Assistant is specially designed to create searchable PDF files from image-only
PDF files, or files that already contain some text elements or text pages; it does this without
altering or applying an OCR process to existing text. In other words, it limits its processing to
the image-only parts of the input PDF. All text-based elements in a PDF remain untouched
including document metadata, annotations, mark-up, stamps and more. The process can run
automatically or with interaction for zoning or proofing. The Assistant loads files you select
from your file system and returns the results to the same location; choose whether to have the
original files overwritten or retained as backup copies. Zoning and proofing occur in pop-up
windows, with no connection to any documents open in OmniPage at the time.
OmniPage Ultimate adds the ability to make PDF files searchable as a pre-programmed job in
DocuDirect. This can be with a Normal Job (starting immediately, at a fixed later time or with
recurrence) or as a Folder Watching job.
Saving and Exporting Saving Recognition Results 63
See “DocuDirect” on page 72.
Page 68

Creating PDF files fr om other applications
The Nuance PDF Create product supplied with OmniPage Ultimate provides the ability to
create Normal PDF files from documents in any print-capable application on your system.
Click File / Print and select the printer ScanSoft PDF Create! Adjust properties as desired
and click OK and supply a file name and location. If View resulting PDF is selected, your
default PDF viewer displays the result.
Sending Pages by Mail
You can send page images or recognized pages as one or more files attached to a mail message
if you have installed a MAPI-compliant mail application, such as Microsoft Outlook. To send
pages by e-mail:
• With automatic processing, select Send in Mail as the setting in the Export Results
drop-down list on the OmniPage Toolbox. The Export Options dialog box appears as
soon as the last available page in the document is recognized or proofed. After export
options are specified, an empty mail message appears with file(s) attached - add
recipients and message text as desired.
• With manual processing, select Send in Mail as the setting in the Export Results drop-
down list and then click its button. The Export Options dialog box appears
immediately and then the mail message with the attachment(s).
• Workflows and jobs accept a Send in Mail export step, but they require the recipients
and message text to be specified as workflow settings, so the workflow can be run
unattended.
Sending to eBook Readers
OmniPage Ultimate supports saving workflow results to two popular eBook formats: Kindle
and ePub.
Sending to Kindle
A Kindle reader is an electronic book product from Amazon. The Kindle Assistant in the
Tools menu lets you create a simple workflow that sends recognition results optimized for
Kindle reader display to a Kindle account at Amazon.
To prepare a Kindle workflow:
1. Have your Kindle reader and its associated e-mail address on hand.
2. Choose Kindle Assistant in the Tools menu.
Saving and Exporting Sending Pages by Mail 64
Page 69

3. Type in a name for the new workflow.
4. Choose a document source: Scan, Load files or Load digital camera files. With file input,
you will be prompted to choose input files when the workflow starts running.
5. Enter the e-mail address linked to your Kindle reader.
6. Provide a name for the output file. All recognition results enter a single file.
7. Choose Save to save the workflow for later use, or Save and Run to immediately run the
workflow and transfer its results to your Kindle device.
This simple workflow has three steps: acquire images, perform OCR and send to Kindle.
Recognition language can be selected. All other settings take either default values or values
optimized for Kindle.
When you run the Kindle Assistant for the first time, a customized output converter is created,
called 'Kindle Document'. It converts colored items to grayscale, pictures to 72 dpi and sets
Formatted Text to remove any columns. This converter is then available for later processing with or without workflows.
You can modify the Kindle workflow using the Workflow Assistant, to add other steps and
change settings. For instance you can specify a page range or add more saving steps, so the
file is not only sent to Kindle, but also saved to file with different settings (for instance with
Flowing Page and color retention). T ake care not to make modifications that are unsuitable for
Kindle - e.g. creating multiple output files, setting non-supported languages etc.
You can also compile workflows targeting Kindle with the Workflow Assistant; set a Send in
Mail step, choose the Kindle output converter in its settings and enter the Kindle e-mail
address. You can do the same without using a workflow by choosing Send in Mail in the
Export results drop-down list.
Sending to ePub
EPub is a free, open-source electronic book standard that can be displayed on any of the
widely popular devices capable of functioning as an ebook reader.
For better ePub results, the ‘Treat as book (ePub)’ option should be selected under
Tools>Options>Process>Retain features. This way processing steps are optimized for ePub
output.
Three output file types are available:
• ePub: This retains as much formatting as possible and allows text to flow.
Saving and Exporting Sending to eBook Readers 65
Page 70

• ePub simple: This removes most formatting, but allows text to flow, so it can be
resized by the mobile device. Many smart devices analyze incoming text and
apply their own formatting.
• ePub for poems: This retains formatting but line breaks from the original are
conserved.
Two ePub sample workflows are shipped with OmniPage Ultimate:
• ePub from PDF or Scanned Document: this retains formatting
• ePub from PDF or Scanned poems: conserves line breaks
The simplest way to prepare an ePub workflow:
1. Choose a document source via Workflow button (1-2-3). With file input, you will be
prompted to choose input files when the workflow starts running (Load Files dialog).
2. Provide a name for the output file (Save to File dialog). All recognition results enter a
single file.
3. Choose Save to save the workflow for later use, or Save and Run to immediately run the
workflow.
Other Export Targets
Turn recognized text into an audio wave file for later listening, using Nuance RealSpeak® or
Vocalizer Expressive
document to file and generate the wave file in one saving step. You must specify the reading
language in the converter options for the mp3 (RealSpeak) or the mp3 premium (Vocalizer)
file type.
OmniPage Ultimate is delivered with a Nuance Cloud Connector component that
can be easily configured by choosing it from the W
OmniPage group. Specify which further Cloud sites you wish to access, and also
which FTP sites you want to use for file saving. Once at least one link has been
established, the Connector is available in the Export Results drop-down list.
®
. A multiple converter is useful for this, allowing you to save the
indows Start menu in the
This list also offers direct connections to two web-based storage sites that cannot be accessed
via the connector: Evernote and Dropbox. Certain cloud services may have limitations, for
example only Google Apps Premier users can upload image files.
In OmniPage Ultimate you can export files to other targets. You can save files to
Microsoft SharePoint 2003, 2007 or 2010, to Hummingbird (Open T
ext) or
iManage (Interwoven). Exporting choices are made in the Export Options dialog
Saving and Exporting Other Export Targets 66
Page 71

box. When you click OK you may be directed to log-in and invited to specify the required
path.
When using SharePoint, the server, login and password information must be provided only
once per session, and it is offered in each subsequent session.
If an ODMA-compliant Document Management System (DMS) is detected in your
computing environment, it will be offered. If you have access to more than one DMS, the
system default will apply. The ODMA server must be pre-configured to accept the file types
to be exported from OmniPage Ultimate, as defined by their extensions.
See Help for more information on these targets.
Saving and Exporting Other Export Targets 67
Page 72

Workflows
A workflow contains a series of processing steps and their settings. It can be saved for
repeated use whenever you have a task needing the same processing. W orkflows usually begin
with a scanning or loading step, but they can also start from the document currently open in
OmniPage. After that, they do not have to conform to the traditional 1-2-3 processing pattern.
Usually a workflow will include a recognition step, but this is not compulsory. For instance,
page images can be saved to image files in a different file type or to an OmniPage Document.
With or without OCR, any number of saving steps is possible, even to different targets, each
with their own export settings.
Workflows are designed for efficient whole-document processing. They can also handle
recognizing or saving single or selected pages from a document.
Some workflows run without user interaction. W
manual image enhancement step, a manual zoning step, a proofing/editing step, the ones when
run-time prompting is requested for input or output file names and paths, or scanning
workflows prompting for more pages.
DocuDirect jobs are closely related to workflows. Jobs are created in the Job W
uses the Workflow Assistant in the creation process. Jobs run workflows according to the job
parameters (mostly timing instructions) and it is more typical for them to run unattended.
Click the Workflow Assistant button
orkflows needing interaction are those with a
izard which
in the Standard toolbar to see its steps and settings.
Running workflows
Here is how to run a sample workflow or one you have created:
1. If your workflow takes input from scanner, place your document in its ADF or its first
page on the scanner bed.
2. Select the desired workflow from the Workflow drop-down list.
3. Press the Start button. The OmniPage Toolbox displays the steps in the workflow and acts
as a progress monitor. The Workflow Status panel shows progress in more detail. To stop
the workflow before it completes, press the Stop button.
Workflows 68
Page 73

4. If run-time input selection is specified, the Load Files dialog box awaits your choice of
files.
5. If you requested a step requiring interaction (image enhancement, manual zoning, or
proofing) the program presents pages for attention.
6. When a page is enhanced, zoned or proofed, click the Page Ready button in
the Toolbox or appropriate dialog box to move to the next page.
7. When the last page is enhanced, zoned or proofed, or when you no longer
to do zoning or proofing, press the appropriate Document Ready
want
button on the Toolbox. Any pages without zones will be auto-zoned.
8. The After Completion menu under Process / Workflows gives you three options to end a
workflow. You can choose to close the document, close OmniPage, or shut down your
computer. These settings are typically applied if the workflow runs unattended - if your
workflow is so, remember to include a saving step.
You can also run workflows from an OmniPage Agent icon
on the Windows taskbar;
right-click it for a shortcut menu listing your workflows. Select one to run it. OmniPage will
be launched if necessary
. If it is running with a document loaded, the Start Workflow dialog
box displays where you can choose what to process from the current document: only the
Workflow-defined pages, all pages, selected pages, or the current page.
If you do not see the OmniPage Agent icon, enable it in the General panel of the Options
dialog box or choose C:\Program Files (x86)\Nuance\OmniPage19\OpAgent.exe.
You can launch some workflows from your desktop, from W
indows Explorer or the Easy
Loader. Right click on an image file icon or file name for a shortcut menu. Multiple file
selection is possible. Choose OmniPage Ultimate and a workflow name from the sub-menu.
This sub-menu also provides quick access to six target formats using default settings: Word,
Excel, PDF, RTF, TXT and WordPerfect. To customize which workflows you would like to
see here, click the Add and Remove Workflows menu item. Only workflows with run-time
prompting for input files are listed here.
Pressing Stop while a workflow is running pauses it. Click S
tart to resume processing. If you
pause a workflow, maybe do some manual processing, and then save the document as an
OmniPage Document, when you later open that OmniPage Document, the interrupted
workflow will resume.
Workflows 69
Page 74

Workflow Assistant
This shows the
steps you have
chosen.
Click the Close button to delete a workflow step.
All subsequent, dependent steps will also be removed.
To change a step, click this arrow and select
from the ones in the drop-down list.
This drop-down list
shows the possible steps
at any given workflow
position.
Use this to add a new step
to your workflow.
Specify settings for
the current step here.
This allows you to create and modify workflows. The Job Wizard also uses this to create or
modify workflows that jobs execute - see the next section. The Assistant offers one or more
steps, each with a drop-down list. This left panel of the Workflow Assistant dialog box lets
you build your workflow.
At any moment in the process, the Assistant drop-down menu offers all steps that are logically
possible at that point.
In OmniPage Ultimate, additional steps are available: Extract Form Data and Mark T
ext.
Creating workflows
Select New Workflow... in the Workflow drop-down list, or from the Process menu. Or
click the Workflow Assistant button in the S
selected.
Workflows Workflow Assistant 70
tandard toolbar when no workflow is
Page 75

The opening Assistant panel offers two starting points:
Choose Fr
change the default workflow name. Then click Next and choose your first step. Choose an
image loading step that can take input from file, scanner or digital camera files. Specify
settings on the right. Then move on to build your workflow: it can include a variety of
different steps. When done, click Finish.
Choose Exi
workflows plus any you have created. Select one as source. Its steps will appear in the
workflow diagram on the right. Enter a name for your new workflow. Click Next to proceed;
modify its steps and settings as described in the next section. The changed settings apply to
the new workflow only and are not written back to the workflow used as the source. Any
changed settings enter the new workflow , but do not af fect the settings in the program. Finally,
select Finish to complete your new workflow.
esh Start to begin with no steps in the workflow diagram on the right. Accept or
sting Workflows to see a list of existing workflows. These are the sample
Modifying workflows
Select the workflow you want to modify in the Workflow drop-down list and click the
Workflow Assistant button in the standard toolbar
menu, select the desired workflow and click Modify... . The first panel of the Workflow
Assistant appears with the workflow loaded. Click the icon in the workflow diagram that
represents the step you want to modify. Click the downward pointing arrow under the icon to
replace this step with another one. Continue modifying steps and/or settings as desired.
Remember that deleting or modifying a step may result in later, dependent steps being
removed. Click Next to replace removed steps or to add new ones. Click Finish to confirm the
changes to your workflow.
After creating or modifying a workflow
item in the Workflow drop-down list, to return to normal processing.
, you must either run a workflow or select the 1-2-3
. Or choose Workflows... in the Tools
Workflow to Kindle
The Kindle Assistant in the Tools menu helps you create a simple workflow that will accept
input, perform OCR and send the results in a suitable format to a Kindle account at Amazon;
it will then appear on the Kindle device registered to that account. See “Sending to eBook
Readers” on page 64.
Workflows Workflow Assistant 71
Page 76

DocuDirect
DocuDirect is a separate but integrated program to let you create jobs to be
processed immediately , or at so
me time in the future. By choosing steps carefully,
you can set up jobs that can run unattended. A job executes a workflow according
to the job settings. Jobs are created in the Job Wizard.
In OmniPage Ultimate you have the following additional DocuDirect capabilities:
• Setting job timing and recurrence
• Folder watching for incoming image files
• E-mail inbox watching for incoming attachments (Outlook and Lotus Notes)
• E-mail notification of job completion to specified recipients
• Driving workflows with barcodes.
Creating New Jobs
Open DocuDirect from the Process Menu or from your system, by choosing Start > All
Programs > Nuance OmniPage Ultimate > OmniPage DocuDirect or from the OmniPage
Agent on the taskbar
Creating a job is basically timing a workflow . To do this, start DocuDirect (as described
above) and click the Create Job icon or choose Create Job from the File menu.
.
The Job Wizard starts. First you need to define your job type. You can create five
dif
ferent types, instances of two basic categories: Normal and Watch type.
Normal and Watch type jobs may have a recurrence pattern. The latter are tailored to monitor
a specified folder or e-mail inbox for incoming images to be processed in OmniPage. A
spec
ific type within this category is Barcode cover page jobs, where barcode cover pages are
used to identify which workflow to carry out.
Normal job: Set starting time and specify or create the W orkflow to be run. If you select
‘Do not start now’ use the Activate button in the DocuDirect to start it.
Workflows DocuDirect 72
Page 77

Job types available in OmniPage Ultimate only:
Barcode cover page job: This is a special type of folder watching job (see below). It
monitors a folder for incoming barcode pages, then processes subsequently incoming
images with the
workflow identified by the barcode. For details, see Barcode
processing later in this chapter.
Folder watching job: Select this job type and browse to the folder(s) to be watched for
incoming image files.
Outlook mailbox watching job: This job watches an Outlook e-mail inbox for incoming
image attachments of a specified type.
Lotus Notes mailbox watching job: Same as above, but a Lotus Notes inbox is watched.
Name your job and click Next.
The next panel shows Start and Stop Options. Specify S
tart and End Time, set whether input
files are to be deleted or saved when the job is completed. If you have a job requiring user
interaction, choose whether to allow it or not with the checkmark Run job without any
prompts. This lets you run such jobs in two ways, avoiding the need to create two jobs. If you
plan to be at the computer as the job runs, de-select the checkmark. If you want to run the job
without being present, select the checkmark. Then only automatic image enhancement will
run, auto-zoning will replace manual zoning and proofing is skipped. In this case you must
ensure that the input and saving file sets and locations are pre-defined.
In OmniPage Ultimate you can set a recurrence pattern and request e-mail notification when
the job is
completed.
From the next panel onwards, you can construct your job (except for barcode cover page jobs)
as you normally do with W
orkflows. Set your starting point (Fresh Start or Existing
Workflows) and proceed as described in the Workflows topic.
The Options dialog box in DocuDirect is in the T
ools menu. Its General panel has an option
Enable OmniPage Agent on system tray at system startup. By default it is on. It must remain
selected for jobs to run at their scheduled time. The option is provided so it is possible to
prevent all jobs from running without having to disable them individually. Its state also
governs the running of barcode cover page jobs.
Workflows Creating New Jobs 73
Page 78

The General panel lets you limit the number of pages allowed in an output document, even if
the file option Create one file for all pages is selected. When the limit is reached, a new file is
started, distinguished by a numerical suffix.
Click Finish to confirm job creation.
Modifying jobs
Jobs with an inactive status can be modified. Select the job in the left panel of
DocuDirect and choose Modify from the Edit menu or click the Modify Job button
First, modify timing instructions as desired. Then the W
orkflow Assistant appears with
.
the workflow steps and settings loaded. Make the desired changes as already described for
workflows. See “Modifying workflows” on page 71.
Managing and running jobs
This is done with DocuDirect. It has two panels. The left panel lists each job, its next run,
status and history. The status is:
Waiting: Scheduled but job start time is in the future.
Running: Processing is currently underway.
Watching: Watching is in progress but there is no processing.
Inactive: Created with timing instruction: D
any deactivated jobs.
Expired: Scheduled job but start time is in the past.
Collecting: Watching in progress but the job is waiting for all
in
coming files to arrive.
Paused: User has paused the job and has not yet resume d it .
Closing: Watch type job is saving its result.
Starting: The status right before Running. Displays when a job
i
s just being started or when more jobs are about to
run than the number of jobs DocuDirect can
simultaneously run.
o not start now; or
Click on a job and a step-by-step analysis of all pages in the job appears in the right panel. It
shows where input was taken from, the page status and where output was directed to. Click on
a plus icon to see more information about the page. Click on a minus icon to hide details. For
jobs with the error or warning status, the listing shows which pages failed or what problems
occurred.
Workflows Creating New Jobs 74
Page 79

Activate Job in the File menu serves to activate any inactive job immediately.
Deactivate Job in the File menu deactivates any active job. If the job is running, this
will stop it before deactivating. Choose this to close a W
atch type job immediately to
save its result.
Stop Job in the File menu stops a job with status Starting, Running, or Paused.
Pause Job is available for jobs with status Running or Starting. To modify such a job’s
timing instructions you must stop it.
Resume Job lets the job continue from its state when it was paused.
Delete Job in the Edit menu serves to delete the currently selected job. Only Inactive
jobs can be deleted.
Rename Job serves to modify the name of any job.
Use the Edit menu to send a copy of a job’s status report to Clipboard.
Use Save OPD As... in the File menu to save any intermediate result of a paused job to an
OPD fi
le.
T o remove data files click Edit, then choose Clear Occurr
ence. This removes files storing the
reporting data from the current occurrence of the current job. Clear All Occurrences removes
all data for all job occurrences of the selected job. These two options are useful to free disk
space, but cleared occurrences cannot be viewed anymore, so use these with caution.
The Workflow viewer
The Workflow viewer, as displayed in the Workflow Status panel, is integrated into
DocuDirect to the right of the list of your jobs. Use it to get comprehensive and detailed
information about the processing of each occurrence of the job. The viewer shows the process
in a step-by-step fashion - following the steps of the workflow. It displays input and output
page information at each stage, allowing you to quickly view any page. Job results are marked
by icons. Drop-down lists give you information about processing steps.
Workflows Creating New Jobs 75
Page 80

Watched Folders
Add a watched
folder to the list
using this Browse for
Folder dialog box.
Specify an image
file type.
In OmniPage Ultimate you can specify watched folders and e-mail inboxes
(Outlook and Lotus Notes) as job input. These allow processing to be started
automatically whenever image files are placed in pre-defined folders or arrive into
inboxes as e-mail attachments.
This is useful to have sets of files with predictable content arriving from remote
locations processed automatically on arrival, even if no-one is in attendance.
T
ypically these are reports or form-like documents that are delivered repeatedly or at recurring
intervals, for example each week or month.
T o use this facility, prepare a set of folders or e-mail folders to be watched. Y
these folders for other purposes, not even for barcode cover page jobs. When setting up such a
job, choose Folder watching job, name it and click Next. In the dialog box that appears,
browse to the folders.
Incoming files are removed from the watched folders as soon as they are transferred to
OmniPage for processing; you should therefore arrange additional storage elsewhere if you
w
ant to retain the incoming files.
ou should not use
Add the desired folders and file types (one type or all types). Click the checkbox in front of
your selected folder to include its subfolders as well. To enable a number of file types, add the
Folder repeatedly, once for each type. Add a checkmark to watch subfolders of the selected
folder as well.
When you reach the next panel of the Job Wizard, you set the timing instructions: a starting
time and an end time for the watching to occur
. You can specify recurrences, for instance to
have the folder(s) watched only during your lunch hour (Start 12.15, End 13.05) every
Workflows Watched Folders 76
Page 81

Monday, Wednesday and Friday , or overnight in the last three days of each month, when you
keep your computer running to collect and process monthly reports arriving from afar.
When files enter a watched folder
in DocuDirect Options for more files to arrive in order to process them together. When files
cease to arrive, processing starts.
To finish the watching early, choose Deactivate Job. Then you can modify the job freely
, the program waits for approximately the interval specified
.
Watched Mailboxes
In OmniPage Ultimate you can specify watched mailboxes as job input. These
allow processing to be started automatically whenever image
types are placed in pre-defined e-mail folders. This is useful to have sets of files
with predictable content arriving processed automatically on arrival, even if noone is in attendance.
The program supports watching Microsoft Outlook and Lotus Notes mailboxes.
files of specified file
Barcode Processing
In OmniPage Ultimate you can run workflows (sets of steps and their settings)
using barcode cover pages that define which workflow should run. A barcode
cover page identifies a workflow (with workflow identifier
workflow steps) and contains information on workflow creation (name of the
creator, date of creation, etc.). Note that barcode processing cannot be recurrent.
, workflow name and
There are two ways of doing barcode processing:
Scanner input:
Workflow processing is driven by placing the cover page on top of a document to be scanned
and pushing the scanner's S
Image file input:
Job processing is driven by copying the barcode cover page image into a watched folder that
will rec
For scanner input you have to
1. Create a workflow that contains the processing steps you need with Scan Images as first
Workflows Watched Mailboxes 77
eive the document images to be processed.
step.
tart button.
Page 82

2. Print a barcode page that identifies the workflow.
3. Start barcode processing from the scanner.
To scan with a barcode page:
1. Place the barcode cover page on the top of the document in the ADF.
2. Press the Start button on the scanner.
3. Select “Barcode cover page workflow” as Scanner button default action on the Scanner
tab of Options. You can also set it to Prompt for workflow. In this case, a dialog box
appears with the available choices: Scanning, Barcode cover page workflow, and all
scanning workflows.
All available pages are processed by the specified workflow, or until a new barcode page is
encountered. The result is saved as specified by the workflow.
For image input you must create a barcode cover page job.
A barcode cover page job uses a special kind of watched folder. Always use a separate folder
for barcode processing. The starting time for the workflow is defined by the moment the
barcode cover page enters a watched folder.
For a barcode cover page job processing you need to
1. Create a workflow that contains the processing steps you need. Select Load Files as input
with “Select files for loading each time this workflow is started” selected.
2. Save a barcode cover page that identifies the workflow.
3. Define timing instructions for barcode folder watching in DocuDirect by creating a
barcode cover page job.
To process with a barcode cover page job:
1. Make sure that the job is running at the required time.
2. The folder is being monitored and the workflow is started as soon as a barcode cover page
is placed in the specified watched folder.
3. The workflow processes image files arriving in the folder after the cover page.
4. The workflow is completed at the specified end time of the job, or each time a new
barcode cover page is detected.
You can copy the barcode cover page image and the image files into the watched barcode
folder yourself, or direct others to do this. You can also place just a barcode cover page image
file in the watched folder, then have a network scanner make and send image files there.
Workflows Barcode Processing 78
Page 83

File-it Assistant
The File-it Assistant lets you create scanning workflows for repeated document conversion
tasks. The Assistant is for scanning jobs that require no user interaction during the processing.
In a typical scenario, operators at a scanning station prepare documents, applying the
appropriate barcode cover page to each, without needing to know anything about the later
processing or destination of the documents, because all that is pre-determined. Associate a
button on your scanner with OmniPage (
page 29.) and print a barcode cover page to identify your workflow. As a result, you can scan,
convert and save without interaction beyond pressing the scanner button.
Create the workflow:
1. Select File-it Assistant from the Tools menu.
2. Name your workflow, choose an output file type, location and file name.
3. Review and optionally change the workflow settings.
4. Print the barcode cover page.
5. Associate OmniPage with a scanner button (must be done only once) in the Control Panel.
See “Scanning to OmniPage and workflows” on page 29.
Use the workflow:
See “Scanning to OmniPage and workflows” on
1. Place the printed barcode cover page on top of a document in your scanner.
2. Push the OmniPage-associated scanner button. The document is converted using steps and
settings from the referenced workflow and sent to the location you defined.
It is possible to use barcode cover pages stored as image files to drive jobs from watched
folders. Such jobs permit interactive steps like manual zoning and proofing that are not
available via the File-it Assistant.
Single-step PDF jobs
Two special workflow steps are available for use inside DocuDirect. Both relate to PDF file
output and can usefully be combined with local folders for automatic processing; MakePDF
Searchable can be used with watched folders as well.
Workflows File-it Assistant 79
Page 84

Convert to PDF Job
This allows input from document files (typically MS office files plus txt, csv) provided their
native applications are installed; output is one PDF file for each input file with the same name
as the input file. The saving location can be specified. Typically, the resulting PDF files are
both searchable and editable. Nuance PDF Create must be present for this job type.
Make PDF Searchable
This accepts input from image-only PDF files or PDF files which may contain image-only
areas or pages. It results in the original PDF files becoming searchable. Nuance PDF Create is
not required for this job type.
Both these jobs allow only a single PDF step. When that is chosen the Next button is not
available and Finish must be chosen when all settings are as desired.
Workflows File-it Assistant 80
Page 85

Technical Information
This chapter provides troubleshooting and other technical information about using OmniPage.
Please also read the Readme file and other help topics, or visit the Nuance web pages.
Troubleshooting
Although OmniPage is designed to be easy to use, problems sometimes occur. Many of the
error messages contain self-explanatory descriptions of what to do – check connections, close
other applications to free up memory, and so on.
Please see your Windows documentation or OmniPage Help for information on optimizing
your system and application performance.
Supported file formats are listed here, Help provides more detail.
Solutions to try first
Try these solutions if you experience problems starting or using OmniPage:
• Make sure that your system meets all the listed requirements. See “Installation and
Setup” on page 6.
• Make sure that your scanner is plugged in and that all cable connections are secure.
• Visit the support section of Nuance’s web site at www.nuance.com. It contains Tech
Notes on commonly reported issues using OmniPage. Our web pages may also offer
assistance on the installation process and troubleshooting.
• Use the software that came with your scanner to verify that the scanner works properly
before using it with OmniPage.
• Make sure you have the correct drivers for your scanner, printer, and video card. Visit
Nuance’s web page through the Help menu and consult its scanner section for more
information.
• Defragment your hard disk. See Windows online Help for more information.
• Uninstall and reinstall OmniPage, as described in the section “Uninstalling the
Software” on page 13 in the Installation and setup chapter.
Technical Information Troubleshooting 81
Page 86

Testing OmniPage
Restarting Windows in its safe mode allows you to test OmniPage on a simplified system.
This is recommended when you cannot resolve crashing problems or if OmniPage has stopped
running altogether. See Windows online Help for more information.
To test OmniPage in safe mode:
1. Restart your computer in safe mode by pressing F8 immediately after you see the ‘Starting
Windows’ message.
2. Launch OmniPage and try performing OCR on an image. Use a known image file, for
instance one of the supplied sample image files.
• If OmniPage does not launch or run properly in safe mode, then there may be a
problem with the installation. Uninstall and reinstall OmniPage, and then run it in
Windows safe mode.
• If OmniPage runs in safe mode, then a device driver on your system may be
interfering with OmniPage operation. Troubleshoot the problem by restarting
Windows in Step-by-Step Confirmation mode. See Windows online Help for more
information.
Text does not get recognized properly
Try these solutions if any part of the original document is not converted to text properly
during OCR:
• Look at the page image and ensure that all text areas are enclosed by text zones. If an
area is not enclosed by a zone, it is generally ignored during OCR.
See “Using zone
templates” on page 42. in the “Processing documents” chapter.
• Make sure text zones are identified correctly. Re-identify zone types and contents, if
necessary , and perform O CR on the document again.
See “Zone types and properties”
on page 39. in the “Processing documents” chapter.
• Be sure you do not have an unsuitable template loaded by mistake. If zone borders cut
through text, recognition is impaired.
• Adjust the brightness and contrast sliders in the Scanner panel of the Options dialog
box. You may need to experiment with different settings combinations to get the
desired results.
• Use the Image Enhancement Tools to optimize your image for OCR.
Technical Information Troubleshooting 82
Page 87

• Check the resolution of the original image. Hover the cursor over a page thumbnail for
a popup display. If the resolution is significantly above or below 300 dpi, recognition
is likely to suffer.
• Make sure the correct document languages are selected in the OCR panel of the
Options dialog box. Only languages included in the document should be selected. In
particular, setting an Asian language for non-Asian texts (and vice versa) is likely to
produce unusable results.
• Recognition results in Japanese, Korean and Chinese can be viewed and saved only if
your system has East Asian language support.
See “Asian language recognition” on
page 48.
• Turn IntelliTrain on and make some proofing corrections. This is most likely to help
with stylized fonts or uniformly degraded documents. If IntelliTrain was running, try
turning it off – on some types of degraded documents it may not be able to help.
See
“IntelliTrain” on page 50.
• Do some manual training, or edit existing training to remove unsuccessful training.
• If you use True Page as the Text Editor formatting level or for export, recognized text
is put into text boxes or frames. Some text may be hidden if a text box is too small. To
view the text, place the cursor in the text box and use the arrow keys on your keyboard
to scroll to the top, bottom, left, or right of the box.
• Check the glass, mirrors, and lenses on your scanner for dust, smudges or scratches.
Clean if necessary.
Problems with fax recognition
Try these solutions to improve OCR accuracy on fax images:
• Ask senders to use clean, original documents if possible.
• Ask senders to select Fine or Best mode when they send you a fax. This produces a
resolution of 200 x 200 dpi.
• Ask senders to transmit files directly to your computer via fax modem if you both
have one. You can save fax images as image files and then load them into OmniPage.
See “Input from image files” on page 25.
System or performance problems during OCR
Try these solutions if a crash occurs during OCR or if processing takes a very long time:
• Check image quality. Consult your scanner documentation on ways to improve the
quality of scanned images.
Technical Information Troubleshooting 83
Page 88

• Break complex page images (lots of text and graphics or elaborate formatting) into
smaller jobs. Draw zones manually or modify automatically created zones and
perform OCR on one page area at a time.
• Restart Windows in safe mode and test OmniPage by performing OCR on the included
See “Working with zones” on page 40.
sample image files.
If you are performing multiple tasks at once, such as recognizing and printing, OCR may take
longer.
Supported File Types
Supported image file formats for loading are TIFF, PCX, DCX, BMP, JPEG, JB2, JP2, GIF,
PNG, XIFF, MAX, PDF, XPS and HD Photo.
Supported file types for saving recognition results as text are:
• ePub (*.epub)
• ePub for poems (*.epub)
• ePub simple (*.epub)
• HTML 3.2 (*.htm)
• HTML 4.0 (*.htm)
• InfoPath (*.xsn)
• Kindle Document (*.doc)
• Microsoft Excel (*.xlsx)
• Microsoft Excel XP, 2003 (*.xls)
• Microsoft PowerPoint (*.pptx)
• Microsoft PowerPoint 97 (*.rtf)
• Microsoft Publisher 98 (*.rtf)
• Microsoft Word 2000, XP (*.rtf)
• Microsoft Word 2003 (WordML) (*.xml)
• Microsoft Word (*.docx)
• MP3 Audio (*.mp3)
• MP3 Audio Premium Quality (*.mp3)
• PDF (*.pdf)
• PDF Edited (*.pdf)
• PDF Searchable Image (*.pdf)
Technical Information Supported File Types 84
Page 89

• PDF with image substitutes (*.pdf)
• Text (*.txt)
• Text - Comma Separated (*.csv)
• Text - Formatted (*.txt)
• Text with line breaks (*.txt)
• Unicode Text (*.txt)
• Unicode Text - Comma Separated (*.csv)
• Unicode Text - Formatted (*.txt)
• Unicode Text with line breaks (*.txt)
• WordPad (*.rtf)
• WordPerfect 12, X3 (*.wpd)
• XML (*.xml)
• XPS (*.xps)
• XPS Searchable Image (*.xps)
Technical Information Supported File Types 85
Page 90

Index
Click a page number to jump to the referenced item.
(E) = Image Enhancement tool
(F) = Form Handling tool
Numerics
3D deskew 34
A
Accuracy
improvement 27, 49, 82
influence of brightness
influence of despeckling
influence of training 49
scanning influence
Acquire Text menu items
Activating OmniPage
Adding
attachments to mail 64
to zones
41
training to training files
words to user dictionary
workflow steps
Additive area selection (E)
25, 28
ADF
Advanced saving option s
Advice on problems
Agent to start OmniPage
Alphanumeric zones
Area definition for SET tools
Arial Unicode MS
Asian language recognition
Asian texts, vertical
Assigning OmniPage to scanner buttons 29
Attachments to mail
Auto-detect layout
Automatic Document Feeder (ADF) 25, 28
Automatic training
Auto-sending by mail
Auto-zoning 29
Auto-zoning vertical text
B
Backgrounds for zoning 38
Barcode processing
Basic processing steps 15
Batch Manager
Black-and-white
3
28
34
27
24
12
50
45
71
33
61
81
12, 69
39
33
49
48
38
64
29
50
64
38
77
59
images
scanning
28
Blacking out confidential words
51
Bold text
Box
25, 66
Boxes
52
Boxes for recognized text
Brightness 28, 82
Brightness / Contrast (E)
Bring to Front tool (F)
56
53
83
33
C
Changing
part of a page
reading order
views
Changing workflows
Character attributes
Character Map
Characters, suspect
Checkbox tool (F)
Checking OCR results
Chinese
Circle text tool (F)
Classic View
Clipboard
sending recognition results
Cloud Connector
Color
images
markers
scanning 28
Color dropout for forms
Coloring image areas
Comb tool (F) 56
Comparing recognized words with originals
Composition of workflows
Contrast 28, 82
Contrast / Brightness (E)
Convert Now Wizard
Converters multiple 61
Converting from PDF
Converting image files 69
Copying to Clipboard
Cover pages for barcode processing
Creating
53
52
15, 19
71
51
46
44
56
45
48
56
15
58
25, 66
59
45
34
34
68
33
27, 63, 64
63, 64
58
77
45
OmniPage Ultimate User’s Guide IND EX 86
Page 91

new workflows from existing ones
training data
workflows
Crookedly scanned pages
Crop (E)
Ctrl to avoid panel redocking
Custom Layout
Custom views
Customizing export converters 61
50
71
34
33
15
30
19
D
Decreasing image resolution 34
Deleting
jobs
75
training files
user dictionaries
Describing document layout
Deskew (E)
Deskewing digital camera images
Desktop
Desktop launching of workflows
Despeckle (E)
Dictionaries
Digital camera input
Direct OCR
Disabling job running
Docking panels
Docking position display
DocuDirect
Document Layout, Form
Document Manager
Document Ready button
Documents
double-sided
exporting
in OmniPage 14
layout description
saving
sending to Clipboard 58
with varied layout
Document-to-document conversion
Dot removal from images 34
Double-sided documents
Drawing zones in Direct OCR 25
Dropbox
Dropout color (E)
Dropping graphics from export 59
Dual screens
50
47
29
34
15
69
34
45
26, 34
24
73
15
15
72
30
15
69
28
58
29
58
29
28
25, 66
34
17
34
71
29
Duplex scanners
Dynamic verifier
28
45
E
East Asian language support 7, 48
Easy Loader
Easy Loader in Quick View
eDiscovery Assistant for searchable PDF
Editing
character attributes
form objects
graphics
in True Page 52
on-the-fly
paragraph attributes
PDF output
recognized text
tables
training files
user dictionaries
vertical texts
Editor
formatting levels
E-mail notification of job completion
Embedding items in OPDs
Embedding templates in OPD files
Enabling OmniPage taskbar icon
Encryption for PDF
English embedded in Asian texts
ePub
Error messages from jobs
Evernote
Excel (XLSX) 84
Existing workflow as new workflow source
Explorer, loading files from
Export converters 61
Export Results button
Exporting
graphics
in Flowing Page
in True Page
repeated 58
to Clipboard
to file 59
to mail
to PDF
Extracting form data 57
Extracting items from OPDs
15, 17, 26
19, 27
51
57
52
53
51
62
51
42, 52
51
47
38
44
72
14
42
69
63
48
64
74, 75
25, 66
27, 69
59
59
60
60
58
64
62
14
63
71
OmniPage Ultimate User’s Guide IND EX 87
Page 92

Extracting text from PDF files
64
F
Fast recognition and saving 18
Fax recognition
Features, new
File-it Assistant
Files
as export target
as image source 25
retained on uninstall
separation options
types for export 60
Fill text tool (F)
Fill (E)
Financial dictionaries
Finding
non-dictionary words 45
suspect words
Finishing
proofing in a workflow 69
workflows
zoning in a workflow
Flexible View
Flipping images
Floating panels
Flowing Page
Form Arrangement toolbar
Form data, extracting
Form drawing toolbar
Form objects, editing
Form processing with dropout
Form zone 40
Formatted Text
Formatted Text view
Formatting levels 44, 60
Formatted Text
Plain Text
True Page 44
Formatting toolbar
Frames
Fresh start for new workflow 71
Fully searchable PDF
83
2
79
58
13
59
56
34
48
45
71
69
15, 17
33
15
60
56
57
55
57
44
60
44
44
15
52, 60, 83
63
G
Get and Convert 27
Google Docs
Graphic tool (F) 56
25, 66
34
Graphic zones
Graphics
editing 52
in export
Grayscale
images 59
scanning
Grouping elements
40
59
28
52
H
Header/footer indicators 44
Hearing texts read aloud
Help display 15, 19
Hiding / showing markers
Highlighting text
History of image enhancement
Horizontal alignment tools (F)
Hue / Saturation (E)
Hyperlinks
52
54
44
53
33
I
Ignore backgrounds 38
Ignore zones
Image enhancement
history 37
in workflows
tools
Image files
conversion
input
reading order
samples
Image panel
Image toolbar 15
Images
backgrounds
black-and-white 59
color
cropping
deskewing 34
editing
flipping
grayscale 59
quality
resolution 34, 59, 83
rotating
saving
substitutes in PDF 62
40
37
32
69
25
25
82
15
38
59
33
52
33
28
33
59
37
56
OmniPage Ultimate User’s Guide IND EX 88
Page 93

Improving accuracy
Increasing memory
Input
from digital camera
from image files
from PDF files
from scanners
via Easy Loader
Installing
OmniPage
scanners
IntelliTrain 50, 83
Interactive job steps
51
Italic text
27, 50, 82
82
26
25
25
27
26
7
8
73
J
Japanese 48
Jobs
73
disabling
error messages
managing
modifying
notification of completion
page limit
recurrent
running
running without prompts
status
74, 75
timing instructions
Joining zones
74, 75
74, 75
74
72
74
76
74, 75
73
76
41
K
Korean 48
L
Language choices verified 48
Languages
Launch
target application
workflows from desktop
Launchpad 10
Layout description
Layout, auto-detect
Legal dictionaries 45, 48
Legal documents
Letter outline strengthening 34
Levels of formatting
Line tool (F)
Linearized PDF 63
47, 83
59
69
29
29
30
44
56
Links to web pages
Loading
Image Enhancement templates 37
image files
images from Windows Explorer
images with Easy Loader
training files
user dictionaries
zone templates 30, 42
Lotus Notes
52
25
27
19, 26
50
47
72, 73, 77
M
Mail 64
Mailbox watching
Managing jobs
Manual 3D deskewing
Manual deskewing
Manual training
Manual zoning
Marked words in Editor
44, 45
Markers
Marking text
Maximising workspace
Medical dictionaries
Memory requirements
Microsoft Outlook
Microsoft SkyDrive
Microsoft Word, opening PDF files in
Modifying
image quality 31
jobs
74
tables
42, 52
zone templates 43
40
zones
Modifying workflows
MRC compression 63
Multicolumn areas
Multi-page image files
Multiple column pages 30
Multiple converters
77
74, 75
34
34
50
38
44
53
17
45, 48
82
64, 72, 73, 77
25, 66
71
52
59
61
N
New features 2
Noise removal from images
Non-dictionary words 44
Non-printing characters
Notification of job completion
Nuance Cloud Connector 25, 66
34
44
72
63
OmniPage Ultimate User’s Guide IND EX 89
Page 94

Numeric zones
39
O
OCR
checking OCR results
Direct OCR
DocuDirect
poor performance in
proofreading results
settings for Direct OCR 24
OCR Brightness (E)
OCR image
OCR/Primary image (E) 33
OmniPage
activating
assigning to scanner buttons
documents in
earlier versions
installing
reinstalling
starting
testing
uninstalling
OmniPage Agent
OmniPage desktop
OmniPage desktop views
OmniPage Documents
saving as
OmniPage Toolbox
OmniPage Workflow Starter
One-button processing
On-the-fly editing
OPD files
embedding items
extracting items
template embedding 42
Opening image files
Operating system requirements
Optimized PDF for web display 63
Optimizing brightness
Options dialog box
Options for proofing 45
Options for saving
Order of page elements 52
Original image
Original image saving
Outlook 72, 73, 77
Overview of processing steps
24
72
31
12
7
13
8
82
13
58
45
83
45
34
29
14
7
12, 69
15
15
14
15
12, 69
19, 27, 29
53
14
14
25
7
28
21
61
31
59
15
P
Page Image panel 15
Page limit for jobs
Page Ready button
Pages
deskewing
multi-page image files
navigation 15
sending as mail
sending to Clipboard
Panels 15
PaperPort
Paragraph
editing attributes
styles
51, 59
Passwords for PDF
Pausing workflows
PDF converting from/to
PDF Edited
PDF file input
PDF flavors
PDF linearized
PDF to MS Word
PDF-make fully searchable
Pending pages
Performance problems during OCR
Plain Text in Editor
Plain Text view
Pleading numbers
Pointer (E)
PowerPoint (PPTX)
Preprocessing images
Primary image
Primary/OCR Image (E) 33
Problems with faxes
Process backgrounds
Process zones 40
Processing
basic steps of
from other applications 24
manual
step-by-step
steps, overview 15
with workflows
Professional dictionaries 45, 48
Program panels
Progress reports from workflows
74
69
34
59
64
58
13, 21
51
63
69
63
62
25
62
63
64
63
53
44, 60
60
30
33
84
31
31
83
38
15
24
24
68
15
75
83
OmniPage Ultimate User’s Guide IND EX 90
Page 95

Prohibited zone shapes
Proofing
in a workflow 69
options
45
Properties of zones
Purpose of training
Purpose of workflows
41
39
49
68
Q
Quality of images 28
Quick Convert View
Quick Convert View with Easy Loader
15, 18
19, 27
R
Reading order 52
Reading text aloud with RealSpeak
Recognition
accuracy
28, 49, 82
languages
problems with faxes
saving results
speeding up
Rectangle tool (F)
Recurrent jobs
Redacting text
Redocking panels
Reducing image area
Registration
Reinstalling OmniPage
Removing image edges
Removing noise from images
Removing workflow steps
Removing zone templates
Repeated exporting 58
Replacing zone templates
Requirements for Asian language support
Resetting views 17
Resolution
Resolution (E)
Retaining paragraph styles 59
Re-training
Rotate (E)
Running
DocuDirect jobs
jobs without prompts 73
workflows
47, 83
83
59
83
56
73, 76
53
15
33
12
13
33
71
43
59, 83
34
50
33
73
68
54
34
43
S
Safe mode 82
Sample image files
Saturation / Hue (E)
Saving
and launching
as OmniPage Document
documents
options
61
original images
PDF files 62
recognition results
59
text
to file 58
to mail
64
to multiple file types
training files
user dictionaries
zone templates
Saving and applying Image Enhancement templates
Scanners
Scanning
Scheduled processing
Searchable PDF
Searching PDF output
Select Area (E)
Selection tool (F) 55
Send to Back tool (F)
Sending
7
SET tools
Setting up a scanner
Setting up Direct OCR
Settings
Settings for workflows 70
Simplified UI
83
9
drivers
duplex
28
setting up
28
input from
pictures
to workflows
Wizard
8
pages by mail
to Clipboard
defining an area 33
Acquire Text
for Direct OCR 24
Options dialog box
zone types
82
33
59
58
58
59
59
61
50
47
43
37
8
28
28
29, 79
72
62, 63
62
33
56
64
58
32
8
24
24
21
42
18
OmniPage Ultimate User’s Guide IND EX 91
Page 96

Single-column pages with tables
Skipping interactive job steps
Slow recognition
Smart folders
Solutions for poor performance
Specialized dictionaries
Speed zoning
Spreadsheet pages
Standard toolbar 15
Starting a user dictionary
Starting DocuDirect
Starting the program 8
Status of jobs
Step-by-step processing
Steps for workflows
Stopping workflows
Storing zoning changes
Straightening pages
Strengthening letter outlines
Striking out text
Subtractive area selection (E)
Suggestions in proofing
Suspect words
Synchronize views (E)
System or performance problems during OCR
System requirements
83
76, 77
41
30
72
74, 75
70
69
34
53
44
33
6
30
73
81
48
47
15
53
34
33
45
T
Tabbed panels 15
Table tool (F)
Table zones
Tables
editing
editing dividers
in single column pages
in Text Editor 52
removing dividers
rows in
zones 40, 42
Taskbar workflow icon
Technical information
Template zones 30, 42, 82
Templates in OPDs
Template, form 57
Testing OmniPage
Text direction
Text Editor 15, 44, 51
Text saving
56
40
52
42
30
42
42
69
81
42
82
38, 48
59
83
Text tool (F)
Text-to-Speech facility
Thumbnails
Tiled panels
Timing of jobs
Toolbar docking / floating
Toolbars
Training
automatic (IntelliTrain) 50
manual
training files
Troubleshooting 81
True Page
True Page editing
True Page export
TWAIN scanner drivers
Types of zones
55
54
15
15
76
45
19
49
50
51
44
52
60
9
39
U
Underlined text 51
Undocking panels
Ungrouping elements
Uninstalling the software
Unloading
training files
user dictionaries
zone templates
URLs
52
User dictionaries
User interaction in workflows
Using Direct OCR
15
52
13
50
47
43
45, 47
69
24
V
Verifying language choices 48
Verifying text
Vertical arrangement tools (F)
Vertical dictionaries 48
Vertical text
Vertical text, auto-zoning
Viewing input or output files 75
Viewing vertical texts
Viewing workflow progress
Views 15
changing
Classic 15
Custom
Flexible
Quick Convert 18
45
48
38
38
75
15, 19
19
17
56
OmniPage Ultimate User’s Guide IND EX 92
Page 97

17
resetting
using Window menu
17
W
Warning messages from jobs 75
Watched folders
Watched mailboxes
Web access for activation
Web display with PDF files
Web page links 52
Window menu for view control
Windows Explorer
Wizard for direct conversions 27, 64
Wizard for scanner setup
Word files as input
Word (DOCX)
Workflow Assistant
Workflow Status
Workflow viewer
Workflows
composition 68
creating
finishing
for form data extraction
image enhancement steps
pausing and stopping
running
started from scanner
steps and settings
taskbar icon
user interaction
viewing status
Working with zones 40
Workspace management
76, 77
77
7
63
17
27, 69
8
29
84
23, 70
15, 19, 75
75
71
71
57
37
69
68
29
70
69
69
75
17
X
XPS 63, 84
Z
Zones 40
adding to 41
alphanumeric
changing types
deleting templates 42
graphic
ignore 40
in Direct OCR
irregular
joining 41
39
40
40
25
41
manual
38, 82, 84
modifying templates
numeric
39
process
40
prohibited shapes
properties
replacing templates
saving templates
table 40, 42
templates
types
unloading templates 43
vertical Asian text
working with
Zoning in a workflow
Zoning on-the-fly
Zoom (E)
Zooming displays
39
42
30, 42, 82
39, 82
48
40
53
33
15, 45
63
42
41
42
69
OmniPage Ultimate User’s Guide IND EX 93
Page 98

THIRD PARTY LICENSES/NOTICES
The word verification, spelling and hyphenation portions of this product are based in part on Proximity Linguistic Technology. The
Proximity Hyphenation System © Copyright 1988. All Rights Reserved. Franklin Electronic Publishers, Inc.
The Proximity/Merriam-Webster American English Linguibases. © Copyright 1982, 1983, 1987, 1988 Merriam-Webster Inc. ©
Copyright 1982, 1983, 1987, 1988 Franklin Electronic Pub lishers, Inc. Words are checked against the 116,000, 80,821, 92,641, 106713,
118,533, 91928, 103,792, 130,690, and 140,713 word Proximity/Merriam-Webster Linguibases. The Proximity/Collins British English
Linguibases. © Copyright 1985 William Collins Sons & Co. Ltd. Legal and Medical Supplements © Copyright 1982 Merriam-Webster
Inc. © Copyright 1982, 1985 Franklin Electronic Publishers, Inc. Words are checked against the 80,307, 90,406, 105,785, and 115,784
word Proximity/Collins Linguibases. The Proximity/Collins French, German, Italian, Portuguese (Brazilian), Portuguese (Continental),
Spanish Linguibases. © Copyright 1984, 1985, 1986, 1988 William Collins Sons & Co. Ltd. © Copyright 1984, 1985, 1986, 1988
Franklin Electronic Publishers, Inc. Words are checked against the 136,771, 150,893, 178,839, 207,119, 212,565, and 194,393 word
Proximity/Collins Linguibases. The Proximity/Van Dale Dutch Lingubase. © Copyright 19 87 Van Dale Lexicografie bv. © Copyright
1987 Franklin Electronic Publishers, Inc. Words are checked against the 119,614 word Proximity/Van Dale Linguibase. The Proximity/
Munksgaard Danish Linguibase. © Copyright 1988 Munksgaard International Publishers Ltd. © Copyright 1988 Franklin Electronic
Publishers, Inc. Words are checked against the 113,000 word Proximity/Munksgaard Linguibase. The Proximity/IDE Norwegian and
Swedish Linguibases. © Copyright 1988 IDE a.s. © Copyright 1988 Franklin Electronic Publishers, Inc. W ords are checked against the
126,123 and 150,000 word Proximity/IDE Linguibases.
INSO/Vantage Research dictionaries: International CorrectSpell ™ spelling correction system © 1993 by Lernout & Hauspie.
Slovenian Speller Database, copyright © 2002 Ambeis d.o.o.
Esperanto dictionary based on compilation by Toon Witkam and Stefan MacGill.
Asian OCR capabilities are jointly developed by the Beijing Wintone Information Technology Corporation Ltd and Nuance
Communications, Inc. All rights reserved.
International Components for Unicode (ICU) project Copyright © 1995-2009 International Business Machines Corporation and others.
This software is based, in part, on the work of the Independent JPEG Group, and Colosseum Builders, Inc.
The Independent JPEG Group's software, copyright © 1991-1995, Thomas G. Lane.
Portions of this software are copyright © 2006 The FreeType Project <www.freetype.org>. All rights reserved. FreeType 2.3.1, Turner,
Wilhelm, Lemberg.
Zlib copyright © 1995-1998 Jean-loup Gailly and Mark Adler.
This product was developed using Kakadu software.
Export Options dialog controls from Allan Nielsen, Supergrid control, copyright © 1999.
This product includes software developed by the OpenSSL project <http://www.openssl.org/> with software written by Eric Young and
Tim Hudson.
Part of this software is derived from the RSA Data Security Inc. MD5 Message-Digest Algorithm.
AES encryption/decryption for PDF © 2001, Dr Brian Gladman, Worcester, UK.
Amazon's Kindle 2 copyright ©1999-2011.
Components for Asian font handling: copyright © 2009 Adobe Systems Incorporated. All rights reserved.
Some integration and other components: © 2009 Microsoft Corp. All rights reserved.
PDF creation: ©1993-2013 Zeon Corporation. All Rights Reserved
© Nuance Communications, Inc., 2013.
All rights reserved. Subject to change without prior notice.
OmniPage Ultimate User’s Guide THIRD PARTY LICENSES/NOTICES 94
 Loading...