

Page 1

OmniForm Reference
Version 2 for Windows 95/NT/3.1
CAERE CORPORATION
100 Cooper Court
Los Gatos, California 95030
European Offices:
Caere GmbH
Innere Wiener Strasse 5
81667 Munich
Germany
Page 2

Please Note
In order to use this program, you should know how to work in the Microsoft Windows environment.
Please refer to your Windows documentation if you have questions about how to use menu
commands, dialog boxes, scroll bars, edit boxes, and so on.
OmniForm Reference
Version 2 for Windows 95/NT/3.1
Copyright© 1996 Caere Corporation. All rights reserved. CAERE®, Logical Form Recognition, and
OmniForm
are trademarks of Caere Corporation.
Formonix is a trademark of Formonix, Inc.
Many of the designations used by manufacturers and sellers to distinguish their products are claimed
as trademarks. Such designations appearing in this manual have been printed in initial caps.
Product Serial Number:
_______________________________________________
(from Disk #1 label)
2
Page 3

Chapter 1
Introduction
OmniForm is the easy way to convert your paper forms to electronic
forms. Use OmniForm to edit, design, and fill forms, manage
information databases, and print, fax, and mail forms among other
functions.
This chapter gives an overview of the form creation and information
management capabilities OmniForm provides, as well as an explanation
of how to use the documentation.
This chapter contains the following sections:
• OmniForm Features
• Using the Documentation
Introduction - 3
Page 4

OmniForm Features
OmniForm, an easy-to-use environment for working with forms, is
more than just form-recognition software. OmniForm includes the
following features:
Form Input
OmniForm uses Logical Form Recognition™ to convert your scanned
paper forms or imported image files into electronic, editable forms.
Fill View
OmniForm Features
Use OmniForm’s
Information entered can easily be searched and sorted.
Design View
Use OmniForm’s
forms. A variety of toolbars make formatting easy and convenient. Use
the scrapbook to store or copy form objects.
OmniForm Database
All information you enter into a form is stored as a part of an OmniForm
database. You can create, duplicate, sort, and search records, and import
and export database information.
Field Validation
You can set up OmniForm to
OmniForm displays a prompt if you enter incorrect information.
Field Calculations
OmniForm’s built-in operators and functions let you define calculations
that display the correct value as you fill the appropriate field(s) in a
form. This automates data entry and reduces the possibility of errors.
Form Printing, Faxing, and Mailing
You can print or fax forms from OmniForm. You have a choice of
printing or faxing just the form, or just the data entered in a form, or both
the form and its information.
fill view
design view
to fill a form with the information you need.
to design your own forms or edit existing
validate
a fillable field automatically.
Use electronic mail to send forms to other users if you have Microsoft
Exchange/Mail or Lotus cc:Mail/Notes installed. Microsoft Exchange/
Mail users can also add routing slips to mailed forms.
Introduction - 4
Page 5

Using the Documentation
This section explains the various instructional and formatting
conventions used in this manual.
Screenshots and Instructions
Most screenshots in this manual were taken in Windows 95. Your dialog
boxes and windows may look slightly different if you are using
Windows NT or Windows 3.1. For example, dialog box titles in
Windows 95 appear in the top left of the box. Dialog box titles in
Windows NT and Windows 3.1 appear in the top middle of the box.
Both screenshot versions are displayed when they differ significantly.
Instructions appropriate to each version of Windows are given where
necessary — for example, double-clicking an icon in a program group
(Windows 3.1 and NT) versus using the Taskbar (Windows 95). Any
instruction specific to Windows NT and 3.1 appears immediately after
the Windows 95 instruction.
Online Help
OmniForm has both online help and context-sensitive help. Use the
commands in the Help menu to find information on OmniForm topics
and on using Help itself.
Using the Documentation
Click the Help button in the OmniForm standard toolbar to turn your
cursor into a question mark icon. Click any command, button, or portion
of the window to open context-sensitive help for that topic.
Formatting
Two formatting conventions are used throughout the manual.
Italicized Text
• Labeled buttons, menu commands, dialog box text, and any text
in an onscreen form are italicized; for example, “Choose
the File menu.”
Menu titles, icon names, dialog box names, and unlabeled
buttons are not italicized.
• A new term may be italicized the first time it is used; for example,
“This is a
Glossary section of the manual.
• Variable entries are italicized; for example, “The entry n must be
between 4 and 18.”
field.” These terms and others are defined in the
fill text
Introduction - 5
Open
in
Page 6

Courier font
Symbols
Using the Documentation
• The Courier font indicates text that you are supposed to enter; for
example, “Type Sample1 in the
• The Courier font is also used to distinguish file paths and file and
folder names from the rest of the text; for example, “Locate the
Sample form in the OmniForm folder.”
Two symbols are used in this manual to highlight text.
File Name
text box and click
OK.
”
This symbol means
This symbol means
It introduces a tip or an item of note.
Note.
Warning.
It introduces cautionary text.
Introduction - 6
Page 7

Chapter 2
Installation and Setup
This chapter describes how to install OmniForm and begin using it. It
contains the following sections:
• Registering OmniForm
• System Requirements
• Installing OmniForm
• Starting OmniForm
Installation and Setup - 7
Page 8
System Requirements
To install and run OmniForm, you need the following setup:
• Computer with an 80386 or higher processor.
• VGA or SVGA monitor.
• Windows-compatible mouse.
• 1.44MB high-density floppy disk drive and internal hard disk.
• A minimum of 11MB hard disk space for the US version; 15MB
for the International English version.
• If you plan to scan forms, you need a Hewlett-Packard (ScanJet
Plus or above), Visioneer, or TWAIN-compatible scanner.
• Total system memory of at least 8MB RAM for Windows 95 and
Windows 3.1; 12MB for Windows NT.
• At least a 4MB permanent swap file for Windows 3.1.
• MS-DOS 5.0 or above for Windows 3.1.
OmniForm 2.01 for Windows 95 and Windows NT will not run on
earlier versions of Windows.
System Requirements
Registering OmniForm
Registering your copy of OmniForm entitles you to technical support,
notification of special offers and upgrades, and the lowest price offered
on the next OmniForm upgrade.
Please complete and send in the registration card included in your
OmniForm package.
See “Caere Product Support” on page 271 for information on technical
support.
Installation and Setup - 8
Page 9

Installing OmniForm
This section describes how to install OmniForm on Windows 95, and on
Windows NT and 3.1.
OmniForm automatically decides which version of the program to
install. If you are running Windows 3.1, for example, OmniForm installs
the 16-bit Windows 3.1 version of OmniForm.
Close all applications — including screen savers and mail applications
— to free up memory before installing OmniForm.
Installing on a Windows 95 System
1 Start Windows 95.
Installing OmniForm
2 Click
The Control Panel appears.
3 Double-click
The Add/Remove Programs Properties dialog box appears.
4 Click
5 Insert OmniForm disk #1 in your computer’s floppy drive and
follow the instruction in the dialog boxes.
Windows fills the
automatically and the InstallShield Wizard appears to guide
you through the setup process.
6 Follow the instructions in each dialog box that appears, and
insert other installation disks as prompted. (Installation may
not require all the disks provided.)
OmniForm installs by default to the location c:\Program
Files. You can select another location if you wish.
in the Taskbar and choose
Start
Add/Remove Programs.
Install...
in the
Install/Uninstall
Command line for installation program
Settings
tab.
Control Panel
.
text box
Installation and Setup - 9
Page 10

Installing on a Windows NT or 3.1 System
1 Start Windows NT or 3.1 and open the Program Manager
window.
2 Insert OmniForm disk #1 in drive a: (or b:) of your computer.
Installing OmniForm
3 Choose
The Run dialog box appears.
4Type a:\setup (or b:\setup) in the
and click OK.
The InstallShield Wizard appears to guide you through the
setup process.
5 Follow the instructions in each dialog box that appears.
OmniForm creates a Caere Applications folder if necessary. You
can select another folder in the Select Program Folder dialog
box if you wish.
6 Insert other installation disks as prompted. (Installation may
not require all the disks provided.)
An OmniForm icon is added to the Caere Applications
program group when installation is complete.
in the Program Manager File menu.
Run
Command Line
text box
Installation and Setup - 10
Page 11
Starting OmniForm
This section describes how to launch OmniForm after it is installed. Any
instruction for Windows NT and 3.1, when different from that for
Windows 95, appears immediately after the Windows 95 instruction.
Starting OmniForm
Install your scanner and test it in Windows
OmniForm. Consult your scanner documentation or the scanner
manufacturer to resolve any scanner problems that occur.
To start OmniForm:
1 Click
Windows NT and 3.1 users: double-click the OmniForm icon in
the Caere Applications folder.
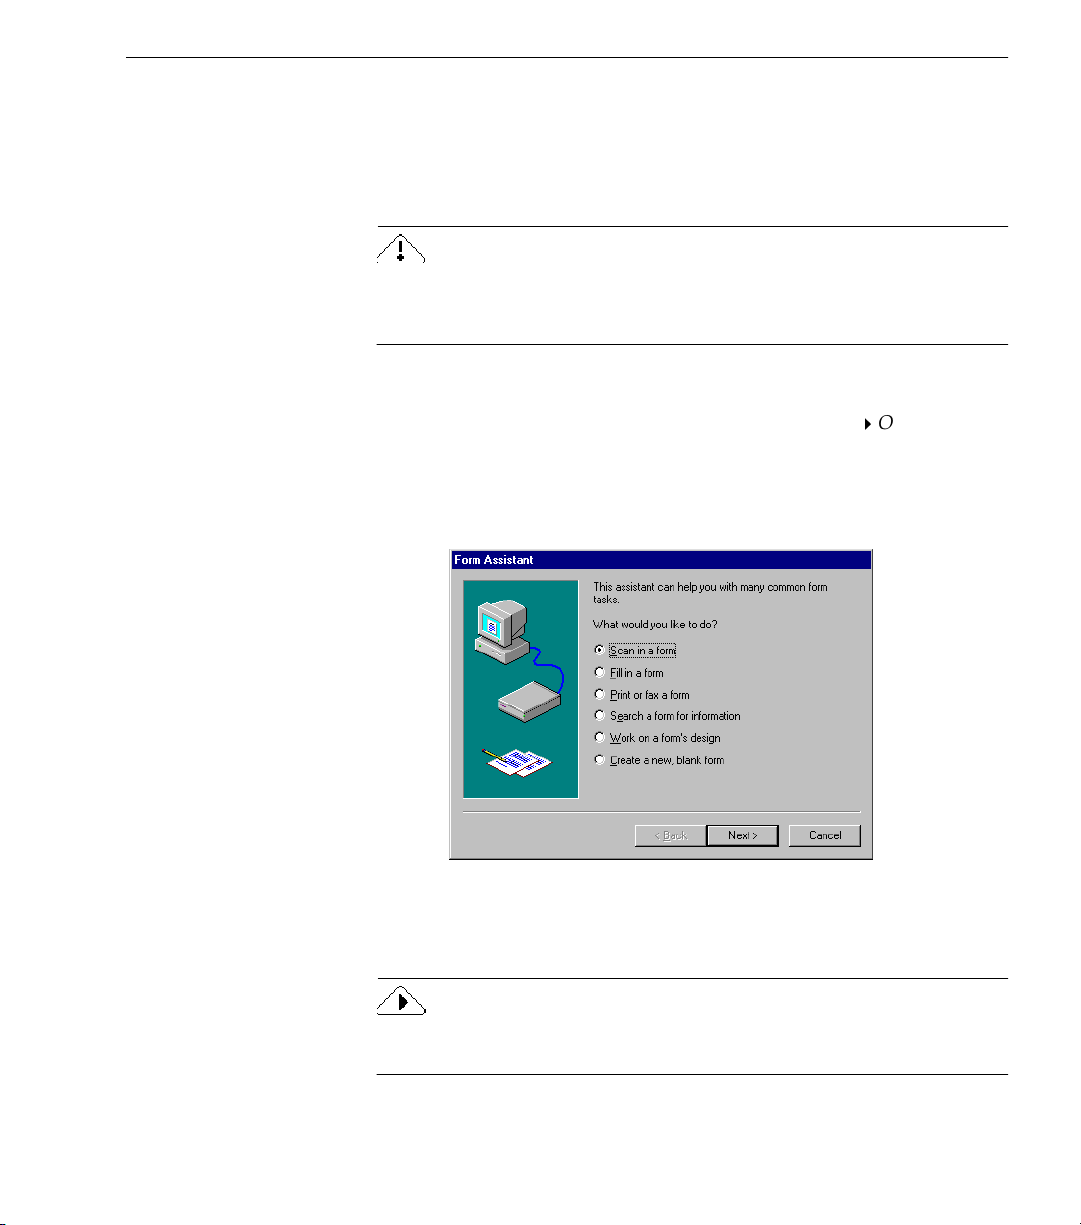
Form Assistant appears. It contains six options. Each is a basic
OmniForm procedure.
in the Taskbar and choose
Start
using it with
before
Programs
OmniForm
.
2 Select an option and click
Click
choose a particular option.
See Chapter 5, OmniForm Procedures, for detailed information on the
basic OmniForm procedures.
to close Form Assistant if you do not want to
Cancel
Next>.
Installation and Setup - 11
Page 12
Chapter 3
Tutorials
These tutorials guide you through some of the main features of
OmniForm. There are four sections in this chapter:
• Tutorial 1 — Load and Fill a Form
• Tutorial 2 — Edit and Design a Form
• Tutorial 3 — Design Your Own Form
• Tutorial 4 — The OmniForm Database
Perform these exercises in order if you are new to OmniForm. Each new
exercise builds upon skills learned in the previous one. Choose the
tutorial you want to practice if you already know the basics of scanning,
designing, and using forms.
The tutorials cross-reference sections in this manual for additional
information on each subject. Read the other chapters in the manual to
learn about OmniForm features not discussed here.
Most screenshots in this chapter were taken in Windows 95. Your dialog
boxes and windows may look slightly different if you are using
Windows NT or Windows 3.1.
Tutorials - 12
Page 13

Tutorial 1 — Load and Fill a Form
You will load the Sample form in this exercise in one of three ways:
• Scan in the Sample form with a scanner if you have one. The form
is supplied inside this manual.
• Fax the Sample form to your computer’s fax modem if you have
no scanner, use your fax software to save it as a PCX or TIFF file,
and open it in OmniForm. The form is inside this manual.
• Locate and open the Sample.tif file if you have no scanner and
no fax modem. It was placed in your OmniForm\Sample Forms
folder during installation.
Decide which method you want to use. You can try all three methods
eventually if you own both a scanner and a fax modem.
After you have loaded the form into OmniForm, you will practice
various features of the program.
Launch OmniForm
Click
Windows NT and 3.1 users: double-click the OmniForm icon in
the Caere Applications folder.
The Form Assistant dialog box appears.
in the taskbar and choose
Start
Tutorial 1 — Load and Fill a Form
Programs
OmniForm
.
If you accidentally close the Form Assistant dialog box, click the
Form Assistant button in the standard toolbar to reopen it.
Tutorials - 13
Page 14
• See the next section if you have a scanner and want to scan the
form.
• See “Fax the Sample Form” on page 17 if you have a fax machine
and a fax modem and want to fax the form to your computer.
• See “Import an Image File” on page 17 if you do not have a
scanner or a fax modem, or if you want to use this method
instead of the other two methods.
Scan the Sample Form
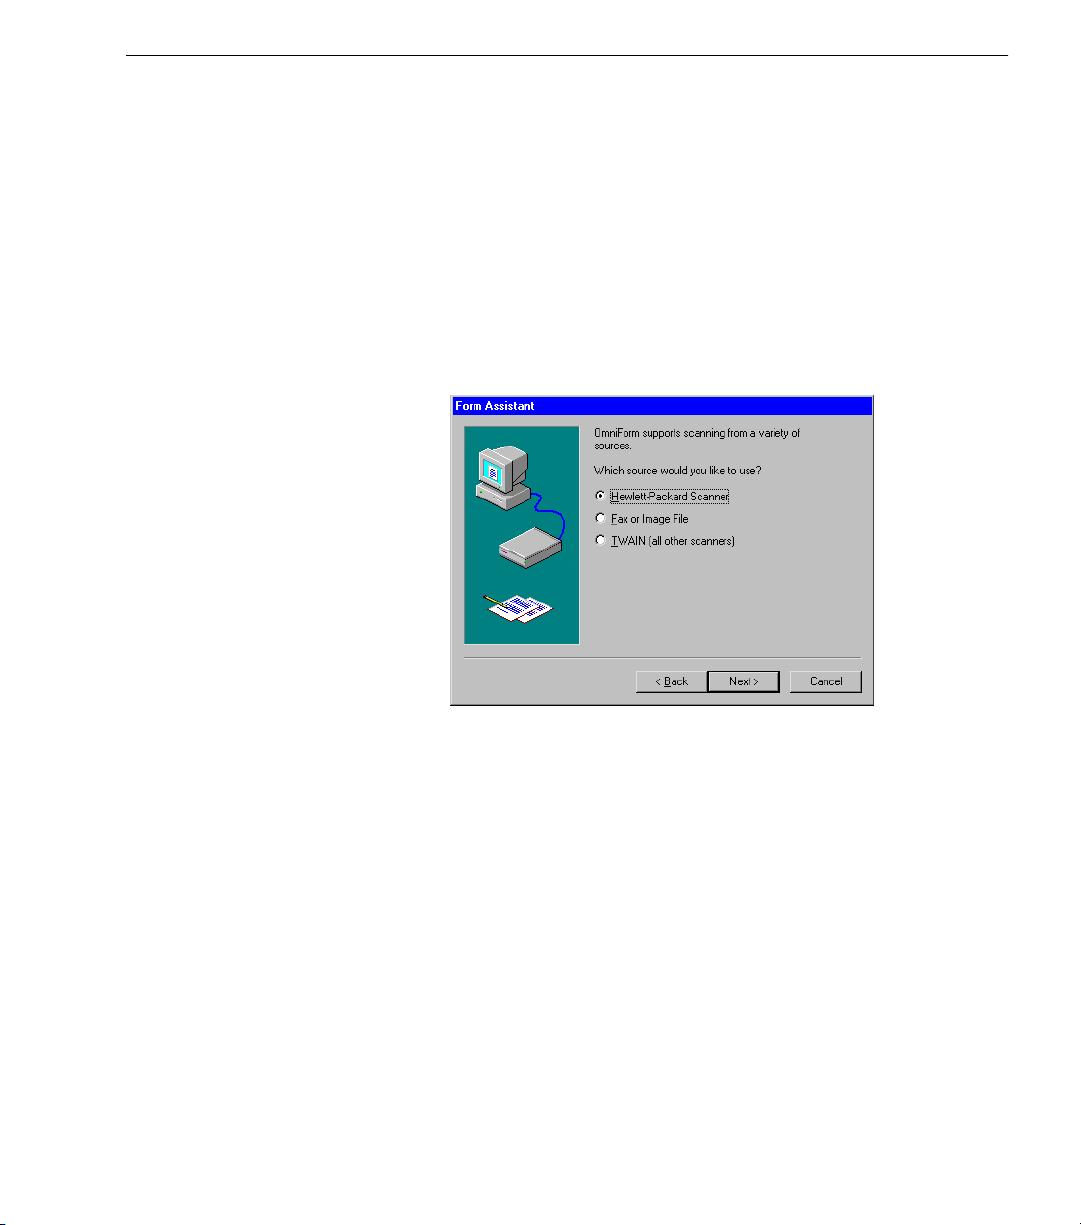
1 Select
2 Select a source for the form in the next window.
Scan in a form
and then click
Tutorial 1 — Load and Fill a Form
.
Next>
•Select
•Select
3 Click
4 Users who selected
Source...
• Select a source in the Select Source dialog box.
• Click
• Proceed to step 8 on page 15.
5 Click
Hewlett-Packard Scanner
proceed to step 5.
TWAIN (all other scanners)
compatible scanner that is not an HP scanner.
.
Next>
TWAIN
in the next window to select a TWAIN source.
to return to Form Assistant.
Select
to continue.
Next>
if you have an HP scanner and
if you have a TWAIN-
as the source can click
Select
Tutorials - 14
Page 15
Tutorial 1 — Load and Fill a Form
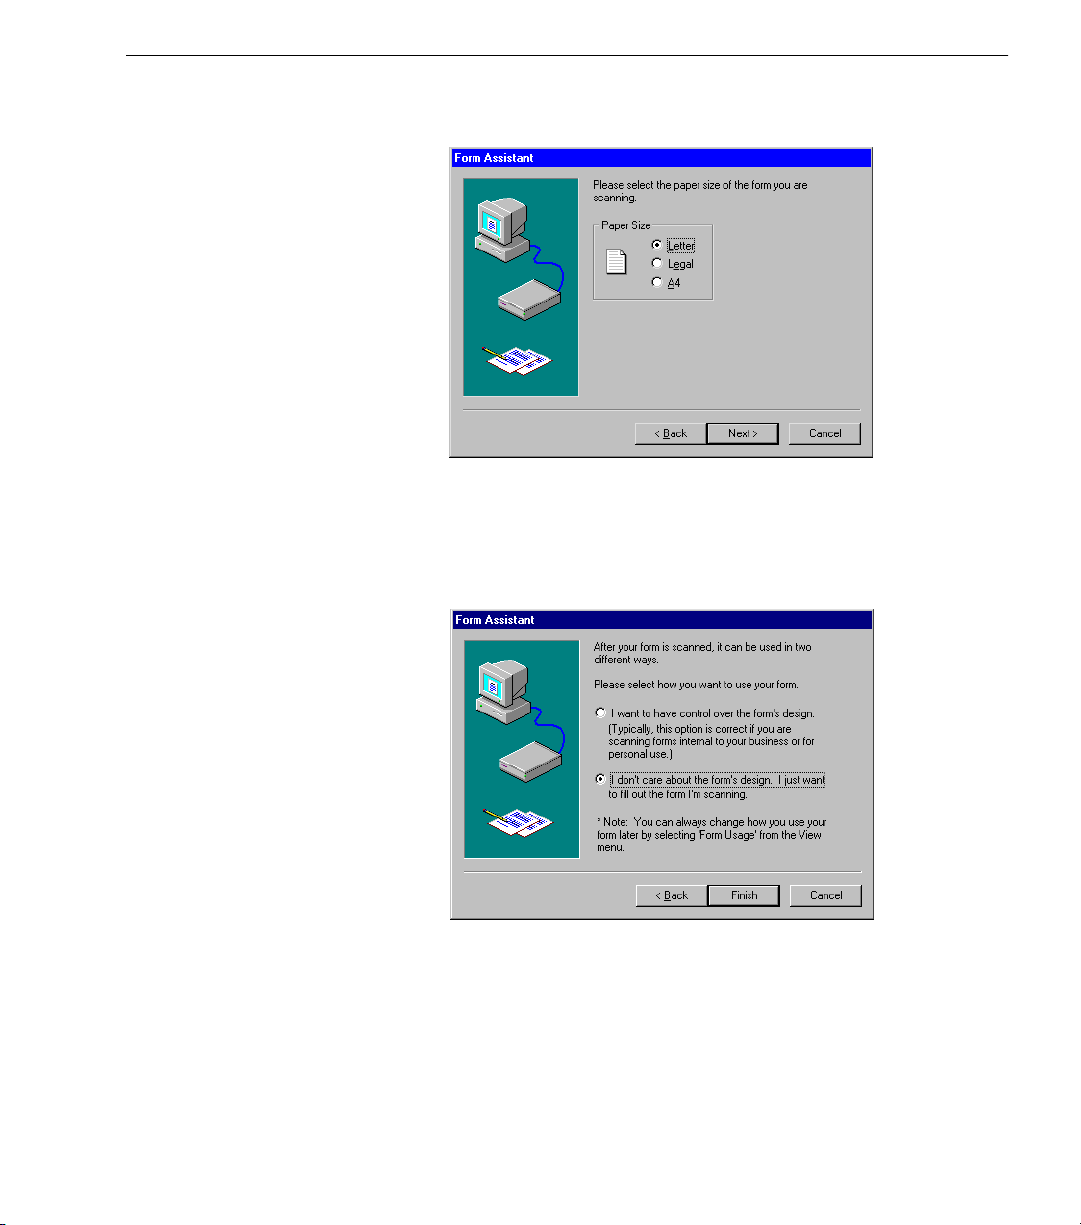
6Select
in the next window if this option is not selected
Letter
already.
The Sample form is a letter-sized page.
7 Click
Next>
.
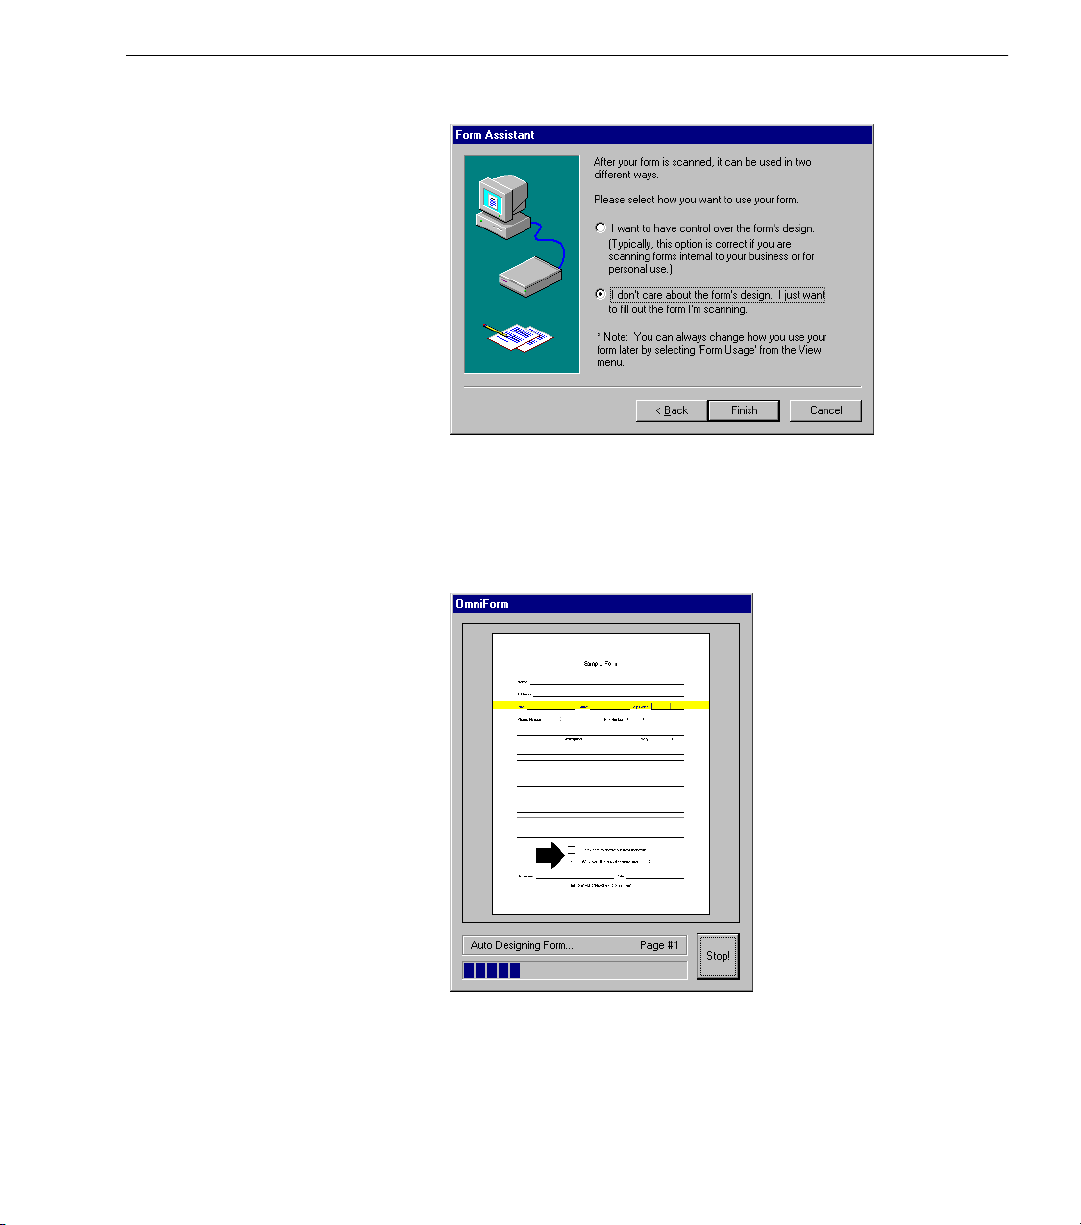
The next window offers two form usage options.
8 Select the second option.
You will just fill the form in this exercise, not work on its
design.
9 Click
Next>
.
The next window prompts you to place a page in your scanner.
10 Make sure the page is aligned correctly in your scanner, and
click
Finish.
Tutorials - 15
Page 16
Tutorial 1 — Load and Fill a Form
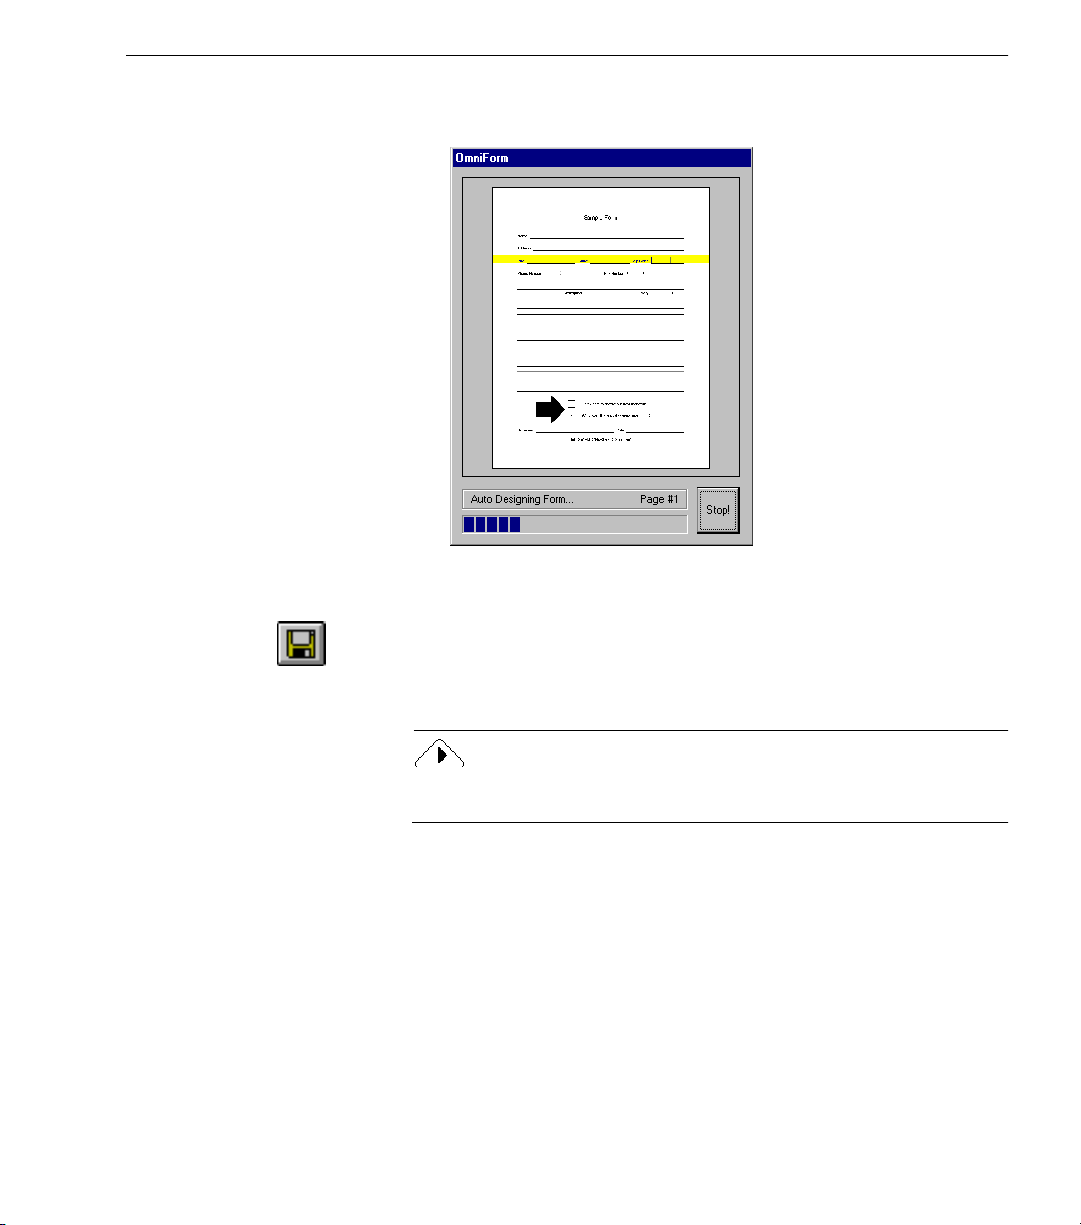
OmniForm scans the form. The OmniForm window displays
scanning, designing, and straightening progress.
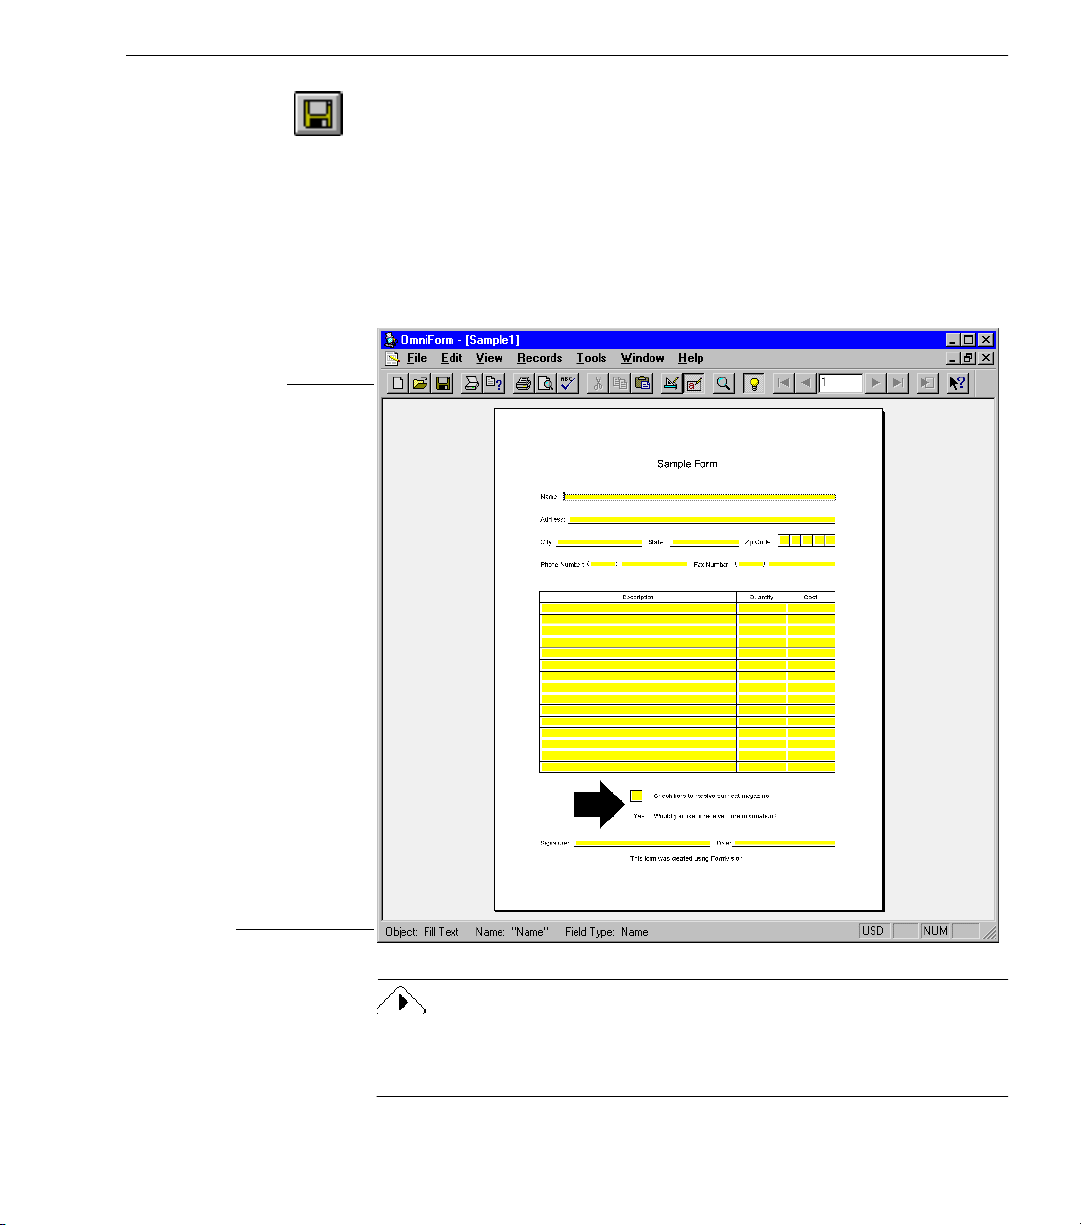
The Sample form opens as Form1 in fill view. It should look the
same as the original copy of the form.
11 Click the Save button or choose
in the File menu.
Save
The Save As dialog box appears.
12 Type Sample1 in the
File name
text box and click
Save.
Proceed to the section “Filling in the Form” on page 21 to begin
using OmniForm’s tools.
Tutorials - 16
Page 17

Fax the Sample Form
To fax the Sample form, you need the following:
• a fax modem connected to your computer
• fax software that is compatible with your fax modem
• access to a regular fax machine
To fax the form:
1 Make sure your fax modem is turned on and that your fax
software is set up to receive a call.
Refer to your fax manual(s) for information.
2 Place the Sample form in the fax machine.
Tutorial 1 — Load and Fill a Form
3 Set faxing resolution to
This setting faxes the form at a resolution of 200 x 200 dots per
inch (dpi). OmniForm may have trouble recognizing
documents faxed at a lower resolution. (
200 x 100 dpi.) Check your fax machine’s manual if you need
more information about its settings.
4 Dial your fax modem’s number and fax the Sample form as you
normally would.
5 Once received, use your fax software to open the Sample form
and save it as a PCX or TIFF file.
Again, refer to your fax software manual if you do not know
how to do this.
6 See the next section, “Import an Image File” for instructions on
how to convert your fax file into an electronic form in
OmniForm.
Import an Image File
OmniForm can recognize PCX or TIFF image files. An image is an
electronic picture of text and/or graphics. This could be a form created
in another program or one received as a fax file. See the previous section,
“Fax the Sample Form” if you want to create a fax file to import.
You will import an image file in this exercise. You can import a fax file
if you have one, or import the Sample.tif form that was placed in your
OmniForm/Sample Forms folder during installation.
Fine
or
Best
.
Standard
resolution is
Tutorials - 17
Page 18
Load the Image File in OmniForm
Tutorial 1 — Load and Fill a Form
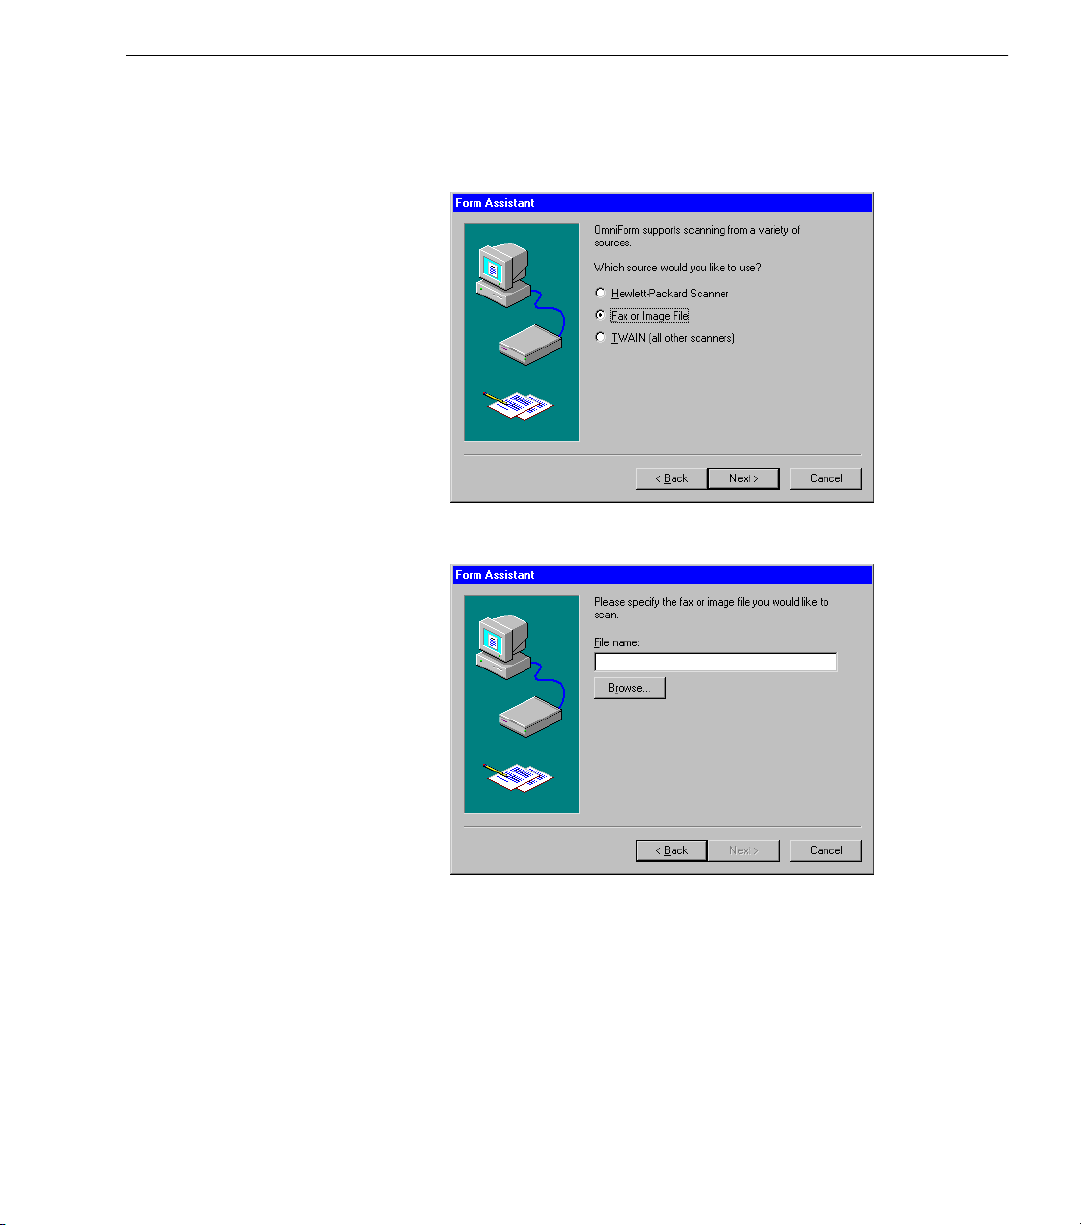
1 Select
2Select
3 Click
Scan in a form
Fax or Image
Browse...
in Form Assistant and then click
in the next window and then click
in the next window.
Next>
Next>
.
.
The Browse dialog box appears.
Tutorials - 18
Page 19
Tutorial 1 — Load and Fill a Form
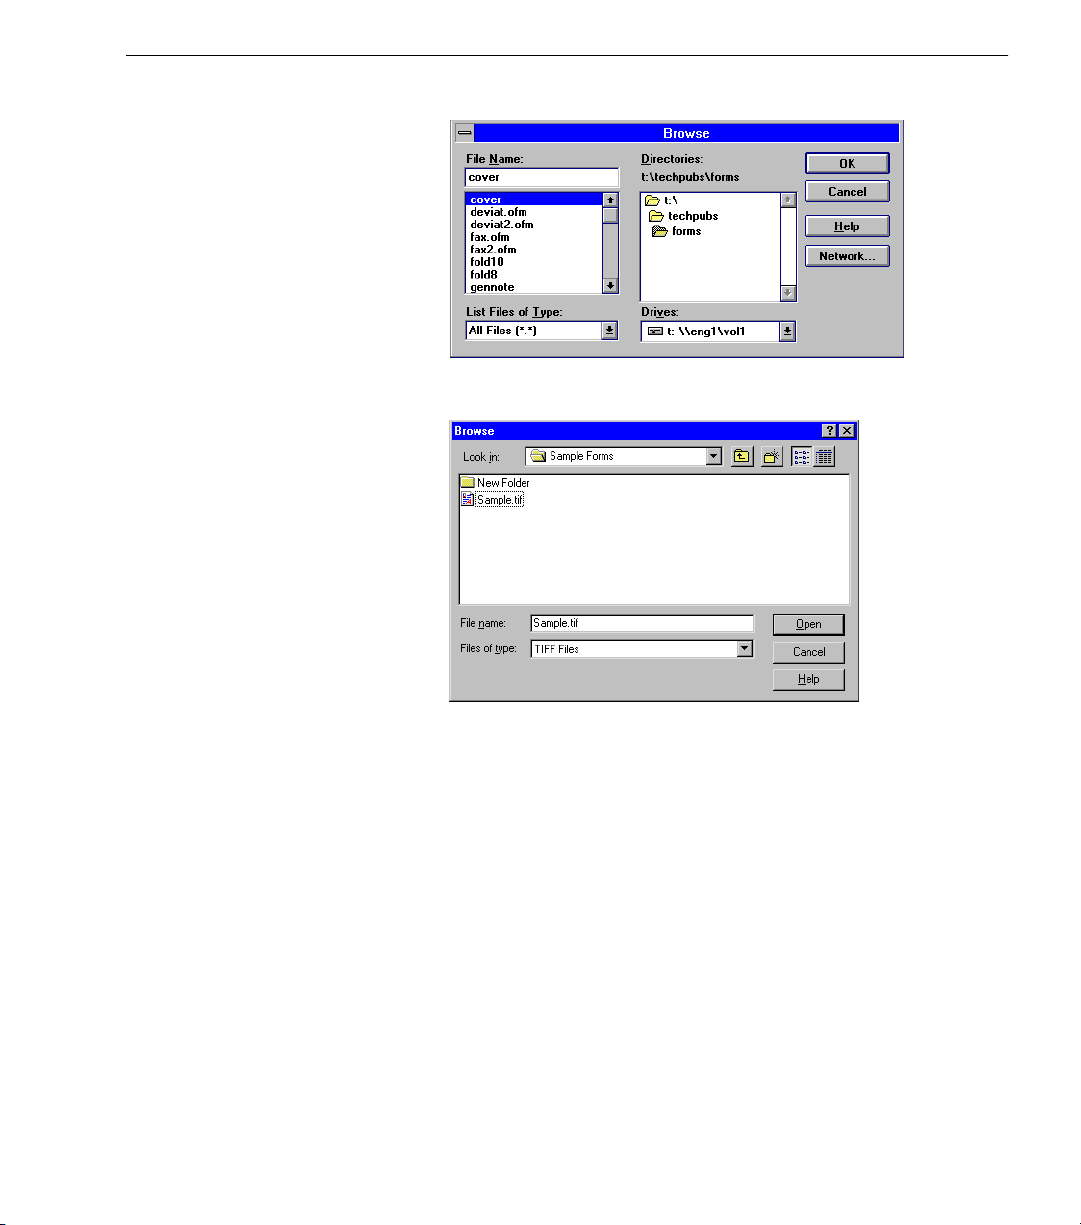
4 This is how the dialog box looks in Windows 3.1 and NT.
5 This is how the dialog box looks in Windows 95.
•Select
TIFF Files
in the
Files of type
drop-down list if you want
to import the Sample.tif file. Locate and select the Sample
file in the OmniForm\Sample Forms (omniform\samples
in Windows 3.1) folder.
• Locate and select your fax file if you created one in the
previous exercise.
• Click
The file name appears in the
6 Click
Next>.
to return to Form Assistant.
Open
File name
text box.
The next window offers two form usage options.
Tutorials - 19
Page 20
Tutorial 1 — Load and Fill a Form
7 Select the second option.
You will just fill the form in this exercise, not work on its
design.
8 Click
Finish>
.
The OmniForm window displays scanning, designing, and
straightening progress.
The Sample form opens as Form1 in fill view.
Tutorials - 20
Page 21
Tutorial 1 — Load and Fill a Form
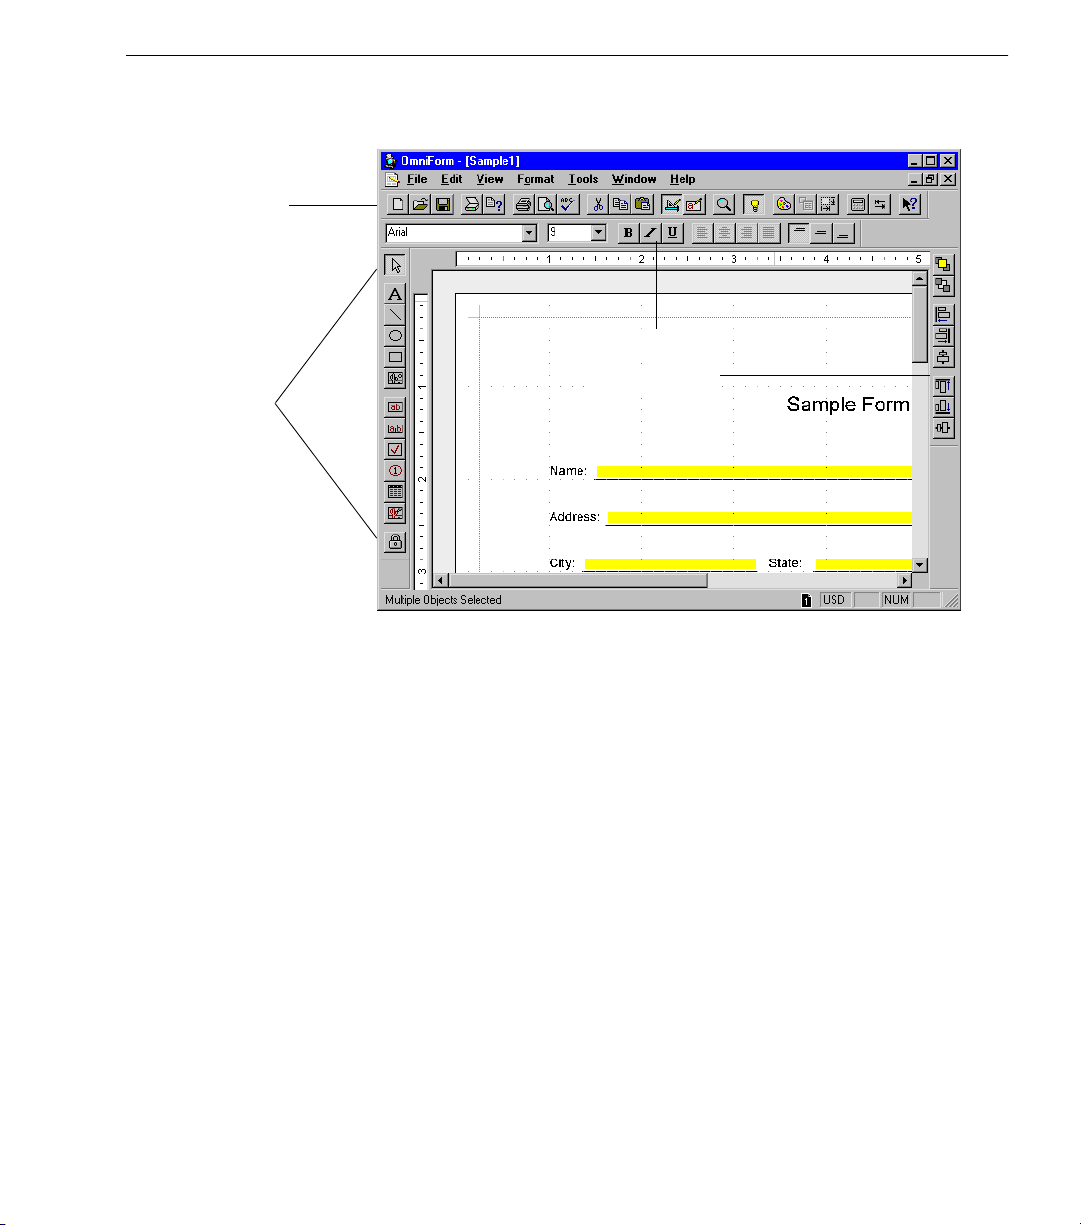
Filling in the Form
Standard toolbar
in fill view
9 Click the Save button or choose
in the File menu.
Save
The Save As dialog box appears.
10 Type Sample1 in the
File Name
text box and click
Save.
The next section shows you how to begin using OmniForm’s tools.
The Sample form you scanned or imported in the previous exercise
opens in fill view.
Status text
If you closed the form after the last exercise, click
Cancel
in Form
Assistant if it opens when you next launch OmniForm. Choose
in the File menu and locate the Sample1 file where you saved it.
Tutorials - 21
Open...
Page 22
Fill View Overview
The standard toolbar appears below the menus. The buttons correspond
to various menu commands. See “Menu Commands” on page 110 for a
description of all menu commands.
Hold the cursor over any
button in the toolbar to
see its function.
Tutorial 1 — Load and Fill a Form
1 Place your cursor over one of the buttons and hold it there
without clicking.
A ToolTip describes the button’s function.
Corresponding status text simultaneously appears in the status
bar at the bottom of the window.
2 Click the Highlight button in the toolbar or choose
Areas
OmniForm highlights all recognized fields in yellow. This
makes it easy to see which fields you can fill.
3 Click the button again to turn field highlighting back on.
4 Click the Zoom button and select a page view in the drop-
down list.
Alternatively, choose
in the cascading menu.
You have a choice of
400%, Page Width, or Whole Page
Fill in the Fields
1 Click the field after
place the cursor there.
This is a
2 Type your name in the fill text field.
Highlight Fill
in the View menu to turn off field highlighting.
in the View menu and select a view
Zoom
50%, 75%, 100%, 150%, 200%, 300%,
views.
on the form or press the Tab key to
Name
fill text
field. The word
on the form is
Name
.
text
Tutorials - 22
Page 23

Tutorial 1 — Load and Fill a Form
3 Continue to press the Tab key to move to and fill in the
City,
and
fields (or click to place the cursor there).
State
You can press Shift-Tab to move to a previous field.
4 Tab to or click in the
This is a
elements.
field. This is a field that is subdivided into
comb
The next fields,
Zip Code
field.
Phone Number
and
Fax Number,
also comb fields.
5 Type five numbers in the
Zip Code
field.
You do not have to click in each box in the field. OmniForm
moves the cursor automatically for you.
6 Tab to or click in the
Phone Number
comb field and type ten
numbers.
The parentheses are already on the form, but you have to type a
hyphen between numbers yourself.
7 Fill in the
The next item is a
Fax Number
comb field.
. A table contains
table
and each cell
cells
contains a field. The cells in the table are all fill text fields. The
headers in the table are text and cannot be changed in fill view.
• Click in the field under
Description
and type Elvis Dancing
Dinner Set.
Address,
comb
are
• Press the Tab key to move to the field under
1.
• Press the Tab key to move to the field under
79.99
• Fill in as many fields as you like.
Quantity
and type
Cost
and type
Tutorials - 23
Page 24
Tutorial 1 — Load and Fill a Form
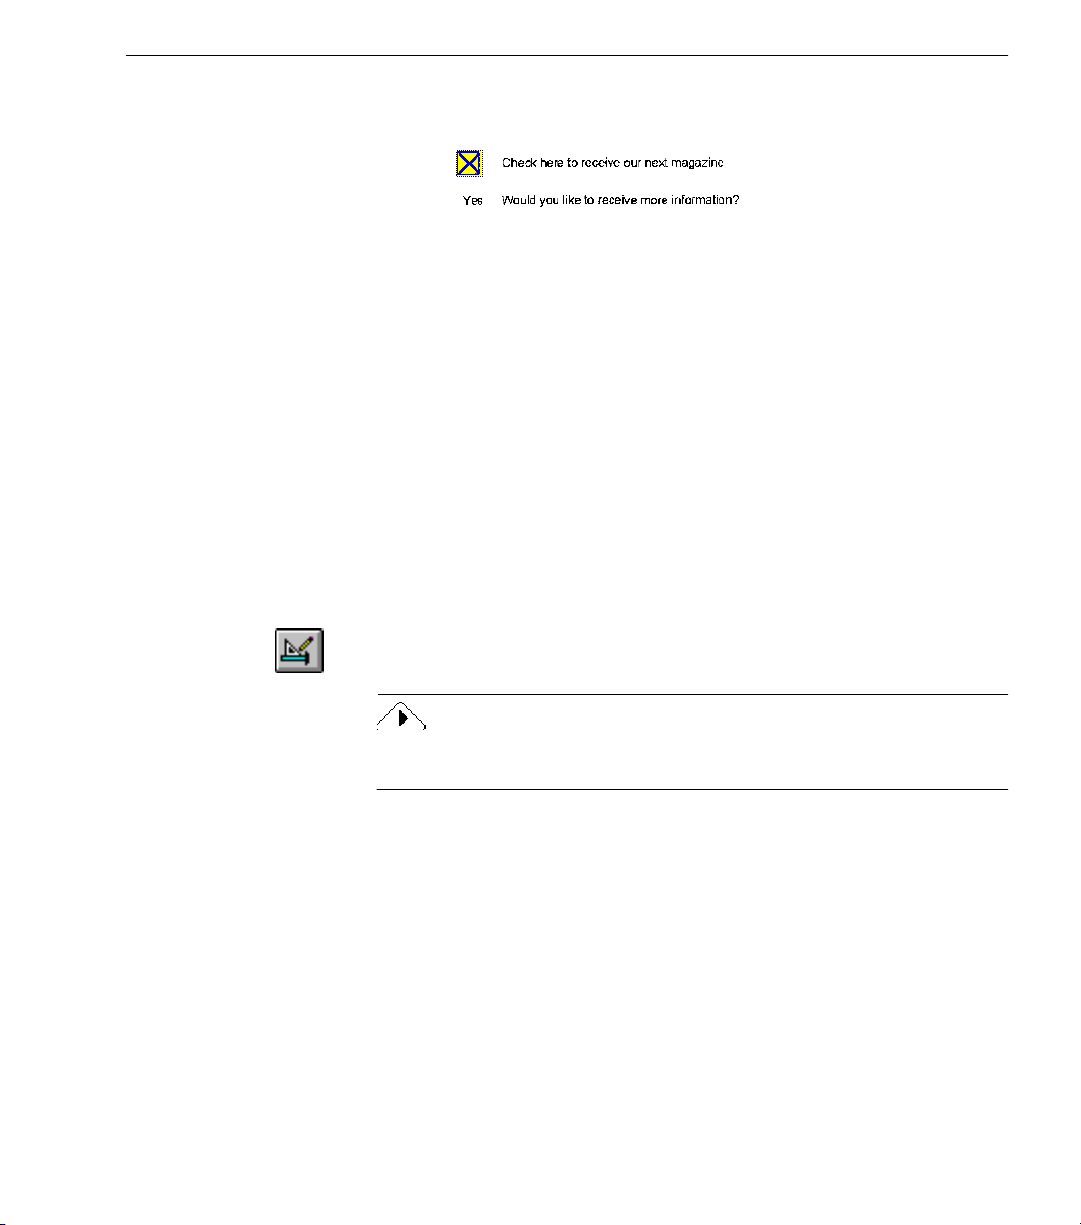
8 Move down the page and click in the square next to the words
Check here to receive our next magazine.
OmniForm provides tools to compensate for missing information on
forms. The next section describes how to create the circle text field, as
well as other design and formatting techniques.
Design View
There are two views in OmniForm: fill view and design view. You fill in
fields in fill view. In design view, you can create and format objects
(these become fields in fill view) and add graphics to a form, among
other functions.
Click the Design button in the standard toolbar or choose
View menu.
As a handy shortcut, click the right mouse button to open a shortcut
menu. Choose
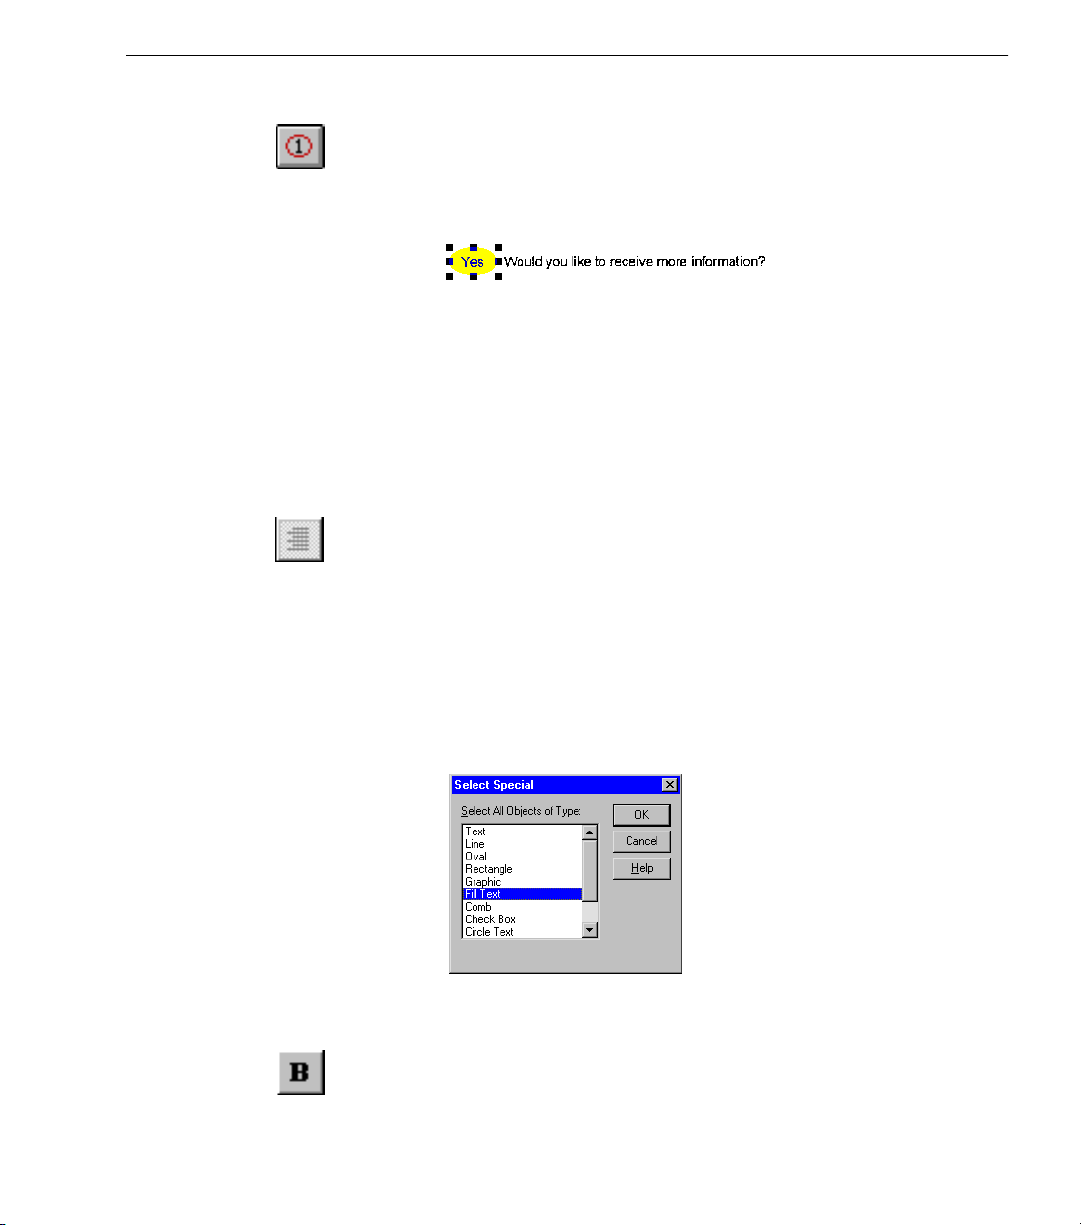
An “X” appears in the box. This is a
9 Click the word
more information?
Nothing happens. This should be a
no circle on the form to indicate this to OmniForm during form
recognition.
Design
next to the words
Ye s
in this menu.
check box
Would you like to receive
circle text
field.
field but there was
Design
in the
Tutorials - 24
Page 25
Standard toolbar
Drawing toolbar
Tutorial 1 — Load and Fill a Form
OmniForm switches to design view. Any text you entered in fill view
disappears in design view. It still exists in fill view.
Font/text toolbar
Arrange toolbar
There are four toolbars in design view: the standard toolbar (different in
design view than in fill view), the font/text toolbar, the drawing toolbar,
and the arrange toolbar.
• Use the standard toolbar for basic file operations such as saving
and printing, and for working with objects.
• Use the font/text toolbar to format characters and paragraphs.
• Use the drawing toolbar to create objects: circles, tables, text, etc.
• Use the arrange toolbar to arrange and align objects on a form.
(Design view also contains the calculation toolbar which appears when
you choose
Calculation
in the Tools menu. See Chapter 9, Using
Calculations, for more information.)
Tutorials - 25
Page 26
Create a Circle Text field
1 Click the Circle Text tool in the drawing toolbar.
Your cursor changes to a plus sign with a circle.
Tutorial 1 — Load and Fill a Form
2 Draw a circle (or oval) around the word
Format Text
1 Click the table to select it.
2 Click the first field under the word
3 Click the Right Alignment button in the font/text toolbar.
4 Choose
5Select
next to the words
Ye s
Would you like to receive more information?
You will select this circle later in fill view.
in the table to select it.
Cost
In an object with multiple elements — a comb or table — you
must always click to select the whole object first and then click
again to select the specific element.
Hold your cursor over the button without clicking to see the
ToolTip if you have trouble finding the button.
Now numbers entered in this
you format the other cells under
cell will be right-aligned. If
Cost
all the decimal points will
Cost
line up.
Select Special...
in the Edit menu.
The Select Special dialog box opens.
Fill Text
and click
OK.
All fill text fields are selected, including the fill text fields in the
table cells.
6 Click the Bold button in the font/text toolbar
.
Now all text in the fill text fields will be bold.
Tutorials - 26
Page 27
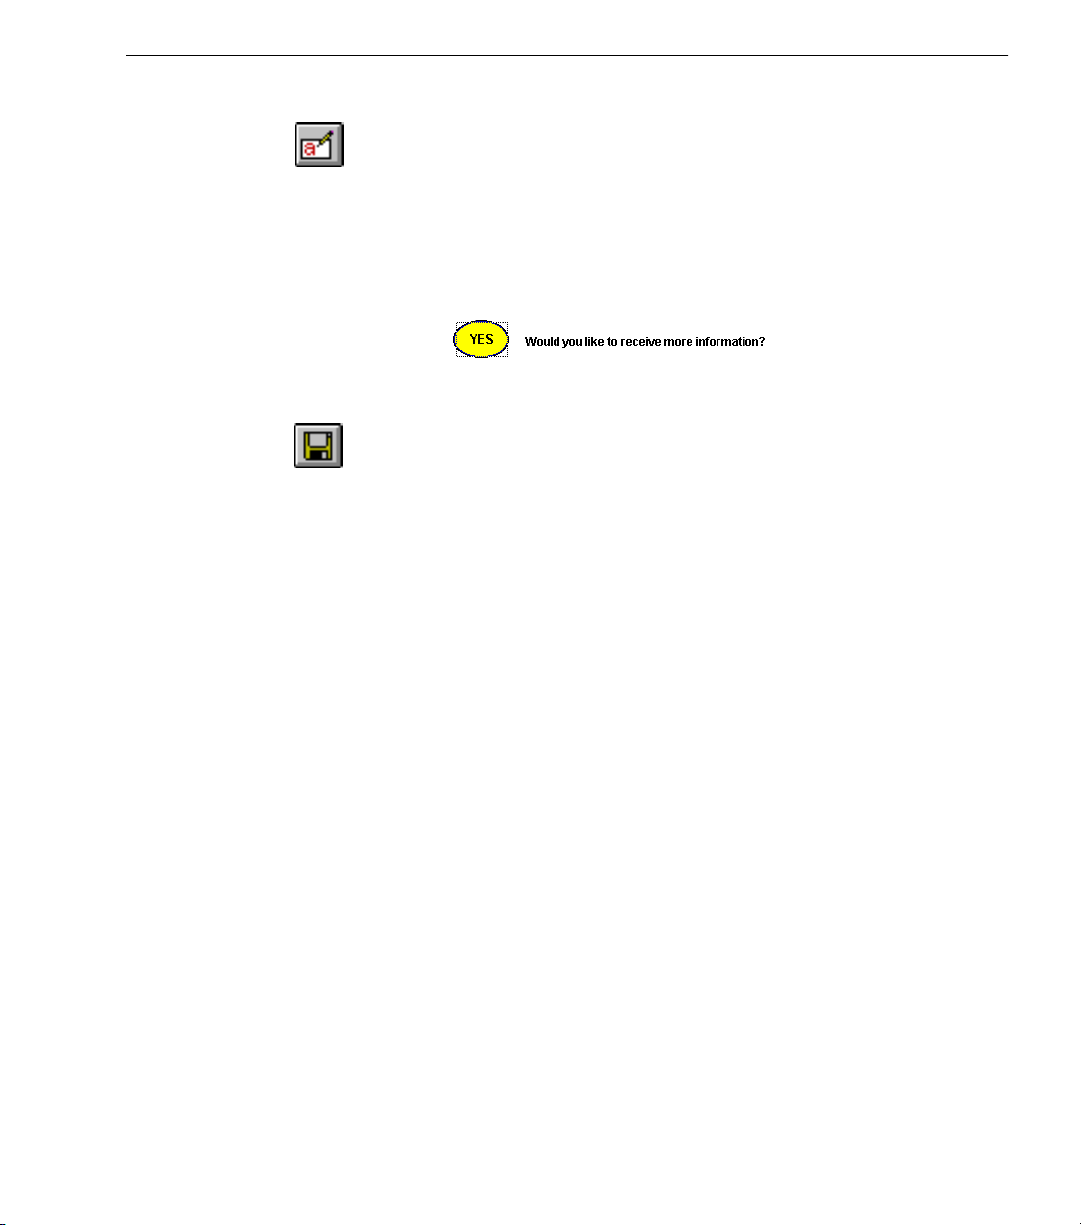
Return to Fill View
1 Click the Fill button in the standard toolbar to return to fill
view.
The text in fill fields is now bold and the number in the table’s
cell is right-aligned.
Cost
Tutorial 1 — Load and Fill a Form
2Click the word
next to the words
Yes
Would you like to receive
more information?
This time, a circle appears around the word
Ye s .
Print the Form
1 Click the Save button or choose
2 Choose
Print...
in the File menu.
in the File menu.
Save
The Print dialog box appears.
3 Select the print options you want.
4 Click OK in the Print dialog box to print a copy of your form.
See “Using the Print... Command” on page 97 for detailed information
on the Print dialog box.
Fax the Form
You must have fax hardware and software installed in order to fax a
form. Refer to your fax documentation for instructions on how to set up
your equipment for faxing. Faxing uses the
1 Choose
Print...
in the File menu.
command.
Print
The Print dialog box appears.
2 Select the print options you want.
3 Click OK in the Print dialog box to fax a copy of your form.
Depending on your fax software, more dialog boxes may
appear after you click OK in the Print dialog box.
See “Using the Print... Command” on page 97 for detailed information
on the Print dialog box.
You will practice more advanced form editing and design in the next
tutorial.
Tutorials - 27
Page 28
Tutorial 2 — Edit and Design a Form
You will scan or import the Sample form into OmniForm again in this
exercise. This time, you will bypass the Form Assistant dialog box so
that you can see which buttons and menu commands to use. You will
verify and correct OCR, and practice redesigning the form. See Chapter
6, Designing a Form, for detailed information on form design.
Launch OmniForm
If OmniForm is already open, proceed to the next section.
Tutorial 2 — Edit and Design a Form
1 Click
launch OmniForm if it is not open already.
Windows NT and 3.1 users: double-click the OmniForm icon in
the Caere Applications folder.
2 Click
in the taskbar and choose
Start
in the Form Assistant dialog box when it appears.
Cancel
Scan or Import the Sample Form
See below for instructions on scanning the sample form. See page 29
instructions on importing the sample.tif image file.
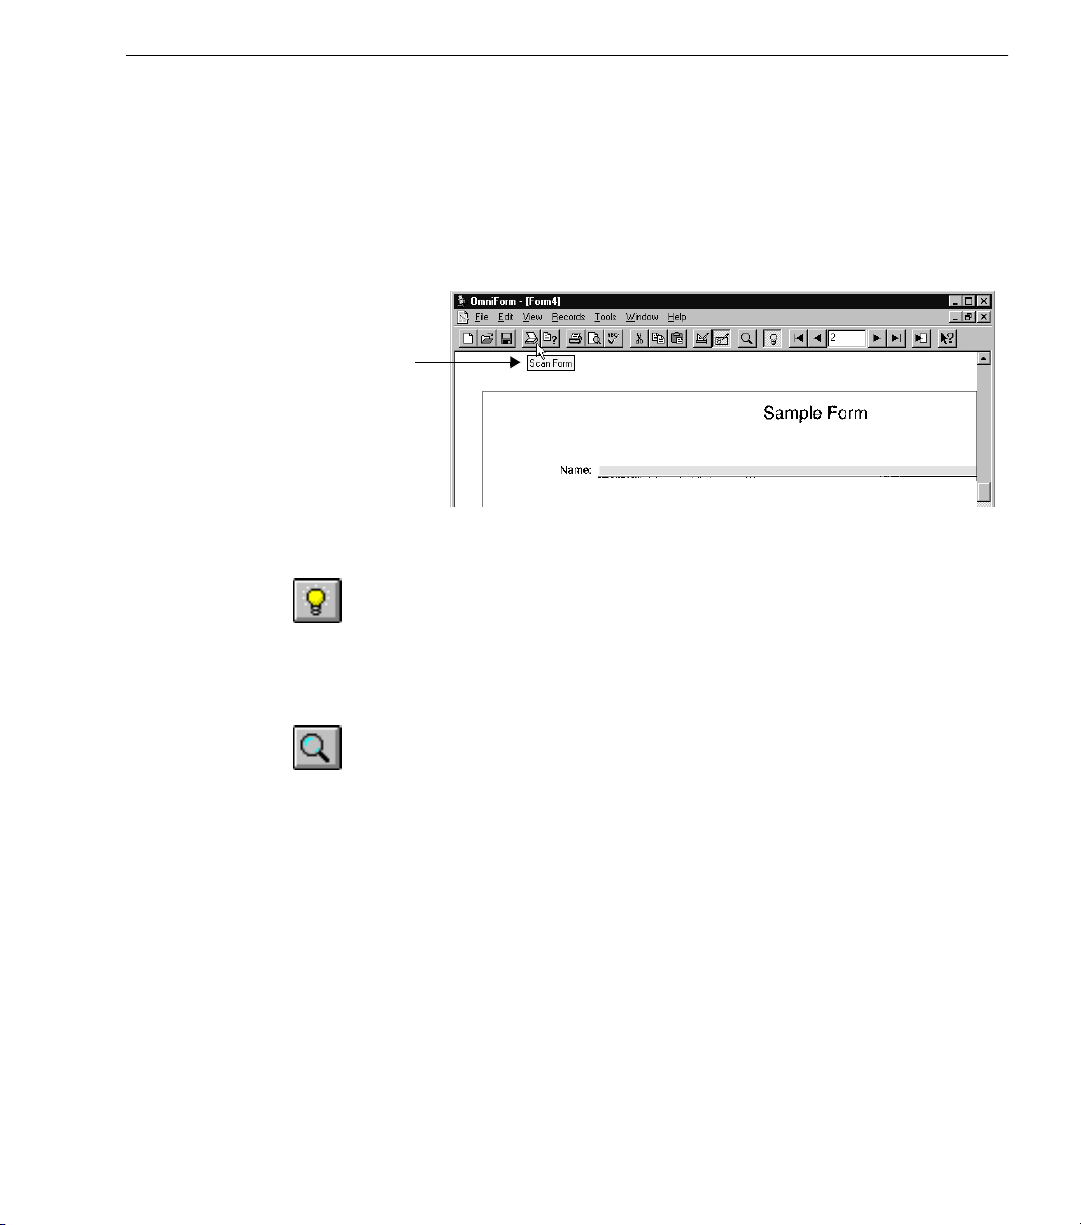
To scan the form:
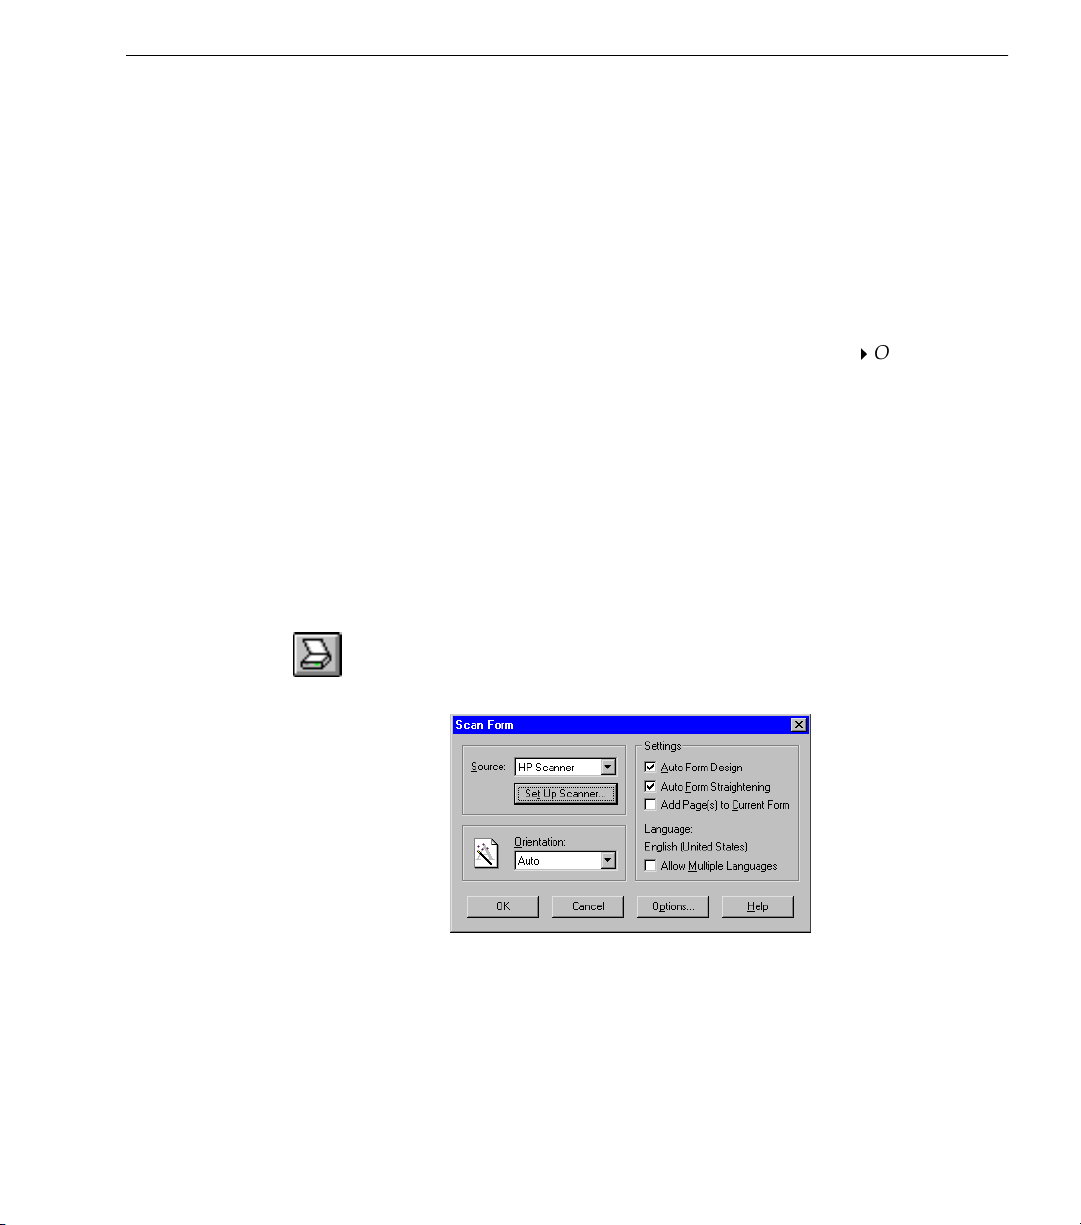
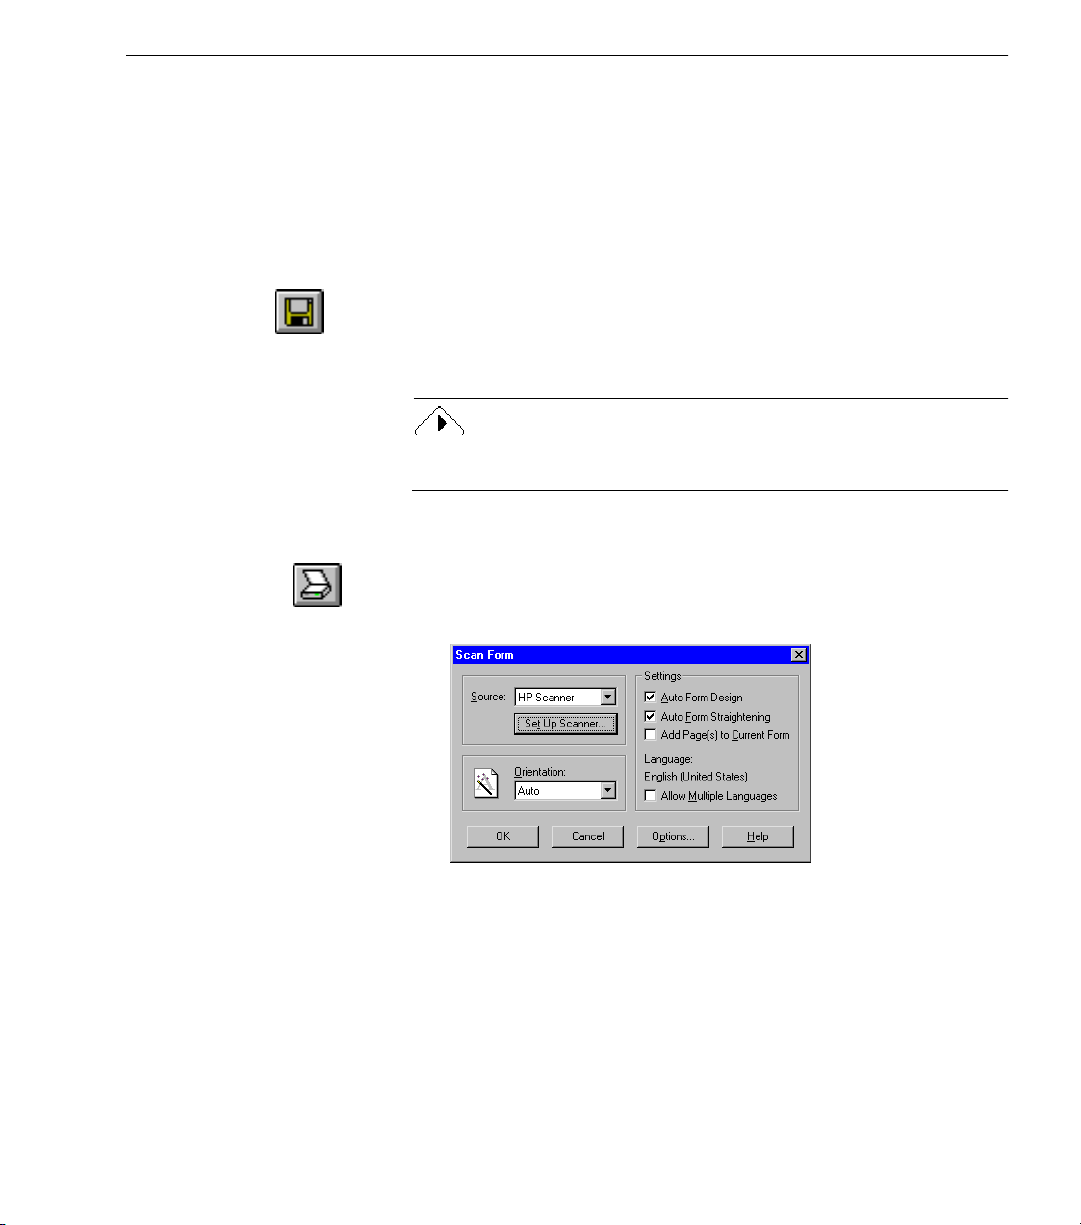
1 Click the Scan Form button in the standard toolbar or choose
Scan Form...
The Scan Form dialog box appears.
in the File menu.
Programs
OmniForm
to
2 Select an option in the
•Select
•Select
HP Scanner
HP scanner. Proceed to step 3.
TWAIN
TWAIN-compatible scanner.
in the
in the
drop-down list.
Source
drop-down list if you have an
Source
drop-down list if you have a
Source
Tutorials - 28
Page 29
Tutorial 2 — Edit and Design a Form
Click
Select Source...
to select a TWAIN source. Click OK to
return to the Scan Form dialog box. Proceed to step 3.
3Select
Auto Form Design
to use Logical Form Recognition to
recognize text and fillable fields in the form.
4 Click
OK.
OmniForm scans the form, recognizes both text and fields, and
opens it in design view.
5 Click the Save button or choose
in the File menu.
Save
The Save As dialog box appears.
6Type Sample2 in the
File Name
text box and click
Save.
Proceed to the section “Verifying the OCR” on page 31 to begin
using OmniForm’s design tools.
To import the form as an image file:
1 Click the Scan Form button in the standard toolbar or choose
Scan Form...
in the File menu.
The Scan Form dialog box appears.
2Select
3 Click
Image File(s)
Select Files...
•Select
TIFF Files
in the
drop-down list.
Source
to open the Select Files dialog box.
in the
Files of Type
drop-down list.
• Windows 95/NT users: locate the sample.tif file in the
OmniForm\Sample Forms folder.
• Windows 3.1 users: locate the sample.tif file in the
omniform\samples directory.
Tutorials - 29
Page 30

Tutorial 2 — Edit and Design a Form
• Double-click the file to place it in the
Files to Process
list box.
• Click OK to return to the Scan Form dialog box.
4 Click OK in the Scan Form dialog box.
5 OmniForm loads the form, recognizes both text and fields, and
opens it in design view.
6 Click the Save button or choose
in the File menu.
Save
The Save As dialog box appears.
7Type Sample2 in the
File Name
text box and click
OK.
The next section explains how to begin using OmniForm’s design tools.
Tutorials - 30
Page 31

Verifying the OCR
In this exercise, you will verify and correct OCR as necessary and copy
a graphic to the new form.
Edit the Text
OCR is not always perfect. Text that is very small, very light or broken,
or difficult to read in any other way can cause recognition problems.
This is easily corrected in OmniForm.
Tutorial 2 — Edit and Design a Form
Recognized, editable form
Horizontal bar
Original scanned image of
the form before OCR
1 Choose
Form Image
in the View menu.
The screen splits to show the form both as it was designed with
OCR and as it was scanned originally.
2 Compare the recognized text in the top view with the original
text in the bottom view.
Each view window has its own scroll bar so you can scroll to
the same portion of each form. Click a window to make it
active. Use the horizontal bar in-between the two windows to
resize the view. Your cursor turns into a resize cursor over the
bar.
Tutorials - 31
Page 32

Tutorial 2 — Edit and Design a Form
3 Use the Zoom button’s drop-down list to zoom your page view
in and out.
4 If you find text in the top window that does not match text in
the bottom window:
• Click the Selection tool in the drawing toolbar if it is not
selected already.
• Click any text object with erroneous text in the top window to
select it.
Your cursor turns into an I-beam when it is positioned over
the editable area.
• Use the cursor to select the portion of the text that does not
match the original.
• Retype the highlighted portion of the text so that it matches
the original.
5 Correct any text as needed this way.
Your text may need no editing, but you can practice selecting
and changing text if you like.
6 Click the Save button or choose
in the File menu to save
Save
your changes.
Tutorials - 32
Page 33

Copy the Arrow Graphic
Graphic box where arrow
will be placed.
Tutorial 2 — Edit and Design a Form
1 Scroll to the arrow at the bottom of the page in the bottom
window and to where it should be in the top window.
Because graphics are not retained during Logical Form
Recognition, the arrow does not appear in the top window.
2 Click the Graphic tool in the drawing toolbar.
Your cursor changes to a Graphic tool shape in the top window
and a crosshair in the second.
3 Use the crosshair to draw a box around the arrow in the bottom
window.
A corresponding box is drawn in the first window.
Arrow in original form.
4 With the new object still selected, click the Object Definition
button in the standard toolbar or choose
Object Definition...
in
the Format menu.
Tutorials - 33
Page 34

Tutorial 2 — Edit and Design a Form
The Graphic Definition dialog box appears.
5Select
6 Click
7 Choose
Form Image
OK.
The arrow appears in the top window.
Form Image
window.
Alternatively, double-click the horizontal bar or drag it all the
way to the top or bottom of the Form window.
in the
Modifying the Form’s Design
In the first tutorial, you modified the form’s design only by adding a
circle field that OmniForm had not recognized. You can do much more
than that. Suppose, for example, you wanted to take the Sample form
and change it into an order form. In this exercise, you will edit some
objects and create new objects to modify the form.
Edit Text and Fill Text Objects
1 Click the Selection tool in the drawing toolbar.
drop-down list.
Source
in the View menu to close the bottom
2 Click the title
Your cursor changes to an I-beam.
3 Highlight
.
Sample
4 Click the fill text object next to the text object
Sample Form
and then type the word Order to replace
Sample
to select it.
Name
.
Tutorials - 34
Page 35

Tutorial 2 — Edit and Design a Form
5 Place the cursor over the middle handle on the right end of the
object and hold down the mouse button.
6 Move the cursor to the left to make the
smaller.
You will create another fill text object next to this one later in
the exercise.
Edit the Table Object
1 Click the table object to select it.
Click the Object Definition button in the standard toolbar or
choose
Object Definition...
The Table Definition dialog box appears.
• Select the number in the
number 10 to replace it.
• Leave 0.25 in the
in the Format menu.
Number of Rows
Height of Rows
text box.
fill text object
Name
text box and type the
2 Click
OK.
The table reduces in size to 10 rows long. This creates more
space to add the objects you will create.
You can use the Scrapbook to store any object in your form. This
way, you can create an object once but use it in as many different
forms as you need. See “Using the Scrapbook” on page 164 for
detailed information.
Tutorials - 35
Page 36

Create Text and Fill Text Objects
1 Click the Text tool in the drawing toolbar.
2 Click the mouse button once or hold the mouse button and
drag the cursor to create a a text object anywhere on the form.
The object has the word
3 With the text object still selected, type the word Title:.
You do not have to select the word
text object itself needs to be selected.
4 Click outside the text object to change the cursor back to the
Selection tool.
Label
Tutorial 2 — Edit and Design a Form
in it.
to replace it. Just the
Label
5 Select the
text object and drag to the end of the Name fill
Title
text object.
6 Click the Fill Text tool in the drawing toolbar.
7 Draw a fill text object next to the word
Do not worry about aligning all the objects precisely right now.
You can do this later.
Create a Check Box Object
1 Click the Check Box tool in the drawing toolbar.
2 Draw a Check Box object above the one already on the form.
Hold the Shift key while you draw to constrain the shape to a
square. The tool turns back into the Selection tool.
3 Select the word
Ye s ,
Would you like to receive more information?
4 Press the Delete key to delete the text or choose Delete in the
Edit menu.
5 Click the Text tool in the drawing toolbar.
6 Click the Lock tool in the drawing toolbar.
You can draw more than one object at a time when the lock is
on. Otherwise, the cursor reverts back to the Selection tool after
you draw one object.
.
Title
and Shift-click to also select the words
Tutorials - 36
Page 37

7 Draw a text object next to the check box and type Check here
to receive our next catalogue.
8 Draw a text object below the check boxes and type Number of
times a year you use our catalogue:.
9 Click the Lock tool to deselect it.
Create Circle Text Objects
1 Click the Circle Text tool in the drawing toolbar.
2 Draw a circle below the check boxes.
Tutorial 2 — Edit and Design a Form
3 Select the circle and choose
4 Choose
in the Edit menu, then choose
Paste
two new circles.
This is an easy way to create objects of the same size. (You
could also hold down the Ctrl key and drag a selected object to
copy it.)
5 Select the second circle and type 2.
6 Select the third circle and type more.
7 Line up the circles under the last text object you drew.
Align and Format the Objects
1 Shift-click to select the
text objects.
2 Click the Align Left button in the arrange toolbar.
The objects align evenly along their left edges.
3 Select other objects and use the buttons in the arrange toolbar
to line them up evenly on the page.
You could also use the
if it is not selected already. A check mark in front of the
command means it is selected. Objects “snap” to the
in the Edit menu.
Copy
Name:, Address:, City:,
Snap to Grid
command in the Tools menu
again to create
Paste
and
Phone Number:
Tutorials - 37
Page 38

Tutorial 2 — Edit and Design a Form
measurement set in the Grid Settings dialog box (choose
Settings...
4 Use the
in the Tools menu).
Select Special...
command in the Edit menu to select
various types of objects and format their text as you choose.
See page 26 for a description of this command.
5 Your redesigned form should look something like this:
Grid
Test in Fill View
1 Click the Fill button in the standard toolbar.
2 Test your new form by filling in fields.
3 Click the Design button to return to design view.
You will design your own form in the next tutorial.
Tutorials - 38
Page 39

Tutorial 3 — Design Your Own Form
The previous two tutorials introduced you to the concepts of loading,
filling in, and modifying a form. In this tutorial, you will create the
personal job-tracking form shown below for a hypothetical free-lance
editor/writer.
Tutorial 3 — Design Your Own Form
See Chapter 6, Designing a Form, for detailed information on form
design.
Tutorials - 39
Page 40

Pre-Organization
It is a good idea to draw a rough draft of a form before you begin to
design it, complete with all fields and graphic elements. This makes the
design process go faster and you will be less likely to have to go back
and redo portions of the form. In this tutorial, the form pictured on the
previous page can serve as your rough draft.
You do not have to design the form exactly as it is pictured. Learn the
form-design concepts presented here and arrange the form as you
please. Use your own graphic files if you have any.
Open a New, Blank Form
1 Launch OmniForm if you closed it after the last tutorial. Click
in Form Assistant if it opens.
Cancel
Tutorial 3 — Design Your Own Form
2 Click the New button in the standard toolbar or choose
the File menu.
A blank form appears.
3 Choose
The Page Setup dialog box appears.
4 Set page setup options as shown in the picture below and then
click
5 Click the Zoom button in the standard toolbar or choose
in the View menu to select the view size you want.
6 Choose
OmniForm Form with the name Job Tracking.
7 Windows 3.1 and NT users: name the file jobtrack.
Page Setup...
OK.
in the File menu and save your form as an
Save
in the File menu.
New
Zoom
in
8 Make sure the Highlight button in the standard toolbar is
selected so that fill objects show up in yellow.
This makes it easier to see size and position while designing.
Tutorials - 40
Page 41

Create the Text Objects
1 Click the Text tool in the drawing toolbar.
You need text objects named Customer:, Contact:,
Address:, City:, State:, Zip:, Job Type, Editing,
Tech Writing, Marketing Writing, Advertising
Copy, Rate:, Expenses:, Profit:, and Comments:.
2 Create the text objects in one of three ways:
• Click the Lock tool in the drawing toolbar to keep the Text tool
selected.
Draw a text object, type its name while it is still selected, then
draw the next one, and so on. Click the Lock tool to deselect it
when you are done.
• Draw a text object.
With the object still selected, choose
Edit menu. Keep choosing
many text objects as you need. Select each object one at a time
and type its name.
• Draw a text object.
With the object still selected, hold down the Ctrl key and drag
to create a copy. Repeat this for each new text object you need.
Select each object one at a time and type its name.
Tutorial 3 — Design Your Own Form
and then
Copy
until you have created as
Paste
Paste
in the
3 Line the text objects up approximately where you see them on
the form on page 40.
Create the Fill Text Objects
Customer Information
1 Click the Fill Text tool in the drawing toolbar.
2 Draw five fill text objects as described in step 2 in the previous
section.
3 Resize the objects as necessary.
Tutorials - 41
Page 42

Tutorial 3 — Design Your Own Form
4 Line the fill text objects up with the
City,
and
State
text objects.
Customer, Contact, Address,
5 Select the Customer fill text object.
6 Click the Object Definition button in the standard toolbar or
choose
Object Definition...
in the Format menu.
The Fill Text Definition dialog box appears.
•Type Customer in the
•Select
Name
in the
Type
text box.
Name
drop-down list.
7 Click
OK.
8 Define the other fill text objects in the same way, choosing the
appropriate selection in the
(Select
Name
in the
drop-down list for the
Ty pe
drop-down list for each.
Typ e
Contact
fill text
object.)
Tutorials - 42
Page 43

Fill Lines
Tutorial 3 — Design Your Own Form
1 Draw a large fill text object.
2 Drag it beneath the text object
Comments.
3 With the object still selected, click the Top Alignment button in
the font/text toolbar.
4 With the object still selected, click the Left Alignment button in
the font/text toolbar.
Text entered in fill view will align to the left and top of the field
in fill view.
5 While the object is still selected, click the Object Appearance
button in the standard toolbar or choose
Object Appearance...
in
the Format menu.
The Object Appearance dialog box appears.
• Click the
Click the bottom line in the
• Click the
Border
Fill Line
tab.
tab.
Borders
square to delete it.
Tutorials - 43
Page 44

Tutorial 3 — Design Your Own Form
Select
deselect
6 Click
OK.
, a solid line, and
Black
as pictured below.
Clear
in the drop-down lists, and
1/4 pt
The bottom border disappears from the selected object and fill
lines appear to show where lines of text will flow.
7 With the object still selected, click the Object Definition button
in the standard toolbar to open the Fill Text Definition dialog
box.
•Type Comments in the
•Select
General
in the
Type
text box.
Name
drop-down list (entries in this field
could consist of numbers, symbols, and letters).
8 Click
OK.
Tutorials - 44
Page 45

Create the Comb Objects
You will draw a simple comb object for the zip code and use the
scrapbook to copy phone and fax numbers.
Zip Code Comb Object
1 Click the Comb tool in the drawing toolbar.
2 Draw a comb object.
3 With the object still selected, click the Object Definition button
or choose
The Comb Definition dialog box appears.
Object Definition...
Tutorial 3 — Design Your Own Form
in the Format menu.
4 Click the
Type Zip Code in the
Select
Type 5 in the
Type 0.2 in the
5 Click
6 Drag the Zip comb object next to the
Phone and Fax Number Comb Objects
1 Choose
The scrapbook opens to the left of the OmniForm window. It
contains
were included in your OmniForm program, each with a
different collection of scraps.
Properties
Zip Code
OK.
Scrapbook
scraps,
tab.
text box.
Name
in the
Number of Elements
Width of Elements
in the Tools menu.
copies of OmniForm objects. Four scrapbooks
drop-down list.
Type
text box.
text box.
text object.
Zip
Tutorials - 45
Page 46

Tutorial 3 — Design Your Own Form
2Select
Special Fields (Special
in Windows 3.1) in the
Scrapbook
drop-down list.
3 Locate the
Phone Number
4 Select the scrap and drag it into the form below the
5 Locate the
Fax Number
6 Select the scrap and drag it into the form below the
scrap in the scrapbook.
scrap in the scrapbook.
City
Phone
objects.
objects.
This exercise illustrates how you can save time by using objects stored
in the scrapbook. See “Using the Scrapbook” on page 164 to learn more
about creating, storing, and copying scraps and scrapbooks.
Your form-in-progress should look similar to this at this point:
Tutorials - 46
Page 47

Create the Check Box Objects
1 Click the Check Box tool in the drawing toolbar.
2 Draw a check box.
Hold down the Shift key to constrain the shape to a square.
Tutorial 3 — Design Your Own Form
3 With the object still selected, choose
Edit menu.
4 Choose
You now have four check boxes of equal size.
The user of this form wants to be able to select only one check
box at a time so that each copy of the form records just one job.
To do so, you must create an
5 Shift-click or drag the cursor around all four check box objects
to select them.
6 With the objects still selected, click the Object Definition button
in the standard toolbar or choose
Format menu.
The Check Box Definition dialog box appears.
two more times.
Paste
option group.
Object Definition...
Copy
and then
in the
Paste
in the
7Type job type in the
8 Click
9 Click
OK.
in the dialog box that asks if you want OmniForm to
Ye s
create unique On-Values for you.
Now you will be able to select only one check box at a time in
fill view. See the “Defining a Check Box Object” on page 145 for
detailed information on Option Groups.
You can define each check box individually if you like as well
to give it a unique name.
Option Group
drop-down list box.
Tutorials - 47
Page 48

Tutorial 3 — Design Your Own Form
10 Drag the check boxes in front of the
Marketing Writing,
Ty pe .
Create the Table Object
Create the Table
1 Click the Table tool in the drawing toolbar.
2 Draw a table.
3 With the table still selected, click the Object Definition button
or choose
The Table Definition dialog box appears.
Object Definition...
and
Advertising Copy
in the Format menu.
Editing, Tech Writing,
text objects under
Job
•Type Task List in the
•Type 2 in the
•Type 2.5 in the
•Type 10 in the
•Type 0.25 in the
4 Click
5 With the table still selected, click the Object Appearance button
OK.
or choose
Number of Columns
Width of Columns
Number of Rows
Height of Rows
Object Appearance...
text box.
Name
text box.
text box.
text box.
text box.
in the Format menu.
Tutorials - 48
Page 49

Tutorial 3 — Design Your Own Form
The Object Appearance dialog box appears.
6 Click the
7 Click the
Background
Border
A one-point black border is selected by default. Just for looks,
add a shadow effect to the border:
•Select
•Select
Lower Right
3 pt
This moves the shadow three points to the right and bottom of
the border.
8 Click
OK.
A shadow appears behind the table.
Use Table AutoFormat
1 With the table still selected, choose
Format window.
The Table AutoFormat dialog box appears.
2 Select the
Ye s
box.
3Select
Columns (Reverse Header).
tab and select
Clear.
tab.
in the
in the
Offset
Location
drop-down list.
drop-down list.
Table AutoFormat...
option in the window to enable the
in the
Appearance
list
The picture on the left shows how the selected option affects
your table.
4 Click
Next>.
Tutorials - 49
Page 50

Tutorial 3 — Design Your Own Form
5 Select the
Names
Ye s
text box.
6 Select the first word
7Type Task.
All fill text fields within cells in this column are automatically
renamed
Task1, Task 2,
You can verify this by selecting a cell and opening the Object
Definition dialog box.
8 Repeat for the second word but change its name to
Completed
All fill text fields within the cells in this column are
automatically renamed
9Make sure
Change Header to Match Field Names
This changes the column names from
Completed.
10 Click
Finish.
Format the Table Cells
1 Place your cursor outside the left edge of the table, hold down
the mouse button and drag your cursor through the nine rows
in the left column but not the
option in the next window to enable the
Label
and click
Rename.
and so forth.
.
Completed1, Completed2,
and so forth.
is selected.
and
Ta s k
Label to Task
row.
Field
Just the nine rows on the left should be selected. Shift-click to
select or deselect rows as necessary.
2 Choose
in the Format menu.
Text...
Tutorials - 50
Page 51

The Text dialog box appears.
Tutorial 3 — Design Your Own Form
• Click the
Margins
tab and type the measurements 0.04,
0.04, 0.02, and 0 as pictured above.
This offsets your text from the border around each row,
making it easier to read.
• Click the
Alignment
tab and select
Left
and
Bottom.
Text entered in fill view will align to the left and bottom of the
cell.
3 Click
4 Repeat steps 2–3 for the
Bottom
OK.
Completed
column but select
for the alignment in the Text dialog box.
Right
and
5 With the right column still selected, click the Object Definition
button or choose
Object Definition...
in the Format menu.
The Fill Text Definition dialog box appears.
•Select
Date
in the
drop-down list.
Type
Tutorials - 51
Page 52

Tutorial 3 — Design Your Own Form
•Select
6 Click
7 Drag the table above the
OK.
Numbers entered in this row will be formatted as right-aligned
dates in the m/d/yy format (10/15/95).
middle of the form.
m/d/yy
in the
drop-down list.
Format
Comments
text object to about the
Create the Graphic Objects
You will create both a graphic object and a fill graphic object. You can
import a graphic into a graphic object in design view. You can import a
graphic into a fill graphic field in fill view.
Fill Graphic Object
1 Click the fill graphic tool in the drawing toolbar.
It is the second-to-last button.
Tutorials - 52
Page 53

2 Draw a box in the upper right corner of the form.
You will import a graphic into this field in fill view later in the
tutorial.
Graphic Object
1 Click the graphic tool in the drawing toolbar.
2 It is below the Rectangle tool.
3 Draw a box in the lower right corner of the form.
4 With the object still selected, click the Object Definition button
or choose
The Graphic Definition dialog box appears.
Object Definition...
Tutorial 3 — Design Your Own Form
in the Format menu.
• Click
• Locate the Logo file in the OmniForm\Sample Forms folder
•Select
5 Click
The graphic is imported into the object you drew and scaled to
fit in the box while maintaining its original proportions. You
could place your own graphic or logo in this object instead.
Browse
(omniform\samples in Windows 3.1) and click
Scale Proportionately
OK.
Define the Calculations
The final objects on this form are fill text objects that have calculations
defined on them. In fill view, these fields become part of a calculation
that determines the profit this user makes on each job after expenses.
These calculations are very simple but you have the ability to create
much more complex ones. See Chapter 9, Using Calculations, for
detailed information.
to open the Browse dialog box.
in the
Options
drop-down list.
Open.
Tutorials - 53
Page 54

Create and Define the Fill Text Objects
1 Click the Fill Text tool.
2 Draw a fill text object anywhere on the page.
3 With the object still selected, click the Object Definition button
or choose
Object Definition...
in the Format menu.
The Fill Text Definition dialog box appears.
•Type Rate in the
•Select
•Select
•Select
Currency
$0.00
Comma Separate Thousands
in the
in the
Name
Ty pe
Format
text box.
drop-down list.
drop-down list.
Parentheses.
Tutorial 3 — Design Your Own Form
and
Enclose Negatives in
4 Click
OK.
Numbers entered the
fill text field will appear as comma-
Rate
delimited dollar amounts: $3,000,000. Negative numbers will
appear within parentheses: ($3,000,000).
5 With the Rate object still selected, choose
Copy
and then
the Edit menu.
6 Choose
7 Use the
Earnings, Expenses,
twice more.
Paste
Object Definition
and
command to name the objects:
Profit.
Because you copied and pasted the objects, the other settings
are exactly the same as for the Rate object.
in
Paste
Tutorials - 54
Page 55

Tutorial 3 — Design Your Own Form
8 Draw another Fill Text object and use the Object Definition
command to define it as pictured below:
9 Click
OK.
Create the Text Objects
1 Click the Text tool.
2 Draw an object and type an x.
3 Draw another object and type an equal sign(=).
4 Drag the objects so they are lined up approximately as shown:
Rate field Hours field Earnings field
Set Up Calculations
Calculate Earnings
Earnings, on this form, equals the hourly rate (
number of hours (
field) spent on the job.
Hours
1 Select the Earnings fill text object.
2 Click the Calculation button in the standard toolbar or choose
Calculation...
in the Tools menu.
Expenses field
Profit field
field) times the
Rate
Tutorials - 55
Page 56

Tutorial 3 — Design Your Own Form
The calculation toolbar appears at the top of the window below
the font/text toolbar.
Accept
Calculation
Cancel
Calculation
Auto
Calculation
Calculation
Builder
Click to Edit Calculation — the calculation
for the field appears in the text box.
3 Click the Calculation Builder button in the calculation toolbar.
The Calculation Builder dialog box appears.
4Locate
5 Double-click
Rate
in the
Rate
list box.
Fields
or select it and click
Paste.
The field name appears in the calculation toolbar.
6 Click the Multiplication (*) button in the Calculation Builder
dialog box.
It appears after
7 Locate and double-click
in the calculation toolbar.
[Rate]
in the
Hours
Fields
list box.
The calculation in the calculation text box should now read:
[Rate]*[Hours]
8 Click the Accept Calculation button in the calculation toolbar to
define the calculation on the Earnings field.
The Calculation Builder dialog box closes.
Tutorials - 56
Page 57

Tutorial 3 — Design Your Own Form
Calculate Profit
Profit, on this form, equals the Earnings minus Expenses. You will create
this calculation manually instead of using the Calculation Builder dialog
box so you can see another feature of OmniForm.
1 Select the Profit fill text object.
2 Click in the calculation toolbar’s text box to activate the toolbar.
Your cursor turns into a calculation cursor.
3 Click the Earnings fill text object in the form.
The field name appears in the calculation toolbar.
4 Click in the calculation text box after
subtraction (-) sign.
5 Click the Expenses fill text object in the form.
The calculation in the calculation text box should now read:
[Earnings]-[Expenses]
Click the Cancel Calculation button in the calculation toolbar if you
make an error to clear the text box and start again.
6 Click the Accept Calculation button in the calculation toolbar to
define the calculation on the
7 Click the Calculation button in the standard toolbar or choose
Calculation...
Customize the Form
Format Objects
As a general rule, forms are easier to read if you use the same font format
for all the text objects. Point size and style can be varied according to
what you decide looks best and is most logical for the form you create.
On the form shown on page 39, all text objects are 9-point Arial bold
with the exception of the text objects under
are entries under a header and it could be confusing if they had the same
formatting as the header.
[Earnings]
field
Profit
in the Tools menu to close the calculation toolbar.
.
Job Type.
and type a
These four objects
See “Format Text” on page 26 for information on using the
Special...
information on changing text and font attributes.
command. See “Formatting Text” on page 155 for detailed
Select
Tutorials - 57
Page 58

Align the Objects
Tutorial 3 — Design Your Own Form
Use the
commands in the Format menu or the Arrange toolbar to
Align
line up selected objects left, right, center, and so forth. See “Align and
Format the Objects” on page 37 for more information.
Use the
Snap to Grid
precisely along a grid. Choose
command in the Tools menu to line fields up
Grid Settings...
in the Tools menu to set the
size of the grid. Turn this command off if you do not want fields
snapping to a grid.
Selecting Objects
There are several ways to select multiple objects.
•The
Select Special...
command in the Edit menu lets you select all
objects of a certain type at the same time. This way, you can apply
the same formatting to all selected objects instead of one by one.
• Shift-click to select multiple objects.
• Hold down the mouse button and drag the cursor around all
objects to select.
An object only has to be touching the selection area to be selected.
Remember to fully enclose table and comb objects unless you
want individual elements and cells selected.
Use the Drawing Tools
You can use the Line, Oval, and Rectangle tools in the drawing toolbar
to customize your form.
To draw the rounded border around the outside of the form:
1 Click the Rectangle tool.
2 Draw a border around the outside edge of the form.
3 With the border still selected, click the Object Appearance
button or choose
Object Appearance...
in the Format menu.
The Object Appearance dialog box appears.
• Click the
Background
tab and select
Clear.
Tutorials - 58
Page 59

Tutorial 3 — Design Your Own Form
• Click the
• Click on each side of the rectangle in the
tab and select the settings shown below.
Border
Borders
box to place
borders around the entire object.
4 Click
OK.
See page 39 again for the completed form. Your final form should look
similar to this depending on how you chose to customize it. Your form
will not as yet have the arrow in the upper right corner. That is added in
fill view.
Tab Order
You can tab from field to field in fill view. This is faster than moving the
cursor to each field. When tabbing, OmniForm moves the cursor
through the fields in the order in which they were created. This may not
be the order you want.
To change tab order:
1 Click the Tab Order button in the standard toolbar or choose
Tab Order...
in the Tools menu.
The Tab Order window appears to the right of the form and
numbers appear by each field on the form.
Tutorials - 59
Page 60

Both indicate current tab order.
Tutorial 3 — Design Your Own Form
In the example above, the user wants the check box fields to be
before the
field because that is the order of the fields on the
Rate
form. Your Tab Order dialog box will not necessarily look the
same as this one.
2 Select the field to reorder.
Note that the corresponding field on the form highlights.
3 Reorder the field in one of the following ways:
• Drag the field up or down in the dialog box to reorder it.
• Click the
Move Up
button to move the field up. Click as many
times as needed to move it into place.
• Click the
Move Down
button to move the field down. Click as
many times as needed to move it into place.
• Click
Auto Order
to have OmniForm order the fields for you.
The tab order numbers on the form change correspondingly
when you reorder a field in the Tab Order dialog box.
4 Repeat for each field you want to reorder.
5 Click the Tab Order button in the standard toolbar or choose
Tab Order...
in the Tools menu to close the Tab Order window.
Tutorials - 60
Page 61

Test the Form in Fill View
1 Click the Fill button or choose
2 Click the fill graphic field in the upper right corner of the form.
The Fill Graphic dialog box appears.
•Select
• Click
• Locate the Arrowr file in the OmniForm\Sample Forms
• Click
Graphic File
Browse
folder (omniform\samples in Windows 3.1).
Open
Tutorial 3 — Design Your Own Form
in the View menu.
Fill
in the
to open the Browse dialog box.
to return to the Fill Graphic dialog box.
drop-down list.
Source
•Select
3 Click
The graphic is imported into the field you drew and stretched
to fill the entire box. Click in the field again if you want to
change the graphic’s appearance or import a new graphic.
4 Tab from field to field to test tab order.
5 Enter text in the fill text fields to see your formatting and to
make sure the fields are large enough for text entered.
6 Select a check box under
7 Click another check box to deselect the first.
8 Enter text in the table cells.
• Verify that text is not flush against a border, making it hard to
• Verify that text in the left column is left-aligned and text in the
Stretch to Fit
OK.
read.
right column is right-aligned.
in the
Job Type.
Options
drop-down list.
Tutorials - 61
Page 62

Tutorial 3 — Design Your Own Form
• You can enter dates in the right column as either January 1,
1995 or 1-1-95 and they will be converted to the m/d/yy
format. Or, you can enter them as 1/1/95 in the first place.
9 Verify that comb field elements contain the right amount of
numbers.
10 Enter numbers in the calculation fields.
The Expenses and Profit fields should fill automatically and
correctly as you fill in the other fields involved in the
calculation.
Return to design view to make any changes you need. Save this form.
You will use it in the next tutorial.
Tutorials - 62
Page 63

Tutorial 4 — The OmniForm Database
Tutorial 4 — The OmniForm Database
This tutorial is a brief introduction to the OmniForm database. A
database is a collection of information stored as individual
record uses the same form design but can contain different information
in its fields. OmniForm automatically creates a database when you scan
in or import a form.
In the previous tutorial, for example, you created the Job Tracking (or
jobtrack) form. As soon as you fill in that form, it becomes the first
record in the new database. The user of this database adds a new record
for each job completed, making it possible to store and find a large
amount of similar information.
See Chapter 8, Managing an OmniForm Database, for detailed
information, including working with records and importing and
exporting databases.
This tutorial shows you how to create new records, search for specific
information in a database, sort records, and delete records. You will use
the job-tracking form you created in the last tutorial.
records.
Each
Duplicating a Database Record
The hypothetical user of this job-tracking database uses the same form
design to enter different information in new records. You can add a new,
empty record to this database and fill in the form each time, or you can
duplicate an existing record that has similar information when you need
to add a new record. This way you do not have to fill in the whole record
— just change one or more fields.
Tutorials - 63
Page 64

Tutorial 4 — The OmniForm Database
To duplicate a record:
1 Locate and open the Job Tracking (jobtrack in Windows
3.1) form you created in the previous tutorial.
2 Enter the customer information shown below.
Suppose you did another job for this company but this time
instead of editing it was marketing writing. You do not have to
retype all the same information for just one change.
3 Choose
4 Click OK in the dialog box that informs you that a record has
been added to the set.
Another record for Franich & Halsey is added to the set and
OmniForm moves to the new record.
5 Select the
The
Duplicate Record
Editing
Creating New Records
Suppose after this job you complete two more jobs and need to add two
more records to the database.
To create new records:
1 Click the New Record button or choose
menu and
OmniForm creates a new, empty record.
2Type The Borne Corporation in the Customer fill text field.
Fill in other information if you like.
3 Click the New Record button again.
in the Records menu.
Marketing Writing
check box is deselected.
in its cascading menu.
New
check box.
in the Records
Go To
Tutorials - 64
Page 65

4Type Zimmer DTP in the Customer fill text field in the new
record.
Fill in other information if you like.
5 Use the Record buttons in the toolbar to scroll through your
records.
First Record Previous Record Next RecordRecord Number Last Record
Search the Database Records
It is not hard to find information when you only have a few records, but
depending on your database, you may have thousands. OmniForm
makes it easy to find the information you need quickly.
To search records:
Tutorial 4 — The OmniForm Database
The field to search
How to search
What to search for
Which records to search
1 Choose
Search...
in the Records menu.
The Search dialog box appears.
•Select
•Select
Customer
is equal to
•Type Franich & Halsey in the
in the
in the
Field Name
Condition
drop-down list.
drop-down list.
text box.
Value
This dialog box illustrates why it is important to give fields a unique
name after you create them. If you had not named the
field, it would appear simply as
FillTextn
(where n is a number)
Customer
making it difficult to decide what to choose.
2 Click
OK.
Tutorials - 65
Page 66

Tutorial 4 — The OmniForm Database
3 OmniForm searches the database and retrieves the two records
that match the search criteria. This is called the
Status text just below the toolbar shows the search results
information.
You can narrow a search further by searching a found set for
more specific information. For example, you might want to find
only editing jobs you had done for Franich & Halsey. You
would enter the appropriate information in the Search dialog
box and select
when you have a large found set.
Only Search Current Record Set.
found set.
This is useful
4 Click the
full database set.
Clear Search
Sort the Database Records
You may need to sort your database records in some logical order, for
example, alphabetically by customer name as you will in this exercise.
To sort records:
1 Choose
The Sort dialog box appears.
•Select
•Select
2 Click
OK.
OmniForm examines the Customer field in each record and
sorts the records alphabetically: the two Franich & Halsey
records are numbers 1 and 2, The Borne Corporation is number
and Zimmer DTP is number
3,
in the Records menu.
Sort...
Customer
Ascending Order
button below the toolbar to return to the
in the
Field Name
(A-Z; descending order would be Z-A).
drop-down list.
4.
3 Click OK in the dialog box that tells you how many records
were sorted.
You could also sort a subset of retrieved search records. You might, for
example, find all a certain customer’s records and then sort those
records by date or any other way you choose.
Tutorials - 66
Page 67

Database Changes
You have changed individual records in fill view in this tutorial.
Changes to one record did not affect changes to another record.
However, changes in design view do affect your records.
To make a change in design view:
Tutorial 4 — The OmniForm Database
1 Click the Design button or choose
2 Delete the graphic object in the lower right corner.
3 Click the Fill button or choose
4 Click the appropriate Records button to view each record.
The logo is now missing from every record.
Any change made in design view affects
database. This is important to remember, especially if you have more
than one user of your database.
You can protect your database from unauthorized changes in several
ways:
• In design view, choose
Protection dialog box.
Select
Protect Data
can be made in fill view to any of the records. This also prevents
users from duplicating or deleting records.
Select
Protect Form
a form in design view. Remember, deleting a fill field in design
view also deletes
in fill view.
• Have other users use the program OmniForm Filler to open the
database. This is a version of OmniForm that has only a fill view.
Users cannot change the form’s design.
Protection...
to make all information read-only. No changes
if you do not want anyone to be able to change
the information that was entered in that field
all
in the View menu.
Fill
the records in that particular
all
in the Tools menu to open the
in the View menu.
Design
Tutorials - 67
Page 68

Deleting Records
You may want to delete an old or obsolete record.
To delete a record:
1 Return to Fill view if you are not in it already.
Tutorial 4 — The OmniForm Database
2 Choose
3 Click
The record you are viewing is deleted permanently from the
database.
Use the command
records. You can also use the command to delete a subset of retrieved
search records. Suppose, for example, you have 14 entries for PatEl
Corporation in your customer update database. Then they go out of
business and you decide you no longer need the information because it
just takes up disk space.
You would search for
choose
Corporation entries would be permanently deleted but your other
records would be safe.
You cannot undo the
Delete All Records
Delete Record
in the warning dialog box that appears.
Ye s
Delete All Records
Delete Record
in the Records menu.
to permanently destroy all database
PatEl Corporation
in the Records menu. This way, all PatEl
in the relevant field, and then
command!.
Tutorials - 68
Page 69

Chapter 4
Views and Form Usage
This chapter describes basic OmniForm concepts you should know
before scanning, importing or designing a new form: what Form
Assistant is and how to use it; the difference between fill view and
design view; how form usage choices affect your form; how to select and
change form usage options; and how to use the international options in
the Options dialog box.
Proceed to Chapter 5, OmniForm Procedures, if you want to begin
working with forms immediately.
This chapter contains the following sections:
• Using Form Assistant
• The Design View Window
• The Fill View Window
• Form Usage Options
• International Settings
Screenshots in this chapter were taken in Windows 95. Your dialog
boxes and windows may look slightly different if you are using
Windows NT or Windows 3.1.
Views and Form Usage - 69
Page 70

Using Form Assistant
This section describes Form Assistant and its basic OmniForm functions.
Form Assistant is a dialog box that appears the first time you launch
OmniForm. Form Assistant makes decision-making easy when
processing a form.
This section contains the following topics:
• Opening Form Assistant
• The Form Assistant Options
• Setting the Form Assistant Startup Option
Opening Form Assistant
There are several ways to open Form Assistant.
• Form Assistant opens automatically the first time you launch
OmniForm.
Windows 95 users: click
Programs
Windows NT and 3.1 users: double-click the OmniForm icon in
the Caere Applications program group.
• Click the Form Assistant button in the standard toolbar at the top
of the window if OmniForm is open.
• Choose
OmniForm
Form Assistant...
.
Using Form Assistant
in the Taskbar and choose
Start
in the File menu if OmniForm is open.
Form Assistant contains six options for basic OmniForm procedures as
described in the next section.
Views and Form Usage - 70
Page 71

The Form Assistant Options
This section gives a brief description of each option in Form Assistant. A
cross-reference after each description points you to step-by-step
instructions for the procedure.
Scan in a form
Using Form Assistant
Select
Scan in a form
determine how you will work with the form in OmniForm. See
“Scanning a Paper Form” on page 84 or “Importing an Image File” on
page 90 for instructions.
Fill in a form
Select
Fill in a form
fill it. See “Filling a Form” on page 95 for instructions.
Print or fax a form
Select
Print or fax a form
a form and print or fax it. See “Using the Print... Command” on page 97
for instructions.
Search a form for information
Select
Search a form for information
information or to open a form and search it. See “Searching With Form
Assistant” on page 101 for instructions.
Work on a form’s design
Select
Work on a form’s design
open a form in design view. See “Opening a Form to Design” on page
103 for instructions.
to scan a paper form or import an image file and to
to fill the currently open form or to open a form and
to print or fax the currently open form or to open
to search the currently open form for
to redesign the currently open form or to
Create a new, blank form
Select
Create a new, blank form
“Creating a New Form” on page 104 for instructions.
to open a blank page in design view. See
Views and Form Usage - 71
Page 72

Setting the Form Assistant Startup Option
You can enable or disable Form Assistant at startup. To do so:
Using Form Assistant
1 Choose
The Options dialog box appears.
• Deselect the
• Select the
2 Click
Options...
not want Form Assistant to appear at startup.
OmniForm will open a blank form instead the next time you
launch it.
Form Assistant to appear at startup.
OK.
in the Tools menu.
Show Form Assistant at Startup
Show Form Assistant at Startup
option if you do
option if you want
Views and Form Usage - 72
Page 73

The Design View Window
This section provides an overview of the design view window.
If a form is open in fill view, click the Design button in the standard
toolbar or choose
As a handy shortcut, click the right mouse button to open a shortcut
menu. Choose
The design view window contains four toolbars and seven menus.
Standard toolbar
Font/text toolbar
Design
Design
The Design View Window
in the View menu to switch to design view.
in this menu.
Arrange toolbar
Drawing toolbar
Status bar: displays current
activity and settings.
The design view window also contains the calculation toolbar. Choose
Calculation
in the Tools menu to display this toolbar. See Chapter 9,
Using Calculations, for detailed information.
Use design view to edit and create fields on an existing form or to create
an entirely new form.
For detailed information on design view and designing forms, see
Chapter 6, Designing a Form.
Views and Form Usage - 73
Page 74

The Fill View Window
This section provides an overview of the fill view window.
If you are in design view, click the Fill button in the standard toolbar or
choose
As a handy shortcut, click the right mouse button to open a shortcut
menu. Choose
The fill view window contains a toolbar and seven menus.
Standard toolbar
Fill
in the View menu to switch to fill view.
in this menu.
Fill
The Fill View Window
Status bar: displays current
activity and settings.
Use fill view to enter data in fields, create a records database, import and
export information to and from records, and print, mail, or fax forms.
See Chapter 7, Filling a Form, for detailed information on how to enter
text into fillable fields and move through a form.
See Chapter 8, Managing an OmniForm Database, for detailed
information on database creation and management.
Views and Form Usage - 74
Page 75

Form Usage Options
This section describes form usage: how it affects the forms you scan in
or import as image files, how to select form usage, and how to change it.
This section contains the following topics:
• Choosing a Form Usage Option
• Where to Select Form Usage Options
• Changing Form Usage
Choosing a Form Usage Option
Form usage affects the way you can use a form once it is in OmniForm.
Form Usage Options
Decide how you will use a form in OmniForm
it: as a
designed
as described below.
OmniForm uses
rectangles, lines, and fillable areas when it designs a form during
scanning or import.
Designed Form
Use this option if you want to be able to:
• have full control over a form’s design
• edit all form elements in design view
• create new objects in design view
• fill fields in fill view
A designed form does not retain graphics during Logical Form
Recognition but you can import graphics.
Original Form
Use this option if you want to be able to:
• have partial control over a form’s design
• maintain a form’s original look
• draw new fillable objects on the form in design view
• fill fields in fill view
form, as an
Logical Form Recognition
original
form, or as a
(LFR) to identify text,
you scan or import
before
non-designed
form image
Views and Form Usage - 75
Page 76

Non-designed Form
This type of form has no fillable fields and no editable text. Basically, it
is just a an image, or picture, on your computer. Use this option if you
want to be able to:
• input a form of such poor quality that it would cause recognition
problems
• draw new fillable objects on the form in design view
• print, fax, or mail the form only
See Chapter 6, Designing a Form, for information on adding graphics,
creating objects, and using other design techniques.
See Chapter 7, Filling a Form, for information on filling fields in fill view.
Where to Select Form Usage Options
Different form usage options are available depending on whether you
open Form Assistant or choose
If you use Form Assistant, you can choose between the designed form
and original form options.
Scan Form...
Form Usage Options
in the File menu.
If you use the
Scan Form...
command, you can choose between the
designed form and non-designed form options.
Form Assistant
You can choose to scan in or import either a designed form or an original
form in Form Assistant.
Designed form option
Original form option
This dialog box is one of several in Form Assistant; it appears during the
scanning or import process.
Views and Form Usage - 76
Page 77

Scan Form Dialog Box
You can choose to scan in or import either a designed form or a nondesigned form in the Scan Form dialog box after choosing
the File menu.
Changing Form Usage
Choose
form. For example:
Form Usage...
•You have an
You would change the form to a designed form.
• You have a
original form to someone.
You would change the form to an original form.
Form Usage Options
Scan Form...
Select this option for a
designed form. Deselect it
for a non-designed form.
in the View menu to change the way you can use a
original
designed
form but decide to change the design.
form that you have edited but want to fax the
in
There is no original view for a form that you design yourself in
OmniForm.
To change form usage:
1 Choose
Form Usage...
in the View menu.
The Form Usage dialog box appears.
Views and Form Usage - 77
Page 78

Form Usage Options
2 Select a form usage option.
•Select
Use Designed Form
to view the form as it was designed
by OmniForm on import along with any changes you have
made to the form’s design.
You can edit all text and fields, and add graphics to the form.
•Select
Use Original Form
to view the form as it looked
originally, before you scanned or imported it to OmniForm.
You can create, resize, move, delete, define, or change the
appearance of fillable fields with this option. Changes you
make to text, graphics, and non-fillable objects are not visible
until you select
Use Designed Form.
3 Click
OK.
Your form changes to reflect the selected option.
You can change form usage for a
non-designed
form to a designed form.
However, it will be blank except for any fillable objects you may have
added.
Views and Form Usage - 78
Page 79

International Settings
This section describes how OmniForm supports different language and
cultural conventions. You can choose from 45 different
International
OmniForm usage — is a combination of a language and a region. The
language you select for a particular region affects how your form
displays currency, numbers, and dates.
Selecting a Language for Your Form(s)
1 If you are in fill view, click the Design button in the standard
toolbar or choose
International Settings
in the
locales
tab in the Options dialog box. A locale — as defined for
in the View menu.
Design
2 Choose
3 Click the
There are two options:
4 Click
The
for the currently open form. If you have the International
English or German version of OmniForm or multiple
dictionaries, a dictionary in this language will also be used
during a spell check.
Options...
International
Current Form.
Language
in the Tools menu.
tab.
Current Form
drop-down list displays the language being used
and
New Forms.
You cannot change the language for this option if you open the
Options dialog box in fill view.
Views and Form Usage - 79
Page 80

International Settings
5 Select a different language for the current form if you like.
Changing the language of the current form could cause OmniForm
to misinterpret any data already entered in that form. OmniForm
warns you of this if at least one field is filled and you change the
Current Form
selection.
6 Click
7 Select a different default language for new forms if you like.
8 Click
New Forms.
The
Language
will be used for the next form you open, scan, or import.
The language selected for a new form will also become the
Current Form
OK.
drop-down list displays the default language that
selection when that form opens in OmniForm.
How OmniForm Uses Language Selections
The
Current Form
• The formatting of currency, number and date entries in the
currently open form.
• Which dictionary is used for spell checking. (The International
English version contains all available dictionaries. Other users
can call 800-654-1187 to order additional dictionaries.)
• The international symbol that appears in the status bar when a
form is open.
The
New Form
• The formatting of currency, number and date entries in new
forms you create by scanning or importing, or by choosing
in the File menu.
• The international symbol that appears in the status bar when no
form is open.
language selection affects:
language selection affects:
New
Control Panel Selections
Selections made
Regional Settings
panel (Windows NT and 3.1).
Only the
displayed in OmniForm.
List Separator
International
control panel (Windows 95) or the
tab do not affect selections made in the
International
option in these control panels affects how data is
Views and Form Usage - 80
control
Page 81

The Options Dialog Box Readouts
n
International Settings
Below the
Language
selection, OmniForm displays readouts: the
international symbol for the selected language (which appears in the
status bar); and currency, number, and date conventions specific to that
language.
The readouts show:
• How OmniForm expects data to be entered in fill view.
• How OmniForm will format data in fill view if it is not entered
correctly. (Formatting takes place after you move the cursor out
of a field.) See the next section for formatting examples.
Formatting Examples
Currency
If you selected
German (Austrian)
as the
Current Form
language, the
numbers 123456 entered in an appropriately defined currency field
would display as öS 1.234,56.
If you selected
German (Liechtenstein)
as the
Current Form
language, the
numbers would display as CHF 1’234.56.
Date
If you selected
English (United States)
as the
Current Form
language, the
date 2/5/96 entered in an appropriately defined date field would
display as February 5, 1996.
If you selected
German (Standard)
as the
Current Form
language, the date
would display as 2. Mai 1996.
The Scan Form Dialog Box
The
New Form
This becomes the
language selection appears in the Scan Form dialog box.
Current Form
You cannot change the
language if this option
Forms
is selected.
New Forms
Click
New Forms
language selectio
Options...
to change the
language section.
New
language after the form is in OmniForm.
Views and Form Usage - 81
Page 82

International Settings
• Click
• If you select
The Object Definition Dialog Box Options
The
Current Form
for fillable objects defined as type
Definition dialog box. For example, the long-date format for English
(United States) is MMMM dd, yyyy. The long-date format for German
(Standard) is d.MMMM yyyy.
Allow Multiple Languages
The
How it Works
You can select
multiple-language forms. OmniForm will then recognize all characters
in all languages it supports. The setting does not affect the language(s)
selected for your form in the Options dialog box and vice versa.
When you select
dictionaries during optical character recognition (OCR) so that
recognizable characters are allowed. If dictionaries were on, special
characters such as umlauts might be discarded or questionable words in
one language could be mistaken for words in another language.
Options...
You cannot change the
to Current Form
associated with the current form. A form can have only one
language.
changes to reflect the
language selection affects available formatting options
Allow Multiple Languages
Allow Multiple Languages,
to change the language for your new form.
New Form
is checked because a language is already
Add Page(s) to Current Form
Current Form
language selection if
, the
Language
language if it is different.
Number, Date, or Currency
Option
in the Scan dialog box for
OmniForm turns off
Add Page(s)
display
in the Object
all
Do not select
may not be as efficient with dictionaries turned off.
Selecting the
Determine which language composes the majority of your form and
select that as the
Options...
Remember that the selected language affects sort order and how dates,
numbers, and currency are formatted in fill view. See “Multiple
Languages” on page 189 for information on spell-checking a form with
multiple languages.
Allow Multiple Languages
New Forms
New Form
in the Scan Form dialog box.
Language
s language before scanning. To do so, click
for a single-language form. OCR
Views and Form Usage - 82
Page 83

Chapter 5
OmniForm Procedures
This chapter describes basic OmniForm procedures: how to turn your
paper forms into electronic forms; how to fill, print, mail, and fax forms;
how to open forms to fill, redesign, and search for information. It also
lists all menu commands.
This chapter contains the following sections:
• Scanning a Paper Form
• Importing an Image File
• Filling a Form
• Printing or Faxing a Form
• Searching a Form
• Opening a Form to Design
• Creating a New Form
• Opening a Form
• Mailing a Form
• Menu Commands
Most screenshots in this chapter were taken in Windows 95. Your dialog
boxes and windows may look slightly different if you are using
Windows NT or Windows 3.1.
OmniForm Procedures - 83
Page 84

Scanning a Paper Form
Scanning a Paper Form
This section describes how to use both Form Assistant and the
Form...
You can scan paper forms directly into OmniForm if you have a scanner.
Forms should be blank with crisp, dark text on a white background for
best results.
You can use the Sample Form included with your OmniForm package
as a test page if you like.
command to turn your paper form into an electronic form.
Scanning With Form Assistant
1 Windows 95 users: click
Programs
Windows NT and 3.1 users: double-click the OmniForm icon in
the Caere Applications folder.
If OmniForm is already open, click the Form Assistant button
in the standard toolbar to open Form Assistant.
Form Assistant appears.
2 Select
3 Select a source for the form in the next window.
•Select
Proceed to step 5.
•Select
compatible scanner. Proceed to step 4.
OmniForm
Scan in a form
Hewlett-Packard Scanner
TWAIN (all other scanners)
and then click
Scan
in the Taskbar and choose
Start
.
.
Next>
if you have an HP scanner.
if you have a TWAIN-
4 Users who selected
window to select a TWAIN source.
• Select a source in the Select Source dialog box.
• Click
• Proceed to step 5.
5 Click
6 Select a paper size in the next window.
•Select
•Select
•Select A4 if the form is 21 by 29.7 centimeters (European).
Select
Next>
Letter
Legal
.
TWAIN
to return to Form Assistant.
if the form is 8.5 by 11 inches.
if the form is 8.5 by 14 inches.
can click
Select Source...
OmniForm Procedures - 84
in the next
Page 85

Scanning a Paper Form
7 Click
Next>
.
The next window only appears if a form is open already.
Proceed to step 9 if a form is not open.
8 Select whether you want the scanned page to be a new form or
to add the page to a currently open form in the next window,
and then click
Next>
.
9 Select form usage in the next window.
• Select the first option if you want to edit or redesign a form.
• Select the second option if you do not want to edit or redesign
a form, just fill it in.
10 Click
Next>
.
The last window prompts you to place a page in your scanner.
11 Make sure the page is aligned correctly in your scanner, and
click
Finish.
OmniForm scans the form. The OmniForm window displays
scanning, designing, and straightening progress.
How your form appears in OmniForm depends on the form
usage option you chose in Form Assistant.
12 Click the Save button in the standard toolbar or choose
in the File menu to name and save your file.
13 Begin to fill or edit your form.
OmniForm Procedures - 85
Save...
Page 86

Scanning a Paper Form
See Chapter 6, Designing a Form, for detailed information on defining,
moving, resizing, and creating fields, and other design functions.
See Chapter 7, Filling a Form, for detailed information on the kinds of
fields you may find on a form and how to fill them.
Using the
Scan Form...
1 Click the Scan button in the standard toolbar or choose
Form...
The Scan Form dialog box appears.
2 Select a source in the
•Select
Proceed to step 3.
•Select
Proceed to step 4.
3 If you selected
to choose a page size and adjust scanning brightness.
Command
in the File menu.
Source
HP Scanner
TWAIN
if you have an HP scanner.
if you have a TWAIN-compatible scanner.
HP Scanner
drop-down list.
as the source, click
Set Up Scanner...
Scan
OmniForm Procedures - 86
Page 87

Scanning a Paper Form
Text on a shaded
background. Select
Auto (AccuPage).
• Select an option under
Select
Select
if the form is 8.5 by 11 inches.
Letter
if the form is 8.5 by 14 inches.
Legal
Page Size
:
Select A4 if the form is 21 by 29.7 centimeters (European).
• Select a scanning brightness under
Select
Auto (AccuPage)
if your scanner supports HP AccuPage
Brightness.
and your form is printed on colored, shaded, or smudged
paper, or if it has very small type.
Select
Lighten
if the form has very thick or run-together text,
or if the background is smudged, shaded, or colored
Select
Normal
if the form has crisp, black text and objects on a
white background.
Select
Darken
if the form has very thin or broken text such as
with a poor-quality fax or a copy of a copy.
Thick, dark text.
Select
Lighten.
Thin, broken text.
Select
Darken.
Crisp, black text.
Select
Normal.
• Click OK to return to the Scan Form dialog box.
• Proceed to step 5.
.
4
TWAIN
users can click
Select Source...
in the next window.
• Select a source in the Select Source dialog box.
• Click
to return to the Scan Form dialog box.
Select
• Proceed to step 5.
5 Select an option in the
•Select
to have OmniForm determine orientation
Auto
Orientation
drop-down list.
automatically.
•Select
•Select
•Select
Portrait
Landscape
Flipped
for a vertically oriented page.
for a horizontally oriented page.
to automatically rotate a portrait page 180
degrees during the scan.
•Select
Flipscape
to automatically rotate a landscape page 180
degrees during the scan.
OmniForm Procedures - 87
Page 88

Scanning a Paper Form
The
Flipped
and
Flipscape
options are useful for scanning pages in a
book that needs to be turned upside down or sideways.
6 Select import options.
•Select
Auto Form Design
to use Logical Form Recognition to
recognize text and fillable fields in the form.
This gives you full control over a form’s design. Graphics are
not retained but you can import them.
• Deselect
Auto Form Design
to scan a form without recognizing
form design. Text and fillable fields are not recognized.
This is useful if you just want to print, fax, or mail a form, or
if the form is of such poor quality that it would cause
recognition problems.
•Select
Auto Form Straightening
to have OmniForm
automatically straighten a crooked page.
This is useful if you scan a page in a large, unevenly cut, or
thick document that is difficult to position correctly.
•Select
Add Page(s) to Current Form
to make the newly scanned
page the next page in the current form.
This option is only available if a form is open.
7 Verify that the selected language under
Language
want for your new form.
• To change the default language for the new form, click
Options...
• Select a language in the
to open a modified Options dialog box.
Language
drop-down list.
See “International Settings” on page 79 for more information
on the international options.
• Click OK to return to the Scan Form dialog box.
is the one you
8Select
Allow Multiple Languages
if your form contains more than
one language that you want OmniForm to recognize.
This setting does not affect the selected language for your form
set in the previous step.
Do not select this setting for a single-language form as optical
character recognition (OCR) may not be as efficient.
OmniForm Procedures - 88
Page 89

Scanning a Paper Form
9 Click OK in the Scan Form dialog box to begin scanning.
(TWAIN users may see a TWAIN dialog box for their scanner
after clicking
See “Scanners” on page 267 for information
OK.
on scanner settings.)
OmniForm scans the form. The OmniForm window displays
scanning, designing, and straightening progress if you selected
those options.
How your form appears depends on whether or not you chose
Auto Form Design
10 Click the Save button in the standard toolbar or choose
in the Scan Form dialog box.
Save...
in the File menu to name and save your file.
11 Begin to fill or edit your form.
See Chapter 6, Designing a Form, for detailed information on defining,
moving, resizing, and creating fields, and other design functions.
See Chapter 7, Filling a Form, for detailed information on the kinds of
fields you may find on a form and how to fill them.
See the sections on printing, faxing, and mailing in this chapter if you
have a non-designed form.
OmniForm Procedures - 89
Page 90

Importing an Image File
Importing an Image File
This section describes how to use both Form Assistant and the
Form...
form.
OmniForm can import and recognize black-and-white forms in either
PCX or TIFF format. Image resolution must be 200, 300, or 400 dots per
inch (dpi). If you have a fax modem, for example, you can receive a
faxed form and use the fax program’s software to save the file in PCX or
TIFF format. OmniForm offers the same import options for image files
as it does for scanned forms.
command to import an image file as a recognized OmniForm
Importing With Form Assistant
1 Windows 95 users: Click
Programs
Windows NT and 3.1 users: double-click the OmniForm icon in
the Caere Applications folder.
Click the Form Assistant button in the standard toolbar if
OmniForm is already open.
Form Assistant appears.
2 Select
3Select
that is in a supported image format.
This could be a form created in another program or one
received as a fax file.
OmniForm
Scan in a form
Fax or Image File
and then click
Scan
in the Taskbar and choose
Start
.
.
Next>
in the next window to recognize a form
4 Click
5 Select a file in the next window.
• Click
• Select a file in the Browse dialog box and click
to Form Assistant.
6 Click
The next window only appears if a form is open already.
Proceed to step 8 if a form is not open.
7 Select to have scan the page as a new form and click
to add the page to the currently open form and click
Next>
Browse...
Next>.
.
if you need to locate a file.
Open
OmniForm Procedures - 90
to return
, or
Next>
Finish>
.
Page 91

Importing an Image File
8 Select form usage in the last window.
• Select the first option if you want to edit or redesign a form.
• Select the second option if you do not want to edit or redesign
a form, just fill it in.
9 Click
Finish>
.
The OmniForm window displays scanning, designing, and
straightening progress.
How your form appears in OmniForm depends on the form
usage options you chose in Form Assistant.
10 Click the Save button in the standard toolbar or choose
in the File menu to name and save your file.
Save...
11 Begin to fill or edit your form.
See Chapter 6, Designing a Form, for detailed information on defining,
moving, resizing, and creating fields, and other design functions.
See Chapter 7, Filling a Form, for detailed information on the kinds of
fields you may find on a form and how to fill them.
OmniForm Procedures - 91
Page 92

Importing an Image File
Using the
Scan Form...
1 Click the Scan button in the standard toolbar or choose
Form...
The Scan Form dialog box appears.
2Select
form in a supported image format.
This could be a form created in another program or one
received as a fax file.
3 Click
• Locate and select a file.
• Click
You can select up to 20 files from one or more folders.
• Click OK to return to the Scan Form dialog box when you are
done.
Command to Import
in the File menu.
Image File(s)
Select Files...
Add File
in the
Source
to open the Select Files dialog box.
to add the file to the
drop-down list to recognize a
Files to Process
Scan
list box.
4 Select an option in the
•Select
automatically.
•Select
•Select
•Select
degrees during the scan.
•Select
degrees during the scan.
The
Flipped
book that needs to be turned upside down or sideways.
to have OmniForm determine orientation
Auto
Portrait
Landscape
Flipped
Flipscape
and
for a vertically oriented page.
to automatically rotate a portrait page 180
Flipscape
Orientation
for a horizontally oriented page.
to automatically rotate a landscape page 180
options are useful for scanning pages in a
drop-down list.
OmniForm Procedures - 92
Page 93

Importing an Image File
5 Select import options.
•Select
Auto Form Design
to use Logical Form Recognition to
recognize text and fillable fields in the form.
This gives you full control over a form’s design. Graphics are
not retained but you can import them.
• Deselect
Auto Form Design
to scan a form without recognizing
form design. Text and fillable fields are not recognized.
This is useful if you just want to print, fax, or mail a form, or
if the form is of such poor quality that it would cause
recognition problems.
•Select
Auto Form Straightening
to have OmniForm
automatically straighten a crooked page.
This is useful if you scan a page in a large, unevenly cut, or
thick document that is difficult to position correctly.
•Select
Add Page(s) to Current Form
to make the newly scanned
page the next page in the current form.
This option is only available if a form is open.
6 Verify that the selected language under
Language
is the one you
want for your new form.
• To change the default language for the new form, click
Options...
• Select a language in the
to open a modified Options dialog box.
Language
drop-down list.
See “International Settings” on page 79 for more information
on the international options.
Click OK to return to the Scan Form dialog box.
7Select
Allow Multiple Languages
if your form contains more than
one language that you want OmniForm to recognize.
This setting does not affect the selected language for your form
set in the previous step.
Do not select this setting for a single-language form as optical
character recognition (OCR) may not be as efficient.
8 Click OK.
OmniForm Procedures - 93
Page 94

Importing an Image File
OmniForm imports the form. The OmniForm window displays
scanning, designing, and straightening progress if you selected
these options.
How your form appears depends on whether or not you chose
to have OmniForm design the form during import.
9 Click the Save button in the standard toolbar or choose
Save...
in the File menu to name and save your file.
10 Begin to fill or edit your form.
See Chapter 6, Designing a Form, for detailed information on defining,
moving, resizing, and creating fields, and other design functions.
See Chapter 7, Filling a Form, for detailed information on the kinds of
fields you may find on a form and how to fill them.
See the sections on printing, faxing, and mailing in this chapter if you
have a non-designed form.
OmniForm Procedures - 94
Page 95

Filling a Form
Filling a Form
This section describes how to use both Form Assistant and the
command to open a form and fill it.
Filling Fields With Form Assistant
1 Windows 95 users: click
Programs
Windows NT and 3.1 users: double-click the OmniForm icon in
the Caere Applications folder.
Click the Form Assistant button in the standard toolbar if
OmniForm is already open.
Form Assistant appears.
2Select
3 Select which form to use in the next window.
• Select the first option and click
Select a form in the Open dialog box and click
to the Form Assistant dialog box.
• Select the second option to work with the current form.
This option is available only if a form is open.
4 Click
OmniForm opens the selected form in fill view.
See “The Fill View Window” on page 74 for a description.
OmniForm
Fill in a form
Finish>
after you select an option.
Start
.
and click
in the Taskbar and choose
Next>.
Browse...
to open a form.
Open
Fill
to return
See Chapter 7, Filling a Form, for detailed information on the kinds of
fields you may find on a form and how to fill them.
Using the
5 Click in a field or press the Tab or Enter key to place the cursor
in the first field.
6 Type the information you want to enter.
7 Press the Tab or Enter key to move to the next field.
Press Shift-Tab or Shift-Enter to move to the previous field.
8 Continue to fill fields in this way.
Command
Fill
1 If you have a form open and are in design view, click the Fill
button in the standard toolbar or choose
2 Follow steps 5–8 in “Filling Fields With Form Assistant” above.
in the View menu.
Fill
OmniForm Procedures - 95
Page 96

Printing or Faxing a Form
Printing or Faxing a Form
This section describes how to use both Form Assistant and the
command to print or fax a form, and how to print a form as a macro.
You must have fax hardware and software installed in order to fax a form.
Refer to your fax documentation for instructions on how to set up your
equipment for faxing. Faxing uses the
in these instructions describes both printing and faxing.
Print...
Printing/Faxing With Form Assistant
1 Windows 95 users: click
Programs
Windows NT and 3.1 users: double-click the OmniForm icon in
the Caere Applications folder.
Click the Form Assistant button in the standard toolbar if
OmniForm is already open.
Form Assistant appears.
2Select
The next window only appears if a form is open already.
Proceed to step 5 if a form is not open.
3 Select which form to use in the next window.
• Select the first option and click
Select a form in the Open dialog box and click
to the Form Assistant dialog box.
• Select the second option to work with the current form.
OmniForm
Print or fax a form
.
in the Taskbar and choose
Start
and click
command. The word
Next>.
Browse...
to open a form.
Open
Print...
print
to return
4 Click
5 Select what data to print or fax in the next window.
•Select
would appear in design view, without any information in
fillable fields.
•Select
graphics, and any information in fillable fields.
•Select
information you have typed in the fillable fields and place the
pre-printed form is in your printer.
after you select an option.
Next>
Print or fax blank copies of the form
Print or fax filled in copies of the form
Print the form’s data over pre-printed forms
to print the form as it
OmniForm Procedures - 96
to print all text,
to print just the
Page 97

Printing or Faxing a Form
Using the
6 Click
7 Select how you would like the form to look in the next window.
8 Click
9 Select the desired print options and click
Print...
1 Click the Print button in the standard toolbar or choose
2 This is how the dialog box looks in fill view in Windows NT
Next>.
• Select the first option to print the form as it was designed by
OmniForm during import or by the person who designed it in
OmniForm.
• Select the second option to print the form as it appeared when
it was a hard copy, without any edits or redesign.
Finish.
The Print dialog box appears.
OK.
See the next section for detailed information about the Print
dialog box options.
OmniForm prints or faxes your form with the settings you
chose. Depending on your fax software, more dialog boxes may
appear after you click OK in the Print dialog box.
Command
Print...
in the File menu.
The Print dialog box appears.
and 3.1.
OmniForm Procedures - 97
Page 98

Printing or Faxing a Form
This dialog box contains the
Quick Print
option. Select this
option to:
• Print forms faster.
• Achieve a smaller file size when using the
Print to File
See the online help for detailed information about the
option.
Print
option.
Quick
3 This is how the dialog box looks in fill view in Windows 95.
4 Select an option in the
•Select
Form and Data
Form/Data
to print all text, graphics, and any
drop-down list.
information in fillable fields.
•Select
Data Only
to print just the information you have typed
in the fillable fields. This is useful if you want to print data
over a pre-printed form.
•Select
Form Only
to print just the form without any
information in fillable fields.
OmniForm Procedures - 98
Page 99

Printing or Faxing a Form
5 Select an option in the
This option is only available if
selected in the
•Select
•Select
Form/data
Current Record Only
Current Record Set
drop-down list.
Data
Form and Data or Data Only
drop-down list.
to print just the current record.
to print the current found set of
records.
•Select
6Select
Collate
All Records
to print every record in the database.
to assemble multiple printed copies in the proper
sequence.
This option is available if your form has more than one page
and your printer supports collating.
7 Enter offset measurements under
want
.
Print offsets for data
if you
This is useful if you want to position data in a specific place on
the page. This option is only available if
the
Form/Data
8Select
Use macro to print form
drop-down list.
if you have a macro programming
Data Only
is selected in
utility installed and want to print a stored print file. This option
is only available if you have set a macro number.
See “Printing Your Form as a Macro” on page 100 for
information.
9 Select any other print options you want.
is
10 Click
OK.
OmniForm prints or faxes your form with the selected settings.
• Depending on your fax software, more dialog boxes may
appear after you click OK in the Print dialog box. See your fax
documentation for information.
• The Print to File dialog box appears after you click
selected the
Print to file
location for the file, type a file name in the
and click
OK.
option in the Print dialog box. Select a
File Name
OmniForm Procedures - 99
OK
if you
text box,
Page 100

Printing Your Form as a Macro
OmniForm supports macro programming utilities, such as Kelly
FlashSIMM, that translate print files to macros and download them to a
Flash storage device in a printer.
Set up a Form as a Macro
1 Open or scan in the form you want to translate to a macro.
2 If the form opens in fill view, click the Design button in the
standard toolbar or choose
to design view.
Printing or Faxing a Form
in the View menu to switch
Design
3 Choose
The Print dialog box appears.
See “Using the Print... Command” on page 97 for detailed
information on the Print dialog box.
4 Type a number in the
5Select
6 Use your macro program to locate the file and assign it the
same macro number you entered in the Print dialog box.
7 Download the file to the flash device in your printer.
See your program’s documentation for detailed instructions.
Print a Macro
1 Launch OmniForm and open the form you want to print.
2 Choose
3Select
4 Select any other options you want and click
See your macro programming utility documentation for an
explanation of the way a stored macro is printed.
in the File menu.
Print...
Macro Number
Print to File
Print...
Use macro to print form.
and click
in the File menu to open the Print dialog box.
text box.
OK.
OK.
OmniForm Procedures - 100
 Loading...