

Page 1

User Manual
Page 2

MacSpeech Dictate™
License Agreement
Copyright [c] 1998-2008 MacSpeech, Inc. and its licensors.
All Rights Reserved.
5. U.S. Gove rnment Restricte d Rights
The SOFT WARE PROD UCT is provide d with Restri cted Right s. Use, duplication or disclosure by
or to the United States Government is subject to restrictions as set for th in subpar agraph (c)(1)(ii)
of the Rig hts in Technica l Data and Computer Sof tware clause at DFARS 252.2 27-7013 and/or
subparagraphs (c)(1) and (2) of the Commercial Computer Software - Restr icted Rights at 48 CFR
52.22 7-19, as applicable. Manufacturer is MacSpeech, Inc. in Salem, New Ha mpshire, U SA.
IMPORTANT - READ CAREFULLY : Before installing this software carefully read the following terms and condit ions. This S oftwa re End-User License A greement (“License Agreeme nt”)
is a bin ding agreeme nt between you (either an individual or a single entity), the e nd-user, and
MacSp eech, Inc. (“MacSpeec h”) r egarding use of the soft ware accompanying this Agreement,
which includes computer soft ware (“SOFT WARE”) and accompanying documentation and may include “online” or electronic documentation and a license key (together “SOF TWARE PRODUCT”).
By in stalling, copying or otherwise using the SOFTWARE PRODUCT, by clickin g on “yes”, you
agree to be bound by the terms of this L icense Agreement. If you do not agree with the terms of
this Lic ense Agre ement, cl ick on “no”, and t he instal lation pr ocess wi ll not cont inue.
1. Grant of License
If you are an individual, this Licens e Agreement grants you (“ Recipient”) a non -exclusive and
non-transfer able r ight to use one copy of the SOFT WARE PRODUCT in the manner d escrib ed
in thi s License Agre ement. If you a re an entity, this Lice nse Agreement g rants yo u (“Re cipient ”)
the right to designate o ne individual within Recipient’s o rganization to have the sol e ri ght o n a
non- exclusive and non -trans ferable basis to use one copy of the SOFTWARE PRODUCT in the
manner described in this Lic ense Agreement.
2. Use Limitations
(a) Single Mac hine
Recipi ent may use the license d copy of the SOFTWA RE on a single computer. The SOFT WARE
is in “u se” o n a computer when it is lo aded into tempora ry memory (i.e. RAM) or installed into
permanent memor y (e.g. hard dis k, CD- ROM or othe r storage device) of that computer. Use on a
“single computer” permits you to transfer the SOFT WARE from one computer to another comp uter
provided the SOFTWARE is i n use on only one computer at a time.
(b) Copies Permitte d
Recipi ent may make one copy of the SOFTWARE solely for backup or archival purposes provided
that Recipient reproduces all copyright , confidenti ality and other pro prietary notices that ar e on
the original copy of the SOFT WARE. Recipient may not copy the printed materials accom panying
the SOF TWARE.
(c) Transfer Prohibited
Recipi ent may not r ent, leas e, sell or otherwise trans fer the SO FTWAR E, whether on the media,
if any, or otherwise, nor any copies of the SOFT WARE, or any of the ac companying docum entation. Recipi ent may not disclo se, make availa ble, or otherwise redistribute all or any part of the
SOFT WARE PROD UCT or any cop ies there of to third parties. In addition, Recipient may not use
the SOFTWARE or any part th ereof, in any for m, in software or other product that i s or will be
distri buted to a thi rd part y.
(d) Limitat ions on Rever se Engineering/ M odific ations
Unless applic able law prohibits enforceme nt of this provision, Recipie nt shall not decompile,
disass emble, reverse engineer, or create derivative works of the SOFTWARE PRODUCT or
of any part of the SO FTWAR E PRODUCT. Re cipient may not alter or modify the SOFT WARE
PRODUC T or any part thereof.
3. Copyr ight Limitations
(a) Ownership
The SOFTWARE PRODUCT is licensed, not sold to Recipient, for use only under the term s of
this L icense Agreeme nt, and MacSp eech reserves all r ights not expressly gr anted to Recipi ent.
Recipi ent owns the media, if any, on whi ch the SOF TWARE PRODUCT is recorded. M acSpee ch
or its suppli ers owns the SOF TWARE and all copyright and other intellectual rights in the
SOFT WARE PRODUCT (including but not limi ted to images, “applets”, photographs , animations,
video, audio, music and text inc orporated into the SOFT WARE PRODUCT), the accompanying
printed materials , and any copies of the SO FTWAR E. Under the ter ms of this License Agreeme nt
Recipi ent receive s only a limited right to use the SO FTWAR E PRODUCT under all terms set forth
by Mac Speech, Inc., which are subject to change. The SOFTWARE PRO DUCT is prote cted by
United States copyri ght laws and internatio nal copyright treatie s, as we ll as by other intellectual
proper ty laws and treaties. Therefo re, Recipient mus t treat the SOF TWARE PRODUCT like any
other copyrighted materia l and not transfer or distribute the SOFT WARE PROD UCT to others.
(b) No Copie s
Except as expressly permitted under “Use Limitati ons” above, Rec ipient may not c opy the
SOFT WARE PRODUCT or acc ompanyin g writte n materials.
4. Term
This License Agreement is effec tive until ter minated. Recipient may terminate thi s License
Agreement at any time by destroying t he SOF TWARE PRODUCT and all copies the reof including any doc umentation. T his Li cense Agreement will ter minate immediately without notice from
MacSp eech if Recipi ent fails to c omply with any provision of th is Agreement. In such event,
Recipi ent must dest roy the SOFTWARE PRODUCT and all of its component pa rts, and delete,
remove, or oth erwise destroy all cop ies of the SOFT WARE PRODUCT t hat are in Recipie nt’s
possession or control including installed SO FTWAR E. All provisions of this License Agreement
relating to disclaimers of warranties, limitation of liability, remedies or damages, and all of
MacSp eech’s prop rietar y rights s hall sur vive termination.
6. Expo rt Restr ictions
The SOFTWAR E PRODUCT, inc luding technic al data, is subjec t to U.S. export control laws,
including the U.S. Ex port Administ ration Act and its as sociate d regul ations, and may be subject
to expor t or import regulatio ns in other countries. Recipient agrees to comply strictly with all such
regulations and ackn owledge s that Recipient has the responsibi lity to obtain licen ses to export ,
re-export or import t he SOFT WARE PRODUCT.
7. Limited Warra nty
With the exclusion of any other warranty, MacSpeech solely warrants for a period of six ty (60)
days from the date of delivery to Recipient (the “Warr anty Pe riod”) that any media on which the
SOFT WARE i s furnished, will b e free from defects in materials and workmanship under normal
use. Recipient ’s sole and exc lusive remedy and the entire liability of MacSpeech and its suppli ers hereunder will be, at Mac Speech’s option, rep air or replacement of the media, if repor ted (or,
upon request, returned) to M acSpee ch or its designee w ithin the Warranty Period. T his warranty
does not apply if such defective media is the result from accident, abuse, or misa pplicat ion. Any
replac ement will be warranted for the remainder of the original Warrant y Period or thirty (30) days,
whichever is longe r.
THE SOFTWARE AND ANY RELATED DOCUMENTATION IS PROV IDED “AS IS” WITHOUT
WARRANTY OF AN Y KIND. EXCEPT AS EX PRESSLY SET FORTH ABOVE, NO OTHER
WARRANTIES, EITH ER EXPRESS OR IMPLI ED CONDITIO NS, REPRESENTATIONS AND
WARRANTIES, ARE MADE WITH RESPECT TO THE SOFTWA RE PRODUCT INCLUDING
BUT N OT LIMI TED TO THE I MPLIED WARRANTY OF MERCHANTABILITY, FITNESS FOR A
PARTICULAR PURPOS E, OR NON- INFRIN GEMENT, AND MACSPEECH AND ITS SUPPLIERS
EXPRESSLY DISCLAIM ALL OTHER WARR ANTIES NOT STATED HEREIN, EXCEPT TO THE
EXTENT THAT SUCH DIS CLAIMERS ARE HE LD TO BE LEGALLY INVALI D. RECIPIENT
ASSUM ES THE RISK AS TO THE QUALITY AND PERFORMANCE OF THE SOFTWARE. SOME
STATES D O NOT PERMIT THE EXCLUSION OF IMPLI ED WARR ANTIES, SO THE ABOVE
EXCLUSION MAY NOT APPLY TO YOU. THIS WARRANT Y GIVES YOU SPECIFIC LEGAL
RIGHTS A ND YOU M AY HAVE OTHER RIGHTS WHICH VARY FROM STATE TO STATE. IT
SHOULD BE UND ERSTOOD BY RECIPIEN T THAT SPEECH RECOGNITION IS INHERENTLY
A STATISTICA L PROCESS AND THAT RECOGNITION ERRORS ARE INHERENT IN THE
PROCESS OF SPEECH RECOGNITION.
8. Disc laimer
TO THE MA XIMUM E XTENT PERMITT ED BY APPLICA BLE LAW, IN NO EV ENT SHALL
MACSPEECH OR ITS SUPPLIERS OR THE OWNERS OF TH E RIG HTS IN THE SOFT WARE
PRODUC T BE LIABLE FOR ANY IN DIRECT, INCI DENTAL, CO NSEQUEN TIAL, SPECIAL,
PUNITI VE, OR OTHER DAMAGES WHATSOE VER, IN CONNECTION WITH OR ARISI NG OUT
OF THE USE OR INA BILIT Y TO USE TH E SOFTWARE P RODUCT (INCLUDING, W ITHOUT
LIMITATION, DAMAG ES FOR LOSS OF BUSINESS REVENUE, PROFITS, USE, DATA OR
OTHER ECONOMIC ADVANTAGE), HOWEVER IT ARISES, WHETHER FOR BREACH OR
IN TORT, EVEN IF MACSPEECH HAS BEEN ADVISED OF THE POSSIBILIT Y OF SUCH
DAMAGES. IN NO EVENT SHALL MACSPEECH’ OR ITS SUPPLIERS’ LIABILITY TO RECIPIENT
HEREUN DER, WHETHER IN CONTRACT, TORT (INCLUDING NEGLIGEN CE) OR OTHERWISE,
EXCEED TH E PRICE ACTUAL LY PAID BY RECIPIEN T FOR THE SOFT WARE PRODUCT. THE
FOREGOING LIMITATIONS S HALL APPLY EVEN IF THE ABOV E-STATED WARRANTY FAILS
OF ITS ESSENTIA L PURPO SE. BECAUSE SOME STATES AND JURISDICT IONS DO NOT
ALLOW TH E EXCLUSION OR LI MITATION OF LIABILIT Y, THE ABOVE LIMITATION MAY NOT
APPLY TO YOU.
9. Speci al Provisi ons
This License Agreem ent shall be governed by and interprete d under the laws of the Commonwealth
of Massachusett s, United St ates of Amer ica, wit hout regar d to conflicts of law provisions. By acceptin g this Lic ense Agreement, Recipient agrees to be subjec t to juris diction in Massachusett s,
and to commence any action arising under or relating to this Licen se Agreement in the appropriate
State or Fe deral Court in Mas sachusetts.
BY CONTINUING WITH THE INSTALLATION OF THE SOFT WARE RECI PIENT
ACKNOW LEDGES THAT RECIPIENT H AS READ AND UND ERSTOOD TH IS LICENS E
AGREEM ENT AND TH AT RECIPIENT AG REES TO BE BOU ND BY ITS TERMS. RECIPI ENT
FURTHER AGREES THAT THIS LICENS E AGREEME NT IS THE CO MPLETE A ND
EXCLUSIVE STATEMENT OF TH E AGREEMENT BETWEEN RECIPIENT AND M ACSPEECH ,
AND SUPERSEDES A NY PROPOSAL OR PRIOR AGREEM ENT, ORAL O R WRITTEN,
AND AN Y OTHER COM MUNIC ATIONS REL ATING TO THE SUBJECT MATTER OF THIS
Copyright (c) 1998-2008 Mac Speech, Inc. and it s licenso rs. All Rights Reserved. Mac Speech
SOFT WARE END -USER LICENSE AG REEMENT.
Dictate is a trademark of Mac Speech, Inc.
2 MacSpeech DictateLicense Agreement
Page 3

Credits
MacSpeech Engineering:
Jeff Ganyard
Chris Hardy
Paul Herzog
Eric Hon-Anderson
Jim Kelley
Fernando Lins
Robert Stuller
Andrew Taylor
Colin Taylor
Chad Weider
Jonathan Wight
…and the rest of MacSpeech:
Sheila Ganyard
Stephane Gauthier
Jay Gonzales
T. Patrick Henebry
Carla Hernandez
Sara Jennings
Donald MacCormick
Dominique Maltais
Craig Nesbitt
Nathan Nesbitt
Anne Schwing
Michael Schwing
Brenda Shiepe
Jack Simonton
Carly Taylor
Special Thanks To:
Apple Inc. for the wonderful Mac OS X.
Nuance Communications, Inc. for their phenomenal speech engine.
Naomi Pearce and Ed Prasek for all their help introducing MacSpeech Dictate to the world.
And of course, thanks to everyone who has ever been involved with MacSpeech. MacSpeech Dictate certainly wouldn’t be
here without all your hard work and support!
Credit Given Where Credit Is Due:
Powered By Dragon®, the Dragon NaturallySpeaking® speech engine
from Nuance Communications, Inc.
The above are registered trademarks of Nuance Communications, Inc. and
are used here under license.
All rights reserved worldwide.
AquaticPrime Framework
Copyright © 2006-2008, Lucas Newman
All rights reserved.
BDAlias
Copyright © 2001-2008, bDistributed.com, Inc.
All rights reserved.
Copyright © 2007-2008 MacSpeech, Inc.
This user manual was partially written using MacSpeech Dictate.
For updates to this document, please see http://www.macspeech.com/support_center
CTGradient
Copyright © 2007-2008 Chad Weider.
Some rights reserved: <http://creativecommons.org/licenses/by/2.5/>
Log4Cocoa
Copyright © 2002-2008, Bob Frank
All rights reserved.
Shortcut Recorder
Copyright © 2006-2008, contributors to ShortcutRecorder.
Contributor details at <http://wafflesoftware.net/shortcut/contributors/>.
All rights reserved.
3 MacSpeech DictateCredits
Page 4

Table of Contents
MacSpeech® Dictate License Agreement 2
Credits 3
Chapter 1: Introduction 5
Chapter 2: Installation 9
Chapter 3: Getting Started 10
Chapter 4: Training 14
Chapter 5: Dictation 20
Chapter 6: Controlling Your Mac 32
Chapter 7: Reference 38
Index 47
4 MacSpeech DictateTable of Contents
Page 5

Chapter 1: Introduion
What Is MacSpeech Dictate?
MacSpeech Dictate is a new way to interact with your Mac.
Instead of typing your input, and clicking your mouse for
commands, now you can dictate your input and speak your
commands.
When you dictate words and phrases, what you say will appear on the screen, in virtually any Macintosh application.
The technology that enables this amazing feat translates
speech to text and characters almost anywhere you would
normally type.
MacSpeech Dictate can be used as a “third hand” to control
your Mac without using the mouse or keyboard. Speaking to
your computer is faster and can help you accomplish tasks
more easily than constantly moving your hands from keyboard to mouse.
MacSpeech Dictate is speaker dependent speech recognition
software. This means that in order to recognize your speech
so accurately, MacSpeech Dictate will be trained to recognize
your unique speech patterns.
Fortunately, MacSpeech Dictate is a quick learner. Initial
training can happen in a few short sessions, and the program
continues to learn as you go. Training data is stored in a profile
along with other things such as the type of microphone you
are using. MacSpeech Dictate can handle multiple profiles,
so others in your family or workgroup can use it, too (on the
same computer).
Will MacSpeech Dictate Replace My
Mouse And Keyboard?
Speech is a useful addition to the way you work with your
computer, but it isn’t a replacement. Some tasks will still be
efficiently performed using your mouse or keyboard. While
using MacSpeech Dictate, you will discover what combination
of speech, mouse, and keyboard use is appropriate for your
tasks.
Who Is MacSpeech, Inc.?
MacSpeech, Inc. people are passionate about the Macintosh
and experienced creators of speech recognition technology.
MacSpeech’s founder and senior engineers were key members of the teams that produced some of the first and some of
the best speech recognition products for Macintosh, including
Voice Navigator, PowerSecretary and iListen.
Being Mac-only means not having hands and creativity
tied by a requirement to maintain a common code-base
across computer platforms. As a uniquely Macintosh-based
company, MacSpeech, Inc. can take advantage of all the
Macintosh has to offer.
MacSpeech Dictate System
Who Should Use MacSpeech Dictate?
MacSpeech Dictate works well for many different people.
For a busy Mac user, MacSpeech Dictate can speed up
work when creating documents such as memos, reports, and
e-mails, or surfing the web and chatting.
Creative Professionals will love MacSpeech Dictate’s ability
to control the Mac interface, effectively allowing them to use
their voice as a “third hand.” MacSpeech Dictate can help
overcome mobility problems that make using a keyboard
difficult or impossible to use. Finally, those who have little or
no typing skills will benefit from MacSpeech Dictate’s ability
to free them from the “hunt and peck” method of typing.
No matter what type of user you are, you need to spend a
little time teaching MacSpeech Dictate the unique qualities
of your voice so the program can understand you better. As
you use MacSpeech Dictate it learns how your voice sounds,
your vocabulary and how you pronounce things. The more
you use the program, the better it will become at recognizing
your speech.
5 MacSpeech DictateChapter 1 — Introduction
Requirements
MacSpeech Dictate has the following minimum system
requirements:
• MacOSXversion10.5.2orgreater(“Leopard”)
or Mac OS X version 10.4.11 or greater (“Tiger”)
• 1GB(ormore)RAM.
• Intelprocessor-basedMac.
• 2GBoffreeharddrivespace.
• AMacSpeech-certiedUSBnoise-canceling
microphone.
Speech recognition takes a lot of horsepower. In order to
decipher what you are saying, your Mac needs to perform
thousands of calculations every second. Slow machines just
can’t keep up with the demand. So if you ever needed a
reason for buying that new top-of-the line computer with loads
of RAM, now you have one.
Page 6

Microphones
MacSpeech Dictate supports microphones which connect to
the Macintosh through the USB port, either directly or through
a USB adapter.
Although today’s Macintosh computers appear to have a port
for sound input, this only works with devices that provide a
LINE IN signal, which is different from the signal produced by
a microphone. For this reason, you should use a high quality,
noise-canceling USB microphone with MacSpeech Dictate.
Tip
For best results, use a MacSpeech-certified
microphone. The iSight and the internal microphone
built into some Macintosh computers are not supported
because these do not have the necessary directional
and noise-canceling properties that are required to
obtain the best speech recognition accuracy.
may be small, but it packs a surprising amount of information,
as shown in Figure 1-1.
Figure 1-1
If you already have a noise-canceling microphone that is
not MacSpeech-certified, don’t panic; it may work. Dictate’s
Microphone Setup assistant can adjust the audio input level
of most microphones to work with your system.
If you use a microphone that is not MacSpeech-certified and
are getting accuracy below 95%, it is a good indication the
microphone you are using is not compatible with MacSpeech
Dictate.
If you received your microphone from MacSpeech along with
MacSpeech Dictate, it is certified to work with the software.
For information on microphones, please see the MacSpeech
Web site at:
http://www.macspeech.com/microphones
MacSpeech Dictate’s User Interface
By design, MacSpeech Dictate has a user interface that tries
to stay out of the way. The small Status window provides
control over the program’s main actions. The Recognition
window indicates what Dictate heard you say, and enables
the Phrase Training feature. The Available Commands
window shows which commands are available at a specific
point in time.
The MacSpeech Dictate Status Window
The Status window is MacSpeech Dictate’s main interface.
This window floats on top of all the other windows on your
screen, so it is always available to you. The Status window
The microphone button indicates your microphone’s status,
and controls whether it is on, off, or asleep:
• When the microphone is on, the button will
show a green circle behind a microphone. The
command Microphone Off or clicking the button will turn the microphone off. The command
Go To Sleep will make it asleep.
• When the microphone is off, the button will
show a red octagon in front of the microphone.
Click the button to turn the microphone on.
• Whenasleep,thebuttonwillshowapurpleoval.
The commands Wake Up or Turn Microphone
On, or clicking the button will turn the micro-
phone on.
Sound Input Level
The sound input level displays the strength of the audio input.
In general, this should be green with a little bit of black space
at the top when you are speaking.
Command Status Indicators
The command status indicators display the status of certain
commands. The top light is for capitalization commands (All
Caps/Caps/No Caps), the middle light for spacing commands
(NoSpace), and the bottom light for numeral commands
(Numeral/Roman Numeral).
MacSpeech Dictate Button
When pressed, the MacSpeech Dictate button will bring the
application to the front, just like clicking the MacSpeech
Dictate icon in the Mac OS X Dock.
6 MacSpeech DictateChapter 1 — Introduction
Page 7

Speech Mode Indicator
The speech mode indicator text in the top right of the status
window tells you MacSpeech Dictate’s current mode. It will
say either “Dictation”, “Command”, “Spelling” or “Asleep.”
Each time you do this will activate the Phrase Training fea-
ture which helps Dictate continually learn more about your
speech.
Recognition Window Button
The recognition window button (picture of branching arrows)
is highlighted when there is a dictated phrase with multiple
recognition options available in the Recognition window.
Current Profile
The current profile text in the bottom right of the status window
is the name of the currently active user profile.
The Recognized Text Indicator
As you speak, the words as MacSpeech Dictate recognizes
them appear below the Status window in white, shadowed
text. Whether this text appears is determined by whether the
Show “Recognized Text” preference is checked in General
Preferences. The default is for the text to appear.
The Recognition Window
The Available Commands Window
The Available Commands window (Figure 1-3) provides a
list of commands that are available to be spoken. This list
varies depending on what is happening on the screen. You
will see different lists of available commands in this window
as the context changes.
Typing a word or phrase in the Search field in this window will
limit the display to only the commands containing that word
or phrase.
The Recognition window (Figure 1-2) shows Dictate’s
recognition of the words you dictated. This window will
appear dynamically during dictation depending on how the
Recognition Preferences are set. It includes a list of close
alternatives to choose from in case the program doesn’t
recognize your most recent word or phrase.
Figure 1-2
You can pick one of these options by saying “Choose <x>” or
“Pick <x>,” where <x> is the number of most accurate option.
Figure 1-3
User Modes
The specific things you can do using speech vary widely,
but they boil down to two main things: entering text and
controlling your Macintosh. In order to accomplish these
tasks, MacSpeech Dictate provides you with the following
operating modes:
Dictation Mode
You will probably use Dictation Mode the most. In Dictation
Mode, MacSpeech Dictate types what you say into a text
area in the active window. That text area can be in a word
processing document, a text field in a dialog box, or even text
that renames icons in the Finder.
All commands available in Command Mode are also available in Dictation Mode. In order to execute a command in
Dictation Mode pause briefly before and after saying the
command. For Example:
This is a sentence that has been dictated PERIOD
[pause] Select All [pause] Copy Selection
The above sequence will type the dictated sentence, then
select the whole document and copy it to the clipboard.
7 MacSpeech DictateChapter 1 — Introduction
Page 8

Command Mode
Command Mode is used when you only want to control your
Mac by voice. In Command Mode, anything not recognized
as a command will be ignored. The advantage of using
Command Mode is that the commands will be more easily
recognized and will be less likely to be confused as something
you want dictated instead.
In Command Mode, you can click buttons, control windows,
launch applications, and use speech instead of pressing keys
on the keyboard or using the mouse. Many commands in
MacSpeech Dictate are written in AppleScript, the scripting
language built into Mac OS X. Commands can be global,
meaning they work everywhere, or application specific, which
means they only work within a particular application.
Spelling Mode
Spelling Mode allows you to spell a word that is not part
of the regular MacSpeech Dictate vocabulary. For example,
you might use this to correctly dictate names and other
proper nouns, proprietary terms, words in other languages,
or acronyms.
Figure 1-4
Sleep Mode
Sleep mode is a special mode where the microphone stays
on, but ignores everything except a command to resume
listening. You say Go to Sleep to put MacSpeech Dictate into
sleep mode, and Turn Microphone On or Wake Up to return
it to the last mode used before putting it to sleep.
Switching Between User Modes
There are several ways to switch between the user modes:
Speech
Say Command Mode, Dictation Mode, Spelling Mode or
Go to Sleep.
Menu
You can also switch modes by bringing MacSpeech Dictate
to the front and selecting the desired mode from MacSpeech
Dictate’s Speech menu.
Hot Keys
You can turn the microphone on or off and cycle between user
modes with customized keyboard shortcuts. To change your
Hot Key preferences, select Preferences from the Dictate
menu and click the Shortcuts icon in the toolbar (figure 1-4).
Any key can be used for a hot key, provided you use at least
one modifier (Command, Control, Option, etc.).
8 MacSpeech Dictate
Page 9

Chapter 2: Inallation
Insert the CD titled “Application Disc”. A window like the one
in Figure 2-1 should appear. If it does not, double-click the
CD image on your desktop. Drag the MacSpeech Dictate
icon shown over to the picture of your Applications folder.
This will copy MacSpeech Dictate and its documentation to
the Applications folder.
Figure 2-1
Launch MacSpeech Dictate by opening your Applications
folder, then double-clicking on the MacSpeech Dictate icon.
Click the Register button to fill out the required information in
the Registration window (Figure 2-2). MacSpeech respects
your privacy, and will not share your information with anyone
else.
Data DVD
During the initial installation, set-up and training, MacSpeech
Dictate will ask for the Data DVD (in most versions titled
“MacSpeech English Data Disc”). This comes with the product, and is a separate disc from the Application CD. Please
have the DVD handy for when the program requests it.
Your Reiration Code
Registration Codes have 16 characters broken into
4 groups of 4 characters each by dashes. Here is an
example:
1A23-4B5C-678D-901E
This code should be on a sticker, on the sleeve for the
MacSpeech Dictate Program CD. After entering your
Registration Code you will receive a license file back
from MacSpeech’s servers.
Removing MacSpeech Dictate
To remove MacSpeech Dictate, follow these steps:
1) Open the Applications folder on your hard drive.
2) Delete the MacSpeech Dictate application, and close the
Applications folder.
Figure 2-2
Click the Register Now button to begin using the program.
(Registration requires an Internet connection.) A dialog box
will appear to confirm your registration has been accepted.
3) Open the Library folder inside your Home folder.
4) Open the folder called Application Support.
5) Look for a folder called MacSpeech; if it exists delete it.
6) Close the Application Support folder and open the
Preferences folder inside the Library folder.
7) Find the file called com.macspeech.dictate.plist and if it
exists, delete it.
8) You can delete profiles by searching for files on your harddrive with the extension .dictationprofile.
Troubleshooting Installation Problems
If you have problems with installation, please visit the
MacSpeech support web site at:
http://www.macspeech.com/support_center
9 MacSpeech DictateChapter 2 — Installation
Page 10
Chapter 3:
Gettin Started
The first step is to get MacSpeech Dictate used to your voice.
You begin by setting up your microphone, and creating your
first Profile. MacSpeech Dictate requires you Enable access
for assistive devices in the Mac OS X Universal Access in
your System Preferences. If this option is not turned on you
will see the following panel:
Figure 3-1
Enable access for assistive devices is on, you may close
the Universal Access System Preferences window and click
the Continue button. MacSpeech Dictate will not allow you to
proceed until Enable access for assistive devices is on.
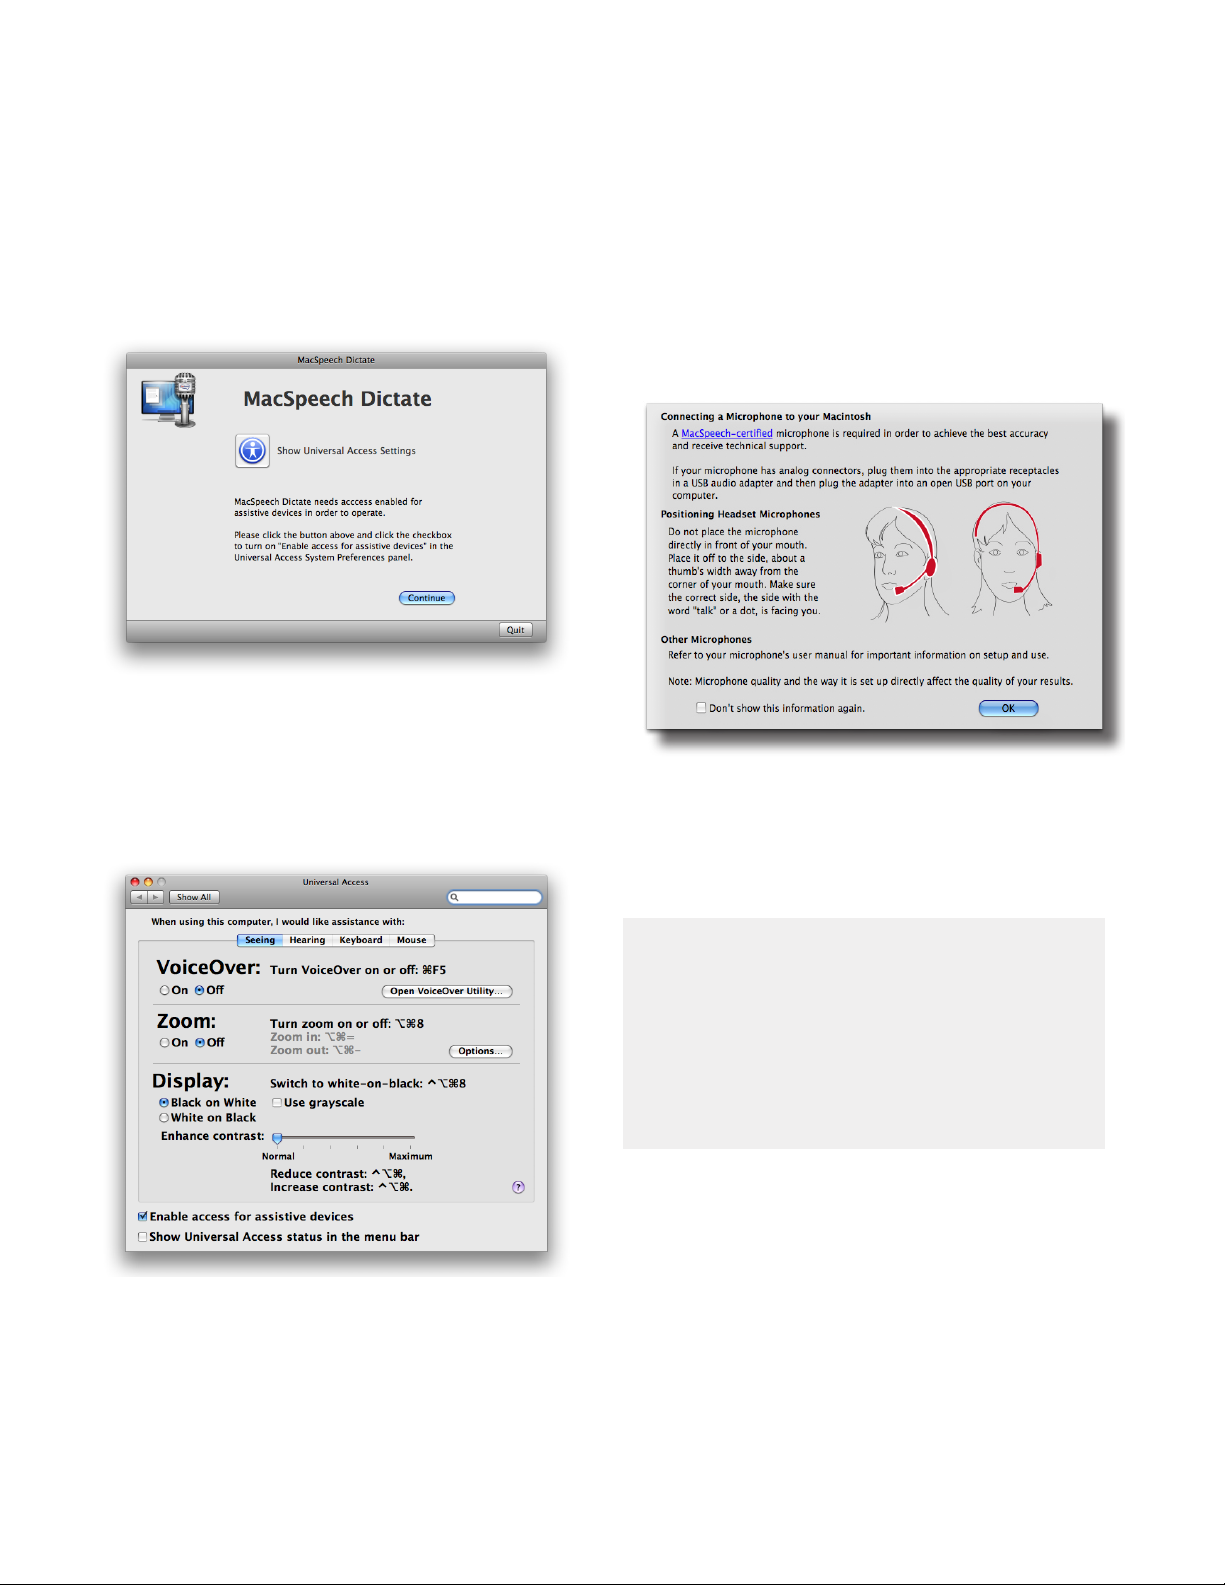
If the Universal Access setting is correct, you will see the
Connecting a Microphone to your Macintosh panel (Figure
3-3). If you have not registered yet, you will also see a panel
asking you to register or select your license key.
If you see this panel, click the icon labelled Show Universal
Access Settings. This will bring up the window shown in
Figure 3-2.
Figure 3-2
Make sure the check box at the bottom for Enable access for
assistive devices is checked. (Don’t turn on VoiceOver at
the top of the window by mistake unless you want your Mac to
talk back to you for every thing it does). Onc e yo u h ave verif i e d
Figure 3-3
The Connecting a Microphone panel gives you information
about connecting your microphone. Follow the directions for
connecting your microphone.
IMPORTANT
You must use a USB connection for your microphone.
It is fine to use a USB adapter. However, MacSpeech
Dictate does not support non-USB input connections,
such as a Mac’s internal microphone, direct analog
microphone jacks, built-in Bluetooth, FireWire, etc.
Positioning the microphone is very important. The microphone should not be directly in front of your mouth, because
direct noise from your breath sounds can affect accuracy.
For most people, the microphone should be one or two
fingertips from the corner of your mouth and off to the side
a bit.
You will be able to test and adjust the connection and positioning during the next steps of Getting Started. For now,
make sure the correct side of the microphone (sometimes
10 MacSpeech DictateChapter 3 — Getting Started
Page 11

marked with a dot or the word “Talk”) is pointing towards your
mouth. When the microphone is connected and positioned,
click OK to close the Connecting a Microphone panel.
Creating a Profile
Now it is time to create a profile that will let MacSpeech
Dictate learn about your voice and your microphone. You will
see a blank Profiles Window (Figure 3-4).
Figure 3-4
TIP:
The “Microphone” pull-down menu may list something
like “AK5370,” “C-Media USB Headset” or “VXI 7.0.2.”
That’s OK. That is the firmware designation for the
USB adapter. (Your Mac has no way to otherwise
identify an analog microphone.)
Select the language model that best suits you from the
Language pull-down menu. MacSpeech Dictate supports
language models including US English, UK (British) English,
US Teen, Australian English, Indian English, and Southeast
Asian (Singaporean) English.
If you use a high-quality, noise-cancelling microphone such
as one from MacSpeech, select Standard Acoustics. If you
are using an Array microphone, click on the Advanced but ton
and then select “Array” from the pop-down menu next to the
word “Acoustics.”
When you have verified your choices, click the Create button.
After a short wait your profile is created. The first Microphone
Setup panel (Figure 3-6) appears.
To create a profile, click the “+” button. This will let you enter
a profile name, and select microphone type and language for
the profile (see Figure 3-5).
Figure 3-5
Select the type of microphone you are using from the
Microphone pull-down menu.
Figure 3-6
The Microphone Setup Volume Adjustment steps will ask
you to read a short bit of text out loud while MacSpeech
Dictate sets the audio levels for your microphone. Click the
microphone icon with the red octagon on it, to enable the microphone. This icon will turn into a green light, and the window
will display a box with text to read (Figure 3-7).
11 MacSpeech DictateChapter 3 — Getting Started
Page 12

Figure 3-7
Read the text in this panel at a normal conversational volume
and pace. You should read until the text box disappears and
the panel changes. You will see the volume meter bar fill, and
the gain indicator slide as you read. If nothing happens after
reading the text, simply start reading the text again from the
beginning.
If the volume meter bar remains empty, or the text doesn’t
disappear after you read it three (3) times, you probably have
a sound input problem. See the Troubleshooting Sound
Input section at the end of this chapter for more information.
resonances from the bones in our head. Recordings lack
these extra resonances, so they sound different than we
expect. (If you don’t hear anything during the playback, check
to make sure your volume is not muted.)
Listen for static, excess noise, a hum, or any other odd sound.
If you hear any these of things, check your microphone’s
connections. If the connections seem OK, the microphone
may be faulty.
To hear the voice sample again, click the Play button.
MacSpeech Dictate is very good at determining the quality
of the sound input, but if you hear anything unusual, consider
re-sampling your voice. To re-sample your voice, click the left
arrow to go to the previous panel.
When you are satisfied with your voice sample, press the
Voice Training button to proceed to Voice Training.
TIP:
Microphone Setup can be used at any time, for example,
to adjust for room noise or microphone positioning.
Run this procedure by selecting Microphone Setup
from the Tools menu.
Checking the Manual Gain Setting b o x w i l l a l l o w y o u t o b y p a s s
automatic volume adjustment and set the gain manually.
The Finished recording panel (Figure 3-8) plays back some
of what was recorded so you can check the sound quality.
Figure 3-8
Chances are, you will think your voice sounds funny. That’s
normal; when we speak, we hear our voices with additional
12 MacSpeech DictateChapter 3 — Getting Started
Page 13

Troubleshooting Sound Input
If MacSpeech Dictate doesn’t respond to your voice or doesn’t
seem to be working at all, check your sound input. The
problem can either be with the hardware (your microphone
or computer) or with software (the Macintosh sound input
settings).
Checking Your Microphone
Make sure the USB adapter is plugged into an open USB port
on your Macintosh. You may want to unplug it and plug it back
in to make sure, then try the following:
1). Quit MacSpeech Dictate if it is running.
2). Open your System Preferences and click on the
Sound icon.
3). Click on the Input tab and make sure your headset is highlighted in the input source list.
4). Click on the Show All icon in the upper left hand
corner of the System Preferences window, then
click the Speech icon.
5). Click the Speech Recognition Pane, then highlight the Listening sub-pane in the middle of the
window.
6). Select your headset from the pop-down menu
labeled “Microphone” towards the bottom of the
screen. Sometimes your headset may be indi-
catedbythermwaredesignatorofyourUSB
pod. This might say something like “AK5370.”
7). Click on the “Calibrate” button. In the next
window, say a few words and note if the signal
meter moves when you speak. If it does,
everything should be working correctly. Quit
System Preferences and re-launch MacSpeech
Dictate. Follow the on-screen instructions or the
instructions in the User’s Guide to set up your
microphone.
If you are not getting sound, you may have a defective microphone. Examine it to make sure there is no mute switch
set to off (some headsets include mute switches). Unplug the
microphone from your USB adapter and unplug the adapter
from your computer.
Re-plug everything and then restart your computer. If
possible, try the headset in a different Macintosh to rule out
any problems with your computer.
13 MacSpeech DictateChapter 3 — Getting Started
Page 14
Chapter 4: Trainin
This chapter covers two methods of training MacSpeech
Dictate to recognize your voice, Voice Training and Vocabulary
Training. Along the way, we will share some insight into how
MacSpeech Dictate works, as well as tips for better recognition. We will also explain how to manage multiple profiles.
Voice Training and Vocabulary Training are not performed during normal use of MacSpeech Dictate for dictation. However,
a third method, Phrase Training, allows you to train the program through the Recognition window during everyday use.
Since it’s part of the standard dictation process, the Phrase
Training feature will be covered in Chapter 5 (“Dictation”).
Why Do I Need To Train MacSpeech
Dictate?
MacSpeech Dictate is speaker dependent, which means it
needs to be trained to get the best accuracy. You do this by
reading one or more training stories so it can adapt to your
unique vocal characteristics.
Luckily, training MacSpeech Dictate is as simple as reading
aloud and only takes a few minutes. The Voice Training part
of the program will guide you through the process.
tend to pepper your speech with lots of “ums,” “uhs,” “likes,”
and “you knows” MacSpeech Dictate will dutifully type what
it thinks you said.
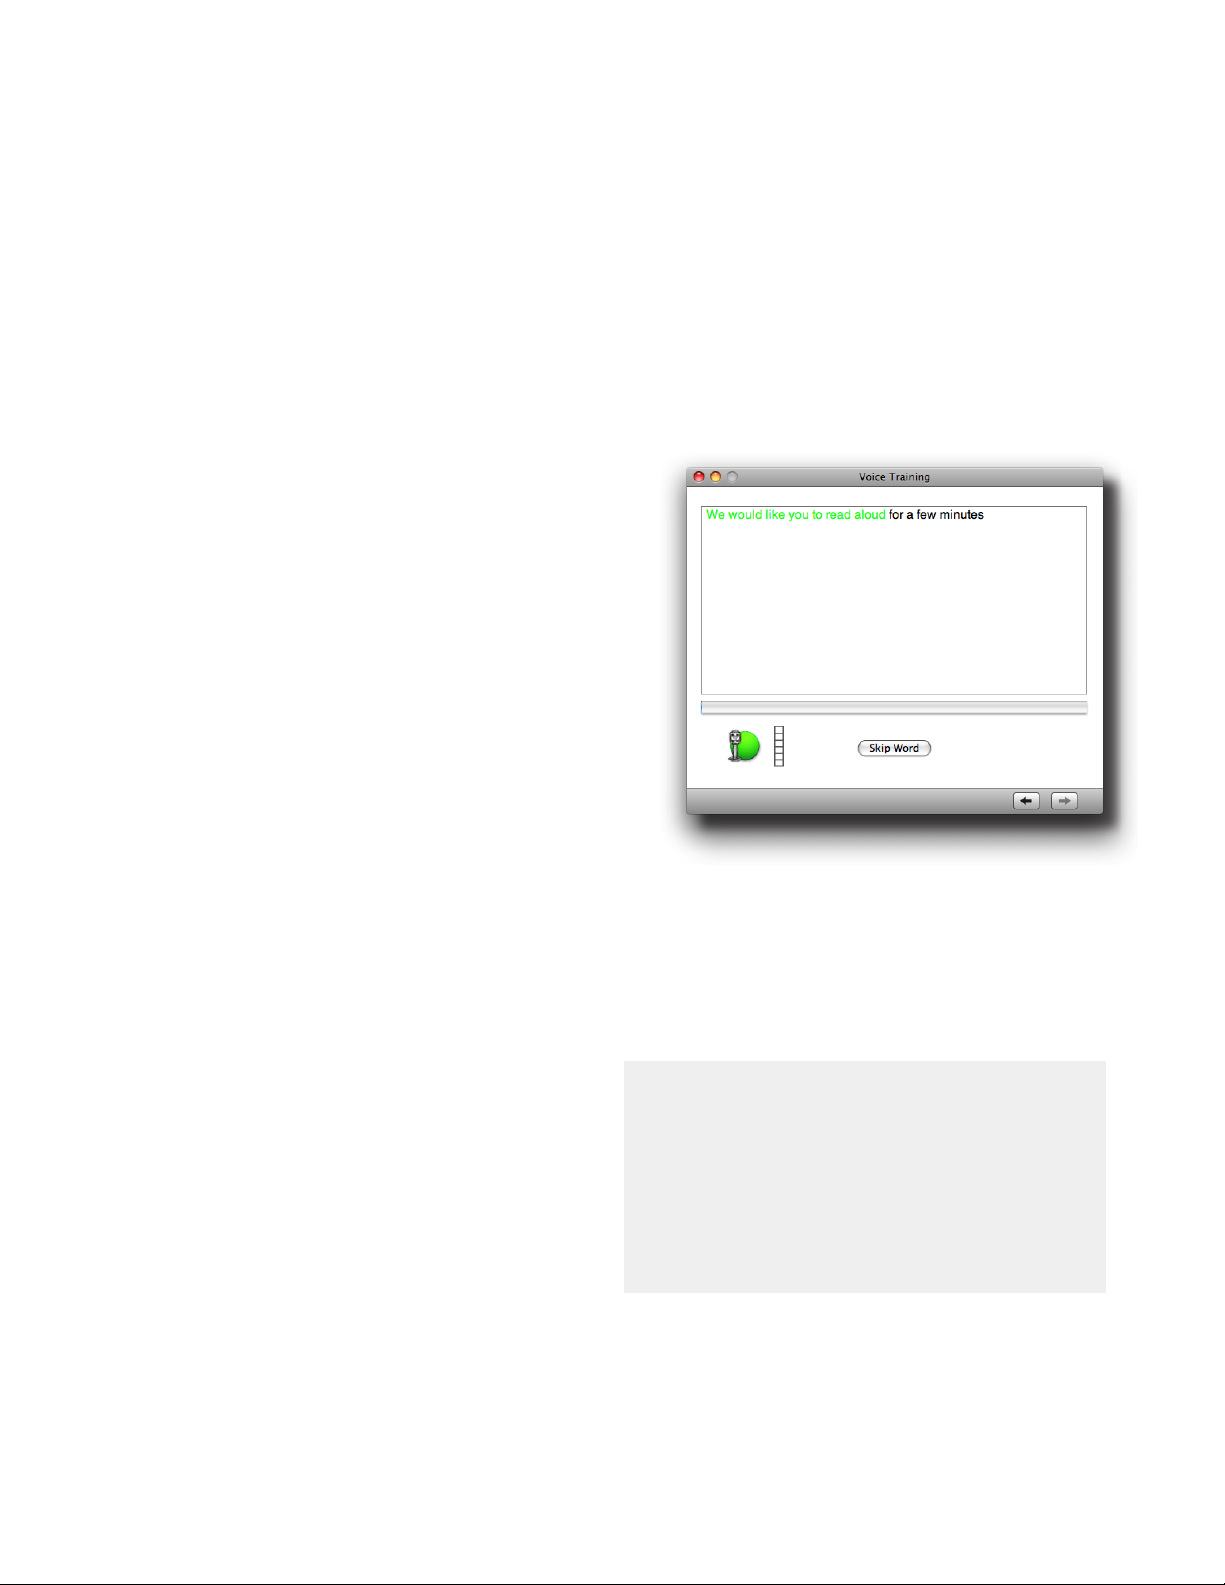
Voice Training
Once you have set up your microphone and created a profile, MacSpeech Dictate automatically starts Voice Training
(Figure 4-1) so you can begin personalizing your profile. You
can re-enter training at any time by choosing Voice Training
from the Tools menu.
Speaking Properly To MacSpeech
Dictate
It is important to relax and speak in a normal conversational
tone. There’s no need to shout or project your voice. In fact,
doing so can be counterproductive and lead to poor accuracy.
It can also lead to vocal fatigue and voice strain. So relax!
It is also important to speak at a normal pace. MacSpeech
Dictate is a continuous speech recognition product, so it
relies on the context of words within phrases to obtain its
accuracy. If you insert… unnatural… pauses… between…
words, accuracy will actually decrease. (This is also why you
shouldn’t look at the screen while you are dictating. Waiting
for MacSpeech Dictate to catch up with you will result in these
unnatural pauses.)
Try to speak clearly. When you talk to people, they can fill in
the words you leave out, and they can compensate for words
you mispronounce or slur. Computers can’t do that.
One last thing: just as MacSpeech Dictate cannot insert words
you don’t say, it also cannot eliminate words or phrases you
say, but do not want in your documents. For example, if you
Figure 4-1
Click the microphone icon and read the text box on the panel.
The text you read turns green as it is recognized. Note that
you need to say punctuation, such as COMMA and PERIOD
(US only) or FULL STOP (all dialects). These commands are
spelled out and capitalized to help you here.
TIP:
After reading the first training story, MacSpeech
Dictate will become familiar with your reading voice,
which may be different from your dictation voice. For
an idea of how accurate MacSpeech Dictate is at this
point, try reading it something out of a magazine or
newspaper.
This will be mentioned a couple of times, but it bears repeating: You need to talk fairly slowly when first starting
Voice Training, but remember to read the text smoothly and
naturally.
14 MacSpeech DictateChapter 4 — Training
Page 15

The text you read turns green as it is recognized
(Figure 4-2).
After a bit of processing (Figure 4-3), MacSpeech Dictate will
indicate when you are at the end of the training section.
Figure 4-2
MacSpeech Dictate automatically moves to the next panel as
you read. If you make a mistake, don’t worry; if MacSpeech
Dictate doesn’t understand you, the text will turn red
(Figure 4-2).
If the text turns red, pause for a moment, then continue reading starting at the text that is not green. If the program stops
on a particular word, try saying just the one word, or with only
a couple of words following it. If this doesn’t help, click the
Skip Word button to continue training.
TIP:
If you get a lot of red text, read fewer words, then
pause until the text turns green. Gradually increase
the number of words you read before pausing as long
as the text continues to turn green.
Figure 4-3
Adapting your voice samples is a time-consuming process. Be
patient; your computer just needs a little time. When adaptation
is complete, MacSpeech Dictate will let you know.
TIP:
It could take a few minutes for MacSpeech Dictate to
analyze your voice. Sometimes it can take about as
long as it took you to read the stories.
Just be patient. Do not Force Quit. Doing so may corrupt your profile and make it unusable.
As you complete each panel, the progress bar indicates
where you are in the story, and how far it is to the end. Keep
reading until you finish the “Welcome” story.
15 MacSpeech DictateChapter 4 — Training
Page 16

Vocabulary Training
MacSpeech Dictate will learn more about your voice as you
use it for dictation. The process of Phrase Training through the
Recognition window (see Chapter 5) will help the program pick
up your speech patterns. But you also can have MacSpeech
Dictate concentrate on learning your communication style
and new words by analyzing existing text.
One way to do this is to use the Vocabulary Training menu
item to “feed” the program text documents. Another method
is to use the spoken command Train Vocabulary from
Selection for text highlighted in any application. You can also
cut and paste this text into Dictate’s Note Pad and choose the
Train Vocabulary from Selection... from the Tools menu.
TIP:
The Vocabulary Training methods improve accuracy
by helping MacSpeech Dictate learn about the way
you put words together. For this reason, it is preferred
that you use text that is written by you, not someone
else.
Figure 4-4
2. You should now see the Include/Exclude panel
(Figure 4-5). Determine which words here you
don’t want MacSpeech Dictate to learn. For
example, there might be proper names that are
not a usual part of your writing, abbreviations or
parts of URLs. For any word you do not want to
add, highlight it in the left column, then click the
“Exclude” button.
Here’s how to use these features to have MacSpeech Dictate
learn new vocabulary from text in documents:
1. You select the text containing new words you want
the program to learn. You can do this by one of
these methods:
Choose Vocabulary Training from the Tools
menu. Read the introduction screen, then click the
right arrow button. A screen will appear (Figure 4-4)
tospecifyles.ClicktheAdd... button, and choose
plaintext or Rich Text(.rtf) les to use. Clickthe
right arrow button.
OR
Within any application, highlight the text you want
Dictate to learn, then speak the command “Train
Vocabulary From Selection”.
OR
Paste text into Dictate’s Note Pad, then choose
Train Vocabulary From Selection from the Tools
menu.
Figure 4-5
3. To move a word you excluded back to the
Included list, highlight it in the right column and
then click the “Include” button. When you are
satisedwithyourchoices,clicktherightarrowto
haveMacSpeechDictateprocessyourlesinto
itsvocabulary(gure4-6).
16 MacSpeech DictateChapter 4 — Training
Page 17

Figure 4-6
4. When nished, MacSpeech Dictate will display a screen
informing you the words have been added to your vocabulary,
asshowningure4-7.Click the“Close” button or the red close
window button to dismiss this window.
To review: For most people the microphone should be one to
two fingertips from the corner of the mouth. It should be out
of the breath stream from your mouth or from your nostrils.
An easy way to tell if the microphone is in your breath stream
is to place a finger over it and see if you can feel anything
when you exhale normally. Once you have the microphone
positioned properly, make sure it is placed there every time
you dictate.
Don’t Over-enunciate!
Train MacSpeech Dictate with your normal, clear speaking
voice. It is ok to enunciate a little more than normal. However,
if you read the training text with extra enunciation, like a radio
announcer, MacSpeech Dictate will think you speak that way
all the time.
You don’t want to over-enunciate, but you do want to speak
clearly. You should not sound stilted or weird; ideally, you
Figure 4-7
Improving Accuracy
There are a variety of things you can do to improve
accuracy.
Proper Microphone Position Is Important!
Improper microphone position is the first thing you should
check when accuracy declines. Make sure the microphone is
pointed towards your mouth, but is not directly in front of it.
Many microphones are noise-canceling, which discard sounds
picked up away from your mouth. In many cases, a user
having problems with accuracy will discover the microphone
has been turned around and the noise-canceling side is
facing towards the mouth. No wonder accuracy is suffering!
should still sound like you — just speaking a bit more distinctly
then you normally might when talking with a friend. Those
experienced with older speech recognition software tend to
develop a style that is a bit more precise than their usual
speaking voices. They find when they are tired, or if they slack
off a bit, their accuracy declines.
Think Before You Speak
Remember, you are developing a new skill when dictating. If
you think before you speak, what you say will come out more
clearly.
Read More Stories
Choose Voice Training from the Tools menu to read another
story. You will see the Choose Story window, as in Figure
4-8.
17 MacSpeech DictateChapter 4 — Training
Page 18

Figure 4-8
The stories you have already read are indicated with a
MacSpeech Dictate icon to the left of its name. Select an
untrained story by clicking its name, click the right arrow
button, then read on.
A Note For Users Of Backup Utilities
To use an automated backup program, such as Apple’s Backup,
Time Machine, or Retrospect from Dantz Development, allow
it to back up the folder where you save profiles for MacSpeech
Dictate.
Adding Profiles
To create a new profile, follow these steps:
1. Choose “Proles”fromtheToolsmenutoopenthe
Proleswindow,asshowningure4-9.
When you have finished reading, click the Finish Training
button. Adaptation of your speech profile will take a while to
complete.
Working With Profiles
Your profiles — your personalized voice files — are the most
important part of MacSpeech Dictate. You have invested your
time and effort into building them. So knowing how to back up
and restore these valuable files is important.
Saving Your Profiles
You can have as many profiles as you have room on your
hard drive space. You may want different profiles for various
reasons -- such as if you use multiple microphones, or if your
voice characteristics change between morning and evening.
Each profile takes around 25 MB of space. Your profiles can
be stored anywhere on your hard drive. You choose the location. It is recommended that you keep these all in one place,
in the Documents folder on your hard drive.
Backing Up A Profile
It is important for you to back up your profiles for MacSpeech
Dictate, just as you would back up any important documents.
In case you need to find them, the profiles are named using
the format <Profile_Name.dictationprofile>.
You can back up your profiles just like any other files -- by
burning a copy of the folder where you keep these files to a
CD, dragging them to an external drive, using Apple’s Time
Machine, etc.
Figure 4-9
2. Click the PlusSign(+)tocreateanewprole.
Typeinthenameforthenewprole.
3. Follow the procedure in Chapter 3 to complete
creatingthenewprole.
Switching Profiles
If more than one person is using MacSpeech Dictate on
your computer, each person will need to have his or her own
profile.
1. Choose “Proles”fromthe“Tools”menutoopen
theProleswindow,asshowningure4-9.
2.Highlighttheproleyouwanttouseandclickthe
“Make Active” button.
3.MacSpeechDictatewillloadtheprole.
Deleting Profiles
To delete a profile, follow these steps:
1.Choose“Proles”fromtheToolsmenutoopenthe
Proleswindow,asshowningure4-9.
2.Highlighttheproleyouwanttodelete.
3. Click the Minus Sign (-).
4.Click“OK”toconrmdeletingtheprole.
If you have only one profile, MacSpeech Dictate will not
allow it to be deleted as a safety precaution. In this case, you
18 MacSpeech DictateChapter 4 — Training
Page 19

need to create a second profile before deleting the first one.
The program will also not delete an active profile. To delete
an active profile you must first switch to (or create) another
profile.
Troubleshooting Training
Most problems with achieving an acceptable level of accuracy
with MacSpeech Dictate can usually be traced to improper
setup. Below are a few tips that will help achieve the best
results.
1. Make sure your microphone is properly connected and System Preferences are properly set
(see “Troubleshooting Sound Input” at the end of
Chapter 3 for more information).
2. Restart your computer, then launch MacSpeech
Dictate.
3. Once MacSpeech Dictate has initialized, select
“Proles…”fromthe“Tools”menu,thenclickthe
“+”buttonintheProleswindow.
4.Followtheproceduresforcreatingaprole.
5. Read some sample text. Make sure it is text without a lot of proper names or technical terms that
MacSpeech Dictate is unlikely to know.
At this point, MacSpeech Dictate knows how you read aloud,
but your dictation style may be different. Reading some
sample text will give you a good idea for how accurate your
profile is at this point. We recommend you read approximately
300 words to get a good sampling.
6. Gauge your accuracy percentage by dividing the
number of errors by the number of words, then
subtract the result from one. For example, if you
read 300 words and there are 9 errors, your error
rate would be .03, so your accuracy would be .97
or 97%.
7. If your accuracy is below 95%, read another story
then repeat steps 5 & 6.
You should get better than 95% accuracy after the first story.
8. Once your accuracy is above 95%, stop reading
training stories.
9.OnceMacSpeechDictatehasnishedprocessing
the training stories choose Vocabulary Training
from the Tools menu in MacSpeech Dictate to
analyze previously created documents typical of
those you intend to dictate. Doing so will make
a noticeable difference in MacSpeech Dictate’s
performance.
You should now be able to use MacSpeech Dictate without
too much fine-tuning.
19 MacSpeech DictateChapter 4 — Training
Page 20

Chapter 5: Diation
This chapter covers using MacSpeech Dictate for dictation.
We will explore how to dictate words and phrases, as
well as special cases such as punctuation, numbers, and
capitalization. This chapter also covers using the Recognition
window to review your dictation, correct your text and enable
Phrase Training to improve your profile’s accuracy. We will
also discuss basic options and advanced considerations for
editing your dictation.
Introducing Dictation
Dictation will likely be the task that you use MacSpeech
Dictate for most often, so it deserves a basic definition for
starters. Dictation is simply the process in which you speak,
then MacSpeech Dictate recognizes your words and phrases,
and outputs those words as text. There are also a set of
“dictation commands” that can be used to navigate and edit
the text that has been dictated.
Speak where you would type
You can dictate into almost any application that supports text
input. Most word processors and text document applications
(e.g. Mail, TextEdit) allow you to dictate a large amount of text
in a document instead of typing it. It is usually straightforward
to navigate and edit this dictated text by voice. MacSpeech
Dictate keeps track of the text you dictated, and follows your
voice commands to position the cursor and select text.
However, there is one main guideline to keep in mind...
Speak, or type...but not together
You will get the best results by following this guideline: Use
your voice, or use your keyboard and mouse, but not both
together.
edit text, it is primarily the application itself that is aware of
what you are doing.
If you are dictating text at the same time as editing by mouse
and keyboard, you may eventually experience odd results in
the text. On the ot h er hand, i f you use onl y your vo ic e to select
and edit misrecognized words that you have just dictated,
it is much less likely MacSpeech Dictate will lose its place.
Your dictated text will remain in sync with the rest of your
document. Also, correcting dictated text by voice will train
your speech profile toward maximum accuracy.
So, the following guideline is worth repeating: Use your voice,
or use your keyboard and mouse, but not both together.
The Built-in Note Pad
MacSpeech Dictate includes a built-in word processor called
Note Pad, which is designed for creating and editing text
through dictation. In fact, you should only use your voice to
add text while in Note Pad. Regular typing will not produce
a normal result (try it out!). This helps provide a consistent
result by not mixing dictating and typing.
You can still copy text from Note Pad, so text dictated there
can be moved to other applications. You also can use common
editing a n d for m at t i n g c o m m a nds like cut, copy, and sel e c t a l l.
These commands are in the Edit and Format menus for Note
Pad.
When you are first starting out with MacSpeech Dictate, try
out the Note Pad. You may also find it handy for practicing or
testing dictation commands off to the side of other applications
for word processing.
Another good saying to remember this rule by is:
If You’re Talking, Talk. If You’re Typing, Type.
Here is a more detailed explanation:
Modern word processors and other applications are designed
to do more than just accept the input of text. They keep track
of changes, manage text markup and custom formatting,
help outline your thoughts, etc. In order to do this, these
applications keep track of text in their own ways.
Most applications also support custom commands for
controlling navigation, editing and other features. When you
use the mouse and keyboard to control these commands and
20 MacSpeech DictateChapter 5 — Dictation
Using Dictation Mode
When off, the microphone button in the Status window has
a red stop sign on top of it, as in Figure 5-1. (If the Status
window is not visible, select Show Status Window from the
Window menu.)
Figure 5-1
Page 21

To dictate text, you may follow these steps:
1. Switch to the application into which you want to
dictate, or use MacSpeech Dictate’s Note Pad
(see Figure 5-2).
2. If necessary, create a new document, or open an
existing document to which you will add text.
Figure 5-2
3. Click the microphone button in the Status window,
or press a keyboard shortcut that corresponds to
the Microphone On/Off. The microphone button
will change from a red stop sign to a microphone
withagreencirclebehindit,asingure5-3.
Handling Misrecognized words
No matter how good MacSpeech Dictate is — or how carefully
you speak — there will be words recognized as something
you didn’t intend. When that happens, there are some special
commands available to assist.
Scratch That or Forget That
Scratch That and Forget That perform the same action.
They delete the last utterance, which is what you said from
the last time you paused, or to the left of where you insert the
cursor in dictated text.
Scratch Word or Forget Word
If Scratch That or Forget That deletes too much, try using
Scratch Word or Forget Word instead. This will erase only
the last word you spoke, or to the left of where you insert the
cursor in dictated text.
These commands can be spoken repeatedly to delete several
recently dictated phrases.
IMPORTANT: The commands Scratch That, Forget That,
Scratch Word, and Forget Word are NOT the equivalent
of the Undo menu command (Cmd-Z) in many Mac OS X
applications. The Scratch/Forget commands will delete the
last phrase dictated, or the text to the left of where you insert
the cursor by voice, even if it was a correction of a previously
dictated word.
Figure 5-3
4. Speak into your microphone. There will be a
short delay while MacSpeech Dictate interprets
your speech, after which text will appear in the
document window.
5. Whenyounishdictating,turnyourmicrophone
off by speaking the command Microphone Off,
or Go to Sleep. You may also use your mouse to
click the microphone button in the Status window.
Dictation Sessions
If you are dictating into the active text area of an application,
and you open a second document in that application or
another application, MacSpeech Dictate starts a new dictation
session for the new window. This allows MacSpeech Dictate
to keep track of words and punctuation for each window.
TIP:
If Scratch That or Forget That deletes to o much, s ay
Scratch Word or Forget Word instead to delete only
the last word you spoke, or the last dictated word to
the left of where you inser ted the cursor using spoken
commands.
Editing Your Document
There are some special rules for editing and navigating your
documents when using MacSpeech Dictate. You can use the
Scratch That, Forget That, Scratch Word and Forget Word
commands we already told you about, but there are many
other commands at your disposal.
Moving Around Documents By Voice
Just because you can’t use the keyboard or mouse before
you are finished editing doesn’t mean you can’t get around. In
fact, once you get used to how to do it, you may prefer moving
around by voice in documents.
21 MacSpeech DictateChapter 5 — Dictation
Page 22

TIP:
If you are navigating a document by voice, you can
use either of the commands Go to End or Move to
End of Document to return to the end of where you
left off dictating.
Here is a list of useful commands for editing and navigating
while in dictating:
Dictation Commands
What You Say What Happens
Capitalize the Word[s]
“text” [through/to “text”]
Delete the Word[s] “text”
[through/to “text”]
Go to Beginning
Go to End or Move to
End of Document
Insert After the Word[s]
“text” [through/to “text”]
Insert Before the Word[s]
“text” [through/to “text”]
Lowercase the Word[s]
“text” [through/to “text”]
Move Backward [1-99]
Words
Move Forward [1-99]
Words
Move to Beginning of
Document
Move to End of Document
New Line Presses the Return key once.
New Paragraph Presses the Return key twice.
No Space <word>
Select the Word[s] “text”
[through/to “text”]
Scratch That / Forget That
Scratch Word / Forget
Word
Select All Selects all text.
Train the Word[s] “text”
[through/to “text”]
Uppercase the Word[s]
“text” [through/to “text”]
Capitalizes the instance of the word
or phrase spoken that is closest to the
insertion point.
Deletes the instance of the word or
phrase spoken that is closest to the
insertion point.
Goes to the Beginning of the current
document.
Goes to the end of the current dictation
session.
Moves the insertion point to just after the
word or phrase you said.
Moves the insertion point to just before
the word or phrase you said.
Makes all characters lowercase in the
instance of the word or phrase spoken
that is closest to the insertion point.
Moves cursor back 1 to 99 words
(Punctuation marks count as words)
Moves cursor forward 1 to 99 words.
(Punctuation marks count as words)
Moves cursor to the beginning of the
current document.
Moves cursor to the End of the current
dictation session.
Types next word without a space
before it.
Selects the instance of the word or
phrase spoken that is closest to the
insertion point.
Deletes the last phrase you said, or to
the left of where you insert the cursor.
Deletes the last word you said, or to the
left of where you insert the cursor.
Selects,correctsthespeciedwords
intext,andtrainsthemintoproleas
speciedwordsarere-dictated.
Makes all characters uppercase in the
instance of the word or phrase spoken
that is closest to the insertion point.
Using “Delete the Word[s]”
When you say Delete the Word[s] followed by a word or
phrase, MacSpeech Dictate finds the occurrence of what was
said closest to the insertion point and deletes it. If there are
multiple instances of the same word in the document, you
can insure you delete the correct instance by using another
command first. Use Select the Word[s], Insert Before the
Word[s] or Insert After the Word[s] to select or move the
insertion point next to the word you want to delete.
Note: This command replaces the “Do Delete” commands in
earlier versions of Dictate.
Using “Select the Word[s]”
Say Select the Word followed by a word or phrase to find
the closest occurrence of that word or phrase to the insertion
point. You can say Select the Word[s] “text” through/to
“text” to select a range of words. For example, suppose you
dictated the following…
“I am teaching my Mac to recognize speech
PERIOD” (US only)
…but MacSpeech Dictate types…
I am teaching my Mac to wreck a nice beach.
You would say…
“Select The Words WRECK through BEACH”
[pause] “recognize speech”
Select the correct instance of a word or phrase by saying
enough words to insure there is only one instance of the
phrase in the document, then use the Select
the Word[s]
command again to zero in on your selection. You can also
use Insert Before the Word[s] or Insert After the Word[s]
to move the insertion point next to the word or phrase you
want to select.
If you would also like to submit the selected text for Phrase
Training, to improve Dictate’s accuracy, use the command
“Train the Word[s]” instead.
Note: This command replaces the “Do Select” commands in
earlier versions of Dictate.
Using “Insert Before The Word[s]” and “Insert
After The Word[s]”
You can say Insert Before the Word followed by a word or
phrase to move the insertion point before that word or phrase.
Likewise, you can say Insert After the Word to move the
insertion point after the word or phrase.
You can also say Insert Before the Words
“text”
through/
to “text” or Insert After the Words “text” through/to
22 MacSpeech DictateChapter 5 — Dictation
Page 23

“text” to move the insertion point before or after a range of
words. This can be very helpful as it allows you to zero in on
exactly where you want the insertion point to go, especially
when there are multiple occurrences of a word or phrase in
a document.
For example, suppose you just dictated the following:
“Now is the time for all good men to come to the aid
of their country.”
If you want to add “and women” after “men,” say the
following:
“Insert After the Words good men”
[pause] “and women”
After inserting the new text you could move the insertion point
back to the end of the document by saying either Go to End
or Move to End of Document.
Note: This replaces the “Do Insert” commands in earlier
versions of Dictate.
The Recognition Window
Despite MacSpeech Dictate’s excellent accuracy, the software
will sometimes recognize a word or phrase differently than
you spoke. The Recognition window (Figure 5-4a) indicates
how your speech is recognized, and lets you train Dictate as
you go along dictating. This is called Phrase Training, and is
designed to further improve the program’s understanding of
your speech. The options in the Recognition window can be
used for correcting misrecognized text in your document.
The Transparency slider lets you set whether you want the
Recognition window to be transparent, or opaque.
Dictate, Correct and Edit
Here’s how to use Recognition window during dictation. The
process can be broken down to three steps: Dictate, Correct
and Edit.
Phrase Training Commands
What You Say What Happens
Choose “1” (or “2”, etc.)
Pick “1” (or “2”, etc.)
Edit “1” (or “2”, etc.)
Cancel Edit
Press Play
Hide Recognition Window Closes the Recognition window.
Show Recognition
Window
Dictate
Make sure you are in Dictation mode. Decide if the text you
just dictated is correct. You can look at the document where
you were dictating, or in the Recognized Text feedback field
(below the Status window). These should show your most
recently dictated word or phrase.
Choosesthespecieditem#inthe
Recognition window as the spoken and
recognized phrase.
Corrects the selected text with the word
or phrase that is item 1 (or 2, etc.) in the
Recognition window.
Allows you to edit item 1 (or 2, etc.) in
the Recognition Window.
Cancels all edits and restores all items in
the Recognition window.
Plays audio of most recent word or
phrase dictated.
Opens the Recognition window.
Figure 5-4a
In the Recognition window, you can play back the audio
of your last spoken word or phrase by clicking on the Play
button or saying the command Press Play.
23 MacSpeech DictateChapter 5 — Dictation
If the text you dictated was recognized correctly, you don’t
need to do anything with the Recognition Window. Just keep
on dictating.
If incorrect, continue with the process of using the Recognition
window. Based on the word or phrase Dictate thought you
said, the Recognition Window will present you with options
that are close to what you dictated (see Figure 5-4 again).
Correct the Recognition / Correct the Text
You can correct MacSpeech Dictate’s recognition of the text,
as well as the text itself in your document by saying the
command Choose <x> or Pick <x>. The <x> represents the
corresponding item number from the Recognition Window
item list. For example, say “Choose 4” or “Pick 4” to choose
item number 4 in the Recognition window as the correctly
recognized text.
If none of the options are correct, and MacSpeech Dictate
doesn’t recognize a word or phrase, use the Recognition
Page 24

window to train your profile to better recognize what was
said. This is called Phrase Training and it is the best way to
improve your accuracy. Depending upon how unique a new
word or phrase is, it may take more than one effort.
What about Editing the Text?
Using Cut, Copy, Paste, Undo/Redo
It is recommended that you do not try to mix dictation and
typing at the same time. To help you remember this, there is
the saying, “If you are talking, talk. If you are typing, type.”
TIP:
After you have worked with MacSpeech Dictate
awhile, the Recognition Window may often list only
a few choices, or it may even be blank as it correctly
recognizes your speech.
Edit the Recognition
If none of the items in the Recognition window corrects what
you dictated, you can Edit one of those items. Speak the
command Edit <x>, where <x> is the corresponding item
number from the Recognition Window item list. For example,
say ““Edit 3” to use item number 3 to establish the correctly
recognized word or phrase (Figure 5-4b).
However, the reality is that every document, whether typed
or dictated, will probably require some text editing. Again,
if you are going to do this using the mouse and keyboard, it
is recommended that you do this after you have completed
dictation for a specified section of text.
For more details on using your voice to control common
editing commands (Cut, Copy, Paste, Undo/Redo) within an
application, please see “Dictation Advanced Topics” at the
end of this chapter.
Tips for using the Recognition window
Here are some tips for using the Recognition window and
Phrase Training features more effectively:
• Use
• Ifthereareotherwordsorphrasesinthedocu-
Train The Word[s] as you dictate in order to
correct misrecognized text, and train your profile
for better accuracy.
ment to correct, use commands such as Select
The Word[s] or Train the Word[s] to highlight
the text in the document. Then work with the
Recognition window to select or edit the text.
Figure 5-4b
Now, you can dictate the correct text, or use Spelling or type
in the correct words. The command Cancel Edit cancels any
changes you made and restores its original contents. When
you are done editing, you can say “Choose <x>” or “Pick
<x>” to select that item from the list and also change your
document.
From our previous example, let’s say that you attempted to
add the words “and women”, but the Recogni tion window gave
you the choices listed in Figure 5-4a. Now you would say,
for example, “Edit 3” and then dictate (or type) “and women”
instead of “and one”. Finally, you would say “Choose 3” to
select the edited item and place the edits in your document.
•
The commands Scratch That and Forget That do
NOT work when editing items in the Recognition
window. Instead, you can use the commands
Scratch Word and Forget Word.
•
The Edit <x> command in the Recognition window is for changing word recognition, not formatting. After applying the command Choose <x> for
an edited item from the Recognition window, you
may still see the item’s format changed to fit the
context (e.g. capitalization, numerals).
Sleep Mode
If you are interrupted while using MacSpeech Dictate, the
program can be put to sleep. In sleep mode the microphone
is still active, but it will only respond to commands intended
to wake it up.
Sleep mode is useful for short interruptions such as
phone calls or taking a break. Sleep mode is activated
by saying Go To Sleep. To wake up MacSpeech Dictate
and return to the mode you were last in, use the command
24 MacSpeech DictateChapter 5 — Dictation
Page 25

Wake Up or Turn Microphone On. When MacSpeech
Dictate is asleep, the Status window will look like
Figure 5-5:
Figure 5-5
If you will be away from the computer for an extended period
of time, use the Microphone Off command instead. This
ensures MacSpeech Dictate can’t accidentally interpret
room noise or speech from a conversation as a Wake Up
command.
Dictating Special Kinds of Words
As you learned while training MacSpeech Dictate, it is
necessary to speak punctuation so it can accurately tell
where sentences begin and end, among other things. There
is an extensive list of things you can say. The following
tables provide a guide to the different things you can say that
produce text beyond just words on the page.
How does MacSpeech Dictate know the difference between
punctuation and a real word? Consider the following
sentences:
Wayne scored the winning goal in the third period
PERIOD (US Only)
The train came to a full stop FULL STOP (all
dialects)
Capitalization Commands
What You Say What Happens
Caps On
Caps Off
Cap <word> Capitalizes the next word spoken.
All Caps <word> Types the next word spoken in CAPS.
All Caps On Makes every word CAPS.
All Caps Off Returns capitalization to normal.
No Caps <word> Makes the next word spoken lower case.
No Caps On
No Caps Off Returns capitalization to normal.
Capitalize the Word[s]
“text” [through/to “text”]
Turnsoncapitalizingtherstletterof
every word.
Turnsoffcapitalizingtherstletterof
every word.
Makes the following text lowercase until
turned off.
Capitalizestheidentiedwordorphrase
spoken that is closest to the insertion
point.
Cap is singular, Other Caps are not
Note that there are several similar commands here, but
each has a different function. The command “Cap <word>”
capitalizes only the next word spoken. Please notice that
this command doesn’t have the letter “s” on the end. The
command Cap <letter> is the only capitalization command
that works in Spelling Mode.
The commands “Cap <word>” and “No Caps <word>” are
expiring commands. When the command is spoken, it will
cause the Caps/AllCaps/NoCaps indicator light to turn
orange (Figure 5-6) until the <word> part of the command is
completed.
MacSpeech Dictate does not use simply word recognition, but
rather an analysis known as continuous speech recognition.
The program analyzes complete phrases as you speak —
taking a close look at what is said both before and after the
current word or phrase. Only then does it decide what was
dictated.
Because of this, MacSpeech Dictate has many special terms
that produce a variety of effects or symbols. Let’s take a look
at them.
Capitalization
MacSpeech Dictate does some capitalization formatting
for you. It will automatically capitalize the first word in a
document, the first word in a sentence, and proper names that
are already in its vocabulary. Otherwise, it uses the following
capitalization commands:
25 MacSpeech DictateChapter 5 — Dictation
Figure 5-6
Caps/AllCaps/NoCaps
The top indicator light in the Status Window lights up green
when the you have turned on one of these commands:
Ca ps On - Capitalizes the first letter of almost every word dictated, until you say “C aps Off ”. For example, if you say, “This
is the title of the book” it will be dictated as “This Is The Title
of the Book”. The top indicator light in the Status Window will
turn green and show the text “Abc” (Figure 5-7).
Note: Not all words are capitalized, such as “the”, “of”, etc.
Page 26

Compound words and No Space commands
The No Space commands are useful when you want to type
words without spaces in between them:
Figure 5-7
AllCaps On - Capitalizes every letter of the words dictated,
until you say “All Caps Off”. For example, if you say, “This is
the title of the book” it will be dictated as “THIS IS THE TITLE
OF THE BOOK”. The top indicator light in the Status Window
will turn green and show the text “ABC” (Figure 5-8).
Figure 5-8
NoCaps O n - Turns of f capitalization of the first letter of every
word dictated, until you say “NoCaps Off”. For example, if
you say, “This is the title of the book due out in January” it will
be dictated as “this is the title of the book due out in january”.
The top indicator light in the Status Window will turn green
and show the text “abc” (Figure 5-9).
“No Space” Commands
What You Say What Happens
No Space On
No Space Off Turns the No Space mode off
No Space <word>
Turns the No Space mode on, so there is
no space between words.
Types the next word without a space in
front of it.
For compound words you could say No Space On before you
say the compound word, and then say No Spac e O f f af te r you
finish speaking the word. For example, to have MacSpeech
Dictate type “AppleTV” you would say the following:
“NO SPACE ON Apple TV NO SPACE OFF”
The middle indicator light in the Status Window lights up
green when the No Space On command is activated (Figure
5-10).
Figure 5-9
When you turn any of these commands off (with the C aps Off,
or AllCaps Off, or NoCa ps Of f commands), then MacSpeech
Dictate resumes automatic capitalization and the indicator
light in the Status Window will be gray.
Hyphenated and compound words
The behavior for dashes and hyphens is slightly different
depending on what you are dictating. For most things,
MacSpeech Dictate puts a space before and after a dash. If
you dictate a US phone number, however, MacSpeech Dictate
will correctly type it without the spaces before and after the
dash.
To make a hyphenated word, you would need to say “hyphen”
where you want the hyphen to appear, as follows:
“free HYPHEN wheeling”
Figure 5-10
You can also say No Space <word> to type the next word
without putting a space in front of it. Using the same example,
you would say:
“Apple NO SPACE TV”
The middle indicator light in the Status window lights up
orange when you say “No Space” and stays lit until you say
the <word> portion of the command (Figure 5-11).
Figure 5-11
Punctuation
There are a variety of things you can say to have MacSpeech
Dictate type punctuation and symbols. The following table
lists the various things you can say, and what MacSpeech
Dictate will type:
26 MacSpeech DictateChapter 5 — Dictation
Page 27

Punctuation Examples
Punctuation Examples
What You Say
Ampersand &
Apostrophe ‘
Apostrophe ess ‘s
Asterisk *
At Sign @
Back Slash \
Back Quote / Backtick ‘
Caret ^
Cents Sign ¢
Close Angle Bracket >
Close Brace }
Close Bracket (US Only)
Close Square Bracket (All
Dialects)
Close Euro Quote »
Close Parenthesis (All Dialects)
Close Bracket (Non-US Dialects)
Close Quote ” (close curly quote)
Close Single Quote ’
Colon :
Comma ,
Copyright Sign ©
Dash <space> -- <space>
Degree Sign °
Dollar Sign $
Dot .
Ellipsis …
Em Dash <space> --- <space>
En Dash <space> -- <space>
Equals Sign =
Euro Sign €
Exclamation Mark (All Dialects)
Exclamation Point (US Only)
Forward Slash /
Full Stop (all dialects) .
Greater Than Sign >
Hash Sign (Non-US dialects) #
Hyphen <word>-<word>
Left Angle Bracket <
Less Than Sign <
Minus Sign -
New Line <one carriage return>
New Paragraph <two carriage returns>
Number Sign (US Only) #
Open Angle Bracket <
Open Brace {
What Happens
]
)
!
What You Say
Open Bracket (US Only)
Open Square Bracket (All
Dialects)
Open Euro Quote «
Open Parenthesis (All Dialects)
Open Bracket (Non-US Dialects)
Open Quote “ (open curly quote)
Open Single Quote ‘ (open single quote)
Percent Sign %
Period (US only) .
Plus Sign +
Point .
Pound Sign (US Only) #
Pound Sign (non-US Dialects)
Pound Sterling Sign (US Only)
Question Mark ?
Registered Sign ®
Right Angle Bracket >
Section Sign §
Semi Colon ;
Sharp Sign (Non-US Dialects) #
Slash /
Space Bar <the space character>
Tab Key <the tab character>
Tilde ~
Trademark Sign ™
Underscore _
Vertical Bar |
Chat /
Instant Messaging
What Happens
[
(
£
In addition to being able to dictate directly to chat windows,
MacSpeech Dictate has some special commands you can
use when dictating an instant message in programs such as
iChat, AIM, MSN Messenger, and many others:
Commands Helpful in Chat Programs
What You Say What Happens
Send Message Sends the current message.
Smiley Face :-)
Frowny Face :-(
Winky Face ;-)
Numerals / Numbers
When you say a number, MacSpeech Dictate will either type
out the words or the number, depending on the context in
which the number was used. If you want to force the program
27 MacSpeech DictateChapter 5 — Dictation
Page 28

to type a number instead of typing the words for the number,
say Numeral before saying the number.
MacSpeech Dictate has the ability to properly format numbers
as they are spoken. Here are some examples:
Number Examples
What You Say What Happens
One or Numeral One 1
Five or Numeral Five 5
Seventeen 17
Forty Two 42
One Hundred Seventy Nine 179
Five Thousand Four Hundred and Twenty
Three
Five COMMA Four Twenty Three 5,423
Twelve Thousand Five Hundred and Thirty
Seven
One Hundred and Forty Two Thousand and
Fifteen
Thirty Five POINT Two Three 35.23
Zero POINT Zero Three (All Dialects)
Naught POINT Naught Three (Non-US
Dialects)
Forty-Three POINT Twenty Eight PERCENT
SIGN
Oh Two Four Six Zero 02460
Oh Two Four Six Zero HYPHEN One Four
Five Eight
Two and Three Fourths 2 3/4
Eleven Over Thirty Two 11/32
Eleven Thirty Seconds 11/32
Ninety Nine Dollars and Fifty Five Cents $99.55
Forty Five Euros and Thirty Five Cents €45.35
Pound Sterling Sign One Hundred and
Twenty POINT Thirty Five
5423
12,537
142,015
0.03
43.28%
02460-1458
£120.35
Fractions
You can dictate common fractions the way you would normally
say them. To dictate 1/2, 1/3, 1/4, 1/5, 1/6, 1/7, 1/8, 1/9, 1/10,
and 1/16 or a multiple of these fractions, just say the fraction
normally. If the fraction is typed out as text (“one half” instead
of “1/2”) try saying NUMERAL before the fraction.
If the denominator (the bottom number) is greater than 10,
enter the fraction by saying slash or over between the two
numbers.
Fraction Examples
What You Say What Happens
One Half 1/2
One Fourth or One Quarter 1/4
Fifteen Sixteenths or Fifteen Over Sixteen 15/16
Fraction Examples
What You Say What Happens
Three and Seven Eights or Three and
Seven Over Eight
Nine SLASH Twelve or Nine Over Twelve 9/12
Five SPACE BAR Three SLASH Fifty Six 5 3/56
One Thirty Over Seventy 130/70
3 7/8
Roman Numerals
Roman Numerals are dictated by saying Roman Numeral
and the number. For large numbers, say the number in smaller
combinations, as shown in the last example below.
Roman Numeral Examples
What You Say What Happens
Roman Numeral One I
Roman Numeral Four IV
Roman Numeral Five V
Roman Numeral Ten X
Roman Numeral Fifty L
Roman Numeral One Hundred C
Roman Numeral Five Hundred D
Roman Numeral One Thousand M
Roman Numeral Twenty Four XXIV
Roman Numeral Thirty One XXXI
Roman Numeral One Thousand [pause]
Roman Numeral Nine Hundred [pause]
Roman Numeral Ninety [pause] Roman
Numeral Seven
MCMXCVII
US ZIP Codes
Five-digit US ZIP Codes are dictated the same as any group
of numbers. When dictating nine-digit ZIP Codes, you must
say the hyphen.
US Zip Code Examples
What You Say What Happens
oh one oh oh ve 01005
Five Three Four Zero Three 53403
Nine Four Seven Oh Four HYPHEN One
One Five Oh
94704-1150
UK and Canadian Postal Codes
You can dictate UK postcodes by saying Postcode followed
by the letters and numbers that make up the postcode.
For Canadian postal codes, say Postal Code followed by
the characters that make up the postal code. Spacing and
formatting will happen automatically.
28 MacSpeech DictateChapter 5 — Dictation
Page 29

UK and Canadian Postal Code Examples
What You Say What Happens
Postcode N G Three Two H X NG3 2HX
Postcode E Ten Seven B D E10 7BD
Postcode E C Two Y Four L K EC2Y 4LK
Postal Code K One A Zero M Five K1A 0M5
Postal Code X Oh A Oh H Oh X0A 0H0
US Telephone Number Examples
What You Say What Happens
One Eight Hundred Five Five Five One Two
One Two
OPEN PARENTHESIS Six Zero Three
CLOSE PARENTHESIS Three Five Zero
Zero Nine Zero Three
One Two One Two Five Five Five Twelve
Twelve
1-800-555-1212
(603) 350-0903
1-212-555-1212
Dates and Times
You can dictate most dates and times the way you would
normally say them. Say Oh or Zero to enter 0. In dialects
other than US and Canada you can also say Naught.
The US dialect of MacSpeech Dictate automatically types the
colon (:) if you say A M or P M when dictating the time. Say
O’clock or Colon Zero Zero to enter “:00.”
Non-US dialects automatically type the point (.) if you say A
M or P M depending on the regional setting.
Date and Time Examples
What You Say What Happens
Twenty Two January Nineteen Ninety Nine 22 January 1999
April Nine COMMA Two Thousand and One April 9, 2001
Fourteen SLASH Oh Seven SLASH Eighty
Five
Three SLASH Eleven SLASH Zero Two 3/11/02
Three SLASH Eleven SLASH Two
Thousand and Two
April First April 1
March Twenty Second March 22
The Nineteen Eighties the 1980’s
Eight COLON Thirty
Seven Forty Five A M
Ten Twenty Two P M
Three O’Clock or Three COLON Zero Zero
Five O’Clock PM
14/07/85
3/11/2002
8:30 (US)
8.30 (others)
7:45 AM (US)
7.45 AM (others)
10:22 PM (US)
10.22 PM (others)
3:00 (US)
3.00 (others)
5:00 PM (US)
5.00 PM (others)
Telephone Numbers
MacSpeech Dictate will format phone numbers for you. For
the US version, just say the number as you normally would,
pausing between groups of numbers.
US Telephone Number Examples
What You Say What Happens
Three Five Zero Zero Nine Zero Three 350-0903
Six Oh Three Three Five Oh Oh Nine Oh
Three
603-350-0903
When dictating a phone number for outside the US you
will need to say all the punctuation (hyphens, spaces, and
parenthesis).
Non-US Telphone Number Examples
What You Say What Happens
OPEN PARENTHESIS Oh One Six Two
Eight CLOSE PARENTHESIS EIght Nine
Four One Five Oh
Oh Two Seven SPACE BAR Six Two Nine
SPACE BAR Eight Nine Four Four
Six One HYPHEN Seven HYPHEN Four Six
Nine Five HYPHEN Two Zero Five Five
OPEN PARENTHESIS Six Five CLOSE
PARENTHESIS Two Seven Seven Eight
Five Nine Zero
(01628) 894150
027 629 8944
61-7-4695-2055
(65) 2778590
Spelling Mode
Spelling Mode allows you to spell one letter or numeral at a
time, or speak punctuation marks. In Spelling Mode, Dictate
recognizes what you say as letters or numerals (e.g. “c”, or “1”)
rather than as words (e.g. “see”, or “won”). To launch Spelling
Mode, say the command Spelling Mode, or select Spelling
from the Speech menu item, or toggle through modes with a
designated hot key.
Spelling Mode Commands Examples
What You Say What Happens
a b c abc
1 2 3 EXCLAMATION POINT 123!
a SPACEBAR b SPACEBAR c a b c
a b CAP c abC
a b c SCRATCH THAT ab
a b c MOVE BACKWARD 1 CHARACTER d abdc
A limited number of commands are available in Spelling
Mode. These include “Cap <letter>”, “Spacebar”, and
“Move Backward/Forward [1-99] Character[s]”. Also, the
commands Scratch That, Scratch Word, Forget That, and
Forget Word will work and can be used to delete the last
letter spoken.
29 MacSpeech DictateChapter 5 — Dictation
Page 30

These commands do NOT work in Spelling Mode: Caps
On/Off, AllCaps On/Off, NoCaps On/Off, New Line, New
Paragraph.
Accuracy Issues
If your recognition accuracy suddenly deteriorates, first take
a look at the signal strength meter in the Feedback window.
When you speak, it should be about 80% to 90% green.
Tips for Spelling Mode:
• Remember thatyou are notin Dictationmode. So, don’t
try to speak full words. Spelling mode is mainly for printing
individual characters. You may need to jump back and forth
between Spelling and Dictation mode, but this can be done
quickly with voice commands.
•Inspellingmode,thecommandsMove Backward/Forward
[1-99] Character[s] only work for characters that have been
spelled.
•WhenenteringSpellingmode,youwillusuallywanttostart
with the command Spacebar, in order to start with a leading
space. Otherwise MacSpeech Dictate will add the letters and
numerals you speak directly on to the end of the last word you
dictated before entering Spelling mode.
For example, you would dictate the following
“This is a test of how to speak SPELLING MODE <pause>
SPACEBAR <pause> abc PERIOD”
The result is:
This is a test of how to speak abc.
If you did not say SPACEBAR you would get:
This is a test of how to speakabc.
If there is too little or too much green in the meter, there
is a good chance your voice is not being input properly
for good recognition. This can happen if the noise level in
the environment in which you are using MacSpeech Dictate
changes from what it was when you first set up your profile.
Don’t panic. All you need to do is select S e t U p M y M i c r o p h o n e
from the Tools menu in MacSpeech Dictate to re-calibrate
your microphone, which takes only a few seconds.
If Dictation Doesn’t Appear In Your Document...
Make sure you are using the same microphone that was
connected when you set up the current profile. Microphones
are profile-specific. To use a different microphone, you need
create a new profile.
For more information on troubleshooting, please see the
MacSpeech Support web site at:
<http://www.macspeech.com/support_center>
Speaking Tips -- For Your Voice
Dictation may help alleviate RSI (Repetitive Strain Injury),
because it eases the burden on your arms and hands. But
speech recognition has its own potential problem, which is
vocal strain. Overuse of your voice can cause hoarseness
and a sore throat. With a bit of preparation, however, you can
easily avoid vocal strain.
Troubleshooting Dictation
Using MacSpeech Dictate for dictation is fairly straight forward
— you speak, and the text appears at the location of the
insertion point, in any document. Occasionally, however, you
may experience reduced accuracy or other problems. There
is usually an easy solution to these issues.
Extra Words
If “extra” words such as “the,” “to,” “of,” “oh,” and “a,” appear in
your document — sometimes when you aren’t even speaking
— this usually means the microphone is too close to your
mouth. MacSpeech Dictate is capturing the sound of your
breath, and attempting to convert this sound into words.
For best results, make sure the microphone is one to two
fingertips away from the corner of your mouth. (If you are softspoken, you might have to have it as c lose as a thumb’s width.
If you have a loud voice, maybe a bit further.) When properly
positioned, you should be able to drink from a normal-sized
glass without touching the microphone or spilling the liquid.
30 MacSpeech DictateChapter 5 — Dictation
Keep Drinking
We’re talking about keeping your vocal cords lubricated.
Speaking for long periods will dry out your throat, so keep
something drinkable nearby. While it is true that some liquid is
better than no liquid, it is also true that some liquids are better
than others. Plain water is best, and, because cold makes
your throat muscles tighten up, water at room temperature is
preferred. Caffeine promotes dehydration, so avoid it.
Find The (Vocal) Middle Ground
It is as much of a mistake to speak too quietly as it is to speak
too loudly while dictating. Either extreme can lead to vocal
strain. Try to keep a conversational speaking tone, as though
you’re speaking to a person who is about an arm’s length
away.
Mind Your Posture
Sit up straight. It helps to have an adjustable chair with
support for good posture. This helps your voice because there
Page 31

is a free flow of air. When slumped in your chair, you work
harder to speak.
Don’t forget to breathe
It is easy to get into the bad habit of squeezing or blasting
out a phrase at a time, with insufficient breath to power your
voice. Try breathing from your diaphragm, not the upper chest
or throat.
Relax
If you are sitting tense and too rigid in your chair, chances are
your voice and vocal cords will be tense too. Make a conscious
effort to keep your shoulders and facial muscles loose.
Take Breaks
Overdoing it seems to be a common trait in almost all computer
related injuries. Dictating too long without a break is a great
way to get a sore throat or end up feeling hoarse. Try not to
dictate more than about 45 minutes without taking a short
break.
Get Professional Help
This last tip is not for everyone, but if you expect to do a lot
of dictation, consider taking a couple of hours of training from
a speech teacher. In a short time, a good vocal coach can
give you useful tips and exercises that will help protect your
voice.
Dictation Advanced Topics
Text Editing & the Purge Cache command
As mentioned at the beginning of this chapter, using a
combination of voice dictation and keyboard/mouse in other
applications can lead to strange behavior with your text.
If you combine dictation and typing to edit a document,
MacSpeech Dictate cannot always keep track of the typed
contents the same way it keeps track of dictated contents. The
dictated contents are tracked in Dictate’s cache (pronounced
“cash”).
In addition, changes made to a document through the common
text editing commands (Cut, Copy, Paste, Undo/Redo) are
tracked by the active application, not MacSpeech Dictate...
even if those commands are initiated by voice commands
through Dictate.
T h is m ea n s y o u c a n st i ll t r y t o us e th e s e t ex t e di t in g co m m an d s
in a dictated document. However, if you want to attempt this
“mixed editing”, you will need to do editing in small batches,
and use a special command (Purge Cache) to commit edits
to the document each time edits are completed.
Text Editing Commands
What You Say What Happens
Cache Document
Copy Selection Copies the selected text.
Cut Selection Cuts the selected text.
Paste From Clipboard Pastes text from clipboard.
Purge Cache
Redo Last Action
Undo Last Action
Select All Selects all text.
Prepares pasted text from other
applications for editing by dictation in
Note Pad.
Commits dictated text to an existing
document.
Tells active application to perform most
recent action again.
Tells active application to undo most
recent action. Equal to Cmd-Z keyboard
shortcut in many applications.
The P ur ge Ca ch e command makes MacSpeech Dictate forget
about any dictated content in the document, so it considers all
the contents simply as typed text. After using Purge Cache,
the program will treat the document as though nothing has
been dictated. MacSpeech Dictate will then better handle
inserting new dictation into the existing text.
To make changes to an existing document, use the selection
commands and dictation to make a set of changes. Use the
Purge Cache command to purge the extra information that
MacSpeech Dictate stores about each dictation. Then you
may move on to the next set of changes.
Another use of this command is during navigation of a window
that has multiple fields, such as an email client, a database,
or a spreadsheet. After finishing dictating in a field, using the
Purge Cache command at the beginning of the next field will
ensure that prior dictation does not affect the contents of the
new field.
Cache Document Command
If you paste text from another application into MacSpeech
Dictate’s Note Pad, you can use the Cache Document
command to prepare that text for editing through dictation.
The Cache Document command only works with documents
in MacSpeech Dictate’s Note Pad. In addition, when you use
the Purge Cache command in Note Pad it automatically
performs a Cache Document command, so that Note Pad
will always know the contents of its own window.
Please check the MacSpeech Support web site for updates on
more advanced technical details for using these commands.
31 MacSpeech DictateChapter 5 — Dictation
Page 32

Chapter 6: Controllin Your Mac
In this chapter, we will look at some ways MacSpeech Dictate
can control a Macintosh. It can open files or applications, type
keyboard commands, and press buttons.
MacSpeech Dictate is not likely to replace your keyboard and
mouse completely. Think of MacSpeech Dictate as a “third
hand” to click a button without raising your hands from the
keyboard, or to open a file without digging through folders. As
you work with it, you will figure out what tasks are right for you
to accomplish by voice, keyboard, and/or mouse.
Using Command Mode
Command mode is used when you want to have MacSpeech
Dictate focus only on executing commands. While all
commands are also available in Dictation mode, dictation
commands are ignored when you are in Command mode.
This makes it easier for MacSpeech Dictate to understand
the commands.
The available commands can be seen in the Available
Commands window (Figure 6-2). The list will change
depending on what you are doing, and which application you
are using Dictate to control. MacSpeech Dictate tracks which
application is active, and automatically loads any commands
it has available for this application.
Figure 6-1
Here are some tips for using Command mode:
• Makesureyousee“Command”inthe
MacSpeech Dictate Status window before you
begin speaking the command.
• Don’tpauseinthemiddleofsayingacommand. If you say “Close <pause> Window” instead of “Close Window,” MacSpeech Dictate
may not understand what you want it to do.
• Toseewhichcommandsareavailable,keep
the Available Commands window open.
You can open this window by saying “Show
Available Commands Window”. Hover your
cursor over a command to see a brief description of what it does.
Switching To Command Mode
To switch to Command mode, do one of the following:
• Say“CommandMode”
• Select“Command”fromMacSpeechDictate’s
Speech menu
• Pressthekeyboardshortcutforswitching
modes.
You can tell MacSpeech Dictate is in Command Mode because
“Command” appears in the Status window, as in Figure 6-1.
Figure 6-2
Launching Applications
MacSpeech Dictate already knows the names of applications
on your hard drive and allows you to open any of them by
voice. Here’s how:
Say “Open [application name].”
Make sure in your Preferences for MacSpeech Dictate that the
box is checked for Generate Application Launch Commands.
You will find this under Command in the Preferences (in the
Dictate menu). Then when you install or update applications,
MacSpeech Dictate can learn how to open them by voice as
well.
NOTE: You can’t launch MacSpeech Dictate by voice, because
it has to be running before it can interpret your speech. If you
32 MacSpeech DictateChapter 6 — Controlling Your Mac
Page 33

want the program to launch when you start your Macintosh,
do one of the following:
- Control-click or hold down the mouse button on the
MacSpeech Dictate icon in the Dock. Select “Open
at Login” from the menu.
- Drag the MacSpeech Dictate icon into the Login
Items section of the Accounts panel in System
Preferences.
Controlling Buttons
MacSpeech Dictate can operate most buttons that appear in
dialog boxes regardless of the mode it is in. You can verbally
press a button by saying:
“Press [button name]”
Figure 6-3
By default, all commands are set as “Active” when you start
MacSpeech Dictate. A particular command can be deactivated by clearing the check mark in the Active column next
to the set.
For example, if a dialog box appears on the screen asking if
you want to save a document, the choices are usually “Don’t
Save,” “Cancel,” and “Save.” You can press these buttons us-
ing your voice by saying Press Don’t Save, Press Cancel,
or Press Save.
MacSpeech Dictate only knows about buttons that were
programmed in accordance with Apple’s programming
guidelines. If you try to press a button by voice and it doesn’t
respond, it is probably because the program you are using
has not told Mac OS X about its buttons.
Managing Commands and Command
Sets
MacSpeech Dictate manages a number of different files
that have commands, words, and text macros. These files
are known as command sets. Some of these sets contain
commands that work everywhere on your Mac; these are
global commands. Others are only active while in a particular
application, and are called application-specific commands.
To access these commands, choose Commands… from the
Tools menu. The Command List window opens, as shown in
Figure 6-3.
Global Commands
MacSpeech Dictate’s Global commands are available in any
application, whenever the microphone is active.
Dictation Commands
MacSpeech Dictate’s Dictation commands are available
when MacSpeech Dictate is in Dictation Mode. These are
general commands for positioning the insertion point, controlling capitalization, and deleting the last spoken word or
phrase.
Types of Commands
There are several types of commands in MacSpeech
Dictate:
• AppleScript: This allows an AppleScript to be
executed when you speak its name. MacSpeech
Dictate has a built-in script editor for editing and
testing scripts.
• TextMacro:Atextmacrotypesapredenedblock
of text when you speak its name. The text can be
a whole form letter or just an address; in fact it
can be any amount of text.
• Keyboard Shortcut: This is a type of command
using AppleScript, that executes keystroke combinations, and deserves special mention. You will
recognize these by their names and functions
equivalent to keyboard commands such as Copy
(Cmd-C), Select All (Cmd-A), Undo (Cmd-Z), etc.
But you can also create or modify your own commands that perform other keystroke combinations.
• Application: These are commands that open a
specicapplication.Youwouldonlyneedtouse
33 MacSpeech DictateChapter 6 — Controlling Your Mac
Page 34

this if there is an application on your hard drive
stored outside the Applications folder that you
would like to open by voice.
• Bookmark: A Bookmark command opens a web
page when it is spoken.
• File or Folder: A File or Folder command will open
a File or Folder when it is spoken.
• Menu Item: Chooses an item from the designated
application’s various menus.
• Shell Script: You use this to run Shell Scripts by
voice. Shell Scripts are scripts created to run in
Mac OS X’s Terminal application.
• AutomatorWorkow:Thiscommandwillrunthe
referencedAutomatorWorkowwhenitsnameis
spoken.
Creating and Modifying Commands
Most commands are written in AppleScript, Apple’s
system-wide scripting language. An AppleScript tutorial
is beyond the scope of this manual. You can learn more
about how to write AppleScript from Apple’s web site, at
http://www.apple.com/applescript/
All the commands built-in to MacSpeech Dictate are open
source, which means their source code is available for you to
view, or copy and modify. Commands can be Automatically
or Manually Created. When you create or modify a command, MacSpeech Dictate automatically saves it for you, and
it appears in the Command list for the Command set in which
it was created.
Creating Commands Automatically
To create an Automatic command, follow these steps:
.
Figure 6-4
5. Drag an existing AppleScriptle,bookmark,
textortextclipping,leorfolder,orAutomator
Workowintotheeditingareaforthenew
command.
When creating a bookmark command, you can
dragtheaddressfromtheaddresseldinmost
browsers directly into the Automatic area of
MacSpeech Dictate’s command window.
6. A suggested name will be entered in the Command
Name Field. Leave it as is or enter a new name.
TIP:
If you are creating your own commands, you will
need to give them unique names that are speakable.
Command names should be two or more words and
composed of words only -- i.e. do not use abbreviations, numerals or punctuation.
Turn off MacSpeech Dictate’s microphone.
1. Switch to MacSpeech Dictate by clicking the
MacSpeech Dictate icon in the Status window, or
using the Dock.
2. Choose “Commands…” from the Tools menu. The
Commands window opens (Figure 6-3). Individual
command sets are listed in the left sidebar. For
this example, we will create a new global command in the Global command set.
3. In the Commands window, select the command
set into which you want the command to be
stored from the “Context” menu.
4. Click the Plus Sign, or select “New Command”
from the File menu. A new command is created
and is ready to be edited, as shown in Figure 6-4.
34 MacSpeech DictateChapter 6 — Controlling Your Mac
Page 35

Creating Commands Manually
You can also create a command manually. Use this method
when you don’t have pre-existing content that will work
with MacSpeech Dictate’s ability to automatically create a
command.
To create a command manually, follow these steps:
1. Switch to MacSpeech Dictate by clicking the
MacSpeech Dictate icon in the Status window, or
using the Dock. Turn off the microphone.
2. Choose “Commands…” from the Tools menu. The
Commands window opens (Figure 6-3). Individual
command sets are listed in the left sidebar. For
this example, we will create a new global command in the Global command set.
3. In the Commands window, select the command
set into which you want the command to be
stored from the “Context” menu.
4. Click the Plus Sign, or select “New Command”
from the File menu. A new command is created
and is ready to be edited, as shown in Figure 6-4.
5. Select the type of command you want to add from
the “Type” pop-down menu, as shown in Figure
6-5.
6. Edit the command so it does what you want when
its name is spoken.
AppleScript
Anything that can be written as an AppleScript can be made
into a voice command. MacSpeech Dictate includes a full
AppleScript Script Editor. Enter the code for the AppleScript
into the Source field. Press the Compile button to verify the
script will compile, and the Stop or Run buttons to stop or
run the script.
To see the result of running a script, click the Result button.
Keyboard Shortcut
Any keystroke combination can be recorded as a Keyboard
Shortcut command. After you create and name a new com-
mand, select the Type as “AppleScript”. Click on the gray
button titled “Click to record shortcut” at the bottom of the
window. Then type in the keystroke combination.
Application
Application commands are for opening applications that can
be seen by your computer. By default, MacSpeech Dictate
already knows how to open all the applications in your
Application folder. You would only need to create this type of
command if you wanted to open an application that is outside
your Applications folder, such as on an external hard drive or
network server.
Bookmark
The quickest way to create a Bookmark command is to
simply drag a URL to the Automatic area of the Command
window, as discussed earlier in this chapter. If you want to
manually create a Bookmark command simply type the web
address, including the “http://” into the URL field, t h e n g i ve the
command a name and description.
Figure 6-5
Types of Commands - More Details
The Command window will look slightly different depending
on what type of command you are creating. This section
will provide additional information to assist you in creating
different types of commands. Refer to Figure 6-5 for an
illustration of how to select the different types of commands
in the Command window.
35 MacSpeech DictateChapter 6 — Controlling Your Mac
File or Folder
A File or Folder command allows you to use your voice to
open any file or folder you could normally open in the Finder.
As with Bookmarks, the quickest way to create a command
of this type is to simply drag a file or folder’s icon into the
Automatic area of a new Command window and name the
command.
If you want to manually create a File or Folder comm a nd, t ype
the path to the item, or click the Browse button and navigate to
it, then give the command a name and description.
Menu Item
A Menu Item command allows you to use your voice to
choose an item from the menu of an application, as though
you were selecting that menu item with the mouse or keyboard shortcut. After you create and name a new command,
select the Type as “Menu Item”. To manually create a Menu
Page 36

Item command, type the path to the item in the “Menu Path”
field (such as “Finder->View->Keep Arranged By->Name”).
Shell Script
A Shell Script is a text file that contains a sequence of
commands for your computer to execute. In Mac OS X, shell
scripts are most commonly created with Apple’s Terminal
program, which you will find inside the Utilities folder on your
hard drive. If you save a Shell Script from within Terminal, you
can drag it into the Automatic area of a new Command and
name it to easily create the command.
To manually create a Shell Script command, select Shell
Script from the Type pop-down menu and write the shell
script directly into the Source field of the Command window,
then choose a name for your command.
Text Macro
Text Macros put whatever is in the Tex t area of t h e Command
window at the insertion point whenever the command’s name
is spoken. They can have an unlimited amount of text in
them.
6. Enter text in the “Text” area that is to be typed
when the name of the command is spoken (you
canalsopasteordictateintothiseld).
7. Enter a name for the new command in the
“Command”eld.
8.Optionally,entertextintothe“Description”eld
(this is for informational purposes only and will not
be typed out).
Your command will automatically be saved.
That’s all there is to it. Whenever you say the name you gave
that command, it will insert the text you put in the Tex t area for
that command at the insertion point of the active application.
Automator Workflows
Mac OS X comes with some examples of Automator Workflows.
Let’s try making one speakable. We’re going to make the
Copy Unread Mail to iPod Notes workflow speakable.
1. Launch MacSpeech Dictate if it is not already running and turn on its microphone.
2. Say “Open Automator”
Text Macros work almost like any other command — you speak
the command name to invoke the macro. Instead of executing
an action, however, a Text Macro enters pre-defined text at
the insertion point in the active document. Like with dictation,
MacSpeech Dictate doesn’t care where the insertion point
is. It can be in a word processing document, a cell in a
spreadsheet, using the text tool of a graphics program, or
even the name of a file in the Finder.
Text Macros are great for form letters, email signatures, starting
a letter – just about anything you need to type frequently.
Creating Your Own Text Macros
Creating text macros is similar to creating other commands.
Here’s how:
1. Switch to the MacSpeech Dictate application by
clicking the MacSpeech Dictate icon in the Status
window Dock. Turn off MacSpeech Dictate’s
microphone.
2. Select “Commands…” from MacSpeech Dictate’s
Tools menu.
3. Click the Plus Sign or select “New Command…”
from the File menu to create a new command.
4. Select “Global” from the “Context” menu to store
the command in the Global command set. You
can also store Text Macros in application-specic
command sets. Doing so will mean the command
will only be available when that application is
active.
5. Select “Text Macro” from the Type pop-down
menu.
3. With your mouse, select “Open Examples Folder”
from Automator’s Help menu. This will open a
Finder window with the Automator Examples in it.
4. Say “Microphone Off.”
5. Switch to MacSpeech Dictate by clicking it’s icon
in either the Status window or the Dock.
6. Select ”Commands…” from the Tools menu.
7. Click the Plus Sign to open a new Command window, or select “New Command…” from the File
menu.
8. Make sure “Globals” is selected from the Context
pop-down menu in the Command window (unless
you want the macro to only execute when a particular application is active. If so, then put it in that
Application’s command set).
9a. At this point, you simply drag the Automator
Workowiconnamed“CopyUnreadMailtoiPod
Notes” to the automatic area in the Command
window, name the command, and (optionally) provide a description and you are done.
If you want to manually create the command, do the following
instead of step 9a:
9b.Select“AutomatorWorkow”fromtheTypemenu
in the Command window.
10. Click the Browse button and navigate to the ex-
ampleworkow.Itislocatedatthefollowingpath:
<HARD DRIVE>/Library/Application Support/
Apple/Automator/Workows
36 MacSpeech DictateChapter 6 — Controlling Your Mac
Page 37

Duplicating Commands
To duplicate a command, do the following:
1. In the side bar, click the command set to which the
command you want duplicated belongs.
2. Highlight the command you want to duplicate in
the command list.
3. Press the button that looks like two documents on
top of each other.
4. The command you highlighted in step 4 is duplicated with the name “<command name> copy.”
Modifying Commands
To modify a command, do the following:
1. In the side bar, click the command set to which the
commandyouwantmodiedbelongs.
2. Highlight the command you want to modify in the
command list.
3. Makeanymodicationsyouwouldlike.
MacSpeech Dictate will automatically save the
modiedcommandforyou.
Window”. This will display a list of commands that can be
spoken at that time. If the command you are trying to execute
is in the list, double-click its name. If you don’t see the command in the Available Commands window, then it is not
available to be spoken.
Deleting Commands
To delete a command, do the following:
1. In the side bar, click the command set to which the
command you want deleted belongs.
2. Highlight the command you want to delete in the
command list.
3. Press the minus button.
Troubleshooting Commands
There are several things to check if a command does not
execute after it is spoken. First, make sure you are pausing
briefly both before and after you say the command. This
will help MacSpeech Dictate recognize what you said as a
command.
If you have problems getting a command to be recognized
while in Dictation mode, try switching to Command mode.
This will limit the vocabulary MacSpeech Dictate understands
to only those words that are in the command names, making
them easier to recognize.
To insure you are in command mode, make sure the microphone
is turned on and say Command mode or select Command
from the Speech menu. When in Command mode, the word
Command will appear in the Status window.
If a command still fails to execute, make sure you are saying
the right thing. To do this, make sure MacSpeech Dictate’s microphone is turned on and say “Show Available Commands
37 MacSpeech DictateChapter 6 — Controlling Your Mac
Page 38

Chapter 7: Reference
This chapter provides a quick reference to menus and
windows.
Getting Technical Support
Via the World Wide Web
MacSpeech’s web site provides access to
technical support resources 24 hours a day.
Go to
http:/www.macspeech.com/support_center
for
answers to many questions. This is where you should go first
for help.
Via E-mail
You can also contact MacSpeech Support via email to dictatesupport@macspeech.com, or by selecting Send Email To
Tech Support from the Help menu when MacSpeech Dictate
is the active application.
Dictate Menu
Startup Mode
This controls the state MacSpeech Dictate is in when it is
launched. You can have it start up with the Microphone off
(Idle - Mic Off), in Dictation mode, in Command mode, or
Sleep.
Figure 7-1
About MacSpeech Dictate
Displays the About window. Click anywhere to dismiss it.
Preferences... (Cmd-comma)
Opens the Preferenc es window, which has four panes. Switch
between panes by clicking the icons in the toolbar at the top
of the window. Closing the Preferences window saves any
changes.
The Preferences panes are General, Recognition,
Command, and Shortcuts. Here is detail on each:
1. General
General Preferences (Figure 7-2a) is where you fine-tune
MacSpeech Dictate’s performance and behavior. It has four
sections, Startup Mode, Startup Actions, Feedback, and
Recognition.
Figure 7-2a
Startup Actions
These options control what happens when MacSpeech Dictate
is launched. Check Show Startup Wind ow to see the star tup
window when MacSpeech Dictate launches. This is useful if
you have are multiple profiles. Check Open a New Note Pad
Window if you prefer dictating into MacSpeech Dictate’s Note
Pad. If you prefer dictating into other applications leave this
unchecked.
Feedback
These options control whether or not to show the Status
window at startup, and if you want to see the recognized
text printed on the screen. When the Show “Recognized
Text” Feedback option is on, whatever you say will appear in
white shadowed text below the Status window whenever the
Status window is visible.
Chapter 7 — Reference
38 MacSpeech Dictate
Page 39

Recognition
Moving the slider towards Faster makes text appear more
quickly, but may sacrifice accuracy. Moving the slider towards
More Accurate makes the program try harder to understand
you, which could slow it down. By default, the slider is set to
balance the two factors. Feel free to experiment to see what
setting works best for you.
2. Recognition Preferences
Recognition Preferences (Figure 7-2b) allows you to adjust
how the Recognition Window is shown and/or hidden.
Figure 7-2b
Enable Command Grouping will group commands, rather
than show them as one big alphabetical list. This option has
two sub-options: Show Global Commands at Top and Show
all Global Commands in One Group.
Global Commands at Top
When checked, this option forces all the Global commands to appear at the top of the Available Commands
window.
Show all Global Commands in One Group
This option puts all the Global commands in one group,
leaving application-specific commands in their separate
groups.
Command Generation at Startup
Turn on Generate Application Launch Commands to allow
each application in the Applications folder on your hard drive
to be opened by voice. With this option on you can say Open
followed by the name of an application to open it by voice. For
example, “Open iChat”, or “Open Safari”.
Show Recognition Window When Dictating will show the
Recognition Window after each word or phrase that you dictate. Close Recognition Window After Each Choice will
hide the Recognition Window after an item is selected for the
list.
3. Command Preferences
Command Preferences allow you to adjust the ways commands are handled. This window has two sections, Available
Commands Window and Command Generation at Startup
(Figure 7-3).
Available Commands Window
Checking Hide at Startup will hide this window when
MacSpeech Dictate starts up.
The Generate Email Commands option generates commands
that can address an email to a person in your Address Book.
4. Shortcuts Preferences
This pane (Figure 7-4) allows you to choose what keyboard
shortcuts you want to use to toggle the microphone on or off,
cycle through the speech modes, and show the Recognition
window.
The defaults are Command-F11 to toggle the microphone,
Command-F10 to select the speech mode, and Command-F9
to show the Recognition window. You can use any key combination you prefer, provided the combination includes at
least one modifier key (Command, Control, or Option). The
Toggle Microphone shortcut turns the mic on and off. The
Select Speech Mode shortcut will switch between Dictation
and Command modes. The Show Recognition Window will
show and hide the Recognition Window.
Figure 7-3
Chapter 7 — Reference
39 MacSpeech Dictate
Figure 7-4
Page 40

Dictate Menu (continued)
Visit MacSpeech’s Web Site
Launches your browser and takes you to MacSpeech’s Web
site (Internet connection required).
Check for Updates…
Checks for to see if there are any software version updates available for MacSpeech Dictate (Internet connection
required).
Services
Provides access to Mac OS X’s Services.
Hide MacSpeech Dictate (Cmd-H)
Hides MacSpeech Dictate
Hide Others (Cmd-Opt-H)
Hides all applications other than MacSpeech Dictate.
Show All
Shows all hidden applications.
Figure 7-6
The Note Pad may provide more control over the text you are
dictating compared to many third-party applications. Many
commonly-used word processing commands are available
for formatting the text in this window. These commands are
in the Edit and Format menus, which are described later in
this chapter.
Quit MacSpeech Dictate (Cmd-Q)
Quits the MacSpeech Dictate application.
File Menu
Figure 7-5
New Note Pad (Cmd-N)
Choose this to open a new Note Pad window (figure 7- 6). You
can dictate directly into a Note Pad window and transfer the
text to another document. Multiple Note Pad windows can be
open at once.
New Command (Cmd-Shift-N)
This opens a new Command window (Figure 7-7).
Figure 7-7
Open (Cmd-O)
Opens a previously saved Note Pad document.
Close (Cmd-W)
This closes the active window.
Save (Cmd-S)
This allows you to save the current Note Pad window.
Save As… (Cmd-Shift-S)
Saves the current Note Pad document under a different
name.
Chapter 7 — Reference
40 MacSpeech Dictate
Page 41

Command Import
Allows importing sets of commands.
Spelling
Choosing this puts MacSpeech Dictate into Spelling mode.
Command Export
Exports designated sets of commands.
ScriptPak Import…
Imports commands that have been exported from iListen. For
more assistance with this, please consult the iListen User
Guide.
Edit Menu
Figure 7-8
All these commands are designed to work exactly as they do
in other Macintosh applications.
Sleep
Choosing this puts MacSpeech Dictate to Sleep. When in
Sleep mode, the microphone will remain on but the program
will ignore everything you say until you say Wake Up.
Tools Menu
Figure 7-10
Profiles…
Opens the Profiles window (Figure 7-11), from which you
can change to a different profile, as well as add or delete
profiles.
Speech Menu
Figure 7-9
The Speech Menu is used to turn the microphone on or off,
and to select MacSpeech Dictate’s mode.
Microphone On/Off
Using this menu item toggles the microphone on and off. The
menu item changes to Microphone Off when the microphone
is on.
Dictation
Choosing this puts MacSpeech Dictate into Dictation mode.
Command
Choosing this puts MacSpeech Dictate into Command
mode.
Figure 7-11
Highlight the profile you want to use, then click the Make
Active button. If there is only one profile listed, clicking the
Make Active button also closes the window.
Commands
The Commands window (Figure 7-12), allows you to manage
Global and Application Specific commands.
Chapter 7 — Reference
41 MacSpeech Dictate
Page 42

Figure 7-12
Microphone Setup…
Use this if accuracy seems to be decreasing. Microphone
Setup will help if you change the microphone’s position, if the
noise level in the environment has changed, or adjust your
profile if the characteristics of your voice change.
Figure 7-14
Vocabulary Training…
Vocabulary Training allows you to have MacSpeech Dictate
analyze documents you have written and discover words
you commonly use which are not in MacSpeech Dictate’s
extensive vocabulary.
Train Vocabulary from Selection…
This allows you to select text in MacSpeech Dictate’s Note
Pad and have MacSpeech Dictate learn new vocabulary from
it.
Vocabulary Training and Train Vocabulary from Selection
both display a window similar to the one shown in Figure
7-15.
Figure 7-13
Voice Training…
Select Voice Training (Figure 7-14) when you want to read
more training stories in order to further improve your accuracy.
Stories you have already read are indicated with a MacSpeech
Dictate icon next to their name. Select a story from the list in
the Voice Training Selection window and then follow the
on-screen instructions.
As you read, recognized text will turn green. If something is
not recognized, the text will turn red. When that happens,
Figure 7-15
pause briefly, and re-read from the text that is not green.
Chapter 7 — Reference
42 MacSpeech Dictate
Page 43

Format Menu
Items in the Format Menu change the look of text in a Note
Pad document. There are two menu items: Fonts and Text.
Fonts
The items in the Font menu (Figure 7-16) control how text is
formatted.
Figure 7-16
Show Fonts (Cmd-T)
This menu item displays the Font palette, as shown in Figure
7-17.
Figure 7-18
Copy Style (Cmd-Opt-C)
This copies the style of the selection.
Paste Style (Cmd-Opt-V)
This applies the style information from the clipboard to the
selection.
Text
Figure 7-17
Bold, Italic, Underline (Cmd-B, Cmd-I, Cmd-U)
These menu items format your selection in Bold, Italics, or
Underlined, respectively.
Bigger, Smaller (Cmd-Plus Sign, Cmd-Minus Sign)
The menu items increase and decrease the size of the selected text.
Show Colors (Cmd-Shift-C )
This menu item displays the Color Palette (Figure 7-18), which
you can use to change the color of the selected text.
Figure 7-19
The menu items in the Text sub-menu allow you to align the
selected text left, right, centered, or justified.
Window Menu
Figure 7-20
Minimize (Cmd-M)
Minimizes the active window to the Dock.
Chapter 7 — Reference
43 MacSpeech Dictate
Page 44

Zoom
Zooms the active window to its full size.
Bring All To Front
Brings all MacSpeech Dictate windows to the front.
Show or Hide Status Window
Shows or hides the Status window.
Show or Hide Available Commands
Shows or hides the Available Commands window.
At the bottom of this menu is a list of all currently open
MacSpeech Dictate windows. The active window is indicated
by a check mark to the left of its name.
Help Menu
Status Window
The Status window displays information about the microphone, sound input, certain commands, recognition options,
and the current profile.
Microphone Off
When the microphone is off, the microphone button will show
a red octagon in front of the microphone. This is the default
state when MacSpeech Dictate is first launched. (You can
change the startup state in Preferences). When off, the signal meter to the right of the microphone button will be empty
(black) as in Figure 7-22. Clicking the microphone button will
turn the microphone on.
Figure 7-22
Figure 7-21
Search
Enter a word or phrase in this field to search for a particular
topic on which you need help.
Welcome
Displays the MacSpeech Dictate Welcome document in a
window.
Tips & Tricks
Displays Tips & Tricks for using the currently installed ver-
sion of MacSpeech Dictate.
Release Notes
Displays the Release Notes for the currently installed version of MacSpeech Dictate.
Quickstart Guide
Displays the Quickstart Guide for the currently installed version of MacSpeech Dictate.
User Manual
Opens the User Guide for the currently installed version of
MacSpeech Dictate.
Microphone On
When the microphone is on, the microphone button will show a
green circle behind the microphone. When on, the signal meter
to the right of the microphone will be partially filled when you
are speaking (Figure 7-23). The command Microphone Off or
clicking the button will turn the microphone off. The command
Go To Sleep will put the program into Sleep mode.
Figure 7-23
Microphone Asleep (Sleep mode)
In Sleep mode the microphone is on, but any incoming sound
is ignored. The microphone button will show a purple oval
(Figure 7-24). There may still be activity in the signal meter,
but no action will be taken. The commands Wake Up or Turn
Microphone On, or clicking the button will turn the microphone on.
Send Email to Tech Support
Prepares a message in your email client to send to MacSpeech
Technical Support.
Chapter 7 — Reference
44 MacSpeech Dictate
Page 45

Figure 7-24
Speech Mode Indicator
The upper right corner of the Status window indicates the
current mode for MacSpeech Dictate. This will be either
Command, Dictation, Spelling, or Asleep. Command,
Dictation and Spelling modes will be indicated no matter
whether the microphone is on or off. If the program is in
Sleep mode, it will indicate Asleep instead of one of the active
modes. MacSpeech Dictate returns to the last mode used
when awakened from Sleep mode.
Different command sets can be shown or hidden by clicking
the triangle next to their name.
The Available Commands window can be re-sized by dragging the grow handle in the lower right corner of the window.
Any command in the list can be activated by double-clicking
its name, as well as by speaking it. Option-double-clicking a
command name will open it in MacSpeech Dictate’s Command
Window for editing.
Current Profile
The lower right corner of the Status window indicates the
Profile that is currently loaded into MacSpeech Dictate.
Recognized Text Indicator
As you speak, the words MacSpeech Dictate thinks you said
appear below the Status window in white, shadowed text.
Whether this text appears or not is determined by how the
Show “Recognized Text” Feedback preference is set in
General Preferences. The default is for the text to appear.
Available Commands window
Recognition window
Figure 7-26
The Recognition window, shown in Figure 7-26 for Mac OS
X 10.5.x (Leopard), lists the options for recognition of each
word or phrase you dictate. You can choose one of the options listed in order to both correct the text, and train Dictate
to improve accuracy. The list can be edited if none of the listed
items are correctly recognized speech.
.
Figure 7-25
The Available Commands window, shown in Figure 7-25
For updates to this document, please check:
http://www.macspeech.com/support_center/
for Mac OS X 10.5.x (Leopard), lists the commands available
to use at any given time. The list can be scrolled if necessary, and will change according to what application is active.
Chapter 7 — Reference
45 MacSpeech Dictate
Copyright © 2007-2008, MacSpeech, Inc.
Page 46

Notes:
Chapter 7 — Reference
46 MacSpeech Dictate
Page 47

Index
A
About MacSpeech Dictate 38
About MacSpeech Dictate menu 38
accuracy 6, 10, 14, 16, 17, 19, 23, 30, 39, 42
percentage, how to gauge 19
Recognition slider 38
adapter, microphone 10, 11, 13
adapting voice samples 15, 16, 21, 22, 34
AllCaps 26
All Caps commands 25
All Caps Off 25
All Caps On 25
AllCaps On 26
Ampersand command 27
Apostrophe command 27
Apostrophe ess command 27
AppleScript 8, 33, 34
AppleScript commands 35
Source field 35
applications
commands to open 34, 35
Hide Others command 40
launching 32
Show All command 40
application specific commands 33, 36, 39, 41
asleep 7
Asterisk command 27
At Sign command 27
audio input
line in 6
USB 6
audio levels 11
audio level settings 11
Automator Workflow commands 36
Available Commands 32, 37, 39, 44, 45
window 32, 45
window preference 39
Available Commands window 32, 45
B
backing up profiles 18
with Apple Backup 18
with Retrospect 18
with Time Machine 18
Back Quote command 27
Back Slash command 27
Backtick 27
Bigger menu 43
Bold menu 43
Bookmark 35
breaks from dictation 31
breath 10, 17, 31
Bring All To Front menu 44
buttons
advances 11
and Apple’s programming guidelines 33
AppleScript Editor
Compile 35
Run 35
Stop 35
Cancel 33
Close 17
controlling 33
Don’t Save 33
Exclude 16
Finish Training 18
Include 16
Make Active 18, 41
Play 12
pressing by voice 32, 33
profiles
minus sign 18
plus sign 18
Register Now 9
Save 33
Skip Word 15
Voice Training 12
C
Cache Document 31
caffeine 30
Canadian postal codes 28
Cancel Edit 24
Cap command 25, 26
capitalization 25
Capitalization 25
Capitalize the Word[s] 25
Cap <letter> 25
Caps Off command 25, 26
Caps On 25
Caps On command 25, 26
Cap <word> 25
Caret command 27
Cents Sign command 27
changing
commands 34
modes 8, 32, 39
profiles. See switching profiles
Chat commands 27
Check for Updates
menu 40
checking
sound quality 12
your microphone 13
Choose 23
in Correction window 23
choose story window 17, 42
clear speaking voice 17
Close Angle Bracket command 27
Close Brace command 27
INDEX
47 MacSpeech Dictate
Page 48

Close Bracket command 27
Close Euro Quote command 27
Close menu 40
Close Parenthesis command 27
Close Quote command 27
Close Single Quote command 27
Close Square Bracket command 27
Colon command 27
Comma command 27
command
editor window 40, 42
exporting 41
generation at startup preference 39
list window 33
menu 41
mode 7, 32, 37, 39, 45
startup preference 38
switching to 32
preferences 39
preferences window 39
sets 33, 33–37
creating 34–37
duplicating 37
modifying 37
types. See commands, types
window 34–37
commands
application 35
application specific 8, 33, 36, 39, 41
Automator 34, 36
Available Commands window 32, 37, 39, 44, 45
bookmark 34, 35
capitalization 25
creating 34
automatically 34
manually 35
deleting 37
dictation 33
Do Delete 22, 23
Do Select 22, 23
duplicating 37
file or folder 35
Forget at 21
global 8, 33, 33–37, 39, 41
Go to Beginning 22, 23
Go to End 22, 23
Go to Sleep 8
Go To Sleep 24
importing 41
Insert After 22, 23
Insert Before 22
keyboard shortcut 33, 35
managing 33
menu 41
menu item 34, 35
microphone 24
Move to Beginning of Document 22
Move to End of Document 22, 23
Numeral 28
punctuation 25–31
Scratch at 21
Scratch Word 21
shell script 34, 36
sleep mode 8, 21
text macros 36
types
Application 33
Automator Workflow 34
Bookmark 34
File or Folder 34
Shell Script 34
Text Macro 33
Wake Up 8, 25
Command Status Indicators 6
compound words 26
configuring microphones. See microphones
Connecting a Microphone 10
continuous speech recognition 14, 25
Copy 24, 31
Copyright Sign command 27
Copy Selection 31
Copy Style menu 43
creating
commands 34
automatically 34
manually 35
profiles 10–13
text macros 36
current profile 7, 30
Cut 24, 31
Cut Selection 31
D
Dantz Development 18
Dash command 27
Data DVD 9
Dates and Times 29
Degree Sign command 27
Delete the Word[s] 22
deleting commands 37
Dictate menu 38, 40
dictation
commands 33
dates and times 29
doesn’t appear in document 30
extra words 30
menu 41
mode 7, 39, 45
startup preference 38
using commands in 7
sessions 21
special kinds of words 25
Telephone Numbers 29
Dictation Commands 22
Disable at Startup preference 39
INDEX
48 MacSpeech Dictate
Page 49

Dollar Sign command 27
Dot command 27
drinking water 30
duplicating commands 37
E
Edit 23, 24
editing text 20
Editing Your Document 21
Edit menu 41
Ellipsis command 27
Em Dash command 27
Enable access for assistive devices 10
Enable Command Grouping preferences 39
En Dash command 27
enunciate 17
Equals Sign command 27
Euro Sign command 27
Exclamation Mark command 27
Exclamation Point command 27
Export
exporting commands 41
F
Feedback Palette 6
Feedback preference 38
File menu 40
Find the (vocal) middle ground 30
Forget at 21, 24
Forget at command 21
Forget Word 21, 24
Format menu 43
Forward Slash command 27
Fractions 28
Frowny Face command 27
Full Stop command 27
G
general preferences 7, 45
window 38
Generate Application Launch Commands preference 39
Generate Email Commands preference 39
getting technical support 38
Via E-mail 38
Via the World Wide Web 38
global commands 33, 41
Go to Beginning command 22, 23
Go to End 23
Go to End command 22, 23
Go to Sleep 8, 21
Go to Sleep command 8, 24
Greater an Sign command 27
H
handling mistakes 21
Hash Sign command 27
Help menu 44
Search field 44
Hide Available Commands menu 44
Hide Correction Window 23
Hide MacSpeech Dictate menu 40
Hide Status Window menu 44
hot keys 8
hyphenation
hyphenated words 26
Hyphen command 27
I
iChat 27
Idle - Mic Off preference 38
iListen
importing from 41
Import
importing commands 41
importing ScriptPaks 41
Import menu 41
Insert After the Word[s] 22
Insert After e Word[s] 22
Insert Before the Word[s] 22
Insert Before e Word[s] 22
installation 9
Instant Messaging 27
Italic menu 43
K
Keyboard Shortcut 33, 35
L
launching applications 32
Left Angle Bracket command 27
Less an Sign command 27
License Agreement 2
Lowercase the Word[s] 22
M
MacSpeech Dictate Icon 6
Menu Item 34
menus
Dictate 38, 40
About MacSpeech Dictate 38
Check for Updates 40
Hide MacSpeech Dictate 40
Hide Others 40
Preferences 38
Quit MacSpeech Dictate 40
Services 40
Show All 40
Visit MacSpeech’s Web Site 40
Edit 41
File 40
Close 40
Import 41
INDEX
49 MacSpeech Dictate
Page 50

New Command 40
New Note Pad 40
Open 40
Save 40
Save As 40
Format 43
Font
Bigger 43
Bold 43
Copy Style 43
Paste Style 43
Show Colors 43
Show Fonts 43
Smaller 43
Underline 43
Text
Align Left 43
Align Right 43
Center 43
Justify 43
Speech 41
Command 41
Dictation 41
Microphone On/Off 41
Sleep 41
Tools
Commands 33, 41
Microphone Setup 41
Profiles 18, 41
Train Vocabulary from Selection 41
vocabulary training 19
Vocabulary Training 41
Voice Training 14, 41
Window
Bring All to Front 43
Mimimize 43
Show/Hide Available Commands 43
Show/Hide Status Window 43
Zoom 43
Microphone On/Off menu 41
microphones 11, 17
array 11
checking 13
configuring 11–13
MacSpeech-certified 6
positioning 17
USB adapter 10
Microphone button 6
Microphone Setup 42
menu 42
window 42
Minimize menu 43
Minus Sign command 27
modes
Command 32, 39
Dictation 39
Sleep 8
Spelling 29
modifying
commands 37
Move Backward [1-99] Words 22
Move Forward [1-99] Words 22
Move to Beginning of Document command 22
Move to End of Document 23
Move to End of Document command 22, 23
Moving Around Documents By Voice 21
MSN Messenger 27
N
New Command menu 40
New Line 22
New Line command 27
New Note Pad menu 40
New Paragraph 22
New Paragraph command 27
No Caps 25
NoCaps 26
No Caps commands 25
No Caps Off 25
No Caps On 25
NoCaps On 26
No Space 22
Note Pad 20, 31, 40, 43
Note Pad window 40
numbers
Canadian Postal Codes 28
Roman Numerals 28
Telephone Numbers 29
UK Postal Codes 28
US ZIP Codes 28
Number Sign command 27
Numeral command 28
O
Open Angle Bracket command 27
Open Brace command 27
Open Bracket command 27
Open Euro Quote command 27
Open menu 40
Open Parenthesis command 27
Open Quote command 27
Open Single Quote command 27
Open Square Bracket command 27
P
Paste 24, 31
Paste From Clipboard 31
Paste Style menu 43
Percent Sign command 27
Period command 27
Phrase Training 7, 14, 20, 23, 24
Pick
in correction window 23
Play button 23
Plus Sign command 27
INDEX
50 MacSpeech Dictate
Page 51

Point command 27
Postal Codes
Canadian 28
UK 28
US ZIP 28
posture 30
Pound Sign command 27
Pound Sterling Sign command 27
PowerSecretary 5
preferences
Available Commands Window 39
Disable at Startup 39
Command
Available Commands Window 39
Command Generation at Startup 39
Enable Command Grouping 39
Show all Global Commands in One Group 39
Show Global Commands at Top 39
Command Generation at Startup 39
Generate Application Launch Commands 39
Generate Email Commands 39
Command Preferences 39
Feedback 38
Recognition Slider
Faster 39
More Accurate 39
Show “Recognized Text” Feedback 38
Show Status Window at Startup 38
General 38
Feedback 38
Recognition 38
Startup Actions 38
Startup Mode 38
Command 38
Dictation 38
Idle - Mic Off 38
Sleep 38
hot keys 8
Recognition Slider 38
Shortcuts 39
Select Speech Mode 39
Toggle Microphone 39
Show Correction Window 39
Startup Actions 38
Open a New Note Pad Window 38
Show Startup Window 38
Preferences menu 38
Press Don’t Save button 33
Press Play 23
Press Save button 33
profiles 45
adding 18
backing up 18
menu 41
standard acoutics 11
switching 18
window 41
working with 18
Punctuation 26
Purge Cache 31
Q
Question Mark command 27
Quit MacSpeech Dictate menu 40
R
RAM 5
Recognition 24
Recognition preferences 38, 39
Recognition window 7, 20, 23, 24, 39, 45
Recognition Window Button 7
Recognized Text 7, 23
Recognized Text Indicator 7, 45
Recording Quality panel 12
Redo 24, 31
Redo Last Action 31
Registered Sign command 27
registration code 9
registration window 9
relaxing 31
Release Notes document 44
removing MacSpeech Dictate 9
Restoring a Profile 18
Right Angle Bracket command 27
Roman Numerals 28
S
Save As menu 40
Save menu 40
Scratch at 21, 24
Scratch at command 21
Scratch Word 21, 24
Scratch Word command 21
ScriptPak Import 41
Section Sign command 27
Select All 22, 31
Select the Word[s] 22
Semi Colon command 27
Send Email to Tech Support 44
Send Message 27
Services menu 40
Sharp Sign command 27
Shell Script command 36
Shortcuts preference 39
Show all Global Commands in One Group preference 39
Show All menu 40
Show Available Commands
menu 44
window 37
Show Colors menu 43
Show Correction Window 23, 39
Show Fonts menu 43
Show Global Commands at Top preference 39
Show “Recognized Text” Feedback preference 7, 38, 45
Show Status Window at Startup preference 38
INDEX
51 MacSpeech Dictate
Page 52

Show Status Window menu 44
signal meter 6
Skip Word 15
Slash command 27
Sleep menu 41
Sleep mode 8, 44, 45
startup preference 38
Smaller menu 43
Smiley Face command 27
Sound Input Level 6
Space Bar command 27
speaker dependent 14
Speech menu 8, 41
Speech Mode Indicator 7, 45
Spelling 7
Spelling mode 29, 30
Tips for 30
Startup Actions preference 38
Startup Mode preference 38
Status window 6, 25, 44
Current Profile 7
“I Heard” Indicator 44
MacSpeech Dictate Icon 6
Microphone Asleep 44
Microphone Off 44
Microphone On 44
Mode Indicator 44
Profile Indicator 44
signal meter 6
Sleep mode 25
Speech Mode Indicator 7
straining your voice 20
switching between user modes 8
switching profiles 18
system requirements 5
T
types of commands
AppleScript 33
Application 33
Automator Workflow 34
Bookmark 34
File or Folder 34
Shell Script 34
Text Macro 33
Typing 20
U
UK Postal Codes 28
Underline menu 43
Underscore command 27
Undo 24, 31
Undo Last Action 31
Undo menu command 21
Uppercase the Word[s] 22
USB adapter 10, 13
user interface 6
Available Commands window 7
search field 7
Status Window 6
Current Profile 7
MacSpeech Dictate Icon 6
signal meter 6
Speech Mode Indicator 7
user modes 7
Command mode 8
Correction 8
Dictation mode 7
Sleep mode 8
switching between 8
using dictation mode 20
US ZIP Codes 28
utilities folder 36
Tab Key command 27
Telephone Numbers 29
Terminal program 36
Text Editing, caution with 31
Text Macro command 36
text macros
creating 36
Text menu 43
Tilde command 27
Tips & Tricks document 44
toggle microphone 21
Tools menu 41
Trademark Sign command 27
training 14
Train the Word[s] 22, 24
Train Vocabulary from Selection 16, 42
Train Vocabulary from Selection menu 42
Transparency slider 23
Troubleshooting 30
Turn Microphone Off command 25
Turn Microphone On 8, 25
INDEX
52 MacSpeech Dictate
V
Vertical Bar command 27
Visit MacSpeech’s Web Site menu 40
vocabulary training 15
Include/Exclude window 42
menu 42
Vocabulary Training 16
vocal coach 31
Voice Navigator 5
voice training 14, 42
green text 14, 15
menu 42
red text 15
window 42
Voice Training 14
W
Wake Up 8
Wake Up command 8, 25
Page 53

Welcome document 44
Window menu 43
windows
automatic commands 34
available commands 7, 32
command editor 40, 42
type pop-down menu 35
command list 33
command preferences 39
connection 11
create a new profile 10
finish training 15
general preferences 38
green text 15
microphone setup 42
new profile information 11
Note Pad 40
preferences
shortcuts 8
profiles 18, 41
recording quality 12
registration 9
shortcuts preferences 39
show universal access settings 10
startup screen 21
status 6, 20, 21, 23, 24
Universal Access System Preference 10
vocabulary training
documents 16
finished 17
processing files 17
unknown words 16
voice training 14, 42
choose story 18
volume adjustment 11
Winky Face command 27
Working with MacSpeech Dictate 20
Z
Zoom menu 44
For updates to this document, please check:
http://www.macspeech.com/support_center/
Copyright © 2007-2008, MacSpeech, Inc.
INDEX
53 MacSpeech Dictate
 Loading...