

Page 1
Nuance Dragon Professional Individual for Mac, v6
User’s guide
For v6 of:
GuideDragon speech recognition
Page 2

Contents
Dragon Professional for Mac User Guide 1
Get started 25
Using the Dragon menu 25
Related topics: 26
The Status Window 26
To show or hide the Status Window 26
To set whether the Status Window should be visible when Dragon starts up 26
Microphone mode button 26
Recognition mode button 27
Window menu button 27
Related topics: 27
The Guidance window 28
Showing or hiding the Guidance window 28
Related topics: 28
Recognition modes 28
Using commands in Dictation mode 29
Example: 29
Example: 29
Related topics: 29
Preferences window 30
To show the Preferences window 30
General 30
Profiles 30
Dragon Anywhere 31
Shortcuts 31
To set a shortcut 31
To delete a shortcut 31
To revert to a previous shortcut 31
Updates 32
Advanced 32
Correction options: 32
MouseGrid options: 32
Data collection options: 32
License 33
2
Page 3

Related topics: 33
Using profiles and dictation sources 33
About profiles and dictation sources 33
Switching profiles and dictation sources 33
Missing dictation sources 34
Working with profiles and dictation sources 34
To add a profile 34
To add a dictation source to an existing profile 35
To change the default dictation source 35
To change the Auto Formatting settings for a profile 35
To delete a profile and dictation sources 35
Related topics: 35
Using DragonPad 35
To dictate and transfer text 36
Closing DragonPad 36
Related topics: 36
FAQs 36
About Dragon Professional Individual for Mac 37
I just installed Dragon. Where did it go? 37
Do I need a unique profile for each user? 37
How can I tell what mode Dragon is in? 37
Why isn't there any punctuation in my dictated text? 37
Recognition 37
I'm not happy with the recognition. What can I do? 37
Dragon entered text into my document when I was trying to dictate a command. Why? 38
How can I make Dragon recognize my name correctly? 38
Accessibility 38
I have color blindness. How can I tell what mode the microphone is in? 38
I have difficulty using a mouse. How can Dragon help me navigate my Mac? 38
Related topics: 39
What's New? 39
Faster and more accurate than ever 39
Formatting and other recognition improvements, for minimal editing 39
Improved set up 40
Improved user interface and experience 40
3
Page 4

Enhanced transcription 40
Transcription Batch Mode 40
Updated web and application support 40
Improved help 40
Related topics: 41
Upgrading from Dragon Dictate 4 or Dragon for Mac 5: FAQ 41
All Upgrades 41
I just finished upgrading – is there anything I can delete to save disk space? 41
My profile won't upgrade. What can I do? 41
What happened to Transcription sources? 42
Upgrading from Dragon for Mac 5 42
How has the Status Window changed? 42
Upgrading from Dragon Dictate version 4 42
I just upgraded from Dragon Dictate version 4 – what do I need to do now? 42
Where did Dragon go? 42
What happened to Text Macros? 42
Where is the Recognition Window? 43
How has the Status window changed? 43
Where is the Note Pad? 43
Where is the Express Editor? 43
Related topics: 43
Activate and Register 43
To activate your license 43
To register your copy of Dragon Professional Individual for Mac 44
To deactivate your Dragon Professional Individual for Mac license 44
Related topics: 44
Use the microphone 45
Microphone Setup 45
To open the Microphone Setup window 45
To complete Microphone Setup 45
To manually adjust gain 45
Related topics: 45
Microphone modes 46
Changing the microphone mode 46
Related topics: 46
4
Page 5

Microphone placement 46
Using your Mac's built-in microphone 47
Positioning a headset microphone 47
Positioning a hand-held microphone 47
Related topics: 47
Dictate text 48
Getting started with dictation 48
Creating a new document 48
Dictation guidelines 49
How to dictate 49
Where to dictate 49
How to add punctuation 49
How to use commands 49
Related Topics: 49
Mixing dictation with typing 49
What applications are supported? 50
What does it mean if my application isn't supported? 50
About the cache 51
Related topics: 51
Dictation overview 51
Paragraph and line breaks 51
Example 51
Punctuation—General 52
Example 52
Quotes 52
To dictate quotes as you speak 52
To dictate quotes after dictating a word or phrase 52
Example 1 52
Example 2 52
Bullets 52
Example 52
Email and Web addresses 52
Example 1 52
Example 2 52
Example 3 53
5
Page 6

Proper nouns 53
Example 1 53
Example 2 53
Hyphenated words 53
Example 1 53
Example 2 53
Compound words 53
Example 1 53
Example 2 53
Abbreviations 53
Example 53
Acronyms 53
Example 1 53
Example 2 54
Related topics: 54
Take it back 54
Example 1 54
Example 2 54
Example 3 55
Related topics: 55
Dictating punctuation and symbols 55
To place punctuation around text 55
Punctuation and symbols 55
Related topics: 57
Dictating letters 57
Recognition modes and spelling 57
Letters 57
Dictating Acronyms 58
Accents and other non-English letters 59
Diacritical Letters 59
Ligatures and Non-Latin Letters 59
Related topics: 60
Dictating numbers 60
Dictating numbers 60
Example 1—Numerals 60
6
Page 7

Example 2—Decimals 60
Example 3—Fractions 60
Example 4—Phone numbers 60
Example 5—Postal codes 60
Example 6—Currency 61
Example 7—Dates 61
Example 8—Time 61
Example 9—Weight 61
Forcing numerals 61
Example 61
Superscripts 61
Example 61
Roman numerals 61
To dictate lowercase Roman numerals 61
Example 1 61
Example 2 61
Numbers mode 61
To dictate numbers in Numbers mode 61
Example 61
Related topics: 62
Correct mistakes 63
Correcting recognition errors 63
Correction vs. editing 63
Example 63
Use Correction if 63
Use select and replace if 63
Related topics: 63
Using Correction 63
Showing the Correction window 64
Making a correction 64
Smart Formatting 65
Related topics: 65
Edit text 66
Revising text 66
Making a selection 66
7
Page 8

Replacing text 67
Inserting text 67
Deleting text 67
To delete the last thing you said 67
To delete a specific word or string of words 67
Copying, cutting and pasting text 67
To cut text 67
To copy text 67
To paste text 67
Related topics: 67
Hearing your text 68
Related topics 68
Format text 69
Auto Formatting 69
To open the Auto Formatting window: 69
Street Addresses 69
Example 69
UK and Canadian postcodes 70
Example 70
Web and email addresses 70
Example 1—Email 70
Example 2—Website 70
Phone numbers 70
Example 70
Abbreviated titles 70
Example 70
Dates 70
Example 70
Times 70
Example 70
Use numerals starting with 70
Example 1 70
Example 2 71
Partially format "-illion" numbers 71
Example 71
8
Page 9

Prices and currencies 71
Example 71
ISO currency codes 71
Example 71
Units of measure 71
Example 1 71
Example 2 71
Social Security Numbers 71
Example 71
All other numbers 71
Example 1—Negative numbers 71
Example 2—Decimals 71
Example 3—Ordinals 71
Common abbreviations 71
Example 71
Expand contractions 72
Example 72
Insert two spaces after period 72
Allow pauses in formatted phrases 72
Example 72
Related topics: 72
Formatting 72
To toggle bold formatting 72
To toggle italic formatting 72
To toggle underlined formatting 72
Related topics: 73
Capitalization 73
Title Case 73
To capitalize a word as you dictate 73
To capitalize the next string of words as you dictate 73
To capitalize words you have already dictated 73
Lowercase 73
To lowercase a word as you dictate 73
To lowercase the next string of words as you dictate 73
To lowercase text you have already dictated 73
9
Page 10

All Caps 74
To make a word ALL-CAPS as you dictate 74
To make the next string of words all-caps as you dictate 74
To make text you have already dictated all-caps 74
Related topics: 74
Spacing 74
To insert a space 74
To adjust spacing as you dictate 74
To delete a space before a word you already dictated 74
Related topics: 74
Aligning text 75
To align the current paragraph 75
To justify text 75
To align the whole document 75
Related topics: 75
Transcription 76
Transcribing recorded audio 76
Selecting an audio file for Transcription 76
Editing a transcribed file 77
Where are my transcriptions? 78
Deleting a Transcription speaker 78
Exiting Transcription mode 78
Related topics: 78
Transcription Training 78
Related topics: 79
Control your computer 80
Launching and quitting applications 80
Related topics: 80
Navigating application windows 81
To open a new file or window 81
To close the current file or window 81
To switch between windows or applications 81
To hide or show windows or applications 81
Related topics: 81
OS X controls 81
10
Page 11

To put your computer in sleep mode 81
To restart your computer 81
To quit unresponsive applications 81
To toggle full screen mode 81
To capture images of your screen 81
Related topics: 82
Working with the Finder 82
Adjusting the window display 82
To show or hide bars in Finder windows 82
To show or hide the Dock 82
To toggle Zoom view 82
Adjusting the folder display 82
To change the way items are displayed 82
To arrange items in your view 82
To create a Sidebar shortcut to the selected item 82
Managing files and folders 83
To open the selected file or folder 83
To rename the currently selected item 83
To rename another item in the current folder 83
To view a Quick Look heads up display of the selected item 83
To view the original file associated with a selected alias 83
To deselect all items in the current folder 83
Creating and deleting items 83
To create a new folder 83
To create a copy of the selected item(s) 83
To create an alias of the selected item 83
To create a compressed Zip file of the selected folder 83
To delete the selected item(s) 83
To permanently delete all files in the Trash folder 83
Navigating windows 83
To go to the next or previous view in the active window 83
To go to the enclosing folder for the selected item 83
To go to a specific folder 83
To open the Go to Folder dialog in the Finder 84
To search the Finder 84
11
Page 12

Navigating folders 84
To open the Connect to Server window 84
To cycle through the open Finder windows 84
To bring all Finder windows to the front 84
To close all Finder windows 84
Ejecting a drive or disc 84
Related topics: 84
Using dialog controls 84
Related topics: 85
Key commands 85
How to say a key command 85
Key names 85
Modifier keys 86
Related topics: 86
Menu Walking 86
Related topics: 86
Mouse commands 87
Moving the mouse 87
To make the cursor begin moving in a specified direction 87
To move the cursor a specified number of units in the specified direction 87
Clicking the mouse 87
Related topics: 87
MouseGrid 87
Opening the MouseGrid 88
Zooming in 88
Dismissing the MouseGrid 88
Changing MouseGrid settings 88
Related topics: 88
Create documents 89
Working with Microsoft Word 89
Creating a document 89
Navigating within your document 89
Selecting text 89
Editing your document 90
Formatting your document 90
12
Page 13

To change the font size 90
To insert a page break 90
Saving your document 90
Printing your document 90
Closing your document 90
Related topics: 90
Working with TextEdit 90
Creating or open a document 91
Navigating within your document 91
Finding text in your document 91
Selecting text 91
Editing your document 91
To paste text using the font formatting of the paste location 91
Formating your document 91
To increase or decrease the font size 92
To apply text spacing, such as indenting and Tabs, from one part of the text to another 92
Saving your document 92
To undo all your changes since the last time you saved 92
Printing your document 92
Closing your document 92
Adjusting your view 92
To wrap text 92
To bring all TextEdit windows to the front 92
To toggle Zoom view for the current window 92
To close all TextEdit windows 92
Related topics: 92
Navigating within a document 92
To move the cursor to the first or last position in the current document 93
To move the cursor a specified number of words from its current position 93
To insert the cursor before a specified word or phrase 93
To move the cursor to its previous position 93
To move the cursor up, down, left or right 93
To move the cursor to a new text field 93
Related topics: 93
Use applications 94
13
Page 14

Working with Mail 94
Creating a new message 95
To reply to the selected message 95
To forward the selected message 95
To resend the selected message 95
Navigating within your message 95
Selecting text 95
Editing your message 96
Formatting text 96
Sending your message 97
Navigating messages and threads 97
To scroll within a message or thread 97
To toggle viewing threads in the Mailbox pane 97
To move between messages 97
To view your selected message or thread in the Mailbox 97
To check for new messages 97
Printing a message 97
Managing your messages 97
To sort your messages 97
To label the selected message 97
To delete the selected message 97
To clear deleted or junk messages 98
Searching your messages 98
To search the text of the current message 98
To search your Mailbox 98
Navigating your mailboxes 98
To switch to the Viewer Window 98
To navigate between Mailboxes 98
Creating and deleting mailboxes 98
To create a new Mailbox 98
To rename the selected Mailbox 98
To delete the selected Mailbox: 98
Adjusting your view 98
Related topics: 99
Working with TextEdit 99
14
Page 15

Creating or open a document 99
Navigating within your document 99
Finding text in your document 99
Selecting text 99
Editing your document 99
To paste text using the font formatting of the paste location 100
Formating your document 100
To increase or decrease the font size 100
To apply text spacing, such as indenting and Tabs, from one part of the text to another 100
Saving your document 100
To undo all your changes since the last time you saved 100
Printing your document 100
Closing your document 100
Adjusting your view 100
To wrap text 101
To bring all TextEdit windows to the front 101
To toggle Zoom view for the current window 101
To close all TextEdit windows 101
Related topics: 101
Working with Microsoft Word 101
Creating a document 101
Navigating within your document 101
Selecting text 101
Editing your document 102
Formatting your document 102
To change the font size 102
To insert a page break 102
Saving your document 102
Printing your document 102
Closing your document 102
Related topics: 102
Working with Safari 102
Opening a Web page 103
Entering text 103
Navigating between pages 103
15
Page 16

To switch between tabs 103
Navigating within a page 103
To scroll 103
To scroll to the top or bottom of the current page 103
To jump to the selected text on the current page 103
To move between editable text fields 104
Searching a website 104
To find specific text on a page 104
To navigate between instances of the search term 104
Loading pages 104
Using tabs 104
To create a tab 104
To close tabs 104
To move a tab into a new window 104
Safari windows 104
To close all Safari windows 104
To reopen Safari windows 104
To bring all Safari windows to the front 104
To merge all current Safari windows 104
Adding or editing Bookmarks 104
To show or hide the Bookmarks Bar 104
To add a bookmark 104
To show or hide the Bookmark Manager 105
To create a shortcut in Dragon for the current page 105
Auto Fill 105
Sharing a Web page 105
Printing 105
Changing your view 105
History 105
Related topics: 105
Working with Firefox 105
Opening a Web page 105
Dictating text 106
Related topics: 106
Working with Calendar 106
16
Page 17

To create a new event 106
To delete an event 106
To search Calendar 106
To refresh your calendars 106
To back up the selected calendar 107
Adjusting your calendar view 107
To change the time period shown 107
To move to a different date 107
To show or hide all-day events on your calendar 107
To show or hide events on a specific calendar 107
Showing and hiding windows 107
To show or hide Calendar panels 107
To toggle Zoom view for the current window 107
Related topics: 107
Working with Messages 107
Related topics: 108
Browse the web 109
Dragon Web Extensions 109
Installing Dragon Web Extensions 109
Upgrading Dragon Web Extensions 109
Setting up Dragon Web Extensions—Safari 110
To allow Dragon to run on all websites 110
Setting up Dragon Web Extensions—Firefox 111
To allow Dragon to run on all websites 111
Using Dragon Web Extensions to access links and other Web controls 112
To click a link or other website control 112
To show all controls 112
To hide the numbers 112
Disabling or Uninstalling Dragon Web Extensions—Firefox 112
To disable or uninstall Dragon Internet Extension 112
To disable Dragon Internet Plug-In 112
Disabling or Uninstalling Dragon Web Extensions—Safari 113
To uninstall Dragon Dictate Web Extensions (v4) 113
To disable or uninstall Dragon Web Extensions (v5 or later) 113
Related topics: 113
17
Page 18

Working with Safari 113
Opening a Web page 113
Entering text 114
Navigating between pages 114
To switch between tabs 114
Navigating within a page 114
To scroll 114
To scroll to the top or bottom of the current page 114
To jump to the selected text on the current page 114
To move between editable text fields 114
Searching a website 114
To find specific text on a page 114
To navigate between instances of the search term 114
Loading pages 115
Using tabs 115
To create a tab 115
To close tabs 115
To move a tab into a new window 115
Safari windows 115
To close all Safari windows 115
To reopen Safari windows 115
To bring all Safari windows to the front 115
To merge all current Safari windows 115
Adding or editing Bookmarks 115
To show or hide the Bookmarks Bar 115
To add a bookmark 115
To show or hide the Bookmark Manager 115
To create a shortcut in Dragon for the current page 115
Auto Fill 116
Sharing a Web page 116
Printing 116
Changing your view 116
History 116
Related topics: 116
Working with Firefox 116
18
Page 19

Opening a Web page 116
Dictating text 116
Related topics: 117
Posting to Facebook and Twitter 117
To post the last text you dictated or selected 117
To dictate text to post 117
Related topics: 118
Make Dragon more accurate 119
Editing Dragon's Vocabulary 119
To open the Vocabulary Editor window 119
The Vocabulary list 119
Searching for vocabulary 120
Adding a User vocabulary item 120
Editing a user vocabulary item 120
Training a vocabulary item 121
Deleting a user vocabulary item 121
Exporting vocabulary items 121
Importing vocabulary items 121
Related topics: 121
Voice Training 121
Related topics: 122
Vocabulary Training 122
To open the Vocabulary Training window 122
To select a file for Vocabulary Training 122
Related topics: 123
Use email 124
Working with email 124
Creating a new message from anywhere on your Mac 124
Working with email applications 124
Other email applications 125
Related topics: 125
Working with Mail 125
Creating a new message 125
To reply to the selected message 125
To forward the selected message 126
19
Page 20

To resend the selected message 126
Navigating within your message 126
Selecting text 126
Editing your message 126
Formatting text 127
Sending your message 127
Navigating messages and threads 127
To scroll within a message or thread 127
To toggle viewing threads in the Mailbox pane 127
To move between messages 127
To view your selected message or thread in the Mailbox 127
To check for new messages 128
Printing a message 128
Managing your messages 128
To sort your messages 128
To label the selected message 128
To delete the selected message 128
To clear deleted or junk messages 128
Searching your messages 128
To search the text of the current message 128
To search your Mailbox 128
Navigating your mailboxes 129
To switch to the Viewer Window 129
To navigate between Mailboxes 129
Creating and deleting mailboxes 129
To create a new Mailbox 129
To rename the selected Mailbox 129
To delete the selected Mailbox: 129
Adjusting your view 129
Related topics: 129
Working with webmail 129
Using Gmail 130
Composing a new email 130
Opening an email 130
Replying to an email 130
20
Page 21

Forwarding an email 130
Deleting an email 131
Navigating Gmail 131
Related topics: 131
AutoTexts 132
Auto-text commands 132
Why you should use Auto-text commands 132
Creating an Auto-text command 133
Editing an Auto-text command 133
Related topics: 133
Using fields with Auto-text commands 133
Setting up your fields 134
Navigating fields and specifying their values 134
To fill in the text fields 134
Related topics: 134
Manage Dragon Commands 135
The Commands window 135
Viewing the commands list 135
To return to the contexts list 136
To filter commands 136
Viewing command details 136
Creating a custom command 137
Editing a custom command 137
Deactivating a command 137
Deleting a custom command 137
Related topics: 137
Create a command 138
What are custom commands? 138
Creating a custom command 138
Menu Item 139
Keystroke 139
Bookmark 140
File or Folder 141
Application 142
Advanced commands 143
21
Page 22

AppleScript 143
Automator Workflow 143
Shell Script 143
Related topics: 144
Import and export commands 144
Exporting commands 144
Importing commands 145
Related topics: 145
Troubleshooting 146
Troubleshooting overview 146
Recognition is poor 146
Have you gotten better results from Dragon in the past? 146
Yes: 146
No: 147
Are you having trouble with a specific word? 147
Cursor is jumping to the wrong place 147
Dragon is only responding to commands 147
No audio detected 147
Commands are not working 148
Are you using a custom command? 148
Yes: 148
No: 148
Correction is not working 148
Dragon is not working with my Web browser 148
Are you using Firefox or Safari? 148
No: 148
Yes: 148
Dragon menu is not showing in the menu bar 149
Auto Sleep is not working 149
Dragon is not responding 149
Related topics: 149
Troubleshooting audio and recognition 149
Supported Devices 149
No audio signal 150
Check your microphone mode 150
22
Page 23

Check your connection 150
Check microphone settings 150
Restart 150
Poor audio quality 151
Check your microphone placement 151
Recalibrate your microphone or reset the gain 151
Reduce background noise 151
Listen to your audio 151
Poor recognition 151
Check your profile 151
Voice Training 152
Vocabulary Training 152
Re-create dictation source 152
Related topics: 154
Troubleshooting Dragon Web Extensions 154
Dictation is not working properly in my Web browser 155
Related topics: 155
Troubleshooting Commands 155
MouseGrid does not appear on my second display 156
New or duplicated commands do not work 156
Custom commands are missing 157
Commands from Dragon Dictate 4 do not work 158
Related topics: 158
Troubleshooting Vocabulary 158
I can't add documents to Vocabulary Training 158
My custom vocabulary words are missing 158
Related topics: 158
Issues with Upgraded Profiles 158
Profile upgrade failed 158
Option 1: 159
Option 2 159
Transcription profile is missing 159
Related topics: 160
Uninstall Dragon Professional Individual for Mac version 6 160
To uninstall Dragon 160
23
Page 24

To remove Dragon's data from your hard drive 160
To remove Dragon Anywhere data 160
To remove the Dragon Web Plug-in 160
To remove the Dragon Web Extension for Safari 160
To remove the Dragon Web Extension for Firefox 161
Related topics: 161
24
Page 25
Get started
Click: To learn:
Using the Dragon menu
l How do I access Dragon's features through the Dragon menu?
The Status Window
l What can I do with the Status Window?
l How do I show or hide the Status Window?
The Guidance window
l How do I show or hide the Guidance window?
l What information is offered in the Guidance window?
Recognition modes
l What are recognition modes?
l How can I tell what recognition mode I'm in?
l How do I switch modes?
Using profiles and dictation
sources
l What is a profile?
l What is a dictation source?
l How do I switch to a different profile or dictation source?
l How do I create a new profile or dictation source?
l How do I delete a profile or dictation source?
Using DragonPad
l What is DragonPad?
l How do I dictate with DragonPad?
Dragon Anywhere
l What is Dragon Anywhere?
l How do I link to my Dragon Anywhere account?
FAQs
l Frequently Asked Questions about Dragon Professional Individual for
Mac version 6
What's New?
l What's new in Dragon Professional Individual for Mac version 6?
New to Dragon? Read these topics to learn the basics about Dragon's features and user interface.
Using the Dragon menu
The Dragon menu gives you access to everything you need to use Dragon. To access the menu, click the icon in
your menu bar.
Select a feature in the Dragon menu to access it, or click a link below to find out more about each feature.
Turn Microphone On / Off—Toggle the microphone on or off
Switch to Transcription / Dictation…—Change to Transcription mode or back to Dictation mode
Show / Hide Status Window—Toggle the Status window
Show / Hide Commands…—Toggle the Commands window
Show / Hide Guidance—Toggle the Guidance window
Edit Vocabulary…—Access the Vocabulary Editor
Add New Auto-text…—Create an Auto-text command to insert frequently used text, such as an address.
Recent Profiles—Choose between recently used profiles and dictation sources. The currently selected
profile is shown with a check mark beside it.
Manage Profiles…—Opens the Profiles pane of the Preferences window
Improve Recognition >
25
Page 26
l Voice Training…—Access the Voice Training window (available only in Dictation mode)
Microphone mode button
The microphone button's icon indicates the microphone mode:
l Transcription Training…—Access the Transcription Training window (available only in
Transcription mode)
l Vocabulary Training…—Access the Vocabulary Training window
l Microphone Setup…—Access the Microphone Setup window
Preferences...—Open the Preferences window
Help >
l About Dragon—See information about the version of Dragon Professional Individual for Mac that
you are running
l Dragon Help—Access Dragon Professional Individual for Mac online help.
l Tutorial—Open the Dragon tutorial.
l DragonPad—Access the DragonPad.
l Deactivate or Activate: Deactivate your license for Dragon Professional Individual for Mac, or
activate a license if you are using the free trial period.
l Register for Support: Register your copy of Dragon Professional Individual for Mac
Quit Dragon: Exit Dragon
Related topics:
l The Status Window
l The Guidance window
l Getting started with dictation
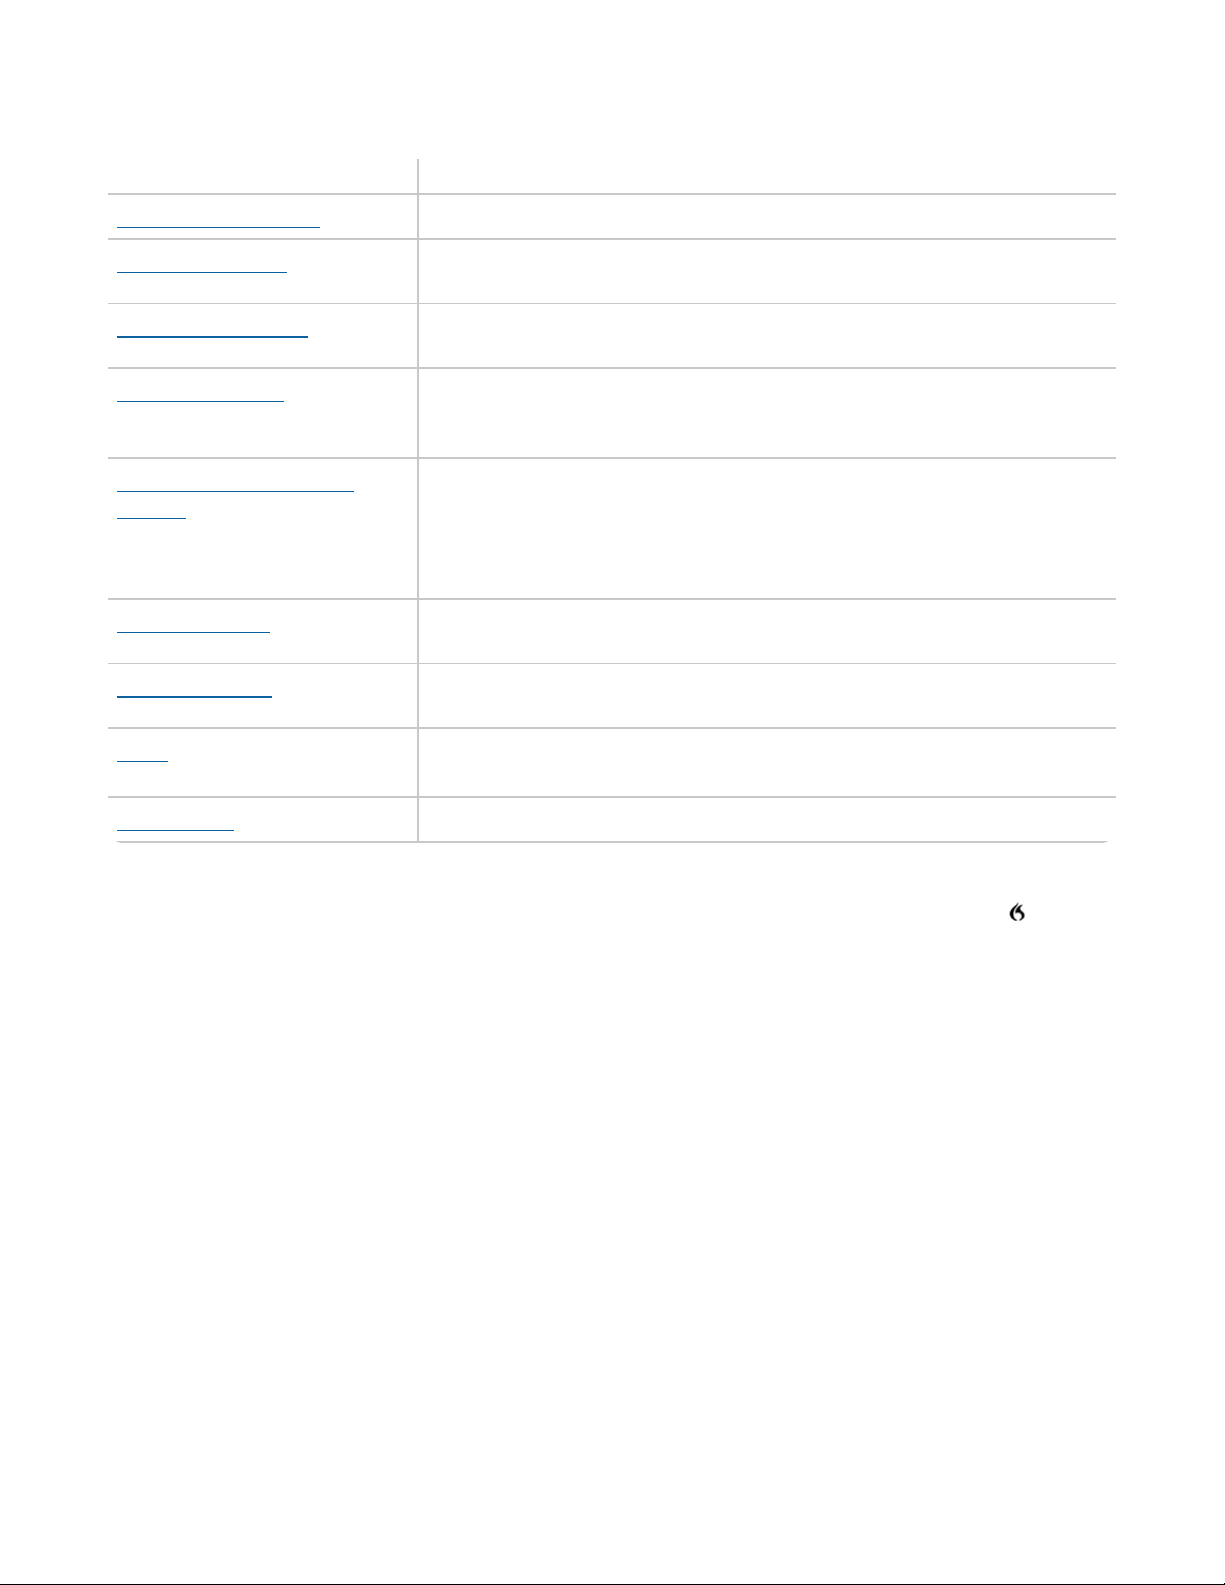
The Status Window
The Status Window gives you quick access to Dragon's most important
features, like the microphone and recognition mode, and offers access to the
Guidance, Commands, and Correction windows.
When the Status Window is showing, it floats over all applications.
To show or hide the Status Window
l Say "Show Status Window" or "Hide Status Window."
Or
l Click the icon in the menu bar, then select Show Status Window or Hide Status Window.
To set whether the Status Window should be visible when Dragon starts up
1. Click the icon in the menu bar and select Preferences…
The Preferences window opens.
2. In the General pane, check or uncheck Show Status Window at Startup.
26
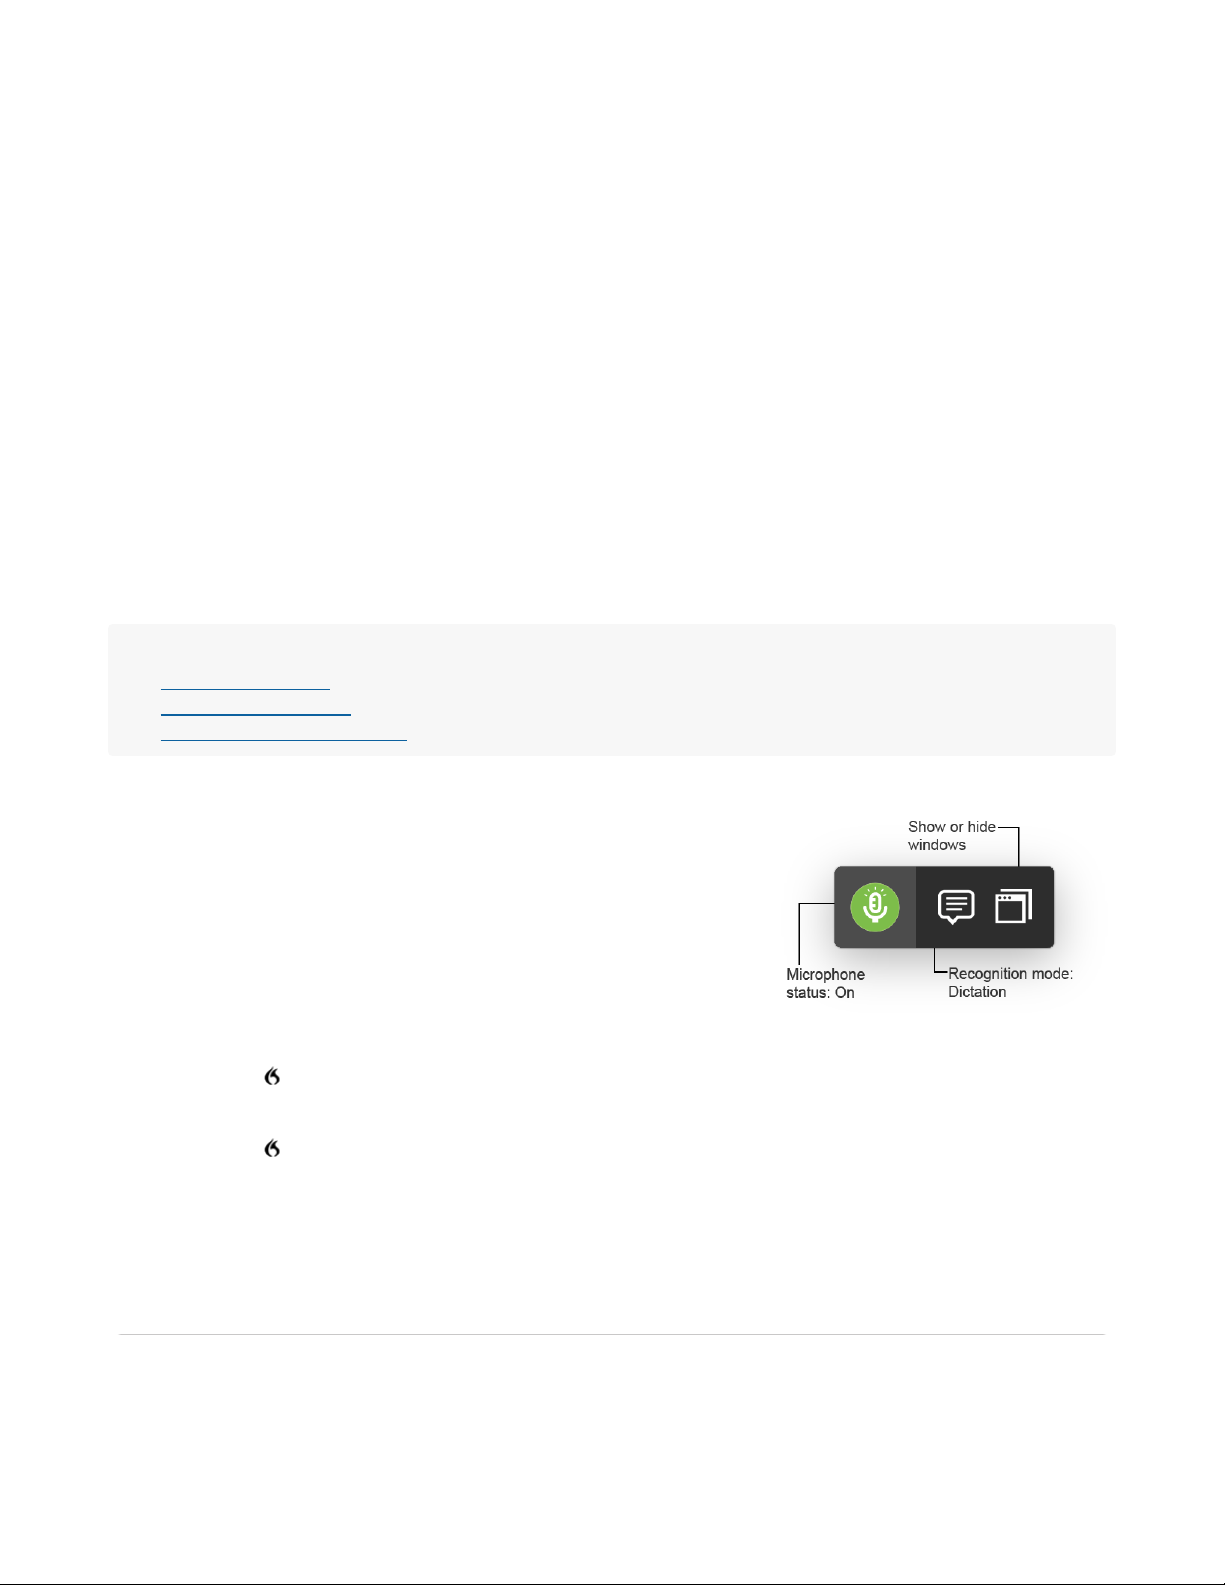
Page 27
Indicator
button
Mode What it means
On Dragon is listening to your speech.
Off Dragon is not listening. Click the button to turn the microphone on.
Sleep
mode
Dragon will only respond to the command "Wake up." All other speech is ignored.
Click the microphone button to toggle the microphone on or off.
See Microphone modes for more information.
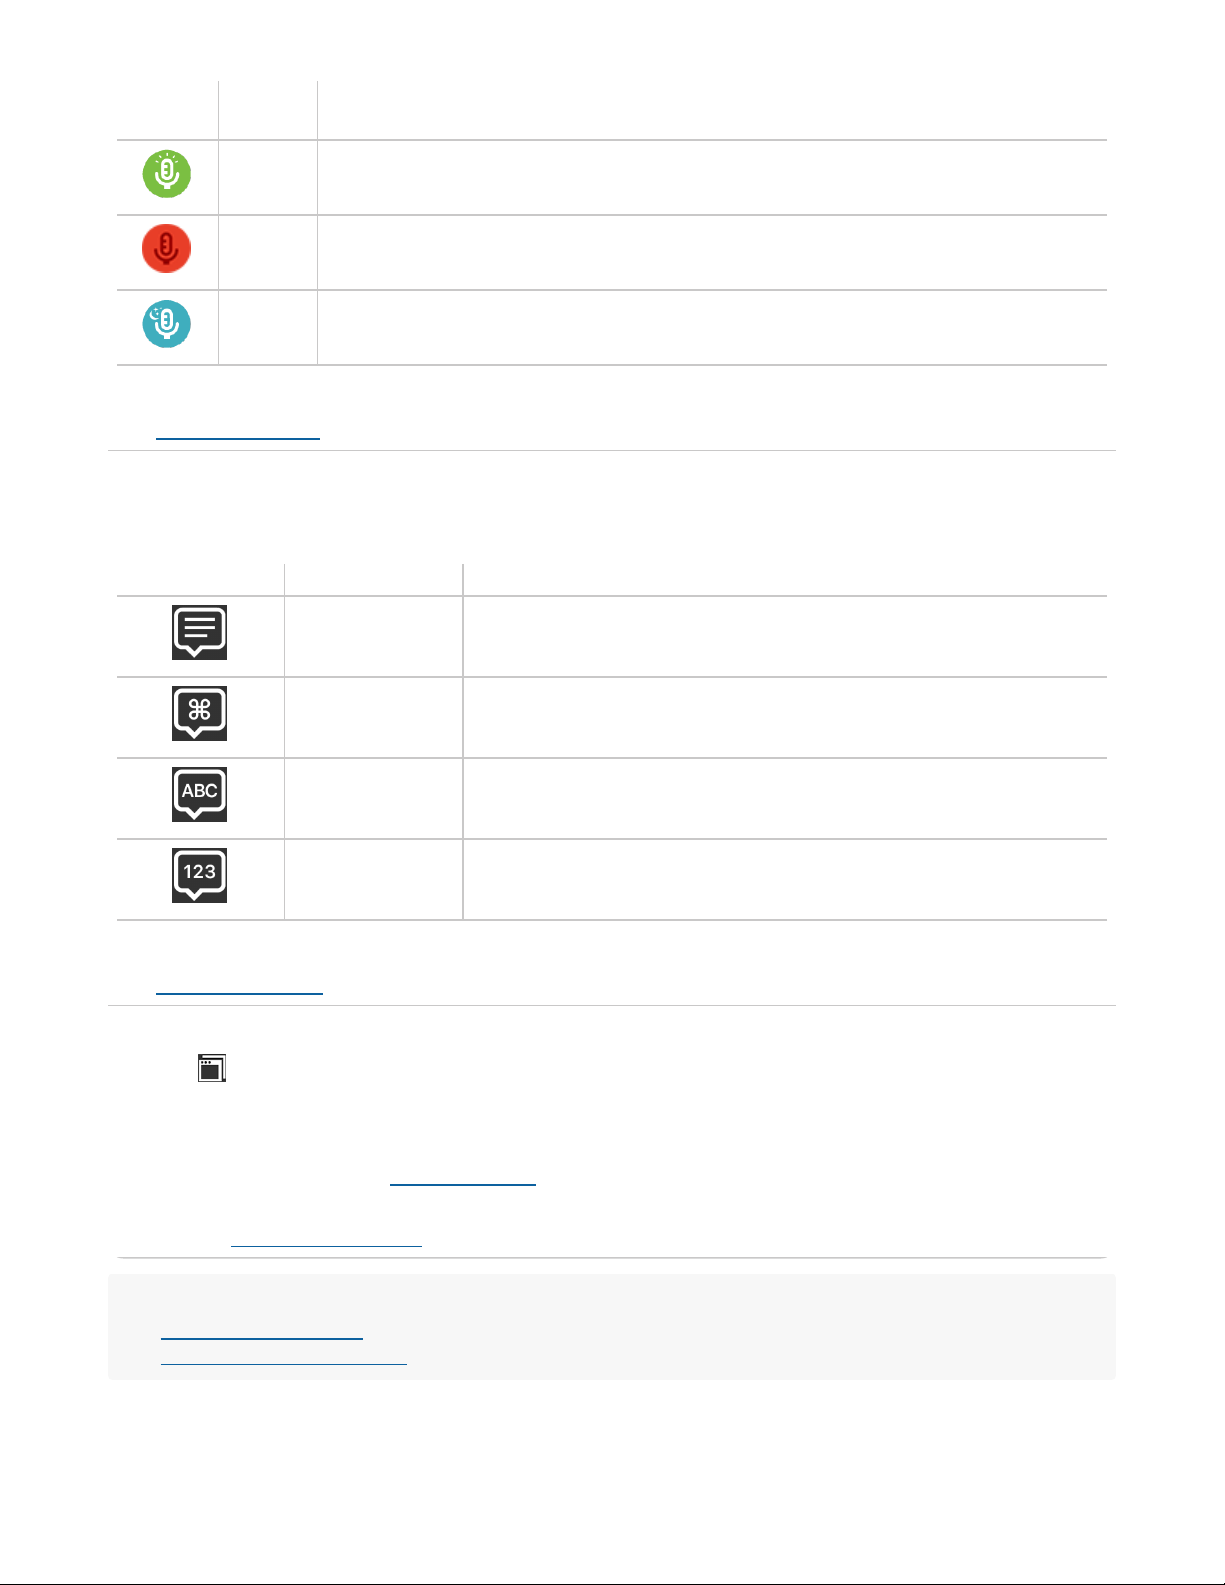
Recognition mode button
The Recognition mode determines what you can say to Dragon. The mode button indicates the current recognition
mode:
Indicator button Mode What you can do
Dictation mode Dictate text to be typed and issue commands
Command mode Issue commands
Spelling mode Dictate letters, numbers, and punctuation
Numbers mode Dictate numbers and some punctuation
Click the Recognition mode button to open the Recognition mode menu.
See Recognition modes for more information.
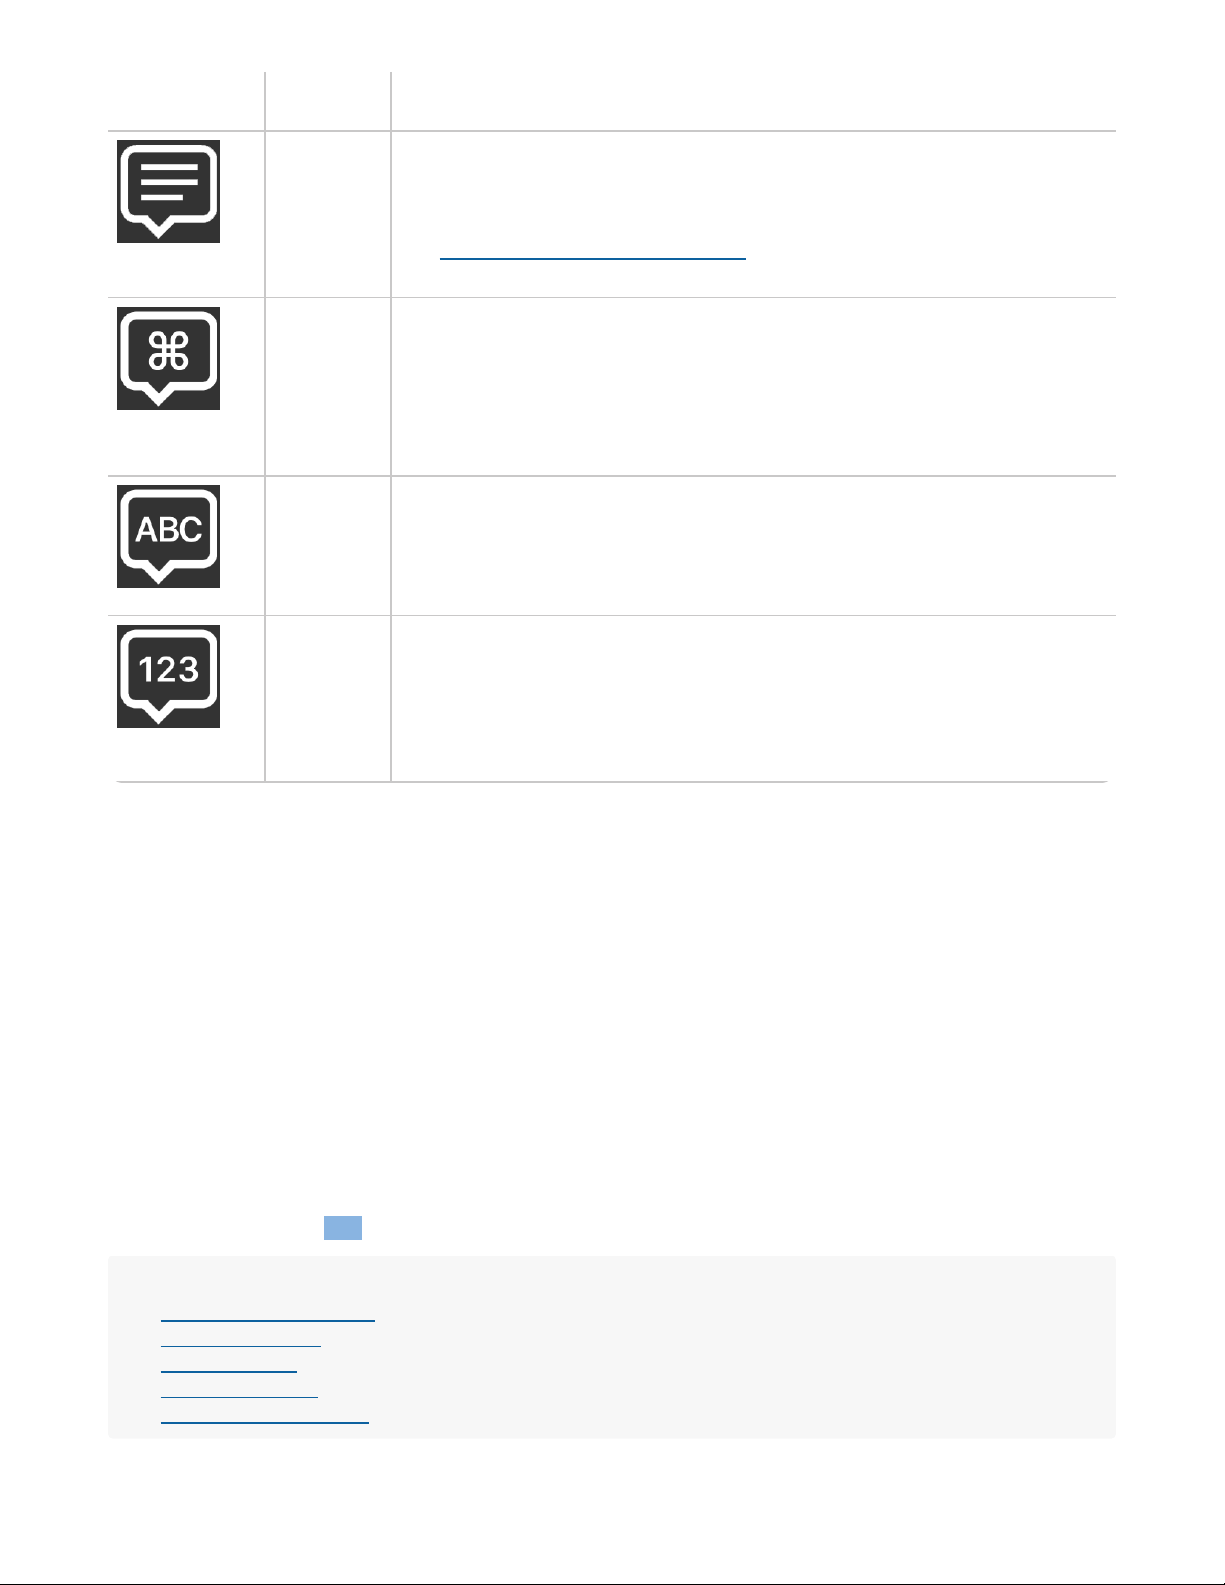
Window menu button
Click the icon to view the Window menu. Here, you can show or hide the following Dragon windows:
l Commands: View and edit Dragon’s commands. See The Commands window for more information.
l Correction: While dictating text, you can view the Correction window to see corrections for the last
utterance spoken. See Using Correction for more information.
l Guidance: View Dragon’s current status and common command suggestions based on your current state.
See The Guidance window for more information.
Related topics:
l Using the Dragon menu
l Getting started with dictation
27
Page 28
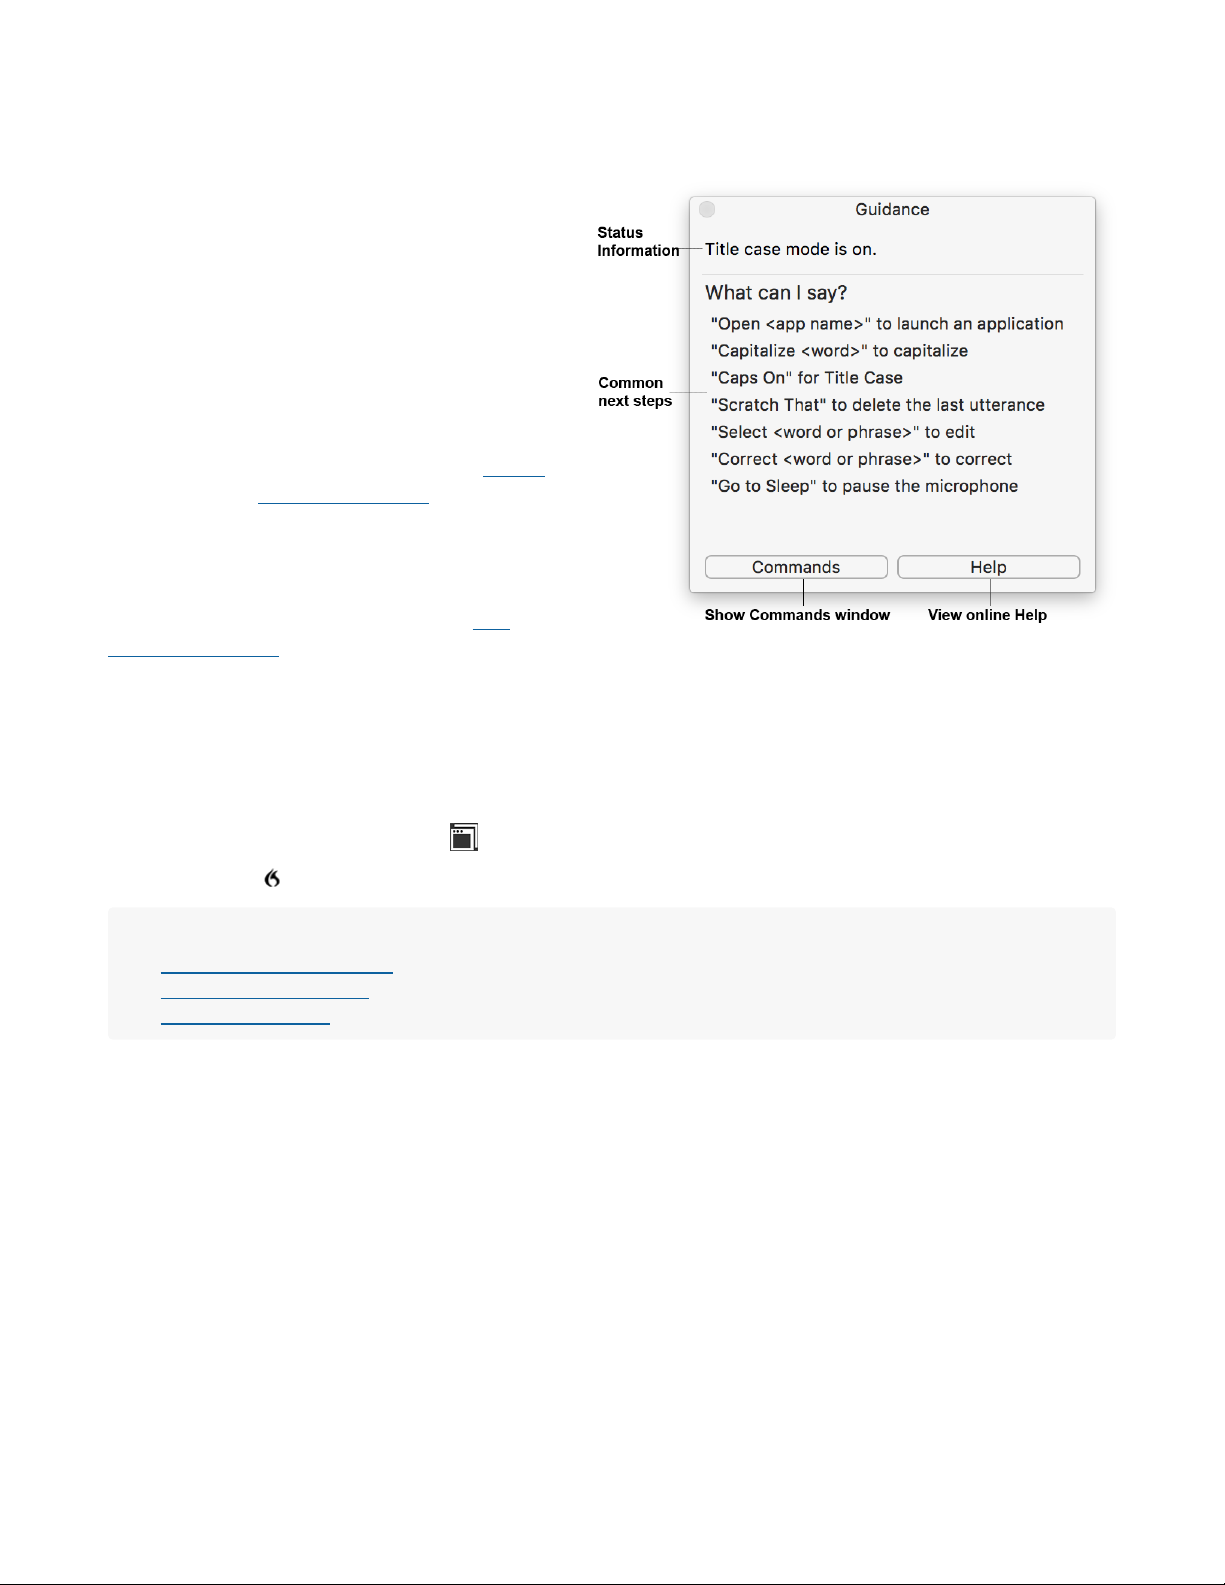
The Guidance window
The Guidance window offers information about Dragon's current status as well as suggested commands. When the
Guidance window is showing, it floats over all applications.
The Guidance window offers information about:
l Dragon’s current state, including:
l The most recent command you spoke,
transcribed into text.
l Special states such as Caps On.
l How Dragon works in the current
application.
For details on how Dragon works in
different applications, see Mixing
dictation with typing.
l Common next steps based on what you are
doing right now.
Click the Commands button to view and edit all of
Dragon's commands. For information, see The
Commands window.
Click the Help button to view the Dragon online help.
Showing or hiding the Guidance window
To show or hide the Guidance window, do one of the following:
l Say "Show Guidance" or "Hide Guidance."
l In the Status window, click the icon and choose Show Guidance or Hide Guidance.
l Click the icon in the menu bar and select Show Guidance or Hide Guidance.
Related topics:
l Mixing dictation with typing
l The Commands window
l The Status Window
Recognition modes
You use recognition modes to tell Dragon what to listen for. Your current mode is displayed in the Status window.
To select modes, do one of the following:
l Say "Switch to Dictation mode," "Switch to Command mode," "Switch to Spelling mode" or "Switch to
Numbers mode."
l Click the Recognition mode icon in the Status Window and select a mode from the menu.
l Press the keyboard shortcut (by default, ⌘ F10) for cycling between recognition modes. See Preferences
window: Shortcuts for more information on setting keyboard shortcuts.
28
Page 29
Status window
icon
Mode What you can do:
Dictation
mode
In Dictation mode, you can:
l Dictate text to be typed, including punctuation, letters and numbers.
l Issue commands.
See Using commands in Dictation mode, below, for tips on getting the best results
in Dictation mode.
Command
mode
In Command mode, you can:
l Issue commands.
If you say something that Dragon can't interpret as a command, nothing happens.
Open the Guidance Window for suggested commands based on your recent
actions.
Spelling
mode
In Spelling mode, you can:
l Dictate letters, numbers, and punctuation.
l Issue commands.
No automatic spacing or capitalization will be applied.
Numbers
mode
In Numbers mode, you can:
l Dictate numbers and some punctuation.
l Issue commands.
All numbers are typed as numerals. You can also enter certain punctuation, such
as mathematical symbols.
Using commands in Dictation mode
Because Dictation mode allows you to dictate and use commands, Dragon uses pauses to determine whether a
phrase should be considered a command or dictated text. For best recognition when issuing a command, speak the
command smoothly and continuously, but pause before and after it.
If you speak smoothly and continuously, Dragon will interpret your words as dictation, even if they include words that
might be a command.
Example:
Say: "Select date and time."
Result: "Select date and time."
If you pause before and after a phrase, Dragon will consider that phrase as a possible command.
Example:
Say: "What is today's date" [pause] "Select date."
Result: "What is today's date."
Related topics:
l Recognition mode button
l Dictation overview
l Dictating letters
l Dictating numbers
l The Commands window
29
Page 30

Preferences window
General
In the General pane of the Preferences window, you can control basic aspects of Dragon's appearance
and behavior.
See more…
Startup options:
l Microphone in Sleep instead of Off at Startup—Select to change the default microphone mode when
Dragon launches to sleep. Otherwise, Dragon launches with the microphone turned off.
This allows you to turn the microphone on by saying "Wake up" rather than having to use your mouse.
l Show Status Window at Startup—Select to show the Status Window at launch time. Otherwise, you will
have to show the Status Window by saying "Wake up". For more information, see The Status Window.
l Launch Dragon at Startup—Select to allow Dragon to launch when you turn on your computer. This
means Dragon will always be available to you – just turn on your microphone and speak.
Command Generation options:
l Generate Application Launch Commands—Select to allow Dragon to create globally available
commands you can use to launch any application on your computer. See Launching and quitting
applications for details.
l Generate Email Commands—Select to allow Dragon to create globally available commands to create
and address an email message to anyone in your Contacts list. See Working with Mail for details on email
commands.
Restart Dragon to see changes to your generated command preferences.
Auto Sleep options:
Adjust the slider to change how long the microphone takes to go to sleep when you are not using it.
Allowing the microphone to go to sleep prevents Dragon from interpreting background noise as dictation
while you are not using it.
Profiles
In this topic, learn how to use the Preferences window to customize Dragon settings, including:
l General preferences
l Profiles and dictation sources
l Dragon Anywhere accounts
l Keyboard shortcuts
l Update Dragon
l Advanced preferences
l License keys or Dragon accounts
The Preferences window allows you to customize various Dragon settings.
To show the Preferences window
l Say "Access Dragon Preferences window."
Or
l Click the icon in the menu bar, then select Preferences…
There are six panes in the Preferences window:
30
Page 31
The Profiles pane allows you to add, edit and delete profiles and audio sources.
See more…
Existing profiles are listed in the Profiles (Voices) box. Dictation sources are listed in the Dictation Sources
(Microphones) box. The name of the active profile and dictation source are each marked with a green dot.
Existing profiles from an earlier versions of Dragon are marked in the Profiles pane with a special icon (
) and need to be upgraded before you can continue using them. Please note that you can't upgrade a
profile that has a missing microphone.
For detailed information, see Using profiles and dictation sources.
Dragon Anywhere
Enter your Dragon Anywhere login credentials to link your desktop version of Dragon to your Dragon
Anywhere account and enable resource sharing.
See Dragon Anywhere for more details.
See more…
Once you are logged in, click Sync Now to share your custom words and Auto-texts with your mobile device.
Select Sync when loading profiles to allow Dragon Anywhere to sync automatically whenever you change
profiles.
Click Sign Out to sign out of your Dragon Anywhere account.
Shortcuts
The Shortcuts pane lets you set global keyboard shortcuts (hot keys) for four Dragon actions.
See more…
l Toggle Microphone. Turns the microphone on or off. Default is ⌘F11.
See Microphone modes for more information.
l Select Speech Mode. Cycles through the recognition modes. Default is ⌘F10.
See Recognition modes for more information.
l Show Correction Window. Shows and hides the Correction Window. Default is ⌘ F9.
See Using Correction for details.
l Dismiss MouseGrid. Hides the MouseGrid. Default is ⌘F12.
See MouseGrid for more details.
To set a shortcut
l Click in the oval shortcut region and type the desired shortcut.
To delete a shortcut
l Click the at the right end of the oval shortcut region.
To revert to a previous shortcut
l Click the curved arrow ( ) at the right end of the oval shortcut region.
31
Page 32

Important Note: OS X includes built-in dictation that can cause conflicts with assigned hot keys. You
should not assign keys F9 through F11 to Apple's hot key sequence for dictation. You should also never
assign any hot key sequence in Dragon that is the same as the one for that operating system's built-in
dictation.
Before using F-key keyboard shortcuts in Dragon, you should double-check your settings in the
Keyboard pane of your Mac's System Preferences. Look for the Use all F1, F2, etc. keys as
standard function keys checkbox. By default, this option is unchecked, which means you need to add
the fn (Function) key to your ⌘-F-key shortcuts in Dragon. If you check that box, you don’t need to use
the fn key with your ⌘ -F-key shortcuts in Dragon, but you do need to use the fn key to access volume
controls, brightness settings, and other quick access functions printed on the F keys.
Updates
Check for updates to Dragon and choose whether to allow Dragon to automatically download and install
updates when they are available.
Advanced
In the Advanced pane of the Preferences window, you can make less common changes to Dragon's
behavior and appearance.
See more…
Correction options:
l Always Show Correction Window When Dictating—Select to always show the Correction Window
while you are dictating.
l Close Correction Window After Each Choice—Select to close the Correction Window automatically
once you have selected a correction option.
l Maximum Recognition Alternatives—Adjust the slider to set the maximum number of alternatives
shown in the Correction Window.
l Show Smart Format Rules—Select to allow Dragon to ask you how to format the text you just corrected
in future.
See Using Correction for more information.
MouseGrid options:
l Switch to Command mode—Select if you want Dragon to switch to Command mode when you turn on
the MouseGrid.
l Enable zoom—Select if you want the MouseGrid to display the magnification window when you focus on
an area too small to show the grid.
l Obscure Transparency—Use the slider to determine how light or dark the MouseGrid section numbers
should be. The lighter it is, the easier it will be to see what's under it.
l Grid color—Click the box next to the option to view a color wheel where you can select a new color for the
MouseGrid section numbers.
l Mouse down color—Click the box next to the option to open a color wheel where you can select a new
color to indicate when the mouse is in a "down" state (e.g. "Press mouse").
See MouseGrid for more information.
Data collection options:
l Send anonymous usage data—Click to allow Dragon to collect anonymous data to improve future
32
Page 33

products and services. You can opt out at any time by deselecting the checkbox.
License
In the License pane, view information about the type of license you are using with Dragon.
See more…
The contents of the License tab vary based on your license type. See Activate and Register for more information on
Dragon licenses.
If you are using the 14-day free trial of Dragon Professional Individual for Mac, you can:
l Click Activate to purchase the product.
If you purchased a perpetual Dragon Professional Individual for Mac license, you can:
l View your serial number.
l Click Deactivate to revoke your computer’s license.
You may wish to do this if you want to transfer Dragon Professional Individual for Mac to a new computer.
If you purchased a subscription to Dragon Professional Individual for Mac, you can:
l View the Nuance account you are using.
l View the expiration date for your account.
l Click Deactivate to remove the license for this copy of Dragon Professional Individual for Mac.
l Click Manage Account to visit the Nuance website.
Related topics:
l The Status Window
l Microphone modes
Using profiles and dictation sources
In this topic, learn how to:
l Switch between profiles and dictation sources (microphones)
l Create a new profile
l Create a new dictation source
l Change the default dictation source for a profile
l Delete a profile or dictation source
About profiles and dictation sources
A profile is a set of data on how you speak. Each user of Dragon must create his or her own profile, with a name that
uniquely identifies it.
A dictation source is a microphone you use to dictate with Dragon. For example, you can use:
l Your Mac's internal microphone
l A USB headset
l A Bluetooth microphone
In order to use Dragon, you must have at least one profile and one available dictation source.
Switching profiles and dictation sources
When you start up Dragon, it activates the profile you used most recently. The name of the active profile is shown with
a check mark in the Dragon menu.
33
Page 34

1. Click the icon in the menu bar and select a profile from the Recent Profiles list.
Dragon loads the profile with its default dictation source.
2. If you have configured more than one dictation source for your profile, you can select a different microphone
from the sub-menu.
If there is only one dictation source, your profile does not include a dictation source sub-menu.
If you do not see your profile in the Recent Profiles list:
1. Click the icon in the menu bar and select Manage Profiles…
2. Select your profile from the list on the left.
3. Click the Load button.
Missing dictation sources
If the selected dictation source is missing (for example, your USB microphone is unplugged), Dragon displays a
warning message. To use Dragon, you must do one of the following:
l Connect the missing microphone
l Select a different microphone
l Set up a new microphone for your profile
Working with profiles and dictation sources
You can create, edit and delete profiles and dictation sources in the Profiles pane in the Preferences window.
To open the Profiles pane, do one of the following:
l Say "Access Profiles window."
l Click the icon in the menu bar and select Manage Profiles…
l Open the Preferences window and click the Profiles icon.
To add a profile
1. Click the button at the bottom of the Profiles (Voices) list in the Profiles pane.
The Profile Enrollment process begins.
2. Give the profile a name and click Continue.
The Audio Source screen appears.
3. Select the Microphone you plan to use from the dropdown menu.
4. Optional: Enter a Name for your microphone.
The name will appear in the Dictation Source (Microphones) list.
5. Click Continue.
The Region screen appears.
6. Select your Region from the dropdown menu and click Continue.
The Region setting helps Dragon determine appropriate spelling and vocabulary.
7. Select the Accent from the dropdown menu that most accurately describes how you speak, then click
Continue.
Dragon saves your new profile. This process may take several minutes. When the profile has been saved, the
Microphone Setup window appears.
8. Complete the Microphone Setup to dictate with the new profile.
You must complete Microphone Setup or Dragon will not be able to adequately recognize your speech.
Complete the Microphone Setup process for each microphone you use with your profile.
34
Page 35

To add a dictation source to an existing profile
1. Click the button under the Dictation Sources (Microphones) field in the Profiles pane.
The dictation source pop-over dialog appears.
2. In the Microphone dropdown menu, select the microphone you wish to add.
3. Optional: Enter a Name for your microphone.
4. Click Continue.
The Microphone Setup window appears.
5. Complete Microphone Setup before using your new Dictation Source.
To change the default dictation source
l In the Default dropdown menu under Dictation Sources (Microphones), select your preferred microphone.
To change the Auto Formatting settings for a profile
1. Click the Auto Formatting… button.
The Auto Formatting dialog box opens.
2. Change the settings as needed.
3. Click Apply to save changes and close the Auto Formatting dialog box.
To delete a profile and dictation sources
Do one of the following:
l Select the profile and click the button at the bottom of the Profiles (Voices) list.
l Select the dictation source and click the button at the bottom of the Dictation Sources (Microphones)
list.
You cannot delete a profile or dictation source if it is currently in use. You must always have at least one profile and
one audio source.
Related topics:
l Microphone Setup
l Preferences window
l Auto Formatting
Using DragonPad
While Dragon offers dictating and editing capabilities in most applications, you can also use the DragonPad to dictate
and edit your text, then transfer it into your document or text field.
If you want to mix dictation and typing in an unsupported application, use DragonPad to avoid navigation errors. See
Mixing dictation with typing for more on this topic.
DragonPad allows you to:
l Dictate text
l Use Correction
l Select and replace text
l Cut, copy and paste
l Adjust capitalization and spacing
You cannot apply text formatting such as bold or italic.
35
Page 36

To dictate and transfer text
1. Make sure the target application – the application you want to dictate into – is open, and the cursor is in the
field where you want the text to appear.
2. Say "Show DragonPad," or click the icon in the menu bar and select Help > DragonPad.
The target application should appear in the Title Bar.
3. Dictate your text.
4. Revise your text as needed.
5. Say "Click Transfer" or click the Transfer button.
DragonPad closes, and the text you dictated appears in the target application.
Closing DragonPad
To close DragonPad without transferring the dictated text:
l Say "Hide DragonPad."
Or
l Click the icon in the upper left corner of the DragonPad window.
Your text is automatically saved, and will appear next time you open DragonPad.
Related topics:
l Using Correction
l Mixing dictation with typing
l Revising text
FAQs
In this topic, get answers to commonly asked questions about:
l Using Dragon
l Improving Dragon's recognition
l Accessibility
36
Page 37

If you are upgrading from Dragon Dictate 4 or Dragon for Mac version 5, see Upgrading from Dragon Dictate 4 or
Dragon for Mac 5: FAQ
About Dragon Professional Individual for Mac
I just installed Dragon. Where did it go?
It's in your Applications folder. Open the Applications folder and double-click Dragon to launch. All of Dragon's
features are available in the Dragon menu ( ), located in the menu bar.
See Using the Dragon menu for more information.
Bonus tip: In the General Preferences, select Launch Dragon at Startup to ensure Dragon is always
running, even after a reboot.
Do I need a unique profile for each user?
Yes. A profile contains specific information about each person's voice. Each profile also contains one or more dictation
sources (microphones) that have been calibrated for use with the user's voice.
See Using profiles and dictation sources for more information.
How can I tell what mode Dragon is in?
Check the Status Window. The microphone button, to the left, indicates the microphone mode – to dictate, the
microphone needs to be on ( ).
The Recognition mode icon in the center of the Status Window indicates what Dragon is listening for – general
dictation and commands (Dictation mode), commands only (Commands mode), letters (Spelling mode), or numbers
(Numbers mode). For most purposes, you should be in Dictation mode ( ). See Recognition modes for more
information.
If you don't see the Status Window, click the icon in the menu bar and select Show Status Window. See The
Status Window for more details.
Note: If you are in Transcription mode, you cannot dictate with Dragon, and the Status Window is hidden.
To exit Transcription mode, click the Switch to Dictation button on the Transcription window, or click the
icon in the menu bar and select Switch to Dictation… to exit Transcription mode. See Transcribing
recorded audio for more information.
Why isn't there any punctuation in my dictated text?
You need to dictate punctuation marks as you speak – with a few exceptions, such as apostrophes and hyphenated
words, Dragon will not attempt to guess where punctuation should be placed. See Punctuation—General for details on
dictating punctuation.
Recognition
I'm not happy with the recognition. What can I do?
First, check your microphone placement: if you are using a headset, the microphone should generally be about an inch
from the side of your mouth. See Microphone placement for more tips.
Next, try running Microphone Setup again. Click the icon in the menu bar and select Improve Recognition >
Microphone Setup… This will ensure that your microphone is properly calibrated for your current environment. See
Microphone Setup for more details.
If you are still having problems, Voice Training can help Dragon understand how you speak. Click the icon in the
menu bar and select Improve Recognition > Voice Training… The more Dragon hears you speak, the better it can
recognize your voice. See Voice Training for more details.
For more tips on improving recognition, see Poor recognition in the Troubleshooting section.
37
Page 38

Dragon entered text into my document when I was trying to dictate a command. Why?
Icon Visual characteristics
l White outline on a green background
l Small white lines around the top of the microphone
l Button pulses based on the volume of the detected audio.
If you do not see any pulsing movement when you speak, the microphone
may be off.
l Dark red outline on a red background
l White outline on a light blue background
l Moon and star icons to the left
l Button pulses based on volume of the detected audio
Dragon detects audio in sleep mode, but only responds to the command
"Wake up."
To make sure Dragon understands that you are dictating a command, pause slightly before and after speaking the
command. If you are still having trouble, try switching to Command mode. See Recognition modes for more
information.
To remove a command mistakenly typed into your document, say "Scratch that." See Take it back for more on
undoing dictated text and commands.
How can I make Dragon recognize my name correctly?
You can add your name to Dragon's vocabulary by using Correction. Just say "Correct that" or "Correct <your name>"
after Dragon types the wrong word, then choose the correct name from the list, or edit one of the options and change it
to your name. For detailed instructions, see Correcting recognition errors.
Alternatively, you can open the Vocabulary Editor and add your name manually. For detailed instructions, see Adding a
User vocabulary item.
If your name is in Dragon's vocabulary, but Dragon's recognition of it is poor, try training the vocabulary term to teach
Dragon how you pronounce your name. See Training a vocabulary item for detailed instructions.
Accessibility
I have color blindness. How can I tell what mode the microphone is in?
If you cannot distinguish the color of the microphone button, look for other visual distinctions between the button
states, as described in the table below:
You can also tell whether the microphone is on by checking the Dragon menu:
1. Click the icon in the menu bar to open the Dragon menu.
2. Check the first option in the Dragon menu.
l If the microphone is on, the first option in the Dragon menu is Turn Microphone Off.
l If the microphone is off or in sleep mode, the option is Turn Microphone On.
I have difficulty using a mouse. How can Dragon help me navigate my Mac?
Dragon includes many ways to control your computer by voice:
38
Page 39

l Use commands like "Activate TextEdit" to launch an application.
See Launching and quitting applications for more details.
l Use commands like "New file," "Close window," or "Switch to next application" to open and close windows or
change which window has focus.
See Navigating application windows for more information.
l Use commands like "Click OK" to control dialog box buttons by voice.
See Using dialog controls for more information.
l Use commands like "Click File menu" to access menus and menu items in any application.
See Menu Walking for more information.
l Use commands like "Press the keys Command S" to access keys and keyboard commands by voice.
See Key commands for more information.
l Use commands like "Move mouse up" and "Mouse click" to control your mouse by voice.
See Mouse commands for more information.
l Say "Open MouseGrid" to use a 3 x 3 grid to move your mouse to a particular area of the screen.
See MouseGrid for more information.
Related topics:
l Getting started with dictation
l Using the Dragon menu
l The Status Window
l Troubleshooting overview
What's New?
This topic describes enhancements and new features in Dragon Professional Individual for Mac version 6.
Faster and more accurate than ever
Dragon Professional Individual for Mac v6 expands the possibilities of speech recognition innovation with a nextgeneration speech engine, significantly increasing accuracy over previous versions. Dragon uniquely brings
consistent, optimal accuracy to the Mac, with Deep Learning technology and adaptation techniques that continuously
adjust to your voice or environmental variations, even while you're dictating. Dragon v6 provides:
l Up to 14% improved accuracy out of the box without training
l Continuous learning—even during dictation—for individually adapted accuracy improvements that enhance
the user experience
l Optimal accuracy achieved for speakers with accents or in slight noisy environments such as in a cubicle
environment
Formatting and other recognition improvements, for minimal editing
Dragon delivers improved recognition of number and email address formatting, hyperlink formatting in auto-texts, and
place names based on how we naturally speak, resulting in fewer overall corrections. Examples include:
l "three double two five" → 3225
l "two point five million" → 2.5 million
l "oh point five" → 0.5
l "quarter of five" → 4:45
l "eight pounds fifty" → £8.50
39
Page 40

l "John dot Smith at Nuance dot com" → john.smith@nuance.com
l Better overall handling of Roman numerals
Improved set up
Dragon provides simplified microphone selection for faster, easier setup:
l No transcription setup option needed
l No smartphone option needed (since built-in mic is already supported along with numerous other microphone
options)
l Audio playback and troubleshooting button to allow the user to hear their audio passage read during setup, so
that they be assured their microphone is working or troubleshoot if there is an audio issue
Improved user interface and experience
Dragon delivers an improved user experience that makes powerful features easier to discover and use.
l Clearer Full Text Control indicator on the new Guidance Window for an enhanced dictation experience
l Improved Status Window, Correction Window and streamlined Profiles management
l New License preference pane to manage licenses or subscriptions
l New automated backups of commands and vocabulary
l Improved Command management
l Faster startup time with optimizations throughout
Enhanced transcription
The enhanced transcription process leverages all the accuracy improvements gained from the state-of-the-art engine,
while reducing the number of steps required to getting your audio recordings transcribed.
l Simplified user interface and better speaker management
l No training is required for transcription; you no longer need to initially transcribe and correct a short 90-second
clip to achieve transcription accuracy
l Acoustic and language model adaptation are automatically leveraged for the current user
l No training is required for third-party transcription; there is also better separation of current user data versus
third-party speaker data
Transcription Batch Mode
Now use Batch Mode and save time if you have multiple audio files to transcribe. In the Transcription Window, simply
drop as many files as you need to have transcribed to the Audio Files to Transcribe list, and Dragon Professional
Individual for Mac transcribes them all together, quickly and efficiently.
Updated web and application support
Dragon empowers you to work even more quickly and accurately by voice with support for Full Text Control* within the
latest business applications. Web and desktop applications with enhanced support include for example:
l Apple Pages
l Apple Keynote
l Apple Numbers
l Microsoft Outlook 2016
l Scrivener
* Full Text Control requires adoption of Apple’s Accessibility API
Improved help
Contextual guidance tailored to your usage helps you maximize the power of Dragon and complete documentation
more efficiently than ever before. Dragon offers multiple ways to accelerate proficiency and get the most out of your
40
Page 41

speech recognition investment—even offering productivity tips and helping you discover advanced Dragon features.
You can take advantage of:
l Helpful tips always available in the Guidance Window
l Improved online Help:
l Enhanced Help that gives users easier access to top searches
l Changing content on main help page with highly used topics featured
l New troubleshooting sections
l Expanded navigational text that gives users more information/context
l More task-based dialog box help
Related topics:
l The Status Window
l The Guidance window
l Transcribing recorded audio
Upgrading from Dragon Dictate 4 or Dragon for Mac 5: FAQ
In this topic, find out answers to common questions about upgrading, including:
l What files can I remove after upgrading?
l What can I do if my profile won't upgrade?
l What happened to Transcription sources?
l Upgrading from Dragon for Mac 5
l Upgrading from Dragon Dictate 4
All Upgrades
I just finished upgrading – is there anything I can delete to save disk space?
You can remove old Dragon files from your hard drive once you are sure that Dragon Professional Individual for Mac 6
is working properly:
1. In the Finder, select Go > Go to Folder…
2.
Copy and paste the following: /Library/Application Support/Dragon
3. Click the Go button.
A Finder window opens, displaying the contents of the specified folder.
4.
Drag the file named Speech Engine Data (English) 4.0 or Speech Engine Data (English) 5.0 to the
Trash.
Important: Do not move any other files in the Dragon folder.
5. Once you have successfully upgraded your profile and verified that it works as expected, you can delete the
backup copies of your old profiles. In the /Documents/Dragon/Support folder, find the zipped backup copies
of your old profiles and drag them to the trash.
My profile won't upgrade. What can I do?
Make sure the microphones listed as Dictation sources in your profile are connected. Missing microphones are marked
with a in the Profiles pane.
See Issues with Upgraded Profiles for more information. If you don't have any custom words, it may be better to create
a new profile.
41
Page 42

What happened to Transcription sources?
Transcription sources are no longer stored in the Profiles pane. If your Dragon for Mac 5 or Dragon Dictate 4 profile
included Transcription sources, they are available in the Speaker dropdown list in the Transcription window.
Upgraded Transcription sources appear in the format "<Transcription source> (<Profile name>)." For example, if you
had a Transcription source named "iPhone" and a user named "Marie," the Speaker appears as "iPhone (Marie)."
Upgrading from Dragon for Mac 5
How has the Status Window changed?
Dragon Professional Individual for Mac 6 features a new, compact Status window. Here's what you need to know:
l Guidance is now its own window. Click the button and select Show Guidance to view hints and common
commands based on your current state.
l Correction is also its own window. The Correction window appears whenever you use a Correction
command, like "Correct that." You can also show the Correction window by clicking the button and
selecting Show Correction.
l The Recognition mode dropdown list has been consolidated into an indicator button: . Click the button to
select a different Recognition mode.
See The Status Window for more information.
Upgrading from Dragon Dictate version 4
I just upgraded from Dragon Dictate version 4 – what do I need to do now?
l Be sure to update your Web Extensions. Go to http://www.nuance.com/extensions5 and follow the
instructions.
l Remove the Dragon Dictate 4 icon from your dock. By default, Dragon Professional Individual for Mac 6
doesn't appear in the dock and works differently from Dragon Dictate.
1. Control-click the Dragon Dictate 4 icon.
2. In the pop-up menu, select Options > Remove from Dock.
l Dragon creates a folder called Dragon in your Documents folder and automatically places all new profiles in
this folder. You can move your existing profiles into this folder or leave your existing profiles where they are.
l Go to the top of the page for information about files you can delete after upgrading.
Where did Dragon go?
Dragon Professional Individual for Mac 6 only appears in the menu bar, not the dock, and is designed to stay running
constantly. You no longer need to switch from your current application to Dragon and switch back to use any of
Dragon's features. You can even change profiles from the menu bar without ever leaving your application!
To launch Dragon, you can do any of the following:
l Go to the Applications folder and double-click the Dragon icon.
If you want to add Dragon to the Dock, drag the Dragon icon from the Applications folder to the
Dock.
l Use Spotlight to search for and launch Dragon.
To make sure Dragon is always running, even if you restart your computer, open Dragon and do the following:
1. Click the icon in the menu bar and select Preferences….
2. In the General pane, select Launch Dragon at Startup.
What happened to Text Macros?
Text Macros are now Auto-texts. They work just like Text Macros.
42
Page 43
To add an Auto-text, click the icon in the menu bar and select Add New Auto-text…
See Auto-text commands for more information.
Where is the Recognition Window?
The Recognition Window in Dragon Dictate 4 is now the Correction window. To show the Correction window:
1. Click the Windows menu ( ) in the Status Window.
2. Select Show Correction.
The Correction window also appears automatically when you use Correction commands, like "Correct <text>." See
Using Correction for more information.
How has the Status window changed?
Dragon Professional Individual for Mac 6 features a completely new Status Window. Here's what you need to know:
l Use the microphone indicator ( ) to toggle the microphone mode.
l Use the Recognition mode indicator ( ) to choose a recognition mode (Dictation, Commands, Numbers, or
Spelling).
l Use the Windows menu ( ) to show or hide the Commands, Correction or Guidance window.
See The Status Window for more information.
Where is the Note Pad?
In Dragon Dictate, you could use the Note Pad to edit text and mix talking with typing. In Dragon Professional
Individual for Mac 6, fully supported applications like Microsoft Word 2016 or TextEdit can be used to replace the
functionality of the Note Pad.
Dragon Professional Individual for Mac 6 supports editing and navigation commands, like "Select <text>" or "Go to
end," in nearly every application, but only fully supported applications allow you to use these commands even if you
used your keyboard or mouse while dictating. See What applications are supported? for a complete list.
Where is the Express Editor?
The Express Editor has been renamed the DragonPad. It has the same features as the Express Editor. See Using
DragonPad for more information.
You may find that using TextEdit to edit text and then copying and pasting into another application is a better workflow.
Related topics:
l FAQs
l What's New?
l Issues with Upgraded Profiles
Activate and Register
If you completed your initial installation without activating the product, you will need to enter a valid serial number or
subscription before your trial period is over to continue using Dragon.
To activate your license
1. Click the icon in the menu bar and select Help > Activate.
Dragon opens the Activation window.
2. If you have not purchased a license or subscription, click the Learn More link, or click here to purchase a
license from the Nuance website.
If you have already purchased a license or subscription, proceed to the next step.
43
Page 44

3. Click the appropriate button:
l Click Serial Number if you have a purchased a perpetual Dragon Professional Individual for Mac 6
license.
The Serial Number screen appears.
l Click Nuance Account if you have purchased a subscription for Dragon Professional Individual for
Mac.
The Nuance Account screen appears.
4. Enter the required information.
5. Click Activate Now (for serial numbers)
Or
Click Sign In (for subscription accounts)
To register your copy of Dragon Professional Individual for Mac
After activating your Dragon Professional Individual for Mac license, Dragon prompts you to register your product. If
you choose to skip registration, you can access it at any time by clicking the icon in the menu bar and selecting
Help > Register for Support.
1. Choose New or Existing Nuance Customer, then click Continue.
2. Enter your email address, a password, and your first and last name.
Your password can be up to 12 characters, and should not contain punctuation or symbols.
3. Click Continue to move to the next screen.
4. Enter your company name, street address, city, state, postal or Zip code, country and phone number.
You must select a country from the dropdown list: the other fields are optional.
5. Click Continue.
On the next screen, Dragon confirms the Model, Memory, and Processor Speed and Cores for your Mac.
6. Select Yes to allow Dragon to collect this information for technical support purposes, or No to prevent it. Then
click Continue.
7. Complete the survey (optional), and check which products you want to receive news and offers about. Then
click Complete Registration.
To deactivate your Dragon Professional Individual for Mac license
1. Click the icon in the menu bar and select Help > Deactivate.
A confirmation dialog appears.
2. Click OK to confirm deactivation.
Your license number or login information are removed, and Dragon quits.
Related topics:
l Microphone placement
l Getting started with dictation
l Using profiles and dictation sources
44
Page 45

Use the microphone
Click: To learn more about:
Microphone modes
l What are microphone modes?
l How can I tell what mode the microphone is in?
l How do I switch modes?
Microphone Setup
l How do I access Microphone Setup?
l Why do I have to go through Microphone Setup?
Microphone placement
l How do I position my microphone for optimal recognition?
Read these topics to learn about using your microphone with Dragon.
Microphone Setup
Microphone Setup allows Dragon to adjust the audio input settings for optimal recognition. Microphone Setup appears
automatically whenever you create a new profile or add a new dictation source. You must complete the setup process
for each new profile and each microphone you associate with a profile.
You can also run the Microphone Setup at any time if you encounter problems with your microphone. For more
information about improving your audio quality, see Poor audio quality.
To open the Microphone Setup window
l Say "Show Microphone Setup window."
Or
l Click the icon in the menu bar and select Improve Recognition > Microphone Setup.
To complete Microphone Setup
1. Click the microphone button ( ) to turn the microphone on.
2. Read aloud the text that appears in the window. Repeat the text if needed.
The Microphone Setup is Finished screen appears when Dragon has finished adjusting the audio input.
3. Click Play to hear the last few seconds of your speech. If it seems too loud or too soft, you may want to set
the gain manually (see below).
4. Click Done to exit the Microphone Setup window.
To manually adjust gain
1. Select Manual Gain.
2. Drag the slider to about 60.
3. Click the microphone button ( ) to turn the microphone on.
4. Read aloud the text in the window until the Microphone Setup is Finished screen appears.
5. Click Play to hear the last few seconds of your speech. If it seems too loud or too soft, click the Back button
and adjust the gain again.
6. When you are satisfied with the volume of your speech, click Done to exit the Microphone Setup window.
Related topics:
l Microphone placement
l Getting started with dictation
l Using profiles and dictation sources
45
Page 46

Microphone modes
State
Status
Window
button
Menu
icon
What you can do
On Dictate text and issue commands.
Off
Dragon does not respond to any spoken commands. You must use your mouse
or keyboard to turn your microphone back on.
Sleep
Dragon ignores all speech except "Wake up."
Your microphone is always in one of three modes. The current mode is indicated by the Microphone button in the
Status Window and by the Dragon menu icon.
Changing the microphone mode
If your microphone is off, do one of the following:
l Click the icon in the menu bar and select Turn Microphone On.
l Click the microphone button in the Status Window (this will turn the microphone on).
l Use the keyboard shortcut to toggle the microphone (default is ⌘F11).
If your microphone is on, do one of the following:
l Say "Microphone off" or "Go to sleep."
l Click the icon in the menu bar and select Turn Microphone Off.
l Click the microphone button in the Status Window (this will turn the microphone off).
l Use the keyboard shortcut to toggle the microphone (default is ⌘F11).
If your microphone is in sleep mode, do one of the following:
l Say "Wake Up" or "Turn microphone on."
l Click the icon in the menu bar and select Turn Microphone On.
l Click the microphone button in the Status Window (this will turn the microphone on).
l Press the keyboard shortcut to toggle the microphone (default is ⌘F11).
By default, Dragon's microphone will go to sleep after one minute of inactivity. You can change the Auto
Sleep setting in the General pane of the Preferences window.
Related topics:
l Microphone placement
l Microphone Setup
l Getting started with dictation
l Preferences window
Microphone placement
Correct microphone positioning is one of the most important ways to enhance recognition accuracy. Even slight
variations can deteriorate accuracy significantly.
46
Page 47

If you are having trouble with audio quality after optimizing your microphone placement, see Troubleshooting audio and
recognition.
Using your Mac's built-in microphone
l Keep your mouth a consistent distance from your device's microphone. Consult your Mac manual if you’re not
sure where the microphone is on your computer.
l Keep your face directed towards your Mac. Avoid turning your head while dictating.
Positioning a headset microphone
l Place the microphone element to the side of your mouth to avoid noise from breathing.
l Keep the microphone element about an inch from the side of your mouth, but not touching it.
l Make sure the front of the microphone points toward your mouth. The front may be labeled with, for example,
a colored dot or the word "Talk."
l Position the headset consistently every time you use it.
l Depending on the microphone you are using, you may need to manually set Gain. See Microphone Setup for
more information.
Positioning a hand-held microphone
l Do not hold the microphone directly in front of your mouth. Hold it below or to the side of your mouth to avoid
noise from breathing.
l Keep the microphone element about 1 to 3 inches away from your mouth.
l Point the front of the microphone toward your mouth. Don't talk into the side of it.
l Be careful not to move the microphone or your head suddenly.
l Do not use a microphone stand or holder. This will make it harder to maintain a consistent position, and the
stand may conduct noise.
l Hold the microphone consistently every time you use it.
l Depending on the microphone you are using, you may need to manually set Gain. See Microphone Setup for
more information.
Related topics:
l Microphone Setup
l Getting started with dictation
47
Page 48

Dictate text
Click: To learn about:
Getting started with dictation
l How to start dictating
l Dictation best practices
Mixing dictation with typing
l What is Full Text Control?
l Using cache commands to resolve issues relating to typing and
dictating
Dictation overview
l Dictating text, including:
l Line and paragraph breaks
l Punctuation
l Quotes
l Bullets
l Email and Web addresses
l Proper nouns
l Hyphenated words
l Compound words
l Abbreviations
l Acronyms
Dictating punctuation and symbols
l Dictating punctuation and special characters
Dictating letters
l Spelling words and phrases
Dictating numbers
l Dictating numbers, including:
l Currency
l Dates
l Decimals
l Fractions
l Numerals
l Phone numbers
l Postal codes
l Roman numerals
l Time
l Weight
Take it back
l How to undo incorrect or misrecognized commands
Read these topics to learn how to dictate with Dragon.
Getting started with dictation
Creating a new document
1. Click the microphone button in the Status Window to turn the microphone on: .
2. Say "Open <application>." For example, "Open Microsoft Word."
3. Say "New file."
4. Begin dictating.
48
Page 49

Dictation guidelines
How to dictate
l Speak clearly and naturally, at your normal conversational tone and pace.
l Pronounce each word clearly, but in a way that is comfortable for you. If you are not sure how to do this,
imagine how a newscaster reads a story and try to copy that style.
l For best recognition, dictate using longer phrases rather than pausing after a each word or every few words.
Hearing a whole phrase helps Dragon predict what words you are likely to say in context, which makes it
more accurate.
Remember, in some applications, it's better not to use your mouse and keyboard while dictating text. See
Mixing dictation with typing for more information, including a list of currently supported applications.
Where to dictate
l For best results, dictate in an area with minimal background noise, as Dragon hears and transcribes
everything.
How to add punctuation
l Pause briefly before and after you dictate punctuation.
l Say all punctuation as you dictate. Except for some in-word punctuation such as apostrophes and hyphens,
Dragon will not insert any punctuation unless you dictate it.
For example, if you want to enter the text "Good morning, Mike!" say "Good morning comma Mike
exclamation point."
How to use commands
l Pause briefly before and after you dictate commands.
l Check the Guidance window for suggested commands based on what you are doing.
Related Topics:
l Dictation overview
l Microphone modes
l Microphone placement
l Microphone Setup
Mixing dictation with typing
In this topic, learn how to:
l Find out what Dragon can do in your current application
l What applications support mixing dictating and typing
l What it means if you are dictating in an unsupported application
l What to do if your cursor is jumping to the wrong place
Dragon allows you to dictate text in virtually any application. In order to use commands such as "Select <text>" or
"Correct <word>," Dragon needs to know where your cursor is within the document. In some applications, including
Microsoft Word 2011 or 2016, Microsoft Outlook 2016, and TextEdit, Dragon can always get that information, even if
you use your keyboard and mouse to change text while you are dictating. Some applications, however, do not allow
Dragon to find out whether you have moved your cursor. If you dictate in these applications, avoid using your mouse or
keyboard.
Dragon notifies you when you are dictating into an application that does not support typing while dictating.
49
Page 50

To make sure you see these notifications:
Supported Not supported*
Address Book Apple Mail
Keynote 6.6 or later BBEdit/TextWrangler
Messages Evernote
Microsoft Word 2011 or
2016
Microsoft Excel
Numbers 3.6 or later Microsoft PowerPoint
Outlook 2016 version
15.24 or later
Pages 5.6 or later
Scrivener 2
Skype
Slack
Stickies
l Say "Show Guidance Window."
Or
l Click the icon in the menu bar and select Show Guidance.
If you use your keyboard or mouse to edit your text or move your cursor within the text, you may lose access to certain
features, such as editing text or using Correction.
What applications are supported?
Dragon is working to support as many applications as possible. Check this page for updates to the supported
applications list.
What does it mean if my application isn't supported?
You can dictate into an unsupported application. If you
want to dictate into an application that is not on the
supported list, you can still dictate text, but try not to use
your keyboard or mouse to add or edit text while
dictating.
Dragon works with applications that support Apple's
Accessibility API. Please check with your applications
developer to ask about adding support for Apple's
Accessibility API.
50
Page 51

Supported Not supported*
TextEdit
*This list is a selection of common applications Dragon is not able to support. Check the Guidance window for
Text Type Examples
Paragraph and line breaks
To add line or paragraph breaks to your document, say one of the
following:
l "New line"
l "New paragraph"
l "Click Enter / Return"
Example
Say: "Hi Mark comma new paragraph It
was good to see you today period."
Result: Hi Mark,
It was good to see you today.
information about an application before attempting to mix dictation and typing.
About the cache
If you mix typing and dictating in an unsupported application, Dragon will lose track of where the cursor is, causing
unpredictable behavior. If this happens, say "Cache document." This command tells Dragon to read the whole
document's contents. When it does this, several things happen:
1. Dragon forgets what it entered in this document.
2. Dragon throws away its recordings of your voice, so using Correction on existing text is no longer possible.
3. Dragon reads all of the document's text from scratch. This means Dragon knows exactly what text the
document contains.
Related topics:
l Dictation overview
l Using Correction
l Navigating within a document
l Revising text
Dictation overview
In this topic, learn how to dictate:
l Line and paragraph breaks
l Punctuation
l Quotes
l Bullets
l Email and Web addresses
l Proper nouns
l Hyphenated words
l Compound words
l Abbreviations
l Acronyms
Start using Dragon to dictate text into most applications in just three steps.
1. Open the application you want to use.
2. Click inside the window or field where you want to place your dictated text.
3. Turn on your microphone and speak!
In general, you can dictate text the same way you would speak, but with punctuation added. Below are examples of
some common types of special text, and how to dictate them.
51
Page 52

Text Type Examples
Punctuation—General
Most punctuation needs to be dictated to appear in the text. Say the
punctuation at the appropriate places in your dictation. Pause briefly
before and after you dictate punctuation.
See Dictating punctuation and symbols for more information.
Example
Say: "We're going to the park comma
then for ice cream period would you like to
come question mark"
Result: We're going to the park, then for
ice cream. Would you like to come?
Dragon will automatically add some punctuation within a word (such as an apostrophe) based on the
context of your dictation. For example, when you say "John's hat," Dragon adds the apostrophe
automatically.
Dragon may also add punctuation in certain cases, such as street addresses or dates, based on your Auto
Formatting preferences. See Auto Formatting for more information.
Quotes
You can add quotation marks before and after you speak a word or
phrase, as you would when typing, or by saying the text first and then
putting quotation marks around it.
To dictate quotes as you speak
1. Say "Open quote."
2. Dictate a word or phrase.
3. Say "Close quote."
To dictate quotes after dictating a word or phrase
l Say "Put quotes around that" to put quotation marks around the
last phrase you spoke.
l Say "Put quotes around <text>" to put quotation marks around
the specified text.
l Say "Put quotation marks around the selection" to put
quotation marks around the selected text.
Example 1
Say: "Open quote Don't find fault comma
find a remedy period close quote"
Result: "Don't find fault, find a remedy."
Example 2
Sample text: My Mom said, my kids are
my life.
Say: "Put quotes around my kids are my
life"
Result: My Mom said, "my kids are my
life".
Bullets
l Say "Bullet selection" to make the selected text into a bulleted
list item.
l Say "Bullet that" to make the last phrase you spoke into a
bulleted list item.
l Say "Bullet <text>" to make the specified text into a bulleted
list item.
Example
Say: "go to the grocery store"
Then say: "Bullet that"
Result: • go to the grocery store
Email and Web addresses
Dictate email and Web addresses as you would say them
conversationally. Many domain names are already in Dragon's
vocabulary.
l To make sure Dragon recognizes that your are dictating a Web
address, include "www dot" at the beginning of the address.
l If you do not include "www dot" in the Web address, you can
say "No space on" to prevent Dragon from inserting spaces in
Example 1
Say: "info at nuance dot com"
Result: info@nuance.com
Example 2
Say: "www dot Boston Globe dot com"
Result: www.BostonGlobe.com
52
Page 53

Text Type Examples
longer addresses.
l Use Spelling mode to enter complex URLs.
l Say "No Caps on" if you want to prevent Dragon from
capitalizing words within an address.
Example 3
Say:"No space on" [pause] "Seattle
Times dot com"
Result: SeattleTimes.com
Proper nouns
Most common names are already in Dragon's vocabulary. When you
say the name, Dragon capitalizes it automatically.
For less common proper nouns, or names that may also be words (e.g.,
Chase, Sandy or Iris), you can say "Cap" before the word.
Example 1
Say: "james is going to boston tomorrow
period"
Result: James is going to Boston
tomorrow.
Example 2
Say: "I will meet you and Cap hope at the
restaurant period"
Result: I will meet you and Hope at the
restaurant.
Hyphenated words
Most common hyphenated words are already in Dragon's vocabulary.
When you say the word, Dragon automatically hyphenates it.
For less common hyphenated words, you can say "Hyphen" in the
appropriate place.
Example 1
Say: "cross country"
Result: cross-country
Example 2
Say: "power hyphen sharing"
Result: power-sharing
Compound words
Most common compound words are already in Dragon's vocabulary.
Say the word, and it will be typed correctly.
If you want to create a compound word where Dragon has typed two
words:
l Say "No space" before dictating the second word.
Or
l Say "Insert before <word>" to insert the cursor before the
second word, then say "No leading space."
Example 1
Say: "firefighter"
Result: firefighter
Example 2
Say: "snow No space shovel"
Result: snowshovel
Abbreviations
Most common abbreviations are already in Dragon's vocabulary. When
you say the word, Dragon abbreviates it automatically.
If Dragon is not abbreviating as expected, check your Auto Formatting
preferences.
Example
Say: "mister james brown"
Result: Mr. James Brown
Acronyms
Most common acronyms are already in Dragon's vocabulary. Say the
acronym, and Dragon formats it automatically.
For less common acronyms, you can say "All caps on" followed by the
acronym letters. For best results, switch to Spelling mode to do this.
Example 1
Say: "The C E O will address the
company tomorrow period"
Result: The CEO will address the
company tomorrow.
53
Page 54

Text Type Examples
See Dictating Acronyms for more information.
Example 2
Say: "Spelling mode" [pause] "All caps on
M R S A"
Result: MRSA
If you frequently dictate text – such as proper nouns, hyphenated or compound words, abbreviations or
acronyms – that Dragon does not recognize, or does not format correctly, say "Correct <text>" to train
Dragon how to recognize the word, or use the Vocabulary Editor to add it to Dragon's vocabulary. See
Using Correction and Editing Dragon's Vocabulary for more information.
Related topics:
l Getting started with dictation
l Dictating punctuation and symbols
l Dictating letters
l Dictating numbers
Take it back
Sometimes Dragon makes a mistake and does something you didn't want it to do, like entering the text "save the
document" instead of actually saving your document.
Other times, you may accidentally use the wrong command, like saying "Cut the selection" when you wanted to say
"Copy the selection."
No matter what happened, or what application you were using, you can use these global commands to undo the
mistake:
l "Undo last action" works like the keyboard shortcut ⌘ Z. It will undo the last command you dictated, or
remove the last paragraph of text you dictated.
l "Redo last action" works when you said "Undo last action" and then changed your mind: it will restore deleted
text or redo a command.
l "Scratch that" deletes the last utterance you dictated. The amount of text deleted depends on where you
paused while dictating.
l "Scratch word" deletes the word to the left of the cursor.
l "Undo dictation" undoes the last thing you said, whether that was a command (such as "Bold that") or an
utterance.
Example 1
1. Say: "The meeting will be held at 12 PM in the assembly room"
Result: "The meeting will be held at 12 PM in the assembly room"
2. Say: "Scratch word"
Result: "The meeting will be held at 12 PM in the assembly"
Example 2
1. Say: "The meeting will be held at 12 PM in the assembly room"
Result: "The meeting will be held at 12 PM in the assembly room"
2. Say: "Undo last action"
Result: <removes text>
54
Page 55

3. Say: "Redo last action"
To enter Say To enter Say
. U.S. dialects:
l Period
l Dot
Non-U.S. dialects:
l Full stop
All dialects:
l Point
?
l Question mark
!
l Exclamation mark
,
l Comma
:
l Colon
;
l Semicolon
-
l Hyphen
–
l Dash
Result: "The meeting will be held at 12 PM in the assembly room"
Example 3
1. Say: "The meeting will be held at 12 PM in the assembly room"
Result: "The meeting will be held at 12 PM in the assembly room"
2. Say: "Bold 12 PM"
Result: "The meeting will be held at 12 PM in the assembly room"
3. Say: "Undo last action"
Result: "The meeting will be held at 12 PM in the assembly room"
Related topics:
l Revising text
Dictating punctuation and symbols
To dictate punctuation or symbols, say the name of the punctuation or symbol at the appropriate places in your
dictation.
In Dictation mode, Dragon will insert intelligent spacing around punctuation. In Spelling and Numbers modes, all
spaces must be inserted by saying "Space bar."
To place punctuation around text
l Say "Put <punctuation> around selection" to place punctuation at the beginning and end of the selected text.
l Say "Put <punctuation> around that" to place punctuation at the beginning and end of the last phrase you
dictated.
l Say "Put <punctuation> around <text>" to place punctuation at the beginning and end of the specified text.
You can use these commands with:
l Quotation marks
l Parentheses
l Brackets
l Braces
l Spanish exclamation marks
l Spanish question marks
Punctuation and symbols
55
Page 56

To enter Say To enter Say
l Minus sign l En-dash
—
l Em-dash
’
l Apostrophe
's
l Apostrophe ess
`
l Backquote
'
l Begin single quote
l Open single quote
'
l Close single quote
l End single quote
"
l Open quote
l Begin quote
"
l Close quote
l End quote
(
l Left parenthesis
l Open parenthesis
)
l Right parenthesis
l Close parenthesis
[ U.S. and Canada:
l Left bracket
l Open bracket
All dialects:
l Left square bracket
l Open square bracket
] U.S. and Canada:
l Right bracket
l Close bracket
All dialects:
l Right square bracket
l Close square bracket
{
l Left brace
l Open brace
l Left curly bracket
l Open curly bracket
}
l Close brace
l Right brace
l Right curly bracket
l Close curly bracket
<
l Left angle bracket
l Open angle bracket
>
l Right angle bracket
l Close angle bracket
\
l Backslash
/
l Forward slash
l Slash
&
l ampersand
l and sign
*
l Asterisk
@
l At sign
When dictating an email address:
l At
_
l Underscore
©
l Copyright sign
®
l Registered sign
^
l Caret
…
l Ellipsis
+
l Plus sign
=
l Equal sign
×
l Multiplication sign
÷
l Division sign
±
l Plus or minus sign
%
l Percent sign
<
l Less than sign
>
l Greater than sign
# U.S. and Canada:
l Pound sign
l Number sign
Other dialects:
°
l Degree sign
56
Page 57

To enter Say To enter Say
l Hash sign
l Sharp sign
$
l Dollar sign
€
l Euro sign
£ U.S. and Canada:
l Pound sterling sign
Other dialects:
l Pound sign
¥
l Yen sign
|
l Vertical bar
~
l Tilde
¶
l Paragraph sign
§
l Section sign
:-(
l Frowny face
:-)
l Smiley face
;-)
l Winky face
Related topics:
Say: Result: Say: Result:
Alpha a November n
l Dictation overview
l Recognition modes
Dictating letters
In this topic, learn how to:
l Spell words in Dictation mode and Spelling mode
l Dictate letters
l Dictate acronyms
l Dictate accents and other non-English letters
If you are trying to dictate a very unusual word, you may find you need to spell it out. If you use the word frequently,
you can add it to Dragon's vocabulary. See Adding a User vocabulary item for more information.
Recognition modes and spelling
You can say the names of letters in Dictation mode.
Spelling mode, however, will generally produce better results because:
l It only understands letters and numbers, so it is less likely to misinterpret your speech.
l It will not attempt to insert spaces if you pause between letters.
To switch to spelling mode, just say "Switch to Spelling mode." Remember to say "Switch to Dictation mode" to return
to Dictation mode when you are done spelling.
Letters
To type a letter:
Click to view the International Radio Alphabet letters
l Say the name of the letter, e.g. "A," "B," etc.
l If you are in Spelling mode, you can use the International Radio Alphabet name of the letter.
57
Page 58

Say: Result: Say: Result:
Bravo b Oscar o
Charlie c Papa p
Delta d Quebec q
Echo e Romeo r
Foxtrot f Sierra s
Golf g Tango t
Hotel h Uniform u
India i Victor v
Juliet j Whiskey w
Kilo k X-ray x
Lima l Yankee y
Mike m Zulu z
When saying a standard English letter name, you can precede the name of the letter by "Letter," e.g.
Dictation mode Spelling mode Result
l "UNICEF"
l "Caps on U N I C E F" UNICEF
"Letter A," "Letter B." This can help clarify what you are trying to say if you are in Dictation mode. For
example, "B" and "bee" sound the same, so "Letter B" helps Dragon interpret your speech correctly.
To repeat a letter (that is, to say a letter that appears twice in succession):
l Say the letter name twice, e.g. "A A" or "T T."
l Say the letter name preceded by "Double," e.g. "Double A" or, in Spelling mode only, "Double Alpha."
Since "Double U" sounds the same as "W," say "U U" or, in Spelling mode, "Double Uniform."
Spelling mode is designed for spelling out unusual words, so letters are lowercase by default. To capitalize a letter:
l Say "Cap" followed by the name of the letter.
l Say "Caps on" mode to capitalize multiple letters in a row.
Because Dictation mode is not optimal for spelling out words, it assumes dictated letters are initials or acronyms
(see examples below). Letters are uppercase by default, unless Dragon interprets the letter as a word (such as "a"). To
lowercase a letter:
l Say "Lowercase" followed by the name of a letter.
l Say "No Caps on" to lowercase multiple letters in a row.
See Capitalization for more on using upper and lower case in Dictation mode.
Dictating Acronyms
Dragon recognizes many acronyms and will automatically format them correctly. In Dictation mode, you can
pronounce acronyms the way you would normally, whether they are pronounced as words (e.g. NATO, AIDS) or
letters (e.g. HTML, BBC).
You can also use Spelling mode to dictate acronyms, but what you say will be slightly different:
58
Page 59

Dictation mode Spelling mode Result
l "No space on
U N I C E F"
l "A A R P" l "Caps on A A R P"
l "Caps on Double A R P"
AARP
l "L period M period
Montgomery"
l "Cap L period Cap M period
Cap M O N T G O M E R Y"
L.M. Montgomery
l "H A L nine thousand" l "Caps on H A L nine zero zero zero" HAL 9000
If you frequently dictate an acronym that Dragon does not recognize, you can teach it to Dragon using
Say:
Result:
A C E I N O U Y
"[Accent] Acute" á é í ó ú ý
"[Accent] Circumflex" â ê î ô û
"[Accent] Grave" à è ì ò ù
"[Accent] Umlaut" ä ë ï ö ü ÿ
"[Accent] Tilde" ã ñ õ
"Ring Above" å
"[Accent] Cedilla" ç
Say: Result: Say: Result:
l "A E
Diphthong
"
l "A E
Ligature"
l "Ligature
A E"
æ
l "O E
Diphthong
"
l "O E
Ligature"
l "Ligature
O E"
œ
l "Eszet"
l "Sharp S"
l "German
Sharp"
l "German
Sharp S"
ß
l "O Slash"
l "O
Oblique
stroke"
ø
Correction or the Vocabulary Editor.
Accents and other non-English letters
Diacritical Letters
A diacritical letter is a letter with a marking above or below it, such as Á or ç. You can add a diacritical letter by saying
the name of the letter, then the type of accent or mark you want to use (see table below for available diacriticals).
You can use diacritical letters in both Dictation mode and Spelling mode.
Ligatures and Non-Latin Letters
You can also say the following ligatures and non-Latin letters:
59
Page 60

Say: Result: Say: Result:
l "Icelandic
Eth"
ð l "Icelandic
Thorn"
þ
l "S
Wedge"
š
Related topics:
Number type Examples
Dictating numbers
In general, you can dictate numbers by saying them as you would
conversationally.
Example 1—Numerals
Say: "One hundred forty two thousand
fifteen"
Result: 142,015
Example 2—Decimals
Say: "Five point four two three"
Result: 5.423
Example 3—Fractions
Say: "Two and three fourths"
Result: 2 3/4
Example 4—Phone numbers
Say: "Seven eight one five six five five
thousand"
Result: 781-565-5000
Example 5—Postal codes
Say:"Boston Massachusetts 0 2 1 1 0"
l Dictation overview
l Recognition modes
Dictating numbers
In this topic, learn how to:
l Dictate numerals, decimals, and fractions
l Dictate phone numbers and postal codes
l Dictate currency
l Dictate dates and times
l Dictate weights and measurements
l Dictate superscripts
l Dictate Roman numerals
l Dictate in Numbers mode
You can dictate numbers in Numbers mode, Dictation mode or Spelling mode.
Results below are based on a profile with the default formatting settings. If Dragon is not formatting
numbers as expected, check your Auto Formatting preferences. See Auto Formatting for more
information.
60
Page 61

Number type Examples
Result: Boston, MA 02110
Example 6—Currency
Say: "Ninety nine dollars and fifty cents"
Result: $99.50
Example 7—Dates
Say: "May fifteenth two thousand fifteen"
Result: May 15, 2015
Example 8—Time
Say:"Eight thirty pm"
Result: 8:30 PM
Example 9—Weight
Say: "Two hundred kilograms"
Result: 200 kg
Forcing numerals
If your dictated numbers appear in text form ("four") rather than
numeral form ("4"), you can force Dragon to interpret your numbers
as numerals:
l Say "Numeral <number>."
Example
Say: "Numeral four"
Result: 4
Superscripts
l Say "Superscript <number>."
Example
Say: "Superscript two"
Result: ²
Roman numerals
l Say "Roman numeral," and then say your number.
To dictate lowercase Roman numerals
1. Say "Roman numeral."
2. Say your number.
3. Say "Lowercase that."
Example 1
Say: "Roman numeral two thousand four"
Result: MMIV
Example 2
Say: "Roman numeral three"
Say: "Lowercase that"
Result: iii
Numbers mode
If you want to dictate many numbers that must be in numeral form,
you can switch to Numbers mode.
To dictate numbers in Numbers mode
1. Say "Numbers mode."
2. Dictate your numbers.
3. Say "Dictation mode" when you are done to switch back.
Example
Say: "One hundred seventy nine"
Result: 179
61
Page 62

Related topics:
l Dictation overview
l Recognition modes
62
Page 63

Correct mistakes
Click: To learn about:
Correcting recognition errors
l What is Correction?
l When to use Correction
Using Correction
l Correcting misrecognized dictations
Read these topics to learn how to correct text that Dragon interpreted incorrectly.
Correcting recognition errors
When you correct your dictation, you tell Dragon that it made a mistake interpreting your speech. Over time, this
process improves your recognition by teaching Dragon not to make the same mistakes.
Before you learn how to correct your dictation, let's examine when you should use this feature.
Correction vs. editing
There two ways to modify the existing dictated content of a document: you can use Editing commands, such as
selecting and replacing a word, or you can use Correction. It's important to know when to use each:
l Use Editing commands if Dragon heard you correctly, but you want to make changes to the content, just as
you would edit something you typed yourself.
l Use Correction when Dragon did not hear you correctly and typed something other than what you actually
said.
Example
Use Correction if
l You said "I'm going out to brunch," and Dragon typed "I'm going out to lunch."
In this case, Dragon made a mistake, and using Correction will teach it not to misrecognize the word "brunch" in the
future.
Use select and replace if
l You said "I'm going out to lunch," but meant to say "I'm going out to brunch."
In this case, Dragon correctly interpreted what you said, but you made a mistake. Using Correction would teach
Dragon that when you said "lunch," it should have recognized it as "brunch." This may make your recognition less
accurate.
If you're not sure what you said, say "Select <text>," then say "Play the selection."
Related topics:
l Using Correction
l Revising text
l Hearing your text
l Take it back
Using Correction
In this topic, learn how to:
l Show the Correction window
l Correct recognition errors
l Use Smart Formatting to change your formatting preferences
63
Page 64

When Dragon has incorrectly typed what you said in Dictation mode, use Correction to correct Dragon's interpretation
of what you said. This helps improve recognition over time.
Correction may not be available while you are dictating in certain applications. Check the Guidance
window for information about what Dragon can do in your current application.
Showing the Correction window
l If you want the Correction window showing whenever you dictate:
1. Click the in the menu bar and select Preferences…
2. Open the Advanced pane.
3. Select Always Show Correction Window When Dictating.
l To open the Correction window during a specific dictation session:
1. Click the Windows menu ( ) in the Status window.
2. Select Show Correction.
l To call the Correction window when you need it, use Correction commands, such as "Correct that" or
"Correct <text>."
The Correction Window presents a phrase as Dragon understood it, which may sometimes be slightly
longer or shorter than the text you had selected. Dragon understands your speech in short phrases, or
utterances, which it defines partly based on where you paused while dictating.
Making a correction
1. Do one of the following to select text for correction:
l Say "Correct <text>," or "Correct that."
l Select the text, then use the Correction hot key (by default, ⌘ F9).
The Correction window presents alternative interpretations of the word or phrase you selected to correct.
The number of alternatives is limited by your setting for Maximum number of alternatives in the
Advanced Preferences pane.
2. Review the list of options.
l If one of the Correction alternatives is correct, say "Choose <number>" (select the number
corresponding to the correct choice).
l If none of the Correction alternatives are correct, edit one of the alternatives to match what you said:
1. Say "Edit <number>." It doesn't matter which alternative you choose to edit.
64
Page 65

The alternative you are editing is now the "target" for dictation and commands. You can edit
using Dictation mode or Spelling mode, or use your keyboard to type in edits to Correction
alternatives.
2. Say "Choose <number>" (choose whichever alternative you edited) when you are done.
l To exit Correction without making a change, say "Cancel correction" or "Cancel edit."
When you choose a correction, Dragon modifies its speech model and saves this information into your profile.
Smart Formatting
After some types of corrections, Dragon's smart formatting feature may ask how you want to automatically format this
text in the future.
For example, if you dictate "kilograms," Dragon will write "kg" if the default Auto format settings are selected.
1. To write out the word "kilogram," say "Correct kilograms."
The Correction window offers a list of options similar to the one below.
2. Say "Choose 2" to select "kilograms."
The Smart Format Rules window appears, asking whether you want Dragon to write out the word "kilograms"
every time you say "kilograms."
3. To change the Auto Format rule, say "Choose <number>" (in this case, "Choose 1").
If you don't want to change the formatting rules – in this case, if you normally want Dragon to write "kg" when
you say "kilogram" – simply resume dictating text, and the Smart Format Rules window will close.
Smart formatting rules are turned on by default when you install Dragon, but you can turn them off in the
Advanced Preferences pane.
Related topics:
l Correcting recognition errors
l The Guidance window
l Correction options:
l Auto Formatting
65
Page 66

Edit text
Click: To learn about:
Revising text
l Selecting text
l Replacing existing text
l Inserting text
l Deleting text
l Copying, cutting and pasting text
Hearing your text
l Hearing text read back to you
Making a selection
Say: To select:
"Select that" The last word or phrase you spoke
"Select <text>" A specified word or phrase
"Select next / previous" The next or previous instance of the same text
"Select <text> to <text>" A range of text from the first word specified through the second word
"Select the paragraph" The current paragraph
"Select next / previous word" The word before or after your cursor
"Select next / previous <number>
words"
The specified number of words (between 1 and 99) before or after your
cursor
"Select all" All the text in the document
"Unselect that" Undo your selection
Dragon defines a "phrase" based on how it detects pauses in your speech.
Read these topics to learn how to use your voice to edit what you have written.
Revising text
In this topic, learn how to use your voice to:
l Select text
l Replace existing text
l Insert text
l Delete text
l Copy, cut and paste text
These Dictation mode commands are designed for basic text editing – to correct your own errors or to modify what you
dictated.
If what you dictated was not correctly recognized by Dragon, use Correction to improve future recognition. See Using
Correction for more information.
When using fully supported applications, such as TextEdit or Microsoft Word 2011 or 2016, you can edit
your text manually using your keyboard and mouse if you prefer. If you are using a different application,
see Mixing dictation with typing for information on how to avoid errors caused by mixing dictation and
typing.
66
Page 67

When you specify a word to select ("Select <text>"), Dragon selects the nearest instance, based on the location of
the cursor. To move to a different instance of the word, say "Select next / previous."
Replacing text
1. Using the Select voice commands above, select the text you want to replace.
2. Dictate the text you want to use instead.
Inserting text
1. Place the cursor where you want to insert the text. For example, say "Insert before <text>." or "Insert after
the paragraph."
2. Dictate the text.
Deleting text
To delete the last thing you said
Say one of the following:
l "Scratch that"
l "Delete that"
l "Undo that"
l "Undo dictation"
To delete a specific word or string of words
l Say "Scratch word" to delete the word to the left of your cursor.
l Say "Delete <text>" to delete a specified word or phrase.
l Say "Delete next" or "Delete previous" to delete the next or previous instance of the same text.
l Say "Delete <text> to <text>" to delete from the first word specified through the second word.
l Say "Delete selection" to delete the selected text.
l Say "Delete the paragraph" to delete the entire paragraph.
Copying, cutting and pasting text
To cut text
l Say "Cut <text>" to cut a specified word or phrase.
l Say "Cut selection" to cut the selected text.
l Say "Cut that" to cut the last word or phrase you spoke.
l Say "Cut the paragraph" to cut the entire paragraph.
To copy text
l Say "Copy <text>" to copy a specified word or phrase.
l Say "Copy selection" to copy the selected text.
l Say "Copy that" to copy the last word or phrase you spoke.
l Say "Copy the paragraph" to cut the entire paragraph.
To paste text
l Say "Paste from clipboard" or "Paste it here."
Related topics:
l Correcting recognition errors
l Using Correction
l Navigating within a document
l Take it back
l Formatting
67
Page 68

Hearing your text
Dragon can access your OS X Text to Speech capabilities, allowing you to hear text read back to you.
Say one of the following to listen to your text:
l "Read That" – Reads the last sentence or utterance before the cursor
l "Read the selection" – Reads selected text
l "Read the words <word> to <word>" – Reads the first specified word through the second specified word
l "Read the paragraph" – Reads the current paragraph
l "Read the document" – Reads the whole document
While the specified text is being read, Dragon will put the microphone in Sleep mode. The microphone will turn on
automatically when the reading is done. To stop listening to the text, say "Wake up" to turn the microphone back on,
then say "Stop reading."
If you want to change the pace of the reading, or the voice you hear, go to your System Preferences and
select Dictation & Speech, then click the Text to Speech tab.
Related topics
l Revising text
l Using Correction
68
Page 69

Format text
Click: To learn about:
Auto Formatting
l Overview: Automatic formatting rules
Capitalization
l Formatting text capitalization:
l Initial caps
l Uppercase
l Lowercase
Spacing
l Inserting a space
l Removing a space
Formatting
l Formatting text:
l Bold
l Italic
l Underline
l Outline
Aligning text
l Left-aligning text
l Right-aligning text
l Centering text
Text type Examples
Street Addresses
Check to allow Dragon to format addresses correctly.
Example
Say: "forty-nine Orchard Lane, Boston,
Massachusetts oh two four four six"
Result: 49 Orchard Lane, Boston, MA
02446
Read these topics to learn how to use text to apply formatting to your dictated text.
Auto Formatting
In this topic, learn how to let Dragon automatically format text, including:
l Street, web and email addresses
l Phone numbers
l Abbreviated titles, such as "Mr." or "Mrs."
l Dates and Times
l Numerals
l Currencies
l Units of measure, such as "km."
l U.S. Social Security Numbers
l Common abbreviations, such as "vs."
Dragon can format addresses, dates and times, numbers, common abbreviations and contractions, and the number of
spaces after a period.
To open the Auto Formatting window:
1. Click the icon in the menu bar and select Manage Profiles…
2. Click the Auto Formatting… button.
Changes to the Auto Formatting settings affect the current profile, marked with a green circle in the
Profiles pane. See Using profiles and dictation sources for more information.
69
Page 70

Text type Examples
Some addresses can be difficult to interpret. For example, if you say "Two hundred forty fifth street," you
might mean "245th Street," "200 45th Street," or "240 5th Street." In this case, you may need to switch to
Spelling mode to get the results you want.
If you frequently dictate a specific address, you can create custom Auto-text commands to insert them
into your dictation. See Auto-text commands for more information.
UK and Canadian postcodes
Check to format postcodes correctly for the UK and Canada.
Example
Say: "W two four R J"
Result: W2 4RJ
Web and email addresses
Check to format electronic addresses correctly.
Example 1—Email
Say: "name at Nuance dot com"
Result: name@nuance.com
Example 2—Website
Say: "W W W dot Nuance dot com"
Result: www.nuance.com
Phone numbers
Check to display properly-formatted phone numbers when you say
seven- or ten-digit sequences.
Vanity phone numbers, such as 1-800-EXAMPLE, are not
supported, nor is automatic formatting of US phone
numbers for UK English users.
Example
Say: "eight hundred five five five one two
one two"
Result: 800-555-1212
Abbreviated titles
Check to shorten common forms of address.
Example
Say: "Mister Smith"
Result: Mr. Smith
Dates
Check to format spoken dates. The dropdown menu offers a number
of formatting choices; a few examples are shown here.
Omitting the year when you speak produces the month
and day as a word and a number, regardless of the
formatting you've selected. For example, "January five" or
"January fifth" produces January 5.
Example
Say: "January fifth 2016"
Result 1: January 5, 2016
Result 2: 5 January, 2016
Result 3: 01/05/2016
Times
Check to format times correctly.
Example
Say: "three twenty A M"
Result: 3:20 AM
Use numerals starting with
Dragon will interpret numbers below the number specified in the
dropdown menu as words, and numbers equal to or greater than that
number as numerals.
Example 1
Say: "three"
Result: Three
70
Page 71

Text type Examples
Example 2
Say: "eleven"
Result: 11
Partially format "-illion" numbers
Check to display a combination of numbers and text for numbers
higher than 999,999.
Example
Say: "Eight million"
Result: 8 million
Prices and currencies
Check to display money amounts properly.
For US and Canadian dialects, say "Pound Sterling" to
get the £ symbol. For example, say "one pound sterling
thirty" to get £1.30.
Example
Say: "one dollar and thirty cents"
Result: $1.30
ISO currency codes
Check to display the three-letter ISO code rather than the currency
symbol.
Example
Say: "fifty euros"
Result: EUR 50
Units of measure
Check to display symbols and abbreviations for common
measurements.
To change the default format for a specific measurement,
change the Smart Formatting settings during the
Correction process. See Smart Formatting for more
information.
Example 1
Say: "six feet three inches"
Result: 6'3"
Example 2
Say: "two kilometers"
Result: 2 km
Social Security Numbers
Check to display properly-formatted US Social Security numbers
when you dictate nine-digit sequences.
Example
Say: "One two three four five six seven
eight nine"
Result: 123-45-6789
All other numbers
Check to format numbers not covered elsewhere in this section,
including:
l Negative numbers
l Decimals
l Ordinals (1st, 2nd, etc.)
Example 1—Negative numbers
Say: "negative five"
Result: -5
Example 2—Decimals
Say: "eight point two five"
Result: 8.25
Example 3—Ordinals
Say: "tenth"
Result: 10th
Common abbreviations
Check to automatically convert words to their common abbreviations.
Example
Say: "versus"
71
Page 72

Text type Examples
Result: vs.
Expand contractions
Check to expand spoken contractions.
Example
Say: "haven't"
Result: have not
Insert two spaces after period
Check to insert two spaces after each period.
While this was once a common convention, today most style guides recommend a single space after a
period.
Allow pauses in formatted phrases
When checked, Dragon's number and phrase formatting will work
even if you pause while speaking.
Example
Say: "three" [pause] "point one four"
Result: 3.14
Related topics:
To toggle bold formatting
l Say "Bold that" to bold the last phrase you dictated.
l Say "Bold <text>" to bold the specified word or words.
l Say "Bold Next" or "Bold Previous" to bold the next or previous instance of the same text.
l Say "Bold the paragraph" to bold the entire paragraph.
l Say "Select <text>," then say "Make the selection bold" to bold selected text.
To toggle italic formatting
l Say "Italicize that" to italicize the last phrase you dictated.
l Say "Italicize <text>" to italicize the specified word or words.
l Say "Italicize Next" or "Italicize Previous" to italicize the next or previous instance of the same text.
l Say "Italicize the paragraph" to italicize the entire paragraph.
l Say "Select <text>," then say "Make the selection italic" to italicize selected text.
To toggle underlined formatting
l Say "Underline that" to underline the last phrase you dictated.
l Say "Underline <text>" to underline the specified word or words.
l Say "Underline Next" or "Underline Previous" to underline the next or previous instance of the same text.
l Say "Underline the paragraph" to underline the entire paragraph.
l Dictation overview
l Dictating numbers
l Using Correction
Formatting
Use these commands to adjust the formatting of your text. These commands are available only in applications that
support text formatting.
72
Page 73

l Say "Select <text>," then say "Make the selection underlined" to underline selected text.
Related topics:
Title Case
To capitalize a word as you dictate
l Say "Cap <word>" to capitalize the next word you dictate.
l Say "Capitalize word" to capitalize the last word you dictated.
To capitalize the next string of words as you dictate
l Say "Caps on" to capitalize the first letter of every word you dictate.
l Say "Caps off" to go back to normal capitalization.
To capitalize words you have already dictated
l Say "Capitalize that" to capitalize the last utterance you dictated.
l Say "Capitalize <text>" to change the specified text to title case.
l Say "Capitalize Next" or "Capitalize Previous" to capitalize the next or previous instance of the same text.
l Say "Capitalize <text> to <text>" to change a range of text from the first specified word through the second
to title case.
l Say "Capitalize the paragraph" to capitalize the entire paragraph.
l Say "Select <text>," then say "Capitalize selection" to change the selected text to title case.
Lowercase
To lowercase a word as you dictate
l Say "No Caps <word>" to make the next word you dictate lowercase.
l Say "Lowercase word" to make the last word you dictated lowercase.
To lowercase the next string of words as you dictate
l Say "No Caps on" to make every word you dictate lowercase.
l Say "No Caps off" to go back to normal capitalization.
To lowercase text you have already dictated
l Say "Lowercase that" to make the last utterance you dictated lowercase.
l Say "Lowercase <text>" to change the specified text to lowercase.
l Say "Lowercase Next" or "Lowercase Previous" to change the next or previous instance of the same text to
lowercase.
l Say "Lowercase <text> to <text>" to change a range of text from the first specified word through the
second to lowercase.
l Say "Lowercase the paragraph" to change the entire paragraph to lowercase.
l Say "Select <text>," then say "Lowercase selection" to change the selected text to lowercase.
l Making a selection
Capitalization
Dragon automatically capitalizes most words when appropriate. For example, Dragon recognizes and automatically
capitalizes the first word in a sentence, most names and places, and many acronyms.
If you need to make adjustments to the capitalization, use these commands.
73
Page 74

All Caps
To make a word ALL-CAPS as you dictate
l Say "All Caps <word>" to make the next word you dictate all-caps.
To make the next string of words all-caps as you dictate
l Say "All Caps on" to make every word you dictate all-caps.
l Say "All Caps off" to go back to normal capitalization.
To make text you have already dictated all-caps
l Say "Uppercase <text>" to change the specified text to all-caps.
l Say "Uppercase Next" or "Uppercase Previous" to change the next or previous instance of the same text to
all-caps.
l Say "Uppercase <text> to <text>" to change a range of text from the first specified word through the
second to all-caps.
l Say "Uppercase the paragraph" to change the entire paragraph to all-caps.
l Say "Select <text>," then say "Uppercase selection" to change the selected text to all-caps.
Related topics:
l Making a selection
l Dictation overview
l Revising text
Spacing
In general, Dragon will automatically insert or suppress spacing where appropriate. For example, spaces are inserted
between words and after punctuation such as periods and commas, but suppressed around hyphens. If you need to
make special adjustments, use these commands.
To insert a space
l Say "Space bar."
To adjust spacing as you dictate
l Say "No space <word>" to prevent automatic insertion of a space before the next word.
l Say "No space on" to prevent automatic insertion of a space between a string of words (such as a Web
address).
l Say "No space off" to go back to normal spacing.
To delete a space before a word you already dictated
1. Say "Insert before <word>" to place the cursor before the word.
2. Say "No leading space" or "Press the key Delete."
Remember, in some applications, it's better not to use your mouse and keyboard while dictating text. See
Mixing dictation with typing for more information, including a list of currently supported applications.
Related topics:
l Dictation overview
l Auto Formatting
l Revising text
74
Page 75

Aligning text
Use these commands to adjust the alignment of your text. These commands are available only in applications that
support text formatting.
To align the current paragraph
l Say "Align the text left / center / right."
To justify text
1. Say "Select <text>" to select the text you want to justify.
2. Say "Justify the text"
To align the whole document
1. Say "Select all."
2. Use the alignment commands above.
Related topics:
l Making a selection
l Formatting
l Spacing
75
Page 76

Transcription
Click: To learn about:
Transcribing recorded audio
l Selecting an audio file for Transcription
l Viewing a transcribed file
Transcription Training
l The Transcription Training process
Read these topics to learn how to use Dragon to transcribe audio files into text.
Transcribing recorded audio
In this topic, learn how to:
l Switch to Transcription mode
l Select an audio file for Transcription
l Edit a transcribed file
l Delete a Transcription speaker
l Exit Transcription mode
To switch to Transcription mode, do one of the following:
l Say "Switch to Transcription mode."
l Click the icon in the menu bar and select Switch to Transcription…
The Transcription window appears, and the Status Window and Guidance Window are hidden.
Selecting an audio file for Transcription
When you switch to Transcription mode, the Transcription window appears:
76
Page 77

1. Choose a Speaker from the list:
l Choose Me if you are transcribing your own speech.
l Choose Someone Else if you are transcribing another person's speech.
2. If you chose Someone Else in the previous step, Dragon prompts you to set up a new profile for
Transcription. Follow the prompts
1. Enter a unique name for the profile, then click Continue.
2. Choose a region, then click Continue.
The region affects spelling, vocabulary, and formatting of the transcribed text.
3. Choose the accent that best describe the recorded voice, then click Continue.
Dragon takes a few moments to create the new profile.
Once you have created a Transcription profile, it will appear in the Speaker dropdown for future use.
3. Optional: Select a Format for the transcribed text, and an application to open the file.
4. Optional: Select a Destination folder for the transcribed text.
By default, Dragon automatically saves your files in Documents/Dragon/Transcribed Files.
5. To select an audio file for transcription, drag the file onto the Audio Files to Transcribe list, or click to
browse to the file.
Dragon can transcribe audio files in mp3, mp4, wav, aif, aiff, m4v, and m4a formats.
6. Click Start to begin the transcription process.
Depending on the size and number of audio files, this may take several minutes. If you want to stop the
transcription, click the button to the right of the progress bar. Dragon provides a partial transcript of the
portion of the file that was processed.
When Dragon has finished transcribing your file, a notification appears.
7. Click OK to dismiss the message, or do one of the following:
l If you transcribed a single audio file, click Open to view the file in the application you selected in step
3.
l If you transcribed multiple audio files, click Show to open a Finder window showing the transcribed
files folder you selected in step 4.
Editing a transcribed file
When Dragon transcribes an audio file, you can choose to open the results in a new Microsoft Word or TextEdit
document. The text will not include any punctuation, unless you dictated punctuation in the transcribed audio file. If
you switch to Dictation mode (see Exiting Transcription mode below), you can select, replace, and format text using
commands such as:
l "Bold <word>"
l "Insert before <word>"
l "Select <text>"
Note that you cannot say "Correct <text>" to fix Transcription errors. Correction requires audio to compare against the
selected text – Dragon doesn't have that data in transcribed files. What you can do is say "Select <text>," then dictate
over it. If what you just spoke is misrecognized, then you can say "Correct <text>" to correct your dictated text. See
Using Correction for more information.
See Mixing dictation with typing for information on how to avoid errors caused by mixing dictation and
typing.
77
Page 78
Where are my transcriptions?
Dragon automatically saves your files in Documents/Dragon/Transcribed Files, or the Destination you chose
before starting transcription. Click Open Transcribed Files Folder to open the folder in a Finder window.
By default, transcribed files will share the name of the audio file you selected. For example, if you selected a file called
Notes08Jul.wav, Dragon would create the text file Notes08Jul.rtf.
Deleting a Transcription speaker
1. In the Speaker dropdown menu, select Edit Speaker List…
A popup window appears.
2. Select the speaker from the list.
3. Click Delete Speaker.
A confirmation dialog appears.
4. Click OK to continue.
5. Click Done to return to the main Transcription window.
Exiting Transcription mode
To return to Dictation mode, do one of the following:
l In the Transcription window, click Switch to Dictation.
l Click the icon in the menu bar and select Switch to Dictation…
Related topics:
l Transcription Training
l Revising text
Transcription Training
If you want to improve the accuracy of Dragon’s transcription, use Transcription Training to teach Dragon to
understand your recordings. You will need an audio sample in mp3, mp4, wav, aif, aiff, m4v, and m4a format that is at
least 6 minutes long.
To switch to Transcription mode, do one of the following:
l Say "Switch to Transcription mode."
l Click the icon in the menu bar and select Switch to Transcription…
The Transcription window appears, and the Status Window and Guidance Window are hidden.
Once you are in Transcription mode:
1. Click the icon in the menu bar and select Improve Recognition > Transcription Training…
A Finder window opens.
2. Browse to your sample audio file, select it, and click Open.
Dragon transcribes the audio. This process may take several minutes. When the transcription is complete,
the first utterance is selected, and a popup dialog appears with an audio player.
78
Page 79
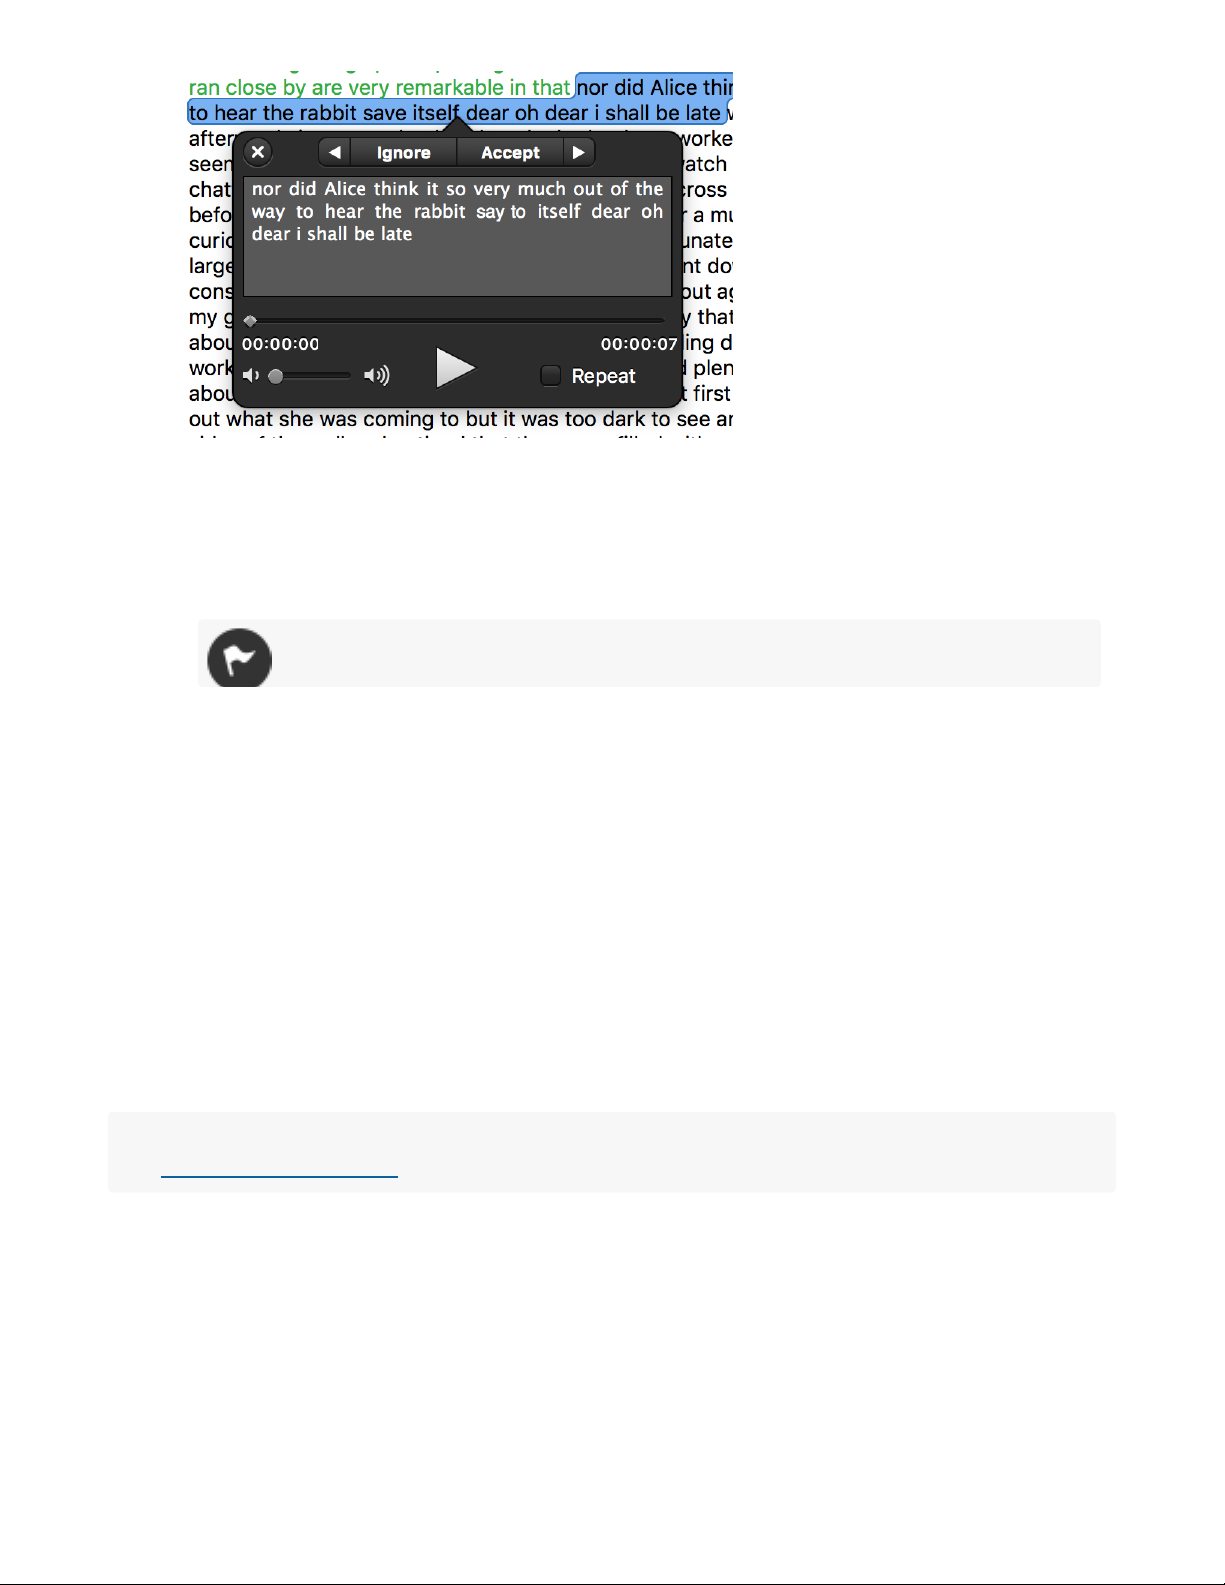
3. In the popup, press Play to listen to the first audio segment.
4. Make sure the words Dragon transcribed, shown in the popup window, are the exact words you hear in the
audio.
l If there are words that were recognized incorrectly, use your keyboard and mouse to select them and
type in the correct words. Press play to listen again, if needed.
Do not add punctuation during Transcription Training. Punctuation will cause Dragon to skip the
selected segment of audio.
5. When the text is correct for that section, click Accept.
l In most cases, the text for that segment turns green, and the training popup moves to the next
utterance.
l If there is a problem with a segment of audio, such as a dog barking in the background, click Ignore.
The text turns red and Dragon will not use that audio segment for the Transcription Training.
l If you made many corrections to a segment of text, the text may also turn red.
6. Repeat the process until you have reviewed enough audio to train.
The blue bar across the Transcription Training window tells you how many seconds of audio are required, and
how many seconds of audio you have accepted.
When you have accepted enough audio, the Train button appears.
7. Click the Train button.
Dragon takes a few minutes to train the new profile.
Related topics:
l Transcribing recorded audio
79
Page 80

Control your computer
Click: To learn about:
Launching and quitting applications
l Launching applications
l Quitting applications
Navigating application windows
l Opening windows
l Closing, hiding or minimizing windows
l Switching between active windows
Menu Walking
l Using an application's menus
Key commands
l Controlling the keyboard with your voice
Mouse commands
l Controlling your mouse with your voice
MouseGrid
l Moving your mouse using numbered sections of a grid.
Using dialog controls
l Clicking a button in a dialog box
OS X controls
l Restarting your Mac
l Putting your Mac to sleep
l Opening the Force Quit dialog
l Changing your screen view
l Taking a screenshot
Working with the Finder
l Changing the display of Finder windows
l Managing files and folders
l Creating and deleting folders, files, and aliases
l Navigating the Finder
l Ejecting drives
Dragon allows you to use your voice to control your mouse and keyboard, application windows, menus, and more.
Read these topics to learn how to use your voice to navigate and control your computer.
Launching and quitting applications
To launch applications using Dragon, just say "Activate <application>" (for example, "Activate Safari"). If the
application is not running currently, it will be launched. If it is already running, this command will bring it to the front.
You can also quit applications by saying "Quit this application" or "Quit <application>" (for example, "Quit TextEdit").
If this is the first time you have launched Dragon, the "Activate" commands will not yet be available. Next
time you launch the application, Dragon will look through all the applications on your computer and generate
Activate commands for each of them.
If you are still unable to use "Activate" commands, click the in the menu bar and select Preferences… In
the General pane, make sure that Generate Application Launch Commands is checked in the General
pane.
Related topics:
l Navigating application windows
l Preferences window
l Working with the Finder
l OS X controls
80
Page 81

Navigating application windows
To open a new file or window
l Say "New file" to open a new file or window in the current application.
l Say "Open file" to access the Open File dialog in the current application.
To close the current file or window
l Say "Close file" or "Close window."
To switch between windows or applications
l Say "Next / Previous application window" to switch to the next or previous open window in the current
application.
l Say "Switch to next / previous application" to switch to the next or previous open application.
To hide or show windows or applications
l Say "Minimize this window" to minimize the current window.
l Say "Show / Hide this application" to show or hide all windows in the active application.
l Say "Hide other applications" to hide all but the current application.
l Say "Show / Hide all applications" to show or hide all currently running applications.
To put your computer in sleep mode
l Say "Put computer to sleep."
l Say "Special sleep" to force the computer to go to sleep.
To restart your computer
l Say "Restart the computer."
l Say "Special Restart" to force the computer to restart without waiting for other tasks to
complete.
To quit unresponsive applications
l Say "Access Force Quit."
To toggle full screen mode
l Say "Switch to full screen" to view the current window in full screen mode.
l Say "Exit full screen" to exit full screen mode.
To capture images of your screen
l Say "Capture screen" to create a screenshot of your entire screen and save it to your
These commands are universally available to navigate between windows in your open applications.
Related topics:
l Launching and quitting applications
l Menu Walking
l Working with the Finder
l Navigating within a document
OS X controls
These commands access OS X functions from any application.
81
Page 82

desktop.
l Say "Capture selection" to define an area of your screen to capture.
Related topics:
Adjusting the window display
To show or hide bars in Finder windows
l Say "Show / Hide Path Bar."
l Say "Show / Hide Status Bar."
l Say "Show / Hide Toolbar."
To show or hide the Dock
l Say "Turn Dock Hiding on / off."
To toggle Zoom view
l Say "Zoom this window."
Adjusting the folder display
To change the way items are displayed
l Say "View as <style>." You can view items as:
l Icons
l Lists
l Columns
To arrange items in your view
l Say "Arrange by <property>" to sort items by the specified property. You can sort
items by:
l Name
l Date modified
l Date created
l Size
l Kind
l Label
To create a Sidebar shortcut to the selected item
l Menu Walking
l Navigating application windows
l Launching and quitting applications
l Working with the Finder
Working with the Finder
In this topic, learn how to use your voice to:
l Change the display of Finder windows
l Manage files and folders
l Create and delete folders, files, and aliases
l Navigate the Finder
l Eject drives
Use these commands to navigate and control the Finder. Use menu walking commands to access other Finder
features. For example, say "Click File menu," then "Click Get Info."
82
Page 83

l Say "Add to Sidebar."
Managing files and folders
To open the selected file or folder
l Say "Open selection."
To rename the currently selected item
1. Say "Select name of selection."
2. Dictate the new name of the item.
To rename another item in the current folder
l Say "Select next / previous name."
File or folder names are selected in alphabetical order.
To view a Quick Look heads up display of the selected item
l Say "Quick look selection."
To view the original file associated with a selected alias
l Say "Show original."
To deselect all items in the current folder
l Say "Deselect All."
Creating and deleting items
To create a new folder
l Say "Make new folder."
Or
l Say "Make new Smart folder."
To create a copy of the selected item(s)
l Say "Duplicate selection."
To create an alias of the selected item
l Say "Make alias."
To create a compressed Zip file of the selected folder
l Say "Compress selection."
To delete the selected item(s)
l Say "Move to Trash."
To permanently delete all files in the Trash folder
l Say "Empty Trash."
Navigating windows
To go to the next or previous view in the active window
l Say "Go back / forward."
To go to the enclosing folder for the selected item
l Say "Go to enclosing folder."
To go to a specific folder
83
Page 84
l Say "Go to <folder>."
Available folders include:
l Computer
l Home
l Desktop
l Utilities
l Network
l Downloads
l Music
l Movies
l Applications folder
To open the Go to Folder dialog in the Finder
l Say "Access Go to Folder window."
To search the Finder
1. Say "Access Find window."
2. Dictate the text you want to search for.
3. Say "Press key Return."
Navigating folders
To open the Connect to Server window
l Say "Access Connect to Server window."
To cycle through the open Finder windows
l Say "Cycle through windows."
To bring all Finder windows to the front
l Say "Bring all to front."
To close all Finder windows
l Say "Close all windows."
Ejecting a drive or disc
1. Select the drive or disc you want to eject.
2. Say "Eject selection."
Related topics:
l Menu Walking
l Navigating application windows
l Launching and quitting applications
l OS X controls
Using dialog controls
Most applications use pop-up dialog boxes to confirm your actions, warn you of a problem, or even make suggestions.
Dragon knows many common dialog button names, allowing you to click buttons with your voice:
l "Click Done"
l "Click OK"
l "Click Continue"
l "Click Save"
84
Page 85

l "Click Don't Save"
How to say a key command
l Say "Press the key <KEYNAME>" to press a single key.
Example: "Press the key Escape."
l Say "Press the key <MODIFIER-KEYNAME>." to press a key combination.
Example: "Press the key Command S."
Key names
Key type Example command
Letter keys (A, B, C, etc.)
Tip: Single letter names are often misrecognized. Use
the International Radio Alphabet (Alpha, Bravo,
Charlie, etc.) for better recognition. See Letters for the
full International Radio Alphabet.
"Press the key S"
Or
"Press the key Sierra"
Number keys (one, two, etc.) "Press the key Five"
Space bar
Note: Unlike most keys, the space bar does not
require the command "Press the key" – you can just
say "Space bar" (not "space").
"Space bar"
Or
"Press the key Space bar"
Delete / Forward Delete "Press the key Delete"
F-Keys (F one, F two, etc.) "Press the key F-eleven"
Return / Enter "Press the key Enter"
Tab
Note: Unlike most keys, the Tab key does not require
"Tab key"
Or
l "Click Cancel"
You can also say "Click Enter" or "Click Return" to choose the default (highlighted) button in a dialog.
For more complex dialogs, such as a sign-in window, say "Click next field" or "Click previous field" to navigate
between text fields.
Related topics:
l Key commands
l Menu Walking
Key commands
Key commands allow you to enter a keystroke with your voice, as if you had typed that key manually on your
keyboard.
Key commands allow you to use keyboard shortcuts you already know to perform tasks, whether or not there a
separate Dragon command for that task. For example, if you want to create a new document in any application, you
can say "New file" or you can say "Press the key combo Command N."
85
Page 86

Key type Example command
the command "Press the key" – you can just say "Tab
key."
"Press the key Tab"
Page Up / Down "Press the key Page Up"
Arrow keys "Press the key Right Arrow"
Home / End "Press the key Home"
Escape "Press the key Escape"
Modifier keys
These keys are used in many keyboard shortcuts:
l Command
l Shift
l Option
l Control
l Caps Lock
Example: "Press the key Command-Shift-F."
Related topics:
l Mouse commands
l Dictating letters
l Menu Walking
Menu Walking
You can use Dragon to "walk through" the menu options of any application, just as you would with your mouse and
keyboard.
1. Say "Click <menu name> menu" or "Open <menu name> menu"
2. Say "Click <menu item>."
Example: "Click File menu," then "Click Print."
If there are submenus, repeat the process as needed.
Example: "Click File menu," then "Click Open Recent," then "Click MyDocument."
While these commands are available from any application, the specific options will vary depending on the
menu contents of your current application. For example, you can say "Click Bookmarks menu" when
you're using Safari, but not when you're using TextEdit.
Related topics:
l Launching and quitting applications
l Navigating application windows
l Key commands
86
Page 87

Mouse commands
Moving the mouse
To make the cursor begin moving in a specified direction
l Say "Move mouse <direction>."
The cursor can move up, down, left, right, or a combination like left and up.
l Say "Faster" or "Slower" to change how fast the cursor moves.
l Say "Stop" to stop the cursor movement.
To move the cursor a specified number of units in the specified direction
l Say "Move mouse <1-100> <units> <direction>." Units may be pixels, centimeters or inches.
Clicking the mouse
Say one of the following:
l "Mouse click"
l "Mouse double click"
l "Mouse triple click"
You can also use modifiers (Command, Option, Shift, Control) with mouse clicks. For example, you
could say "Control mouse click."
l Say "Hold mouse" or "Press mouse" to click and hold the mouse.
l Say "Release mouse" to release the mouse button.
These commands allow you to control your mouse pointer with your voice. If you want to move the mouse to a specific
part of the screen, you can say "Open MouseGrid" to turn on the MouseGrid.
Related topics:
l MouseGrid
l Key commands
MouseGrid
The MouseGrid allows you to move your mouse pointer to a specific area. Summoning the MouseGrid displays a
transparent three-by-three grid over your screen with the sections numbered one through nine.
87
Page 88

With the MouseGrid on the screen, speak the number you want to focus on. A new three-by-three grid will appear in
Opening the MouseGrid
l Say "Open MouseGrid" to open the full-screen MouseGrid.
l Say "Open small MouseGrid" to open a small grid centered around the pointer's current location.
Zooming in
l Say "<1-9>" to select and zoom in on the specified section of the grid.
Dismissing the MouseGrid
l Say "Cancel" to remove the MouseGrid.
Changing MouseGrid settings
Open the Advanced pane of the Preferences window to adjust the appearance and behavior of the MouseGrid. See
Preferences window: Advanced for more information.
that spot, with your mouse pointer at the center.
You can repeat the process as many times as you need. When the grid area becomes too small to display numbers,
you will see a magnification window.
When the MouseGrid is on, you can use mouse commands, such as "Mouse click," to further control the mouse.
Related topics:
l Mouse commands
l Key commands
88
Page 89

Create documents
Click: To learn about:
Working with Microsoft Word
l Creating a Microsoft Word document
l Navigating within a document
l Editing and formatting text
l Saving a document
l Printing a document
Working with TextEdit
l Creating a TextEdit document
l Navigating within a document
l Editing and formatting text
l Saving a document
l Printing a document
l Adjusting your view
Navigating within a document
l Placing the cursor
l Moving to the beginning or end of a document
Creating a document
With Word active, do one of the following:
l Say "New file" to create a new document in Word.
l Say "Open file" to access the Open dialog.
Navigating within your document
Move your cursor to a different point in your text with the standard navigation commands, such as:
l "Insert before <text>"
l "<Direction> arrow" (up, down, left or right)
l "Go to beginning / end"
See Navigating within a document for more information.
Selecting text
Use the standard commands for making a selection, such as:
l "Select <text>"
l "Select All"
Read these topics to learn how to create a document, dictate and revise text, and save your document.
Working with Microsoft Word
In this topic, learn how to use your voice to:
l Create a Word document
l Navigate within a document
l Edit and format text
l Save a document
l Print a document
The commands below are available when you are using Microsoft Word 2011 or 2016. Use the menu walking
commands to access other Word features. For example, say "Click View menu," then "Click Web Layout."
Note: You cannot dictate in tables. Add tables after you have finished dictating the main body of the
document.
89
Page 90

l "Select next / previous word"
l "Unselect that"
See Revising text for more information.
Editing your document
Use the standard commands for revising your text, such as:
l "Cut <text>"
l "Cut selection"
l "Copy <text>"
l "Copy selection"
l "Paste from clipboard"
l "Delete <text>"
l "Delete selection"
See Revising text for more information.
Formatting your document
Use the global commands to format the last word or phrase you spoke:
l "Bold / Italicize / Underline that"
To change the font size
l Say "Set font size to <number> points."
To insert a page break
l Say "Insert Page Break."
Saving your document
l Say "Save this document."
Printing your document
l Say "Print the document."
Closing your document
l Say "Close file."
Related topics:
l Menu Walking
l Navigating application windows
l Launching and quitting applications
Working with TextEdit
In this topic, learn how to use your voice to:
l Create a TextEdit document
l Navigate within a document
l Edit and format text
l Save a document
l Print a document
l Adjust your view
These commands are available when you are using TextEdit. Use the menu walking commands to access other
TextEdit features. For example, say "Click File menu," then "Click Export as PDF."
90
Page 91

Creating or open a document
With TextEdit active, do one of the following:
l Say "New file" to create a new document in TextEdit.
l Say "Open file" to access the Open dialog.
Navigating within your document
Move your cursor to a different point in your text with the standard navigation commands, such as:
l "Insert before <text>"
l "<Direction> arrow" (up, down, left or right)
l "Go to beginning / end"
See Navigating within a document for more information.
Finding text in your document
1. Say "Show Find window."
2. Say the word or phrase you want to search for.
3. Say "Find next / previous" to navigate search results.
4. Say "Go to next field" to return to the document.
Selecting text
Use the standard commands for making a selection, such as:
l "Select <text>"
l "Select All"
l "Select next / previous word"
l "Unselect that"
See Revising text for more information.
Editing your document
Use the standard commands for revising your text, such as:
l "Cut <text>"
l "Cut selection"
l "Copy <text>"
l "Copy selection"
l "Paste from clipboard"
l "Delete <text>"
l "Delete selection"
See Revising text for more information.
To paste text using the font formatting of the paste location
l Say "Paste and match style."
Formating your document
You can use any of the standard commands to format or align text, such as:
l "Bold / italicize / underline that"
l "Make <text> bold / italic / underline"
l "Make selection bold / italic / underline"
l "Align the text left / center / right"
91
Page 92

See Formatting for more information.
To increase or decrease the font size
l Say "Make selection bigger / smaller."
To apply text spacing, such as indenting and Tabs, from one part of the text to another
1. Place your cursor in the section of the text whose spacing you want to copy.
2. Say "Copy Text Ruler."
3. Move your cursor to the section of the text where you want to apply the Text Ruler.
4. Say "Paste Text Ruler."
Saving your document
l Say "Save this document."
Or
l Say "Show Save As window."
To undo all your changes since the last time you saved
l Say "Revert to last saved version."
Printing your document
l Say "Print this document."
Closing your document
l Say "Close file."
Adjusting your view
l Say "Toggle Text Ruler" to show or hide the Text Ruler.
l Say "Toggle Fonts palette" to show or hide the Fonts palette.
To wrap text
l Say "Wrap text to page."
To bring all TextEdit windows to the front
l Say "Bring all windows to front."
To toggle Zoom view for the current window
l Say "Zoom this window."
To close all TextEdit windows
l Say "Close all windows."
Related topics:
l Menu Walking
l Navigating application windows
l Launching and quitting applications
Navigating within a document
When you are dictating or editing text, it is important to know how to navigate your document.
92
Page 93

In Microsoft Word or TextEdit, you can use your keyboard or mouse to perform these tasks. See Mixing
To move the cursor to the first or last position in the current document
l Say "Go to beginning / end."
To move the cursor a specified number of words from its current position
l Say "Move backward / forward <number> word(s)."
You can move between 1 and 99 words forward or backward.
To insert the cursor before a specified word or phrase
l Say "Insert before <text>."
When you specify a word as an insertion point, if that text appear more than once in the document,
Dragon selects the nearest instance.
To move the cursor to its previous position
l Say "Go back."
To move the cursor up, down, left or right
l Say "<Direction> arrow."
The cursor will move one position in the specified direction, as it would if you pressed the arrow keys.
To move the cursor to a new text field
l Say "Click next / previous field."
This command is for:
l Documents such as emails that contain multiple text fields
l Dialog boxes, such as sign-in window, that include multiple fields
l Spreadsheets
dictation with typing for information on using your keyboard and mouse while dictating with Dragon.
Related topics:
l Launching and quitting applications
l Navigating application windows
93
Page 94

Use applications
Click: To learn about:
Working with Microsoft Word
l Creating a document
l Navigating within a document
l Editing and formatting text
l Saving a document
l Printing a document
Working with TextEdit
l Creating a document
l Navigating within a document
l Editing and formatting text
l Saving a document
l Printing a document
l Adjusting your view
Working with Mail
l Opening a new email addressed to anyone in your Contacts
l Creating new messages
l Navigating message text
l Editing and formatting text
l Sending a message
l Viewing messages and threads
l Printing a message
l Sorting and labeling messages
l Searching your mail
l Navigating Mailboxes
Working with Safari
l Opening a Web page
l Entering text
l Navigating the Web
l Navigating a Web page
l Loading a page
l Using Safari windows and tabs
l Adding and editing bookmarks
l Using Auto Fill
l Sharing a Web page
l Printing a Web page
l Adjusting your view
Working with Calendar
l Creating and deleting events
l Changing your view
l Searching your calendars
l Backing up your calendars
Working with Messages
l Sending a message
Read this topic to learn how to control popular OS X applications with your voice.
Working with Mail
In this topic, learn how to use your voice to:
l Create new messages in Mail
l Navigate message text
l Edit and format text
l Send a message
l View messages and threads
94
Page 95

l Print a message
Creating a new message
l Say "New message" to compose a new message from scratch.
To reply to the selected message
Say one of the following:
l "Reply to this message"
l "Reply All to this message"
To forward the selected message
Do one of the following:
l Say "Forward this message" to forward the whole message.
l Say "Forward selection" to forward a selected portion of the message.
l Say "Redirect this message" to send the message directly to a new recipient.
To resend the selected message
l Say "Send this message again."
Navigating within your message
Move your cursor to a different point in your text with the standard navigation commands, such as:
l "Insert before <text>"
l "<Direction> arrow" (up, down, left or right)
l "Click next / previous field"
See Navigating within a document for more information.
You can also say any of the following in Mail:
l "Move to beginning / end of message"
l "Move up / down one paragraph"
l "Move left / right one word"
l "Move to beginning / end of this line"
l "Move left / right one character"
Selecting text
Use the standard commands for making a selection, such as:
l "Select <text>"
l "Select All"
l "Select next / previous word"
l "Unselect that"
l Sort and label messages
l Search your mail
l Navigate Mailboxes
The commands below are available when you are using Apple Mail. Use the menu walking commands to access other
Mail features. For example, say "Click Message menu," then "Click Add Sender to Contacts."
Remember, in some applications, it's better not to use your mouse and keyboard while dictating text. See
Mixing dictation with typing for more information, including a list of currently supported applications.
95
Page 96

See Revising text for more information.
You can also say any of the following in Mail:
l "Extend selection left / right one character"
l "Extend selection to beginning / end of line"
l "Extend selection up / down one line"
l "Extend selection to end of paragraph"
l "Extend selection up / down one paragraph"
l "Extend selection to beginning / end of message"
l "Extend selection to end of window"
Editing your message
Use the standard commands for revising your text, such as:
l "Cut <text>"
l "Cut selection"
l "Copy <text>"
l "Copy selection"
l "Paste from clipboard"
l "Delete <text>"
l "Delete selection"
See Revising text for more information.
You can also say any of the following in Mail:
l "Paste as quotation"
l "Paste and match style"
l "Append selected messages"
l "Check spelling"
Formatting text
You can use the global commands to format the last word or phrase you spoke:
l "Bold / Italicize / Underline that"
You can also say any of the following:
l Say "Make selection bigger / smaller" to increase or decrease the font size by one point.
l Say "Increase / decrease quote level" to format the selected text as a quote and increase or decrease the
quote level:
If you want to apply formatting from one section of text to another:
1. Select the formatted text.
2. Say "Copy style of selection."
3. Select the text where you want to apply the formatting.
4. Say "Paste style."
96
Page 97

Sending your message
l Say "Send message."
Navigating messages and threads
To scroll within a message or thread
l Say "Move up / down one page."
To toggle viewing threads in the Mailbox pane
Say one of the following:
l "Expand / Collapse this thread"
l "Expand / Collapse all threads"
To move between messages
l Say "Go to next / previous message."
To view your selected message or thread in the Mailbox
l Say "Jump to selection."
To check for new messages
l Say "Get new mail."
Printing a message
l Say "Print this document."
Managing your messages
To sort your messages
l Say "Sort by <property>."
You can sort messages by:
l Attachments
l Date Received
l Date Sent
l Flags
l From
l To
l Subject
l Size
To label the selected message
l Say "Mark as <status>."
You can mark messages as:
l Flagged
l Unflagged
l High Priority
l Low Priority
l Normal Priority
l Junk Mail
l Read
l Unread
To delete the selected message
l Say "Delete selection."
97
Page 98

To clear deleted or junk messages
Say one of the following:
l "Erase deleted messages in all accounts"
l "Erase deleted messages on my Mac"
l "Erase Junk Mail"
Searching your messages
To search the text of the current message
1. Do one of the following:
l Say "Access Find window."
l With text selected in the current message, say "Use selection for Find."
2. Dictate the word or phrase you want to search for.
To search your Mailbox
1. Say "Find in selected mailboxes."
2. Dictate the word or phrase you want to search for.
3. Say "Find Next / Previous" to switch between Find results.
Navigating your mailboxes
To switch to the Viewer Window
l Say "Show Message Viewer."
To navigate between Mailboxes
Say one of the following:
l "Go to Inbox"
l "Go to Drafts"
l "Go to Sent box"
Creating and deleting mailboxes
To create a new Mailbox
Say one of the following:
l "Make new Mailbox"
l "Make new Smart Mailbox"
To rename the selected Mailbox
l Say "Rename selected Mailbox."
To delete the selected Mailbox:
l Say "Delete this Mailbox."
Adjusting your view
l Say "New Viewer Window" to open a new Viewer Window.
l Say "Show / Hide Mailboxes" to toggle the Mailbox list view.
l Say "Show / Hide Toolbar" to toggle the Toolbar.
l Say "Zoom this window" to toggle Zoom view for the current window.
98
Page 99

l Say "Arrange in front" to bring all Mail windows to the front.
Related topics:
Creating or open a document
With TextEdit active, do one of the following:
l Say "New file" to create a new document in TextEdit.
l Say "Open file" to access the Open dialog.
Navigating within your document
Move your cursor to a different point in your text with the standard navigation commands, such as:
l "Insert before <text>"
l "<Direction> arrow" (up, down, left or right)
l "Go to beginning / end"
See Navigating within a document for more information.
Finding text in your document
1. Say "Show Find window."
2. Say the word or phrase you want to search for.
3. Say "Find next / previous" to navigate search results.
4. Say "Go to next field" to return to the document.
Selecting text
Use the standard commands for making a selection, such as:
l "Select <text>"
l "Select All"
l "Select next / previous word"
l "Unselect that"
See Revising text for more information.
Editing your document
l Working with email
l Menu Walking
l Navigating application windows
l Launching and quitting applications
l Working with webmail
Working with TextEdit
In this topic, learn how to use your voice to:
l Create a TextEdit document
l Navigate within a document
l Edit and format text
l Save a document
l Print a document
l Adjust your view
These commands are available when you are using TextEdit. Use the menu walking commands to access other
TextEdit features. For example, say "Click File menu," then "Click Export as PDF."
99
Page 100

Use the standard commands for revising your text, such as:
l "Cut <text>"
l "Cut selection"
l "Copy <text>"
l "Copy selection"
l "Paste from clipboard"
l "Delete <text>"
l "Delete selection"
See Revising text for more information.
To paste text using the font formatting of the paste location
l Say "Paste and match style."
Formating your document
You can use any of the standard commands to format or align text, such as:
l "Bold / italicize / underline that"
l "Make <text> bold / italic / underline"
l "Make selection bold / italic / underline"
l "Align the text left / center / right"
See Formatting for more information.
To increase or decrease the font size
l Say "Make selection bigger / smaller."
To apply text spacing, such as indenting and Tabs, from one part of the text to another
1. Place your cursor in the section of the text whose spacing you want to copy.
2. Say "Copy Text Ruler."
3. Move your cursor to the section of the text where you want to apply the Text Ruler.
4. Say "Paste Text Ruler."
Saving your document
l Say "Save this document."
Or
l Say "Show Save As window."
To undo all your changes since the last time you saved
l Say "Revert to last saved version."
Printing your document
l Say "Print this document."
Closing your document
l Say "Close file."
Adjusting your view
l Say "Toggle Text Ruler" to show or hide the Text Ruler.
l Say "Toggle Fonts palette" to show or hide the Fonts palette.
100
 Loading...