

Page 1

USER’S GUIDE
Page 2

July 2006. Version 9 Professional, Medical, and Legal, Preferred, Standard, Essentials editions.
This material may not include some last-minute technical changes and/or revisions to the
software. Changes are periodically made to the information provided here. Future versions of
this material will incorporate these changes.
Nuance Communications, Inc. has patents or pending patent applications covering the subject
matter contained in this document. The furnishing of this document does not give you any
license to such patents. This software is protected under the following patents, among others:
5,027,406; 5,168,548 5,202,952; 5,231,670; 5,388,183; 5,428,707; 5,465,318; 5,526,463; 5,680,511;
5,715,367; 5,754,972; 5,765,132; 5,794,189; 5,799,279; 5,818,423; 5,822,730; 5,850,627; 5,890,181;
5,909,666; 5,915,236; 5,920,836; 5,920,837; 5,949,886; 5,960,394; 5,970,448; 5,970,460; 5,983,179;
6,029,124; 6,058,366; 6,064,959; 6,073,097; 6,088,671; 6,092,043; 6,092,044; 6,101,468; 6,125,342;
6,125,347; 6,138,098; 6,151,575; 6,163,768; 6,167,377; 6,212,498; 6,260,013; 6,292,779; 6,349,282;
6,424,943; 6,456,972. 6,393,399, 6,360,237, 6,456,972, 6,490,555, 6,601,027, and 6,912,498 .
No part of this manual or software may be reproduced in any form or by any means, including,
without limitation, electronic or mechanical, such as photocopying or recording, or by any
information storage and retrieval systems, without the express written consent of Nuance
Commications, Inc. Specifications are subject to change without notice.
Copyright © 2002-2006 Nuance Commications, Inc. All rights reserved.
Nuance, ScanSoft, the Nuance logo, the Dragon logo, Dragon, DragonBar, NaturallySpeaking,
NaturallyMobile, RealSpeak, Nothing But Speech (NBS), Natural Language Technology,
Select-and-Say, MouseGrid, and Vocabulary Editor are registered trademarks or trademarks of
Nuance Commications, Inc. in the United States or other countries. All other names and
trademarks referenced herein are trademarks of Nuance Commications or their respective
owners. Designations used by third-party manufacturers and sellers to distinguish their products
may be claimed as trademarks by those third-parties.
Page 3

Pentium is a registered trademark of Intel Corporation.
Adobe and Acrobat are registered trademarks of Adobe Systems Incorporated.
Corel and WordPerfect are registered trademarks of Corel Corporation.
Lotus and Lotus Notes are registered trademarks of Lotus Development Corporation.
Microsoft, Outlook, Windows, Windows NT, Visual Basic, and PowerPoint are trademarks or
registered trademarks of Microsoft Corporation.
Voice It, the Voice It logo, and Voice It Link are trademarks or registered trademarks of VXI
Corporation.
AMD is a trademark of Advanced Micro Devices, Inc.
Sound Blaster is a registered trademark of Creative Technology Ltd.
America Online is a registered trademark of America Online, Inc., a division of AOL Time
Warner.
Sony and Memory Stick are regitered trademarks of the Sony Corporation
Panasonic is a registered trademark of the Matsushita Electric Industrial Co., Ltd
iPAQ is a registered trademark of the Hewlett-Packard Company
Palm OS is a registered trademark of of PalmSource, Inc. or its affiliates.
Macromedia Flash™ is a trademark of Macromedia, Inc
Dave Barry in Cyberspace, © Copyright 1996 by Dave Barry, published by Crown Publishers.
3001: The Final Odyssey, © Copyright 1997 by Arthur C. Clarke, published by HarperCollins
Publishers.
Dogbert's Top Secret Management Handbook, © Copyright 1996 by United Feature Syndicate, Inc.,
published by HarperBusiness, a division of HarperCollins Publishers.
Success Is a Journey: 7 Steps to Achieving Success in the Business of Life, © Copyright 1999 by Jeffrey J.
Mayer, published by McGraw Hill.
Charlie and the Great Glass Elevator, © Copyright 1972 by Roald Dahl, published by Alfred A.
Knopf, Inc., and Penguin Books.
The Captain of Battery Park, © Copyright 1978 by Eugene Pool, published by Addison-Wesley.
50-A11A-10160
Page 4

Page 5

Contents
CHAPTER 1 Introduction 1
About this guide 2
What should I expect from Dragon
NaturallySpeaking? 3
What’s new in Version 9? 4
CHAPTER 2 Installation and Training 5
System requirements 5
Plugging in the microphone 6
Installing the software 7
Activating Dragon NaturallySpeaking 12
Creating a new user 13
Setting up your microphone 16
Training a new user 18
Adapting to your writing style 19
Version 9 File Structure 20
CHAPTER 3 Starting to Dictate 23
Starting Dragon NaturallySpeaking 23
Turning on the microphone 24
Starting to dictate 25
Getting Help 29
Troubleshooting 31
The DragonBar 31
Using QuickStart 34
CHAPTER 4 Working on your Desktop 37
Programs, documents and folders 37
Switching between open windows 38
Opening and closing menus 39
Selecting buttons, tabs, and options 40
Selecting icons on the desktop 41
Dragon NaturallySpeaking User’s Guide
v
Page 6

Contents
Resizing and closing windows 42
Scrolling in windows and list boxes 42
Opening lists and making selections 43
Pressing keyboard keys 43
Moving the mouse pointer and clicking the
mouse 48
CHAPTER 5 Correcting and Editing 53
Correcting mistakes 53
Selecting text by voice 58
Moving around in a document 62
Copying, cutting, and pasting text 64
Deleting text 65
Spelling as you dictate 67
Playing back your dictation (Preferred and
higher) 69
Using text-to-speech 74
CHAPTER 6 Formatting 77
Capitalizing text 77
Formatting text 80
CHAPTER 7 Dictating Names, Numbers, Punctuation &
Special Characters 85
Dictating numbers 85
Punctuation 95
Dictating hyphenated words 98
Dictating compound words 100
Dictating names 101
Dictating abbreviations and acronyms 101
Dictating e-mail and Web addresses 102
Dictating special characters 103
Switching Recognition Modes 108
vi
Dragon NaturallySpeaking User’s Guide
Page 7

Contents
INDEX111
Dragon NaturallySpeaking User’s Guide
vii
Page 8

Page 9

CHAPTER
D
1
Introduction
ragon NaturallySpeaking lets you talk to your computer instead
of typing. As you talk, your words are transcribed onto your
screen and into your documents or e-mail messages.
Talking to a computer while it types what you say is called dictating.
You can dictate, rather than type, into any program that accepts text.
You can use Dragon NaturallySpeaking to:
■ Compose letters, memos, and send e-mail messages. You can cut
and paste inside your documents as well as revise and format text.
Just think about what you want to say, and then say it into the
microphone.
■ Enter data into forms or spreadsheets. (Available in Professional and
higher editions) Most people can dictate numbers faster than they
can type. Using Dragon NaturallySpeaking Professional or higher
editions, you can create custom voice commands to let you move
from field to field on your form by voice.
■ Work on the Web. You can search the Web, access information, and
navigate Web pages by speaking URLs and links.
■ Start programs and open menus.
■ Use handheld recorders to dictate while you are away from your
computer. Dragon NaturallySpeaking can then transcribe what you
said. (Available in Preferred and higher editions.)
Dragon NaturallySpeaking User’s Guide
1
Page 10

1
Introduction
About this guide
This guide covers all editions of Dragon NaturallySpeaking.
Most of the information presented in this guide is applicable to all the
editions. Differences between the editions is noted in the text.
Conventions used in this guide
1 This guide contains many examples of words and phrases you can
say when using Dragon NaturallySpeaking. These examples
appear in italics with quotation marks, for example: “Format That
Bold.”
2 Some procedures also include sample text for you to dictate.
Sample text appears in a different typeface, with punctuation in
square brackets.
3 Standard, Preferred, Professional and higher editions: This guide
applies to the five English dialects that ship with Dragon
NaturallySpeaking:
■ US English
■ UK English
■ Australian English
■ Indian English
■ Southeast Asian English
US English uses US spelling, punctuation, and time and currency
formats. We recommend US English for Canadian users since this
dialect formats numbers (including times, telephone numbers, and
currency) in North American formats.
All other dialects use UK spelling, punctuation, and time and
currency formats (some number settings depend on your Windows
Regional Settings). Where multiple dialects are used in dictation
examples, those dialects appear in a different font style. For
example:
You can also correct a longer phrase by saying “Correct [text]
2
Dragon NaturallySpeaking User’s Guide
Page 11

1
Introduction
Through [text]” (US/Canada) or “Correct [text] To [text]” (Other
Dialects).
4 This guide uses US spelling and punctuation for consistency.
5 This guide also includes tips and notes to help you use the
software more effectively. Tips and notes appear like this:
TIP
If you pause correctly, but Dragon NaturallySpeaking still types a
command as dictation, you can force it to recognize what you say as a
command by holding down the CTRL key.
NOTE
interpret everything you say as a number. If you dictate words, the results will
be unpredictable. However, you can still navigate menus and switch between
programs by voice when Numbers Mode is on.
With Numbers Mode on, Dragon NaturallySpeaking tries to
What should I expect from Dragon
NaturallySpeaking?
One reason to use Dragon NaturallySpeaking is to do your writing
more quickly; creating letters, reports, and other documents by voice.
Another is to reduce the stress associated with keyboarding. Or maybe
you just like the idea of being able to lean back in your chair, put your
feet up on the desk, and still get work done.
Dragon NaturallySpeaking is good for all these reasons, but making it
work well requires some effort from you. Dragon NaturallySpeaking
learns about your voice and pronunciation as you use it. When you use
words the program doesn’t know, it will misrecognize them. By
correcting your mistakes, you help Dragon NaturallySpeaking
its ability to recognize your way of speaking.
Do I still need my keyboard and mouse?
Although you can use Dragon NaturallySpeaking to do almost
everything on your computer by voice, some things are still easier to
do by mouse or keyboard.
improve
Dragon NaturallySpeaking User’s Guide
3
Page 12

1
If using a mouse and keyboard is an option for you, try experimenting
with using your voice and using your hands for different tasks, to see
what works best. If using a mouse and keyboard is not an option, see
“Working on your Desktop” on page 37.
Introduction
What’s new in Version 9?
For a complete list of what’s new in Version 9, see the online help.
4
Dragon NaturallySpeaking User’s Guide
Page 13

CHAPTER
T
2
Installation and Training
his chapter describes how to install, set up, and train Dragon
NaturallySpeaking.
System requirements
To run Dragon NaturallySpeaking, your system must meet the
following requirements:
®
■ Intel
■ 1GB RAM (512 MB free minimum)
■ Minimum of 650 MB of free hard disk space for a Custom
■ Windows 2000 or Windows 2000 Advanced Server (Service Pack 4
■ 16-bit Creative
■ Microsoft
■ CD-ROM drive (8x or faster) required for installation.
Pentium® 4 (or equivalent AMD processor) 1GHz processor
or greater. Recommended: 2.4 GHz)
NOTE
Dragon NaturallySpeaking will not install on machine with a
processor of less than 1GHz CPU speed.
Installation where you install only the program files and 1 set of
speech files. Installations can range from 800 MB (US English
Essentials) to 2.5 GB (US English Professional Medical).
or higher), Windows Server 2003, Windows XP Pro or Windows XP
Home (SP1 or SP2). Windows ME and Windows NT are not
supported.
NOTE
release.
capable of and set to 16 bit, 11KHz for audio recording.
at www.microsoft.com).
Future versions of Microsoft Windows are not supported in this
®
Labs Sound Blaster®, or compatible sound card
®
Internet Explorer® 5 or higher (free download available
Dragon NaturallySpeaking User’s Guide
5
Page 14

2
■
Nuance-approved noise-canceling headset microphone. A
Installation and Training
microphone is included with the full product. A microphone is not
included with upgrade versions of Dragon NaturallySpeaking.
■ Speakers - optional for playback of recorded speech and text-to-
speech features. (Available only in Preferred and higher editions).
■ An Internet connection for product activation and automatic
updates.
Multiple users on one computer
Dragon NaturallySpeaking is licensed on a “per individual” basis.
You are permitted to install the software on more than one
computer (for example, on a desktop and a laptop computer, or on
a work computer and a home computer), although you may not
use the software concurrently on more than one computer, and
you are permitted to create multiple voice profiles, so long as each
voice profile is for you. If someone else desires to create or use
another voice profile, however, that person must purchase a
separate license for Dragon NaturallySpeaking. Volume license
agreements are available.
Plugging in the microphone
To use Dragon NaturallySpeaking, you will need to plug in your
microphone.
1 Insert the microphone plug into the MIC input jack of your sound
card. Microphones and sound cards vary, but the microphone jack
is usually red and has a picture of a microphone. If your sound card
does not have a MIC jack, use the LINE IN jack.
If you are not sure how to plug in your microphone, consult the
documentation that came with your computer.
Also, if you have a USB or array microphone (supported in
Preferred and higher editions), follow the instructions that came
with it instead of this description.
6
Dragon NaturallySpeaking User’s Guide
Page 15

2
Installation and Training
2 Insert the headphone plug into the LINE OUT jack on your
sound card. If your sound card does not have a LINE OUT jack,
use the SPEAKER or HEADPHONE jack.
NOTE
these to playback recorded speech instead of your headphones.
If you already have speakers for your computer, you can also use
Installing the software
Before installing, modifying or upgrading Dragon NaturallySpeaking:
■ Close all open applications.
■ Turn off or disable any antivirus software; installation can
sometimes trigger a false virus report.
NOTE
You must have Administrator rights to install or uninstall Dragon
NaturallySpeaking on Windows 2000 and Windows XP.
For Windows 2000 and Windows XP Professional systems with limited user
accounts (users with restricted privileges), if the administrator wants to create
a Dragon NaturallySpeaking user for a limited user, the administrator must
log on as the limited user. If an administrator creates a Dragon
NaturallySpeaking user for a limited user account from an administrator
account, the limited user account will not be able to access that user.
Administrator rights are not required to create a user or use the software after
installation. These restrictions also apply for an upgrade installation.
Coexistence with other Dragon
NaturallySpeaking products
Coexistence with previous versions of Dragon NaturallySpeaking
You can have only one version of Dragon NaturallySpeaking installed
on your system.
NOTE
Running Version 7 or 8 concurrently with Version 9 is not
supported.
Dragon NaturallySpeaking User’s Guide
7
Page 16

2
Installation and Training
Coexistence with Dragon NaturallySpeaking SDK Client Edition
You can install Dragon NaturallySpeaking SDK Client Edition 9 on
the same machine where Dragon NaturallySpeaking 9 is installed. In
addition, Dragon NaturallySpeaking 9 and Dragon NaturallySpeaking
SDK Client Edition 9 can share vocabularies and users.
You can only run one product at the same time. For example, if you are
running Dragon NaturallySpeaking you cannot run any of the SDK
Client tools or samples.
NOTE
Coexistence with Dragon NaturallySpeaking SDK Client Edition
Version 8 is not supported.
Upgrading from a previous version
You can upgrade from Dragon NaturallySpeaking Versions 7 and 8.
During an upgrade, the V9 upgrade procedure will ask you to:
■ Remove the previous Dragon NaturallySpeaking installation. If you
choose not to remove the previous installation, you cannot continue
to upgrade. Removing Version 7 or 8 will not remove your V7 or 8
speech files and vocabularies.
■ Migrate your existing user files and vocabularies to Version 9. If you
choose not to upgrade your user files and vocabularies during the
upgrade, you can do so at a later time by running the Version 9
Upgrade Tool.
NOTE
decide to later reinstall the previous version.
The user files from previous versions remain untouched in case you
Once V9 is installed, your previous version will no longer be
functional.
Edition considerations
You must upgrade to the same edition or higher and to the same
language.
For example, if you started with Version 8 German/English and you
upgrade to Version 9 English only, your Version 8 German users will
not be upgraded. Upgrading to Version 9 German/English will
8
Dragon NaturallySpeaking User’s Guide
Page 17

2
Installation and Training
upgrade both your German and English users. After upgrading, you
can install other Version 9 languages.
Directory Changes
For information on changes to the directory structure when upgrading
from Version 7 or 8, see “Version 9 File Structure” on page 20.
To install Dragon NaturallySpeaking:
1 Insert the first Dragon NaturallySpeaking CD into your CD-ROM
drive.
If the installation does not start automatically, use the Windows
Explorer to find and double-click setup.exe on the CD.
Depending on your installation options, you may be prompted to
insert additional Dragon NaturallySpeaking CDs.
2 Provide your customer information, including the serial number
supplied with your Dragon NaturallySpeaking installation.
3 Choose your installation directory. If there are no previous versions
of Dragon NaturallySpeaking on your system, the default directory
is:
C:\Program Files\Nuance\NaturallySpeaking9
For a list of directories created by installation, see “Version 9 File
Structure” on page 20.
Dragon NaturallySpeaking User’s Guide
9
Page 18

2
4 Choose your Setup Type (Preferred and higher editions):
Installation and Training
TYPE DESCRIPTION
Typical/
Complete
Installs all options and speech files and
requires the most disk space.
Custom Lets you select which options and speech
files to install. Customizing your installation
options can greatly reduce the disk space
required for installation.
Modifying options (Professional)
For the Professional edition, you can modify
the following settings during a custom
installation. These settings are applied to all
users created with this installation of Dragon
NaturallySpeaking, including users created
from Windows XP limited accounts:
■ "Modify the application's settings for all
users" displays the Options dialog box at
the end of the installation. The Options
dialog box lets you change Dragon
NaturallySpeaking’s standard behavior,
including specifying hot keys,
customizing how text is formatted, initial
microphone settings, and setting the how
often your user files are backed up.
■ “Modify the administrative settings”
displays the Administrative settings
dialog box at the end of the installation.
The Administrative settings dialog box
lets you set up the Roaming User feature
as well as well as set the backup location
of your user files and restrict users from
modifying commands and vocabularies.
NOTE
components by selecting Custom installation, you can install them later by
running the Setup program again and choosing Modify.
If you decide not to install some Dragon NaturallySpeaking
10
Dragon NaturallySpeaking User’s Guide
Page 19
2
Installation and Training
Installing other languages, dialects and specialized vocabularies
To install user files for the other languages or dialects supplied
with your edition, choose “Custom” from the setup screen and
click Next.
Select the user file for the dialect you want and click Next to
continue the installation
The user files for each language or dialect contain both spellings
and pronunciations specific to that region. For example, users
who wish to dictate US English spellings—including users with
accents—should install the US (American) English user files.
Click Next to continue.
5 You can enable the Dragon NaturallySpeaking QuickStart option.
By enabling QuickStart, Dragon NaturallySpeaking launches at
system startup time and adds the Dragon NaturallySpeaking
QuickStart icon to the Windows task bar. For more information on
the QuickStart option, see “Using QuickStart” on page 34.
6 Upgrade only: If you are upgrading from Version 7 or 8, you can
select to upgrade your users as part of the Version 9 installation by
checking “Upgrade existing speech files to work with this
installation.” You may be prompted later to re-train some of your
existing users.
You can upgrade your V7 or V8 users at a later time by running the
User Upgrade Wizard from the Open User dialog box once the
product is installed. For more information, see the online help.
Dragon NaturallySpeaking User’s Guide
11
Page 20

2
7 Continue following the on-screen instructions. The setup program
8 When prompted, make sure to register your copy of Dragon
9 Select "Check the Internet for program updates after setup
Installation and Training
will install the files for Dragon NaturallySpeaking to your
computer.
NaturallySpeaking. Once registered, Nuance can notify you of
product updates and other offers.
completes." This lets you automatically update Dragon
NaturallySpeaking over the Internet when updates are available.
Click Finish to complete the installation. The program may ask
you to reboot your computer.
Activating Dragon
NaturallySpeaking
The first time you start Dragon NaturallySpeaking, you will be
prompted to activate your copy of Dragon NaturallySpeaking.
If you do not activate the software, Dragon NaturallySpeaking will
stop working after starting the product fives times.
NOTE
NaturallySpeaking. The activation process sends only your product serial
number and a number that uniquely identifies the machine where Dragon
NaturallySpeaking is being installed. No personal information is transmitted
to Nuance.
To activate the Dragon NaturallySpeaking:
You must be connected to the Internet to activate Dragon
12
Dragon NaturallySpeaking User’s Guide
Page 21
2
Installation and Training
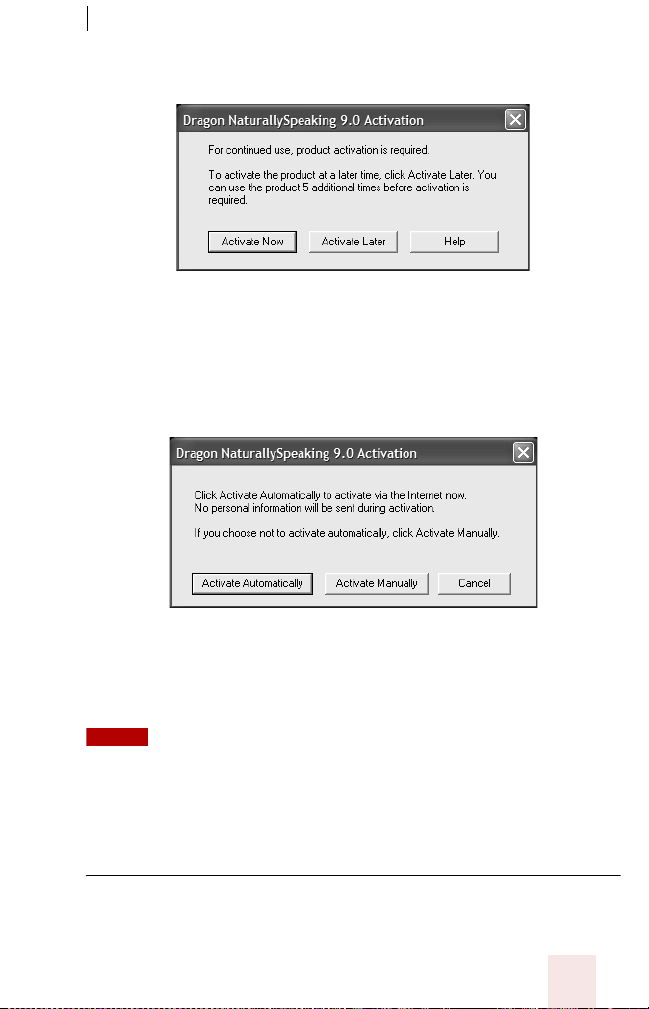
1 Start Dragon NaturallySpeaking. This displays the Activation
dialog box.
If you choose “Activate Later”, you will be prompted to activate
each time you start Dragon NaturallySpeaking. If you start the
program five times without activating, Dragon NaturallySpeaking
will be disabled.
2 Click “Activate Now.” This displays the Activation Screen:
3 Click Activate Automatically. Clicking Activate Automatically
automatically activates the Dragon NaturallySpeaking and
requires no further action from you.
NOTE
If you choose “Activate Manually”, the activation process will direct you to the
Nuance product activation web site where you will be prompted to complete
several steps to activate Dragon NaturallySpeaking.
Nuance strongly recommends that activate automatically.
Creating a new user
Before you can begin using Dragon NaturallySpeaking, you must
create a user.
Dragon NaturallySpeaking User’s Guide
13
Page 22
2
Installation and Training
Your user files store acoustic information about your voice that Dragon
NaturallySpeaking uses to recognize what you say. These files also
store any changes you make to the standard Dragon
NaturallySpeaking vocabulary, for example, any specialized words,
names, acronyms, and abbreviations you might add.
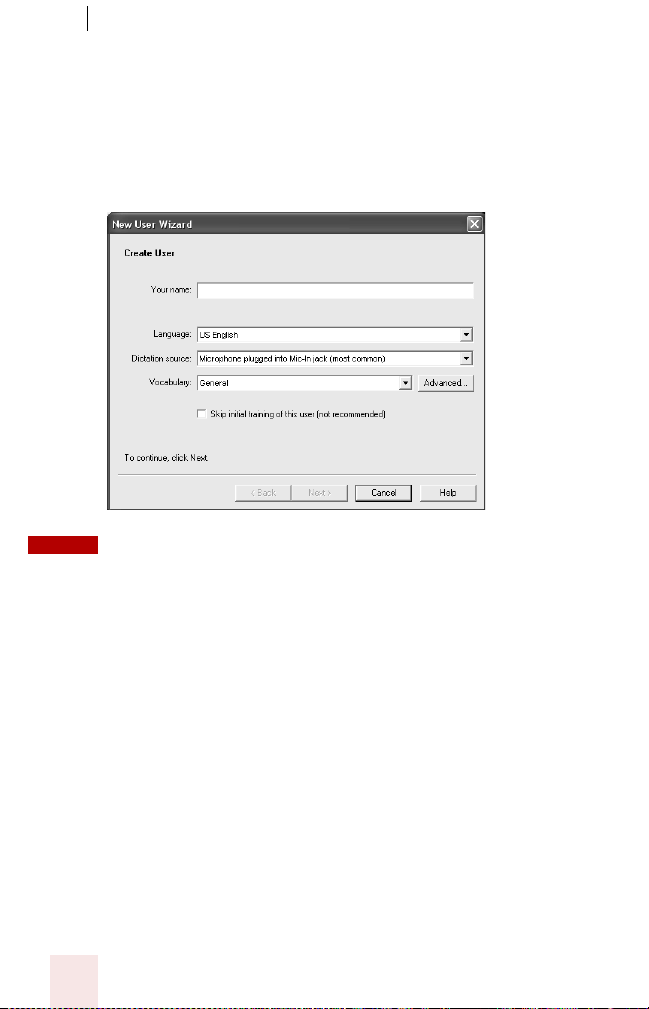
When you launch the software for the first time, the New User Wizard
starts and leads you through creating a new user. For example:
NOTE
NaturallySpeaking loads that user. If you upgraded multiple users, Dragon
NaturallySpeaking displays all the upgraded users in the Open User dialog
box.
If you upgraded a single user from a previous version, Dragon
Creating a user
1 To create a user, you must type a name in the Your N ame field.
The software automatically picks the best speech model and
vocabulary settings for your system. For more information, see
“About vocabularies and languages” below.
2 Select your dictation source (the type of device into which you will
be speaking). The most common choice is a headset microphone
plugged into the mic-in jack of your computer. Check the list to be
sure that you have selected the correct source.
3 Initial Training: You can select to skip initial training for the user
you are creating. Initial training includes reading aloud for several
14
Dragon NaturallySpeaking User’s Guide
Page 23

2
Installation and Training
minutes from a list of available texts and will enhance your initial
recognition accuracy.
You can select "Skip initial training of this user" to skip the initial
training session of the New User Wizard. When you skip the initial
training, it is important to read the text exactly as presented when
the New User Wizard leads you through the volume and quality
checks for your microphone. If you want to do additional training
later, you can run Perform Additional Training from the Accuracy
Center.
4 Click Next to continue.
About vocabularies and languages
Languages (Preferred, Professional, and higher editions)
Some editions of Dragon NaturallySpeaking Version 9 let you to
create and train users in multiple languages. If you have purchased an
edition with support for more than one language, you can add
additional languages by choosing "Custom Install" during Setup. For
Preferred and Professional editions, if you didn't select additional
languages during Setup, you can also select an additional language
when you create a new user. In this instance, you will need the Dragon
NaturallySpeaking CD to install the language files before you can
create the user.
Vocabular y
Dragon NaturallySpeaking uses a vocabulary to recognize words
correctly based not only on the sound of the words, but on their
context.
Vocabular y size
When you create a set of user files, Dragon NaturallySpeaking
recommends the vocabulary that best fits your computer's speed and
memory. For most users, this recommendation should be followed.
Depending on your edition, you may see an Advanced button.
Experienced users may want to click the Advanced button to specify a
different vocabulary size:
■ Large: for computers with more than 512MB of RAM.
Dragon NaturallySpeaking User’s Guide
15
Page 24
2
■
Empty Dictation: a vocabulary with a language model but without
any words. Empty Dictation is designed for experienced users or resellers who want to create highly specialized vocabularies.
(Professional and higher editions)
Installation and Training
Speech Model
Dragon NaturallySpeaking uses the speech model to adapt to your
voice during training. When you create a set of user files, Dragon
NaturallySpeaking recommends the speech model that best fits your
computer's speed and memory. See the online help for more
information on speech models.
Setting up your microphone
Click Next to have the New User Wizard lead you through setting up
your microphone.
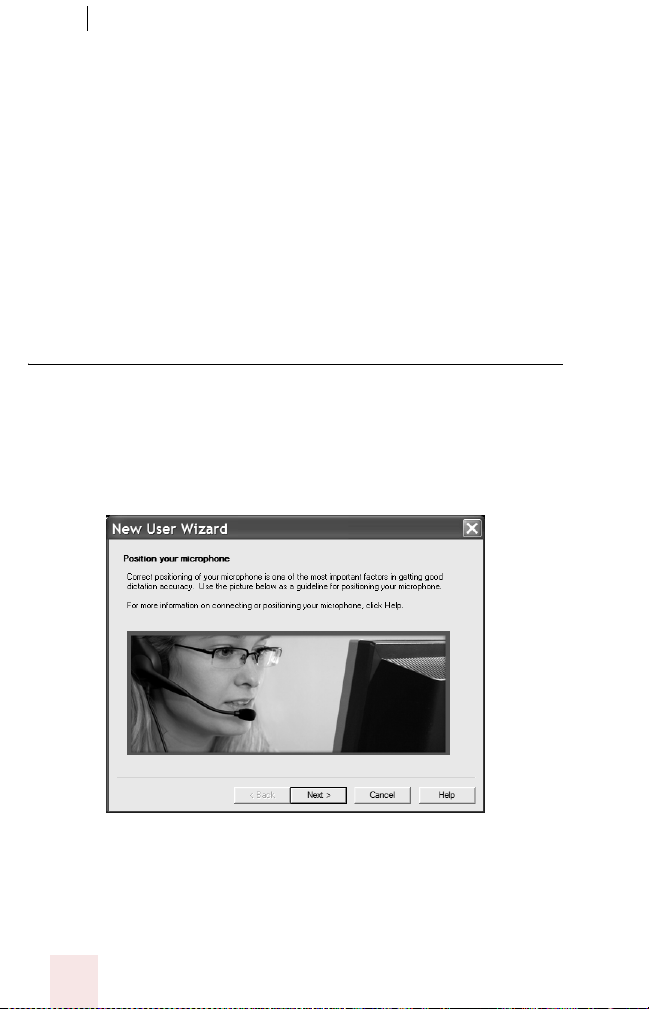
Positioning your microphone
The New User Wizard first explains how to position your microphone:
Once you have correctly positioned the microphone, click Next to
continue.
16
Dragon NaturallySpeaking User’s Guide
Page 25

2
Installation and Training
Position the microphone
Positioning the microphone is important. If the microphone is out of
place, Dragon NaturallySpeaking may not be able to hear you clearly
and may make more mistakes.
Consistent position is also important. Make sure that you position the
microphone the same way each time you use Dragon
NaturallySpeaking.
Using a headset microphone
■ Position the microphone about a half-inch (approximately the
width of your thumb) from your mouth and a little off to the side.
The microphone should not touch your mouth, but it can be almost
touching your lips.
■ If you need to move the microphone out of the way, you can lift the
"boom" up and over your head, rather than bending it out of
position or removing the headset.
Using a handheld microphone (Preferred and
Professional)
■ Hold the microphone one to three inches from your mouth and a
little off to the side.
■ If the volume display on the DragonBar
microphone slightly farther from your mouth.
TM
turns red, try holding the
Using an array microphone (Professional and
higher)
■ Position the array between 18 and 30 inches from and pointed at
your mouth.
■ Avoid blocking the path between your mouth and the array, for
example by holding a book or paper in front of your face.
■ Avoid having any source of noise or signal other than your voice
directly facing the array within at least 15 feet.
Dragon NaturallySpeaking User’s Guide
17
Page 26

2
Installation and Training
Check your volume
When the “Adjust Your Microphone: Volume Check” screen appears,
click the “Start Volume Check” button and then read aloud the text
displayed in the box.
When the program beeps to indicate it has finished checking the
volume, click Next.
Sound quality check
When the “Adjust Your Microphone: Quality Check” screen appears,
click “Start Quality Check” and then read aloud the text displayed in
the box.
The program beeps when it has finished evaluating the sound quality
of your system. If Dragon NaturallySpeaking displays “PASSED,”
click the Next button to continue.
Training a new user
You will not be prompted to start General Training if you elected to
skip initial training when you created the user.
Performing the training when creating a user will enhance your initial
recognition accuracy. Initial training includes reading aloud for several
minutes from a list of available texts.
NOTE
For more information on training a mobile user, see the online
help.
A yellow arrow shows you where to start reading. To take breaks while
you're training the program, click Pause.
To advance through the first two screens, you must say the sentences
without pausing. For the rest of the screens, it's okay to pause in the
middle of a sentence.
When the words change color, it means the computer has heard and
recognized them. If you keep reading the same words, and the
18
Dragon NaturallySpeaking User’s Guide
Page 27

2
Installation and Training
computer still doesn't get it, just click Skip. Otherwise, click Next to
continue.
Choose a text to read aloud and click OK.
You only need to read for about five minutes to train Dragon
NaturallySpeaking to recognize your voice.
You can take breaks during this training by clicking Pause. Don't
worry if you make mistakes or laugh. You should try to read exactly
what you see on the screen, but it's okay if you read something
incorrectly. The computer will either ignore the mistake or display the
yellow arrow so you read the text again.
The progress bar shows how much text you have left to dictate.
NOTE
During training, dictating punctuation is not necessary.
When you’ve read enough, the New User Wizard displays a
congratulations message. When you click OK, Dragon
NaturallySpeaking starts adapting to your voice.
Adapting to your writing style
After adapting to your voice, the New User Wizard prompts you to
adapt Dragon NaturallySpeaking to your writing style.
Dragon NaturallySpeaking can analyze your writing style to increase
your overall recognition accuracy during dictation. This tool scans
documents in your My Documents directory. These documents include
Microsoft Word, Corel WordPerfect, text files, html files, and rich text
files (.rtf).
Adapting to your writing style can add 5 to 30 minutes to user training.
Make sure all other programs are closed when you run this step.
NOTE
Though we recommend that you run this part of the New
User Wizard, if you plan to skip this part of User creation, select "Skip
this step" rather than Cancel.
Click Start to continue. While scanning your system, the New User
Wizard displays its status. When Dragon NaturallySpeaking is done
adapting to your writing style, click Next.
You are now ready to dictate.
Dragon NaturallySpeaking User’s Guide
19
Page 28

2
Installation and Training
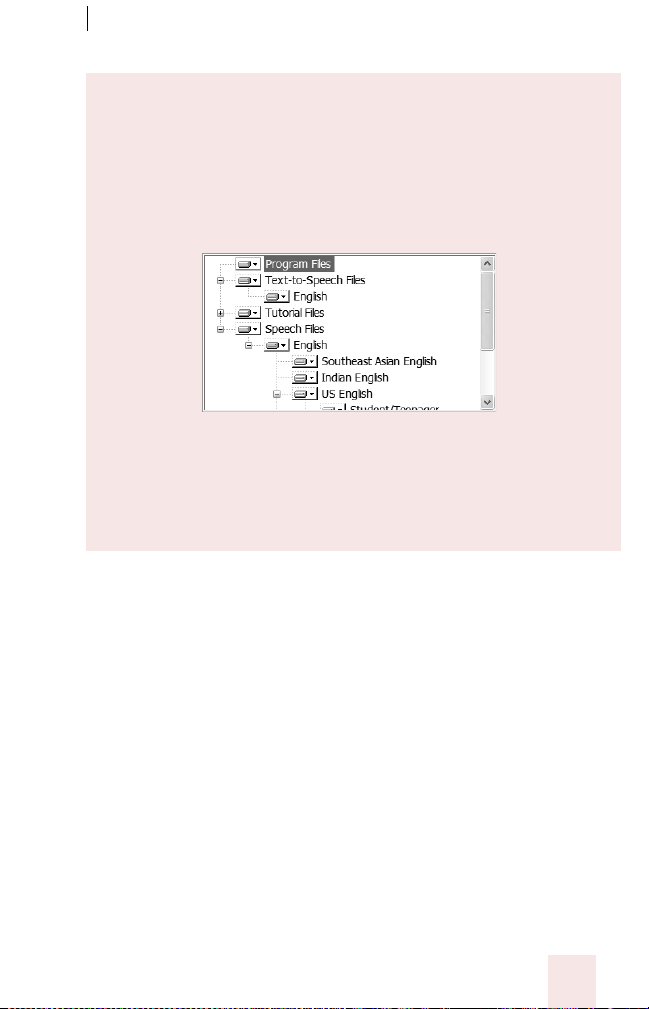
Version 9 File Structure
Upgrading from Dragon NaturallySpeaking V7 or V8 to V9 will
automatically relocate some NaturallySpeaking directories and files.
Note: The following directory structures and file locations assume an
installation to a default location.
V7.0 Directory structure for all supported
Windows operating systems
The V7.0 directory structure before upgrading to V9:
C:\Program Files\ScanSoft\NaturallySpeaking
\Custom
\Data
\Help
\Program
\Results
\Training
\Tutorial (optional installation)
\Users
Note: The \Custom directory is present only if you use nsadmin to create
custom words, commands, or vocabularies. The Dragon NaturallySpeaking
V7.3 directory structure is the same as V8.
V8 Windows 2000/XP Pro/XP Home directory
structure
The V8 directory structure before upgrading to V9:
C:\Program Files\ScanSoft\NaturallySpeaking
\Help
\Program
\Tutorial (optional)
C:\Documents and Settings\All Users\Application
Data\ScanSoft\NaturallySpeaking\
\Custom
\Data
20
Dragon NaturallySpeaking User’s Guide
Page 29

2
Installation and Training
\Data\Training
\Users
C:\Documents and Settings\<username>\Application
Data\ScanSoft\NaturallySpeaking\
\Results
V9 Windows 2000/XP Pro/XP Home/
Windows Server 2003 directory structure
The Directory structure after installing V9 on Windows 2000/XP Pro/
XP Home/Windows 2000 Advanced Server/Windows Server 2003:
C:\Program Files\Nuance\NaturallySpeaking9
\Help
\Program
\Tutorial (optional)
C:\Documents and Settings\All Users\Application
Data\Nuance\NaturallySpeaking9\
\Custom
\Data
\Data\Training
\Users
C:\Documents and Settings\<username>\Application
Data\Nuance\NaturallySpeaking9\
\Results
Uninstalling on XP Professional or XP Home
The following files will remain on your machine after you uninstall
Dragon NaturallySpeaking:
C:\Windows\Speech
VText.dll
Vdict.dll
WrapSAPI.dll
XTel.Dll
Xcommand.dll
Xlisten.dll
Xvoice.dll
spchtel.dll
speech.cnt
speech.dll
vcauto.tlb
vcmd.exe
vcmshl.dll
Dragon NaturallySpeaking User’s Guide
21
Page 30

2
Installation and Training
vtxtauto.tlb
Dragon NaturallySpeaking installed these files for Microsoft SAPI4
support. If you do not have other speech applications that require
SAPI4, you can safely remove these files manually. If have installed
other speech applications that require SAPI4 support, you may need to
re-install those applications if you remove the files.
Dragon NaturallySpeaking Log Files, samples,
and tools
You can view the following files from the Windows Start menu:
■ NaturallySpeaking log file (dragon.log), select Programs>Dragon
NaturallySpeaking 9.0>Show Dragon Log from the Start menu.
■ NaturallySpeaking setup files (dgnsetup.log), select
Programs>Dragon NaturallySpeaking 9.0>Show Setup Log from
the Start menu.
■ Samples of structured commands, select Programs>Dragon
NaturallySpeaking 9.0>Sample Commands from the Start menu.
(Professional editions only.)
■ Tools, select Programs>Dragon NaturallySpeaking 9.0>Dragon
NaturallySpeaking Tools from the Start menu. (Professional
editions only.)
22
Dragon NaturallySpeaking User’s Guide
Page 31

CHAPTER
3
Starting to Dictate
ow that you’ve installed your software and completed training,
N
you’re ready to dictate your first sentence.
Starting Dragon NaturallySpeaking
If Dragon NaturallySpeaking is not already running, you can start it by:
■ Double-clicking the Dragon NaturallySpeaking
icon.
■ Selecting Programs>Dragon NaturallySpeaking
from the Start menu.
■ Right-clicking the QuickStart taskbar tray icon and
selecting Start Dragon NaturallySpeaking, if the
QuickStart option is enabled. For more information
on using the QuickStart option, see “Using
QuickStart” on page 34.
NOTE
connection (Windows XP Professional and Windows XP Home), but interactive
dictation is not supported. Using a Remote Desktop connection, you can access
the DragonBar and transcribe dictation but you cannot use a microphone
attached to the remote machine to dictate.
Dragon NaturallySpeaking User’s Guide
You can start Dragon NaturallySpeaking over a Remote Desktop
23
Page 32

3
Starting to Dictate
Turning on the microphone
Before you can dictate, you need to turn on the microphone. You turn
on the microphone by:
■ Click the microphone icon on the DragonBar. You can click this
icon again to turn it off.
Microphone
■ Pressing the plus (+) key on the numeric keypad to turn the
microphone on, and then press it again to turn the microphone off.
■ Clicking the microphone icon in the Windows task bar.
The button and the volume meter on the DragonBar change to show if
the microphone is off or on.
Shows that the microphone is off
Shows that the microphone is on
NOTE
Once the microphone is off, you cannot turn it on again by voice.
Sleeping and waking up
To make Dragon NaturallySpeaking stop listening temporarily:
1 Say "Go to Sleep" or "Stop Listening."
Dragon NaturallySpeaking ignores everything except the "Wake
Up" or "Listen To Me" commands.
2 To reactivate the microphone, say "Wake Up" or "Listen To Me."
You can also press the numeric (+) key to turn on the microphone.
24
Dragon NaturallySpeaking User’s Guide
Page 33

3
Starting to Dictate
Starting to dictate
To begin dictating, start a word processor (such as Microsoft® Word or
®
Corel
WordPerfect®) and begin a new document. Make sure your text
insertion point is at the start of the new document.
DragonPad
You can use the DragonPad, a simple word processor included
with Dragon NaturallySpeaking. To open the DragonPad, from
the Tools menu on the DragonBar, click DragonPad.
TIP
Remember to click in the window you want to talk to before you
speak.
Start talking. As you talk, text displays in the Results box while
Dragon NaturallySpeaking figures out what you said. The Results box
is a small yellow window that appears on-screen as you dictate. For
example:
The words in the Results box may change as the program considers
different interpretations of what it heard.
The Results box displays a line that changes from yellow to green as
you speak, indicating the volume of your dictation.
NOTE
command, the Results box displays a bold blue border.
When Dragon NaturallySpeaking recognizes what you said as a
You can also anchor the Results box permanently in one place. From
the Tools menu of the DragonBar, click Options, then click the View
tab and enable the Anchor option.
Don’t worry about mistakes at this point; Dragon NaturallySpeaking
improves as you use it.
Using Natural Punctuation
Dragon NaturallySpeaking can automatically add periods and commas
at the appropriate places in your dictation without you having to
explicitly speak that punctuation. The Natural Punctuation feature
Dragon NaturallySpeaking User’s Guide
25
Page 34

3
Starting to Dictate
can be useful in helping you get used to dictation by focusing on what
you are saying rather than how your speech is punctuated.
Natural Punctuation inserts only periods and commas. You have to
dictate other punctuation marks. Even with Natural Punctuation
turned on, you can still dictate periods and commas. As you become
more adept at dictation and want more control over where punctuation
appears, you may want to explicitly dictate all your punctuation.
NOTE
"autopunctuation on" and "autopunctuation off" or by selecting Options from
the Tools menu of the DragonBar and clicking "Automatically add commas
and periods" on the Formatting tab.
You can turn Natural Punctuation on and off by voice by saying
For more information on Natural Punctuation see “Using Natural
Punctuation” on page 95.
Dictating punctuation
You can dictate punctuation at any time while you are using Dragon
NaturallySpeaking, even when Natural Punctuation is enabled.
Use the following list as a guide to dictating the most common
punctuation marks. (For a complete list of punctuation, see the online
help.)
TO ENTER SAY (US/Canada) SAY (Other Dialects)
, comma comma
. period full stop
! exclamation point
or exclamation
mark
? question mark question mark
- hyphen hyphen
: colon colon
exclamation mark
26
Dragon NaturallySpeaking User’s Guide
Page 35

3
Starting to Dictate
Starting new lines and paragraph
While you are dictating, you can use the following commands to
duplicate the action of pressing the Enter key once (to add a new line)
or twice (to add a new paragraph).
TO SAY
Add a new line "New Line"
Add a new
paragraph
Saying "New Paragraph" presses the Enter key twice and capitalizes the next
word you dictate.
"New
Paragraph"
Tips for dictating text
■ To erase the last thing you said, say "Scratch That."
■ You can repeat "Scratch That" to undo a sequence of phrases.
■ To undo the effects of a command, say "Undo That." If “Undo
That” fails to undo an action, try repeating the command until you
completely undo the operation.
■ To stop a recognition in progress (and turn the microphone off),
click the small red button inside the Results box.
■ You can change the very last phrase you spoke by saying "Bold
That," "Cap That," "Correct That," and so on; you do not have to
select the text first.
■ To remove a trailing space after a word, you can say "Delete
Previous Character."
■ You can create a spoken form for words you prefer not to say aloud.
For example, you can create a command that types "Snookums"
whenever you say "Mary's nickname."
■ To clear (deselect) your last selection, say "Unselect That."
For information on correcting any mistakes, see Chapter 5,
“Correcting and Editing.”
Dragon NaturallySpeaking User’s Guide
27
Page 36

3
Starting to Dictate
Using the Dictation Box
Normally you can dictate and use Dragon NaturallySpeaking voice
commands in any text window of any application. However, you may
occasionally find an application or a specific window in an application
where some voice commands won’t work or will not work consistently.
In these situations, you can use a special window, called the Dictation
Box. The Dictation Box allows you to dictate and edit text in these
non-standard windows without the difficulties you might otherwise
experience.
To start the Dictation Box:
1 Place you cursor where you want to put the text.
2 Start the Dictation Box by either:
■ Saying "Show Dictation Box"
■ Select Tools > Dictation Box from the Dragon Bar
■ Use CTRL + SHIFT + D
3 When the Dictation Box displays, you can dictate and edit text
inside the Dictation Box using all of Dragon NaturallySpeaking's
commands.
4 Once you are done dictating and editing the text, say or click
"Transfer". The text you dictated in the Dictation Box is
transferred to the application.
For more information on using the Dictation box with a non-standard
window, see the online help.
Printing and saving your dictated text
Printing
From the File menu of your word processor, use the mouse to choose
Print. Or say “Click File,” pause, and say “Print.” You can also simply
say, “Print Document” or “Print File” if the Natural Language
Commands are enabled. See the online help for more information.
28
Dragon NaturallySpeaking User’s Guide
Page 37

3
Starting to Dictate
Saving
From the File menu, choose Save. You can also say “Click File” and
then say “Save.” Remember, you have to pause between the “Click
File” and the “Save” commands to have Dragon NaturallySpeaking
recognize them as two separate commands. If the Natural Language
Commands have been enabled, you can say “Save Document.”
Getting Help
To access the online Help for Dragon NaturallySpeaking, click the
Help menu on the DragonBar and choose Help Topics. Alternately,
you can say “Give Me Help.” You can print individual Help topics with
the Print button in the Help window. To open the online Help links,
just say their names. The links will be displayed next to the
application window and will give you examples of the most common
commands that work in the application you are currently using.
The online help includes the following information not found in the
User Guide:
■ Creating and Managing Users
■ Dictation Guidelines
■ Dictating using a Portable Recorder (Preferred and higher editions)
■ Dictating with a Roaming User (Professional and higher editions)
■ Correcting Recognition Errors
■ Revising Text
■ Improving Recognition Accuracy
■ Working on your desktop
■ Working in programs
■ Creating Commands with MyCommands (Professional and higher
editions)
■ Dragon NaturallySpeaking Tools (Professional and higher editions)
“What Can I Say?”
Saying “What Can I Say?” will bring up the Sample Commands
window. The Sample Command window displays a small selection of
useful commands that Dragon NaturallySpeaking recognizes for the
Dragon NaturallySpeaking User’s Guide
29
Page 38

3
Starting to Dictate
current context, whether it is a particular program you are using or the
Windows desktop.
To open the Sample Command Window
Choose Sample Commands from the Help menu on the DragonBar or
say “What can I say”. The Sample Commands window opens,
displaying a selection of commands next to the window you are
working in.
The contents of the
Sample Commands
window change
depending upon what
application is
currently active.
For example, when
you switch between
Microsoft Word and
Microsoft Outlook,
the contents of the
Sample Commands
window changes
accordingly
If you want to see additional commands that are available to you, click
Command Browser at the top of the Sample Commands window. The
Command Browser is described in more detail in the online help.
Notes
■ A list of Global commands (available everywhere) appears if there
are no sample commands available for a specific program.
■ Commands marked with an asterisk (*) are available only if the
Enable Natural Language Commands check box is selected on the
Startup/Shutdown tab of the Options dialog box.
30
Dragon NaturallySpeaking User’s Guide
Page 39

3
Starting to Dictate
Tut ori al
To start the Tutorial, choose Tutorial from the Help menu on the
DragonBar. The Tutorial includes a number of lessons covering the
basics of Dragon NaturallySpeaking.
Troubleshooting
If you are having problems using Dragon NaturallySpeaking, or if you
are getting unexpected results, please refer to the “Resolving
Problems” and “Tips” section of the online help.
The DragonBar
The DragonBarTM gives you access to Dragon NaturallySpeaking
functions and features.
Change
Position
Menus
Extras
Microphone
The Sound menu and the Extras toolbar is available only in Preferred
and higher editions.
Status
Microphone button and volume display
When the microphone is on, the Volume Display shows the sound
level. Yellow means silence or that your speaking too softly, green
means you are speaking at a proper level, and red means you are
speaking to loudly.
Volum e display
Dragon NaturallySpeaking User’s Guide
31
Page 40

3
Starting to Dictate
The Select-and-Say Indicator
The DragonBar includes a "Select and Say" indicator that turns green
when you are in an application or window where all of
NaturallySpeaking's functionality is supported.
Normally you can dictate and use Dragon NaturallySpeaking voice
commands in any text window of any application. However, you may
occasionally find an application or a specific window in an application
where some voice commands won't work or will not work consistently.
When you are in a non-standard window, the Select-and-Say indicator
goes out, indicating that you may have some difficulty selecting and
editing dictated text.
Also, when you start dictating into a non-standard window, the
DragonBar will display the message, 'Dictating into a non-standard
window".
If you have difficulty in dictating or correcting in one of these nonstandard windows, use the Dictation box.
See the online help for more information on using the Dictation Box.
Extras toolbar (Preferred and higher editions)
If present in your edition, you can click the Extras button on the
far right of the DragonBar to open the Extras toolbar. The Extras
toolbar displays buttons for hand-held recorder transcription and
playing back your dictation.
32
Dragon NaturallySpeaking User’s Guide
Page 41

3
Starting to Dictate
Start Playback Skip ForwardStop Playback
Correction
Fast Playback Skip Back Transcribe
Correction
Clicking the Correction button opens the Correction menu to teach
the computer what you said. See Chapter 5, “Correcting and Editing.”
Transcribe
Use this button to transcribe your speech from a handheld recorder.
See the online help for more information.
Start Playback, Fast Playback, and Stop Playback
When you select text and click the Start Playback button, you hear a
recording of your dictation. A yellow arrow displays on your screen
during playback, following what you said. Click the Fast Playback
button to play the recording at a faster speed. Click the Start Playback
button to return to a normal speed. Click the Stop Playback button to
stop the recorded speech playback.
Skip Back and Skip Forward
Use these buttons to skip backward or forward one utterance. To
Dragon NaturallySpeaking, an utterance is a group of words said
together without pausing. The Extras menu items can be displayed in
the main DragonBar. See the online help for more information.
Dragon NaturallySpeaking User’s Guide
33
Page 42

3
Starting to Dictate
Changing the DragonBar position
To change the position of the DragonBar, click the Dragon icon at the
far left of the DragonBar. A menu displays which lets you move the
DragonBar as follows:
SELECT... TO...
Docked to Top mode
(default)
Docked to Bottom mode lock the DragonBar to the bottom of
Floating mode freely position the DragonBar
Cling mode make the DragonBar appear just
Tray Icon Only mode hide the DragonBar completely and
lock the DragonBar to the top of the
screen
the screen
above the window into which you
are dictating.
only display the Microphone icon in
the Windows task bar.
NOTE
Only Mode.” To make a hidden DragonBar reappear, right-click on the small
microphone in the lower right corner of the screen. From the menu that
appears, click Restore Previous DragonBar Mode.
You can also hide the DragonBar by saying “Switch to Tray Icon
Controlling Dragon NaturallySpeaking with
voice commands
You can operate Dragon NaturallySpeaking with voice commands. For
example, to show the Extras toolbar, say “Show Extras Bar.” For a list
of other voice commands that control Dragon NaturallySpeaking, see
“Controlling the DragonBar” in the online help.
Using QuickStart
The Dragon NaturallySpeaking QuickStart taskbar tray icon gives you
quick access to Dragon NaturallySpeaking and recent users. Rightclicking the QuickStart icon displays the QuickStart menu.
34
Dragon NaturallySpeaking User’s Guide
Page 43

3
Starting to Dictate
NOTE
Setup process.
This option is installed at the end of Dragon NaturallySpeaking
Enabling QuickStart
By enabling QuickStart, Dragon NaturallySpeaking launches
automatically at system startup time and adds the Dragon
NaturallySpeaking icon to the Windows taskbar.
There are two ways to enable QuickStart:
■ During installation. The final installation screen includes the
option to enable QuickStart.
■ From the Options dialog box. From the Tools menu on the
DragonBar, click options and then click the Startup/Shutdown tab.
To enable QuickStart, select “Launch in QuickStart mode on
Windows startup.” See page 36 for more information.
Shutting off QuickStart
To permanently disable QuickStart, de-select it from the Startup/
Shutdown tab of the Options dialog box.
Temporarily Disabling QuickStart
To temporarily disable QuickStart, right-click the QuickStart taskbar
tray icon and select “Exit NaturallySpeaking QuickStart.” This
removes the QuickStart taskbar tray icon from the Windows taskbar.
When you re-start Windows, the QuickStart taskbar tray icon redisplays. You can also re-start QuickStart without re-starting Windows
by selecting Start->Programs->Startup->Dragon NaturallySpeaking.
Dragon NaturallySpeaking User’s Guide
35
Page 44

3
Starting to Dictate
Using QuickStart
You access QuickStart by right-clicking the QuickStart taskbar tray
icon. This displays the QuickStart menu.
SELECT... TO...
Start
NaturallySpeakin
g
Open User… Display the Open User dialog box. Once
Open Recent User Open a menu listing your most recently
Help Open the Help menu
Close DragonBar Unload all users and closes the DragonBar
Exit
NaturallySpeakin
g QuickStart
Start NaturallySpeaking
If you have only one user defined,
NaturallySpeaking opens with that user
loaded. If you have more than one user,
the Open User dialog box displays and
NaturallySpeaking starts once you select a
user to load.
you select (or create) a user,
NaturallySpeaking starts.
loaded users.
Remove the QuickStart taskbar tray icon
from the Windows taskbar and closes
NaturallySpeaking if it is currently
running. You must re-start Windows to restart the QuickStart feature.
If the QuickStart icon becomes unavailable for any reason, you can
always start the program from the Windows Start Menu.
36
Dragon NaturallySpeaking User’s Guide
Page 45

CHAPTER
T
4
Working on your Desktop
his chapter describes how to control almost everything on your
computer with Dragon NaturallySpeaking voice commands.
Programs, documents and folders
Using voice commands, you can start programs and open documents
and folders that appear in your Start menu or desktop.
You can’t start Dragon NaturallySpeaking by voice. However, you can
automatically start Dragon NaturallySpeaking in sleep mode whenever
you start Windows by selecting “Microphone on (asleep)” option in the
Miscellaneous tab of the Options dialog box. See the online help for
more information.
Starting a program
To start a program from the Start menu, say “Start” and then the name
of the program exactly as it appears on the menu or submenu of the
Start menu. You can also say the name displayed below the icon on
your desktop.
®
For example, to start Microsoft
Explorer.”
Internet Explorer®, say “Start Internet
Opening documents and folders from the
Start menu
To open a document or folder from the Start menu, say “Start” and
then the name of the document or folder exactly as it appears on the
menu.
Dragon NaturallySpeaking User’s Guide
37
Page 46

4
Working on your Desktop
For example, to open a document named sales.doc, you could say
“Start Sales dot doc.” To open a document named journal.wpd, you
could say “Start journal dot w p d.”
®
To open a document or folder from your Windows
desktop, just say
“Start” and then the name below the icon. For example, to open a
folder named “Projects,” say “Start Projects.”
Say “Start Projects”
Switching between open windows
You can switch between the windows you have open by saying “Switch
to” and then say the name of the program or document window exactly
as it appears in the title bar.
®
For example, if Microsoft
saying “Switch to Microsoft word.”
You can also switch between open windows by saying “Switch to
Previous Window” (same as pressing
Window” (same as pressing
Word® is running, you can switch to it by
ALT+TAB) and “Switch to Next
ALT+SHIFT+TAB).
SAY THIS TO
Switch to Next
Switch to the next application.
Window
Switch to
Switch to the previous application.
Previous
Window
Switch to
Make Microsoft
Microsoft
Word
Switch to
(name of
application)
38
Switch to the open application you specify. Say the
name of the application as it appears in the title
bar of the application window.
®
Word the active application.
Dragon NaturallySpeaking User’s Guide
Page 47

4
Working on your Desktop
Opening and closing menus
You can activate any menu by saying the menu name.
To open a menu:
1 Open a program window (for example, Microsoft
it active.
Say the name of the menu you want to open (for example, say “File”).
If the command does not work, try saying “Click” and then the name
of the menu you want to open (for example, say “Click File”).
Say “File or
“Click File”
Say “Save”
2 In this example, the File menu should open. If the command
doesn’t work (for example, if the word “click” is typed into your
document), you may have paused in the middle of the command.
3 Say the name of a menu item to activate it (for example, say
“Save”).
®
Word) and make
4 To close a menu, say “Cancel.”
TIP
To open the Start menu, say “Click Start” or “Click Start Menu.”
NOTE
If commands are often typed into your document instead of
recognized as commands, you can make Dragon NaturallySpeaking
recognize commands only when they are preceded by saying “Click.”
To do this, select the “Require ‘Click’ to select menu or control”
check box on the Commands tab of the Options dialog box. For more
information, see the online help.
Dragon NaturallySpeaking User’s Guide
39
Page 48

4
Working on your Desktop
Selecting buttons, tabs, and options
When Dragon NaturallySpeaking is running, you can select any
button, check box, text box, or other dialog box option you see by
saying it’s name. If that doesn’t work, say “Click” and then its name.
For example, to select a check box labeled “Toolbar,” say “Toolbar” or
“Click Toolbar.” To clear the check box (deselect it), say its name again.
Say “Wrap to window” or
“Click Wrap to window”
You can select tabs by saying the name of the tab, alone or preceded by
“Click.” In the dialog box pictured, you could say “Options” or “Click
Options” to select the Options tab. You can also move between tabs by
saying “Go to Next Tab” and “Go to Previous Tab.”
NOTE
by saying their names. If this happens, the following method of selecting
items may work: say “Tab Key” repeatedly to move to the item you want,
then say “Press Space Bar” to select it. See also “Moving the mouse pointer
and clicking the mouse,” on page 48.
In some programs, you may not be able to select dialog box items
40
Dragon NaturallySpeaking User’s Guide
Page 49

4
Working on your Desktop
Selecting icons on the desktop
You can use voice commands to select icons on the Windows®
desktop.
To select an icon on the desktop:
1 Switch to the Windows
open applications and place the mouse pointer over the desktop
icon. Say “Mouse Click” to make the desktop active.
®
desktop. To do this by voice, minimize all
2 Say the name of the icon (for example, “My Computer”). Dragon
NaturallySpeaking types the icon name and Windows
3 To select another icon, say “Move” and then the direction (up,
®
selects it.
down, left, right) and number of icons (up to 20).
For example, say “Move Right 1,” “Move Down 2,” or “Move Up 3.”
Say “My Computer”
to select My
Computer
Say “Move Down 2”
to select Recycle Bin
After you select an icon, you can say “Press Enter” to start or open it
and “Press Shift F10” to display its menu (as if you right-clicked the
icon with the mouse.)
You can also use voice commands for these actions. See “Marking and
dragging objects” on page 50.
Dragon NaturallySpeaking User’s Guide
41
Page 50

4
Working on your Desktop
Resizing and closing windows
To resize and close windows, say “Click” and then one of the following
window commands:
SAY THIS TO
Click Minimize or
Click Control Menu
(pause) Minimize
Click Maximize or
Click Control Menu
(pause) Maximize
Click Restore or
Click Control Menu
(pause) Restore
Click Close or
Press ALT F4
Press CTRL F4 Close the active document, not the
Click Start Menu or
Click Start or
Press CTRL ESC
Minimize the active window.
Maximize the active window.
Restore window to previous size.
Close the active program.
whole program (works in many
programs).
Open the Windows® Start Menu.
NOTE
TIP
any of the window commands, you can open the Control menu by saying
“Click Control Menu” and then say them.
“Click” is NOT optional for the Control menu commands.
If you have trouble getting Dragon NaturallySpeaking to recognize
Scrolling in windows and list boxes
You can scroll vertically in a window (for example, an online Help
window) or list box by saying “Move Down” and “Move Up” and then a
42
Dragon NaturallySpeaking User’s Guide
Page 51

4
Working on your Desktop
number of scroll bar arrow clicks (up to 20). For example, say “Move
Down 4” or “Move Up 10.”
You can scroll horizontally by saying “Move Left” and “Move Right” and
then a number of scroll bar arrow clicks (up to 20). For example, say
“Move Left 10” or “Move Right 5.”
Opening lists and making selections
You can activate any list box by saying the list box name.
To open a list box:
1 Say the name of the list box you want to open.
2 Say "Show Choices," "Drop List," or "Open List." The list box
opens to show all the choices available in the list.
To make a selection from an open list
1 Say the full name of the selection.
2 Say "Move Down" or "Move Up" and the number of places your
selection is from the current selection.
Pressing keyboard keys
You can activate Windows® menus and controls by pressing keys. With
Dragon NaturallySpeaking you can “press” any key on your keyboard
by voice. You can press letters, numbers, modifier keys (
CTRL, and ALT), and so on.
You can say “Press,” “Press Key,” or “Type”—all three voice commands
work the same way.
NOTE
commands. You must select the text by voice or mouse and delete it or say
“Press Delete.”
Dragon NaturallySpeaking User’s Guide
“Scratch That” will not erase keystrokes dictated with the Press Key
SHIFT,
43
Page 52

4
Working on your Desktop
Pressing letters
You can press any letter on your keyboard by saying “Press” and then
the letter. When you’re pressing letters, you must say “Press” before
each one. For example, to enter “txt,” say “Press t,” “Press x,” “Press t,”
pausing between letters.
TIP
You can also spell words using Spell mode. See “Switching
Recognition Modes” on page 108 for more information.
For similar-sounding letters (such as b, d, and v), you can use the
International Communications Alphabet to “spell” the letter keys, for
example, “Press alpha” or “Press bravo” or say “Press d as in David,”
and so on (you can also say “Press d for David,” and so on) as you would
if you were spelling something to another person over the phone.
SAY THEN
Press a
b
any letter a–z or any international alphabet word
alpha through zulu
a as in Albert/Alice/alpha
b as in Bill/Buffalo/bravo
c as in Cathy/Carl/Charlie
d as in David/daughter/delta
e as in Edgar/enter/echo
f as in Frank/fancy/foxtrot
g as in George/gopher/golf
h as in Henry/helmet/hotel
i as in Iris/Ireland/India
j as in John/justice/Juliet
k as in Karen/kitchen/kilo
l as in Larry/lemon/lima
m as in Mickey/magic/Mike
44
Dragon NaturallySpeaking User’s Guide
Page 53

4
Working on your Desktop
SAY THEN
n as in Nancy/nobody/November
o as in Otto/over/Oscar
p as in Paul/people/papa
q as in Quentin/question/Quebec
r as in Robert/Rachel/Romeo
s as in Sam/Singapore/sierra
t as in Terry/Tyler/tango
u as in Ursula/unit/uniform
v as in Valerie/visit/Victor
w as in Wendy/wake/whiskey
x as in Xavier/Xerxes/xray
y as in Yolanda/Yvonne/yankee
z as in Zachary/zookeeper/zulu
(you can also say “for” instead of “as in”)
NOTE
Cathy” or “Press Carl.”
You can say “Press c” or “Press Charlie” but you cannot say “Press
Capitalizing a letter
You can capitalize a letter by saying “Press Cap” and then the letter.
For example, to enter “28K” say “twenty eight” and then “Press Cap K”
(or “Press Cap K for Karen”).
Pressing numbers
You can press numbers (0 to 9) by saying “Press” and then the number.
For example, say “Press 8.”
Dragon NaturallySpeaking User’s Guide
45
Page 54

4
Working on your Desktop
Pressing key combinations
When you’re pressing keys, you can press any combination of the
modifier keys (
key, such as a letter. For example, you can say:
■ “Press Control Z” (undoes last action)
■ “Press Alt F” (opens File menu)
■ “Press Shift Tab” (moves backward through dialog box options)
SHIFT, CTRL, and ALT) at the same time as another
NOTE
Alt Delete” (the keyboard shortcut for restarting a computer).
Dragon NaturallySpeaking ignores the command “Press Control
Pressing function and numeric keypad keys
To press a function key (F1 to F12), say “Press Function” and then the
name of the key. For example, say “Press Function 1” to bring up the
online Help.
To press the keys on the numeric keypad, say “Press Keypad” and then
the name of the key. For example, you can say “Press Keypad Minus” to
press the keyboard shortcut that opens the Correction Menu. See the
complete list below:
SAY THEN
Press Keypad 1
Keypad 9 (you can say any number from 0 to 9)
All Dialects: Keypad Point (.)
US/Canada: Keypad Period (.)
Other Dialects: Keypad Full Stop (.)
Keypad Slash (/)
Keypad Asterisk (*)
Keypad Minus (-) (opens the Correction menu)
Keypad Plus (+) (turns the microphone on or off)
Keypad Star (*) (opens the NaturallySpeaking
menu on the DragonBar)
Keypad Enter
46
Dragon NaturallySpeaking User’s Guide
Page 55

4
Working on your Desktop
NOTE
You can say “Press Num Lock” to turn Num Lock on.
Num Lock must be on for the “Press Keypad” commands to work.
Pressing other keys
Here’s a list of other keys you can press by voice:
SAY THEN
Press Up Arrow
Down Arrow
Right Arrow
Left Arrow
Home Key
End Key
Page Up
Page Down
Insert Key
Delete Key
Control Key
Shift Key
Alt Key
Print Screen
Scroll Lock
Pause Key
Num Lock
Caps Lock
Dragon NaturallySpeaking User’s Guide
47
Page 56

4
Working on your Desktop
Moving the mouse pointer and
clicking the mouse
Dragon NaturallySpeaking provides hands-free mouse control with
MouseGrid and the mouse motion voice commands. You can use these
features to position the mouse pointer anywhere on the screen, click
the mouse buttons, and drag objects—all by voice.
Moving the mouse pointer with MouseGrid
You can position the mouse pointer anywhere on the screen by using
MouseGrid. You can move the pointer relative to the full screen or the
active window.
To use MouseGrid:
1 Say “MouseGrid” to place the MouseGrid over the full screen (as in
this example) or say “MouseGrid Window” to place it over the active
window. For example:
48
Dragon NaturallySpeaking User’s Guide
Page 57

4
Working on your Desktop
2 Say a grid number from 1 to 9 to position the pointer in that
numbered area. In this example, to position the pointer over the
Recycle Bin, say “4.” A smaller MouseGrid will appear in the
chosen grid square.
Say “4” to place
a smaller
MouseGrid over
grid square
number 4.
3 To zoom in over the desired area, say another grid number. In this
example, say “4” to place the pointer over the Recycle Bin icon.
4 Continue to say the respective grid number to zoom in until the
mouse pointer is over an icon or other object. You can use voice
commands to click the mouse or mark and drag the object. See the
following sections for instructions.
TIP
You can undo the last MouseGrid action by saying “Undo That.”
To close MouseGrid, say “Cancel.”
Moving the pointer with the “Mouse” command
You can move the mouse pointer up, down, left, or right a short
distance (a few millimeters) by using the mouse pointer commands.
Dragon NaturallySpeaking User’s Guide
49
Page 58

4
You can combine moving the mouse pointer and clicking the mouse in
a single voice command. For example, you can say “Mouse Up 3 Click”
or “Mouse Right 2 Double Click.”
Working on your Desktop
To move the pointer:
1 Say “Mouse” followed by the direction and number of times to
move it (up to 10). For example, say “Mouse Up 5” or “Mouse Left
10.”
2 When the pointer is over an icon or other object, you can use voice
commands to click the mouse or mark and drag the object.
Clicking the mouse
You can click, double-click, left-click, and right-click the mouse
buttons by voice.
To click the mouse:
1 Position the mouse pointer over the object you want to select (for
example, say “MouseGrid 9 1” or “Mouse 2”).
2 Say “Mouse Click,” “Mouse Double Click,” “Mouse Left Click,” or
“Mouse Right Click.”
When an object is selected, you can mark and drag the object (as
described in the next section).
Marking and dragging objects
You can mark an object and drag it to a different location by voice.
To mark and drag an object:
1 Position the mouse over the icon or object you want to drag and
then say “Mark” (for example, say “MouseGrid 9 1 Mark”).
2 Move the mouse pointer to where you want to drag the object and
then say “Drag” (for example, say “MouseGrid 6 3 Drag”).
50
Dragon NaturallySpeaking User’s Guide
Page 59

4
Working on your Desktop
TIP
Instead of “Drag,” you can also say “Control Drag” and “Shift Drag”
to drag while holding down the CTRL or SHIFT key.
Moving the pointer with the mouse motion
commands
In addition to the mouse movement methods described above, you
can also move the mouse by using the mouse motion commands. Say,
for example, “Move Mouse Right.” The mouse pointer will begin
moving to the right and will keep moving until you say “Stop.”
Enabling the mouse motion commands
To use the mouse motion commands:
1 From the Tools menu on the DragonBar, choose Options and then
the Commands tab.
2 Select “Enable mouse motion commands” and click OK.
3 Click the Speed button to choose how fast the mouse pointer
moves when you use a mouse motion command.
The mouse motion commands
Here is a summary of the available mouse motion commands.
SAY THEN A
DIRECTION
Move Mouse
Mouse Move
Drag Mouse
Mouse Drag
Up
Down
Right
Left
Upper Left
Lower Left
Upper Right
Lower Right
THEN A
SPEED
(OPTIONAL)
Fast
Faster
Much Faster
Very Fast
Slow
Slower
Much Slower
Very Slow
While the mouse is moving, you can say any of the commands above.
You can also say:
Dragon NaturallySpeaking User’s Guide
51
Page 60

4
■
“Stop” or “Cancel” to stop the mouse from moving
■ “Up,” “Down,” “Left,” “Right,” “Upper Left,” “Lower Left,” “Upper
Working on your Desktop
Right,” or “Lower Right” to change the direction in which the mouse
is moving
■ “Faster,” “Much Faster,” Slower,” or “Much Slower” to change the
speed at which the mouse is moving
■ “Click,” “Double Click, “Right Click,” or “Left Click” to click the
mouse buttons
■ “Go to Sleep,” “Stop Listening,” or “Microphone Off” to turn the
microphone off
To specify which mouse button (left, right, or center) is being held
down during mouse drags or if you want the
SHIFT, CTRL, or ALT
key held down during the mouse drag, use one of these commands
before saying one of the drag commands in the table above:
■ Left
■ Middle (requires a three-button mouse)
■ Right
■ Shift
■ Control
■ Alt
■ Right Shift
■ Right Control
■ Right Alt
For example, to drag with the
“Shift Mouse Drag Up.” To drag with the right
SHIFT key held down, you could say
ALT key held down (the
ALT key on the right side of the keyboard), you could say “Right Alt
Drag Mouse Upper Left.”
52
Dragon NaturallySpeaking User’s Guide
Page 61

CHAPTER
W
5
Correcting and Editing
hen Dragon NaturallySpeaking types the wrong words, you
should correct these mistakes. By giving the program the right
word, you actually teach the program not to make the same
mistakes again.
Correcting mistakes requires some extra effort, but it saves you time in
the long run by making Dragon NaturallySpeaking more accurate.
You’ll probably need to correct mistakes often when you first start
dictating, and then less frequently as the program learns from your
corrections.
Make it a habit to correct mistakes to continue to improve the accuracy
of the program. Make sure you save your speech files when prompted,
to preserve the adjustments the program makes.
TIP
You must select a word before typing over it. Using the backspace key
and retyping (or saying “Scratch That”) will not enable the software to learn
from corrections and improve recognition accuracy. For accuracy to improve,
you must first select text and then correct it or overwrite it with the words you
said.Mrs.
Correcting mistakes
There are a number of ways you can correct the misrecognitions in a
document. The following techniques describe the most basic methods,
but you can combine these techniques in any manner that suits your
working style.
Dragon NaturallySpeaking User’s Guide
53
Page 62

5
Correcting and Editing
Correcting text with the keyboard
1 Move the insertion point to the beginning of the dictation you
want to correct.
2 Press the Correction hot key to display the Correction menu. By
default, this is the minus (-) key on the numeric keypad. You can
change the hot key assignment on the Hot keys tab of the Options
dialog box. You can also click the Correction button on the Extras
toolbar of the DragonBar.
3 If one of the alternatives is correct, press the Down Arrow key to
highlight that choice and then press Enter to accept it. If no
alternative is correct, just type or say the correct text.
4 Continue until all the text is correct.
Correcting text using voice commands
1 Say "Select" or “Correct” and the text that is incorrect, the
Correction menu appears with a number of alternatives.
■ If one alternative is correct, say "Choose" and the number of that
alternative.
■ If none of the alternatives is correct, say "Spell That," spell the
correct word or words into the Spell dialog box, and then say "OK."
Selecting a large amount of text or an entire document and then
saying “Spell That” can produce unpredictable results.
2 Verify that the correct text appears in the document in place of the
misrecognized text and continue to the next misrecognition.
Correcting text while playing back dictation
(Preferred and higher editions)
1 Move the insertion point to the beginning of the dictation you
want to correct.
54
Dragon NaturallySpeaking User’s Guide
Page 63

5
Correcting and Editing
2 Click Play That Back on the Sound menu of the DragonBar or
click the Start Playback button on the Extras toolbar. You can also
say, “Play that back”.
3 When the playback of your dictation reaches a recognition error,
press the correction hot key. By default, this is the minus (-) key
on the numeric keypad.
4 If one of the alternatives is correct, press the Down Arrow key to
highlight that choice and then press Enter to accept it. If no
alternative is correct, just type or say the correct text and press the
Correction hot key again. Playback will continue automatically
from the point where you stopped.
5 Continue until all the text is correct.
Using the Correction menu
The Correction menu shows Dragon NaturallySpeaking’s best guess
of the alternatives to the words you dictated and selected.
In the following example, Dragon NaturallySpeaking heard the word
“quick” as “clinic.”
Say “Choose 2” to
replace “clinic” with
“quick.”
You can also say
“Spell That” to spell a
word or “Cap That”
to capitalize it.
Dragon NaturallySpeaking User’s Guide
55
Page 64

5
Correcting and Editing
In this example, you would choose the correct word from the
Correction menu by saying “Choose” and the number next to your
choice.
TIP
You can change the number of choices displayed to you. In the Options
dialog box, click the Correction tab and increase the number in “Show no
more than n choices.” If you want to display your choices without the
Correction menu taking up too much space on the screen, select the “Show
only the choices” option. See the online help for more information.
When the Correction menu list appears, you can also choose to:
■ spell the word (in this example, say “Spell That q-u-i-c-k”). Selecting
a large amount of text and then saying “Spell That” can produce
unpredictable results.
■ Pressing the Correction hot key (-) while the Correction menu is
open will display the Spell Dialog box.
■ listen to a recording of what you just said (say “Play That Back”)
■ capitalize it (say “Cap That,” in this example, to get “Clinic”)
■ say “Unselect That” to cancel the selection and close (dismiss) the
Correction menu
■ ignore the Correction list and keep dictating (in the example above,
just say “quick,” which replaces the selected text)
TIP
If you prefer not to see the Correction menu every time you select text
by voice, you can turn it off. In the Options dialog box, click the Correction
tab to display the Correction options, then clear the check box “‘Select’
commands bring up Correction menu.”
To help you quickly find the alternative you want, the recognition
choices in the Correction menu appear in boldface where they differ
56
Dragon NaturallySpeaking User’s Guide
Page 65

5
Correcting and Editing
from the word you’ve selected. (This is only applicable when you’ve
selected more than one word at a time.)
The words that
are different from
the selection
appear in bold,
to help you find
the correct
alternative
quickly.
If you select any leading or trailing spaces (including paragraph marks)
along with the text you want to correct, choosing one of the
alternatives in the Correction menu deletes those leading and trailing
spaces.
Correcting Punctuation
Note the following when correcting punctuation:
■ When you select a phrase (more than one word) that has
punctuation, make sure to dictate that punctuation. For example,
say you initially dictated, "Today is Thursday I have a meeting at 11
o'clock" and the text was transcribed as "Today is Thursday, I have
a meeting at 11 o'clock." If you want to change the comma to a
period, say "Select Thursday comma". If the correct punctuation
appears in the Correction menu, select it. Otherwise you can dictate
over the selection, for example by saying "Thursday period".
Dragon NaturallySpeaking User’s Guide
57
Page 66

5
■
When you select punctuation, the Correction menu may include
Correcting and Editing
alternate punctuation. For example:
■ If Natural Punctuation is turned on, when you select a phrase that
has punctuation added by NaturallySpeaking, the choices will
include punctuation changes. For example:
NOTE
the Natural Punctuation feature, the selection will extend to include that
punctuation.
When you select a word that has adjacent punctuation added by
Selecting text by voice
Using Select-and-Say
You can revise your dictation without correcting it by selecting the text
using the “Select” command and then saying new words to replace the
selected text.
58
®
Dragon NaturallySpeaking User’s Guide
Page 67

5
Correcting and Editing
To use Select-and-Say®:
1 Dictate the sentence below:
US/Canada: Let’s meet for lunch on Tuesday [period]
Other Dialects: Let’s meet for lunch on Tuesday [full stop]
2 Say “Select lunch on Tuesday.” The words “lunch on Tuesday”
should be highlighted on the screen.
3 Say “dinner on Wednesday.” These words should replace “lunch on
Tuesday.”
Since “Tuesday” and “Wednesday” sound completely different,
Dragon NaturallySpeaking
recognition mistake but rather revising your dictated text.
TIP
You can also select punctuation marks.
4
Say: “Select period” (US/Canada) or “Select full stop” (Other
Dialects). If there’s more than one period or full stop, you can say
“Select Again” to select a different one.
5 To replace the period or full stop with an exclamation mark, say
“exclamation mark.”
will know you are not correcting a
TIP
It is often easier for Dragon NaturallySpeaking to find the matching
text if you select a short phrase rather than individual words. If you select
some words that are already correct, just say them again along with the ones
you want to change.
Selecting the same text again
If the words you’re trying to select appear more than once on the
screen and Dragon NaturallySpeaking selects the wrong ones, just say
“Select Again.” The program then looks for another instance of the
same word or words.
You can also say “Select Again” if Dragon NaturallySpeaking selects a
word that sounds like the word you want, but is not the correct one (for
example, “two” instead of “too”).
Dragon NaturallySpeaking User’s Guide
59
Page 68

5
Correcting and Editing
Unselecting words
If the wrong text is selected, say “Unselect That.”
You can also “unselect” words by moving your insertion point (by
mouse or voice) to another part of your document. For example, say
“Go to End of Line” or click somewhere else in your document.
Selecting a longer phrase
You can select a longer phrase by saying “Select [text] Through [text]”
(US/Canada) or “Select [text] To [text]” (Other Dialects). For [text],
substitute the actual word or words at the beginning and the end of the
range of wrong words. For example, you could correct the underlined
words in the following sentence:
With a little practice, who will develop a habit of dictating an unclear
steady voice, and the computer will understand you better.
by saying:
(US/Canada) “Select who Through unclear” or “Select who will Through an
unclear”
(Other Dialects) “Select who To unclear” or “Select who will To an unclear”
Then dictate the correct text:
“you will develop the habit of dictating in a clear”
The final corrected sentence reads:
With a little practice, you will develop the habit of dictating in a clear,
steady voice, and the computer will understand you better.
,
NOTE
sequence (next to each other). You can’t use a single command to correct
words that are in different parts of your document.
If you’re correcting more than one word, the words must all be in
Selecting your whole document
To select all the text in your document, say “Select Document” or “Select
All.” This command is useful when you want to change the font or the
way text is aligned.
60
Dragon NaturallySpeaking User’s Guide
Page 69

5
Correcting and Editing
When you want to copy all the text in a document to another window,
the easiest way to do it is with the “Copy All to Clipboard” command.
NOTE
commands don’t work, nor can you overwrite the selection by dictating new
text. This prevents you from accidentally deleting a large part of your
document. To remove a large selection, you can say “Delete That” instead.
When a lot of text is selected, the “Scratch That” and “Cut That”
Selecting an entire paragraph or line
You can select the current paragraph by saying “Select Paragraph.” To
select the current line, say “Select Line.”
You can also select a number of paragraphs or lines (up to 20). For
example, you can say “Select Previous 5 Paragraphs.”
SAY THEN THEN
Select Next Paragraph
Previous 2...20
Paragraphs
Forward Line
Back 2.20 Lines
Last
Selecting a word or character
You can select the current word by saying “Select Word.” To select a
character, say “Select Next Character” or “Select Previous Character.”
You can also select a number of words or characters (up to 20). For
example, say “Select Previous 2 Words.”
SAY THEN THEN
Select Next Word
Previous 2...20 Words
Dragon NaturallySpeaking User’s Guide
61
Page 70

5
Correcting and Editing
SAY THEN THEN
Forward Character
Back 2...20
Characters
Last
Moving around in a document
When you’re editing a document, you can move around in it by voice.
After you place the insertion point where you want it, you can dictate
more text, select text, copy and paste, or apply formatting.
Going to the top or bottom of a page or
document
You can move to the top or bottom of the current page by saying “Page
Up” (equivalent to pressing the
(equivalent to pressing the
You can move to the top or bottom of your document by saying “Go to
To p” or “Go to Bottom.”
PAGE UP key) or “Page Down”
PAGE DOWN key).
SAY THEN
Go to Top
Move to Bottom
Top o f Doc umen t
Beginning of Document
Start of Document
Bottom of Document
End of Document
62
Dragon NaturallySpeaking User’s Guide
Page 71

5
Correcting and Editing
Going to the beginning or end of a line
You can move to the beginning or end of the current line by saying
“Go to Beginning of Line” or “Go to End of Line.”
SAY THEN
Go to Beginning of Line
Move to Start of Line
End of Line
Placing the insertion point before or after a
specific word
You can place the insertion point before a specific word by saying
“Insert Before” and then the word or words. You can place the insertion
point after a word by saying “Insert After” and then the word or words.
After you move the insertion point where you want it, you can dictate
more text, paste text, add punctuation, and so on.
To place the insertion point before a specific
word:
To move the insertion point before the word “lets” in the sentence
below, say “Insert Before lets” (or “Insert Before lets me talk”). Remember
not to pause between any of the words.
Dragon NaturallySpeaking lets me talk instead of type.
To place the insertion point after a specific
word:
To move the insertion point after the word “talk” in the sentence
below, say “Insert After talk” (or “Insert After lets me talk”).
Dragon NaturallySpeaking lets me talk instead of type.
Moving up or down a paragraph or line
You can move up or down a paragraph by saying “Move Up a
Paragraph” or “Move Down a Paragraph.” You can also move up and
Dragon NaturallySpeaking User’s Guide
63
Page 72

5
down a number of paragraphs (up to 20). For example, you can say
“Move Up 3 Paragraphs.”
You can move up or down a line by saying “Move Up a Line” or “Move
Down a Line.” You can also move up and down a number of lines (up to
20). For example, you can say “Move Down 3 Lines.”:
Correcting and Editing
SAY THEN THEN
Move Up a Paragraph or 1 Paragraph
Back 2...20 Paragraphs
Down a Line or 1 Line
Forward 2...20 Lines
Moving right or left a word or character
You can move to the right or left of a word by saying “Move Right a
Wo rd ” or “Move Left a Word.” You can also move right or left a number
of words (up to 20). For example, you can say “Move Right 3 Words.”
You can move to the next or previous character by saying “Move Right a
Character” or “Move Left a Character.” You can also move forward and
backward a number of characters (up to 20). For example, you can say
“Move Left 4 Characters” or “Move Back 6 Characters.”
SAY THEN THEN
Move Right a Word or 1 Word
Forward 2...20 Words
Left a Character or 1 Character
Back 2...20 Characters
Copying, cutting, and pasting text
You can move text from one place to another by using the “Copy That,”
“Cut That,” and “Paste That” commands.
64
Dragon NaturallySpeaking User’s Guide
Page 73

5
Correcting and Editing
To copy, cut, or paste text:
1 Select the text you want to copy or cut.
2 Say “Copy That” or “Cut That.”
3 Move the insertion point to where you want to paste the text.
4 Say “Paste That.”
Deleting text
Deleting the last words you dictated
You can erase the last words you dictated by saying “Scratch That.”
When you say this command, Dragon NaturallySpeaking deletes the
last thing it typed into your document. This may be a full sentence, a
phrase, or just one word, if that’s all you said before pausing.
You can say “Scratch That” up to 10 times to delete the last few things
you said. If you repeat the command, you must pause before saying it
again. You can also say, for example, “Scratch That 5 Times.”
Going back as you dictate
When you’re dictating, sometimes you may hesitate or think of a
better way to say something right after you’ve said it. When this
happens, you can use the “Resume With” command to return to where
you were before the mistake.
Just say “Resume With” followed immediately by the word or words to
which you want to return. Then, continue dictating. Any text after the
new position of the insertion point will be replaced with your new
dictation.
NOTE
in the middle. Say “Resume With” and then immediately say the words to
which you want to return. These words must be in the last three or four
sentences (100 characters) you said; you can’t use “Resume With” to return to
an earlier part of your document.
Dragon NaturallySpeaking User’s Guide
When using the “Resume With” command, remember not to pause
65
Page 74

5
Correcting and Editing
To go back as you dictate:
1 Suppose you dictate this sentence: “I have a deadline this week, but
we could meet for lunch… um… er… next Wednesday.”
2 To correct the sentence, return to the last correct words you
remember dictating. For example, say “Resume With meet for lunch.”
(Remember not to pause in the middle.)
3 Then, dictate the rest of the sentence. For example, say “next
Wednesday at noon.”
Deleting specific words
You can delete text by selecting it and saying “Delete That.”
To delete text:
1 Select the text you want to delete.
2 Say “Delete That.”
You can also say “Scratch That” to do the same thing.
Deleting the next or previous paragraph or line
You can delete the next or previous paragraph by saying “Delete Next
Paragraph” or “Delete Previous Paragraph.” You can delete the next or
previous line by saying “Delete Next Line” or “Delete Previous Line.”
You can also delete a number of paragraphs or lines (up to 20). For
example, you can say “Delete Previous 5 Paragraphs.” See the complete
list below:
SAY THEN THEN
Delete Next Paragraph
Previous 2...20 Paragraphs
Forward Line
Back 2...20 Lines
Last
66
Dragon NaturallySpeaking User’s Guide
Page 75

5
Correcting and Editing
Deleting the next or previous word or character
You can delete the next or previous word by saying “Delete Next Word”
or “Delete Previous Word.” You can delete the next or previous character
by saying “Delete Next Character” or “Delete Previous Character.”
You can also delete a number of words or characters (up to 20). For
example, you can say “Delete Previous 5 Words.” See the complete list
below:
SAY THEN THEN
Delete Next Word
Forward 2...20 Words
Previous Character
Back 2...20 Characters
Last 2...20 Characters
NOTE
“Backspace.” This is equivalent to pressing the BACKSPACE key. You can
“press” it multiple times (up to 20) by saying, for example, “Backspace 5.”
Another way to delete the previous character is by saying
Spelling as you dictate
With the Spell command in Dragon NaturallySpeaking, you can easily
spell a word or phrase you want to dictate into your document. This
can be useful if you are dictating a word that is not likely to be in the
Dragon NaturallySpeaking vocabulary, such as a proprietary term, a
proper name, or a non-English word. Say, for example, “Spell b-u-o-n
space g-i-o-r-n-o.” The word you spelled appears right in your
document.
You must say “Cap” if the word contains a capital letter. For example,
say “Spell Cap R-u-m-p-e-l-s-t-i-l-s-k-i-n” to type “Rumpelstilskin.”
Dragon NaturallySpeaking User’s Guide
67
Page 76

5
Correcting and Editing
If you say “Spell” by itself, without any letters after it, the Spell dialog
box opens.
You can then speak the letters and Dragon NaturallySpeaking will
type them or you can correct any errors in the word you spelled.
When spelling, you can say numbers and special characters as well as
letters. For example, to dictate an automobile license plate number,
you could say “Spell y-h-m-6-0-9.” Dragon NaturallySpeaking would
type “yhm609.” Say “Spell Cap-m-a-c-m-i-l-l-a-n-trademark” to get
“MacMillan™” in your document.
Spelling a word adds that word to the active vocabulary. Words that
contain numbers are not added to the vocabulary.
To dictate unusual text such as automobile license plate numbers or
TIP
product codes, you can also switch to Spell mode by saying “Switch To Spell
Mode,” and then dictate letters.
You can make the Spell dialog box appear whenever you use the Spell
command by setting the “Spell” commands bring up the Spell dialog box
option on the Correction tab in the Options dialog box. See the online
help for more information.
You can also access the Spell dialog box when using the "Select" or
“Correct” commands.
For a list of how to spell special characters, see the Spelling topic in
the online Help.
68
Dragon NaturallySpeaking User’s Guide
Page 77

5
Correcting and Editing
Playing back your dictation
(Preferred and higher)
Playback commands work in the DragonPad, Microsoft Word 97, 2000,
2002 and 2003, Corel WordPerfect 8 and 9, and Lotus Notes.
Although Dragon NaturallySpeaking never makes a spelling mistake,
the mistakes it does make can be challenging to find and fix.
Sometimes, what the program types looks very different from what
you actually said.
To make correcting mistakes easier, Dragon NaturallySpeaking
records your voice as you dictate. You can play back your voice
whenever you cannot tell by looking at your document what you
originally said.
NOTE
higher edition, playback is available only until you close a document. After
you close a document, Dragon NaturallySpeaking deletes the recorded
dictation for that document. See page 72 for information on saving dictation
for later correction (Professional and higher editions).
Unless you have Dragon NaturallySpeaking Professional or a
Playing back dictation from the Correction
menu
When you’re working in the Correction menu, click the Play Back
button or say “Play That Back” to play the dictation that goes with the
words you’re correcting. Then edit the text to match what you said.
You can set up Dragon NaturallySpeaking to play back dictation
automatically whenever you open the Correction menu. On the
NaturallySpeaking menu, select Tools>Options>Correction tab. On
the Correction tab, select “Automatic playback on correction.”
Sometimes, there’s no dictation to play back. For example, you cannot
play back text that wasn’t entered by voice, such as words you typed or
pasted into your document.
NOTE
after you have cut it, copied it, pasted it, or otherwise moved it around in the
document.
Dragon NaturallySpeaking User’s Guide
Even when you have entered text by voice, you cannot play it back
69
Page 78

5
Correcting and Editing
If you have Dragon Naturally Speaking Professional or a higher
edition, you can save your dictation with your document for later
playback (see “Dictate now, correct later” on page 72). Otherwise, you
cannot play back dictation after closing a document.
If dictation is not available, the Play Back button is dimmed (grayed
out). When playback is not available, you may find text-to-speech
useful for checking your work. See “Using text-to-speech” on page 74.
Playing back dictation in a document
To help you check your work for mistakes, you can play back a line, a
paragraph, a selection, or the whole document. After playback starts,
you can stop it as soon as you notice a mistake and automatically open
the Correction menu.
The Playback toolbar is an extra section of the DragonBar that is
normally hidden. To see the Playback toolbar, click the double
chevron icon on the DragonBar to open the Extras toolbar
(Preferred and higher editions).
Start Playback Skip ForwardStop Playback
Correction
Fast Playback Skip Back Transcribe
To play back dictation:
To play back dictation, do any of the following:
■ Select the text you want to play back, and say “Play That Back.”
■ Click the Start Playback button on the Playback toolbar.
70
Dragon NaturallySpeaking User’s Guide
Page 79

5
Correcting and Editing
■ Move the insertion point to the text you want to play back and say
any of the following commands:
SAY TO
Play Back Line Play back dictation for the current line.
Play Back Paragraph Play back dictation for the current
paragraph.
Play Back Document Play back dictation for the whole
document.
Play Back Window Play back dictation for the text in view.
Play Back to Here Play back dictation from the top of the
document window to the insertion
point.
Play Back from Here Play back dictation from the insertion
point to the bottom of the document
window.
To stop playback:
To stop playback, do any of the following:
■ Click the Stop Playback button on the Playback toolbar.
■ Click anywhere in the document window.
■ Press the ESC key.
(It’s not possible to stop playback by voice, because the computer
cannot hear speech input when it’s playing back dictation.)
To skip backward or forward:
You can skip backward or forward in your document by a few words by
clicking the Skip Backward and Skip Forward buttons.
To stop playback and correct a mistake:
To stop playback and correct a mistake, do any of the following:
■ Click the Correction button on the Playback toolbar.
■ Press the minus (-) key on the numeric keypad.
Dragon NaturallySpeaking User’s Guide
71
Page 80

5
Correcting and Editing
This stops playback and simultaneously opens the Correction menu.
There you can correct the text for the last phrase played back.
NOTE
dictation (40 MB). If you want to be able to store more dictation, you can
change the amount of disk space that’s set aside for storing it. On the Tools
menu, click Options, and then click the Data tab. Increase the number in the
“Disk space reserved for playback” box.
By default, Dragon NaturallySpeaking stores about 30 minutes of
Dictate now, correct later
When you dictate into the DragonPad, you can save your dictation
with your text so either you or someone else can correct it later. You
must create and edit your file in the DragonPad to be able to play back
dictation. This feature is available in Dragon NaturallySpeaking
Professional and higher editions.
You can save dictation with your document if you select the Save
recorded dictation with document box on the Data tab of the Options
dialog. The first time you save a document in DragonPad during an
editing session, Dragon NaturallySpeaking asks you whether you want
to save your speech data. If you save your speech data, you can reopen
the document at a later time and play back your dictation. If you do
not save your speech data, your dictation is stored only during the
current editing session.
Correcting your own dictation
If you save your dictation, you can open your file later and play back
and correct the text as if you had just dictated it.
Correcting someone else's dictation
You can play back someone else's dictation and correct the text to
match the dictation. You can do this in two ways:
■ You can correct the dictation using your user files.
■ You can correct the dictation using the document author's user files.
Correcting with your user files
You should use this correction technique if you regularly correct
another person's text by voice and it is not important to maximize the
author's recognition accuracy.
72
Dragon NaturallySpeaking User’s Guide
Page 81

5
Correcting and Editing
When you use your user files, you can correct the dictation just as you
would correct your own dictation, using any combination of voice
commands and keyboard typing. Even though you are correcting
someone else's dictation, your work won't reduce recognition accuracy
for either you or the person who dictated the text. But your corrections
to the other person's dictation won't improve recognition either.
Correcting with the document author's user files
You should use this correction technique if you do not need to correct
by voice and it is important to maximize the author's recognition
accuracy.
TIP
This technique works if all work is done on a single computer. Consult
your Dragon NaturallySpeaking reseller about ways to dictate on one
computer and correct on another.
If you correct dictation using the author’s user files, you must not
correct by voice, or you may reduce that person’s recognition accuracy.
You can, however, improve the author’s recognition accuracy if you
make corrections by using the keyboard and mouse with the
Correction Menu. See the following procedure for details.
To correct using someone else's user files:
1 Make sure you are not wearing the microphone headset, or that the
microphone is not turned on or plugged in. This will ensure that
you don't accidentally reduce the accuracy of someone else's user
files by using your voice.
2 Make sure the DragonPad Extras toolbar is displayed so you can
see the playback command buttons.
3 Open the user files of the person whose text you will correct.
4 In DragonPad, open the document to correct.
5 Use the buttons on the Extras toolbar to play back dictation.
6 Select the text you want to correct by mouse or keyboard.
Dragon NaturallySpeaking User’s Guide
73
Page 82

5
7 Press the correction hot key (normally the minus [-] key on the
Correcting and Editing
numeric key pad) or click the Correct button on the DragonBar
Extras toolbar. The Correction Menu appears with the selected
text.
8 Use the keyboard to correct the text.
9 Save the text and the user's speech files when you are done.
Using text-to-speech
Text-to-speech is available in Dragon NaturallySpeaking Preferred
and higher editions.
You can use text-to-speech to have text on your screen (not your
current dictation) read aloud in a computer voice. For example, you
can have a document that you (or someone else) dictated read back
while you listen for mistakes and sections you may want to revise.
Text-to-speech is available only in the DragonPad, Microsoft Word,
and Corel WordPerfect. You can, however, copy and paste text from
other programs and then use text-to-speech.
To start text-to-speech:
To start text-to-speech, do any of the following:
■ Select the text you want to hear (a line, a paragraph, and so on), and
then say “Read That.”
■ Select the text you want to hear, and then select Read That from
the Advanced submenu (or right-click in your document and click
Read That from the shortcut menu).
■ Move the insertion point to the text you want to hear and say any of
the following commands:
SAY TO
Read Line Read back the current line.
Read Paragraph Read back the current paragraph.
Read Document Read back the whole document.
74
Dragon NaturallySpeaking User’s Guide
Page 83

5
Correcting and Editing
SAY TO
Read Window Read back the text in view.
Read to Here Read back from the top of the document
window to the insertion point.
Read from Here Read back from the insertion point to the
bottom of the document window.
To stop text-to-speech:
To stop text-to-speech, do any of the following:
■ From the NaturallySpeaking menu, point to Advanced and click
Stop Playback/Reading.
■ Right-click in your document and click Stop Playback/Reading
from the shortcut menu.
■ Press the ESC key.
You can control the speed, pitch, volume, and other text-to-speech
settings. From the Tools menu, click Options>Text-to-Speech Tab
Notes on correcting with another author’s user
files
This technique works if all work is done on a single computer.
Consult your Dragon NaturallySpeaking reseller about ways to dictate
on one computer and correct on another.
To display the DragonBar Extras toolbar, click the double
chevron icon on the DragonBar. You cannot display the Extras
toolbar if the DragonBar is in cling mode.
In the Correction Menu, you can use the mouse or keyboard to
select any of the commands displayed below the correction choices.
For example, you can click “Spell That” to open the Spell dialog box
and spell the word.
You may want to select the following on the Correction tab of the
Options dialog box:
■ “Correct” command brings up Correction menu
■ Automatic playback on correction box
Dragon NaturallySpeaking User’s Guide
75
Page 84

5
Correcting and Editing
With these settings, Dragon NaturallySpeaking will automatically play
back the author's dictation for each text selection you correct. The
Correction Menu does not play back dictation.
When you correct someone else's dictation, make sure that the amount
of disk space you have reserved for storing dictation is at least as large
as the amount allocated for the user that created the text. You allocate
the disk space on the Data tab of the Options dialog box.
Saving dictation with documents can take up a lot of disk space,
typically more than a megabyte per minute of dictation. To save this
space, delete any dictation you no longer need. Dragon
NaturallySpeaking saves dictation in a file with the same name as the
document, but with the extension .dra. For example, if you dictate a
document called MyDoc.rtf and save your dictation, Dragon
NaturallySpeaking saves your dictation in a file called MyDoc.dra in
the same directory as your document.
76
Dragon NaturallySpeaking User’s Guide
Page 85

CHAPTER
Y
6
Formatting
ou can bold text, change font sizes and styles, capitalize text, and
apply other formatting by voice.
Many Dragon NaturallySpeaking formatting commands work for text
that is selected (highlighted) in your document. To select text by
voice, say “Select” plus the words you want to select. See “Selecting
text by voice” on page 58 for information.
Types of commands
Most of the commands listed in this chapter are global—they are
available in virtually every application. In addition to the global
commands listed here, Dragon NaturallySpeaking includes many
commands for editing and formatting that work in common
applications. For more information on finding these commands
see the online help.
NOTE
whether Dragon NaturallySpeaking should type a space before or after
the word, or whether the word is capitalized in a title) by using the
Word Properties dialog box. See the online help for more information.
You can change the formatting properties of a word (such as
Capitalizing text
Capitalizing the first letter of the next word you
dictate
Dragon NaturallySpeaking capitalizes many words automatically. It
capitalizes the first word in a sentence (following a period, question
Dragon NaturallySpeaking User’s Guide
77
Page 86

6
Formatting
mark, or exclamation mark). It capitalizes the first word after you say
“New Paragraph” (though not when you say “New Line”) and it
capitalizes proper names (when these words are already in the Dragon
NaturallySpeaking vocabulary in capitalized form).
NOTE
the Word Properties dialog box. See the online help for more information.
You can change the spacing and capitalization rules for a word in
When you’re dictating, you can capitalize words that aren’t
automatically capitalized by saying “Cap” and then the word. For
example, say “Cap zelda” to get “Zelda.”
TIP
If saying “Cap <word>” doesn’t work, try say “Cap Next <word>.”
TIP
To dictate the word “cap,” for example, in this sentence: “The
company is putting a cap on salary increases,” you must say “the company is
putting a” then say “Spell c-a-p,” and then say “on salary increases.” In this
way, Dragon NaturallySpeaking knows that you do not want to capitalize
any of the words within the sentence.
Capitalizing consecutive words
When you want to capitalize consecutive words (for example, if you’re
dictating a book title), you can turn capitals on and then turn them off
when you’re finished. This is usually easier than saying “Cap” before
each word. Another way to do consecutive capitalization is to dictate
the words, pause, and then say “Capitalize That” or “Cap That.”
To capitalize consecutive words:
1 Say “Caps On” to turn capitals on.
NOTE
case. This means it capitalizes all words except for articles and prepositions
(such as “the” and “to”).
When “Caps On” is active, Dragon NaturallySpeaking uses title
2
Dictate the words you want capitalized. For example, say: “success
is a journey [colon] seven steps to achieving success in the business of life”
Dragon NaturallySpeaking types: “Success Is a Journey: Seven
Steps to Achieving Success in the Business of Life”
78
Dragon NaturallySpeaking User’s Guide
Page 87

6
Formatting
3 Say “Caps Off” to turn capitals off.
Dictating the next word in all capital letters
When you’re dictating, you can enter a word in all capital letters by
saying “All Caps” and then the word.
For example, say “All Caps please” to get “PLEASE.”
Dictating consecutive words in all capital letters
When you want to dictate consecutive words in all capitals, you can
turn all capitals on and then turn them off when you’ve finished.
To dictate consecutive words in all capitals:
1 Say “All Caps On” to turn all capitals on (like pressing the CAPS
LOCK
key).
2 Dictate the words that you want to appear in all caps. For example,
say “the end”. Dragon NaturallySpeaking types “THE END”
3 Say “All Caps Off” to turn all capitals off.
Dictating the next word in all lowercase letters
When you’re dictating, you can enter a word in all lowercase letters by
saying “No Caps” and then the word.
For example, say “No Caps Jennifer” to get “jennifer.” (Dragon
NaturallySpeaking normally capitalizes this and other proper names.)
Dictating consecutive words in all lowercase
letters
When you want to dictate consecutive words in lowercase letters (for
example, names of computer files or e-mail addresses), you can turn
the “no capitals” feature on and then turn it off when you are finished.
This is usually easier than saying “No Caps” before each word.
Dragon NaturallySpeaking User’s Guide
79
Page 88

6
Formatting
To dictate consecutive words in all lowercase
letters:
1 Say “No Caps On” to turn no capitals on.
2 Dictate the words you want to appear in all lowercase.
3 Say “No Caps Off” to turn no capitals off.
Capitalizing (or uncapitalizing) text already in
your document
You can change the capitalization of text already in your document by
selecting it and then saying “Capitalize That,” “Cap That,” or “All Caps
That,” or “Uncapitalize That,” “Uncap That,” or “No Caps That.”
To capitalize or uncapitalize text:
1 Select the text you want to change.
2 Say “Capitalize That,” “Cap That,” or “All Caps That,” or
“Uncapitalize That,” “Uncap That,” or “No Caps That.”
Formatting text
You can use voice commands to specify any combination of font name,
size, and style, in that order. These commands change text you dictate
from then on or text you have selected.
To set a new style for text you are about to dictate, use the “Set Font”
and “Set Size” commands. To change the style of text you have already
selected, use the “Format That” command.
Changing the font as you dictate
While dictating, you can change the font face, size, and style by saying
“Set Font” followed by the font attributes you want. For example, you
can say “Set Font Times” or “Set Font Arial 12 Bold.” When you
continue dictating, the new text appears with the font attributes you
set.
80
Dragon NaturallySpeaking User’s Guide
Page 89

6
Formatting
Changing font face
SAY THEN
Set Font Arial
Courier
Courier New
Garamond
Helvetica
Palatino
Times
Times New Roman
Changing font size
Say “Set Size” and then a size from 4 to 100 points. For example, say
“Set Size 18.” Then, continue dictating.
Changing font style
SAY THEN
Set Font Bold
Italics
Bold Italics
Underline
Strikeout
Plain or Plain Text or Normal or Regular
Changing a combination of font face, size, and style
Say “Set Font” and then the attributes you want (listed in the previous
sections). You can specify any combination of font face, size, and style,
but you must specify these attributes in that order (font face, then size,
then style). See the list of examples below:
■ “Set Font Arial”
■ “Set Font Arial 12” or “Set Font Arial 12 Point”
Dragon NaturallySpeaking User’s Guide
81
Page 90

6
■
“Set Size 12 Bold”
■ “Set Font Arial Bold”
■ “Set Font Bold”
Formatting
NOTE
not the “Set Font” command.
If you’re changing only the font size, use the “Set Size” commands,
Changing the font later
You can go back and change the font face, size, or style of text by
selecting it and then using the “Format That” commands. “Format
That” works on selected text with the same combinations of font face,
size, and style as the “Set Font” commands (see the tables in the
previous section.)
To change the font:
1 Select the text you want to change.
2 Say “Format That” and then the font attributes you want to apply
as described in the previous section. For example, say “Format that
Arial 18.”
Bold, italics, and underlining
You can apply formatting to text in your document by selecting it and
then saying “Bold That,” “Italicize That,” or “Underline That.” You can
also say “Strikeout That.”
To add bold, italics, and underlining:
1 Select the text you want to change.
2 Say “Bold That,” “Italicize That,” Underline That,” or “Strikeout
That.”
To remove formatting:
1 Select the text you want to change.
2 Say “Restore That” to remove formatting.
82
Dragon NaturallySpeaking User’s Guide
Page 91

6
Formatting
Aligning text
You can change how text is aligned by placing your insertion point in
the text and saying “Center That,” “Left Align That,” or “Right Align
That.”
To align text:
1 Move the insertion point to the text you want to align.
2 Say “Center That,” “Left Align That,” or “Right Align That.”
You can also use the following commands on selected text: “Format
That Centered,” “Format That Left Aligned,” and “Format That Right
Aligned.”
Bulleted text
To add bullets to text, place your insertion point in the text and say
“Format that Bullet Style.” To remove bullets, say “Format that Bullet
Style” again.
Dragon NaturallySpeaking User’s Guide
83
Page 92

6
Formatting
84
Dragon NaturallySpeaking User’s Guide
Page 93

CHAPTER
T
7
Dictating Names, Numbers,
Punctuation & Special
Characters
his chapter describes how to dictate numbers, punctuation, Web
addresses, and a few other special items. For complete
information on this topic, see the online help.
NOTE
would like, you can change the formatting properties of the word by using the
Word Properties dialog box. See the online help for more information.
If Dragon NaturallySpeaking is not formatting a word as you
Dictating numbers
In most cases you can dictate numbers, including postal codes, as you
normally say them. Dragon NaturallySpeaking will display either a
number (“3”) or the word (“three”), based on the context. To force
recognition of digits as numerals instead of text without using the
Numbers Mode, say "Numeral" before you say the digit, for example,
say "Numeral Three" to get 3. When dictating numbers:
■ You can use or omit the word "and" as part of a number. For
example, say "one hundred fifty" instead of "one hundred and fifty"
to get the number 150.
■ You can use "oh" and "zero" interchangeably to get 0.
■ If you want a comma in a four-digit number, you must speak it
explicitly. Numbers with five or more digits automatically include
commas, with the exception of US ZIP codes.
■ For a decimal point, say “point.”
Dragon NaturallySpeaking User’s Guide
85
Page 94

7
TIP
Mode.” See “Switching Recognition Modes” on page 108 for more
information.
TO ENTER SAY
Dictating Names, Numbers,
Punctuation & Special Characters
If you want to dictate only numbers, you can switch to “Numbers
1one
numeral one
5 five
numeral five
17 seventeen
23 twenty three
179 one hundred seventy nine
one seventy nine
5423 five thousand four hundred and twenty three
5,423 five [comma] four twenty three
12,537 twelve thousand five hundred and thirty seven
142,015 one hundred and forty two thousand and
fifteen
35.23 thirty five [point] two three
0.03 All Dialects: zero [point] zero three
Outside US/Canada: nought [point] nought
three
43.28% forty three [point] twenty eight [percent sign]
02460 oh two four six zero
02460-1458 oh two four six zero [hyphen] one four five
eight
2 3/4 two and three fourths
11/32 eleven over thirty two
86
Dragon NaturallySpeaking User’s Guide
Page 95

7
Dictating Names, Numbers,
Punctuation & Special Characters
TO ENTE R SAY
$99.50 ninety nine dollars and fifty cents
45.35 45 Euros and thirty-five cents
£120.35 pound sterling sign one hundred and twenty
point thirty five [All Dialects]
NOTE
dates, make sure that your Regional Settings match the language (dialect) you
selected when you created your user.
If you are having problems dictating numbers, currency, times, or
Changing the format of a number
If Dragon NaturallySpeaking enters a number in a format you don’t
want, you can use voice commands to convert it to a numeral or to
spell it out.
For example, you can change “seven dollars” to “$7” (US/Canada) or
“seven pounds” to “£7” (Other Dialects) by saying “Format That
Number.”
And you can change “$7” to “seven dollars” (US/Canada) or “£7” to
“seven pounds” (Other Dialects) by saying “Format That Spelled Out.”
These commands change the last number dictated or a selected
number.
SAY TO CHAN G E
Format That Number one to 1
first to 1st
nineteenth to 19th
5 million to 5,000,000
five million to 5,000,000
eight dollars to $8 (US/Canada)
seven pounds to £7 (Other Dialects)
Format That Spelled Out 4th to fourth
27 to twenty-seven
5,000,000 to five million
Dragon NaturallySpeaking User’s Guide
87
Page 96

7
NOTE
commands work for numerals and currency, but not for dates, times of day,
telephone numbers, and most fractions.
Dictating Names, Numbers,
Punctuation & Special Characters
The “Format That Number” and “Format That Spelled Out”
Using Numbers Mode
Any time you need to dictate a series of numbers and do not want
Dragon NaturallySpeaking to recognize them as words, you can turn
on Numbers Mode. This could be useful, for example, if you are
®
dictating in a spreadsheet program, such as Microsoft
Excel®.
To turn on Numbers Mode, say “Start Numbers Mode” or “Numbers
Mode On.” To turn off Numbers Mode, say, “Stop Numbers Mode” or
“Numbers Mode Off” or “Switch to Normal Mode.”
For more information on Numbers Mode and more ways to turn
Numbers Mode on and off, see the section “Switching Recognition
Modes” on page 108.
Dates
You can dictate most dates the way you would normally say them. Say
“oh” or “zero” to enter 0. In dialects other than US/Canada, you can
also say “nought.”
TO ENTER SAY
22 January
1999
April 9, 2001 April 9 [comma] two thousand and one
14/07/85 fourteen [slash] oh seven [slash] eighty five
3/11/02 three [slash] eleven [slash] zero two
3/11/2002 three [slash] eleven [slash] two thousand
April 1st April first
March 22nd March twenty second
the 1980s the nineteen eighties
twenty two January nineteen ninety nine
and two
88
Dragon NaturallySpeaking User’s Guide
Page 97

7
Dictating Names, Numbers,
Punctuation & Special Characters
Times of day
Dictate the time of day the way you would normally say it.
US/Canada: Dragon NaturallySpeaking automatically types the colon
(:) if you say “a m” or “p m” when dictating the time. Say “o’clock” or
“colon zero zero” to enter:00.
TO ENTE R SAY
8:30 eight [colon] thirty or eight [numeric colon] thirty
7:45 AM seven forty five a m
10:22 PM ten twenty two p m
3:00 three o’clock or three [colon] zero zero
5:00 PM five o’clock p m
TIP
Dragon NaturallySpeaking will recognize times more accurately if you
say “numeric colon” instead of “colon” when dictating times.
Other Dialects: Dragon NaturallySpeaking automatically types the
point (.) if you say “a m” or “p m” when dictating the time, depending
on the regional setting. Say “o’clock” or “point zero zero” to enter .00.
TO ENTE R SAY
8.30 eight [point] thirty
7.45 AM seven forty five a m
10.22 PM ten twenty two p m
3.00 three o’clock
5.00 PM five o’clock p m
NOTE
regional Windows
The format of “a.m.” and “p.m.” depends on your computer’s
®
settings.
Telephone numbers
North American phone numbers
Say US and Canadian phone numbers as you normally would, pausing
briefly between each group of numbers.
Dragon NaturallySpeaking User’s Guide
89
Page 98

7
Dictating Names, Numbers,
Punctuation & Special Characters
You don’t need to dictate hyphens for most phone numbers (numbers
that are 7, 10, or 11 digits long). Dragon NaturallySpeaking will add
them automatically.
TO ENTER SAY
965-5200 nine six five fifty two hundred
617-965-5200 six one seven nine six five fifty two oh oh
1-800-555-1212 one eight hundred five five five one two
one two
(617) 965-5200 [open parenthesis] six one seven [close
parenthesis] nine six five five two zero
zero
1-212-555-1212 one two one two five five five one two one
two
Telephone numbers outside North America
To dictate other phone numbers, including European phone numbers,
you must say all the punctuation, including the hyphens, spaces, and
parentheses.
TO ENTER SAY
(01628) 894150 [open parenthesis] oh one six two eight
[close parenthesis] eight nine four one five
oh
027 629 8944 oh two seven [space bar] six two nine
[space bar] eight nine four four
61-7-4695-2055 six one [hyphen] seven [hyphen] four six
nine five [hyphen] two zero five five
(65) 2778590 [open parenthesis] six five [close
parenthesis] two seven seven eight five
nine zero
TIP
In dialects other than US/Canada, you can say “bracket” instead of
“parenthesis.”
90
Dragon NaturallySpeaking User’s Guide
Page 99

7
Dictating Names, Numbers,
Punctuation & Special Characters
Fractions
You can dictate most common fractions the way you would normally
say them. To dictate 1/2, 1/3, 1/4, 1/5, 1/6, 1/7, 1/8, 1/9, 1/10, and 1/16
or a multiple of these fractions, just say the fraction normally.
TO ENTE R SAY
1/2 one half
1/4 one fourth or one quarter
15/16 fifteen sixteenths or fifteen over sixteen
3 7/8 three and seven eighths or three and seven over
eight
If the denominator (bottom number in the fraction) is greater than 10,
you can enter the fraction by saying “slash” or “over” between the two
numbers.
TO ENTE R SAY
9/12 nine [slash] twelve or nine over twelve
5 3/56 five [space bar] three [slash] fifty six
130/70 one thirty over seventy
A few common fractions can also be displayed on your computer as
special characters (such as ¼, ½, or ¾) instead of two numbers
separated by a slash character (such as 1/4, 1/2, or 3/4). For information
about dictating fraction characters, see “Dictating uncommon special
characters” on page 104.
Dragon NaturallySpeaking User’s Guide
91
Page 100

7
Dictating Names, Numbers,
Punctuation & Special Characters
Roman numerals
You can dictate Roman numerals by saying “Roman numeral” and the
number. For large numbers, say the number in small combinations (as
in the examples shown here).
TO ENTER SAY
I Roman Numeral one
IV Roman Numeral four
VRoman Numeral five
X Roman Numeral ten
LRoman Numeral fifty
C Roman Numeral one hundred
D Roman Numeral five hundred
M Roman Numeral one thousand
XXIV Roman Numeral twenty our
XXXI Roman Numeral thirty one
MCMXCVII Roman Numeral one thousand
Roman Numeral nine hundred
Roman Numeral ninety
Roman Numeral seven
TIP
Don’t pause after the word “Roman Numeral” when you’re dictating a
Roman numeral. If you pause, Dragon NaturallySpeaking may enter, for
example, “Roman numeral three” instead of “III.”
Postal and ZIP Codes
Dragon NaturallySpeaking can automatically formats postal codes.
This feature is controlled from the Formatting tab of the Options
dialog box. For more information, see the online help.
92
Dragon NaturallySpeaking User’s Guide
 Loading...