

Page 1

A Lernout & Hauspie Company
Quick Start
When you see this...
...you can talk
to your favorite
programs!
Installing
Dragon
NaturallySpeaking
See page 2
Teaching
the program
how you speak
See page 4
Beginning
to dictate
See page 8
Command
Quick
Reference
See inside back cover
Dragon NaturallySpeaking lets you talk to your
computer instead of typing. You can talk to Microsoft
®
Internet Explorer®, e-mail, chat, and virtually any other
program in which you normally type. Talking to a
program while Dragon NaturallySpeaking types what
you say is called “dictating.”
Quick Start 03-101-50-01
Essentials
Page 2

I
f you have an earlier version of Dragon
NaturallySpeaking, see page 15 for upgrade
information.
1. If you’re running a virus checker (for example,
McAfee®VirusScan®or Symantec™Norton
AntiVirus™), turn it off. Sometimes installation
can trigger a false virus report.
2. Put the Dragon NaturallySpeaking CD into
your CD-ROM drive. Setup begins automatically.
If installation does not begin automatically, use
Windows Explorer to find your CD-ROM drive;
then double-click Setup.exe to start the installation.
3. Follow the instructions on your screen to
complete the installation.
The product CD Key you’ll need to complete the
installation is located on a sticker on your CD sleeve.
4. Dragon Systems recommends that you register
online now, if you can, so we can notify you of
product upgrades and other offers.
5. If installation prompts you to restart your
computer, select Yes to restart before you launch
Dragon NaturallySpeaking.
NOTE
PAGE 2
Installing Dragon
NaturallySpeaking
NEW in version 5:
e-mail
D
ictate into popular e-mail programs with
special built-in voice commands. Dragon
NaturallySpeaking works with these and other
popular e-mail applications:
America OnLine®4.0 or 5.0
QUALCOMM
®
Eudora®Pro 4.3
Microsoft Outlook
®
97, 98, or 2000
Microsoft Outlook Express 5
Netscape
®
Messenger®in Netscape
Communicator
®
4.73
Dragon NaturallySpeaking version 5 also has
many new and improved commands for surfing
the web with Microsoft Internet Explorer. For
more information, see the online Help.
Page 3
Connecting Your
Microphone
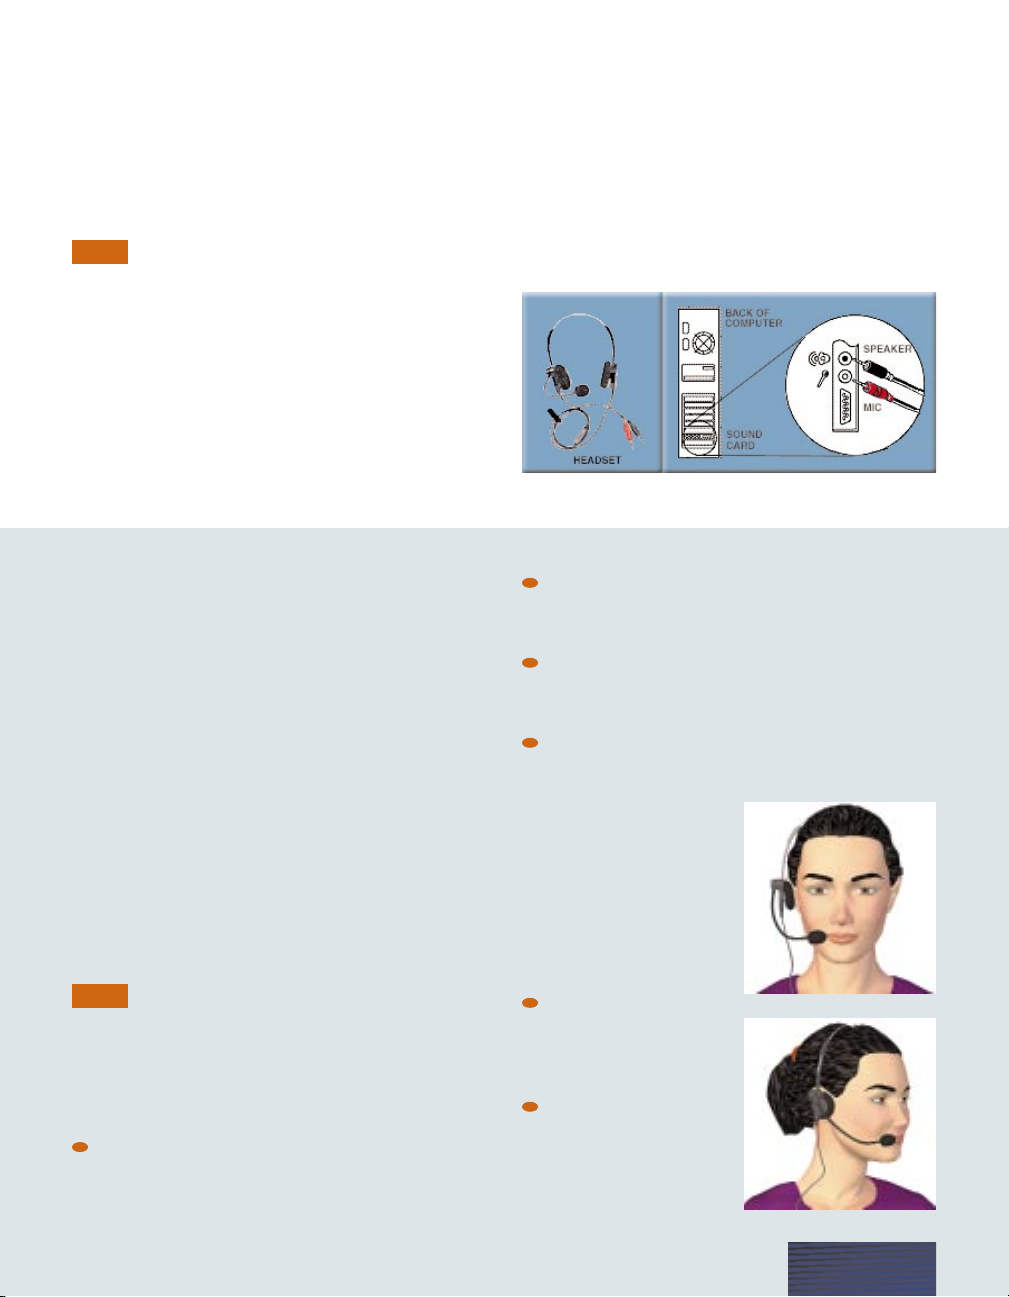
R
efer to the following diagram to connect your
microphone to your computer.
Not all systems use the same icons for input and
output jacks. If you have questions, consult the user’s
manual that came with your computer.
1. Insert the RED or PINK plug into the MIC
input jack on your computer sound card. Sound cards
vary, but the microphone jack is usually red and has a
picture of a microphone. If your sound card does not
have a MIC jack, use the LINE IN jack.
2. Insert the BLACK or BROWN plug into the
LINE OUT jack on your computer sound card. If
your sound card does not have a LINE OUT jack,
use the SPEAKER or HEADPHONE jack.
3. If your headset microphone includes an amplifier
box, install batteries in the box. See your microphone
documentation for complete instructions.
NOTE
PAGE 3
Positioning Your
Microphone
T
o talk to programs using Dragon
NaturallySpeaking, you need to speak into the
microphone that came with your software. It’s very
important that the microphone be in just the right
position, so that Dragon NaturallySpeaking can
hear you loud and clear. Whenever you use Dragon
NaturallySpeaking, start by making sure your
microphone is in the right position.
If the microphone is out of place, Dragon
NaturallySpeaking won’t be able to hear you as
clearly and may make more mistakes.
It’s a good idea to sip water when you do a lot
of dictating, so you don’t get hoarse. If you drink through
a straw, you won’t have to move the microphone out of
place.
Positioning a Headset Microphone
Position the microphone about a half-inch
from your mouth and a little off to the side. The
microphone should not touch your mouth, but it
can be almost touching your lips.
It’s okay to touch the foam covering while you’re
adjusting the microphone, but don’t touch the
microphone while you’re talking.
The side of the microphone that you should speak
into may be marked with a colored dot or the word
“Talk.”
If you need to move the microphone out of the
way, you can lift the “boom” up and over your
head, rather than
bending it out of
position or removing
the headset.
Positioning
a Handheld
Microphone
Hold the microphone
one to three inches
from your mouth and
a little off to the side.
If the volume display
on the DragonBar
turns red, try holding
the microphone
slightly farther from
your mouth.
TIP
Page 4
S
tart Dragon NaturallySpeaking, if it’s not already
running. Here’s how:
Double-click the desktop icon for Dragon
NaturallySpeaking
Or go to the Start menu, point to Programs, and
click Dragon NaturallySpeaking.
The first time you start Dragon NaturallySpeaking,
the program automatically starts the New User
Wizard. This wizard takes you step-by-step through
the process of creating a personal speech profile called
a “user.”
A user stores information the program needs to
recognize your speech, for example, information about
how you pronounce different words. If more than one
person will be using Dragon NaturallySpeaking on
this computer, each one must create a unique user.
The rest of this section explains each step in the New
User Wizard. If you have difficulty with any step, this
section can help answer your questions.
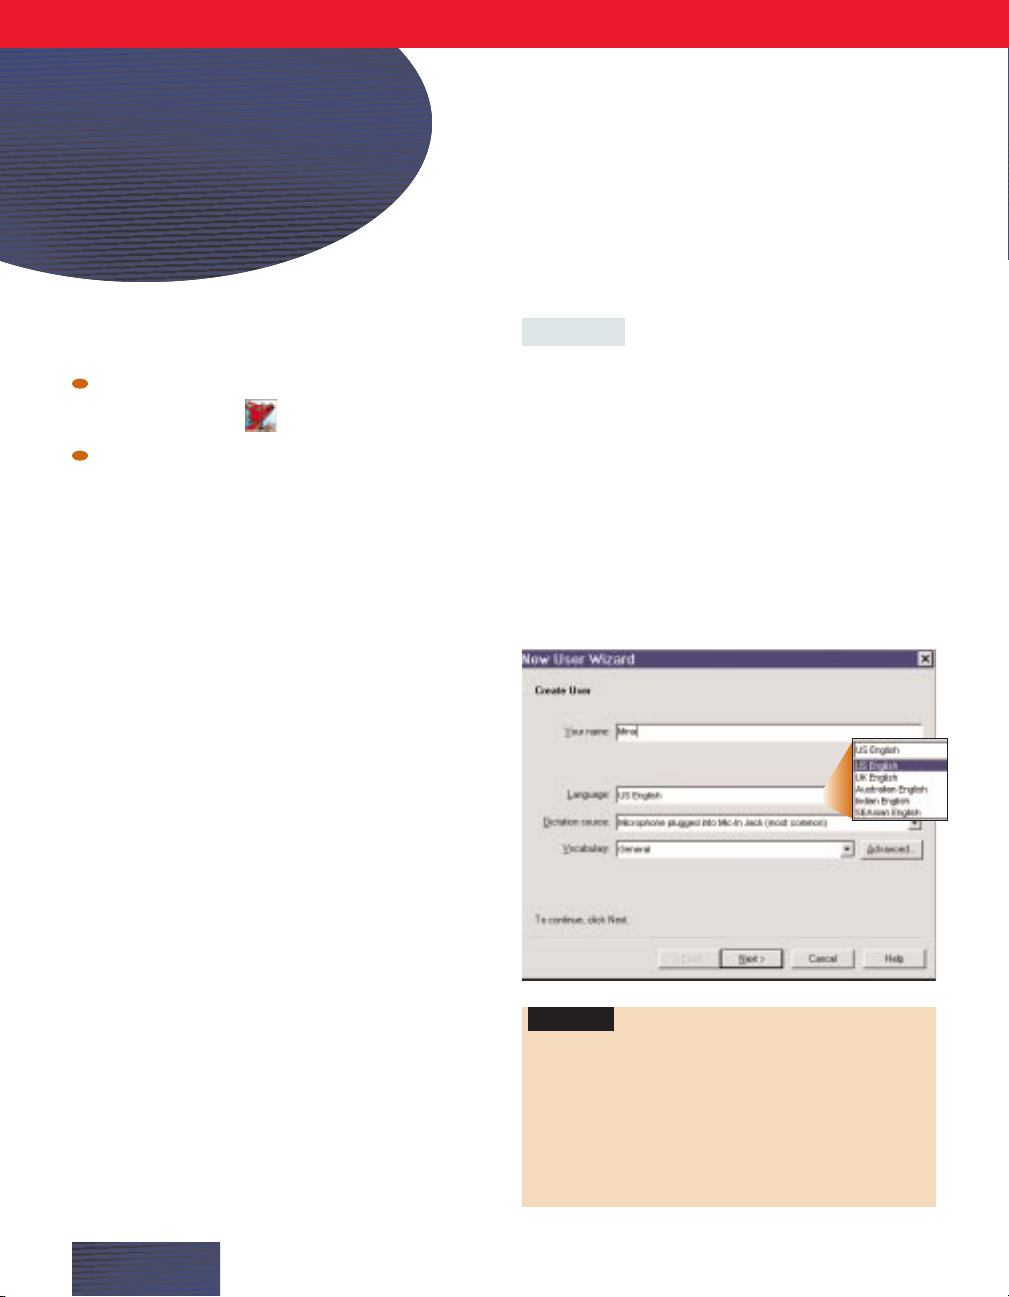
STEP 1:
Create a User
1. Name this user with your name or any other
unique name.
2. Choose a language (dialect). The English version
of Dragon NaturallySpeaking 5 ships with five
dialects: US English, UK English, Australian English,
Indian English, and Southeast Asian English. Choose
the dialect that most closely matches your accent
when you speak English.
PAGE 4
Teaching the
Program How
You Speak
Some commands behave differently for different
dialects depending on the Regional Settings of your
computer. If you have problems dictating times or
currency, set the Regional Settings in your Windows
Control Panel to match the language dialect you
selected in this step. See your user’s guide for more
information.
Important
Page 5
3. Choose a dictation source. If you will be
dictating into a headset or handheld microphone
connected to your computer, choose “Microphone
plugged into Mic-In Jack.” If you will be using
another type of microphone, select the option that
matches your dictation source from the drop-down
list.
If you are using a microphone not supplied with
your program, check the Hardware Compatibility List on
the Dragon Systems website (www.dragonsystems.com)
to see if your version supports the microphone you plan
to use.
4. Choose a vocabulary. Most adult users should use
the default choice, “General.” Younger speakers of
U.S. English (aged 9–15) should select the “Teens”
vocabulary. Most users should not need the Advanced
option.
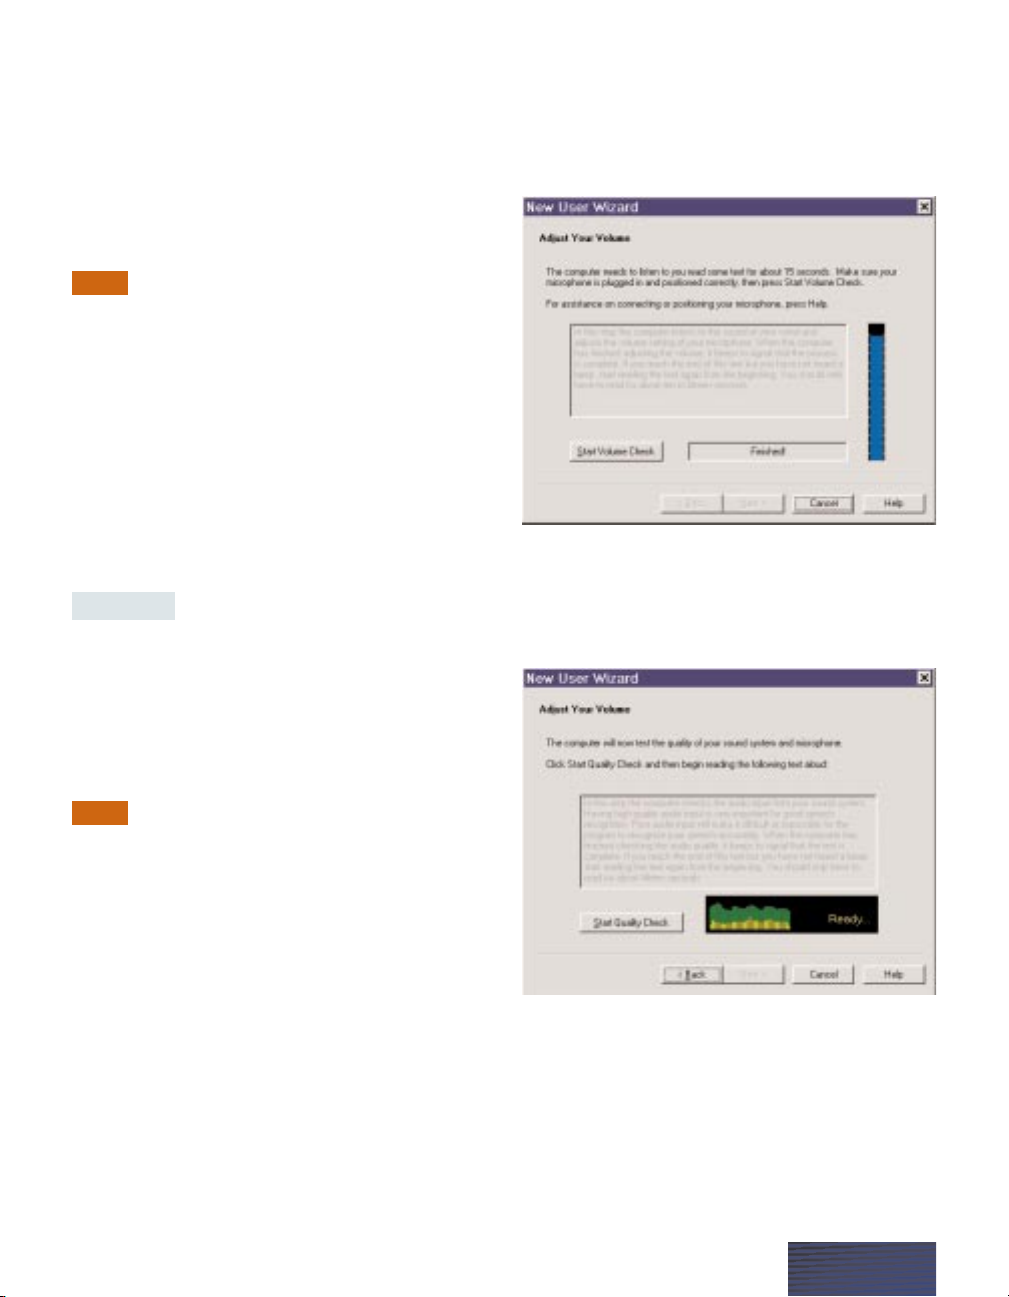
STEP 2:
Check your audio
settings
B
efore beginning this step, make sure your
microphone is properly connected and positioned.
If your computer has more than one sound card,
you will be asked to select one in this step.
1. Check your microphone volume by clicking Start
Volume Check, then read aloud the text in the box.
When the program beeps to indicate it has finished
checking the volume, click Next.
2. Check your sound quality. Click Start Quality
Check and then read aloud the text in the box. When
the program beeps to indicate it has finished checking
the volume, click Next.
NOTE
NOTE
PAGE 5
Page 6
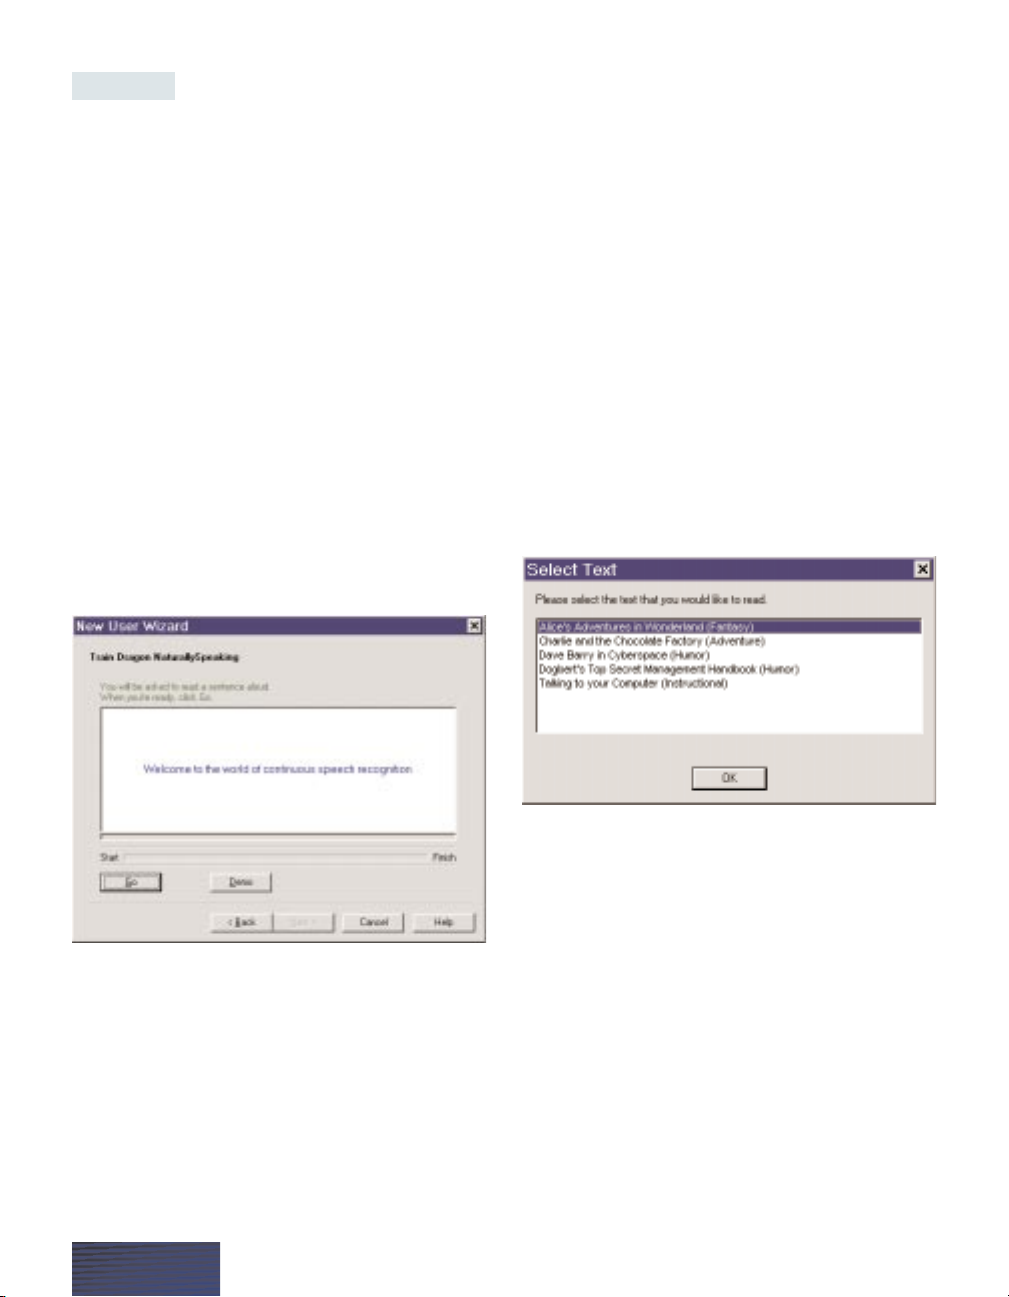
STEP 3:
Train Dragon
NaturallySpeaking
N
o two people sound exactly alike, so before you
can start talking to the computer, you have to
teach Dragon NaturallySpeaking how you pronounce
different words.
It usually takes only about five minutes to teach the
computer how you speak, but you have to do this the
first time you use Dragon NaturallySpeaking. You do
this by reading aloud part of a book or a story into
your microphone (you can choose from several texts).
Information about your voice is saved in the user file
you just created.
1. A yellow arrow shows you where to start reading.
To take breaks while you’re training the program, just
click Pause.
2. To advance through the first two screens, you
must say the sentences without pausing. For the rest
of the screens, it’s okay to pause in the middle of a
sentence.
When the words turn black, it means the computer
has heard and recognized them. If you keep reading
the same words, and the computer still doesn’t get it,
just click Skip.
3. Click Next to continue.
4. Choose a text to read aloud. In Dragon
NaturallySpeaking version 5, you only need to read
for about five minutes to train the computer to
recognize your speech. Sometimes, a new text will
begin at the end of the one you chose; this is because
the program needs a little more information about
how you speak.
You can take breaks while you’re training the
computer. Just click Pause.
PAGE 6
Page 7

Don’t worry if you make mistakes. You should try to
read exactly what you see on the screen, but it’s okay if
you read something incorrectly. The computer will
either ignore the mistake or display the yellow arrow
so you can try again.
The progress bar shows how much text you have left
to dictate. Make sure you read until you can click the
Finish button. Otherwise, the computer will not save
your training for this user. When you are done
reading, click Finish.
STEP 4:
Congratulations! YouÕre
ready to dictate.
W
hen you’re finished dictating, you will receive
a message saying “Congratulations! You have
finished the training. Click OK, and General Training
will spend a few minutes adapting and saving your
speech files.” Click OK and wait for the program to
finish adapting to your voice.
When adaptation is complete, you will see this next
screen.
If you are upgrading from a previous version, you
may want to See what’s new in version 5. Or, you can
simply Begin dictating.
When you have made your choice, click Finish.
Then open your favorite word processor or e-mail
program and start dictating.
Turning on the
Microphone
B
efore you can dictate, you need to turn the
microphone on by clicking the microphone icon
on the DragonBar. You can click this icon again to
turn it off.
Or you can press the plus (+) key on the numeric
keypad to turn the microphone on, and then press it
again to turn the microphone off.
After you click the microphone icon, remember to
click in the window you want to talk to before you
speak.
PAGE 7
Page 8

Welcome to the
DragonBar
W
hen you see the DragonBar on your screen,
you can dictate into virtually any program.
The DragonBar contains the following parts, starting
from the left side:
The Dragon icon
Click on the icon (or right-click anywhere on the
DragonBar) to display a menu that controls how the
DragonBar looks and acts on your screen. See the
online Help for more information.
NaturallySpeaking menu
The NaturallySpeaking menu on the DragonBar
contains all the menu commands that you can use
while working in Dragon NaturallySpeaking. Some of
these commands are also available from other parts of
the DragonBar, for example, opening the online Help.
Microphone icon and volume display
Click on the microphone icon to turn speech
recognition on and off.
Microphone is off.
Microphone is on and ready to dictate.
The volume display indicates how well the program is
hearing your voice.
Display Help icon
Click on the icon to open the Dragon
NaturallySpeaking online Help.
Manage users
Click Users to display a menu that contains a list of
your users, and a command that opens the Manage
Users dialog box.
PAGE 8
Beginning
to Dictate
The DragonBar
Dragon icon Microphone icon Manage Users
NaturallySpeaking menu Volume display Display Help icon
Page 9

Using the DragonBar
Y
ou can display and use the DragonBar in different
ways, or modes. You can also specify whether or
not the DragonBar always appears on top of the active
window.
To change the DragonBar mode
Click on the Dragon icon on the left side of the
DragonBar, or right-click anywhere on the DragonBar
to open the DragonBar shortcut menu. Then, on the
DragonBar shortcut menu, click the mode you want.
The DragonBar has five modes:
Floating mode
The DragonBar appears in a window you can drag
around the screen.
Docked to top mode
The DragonBar always stays at the top of the screen.
This is the mode in which the DragonBar appears the
first time you start Dragon NaturallySpeaking.
Docked to bottom mode
The DragonBar always stays at the bottom of the
screen. If the Windows taskbar is visible at the bottom
of the screen, the DragonBar appears just above it.
Cling mode
The DragonBar “clings” to the top left of the active
window. When you drag the active window to a new
location on your screen, the DragonBar moves with it.
In Cling mode, you do not see the Users button.
Tray icon only mode
The DragonBar is not visible on the screen and you
do not have access to the NaturallySpeaking menu.
A microphone icon in the Windows system tray
indicates that Dragon NaturallySpeaking is running.
To return to the last DragonBar mode, right-click on
the microphone icon and click Restore Previous
DragonBar Mode in the shortcut menu.
To make the DragonBar appear
always on top
Click on the Dragon icon on the left side of the
DragonBar, or right-click anywhere on the
DragonBar, to open the DragonBar shortcut menu.
Then, on the DragonBar shortcut menu, click Always
on Top.
PAGE 9
Page 10

Starting to Dictate
W
e recommend that you start dictating in
WordPad. If WordPad is not already open, start
it up from the Start menu. Make sure you click in the
WordPad window to make it active. Then check to
make sure that the microphone is on. You are now
ready to dictate.
When you begin to dictate, follow these guidelines:
Speak clearly and pronounce each word. Try not
to mumble or slur.
Speak in phrases or complete sentences,
not…like…this.
Think through what you’re going to say before you
say it.
Your first words may take a moment to appear on the
screen while Dragon NaturallySpeaking warms up.
When you talk, text shows up in the small Results
box while Dragon NaturallySpeaking figures out what
you said.
At times the computer will type something that
sounds like what you said but isn’t quite right. People
sometimes misunderstand each other in the same way.
But the computer is not a person, so it won’t help to:
YELL!!!
T a a a a l k s l o o o o o w w w l y y y y…….
Or. Say. Only. One. Word. At. A. Time.
In fact, the computer does better when you speak in
long phrases, using your “natural” voice.
Adding Punctuation
You must tell the computer where to put the
punctuation.
If you are dictating in UK, Australian, Indian,
or Southeast Asian English, you must say “full stop” in
place of “period.” For more information on punctuation
in different dialects, see the online Help.
Dictate the text below and say “comma,” “period,”
and “question mark” to add the punctuation marks.
Harriet [comma] I heard that you are starting a
new job in San Francisco [period] Congratulations
[exclamation mark] When does the new job start
[question mark] I would love to have lunch with
you before you leave [period]
Adding Paragraphs, Line Spaces,
and Tabs
To start a new paragraph, say “New Paragraph.” To
start a new line, say “New Line.” To line up text using
tabs, say “Tab Key.”
New Paragraph, New Line, and Tab Key are examples
of Dragon NaturallySpeaking commands. You must
say commands quickly, without pausing in the middle
of saying a command.
Dictate the text below, making sure to say the
commands as shown.
date [Tab Key] [Tab Key] city [New Paragraph]
June 15 [Tab Key] [Tab Key] Los Angeles [New Line]
June 16 [Tab Key] [Tab Key] San Francisco [New Line]
June 17 [Tab Key] [Tab Key] Seattle [New Line]
You can see a list of Dragon NaturallySpeaking
commands and punctuation marks in the detachable
Command Quick Reference card at the back of this
guide. You will find more command lists, including
punctuation and special characters, in the online
Help.
More About Commands
Commands are words that tell a program to do
something. For example, “Go To Sleep” is a command
that tells Dragon NaturallySpeaking to stop listening
temporarily. When you say a command, you must
NOTE
PAGE 10
Page 11

pause before and after saying it, otherwise Dragon
NaturallySpeaking might interpret the command as
dictation.
Dictate this paragraph, saying all the commands as
shown:
[New Paragraph] I’ll be staying at the Jackson hotel
[period] Here’s the phone number where you can
reach me [colon] [Go to Sleep]
(under your breath)
hmm, where did I put that number? ah, got it.
[Wake Up] 202 555 0828 [period]
Remember to pause before saying the “Go To Sleep”
command. If the program types the words “Go To
Sleep” or other similar words, say “Undo That,” and
then try saying the command again, pausing briefly
before and after.
The detachable Command Quick Reference card in
the back of this guide lists the commands you may
find most useful.
Becoming an expert? There are more commands
you can try. Click the Help icon and click View Command
List.
Changing Words
It’s normal for the computer to misunderstand some
words, especially at first. Fixing the mistakes Dragon
NaturallySpeaking makes may slow you down a bit,
but once you get the hang of dictating, it’s a lot faster
than typing.
The next section tells you how to move around your
document to select, correct, delete, insert, and format
words you dictate.
Moving Around Your Document
You can move around your document by voice to
select text, correct mistakes, and format text. In order
to select a word or phrase, you need to move the
insertion point before or after the word or phrase you
want.
You can move to the top or bottom of the current
page by saying “Page Up” (equivalent to pressing the
PAGE UP key) or “Page Down” (equivalent to pressing
the PAGE DOWN key).
You can move to the top or bottom of your document
by saying “Go to Top” or “Go to Bottom.” You can
move to the beginning or end of the current line by
saying “Go to Beginning of Line” or “Go to End of
Line.”
To move forward one word at a time, say “Move
Forward a Word.” To move back a word, you can
say “Move Back a Word.” You can move forward,
backward, left, or right by characters or words.
To move up one line at a time, say “Move Forward a
Line.” To move back a line, you can say “Move Back
a Line.” You can move forward, backward, up, or
down by lines or paragraphs.
You can also say, for example, “Move Back Five Words”
or “Move Down Two Paragraphs.” You can move the
insertion point from 2 to 20 characters, words, lines,
or paragraphs at a time.
For variations on the Move commands, see the
Command Quick Reference card at the back of this
guide or the Command List of the online Help.
Selecting Words
To select forward one word at a time, say “Select
Next Word.” To select the previous word, you can say
“Select Previous Word.” You can select by characters,
words, lines, or paragraphs.
You can also say, for example, “Select Previous Five
Words” or “Select Next Two Paragraphs.” You can
select from 2 to 20 characters, words, lines, or
paragraphs at a time.
To undo a selection, say “Unselect That.” The
selection disappears.
When text is selected, the next thing you say replaces
the selected text. If the wrong thing happens,
immediately say “Undo That” to undo the last action.
TIP
PAGE 11
Page 12

Correcting Words
When Dragon NaturallySpeaking makes a mistake,
it may be because the word you said is not in the
program’s vocabulary. You can correct only the last
word or phrase you dictated. For example, dictate this
sentence:
I have always wanted to see the White House
[period]
1. Pause when you see the program make a mistake.
2. Say “Spell That” or “Correct That.” The
Correction box opens.
3. If you see the word or phrase you want in the list,
you can choose it by saying, for example, “Choose 3.”
You can choose any number that appears in the list.
4. Or, you can spell or type the word or phrase in
the Correction box. Say each letter at normal speed,
without pausing. If the word has a capital letter, just
say “cap” before that letter. Spelling will erase the list
of choices and bring up new ones as you spell.
5. When the correct word appears in the Correction
box, choose it by saying, for example, “Choose 1.” You
can choose any number that appears in the list.
You can move around the Correction box by voice,
and dictate special characters. For more information,
see the online Help.
Deleting Words
To delete words you just dictated, pause briefly and
say “Scratch That.” To delete words anywhere in your
document, move to the words and select them, and
then say “Delete That.”
Say (without pausing):
I’m looking forward to seeing you [period]
Pause briefly and say “Scratch That” to delete the
entire phrase. If the entire phrase is not deleted, you
can keep repeating “Scratch That” (up to 10 times).
Dictate the sentence below, without pausing.
Meet me at the front entrance to the
Smithsonian [period]
Say “Move Back Five Words.” Then say, “Select Next
Word.” The word “front” is selected.
Say “Delete That.” The word “front” disappears.
Say “Go to Bottom” to move to the end of your
document and resume dictating.
Deleting Characters
To delete backward one character at a time, say
“Backspace.” This is like pressing the Backspace key
on your keyboard.
To delete forward one character at a time, say “Delete
Next Character.” (To delete the previous word, you
can say “Delete Previous Word.” )
For variations on the Delete Next or Delete Previous
commands, see the Command Quick Reference card
at the back of this guide or the Command List of the
online Help.
Inserting Words
When you want to insert words anywhere in your
document, you can use the Move commands to move
the insertion point to the beginning of that word.
PAGE 12
Page 13

You can then dictate the word or phrase you want
to insert (you must also dictate the space following the
inserted word).
Dictate this sentence:
I ran into an old friend at the Lincoln Memorial
[period]
Say “Go To Beginning of Line.”
Say “[Cap] Last week [spacebar].”
Then say, “Move Forward Five Words.” The insertion
point moves to just before “friend.”
Say “college [spacebar].”
The sentence now reads:
Last week I ran into an old college friend at the
Lincoln Memorial [period]
Capitalizing Words
You can capitalize words as you dictate, or later as you
review your document. To capitalize the last thing you
said, say “Cap That.” To make the last thing you said
appear in all capitals, say “All Caps That.” To make
the last thing you said appear in all lowercase, say “No
Caps That.”
To turn capitals on for the next thing you dictate, for
example, a book title, say “Caps On.” When you are
finished dictating the title, say “Caps Off.” You can
also turn all caps, or no caps, on and off the same way.
For a list of capitalization commands, see your
Command Quick Reference card or the online Help.
Formatting Words
You can format words as you dictate, or later as
you review your document. For example, you can
change font size and style, and apply bold, italics, or
underlining.
To format the last words you dictated, pause and say a
formatting command, for example, “Set Font 12 Point”
or “Format That Bold.”
To change the format for the next thing you dictate,
say, for example, “Set Font Arial 12 Point Italic.” The
change will apply to any text you have selected and
from that point onward. You can say any combination
of font face, size, and style.
To format words anywhere in your document, first
select the words and then say a formatting command.
Dictate this sentence:
We spent all morning at the [Caps On] National
Portrait Gallery [Caps Off] [period]
Say “Select Previous Three Words.” The words “National
Portrait Gallery” are selected.
Say “Format That Italics.” The selection now reads
“National Portrait Gallery.”
Next, say “Move Back Four Words.” The insertion
point moves to before “all.”
Say “Select Next Two Words.” The words “all morning”
are selected.
Say “Format That Bold.” The selection now reads “all
morning.”
Say “Restore That” to remove the bold formatting.
Experiment with other formatting commands, such
as “Format That Underlined.” You can find lists of
formatting commands in the Command Quick
Reference card or the online Help.
In WordPad and Microsoft Chat 2.1 and 2.5, you
can also say
“Bold That,” Italicize That,”
or
“Underline
That”
to format selected text.
Dictating Numbers
Any time you need to dictate a series of numbers and
do not want Dragon NaturallySpeaking to recognize
them as words, you can turn on Numbers Mode. To
turn Numbers Mode on from the NaturallySpeaking
menu, point to Words and then click Numbers Mode.
You can also say “Start Numbers Mode” or “Numbers
Mode On.” To turn Numbers Mode off, click
NOTE
PAGE 13
Page 14

Numbers Mode again. You can also say “Stop
Numbers Mode” or “Numbers Mode Off.” For more
information, see the online Help.
Improving Your Accuracy
Now that you’re dictating comfortably, you probably
want the program to make even fewer mistakes.
Here are some things you can do to improve your
recognition accuracy.
Add a New Word
Sometimes, the program makes a mistake because the
word you said isn’t in its vocabulary: for example, if
you say an unusual name, such as “Rusinow.” When
you correct the word, “Rusinow” won’t appear in the
Correction box.
From the NaturallySpeaking menu, point to Words,
then click Add Individual Word. Then type or spell
the word you want, and click Add. This way you
automatically add it to the Dragon NaturallySpeaking
vocabulary so that the program will recognize it the
next time.
Want to see what’s in the vocabulary? Here’s
how. On the DragonBar, point to Advanced, then click
Edit Vocabulary.
Train Words
You can teach Dragon NaturallySpeaking to
understand a word you just added, or a word it keeps
getting wrong. If you’ve tried the previous steps, and
the word is still not recognized, the program might
need some special training. Here’s how:
From the NaturallySpeaking menu, point to Words,
then click Train Words. Follow the instructions on the
screen to train the word Dragon NaturallySpeaking
gets wrong.
Add Words from Documents
Teaching Dragon NaturallySpeaking how you write
will improve your accuracy. We all write differently, so
the more the program knows about how you write,
the more likely it is to type the right thing when you
dictate.
Teaching Dragon NaturallySpeaking how you write is
much easier than teaching it how you speak. All you
have to do is let the program read some documents
you’ve already written on the computer.
From the NaturallySpeaking menu, point to Words,
and then click Add Words from Documents. For a
description of this feature, click the Help button in
the Add Words from Documents box.
This step isn’t required to get started, so you
can save it for another time. For more information on
Add Words from Documents, see the online Help.
Vocabulary Builder
™
can give you more control
over the words you add. From the NaturallySpeaking
menu, point to Advanced, then click Build Vocabulary
and follow the instructions on the screen.
TIP
NOTE
TIP
PAGE 14
Page 15

Train Your User Again
Spend more time teaching Dragon NaturallySpeaking
how you speak. If Dragon NaturallySpeaking
continues to make many mistakes and doesn’t seem
to be getting better, it may help to go back and read a
selection of text to the program for about 20 minutes.
From the NaturallySpeaking menu, point to Advanced,
then click Train User.
Remember, you can always fix mistakes the oldfashioned way—with the mouse and keyboard.
If Dragon NaturallySpeaking is taking too long
to recognize something, you can make it stop by clicking
the small red button inside the Results box.
Get Help!
If you ever get stuck, just click the Help button on
the DragonBar, or say “Give Me Help.” You’ll find
some good advice, and some useful tips and shortcuts,
too. The Command List is a good place to start, since
it lists all the Dragon NaturallySpeaking voice
commands.
Minimum System
Requirements
Windows®98, 2000, Millennium, or Windows NT
®
4.0 (with Service Pack 6 or greater)
266 MHz processor
64 MB RAM
150 MB free disk space (Compact installation)
Dragon Systems-certified sound card—see list at
www.dragonsys.com/support/techsupp/index.html
CD-ROM for installation
Noise-canceling headset microphone
Dragon NaturallySpeaking is optimized for many
popular processors, including the Intel®Pentium®III,
Intel Pentium II, Intel Pentium with MMX™, Intel
Celeron™, AMD K6®-2, AMD K6-III with
3DNow!™, AMD Athlon™, and more.
Upgrading from an
earlier version of Dragon
NaturallySpeaking
I
f you have version 3 or later of Dragon
NaturallySpeaking installed on your computer, you
can choose to upgrade it to version 5. To upgrade
from an earlier version, answer “Yes” when installation
asks if you want to upgrade. The installation will
upgrade your speech files and vocabulary files to the
latest version. Any words you have added to your
vocabulary in the earlier version will be retained. You
will be prompted to retrain your existing user(s),
which takes approximately five minutes in version 5.
Once your speech files have been upgraded to
version 5, they cannot be used by previous versions of
Dragon NaturallySpeaking.
Uninstalling Dragon
NaturallySpeaking
T
o uninstall the product, click the Windows Start
menu, point to Settings, and click Control Panel.
Double-click the Add/Remove Programs icon, select
Dragon NaturallySpeaking 5, click Add/Remove, and
select the Remove option. You’ll be given the
opportunity to save your speech files in case you want
to reinstall.
NOTE
TIP
PAGE 15
Detach this card for quick reference to
Dragon NaturallySpeaking commands.
▲
Page 16

About commands
When Dragon NaturallySpeaking hears certain
phrases, it performs an action instead of typing the
words into your document. These phrases are called
“voice commands,” or just “commands.”
Following is a list of the most popular Dragon
NaturallySpeaking commands. For a complete list,
see the online Help.
To make commands work:
Don’t
pause in the middle of saying a command. If
the command is
“Scratch That,”
for example, don’t
pause between the words “scratch” and “that.”
Do
pause briefly before saying the command. The
pause lets Dragon NaturallySpeaking know that
the phrase is a command.
What if I say a command, but itÕs typed as
dictation?
If you pause correctly, but Dragon NaturallySpeaking
still types your command as dictation, you can force it
to recognize what you say as a command by holding
down the
CTRL key while you speak.
What if I dictate text, but itÕs interpreted as a
command?
If you dictate text, but Dragon NaturallySpeaking
interprets your words as commands, you can force it
to type your words as dictation by holding down the
SHIFT key while you speak.
PAGE I
Dragon NaturallySpeaking
Command
Quick Reference
Controlling the microphone
Go to Sleep Make the microphone stop
listening temporarily.
Wake Up Reactivate the microphone when
it’s sleeping.
Microphone Off Turn the microphone off.
Getting Help
Give Me Help Opens the online Help.
View Command List Opens the command list for the
or What Can I Say online Help.
Adding paragraphs, lines, and spaces*
New Line Press the Enter key once.
New Paragraph Press the Enter key twice.
Tab Key Press the Tab key.
Space Bar Press the space bar.
No Space “glass” Type the next word without a
space before it. In this example,
“window No Space glass” =
windowglass.
No Space On Stop putting spaces between
words.
No Space Off Start putting spaces between
words.
* You need not pause before these commands.
Selecting text
Select Next Word
Forward
2...20
Words
Previous Character
Back
2...20
Characters
Paragraph
2...20
Paragraphs
Select That Select the last thing you said.
Unselect That Unselect selected text.
Select All/ Select all the text in your
Select Document document.
THEN (one):THEN (one):
SAY:
TO:SAY:
TO:SAY:
TO:SAY:
Page 17

PAGE II
Moving around in a document
Go to Bottom Move to the end of your document.
Go to Top Move to the beginning of your
document.
Go to Beginning Move to the start of the current
of Line line.
Go to End Move to the end of the current
of Line line.
Moving up or down
Move Up 1 Line
Back
2...20
Lines
Down 1 Paragraph
Forward
2...20
Paragraphs
Moving right or left
Move Right 1 Word
Forward
2...20
Words
Left 1 Character
Back
2...20
Characters
Deleting text
Delete Next Word
Forward
2...20
Words
Previous Character
Back
2...20
Characters
Paragraph
2...20
Paragraphs
Copying, cutting, and pasting text
Cut That Cuts the selected text.
Copy That Copies the selected text to the
clipboard.
Copy All to Copies the entire document to the
Clipboard clipboard.
Paste That Pastes the text from the clipboard
into the document at the insertion
point.
TO:SAY:
THEN (one):THEN (one):
SAY:
THEN (one):THEN (one):
SAY:
THEN (one):THEN (one):
SAY:
TO:SAY:
Correcting text
Correct That Correct the last thing you said.
Spell “g-l-a-s-s” Spell the next word, such as
“glass.”
Spell That Spell the last thing you said, in
“g-l-a-s-s” this case, “glass.”
Correction dialog box commands
Choose 2 Select an alternative from the
numbered list and enter it in your
document, in this example, choice
number 2.
Select 3 Select an alternative from the
numbered list for editing, in this
example, choice number 3.
Erasing and undoing
Scratch That Erase the last thing you said. You
can say “Scratch That” up to 10
times.
Delete That Delete selected text.
Undo That Undo the last action (useful for
undoing commands).
Backspace Press the Backspace key. You can
say, for example, “Backspace 2”
for any number
2...20.
Capitalizing text
Cap “glass” Start the next word with a capital,
in this example, “Glass.”
All Caps “glass” Type the next word in all capitals,
in this example, “GLASS.”
No Caps “Jack” Type the next word in all
lowercase, in this example, “jack.”
Caps On Turn initial caps on.
Caps Off Turn initial caps off.
All Caps On Turn all capitals on (like pressing
the
CAPS LOCK key).
All Caps Off Turn all capitals off.
No Caps On Turn all lowercase on.
No Caps Off Turn all lowercase off.
TO:SAY:
TO:SAY:
TO:SAY:
TO:SAY:
Page 18

PAGE III
Entering numbers
5 five or numeral five
23 twenty three
179 one hundred seventy nine or one
hundred and seventy nine
5423 five thousand four hundred twenty
three
5,423 five [comma] four twenty three
12,532 twelve thousand five hundred thirty
two
January 22, 1960 January twenty two [comma]
nineteen sixty
4/9/2000 four [slash] nine [slash] two
thousand
8:30 eight [colon] thirty
4:45 AM four forty five a m
3:00 PM three o’clock p m
617-965-5200 six one seven nine six five fifty two
hundred
(01628) 894150 open parenthesis oh one six two
eight close parenthesis space bar
eight nine four one five oh
$45 US/Canada: forty five dollars
Other Dialects: dollar sign forty five
£ 45 US/Canada: pound sterling sign
forty five
Other Dialects: forty five pounds
1/2 one half
3 7/8 three and seven eighths
Start Numbers Mode or Numbers Mode On
Tell Dragon NaturallySpeaking to recognize your
dictation as numbers, typed as numerals.
Stop Numbers Mode or Numbers Mode Off
Resume normal recognition of text and numbers.
Entering punctuation and special characters
& ampersand * asterisk
’ apostrophe ’s apostrophe s
@ at sign ` backquote
‘ open single quote/ ’ close single quote/
begin single quote end single quote
SAY:FOR:SAY:FOR:
TO:
SAY:
TO:
SAY:
SAY:FOR:
“ open quote “ close quote/
begin quote end quote
\ backslash / slash/
forward slash
: colon , comma
^ caret — dash
. dot/ . US/Canada: period
point Other Dialects:
full stop
$ dollar sign ... ellipsis
= equal sign Û euro sign/euro
! exclamation point - hyphen
{ US/Canada: open } US/Canada: close
brace/left brace brace/right brace
Other Dialects: Other Dialects:
open curly bracket/ close curly bracket/
left curly bracket right curly bracket
[ US/Canada: ] US/Canada:
open bracket/ close bracket/
left bracket right bracket
Other Dialects: Other Dialects:
open square close square
bracket/left bracket/right
square bracket square bracket
( All Dialects: ) All Dialects:
open parenthesis/ close parenthesis/
left parenthesis right parenthesis
Outside US/Canada: Outside US/Canada:
open bracket/ close bracket/
left bracket right bracket
< open angle > close angle
bracket/ bracket/
less than greater than
- minus sign + plus sign
% percent sign ? question mark
£ US/Canada: pound # US/Canada:
sterling sign number sign/
Other Dialects: pound/pound sign
pound sign/pound Other Dialects:
hash sign/
sharp sign
§ section sign ; semicolon
(space) space bar (tab) tab key
~ tilde _ underscore
| vertical bar :-( frowny face
:-) smiley face ;-) winky face
SAY:FOR:SAY:FOR:
Page 19

PAGE IV
Mailbox commands for e-mail
Check For New Mail Check the Inbox for new
or Refresh Mail messages.
Create Mail Create a new e-mail message.
or New Message
Open Mail Open the selected e-mail message.
or Open That
Close Mail Close the selected e-mail message
or Close That window. This command does not
close your main e-mail program.
It does not work in Netscape
Messenger.
Sending, replying to, forwarding, and printing e-mail
Reply Mail or Reply to the sender of the current
Reply To Message message.
Reply To All Reply to all recipients of the
current message.
Forward Mail Forward the current message.
Send Mail Sends the current message.
Print Mail Prints the current message.
Delete Mail Deletes the current message.
Moving around in an e-mail message
Go to To Field Move to the To field. In AOL only,
or To you can say “Send To.”
Go To CC Field Move to the CC field. In AOL only,
or CC you can say “Copy To.”
Go To BCC Field Move to the BCC field.
or BCC
Go To Subject Field Move to the Subject field.
or Subject
Go To Body Field Move to the Body field.
or Body
Go To First Field Move to the first field of the view.
or First
Go To Next Field Move to the next field of the view.
or Next
Go To Previous Field Move to the previous field of the
or Previous view.
Go To Last Field Move to the last field of the view.
or Last
TO:SAY:
TO:SAY:
TO:SAY:
Formatting text
Format That Bold Apply bold to either the last thing
you said or selected text.
Format That Italics Apply italics to either the last thing
you said or selected text.
Format That Apply underlining to either the last
Underlined thing you said or selected text.
Restore That Remove formatting from selected
text.
Left Align That Left align the selected text.
Right Align That Right align the selected text.
Center That Center the selected text.
Starting, stopping, and switching programs
Start Start a program or document on
Internet Explorer
your Start menu or desktop, in this
example, Internet Explorer.
Start
Mail
Start your default e-mail program.
Click Start menu Open the Windows Start menu.
Switch To Switch to a running program, in
Internet Explorer
this example, Internet Explorer. The
name must be in the program’s title
bar.
Switch To Switch to the next open window
Next Window on your screen.
Switch To Switch to the previous open
Previous Window window on your screen.
Click Close Close the current window or
program.
Controlling windows and menus
Click File Click a menu, button, or control, in
this example, “File.”
Click Maximize Maximize the current window to
take up the full screen.
Click Minimize Minimize the current window to the
taskbar.
Click Restore Restore the current window to its
normal size.
TO:SAY:
TO:SAY:
TO:SAY:
Page 20

A Lernout & Hauspie Company
Technical Support
Dragon Systems offers free telephone support for 30 days,
and unlimited Web-based support. Your free 30-day period
begins with your first call. You may buy additional telephone
support after the free period.
Before calling Technical Support, please collect the following
information (if you cannot find it, Technical Support can
help):
your product serial number (located on your CD sleeve)
any error message text
sound card name and model
program log files (dragon.log and dgnsetup.log) (attach
them if you send e-mail to Technical Support)
Copyright © 2000 Lernout & Hauspie Speech Products N.V. All rights reserved.
Dragon Systems, L&H, NaturallySpeaking, Vocabulary Builder, Vocabulary
Editor, and the L&H and Dragon Systems logos are registered trademarks or
trademarks of L&H in the United States and/or other countries. All other names
and trademarks referenced herein are trademarks of L&H or their respective
owners.
Contact
Dragon
Systems
DRAGON SYSTEMS USA
A Lernout & Hauspie Company
320 Nevada Street
Newton, Massachusetts 02460
USA
TEL +1-617-965-5200
FAX +1-617-527-0372
E-MAIL info@dragonsys.com
WEB www.dragonsystems.com
DRAGON SYSTEMS UK
A Lernout & Hauspie Company
Seagate House
Globe Park
Marlow
Buckinghamshire SL7 1LW
United Kingdom
TEL +44 (0) 1628 894150
FAX +44 (0) 1628 894151
E-MAIL info@dragon.co.uk
WORLDWIDE HEADQUARTERS
Lernout & Hauspie Speech
Products N.V.
Flanders Languages Valley, 50
8900 Ieper Belgium
TEL +32-57-228-888
FAX +32-57-208-48
WEB www.LHSL.com
Web www.DragonSystems.com/support
Includes product updates, hardware
compatibility information, answers to
frequently asked questions, and
discussion forums.
Telephone 617-965-7670
Contact InformationContact Method
Quick Start 03-101-50-01
 Loading...