

Page 1
1
Page 2

Page 3

Chapter 1: Introducing the Nuance
Management Server
Dragon NaturallySpeaking Professional Overview
Dragon NaturallySpeaking Professional (DNS Professional) with Nuance Management Server in
the Cloud introduces a client-server architecture to DNS Professional.
Instead of installing a copy of DNS Professional on every user's machine and administering
Dragon from the software's Administrative user interface, you install the Dragon Client on each
user's machine, and administer the DNS Professional from a centralized server that Nuance hosts.
The Nuance Management Server in the Cloud allows you to administer all of your Dragon clients at
once.
Network setup is straightforward and efficient when you use the NMS Server to apply consistent
settings to many workstations running Dragon Client throughout the facility, changing multiple
settings on the NMS Server with the click of a mouse on its Nuance Management Console.
You can take cross-network action on Dragon clients from a central NMS Server:
n Create multiple sites where Dragon Clients are installed and assign the same backup
location, roaming user profile storage location, and amount of archive storage/playback
space to all users on one site in a single stroke.
n Grant, revoke, and manage all dictating users and administrators (NMS Administrator)
licenses, including viewing the number/type of licenses used/still available.
n Create groups of users and then assign entire groups to one or more sites, all at one time.
n Search through groups of users for those associated with a particular site.
n View/access Dragon logs on every Dragon Client workstation.
n Audit session events across the entire network (who logged on when and other related
events) for a particular slice of time or particular user.
n Display a complete list of all downloaded updates and approve or not approve installation of
them—all from a single window.
1
Page 4

Dragon NaturallySpeaking 13 Administrator Guide
n Create user accounts for users, then use simple software tools provided to quickly
upgrade old user profiles, then associate upgraded profiles with new user accounts
n Choose to upload speech data to Nuance's Research department for particular users
or all users in your organization.
These features help you to readily manage a network of Dragon Clients.
Dragon NaturallySpeaking Professional components
Dragon NaturallySpeaking Professional is made up of software modules that include clients,
servers, databases, user profile directories, and web services that integrate with one another.
The modules are in these groups:
n Nuance Management Server components
n Dragon Clients
n roaming user profiles directory (on any server of the network or on its own machine)
Nuance Management Server components
The Nuance Management Server (NMS Server) components are:
n Nuance Management Server (NMS) — Main Web service that drives DNS
Professional and helps it interact with external clients and servers by carrying out
several vital tasks involving allowing user access, determining settings on servers and
clients, and storing information about user preferences and transcription formatting.
The NMS Server also stores user identification and related administrative information
centrally, keeping user profiles available at any site the user travels ("roams") to within
the organization and its affiliate facilities, whether the machines are located in different
offices of the same site or at other sites in distant cities. If you have DNS Professional
with NMS in the Cloud, your NMS server is hosted by Nuance.
n Nuance Management Console — An interface to the Nuance Management Server
for managing set up of all Dragon Clients on the network.
Dragon Client — Receives and interprets user or healthcare user dictation, producing text
corresponding to each user's speech. The Dragon Client sends the text into a target
application and also preserves text and audio in the speech profiles.
Roaming user profile directory
Roaming user profile Directory — Central storage area for roaming user profiles for
dictating . A single central storage location applies to a particular site in DNS Professional. A
roaming user profile contains the accumulated speech information for a particular user from
all the Dragon Client workstations where that person has dictated, enveloping the language
the user speaks, the accent (if applicable) used, vocabulary or vocabularies, and microphone
and/or dictation recording device. These user profiles are called roaming user profiles in other
editions of DNS Professional, because their existence at a central location allows speakers to
"roam" from location to location and work with the same profile. (These profiles are unrelated
to Microsoft Windows user profiles.)
Nuance hosted servers
Nuance hosts servers and services at its headquarters that your DNS Professional network
interacts with:
2
Page 5

Chapter 1: Introducing the Nuance Management Server
n NuanceLink — Hosted by Nuance on the Internet. Automatically downloads various
updates to the NMS Server over the Internet.
Behind the scenes web services on the NMS Server help it interact with all of these clients
and servers as well as carry out its own processes to manage the entire DNS Professional
network.
Who works on the network
Two types of people work on the network:
n System Administrators — Manage the entire system through the Nuance
Management Console.
n Users or end users — Dictate using the Dragon Client.
Stand Alone Mode
You can also run Dragon NaturallySpeaking Professional in stand alone mode.
Stand alone mode functions like previous versions of DNS Professional, where Dragon is
not connected to the Nuance Management Server, and you install and administer Dragon
on the same machine.
If you run Dragon in stand alone mode rather than connected to the NMS, you will see the
following differences:
• Sharing of words, commands, and command sets is not available through the NMS. The
Administrator can use a command-line tool to share these objects between multiple DNS
Professional installations. For more information, see Appendix: Managing Custom Words
and Commands in Stand Alone Mode on page 264.
• The Administrative Settings - Roaming tab is available.
• The Administrative Settings - Miscellaneous tab is available.
• The Connection Center is not available.
• The Enable NMS option on the NMS Settings tab is disabled.
Enabling Administration with the Nuance Management Server
When you install the Dragon Client, it is in stand alone mode. To switch to using the NMS as
your administrative server, take the following steps on the Dragon Client:
3
Page 6
Dragon NaturallySpeaking 13 Administrator Guide
1. Navigate to Tools > Administrative Settings:
2. Click the NMS Settings tab.
3. In the NMS Options section, click the Enable NMS checkbox.
4. In the Server field, enter the address of the NMS server.
5. In the Login Options section, select one of the radio buttons. Your administrator will tell
you which selection is appropriate for your site.
6. Click OK to save your changes.
User Groups Worksheet
Before you begin to enter specifics into the Nuance Management Console, you need to
gather required information delineated below. Having these lists available in advance saves
time and provides a framework you can use to develop the configuration that works best for
your facility.
4
Page 7

Chapter 1: Introducing the Nuance Management Server
n Names of all people who will administer the system.
n Names of all users that will dictate using the Dragon NaturallySpeaking Professional
client.
n Groupings of users based on the client settings and options they will use.
n Names of all locations within your organization where the system is deployed; a site in
Dragon NaturallySpeaking Professional is one or more locations all storing roaming
user profiles in the same directory folder.
n Names/IP addresses of all the computers that will run the Dragon NaturallySpeaking
Professional client.
n Names of computers and full UNC paths to all locations where you expect to store the
roaming user profiles for users.
n Names of computers and full paths to backup locations.
Recommendations
Nuance recommends that you plan the naming of the components of your organization and
the structure of your groups before you begin to configure Dragon NaturallySpeaking
Professional.
n Site names should reflect the set of roaming or non-roaming user profiles for users
associated with the site. For example, if you divide your user profiles by location, you
could use that location in the name of the site, as it is more helpful than using Site 1,
Site 2, and so on.
n Group names should reflect the user accounts that are members of each group.
However, if you have more than one group of a specific type, you should distinguish
the groups by adding the group location to the group name; for example, Writers-
Longwood, Writers-Northwest.
For your convenience we have included a User Groups Worksheet at the end of this section
to help you analyze the needs of the groups in your organization. See User Groups
Worksheet on page 7
Configuring your organization
As part of the initial configuration, Nuance provides the following default components:
n Organization
n Site
n NMC Administration Group
n NMC Administrator User Account
You will rename these components to meet the needs of your organization.
Prerequisites:
n Encrypted license key: Nuance adds this key to the Nuance Management
Server.
n Default login credentials: Use the following information to log in to the Nuance
Management Console:
5
Page 8

Dragon NaturallySpeaking 13 Administrator Guide
User Login: The unique user ID for your organization. Nuance sends the ID to your
contact person.
Password: The unique password for your organization. Nuance sends the
password to your contact person.
To configure your organization
1. Log in to the Nuance Management Console using the credentials sent to you by Nuance.
See Accessing NMS Server: Logging in through the Nuance Management Console on
page 10.
2. Rename the default site.
See Viewing, modifying, and deleting sites on page 38.
3. Rename the default administrator group.
See Viewing, modifying, and deleting groups on page 53
Steps to configuring other objects in your organization
When you have finished the steps above, you are ready to create and configure user
accounts, groups, and, if necessary, sites required by your facility. The list below summarizes
the configuration process and the references give you access to more detailed information on
each step.
1. Create and configure sites (see Configuring a site in your facility on page 34).
2. Create groups for individuals who will either administer the NMS Server or use Dragon
NaturallySpeaking Professional for dictation (see Understanding groups on page 41).
3. Create user accounts that assign each user or server administrator in the Dragon Nat-
urallySpeaking Professional system a user name and password (see Creating user
accounts on page 56).
4. Install Dragon NaturallySpeaking Professional clients on local and remote workstations of
your organization. For details, refer to the Dragon NaturallySpeaking Professional Installation Guide.
Notes:
n In most organizations, user accounts should only be added to more than one group if
the same user will both dictate with Dragon NaturallySpeaking Professional and
administer the NMS Server.
n If a user account belongs to two groups, the settings for the group listed first under
Group Memberships supersede the settings for the other groups the user or
administrator belongs to. Likewise, if a group belongs to more than one site, the
settings for the site listed first for that group supersede the settings for other sites. For
more information on relationships between settings for sites, groups, and user
accounts, see Understanding groups on page 41.
6
Page 9

User Groups Worksheet
Chapter 1: Introducing the Nuance Management Server
7
Page 10

Dragon NaturallySpeaking 13 Administrator Guide
Group using same setting
Type of
setting
or option
Vocabulary Default vocabulary
Action
controlled by
setting or option
or option:
Group 1 Group 2 Group 3
Administrative
settings
Types of commands Mouse motion and speed
Enable HTML support
Enable commands in HTML (web
Dictate "Click" to select hyperlinks
Recognition mode switching
Web search
Desktop search
Email/calendar
Cut shortcuts
Delete shortcuts
Copy shortcuts
Create DM-IV profiles by default
page) windows
Left variable delimiter
Right variable delimiter
Enable Natural language com-
mands – Word
Enable Natural language com-
mands – Excel
Enable Natural language com-
mands – PowerPoint
Enable Natural language com-
mands – Word Perfect
Enable Facebook post commands
Enable Twitter post commands
Auto-Formatting Abbreviate common English units
of measure
8
Page 11

Chapter 1: Introducing the Nuance Management Server
Group using same setting
Type of
setting
or option
Abbreviate titles
Allow pauses in formatted phrases
Action
controlled by
setting or option
or option:
Group 1 Group 2 Group 3
Automatically add commas and peri-
ods
Caps Lock key overrides cap-
italization commands
Expand common English con-
tractions
Format ISO currency codes
Format other numbers
Format phone numbers
Format prices
Format street addresses
Format times
Format web and e-mail addresses
Insert two spaces after period
"million" instead of ".000.000"
Format US Social Security Num-
bers
Format UK and Canadian post-
codes
Date format
Numbers, if greater than or equal to
Prerequisites for the Nuance Management Console
The Nuance Management Console (NMC)is a web-browser based application that is part of
the overall Nuance Management Server (NMS) system. The NMC supports many functions
for Nuance applications.
On the computer that will access the Nuance Management Console, make sure the
following items are installed:
n Microsoft .NET framework. See System Requirements for Dragon
NaturallySpeaking Professional on page 166 for supported versions.
n Full trust privileges
9
Page 12
Dragon NaturallySpeaking 13 Administrator Guide
n Intranet or Trusted Web Site
n Internet Explorer See System Requirements for Dragon NaturallySpeaking
Professional on page 166 for supported versions.
Adding the Nuance Management Console URL as a trusted site
1. In Internet explorer, Select Tools -> Internet options -> Security Tab -> Click on Trus-
ted sites icon -> Sites.
2. Enter the Nuance Management Console URL
3. Click Add.
4. Uncheck the checkbox Require Server verification (https:) for all sites in this zone.
5. If you see the following security warning, click Run.
10
6. When the file downloads are complete, you will see the login screen. Enter your User
Login and Password and click Log in.
Accessing NMS Server: Logging in through the Nuance Management Console
1. Open a browser window in Internet Explorer. See System Requirements for Dragon NaturallySpeaking Professional on page 166
2. In the URL field of the browser, enter the URL of the Nuance Management Console. You
should have received this URL in your welcome letter from Nuance.
3. When the Nuance Management Console log on box appears, enter the user name and
password you received from Nuance.
4. Click Log in. (You should change the password before you exit the Nuance Management
Console.
5. The Home page appears.
Page 13

Chapter 1: Introducing the Nuance Management Server
This page displays links to the various features of the server:
6. From here, you can view:
l User Accounts—Each person who needs to use the NMS Server
(NMC Administrators) or to use a Dragon NaturallySpeaking Professional Client
(users that dictate) requires a user account with a user name and password to gain
access. People who are NMC Administrator users interface with the Nuance Man-
agement Console only to manage the system and people that are users access only
Dragon NaturallySpeaking Professional Clients to dictate. As an NMC Administrator,
you can add a user account, search for a particular user account, and/or change a user's
user account information and/or settings, and delete a user account.
l Groups—You can assign users to logical groups that identify either the specialty, locale,
or another unifying characteristic of the group members, but you usually group members
together who are using the same Dragon NaturallySpeaking Professional settings and
options, including formatting options for the results of dictation. Users in a group should
also store their user profiles in the same location. Once users are in groups, you can
change the user settings for all members of the group at once. Once you assign the same
settings to all group members, you can later modify those settings for a single user in the
group. You also use groups to assign levels of Nuance Management Console administrator access.
l Licensing—You can view the number of NMC Administrator and Dragon Pro-
fessional licenses that your organization has purchased from Nuance, how many are
assigned, and how many are still available. In addition, you can grant and revoke those
licenses.
l Utilities—Administrators can view and send messages to users, as required. Messages
provide notifications about when words or command sets are updated in the NMC.
8. Before you proceed, if you are not planning to configure the NMS Server in Active Dir-
ectory, you should change the password of the initial login account Nuance provides. To
change the password, refer to Change the NMC Administrator password on page 11 and
then return here.
9. To access and add to your organization information, proceed to Accessing and adding to
your organization data on page 13.
Note:
A user that is affiliated with multiple organizations, will find that each practice or organization
has a distinct organization ID. In addition, each practice or organization can assign that user
a different user name and password.
Change the NMC Administrator password
Any time after you first log on to the Nuance Management Console, you can configure global
settings for the entire Dragon NaturallySpeaking Professional network. Those global
settings include:
n Initial log/password
n Number of SQL trace lines to display (limit the number to avoid them scrolling off the
screen)
n FTP path on the data collection server
11
Page 14
Dragon NaturallySpeaking 13 Administrator Guide
To change these settings, you take these steps:
Caution:
If you are planning work in the Active Directory Services interface, do not change the
password of the account Nuance supplies for initial login until after you have configured Active
Directory.
For more information, see Setting up the Nuance Management Server to run Active Directory
Services on page 18.
1.
In the upper left of the screen, click on the circle icon with the NMC logo . You then
see the following options, shown in the illustration:
12
l Change password, with a person symbol
l Upload NMC Log File, with a wrench symbol above it
l Log out, with a back arrow above it
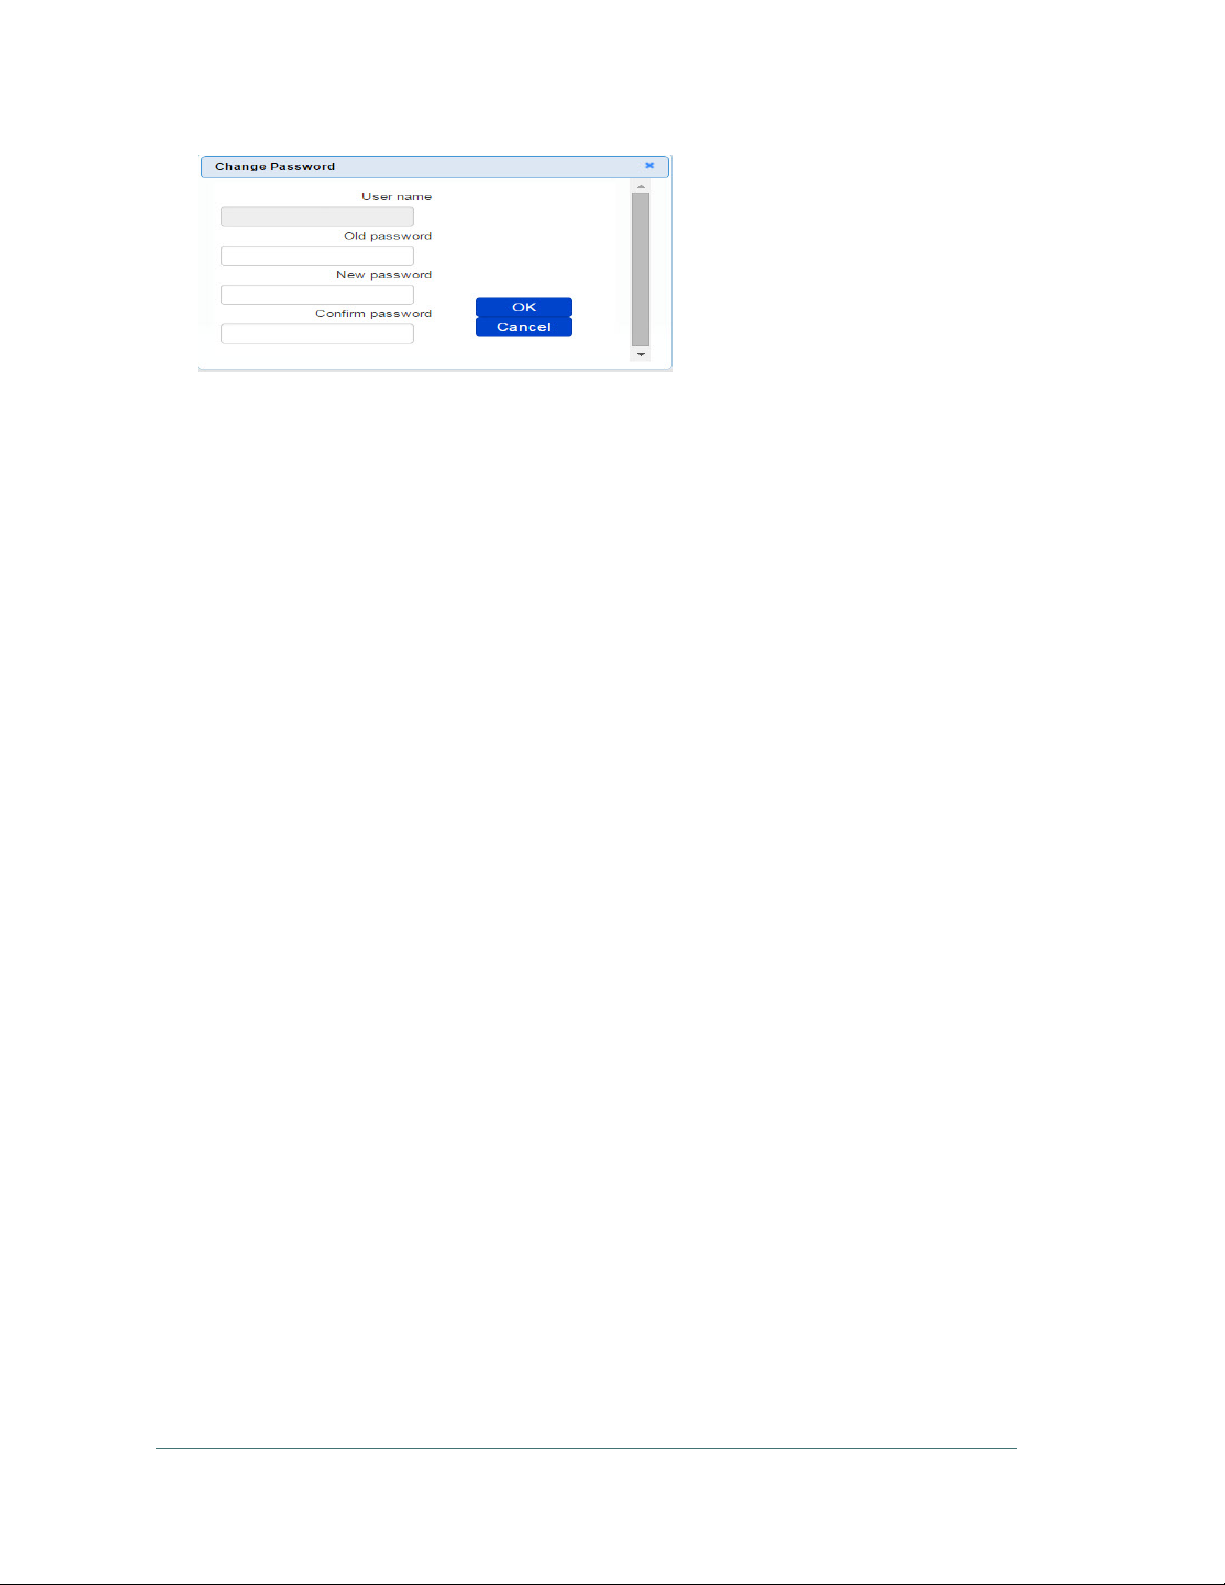
2. Select Change password and the Change Password dialog box opens. After you have
logged in for the first time, this dialog box is where you change the password of the NMC
Administrator account that Nuance provides for initial login. In the User name text box,
you can change the name of the user ID that Nuance sent you. Enter your old password,
then the new password. Then confirm the new password in the Confirm password text
box and click OK).
Page 15
Chapter 1: Introducing the Nuance Management Server
3. In the NMC Application Menu, you see headings for several types of settings that you
can click to open and close the information under them:
l General
l Nuance Management Console
l Nuance Management Server
l SMTP
l Data Collection FTP
l Reports
4. If you do not see any settings below General, click that heading and set the settings (see
preceding illustration):
l Disable scheduled NMS database backups — Select this option to turn off any
scheduled back up operations for the NMS database.
l LINQ to SQL trace output—Click/select this check if you want the NMS Server to
use LINQ to SQL technology to send database messages that NMS SQL Database
generates to a list, tracing the messages so that you can monitor them. If you have
trouble with your system, Nuance Technical Support or Service personnel might
need to look at these messages.
5. If you do not see any settings below Data Collection FTP, click that heading and view
the settings (see illustration below). Nuance sets these values for you and you normally
do not change them, except in rare circumstances when Nuance asks you to.
l Data collection FTP server path—You should see the location of the Nuance Data
Collection FTP server that the NMS Server uploads collected data to.
l Data collection FTP server login—Enter the login name that the NMS Server
should use to log in to the Nuance Data Collection Server to upload collected data.
l Data collection FTP server password—Enter the password that the NMS Server
should use to log in to the Nuance Data Collection Server to upload collected data.
6. Use the SMTP section to set up and enable a mail server on the Nuance Management
Server. For details, see Enable SMTP.
Accessing and adding to your organization data
Once you have accessed the Nuance Management Console, you are in the Home tab.
From here you can view your organization information and enter details about your
organization by taking several steps.
Notes:
13
Page 16

Dragon NaturallySpeaking 13 Administrator Guide
n Enhancements help you find and manage items and data in an organization. For
details, see Finding and managing organization data.
n Many organization level options are now located on the Organizations Details screen
on the Products tab. For details, see Configure product settings for an organization.
n Typical enterprises have only one Nuance organization GUID, a single string of
numbers and letters that Nuance assigns to you as a customer. That identifier is for
your entire organization.
1. Under Sites, click Organization Overview. The Nuance Management Console displays
the Manage Organization screen which contains:
l In the Organization text box the Default organization name.
l A list of the organization's Sites. Initially, you see the Default site. You later change
this site's name to match one of your sites and create additional sites as well.
l To view a group, expand a site.
l To view the users that belong to a group, select the group. Users are displayed on the
right side of the screen.
14
Page 17
Chapter 1: Introducing the Nuance Management Server
More About Nuance Supplied Groups and Licenses
l The NMC Administration group includes two initial user accounts, one the account
you used to log in for the first time.
l NMC Administrator licenses, the type of licenses required to set up the network in
the NMS Server through the Nuance Management Console.
2. To view or modify the organization's information, click the Details icon in the Sites >
Organizations ribbon.
Organization Details—General tab
The following fields are configured by Nuance Order Management. You can configure
the fields. However, that action should not be necessary.
n Organization name: This is the customer ID that Nuance created when it created
your organization. You cannot edit this field.
n Contact name: Enter the name of the person Nuance should contact to interface
with your organization.
n Email: Enter the email address of the person in your organization that Nuance
should send email to.
n Organization ID: You see the organization identifier that Nuance assigned to
you. You can always find this identifier here.
n Date Created: The date the organization was created.
Organization Details—Address tab
n Street 1, 2, and 3: Enter the address of your organization's headquarters.
Individual sites of the organization show the address of its other particular facilities.
n City, State, Zip, Country: Fill in the City, the State (to the right of the City field),
the Zip code (below the City field), and the Country of your organization's
headquarters. Individual sites of the organization show the address of its other
facilities.
15
Page 18

Dragon NaturallySpeaking 13 Administrator Guide
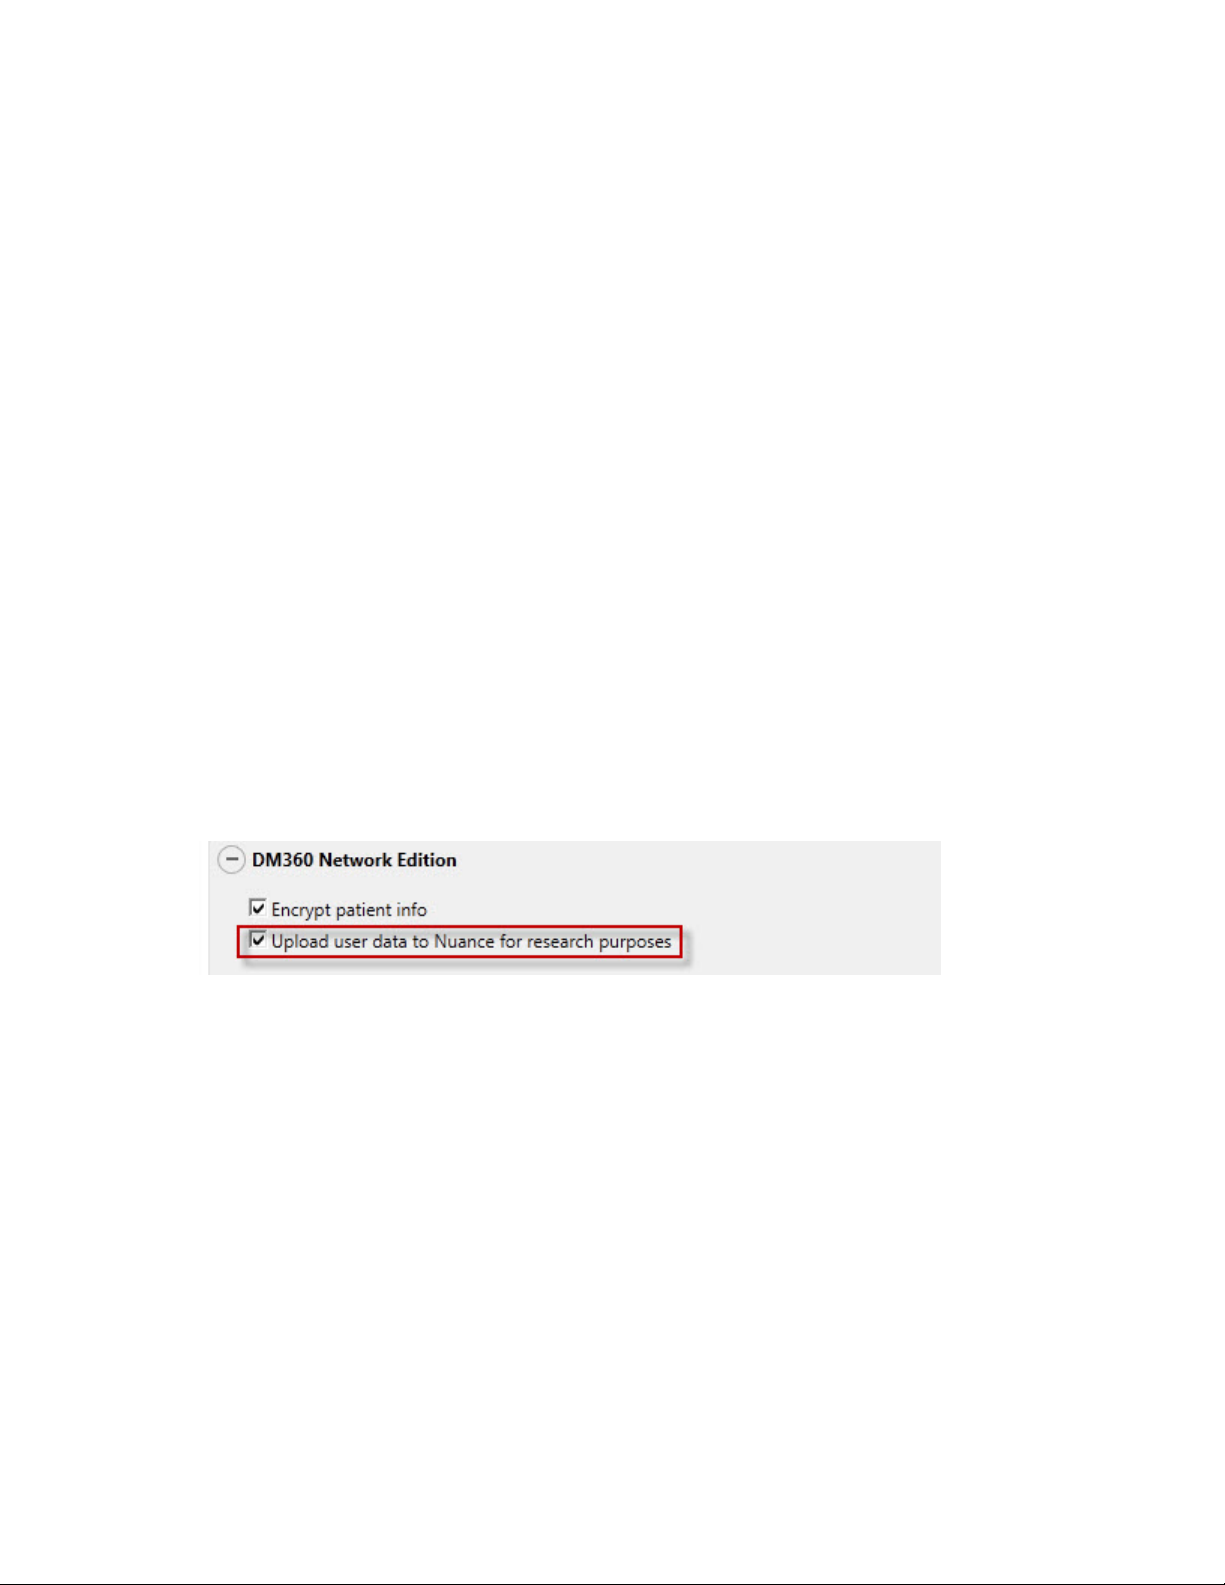
Organization Details—Products tab
n Use the settings on this page to set organization level options for your products.
For Dragon Professional, the Organization Details > Products tab contains a
section called Dragon NaturallySpeaking. This section contains the following
setting:
Upload user data to Nuance for research purposes: Click/select this check
box to upload data from your dictation and user profiles to Nuance so that the
company can improve future versions of the product and further enhance speech
recognition technology. The data transferred is encrypted.
For more information, see Configure product settings for an organization.
16
Page 19

Chapter 1: Introducing the Nuance Management Server
Organization Details—Organization Tokens tab
n Use the settings on this page to create a token for an organization. For more
details, see Creating Organization Tokens.
17
Page 20

Dragon NaturallySpeaking 13 Administrator Guide
Organization Details—Domains tab
n Use the settings on this page to add an Active Directory connection string. For
more details, see Set the Active Directory Connection String.
Setting up the Nuance Management Server to run Active Directory Services
You can use Active Directory Services to manage your DNS Professional network. Ideally,
you should decide to use Active Directory Services before you install the DNS
Professional network because enabling Active Directory Services requires that you perform
specific steps during the installation process. However, you can enable Active Directory
Services before or after you have installed the DNS Professional network.
Enabling Active Directory Services
2. Creating NMC Administrator Account in NMS Server for Active Directory Administrator:
l Install the Nuance Certificates on any workstation where you want to log in through the
Nuance Management Console. (Refer to the Nuance Management Console Help.)
l Log in to NMS Server using the admin login Nuance provides.
l Prepare to create user accounts by changing the name of the organization/site Nuance
provides to match your organization and site.
l Create an NMC Administrator user account for the Active Directory administrator.
See Create a user account.
l If you would like, create all other user accounts now; or you can create user accounts
later.
l Create Single Sign-On User Accounts: If you want to set up to log in only once, you
can set up Active Directory Single Sign-On user accounts (they are optional); see
Creating Active Directory Single Sign-On user accounts on page 18. You need to cre-
ate these accounts before you can associate a user account with an already existing
upgraded roaming user profile.
18
3. Set the Active Directory connection string.
4. Continue to configure the NMS Server as Active Directory Administrator
l Follow instructions in the Nuance Management Console Help.
Creating Active Directory Single Sign-On user accounts
Dragon NaturallySpeaking Professional supports Active Directory Single Sign-On, which
allows users to log in using their Windows credentials.
The following sections describe how to configure Active Directory Single Sign-On accounts.
Note: For the most current information on how to configure Single Sign-On accounts, see the
https://isupport.nuance.com website.
Implementing Active Directory Single Sign-On
When you implement Active Directory Single Sign-On, you set up to automatically log in when
they have logged in to Windows. In this type of setup, avoid having to enter their login and
Page 21
Chapter 1: Introducing the Nuance Management Server
password multiple times.
Steps
n You must configure the NMS Server to use Windows Active Directory Services. For
more information see Setting up the Nuance Management Server to run Active
Directory Services on page 18.
n You must set up Windows Domain user names and user account login names that
are identical. For more information, see To configure Active Directory Single Sign-
On.
If the login credentials for an existing user account do not match the user’s Windows login,
you must delete the user account and create a new one. Make sure the login credentials for
the new account match the user's Windows login credentials.
To configure Active Directory Single Sign-On
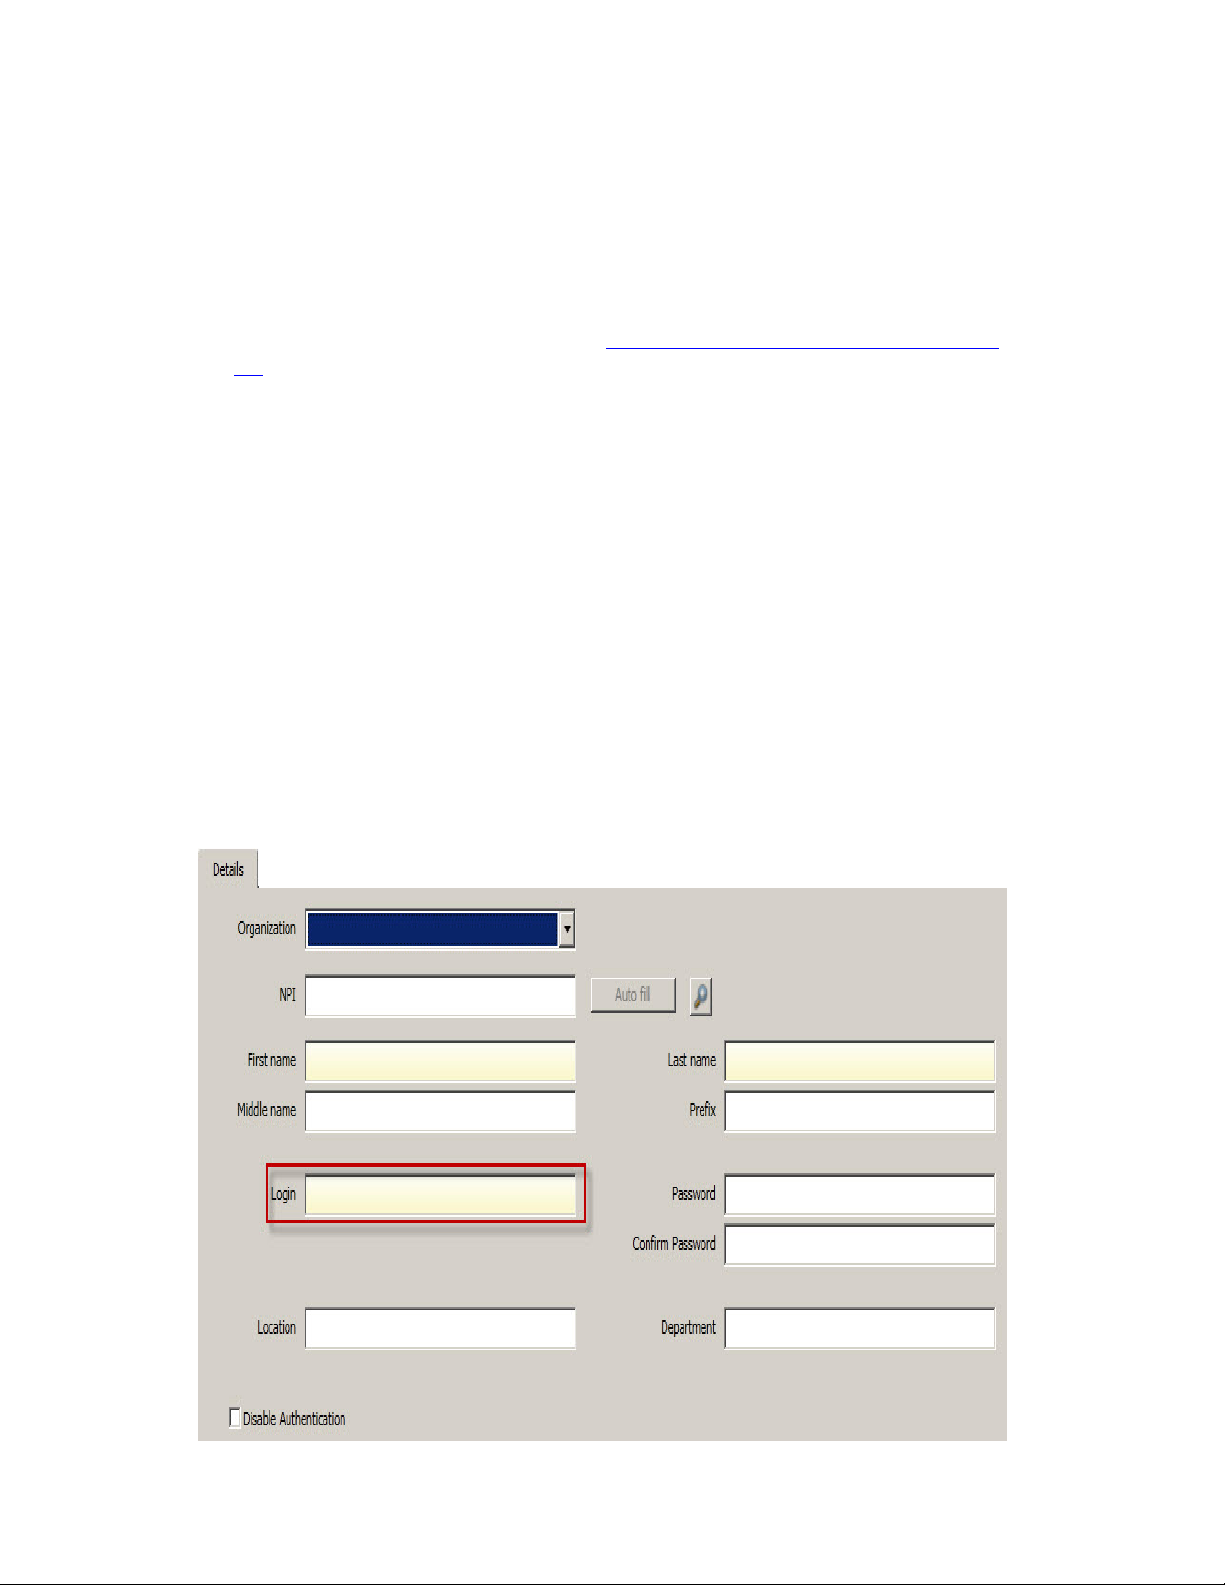
1. During the process of creating useruser accounts in the NMS Server, be sure to assign
a login name that matches the user name of the provider's Windows Domain login
name (see the next illustration).
In the Login field, enter the user name of the provider's Windows Domain login name.
The logins for DNS Professional and Windows must be identical.
For example, if a provider's Windows Domain login name is one of the following:
• "Domain\John_Doe"
• "John_Doe@domain.example.com"
You enter "John_Doe" in the Login field.
19
Page 22
Dragon NaturallySpeaking 13 Administrator Guide
For DNS Professional, for each Dragon client, perform the steps in Enabling Dragon client
computers for Active Directory Single Sign-On.
Enabling Dragon client computers for Active Directory Single Sign-On
To enable the Active Directory Single Sign-on feature for Dragon users, perform the following
actions on each Dragon client computer.
Enable Active Directory Login in the Dragon Client
Take the following steps on each Dragon Client installation:
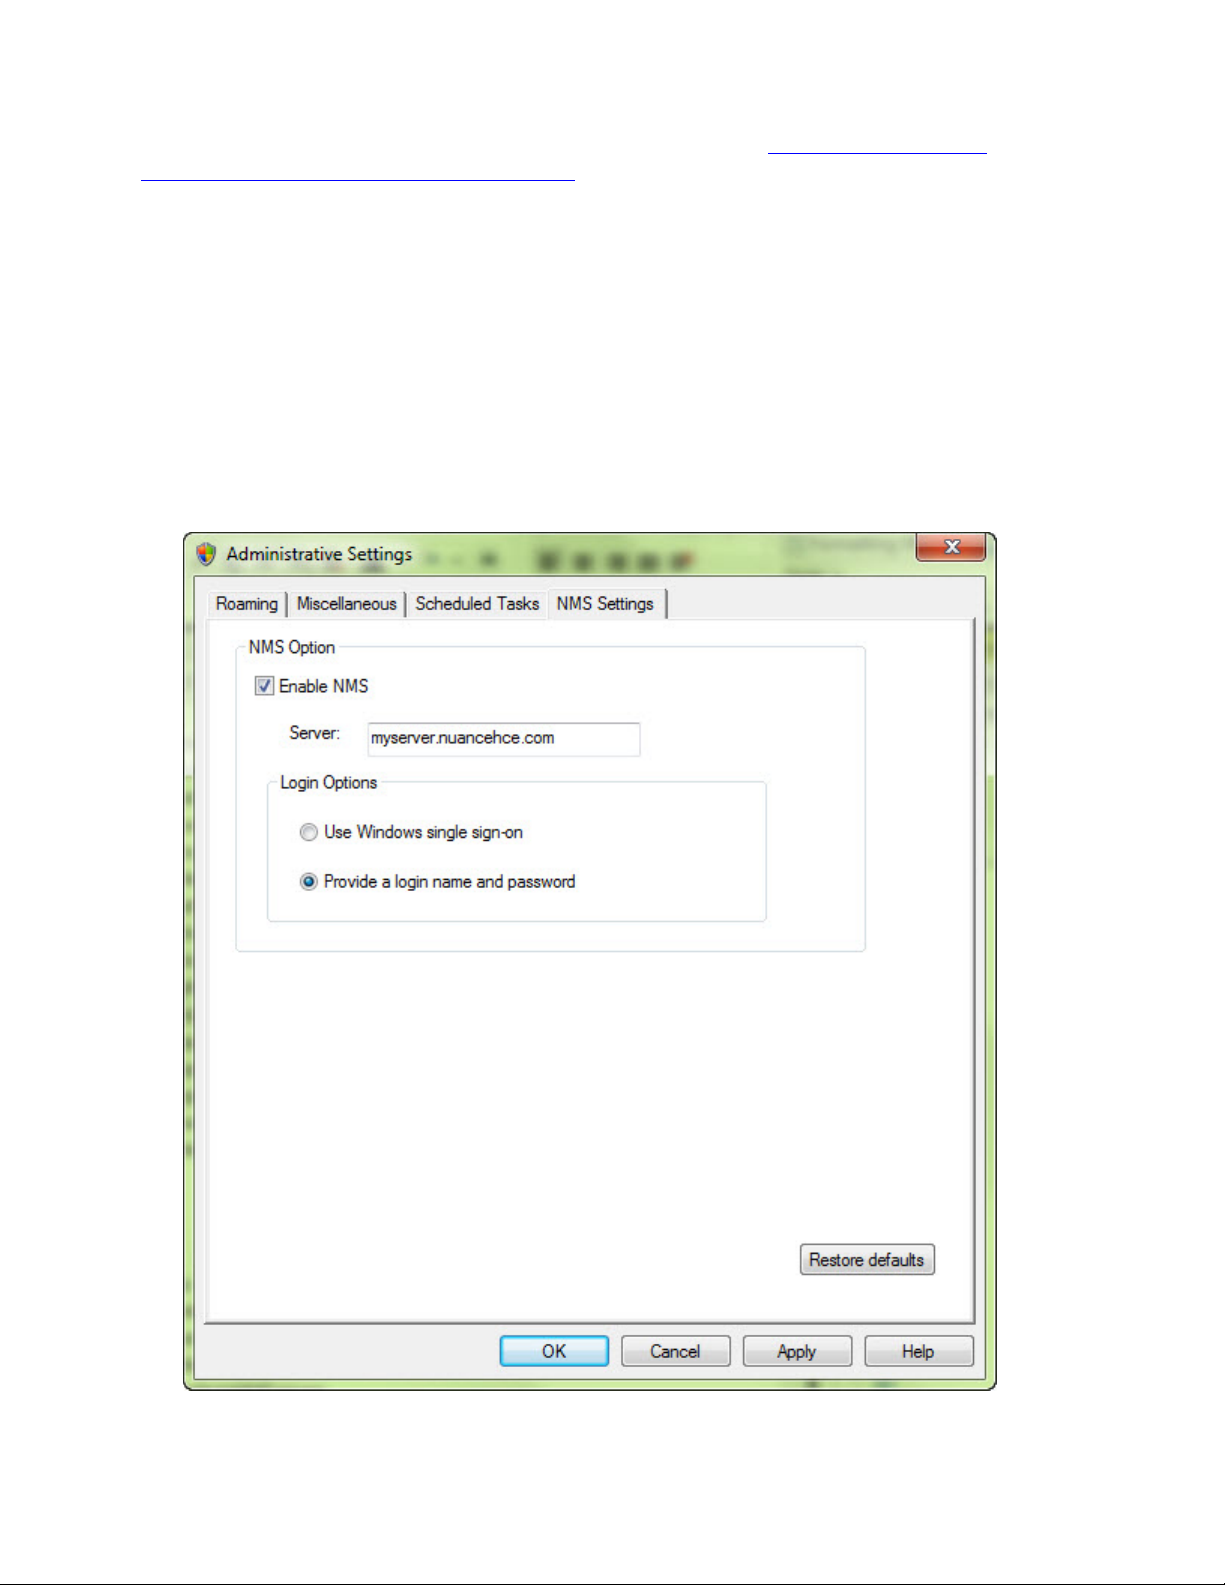
1. In the Dragon Bar, go to Tools > Administrative Settings. The Administrative Settings
dialog appears.
2. Click the NMS Settings tab:
20
3. Select the Enable NMS checkbox if it is not already selected.
4. In the Server field, enter the address of the Local Authenticator.
Page 23
Chapter 1: Introducing the Nuance Management Server
5. In the Login options section of the tab, select the Use Windows single sign on radio
button.
6. Click OK.
You can help Nuance improve the future quality of speech recognition by sending speech
data from your network to Nuance on a regular basis. No personal information is ever sent to
Nuance and participation in data collection is completely voluntary.
The process of accruing the speech data that Nuance can use is called data collection.
When you turn on data collection, you let the Dragon clients collect up to 500 MB of text and
data per user about optimizations performed and send it to the Nuance Management Server
to be stored.
The Nuance Management Server then uploads the data every night at 2:00 AM. Only
Nuance can change this schedule.
Turning on data collection for your site
To turn on data collection for your entire site, take these steps:
1. On the menu bar, click Organizations > Search.
2. Enter search criteria and click the magnifying glass.
3. To see your organization's information and add details to it, click the Organization >
Details icon in the ribbon.
4. Select the Products tab.
5. Expand the Dragon Naturally Speaking section.
6. Select the Upload user data to Nuance for research purposes option.
7. Click Save to save the change.
21
Page 24

Dragon NaturallySpeaking 13 Administrator Guide
Turning on data collection for individual or users
You can also turn on data collection for individual end users in the User Account Details tab
under the Network Edition US sub-tab:
1. On the menu bar, click the User Accounts ribbon, then click the Search icon in the ribbon
under User Accounts.
2. When the name of the user appears in the User Accounts screen, double click the name
to open the User Account Details for that healthcare provider.
3. Click the Dragon Professional tab.
4. Expand the User Account Options section.
5. Go to the bottom of the User account options section and click the Upload dictation
data to Nuance for research purposes check box.
6. Click Save to save the change to the user account settings.
7. You can repeat these steps for selected individual user accounts in the NMS Server.
22
Page 25

Chapter 1: Introducing the Nuance Management Server
Privacy of your data and Nuance data collection
When you implement Data Collection it is for sending recognition data to Nuance to improve
the accuracy of this and future products. Nuance works with collected data because our
software can learn from experience about the language you, and your fellow professionals,
use. We track the vocabulary, syntax, and pronunciation used by professionals in practice,
and our experience makes our products more accurate and easier to use for you and others.
Nuance will never pass your recognition data on to anyone else or use it for any other
purpose other than as set out in this notice.
Nuance will only collect recognition data (on behalf of your organization), and will collate and
combine it with recognition data collected from other health professionals using Data
Collection. We will not store the recognition data under your name, the company name, or
an individual’s name, although the database will contain a search function enabling such
terms to be searchable within the database.
Nuance will use the recognition data in accordance with your organization’s instructions. We
use it to conduct research in order to enhance and improve the accuracy of this and future
products.
The only people with access to this data will be our employees, permitted agents, subcontractors, etc. on a need to know basis, all of whom are bound by obligations of
confidentiality to keep the data strictly confidential.
Nuance will transfer the personal data to its Data Collection sites that may be located
outside of the EEA. However, Nuance shall ensure that any such transfer is compliant with
the EU Data Protection Directive.
Our corporate policies and practices, and our contractual commitments to your organization,
require us to take appropriate technical and organizational measures against unauthorized
or unlawful processing of any personal data that you have provided to us and against
accidental loss or destruction of, or damage to, that personal data.
23
Page 26

Page 27

Chapter 2: Overview of NMS in the
cloud
This chapter discusses NMS in the cloud; how it works, how it differs from hosting an
on-premise NMS, and how to upgrade to NMS in the cloud.
Overview of NMS in the cloud
Nuance Management Server (NMS) in the Cloud stores data objects on the cloud server in the
Nuance data center. These objects include the following profile customizations:
n User account
n Text and Graphics/auto-texts
n Custom words
n Custom Command Sets
Storing objects in NMS in the cloud allows organizations that have more than one Nuance product
to share data across multiple Nuance applications. For example, if an administrator at an
organization creates an auto-text in the Nuance Management Console, that organization's users
can see and use that object with Dragon NaturallySpeaking Professional as well as any application
that uses Speech Anywhere Services.
What will be different when you migrate to NMS in the cloud?
This section describes what you can expect when moving or upgrading to the NMS in the cloud
configuration.
Note: Text and Graphics and DragonTemplates are supported. Text and Graphics with Lists are
not supported.
n NMS is hosted in the Nuance Data Center instead of being hosted in your organization.
n The cloud NMS stores all the Dragon user settings.
n Management - Your administrators access the cloud Nuance Management Console to
configure and manage users. This provides the administrators with one place where they
can view and manage all product licenses for NMS supported products.
25
Page 28

Dragon NaturallySpeaking 13 Administrator Guide
n Shared content (profile sharing) with other Nuance products. Text and Graphics/auto-
texts and custom words can be shared between DNS Professional and
SpeechAnywhere Services powered third party applications.
n Single and centralized cloud management of products.
n Management of cloud Text and Graphics/auto-texts using the cloud Nuance
Management Console.
n Management of Dragon and NMS settings that was previously accomplished using the
on-premise Nuance Management Console is now done using the cloud/hosted
Nuance Management Console.
n User profiles are enhanced with customizations; auto-texts and custom words that are
defined at the Site or Group level.
n Importing, exporting, and deletion of user profiles is not available in the cloud NMS.
These features have been moved to the Dragon client for Dragon NaturallySpeaking
Professional.
n An administrator can back up and restore a user account from the User Accounts
screen.
n In some cases, you may need to install and configure an NMS “Local Authenticator”
when on-premise LDAP or Active Directory support is required.
n Speech node collections are defined at the organization level.
n NMS download packages are distributed to individual organizations instead of to
everyone on the system.
n You can add comments to organization tokens
n The Organization Tokens tab and Credentials tab are visible to all administrators.
Managing user logins
User logins in the cloud must be unique. If a user’s login is being used by a user in another
organization in the cloud NMS, this is a user login conflict that needs to be resolved before the
user can be migrated to the cloud NMS. For example, if you are upgrading "Bob" to NMS in
the cloud, and user login "Bob" already exists in the cloud NMS, this is a naming conflict. For
more details, see Move data from an existing user to the cloud NMS server.
Organizations using LDAP/AD
If you are using LDAP or Active Directory to authenticate users, there should be no conflicts
when moving to the cloud. The NMS uses a “domain” along with the login which maps to a
unique organization.
1. Install and configure the NMS Local Authenticator.
2. Minor configuration of the NMS Local Authenticator is required which basically consists of
setting a domain name and the LDAP address where non-trusted LDAP/AD functionality
is required. For details, see Install the Local Authenticator.
Organizations using NMS native credentials
26
If you are using NMS native logins to authenticate users, when you move to the cloud, the
NMS native logins may conflict with existing user accounts. For example, if your organization
has a user login called “bob” and a user login called “bob” is already in use in the cloud
system, you must change the user login before you can move that user account to NMS in the
cloud. The Local Authenticator is not required.
Page 29

Chapter 2: Overview of NMS in the cloud
The Cloud Migration tool considers a user account on an on-premise NMS and a user
account on the cloud NMS to be the same if their user logins are the same and both
accounts belong to the same organization.
Using the Profile Association Tool
The Profile Association tool is only required for US customers that are upgrading from a
version of DNS Professional that does not support NMS in the cloud.
Administrators install the Profile Association Tool in a location that:
n Has access to the profile store
n Communicates with the NMS in the cloud
The workflow for using the profile association tool is:
n Nuance sets up an Organization for your organization in the cloud NMS.
n Your administrator uses the cloud Nuance Management Console to create user
accounts
n Your administrator runs the standalone Profile Association Tool to:
n Search the user profile store for available user profiles that require
user accounts
n Search the cloud NMS server for user accounts that need user
profiles
n Allows the administrator to map the user profiles to the user
accounts.
Authentication
After you upgrade a user account or a Dragon client to Nuance Management Server (NMS)
in the cloud, users must log into the system using the Dragon client in connected mode. This
action authenticates the user with the NMS and allows them to later use Dragon in
disconnected mode.
The user cannot use Dragon in disconnected mode until they first login to Dragon in
connected mode.
The following only applies to organizations that are using LDAP/Active Directory SSO for
authentication. NMS native credential users do not require the Local Authenticator.
Since the NMS is no longer on-premise, you must install and configure the “NMS Local
Authenticator” to query your LDAP/Active Directory store and validate user credentials. You
install the “NMS Local Authenticator” at your site and configure your Dragon Clients to point
to the Local Authenticator. The Local Authenticator tests the user credentials and sends
authentication requests to the cloud NMS to retrieve data.
Profile importing, exporting, and deleting
Since the NMS in the cloud does not have access to the profile store, this functionality is no
longer available in the Nuance Management Console. Instead, it is available and performed
through the Dragon Client.
If an administrative task requires the importing, exporting, or deletion of user profile(s),
someone must perform these actions on the Dragon workstations. For details, see the
Dragon Help.
27
Page 30

Dragon NaturallySpeaking 13 Administrator Guide
Overview of Installing and Configuring NMS in the Cloud
This section provides an overview of how to install and configure Dragon NaturallySpeaking
Professional with the Nuance Management Server (NMS) in the cloud. For a detailed list of
steps and prerequisites, see Dragon in the Cloud Installation Checklist in the Dragon
NaturallySpeaking Professional Installation Guide.
Overview of Installing and Configuring NMS in the Cloud
You will complete the following steps to install and configure Dragon NaturallySpeaking
Professional with the Nuance Management Server (NMS) in the cloud:
1. Before You Begin
2. Set Up Your roaming user profile Host Machine
3. Install the Local Authenticator (Optional)
4. Install and Configure Dragon clients
Before You Begin
Before you begin, Nuance will send you a welcome email containing the information that you
need to install and configure NMS in the cloud, including:
n The URL for NMS in the cloud.
n Your Organization ID.
n Your administrator user name and password.
n An alphanumeric token that you will need to install the Local Authenticator.
Keep this information on hand; you will need it as you install and configure DNS Professional
with NMS in the cloud.
Install the Local Authenticator
If you want to use LDAP or Active Directory Single Sign On for your authentication, and are
using NMS in the cloud, you must install the NMS Local Authenticator.
The cloud NMS cannot test LDAP credentials inside your organization. The NMS Local
Authenticator fills this gap by testing LDAP credentials. If they pass verification, the Local
Authenticator sends the credentials to NMS in the cloud for processing.
You install the Local Authenticator on a local server that is accessible to both the cloud NMS
and your Dragon Clients. Once a client authenticates with the Local Authenticator, the cloud
NMS server is used for all other client requests; using the session the client was granted
during authentication.
If you want to use Dragon's native authentication, you do not need to install the Local
Authenticator.
28
See Installing the Dragon Client in the Dragon NaturallySpeaking Professional Installation
Guide for instructions on how to install the Local Authenticator.
Set Up Your roaming user profile Host Machine
Set up the machine that will host your roaming user profiles. For more information, see
Setting up the roaming user profiles machine and Checklists for Setting up a file server for
roaming user profiles in the Dragon NaturallySpeaking Professional Installation Guide.
Page 31

Chapter 2: Overview of NMS in the cloud
Install and Configure Dragon NaturallySpeaking Professional Clients
Follow the instructions in the "Installing the Dragon Client" chapter of the DNS Professional
Installation Guide to install the latest Dragon Professional clients and configure them to use
either NMS in the cloud or the Local Authenticator.
Setting the NMS download location
1. In the Nuance Management Console, in the Organizations section, click Organization
Overview.
2. In the Organizations section of the ribbon, click Details.
3. On the Products tab, expand the DNS Professional section.
4. In the Downloads section, select Download from cloud.
5. Click OK.
Logging existing and new users into NMS in the cloud
When a user logs into the Dragon client, Dragon queries NMS to get the user login
information for the user. Dragon uses the login to find the user profile folder for the user.
In all versions of NMS, user logins must be unique.
NMS introduces changes that make it easier to move users to NMS in the cloud. When you
move a user to NMS in the cloud, and the user login already exists in the cloud, that user
login will have to be changed as a part of the migration process. To avoid having to rename
the user profile folder, NMS provides Dragon with the user profile folder name (instead of
the user login). Dragon uses this information to find the profile folder for the user and log
them into the system.
For a new user, the NMS generates a folder name using the format login_GUID and returns
this to Dragon. Dragon uses this value to create the profile folder for the new user. NMS only
appends the GUID to the profile folder name, not to the user profile.
For example, for a new user profile "bob", the NMS generates the folder name: “bob_
35B5CB9B-922B-47FB-AA20-AE2E515D9802”.
"bob' is the name of the profile and is stored in the folder “bob_ 35B5CB9B-922B-47FBAA20-AE2E515D9802”.
When the user logs into Dragon, NMS authenticates the user’s credentials and returns a
unique name for Dragon to use to create the user’s profile location.
After you upgrade a user account or a Dragon client to Nuance Management Server
(NMS) in the cloud, users must log into the system using the Dragon client in connected
mode. This action authenticates the user with the NMS and allows them to later use
Dragon in disconnected mode.
The user cannot use Dragon in disconnected mode until they first login to Dragon in
connected mode.
29
Page 32

Page 33

Chapter 3: Configuring sites
You can create and configure sites for your organization. Each site represents a
location on a server where you store user profiles. Typically, each site corresponds
to a physical location in your organization, such as a hospital, clinic, or data center.
Often you need only one site for your entire organization. Sites help you define the
structure of your DNS Professional Network. The options that you choose for a site
affect all of the user profiles stored in that location.
Searching for an organization
The Search Organizations screen allows you to search for an organization by name,
Organization ID, and/or license type.
To view and use the Search Organizations screen, you must have the rights to view more than
one organization in the Nuance Management Console.
1. In the Nuance Management Console, click Organizations.
2. In the Organizations area, click Search.
3. On the Search Organizations screen, one or more of the following fields:
l Name: The name of the organization.
l Organization Id: An identifier that Nuance assigns to you as a customer.
l Status: One of All, Enabled, or Disabled.
l License type: A license type that the organization uses.
4. Click the magnifying glass. The Search Organizations screen displays the search results with
the following information:
l Name: The name of the organization.
l Organization Id: An identifier that Nuance assigns to you as a customer.
l Status: One of All, Enabled, or Disabled.
l Users: The number of users in the organization.
5. To view and modify sites, groups, and settings for an organization, select the organization and
click Manage (the bottom right of the screen). Clicking Manage makes the selected organ-
ization the 'current' organization in the Nuance Management Console. All organization fields in
the Nuance Management Console will use the selected organization as the default value.
31
Page 34

Dragon NaturallySpeaking 13 Administrator Guide
6. To view details about an organization, select the organization and click Details. This action
displays the Organization Details screen.
Finding and managing organization data
NMS introduces changes to the Manage Organization screen to help you manage an
organization's data.
When you first open the Manage Organization screen, the Organization field displays the
name of the currently managed organization. You can change the value in this field. Changing
the value will change the data that the Manage Organization screen displays.
The left side of the Manage Organization screen displays a tree-like representation of the
current organization:
n The first element in the tree is the current organization.
n The second element in the tree is the sites element. To view the sites in the current
organization, expand the sites level.
n The third element in the tree is the groups element. To view the groups in the current
organization, expand the groups level.
To view information about users that are part of a site in the organization, or part of a group in
the organization, in the tree, select the site or group. The Nuance Management Console
displays the following information about the users at that level:
n First Name: The first name of the user.
n Last Name: The last name of the user.
n Login Id: The login name of the user.
n Licenses: The licenses that the user has.
Searching for sites, groups, and users in an organization
The tree structure on the left side of the Manage Organization screen contains an element
called 'Click here to search'. This item is at the same level as the organization element in the
tree. Use the 'Click here to search' item to search for sites, groups, and users in an
organization.
1. Click the 'Click here to search' item. A search field appears to the right of this item.
2. In the search field, enter search criteria. Search for sites and groups by their name. Search
for users by their login name. Search criteria must be at least 3 characters in length.
i. To search for a site, enter the name of the site.
ii. To search for a group, enter the name of the group.
iii. To search for a user, enter the login name of the user.
3. After you enter the search criteria, click the magnifying glass.
4. The Manage Organization screen displays the search results under the 'Click here to
search' item as follows, where x is the number of matched items for that object:
32
l Sites (x)
l Groups (x)
Page 35

Chapter 3: Configuring sites
l Users (x)
5. To view sites, groups, or users that matched the search criteria, under the 'Click here to
search' item, expand the Sites, Groups, or Users level.
Note: You can only view the top level search result objects. For example, if a site is found
and displayed in the search results, you cannot click on the site to view it's groups.
Using right-click actions to find and manage organization data
In the Manage Organization screen, you can use right-click actions to find and manage
objects in the organization tree.
Organization level
n To view details about an organization, right-click the organization and select Details.
n To set an organization as the default organization, right-click the organization and
select Set as default.
n To add a site to an organization, right-click the organization and select Add Site.
n To add a group to an organization, right-click the organization and select Add Group.
Site level
n To view details about a site, right-click the site and select Details.
n To add a site to an organization, right-click a site and select Add.
n To delete a site, right-click the site and select Delete.
n To add a group to an organization, right-click a site and select Add Group.
Group level
n To view details about a group, right-click the group and select Details.
n To copy a group, right-click a group and select Copy.
n To add a group to an organization, right-click a group and select Add
n To delete a group, right-click a group and select Delete.
n To add a user account to a group, right-click the group and select Add User
Account.
User level
n To view details about a user, right-click the user and select Details.
n To add a user, right-click and select Add.
n To delete a user, right-click the user and select Delete.
n To create back up copies of one or more user profiles, right-click a user and select
Backup user profiles.
n To restore one or more use profiles, right-click a user and select Restore user
profiles.
n To request Dragon logs for a user, right-click the user and select Request Dragon
logs.
n To view client logs for a user, right-click the user and select Client Logs.
33
Page 36

Dragon NaturallySpeaking 13 Administrator Guide
Configure product settings for an organization
An administrator sets many product settings at the organization level. On the Organizations
Details screen, the Products tab contains expandable areas that contain settings for
different products that use the Nuance Management Server and the Nuance Management
Console.
The settings for a product are only visible if the administrator has the “Manage” right for the
particular product.
1. In the Sites area, click Organization Overview.
2. In the Sites area, click Details.
3. On the Organizations Details screen, click Products.
4. Set one or more of the following settings.
General
Institution code: The code for the transcription system used by the organization.
Nuance organization GUID: A single string of numbers and letters that Nuance assigns to
you as a customer. The identifier is for your entire
organization.
Nuance Management Server
You must have the 'Manage NMS' right to view and modify these settings.
NMC Inactivity timeout in __ minutes: The number of minutes the NMS waits before
logging out an inactive administrator.
Configuring a site in your facility
A site represents a location on a server where you store user profiles. It typically corresponds
to a physical location in your organization, such as an office or data center. An organization
can contain multiple sites. The options that you choose for a site affect all user profiles stored
in that location. .
To add a site to an organization
1. 1. In the Sites area, click Add. The Nuance Management Console displays the
Site screen.
2. Use the General tab to configure or view the following:
l Organization: View the name of the account associated with the site.
l ID: Enter the unique identification number that you want to associate with
the site. This field is required. When you create a site (Click Add in the
Sites area), the Nuance Management Console automatically creates a
unique site ID and places it in the ID field. The ID is equal to the highest site
ID that exists in the organization plus one. You can edit the automatically
generated site ID.
l Name: Enter the name of the site. This field is required.
l System Site Id: The system id for the site.
34
Page 37

Chapter 3: Configuring sites
3. Use the Address tab to configure the following:
l Street 1: The first street address for the site.
l Street 2: A second street address for the site.
l Street 3: A third street address for the site.
l City: The City associated with the site.
l Zip: The zip code associated with the site.
l Country: The country associated with the site.
5. Click Save to save the settings for this site. When you save the settings, the
Groups list becomes visible on the General tab. It is empty until you add
groups as members of the site. See Creating groups.
Setting miscellaneous site settings
1. At the top of the Nuance Management Console, in the Sites section, click Organization
Overview.
2. On the Manage Organization screen, in the navigation tree on the left-side of the
screen, select a site.
3. In the Sites > Sites section, click Details.
4. Click the Dragon Professional tab.
5. Expand the Miscellaneous section:
n Prompt users to log out after __ minutes: The default is 30 minutes, the
minimum is 5 minutes.
You can enter any value between 1 and 1440 minutes, but it should be long enough
that Dragon will not think that the users have finished dictating when they are only
pausing. When dictating, users should be warned not to pause for more than the
number of seconds you configure here. At the end of their dictation, users must
record silence for at least that number of seconds.
n Log out users who do not respond after __ seconds: By default enabled, set
to a value of 60 seconds, and applied to all users associated with the site that this
user account is associated with.
The option instructs the Client to log out this user after the client has been idle and
the user has been prompted to respond, but the number of seconds you indicate
here elapses without a response.
The Log out users who do not respond after __ seconds: field accepts a
numeric value (seconds) up to three characters in length.
n Insert Text & Graphics command using __ : The default value is Type keys (
SHIFT + INSERT). The correct setting depends on the system that the user is dictating
into. In most cases the default setting is sufficient.
This option enables the user to insert Text & Graphics command contents into the
dictated document using one of the following:
l Type keys (Shift + Insert)
l Hook Paste
35
Page 38

Dragon NaturallySpeaking 13 Administrator Guide
l Simulate Keystrokes
l Type keys (CTRL+V)
l Type keys (Ctrl+V) SDK
l Use Windows Paste Command
n Disable automatic switching of dictation source to an available default: This
is deselected by default.
If you select this option, the user will not automatically be switched to an available
default dictation source if the currently configured source is unavailable.
n Allow disconnected mode: For Dragon users that work off the network. Permits
users to log on to a Dragon client when the workstation is not connected to the
network, such as when the user is working off-site on a laptop, the network is down, or
for some reason the roaming user profiles directory (where the Roaming User Profiles
are stored) is unavailable.
If you choose to allow users to dictate in Disconnected mode, do not enable the
Remove local cache data after usage option in the Data settings for the site. If you
enable both settings, when the user logs out after dictating in Disconnected mode,
the results of the user's dictation end up being deleted from the local cache and all the
work lost.
n Suppress warning for using multicore speech profiles on single core
machines: Select to suppress the warning that displays if a user profile with a
BestMatch-IV or BestMatch-IV model loads on a single-core computer. This option is
disabled by default.
Setting site Data storage settings
On the Dragon Professional tab, under Data, you can configure local and server data
storage settings.
36
Page 39

Chapter 3: Configuring sites
Store correction in archive
Enabled by default: When you elect this option, Dragon NaturallySpeaking Professional
stores a list of corrections that the optimization uses in a local archive. If you do not select this
option before you run the optimization, you may see a message that there is not enough data
for the optimization to process. Be sure to select this option whenever you use Dragon
NaturallySpeaking Professional for an extended period of time.
__ (minutes) archive size
Set the archive size to control how many minutes of information is stored. The default
setting is 180 minutes.
__ MB disk space reserved for playback
Adjusts the amount of disk cache space set aside for any overflow of dictation from a user's
computer's memory (RAM). Increase the amount of disk space if you want to save more
dictation data. If you do not want to keep any dictation (to conserve disk space) set the
amount to 0 MB. The default is 100 MB.
Save recorded dictation with document __
Description
Automatically back up user profile every __ saves
Description
Don't back up user profile
Description
Create usability log
Instructs the software to create a log of all the menu commands, toolbar buttons, and voice
commands that the users use during a Dragon NaturallySpeaking Professional session.
This log can help technical support personnel solve software problems and should only be
enabled if they instruct you to enable it. The Dragon client creates the usability log in:
C:\Documents and Settings\<username>\Application
Data\Nuance\NaturallySpeaking13\DgnUsability.log
Remove local cache data after usage
By default, disabled at site level. Deletes the contents of the local cache when the user logs
out. If you want to enable this option, you must disable the Allow disconnected mode
option. Conversely, if you want to enable the Allow disconnected mode option, then you
must disable this option to allow it to work. The effects of one setting cancel out the effects of
the other.
Conserve server archive size
Off by default. Select this option to prevent the copying of Dragon Recorded Audio (.DRA)
files (files that contain the acoustic data from the latest dictation session) to the Roaming
User Profile location when the program synchronizes the local cache user profile with the
roaming user profile. If you leave this box unchecked, Dragon NaturallySpeaking
Professional integrates the local .DRA files with the roaming user profile when
synchronizing it with the local cache.
37
Page 40

Dragon NaturallySpeaking 13 Administrator Guide
The .DRA files are not copied once they grow to the maximum size you set in the __ MB disk
space reserved for network archive option.
__ MB disk space reserved for network archive
Description here.
Viewing, modifying, and deleting sites
Once you have created and configured a site, you can return to it at any time and perform the
tasks below: To refresh the data on the Organizations screen, press Refresh at the bottom
right of the screen.
Note: You must have appropriate NMC Administrator security rights to perform these
tasks.
Finding and viewing a site
1. Select Organizations > Search.
2. Search for an organization.
3. Select an organization and click Manage.
4. In the left-side panel, select a site.
5. In the Site area, click Details.
6. To view the site details you can double-click the name of the site on the list.
7. The Site tab opens and displays all of the settings for the site on the General and
Address tabs.
38
Page 41

Chapter 3: Configuring sites
Deleting a site
In the Nuance Management Console:
1. Remove any groups that are associated with the Site you will delete. See Viewing,
modifying, and deleting groups for details.
2. Remove the users that are associated with the groups you deleted. See Viewing,
modifying, and deleting user accounts for details.
3. On the menu bar, Organizations > Search.
4. Search for and select an organization, and click Manage.
5. In the left-side panel, select a site.
6. On the ribbon, select Delete.
7. On the Confirm Site Deletion dialog box, click Yes.
Modifying a site
1. Find the site that you want to modify, using the procedure in Finding and viewing a
site above.
2. You can make changes depending on your security rights, detailed in Setting
Privileges for administrator groups on page 48.
Text boxes containing data that you cannot modify are gray to show they are
inactive.
3. On the General tab, modify the ID and the Name.
o add groups to or remove groups from a site , see Creating groups.
4. Use the Address tab to configure the following:
l Street 1: The first street address for the site.
l Street 2: A second street address for the site.
l Street 3: A third street address for the site.
l City: The City associated with the site.
l Zip: The zip code associated with the site.
l Country: The country associated with the site.
6. Click Save to save the settings for this site. When you save the settings, the Groups
list becomes visible on the General tab. It is empty until you add groups as members
of the site. See Creating groups.
Creating Organization Tokens
Complete the following steps to create an organization token:
1. In the Nuance Management Console, go to Organizations > Search.
2. Search for and select an organization.
3. In the Organizations area, click the Details icon. The Organization Details screen
appears.
4. In the Organization Tokens tab, click Add to generate a new organization token. The
39
Page 42

Dragon NaturallySpeaking 13 Administrator Guide
Token field is pre-filled. Optionally, enter a value in the Comment field. Click Save.
5. The new token appears in the Token table. Copy or make a note of this value; you will
need it to configure EHR Single Sign-On.
See Creating Active Directory Single Sign-On user accounts on page 18 for information
on using the tokens to configure EHR Single Sign-On.
40
Page 43

Chapter 4: Configuring groups and
user accounts
In the Nuance Management Console you can create groups of user accounts and associate them
with the sites that you have created within your organization. This chapter describes how to set up
and work with groups and user accounts, and explains how they work together.
Understanding groups
In the Nuance Management Console you can create groups of or administrator and associate
them with the sites within your organization. Setting up groups makes it easier for you to manage
the settings for large numbers of similar users. For instance, if you have a large group of Dragon
Client users , you can change a setting for one member of the group and quickly apply that change
to all members of the group, rather than changing that settings for each userone at a time.
You use the Groups ribbon to:
n Create (add) and delete a group.
n Search for a group.
n Add a user account to a group.
n Access Group Details to configure, edit, copy, and delete a group.
When you first log in to the Nuance Management Console, it already contains groups that Nuance
provides:
n NMC Administration
When you log in to the NMS Server for the first time, you used the default Admin user account, a
member of the NMC Administration group.
Generating Types of Groups
All groups that you can create fall into two broad categories:
n Dragon Professional Author groups—Users who plan to dictate. Members of this type of
group have access to the Dragon Client to dictate but do not need access to the Nuance
Management Console to make changes to the settings configured there.
41
Page 44

Dragon NaturallySpeaking 13 Administrator Guide
n NMC Administration groups—Network/system administrators who plan to configure
the NMS Server and Dragon Clients for your sites. Members of this type of group have
access to the Nuance Management Console to configure particular settings based on
the Security Rights you assign them, but do not need access to the Dragon Client
because they are not dictating. (For more on administrator Security Rights, see Setting
Privileges for administrator groups on page 48
Depending on the needs of your organization you might want to create more groups, for
example, a clinic might choose to create these groups:
n Two groups with the role of NMC Administrator, the first a small group who can
change all options in the Nuance Management Console and the second a larger group
of administrators who can change only group settings.
Your organization can have more than one type of administrator group. For instance,
administrator level user groups that Nuance recommends you create:
n Super users—Who can take all types of actions in the NMS Server.
n License administrators—Who create and grant/revoke licenses.
n Group administrators—Who help decide on settings in their particular group need.
n Help desk—Who might have only view access to the information in NMS Server to
help them answer questions that arise.
Determining site or group settings for members of more than one site or group
Users can be members of multiple groups. Groups belong to one specific site. who are in
more than one group can, logically, be subject to settings from several groups.
This situation raises the question of which site's or group's settings take precedence over
those of the other sites or groups for the individual .
42
Page 45

Chapter 4: Configuring groups and user accounts
When group settings supersede those of other
groups
n If a provider's user account is a member of more than one group, the group that
appears first in the User Account Details > Group Memberships > Selected
Groups list for that user account controls the settings that take effect for that
provider. (See the illustration below.)
n You can reorganize the order of the groups in the list to put the correct group at the
top.
Creating Groups
When you create a group, you configure the identifying information for the group and specify
the group type.
Steps for creating a group
To create a group, you configure settings on the following tabs:
Details tab
1. On the menu bar, click Groups and then click the Add icon on the Groups ribbon.
The Add group dialog opens. The Base new group on what existing group?
field lists all available groups for the current site.
2. In the Base new group on what existing group? field, select a group.
3. Press OK.
43
Page 46

Dragon NaturallySpeaking 13 Administrator Guide
4. On the Group Details page, in the Details tab, in the Group name field, enter the
name you want to assign to the group. The name is required. You must choose a
unique name and Nuance recommends that you choose one that is immediately recognizable.
5. In the Sites field, associate the group with a site.
6. In the Role field, chose a role for the members of the group.
7. In the Privileges section, select the privileges for the group.
Grants tab
You can only configure grants for a group if you are using the NMC Administrator
role. The Grants tab is where you view and control what an group members can
create, view, edit, or delete. The Grants tab is also where you view and control the
users, groups, and sites that group members can perform actions on.
The following are some examples of grants:
l Create Site: Allow an administrator to create a site in an organization.
l View Site: Allow an administrator to view the sites in an organization.
l Modify Site: Allow an administrator to modify the sites in an organization.
l Delete Site: Allow an administrator to delete the sites in an organization.
To add a grant to a group:
1. In the Group Details screen, click the Grants tab.
2. Click Add.
3. On the Add Group Grant screen, in the Object Type area, select the object that
the grant applies to:
l Organization
l Site
l Group
l Global
4. In the Grants area, select one or more grants. To select multiple grants, hold down
the Ctrl key and select more than one grant. The grants you can select depend on
the object you select in the Object Type area.
5. In the Object area, select one or more organizations, sites, or groups. Again, the
type of object you can select depends on the object you select in the Object Type
area. For example, if you select "Group" in the Object Type area, the Object area
displays all the groups that you can apply grants to.
6. Click Add.
To delete a grant
44
1. In the Group Details screen, click the Grants tab.
2. In the Grants area, select a grant.
Page 47

Chapter 4: Configuring groups and user accounts
3. In the Delete column, click the red x.
Dragon Professional tab
1. Configure the Administrative settings:
l Disable the use of Advanced scripting commands:
Prevents group members from accessing Dragon NaturallySpeaking
Professional's Advanced scripting tools.
l Create BM-IV profiles by default (recommended for virtualized envir-
onment): Selecting the Create BM-IV profiles by default (recommended for virtualized environment) option makes all users in a site use BestMatch IV acoustic
models when they create a profile.
2. Configure the voice Commands that you want to be available to the members of
this group. For more information, see Setting Dragon NaturallySpeaking
Professional voice command options for user groups on page 100
3. Configure the Auto Formatting settings for the group to select the way that certain
words spoken by any member of the group should be formatted. See Setting Auto-
Formatting Dragon NaturallySpeaking Professional options on page 82
Saving a group
After you have finished entering all the information necessary to define the group:
1. Click Save to save your settings and complete the configuration of the group.
2. You can later return to the group at any time to modify any settings, change sites the
group belongs to, or add and remove user accounts from the group.
Steps for viewing or modifying a group
Details tab
1. In the Nuance Management Console, search for a group.
2. On the Groups screen, double-click a group or select a group and click Details.
3. On the Group Details screen, click the Details tab.
4. View or modify the following fields:
Group name - The name for the group. The name is required and must be a
unique name.
Organization - The name of the organization. Nuance creates this name
when it creates your organization.
Sites - The site that the group is associated with.
Role - The role for the members of the group.
45
Page 48

Dragon NaturallySpeaking 13 Administrator Guide
Privileges - The privileges that are assigned to an administrator group. For
details, see Setting Privileges for groups.
Members tab
On the Members tab under Group Details, you can:
n Select individual user accounts to make those users members of the group. You
can assign users to more than one group.
To add or remove users from a group
If a user is a member of only one group, you cannot delete the user from that group,
because a user must belong to at least one group.
1. On the Group Details screen, click the Members tab.
2. A list of current group members (users) is displayed. The list of available users is constrained to users created manually or users that logged into Dragon and were
assigned to the group
3. In the list of Group members, click on and highlight a user account, then click the
Add/Remove button below the list.
4. In the Group membership window:
1. To add someone to a group, in the Member column, check the check-
box beside their name.
2. To remove someone from a group, in the Member column, un-check
the check-box beside their name.
5. Click Save.
Security tab
On the Security tab under Group Details, you can view the permissions that control
the actions (create, view, edit, delete) that members of a group can perform on specific
objects (sites, groups, and users).
To add a permission to a group
1. On the Group Details screen, click the Security tab.
2. Click Add.
3. In the Add Group Permission dialog-box, under Grants, select one or more
grants. To select multiple grants, press down the Ctrl key and select more than one
grant.
4. In the Groups area, apply the grant(s) to one or more groups.
5. Click Add.
46
Page 49

Grants tab
You can only configure grants for a group if you are using the NMC
Administrator role. The Grants tab is where you view and control what an group
members can create, view, edit, or delete. The Grants tab is also where you view
and control the users, groups, and sites that group members can perform actions
on.
The following are some examples of grants:
l Create Site: Allow an administrator to create a site in an organization.
l View Site: Allow an administrator to view the sites in an organization.
l Modify Site: Allow an administrator to modify the sites in an organization.
l Delete Site: Allow an administrator to delete the sites in an organization.
To add a grant to a group:
1. In the Group Details screen, click the Grants tab.
2. Click Add.
3. On the Add Group Grant screen, in the Object Type area, select the object that
the grant applies to:
Chapter 4: Configuring groups and user accounts
4. In the Grants area, select one or more grants. To select multiple grants, hold down
the Ctrl key and select more than one grant. The grants you can select depend on
the object you select in the Object Type area.
5. In the Object area, select one or more organizations, sites, or groups. Again, the
type of object you can select depends on the object you select in the Object Type
area. For example, if you select "Group" in the Object Type area, the Object area
displays all the groups that you can apply grants to.
6. Click Add.
To delete a grant
1. In the Group Details screen, click the Grants tab.
2. In the Grants area, select a grant.
3. In the Delete column, click the red x.
l Organization
l Site
l Group
l Global
Dragon Professional tab
1. View and configure the Administrative settings:
l Disable the use of Advanced scripting commands:
Prevents group members from accessing Dragon NaturallySpeaking
47
Page 50

Dragon NaturallySpeaking 13 Administrator Guide
Professional's Advanced scripting tools.
l Create BM-IV profiles by default (recommended for virtualized envir-
onment): Selecting the Create BM-IV profiles by default (recommended for virtualized environment) option makes all users in a site use BestMatch IV acoustic
models when they create a profile.
2. View and configure the voice Commands that you want to be available to the
members of this group. For more information, see Setting Dragon NaturallySpeaking
Professional voice command options for user groups on page 100
3. View and configure the Auto Formatting settings for the group to select the way that
certain words spoken by any member of the group should be formatted. This includes
general and other settings that you want rendered consistently in documents
generated by the group. See Setting Auto-Formatting Dragon NaturallySpeaking
Professional options on page 82
Setting Privileges for administrator groups
Privileges control the rights for a specific product. Privileges determine the UI elements and
features that an administrator can view and use in the Nuance Management Console.
Setting privileges for a group
1. 1. In the Nuance Management Console, search for a group.
2. 2. On the Groups screen, double-click the group or select the group, and in the Groups
section, select Details.
3. 3. On the Group Details screen, in the Privileges area, select the privileges for the group.
The following are some of the privileges that an administrator can have:
48
Page 51

Privilege Description
Chapter 4: Configuring groups and user accounts
Manage
Organizations
View, edit, or
delete
organizations.
Manage Sites View, edit, or
delete sites.
Manage Groups View, edit, or
delete groups.
Manage Licenses View, grant, and
revoke licenses,
and receive
notifications
when licenses
are about to
expire.
Send Message Send messages
to a user,
administrator,
site, or group.
View Trends View client device
usage
information,
speech
recognition
metrics, and
license usage.
Product Manage
NMS
Configure
settings for the
Nuance
Management
Server.
Product Manage
<Product>
Configure
settings for a
product. For
example, DM360
Network Edition
or Dragon
Professional.
When you create a group and select the role of NMC Administrator for members of the
group to give those members access to the Nuance Management Console, the Security
Rights list becomes available.
49
Page 52

Dragon NaturallySpeaking 13 Administrator Guide
You now give security rights to the members of the group to further delineate exactly what the
group members can do when they access the console.
The group's rights can restrict members to only viewing information created by others, or can
extend right to add and delete some types of information but not fir other types, and—at the
other end of the spectrum—can cover taking virtually any action in the console.
Group rights determine what an administrator can see and do in the Nuance Management
Console. When you log into the NMS, the NMS sends the Nuance Management Console a
set of flags that are based on your group rights. These flags determine the actions you can
perform and the Nuance Management Console UI elements you can see and interact with.
This applies to working with Accounts, groups, and sites. You can now assign Access rules to
the members of the group to further delineate exactly what organizations, sites and groups
they can access through the console. By default, a group has access to all sites and groups in
their organization.
As you plan your network configuration, you need to plan out the group security rights
assignments. Before you proceed, decide which security rights to assign to each group, using
the security rights options for members of the NMC Administrator groups. A subset of those
options are shown in the table that follows.
50
Page 53

Chapter 4: Configuring groups and user accounts
Security Rights Group members can:
Organization - View
organizations
View only the organization where
the administrator's own user
account was created.
Organization - Able to edit an
Edit an existing organization.
existing organization
Organization - Able to delete
organizations
Organization - Create system Create a system.
Organization - Modify system Modify a system.
Organization - Delete system Delete a system.
Organization - Create domain Create a domain.
Organization - Modify domain Modify a domain.
Organization - Delete domain Delete a domain.
Delete an organization.
Site - View sites View the sites that have groups the
administrator belongs to as a
member.
Site - Able to create new sites Create new sites for all
organizations that the administrator
can access.
Site - Able to modify existing
sites
Modify sites for any organization that
the administrator can access.
Site - Able to delete sites Delete sites for any organization that
the administrator can access.
Group - View groups View all groups that the
administrator has been assigned to
as a member.
Group - Able to create new
groups
Create new groups in the NMS
Server organization that the
administrator has access to.
Group - Able to edit existing
groups
Edit groups that already exist in the
NMS Server organization that the
administrator has access to.
Group - Able to delete groups Delete groups from the NMS Server
organization that the administrator has
access to.
51
Page 54

Dragon NaturallySpeaking 13 Administrator Guide
Security Rights Group members can:
User Account - View user
accounts
View accounts for all users who are
in the same groups as the
administrator.
User Account - Able to create
Create a new user account.
a new user account
User Account - Able to edit an
Edit an existing user account.
existing user account
User Account -
Able to enroll user accounts in
Create group members by placing
user accounts in groups.
groups
User Account - Able to delete
Delete an existing user account.
user accounts
Licensing - Able to view licenses View existing licenses.
Licensing - Able to grant licenses Grant licenses to users.
Licensing - Able to revoke
licenses
Revoke licenses from users.
Licensing - Notified when
licenses are expiring
Dragon - Able to view Profile
Optimizer status
Dragon - Able to view Profile
Optimizer task failure.
Dragon - Able to view Profile
Optimizer tasks
Dragon - Able to execute
ACO/LMO for a user
Miscellaneous - Able to view
downloaded packages
Receive notifications when licenses
are about to expire.
(Only for the DNS Professional
product) - View Profile Optimizer
Speech Node status using the
Profile Optimizer Status utility.
(Only for the DNS Professional
product) - View information about
task failures in the Profile
Optimizer Tasks screen.
(Only for the DNS Professional
product) - Access the Profile
Optimizer Tasks utility.
(Only for the DNS Professional
product) - Use the User Profile
Association utility.
(Only for the DNS Professional
product) - View update packages
downloaded from the NuanceLink
using the Messages utility.
52
Page 55

Chapter 4: Configuring groups and user accounts
Security Rights Group members can:
Miscellaneous - Able to
approve downloaded
packages
(Only for the DNS Professional
product) - NMS Server automatically
downloads periodic medication and
command updates for Dragon
Medical Client and sends a message
that the package has been
downloaded but requires approval to
install. Once users with this right
approve this package in the
Approval utility, the NMS Server
initiates the process of adding the
medication or command update to
the appropriate language models.
The integration and distribution of
changes is actually handled by the
Profile Optimizer and its
Speech Nodes.
Viewing, modifying, and deleting groups
Once you have created and configured a group you can return to it at any time and perform
the tasks below.
Note: You must have the appropriate NMC Administrator security rights to perform these
tasks.
Finding and viewing a group
1. On the menu bar, click Groups and then click the Search icon. The Groups screen
opens, allowing you to search by Group name, Organization, or Role.
2. Enter a group name in the Group name field, and/or select an organization or role to
search on, then click the magnifying glass.
3. The search results appear on the Groups screen.
4. Click on the name of the group that you want to view.
The Group Details window opens and displays all of the settings for the group on
various tabs.
53
Page 56

Dragon NaturallySpeaking 13 Administrator Guide
Deleting a group
1. On the menu bar, click Groups and then click the Search icon.
The Groups screen opens. To refresh the data on the Groups screen, press
Refresh at the bottom right of the screen.
2. Use the procedure in Finding and viewing a Group to find the group you want to
delete.
3. Select the group that you want to delete from the list and then click Delete on the
Groups ribbon.
A message asks you to confirm that you want to delete the group.
4. Click Yes.
The group is removed from the system. User accounts associated with the group are
not deleted. However, you should make sure to reassign the user accounts to other
groups.
Modifying a group
1. Use the procedure in Finding and viewing a Group to find the group you want to
modify.
2. The changes you can make to a group depend on your security rights.
Fields that you cannot modify are shaded gray and are inactive.
3. On the Members tab, you can:
l Add or remove group members (user accounts)
7. When your modifications are complete, click Save to apply them to the group.
Setting Dragon NaturallySpeaking Professional voice
command options for user groups
Under Group Details > Dragon Professional > Commands, you set voice command
options that control how Dragon NaturallySpeaking Professional interprets voice commands.
Once you configure commands for a group, the command settings apply to all users in the
group.
n Enable mouse motion commands: By default, this feature is enabled. Allows the
user to use mouse motion commands such as "Move Mouse left," "Faster," and
"Slower." Use the Mouse movement slider to control how quickly the mouse pointer
moves across the screen.
54
n Enable HTML support: By default, the group level setting applies.
Enabling this setting makes available a set of commands designed to help users surf
the web by voice in web browsers. You may need to disable this setting for certain
applications. For more information, see the client Help.
Page 57

Chapter 4: Configuring groups and user accounts
n Enable commands in HTML windows: By default the group level setting applies.
Enabling this option makes available a set of voice commands designed for users to
use for creating or editing messages in HTML format in certain Microsoft Outlook
dialog boxes. These dialog boxes appear with the Internet Explorer symbol (a small
document icon with the letter "e" in it) in the left corner of the window header. You
may need to disable this setting for certain applications. For more information, see
the Client Help.
n Enable automatically select first field:
Select this option to disable the "automatically select the first field" feature for a group
of users.
n Require click to select hyperlinks in HTML windows: By default, this feature is
enabled and the group level setting applies.
n Requires that the user speak the word "Click" to select a hyperlink,
such as "Click nuance.com" instead of just "nuance.com."
n Enable recognition mode switching commands: Enabling recognition mode
switching allows users in the group to dictate and say the mode switching commands
interchangeably. Turning off recognition mode switching disables the ability to switch
between modes. For example:
l Dictation Mode: In Dictation Mode, Dragon NaturallySpeaking Professional inter-
prets everything you say as dictation and nothing is interpreted as a command. Say
"Start Dictation Mode" or "Switch to Dictation Mode."
l Command Mode: In Command Mode, Dragon NaturallySpeaking Professional inter-
prets everything you say as a command and nothing is interpreted as dictated text.
Say "Start Command Mode" or "Switch to Command Mode."
l Spell Mode: In Spell Mode, Dragon NaturallySpeaking Professional allows you to
say any combination of letters, digits, or symbols as you might need to do dictating
license plate or parts numbers. Say "Start Spell Mode" or "Switch to Spell Mode."
l Numbers Mode: In Numbers Mode, Dragon NaturallySpeaking Professional inter-
prets your dictation as numbers. Say "Start Numbers Mode" or "Switch to Numbers
Mode."
l Normal Mode: The most flexible mode in Dragon NaturallySpeaking Professional
is Normal Mode. In Normal Mode, Dragon NaturallySpeaking Professional
distinguishes dictation from commands by analyzing what you say between pauses.
Say "Start Normal Mode" or "Switch to Normal Mode."
For more information on modes, see the Client Help.
n Enable web search commands: Select this option to make available Web search
commands that let users in the group search the Internet using commands that are
patterned on their natural speech. See Voice Shortcuts for Web Search in the Client
Help for more information.
n Enable desktop search commands: Select this option to make available Desktop
search commands that let users in the group search their Windows desktops using
commands that are patterned on their natural speech. See Voice Shortcuts for
Desktop Search in the Client Help for more information.
n Enable Email and Calendar commands: Select this option to make available
Voice Shortcuts for Email and Calendar that let users in the group control Outlook's
55
Page 58

Dragon NaturallySpeaking 13 Administrator Guide
email and calendar functions using commands that are patterned on their normal
speech. See the Client Help for more information.
n Enable cut shortcut commands, Enable delete shortcut commands, Enable
copy shortcut commands: Select these options to enable the Cut, Copy and
Delete Quick Voice Formatting Commands. Delete and Copy are enabled by default.
n Variable delimiters: By default the group level setting applies.
The variable delimiters are used by Text and Graphics/auto-text commands that
incorporate Voice (variable) Fields. Voice Fields are variable fields where the user
can later type or dictate a specific value.
By default, Text and Graphics/auto-text Voice commands use the square bracket [ ]
characters to indicate the presence of a variable field. To change the variable
delimiting characters, specify a character for the left and right delimiters.
The delimiting "characters" can each be up to 5 characters long. The left and right
delimiters cannot be exactly the same as each other or, when you try to apply them,
the Dragon NaturallySpeaking Professional displays a message that they are not
valid.
Caution: Nuance recommends you set the delimiting characters once and
never change them, because if, for instance, you use square brackets in
several Text and Graphics/auto-text commands, then change the delimiting
characters to */ and /*, the Text and Graphics/auto-text commands that are
using the square brackets then fail because the Client looks for variables only
between */ and /*, not between [ and ].
For more information about using variables with Text and Graphics/auto-text
commands, see the Client Help.
n Enable natural language commands: This series of four options enables the
users in the group to use Natural Language commands with the applications
Microsoft Word, WordPerfect, Microsoft Excel, and Microsoft PowerPoint. This
feature uses an additional 8 MB of memory and requires that you restart your
computer before it takes effect. Natural Language Commands are available by
default only in Microsoft Word.
Enable Facebook post commands: Enable this option to use commands that work
with Facebook.
Enable Twitter post commands: Enable this option to use commands that work
with Twitter.
56
Creating user accounts
To create a user account in the Nuance Management Console, you configure the basic
settings in the User Account Details window.
Page 59

Chapter 4: Configuring groups and user accounts
Creating a user account
1. On the menu bar, click User Accounts and then click the Add icon on the User
Accounts ribbon.
The User Account Details window opens.
2. Configure the options and settings on tabs in the User Account Details window:
l Details and Address.
l Messaging. See Send a message to a user for details.
3. Click Save to save the user account settings.
You are prompted to grant the new user a license.
4. Click Yes to assign a license to the user account. Click No to create the user without a
license and remain on the New User tab.
5. If you click Yes, a message prompts you to select the type of license that you want to
assign to the user account.
6. Select the license type for the user account and click OK. (The number in parentheses
indicates how many licenses of that type are still available.)
Configuring user accounts
Before users at your facility can begin using Dragon Client, you must create a user account
for each professional in the NMS Server, through the Nuance Management Console. When
one of these end users opens the Dragon Client, the server checks to make sure that the
userhas an account and a license associated with the account. After verifying the account
and license, the server checks the roaming user profiles Server to find a user profile for that
user(for more information, see Creating a user profile on page 108
57
Page 60

Dragon NaturallySpeaking 13 Administrator Guide
A user profile stores acoustic information about the voice of the individual provider. Dragon
Client uses this vocal data to help it recognize what the useris saying.
If the user does not have a user profile, Dragon Client opens the New Profile Wizard, where
the user enters basic data, selects a medical vocabulary, and presses a button to have the
client create a user profile. If a user profile exists, the Dragon Client accesses that profile and
the user can begin dictating. If the provider's user profile is not associated with a valid account
or the account does not have a license assigned to it, the user cannot use that profile to
dictate.
The NMS Server lets you select the default language and accent that apply to creating a user
profile, though the user can change these settings in the wizard.
You can add or delete user accounts on the User Accounts ribbon. You can use this ribbon
to modify existing user accounts and to edit their settings at any time. If you have the required
security settings, you can also view the Dragon Client logs through the DM360 Network
Edition Client Logs icon on the ribbon.
In DNS Professional, you can use a text file to import multiple users into an existing group.
You can also set the user account type and apply a license to each of the users you import.
For details, see Import multiple users into the NMS server on page 63.
Note: If you delete a user account, you can reassign the license associated with it to another
user account. See Managing licenses on page 91.
When you create user accounts, keep in mind:
n If a user account is a member of more than one group, you should be sure that the
group whose settings you want to take precedence appears first in the Group
Memberships > Selected Groups list for the user account.
n In most organizations, users should only be members of multiple groups because they
use both the Dragon Client and the Nuance Management Console. In this instance,
the person would be both a healthcare user and an administrator.
n Although it is less common, some users might belong to multiple groups.
Configuring user account details and address settings
On the User Account Details > Details and Address tabs, you store contact,
identification, and login credentials for a user account.
1. The Details tab displays the Organization associated with the user account that you are
creating.
2. Enter the information for the user associated with the user account. The First Name, Last
Name, and Login are required. The Login must be unique.
The first name, last name, and login must be the same as the first name, last name, and
login for the user in the back end system. If the login ID already exists, “Login unavailable”
appears in red under the Login field.
3. In the Middle name field, enter the middle name of the user.
4. In the Prefix field, enter a prefix to be placed before the user name.
58
Page 61

Chapter 4: Configuring groups and user accounts
5. Enter the Password. You should always follow Microsoft's strong password guidelines
or have similar organizational guidelines for ensuring passwords are not easy to guess.
For more details about setting options for passwords, see Setting user password settings.
6. Enter the Location (usually the primary work site) and the Department of the user.
7. Click the Address tab and enter the home address information of the user associated
with the account. This information is optional and is for your own convenience only, as the
NMS Server does not use it.
9. Continue to
create the
user account
on the Group
Memberships tab. See Assigning user accounts to groups on page 62.
10. To send email or a text message to the user when they receive an NMS message, set the
options in the Messaging tab. See Enable sending messages to an administrator on
page 60
Administrators can send messages to other administrators
An administrator can send messages to contacts in an organization. Organizations and their
administrators can receive notifications about events including system upgrades, outages,
notices, news, etc.
The administrator sets up an email address for an organization. The administrator also sets
up an email address for the following Nuance Management Console Users:
n All users with an NMC Administration license that are in the NMC Administrator
group (assuming NMC Administration licenses have been imported for that
organization).
n All NMC Administrator groups (assuming NMC Administration licenses have been
imported for that organization).
Afterwards, the administrator can send NMS messages to NMS users (by licenses, group,
or user accounts) and can send emails to organization(s).
Messages can be sent to one or more sites or Nuance Management Console users in one
step, even if they are from different organizations.
Messages may be sent for a variety of reasons, including:
n a user has an NMS message
n there are medication and command updates that require approvals
59
Page 62

Dragon NaturallySpeaking 13 Administrator Guide
n a new patch is available for deployment
n a new NMS patch is available for deployment
n the number of available licenses is low
n scheduled “trend” reports are available
n troubleshooting information is required by support personnel.
n system maintenance or outages are planned.
n other news or events
Enable sending messages to an administrator
You can configure the Nuance Management Server (NMS) to send email messages and
SMS messages to administrators when they receive a message from the NMS. You can
enable email messaging, SMS messaging, or both when you create a user or after you create
a user.
Enable sending email to an administrator when they receive an NMS message
To send an email to an administrator when they receive an NMS message, perform the
following steps:
1. On the User Account Details screen, click the Messaging tab.
2. In the Email section, select Inform me via email when I receive NMS messages. If you
select this option, you must enter an email address in the Email field to be able to save the
administrator.
3. In the Email field, enter an email address for the administrator.
4. To save the changes and close the administrator, click Save. To save the changes and edit
another administrator, click Save & New.
60
Enable sending an SMS message to an administrator's phone when they receive an NMS message
To send an SMS message to an administrator's mobile phone when they receive an NMS
message, perform the following steps:
Page 63

Chapter 4: Configuring groups and user accounts
1. On the User Account Details screen, click the Messaging tab.
2. In the Mobile Phone section, select Inform me via SMS when I receive
NMS messages. If you select this option, you must enter values in the Mobile Phone
field and the Mobile Phone Provider field to be able to save the administrator.
.
3. In the Mobile Phone field, enter the mobile phone number for the administrator.
4. In the Mobile Phone Provider drop-down field, select the administrator's mobile pro-
vider.
The following is the current list of supported mobile :
l Alltel
l AT&T
l Boost Mobile
l Sprint Nextel
l Sprint PCS
61
Page 64

Dragon NaturallySpeaking 13 Administrator Guide
l T-Mobile
l US Cellular
l Verizon
l Virgin Mobile USA
5. In the Message Delivery Type, choose the message delivery type:
i. To include the body of the message in the email or SMS message, select Include the mes-
sage body in the delivery (default).
ii. To have the email or SMS message only inform the recipient that they have an
NMS message, select Simply inform me that I have a message; I will retrieve it
myself.
6. To save the changes and close the administrator, click Save. To save the changes and edit
another administrator, click Save & New.
Assigning user accounts to groups
Use the User Account Details > Group Memberships tab to make a user account a
member of one or more groups by indicating group memberships for the user account.
Use the Site filter drop down to choose the appropriate site for the user.
The Available Groups list displays all available groups for the selected site.
Notes:
n You must assign each user account to at least one group. If you do not assign a user
account to a group, the NMS Server does not let you save the user account.
n If a user account is a member of more than one group, the group whose settings take
precedence over settings of other groups appears first in the User Account Details >
Group Memberships > Selected Groups list for that user account.
n You can use the Available groups filter drop-down list to refine the list of groups that
display in the User Account Details page.
n User accounts can only be added to groups by someone who is an
NMC Administrator with the appropriate security rights. If you want users in your
organization to be able to assign themselves to groups, you must create a group with
the appropriate rights and add those users to the group.
Assigning a user account to a group
1. On the User Account Details screen, click Group Memberships.
2. In the Available Groups area, select a group name.
3. Click the right arrow button to move your selection to the Selected Groups area.
4. Repeat steps 1 and 2 until the user account is assigned to all of the groups that you require.
5. Click Save to save your selections.
62
Removing a user account from a group
There are two ways to remove a user account from a group:
Page 65

Chapter 4: Configuring groups and user accounts
n In the User Account Details > Group Memberships tab, select the group that
you want to remove the user account from and click the left arrow button. The group
is removed from the Selected Groups area.
n In the Group Details > Members tab click the Add/Remove button under the
Group members list. Use the Group Membership - User Accounts window to
select the name of the user account from the Selected User Accounts list and
move it to the Available User Accounts list using the left arrow button.
Configuring Users for Active Directory Authentication
Complete the following steps for each user you want to configure for Active Directory
authentication.
Note: You can also import users and their domains and usernames in bulk. For details, see
Import multiple users into the NMS server in the Nuance Management Console Help.
1. Under User Accounts, click Search. Search for and double-click a user.
2. In the Credentials tab, click the NTLM tab, and click Add to add a new domain
mapping. The New Credential dialog appears:
3. The User Name and Organization Name are already filled out. Use the Domain drop
down to choose the user's domain, and enter her LDAP login for that domain in the Login
field.
4. Click OK to save your changes.
Import multiple users into the NMS server
In Dragon NaturallySpeaking Professional, you can use the Import Users wizard to import
multiple users at one time into the system. You can also assign user account types and
licenses to the users and assign the users to specific Groups.
To perform a mass import of users, you must perform the following two main tasks:
1. Create a comma-delimited text file or an XML file that contains information about the
users, including user names and passwords.
2. Use the file to import users into the Nuance Management Server.
63
Page 66

Dragon NaturallySpeaking 13 Administrator Guide
Creating a file with information about users to import
To import multiple users into the Nuance Management Server (NMS) , you must create either
a comma-delimited text file or an XML file that contains user information. The Import Users
wizard supports both file types. However, each file must conform to specific formatting
standards.
Creating a comma-delimited text file for importing users
The comma-delimited text file can contain the following fields for each user:
n First name (50 characters maximum)
n Last name (50 characters maximum)
n Login id (30 characters maximum)
n Password (30 characters maximum)
The fields must be separated by commas. The First name, Last name, and Login id fields
must contain characters. The Password field can be blank.
Example: A comma-delimited text file with user information
The following is an example of a valid text file containing user information.
Notice there is no password in the second example. When importing a comma-delimited file, if
the password is blank, you must still place a comma after the login id field and leave the
password field blank. The NMS expects four fields in the text file.
Jack, Degnan, jdegnan, pwd124
Tim, Roberts, troberts,
Frank, Fiddler, ffiddler, fflr2
Creating an XML file for importing users
The XML file must begin with the XML version declaration processing instruction, <?xml
version="1.0"... ?>.
The XML file can contain the following fields for each user. The fields can contain commas.
n First name (required: 1 character minimum, 50 characters maximum)
n Last name (required: 1 character minimum, 50 characters maximum)
n Middle name (50 characters maximum)
n Prefix (10 characters maximum)
n Login id (required: 3 characters minimum, 30 characters maximum)
64
n Password (required: 30 characters maximum)
n Location (50 characters maximum)
n Department (50 characters maximum)
n Email address (50 characters maximum)
n Street 1 (60 characters maximum)
n Street 2 (60 characters maximum)
n Street 3 (60 characters maximum)
Page 67

Chapter 4: Configuring groups and user accounts
n City (40 characters maximum)
n State (5 characters maximum)
n ZipCode (20 characters maximum)
n NTLMCredential (160 characters maximum) Syntax:
<NTLMCredential><DomainName>\<UserName></NTLMCredential>
Note: The NTLM Credential element allows you to import a user's domain and user name
pair for multi-domain LDAP. For this import to work, you must create an Active Directory
connection string entry for each unique DomainName that you specify in the
NTLMCredential element before you run the import. For example if you support two
domains, Domain1 and Domain2, you must create an Active Directory connection string
entry for each of these domains before you can do a bulk import of users on either domain.
Example: An XML file with user information
The following is an example of a valid XML file containing user information:
65
Page 68

Dragon NaturallySpeaking 13 Administrator Guide
If the user import field is not required, you can omit the attribute. The attributes can be placed
in any order in the XML file. The Users and User elements are in the following default XML
name space:
http://nuance.com/NAS/UserImport
Importing users into the Nuance Management Server
After you create a comma-delimited text file or an XML file that contains user information, you
must use the file and the Nuance Management Console to import users into the system.
At any time in the following steps, you can press Cancel to exit a step and stop the import
process. You can also click the left arrow button to return to the previous screen in the Import
Users wizard.
1. In the Nuance Management Console, select the User Accounts tab.
2. Select Import. The Import Users wizard appears.
3. In the Select a File To Import screen, enter the path and name of the file that contains
the user information. If for any reason you decide to not import the users, press Cancel.
66
4. If the path and name of the text file are valid, the Next button is enabled. Press Next. If the
Import Users wizard has trouble parsing the data from the text file or simply cannot find any
users in the text file, the wizard displays a message that tells you no users were found.
Press OK to close the message. You may now re-enter the name of the text file or make
changes to the existing text file and retry this step.
5. The Users to Import screen displays information about the users from the text file.
6. Review the list of users to import. Press Next to continue. If you wish to cancel the import
of users, press Cancel. To return to the previous page, click the left arrow button.
Page 69

Chapter 4: Configuring groups and user accounts
If the Import Users wizard encounters errors when importing the user data, the Nuance
Management Console displays a message. Press Close on the dialog to leave this step.
7. On the Select an Organization screen, select the organization to associate with the
users.
8. Press Next.
9. The Select Group Membership screen displays a list of groups that you can associate
with the users. The left side of the Available Groups page displays all available groups
for the current organization and the site in the Select Site field.
67
Page 70

Dragon NaturallySpeaking 13 Administrator Guide
10. In Available Groups, select one or more groups. Use the arrows to move the selected
groups to the Selected Groups list. You must select at least one group.
11. Press Next.
12. If you have the administrative rights to grant licenses to users, the Import Users wizard dis-
plays the Select Licenses screen. The screen lists all the licenses that you can grant to
the users. The list displays the license type and the number of available licenses for each
license type.
You cannot apply a license type to the users if the number of available licenses is less than
the number of users In this case, the license type is disabled and you cannot select it in the
screen.
13. Optional: Select the licenses to apply to the users. Press Next.
68
Page 71

Chapter 4: Configuring groups and user accounts
14. In the Ready to Import screen, press Next to start importing the users.
15. The Import Users wizard displays the Performing Import screen and starts to import the
users. A progress indicator displays the status of the import process. When the wizard fin-
69
Page 72

Dragon NaturallySpeaking 13 Administrator Guide
ishes importing all the users, press Next.
16. The Import Results screen displays a list of all the users that the Import Users wizard
imported into the system. If the wizard could not import a user, the Import Results screen
displays information about why the user was not imported.
17. Press Finish.
XML schema for the user XML import file
The following schema defines the file format for any XML file that contains user information for
importing users into the system.
<?xmlversion="1.0"encoding="utf-8"?> <xs:schema
id="UserImportSchema"
targetNamespace="http://nuance.com/NAS/UserImport"
elementFormDefault="qualified"
xmlns="http://nuance.com/NAS/UserImport"
70
xmlns:mstns="http://nuance.com/NAS/UserImport"
Page 73

Chapter 4: Configuring groups and user accounts
xmlns:xs="http://www.w3.org/2001/XMLSchema" >
<!-- Users element -->
<xs:elementname="Users"type="Users">
<xs:annotation>
<xs:documentation>A collection of users to
import</xs:documentation>
</xs:annotation>
</xs:element>
<!-- Users type definition -->
<xs:complexTypename="Users">
<xs:annotation>
<xs:documentation>This types defines the user collection</xs:documentation>
</xs:annotation>
<xs:sequence>
<xs:elementname="User"type="User"minOccurs="1"maxOccurs="unbounded">
<xs:annotation>
<xs:documentation>One of more users to
import</xs:documentation>
71
Page 74

Dragon NaturallySpeaking 13 Administrator Guide
</xs:annotation>
</xs:element>
</xs:sequence>
</xs:complexType>
<!-- User type definition -->
<xs:complexTypename="User">
<xs:annotation>
<xs:documentation>This type defines the basic user
information that can be imported</xs:documentation>
</xs:annotation>
<xs:attributename="LastName"type="NameString"use="required"/>
<xs:attributename="FirstName"type="NameString"use="required"/>
<xs:attributename="MiddleName"type="NameString" />
<xs:attributename="Prefix"type="PrefixString"/>
<xs:attributename="LoginId"type="LoginIdString"use="required"/>
72
<xs:attributename="Password"type="PasswordString"use="required"/>
<xs:attributename="Location"type="GeneralInfoString" />
<xs:attributename="Department"type="GeneralInfoString"/>
Page 75

Chapter 4: Configuring groups and user accounts
<xs:attributename="EmailAddress"type="GeneralInfoString"/>
<xs:attributename="Street1"type="StreetAddressString"/>
<xs:attributename="Street2"type="StreetAddressString"/>
<xs:attributename="Street3"type="StreetAddressString"/>
<xs:attributename="City"type="CityString"/>
<xs:attributename="State"type="StateString"/>
<xs:attributename="ZipCode"type="ZipString"/>
</xs:complexType>
<!-- Name String -->
<xs:simpleTypename="NameString">
<xs:annotation>
<xs:documentation>A general string from names (50
characters maximum)</xs:documentation>
</xs:annotation>
<xs:restrictionbase="xs:string">
<xs:minLengthvalue="1"/>
<xs:maxLengthvalue="50"/>
</xs:restriction>
</xs:simpleType>
73
Page 76

Dragon NaturallySpeaking 13 Administrator Guide
<!-- Login Id String -->
<xs:simpleTypename="LoginIdString">
<xs:annotation>
<xs:documentation>A string that contains the user's
login id (30 characters maximum)</xs:documentation>
</xs:annotation>
<xs:restrictionbase="xs:string">
<xs:minLengthvalue="3"/>
<xs:maxLengthvalue="30"/>
</xs:restriction>
</xs:simpleType>
<!-- Password String -->
<xs:simpleTypename="PasswordString">
<xs:annotation>
< xs:documentation>A string for the user's login password (30 characters maximum)</xs:documentation>
74
</xs:annotation>
<xs:restrictionbase="xs:string">
<xs:maxLengthvalue="30"/>
Page 77

Chapter 4: Configuring groups and user accounts
</xs:restriction>
</xs:simpleType>
<!-- Prefix String -->
<xs:simpleTypename="PrefixString">
<xs:annotation>
<xs:documentation>A user name prefix (10 characters
maximum)</xs:documentation>
</xs:annotation>
<xs:restrictionbase="xs:string">
<xs:maxLengthvalue="10"/>
</xs:restriction>
</xs:simpleType>
<!-- General Info String -->
<xs:simpleTypename="GeneralInfoString">
<xs:annotation>
<xs:documentation>A general information string (50
characters maximum)</xs:documentation>
</xs:annotation>
<xs:restrictionbase="xs:string">
75
Page 78

Dragon NaturallySpeaking 13 Administrator Guide
<xs:maxLengthvalue="50" />
</xs:restriction>
</xs:simpleType>
<!-- Street Address String -->
<xs:simpleTypename="StreetAddressString">
<xs:annotation>
<xs:documentation>A street address string (60 characters maximum)</xs:documentation>
</xs:annotation>
<xs:restrictionbase="xs:string">
<xs:maxLengthvalue="60"/>
</xs:restriction>
</xs:simpleType>
<!-- City String -->
<xs:simpleTypename="CityString">
<xs:annotation>
76
<xs:documentation>A city string (40 characters maximum)</xs:documentation>
</xs:annotation>
Page 79

Chapter 4: Configuring groups and user accounts
<xs:restrictionbase="xs:string">
<xs:maxLengthvalue="40"/>
</xs:restriction>
</xs:simpleType>
<!-- State String -->
<xs:simpleTypename="StateString">
<xs:annotation>
<xs:documentation>A state string (5 characters maximum)</xs:documentation>
</xs:annotation>
<xs:restrictionbase="xs:string">
<xs:maxLengthvalue="5"/>
</xs:restriction>
</xs:simpleType>
<!-- Zip String -->
<xs:simpleTypename="ZipString">
<xs:annotation>
77
Page 80

Dragon NaturallySpeaking 13 Administrator Guide
<xs:documentation>A zip code string (20 characters maximum)</xs:documentation>
</xs:annotation>
<xs:restrictionbase="xs:string">
<xs:maxLengthvalue="20"/>
</xs:restriction>
</xs:simpleType>
<!— -NTLM Credential String -->
<xs:simpleType name="NTLMCredentialString">
<xs:annotation>
<xs:documentation>A NTLM Credential string (160
characters max)</xs:documentation>
</xs:annotation>
<xs:restriction base="xs:string">
<xs:maxLength value="160"/>
</xs:restriction>
</xs:simpleType>
</xs:schema>
78
Setting user account Dragon NaturallySpeaking Professional client options
On the User Account Details > Dragon Professional > User Account Options tab, you
can configure settings for the individual user that override settings that you already selected
for the group.
Page 81

Chapter 4: Configuring groups and user accounts
Setting User Account options
By default, settings are configured at the group level and the Group option to the right of
a setting is selected. To override the group settings, select the Personal option next to a
setting.
n Enable HTML support: By default, the group level setting applies.
Enabling this setting makes available a set of commands designed to help users
surf the web by voice in web browsers. You may need to disable this setting for
certain applications. For more information, see the client Help.
n Enable commands in HTML windows: By default the group level setting
applies.
Enabling this option makes available a set of voice commands designed for
users to use for creating or editing messages in HTML format in certain Microsoft
Outlook dialog boxes. These dialog boxes appear with the Internet Explorer
symbol (a small document icon with the letter "e" in it) in the left corner of the
window header. You may need to disable this setting for certain applications. For
more information, see the Client Help.
n Require click to select hyperlinks in HTML windows: By default the group
level setting applies.
If you select this option, it requires that the user speak the word "Click" to select a
hyperlink, such as "Click nuance.com" instead of just "nuance.com." You may
need to disable this setting for certain applications.
n Enable automatically select first field:
Select this option to disable the "automatically select the first field" feature for a
user or a group of users.
n Variable delimiters: By default the group level setting applies. Usually you do not
change delimiters for an indivudal user because they are most effective when they
apply across an entire group's documents.
l Variable delimiters in templates (Text & Graphics commands that incorporate
voice (variable) fields), are characters that surround each voice field location in
the template/command where the user can later type or dictate a specific
value.
l By default, a pair of square brackets [ ] indicates the presence of a voice field.
To use different characters to indicate a voice field, enter the characters you
prefer to use for left and right delimiters.
l Delimiting "characters" can each be up to 5 characters long. The left and right
delimiters cannot be exactly the same as each other or, when you try to apply
them, Dragon NaturallySpeaking Professional displays a message that they
are not valid.
n Saving the user also saves local acoustics: By default the site level setting
applies.
79
Page 82

Dragon NaturallySpeaking 13 Administrator Guide
Select this option to save the user's acoustic information locally on the client. By
saving the acoustic information, any corrections the user makes are available
even after a close and re-open of the user profile. In addition, selecting this option
synchronizes all corrections in the Local cache user profile with the roaming user
profiles if you also turned on the Always copy acoustic information to
network option at the site level (active by default).
Log out users who do not respond after __ seconds: By default enabled,
set to a value of 60 seconds, and applied to all users associated with the site that
this user account is associated with.
The option instructs the Client to log out this user after the client has been idle and
the user has been prompted to respond, but the number of seconds you indicate
here elapses without a response.
The Log out users who do not respond after __ seconds: field accepts a
numeric value (seconds) up to three characters in length.
n The number of seconds that the client remains idle before
prompting a user is based on the number of seconds set in the
Miscellaneous settings for the site in Prompt users to log off
after __ minutes:. You cannot change that setting for individual
users.
The number of seconds the client can be idle before prompting a
user to log off always applies to all users across the entire site.
n Remove local cache data after usage: By default the site level setting applies.
Deletes the contents of the local cache when the user logs out.
Note: If you want to enable this option, you must disable the Allow
disconnected mode option in the Site > Roaming user profile settings to
allow it to work. Conversely, if you want to enable the Allow disconnected
mode option, you must disable this option to allow it to work. The effects of one
setting cancel out the effects of the other.
n Save user profiles upon automatic logout:
n Enable recognition mode switching commands: Enabling recognition mode
switching allows users in the group to dictate and say the mode switching
commands interchangeably. Turning off recognition mode switching disables the
ability to switch between modes. For example:
n l Dictation Mode: In Dictation Mode, Dragon NaturallySpeaking
Professional interprets everything you say as dictation and nothing
is interpreted as a command. Say "Start Dictation Mode" or "Switch
to Dictation Mode."
l Command Mode: In Command Mode, Dragon NaturallySpeaking
Professional interprets everything you say as a command and nothing is interpreted as dictated text. Say "Start Command Mode" or
"Switch to Command Mode."
l Spell Mode: In Spell Mode, Dragon NaturallySpeaking Pro-
fessional allows you to say any combination of letters, digits, or sym-
80
Page 83

Chapter 4: Configuring groups and user accounts
bols as you might need to do dictating license plate or parts numbers. Say "Start Spell Mode" or "Switch to Spell Mode."
l Numbers Mode: In Numbers Mode, Dragon NaturallySpeaking
Professional interprets your dictation as numbers. Say "Start Numbers Mode" or "Switch to Numbers Mode."
l Normal Mode: The most flexible mode in Dragon
NaturallySpeaking Professional is Normal Mode. In Normal
Mode, Dragon NaturallySpeaking Professional distinguishes
dictation from commands by analyzing what you say between
pauses. Say "Start Normal Mode" or "Switch to Normal Mode."
For more information on modes, see the Client Help.
n Enable web search commands: Select this option to make available Web
search commands that let users in the group search the Internet using commands
that are patterned on their natural speech. See Voice Shortcuts for Web Search in
the Client Help for more information.
n Enable desktop search commands: Select this option to make available
Desktop search commands that let users in the group search their Windows
desktops using commands that are patterned on their natural speech. See Voice
Shortcuts for Desktop Search in the Client Help for more information.
n Enable Email and Calendar commands: Select this option to make available
Voice Shortcuts for Email and Calendar that let users in the group control
Outlook's email and calendar functions using commands that are patterned on
their normal speech. See the Client Help for more information.
n Enable cut shortcut commands, Enable delete shortcut commands,
Enable copy shortcut commands: Select these options to enable the Cut,
Copy and Delete Quick Voice Formatting Commands. Delete and Copy are
enabled by default.
n Enable natural language commands: This series of four options enables the
users in the group to use Natural Language commands with the applications
Microsoft Word, WordPerfect, Microsoft Excel, and Microsoft PowerPoint. This
feature uses an additional 8 MB of memory and requires that you restart your
computer before it takes effect. Natural Language Commands are available by
default only in Microsoft Word.
n Enable Facebook post commands:
n Enable Twitter post commands:
n Upload dictation data to Nuance for research purposes: By default the
Organization level setting applies.
Select this option to automatically upload data from a user's dictation and user
profile to Nuance so that the company can improve future versions of the product
and further enhance speech recognition technology. You might want to turn on
this option for a user whose dictation is particularly difficult to recognize.
81
Page 84

Dragon NaturallySpeaking 13 Administrator Guide
Setting Auto-Formatting Dragon NaturallySpeaking Professional options
You use the Auto-Formatting options to set up text formatting that Dragon
NaturallySpeaking Professional Clients automatically apply to all user dictation, producing
consistently formatted reports across the entire organization. Changing these options for a
group affects all members of that group exclusively. Customizing the options for a single
user's user account affects only that user's dictation.
The Auto-Formatting options activate different forms of automatic formatting. The
automatic formats let users dictate in a natural way and also dictate different types of word
formats, such as abbreviations, contractions, and e-mail addresses.
These formats do not have the last say on punctuation of numbers and currency; instead,
numeric punctuation is ultimately controlled by settings on the Regional Options tab of the
Windows Control Panel Regional and Language Options dialog box. (Although the
numeric formats are usually standard for the country shown in that dialog box, you can click
the Customize... button to find tabs for Numbers and Currency to customize the formats.)
NMS Server administrators set General formatting options on the Group Details > Dragon
Professional tab. However, users can choose to override Auto-Formatting settings that
apply to the documents that result from their dictation.
For more information on how the Auto-Formatting option settings are stored and whose
setting of them takes precedence, refer to Setting general auto-formatting options in the client
or the Nuance Management Server on page 168.
Setting Auto-Formatting options
On the Group Details > Dragon Professional tab, expand the Auto-Formatting section.
n Abbreviate common English units of measure: Enabled by default.
Automatically inserts abbreviations for units of measure. For example, "mm" for
"millimeter".
n Abbreviate titles: Enabled by default. Inserts abbreviated versions of any title in
the default lexicon. For example, "Mr." instead of "Mister."
n Allow pauses in formatted phrases: Enabled by default. Lets number and
phrase formatting work together if you pause while speaking a number.
n Automatically add commas and periods: Disabled by default. Automatically
adds commas and periods based on pause length and sentence structure.
n Caps Lock key overrides capitalization commands: Disabled by default.
When this option is enabled and the keyboard Caps Lock key is active, several
Dragon NaturallySpeaking Professional capitalization commands are not active:
"Cap <word>", "Caps On", "Caps Off" "All-Caps <word>", "All-Caps On", "AllCaps Off", "No-Caps <word>", "No-Caps On", and "No-Caps Off".
82
n Expand common English contractions: Disabled by default. Enables Dragon
Page 85

Chapter 4: Configuring groups and user accounts
NaturallySpeaking Professional to recognize contractions while transcribing
dictation. If you clear this box, Dragon NaturallySpeaking Professional
transcribes spoken contractions in a more formal manner. For example, if you
say "Don't go near the water," Dragon NaturallySpeaking Professional
transcribes "Do not go near the water."
In some situations, the formal expression of a contraction might be ambiguous.
For example, the phrase "It's always" could either mean "It is always" or "It has
always" depending on the tense of the verb that follows. In this situation, Dragon
NaturallySpeaking Professional always expands the contraction, regardless of
how this option is set.
n Format ISO currency codes: Disabled by default. Inserts currency codes rather
than currency symbols. For example, "USD10.00" instead of "10 dollars," or
"EUR50,00" instead of "50 euros."
n Format other numbers: Enabled by default. Inserts properly formatted
decimals, negative numbers, and fractions. For example, "-1" instead of "negative
1."
n Format phone numbers: Enabled by default. Turns on automatic formatting of
US telephone numbers when you speak a sequence of seven or ten numbers. For
example, if you say "7815551234", Dragon NaturallySpeaking Professional will
transcribe "781-555-1234."
n Format prices: Enabled by default. Inserts prices and currencies in the proper
format with the appropriate currency symbol. For example, "$10.00" instead of "10
dollars," or " 50,00" instead of "50 euros."
n Format street addresses: Enabled by default. Inserts a properly formatted
street address. For example:
“One seventy West one hundred south number fifty Salt_Lake_City Utah eight
four seven zero zero”
becomes:
“170 W. 100 S., #50, Salt Lake City, UT 84700”
n Format times: Enabled by default. Turns on automatic standard time
formatting. For example, if you say "Six Thirty PM," Dragon NaturallySpeaking
Professional transcribes "6:30 PM." Dictating standard time runs on a 12 hour
clock, letting you make the distinction between AM and PM.
Military time: With this option enabled, you can also dictate times in military
format. For example, if you say "sixteen hundred hours," Dragon
NaturallySpeaking Professional transcribes "1600 hrs." If you say "oh three oh
five hours" or "zero three zero five hours," Dragon NaturallySpeaking
Professional transcribes "0305 hrs."
Dictated Military time uses a 24 hour clock and abbreviates "hours" to "hrs."
n Format web and e-mail addresses: Enabled by default. Applies correct
formatting to Web and e-mail addresses. For example, "john_
doe@acmecorp.com" instead of "john_doe at acme corp dot com."
n Insert two spaces after period: Disabled by default. Adds two spaces after the
end of a sentence instead of a single space. Having two spaces at the end of a
83
Page 86

Dragon NaturallySpeaking 13 Administrator Guide
sentence used to be standard with mono space fonts produced by typewriters, but
is less common with proportional fonts used in word processing programs. If you do
not select this option, Dragon NaturallySpeaking Professional adds a single space
after the period.
n "million" instead of ".000.000": Enabled by default. Inserts numbers as a
combination of Arabic numerals and text. For example, "5 million" instead of
"5,000,000."
North American region settings
n Format US Social Security Numbers: Disabled by default. Inserts hyphens in the
appropriate location of a number that contains 9 digits when someone dictates it with
pauses where the hyphens belong.
n Format UK and Canadian postcodes: Disabled by default. Properly formats UK and
Canadian postcodes. For example, "N1 8HQ" instead of "n18hq," or "L3X 1A4" instead
of "l3x1a4." .
n Date format: Controls how Dragon NaturallySpeaking Professional formats
dates when the day, month, and year have all been dictated. Select the format you
want from the list.
If you use the default Dates As Spoken value, you need to dictate dates in an
unambiguous way, using the name of the month not the digit for the month. For
example, with Dates As Spoken selected, Dragon NaturallySpeaking
Professional correctly formats "January eleven two thousand nine" and "the
seventh of February two thousand four" as dates but formats "eleven one two
thousand nine" as a number.
If you prefer to dictate dates using digits for the month, try selecting the value that
best matches how you dictate the date. For example, if you normally say "eleven
one two thousand nine", you should set the date format to D/M/YYYY to have
Dragon NaturallySpeaking Professional correctly transcribe the date.
If you omit the year, for example, you say "July twelve", Dragon
NaturallySpeaking Professional transcribes "July 12" ("The twelfth of July"
becomes "12 July") regardless of the type of date formatting you select.
Valid values are:
l Dates As Spoken
l Month D,YYYY
l Month DD,YYYY
l Mon D,YYYY
l Mon DD,YYYY
l M/D/YYYY
l M/D/YY
l MM/DD/YYYY
l MM/DD/YY
l MM-DD-YY
l D Month, YYYY
84
Page 87

l D/M/YYYY
l D/M/YY
l DD/MM/YYYY
l DD/MM/YY
l DD-Mon-YY
l YYYY-MM-DD
n Numbers, if greater than or equal to __: Enabled by default. Inserts
numbers as numerals if they are equal to or greater than the value shown in the
drop-down list. If the number is less than the chosen value, the number is spelled
out. For example, if you select "10," Dragon NaturallySpeaking Professional
transcribes "five" when you dictate "five" and "11" when you dictate "eleven".
Valid values are: Do Not Format, 0, 2, 10, 100. The default value is 0.
Viewing User Profile settings
Chapter 4: Configuring groups and user accounts
In the User Account Details > User Profile tab, you view current settings for a User
Profile. This information is 'read only' in the Nuance Management Console.
The settings that you can view in the User Profile tab are:
n Language: The language or dialect (such as US English or UK English) that the user
uses for dictation. Your choices will depend on the Dragon Medical edition you are
using.
n Language Accent: The type of accent that the user uses for dictation.
n Vocabulary: The Vocabulary list shows the different types of vocabularies available
with Dragon Medical and shows the vocabulary selected for the user profile
associated with the user account. For a list of available Medical vocabularies, see
Selecting a medical vocabulary on page 1.
n Input Devices: The type of device into which the user will be speaking.
The fields in the User Account Details > User Profile tab display language specific
information for DNS Professional .
The following text is displayed above the Language field:
'When a profile is linked to this user account, this section will be populated with the profile
settings the user selected in Dragon Professional'.
Language:
n If the user is using US settings, the field displays “Language: English (US)”.
n If the user is using UK settings, the field displays “Language: English (UK)”.
n If the user's language settings are not know, the field displays “Language: ”.
Language Accent:
n If the user's language settings are not know, the field displays “Language Accent:
”.
85
Page 88

Dragon NaturallySpeaking 13 Administrator Guide
Vocabulary:
n If the user's language settings are not know, the field displays “Vocabulary: ” and is
disabled.
Input Devices:
n If the user's language settings are not know, the field displays “Input devices: ” and
is disabled.
Profile folder name:
n The name of the folder that contains the profile.
Automatically log out an administrator after a period of inactivity
You can set the NMS to automatically log out a user after a specific time of inactivity.
After you set the timeout value, the NMS applies the value the next time a user logs into the
NMS.
When the NMS logs out a user, it discards all unsaved data.
1. In the Nuance Management Console, click Organizations.
2. In the click Organizations area, click Search.
3. Enter search criteria and click the magnifying glass.
4. Select an organization.
5. In the Organizations area, select Details.
6. On the Organization Details screen, click Products.
7. Expand the Nuance Management Server section.
8. In the NMC Inactivity timeout in __ minutes field, enter a value.
9. Click OK.
Viewing, modifying, and deleting a user account
Once you have created and configured a user account you can return to it at any time and
perform the tasks below:
Notes:
n You must have the appropriate Nuance Management Console Administrator security
rights to perform these tasks.
86
Finding and viewing a user account
1. On the menu bar, click User Accounts and then click the Search icon on the User
Accounts ribbon.
2. Enter your search criteria on the User Accounts tab.
Page 89

Chapter 4: Configuring groups and user accounts
You can search for user accounts based on the information that you entered on the
User Account Details tab. You do not have to fill out all of the fields; you can
search on a single field or even a few letters in that field.
3. Click the magnifying glass.
The system displays a list of user accounts that meet your search criteria. If you click
the magnifying glass without entering any search criteria, the system displays a list of
all of the user accounts in the system.
4. In the list, double-click on the name of the user whose account information you want
to view, or select the user on the list and then click Details in the User Accounts
ribbon.
The User Account Details window opens and displays all of the settings for the
selected user account on the Details, Address, Group Memberships,
Messaging. For more details about these tabs, see Creating user accounts on page
56
Deleting a user account
1. On the menu bar, click User Accounts and then click the Search icon on the User
Accounts ribbon.
2. In the User Accounts window, enter your search criteria.
3. You can search for user accounts based on the information that you entered on the User
Account Details tab. You do not have to fill out all of the fields; you can search on a
single field or even a few letters in that field.
4. Click the magnifying glass.
5. Select the user Account that you want to delete from the list and then click Delete on the
User Accounts ribbon.
6. A message displays and asks if you want to delete the user account. Click Yes to delete
the account.
Modifying a user account
1. Use the procedure above to find the user account.
The changes you can make to a user account depend on your security rights. Fields
that you cannot modify are shaded in gray and are inactive.
2. On the Details and Address tabs (see Configuring user account details and
address settings on page 58) you can:
l Change contact information for the user
l Change the user account password. For more details about setting options for
passwords, see Setting user password settings.
3. On the Group Memberships tab you can:
l Add or remove the user account from a group. See Assigning user accounts to
groups on page 62
l Set the default group for a user by moving it to the top of the Selected Groups list.
87
Page 90

Dragon NaturallySpeaking 13 Administrator Guide
5. iii. On the Messaging tab you can:
6. l Set email and mobile messaging options. See Enable sending mes-
sages to an administrator on page 60.
4. On the Dragon Professional tab you can:
l Configure the User Account Options, see Setting user account Dragon Nat-
urallySpeaking Professional client options on page 78
l Modify the text Auto Formatting settings, see Setting Auto-Formatting Dragon
NaturallySpeaking Professional options on page 82
5. On the User Profile tab you can:
n l View the default language and accent for the user profile.
l View the Vocabulary and Input devices for the user profile. See
Viewing User Profile settings on page 85.
l View the Dragon client settings that are only configurable in the
Dragon client for the user profile.
4. When your modifications are complete, click Save to apply them to the user account.
Changing the user account password
1. On the User Account Details screen, click the Details tab.
2. Click the Change password button.
3. In the Change Password dialog box, enter the new password and then confirm it by enter-
ing it a second time.
4. Click OK to save the password and return to the User Account Details tab
Applying Dragon Settings to organizations, sites, or
88
groups
You can apply Dragon NaturallySpeaking Professional Settings at the following levels:
n For the organization
n For the site
Page 91

Chapter 4: Configuring groups and user accounts
n For the group
n For the user account
One feature that you must set on the Dragon Client is the Vocabulary.
If you set the feature for a group, and the group is the first on the Group Details >
Members > Group members list, it applies to all user accounts in that group.
If you set feature for a user account, it applies only to that user account and the user account
level setting overrides the group or site setting.
Configuring the Dragon settings
The following links provide more information on the how to configure the Dragon settings:
n Turning on data collection for your site on page 176
n Setting Dragon NaturallySpeaking Professional voice command options for user
groups on page 100
n Setting Auto-Formatting Dragon NaturallySpeaking Professional options on page 82
89
Page 92

Page 93

Chapter 5: Managing licenses
You can quickly and easily assign licenses to individuals who are managing the
system or dictating using the Dragon Client. This chapter describes how to grant
and revoke licenses and how to obtain information on the licenses being used by
your organization.
Use this chapter to configure settings in the NMC that are common for most
products that use the Nuance Management Server.
The information in this chapter is for administrators that have the
privileges to configure settings for Dragon NaturallySpeaking
Professional.
Managing licenses
When you first install Dragon NaturallySpeaking Professional, you enter the organization number
that Nuance provides, and after the installation is complete, you already have a user account
named admin that you can use to log on.
You purchase three types of licenses:
n Dragon NaturallySpeaking Professional Administrator—License to access the NMS
Server and configure the system. Nuance provides two free licenses of this type.
n Author—License for any type of user to dictate using the Dragon Client.
DNS Professional allows only NMC Administrator users with particular privileges to manage
licenses for all other users.
Types of license upgrades available
If you are an existing customer and would like to purchase additional licenses or upgrade your
existing licenses, you can contact your Nuance representative.
Obtaining and applying licenses
When you first purchase the product, you also usually purchase some initial licenses. To later
purchase additional licenses, contact your Nuance representative.
91
Page 94

Dragon NaturallySpeaking 13 Administrator Guide
Importing licenses included with Dragon NaturallySpeaking Professional
You can purchase as many licenses as you need up front when you purchase the
product. Later, when you start the NMS Server, to download the licenses purchased for
your account:
1. On the menu bar click Licensing, and then click the Import License Key icon. The
Import License Key window opens.
2. Copy and paste the encrypted license key you received in e-mail into the License Key
box.
3. Click Show Information.
4. Click Import. The NMS Server decrypts the license key and generates the licenses on
your system where they become available for you to grant to the user accounts you create.
Purchasing and obtaining new licenses
When you purchase additional licenses through your Nuance representative, once the
licenses have been issued, you see a message about the license or licenses in Utilities>
Messages. You do not have to take any action to receive those licenses. You are not
required to approve them to initiate download of those licenses; instead, the licenses
appear in the Licenses Summary when you click Licensing > View Licenses tab,
where you can grant those licenses to particular administrators or . To refresh the data on
the Licenses Summary screen, press Refresh at the bottom right of the screen.
For more information on working with the licenses in the Licenses Summary, see:
n Granting licenses on page 95
n Receiving expiration alerts and renewing licenses on page 97
n Revoking licenses on page 98
Viewing licenses
After you have purchased licenses and prepared to grant those licenses, any individual with
an NMC Administrator user account that you assigned the appropriate security rights can
take steps to view the licenses that are in the NMS Server.
Viewing existing licenses
1. Click Licensing on the menu bar.
2. Click the View Licenses icon.
3. In the Licenses Summary screen, enter the search criteria.
4. Click Search. The Licenses Summary screen displays the search results.
92
l Organization Name—Each license is associated with a particular organization for a
particular product.
l Mode—This field is always set to Account or Enterprise.
Page 95

Chapter 5: Managing licenses
l OEM Name— Ignore this field.
l Product Name—For an NMC Administrator license, the product name is the
Nuance Mgt Console (NMC); for a Dragon Professional license, the product type
is Dragon NaturallySpeaking.
l License Type—NMC Administrator (for using the Nuance Management
Console), or Dragon Professional (for dictating on client workstations).
l Expires on—The expiration date for the license.
l Total Licenses— Total number of licenses of the particular type that you have,
whether or not you have granted them to anyone.
l Used Licenses—Total number of licenses of the particular type that you have gran-
ted to user accounts.
5. To refresh the data on the Licenses Summary screen, press Refresh at the bottom
right of the screen.
6. From this table, you can now grant or revoke licenses.
As you grant the licenses, the number of that type of licenses available automatically
adjusts in the table. Likewise, when you receive the new licenses from Nuance, the
NMS Server adjusts the number of licenses of that type in the Licenses Summary
table.
Viewing license usage information
In the Nuance Management Console, you can create a report and view data about how your
DNS Professional licenses are being used in your network by indicating how often and when
users last logged in to either the Dragon Client (Author licenses) or the NMS (Administrator
licenses).
You can view usage information for available license types. The following license types are
specific to DNS Professional:
n NMC Administrator
n Author license
.You can use the license usage information in the report to manage and optimize the use of
DNS Professional licenses in your organization. For example, if a user with a DNS
Professional license does not use the license frequently, you can re-assign the DNS
Professional license to another user.
You can also use the license usage information to plan the future license requirements for
your organization.
To generate and view the usage report, you must have the proper administrative rights in the
Nuance Management Server (NMS).
1. Open the Nuance Management Console.
93
Page 96

Dragon NaturallySpeaking 13 Administrator Guide
2. In the Trends section, under Usage, select License Use.
The Nuance Management Console displays the License Usage view.
3. Select the search criteria for the report:
i. The Organization field is greyed out.
ii. In the License type field, select a license type.
iii. In the Start Date/Time field, select a start date and time.
iv. In the End Date/Time field, select an end date and time.
5. Click the magnifying glass.
The Nuance Management Console generates a report using data from the Nuance
Management Server.
The Nuance Management Console displays the report as a grid with the following
information:
94
n Login - The login information of the user.
n Last Name - The last name of the user.
n First Name - The first name of the user.
n Last Login - The date and time that the user last logged into the system.
Page 97

Chapter 5: Managing licenses
n Days Since Last Login - The number of days since the last date the user logged
into the system.
n Login Count -The total number of times the user logged into the system between the
Start Date/time to the End date/time.
Save search results to a .csv file
On screens that display search results, you can save the search result data for future use.
A status bar at the bottom right of the screen displays:
n
The number of rows on the screen, for example: .
n
An icon that refreshes the search results .
n
The save icon.
i.
Press the icon.
ii. In the dialog box, browse to a location to save the file.
iii. Press Save.
Granting licenses
You can grant licenses when you create a user account or after you create the account.
If you delete a user account for a professional who still has an active license, the license
becomes available for you to grant to another user.
Granting a license immediately after creating a user account
1. When you first create a new user account, if you have already downloaded licenses,
when you save the user account, the NMC display the Licenses dialog box .
2. In the Licenses dialog box , select one or more types of licenses to assign to the user
account.
3. Once you select the license types, if purchased licenses of that type are available on
the server, NMS Server automatically assigns them to the user account. Otherwise, it
pops up a message, saying the license is not available. If the license is not available,
that's not a problem, as you can grant the license later, after you either purchase or
download more licenses or free up a license from another user account by revoking
that account's license or deleting the user account.
Granting a license to an existing user account
To grant a license to an existing user account:
1. Click Licensing on the menu bar.
2. In the ribbon below the Licensing tab, click the View Licenses icon.
3. In the Licenses Summary screen, enter search criteria in the fields and click Search.
95
Page 98

Dragon NaturallySpeaking 13 Administrator Guide
4. Click on the row with the type of license that you want to grant.
5. In the License Allocation section, click the Grant icon.
6. When the Grant License tab opens, the organization's name and the type of license
appear in the top left of the screen. Below the organization name, you see a list of
Available Users containing the names of people whose user accounts that do not
have licenses. To the right of the Available Users section, you see an empty list of
Selected Users. A small box labeled Available Licenses displays the number of
licenses that are available for you to assign.
96
Select the person or persons to grant the license to in the Available Users list and
those names become highlighted.
7. Click the > button between the two lists to move that user's name to the Selected
Users list. The user name(s) move to the Selected Users list on the right and the
number of available licenses then reduces to show that fewer licenses are available.
8. If you missed any names, repeat the last three steps for other users in the Available
Users list who you'd like to grant the same type of license.
9. If you make a mistake or change your mind about granting one of these licenses while
the tab is still open, you can click on the name in the Selected Users list and click the <
button to return that name to the Available Users list.
Page 99

Chapter 5: Managing licenses
10. When you are satisfied that licenses listed are those you want to grant, click OK to
save the information and grant the licenses. The tab closes and you return to the
Licenses Summary table.
11. Repeat this process for each type of license you want to grant.
Receiving expiration alerts and renewing licenses
Thirty days before a Dragon NaturallySpeaking Professional license is going to expire, you
start receiving alerts about that fact. You should be sure to renew the license before it
expires.
Viewing messages about expired licenses
If a license is close to expiring, you receive a reminder message. To view messages that
might contain alerts about licenses that are expiring soon:
1. Click the Utilities tab on the ribbon.
2. Click Messages.
3. In the Messages window, search for messages that are related to licenses. Expiration
messages look like the following messages:
4. If the message says a license or set of licenses are about to expire, you should follow
the renewal process below to renew the license.
Renewing the License
To renew an existing license:
1. Contact your Nuance representative. The representative should be able to verify your
official organization number and take you through the process of purchasing renewal
licenses and any additional licenses you would like.
97
Page 100

Dragon NaturallySpeaking 13 Administrator Guide
2. Once the renewal is approved, the licenses download to the Nuance Management
Server. You can then see the licenses in your Nuance Management Console.
Revoking licenses
To revoke a license that is associated with a user account:
1. Click Licensing on the menu bar and in the ribbon below the Licensing tab you see the
View Licenses icon.
2. Click the View Licenses icon.
3. Enter search criteria and click Search.
4. Click on a license that you want to revoke.
5. To revoke the license from one or more uses, in the Licensing area, click the Revoke
icon. The Nuance Management Console displays the Revoke License tab. In the tab, you
see a list of Licensed Users to the left and an empty Selected users list to the right.
6. In the Licensed Users list, select one or more users to revoke a license from, then click
the button between the two lists with a > symbol in it. The names move to the Selected
users list.
7. Click OK to save the change. The tab closes and you return to the Licenses Summary
table. The newly revoked licenses should be added to the number of licenses available in
the table.
8. Repeat this process for each type of license you want to revoke.
Dictating with Author licenses while disconnected from network
Because licenses to dictate with a Dragon Client are always stored on the NMS Server, each
user with an Author license must log on to the network at least every 90 days. The 90 day
limit is how long the professional can dictate (usually on a laptop) without connecting to the
server to refresh the license.
If the user tries to dictate for longer than 90 days without connecting to the server, Dragon
NaturallySpeaking Professional rejects that provider's user name and password, and
prompts the professional to connect to the network.
The Dragon Client continues to refuse the user access until after the dictation equipment has
been reconnected to the network, where the NMS Server can confirm authorization to use
the license.
98
 Loading...