

Page 1

Administrator Guide
Version 11.5
1
Page 2

Dragon Administrator Guide version 11.5
Copyright
2011. Dragon version 11.5.
This material may not include some last-minute technical changes and/or revisions to the software. Changes are periodically
made to the information provided here. Future versions of this material will incorporate these changes.
No part of this manual orsoftware may be reproduced in any form or by any means, including, without limitation, electronic or
mechanical, such as photocopying or recording, or by any information storage and retrieval systems, without the express
written consent of Nuance Communications, Inc. Specifications are subject to change without notice.
Copyright © 2002-2010 Nuance Communications, Inc. All rights reserved.
Nuance, ScanSoft, the Nuance logo, the Dragon logo, Dragon, DragonBar, NaturallySpeaking, NaturallyMobile, RealSpeak,
Nothing But Speech (NBS), Natural Language Technology, Select-and-Say, MouseGrid, and Vocabulary Editor are registered
trademarks or trademarks of Nuance Communications, Inc. in the United States or other countries. All other names and trademarks referenced herein are trademarks of Nuance Communications or their respective owners. Designations used by thirdparty manufacturers and sellers to distinguish their products may be claimed as trademarks by those third-parties.
Adobe and Acrobat are registered trademarks of Adobe Systems Incorporated. AMD is a trademark of Advanced Micro
Devices, Inc. America Online is a registered trademark of America Online, Inc., a division of AOL Time Warner. Corel and
WordPerfect are registered trademarks of Corel Corporation. iPAQ is a registered trademark of the Hewlett-Packard Company.
Lotus and Lotus Notes are registered trademarks of Lotus Development Corporation. Macromedia Flash? is a trademark of Macromedia, Inc. Microsoft, Outlook, Windows, Windows NT, Visual Basic, and PowerPoint are trademarks or registered trademarks of Microsoft Corporation. Mozilla, Mozilla Firefox, and Mozilla Thunderbird are trademarks or registered trademarks of
the Mozilla Foundation. Palm OS is a registered trademark of PalmSource, Inc. or its affiliates. Panasonic is a registered trademark of the Matsushita Electric Industrial Co., Ltd. Pentium is a registered trademark of Intel Corporation. Sony and Memory
Stick are registered trademarks of the Sony Corporation. Voice It, the Voice It logo, and Voice It Link are trademarks or registered trademarks of VXI Corporation.
Disclaimer
Nuance makes no warranty, express or implied, with respect to the quality, reliability, currentness, accuracy, or freedom from
error of this document or the product or products referred to herein and specifically disclaims any implied warranties, including, without limitation, any implied warranty of merchantability, fitness for any particular purpose, or non-infringement.
Nuance disclaims all liability for any direct, indirect, incidental, consequential, special, or exemplary damages resulting from the
use of the information in this document. Mention of any product not manufactured by Nuance does not constitute an endorsement by Nuance of that product.
Notice
Nuance Communications, Inc. is strongly committed to creating high quality voice and data management products that, when
used in conjunction with your own company’s security policies and practices, deliver an efficient and secure means of managing confidential information.
Nuance believes that data security is best maintained by limiting access to various types of information to authorized users only.
Although no software product can completely guarantee against security failure, Dragon Medical Enterprise Network Edition
software contains configurable password features that, when used properly, provide a high degree of protection.
We strongly urge current owners of Nuance products that include optional system password features to verify that these features are enabled! You can call our support line if you need assistance in setting up passwords correctly or in verifying your
existing security settings.
Published by Nuance Communications, Inc., Burlington, Massachusetts, USA
Visit Nuance Communications, Inc. on the Web at www.nuance.com.
Visit Nuance Healthcare on the Web at www.nuance.com/healthcare.
2
Page 3

Contents
Chapter 1: Introduction to Dragon 11.5 1
Getting started with Dragon 11.5 2
Dragon version 11.5 - What's New for administrators 4
Configuring how Dragon receives audio from a smartphone 6
How Dragon receives audio from a smartphone 6
Configuring the smartphone server 6
Dictating with a smartphone over a network 11
Using the Dragon Remote Microphone Application in a home network 11
Using the Dragon Remote Microphone Application in Public Wi-Fi Hotspots 11
Using the Dragon Remote Microphone Application in corporate environments with multiple subnets 11
Issues with Firewalls, Antivirus software and Malware detection software 12
iOS 4.3 and HotSpot Tethering 12
Creating Windows shortcuts to User Profiles and Vocabularies 13
To create a shortcut to a User Profile and Vocabulary 13
Types of Paths 14
Using multiple acoustic models with a User Profile 15
Acoustic Optimization for User Profiles with BestMatch IV acoustic models 15
Multiple acoustic models and User Profiles on single and multi-core computers 15
Using Australian, Indian, and Southeast Asian accents in Dragon 11 or greater
17
Upgrading User Profiles older than Version 10.0 Service Pack 1 to Dragon 11 or greater
17
Upgrading User Profiles newer than Version 10.0 Service Pack 1 to Dragon 11 or
greater 18
Installing, modifying and upgrading Dragon 21
Chapter 2: Preparing to Install Dragon 23
Preparing for an installation or upgrade 24
Installation restrictions 24
File Structure 24
Installation checklist 25
Installation checklist 25
Upgrade checklist 26
Support Checklist 26
Dragon system requirements 27
Processor 27
Processor cache 27
Page 4

Contents
Operating systems and RAM 27
Free hard disk space 28
Microphone 28
Sound card 28
Other requirements 28
Storage space required for User Profiles 30
Installing on or Upgrading to Windows Vista and Windows 7 32
Upgrade considerations 32
Roaming User Profiles in an MSIInstallation on Vista or Windows 7 32
Coexistence with other Dragon products 33
Coexistence with previous versions of Dragon 33
Coexistence with Dragon SDK Client Edition 33
Run Dragon SDK Client Edition 11 on a computer with Dragon 11 or greater 33
Run Dragon 11 or greater on a computer with Dragon SDK Client Edition 11 33
Chapter 3: Installing Dragon 35
Installing Dragon on a single computer 36
Installing the Dragon 11.5 service pack 40
Sample custom installation of Dragon Medical 41
Preparing for the Roaming feature 41
Install Dragon 41
Setting the Dragon Options 42
Setting the Administrative Options: Roaming User Profiles 51
Setting the Administrative Options: Miscellaneous options 54
Setting the Administrative Options: Scheduled Tasks 55
Setting Auto-Formatting Options 55
57
Post Installation Tasks 58
Cleaning up after uninstalling Dragon 58
Dragon file structure 59
Turning off Dragon's use of Microsoft Active Accessibility Service 63
Choosinga Medical Vocabulary toSupport YourSpecialty 65
Dragon Medical USand UKEnglish Vocabularies and Specialties 65
Enhancing the privacy of patient data 71
Security Considerations 71
Chapter 4: Upgrading Dragon 73
Upgrading Dragon 74
Installing on or Upgrading to Windows Vista and Windows 7 76
Upgrade considerations 76
Roaming User Profiles in an MSIInstallation on Vista or Windows 7 76
4
Page 5

Contents
Upgrading multiple User Profiles 77
Using the User Profile Upgrade Wizard 77
User Profile Upgrade Wizard: Select the profile(s) to upgrade 77
User Profile Upgrade Wizard: Begin profile upgrading 80
Step 3: Upgrade the end-user systems 81
Preparing to upgrade Roaming User Profiles 83
Step 1: Install Dragon 11 or greater on the computer where you upgrade the Dragon 9.x or
10.x Master Roaming User Profiles 83
Step 2:On the Dragon 9.x or 10.x end-user systems that use the Roaming feature 83
Step 3: On the central network storage location for the Dragon 9.x or 10.x Master Roaming
User Profiles 84
Step 4: Copy the Dragon 9.x or 10.x Master Roaming User Profiles to the Dragon 11 or greater
client computer 84
Step 5: On the administrator system where you plan to upgrade the Dragon 9.x or 10.x Master
Roaming User Profiles 84
Upgrading master Roaming User Profiles 86
Step 1:Upgrade the Dragon 9.x or 10.x Master Roaming User Profiles 86
Step 2: Clean up the Dragon 9.x or 10.x locations for master Roaming User Profiles (optional)
89
Step 3: Copy the Dragon 11 or greater Master Roaming User Profiles to their network location
(Optional) 90
Step 4: Upgrade end-user systems to Dragon 11 or greater 90
Upgrading end-user systems 91
Step 1: Upgrade Dragon 9.x or 10.x systems that use the Roaming feature 91
Upgrading multiple User Profiles 93
Using the User Profile Upgrade Wizard 93
User Profile Upgrade Wizard: Select the profile(s) to upgrade 93
User Profile Upgrade Wizard: Begin profile upgrading 96
Vocabularies Created by a Third Party (other than by Nuance) 96
Using a custom vocabulary from Dragon Medical 10.x or earlier with Dragon Medical 11 or
greater 96
Upgrading User profiles with third party vocabularies 96
Step 2: Upgrade a User Profile that uses a custom vocabulary 97
Step 3: Import custom words to the upgraded User Profile 97
Step 4: Export the customized vocabulary 98
Step 5: Use nsadmin or the Data Distribution tool to copy the vocabulary you export 98
Chapter 5: Installing Dragon using the Windows installer (MSI) 99
Overview of Installing Dragon using the Windows Installer (MSI) 101
Before You Begin 101
Finding the MSI Installer on the DVD 101
5
Page 6

Contents
Windows Vista Notes 102
Overview of the Network Installation of Dragon from a Server 103
Overview of Pushing Client Installation from a Server 103
Support for SMS and Windows 2003 Server with Active Directory 103
Overview of Alternative Ways to Carry Out Administrative Installation 104
Modifying Roaming User Profile, Miscellaneous, Schedule Settings in the INI File 105
Understanding and applying the Roaming User Options 105
Editing Miscellaneous and Scheduled Task Settings in nsdefaults.ini File 110
Understanding Network and Connection Settings in roamingdef.ini File 114
Carrying Out an Administrative Installation with .bat File 116
Understanding the script in admininstall.bat 116
Modifying admininstall.bat 118
Install Dragon on an initial computer and choose the default settings 119
Extracting MSI/MST Files from the Dragon setup.exe 120
Extracting MSI/MST Files from setup.exe 120
Using .MSI/.MST Files for Custom Installations Example 123
Step1: Running setup.exe to Extract .MSI and .MST Files 123
Step 2: Passing MST File to setup.exe to Install Dragon 123
Installation using the Dragon installation process 125
Install the Same Configuration on Additional computers 127
Creating Custom Installation Using Microsoft Custom Install Wizard 129
Installing the Microsoft Custom Installation Wizard 129
Modifying setup Properties for Custom Installation 129
Installation using the Dragon command line 137
Running natspeak.exe to Set Options 138
Natspeak.exe command line reference 142
Other Actions You Can Take on Command Line 143
Modifying Default Installation Directory 144
Configuring Installation of Product Updates 145
Suppressing Reboot of the computer After Installation 146
Setting Dragon to Run in QuickStart Mode 147
Installing the same Roaming User Profile Configuration on Additional computer(s)
Silent Installation with Language Other Than US English 149
Revising Day/Time of Scheduled Tasks (Optional) 150
Configuring Local or On-Demand Install of Vocabularies/Text-to-Speech (Optional)
Installing only particular vocabularies locally, others on-demand 152
Installing Text-to-Speech feature 153
Upgrading Your Dragon Installation from the Command Line 154
148
152
6
Page 7

Contents
Upgrading Roaming User Profiles 154
Step-by-Step Process for Upgrading Roaming User Profiles 156
Major and Minor Upgrades: Silent Upgrade 161
Overview of Silent Upgrade 161
GUIDs for uninstalling 161
Step-by-Step Upgrade Process 162
Using setup.exe for Upgrades 165
Using setup.exe for Silent Upgrades 165
Step-by-Step Command Line Installation with msiexec.exe 166
Finding the MSI Installer on the Dragon DVD 166
Install Dragon on Initial computer and Establish Configuration 166
Install Same Configuration on Additional computer(s) 166
Additional Options for Installations with msiexec.exe 169
Additional Options for Silent Installations 170
Modifying Default Installation Directory 170
Configuring Installation of Product Updates 170
Suppressing Reboot of computer After Installation 171
Suppressing Reboot of computer After Installation 171
Setting Dragon to run in QuickStart Mode 171
Installing the Same Roaming User Profile Configuration on Additional computer(s) 172
Launching Online Registration Form After Installation 172
Installing Some Vocabularies Locally and Others On Demand 173
Installing Text-to-Speech Feature 174
Reinstalling Dragon with Particular Set of Features 174
Setting Day/Time for Scheduled Tasks 174
Launching Online Registration Form After Installation 175
MSI Options Specific to Dragon 176
MSI Options for Installing Dragon Features/Advanced Options 180
MSI Options for Roaming User Profile, Tuning, and Data Collection Setup 183
Feature Variables to Set Through the ADDLOCAL or ADVERTISE Properties 186
Installing Visual C++ Runtime for Dragon 191
Manually Installing Visual C++ Runtime 191
Pushing an installation of the Visual C++ Runtime 191
Using an MSIfile to install the Visual C++ Runtime from a command line 192
Command Line Options for vcruntime.exe 192
Chapter 6: Configuring and using the Roaming feature and Roaming
User Profiles 193
Setting up the Roaming feature 195
Overview of the Roaming feature 197
7
Page 8

Contents
The relationship between the Master and the Local Roaming UserProfile 197
Advantages of the Roaming feature 197
Hosting Master Roaming User Profiles 198
Why the Master Roaming User Profiles should be in shared directories 198
Controlling user access to other user's profiles 199
Backing up your Master Roaming User Profiles 200
Setting up the Roaming feature 202
Creating a network storage location for the Master Roaming User Profiles 203
What to consider for the Master Roaming User Profile location 203
Using a networked computer or Windows file server 203
Using a HTTPor HTTPS web server 204
Where to install and configure Dragon 207
Installing Dragon where you plan to dictate using the Roaming feature 207
Installing Dragon on the same computer as your Master Roaming User Profiles 207
For more information on installing or upgrading Dragon 207
Storage space required for the Master and Local Roaming User Profiles 209
For each Master Roaming User Profile- on the network 209
For each computer where Dragon is installed 209
For each Local Roaming User Profile- on the client PC 209
How Dragon Synchronizes Master and Local Roaming User Profiles 211
What happens during synchronization 211
What files are synchronized 212
Estimating Network traffic caused by synchronization 215
Enabling the Roaming feature on each computer where a user will dictate 218
Step 1: Start Dragon 218
Step 2: If already Dragon is running, select Administrative Settings 218
Step 3: Turn on the Roaming feature 218
Step 4: Set the location of Master Roaming User Profiles 219
Step 5: Set location of Local Roaming User Profiles 220
Step 6: Set Roaming feature options 221
Notes: 221
Administrative Settings: Roaming tab 222
Administrative Settings: Roaming User Network Location 225
Display Name 225
Network Location—Address 225
Setting up HTTPConnection: HTTP Settings 227
Authentication 227
Connection 227
Firewall and Proxy Servers 228
8
Page 9

Contents
Timeouts 228
Test Connection 229
Restore Defaults 229
Setting up secure web server connection: SSL Settings 230
Certificate Store 230
Open SSL 231
General 231
Test Connection 231
Restore Defaults 231
Testing and troubleshooting an HTTP connection 232
Troubleshooting test connections 232
Setting and selecting Roaming User Profile options 234
Roaming User Profile options on the Administrative Settings dialog box 234
Creating a Roaming User Profile on the local computer 240
Creating and training a new Roaming User Profile 241
Converting a non-roaming local User Profile into a Roaming User Profile 242
Dictating with a Roaming User Profile 243
Opening a Roaming User Profile 244
Using multiple dictation sources with a single User Profile 245
To add a new dictation source to a user profile 245
Running the Acoustic and Language Model Optimizer for Roaming User Profiles 246
Running the Acoustic and Language Model Optimizer on a multi-core computer 246
Running the Acoustic and Language Model Optimizer on a User Profile with two acoustic models 246
To run the Acoustic and Language Model Optimizer to optimize Roaming User Profiles 247
Controlling user access to other user's profiles 248
Making it easier for users to select their User Profiles 248
Configuring Internet Information Services and WebDAV for HTTP Roaming 251
Configuring Internet Information Servicesand WebDAV 252
Installing and configuring WebDAV on Internet Information Services 6.0 252
Installing and configuring WebDAV on Internet Information Services 7.0 253
Configuring Dragon internet roaming 255
Upgrading Roaming User Profiles:Overview 256
Step 1: Preparing to upgrade Roaming User Profiles 256
Step 2: Upgrading the User Profiles 257
Step 3: Upgrade the end-user systems 257
Preparing to upgrade Roaming User Profiles 258
Step 1: Install Dragon 11 or greater on the computer where you upgrade the Dragon 9.x or
10.x Master Roaming User Profiles 258
Step 2:On the Dragon 9.x or 10.x end-user systems that use the Roaming feature 258
9
Page 10

Contents
Step 3: On the central network storage location for the Dragon 9.x or 10.x Master Roaming
User Profiles 259
Step 4: Copy the Dragon 9.x or 10.x Master Roaming User Profiles to the Dragon 11 or
greater client computer 259
Step 5: On the administrator system where you plan to upgrade the Dragon 9.x or 10.x
Master Roaming User Profiles 259
Upgrading master Roaming User Profiles 261
Step 1:Upgrade the Dragon 9.x or 10.x Master Roaming User Profiles 261
Step 2: Clean up the Dragon 9.x or 10.x locations for master Roaming User Profiles (optional)
Step 3: Copy the Dragon 11 or greater Master Roaming User Profiles to their network location
(Optional) 265
Step 4: Upgrade end-user systems to Dragon 11 or greater 265
Upgrading end-user systems 266
Step 1: Upgrade Dragon 9.x or 10.x systems that use the Roaming feature 266
264
Chapter 7: Customizing and optimizing Vocabularies 269
Customizing Vocabularies with the Vocabulary Tool 270
Voctool command line examples 283
Definition: The language model 285
About language model slots 286
Storing language model information 286
Chapter 8: Customizing a User Profile 287
Adding words, commands, or vocabularies to User Profiles 288
Using the Data Distribution Tool 288
Creating the Data Distribution Directory 289
The Nsadmin utility for new words, vocabularies, and commands 296
Using paths with the nsadmin utility 304
Chapter 9: Maintaining a Dragon installation 305
Maintaining Installations 306
Using Acoustic and Language Model Optimizer and Scheduler Tools 307
Running Acoustic and Language Model Optimizer on Non-Roaming User Profiles 307
Running the Acoustic and Language Model Optimizer on a multi-core computer 307
To run the acoustic and language model optimizers on non-Roaming User Profiles: 308
Running Acoustic and Language Model Optimizer on Roaming User Profiles 308
Removing One or More Optimization Schedules 310
Exporting and Importing User Profiles 311
Exporting User Profiles 311
Importing User Profiles 311
Handling Dragon Error Messages 312
Working with the Usability Log 313
10
Page 11

Contents
Accessing the Dragon Knowledge Database 314
Hardware Compatibility List 315
Managing user administrative privileges 316
Chapter 10: Working with Custom commands 317
Managing and Securing Custom Commands 318
Using the Convert XML to DAT tool 319
Using the MyCommands Protection Utility 321
Chapter 11: Commands that perform actions based on the application
state 323
Using Structured Commands 324
Structured Command Samples 325
Importing Sample Structured Commands 327
Chapter 12: Configuring administrative features in Dragon 329
Summaries of Administrative Settings Dialog Boxes 330
Administrative Settings: Roaming tab 331
Administrative Settings: Roaming User Network Location 334
Display Name 334
Network Location—Address 334
Administrative Settings: Miscellaneous tab 336
Notes 338
Administrative Settings: Scheduled Tasks tab 340
Accuracy Tuning 340
Data Collection 340
Glossary 342
.DRA files (definition) 344
Accuracy Center(definition) 345
Accuracy Tuning (definition) 346
Acoustic Optimizer (definition) 347
Advanced Scripting (definition) 348
Commands-only Vocabulary (definition) 349
Command Browser (definition) 350
Correction menu (definition) 351
Command Mode (definition) 352
Correction-only mode (definition) 353
Data Distribution Tool (definition) 354
Dictation Box (definition) 355
Dictation Mode (definition) 356
Dictation Source (definition) 357
DragonPad (definition) 358
11
Page 12

Contents
Hidden Mode (definition) 359
Language Model optimization (definition) 360
Language Model Optimizer (definition) 361
Normal Mode (definition) 362
Numbers mode (definition) 363
QuickStart (definition) 364
Recognition Modes (definition) 365
Roaming User (definition) 366
Spell Mode (definition) 367
User Profile (definition) 368
12
Page 13

Chapter 1: Introduction to
Dragon 11.5
Dragon version 11.5 contains new features and improvements that enhance your ability to talk to, control, and interact with your computer. This section contains general information on Dragon and information on the exciting new features of Dragon 11.5.
Getting started with Dragon 11.5 2
Dragon version 11.5 - What's New for administrators 4
Configuring how Dragon receives audio from a smartphone 6
Dictating with a smartphone over a network 11
Creating Windows shortcuts to User Profiles and Vocabularies 13
Using multiple acoustic models with a User Profile 15
Using Australian, Indian, and Southeast Asian accents in Dragon 11 or greater 17
1
Page 14

Dragon Administrator Guide version 11.5
Getting started with Dragon 11.5
Dragon version 11.5 - What's New for administrators
This section describes the new administrator features of
Dragon Version 11.5.
For more information about Dragon NaturallySpeaking,
see
http://www.nuance.com/naturallyspeaking/
Installing, modifying and upgrading Dragon
and Installation checklists
View information on the different ways to install, mod-
ify, and upgrade Dragon.
Dragon on the Web
The Nuance Web site
(www.nuance.com) gives
you access to many
resources, including
Frequently Asked Questions, usage tips, customer
stories, Customer Service
information, Technical Support content, and a detailed
comparison between Dragon
editions.
Setting up the Roaming feature
The
Roaming
feature lets
users dictate with Dragon
from different network locations and different computers without having to
create and train individual
User Profiles at each location.
Adding words,commands, or vocabularies to User Profiles
You use the nsadmin command line utility and the
Dragon
Data Distribution Tool
when you want to make
new words, customized vocabularies or new commands
available to all User Profiles on a particular Dragon installation.
Using the Convert XML to
DAT tool
and the MyCommands Pro-
tection Utility
You can make your custom
commands more secure in
two ways:
n Use the
DAT tool
Convert XML to
to convert any
XML files of commands
to DAT format.
n With the
Protection Utility
MyCommands
, you
can prevent unauthorized
Dragon users from editing
the commands by locking
access to the file.
Dragon system requirements
2
Page 15

Chapter 1: Introduction to Dragon 11.5
Using Structured Commands
Dragon Professional, Medical, and Legal editions - include an
extension to Text-and-Graphics commands that let you
to set the values of variables in text blocks based on
voice input.
Dragon 11 is compatible
with Windows 7, Windows
Vista, Windows XP SP3,
Windows Server 2008
3
Page 16

Dragon Administrator Guide version 11.5
Dragon version 11.5 - What's New for administrators
The following table lists details about the new features and changes in Dragon 11.5.
New features
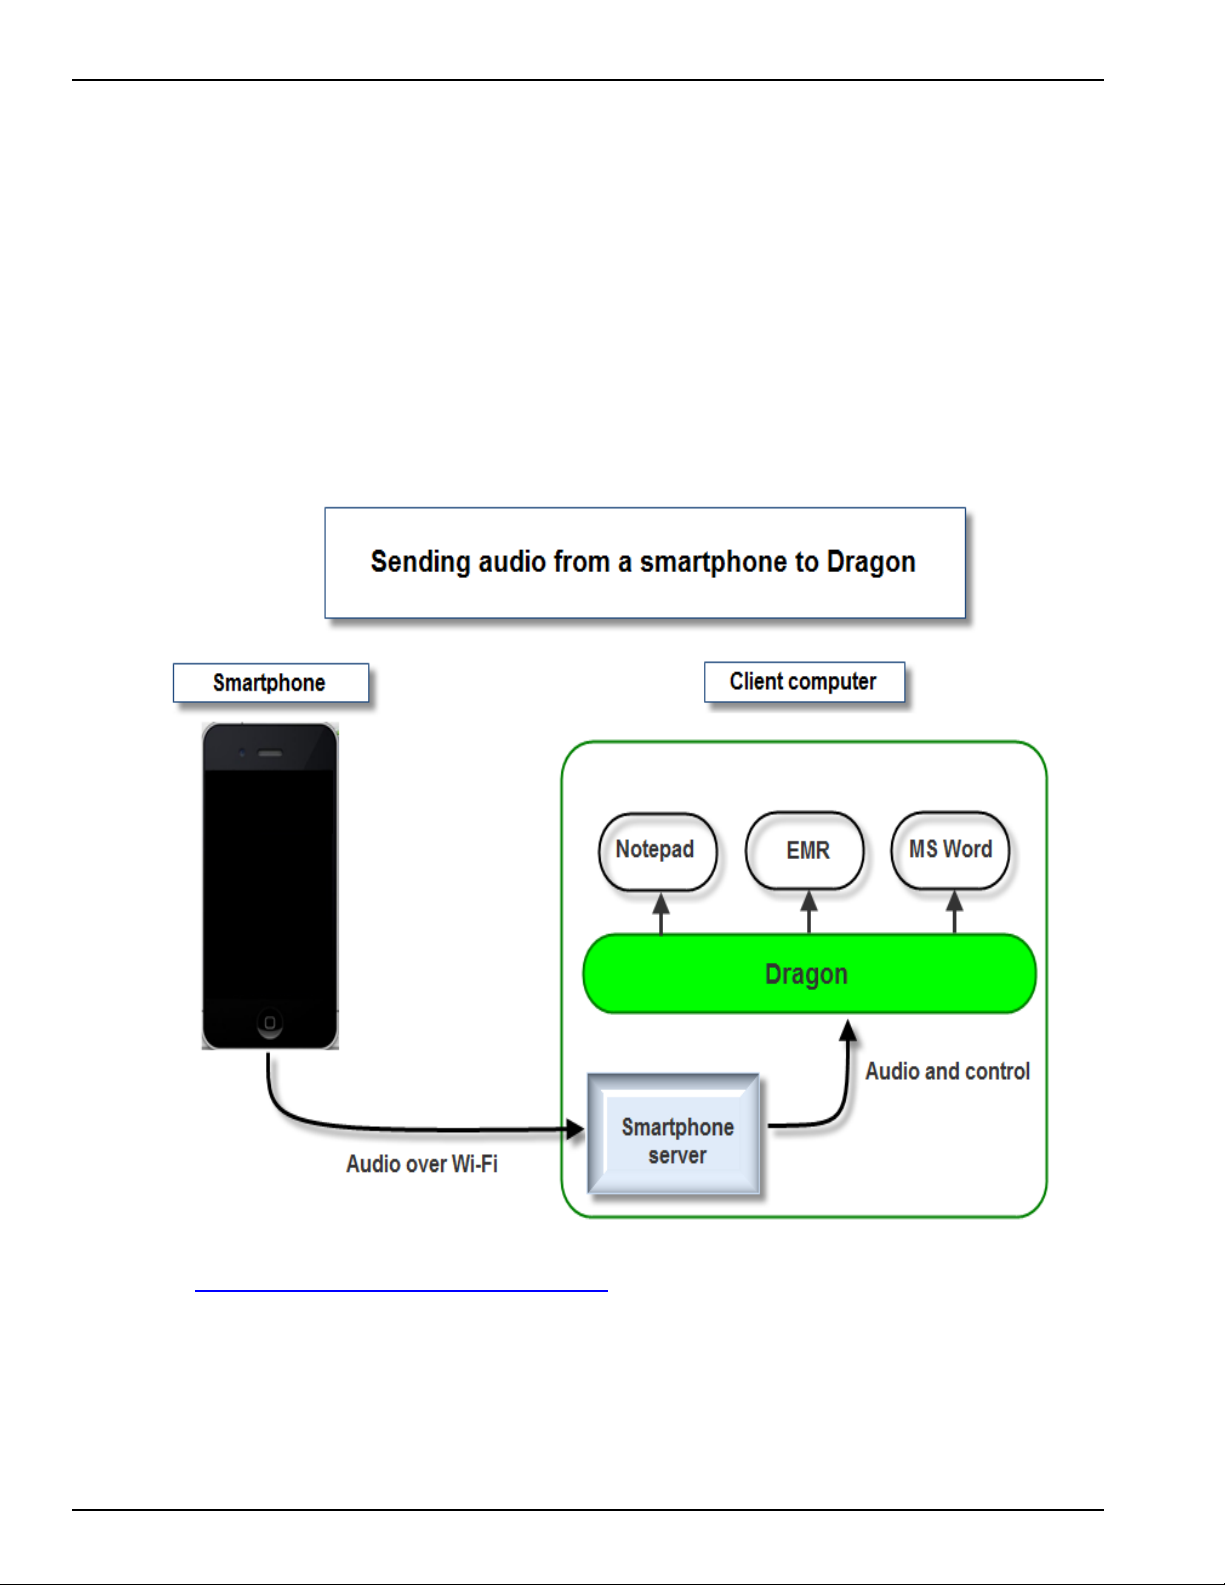
Use a smartphone as a microphone for dictation
You can create a User Profile that uses a smartphone as a dictation source. You can also add a
smartphone as a dictation source to an existing User Profile. You use the Dragon Remote
Microphone application on the smartphone to start dictating into Dragon. As you dictate, the
smartphone transfers the audio data through a Wi-Fi connection to the smartphone server. The
server processes the audio and sends it to Dragon.
See Configuring how Dragon receives audio from a smartphone for more details on the smart-
phone server.
See Dictating with a smartphone over a network for more details about networks that support
a smartphone as a dictation device.
See the Dragon Help for more details on dictating with a smartphone.
Support for Internet Explorer version 9
You can use Dragon 11.5 with Internet Explorer 9 from Microsoft. Dragon 11.5 also supports
Internet Explorer version 6 or greater. A complete list of commands you can use with Internet
Explorer is available through the Command Browser. You can also view commands in the
Dragon Sidebar while you use Dragon.
For information on new commands you can use with Internet Explorer 9, see the Dragon Help.
For more information on applications that Dragon 11.5 supports, see http://ww-
w.nuance.com/ucmprod/groups/dragon/@web-enus/documents/collateral/nd_004125.pdf
Save a User Profile locally or to the master location
An administrator can set the Prompt before saving to network location option in the
Administrative Settings - Roaming tab to let users choose where to save their User Profile.
When an administrator enables this option, when a user attempts to close Dragon or turn off or
log off the operating system, a dialog box appears that lets the user choose to save their profile
locally or to the master network location. A user can save their profile locally if they are on a
slow network. A user can save their profile to the master location to ensure any updates to
their profile are available at other network locations.
See Setting and selecting Roaming User Profile options for more information.
Installing the Dragon 11.5 service pack
If a user already has Dragon 11 on their computer, they can download and install the Dragon
11.5 service pack using the Nuance Update Service. See Installing the Dragon 11.5 service
pack for more information.
4
Page 17

Chapter 1: Introduction to Dragon 11.5
New features
Upgrading from earlier versions of Dragon
You can upgrade Dragon versions 9.x and 10.x to Dragon 11.5. Upgrades from version 8.x and
earlier are not supported.
5
Page 18
Dragon Administrator Guide version 11.5
Configuring how Dragon receives audio from a smartphone
How Dragon receives audio from a smartphone
When a user sets up a smartphone as a dictation source and begins dictating into the phone, the
Dragon Remote Microphone application sends the audio to a component called the smartphone
server. The smartphone server processes the audio and sends it to Dragon.
The Dragon installation process installs the smartphone server on the same computer where you
install Dragon.
See Dictating with a smartphone over a network for more details about networks that support a
smartphone as a dictation device.
Configuring the smartphone server
You use the DNSSPServer.exe.config file to modify settings for the smartphone server.
TheDNSSPServer.exe.config file is an XML-based configuration file that the Dragon installation
6
Page 19

Chapter 1: Introduction to Dragon 11.5
process places in the same folder as the smartphone server .exe file (dnsspserver.exe).:
On Windows 7, the dnsspserver.exe.config file is in the following directory:
C:\Program Files\Nuance\NaturallySpeaking11\Program
Use caution if you modify the configuration settings for the smartphone server since incorrect settings can have unforeseen side effects.
Serious problems may occur if you modify the configuration file incorrectly. Nuance cannot guarantee that these problems can be resolved and you may need to reinstall the software. Modify the
configuration file at your own risk.
Set message logging
In the DNSSPServer.exe.config file, in the <switches> section, set the value parameter for the ServiceDebugLevel option to one of the following values:
Message type Value
No tracing "Off"
Fatal error or application crash "Critical"
Recoverable error "Error"
Non-critical problem "Warning"
Informational message "Information"
Debugging trace "Verbose"
For example:
<add name="ServiceDebugLevel" value="Information" />
Viewing log information
Each time the smartphone server starts, the server creates a tracing / error log file (spserver.log) in
the current Windows user’s TEMP directory. You can view this file when trouble shooting problems with the smartphone server.
You can also view logging information in real-time by performing the following steps:
1. Stop Dragon (or the dnsspserver.exe process)
2. Run the smartphone server manually in debug mode: In a command prompt, navigate to the
directory that stores the dnsspserver.exe file. Type “dnsspserver /debug".
3. Restart Dragon.
Set the logging of network statistics
You can enable the gathering and logging of network statistics data. The data is placed in the
SpServer.log and the Dragon.log.
In the DNSSPServer.exe.config file, in the <appSettings> section, set the value parameter for the
DNSNetMonitoring option to one of the following values:
7
Page 20

Dragon Administrator Guide version 11.5
Audio support type Value
Enable the logging of network statistics "True"
Disable the logging of network statistics "False"
For example:
<add key="DNSNetMonitoring" value="true"/>
Set the time interval of network statistic reports
You can set the time period, in seconds, during which the system gathers network statistics.
When the time period expires, the system prints the statistics to the SpServer.log and the Dragon.log. log files.
For example:
<add key="DNSNetMonitorStatisticsWindow" value ="60"/>
Example log entry:
Info: NetStats: [Interval=60s, 44058Bps, Total=43854Bps]
Log entry explanation:
Over a 60 second time interval, an average of 44058 bytes per second was received, and an aver-
age of 43854 bytes per second is being received for the session to date. (44100Bps is considered
nominal for 22050Hz audio).
Set the time interval for logging audio not received
You can set the maximum time that elapses before the system logs no audio received. The system
logs the message when the timeout elapses (See Set the time interval for network statistic
reports).
For example:
<add key="DNSNetMonitorMaxPacketGap" value="5"/>
Audio not received log entries
The system logs 3 types of entries that are related to audio not received.
Log type Example Explanation
No audio received Warning: NetStats: No audio
data for 15s
Audio received after
interval of no audio
Warning: NetStats: Audio
data gap=90s > max=5s
Over a 15 second interval, no audio was
received.
When the system receives audio, it logs a
message that shows the amount of time that
elapsed without receiving audio and the maximum value specified by this parameter. In
this example, 90 seconds passed without
receiving audio data.
Session ends NetStats: Info: [Ses-
sion=92s, Total=44128Bps]
8
When a session ends (the dictation microphone is turned off), the system logs a message about the session length and the
Page 21

Chapter 1: Introduction to Dragon 11.5
Log type Example Explanation
average transfer rate. In this example, the
session length was 92 seconds and the average transfer rate was 44128Bps.
Set the audio sources that Dragon allows
In the DNSSPServer.exe.config file, in the <appSettings> section, set the value parameter for the
DNSAllowAnyAudioSource option to one of the following values:
Audio support type Value
[Default] Allow only smartphone audio sources "false"
Allow ANY DNS audio source "true"
For example:
<add key="DNSAllowAnyAudioSource" value="false" />
Set encryption of audio data sent between the phone and the server
In the DNSSPServer.exe.config file, in the <appSettings> section, set the value parameter for the
AudioDataEncryption option to one of the following values:
n "none" = [Default] Do not encrypt audio data
Set the default sample rate for Dragon
In the DNSSPServer.exe.config file, in the <appSettings> section, set the value parameter for the
SampleRate option to one of the following values (in Hz):
n "11025"
n "22050"
For example:
<add key="SampleRate" value="22050" />
Set the domain name for the Bonjour Domain Name Service
In the DNSSPServer.exe.config file, in the <appSettings> section, set the value parameter for the
BonjourDomainName option to the domain name for the service. An empty string represents
the default domain.
For Example:
<add key="BonjourDomainName" value=""/>
You can set the BonjourDomainName option to a valid domain name for your network provided
your computer has a real IP Address and is not using one of the private 10. 192., or 168. NAT
addresses.
9
Page 22

Dragon Administrator Guide version 11.5
Set the timeout interval for the smartphone and server connection
In the DNSSPServer.exe.config file, in the <appSettings> section, set the value parameter for the
SPServiceSessionTimeout option to the number of seconds of inactivity that occurs before the
connection between the smartphone and the smartphone server is released and made available to
other smartphones..
For example:
<add key="SPServiceSessionTimeout" value="120"/>
Set the address port that the smartphone web listener uses
In the DNSSPServer.exe.config file, in the <appSettings> section, set the value parameter for the
SPServiceWebListenerPort option to a port address within the 1025-65535 range.
For example:
<add key="SPServiceWebListenerPort" value="51001" />
Note: The default value for SPServiceWebListenerPort is 51001.
Set the maximum number of bytes per message that the smartphone
web listener can receive
In the DNSSPServer.exe.config file, in the <appSettings> section, set the value parameter for the
SPServiceMaxReceivedMessageSize option to the maximum number of bytes that a message
can contain for it to be accepted by the smartphone web listener.
For example:
<add key="SPServiceMaxReceivedMessageSize" value="131072" />
10
Page 23

Chapter 1: Introduction to Dragon 11.5
Dictating with a smartphone over a network
You can use the Dragon Remote Microphone Application on a smartphone or other supported
devices as a wireless microphone to dictate with Dragon.
To use the application as a wireless microphone, your mobile device and the Dragon client computer must be on the same Wi-Fi network.
Note: Your device and Dragon NaturallySpeaking cannot communicate using cellular networks. A
Wi-Fi connection is required..
Using the Dragon Remote Microphone Application in a home network
Bonjour works on home networks where all computers are on the same subnet, which is a common configuration. As an alternative to using Bonjour, you can also choose to enter the IP address
or computer name that runs Dragon.
If the home network has multiple routers, you need to enter the correct IP address or computer
name of the target computer or turn on multi-cast routing. See the Dragon Help for details.
Using the Dragon Remote Microphone Application in Public Wi-Fi Hotspots
There are two general types of public Wi-Fi:
n Pure open Wi-Fi where a user turns on their computer or device, and they are “just on”. This is
similar to a typical home networking setup with one router as described above. The Dragon
Remote Microphone Application should work with this Wi-Fi configuration.
n Locations such as Starbucks and Panera, which use service providers such as AT&T Wi-Fi,
where the user must logon or accept the terms of service and where user fees may apply.
Nuance does not support this Wi-Fi configuration. The typical security settings in this kind of
network prevent the iPhone to communicate with the Dragon client computer.
Using the Dragon Remote Microphone Application
in corporate environments with multiple subnets
If the Dragon client computer and the iPhone are on the same wireless network and multi-cast
routing is enabled, Bonjour discovery should work. You may find that this multi-cast configuration is not very common. IT departments may disable multi-cast routing to reduce security
threats and to reduce Wi-Fi bandwidth consumption.
If multi-cast is disabled, Bonjour discovery does not work. For Bonjour discovery to work on a
site has computers on multiple wired or wireless subnets, an administrator needs to enable the
multi-cast feature on the routers. This effectively puts all computers on the same subnet.
11
Page 24

Dragon Administrator Guide version 11.5
The site can also use Bonjour with unicast routing with a Domain Name Server. This network configuration requires all computers to have real IP addresses and not the 10., 192. and 168.
addresses.
As an alternative to Bonjour, users at this type of site can choose to enter the IP address or computer name of the Dragon client computer.
Issues with Firewalls, Antivirus software and Malware detection software
When you create a user profile for the Dragon Remote Microphone Application. Dragon automatically opens port 51001 in the Windows firewall.
Port 51001 needs to be open for the Dragon Remote Microphone Application to communicate
with the computer where Dragon is running. Some non-Windows firewalls, antivirus, and malware
detection software may disable port 51001. If that occurs, you need to configure the software to
open port 51001.
iOS 4.3 and HotSpot Tethering
iOS 4.3 provides the ability to connect a computer to the iPhone via WiFi and then connect the
iPhone to the Internet using 3G. This allows the computer to access the Internet even when a
WiFi network is not available.
Note: This configuration is not supported The Dragon Remote Microphone Application does not
work when a computer is tethered to the iPhone.
12
Page 25

Chapter 1: Introduction to Dragon 11.5
Creating Windows shortcuts to User Profiles and Vocabularies
If Dragon is shared with other people, or if a person has more than one User Profile, you can
create Windows Shortcuts on the Desktop to start Dragon and open particular User Profiles. If
User Profiles have multiple Vocabularies, you can also specify the Vocabulary to open.
To create a shortcut to a User Profile and Vocabulary
1. Right-click the Dragon shortcut icon on the Windows Desktop and then click Properties to
open the icon's Properties dialog box.
2. Click the Shortcut tab of the Properties dialog box.
In the Start In box, at the end of the path type "natspeak.exe /user <User Profile name>".
The text in the target box should look similar to the following line:
"C:\Program Files\Nuance\NaturallySpeaking11\Program\Natspeak.exe"
/user "David"for Windows XP
"C:\Program Files (x86-
)\Nuance\NaturallySpeaking11\Program\Natspeak.exe/user "David"" for
Windows Vista, 7 or Windows Server 2008.
David is the name of the User Profile.
For Roaming User Profiles:
Or, if Roaming User is enabled, type the path to the Master Roaming User Profile location, then /user, then the sub-folder if applicable, and then the User Profile name on
the network. The text in the target box should look similar to the following:
"C:\Program Files\Nuance\NaturallySpeaking11\Program\NatSpeak.exe"
/user "\\<server_name>\<subfolder_path>\<user_profile_name>"for Win-
dows XP.
"C:\Program Files (x86)\Nuance\NaturallySpeaking11\Program\Natspeak.exe/user "\\<server_
name>\<subfolder_path>\<user_profile_name>" for (Windows Vista, 7, or Windows
Server 2008)
For Vocabularies
To specify a Vocabulary, follow the User Profile name with "/Vocabulary" and the
name of the Vocabulary. The text in the target box should look similar to the following:
13
Page 26

Dragon Administrator Guide version 11.5
"C:\Program Files\Nuance\NaturallySpeaking11\Program\NatSpeak.exe"
/user "David" /Vocabulary Politics
If the User Profile or Vocabulary name contains a space, enclose the name in quotation
marks. For example, enter: /user "Mike Workman" /Vocabulary "American History"
If the User Profile name contains a space, enclose the name in quotation marks. For
example, type: /user "Mike Workman"
3. Click OK.
When finished, double-click the shortcut icon to start Dragon. The User Profile opens along with
the Vocabulary specified.
Types of Paths
The path can be a UNC, HTTP, or HTTPs path:
UNC
"C:\Program Files\Nuance\NaturallySpeaking11\Program\Natspeak.exe" /user
"\\<directory>\<directory>\<username>"
For example:
"C:\Program Files\Nuance\NaturallySpeaking11\Program\Natspeak.exe" /user
"\\Roaming\Profiles\Roaming1"
HTTP or HTTPS
"C:\Program Files\Nuance\NaturallySpeaking11\Program\Natspeak.exe" /user
"http://<url_of_server>\<user_name>"
For example:
"C:\Program Files\Nuance\NaturallySpeaking11\Program\Natspeak.exe" /user
"http://test01.roam.test\Roaming1"
The path to an HTTPor HTTPSlocation must only contain forward slashes - the same as the Network
Location dialog.
Precede the username with a backslash.
TIP
It is possible to add a shortcut to the top of the Start menu by dragging the shortcut icon onto the
Start button.
14
Page 27

Chapter 1: Introduction to Dragon 11.5
Using multiple acoustic models with a User Profile
If the computer that a user dictates on meets certain system requirements, Dragon 11 or greater
uses two acoustic models with a User Profile. Using two acoustic models instead of one improves
recognition and dictation accuracy. Acoustic models that can be added in pairs to a User Profile
are called BestMatch IV models.
Any time you add a new dictation source to a User Profile that uses two BestMatch IV models,
the dictation source will also be associated with the two models.
A User Profile with two BestMatch IV models uses more computer resources, including RAM
memory, than a User Profile with one acoustic model. Dragon 11 or greater uses two BestMatch
IV models on a multi-core computer with at least 2 GB RAM. Dragon 11 or greater recognizes
when it is installed on a computer that meets these system requirements and selects the BestMatch IV acoustic model as the default.
Acoustic Optimization for User Profiles with BestMatch IV acoustic models
If a User Profile includes BestMatch IV models, you must run the Acoustic and Language Model
Optimizer (ACO) on a computer with multi-core processors. Dragon 11 or greater uses two BestMatch IV models only on a multi-core computer with at least 2 GB of RAM.
If the ACO processes a User Profile that was created on a computer with multi-core processors,
the optimizer always selects the BestMatch IV models to optimize.
If a User Profile is associated with BestMatch III models without accents, and you run the optimizer on a computer that supports BestMatch IV models, if automatic acoustic model selection is
enabled, the optimizer will automatically choose a BestMatch IV model to optimize.
Multiple acoustic models and User Profiles on single and multi-core computers
If a user creates a User Profile on a multi-core computer, when the user opens the User Profile on
a single-core computer, Dragon uses the first acoustic model for recognition. Dragon does not
load the second acoustic model.
If a user creates a User Profile on a single-core computer, when the user opens the User Profile on
a multi-core computer, Dragon uses the single acoustic model for recognition.
If a user selects BestMatch IV models for a User Profile and trains the profile on a multi-core computer, when the user opens the User Profile on a single-core computer, Dragon displays the following warning message:
"Your computer has a single core processor. You have opened a User Profile created on a computer with a multi-core processor.
15
Page 28

Dragon Administrator Guide version 11.5
Dragon NaturallySpeaking will work normally on this computer but you may see some change in
performance and accuracy".
16
Page 29

Chapter 1: Introduction to Dragon 11.5
Using Australian, Indian, and Southeast Asian accents in Dragon 11 or greater
In Dragon 11 or greater , a user selects one of the following languages in the Region section of
the Profile Creation wizard.
n Australia
n Indian Subcontinent
n Southeast Asia
Language Region Accent
English United States n Standard
n Australian accented English
n British accented English
n Indian accented English
n Inland Northern US (Great Lakes area)
n Southeast Asian accented English
n Southern US
n Spanish accented English
English Canada n Standard
n Australian accented English
n British accented English
n Indian accented English
n Inland Northern US (Great Lakes area)
n Southeast Asian accented English
n Southern US
n Spanish accented English
English United Kingdom n Standard
n Australian accented English
n Indian accented English
n Southeast Asian accented English
Upgrading User Profiles older than Version 10.0
Service Pack 1 to Dragon 11 or greater
When you upgrade Dragon 9.x User Profiles and Dragon 10.0 profiles (prior to Service Pack 1)
that contain Australian, Indian, and Southeast Asian acoustic models, Dragon 11 or greater
upgrades them directly to the same models in Dragon 11 or greater .
17
Page 30

Dragon Administrator Guide version 11.5
Dragon 9.x Acoustic
Model
Australian English |
Bluetooth 8 kHz
Australian English |
BestMatch
Indian English | Bluetooth 8 kHz
Indian English | BestMatch
SE Asian English | Bluetooth 8 kHz
SE Asian English | BestMatch
UK English | BestMatch UK English | BestMatch III/IV UK English | Large | General
UK English | BestMatch
III
UK English | Bluetooth
8 kHz
Dragon 11 or greater
Acoustic Model Dragon 11 or greater Vocabulary
Australian English | Bluetooth
8 kHz
Australian English | BestMatch III/IV
Indian English | Bluetooth 8
kHz
Indian English | BestMatch
III/IV
Southeast Asian English |
Bluetooth 8 kHz
Southeast Asian English |
BestMatch III/IV
UK English | BestMatch III/IV UK English | Large | General
UK English | Bluetooth 8 kHz UK English | Large | General
Australian English | Large | General
Australian English | Large | General
Indian English | Large | General
Indian English | Large | General
Southeast Asian English | Large | General
Southeast Asian English | Large | General
Upgrading User Profiles newer than Version 10.0
Service Pack 1 to Dragon 11 or greater
When you upgrade Dragon 10.0 SP1 or later User Profiles that contain Australian, Indian, and
Southeast Asian acoustic models as “accent models”, Dragon 11 or greater upgrades them to specific acoustic models in Dragon 11 or greater .
Dragon 10 Acoustic
Model
UK English | Bluetooth
8 kHz | Australian
accented English
UK English | BestMatch
| Australian accented
English
UK English | Bluetooth
8 kHz | Indian
accented English
UK English | Bestmatch | Indian
accented English
Dragon 11 or greater
Acoustic Model Dragon 11 or greater Vocabulary
Australian English | Bluetooth 8 kHz
Australian English | BestMatch III/IV
Indian English | Bluetooth 8
kHz
Indian English | Bestmatch
III/IV
Australian English | Large | General
Australian English | Large | General
Indian English | Large | General
Indian English | Large | General
UK English | Bluetooth
8 kHz | SE Asian
accented English
18
Southeast Asian English |
Bluetooth 8 kHz
Southeast Asian English | Large | General
Page 31

Chapter 1: Introduction to Dragon 11.5
Dragon 10 Acoustic
Model
UK English | BestMatch
| SE Asian accented
Dragon 11 or greater
Acoustic Model Dragon 11 or greater Vocabulary
Southeast Asian English |
Southeast Asian English | Large | General
BestMatch III/IV
English
UK English | BestMatch UK English | BestMatch
UK English | Large | General
III/IV
UK English | BestMatch
III
UK English | Bluetooth
UK English | BestMatch
UK English | Large | General
III/IV
UK English | Bluetooth 8 kHz UK English | Large | General
8 kHz
BestMatch IV models are not provided for the following:
n US English Teens (11 kHz and Bluetooth)
n UK and AUS (Bluetooth)
n IND and SEA (11 kHz and Bluetooth)
See Dragon - What's New for administrators for more information on Two-pass models.
19
Page 32

Page 33

Installing, modifying and upgrading Dragon
To install DragonNaturallySpeaking or DragonMedical
1. Be sure your systems meet the system requirements.
2. Prepare for the installation or upgrade by backing up User Profiles before upgrading.
3. Install or upgrade the software by choosing the type of installation. See the table below for
installation options.
4. Become familiar with the Dragon file structure and carry out other post installation tasks.
Note: When an administrator installs Dragon 11 or greater , installation instructions appear in the
primary language for the product. An administrator cannot install Dragon using a language that is
different than the primary language. For example, when an administrator installs Dragon 11 or
greater , Professional English, installation instructions appear in English.
Installation topic Topic link
Installation checklists
System requirements
Preparing for an installation or upgrade
Installing Dragon on a single computer
This topic describes the basics steps for installing Dragon on a single
computer. It covers both a Typical/Complete installation and a Cus-
tom installation, sometimes linking you to further detail in another
topic.
Installing using the Windows Installer (MSI)
Dragon includes a native Windows Installer (MSI) that lets an administrator customize installations as well as install across a network to
multiple client computers. In addition, an administrator can use this
service to upgrade, modify, repair, or remove an existing Dragon
installations.
Upgrading from a previous version
An administrator can upgrade installations to Dragon 11 or greater
from Dragon NaturallySpeaking Versions 9.x and 10.x .
View the Dragon file structure and carry out post
installationtasks
Installation checklists
System requirements
Preparing for an installation or
upgrade
Installing on a single com-
puter
Using the Windows Installer
(MSI) to install Dragon
Upgrading from a previous
version
Post Installation Tasks
21
Page 34

Page 35

Chapter 2: Preparing to
Install Dragon
This section contains information on the prerequisites for installing Dragon, Dragon system requirements, and information on which Dragon products you can install on the same computer.
Note: You can only upgrade from Dragon 9.x or greater to Dragon 11.5. Upgrading from Dragon 8.x or
earlier to Dragon 11.5 is not supported.
Preparing for an installation or upgrade 24
Installation checklist 25
Dragon system requirements 27
Storage space required for User Profiles 30
Installing on or Upgrading to Windows Vista and Windows 7 32
Coexistence with other Dragon products 33
23
Page 36

Dragon Administrator Guide version 11.5
Preparing for an installation or upgrade
Before installing, modifying, or upgrading DragonNaturallySpeaking or DragonMedical:
n Close all open applications.
n Turn off or disable any antivirus software; installation can sometimes trigger a false virus report.
n Look at the supplied Installation Checklist.
Installation restrictions
n Be sure your system meets the hardware requirements before attempting to install Dragon. See
Dragon system requirements
n Administrator rights are not required to create a User Profile or use the software after
installation.
n These restrictions also apply to an upgrade installation: On Windows XP Professional, Vista,
Windows 7, and Windows Server 2008, if you want to create a Dragon User Profile for a
Windows limited user (with restricted privileges), you must log on to Windows using that
limited user account, then create the Dragon User Profile. If you create a Dragon user account for
a Windows limited user while logged in as a Windows administrator, the limited user will not be
able to access that user account.
n Dragon is licensed on a “per individual” basis. You are permitted to install the software on more
than one computer (for example, on a desktop and a laptop computer, or on a work and a home
computer), but you cannot use the software concurrently on more than one computer.
You are permitted to create multiple User Profiles, so long as each User Profile is for a single
individual. If someone else wants to create or use another User Profile, that person must
purchase a separate license for Dragon.
Volume license agreements are available.
File Structure
Upgrading from Dragon NaturallySpeaking 9.x or 10.x automatically relocates some Dragon NaturallySpeaking directories and files.
For information, see Dragon File Structure.
24
Page 37

Installation checklist
Installation checklist
Do all of your workstations meet the recommended system requirements for Dragon? (
Will you install the Dragon software manually at each computer or will installation be unattended? (If the latter, read Installing, modifying, and upgrading Dragon for information on setup
or MSI command-line parameters.)
Which features will you install on each computer?
Which vocabularies do you need to install on each computer?
Note: Installing only selected vocabularies helps conserve disk space consumption
and shortens setup time. A full installation with all vocabularies uses about 4800 MB
and takes about 20 minutes, while an installation with only one vocabulary uses less
than 1800 MB. See Dragon system requirements for more information on disk size
requirements.
Chapter 2: Preparing to Install Dragon
Will you install the tutorial (recommended)?
Will you install the text-to-speech component?
Will you set up roaming User Profiles? (Read Setting up the Roaming feature)
If so, where will you place the User Profiles?
In a shared network directory?
In multiple shared network directories? (for example, one per
department or clinic)
In each user’s Windows home directory?
Note: Placing each user’s profile in his or her Windows home directory
is not recommended, because this makes it more difficult for the administrator to perform operations on multiple User Profiles, such as running
the Acoustic and Language Model Optimizer or upgrading User Profiles
to a new version.
On an Internet server running WebDAV (HTTP roaming)?
If not, what location will you designate as the backup directory for each User
Profile?
25
Page 38

Dragon Administrator Guide version 11.5
Where will you place the data distribution directory for distributing word lists
and command sets?
Will you be collecting data for the acoustic optimizer?
Will you restrict users from modifying commands and vocabularies?
Which default user-specific options will you set at installation time? (See the
Dragon Help on the Options dialog.) Which Administrative options will you set?.
Note: Where you store User Profiles will also depend on other factors. Each User
Profile requires about 160 MB hard disk space if it is local, 55 MB if it is roaming.
With default settings, acoustic optimizer data can take up to an additional space per
workstation, to a total of 1000 MB in the master Roaming User Profile (more precisely, 1000 MB per dictation source per master Roaming User Profile). Acoustic
optimizer data contains text and audio data that can be read or heard by anyone with
access to the User Profiles.
Upgrade checklist
Are there User Profiles that need to be upgraded from a previous version?
If so, will an administrator upgrade them or will each end user upgrade his/her
own?
Support Checklist
Who will be responsible for running the Acoustic and Language Model Optimizer?
Who is responsible for collecting word lists and commands?
Who is responsible for distributing word lists and commands?
Will words and commands be distributed through the data distribution directory or by some
other means, such as email?
Who will Dragon users contact if they need help?
26
Page 39

Chapter 2: Preparing to Install Dragon
Dragon system requirements
During the installation process, the software checks that your system meets the following requirements. If they are not met, Dragon will not be installed. Note that at least 2 GBof RAMis
required for installation in Windows 7 and Windows Server 2008. See Operating systems and
RAM, below.
NOTE
The Professional and Legal editions of Dragon do not support dictation directly into Electronic
Medical Record (EMR) Systems. For EMR support, please use Dragon Medical Edition.
Processor
Minimum
Minimum 1 GHz Intel® Pentium® or equivalent AMD processor.
2.4 GHz Intel Dual Core or equivalent AMD processor. (IMPORTANT: SSE2 instruction set
required)
Recommended
Intel Pentium 2.4 GHz (dual 1.8 GHz core processor) or equivalent AMD processor.
Faster processors produce faster performance.
NOTE
Streaming SIMD Extensions (SSE) are not supported.
Processor cache
Recommended: 2 MB
Operating systems and RAM
Operating system 32-bit 64-bit RAM min
Windows7 √ √
Windows XP Home
√ X
2 GB 4 GB
1 GB 2GB
(SP2 or greater)
Windows XP Pro-
√ X
1 GB 2GB
fessional (SP2 or greater)
recommended
RAM
Windows Vista, including SP1 and SP2
Windows Server 2003
(SP2 or greater, R2)
√ √
√ √
1 GB 2GB
2 GB 4GB
27
Page 40

Dragon Administrator Guide version 11.5
Operating system 32-bit 64-bit RAM min
Windows Server 2008,
including SP1 and SP2
and R2
Note:Windows 2000, Windows 2000 Server, and Windows XP 64-bit are not supported and
installation is blocked on those systems.
NOTE
* If your computer has less than the recommended amount of RAM, Dragon will install but displays a message recommending that you install additional RAM for optimum performance.
Free hard disk space
n 5 GB minimum for a custom installation where you install only the program files and one User
Profile. Installations can range from 800 MB (US English Home Edition) to 5 GB (Dragon
Medical Practice Edition).
√ √
RAM
recommended
2GB 4 GB
n 5 GB minimum for non-English versions.
Microphone
n Nuance-approved noise-canceling microphone. For a complete listing of Dragon-compatible
audio input devices, visit http://support.nuance.com/compatibility on the Dragon
Support Web pages.
Note: Dragon Medical Edition has built-in support for the Dictaphone PowerMics. For more
information, see the following topics in the Dragon Help:
l Using the Dictaphone PowerMic (the beige PowerMic)
Only newer beige PowerMics work with Dragon Medical Edition on Windows
Vista.
l Using the Dictaphone PowerMic II (the black PowerMic)
PowerMic II packaging should display Vista compliance labeling. If you are
unsure about the compatibility, confirm that the firmware version is v. 2.02 or
greater. Refer to http://support.nuance.com/compatibility
n For Bluetooth microphones, Tablet PCs, and other hardware, visit
http://support.nuance.com/compatibility.
Sound card
28
Sound card capable of supporting 22 kHz 16-bit audio recording.
Other requirements
n Microsoft
Dragon 11.5 supports Internet Explorer 9.
n Creative ® Labs Sound Blaster ® 16 or equivalent sound card supporting 16-bit recording
n DVD-ROM drive required for installation.
®
Internet Explorer 7 or higher (free download available at www.microsoft.com).
Page 41

Chapter 2: Preparing to Install Dragon
n Nuance-approved headset microphone (included in purchase). See details at
support.nuance.com/compatibility/ (includes Bluetooth microphones, recorders, and Tablet
PCs).
n Speakers (optional for playback of recorded speech and Text-To-Speech features).
n An Internet connection for product activation. Note that product activation is not required for
Enterprise editions.
29
Page 42

Dragon Administrator Guide version 11.5
Storage space required for User Profiles
Adequate storage space must be available for Dragon User Profiles (that store information about
each particular person's voice, vocabulary, custom commands (if applicable), and option settings).
The space needs to exist on:
n Stand-alone installations where end-users work on dedicated computers.
AND
n Only for Enterprise Profile Management Central computers (sometimes servers) where Master
Roaming User Profiles are stored.
Having Roaming User Profiles lets end-users run Dragon on more than one computer or device by
accessing centrally stored provider-specific voice and speech information, rather than requiring
that the profile be on each computer.
Roaming User Profiles also let end-users with one computer use Dragon from different locations
that have a connection to the network, for example, the office, at home, or different locations
with the office or home.
The following information should be treated as guidelines for allocating disk space on your sys-
tem. The actual amount of disk space will vary from site to site.
For each Master Roaming User Profile (User Profiles stored on the central computer), you should
plan to have this much space:
n 55 MB for each Roaming User Profile
n 18 MB for each additional vocabulary you add for this User Profile
n 35 MB for each additional dictation source you add for this User Profile
n 1000 MB for Acoustic Optimizer data associated with each dictation source of each User
Profile
To set how much data you have elected to store:
1. On the
2. When the
work archive
DragonBar
, select
Tools>Administrative Settings
Administrative Settings
option.
.
dialog box opens, check the
Disk space reserved for net-
In addition, for the Local Roaming User Profile, you should plan to have the following space on
each PC where the end-user dictates:
n 55 MB for each Roaming User Profile
n 18 MB for each additional vocabulary added for this user profile
30
n 35 MB for each additional dictation source added for this user profile
n 240 MB for acoustic optimizer data associated with each dictation source of each User Profile
The settings in the
Data
tab of the
Options
dialog box control how much acoustic optimizer data
Dragon retains locally:
Page 43

Chapter 2: Preparing to Install Dragon
1. To set the number of minutes of audio to retain locally, click the
Archive size...
button and
position the slider.
2. To turn off retaining this data locally, check the
file (for portability)
option.
Conserve disk space required by User pro-
A non-Roaming User Profile requires approximately three times as much disk space as a local
Roaming User Profile. Dragon periodically creates a backup copy of a non-Roaming User Profile
and stores the copy on the local computer. On the other hand, a Roaming User Profile is stored in
a network storage location and Dragon does not create a backup copy of a Roaming User Profile.
An administrator should create backup copies of all Roaming User Profiles on a regular basis.
31
Page 44

Dragon Administrator Guide version 11.5
Installing on or Upgrading to Windows Vista and Windows 7
Dragon NaturallySpeaking and Dragon Medical Versions 9.5 and higher are compatible with all editions of Windows Vista and Windows 7. Dragon runs on 32-bit and 64-bit computers for these
operating systems.
Earlier versions of Dragon (version 8.x, 9.0, 9.1) will not install or run on Windows Vista or Windows 7.
Note: You can only upgrade from Dragon 9.x or greater to Dragon 11 or greater . Upgrading from
Dragon 8.x or earlier to Dragon 11 or greater is not supported.
Upgrade considerations
If you upgrade a computer from a previous version of Windows to Windows Vista or Windows 7,
and that computer has Version 8.x, 9.0, or 9.1 of Dragon installed, that version of Dragon will not
work after upgrading to Windows Vista or Windows 7.
All your User Profiles from these previous versions remain intact and can be upgraded when you
install Dragon 11 or greater .
See "Upgrading User Profiles to Dragon 11 or greater " in Dragon - What's New for administrators
for more information.
Roaming User Profiles in an MSIInstallation on
Vista or Windows 7
For more on carrying out an MSIinstallation on Windows Vista or Windows 7, see Modifying
Roaming User Profile, Miscellaneous, Schedule Settings in the INI File.
32
Page 45

Chapter 2: Preparing to Install Dragon
Coexistence with other Dragon products
Coexistence with previous versions of Dragon
You can have only one version of Dragon installed on your system.
Note: Running Dragon 9.x or 10.x concurrently with Dragon 11 or greater is not sup-
ported.
Coexistence with Dragon SDK Client Edition
You can install Dragon SDK Client Edition 11 on the same computer where Dragon 11 or greater
is installed. In addition, Dragon and Dragon SDK Client Edition can share User Profiles.
If you install the Dragon 11 SDK Client Edition (DSC 11) and Dragon 11.5 on the same machine,
if you uninstall DSC 11, you may not be able to start Dragon 11.5. To fix this issue, run the
Repair option from the installation DVD. Enter the installation DVD into the DVD drive of the
Dragon workstation and start the installation process. At the prompt, select the Repair option and
follow the instructions on the screen.
If you are running Dragon SDK Client Edition, you can not display the DragonBar.
Note: Dragon 11 or greater can coexist with Dragon SDK Client Edition 9.x. and
10.x.
Run Dragon SDK Client Edition 11 on a computer with Dragon 11 or greater
You must have administrator privileges to perform the following step. In Windows Vista, make
sure to elevate the command prompt.
At a command prompt, type the following command:
C:\Program Files\Nuance\Dragon SDK Client Edition11\Program\natspeak.exe /fixguids
Run Dragon 11 or greater on a computer with Dragon SDK Client Edition 11
You must have administrator privileges to perform the following step. In Windows Vista, make
sure to elevate the command prompt.
At a command prompt, type the following command:
C:\Program Files\Nuance\NaturallySpeaking11\Program\natspeak.exe /fixguids
33
Page 46

Page 47

Chapter 3: Installing Dragon
This section provides information on how to install Dragon, post-installation tasks, the Dragon file structure, sample commands, and medical vocabularies (for Dragon Medical Edition).
Note: You can only upgrade from Dragon 9.x or greater to Dragon 11.5. Upgrading from Dragon 8.x or
earlier to Dragon 11.5 is not supported.
Installing Dragon on a single computer 36
Installing the Dragon 11.5 service pack 40
Sample custom installation of Dragon Medical 41
57
Post Installation Tasks 58
Cleaning up after uninstalling Dragon 58
Dragon file structure 59
Turning off Dragon's use of Microsoft Active Accessibility Service 63
Choosinga Medical Vocabulary toSupport YourSpecialty 65
Enhancing the privacy of patient data 71
35
Page 48

Dragon Administrator Guide version 11.5
Installing Dragon on a single computer
This topic presents the basic steps for installing DragonNaturallySpeaking or DragonMedical on a sin-
gle computer.
For a complete step-by-step procedure of installing Dragon on a single computer, please see the
Dragon GettingStarted Guide, available in printed form, or the Dragon User Guide, available on the
DVDin
Notes:
n In Dragon 11 or greater , the installation process does not present the QuickStart option. If you
n You must have Windows Administrator rights to install or uninstall Dragon or Dragon Medical on
\documentation\enx\User Guide.pdf
wish to enable this option, you can do so after Dragon is installed.
Windows XP, Windows Vista, Windows 7, or Windows Server 2008. For more information
about how Administrator rights impact the creation of Dragon User Profiles, refer to Preparing
for an installation or upgrade.
.
n When you install Dragon 11 or greater , Dragon installs using the primary language for the
product. You cannot install Dragon using a language that is different than the primary language.
For example, when you install Dragon 11 or greater Professional, English version, Dragon
installs using the English language.
If you attempt to use the setup.exe with the /l option on the command line to install 5 using a
non-primary language, the installation process uses the primary language for that edition of
Dragon and ignores the /l option.
Installing on Windows Vista and Windows 7
For information about installing the product on Windows Vista and Windows 7, refer to Installing
or Upgrading to Windows Vista and Windows 7.
Installing Dragon on a single computer
To install DragonNaturallySpeaking or DragonMedical:
1. Insert the first Dragon DVD into your DVDdrive.
If the installation does not start automatically, use the Windows Explorer to find and doubleclick
setup.exe
on the DVD.
36
When you start the installation, you might see a message from your Operating System saying
program needs your permission to continue
2. After the Windows Installer begins, it installs software packages (if they are not already
installed):
Visual C++ 9.0 Runtime for Dragon
3. After the installation Wizard begins, click
text of the agreement and select
I accept...
. Click
Next
to proceed to the License Agreement. Read the
, then click
Continue
Next
again.
to start the installation.
A
Page 49

Chapter 3: Installing Dragon
4. Enter your customer information—
User Name
and
Organization
—then the
Serial Number
supplied to your Dragon installation.
5. Choose your installation directory. If there are no previous versions of Dragon on your system,
the default directory in Windows XP is:
C:\Program Files\Nuance\NaturallySpeaking11
See Dragon file structure on page 59
6. Choose your
Setup Type
:
If you decide not to install some Dragon components by selecting Custom installation, you can
install them later by running the Setup program again and choosing Modify.
l
Typical/Complete
l
Custom
: Lets you select options and User Profiles to install. Customizing your installation
: Installs all options and User Profiles and requires the most disk space.
options can greatly reduce the disk space required.
In the Professional and Medical editions, you can modify the following settings during a custom installation. These settings are applied to all User Profiles created with this installation
of Dragon, including User Profiles created from Windows XP, Windows Vista, Windows 7,
and Windows Server 2008 limited accounts:
l
Modify the application's settings for all users
displays the Options
dialog box at the end of the installation. The Options dialog box lets you
change the product's standard behavior:
l Change hot key settings
l Customize how text is formatted
l Choose initial microphone settings
l Set how often your User Profiles are backed up
l Set where you can dictate commands, such as in web pages
or other windows
l
Modify the administrative settings
dialog box at the end of the installation. The Administrative settings dialog
box lets you:
l Set up the Roaming feature
l Set the backup location of your User Profiles
l Restrict users from modifying commands and vocabularies
l Schedule the Acoustic Optimizer and Data Collection tasks
l
Modify the Auto-Formatting options for all users
matting
dialog box at the end of the installation. In this dialog box, you can
choose ways that text should be automatically formatted (such as postal
codes in US or UK format) and the number of spaces after a period. In the
Medical editions of Dragon, you can also change the medical formatting
options in this dialog box.
7. Click
Next
and on the
Ready to Install the Program
optional actions:
Enable QuickStart option for the current user
and places the QuickStart icon in the Windows task bar.
displays the Administrative settings
displays the
Auto-For-
page you can choose to take two
—Launches the product on system startup
37
Page 50

Dragon Administrator Guide version 11.5
Upgrade existing speech files to work with the installation
—Immediately after you reboot,
the User Profile upgrade process begins. You can make this choice to upgrade User Profiles
from Dragon 9.x or 10.x.
8. Continue following the on-screen instructions. The setup program will install the files for
Dragon on your computer.
9. If you are upgrading and chose to upgrade User Profiles, when the message about upgrading
your User Profiles pops up, click OK.
10. If you did a
l If you checked
opens. For more information on the
l If you checked
Custom
installation one or more of the following windows opens immediately:
Modify the application's settings for all users
Options
Modify the administrative settings
dialog box, see the main Dragon Help file.
, the
Administrative Settings
, the
Options
dialog box
box opens. For more information on setting administrative settings under the Roaming,
Miscellaneous, and Scheduled Tasks tabs:
l See Administrative Settings: Roaming tab
l See Administrative Settings: Miscellaneous
l See Administrative Settings: Scheduled Tasks
l If you checked
page, the
matting
Modify the Auto-formatting options for all users
Auto-Formatting
dialog box opens. For more information on the
dialog box, see the main Dragon Help file.
on the
Custom Setup
Auto-For-
dialog
11. After you click
Finish
, the installation process displays a screen that allows you to register your
copy of Dragon. There are many benefits to registering Dragon including receiving updates from
Nuance, special deals on product upgrades, and notifications about upcoming product releases.
You can choose to register online, through a printed form, or opt to register at a later time.
Select a registration option and Click OK. If you choose one of the first two options, you are
38
Page 51

shown an online registration site or a form that you fill out and print.
Chapter 3: Installing Dragon
12. After you select OK, if you are prompted to restart your computer, restart it now. Otherwise,
skip to the next step.
13. Start the product:
Select
14. If you have User Profiles from Dragon 9.x or 10.x and you chose the
Start>All Programs>Dragon NaturallySpeaking 11.5
speech files to work with the installation
ard
opens automatically. Otherwise, if you do not have any User Profiles to upgrade, the
User Profiles wizard
Activating Dragon
The first time you start Dragon, you will be prompted to activate your copy of Dragon. If you do
not activate the software, Dragon will stop working after you start the product fives times.
For more information on activation, please see the Dragon User Guide.
.
Upgrade existing
check box earlier, the
opens automatically so that you can create the first User Profile.
User Profile Upgrade Wiz-
New
39
Page 52

Dragon Administrator Guide version 11.5
Installing the Dragon 11.5 service pack
You can download the service pack for Dragon 11.5 through the Nuance Update Service. The Nuance
Update Service is an automatic update service you connect to from Dragon NaturallySpeaking. To open the
Nuance Update Service, do the following:
1. Close all applications on the computer. Do not reopen the applications until after Dragon 11.5
installs on the computer.
2. Start Dragon NaturallySpeaking 11.
3. Click on Help > Check for Updates.
4. When the Update Service starts, select the Dragon NaturallySpeaking 11.5 update.
5. Click Next.
6. Use the Download button to save the service pack to the computer.
7. Once the service pack downloads to the computer, double-click the service pack.
8. Follow the instructions in the installation wizard to install Dragon 11.5.
40
Page 53

Chapter 3: Installing Dragon
Sample custom installation of Dragon Medical
Note: This is an example only and is provided to give administrators an overview of a typical
installation and the kind of decisions you have to make. Though the example provides recommendations it is not meant as a substitute for your own planning.
For more information, see:
n Installation checklists
n Installing Dragon on a single computer
n Step-by-Step Command Line Installation
n Overview of Pushing Client Installation from Server
Preparing for the Roaming feature
1. Create network storage location for Master Roaming User Profiles. For example, you can create
a shared drive that all Dragon users will have read/write access to. In this example, we'll name
this shared folder
Dragon
.
2. In the shared
tory
.
Dragon
l Dragon Profiles is the location for the master copies of the User Profiles. (For
folder, you can create 2 sub-folders;
Dragon Profiles
and
Data Direc-
planning purposes allow for 1100 MB per User Profile.)
l Data Directory is the location for custom commands and word lists that auto-
matically update the User Profiles by use of the Data Distribution Tool.
For more information, see Setting up the Roaming feature.
Install Dragon
To install Dragon:
1. Insert the first Dragon DVD into your DVDdrive or if installing from network drive, click on
setup.exe.
2. When you have the option, choose
Custom
installation. For example:
Custom
lets you select options and User Profiles to install. Customizing your installation
options can greatly reduce the disk space required.
Click Next to continue.
3. On the Additional options screen, select all three options. For example:
41
Page 54

Dragon Administrator Guide version 11.5
Click
Next
to continue.
Setting the Dragon Options
When the installation is complete, the three customization dialog boxes will open. The first to
open is the
Corrections tab:
You use this tab to control how the correction feature and spelling features work.
In this example:
Options
dialog box.
n Check
Enable double-click to correct
with the mouse.
. Selecting this checkbox gives the user a way to correct
42
Page 55

Chapter 3: Installing Dragon
The Commands tab:
You use this tab to set options that control how Dragon interprets commands. Unless otherwise
indicated, changing these options only affects the current user; any other users keep their existing
settings.
The following example shows the default settings:
43
Page 56

Dragon Administrator Guide version 11.5
44
The View tab:
You use the
Box
.
View
tab to control the behavior and appearance of the DragonBar and the
Results
Page 57

Chapter 3: Installing Dragon
The Hot keys tab:
You use the Hot keys tab to specify hot key assignments.
If your users will be using Dragon on a Notebook, then click
F10
key to change the hotkey.
Microphone on/off
and hit the
45
Page 58

Dragon Administrator Guide version 11.5
46
The PowerMic I and II tabs:
If you are using Dragon and you are using a Dictaphone PowerMic for dictation, the Options
dialog box displays the PowerMic I and II tabs. Dragon has built-in support for PowerMic or PowerMic II microphones. You can use the PowerMic II microphone buttons to perform predefined
actions (described in the table below) or program the buttons to take custom actions.
The following example shows the default settings for the PowerMic II:
Page 59

Chapter 3: Installing Dragon
The Playback/Text-to-Speech tab:
You use the Playback/Text-to-speech tab to adjust the attributes of text-to-speech and playback.
In this example, increase the
Speed
slider slightly. The default value is a little too slow. For exam-
ple:
47
Page 60

Dragon Administrator Guide version 11.5
48
The Miscellaneous tab:
You use this tab to set miscellaneous options.
In this example
n Leave the
Have the microphone on but asleep
option unchecked unless the user cannot or
does not want to use their hands to turn the microphone on and off.
For example:
Page 61

Chapter 3: Installing Dragon
The Dictation Box tab:
On the Dictation tab, you can define how the
Dictation Box
operates.
You access the Dictation tab by selecting Tools > Dictation Box from the Dragon menu.
For more information on the
Dictation Box
, see the
Using the Dictation Box
topic in Dragon
help file.
The following example shows the default settings for the
Dictation Box
:
49
Page 62

Dragon Administrator Guide version 11.5
50
The Data tab:
You use the Data tab to instruct Dragon to store corrections in an archive, conserve disk space for
better portability of User Profiles, and control how Dragon adapts training, saves recorded dictation, and backs up User Profiles.
In this example:
n Set the
Automatically back up user profile every "n" saves
to nothing if your users are
using the Roaming feature. When you have a Roaming User Profile, the Master Roaming User
Profile most likely resides on a server that should be backed up every night.
For example:
Page 63

Chapter 3: Installing Dragon
Setting the Administrative Options: Roaming User Profiles
The second dialog to open at the end of the installation is the Administrative Settings dialog box.
This section describes the
You use the
ture. You must set up the Roaming feature on each computer where you want users to dictate
with a Roaming User Profile. For more information, see Administrative Settings: Roaming tab.
In this example:
1. Select
2. Click the
the network location of the master Roaming User Profiles. The location you pick must be accessible to all computers on the network that you want available for dictation with Dragon. In this
Roaming
Enable
Add
to activate the Roaming feature and the Roaming User Profile options.
button. You use the
Roaming
tab of the
tab of the Administrative options dialog box
Administrative Settings
dialog box to set up the Roaming fea-
Roaming User Network Location
dialog box to define
51
Page 64

Dragon Administrator Guide version 11.5
example, we'll use the network storage location we initially created.
52
Page 65

Chapter 3: Installing Dragon
3. The
Administrative Settings
dialog box also contains several options that you can choose from
to indicate how you want a Roaming User Profile to function at each Roaming User Profile location.
In addition to the default settings, also enable the
open/close only
l
and
Always copy acoustic information to network
Access network at user profile
options. For example:
Click
OK
to continue.
5. You will be prompted to create the default directory if it does not already exist, when you see
the following message, always click Yes:
53
Page 66

Dragon Administrator Guide version 11.5
Setting the Administrative Options: Miscellaneous options
When the installation is complete, the three customization dialog boxes will open. The second to
open is the Administrative Settings dialog box. This section describes the Administrative options
dialog box
In this example, click
work directory that you created at the beginning.
Change...
to set the location of the
Data Distribution Location
to the net-
54
Also make sure to deselect the
from automatically checking the Nuance web site for product updates if you want to control
which updates your users can get.
Check for product updates at startup
option to disable Dragon
Page 67

Chapter 3: Installing Dragon
Setting the Administrative Options: Scheduled
Tasks
When the installation is complete, the three customization dialog boxes will open. The second to
open is the Administrative Settings dialog box. This section describes the
of the Administrative options dialog box
Scheduled Tasks
tab
The following example shows the default settings for the
Scheduled Tasks
tab:
For more information, see the Dragon Help file.
Setting Auto-Formatting Options
The third dialog to open at the end of the installation is the
example, this version of the Auto-Formatting dialog box displays when you are installing a nonmedical edition of Dragon:
Auto-Formatting
dialog box. For
55
Page 68

Dragon Administrator Guide version 11.5
56
To set Auto-Formatting Options
1. Set the Auto-Formatting options.
2. Click
3. Click
Apply
OK
to save your changes and leave the
Auto-Formatting
to save your changes in the current tab, close the
dialog box open.
Auto-Formatting
dialog box, and
have the changes take effect. Your changes do not take effect until after you close the dialog
box.
Nuance recommends that you review these tabs to make appropriate choices for your site.
Page 69

Chapter 3: Installing Dragon
57
Page 70

Dragon Administrator Guide version 11.5
Post Installation Tasks
Once you have installed or upgraded Dragon, you might want to carry out some of these tasks
before you proceed:
n Cleaning up after uninstalling Dragon
n Dragon File Structure
n Turning off Dragon's use of Microsoft Active Accessibility Service
n ChoosingMedical Vocabulary toSupport YourSpecialty (Dragon Medical only)
Cleaning up after uninstalling Dragon
The following files will remain on your computer after you uninstall DragonNaturallySpeaking or
DragonMedical:
C:\Windows\Speech
n VText.dll
n Vdict.dll
n WrapSAPI.dll
n XTel.dll
n Xcommand.dll
n Xlisten.dll
n Xvoice.dll
n spchtel.dll
n speech.cnt
n speech.dll
n speech.hlp
n vcauto.tlb
n vcmd.exe
n vcmshl.dll
n vtxtauto.tlb
Dragon installed these files for Microsoft SAPI4 support. If you do not have other speech applications that require SAPI4, you can safely remove these files manually. If have installed other
speech applications that require SAPI4 support, you may need to re-install those applications if
you remove the files.
58
Page 71

Chapter 3: Installing Dragon
Dragon file structure
Upgrading from Dragon NaturallySpeaking 9.x or 10.x to Dragon 11 or greater will automatically
relocate some Dragon NaturallySpeaking directories and files.
You can only upgrade from Dragon 9.x or greater to Dragon 11 or greater . Upgrading from
Dragon 8.x or earlier to Dragon 11.5 is not supported.
The following directory structures and file locations assume an installation to a default location.
V9.0/V9.1 Windows 2000/XP Pro/XP Home/Windows
Server 2003 directory structure
The V9.0/V9.1 directory structure before upgrading to Dragon 11 or greater :
C:\Program Files\Nuance\NaturallySpeaking9
\Help
\Program
\Tutorial (optional)
C:\Documents and Settings\All Users\Application Data\Nuance\NaturallySpeaking9\
\Custom
\Data
\Data\Training
\Users
C:\Documents and Settings\<username>\Application Data\Nuance\NaturallySpeaking9\
\Results
V9.5 Windows 2000/XP Pro/XP Home/Windows Server
2003 directory structure
The V9.5 directory structure on Windows 2000/XP Pro/XP Home/Windows 2000 Advanced
Server/Windows Server 2003 before upgrading to Dragon 11 or greater :
C:\Program Files\Nuance\NaturallySpeaking9
\Ereg
\Help
\Program
\Tutorial (optional)
C:\Documents and Settings\All Users\Application Data\Nuance\NaturallySpeaking9\
\Custom
\Data
\Data\Training
\Users
59
Page 72

Dragon Administrator Guide version 11.5
C:\Documents and Settings\<username>\Application Data\Nuance\NaturallySpeaking9\
\Results
V9.5 Windows Vista directory structure
The V9.5 directory structure on Windows Vista before upgrading to Dragon 11 or greater :
C:\Program Files\Nuance\NaturallySpeaking9
\Ereg
\Help
\Program
\Tutorial (optional)
C:\ProgramData\Nuance\NaturallySpeaking9\
\Custom
\Data
\Data\Training
\Users
C:\Users\<username>\AppData\Roaming\Nuance\NaturallySpeaking9\
\Results
V10 Windows 2000/XP Pro/XP Home/Windows Server
2003 directory structure
The V10 directory structure on Windows 2000/XP Pro/XP Home/Windows 2000 Advanced
Server/Windows Server 2003 before upgrading to Dragon 11 or greater :
C:\Program Files\Nuance\NaturallySpeaking10
\Ereg
\Help
\Program
\Tutorial (optional)
C:\Documents and Settings\All Users\Application Data\Nuance\NaturallySpeaking10\
\Custom
\Data
\Data\Training
\Users
C:\Documents and Settings\<username>\Application Data\Nuance\NaturallySpeaking10\
\Results
V10 Windows Vista and Windows 7 directory structure
The V10 directory structure on Windows Vista before upgrading to Dragon 11 or greater :
60
Page 73

Chapter 3: Installing Dragon
C:\Program Files(x86)\Nuance\NaturallySpeaking10
\Ereg
\Help
\Program
\Tutorial (optional)
C:\ProgramData\Nuance\NaturallySpeaking10\
\Custom
\Data
\Data\Training
\Users
C:\Users\<username>\AppData\Roaming\Nuance\NaturallySpeaking10\
\Results
Dragon 11 or greater Windows XP Pro/XP
Home/Windows Server 2003 directory structure
The Dragon 11 or greater directory structure on Windows XP Pro/XP Home/Windows Server
2003:
C:\Program Files\Nuance\NaturallySpeaking11
\Ereg
\Help
\Program
\Tutorial (optional)
C:\Documents and Settings\All Users\Application Data\Nuance\NaturallySpeaking11\
\Custom
\Data
\Data\Training
\Users
\RoamingUsers
C:\Documents and Settings\<username>\Application Data\Nuance\NaturallySpeaking11\
\results
Dragon 11 or greater Windows Vista, Windows 7 and
Windows Server 2008 directory structure
The Dragon 11 or greater directory structure on Windows Vista and Windows 7:
C:\Program Files(x86)\Nuance\NaturallySpeaking11
\Ereg
\Help
61
Page 74

Dragon Administrator Guide version 11.5
\Program
\Tutorial (optional)
C:\ProgramData\Nuance\NaturallySpeaking11\
\Custom
\Data
\Data\Training
\Users
C:\Users\<username>\AppData\Roaming\Nuance\NaturallySpeaking11\
\results
62
Page 75

Chapter 3: Installing Dragon
Turning off Dragon's use of Microsoft Active Accessibility Service
DragonNaturallySpeaking and DragonMedical use Microsoft Active Accessibility Service to let you
control certain menus and dialog boxes by voice. Without Microsoft Active Accessibility Service,
you would be unable to use Dragon to select menu commands and dialog box controls with your
voice.
If you don't need to control the menus and dialog boxes by voice, you can speed up Dragon performance by turning off Microsoft Active Accessibility Services.
To turn off Active Accessibility Services in Dragon for
all applications
1. Open the
2. Click the
3. Clear the
4. Click
Options
Miscellaneous
Voice enable menus and dialog controls
OK
. You will need to exit and re-start Dragon for this change to take effect.
dialog box by selecting
tab.
Tools>Options
box if it is selected.
on the
DragonBar
.
To turn off Active Accessibility in Dragon for specific
applications
1. Exit Dragon.
2. Open
nssystem.ini
C:\Documents and Settings\All Users\Application Data\Nuance\NaturallySpeaking11
See Dragon file structure for information on Dragon paths in other Windows operating
systems.
in a text editor. In Windows XP, by default,
nssystem.ini
is located in:
3. Under [MSAA Modules Disabled], add a line similar to the following for each application
where you want to disable the use of Active Accessibility Services:
<executable_name>=1
4. Save and close nssystem.ini.
5. Re-start Dragon.
For example, to disable Dragon use of Active Accessibility Services in Microsoft Word and Microsoft Excel, you would add the following lines to
nssystem.ini
:
63
Page 76

Dragon Administrator Guide version 11.5
[MSAA Modules Disabled]
winword.exe=1
excel.exe=1
Note: If you do not know the name of an application's executable file, you can start the appli-
cation from the Windows
Start
menu and then use the Windows Task Manager to view the list of
current Windows applications. The executable names are listed under Image Name on the Processes tab. You can also right-click the application's icon and select the shortcut tab—the
field will provide the name of the executable.
Target
64
Page 77

Chapter 3: Installing Dragon
Choosinga Medical Vocabulary
toSupport YourSpecialty
If you are using Dragon Medical, you should know which medical vocabulary supports your specialty, so that you can readily select the correct vocabulary from the list provided.
Dragon Medical USand UKEnglish Vocabularies and
Specialties
Notes:
n Specialties and Medical Vocabularies marked with a (
1
) are not available in the Dragon Medical
Small Practice Edition.
n The Physical Medicine and Rehabilitation and the Speech and Language Pathology vocabularies
not available in UK English are marked with a (2).
Specialty Medical Vocabulary to Choose
Addiction Psychiatry Addiction Psychiatry
Adolescent Medicine Family Medicine, Internal Medicine, or Pediatrics
Allergy and Immu-
Allergy and Immunology
nology
Anesthesiology Anesthesiology
Bariatric Surgery Surgery
Behavioral Health Psychiatry
Blood Bank-
Pathology
1
ing/Transfusion Medicine
BreastSurgery Surgery
Cardiac Surgery Cardiac Surgery
Cardiology Cardiology
Cardiothoracic Sur-
Surgery
gery
Cardiovascular Dis-
Internal Medicine
ease
Chemical Pathology Pathology
Child and Adoles-
Psychiatry
1
cent Psychiatry
65
Page 78

Dragon Administrator Guide version 11.5
Specialty Medical Vocabulary to Choose
Child Abuse Pedi-
Pediatrics
atrics
Clinical Cardiac Elec-
Cardiology
trophysiology
Critical Care Med-
Anesthesiology or Internal Medicine
icine
Dentistry Dentistry
Dermatology Dermatology
Dermatopathology Pathology
Developmental-
Pediatrics
1
Behavioral Pediatrics
Diagnostic Radiology Radiology
1
ENT ENT
Ear, Nose, and
ENT
Throat
EEG Psychiatry
EmergencyMedicine Emergency Medicine
EMGExaminations Neurology
Endocrinology Endocrinology Diabetes and Metabolism
Epidemiology Epidemiology
Family Medicine Family Medicine
Fetal Medicine Fetal Medicine
Forensic Pathology Pathology
1
Forensic Psychiatry Psychiatry
Gastroenterology Gastroenterology
General Medicine GeneralMedicine
Geriatric Medicine Geriatric Medicine or FamilyMedicine
Geriatric Psychiatry Psychiatry
Hand Surgery Hand Surgery or Plastic Surgery
Hematology Hematology
66
Hospice and Palliative Medicine
Pain Medicine, Emergency Medicine, Family Medicine,
Page 79

Specialty Medical Vocabulary to Choose
Internal Medicine, Pediatrics, or Physical Medicine and
Rehabilitation
2
Infectious Disease Infectious Disease
Internal Medicine Internal Medicine
Chapter 3: Installing Dragon
Interventional Car-
Internal Medicine
diology
Medical Education
Medical Education and Writing
and Writing
Medical Micro-
Pathology
1
biology
Medical Oncology Internal Medicine
Medical Toxicology Emergency Medicine, Pediatrics
Mental Health Addiction Psychiatry, Endocrinology Diabetes and
Metabolism, Psychiatry, or Psychology
Midwifery Midwifery
Neonatal and Peri-
Neonatal and Perinatal Medicine
natal Medicine
Nephrology Nephrology
Neurodevelopmental
Pediatrics
Disabilities
Neurology Neurology
Neuromuscular Med-
Physical Medicine and Rehabilitation
icine
Neuropathology Pathology
1
Neuropsychology Psychiatry, Neurology
Neurosurgery Neurosurgery
Neurotology ENT
Nuclear Medicine Nuclear Medicine
Nuclear Radiology Radiology
1
Nursing Nursing
Obstetrics and Gyne-
Obstetrics and Gynecology
cology
2
67
Page 80

Dragon Administrator Guide version 11.5
Specialty Medical Vocabulary to Choose
Oncology Oncology
Ophthalmology Ophthalmology
Oral and Facial Sur-
Oral and Facial Surgery
gery
Orthopaedic Surgery Orthopaedic Surgery
Osteopathy Osteopathy
Otolaryngology ENT
Pain Medicine Pain Medicine
Pathology Pathology
1
Pediatric Cardiology Pediatric Cardiology
Pediatric Critical
Pediatrics
Care Medicine
Pediatric Dentistry Pediatric Dentistry
Pediatric Der-
Dermatology
matology
Pediatric
EmergencyMedicine or Pediatrics
EmergencyMedicine
Pediatric Endo-
Pediatrics
crinology
Pediatric ENT Pediatrics
Pediatric Gas-
Pediatric Gastroenterology
troenterology
Pediatric Hema-
Pediatrics
tology-Oncology
Pediatric Infectious
Pediatrics
Diseases
Pediatric Nephrology Pediatrics
Pediatric Oto-
ENT
laryngology
Pediatric Pathology Pathology
Pediatric Pul-
Pediatrics
monology
Pediatric Rehabil-
Physical Medicine and Rehabilitation
itation Medicine
1
2
68
Page 81

Chapter 3: Installing Dragon
Specialty Medical Vocabulary to Choose
Pediatric Rheu-
Pediatrics
matology
Pediatric Surgery Surgery
Pediatric Transplant
Pediatrics
Hepatology
Pediatric Urology Urology
Pediatrics Pediatrics
Physical Medicine
Physical Medicine and Rehabilitation
and Rehabilitation
Plastic Surgery Plastic Surgery
Plastic Surgery
ENT
within Head and
Neck
Podiatry Podiatry
Proctology Colon and Rectal Surgery
Psychiatry Psychiatry or Addiction Psychiatry
2
Psychology Psychology
Pulmonary Disease Pulmonary Disease
Radiation Oncology Radiology
1
Radiation Therapy Radiation Therapy
Radiologic Physics Radiology
1
Radiology Radiology 1 or Nuclear Medicine
Rheumatology Rheumatology
Sleep Lab SleepLab
Sleep Medicine Family Medicine or ENT
Speech and Language
Speech and Language Pathology
12
Pathology
Spinal Cord Injury
Physical Medicine and Rehabilitation
2
Medicine
Sports Medicine Emergency Medicine, Family Medicine, or Physical Med-
icine and Rehabilitation
Surgery Surgery
69
Page 82

Dragon Administrator Guide version 11.5
Specialty Medical Vocabulary to Choose
Thoracic Surgery Thoracic Surgery
Transplant Hep-
InternalMedicine
atology
Trauma Surgery Surgery
Undersea and Hyper-
EmergencyMedicine
baric Medicine
Urology Urology
Vascular Surgery Vascular Surgery
Vascular and Inter-
Vascular and Interventional Radiology
ventional Radiology
1
70
Page 83

Chapter 3: Installing Dragon
Enhancing the privacy of patient data
When a user dictates using Dragon Medical, Dragon automatically saves all audio and transcribed
text in Dragon Recorded Audio (.DRA) files. If the user corrects any of the dictated text, Dragon
automatically stores these corrections in .enwv files. Both these files are saved in the background.
These automatically created .DRA and .enwv files are used by Dragon to optimize the User Profile. For example, Dragon uses these files when a user runs the Acoustic and Language Model
Optimizer.
Dragon encrypts these automatically created .DRA and .enwv files before storing them in the
local or Roaming User Profile directories to ensure they do not become a back door into patient
data and violate the patient's privacy. These files are also encrypted when a user dictates into a supported application like Microsoft Word or an Electronic Medical Record (EMR)application.
Due to the restrictions mandated by the HIPAAregulations, these encrypted .DRA and .enwv
files can only be opened by Dragon Medical for its internal use. For example, they cannot be
accessed by the non-Medical versions of Dragon, the Dragon NaturallySpeaking SDK Client Edition (DSC), or the Dragon NaturallySpeaking SDK Server Edition (DSS). In addition, any
encrypted .DRA and .enwv files automatically created by Dragon, cannot be opened in DragonPad.
Notes:
n Dragon Medical does not encrypt .DRA files explicitly saved by a user. For example, if a user
saves recorded dictation when saving a document (for example, in Word, WordPerfect, or
DragonPad), these saved .DRA files are unencrypted. The user who created these files has the
responsibility of saving these files in a secure location.
n Nuance does not guarantee that the file encryption provided in Dragon will ensure total HIPAA
compliance. Other security measures are required for full compliance.
Security Considerations
As long as other adequate security protections are in place to protect patient data, you can avoid
saving excess patient data by choosing to:
1. Turn off encryption of patient data (not recommended)
2. Turn off creation of .DRA files and set options to conserve disk space, resulting in fewer saved
files
3. Turn off creation of unencrypted .nwv files
Turning on/off encryption of patient data
It is possible to turn off the encryption of these background speech recognition files by un-checking the Encrypt Patient Health Information check box in the Miscellaneous tab of the Administrative
Settings Dialogue.
Nuance can not guarantee HIPAA compliance when this feature is turned off.
71
Page 84

Dragon Administrator Guide version 11.5
For more information, see the Miscellaneous tab of the
Administrative Settings
dialog box.
Turning on/off creation of .dra patient data files
You can choose to turn off creation of the .DRA files containing patient data to further protect
the patient's privacy when other security measure are in place, by:
n Turning off data collection, which sends data to Nuance for future product improvements. The
check box to enable/disable data collection is on the
Administrative Settings
l About Data Collection and Other Scheduled Tasks
dialog box. For more information, see:
Scheduled Tasks
tab of the
__and
n Checking settings to conserve disk space, which automatically stops creating files that require
large amounts of storage space:
i. On the DragonBar, select
Tools>Options
and click the
Data
tab.
ii. Check the Conserve disk space required by user profiles (for portability) option. For more infor-
mation on the
topic on the
Data
Data
tab of the
tab in the
Options
Options
dialog box, refer to the main Dragon Help file's
dialog box.
Turning on/off creation of unencrypted text correction .nwv archive
files
To further ensure privacy, any user can turn of creation of archive files that might contain patient
data:
1. On the DragonBar, select
2. Uncheck the Store correction in archive option. For more information on the
Options
dialog box, refer tothe main Dragon Help file's topic on the
Tools>Options
and click the
Data
tab.
Data
Data
tab of the
tab in the
Options
dialog box.
72
Page 85

Chapter 4: Upgrading Dragon
This section contains information on how to upgrade Dragon and Roaming User Profiles, as well as how
to upgrade third-party Vocabularies. You can update Dragon 9.x and 10.x User Profiles to Dragon 11 or
greater .
Note: You can only upgrade from Dragon 9.x or greater to Dragon 11.5. Upgrading from Dragon 8.x or
earlier to Dragon 11.5 is not supported.
Upgrading Dragon 74
Installing on or Upgrading to Windows Vista and Windows 7 76
Upgrading multiple User Profiles 77
Preparing to upgrade Roaming User Profiles 83
Upgrading master Roaming User Profiles 86
Upgrading end-user systems 91
Upgrading multiple User Profiles 93
73
Page 86

Dragon Administrator Guide version 11.5
Upgrading Dragon
An administrator performs the following steps to upgrade a User Profile from Dragon 9.x or 10.x
to Dragon 11 or greater :
n Prepare to upgrade:
n Based on the version of Dragon being upgraded from, determine how to proceed
(see What you should know before upgrading from a previous version)
n If upgrading to Windows Vista, see Installing on or Upgrading to Windows Vista
n Carry out one of these procedures:
n Upgrade multiple User Profiles (see Upgrading multiple User Profiles)
n Upgrade Roaming User Profiles (see Upgrading Roaming User Profiles )
n Upgrade User Profiles with custom or customized vocabularies (see Upgrading User
profiles with Custom and Customized Vocabularies )
Administrators can work with the
User Profile Upgrade Wizard
(see Upgrading multiple User
Profiles)
See "Upgrading User Profiles to Dragon 11 or greater " in Dragon - What's New for administrators
for more information.
Note: You can only upgrade from Dragon 9.x or greater to Dragon 11.5. Upgrading from Dragon
8.x or earlier to Dragon 11.5 is not supported.
Note: If upgrading from Dragon version 8.x or earlier to Dragon 11 or greater , version 8.x or ear-
lier custom words and commands can be re-used in Dragon 11 or greater :
1. In Dragon 8.x or earlier, export the custom words and commands
2. In Dragon 11 or greater , create a new User Profile
3. In Dragon 11 or greater , import the custom words and commands
See the Dragon Help for information on exporting and importing custom words and commands.
What you should know before upgrading from a previous version
An administrator can upgrade to Dragon 11 or greater from Dragon NaturallySpeaking or Dragon Med-
ical Versions 9.x or 10.x. An administrator upgrades to Dragon 11 or greater by following the
installation instructions for Dragon 11 or greater , but should first be sure to:
74
n Uninstall the previous version, when it is required for the version the administrator is upgrading
from.
n Retain existing User Profiles, to be updated after the installation completes.
n Check that it is possible to upgrade from the existing edition to the edition the administrator is
installing.
Note: You can only upgrade from Dragon 9.x or greater to Dragon 11.5. Upgrading from Dragon
8.x or earlier to Dragon 11.5 is not supported.
Page 87

See "Upgrading User Profiles to Dragon 11 or greater " in Dragon - What's New for administrators
for more information.
Upgrading from Dragon 9.x
The Dragon 11 or greater installation installs in the Dragon 9.x directories and overwrites the files
in those directories.
Upgrading from Dragon 10.x
Uninstall Dragon version 10.x before installing Dragon 11 or greater .
Upgrading from Dragon 11.0
To install Dragon 11.5, you must first have Dragon 11.0 installed on the computer.
Chapter 4: Upgrading Dragon
Edition considerations
An administrator must upgrade to the same edition or greater and to the same language.
For example, if upgrading from Version 9.1 German/English to Dragon 11 or greater English
only, the Dragon 9.1 German User Profiles are not upgraded. Upgrading to Dragon German/English upgrades both German and English User Profiles. After upgrading, an administrator
can install other Dragon languages.
Notes:
n If a user is using Dragon version 8.x or earlier, they can re-use custom words and commands in
Dragon 11 or greater :
1. In Dragon 8.x or earlier, export the custom words and commands
2. In Dragon 11 or greater , create a new User Profile
3. In Dragon 11 or greater , import the custom words and commands
See the Dragon Help for information on exporting and importing custom words and
commands.
n When an administrator installs Dragon 11 or greater , Dragon installs using the primary language
for the product. An administrator cannot install Dragon using a language that is different than
the primary language. For example, if an administrator installs Dragon 11 or greater
Professional, English version, Dragon installs using the English language. If the administrator
attempts to use the /l option with setup.exe to install Dragon 11 or greater using a nonprimary language, the installation process uses the primary language for that edition of Dragon
and ignores the /l option.
75
Page 88

Dragon Administrator Guide version 11.5
Installing on or Upgrading to Windows Vista and Windows 7
Dragon NaturallySpeaking and Dragon Medical Versions 9.5 and higher are compatible with all editions of Windows Vista and Windows 7. Dragon runs on 32-bit and 64-bit computers for these
operating systems.
Earlier versions of Dragon (version 8.x, 9.0, 9.1) will not install or run on Windows Vista or Windows 7.
Note: You can only upgrade from Dragon 9.x or greater to Dragon 11 or greater . Upgrading from
Dragon 8.x or earlier to Dragon 11 or greater is not supported.
Upgrade considerations
If you upgrade a computer from a previous version of Windows to Windows Vista or Windows 7,
and that computer has Version 8.x, 9.0, or 9.1 of Dragon installed, that version of Dragon will not
work after upgrading to Windows Vista or Windows 7.
All your User Profiles from these previous versions remain intact and can be upgraded when you
install Dragon 11 or greater .
See "Upgrading User Profiles to Dragon 11 or greater " in Dragon - What's New for administrators
for more information.
Roaming User Profiles in an MSIInstallation on
Vista or Windows 7
For more on carrying out an MSIinstallation on Windows Vista or Windows 7, see Modifying
Roaming User Profile, Miscellaneous, Schedule Settings in the INI File.
76
Page 89

Chapter 4: Upgrading Dragon
Upgrading multiple User Profiles
You use the User Profile Upgrade Wizard to upgrade a Dragon 9.x or 10.x User Profile to Dragon
11 or greater . You do not need to upgrade Dragon 11 User Profiles to Dragon 11.5. There are
two ways you can start the User Profile Upgrade Wizard:
n In the Open User profile dialog box, select a User Profile to upgrade. Dragon displays a dialog
that gives you the option of upgrading the User Profile now (by pressing OK) or upgrading the
User Profile later (by pressing Cancel). If the user selects OK. Dragon displays the
Profile Upgrade Wizard
.
User
n In the Start menu, select
NaturallySpeaking Tools>Upgrade User Profiles
Upgrade Wizard
.
Programs>Dragon NaturallySpeaking 11.5>Dragon
. Dragon displays the
User Profile
Using the User Profile Upgrade Wizard
The User Profile Upgrade Wizard guides you through the process of upgrading User Profiles from
Dragon 9.x and 10.x.
The wizard cannot upgrade User Profiles created by versions of Dragon prior to Dragon 9.
User Profile Upgrade Wizard: Select the profile(s) to upgrade
On the Select the profile(s) to upgrade page, you see these elements:
User profiles to upgrade
This screen displays the location and name of all the User Profiles that the wizard will upgrade.
Modify the list of User Profiles to include all User Profiles that you want to upgrade. The wizard
starts by including all the User Profiles in the current folder as candidates to upgrade. You add
User Profiles to the list by clicking the
tional User Profiles in other locations. You remove User Profiles from the list by selecting them
and clicking the
you want to upgrade, click
Remove from list
Next
.
Browse to add a profile
button. Once the list of User Profiles contains the profiles
button and browsing for addi-
Note: If you have roaming users in your network, see Upgrading Roaming User
Profiles:Overview
Current Location
The location of the User Profiles to upgrade.
User Profile
Displays the names of all the User Profiles to upgrade.
Total profiles to be upgraded
Displays the total number of User Profiles to upgrade.
77
Page 90

Dragon Administrator Guide version 11.5
Browse to add a profile
Opens a
to upgrade.
Remove from list
Deletes the User Profile you select from the User Profile Upgrade Wizard.
Once you have made a selection, click
If you choose to upgrade only one User Profile, the wizard displays the number of minutes the
upgrade requires to complete.
Browse for Folder
window that you use to locate additional User Profiles for the wizard
Next
.
If you upgrade a UK User Profile, the wizard displays a page that lets you select a region for the
profile.
User Profile Upgrade Wizard: Choose where to store
the upgraded profile(s)
As the User Profile Upgrade Wizard updates a User Profile to Dragon 11 or greater , the wizard
can move a copy of the upgraded User Profile to another location without modifying the old profile. This allows you to use the original profile if you need to and makes the profile compatible
with operating systems like Windows XP that store all user data in the Documents and Settings
folder.
78
Page 91

Location for upgraded profile(s)
Chapter 4: Upgrading Dragon
Click the
Browse
button or select a new destination from the list if you want to choose a des-
tination other than the suggested destination.
Advanced
Click the
Advanced
button to open the Advanced Options dialog box where you can change
how the wizard upgrades the User Profile.
User Profile Upgrade Wizard: Advanced Options
The
Advanced Options
User Profiles.
User profiles to
The
User profiles to
tic model for each profile you plan to update.
Attribute Name Old Value New Value
Location The name of the User
Profile.
dialog box lets you make finer adjustments to how the wizard upgrades
list box provides information about the location, vocabulary, and the acous-
The current location of the
User Profile.
The location where Dragon
will place the updated User
Profile.
Vocabulary The name of the current
vocabulary for the User
Profile.
Acoustic
model
The name of the audio
input device for the User
Profile.
The name of the base vocabulary for the current vocabulary.
The name of the current language/voice model for the
User Profile.
The name of the new base
vocabulary for the current
vocabulary.
The name of the new language/voice model for the
User Profile.
Setting a location for an upgraded User Profile
When you click on the
Location
chose on the
text box. The text box displays the location that the wizard recommends or that you
Choose where to store the upgraded profile(s)
Location
line in the
User profiles to
list box, Dragon enables the
page. You can click Browse and
choose a new location.
Setting a new base vocabulary for a User Profile
When you click on the
NewBase Vocabulary
or the one that the
Vocabulary
line in the
User profiles to
list box, Dragon enables the
text box. The text box displays the current vocabulary of the User Profile
User Profile Upgrade Wizard
assigns to the upgraded User Profile if Dragon
does not support the old vocabulary. If Dragon supports the current vocabulary, the message
<Unable to upgrade> appears.
You can select a new base vocabulary from the drop-down list.
New
79
Page 92

Dragon Administrator Guide version 11.5
Setting a new acoustic model for a User Profile
When you click on an
Acoustic model
line in the
User profiles to
New Acoustic Model text box. The text box displays the current language (such asUSEnglish),
language model, and accent of the User Profile. You can choose a new acoustic model from the
drop-down list.
After you modify the information for each User Profile in the list box, click
wizard, and click
Next
to proceed.
User Profile Upgrade Wizard: Begin profile upgrading
On the
wizard requires approximately 12 to 24 minutes to upgrade each User Profile.When the process is
complete, click
If the
Open User Profile
begin dictation.
Upgrading Roaming User Profiles:Overview
Begin profile upgrading
Finish
.
User Profile Upgrade
window opens and displays a list of the User Profiles you can choose from to
page, click
Begin upgrading
wizard starts automatically after you upgrade and start Dragon, the
list box, Dragon displays the
OK
to return to the
to start the upgrade process. The
This section describes how to upgrade Roaming User Profiles from Dragon NaturallySpeaking or
Dragon Medical 9.x or 10.x to Dragon 11 or greater .
When you use the Roaming feature, each Dragon User Profile has a master Roaming User Profile
that can be opened from multiple networked computers where Dragon is installed. These master
Roaming User Profiles are stored on a network location made accessible to your Dragon users.
When a master Roaming User Profile is opened from that central network location, Dragon transfers a copy of that profile to the Local Roaming User Profile on the local computer.
Since the Local Roaming User Profile is a copy of the User Profile data taken from the master
Roaming User Profile, you cannot directly upgrade the Local Roaming User Profile when you
upgrade the local Dragon installation from Dragon 9.x or 10.x to Dragon 11 or greater .
Notes:
n You can only upgrade from Dragon 9.x or greater to Dragon 11.5. Upgrading from Dragon 8.x or
earlier to Dragon 11.5 is not supported.
n If upgrading from Dragon version 8.x or earlier to Dragon 11 or greater , version 8.x or earlier
custom words and commands can be re-used in Dragon 11 or greater . See the Dragon Help for
information on exporting and importing custom words and commands.
i. In Dragon 8.x or earlier, export the custom words and commands
ii. In Dragon 11 or greater , create a new User Profile
80
iii. In Dragon 11 or greater , import the custom words and commands
n Upgrading a set of Dragon 9.x or 10.x master Roaming User Profiles to Dragon 11 or greater
leaves the Dragon 9.x or 10.x master Roaming User Profiles unchanged and intact. This allows
Page 93

Chapter 4: Upgrading Dragon
the users in your network to run Dragon 9.x or 10.x while you plan your upgrade.
n Plan to upgrade the master Roaming User Profiles at a time when they are not being opened by
end users, for example during the night or on a weekend.
n Even though the Dragon 11 or greater User Profile Upgrade Wizard supports both mapped drives
and UNC paths, Nuance strongly recommends that you upgrade your Master Roaming User
Profiles on a drive on a computer where Dragon 11 or greater is locally installed. Nuance does
not recommend that you upgrade your Master Roaming User Profiles across a network to either
a mapped drive or UNCpath; upgrading over a network will take an undetermined length of
time. In addition, the User Profile Upgrade Wizard does not support upgrading User Profiles over
an HTTPconnection.
Step 1: Preparing to upgrade Roaming User Profiles
To upgrade your Master Roaming User Profiles from a previous version of Dragon, Nuance recommends that you install Dragon 11 or greater directly on the network computer where the
Dragon 9.x or 10.x Master Roaming User Profiles are located and upgrade those Master Roaming
User Profiles directly to Dragon 11 or greater Master Roaming User Profiles.
If you are unable to install Dragon where your Dragon 9.x or 10.x Master Roaming User Profiles
are located, Nuance recommends that you:
1. Install Dragon 11 or greater on a separate computer where you will perform the upgrades.
2. Copy the Dragon 9.x or 10.x Master Roaming User Profiles from their network location to the
computer where Dragon 11 or greater is installed.
3. Upgrade the Dragon 9.x or 10.x Master Roaming User Profiles on the computer where Dragon
11 or greater is installed.
4. Copy the upgraded Dragon 11 or greater Master Roaming User Profiles to a network accessible
directory on the original network location.
For more information, see Preparing to upgrade Roaming User Profiles.
Step 2: Upgrading the User Profiles
As administrator you must separately upgrade the master Roaming User Profiles to Dragon 11 or
greater using the Dragon 11 or greater
After you upgrade the Dragon 9.x or 10.x Master Roaming User Profiles, you can then proceed to
upgrade end-user systems that deploy the Roaming feature.
For more information, see Upgrading master Roaming User Profiles
User Profile Upgrade Wizard
.
Step 3: Upgrade the end-user systems
After you have upgraded the master Roaming User Profiles, you can then proceed to upgrade enduser systems that deploy the Roaming feature.
Note: You can only upgrade from Dragon 9.x or greater to Dragon 11.5. Upgrading from Dragon
8.x or earlier to Dragon 11.5 is not supported.
For more information:
81
Page 94

Dragon Administrator Guide version 11.5
See Upgrading end-user systems.
See "Upgrading User Profiles to Dragon 11 or greater " in Dragon - What's New for administrators
for more information.
82
Page 95

Chapter 4: Upgrading Dragon
Preparing to upgrade Roaming User Profiles
Step 1: Install Dragon 11 or greater on the
computer where you upgrade the Dragon 9.x or
10.x Master Roaming User Profiles
Nuance recommends that administrators install Dragon 11 or greater on the computer where the
Dragon 9.x or 10.x Master Roaming User Profiles are located. If that is not possible, Nuance recommends that administrators install Dragon 11 or greater on a separate computer where they will
perform the upgrades.
For more information on installing, see Installing Dragon on a single computer.
Notes:
n If during the installation or upgrade, you see the
this installation
the
User Profile Upgrade Wizard
n If you are unable to install Dragon where the Dragon 9.x or 10.x Master Roaming User Profiles
are located, Nuance recommends that you install Dragon 11 or greater on a separate computer
where you perform the upgrades. For more information, see Upgrading Roaming User
Profiles:Overview.
n You can only upgrade from Dragon 9.x or greater to Dragon 11.5. Upgrading from Dragon 8.x or
earlier to Dragon 11.5 is not supported
n If upgrading from Dragon 8.x or earlier to Dragon 11 or greater , version 8.x or earlier custom
words and commands can be re-used in Dragon 11 or greater . See the Dragon Help for
information on exporting and importing custom words and commands:
i. In Dragon 8.x or earlier, export the custom words and commands
ii. In Dragon 11 or greater , create a new User Profile.
iii. In Dragon 11 or greater , import the custom words and commands
prompt, be sure to leave this option unchecked. You can manually running
in a later step.
Upgrade existing speech files to work with
Step 2:On the Dragon 9.x or 10.x end-user systems
that use the Roaming feature
On the end-user systems where the users dictate using the Dragon 9.x or 10.x Roaming feature,
save and close any open User Profiles on each Dragon 9.x or 10.x system that uses the Roaming feature.
Note: If there is no time when all the Roaming User Profiles are not in use (for example, in a hos-
pital where some physicians use Dragon during a night shift), administrators can upgrade different
groups of Roaming User Profiles at different times.
83
Page 96

Dragon Administrator Guide version 11.5
Step 3: On the central network storage location for
the Dragon 9.x or 10.x Master Roaming User
Profiles
1. (Optional) Back up the master Roaming User Profiles to a separate location, either by using any
system backup utility that is implemented at your facility or by using the Dragon The
User Profiles
Note: You do not need to back up the Roaming User Profiles because the upgrade retains the
Dragon 9.x or 10.x User Profiles in a directory that is separate from the Dragon 11 or greater User
Profiles.
2. Create a new directory on the shared network drive to store the upgraded Dragon 11 or greater
Master Roaming User Profiles. Although you can store the upgraded User Profiles in the same
location as the current User Profiles — this would make two versions of each User Profile visible to the end user and lead to confusion — Nuance recommend creating a location that is different from the location that stores the current (Dragon 9.x or 10.x) User Profiles.
dialog.
Manage
Step 4: Copy the Dragon 9.x or 10.x Master
Roaming User Profiles to the Dragon 11 or greater
client computer
If you install Dragon 11 or greater on the computer where the Dragon 9.x or 10.x Master Roaming User Profiles are located, then proceed to Step 5 below.
If Dragon 11 or greater is not installed on the computer where the Dragon 9.x or 10.x Master
Roaming User Profiles are located, perform the following steps on the Dragon 11 or greater client
computer:
1. Create a directory to store all the Master Roaming User Profiles you plan to upgrade.
2. Copy the Dragon 9.x or 10.x Master Roaming User Profiles from the network location to the
directory.
Step 5: On the administrator system where you
plan to upgrade the Dragon 9.x or 10.x Master
Roaming User Profiles
1. Start Dragon and make sure the Roaming feature is off.
84
To turn off the Roaming feature:
i. Close any open User Profiles.
ii. Click
iii. On the
2. Close Dragon.
3. Follow the instructions in the next section, Upgrading master Roaming User Profiles.
Administrative Settings
plays the
Administrative Settings
Roaming
tab, make sure
on the
dialog box.
Enable
DragonBar Tools
is not selected.
menu. This action dis-
Page 97

Chapter 4: Upgrading Dragon
See "Upgrading User Profiles to Dragon 11 or greater " in Dragon - What's New for administrators
for more information.
85
Page 98

Dragon Administrator Guide version 11.5
Upgrading master Roaming User Profiles
You must use the User Profile Upgrade Wizard to upgrade Dragon 9.x or 10.x master Roaming
User Profiles to Dragon 11 or greater .
Before you proceed with the tasks in this topic, complete the procedure in Preparing to upgrade
Roaming User Profiles.
After you upgrade the Dragon 9.x or 10.x Master Roaming User Profiles and optionally copy them
back to their network location, you can proceed to upgrade your end-user systems that use the
Roaming feature. For more information, see Upgrading end-user systems.
You can only upgrade from Dragon 9.x or greater to Dragon 11.5. Upgrading from Dragon 8.x or
earlier to Dragon 11.5 is not supported
Step 1:Upgrade the Dragon 9.x or 10.x Master
Roaming User Profiles
On the computer with the Dragon 9.x or 10.x Master Roaming files and where Dragon 11 or
greater is installed:
1. Select
Tools>Upgrade User Profiles
2. On the Select the profile(s) to upgrade page, click Browse to add a profile... to select the
location of the Dragon 9.x or 10.x Master Roaming User Profiles. The Select the profile(s) to
upgrade page now displays a list of User Profiles in the selected directory:
Start>Programs>Dragon NaturallySpeaking 11.5>Dragon NaturallySpeaking
.
86
Page 99

Chapter 4: Upgrading Dragon
Continue to add User Profiles from other local locations or use the Remove from list button to
remove specific User Profiles. Click Next to continue.
87
Page 100

Dragon Administrator Guide version 11.5
3. If you choose to upgrade only one User Profile, the wizard displays the number of minutes the
upgrade requires to complete the upgrade.
4. If you upgrade a UK User Profile, the wizard displays a page that lets you select a region for the
profile.
5. On the Choose where to store the upgraded profile(s) page, in the Location for upgraded
profile(s) text box, choose the local location you previously created to contain the upgraded
Dragon 11 or greater master Roaming User Profiles. If a location is not visible, click Browse,
88
 Loading...