

Page 1
Page 2

Dragon Dictate
Version 2.5
User Workbook
Page 3

User Workbook(July 2011)
for Dragon DictateVersion 2.5
No part of this document may be reproduced in any form or by any means, electronic or mechanical,
including photocopying, recording, or by any information storage and retrieval systems, without the
express written consent of Nuance Communications, Inc.
Nuance, the Nuance logos, the Dragon logos, Dragon Dictate, and Dictate are trademarks or registered
trademarks of Nuance Communications, Inc. or its affiliates in the United States and/or other countries. All
other company names and product names referenced herein are the trademarks of their respective
owners.
Part number: 50-S61A-20070
Page 4

CONTENTS
Welcome to Dragon Dictate 2.5................................................................................................1
Learning More and Getting Help......................................................................................2
Chapter 1: Creating a Profile....................................................................................................3
Adding and Deleting Profiles ...........................................................................................7
Additional Audio Input Devices........................................................................................7
SUMMARY: Creating a Profile.........................................................................................8
Chapter 2: Microphone Control................................................................................................9
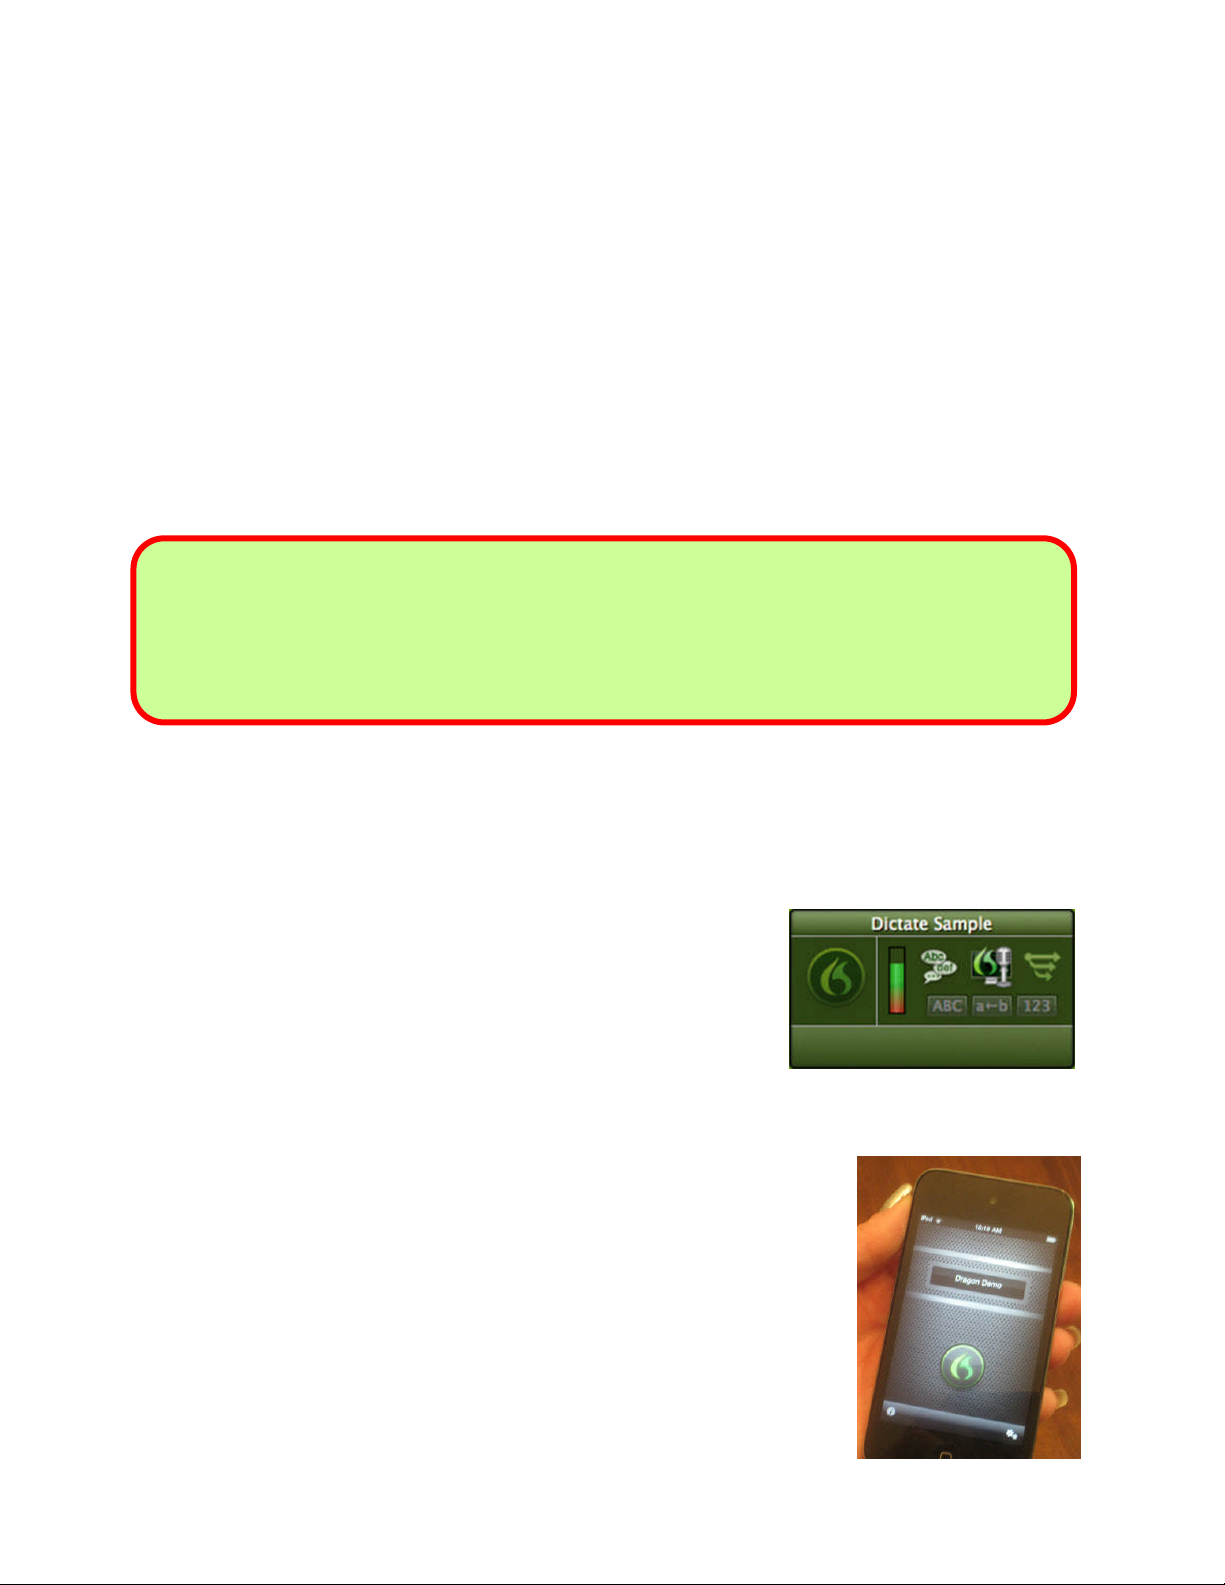
The Status Window and the Microphone Icon..................................................................9
Turning the Microphone On and Off ..............................................................................10
Microphone Voice Commands and Sleep Mode............................................................10
Optional Hot Keys including Microphone On/Off............................................................12
Dragon Remote Microphone..........................................................................................12
SUMMARY: Microphone Control...................................................................................14
Chapter 3: Dictating Text and Punctuation...........................................................................15
How to Dictate...............................................................................................................15
Punctuation...................................................................................................................17
New Line and New Paragraph.......................................................................................17
Capitalization.................................................................................................................18
Auto Formatting Options................................................................................................20
Recognition Modes........................................................................................................21
SUMMARY: Dictating Text and Punctuation.................................................................24
Chapter 4: Customizing the Vocabulary................................................................................25
Why Is Vocabulary Customization Important? ...............................................................25
Using the Vocabulary Editor ..........................................................................................25
Adding Vocabulary Entries: Words, Phrases and Acronyms … .....................................27
The Importance of Spoken Forms .................................................................................29
Deleting Words..............................................................................................................31
Vocabulary Training.......................................................................................................32
Customizing the Vocabulary from Existing Documents..................................................33
Importing and Exporting Vocabulary Entries..................................................................35
Page 5

SUMMARY: Customizing the Vocabulary......................................................................36
Chapter 5: Correcting Recognition Errors ............................................................................38
Correcting via the Recognition Window.........................................................................38
Using Playback and Text to Speech to Aid Correction...................................................41
SUMMARY: Correcting Recognition Errors ...................................................................43
Chapter 6: Formatting and Editing Text by Voice.................................................................44
How to Issue Commands...............................................................................................45
The Available Commands Window................................................................................46
Navigation Commands ..................................................................................................47
Selecting Text and Cut/Paste Options...........................................................................47
Replacing and Inserting Words......................................................................................48
Commands to Edit and Format Text (bold, underline, etc.)............................................49
SUMMARY: Editing and Formatting Text.......................................................................50
Chapter 7: Controlling Applications by Voice.......................................................................52
Using Voice Commands Within Microsoft Word.............................................................52
Keyword-Searching the Computer.................................................................................52
Opening and Closing Applications.................................................................................53
Resizing Windows and Switching Between Them .........................................................53
“Voice-Pressing” Keys...................................................................................................54
SUMMARY: Controlling Applications By Voice..............................................................55
Chapter 8: Email and the Web................................................................................................56
Creating Email Messages..............................................................................................56
Working on the Web......................................................................................................57
SUMMARY: Email and the Web....................................................................................60
Chapter 9: Custom Commands..............................................................................................61
Boost Productivity by Automatically Inserting Text.........................................................61
Duplicating and Editing Commands...............................................................................63
Managing Commands ...................................................................................................64
SUMMARY: Custom Commands...................................................................................64
Chapter 10: Best Practices and Top Tips..............................................................................65
Page 6

WELCOME TO DRAGON DICTATE 2.5
Dragon Dictate lets you use your voice to perform actions on your computer such as creating or
editing documents, managing email, entering prices and other numeric data, searching the web,
and more. By reducing keyboard and mouse usage, you can focus more on the content of your
writing and get more done faster on your Mac.
This workbook presents the information an end-user needs to know to get started, but it does
not cover every aspect of Dragon. The basic training offered here will show you how to:
Type by voice:
Dictate text and punctuation
Format, edit, and revise text by voice
Command and control your Mac by voice:
Voice commands to use the Internet and email, open programs, close or minimize
windows, switch between windows, etc.
“Voice-press” keys or key combinations on your keyboard
Create custom commands to control your Mac
Achieve the highest possible accuracy:
Personalize the software’s Vocabulary with custom words and phrases, spoken forms
(pronunciations) and written forms, to ensure that Dragon is able to transcribe exactly
what you want
Correct Dragon’s errors when needed so that the software can learn from them and
avoid mistakes in the future
For information about how to install Dragon Dictate, consult the Quickstart Guide or the product
User Guide. Once the software is installed, we recommend you read through this workbook. It
contains progressive explanations and illustrations, as well as step-by-step instructions and
practice exercises. Highlighted notes and tips provide details and alert you to potential pitfalls.
Copyright 2011 Nuance Communications, Inc. All rights reserved.
1
Page 7

LEARNING MORE AND GETTING HELP
If you complete this workbook and find that you still need more information, visit
www.nuance.com/dragon to access a variety of product training and support resources
including the following:
Product information: Product tips, feature demo videos, Frequently Asked Questions,
and Customer Service information; printable documentation (User Guides, command
print outs) and listings of microphones tested by Nuance for use with Dragon
Tech Support: a comprehensive Tech Support area with a Knowledge Base that
contains the latest technical information for Version 2.5 and previous versions, as well as
contact information to log personal support requests
Additional training resources: learn more about the available training video CD and
one-on-one web-based training; links to Value-Added Resellers who offer training and
customization services for Dragon (in person or remotely)
Community: visit the Dragon Dictate Customer Forum and Discussion Board so you
can connect with other Dragon customers to share ideas and best practices
Copyright 2011 Nuance Communications, Inc. All rights reserved.
2
Page 8
CHAPTER 1:CREATING A PROFILE
Adjust the microphone headset so that it feels
After you’ve installed Dragon Dictate on your Mac, your first step is to create a profile. This
profile stores information about the unique characteristics of your voice. It also includes a
customizable Vocabulary (the words Dragon is prepared to recognize when you speak),
personal formatting preferences and customizable voice commands that you can use to control
your Mac. If different people are using Dragon, each person will need to create an individual
profile.
When you create a profile, Dragon starts with a general language model and then adapts to how
individuals speak and which words they use. This way, the software accommodates users with
varying accents and speech patterns. Your profile is key to helping Dragon accurately determine
the words spoken and choose between words that might sound alike. Dragon refines your
profile regularly, resulting in improved accuracy over time.
TIP For best results, creating a profile should be done in your “normal” environment, with the
same background noise and equipment you plan to use moving forward.
The first time you launch Dragon Dictate, you will be prompted to create a new profile. This
includes Voice Training, where you read aloud for a few minutes, enabling Dragon to adapt its
acoustic model to the unique way you sound. Profile creation takes about 5-10 minutes to
complete, and then you will be ready to dictate.
Step 1: Make sure your USB microphone is
connected and is selected as the sound input
device. (To be sure that your microphone is properly
connected, select System Preferences / Sound /
Input.) Adjust the microphone headset so that it
feels comfortable and stable. The microphone’s
listening side must face the corner of your mouth
(not the front) about a thumb's width away. You may
need to experiment a bit to find what position is best
comfortable and stable.
Copyright 2011 Nuance Communications, Inc. All rights reserved.
for you.
3
Page 9
Step 2: Launch Dragon. If Dragon has never been used before on this computer, this
chance to set your profile’s location, you may
place it anywhere you’d like.
automatically brings up the first screen of the Profile Creation Wizard. (Otherwise,
choose Profiles from the Tools menu and click the button at the bottom of the
window).
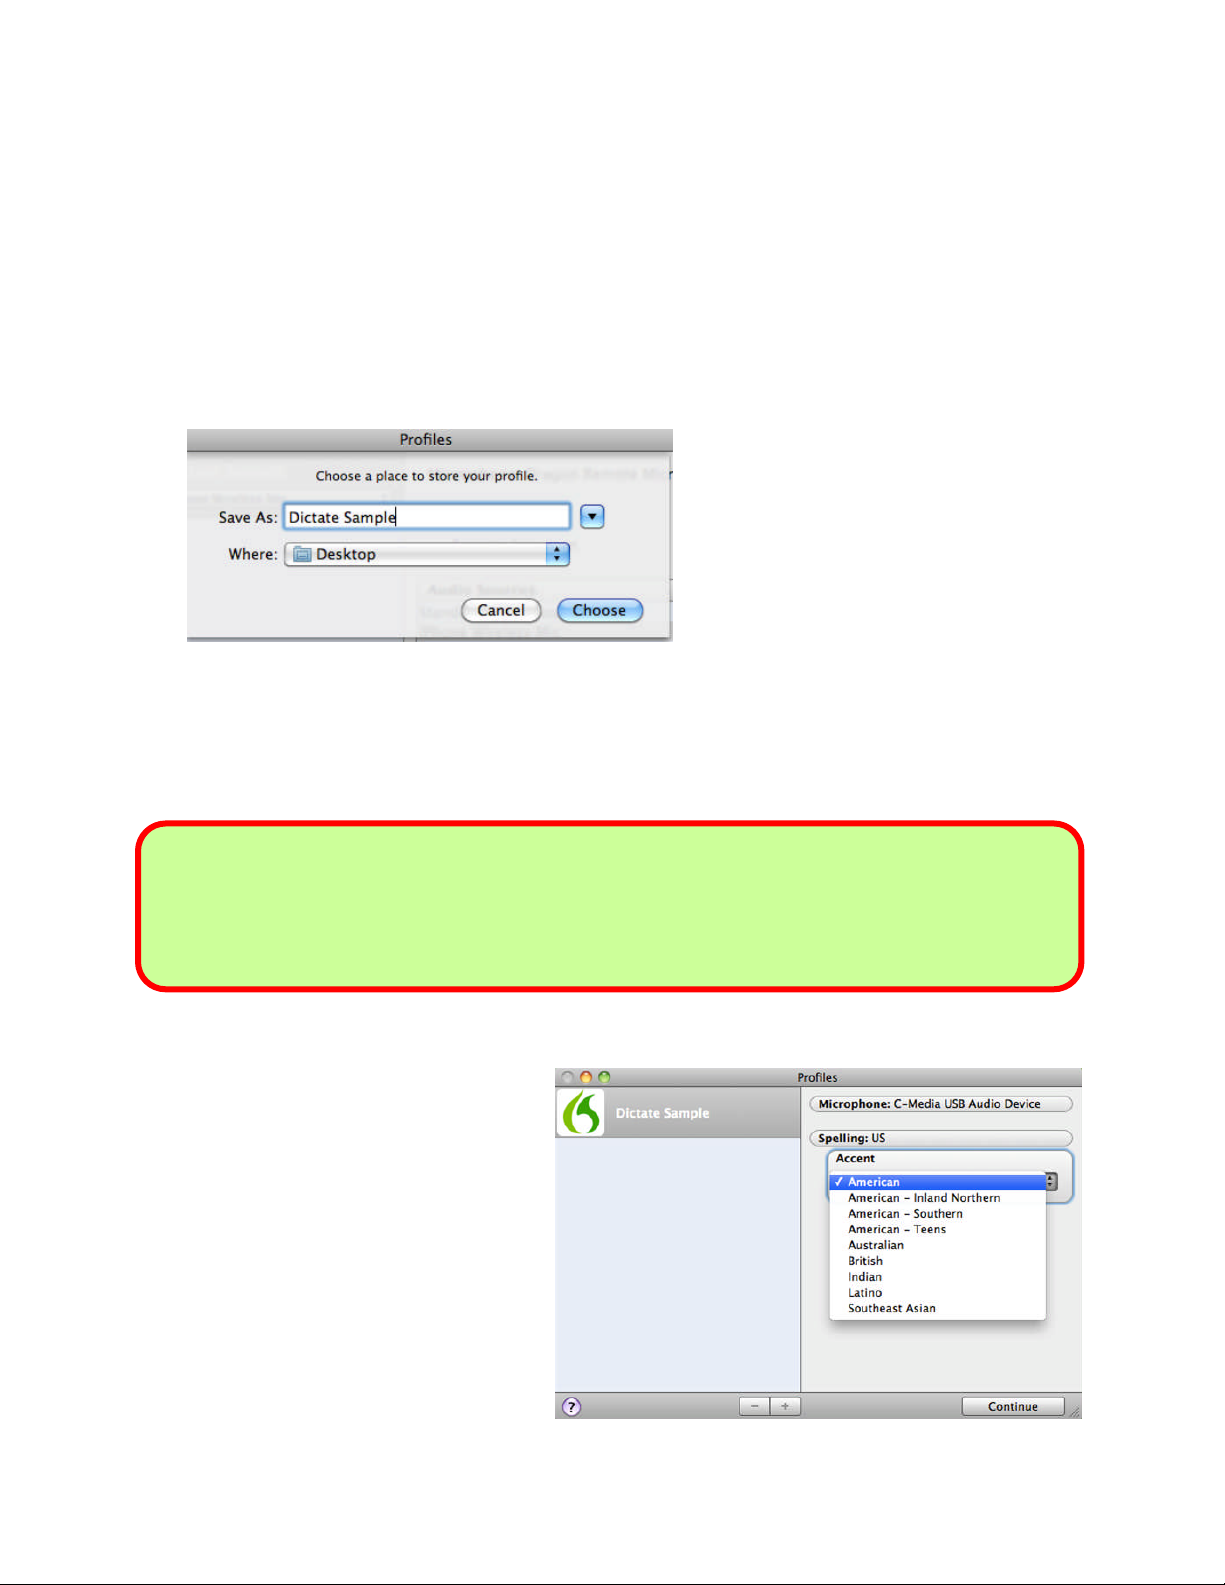
Step 3: Provide a name for your profile and specify the folder where you want to save the user
files on your Mac. Then click Choose.
The data for your profile is stored on your
hard disk as a package. When offered the
Step 4: Select the USB microphone from the list of options that appears in the Microphone field
at the top of the next screen.
NOTE For best results, do NOT use the Internal Microphone option. A USB headset, such as
the headset shipped with the boxed package of Dictate, delivers the highest quality
audio, enabling Dragon to provide the most accurate results for your dictation.
Step 4: Select your Spelling preference
(US or UK) and select your
general accent from the options
in the Accent field. Then click
Continue, and Dragon will
proceed to microphone setup.
Selecting one of the accent model options can
help to improve initial recognition accuracy for
speakers with accents.
Copyright 2011 Nuance Communications, Inc. All rights reserved.
4
Page 10
Step 5: Dragon will now calibrate the volume setting within the Microphone Setup window. Click
read aloud. Text will turn
again when you’re ready
the microphone icon (turning the icon from red to green) and read aloud the text that
appears in the box in a clear but natural voice. Feel free to say the punctuation. The
level indicator to the right of the microphone icon shows your sound input level. Dragon
sets your microphone sound input level optimally and will let you know when it has
heard enough. You can listen to a playback of your voice for any problems such as too
much background noise or distortion. Click Voice Training to advance.
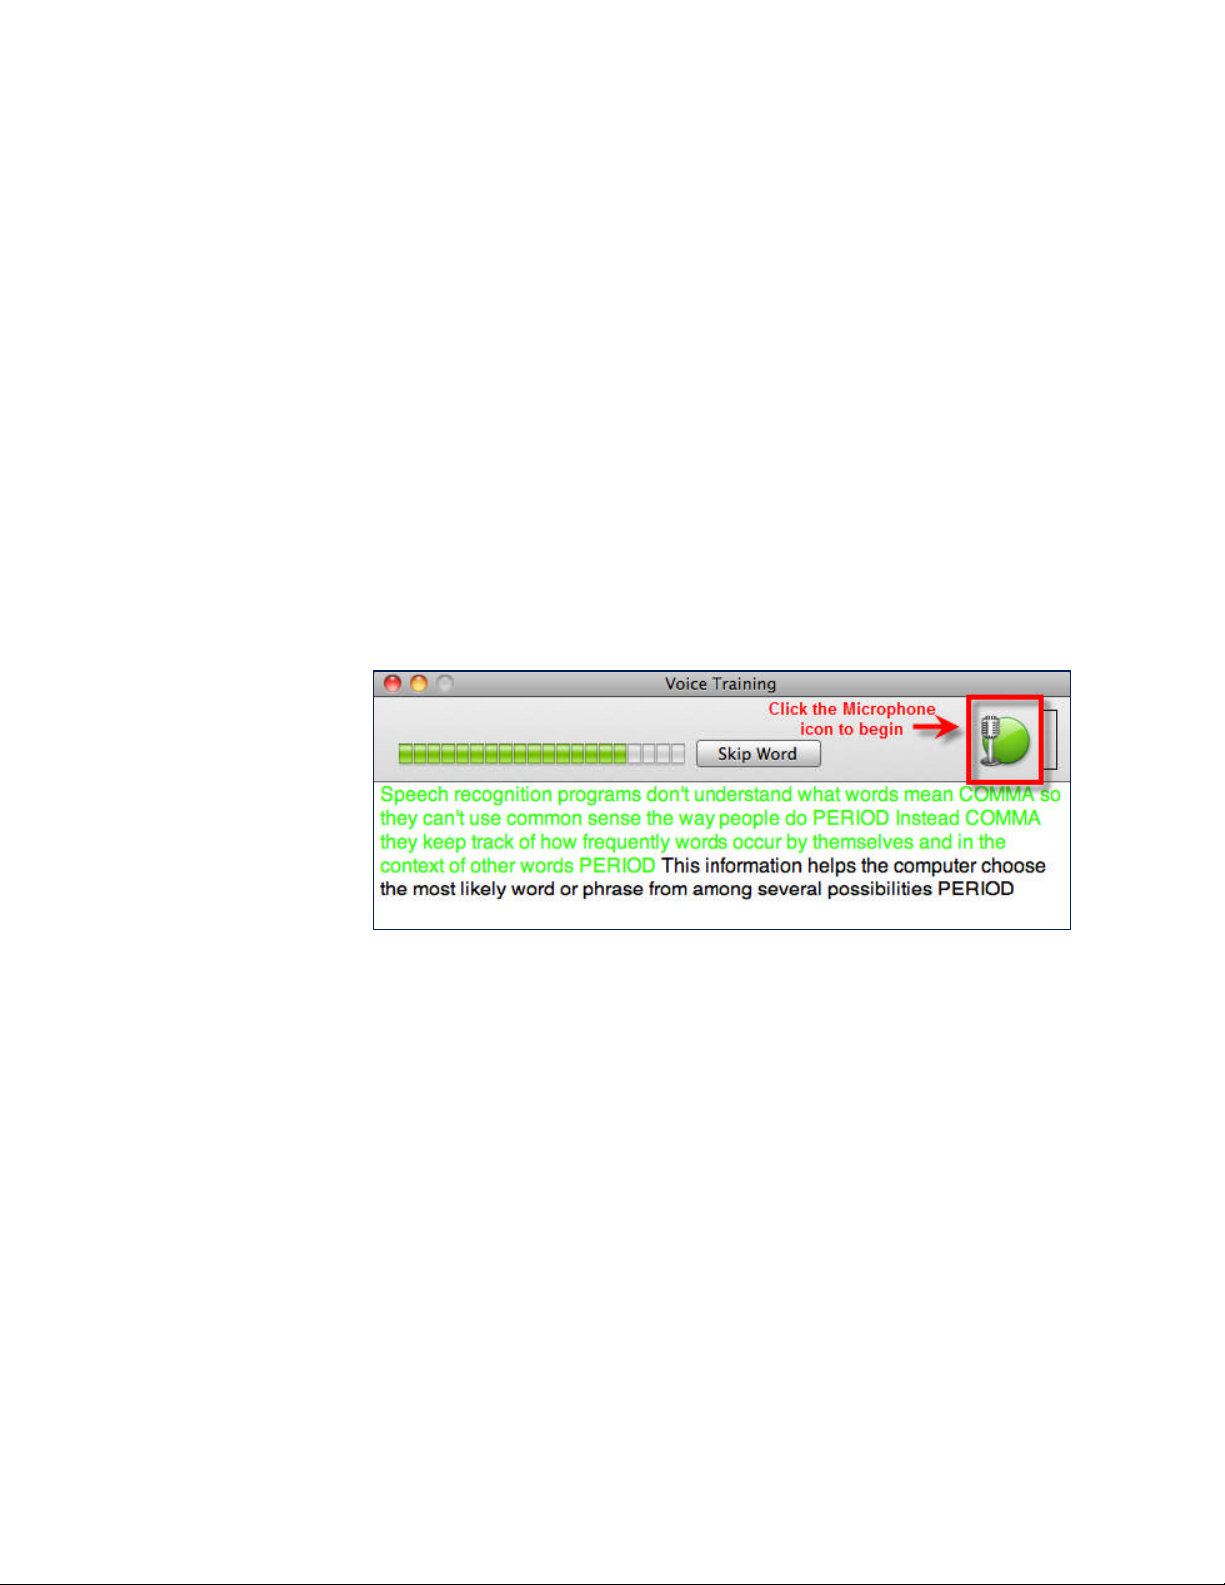
Step 6: The next step is a brief Voice Training, where Dragon asks you to read a story for about
five minutes so that it can adapt to the way you speak. During Voice Training, Dragon
listens to your speech, matching your voice and pronunciation to the actual words of the
story. When you’re ready to begin, click the arrow key to advance and then enable the
microphone by clicking the icon.
During Voice Training,
Dragon presents words
on the screen for you to
green as it is
recognized. If you need
to pause, click the
microphone icon to turn
it to a red “stop sign,”
and then click the icon
to resume reading.
Step 7: Dragon presents the first prompt to read. Proceed through the training text by reading it
exactly as it is displayed. The words will turn green once Dragon has “heard” them, but
there is no need to wait for this to happen: just speak at your normal pace, clearly and
naturally. Progress from page to page is shown by the horizontal progress indicator
above the text.
If you need to pause for any reason, press the microphone icon, and then activate it
again when you’re ready to continue. Take your time. Try to read naturally but precisely
what is on the screen. If the software needs to hear you re-read something, the text will
turn red instead of green to indicate that you should re-read that word or phrase. If
Copyright 2011 Nuance Communications, Inc. All rights reserved.
necessary, click “Skip Word” to proceed past difficult text.
5
Page 11

During Voice Training, Dragon is learning how you sound when you dictate. Using the
same tone, pace and volume you are likely to use day-to-day will help Dragon
recognize your future dictations most accurately. You may want to keep an eye on the
sound input level indicator (the vertical bar to the right of the microphone icon). Speak
at a level that keeps this at about the middle of the green section.
Once it has heard enough, Dragon takes a moment to process the acoustic information you just
provided and to create your profile. Your profile is now complete, and you’re ready to start
dictating!
TIP If you choose, you can complete additional Voice Training to improve your accuracy at a
later time. This process allows you to read additional stories to Dragon so that it can
further adapt to your unique voice.
Everyone should consider providing some reading for acoustic training after the first few days of
practicing dictation. By then, speaking clearly into the microphone should be familiar, and
reading aloud text presented by Dragon should better reflect how you actually dictate. If your
speech presents a particular challenge for speech recognition (due to a lisp or a strong accent
for instance), you should perform an additional reading for acoustic training as soon as possible.
To complete additional Voice Training:
Step 1: Select Voice Training from the Tools menu.
Step 2: When the Select Text window opens, choose a text to read, then click the right arrow to
continue. Turn on the microphone as indicated and read the story just as you did within
the original Voice Training.
Copyright 2011 Nuance Communications, Inc. All rights reserved.
6
Page 12
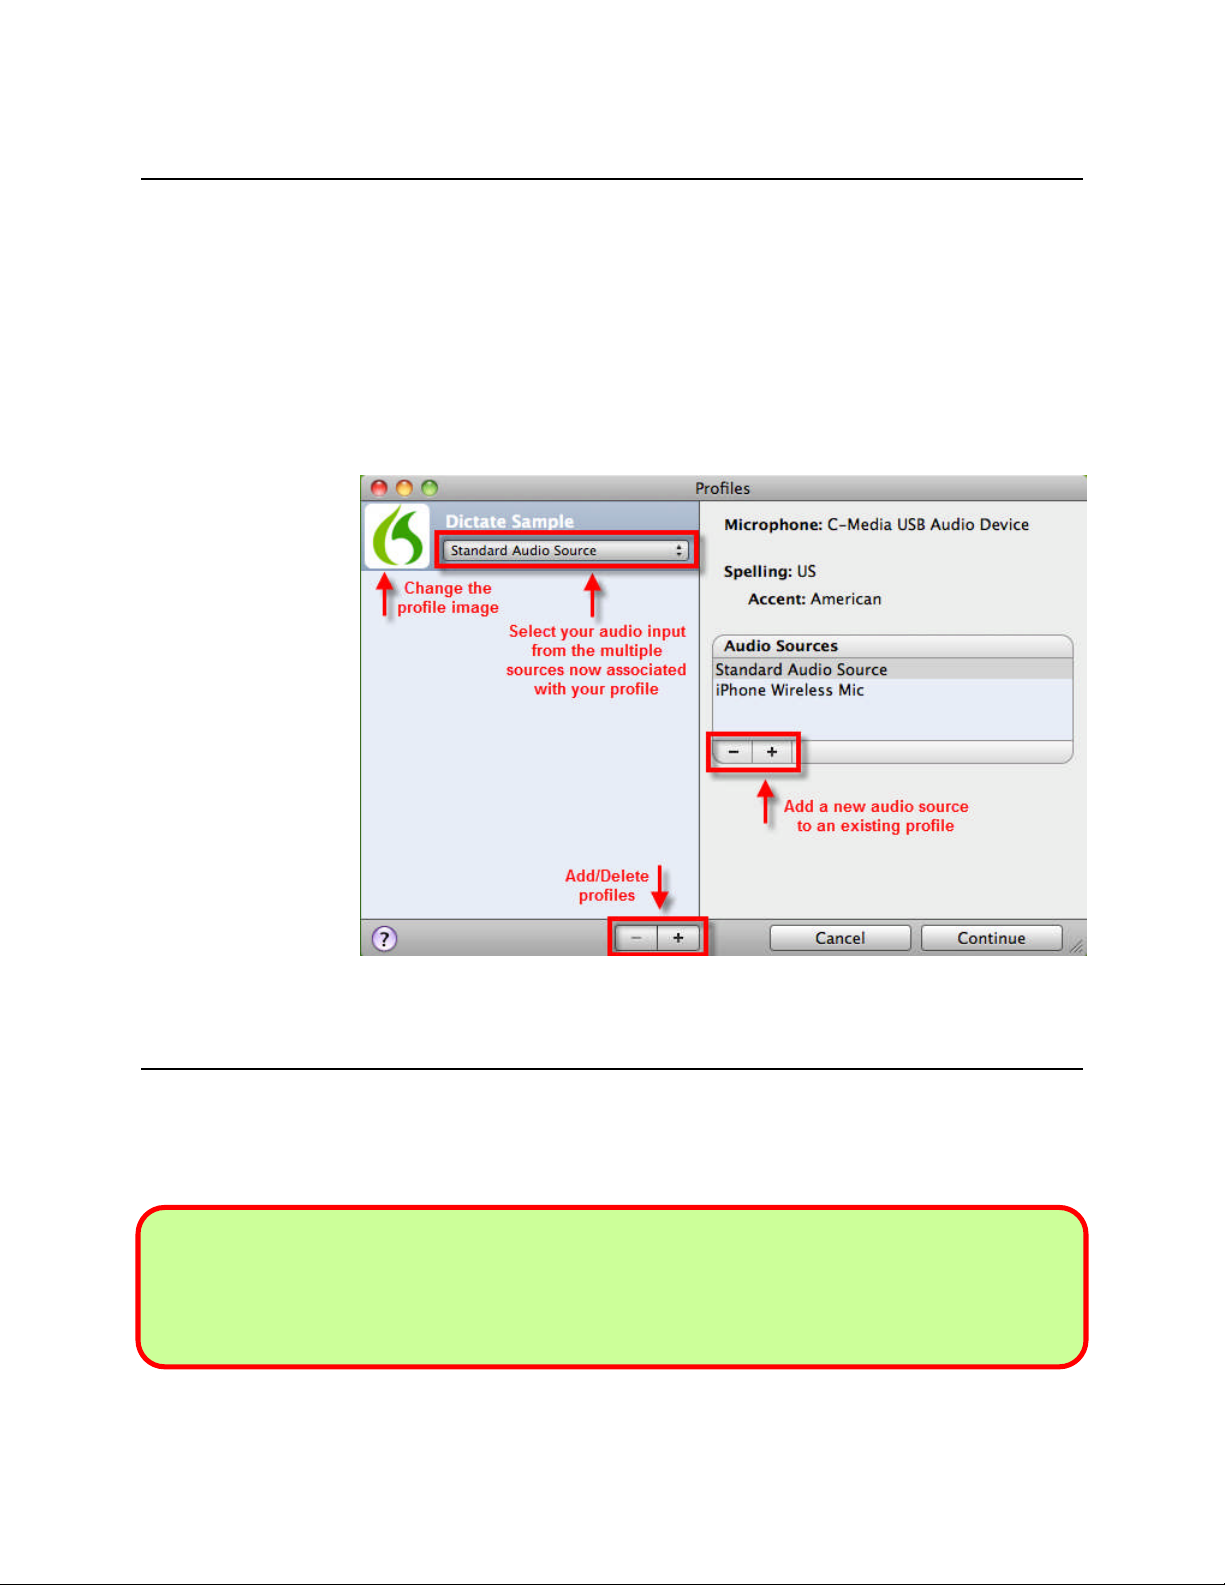
ADDING AND DELETING PROFILES
To access the Profiles window, select Profiles from the Tools menu.
By clicking on the image to the left of your profile name, you can change the image associated
with a specific profile. Select and modify an image if you choose, and then click Set.
To add a new profile to your copy of Dragon Dictate, just click the + sign at the bottom of the
window. You can delete old or unused profiles with the - button.
The Profiles window
allows you to manage
your voice profiles. To
access the Profiles
window, select Profiles
from the Tools menu.
ADDITIONAL AUDIO INPUT DEVICES
There are many different ways that you can provide audio to Dragon for transcription. Adding a
new audio source to your profile is helpful if you want to use more than one type of microphone
for your dictation.
NOTE If you already have a Dragon profile and want to use another type of audio input
device (such as your iPhone), don’t create a new profile. Add a new source to your
existing profile instead.
Copyright 2011 Nuance Communications, Inc. All rights reserved.
7
Page 13

Since your profile stores all of the information about your customized instance of Dragon –
things like your personalized vocabulary so that Dragon knows the correct pronunciation and
spelling of the unique words you dictate, or perhaps custom voice commands that you create for
the tasks that you personally perform on your Mac – you’ll want to leverage your customized
profile regardless of which microphone you’re using.
To add a new audio source to your existing profile, click the + sign under the Audio Sources
field and provide a name for that source.
Now that you have multiple sources, a new field will appear under your profile name, allowing
you to easily select which microphone you plan to use for your dictation. If necessary, you can
delete an audio source later by using the minus sign in the Audio Sources field.
SUMMARY: CREATING A PROFILE
Each person who wants to dictate with Dragon first needs to create his or her own
profile. This is a short process, guided through a series of screens. You can change the
images associated with a specific profile. In the Profiles window (found under the Tools
menu), click the image to the left of the profile name, select and modify your image, and
click Set.
Make sure your microphone is properly connected and positioned, and the appropriate
audio input source (microphone) is selected. Additional audio input sources (such as
mobile devices) are reviewed later in this workbook.
You can “enroll” an additional audio source for an existing profile (for instance, if you
want to use your iPhone as a wireless microphone). Your various dictation sources will
benefit from the same vocabulary customizations (special words and phrases,
pronunciations, spellings, etc.).
When reading the acoustic training text, speak clearly but naturally, using the same
volume, pitch and pace you are likely to use day-to-day. Try to read what is prompted as
if you were dictating it. You can pause the Voice Training if you need to clear your throat
or speak to someone.
Copyright 2011 Nuance Communications, Inc. All rights reserved.
8
Page 14

CHAPTER 2: MICROPHONE CONTROL
lso includes a “bring to
front” button and icons to control the recognition
below the Status window.
Before you can dictate, you need to be sure that Dragon Dictate will be able to hear you. Your
microphone must be connected and positioned correctly of course, but the software also needs
to know whether to “listen.” This lesson shows several ways to turn Dragon’s microphone on or
off, and introduces the Status window.
THE STATUS WINDOW AND THE MICROPHONE ICON
The Status window is the primary user interface for Dragon Dictate and can be considered the
application’s “control center.” When the Status window is showing, it floats over all other
applications.
The Status window includes the name of the
active profile, a microphone icon and sound
input level. The window a
mode and the correction process. As an option,
the last recognized utterance can be listed
To show or hide the Status window: say Show Status window or Hide Status window or
choose “Show/Hide Status Window” from the Window menu. You can set the Status window’s
transparency using the slider found under the Dictate / Preferences menu, Appearance tab.
WHAT’S INSIDE THE STATUS WINDOW:
The top panel of the Status window identifies the active profile by name.
Next to the microphone icon, Dragon provides a sound input level, a mode button, a
“bring to front” button, and a button for the Recognition Window, used to correct errors.
Beneath these icons, buttons indicate whether the commands for capitalization, spacing
or numbers are currently active.
The bottom area of the Status window indicates the dictation target window (e.g., which
application Dragon will place your text into).
Below the Status window, Dragon can list the last recognized utterance if the “Show
Recognized Text” option is enabled under the Dictate / Preferences menu, General tab.
Copyright 2011 Nuance Communications, Inc. All rights reserved.
9
Page 15
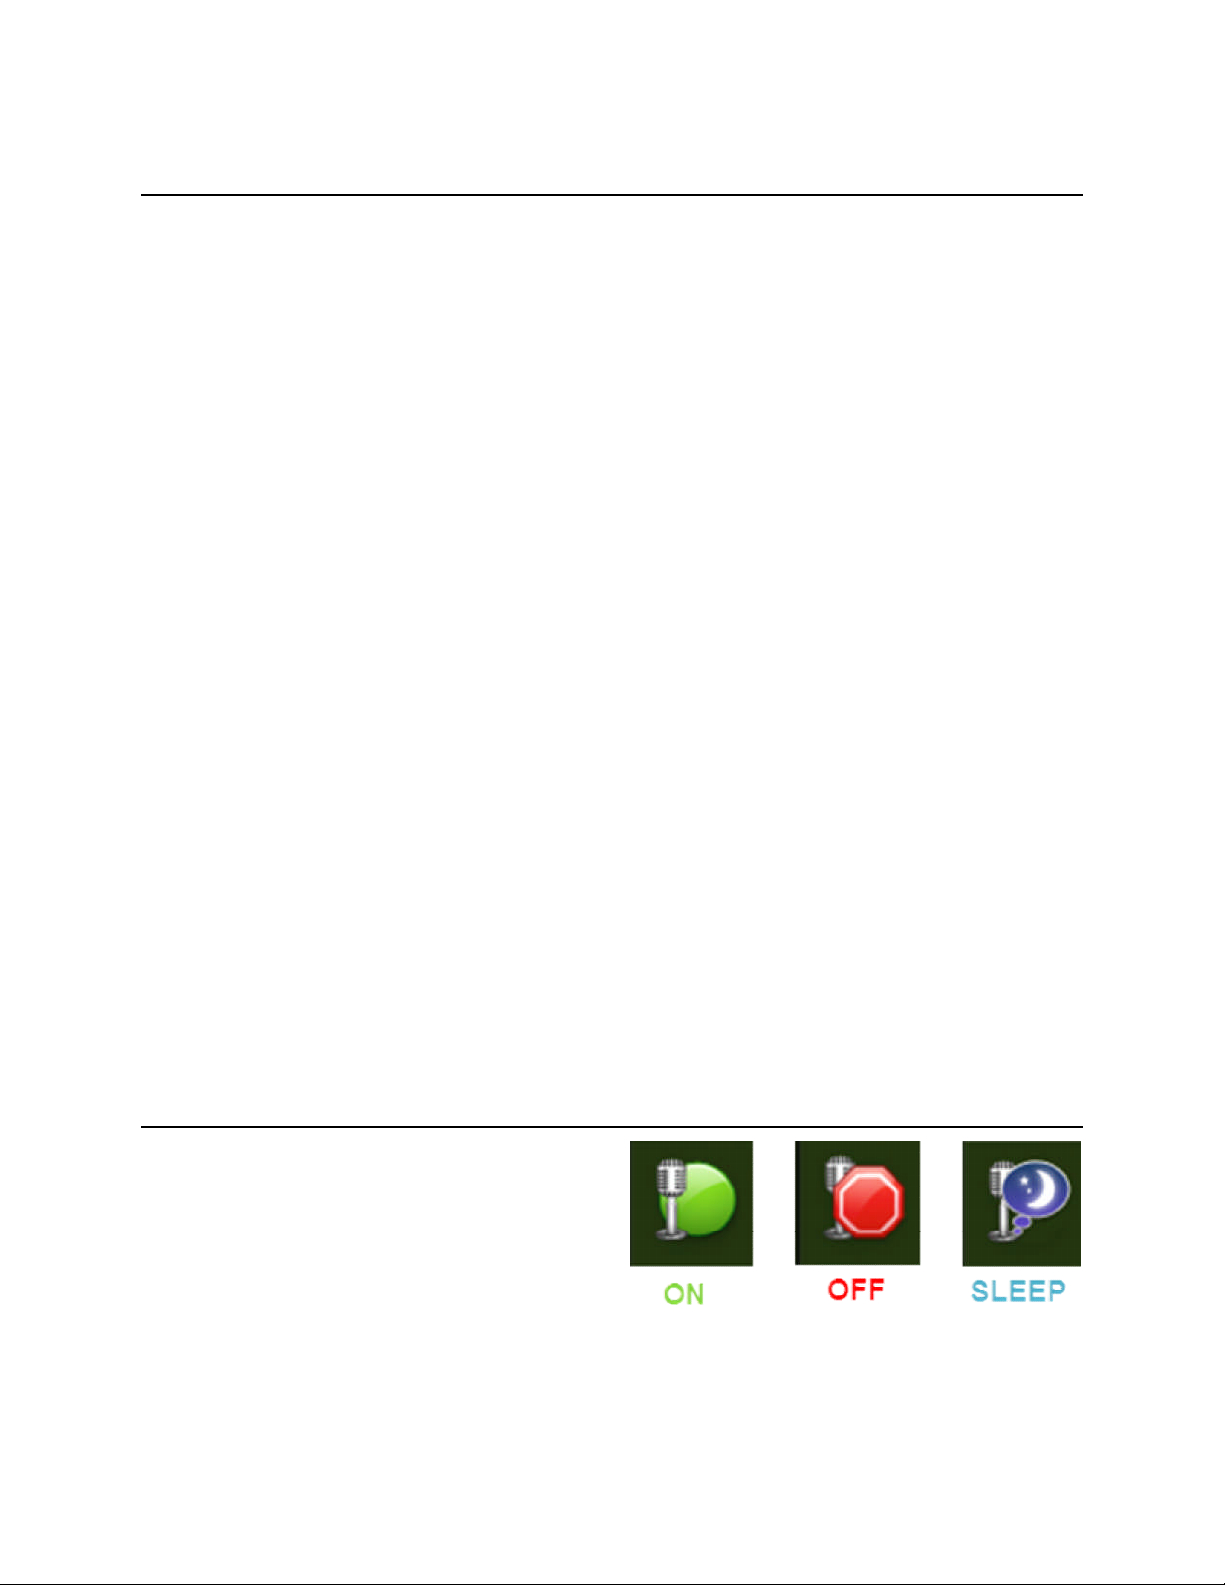
TURNING THE MICROPHONE ON AND OFF
Within the Status window, the microphone icon appears as a red “stop sign” when the
microphone is off. This indicates that Dragon is not listening at all – no sound can affect it. The
microphone becomes a green circle when the microphone is on, indicating that Dragon is
listening and is ready to transcribe your text or respond to your commands. In addition to the
Status window, you can view whether the microphone is on or off by observing the microphone
display in the menu bar and the Dock icon.
There are several different ways to turn the microphone on or off.
To turn the microphone on:
Click the microphone icon in the Status window or the optional status menu item in the
menu bar so that it appears with a round green button.
Choose Microphone On from the Speech menu.
Choose Microphone On from the Dock menu. (To reveal the Dragon Dictate Dock menu,
hold the Control key while clicking the Dictate icon in the Dock.)
To turn the microphone off:
Click the microphone icon in the Status window or the optional status menu item in the
menu bar so that it appears with a red “stop sign” button.
Choose Microphone Off from the Speech menu.
Choose Microphone Off from the Dock menu.
MICROPHONE VOICE COMMANDS AND SLEEP MODE
When you feel comfortable talking to your
computer, you may choose to use your voice to
control the microphone instead of using your
mouse or keyboard. Voice commands can turn
the microphone off entirely or put the
microphone in and out of a “sleeping” state where it doesn’t transcribe your words but it is still
listening. The advantage of Sleep Mode – vs. turning the microphone entirely off – is that you
can use voice commands to resume your dictation.
Copyright 2011 Nuance Communications, Inc. All rights reserved.
10
Page 16
To control the microphone by voice:
Step 1: Turn the microphone on by clicking on its icon, then say go to sleep. Note that the
microphone display now shows a blue balloon with a crescent moon to indicate that
Dragon is asleep.
Step 2: To return to the active microphone from the sleep state, say Wake up or Turn [the]
microphone on.
Step 3: Say Microphone off to exit Sleep mode and stop Dragon from listening entirely.
NOTE For all voice commands, there should be a brief silence before and after, but none
in the middle of your command. Otherwise the program cannot recognize the
command and instead transcribes the words. For example, say the words “go to
sleep” together in a natural flow without pausing or inserting additional words.
Putting the microphone to sleep is useful when you need to put Dragon “on hold” for a moment.
However, leaving it in that state for a long time is not recommended. Turn the microphone off if
you will not be dictating for a while (and are physically able to turn on the microphone manually).
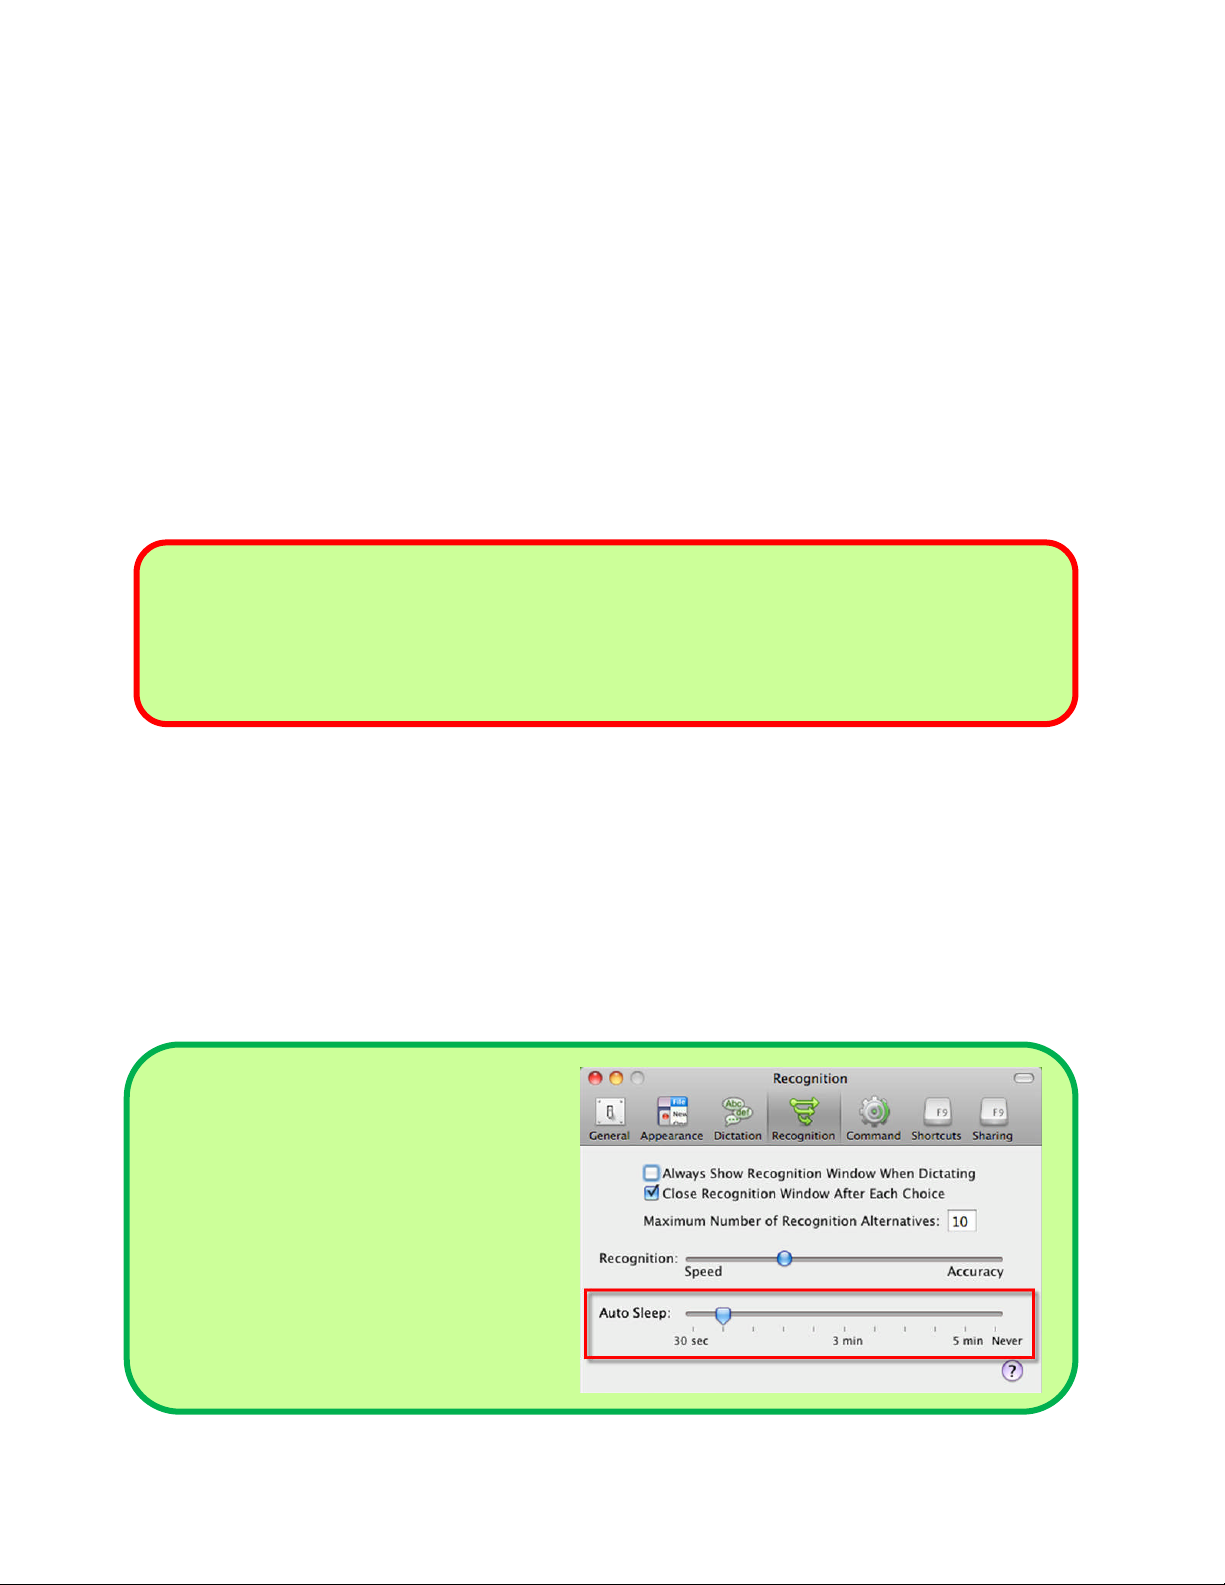
If the microphone is on but does not receive input after one minute, the microphone will
automatically go into Sleep mode. This Auto Sleep functionality is helpful as it forces you to
follow effective microphone control even when you forget to turn the microphone off.
TIP You can set your personal preference
for the time allotted for the Auto
Sleep microphone functionality (any
range from 30 seconds to five
minutes). Adjust the slider found
under the Dictate / Preferences
menu, Recognition tab. Here you
also have the option to turn off the
Auto Sleep functionality entirely.
Copyright 2011 Nuance Communications, Inc. All rights reserved.
11
Page 17
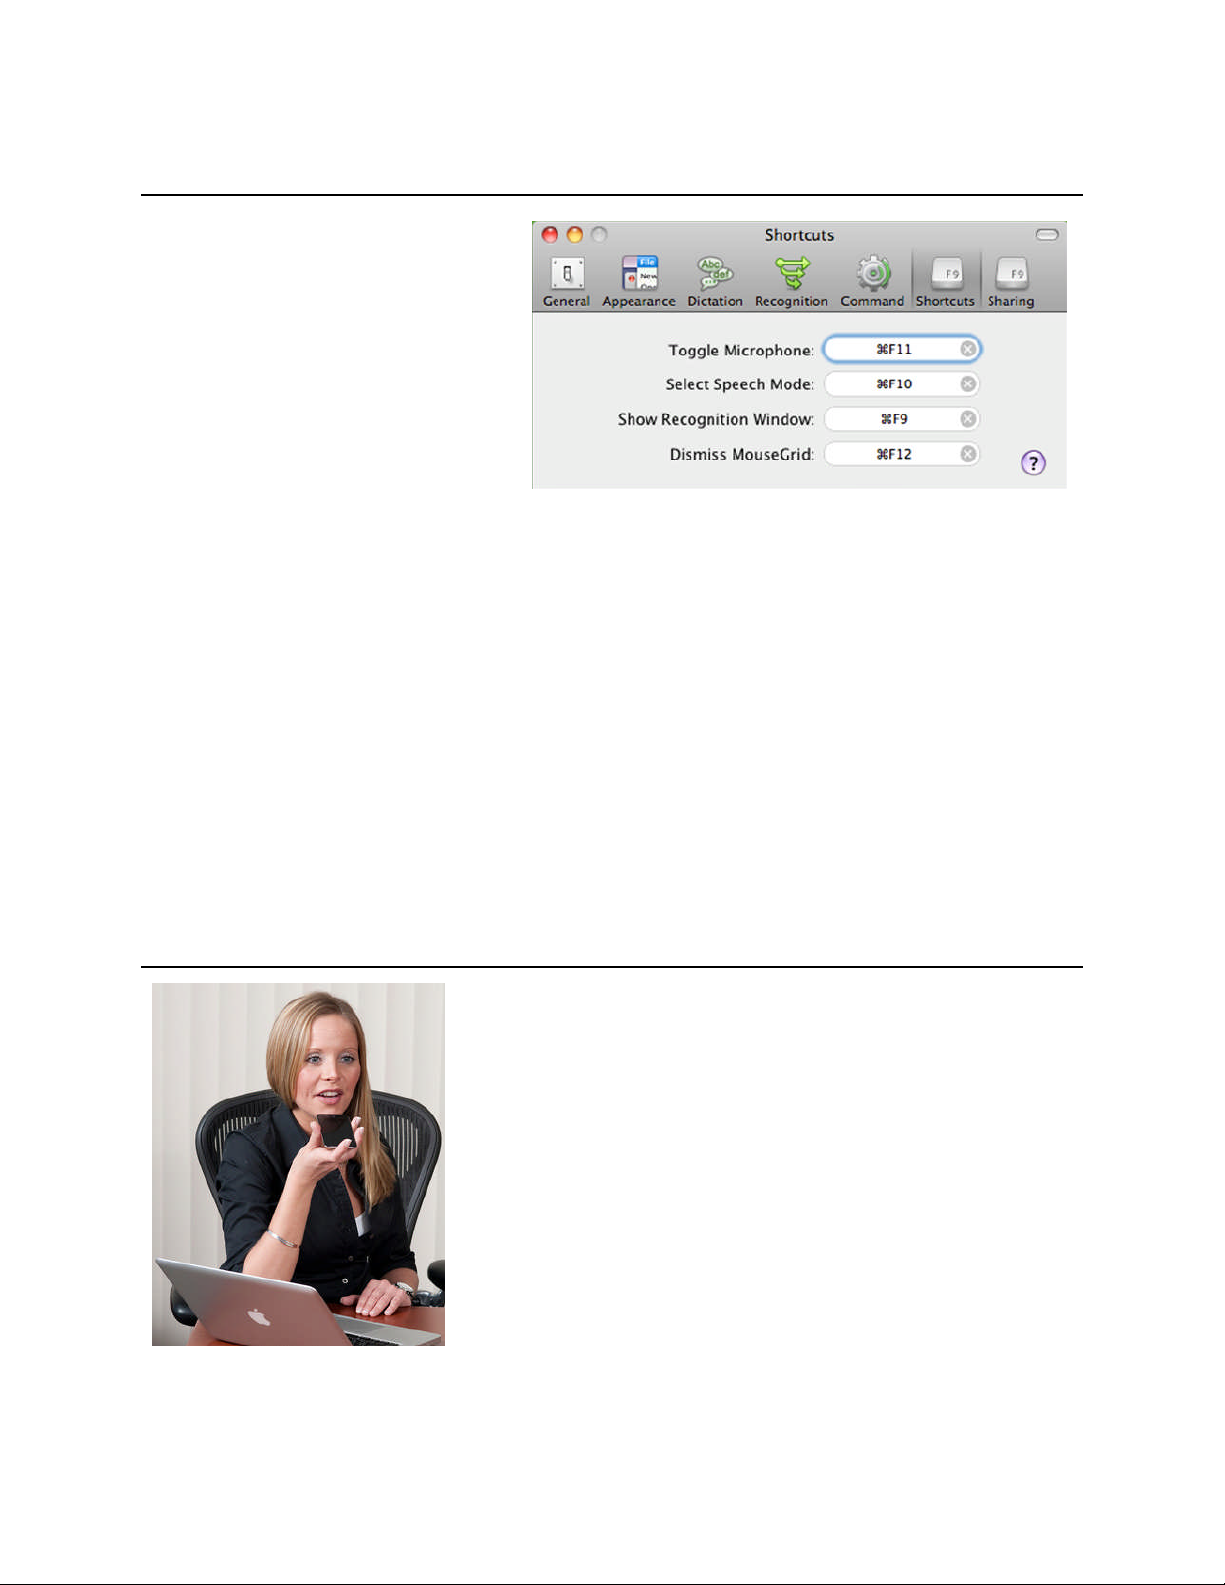
OPTIONAL HOT KEYS INCLUDING MICROPHONE ON/OFF
app turns your iPhone or iPod touch
Some users may find it faster to
press a key or two rather than
moving and clicking the mouse, so
Dragon offers a series of global
keyboard shortcuts, or “hot keys” to
perform various useful tasks. Hot
keys can turn the microphone on/off,
switch between speech modes,
show/hide the Recognition window to
make corrections and dismiss the
mouse grid (used to control the mouse by voice).
By default, the hot key combination to control the microphone is Function Command F11.
Optional keyboard shortcuts (hot keys) can be configured to
control the microphone and other Dictate tasks.
To set the hot keys for the microphone, along with the other hot keys, select the Preferences
option from the Dictate menu. Under the Shortcuts tab, click in the oval shortcut region and type
your desired key combination. To delete a shortcut, click the X at the right end of the oval
shortcut region.
DRAGON REMOTE MICROPHONE
Most customers use Dragon by speaking directly to their Mac
using the microphone included with their Dragon software
purchase. But some users can be frustrated by wearing a
headset that tethers them to their Mac. With the introduction of
the free Dragon Remote Microphone application (available in
the Apple app store), you can achieve the same great accurate
transcription using a device you may already have: your
iPhone! The Dragon Remote Microphone app converts a user’s
iPhone, iPad, or iPod touch 4th gen into a wireless microphone
The Dragon Remote Microphone
into a wireless microphone.
Copyright 2011 Nuance Communications, Inc. All rights reserved.
via WiFi.
12
Page 18
We recommend that you first begin using Dragon with the standard headset microphone, and
Status window no longer controls
off,
press the Dragon
button on your device
add your mobile device as an alternate audio input option once you are more comfortable using
Dragon to dictate text and control your computer.
Step 1: In the Profiles window, click the + symbol under the Audio Sources box. Provide a name
for your mobile device and select “Dragon Remote Microphone” from the drop-down
menu options.
Step 2: A dialog prompts you to download and install the Dragon Remote Microphone app from
the iTunes store if you have not already done so.
NOTE: Your Mac must be connected to a local area network, and your mobile device must
establish a wireless connection to the same local area network before launching the
Dragon Remote Microphone app. The app may not work on certain public networks
that restrict device to device networking for security reasons.
Step 3: Within the Settings for the Dragon Remote Microphone app on your mobile device
(found under the gears icon), the name of the Mac running your Dragon Remote
Microphone profile will be displayed. Select your Mac and proceed with Voice Training.
Step 4: When you complete Voice Training, your profile opens
with your mobile device as the audio input source. Note
that the Status window now has a different appearance
since the ability to determine whether or not Dragon is
“listening” is now controlled by your mobile device and
can’t be controlled from your desktop.
The microphone icon in the
whether Dragon “listens.”
Step 5: To control the microphone, click the Dragon button within the
app on your device. (The green icon indicates the microphone
is on; the red icon indicates the microphone is off. Voice
commands will also work.)
Copyright 2011 Nuance Communications, Inc. All rights reserved.
To turn the
microphone on or
screen.
13
Page 19

Your profile in the Profiles window will now display the Dragon Remote Microphone as one of
the audio input options within a drop-down menu when you open Dragon. Be sure that you
select the correct option before you begin your dictation.
SUMMARY: MICROPHONE CONTROL
Dragon “listens” whenever its microphone is on. Remember to turn the microphone off
(or put it into its sleeping state if appropriate) when you are not dictating, like before
answering the phone, speaking to someone, or clearing your throat. This is a simple but
important habit you should develop quickly.
To control the microphone, click the microphone icon in the Status window or in the
menu bar / Dock menu. (To set preferences to control the microphone in the menu bar /
Dock menu, select the Dictate / Preferences menu, Appearance tab.)
Keyboard shortcuts can also be a fast and convenient way to turn the microphone on
and off. You can change any of Dragon’s default hot keys, including the microphone’s, in
the Shortcuts Preferences pane (found under the Dictate / Preferences menu).
You can turn the microphone off by saying microphone off, but then the mouse or
keyboard need to be used to turn it back on. You can say go to sleep to put the
microphone into a sleeping state, and then say wake up or turn [the] microphone on
when you’re ready to dictate again.
Microphone off, go to sleep, wake up and turn [the] microphone on are all voice
commands. In order for Dragon to recognize and execute the desired action, you must
pause slightly before and after but not in the middle of the command.
Copyright 2011 Nuance Communications, Inc. All rights reserved.
14
Page 20

CHAPTER 3: DICTATING TEXT AND PUNCTUATION
You can use Dragon Dictate to enter text into all of your favorite Mac applications. What you
dictate will be inserted wherever Dragon sees the blinking cursor within the active application.
But talking to a computer isn’t exactly the same as talking to a person.
HOW TO DICTATE
Speech recognition programs don't understand what words mean, so they can't use common
sense the way people do. Instead they keep track of how frequently words occur by themselves
and in the context of other words. These contextual clues help the computer choose the most
likely word or phrase from among several possibilities. For this reason, accuracy increases if
you speak in longer, continuous phrases. Computers can't understand mumbled speech or
missing words either. They only understand what was actually spoken.
Try thinking about what you want to say before you start to speak. This can be challenging at
first, particularly for those who have been “thinking through their fingers” for years, but you’ll
develop the habit once you see what a difference it makes. And keep in mind, there’s no need
to talk robotically or to talk really slow. Don’t yell or whisper. Just speak at your normal pace in a
normal tone.
Are you ready to get started? For these exercises, open a word processor (like TextEdit or
Microsoft Word). Dragon Dictate also offers its own built-in word processor, called Note Pad,
which is specifically created for dictation through Dragon Dictate.
TIP A common technique is to dictate into a Note Pad window and then copy and paste into
another application. Note Pad window contents are saved as.rtf files which can be opened
for editing later with another word processor (such as TextEdit or Microsoft Word). You
can also open an existing .rtf file into a Note Pad window.
Copyright 2011 Nuance Communications, Inc. All rights reserved.
15
Page 21

To summon a new Note Pad window:
Step 1: Say File New when Dragon Dictate is front-most or choose New Note Pad from the File
menu.
Step 2: To set the default font and size for a new empty Note Pad window, select the Format
menu and choose Font / Show Fonts. Specify the desired font and size, and close the
Font palette.
TIP Before dictating, make sure the desired window is active. The application where Dragon
will place your transcribed text is listed in the bottom panel of the Status window.
As you dictate, Dragon places your transcribed text directly into the active application.
Underneath the Status window, you can also choose to have Dragon display the last utterance
of your speech as it is recognized. This includes text and punctuation. Check the “Show
Recognized Text” option found under the General tab within the Dictate / Preferences menu.
Review the following text sample then dictate it in a blank document. (Ignore
any errors for now.)
The more I use it, the software will adapt to the way I sound and the words I
use. At the same time, I will also acquire good habits like pausing optimally,
keeping silent when hesitating, and turning the microphone off, or putting it
into its sleep state, when necessary!
NOTE Don’t forget to turn off your microphone when you finish dictating!
Copyright 2011 Nuance Communications, Inc. All rights reserved.
16
Page 22

PUNCTUATION
Note that Dragon Dictate does not automatically insert punctuation marks for you. Include your
punctuation as you dictate your text. Here are the most common punctuation marks, followed by
what you say to “voice-type” them:
. period
, comma
? question mark
“ open quote
” close quote
( open paren
) close paren
! exclamation point or exclamation mark
: colon
; semi-colon
… ellipsis
& ampersand or and sign
-- dash
- hyphen
A complete list of punctuation is available in the User Guide and product Help. Note that you
don’t always have to say hyphens: thanks to its built-in Vocabulary, Dragon can automatically
include hyphens in items such as 3-year-old, above-mentioned, after-tax, ad-libbed, anklelength, and more. Dragon will also automatically hyphenate famous names like Abdul-Jabbar.
Look at the following sample, and then dictate it including the correct
punctuation. (If any word is misrecognized, ignore it for now.)
How is this different from dictating to a person? I should try to provide “clean
input” (speaking naturally, but without mumbling or trailing off)! :-)
Dictate the last punctuation as smiley face.
NEW LINE AND NEW PARAGRAPH
When typing, you use your Return / Enter key to start a new line or new paragraph. When
you’re dictating within Note Pad, TextEdit or Microsoft Word, you can still press your Enter key
(or any other key on your keyboard), but you can also simply say commands like new line or
new paragraph.
Copyright 2011 Nuance Communications, Inc. All rights reserved.
17
Page 23
When you start dictating a new paragraph, Dragon will capitalize its first letter automatically, just
like it automatically capitalizes after a period, an exclamation point, or a question mark. By
default, Dragon does NOT capitalize the first word after you say the command new line.
TIP To delete your last utterance (the last string of words Dictate just transcribed), you can say
scratch that. To undo the last action Dictate performed on your Mac, say undo last
action. This is equivalent to Undo in the Edit menu, and is especially helpful if you
mistakenly issued a voice command that triggers an unexpected action on your screen.
Dictate the following sample, including the correct punctuation and line
spacing. (If any recognition errors occur, ignore them for now.)
These lessons remind me that "practice makes perfect."
(Who said this, Confucius?)
When it comes to speech recognition software, truer words were never
spoken…
CAPITALIZATION
Since many of the words that require capitalization (such as proper names, places, common
products, etc.) will be automatically capitalized when you dictate them, you often don't need to
worry about capitalization within your dictation. However, follow these steps to capitalize text
that is not automatically generated by Dragon:
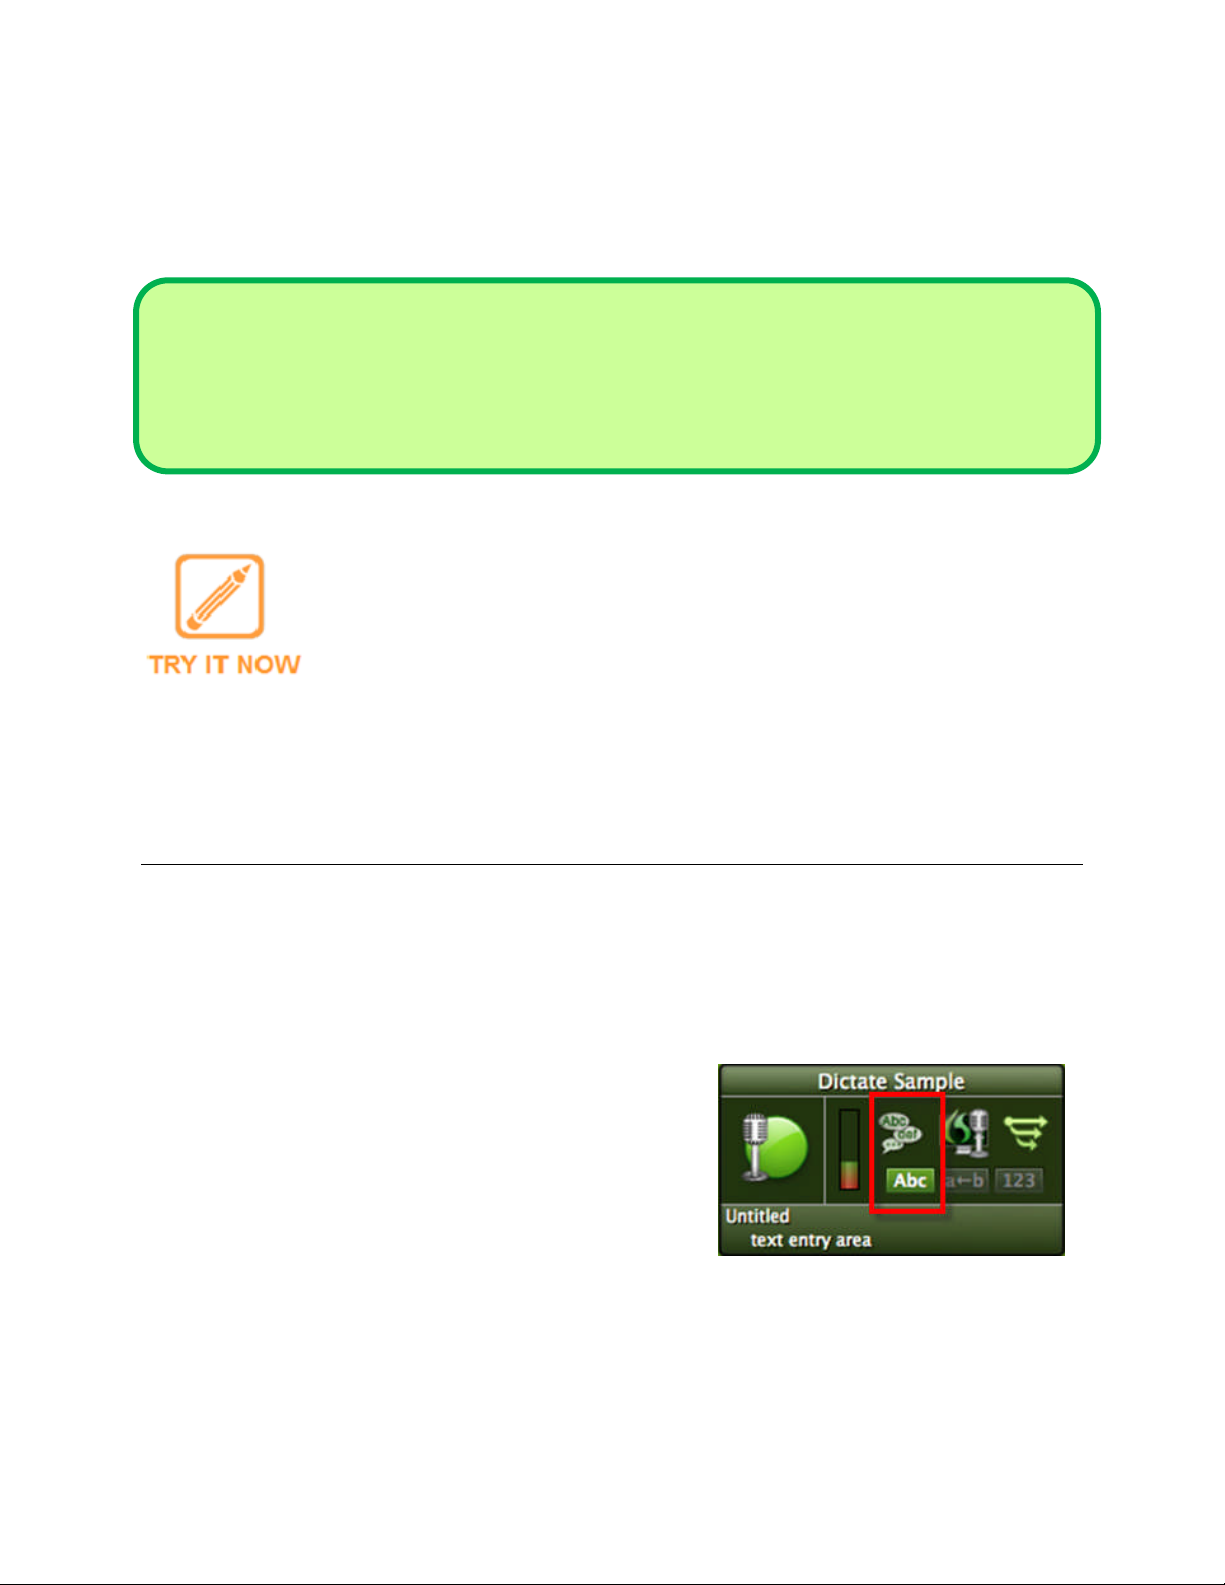
To capitalize a single word: If you’re dictating
words that aren’t usually capitalized, say Cap
followed by the word to be capitalized. In the
Status window, the first indicator light will glow
yellow and will read "ABC." When you dictate the
word, it will be typed with an initial capital letter,
and the indicator light will go out automatically.
The first indicator light under the Modes
button in the Status window illuminates to
display the status of capitalization
commands.
Copyright 2011 Nuance Communications, Inc. All rights reserved.
18
Page 24

To capitalize a string of words: If you’re about to dictate a string of words that need to be
capitalized, say Caps On, followed by Caps Off when you complete the capitalized text.
In the Status window, the first indicator light will glow green and will read "ABC." The
indicator light will go out after you have turned off this command.
To capitalize an entire word: For all uppercase letters in your text, say All Caps followed
by the word to be capitalized. In the Status window, the first indicator light will glow
yellow and will read "ABC." When you dictate the word, it will be typed in all uppercase
letters, and the indicator light will go out automatically.
To capitalize all letters in a phrase: Say All Caps On to dictate a string of words to
appear in all capitalized letters, followed by All Caps Off when you have completed the
dictated text. In the Status window, the first indicator light will glow green while you say
the series of words, which will be typed in all uppercase letters. The indicator light will go
out when the command is turned off.
If you do not want capitalization for text that is generally capitalized, say No Caps / No
Caps On before dictating the word(s).
If the capital letters you’re trying to dictate are an acronym (a series of capital letters without any
spaces or periods between them), say Capital before each letter. For example, saying “Capital
A Capital P Capital C” would generate APC. Dictating “Cap A Cap P Cap C” would generate A P
C with spaces. If you want to dictate initials (a capital letter followed by a period), say Capital or
Cap followed by the letter, and say dot between each letter For example, you would say, “Cap
A dot Cap P dot Cap C dot” to generate A.P.C.
Dictate the following words, including the correct capitalization:
Name and Age
G.S.
DATE OF BIRTH
ASP
Copyright 2011 Nuance Communications, Inc. All rights reserved.
19
Page 25
TIP If you will be dictating initials or acronyms often, it would be faster and easier to enter
them in your Vocabulary with an easier to dictate “spoken form.” See the next chapter for
more details on this helpful feature.
AUTO FORMATTING OPTIONS
As you saw in your first dictation, Dragon Dictate automatically inserts spaces between words. It
also follows spacing and capitalization rules: for example, it inserts a space after close quote
but none after open quote, and it capitalizes at the beginning of sentences and paragraphs.
Dragon also offers contextual
automatic formatting that allows you
to naturally dictate prices, times,
dates, abbreviations, contractions,
units of measure, street addresses,
email addresses, URLs, and other
special text.
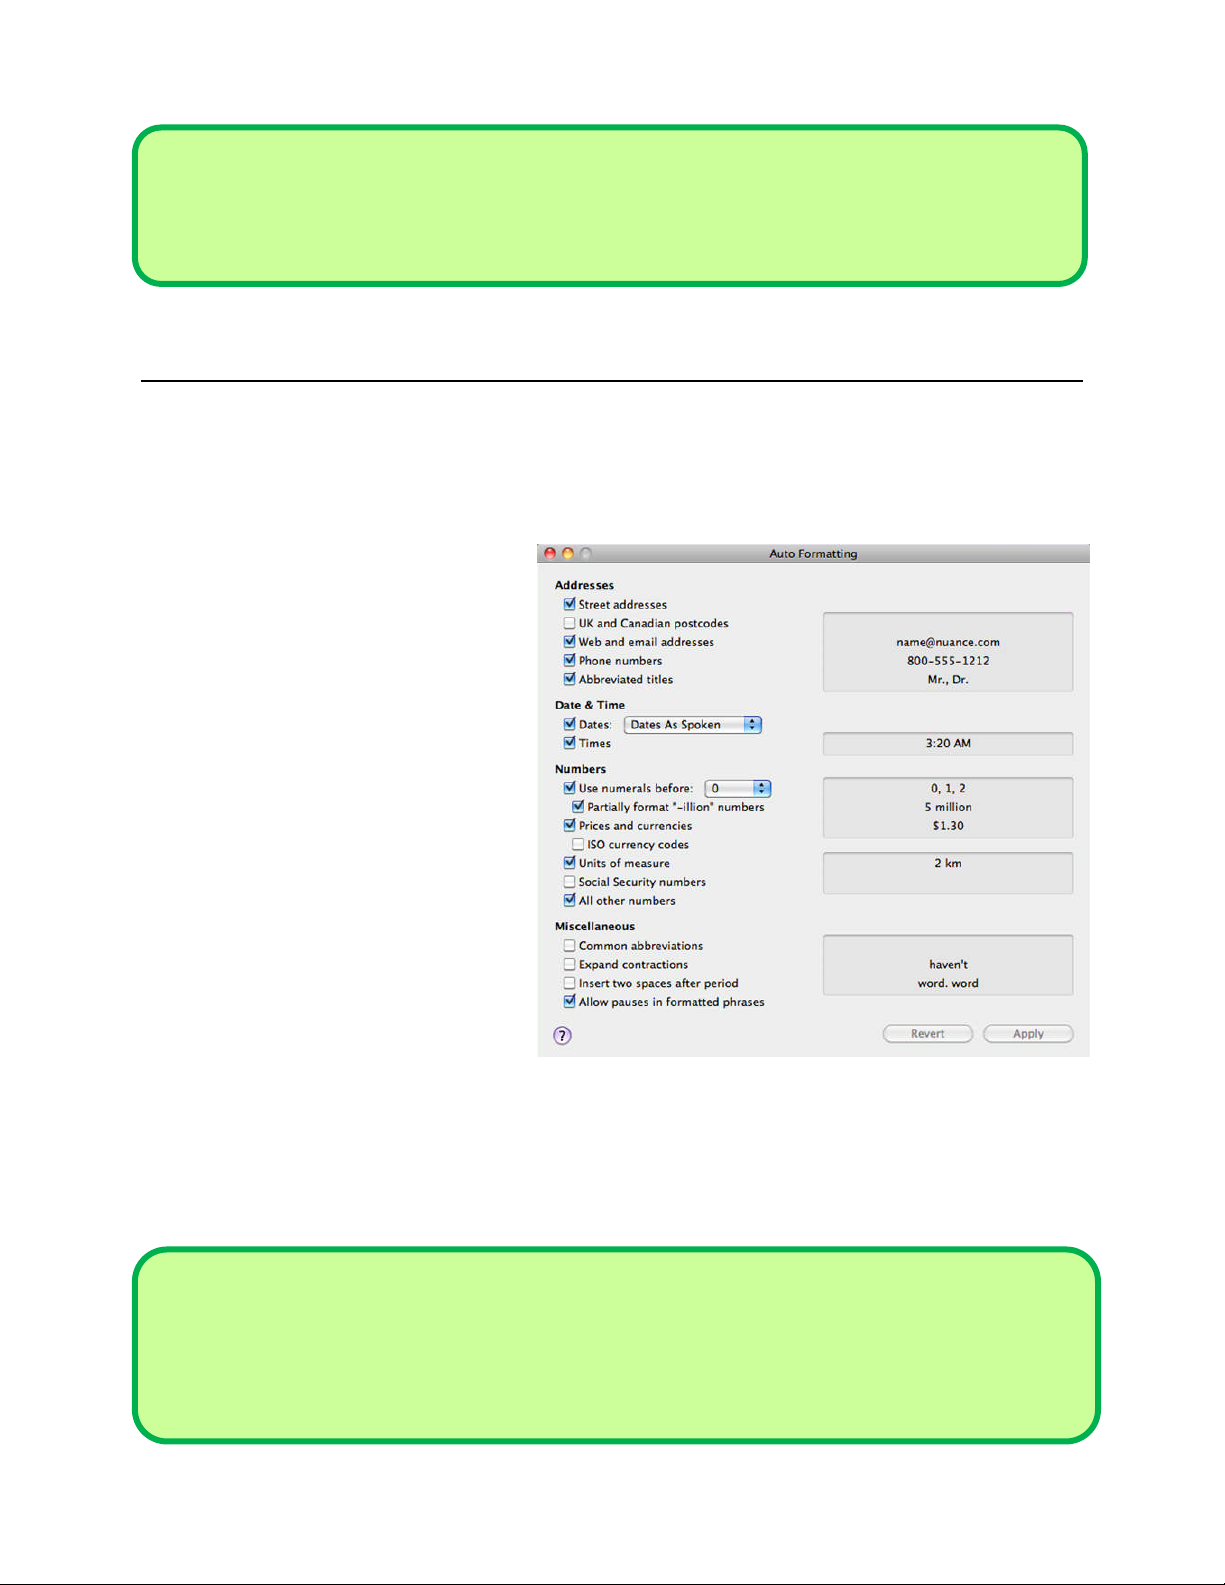
On the Auto Formatting window
(available from the Tools menu), you
can turn Dragon’s rules of automatic
formatting off and on, as desired.
For example, you can choose to have
Dragon systematically transcribe
numbers as words not digits. (By
default, Dragon uses numerals for all
Set your personal formatting preferences -- for items such as
numbers, dates, times, abbreviations and more – within the Auto
Formatting window.
dictated numbers. If you uncheck this option, Dragon will spell out all numbers. You can say
“numeral” before a number to ensure it is transcribed as a digit.)
TIP You can change the default date format to one of the many date formats offered on the
Auto Formatting dialog. To correctly format times (so that Dragon inserts the colon and
double-zero for the top of the hour, instead of inserting “o’clock”), be sure to specify AM or
PM after the time (e.g., say “seven forty-five PM” to generate 7:45 PM).
Copyright 2011 Nuance Communications, Inc. All rights reserved.
20
Page 26

1) Dictate these phone numbers (with and without area code). There’s no
need to say "hyphen."
Please call 607-585-3926 instead of 587-1239.
Toll free directory: 1-800-555-1212
2) Dictate the following address. For the line containing the zip code, just say
Oakland California 9 1 2 3 5; Dragon automatically uses the postal
abbreviation for the state, and precedes it with a comma.
127 Evergreen Terrace
Oakland, CA 91235
3) Dictate the following dates and times.
Wednesday, July 16, 2012 at 6:00 PM
10/15/09 (say slash) at 8:30 AM
4) Dictate the following price as forty dollars and ninety cents; Dragon will
automatically format it with the dollar sign and dot.
Suggested retail price: $40.90
5) Dictate the following URL as w w w dot the best business dot com. Dragon
will automatically remove the spaces between words.
Please visit www.thebestbusiness.com for more information.
6) Dictate the following email addresses. (Remember: for email addresses
you frequently dictate, adding them to your vocabulary will ensure that you
can dictate them very quickly and with high accuracy.)
Laura_Miller@aol.com (say “Laura underscore Miller” at A O L dot com”)
customerservice@electricalexperts.com (say “customer service at electrical
experts dot com”)
RECOGNITION MODES
There may be times when you want to do a special kind of dictation. For example, you may be
entering many numbers or characters in a row, such as inputting figures or product codes into a
Copyright 2011 Nuance Communications, Inc. All rights reserved.
21
Page 27

database. Dragon offers unique recognition modes that can help to improve your accuracy in
these instances.
The recognition mode determines whether and how
Dictate will respond to your speech. There are several
different ways to confirm what mode is currently active:
The Status window indicates what mode is
currently active. The mode button’s icon
represents the current mode.
The current mode is checked in the mode menu,
which appears when you click the mode button
in the Status window. The current mode is also
Recognition Modes can be accessed
within the Status window. The Mode
menu appears when you click the Mode
button, found next to the Sound Level
indicator.
checked in the Speech menu and the Dock
menu.
Most customers work in the default Dictation Mode. If Dragon can interpret your words as a
command, it obeys the command. Otherwise Dragon interprets your words as dictation, and
types those words at the insertion point in the front-most application. Take a moment to explore
Dragon’s other recognition modes, which include Numbers Mode, Spelling Mode, and
Command Mode.
Numbers Mode
If you are about to dictate a sequence of numeric data, you may choose to switch to Numbers
Mode. When in this mode, the software tries to recognize everything it hears as number-related
(or as a command).
Step 1: Say Numbers mode or choose Numbers Mode
from the Status window mode menu. You can
also choose from the Speech or Dock menus or
press the keyboard shortcut for cycling between
modes. (Notice the mode icon change in the
Status window.)
Copyright 2011 Nuance Communications, Inc. All rights reserved.
The Status window displays the current
Numbers Mode.
22
Page 28

Now that Dragon is in Numbers mode, you can:
Dictate numbers and punctuation (hyphen, dot or point)
Say new line, new paragraph and space
Step 2: To resume regular dictation, you can say Dictation mode, or use the Mode menu in the
Status window.
Spelling Mode
The Spelling Mode is very useful for dictating character sequences which don’t form
pronounceable words, as is often the case for part numbers, license plate numbers, codes…
(It’s also useful for spelling out terms which you anticipate Dragon won’t know, such as words in
a foreign language or unusual product names.)
Step 1: Say Spelling Mode or select the Spelling mode from the Status window mode menu.
The Status window will indicate that Spell Mode is on.
You can now dictate characters, including letters, digits, and symbols.
To capitalize a letter, say cap immediately followed by the letter
Say new line or new paragraph, as well as space or spacebar
Step 2: You can return to normal dictating by voice (say Dictation mode) or by clicking the
Mode menu in the Status window.
TIP Most of the time Dictate will insert spaces automatically before or after punctuation and
between words. But in Spelling mode, no automatic spaces are inserted – you must insert
any desired spaces yourself. To insert a space, say Space Bar.
Copyright 2011 Nuance Communications, Inc. All rights reserved.
23
Page 29

SUMMARY: DICTATING TEXT AND PUNCTUATION
What you dictate is transcribed at the insertion point (the blinking vertical bar or cursor
where characters would appear if you started to type). Before you dictate, make sure
that the desired window is not just visible, but also has the focus.
Speaking in longer, continuous phrases provides contextual clues and thus helps
Dragon choose between homophones like “right” and “write” or “to” and “two.”
Punctuation is part of the dictation context—it has an impact on recognition accuracy.
Two very frequent dictation commands are new paragraph (which adds a blank line)
and new line. By default, new line does NOT trigger capitalization of the following word.
Dragon can format dates, times, prices, street addresses, phone numbers, Web
addresses, units of measure, and other special text automatically. The Auto Formatting
window (found under the Tools menu) lets you turn these built-in rules off or on as
desired.
The restricted recognition modes can make dictating special text more efficient. They are
accessible by voice commands (“Numbers Mode,” “Spelling Mode”) and through the
Status window’s Mode icon and menu.
If you will be dictating only numbers and punctuation, consider turning Numbers Mode
on. If dictating a long sequence of characters (letters, digits, punctuation, symbols),
consider Spelling Mode.
When spelling out, you can insert a capital letter by saying cap just before the letter, and
you can say space or spacebar.
Copyright 2011 Nuance Communications, Inc. All rights reserved.
24
Page 30

CHAPTER 4: CUSTOMIZING THE VOCABULARY
Dragon includes more than 150,000 words and phrases in its standard “out-of-the-box”
vocabulary, so it’s prepared to recognize most of the text that you will likely dictate. But what
happens if you dictate unique words or terms that aren’t in the standard vocabulary? Dragon
has the amazing ability to “learn” the desired spelling and formatting of the specific text that you
dictate. This includes acronyms, abbreviations, special phrases, names of people, places,
products, etc.
WHY IS VOCABULARY CUSTOMIZATION IMPORTANT?
An unusual name may seem commonplace to you because you use it frequently, but a person
who hears it for the first time may not be able to recognize and spell it: that name is not yet a
part of this person’s vocabulary. Similarly, if a word or phrase is not in Dragon’s active
vocabulary, the software cannot transcribe it correctly without a little instruction. When you
created your profile, you provided acoustic information which Dragon incorporated into its
acoustic model. To get optimal accuracy, you should also help the software adapt its language
model and Vocabulary.
Personalizing the Vocabulary early and often is strongly recommended. Vocabulary
customization helps to ensure that Dragon is prepared to recognize the words and terms that
you will dictate regularly. Dragon will make fewer recognition mistakes because vocabulary
customization helps Dragon “get it right the first time” -- including spelling, capitalization, and
spacing.
USING THE VOCABULARY EDITOR
The Vocabulary Editor window is your interface for viewing and editing the list of words, phrases
and symbols that Dictate can type for you. It also allows you to add new entries, as well as edit
existing entries—including their Spoken Forms and Properties.
Copyright 2011 Nuance Communications, Inc. All rights reserved.
25
Page 31

The Vocabulary Editor contains a built-in vocabulary list of more than 150,000 words and a user
phrases and symbols that Dictate is prepared
list that you can customize based on your individual needs. An icon next to each word
distinguishes built-in vocabulary from user vocabulary. The default view combines both lists to
show all words that Dragon is prepared to recognize. By scrolling through the list, you can see
that the built-in Vocabulary already includes many names of people, places, institutions and
products, as well as common words, phrases, and abbreviations.
To view the Vocabulary Editor:
Step 1: Select Vocabulary Editor from the Tools menu to open the Vocabulary Editor window
and view the entries currently in Dragon’s active Vocabulary.
The Vocabulary Editor lists the words,
to transcribe.
Step 2: Click on the i information icon at the bottom of the window for more information about
each word. Most entries only have a Written Form, but some also have at least one
Spoken form. By browsing these words, you can get ideas about what entries you might
add or edit.
Copyright 2011 Nuance Communications, Inc. All rights reserved.
26
Page 32

ADDING VOCABULARY ENTRIES: WORDS, PHRASES AND ACRONYMS …
To add a new word or phrase:
Step 1: Open the
Vocabulary Editor
and click the + icon
at the bottom of the
Vocabulary Editor
window. In the
dialog box, type the
new word or phrase
exactly as you want
it to appear during
transcription.
Step 2: To add a
description of how
the word is spoken,
click Advanced to
reveal the rest of
the dialog.
Teach Dragon the unique words and phrases that you will dictate using the
Vocabulary Editor.
Step 3: Click OK, and the
word or phrase will now be included in your custom Vocabulary.
Alternately, you can quickly search for a particular Vocabulary entry by entering it in the Search
field and pressing Return. The drop-down list in the Search field allows you to filter your search
criteria by “contains,” “begins with” or “ends with” options. Press Escape to clear the Search
field.
If the word or term appears in the scrollable list, it is already in the active layer of the
Vocabulary. If you execute a search and no match is found (and you’re in the “All” view), Dictate
will offer to add the term to your user vocabulary. To add it, click Yes (you can edit the new
vocabulary item later). To decline, click No.
Copyright 2011 Nuance Communications, Inc. All rights reserved.
27
Page 33

Some of the "words" in the Vocabulary Editor aren't single words. Of course is listed. So is as
well as. There are also names of people, places, products, and institutions: Mother Teresa,
Madison Square Garden, KitchenAid, Brigham and Women's Hospital, Marine Corps, Library of
Congress, Babe Ruth, Accounts Payable, George Washington, Johnson & Johnson, Division I,
LAN Server …
Multi-word vocabulary entries help the software resolve spelling and capitalization ambiguities: if
the Vocabulary didn’t contain the phrase Mother Teresa, dictating it would probably produce the
transcription "mother Theresa"—because the word mother is usually not capitalized, and
because Theresa is the more common spelling of the name. Having the phrase in its
Vocabulary helps Dragon know that the words “Mother” and “Teresa” are likely to occur
together, and hence helps Dragon choose the desired capitalization and spelling.
We strongly recommend adding personal “multi-words” to your Vocabulary. This will later save
you time since you will not have to adjust their spelling and capitalization after transcription.
When adding names of people, consider nicknames and diminutives as well as formal names,
particularly for names that are very short or that can be spelled different ways: for instance, one
might add Liz Hansen, Elizabeth McGee Hansen, Jennifer B. Addams, Jennifer Addams, Jenny
Addams, etc. This idea applies to more than just names. Whenever you add an item to the
Vocabulary, think of its possible variations: singular/plural for nouns, present/past/gerund for
verbs …
TIP If something is not in the Vocabulary, the software cannot recognize it. So don’t hesitate
to add items even if you think you will not dictate them very often! When adding an entry
to the Vocabulary, be sure to spell and capitalize it correctly. Otherwise, it will appear
misspelled in your documents every time you dictate it.
Copyright 2011 Nuance Communications, Inc. All rights reserved.
28
Page 34

1) In the Vocabulary Editor, search for a few familiar names such as your
own first and last names, your town, company, colleagues or relatives; if
necessary, add them using the + button.
2) Open a word processor (such as Note Pad, which automatically opens
when you start Dictate) and start a list of Vocabulary entries relevant to you;
some suggestions are below.
Jargon and phrases specific to your profession (such as distro, site visit
and non-State)
Names of places, facilities or organizations (such as Building 52, or
County Adoption Center)
Names of products (such as MicroPore tape or Latex Exterior Semi-
Gloss)
Acronyms, part numbers, codes (such as FICA, 501c(3) or RX-70y)
Names of people (coworkers, clients, friends, relatives …) including full
combinations for names that could be spelled differently (Kristin, Gene,
Steven, McGregor, Wolfe …) or are very short (Kip, Kit, Dee …) since this
helps Dragon resolve acoustic ambiguities.
If you are using Dragon at work, note that your employer may be able to
give you some lists that could save you time: lists of staff or clients,
departments, units or divisions, products, trademarks, building names, as
well as glossaries of terms and acronyms. Starting from such lists doesn’t
just save time; it may also help add these items with their official, correct
spelling.
THE IMPORTANCE OF SPOKEN FORMS
Some words or phrases could be pronounced in several ways, and some are not pronounced
“the way they are written” (because of silent letters, for instance). For example, acronyms are
often pronounced letter by letter, but not always (e.g., ASAP is pronounced "ay sap" by many
people or A-S-A-P by others). Dragon enables a “Spoken Form” in the Vocabulary so that you
can pronounce words your own way.
Copyright 2011 Nuance Communications, Inc. All rights reserved.
29
Page 35
If the information area is not present on the Vocabulary Editor window, click the i information
type a more complicated word or
phrase.
icon to summon it. Take a moment to scroll through and look at existing spoken forms—you will
get ideas for what kinds of entries warrant them and how they can be written.
TIP Vocabulary entries may have more than one spoken form. You may add spoken forms to
custom entries as well as to existing entries. This way you can dictate words in the way
that comes most naturally to you. For example, to enter the symbol ©, you might like to
say “circle see” instead of the existing spoken form “copyright sign.”
Spoken forms should not include punctuation (including periods), abbreviations, or symbols.
Here are a few examples:
Written Form: The Man from U.N.C.L.E
Spoken Form: the man from uncle
Written Form: St. Clement's Hospital
Spoken Form: Saint Clements Hospital
Written Form: Soddy-Daisy, TN.
Spoken Form: Soddy Daisy Tennessee
Written Form: Trenton-Mercer Airport
Spoken Form: Trenton Mercer Airport
Adding Spoken Forms allows you to dictate in the way that is most natural, but also quickest for
you. In addition to indicating pronunciation, Spoken Forms can be used for “vocal shorthand”
and automatic substitution. You say something short and easy, and Dragon types something
longer or “trickier” to say or remember. This capability can be used to give consistency and
clarity to your writings. For example, your Spoken Form can be “New York O C F S” and the
Written Form appears as “New York Office of Children and Family Services.”
By adding a Spoken Form to
words in the Vocabulary Editor
you can specify how an item will
be pronounced. Spoken forms
can be used for “vocal
shorthand” – say something
short and easy, and Dragon will
Copyright 2011 Nuance Communications, Inc. All rights reserved.
30
Page 36

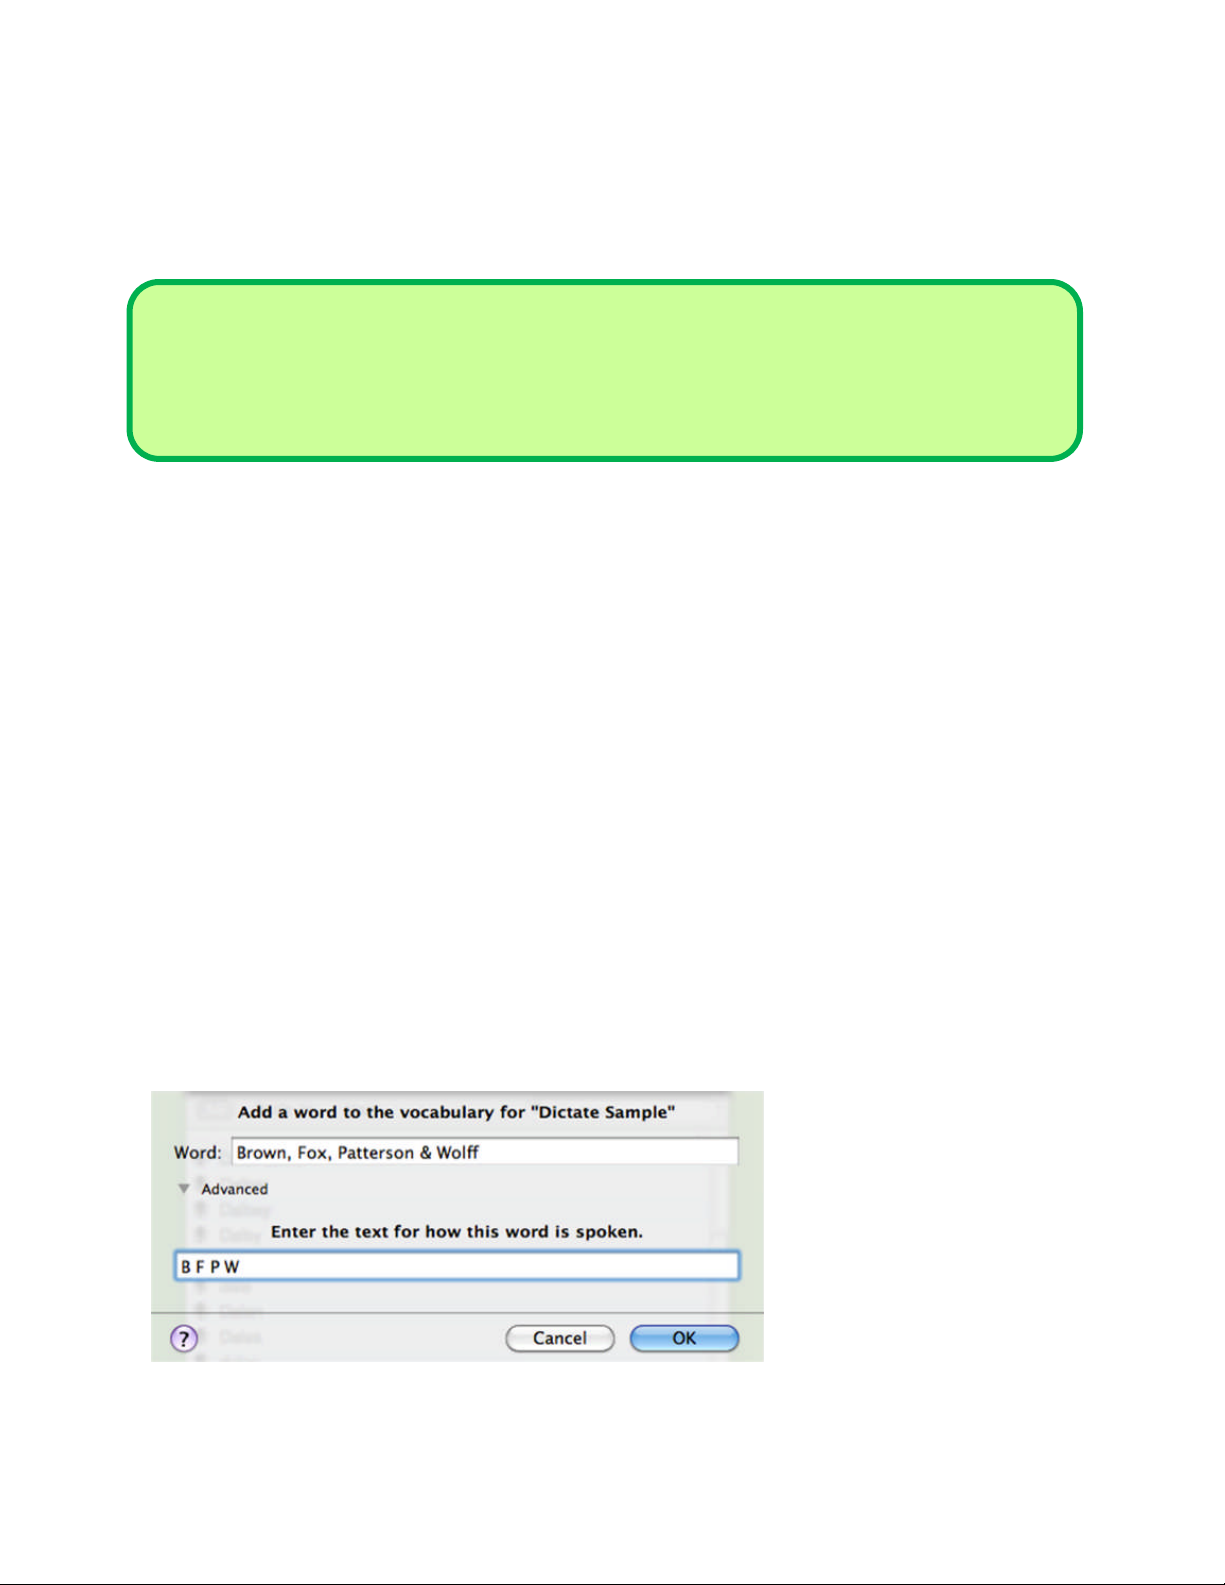
To add a Spoken Form in the Vocabulary Editor:
Step 1: First, decide what you want to say, and what Dragon should transcribe when you say it.
For example, suppose your school, Central Lexington United High School, is often
called CLUHS or "cluss". When you dictate “cluss,” do you want Dragon to type CLUHS
or Central Lexington United High School?
Step 2: Press + to add a new word or phrase. In the Word field, type what you want Dragon to
write. Be careful with its capitalization, spacing, and spelling — including symbols or
punctuation marks if needed, as in E*TRADE.
Step 3: In the next field, type what you will actually say. (Click the Advanced arrow if the spoken
form field is not automatically displayed.) In some cases (as in our “cluss” example),
you will enter one or more “made-up words” to represent the desired sound.
Step 4: Click OK.
TIP Entries containing symbols, digits, or unusual spacing are particularly likely to warrant a
Spoken Form. If the written form of a word contains any punctuation, consider providing a
spoken form so that there is no doubt as to how the item will be pronounced.
If you add email addresses to the Vocabulary, giving them a Spoken Form can make them
quicker to dictate. For example, to type AmyT&JohnB@yahoo.com, you could have a spoken
form of “Amy and John at yahoo dot com” or even just “Amy and John at yahoo.”
DELETING WORDS
Deleting a word can be helpful if it “competes” with a word you are trying to dictate (e.g., if
Dragon consistently transcribes Schaefer when you are trying to dictate Shafer, you can delete
the word that is not important to you from your Vocabulary).
Copyright 2011 Nuance Communications, Inc. All rights reserved.
31
Page 37

To delete a vocabulary item:
word or phrase, select the Train option from the Tool
Step 1: Open the Vocabulary Editor (found under the Tools menu).
Step 2: Highlight the word/phrase you want to delete and choose Delete from the gear icon
menu at the bottom of the window.
Step 3: A dialog appears giving you an opportunity to change your mind. Click OK.
VOCABULARY TRAINING
If at some point you find that an item is not transcribed as you intended, remember that it might
need a spoken form, or a longer entry in the Vocabulary. You may also want to train the
pronunciation of the item. This means that you pronounce the item several times, so that
Dragon Dictate can record your voice saying it and better “learn” how you pronounce that
specific vocabulary item.
To train a vocabulary item:
Step 1: Open the Vocabulary Editor and select
the item from the vocabulary list. Choose
Train from the tool (gear) menu at the
bottom of the Vocabulary Editor window.
To “teach” Dragon how you pronounce a specific
(gear) menu in the Vocabulary Editor and follow the
short “Train Words” process.
Copyright 2011 Nuance Communications, Inc. All rights reserved.
32
Page 38

Step 2: Dragon Dictate opens a new dialog that highlights the word or phrase you are about to
train. Click Train again and then say the word or phrase three times. Dragon indicates
that it has heard you each time and then confirms that the training process is complete.
Be sure to use your natural dictation voice when training words. When providing acoustic
training, there is a natural tendency to over-enunciate or speak loudly. Since you will not overenunciate in your normal dictations, doing so in the Train Words window would provide Dragon
with non-representative acoustic data. Relax, and speak clearly, but not louder or slower than
you would when dictating normally.
TIPThe i icon displays the information area for vocabulary entries. Here you can edit the
capitalization and spacing features for user vocabulary items, and for most built-in
vocabulary items.
Spaces before and after: normal words will have one space before and one space after.
But a punctuation mark might follow a different rule.
Next Word: how should the word following this item be capitalized? In most cases,
natural capitalization (the default) will be the right choice.
Lowercase in titles: a "title" is a phrase dictated while title casing is turned on (Caps
On). You might prefer that "small" words such as "of" or "in" not be capitalized in such
phrases.
CUSTOMIZING THE VOCABULARY FROM EXISTING DOCUMENTS
Another efficient way to help Dragon learn unknown words – and therefore boost your accuracy
-- is to let Dragon analyze text that is similar to what you are likely to dictate. The Vocabulary
Training tool uses many documents at once to “harvest” potential words to add to the
Vocabulary, as well as to “adapt to your writing style” (i.e., learn frequency information). The
greater the amount of relevant text Dragon gets to analyze, the better it can adapt its
Vocabulary to what you usually need to dictate. (This is similar to giving a just-hired
transcriptionist many documents in which to observe the terms used, their spellings, the words
that often appear before or after, etc. Doing so would help the transcriptionist get ready to
transcribe your dictations most accurately, right from the start.)
Copyright 2011 Nuance Communications, Inc. All rights reserved.
33
Page 39

“Adapting to writing style” will make Dragon learn frequency information, which increases
accuracy since it helps differentiate between homophones like “world” and “whirled.”
Dragon can perform its text analysis on the following file types: .txt (plain text), .rtf (Rich Text),
.doc(x) (Microsoft Word), and .odt files.
TIP If significant text exists only in an application that doesn’t normally produce files of these
types (PowerPoint is an example), see whether this application lets you copy text so you
can paste it in the Note Pad and save it from there, or whether it offers a way to extract
plain text (it could be called “export” or “save as outline” for instance).
To analyze existing documents:
Step 1: Locate some electronic documents you have stored on your Mac — it doesn’t matter if
they were written by you or someone else. Think of reports, letters, memos, proposals
... The more closely these documents match the dictation you will usually be doing, the
better. Spell-check the documents if necessary. (Dragon would detect misspellings as
unknown words.) There is no need to analyze all documents at one time; you can
repeat this step later if you choose.
Step 2: Choose the Vocabulary Training option
from the Tools menu.
Step 3: Click Add to select the files you want
Dragon to analyze. You can also drag files
directly into the window if you choose.
Step 4: Click the Right Arrow button to proceed.
Dragon will now analyze the text contained
in the designated documents. This may
take a moment. If there is a lot of text to
analyze, you should run this tool when you
do NOT need to use Dragon for something
The Vocabulary Training window gives you an
opportunity to select the files you would like Dragon
to analyze to learn your vocabulary and writing style.
else.
Copyright 2011 Nuance Communications, Inc. All rights reserved.
34
Page 40
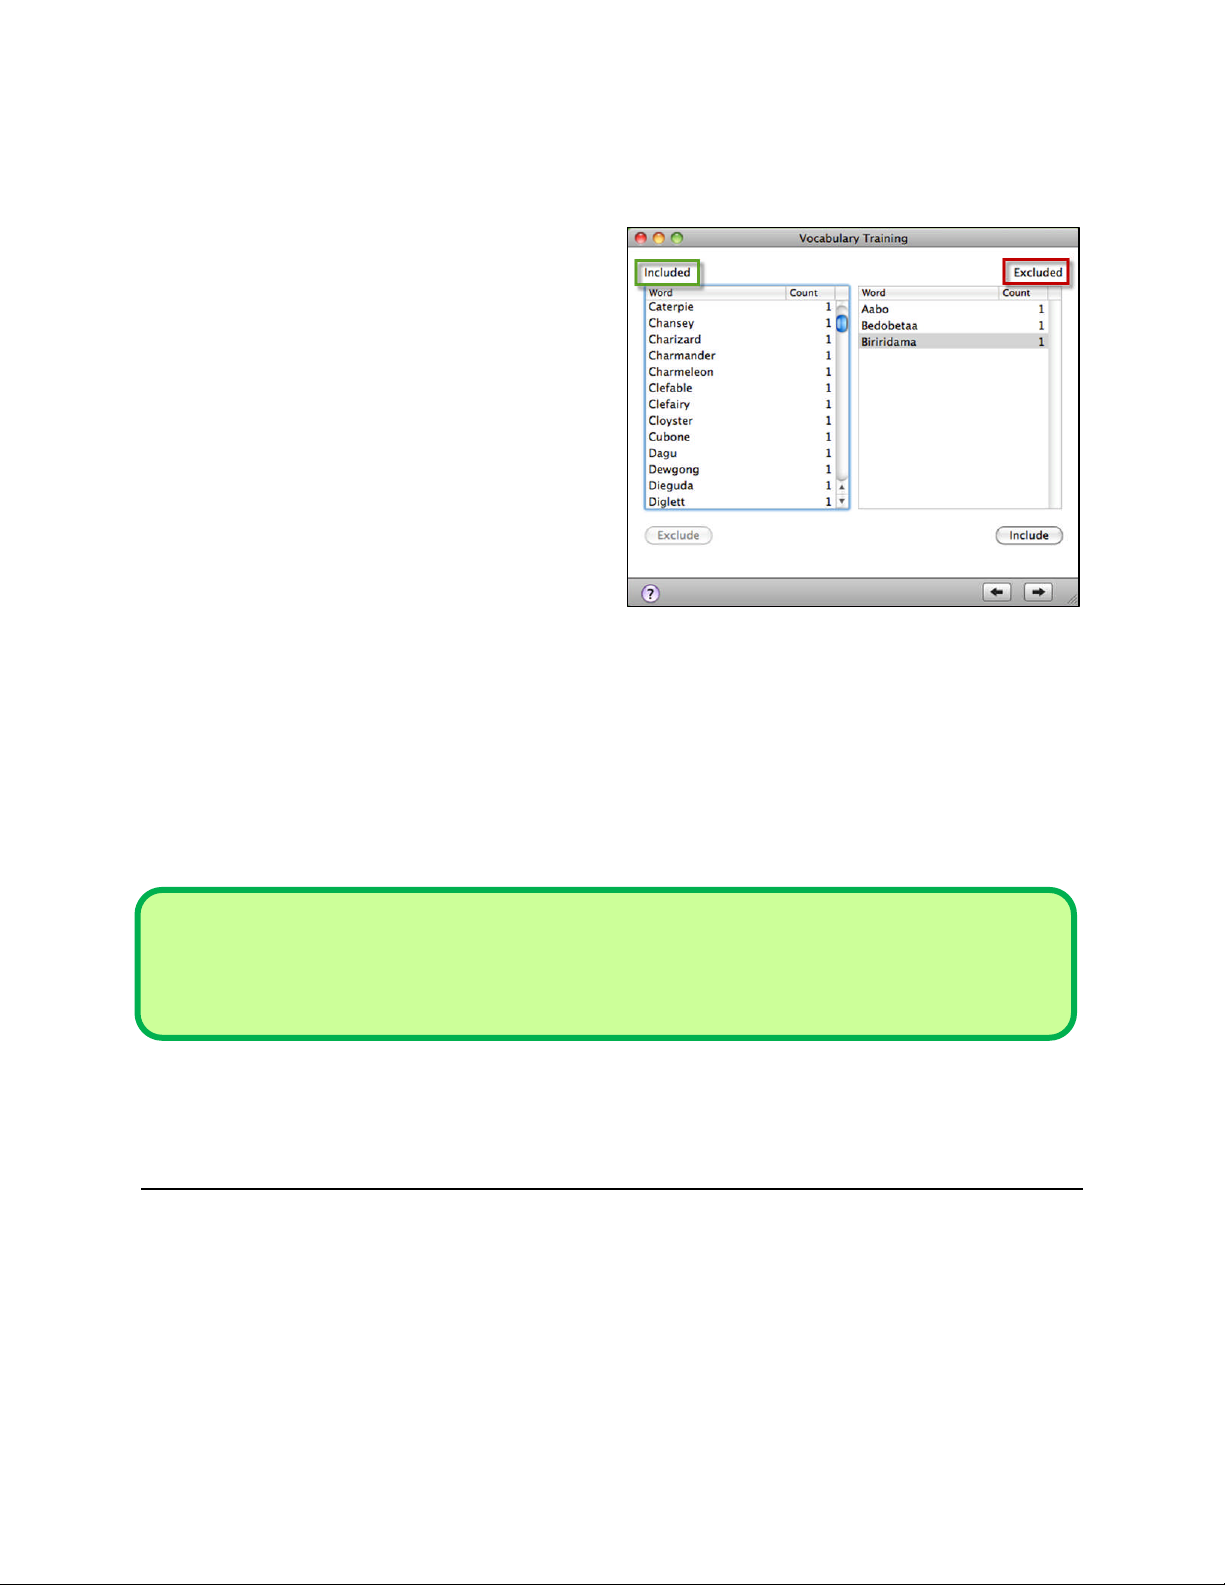
Step 6: Dragon will then present you with a list of the “unknown” words it found in a series of
the Vocabulary Training window to select the new words
two columns (Included and Excluded). Each word is followed by the number of times
that word was encountered. (The
words found most frequently are
presented at the top since they are
most likely to be relevant, unlike those
that only occurred a few times.)
Dragon will include words from the
Included column into your vocabulary.
You can transfer specific words to/from
the Included and Excluded columns by
selecting the word and clicking the
Use the Exclude and Include buttons at the bottom of
Exclude/Include buttons at the bottom
that will remain on the Included list for your Vocabulary.
of the window.
Step 7: When only the words you want to add to your Vocabulary are listed in the left column,
click the Right Arrow button to proceed. Dragon signals when the words have been
added to your Vocabulary. Click Done to exit the window.
TIP You can also analyze text from a document that is already open. Select the text you want
to analyze and say Train Vocabulary from Selection. Or within a Note Pad window,
select the text and choose “Train Vocabulary from Selection” from the Tools menu.
IMPORTING AND EXPORTING VOCABULARY ENTRIES
Once you’ve customized your Vocabulary, Dragon is better prepared to recognize the unique
words that you are likely to dictate. But note that a user Vocabulary is specific to an individual
profile. You may want to copy user vocabulary from one profile to share with another profile.
Copyright 2011 Nuance Communications, Inc. All rights reserved.
35
Page 41

To export and import a list of “words” (i.e. Vocabulary entries):
Step 1: To export your customized Vocabulary, select the User view from within the Vocabulary
Editor window. Highlight the items you want to include in your export file and click the
Export option from the gear icon. Dragon creates an XML file that you can name and
save.
Step 2: When you're ready to import a list, open the Vocabulary Editor and choose Import from
the gear menu and select the XML file that you exported. The imported entries will now
be viewable in the Vocabulary Editor of each profile.
SUMMARY: CUSTOMIZING THE VOCABULARY
You can access the Vocabulary Editor through the Tools menu.
You can locate an item in the Vocabulary Editor by entering it in the Search field. The
drop-down list in the Search field allows you to filter your search criteria by “contains,”
“begins with” or “ends with” options.
Spoken Forms are an efficient way to help Dragon transcribe “special words.” You can
view many examples of Spoken Forms in the Vocabulary Editor. In addition to clarifying
pronunciation (particularly useful for items that contain digits, symbols, or silent letters),
Spoken Forms can be used to allow the speaker to say something quite different, and
much shorter and easier, than their associated written form. For example, you can just
say just “E O B stat,” and Dragon types “Explanation of Benefit (EOB) statement.”
You can view or change the special Properties of Vocabulary entries, including spacing
and capitalization.
When providing acoustic training, remember to speak as you typically do when you
dictate to Dragon. It’s important to avoid the temptation to over-enunciate or speak
loudly when training a word or phrase in isolation.
Copyright 2011 Nuance Communications, Inc. All rights reserved.
36
Page 42

The Vocabulary Training window is accessible from the Tools menu. This tool can
analyze existing documents to learn about the “writing style” you plan to use—meaning,
which words are used with what frequency, and what words appear near each other.
You can input documents written by someone else, as long as they are similar to what
you will dictate. To be used in this tool, files must be text files (.txt, .rtf, .doc(x), or .odt
files).
The Vocabulary Training tool can process many files at a time. You may wish to re-run it
whenever you create or find suitable text. The more (relevant) text is processed, the
more refined your profile can become. When presented with the unknown words the tool
found in the texts, you can choose which ones to add.
Adding words and phrases to the Vocabulary and letting Dragon see how often and next
to what you are likely to dictate these items helps pre-empt recognition errors so Dragon
can deliver greater accuracy when you dictate.
Copyright 2011 Nuance Communications, Inc. All rights reserved.
37
Page 43

CHAPTER 5: CORRECTING RECOGNITION ERRORS
Sometimes Dragon will make mistakes as it transcribes your text. Just as human beings
sometimes can’t recognize words correctly, Dragon may mistakenly insert text that is different
from what you actually dictated.
Dragon uses contextual clues and statistical information to guess what to transcribe, but
sometimes Dragon can’t guess correctly. Instead it types what could be a likely alternative
according to its statistics. We call this a “misrecognition.” But if you take time to correct Dragon’s
mistakes, the software will actually “learn” from your corrections, and will be less likely to make
the same mistake again.
TIP Dragon can’t recognize and transcribe a word it has never seen. For this reason, Dragon’s
Vocabulary customization tools, reviewed in the previous chapter, are a critical component
to achieving fewer recognition errors.
If you notice a misrecognition as you dictate a phrase or sentence, it's usually best to finish your
train of thought before you correct that mistake. But remember that correcting Dragon’s
mistakes is critical! Otherwise the software will continue to make the same mistake every time
you dictate that word or phrase, and you will quickly grow frustrated.
What if the mistake was your own and not Dragon’s? In other words, what if you misspeak, or if
you simply change your mind while dictating, and now you want to replace the text that appears
on your screen? The instructions below explain how to correct Dragon’s mistakes, but this
workbook will cover how to edit and modify your text in the next chapter.
CORRECTING VIA THE RECOGNITION WINDOW
If you see a misrecognition (i.e., Dragon transcribes text that is not exactly what you said), use
the Recognition window to correct Dragon’s interpretation of what you said. The Recognition
window “trains” the voice model within your profile. In other words, the Recognition window is
used to “teach” Dragon and to improve its accuracy in recognizing your speech.
Copyright 2011 Nuance Communications, Inc. All rights reserved.
38
Page 44

To correct misrecognized text:
can select the correct option, or edit one of the listed
Step 1: To summon the Recognition window, say Train or Correct followed by the word or
phrase you would like to correct.
TIP The Recognition window (and voice model training in general) operates on dictated
utterances (the strings of dictated text that occur between pauses as you dictate). Dragon
will select text for correction based partly on where you paused while dictating. Therefore,
the phrase that is selected when you say “Train” or “Correct” or the phrase that appears in
the Recognition window might be longer or shorter than what you initially specified.
Step 2: When the Recognition window is showing, it floats over all applications. The
Recognition window presents alternative interpretations of the phrase containing the
current selection or insertion point in the dictation document. The first alternative is the
interpretation that Dragon entered in your document.
TIP You can set the number of additional alternatives presented in the Recognition window by
customizing the setting for the “Maximum number of alternatives” in the Recognition
Preferences pane (select the Dictate menu, choose Preferences, then click the
Recognition tab).
Step 3: If what you actually said is in the list of
choices, you can pick it by voice: say
Choose or Pick immediately followed by
the number of the desired choice (i.e.,
“choose 2” or “pick 3”). You can also
select your alternative choice by clicking
the numbered button at the left of the
correct alternative.
If the Recognition window does not list the
correct alternative, you can edit one of the
alternatives so that it is correct.
The Recognition window lists alternatives when
Dragon “misrecognizes” something you said. You
choices until it is correct.
Copyright 2011 Nuance Communications, Inc. All rights reserved.
39
Page 45

To edit an alternative:
Say Edit followed by the number at the left of the desired alternative. (Or you can
click once to select the alternative, pause, and then click once inside the text of
the alternative.)
The alternative you are editing is now the “target” for dictation and commands.
You can edit the text by voice using Dictation or Spelling mode, or type the
correct text manually. When you are finished, say Choose followed by the
number of the option you edited.
To exit editing mode without entering the corrected phrase into your document,
say Cancel Edit or click elsewhere.
Step 4: To close the Recognition window, say Hide Recognition Window or Cancel training.
You have now performed phrase training. Internally, Dragon Dictate will modify its
speech model, and will save this information into your profile the next time your profile
is saved.
After dictating the following, use the Recognition Window to fix any
recognition errors.
Until further notice, the BHDP meeting will be held in room B31 (not B40).
Special invitees this week: Stephen Hess, Anne Petersen, and Gene Wood.
TIP Try different Recognition Preferences pane settings and different ways of summoning and
closing the Recognition window as you train your dictation. You’ll soon settle on a favorite
way of working.
Additional ways to access the Recognition window include the following:
Say Show Recognition window immediately after dictating text that contains an error.
Click the “Open Recognition window” button (the rightmost icon) in the Status Window.
Press the Recognition window keyboard shortcut (by default, Function/Command/F9).
Copyright 2011 Nuance Communications, Inc. All rights reserved.
40
Page 46

If “Show Recognition window when dictating” is checked in the Recognition Preferences
pane (found under the Preferences option of the Dictate menu), the Recognition window
will open automatically when you are dictating in Dictation mode or Spelling mode as
soon as the insertion point is within or after a phrase capable of being trained. Usually
this will be as soon as you dictate anything.
Additional ways to close the Recognition window include the following:
Say Cancel Edit.
Say Cancel Recognition.
Click the close button at the top left of the Recognition window.
Press the Recognition window keyboard shortcut (by default, Function/Command/F9).
If “Close Recognition window after each choice” is checked in the Recognition
Preferences pane, the Recognition window will close automatically as soon as you use it
to replace a dictated phrase with its correct version.
Dictate uncommon words, such as nicknames or product names, until a few
misrecognitions appear. Use the Recognition window and practice editing
what you actually said from the list of alternative options.
USING PLAYBACK AND TEXT TO SPEECH TO AID CORRECTION
Just as with any written work, you should always proofread your dictated text to be sure that
everything appears as you intended. While it’s true that Dragon will not make a spelling mistake,
it may insert text that is not what you intended. Sometimes Dragon’s mistakes (i.e., the
misrecognitions within your text) can be difficult to see, which could be the case if Dragon
transcribes “and” when you actually said “an.” HEARING your text can help you catch mistakes,
especially ones that a spelling or grammar checker might miss.
As you’re proofreading your text, you may not remember exactly what you actually said. This
can be a challenge especially if you dictate a significant amount of text before correcting.
Dragon’s playback feature is very helpful in these instances.
Copyright 2011 Nuance Communications, Inc. All rights reserved.
41
Page 47

To use the playback feature:
Step 1: If you need a reminder of what you actually dictated to generate a passage of text,
select the text you want to review and correct.
Step 2: Open the Recognition window (following one of the options outlined above). Once the
Recognition window appears, say Press Play (or click the Play button at the top right of
the Recognition window) to hear the recording of your voice as you dictated that text.
Step 3: In most cases, Dragon Dictate will have preserved the recording of your speech from
when you dictated the phrase. Use the content of the audio playback to accurately
correct the transcribed text.
Dictate a detailed paragraph about a recent trip: where, how long… Then
select portions of the text to play back. If you find any misrecognitions, use
the Recognition window and editing commands to correct them.
Dragon Dictate can also read your text back to you using the text-to-speech capabilities that are
built into the Mac OS X. A computerized voice reads your text aloud, providing a proofreading
tool that can help you identify any mistakes that Dragon may have made. This tool also lets you
listen to the flow of your writing so you can decide where to make changes during editing.
Say Read document or Read the selection to have Dragon Dictate read the entire document
or the text you’ve selected by highlighting with your mouse. You can also use the command
Read the words [text] through [text] or Proofread the words [text] to [text] to tell Dictate to
read a specific passage of text. Say Wake up … Stop reading to stop the audio.
TIP You can change the voice you hear during the proofreading by clicking on Speech under
your Mac System Preferences and selecting Text to Speech. You can choose between
multiple male and female voices. You can also change your preferred voice’s speaking
rate (i.e., slow, normal, fast).
Copyright 2011 Nuance Communications, Inc. All rights reserved.
42
Page 48

SUMMARY: CORRECTING RECOGNITION ERRORS
Although correcting misrecognitions can seem time-consuming at first, it will result in
increased accuracy, which in turn means that there will be fewer and fewer
misrecognitions to address.
In Correction commands, do not pause at all between saying “train” or “correct” and the
misrecognized word(s).
To proofread using playback – hearing your own voice played back to be sure of what
exactly was said -- click Play in the Recognition Window or say Press Play.
To have a computerized voice read your text aloud to you, making it easier to proofread
the content of your final document, say Read document.
Copyright 2011 Nuance Communications, Inc. All rights reserved.
43
Page 49

CHAPTER 6: FORMATTING AND EDITING TEXT BY VOICE
As you learned, Dragon transcribes your dictation wherever the insertion point is (usually shown
as a thin blinking vertical bar some call a cursor.) You can also use your voice to move around
within a document and edit the contents.
Mouse and keyboard actions can be combined seamlessly with dictation and voice control if you
are working within Note Pad, TextEdit or Microsoft Word 2011. But when you’re dictating
outside of these applications, it is important to keep in mind that you should not mix your voice
with your hands when creating and editing documents.
NOTE Navigating within a document or editing the dictated text requires that Dragon has the
ability to constantly “see” or “know” the location of the cursor within your document.
Since Dragon is tightly integrated with TextEdit, Note Pad and Microsoft Word 2011,
Dragon knows where your cursor is within a document whether you are using your
voice or using your mouse and keyboard. Within some applications, Dragon can’t track
mouse/keyboard movements and may lose track of where the cursor is located. For
this reason, do not mix dictation with mouse/keyboard actions.
With some applications on your Mac, such as Mail or Microsoft Excel, Dragon can’t actually
“see” what’s going on. It doesn’t know what the current document window looks like, or what
you do there. Dragon knows only what tasks you have completed BY VOICE. As it works with
text, Dragon memorizes its own actions: the text it types, the navigation it performs. This
memory is called the cache. The cache is how Dragon keeps track of what text is in the window
and where the selection or insertion point is located within that text.
When you’re using Dragon to work with text outside of Note Pad, TextEdit or Microsoft Word
2011 therefore, you shouldn’t do anything with a mouse or keyboard that Dictate can’t track.
Don’t use the mouse and keyboard to navigate, select, cut and paste, or type. If you do,
Dictate’s cache will get out of sync with reality. Dictate won’t recognize that you’ve made a
manual change to a document where you’ve been dictating, so navigating and editing
commands will not work reliably.
Copyright 2011 Nuance Communications, Inc. All rights reserved.
44
Page 50

This rule is easily broken since many of us are accustomed to using a keyboard and mouse to
execute routine tasks. To reduce this risk, you may find it easier to work in a Note Pad window
or Word document (where you can combine dictation and mouse/keyboard input in whatever
way is most efficient for you) and then copy the text and paste it into some other application. It’s
better not to get the cache out of sync if you can help it, but you can easily work around mixed
text input options by creating a new cache for your document.
To start a new cache:
Step 1: Say cache document, which instructs Dragon to read the whole document’s contents,
no matter how that content was created. Dragon disregards what it entered by voice
within this document, and deletes its recordings of your voice (so training on existing
text is no longer possible). Dragon now has an accurate record of the current document
contents, so you can proceed with dictation and reliably format and edit the text by
voice.
Step 2: Alternatively, you can say cache selection. This is similar to the “cache document”
command, but it works only on the currently selected text. Commands for navigation
and editing text will work reliably only within this region. (To work with Dragon outside
this region of your document, you would need to issue another “cache” command.)
HOW TO ISSUE COMMANDS
Voice commands are used to tell Dragon to perform an action instead of transcribing your words
into text. The key to effective commands is where and when you pause while issuing the
command. When issuing voice commands, pause before and after you issue the command. But
do not pause while saying the command itself. Any hesitation will cause the words of the
command to be typed on the screen. (If this happens, just say scratch that and try again,
without pausing this time.)
For example, the correct command is “scratch that” instead of “oops! I guess I need to scratch
… my mistake here …that whole paragraph.” Effectively pausing as you state specific
commands will determine whether Dragon correctly executes the task for you.
Copyright 2011 Nuance Communications, Inc. All rights reserved.
45
Page 51
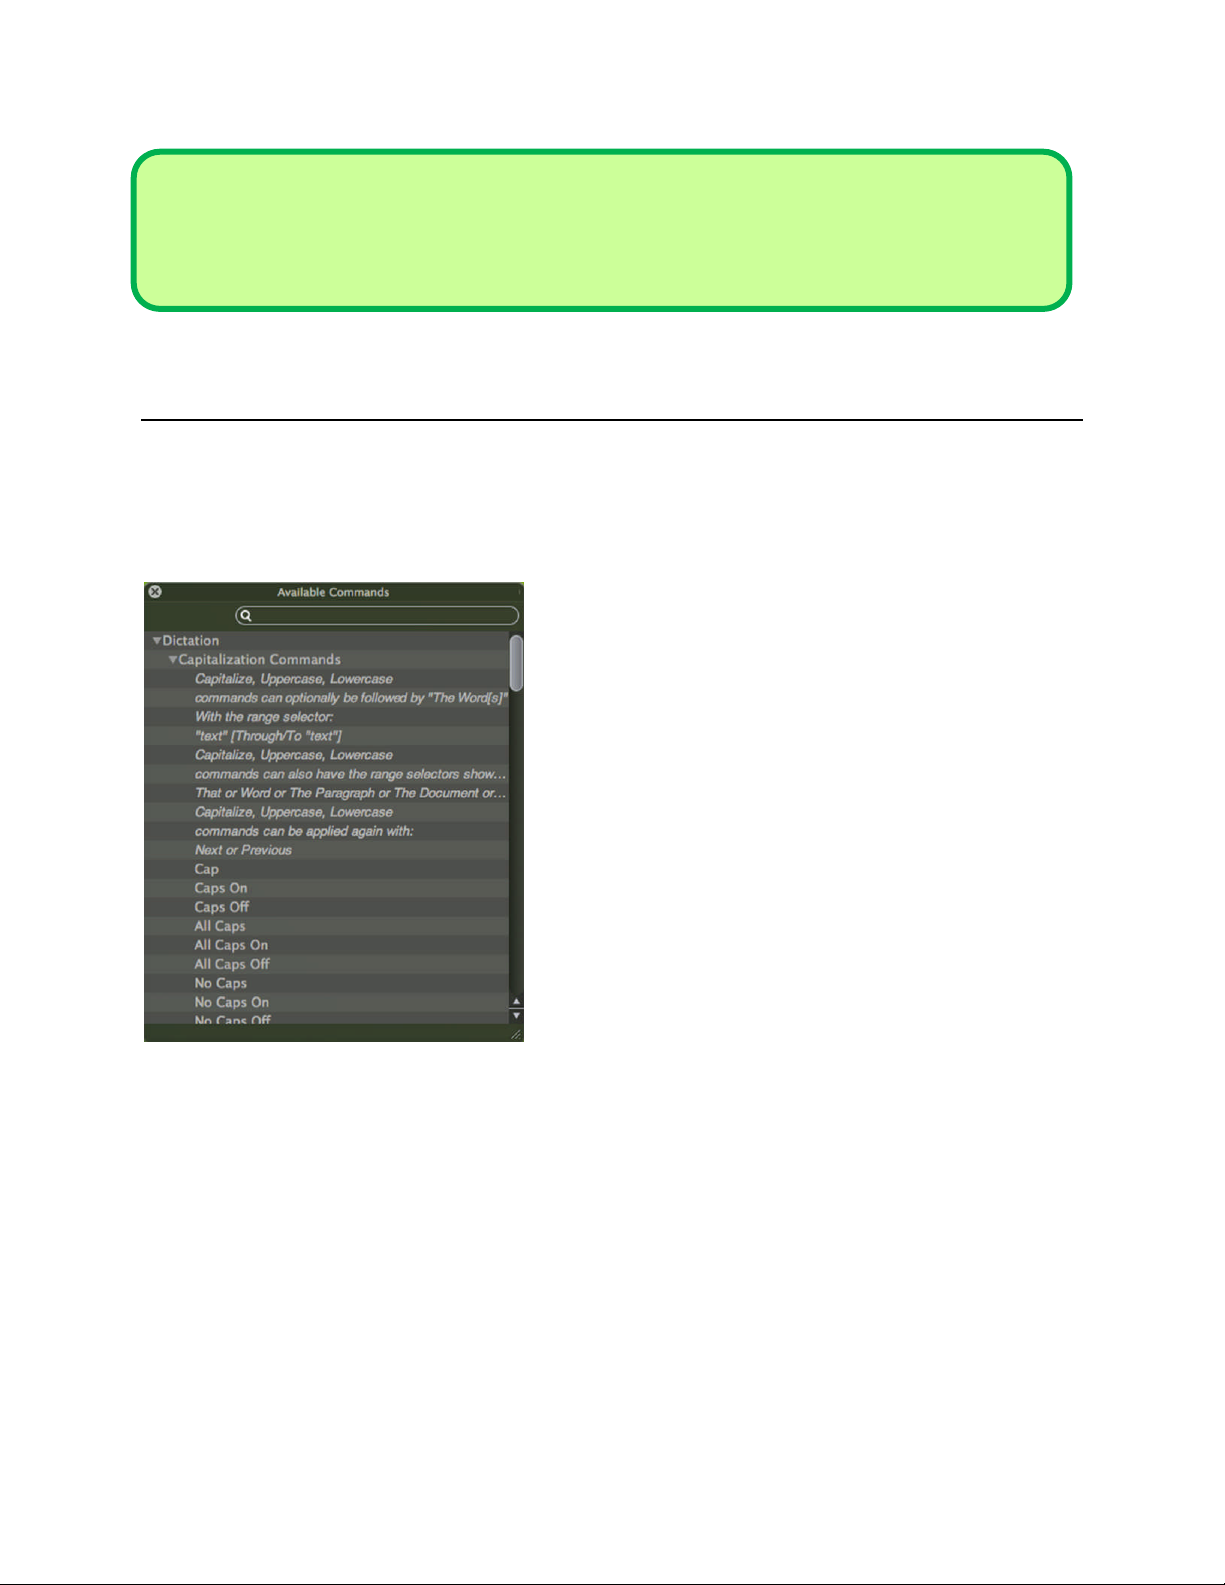
TIP If the command you want to execute is confused with dictated text, switch to Command
mode to ensure that Dragon understands your words as a command to be obeyed, and
not dictation to be typed.
THE AVAILABLE COMMANDS WINDOW
To learn what commands are available at any moment, use the Available Commands window,
which serves as a “cheat sheet” on your desktop to remind you about the voice commands that
you can use to control your computer.
To show the Available Commands window, say Show
Available Commands or choose “Show Available
Commands” from the Windows menu. When the
Available Commands window is showing, it floats over
all applications so it is always available for your
reference. You can hide the Available Commands
window by saying Hide Available Commands or by
choosing “Hide Available Commands” from the
Window menu.
To discover commands, scroll through the window, or
use the Search field. You can hover the mouse over a
The Available Commands window displays the
commands that are available at any given time
to help you get more done on your Mac.
command’s name in the Available Commands window
to see a tooltip displaying its description.
The list of commands displayed in the Available Commands window changes automatically
depending on what mode you’re in, what application is front-most, and whether the Recognition
window is open. The order in which commands are displayed depends on your settings in the
Command Preferences pane (e.g., whether you have generated the application launch and
email commands which will be discussed later in this workbook).
Copyright 2011 Nuance Communications, Inc. All rights reserved.
46
Page 52

TIP If there is text in the Search field, the list of commands is filtered to display only
commands containing that text. To be certain that all commands are displayed, empty the
Search field (click in the Search field and press Escape).
NAVIGATION COMMANDS
Some commands move the insertion point regardless of its starting location:
Go to beginning –- moves to the beginning of the document
Go to end –- moves to the end of the document
Other commands move the insertion point relative to its present location:
Move [left / back] [1-99] word(s) –- e.g., move left 7 words
Move [right / forward] [1-99] word(s) –- e.g., move forward 3 words
The insert commands position the insertion point just before or just after a specific word or
phrase:
Insert before your office –- moves the insertion point to just before the phrase "your
office"
Insert after park yesterday -– moves the cursor to just after the phrase “park
yesterday”
SELECTING TEXT AND CUT/PASTE OPTIONS
The select commands let you “highlight” editable text visible on the screen. You can say select
followed by the specific word or phrase you want to highlight.
You can also select a range of text by naming its “start text” through “end text.” For example,
“select do let THROUGH convenience” would select the entire range of text "do let me know at
your earliest convenience." You can include punctuation in your selection, or select the entire
content by saying select all.
Copyright 2011 Nuance Communications, Inc. All rights reserved.
47
Page 53
Selection commands are especially helpful when combined with cut and paste commands.
When you have selected your specified text, you can say Cut selection or Copy selection. To
paste, say Paste from Clipboard.
As with all commands, say the “select” commands as a continuous phrase, with a brief pause
before and after. For commands that quote words from your screen, choose your target words
before you start to say the command.
TIPIf the word or phrase you are trying to select appears more than once in your document,
say Select again (or Select previous / Select next) until the correct instance is
highlighted. To unselect text, say Unselect that.
REPLACING AND INSERTING WORDS
The select commands are very useful when you need to change some of the text on your
screen. As you would with mouse or keyboard, you select the relevant segment, and then you
overwrite it—by dictating or typing.
For instance, if your text reads "100 Main Street," but you want to change it to "500 Washington
Street," say “select 100 Main” (pause) “500 Washington.”
TIP To select large passages of text, take advantage of the select [start text] through [end
text] command structure.
Practice “overwriting” by voice. Dictate the following paragraph then issue
the commands listed below.
I will be in Boston for a few days next week, and would love to get together
for lunch. We could meet at your office at noon. I’ll be staying at the Madison
downtown; give me a call. Talk to you soon!
“Select lunch” You should see the word “lunch” highlighted.
Copyright 2011 Nuance Communications, Inc. All rights reserved.
48
Page 54

Say “an early dinner” The sentence should now read “get together
for an early dinner.”
“Select noon” You should now see the word “noon” highlighted.
Say “six o’clock PM” The sentence should now read “We could
meet at your office at 6:00 PM.”
“Select in through week” The words “in Boston for a few days next
week” are highlighted.
Say “in your area on Tuesday” The sentence should now read “I
will be in your area on Tuesday…”
Observe the insertion point’s current position. Say “insert after dinner”
then say “if you have time”
“Insert before exclamation mark” (observe the move), then say
“comma I hope”
COMMANDS TO EDIT AND FORMAT TEXT (BOLD, UNDERLINE, ETC.)
Just as you can select editable text using the commands select [text] and select [start text]
through [end text], you can say the verbs bold, underline, and italicize immediately followed
by the word(s) (and punctuation) you’d like to format or edit (e.g., “Bold ‘Commands to Edit and
Format Text’” or “Bold ‘Commands’ through ‘Format Text’”). This “Quick Voice Formatting” also
applies to delete and cut commands, making it easy to remove extra text from your document.
TIP Rather than inserting "open" and "close" quotation marks, parentheses, and brackets
during dictation, you can use a single voice command during editing such as:
Put brackets around [existing text]
Put parentheses around [existing text]
Put quotes around [existing text]
Dictate the following text, and then format the text as instructed.
It was nice meeting you Tuesday. I think you have some good ideas about
the Johnson project! Let’s get the team focused on this project by February.
Copyright 2011 Nuance Communications, Inc. All rights reserved.
49
Page 55

When you have time, could you write up your comments and email them to
me? I would really appreciate it.
“Italicize I think through project”
“Put quotes around the team”
“Bold by February”
“Delete when you have time comma”
“Underline really”
The same type of Quick Voice Formatting commands outlined above can be applied to words
that you would like to capitalize with a Capitalize [text] command. For example, to capitalize
the heading of this section, you could say, “Capitalize commands through format text.” To go
beyond initial capitalization to have the entire word capitalized, say Uppercase [text].
SUMMARY: EDITING AND FORMATTING TEXT
You can use your mouse and keyboard combined with voice commands to format and
edit documents within TextEdit, Note Pad and Microsoft Word 2011. With all other
applications, don’t mix your voice with your hands. Otherwise Dictate will not be able to
perform navigation and formatting commands reliably within your document.
If you mistakenly mix manual input with voice commands, use the cache document
command. Dictate will now have an accurate record of the current document contents,
so you can proceed with dictation and reliably format and edit the text by voice.
Commands to select text can address small or large amounts of text, even several
paragraphs or the entire document (select all). When selecting text, include dictated
punctuation if appropriate.
If the word or phrase you want to select appears in several places, you can use select
[text], followed by the command select again to move to the next instance.
To unselect text say unselect that.
Copyright 2011 Nuance Communications, Inc. All rights reserved.
50
Page 56

At first, uttering the whole command can be tricky for commands that quote words from
your text, such as bold [start text] through [end text] or insert before [text]. Deciding
what you are going to say before starting to speak is recommended.
As with all Dragon commands, you must pause briefly before and after saying these
formatting commands. If you mistakenly paused mid-command, just say scratch that,
pause, and give the complete command again.
You say scratch that to delete the last thing you said. To undo the last action, you can
say undo last action.
Copyright 2011 Nuance Communications, Inc. All rights reserved.
51
Page 57

CHAPTER 7: CONTROLLING APPLICATIONS BY VOICE
Dragon Dictate can do much more than type and format your dictated text. You can start
programs, open desktop items, control windows, “voice-click” buttons, “voice-press” keys, move
the mouse pointer, and much more – all without touching the mouse or keyboard.
USING VOICE COMMANDS WITHIN MICROSOFT WORD
In addition to the correction, formatting and editing commands reviewed in previous chapters,
Dragon Dictate offers application-specific commands for TextEdit, Microsoft Word 2011 and
other applications to allow you to do more by voice. These application-specific commands are
listed in the Available Commands window, but some of the most helpful Word commands are
highlighted below:
file new or new blank document
file save
insert hyperlink
insert page break
insert page numbers
insert picture from file
insert table
insert text box
check spelling and grammar
set font size to # points (e.g., “set font size to 24 points”)
KEYWORD-SEARCHING THE COMPUTER
The “Dragon Voice Shortcuts for Desktop Search” help speed up a process many of us go
through very often: finding information that we know is somewhere on our computer.
At any time, no matter what application is currently active on your screen, these commands let
you launch a search for items containing the keyword(s) you specify. The commands leverage
Spotlight, the fast and convenient search technology built into Mac OS X. These commands
include:
Copyright 2011 Nuance Communications, Inc. All rights reserved.
52
Page 58

Search Mail for <xyz>: searches for the keyword(s) <xyz> in just the emails indexed on
your computer
Search Mac for <xyz>: searches your Mac for documents and content
Search Spotlight for <xyz>: searches files, images, contacts and more stored on your
Mac
OPENING AND CLOSING APPLICATIONS
To generate commands for launching applications, be sure that you check "Generate
Application Launch Commands" found under the Dictate / Preferences menu, Command tab.
You will need to quit Dragon Dictate and start it up again for this preference to take place. As
the program starts up, it will look through all the applications on your computer and generate
launch commands for all of the applications on your computer. Now, to start a program by voice,
you can say activate (or open or launch) immediately followed by the name of the application
(e.g., “Open iTunes,” “Activate Automator,” or “Launch Safari”). The commands for launching
applications will now appear in the Available Commands window.
To close the active window, you can say close window. To exit the application entirely, say
quit this application. You can also say quit or kill followed by the application name (e.g., “Quit
TextEdit”).
TIP When closing an application, you can use your voice to control the dialog that presents
options to Save, Don’t Save or Cancel, say Press [button name] for the option you
choose. For example, to close without saving, say “Press Don’t Save.”
RESIZING WINDOWS AND SWITCHING BETWEEN THEM
To maximize an active window (enlarge it to fit the screen), say zoom this or zoom the
window. To minimize an active window, say minimize window (the window remains on your
screen, minimized as a taskbar icon).
Copyright 2011 Nuance Communications, Inc. All rights reserved.
53
Page 59

If several windows are open on your computer, you can change which one is active and in the
foreground using a variety of voice commands:
Switch to previous application: to go back to the previously active window (or say
switch to next application as many times as necessary to cycle through all the open
windows)
Next application window: to activate the next window in the open application;
previous application window: to activate the previous window in the active application
Hide this application: to hide the fore-most application; say hide other applications to
hide all applications except the fore-most application (hide all applications / show all
applications are also available)
“VOICE-PRESSING”KEYS
At times, you may wish to press a key or two on your keyboard. In Note Pad, TextEdit or
Microsoft Word 2011, you can continue to incorporate the use of your keyboard in your
document creation. But as explained in the previous chapter, the "Golden Rule" of Dragon
Dictate suggests that in some applications you limit manual keystrokes when dictating.
Fortunately you can use Dragon to “voice-press” the keys.
Dragon lets you “voice-type” any key on your keyboard. Tab key and spacebar can be used as
stand-alone commands. For other keys, say press the key followed by the name of the key(s):
any letter or number, but also Page Up, Home, Enter, Tab, Caps Lock, F2, Control, Alt, Shift,
etc. You can also combine modifier keys into a command by saying press the key combo
followed by the modifier and key name (e.g., “press the key combo command shift four”).
Examples include:
press the key page up
press the key F5
press the key Escape
press the key combo option Enter
press the key combo command
shift
To undo a keystroke, you can say undo last action.
Copyright 2011 Nuance Communications, Inc. All rights reserved.
54
Page 60

SUMMARY: CONTROLLING APPLICATIONS BY VOICE
You can open an application by saying activate, launch or open immediately followed
by the name of the application.
You can switch between windows with commands like switch to next / previous
application or switch to next / previous window.
You can “voice-press” any key(s) by saying press the key or press the key combo
followed by the name of the key or combination of keys.
Dragon offers commands to search your computer for items containing the keyword(s)
you specify (these commands take advantage of the search capabilities of Spotlight,
which must be running on your computer). For instance, to find all indexed files
containing the words “Canada” and “budget”, you can say “search Mac for Canada
budget.”
You can also use voice commands to control mouse movement and mouse clicks. View
the “Mouse Commands” under the “Global” section in the Available Commands window.
Copyright 2011 Nuance Communications, Inc. All rights reserved.
55
Page 61

CHAPTER 8: EMAIL AND THE WEB
Dictating is in itself a great benefit of Dragon Dictate for email usage. But Dragon also offers
Mail-specific voice commands that will make it even faster and easier to create and manage
your email.
To be sure that commands are available to control Mail, check Generate Email Commands in
the Command Preferences pane, found under the Commands tab of the Dictate / Preferences
menu. This will generate the list of email commands for your reference in the Available
Commands window.
CREATING EMAIL MESSAGES
You can use Dragon Voice Shortcut commands to create and send an email regardless of what
application is currently active on your desktop.
To send an email to one or more of your contacts:
Step 1: Consult your Address Book in Mail. Dragon Dictate allows you to say the name of any
person or group having an email address in your Address Book.
Step 2: Say Send an email to [Name] where “name” is the primary addressee of your
message. You can specify multiple recipients by appending and [Name] to your
command.
Step 3: When you have specified the recipients, Dragon creates a new email window
addressed as specified, with the insertion point (cursor) in the subject line ready for you
to dictate a subject. After you’ve entered the subject say Press the key Tab (or just say
Tab key) to move to the body of your message.
Step 4: After you’ve dictated your text, say Send message to send your mail.
TIP As you create emails, you can move between fields by saying Press the key Tab or
Tab key.
Copyright 2011 Nuance Communications, Inc. All rights reserved.
56
Page 62

You can also use your voice to perform routine tasks within Mail:
new message – creates a new mail message
forward this message – forwards the highlighted or open mail message
reply to this message / reply all to this message – replies to the highlighted or open
mail message
TIP Dragon will automatically format email addresses as you say them (e.g., “sam dot johnson
at hotmail dot com”). You may want to add complicated email addresses to your
Vocabulary if you will use them frequently.
WORKING ON THE WEB
Dragon Voice Shortcuts for Web Search make it faster and easier to find information on the
Internet. You can search Bing, Yahoo or Google for any subject area using a single voice
command. Simply say Search Yahoo for [search criteria], Search Bing for [search criteria]
or Search Google for [search criteria]. For example, “Search Google for Boston Celtics
schedule.” Dragon will open your browser, go to the specified search engine, automatically
conduct the requested search and present the search results for you.
A key advantage of these “Web search shortcuts” is that, like the desktop search shortcuts and
email shortcuts, they can be used anytime, no matter what program is currently active on your
screen. What a convenient way to get more done faster!
Dragon Dictate also offers the Web 100 Commands to make it faster and easier to find what you
need on the Web. These commands take you in your browser to any of 100 commonly used
Web sites. Simply use the Jump to [site address] command. For example, you can say “Jump
to CNN” to open the CNN web page no matter what application is currently active on your
screen.
In the Commands Preferences pane (found under the Dictate / Preferences menu, Command
tab), be sure that you have enabled “Web site commands.” If so, you will see a listing for the
“Web 100” subgroup under the Global group of commands in the Available Commands window.
Copyright 2011 Nuance Communications, Inc. All rights reserved.
57
Page 63

To go to a specific web site that is not included within the Web 100 Commands:
Step 1: Within Safari, say Create new browser window or create a new tab if necessary.
(You can also say Make new browser window or make a new tab).
Step 2: In the browser window, say Access Open Location Window or Show Open Location
Window to move your cursor to the address bar of the current window. (Within a new
tab, your cursor will automatically be placed in the address bar).
Step 3: Dictate the web address, just as you would say it to a friend (e.g., w w w dot nuance dot
com slash dragon). If you’re dictating a complex URL, you may want to switch to Spell
mode to ensure the highest level of recognition accuracy. When you have dictated the
complete address, say Press the key Enter.
Step 4: Say Close window when you are finished with the page.
You can jump to specific pages by saying Jump Back, Jump Forward or Jump to Bookmark
[1-9] (e.g., “Jump to bookmark 7”).
Go to Amazon and ESPN.com without opening Safari. Then open a new
browser window and navigate to www.nuance.com/dragon.
Once you’re on a page, you can navigate the content of the page by saying commands such as:
Move to [next/previous] link – when the link you want to access is highlighted, say
Jump to this link
Scroll to bottom / scroll to top (additional scrolling commands include: scroll
up/scroll down; scroll left/scroll right; scroll one screen up/scroll one screen
down)
Copyright 2011 Nuance Communications, Inc. All rights reserved.
58
Page 64

Twitter and Facebook
Use voice commands to quickly and easily post to
post to Facebook and Twitter,
Dragon also offers built-in commands that enable
you to more easily update Facebook. Just say Post
to Facebook and dictate your text or paste the text
you want to post. You can edit the text however you
would like – by voice or keyboard – before posting.
If it’s easier for you, you can dictate your post first,
and then say: Post that to Facebook, where “that”
Facebook.
is the last utterance Dragon just heard.
Before using voice commands to
you must enable Dictate to
access your account. Dictate
does not store your password
information.
Note that Facebook does not need to be open to use these commands.
The first time you use one of these commands, Dragon will prompt you to provide your
Facebook credentials. You can also configure your account by selecting the Dictate /
Preferences menu, Sharing tab. Dictate does not store your password. When your post is listed,
it includes a tagline revealing that the post was created with Dragon Speech Recognition.
If you have a Facebook account, use Dragon to dictate your current status
without opening Facebook. Say “Post to Facebook” and enter your text in the
“Share on Facebook” box. (If this is your first time using this command, follow
the prompts to enable Dragon to access your account.)
Similar shortcuts are available for Twitter. Tweets are quickly captured by voice: just select
dictated or typed text (via mouse or voice command), and say Post that to Twitter. Additional
Twitter commands include Tweet [text] and Post to Twitter [text].
Copyright 2011 Nuance Communications, Inc. All rights reserved.
59
Page 65

SUMMARY: EMAIL AND THE WEB
Dragon Voice Shortcuts for Email and Web Search allow you to control Mail and Safari
tasks regardless of what application is currently active.
To send an email say Send an email to [Name].
To search the Web, say Search [Bing/Google/Yahoo] for [search criteria].
You can jump to any of 100 specific web sites by saying Jump to [site address]. If the
web site you want to browse is not part of an existing command, you can dictate the web
address and navigate links by voice.
Voice commands can make it faster and easier to post your status to Facebook and
Twitter. The Facebook/Twitter applications do not need to be open for these commands
to work.
Copyright 2011 Nuance Communications, Inc. All rights reserved.
60
Page 66

CHAPTER 9: CUSTOM COMMANDS
To create your own
Commands window
The Commands window is your interface for management of global commands (i.e., commands
that are always available) and application-specific commands (i.e., commands that become
available only when a certain application is front-most). To open the Commands window, select
the Commands option from the Tools menu.
To switch among command lists, select a command set from the left column. At the top of the
middle column, choose to view all commands, built-in commands or user-defined commands. (It
is the combination of both of these settings that determines which commands are displayed.)
Various built-in voice commands control tasks on your Mac such as formatting text, searching
the Internet, creating a new email, and more. You can modify these commands – and even
create custom commands – so that Dragon Dictate works the way that you work.
BOOST PRODUCTIVITY BY AUTOMATICALLY INSERTING TEXT
Custom commands can provide considerable time-savings and convenience. One of the most
convenient options is a voice command that will automatically insert frequently used text into
your document, whether it’s a simple line of boilerplate information or multiple paragraphs of
complicated text.
custom voice
command, click on
the + button at the
bottom of the
(accessed by
selecting
Commands from
the Tools menu).
Copyright 2011 Nuance Communications, Inc. All rights reserved.
61
Page 67

To create a new command:
Step 1: Click the + button at the bottom of the Commands window (or select New Command
from the File menu).
Step 2: A workspace appears in the right-hand column. Click within the Command Name field to
enter a name.
TIP The command’s name is the phrase you will say to cause the command to execute.
Choose it well! It should be easy to remember and easy to say, like Paste Signature Block
or Enter Home Directions.
Choose a descriptive, meaningful name (as opposed to a name like “macro 3”).
Make it neither long nor short (between 2 and 5 words is usually best). Avoid single
words, and phrases you may need to dictate.
Use words that are easily pronounced and recognized (all words in the command
name should be in the Vocabulary), and avoid symbols—for instance, use
“number” instead of “#”, otherwise Dragon would expect to hear “number sign” or
“pound sign” when you say the command.
Step 3: In the Description field, enter some information about your command. This is optional,
but it helps remember any important details about the command (its intent, when and
where you might use it, etc.).
Step 4: In the Context field, select the application in which you want the command to be
available. For all applications, choose Global. Contexts for which Dragon already has
application-based commands are listed in the pop-up menu. To create a new context,
click Choose and select an application in the Open dialog.
Step 5: Select the “Text Macro” option from the pop-up menu within the Type field. You may
also choose to leave the default “(automatic)” type in the field.
Step 6: If your text already exists electronically, drag the text that you want Dragon to paste
when you say your command into the open box. If necessary, you can create (or edit)
the text within this window, either by voice or by keyboard.
Copyright 2011 Nuance Communications, Inc. All rights reserved.
62
Page 68

Step 7: Once the command is named and edited as you want it, click Save.
Create your own command. When you’re done, open Note Pad, and then
say your command’s name. (Commands you create yourself follow the usual
rule: you must pause before and after, but not in the middle.) You may
realize now that you could make your command even more convenient.
Perhaps you want to add a blank line before the content so the text placed
by your command automatically starts as a new paragraph. The section
below explains how to edit a custom command.
TIP The same process outlined above can be used to create other types of commands. Other
command types include:
AppleScript: the command executes a script written in AppleScript
Application: the command launches a specified application
Bookmark: the command jumps to a URL in your default browser
File or Folder: the command opens a specified file or folder in the Finder
Menu Item: the command chooses a menu item (specified by menu and menu
item name)
Shell Script: the command executes a shell script (a shell script to be run from
within Dragon should generally be created and tested elsewhere)
Automator Workflow: the command executes an Automator workflow, specified
by the pathname of the workflow file
Keystroke: the command executes the simulated pressing of a specific key, or
group of keys
DUPLICATING AND EDITING COMMANDS
Instead of making a command from scratch, you can create a command based on the “clone” of
an existing one, by clicking Duplicate from the tool (gear) menu in the Commands window.
To edit an existing command, select the command name from the list and edit the right-hand
column. Click Save when you’re done editing. Changes that you make in the Commands
window might not be registered until you close the Commands window.
Copyright 2011 Nuance Communications, Inc. All rights reserved.
63
Page 69

MANAGING COMMANDS
To activate or deactivate a command, click the checkbox to the left of the command’s name. A
deactivated command still exists, but it is not listed in the Available Commands window, you
can’t issue the command, and Dragon doesn’t have to consider that phrase as a possible
command when you say it. So deactivating commands can be useful, but you probably should
wait before doing so to see which commands you really don’t need.
To delete a command, select the command and press Delete, or choose Delete from the tool
(gear) menu. You can’t delete an unmodified built-in command. Deleting a built-in command that
you’ve modified restores the original unmodified built-in command.
SUMMARY: CUSTOM COMMANDS
You can quickly create custom commands to insert blocks of text in your documents.
This is done using the Commands window, which you can bring up by selecting
Commands from the Tools menu.
If the boilerplate text you want to use for your text macro command already exists in an
electronic document, you can copy and paste it into the content box of the Commands
window. If not, you can enter the text directly within the box either by voice or with your
keyboard.
Names for custom commands should be memorable, intuitive, easy-to-pronounce
phrases. Avoid names that could be used as dictation, such as single words.
Copyright 2011 Nuance Communications, Inc. All rights reserved.
64
Page 70

CHAPTER 10: BEST PRACTICES AND TOP TIPS
You already know that personalizing Dragon’s vocabulary is a small investment of time that
makes a big difference in how accurately the software can work for you. You also know that
using proper correction technique to fix misrecognitions allows Dragon to learn from its
mistakes.
Here we provide some of the best practices and usage strategies you can put in place to ensure
the most successful and enjoyable experience with Dragon Dictate.
BE PATIENT. In general, the best thing you can do to make Dragon recognize your
speech more accurately is to use the software regularly. Over time, Dragon adapts to the
unique characteristics of your voice. Don’t get frustrated if the recognition accuracy is not
perfect right out of the box.
When dictating, speak in long, natural utterances at a normal pace and in your normal
tone. Try to think about what you want to say before you start dictating.
Practice effective microphone control. Be sure to turn your microphone off when you’re
not dictating.
If you don’t want to be tethered to your computer, consider using the Dragon Remote
Microphone application which turns your iPhone or iPod touch into a wireless
microphone.
Personalize the Vocabulary to help preempt recognition errors (This includes editing
Spoken Forms or Word Properties as needed, designating specific documents for
Dragon to analyze, and providing Vocabulary Training for specific words that create
recognition challenges.) If Dragon “learns” the unique words you are likely to use, it will
be more likely to correctly transcribe your dictated text.
Correcting misrecognitions enables Dragon to learn from its mistakes so it will be less
likely to incorrectly transcribe that word or phrase in the future.
Copyright 2011 Nuance Communications, Inc. All rights reserved.
65
Page 71

In some cases (if a certain word is consistently misrecognized, or if overall accuracy is
lower than you expected), you will want to provide Dragon some additional acoustic
data. Complete additional Voice Training (reading more text to Dragon) by selecting
Voice Training from the Tools menu.
Try to complete your dictation in Note Pad (Dragon’s built-in word processor), TextEdit
or Microsoft Word 2011. In these applications, you can freely combine dictation with
manual text entry via mouse or keypad. In other applications, it is best not to combine
dictation with mouse/keyboard entry. If you break this “Golden Rule,” say cache
document so that navigation and editing commands will continue to work reliably.
When issuing commands, do not pause in the middle of the command. Pause before
you begin the command, and at the end of the command.
Consider creating custom commands to get more done faster. You can create your own
voice commands to have Dragon automatically execute routine tasks on your computer.
If you misspeak, say scratch that to delete the last transcribed utterance. If you issue a
command by mistake, say undo last action.
To format and edit your text, say bold/italicize/underline/cut/delete followed by the
word or phrase you want to format or edit. To select a range of text, say select [first
word] through [last word]. If you have multiple instances of the requested word or
phrase in your document, say select next or select previous until the correct option is
selected.
Regardless of what application is currently active, you can send an email to one or more
of your contacts by issuing the command send an email to [Name].
Quickly and easily find information on the Web with Dragon Voice Shortcut commands
such as search Bing for [text]. Or quickly access a specific web site using a Web 100
command such as Jump to YouTube.
Copyright 2011 Nuance Communications, Inc. All rights reserved.
66
Page 72

PRACTICE EXERCISE: CREATING A MEMO BY VOICE
Launch Note Pad or your usual word processor. Using your new dictation and formatting skills,
try to create the following document entirely by voice. After you have created the sample
signature block shown in the sample below, replace it with your own information.
December 5, 2011
AnyCorporation
Gene Hansen-Wolffe
P.O. Box 3299
Minneapolis, MN 67811-3299
Dear Gene,
I am pleased to report that my team has reviewed the Western Region Report for this
quarter. As of November 29, 2011:
The total is $875,512.89.
Please let me know your projected figures for the rest of Q3.
As always, don’t hesitate to contact me at the number below.
Sincerely,
Sara Petersen
Regional Sales Manager
My Company, Inc.
202-965-5000
mobile: 715-377-1925
fax: 800-968-2231
sara.petersen@mycompany.com
Copyright 2011 Nuance Communications, Inc. All rights reserved.
67
Page 73

 Loading...